

Samsung SmartCam A1, SNA-R1120W Quick Start Manual

Sl\MSUNG
\1\'ISeNeT
Quick
Start
Guide
Guide
de
demarrage
rap
ide
Guia
de
inicio rapido
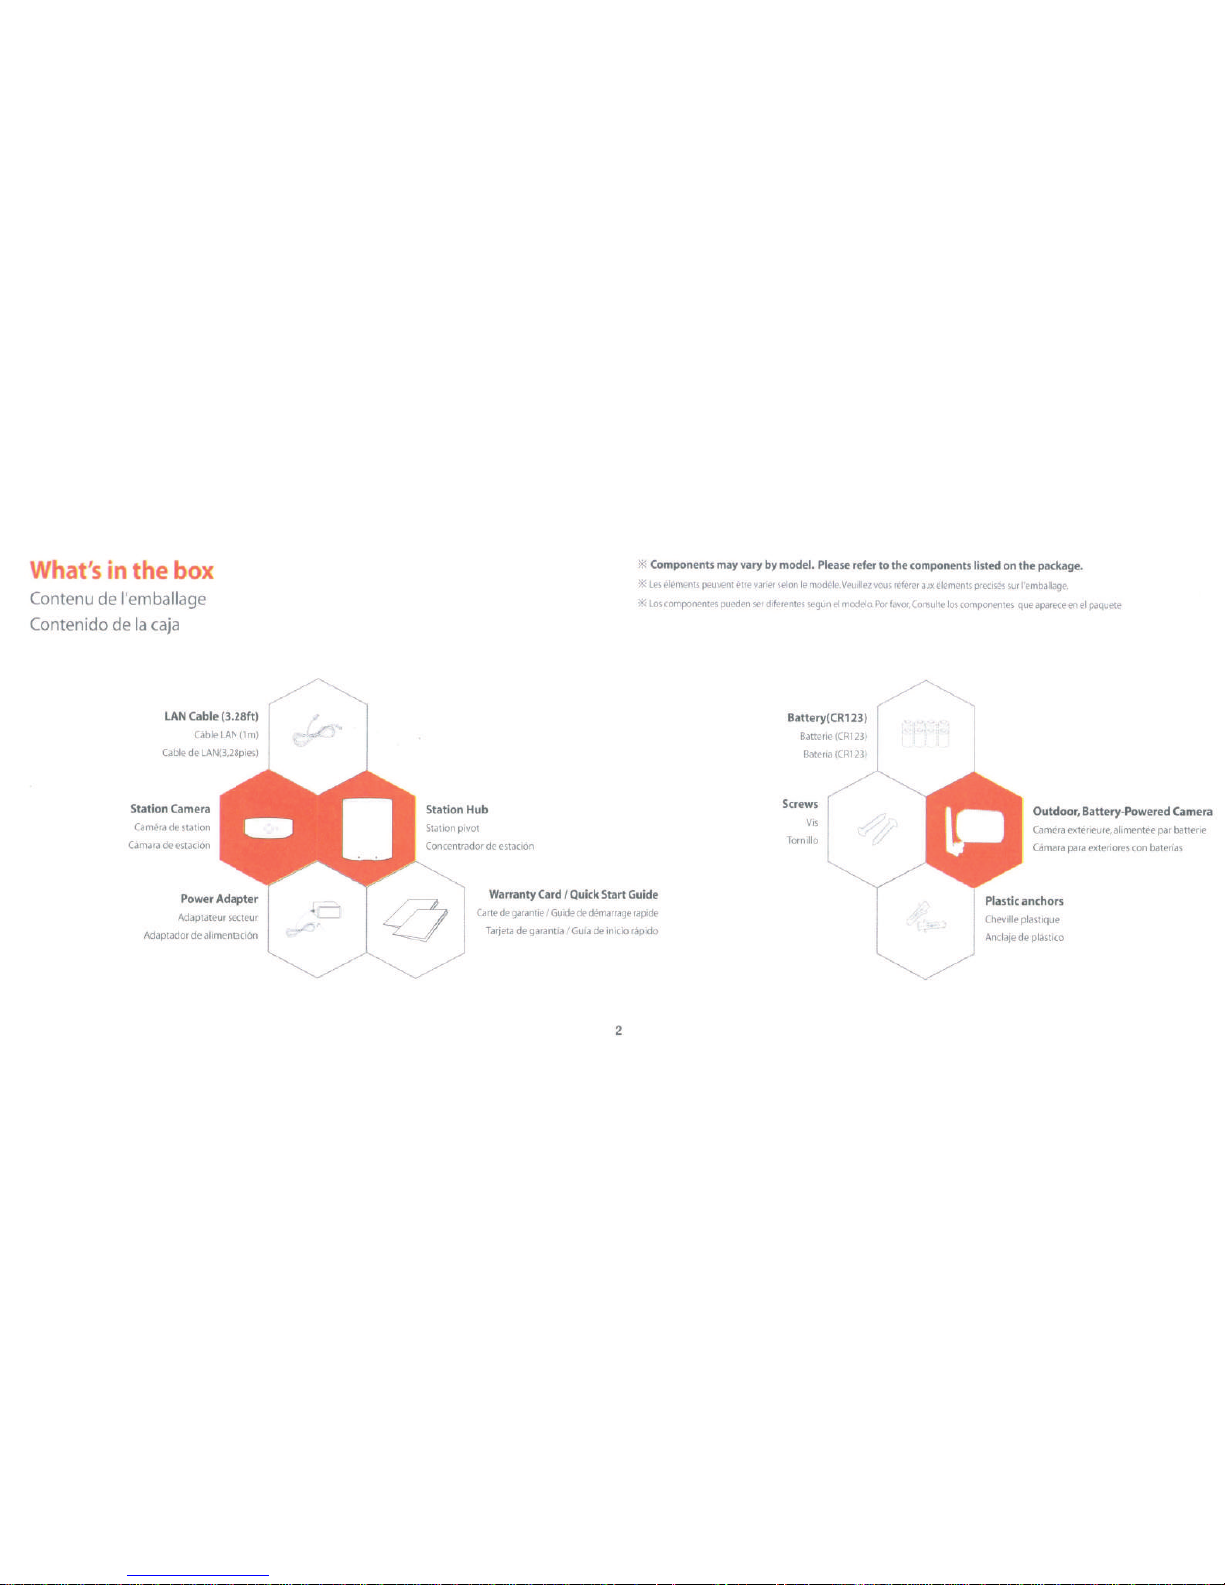
What's
in
the
box
Contenu
de
l'
emballage
Contenido
de
Ia
caja
LAN
Cable
(3.28ft)
Gible
LAN
(1m)
Cable
de
LAN(3,28pies)
Station
Camera
Camera
de
station
camara
de
estaci6n
Power Adapter
Adaptateur secteur
Adaptador
de
alimentaci6n
,.,
_..;=f
_(...,
e="'-
~
l
~---
X
Components
may
vary
by
model.
Please
refer
to
the
components
listed
on
the
package.
X
Les
elements
peuvent
etre
varier
selonle
modele.Veuillez
vous
referer
aux
elements
precise's
sur
l'emballage.
X
Los
componentes
pueden
ser
diferentes
segun
el
modelo.
Por
favor,Consulte
los
componentes
que
aparece
en
el
paquete
Station Hub
Station pivot
Concentrador
de
estaci6n
Warranty
Card
I
Quick
Start
Guide
Carte
de
garantie
I
Guide
de
demarrage
rapide
Tarjeta
de
garantia
I
Guia
de
inicio
rapido
2
Battery(
CR
123)
Batterie
(CR123)
Screws
Vis
Tornillo
Outdoor,
Battery-Powered
Camera
Camera
exterieure,
alimentee
par
batterie
Cimara
para
exteriores
con
baterias
Cheville plastique
Anclaje
de
plastico
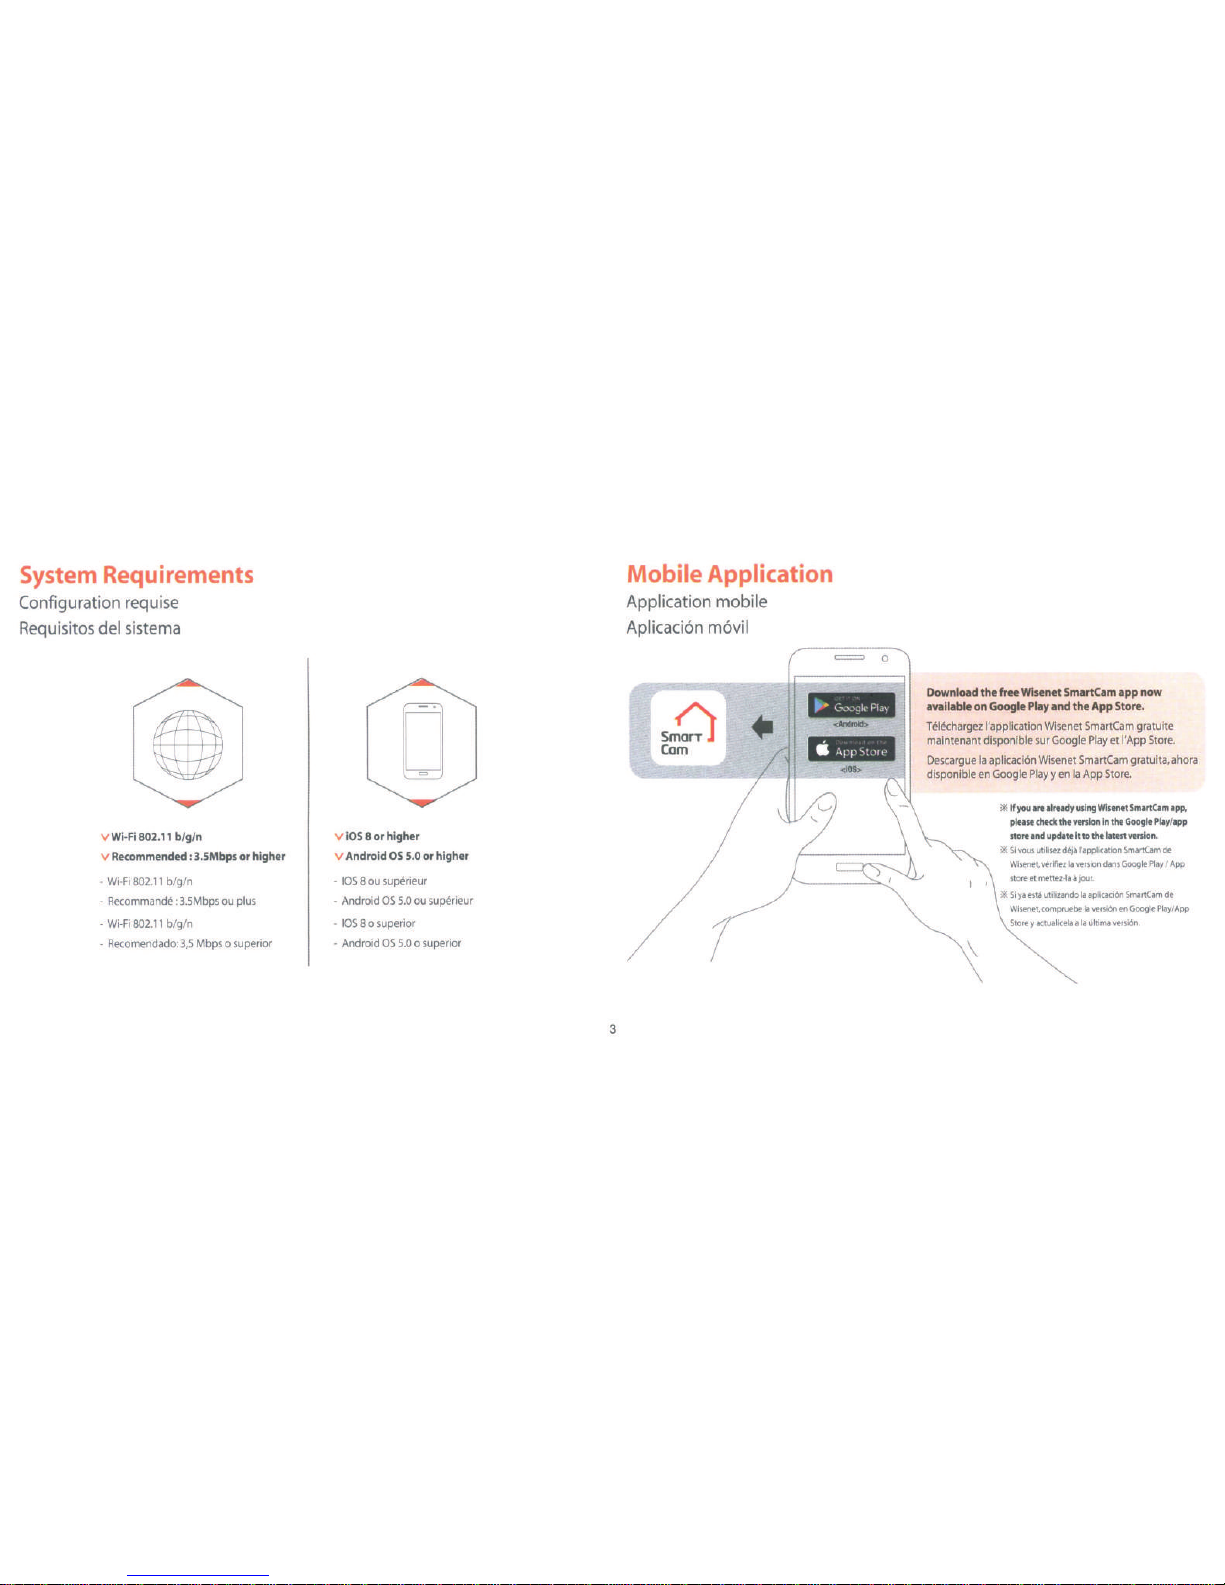
System Requirements
Configuration requise
Requisites
del
sistema
v
Wi-Fi
802.11
b/g/n
v
Recommended: 3.5Mbps
or
higher
-
Wi-
Fi
802.1
1 b/g/n
-
Recomma
nde:
3.5Mbps
ou
p
lus
-
Wi-Fi
802.1
1 b/g/n
-
Recomendado:
3,5
Mbps
o
superior
V
iOS
8
or
higher
V
Android
OS
5.0
or
higher
-
lO
S
8
ou
su
perieur
- Andro
id
OS
5.0
ou
super
i
eur
-
lOS
8 o
superior
-
Android
OS
5.0
o superior
3
Mobile
Application
Application mobile
Aplicaci6n m6vil
s
!:'l
Com
=
0
Download
the
free Wisenet
SmartCam
app
now
available
on
Google Play
and
the
App
Store.
Telechargez
!'application
Wisenet
SmartCam
gratuite
maintenant disponible
sur
Google
Play
et
I'
App
Store
.
Descargue
Ia
aplicaci6n
Wise
net
SmartCam
gratuita,
ahara
disponible
en
Google
Play
yen
Ia
App
Store.
\
*
If
you
are
already
using
Wlsenet
SmartCam
app
,
please
check
the
version
In
the
Google
Play
/
app
store
and
update
It
to
the latest
version
.
*
51
vous
utilisez
d~jal'application
SmartCam
de
Wisenet.
verlfiez
Ia
version
dans
Google
Play
I
App
store
et
mettez·la
a
jour.
*
Si
ya
esta
utillzando
Ia
aplicaci6n
SmartCam
de
Wlsenet,
compruebe
Ia
versi6n
en
Google
Play
/
App
Storey
actualfcela
a
Ia
Ultima
versi6n
.

Station
Hub
Overview
Aper~u
station
pivot
De
scripci6n
general
del
concentrador
de
estacl6n
r""=
-
t .•...... ~ ·····•
Sp11ktr
Mill
!
l
Hiut·~rlour
s
Alt~voces
LID
St1tualndlc1tor
1 • • • •
..
• T
..
· •
·r
• • • •
"1
l.
· · · · · · · · · · • · · · •
Reatt
button
lndlcateur
d'et
at
LED
i ! i
I I '
l
ndlcador
LED
de
estado
! ! i
I I I
: l !
-....._
: . : I '
~
Bouton
de
1'\\lnltlilllsMion
Boton
de
relnlclo
P1lrlng
button
1 • • • • • • • • • • • • • • • • • • •
1
r
..
• • • •
..
• • • • •
..
• • • • •
mlcroSD
Slot
Bouton
de
couplage
! !
Emplacement
microSO
' '
Bot6n
de
emparejamlento
! !
Ranura
mlcroSD
1
~
:
• • • • • • • • • • • • • · '
WI·PI
Direct
button
(~l·
fl·
l
... ,.)
Bouton
WI·
FI
Dlroct
lthernet
Port •·······
•••••••••
-~~
Bot6n
WI·
FI
Dlroct
Port Eth
ernet
~..
• • • • • • • • •
••••• , Power
Puerto Etherne
t
~r~·
Al
l
1 \:-.
~
__,
mental
on
Al
lmC!ntacl6n
Came a Overvi
w
Vu
e d'ensembl
e de Ia camera
Desc
ripci6n
gene
ral
de Ia camara
·············•
Lena
1
"
•••
*
Outdoor
b1tttry-powered
ctmert mty
not
belncludtd
depending
on
the
model
.
*
L~
cilmera
11~terltur11
A
plio
nt
P\lYt
p.u
ttro
lnclutsolon
It
modolo
.
*
Outdoor
bettl!rY'J.lOWOr~
cl!mllrA
quo
no
st~lncluyo
dopondlondo
del
modolo.
.... " ••..
"1
r. . ......
" •
••
" ·
....
·
1
LID
Stttua
lndlcttor
i !
lndlcatllur
d'6tAt
LEO
Objoctlf
Lente
',o I
r--
-::~::j:=:t
:
::-~
.,..,
lndicAdor
LEO
dt
ostedo
Microphone
1 • · ;
Microphone
i
1
...........
.
: • • •
..
• • • • •
..
• • • • • •
..
Ptlrlng
button
:
I
I
I
I
Mlcroftlno
J
J...
•
~--~~~
Motion
Stnaor
t • •
~.IF-
-..;...
___
....,("""~
C1ptour
de
mouvomon
t
Sensor
de
movlmlonto
4
oton
do
ompij!'O)Amlento
· • '
LID
Stttua
lndlcltof
l
ndlcAtour
d'otilt
LEO
lndlcador
LEO
do
estAdo
Mlcrophono
Mlcroftlno
i · ·•
Power
Switch
!
lnturrupl@ur
d'AIImtntitlon
I

C
eate accou
t
a regis
er
Station Hub
Creez
un
compte
et
enregistrez
Ia
station
pivot
Crear
cuenta
y
registrar
el
concentrador
de
estaci6n
Connect the power
adapter
to
the
Station Hub and
plug
it into
the
nearest
wall
outlet.
Branchez
l'adaptateur secteur
a
Ia
station pivot et inserez-le
dans
Ia
prise
de
courant
Ia
plus proche.
Conecte
el
adaptador
de
alimentaci6n
al
concentrador
de
estaci6n y enchufe
este
en
el
enchufe
de
pared
mas
cercano.
s
nCl
Com
User
Password:
___
_
Camera
Name
:
____
_
Camera
Password
:
___
_
Save your Account and Device information here.
Enregistrez
vos
informations
de
compte/appareil
ici.
Guarde
Ia
informacion
de
su
cuenta y dispositive aqui.
Open
the
Wise
net
SmartCam
app
and create
an account.
Follow
the
on-screen instructions to
register.
Ouvrez
I'
application Wisenet
SmartCam
et
creez
un
compte.
Suivez
les
instructions
a
l'ecran
pour
vous
inscrire.
Abra
Ia
aplicaci6n Wisenet
SmartCam
y
cree
una
cuenta.
Siga
las
instrucciones
en
pantalla
para
registrarse.
5
Camera
Power
0
Mise
sous
tension
de
Ia
camera
Encendido
de
Ia
camara
Station Camera Power on
Mise
sous
tension
de
Ia
camera
de
station
Encendido
de
Ia
camara
de
estaci6n
X
Before pairing, dock
the
station camera
to
the
station
hub
to
charge
it
sufficiently,
then
try
pairing.
X
Avant
le
couplage,
placez
Ia
camera
de
Ia
station
sur
Ia
station pivot pour
Ia
recharger suffisamment,
puis
essayez
de
Ia
coupler.
X
Antes
de
emparejar, acople
Ia
camara
de
Ia
estaci6n
al
concentrador
de
Ia
estaci6n
para
cargarla
lo
suficiente
y,
a
continuaci6n, intente emparejar.
Outdoor Battery-Powered Camera Power on
Camera
exterieure
alimentee
par une batterie
Encendido
de
Ia
camara
para
exteriores
con
baterfas
X
Outdoor
battery-powered camera may
not
be
included
depending on the
model.
X
La
camera
exterieure
a
pile
ne
peut
pas
etre
inclue
selon
lemodele.
X
Outdoor
battery-powered
camera
que
nose
incluye
dependiendo
del
modelo.
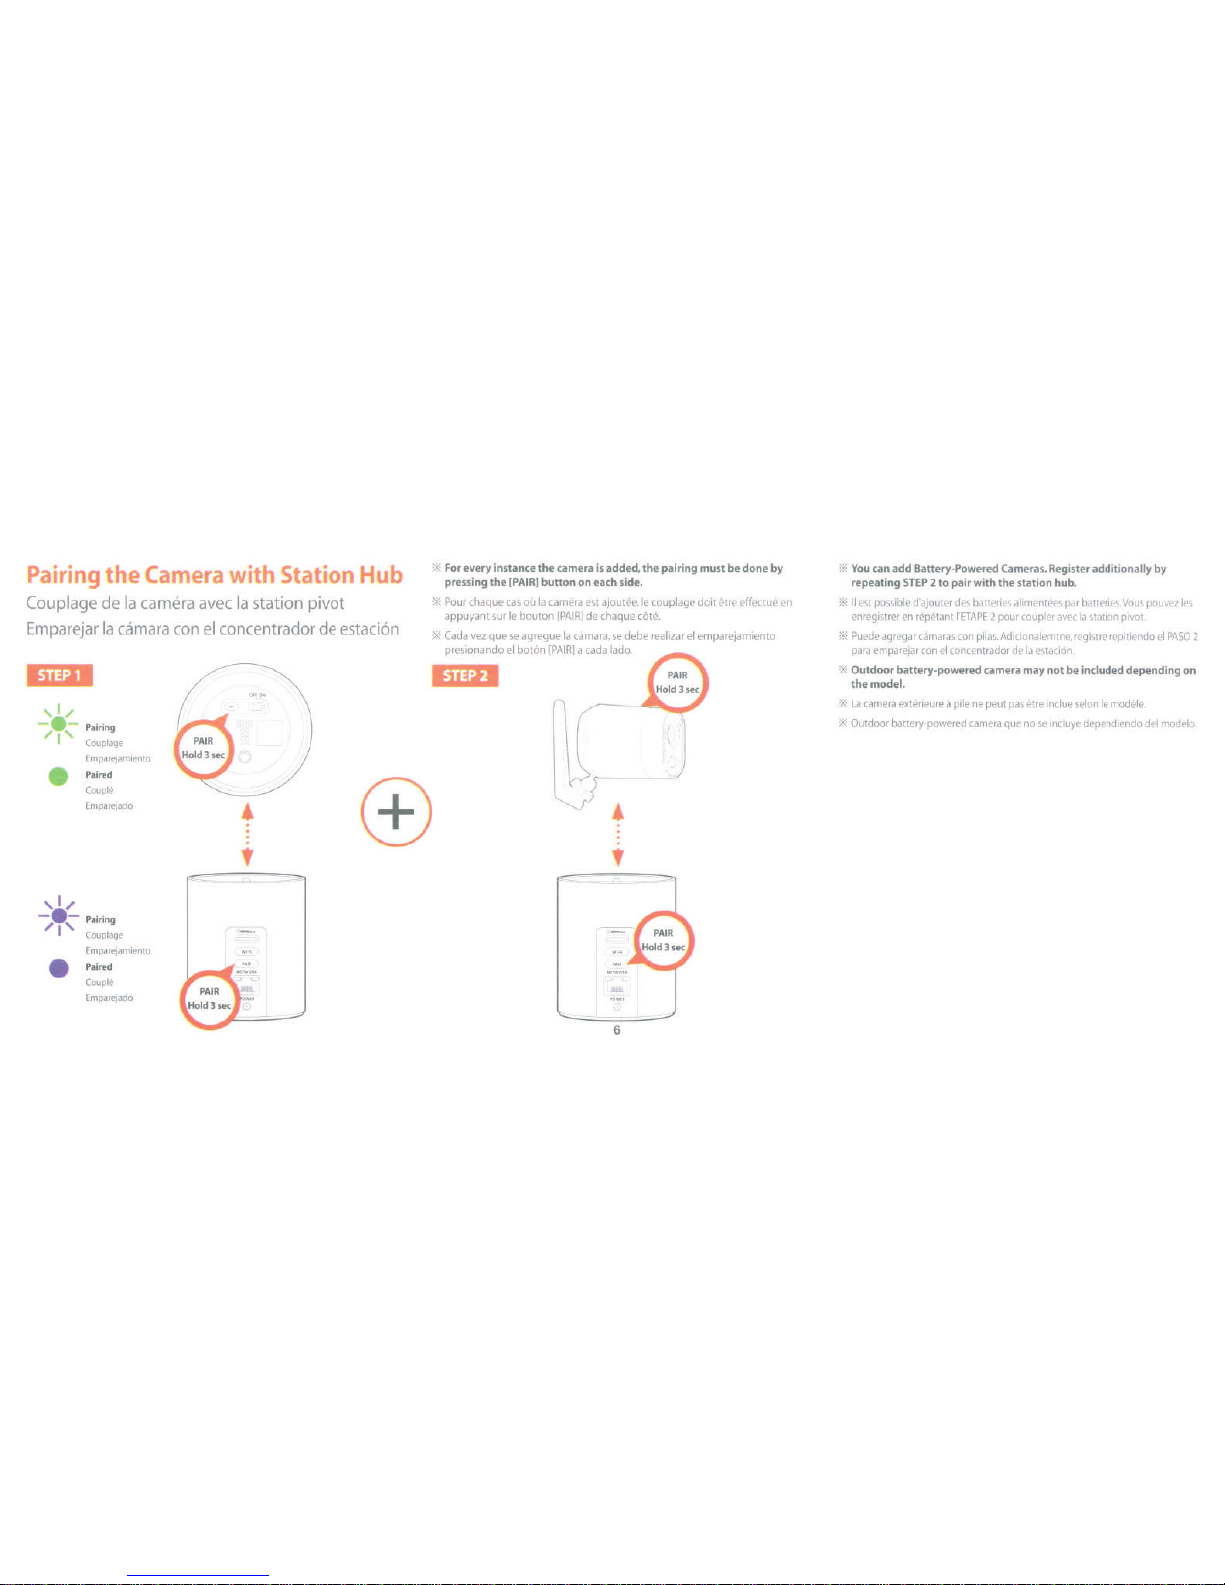
Pair·
ng
the
amera
with
Station
Hub
Couplage
de
Ia
camera
avec
Ia
station
pivot
Emparejar
Ia
camara
con
el
concentrador
de
estaci6n
ljdijli
Pairing
Couplage
Emparejamiento
Paired
Couple
Emparejado
Pairing
Couplage
Emparejamiento
•
Paired
Couple
Emparejado
•
'
""'
For
every
instance
the
camera
is
added, the pairing
must
be
done
by
pressing
the
[PAIR]
button
on
each
side.
""'
Pour
chaque
cas
ou
Ia
camera
est
ajoutee,
le
couplage doit
etre
effectue
en
appuyant
sur
le
bouton
[PAIR]
de
chaque
cote.
""'
Cad
a
vez
que
se
agregue
Ia
Gimara,
se
debe realizar
el
emparejamiento
presionando
el
bot6n
[PAIR]
a
cad
a
!ado.
'idD
•
'
6
.I
\
""'
You
can
add
Battery-Powered
Cameras.
Register
additionally
by
repeating
STEP
2 to pair with the station
hub.
""'
II
est
possible
d'ajouter
des
batteries
alimentees
par
batteries.
Vous
pouvez
les
enregistrer
en
repetant
I'ETAPE
2
pour
coupler
avec
Ia
station
pivot.
""'
Puede
agregar
camaras
con
pi
las.
Adicionalemtne,
registre
repitiendo
el
PASO
2
para
emparejar
con
el
concentrador
de
Ia
estaci6n.
""'
Outdoor
battery-powered
camera
may
not
be
included
depending
on
the
model.
""'
La
camera
exterieure
a
pile
ne
peut
pas
etre
inclue
selon
le
modele.
""'
Outdoor
battery-powered
camera
que
nose
incluye
dependiendo
del
modelo.
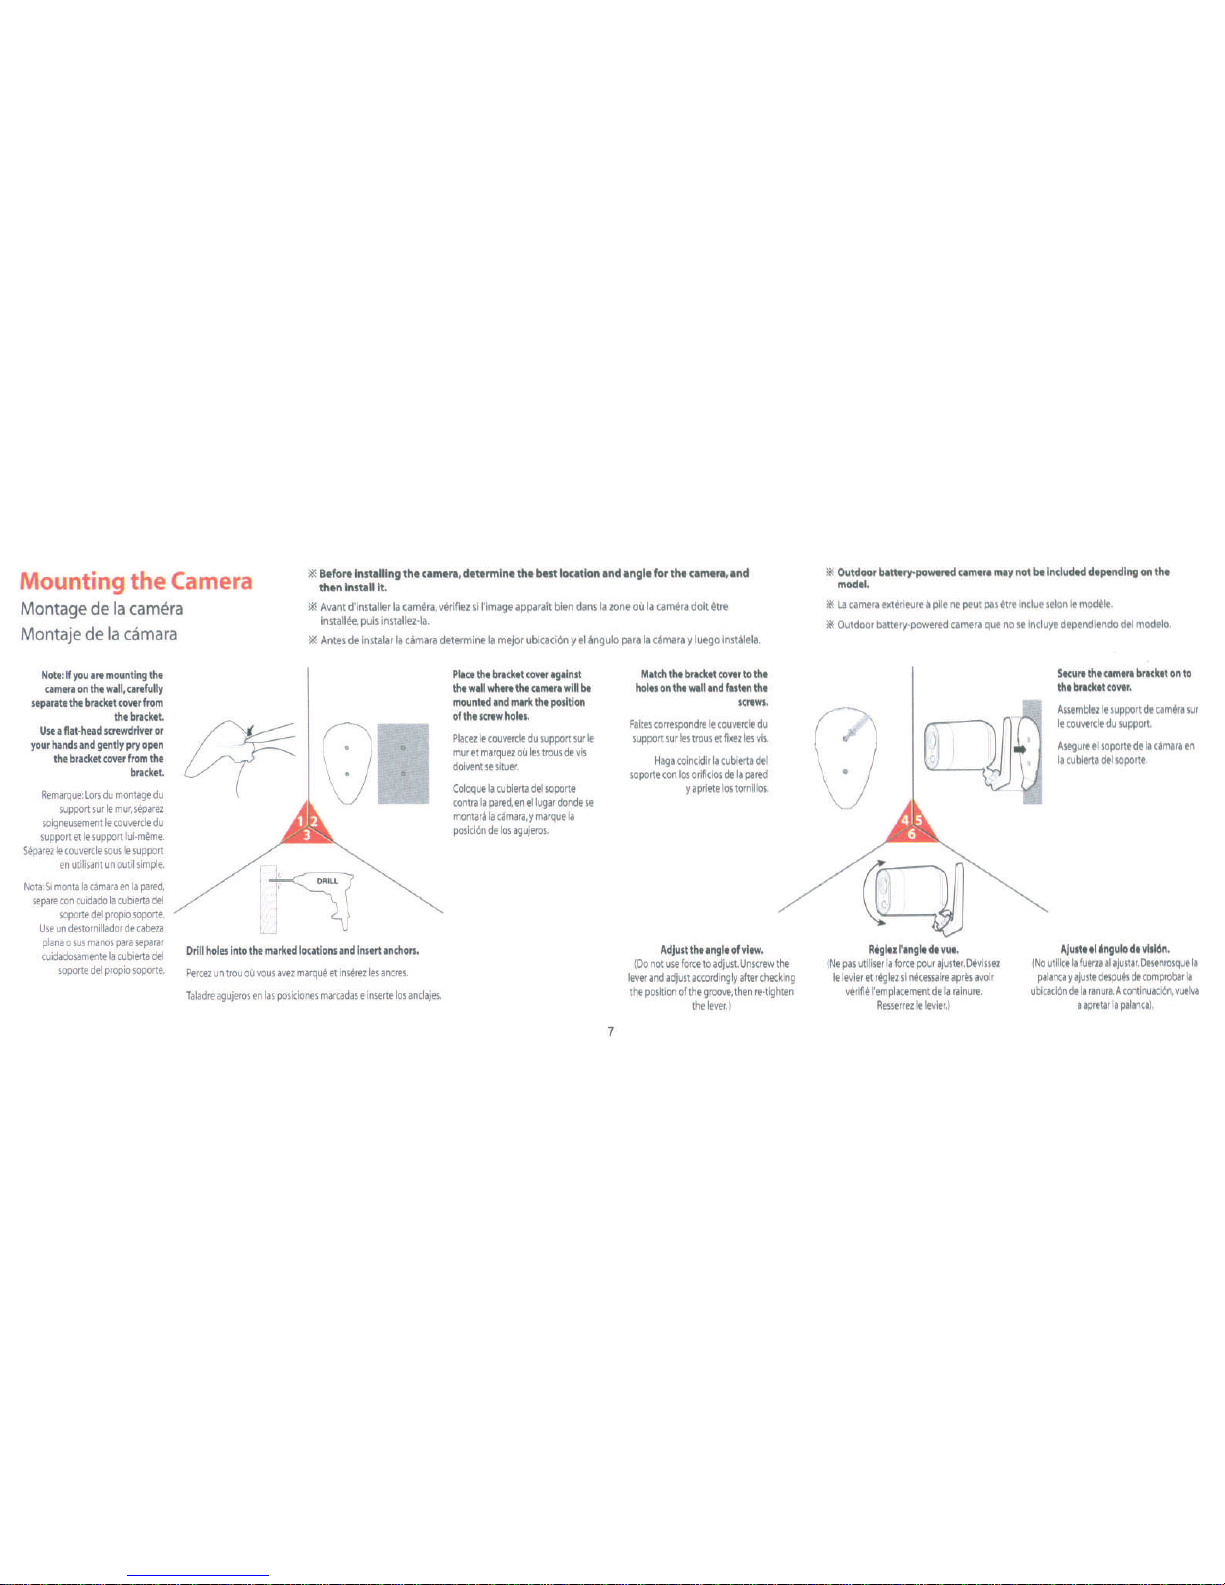
Mounting
the
Camera
Montage
de
Ia
camera
*
Before installing the camera, determine the best location and angle
for
the camera, and
then Install
it.
*
Avant
d'installer
Ia
camera,
verifiez
si
!'image
apparalt
bien
dans
Ia
zone
ou
Ia
camera
doit
~tre
installee,
puis
installez-la.
Montaje
de
Ia
camara
Note
:
If
you
are
mounting
the
camera
on
the
wall,
carefully
separate
the
bracket
cover
from
the
bracket
.
Use
a
flat-head
screwdriver
or
your
hands
and
gently
pry
open
the
bracket
cover
from
the
bracket.
Remarque:
Lors
du
montage
du
support
sur
le
mur
,
separez
soigneusement
le
couvercle
du
support
et
le
support
lui-meme
.
Separez
le
couvercle
sous
le
support
en
utilisant
un
outil
simple.
Nota:
Si
monta
Ia
camara
en
Ia
pared
,
separe
con
cuidado
Ia
cubierta
del
soporte
del
propio
soporte
.
Use
un
destornillador
de
cabeza
plana
o
sus
manos
para
separar
cu
i
dado
s
amente
Ia
cubierta
del
soporte
del
propio
soporte
.
*
Antes
de
lnstalar
Ia
camara
determine
Ia
mejor
ublcacl6n
y
el
angulo
para
Ia
camara
y
luego
lnstalela.
0
..
I I
·
~
Drill
holes
into
the
marked
locations
and
insert
anchors.
Percez
un
trou
ou
vous
avez
marque
et
inserez
les
ancres
.
Taladre
agujeros
en
las
posiciones
marcadas
e
inserte
los
anclajes
.
Plact
tht
bracktt
coVtr
against
tht
wall
whtrt tht
camera
will
bt
mounted
and
mark
tht
position
of
tht
scrtw
holts.
Placez
le
couvercle
du
support
sur
le
mur
et
marquez
ou
les
trous
de
vis
doivent
se
situer
.
Coloque
Ia
cublerta
del
soporte
contra
Ia
pared,
en
ellugar
donde
se
montara
Ia
c.!
mara
,
y
marque
Ia
posici6n
de
los
agujeros.
7
Match
tht
bracket
coVtr
to
tht
holts
on
tht
walland
fasten
tht
scrtws
.
Faltes
correspondre
le
couvercle
du
support
sur
les
trous
et
fixez
les
vis
.
Hag
a
colncldlr
Ia
cublerta
del
soporte
con
los
orlficlos
de
Ia
pared
y
apriete
los
tornlllos
.
Adjust
tht
angle
of
vltw
.
(
Do
not
use
force
to
adjust.
Unscrew
the
lever
and
adjust
accordingly
after
checking
the
position
of
the
groove
,
then
re-tighten
the
lever.)
~
Outdoor
bltttry-powtred
cam
er
a
may
not
btlncludtd
dtptndlng
on
tht
model
.
~
La
camera
exterleur
e
a
pile
ne
peut
PliS
~tre
Indue
selon
le
modele
.
~
Outdoor
battery-powered
camera
que
no
se
lncluye
dependlendo
del
modelo.
cq
Rigltz
l'
anglt
dt
vue.
(
Ne
pas
utlllser
Ia
force
pour
ajuster
.
Devlssez
le
levier
et
reglez
sl
necessalre
a
pres
a
voir
verifie
!'
emplacement
de
Ia
ralnure
.
Resserrez
le
levier
.)
Steurt
tht
camera
bracket
on
to
the
bracket
coVtr
.
Assemblez
le
support
de
camera
sur
le
couvercle
du
support
.
Asegure
el
soporte
de
Ia
cjmara
en
Ia
cublerta
del
soporte
.
Ajustt
ti 'ngulo dt
vlsl6n
.
(
No
utlllce
Ia
fuerza
al
ajustar
.
Desenrosque
Ia
palanca
y
ajuste
despues
de
comprobar
Ia
ublcac
l
6n
de
Ia
ranura
. A
contlnuacl6n
,
vuelva
a
apretar
Ia
palanca
).
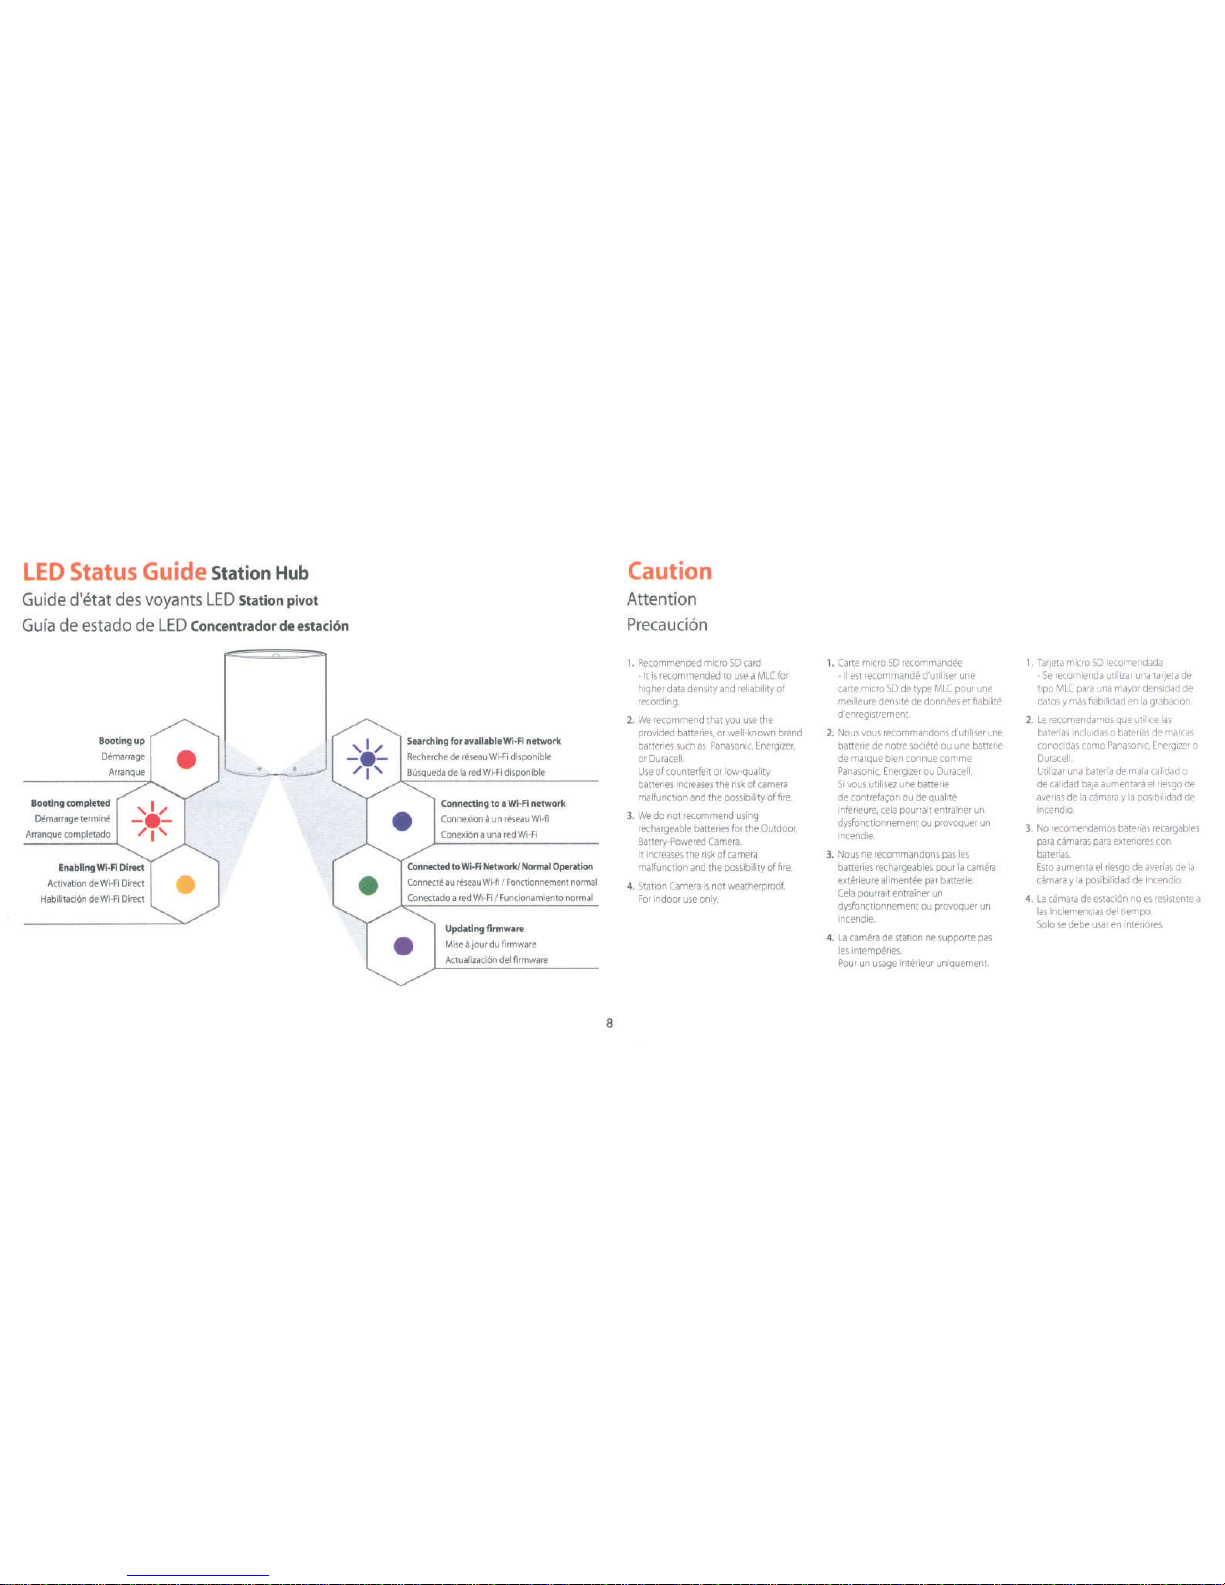
LED
Status
Guide Station
Hub
Guide d'etat
des
voyants
LED
Station pivot
Gufa
de
estado
de
LED
Concentradordeestacion
Booting
completed
Demarrage
termine
Arranque
completado
Enabling WI-
FI Direct
Activation
de
Wi-Fi
Direct
Habilitaci6n
de Wi-
Fi
Direct
•
Searching
for
available
Wi-Fi network
Recherche
de
reseau
Wi-Fi
disponible
Busqueda
de
Ia
red
Wi-Fi dis
ponible
Connecting
to a Wi
-Fi
network
Connexion a un
reseau
Wi-fi
Conexi6n a una
red Wi-
Fi
Connected
to
Wi-Fi Network!
Normal
Operation
Connect<!
au
reseau Wi-
fi I Fonctionnement
normal
Conectado a red
Wi-F
i I
Funcionamiento
normal
•
Updating
flnmware
Mise a jour
du
firmware
Actualizaci6n
del
firmware
8
Caution
Attention
Precauci6n
1.
Recommended
micro
SD
card
-
It
is
recommended
to
use a MLC
for
higher
data
density
and
reliability of
recording
2.
We
recommend
that
you
use
the
provided
batteries,
or
well-known
brand
batteries
such
as
Panasonic,
Energizer,
or Dur
acell.
Use
of counterfeit
or
low-quality
batteries
increases
the risk
of
came
ra
mal
function
and
the
possibility
of fir
e.
3.
We
do
not
recommend
using
r
echargeable
batteries for t
he
Outdoor,
Battery-Powered
Camera.
It
increases
the
risk
of ca
mera
malfunction and
the
possibility
of fir
e.
4.
Station
Came
ra
is not
weathe
rproof.
For
indoor
use
only.
1.
Carte
micro
SD
recommandee
-II
est
recommande
d'utiliser
une
carte
micro
SD
de
type
MLC
pour
une
meilleure
densite
de
donnees
et
fiabilite
d'enregrstrement.
2.
Nous
vous
recommandons
d'utiliser
une
batterie
de
notre
societe
ou
une
batterie
de
marque
bien
connue
com
me
Panasonic,
Energizer
ou
Duracell.
Si
vous
util
isez
une
batterie
de
contrefac;on
ou
de
qua
lite
inferieure,
cela
pourrait
entrainer
un
dysfonctionnement
ou
provoquer
un
incendie.
3.
Nous
ne recommandons
pas
les
ba
tter
ies
rechargeables
pour
Ia
camera
exterieure
alimentee
par
batterie
.
Ce
la pourrait
entrainer un
dy
sfonctionnement
ou
provoquer
un
incendie.
4.
La
came
ra
de
station
ne
supporte
pas
les
intemperies.
Pour
un usa
ge
interieu
r uniquement.
1.
Tarjeta
micro
SD
recomendada
-
Se
recomienda util
rzar
una
tarjeta
de
trpo
MLC
para
una
mayor
densrdad
de
datos y mas
fiabilidad
en
Ia
grabaci6n
.
2.
Le
recomendamos
que
utilice
las
baterias
rnclurdas o baterias
de
marcas
conocidas
como
Panasonrc,
Energrzer
o
Duracell.
Utrlizar
una
bateria
de
mala
calidad
o
de
calidad
baja
aumentara
el
riesgo
de
averias
de
Ia
camara y Ia
posibilidad
de
incendio.
3.
No
recomendamos
baterias
recargables
para
camaras
para
exteriores
con
baterias.
Esto
au
menta
el
riesgo
de
averias
de
Ia
camara y Ia
posibilidad
de
incendro.
4.
La
camara
de
estaci6n
noes
resistente
a
las
inclemencias
del
tiempo.
Solo
se
debe
usar
en
interiores.

SAM
SUNG
\A
:'
ISeNeT
PT01-004720B

Design and specications are subject to change without notice. Under no
circumstances, this document shall be reproduced, distributed or changed,
partially or wholly, without formal authorization of
Wisenet, SSNR are trademarks of
©2016 All rights reserved.
Stream crystal-clear 1080p Full HD video
from the station camera.
* 1080p resolution applies to station
camera only
Wide Dynamic Range (WDR)
automatically detects when the light
needs balancing, adjusting for clear
viewing - even in harsh lighting.
Accurately corrects video in low-light
levels to produce clear footage, even in
pitch-black darkness up to 24ft (7m).
Record and save video using a micro
SD card up to 128GB, SDXC, to easily
track back to the activity captured.
Automatically transitions between day
and night mode to ensure you get the
best picture at any time of day.
Use the SmartCam station camera’s built-
in speaker and mic to enable Two-Way
Talk, making sure you stay connected.
Monitor in Full HD
Perfect lighting every time
Smooth night vision
Easy to save, easy to track
Automatic adjustments for day&night
Talk back and forth
Watch over your home
indoors and outdoors
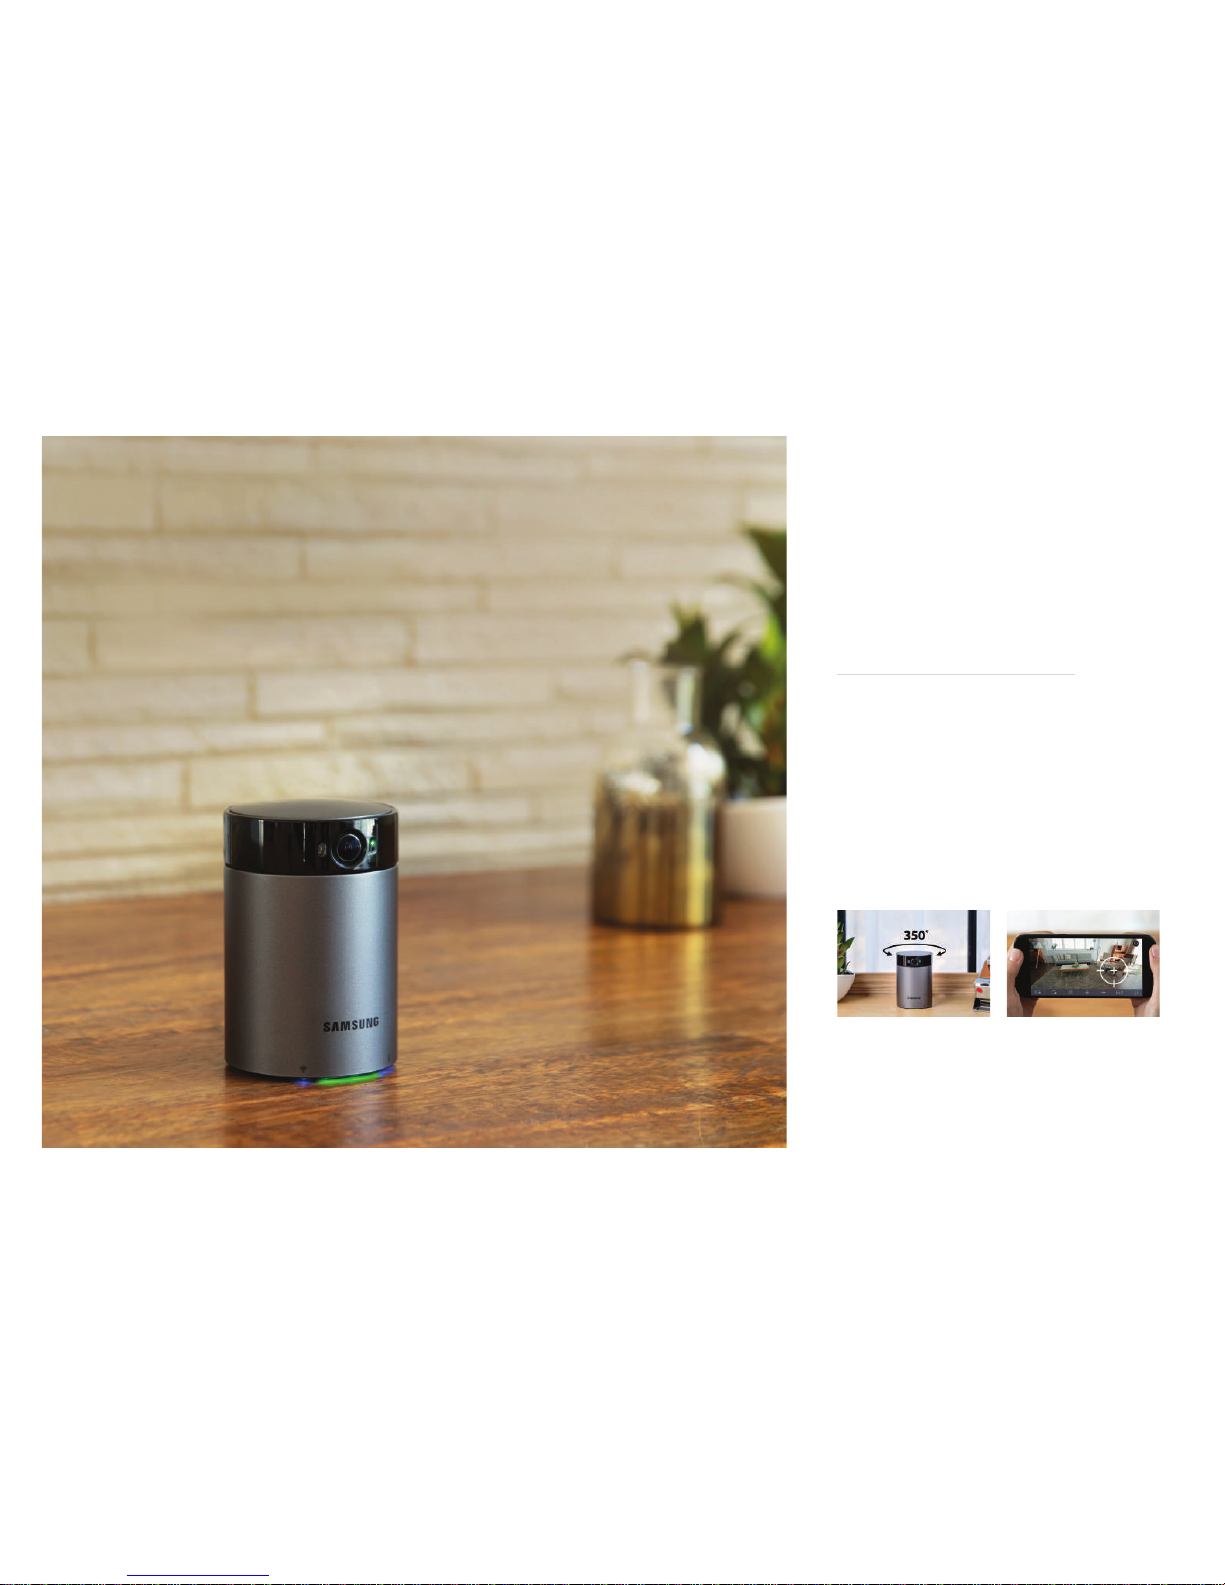
Get the complete
picture
You won’t miss a thing with the
A1 Station Camera. It can pan 350
degrees and automatically tracks any
movement within the lens viewing
angle in Full HD quality.
The versatile SmartCam A1
security system
The SmartCam A1 puts you in complete control of your home’s
security - anytime, anywhere. Monitor your home from your
mobile device via the station hub, with a portable Full HD
Station Camera and completely wireless, weather-resistant
Outdoor Battery-powered Cameras.
There’s more to see Auto Tracking
Pans up to 350-degrees when
mounted onto the station hub.
Automatically tracks a
person or object when
motion is detected within
the camera’s view.
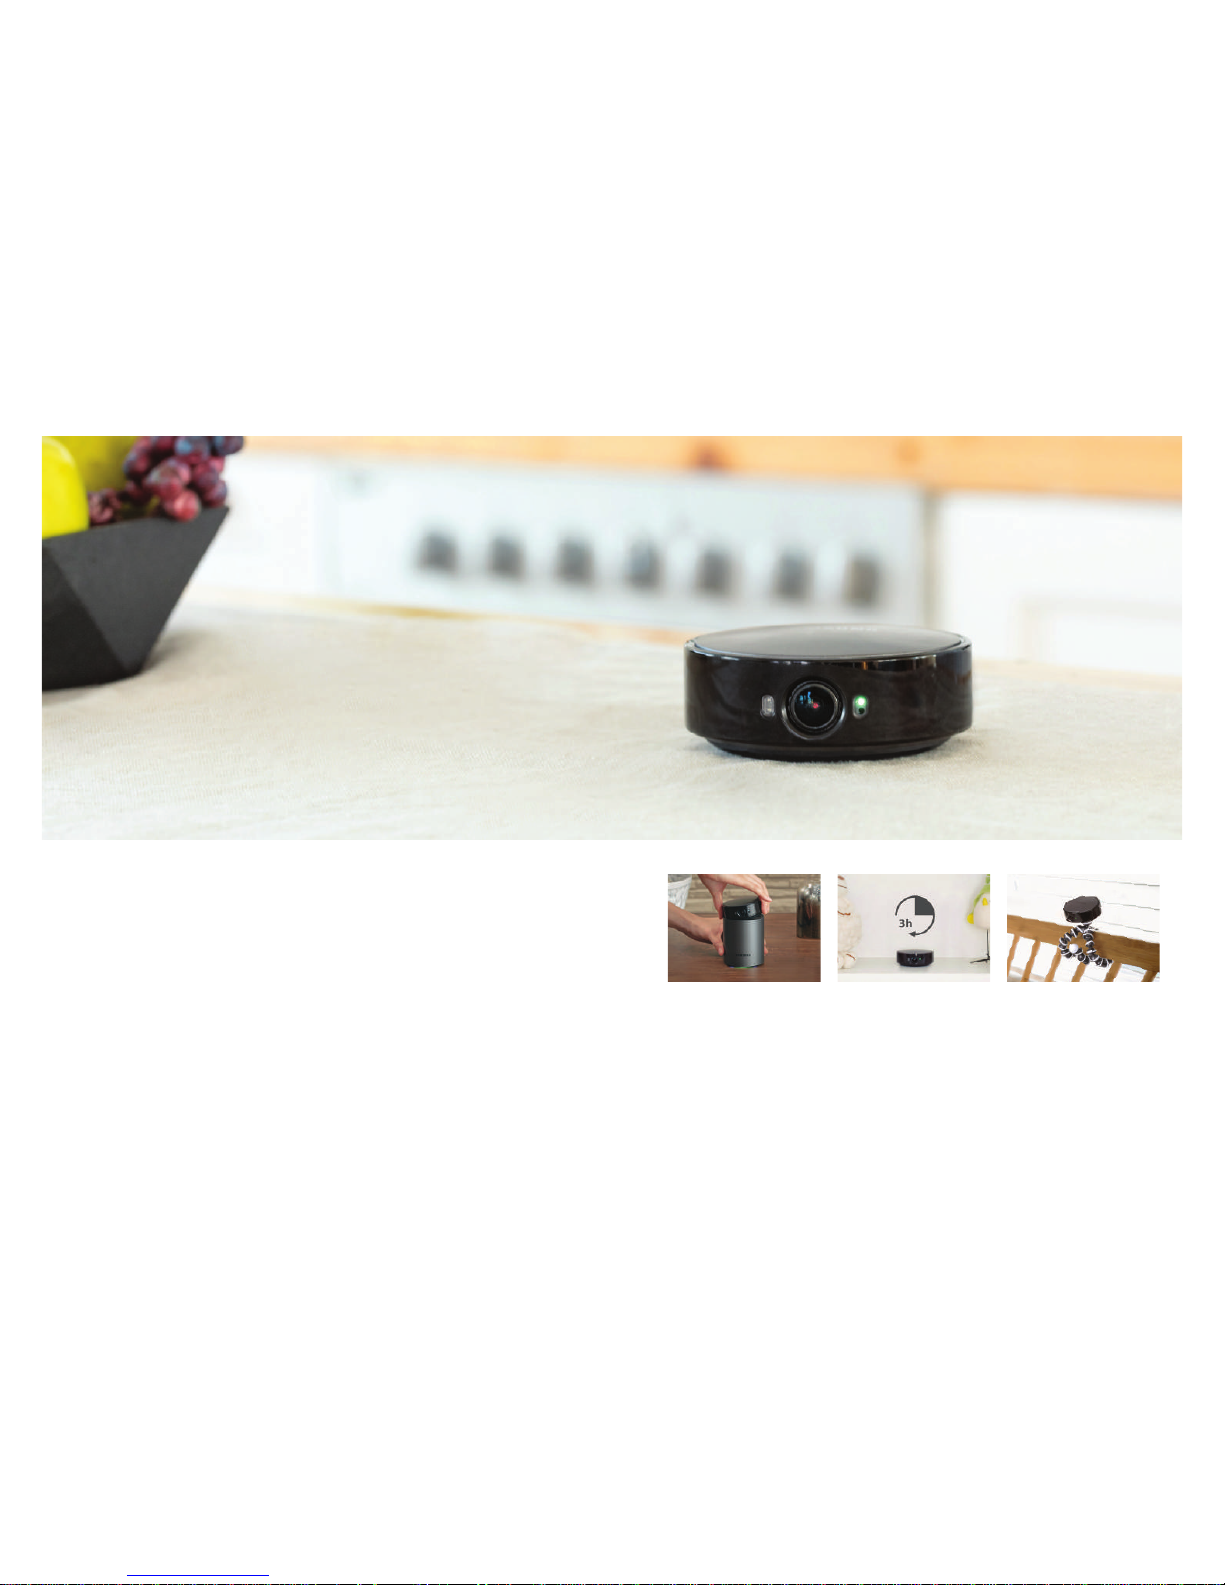
See it all even
when you’re not there
Life can get busy and you’re constantly on the go. But with
up to three hours of continuous recording, you can place
the Station Camera anywhere you need to keep an eye
on activity. Capture your baby napping while you have
a break, watch over the kids playing in the backyard - or
monitor your pets while you’re out of the house.
Wireless Station Camera Up to 3 hours of monitoring Tripod compatibility
You don’t even need to connect
the station camera to power,
with up to three hours of
battery-powered monitoring.
For maximum exibility, simply
mount your Station Camera
onto a tripod and place it
wherever you need to keep an
extra eye.
Move your Station Camera
anywhere you need to
monitor - with one Station
Camera, you can check any
aspect of your home.
* Based on continuous streaming
and recording
* Tripod is not included in the package
 Loading...