

Page 1
www.samsung.com
User Manual
English. 12/2016. Rev.1.0
SM-A320F
SM-A320Y/DS
SM-A720F
SM-A320F/DS
SM-A520F
SM-A720F/DS
SM-A320Y
SM-A520F/DS
Page 2

2
Table of Contents
Basics
4 Read me first
6 Device overheating situations and
solutions
9 Maintaining water and dust resistance
10 Package contents
11 Device layout
15 Battery
20 SIM or USIM card (nano-SIM card)
32 Memory card (microSD card)
36 Turning the device on and off
37 Controlling the touchscreen
40 Home screen
46 Lock screen
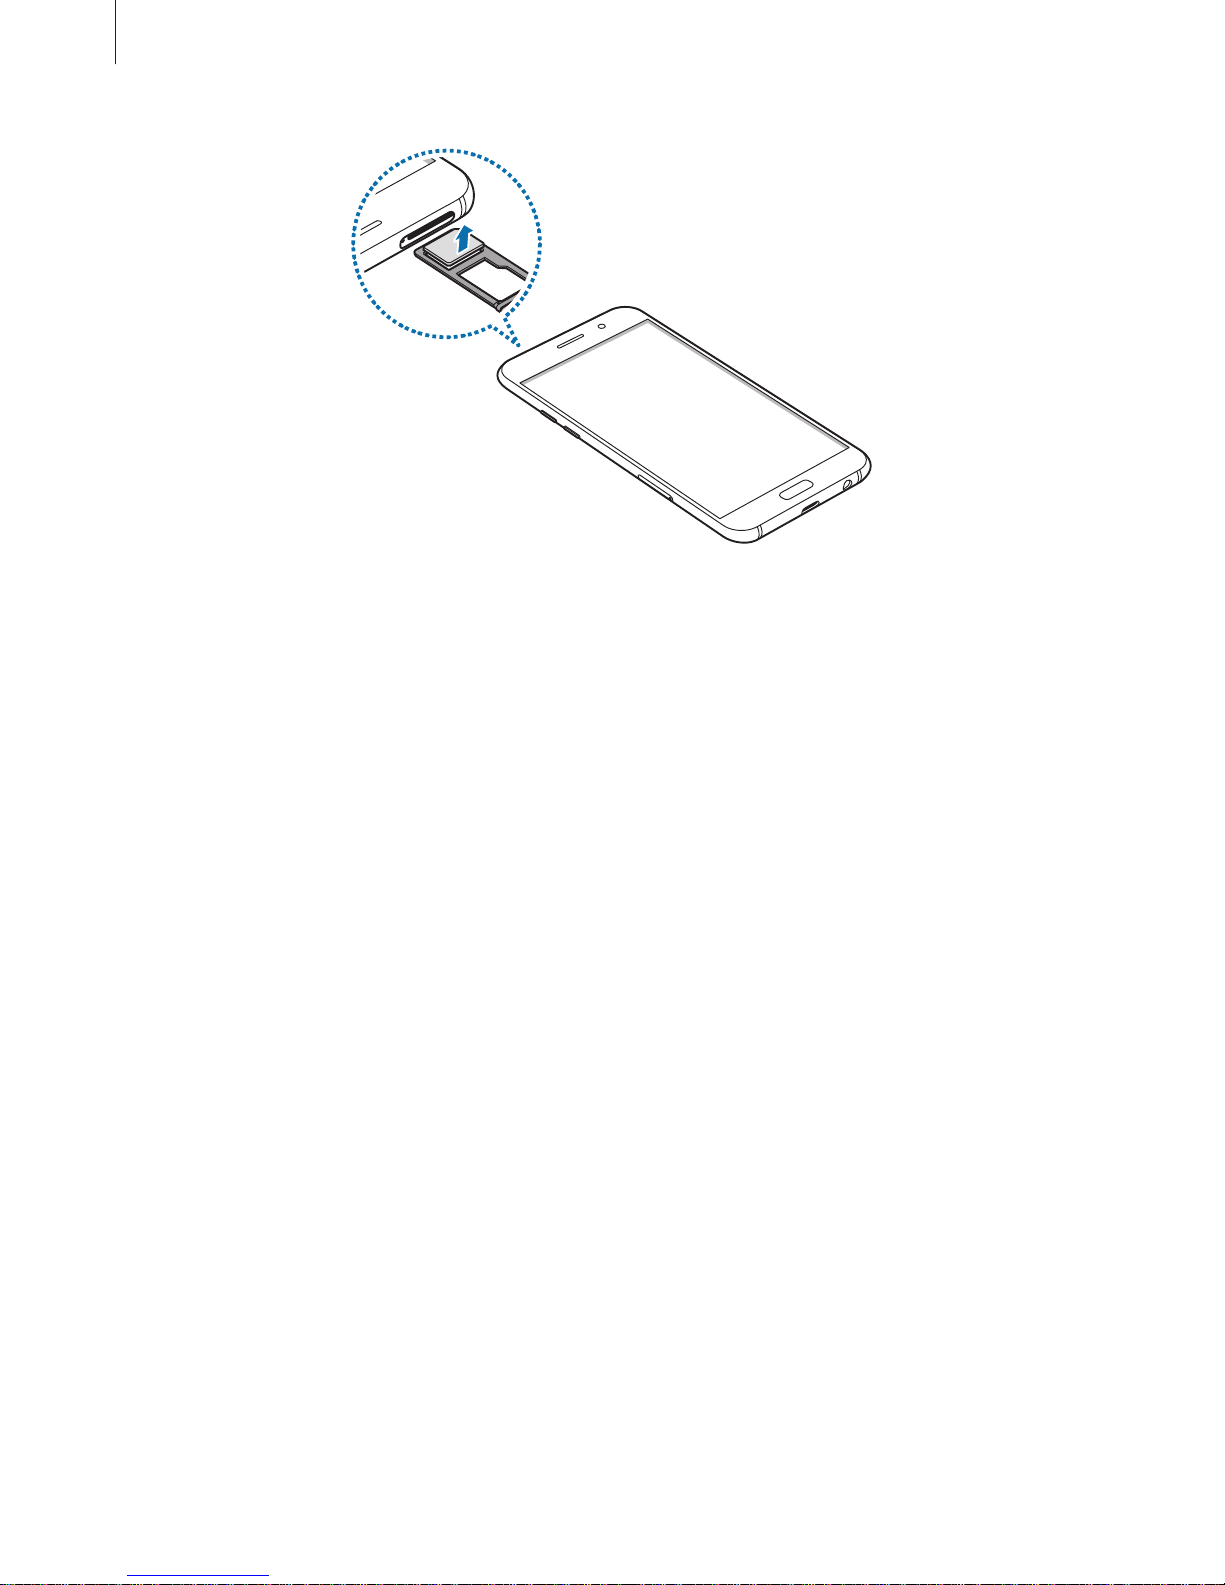
48 Always On Display
50 Notification panel
52 Entering text
55 Screen capture
55 Opening apps
56 Secure Folder
59 Multi window
64 Samsung account
66 Transferring data from your previous
device
68 Device and data management
70 Quick connect
73 Sharing features
74 Emergency mode
Applications
75 Installing or uninstalling apps
77 Phone
81 Contacts
84 Messages
87 Internet
89 Email
90 Camera
102 Gallery
107 Samsung Pay
111 Samsung Members
113 Game Launcher
115 Samsung Notes
117 Calendar
118 S Health
121 S Voice
122 Voice Recorder
124 My Files
124 Clock
126 Calculator
126 Radio
127 Google apps
Page 3

Table of Contents
3
Settings
129 Introduction
129 Connections
142 Sounds and vibration
143 Notifications
143 Display
145 Wallpapers and themes
146 Advanced features
148 Device maintenance
150 Applications
150 Lock screen and security
155 Cloud and accounts
157 Google
157 Accessibility
158 General management
158 Software update
159 User manual
159 About device
Appendix
160 Troubleshooting
166 Removing the battery
Page 4

4
Basics
Read me first
Please read this manual before using the device to ensure safe and proper use.
•
Descriptions are based on the device’s default settings.
•
Some content may differ from your device depending on the region, service provider,
model specifications, or device’s software.
•
Content (high quality content) that requires high CPU and RAM usage will affect the
overall performance of the device. Apps related to the content may not work properly
depending on the device’s specifications and the environment that it is used in.
•
Samsung is not liable for performance issues caused by apps supplied by providers other
than Samsung.
•
Samsung is not liable for performance issues or incompatibilities caused by edited
registry settings or modified operating system software. Attempting to customise the
operating system may cause the device or apps to work improperly.
•
Software, sound sources, wallpapers, images, and other media provided with this device
are licensed for limited use. Extracting and using these materials for commercial or other
purposes is an infringement of copyright laws. Users are entirely responsible for illegal
use of media.
•
You may incur additional charges for data services, such as messaging, uploading and
downloading, auto-syncing, or using location services depending on your data plan. For
large data transfers, it is recommended to use the Wi-Fi feature.
•
Default apps that come with the device are subject to updates and may no longer be
supported without prior notice. If you have questions about an app provided with
the device, contact a Samsung Service Centre. For user-installed apps, contact service
providers.
•
Modifying the device’s operating system or installing softwares from unofficial sources
may result in device malfunctions and data corruption or loss. These actions are violations
of your Samsung licence agreement and will void your warranty.
•
The images in this manual are based on the SM-A520F model.
Page 5
Basics
5
•
Be careful not to forget your unlock codes for the screen lock, accounts, and other
security features. If you forget an unlock code, you will not be able to use the device if
you do not reset it. Samsung is not responsible for any data loss or inconvenience caused
by forgotten unlock codes.
•
Depending on the region or model, some devices are required to receive approval from
the Federal Communications Commission (FCC). If your device is approved by the FCC,
you can view the FCC ID of the device. To view the FCC ID, tap
Apps
→
Settings
→
About device
→
Battery info
.
•
Depending on the region, you can view the regulatory information on the device. To view
the information, tap
Apps
→
Settings
→
About device
→
Regulatory information
.
Instructional icons
Warning: situations that could cause injury to yourself or others
Caution: situations that could cause damage to your device or other equipment
Notice: notes, usage tips, or additional information
Page 6

Basics
6
Device overheating situations and solutions
When the device heats up while charging the battery
While charging, the device and the charger may become hot. During wireless charging or fast
charging, the device may feel hotter to the touch. This does not affect the device’s lifespan or
performance and is in the device’s normal range of operation. If the battery becomes too hot,
the charger may stop charging.
Do the following when the device heats up:
•
Disconnect the charger from the device and close any running apps. Wait for the
device to cool down and then begin charging the device again.
•
If the lower part of the device overheats, it could be because the connected USB
cable is damaged. Replace the damaged USB cable with a new Samsung-approved
one.
•
When using a wireless charger, do not place foreign materials, such as metal objects,
magnets, and magnetic stripe cards, between the device and the wireless charger.
When the device heats up during use
When you use features or apps that require more power or use them for extended periods,
your device may temporarily heat up due to increased battery consumption. Close any
running apps and do not use the device for a while.
The following are examples of situations in which the device may overheat.
•
During the initial setup after purchase or when restoring data
•
When downloading large files
•
When using apps that require more power or using apps for extended periods
–
When playing high-quality games for extended periods
–
When recording videos for extended periods
–
When streaming videos while using the maximum brightness setting
–
When using the Screen Mirroring feature (When connecting to a TV)
Page 7

Basics
7
•
While multitasking (or, when running many apps in the background)
–
When using Multi window
–
When updating or installing apps while recording videos
–
When downloading large files during a video call
–
When recording videos while using a navigation app
•
When using large amount of data for syncing with the cloud, email, or other accounts
•
When using a navigation app in a car while the device is placed in direct sunlight
•
When using the mobile hotspot and tethering feature
•
When using the device in areas with weak signals or no reception
•
When charging the battery with a damaged USB cable
•
When the device’s multipurpose jack is damaged or exposed to foreign materials, such as
liquid, dust, metal powder, and pencil lead
•
When you are roaming
Do the following when the device heats up:
•
Keep the device updated with the latest software.
•
Conflicts between running apps may cause the device to heat up. Restart the device.
•
Deactivate the Wi-Fi, GPS, and Bluetooth features when not using them.
•
Close apps that increase battery consumption or that run in the background when
not in use.
•
Delete unnecessary files or unused apps.
•
Decrease the screen brightness.
•
If the device overheats or feels hot for a prolonged period, do not use it for a while. If
the device continues to overheat, contact a Samsung Service Centre.
Page 8

Basics
8
Device limitations when the device overheats
When the device heats up, the features and performance may be limited or the device may
turn off to cool down.
•
If the device becomes hotter than usual, a device overheating message will appear. To
lower the device’s temperature, the screen brightness and the performance speed will be
limited and battery charging will stop. Running apps will be closed and you will only be
able to make emergency calls until the device cools down.
•
If the device overheats or feels hot for a prolonged period, a power off message will
appear. Turn off the device, and wait until it cools down.
Precautions for operating environment
Your device may heat up due to the environment in the following conditions. Use caution to
avoid shortening the battery’s lifespan, damaging the device, or causing a fire.
•
Do not store your device in very cold or very hot temperatures.
•
Do not expose your device to direct sunlight for extended periods.
•
Do not use or store your device for extended periods in very hot areas, such as inside a
car in the summertime.
•
Do not place the device in any areas that may overheat, such as on an electric heating
mat.
•
Do not store your device near or in heaters, microwaves, hot cooking equipment, or high
pressure containers.
•
When using a wireless charger, do not place foreign materials, such as metal objects,
magnets, and magnetic stripe cards, between the device and the wireless charger.
•
Never use a damaged charger or battery.
Page 9

Basics
9
Maintaining water and dust resistance
Your device supports water- and dust-resistance. Follow these tips carefully to maintain the
water- and dust-resistance of your device. Failure to do so may result in damage to your
device.
•
Do not immerse the device in water deeper than 1.5 m or keep it submerged for more
than 30 minutes.
•
Do not expose the device to water moving with force.
•
If the device is exposed to clean water, dry it thoroughly with a clean, soft cloth. If the
device is exposed to other liquids, such as salt water, ionised water, or alcoholic beverage,
rinse it with clean water and dry it thoroughly with a clean, soft cloth. If you do not follow
these instructions, the device’s performance and appearance may be affected.
•
If the device has been immersed in water or the microphone or speaker is wet,
sound may not be heard clearly during a call. Wipe the device with a dry cloth or dry it
thoroughly before using it.
•
The touchscreen and other features may not work properly if the device is used in water.
•
Your device has been tested in a controlled environment and certified to be waterand dust-resistant in specific situations (meets requirements of classification IP68 as
described by the international standard IEC 60529-Degrees of Protection provided
by Enclosures [IP Code]; test conditions: 15-35 °C, 86-106 kPa, 1.5 metre, 30 minutes).
Despite this classification, it is still possible for your device to be damaged in certain
situations.
Page 10

Basics
10
Package contents
Check the product box for the following items:
•
Device
•
Quick start guide
•
The items supplied with the device and any available accessories may vary
depending on the region or service provider.
•
The supplied items are designed only for this device and may not be compatible
with other devices.
•
Appearances and specifications are subject to change without prior notice.
•
You can purchase additional accessories from your local Samsung retailer. Make
sure they are compatible with the device before purchase.
•
Use only Samsung-approved accessories. Using unapproved accessories may cause
the performance problems and malfunctions that are not covered by the warranty.
•
Availability of all accessories is subject to change depending entirely on
manufacturing companies. For more information about available accessories, refer
to the Samsung website.
Page 11
Basics
11
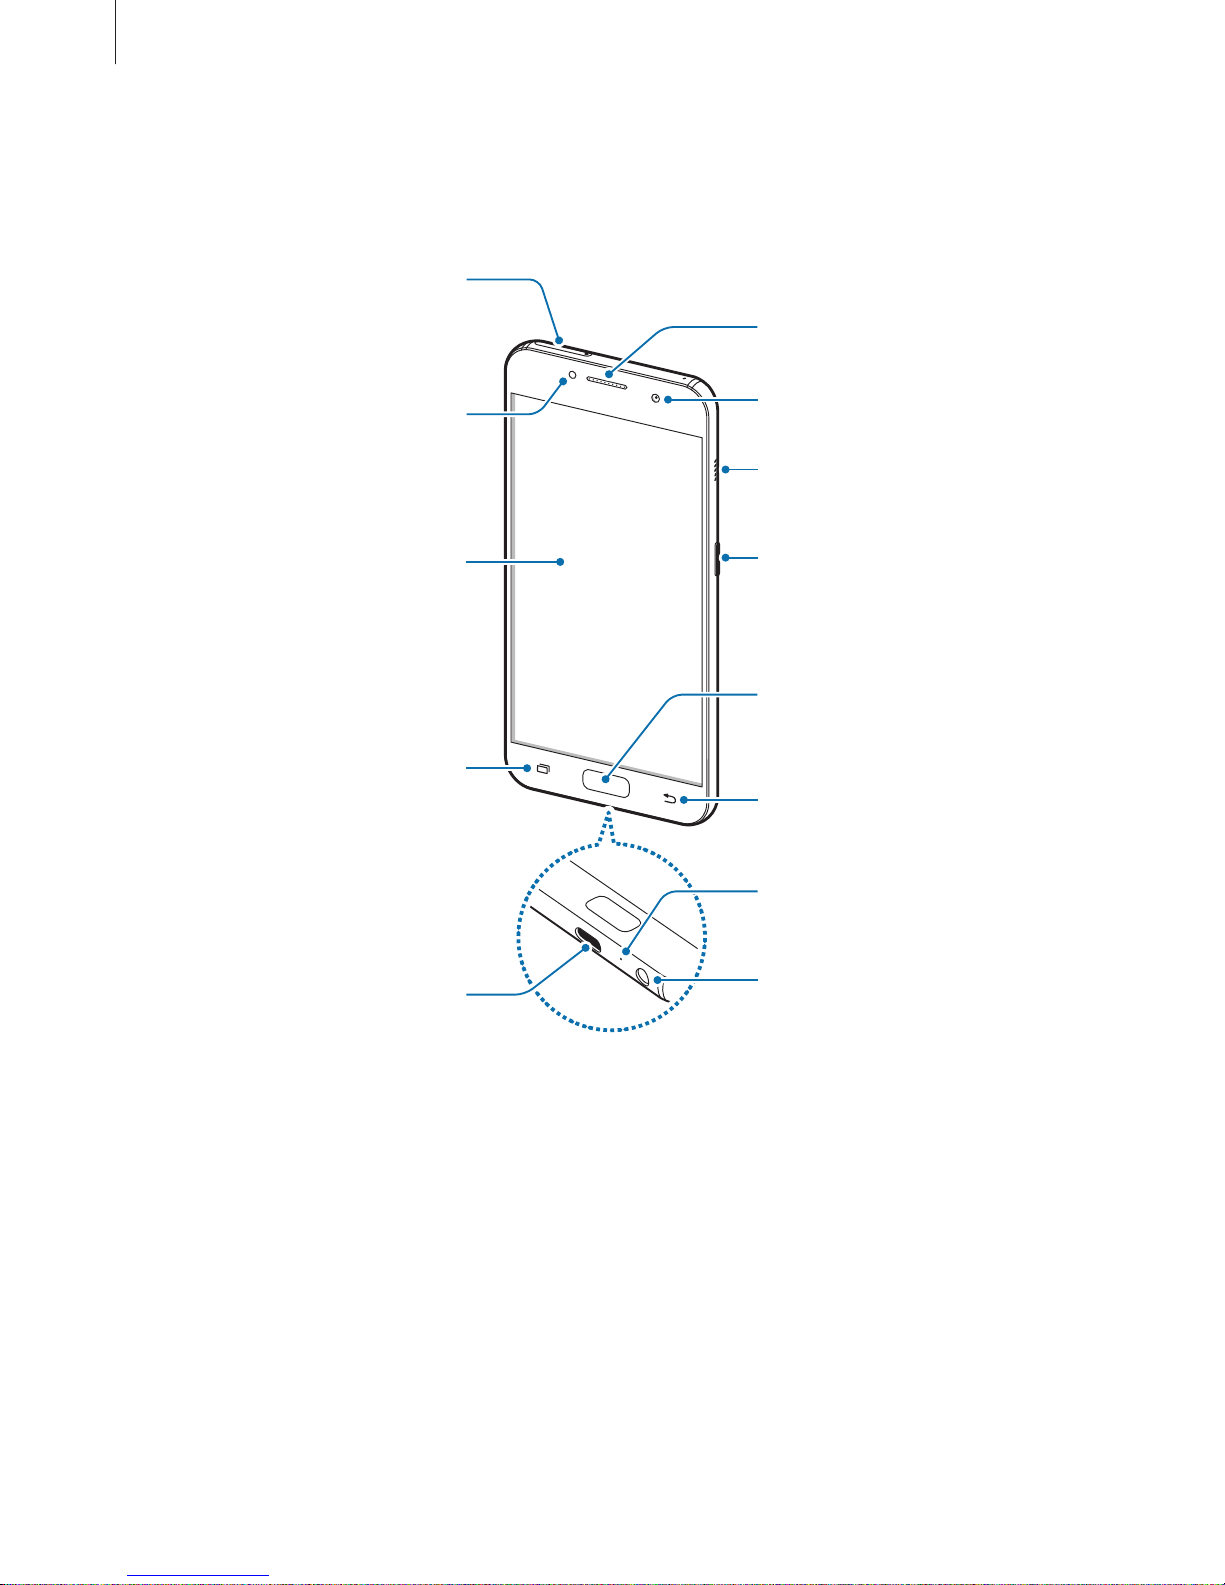
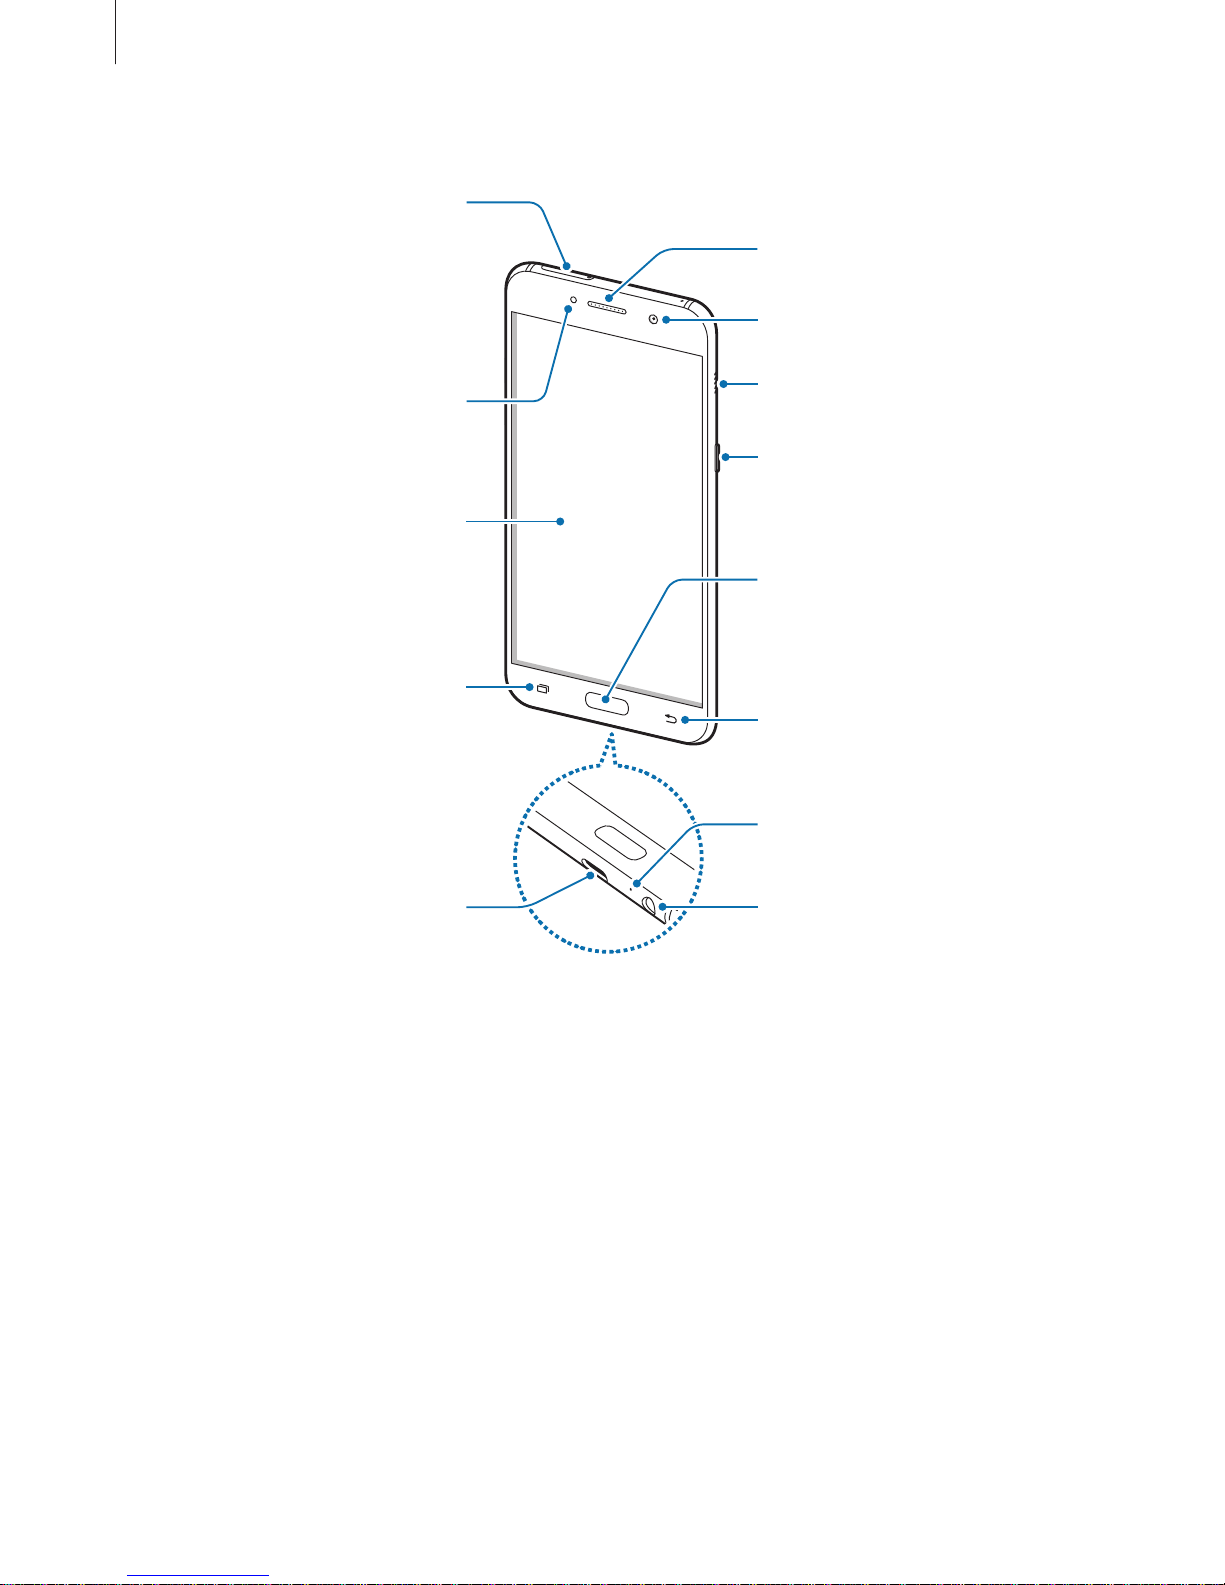
Device layout
–
Type 1 (SM-A320F, SM-A320Y):
Microphone
Back key
Headset jack
Multipurpose jack (USB Type-C)
Front camera
Speaker
Power key
Loud speaker
Touchscreen
Recents key
Home key (Fingerprint
recognition sensor)
Proximity sensor
SIM card / Memory card tray
Page 12
Basics
12
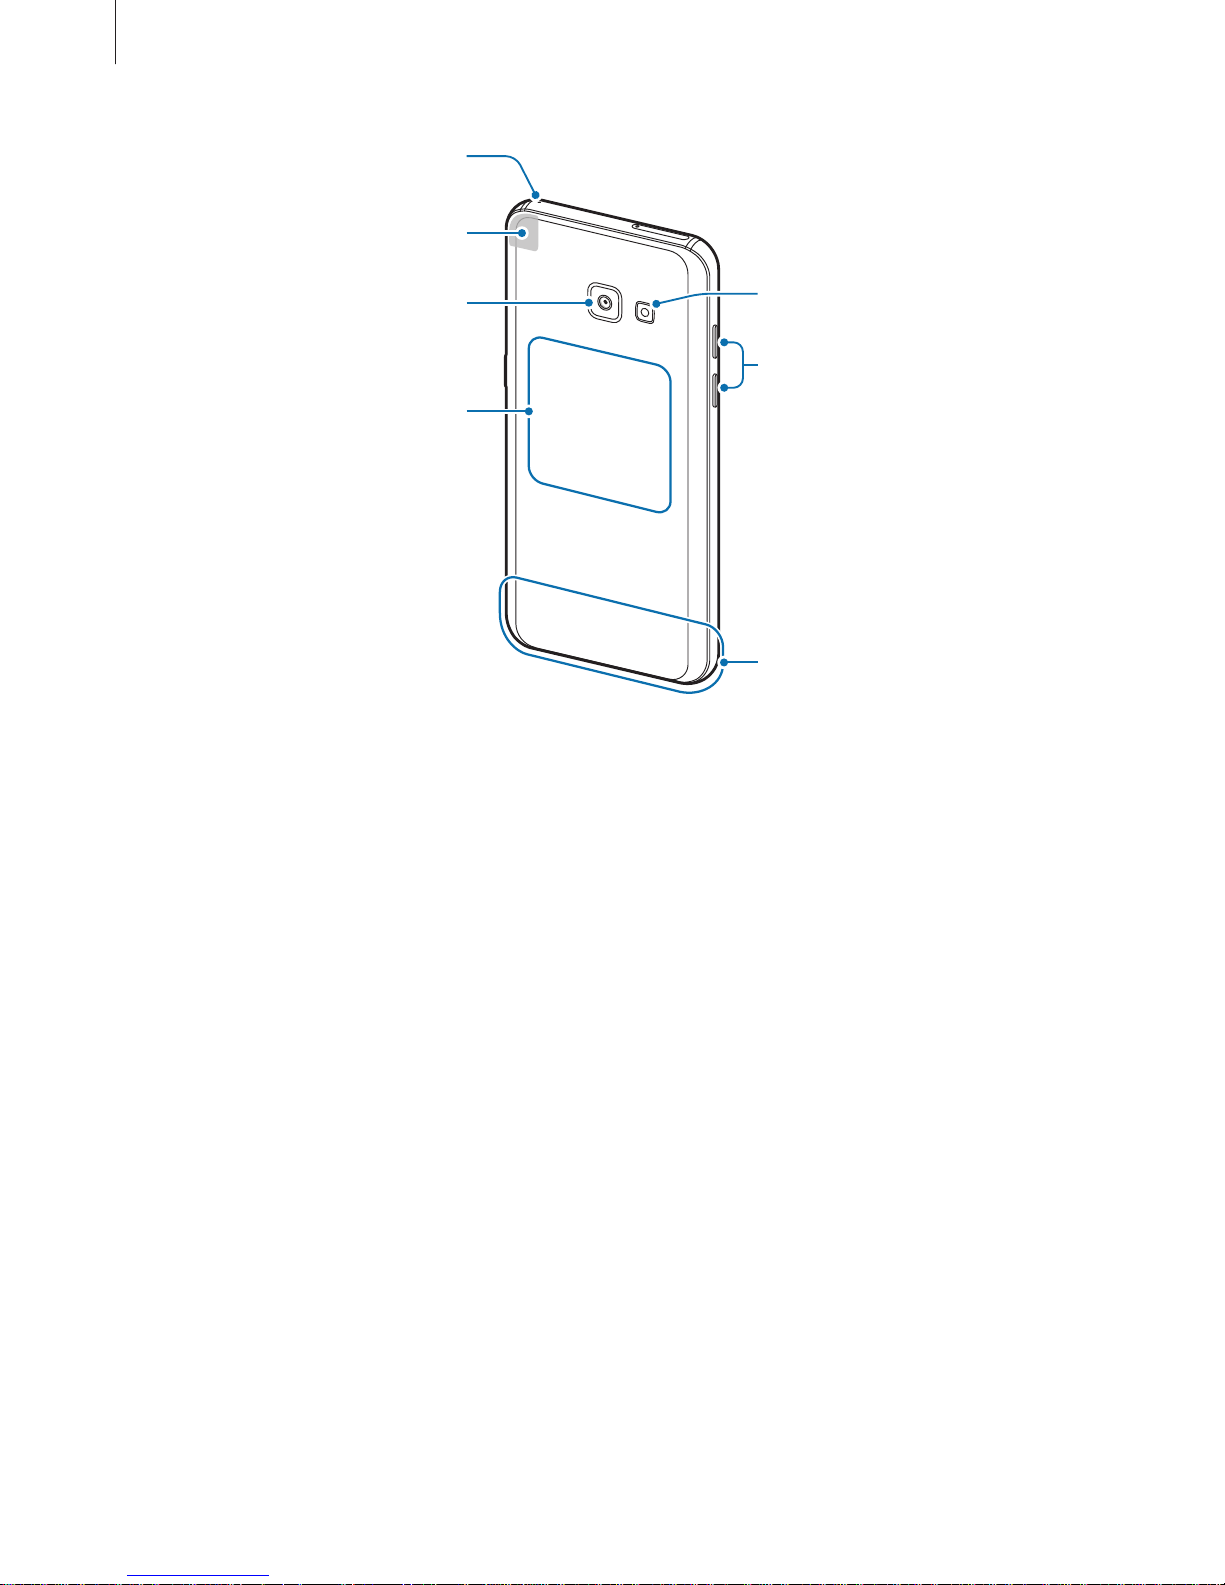
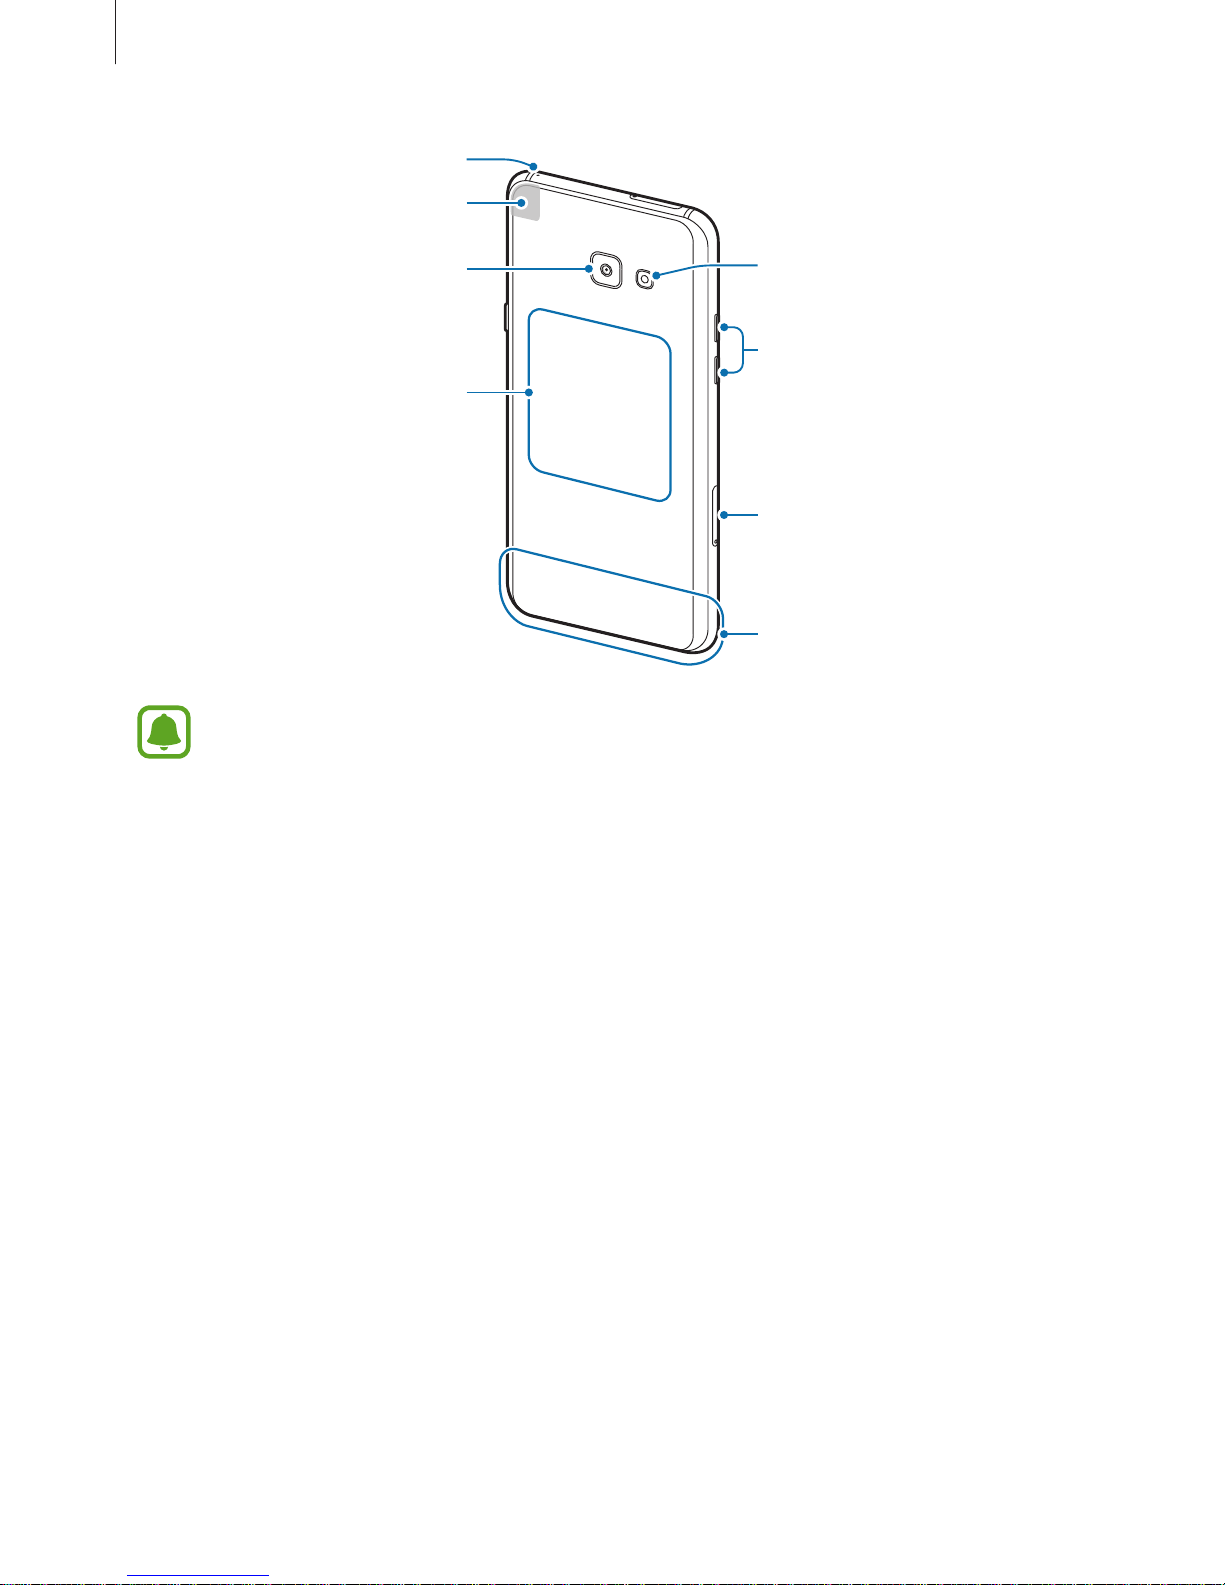
Main antenna
Volume key
NFC antenna / MST antenna
Rear camera
Microphone
Flash
GPS antenna
Page 13
Basics
13
–
Type 2 (SM-A520F, SM-A720F):
Microphone
Back key
Headset jack
Multipurpose jack (USB Type-C)
Front camera
Speaker
Power key
Loud speaker
Touchscreen
Recents key
Home key (Fingerprint
recognition sensor)
Proximity / RGB sensor
► Single SIM models: Memory
card tray
► Dual SIM models: SIM card /
Memory card tray
Page 14
Basics
14
Main antenna
SIM card tray
Volume key
NFC antenna / MST antenna
Rear camera
Microphone
Flash
GPS antenna
•
Connectivity problems and battery drain may occur in the following situations:
–
If you attach metallic stickers on the antenna area of the device
–
If you attach a device cover made with metallic material to the device
–
If you cover the device’s antenna area with your hands or other objects while
using certain features, such as calls or the mobile data connection
•
Using a Samsung-approved screen protector is recommended. Unapproved screen
protectors may cause the sensors to malfunction.
•
Do not allow water to contact the touchscreen. The touchscreen may malfunction
in humid conditions or when exposed to water.
Page 15
Basics
15
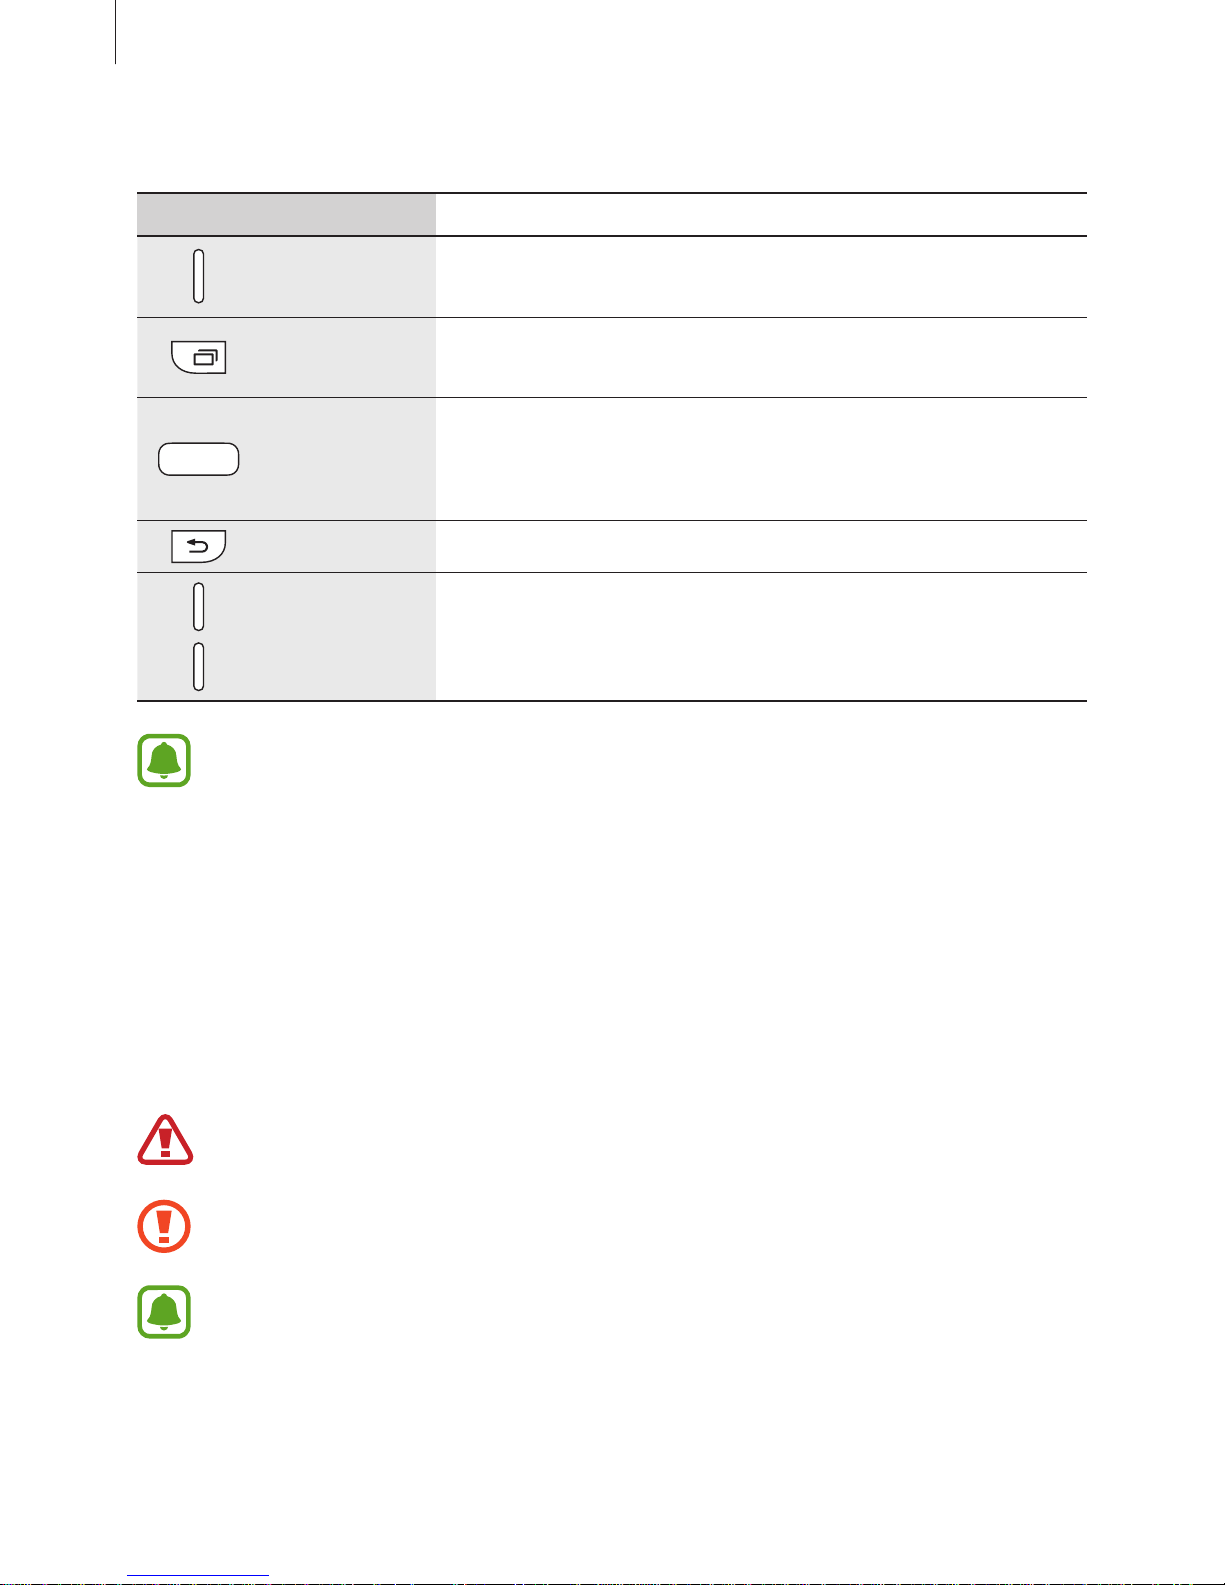
Keys
Key Function
Power
•
Press and hold to turn the device on or off.
•
Press to turn on or lock the screen.
Recents
•
Tap to open the list of recent apps.
•
Tap and hold to launch the split screen view.
Home
•
Press to turn on the screen while the screen is locked.
•
Press to return to the Home screen.
•
Press and hold to launch
Google
.
Back
•
Tap to return to the previous screen.
Volume
•
Press to adjust the device volume.
The function of the keys may not be available depending on the region or service
provider.
Battery
Charging the battery
Charge the battery before using it for the first time or when it has been unused for extended
periods.
Use only Samsung-approved chargers, batteries, and cables. Unapproved chargers or
cables can cause the battery to explode or damage the device.
Connecting the charger improperly may cause serious damage to the device. Any
damage caused by misuse is not covered by the warranty.
To save energy, unplug the charger when not in use. The charger does not have a
power switch, so you must unplug the charger from the electric socket when not in
use to avoid wasting power. The charger should remain close to the electric socket
and easily accessible while charging.
Page 16
Basics
16
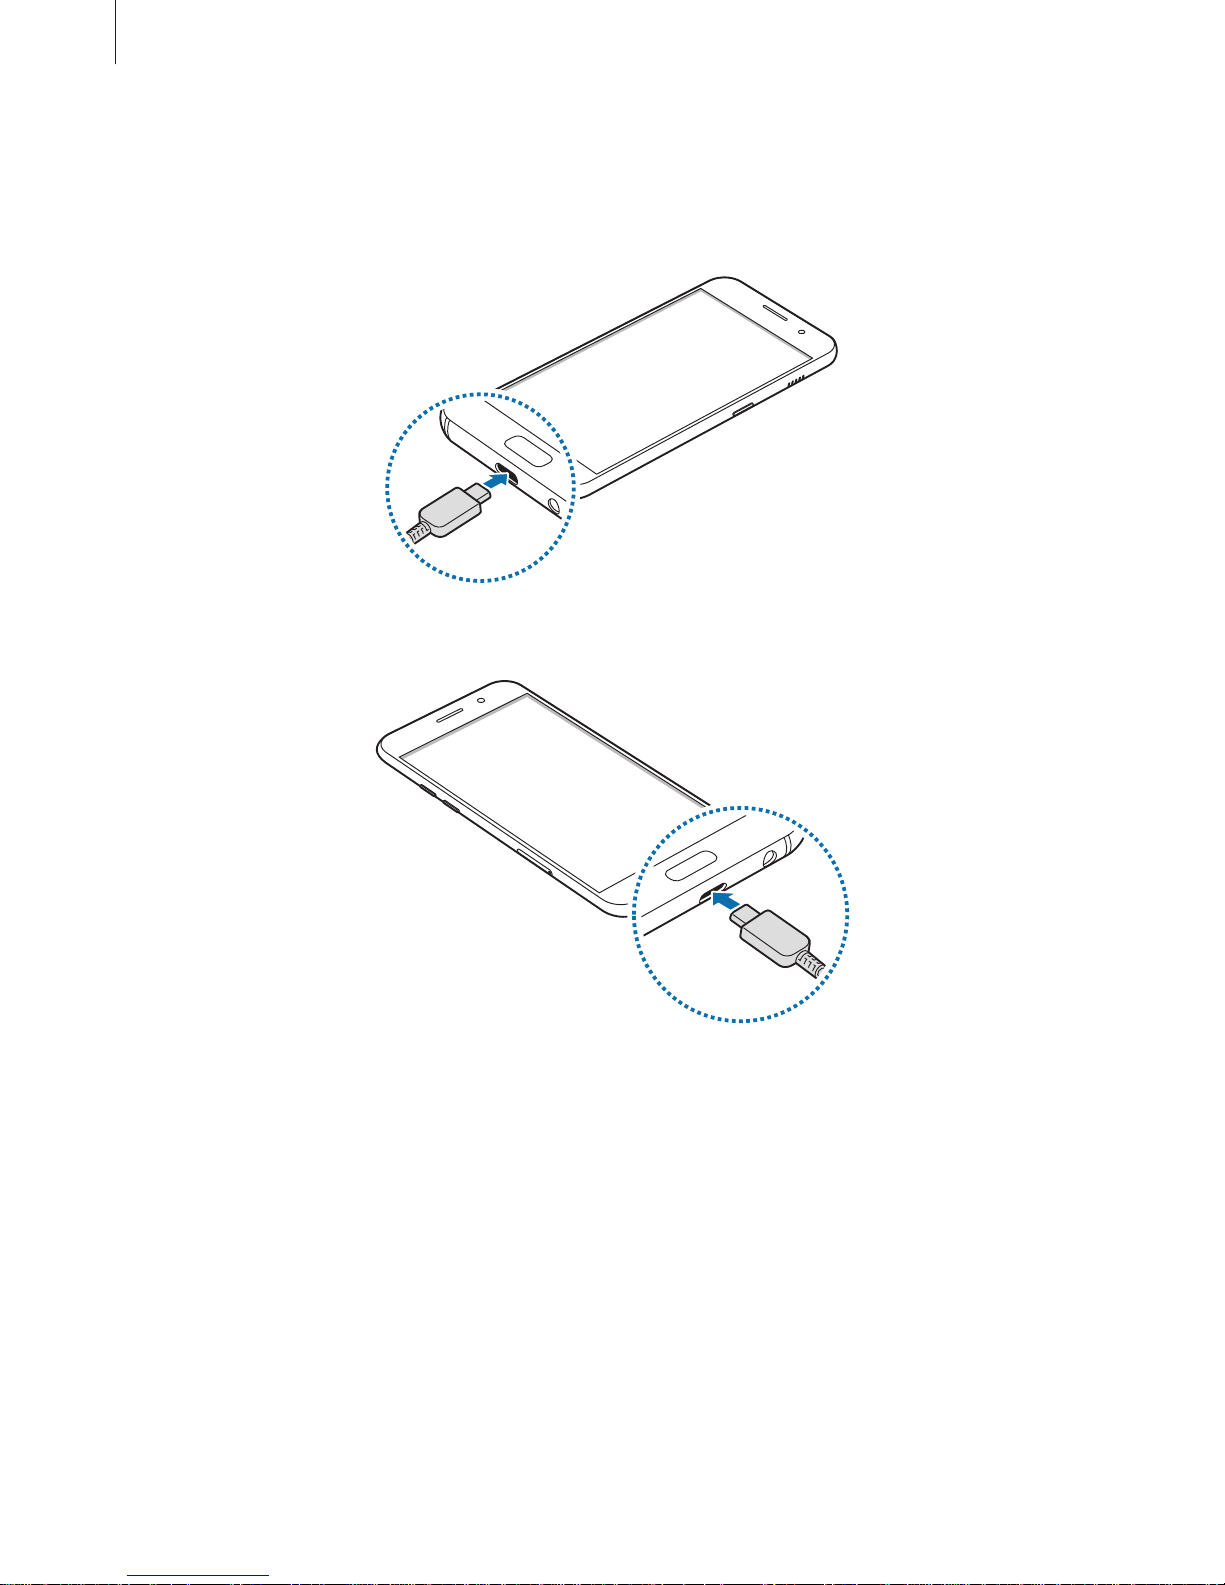
1
Connect the USB cable to the USB power adaptor, and plug the USB cable into the
device’s multipurpose jack.
–
Type 1 (SM-A320F, SM-A320Y):
–
Type 2 (SM-A520F, SM-A720F):
2
Plug the USB power adaptor into an electric socket.
3
After fully charging, disconnect the device from the charger. First unplug the charger
from the device, and then unplug it from the electric socket.
Page 17

Basics
17
Viewing the remaining charging time
While charging, open the Home screen and tap
Apps
→
Settings
→
Device maintenance
→
Battery
.
The actual charging time may vary depending on the status of your device and the
charging conditions. The remaining charging time may not be displayed when you
charge the device in very cold or very hot conditions.
Reducing the battery consumption
Your device provides various options that help you conserve battery power.
•
Optimise the device using the device maintenance feature.
•
When you are not using the device, turn off the screen by pressing the Power key.
•
Activate power saving mode.
•
Close unnecessary apps.
•
Deactivate the Bluetooth feature when not in use.
•
Deactivate the Wi-Fi feature when not in use.
•
Deactivate auto-syncing of apps that need to be synced, such as emails.
•
Decrease the backlight time.
•
Decrease the screen brightness.
Battery charging tips and precautions
•
When the battery power is low, the battery icon appears empty.
•
If the battery is completely discharged, the device cannot be turned on immediately
when the charger is connected. Allow a depleted battery to charge for a few minutes
before turning on the device.
•
If you use multiple apps at once, network apps, or apps that need a connection to
another device, the battery will drain quickly. To avoid losing power during a data
transfer, always use these apps after fully charging the battery.
•
Using a power source other than the charger, such as a computer, may result in a slower
charging speed due to a lower electric current.
•
The device can be used while it is charging, but it may take longer to fully charge the
battery.
Page 18

Basics
18
•
If the device receives an unstable power supply while charging, the touchscreen may not
function. If this happens, unplug the charger from the device.
•
While charging, the device and the charger may heat up. This is normal and should not
affect the device’s lifespan or performance. If the battery gets hotter than usual, the
charger may stop charging.
•
If you charge the device while the multipurpose jack is wet, the device may be damaged.
Thoroughly dry the multipurpose jack before charging the device.
•
If the device is not charging properly, take the device and the charger to a Samsung
Service Centre.
Fast charging
The device has a built-in fast charging feature. You can charge the battery more quickly while
the device or its screen is turned off.
This feature may not be available depending on the region or service provider.
About Fast charging
•
Fast charging uses battery charging technology that charges the battery faster by
increasing the charging power. The device supports Samsung’s Adaptive fast charging
feature and Qualcomm Quick Charge 2.0.
•
To use Fast charging on your device, connect it to a battery charger that supports
Adaptive fast charging or Quick Charge 2.0.
Increasing the charging speed
To increase the charging speed, turn the device or its screen off when you charge the battery.
While charging the battery when the device is turned off, the
icon appears on the screen.
If the fast charging feature is not activated, on the Home screen, tap
Apps
→
Settings
→
Device maintenance
→
Battery
→ →
Advanced settings
, and then tap the
Fast cable
charging
switch to activate it.
•
You cannot use the built-in fast charging feature when you charge the battery
using a standard battery charger.
•
If the device heats up or the ambient air temperature rises, the charging speed may
decrease automatically. This is a normal operating condition to prevent damage to
the device.
Page 19
Basics
19
Power saving mode
Activate power saving mode to extend the battery’s usage time.
1
On the Home screen, tap
Apps
→
Settings
→
Device maintenance
→
Battery
→
MID
.
2
Tap
CUSTOMISE
to change the power saving settings before entering power saving
mode.
3
Tap
APPLY
.
Maximum power saving mode
In maximum power saving mode, the device decreases battery consumption by applying the
dark theme and limiting the apps and features available. Network connections, except for the
mobile network, will be deactivated.
1
On the Home screen, tap
Apps
→
Settings
→
Device maintenance
→
Battery
→
MAX
.
2
Tap
CUSTOMISE
to change the power saving settings before entering maximum power
saving mode.
3
Tap
APPLY
.
After entering maximum power saving mode, on the Home screen, tap
and select an app
to use. To remove apps, tap
→
Edit
and select an app with .
To deactivate maximum power saving mode, tap
→
Disable Maximum power saving
mode
.
The estimated battery usage time may vary depending on your device settings and
operating conditions.
Page 20
Basics
20
SIM or USIM card (nano-SIM card)
Installing the SIM or USIM card
Insert the SIM or USIM card provided by the mobile telephone service provider.
•
Use only a nano-SIM card.
•
Use caution not to lose or let others use the SIM or USIM card. Samsung is not
responsible for any damages or inconveniences caused by lost or stolen cards.
•
Dual SIM models: In some areas, data transfer speeds may be slower if two SIM
cards are inserted in the device than when one SIM card is inserted.
•
Some LTE services may not be available depending on the service provider. For
more information about service availability, contact your service provider.
Page 21
Basics
21
►
Single SIM models:
–
Type 1 (SM-A320F, SM-A320Y):
Page 22
Basics
22
–
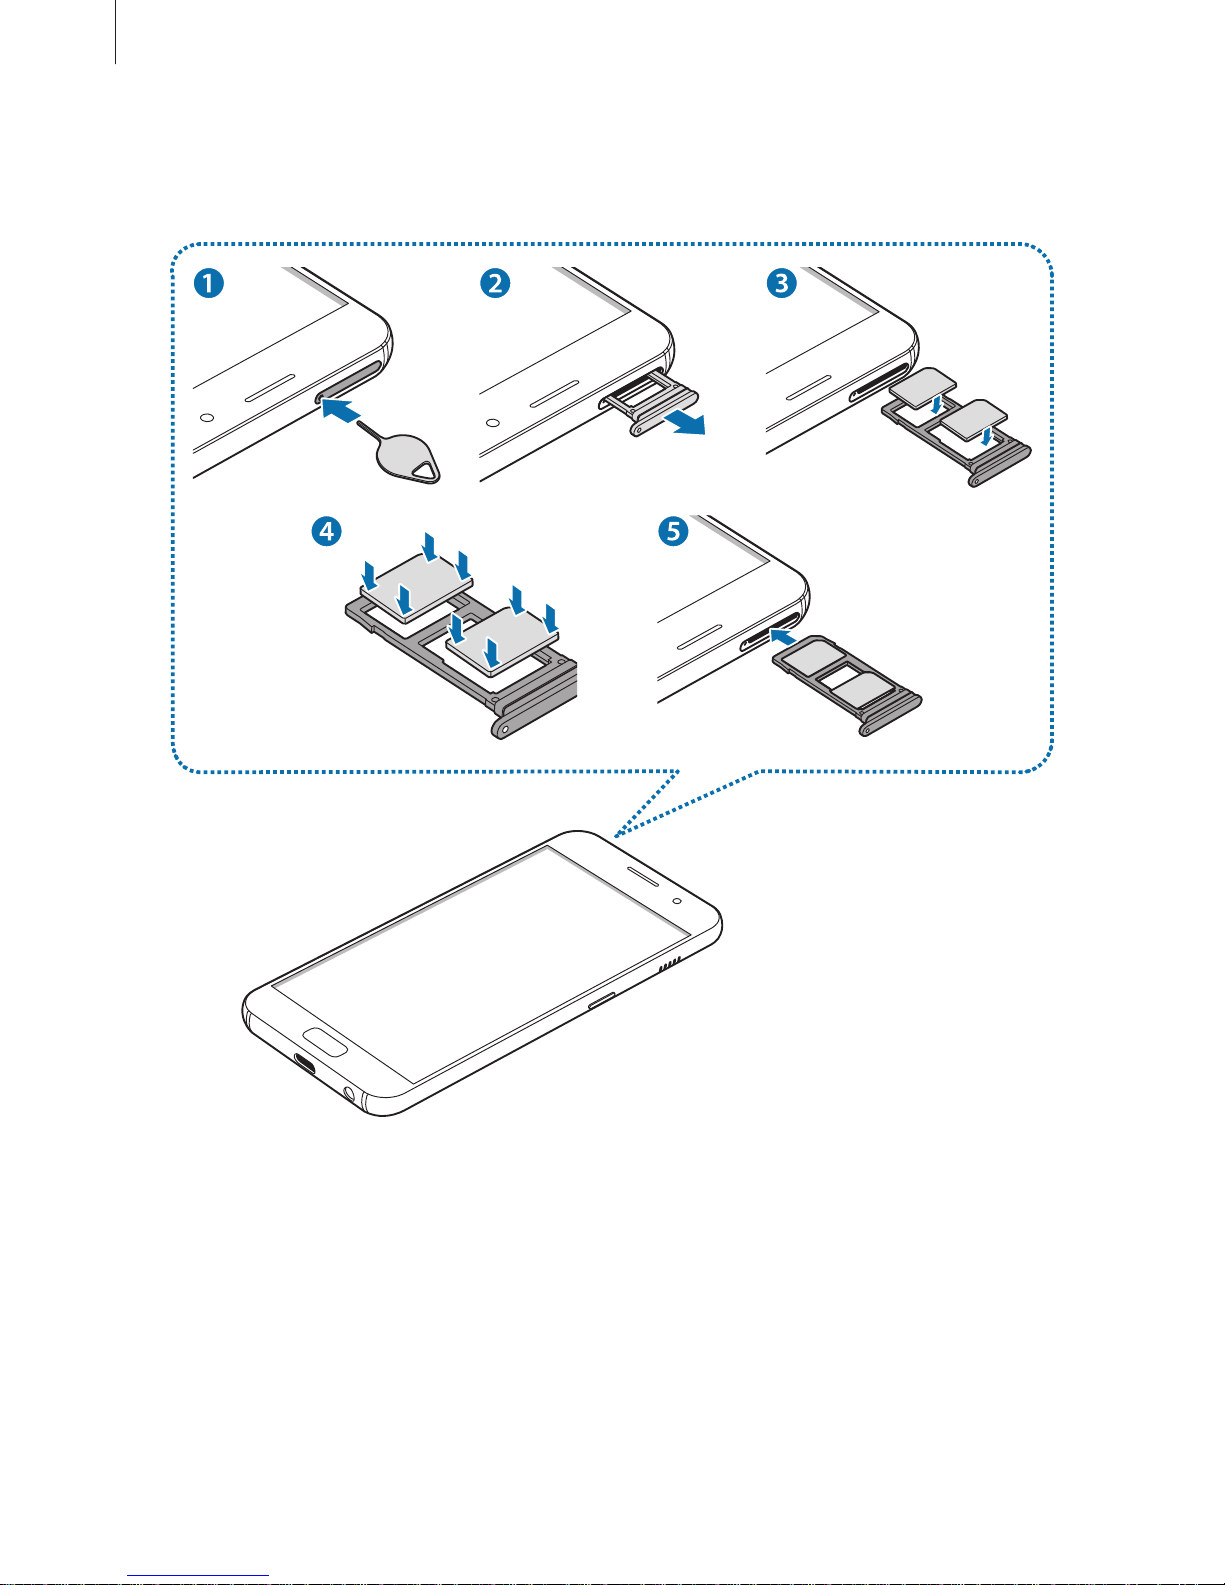
Type 2 (SM-A520F, SM-A720F):
Page 23
Basics
23
►
Dual SIM models:
–
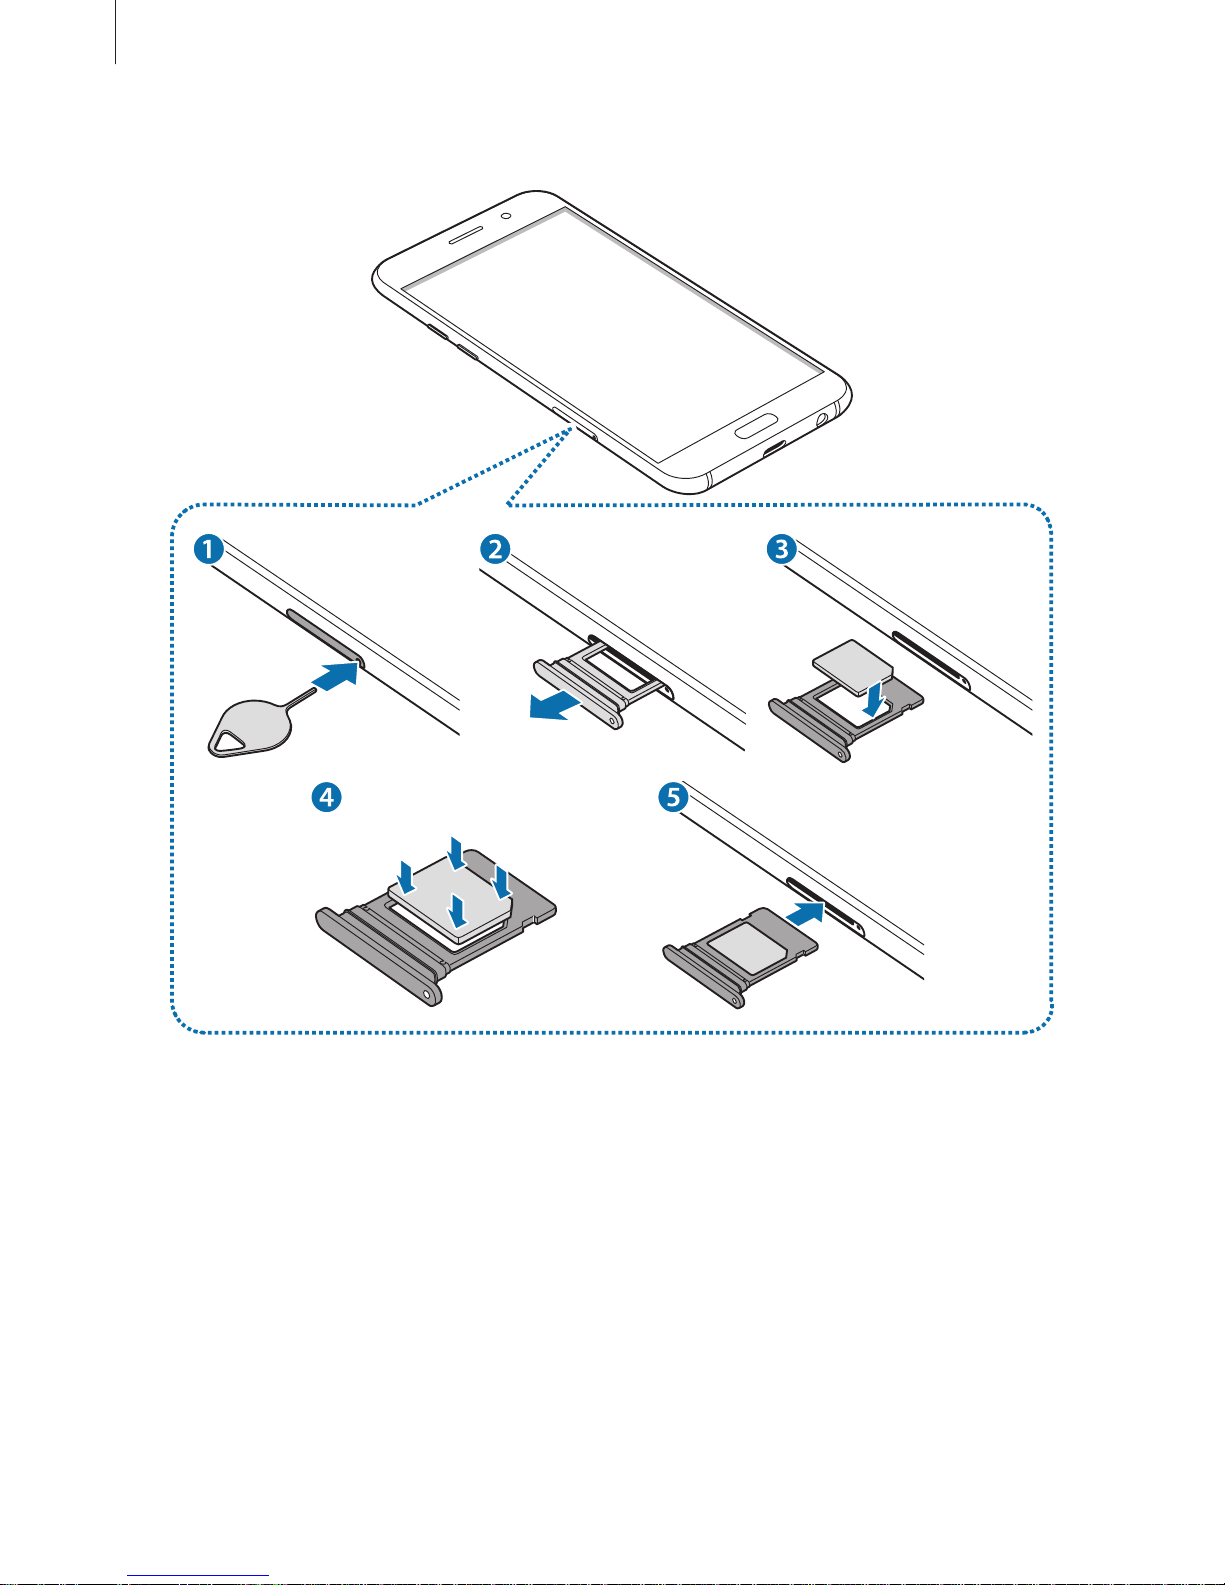
Type 1 (SM-A320F, SM-A320Y):
Page 24
Basics
24
–
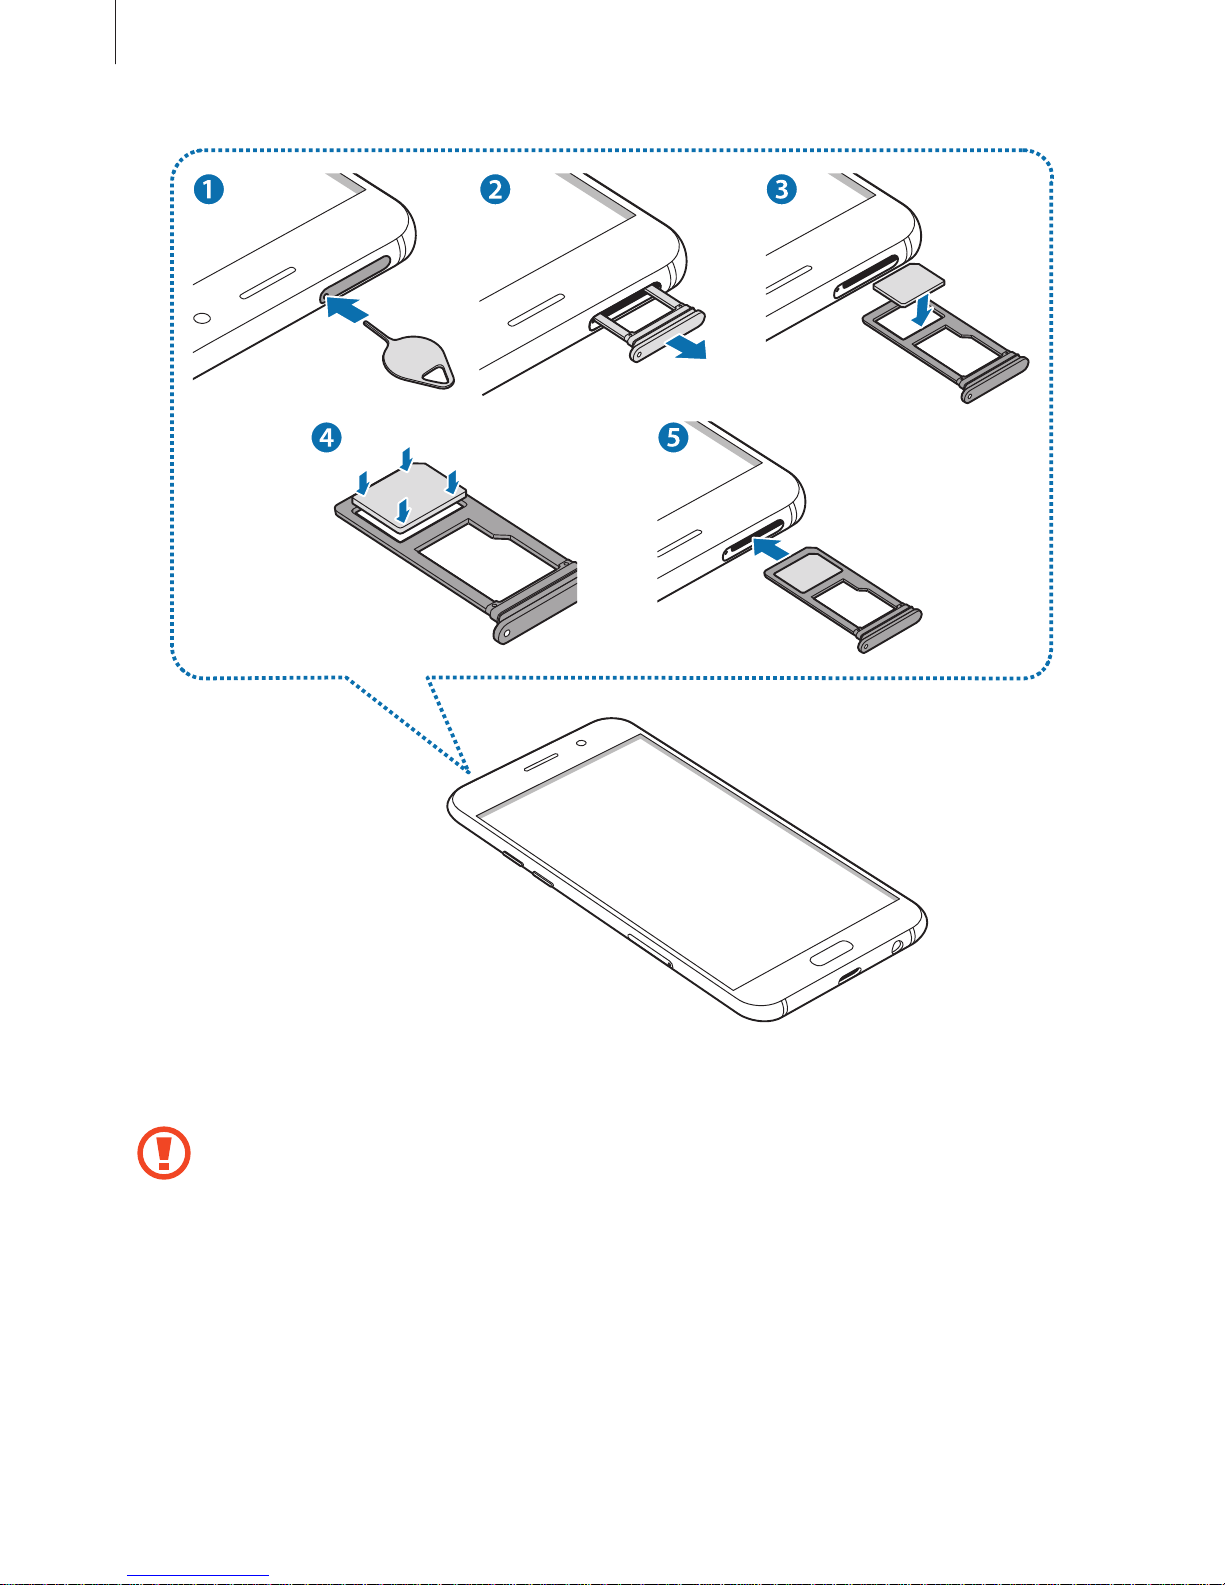
Type 2 (SM-A520F, SM-A720F):
Page 25
Basics
25
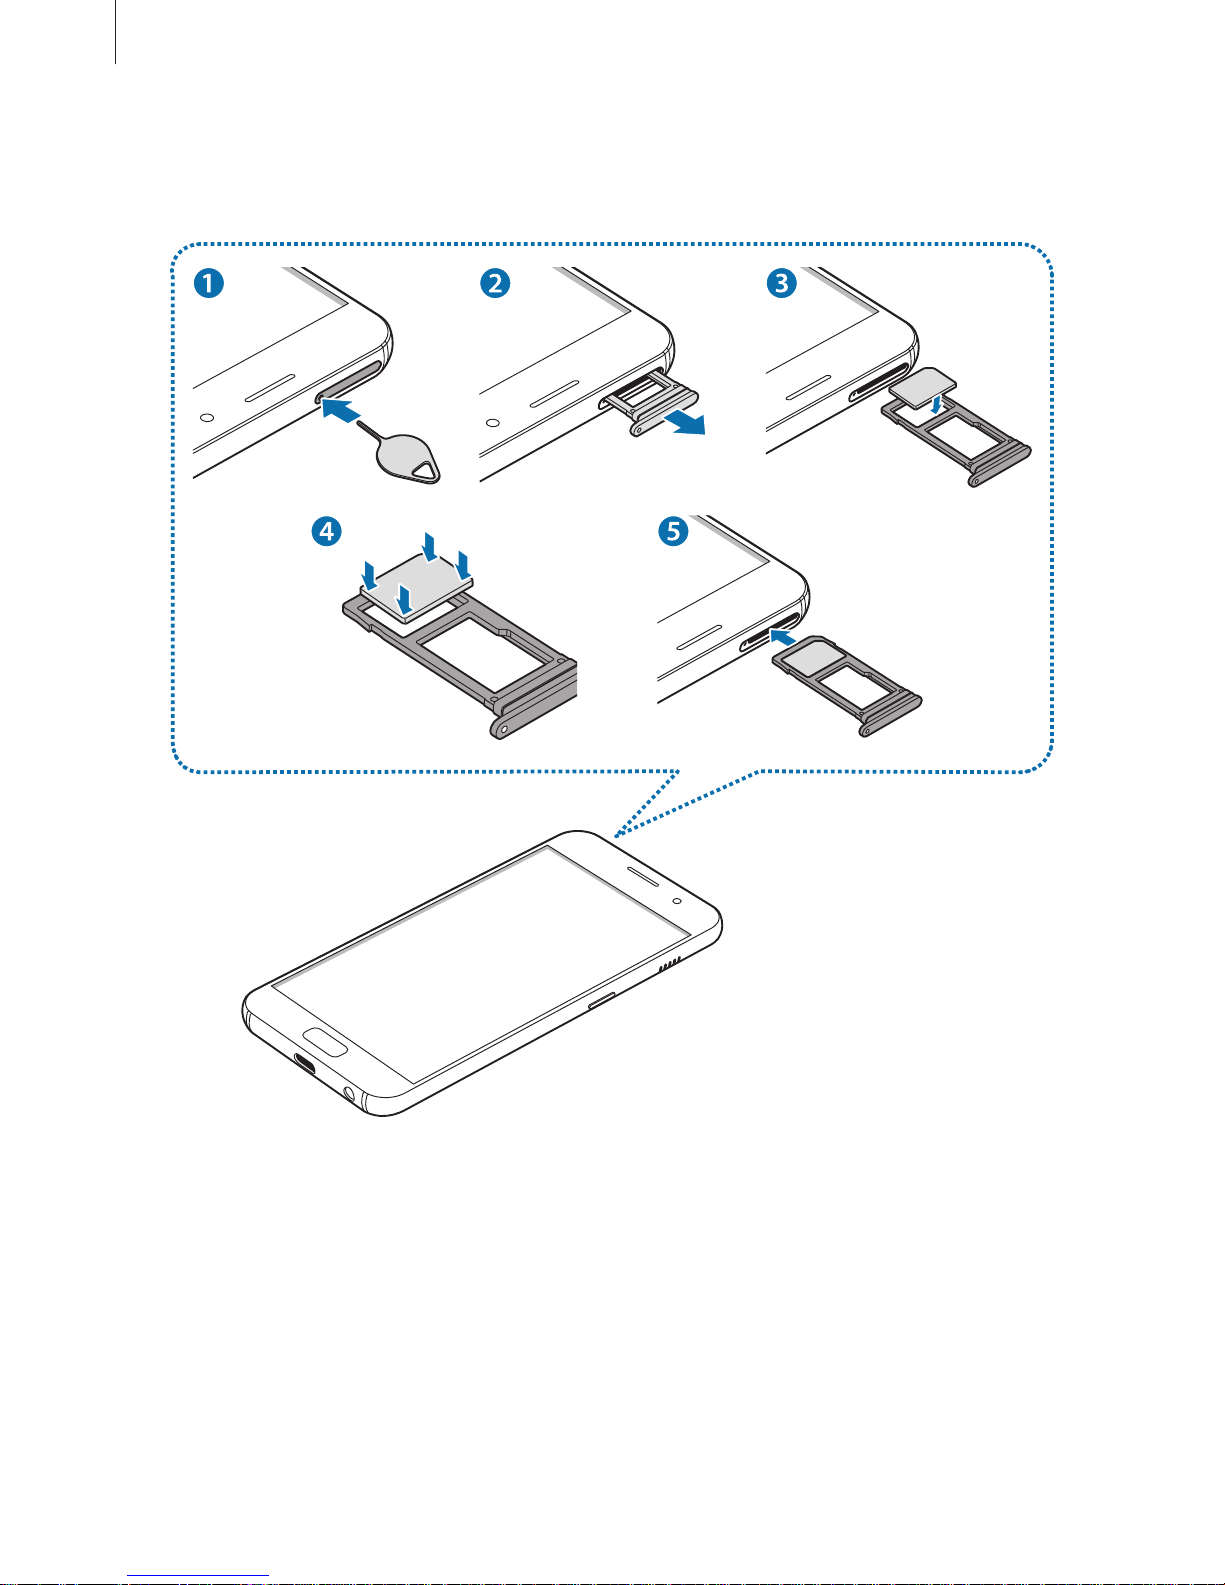
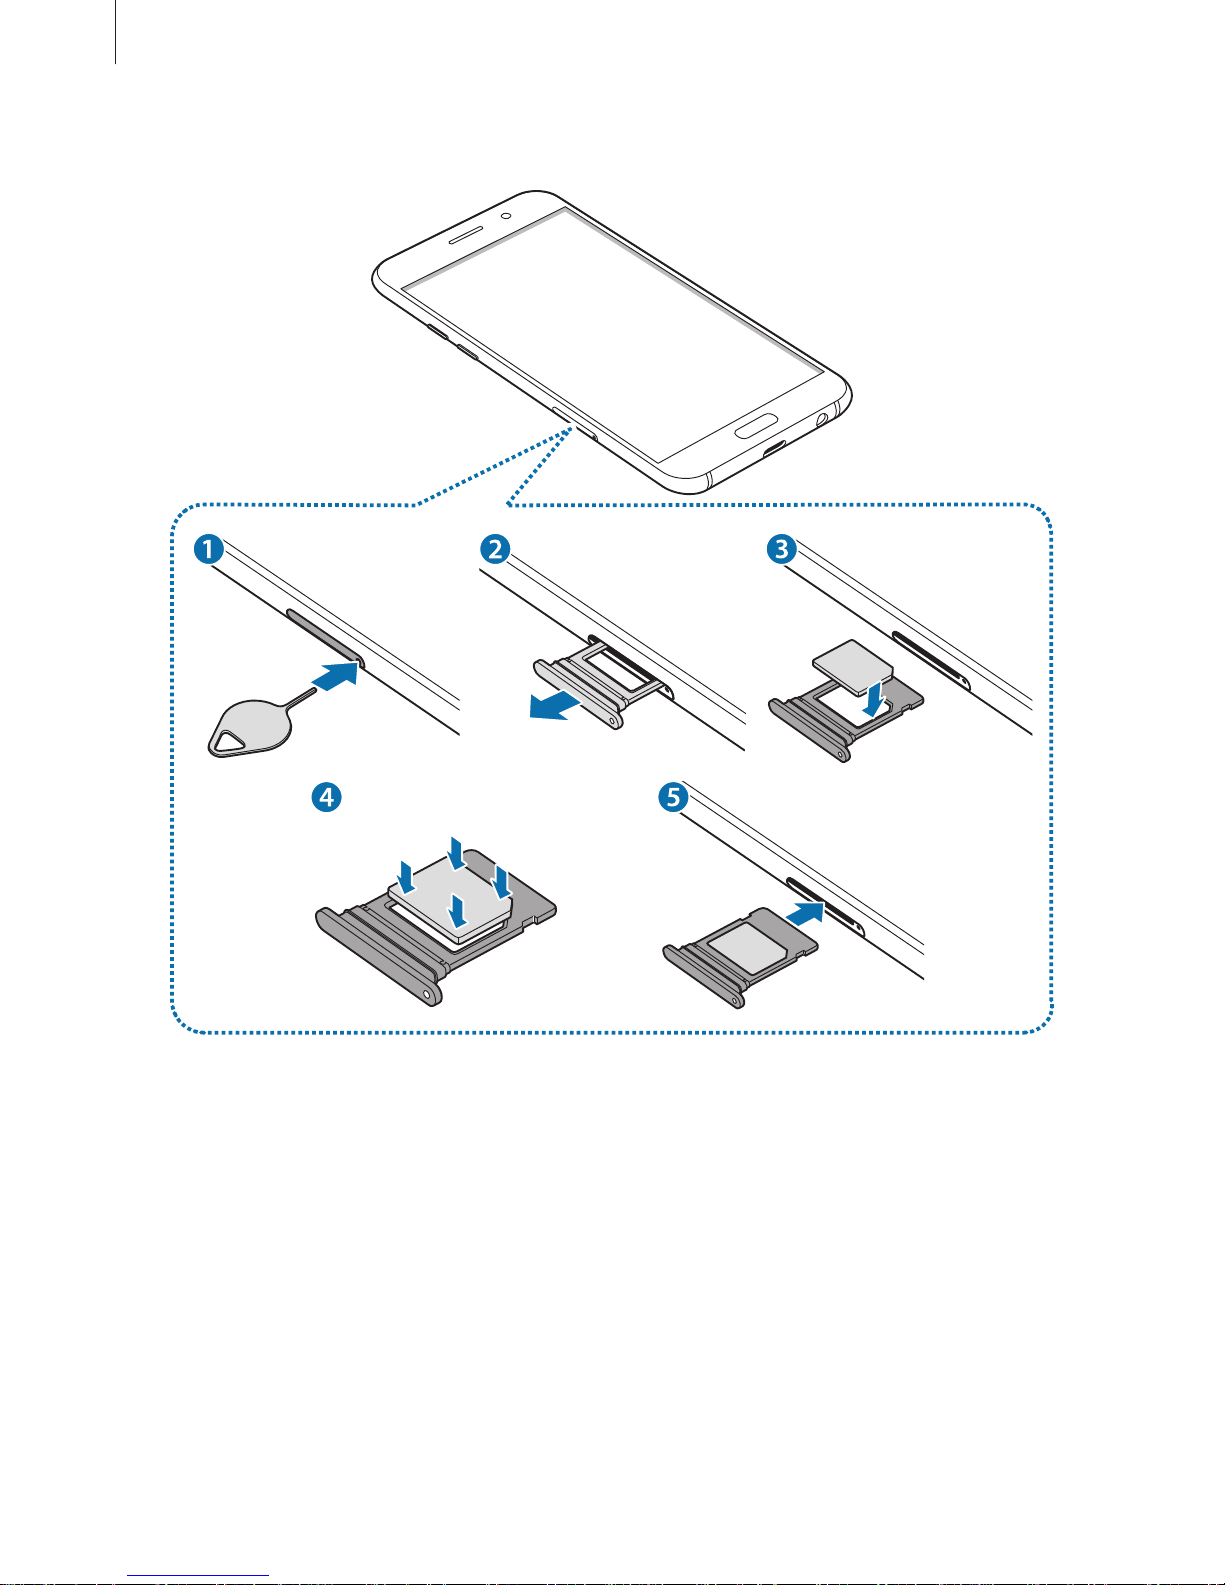
1
Insert the ejection pin into the hole on the tray to loosen the tray.
Ensure that the ejection pin is perpendicular to the hole. Otherwise, the device may
be damaged.
2
Pull out the tray gently from the tray slot.
Page 26
Basics
26
3
►
Single SIM models: Place the SIM or USIM card on the tray with the gold-coloured
contacts facing downwards.
►
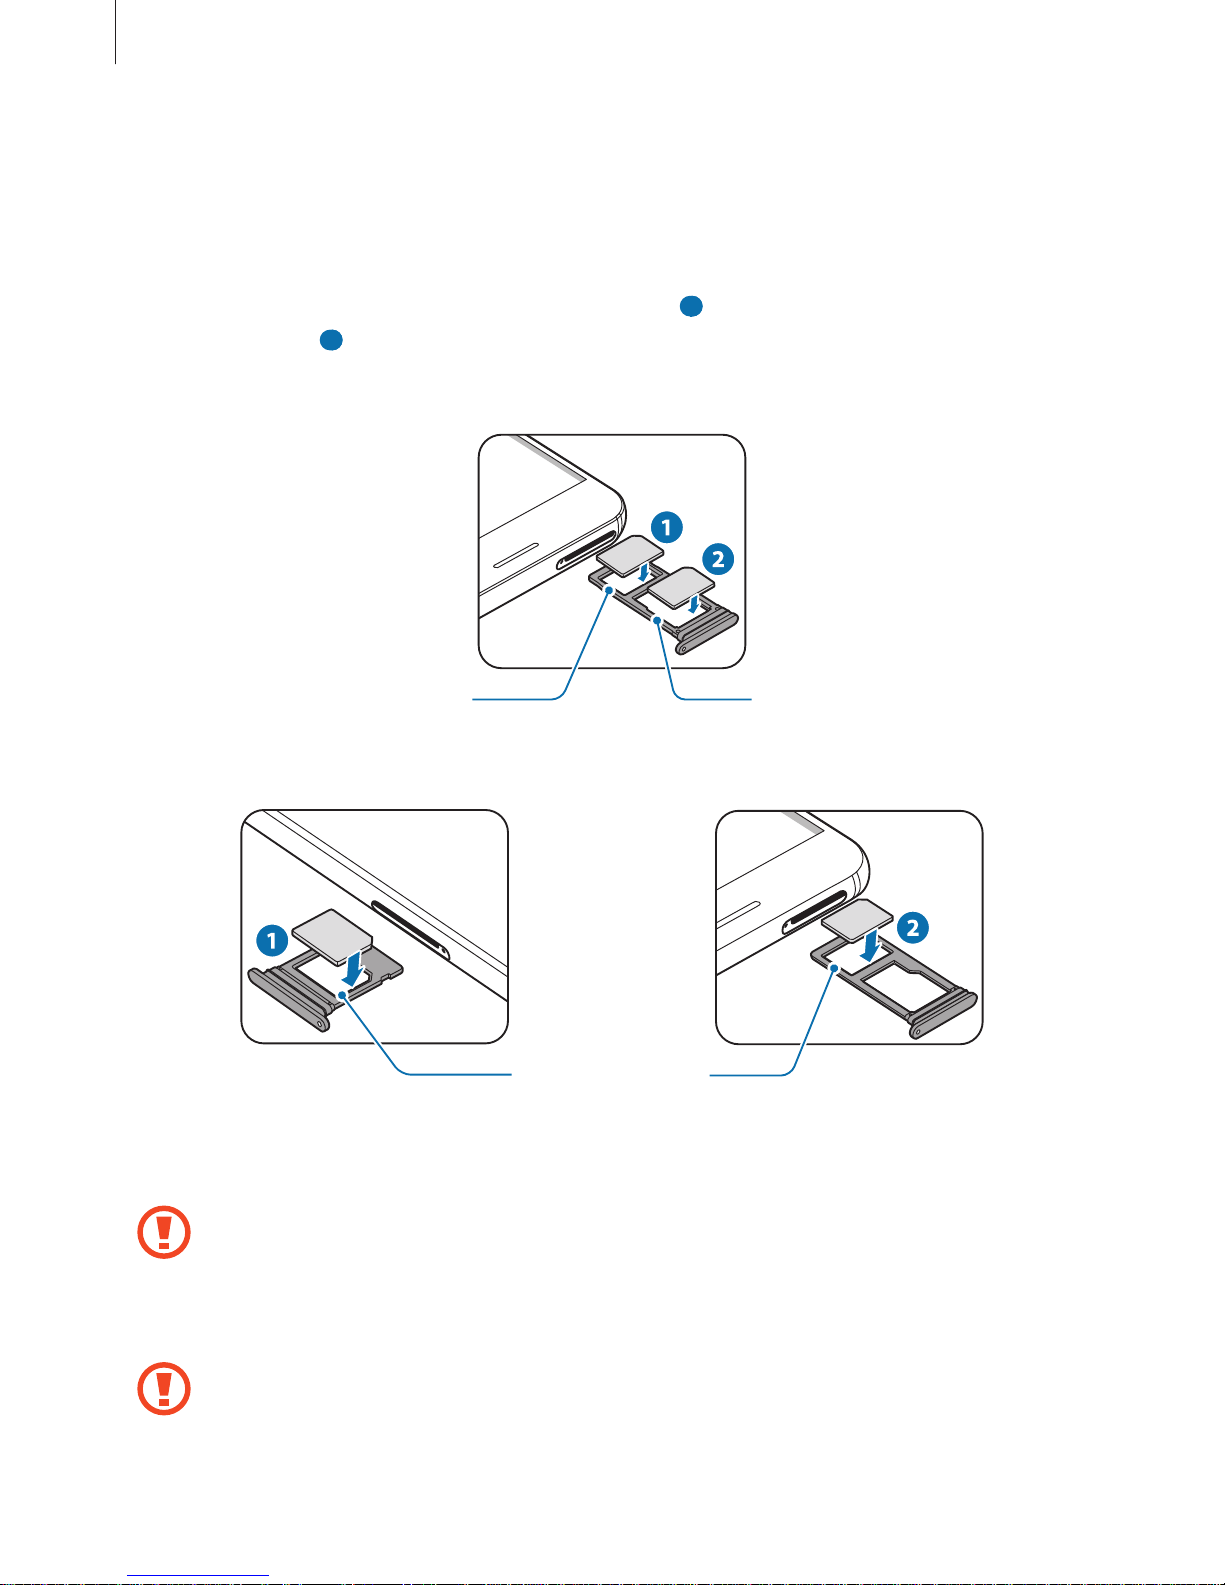
Dual SIM models: Place the SIM or USIM card on the tray with the gold-coloured
contacts facing downwards.
Place the primary SIM or USIM card on the tray 1 (
1 ) and the secondary SIM or USIM card
on the tray 2 (
2 ).
–
Type 1 (SM-A320F, SM-A320Y):
Tray 2Tray 1
–
Type 2 (SM-A520F, SM-A720F):
Tray 1
Tray 2
4
Gently press the SIM or USIM card into the tray to secure it.
If the card is not fixed firmly into the tray, the SIM card may leave or fall out of the tray.
5
Insert the tray back into the tray slot.
•
If you insert the tray into your device while the tray is wet, your device may be
damaged. Always make sure the tray is dry.
•
Fully insert the tray into the tray slot to prevent liquid from entering your device.
Page 27
Basics
27
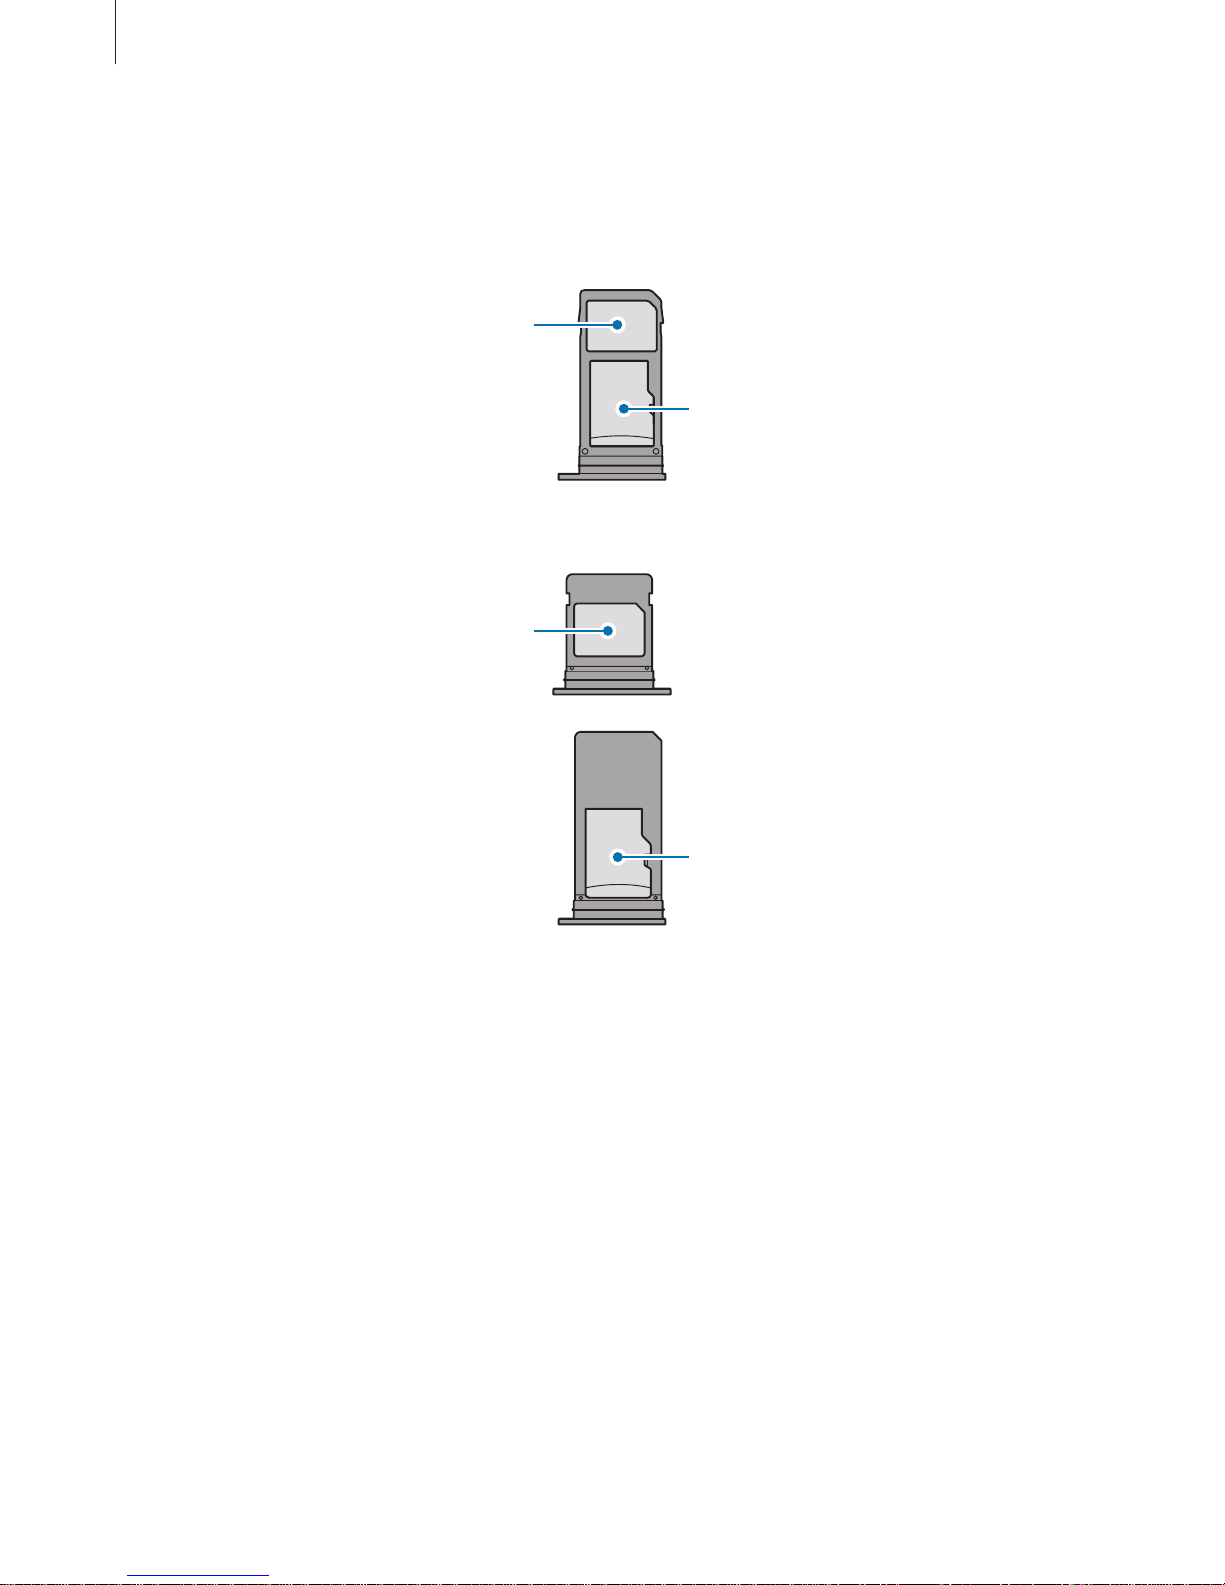
Correct card installation
►
Single SIM models:
–
Type 1 (SM-A320F, SM-A320Y):
Nano-SIM card
microSD card
–
Type 2 (SM-A520F, SM-A720F):
Nano-SIM card
microSD card
Page 28
Basics
28
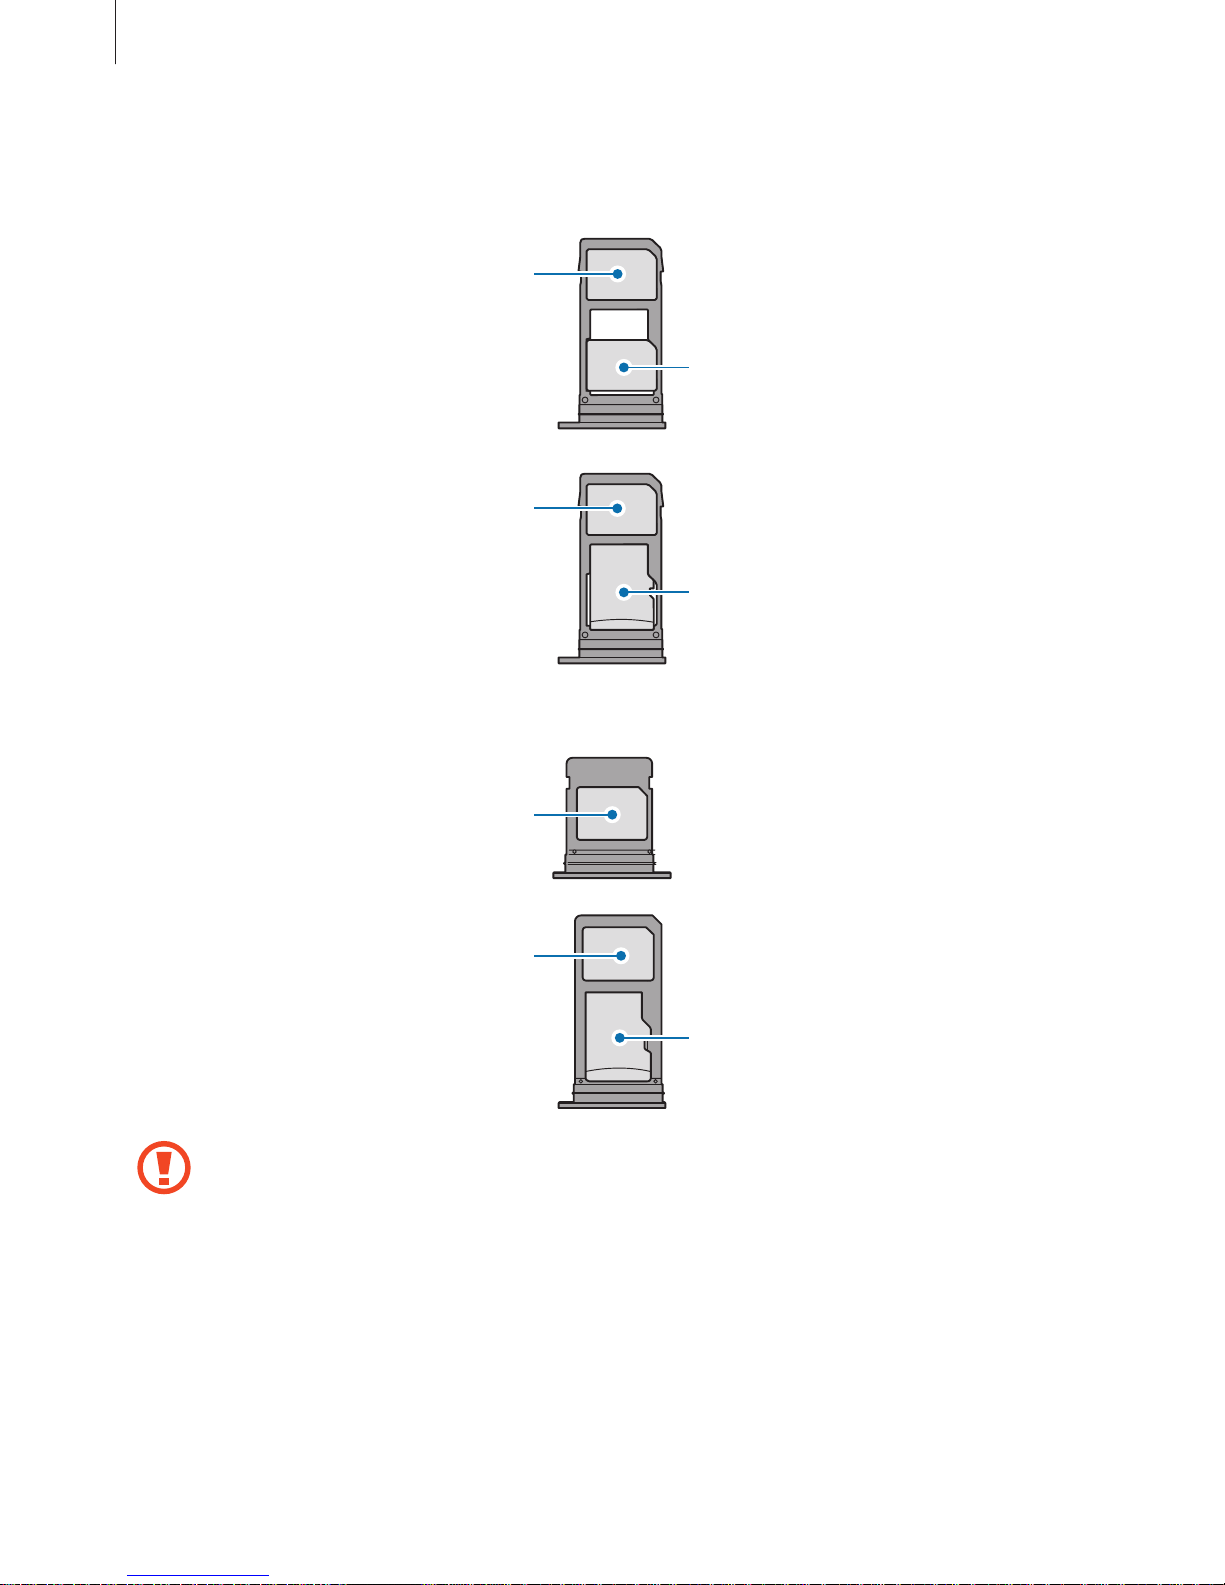
►
Dual SIM models:
–
Type 1 (SM-A320F, SM-A320Y):
Nano-SIM card
Nano-SIM card
microSD card
Nano-SIM card
–
Type 2 (SM-A520F, SM-A720F):
Nano-SIM card
Nano-SIM card
microSD card
•
Use only a nano-SIM card.
•
You cannot insert a nano-SIM card and a microSD card in tray 2 at the same time.
Page 29
Basics
29
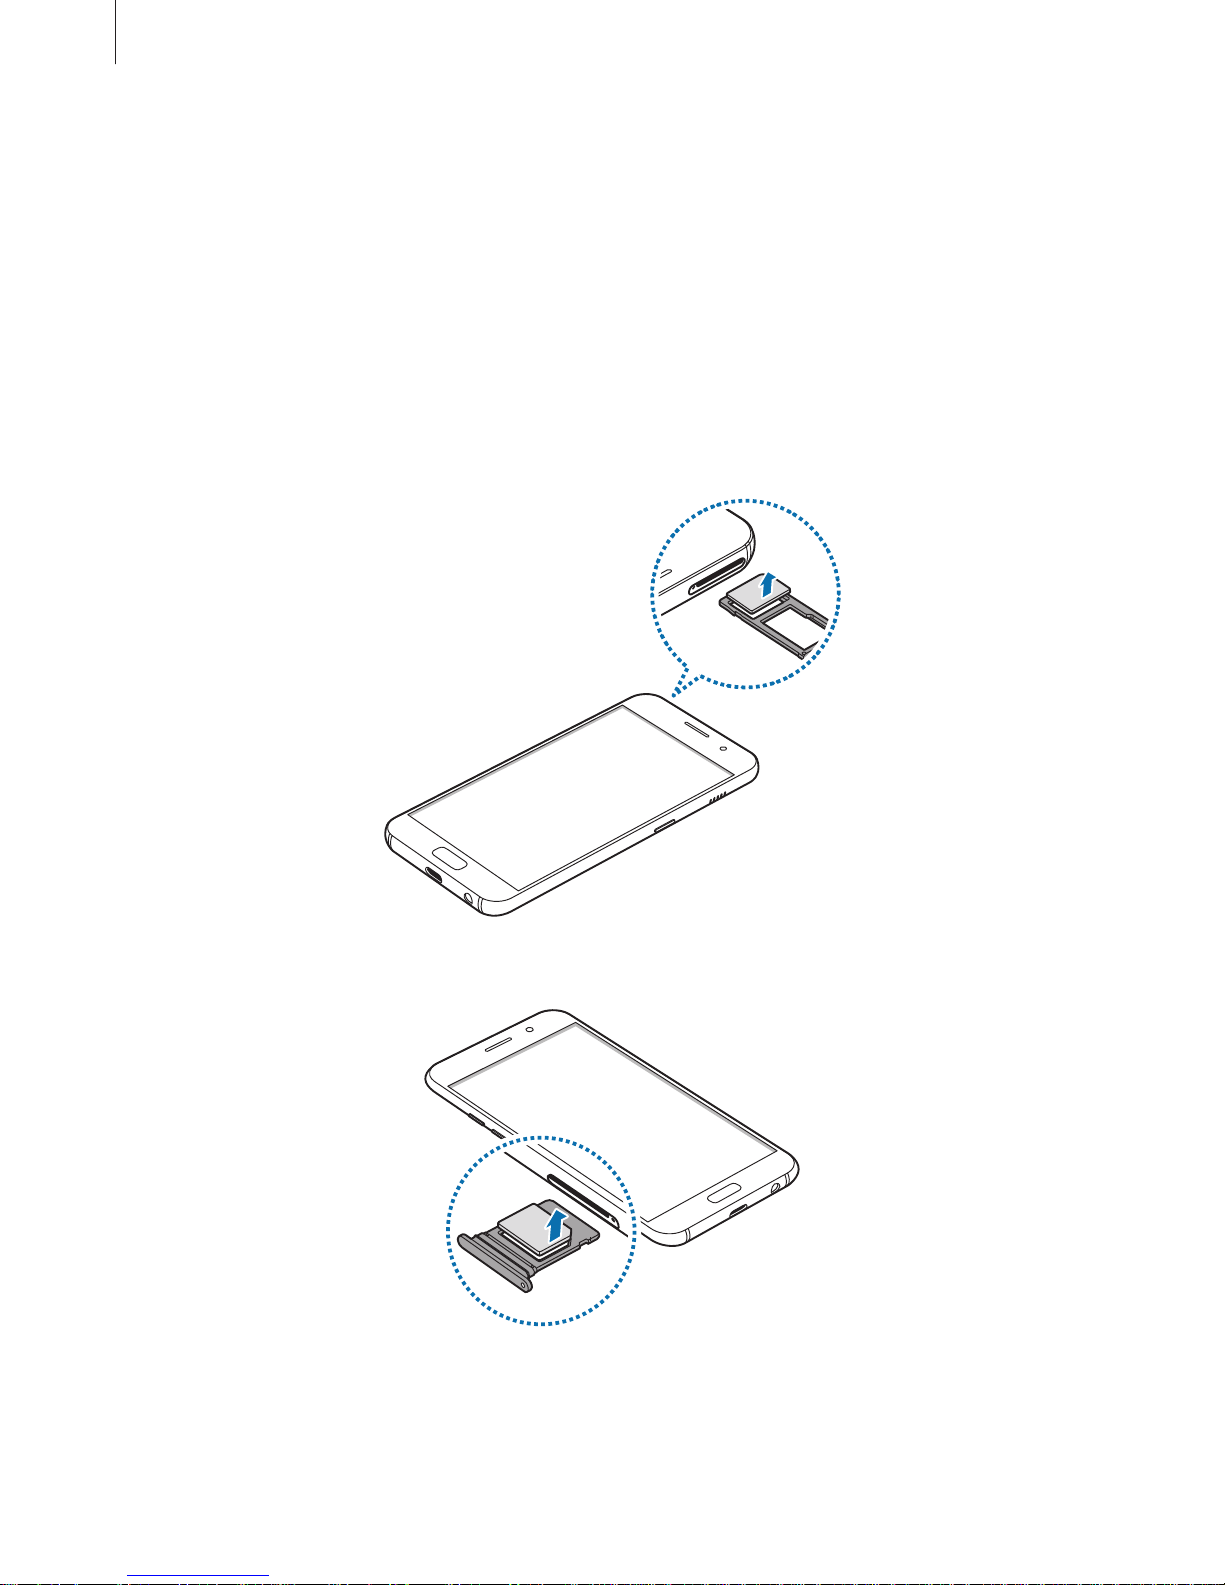
Removing the SIM or USIM card
1
Insert the ejection pin into the hole on the tray to loosen the tray.
2
Pull out the tray gently from the tray slot.
3
Remove the SIM or USIM card.
►
Single SIM models:
–
Type 1 (SM-A320F, SM-A320Y):
–
Type 2 (SM-A520F, SM-A720F):
Page 30
Basics
30
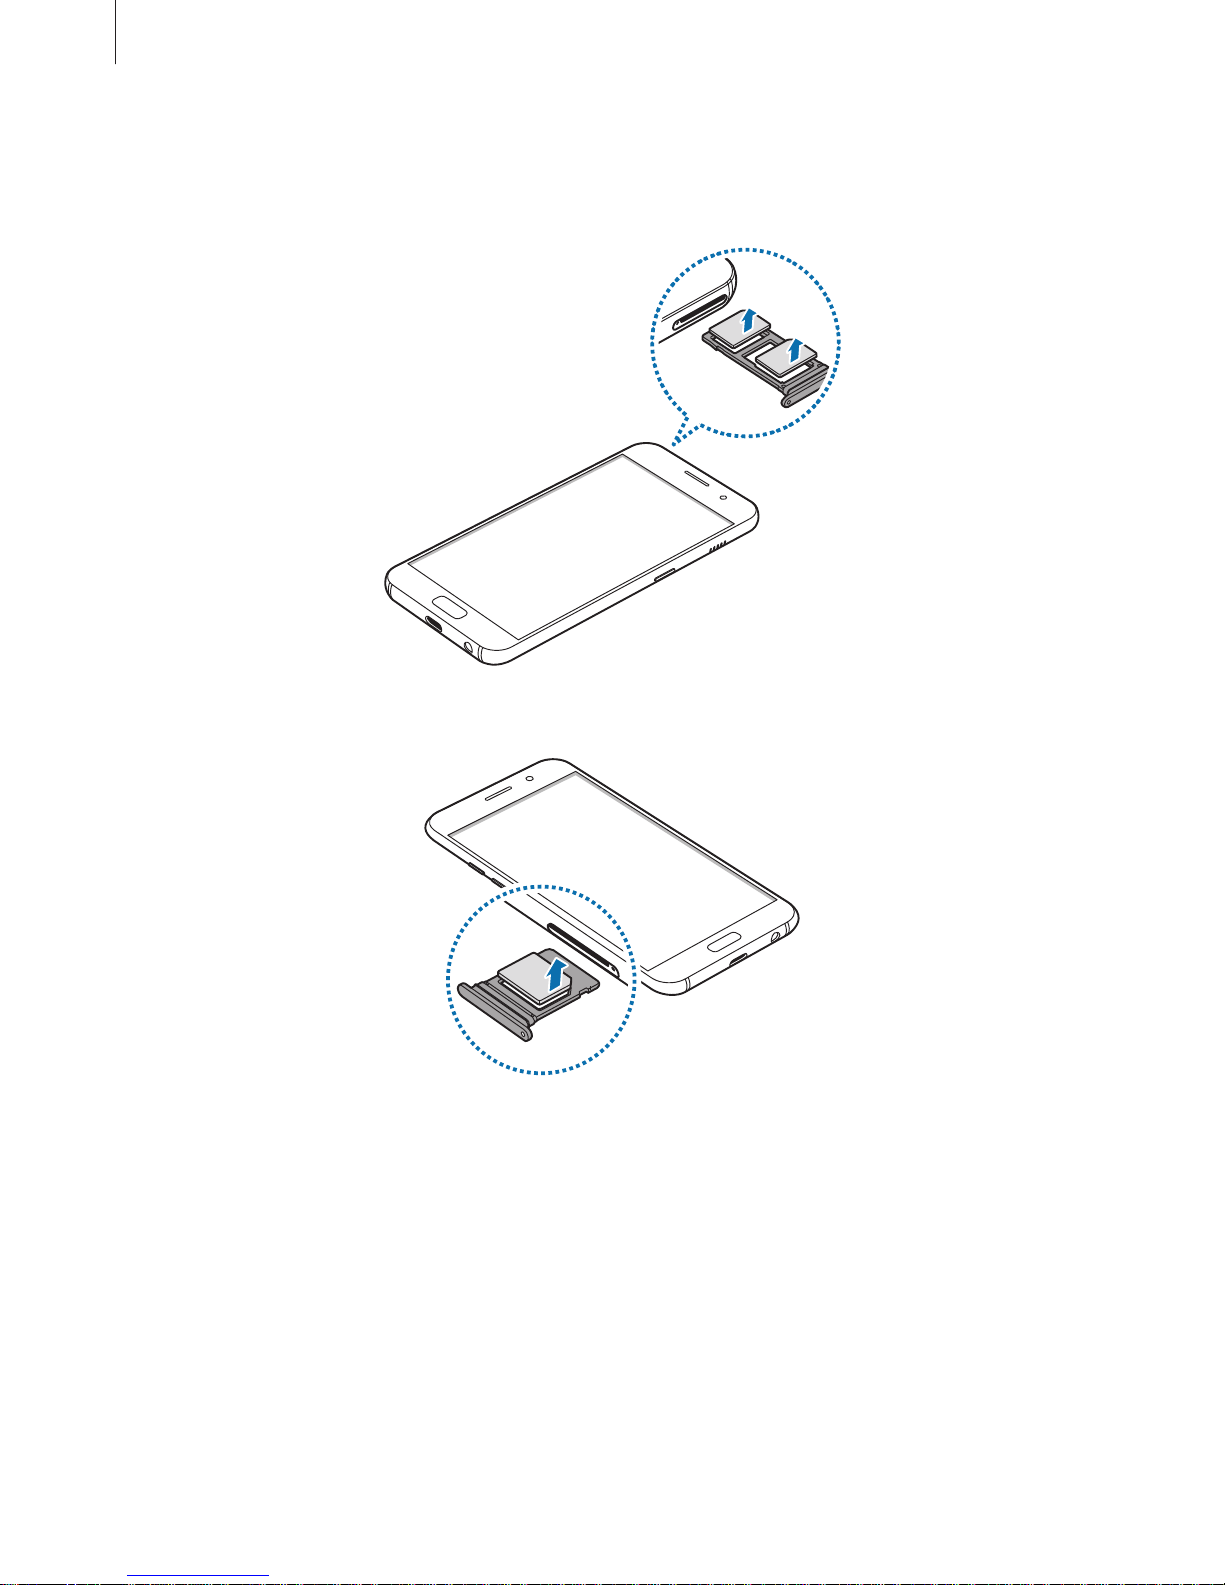
►
Dual SIM models:
–
Type 1 (SM-A320F, SM-A320Y):
–
Type 2 (SM-A520F, SM-A720F):
Page 31
Basics
31
4
Insert the tray back into the tray slot.
Using dual SIM or USIM cards (dual SIM models)
If you insert two SIM or USIM cards, you can have two phone numbers or service providers for
a single device.
Activating SIM or USIM cards
On the Home screen, tap
Apps
→
Settings
→
Connections
→
SIM card manager
. Select a
SIM or USIM card and tap the switch to activate it.
Customising SIM or USIM cards
On the Home screen, tap
Apps
→
Settings
→
Connections
→
SIM card manager
and select
a SIM or USIM card to access the following options:
•
Icon
: Change the icon of the SIM or USIM card.
•
Name
: Change the display name of the SIM or USIM card.
•
Network mode
: Select a network type to use with the SIM or USIM card.
Setting preferred SIM or USIM cards
When two cards are activated, you can assign voice calls, messaging, and data services to
specific cards.
On the Home screen, tap
Apps
→
Settings
→
Connections
→
SIM card manager
and set
the feature preferences for your cards in
Preferred SIM card
.
Page 32
Basics
32
Memory card (microSD card)
Installing a memory card
Your device’s memory card capacity may vary from other models and some memory cards
may not be compatible with your device depending on the memory card manufacturer and
type. To view your device’s maximum memory card capacity, refer to the Samsung website.
•
Some memory cards may not be fully compatible with the device. Using an
incompatible card may damage the device or the memory card, or corrupt the data
stored in it.
•
Use caution to insert the memory card right-side up.
•
The device supports the FAT and the exFAT file systems for memory cards. When
inserting a card formatted in a different file system, the device will ask to reformat
the card or will not recognise the card. If the device does not recognise your
memory card, format it on your computer.
•
Frequent writing and erasing of data shortens the lifespan of memory cards.
•
When inserting a memory card into the device, the memory card’s file directory
appears in the
My Files
→
SD card
folder.
Page 33
Basics
33
–
Type 1 (SM-A320F, SM-A320Y):
Page 34
Basics
34
–
Type 2 (SM-A520F, SM-A720F):
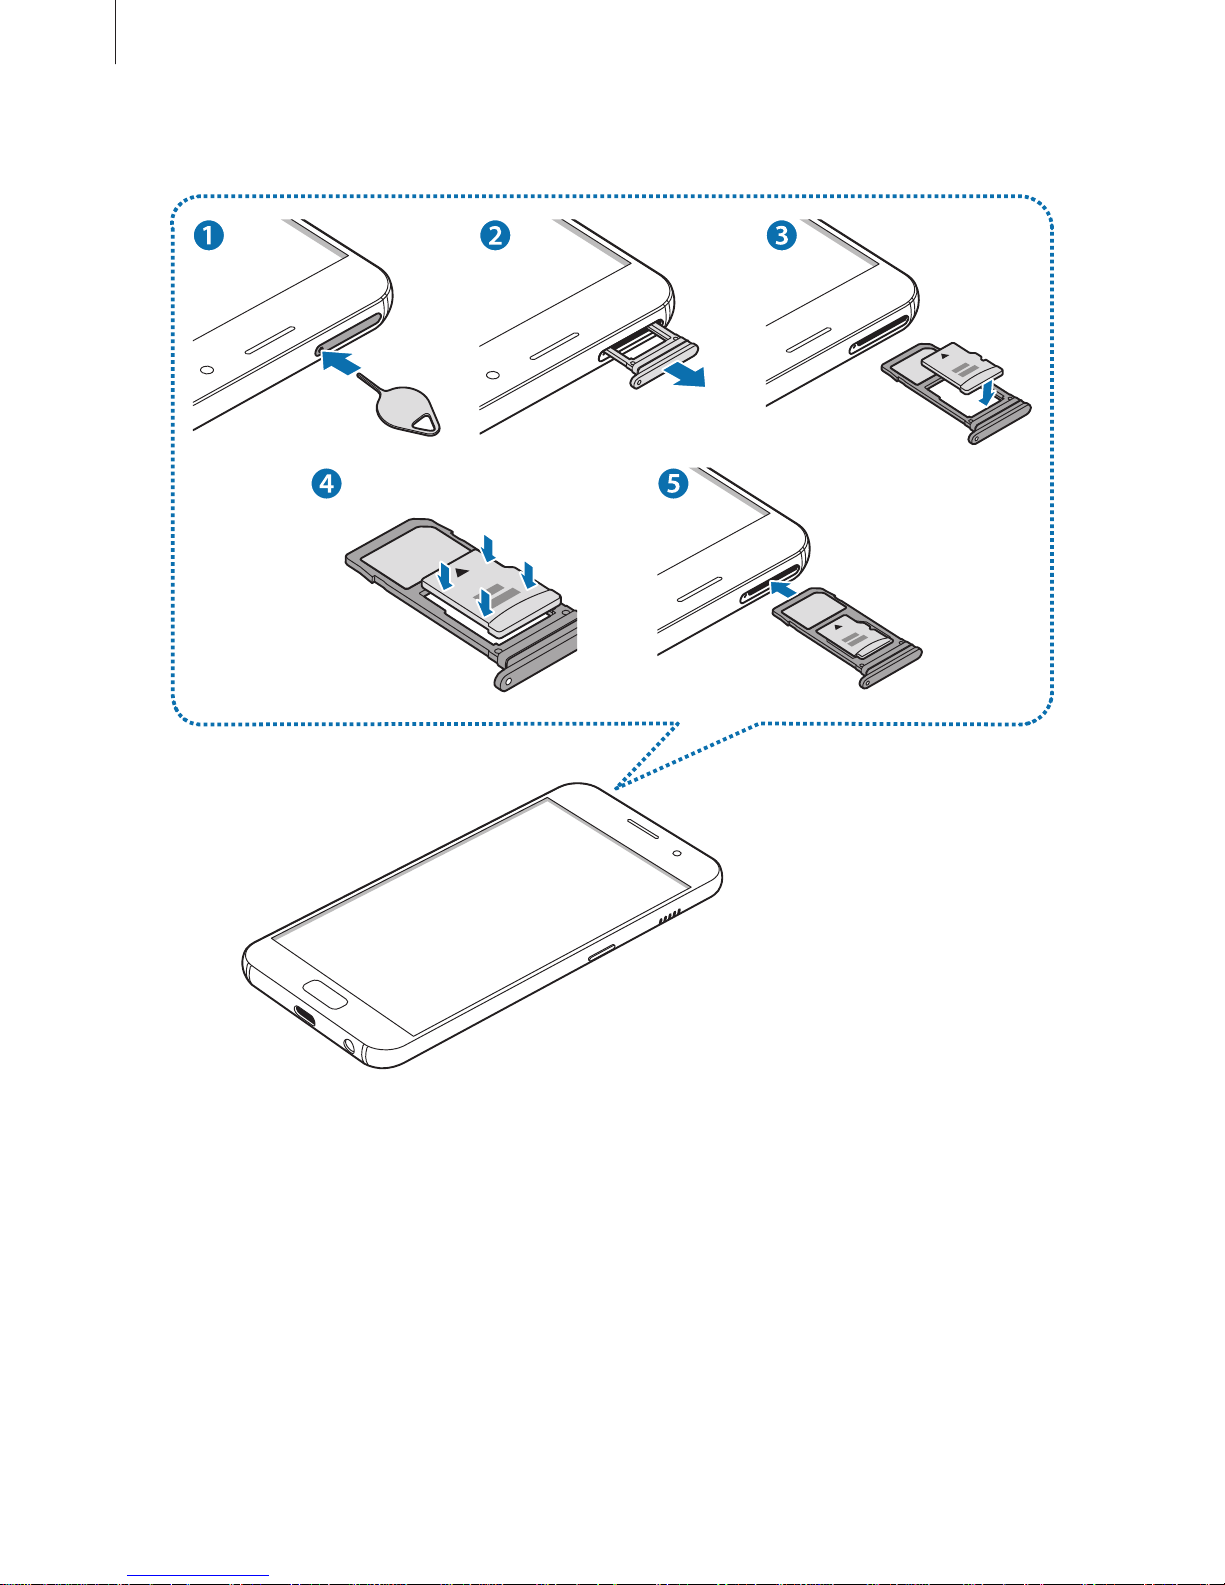
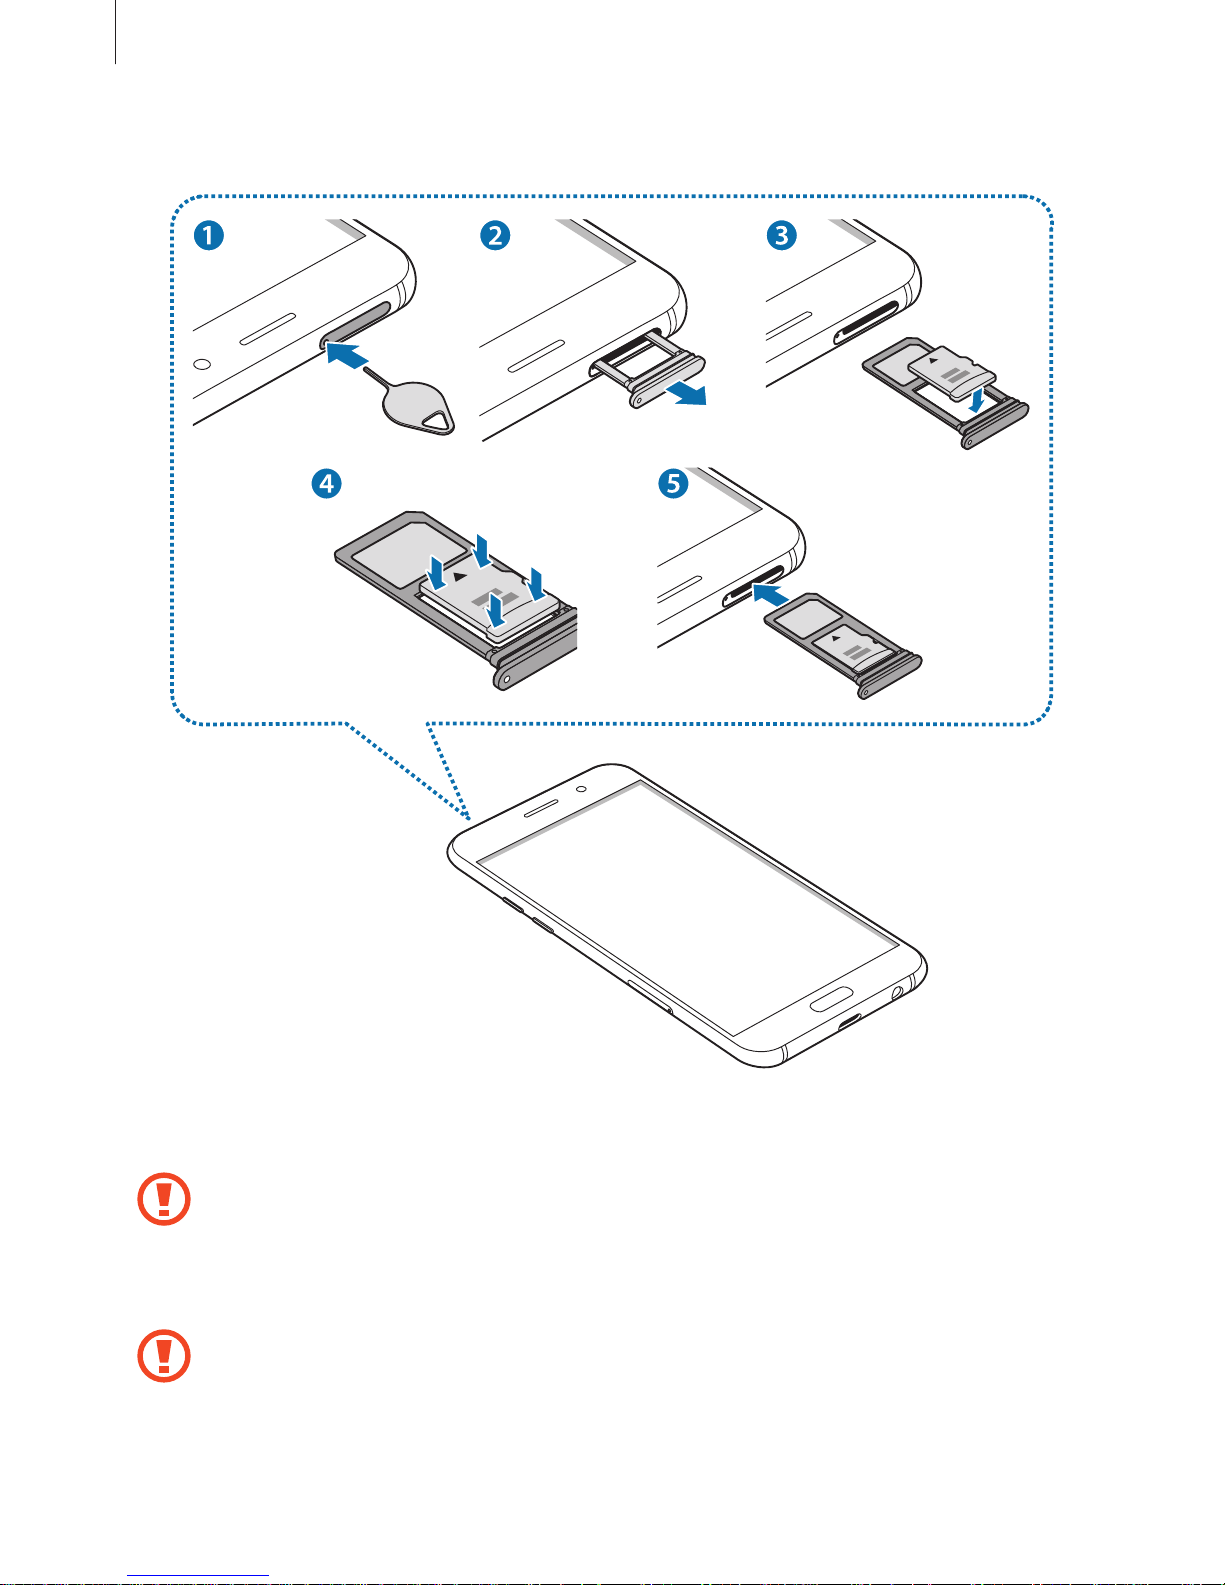
1
Insert the ejection pin into the hole on the tray to loosen the tray.
Ensure that the ejection pin is perpendicular to the hole. Otherwise, the device may
be damaged.
2
Pull out the tray gently from the tray slot.
When you remove the tray from the device, the mobile data connection will be
disabled.
Page 35
Basics
35
3
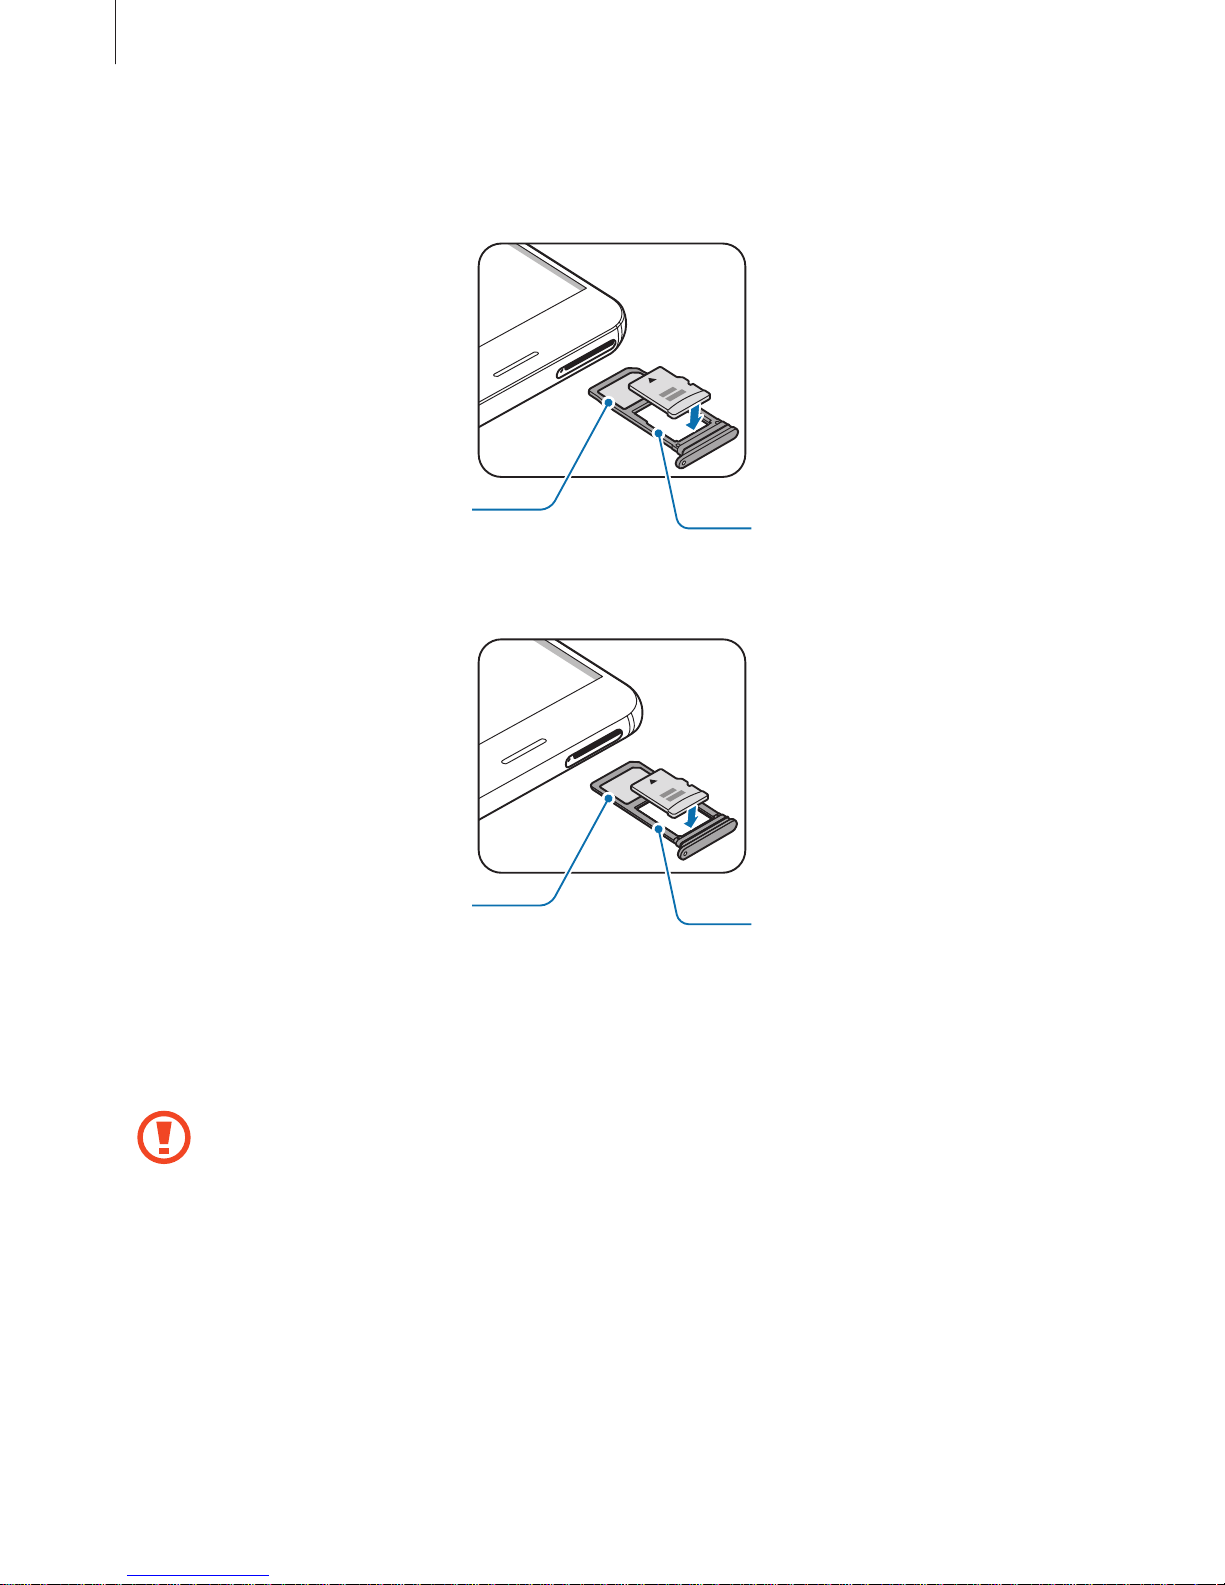
Place a memory card on the tray 2 with the gold-coloured contacts facing downwards.
–
Type 1 (SM-A320F, SM-A320Y):
Tray 2
Tray 1
–
Type 2 (SM-A520F, SM-A720F):
Tray 2
Tray 1
4
Gently press the memory card into the tray to secure it.
5
Insert the tray back into the tray slot.
•
If you insert the tray into your device while the tray is wet, your device may be
damaged. Always make sure the tray is dry.
•
Fully insert the tray into the tray slot to prevent liquid from entering your device.
Page 36

Basics
36
Removing the memory card
Before removing the memory card, first unmount it for safe removal.
On the Home screen, tap
Apps
→
Settings
→
Device maintenance
→
Storage
→ →
Storage settings
→
SD card
→
Unmount
.
1
Insert the ejection pin into the hole on the tray to loosen the tray.
2
Pull out the tray gently from the tray slot.
3
Remove the memory card.
4
Insert the tray back into the tray slot.
Do not remove the memory card while the device is transferring or accessing
information. Doing so can cause data to be lost or corrupted or damage to the
memory card or device. Samsung is not responsible for losses that result from the
misuse of damaged memory cards, including the loss of data.
Formatting the memory card
A memory card formatted on a computer may not be compatible with the device. Format the
memory card on the device.
On the Home screen, tap
Apps
→
Settings
→
Device maintenance
→
Storage
→ →
Storage settings
→
SD card
→
Format
→
FORMAT
.
Before formatting the memory card, remember to make backup copies of all
important data stored in the memory card. The manufacturer’s warranty does not
cover loss of data resulting from user actions.
Turning the device on and off
Press and hold the Power key for a few seconds to turn on the device.
When you turn on your device for the first time or after performing a data reset, follow the onscreen instructions to set up your device.
To turn off the device, press and hold the Power key, and then tap
Power off
.
Follow all posted warnings and directions from authorised personnel in areas where
the use of wireless devices is restricted, such as aeroplanes and hospitals.
Page 37
Basics
37
Restarting the device
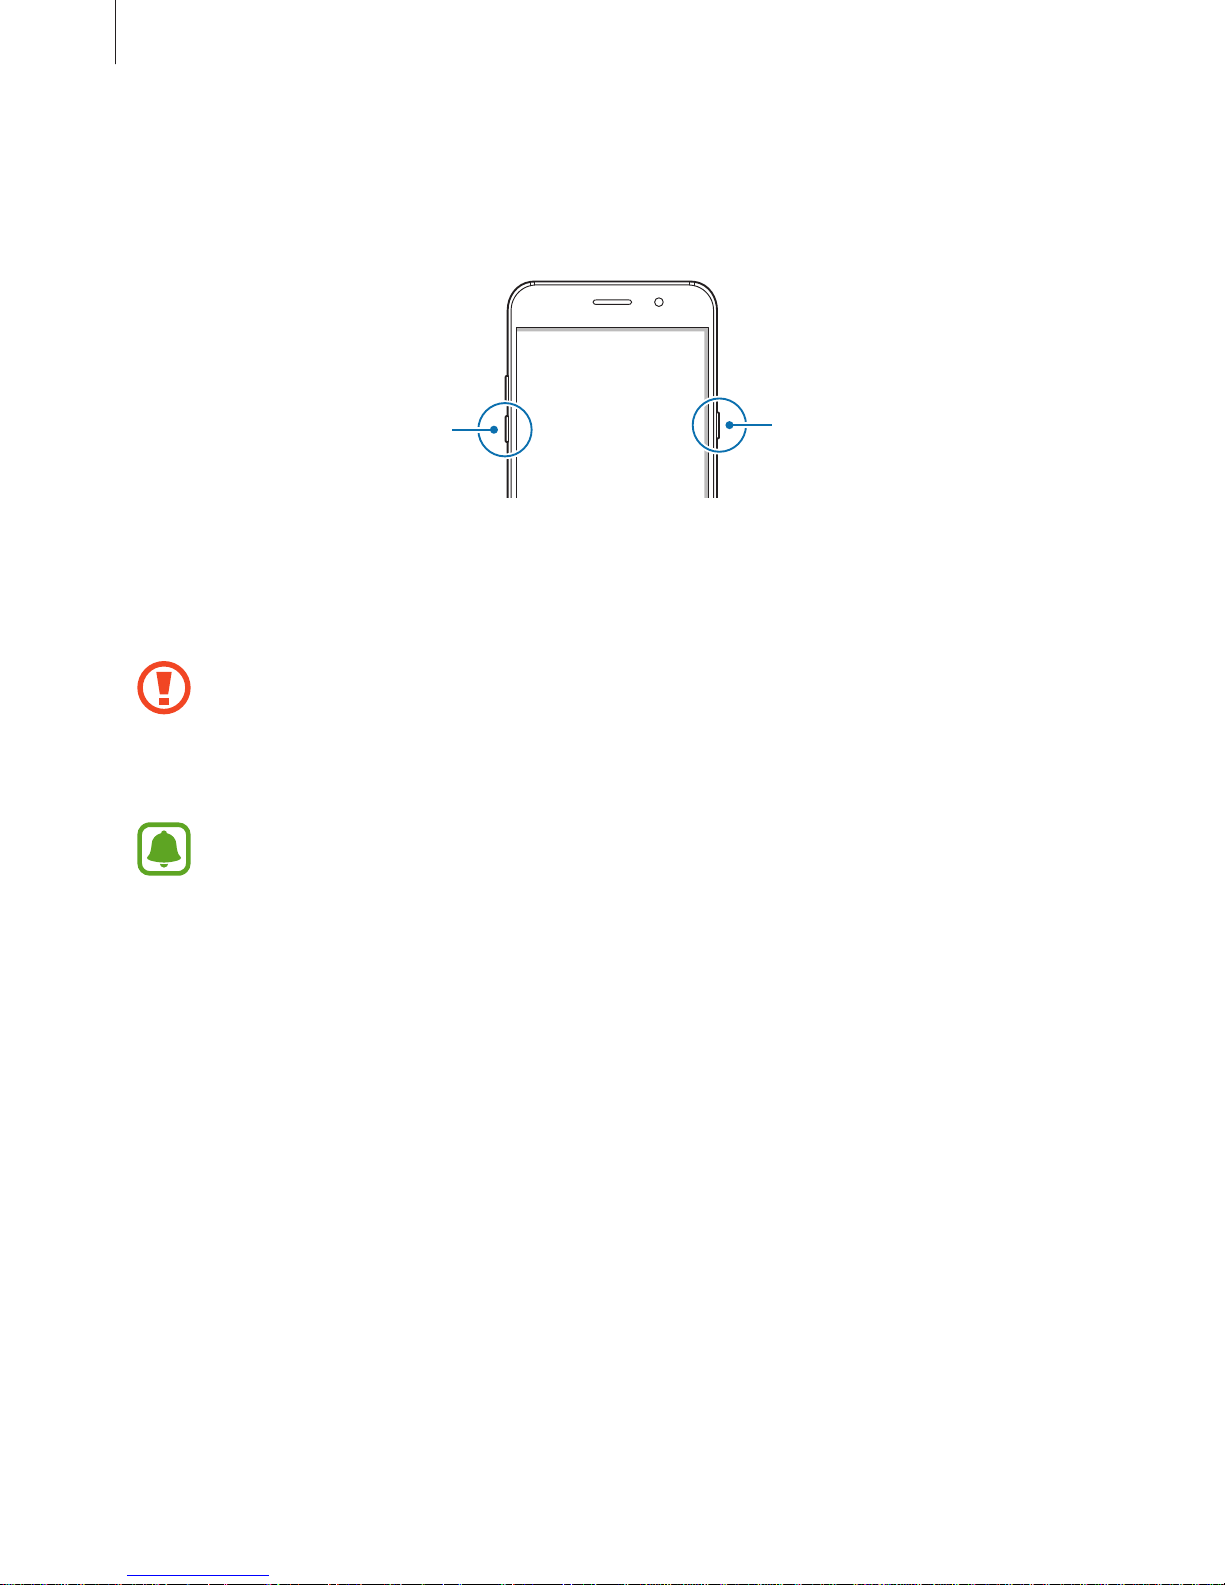
If your device is frozen and unresponsive, press and hold the Power key and the Volume
Down key simultaneously for more than 7 seconds to restart it.
Power key
Volume Down key
Controlling the touchscreen
•
Do not allow the touchscreen to come into contact with other electrical devices.
Electrostatic discharges can cause the touchscreen to malfunction.
•
To avoid damaging the touchscreen, do not tap it with anything sharp or apply
excessive pressure to it with your fingertips.
•
The device may not recognise touch inputs close to the edges of the screen, which
are outside of the touch input area.
•
Leaving the touchscreen idle for extended periods may result in afterimages
(screen burn-in) or ghosting. Turn off the touchscreen when you do not use the
device.
•
It is recommended to use fingers when you use the touchscreen.
Page 38
Basics
38
Tapping
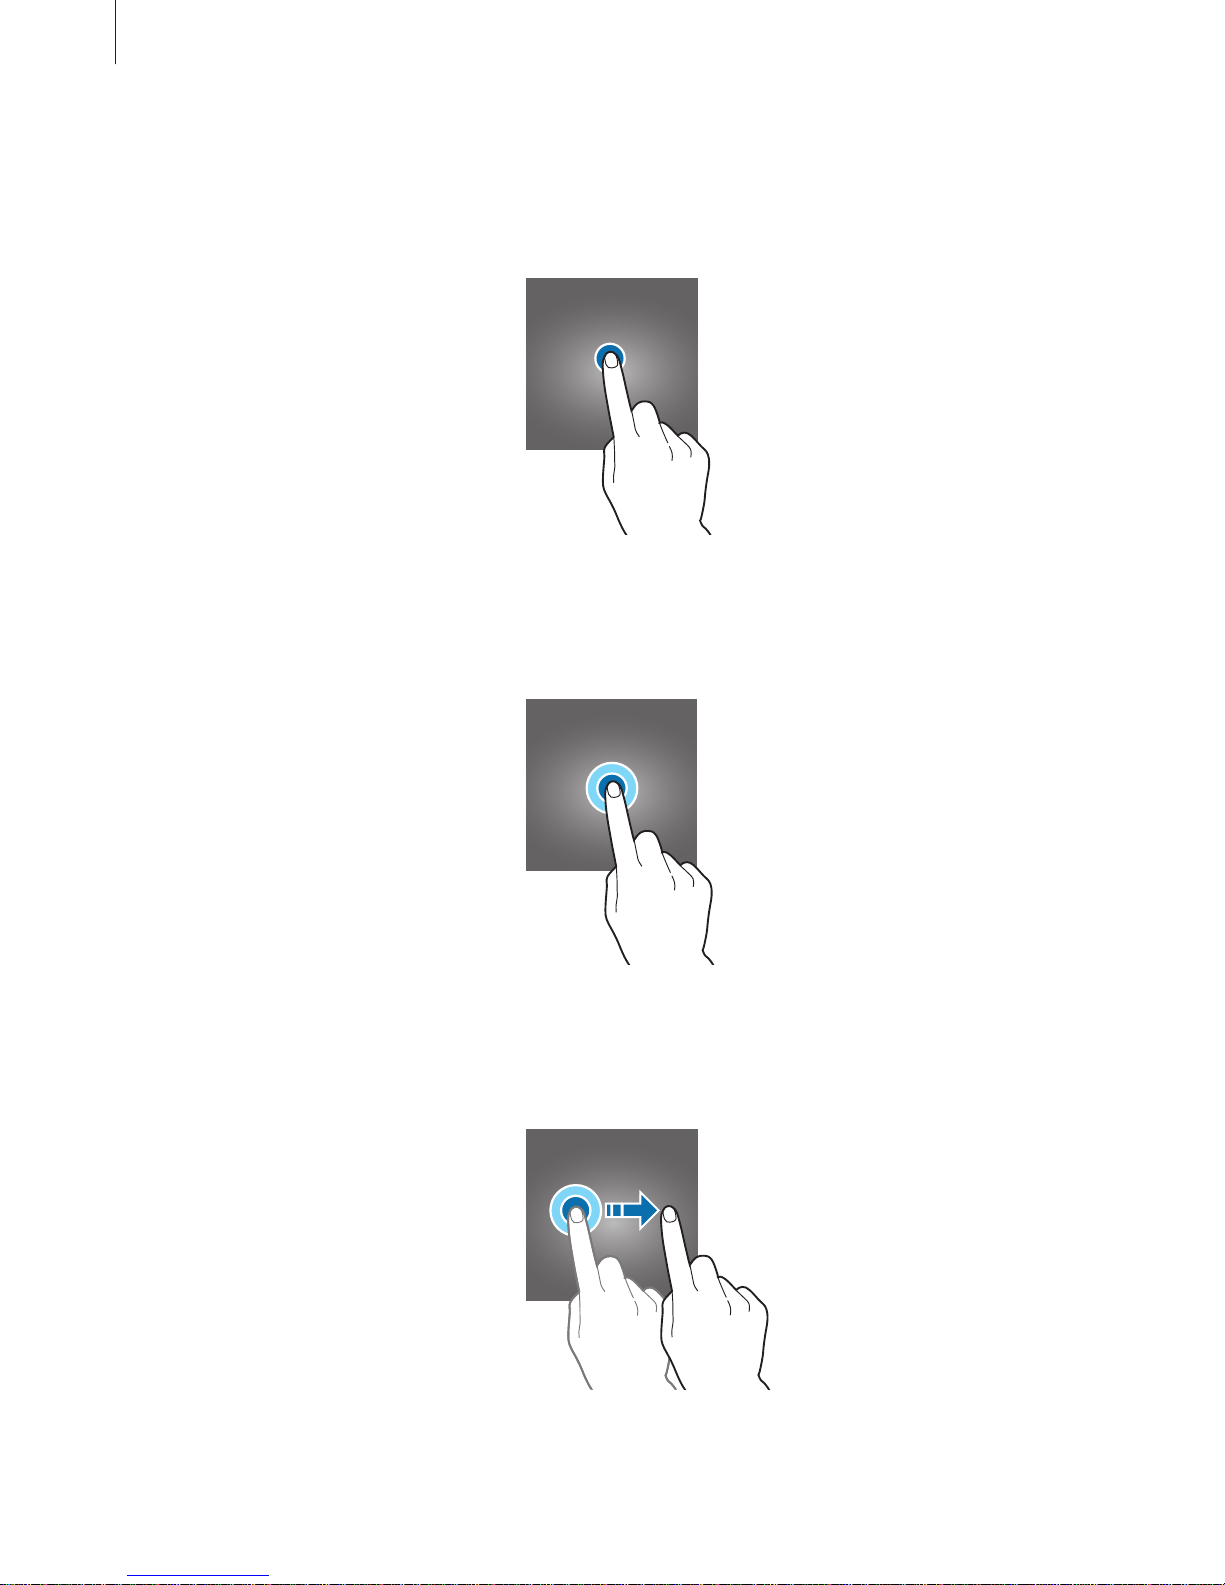
To open an app, to select a menu item, to press an on-screen button, or to enter a character
using the keyboard on the screen, tap it with your finger.
Tapping and holding
Tap and hold an item or the screen for more than 2 seconds to access available options.
Dragging
To move an item, tap and hold it and drag it to the target position.
Page 39
Basics
39
Double-tapping
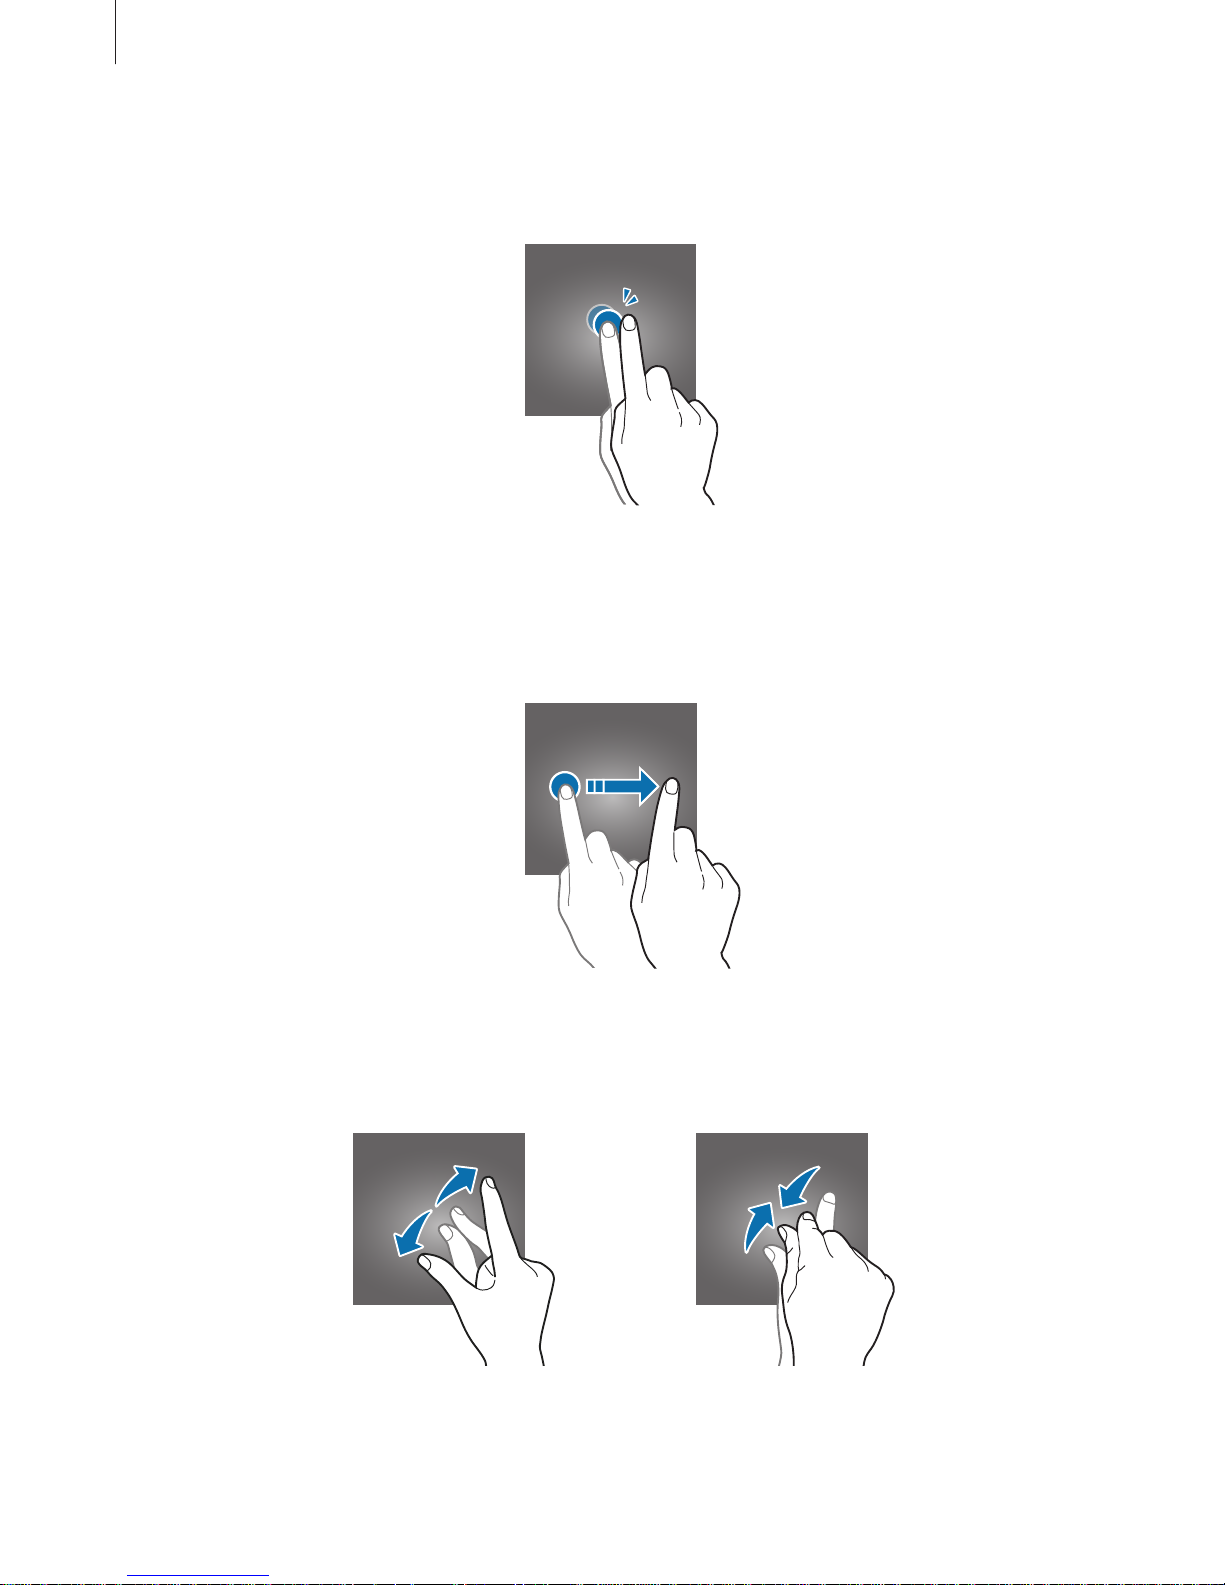
Double-tap on a webpage or image to zoom in. Double-tap again to return.
Swiping
Swipe to the left or right on the Home screen or the Apps screen to view other panels. Swipe
upwards or downwards to scroll through a webpage or a list of items, such as contacts.
Spreading and pinching
Spread two fingers apart on a webpage, map, or image to zoom in a part. Pinch to zoom out.
Page 40
Basics
40
Home screen
Home screen
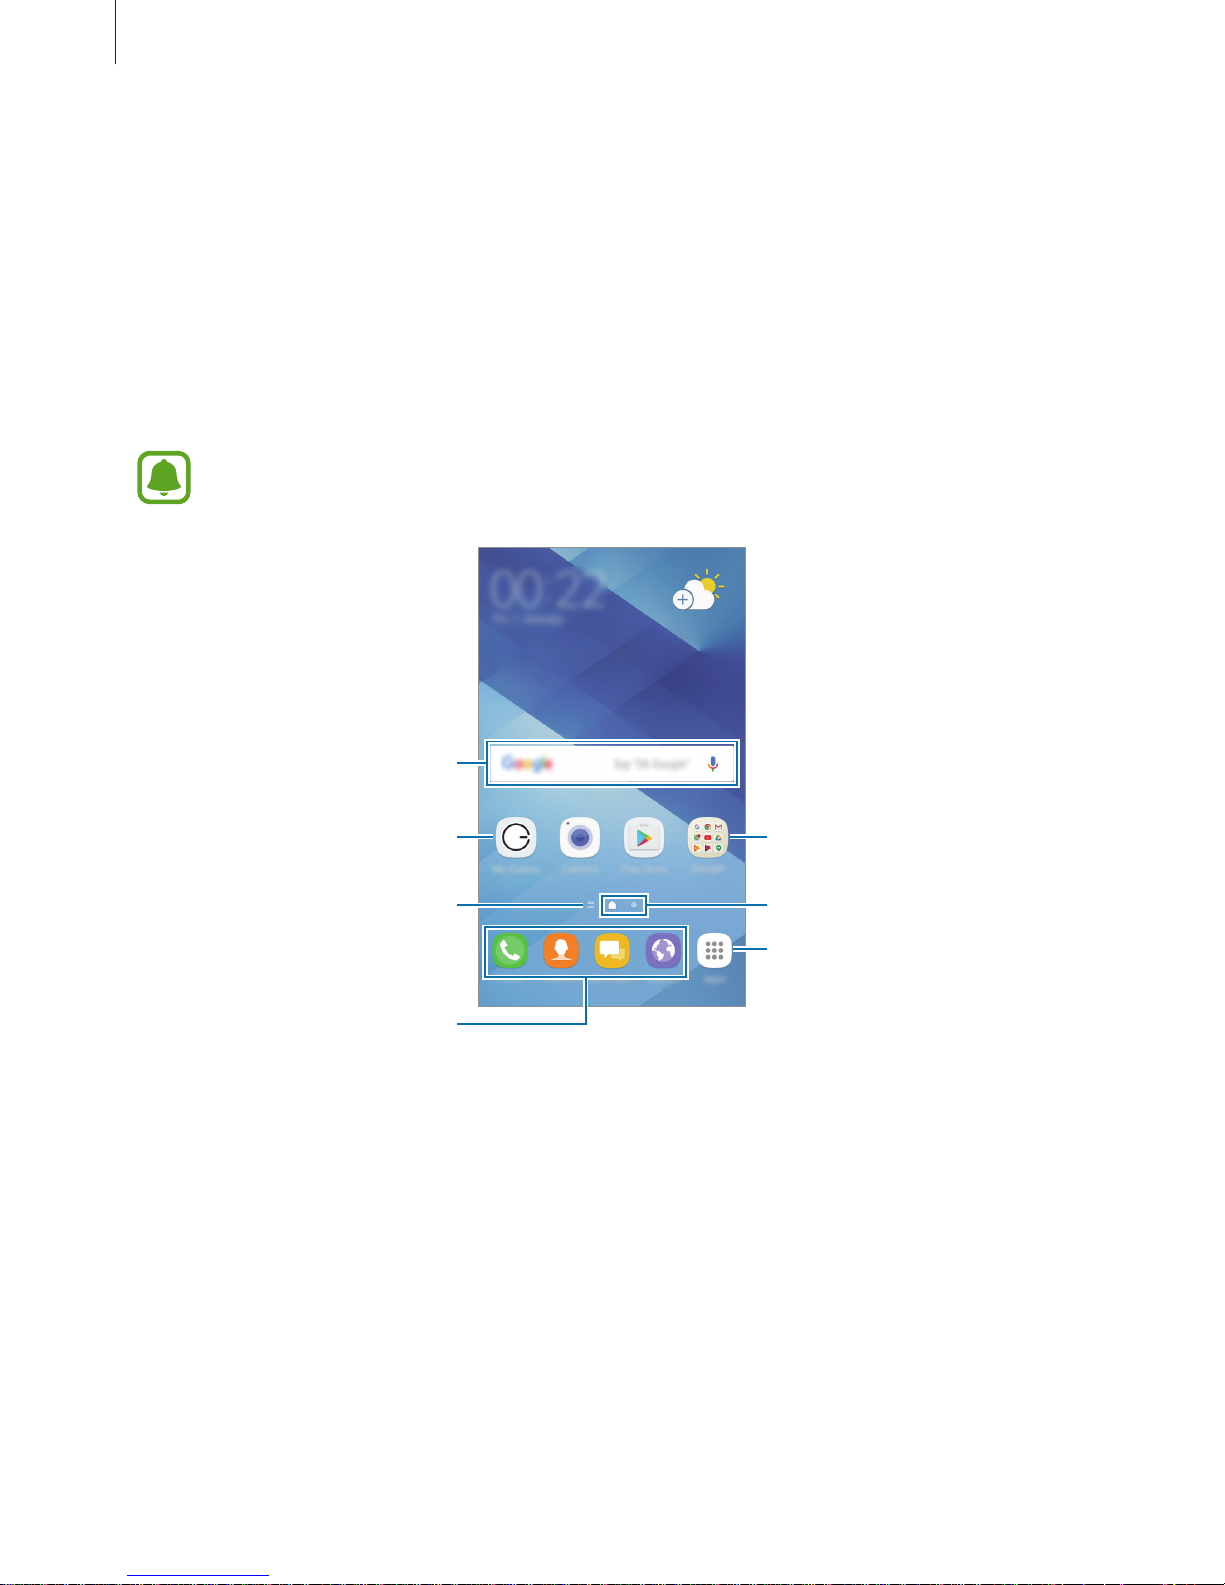
The Home screen is the starting point for accessing all of the device’s features. It displays
widgets, shortcuts to apps, and more.
To view other panels, swipe to the left or right, or tap one of the screen indicators at the
bottom of the screen.
The Home screen may appear differently depending on the region or service
provider.
A widget
An app A folder
Screen indicators
Favourite apps
Apps screen icon
News screen indicator. View the
latest articles in various
categories.
Page 41
Basics
41
Home screen options
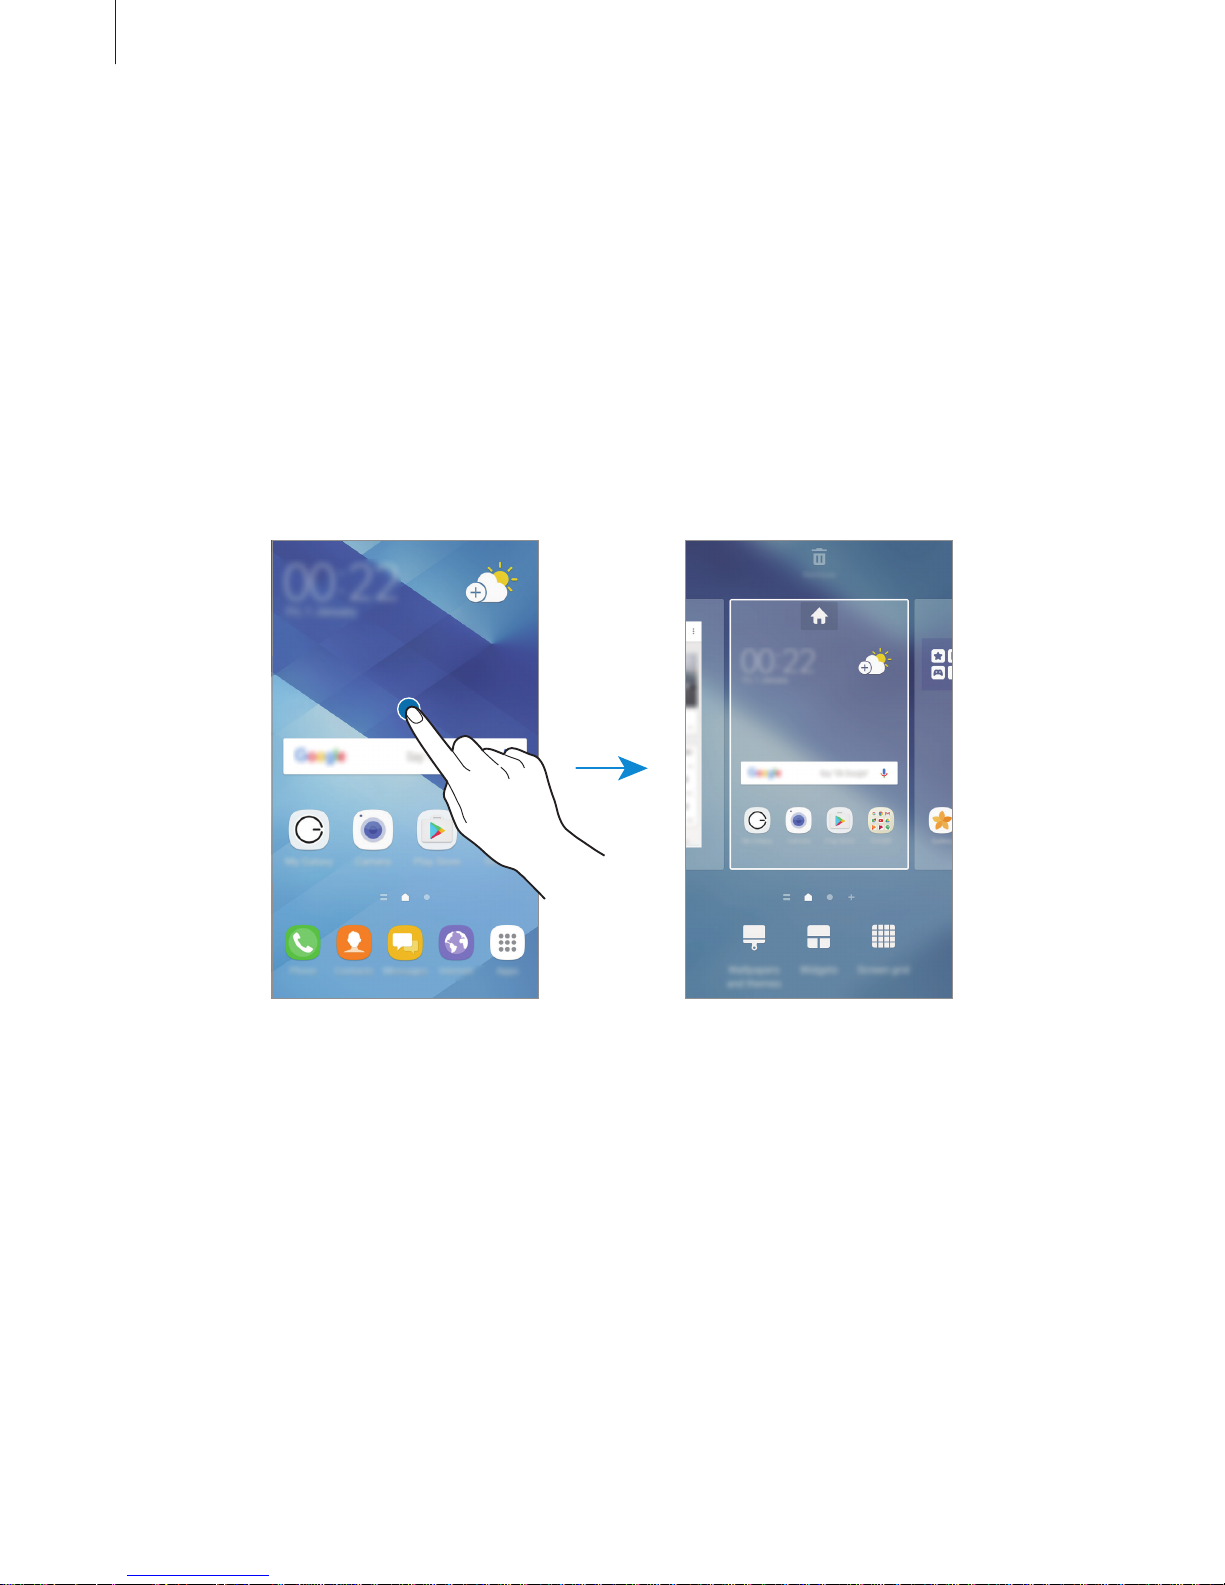
On the Home screen, tap and hold an empty area, or pinch your fingers together to access
the available options. Customise the Home screen by adding, deleting, or rearranging Home
screen panels. You can also set the Home screen wallpaper, add widgets to the Home screen,
and more.
•
Wallpapers and themes
: Change the device’s wallpaper, theme, or icons.
•
Widgets
: Add widgets to the Home screen. Widgets are small apps that launch specific
app functions to provide information and convenient access on your Home screen.
•
Screen grid
: Change the size of the grid to display more or less items on the Home screen
and the Apps screen.
Adding items
Tap and hold an app or a folder from the Apps screen, and then drag it to the Home screen.
To add widgets, tap and hold an empty area on the Home screen, tap
Widgets
, tap and hold a
widget, and then drag it to the Home screen.
Page 42
Basics
42
Moving items
Tap and hold an item on the Home screen, and then drag it to a new location.
You can also move frequently used apps to the shortcuts area at the bottom of the Home
screen.
To move the item to another panel, drag it to the side of the screen.
To move an item more easily, tap and hold an item, and drag it to
Move apps
at the top of the
screen. The item will move to the panel at the top of the screen. Swipe to the left or right to
move to another panel and drag the item to a new location.
Removing items
Tap and hold an item, and then drag it to
Remove
at the top of the screen.
Creating folders
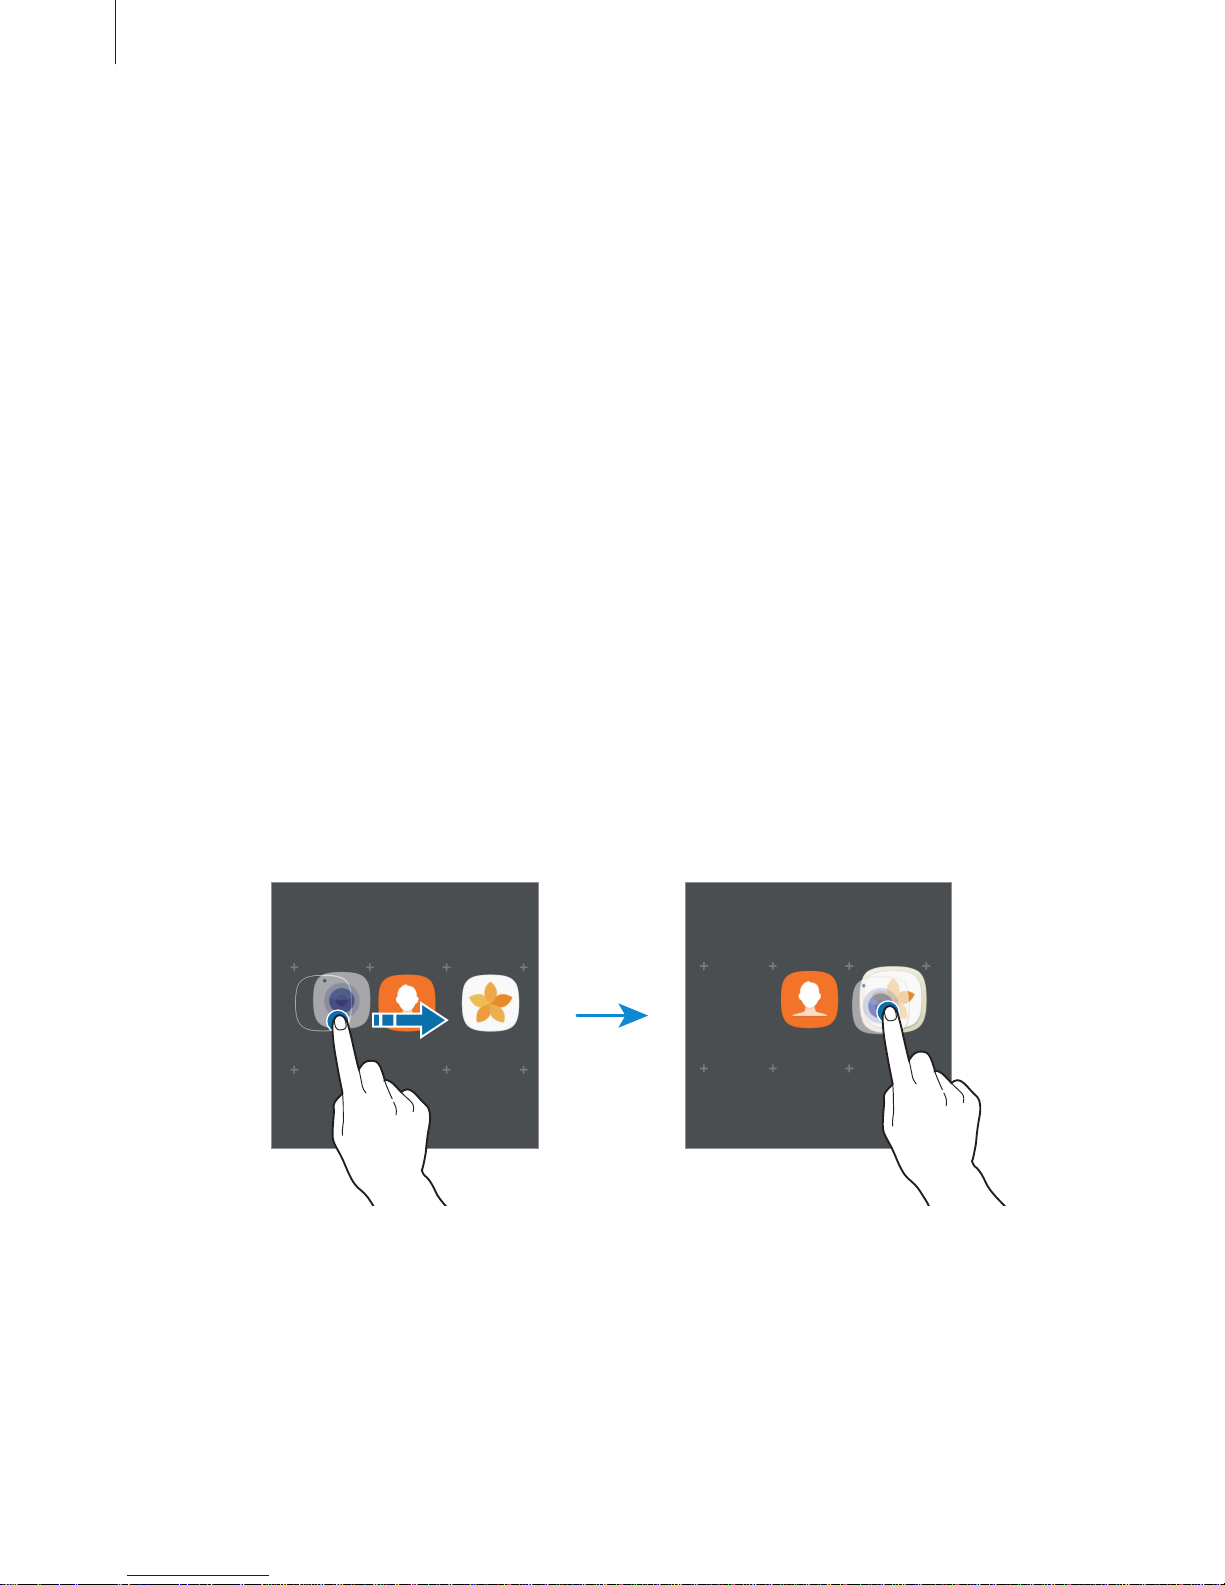
Create folders and gather similar applications to quickly access and launch apps.
1
On the Home screen, tap and hold an app, and then drag it over another app.
2
Drop the app when a folder frame appears around the apps.
A new folder containing the selected apps will be created.
Page 43
Basics
43
3
Tap
Enter folder name
and enter a folder name.
To change the folder colour, tap
.
To add more apps to the folder, tap
ADD
, tick the apps, and then tap
ADD
. You can also
add an app by dragging it to the folder on the Home screen.
To move apps from a folder to the Home screen, tap the folder, and then drag an app to the
Home screen.
To delete apps in a folder, tap the folder, and then drag the app you want to delete to
Remove
at the top of the screen.
Managing panels
On the Home screen, tap and hold an empty area to add, move, or remove a panel.
To add a panel, swipe to the left, and then tap
.
To move a panel, tap and hold a panel preview, and then drag it to a new location.
To remove a panel, tap and hold a panel preview, and then drag it to
Remove
at the top of
the screen.
To set a panel as the main Home screen, tap
.
Using quick options
On the Home screen, tap and hold an app icon or folder to quickly access options.
Apps screen
The Apps screen displays icons for all apps, including newly installed apps.
On the Home screen, tap
Apps
to open the Apps screen. To view other panels, swipe to the
left or right, or select a screen indicator at the bottom of the screen.
Moving items
This feature may not be available depending on the region or service provider.
On the Apps screen, tap
→
Edit
. Tap and hold an item and drag it to a new location.
To move the item to another panel, drag it to the side of the screen.
Page 44
Basics
44
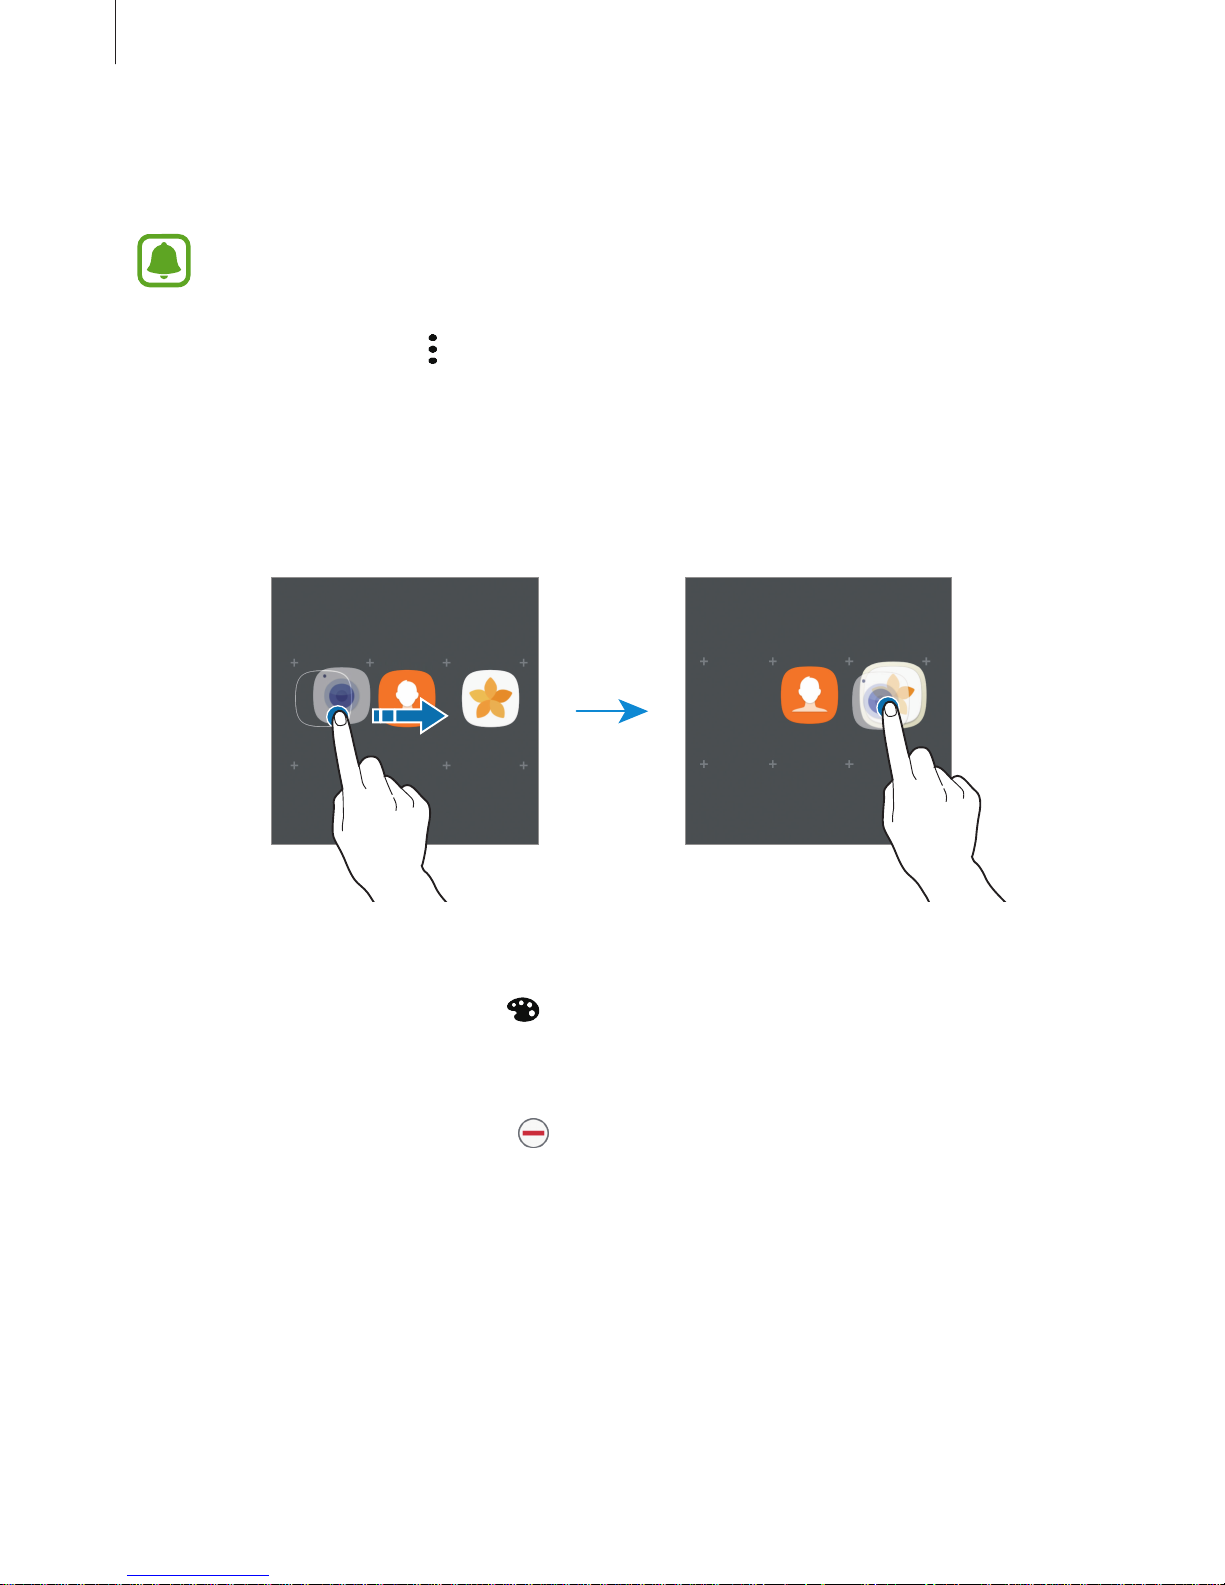
Creating folders
Create folders and gather similar applications to quickly access and launch apps you want.
This feature may not be available depending on the region or service provider.
1
On the Apps screen, tap →
Edit
.
2
Tap and hold an app, and then drag it over another app.
3
Drop the app when a folder frame appears around the apps.
A new folder containing the selected apps will be created.
4
Tap
Enter folder name
and enter a folder name.
To change the folder colour, tap
.
To add more apps to the folder, tap
ADD
, tick the apps, and then tap
ADD
. You can also
add an app by dragging it to the folder on the Apps screen.
To delete a folder, select a folder with
. Only the folder will be deleted. The folder’s apps will
be relocated to the Apps screen.
Page 45
Basics
45
Rearranging items
You can rearrange items in alphabetical order on the Apps screen.
On the Apps screen, tap
→
Sort
→
Alphabetical order
.
Searching for items
You can search for apps on the Apps screen or from
Galaxy Apps
or
Play Store
.
On the Apps screen, enter characters in the search field. The device will search for and display
the items containing the characters you entered.
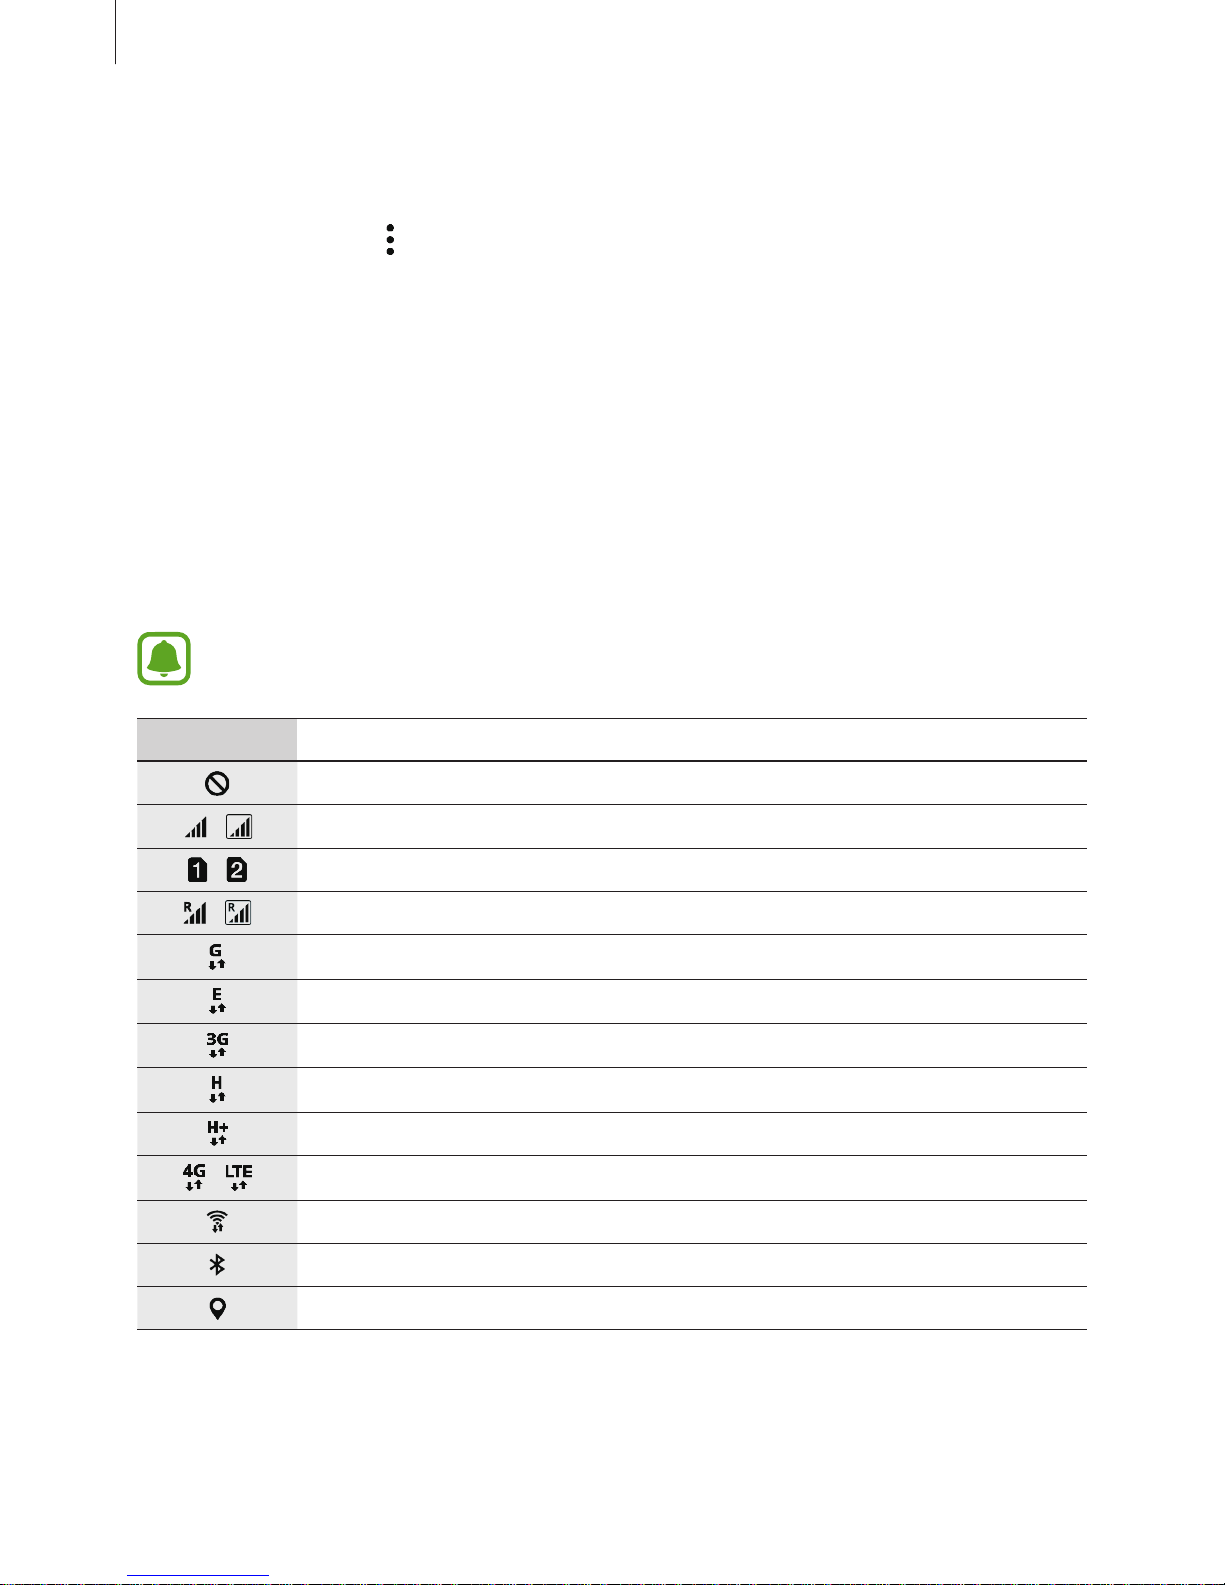
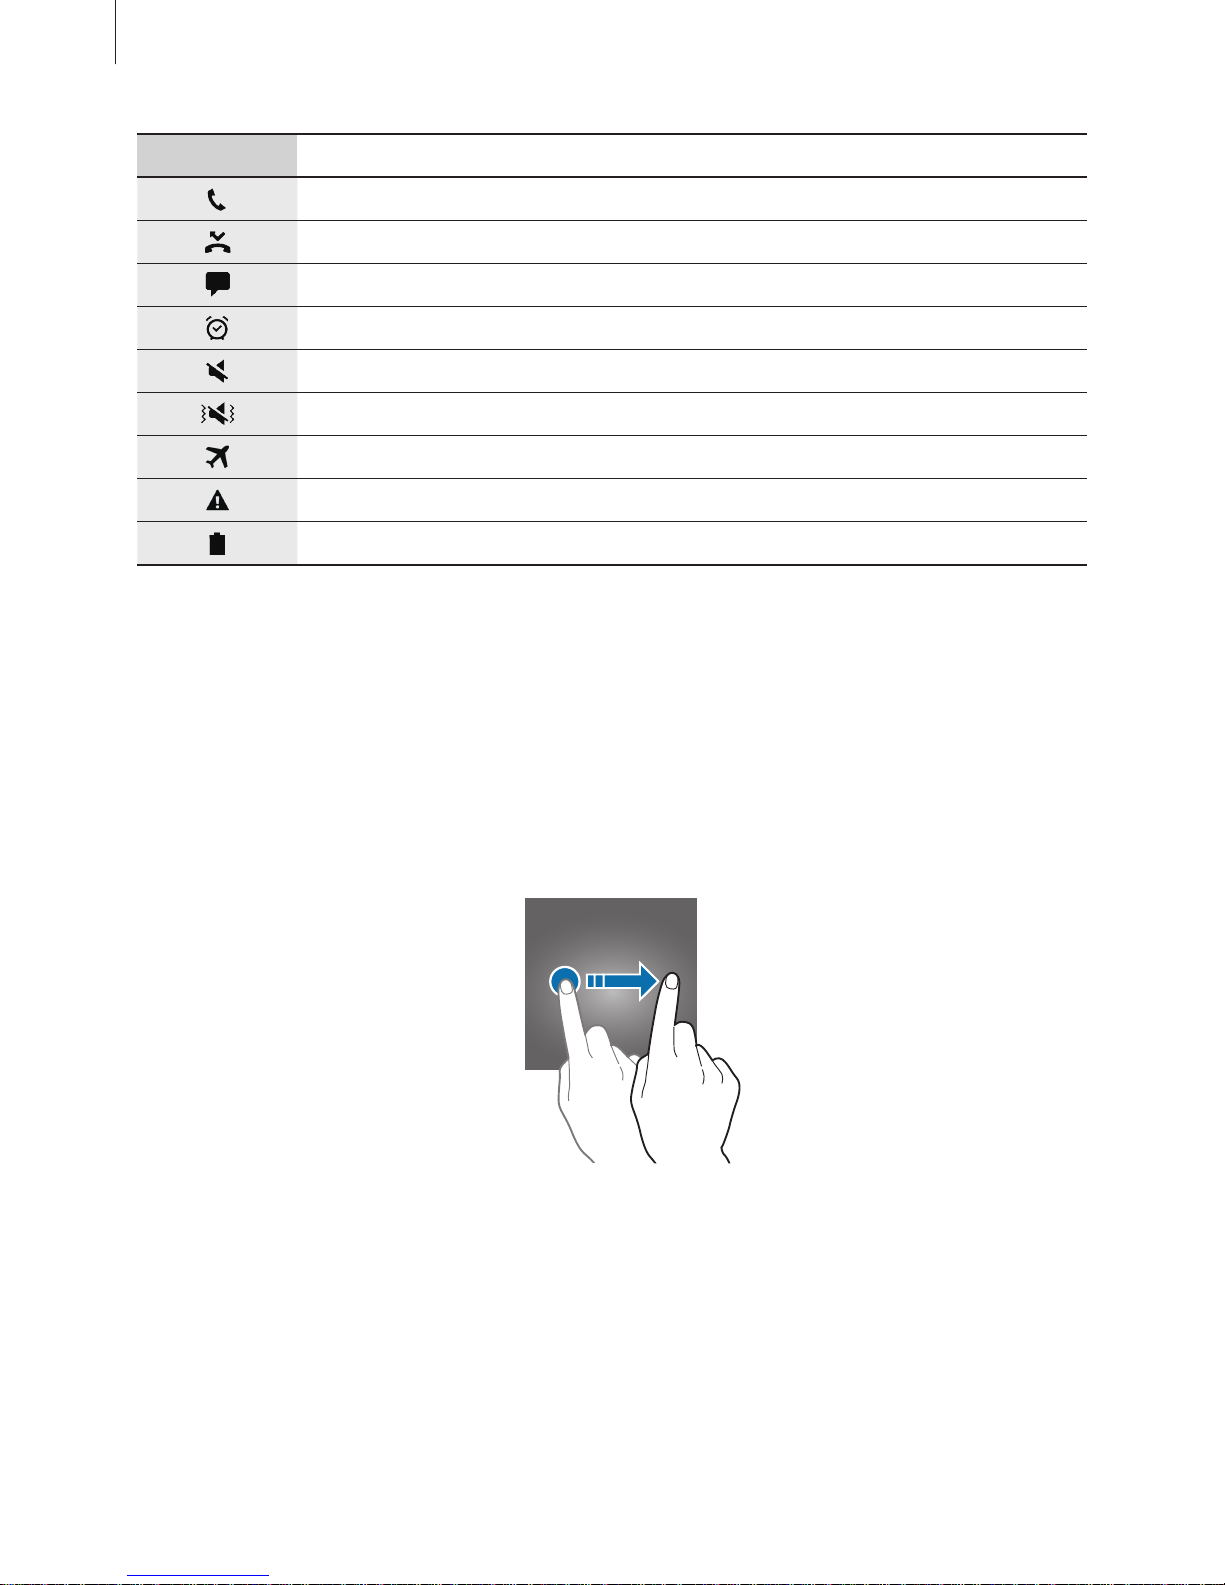
Indicator icons
Indicator icons appear on the status bar at the top of the screen. The icons listed in the table
below are most common.
The status bar may not appear at the top of the screen in some apps. To display the
status bar, drag down from the top of the screen.
Icon Meaning
No signal
/
Signal strength
/
Currently accessing SIM or USIM card (dual SIM models)
/
Roaming (outside of normal service area)
GPRS network connected
EDGE network connected
UMTS network connected
HSDPA network connected
HSPA+ network connected
/
LTE network connected
Wi-Fi connected
Bluetooth feature activated
GPS activated
Page 46
Basics
46
Icon Meaning
Call in progress
Missed call
New text or multimedia message
Alarm activated
Mute mode activated
Vibration mode activated
Flight mode activated
Error occurred or caution required
Battery power level
Lock screen
Pressing the Power key turns off the screen and locks it. Also, the screen turns off and
automatically locks if the device is not used for a specified period.
The screen is locked with
Swipe
, the default screen lock method.
Press the Power key or the Home key and swipe in any direction to unlock the screen.
Page 47

Basics
47
To change the screen lock method, on the Apps screen, tap
Settings
→
Lock screen and
security
→
Screen lock type
, and then select a method.
When you set a pattern, PIN, password, or fingerprint for the screen lock method, you can
protect your personal information by preventing others from accessing your device. After
setting the screen lock method, the device will require an unlock code whenever unlocking it.
•
Swipe
: Swipe in any direction on the screen to unlock it.
•
Pattern
: Draw a pattern with four or more dots to unlock the screen.
•
PIN
: Enter a PIN with at least four numbers to unlock the screen.
•
Password
: Enter a password with at least four characters, numbers, or symbols to unlock
the screen.
•
None
: Do not set a screen lock method.
•
Fingerprints
: Register your fingerprints to unlock the screen. Refer to Fingerprint
recognition for more information.
•
You can unlock your device’s screen remotely from the Find My Mobile website
(findmymobile.samsung.com) using your Samsung account. To use this feature, the
device must be connected to a Wi-Fi or mobile network and you must sign in to
your Samsung account.
•
If the unlock code is forgotten, you will not be able to use the device if you do not
reset it. Samsung is not responsible for any data loss or inconvenience caused by
forgotten unlock codes.
•
You can set your device to perform a factory data reset if you enter the unlock code
incorrectly several times in a row and reach the attempt limit. On the Apps screen,
tap
Settings
→
Lock screen and security
→
Secure lock settings
and tap the
Auto factory reset
switch to activate it.
Page 48

Basics
48
Always On Display
You can set the device to display information, such as a clock, calendar, or image, on the
screen when it is turned off.
1
On the Apps screen, tap
Settings
→
Display
→
Always On Display
and tap the switch to
activate it.
2
Tap
Layouts
→
Content to show
and select an item to display.
•
Clock
: Select a clock style and a background image.
•
Calendar
: Select a calendar style.
•
Image
: Select an image to display on the screen when it is turned off.
When you select
Clock
or
Calendar
, you can set to display notification icons as well. Tap
the
Show notifications
switch to activate it.
When the screen is off, the device will display the selected information.
This feature will be deactivated when the battery power drops below 5 %.
Setting the schedule for the Always On Display feature
On the Apps screen, tap
Settings
→
Display
→
Always On Display
and tap the
Show always
switch to deactivate it. Then, tap
Set schedule
and set the start time and end time.
Page 49
Basics
49
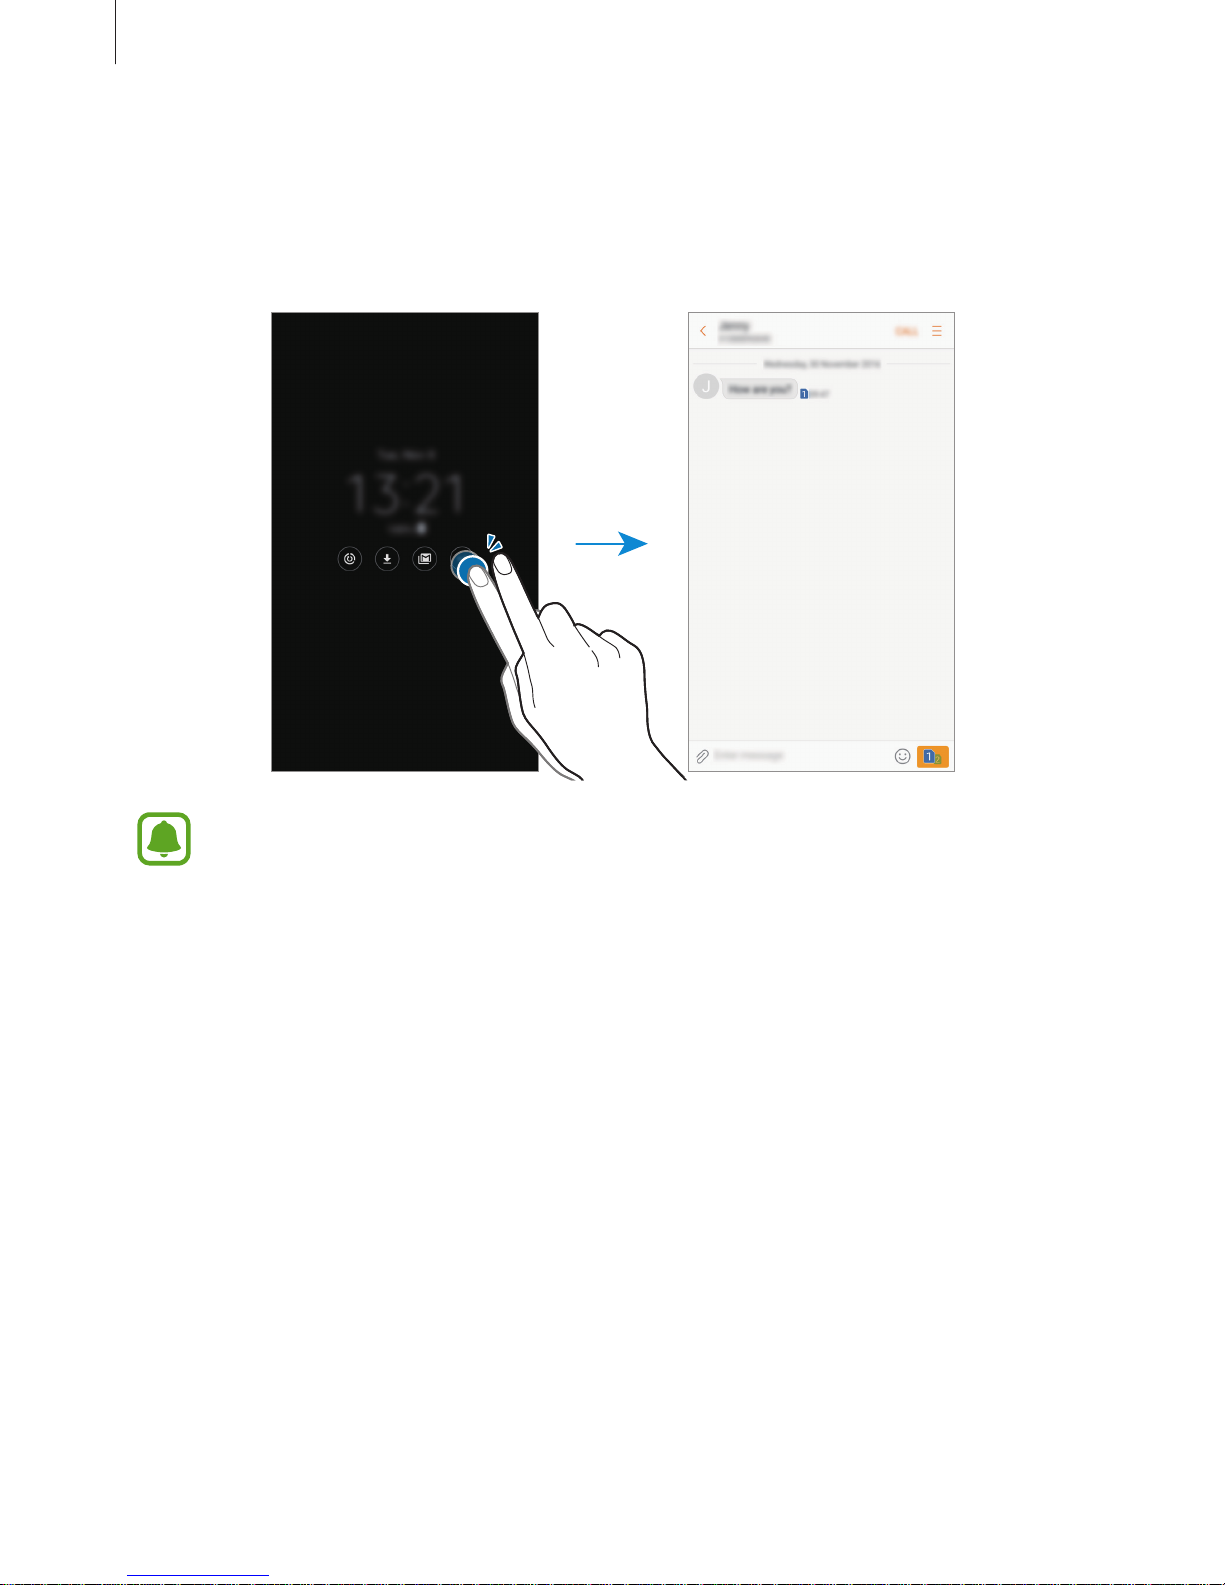
Opening notifications when the screen is off
When you receive message, missed call, or app notifications, notification icons will appear on
the screen even when it is turned off. Double-tap a notification icon with your finger to view
its notification.
If the screen is locked, you must unlock it to view notifications.
Controlling music playback when the screen is off
You can control music playback when the screen is off, without turning on the screen.
Double-tap the title of the currently playing song with your finger. The music controller will
appear. Double-tap the icons to control the playback.
Page 50
Basics
50
Notification panel
Using the notification panel
When you receive new notifications, such as messages or missed calls, indicator icons appear
on the status bar. To see more information about the icons, open the notification panel and
view the details.
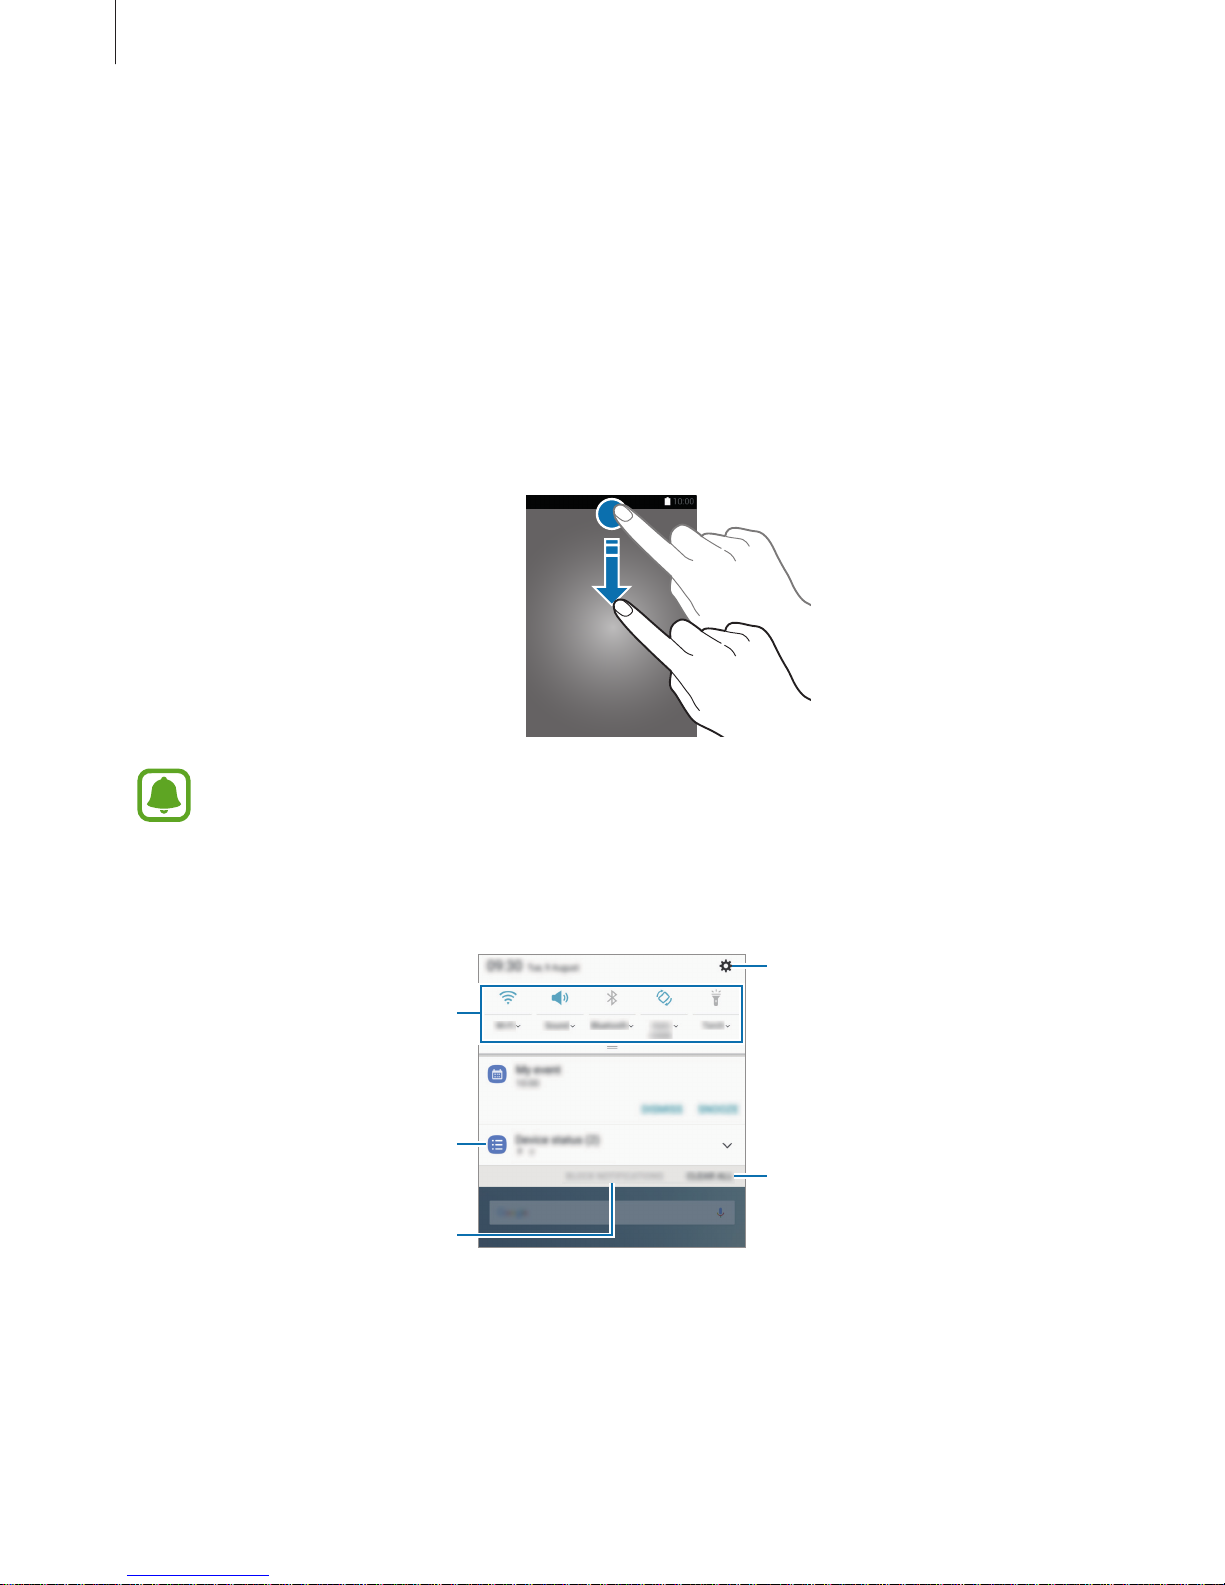
To open the notification panel, drag the status bar downwards. To close the notification panel,
swipe upwards on the screen.
You can open the notification panel, even on the locked screen.
You can use the following functions on the notification panel.
►
Single SIM models:
Launch
Settings
.
Tap a notification and perform
various actions.
Clear all notifications.
Quick setting buttons
Block notifications from apps.
Page 51
Basics
51
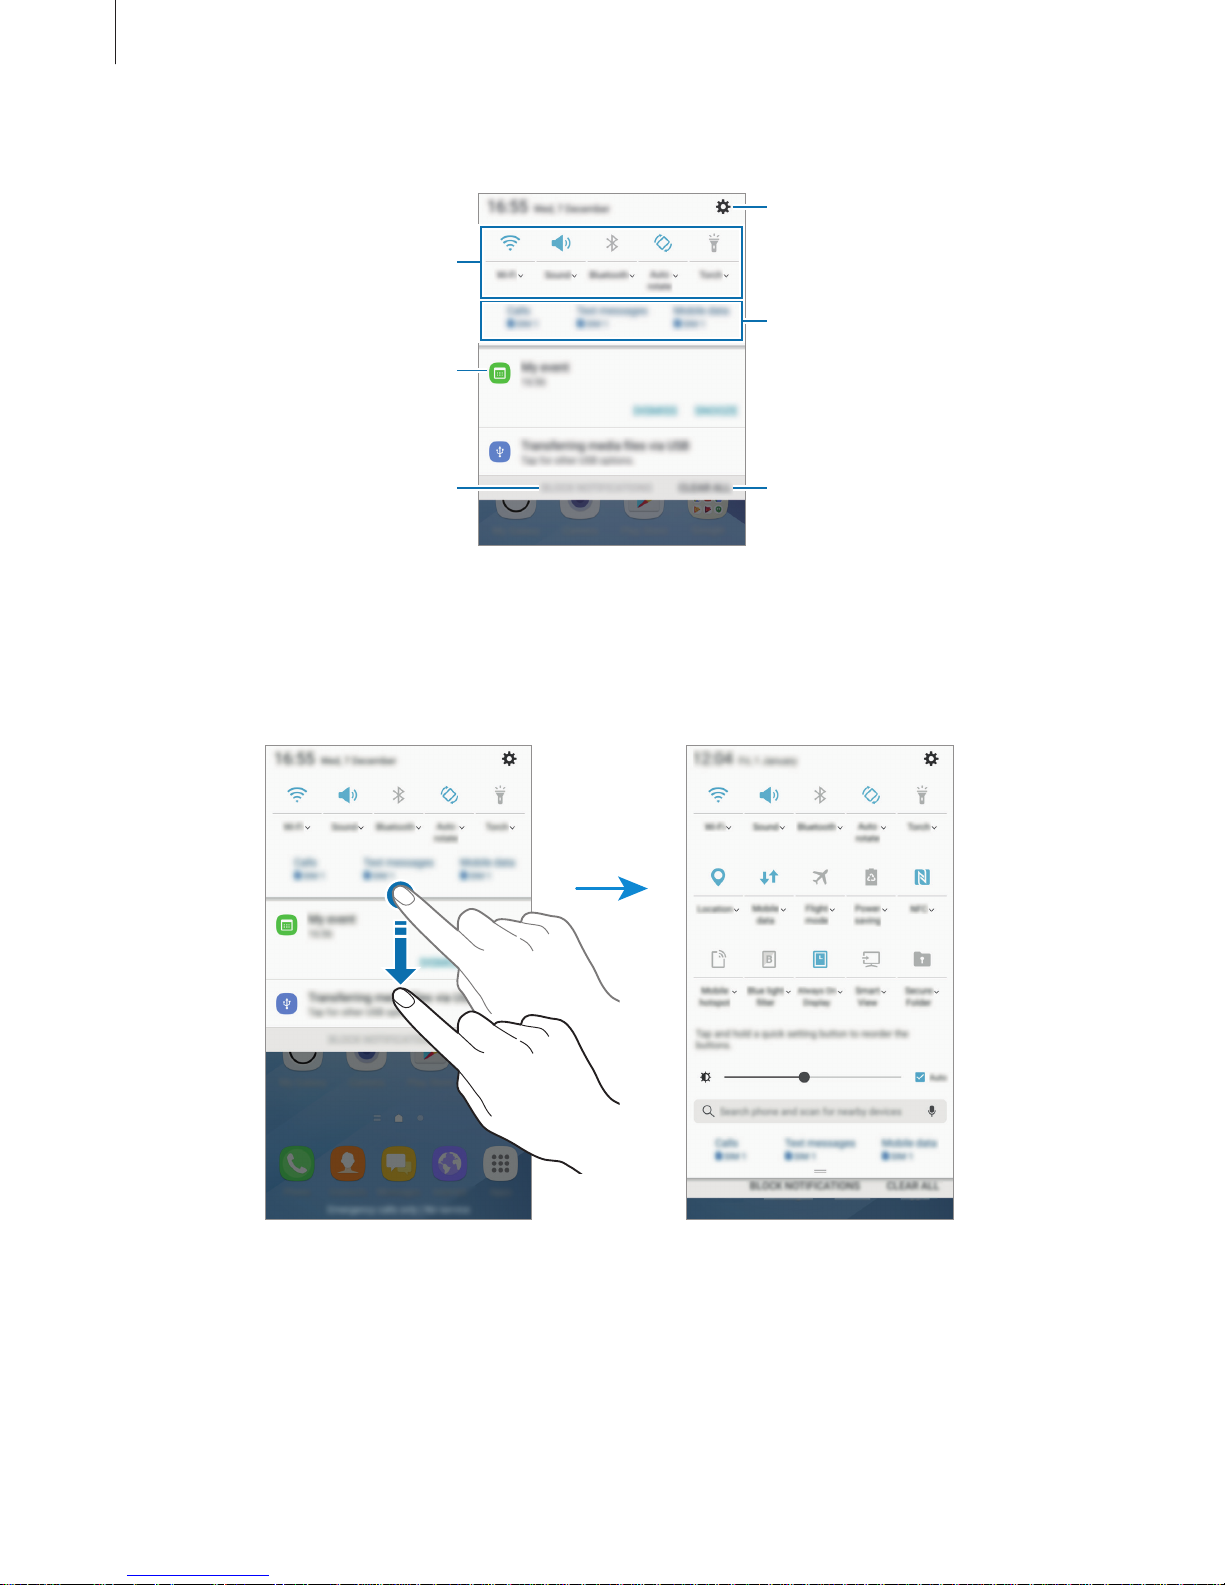
►
Dual SIM models:
Tap a notification and perform
various actions.
Clear all notifications.
Launch Settings.
Block notifications from apps.
Quick setting buttons
SIM and USIM card feature
preferences. Tap to access the
SIM card manager.
Using quick setting buttons
Tap quick setting buttons to activate certain features. Swipe downwards on the notification
panel to view more buttons.
To view more detailed settings, tap the text under each button.
To rearrange buttons, tap and hold a quick setting button until all the quick setting buttons
are displayed. Then, tap and hold a button, and then drag it to another location.
Page 52
Basics
52
Finder
Search for a variety of content with a keyword or search for nearby devices.
This feature may not be available depending on the region or service provider.
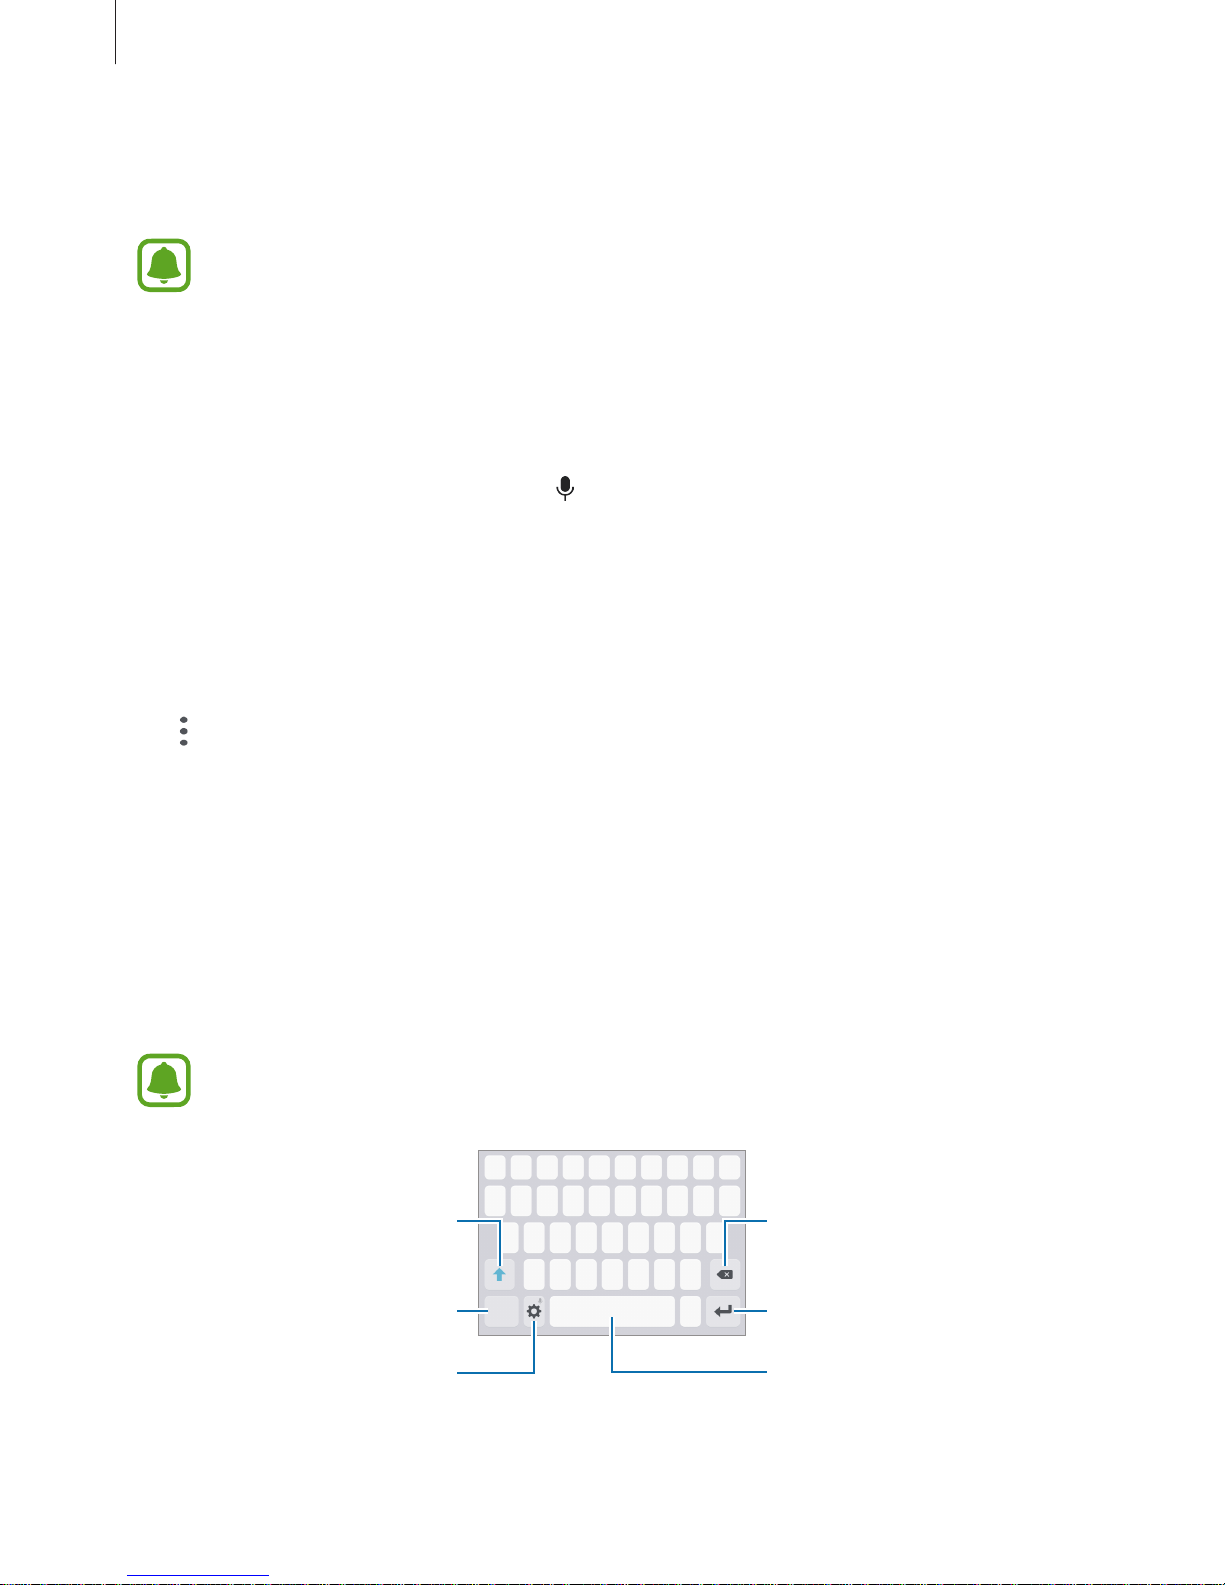
Searching for content or nearby devices
Open the notification panel, swipe downwards on the notification panel, and then tap
Search
phone and scan for nearby devices
.
Enter a keyword in the search field or tap
and say a keyword.
To get more refined results, tap
Filter
under the search field, and then select filter details.
To search for nearby devices, tap
REFRESH
. Refer to Quick connect for more information.
Setting search categories
You can set search categories to search for content in specific search fields.
Tap
→
Settings
→
Select search locations
and select categories.
Entering text
Keyboard layout
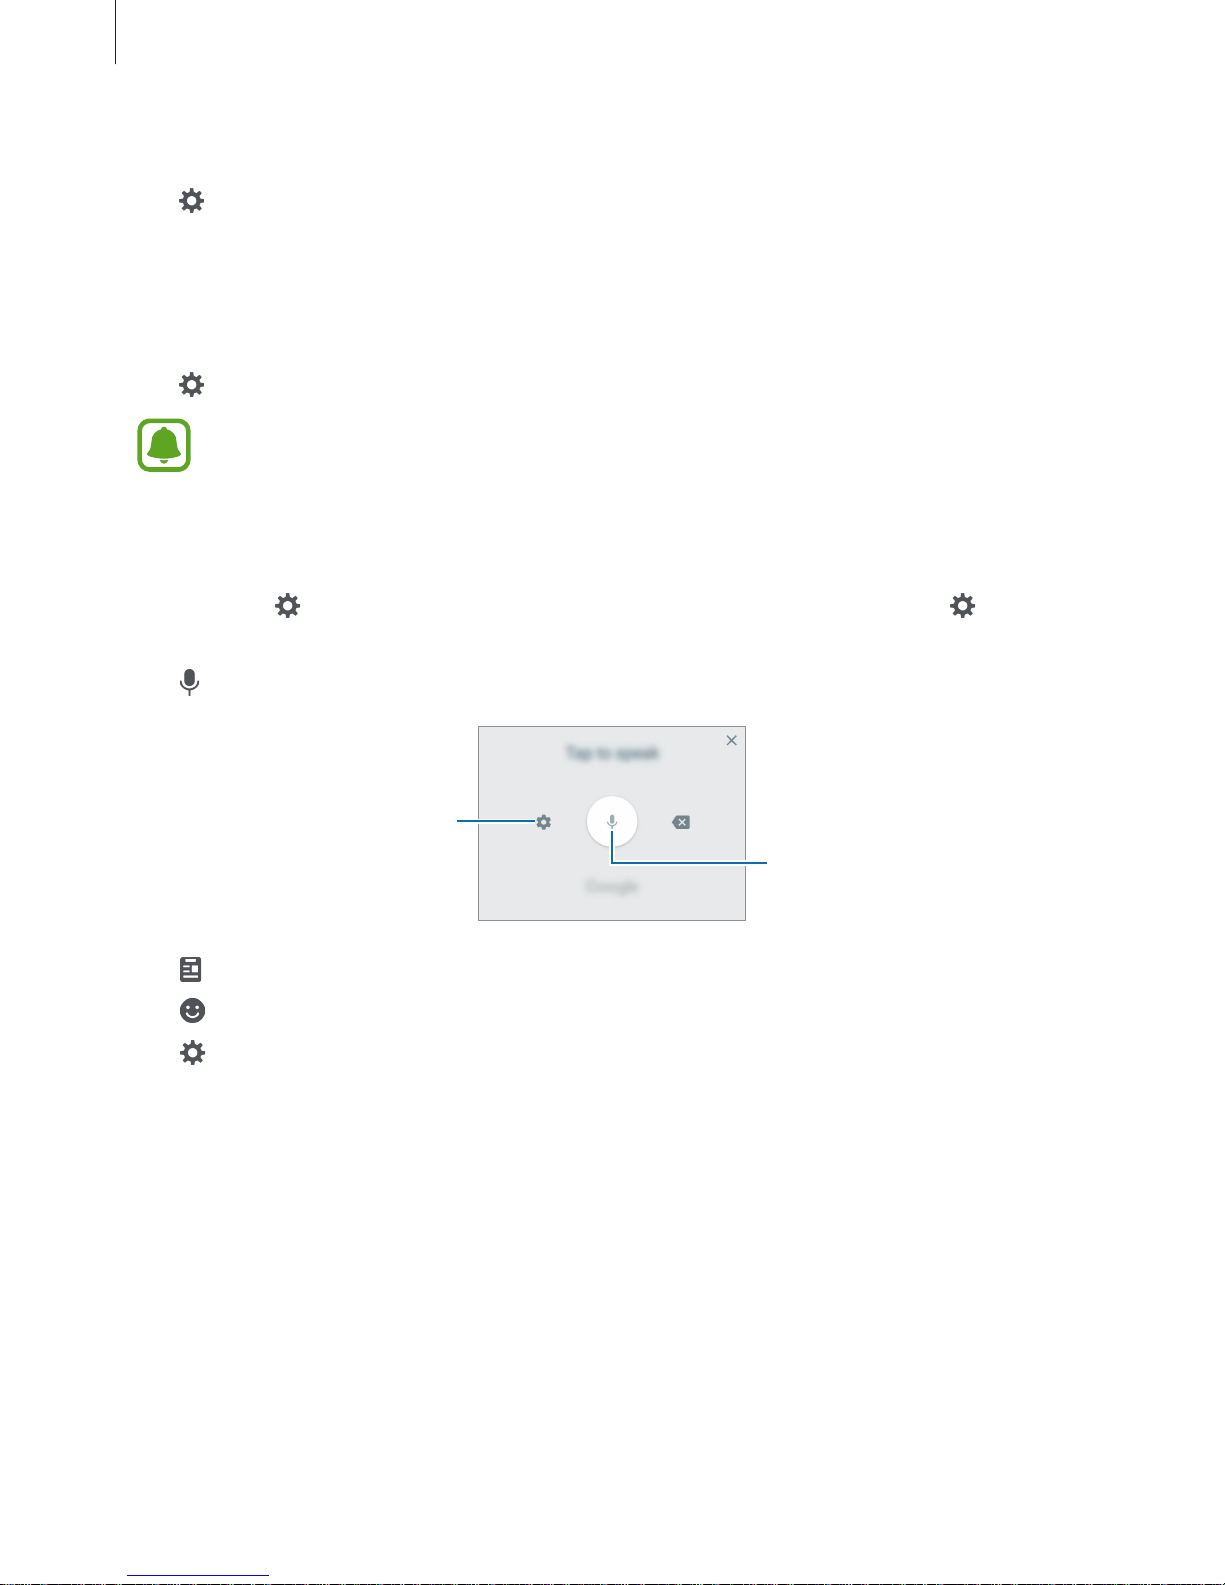
A keyboard appears automatically when you enter text to send messages, create notes, and
more.
Text entry is not supported in some languages. To enter text, you must change the
input language to one of the supported languages.
Break to the next line.
Delete a preceding character.
Enter punctuation marks.
Enter uppercase. For all caps, tap
it twice.
Change the keyboard settings.
Enter a space.
Page 53
Basics
53
Changing the input language
Tap →
Languages and types
→
Add input languages
, and then select the languages to
use. When you select two or more languages, you can switch between the input languages
by swiping to the left or right on the space key.
Changing the keyboard layout
Tap →
Languages and types
, select a language, and then select a keyboard layout to use.
On
3x4 keyboard
, a key has three or four characters. To enter a character, tap the
corresponding key repeatedly until the desired character appears.
Additional keyboard functions
Tap and hold
to use various functions. Other icons may appear instead of the icon
depending on the last function that was used.
•
: Enter text by voice.
Change the voice input settings.
Start or pause entering text by
voice.
•
: Add an item from the clipboard.
•
: Enter emoticons.
•
: Change the keyboard settings.
Page 54

Basics
54
Copying and pasting
1
Tap and hold over text.
2
Drag or to select the desired text, or tap
Select all
to select all text.
3
Tap
Copy
or
Cut
.
The selected text is copied to the clipboard.
4
Tap and hold where the text is to be inserted and tap
Paste
.
To paste text that you have previously copied, tap
Clipboard
and select the text.
Dictionary
Look up definitions for words while using certain features, such as when browsing webpages.
1
Tap and hold over a word that you want to look up.
If the word you want to look up is not selected, drag
or to select the desired text.
2
Tap
Dictionary
or
More
→
Dictionary
on the options list.
If a dictionary is not preinstalled on the device, tap
Move to Manage dictionaries
→
next to a dictionary to download it.
3
View the definition in the dictionary pop-up window.
To switch to the full screen view, tap
. Tap the definition on the screen to view more
definitions. In the detailed view, tap
to add the word to your favourite words list or tap
Search Web
to use the word as a search term.
Page 55

Basics
55
Screen capture
Capture a screenshot while using the device.
Capturing screenshots
Press and hold the Home key and the Power key simultaneously. You can view captured
images in
Gallery
.
You can also capture screenshots by swiping your hand to the left or right across the screen.
If this feature is not activated, open the Apps screen, tap
Settings
→
Advanced features
→
Palm swipe to capture
and tap the switch to activate it.
It is not possible to capture a screenshot while using some apps and features.
Smart capture
You can capture the current screen and scrollable area. You can also immediately crop and
share the captured screen.
If this feature is not activated, open the Apps screen, tap
Settings
→
Advanced features
→
Smart capture
, tap the switch to activate it, and then capture a screenshot. On the screen you
are capturing, use one of the following options:
•
Scroll capture
: Capture more content that continues across multiple screens, such as a
web page. The screen will automatically scroll down and more content will be captured.
•
Draw
: Write or draw on the screenshot.
•
Crop
: Crop a portion from the screenshot.
•
Share
: Share the screenshot.
Opening apps
On the Home screen or the Apps screen, select an app icon to open it.
To open an app from the list of recently used apps, tap
and select a recent app window.
Closing an app
Tap
and drag a recent app window to the left or right to close it. To close all running apps,
tap
CLOSE ALL
.
Page 56
Basics
56
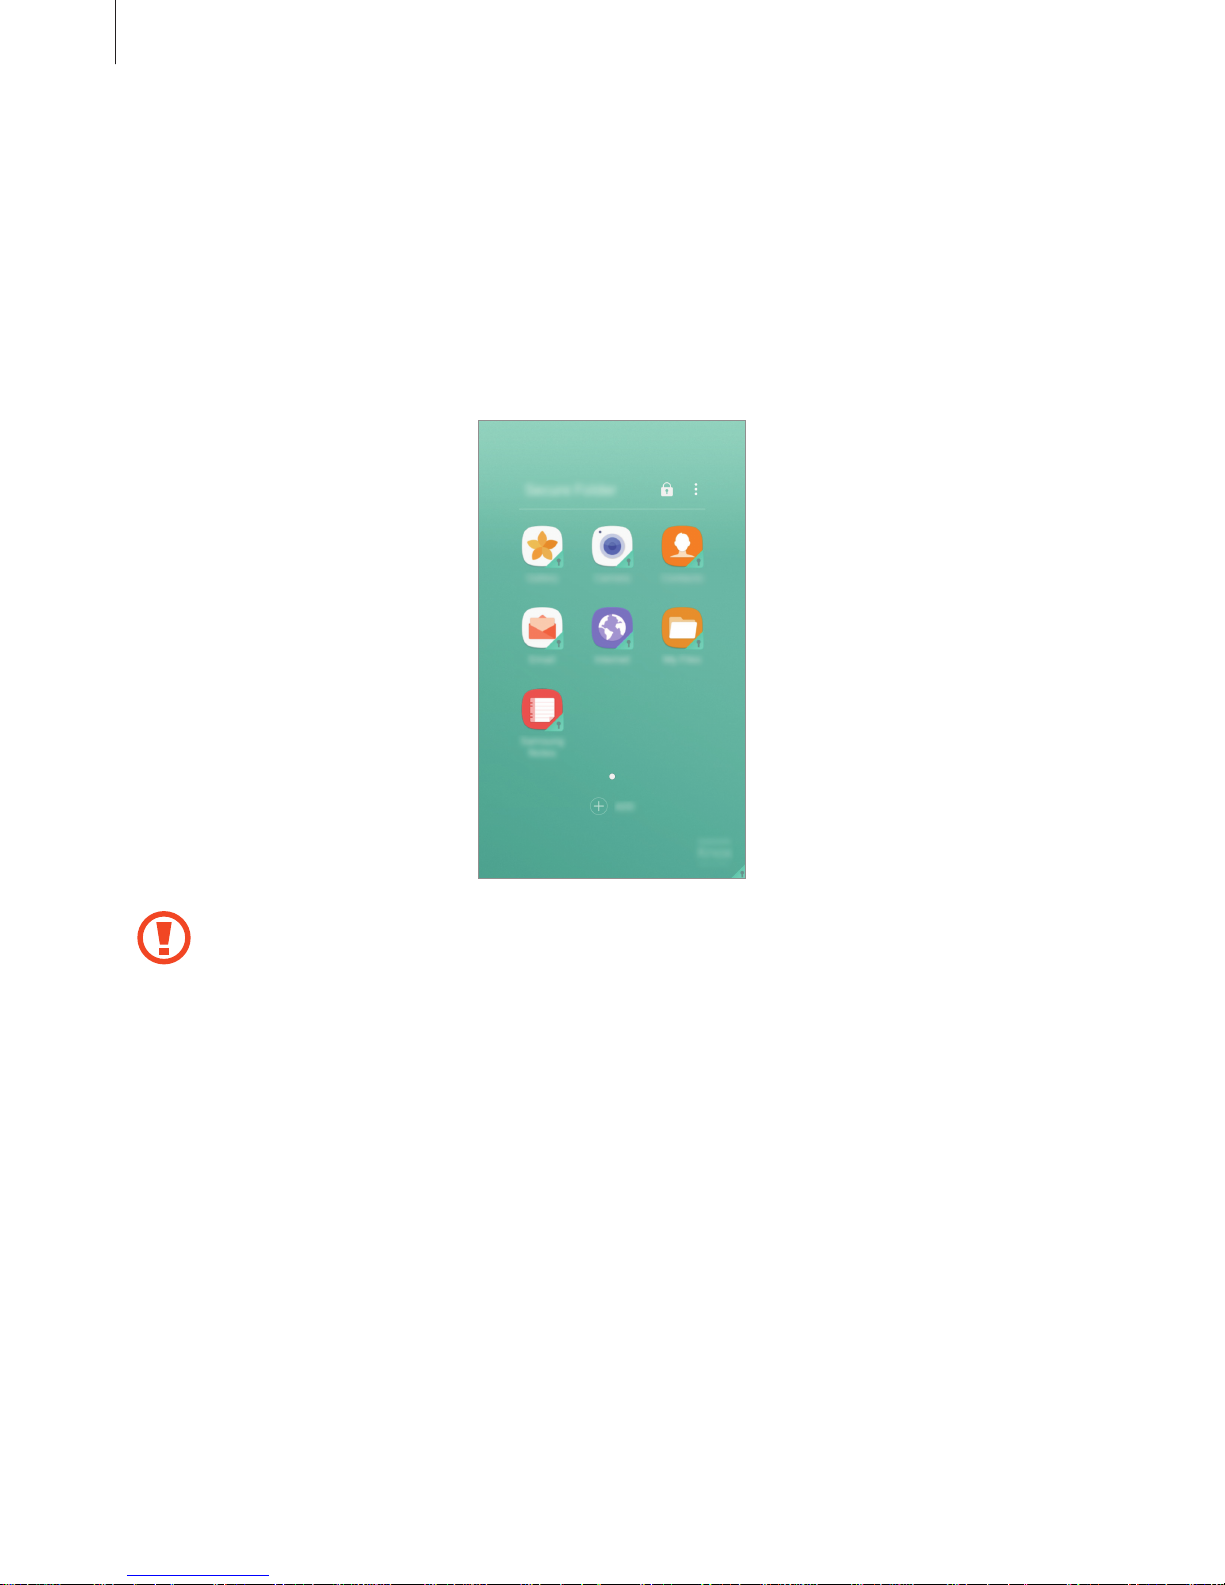
Secure Folder
Introduction
Secure Folder protects your private content and apps, such as photos and notes, from being
accessed by others. You can keep your private content and apps secure even when the device
is unlocked.
Secure Folder is a separate, secured storage area. The data in Secure Folder cannot be
transferred to other devices via unapproved sharing methods, such as USB or Wi-Fi
Direct. Attempting to customise the operating system or modifying software will
cause Secure Folder to be automatically locked and inaccessible. Before saving data in
Secure Folder, make sure to back up a copy of the data in another secure location.
Page 57
Basics
57
Creating Secure Folder
1
On the Apps screen, tap
Settings
→
Lock screen and security
→
Secure Folder
.
2
Tap
SIGN IN
and sign in to your Samsung account.
3
Select a lock method to use for Secure Folder and follow the on-screen instructions to
complete the setup.
A shortcut to Secure Folder will be added to the Home screen and the Apps screen.
If you forget your Secure Folder unlock code, you can reset it using your Samsung
account. Tap the reset button that appears when an incorrect unlock code is entered,
and enter your Samsung account password.
Setting auto lock for Secure Folder
Set the device to automatically lock Secure Folder when it is not being used.
1
On the Apps screen, tap
Samsung
→
Secure Folder
.
2
Tap →
Settings
→
Auto lock Secure Folder
.
3
Select a lock option.
To manually lock your Secure Folder, tap .
Moving content
Move content, such as photos and contacts, to Secure Folder. The following actions are an
example of moving an image from the default storage to Secure Folder.
1
On the Apps screen, tap
Gallery
.
2
Select an image and tap →
Move to Secure Folder
.
The selected items will be moved to the corresponding app in Secure Folder.
You can move content from Secure Folder to the corresponding app in the default
storage. Select an item and tap
→
Move out of Secure Folder
.
Page 58

Basics
58
Adding apps
Add an app to use in Secure Folder.
1
On the Apps screen, tap
Samsung
→
Secure Folder
.
2
Tap
ADD
.
3
Tick one or more apps installed on the device and tap
ADD
.
To install apps from
Play Store
, tap
DOWNLOAD FROM PLAY STORE
.
Removing apps from Secure Folder
Tap and hold an app, and drag it to
Disable
or
Uninstall
at the top of the screen.
Adding accounts
Add your Samsung and Google accounts, or other accounts, to sync with the apps in Secure
Folder.
1
On the Apps screen, tap
Samsung
→
Secure Folder
.
2
Tap →
Settings
→
Accounts
→
Add account
.
3
Select an account service.
4
Follow the on-screen instructions to complete the account setup.
Hiding Secure Folder
You can hide the Secure Folder shortcut from the Home screen and the Apps screen.
1
On the Apps screen, tap
Samsung
→
Secure Folder
.
2
Tap →
Settings
and tap the
Show Secure Folder
switch to deactivate it.
To show the Secure Folder shortcut again, open the Apps screen, tap
Settings
→
Lock screen
and security
→
Secure Folder
, and then tap the
Show Secure Folder
switch to activate it.
Page 59

Basics
59
Uninstalling Secure Folder
You can uninstall Secure Folder, including the content and apps in it.
1
On the Apps screen, tap
Settings
→
Lock screen and security
→
Secure Folder
→
Uninstall
.
2
Tap
UNINSTALL
or
BACK UP AND UNINSTALL
.
•
UNINSTALL
: Uninstall Secure Folder immediately. All apps in Secure Folder, including
their content and accounts, will be deleted.
•
BACK UP AND UNINSTALL
: Back up content and uninstall Secure Folder. To access
data backed up from Secure Folder, open the Apps screen and tap
Samsung
→
My
Files
→
My device
→
Secure Folder
.
Notes saved in
Samsung Notes
will not be backed up.
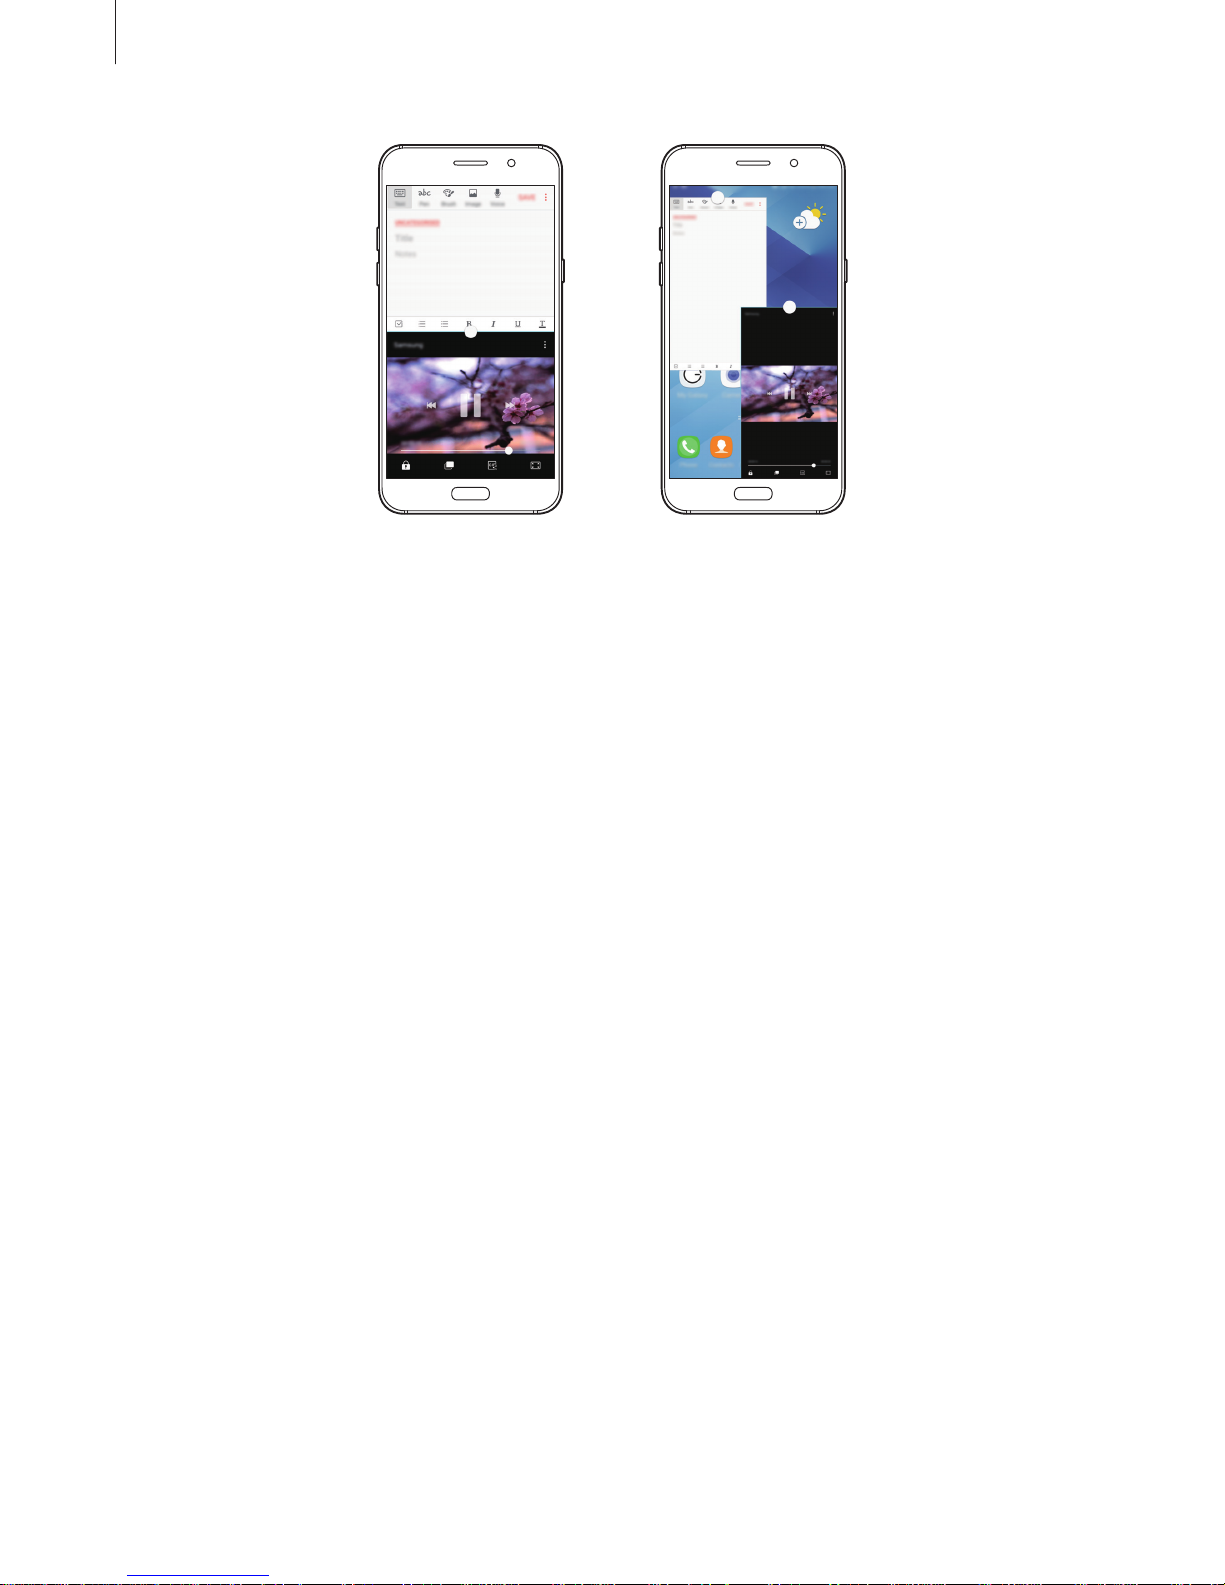
Multi window
Introduction
Multi window lets you run two apps at the same time in the split screen view. You can also run
multiple apps at the same time in the pop-up view.
Some apps may not support this feature.
Page 60
Basics
60
Split screen view
Pop-up view
Page 61
Basics
61
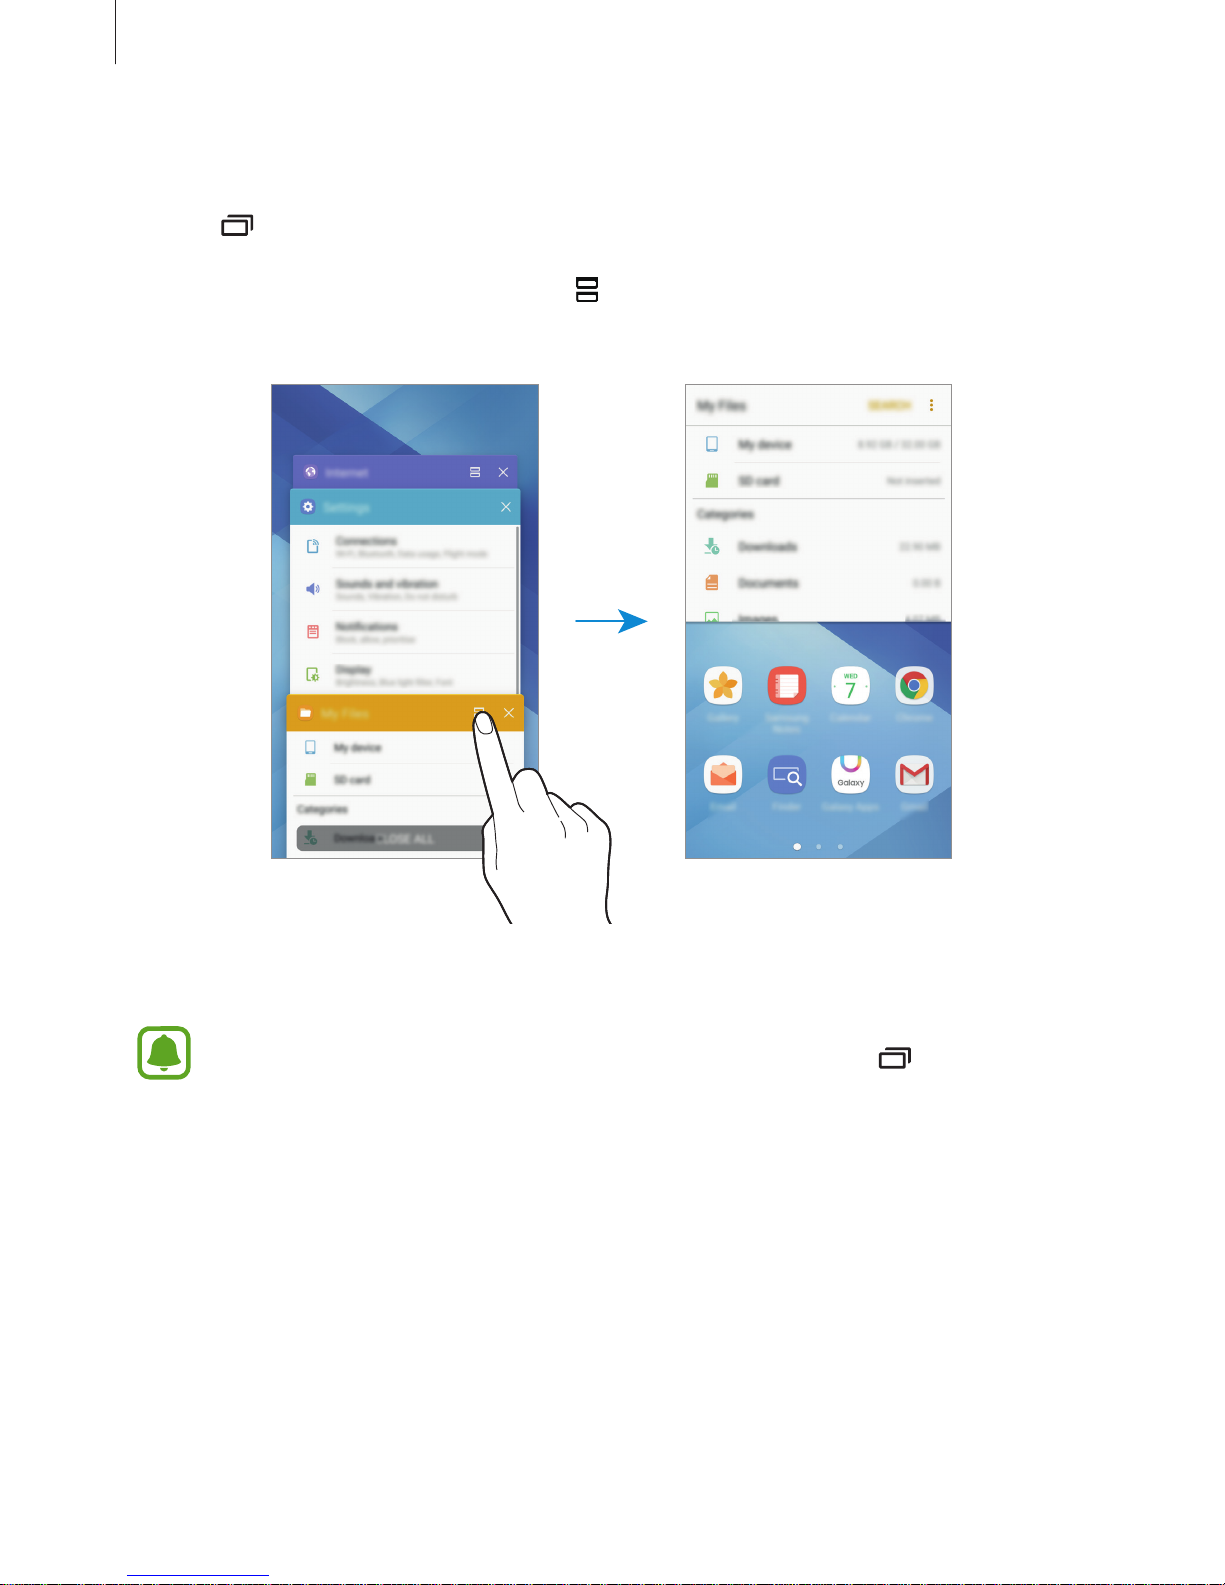
Split screen view
1
Tap to open the list of recently used apps.
2
Swipe upwards or downwards and tap on a recent app window.
The selected app will launch in the upper window.
3
Swipe to the left or right to select another app to launch.
You can also launch the split screen view by tapping and holding .
Page 62
Basics
62
Using additional options
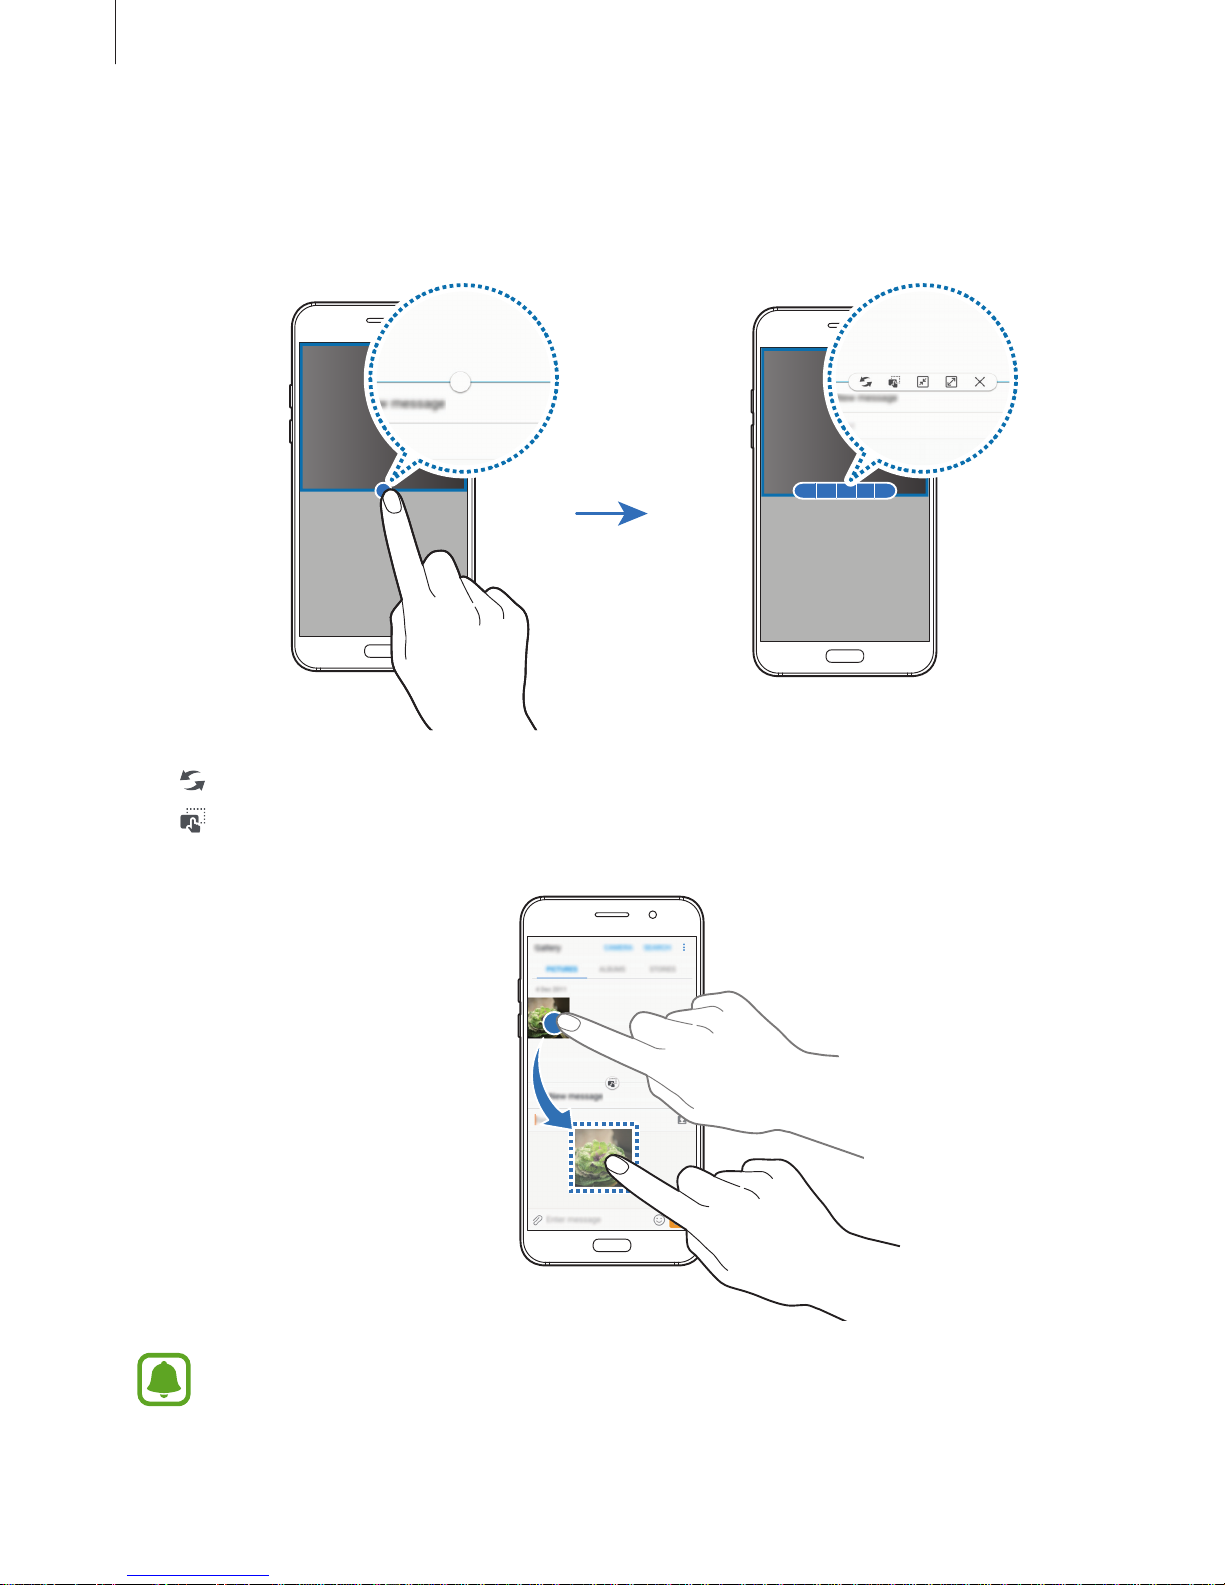
When using apps in the split screen view, select an app window and tap the circle between
the app windows to access the following options:
•
: Switch locations between app windows.
•
: Drag and drop text or copied images from one window to another. Tap and hold an
item in the selected window and drag it to a location in another window.
Some apps may not support this feature.
Page 63
Basics
63
•
: Minimise the window.
This feature may not be available depending on the region or service provider.
•
: Maximise the window.
•
: Close the app.
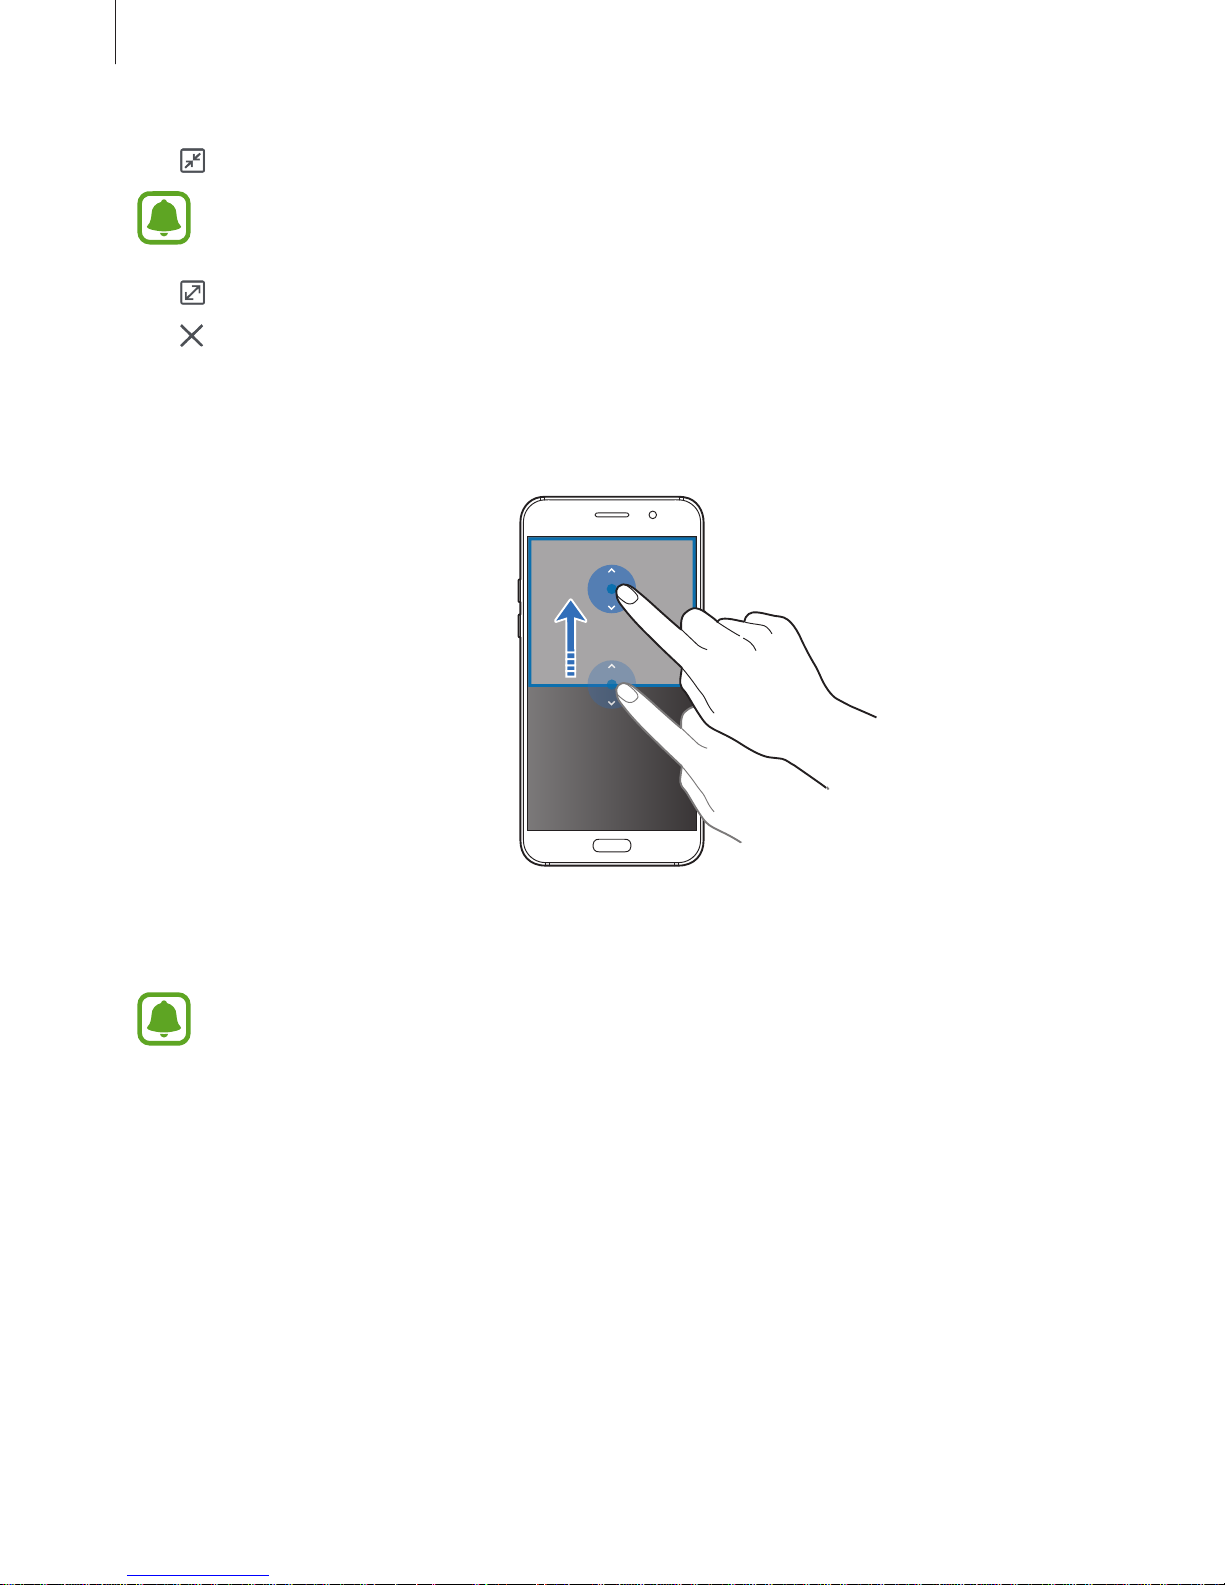
Adjusting the window size
Drag the circle between the app windows up or down to adjust the size of the windows.
Pop-up view
This feature may not be available depending on the region or service provider.
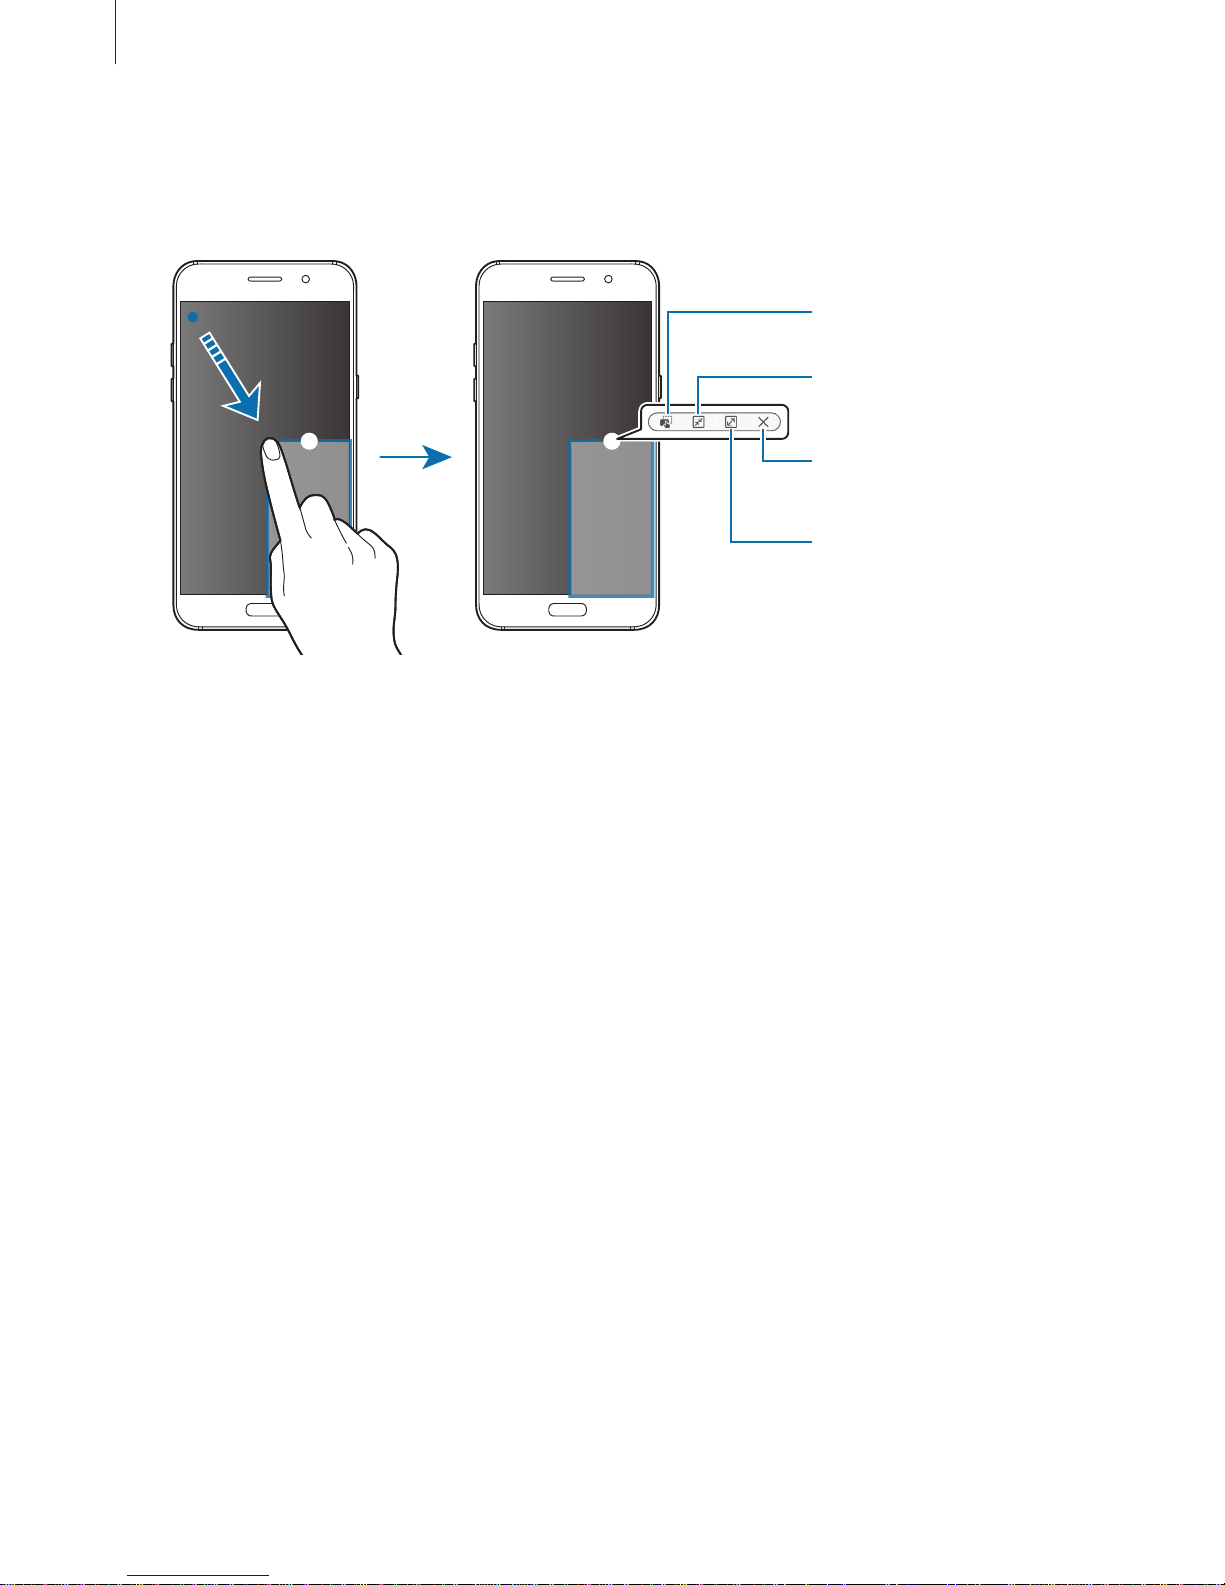
1
On the Home screen, launch an app to use in the pop-up view.
Page 64
Basics
64
2
Drag down diagonally from either end of the top edge.
The app screen will appear in the pop-up view.
Minimise the window.
Close the app.
Maximise the window.
Drag and drop content.
Moving pop-up windows
To move a pop-up window, tap and hold the circle on a window and drag it to a new location.
Samsung account
Introduction
Your Samsung account is an integrated account service that allows you to use a variety of
Samsung services provided by mobile devices, TVs, and the Samsung website. Once your
Samsung account has been registered, you can use apps provided by Samsung, without
signing in to your account.
Create your Samsung account with your email address.
To check the list of services that can be used with your Samsung account, visit
account.samsung.com. For more information on Samsung accounts, open the Apps screen
and tap
Settings
→
Cloud and accounts
→
Accounts
→
Samsung account
→
Help
.
Page 65

Basics
65
Registering your Samsung account
Registering a new Samsung account
If you do not have a Samsung account, you should create one.
1
On the Apps screen, tap
Settings
→
Cloud and accounts
→
Accounts
→
Add account
.
2
Tap
Samsung account
→
CREATE ACCOUNT
.
3
Follow the on-screen instructions to complete creating your account.
Registering an existing Samsung account
If you already have a Samsung account, register it to the device.
1
On the Apps screen, tap
Settings
→
Cloud and accounts
→
Accounts
→
Add account
.
2
Tap
Samsung account
.
3
Enter your email address and password, and then tap
SIGN IN
.
If you forget your account information, tap
Forgotten your ID or password?
You can find
your account information when you enter the required information and security code
displayed that is on the screen.
Removing your Samsung account
When you remove your registered Samsung account from the device, your data, such as
contacts or events, will also be removed.
1
On the Apps screen, tap
Settings
→
Cloud and accounts
→
Accounts
.
2
Tap
Samsung account
and tap the account to remove.
3
Tap →
Remove account
→
REMOVE ACCOUNT
→ OK.
4
Enter your Samsung account password and tap
REMOVE ACCOUNT
.
Page 66
Basics
66
Transferring data from your previous device
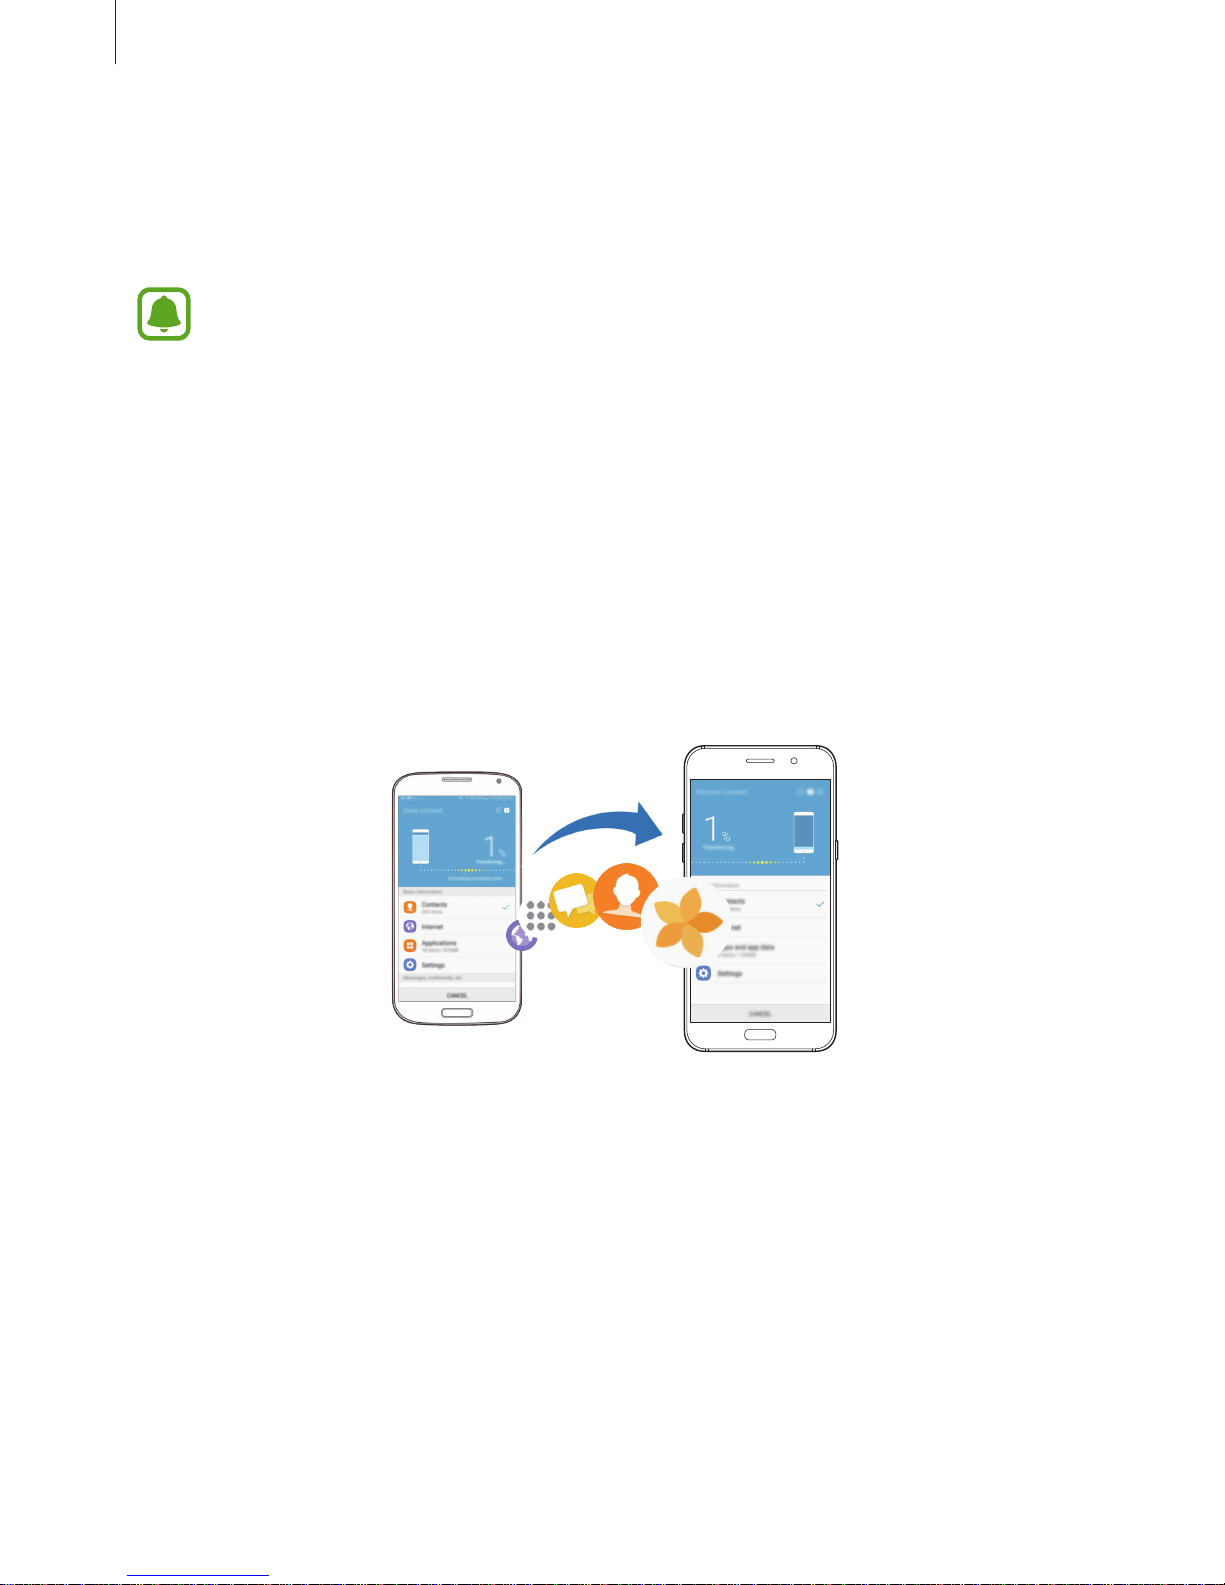
You can transfer contacts, images, and other data from a previous device to your device via
Smart Switch or Samsung Cloud.
•
This feature may not be supported on some devices or computers.
•
Limitations apply. Visit www.samsung.com/smartswitch for details. Samsung
takes copyright seriously. Only transfer content that you own or have the right to
transfer.
Transferring data via Smart Switch
Transfer data between mobile devices via Smart Switch. You can download the app from
Galaxy Apps
or
Play Store
.
Transferring data from a mobile device
Transfer data from your previous device to your device.
1
On the previous device, download and install Smart Switch from
Play Store
. Then, launch
Smart Switch
.
2
Place the devices near each other.
3
Launch
Smart Switch
on both devices.
4
When using this feature for the first time, tap
START
on your device.
5
After you select how to send data and connect your previous device to your device,
follow the on-screen instructions to transfer data from the previous device.
Page 67
Basics
67
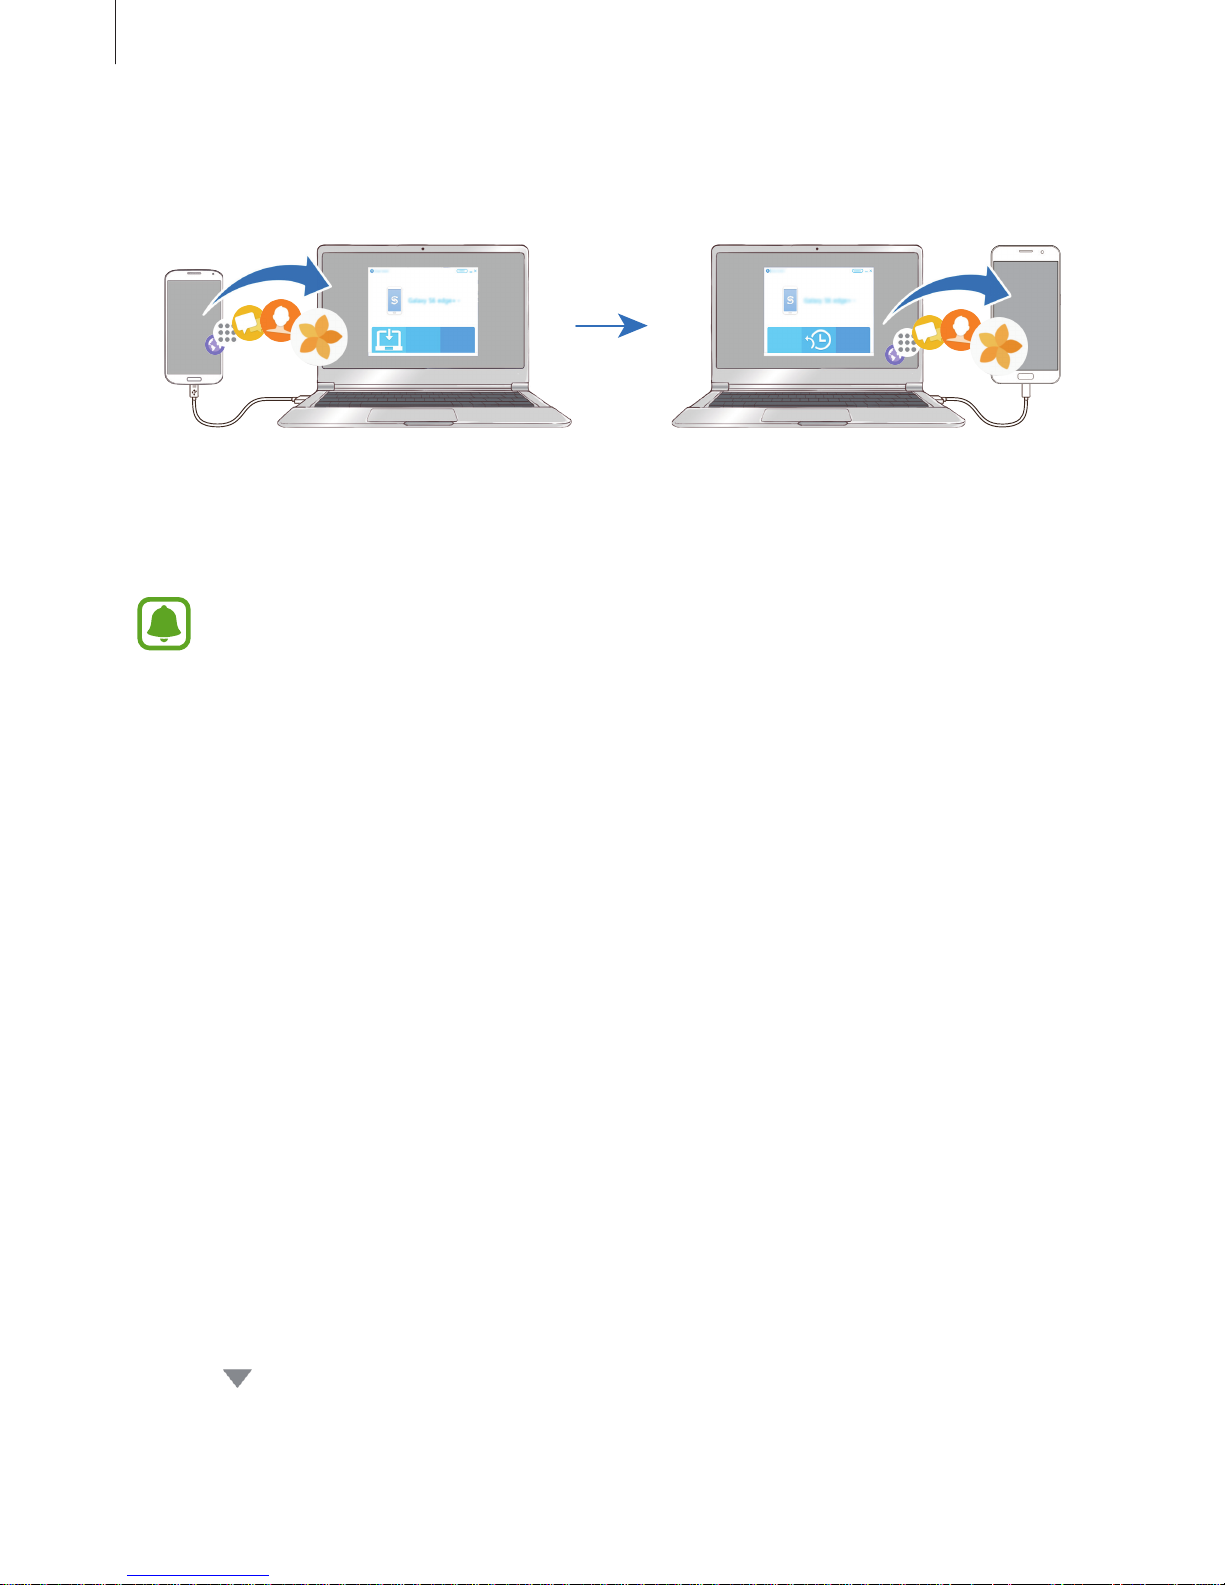
Transferring backup data from a computer
Back up data from your previous device to a computer and import the data to your device.
1
On the computer, visit www.samsung.com/smartswitch to download Smart Switch.
2
On the computer, launch Smart Switch.
If your previous device is not a Samsung device, back up data to a computer using a
program provided by the device’s manufacturer. Then, skip to the fifth step.
3
Connect your previous device to the computer using the USB cable.
4
On the computer, follow the on-screen instructions to back up data from the device.
Then, disconnect your previous device from the computer.
5
Connect your device to the computer using the USB cable.
6
On the computer, follow the on-screen instructions to transfer data to your device.
Transferring data via Samsung Cloud
Back up data from your previous device to Samsung Cloud and restore the data to your
device. You must register and sign in to your Samsung account to use Samsung Cloud. Refer
to Samsung account for more information.
1
On the previous device, back up the data to your Samsung account.
2
On your device, tap
Apps
→
Settings
→
Cloud and accounts
→
Samsung Cloud
→
Restore
.
3
Tap and select the previous device from the devices list.
4
Tick the data types you want to restore and tap
RESTORE NOW
.
Page 68
Basics
68
Device and data management
Connecting the device to a computer for data transfer
Move audio, video, image, or other types of files from the device to the computer, or vice
versa.
Do not disconnect the USB cable from the device when you are transferring files.
Doing so may cause data loss or device damage.
The devices may not connect properly if they are connected via a USB hub. Directly
connect the device to the computer’s USB port.
1
Connect the device to the computer using the USB cable.
2
Open the notification panel, and then tap
Transferring media files via USB
→
Transferring media files
.
If your computer does not support Media Transfer Protocol (MTP), tap
Transferring
images
.
3
Tap
ALLOW
to permit the computer to access your device’s data.
When the computer recognises your device, the device will appear in My PC.
4
Transfer files between your device and the computer.
Updating the device
The device can be updated to the latest software.
Updating over the air
The device can be directly updated to the latest software by the firmware over-the-air (FOTA)
service.
On the Apps screen, tap
Settings
→
Software update
→
Download updates manually
.
When you tap the
Download updates automatically
switch to activate it, updates
will be downloaded when the device is connected to a Wi-Fi network.
Page 69

Basics
69
Updating with Smart Switch
Connect the device to a computer and update the device to the latest software.
1
On the computer, visit www.samsung.com/smartswitch to download and install Smart
Switch.
2
On the computer, launch Smart Switch.
3
Connect the device to the computer using a USB cable.
4
If a software update is available, follow the on-screen instructions to update the device.
•
Do not turn off the computer or disconnect the USB cable while the device is
updating.
•
While updating the device, do not connect other media devices to the computer.
Doing so may interfere with the update process. Before updating, disconnect all
other media devices from the computer.
Backing up and restoring data
Keep your personal information, app data, and settings safe on your device. You can back up
your sensitive information and access it later. You must sign in to your Google or Samsung
account to back up or restore data. Refer to Samsung account and Accounts for more
information.
Using a Samsung account
On the Apps screen, tap
Settings
→
Cloud and accounts
→
Backup
→
Back up my data
for the Samsung account, tap the switches next to the items you want to back up to activate
them, and then tap
BACK UP NOW
.
Data will be backed up to Samsung Cloud. Refer to Samsung Cloud for more information.
To set the device to automatically back up data, tap the
Auto back up
switch to activate it.
To restore data using a Samsung account, tap
Restore
. Current data will be deleted from the
device to restore the selected items.
Page 70

Basics
70
Using a Google account
On the Apps screen, tap
Settings
→
Cloud and accounts
→
Backup
and tap the
Back up my
data
switch for the Google account to activate it. Tap
Backup account
and select an account
as the backup account. To add the backup account, tap
Add account
.
To restore data using a Google account, tap the
Automatic restore
switch to activate it. When
you reinstall apps, backed up settings and data will be restored.
Performing a data reset
Delete all settings and data on the device. Before performing a factory data reset, ensure you
back up all important data stored on the device. Refer to Backing up and restoring data for
more information.
On the Apps screen, tap
Settings
→
General management
→
Reset
→
Factory data reset
→
RESET DEVICE
→
DELETE ALL
. The device automatically restarts.
Quick connect
Introduction
Quickly search for and connect with nearby devices, such as Bluetooth headsets or TVs, using
the Quick connect feature.
•
If the device you want to connect does not support the Quick connect feature,
activate its Wi-Fi Direct or Bluetooth feature before launching Quick connect on
your device.
•
Connection methods may vary depending on the type of connected devices or the
shared content.
Page 71

Basics
71
Connecting to other devices
1
Open the notification panel, swipe downwards on the notification panel, and then tap
Search phone and scan for nearby devices
.
2
Tap
REFRESH
.
The Wi-Fi and Bluetooth features will be activated and the device will automatically
search for nearby devices.
3
Select a device from the list and connect to it by following the on-screen instructions.
The next steps may vary depending on the connected device.
Sharing content
Share content with the connected devices.
1
Open the notification panel, swipe downwards on the notification panel, and then tap
Search phone and scan for nearby devices
.
2
Tap
REFRESH
.
3
Select a device from the list of detected devices.
4
Tap
Transfer files
and select a media category.
5
Follow the on-screen instructions to send content to the connected device.
The next steps may vary depending on the selected media category.
Connecting to a TV
Connect your device and a TV to view the device’s content on the larger screen. You may be
able to use more features depending on the connected TV.
1
Turn on the TV and place your device close to the TV.
2
Open the notification panel, swipe downwards on the notification panel, and then tap
Search phone and scan for nearby devices
.
Page 72
Basics
72
3
Select the TV.
The list of features you can use with the TV appears.
4
Select a feature and follow the on-screen instructions to use the feature.
Available features may vary depending on the TV.
•
Smart View
: View your device’s content on the TV screen. You may need to activate
the Screen Mirroring feature on the TV depending on the TV you want to connect. If
the TV does not support the Screen Mirroring feature, use compatible accessories to
enable the feature. Compatible accessories include HomeSync and an AllShare Cast
dongle.
•
TV to mobile device
: Watch TV on your device’s screen. You can continue watching TV
within the allowed connection range.
•
Control TV
: Use your device as a remote control for the TV.
•
TV sound to mobile device
: Listen to the sound via the device’s speaker while
watching the TV. You can connect a headset to the device so that others do not hear
the TV sound.
This feature may not be available depending on the region or service provider.
•
Register TV
/
Deregister TV
: Register the TV to your device to use additional features,
such as
Control TV
.
•
Some files may be buffered during playback, depending on the connection.
•
If the TV does not support High-bandwidth Digital Content Protection (HDCP), you
cannot view Digital Rights Management (DRM)-protected content on the TV.
Streaming content on the registered TV
If you register a TV to your device, you can more easily connect to the TV while playing
content.
When your device recognises the registered TV while you are watching content, the
icon
will appear on the device. Tap the icon to stream the content from your device to your TV.
•
This feature is supported only by the device’s default gallery app.
•
When the registered TV is connected to an electric socket, you can use this feature
even if the TV screen is turned off.
Page 73

Basics
73
Sharing features
Share content by using various sharing options. The following actions are an example of
sharing images.
You may incur additional charges when sharing files via the mobile network.
1
Tap
Gallery
on the Apps screen.
2
Select an image.
3
Tap
Share
and select a sharing method, such as Bluetooth and email.
You can also use the following options:
•
Link sharing
: Upload content to the Samsung storage server and share the link and
the access code with others, even if they are not saved in your contacts list. To use this
feature, your phone number must be verified.
•
Transfer files to device
: Share content with nearby devices via Wi-Fi Direct or
Bluetooth. The visibility settings must be activated on the devices.
•
View content on TV (Smart View)
: View your device’s displayed content on a larger
screen via a wireless connection.
When you have a communication or sharing history, the people you contacted will
appear on the sharing options panel. To directly share content with them via the
corresponding app, select a person’s icon. If the feature is not activated, open the
Apps screen, tap
Settings
→
Advanced features
, and then tap the
Direct share
switch to activate it.
4
Follow the on-screen instructions to share the image with others.
When the image is sent to the recipients’ devices, a notification will appear on their devices.
Tap the notification to view or download the image.
Page 74
Basics
74
Emergency mode
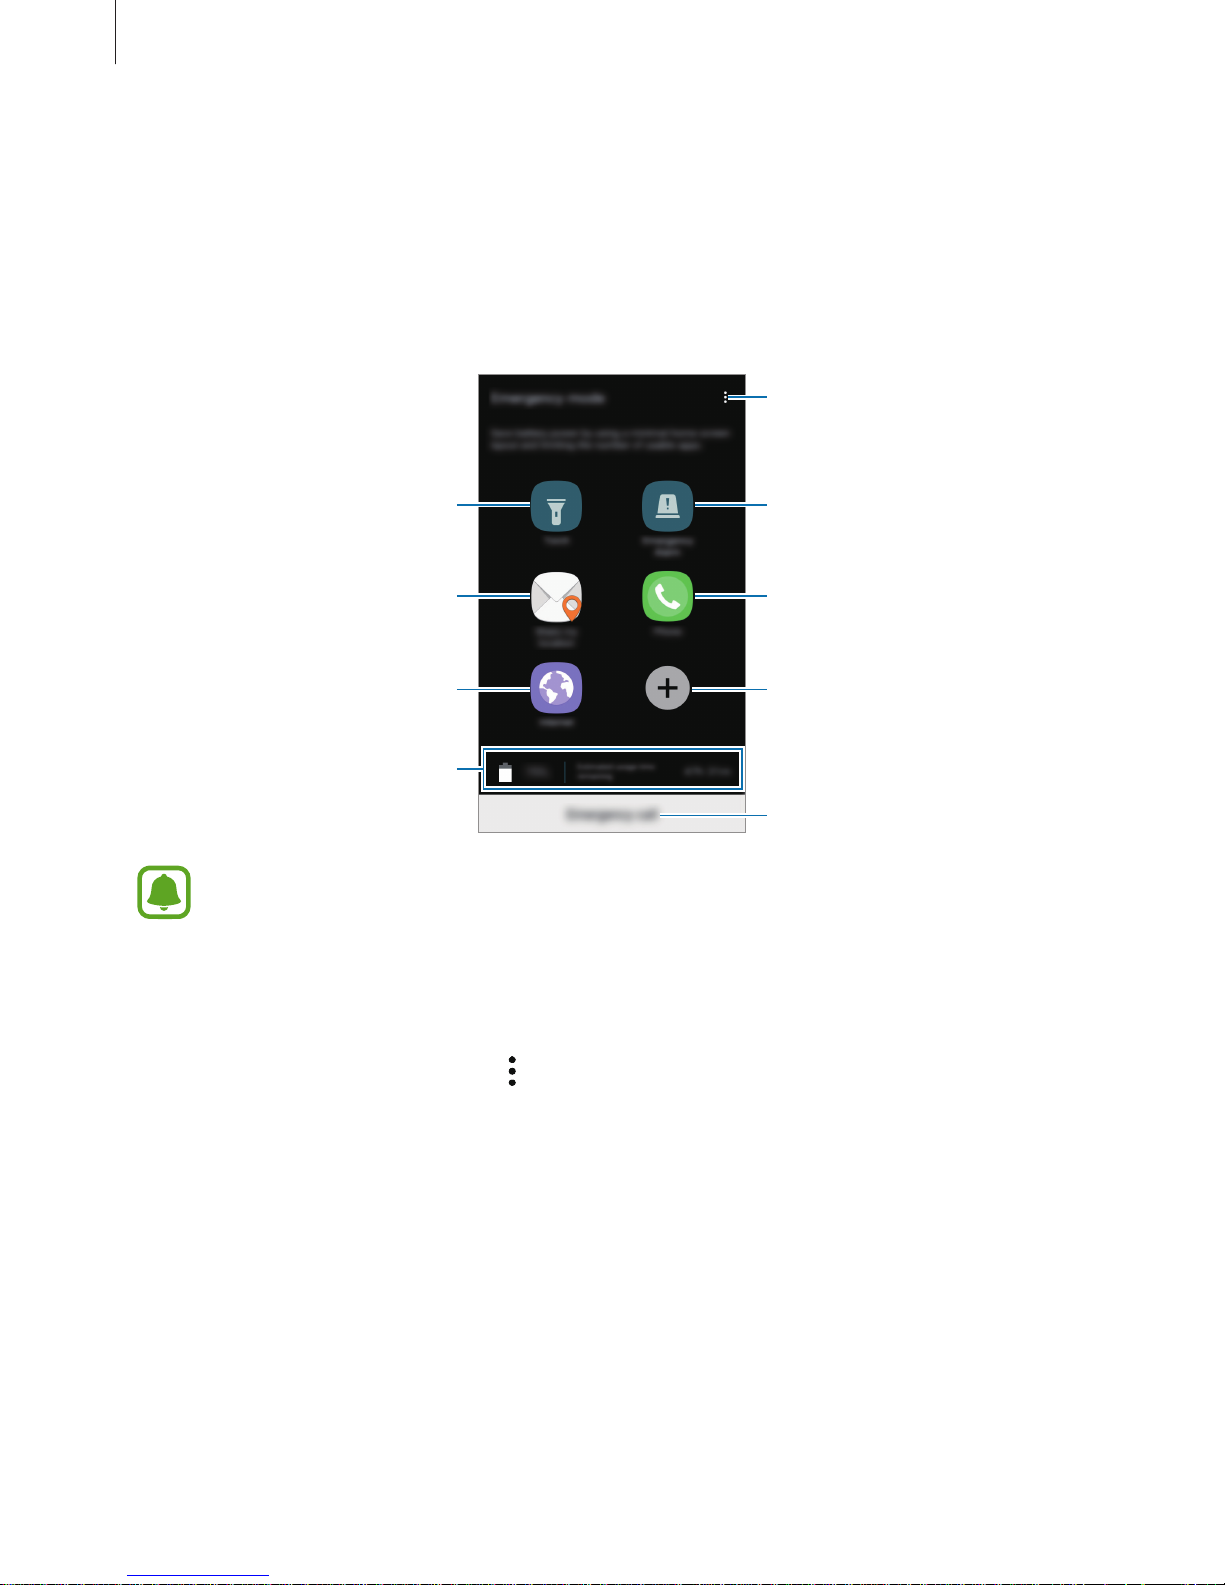
Emergency mode changes the screen to grey tones to reduce battery consumption. Some
apps and functions will be restricted. In emergency mode, you can make an emergency call,
send your current location information to others, sound an emergency alarm, and more.
Press and hold the Power key, and then tap
Emergency mode
.
Add more apps to use.
Make an emergency call.
Remaining battery power and
usage time left
Turn on the flash.
Make a call.Send your current location
information in a message.
Browse the Internet.
Access additional options.
Sound alarms.
The usage time left shows the time remaining before the battery power runs
out. Usage time left may vary depending on your device settings and operating
conditions.
Deactivating emergency mode
To deactivate emergency mode, tap
→
Disable Emergency mode
. Alternatively, press and
hold the Power key, and then tap
Emergency mode
.
Page 75
75
Applications
Installing or uninstalling apps
Galaxy Apps
Purchase and download apps. You can download apps that are specialised for Samsung
Galaxy devices.
Tap
Galaxy Apps
on the Apps screen.
This app may not be available depending on the region or service provider.
Installing apps
Browse apps by category or tap the search field to search for a keyword.
Select an app to view information about it. To download free apps, tap
INSTALL
. To purchase
and download apps where charges apply, tap the price and follow the on-screen instructions.
To change the auto update settings, tap →
Settings
→
Auto update apps
, and
then select an option.
Play Store
Purchase and download apps.
Tap
Play Store
on the Apps screen.
Installing apps
Browse apps by category or search for apps by keyword.
Select an app to view information about it. To download free apps, tap
INSTALL
. To purchase
and download apps where charges apply, tap the price and follow the on-screen instructions.
To change the auto update settings, tap →
Settings
→
Auto-update apps
, and
then select an option.
Page 76
Applications
76
Managing apps
Uninstalling or disabling apps
On the Apps screen, tap →
Edit
. The icon appears on the apps that you can disable
or uninstall. Select an app and tap
DISABLE
or OK. Alternatively, on the Apps screen, tap
Settings
→
Applications
, select an app, and then tap
DISABLE
or
UNINSTALL
.
•
DISABLE
: Disable selected default apps that cannot be uninstalled from the device.
•
UNINSTALL
: Uninstall downloaded apps.
Enabling apps
On the Apps screen, tap
Settings
→
Applications
→ →
Disabled
, select an app, and
then tap
ENABLE
.
Setting app permissions
For some apps to operate properly, they may need permission to access or use information
on your device. When you open an app, a pop-up window may appear and request access to
certain features or information. Tap
ALLOW
on the pop-up window to grant permissions to
the app.
To view your app permission settings, open the Apps screen and tap
Settings
→
Applications
. Select an app and tap
Permissions
. You can view the app’s permissions list and
change its permissions.
To view or change app permission settings by permission category, open the Apps screen,
tap
Settings
→
Applications
→ →
App permissions
. Select an item and tap the switches
next to apps to grant permissions.
If you do not grant permissions to apps, the basic features of the apps may not
function properly.
Page 77
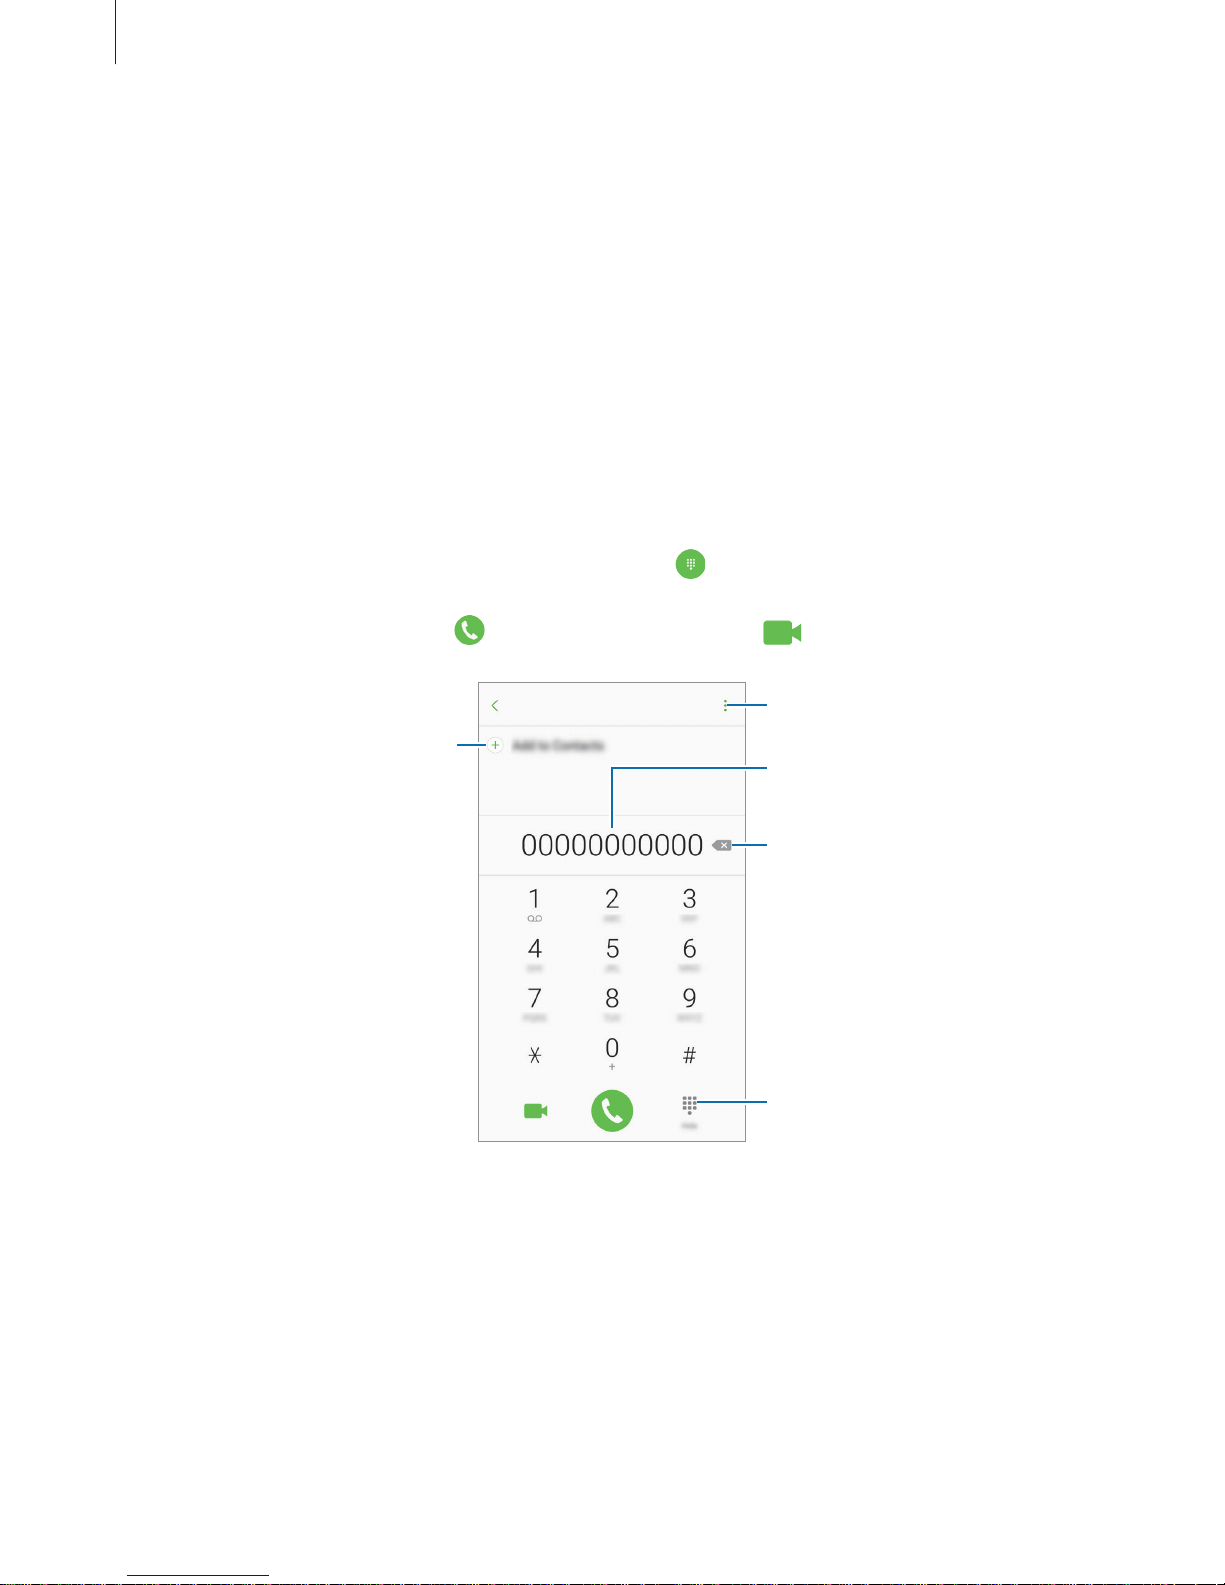
Applications
77
Phone
Introduction
Make or answer voice and video calls.
Making calls
1
Tap
Phone
on the Apps screen.
2
Enter a phone number.
If the keypad does not appear on the screen, tap
to open the keypad.
3
►
Single SIM models: Tap to make a voice call, or tap to make a video call.
Add the number to the contacts
list.
Preview the phone number.
Hide the keypad.
Delete a preceding character.
Access additional options.
Page 78
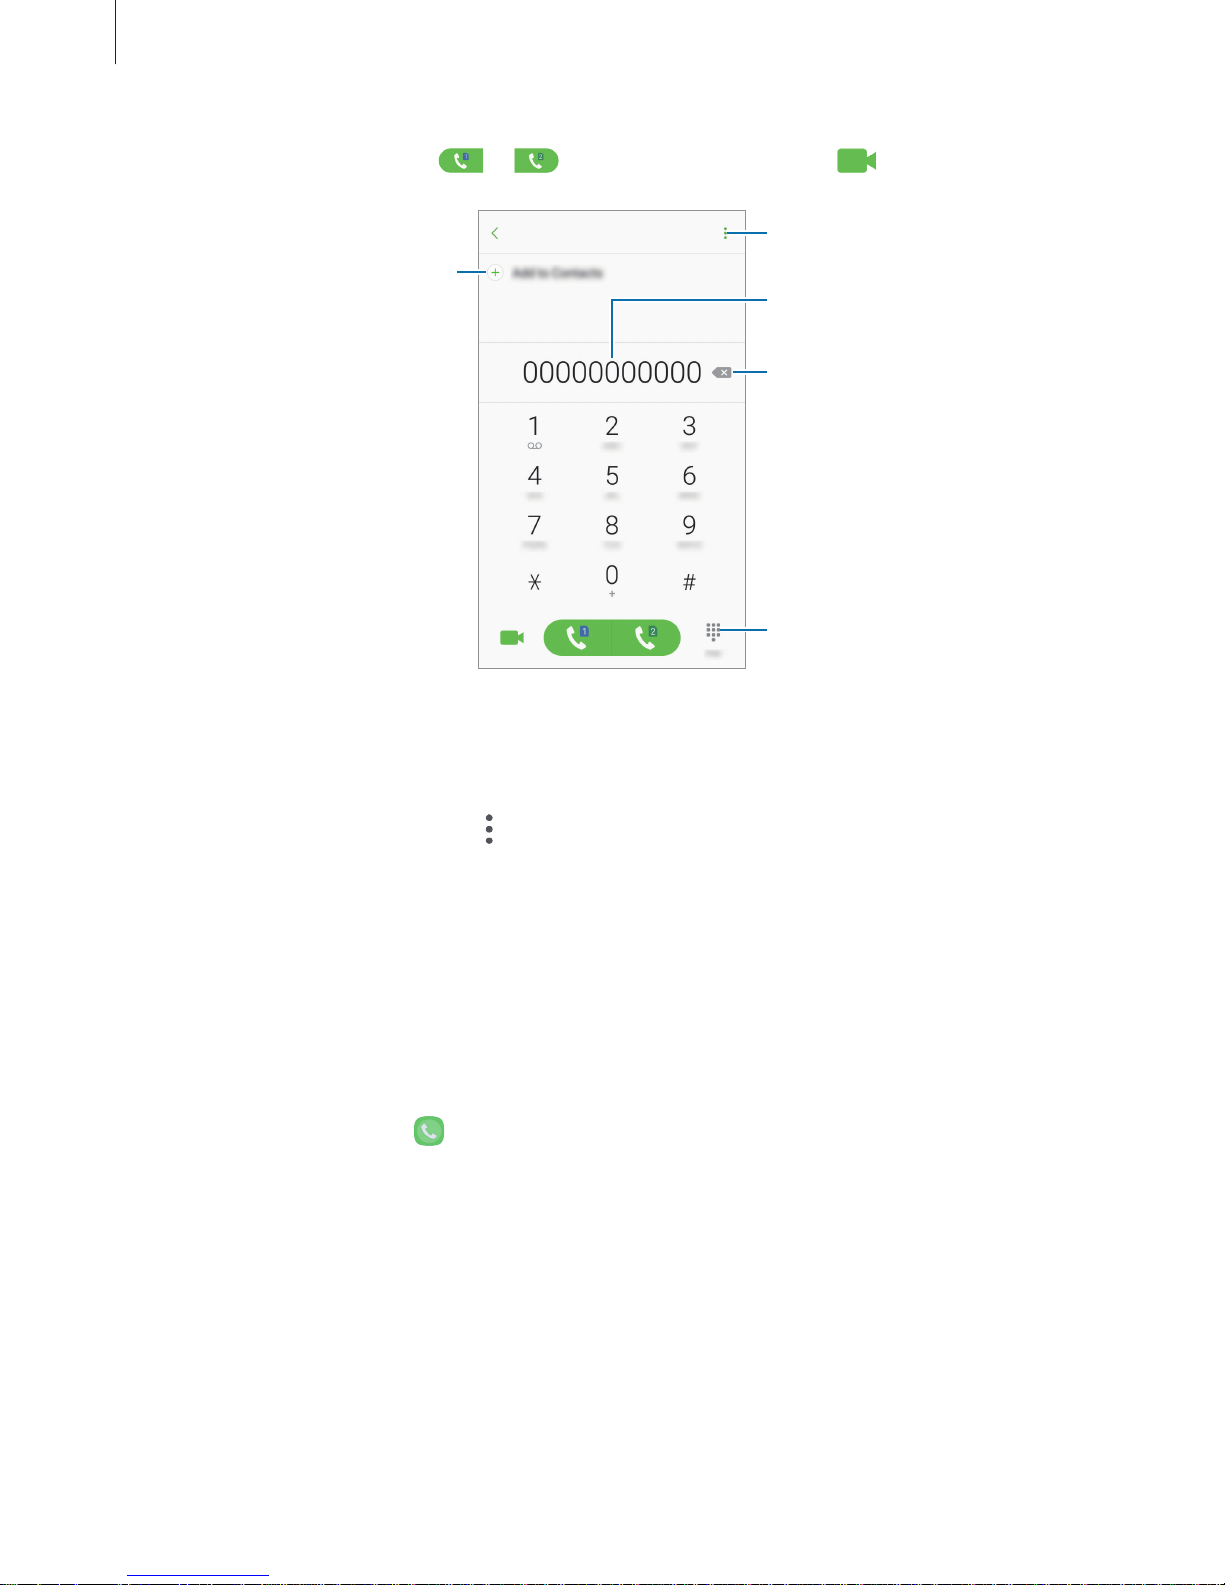
Applications
78
►
Dual SIM models: Tap or to make a voice call, or tap to make a video call.
Add the number to the contacts
list.
Preview the phone number.
Hide the keypad.
Delete a preceding character.
Access additional options.
Using speed dial
Set speed dial numbers to quickly make calls.
To set a number to speed dial, tap
→
Speed dial
, select a speed dial number, and then
select a contact.
To make a call, tap and hold a speed dial number on the keypad. For speed dial numbers 10
and up, tap the first digit(s) of the number, and then tap and hold the last digit.
For example, if you set the number 123 as a speed dial number, tap 1, tap 2, and then tap and
hold 3.
Making calls from the locked screen
On the locked screen, drag outside the large circle.
Making calls from call logs or contacts list
Tap
RECENTS
or
CONTACTS
, and then swipe to the right on a contact or a phone number to
make a call.
Page 79
Applications
79
Making an international call
1
Tap to open the keypad if the keypad does not appear on the screen.
2
Tap and hold 0 until the + sign appears.
3
►
Single SIM models: Enter the country code, area code, and phone number, and then
tap
.
►
Dual SIM models: Enter the country code, area code, and phone number, and then
tap
or .
Receiving calls
Answering a call
When a call comes in, drag outside the large circle.
Rejecting a call
When a call comes in, drag outside the large circle.
To send a message when rejecting an incoming call, drag the rejection message bar upwards.
To create various rejection messages, open the Apps screen, tap
Phone
→
→
Settings
→
Quick decline messages
, enter a message, and then tap
.
Missed calls
If a call is missed, the icon appears on the status bar. Open the notification panel to view
the list of missed calls. Alternatively, on the Apps screen, tap
Phone
→
RECENTS
to view
missed calls.
Page 80
Applications
80
Blocking phone numbers
Block calls from specific numbers added to your block list.
1
On the Apps screen, tap
Phone
→ →
Settings
→
Block numbers
.
2
Tap to select contacts and tap
DONE
.
To manually enter a number, tap
Enter phone number.
, enter a phone number, and then
tap
.
When blocked numbers try to contact you, you will not receive notifications. The calls will be
logged in the call log.
You can also block incoming calls from people that do not show their caller ID. Tap the
Block anonymous calls
switch to activate the feature.
Options during calls
During a voice call
The following actions are available:
•
: Access additional options.
•
Add call
: Dial a second call.
•
Extra volume
: Increase the volume.
•
Bluetooth
: Switch to a Bluetooth headset if it is connected to the device.
•
Speaker
: Activate or deactivate the speakerphone. When using the speakerphone, speak
into the microphone at the top of the device and keep the device away from your ears.
•
Keypad
/
Hide
: Open or close the keypad.
•
Mute
: Turn off the microphone so that the other party cannot hear you.
•
: End the current call.
During a video call
Tap the screen to use the following options:
•
: Access additional options.
•
Switch
: Switch between the front and rear cameras.
•
: End the current call.
•
Mute
: Turn off the microphone so that the other party cannot hear you.
Page 81
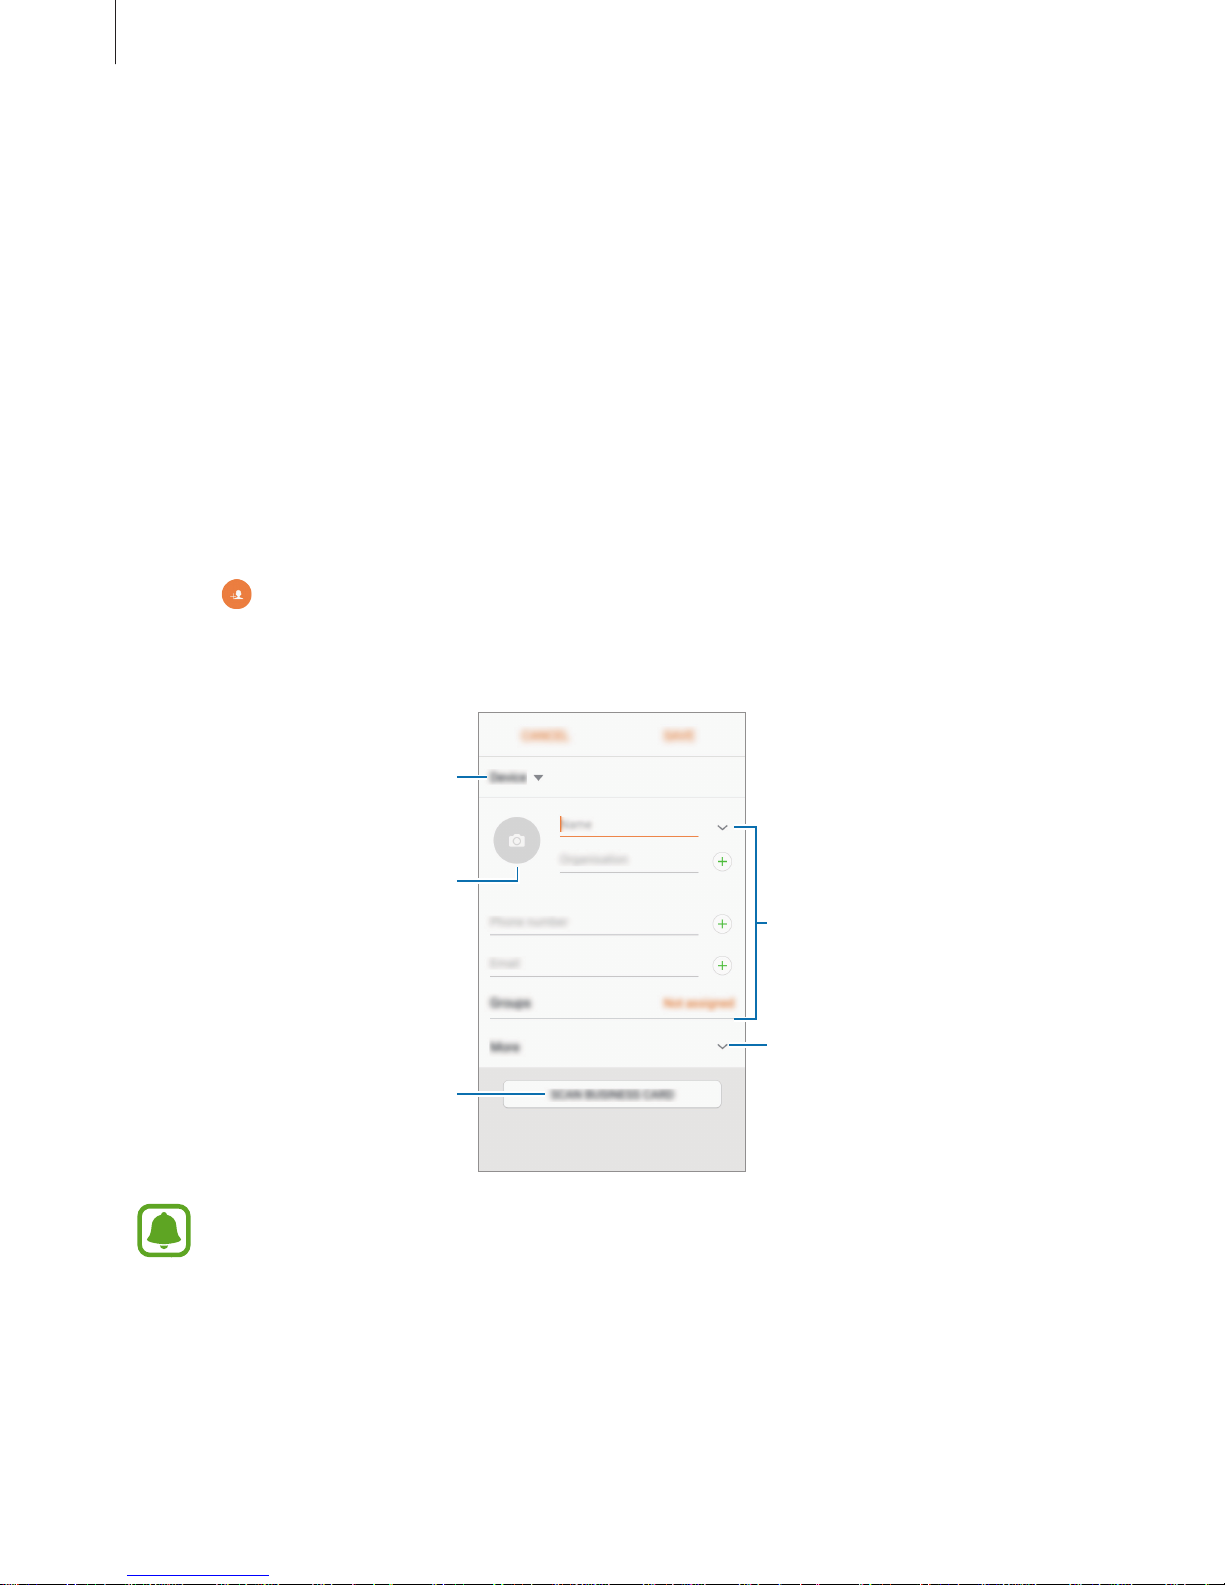
Applications
81
Contacts
Introduction
Create new contacts or manage contacts on the device.
Adding contacts
Creating a new contact
1
Tap
Contacts
on the Apps screen.
2
Tap and select a storage location.
3
Enter contact information.
Select a storage location.
Add an image.
Open more information fields.
Scan contact information from a
business card.
Enter contact information.
Depending on the selected storage location, the types of information you can save
may vary.
4
Tap
SAVE
.
Page 82

Applications
82
Adding a phone number to Contacts from the keypad
1
Tap
Phone
on the Apps screen.
2
Enter the number and tap
Add to Contacts
.
If the keypad does not appear on the screen, tap
to open the keypad.
3
Tap
Create contact
to create a new contact, or tap
Update existing
to add the number to
an existing contact.
Adding a phone number to Contacts from the calls list
1
On the Apps screen, tap
Phone
→
RECENTS
.
2
Tap a caller’s image, or tap a phone number →
Details
.
3
Tap
CREATE CONTACT
to create a new contact, or tap
UPDATE EXISTING
to add the
number to an existing contact.
Importing contacts
Add contacts by importing them from other storages to your device.
1
Tap
Contacts
on the Apps screen.
2
Tap →
Settings
→
Import/export contacts
→
IMPORT
.
3
Select a storage location to import contacts from.
4
Select a storage location to save contacts to.
5
Tick VCF files or contacts to import and tap
DONE
.
Page 83
Applications
83
Syncing contacts with your web accounts
Sync your device contacts with online contacts saved in your web accounts, such as your
Samsung account.
On the Apps screen, tap
Settings
→
Cloud and accounts
→
Accounts
, select an account
name, select the account to sync with, and then tap the
Sync Contacts
switch to activate it.
Searching for contacts
On the Apps screen, tap
Contacts
.
Use one of the following search methods:
•
Scroll up or down the contacts list.
•
Drag a finger along the index at the right side of the contacts list to scroll through it
quickly.
•
Tap the search field at the top of the contacts list and enter search criteria.
Tap the contact’s image, or tap the contact’s name
→
Details
. Then take one of the following
actions:
•
: Add to favourite contacts.
•
/ : Make a voice or video call.
•
: Compose a message.
•
: Compose an email.
Sharing profile
Share your profile information, such as your photo and status message, with others using the
profile sharing feature.
•
This feature may not be available depending on the region or service provider.
•
This feature is only available for contacts who have activated the profile sharing
feature on their device.
On the Apps screen, tap
Contacts
→ your profile →
Profile sharing
, and then tap the switch
to activate it. To use this feature, your phone number must be verified. You can view your
contacts’ updated profile information in
Contacts
.
To set additional items to share, tap
Shared profile info
and select items.
To set a contact group to share your profile with, tap
Share with
and select an option.
Page 84

Applications
84
Sharing contacts
You can share contacts with others by using various sharing options.
1
Tap
Contacts
on the Apps screen.
2
Tap →
Share
.
3
Tick contacts and tap
SHARE
.
4
Select a sharing method.
Messages
Introduction
Send and view messages by conversation.
Sending messages
You may incur additional charges for sending messages when you are roaming.
1
Tap
Messages
on the Apps screen.
2
Tap
.
3
Add recipients and tap
COMPOSE
.
Page 85
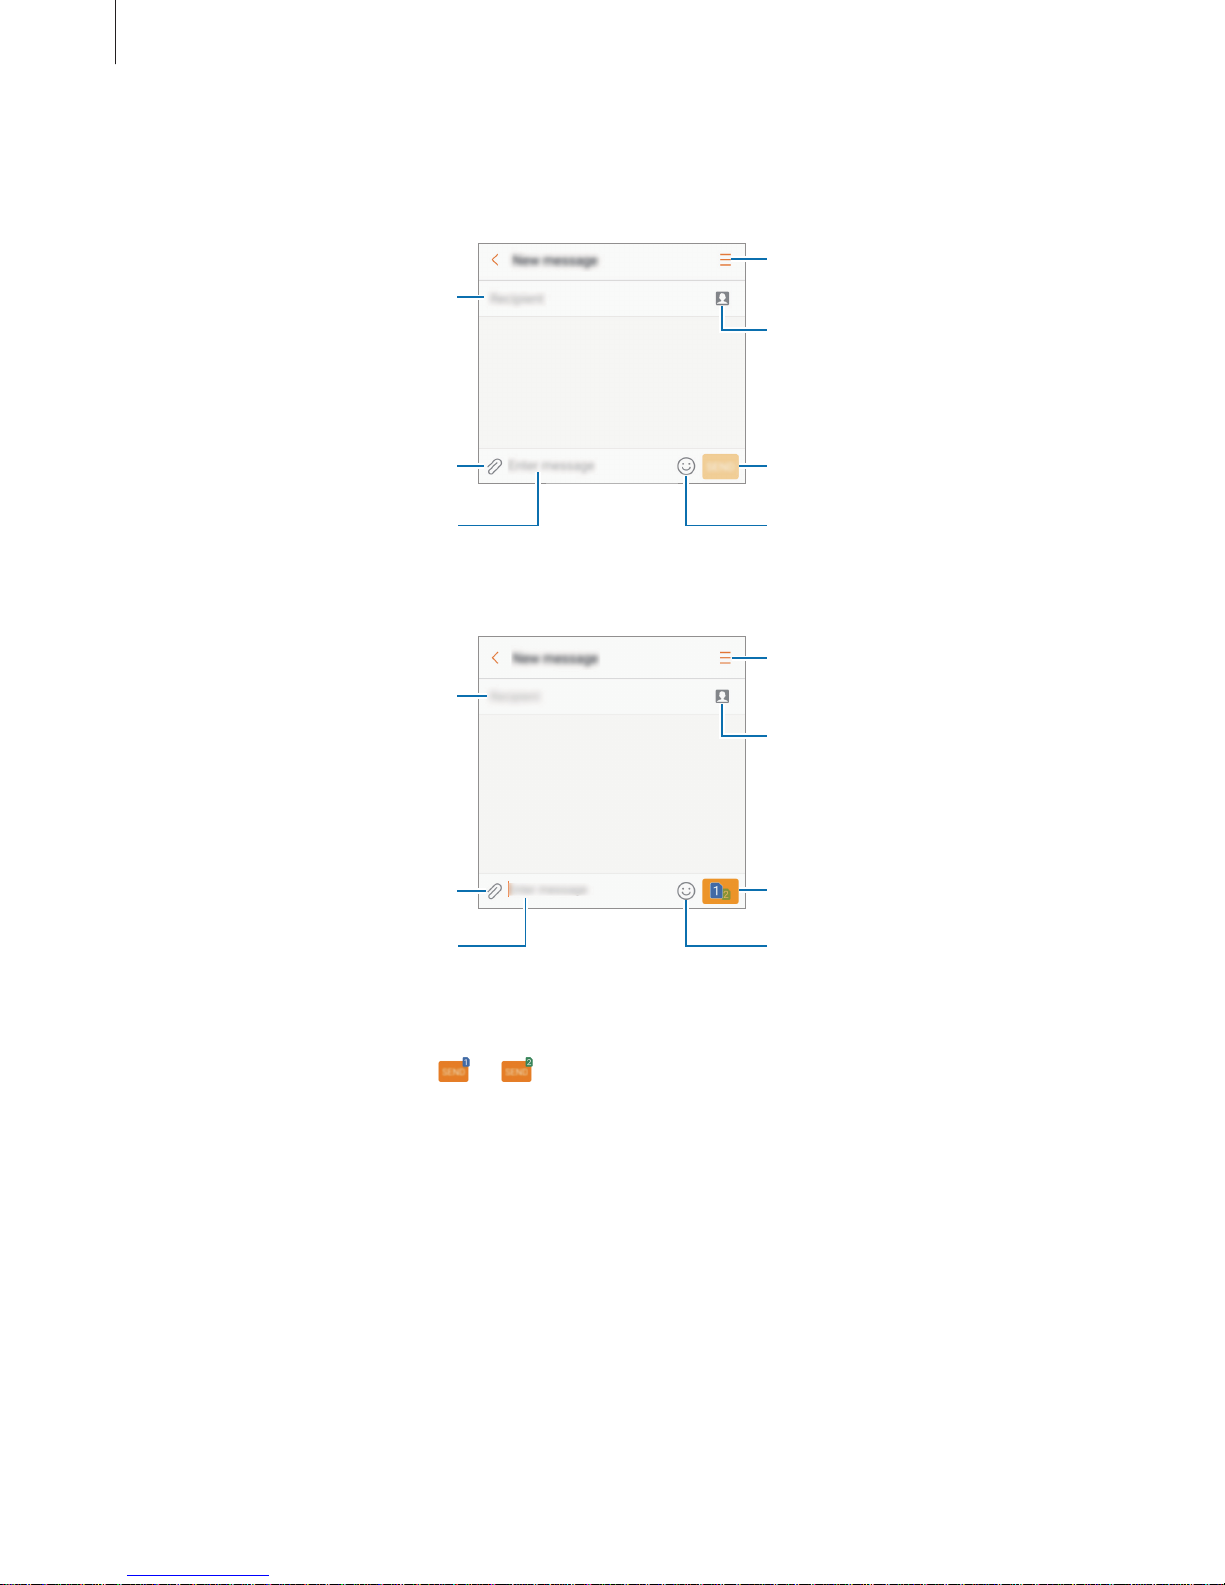
Applications
85
4
Enter a message.
►
Single SIM models:
Access additional options.
Enter a message.
Add recipients from the contacts
list.
Enter emoticons.
Attach files.
Edit recipients.
Send the message.
►
Dual SIM models:
Access additional options.
Enter a message.
Select contacts from the
contacts list.
Enter emoticons.
Enter recipients.
Attach files.
Send the message.
5
►
Single SIM models: Tap
SEND
to send the message.
►
Dual SIM models: Tap or to send the message.
Page 86

Applications
86
Viewing messages
Messages are grouped into message threads by contact.
You may incur additional charges for receiving messages when you are roaming.
1
Tap
Messages
on the Apps screen.
2
On the messages list, select a contact.
3
View your conversation.
►
Single SIM models: To reply to the message, enter a message and tap
SEND
.
►
Dual SIM models: To reply to the message, enter a message and tap or .
Blocking unwanted messages
Block messages from specific numbers added to your block list.
1
Tap
Messages
on the Apps screen.
2
Tap →
Settings
→
Block messages
→
Block numbers
.
3
Tap
INBOX
or
CONTACTS
to select contacts and tap .
To manually enter a number, tap
Enter number
, and then enter a phone number.
Setting the message notification
You can change notification sound, display options, and more.
1
Tap
Messages
on the Apps screen.
2
Tap →
Settings
→
Notifications
, and then tap the switch to activate it.
Page 87

Applications
87
3
Change the notification settings.
•
Notification sound
: Change the notification sound.
•
Vibrations
: Set the device to vibrate when you receive messages.
•
Pop-up display
: Set the device to display messages in pop-up windows.
•
Preview message
: Set the device to display message content on the locked screen
and in pop-up windows.
Setting a message reminder
You can set an alert at an interval to let you know that you have unchecked notifications.
If this feature is not activated, open the Apps screen, tap
Settings
→
Accessibility
→
Notification reminder
, and then tap the switch to activate it. Then, tap the
Messages
switch
to activate it.
Internet
Introduction
Browse the Internet to search for information and bookmark your favourite webpages to
access them conveniently.
Browsing webpages
1
Tap
Samsung
→
Internet
on the Apps screen.
2
Tap the address field.
3
Enter the web address or a keyword, and then tap Go.
Page 88
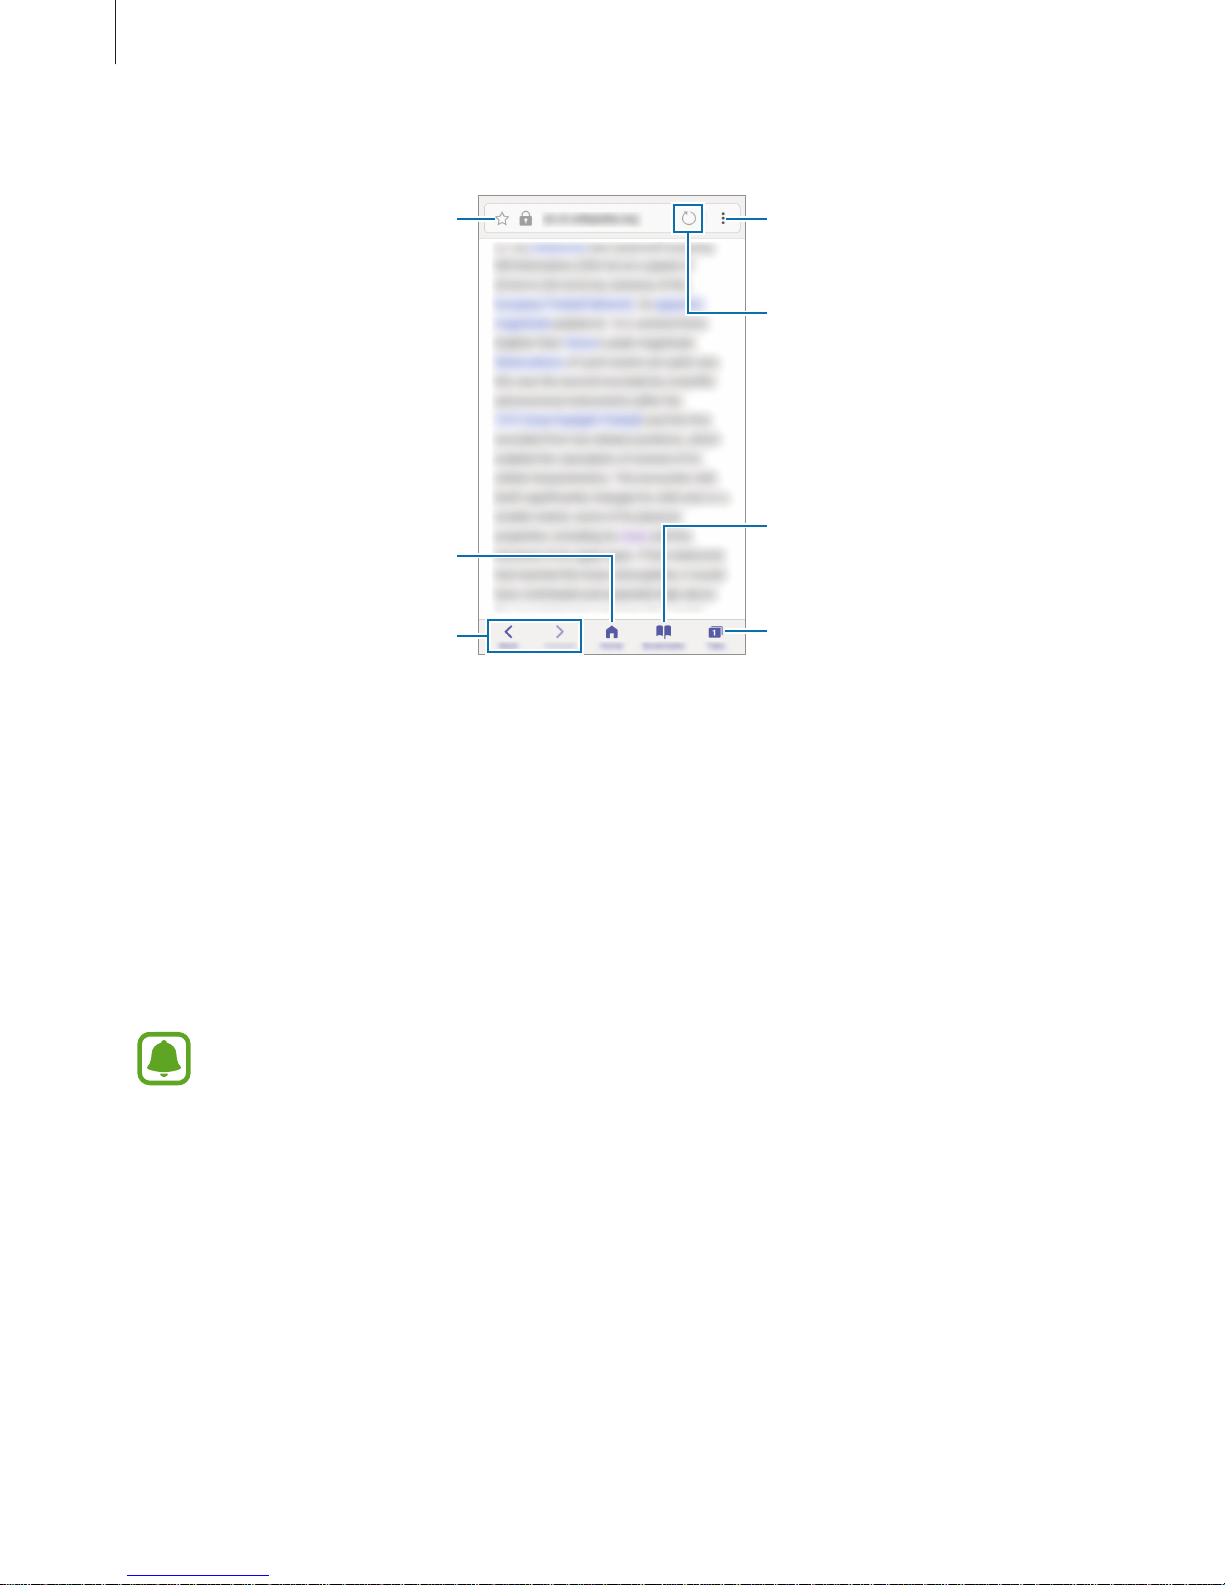
Applications
88
To view the toolbars, drag your finger downwards slightly on the screen.
Open the homepage.
Bookmark the current webpage.
Move to the previously visited
page.
Open the browser's tab
manager.
Access additional options.
Refresh the current webpage.
View your bookmarks, saved
webpages, and recent browsing
history.
Using secret mode
In secret mode, you can separately save and manage open tabs, bookmarks, and saved pages.
You can lock secret mode using a password and your fingerprint.
Activating secret mode
In the toolbar at the bottom of the screen, tap
Tabs
→
ENABLE SECRET
. If you are using this
feature for the first time, set whether to use a password for secret mode.
In secret mode, you cannot use some features, such as screen capture.
In secret mode, the device will change the colour of the toolbars.
Page 89

Applications
89
Changing security settings
You can change your password or the lock method.
Tap
→
Settings
→
Privacy
→
Secret mode security
→
Change password
. To set your
registered fingerprint as the lock method along with the password, tap the
Fingerprints
switch to activate it. Refer to Fingerprint recognition for more information about using your
fingerprints.
Deactivating secret mode
In the toolbar at the bottom of the screen, tap
Tabs
→
DISABLE SECRET
.
Email
Setting up email accounts
Set up an email account when opening
Email
for the first time.
1
Tap
Samsung
→
Email
on the Apps screen.
2
Enter the email address and password, and then tap
SIGN IN
.
To manually register an email account, tap
MANUAL SETUP
.
3
Follow the on-screen instructions to complete the setup.
To set up another email account, tap
→
Settings
→
Add account
.
If you have more than one email account, you can set one as the default account. Tap
→
Settings
→ →
Set default account
.
Sending emails
1
Tap to compose an email.
2
Add recipients and enter an email text.
3
Tap
SEND
to send the mail.
Page 90

Applications
90
Reading emails
When
Email
is open, the device will automatically retrieve new emails. To manually retrieve
emails, swipe downwards on the screen.
Tap an email on the screen to read it.
If email syncing is disabled, new emails cannot be retrieved. To enable email syncing,
tap
→
Settings
→ your account name, and then tap the
Sync account
switch to
activate it.
Camera
Introduction
Take photos and record videos using various modes and settings.
Camera etiquette
•
Do not take photos or record videos of other people without their permission.
•
Do not take photos or record videos where legally prohibited.
•
Do not take photos or record videos in places where you may violate other people’s
privacy.
Launching Camera
Use the following methods to launch
Camera
:
•
Tap
Camera
on the Apps screen.
•
Press the Home key twice quickly.
•
On the locked screen, drag outside the large circle.
•
Some methods may not be available depending on the region or service provider.
•
Some camera features are not available when you launch
Camera
from the locked
screen or when the screen is turned off while the security features are activated.
Page 91
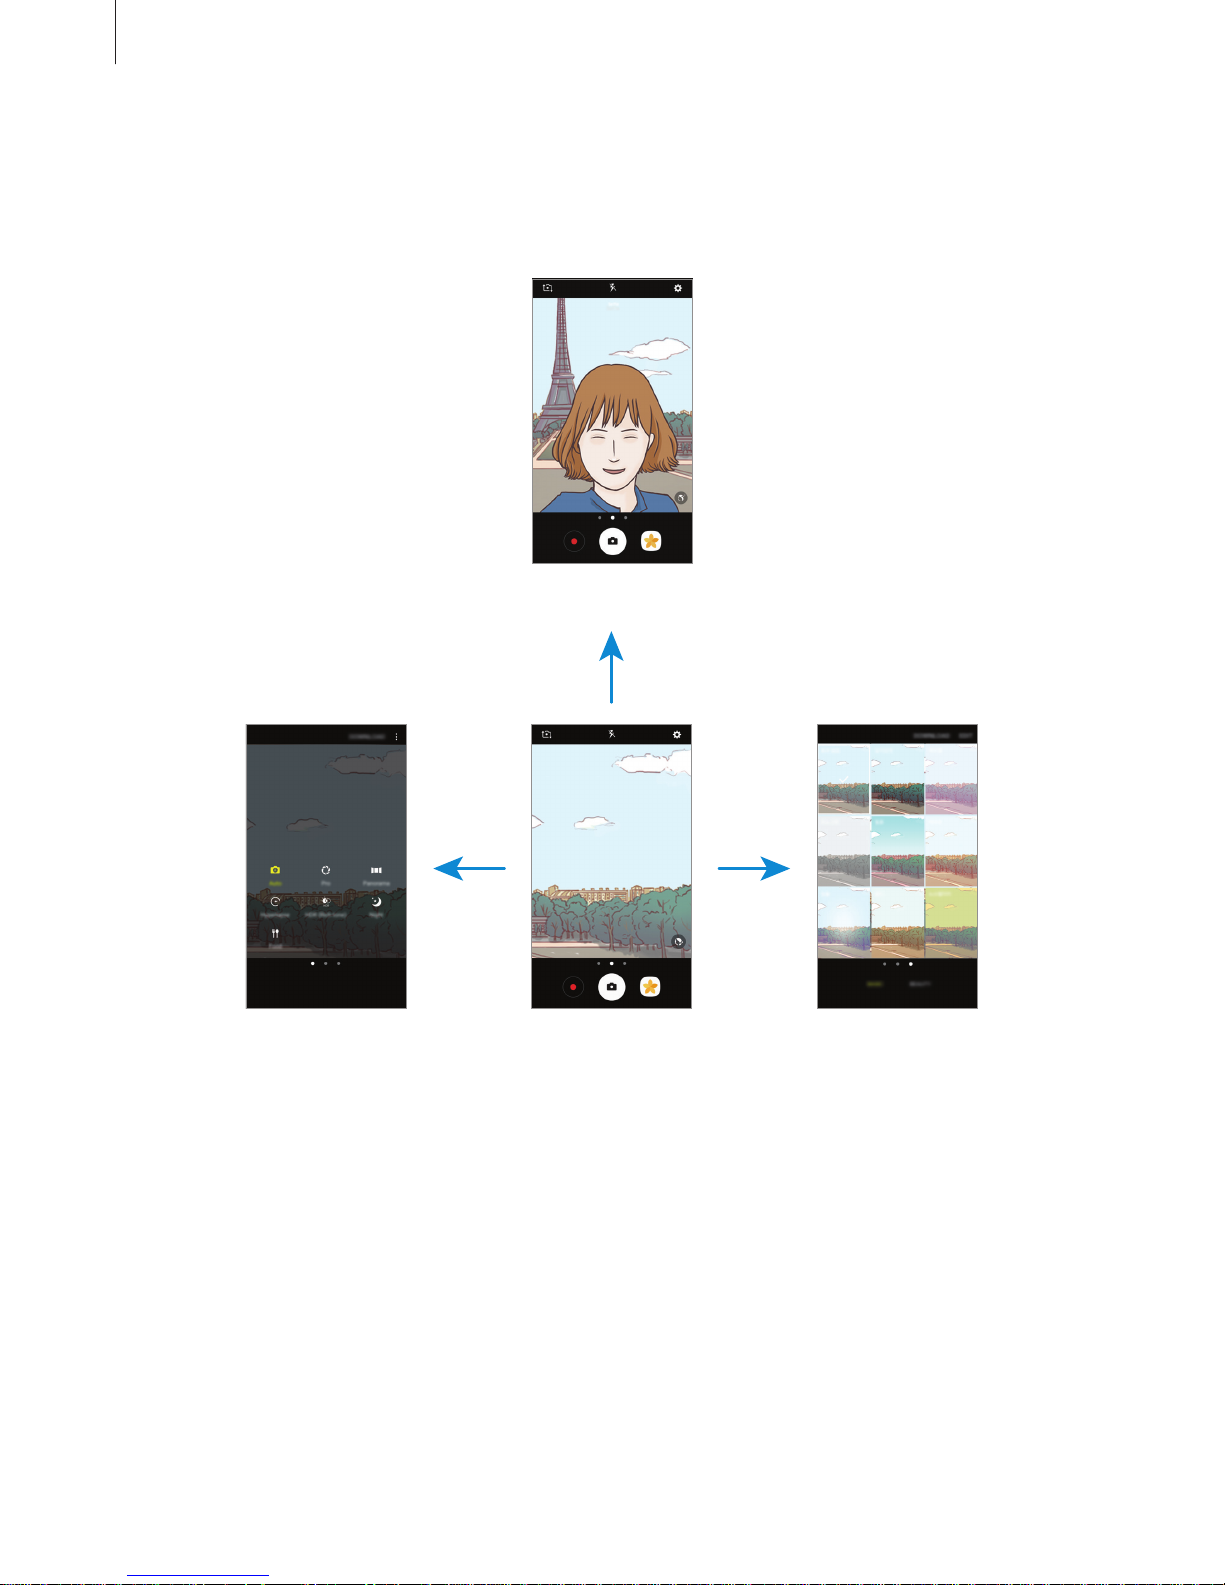
Applications
91
Using swipe gestures
Quickly control the preview screen by swiping in different directions. You can change the
shooting mode, switch between cameras, or apply filter effects.
Front camera preview
Rear camera previewShooting modes Filter effects
Switching cameras
On the preview screen, swipe upwards or downwards to switch between cameras.
Viewing shooting modes
On the preview screen, swipe from the left to the right to open the shooting modes list.
Page 92
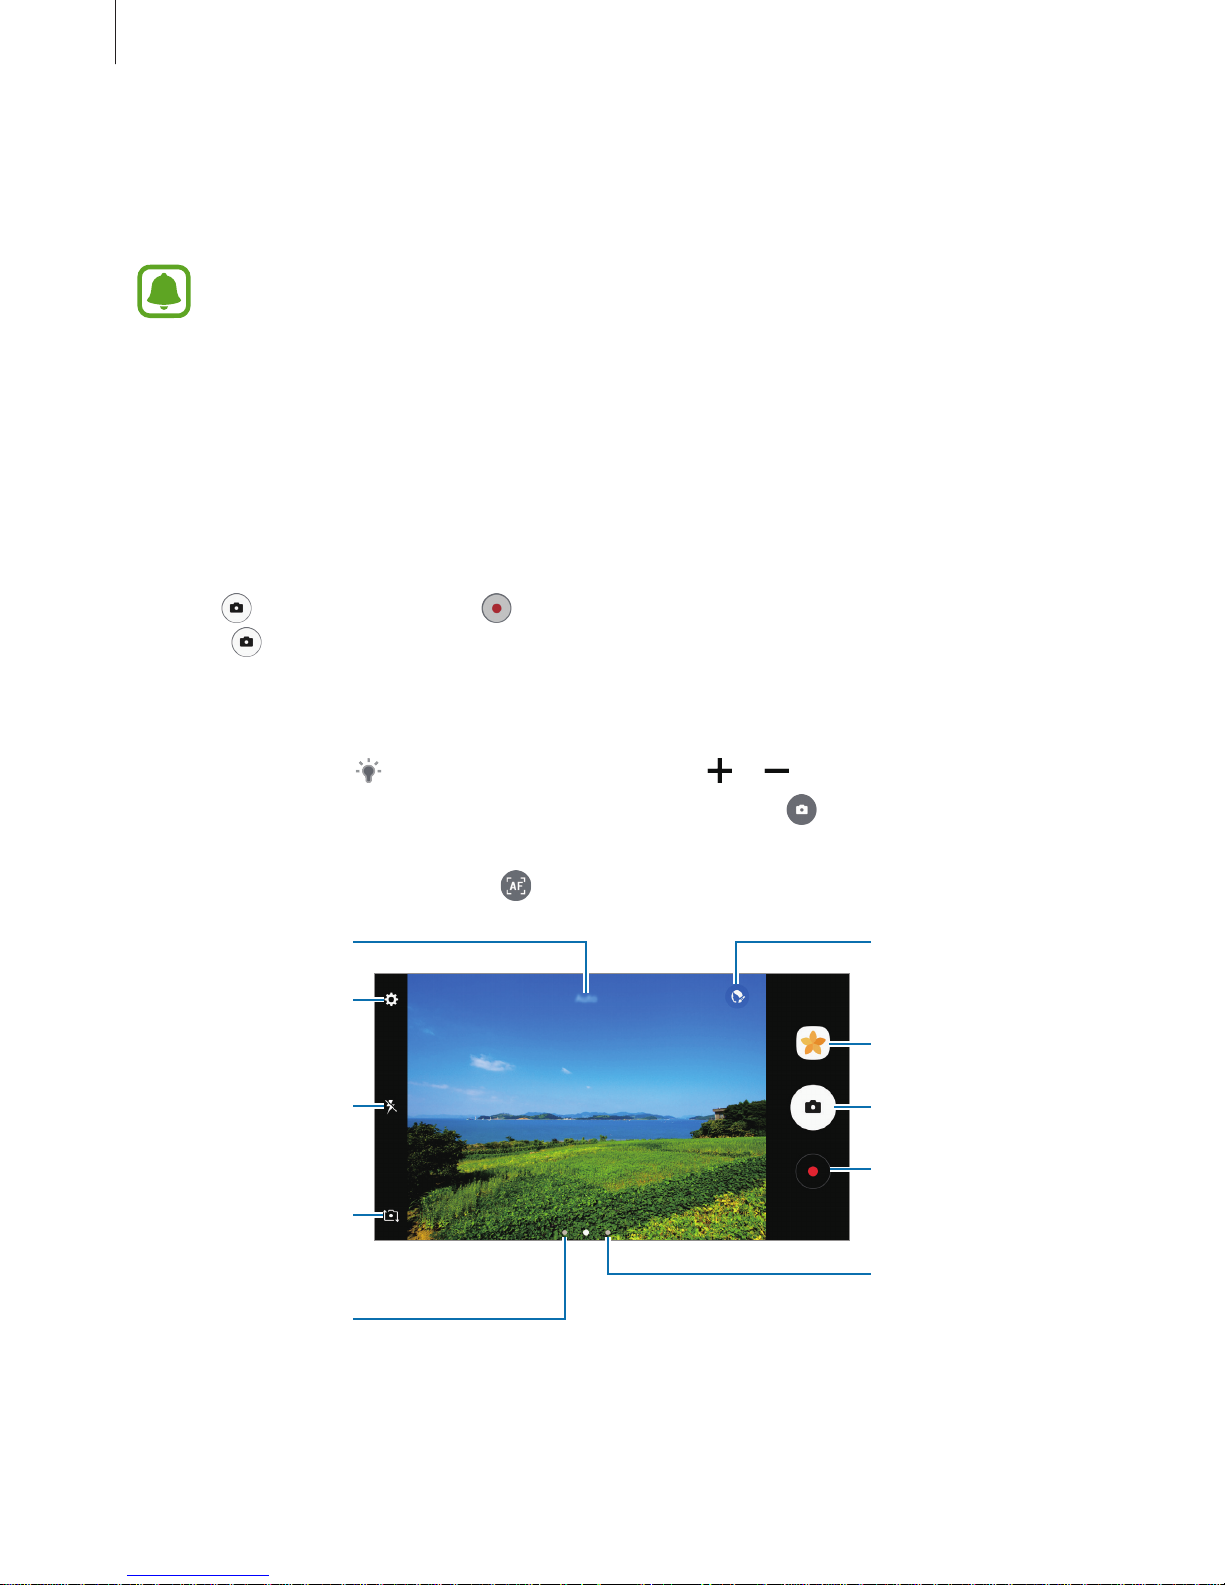
Applications
92
Viewing filter effects
One the preview screen, swipe from the right to the left to open the filter effects list. You can
apply a unique feel to your photos or videos.
This feature is only available in some shooting modes.
Basic shooting
Taking photos or recording videos
1
Tap the image on the preview screen where the camera should focus.
2
Tap to take a photo or tap to record a video. To take a series of photos, tap and
hold
.
•
Spread two fingers apart on the screen to zoom in, and pinch to zoom out.
•
To adjust the brightness of photos or videos, tap the screen. When the adjustment bar
appears, drag
on the adjustment bar towards or .
•
To capture an image from the video while recording, tap .
•
To change the focus while recording a video, tap where you want to focus. To focus on
the centre of the screen, tap
.
Camera settings
Switch between the
front and rear
cameras.
Change the flash
setting.
Record a video.
Take a photo.
Filter effects
Shooting modes
Preview thumbnail
Make faces appear
brighter and clearer.
Current mode
Page 93
Applications
93
•
The preview screen may vary depending on the shooting mode and which camera
is being used.
•
The camera automatically shuts off when unused.
•
Make sure that the lens is clean. Otherwise, the device may not work properly in
some modes that require high resolutions.
•
The front camera features a wide-angle lens. Minor distortion may occur in wideangle photos and does not indicate device performance problems.
Locking the focus and exposure
You can lock the focus or exposure on a selected area to prevent the camera from
automatically adjusting based on changes to the subjects or light sources.
Tap and hold the area to focus, the AF/AE frame will appear on the area and the focus and
exposure setting will be locked. The setting remains locked even after you take a photo.
This feature is only available in some shooting modes.
Customising shooting modes
On the preview screen, swipe to the right to open the shooting modes list and select a mode.
To view the description of each mode, tap
→
Info
.
To rearrange modes, tap
→
Edit
, tap and hold a mode icon, and then drag it to a new
location.
To add mode shortcuts to the Home screen, tap
→
Add shortcut on home screen
.
Page 94
Applications
94
Auto mode
Auto mode allows the camera to evaluate the surroundings and determine the ideal mode
for the photo.
On the shooting modes list, tap
Auto
.
Pro mode
Take photos while manually adjusting various shooting options, such as exposure value and
ISO value.
On the shooting modes list, tap
Pro
. Select options and customise the settings, and then tap
to take a photo.
•
: Select an appropriate white balance, so images have a true-to-life colour range. You
can set the colour temperature.
•
: Select an ISO value. This controls camera light sensitivity. Low values are for
stationary or brightly lit objects. Higher values are for fast-moving or poorly lit objects.
However, higher ISO settings can result in noise in photos.
•
: Change the exposure value. This determines how much light the camera’s sensor
receives. For low-light situations, use a higher exposure.
Panorama
Take a series of photos horizontally or vertically and then stitch them together to create a
wide scene.
On the shooting modes list, tap
Panorama
.
To get the best shots using panorama mode, follow these tips:
•
Move the camera slowly in one direction.
•
Keep the image within the frame on the camera’s viewfinder. If the preview
image is out of the guide frame or you do not move the device, the device will
automatically stop taking photos.
•
Avoid taking photos of indistinct backgrounds, such as an empty sky or a plain
wall.
Page 95
Applications
95
Hyperlapse
Record scenes, such as passing people or cars, and view them as fast-motion videos. The
frame rate is automatically adjusted to record smoother, less shaky fast-motion videos while
walking, travelling by vehicle, and more.
•
This feature may not be available depending on the region or service provider.
•
In this mode, auto focusing will not operate.
1
On the shooting modes list, tap
Hyperlapse
.
2
Tap and select a frame rate option.
If you set the frame rate to
Auto
, the device will automatically adjust the frame rate
according to the changing rate of the scene.
3
Tap to start recording.
4
Tap to finish recording.
5
On the preview screen, tap the preview thumbnail and tap to view the video.
Selfie
Take self-portraits with the front camera. You can preview various beauty effects on the
screen.
1
On the preview screen, swipe upwards or downwards, or tap to switch to the front
camera for self-portraits.
2
On the shooting modes list, tap
Selfie
.
3
Face the front camera lens.
4
When the device detects your face, show your palm to the front camera. After
recognising your palm, a countdown timer will appear. When the time is up, the device
will take a photo.
To use various shooting options for the front camera, tap →
Ways to take
pictures
, and then tap the switches to activate them.
Page 96
Applications
96
Applying beauty effects
You can modify facial features, such as your skin tone or face shape, before taking selfportraits.
This feature is available only in
Selfie
mode.
1
On the preview screen, tap .
2
Select the options below to apply beauty effects to your face on the preview screen and
take a photo of yourself.
•
Skin Tone
: Make your skin appear brighter and clearer.
•
Slim Face
: Adjust the face shape and make your face appear slimmer.
•
Large Eyes
: Make your eyes appear bigger.
Wide selfie
Take a wide self-portrait and include as many people in the photo as possible to avoid leaving
people out.
1
On the preview screen, swipe upwards or downwards, or tap to switch to the front
camera for self-portraits.
2
On the shooting modes list, tap
Wide selfie
.
3
Face the front camera lens.
4
When the device detects your face, show your palm to the front camera. After
recognising your palm, a countdown timer will appear. When the time is up, the device
will take a photo.
To use various shooting options for the front camera, tap →
Ways to take
pictures
, and then tap the switches to activate them.
Page 97
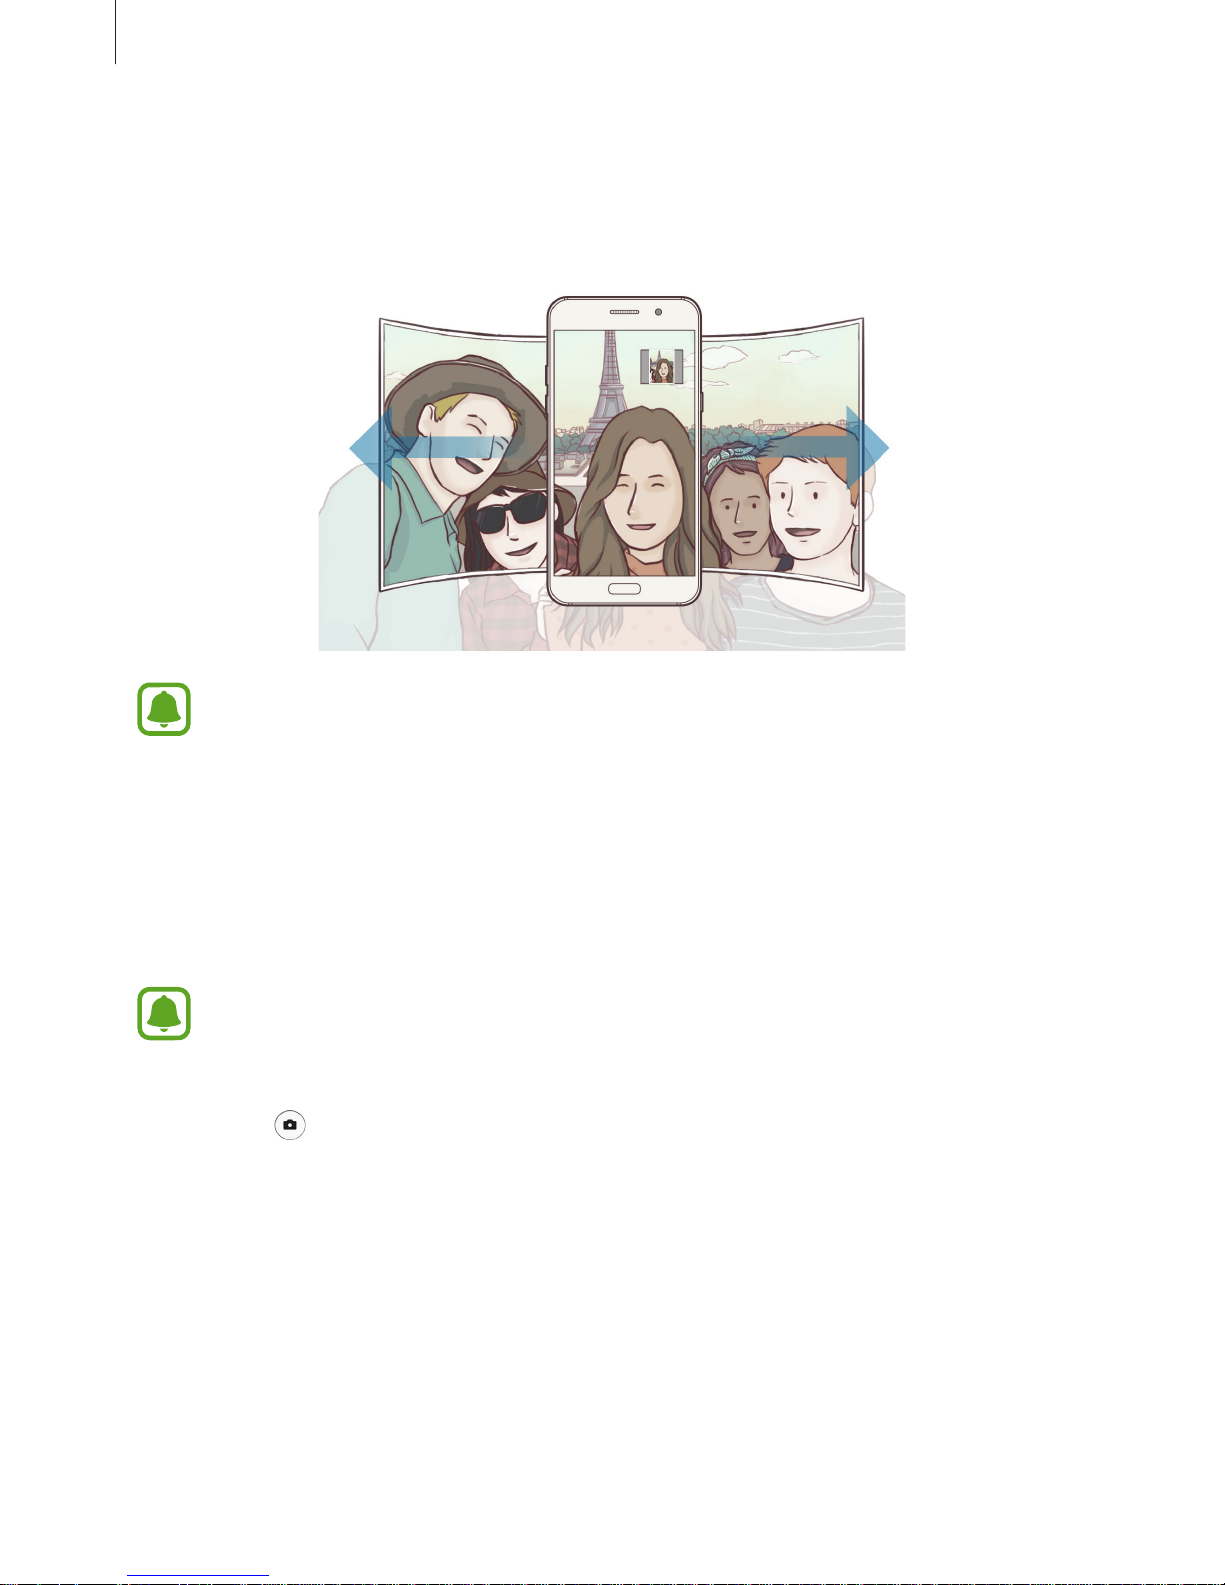
Applications
97
5
Slowly swivel the device left and then right or vice versa to take a wide self-portrait.
The device will take additional photos when the white frame moves to each end of the
viewfinder window.
•
Make sure to keep the white frame inside the viewfinder window.
•
The subjects should remain still while taking wide self-portraits.
•
The top and bottom parts of the image displayed on the preview screen may be
cut out of the photo depending on the shooting conditions.
Continuous shot
Take a series of photos of moving subjects.
This feature may not be available depending on the region or service provider.
On the shooting modes list, tap
Continuous shot
.
Tap and hold
to take several photos continuously.
Page 98
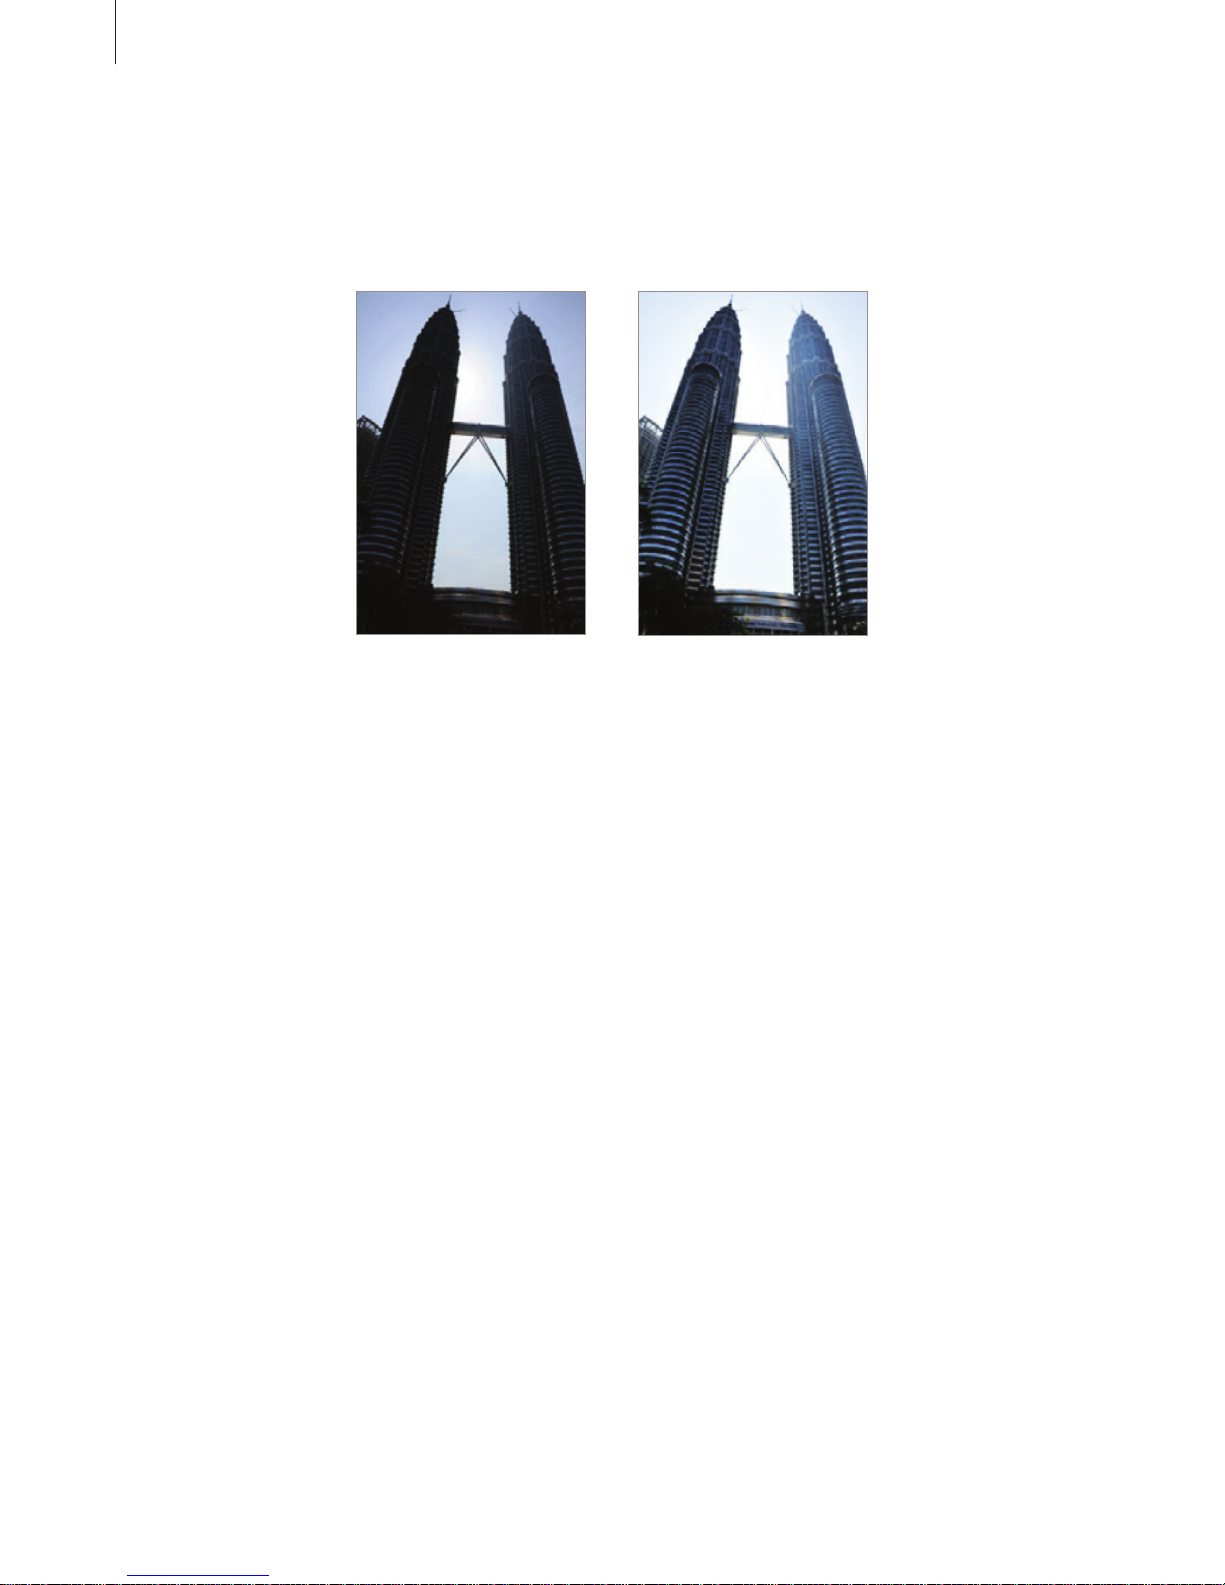
Applications
98
HDR (Rich tone)
Take photos with rich colours and reproduce details even in bright and dark areas.
On the shooting modes list, tap
HDR (Rich tone)
.
Without effect With effect
Night
Take a photo in low-light conditions, without using the flash.
On the shooting modes list, tap
Night
.
Page 99
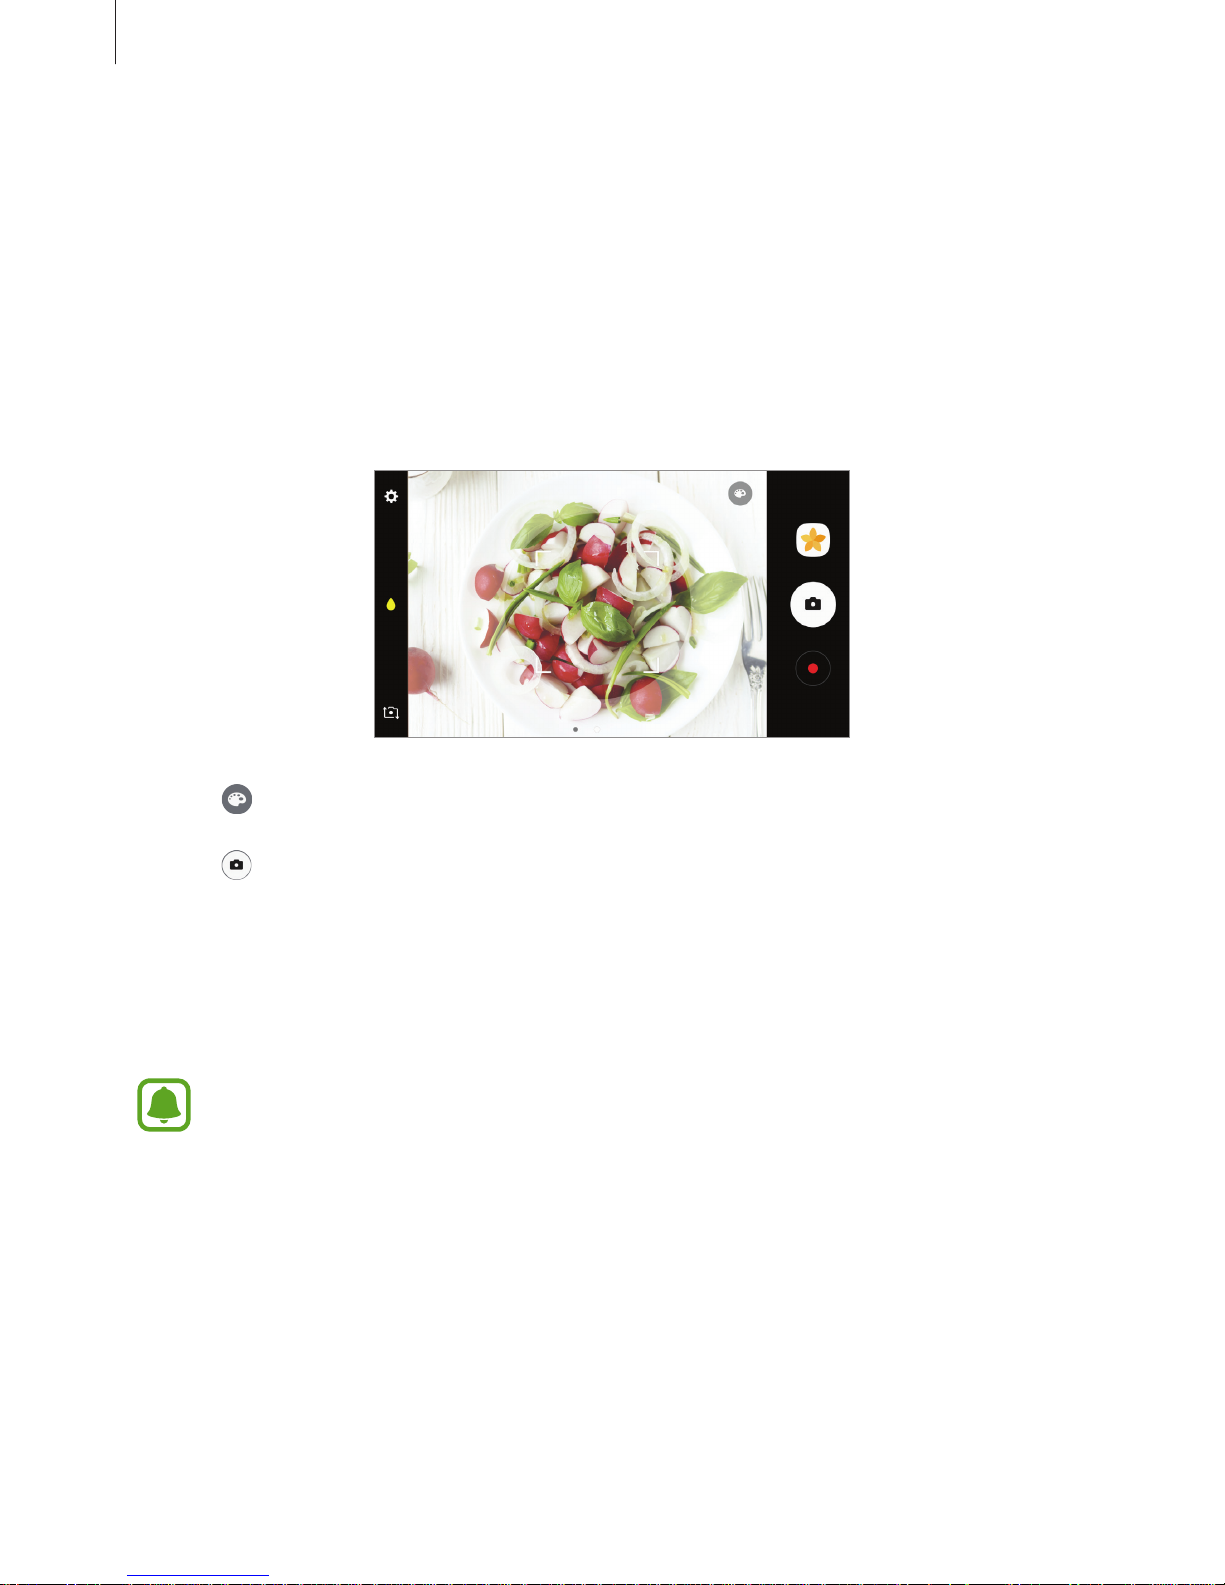
Applications
99
Food
Take photos of food with more vibrant colours.
1
On the shooting modes list, tap
Food
.
2
Tap the screen and drag the circular frame over the area to highlight.
The area outside the circular frame will be blurred.
To resize the circular frame, drag a corner of the frame.
3
Tap and drag the adjustment bar to adjust the colour tone.
4
Tap to take a photo.
Downloading modes
Download more shooting modes from
Galaxy Apps
.
On the shooting modes list, tap
DOWNLOAD
.
Some downloaded shooting modes do not have access to every feature.
Page 100
Applications
100
Camera settings
Quick settings
On the preview screen, use the following quick settings.
The available options may vary depending on the shooting mode and which camera
is being used.
•
: Select a metering method. This determines how light values are calculated.
Centre-weighted
uses the light in the centre portion of the shot to calculate the
exposure of the shot.
Spot
uses the light in a concentrated centre area of the shot to
calculate the exposure of the shot.
Matrix
averages the entire scene.
•
: Activate or deactivate the flash.
•
: Focus on a subject inside the circular frame and blur the image outside the frame.
Camera settings
On the preview screen, tap .
The available options may vary depending on the shooting mode and which camera
is being used.
Rear camera
•
Picture size
: Select a resolution for photos. Using a higher resolution will result in higher
quality photos, but they will take up more memory.
•
Video size
: Select a resolution for videos. Using a higher resolution will result in higher
quality videos, but they will take up more memory.
Front camera
•
Picture size
: Select a resolution for photos. Using a higher resolution will result in higher
quality photos, but they will take up more memory.
•
Video size
: Select a resolution for videos. Using a higher resolution will result in higher
quality videos, but they will take up more memory.
•
Save pictures as previewed
: Invert the image to create a mirror-image of the original
scene, when taking photos with the front camera.
•
Ways to take pictures
: Select shooting options to use.
 Loading...