

Samsung SMA705W User Manual

Settings
•
Navigation bar: Change the navigation bar settings. Refer to Navigation bar (soft buttons)
for more information.
•
Accidental touch protection
input when it is in a dark place, such as a pocket or bag.
•
Touch sensitivity
protectors.
•
Screensaver
Screensaver for more information.
: Increase the touch sensitivity of the screen for use with screen
: Set the device to launch a screensaver when the device is charging. Refer to
: Set the device to prevent the screen from detecting touch
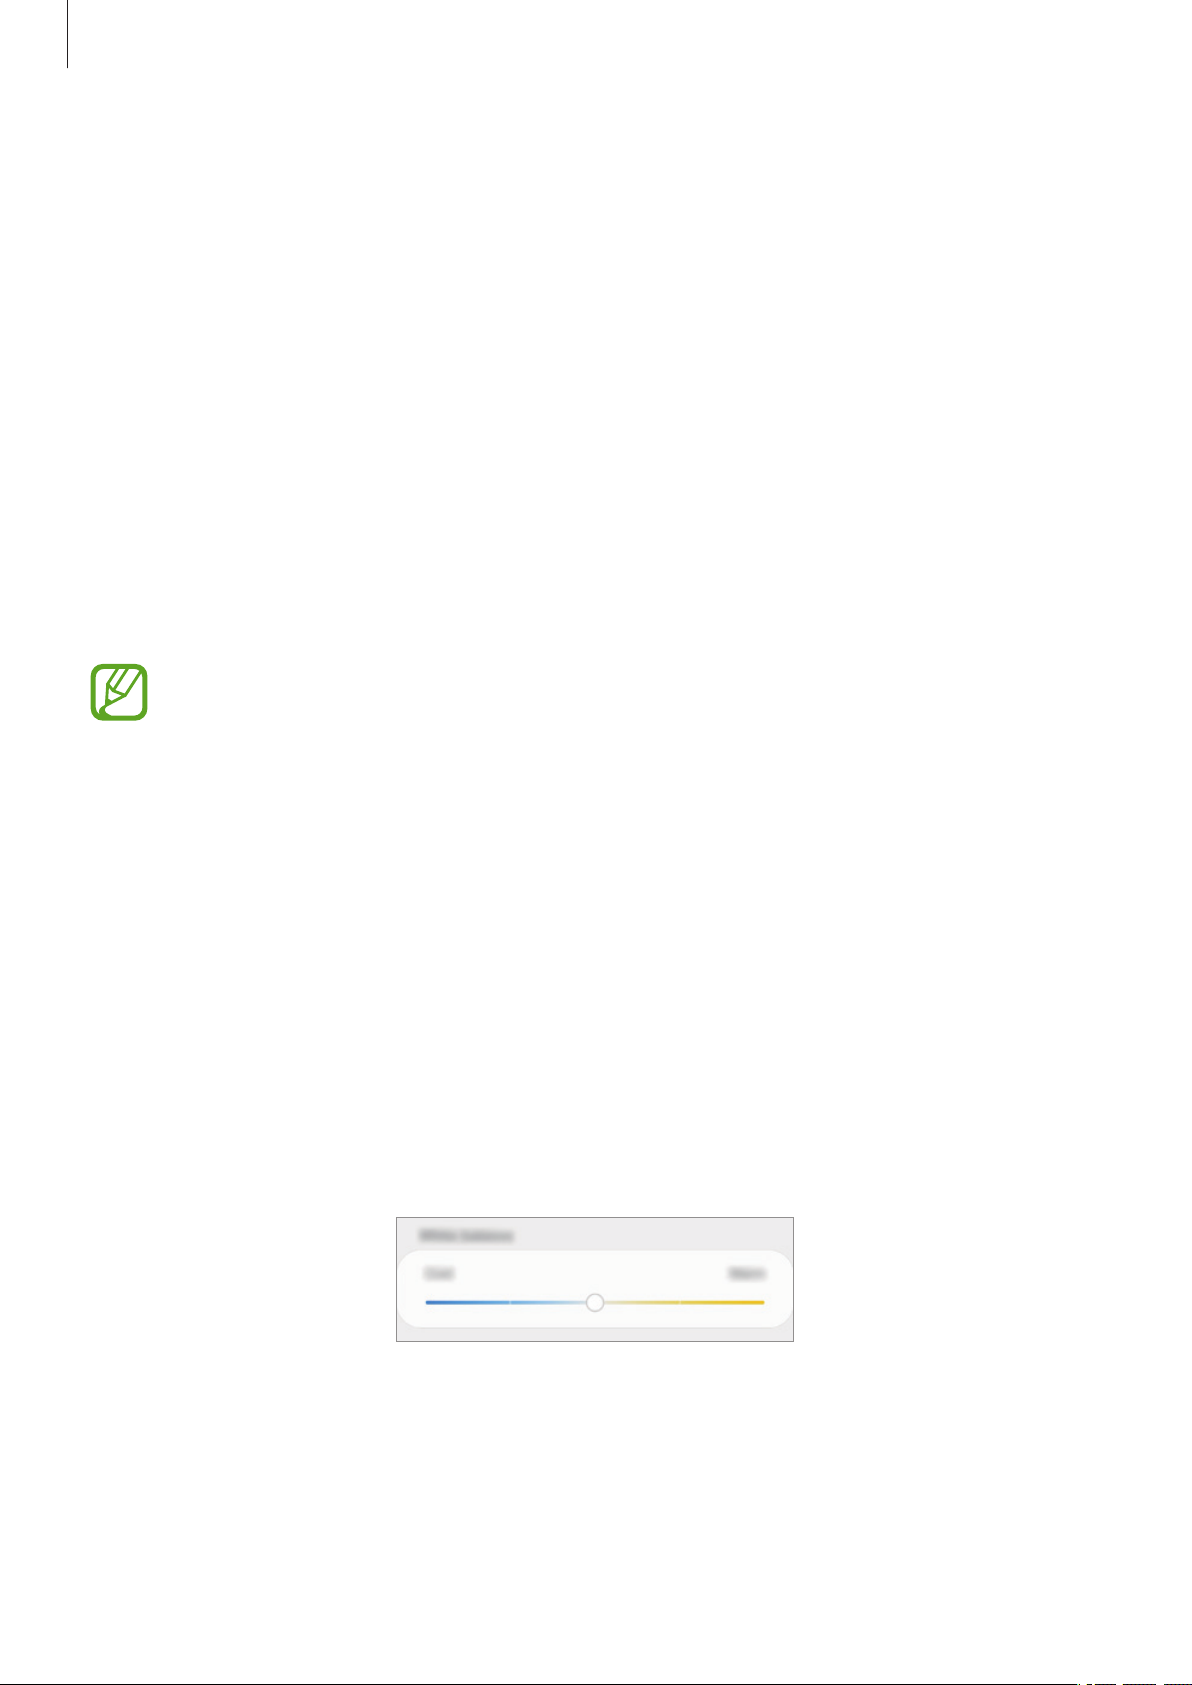
Blue light filter
Reduce eye strain by limiting the amount of blue light emitted by the screen.
While you are watching HDR videos from HDR-exclusive video services, the blue light filter
may not be applied.
On the Settings screen, tap
1
switch to activate it.
Drag the adjustment bar to adjust the filter’s opacity.
2
To set the schedule to apply the blue light filter to the screen, tap the
3
scheduled
•
Sunset to sunrise
the morning based on your current location.
•
Custom schedule
switch to activate it and select an option.
: Set the device to apply the blue light filter at night and turn it off in
: Set a specific time to apply the blue light filter.
Display
→
Blue light filter
, and then tap the
Turn on now
Turn on as
172
Settings
Changing the screen mode or adjusting the display colour
Select a screen mode suitable for viewing movies or images, or adjust the display colour to
your preference. If you select the
balance by colour value.
Adaptive display
mode, you can adjust the display colour
Changing the screen mode
On the Settings screen, tap
•
Adaptive display
display. You can also adjust the display colour balance by colour value.
•
AMOLED cinema
•
AMOLED photo
•
Basic
: This is set as default and is suitable for general use.
•
You can adjust the display colour only in
•
Adaptive display
•
You cannot change the screen mode while applying the blue light filter.
: This optimizes the colour range, saturation, and sharpness of your
: This is suitable for watching videos.
: This is suitable for viewing images.
Display
mode may not be compatible with third-party apps.
→
Screen mode
and select a mode you want.
Adaptive display
mode.
Optimizing the full screen colour balance
Optimize the display colour by adjusting the colour tones to your preference.
When you drag the colour adjustment bar towards
When you drag the bar towards
On the Settings screen, tap
1
Adjust the colour adjustment bar under
2
The colour balance of the screen will be optimized.
Warm
Display
, the red colour tone will increase.
→
Screen mode
White balance
Cool
, the blue colour tone will increase.
→
Adaptive display
.
.
173
Settings
Adjusting the screen tone by colour value
Increase or lower certain colour tones by adjusting the values individually.
On the Settings screen, tap
1
Tap
2
3
Advanced settings
Adjust the colour bars to your preference.
The screen tone screen will be adjusted.
.
Display
→
Screen mode
→
Adaptive display
.
Screensaver
You can set to display images as a screensaver when the screen turns off automatically. The
screensaver will be displayed when the device is charging.
On the Settings screen, tap
1
Select an option.
2
If you select
Photo Frame
Display
or
Photos
→
Screensaver
, a slideshow with selected images will start. If you
and tap the switch to activate it.
select
Tap to select albums for displaying images.
3
When you are finished, tap the Back button.
4
To preview the selected option, tap
Photo Table
When you tap the screen while your screensaver is displayed, the screen will turn on.
, selected images will appear as small cards and overlap.
Preview
.
174

Settings
Wallpapers and themes
Change the wallpaper settings for the Home screen and the locked screen or apply various
themes to the device.
On the Settings screen, tap
•
Wallpapers
•
Themes
•
Icons
: Change the icon style.
•
AODs
: Select an image to display on the Always On Display.
: Change the wallpaper settings for the Home screen and the locked screen.
: Change the device’s theme.
Wallpapers and themes
Lock screen
Options
Change the settings for the locked screen.
On the Settings screen, tap
The available options may vary depending on the screen lock method selected.
Lock screen
.
.
•
Screen lock type
•
Smart Lock
detected. Refer to Smart Lock for more information.
•
Secure lock settings
•
Always On Display
Refer to Always On Display for more information.
•
Clock style
•
Roaming clock
locked screen when roaming.
: Change the type and colour of the clock on the locked screen.
: Change the screen lock method.
: Set the device to unlock itself when trusted locations or devices are
: Change screen lock settings for the selected lock method.
: Set the device to display information while the screen is turned off.
: Change the clock to show both the local and home time zones on the
175

Settings
•
FaceWidgets
•
Contact information
address, on the locked screen.
•
Notifications
•
App shortcuts
•
About Lock screen
: Change the settings of the items displayed on the locked screen.
: Set the device to show contact information, such as your email
: Set how to show notifications on the locked screen.
: Select apps to display shortcuts to them on the locked screen.
: View the Locked screen version and legal information.
Smart Lock
You can set the device to unlock itself and remain unlocked when trusted locations or devices
are detected.
For example, if you have set your home as a trusted location, when you get home your device
will detect the location and automatically unlock itself.
•
This feature will be available to use after you set a screen lock method.
•
If you do not use your device for four hours or when you turn on the device, you
must unlock the screen using the pattern, PIN, or password you set.
On the Settings screen, tap
1
Unlock the screen using the preset screen lock method.
2
Select an option and follow the on-screen instructions to complete the setting.
3
Lock screen
→
Smart Lock
.
176

Settings
Biometrics and security
Options
Change the settings for securing the device.
On the Settings screen, tap
•
Face recognition
Face recognition for more information.
•
Fingerprints
Fingerprint recognition for more information.
•
Biometrics preferences
•
Google Play Protect
about potential harm and remove them.
•
Find My Mobile
Mobile website (findmymobile.samsung.com) to track and control your lost or stolen
device.
You can also allow the Google location service to provide more accurate information
about the location of your device.
•
Security update
•
Samsung Pass
: Set the device to unlock the screen by recognizing your face. Refer to
: Register your fingerprints to unlock the screen. Refer to
: Activate or deactivate the Find My Mobile feature. Access the Find My
: View the version of your device’s software and check for updates.
: Verify your identity easily and securely via your biometric data. Refer to
Biometrics and security
: Change the settings for biometric data.
: Set the device to check for harmful apps and behaviour and warn
.
Samsung Pass for more information.
•
Install unknown apps
sources.
•
Secure Folder
others. Refer to Secure Folder for more information.
•
Encrypt SD card
If you reset your device to the factory defaults with this setting enabled, the
device will not be able to read your encrypted files. Disable this setting before
resetting the device.
: Create a secure folder to protect your private content and apps from
: Set the device to encrypt files on a memory card.
: Set the device to allow the installation of apps from unknown
177
Settings
•
Other security settings
•
Location
•
App permissions
You can also edit the permission settings.
•
Send diagnostic data
usage information to Samsung.
•
Receive marketing information
information, such as special offers, membership benefits, and newsletters.
: Change settings for location information permissions.
: View the list of features and apps that have permission to use them.
: Configure additional security settings.
: Set the device to automatically send the device’s diagnostic and
: Set whether to receive Samsung marketing
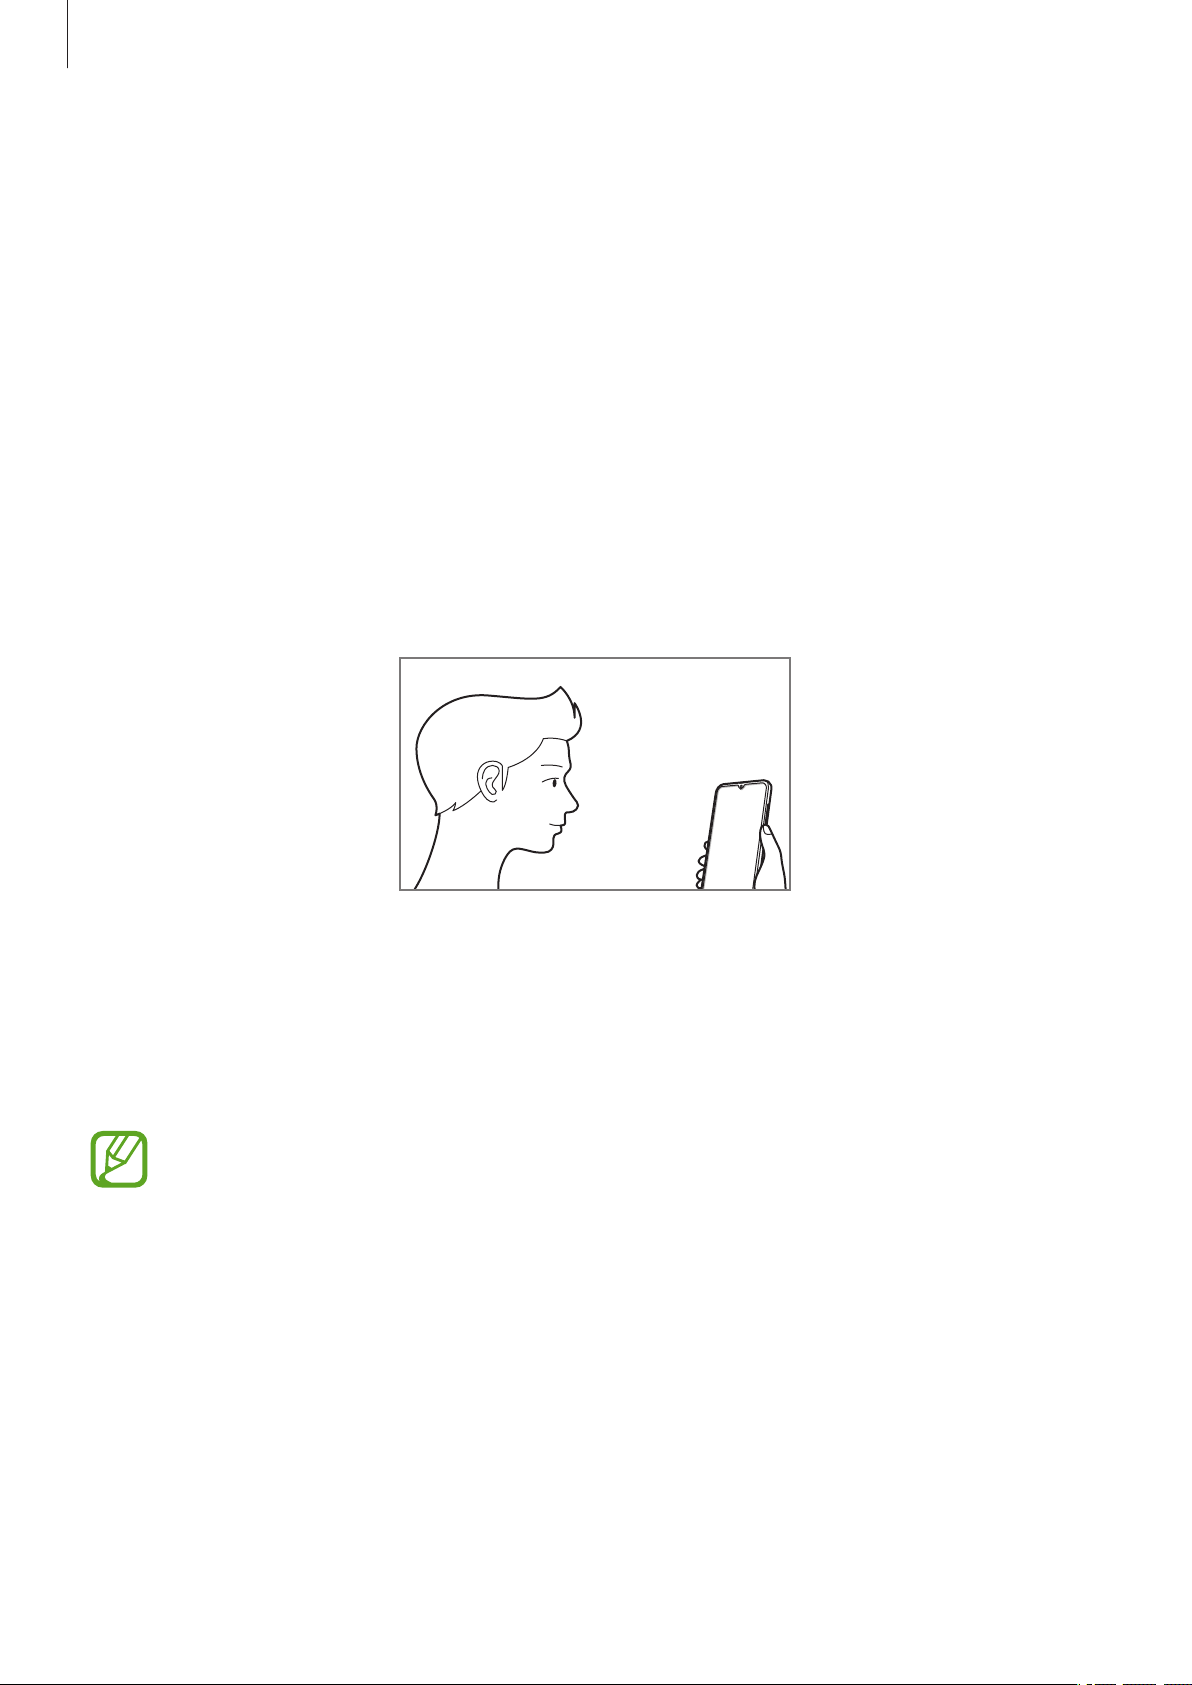
Face recognition
You can set the device to unlock the screen by recognizing your face.
•
If you use your face as a screen lock method, your face cannot be used to unlock
the screen for the first time after turning on the device. To use the device, you must
unlock the screen using the pattern, PIN, or password you set when registering the
face. Be careful not to forget your pattern, PIN, or password.
•
If you change the screen lock method to
of your biometric data will be deleted. If you want to use your biometric data in
apps or features, you must register your biometric data again.
Swipe
or
None
, which are not secure, all
Precautions for using face recognition
Before using the face recognition to unlock your device, keep the following precautions in
mind.
•
Your device could be unlocked by someone or something that looks like your image.
•
Face recognition is less secure than Pattern, PIN, or Password.
For better face recognition
Consider the following when using face recognition:
•
Consider the conditions when registering, such as wearing glasses; a hat, mask, or beard;
or heavy makeup
•
Ensure that you are in a well-lit area and that the camera lens is clean when registering
•
Ensure your image is not blurry for better match results
178
Settings
Registering your face
For better face registration, register your face indoors and out of direct sunlight.
On the Settings screen, tap
1
Unlock the screen using the preset screen lock method.
2
If you have not set a screen lock method, create one.
Read the on-screen instructions and tap
3
Select whether you are wearing glasses or not and tap
4
Hold the device with the screen facing towards you and look at the screen.
5
Biometrics and security
Continue
.
→
Face recognition
Continue
.
.
Position your face inside the frame on the screen.
6
The camera will scan your face.
When the useful face recognition screen appears, turn on a switch to activate a feature
OK
and tap
If unlocking the screen with your face is not working properly, tap
to remove your registered face and register your face again.
.
Remove face data
179

Settings
Deleting the registered face data
You can delete face data that you have registered.
On the Settings screen, tap
1
Unlock the screen using the preset screen lock method.
2
Tap
3
Remove face data
Once the registered face is deleted, all the related features will also be deactivated.
Biometrics and security
→
Remove
.
→
Face recognition
.
Unlocking the screen with your face
You can unlock the screen with your face instead of using a pattern, PIN, or password.
On the Settings screen, tap
1
Unlock the screen using the preset screen lock method.
2
3
Tap the
Face unlock
If you want to reduce the possibility of recognizing faces in photos or videos, tap the
switch to activate it.
Biometrics and security
→
Face recognition
.
Faster recognition
speed.
On the locked screen, look at the screen.
4
When your face is recognized, you can unlock the screen without using any additional
screen lock method. If your face is not recognized, use the preset screen lock method.
switch to deactivate it. This may decrease the face recognition
180

Settings
Fingerprint recognition
In order for fingerprint recognition to function, your fingerprint information needs to be
registered and stored in your device. After registering, you can set the device to use your
fingerprint for the features below:
•
Screen lock
•
Secure Folder
•
This feature may not be available depending on the region or service provider.
•
Fingerprint recognition uses the unique characteristics of each fingerprint to
enhance the security of your device. The likelihood of the fingerprint sensor
confusing two different fingerprints is very low. However, in rare cases where
separate fingerprints are very similar the sensor may recognize them as identical.
•
If you use your fingerprint as a screen lock method, your fingerprint cannot be
used to unlock the screen for the first time after turning on the device. To use
the device, you must unlock the screen using the pattern, PIN, or password you
set when registering the fingerprint. Be careful not to forget your pattern, PIN, or
password.
•
If your fingerprint is not recognized, unlock the device using the pattern, PIN,
or password you set when registering the fingerprint, and then re-register your
fingerprint. If your pattern, PIN, or password is forgotten, you will not be able to
use the device if you do not reset it. Samsung is not responsible for any data loss or
inconvenience caused by forgotten unlock codes.
•
If you change the screen lock method to
of your biometric data will be deleted. If you want to use your biometric data in
apps or features, you must register your biometric data again.
Swipe
or
None
, which are not secure, all
181

Settings
For better fingerprint recognition
When you scan your fingerprints on the device, be aware of the following conditions that
may affect the feature’s performance:
•
The device may not recognize fingerprints that are affected by wrinkles or scars.
•
The device may not recognize fingerprints from small or thin fingers.
•
To improve recognition performance, register fingerprints of the hand used most often to
perform tasks on the device.
•
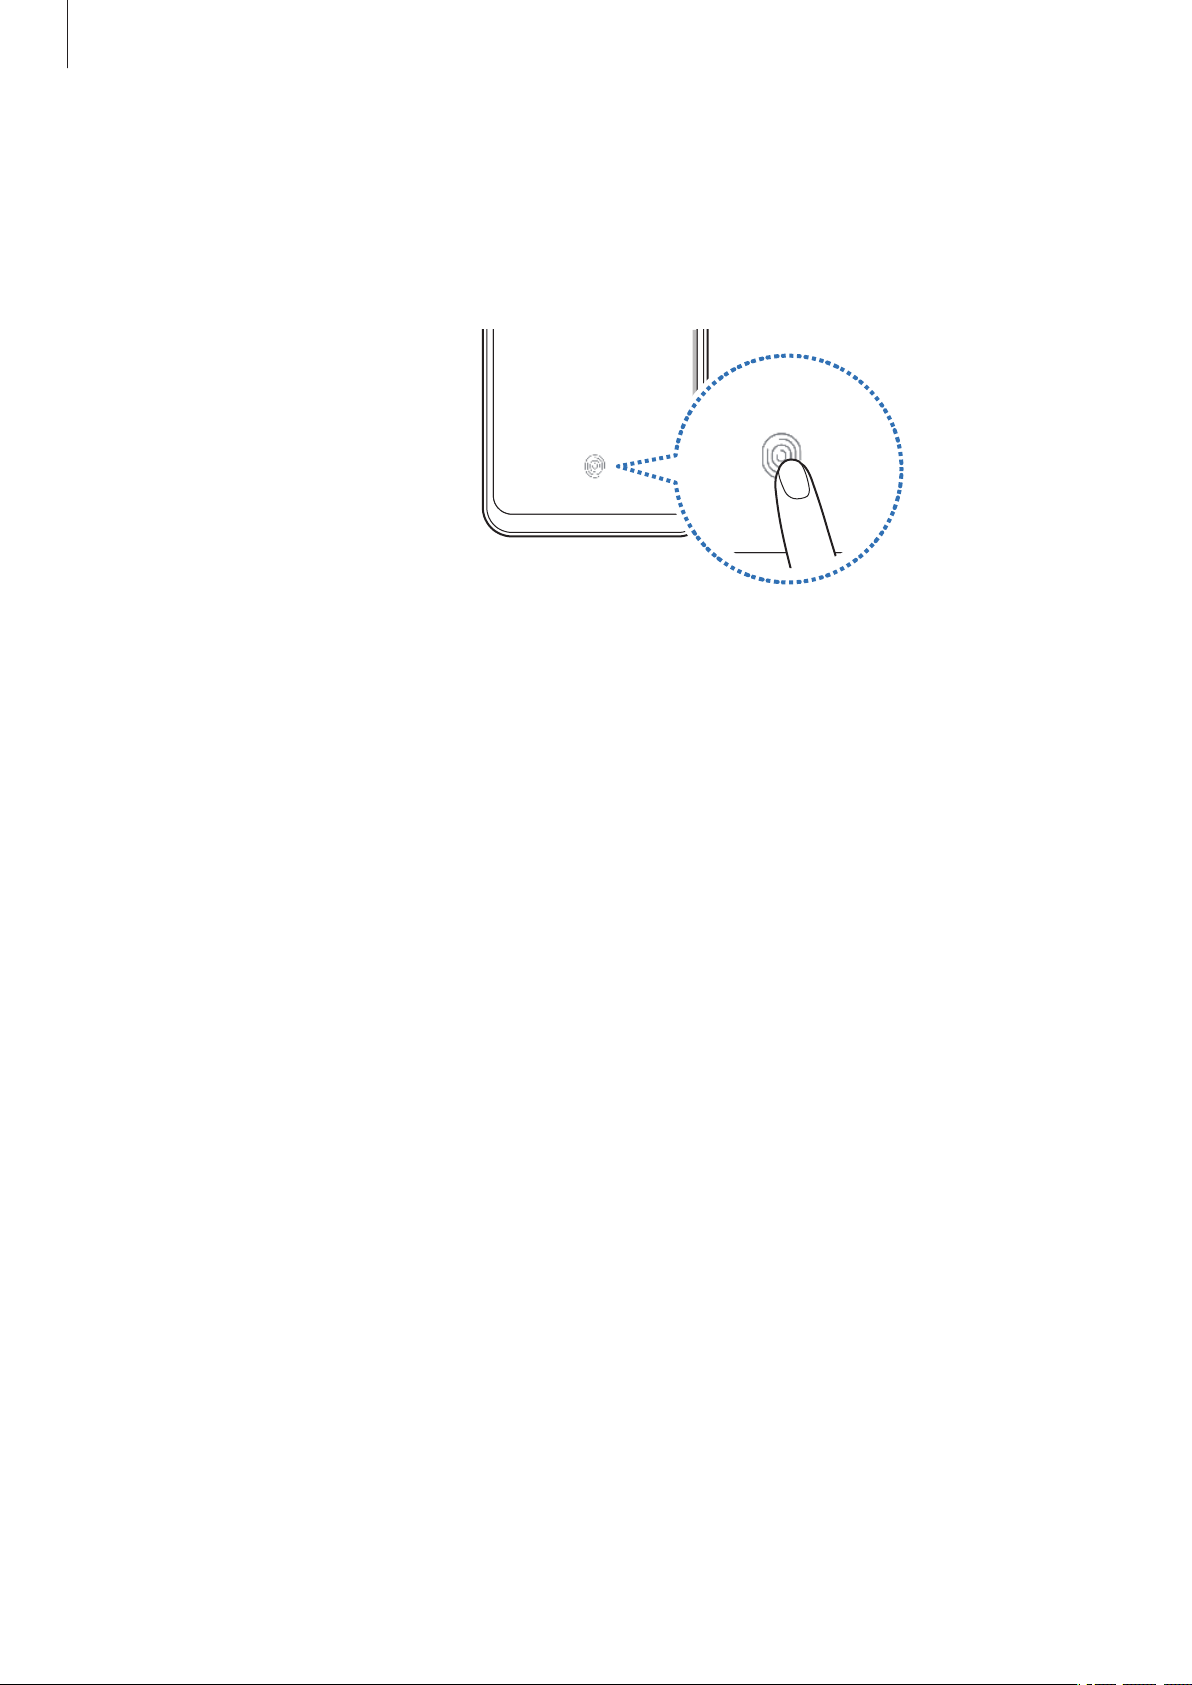
Your device has a built-in fingerprint recognition sensor at the bottom centre of
the screen. Ensure that the screen protector or the touchscreen on the fingerprint
recognition sensor area is not scratched or damaged by objects, such as coins, keys, pens,
and necklaces.
•
Ensure that the fingerprint recognition sensor area at the bottom centre of the screen
and your fingers are clean and dry.
•
If you bend your finger or use a fingertip, the device may not recognize your fingerprints.
Press the screen so that your fingertip spreads over the wide surface of the fingerprint
recognition area.
Registering fingerprints
On the Settings screen, tap
1
Unlock the screen using the preset screen lock method.
2
If you have not set a screen lock method, set one.
Biometrics and security
→
Fingerprints
.
182
Settings
Register your fingerprint.
3
Place your finger on the fingerprint recognition sensor at the bottom of the screen. After
the device detects your finger, lift it up and place it on the fingerprint recognition sensor
again.
Repeat this action until the fingerprint is registered.
When you are finished registering your fingerprints, tap
4
Deleting registered fingerprints
You can delete registered fingerprints.
On the Settings screen, tap
1
Unlock the screen using the preset screen lock method.
2
Select a fingerprint to delete and tap
3
Biometrics and security
Remove
→
Done
→
Fingerprints
Remove
.
.
.
183

Settings
Unlocking the screen with your fingerprints
You can unlock the screen with your fingerprint instead of using a pattern, PIN, or password.
On the Settings screen, tap
1
Unlock the screen using the preset screen lock method.
2
Tap the
3
On the locked screen, place your finger on the fingerprint recognition sensor and scan
4
your fingerprint.
Fingerprint unlock
Biometrics and security
switch to activate it.
→
Fingerprints
.
Samsung Pass
Samsung Pass allows you to sign in to your Samsung account, websites, or apps more easily
and securely via your biometric data, such as fingerprints, rather than entering your login
information. Also, Samsung Pass allows you to enter the personal information, such as your
address or payment card information, more easily and quickly via your registered biometric
data.
Register your biometric data to Samsung Pass and set to sign in to supported websites or
apps using the data via Samsung Pass.
•
To use this feature, your device must be connected to a Wi-Fi or mobile network.
•
To use this feature, you must register and sign in to your Samsung account. For
more information, refer to Samsung account.
•
The website sign-in feature is only available for websites that you access via the
Internet
•
Registered biometric data and saved payment card information are only saved to
your device and are not synced with other devices or servers.
app. Some websites may not support this feature.
184

Settings
Registering Samsung Pass
Before using Samsung Pass, register your biometric data to Samsung Pass.
On the Settings screen, tap
1
Tap
2
3
4
5
Sign-in
Agree to the terms and conditions of Samsung Pass.
Tap
Continue
Refer to Fingerprint recognition for more information.
Scan your fingerprint and tap
If the
added on the Home screen.
If the
can use your registered biometric data to verify your identity instead of entering the
Samsung account password.
Add Samsung Pass to Home screen
Use Samsung Pass instead of Samsung account password
, enter your Samsung account ID and password, and then tap
and register your fingerprints.
Biometrics and security
Next
to complete the Samsung Pass registration.
option is ticked, the Samsung Pass icon will be
→
Samsung Pass
.
Sign in
option is ticked, you
.
Verifying the Samsung account password
You can use your registered biometric data to verify your identity instead of entering your
Samsung account password when, for example, you purchase content from
Galaxy Store
(
On the Settings screen, tap
1
Unlock the screen using the preset screen lock method.
2
Tap
3
switch to activate it.
→
Settings
).
Biometrics and security
→
Samsung account
, and then tap the
→
Samsung Pass
Verify with Samsung Pass
Galaxy Apps
.
185

Settings
Using Samsung Pass to sign in to websites
You can use Samsung Pass to easily sign in to websites that support ID and password autofill.
Open a website that you want to sign in to.
1
Enter your user name and password, and then tap the website’s sign in button.
2
When a pop-up window asking whether you want to save the sign-in information
3
appears, tick
You can now use the biometric data you registered to Samsung Pass when signing in to
the website.
Sign in with Samsung Pass
and tap
Remember
.
Using Samsung Pass to sign in to apps
You can use Samsung Pass to easily sign in to apps that support ID and password autofill.
Open an app that you want to sign in to.
1
Enter your user name and password, and then tap the app’s sign in button.
2
When a pop-up window asking whether you want to save the sign-in information
3
Save
appears, tap
You can now use the biometric data you registered to Samsung Pass when signing in to
the app.
.
186
Settings
Managing sign-in information
View the list of websites and apps you have set to use Samsung Pass and manage your sign-in
information.
On the Settings screen, tap
1
Unlock the screen using the preset screen lock method.
2
Tap
3
4
Sign-in
Tap
Edit
To delete the website or app, tap
and select a website or app from the list.
and modify your ID, password, and the website’s or app’s name.
Biometrics and security
Delete
.
→
Samsung Pass
.
Using Samsung Pass with websites and apps
When using websites or apps that support Samsung Pass, you can easily sign in with
Samsung Pass.
To see the list of websites and apps that support Samsung Pass, on the Settings screen, tap
Biometrics and security
method, and then tap
Pass,
Partners
will not appear.
→
Samsung Pass
→
Partners
, unlock the screen using your preset screen lock
. If there are no websites or apps that support Samsung
•
Available websites and apps may vary depending on the region or service provider.
•
Samsung is not responsible for any loss or inconvenience caused by signing in to
websites or apps via Samsung Pass.
187

Settings
Entering your personal information automatically
You can use Samsung Pass to easily enter your address or payment card information on apps
that support personal information autofill.
On the Settings screen, tap
1
Unlock the screen using the preset screen lock method.
2
Tap
3
4
Autofill forms
Enter the information and tap
You can now use the biometric data you registered to Samsung Pass when entering the
personal information automatically on supported apps.
and select
Biometrics and security
Add address
Save
.
or
Add card
→
Samsung Pass
.
.
Deleting your Samsung Pass data
You can delete your biometric data, sign-in information, and app data registered to Samsung
Pass. Your agreement to the terms and conditions and your Samsung account will remain
active.
On the Settings screen, tap
1
Biometrics and security
→
Samsung Pass
.
Unlock the screen using the preset screen lock method.
2
Tap →
3
Enter your Samsung account password and tap OK.
4
Your Samsung Pass data will be deleted.
Settings
→
Delete data
→
Delete
.
188
Settings
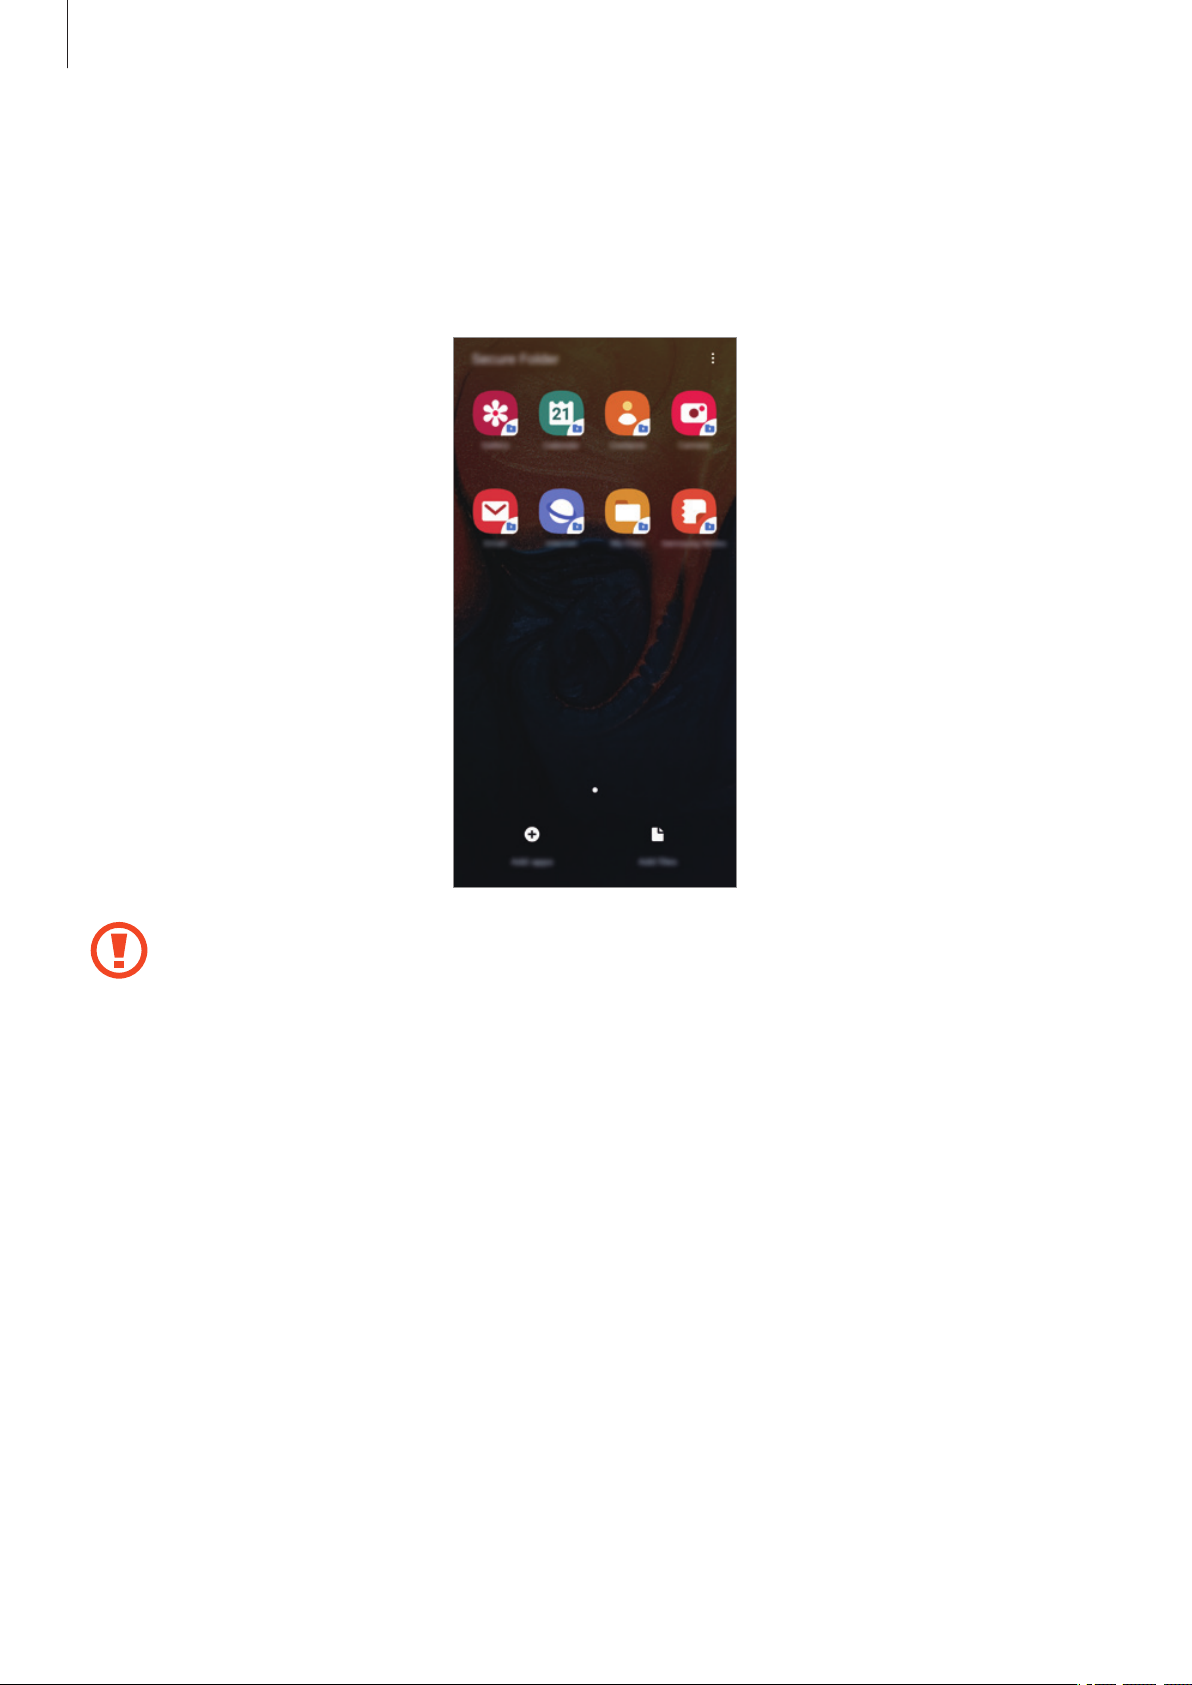
Secure Folder
Secure Folder protects your private content and apps, such as photos and contacts, from
being accessed by others. You can keep your private content and apps secure even when the
device is unlocked.
Secure Folder is a separate, secured storage area. The data in Secure Folder cannot be
transferred to other devices via unapproved sharing methods, such as USB or Wi-Fi
Direct. Attempting to customize the operating system or modifying software will
cause Secure Folder to be automatically locked and inaccessible. Before saving data in
Secure Folder, make sure to back up a copy of the data in another secure location.
189
Settings
Setting up Secure Folder
Launch the
1
Tap
2
3
4
5
Continue
Enter your Samsung account ID and password and tap
Read and agree to the terms and conditions and tap
Select a lock method to use for Secure Folder and follow the on-screen instructions to
complete the setup.
To change the name or icon colour of Secure Folder, tap
•
•
Settings
.
When you launch the
preset lock method.
If you forget your Secure Folder unlock code, you can reset it using your Samsung
account. Tap the reset button at the bottom of the locked screen, and enter your
Samsung account password.
app and tap
Secure Folder
Biometrics and security
Sign in
Next
app, you must unlock the app using your
→
Secure Folder
.
.
→
Customize icon
.
.
Setting auto lock for Secure Folder
Set the device to automatically lock Secure Folder when it is not being used.
Launch the
1
Select a lock option.
2
To manually lock your Secure Folder, tap →
Secure Folder
app and tap →
Settings
Lock
→
Auto lock Secure Folder
.
.
190
 Loading...