

Page 1

USER MANUAL
SM-A6060
English (HK). 05/2019. Rev.1.1
www.samsung.com/hk
Page 2

Table of Contents
Basics
4 Read me first
6 Device overheating situations and
solutions
9 Device layout and functions
14 Battery
16 SIM or USIM card (nano-SIM card)
21 Memory card (microSD card)
24 Turning the device on and off
25 Initial setup
27 Samsung account
28 Transferring data from your previous
device (Smart Switch)
30 Understanding the screen
42 Notification panel
72 Contacts
76 Messages
79 Internet
81 Email
82 Camera
98 Gallery
103 AR Emoji
110 Multi window
113 Samsung Pay
116 Samsung Health
120 Galaxy Wearable
120 Samsung Members
121 Samsung Notes
122 Calendar
123 Voice Recorder
44 Entering text
Apps and features
47 Installing or uninstalling apps
49 Bixby
58 Bixby Vision
61 Bixby Home
63 Reminder
67 Phone
125 My Files
125 Clock
127 Calculator
127 Radio
128 Game Launcher
131 Kids Home
133 SmartThings
137 Sharing content
138 Google apps
2
Page 3

Table of Contents
Settings
140 Introduction
140 Connections
141 Wi-Fi
143 Bluetooth
144 NFC and payment
147 Data saver
147 SIM card manager
148 Mobile Hotspot and Tethering
149 More connection settings
152 Sounds and vibration
152 Dolby Atmos (surround sound)
153 Separate app sound
153 Notifications
182 Digital wellbeing
183 Device care
184 Optimising your device
184 Battery
185 Storage
185 Memory
186 Security
186 Apps
186 General management
187 Accessibility
188 Software update
188 User manual
189 About phone
154 Display
155 Night mode
155 Screen saver
156 Wallpapers and themes
156 Lock screen
157 Smart Lock
157 Biometrics and security
159 Face recognition
162 Fingerprint recognition
166 Samsung Pass
170 Secure Folder
174 Accounts and backup
175 Samsung Cloud
176 Google
177 Advanced features
Appendix
190 Troubleshooting
178 Bixby Routines
180 Motions and gestures
181 Dual Messenger
3
Page 4

Basics
Read me first
Please read this manual before using the device to ensure safe and proper use.
•
Descriptions are based on the device’s default settings.
•
Some content may differ from your device depending on the region, service provider,
model specifications, or device’s software.
•
Content (high quality content) that requires high CPU and RAM usage will affect the
overall performance of the device. Apps related to the content may not work properly
depending on the device’s specifications and the environment that it is used in.
•
Samsung is not liable for performance issues caused by apps supplied by providers other
than Samsung.
•
Samsung is not liable for performance issues or incompatibilities caused by edited
registry settings or modified operating system software. Attempting to customise the
operating system may cause the device or apps to work improperly.
•
Software, sound sources, wallpapers, images, and other media provided with this device
are licensed for limited use. Extracting and using these materials for commercial or other
purposes is an infringement of copyright laws. Users are entirely responsible for illegal
use of media.
•
You may incur additional charges for data services, such as messaging, uploading and
downloading, auto-syncing, or using location services depending on your data plan. For
large data transfers, it is recommended to use the Wi-Fi feature.
•
Default apps that come with the device are subject to updates and may no longer be
supported without prior notice. If you have questions about an app provided with
the device, contact a Samsung Service Centre. For user-installed apps, contact service
providers.
•
Modifying the device’s operating system or installing softwares from unofficial sources
may result in device malfunctions and data corruption or loss. These actions are violations
of your Samsung licence agreement and will void your warranty.
•
Depending on the region or service provider, a screen protector is attached for protection
during production and distribution. Damage to the attached screen protector is not
covered by the warranty.
4
Page 5
Basics
•
You can see the touchscreen clearly even in strong outdoor sunlight by automatically
adjusting the contrast range based on the surrounding environment. Due to the nature
of the product, displaying fixed graphics for extended periods may result in afterimages
(screen burn-in) or ghosting.
–
It is recommended not to use fixed graphics on part or all of the touchscreen for
extended periods and turn off the touchscreen when not using the device.
–
You can set the touchscreen to turn off automatically when you are not using it.
Launch the
of time you want the device to wait before turning off the touchscreen.
–
To set the touchscreen to automatically adjust its brightness based on the
surrounding environment, launch the
Adaptive brightness
•
Depending on the region or model, some devices are required to receive approval from
the Federal Communications Commission (FCC). If your device is approved by the FCC,
you can view the FCC ID of the device. To view the FCC ID, launch the
About phone
tap
Settings
→
app, tap
switch to activate it.
Status
Display
.
→
Screen timeout
Settings
app, tap
, and then select the length
Display
, and then tap the
Settings
app and
Instructional icons
Warning: situations that could cause injury to yourself or others
Caution: situations that could cause damage to your device or other equipment
Notice: notes, usage tips, or additional information
5
Page 6

Basics
Device overheating situations and solutions
When the device heats up while charging the battery
While charging, the device and the charger may become hot. During wireless charging or fast
charging, the device may feel hotter to the touch. This does not affect the device’s lifespan or
performance and is in the device’s normal range of operation. If the battery becomes too hot,
the charger may stop charging.
Do the following when the device heats up:
•
Disconnect the charger from the device and close any running apps. Wait for the
device to cool down and then begin charging the device again.
•
If the lower part of the device overheats, it could be because the connected USB
cable is damaged. Replace the damaged USB cable with a new Samsung-approved
one.
The wireless charging or fast charging feature is only available on supported models.
When the device heats up during use
When you use features or apps that require more power or use them for extended periods,
your device may temporarily heat up due to increased battery consumption. Close any
running apps and do not use the device for a while.
The following are examples of situations in which the device may overheat. Depending on
the functions and apps you use, these examples may not apply to your model.
•
During the initial setup after purchase or when restoring data
•
When downloading large files
•
When using apps that require more power or using apps for extended periods
–
When playing high-quality games for extended periods
–
When recording videos for extended periods
–
When streaming videos while using the maximum brightness setting
–
When connecting to a TV
6
Page 7

Basics
•
While multitasking (or, when running many apps in the background)
–
When using Multi window
–
When updating or installing apps while recording videos
–
When downloading large files during a video call
–
When recording videos while using a navigation app
•
When using large amount of data for syncing with the cloud, email, or other accounts
•
When using a navigation app in a car while the device is placed in direct sunlight
•
When using the mobile hotspot and tethering feature
•
When using the device in areas with weak signals or no reception
•
When charging the battery with a damaged USB cable
•
When the device’s multipurpose jack is damaged or exposed to foreign materials, such as
liquid, dust, metal powder, and pencil lead
•
When you are roaming
Do the following when the device heats up:
•
Keep the device updated with the latest software.
•
Conflicts between running apps may cause the device to heat up. Restart the device.
•
Deactivate the Wi-Fi, GPS, and Bluetooth features when not using them.
•
Close apps that increase battery consumption or that run in the background when
not in use.
•
Delete unnecessary files or unused apps.
•
Decrease the screen brightness.
•
If the device overheats or feels hot for a prolonged period, do not use it for a while. If
the device continues to overheat, contact a Samsung Service Centre.
7
Page 8

Basics
Precautions for device overheating
If you begin to feel uncomfortable due to the device overheating, stop using the device.
When the device heats up, the features and performance may be limited or the device may
turn off to cool down. The feature is only available on supported models.
•
If the device overheats and reaches a certain temperature, a warning massage will appear
to prevent device failure, skin irritations and damages, and battery leakage. To lower the
device’s temperature, the screen brightness and the performance speed will be limited
and battery charging will stop. Running apps will be closed and all calling and other
features will be limited, except for emergency calls, until the device cools down.
•
If the second message appears due to a further increase of the device’s temperature, the
device will turn off. Do not use the device until the device’s temperature drops below the
specified level. If the second warning message appears during an emergency call, the call
will not be disconnected by a forced shut down.
Precautions for operating environment
Your device may heat up due to the environment in the following conditions. Use caution to
avoid shortening the battery’s lifespan, damaging the device, or causing a fire.
•
Do not store your device in very cold or very hot temperatures.
•
Do not expose your device to direct sunlight for extended periods.
•
Do not use or store your device for extended periods in very hot areas, such as inside a
car in the summertime.
•
Do not place the device in any areas that may overheat, such as on an electric heating
mat.
•
Do not store your device near or in heaters, microwaves, hot cooking equipment, or high
pressure containers.
•
Never use a damaged charger or battery.
8
Page 9

Basics
Device layout and functions
Package contents
Refer to the quick start guide for package contents.
•
The items supplied with the device and any available accessories may vary
depending on the region or service provider.
•
The supplied items are designed only for this device and may not be compatible
with other devices.
•
The supplied earphones (USB Type-C) which support digital output are designed
only for this device. They may not be compatible with other devices that use
different audio output method.
•
Appearances and specifications are subject to change without prior notice.
•
You can purchase additional accessories from your local Samsung retailer. Make
sure they are compatible with the device before purchase.
•
Use only Samsung-approved accessories. Using unapproved accessories may cause
the performance problems and malfunctions that are not covered by the warranty.
•
Availability of all accessories is subject to change depending entirely on
manufacturing companies. For more information about available accessories, refer
to the Samsung website.
9
Page 10
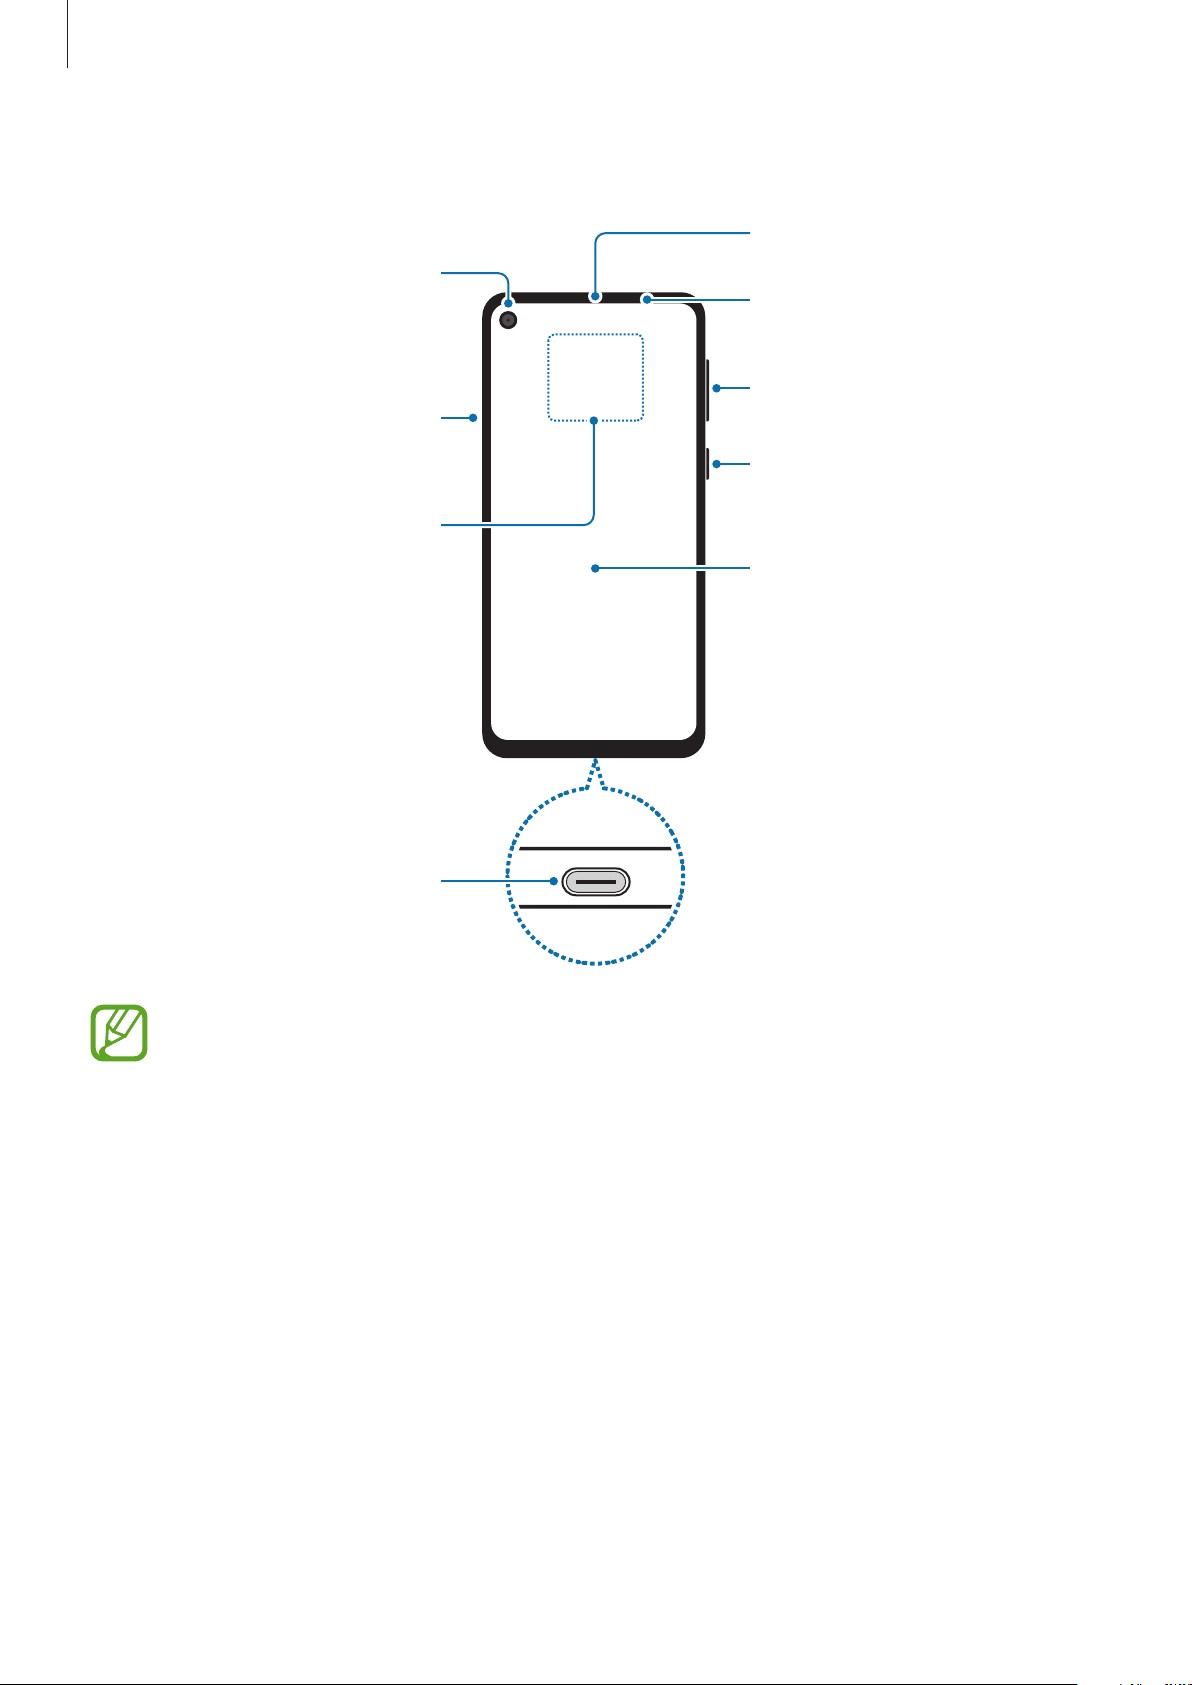
Basics
Microphone
Device layout
Front camera /
Memory card tray
On-Screen Sound
Light sensor
SIM card /
Proximity sensor
Volume key
Power key / Bixby key
Touchscreen
Earphone jack /
Multipurpose jack
(USB Type-C)
This device supports the On-Screen Sound feature to emit and transmit sound
through vibrations. As a result, you may feel vibrations during calls.
10
Page 11
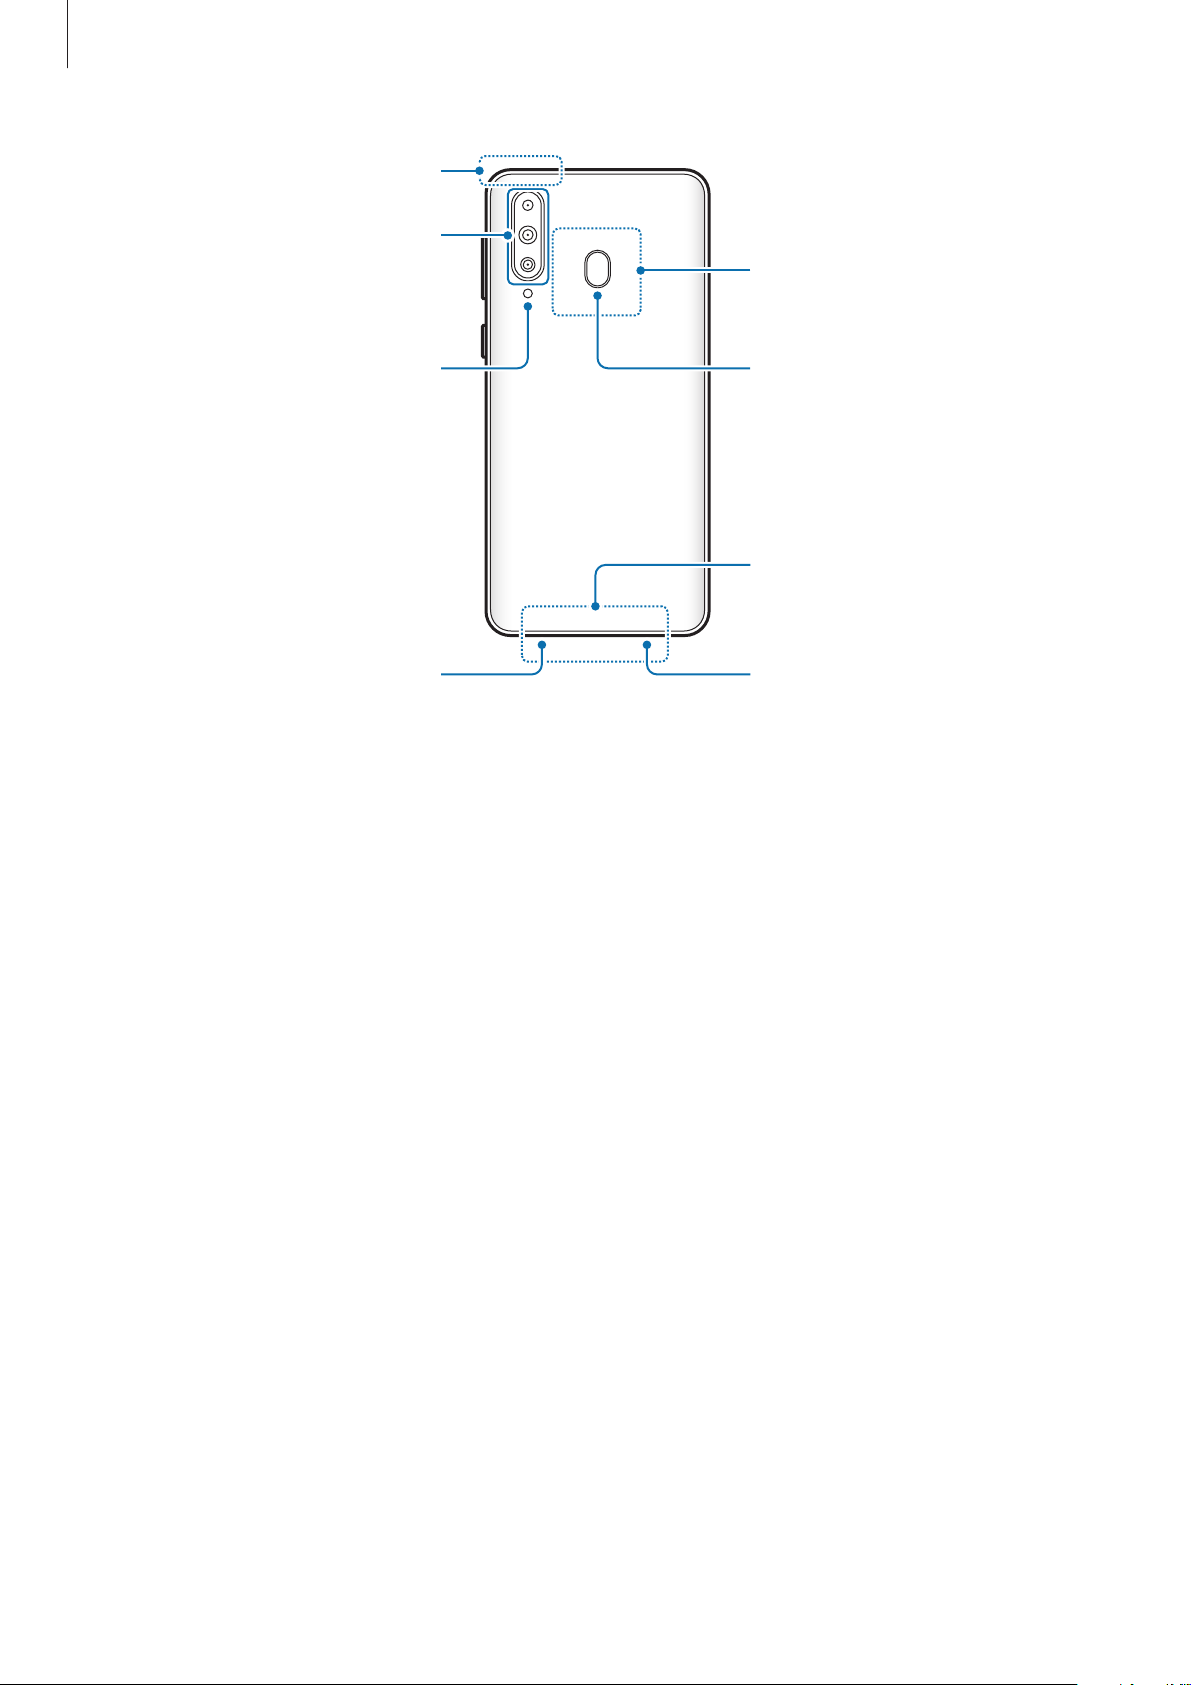
Basics
GPS antenna
Rear camera (Triple)
NFC antenna
Flash
Speaker
Fingerprint recognition
sensor
Main antenna
Microphone
11
Page 12

Basics
•
When using the speakers, such as when playing media files or using speakerphone,
do not place the device close to your ears.
•
Be careful not to expose the camera lens to a strong light source, such as direct
sunlight. If the camera lens is exposed to a strong light source, such as direct
sunlight, the camera image sensor may be damaged. A damaged image sensor is
irreparable and will cause dots or spots in pictures.
•
If you use the device with its glass or acrylic body broken, there may be a risk of
injury. Use the device only after it has been repaired at a Samsung Service Centre.
•
Connectivity problems and battery drain may occur in the following situations:
–
If you attach metallic stickers on the antenna area of the device
–
If you attach a device cover made with metallic material to the device
–
If you cover the device’s antenna area with your hands or other objects while
using certain features, such as calls or the mobile data connection
•
Using a Samsung-approved screen protector is recommended. Unapproved screen
protectors may cause the sensors to malfunction.
•
Do not allow water to contact the touchscreen. The touchscreen may malfunction
in humid conditions or when exposed to water.
•
Do not cover the proximity or light sensor area with screen accessories, such as a
screen protector or stickers. Doing so may cause the sensor to malfunction.
12
Page 13

Basics
Hard keys
Key Function
•
Press and hold to turn the device on or off.
Power
•
Press to turn on or lock the screen.
To use the Bixby key, switch the Power key to the Bixby key first. Refer
Volume key
Power key / Bixby key
Bixby
Volume
Soft buttons
Recents button
to Waking up Bixby using the Bixby key for more information.
•
Press and hold to start a conversation with Bixby. Refer to Using
Bixby for more information.
•
Press to adjust the device volume.
Back button
Home button
When you turn on the screen, the soft buttons will appear at the bottom of the screen. The
soft buttons are set to the Recents button, Home button, and Back button by default. Refer to
Navigation bar (soft buttons) for more information.
13
Page 14
Basics
Battery
Charging the battery
Charge the battery before using it for the first time or when it has been unused for extended
periods.
Use only Samsung-approved chargers, batteries, and cables. Unapproved chargers or
cables can cause the battery to explode or damage the device.
•
Connecting the charger improperly may cause serious damage to the device. Any
damage caused by misuse is not covered by the warranty.
•
Use only USB Type-C cable supplied with the device. The device may be damaged
if you use Micro USB cable.
To save energy, unplug the charger when not in use. The charger does not have a
power switch, so you must unplug the charger from the electric socket when not in
use to avoid wasting power. The charger should remain close to the electric socket
and easily accessible while charging.
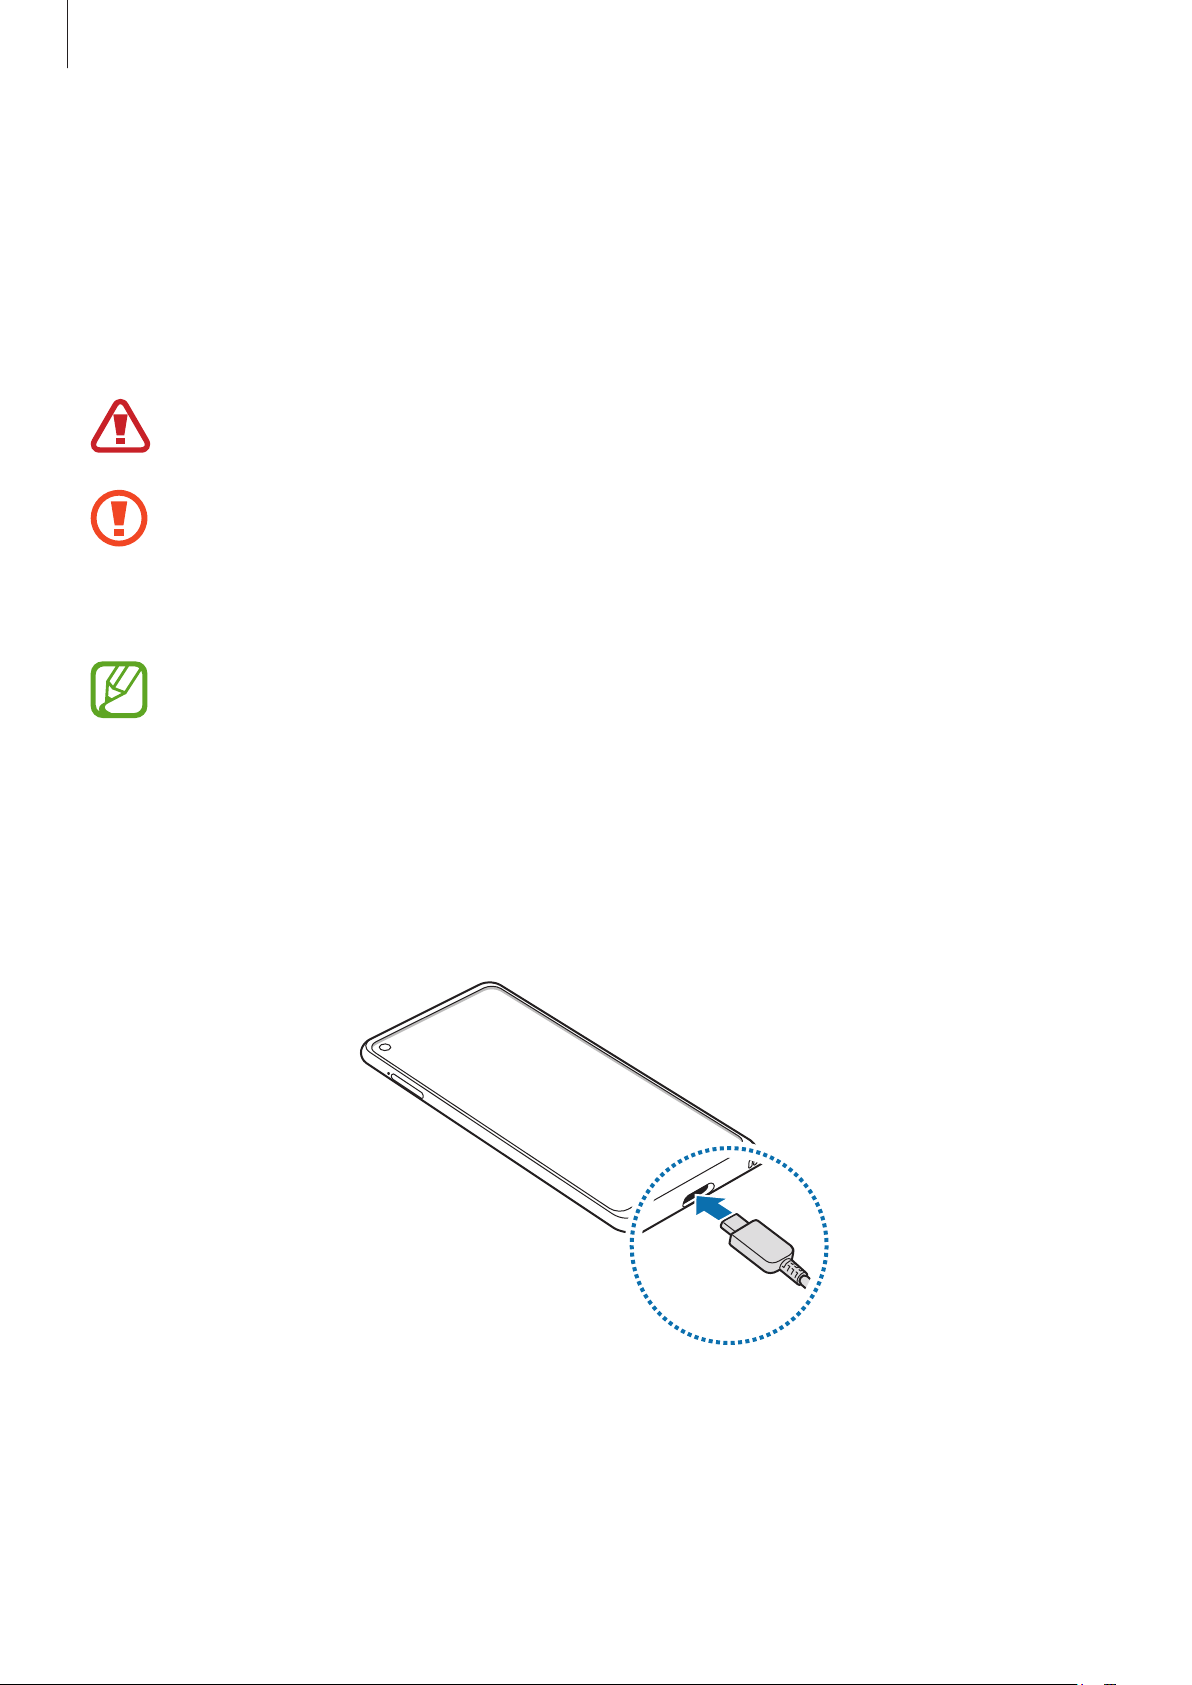
Connect the USB cable to the USB power adaptor.
1
Plug the USB cable into the device’s multipurpose jack.
2
Plug the USB power adaptor into an electric socket.
3
After fully charging, disconnect the charger from the device. Then, unplug the charger
4
from the electric socket.
14
Page 15

Basics
Reducing the battery consumption
Your device provides various options that help you conserve battery power.
•
Optimise the device using the device care feature.
•
When you are not using the device, turn off the screen by pressing the Power key.
•
Activate power saving mode.
•
Close unnecessary apps.
•
Deactivate the Bluetooth feature when not in use.
•
Deactivate auto-syncing of apps that need to be synced.
•
Decrease the backlight time.
•
Decrease the screen brightness.
Battery charging tips and precautions
•
When the battery power is low, the battery icon appears empty.
•
If the battery is completely discharged, the device cannot be turned on immediately
when the charger is connected. Allow a depleted battery to charge for a few minutes
before turning on the device.
•
If you use multiple apps at once, network apps, or apps that need a connection to
another device, the battery will drain quickly. To avoid losing power during a data
transfer, always use these apps after fully charging the battery.
•
Using a power source other than the charger, such as a computer, may result in a slower
charging speed due to a lower electric current.
•
The device can be used while it is charging, but it may take longer to fully charge the
battery.
•
If the device receives an unstable power supply while charging, the touchscreen may not
function. If this happens, unplug the charger from the device.
•
While charging, the device and the charger may heat up. This is normal and should not
affect the device’s lifespan or performance. If the battery gets hotter than usual, the
charger may stop charging. If this occurs during wireless charging, disconnect the device
from the charger to let it cool down, then charge the device again later.
•
If you charge the device while the multipurpose jack is wet, the device may be damaged.
Thoroughly dry the multipurpose jack before charging the device.
•
If the device is not charging properly, take the device and the charger to a Samsung
Service Centre.
15
Page 16
Basics
Fast charging
The device has a built-in fast charging feature. You can charge the battery more quickly while
the device or its screen is turned off.
Increasing the charging speed
To increase the charging speed, turn the device or its screen off when you charge the battery.
While charging the battery when the device is turned off, the
If the fast charging feature is not activated, launch the
Battery
→ →
•
•
•
Settings
While charging, you cannot activate or deactivate this feature.
You cannot use the built-in fast charging feature when you charge the battery
using a standard battery charger.
If the device heats up or the ambient air temperature rises, the charging speed may
decrease automatically. This is a normal operating condition to prevent damage to
the device.
, and then tap the
Fast cable charging
Settings
icon appears on the screen.
app, tap
switch to activate it.
SIM or USIM card (nano-SIM card)
Installing the SIM or USIM card
Device care
→
Insert the SIM or USIM card provided by the mobile telephone service provider.
You can insert two SIM or USIM cards so you can have two phone numbers or service
providers for a single device. In some areas, data transfer speeds may be slower if two SIM
cards are inserted in the device than when one SIM card is inserted.
Use caution not to lose or let others use the SIM or USIM card. Samsung is not
responsible for any damages or inconveniences caused by lost or stolen cards.
Some LTE services may not be available depending on the service provider. For more
information about service availability, contact your service provider.
16
Page 17

Basics
1
2 3
4 5
17
Page 18

Basics
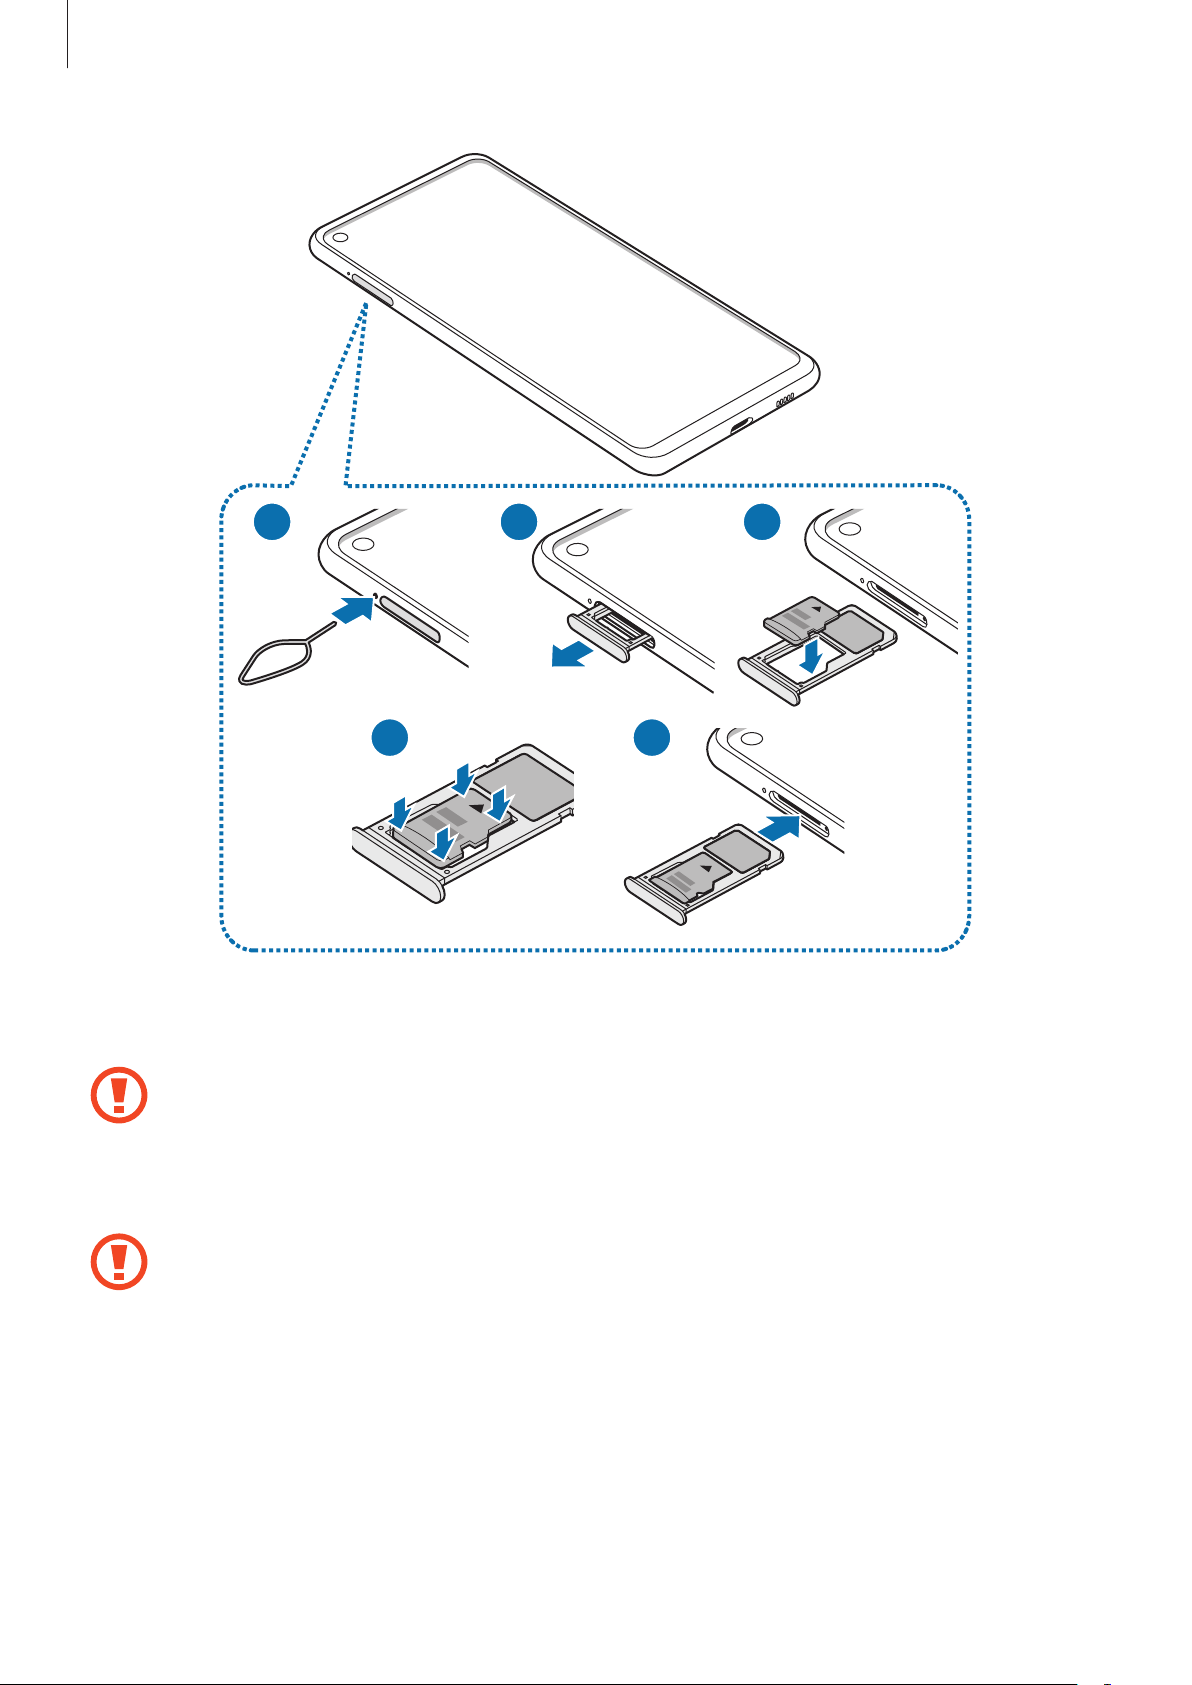
Insert the ejection pin into the hole next to the tray to loosen the tray.
1
Ensure that the ejection pin is perpendicular to the hole. Otherwise, the device may
be damaged.
Pull out the tray gently from the tray slot.
2
Place the SIM or USIM card on the tray with the gold-coloured contacts facing
3
downwards. Place the primary SIM or USIM card on the tray 1 (
1 ) and the secondary SIM
or USIM card on the tray 2 (
2 ).
1
2
Tray 2
Gently press the SIM or USIM card into the tray to secure it.
4
If the card is not fixed firmly into the tray, the SIM card may leave or fall out of the tray.
Insert the tray back into the tray slot.
5
Tray 1
•
If you insert the tray into your device while the tray is wet, your device may be
damaged. Always make sure the tray is dry.
•
Fully insert the tray into the tray slot to prevent liquid from entering your device.
18
Page 19
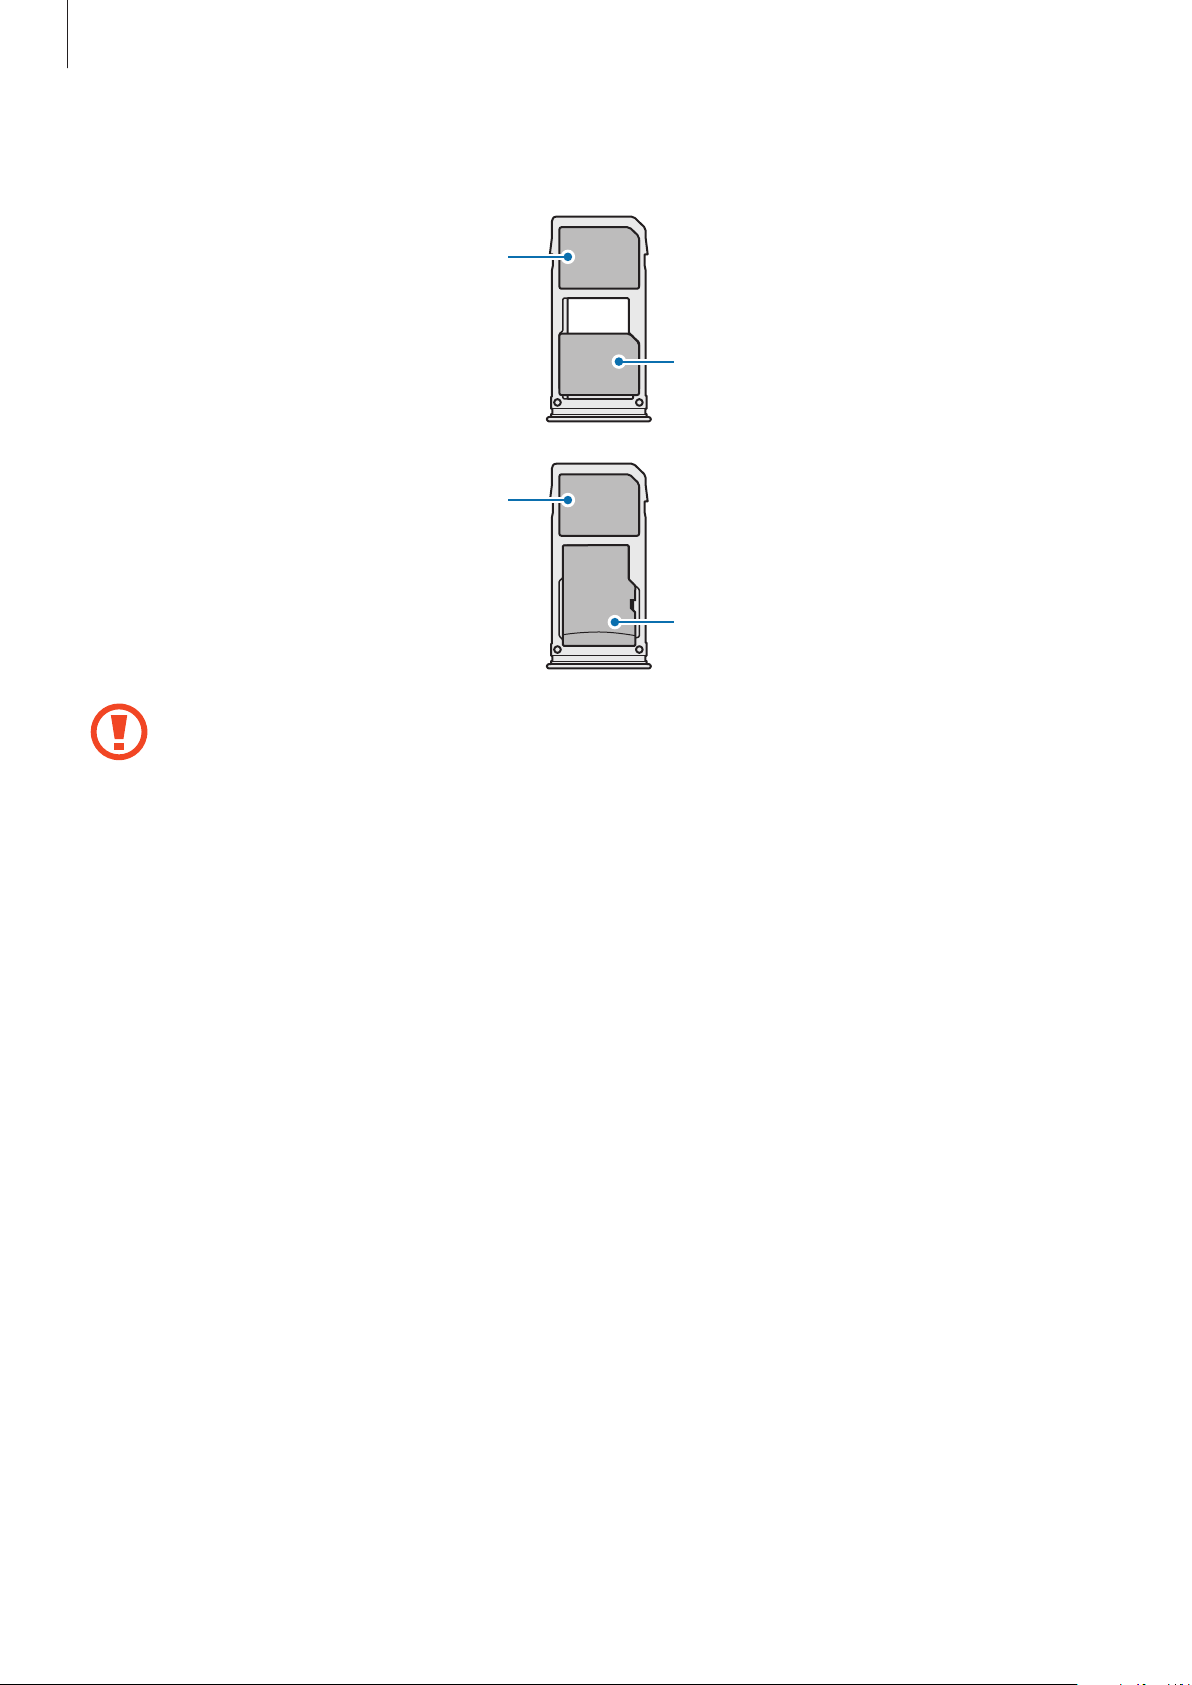
Basics
Correct card installation
Nano-SIM card 1
Nano-SIM card
Nano-SIM card 2
microSD card
•
Use only a nano-SIM card.
•
You cannot insert a nano-SIM card and a microSD card in tray 2 at the same time.
Removing the SIM or USIM card
Insert the ejection pin into the hole next to the tray to loosen the tray.
1
Pull out the tray gently from the tray slot.
2
Remove the SIM or USIM card.
3
Insert the tray back into the tray slot.
4
19
Page 20

Basics
Using dual SIM or USIM cards
If you insert two SIM or USIM cards, you can have two phone numbers or service providers for
a single device.
Activating SIM or USIM cards
Launch the
card and tap the switch to activate it.
Settings
app and tap
Connections
→
SIM card manager
. Select a SIM or USIM
Customising SIM or USIM cards
Launch the
USIM card to access the following options:
•
Icon
•
Name
•
Network mode
Settings
: Change the icon of the SIM or USIM card.
: Change the display name of the SIM or USIM card.
app, tap
: Select a network type to use with the SIM or USIM card.
Connections
→
SIM card manager
, and then select a SIM or
Setting preferred SIM or USIM cards
When two cards are activated, you can assign voice calls, messaging, and data services to
specific cards.
Launch the
preferences for your cards in
Settings
app, tap
Connections
Preferred SIM card
→
SIM card manager
, and then set the feature
.
20
Page 21
Basics
Memory card (microSD card)
Installing a memory card
Your device’s memory card capacity may vary from other models and some memory cards
may not be compatible with your device depending on the memory card manufacturer and
type. To view your device’s maximum memory card capacity, refer to the Samsung website.
•
Some memory cards may not be fully compatible with the device. Using an
incompatible card may damage the device or the memory card, or corrupt the data
stored in it.
•
Use caution to insert the memory card right-side up.
•
The device supports the FAT and the exFAT file systems for memory cards. When
inserting a card formatted in a different file system, the device will ask to reformat
the card or will not recognise the card. To use the memory card, you must format it.
If your device cannot format or recognise the memory card, contact the memory
card manufacturer or a Samsung Service Centre.
•
Frequent writing and erasing of data shortens the lifespan of memory cards.
•
When inserting a memory card into the device, the memory card’s file directory
appears in the
My Files
→
SD card
folder.
21
Page 22
Basics
1
4 5
Insert the ejection pin into the hole next to the tray to loosen the tray.
1
Ensure that the ejection pin is perpendicular to the hole. Otherwise, the device may
2 3
be damaged.
Pull out the tray gently from the tray slot.
2
When you remove the tray from the device, the mobile data connection will be
disabled.
22
Page 23
Basics
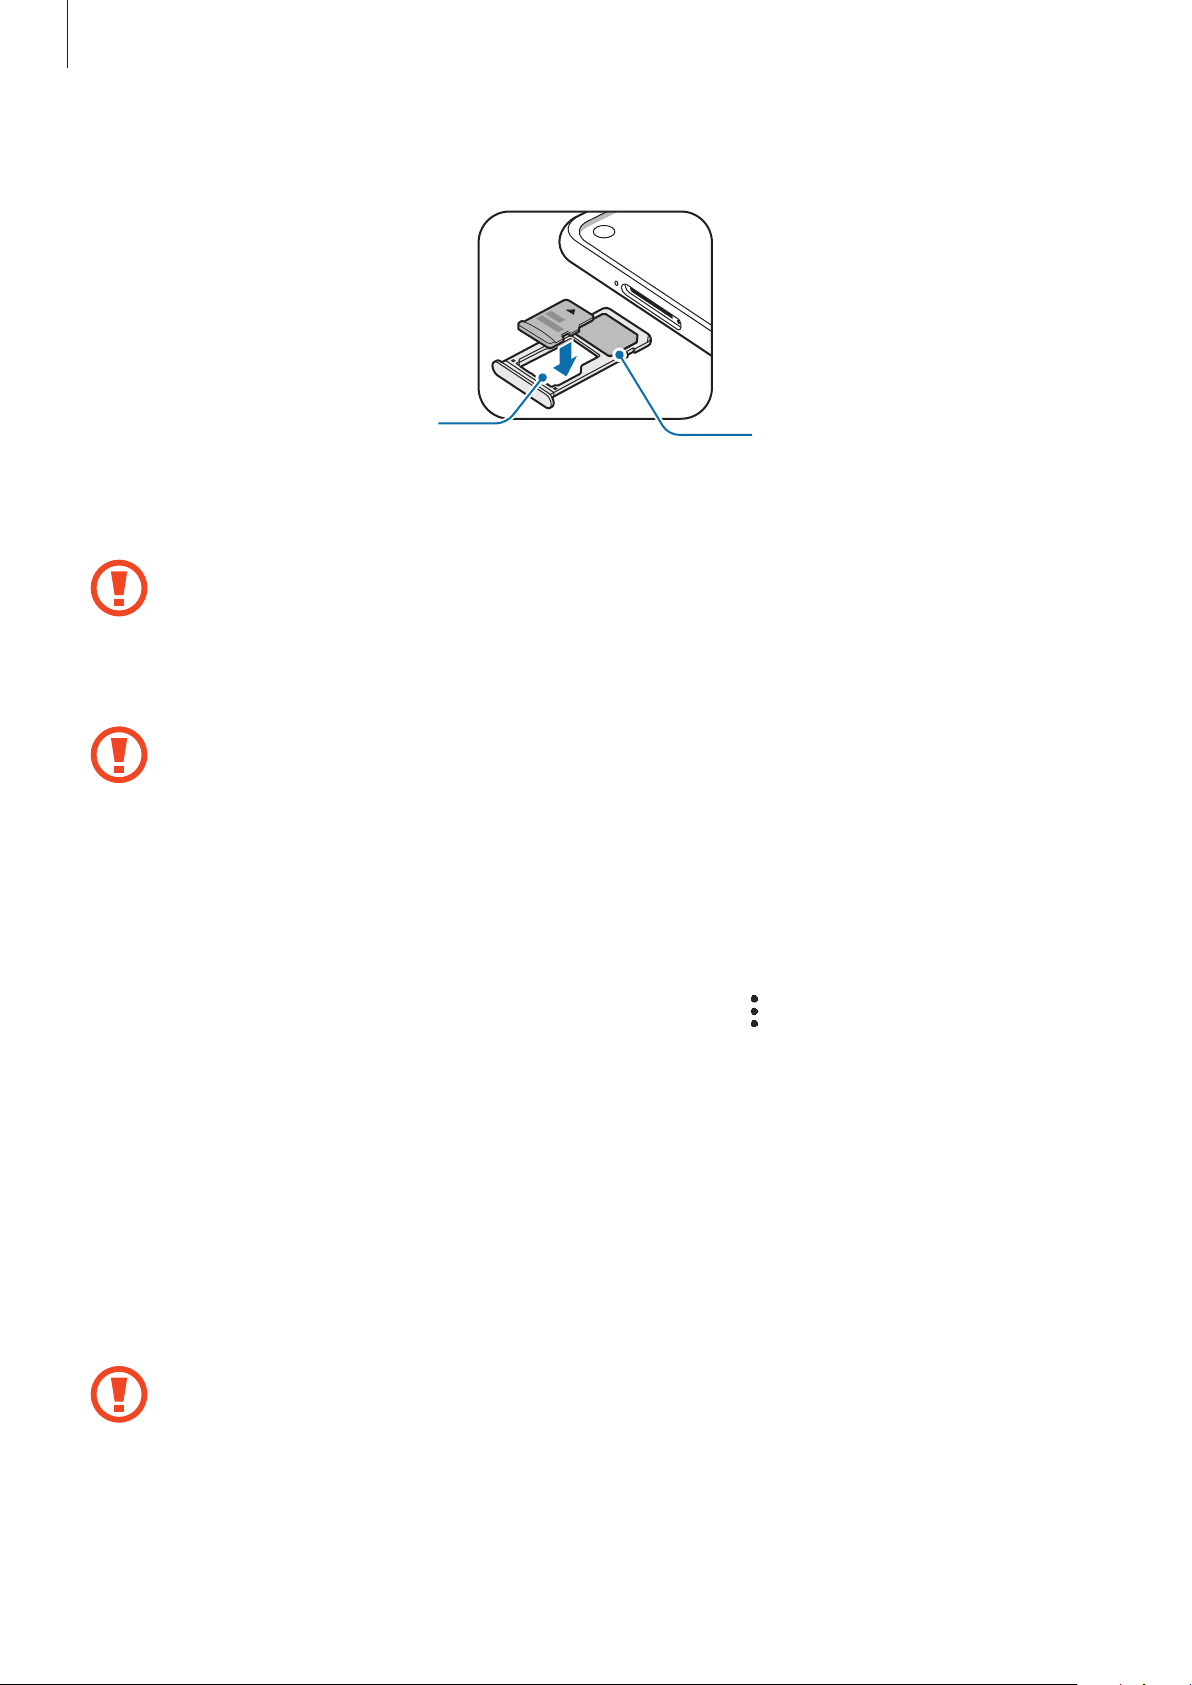
Place a memory card on the tray 2 with the gold-coloured contacts facing downwards.
3
Tray 2
Gently press the memory card into the tray to secure it.
4
If the card is not fixed firmly into the tray, the memory card may leave or fall out of the
tray.
Insert the tray back into the tray slot.
5
•
If you insert the tray into your device while the tray is wet, your device may be
damaged. Always make sure the tray is dry.
•
Fully insert the tray into the tray slot to prevent liquid from entering your device.
Tray 1
Removing the memory card
Before removing the memory card, first unmount it for safe removal.
Launch the
→
card
Insert the ejection pin into the hole next to the tray to loosen the tray.
1
Pull out the tray gently from the tray slot.
2
Remove the memory card.
3
Insert the tray back into the tray slot.
4
Settings
Unmount
Do not remove external storage, such as a memory card or USB storage, while the
device is transferring or accessing information, or right after transferring data. Doing
so can cause data to be corrupted or lost or cause damage to the external storage or
device. Samsung is not responsible for losses, including loss of data, resulting from
the misuse of external storage devices.
app and tap
.
Device care
→
Storage
→ →
Storage settings
→
SD
23
Page 24
Basics
Formatting the memory card
A memory card formatted on a computer may not be compatible with the device. Format the
memory card on the device.
Launch the
→
card
Settings
Format
Before formatting the memory card, remember to make backup copies of all
important data stored in the memory card. The manufacturer’s warranty does not
cover loss of data resulting from user actions.
app and tap
.
Device care
→
Storage
→ →
Storage settings
→
SD
Turning the device on and off
Press and hold the Power key for a few seconds to turn on the device.
When you turn on your device for the first time or after performing a data reset, follow the
on-screen instructions to set up your device.
To turn off the device, press and hold the Power key, and then tap
While the Power key is switched to the Bixby key, open the notification panel, tap
then tap
Power off
.
Power off
.
, and
Follow all posted warnings and directions from authorised personnel in areas where
the use of wireless devices is restricted, such as aeroplanes and hospitals.
Restarting the device
To restart the device, press and hold the Power key, and then tap
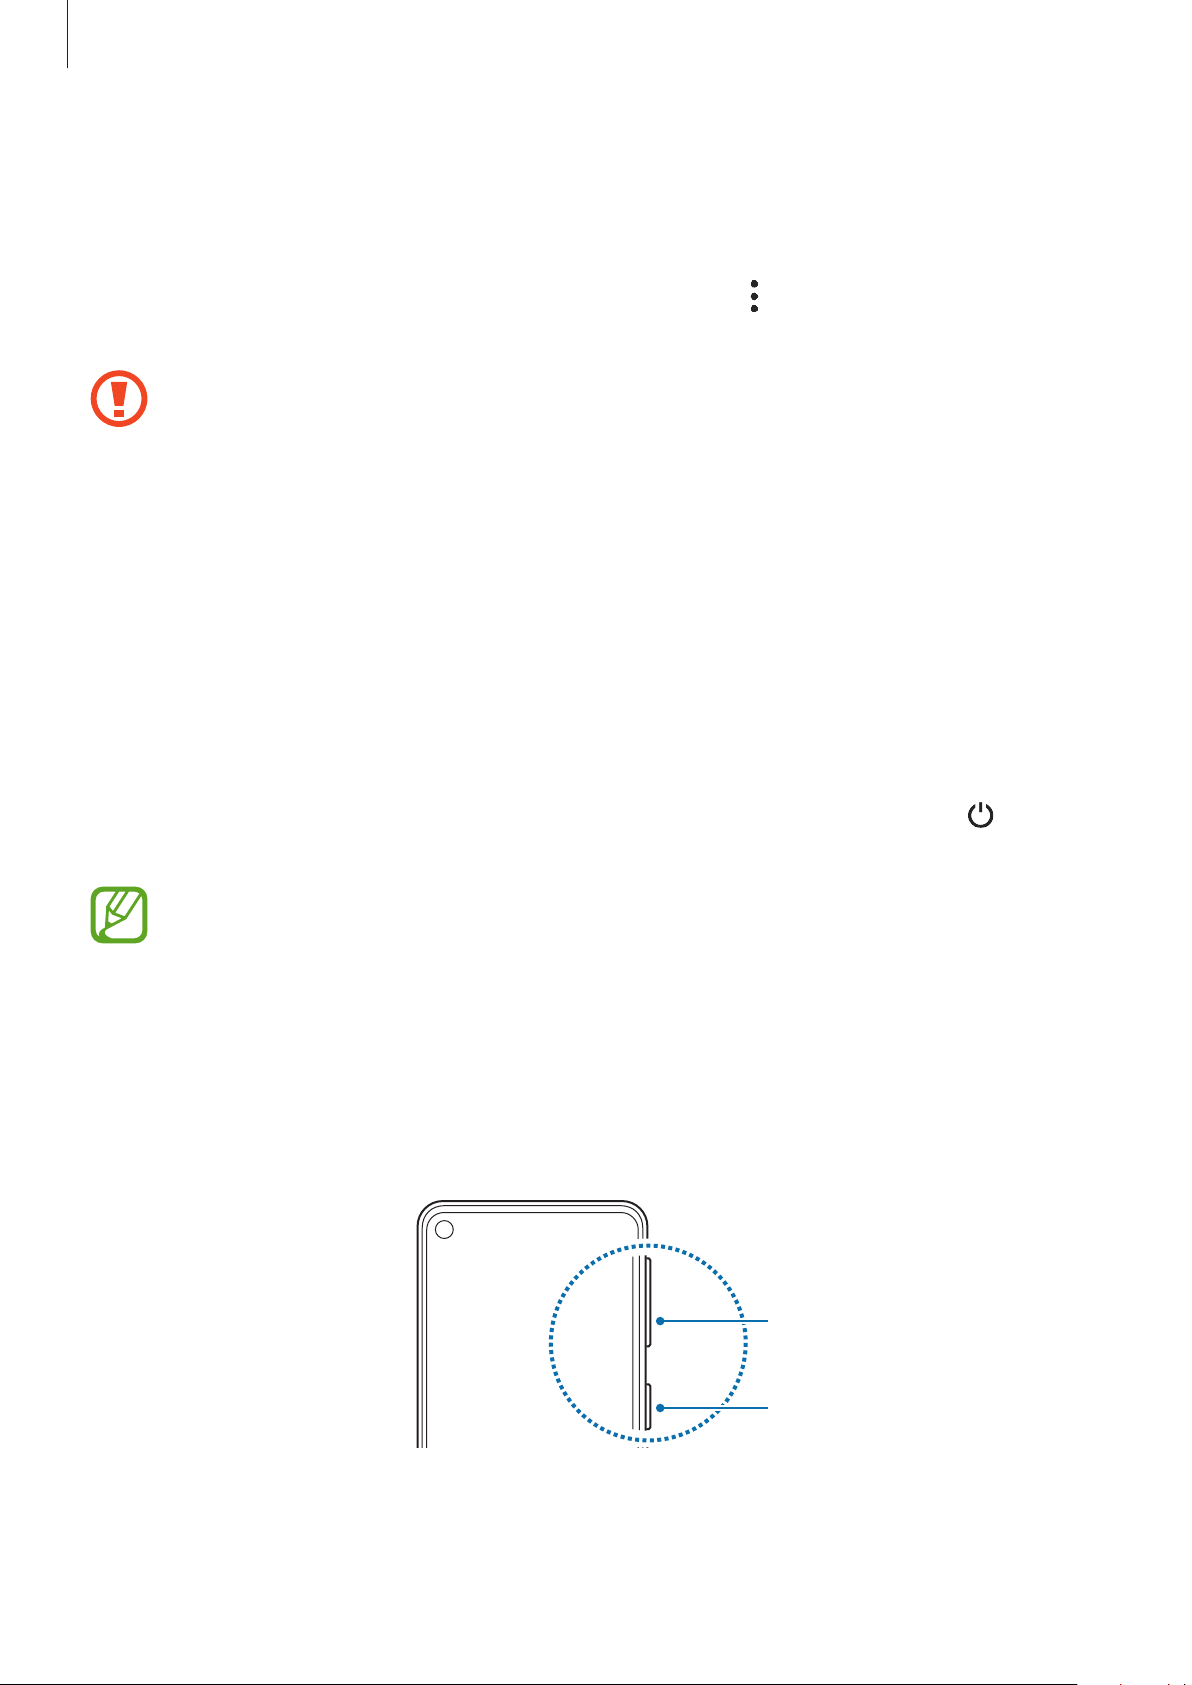
If your device is frozen and unresponsive, press and hold the Power key and the Volume
Down key simultaneously for more than 7 seconds to restart it.
Restart
Volume Down key
Power key
.
24
Page 25

Basics
Emergency mode
You can switch the device to emergency mode to reduce battery consumption. Some apps
and functions will be restricted. In emergency mode, you can make an emergency call, send
your current location information to others, sound an emergency alarm, and more.
Activating emergency mode
To activate emergency mode, press and hold the Power key, and then tap
The usage time left shows the time remaining before the battery power runs
out. Usage time left may vary depending on your device settings and operating
conditions.
Deactivating emergency mode
To deactivate emergency mode, tap →
hold the Power key, and then tap
Emergency mode
Turn off Emergency mode
.
Emergency mode
. Alternatively, press and
Initial setup
When you turn on your device for the first time or after performing a data reset, follow the
on-screen instructions to set up your device.
The initial setup procedures may vary depending on the device’s software and your
.
region.
Turn on the device.
1
25
Page 26

Basics
Select your preferred device language and select .
2
Select a language.
Read and agree to the terms and conditions and tap
3
Retrieve your settings from a previous device.
4
Select a Wi-Fi network and connect to it.
5
If you do not connect to a Wi-Fi network, you may not be able to set up some device
features during the initial setup.
Follow the on-screen instructions to proceed the initial setup.
6
Set a screen lock method to protect your device. You can protect your personal
7
information by preventing others from accessing your device. To set the screen lock
method later, tap
Not now
.
Next
.
26
Page 27

Basics
Sign in to your Samsung account. You can enjoy Samsung services and keep your data
8
up to date and secure across all of your devices. Refer to Samsung account for more
information.
Tap
9
Finish
The Home screen will appear.
to complete the initial setup.
Samsung account
Your Samsung account is an integrated account service that allows you to use a variety of
Samsung services provided by mobile devices, TVs, and the Samsung website.
To check the list of services that can be used with your Samsung account, visit
Help
Settings
.
account.samsung.com. For more information on Samsung accounts, launch the
and tap
Accounts and backup
→
Accounts
→
Samsung account
→ →
Creating a Samsung account
If you do not have a Samsung account, you should create one. You can create a Samsung
account using your email address.
Launch the
1
Samsung account
Alternatively, launch the
Tap
2
3
Create account
Follow the on-screen instructions to complete creating your account.
Settings
.
app and tap
Settings
.
Accounts and backup
app and tap
.
→
Accounts
→
Add account
Signing in to your Samsung account
app
→
If you already have a Samsung account, sign in to your Samsung account.
Launch the
1
Samsung account
Alternatively, launch the
Enter your Samsung account ID and password and tap
2
Settings
.
app and tap
Settings
Accounts and backup
app and tap .
Sign in
27
→
Accounts
.
→
Add account
→
Page 28

Basics
Read and agree to the terms and conditions and tap
3
Samsung account.
If a pop-up window about using biometric data appears, tap Register. You can verify
your Samsung account password via your biometric data, such as fingerprints. Refer to
Samsung Pass for more information.
Next
to finish signing in to your
Finding your ID and resetting your password
If you forget your Samsung account ID or password, tap
Samsung account sign-in screen. You can find your ID or reset your password after you enter
the required information.
Find ID
or
Reset password
on the
Removing your Samsung account
When you remove your Samsung account from the device, your data, such as contacts or
events, will also be removed.
Launch the
1
Tap
2
Tap
3
Samsung account
Remove
Settings
, enter your Samsung account password, and then tap OK.
app and tap
→ →
Remove account
Accounts and backup
.
→
Accounts
.
Transferring data from your previous device (Smart Switch)
You can use Smart Switch to transfer data from your previous device to your new device.
Launch the
Settings
•
This feature may not be supported on some devices or computers.
•
Limitations apply. Visit www.samsung.com/hk/apps/smart-switch for details.
Samsung takes copyright seriously. Only transfer content that you own or have the
app and tap
Accounts and backup
→
Smart Switch
.
right to transfer.
28
Page 29

Basics
Transferring data wirelessly
Transfer data from your previous device to your device wirelessly via Wi-Fi Direct.
On the previous device, launch Smart Switch.
1
If you do not have the app, download it from
On your device, launch the
2
Switch
Place the devices near each other.
3
On the previous device, tap
4
On the previous device, select an item to transfer and tap
5
On your device, tap
6
Follow the on-screen instructions to transfer data from your previous device.
7
After the data is done transferring, you can view a list of the transferred data on your
device.
.
Receive
Settings
Send data
.
app and tap
→
Galaxy Store
Accounts and backup
Wireless
.
or
Play Store
SEND
.
→
.
Smart
Backing up and restoring data using external storage
Transfer data using external storage, such as a microSD card.
Back up data from your previous device to external storage.
1
Insert or connect the external storage device to your device.
2
On your device, launch the
3
→
→
Follow the on-screen instructions to transfer data from external storage.
4
Restore
.
Settings
app and tap
Accounts and backup
→
Smart Switch
29
Page 30
Basics
Understanding the screen
Controlling the touchscreen
•
Do not allow the touchscreen to come into contact with other electrical devices.
Electrostatic discharges can cause the touchscreen to malfunction.
•
To avoid damaging the touchscreen, do not tap it with anything sharp or apply
excessive pressure to it with your fingertips.
•
It is recommended not to use fixed graphics on part or all of the touchscreen for
extended periods. Doing so may result in afterimages (screen burn-in) or ghosting.
•
The device may not recognise touch inputs close to the edges of the screen, which
are outside of the touch input area.
•
It is recommended to use fingers when you use the touchscreen.
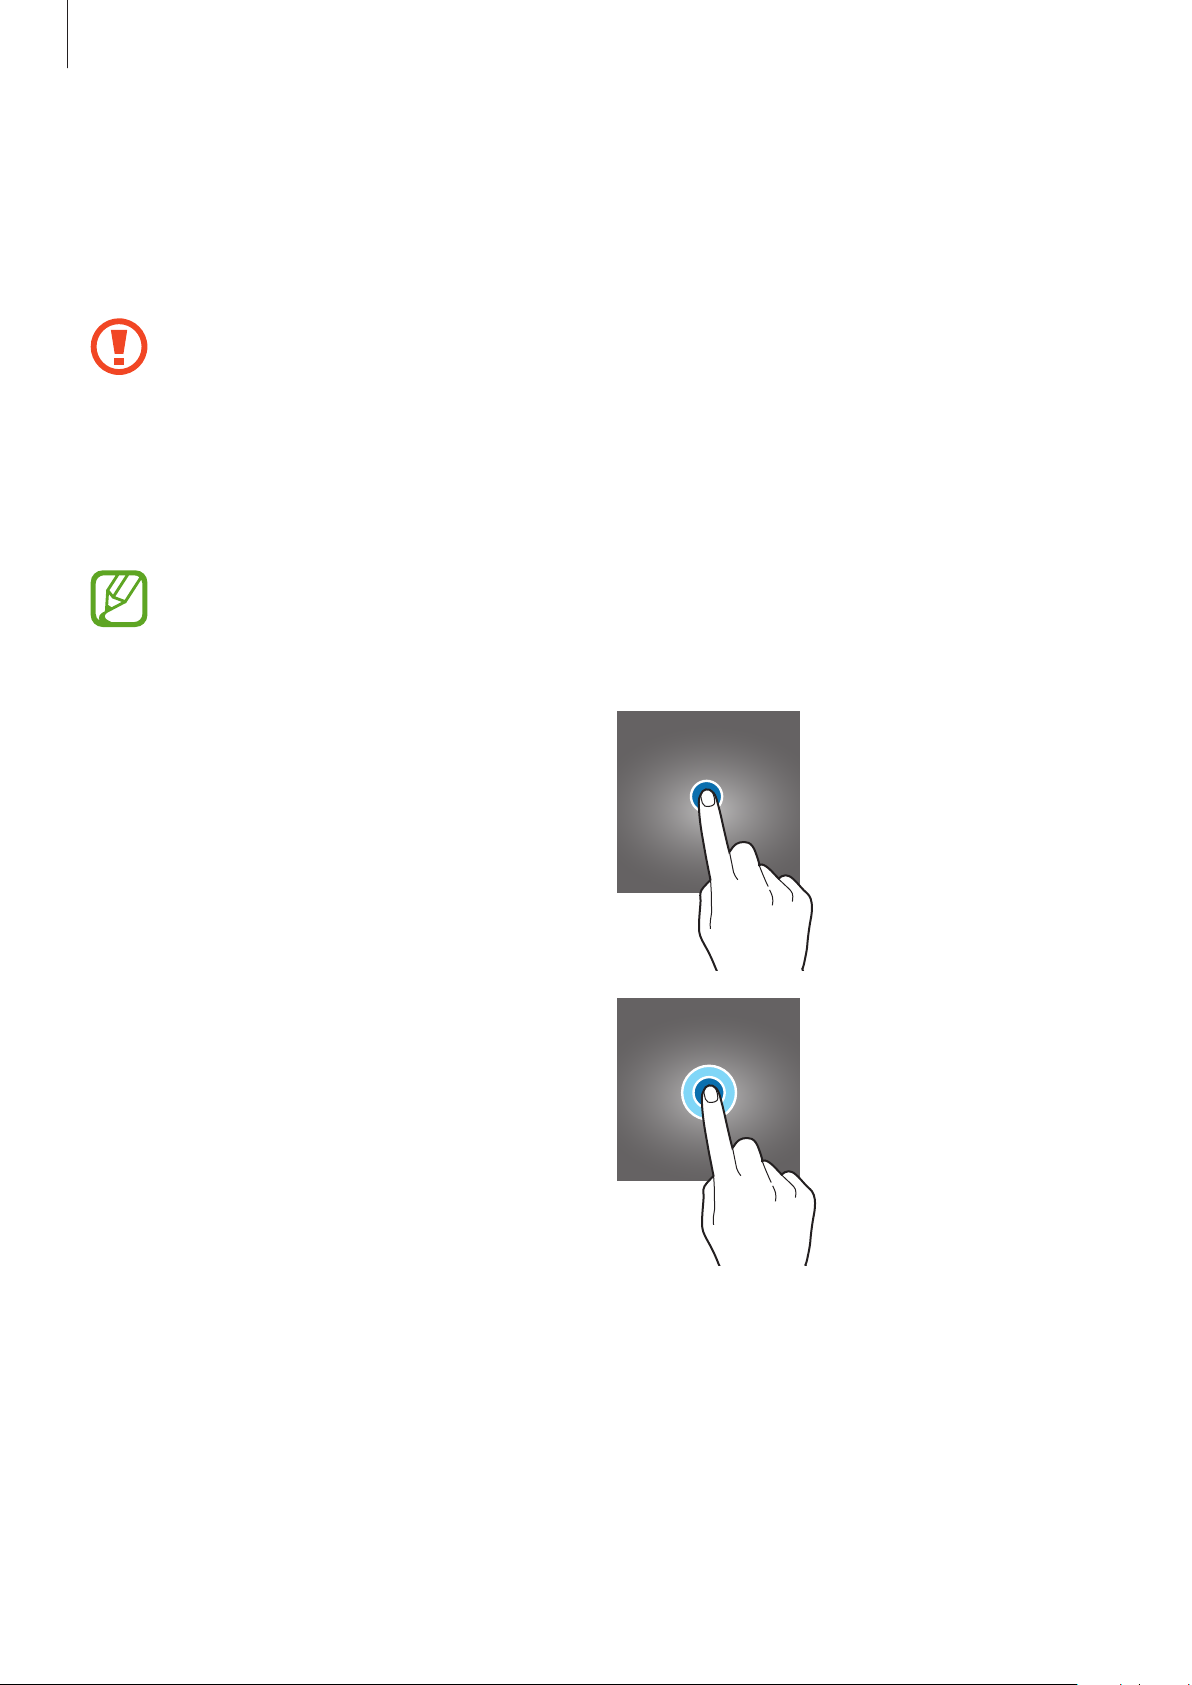
Tapping
Tap the screen.
Tapping and holding
Tap and hold the screen for approximately
2 seconds.
30
Page 31
Basics
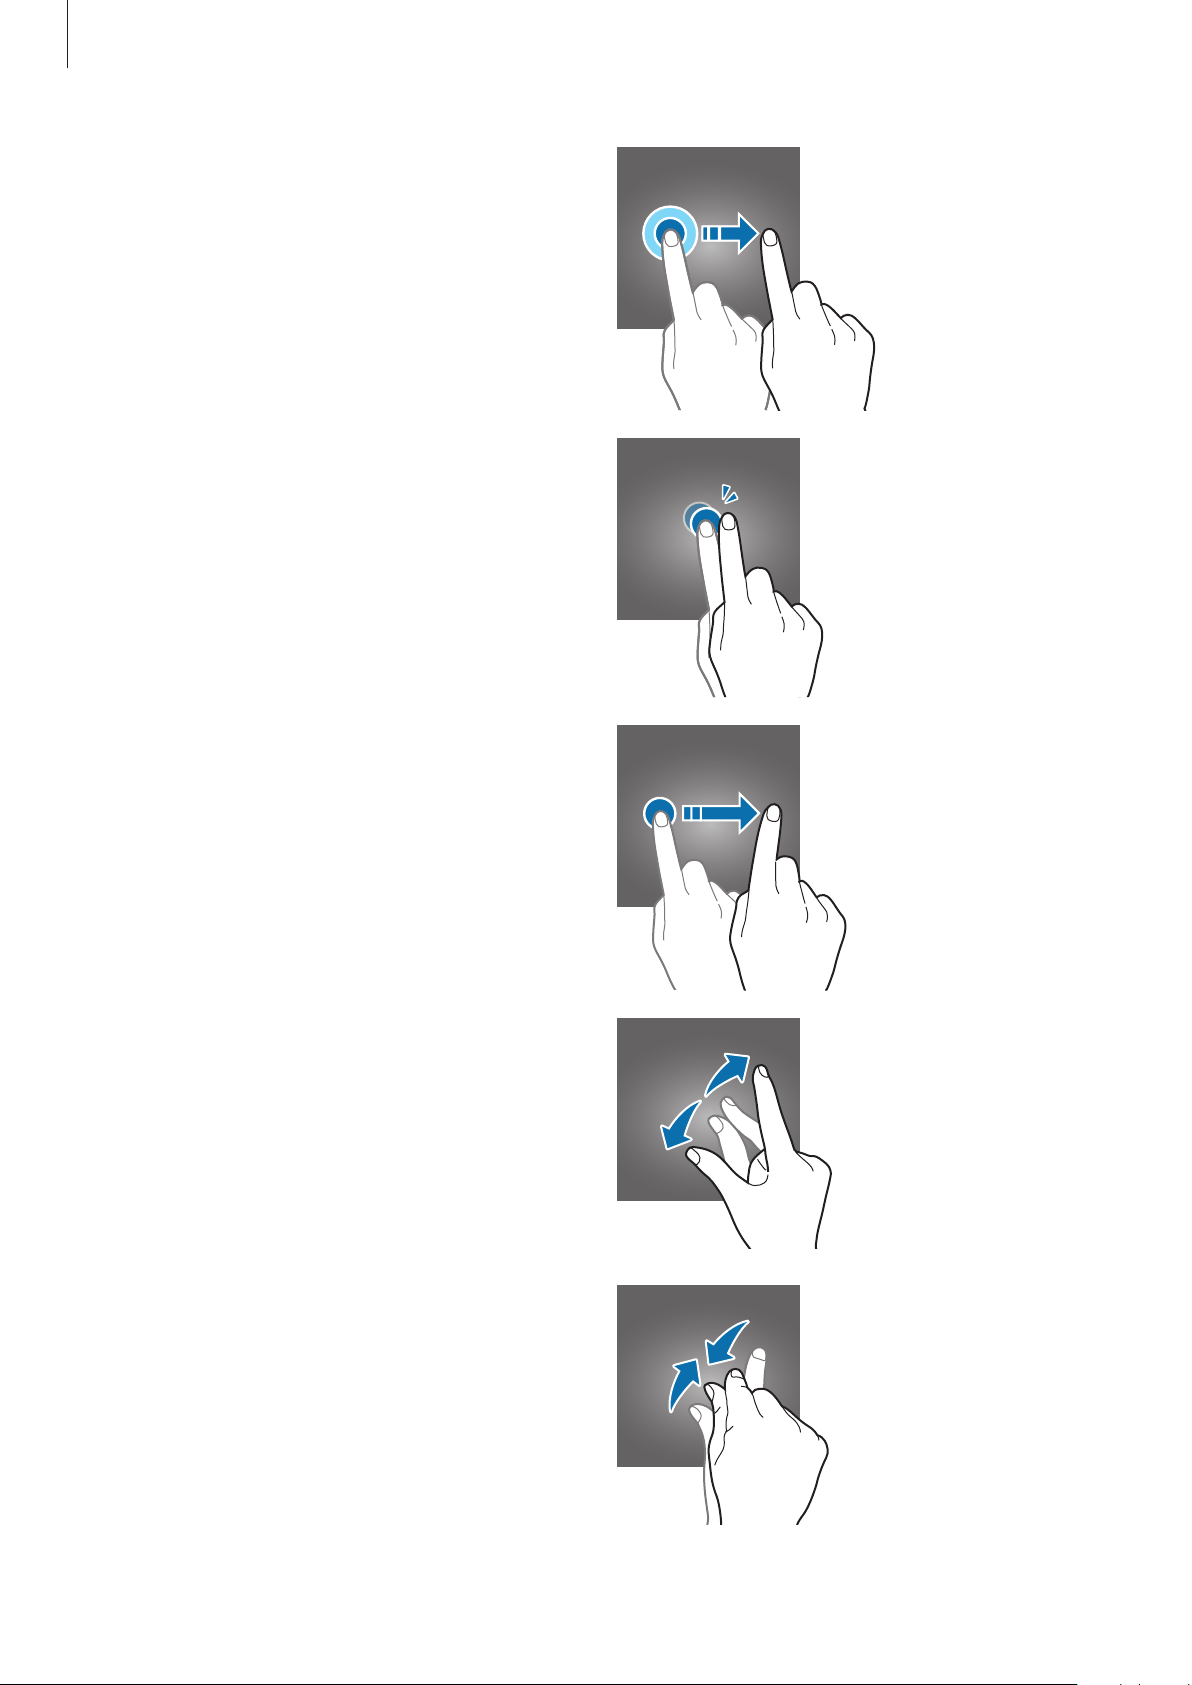
Dragging
Tap and hold an item and drag it to the
target position.
Double-tapping
Double-tap the screen.
Swiping
Swipe upwards, downwards, to the left, or
to the right.
Spreading and pinching
Spread two fingers apart or pinch on the
screen.
31
Page 32
Basics
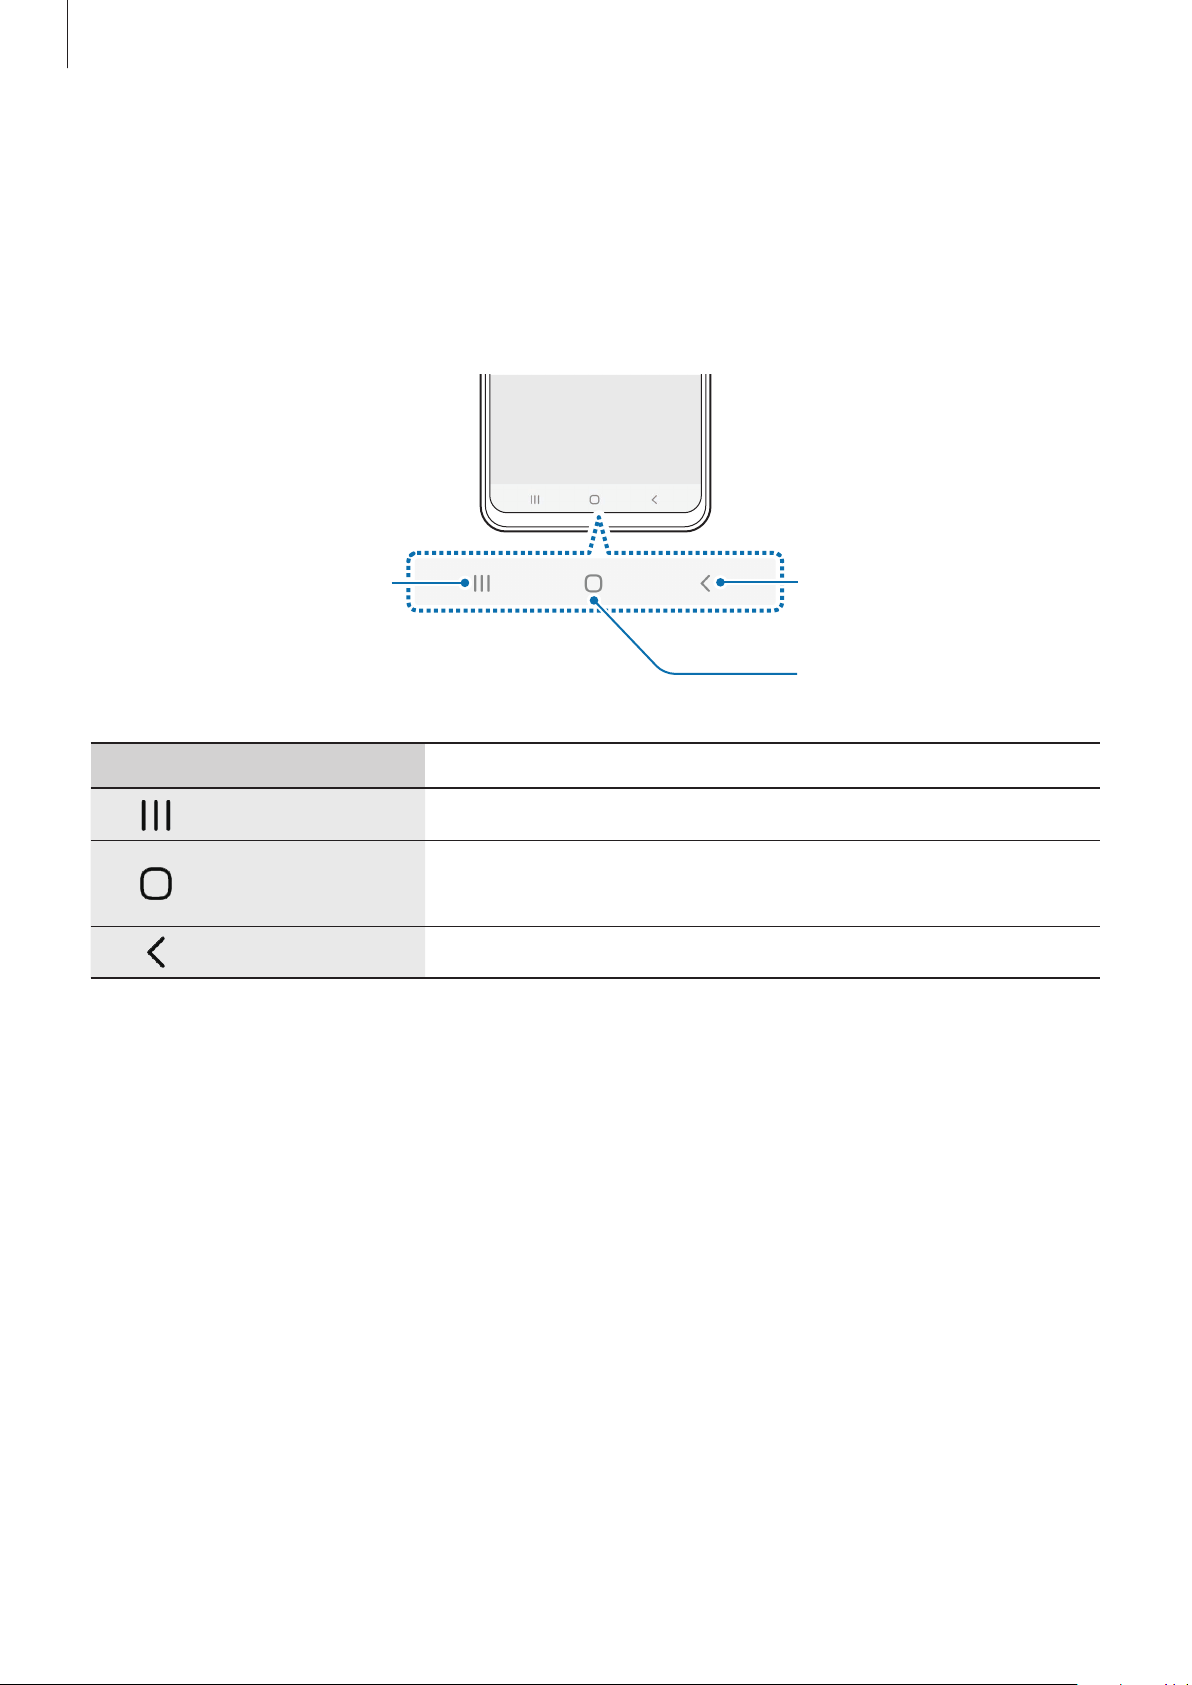
Navigation bar (soft buttons)
When you turn on the screen, the soft buttons will appear on the navigation bar at the
bottom of the screen. The soft buttons are set to the Recents button, Home button, and Back
button by default. The functions of the buttons can change according to the app currently
being used or usage environment.
Recents button
Button Function
Recents
Home
Back
•
Tap to open the list of recent apps.
•
Tap to return to the Home screen.
•
Tap and hold to launch the
•
Tap to return to the previous screen.
Back button
Home button
Google Assistant
app.
32
Page 33
Basics
Hiding the navigation bar
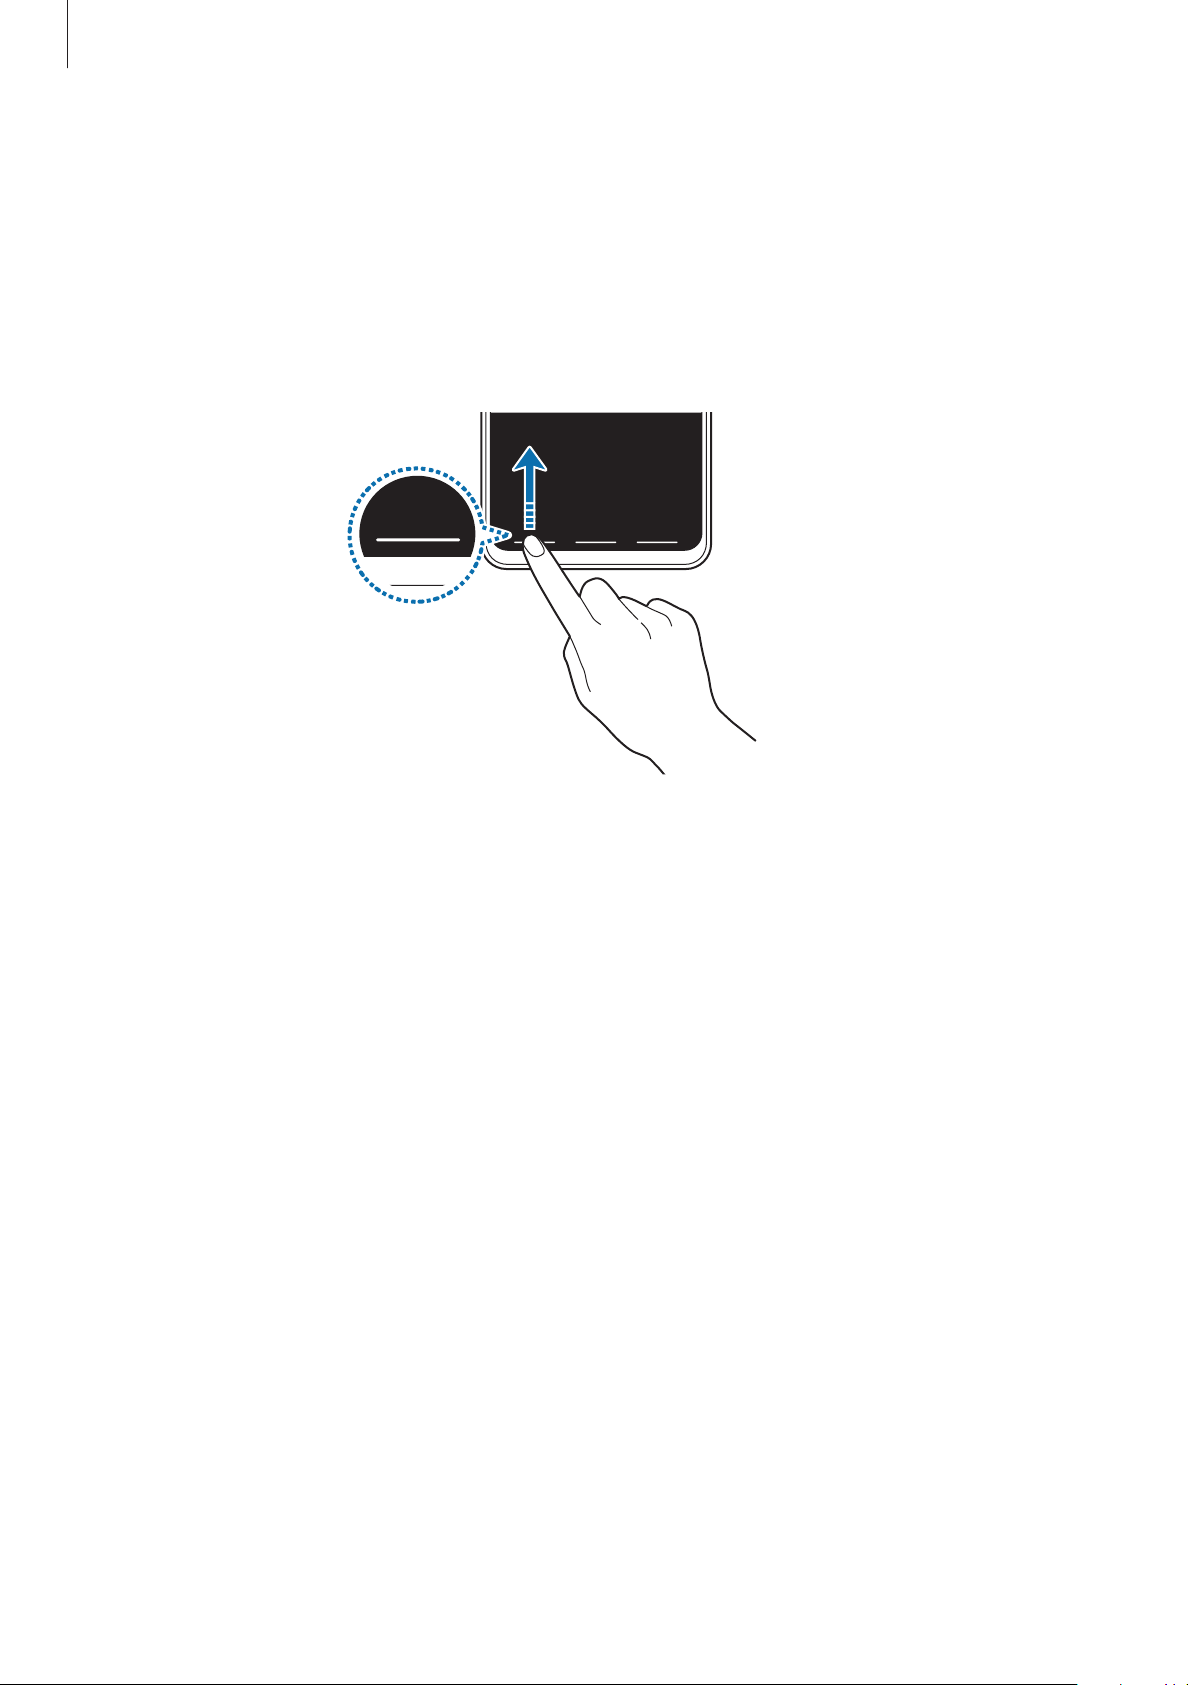
View files or use apps on a wider screen by hiding the navigation bar.
Launch the
under
where the soft buttons are located. To use the soft buttons, drag the gesture hint of the
desired button upwards.
Settings
Navigation type
app, tap
Display
. The navigation bar will be hidden and the gesture hints will appear
→
Navigation bar
, and then tap
Full screen gestures
If you want to hide the gesture hints at the bottom of the screen, tap the
switch to deactivate it.
Setting the navigation bar
Launch the
•
Navigation type
navigation bar, tap
the soft buttons by dragging the gesture hint of the desired button upwards.
•
Button order
•
Gesture hints
where the soft buttons are located. This feature appears only when you select
gestures
Settings
: Change the order of the buttons on the navigation bar.
: Set the device to display indicators at the bottom of the screen to show
.
app, tap
: Set the device to hide or display the navigation bar. To hide the
Full screen gestures
Display
→
Navigation bar
. While the navigation bar is hidden, you can use
, and then select an option.
Gesture hints
Full screen
33
Page 34
Basics
Home screen and Apps screen
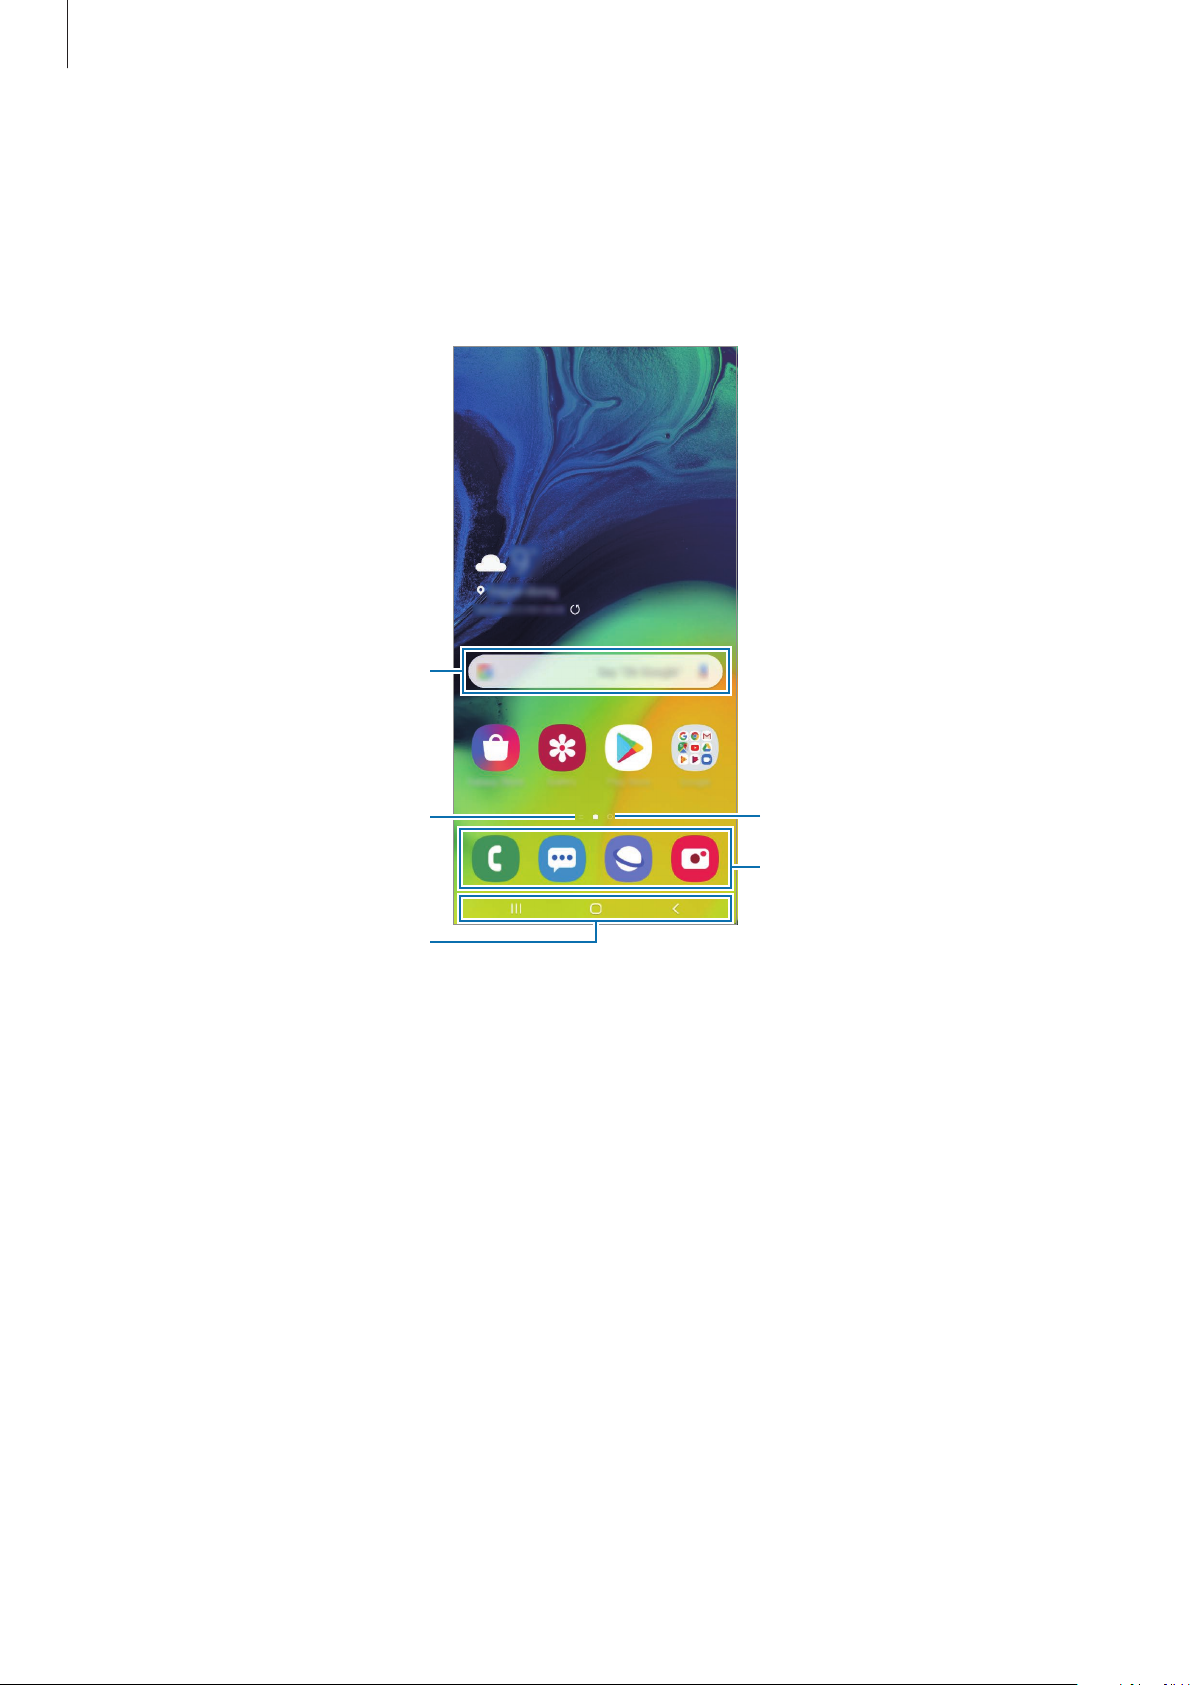
The Home screen is the starting point for accessing all of the device’s features. It displays
widgets, shortcuts to apps, and more.
The Apps screen displays icons for all apps, including newly installed apps.
A widget
Bixby Home indicator. View your
customised content.
Navigation bar (soft buttons)
Screen indicator
Favourite apps
34
Page 35
Basics
Switching between Home and Apps screens
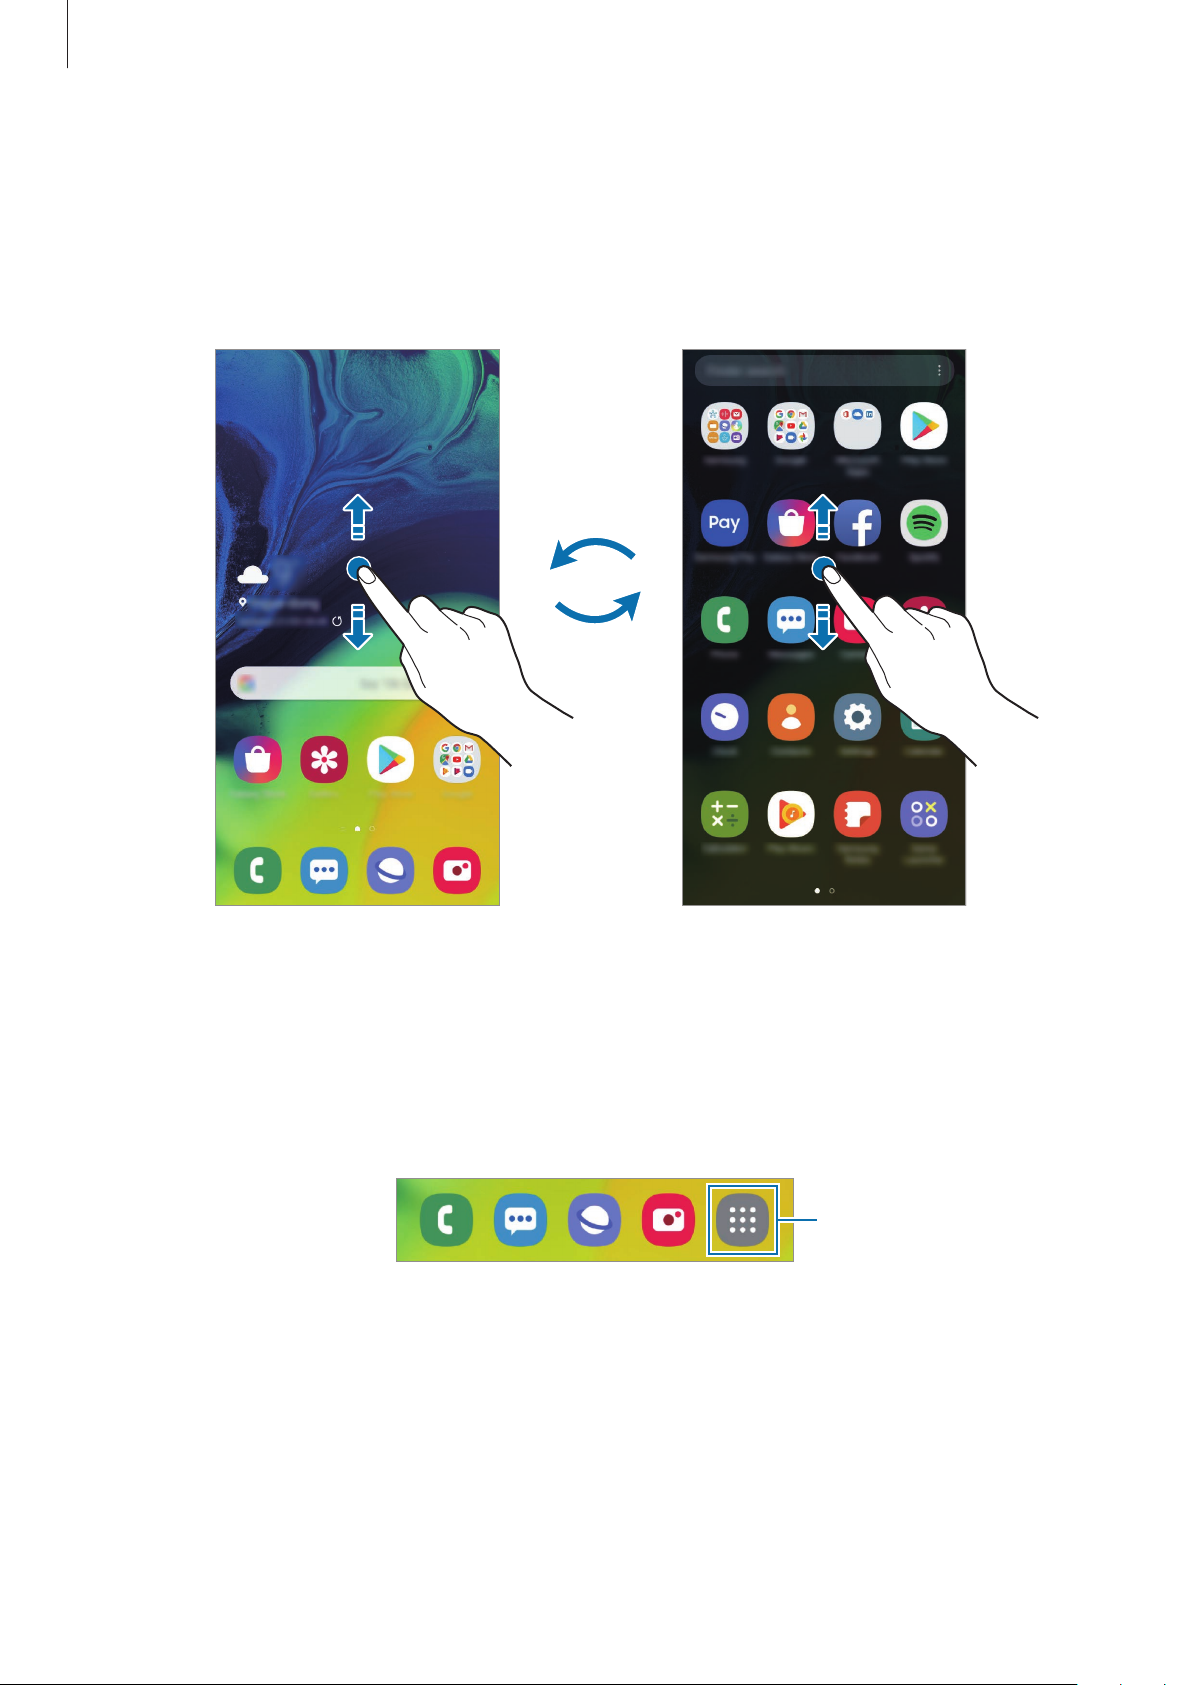
On the Home screen, swipe upwards or downwards to open the Apps screen.
To return to the Home screen, swipe upwards or downwards on the Apps screen.
Alternatively, tap the Home button or the Back button.
Home screen Apps screen
If you add the Apps button on the Home screen, you can open the Apps screen by tapping
the button. On the Home screen, tap and hold an empty area, tap
then tap the
Apps button
switch to activate it. The Apps button will be added at the bottom
Home screen settings
, and
of the Home screen.
Apps button
35
Page 36
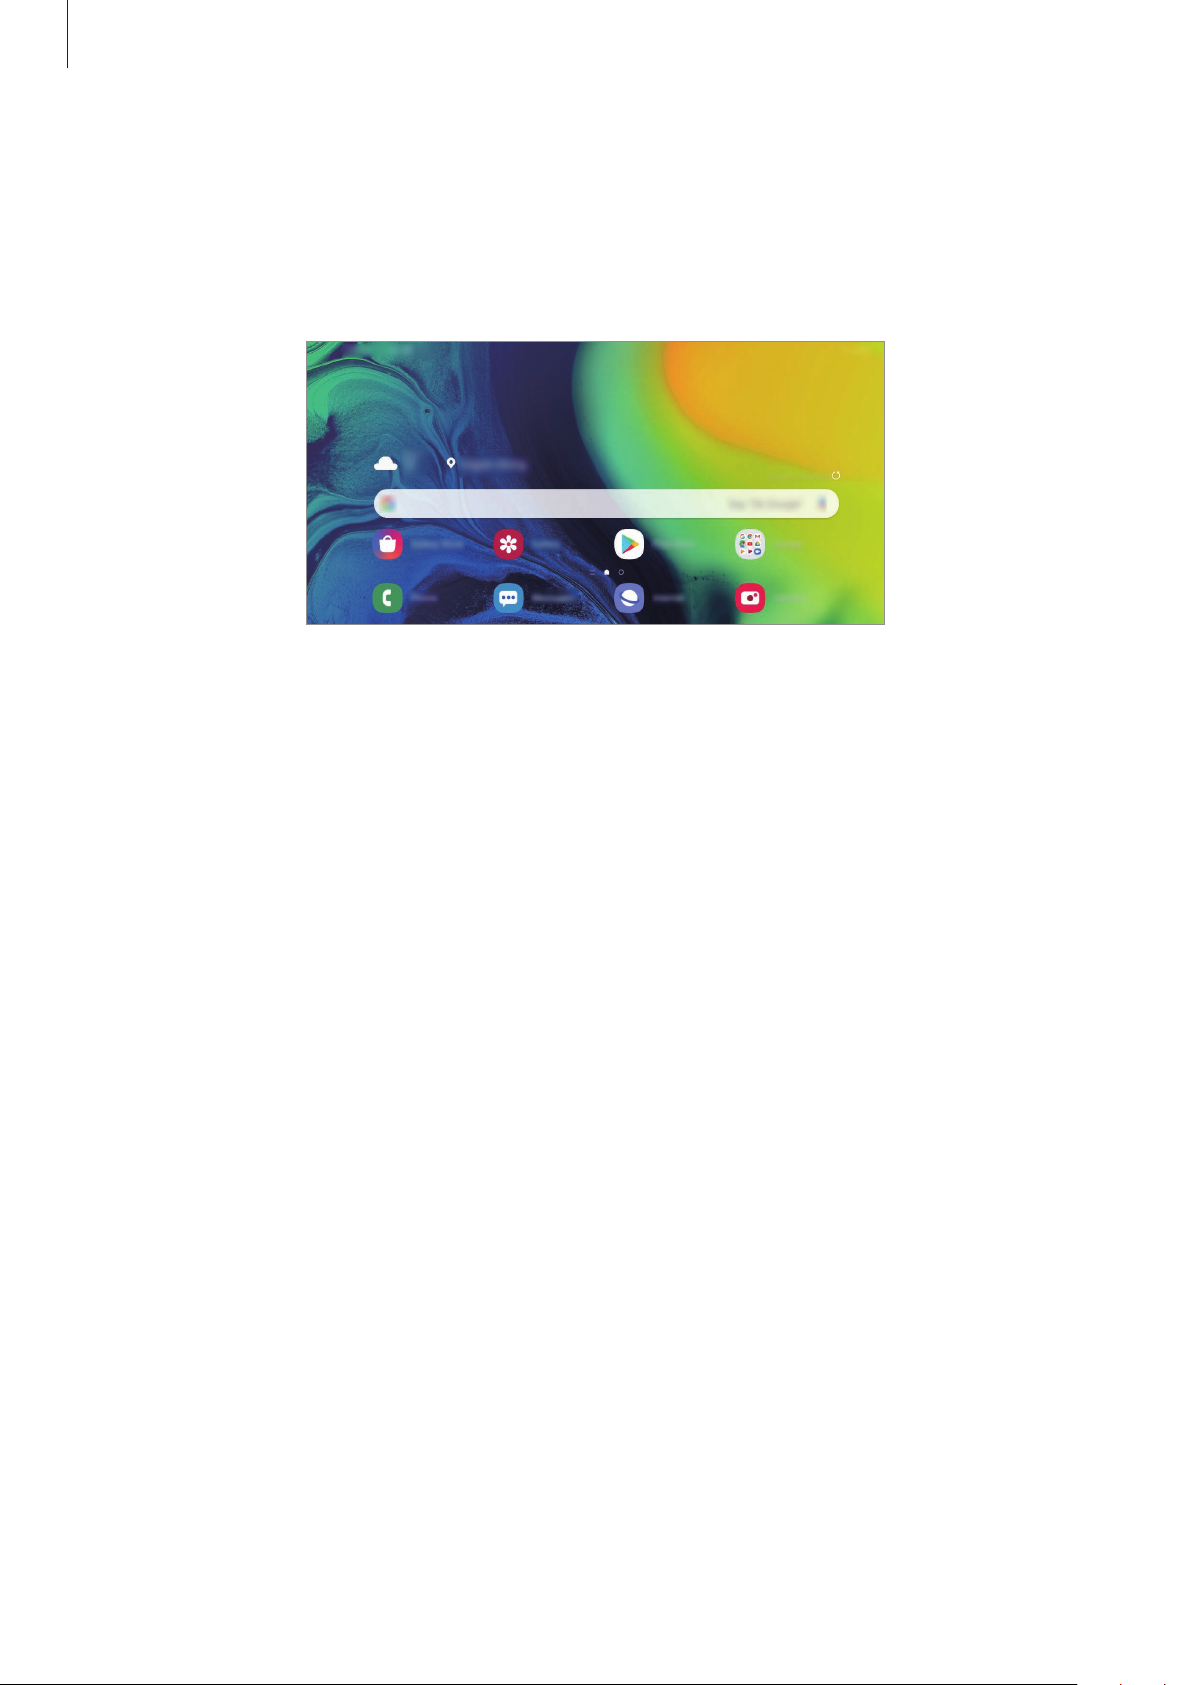
Basics
Display the screen in landscape mode
On the Home screen, tap and hold an empty area, tap
Rotate to landscape mode
the
Rotate the device until it is horizontal to view the screen in landscape mode.
switch to activate it.
Home screen settings
, and then tap
Moving items
Tap and hold an item, and then drag it to a new location. To move the item to another panel,
drag it to the side of the screen.
To add a shortcut to an app on the Home screen, tap and hold an item on the Apps screen,
and then tap
You can also move frequently used apps to the shortcuts area at the bottom of the Home
screen.
Add to Home
. A shortcut to the app will be added on the Home screen.
36
Page 37
Basics
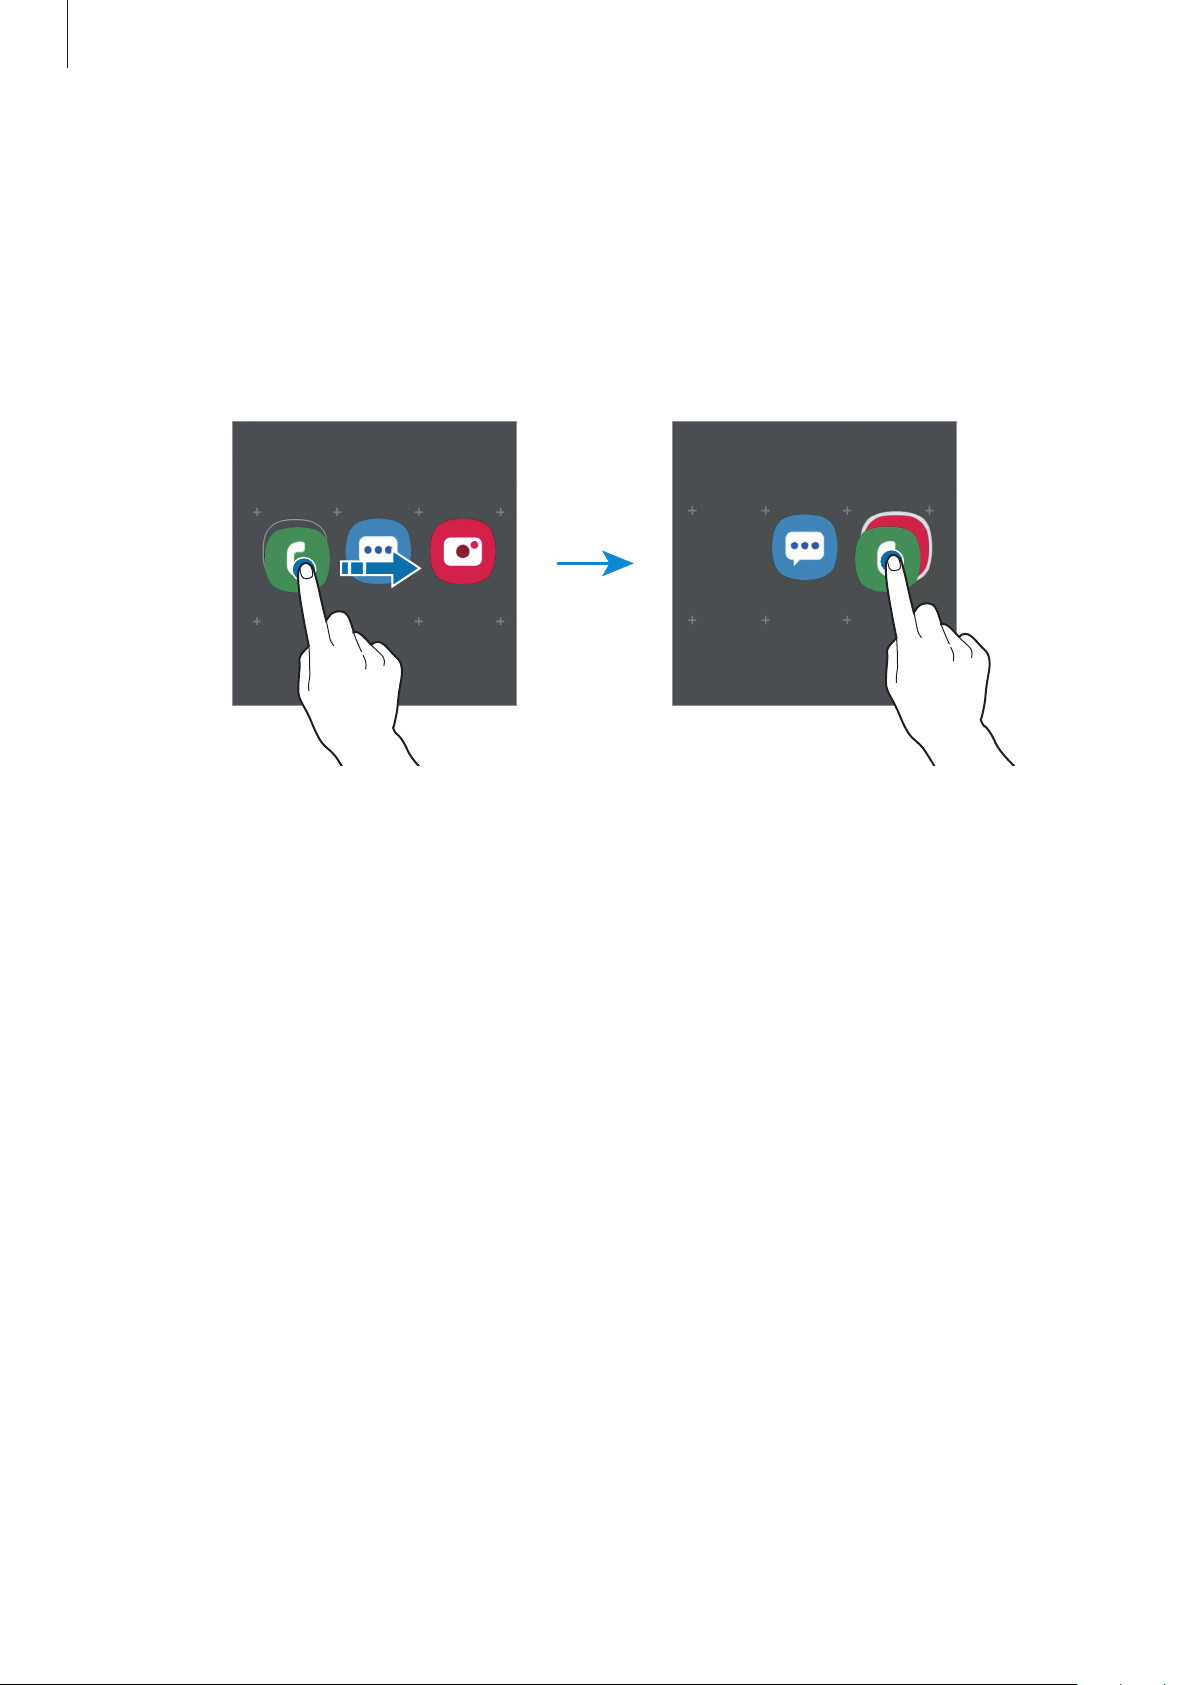
Creating folders
Create folders and gather similar apps to quickly access and launch apps.
On the Home screen or the Apps screen, tap and hold an app, and then drag it over another
app.
A new folder containing the selected apps will be created. Tap
folder name.
•
Adding more apps
Tap
Add apps
by dragging it to the folder.
on the folder. Tick the apps to add and tap
Enter folder name
Add
. You can also add an app
and enter a
•
Moving apps from a folder
Tap and hold an app to drag it to a new location.
•
Deleting a folder
Tap and hold a folder, and then tap
folder’s apps will be relocated to the Apps screen.
Delete folder
. Only the folder will be deleted. The
37
Page 38
Basics
Editing the Home screen
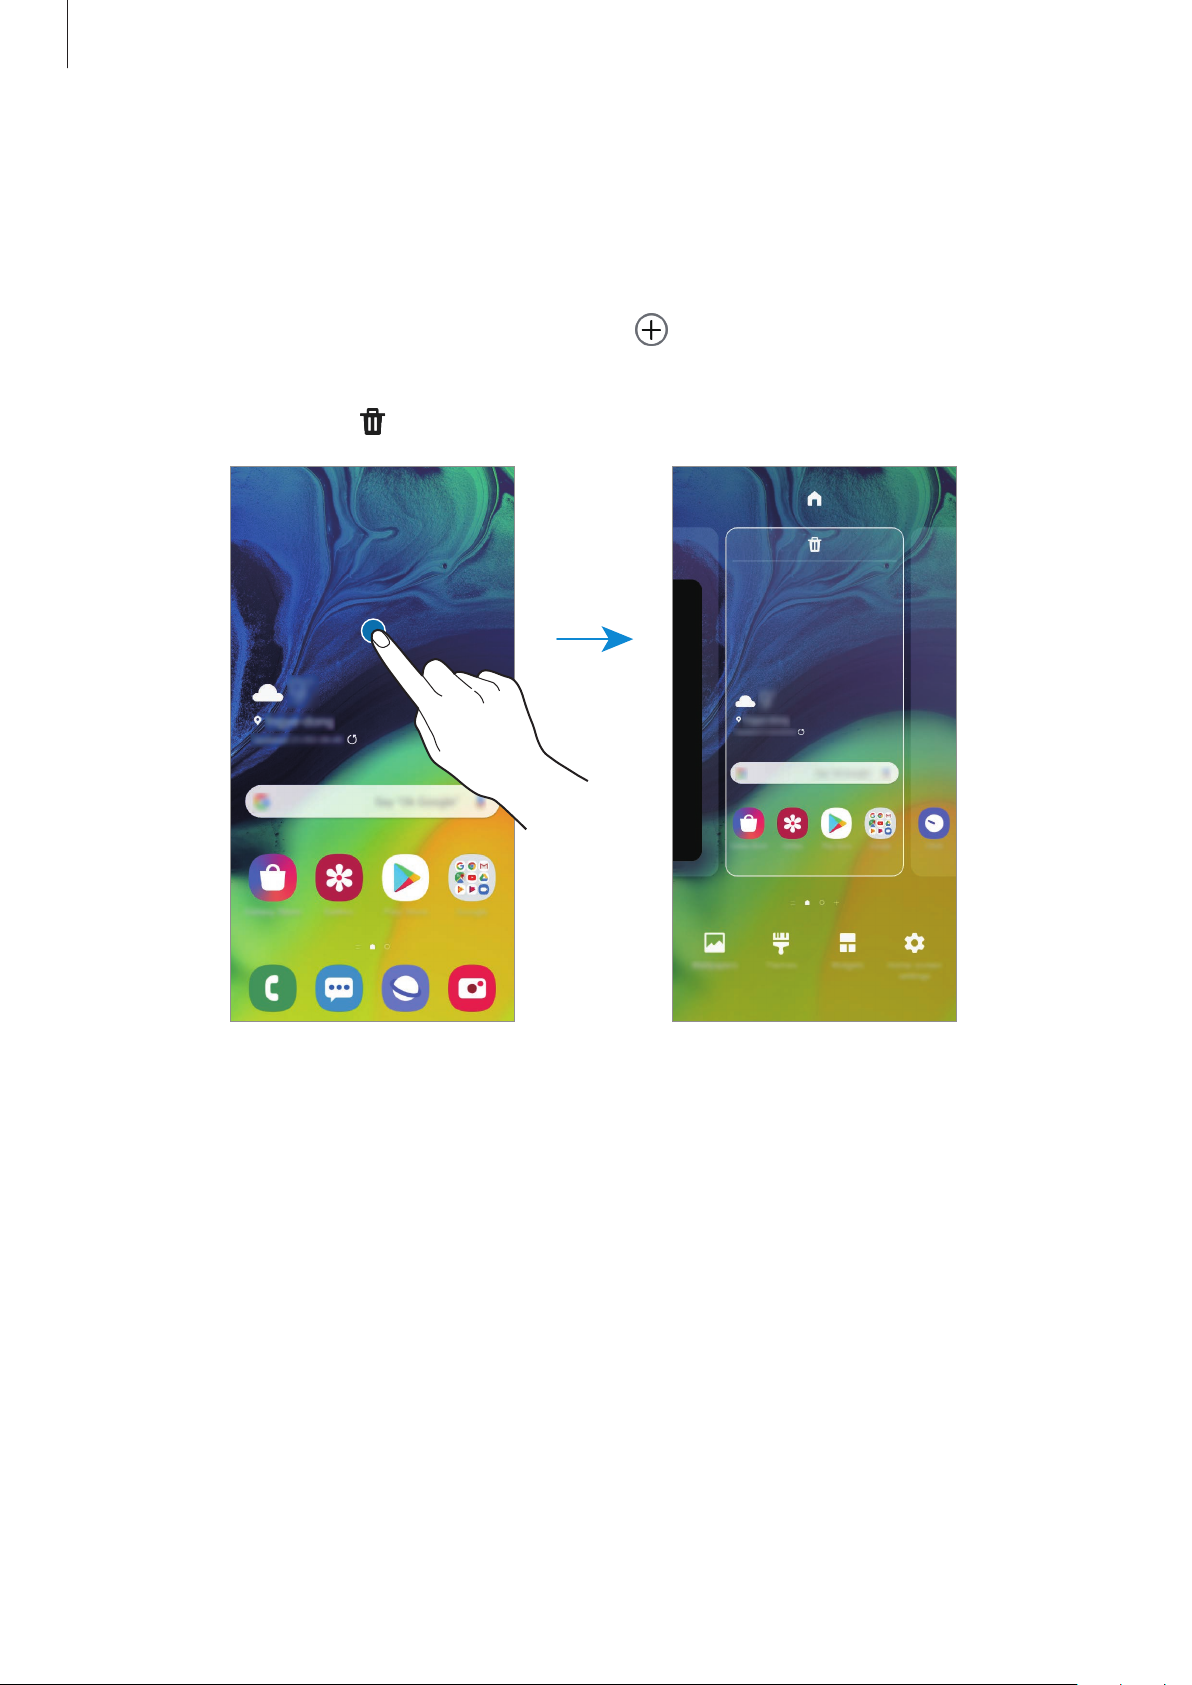
On the Home screen, tap and hold an empty area, or pinch your fingers together to access
the editing options. You can set the wallpaper, add widgets, and more. You can also add,
delete, or rearrange Home screen panels.
•
Adding panels: Swipe to the left, and then tap .
•
Moving panels: Tap and hold a panel preview, and then drag it to a new location.
•
Deleting panels: Tap on the panel.
•
Wallpapers
•
Themes
and wallpapers, will change depending on the selected theme.
•
Widgets
information and convenient access on your Home screen. Tap and hold a widget, and
then drag it to the Home screen. The widget will be added on the Home screen.
•
Home screen settings
Home screen and more.
: Change the wallpaper settings for the Home screen and the locked screen.
: Change the device’s theme. Visual elements of interface, such as colours, icons,
: Widgets are small apps that launch specific app functions to provide
: Change the size of the grid to display more or fewer items on the
38
Page 39
Basics
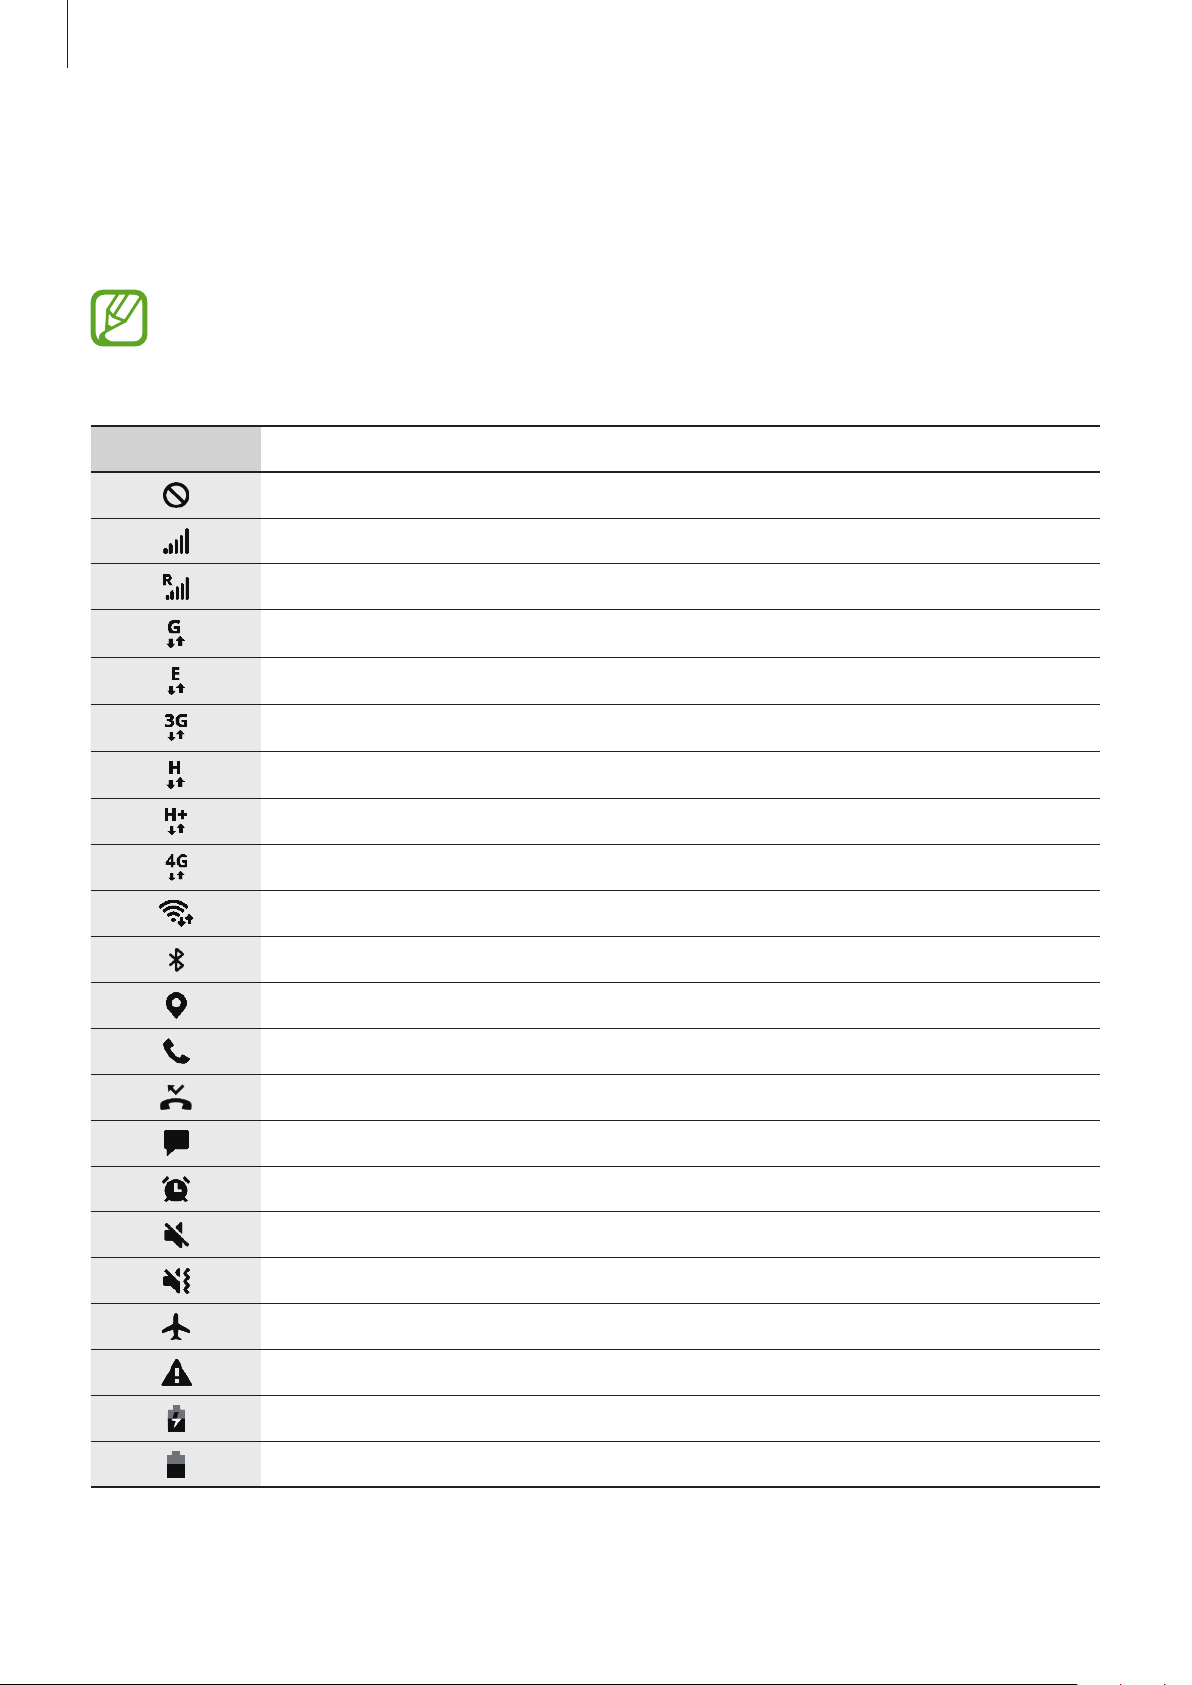
Indicator icons
Indicator icons appear on the status bar at the top of the screen. The icons listed in the table
below are most common.
•
The status bar may not appear at the top of the screen in some apps. To display the
status bar, drag down from the top of the screen.
•
Some indicator icons appear only when you open the notification panel.
Icon Meaning
No signal
Signal strength
Roaming (outside of normal service area)
GPRS network connected
EDGE network connected
UMTS network connected
HSDPA network connected
HSPA+ network connected
LTE network connected (LTE-enabled models)
Wi-Fi connected
Bluetooth feature activated
Location services being used
Call in progress
Missed call
New text or multimedia message
Alarm activated
Mute mode activated
Vibration mode activated
Flight mode activated
Error occurred or caution required
Battery charging
Battery power level
39
Page 40

Basics
Locked screen
Lock screen
Pressing the Power key turns off the screen and locks it. Also, the screen turns off and
automatically locks if the device is not used for a specified period.
To unlock the screen, swipe in any direction when the screen turns on.
If the screen is off, press the Power key or raise your device to turn on the screen.
Changing the screen lock method
To change the screen lock method, launch the
, and then select a method.
type
When you set a pattern, PIN, password, or your biometric data for the screen lock method,
you can protect your personal information by preventing others from accessing your device.
After setting the screen lock method, the device will require an unlock code whenever
unlocking it.
•
Swipe
•
Pattern
•
PIN
: Swipe in any direction on the screen to unlock it.
: Draw a pattern with four or more dots to unlock the screen.
: Enter a PIN with at least four numbers to unlock the screen.
Settings
40
app, tap
Lock screen
→
Screen lock
Page 41
Basics
•
Password
the screen.
•
None
•
Face
information.
•
Fingerprints
recognition for more information.
You can set your device to perform a factory data reset if you enter the unlock code
: Enter a password with at least four characters, numbers, or symbols to unlock
: Do not set a screen lock method.
: Register your face to unlock the screen. Refer to Face recognition for more
: Register your fingerprints to unlock the screen. Refer to Fingerprint
incorrectly several times in a row and reach the attempt limit. Launch the
app, tap
screen lock method, and then tap the
Lock screen
→
Secure lock settings
, unlock the screen using the preset
Auto factory reset
switch to activate it.
Settings
Screen capture
Capture a screenshot while using the device.
Use the following methods to capture a screenshot. Captured screenshots will be saved in
Gallery
•
•
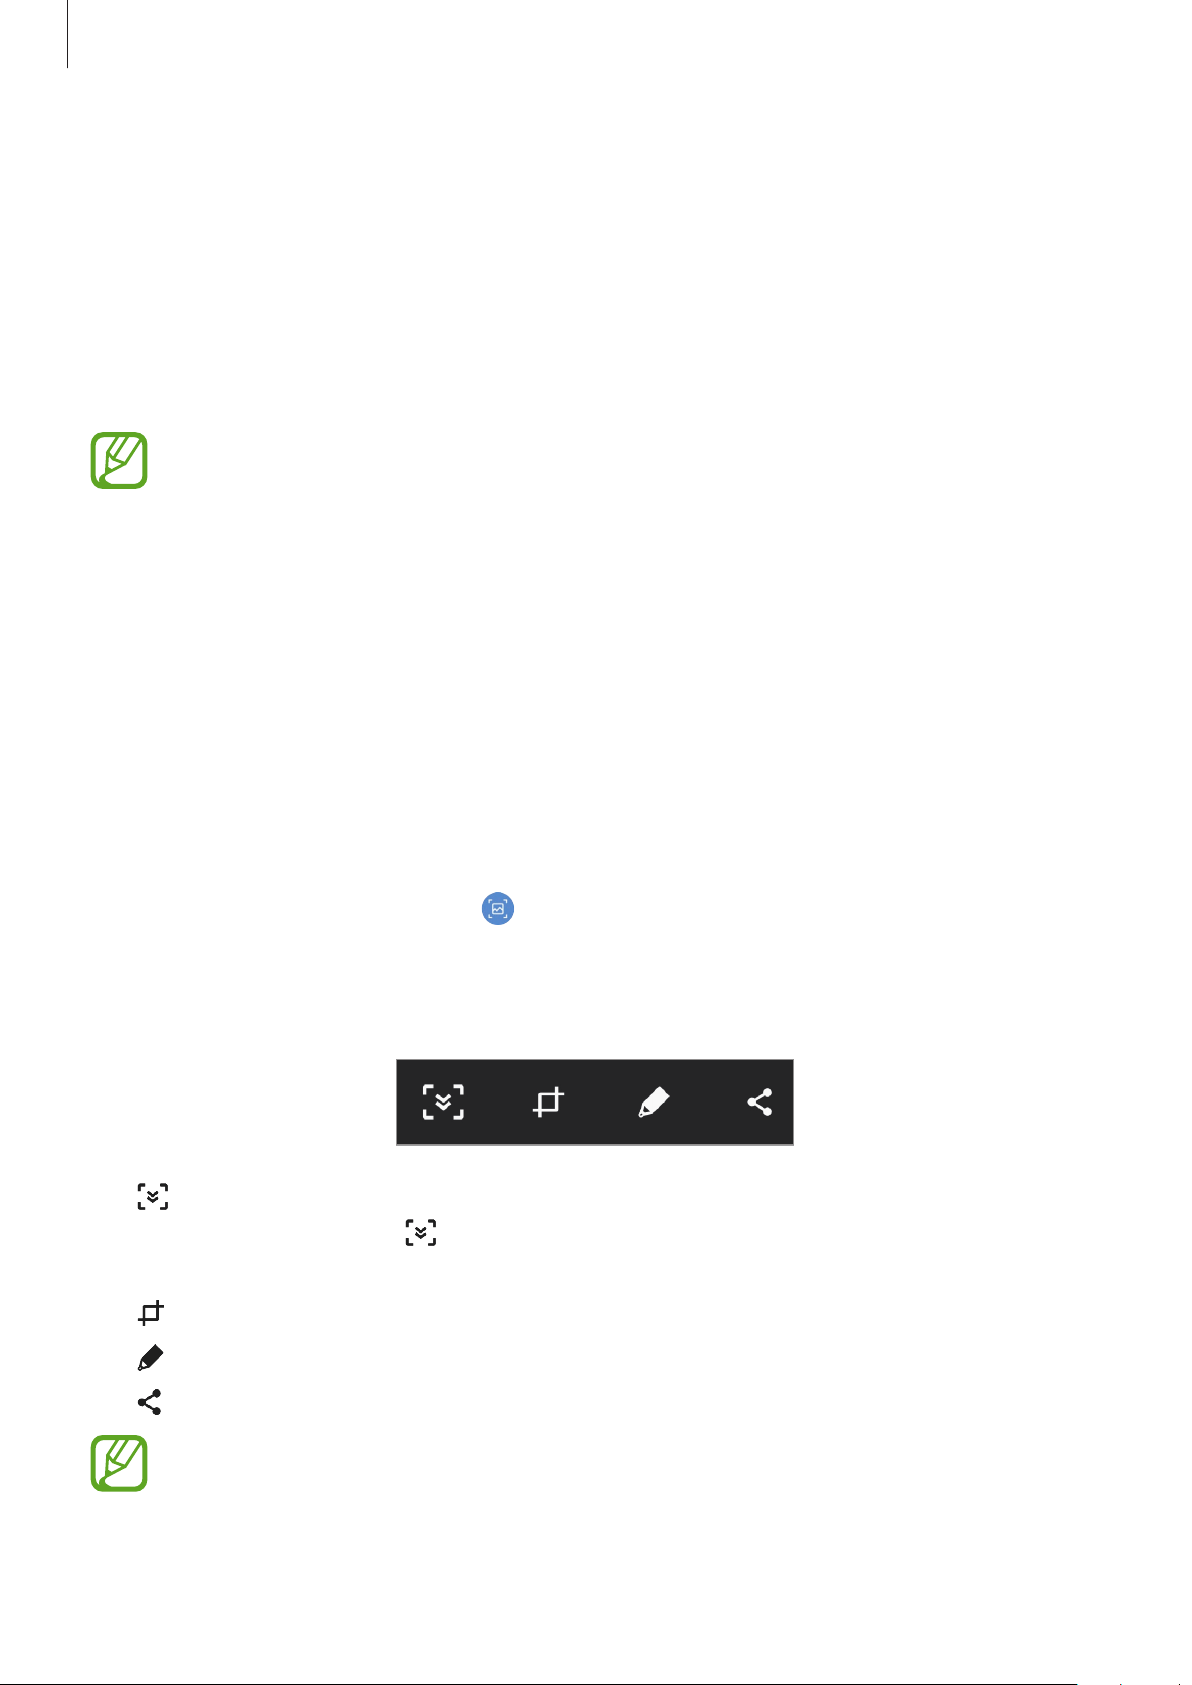
After capturing a screenshot, use the following options on the toolbar at the bottom of the
screen:
.
Key capture: Press and hold the Volume Down key and the Power key simultaneously.
Quick setting button capture: Open the notification panel, swipe downwards on the
(
notification panel, and then tap
Capture screen
).
•
•
•
•
: Capture the current content and the hidden content on an elongated page, such as a
webpage. When you tap
will be captured.
: Crop a portion from the screenshot. The cropped area will be saved in
: Write or draw on the screenshot.
: Share the screenshot with others.
If the options are not visible on the captured screen, launch the
Advanced features
, the screen will automatically scroll down and more content
, and then tap the
Smart capture
41
switch to activate it.
Gallery
Settings
.
app, tap
Page 42
Basics
Notification panel
When you receive new notifications, such as messages or missed calls, indicator icons appear
on the status bar. To see more information about the icons, open the notification panel and
view the details.
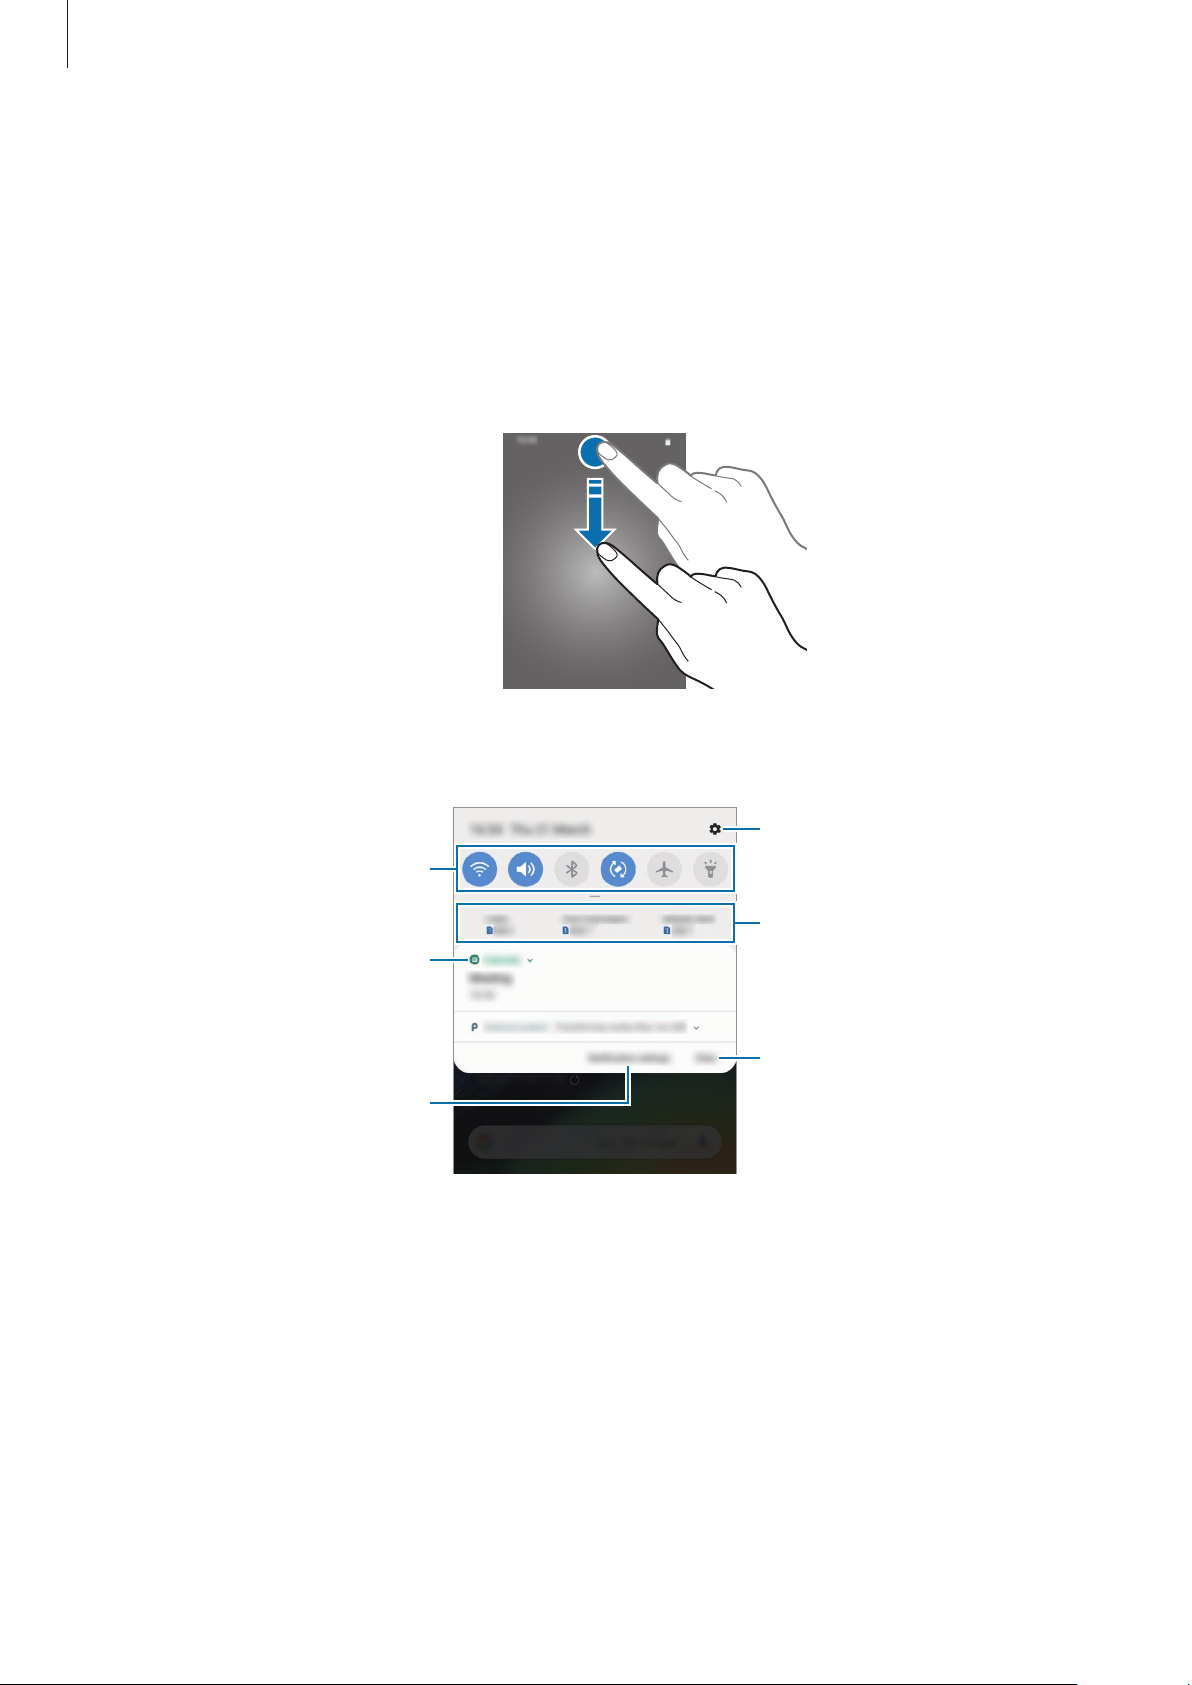
To open the notification panel, drag the status bar downwards. To close the notification panel,
swipe upwards on the screen.
You can use the following functions on the notification panel.
Quick setting buttons
View the notification details and
perform various actions.
Access the notification settings.
Launch Settings.
Preferred SIM or USIM card for
each option. Tap and hold to
access the SIM card manager.
Clear all notifications.
42
Page 43
Basics
Using quick setting buttons
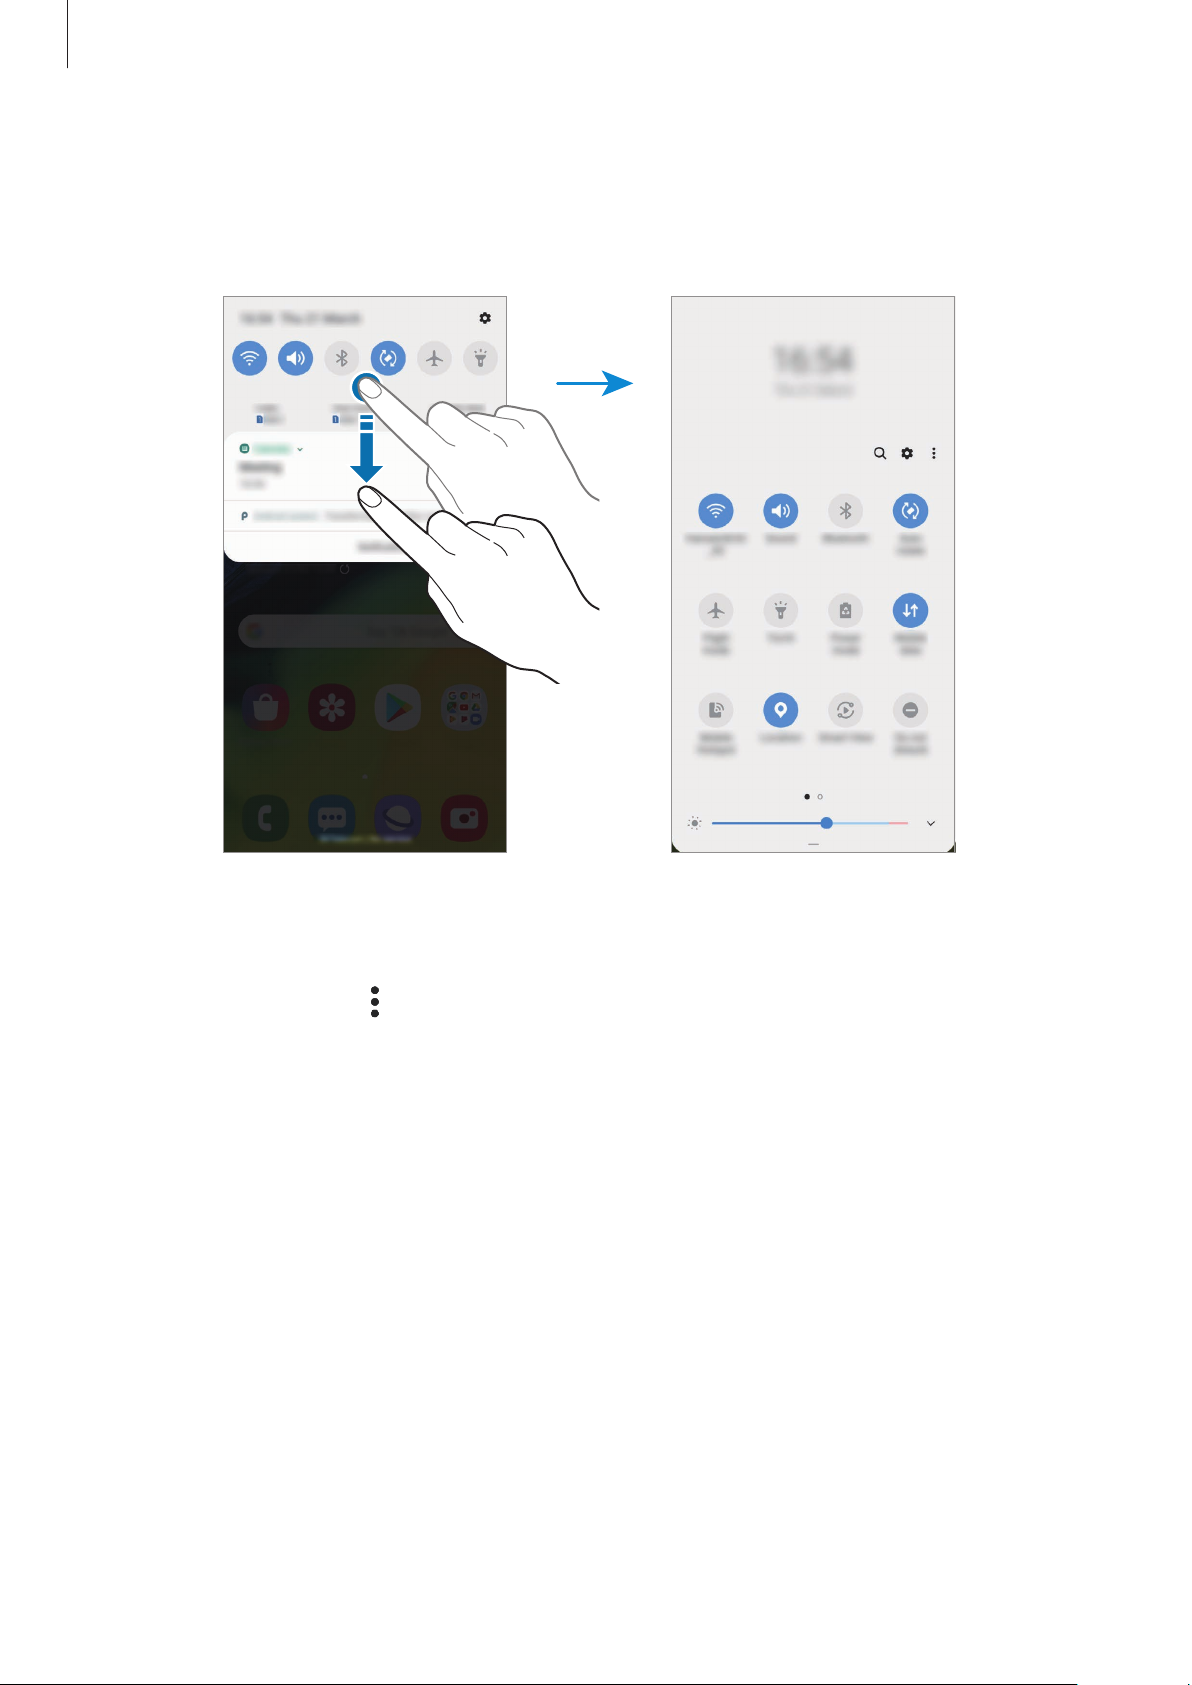
Tap quick setting buttons to activate certain features. Swipe downwards on the notification
panel to view more buttons.
To change feature settings, tap the text under each button. To view more detailed settings,
tap and hold a button.
→
To rearrange buttons, tap
another location.
Button order
, tap and hold a button, and then drag it to
43
Page 44
Basics
Additional keyboard functions
Entering text
Keyboard layout
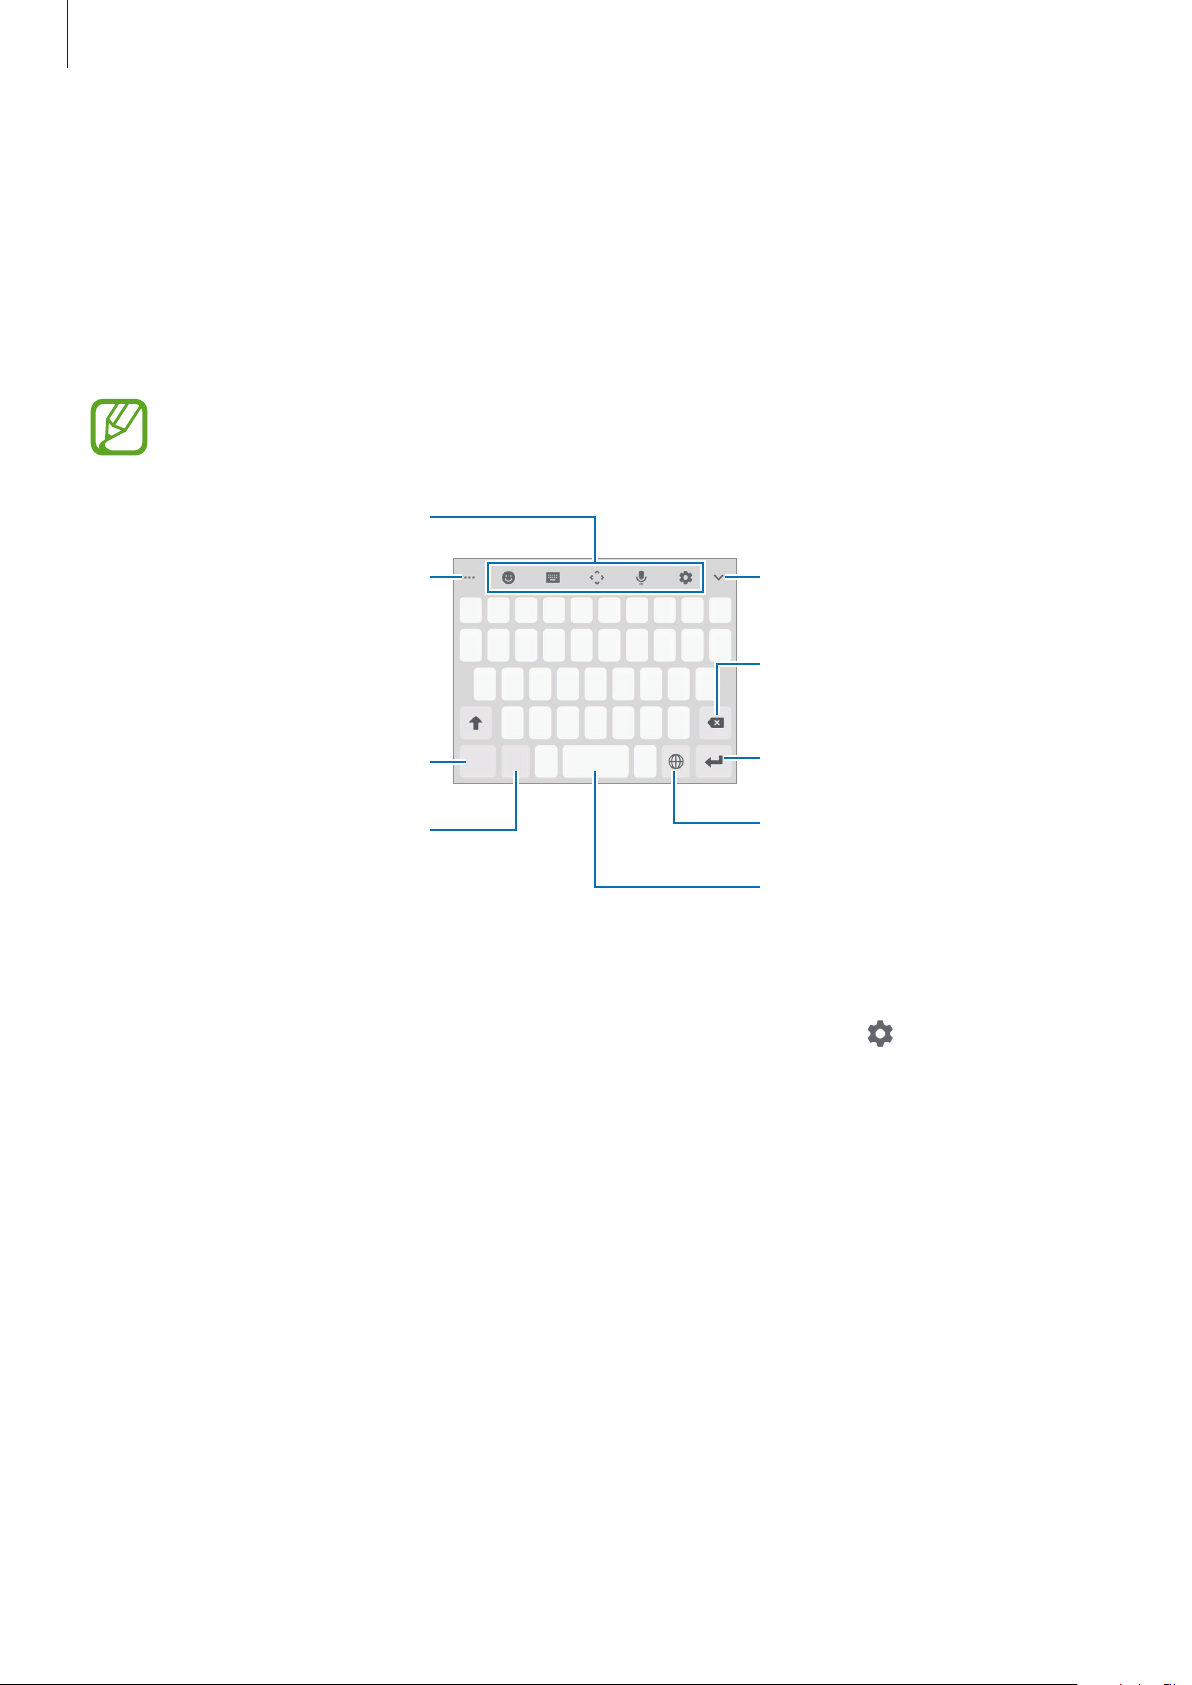
A keyboard appears automatically when you enter text to send messages, create notes, and
more.
Text entry is not supported in some languages. To enter text, you must change the
input language to one of the supported languages.
View more keyboard functions.
Enter symbols.
Enter numbers.
Hide the keyboard.
Delete a preceding character.
Break to the next line.
Change the input language.
Enter a space.
Changing the input language
Tap the input language key to switch between the input languages. Tap →
→
and types
Manage input languages
and select the languages to use.
Languages
44
Page 45
Basics
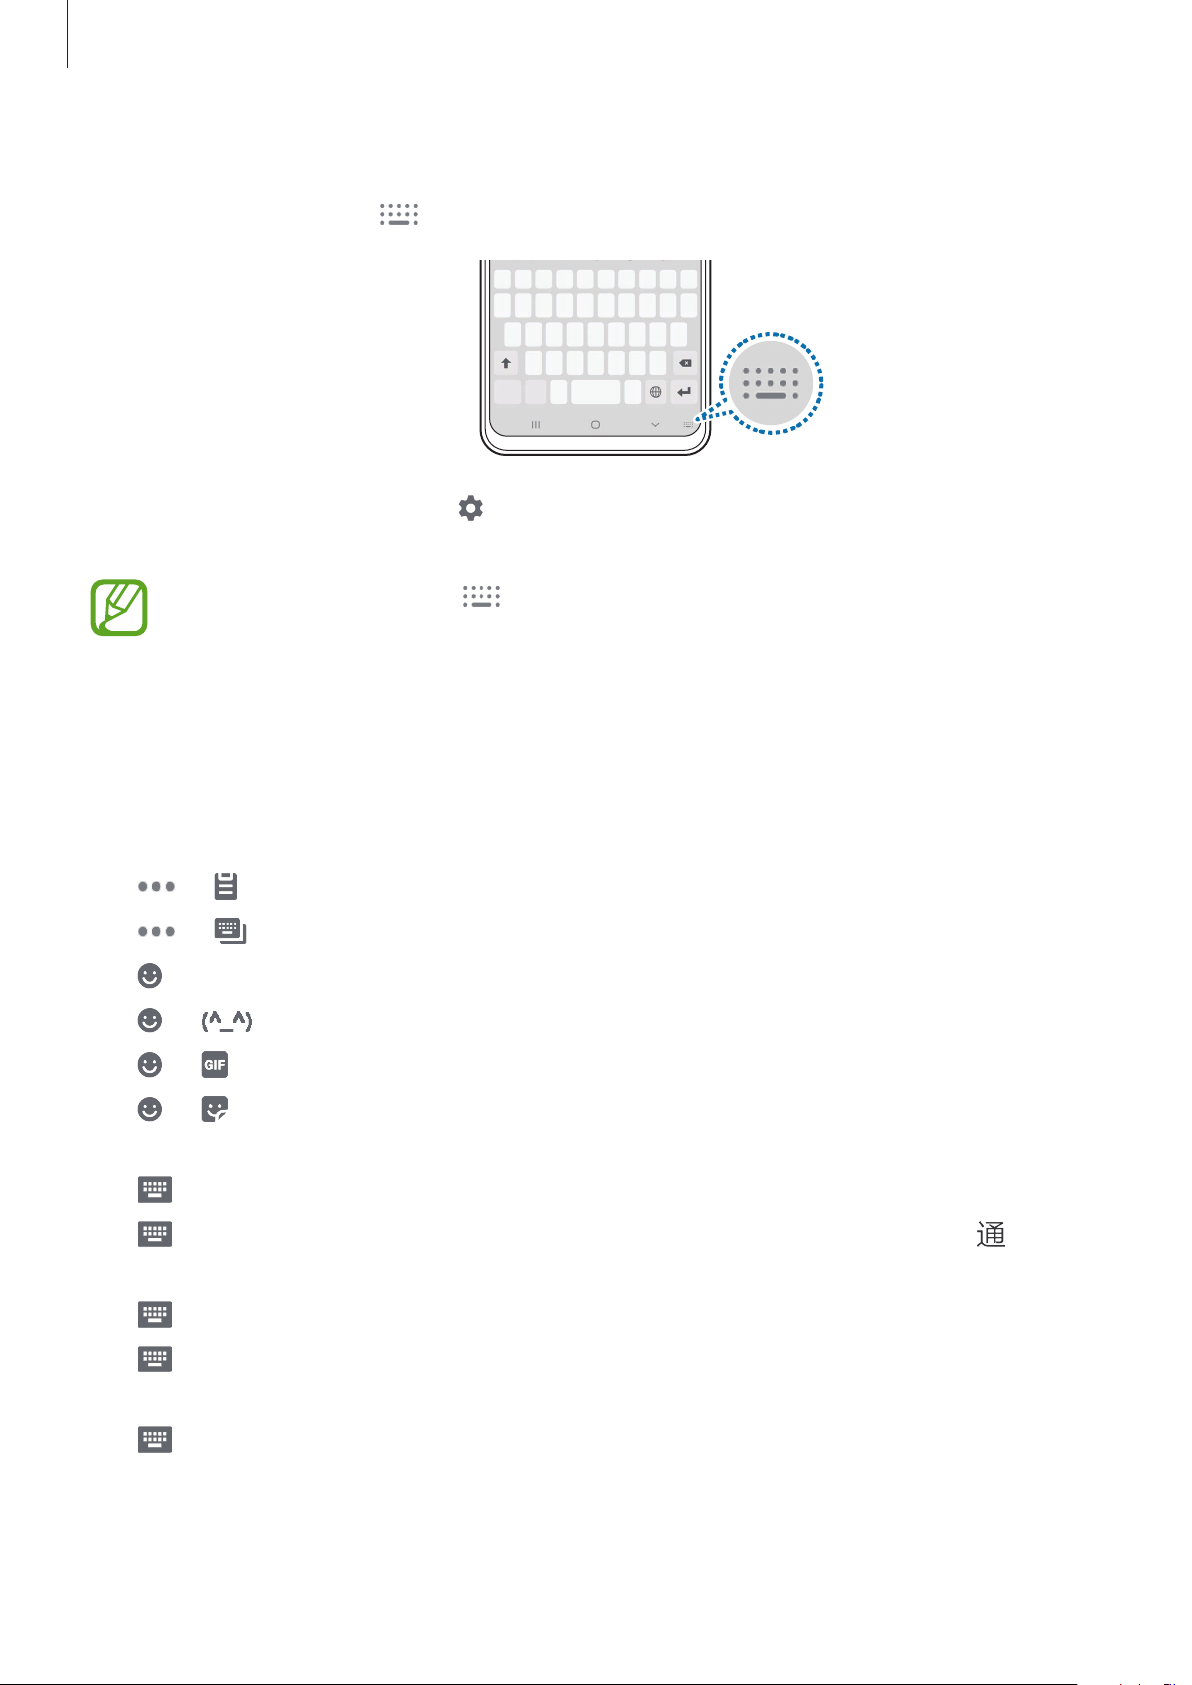
Changing the keyboard
On the navigation bar, tap to change the keyboard.
To change the keyboard type, tap →
select the keyboard type you want.
•
If the keyboard button ( ) does not appear on the navigation bar, launch the
Settings
the
•
On a
the corresponding key repeatedly until the desired character appears.
app, tap
Show Keyboard button
3 x 4 keyboard
General management
, a key has three or four characters. To enter a character, tap
Additional keyboard functions
•
•
•
•
•
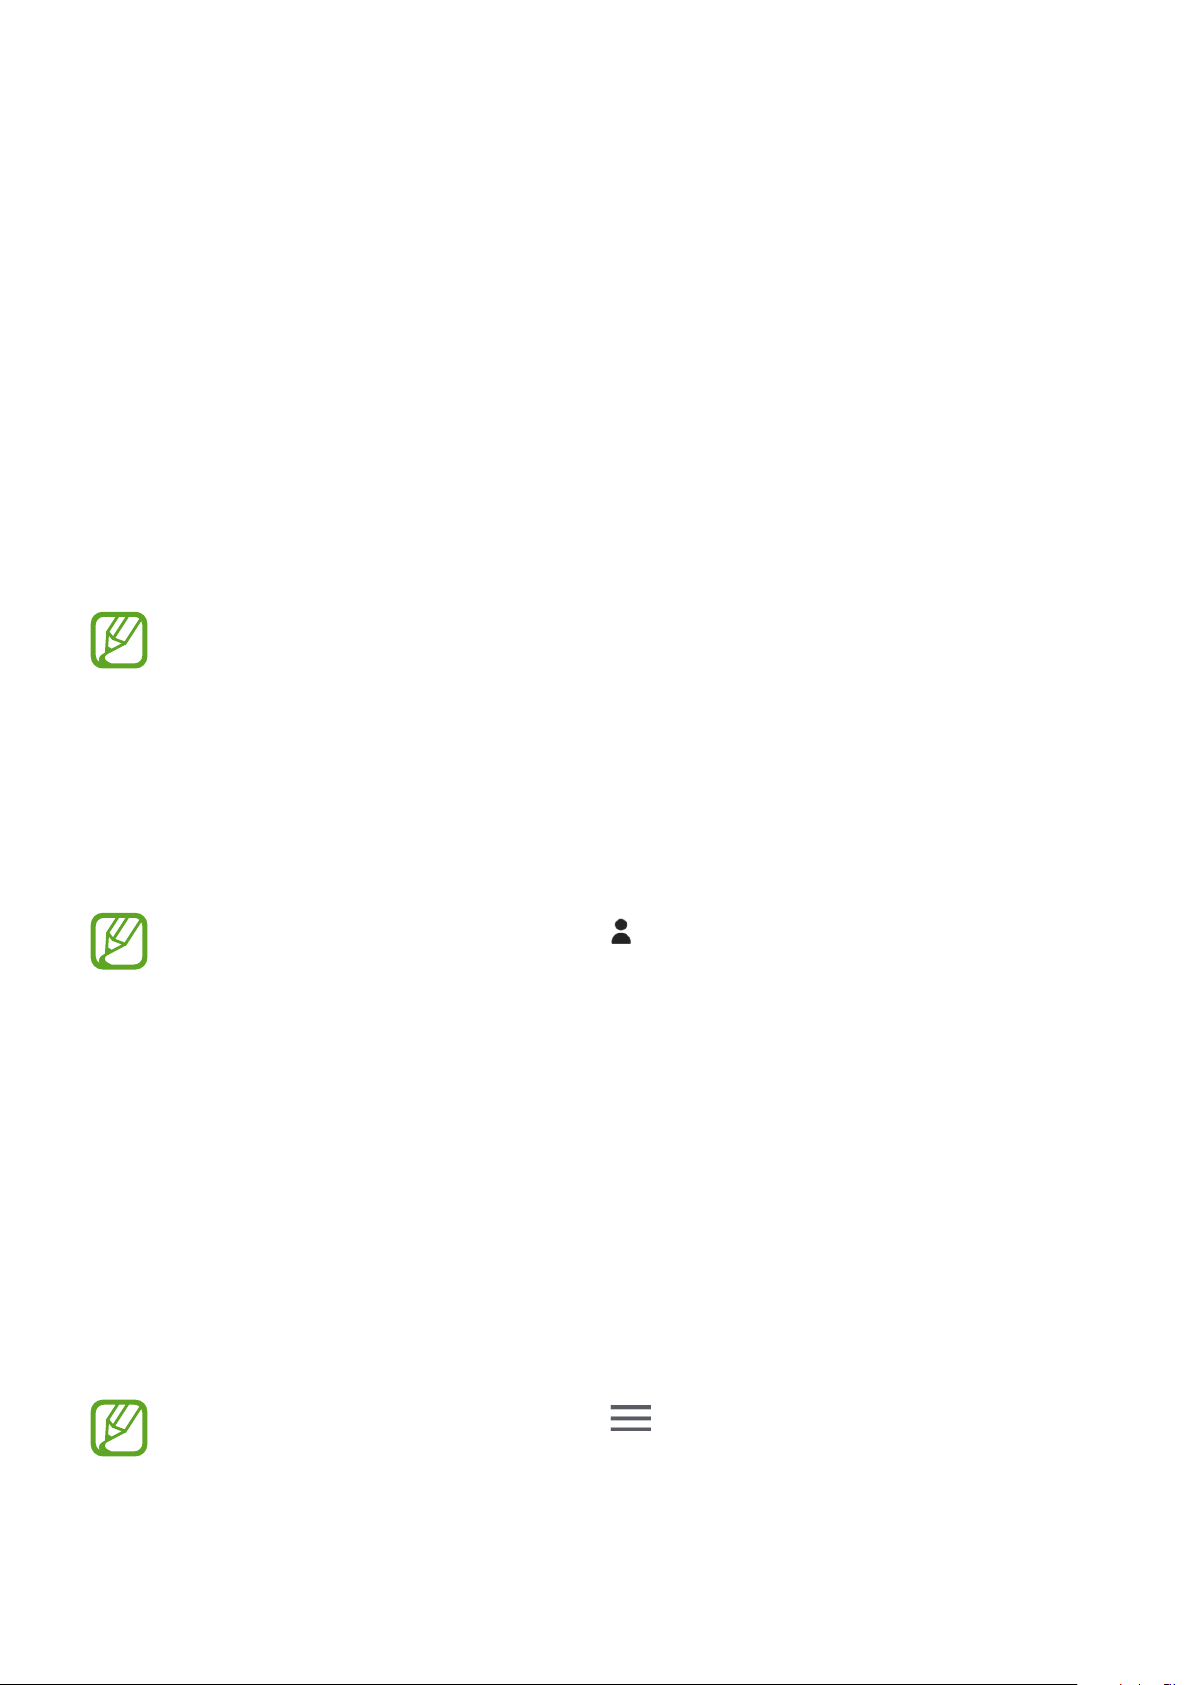
→ : Add an item from the clipboard.
→ : Change the keyboard mode or size.
: Enter emoticons.
→ : Enter kaomojis.
→ : Attach animated GIFs.
Languages and types
→
Language and input
switch to activate it.
, select a language, and then
, and then tap
•
→ : Enter stickers. You can also enter My Emoji stickers that look like you. Refer to
Using My Emoji stickers in chats for more information.
•
•
•
•
•
→
Cj. Qwerty
→
Stroke
you are unsure about which stroke to enter.
→
Py. Qwerty
→
Pinyin 3 x 4
corresponding key and select characters from the left side.
→
Half-screen handwriting
mode.
: Switch to the qwerty keyboard.
: Switch to stroke mode. Tap stroke keys to enter a character. Tap when
: Switch to qwerty pinyin mode.
: Switch to 3x4 pinyin mode. To enter a character, tap the
or
Full-screen handwriting
45
: Switch to handwriting
Page 46

Basics
•
: Open the text editing panel.
•
: Enter text by voice.
•
: Change the keyboard settings.
Copying and pasting
Tap and hold over text.
1
Drag or to select the desired text, or tap
2
Tap
Copy
or
Cut
3
The selected text is copied to the clipboard.
Tap and hold where the text is to be inserted and tap
4
To paste text that you have previously copied, tap
.
Select all
Paste
Clipboard
to select all text.
.
and select the text.
Dictionary
Look up definitions for words while using certain features, such as when browsing webpages.
Tap and hold over a word that you want to look up.
1
If the word you want to look up is not selected, drag
Tap
2
Dictionary
on the options list.
or to select the desired text.
If a dictionary is not preinstalled on the device, tap
next to a dictionary, and then tap
View the definition in the dictionary pop-up window.
3
To switch to the full screen view, tap
definitions. In the detailed view, tap
Search Web
to use the word as a search term.
INSTALL
to download it.
. Tap the definition on the screen to view more
to add the word to your favourite words list or tap
46
Move to Manage dictionaries
, tap
Page 47
Apps and features
Installing or uninstalling apps
Galaxy Store
Purchase and download apps. You can download apps that are specialised for Samsung
Galaxy devices.
Launch the
Galaxy Store
This app may not be available depending on the region or service provider.
app.
Installing apps
Browse apps by category or tap the search field to search for a keyword.
Select an app to view information about it. To download free apps, tap
and download apps where charges apply, tap the price and follow the on-screen instructions.
To change the auto update settings, tap →
then select an option.
Settings
→
INSTALL
Auto update apps
. To purchase
, and
Play Store
Purchase and download apps.
Launch the
Play Store
app.
Installing apps
Browse apps by category or search for apps by keyword.
Select an app to view information about it. To download free apps, tap
and download apps where charges apply, tap the price and follow the on-screen instructions.
To change the auto update settings, tap →
then select an option.
47
Settings
→
INSTALL
Auto-update apps
. To purchase
, and
Page 48

Apps and features
Managing apps
Uninstalling or disabling apps
Tap and hold an app and select an option.
•
Disable
•
Uninstall
Enabling apps
: Disable selected default apps that cannot be uninstalled from the device.
: Uninstall downloaded apps.
Launch the
Settings
app, tap
Apps
→ →
Disabled
, select an app, and then tap
Enable
.
Setting app permissions
For some apps to operate properly, they may need permission to access or use information
on your device. When you open an app, a pop-up window may appear and request access to
certain features or information. Tap
app.
To view your app permission settings, launch the
and tap
To view or change app permission settings by permission category, launch the
and tap
grant permissions.
Permissions
Apps
→ →
If you do not grant permissions to apps, the basic features of the apps may not
function properly.
. You can view the app’s permissions list and change its permissions.
App permissions
Allow
on the pop-up window to grant permissions to the
Settings
. Select an item and tap the switches next to apps to
app and tap
Apps
. Select an app
Settings
app
48
Page 49

Apps and features
Bixby
Introduction
Bixby is a user interface that helps you use your device more conveniently.
You can talk to Bixby or type text. Bixby will launch a function you request or show the
information you want. It also learns your usage patterns and environments. The more it learns
about you, the more precisely it will understand you.
•
To use Bixby, your device must be connected to a Wi-Fi or mobile network.
•
To use Bixby, you must sign in to your Samsung account.
•
Bixby is only available in some languages, and certain features may not be
available depending on your region.
Starting Bixby
When you launch Bixby for the first time, the Bixby intro page will appear. You must select
the language to use with Bixby, sign in to your Samsung account according to the on-screen
instructions, and then agree to the terms and conditions.
Launch the
1
Select the language to use with Bixby.
2
Tap
3
Sign in to Samsung account
Samsung account.
If you are already signed in, your account information will appear on the screen.
Bixby
app.
and follow the on-screen instructions to sign in to your
49
Page 50
Apps and features
Tap .
4
Read and agree to the terms and conditions and tap .
5
Tap and follow the on-screen instructions to register your voice.
6
If you set the voice wake-up feature, you can start a conversation with Bixby by saying “Hi,
Bixby”.
Tap the
7
If you activate the feature, you can start a conversation with Bixby by pressing and
holding the Bixby key.
Tap to complete the setup.
8
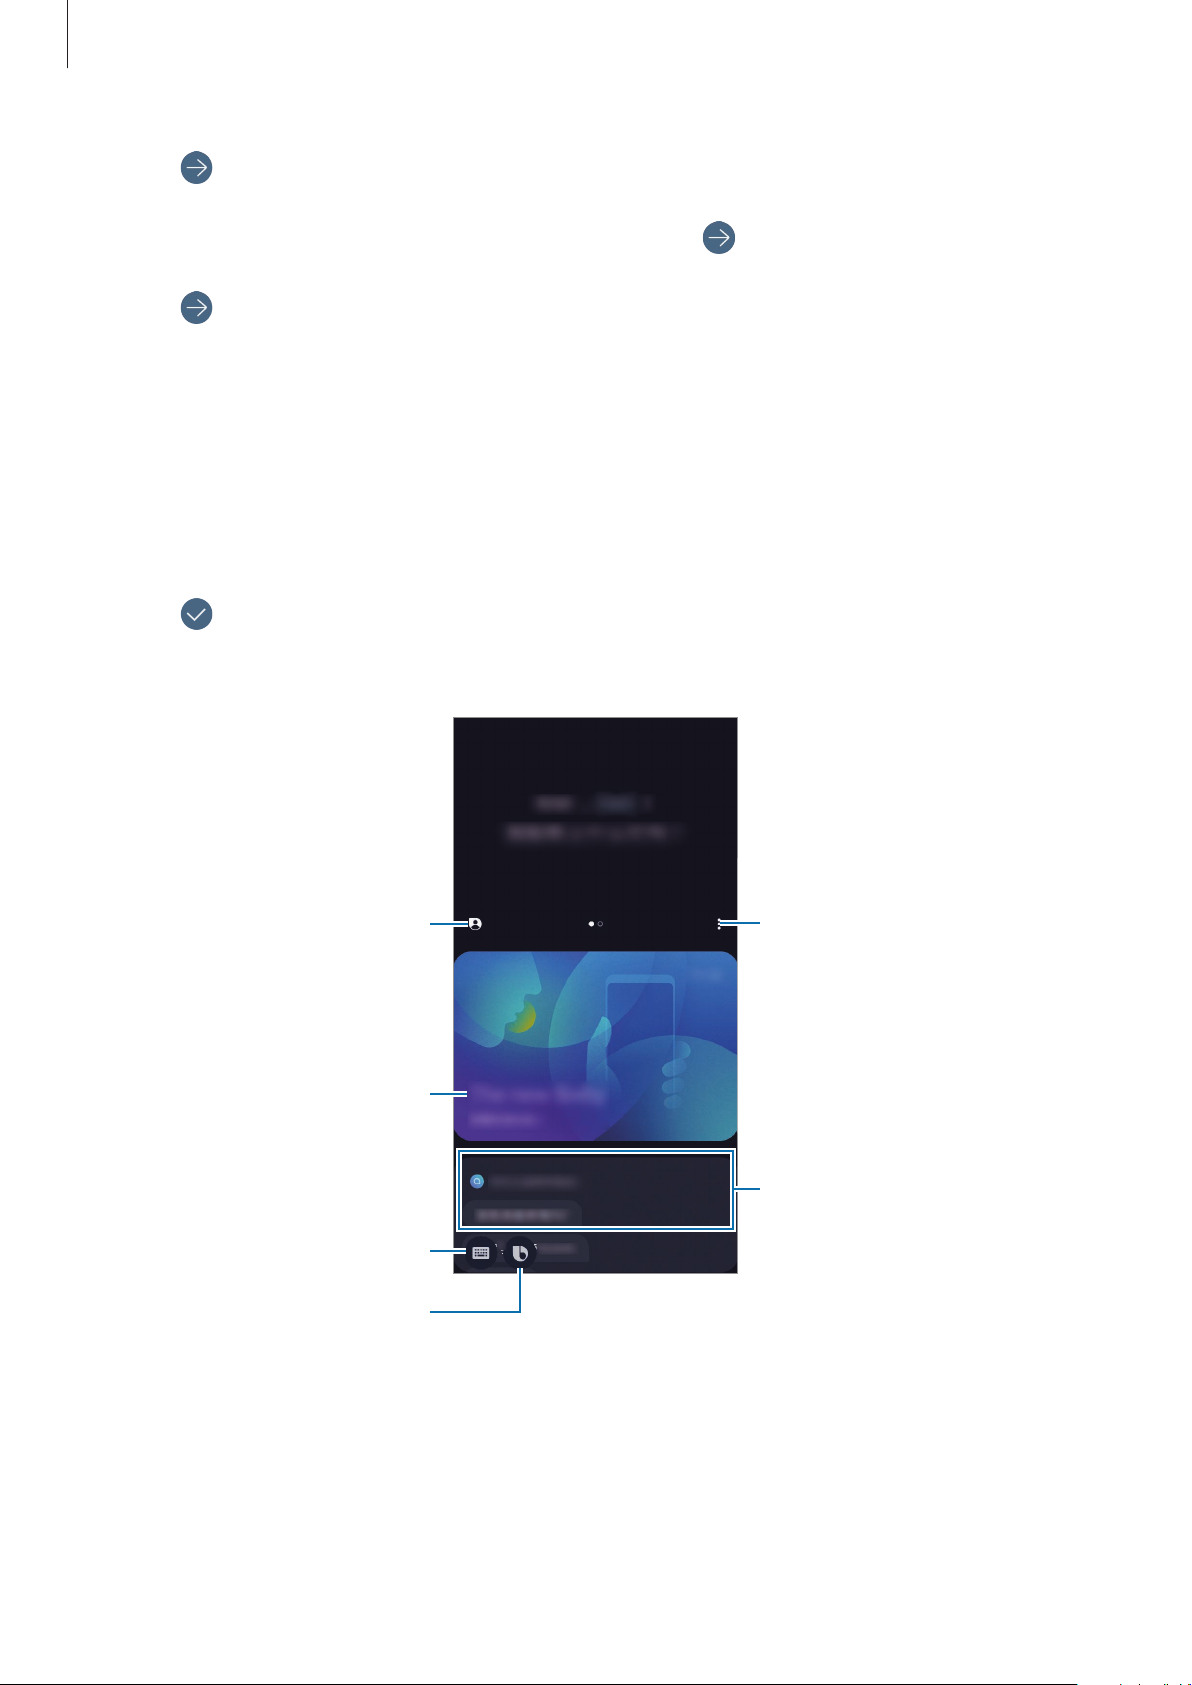
The Bixby screen will appear.
Wake Bixby with Power key
My profile
switch to switch the Power key to the Bixby key.
Access additional options.
Tutorials
Communicate via text.
Communicate via voice.
Suggested commands
50
Page 51
Apps and features
Using Bixby
When you say what you want to Bixby, Bixby will launch corresponding functions or show the
information you requested.
Launch the
Bixby
app, tap , and then say what you want to Bixby. Alternatively, say “Hi,
Bixby”, and when the device emits a sound, say what you want.
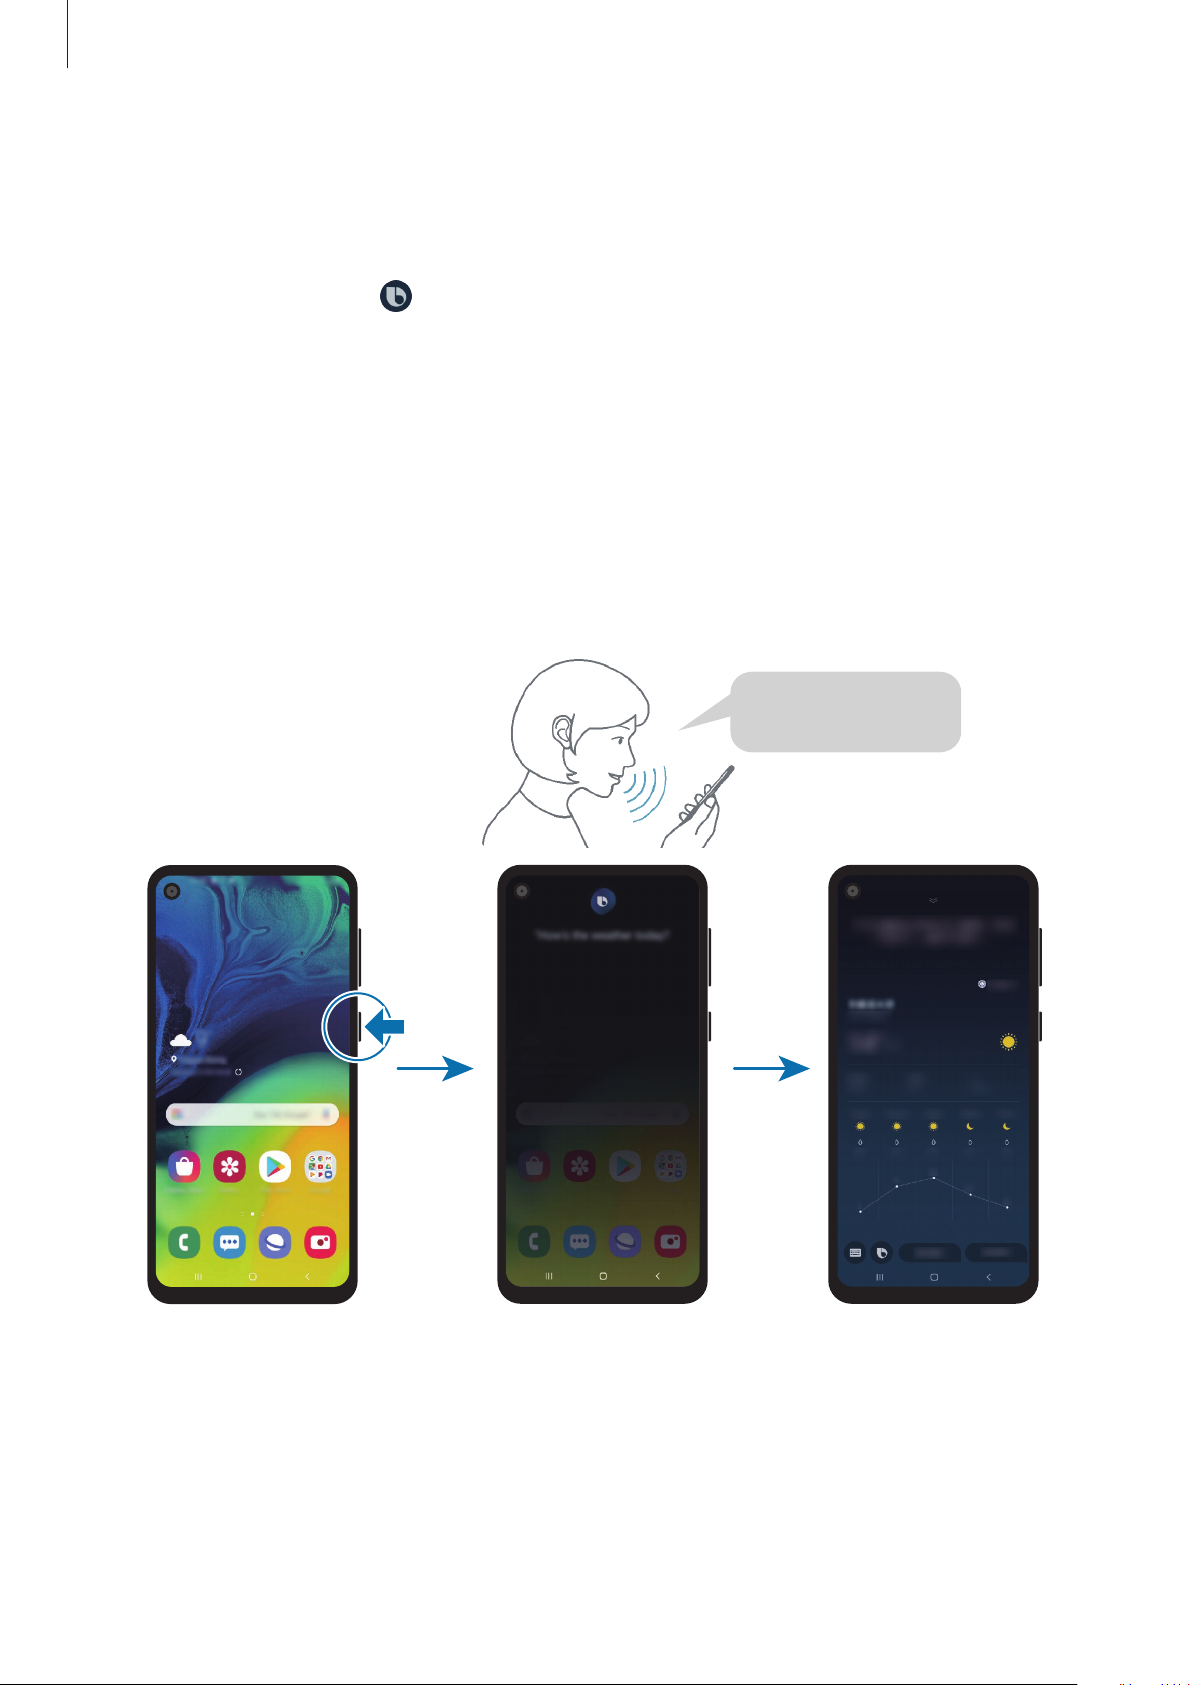
If you switch the Power key to the Bixby key, you can start a conversation with Bixby by
pressing and holding the Bixby key.
For example, while pressing and holding the Bixby key, say “How’s the weather today?” The
weather information will appear on the screen.
If you want to know the weather tomorrow, while pressing and holding the Bixby key, just
say “Tomorrow?” Because Bixby understands the context of the conversation, it will show you
tomorrow’s weather.
"How's the weather
today?"
Starting a conversation Corresponding function
Listening
launched
51
Page 52

Apps and features
If Bixby asks you a question during a conversation, while pressing and holding the Bixby key,
answer Bixby. Or, tap
If you are using headphones or Bluetooth audio, or start a conversation by saying “Hi, Bixby”,
you can continue the conversation without tapping the icon. Launch the
→
Settings
→
Automatic listening
and answer Bixby.
→
Hands-free only
Bixby
.
app and tap
Waking up Bixby using your voice
You can start a conversation with Bixby by saying “Hi, Bixby”. Register your voice so that Bixby
will respond to your voice when you say “Hi, Bixby”.
Launch the
1
Tap the
2
Follow the on-screen instructions to complete the setup.
3
Now you can say “Hi, Bixby”, and when the device emits a sound, start a conversation.
Bixby
Wake with “Hi, Bixby”
app and tap →
Settings
switch to activate it.
→
Voice wake-up
.
Waking up Bixby using the Bixby key
You can start a conversation with Bixby by pressing and holding the Bixby key. Switch the
Power key to the Bixby key first.
Press and hold the Power key, tap
Alternatively, open the notification panel, swipe downwards on the notification panel, and
(
then tap
Power key for Bixby
, and then tap the switch to activate the feature.
) to activate it.
Communicating by typing text
If your voice is not recognised due to noisy environments or if you are in a situation where
speaking is difficult, you can communicate with Bixby via text.
Launch the
During the communication, Bixby also will answer you through text instead of voice
feedback.
Bixby
app, tap , and then type what you want.
52
Page 53
Apps and features
Bixby usages
Launching apps or services
You can launch features quickly via Bixby. You can also use various convenient services, such
as ordering coffee or searching for nearby restaurants or hotels and making a reservation.
For example, launch the
call to the contact saved as mom.
Bixby
app, tap , and then say “Call mom”. Bixby will now make a
Viewing more ways to use Bixby
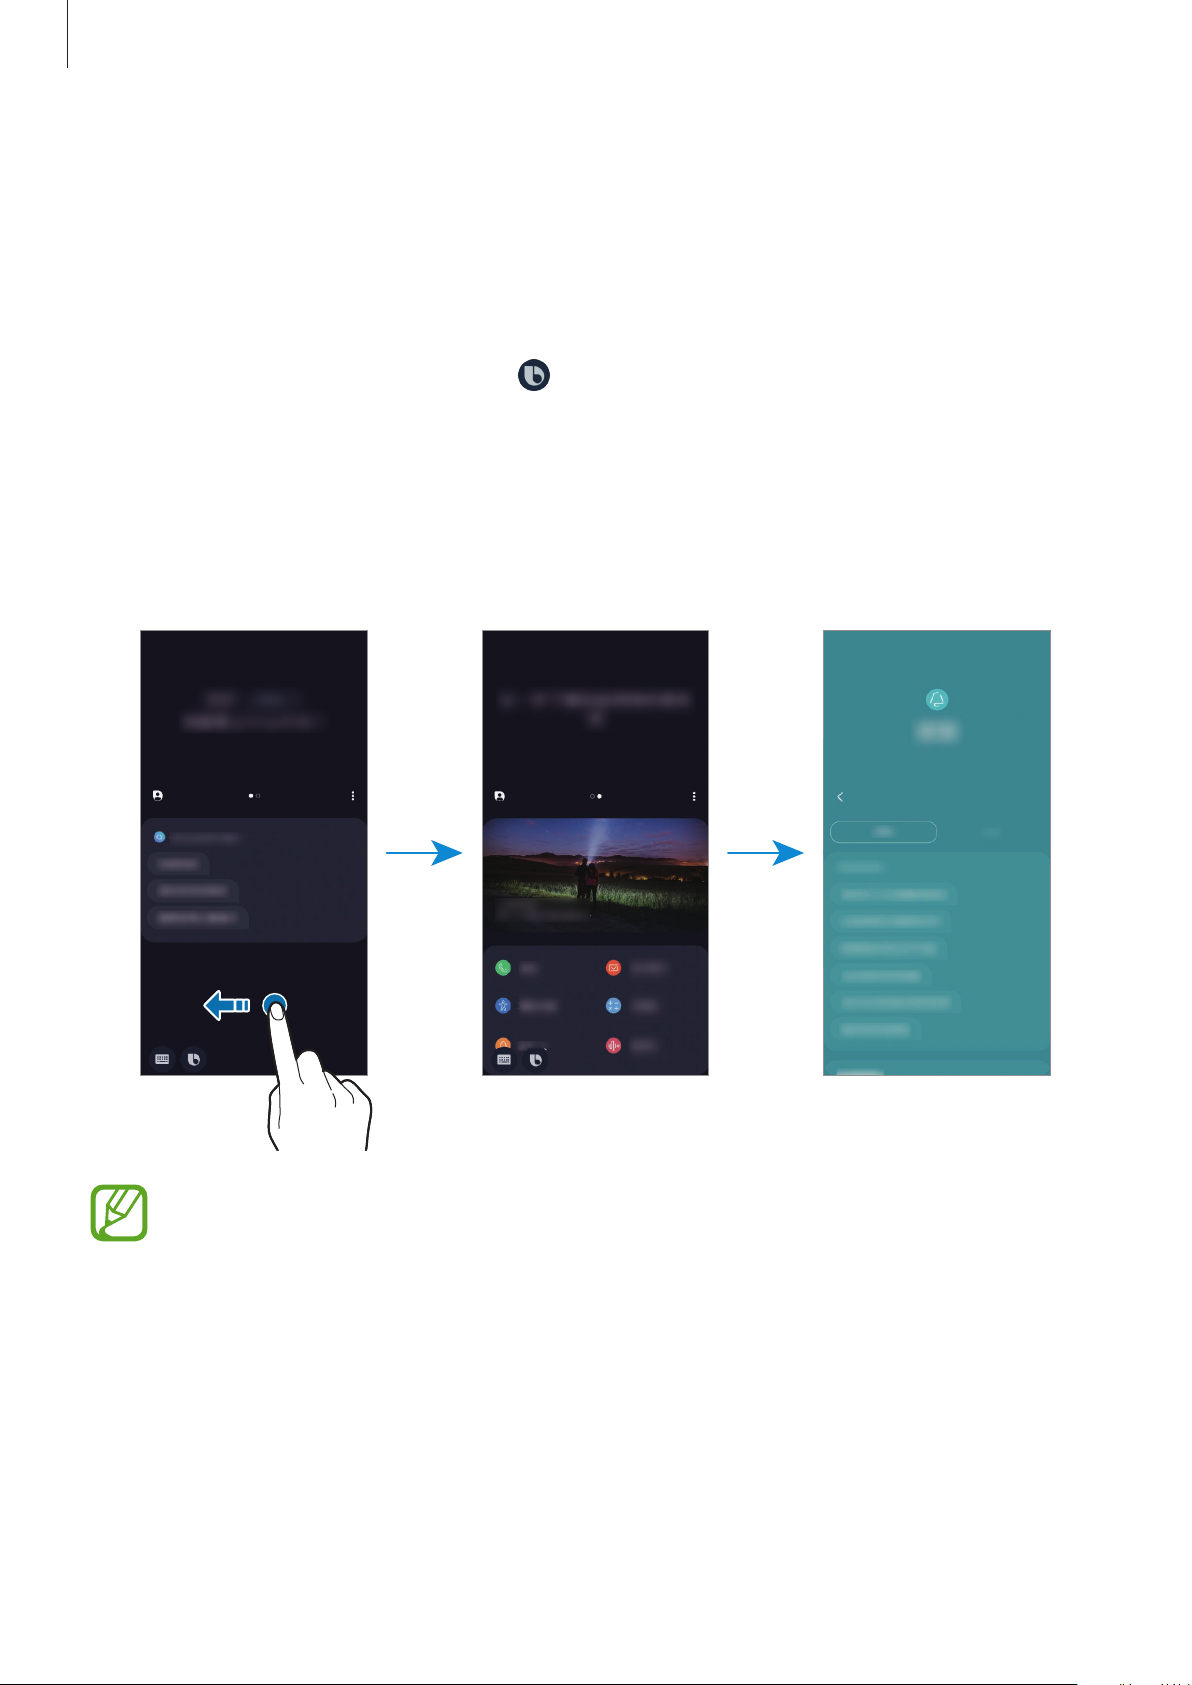
To view more ways to use Bixby, launch the
You can check out services supported by Bixby and examples of commands.
Bixby
app and swipe to the left on the screen.
Some features may not be available depending on the region or service provider.
53
Page 54
Apps and features
Additional Bixby functions
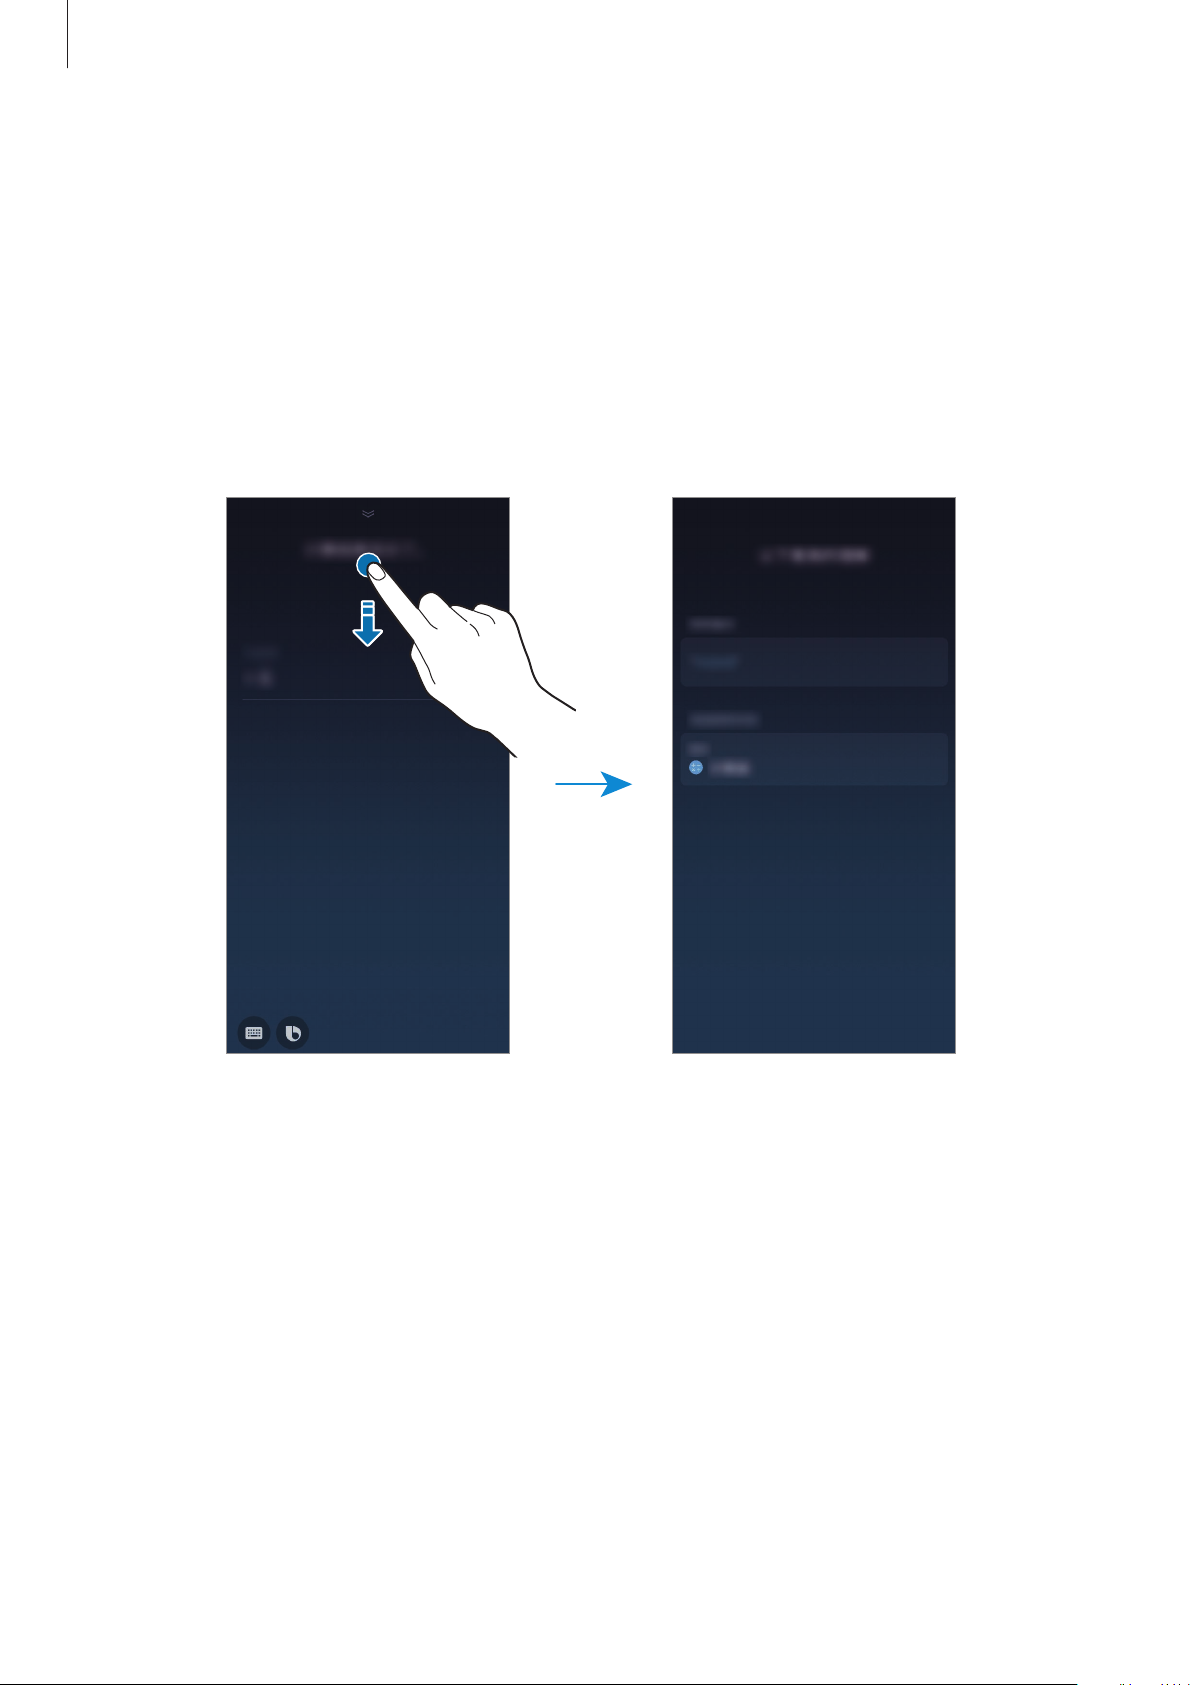
Checking what Bixby understood
You can check how Bixby understood what you said. If Bixby understood your intention
differently, you can let Bixby know the correct meaning.
Drag Bixby’s answer area downwards. What Bixby understood and any used services will
appear. If Bixby misunderstood your intention, edit the content and change the app or
service to use.
54
Page 55
Apps and features
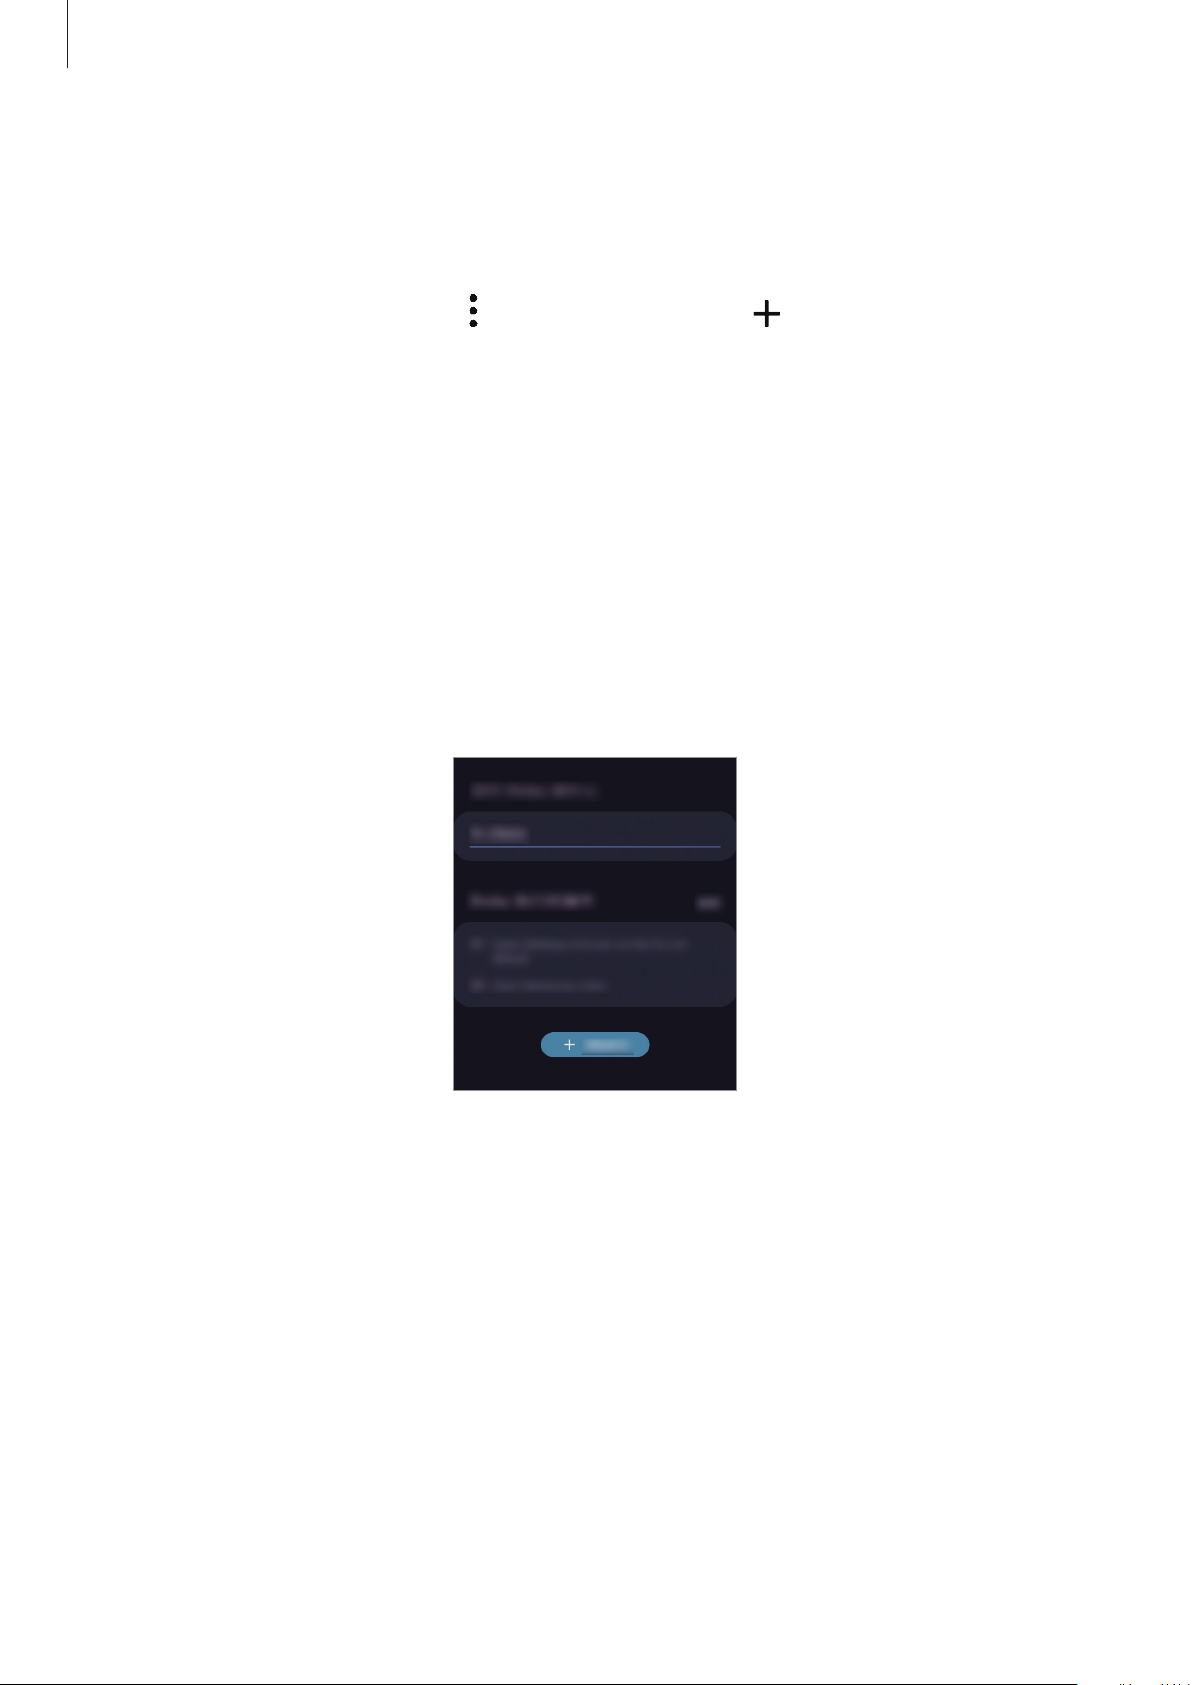
Using quick commands
You can add quick commands so that you can give commands more quickly and easily. You
can also give multiple commands together by adding them to a quick command.
Launch the
1
Tap
2
3
4
Quick command word or phrase
Tap
Add a command
•
Select a command
•
Say a command
•
Type a command
Select or enter a command that Bixby will perform.
To add additional commands, tap
Bixby
app and tap →
and select a method you want.
: Select one from the commands list.
: Say your command.
: Type your command.
Quick commands
and enter a quick command name.
Add a command
→ .
.
Tap
Save
5
Now you can give multiple commands by saying the quick commands you added.
.
55
Page 56
Apps and features
Using earphones or a Bluetooth headset
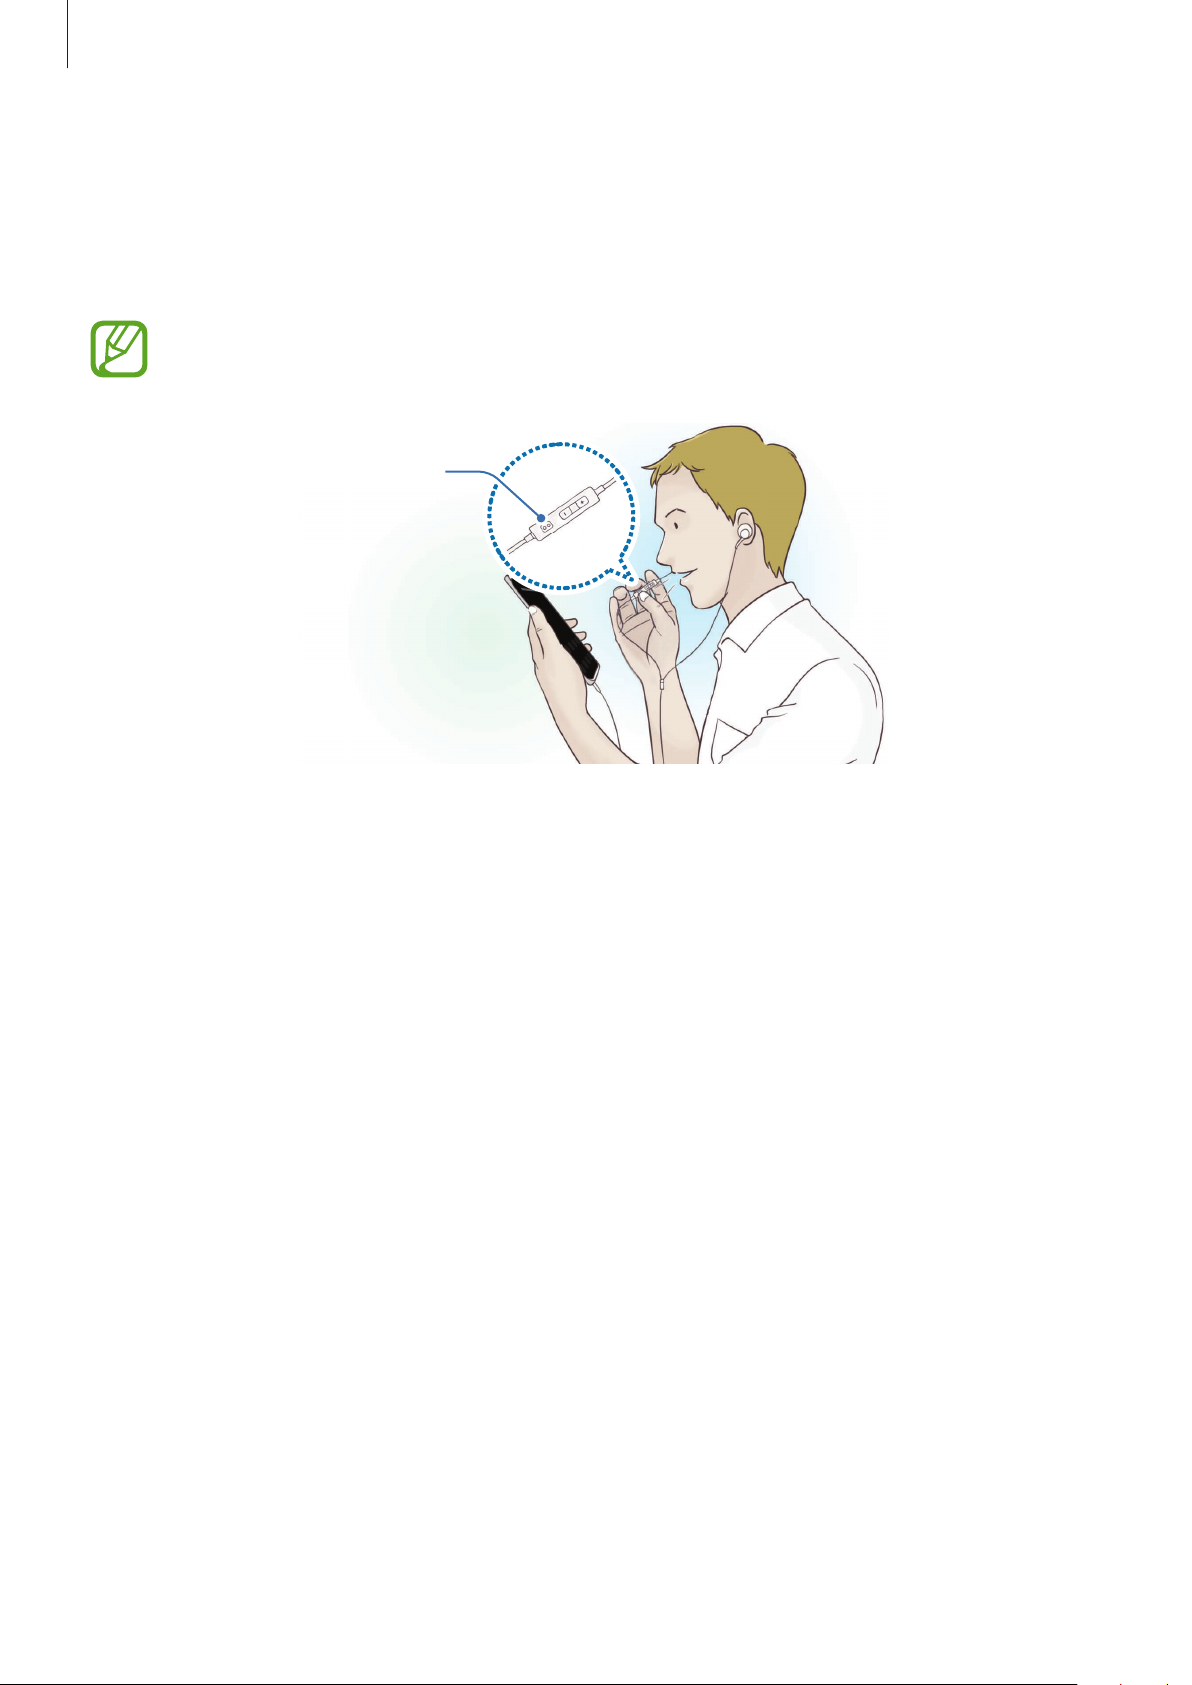
Connect earphones or a Bluetooth headset to the device when your voice is not heard clearly
via the built-in microphone due to noisy environments. Press and hold the Call button on
earphones or a Bluetooth headset to start a conversation with Bixby.
This feature may not be available or its method of use may vary depending on the
earphones and Bluetooth headset.
Call button
56
Page 57

Apps and features
Customising the Bixby settings
Launch the
•
Language and voice style
style of voice feedback. The selected language is applied only when you talk with Bixby.
•
Voice response
•
Automatic listening
can respond without pressing the icon. This option is available only if you are using
headphones or Bluetooth audio, or start a conversation by saying “Hi, Bixby”.
•
Voice wake-up
change the settings for the voice wake-up feature.
•
Use while phone locked
searching for nearby restaurants, while the device is locked.
Bixby
app and tap →
Bixby is only available in some languages, and certain features may not be
available depending on your region. To see the list of supported languages, tap
Language
.
: Change the voice feedback settings for Bixby.
: Set Bixby to automatically listen when it asks a question so you
: Set Bixby to wake up when it hears you say “Hi, Bixby”. You can also
: Set Bixby to complete some actions, such as making a call or
Settings
: Set the language to communicate with Bixby and set the
.
•
Bixby dictation
while the Samsung keyboard is open. This option is available only when you switch the
Power key to the Bixby key.
•
Wake Bixby with Power key
conversation with Bixby by pressing and holding the Bixby key.
•
Marketing notifications
•
Privacy
experience.
•
About Bixby Voice
: Set to use Bixby’s interactive and customised services to enhance your
: Set to use the dictation mode when you press and hold the Bixby key
: Switch the Power key to the Bixby key to start a
: Set to receive notifications about marketing information.
: View the Bixby version and legal information.
57
Page 58
Apps and features
Bixby Vision
Introduction
Bixby Vision is a service that provides various features based on image recognition.
You can use Bixby Vision to quickly search for information by recognising objects or your
current location.
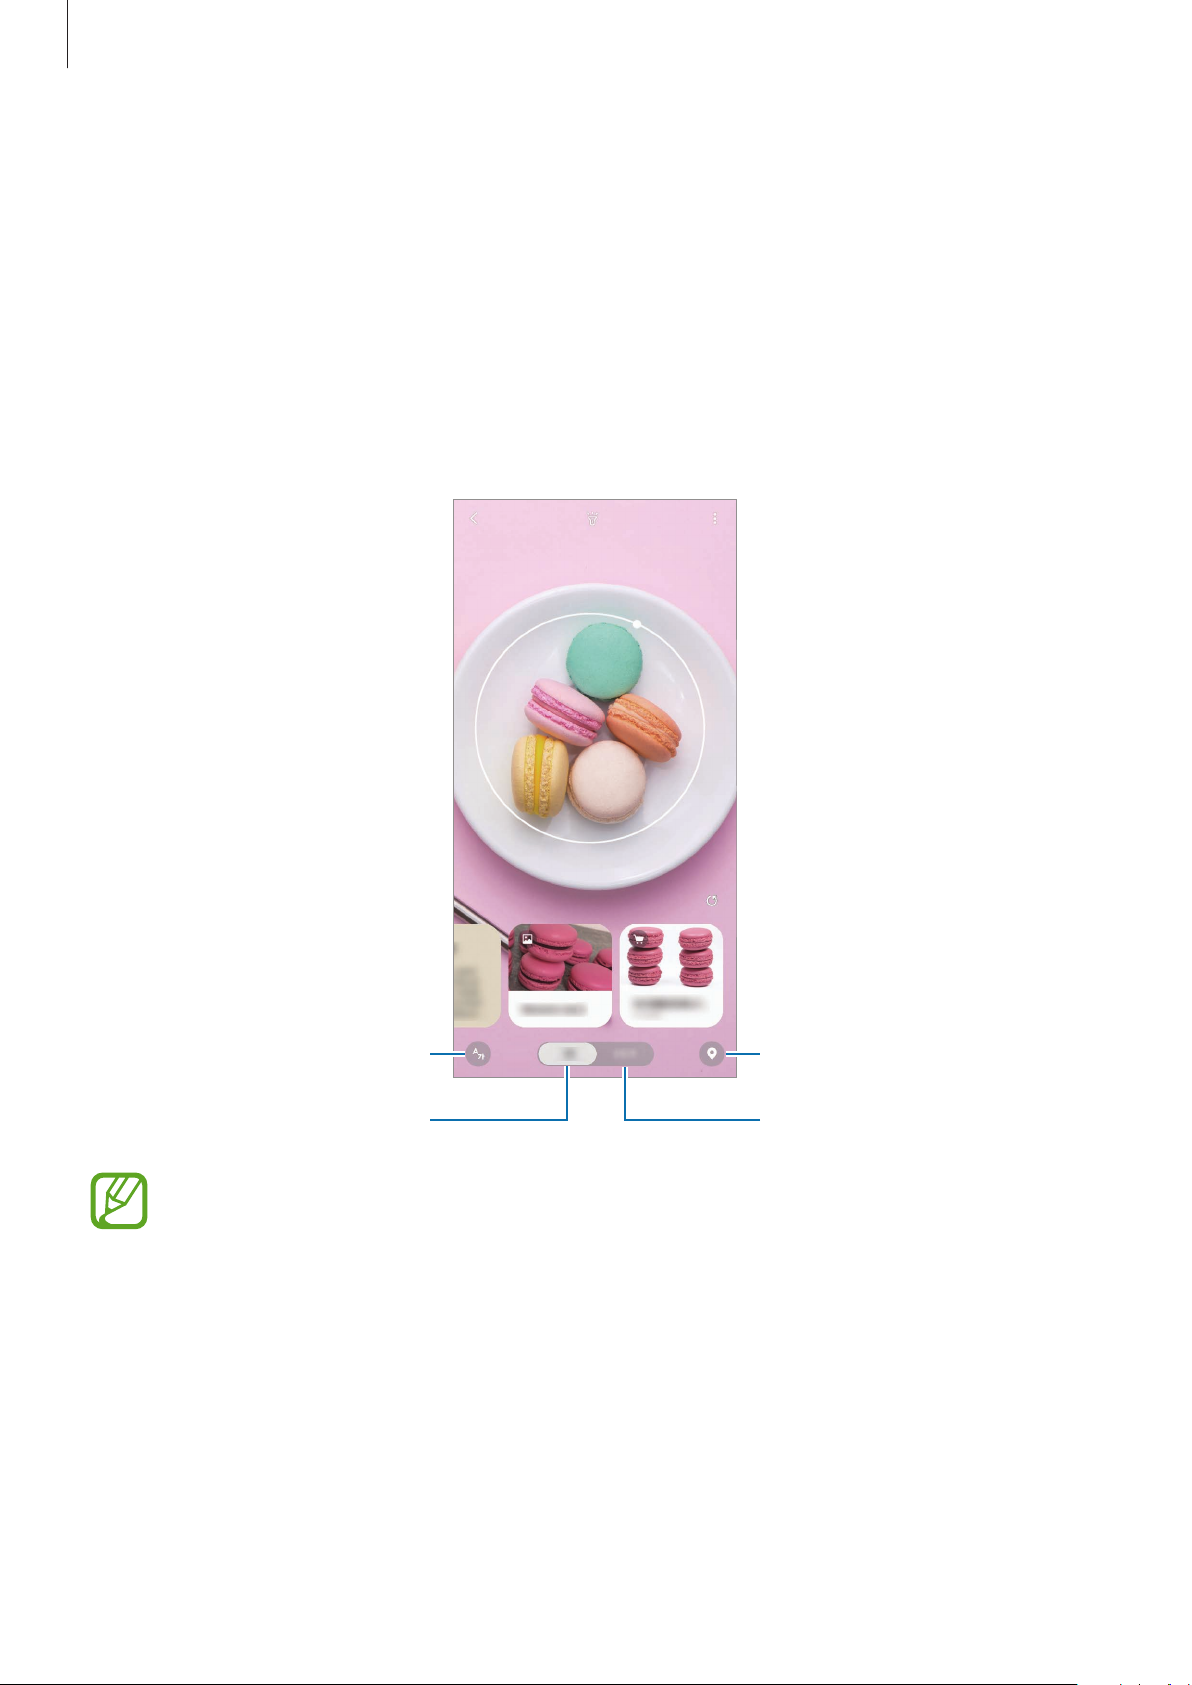
Use a variety of useful Bixby Vision features.
Extract or translate text.
Search for images.
•
To use this feature, the device must be connected to a Wi-Fi or mobile network.
•
To use some Bixby Vision features, you must sign in to your Samsung account.
•
The available features and search results may vary depending on the region or
service provider.
•
This feature may not be available or you may not get correct search results
depending on the image size, format, or resolution.
•
Samsung is not responsible for the product information provided by Bixby Vision.
Search for locations.
Download additional apps.
58
Page 59

Apps and features
Launching Bixby Vision
Launch Bixby Vision using one of these methods.
•
In the
•
In the
•
In the
•
If you added the Bixby Vision app icon to the Home screen, launch the
Camera
Gallery
Internet
app, tap
app, select an image and tap .
app, tap and hold an image and tap
Bixby Vision
.
Bixby Vision
.
Bixby Vision
app.
Searching for similar images
Search for images similar to the recognised object online. You can view various images with
properties similar to the object, such as colour or shape.
For example, if you want to know the title of a photo or image, use the Bixby Vision
features. The device will search for and show you related information or images with similar
characteristics.
Launch the
1
Tap
2
3
Lens
Select a search result with on it.
The similar images will appear.
Camera
and keep the object within the screen to recognise it.
app and tap
Bixby Vision
.
Translating or extracting text
Recognise and show the translated text on the screen. You can also extract text from a
document or an image file.
For example, if you want to know what a sign says while travelling abroad, use the Bixby
Vision features. The device will translate the sign’s text into the language you select.
Launch the
1
Tap and keep the text within the screen to recognise it.
2
The translated text will appear on the screen.
•
To extract text, tap . You can share or save the extracted text.
•
To save the screen with the translated text as an image, tap . The screen will be
saved in
•
To change the source or target language, tap the language settings panel at the top of
the screen.
Camera
Gallery
app and tap
.
Bixby Vision
59
.
Page 60

Apps and features
Searching for places
Search for information about nearby places by recognising your current location. You can also
view deals available nearby.
For example, if you want to search for nearby stores having sales, use the Bixby Vision
features. The device will search for and show you the sales happening in the nearby stores.
Launch the
1
Tap and point the camera towards the direction you want to search for places.
2
You can view basic information about nearby places.
•
If you want to search for places in another direction, point the camera towards the
direction.
•
You can view your current location and weather information. To view your current
location on the map, point the camera towards the ground. To view the current
weather information, point the camera towards the sky.
Select a search result on the screen.
3
The device will show the information of nearby places and deals.
Camera
app and tap
Bixby Vision
.
60
Page 61
Apps and features
Bixby Home
On the Bixby Home screen, you can view recommended services and information that Bixby
provides by analysing your usage patterns and your routine.
•
To view more content, connect to a Wi-Fi or mobile network.
•
To fully use this feature, you must sign in to your Samsung account.
Opening Bixby Home
On the Home screen, swipe to the right.
1
The Bixby Home screen will appear.
When launching this feature for the first time or after performing a data reset, follow the
on-screen instructions to complete the setup.
Swipe upwards or downwards to view recommended content.
2
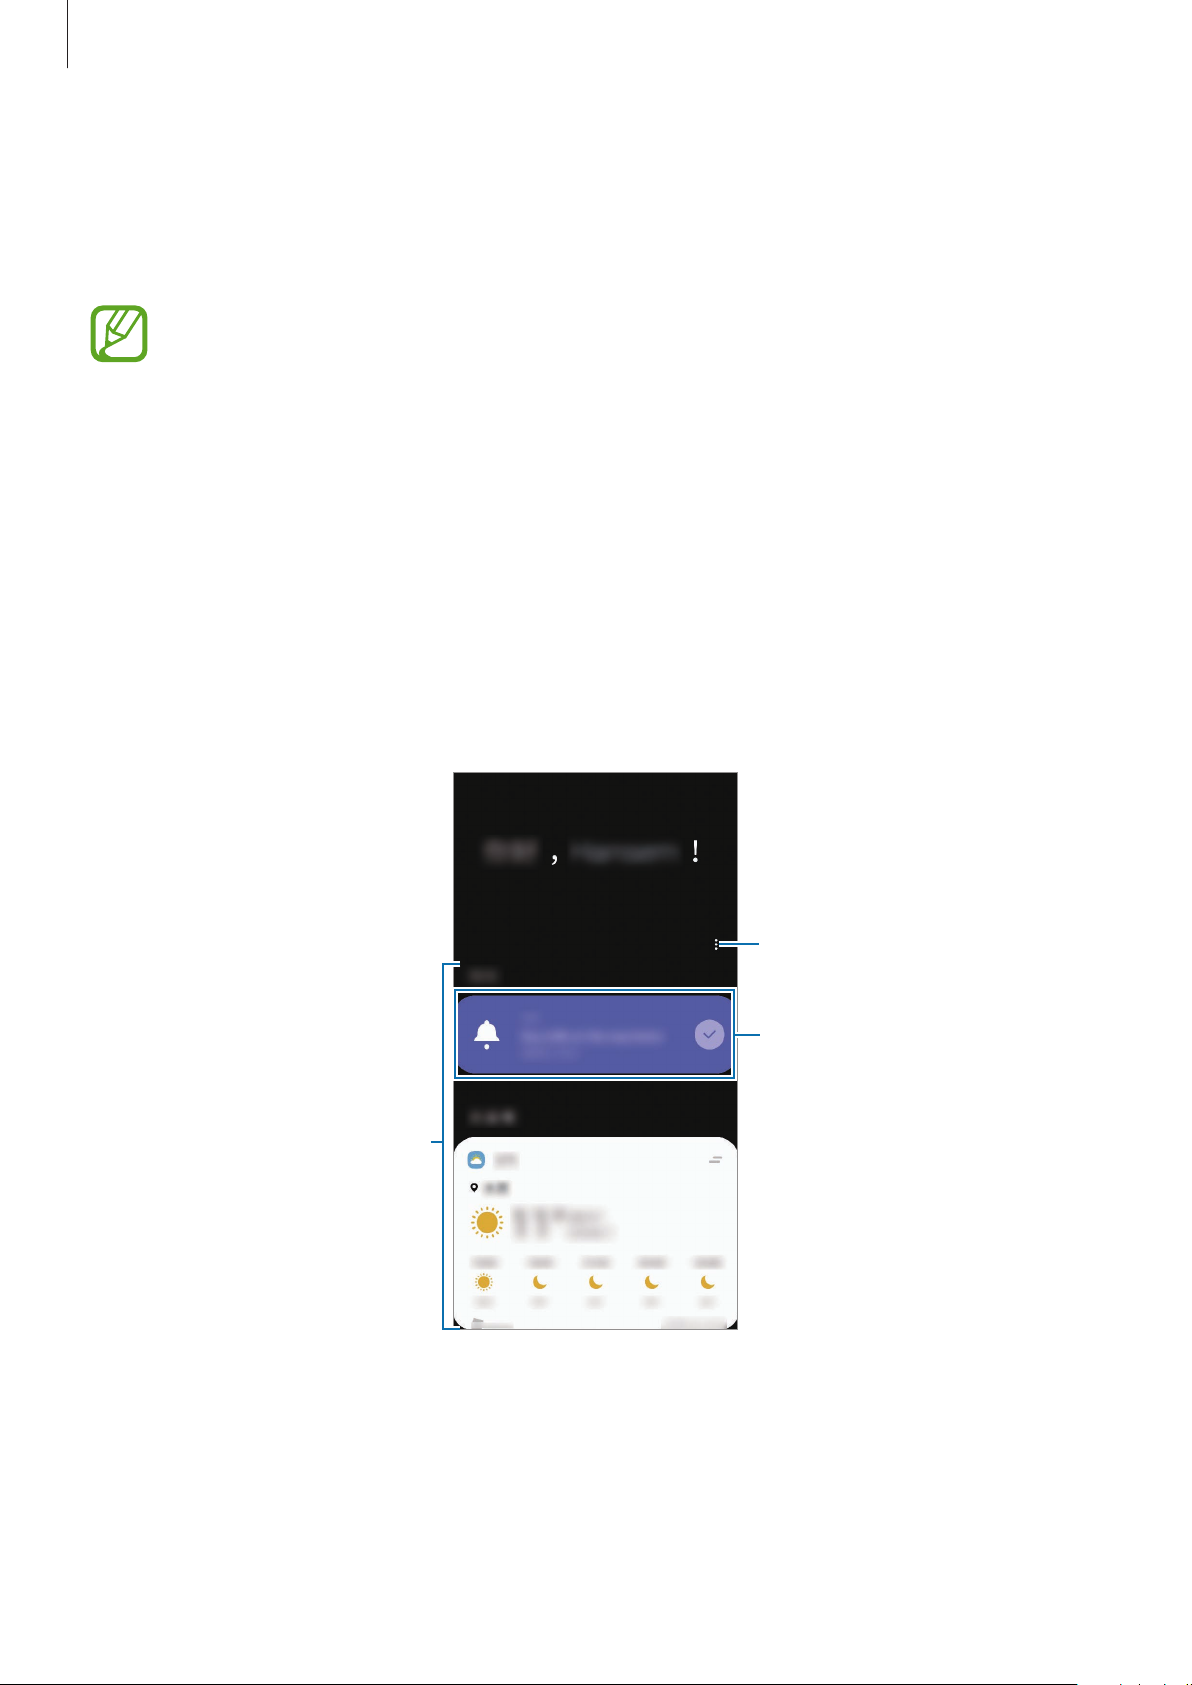
Recommended content
Access additional options.
Upcoming reminder
To close Bixby Home, swipe to the left on the screen or tap the Back button.
3
61
Page 62

Apps and features
Using recommended content on Bixby Home
When you open Bixby Home, you can view the content that is frequently updated as cards.
Swipe upwards or downwards to view the cards.
For example, on the way to the office in the morning, you can view your day’s schedule and
play your favourite music on the Bixby Home screen. In the evening, you can view alarms,
check your daily activity, and view your friends’ feeds.
The content and order of the cards update automatically at a specified interval. To
manually update cards, swipe downwards on the screen.
Editing cards list
•
To pin a card to the top of the Bixby Home screen, tap →
→
tap
Unpin
.
Pin to top
. To unpin a card,
•
To stop displaying a card on the list, drag the card to the right and tap
•
To hide a card from the list, drag the card to the right and tap
Selecting apps to show as cards
Add or delete apps to show as cards on the Bixby Home screen.
On the Bixby Home screen, tap
them.
If an app is not installed on the device, you must install it to use it. On the Bixby Home
→
screen, tap
Cards
→
Cards
and then download an app.
and tap the switches next to items to add or delete
Customising the Bixby Home settings
On the Bixby Home screen, tap →
•
Customisation Service
your experience.
: Set to use Bixby’s interactive and customised services to enhance
Settings
.
Don’t show again
Hide for now
.
.
•
Bixby Home content providers
the terms and conditions and privacy policies of each content provider.
•
About Bixby Home
: View the Bixby Home version and legal information.
: Read and agree to or withdraw your agreement from
62
Page 63
Apps and features
Reminder
Create reminders to schedule to-do items or to view content later. You will receive
notifications at the preset time or location for each reminder.
•
To receive more accurate notifications, connect to a Wi-Fi or mobile network.
•
To fully use this feature, you must sign in to your Samsung account.
•
To use location reminders, the GPS feature must be activated.
Starting Reminder
You can start Reminder from Bixby Home.
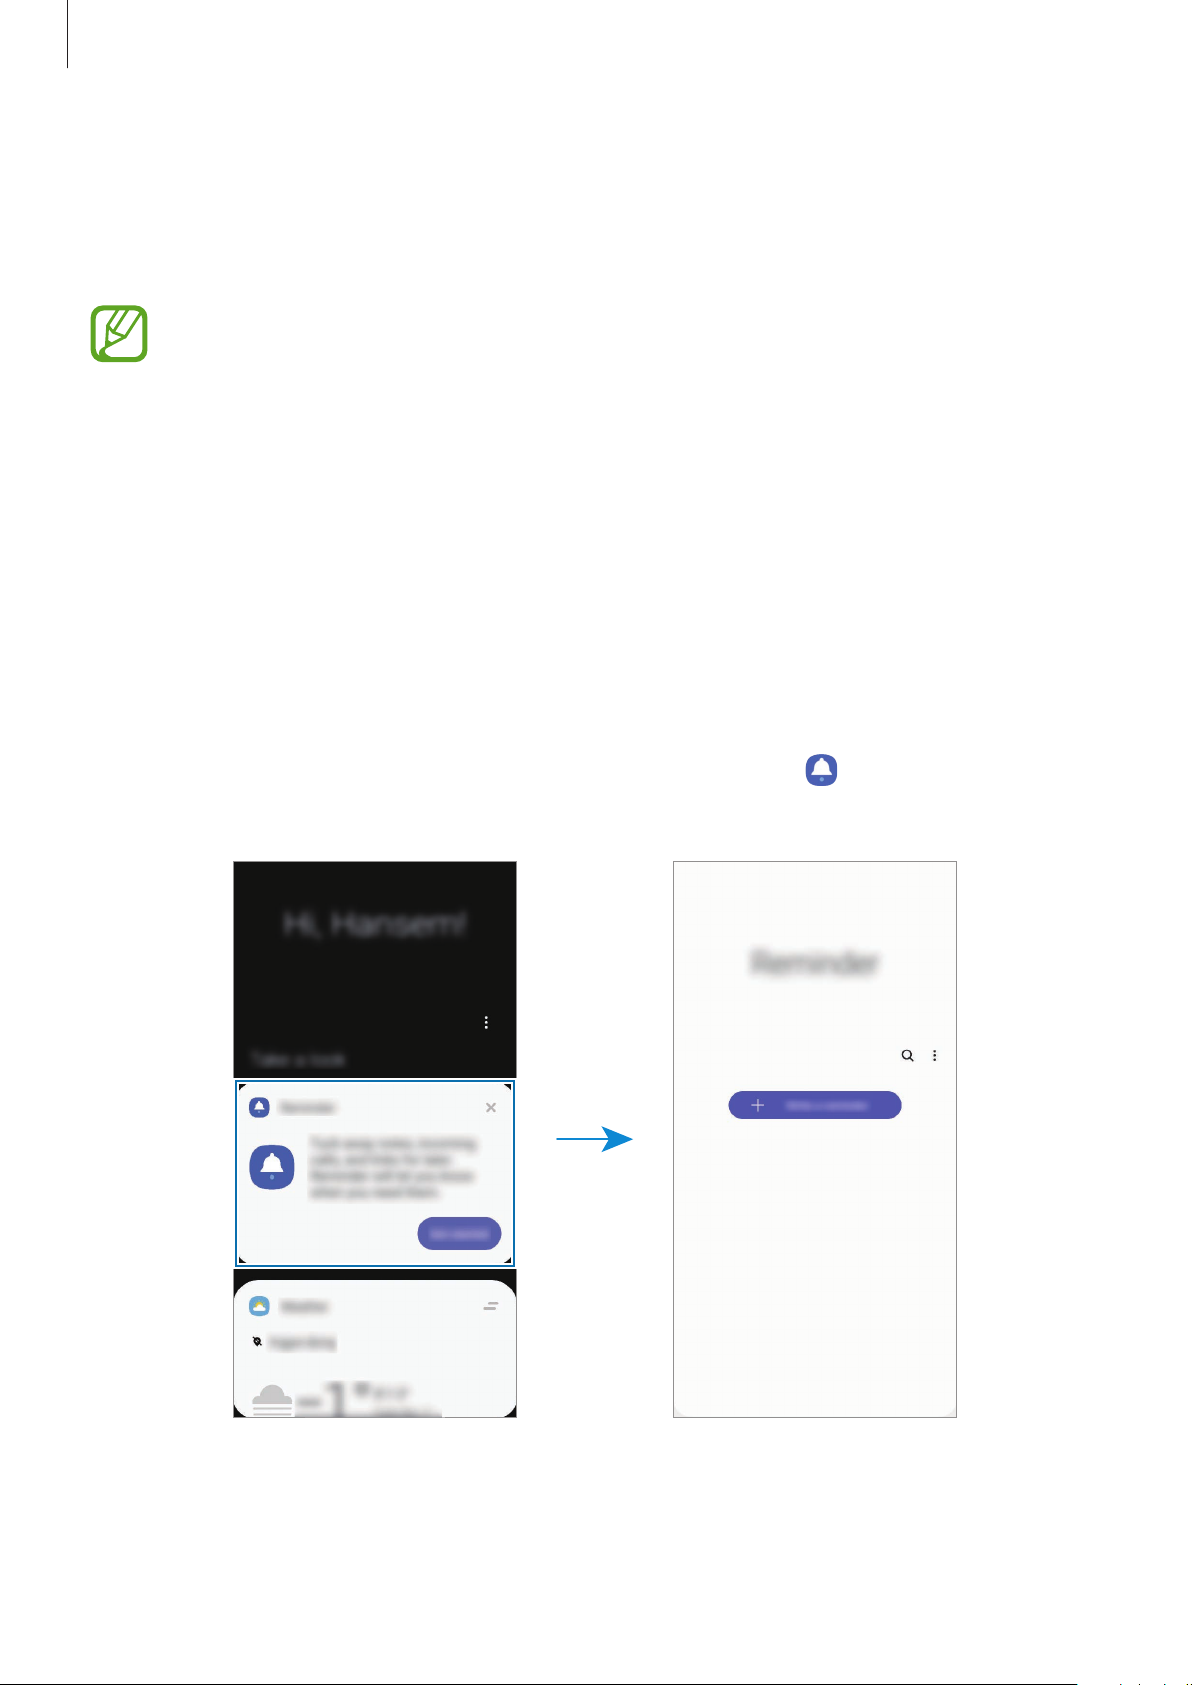
On the Home screen, swipe to the right.
1
The Bixby Home screen will appear.
Tap
2
Get started
The Reminder screen will appear and the
Apps screen.
on the
Reminder
card.
Reminder
app icon (
) will be added to the
63
Page 64
Apps and features
Creating reminders
Create reminders with various methods. Reminder will alert you if you create a reminder with
a specified time or location setting. You can also save various content, such as a single memo
or webpage address, and view it later.
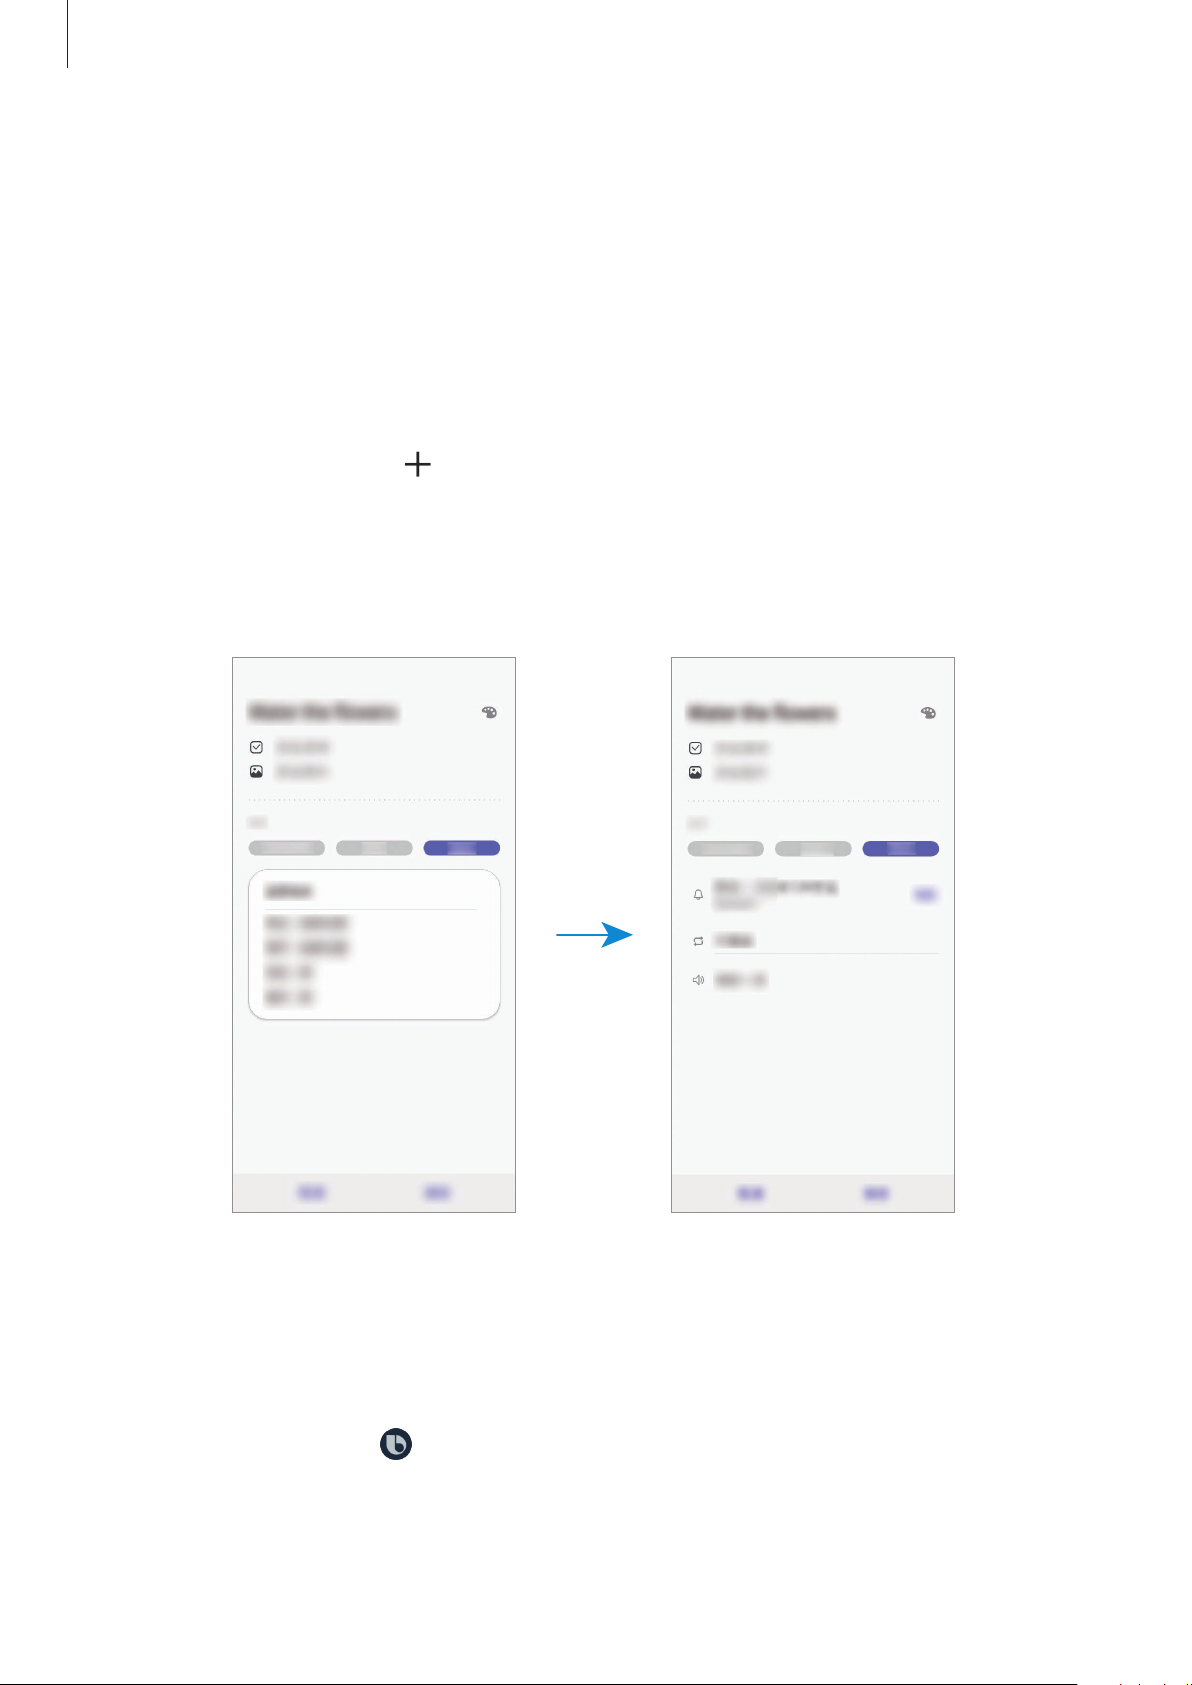
For example, create a reminder to alert you to ‘Water the flowers when I get home’.
Launch the
1
Tap
2
Tap
3
Tap
4
Reminder
Write a reminder
Place
When I arrive at
→
Set conditions
→
app.
or and enter ‘Water the flowers’.
→
Done
Pick a place
.
and set the location to home.
Tap
Save
5
When you arrive at home, the ‘Water the flowers’ notification will appear.
Creating reminders with Bixby
Launch the
home”.
Bixby will save what you said as a reminder.
to save the reminder.
Bixby
app, tap , and then say “Remind me to water the flowers when I get
64
Page 65
Apps and features
Reminder information
Checking reminder notifications
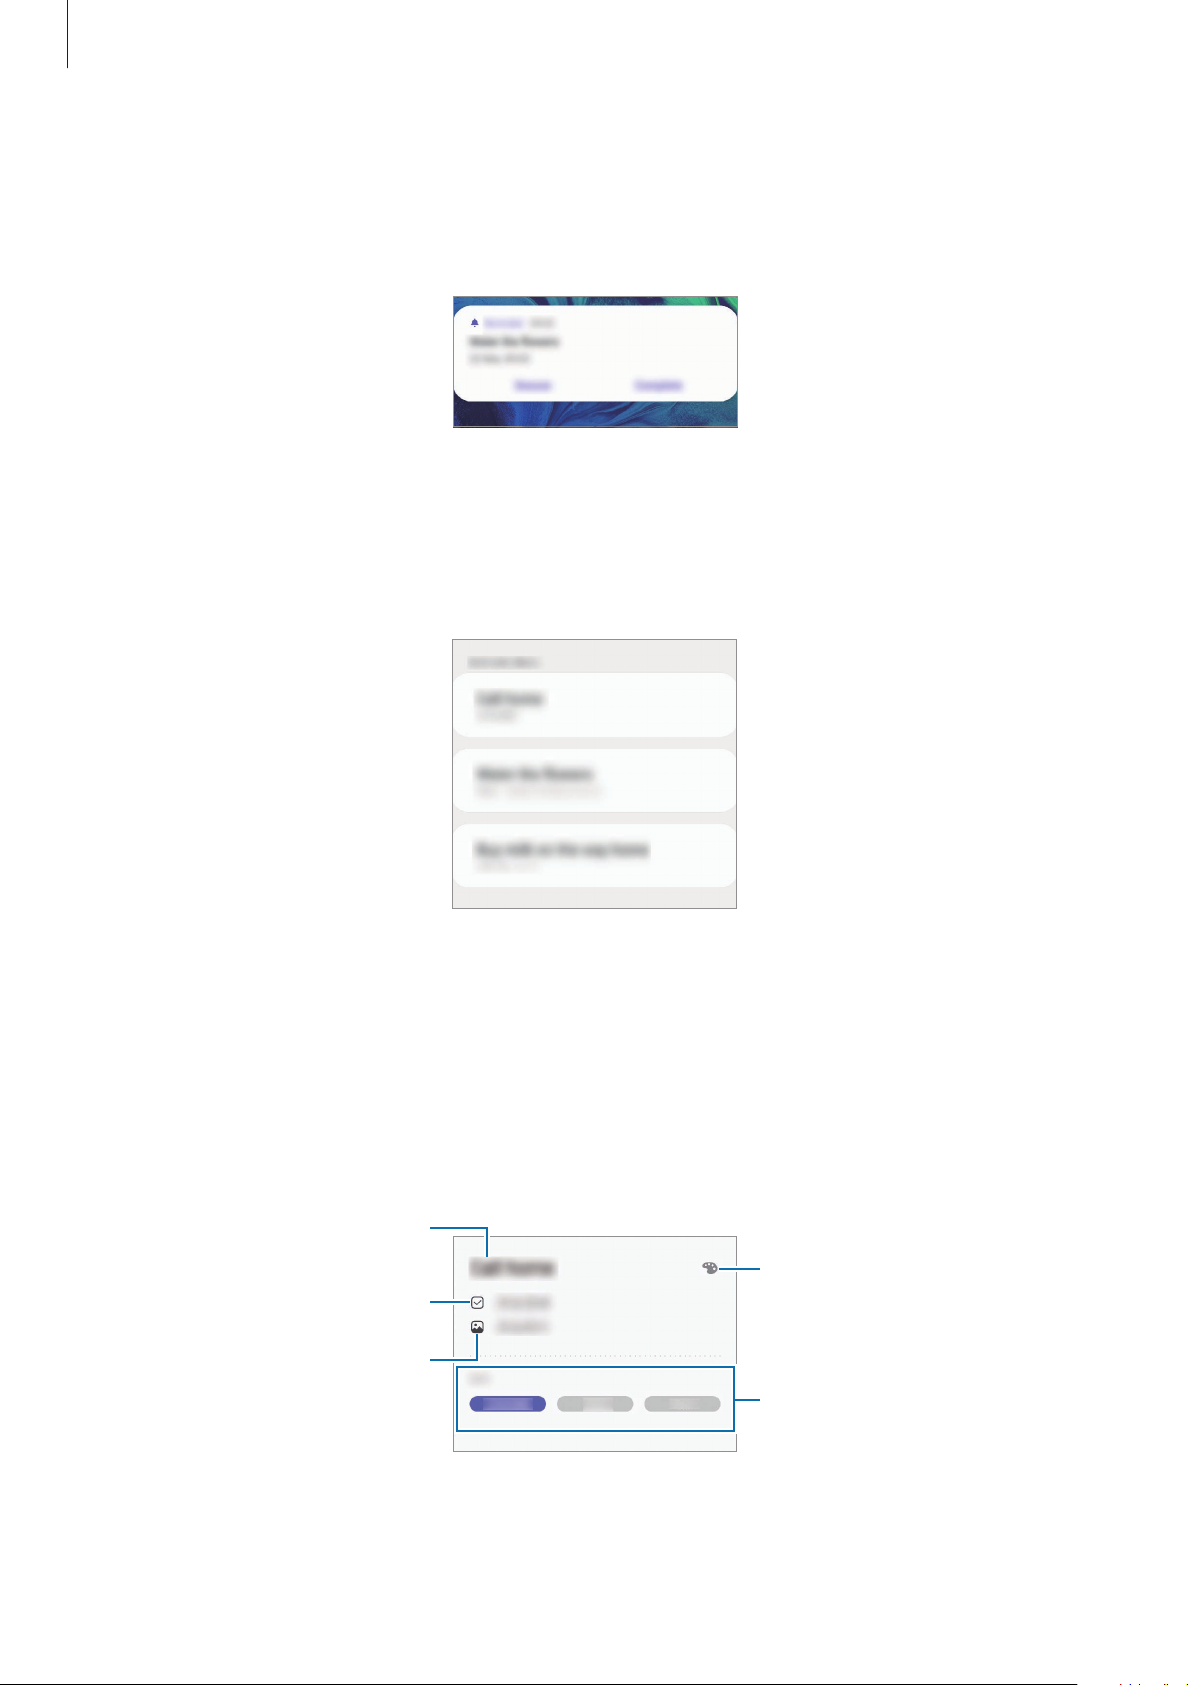
At the preset time or location, a notification pop-up window will appear. Tap
Snooze
.
Viewing the reminders list
Launch the
reminder.
Reminder
app to view your reminders list. To view reminder details, select a
Complete
or
Editing reminder details
Add or edit reminder details, such as frequency, date and time, or location.
On the reminders list, select a reminder to edit and tap
1
Edit the conditions and tap
2
Add a checklist.
Add an image.
Save
.
Edit
.
Change the reminder's colour.
Reminder conditions
65
Page 66

Apps and features
Completing reminders
Mark reminders that you do not need to be reminded of as complete.
On the reminders list, select a reminder and tap
the left.
Restoring reminders
Restore reminders that have been completed.
On the reminders list, tap →
1
Tick items to restore and tap
2
Reminders will be added to the reminders list and you will be reminded at the preset
times.
Completed
Restore
.
Complete
→
Edit
. Alternatively, drag the reminder to
.
Deleting reminders
To delete a reminder, drag the reminder to the right. To delete multiple reminders, tap and
hold a reminder, tick reminders to delete, and then tap
Delete
.
66
Page 67
Apps and features
Phone
Introduction
Make or answer voice calls.
Making calls
Launch the
1
Enter a phone number.
2
Tap to make a voice call.
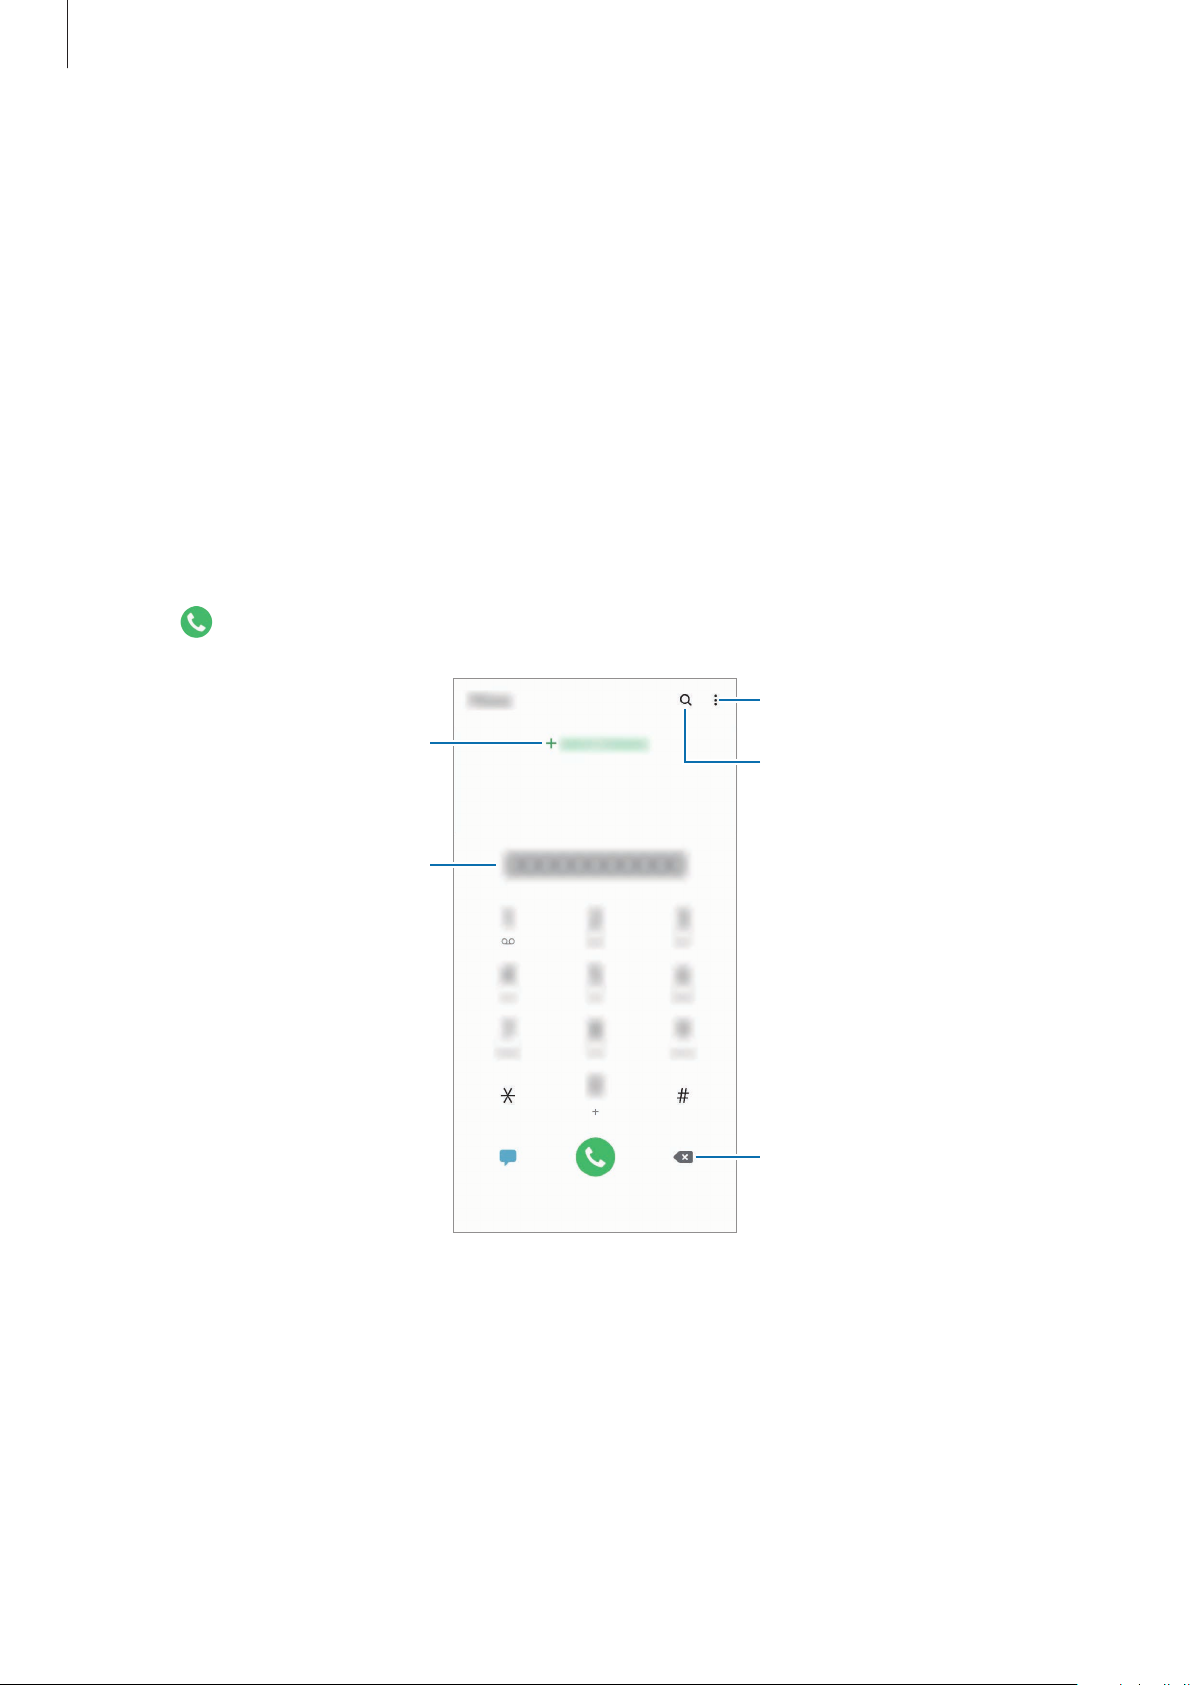
3
Add the number to the contacts
Preview the phone number.
Phone
app and tap
list.
Keypad
.
Access additional options.
Search for a contact.
67
Delete a preceding character.
Page 68

Apps and features
Making calls from call logs or contacts list
Launch the
a phone number to make a call.
If this feature is deactivated, launch the
and gestures
Phone
app, tap
, and then tap the
Recents
or
Contacts
Settings
Swipe to call or send messages
, and then swipe to the right on a contact or
app, tap
Advanced features
switch to activate it.
→
Motions
Using speed dial
Set speed dial numbers to quickly make calls.
To set a number to speed dial, launch the
dial numbers
To make a call, tap and hold a speed dial number on the keypad. For speed dial numbers 10
and up, tap the first digit(s) of the number, and then tap and hold the last digit.
For example, if you set the number 123 as a speed dial number, tap 1, tap 2, and then tap and
hold 3.
, select a speed dial number, and then add a phone number.
Phone
app, tap
Keypad
or
Contacts
→ →
Speed
Making calls from the locked screen
On the locked screen, drag outside the circle.
Making an international call
Launch the
1
Tap and hold 0 until the + sign appears.
2
Enter the country code, area code, and phone number, and then tap .
3
Phone
app and tap
Keypad
.
68
Page 69

Apps and features
Receiving calls
Answering a call
When a call comes in, drag outside the large circle.
Rejecting a call
When a call comes in, drag outside the large circle.
To send a message when rejecting an incoming call, drag the
and select a message to send. If the
saved to alert you of the rejected call one hour later.
To create various rejection messages, launch the
decline messages
, enter a message, and then tap .
Add reminder
switch is activated, a reminder will be
Phone
app, tap →
Send message
Settings
bar upwards
→
Quick
Missed calls
If a call is missed, the icon appears on the status bar. Open the notification panel to view
the list of missed calls. Alternatively, launch the
calls.
Phone
app and tap
Recents
to view missed
Blocking phone numbers
Block calls from specific numbers added to your block list.
Launch the
1
Phone
app and tap →
Settings
→
Block numbers
.
Tap
2
When blocked numbers try to contact you, you will not receive notifications. The calls will be
logged in the call log.
Recents
To manually enter a number, tap
tap
.
You can also block incoming calls from people that do not show their caller ID. Tap the
Block unknown callers
or
Contacts
, select contacts or phone numbers, and then tap
Add phone number
switch to activate the feature.
69
, enter a phone number, and then
Done
.
Page 70
Apps and features
Options during calls
During a voice call
The following actions are available:
•
: Access additional options.
•
Add call
call, the first call will be resumed.
•
Hold call
•
Bluetooth
•
Speaker
the device away from your ears.
•
Mute
: Dial a second call. The first call will be put on hold. When you end the second
: Hold a call. Tap
: Switch to a Bluetooth headset if it is connected to the device.
: Activate or deactivate the speakerphone. When using the speakerphone, keep
: Turn off the microphone so that the other party cannot hear you.
Resume call
to retrieve the held call.
•
Keypad / Hide
•
: End the current call.
To hear the other caller’s voice better during a call, keep your ear close to the
On-Screen Sound area.
: Open or close the keypad.
Adding a phone number to Contacts
Adding a phone number to Contacts from the keypad
Launch the
1
Enter the number.
2
Tap
3
Add to Contacts
Phone
app and tap
.
Keypad
.
Tap
4
Create contact
an existing contact.
to create a new contact, or tap
70
Update existing
to add the number to
Page 71

Apps and features
Adding a phone number to Contacts from the calls list
Launch the
1
Tap a caller’s image and tap
2
Tap
3
Create contact
an existing contact.
Phone
app and tap
to create a new contact, or tap
Recents
Add
, or tap a phone number and tap
.
Add to Contacts
Update existing
.
to add the number to
Adding a tag to a phone number
You can add tags to numbers without saving them to Contacts. This allows you to view the
caller’s information when they call without having them listed in Contacts.
Launch the
1
Tap a phone number → .
2
Tap
3
Add tag
Phone
, enter a tag, and then tap
app and tap
Recents
.
Add
.
When a call comes from that number, the tag will show under the number.
71
Page 72
Apps and features
Contacts
Introduction
Create new contacts or manage contacts on the device.
Adding contacts
Creating a new contact
Launch the
1
Select a storage location.
2
Enter contact information.
3
Contacts
Add an image.
app and tap .
Select a storage location.
Enter contact information.
Open more information fields.
Depending on the selected storage location, the types of information you can save
may vary.
Tap
Save
4
.
72
Page 73

Apps and features
Importing contacts
Add contacts by importing them from other storages to your device.
Launch the
1
→
Import
Select a storage location to import contacts from.
2
Tick VCF files or contacts to import and tap
3
Select a storage location to save contacts to and tap
4
Contacts
.
app and tap →
Manage contacts
Done
.
Import
→
Import/export contacts
.
Syncing contacts with your web accounts
Sync your device contacts with online contacts saved in your web accounts, such as your
Samsung account.
Launch the
1
to sync with.
Settings
app, tap
Accounts and backup
→
Accounts
and select the account
Tap
2
Sync account
For the Samsung account, tap
it.
and tap the
Contacts
→
Sync settings
switch to activate it.
and tap the
Contacts
switch to activate
Searching for contacts
Launch the
Use one of the following search methods:
•
Scroll up or down the contacts list.
•
Drag a finger along the index at the right side of the contacts list to scroll through it
quickly.
•
Tap at the top of the contacts list and enter search criteria.
Contacts
app.
73
Page 74
Apps and features
Tap the contact. Then take one of the following actions:
•
: Add to favourite contacts.
•
: Make a voice call.
•
: Compose a message.
•
: Compose an email.
Sharing contacts
You can share contacts with others by using various sharing options.
Launch the
1
Select contacts and tap
2
Select a sharing method.
3
Contacts
app and tap →
Share
.
Share
.
Saving and sharing profile
Save and share your profile information, such as your photo and status message, with others
using the profile sharing feature.
•
To use this feature, you must sign in to your Samsung account.
Launch the
1
Tap
2
•
•
•
The profile sharing feature may not be available depending on the region or
service provider.
•
The profile sharing feature is only available for contacts who have activated the
profile sharing feature on their device.
Contacts
Tap here to share your profile
To use the profile sharing feature, your phone number must be verified. You can view
your contacts’ updated profile information in
To change the scope of contacts to share your profile with, tap
select an item to share, and then select an option.
app and select your profile.
and tap the switch to activate it.
Contacts
.
Select what’s shared
,
74
Page 75

Apps and features
Creating groups
You can add groups, such as family or friends, and manage contacts by group.
Launch the
1
Enter a group name.
2
To set a group ringtone, tap
Tap
3
4
Add member
Tap
Save
Contacts
.
app and tap →
Group ringtone
, select contacts to add to the group, and then tap
Groups
→
Create group
and select a ringtone.
.
Done
.
Sending a group message
You can send a group message to a group’s members at the same time.
Launch the
Contacts
app, tap →
Groups
, select a group, and then tap →
Send message
Merging duplicate contacts
When you import contacts from other storages, or sync contacts with other accounts, your
.
contacts list may include duplicate contacts. Merge duplicate contacts into one to streamline
your contacts list.
Launch the
1
Tick contacts and tap
2
Contacts
app and tap →
Merge
.
Manage contacts
→
Merge contacts
.
Deleting contacts
Launch the
1
Select contacts and tap
2
To delete contacts one by one, open the contacts list and tap a contact. Then tap
Contacts
app and tap →
Delete
.
Delete
.
→
Delete
.
75
Page 76
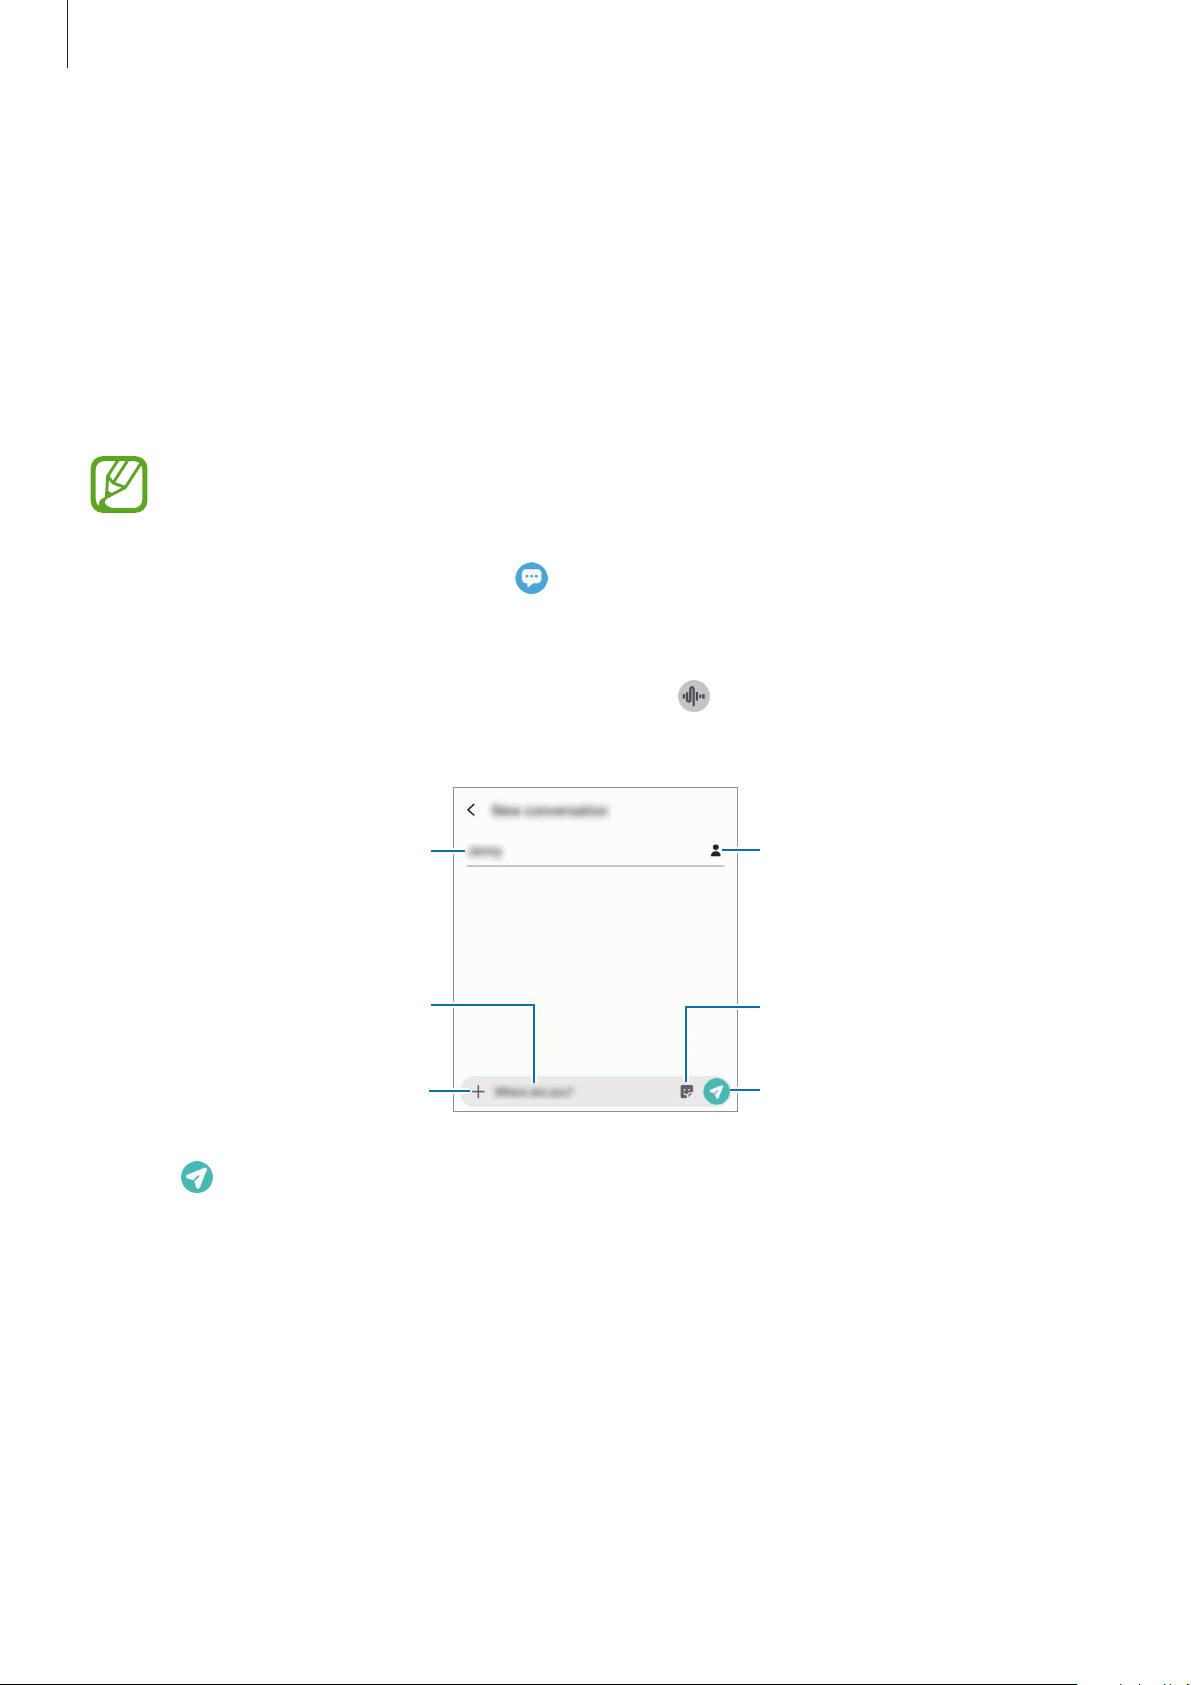
Apps and features
Messages
Introduction
Send and view messages by conversation.
Sending messages
You may incur additional charges for sending messages when you are roaming.
Launch the
1
Add recipients and enter a message.
2
To record and send a voice message, tap and hold
release your finger. The recording icon appears only while the keyboard is hidden.
Messages
Enter a message.
app and tap .
Recipient
Attach files.
, say your message, and then
Enter recipients.
Enter stickers.
Send the message.
Tap to send the message.
3
76
Page 77

Apps and features
Viewing messages
Messages are grouped into message threads by contact.
You may incur additional charges for receiving messages when you are roaming.
Launch the
1
On the messages list, select a contact or a phone number.
2
View your conversation.
3
•
To reply to the message, tap
•
To adjust the font size, spread two fingers apart or pinch on the screen.
•
To add the phone number to Contacts, tap
Messages
app and tap
Enter message
Conversations
, enter a message, and then tap .
Add to contacts
.
Blocking unwanted messages
Block messages from specific numbers added to your block list.
Launch the
1
Block numbers
Messages
.
app and tap →
Settings
→
Block numbers and messages
.
→
Tap
2
Inbox
then tap
To manually enter a number, enter a phone number under
and select a contact or a phone number. Or, tap
Done
.
Contacts
Enter number
, select contacts, and
and tap .
77
Page 78

Apps and features
Setting the message notification
You can change notification sound, display options, and more.
Launch the
1
activate it.
Change the notification settings.
2
Messages
app, tap →
Settings
→
Notifications
, and then tap the switch to
Setting a message reminder
You can set an alert at an interval to let you know that you have unchecked notifications. If
this feature is not activated, launch the
→
Notification reminders
, and then tap the switch to activate it.
Settings
app, tap
Accessibility
→
Advanced settings
Deleting messages
Launch the
1
On the messages list, select a contact or a phone number.
2
Messages
app and tap
Conversations
.
Tap and hold a message, then tap
3
To delete multiple messages, tick messages you want to delete.
Tap
4
Delete
.
Delete
.
78
Page 79
Apps and features
Internet
Introduction
Browse the Internet to search for information and bookmark your favourite webpages to
access them conveniently.
Browsing webpages
Launch the
1
Tap the address field.
2
Enter the web address or a keyword, and then tap Go.
3
To view the toolbars, drag your finger downwards slightly on the screen.
To switch between tabs quickly, swipe to the left or right on the address field.
Bookmark the current webpage.
Internet
app.
Refresh the current webpage.
Move between pages.
Open the homepage.
Access additional options.
Open the browser's tab
manager.
79
Page 80
Apps and features
Using secret mode
In secret mode, you can separately manage open tabs, bookmarks, and saved pages. You can
lock secret mode using a password and your biometric data.
Activating secret mode
In the toolbar at the bottom of the screen, tap →
this feature for the first time, set whether to use a password for secret mode.
In secret mode, the device will change the colour of the toolbars.
In secret mode, you cannot use some features, such as screen capture.
Turn on Secret mode
. If you are using
Changing security settings
You can change your password or the lock method.
Tap
To set your registered biometric data as the lock method along with the password, tap the
Fingerprints
using your biometric data.
→
Settings
→
Privacy and security
switch to activate it. Refer to Fingerprint recognition for more information about
→
Set Secret mode lock
→
Change password
Deactivating secret mode
In the toolbar at the bottom of the screen, tap →
Turn off Secret mode
.
.
80
Page 81
Apps and features
Setting up email accounts
Set up an email account when opening
Launch the
1
On the list, select an email service or tap
2
Follow the on-screen instructions to complete the setup.
3
To set up another email account, tap
If you have more than one email account, you can set one as the default account. Tap
→ →
Set default account
Email
app.
.
Email
→ →
for the first time.
Other
.
Add account
.
Sending emails
Tap to compose an email.
1
Add recipients and enter a subject line and text.
2
→
Tap to send the email.
3
Reading emails
When
emails, swipe downwards on the top of the emails list.
Tap an email on the screen to read it.
Email
is open, the device will automatically retrieve new emails. To manually retrieve
If email syncing is disabled, new emails cannot be retrieved. To enable email syncing,
tap
it.
→ → your account name, and then tap the
Sync account
switch to activate
81
Page 82

Apps and features
Camera
Introduction
Take photos and record videos using various modes and settings.
Camera etiquette
•
Do not take photos or record videos of other people without their permission.
•
Do not take photos or record videos where legally prohibited.
•
Do not take photos or record videos in places where you may violate other people’s
privacy.
Launching Camera
Use the following methods to launch Camera:
•
Launch the
•
Press the Power key twice quickly.
•
On the locked screen, drag outside the circle.
•
•
Camera
Some camera features are not available when you launch the
locked screen or when the screen is turned off while the screen lock method is set.
If photos you take appear blurry, clean the camera lens and try again.
app.
Camera
app from the
82
Page 83
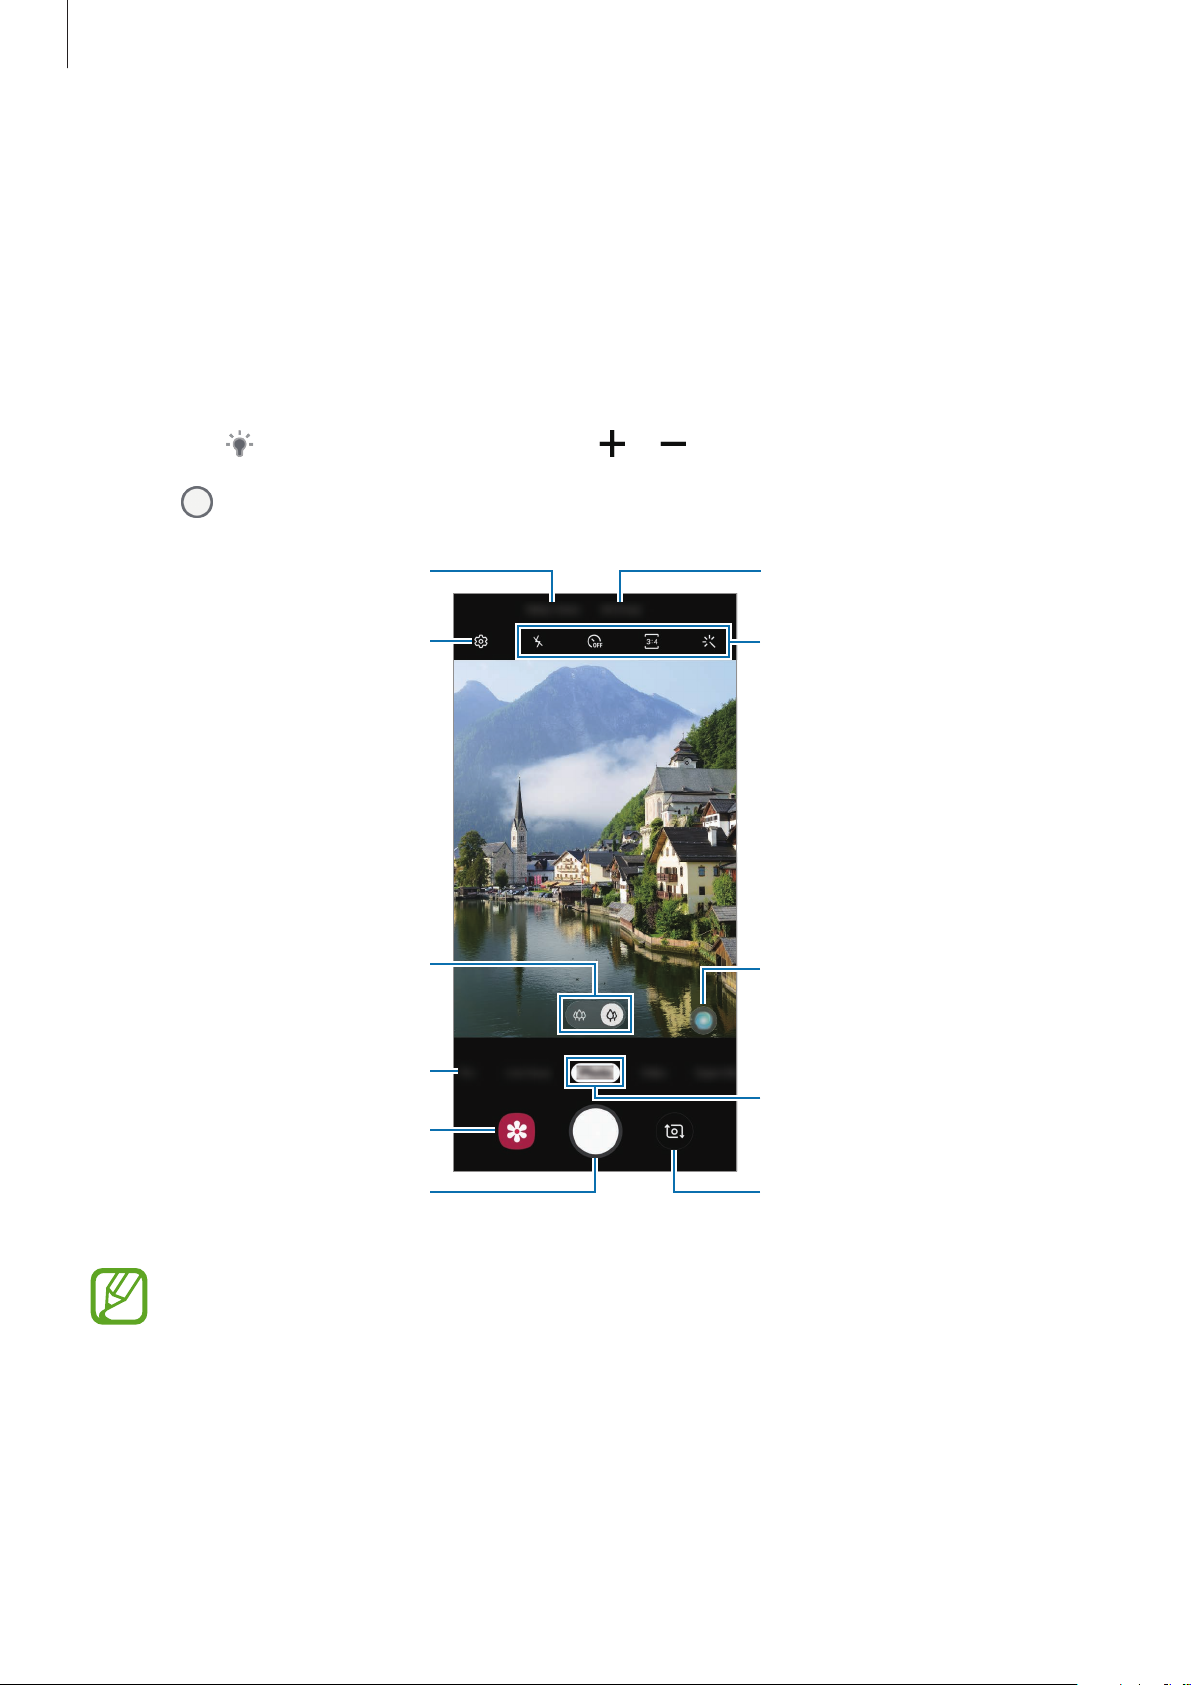
Apps and features
Bixby Vision
Taking photos
Tap the image on the preview screen where the camera should focus.
1
•
Spread two fingers apart on the screen to zoom in, and pinch to zoom out.
Alternatively, drag the lens selection icon to the left or right. Zooming features are
available only when using the rear camera.
•
To adjust the brightness of photos, tap the screen. When the adjustment bar appears,
drag
Tap to take a photo.
2
on the adjustment bar towards or .
Camera settings
Select a lens.
AR Emoji
Options for current shooting
mode
Scene optimiser button
Shooting modes
Current mode
Preview thumbnail
Take a photo.
•
The preview screen may vary depending on the shooting mode and which camera
is being used.
•
The camera automatically shuts off when unused.
•
Make sure that the lens is not damaged or contaminated. Otherwise, the device
may not work properly in some modes that require high resolutions.
•
Your device’s camera features a wide-angle lens. Minor distortion may occur in
wide-angle photos or videos and does not indicate device performance problems.
83
Switch between the front and
rear cameras.
Page 84
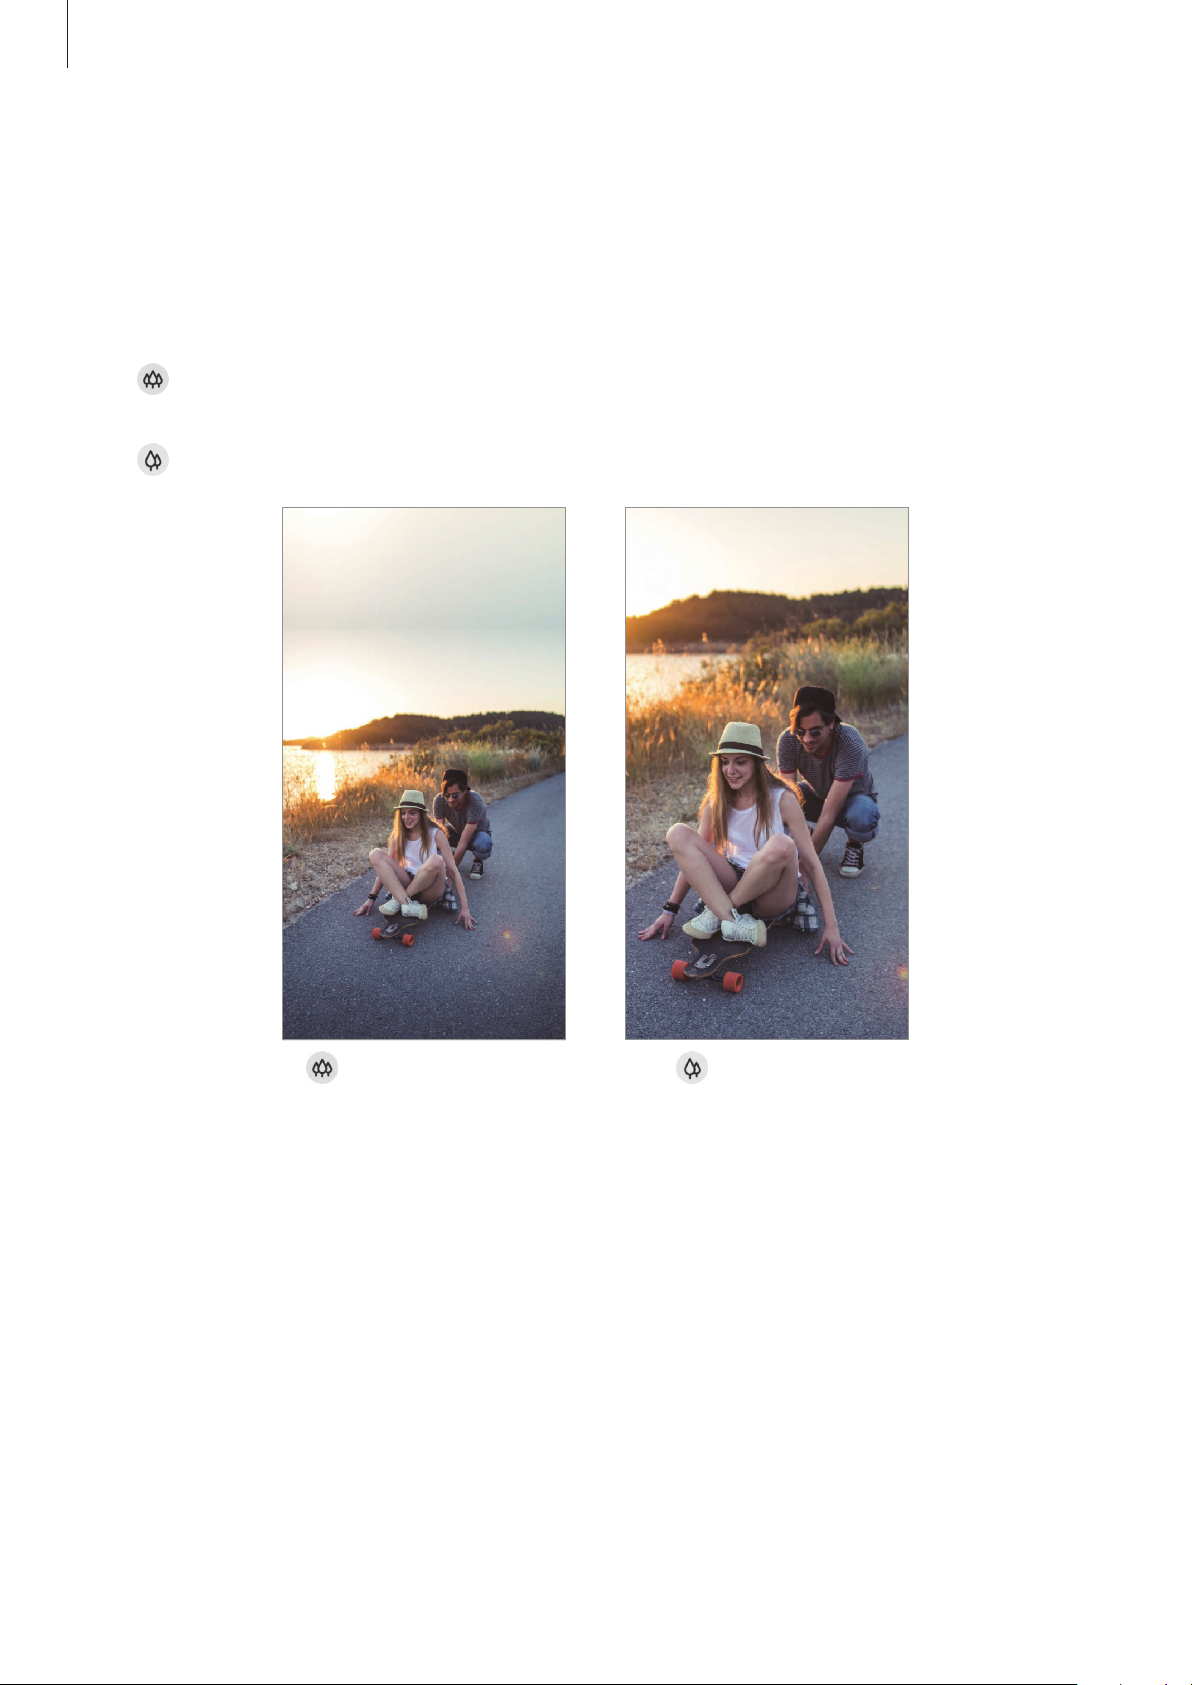
Apps and features
Selecting a lens for shooting
You can take photos and record videos using various angles of view with the Ultra wide lens
and wide-angle lens.
On the preview screen, tap
or record a video.
•
•
: The Ultra wide lens lets you take wide-angle photos or record wide-angle videos
which look just like the actual view. Use this feature to take landscape photos.
: The wide-angle lens lets you take basic photos or record normal videos.
Photo
or
Video
, select the lens you want, and then take a photo
84
Basic shooting Ultra wide shooting
Page 85
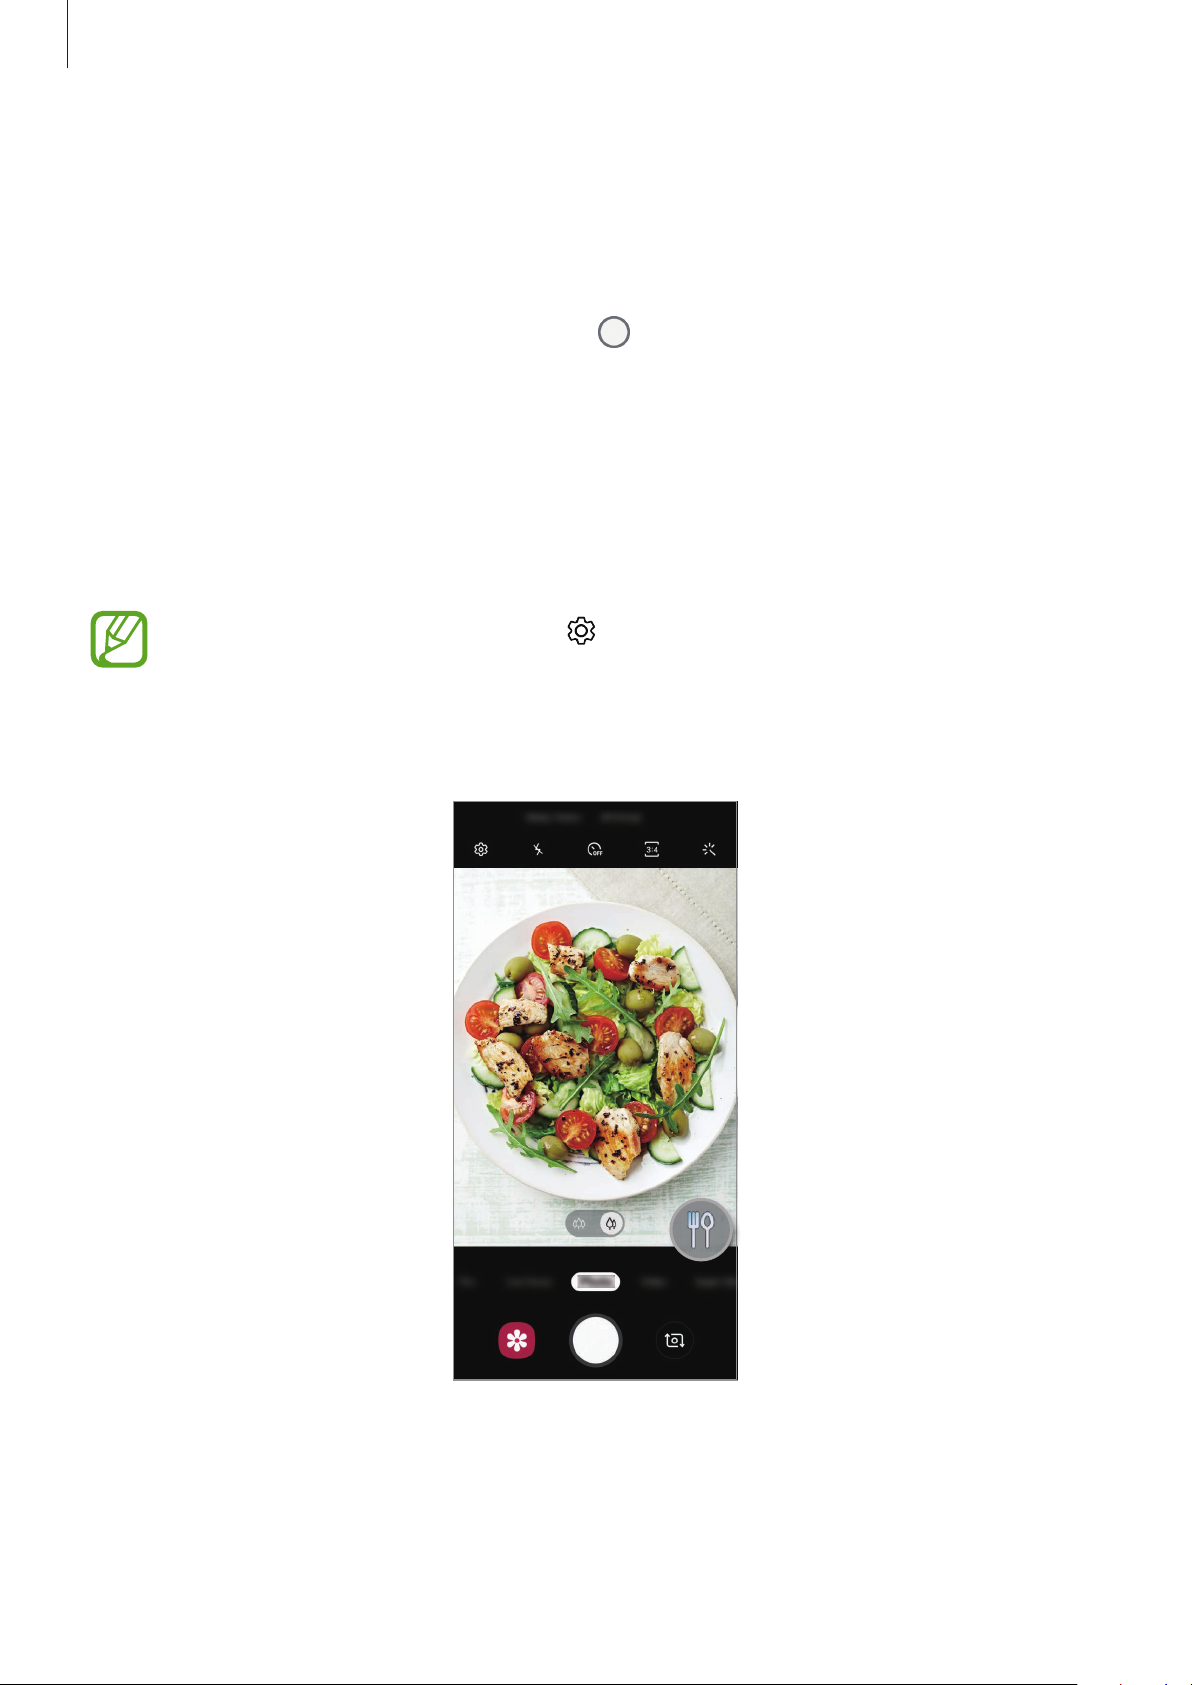
Apps and features
Photo mode (Intelligent camera)
The camera adjusts the shooting options automatically depending on the surroundings to
capture photos easily. The intelligent camera feature automatically recognises the subject
and optimises the colour and any effects.
On the shooting modes list, tap
Photo
and tap to take a photo.
Scene optimiser
The camera adjusts the colour settings and applies the optimised effect automatically by
recognising the subject.
On the shooting modes list, tap
optimiser button will change and the optimised colour and effect will be applied.
•
If this feature is not activated, tap on the preview screen and tap the
optimiser
•
If you do not want to use this feature, tap the scene optimiser button on the
preview screen.
switch to activate it.
Photo
. When the camera recognises the subject, the scene
Scene
85
Page 86
Apps and features
Taking selfies
You can take self-portraits with the front camera.
On the shooting modes list, tap
1
On the preview screen, swipe upwards or downwards, or tap to switch to the front
2
camera for self-portraits.
Face the front camera lens.
3
4
Tap
to take a photo.
Photo
.
Applying filter and beauty effects
You can select a filter effect and modify facial features, such as your skin tone or face shape,
before taking a photo.
On the preview screen, tap .
1
Select a filter effect or beauty effects and take a photo.
2
Locking the focus (AF) and exposure (AE)
You can lock the focus or exposure on a selected area to prevent the camera from
automatically adjusting based on changes to the subjects or light sources.
Tap and hold the area to focus, the AF/AE frame will appear on the area and the focus and
exposure setting will be locked. The setting remains locked even after you take a photo.
This feature is available only in
Pro
modes.
86
Page 87
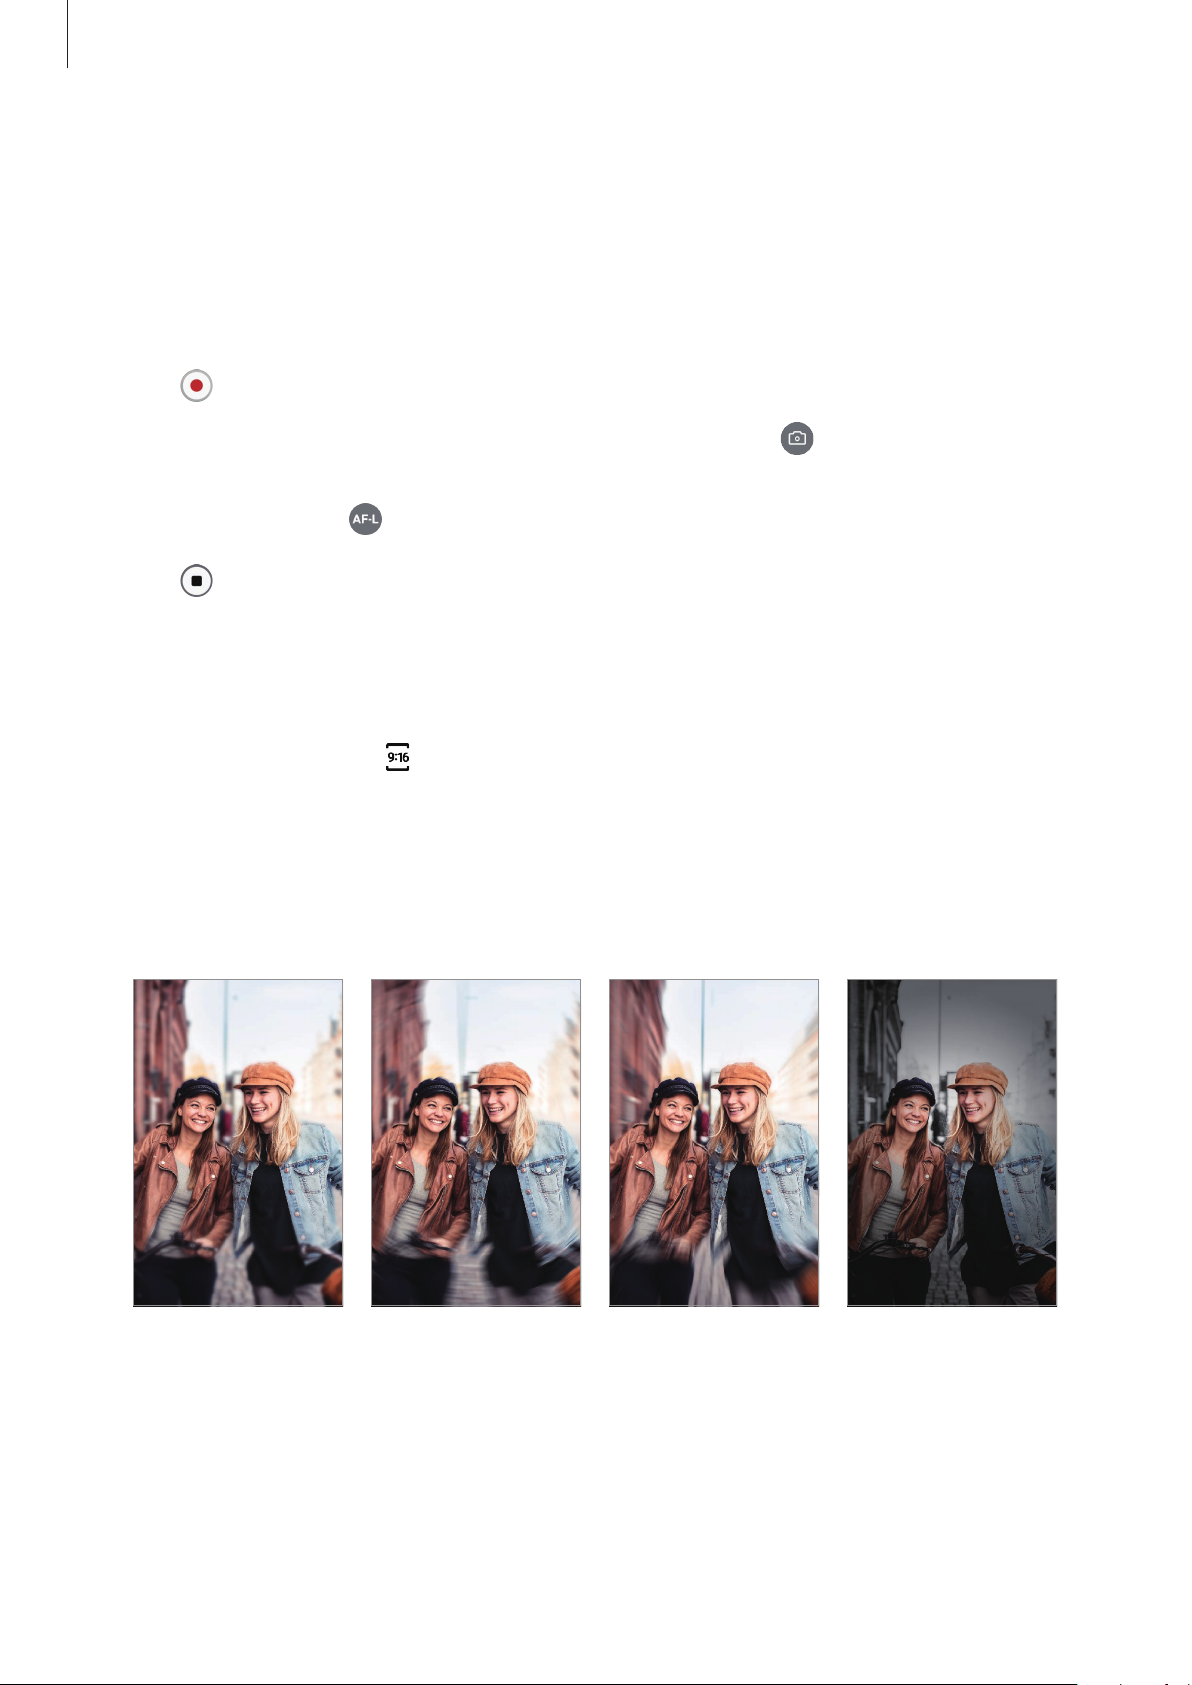
Apps and features
Video mode
The camera adjusts the shooting options automatically depending on the surroundings to
record videos easily.
On the shooting modes list, tap
1
Tap to record a video.
2
•
To capture an image from the video while recording, tap .
•
To change the focus while recording a video, tap where you want to focus. To use auto
focus mode, tap
3
Tap
to stop recording the video.
to cancel the manually set focus.
Video
.
Changing the screen ratio for a video
You can set the screen ratio for a video.
On the preview screen, tap
and select a screen ratio.
Live focus mode
The camera allows you to take photos where the background is blurred and the subject
stands out clearly. You can also apply a background effect and edit it after taking a photo.
Blur Spin Zoom Colour point
87
Page 88
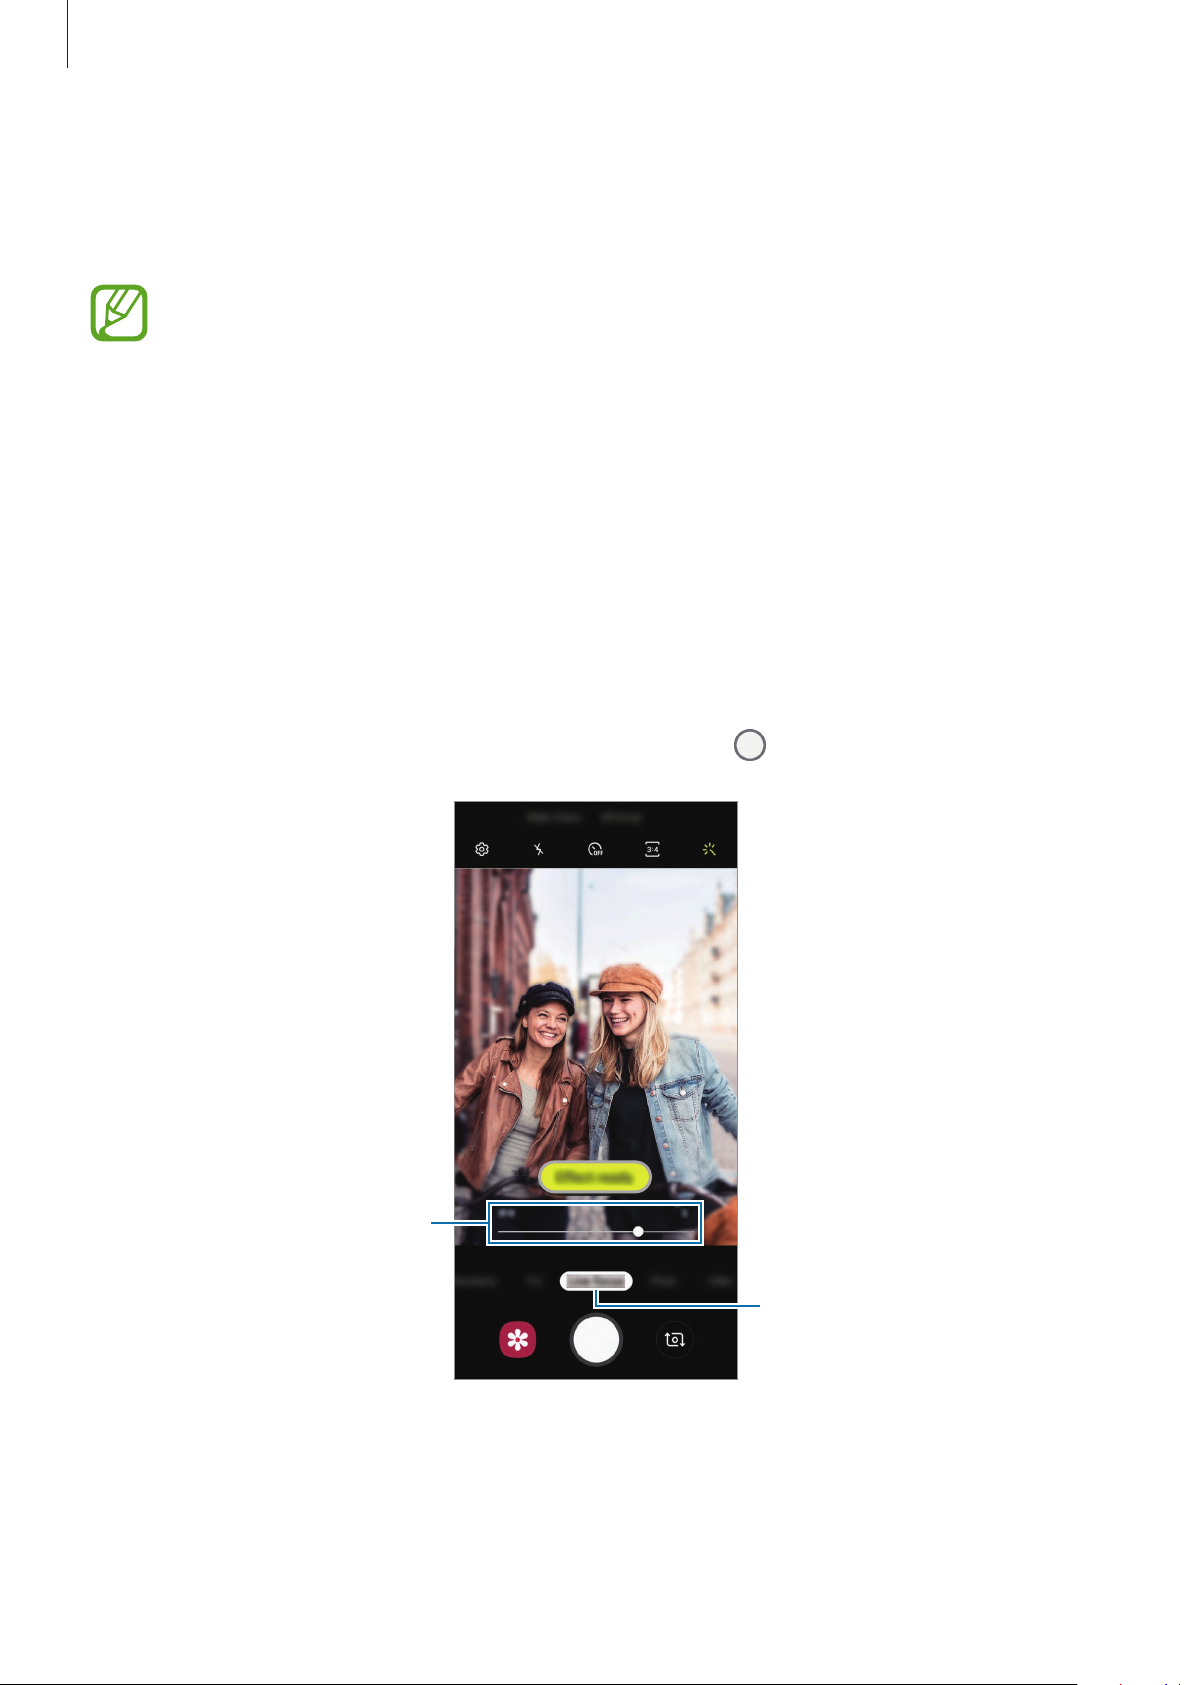
Apps and features
Taking portraits that stand out using the Live focus feature
Select a background effect on the preview screen and take a photo that stands out the
subject.
•
Use this feature in a place that has sufficient light.
•
The background blur may not be applied properly in the following conditions:
–
The device or the subject is moving.
–
The subject is thin or transparent.
–
The subject has a similar colour or pattern to the background.
–
The subject or background is plain.
On the shooting modes list, tap
1
Drag the background blur adjustment bar to the left or right to adjust the blur level.
2
3
When
Effect ready.
appears on the preview screen, tap to take a photo.
Live focus
.
Background effect intensity
adjustment bar
Live focus
88
Page 89
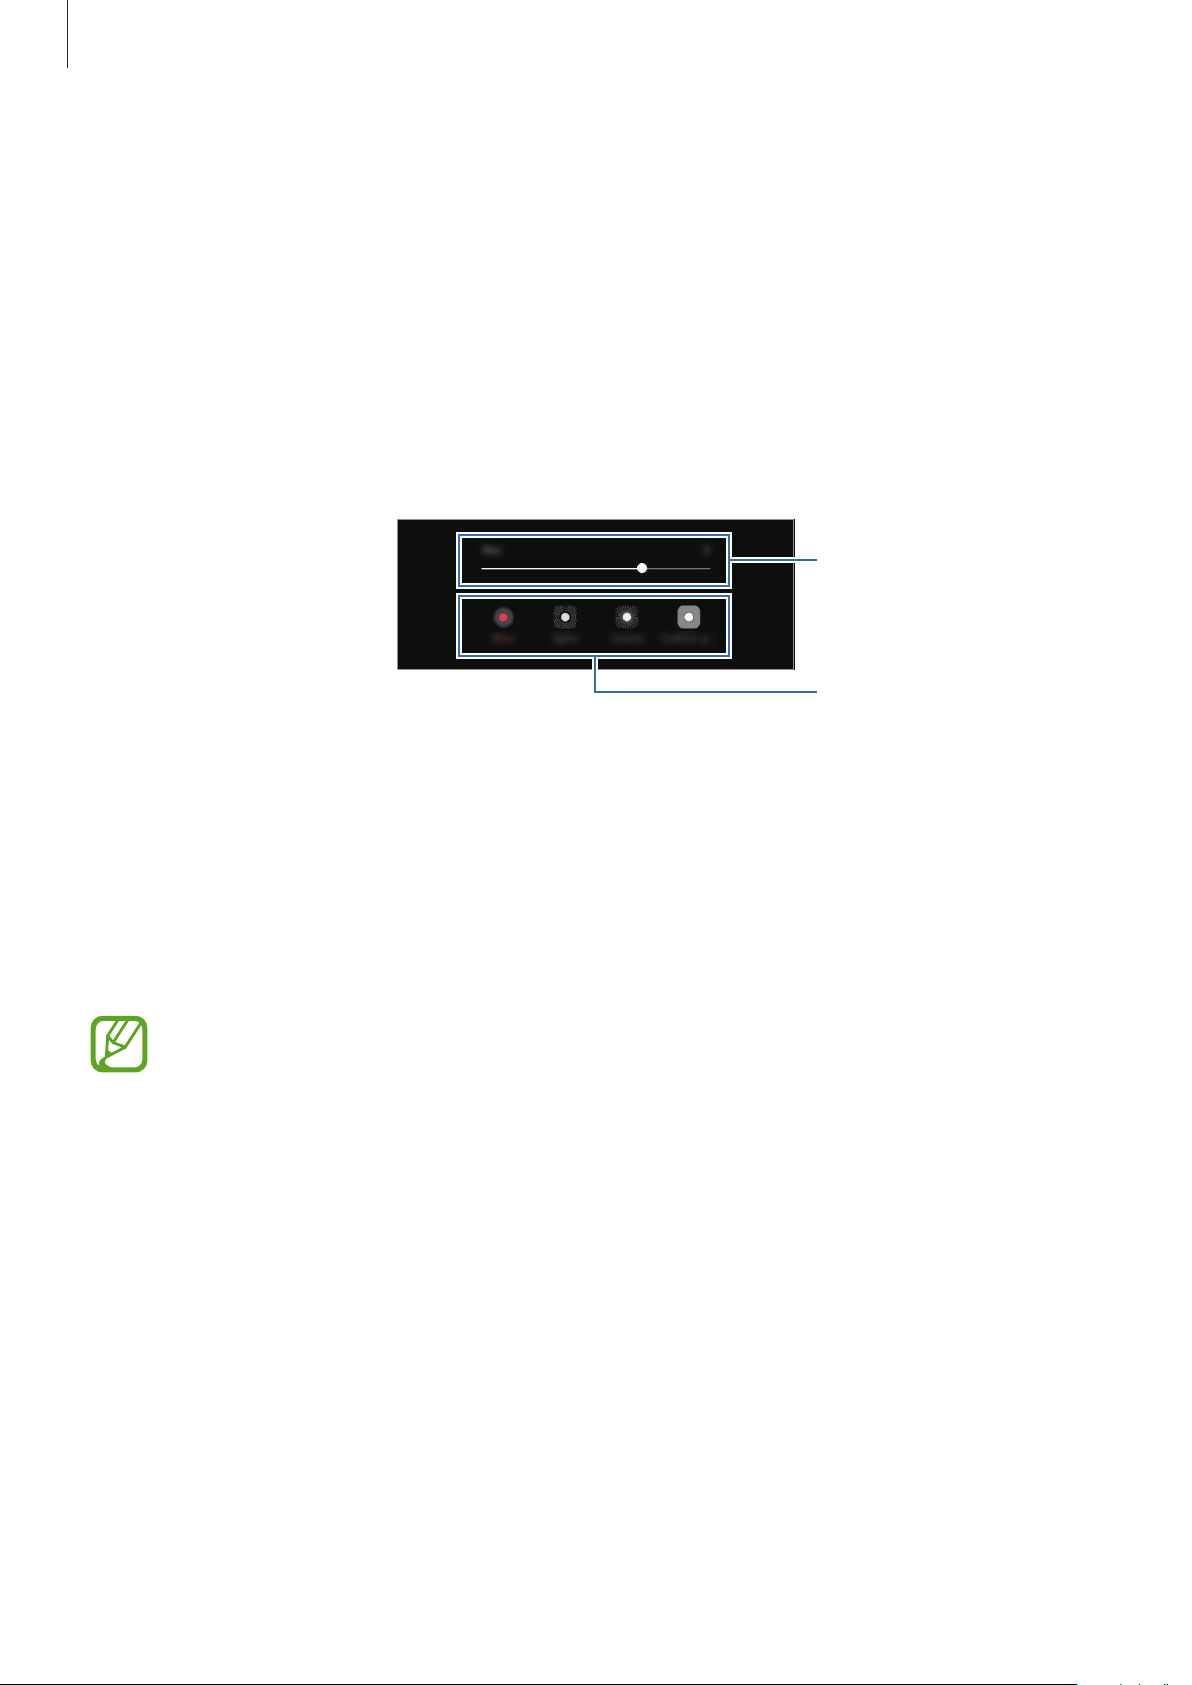
Apps and features
Editing the background of the Live focus photos
You can also edit the background effect and the intensity of the background effect for a
photo taken with the Live focus feature.
Select a photo taken with the Live focus feature and tap
1
Select a background effect you want.
2
To adjust the intensity of the background effect, drag the adjustment bar to the left or
right.
Tap
3
Apply
to save the photo.
Change background effect
Adjust the intensity of the
background effect.
Change the background
effect.
.
Super Slow-mo mode
Super slow motion is a feature that records a quickly passing moment slowly so that you can
appreciate it later. After the video is recorded, background music will be added automatically.
Use this feature in a place that has sufficient light. When recording a video indoors
with insufficient or poor lighting, some of the following situations may occur:
•
The screen may appear dark due to the small amount of light.
•
The screen may flicker in certain lighting conditions, such as in places with
fluorescent lighting.
•
Noise may occur.
89
Page 90
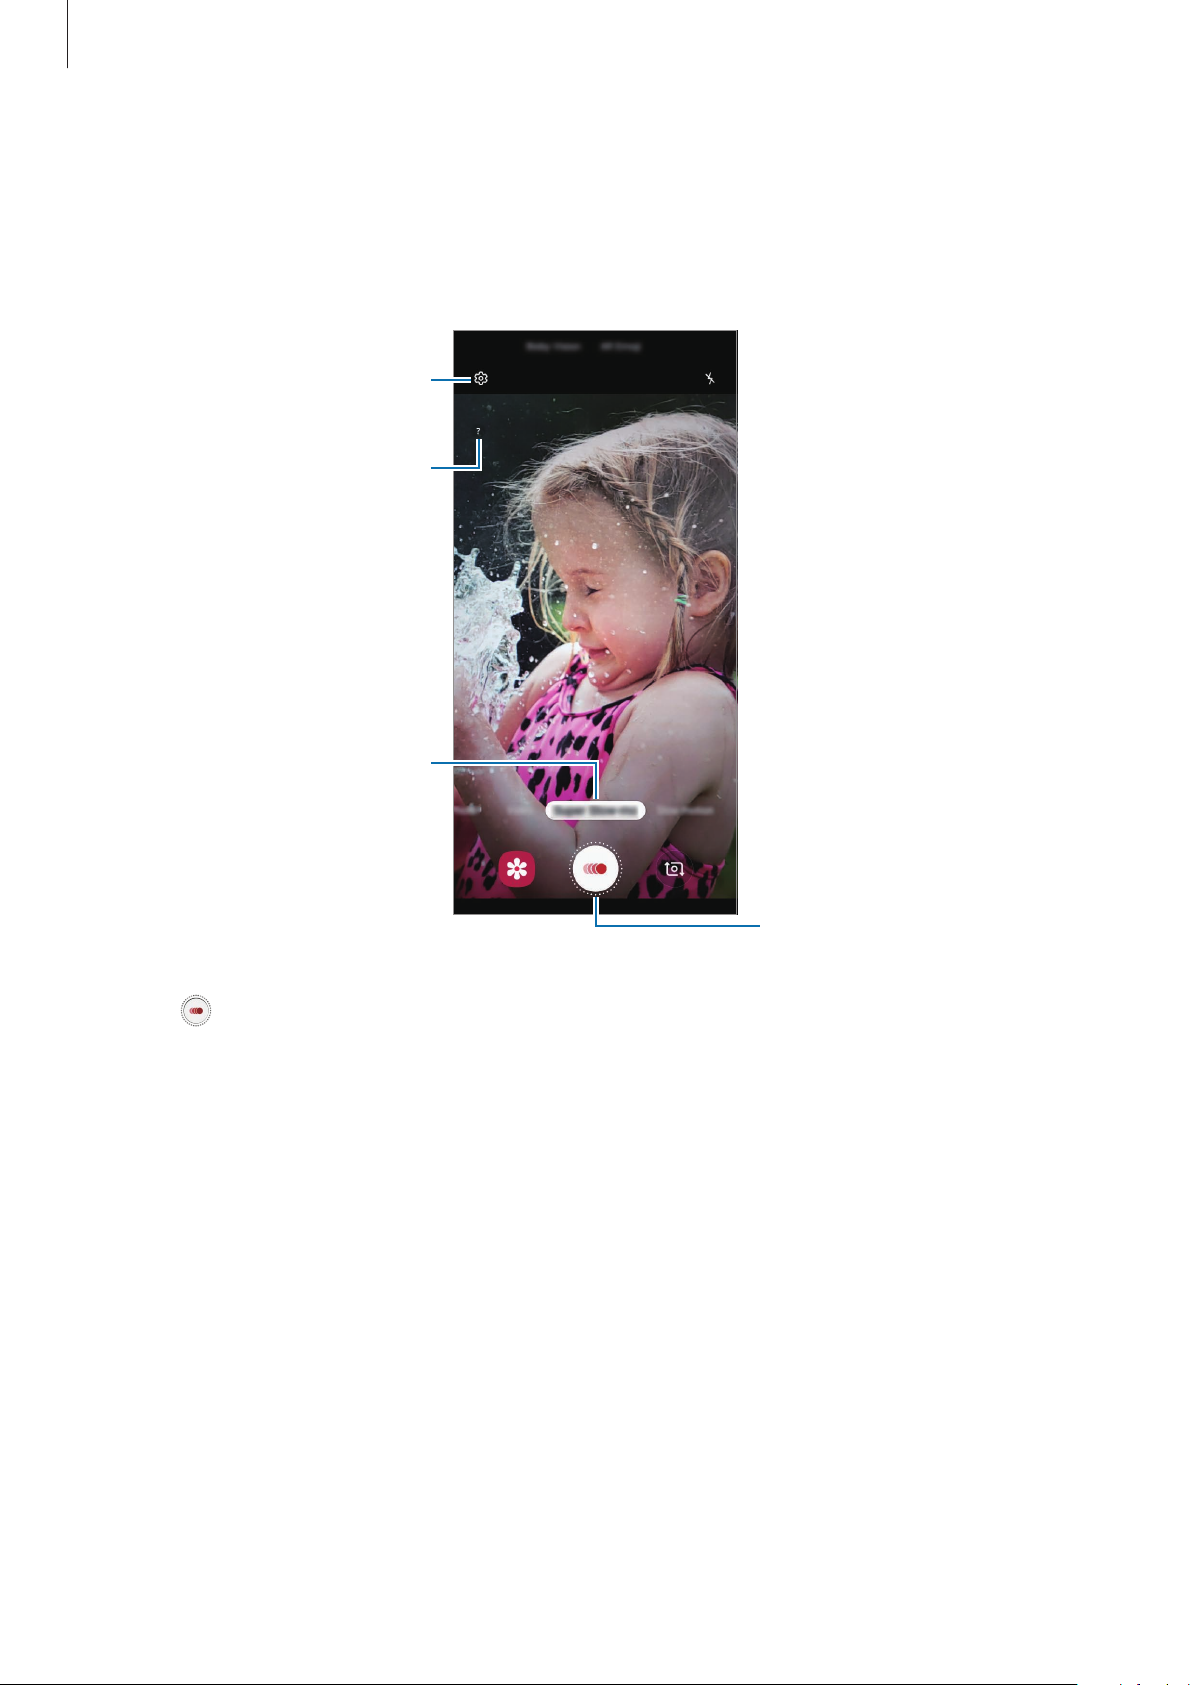
Apps and features
Recording super slow motion videos
Record a video by capturing a single moment that the subject is moving.
On the shooting modes list, tap
1
Camera settings
View information.
Super Slow-mo
Super Slow-mo
.
Start recording a video.
Tap
2
The device will capture the moment in super slow motion and save it as a video.
.
90
Page 91
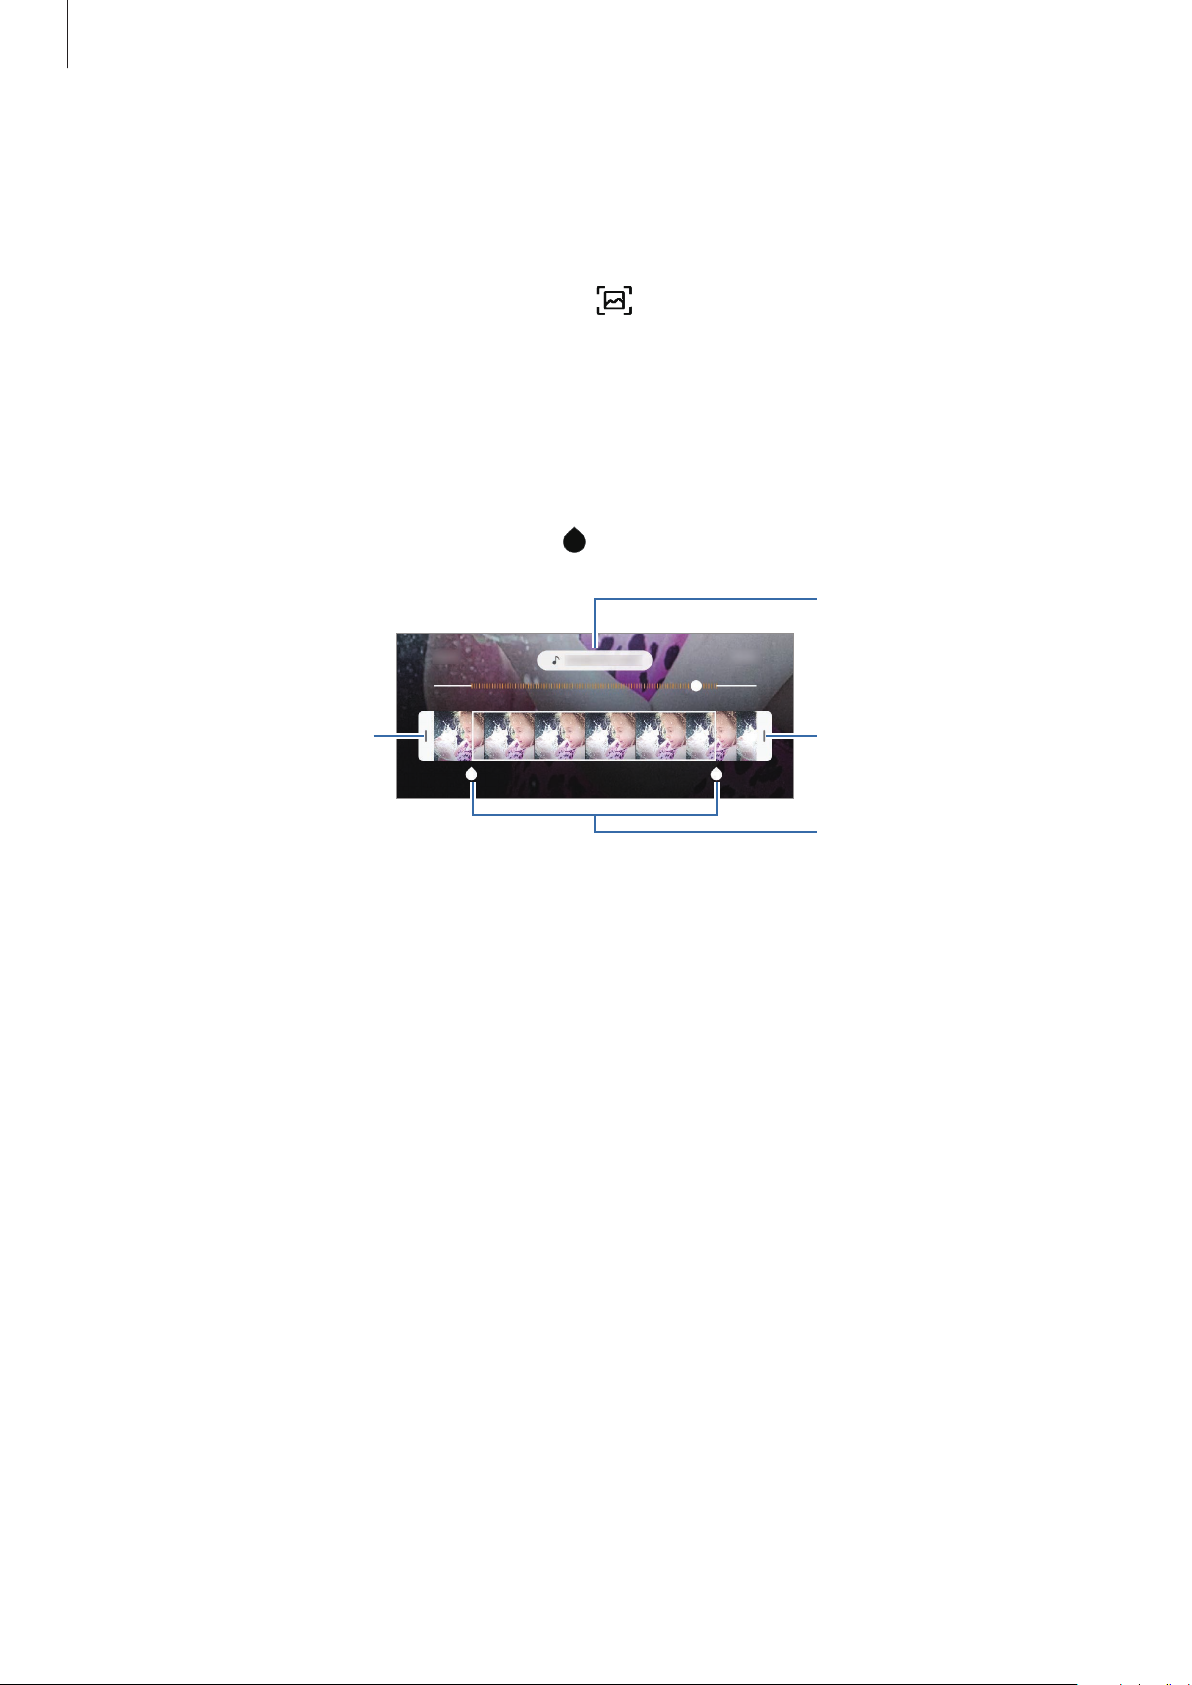
Apps and features
Change the background
Playing super slow motion videos
Select a super slow motion video and tap
Play super slow-mo video
.
Random background music will automatically accompany the video during playback.
To capture an image while playing a video, tap
.
Editing super slow motion videos
On the playback screen, you can edit the video and save it as a different file or share it.
To crop out a desired section of the video, drag the start bracket and the end bracket to the
desired points to select the section to keep.
To edit the super slow motion section, drag
Start bracket
to the left or right.
music.
End bracket
Super slow motion section
91
Page 92
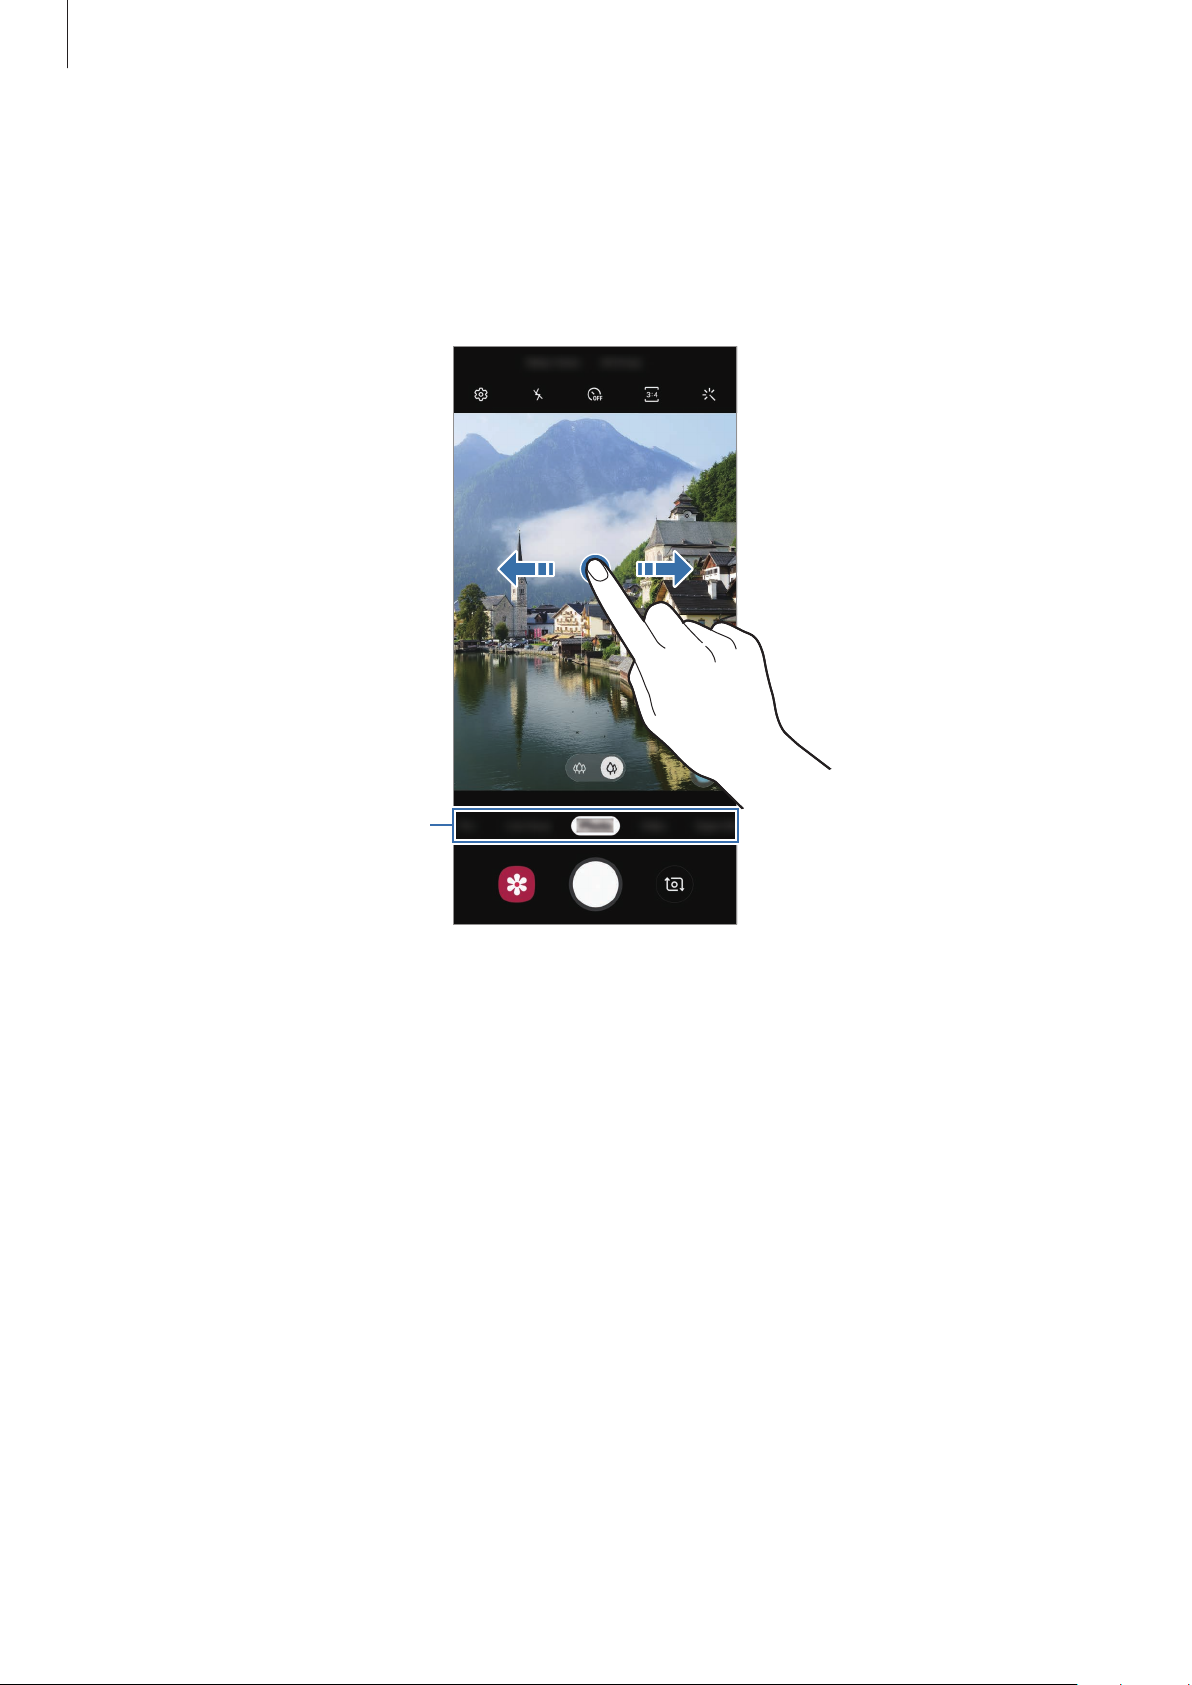
Apps and features
Using shooting modes
To change the shooting mode, drag the shooting modes list to the left or right, or swipe to
the left or right on the preview screen.
Select a shooting mode you want.
Shooting modes list
92
Page 93
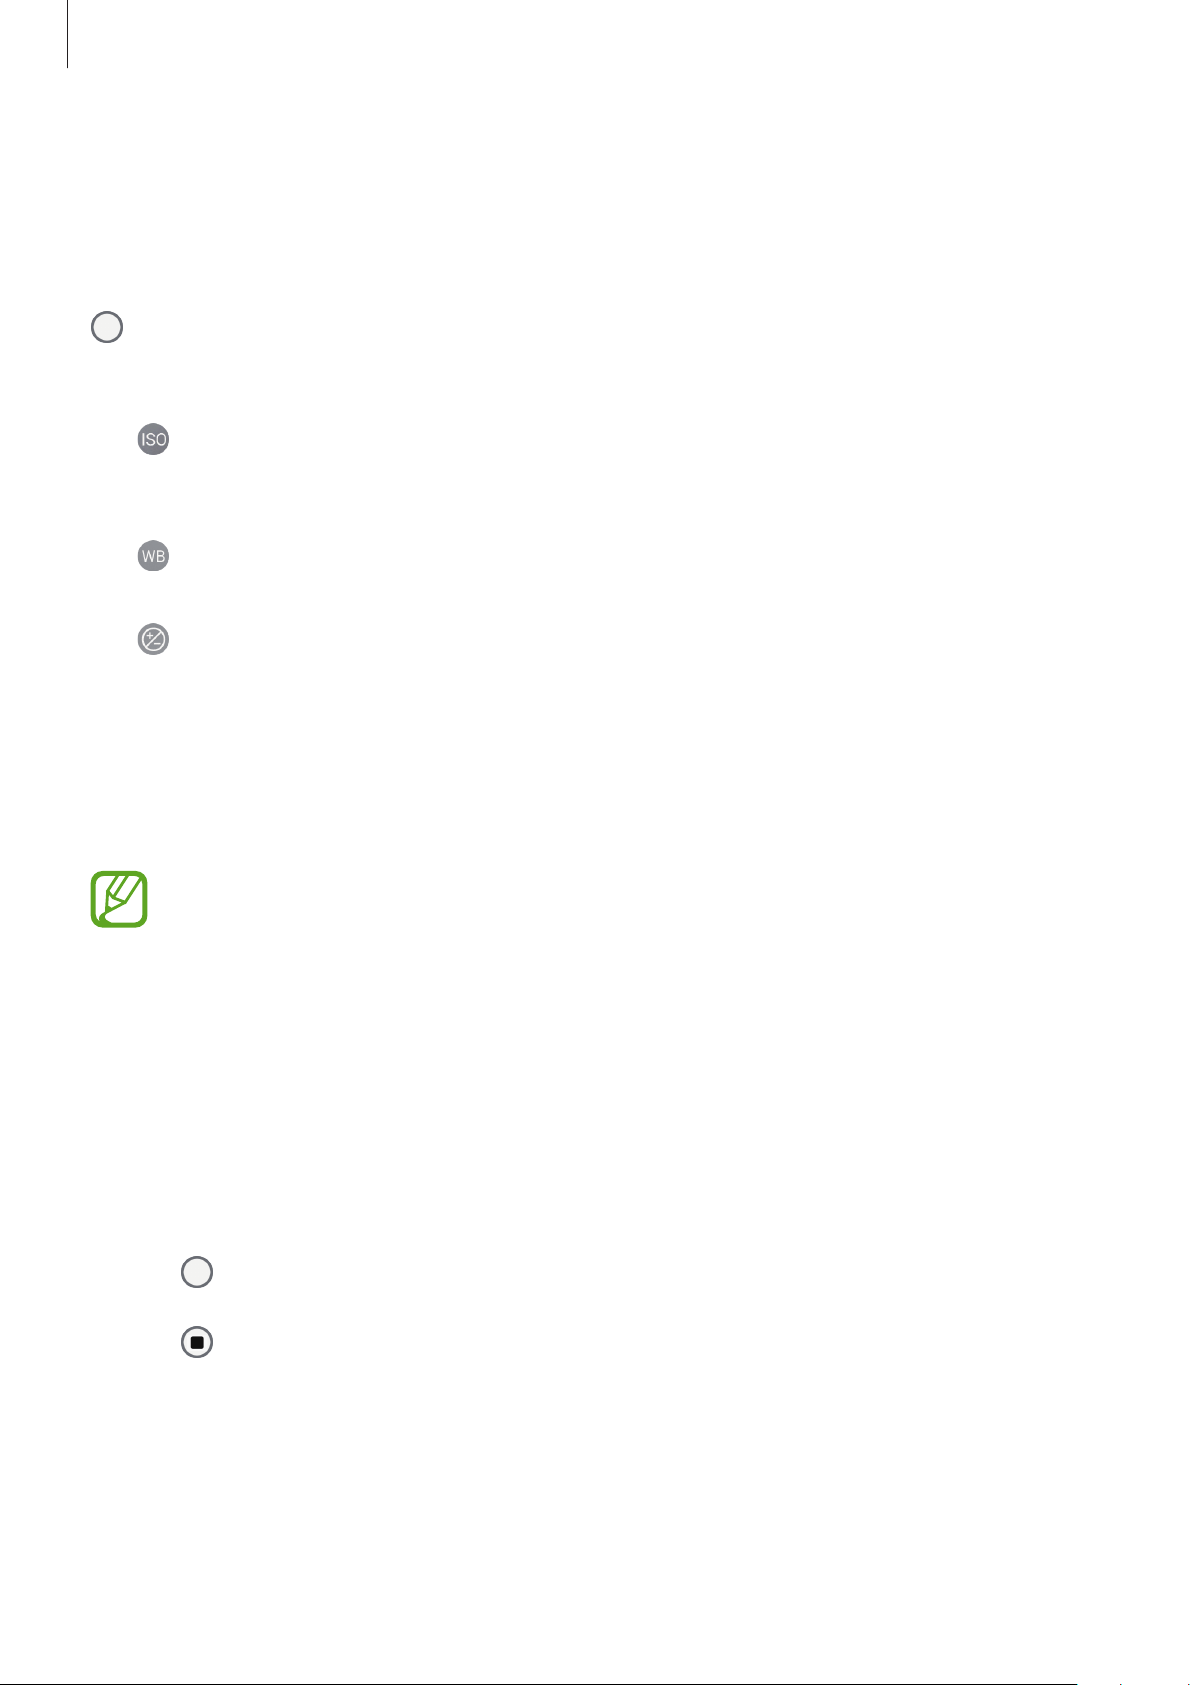
Apps and features
Pro mode
Capture photos while manually adjusting various shooting options, such as exposure value
and ISO value.
On the shooting modes list, tap
to take a photo.
Pro
. Select options and customise the settings, and then tap
Available options
•
•
•
: Select an ISO value. This controls camera light sensitivity. Low values are for
stationary or brightly lit objects. Higher values are for fast-moving or poorly lit objects.
However, higher ISO settings can result in noise in photos.
: Select an appropriate white balance, so images have a true-to-life colour range. You
can set the colour temperature.
: Change the exposure value. This determines how much light the camera’s sensor
receives. For low-light situations, use a higher exposure.
Panorama mode
Using panorama mode, take a series of photos and then stitch them together to create a wide
scene.
To get the best shots using panorama mode, follow these tips:
•
Move the camera slowly in one direction.
•
Keep the image within the frame on the camera’s viewfinder. If the preview
image is out of the guide frame or you do not move the device, the device will
automatically stop taking photos.
•
Avoid taking photos of indistinct backgrounds, such as an empty sky or a plain
wall.
On the shooting modes list, tap
1
Tap and move the device slowly in one direction.
2
Tap to stop taking photos.
3
Panorama
.
93
Page 94
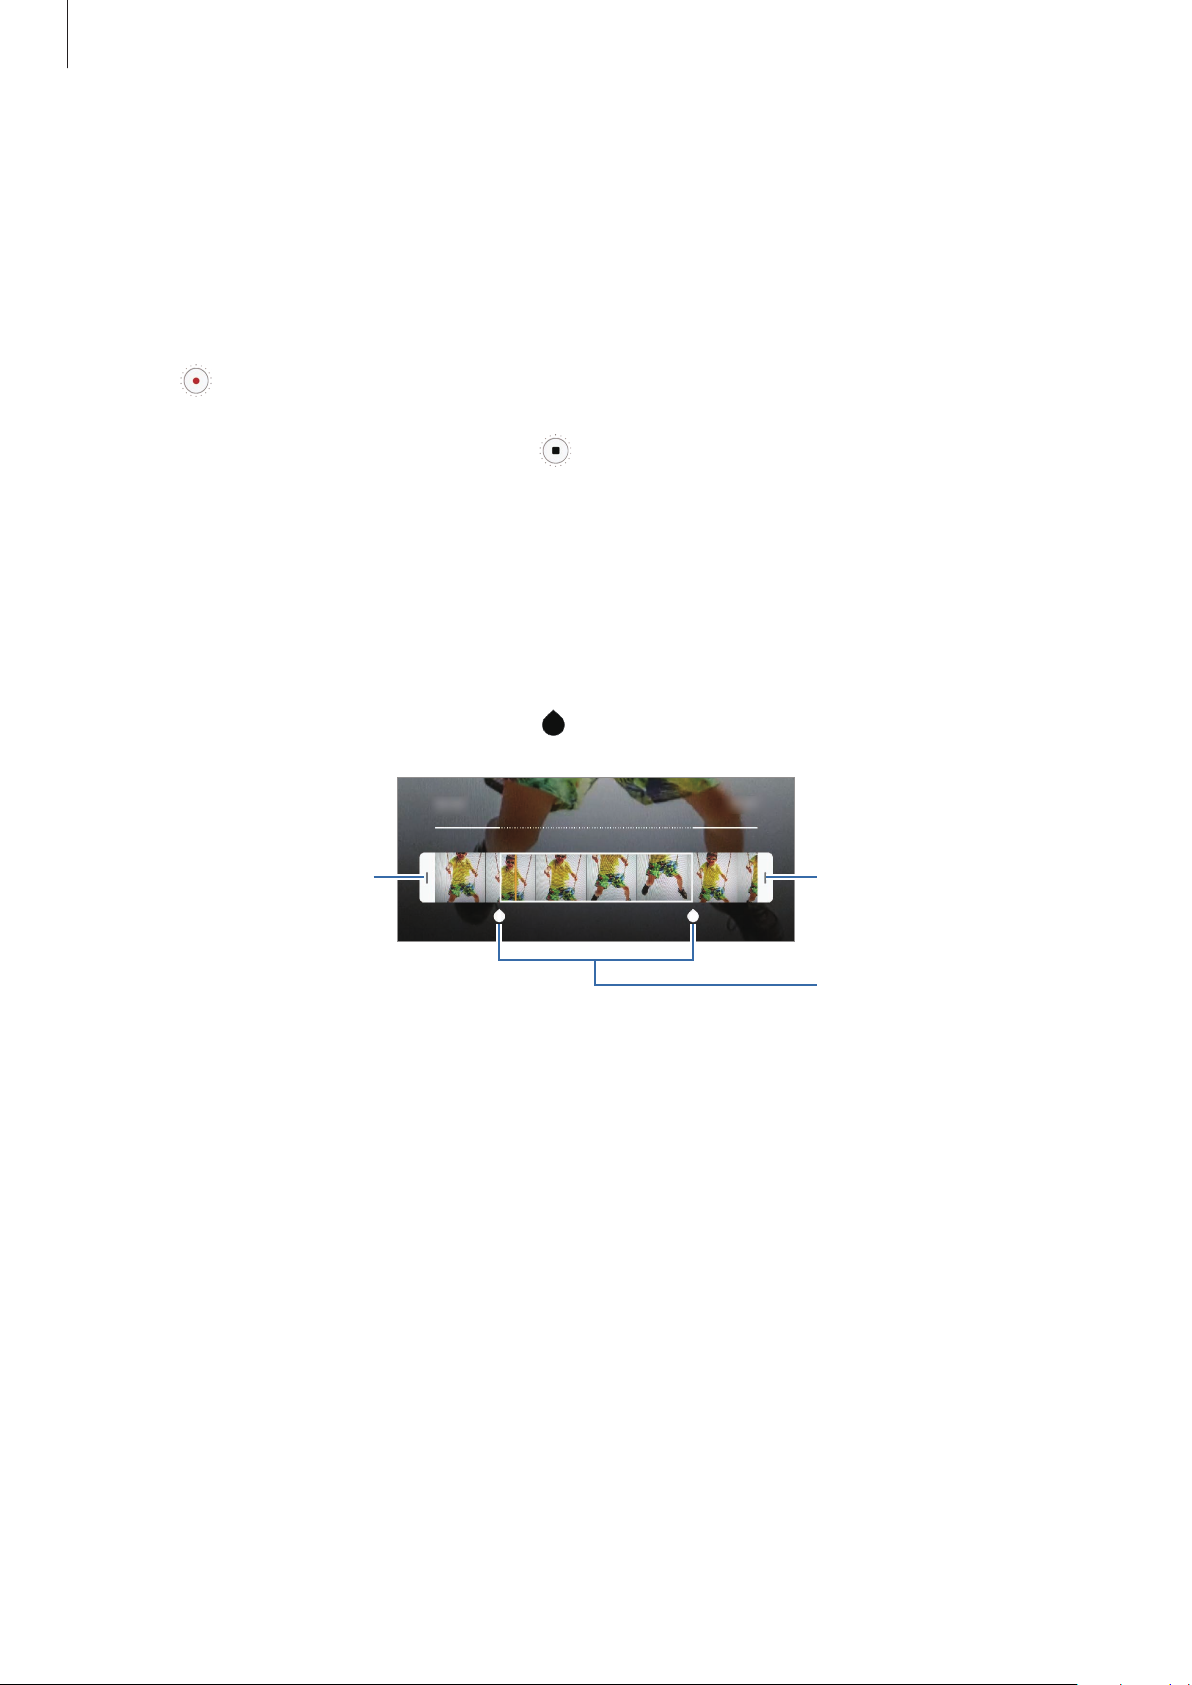
Apps and features
Slow motion mode
Record a video for viewing it in slow motion. You can specify sections of your videos to be
played in slow motion.
On the shooting modes list, tap
1
Tap to start recording.
2
When you are finished recording, tap to stop.
3
On the preview screen, tap the preview thumbnail.
4
Tap
5
Play slow motion video
The fastest section of the video will be set as a slow motion section and the video will
start playing. Up to two slow motion sections will be created based on the video.
To edit the slow motion section, drag
Start bracket
Slow motion
.
.
to the left or right.
End bracket
Slow motion section
94
Page 95
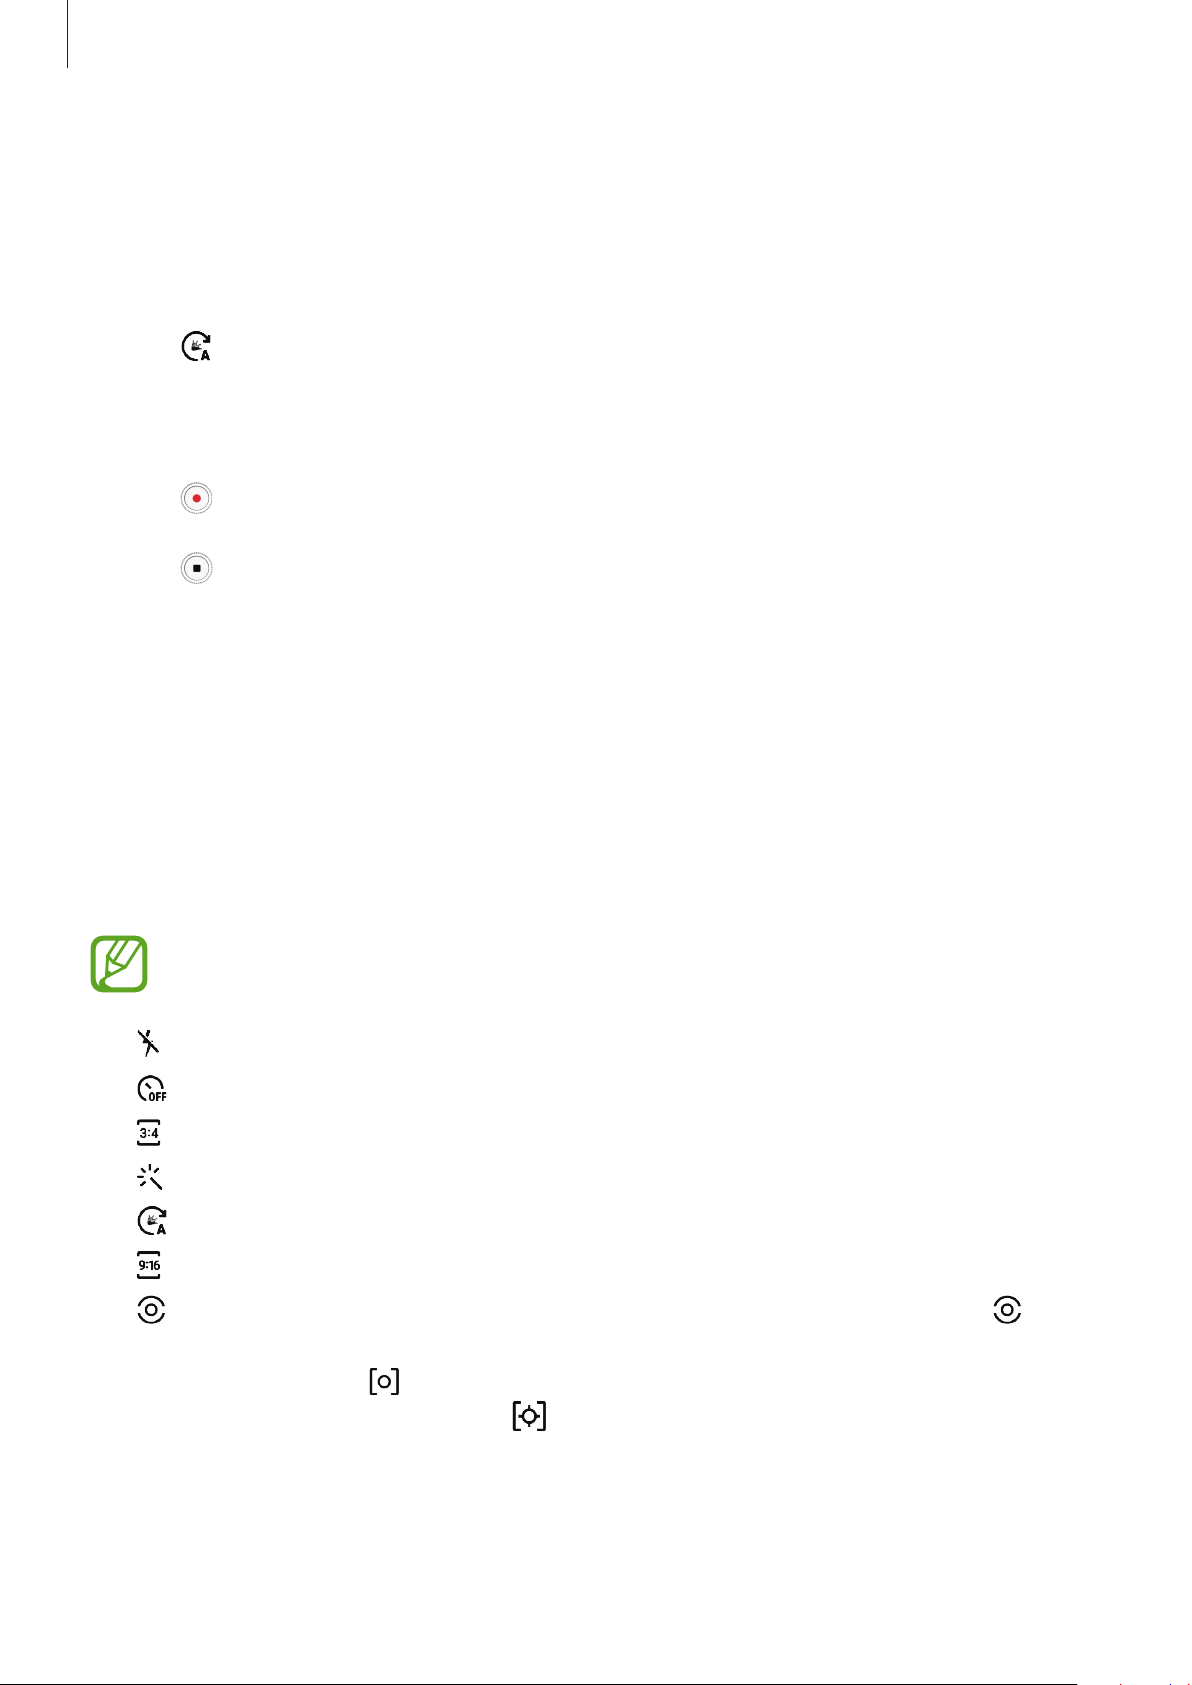
Apps and features
Hyperlapse mode
Record scenes, such as passing people or cars, and view them as fast-motion videos.
On the shooting modes list, tap
1
Tap and select a frame rate option.
2
If you set the frame rate to
according to the changing rate of the scene.
Tap to start recording.
3
Tap to finish recording.
4
On the preview screen, tap the preview thumbnail and tap
5
video.
Hyperlapse
Auto
, the device will automatically adjust the frame rate
.
Customising camera settings
Options for current shooting mode
Play hyperlapse
to view the
On the preview screen, use the following options.
The available options may vary depending on the shooting mode.
•
: Activate or deactivate the flash.
•
: Select the length of the delay before the camera automatically takes a photo.
•
: Select an aspect ratio for photos.
•
: Apply a filter effect or beauty effects.
•
: Select a frame rate.
•
: Select an aspect ratio for videos.
•
: Select a metering method. This determines how light values are calculated.
Centre-weighted
exposure of the shot.
calculate the exposure of the shot.
uses the light in the centre portion of the shot to calculate the
Spot
uses the light in a concentrated centre area of the shot to
Matrix
averages the entire scene.
95
Page 96

Apps and features
Camera settings
On the preview screen, tap . Some options may not be available depending on the
shooting mode.
Intelligent features
•
Scene optimiser
effect automatically depending on the subject or scene.
Pictures
•
Hold Shutter button to
button.
•
Save options
: Set the device to adjust the colour settings and apply the optimised
: Select an action to perform when you tap and hold the camera
: Select how you want to save photos.
Tap the
images. The files retain all of a photo’s data for the best image quality, but they will take
up more memory.
Videos
•
Rear video size
Using a higher resolution will result in higher quality videos, but they will take up more
memory.
•
Front video size
Using a higher resolution will result in higher quality videos, but they will take up more
memory.
•
High efficiency video
(HEVC) format. Your HEVC videos will be saved as compressed files to conserve the
device’s memory.
HEIF pictures (Photo)
: Select a resolution for videos you want to take with the rear camera.
: Select a resolution for videos you want to take with the front camera.
: Set the device to record videos in the High Efficiency Video Codec
•
You cannot play the HEVC videos on other devices or share them online.
•
Super slow motion and slow motion videos cannot be recorded in the HEVC
switch to set the device to save photos as high efficiency
format.
96
Page 97

Apps and features
Useful features
•
HDR (rich tone)
dark areas.
•
Grid lines
•
Location tags
•
Camera modes
•
Shooting methods
a video.
: Display viewfinder guides to help composition when selecting subjects.
•
GPS signal strength may decrease in locations where the signal is obstructed,
such as between buildings or in low-lying areas, or in poor weather conditions.
•
Your location may appear on your photos when you upload them to the
Internet. To avoid this, deactivate the location tag setting.
: Take photos with rich colours and reproduce details even in bright and
: Attach a GPS location tag to the photo.
: View available shooting modes or edit the shooting modes list.
: Select additional shooting methods for taking a photo or recording
•
Storage location
you insert a memory card.
•
Quick launch
quickly.
•
Watermark
•
Reset settings
•
Contact us
Members for more information.
•
About Camera
: Add a watermark in the bottom left corner when taking pictures.
: Ask questions or view frequently asked questions. Refer to Samsung
: Select the memory location for storage. This feature will appear when
: Set the device to launch the camera by pressing the Power key twice
: Reset the camera settings.
: View the Camera app version and legal information.
97
Page 98
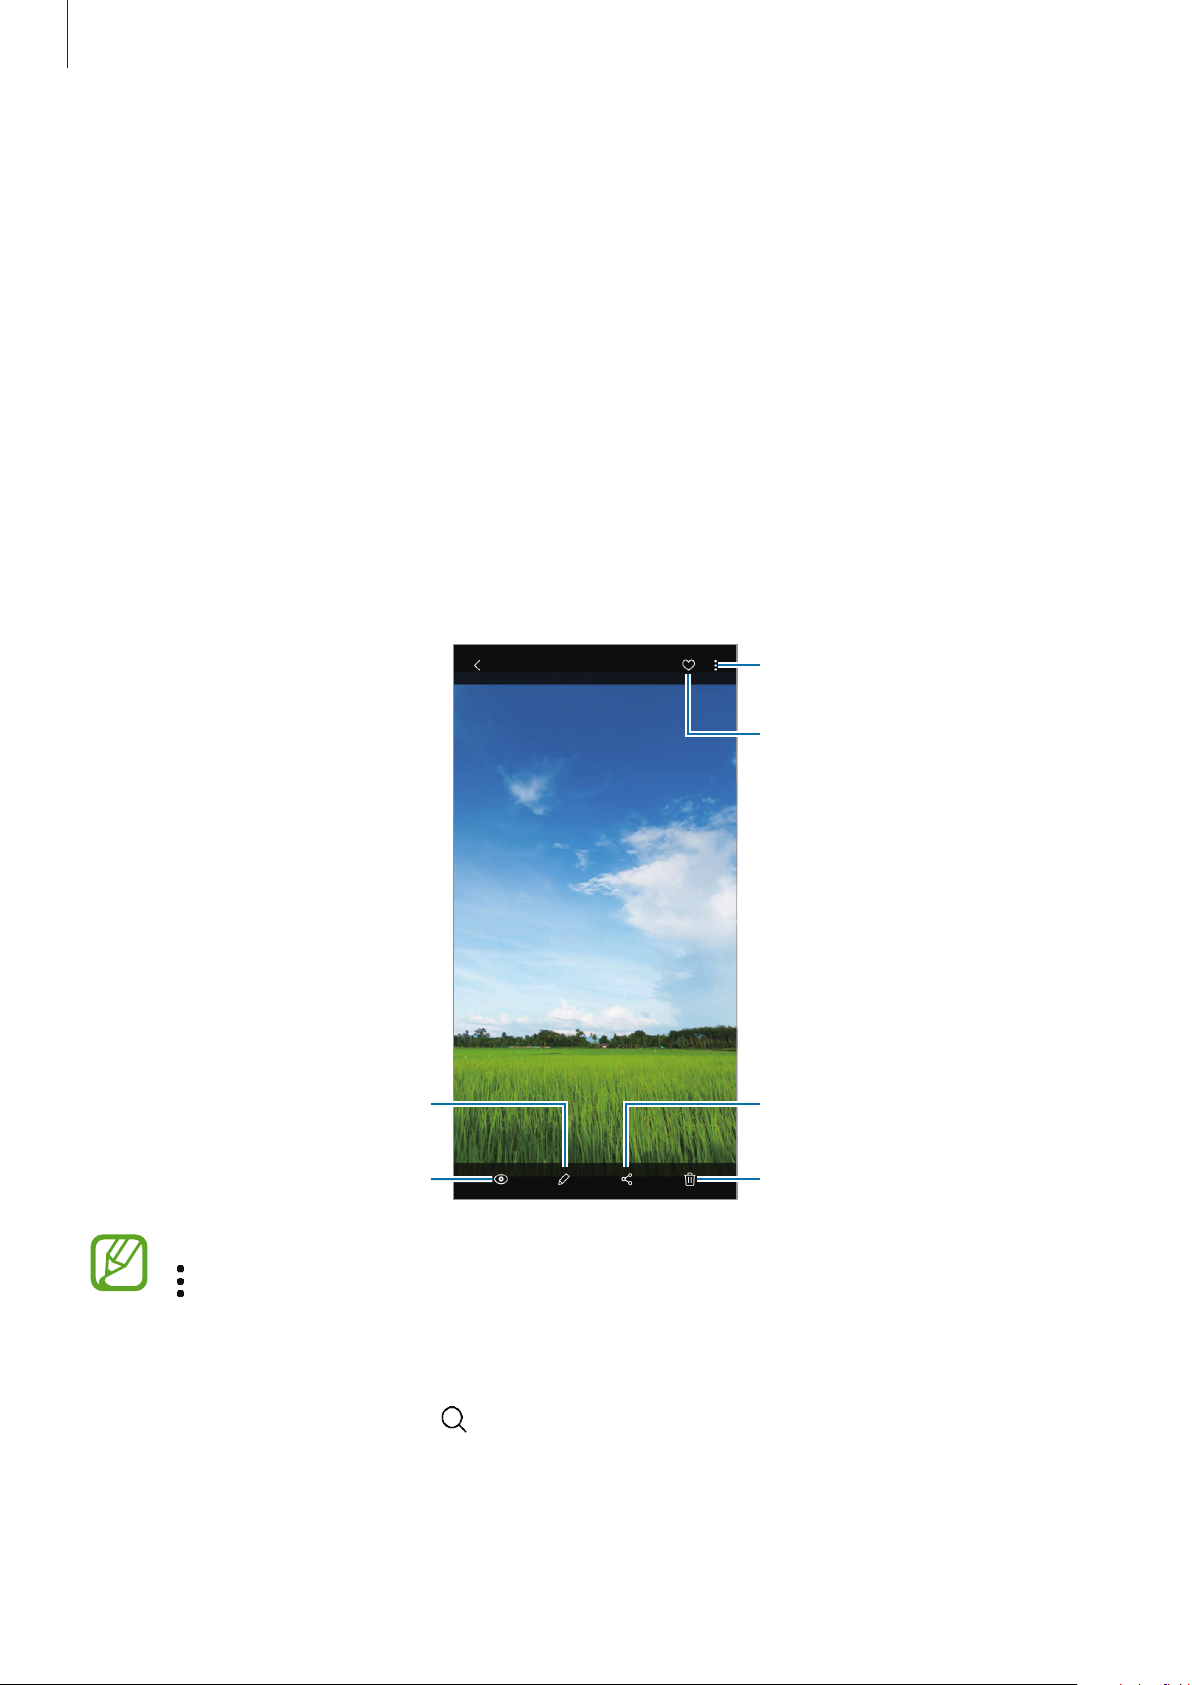
Apps and features
Gallery
Introduction
View images and videos stored in your device. You can also manage images and videos by
album or create stories.
Viewing images
Launch the
1
Select an image.
2
Gallery
app and tap
Pictures
.
Access additional options.
Add the image to favourites.
Modify the image.
Bixby Vision
You can create a movie, animated GIF, or collage from multiple images. On the list, tap
→
Create movie, Create GIF
, or
Create collage
, and then select images.
Searching for images
Launch the
locations, or documents.
To search for images by entering keywords, tap the search field.
Gallery
app and tap
to view images sorted by category, such as types,
98
Share the image with others.
Delete the image.
Page 99
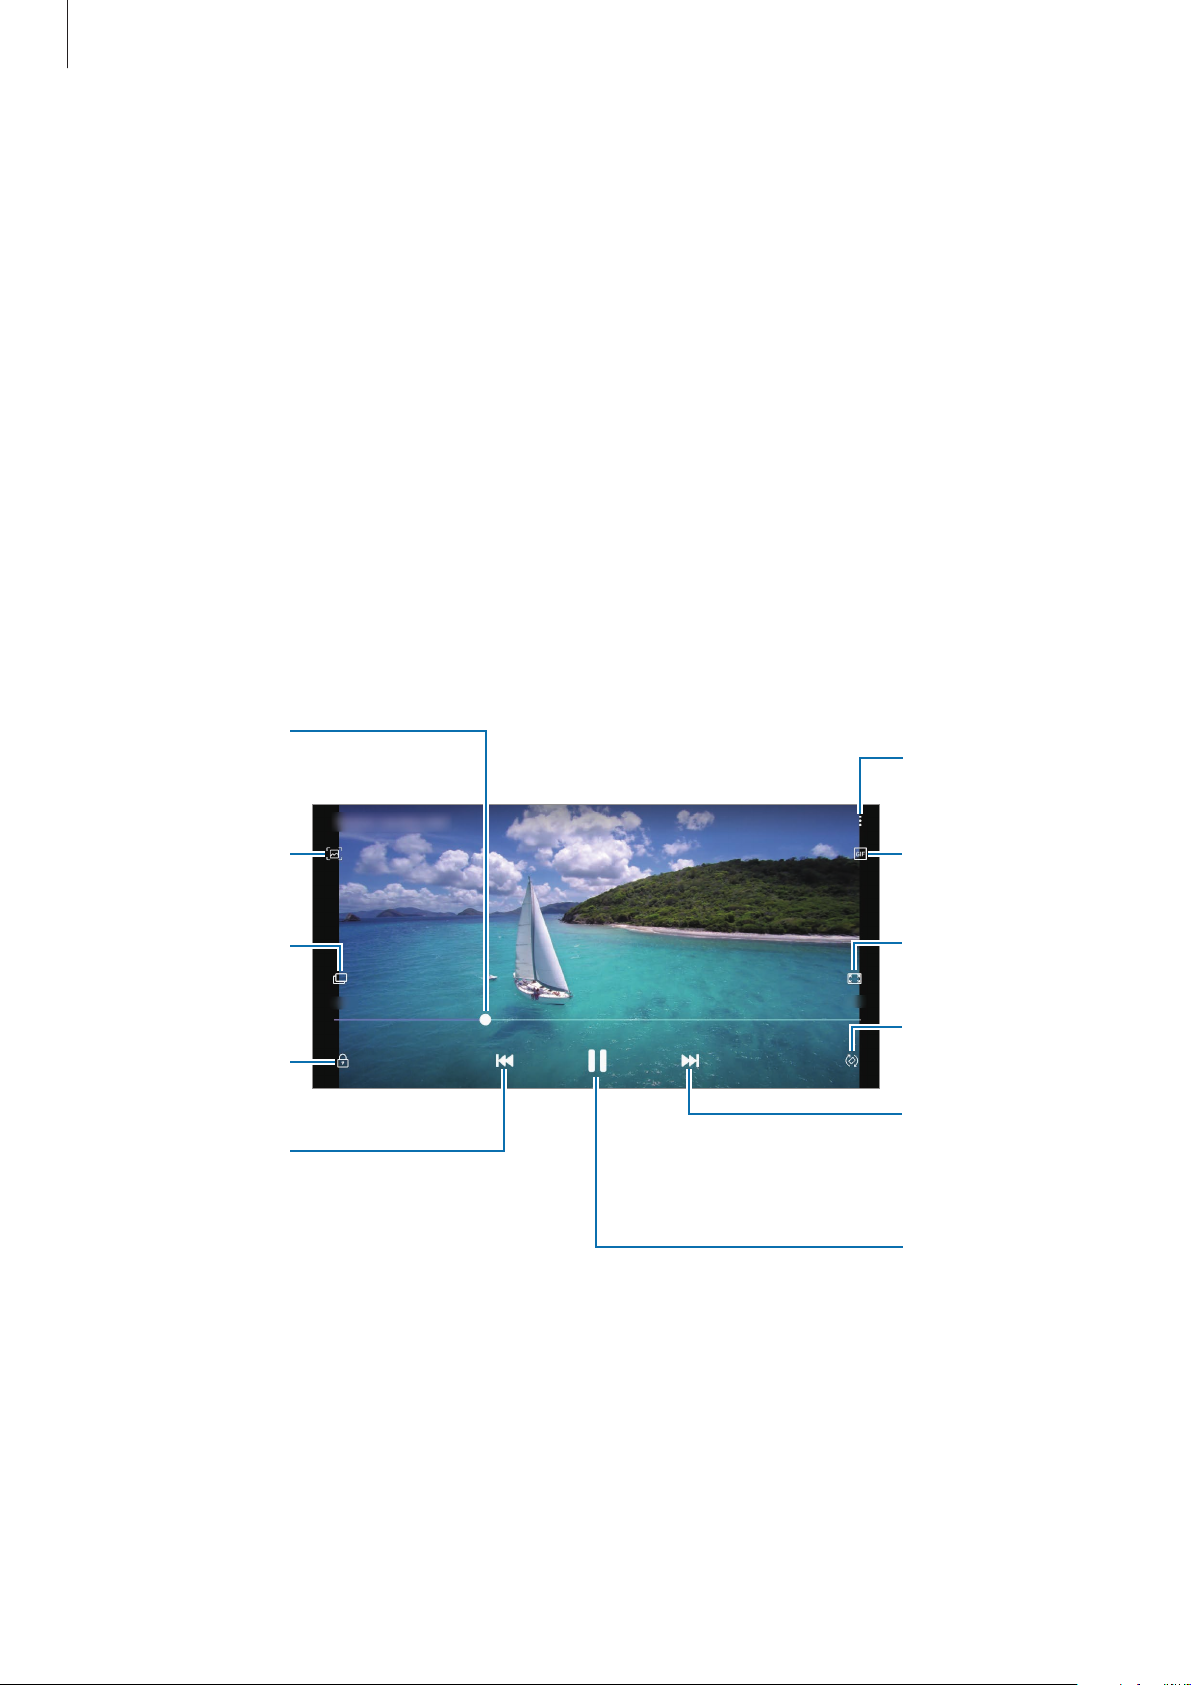
Apps and features
Rewind or
Editing the background of Live focus photos
You can edit the background effect and the intensity of the background effect for a photo
taken with the Live focus feature.
Launch the
background effect
Gallery
app, select a photo taken with the Live focus feature, tap
to change the background effect or adjust its intensity by dragging the
adjustment bar to the left or right.
Viewing videos
Launch the
1
Select a video to play.
2
Tap
3
Play video
fast-forward by
dragging the bar.
Capture the
current screen.
Gallery
app and tap
to play the video.
Pictures
Change
.
Access additional
options.
Create an
animated GIF.
Switch to the
pop-up video
player.
Lock the
playback screen.
Skip to the
previous video.
Tap and hold to
rewind.
Change the
screen ratio.
Rotate the
screen.
Skip to the next
video. Tap and
hold to
fast-forward.
Pause and
resume playback.
Drag your finger up or down on the left side of the playback screen to adjust the brightness,
or drag your finger up or down on the right side of the playback screen to adjust the volume.
To rewind or fast-forward, swipe to the left or right on the playback screen.
99
Page 100
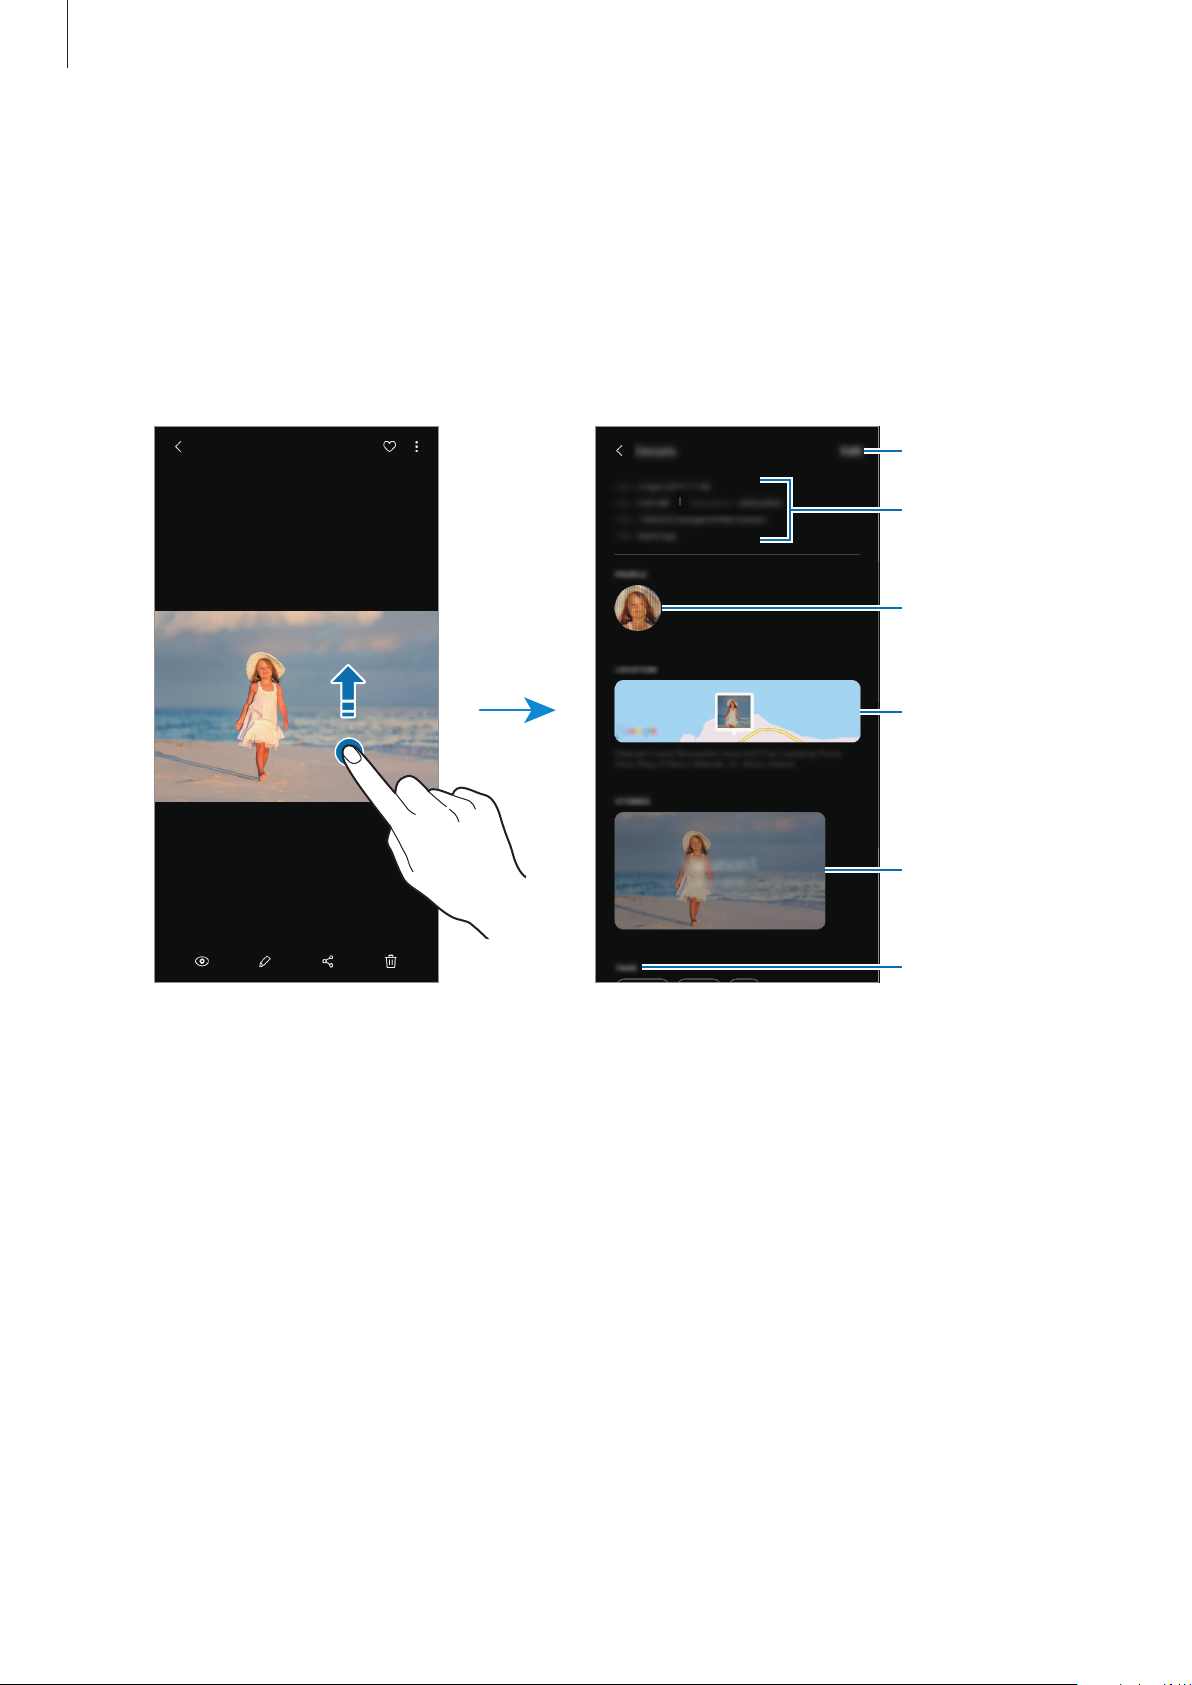
Apps and features
Viewing the details of images and videos
You can view file details, such as people, location, and basic information. If there is auto
created content, such as a story or a GIF, the content will also be displayed.
While viewing an image or on the video preview screen, drag upwards on the screen. File
details will appear.
You can also view related content by tapping information on the screen.
Edit information.
File details
People
information
Viewing photos or videos by category
You can view photos and videos by category.
Launch the
category.
•
Videos
Gallery
app, tap
Pictures
or
Albums
: View the videos saved in your device.
, and then drag the list downwards to select a
Location
information
Auto created
content
Tags
•
Favourites
•
Locations
•
Suggested
: View your favourite photos and videos.
: View photos and videos taken in the same location.
: View recommended content.
100
 Loading...