

Samsung SMA505GN User Manual
Apps and features
On the shooting modes list, tap
1
Tap and move the device slowly in one direction.
2
Tap to stop taking photos.
3
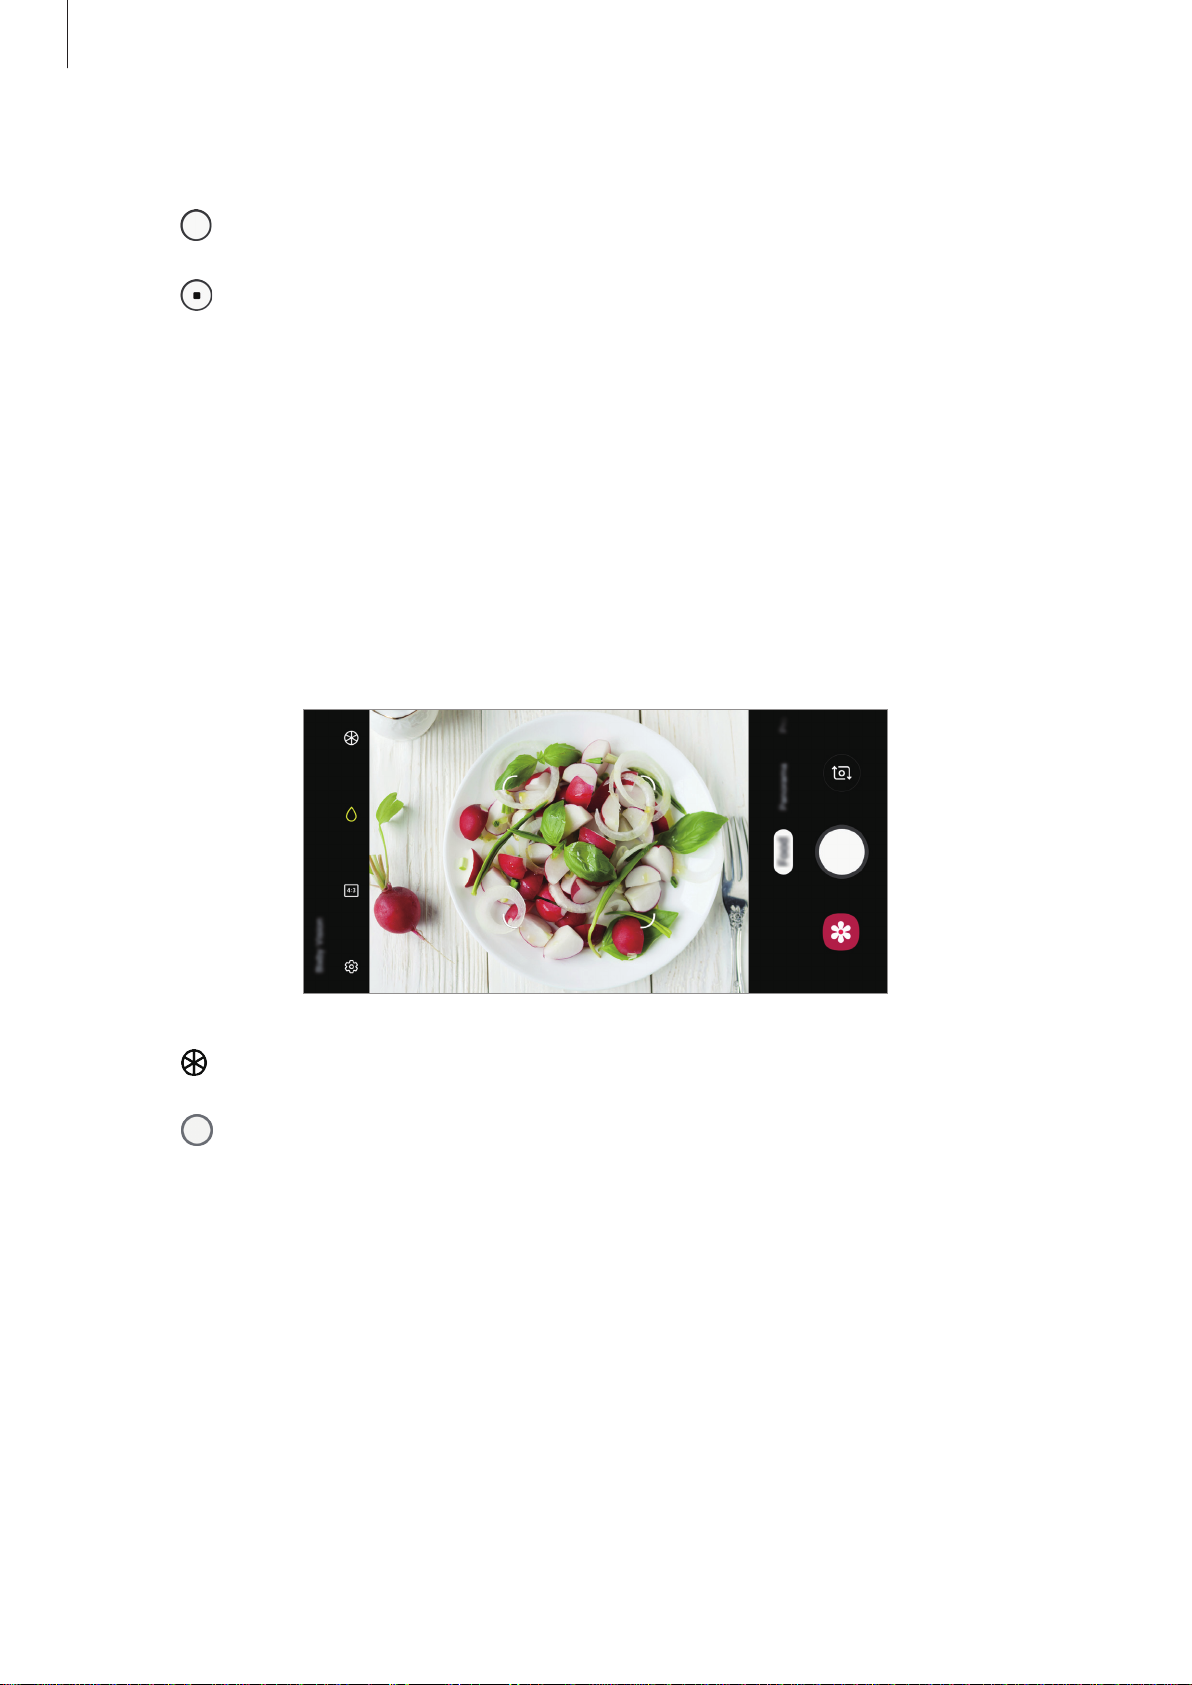
Food mode
Take photos of food with more vibrant colours.
On the shooting modes list, tap
1
Tap the screen and drag the circular frame over the area to highlight.
2
The area outside the circular frame will be blurred.
To resize the circular frame, drag a corner of the frame.
Panorama
Food
.
.
Tap and drag the adjustment bar to adjust the colour tone.
3
Tap to take a photo.
4
107

Apps and features
Customising camera settings
Options for current shooting mode
On the preview screen, use the following options.
The available options may vary depending on the shooting mode.
•
: Activate or deactivate the flash.
•
: Select the length of the delay before the camera automatically takes a photo.
•
: Apply beauty effects or a filter effect.
•
: Select a frame rate.
•
/ : Select an aspect ratio for videos.
•
: Select a metering method. This determines how light values are calculated.
Centre-weighted
exposure of the shot.
calculate the exposure of the shot.
•
: In
Food
mode, focus on a subject inside the circular frame and blur the image outside
the frame.
•
: In
Food
mode, adjust the colour tone.
uses the light in the centre portion of the shot to calculate the
Spot
uses the light in a concentrated centre area of the shot to
Matrix
averages the entire scene.
Camera settings
On the preview screen, tap . Some options may not be available depending on the
shooting mode.
Intelligent features
•
Scene optimiser
on the subject or scene.
: Set the device to adjust the colour settings automatically depending
•
Shot suggestions
recognising the position and angle of your subject.
•
Flaw detection
photos, or if there are smudges on the lens.
: Set the device to suggest the ideal composition for the photo by
: Set to receive notifications when someone blinks or appears blurry in
108

Apps and features
Pictures
•
Rear picture size
Using a higher resolution will result in higher quality photos, but they will take up more
memory.
•
Front picture size
Using a higher resolution will result in higher quality photos, but they will take up more
memory.
•
Hold Shutter button to
button.
•
Save options
Videos
•
Rear video size
: Select a resolution for photos you want to take with the rear camera.
: Select a resolution for photos you want to take with the front camera.
: Select an action to perform when you tap and hold the camera
: Select how you want to save photos.
: Select a resolution for videos you want to take with the rear camera.
Using a higher resolution will result in higher quality videos, but they will take up more
memory.
•
Front video size
Using a higher resolution will result in higher quality videos, but they will take up more
memory.
•
Advanced recording options
If you activate the
Efficiency Video Codec (HEVC) format. Your HEVC videos will be saved as compressed files
to conserve the device’s memory.
If you activate the
scene’s contrast and colour are optimised.
•
You cannot play the HEVC videos on other devices or share them online.
•
Super slow motion and slow motion videos cannot be recorded in the HEVC
format.
•
To play the HDR10+ video properly, the device must support HDR10+.
: Select a resolution for videos you want to take with the front camera.
: Set the device to use an advanced recording option.
High efficiency video
Save as HDR10+ videos
feature, you can record videos in the High
feature, you can record videos in which each
•
Video stabilisation
from camera shake while recording a video.
: Activate anti-shake to reduce or eliminate blurry image resulting
109
Apps and features
Useful features
•
HDR (rich tone)
dark areas.
•
Grid lines
•
Location tags
•
Camera modes
•
Shooting methods
: Display viewfinder guides to help composition when selecting subjects.
•
GPS signal strength may decrease in locations where the signal is obstructed,
such as between buildings or in low-lying areas, or in poor weather conditions.
•
Your location may appear on your photos when you upload them to the
Internet. To avoid this, deactivate the location tag setting.
: Take photos with rich colours and reproduce details even in bright and
: Attach a GPS location tag to the photo.
: View available shooting modes or edit the shooting modes list.
: Select a shooting method for taking a photo or recording a video.
•
Storage location
you insert a memory card.
•
Quick launch
quickly.
This feature may not be available depending on the region or service provider.
•
Quick review
•
Watermark
•
Reset settings
•
Contact us
Members for more information.
•
About Camera
: Add a watermark in the bottom left corner when taking pictures.
: Ask questions or view frequently asked questions. Refer to Samsung
: Select the memory location for storage. This feature will appear when
: Set the device to launch the camera by pressing the Power key twice
: Set the device to show photos after capturing them.
: Reset the camera settings.
: View the Camera app version and legal information.
110
Apps and features
Gallery
Introduction
View images and videos stored in your device. You can also manage images and videos by
album or create stories.
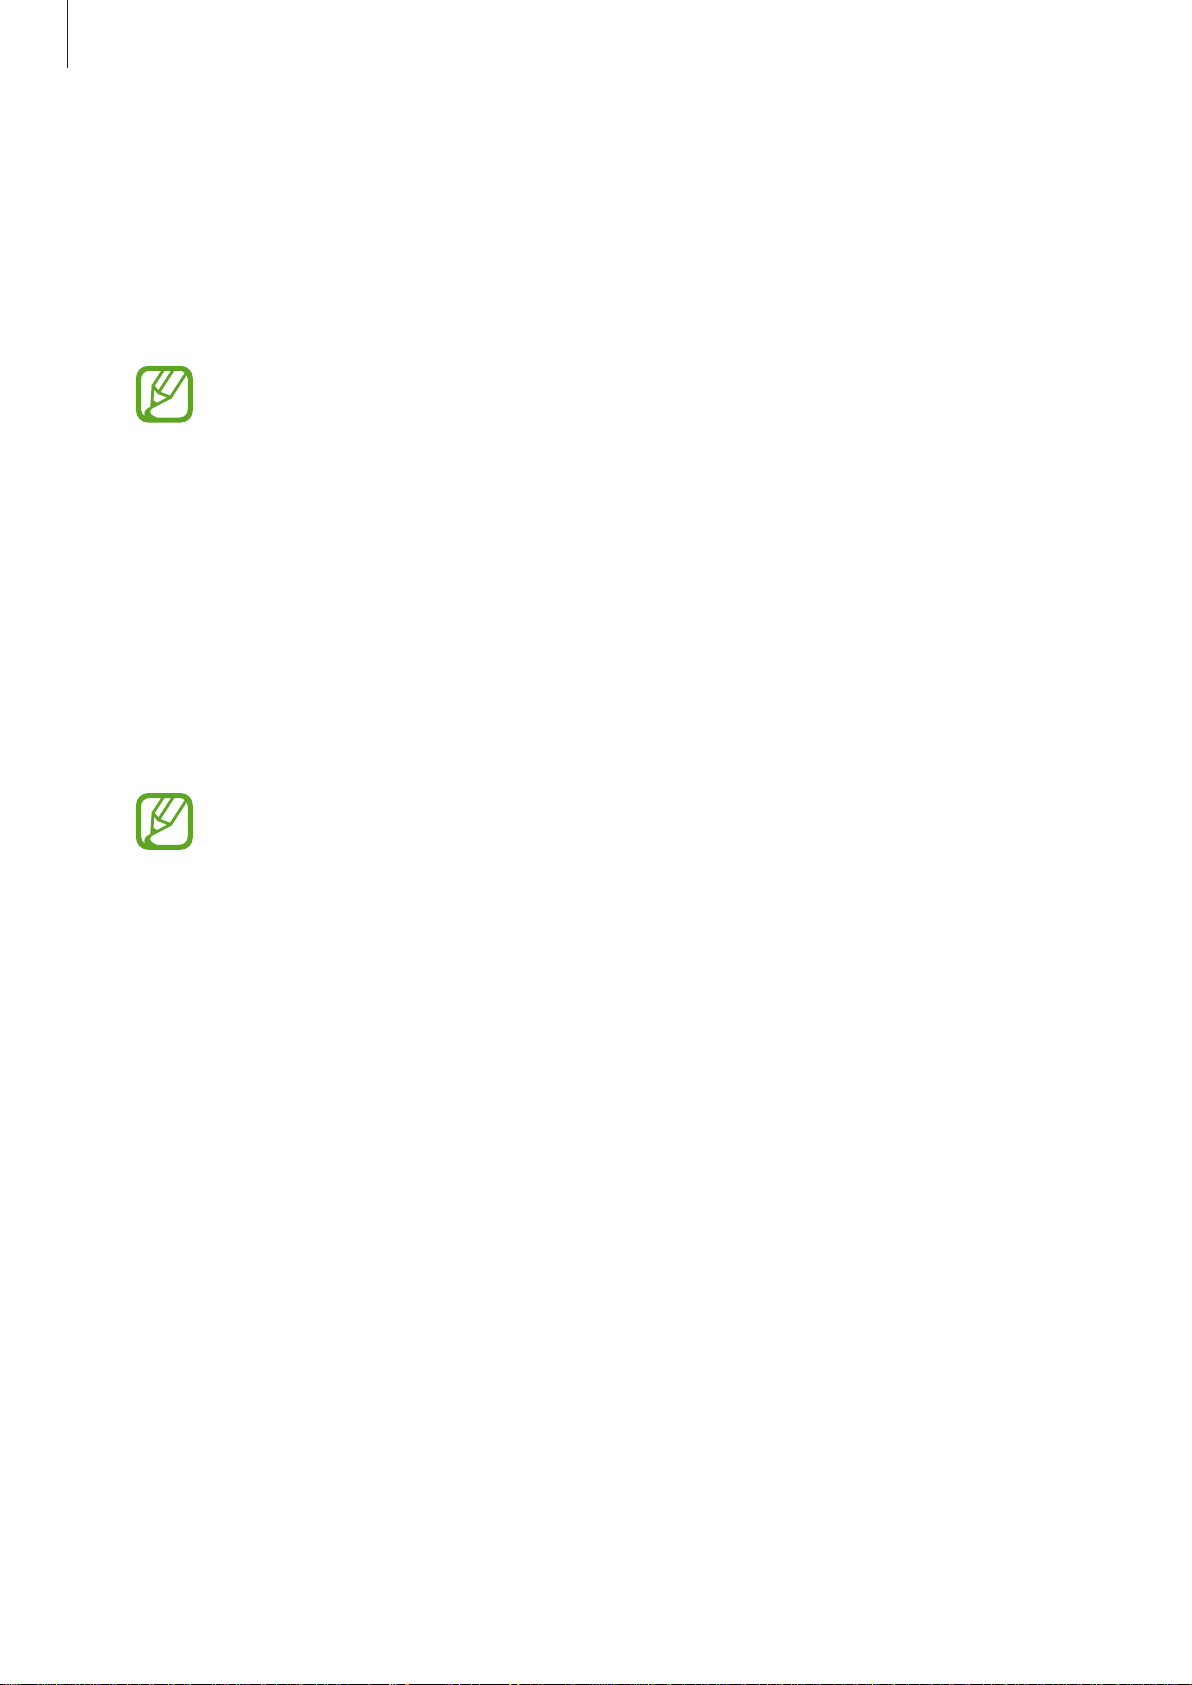
Viewing images
Launch the
1
Select an image.
2
Gallery
app and tap
Pictures
.
Access additional options.
Add the image to favourites.
Modify the image.
Bixby Vision
You can create a movie, animated GIF, or collage from multiple images. On the list, tap
→
Create GIF
, or
Create collage
, and then select images.
Searching for images
Launch the
locations, or documents.
To search for images by entering keywords, tap the search field.
Gallery
app and tap to view images sorted by category, such as types,
111
Share the image with others.
Delete the image.

Apps and features
Rewind or
Viewing videos
Launch the
1
Select a video to play.
2
Tap
3
Lock the playback
Play video
fast-forward by
dragging the bar.
Capture the
current screen.
Switch to the
pop-up video
Skip to the
previous video.
Tap and hold to
Gallery
player.
screen.
rewind.
app and tap
to play the video.
Pictures
.
Access additional
options.
Create an
animated GIF.
Change screen
ratio.
Rotate the screen
Skip to the next
video. Tap and
hold to
fast-forward.
Pause and
resume playback.
Drag your finger up or down on the left side of the playback screen to adjust the brightness,
or drag your finger up or down on the right side of the playback screen to adjust the volume.
To rewind or fast-forward, swipe to the left or right on the playback screen.
112
Apps and features
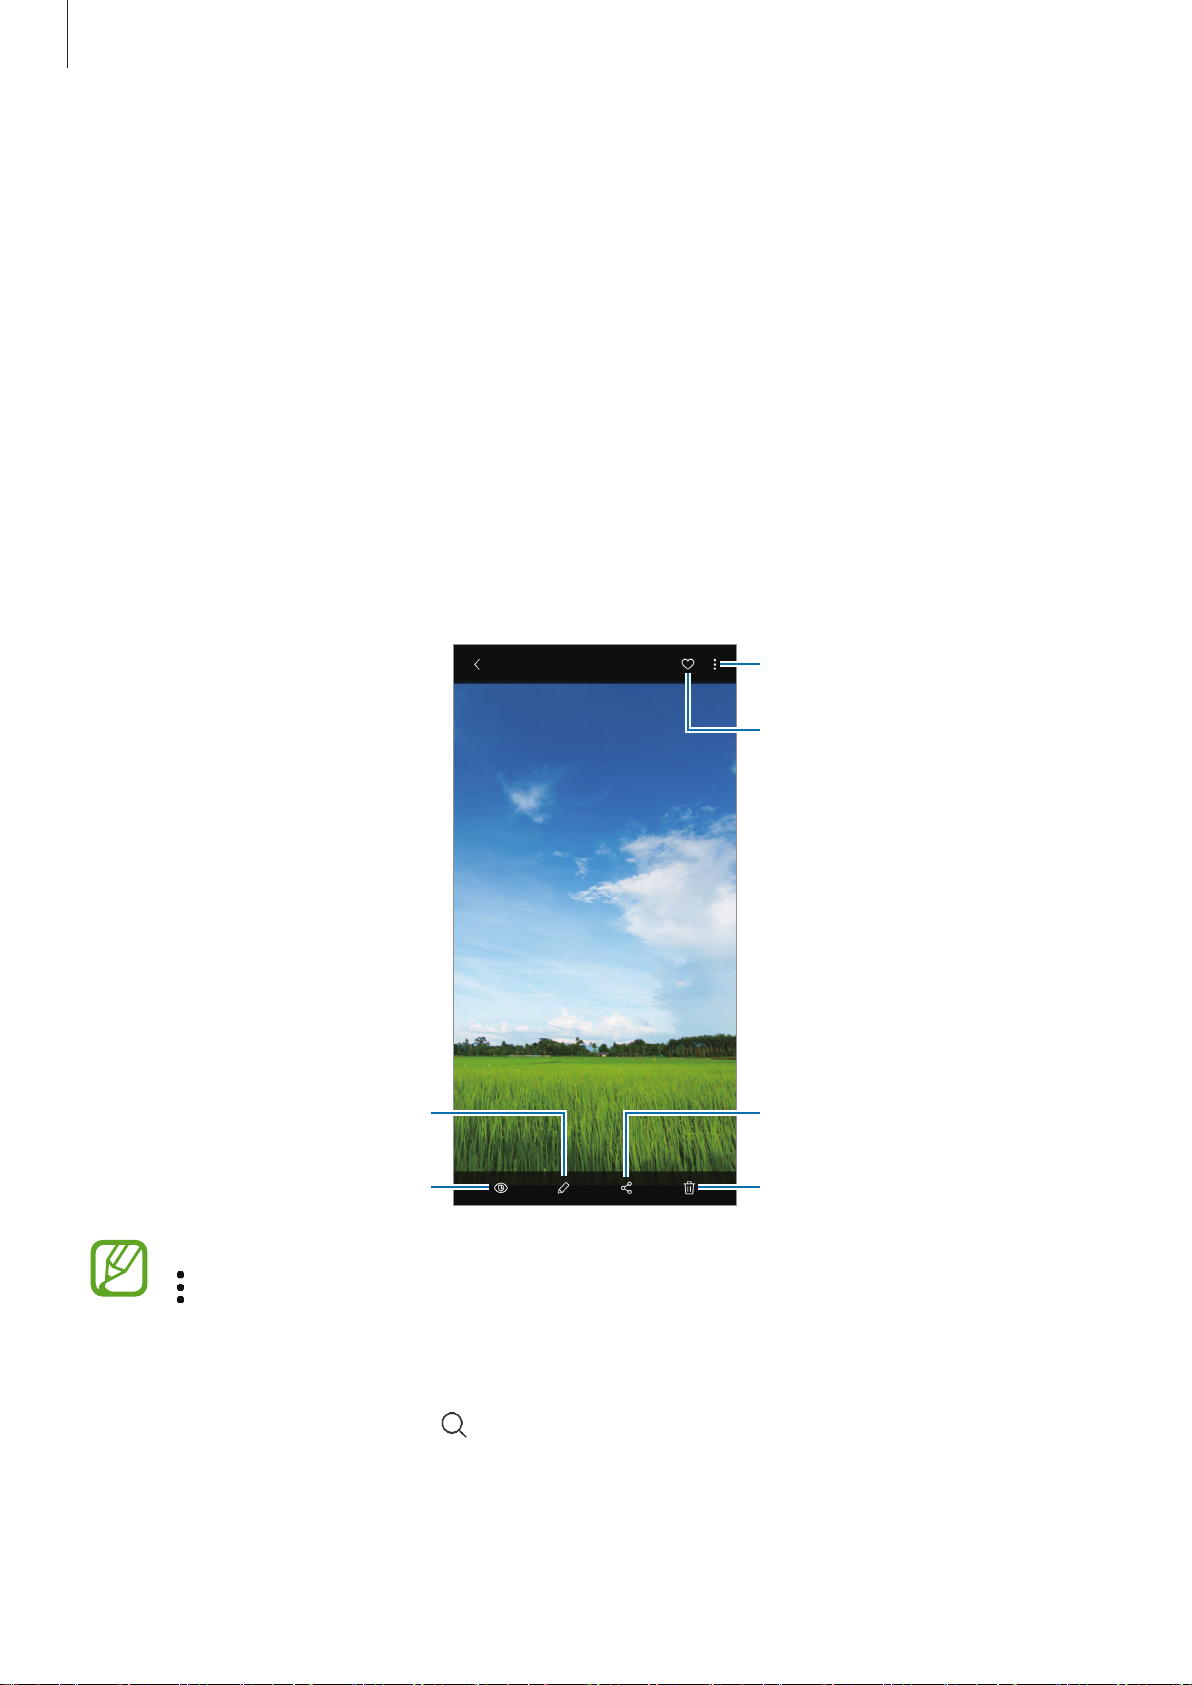
Viewing the details of images and videos
You can view file details, such as people, location, and basic information. If there is auto
created content, such as a story or a GIF, the content will also be displayed.
While viewing an image or on the video preview screen, drag upwards on the screen. File
details will appear.
You can also view related content by tapping information on the screen.
Edit information.
File details
People
information
Location
information
Auto created
content
Tags
113

Apps and features
Viewing albums
You can view your images and videos sorted by folders or albums. The movies, animated GIFs,
or collages that you have created will also be sorted in your folders on the albums list.
Launch the
Gallery
app, tap
Albums
, and then select an album.
Hiding albums
You can hide albums.
You cannot hide albums created by default, such as the
albums.
Launch the
1
Tap →
2
Tap an album switch to hide.
3
Gallery
Hide or unhide albums
app and tap
Albums
.
.
Camera
and
Screenshots
Viewing stories
When you capture or save images and videos, the device will read their date and location
tags, sort the images and videos, and then create stories. To create stories automatically, you
must capture or save multiple images and videos.
Launch the
Gallery
app, tap
Stories
, and then select a story.
Creating stories
Create stories with various themes.
Launch the
1
Tap →
2
Enter a title for the story and tap
3
Tick images or videos to include in the story and tap
4
Gallery
Create story
app and tap
Stories
.
Create
.
.
Done
.
114

Apps and features
To add images or videos to a story, select a story and tap
To remove images or videos from a story, select a story, tap
remove, and then tap
Remove from story
.
→
Add
→
.
Edit
, tick images or videos to
Deleting stories
Launch the
1
Tap and hold a story to delete, and tap
2
Gallery
app and tap
Stories
.
Delete
.
Sharing albums
Create albums and share them with your family and friends saved in your contacts. They can
view shared albums on devices signed in to their Samsung account, such as smartphones,
TVs, or refrigerators.
•
To use this feature, your phone number must be verified.
•
To use this feature, you must register and sign in to your Samsung account.
•
You may incur additional charges when sharing files via the mobile network.
Creating albums to share
Launch the
1
Tap
2
3
4
5
Create shared album
When using this feature for the first time, you must first agree to the terms and conditions
of Samsung Social.
Enter a title for the album and tap
Select a group to share with.
Tap OK.
Gallery
app and tap
.
Shared
Create
.
.
The recipients will receive a notification.
115

Apps and features
Adding images or videos to an album
Launch the
1
Select an album to add images or videos.
2
Tap and tick images or videos to add.
3
Tap
4
Done
Gallery
.
app and tap
Shared
.
Syncing images and videos with Samsung Cloud
When you sync your
be saved in Samsung Cloud. You can view images and videos saved in Samsung Cloud in your
Gallery
Launch the
switch to activate it. The
app and from other devices.
Gallery
Gallery
app, tap →
app with Samsung Cloud, photos and videos you take will also
Gallery
Settings
app and Samsung Cloud will be synced.
, and then tap the
Sync with Samsung Cloud
Deleting images or videos
Deleting an image or a video
Select an image or a video and tap at the bottom of the screen.
Deleting multiple images and videos
On the Gallery screen, tap and hold an image or a video to delete.
1
Tick the images or videos to delete.
2
Tap
3
Delete
.
116
Apps and features
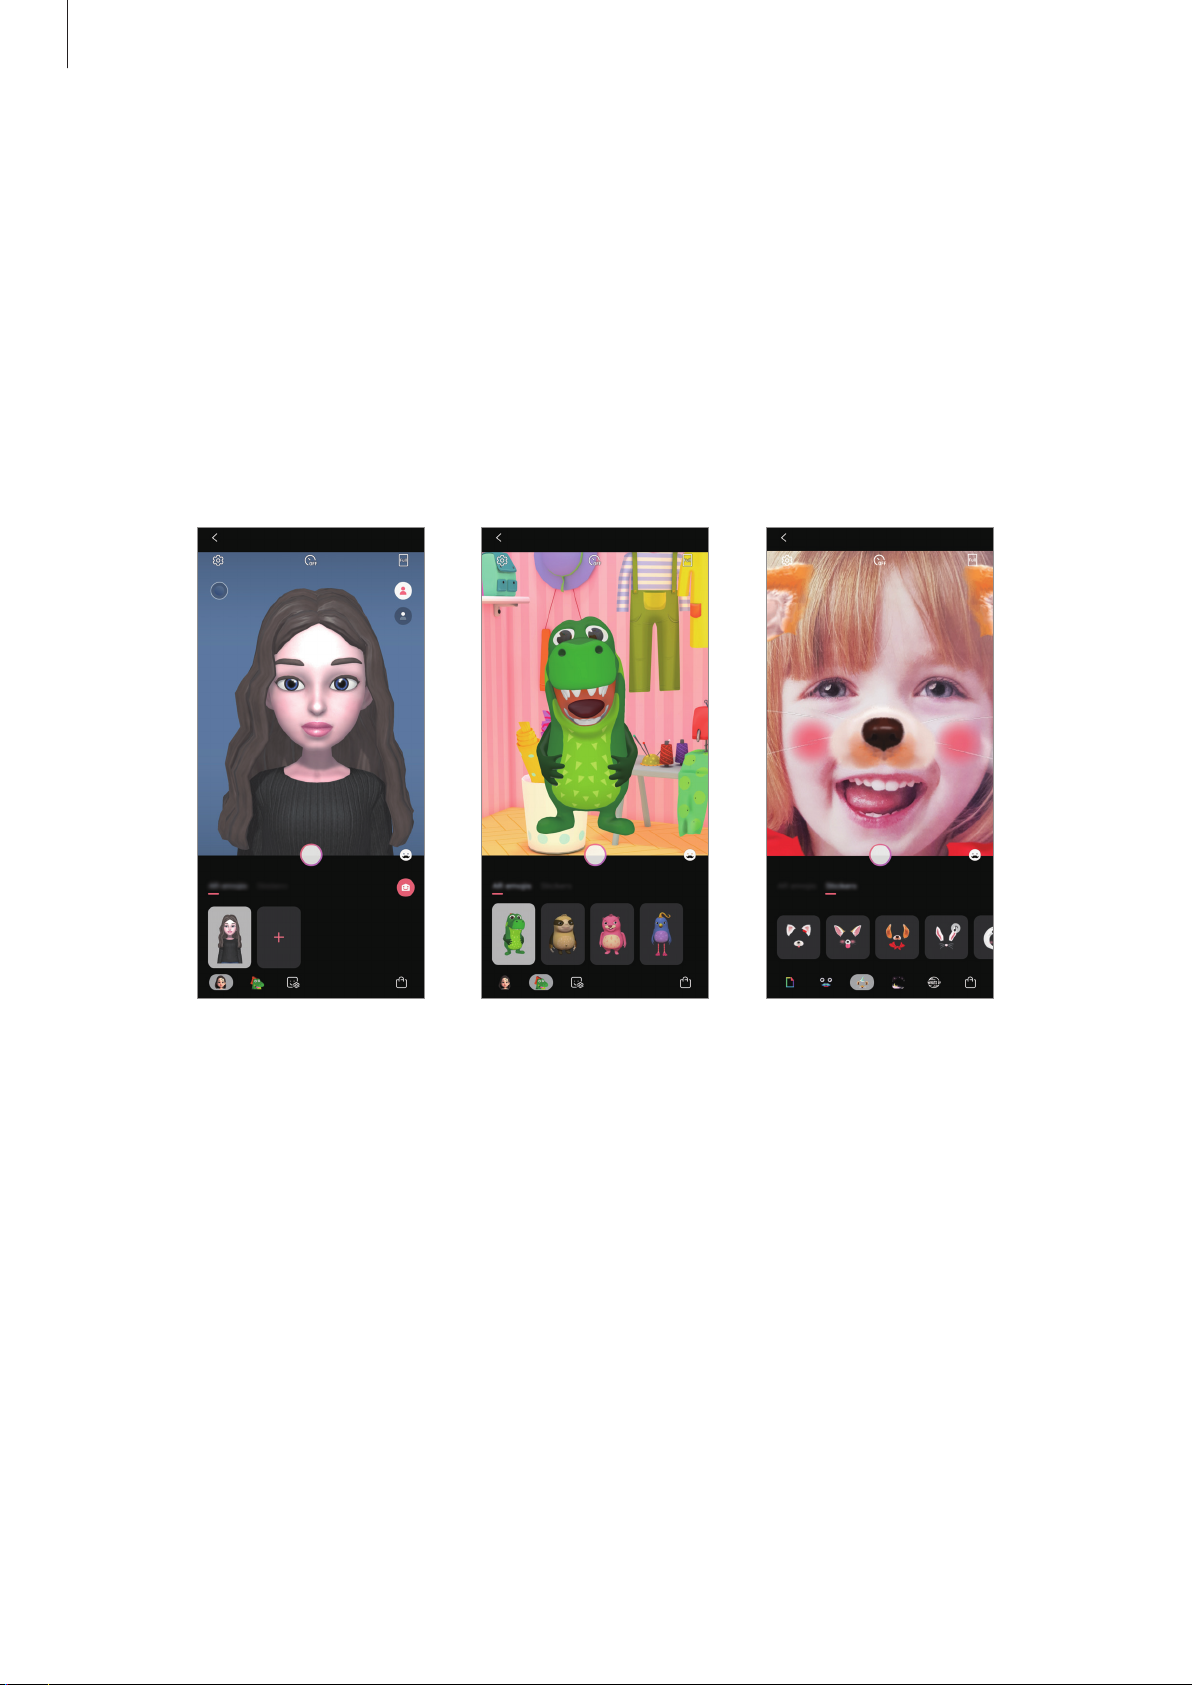
AR Emoji (Galaxy-A50 models only)
Introduction
Create a My Emoji that looks just like you, and take photos and record videos using My Emojis,
character Emojis, or stickers.
You can customise My Emoji’s features, such as the face shape or hairstyle, and decorate My
Emoji with various accessories. You can also express yourself in fun ways using My Emoji
stickers during a conversation.
My Emojis Character Emojis Stickers
117
Apps and features
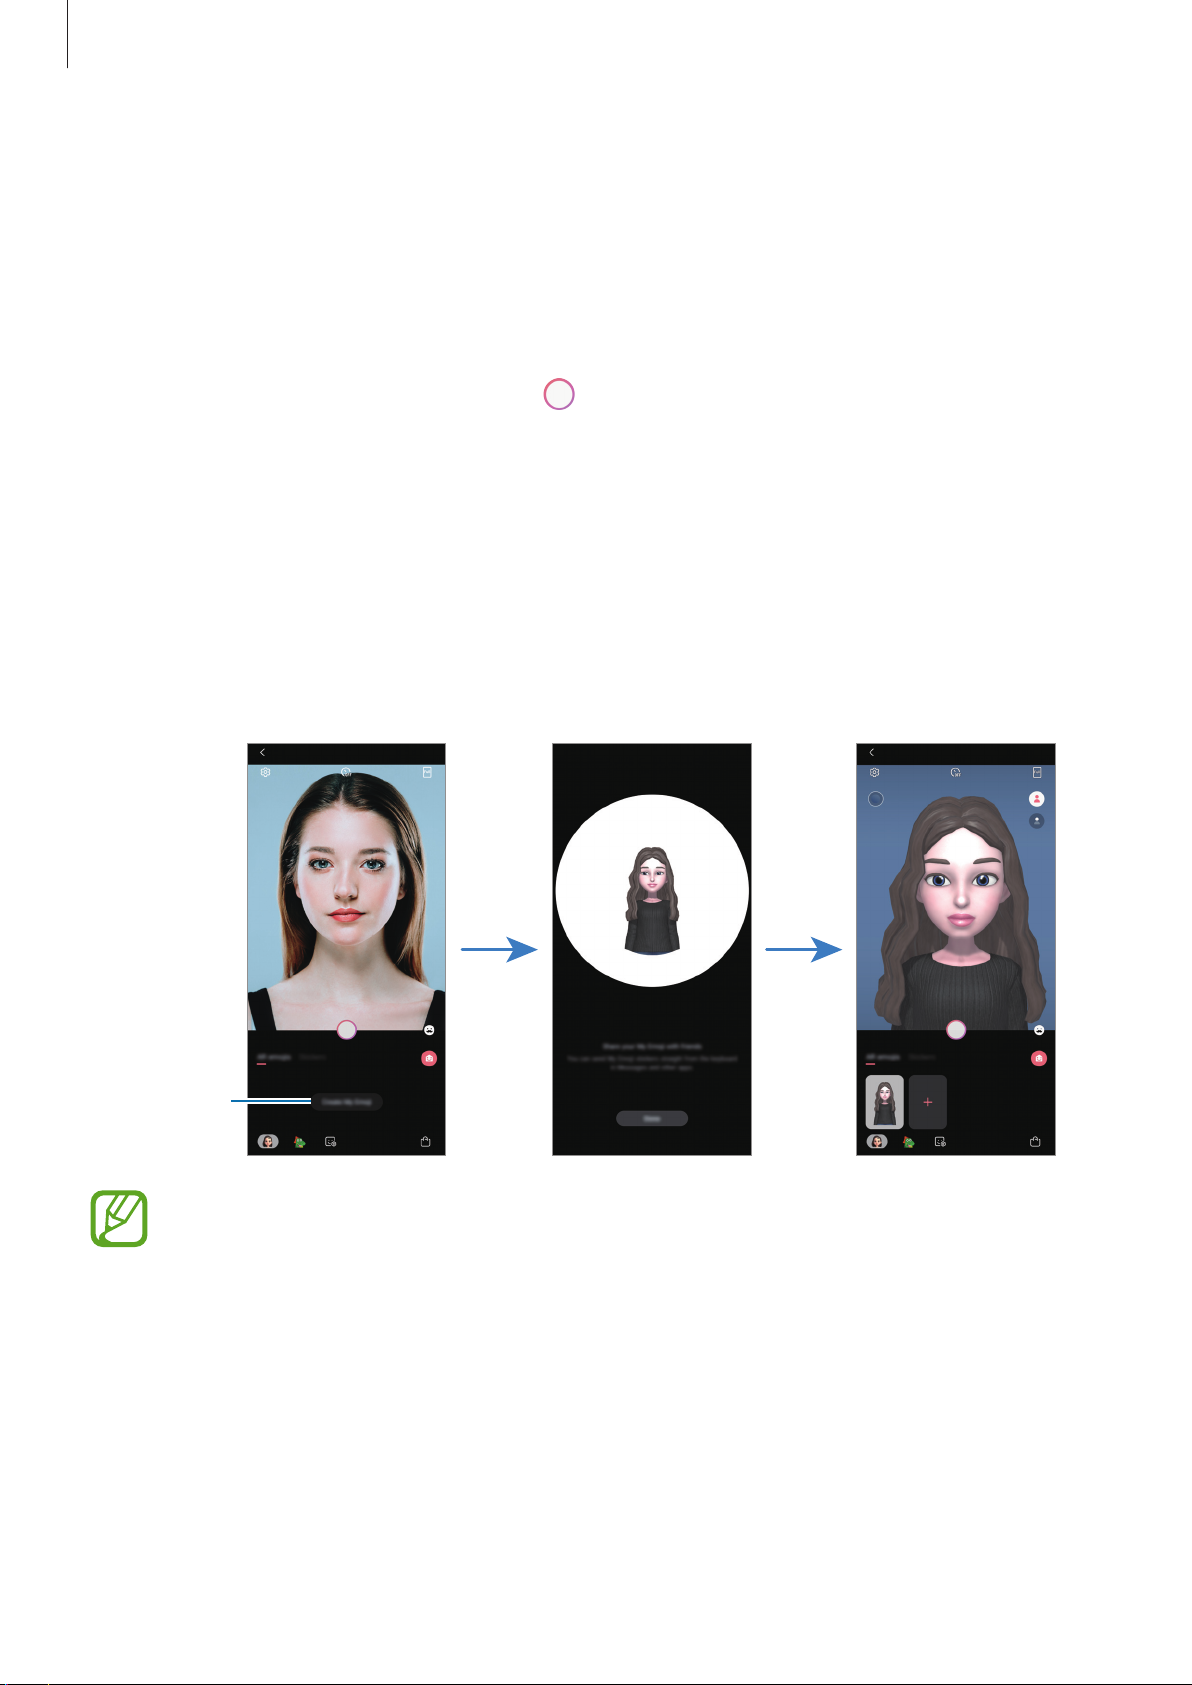
Creating My Emoji
Make a My Emoji that looks like you. My Emoji stickers with various expressions will be
automatically generated.
Launch the
1
Align your face on the screen and tap to take a photo.
2
Select My Emoji’s gender and age range and tap
3
Decorate a My Emoji and tap
4
Tap
5
Done
The My Emoji and My Emoji stickers are now created. You can view My Emoji stickers on
the My Emoji home screen. Refer to My Emoji stickers for more information.
Camera
.
app and tap
Next
AR Emoji
.
→
Create My Emoji
Next
.
.
Create My
Emoji.
You can use the
the rear camera, it will automatically switch to the front camera. To switch between
cameras, swipe upwards or downwards on the preview screen.
AR Emoji
feature in both the front and rear cameras. If you are using
118
Apps and features
Deleting My Emoji
Launch the
delete and tap
Camera
. The My Emoji and My Emoji stickers will be deleted.
app and tap
AR Emoji
. Tap and hold the My Emoji that you want to
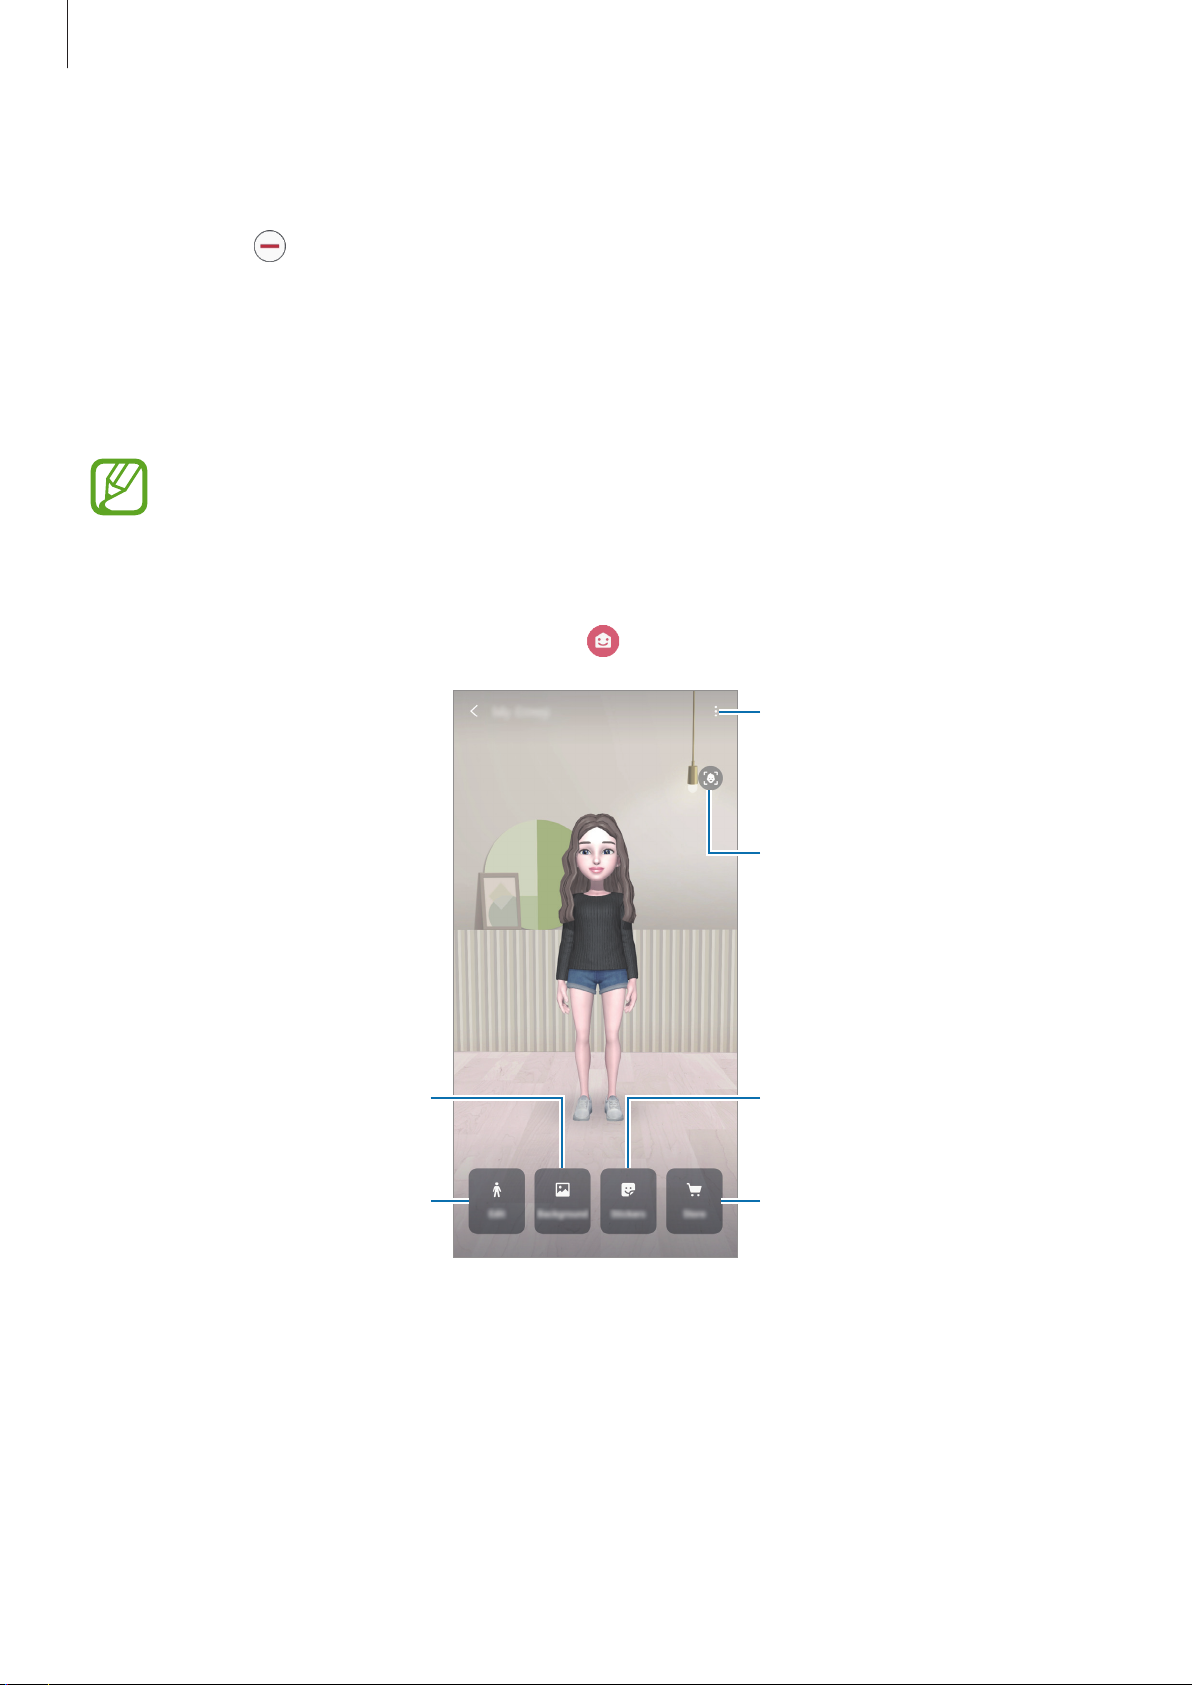
Customising My Emoji
Edit or decorate a My Emoji on the My Emoji home screen after downloading various items
from AR World. You can also add My Emoji stickers.
Available options may vary depending on the region or service provider.
My Emoji home screen
Launch the
Camera
app and tap
AR Emoji
→ . My Emoji home screen will appear.
Select a My Emoji to edit.
Change the My Emoji home
screen's background.
Edit the My Emoji.
Capture the current screen.
Create stickers.
Download items from AR World.
119
Apps and features
Editing My Emoji
Edit a My Emoji or change the background of the My Emoji home screen.
On the My Emoji home screen, tap
Edit
or
Background
.
Downloading items from AR World
Decorate a My Emoji after downloading items, such as clothes or accessories, from AR World.
On the My Emoji home screen, tap
downloaded items on the My Emoji editing screen.
Store
and download the items you want. You can view the
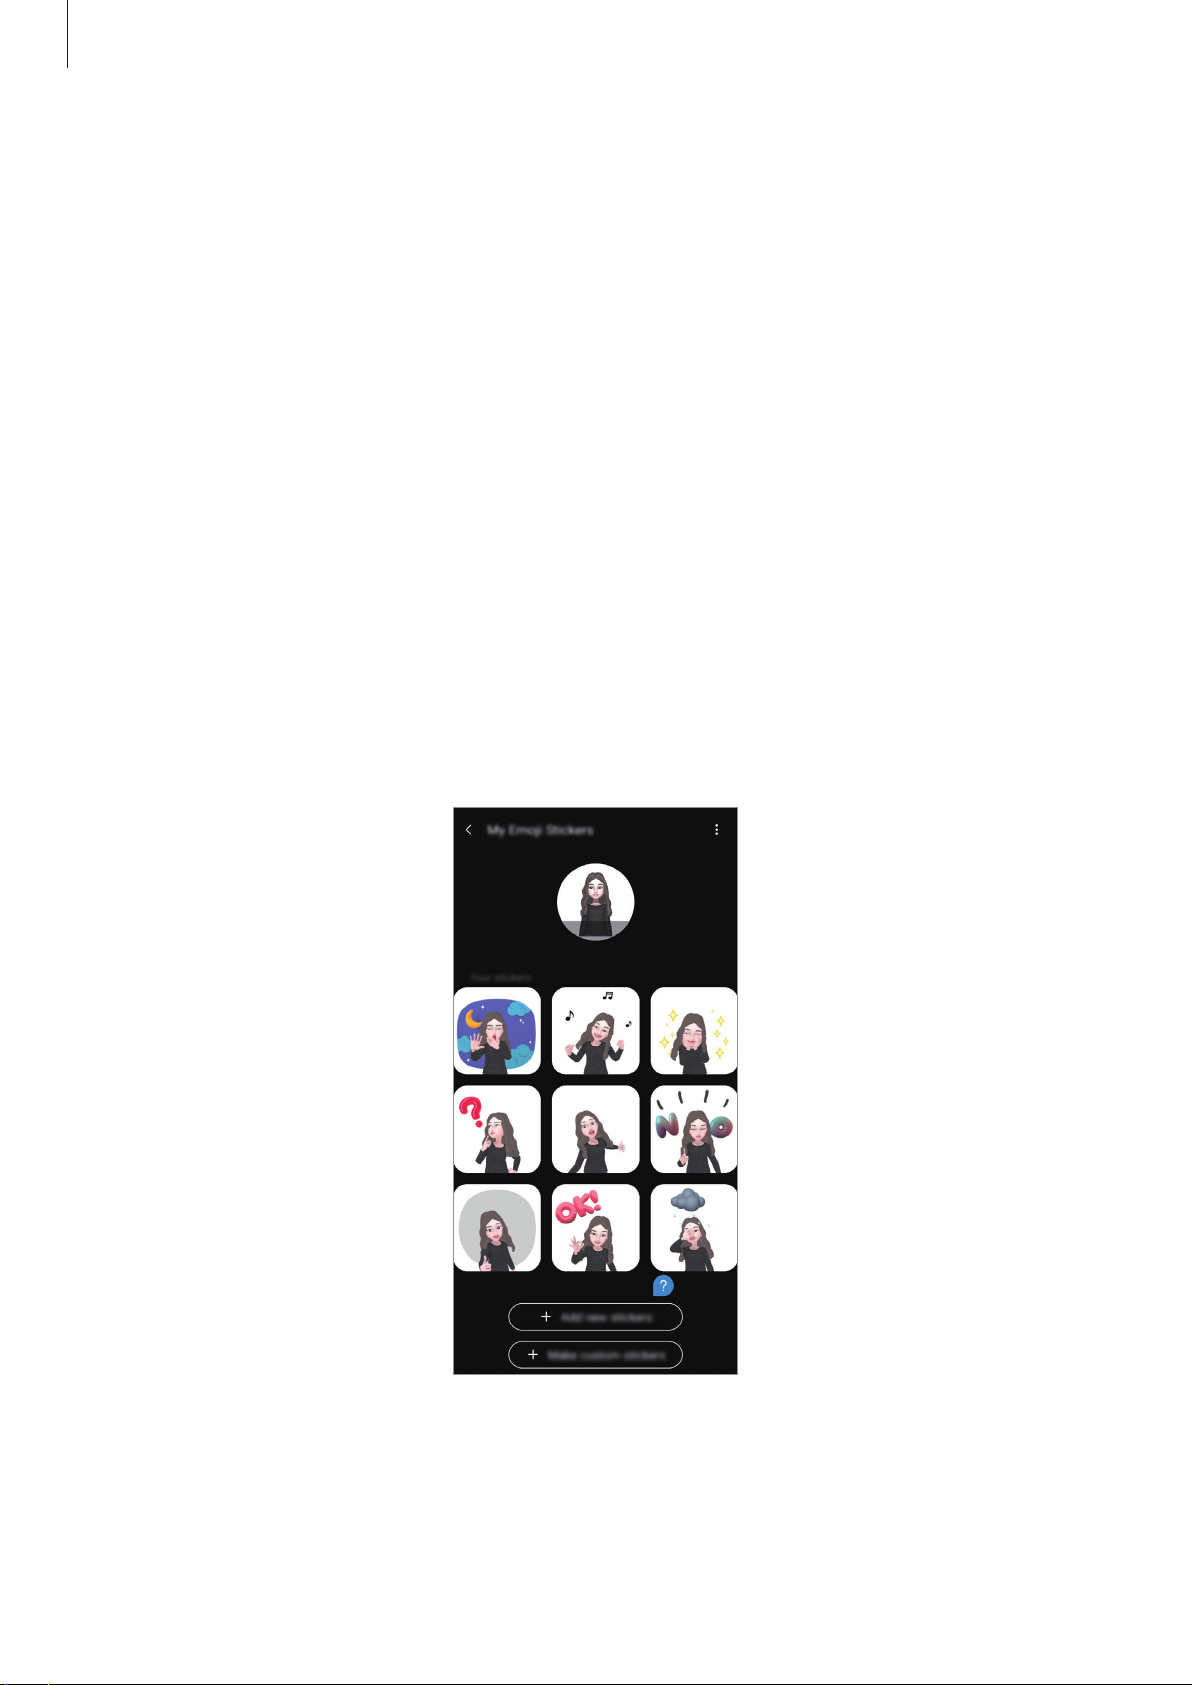
My Emoji stickers
Create your own stickers with My Emoji expressions and actions. You can use My Emoji
stickers when sending messages or on a social network.
Viewing My Emoji stickers
On the My Emoji home screen, tap
Stickers
. Then, you can view My Emoji stickers.
120

Apps and features
Adding stickers
On the My Emoji home screen, tap
Add
and then tap
messages or on a social network.
. The sticker will be added and you can use it during a conversation via
Stickers
Creating your own stickers
Create My Emoji stickers how you want.
On the My Emoji home screen, tap
1
Edit stickers how you want.
2
•
: Select an expression.
•
: Select an action.
•
: Add stickers.
•
: Enter text.
•
: Select the sticker’s background.
→
Stickers
Add new stickers
→
Make custom stickers
, tick the stickers you want,
.
3
Tap
Save
.
121
Apps and features
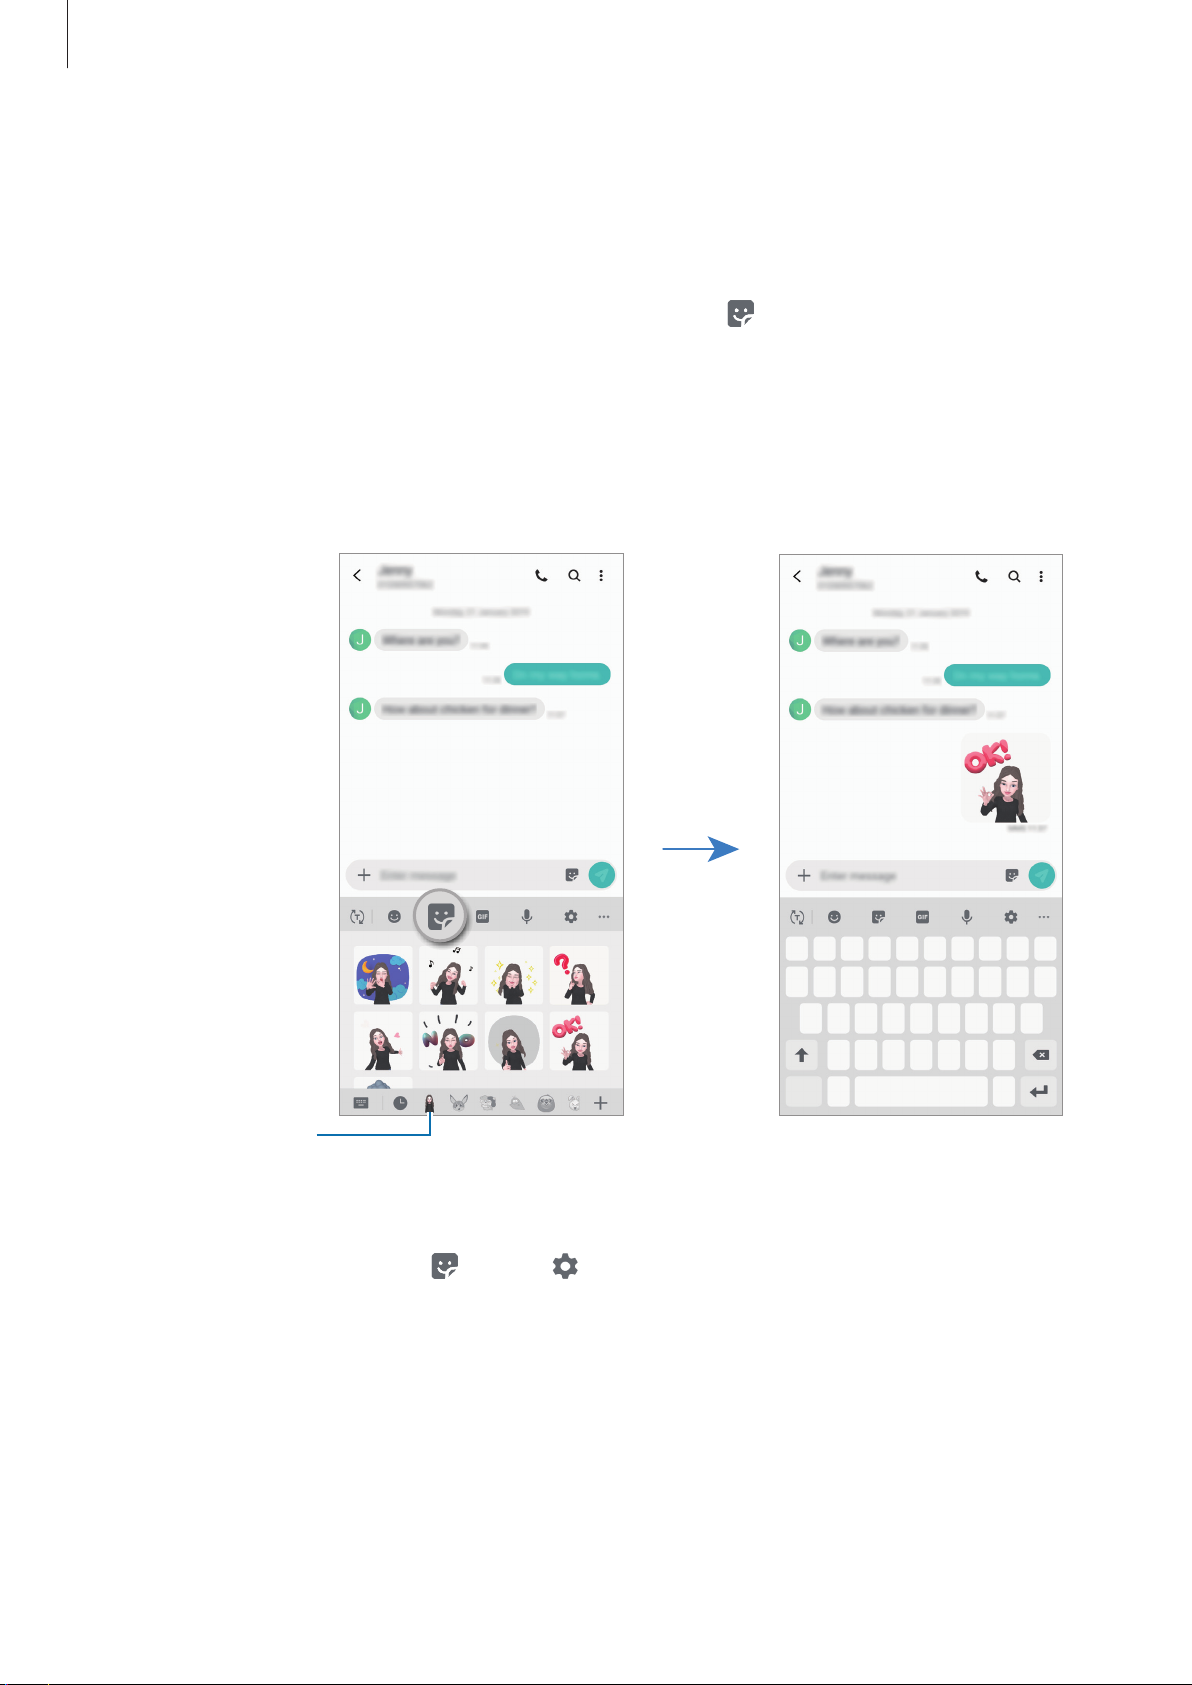
Using My Emoji stickers in chats
You can use My Emoji stickers during a conversation via messages or on a social network. The
following actions are an example of using My Emoji stickers in the
While composing a message in the
1
Tap the My Emoji icon.
2
Select one of the My Emoji stickers.
3
The My Emoji sticker will be inserted.
Messages
app, tap on the Samsung keyboard.
Messages
app.
Avatar icon
Deleting My Emoji stickers
On the Samsung keyboard, tap and tap at the bottom of the keyboard. Select the My
Emoji stickers you want to delete and tap
Delete
.
122
Apps and features
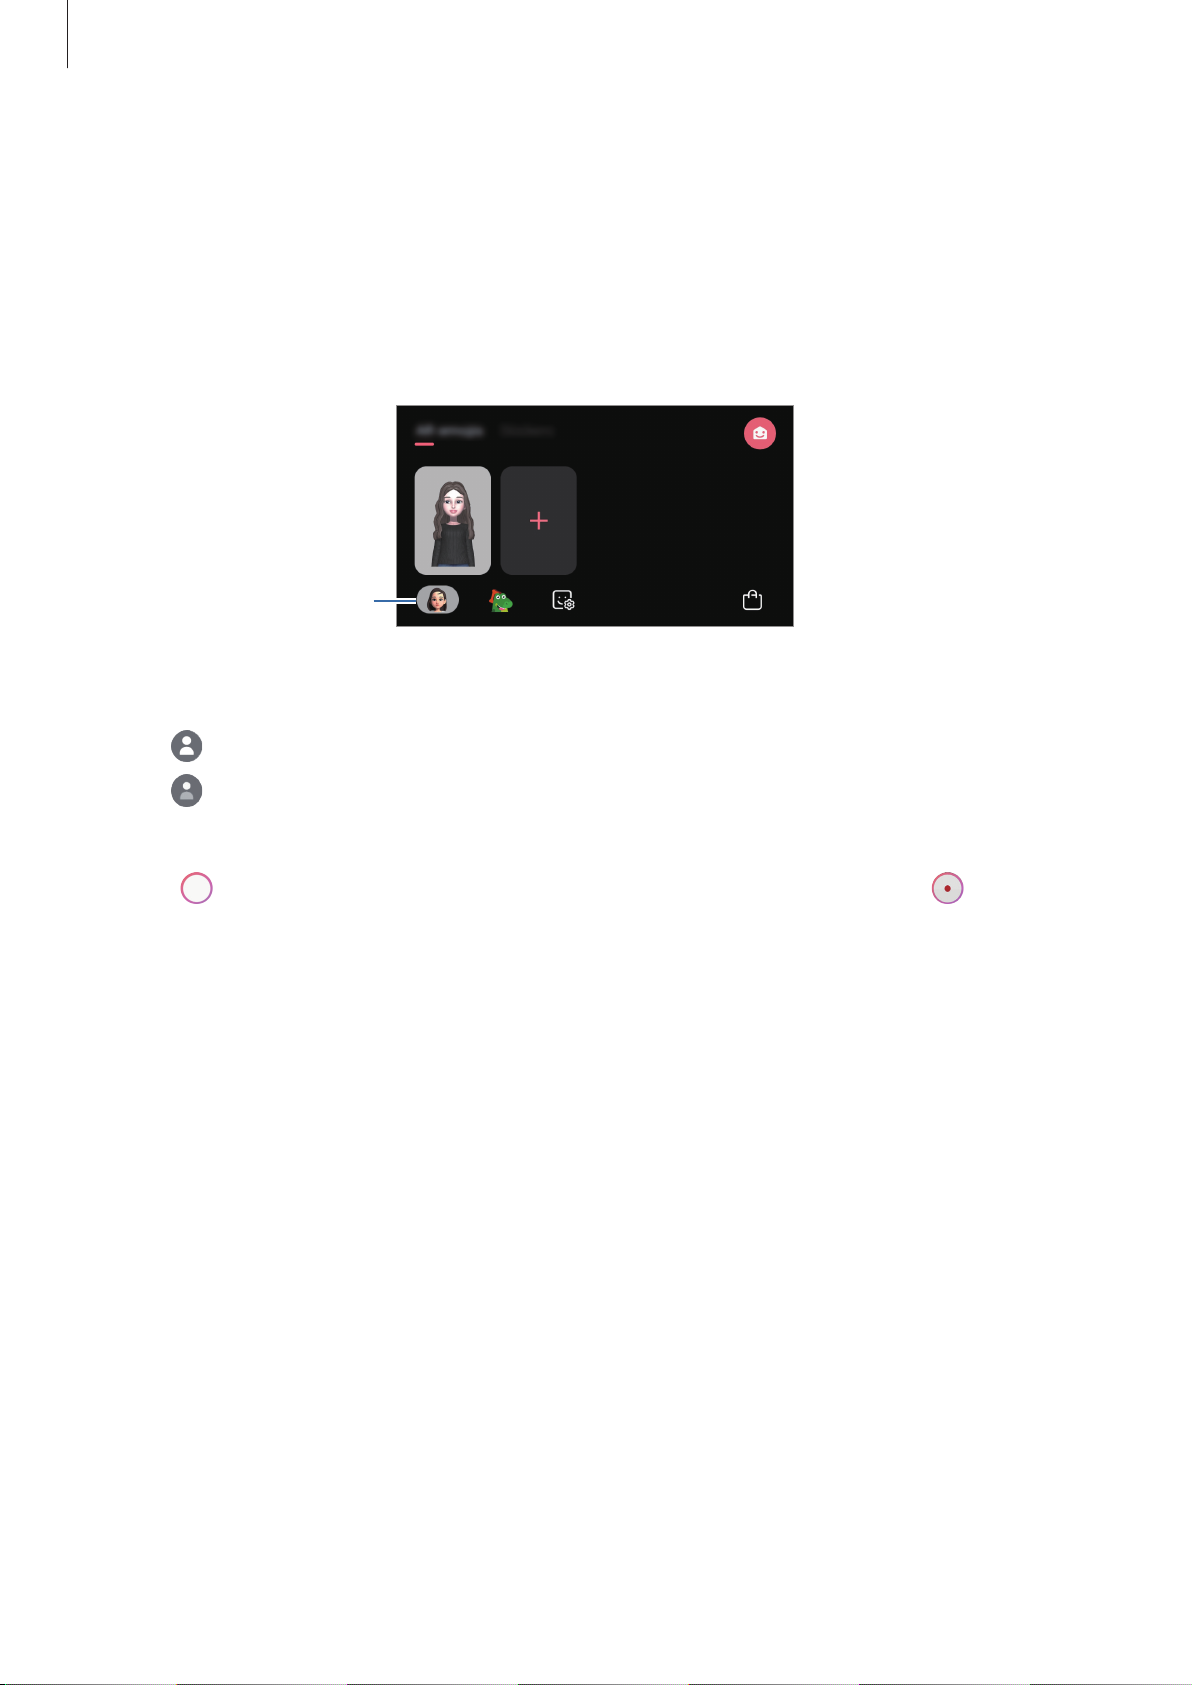
Capturing photos or videos with My Emoji
Create fun photos or videos with My Emoji using various shooting modes.
Launch the
1
Select a My Emoji you want to use.
2
Select the mode you want to use.
3
•
•
mask.
(
Basic
(
Mask
Camera
My Emoji
): My Emoji mimics your expressions.
): My Emoji’s face appears over your face so it looks like you are wearing a
app and tap
AR Emoji
.
Tap
4
video.
You can view and share the photos and videos that you have captured in
to take a photo, or swipe to the left on the preview screen and tap to record a
Gallery
.
123
Apps and features
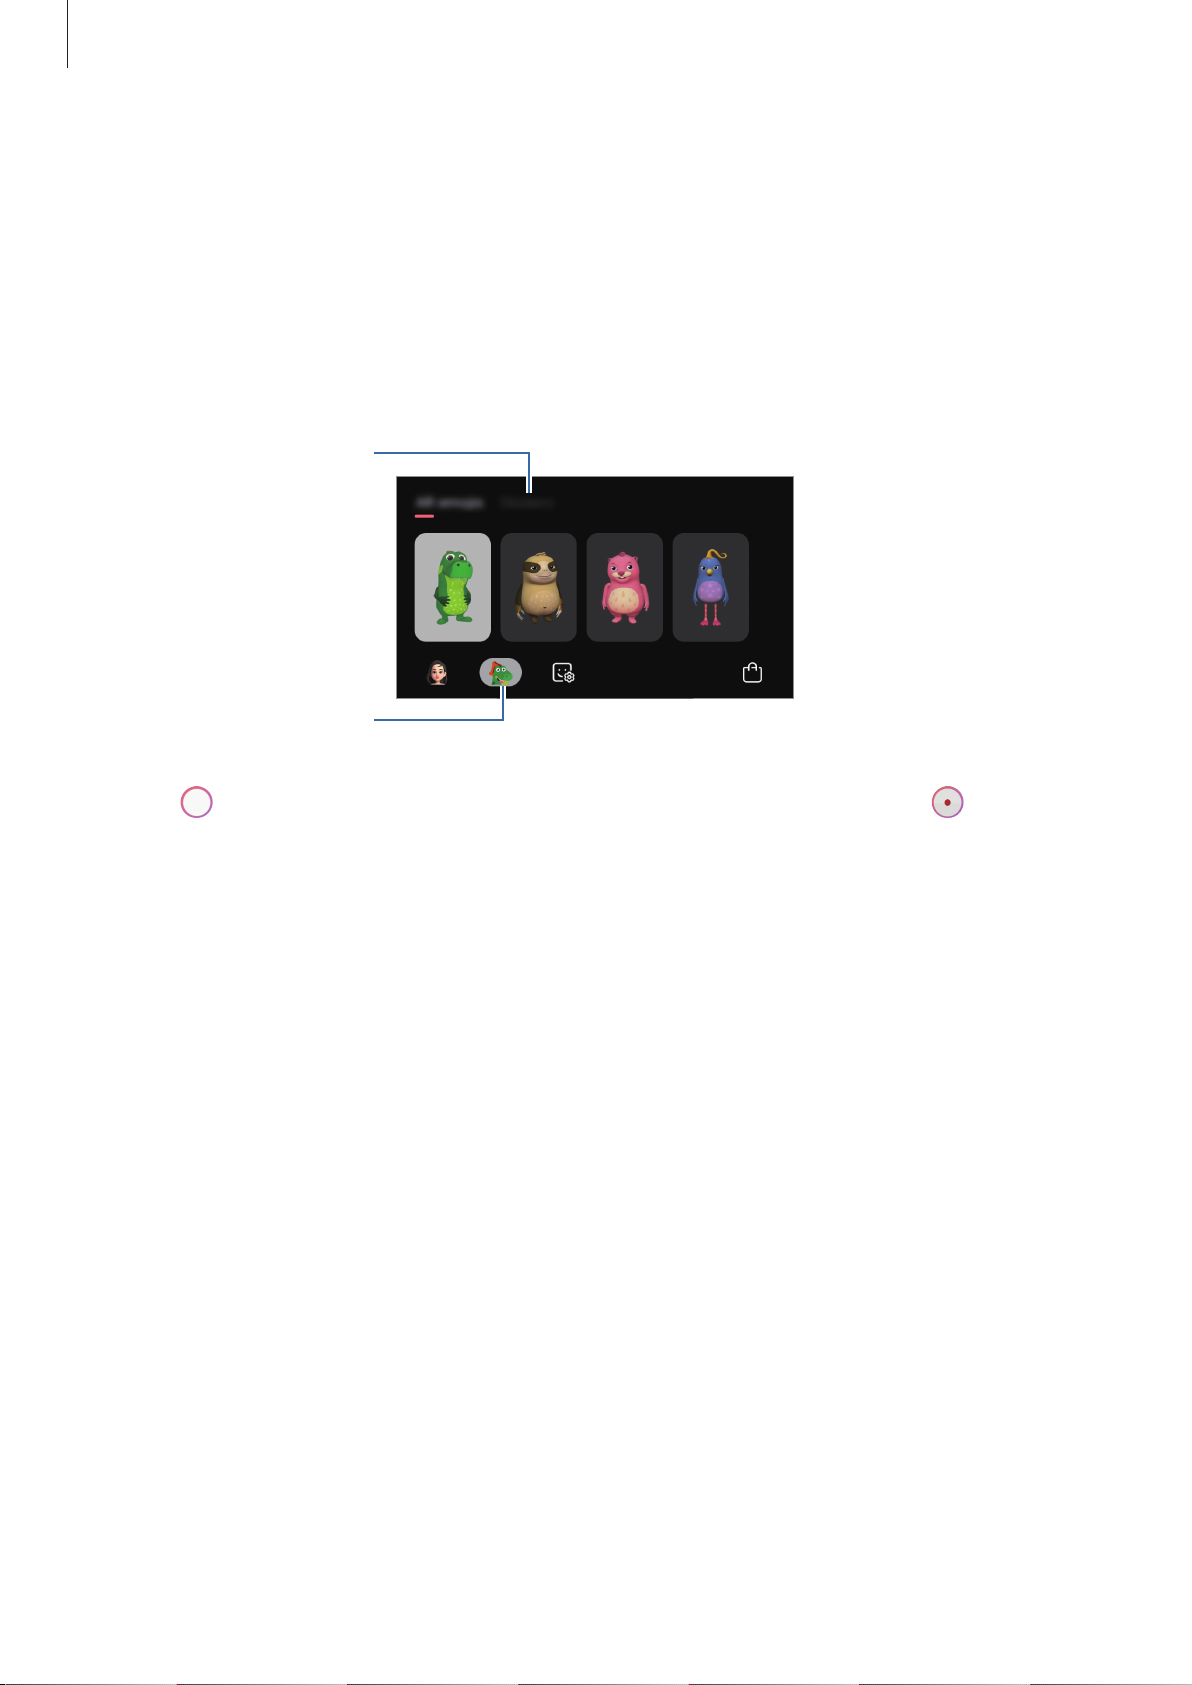
Stickers
Capturing videos with character Emojis or stickers
Character Emojis mimic your expressions. You can also apply sticker effects that follow your
face.
Launch the
1
Select a character Emoji, or tap
2
Tap to take a photo, or swipe to the left on the preview screen and tap to record a
3
video.
You can view and share the photos and videos that you have captured in
Camera
Character Emoji
app and tap
AR Emoji
Stickers
.
and select a sticker you want to use.
Gallery
.
124

Apps and features
Always On Display
You can view information, such as the clock or calendar, or control music playback on the
screen when it is turned off.
You can also check notifications for new messages or missed calls.
•
The brightness of the Always On Display may change automatically depending on
the lighting conditions.
•
If the sensor at the top of the device is covered for a certain period, the Always On
Display will turn off.
Setting how to display the Always On Display
You can select how to display the Always On Display. The Always On Display can be set to
appear continuously or only appear when tapping the screen while it is turned off. Also, you
can set the time to display the Always On Display.
Launch the
select a mode you want.
Settings
app, tap
Lock screen
→
Always On Display
→
Display mode
, and then
125
Apps and features
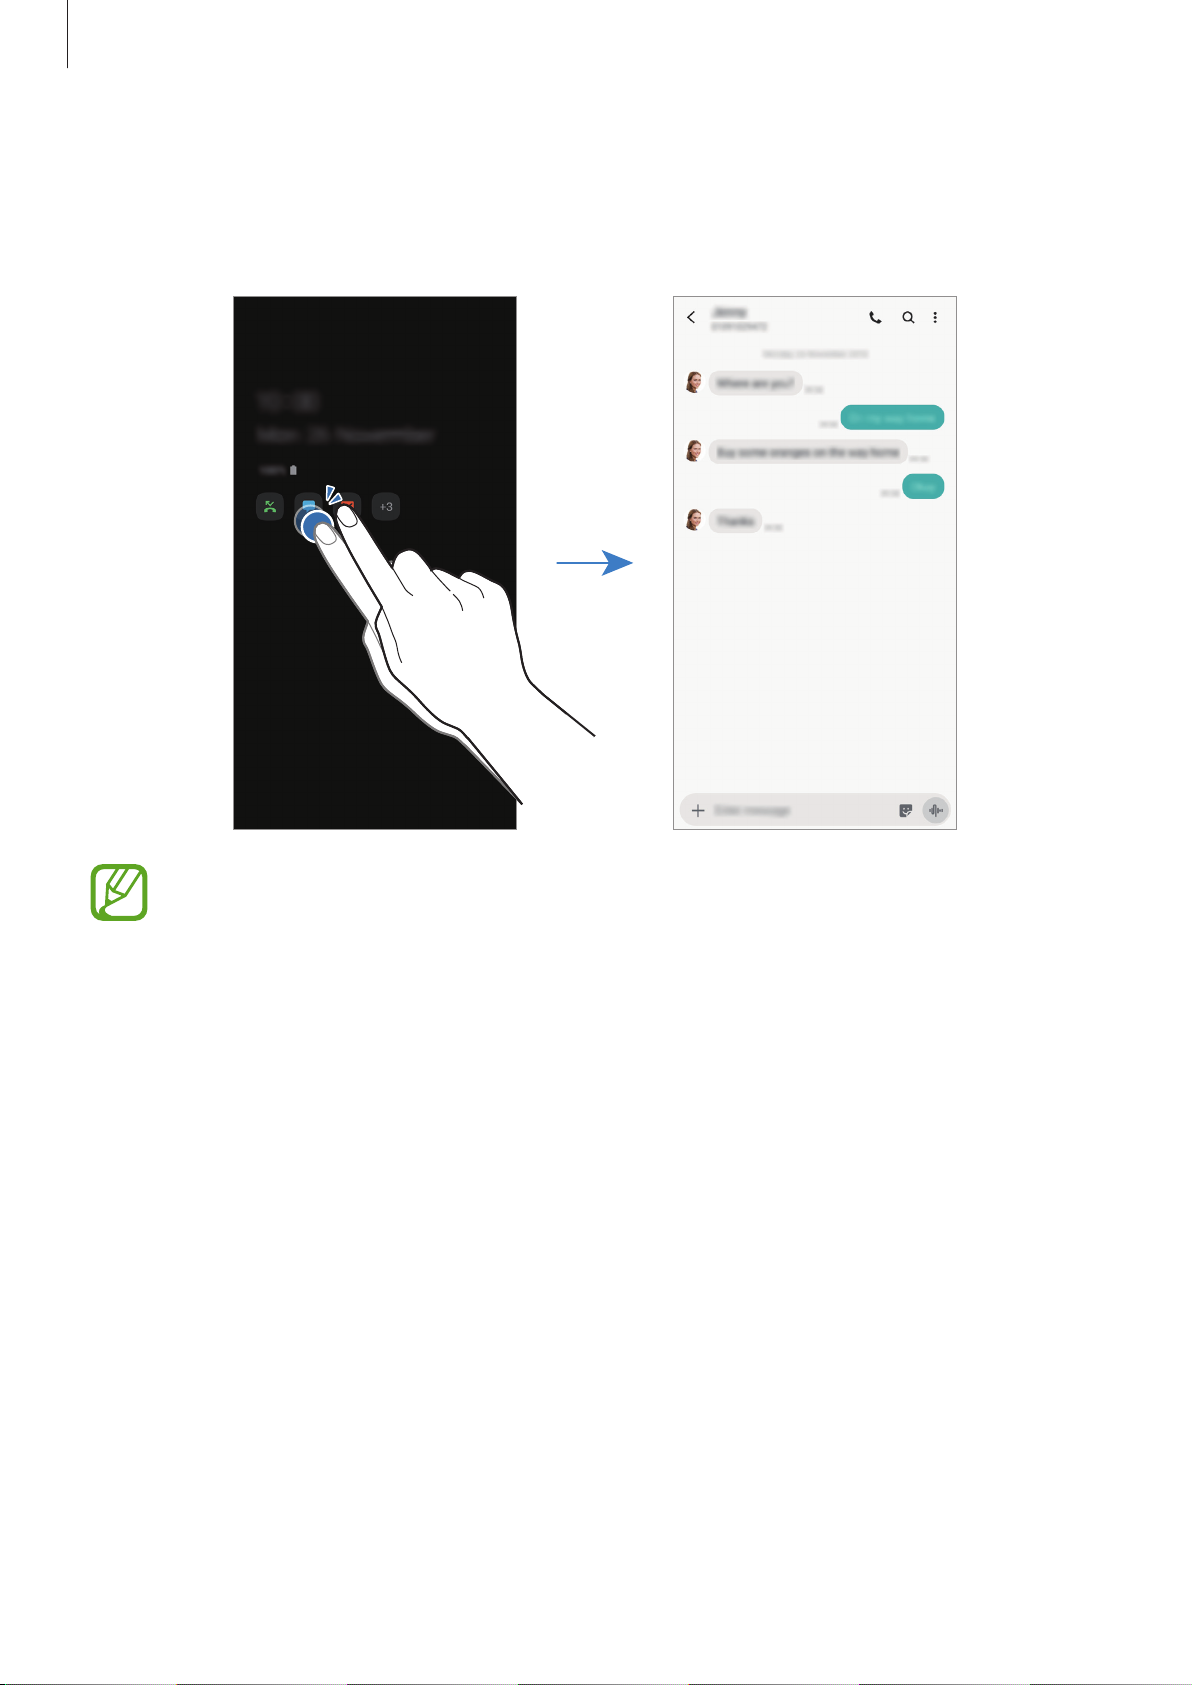
Opening notifications on the Always On Display
When you receive message, missed call, or app notifications, notification icons will appear on
the Always On Display. Double-tap a notification icon to view its notification.
If the screen is locked, you must unlock it to view notifications.
Controlling music playback on the Always On Display
You can control music playback on the Always On Display.
Launch the
1
switch to activate it.
To control music playback on the Always On Display, double-tap the clock.
2
Swipe to the left or right on the clock to move to the music controller.
3
Tap the icons to control the playback.
4
Settings
app, tap
Lock screen
→
FaceWidgets
, and then tap the
Music
126

Apps and features
Displaying an image to the Always On Display
You can display an image on the Always On Display. You can also display an animated GIF.
Launch the
1
Drag the types list to the left and select the type with an image on it.
2
Tap and select an image.
3
To insert an animated GIF, tap
Tap
4
Done
Settings
.
app →
Lock screen
GIF
and select a file.
→
Clock style
→
Deactivating the Always On Display feature
Launch the
deactivate it.
Settings
app, tap
Lock screen
, and then tap the
Always On Display
Always On Display
switch to
.
127
Apps and features
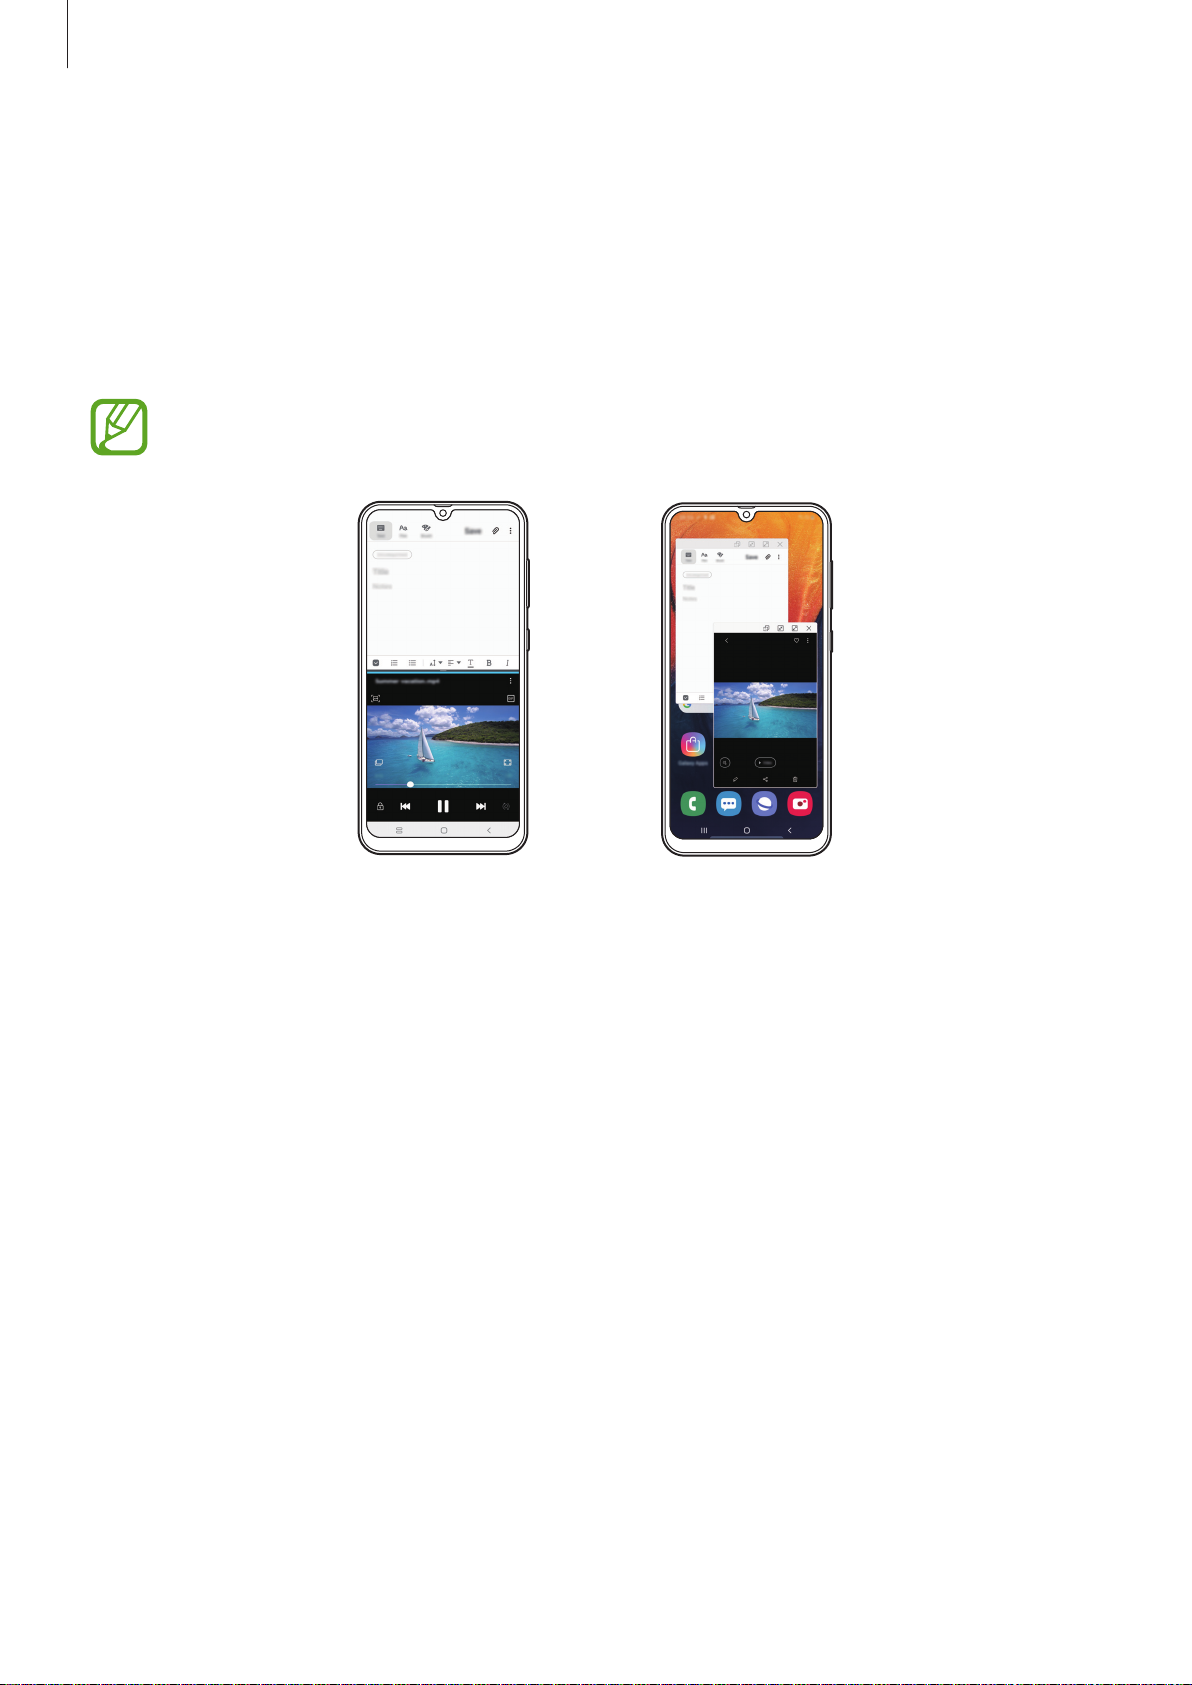
Multi window
Introduction
Multi window lets you run two apps at the same time in the split screen view. You can also run
multiple apps at the same time in the pop-up view.
Some apps may not support this feature.
Split screen view Pop-up view
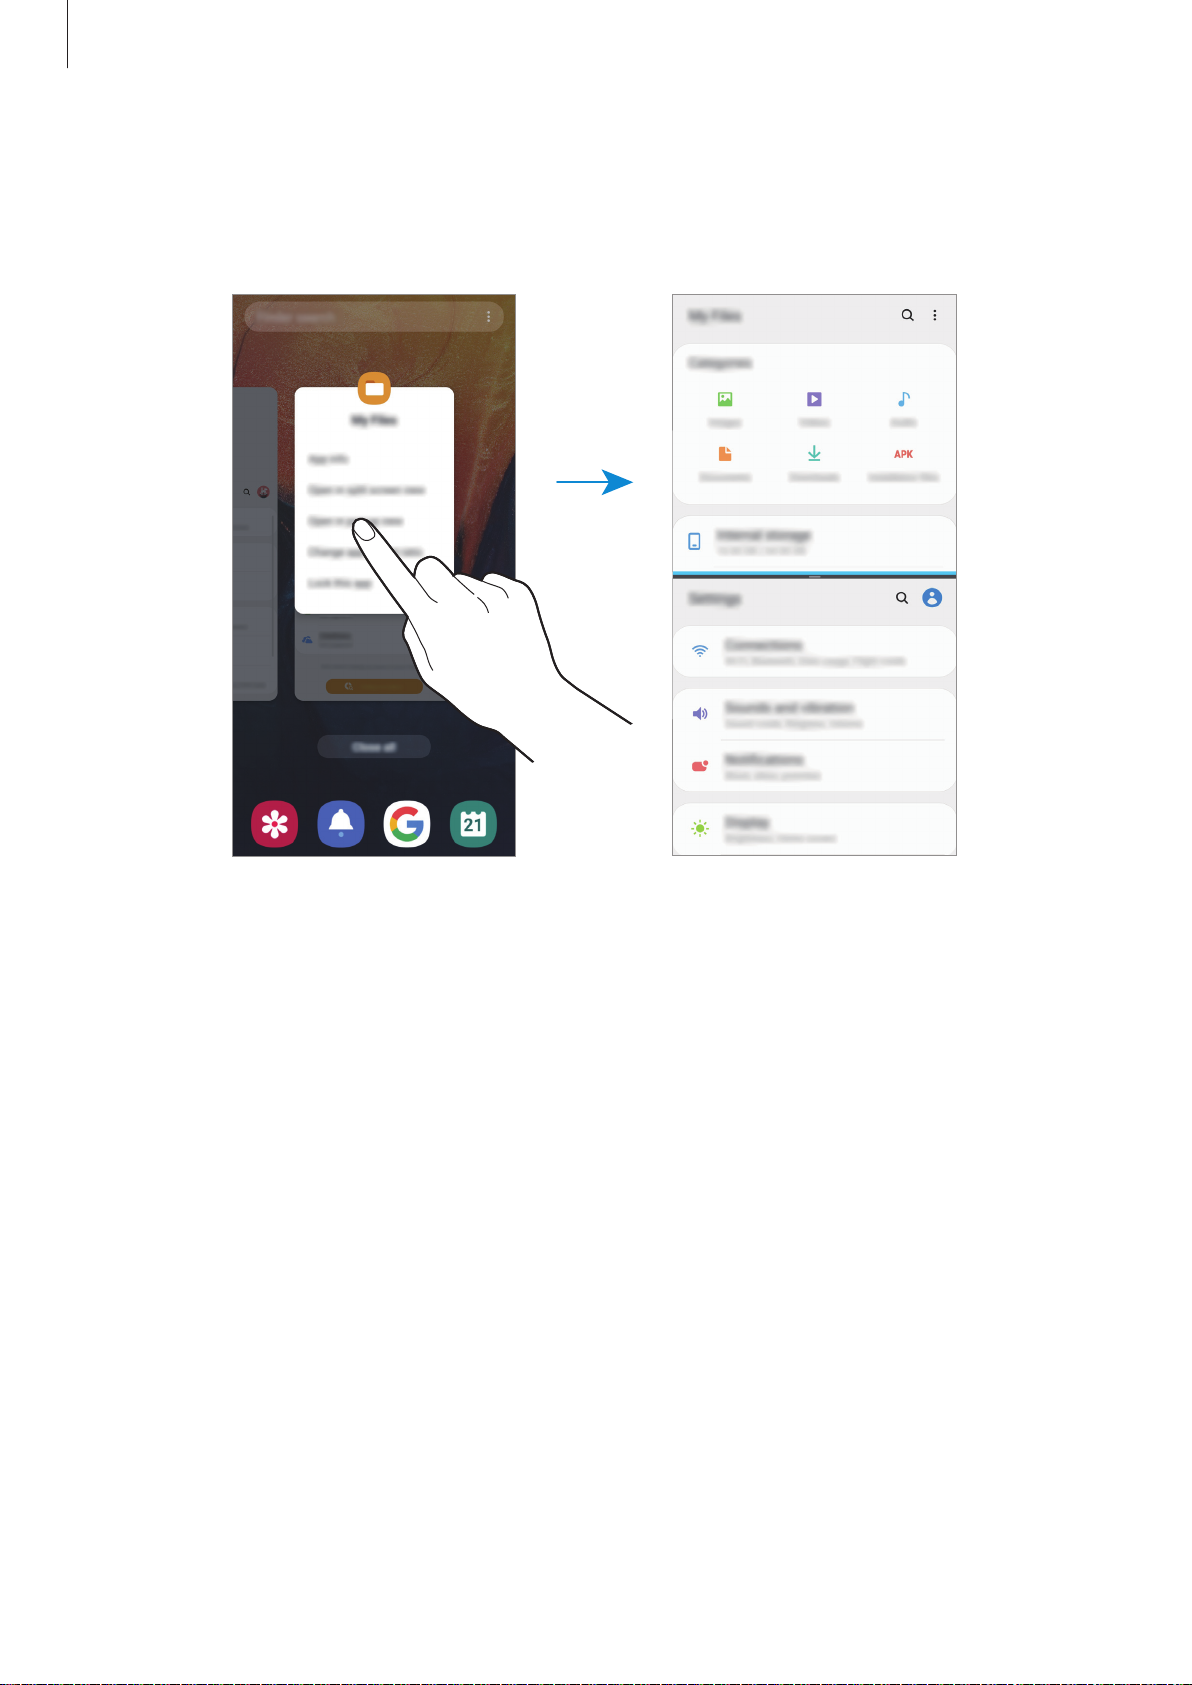
Split screen view
Tap the Recents button to open the list of recently used apps.
1
Swipe to the left or right, tap an app’s icon, and then tap
2
The selected app will launch in the upper window.
Open in split screen view
.
128
Apps and features
On the lower window, swipe left or right to select another app to launch.
3
To launch apps not on the list of recently used apps, tap the Home button or Back button
and select an app.
Adjusting the window size
Drag the bar between the app windows up or down to adjust the size of the windows.
When you drag the bar between the app windows to the top or bottom edge of the screen,
the window will be maximised.
129
Apps and features
Minimise the
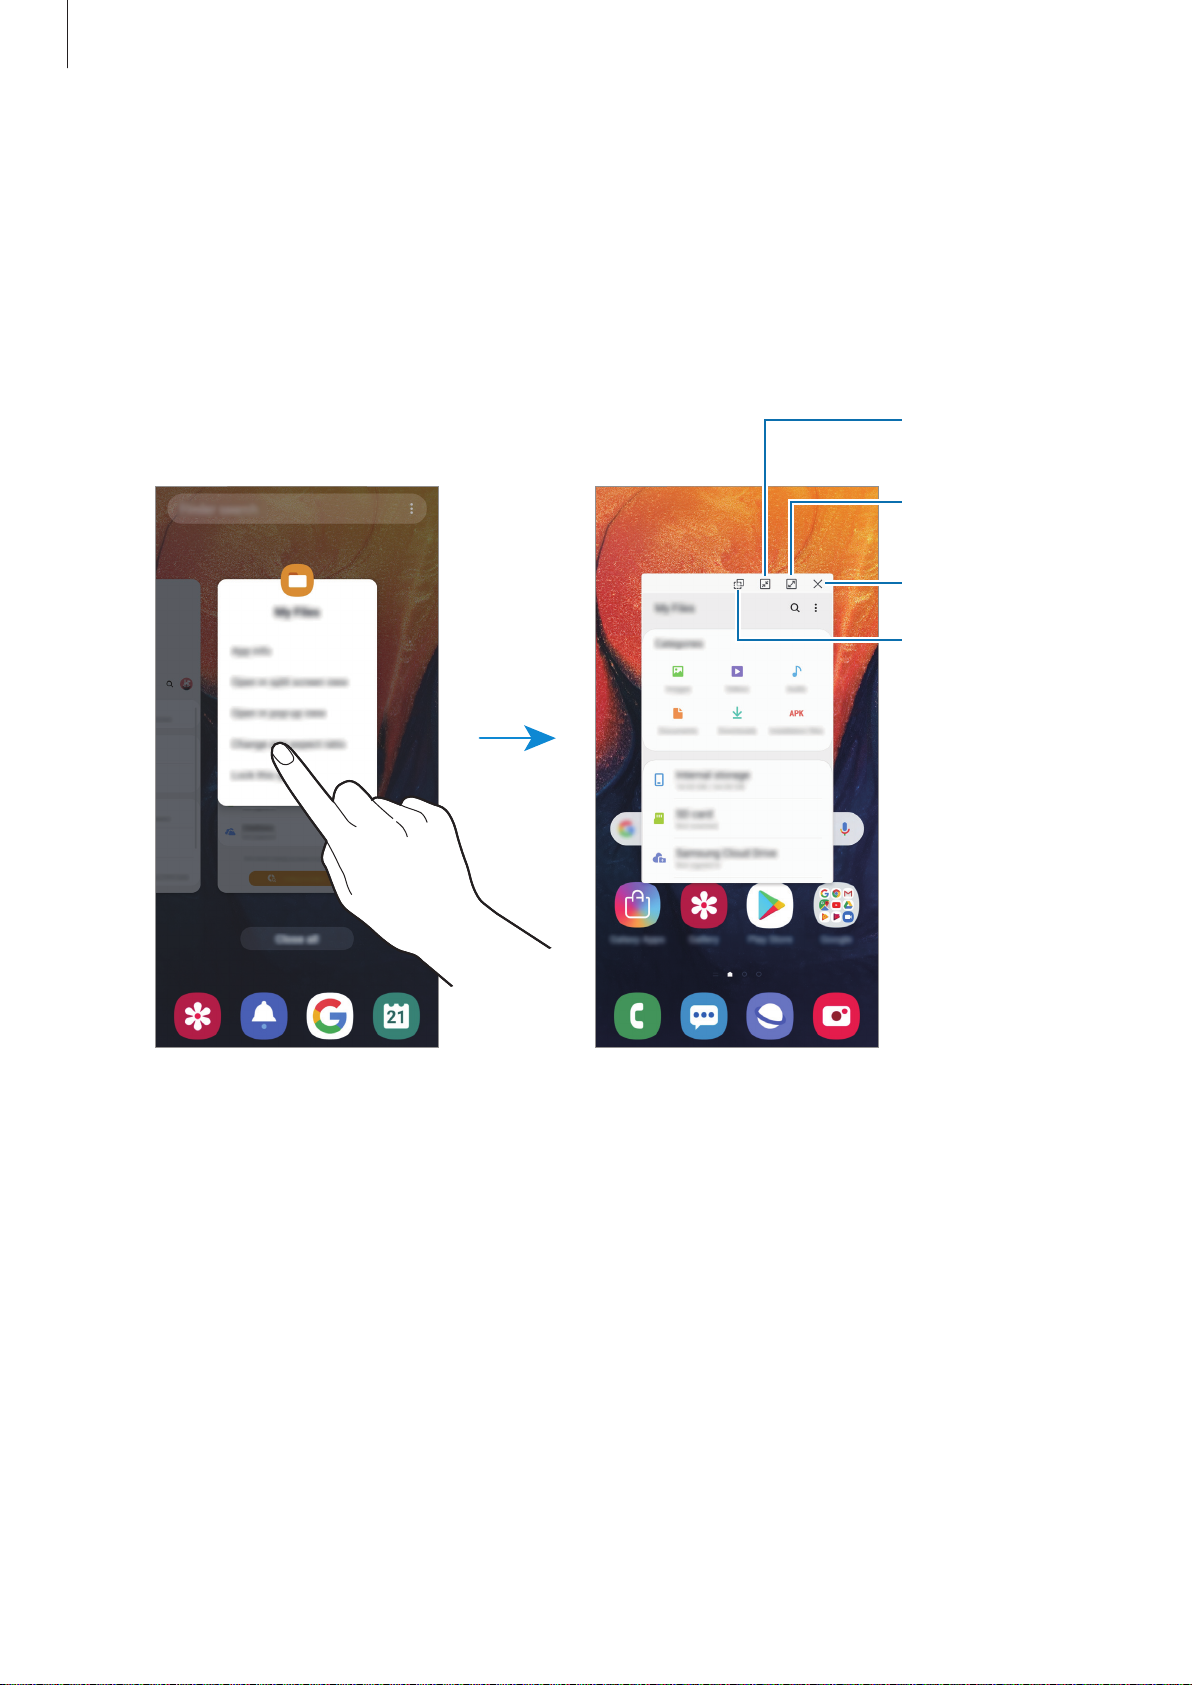
Pop-up view
Tap the Recents button to open the list of recently used apps.
1
Swipe to the left or right, tap an app’s icon, and then tap
2
The app screen will appear in the pop-up view.
Open in pop-up view
window.
Maximise the
window.
Close the app.
Adjust the
transparency
level.
.
Moving pop-up windows
To move a pop-up window, tap the window’s toolbar and drag it to a new location.
130
Apps and features
Kids Home
Introduction
You can restrict children’s access to certain apps, set their usage times, and configure settings
to provide a fun and safe environment for children when they use the device.
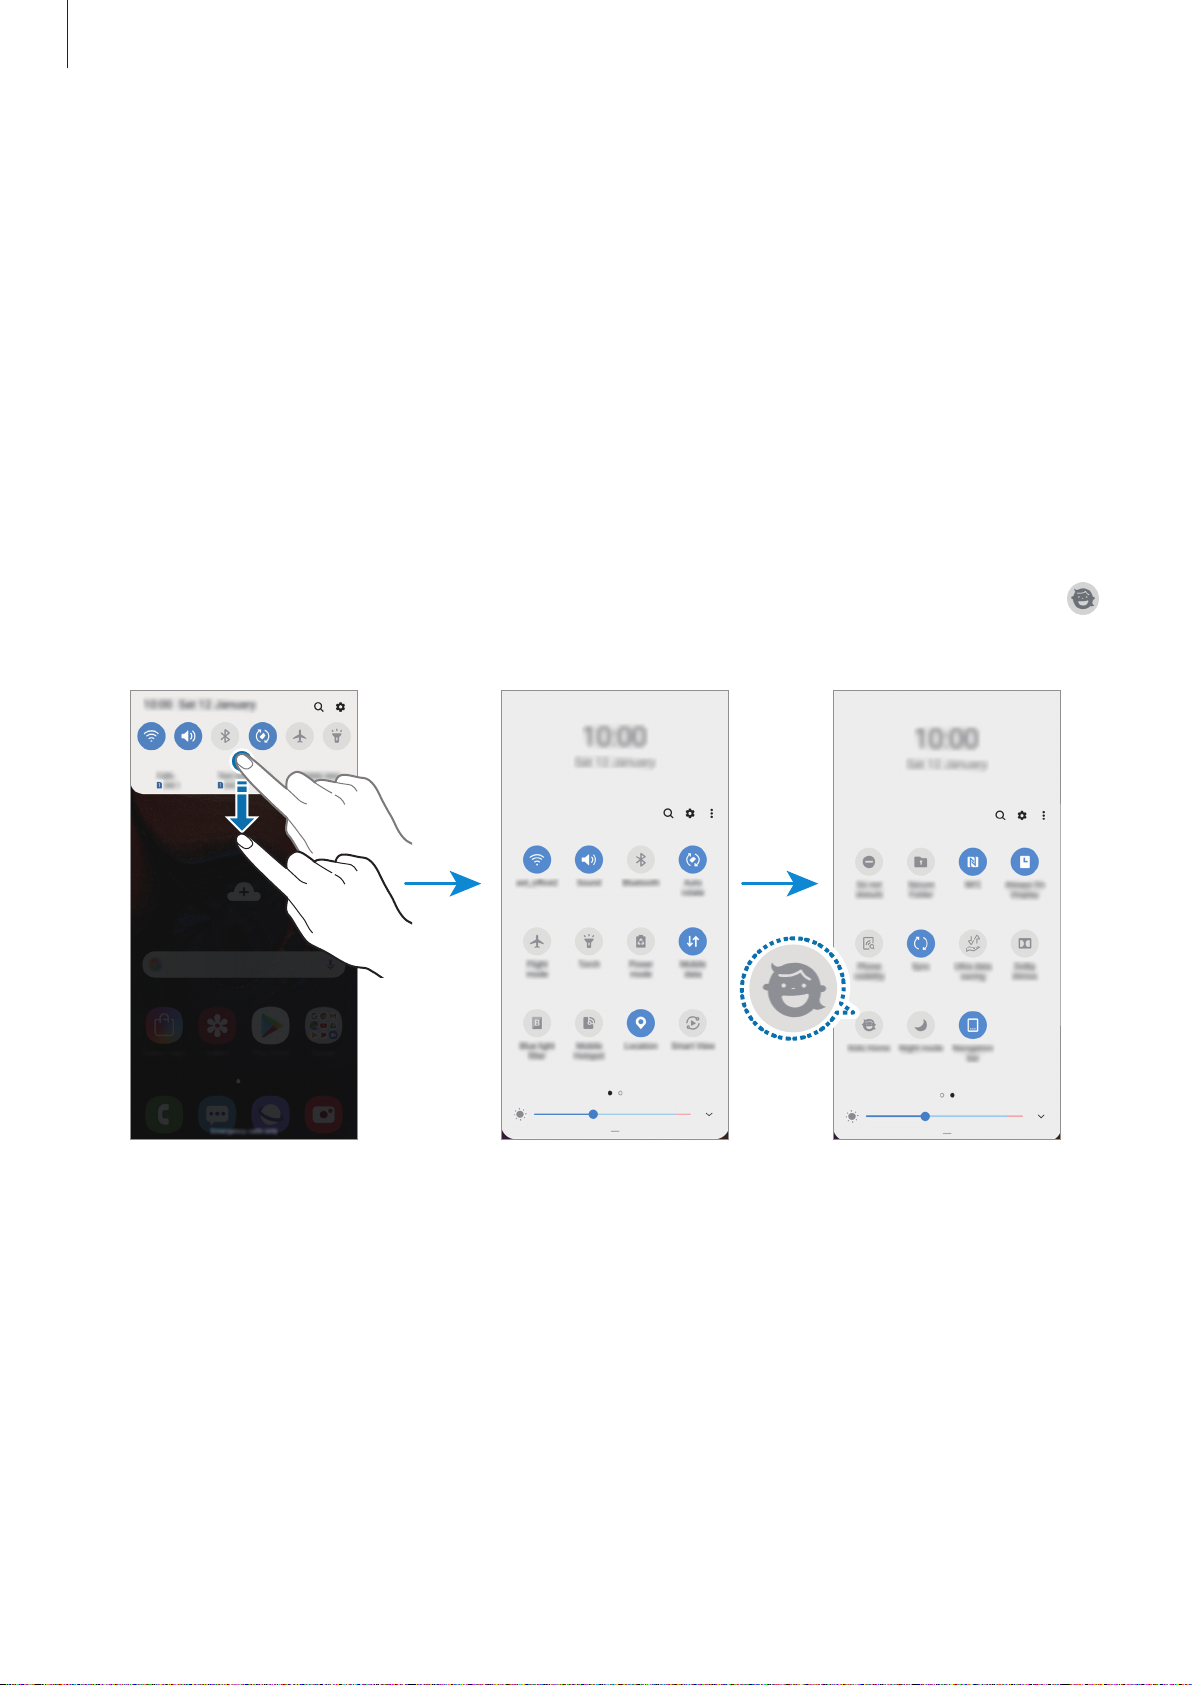
Starting Kids Home
When starting Kids Home for the first time or after performing a data reset, follow the
on-screen instructions to complete the setup.
Open the notification panel, swipe downwards on the notification panel, and then tap
1
Kids Home
(
) to activate it.
Read the Kids Home intro page and tap
2
Next
131
.

Apps and features
Create a PIN to use when using Kids Home.
3
If you have already set the screen lock method on your device, you can use the same lock
method for Kids Home.
The Kids Home screen will appear.
The created PIN will be used when activating the
Kids Home.
Parental control
feature or closing
Using Kids Home
Open the notification panel, swipe downwards on the notification panel, and then tap
Kids Home
(
The Kids Home screen will appear.
) to activate it.
Access additional options.
Available apps
Kids Phone
Configuring settings for Kids Home
On the Kids Home screen, tap →
•
Name
•
Set daily playtime
: Manage your child’s profile.
: Restrict the usage time for Kids Home.
Parental control
132
and enter the PIN.
Kids Gallery
Kids Camera
Apps and features
•
Daily usage
•
Activity
•
Frequently contacted
•
My kid’s creations
•
Allowed content
: View the daily usage time of Kids Home.
: View the activity history of Kids Home.
: View the frequently used contacts in Kids Home.
: View the works created from the apps in Kids Home.
: Check the apps or content supported by Kids Home and add them.
Closing Kids Home
To close Kids Home, tap the Back button or tap →
PIN.
Close Kids Home
, and then enter your
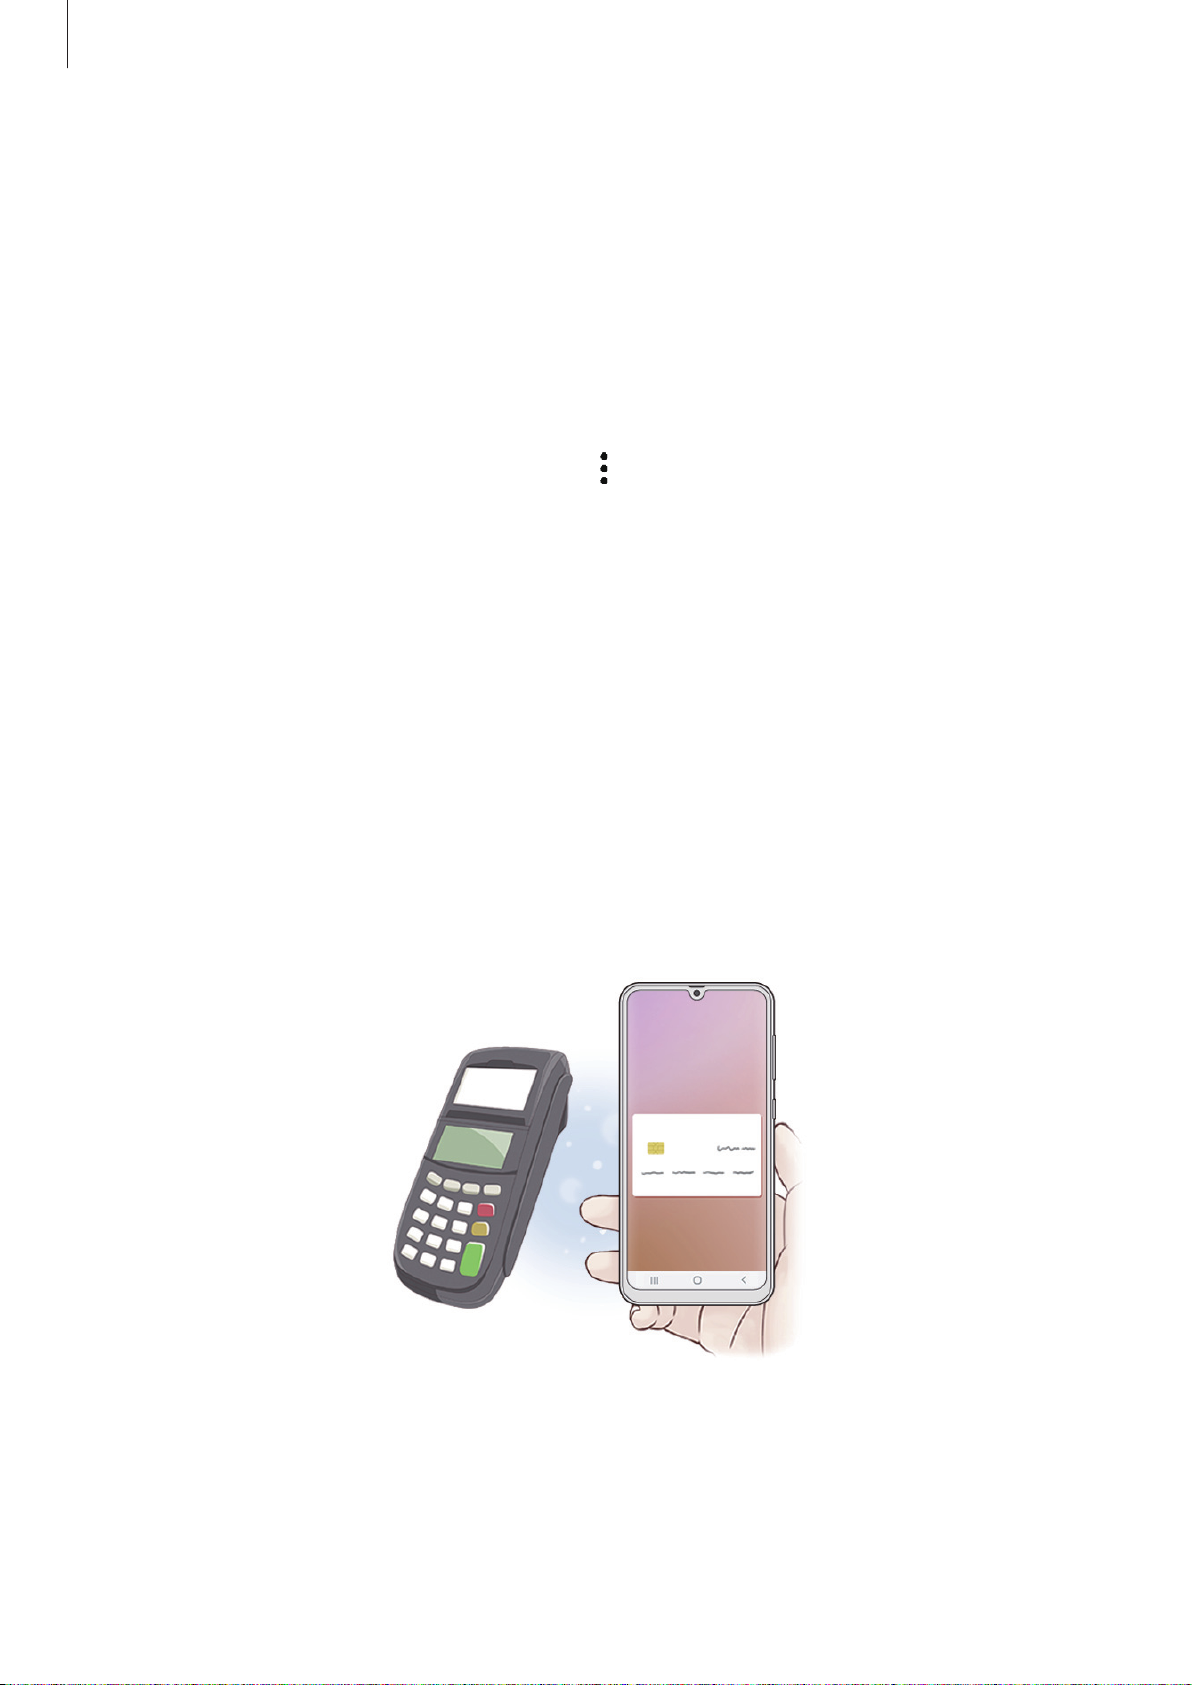
Samsung Pay
Introduction
Register frequently used cards to Samsung Pay, a mobile payment service, to make payments
quickly and securely. Samsung Pay supports magnetic secure transmission (MST) as well as
near field communication (NFC) to allow payment through standard credit card readers.
You can view more information, such as cards that support this feature at
www.samsung.com/samsungpay.
133
Apps and features
•
To use this feature, you must sign in to your Samsung account and register your
biometric data. For more information, refer to Samsung account, Fingerprint
recognition.
•
To make payments with Samsung Pay, the device may be required a connection to
a Wi-Fi or mobile network depending on the region.
•
This app’s availability and supported features may vary depending on the region or
service provider.
•
The procedures for the initial setup and card registration may vary depending on
the region or service provider.
•
Magnetic secure transmission (MST) may not be supported depending on the
region.
Setting up Samsung Pay
When running this app for the first time or restart it after performing a data reset, follow the
on-screen instructions to complete the initial setup.
Launch the
1
Sign in to your Samsung account.
2
Read and agree to the terms and conditions.
3
Register your fingerprint or irises to use when making payments.
4
Create a PIN to use when making payments.
5
This PIN will be used to verify various actions in Samsung Pay, such as making
payments and unlocking the app.
Samsung Pay
app.
Registering cards
You can easily register cards by capturing their images with the camera.
You can check the cards that support this feature from the Samsung Pay website
(www.samsung.com/samsungpay).
Launch the
complete your card registration.
Samsung Pay
app, tap
Add
, and then follow the on-screen instructions to
134
 Loading...