

Page 1

Samsung
Universal Print
Driver 2
User’s Guide
Samsung Electronics, Co., Ltd.
Version 1.0
March, 2013
SAMSUNG ELECTRONICS RESERVES THE RIGHT TO CHANGE PRODUCTS,
INFORMATION AND SPECIFICATIONS WITHOUT NOTICE.
Products and specifications discussed herein are for reference purposes only. All information
discussed herein is provided as an “AS IS” basis, without warranty of any kind.
This document and all information discussed herein remain the sole and exclusive property of
Samsung Electronics, Co., Ltd.. No license of any patent, copyright, mask work, trademark or
any other intellectual property right is granted by one party to the other party under this document,
by implication, estoppels or otherwise.
Samsung products are not intended for use in life support, critical care, medical, safety equipment,
or similar applications where product failure could result in loss of life or personal or physical
harm, or any military or defense application, or any governmental procurement to which special
terms or provisions may apply.
For updates or additional information about Samsung products, contact your nearest Samsung
office.
All brand names, trademarks are registered trademarks belong to their respective owners.
© 2013 Samsung Electronics Co., Ltd. All rights reserved.
Page 2

Page 2 of 15
2
© Samsung Electronics Co., Ltd. All Rights Reserved.
COPYRIGHT
© 2013 Samsung Electronics Co., Ltd. All rights reserved.
This guide is provided for information purposes only. All information included herein is subject to
change without any notice. Samsung Electronics is not responsible for any direct or indirect
damages, arising from or related to use of this user’s guide.
Samsung Universal Print Driver is a trademark of Samsung Electronics Co., Ltd.
Samsung and Samsung logo are trademarks of Samsung Electronics Co., Ltd.
All other brand, product and company names herein may be the trademarks of their respective
owners.
Page 3

Page 3 of 15
3
© Samsung Electronics Co., Ltd. All Rights Reserved.
Table of Contents
COPYRIGHT ................................................................................................................................ 2
INTRODUCTION ......................................................................................................................... 4
Driver Types ........................................................................................................................... 4
What’s New ............................................................................................................................ 4
SUPPORTED ENVIRONMENTS .................................................................................................... 6
Client Operating Systems ........................................................................................................ 6
Server Operating Systems....................................................................................................... 6
Microsoft Windows Terminal Servers ...................................................................................... 6
Microsoft Windows Cluster Servers ......................................................................................... 6
Citrix ....................................................................................................................................... 7
BEFORE YOU INSTALL................................................................................................................ 8
Check Your Environment ......................................................................................................... 8
Download the Driver You Prefer.............................................................................................. 8
INSTALLATION ................................ ........................................................................................... 8
Using Samsung Installer (Recommended) .............................................................................. 8
Using Add a Printer Wizard Method From Devices and Printers Folder .................................... 9
UNINSTALLATION ...................................................................................................................... 9
How To Uninstall UPD2 With Samsung Uninstaller .................................................................. 9
How To Uninstall UPD2 From Devices and Printers Folder .....................................................10
USING “Samsung Universal Print Driver 2” ................................................................................11
How To Select Your Printer Automatically ..............................................................................11
How To Select Your Printer Manually .....................................................................................12
Before you select manually… ..............................................................................................12
Use of [Printer Model] features in Device Options of Printer Properties ..............................13
SUPPORTED PRINTERS .............................................................................................................14
Page 4

Page 4 of 15
4
© Samsung Electronics Co., Ltd. All Rights Reserved.
Driver Type
Description
Samsung Universal Print Driver 2
Supporting SPL or PCL6 supported models
* Recommend for all users (from home users to IT administrators)
Samsung Universal Print Driver 2 PS
Supporting PS supported models
* Recommend for users who want to get PostScript output
Samsung Universal Print Driver 2 PCL6
Supporting PCL6 supported models
* Recommend for users who want to get PCL6 output
Samsung Universal Print Driver 2 XPS
Supporting SPL, PCL6 or XPS supported models
* Recommend for users who want to get the output from XPS print
path
* XPS printer driver can be installed only on Windows Vista OS or
higher
INTRODUCTION
The Samsung Universal Print Driver(UPD) is a single driver that can be used for different printer
models. If you install only one Universal Print Driver, you can access any Samsung printer which is
supported by UPD. UPD gives the user instant access to not only Samsung printer devices, but also
other vendor’s PDL devices(*) without installing separate drivers.
(*)Samsung does not guarantee print quality or feature compatibility.
UPD first released in 2009. It has been upgraded to give the users more useful features and
compatible with users’ IT environments. “Samsung Universal Print Driver 2” (UPD2) has
released in 2013.
Driver Types
There are 4 types of Samsung Universal Print Driver 2, which are up to PDL type.
- All types are Microsoft certified.
What’s New
- Faster And Simpler Device Discovery
o UPD2 gives the user faster printer discovery and supports flexible configuration
of the devices. It reflects the configuration on the UI dynamically and instantly.
o In the case of non-SNMP communication environment where automatic discovery
is invalid, UPD2 now supports manual printer selection so that a wider range of
user can use UPD2 without any environmental restriction.
- Lighter And More Reliable Driver Operation by On-the-fly UI
o UPD2 has improved and simplified UI design. When the user selects their own
preferred printer, UI layout and device configuration (options) of the printer are
shown on-the-fly.
Page 5

5
© Samsung Electronics Co., Ltd. All Rights Reserved.
o Giving lighter and more reliable driver’s UI operation to the users, UPD2 no
longer pop-ups the window when opening driver’s UI by separating UPD
applications.
- Support Model’s Full Features
o Users can use the same full features as model-specific print drivers with UPD2.
Manual Duplex and Special Pages (including Cover Page, Insert Pages and
Exception Pages) are now newly supported.
Page 5 of 15
Page 6

6
© Samsung Electronics Co., Ltd. All Rights Reserved.
OS Name
Architecture
Edition
Microsoft Windows XP
32 bits
64 bits
Home Edition
Professional
Microsoft Windows Vista
32 bits
64 bits
Business
Enterprise
Home Basic
Home Premium
Ultimate
Microsoft Windows 7
32 bits
64 bits
Starter
Home Premium
Professional
Enterprise
Ultimate
Microsoft Windows 8
32 bits
64 bits
Pro
Enterprise
OS Name
Architecture
Edition
Microsoft Windows 2003
32 bits
64 bits
Datacenter
Enterprise
Standard Edition
Microsoft Windows 2008
32 bits
64 bits
Datacenter
Enterprise
Standard Edition
Microsoft Windows 2008 R2
64 bits
Datacenter
Enterprise
Standard Edition
Microsoft Windows 2012
64 bits
Foundation
Essentials
Standard
Datacenter
SUPPORTED ENVIRONMENTS
Client Operating Systems
Page 6 of 15
Server Operating Systems
Microsoft Windows Terminal Servers
Windows Server 2003 SP2, 2008, 2008 R2 and Server 2012
Microsoft Windows Cluster Servers
Windows Server 2003 SP2, 2008, 2008 R2 and Server 2012
Page 7

7
© Samsung Electronics Co., Ltd. All Rights Reserved.
Citrix
Citrix XenApp 6.5
o Microsoft Windows Server 2008 R2
Citrix XenApp 6.0
o Microsoft Windows Server 2008 R2
Citrix XenApp 5.0
o Microsoft Windows Server 2008
o Microsoft Windows Server 2003
Page 7 of 15
Page 8

8
© Samsung Electronics Co., Ltd. All Rights Reserved.
BEFORE YOU INSTALL
Check Your Environment
1. Check the system requirements.
a. Refer to “Supported Environments” section for details.
2. Check your printer’s supported PDL and decide which driver package you will use.
a. Refer to “Supported Printers” sections for details.
Download the Driver You Prefer
1. Visit Samsung Printer Driver Download Page
http://www.samsung.com/printer/usefulsoftware
2. Download the preferred type of UPD2 as you checked previously.
INSTALLATION
UPD2 gives the user two choises of installation methods.
Page 8 of 15
At first, when you click download UPD2 executable file, you will see following dialog.
Using Samsung Installer (Recommended)
Select “Install” button shown in above dialog window to install by using Installer software. Follow
the instructions shown in the dialog window after clicking [OK] button.
* If you install UPD2 with Samsung Installer, you can use “Select Printer” application,
which can discover printer through local and network and connect selected device to UPD2
easily.
Page 9

Page 9 of 15
9
© Samsung Electronics Co., Ltd. All Rights Reserved.
Using Add a Printer Wizard Method From Devices and Printers Folder
1. Select “Extract” button to extract install files. Open Devices and Printers(*) Folder.
2. Click [Add a printer] button on the folder to install the driver using extracted files.
3. Follow the instructions that Add a Printer Wizard guides you.
(*)Folder name may differ from each OS.
UNINSTALLATION
How To Uninstall UPD2 With Samsung Uninstaller
If you installed UPD2 using Installer, you can uninstall UPD2 by Samsung Printer Software
Uninstaller.
1. Select Uninstall Samsung Printer Software from Start > All Programs > Samsung
Printers
2. Launch the Uninstall Samsung Printer Software window.
Read the instructions, then click [Next] button to continue and follow the instructions displayed
in the window.
Page 10

Page 10 of 15
10
© Samsung Electronics Co., Ltd. All Rights Reserved.
How To Uninstall UPD2 From Devices and Printers Folder
If you installed UPD2 using Add Printer Wizard, you can uninstall UPD2 as following steps.
1. Select Start > Control Panel > Devices and Printers
2. Right click your UPD2 printer icon > context menus > Remove device.
3. Select Print server properties > Drivers tab.
4. Select UPD2 driver item and select [Remove…] button.
5. Select Remove driver and driver package option and click [OK].
If removing driver package fails, please restart your PC and try it again.
Page 11

Page 11 of 15
11
© Samsung Electronics Co., Ltd. All Rights Reserved.
USING “Samsung Universal Print Driver 2”
When user wants to search and set their own printer in their local or network environment, UPD2
gives the user various methods.
How To Select Your Printer Automatically
Under SNMP connection supported environment, the following procedure leads the user to search and set
your local or network printer automatically.
1. Launch a software(Select Printer) by selecting “Select Printer” application.
Start > Samsung Printers > Samsung Universal Print Driver 2 (PDL Name)
2. Click [Add] button to start searching printers in your network automatically.
a. If you previously specified the printer during installation, printer is listed, otherwise
no printer is listed.
3. While searching the printers, Add Device window will be displayed.
After searching, select the printer you want to add to the list (multiple selection is
available), then click [Add] button.
Page 12

Page 12 of 15
12
© Samsung Electronics Co., Ltd. All Rights Reserved.
4. After “Select Printer” dialog window (shown in 2 above) is displayed and select the model
you want to add, then click [OK] button.
5. If the selected printer is supported device, operation successful message dialog will be shown
and the UPD2’s configuration will be applied to the UI. Check your UPD2’s printer properties.
How To Select Your Printer Manually
If user’s network environment can’t use SNMP communication because of internal network policy or
some reasons, user can select the printer manually using the following methods.
Before you select manually…
Set a “port” using the following steps. It is a required procedure before selecting printer manually.
1. Select Start > Control Panel > Devices and Printers.
2. Right click your UPD2 printer icon > context menus > Printer Properties.
3. Open “Ports” tab and click [Add Port…] button.
4. Select Port types that you want to add.
5. Click [New Port…] button and then follow the instructions.
Page 13

Page 13 of 15
13
© Samsung Electronics Co., Ltd. All Rights Reserved.
Use of [Printer Model] features in Device Options of Printer Properties
(1) Select Manually By Using [Select printer when changing port]
When this feature is checked, UPD2 will automatically access the port that previously set (or
changed) and detect the printer. If UPD2 supports the detected printer, [Printer Model]
will automatically changed to the connected printer and dynamically UI will be displayed as
expected.
In the case the connected port is invalid, warning message will be displayed, in this case, try
[Printer Model] selection described in the followings.
With this feature unchecked in UI, UPD2 will not detect the connected printer automatically
even if port is set (or changed).
(2) Select Manually By Selection of [Printer Model]
User can select the printer from the list of [Printer Model](drop down list box).
After selecting the model user preferred, settings are automatically applied to the driver.
(3) [Check Now] button
When the users press this button, UPD2 immediately checks the printer which is currently
connected to the port and automatically apply the setting to the driver.
(4) Using [Add Printer]
After you set the printers by manually (or even automatically), to make easier access to the
printer that is already selected in [Printer Model] list, users can create a static printer
which is currently selected printer in [Printer Model] to your [Devices and Printers]
folder by clicking this [Add Printer] button.
The driver will be created in the following format:
<Printer Name> (Port Name)
e.g.)
Settings:
Port: 10.88.100.100
Printer Model : Samsung CLX-9252 9352 Series
Click [Add Printer] button, then following new printer will be created.
“Samsung CLX-9252 9352 Series (10.88.100.100)”
Page 14
Page 14 of 15
14
© Samsung Electronics Co., Ltd. All Rights Reserved.
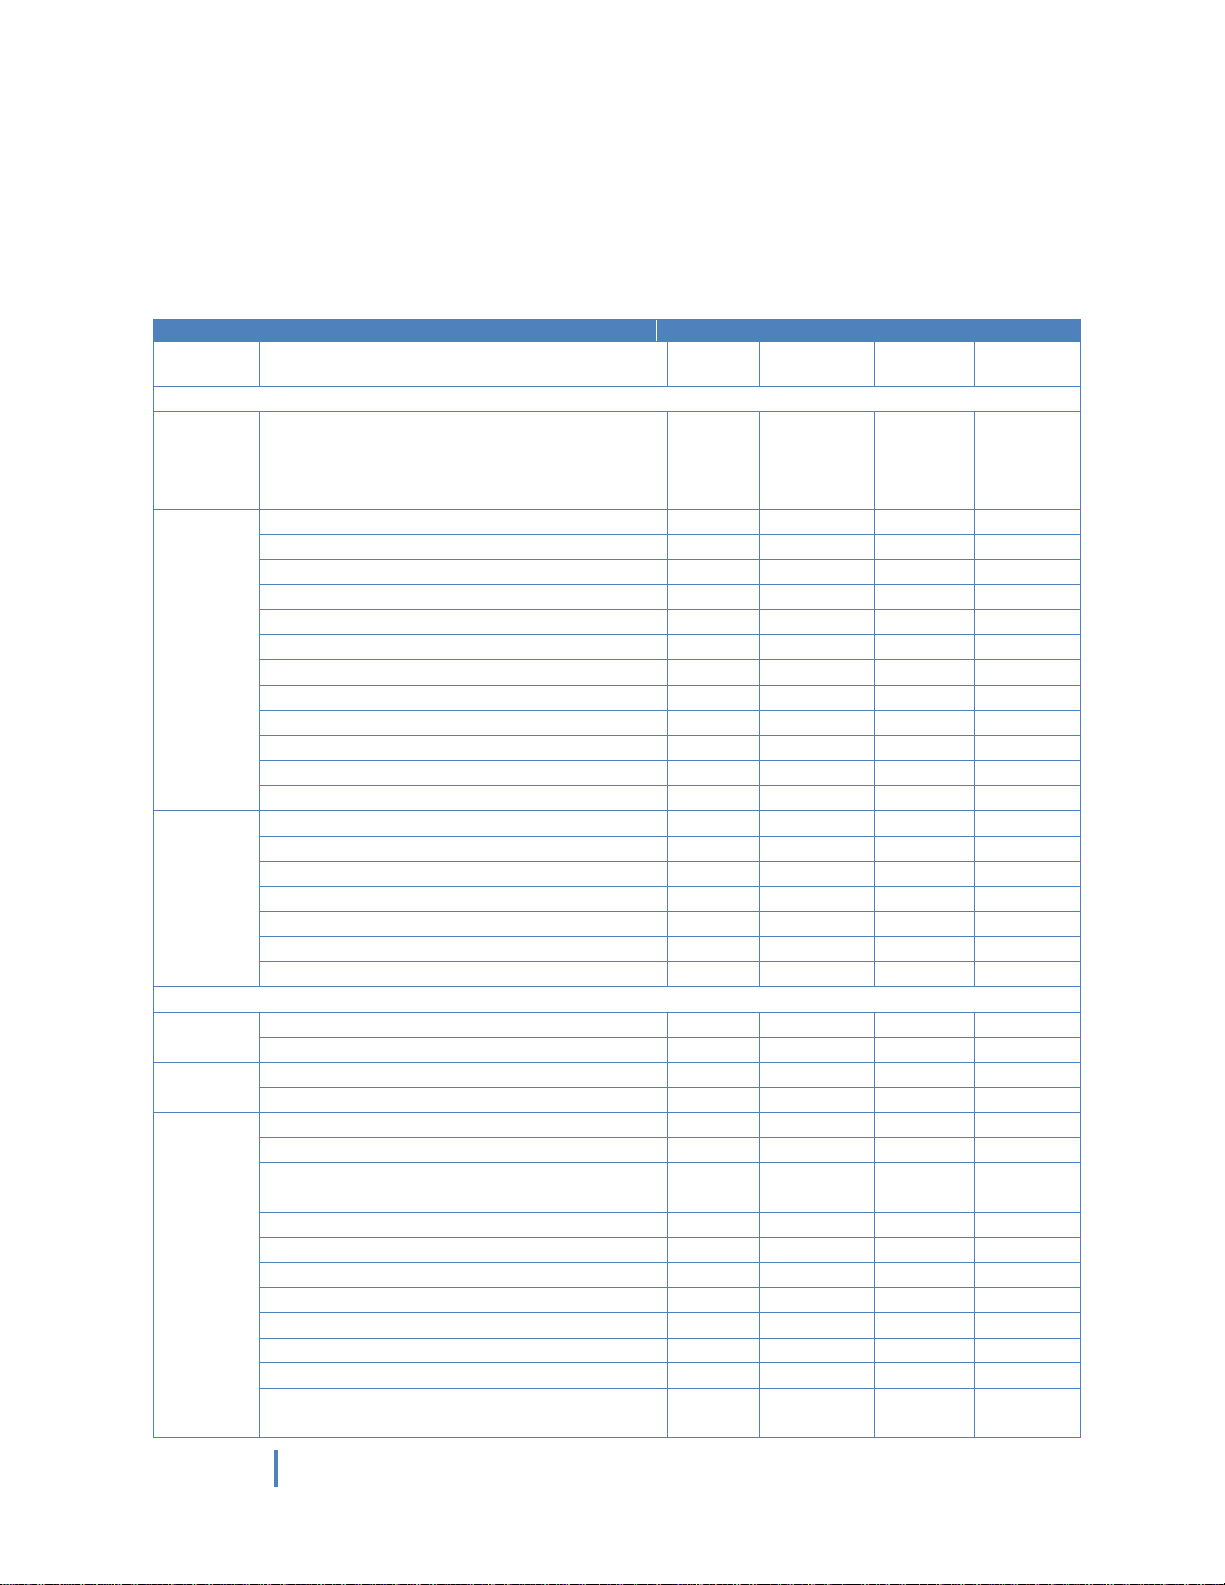
Device(Model)
Driver
Series
Model Number
UPD2
UPD2
PCL6
UPD2 PS
UPD2
XPS
Color Models
CF-
5100P
530 Series
555P
5800P/6800
O X X
X
CLP-
300/310/320 Series
O X X
X
350 Series
O O O
O
360 Series
O X X
O
410 Series
O O O
O
500/510 Series
O X X
X
550 Series
O O O
X
600 Series
O X X
X
610/620 Series
O O X
X
650/660/670 Series
O O O
X
680 Series
O O O
O
770 Series
O O O
X
775 Series
O O O
O
CLX-
216x/3160/3170/3180 Series
O O X
X
3300/4190/6260 Series
O O O
O
6200/6220/6240/6250 Series
O O O
X
8380/8385X/8540/8540X Series
O O O
X
8640 8650 Series
O O O
O
9250 9350 Series
O O O
X
9252 9352/92x1 93x1/981x/982x Series
O O O
O
Monochrome Models
M
262x 282x/267x 287x Series
O O X
O
332x 382x 402x/337x 387x 407x Series
O O O
O
MFP-
560/65x/750 Series
O X X
X
830 Series
O O X
X
ML-
1000/1200/1430/1440 Series
O X X
X
1450 Series
O O X
X
1510_700/1520/1610/1630/1630W/
1660/1670/1710/1740 Series
O X X
X
1750 Series
O O X
X
1860/1865W/191x 252x/200/2010 Series
O X X
X
2150 Series
O O O
X
2160 Series
O X X
O
2240/2245 Series
O X X
X
2250 Series
O O O
X
2510/2525W/2540 Series
O X X
X
2550/2550S/2570/2580/2850/2853/2855
Series
O O O
X
SUPPORTED PRINTERS
The list below is based on the UPD2 Ver.2.50.00.00.
Newer devices(models) will be added accordingly. Visit http://www.samsung.com/printer for the latest
supported printers.
Page 15

Page 15 of 15
15
© Samsung Electronics Co., Ltd. All Rights Reserved.
2950 Series
O O X
O
3050 Series
O O O
X
3300 Series
O X X
X
331x Series
O X X
O
3470/3475/3560 Series
O O O
X
371x/375x Series
O O O
O
4050/4055 Series
O O O
X
4300/4500/5080 Series
O X X
X
451x 501x Series
O O O
O
4550/4555 Series
O O O
X
551x 651x Series
O O X
O
6040/6070/6080 Series
O O O
X
8850 8950/8x00 Series
O O O X Msys
5150_5200
O X X
X
SCX-
3200 Series
O X X
X
3400 Series
O X X
O
4100/4200 Series
O X X
X
4214F O X X X
4300/4500/4500W/4600/4623/4623FW
Series
O X X
X
4650 4x21S Series
O X X
O
470x/472x Series
O O X
X
4725 Series
O O O
X
483x 5x3x Series
O O O
O
4x16 Series
O X X
X
4x20 Series
O O O
X
4x24/4x25/4x26 Series
O O X
X
4x28/5635/5835_5953/5835_5935X Series
O O O
X
5x15 Series
O O X
X
5x30 Series
O O O
X
6545/6545X/6x55/6x55X/681x Series
O O O
X
6x20/6x22/6x45 Series
O O O
X
8030 8040 Series
O O O
X
8123 8128/8230 8240/881x/882x Series
O O O
O
SF-
5100P
530 Series
555P
5800P/6800P
O X X
X
760 Series
O X X
O
 Loading...