

Samsung SLC430, SLC430W Users Manual
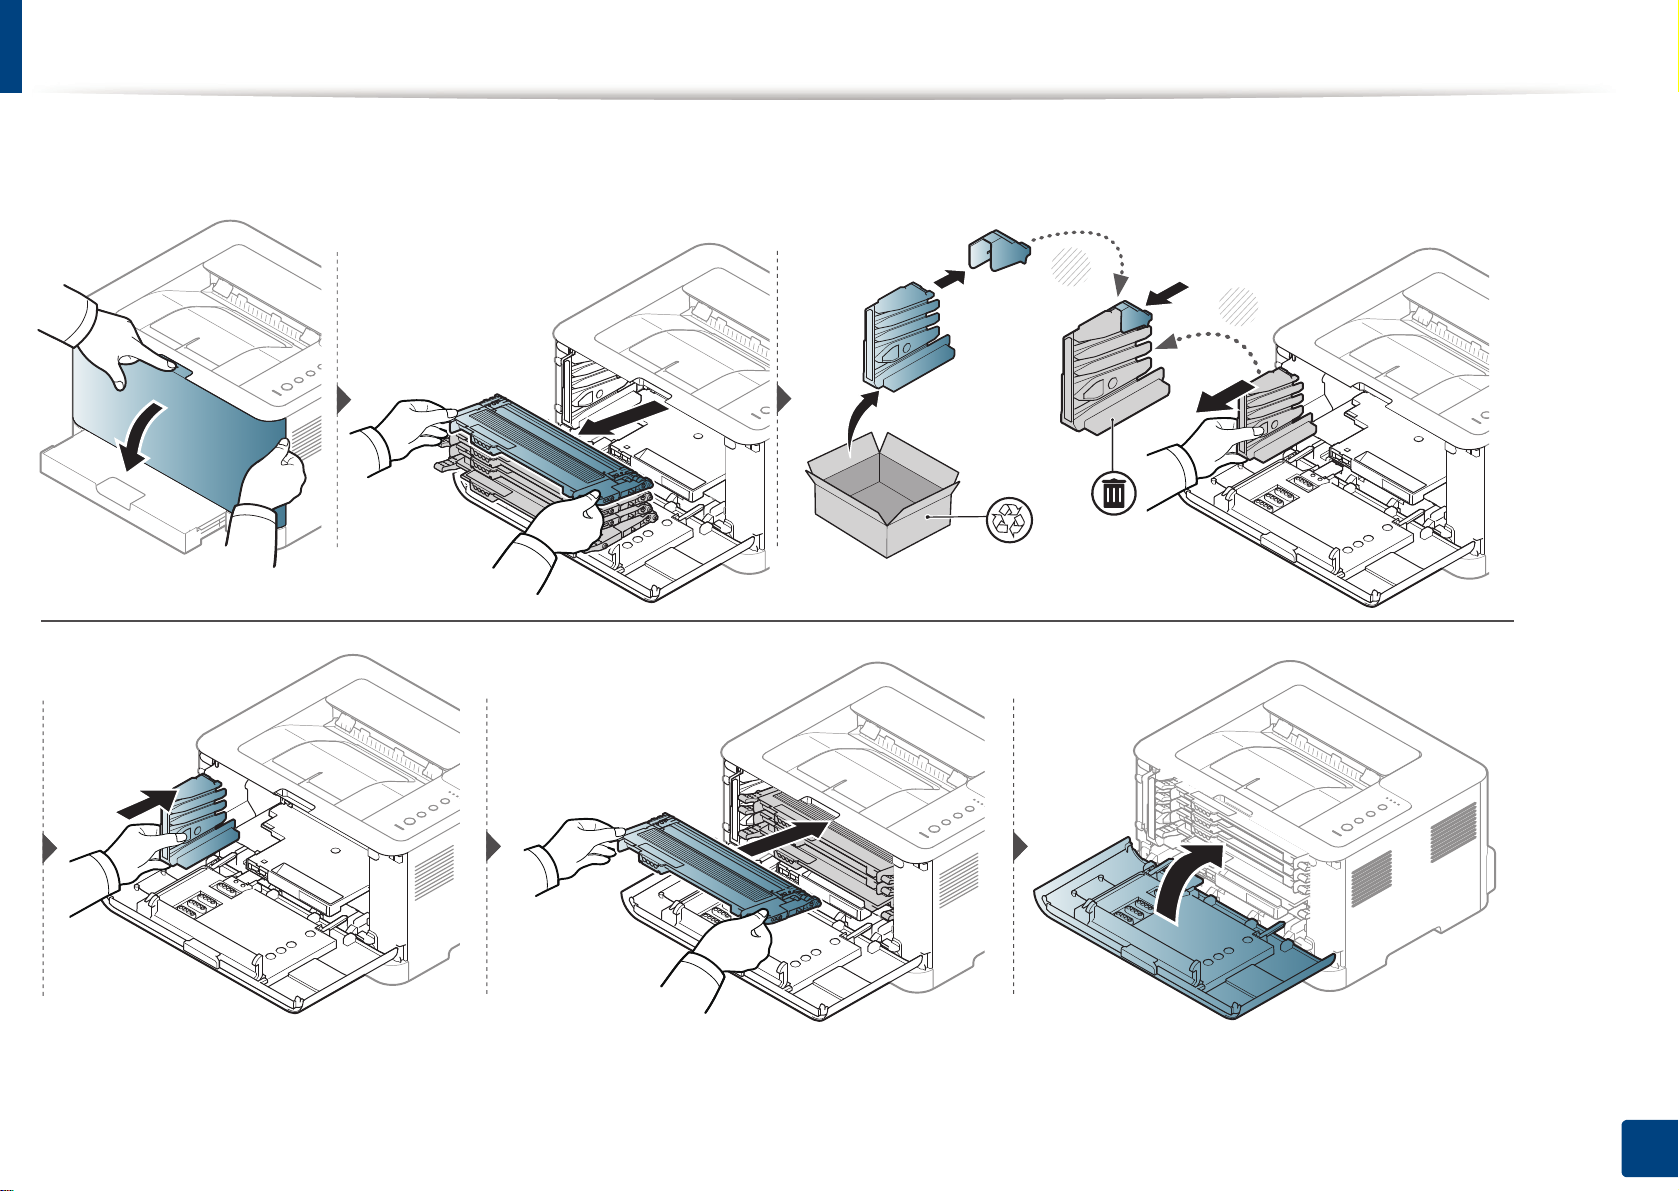
Replacing the waste toner container
2
1
The order information is provided for optional accessories (see "Available supplies" on page 42).
3. Maintenance
51

Replacing the imaging unit
When the life span of the imaging unit has expired, the Smart Panel program window appears on the computer, indicating the imaging unit needs to be placed.
Otherwise, your machine stops printing.
• Don’t use sharp objects such as a knife or scissors to open the imaging unit package. You could damage the surface of the imaging unit.
• Be careful not to scratch the surface of the imaging unit.
• To prevent damage, do not expose the imaging unit to light for more than a few minutes. Cover it with a piece of paper to protect it if necessary.
• Before closing the front cover, make sure all toner cartridges are installed properly.
3. Maintenance
52
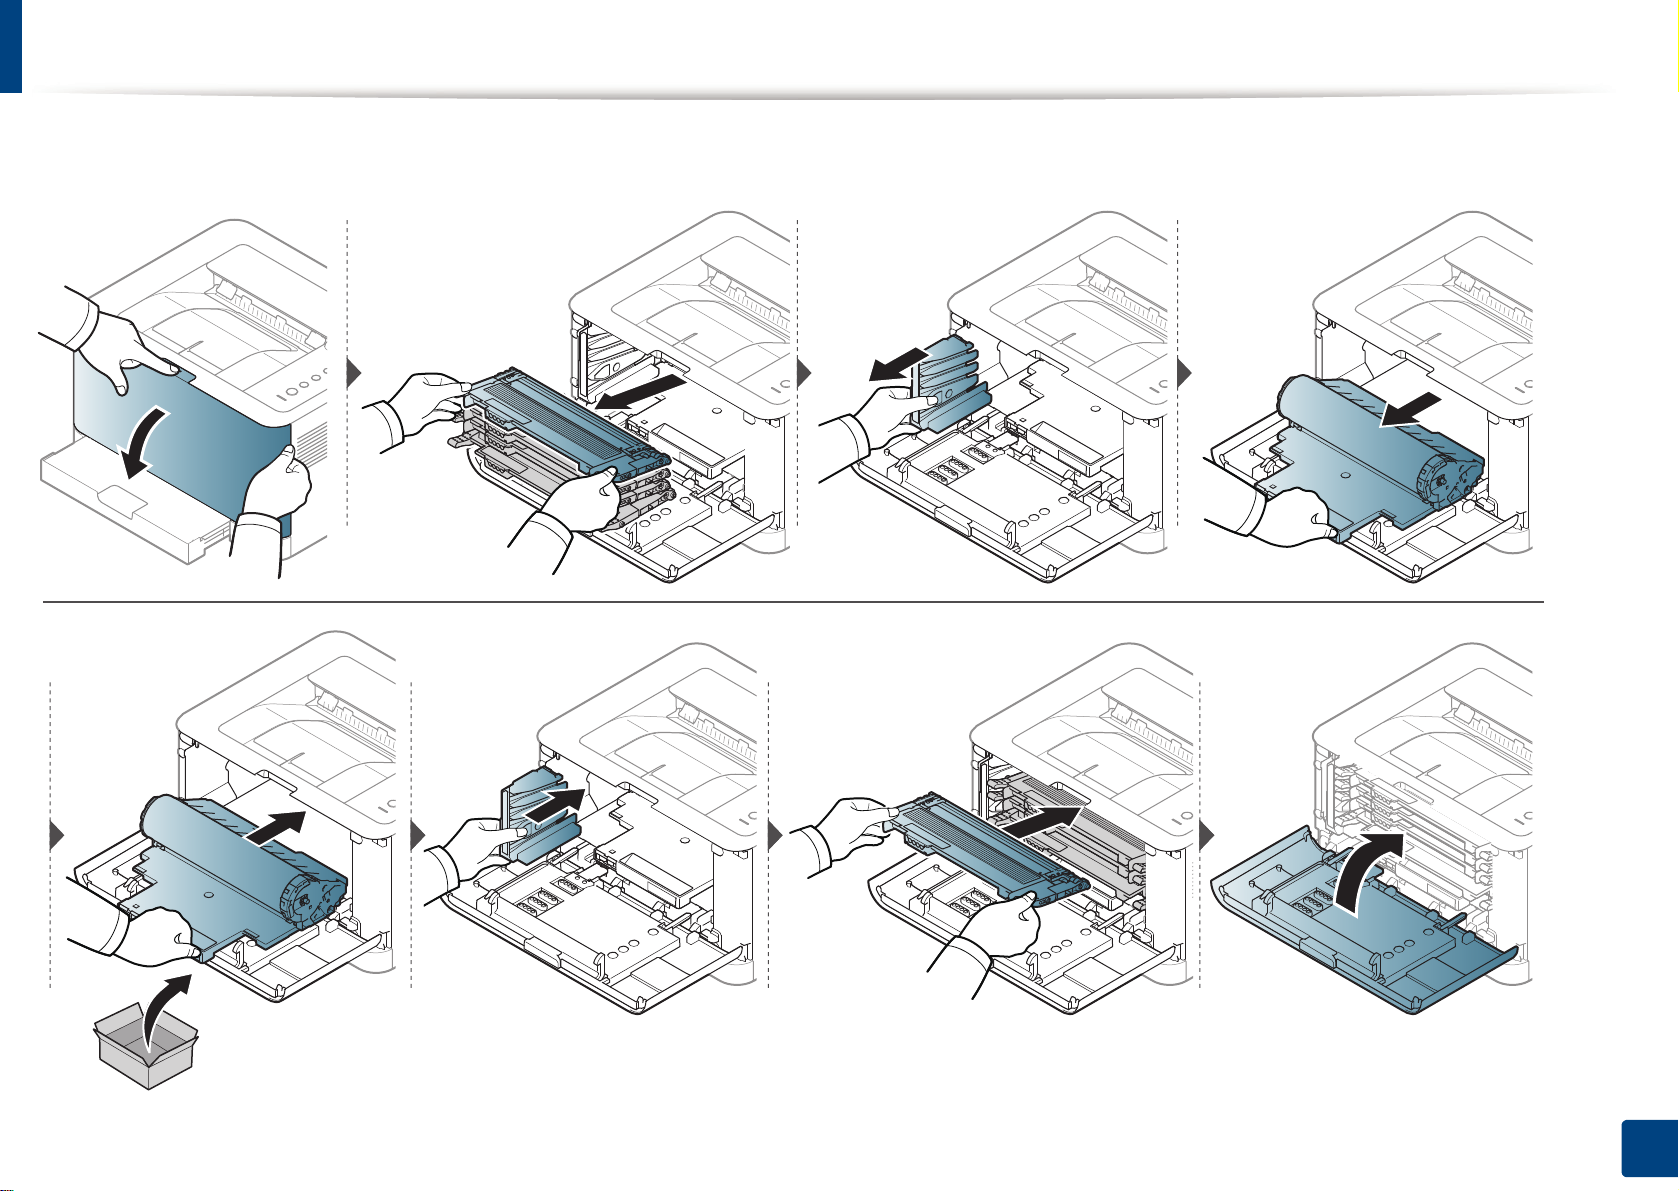
Replacing the imaging unit
3. Maintenance
53

Cleaning the machine
If printing quality problems occur or if you use your machine in a dusty environment, you need to clean your machine regularly to keep it in the best printing
condition and use your machine longer.
• Cleaning the cabinet of the machine with cleaning materials containing large amounts of alcohol, solvents, or other strong substances can discolor or distort the
cabinet.
• If your machine or the surrounding area is contaminated with toner, we recommend you use a cloth or tissue dampened with water to clean it. If you use a vacuum
cleaner, toner blows in the air and might be harmful to you.
• During the printing process, paper, toner, and dust particles can accumulate inside the machine. This buildup can cause print quality problems, such as toner
specks or smearing. Cleaning the inside of the machine clears and reduces these problems.
4
Cleaning the outside
Clean the machine cabinet with a soft, lint-free cloth. Dampen the cloth slightly with water, but be careful not to let any water drip onto or into the machine.
5
Cleaning the inside
During the printing process, paper, toner, and dust particles can accumulate inside the machine. This buildup can cause print quality problems, such as toner specks
or smearing. Cleaning the inside of the machine clears and reduces these problems.
3. Maintenance
54
Cleaning the machine
2
1
• Use a dry lint-free cloth to clean the machine.
• If your machine has a power switch, turn the power switch off before cleaning the machine.
• Before opening the top cover, close the output support first.
1
2
3. Maintenance
55

Tips for moving & storing your machine
• When moving the machine, do not tilt or turn it upside down. Otherwise, the inside of the machine may be contaminated by toner, which can cause damage to
the machine or reduce print quality.
• When moving the machine, make sure at least two people are holding the machine securely.
3. Maintenance
56
4. Troubleshooting
This chapter gives helpful information for what to do if you encounter an error.
• Tips for avoiding paper jams 58
• Clearing paper jams 59
• Understanding the status LED 62
This chapter gives helpful information for what to do if you encounter an error.
If your machine has a display screen, check the message on the display screen first to solve the
error. If you cannot find a solution to your problem in this chapter, refer to the
Troubleshooting chapter in the Advanced User's Guide (see "Troubleshooting" on page 172).
If you cannot find a solution in the User's Guide or the problem persists, call for service.

Tips for avoiding paper jams
By selecting the correct media types, most paper jams can be avoided. To avoid paper jams, refer to the following guidelines:
• Ensure that the adjustable guides are positioned correctly (see "Tray overview" on page 27).
• Do not overload the tray. Ensure that the paper level is below the paper capacity mark on the inside of the tray.
• Do not remove paper from the tray while your machine is printing.
• Flex, fan, and straighten paper before loading.
• Do not use creased, damp, or highly curled paper.
• Do not mix paper types in a tray.
• Use only recommended print media (see "Print media specifications" on page 68).
• Perforated or embossed paper does not separate easily. Flex the sheets back and forth to loosen them, and fan them. Feed single paper from tray if there are
multi-feeds or paper jams.
• Grain refers to the alignment of the paper fibers in a sheet of paper. Grain long paper is recommended.
• Do not use rough-edged paper.
4. Troubleshooting
58
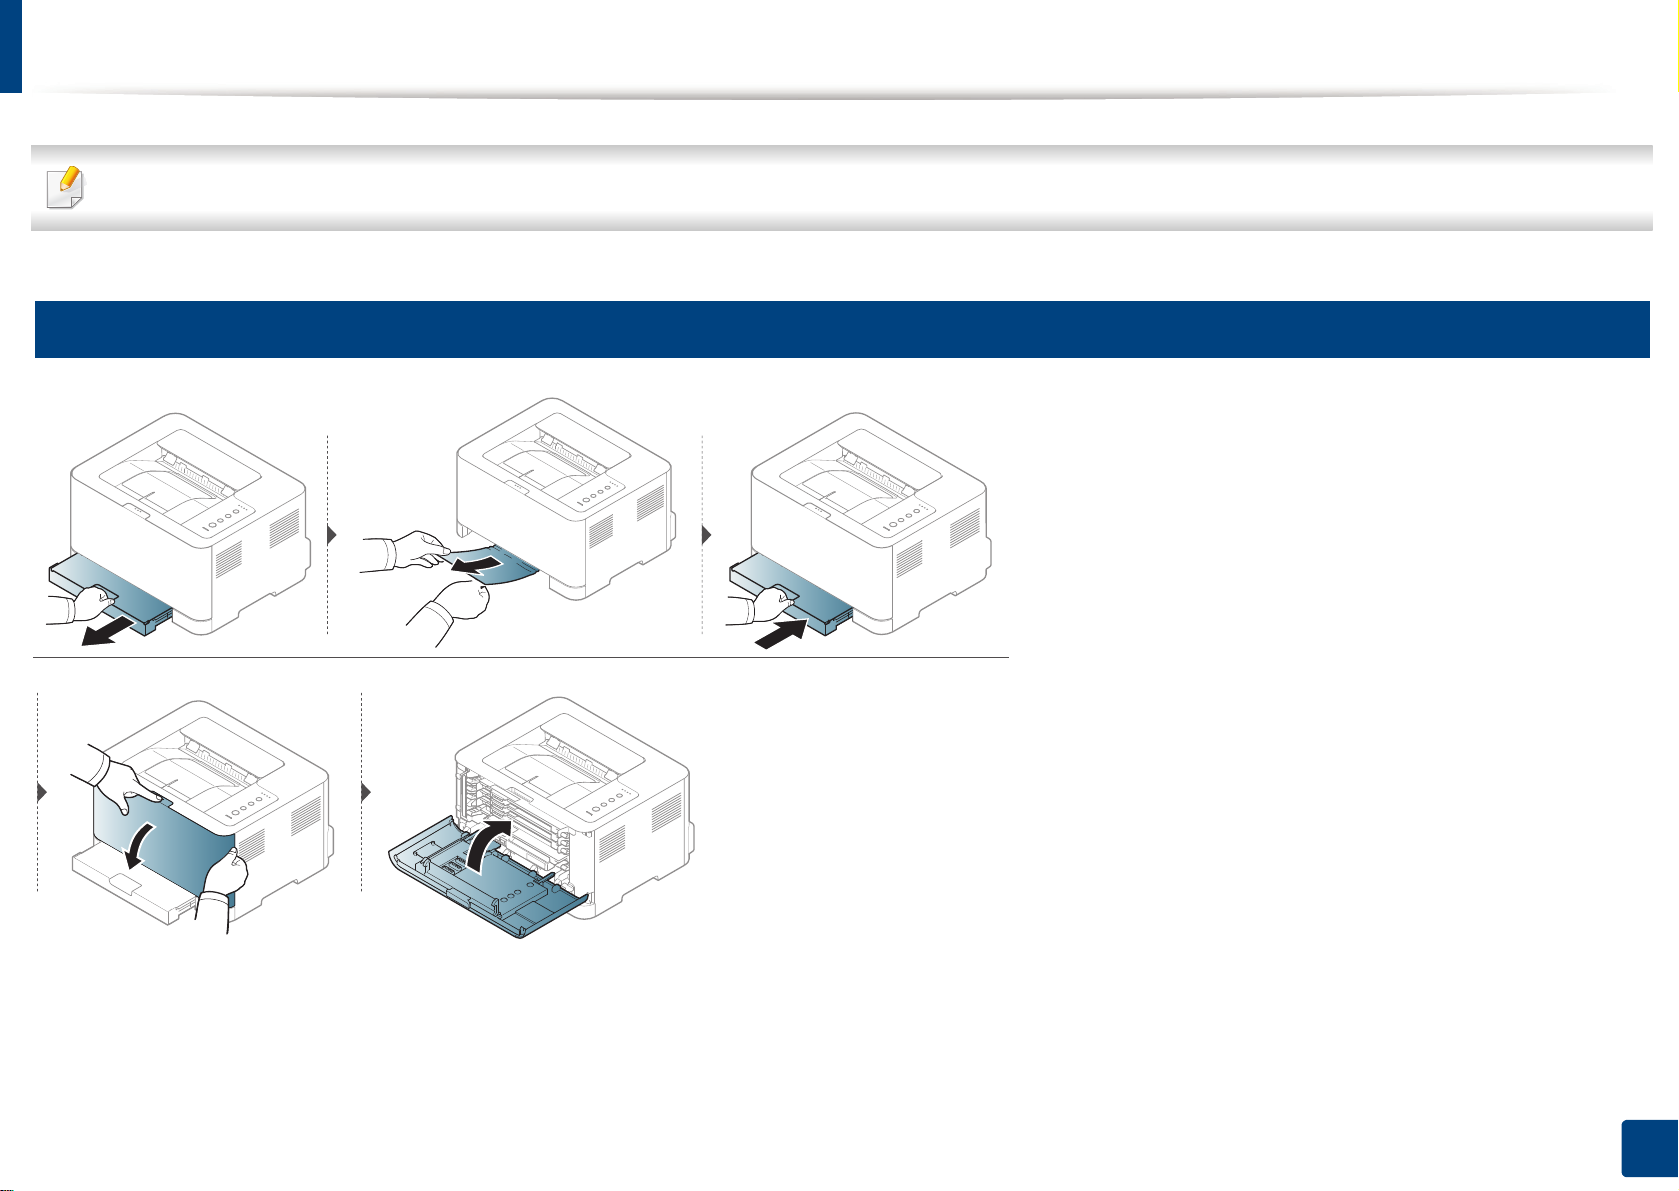
Clearing paper jams
To avoid tearing the paper, pull the jammed paper out slowly and gently.
1
In tray
4. Troubleshooting
59
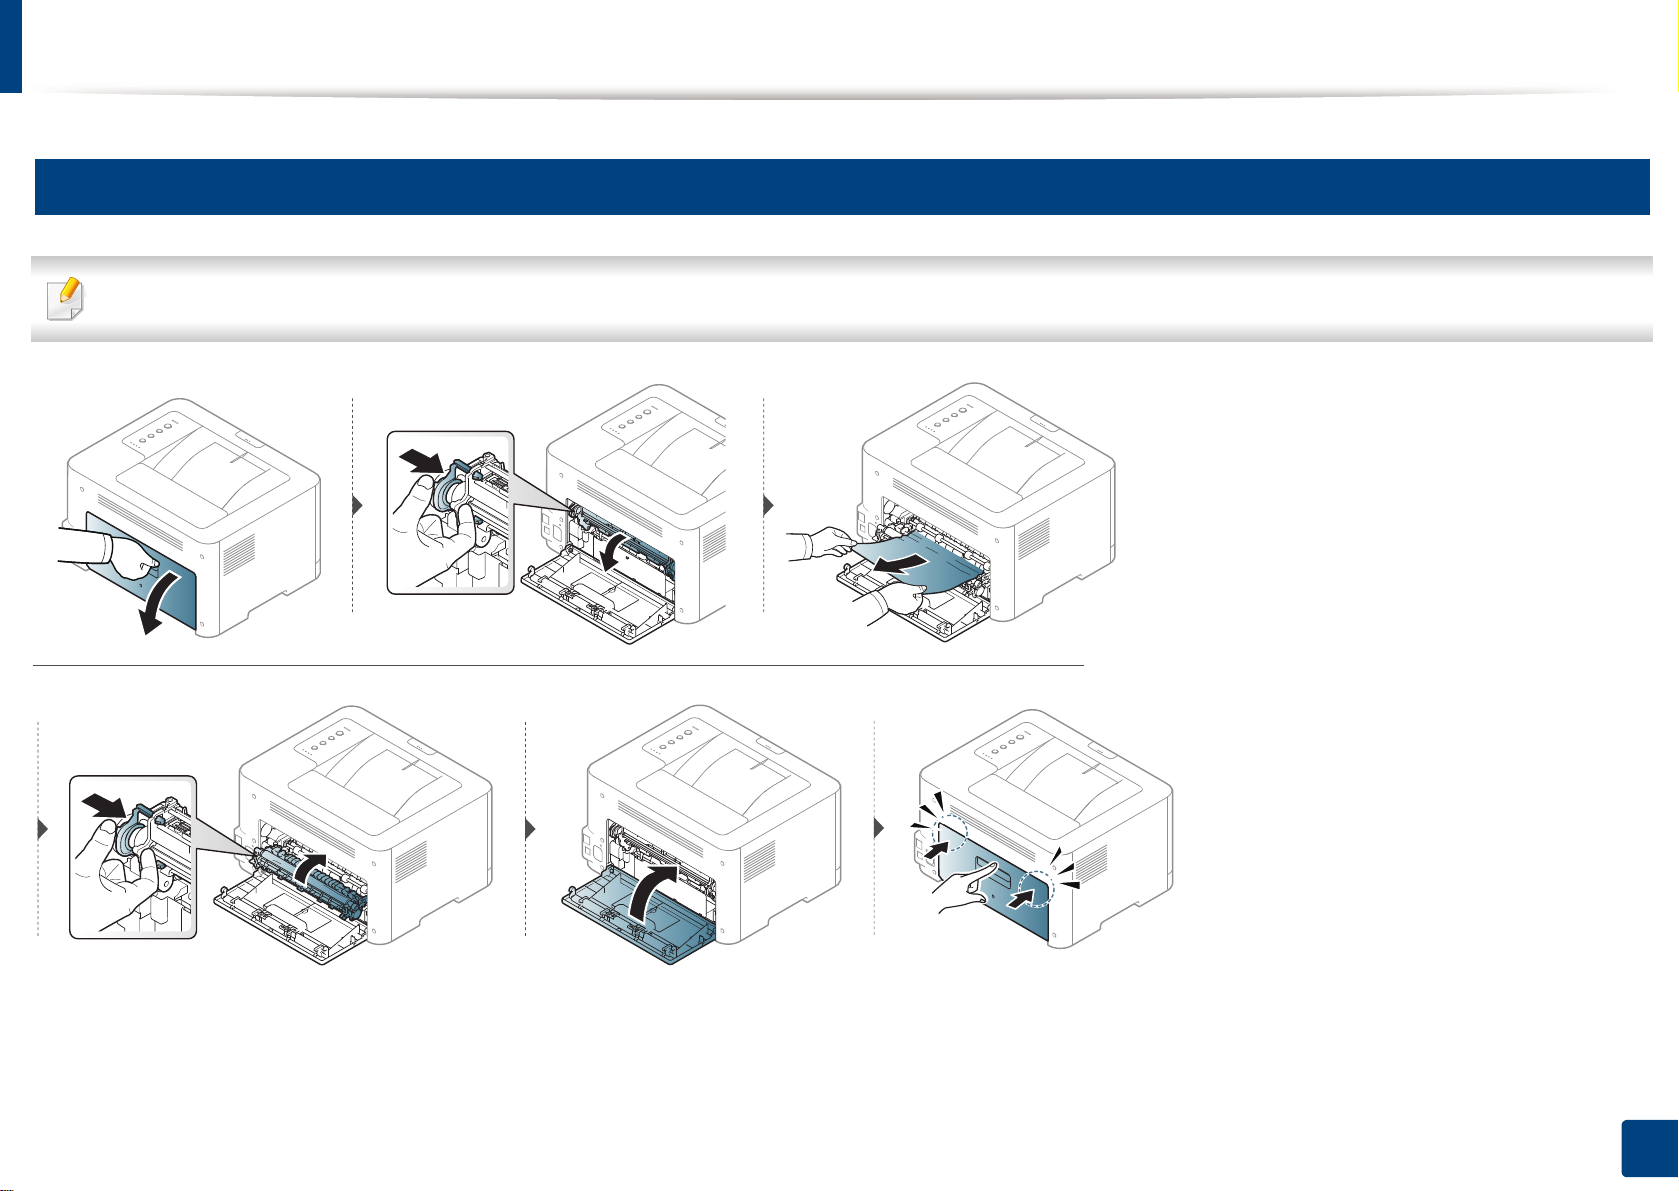
Clearing paper jams
2
Inside the machine
The fuser area is hot. Take care when removing paper from the machine.
4. Troubleshooting
60
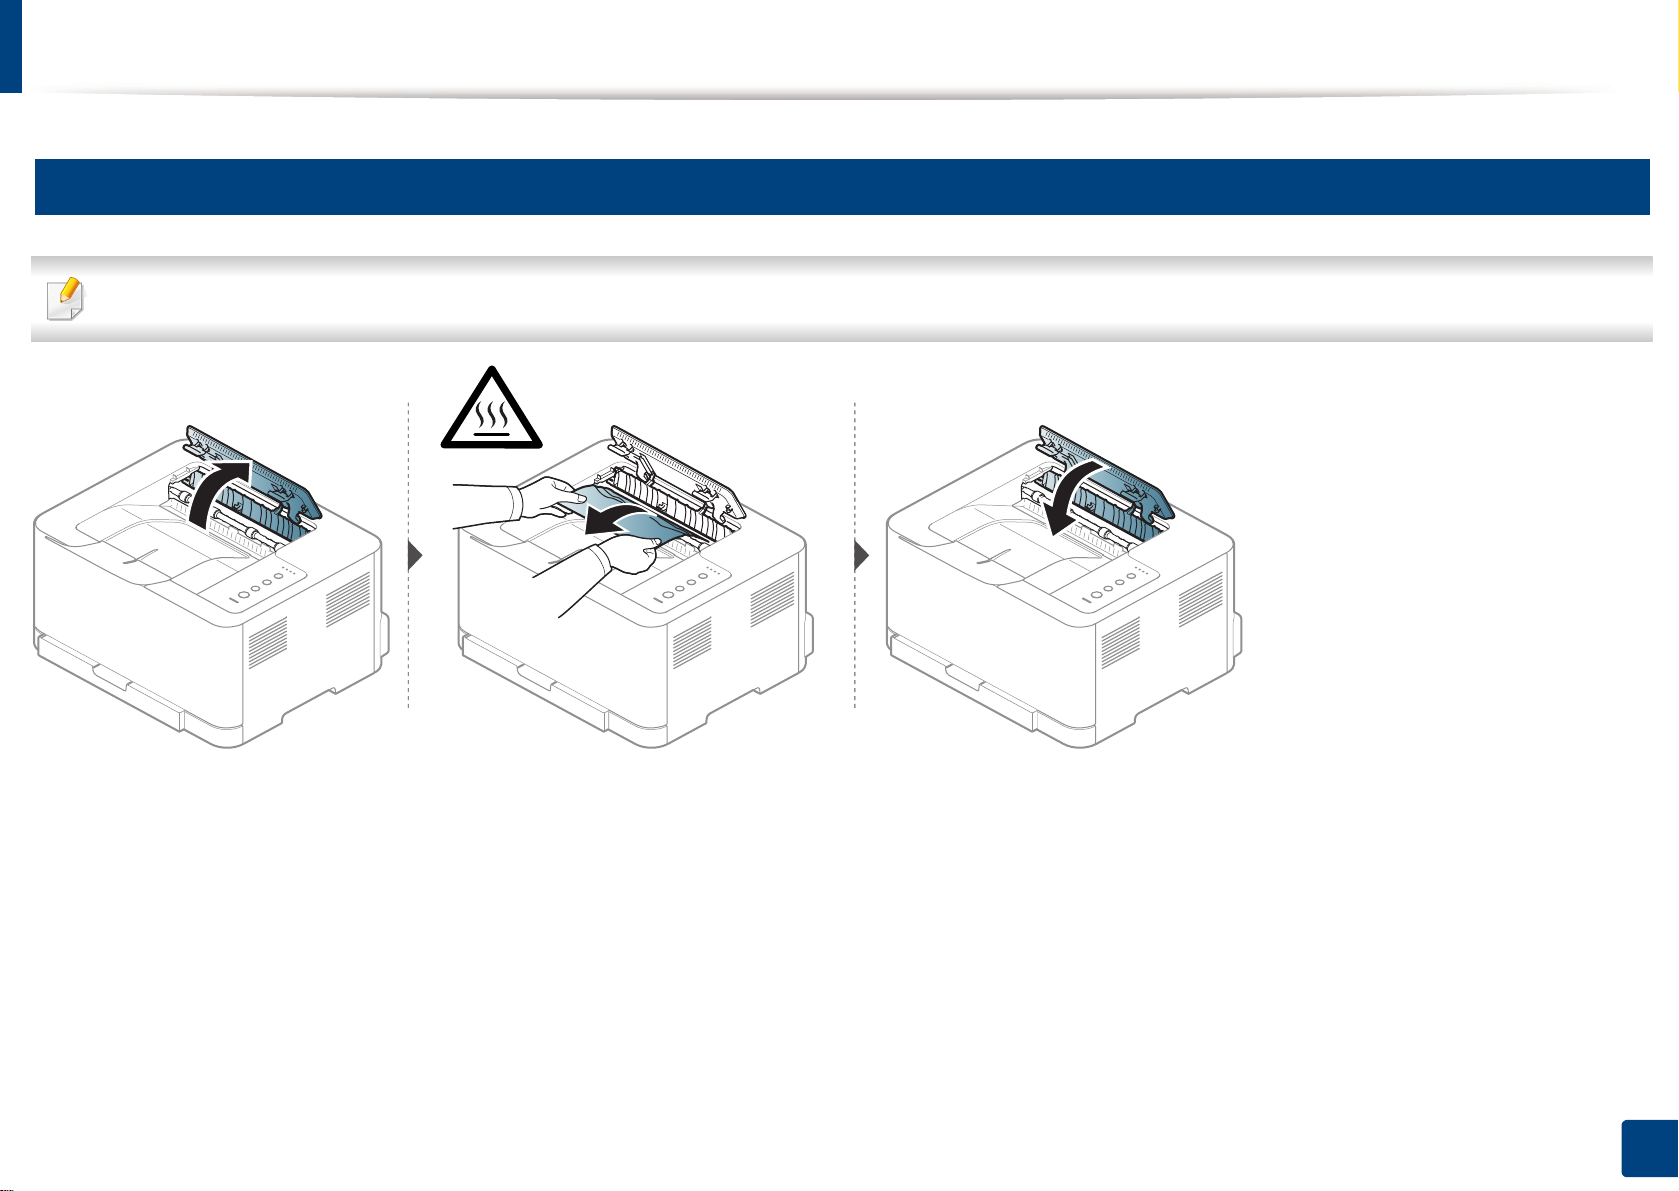
Clearing paper jams
3
In exit area
The fuser area is hot. Take care when removing paper from the machine.
4. Troubleshooting
61

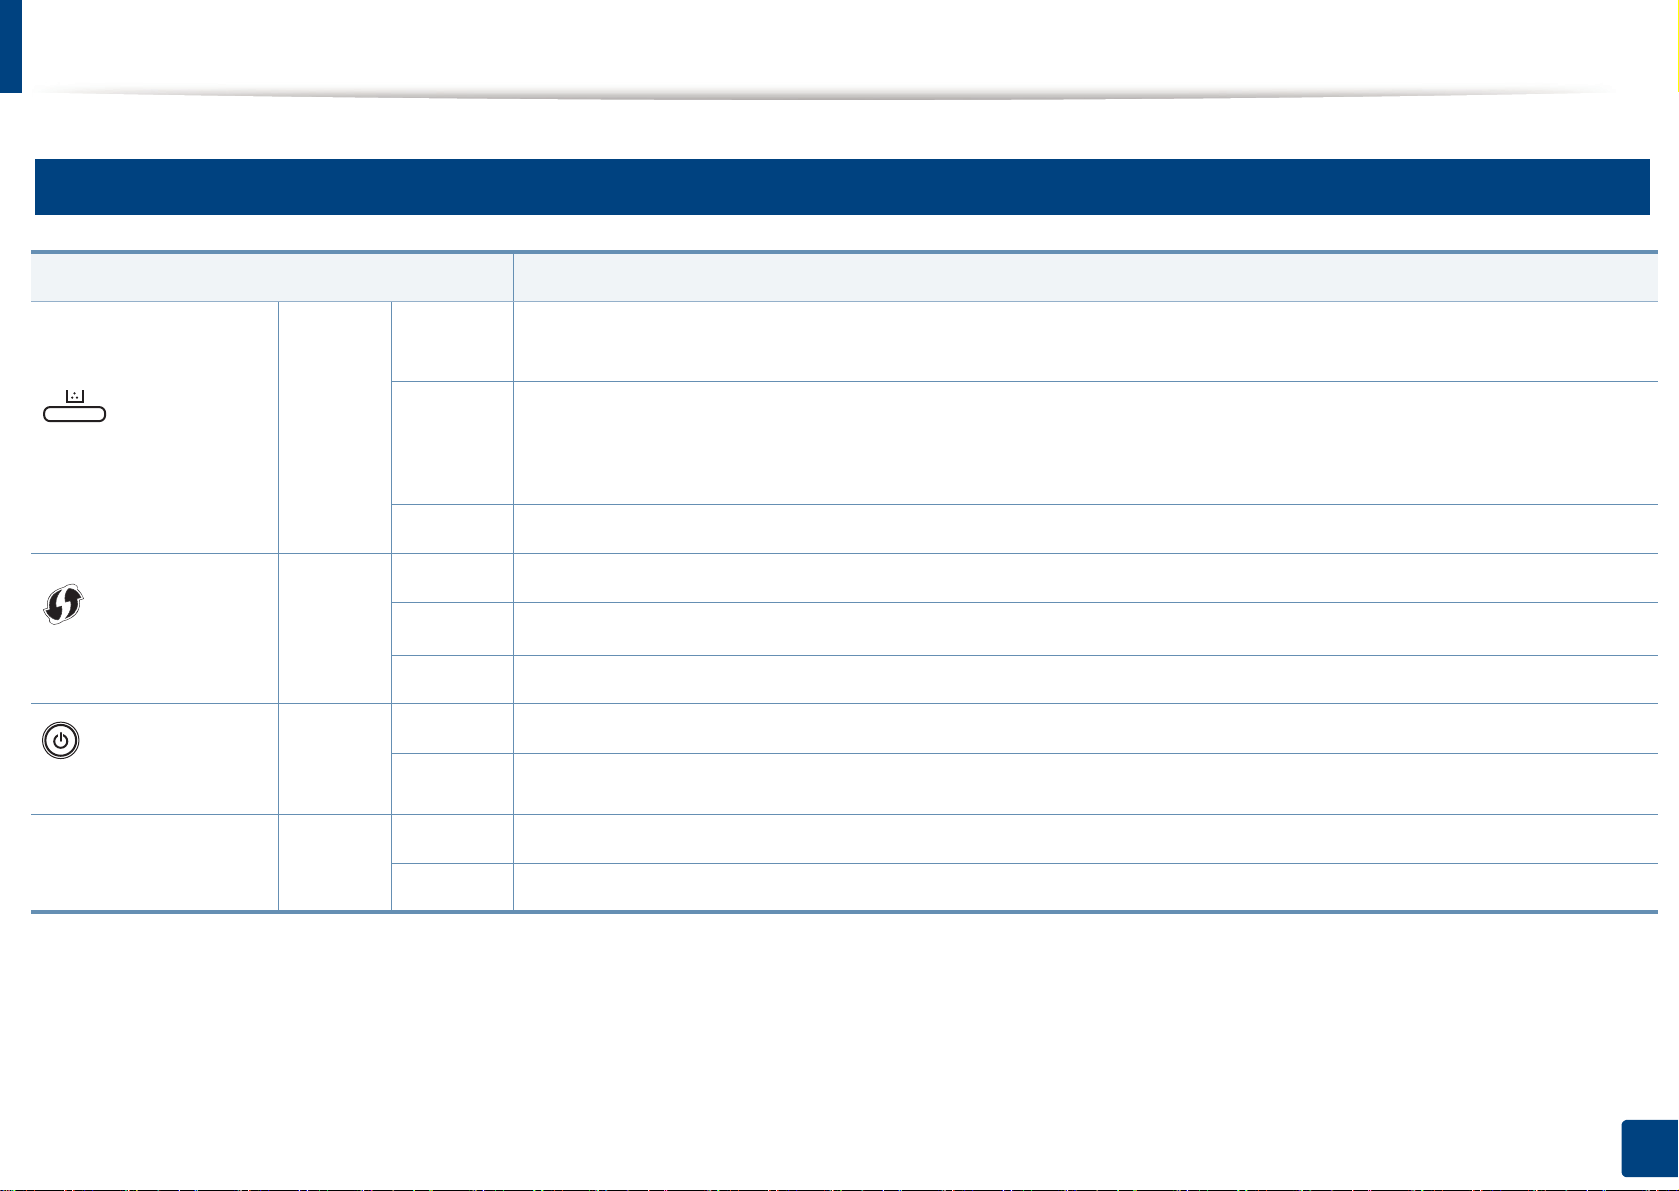
Understanding the status LED
The color of the LED indicates the machine's current status.
• Some LEDs may not be available depending on model or country (see "Control panel overview" on page 20).
• To resolve the error, look at the error message and its instructions from the troubleshooting part (see "Troubleshooting" on page 172).
• You also can resolve the error with the guideline from the computer’s Samsung Printing Status program window (see "Using Samsung Printer Status" on page
164).
• If the problem persists, call a service representative.
4. Troubleshooting
62
Understanding the status LED
4
Status LED
The color of the status LED indicates the machine's current status.
Status Description
(
Status LED
)
Off
Blue
Orange
• The machine is off-line.
• The machine is in power saver mode. When data is received, or any button is pressed, it switches to on-line automatically.
On The machine is on-line and can be used.
Blinking
• When the status LED slowly blinks, the machine is receiving data from the computer.
• When the status LED blinks rapidly, the machine is printing data.
• The toner cartridge lifea is totally empty. Remove the old toner cartridge and install a new one.
• A paper jam has occurred (see "Clearing paper jams" on page 59).
• The door is open. Close the door.
On
• There is no paper in the tray. Load paper in the tray (see "Loading paper in the tray" on page 28).
• The machine has stopped due to a major error.
• The waste toner container is not installed in the machine, or the waste toner container is full (see "Replacing the waste toner
container" on page 50).
• An imaging unit has almost reached its estimated cartridge life. It is recommended to replace the imaging unit.
• A minor error has occurred and the machine is waiting for the error to be cleared. When the problem is cleared, the machine
resumes its original task.
Blinking
• Small amount of toner is left in the cartridge. The estimated cartridge life of toner is close. Prepare a new cartridge for
replacement. You may temporarily increase the printing quality by redistributing the toner (see "Redistributing toner" on page
b
46).
a. Estimated cartridge life means the expected or estimated toner cartridge life, which indicates the average capacity of print-outs and is designed pursuant to ISO/IEC 19798. The number of pages
may be affected by operating environment, printing interval, media type, and media size. Some amount of toner may remain in the cartridge even when the orange LED is on and the printer stops
printing.
b. Some LEDs may not be available depending on model or country(see "Control panel overview" on page 20).
4. Troubleshooting
63
Understanding the status LED
5
Toner / WPS / Power / Eco LED
Status Description
Orange
(Toner LED)
Blue
(WPS LED)
(Power/Wake Up LED)
Eco Blue
b
Blue
Blinking
On
Off
Blinking
On
Off
On
Off
On
Off
Small amount of toner is left in the cartridge. The estimated cartridge life of toner is close. Prepare a new cartridge for replacement.
You may temporarily increase the printing quality by redistributing the toner (see "Redistributing toner" on page 46).
• A toner cartridge has almost reached its estimated cartridge lifea. It is recommended to replace the toner cartridge (see "Replacing
the toner cartridge" on page 48).
• The toner cartridge is not installed or the wrong toner cartridge is installed (see "Replacing the toner cartridge" on page 48).
All toner cartridges are at normal capacity.
The machine is connecting to a wireless network.
The machine is connected to a wireless network (see "Using the WPS Settings menu" on page 108).
The machine is disconnected from a wireless network.
The machine is in power save mode.
The machine is in ready mode or the machine’s power is off.
Eco mode is on (see "Eco printing" on page 38).
Eco mode is off.
a. Estimated cartridge life means the expected or estimated toner cartridge life, which indicates the average capacity of print-outs and is designed pursuant to ISO/IEC 19798. The number of pages may be affected by
operating environment, printing interval, graphics, media type and media size. Some amount of toner may remain in the cartridge even when orange LED is on and the printer stops printing.
b. Wireless model only (see "Features by model" on page 6).
4. Troubleshooting
64

5. Appendix
This chapter provides product specifications and information concerning applicable regulations.
•Specifications 66
• Regulatory information 74
•Copyright 85
 Loading...