

Samsung SKK-8K Installation Guide
Left Right
Left Right
Case A Case B
Small Cap Big Cap
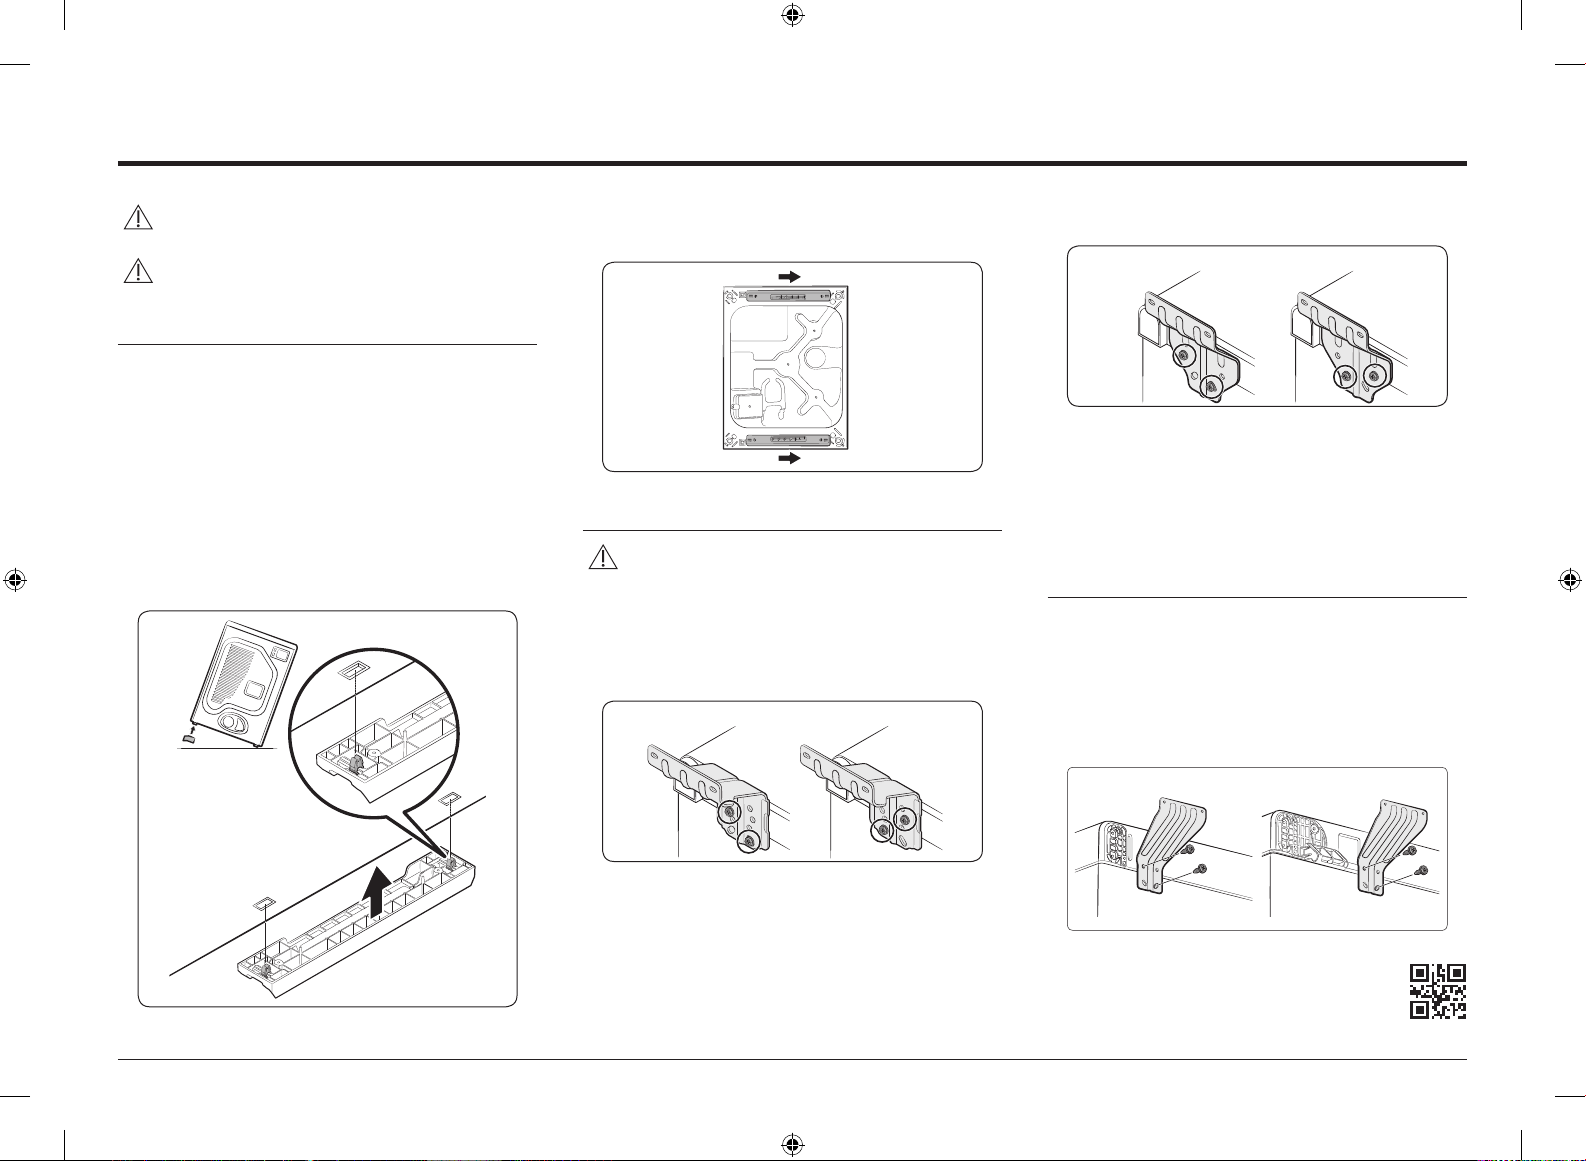
STACKING KIT INSTALLATION INSTRUCTIONS (WASHER & DRYER ONLY)
CAUTION : Two people are required to lift the dryer on to
the washer.
WARNING : These washer and dryer are not suitable for
mobile home or RV installation.
Dryer
STEP 1 Have two persons place the dryer on a non-slippery
floor. Then, have one person tilt the dryer to the side.
Do not lay the dryer down. The dryer may be scratched.
STEP 2-1 SKK-7*, SKK-8*: Check if the legs are tightened up,
and then insert the stacking support guides in the
rectangular holes of the dryer’s base until you hear a
clicking sound. You don’t need to remove the legs.
STEP 2-2 SKK-BB: Disassemble legs, and Snap the stacking
support guides into the rectangular holes in the dryer
base and secure each with two(2) screws Phillips-pan
head (6006-001174)
STEP 3 Repeat the same step above on the other side.
STEP 4 Bottom view of the dryer after assembling the Stacking
Support Guides to the dryer base.
* Use a stacking-kit compatible with the purchased model.
Washer (Stacking kit: SKK-7*, SKK-8*, for 27” models)
CAUTION : You need to use the proper rear bracket
depending on your washer model. (There are 2 different
rear brackets : DC61-04160A, DC61-04955A)
5-1) DC61-04160A :
WF5*K**, WF4*H**, WF4*K**, WF4*M**, WF4*N**,
WF18H**, WF20H**, WF20M**, WF22H**, WF22K**,
WF15K**, WF16J65**
5-2) DC61-04955A :
WF5*R**, WF4*R**
DO NOT TIGHTEN SCREWS COMPLETELY
STEP 5-2 LOOSELY assemble the Rear Brackets (DC61-04955A)
to the washer as shown below. Use two (2) Screws-Hex
Head (6002-001431) with washers (DC60-00044A) in
each washing machine Top Cover tail, per bracket.
* Before installing the rear bracket, loosen two screws
(Screw-Hex) on the Cover Top that is secured to the frame.
Washer (Stacking kit: SKK-BB, for 30” models)
WF56H**
STEP 5-3
Loosely assemble the Rear Bracket (DC61-03846A) to
the washer as shown above in either case A or Case B,
Use (2) Screws-Hex Head (6009-001476) with washers
(DC60-00044A) to the each hole of Cover Top and Frame.
* Case A only : Before installing the rear bracket, loosen two screws
(Screw-Hex) on the Cover Top that is secured to the frame.
DO NOT TIGHTEN SCREWS COMPLETELY
STEP 5-1 LOOSELY assemble the Rear Brackets
(DC61-04160A) to the washer as shown below. Use
two (2) Screws-Hex Head (6002-001431) with washers
(DC60-00044A) in each washing machine Top Cover tail,
per bracket.
StakingKit_DC68-01052R-09_EN.indd 1 2019-03-08 2:27:50
* Before installing the rear bracket, loosen two screws
(Screw-Hex) on the Cover Top that is secured to the frame.
DC68-01052R-09

STACKING KIT INSTALLATION INSTRUCTIONS (WASHER & DRYER ONLY)
STEP 6 Lift and position dryer
into the position on the
washer shown above, slide
dryer backwards to make
contact with rear brackets.
CAUTION : To prevent noise, check the followings.
• Make sure the washer is level.
• Make sure the dryer’s leveling legs are tightened up.
(Stacking kit: SKK-7*, SKK-8*, for 27” models)
STEP 7 Align rear brackets with
mounting holes on the
rear of dryer as shown
above.
STEP 8 LOOSELY assemble rear
brackets to the back of
the dryer using two (2)
Screws- Phillips Pan Head
(6006-001174) for each
rear bracket as shown
above.
Extra screws may be
included with this kit.
STEP 9 Tighten screws on the
dryer side of the rear
bracket.
STOP
HERE
STEP 10 Tighten screws on the
washer side of the rear
bracket.
* DO NOT REVERSE THE ORDER OF
STEPS 9 & 10.
STEP 11 Stacked Unit is now ready
to be installed. Refer
to detailed installation
instructions packed with
products.
Stacking kit components
Stacking Support Guides (2)
Rear Bracket (2) (WF5*K**, WF4*H**,
WF4*K**, WF4*M**, WF4*N**, WF18H**,
WF20H**, WF20M**, WF22H**,
WF22K**, WF15K**, WF16J65**)
Rear Bracket (2) (WF5*R**, WF4*R**)
Stacking Support Guides (2)
Rear Bracket (2) (WF56H**)
Screws-Hex Head (4)
Screws Phillips-Pan Head (8) - 6006-001174
Washer (4) - DC60-00044A
Rear Bracket
(WF5*K**, WF4*H**,
WF4*K**, WF4*M**,
WF4*N**, WF18H**,
WF20H**, WF20M**,
WF22H**, WF22K**,
WF15K**, WF16J65**)
Screw-Hex Head
SKK-BB (M5, L10)
SKK-7*, SKK-8* (M5, L16)
Rear Bracket
Screw Phillips-Pan
(WF56H**)
Head
(M4, L12)
SKK-7*, SKK-8*
SKK-7*, SKK-8*
SKK-7*, SKK-8*
SKK-BB
SKK-BB
SKK-BB
SKK-7*, SKK-8*
- DC61-04159A
- DC61-04160A
- DC61-04955A
- DC61-01480B
- DC61-03846A
- 6009-001476
- 6002-001431
Rear Bracket
(WF5*R**, WF4*R**)
Washer (ID5, OD10)
WARNING : Additional gas hook-up components are
required for gas dryer.
StakingKit_DC68-01052R-09_EN.indd 2 2019-03-08 2:27:51
Stacking Support Guide
 Loading...