

Page 1

MF68-00274E
DIGITAL SATELLITE RECEIVER
DSB-A200C
GB
Instructions for use. . . . . . . . . . . . GB
Instructions for use
Istruzioni per l’uso
Istruzioni per l’uso . . . . . . . . . . . . I
I
DSB-A200C
RICEVITORE SATELLITARE DIGITALE
REV. 1.1
Page 2

Istruzioni per l’uso . . . . . . . . . . . . . . . I
DSB-A200C
Page 3

DSB-A200C
Istruzioni per l’uso
I
RICEVITORE SATELLITARE DIGITALE
Page 4

ISTRUZIONI PER LA SICUREZZA
Il presente decodificatore digitale è stato costruito in conformità agli standard internazionali sulla
sicurezza. Leggere con attenzione le misure di sicurezza consigliate di seguito.
DSB-A200C
ALIMENTAZIONE DI RETE
: AC 100-240V~, 50/60Hz
SOVRACCARICO: non sovraccaricare le prese a parete, le prolunghe o gli adattatori.
In caso di sovraccarico, sussiste il pericolo di incendio o scossa elettrica.
LIQUIDI: tenere i liquidi lontani dal decodificatore digitale.
PULIZIA: prima di eseguire la pulizia, scollegare il decodificatore digitale
dalla presa a parete.
Adoperare un panno leggermente inumidito con acqua (non utilizzare
solventi) per pulire la superficie esterna.
VENTILAZIONE: non ostruire i fori di ventilazione del decodificatore digitale.
Assicurarsi che venga mantenuto il flusso d'aria attorno al dispositivo.
Non esporre mai il decodificatore digitale alla luce solare diretta e non
posizionarlo accanto ad apparecchiature di riscaldamento, ad esempio
radiatori. Non posizionare altre apparecchiature elettriche sopra il
decodificatore digitale. Assicurare una distanza di almeno 30 mm tra il
decodificatore e la parete.
ATTACCHI: non utilizzare attacchi diversi da quelli consigliati dal produttore,
onde evitare rischi o danni all'apparecchiatura.
COLLEGAMENTO ALL'LNB DELL'ANTENNA PARABOLICA:
la tensione del cavo a connettore LNB è presente nel relativo nucleo
centrale. Pertanto, si raccomanda di scollegare il decodificatore digitale
dall'alimentazione di rete prima di collegare o scollegare questo cavo.
IN CASO CONTRARIO, L'LNB POTREBBE DANNEGGIARSI.
I
INTERVENTI DI SERVIZIO:
non tentare di eseguire interventi di servizio sul prodotto.
Qualsiasi tentativo di riparazione comporta l'annullamento della garanzia.
In caso di necessità, contattare il personale di assistenza qualificato.
LAMPI: se il decodificatore digitale è installato in un'area soggetta a
intense perturbazioni, è indispensabile predisporre dispositivi di
protezione per il connettore di rete del decodificatore digitale e
della linea telefonica del modem.
Durante i temporali è inoltre necessario seguire le istruzioni del
produttore per la salvaguardia di altre apparecchiature, ad
esempio televisore, impianto Hi-Fi, ecc., collegate al
decodificatore digitale.
MESSA A TERRA
NNoottaa : eliminare le batterie usate nei luoghi previsti dalle norme per la protezione ambientale.
: la terra del cavo LNB deve essere collegata direttamente alla terra di
sistema dell'antenna parabolica.
Il sistema di messa a terra deve essere conforme alle normative locali.
I-1
Page 5

DSB-A200C
DSB-A200C
SOMMARIO CARATTERISTICHE GENERALI
Istruzioni per la sicurezza. . . . . . . . . . . . . . . . . . . . . . . . . . . . . . . . 1
Caratteristiche generali . . . . . . . . . . . . . . . . . . . . . . . . . . . . . . . . . 3
Collegamento del STB. . . . . . . . . . . . . . . . . . . . . . . . . . . . . . . . . . . 4
Descrizione . . . . . . . . . . . . . . . . . . . . . . . . . . . . . . . . . . . . . . . . . . . 6
Pannello frontale . . . . . . . . . . . . . . . . . . . . . . . . . . . . . . . . . . . . . . . 6
Pannello posteriore . . . . . . . . . . . . . . . . . . . . . . . . . . . . . . . . . . . . . 7
Telecomando . . . . . . . . . . . . . . . . . . . . . . . . . . . . . . . . . . . . . . . . . 8
Funzioni di base . . . . . . . . . . . . . . . . . . . . . . . . . . . . . . . . . . . . . . . 10
Azionamento del ricevitore . . . . . . . . . . . . . . . . . . . . . . . . . . . . . . . 16
Menu principale. . . . . . . . . . . . . . . . . . . . . . . . . . . . . . . . . . . . . . . . 16
1. Installazione . . . . . . . . . . . . . . . . . . . . . . . . . . . . . . . . . . . . . . . 16
1.1 Impostazioni LNB. . . . . . . . . . . . . . . . . . . . . . . . . . . . . . . . 17
1.2 Impostazioni posizionatore . . . . . . . . . . . . . . . . . . . . . . . . . 17
1.2.1 Modalità utente. . . . . . . . . . . . . . . . . . . . . . . . . . . . . . . . 18
1.2.2 Modalità installatore . . . . . . . . . . . . . . . . . . . . . . . . . . . . 18
1.3 Impostazione Solarsat . . . . . . . . . . . . . . . . . . . . . . . . . . . . 19
1.4 Auto scansione . . . . . . . . . . . . . . . . . . . . . . . . . . . . . . . . . 19
1.5 Scansione manuale . . . . . . . . . . . . . . . . . . . . . . . . . . . . . . 20
1.6 Scansione SMATV . . . . . . . . . . . . . . . . . . . . . . . . . . . . . . . 21
Azzera alle impostazioni di fabbrica
1.7
2. Organizzazione canale . . . . . . . . . . . . . . . . . . . . . . . . . . . . . . . 22
2.1 Cancella satellite . . . . . . . . . . . . . . . . . . . . . . . . . . . . . . . . 22
2.2 Cancella trasponditore . . . . . . . . . . . . . . . . . . . . . . . . . . . . 22
2.3 Cancella canale . . . . . . . . . . . . . . . . . . . . . . . . . . . . . . . . . 22
2.4 Cancella tutti i canali . . . . . . . . . . . . . . . . . . . . . . . . . . . . . 23
2.5 Cancella canali criptati . . . . . . . . . . . . . . . . . . . . . . . . . . . . 23
2.6 Canali preferiti . . . . . . . . . . . . . . . . . . . . . . . . . . . . . . . . . . 23
2.7 Spostamento e modifica dei canali . . . . . . . . . . . . . . . . . . . 24
3. Chiave elettronica . . . . . . . . . . . . . . . . . . . . . . . . . . . . . . . . . . 25
3.1 Imposta blocco canale . . . . . . . . . . . . . . . . . . . . . . . . . . . . 25
3.2 Modifica codice PIN . . . . . . . . . . . . . . . . . . . . . . . . . . . . . . 26
4. Impostazioni di sistema . . . . . . . . . . . . . . . . . . . . . . . . . . . . . . 26
4.1 Selezione lingua . . . . . . . . . . . . . . . . . . . . . . . . . . . . . . . . . 26
4.2 Impostazioni OSD . . . . . . . . . . . . . . . . . . . . . . . . . . . . . . . 27
4.3 Impostazioni media . . . . . . . . . . . . . . . . . . . . . . . . . . . . . . 28
4.4 Modem Settings. . . . . . . . . . . . . . . . . . . . . . . . . . . . . . . . . 29
4.5 Impostazioni ora e timer . . . . . . . . . . . . . . . . . . . . . . . . . . . 29
4.6 Informazioni di sistema. . . . . . . . . . . . . . . . . . . . . . . . . . . . 30
4.7 Aggiornamento software. . . . . . . . . . . . . . . . . . . . . . . . . . . 30
4.8 Copia dati canale . . . . . . . . . . . . . . . . . . . . . . . . . . . . . . . . 31
5. Interfaccia comune . . . . . . . . . . . . . . . . . . . . . . . . . . . . . . . . . 31
Risoluzione dei problemi. . . . . . . . . . . . . . . . . . . . . . . . . . . . . . . . . 32
Smaltimento . . . . . . . . . . . . . . . . . . . . . . . . . . . . . . . . . . . . . . . . . . 32
Caratteristiche tecniche . . . . . . . . . . . . . . . . . . . . . . . . . . . . . . . . . 33
. . . . . . . . . . . . . . . . . . . . 21
1. SEZIONE UTENTE
4000 CANALI PROGRAMMABILI
SCARICAMENTO SOFTWARE TRAMITE SATELLITE E PC
GUIDA ELETTRONICA AVANZATA AI PROGRAMMI
SUPPORTO MULTILINGUE PER L'OSD
SUPPORTO MULTILINGUE PER SOTTOTITOLI E TELETEXT (OSD E VBI)
DiSEqC 1.2 SUPPORTATO
TELECOMANDO A INFRAROSSI A FUNZIONALITÀ COMPLETA
DISPLAY LED A 7 SEGMENTI
FUNZIONE DI RICERCA AUTOMATICA E MANUALE
ORGANIZZAZIONE DEI CANALI (PROGRAMMABILE)
USCITE SCART ED RCA
BASSO CONSUMO ENERGETICO
9 ELENCHI DI CANALI PREFERITI
EPG AD AGGIORNAMENTO AUTOMATICO
PASS LOOP PER SEGNALE RGB
15 TIMER PER IMPOSTARE L'ACCENSIONE/LO SPEGNIMENTO
DI PROGRAMMI (EVENTI)
2. SEZIONE SINTONIZZATORE
SINTONIZZATORE A BANDA LARGA 950~2150 MHz
USCITA FI CON PASS LOOP CC PER RICEVITORE ANALOGICO
SUPPORTO DELLA VERSIONE DiSEqC 1.2
COMMUTAZIONE 13V/18V
CONTROLLO DEL TONO CONTINUO A 22KHz
3. SEZIONE VIDEO
COMPATIBILE DVB-S
VIDEO MPEG-2 (MP@ML)
NOTAZIONE VELOCITÀ 2~45 MS/s
COMPATIBILE PER SCPC ED MCPC
SUPPORTO DEL FORMATO 4:3 (NORMALE) E 16:9
(SCHERMO LARGO)
USCITA MODULATORE
4. SEZIONE AUDIO
LIVELLO AUDIO MPEG 1 I & II
MODALITÀ AUDIO MONO, DUALE, STEREO E JOINT STEREO
FREQUENZE DI CAMPIONAMENTO A 32, 44.1 E 48 kHz
REGOLAZIONE VOLUME E FUNZIONE DI DISATTIVAZIONE AUDIO
TRAMITE TELECOMANDO
USCITA AUDIO DIGITALE SPDIF
USCITA DOLBY DIGITAL A FLUSSO DI BIT CODIFICATA (OTTICA)
I
I-2
RICEVITORE SATELLITARE DIGITALE
I-3
Page 6

DSB-A200C
DSB-A200C
COLLEGAMENTO DEL “STB”
COLLEGAMENTO DEL “STB”
1. POSIZIONE DEL RICEVITORE
Il STB deve essere posizionato in un luogo in cui è assicurata una ventilazione
sufficiente.
Non posizionare il ricevitore in un vano completamente chiuso in cui è impedito il
flusso d'aria, in quanto potrebbe surriscaldarsi.
Evitare l'esposizione del dispositivo alla luce solare diretta e all'eccessiva umidità,
maneggiarlo con cautela e proteggerlo dagli animali domestici.
Non posizionare altri componenti elettronici sul ricevitore.
La posizione deve essere accessibile senza difficoltà per il cavo dell'antenna.
2. COLLEGAMENTO DEL RICEVITORE ALL'ANTENNA PARABOLICA
Dopo aver installato l'antenna, collegare il cavo coassiale dall'LNB dell'antenna al
terminale contrassegnato "DISH INPUT" sul retro del STB.
Tutti i connettori dei cavi devono essere serrati a mano; non utilizzare alcun tipo di
chiave. Il cavo deve essere coassiale, intrecciato all'estremità con impedenza di 75ohm
e connettore del tipo "F".
3. COLLEGAMENTO DEL RICEVITORE AL TELEVISORE
Il ricevitore può essere collegato al televisore in quattro modi;
Tramite il cavo SCART, il cavo RF, il cavo RCA o il cavo Color component (Componente
colore) (Y, Pb, Pr).Color component (Y, Pb, Pr) fornisce la riproduzione più fedele dei
colori. Collegare il cavo RF al terminale contrassegnato con “RF OUT” sul pannello
posteriore dell'STB e l'altra estremità alla presa d'ingresso RF del televisore. Se il
televisore viene collegato tramite il cavo SCART, collegare il connettore SCART
contrassegnato con TV alla relativa presa SCART sul televisore.
7. COLLEGAMENTO DI UN SISTEMA AUDIO DIGITALE
Collegare un cavo a fibre ottiche tra Optical SPDIF sul ricevitore e Optical SPDIF sul sistema
audio digitale.
8. INSERIMENTO DEL MODULO CAM COMMON INTERFACE E DELLA SMARTCARD
Il STB supporta i moduli CAM Common Interface con le specifiche DVB.
I moduli CAM CI includono un lettore incorporato di smartcard.
● Inserire la smartcard nel modulo CAM delicatamente con il chip dorato rivolto verso l'alto
● Inserire delicatamente il modulo CAM nello slot in modo che venga posizionato saldamente
nel supporto.
● Per rimuovere il modulo CAM, spingere il pulsante presente al lato dello slot CAM.
Il modulo CAM verrà espulso dal supporto.
NNoottaa : sono disponibili attualmente i seguenti moduli CAM Common Interface:
IRDETO, CONAX, CRYPTOWORKS, VIACCESS, NAGRAVISION, SECA, ecc.
Figura del collegamento
I
4. COLLEGAMENTO DEL RICEVITORE ANALOGICO
Per consentire agli utenti che utilizzano ricevitori analogici di ricevere canali
analogici, il STB è stato dotato di un terminale con collegamento ad anello
contrassegnato "LOOP".
Collegare il cavo coassiale dal terminale al terminale di ingresso FI del ricevitore
analogico. Con il STB in standby, sarà possibile sintonizzare e visualizzare
i canali analogici dal ricevitore analogico.
5. COME COLLEGARE IL VCR
Per collegare un VCR o un lettore DVD, il STB viene dotato di SCART
sul retro con contrassegno "AV2". Utilizzando un connettore SCART, è possibile
collegare il VCR o il lettore DVD al ricevitore.
NNoott aa :
supportato da standby.
6. COLLEGAMENTO DEL SISTEMA ESTERNO AUDIO / HI-FI
Per consentire il collegamento di qualsiasi sistema esterno Audio Hi-Fi, il ricevitore è
stato dotato di due connettori RCA sul retro del ricevitore, contrassegnati
rispettivamente AUDIO L e R per il collegamento dell'uscita audio di destra e di sinistra.
I-4
RICEVITORE SATELLITARE DIGITALE
È possibile modificare le diverse impostazioni dei supporti nel modo desiderato.
Posizionare il cursore sul sottomenu e premere OK.
● Premere i tasti
/
per spostare le sotto voci e premere i tasti / per selezionare l'opzione
desiderata.
● Premere il tasto OK per confermare la scelta. ● Premere i tasti MENU/EXIT per uscire dal menu.
● Selezionare il sistema TV :
PAL, SECAM, NTSC, PAL ➔ (auto)NTSC, SECAM ➔ (auto)NTSC,
NTSC ➔ (auto)PAL or NTSC ➔ (auto)PAL
● Selezionare il tipo di televisore in uso: Tipo di formato STANDARD 4: 3 o SCHERMO LARGO 16 : 9.
● Selezionare la conversione del formato : Letter box, Pan & Screen, Mixed o Full.
● Selezionare il tipo di segnale video : Composito+RGB o Composito.
● Selezionare il formato dell’uscita SPDIF: Compressed o Uncompressed
(compresso o non compresso)
● Selezionare il canale RF : Ch 21~Ch 69 ● Selezionare il sistema di trasmissione : B/G, I o D/K.
NNoott aa :
Selezionando l'uscita segnale video RGB, viene disattivata l'uscita video YUV (YPbPr).
Selezionando composite + uscita segnale video YUV, viene disattivata l'uscita video
YUV (YPbPr).
I-5
Page 7
DSB-A200C
DSB-A200C
DESCRIZIONE
DESCRIZIONE
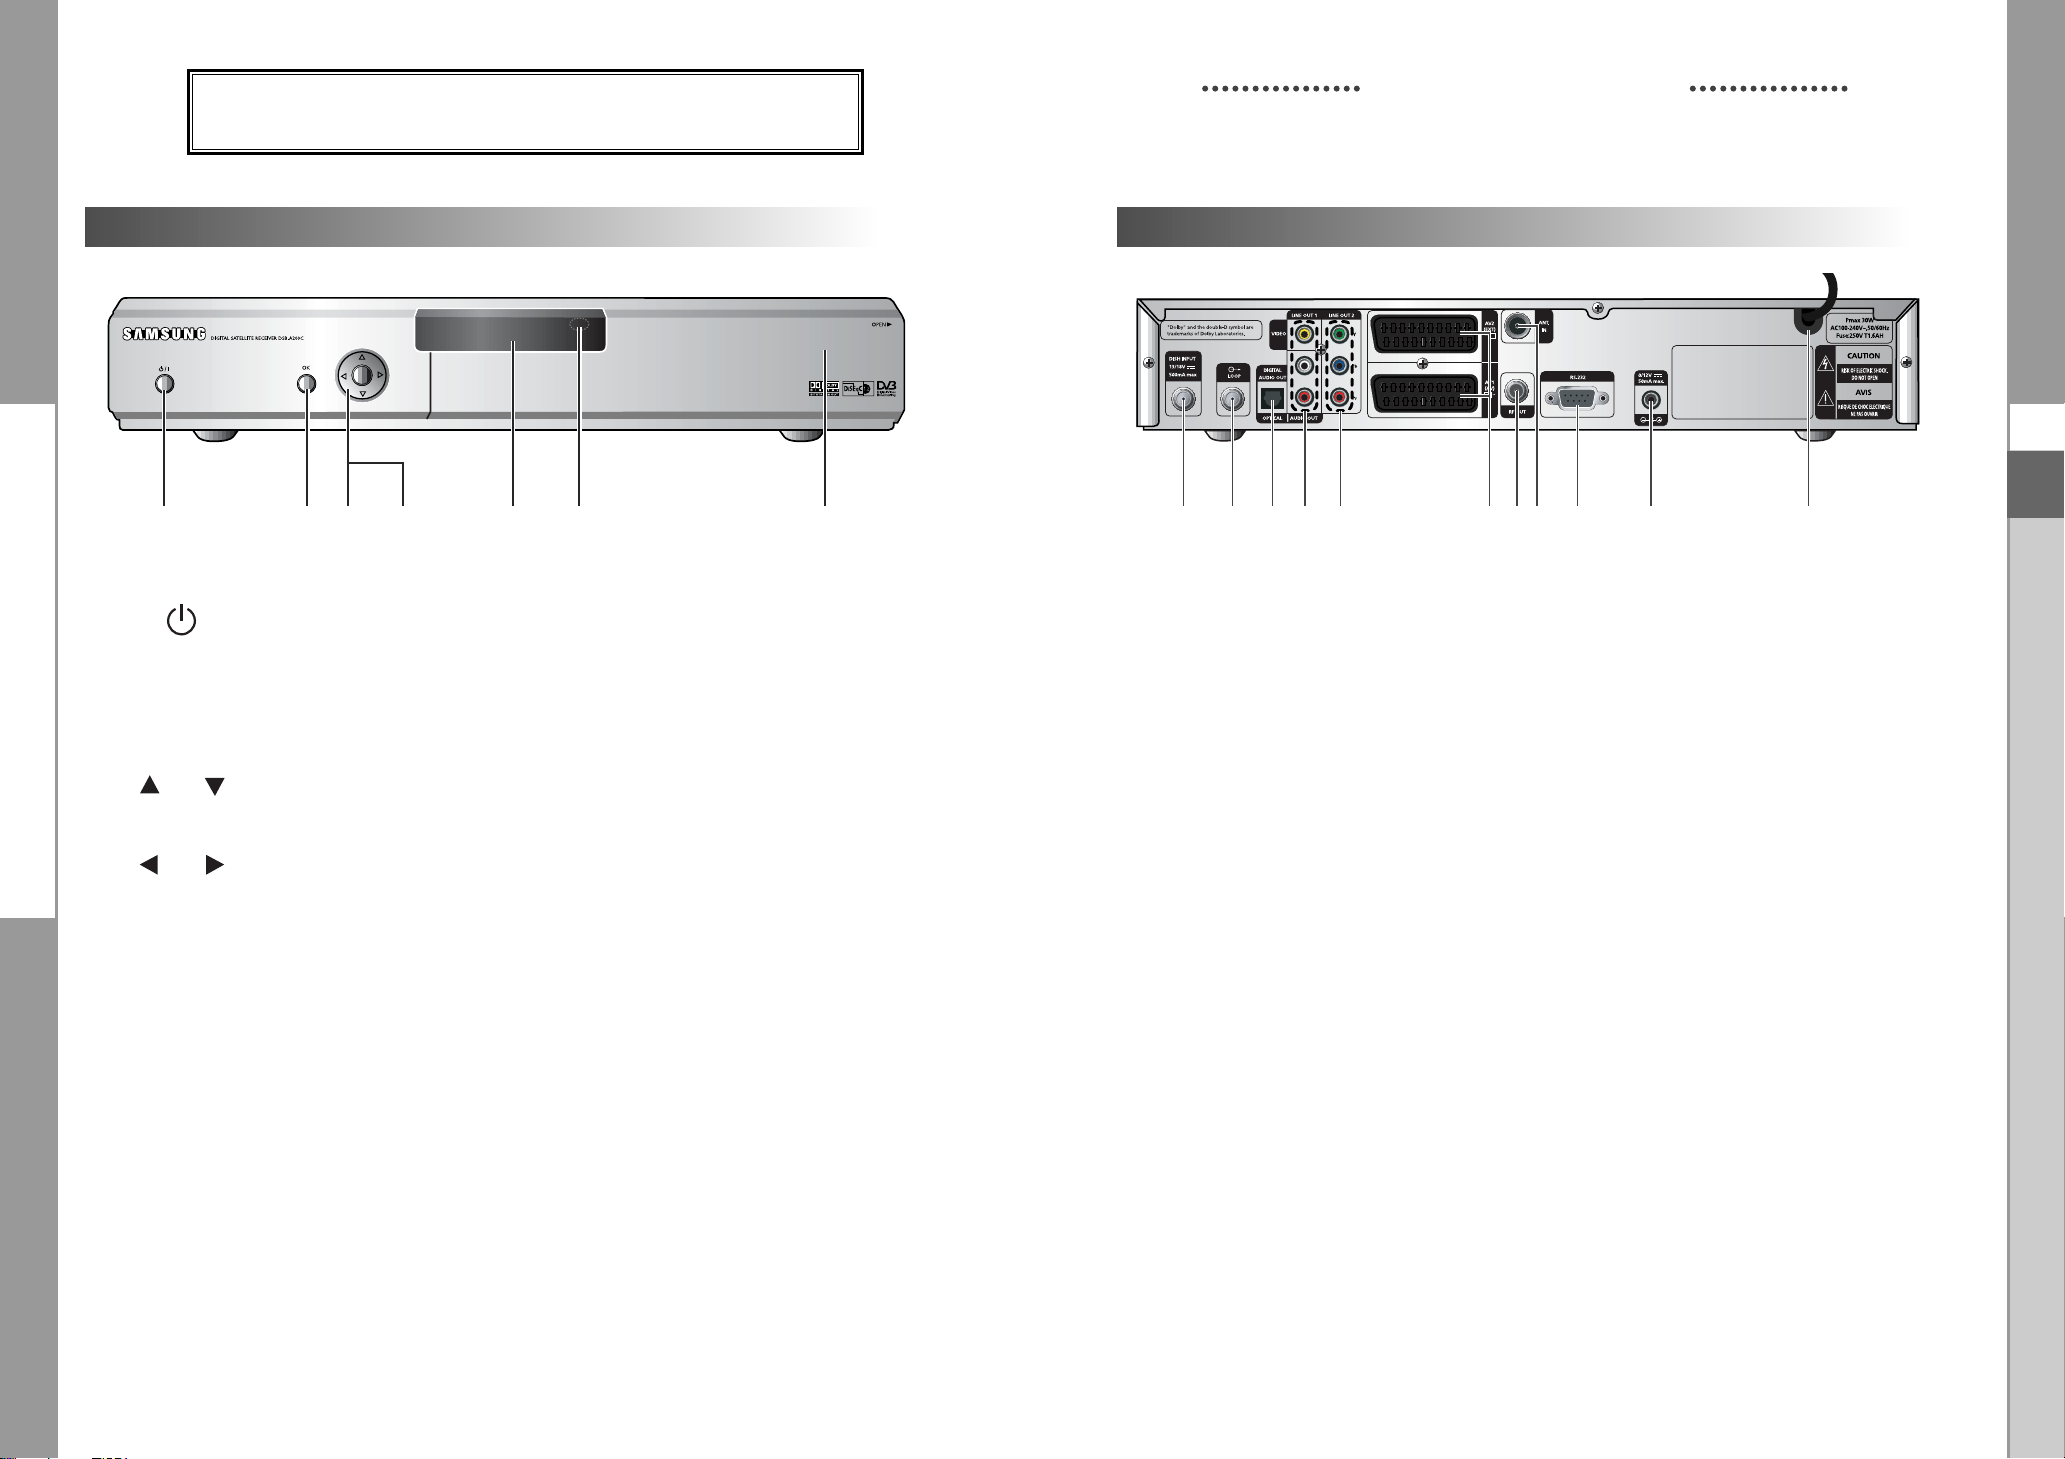
Pannello frontale
1
1.
2. OK
3. ,
23 645
7
Questo tasto serve per accendere il ricevitore o metterlo in
modalità standby.
Questo tasto serve per inserire i dati del ricevitore nel sistema
di menu e per confermarli.
Questo tasto serve per selezionare le voci. Premendolo mentre
si guarda il televisore, viene visualizzato un elenco di canali.
Questi tasti servono per cambiare i canali mentre si guarda il
televisore e per spostare la barra di evidenziazione per la selezione
delle opzioni del menu.
Pannello posteriore
11
1. AC MAINS Deve esservi inserita la spina del cavo di alimentazione della rete CA.
2. 0/12V Serve per il collegamento a un interruttore LNB esterno.
3. RS 232 DATA PORT Serve per collegare il ricevitore a un computer che legge e carica le
4. ANT.IN Serve per collegare i canali RF locali al televisore tramite Loop.
5. RF OUT Serve per collegare il televisore tramite il cavo RF.
8
L'intervallo della tensione CA in entrata è di 100V-240V~, 50Hz/60Hz.
ricevitore (standby).
informazioni relative ai dati.
6710 594
32
1
I
4. ,
5. Display a 7 segmenti
6. Sensore a infrarossi
7. Slot per moduli CA
NNoott aa : I moduli CA e le smart card vengono distribuiti solo dai service
Questi tasti servono per alzare e abbassare manualmente il livello
del volume mentre si guarda il televisore e per spostare la barra di
evidenziazione per la selezione delle opzioni del menu.
Il display LED mostra il numero di canale corrente.
Quando il ricevitore è in modalità standby, il display visualizza l'ora
corrente.
Riceve i comandi IR dal telecomando.
Nello slot si può utilizzare un modulo CA di un service provider
qualsiasi.
provider e da alcuni rivenditori, non da SAMSUNG.
I-6
RICEVITORE SATELLITARE DIGITALE
6. SCART AV Servono per collegare le scart AV per il televisore e il videoregistratore
o il lettore DVD.
7. COMPONENTE COLORE (Y, Pb, Pr)
Serve per collegare l'STB al televisore utilizzando il cavo COLOR
COMPONENT (Y, Pb, Pr). Per visualizzare un'immagine normale
collegando un cavo componente colore, impostare il tipo di segnale
video su Composito + YUV nella modalità impostazione multimediale.
8. VIDEO, AUDIO R/L Questi connettori RCA servono per collegare qualunque audio e
video esterno.
DIGITIAL AUDIO OUT(OPTICAL)
9.
Uscita per il collegamento a un amplificatore digitale.
10. LOOP Consente il collegamento di un ricevitore analogico.
Il ricevitore è dotato di questa porta ‘LOOP’.
11. DISH INPUT Questa porta serve per collegare il cavo coassiale dall'LNB del riflettore
parabolico. La porta fornisce l'ingresso IF e l'intervallo della frequenza
è di 950-2150 MHz. Anche la tensione di commutazione di 13V e 18V
viene fornita da questa porta.
I-7
Page 8

DSB-A200C
Telecomando
DSB-A200C
DESCRIZIONE DESCRIZIONE
NNoo tt aa : Quando si inseriscono le batterie,
verificare che la polarità (+/-) sia corretta.
1. POWER
Serve per accendere il ricevitore o metterlo
nella modalità STANDBY.
2. TASTI NUMERICI 0-9
Questi tasti servono per immettere i valori
numerici e per selezionare il canale
inserendone direttamente il numero.
3. PG+/PG-
Questi tasti servono per spostarsi su e giù
nelle pagine del menu e dell'elenco TV/Radio.
4. TV/RADIO
Questo tasto serve per passare dal canale
del televisore al canale della radio.
5. MUTE
Questo tasto serve per passare dall'audio
normale all'assenza di audio.
6. FAV
Questo tasto serve per passare da un
elenco all'altro di preferiti.
7. EPG
Il tasto Electronic Program Guide (Guida
elettronica ai programmi) visualizza la guida
ai programmi TV/Radio.
8. LAST
Questo tasto serve per richiamare direttamente
dall'elenco il canale che si stava guardando.
9. TEXT (VERDE)
Questo tasto serve per selezionare la modalità
dei sottotitoli. Il tasto funziona come il tasto
VERDE del menu. Premendolo una volta
appaiono i sottotitoli. È possibile selezionare
la lingua desiderata utilizzando i tasti su/giù
dei canali. Premendolo due volte, appare la
schermata Teletext senza impostare nulla sul
televisore. Questo Teletext può essere
visualizzato su un televisore che non supporta
la funzione Teletext. Premendolo tre volte,
Teletext è disponibile sul televisore. Questo
significa che è possibile selezionare Teletext
dal televisore mediante il telecomando.
10. ALT (GIALLO) Questo tasto serve per selezionare l'elenco audio per il servizio corrente.
Il tasto funziona come il tasto GIALLO del menu. Premendolo una volta
appare l'audio. Premendolo due volte appare il video. I servizi audio e video
non vengono forniti per ogni canale e dipendono dalle condizioni in cui si
trova l'operatore. Questo tasto serve per visualizzare il messaggio di aiuto
nel sottomenu.
11. AUDIO (BLU) Questo tasto serve per cambiare l'audio del canale di sinistra, di destra o
di entrambi. Il tasto funziona come il tasto BLU del menu.
12.
i (INFORMATIONI) Questo tasto serve per visualizzare sullo schermo il riquadro delle
(ROSSO) informazioni relative al programma.
Il tasto funziona come il tasto ROSSO del menu. Premendolo una volta
si possono ottenere informazioni semplici sul programma.
Premendolo due volte, nel riquadro del testo si ottengono informazioni
dettagliate sul canale.
13. MENU Questo tasto serve per aprire il menu o per tornare al menu precedente.
14. EXIT Questo tasto viene utilizzato per uscire da un menu o ritornare al
menu precedente.
15. OK Questo tasto serve per inserire i dati del ricevitore nel sistema di menu
e confermarli. Questo tasto serve per selezionare le voci. Premendolo
mentre si guarda il televisore, viene visualizzato un elenco di canali.
/ / /
16.
Questi tasti servono per spostare la barra di evidenziazione per la
selezione delle opzioni del menu.
17. CH /CH Questi tasti servono per cambiare canale.
18. VOL+/VOL- Questi tasti servono per alzare o abbassare il volume.
19. TIMER Questo tasto serve per impostare eventi (programmi) nel/i timer in EPG.
Se un evento viene impostato nel timer, verrà attivato/disattivato
automaticamente in base all'ora di avvio/fine dell'evento. Questo tasto
serve per attivare/disattivare il/i timer in EPG. Dopo aver attivato la
schermata EPG premendo il tasto ‘EPG’, è possibile selezionare l'evento
(programma) desiderato utilizzando i tasti
/ e /
. Premere quindi il
tasto ‘timer’. Se l'evento è impostato nel timer, nell'angolo a destra del
nome dell'evento appare ®. Viene visualizzato anche ‘EPG’ in ‘Ripetizione
evento’ nel menu ‘Impostazioni ora e timer’. Tuttavia, se non vi è alcun
evento su EPG per il canale, il timer non può essere supportato.
I
I-8
RICEVITORE SATELLITARE DIGITALE
I-9
Page 9

DSB-A200C
DSB-A200C
FUNZIONI DI BASE
FUNZIONI DI BASE
1. Schermo di visualizzazione
Prima di visualizzare il programma televisivo, è necessario eseguire l'installazione.
Inizialmente verranno visualizzate solo immagini di menu.
Dopo aver programmato i canali televisivi, verrà visualizzata l'immagine (o intestazione) seguente ogni
volta che si passa da un canale all'altro:
Numero canale
Informazioni sul programma Programma preferito corrente Stato segnale
● Premere il tasto ROSSO ( i ) in modalità di visualizzazione.
● Selezionare il canale premendo i tasti NUMERICI (0~9) o
Il numero della traccia audio nel canale corrente
/
e selezionare il tasto TV/RADIO
per passare al canale TV o Radio.
Questa immagine verrà visualizzata ogni volta che si cambia canale.
Quando si preme il tasto TV/RADIO sul telecomando, si passa dal programma
TV al programma RADIO e viceversa.
Informazioni dettagliate sul programma
● Premere il tasto ROSSO ( i ) due volte mentre si sta guardando un programma.
Verrà visualizzata innanzitutto l'intestazione sopra descritta.
Premendo una seconda volta il tasto ROSSO ( i ), è possibile visualizzare su un altro banner
informazioni dettagliate sul programma in uso, nel caso siano disponibili.
Quando le informazioni sono costituite da più pagine, PG+/PG- può essere utilizzato per andare su è
giù nelle pagine.
NNoottaa : questo servizio dipende dal provider dei servizi.
2. Regolazione del volume
Per regolare il livello del volume :
3. Selezione della traccia audio
● Premere il tasto
tracce audio.
● Premere il tasto
GIALLO (ALT)
/
e OK per selezionarne una.
per visualizzare l'elenco delle
4. Selezione della traccia video
● Premere il tasto
visualizzare l'elenco delle tracce video.
● Press
/
GIALLO (ALT)
due volte per
and OK key to select one.
5. Elenco canali secondari
Se dopo aver cambiato canale sono disponibili dei canali
secondari nel canale (programma) corrente, nell'angolo a destra
del riquadro appare [C]. In questo caso, premere il tasto GIALLO (ALT).
Viene visualizzato l'elenco di tutti i canali secondari.
Selezionare dall'elenco il canale secondario desiderato.
6.
Elenco dei servizi
● Premere il tasto OK mentre si sta guardando un programma.
● Selezionare l'elenco premendo il tasto TV/RADIO o FAV.
L'icona accanto al nome del canale simbolizza un
canale codificato, mentre l'icona accanto al nome del
canale simbolizza un canale bloccato.
● Selezionare il canale premendo
● Premere il tasto OK per guardare quel canale.
/
PG+/PG-.
,
I
● Premere i tasti
● Premere il tasto MUTE per disattivare l'audio.
● Premere nuovamente il tasto MUTE o i tasti
/
, VOL- o VOL+ per regolare il livello del volume.
/
per annullare la disattivazione dell'audio.
I-10
RICEVITORE SATELLITARE DIGITALE
Il tasto colorato corrisponde all'elenco di servizi seguente.
● Ta sto VERDE (TEXT) - Preferiti
● Ta sto
● Ta sto BLU (AUDIO) - Provider
● Ta sto ROSSO ( i ) - Transponditore
GIALLO (ALT)
- Alfabetico
I-11
Page 10

DSB-A200C
6.1
Servizio Preferiti
FUNZIONI DI BASE FUNZIONI DI BASE
7.
Informazioni sul programma
DSB-A200C
● Premere il tasto VERDE (TEXT) sul telecomando per selezionare
l'elenco Preferiti.
● Premere il tasto VERDE (TEXT) per passare da un elenco
di gruppi e canali all'altro.
● Utilizzare i tasti
/
PG+/PG- per selezionare il gruppo di
,
preferiti desiderato.
6.2
Servizio Alfabetico
● Premere il tasto GIALLO (ALT) sull'unità di controllo per
selezionare l'elenco Preferiti.
● Premere il tasto GIALLO (ALT) per passare da un elenco di
gruppi e canali all'altro.
/
● Utilizzare i tasti
PG+/PG- per selezionare un gruppo
,
alfabetico desiderato.
6.3
Provider di servizi
● Premere il tasto BLU (AUDIO) sul telecomando per selezionare
l'elenco di provider.
● Premere il tasto BLU (AUDIO) per passare da un elenco di
gruppi e canali all'altro.
● Utilizzare i tasti
/
PG+/PG- per selezionare un gruppo di
,
provider desiderato.
EPG-Guida elettronica ai programmi
La guida elettronica al programma fornisce per tutti i canali le
informazioni sul programma scelto.
NNoottaa : 1. Questo servizio dipende dal provider dei servizi.
2. Dopo che il ricevitore ha rilevatore l’ora GMT dal
segnale (ciò richiede alcuni secondi), è in grado di
visualizzare le informazioni EPG corrette.
● Premere il tasto EPG mentre si sta guardando un programma.
Questa funzione viene visualizzata sullo schermo utilizzando
solo l’orario. Sul display LED del ricevitore apparirà “EPG”.
● Tasto VERDE (TEXT): Il tasto verde serve per tornare alla data precedente.
● Tasto GIALLO (ALT): Il tasto giallo serve per passare alla data successiva.
● Il tasto BLU (AUDIO) può essere utilizzato per andare su nelle pagine se vi sono diverse
pagine di informazioni.
● Il tasto ROSSO( i ) può essere utilizzato per andare giù nelle pagine se vi sono diverse
pagine di informazioni.
L'intervallo di tempo può essere regolato premendo i seguenti tasti sulla schermata EPG:
tasto 1: 1 ora e 30 minuti tasto 2: 30 minuti tasto 3: 15 minuti
Tramite i tasti TV/RADIO o FAV è possibile navigare tra i diversi elenchi di programmi.
● Selezionare il canale premendo i tasti
corrente.
Per tornare all'evento corrente, premere il tasto LAST durante lo spostamento degli eventi
/
PG+/PG- e premere il tasto OK per guardare il canale
,
di questo canale.
● Premendo il tasto TIMER sul telecomando nella schermata EPG, se il canale corrente implica
un evento il timer viene impostato immediatamente e viene indicato sulla schermata EPG.
Un programma impostato in questo modo viene indicato nel campo Timer di Impostazioni ora e
timer <Time & Timer Settings>.
I
6.4
Servizio transponditore
● Premere il tasto ROSSO ( i ) sul telecomando per selezionare
l'elenco dei risponditori.
● Premere il tasto ROSSO ( i ) per passare da un elenco di gruppi
e canali all'altro.
/
● Utilizzare i tasti
PG+/PG- per selezionare il gruppo di
,
risponditori desiderato.
I-12
8.
Sottotitolo
Se il programma corrente prevede i sottotitoli, premere il tasto
VERDE (TEXT) per visualizzare l’elenco delle lingue dei sottotitoli
corrente. Se nel programma corrente è disponibile Sottotitolo
(Subtitle), dopo aver cambiato programma (canale) o aver premuto
il tasto ROSSO ( i ) sull'etichetta viene visualizzato .
Per modificare la lingua dei sottotitoli:
● Premere il tasto VERDE (TEXT) per visualizzare l'elenco delle
lingue dei sottotitoli.
● Utilizzare i tasti
● Premere il tasto OK per visualizzare la lingua dei sottotitoli desiderata.
/
per selezionare la lingua dei sottotitoli desiderata.
I menu visualizzati sono stati progettati allo scopo di assicurare un utilizzo semplice del ricevitore
da parte dell’utente.
RICEVITORE SATELLITARE DIGITALE
I-13
Page 11

DSB-A200C
DSB-A200C
FUNZIONI DI BASE FUNZIONI DI BASE
9. OSD Teletext
Se il programma corrente prevede Teletext, premere due volte il tasto
VERDE (TEXT) per visualizzare l'elenco delle lingue correnti per
Te letext, per avere Teletext in OSD indipendentemente dal tipo di
televisore.
[T] nell'angolo destro del riquadro indica che Teletext è disponibile
per questo evento (programma). Anche se nel riquadro appare [T],
Teletext può non essere disponibile a causa della trasmissione.
Per modificare il Teletext OSD:
● Utilizzare i tasti
● Premere il tasto OK per visualizzare il Teletext OSD desiderato.
/
per selezionare un Teletext OSD desiderato.
10. VBI Teletext
Se il programma corrente prevede Teletext VBI, premere tre volte
il tasto VERDE (TEXT) per visualizzare l'elenco delle lingue correnti
per Teletext.
Questo Teletext viene visualizzato sullo schermo dai televisori che
supportano Teletext.
[T] nell'angolo destro del riquadro indica che Teletext è
disponibile per questo evento (programma). Anche se nel
riquadro appare [T], Teletext può non essere disponibile a
causa della trasmissione.
12. Near Video on Demand (NVOD)
Se il canale cambiato è un canale del servizio NVOD,
nell'angolo destro del riquadro appare [N].
In questo caso, premere il tasto GIALLO (ALT).
Viene visualizzato l'elenco di tutti gli NVOD.
Selezionare dall'elenco il programma NVOD.
Selezionare l'ora desiderata per la visione utilizzando i tasti
/
e poi premere il tasto OK per guardare il programma.
13. Canale secondario o canale multi feed
Se il canale cambiato è un canale del servizio multi feed,
nell'angolo destro del riquadro appare [C].
In questo caso, premere il tasto GIALLO (ALT).
Viene visualizzato l'elenco di tutti i canali secondari.
Selezionare un programma dall'elenco, utilizzando i tasti
/
, e poi premere il tasto OK per guardare il programma
selezionato.
I
Per modificare il Teletext VBI:
● Utilizzare i tasti
● Premere il tast OK per visualizzare il Teletext VBI desiderato.
/
per selezionare il Teletext VBI desiderato.
11. Modalità audio (Audio Mode)
Mediante il tasto BLU (AUDIO) è possibile scegliere la modalità tra
sinistra, destra o stereo.
Per modificare la modalità audio:
● Premere il tasto BLU (AUDIO) per selezionare sinistra, destra o
stereo.
● Premere il tasto EXIT per salvarla e uscire da questo menu.
I-14
RICEVITORE SATELLITARE DIGITALE
I-15
Page 12

DSB-A200C
DSB-A200C
AZIONAMENTO DEL RICEVITORE
AZIONAMENTO DEL RICEVITORE
Menu principale
Dopo aver installato l’antenna e il STB con i connettori appropriati.
● Collegare l’alimentazione principale CA e lo switch al ricevitore.
● Premere il tasto MENU per visualizzare il menu principale.
Il display LED visualizzerà “MENU”.
Apparirà la seguente schermata:
Le voci del sottomenu verranno visualizzate.
Per i sottomenu Installazione, Organizzazione canale e Chiave
elettronica è necessario il codice PIN.
Prima di seguire le istruzioni del menu di installazione,
è necessario verificare che tutte le informazioni del 4° menu
“Impostazioni di sistema” siano appropriate.
● Per visualizzare il messaggio di aiuto, premere il tasto GIALLO (ALT).
1. Installazione
1.1 Impostazioni LNB
È possibile selezionare le impostazioni del satellite e
dell’LNB per eseguire la ricerca dei canali e modificare le
impostazioni per il tono a 22kHz. I parametri impostati in questo
menu sono necessari per la programmazione dei canali per la
Auto scansione e Scansione manuale.
Le informazioni necessarie sono disponibili nelle istruzioni relative
all’antenna e all’LNB; in caso contrario, contattare il rivenditore.
● Impostare l’interruttore di alimentazione dell’LNB su “On”.
● Selezionare il nome del satellite desiderato.
● Selezionare il tipo di LNB (frequenza).
● Selezionare la modalità DiSEqC
(off, DiSEqC A, DiSEqC B, DiSEqC C, DiSEqC D, Tono a raffiche A, Tono a raffiche B)
Se si utilizza un posizionatore, selezionare Posizionatore
22KHz: Se si sta utilizzando un LNB duale o due antenne collegate a un commutatore di toni
a 22kHz, con quest’ultimo (“On”, “Off” o “Auto”) è possibile attivare alternativamente uno
dei due LNB o delle due antenne.
0/12V: Se si utilizzano due antenne o LNB è posizionato su 0/12V; selezionare antenne o
LNB utilizzati, attivi o inattivi. Il terminale 0/12V si trova sul retro dell'STB.
DiSEqC1.2
(“Yes” o “No”)
I
Il menu include le impostazioni per la personalizzazione,
l’aggiunta di nuovi servizi e la visualizzazione dello stato del ricevitore.
● Selezionare "Installazione" nel menu principale per selezionare
il sottomenu.
● Immettere il codice PIN.
Se non è stato immesso il proprio codice PIN, sarà valido
il codice PIN 0000 impostato in fabbrica.
I-16
1.2 Impostazioni posizionatore
Se si dispone di un sistema DiSEqC 1.2 motorizzato
completamente compatibile con DiSEqC1.2, si possono utilizzare
le funzioni DiSEqC 1.2 disponibili.
● Selezionare Satellite.
● Selezionare qualsiasi risponditore dai satelliti precedenti e
controllare la frequenza, la notazione di velocità, la FEC e la
polarità.
In caso di problemi, contattare il rivenditore. Talvolta, a causa della
trasmissione, il trasponditore può non essere disponibile.
Per il satellite desiderato è meglio selezionare il trasponditore principale.
● Selezionare dalla modalità menu:
Modalità “Utente” : Attiva il controllo della funzione di base del posizionatore.
Consigliato per gli utenti inesperti.
Gli utenti utilizzano in generale la modalità “Utente”.
Modalità “Installatore” : Usato per cercare manualmente la posizione di un satellite.
RICEVITORE SATELLITARE DIGITALE
I-17
Page 13

DSB-A200C
DSB-A200C
AZIONAMENTO DEL RICEVITORE
1.2.1 Modalità utente
● Selezione della modalità di movimento:
È possibile scegliere il tipo di movimento del posizionatore:
continuo, progressivo o a tempo.
● Posizionare l’antenna verso nord, sud, est e ovest e utilizzare il
tasto/ / / per azionare il motore. Il tastoregola la
posizione verso ovest, il tasto regola la posizione verso est, il
tastoregola la posizione verso nord e il tastoregola
la posizione verso sud .
● Al termine, selezionare “Memorizza Posizione Corrent.” e
premere il tasto OK per reimpostare il posizionatore.
NNoottaa : il livello indicato in “Stato Segnale” è solo a scopo di riferimento.
La qualità del segnale può essere adeguata anche se non viene indicato massimo.
● Passare alla posizione desiderata.
Quando si raggiunge la posizione desiderata viene visualizzato “Arresta”; ora è possibile proseguire
con le altre operazioni.
● Selezionare Calculate Sat Positions per ricalcolare la posizione del satellite e il tasto OK.
1.2.2 Modalità installatore
AZIONAMENTO DEL RICEVITORE
1.3 Impostazioni Solarsat
Questo menu si riferisce esclusivamente all’antenna Solarsat.
Quando viene selezionato, appare il messaggio.
“Questo menu vale solo per un’antenna solarsat.
Se avete un’antenna solarsat premere OK, in case contrario
premere EXIT.”
È possibile impostare il valore in base alla propria località.
● Per impostare il valore di data e ora, utilizzare i tasti
PG+/PG- per modificare il valore.
● Utilizzare i tasti
● Utilizzare i tasti
/
per cambiare posizione.
/
per passare da un campo all’altro.
1.4 Auto scansione
Il sottomenu “Auto scansione” consente di scaricare
automaticamente i canali non in onda dai satelliti preprogrammati.
Per scaricare automaticamente i canali:
In ogni satellite si può selezionare la modalità Tutti/No/Solo liberi
<All/Off/Only Free> utilizzando i tasti / , che spesso possono
essere visualizzati come PG+/PG-.
I
Dopo aver controllato lo stato del posizionatore, l’installatore
deve utilizzare questo menu. Prima di utilizzare questa modalità,
è necessario impostare i “Disattiva limiti”.
● Selezionare Drive Motor West/East e utilizzare i tasti
/
per
azionare il motore.
Il tastodetermina lo spostamento verso ovest,
mentre il tasto determina lo spostamento verso est.
● Selezionare “Attiva limiti” per consentire il valore
“Imposta limite”.
● Selezionare “Disattiva limiti” per impossibilitare il valore
“Imposta limit”.
● Selezionare “Azzera posizionatore” e il tasto OK per reimpostare il posizionatore.
I-18
RICEVITORE SATELLITARE DIGITALE
Off : nessuna ricerca
Tutti : ricerca di tutti i canali
Only Free (Solo non a) : ricerca dei canali gratuiti
● Premere il tasto OK.
Verrà visualizzato il menu Auto scansione.
Tutti i canali dell’elenco verranno scaricati automaticamente dal satellite selezionato.
Dopo la ricerca, verrà visualizzato il messaggio “Il nostro ricevitore...”.
Premere quindi il tasto OK per la conferma.
I-19
Page 14

DSB-A200C
DSB-A200C
AZIONAMENTO DEL RICEVITOREAZIONAMENTO DEL RICEVITORE
1.5 Scansione manuale
Per sintonizzare i nuovi canali e i segnali deboli, il STB è stato
dotato di un’opzione di Scansione manuale tramite cui l’utente
può immettere i dati sul canale.
Dopo aver selezionato “Scansione manuale” dal menu
Installation, viene visualizzata la schermata seguente:
● Selezionare il satellite di destinazione per la ricerca manuale.
Per eseguire la scansione dei programmi da un satellite non
presente nell'elenco di questo menu, selezionare ‘Satellite 1’,
‘Satellite 2’ o ‘Satellite 3’. Nel caso di ‘Satellite 1’, ‘Satellite 2’ o
‘Satellite 3’, inserire tutte le informazioni relative al satellite desiderato.
● Load a transponder.
Questa opzione consente all’utente di caricare qualsiasi risponditore dall’elenco
preprogrammato disponibile all’interno del ricevitore.
NNoottaa : Specie in Nuovo trasponditore in Carica TR, il nuovo trasponditore può essere
aggiunto all'elenco dei trasponditori per essere utilizzato successivamente in
Scansione automatica (Auto Scanning), ma solo se col nuovo trasponditore si
trova almeno un canale. Per salvarlo, premere il tasto OK. Per impostare ‘NUOVO’
come nuovo trasponditore in Carica TR, inserire ‘0’ in Carica TR o andare su
‘NUOVO’ utilizzando i tasti
● Immettere la frequenza del risponditore che si desidera trovare.
● Immettere la notazione della velocità del risponditore che si desidera trovare.
● Selezionare la FEC (Forward Error Correction) del risponditore che si desidera trovare.
È possibile selezionare il valore di 1/2, 2/3, 3/4, 5/6, 7/8 o Auto.
● Selezionare la polarizzazione del risponditore che si desidera trovare.
(Horizontal/Vertical/Circular Left/Circular Right)
La linea LNB genera 18 V nel caso della polarizzazione orizzontale e 13 V nel caso di quella
verticale.
● Selezionare la modalità di tasteggio “Tutti” o “Only Free (Solo non)”.
● Impostare la ricerca di rete su “Si”. Utilizzando il trasponditore di guida, è possibile ottenere
dal trasponditore un numero maggiore di canali. Si può inoltre visualizzare ‘Nome rete’ sullo
schermo. Questo servizio dipende dalle informazioni provenienti dal segnale di trasmissione.
● Selezionare “Si” nella ricerca per PID solo se si è interessati a un programma SCPC.
La ricerca può essere effettuata manualmente inserendo i singoli valori del PID (Packet
Identifier) (Identificativo pacchetto) (Video/Audio/PCR).
● Dopo aver selezionato l'opzione, premere il tasto OK per avviare il processo di scansione.
/
.
1.6 Scansione SMATV
Nel caso in cui più generazioni utilizzino la stessa antenna o lo
stesso LNB, cercare il servizio tra 950 e 2150MHz.
● Selezionare il tipo di ricerca “Automatico”o “Manuale”.
● Selezionare la modalità di ricerca “Tutti” o “Solo non a
pagamento”.
● È possibile immettere notazioni di velocità comprese tra 1 e 4.
NNoottaa : 1. Se il tipo di ricerca è impostato su Automatic
durante la ricerca SMATV, è sufficiente immettere la
notazioni di velocità alternativa (1~4) desiderata.
2. Se il tipo di ricerca è impostato su Manual durante la
ricerca SMATV, è necessario immettere sia la
frequenza che la notazione di velocità.
3. La modalità DiSEqC può essere supportata per
SMATV in ‘Impostazioni LNB’. Per supportare la
modalità DiSEqC, in ‘Impostazioni LNB’ devono
essere selezionati sia SMATV che il satellite.
Selezionando “Automatico” (“Automatic”), il decodificatore
effettua la ricerca in base ai simboli di tutti i canali disponibili su
tutte le frequenze.
Mentre con “Manuale” (“Manual”) analizza i canali con
informazioni precise in base ai simboli e alla frequenza.
1.7 Azzera alle impostazioni di fabbrica
Questa funzione viene utilizzata per ripristinare i valori predefiniti
se l’utente riscontra qualche problema dopo aver modificato
scorrettamente i valori dei dati dei canali o altri valori.
Verrà visualizzata la schermata seguente:
Nella finestra di dialogo di richiesta, premere il tasto OK per
ripristinare automaticamente le impostazioni predefinite del
ricevitore.
NNoottaa : le impostazioni precedenti verranno eliminate.
Vengono cancellate tutte le impostazioni e le informazioni,
inclusi i dati relativi ai canali.
I
I-20
RICEVITORE SATELLITARE DIGITALE
I-21
Page 15

DSB-A200C
DSB-A200C
AZIONAMENTO DEL RICEVITOREAZIONAMENTO DEL RICEVITORE
2. Organizzazione canale
Il menu “Organizzazione canale” include 7funzioni.
Utilizzando il trasponditore di guida, è possibile ottenere dal
trasponditore un numero maggiore
Questo menu serve per eliminare qualche canale dall'elenco dei
canali relativi a un determinato satellite o trasponditore.
Consente inoltre di creare un elenco di preferiti e di modificare la
posizione dei canali.
● Immettere il Codice PIN.
Se non è stato immesso il proprio Codice PIN, sarà valido il
Codice PIN 0000 impostato in fabbrica.
2.1 Cancella satellite
● Selezionare l’elenco di satelliti che si desidera,eliminare
premendo il tasto ROSSO ( i ).
● Premere il tasto OK per confermare.
NNoottaa : questa funzione non elimina il satellite ma solo l’elenco di
canali registrati per il satellite.
2.2 Cancella trasponditore
● Selezionare l’elenco di trasponditori che si desidera eliminare
premendo il tasto ROSSO ( i ).
● Premere il tasto OK per confermare.
NNoottaa : questa funzione non elimina il risponditore ma solo l’elenco
di canali registrati per il risponditore.
2.4 Cancella tutti i canali
Nella finestra di dialogo di richiesta, premere il tasto OK per
eliminare tutti i canali e premere
MENU / EXIT
per uscire.
2.5 Cancella canali criptati
Nella finestra di dialogo di richiesta, premere il tasto OK per
eliminare i canali codificati e premere
MENU / EXIT
per uscire.
2.6 Canali preferiti
Il canale attuale può essere registrato immediatamente nel
Gruppo preferiti (Favorite Group) desiderato.
È inoltre possibile registrare un canale in vari gruppi di preferiti.
● Selezionare il Gruppo preferiti (Favorite Group) (FAV1~FAV9)
mediante il tasto FAV.
● Selezionare l'elenco dei canali desiderati utilizzando i tasti
/
o PG+/PG- nella finestra degli elenchi TV o RADIO.
● Premere il tasto ROSSO ( i ) e registrare il canale selezionato nel
Gruppo preferiti (Favorite Group).
● Premere quindi il tasto OK per la conferma.
I
2.3 Cancella canale
● Selezionare il canale che si desidera eliminare premendo il
tasto ROSSO ( i ).
● Premere il tasto OK per confermare.
I-22
Utilizzare il tasto TV/RADIO per modificare l'elenco TV o Radio e il tasto FAV per modificare
l'elenco dei preferiti.
● Premendo il tasto TV/RADIO, vengono attivati l'elenco TV e Radio.
● Premere il tasto FAV per selezionare un altro elenco di preferiti.
Per eliminare i canali dal Gruppo preferiti (Favorite Group):
● Con i tasti
● Premere il tasto ROSSO ( i ) per eliminare il canale selezionato dai canali preferiti.
NNoottee
: Un elenco di preferiti può contenere massimo 200 canali.
RICEVITORE SATELLITARE DIGITALE
/
o PG+/PG- selezionare un elenco di canali da eliminare.
I-23
Page 16

DSB-A200C
DSB-A200C
AZIONAMENTO DEL RICEVITOREAZIONAMENTO DEL RICEVITORE
2.7 Spostamento e modifica dei canali
● Selezionare l'elenco TV/RADIO utilizzando i tasti
TV/RADIO.
● Nell'elenco TV o Radio selezionare un canale utilizzando i
tasti / o PG+/PG- o i tasti numerici.
● Selezionare il canale premendo il tasto ROSSO ( i ).
● Premere i tasti
/
o PG+/PG- per modificare la posizione del
canale desiderato e premere il tasto OK per la conferma.
● Per rimettere il canale nella posizione iniziale, non premere il
tasto OK ma il tasto BLU (AUDIO).
Per modificare il nome di un canale
● Selezionare l'elenco TV/RADIO utilizzando i tasti
TV/RADIO.
● Selezionare un canale da rinominare utilizzando i tasti
PG+/PG- o i tasti numerici.
● Premere il tasto VERDE (TEXT).
Viene visualizzata la tabella dei font.
● Mediante i tasti Num. 1~6, selezionare la tabella dei font
desiderata.
● Selezionare il carattere desiderato mediante
premere il tasto OK per incollare il carattere sulla stringa.
/
o
/
o
/
/ , /
e
3. Chiave elettronica
La funzione “Chiave elettronica” imposta delle restrizioni
ai canali che possono essere visualizzati e impedisce l’accesso
non autorizzato al STB tramite il PIN (Personal Identification
Number) a quattro cifre.
(Il codice PIN preimpostato in fabbrica è : 0000)
Se si seleziona questo menu, si potrà scegliere tra due opzioni:
impostare il blocco per qualsiasi canale desiderato oppure
modificare il PIN.
● Immettere il codice PIN.
Se non è stato immesso il proprio codice PIN, sarà valido il
codice PIN 0000 impostato in fabbrica.
o
3.1 Imposta blocco canale
● Selezionare il canale premendo
● Quando si preme il tasto TV/RADIO, si passa dal programma
/
, PG+/PG-, / .
TV al programma Radio e viceversa.
● Selezionare il blocco canale premendo il tasto
ROSSO ( i ).
● Premere il tasto OK per confermare.
I
NNoottaa : Ta st o ROSSO: Spazio indietro
Ta sto EXIT: Per uscire dalla tabella dei font senza modificare il nome del canale.
Ta sto PG+/PG-: Serve per spostare la barra di evidenziazione “Sposta e modifica canali”
<Move & Edit Channel> nell'elenco di tutti i canali.
● Premere il tasto MENU e poi il tasto OK per salvare i dati impostati.
I-24
Il canale verrà bloccato. Quando si vorrà vedere questo canale,
sarà necessario immettere il PIN nella finestra di richiesta.
L'inserimento del codice PIN, che consente l'accesso a un
canale originario bloccato, agisce su tutti i canali originari bloccati.
Significa che, inserendo il codice PIN corretto in uno qualsiasi
dei canali originai bloccati, è possibile accedere a tutti i canali originari bloccati.
Per annullare il blocco :
● Premere il tasto ROSSO ( i ) una seconda volta annullare il blocco.
RICEVITORE SATELLITARE DIGITALE
I-25
Page 17

DSB-A200C
DSB-A200C
AZIONAMENTO DEL RICEVITOREAZIONAMENTO DEL RICEVITORE
3.2 Modifica codice PIN
Per modificare il codice PIN, selezionare la seconda opzione “Modifica codice PIN”.
Verrà visualizzato il menu seguente:
Se si seleziona questa opzione. è necessario immettere il
Codice PIN corrente nel primo campo e il Codice PIN desiderato
nel secondo campo.
Per confermare, è necessario immettere il nuovo Codice PIN
una seconda volta.
Ricordare che il Codice PIN deve essere un valore numerico
di quattro cifre.
IL CODICE PIN PREIMPOSTATO IN FABBRICA : 0 0 0 0.
NNoottaa : Se si dimentica il codice PIN, consultare la sezione ‘Informazioni di sistema’.
Una volta modificata la password, è necessario ricordarla e conservarla in un
luogo sicuro.
4. Impostazioni di sistema
Questa opzione consente di modificare le impostazioni
predefinite in base alle proprie esigenze.
4.2 Impostazioni OSD
È possibile impostare la trasparenza dell'OSD, l'ora della
visualizzazione, lo schema del colore e la posizione dell'OSD.
● Selezionare il livello di trasparenza dell'OSD.
Il livello di trasparenza dell'OSD varia da 0 a 100%.
L'impostazione viene effettuata mediante i tasti numerici, i tasti
/
o i tasti PG+/PG-.
/
Tasti
Tasti PG+/PG- : Impostazione con incrementi del 10%.
NNoottaa : La trasparenza NON vale per lo schema del colore con
l'opzione “Definito dall'utente” <User Defined>.
● Impostare la durata della visualizzazione del riquadro delle
informazioni che appare sullo schermo.
La durata varia da 0,5 a 60,0 secondi.
L'impostazione viene effettuata mediante i tasti numerici,
i tasti / o i tasti PG+/PG-.
/
Tasti
Tasti PG+/PG- : Regolazione con incrementi di 1 sec.
● Impostazione dello schema del colore:
: Impostazione con incrementi dell'1%.
: Regolazione con incrementi di 0,5 sec.
I
4.1 Selezione lingua
L’op zione “Selezione lingua” consente all'utente di
selezionare la lingua desiderata per OSD, audio, Teletext,
sottotitoli o EPG. Le lingue per audio, Teletext, sottotitoli ed
EPG dipendono tuttavia dalla trasmissione.
Ad esempio, anche se è possibile selezionare la lingua per i
sottotitoli, questa può non essere supportata a causa della
mancanza di sottotitoli nel programma.
● Per favorire gli utenti delle varie nazioni, che parlano lingue
diverse, i linguaggi OSD sono disponibili in 20 lingue.
● Per selezionare il menu della lingua desiderata, premere il
tasto/ per modificare la lingua e premere OK.
● La lingua dell’OSD, la traccia audio, il Teletext, i sottotitoli
o l’EPG verranno modificati in base alla lingua selezionata.
I-26
Il colore può essere modificato in base alle proprie preferenze.
(Ad es. sfondo, testo, simbolo, riga, ecc)
/
Tasti
: selezionare la modalità per lo schema
del colore.
Schema colore 1 : cambia il menu nel colore azzurro.
Schema colore 2 : cambia il menu nel colore verde.
Schema colore 3 : cambia il menu nel colore marrone scuro.
Definito dall'utente : Imposta il colore in base alle preferenze
dell'utente.
Colori EPG : Imposta il colore nel menu EPG.
NNoottaa : In seguito, gli schemi colore 1, 2 e 3 possono essere modificati
aggiornando il software.
RICEVITORE SATELLITARE DIGITALE
I-27
Page 18

DSB-A200C
DSB-A200C
AZIONAMENTO DEL RICEVITOREAZIONAMENTO DEL RICEVITORE
Impostazione della modalità definita dall'utente o del colore EPG
● Premere il tasto VERDE (TEXT).
Viene visualizzata la voce che si desidera modificare.
● Utilizzando i tasti
● Impostare il colore desiderato utilizzando i tasti
● Premere il tasto OK per confermare la scelta.
/
spostare la voce da modificare.
/
.
Per visualizzare il messaggio di aiuto, premere il tasto
GIALLO (ALT).
Posizione dell'OSD
● Posizionare il cursore nella posizione desiderata e premere i
tasti / o / finché la schermata si sposta nella posizione prescelta.
La schermata si sposta nella posizione desiderata.
4.3 Impostazioni media
È possibile modificare le diverse impostazioni dei supporti nel
modo desiderato.
Posizionare il cursore sul sottomenu e premere OK.
● Premere i tasti
tasti / per selezionare l'opzione desiderata.
● Premere il tasto OK per confermare la scelta.
● Premere i tasti MENU/EXIT per uscire dal menu.
● Selezionare il sistema TV :
(auto)NTSC, SECAM ➔ (auto)NTSC, NTSC ➔
(auto)PAL or NTSC ➔ (auto)PAL
● Selezionare il tipo di televisore in uso:
Tipo di formato STANDARD 4: 3 o SCHERMO LARGO 16 : 9.
● Selezionare la conversione del formato :
Letter box, Pan & Screen, Mixed o Full.
● Selezionare il tipo di segnale video :
Composito+RGB o Composito.
● Selezionare il formato dell’uscita SPDIF:
Compressed or Uncompressed (compresso o non compresso)
● Selezionare il canale RF : Ch 21~Ch 69
● Selezionare il sistema di trasmissione : B/G, I o D/K.
/
per spostare le sotto voci e premere i
PAL, SECAM, NTSC, PAL ➔
4.4 Modem Settings
Servono solo per supportare il servizio PPV tramite un
programma CONAX.
● Tipo di modem : Selezionare il modem in uso: Esterno
<External> o Esterno avanzato <Advanced
External>.
● Prefisso : Se si usa una linea interna, per chiamare
all'esterno può essere necessario inserire il
prefisso. Per inserire il prefisso o la stringa di
configurazione, premere il tasto VERDE (TEXT).
● Composizione : Scegliere tra A pulsanti <Tone> e A impulsi <Pulse>.
NNoottaa : Il modem esterno viene fornito solo dai service provider e da alcuni rivenditori,
non da SAMSUNG.
4.5 Impostazioni ora e timer
1) ora
● Posizionare il cursore sul sottomenu e premere OK.
● Premere i tasti
L’ora locale verrà modificata in base all’area geografica
dell’utente.
Il GMT si riferisce all'ora standard di Greenwich.
Questa non può essere modificata.
2) Timer
Sono supportati 15 timer, inclusi quelli EPG.
● In ‘Timer’ selezionare il numero di timer, da 1 a 15, utilizzando i tasti
● Premere i tasti
Daily, Every Sunday, Every Monday, Every Tuesday, Every Wednesday, Every Thursday, Every Friday,
Every Saturday, Once (giornaliera, ogni domenica, ogni lunedì, ogni martedì, ogni mercoledì, ogni
giovedì, ogni venerdì, ogni sabato, una volta)
Se il timer viene impostato dalla schermata EPG, in ‘Ripetizione evento’ <Event Repetition> viene
visualizzato EPG.
● Premere i tasti Numerici (0~9) per impostare la durata desiderata e premere i tasti
scegliere l’ora di accensione. Se il valore impostato per ‘Ora accensione’ <Switch-on Time> è
uguale a quello di ‘Ora spegnimento’ <Switch-on Time>, il timer funziona per 24 ore.
● Selezionare TV program per impostare il programma evento premendo i tasti
preme il tasto TV/RADIO, si passa dal programma TV al programma Radio e viceversa.
● I timer possono essere impostati su Ogni giorno <Daily>, Ogni lunedì <Every Monday>, Ogni
domenica <Every Sunday>, ecc. La priorità ha la ripetizione evento più bassa. Ad esempio,
impostando i timer su una volta e ogni giorno, ‘Una volta’ <Once> prenderà il posto di ‘Ogni giorno’
<Daily> per quel giorno particolare. Se il timer è attivo, in ‘Timer’ viene visualizzato il messaggio ‘In
funzione’ <Running> con un numero di timer.
/
per modificare l’ora locale nel fuso orario.
/
.
/
per selezionare la ripetizione degli eventi che si desidera impostare :
/
. Quando si
/
per
I
I-28
RICEVITORE SATELLITARE DIGITALE
I-29
Page 19

DSB-A200C
DSB-A200C
AZIONAMENTO DEL RICEVITOREAZIONAMENTO DEL RICEVITORE
4.6 Informazioni di sistema
Se si desidera contattare il proprio provider di servizi oppure un
centro servizi, è possibile che vengano richieste le informazioni
disponibili in questo menu.
Posizionare il cursore sul sottomenu e premere il tasto OK.
Apparirà la seguente schermata.
NNoottaa : Se si dimentica il codice PIN, premere quattro volte il
tasto ‘0’. Viene visualizzato il codice PIN corrente.
Tenere presente che, con questo metodo, anche i
bambini o altre persone possono visualizzare il
codice PIN.
4.7 Aggiornamento software
È possibile scaricare e aggiornare il software di questo STB tramite
i satelliti ASTRA, Sirius e Hotbird quando viene rilasciata una nuova
versione.
NNoottaa : In futuro, i satelliti per l'aggiornamento del software
Samsung possono cambiare.
Durante lo scaricamento, non spegnere il STB.
Se esiste una nuova versione del software da scaricare,
verrà richiesto se si desidera eseguire l’aggiornamento o no.
Se si preme il tasto OK, l’aggiornamento inizia immediatamente.
Se l’aggiornamento risulta impossibile, verrà visualizzato il messaggio seguente “You can’t update
software!” Oppure, se non è necessario l’aggiornamento, “You don’t need to update software!”
verrà visualizzato il messaggio
Se si viene informati che è cambiato il trasponditore per il software Samsung, selezionare ‘Modalità
utente avanzata’ <User Advanced Mode> nella modalità Menu utilizzando il tasto
Impostare quindi i parametri esatti per il nuovo trasponditore per Samsung.
/
.
4.8 Copia dati canale
Se si desidera copiare i dati dei canali da un ricevitore a
un altro, attenersi alle istruzioni seguenti.
Creare i dati dei canali personalizzati, ad esempio i
canali preferiti e bloccati, nel ricevitore master.
Quindi, tenere a portata di mano il ricevitore master
quando si installa un altro ricevitore.
1. Collegare i ricevitori master e slave
2. Ricevitore master (ricevitore installato) : modalità
stand-by
3. Ricevitore slave (ricevitore da installare) : modalità Menu
4. Collegare 2 ricevitori con cavo seriale RS232
(Entrambe le estremità devono avere un connettore maschio con segnali incrociati)
5. Selezionare ‘Impostazioni di sistema’ e premere il tasto OK.
6. Selezionare ‘Copia dati canale’ utilizzando i tasti
7. Premere ‘OK’ per avviare la copia dei dati sui canali
NNoottaa : Utilizzare questa funzione dopo aver rimosso la SMART CARD od i moduli CAM.
/
.
5. Interfaccia comune
Il presente decodificatore è dotato di due slot PCMCIA che
consentono l’utilizzo di due moduli CI-CAM.
Quando un modulo CAM Common Interface viene inserito in uno
slot PCMCIA, il sistema rileva il tipo di CAM automaticamente e
visualizza il menu principale.
Scegliendo questo menu sarà possibile accedere alle diverse
opzioni disponibili con il tipo di CAM, ad esempio autorizzazioni,
prenotazioni, dettagli del pacchetto ecc.,
NNoottaa : Il menu varia a seconda della CAM inserita.
Se il modulo non è stato ancora installato, viene specificata
la fase “Nessuna card”.
I
I-30
Durante l'inserimento di qualsiasi CAM, video o audio possono risultare distorti.
Questo non significa che il decodificatore è guasto.
RICEVITORE SATELLITARE DIGITALE
I-31
Page 20

DSB-A200C
DSB-A200C
RISOLUZIONE DEI PROBLEMI
Problema Causa possibile Soluzione
Nessun LED visualizzato Il cavo di alimentazione Collegare il cavo di
sul pannello anteriore; non è collegato correttamente alimentazione correttamente
assenza di alimentazione
Nessuna immagine sullo Ricevitore in modalità standby; Impostare il ricevitore su "On";
schermo cavo Scart non collegato Verificare il collegamento e correggere;
saldamente all’uscita video del
televisore; canale errato Verificare il canale e l’uscita video e
o uscita video selezionata correggere (consultare il manuale di
scorrettamente sul televisore istruzioni del televisore)
Audio assente Cavo audio non collegato Verificare il collegamento e correggere;
correttamente;
Livello sonoro = 0; Aumentare il livello sonoro sul televisore;
disattivazione audio attiva Premere il tasto MUTE
Il telecomando non Utilizzo errato; Puntare il telecomando
funziona direttamente verso il ricevitore.
batterie esaurite o inserite Sostituire le batterie o inserirle
scorrettamente correttamente
Immagine non nitida. Potenza del segnale troppo Verificare la potenza del segnale nel menu
bassa "Auto Scan", correggere l’allineamento
dell’antenna
Messaggio di errore Cavo dell’antenna non collegato Verificare il collegamento e correggere;
"Searching for signal" o allentato;
LNB difettoso; Modificare l’LNB;
posizione errata dell’antenna Verificare la posizione e correggere,
satellitare; Verificare la potenza del segnale nel menu
"Auto Scan"
Messaggio di errore Satellite non ancora impostato Eseguire la ricerca tramite il menu
"Channel data does not exist."
Messaggi di errore: Smartcard: (dipende dal modello)
"Please check the non inserita o non Verificare la smartcard.
Smartcard"; inserita correttamente. Inserire la smartcard.
"Please insert the
Smartcard".
"Automatic scanning" o "Manual scanning"
CARATTERISTICHE TECNICHE
Alimentazione
Tipo : SMPS
Tensione di ingresso : AC 100 - 240V~, 50/60 Hz
Potenza fusibili: 250 V/T1.6 AH
Sintonizzatore
Intervallo difrequenza : 950 ~ 2150 MHz
Livello segnale di ingresso : -65 ~ -25 dBm
Selezione canale: sintetizzatore frequenze PLL
75 Ω
Impedenza di ingresso :
Tipo di connettore : F tipo femmina
C o n t rollo alimentazione LNB: 13 V/18 V, tono 22 KHz
DiSEqC : versione 1.2 supportata
Demodulatore
Tipo : QPSK DEMODULATION (DVB-S)
Notazione della velocità: 2 ~ 45 Ms/s
FEC intern a : Viterbi Convolutional
FEC estern a : Reed Solomon Coding (204,188) t = 8
Decoder video
Decodifica sistema: MPEG 2 ISO/IEC 13818 (flusso di trasport o )
Profilo e livello: MPEG 2 M P @ M L ( 4 : 2 : 2 )
Velocità dati: 1~ 15 Mb/s
Formati video: 4:3 (normale) e 16:9 (schermo larg o )
Risoluzione immagine: 720(H) x 576(V) x 50 campi/sec
Decoder audio
Decodifica sistema: Livello MPEG 1 ISO/IEC 11172~3 I e II
Modalità audio: mono, duale, stereo, joint stere o
Frequenza di campionamento:
sbilanciata
Coding Rate - 1/2,2/3,3/4,5/6,7/8
32, 44.1, 48 kHz
I
SMALTIMENTO
Il dispositivo, il materiale di imballaggio (ad esempio stirene in schiuma) e le batterie
non devono essere mai eliminate con i rifiuti domestici.
Richiedere le informazioni relative alle normative locali e smaltire i rifiuti nel rispetto di
tali norme.
I-32
RICEVITORE SATELLITARE DIGITALE
I-33
Page 21

DSB-A200C
DSB-A200C
CARATTERISTICHE TECNICHE
Uscita A/V
TV SCART : VIDEO (CVBS, RGB), AUDIO R&L
VCR SCART : VIDEO (CVBS,RGB), AUDIO R&L
PRESA RCA : VIDEO (CVBS), AUDIO R&L
:
SPDIF
Uscita componente (Y, Pb, Pr) : livello uscita Y:
Modulatore RF
Uscita modulatore : CH 21~69 (preimpostato su CH 21)
Tipo video : PAL B/G, K, I
Livello output UHF : 70±5 dBµV
Connetto re diuscita : IEC maschio
Connetto re ant. O/P : IIEC femmina
Metodo di sintonizzazione : sintetizzatore frequenze PLL
Interfaccia datiseriale
Standard : RS232C, Max. 115.2 kB
Tipo di connettore : 9 pin tipo D femmina
Uscita audio digitale
1Vp-p(75Ω)
livello uscita Pb/Pr: 0,684
Vp-p(75Ω)
MEMO
I
Common Interface
Tipo di modulo : PCMCIA TYPE II x 2
CAM disponibile : VIACCESS, IRDETO, NAGRAVISION,
CRYPTOWORKS, CONAX, SECA, Etc.
RICEVITORE SATELLITARE DIGITALE
I-35I-34
Page 22

Instructions for use . . . . . . . . . . . . . . GB
DSB-A200C
Page 23

DSB-A200C
Instructions for use
GB
DIGITAL SATELLITE RECEIVER
Page 24

SAFETY INSTRUCTIONS
This STB has been manufactured to satisfy international safety standards.
Please read the following recommended safety precautions carefully.
MAINS SUPPLY: AC 100-240V~, 50/60Hz
OVERLOADING: Do not overload wall outlets, extension cords or adapters
as this can result in fire or electrical shock.
LIQUIDS: Keep liquids away from the STB.
CLEANING: Before cleaning, disconnect the STB from the wall socket.
Use a cloth lightly dampened with water(no solvents) to
clean the exterior.
DSB-A200C
VENTILATION: Do not block the STB ventilation holes. Ensure that free airflow
is maintained around the STB. Never store the STB where it is
exposed to direct sunlight or near heating equipment e.g. a
radiator.
Never stack other electronic equipment on top of the STB.
Place the STB at least 30mm from the wall.
ATTACHMENTS: Do not use any attachment that is not recommended by the
manufacturer; it may cause a hazard or damage the equipment.
CONNECTION TO THE SATELLITE DISH LNB:
The LNB connector cable has voltage in its center core. It is
therefore recommended that the STB be disconnected from
the mains power before connecting or disconnecting this cable.
FAILURE TO DO SO COULD DAMAGE THE LNB.
SERVICING: Do not attempt to service this product yourself.
Any attempt to do so will make the warranty invalid.
Refer all servicing to a qualified service agent.
LIGHTNING: If the STB is installed in an area subject to intense lightning
activity, protection devices for the STB mains connector and
modem telephone line are essential.
The individual manufacturer’s instruction for safeguarding other
equipment, such as TV set, Hi-Fi, etc., connected to the STB must
also be followed during lightning storms.
GB
GROUNDING: The ground of the LNB cable must be directly connected to the
system ground for the satellite dish.
The grounding system must comply with local regulations
NNoott ee :Dispose the used batteries at designated place for environment protection
GB-1
Page 25

DSB-A200C
DSB-A200C
CONTENT GENERAL FEATURES
Safety Instructions . . . . . . . . . . . . . . . . . . . . . . . . . . . . . . . . . . . . . 1
General Features . . . . . . . . . . . . . . . . . . . . . . . . . . . . . . . . . . . . . . . 3
Connecting Your STB . . . . . . . . . . . . . . . . . . . . . . . . . . . . . . . . . . . 4
Description . . . . . . . . . . . . . . . . . . . . . . . . . . . . . . . . . . . . . . . . . . . 6
Front Panel . . . . . . . . . . . . . . . . . . . . . . . . . . . . . . . . . . . . . . . . . . . 6
Rear Panel . . . . . . . . . . . . . . . . . . . . . . . . . . . . . . . . . . . . . . . . . . . 7
Remote Control Unit . . . . . . . . . . . . . . . . . . . . . . . . . . . . . . . . . . . . 8
Basic Functions. . . . . . . . . . . . . . . . . . . . . . . . . . . . . . . . . . . . . . . . 10
Operating The Receiver . . . . . . . . . . . . . . . . . . . . . . . . . . . . . . . . . 16
Main Menu . . . . . . . . . . . . . . . . . . . . . . . . . . . . . . . . . . . . . . . . . . . . 16
1. Installation . . . . . . . . . . . . . . . . . . . . . . . . . . . . . . . . . . . . . . . . 16
1.1 LNB Setting . . . . . . . . . . . . . . . . . . . . . . . . . . . . . . . . . . . . 17
1.2 Positioner Setting. . . . . . . . . . . . . . . . . . . . . . . . . . . . . . . . 17
1.2.1 User Mode . . . . . . . . . . . . . . . . . . . . . . . . . . . . . . . . . . . 18
1.2.2 Installer Mode . . . . . . . . . . . . . . . . . . . . . . . . . . . . . . . . . 18
1.3 Solarsat Setting . . . . . . . . . . . . . . . . . . . . . . . . . . . . . . . . . 19
1.4 Auto Scanning . . . . . . . . . . . . . . . . . . . . . . . . . . . . . . . . . . 19
1.5 Manual Scanning . . . . . . . . . . . . . . . . . . . . . . . . . . . . . . . . 20
1.6 SMATV Scanning . . . . . . . . . . . . . . . . . . . . . . . . . . . . . . . . 21
1.7 Reset to Factory Defaults . . . . . . . . . . . . . . . . . . . . . . . . . . 21
2. Channel Organising . . . . . . . . . . . . . . . . . . . . . . . . . . . . . . . . . 22
2.1 Delete Satellite . . . . . . . . . . . . . . . . . . . . . . . . . . . . . . . . . . 22
2.2 Delete Transponder . . . . . . . . . . . . . . . . . . . . . . . . . . . . . . 22
2.3 Delete Channel . . . . . . . . . . . . . . . . . . . . . . . . . . . . . . . . . 22
2.4 Delete All Channel . . . . . . . . . . . . . . . . . . . . . . . . . . . . . . . 23
2.5 Delete Scrambled Channels . . . . . . . . . . . . . . . . . . . . . . . . 23
2.6 Favorite Channels . . . . . . . . . . . . . . . . . . . . . . . . . . . . . . . 23
2.7 Move & Edit Channel . . . . . . . . . . . . . . . . . . . . . . . . . . . . . 24
3. Parental Lock . . . . . . . . . . . . . . . . . . . . . . . . . . . . . . . . . . . . . . 25
3.1 Set Channel Lock. . . . . . . . . . . . . . . . . . . . . . . . . . . . . . . . 25
3.2 Change PIN Code . . . . . . . . . . . . . . . . . . . . . . . . . . . . . . . 26
4. System Setup . . . . . . . . . . . . . . . . . . . . . . . . . . . . . . . . . . . . . . 26
4.1 Language Selection . . . . . . . . . . . . . . . . . . . . . . . . . . . . . . 26
4.2 OSD Setting. . . . . . . . . . . . . . . . . . . . . . . . . . . . . . . . . . . . 27
4.3 Media Settings. . . . . . . . . . . . . . . . . . . . . . . . . . . . . . . . . . 28
4.4 Modem Settings. . . . . . . . . . . . . . . . . . . . . . . . . . . . . . . . . 29
4.5 Time &Timer Setting . . . . . . . . . . . . . . . . . . . . . . . . . . . . . . 29
4.6 System Information . . . . . . . . . . . . . . . . . . . . . . . . . . . . . . 30
4.7 Software Upgrade . . . . . . . . . . . . . . . . . . . . . . . . . . . . . . . 30
4.8 Copy Channel Data . . . . . . . . . . . . . . . . . . . . . . . . . . . . . . 31
5. Common Interface . . . . . . . . . . . . . . . . . . . . . . . . . . . . . . . . . . 31
Troubleshooting. . . . . . . . . . . . . . . . . . . . . . . . . . . . . . . . . . . . . . . . 32
Disposal . . . . . . . . . . . . . . . . . . . . . . . . . . . . . . . . . . . . . . . . . . . . . . 32
Technical Specifications . . . . . . . . . . . . . . . . . . . . . . . . . . . . . . . . . 33
1. USER SECTION
2. TUNER SECTION
3. VIDEO SECTION
4. AUDIO SECTION
4000 PROGRAMMABLE CHANNELS
SOFTWARE DOWNLOAD VIA SATELLITE & PC(Secured)
ADVANCED ELECTRONIC PROGRAM GUIDE
MULTI LANGUAGE SUPPORTED FOR OSD
SUBTITLE & TELETEXT(OSD & VBI)SUPPORTED
WITH MULTI LANGUAGE
DiSEqC 1.2 SUPPORTED
FULL FUNCTION INFRARED REMOTE CONTROL UNIT
7 SEGMENT LED DISPLAY
AUTO AND MANUAL SCAN FACILITY
CHANNEL ORGANIZING(PROGRAMMABLE)
SCARTS & RCA OUTPUT
LOW POWER CONSUMPTION
9 FAVORITE LISTS
AUTO UPDATED EPG
PASS LOOP FOR RGB SIGNAL
15 TIMERS TO RESERVE PROGRAMS(EVENTS) FOR TURNING
ON/OFF
950~2150 MHz WIDE BAND TUNER
IF OUTPUT WITH DC PASS LOOP FOR ANALOG RECEIVER
SUPPORTING DiSEqC 1.2 VERSION
13V/18V SWITCHING
22KHz CONTINUOUS TONE CONTROL
DVB-S COMPLIANT
MPEG-2 VIDEO(MP@ML)
2~45 MS/s SYMBOL RATE
COMPATIBLE FOR BOTH SCPC/MCPC
SUPPORTS ASPECT RATIO 4:3(NORMAL) AND
16:9(WIDE SCREEN)
MODULATOR OUTPUT
MPEG 1 AUDIO LAYER I & II
MONO, DUAL, STEREO AND JOINT STEREO AUDIO MODE
32, 44.1 AND 48 kHz SAMPLING FREQUENCIES
VOLUME CONTROL AND MUTE FUNCTION THROUGH
REMOTE CONTROL UNIT
SPDIF DIGITAL AUDIO OUTPUT
DOLBY DIGITAL ENCORDED BIT-STREAM OUTPUT(OPTIONAL)
GB
GB-2
DIGITAL SATELLITE RECEIVER
GB-3
Page 26

DSB-A200C
DSB-A200C
CONNECTING YOUR "STB"
CONNECTING YOUR “STB”
1. LOCATION OF THE RECEIVER
Your
STB
should be placed under proper ventilation.
Don’t put in completely enclosed cabinet that will restrict the flow of air,
resulting in overheating.
The location should be safeguarded from direct sunlight,
excess moisture, rough handling or household pets.
Avoid stacking other electronic components on the top of the receiver.
The location should be safely accessible by the cable from your
antenna system.
2. CONNECTING THE RECEIVER WITH DISH SYSTEM
After installing your antenna system, connect the coaxial cable from the
LNB of your antenna to “DISH INPUT” terminal marked at the rear
of the
STB
.
All cable connectors should be finger tightened; do not use any kind
of wrench while tightenning connectors. The cable should be 75ohm
impedance coaxial twisted at the end with an “F” type connector.
3. CONNECTING THE RECEIVER TO TV
To connect the receiver with your television, you can use four methods;
Via SCART cable, RF cable, RCA cable or Color component(Y, Pb, Pr) cable.
Color component(Y, Pb, Pr) provides the more faithful reproduction of the colors.
Connect the RF cable to the terminal marked “
of
STB
and its other end to the TV RF input socket.
In the case of connecting your TV through
SCART
connector marked TV to the respective
RF OUT
SCART
SCART
” at the rear panel
cable, connect the
port on the TV.
7. CONNECTING DIGITAL AUDIO SYSTEM
Connect a fiber optic cable between Optical SPDIF on the receiver and Optical SPDIF
on the Digital Audio System.
8. INSERTING COMMON INTERFACE CAM(CONDITIONAL ACCESS MODULE)
AND SMARTCARD
The STB supports Common Interface CAMs under DVB specification.
The CI CAMs include a built-in smart card reader.
● Insert the smart card into the CAM gently with the gold colored chip upwards
● Slide in the CAM gently inside the slot so that it sits in the socket tightly.
● To remove the CAM push the button provided by the side of the CAM slot.
The CAM will be ejected from the socket.
NNoott ee :
Connecting Figure
The following Common Interface CAMs are available now:
IRDETO, CONAX, CRYPTOWORKS, VIACCESS, NAGRAVISION, SECA, Etc.
GB
4. CONNECTING YOUR ANALOG RECEIVER
To facilitate the user using analog receiver to view analog channels,
STB
has been provided with a loop through terminal marked as “
Connect the coaxial cable from this terminal to the IF input terminal of
your analog receiver. Now by keeping the
STB
in standby,
you will be able to tune and view analog channels from
your analog receiver.
5. CONNECTING YOUR VCR
To connect a VCR or DVD player, the STB has been provided with SCART
at the rear marked “AV2”.
Using a SCART connector, the VCR or DVD player can be connected to the receiver.
NNoott ee :
This is supported by standby.
6. CONNECTING EXTERNAL AUDIO / HI-FI SYSTEM
To connect any external Audio Hi-Fi system, the receiver has been provided
with two RCA connectors at the back of the receiver,
marked with AUDIO L and R respectively to connect the left and right Audio.
GB-4
LOOP
”.
You can set the various media settings you want.
Place the cursor on this sub menu(System Setup ➔ media setting menu) and press OK.
● Press the
● Press the OK key to confirm. ● Press the MENU/EXIT keys to exit the menu.
● Select the TV system : PAL, SECAM, NTSC, PAL ➔ (auto)NTSC, SECAM ➔
/
keys to move the sub items and press the /
(auto)NTSC, NTSC ➔ (auto)PAL or NTSC ➔ (auto)PAL
● Select the TV type according to your TV: STANDARD 4: 3 ratio or WIDE SCREEN 16 : 9 ratio type.
● Select the aspect ratio conversion : Letter box, Pan & Screen, Mixed or Full
● Select the Video Signal Type : Composite, Composite + RGB, Composite + YUV or S-Video
● Select the RF Channel : Ch 21~Ch 69 ● Select Broadcasting System : B/G, I or D/K
NNoott ee :
Selecting RGB video signal out, YUV(YPbPr) video out turns off.
Selecting composite+YUV video signal out, YUV(YPbPr) video out turns on.
DIGITAL SATELLITE RECEIVER
GB-5
keys to select the option.
Page 27

DSB-A200C
DSB-A200C
DESCRIPTION
DESCRIPTION
Front Panel
1
1.
2. OK
3. ,
4. ,
5. 7
Segment Display This LED display will show the current channel number.
6. Infrar
7. CA Module Slot
ed Sensor This is to receive the IR commands from the Remote
23 645
This key is for turning the receiver on and Standby.
This key is for entering and confirming any data to the receiver in the
menu system. This key is for selecting the item. Press while viewing
TV and a list of channels is displayed.
These keys are for changing the channels during watching TV and for
moving the highlight bar for selecting options on the menu.
These keys are for increasing and decreasing the volume level
manually during watching TV and for moving the highlight bar for
selecting options on the menu.
While the receiver is in Standby mode, the display will
show the current time.
Control Unit.
In the slot you can use a CA module from a service provider
of your own choice.
Rear Panel
7
11
1. AC MAINS This is to plug in the AC mains power cord.
2. 0/12V This is for connecting to an external LNB switch.
3. RS 232 DATA PORT This is for connecting your receiver to a computer for reading
4. ANT.IN This is for connecting your local RF channels to your TV through Loop.
5. RF OUT This is for connecting to your TV via RF cable.
6. AV SCARTS This is for connecting to your AV scarts for TV & VCR or
7. COLOR COMPONENT(Y, Pb, Pr)
8. VIDEO, AUDIO R/L These RCA connectors are for connecting any external video
8
The input AC voltage range is 100V to 240V~, 50Hz/60Hz supply.
and loading data information.
DVD player.
This is for connecting STB to your TV by using COLOR
COMPONENT(Y, Pb, Pr) cable. To view a normal picture by
connecting a color component cable, set the video signal
type to Composite + YUV in Media Setting mode.
and audio.
6710 594
32
1
GB
NNoott ee : CA modules and smart cards are only distributed by service
Providers and special distributors, not by SAMSUNG.
GB-6
DIGITAL SATELLITE RECEIVER
9.
DIGITAL AUDIO OUT(OPTICAL)
Output for connection to a digital amplifier.
10. LOOP To enable the connection of an Analog receiver.
The receiver is provided with this ‘
11. DISH INPUT This port is to connect the coaxial cable from LNB of your dish.
The IF input is provided through this port and the input frequency
range is 950-2150 MHz. Also the voltage switching 13V and
18V is passed through this port.
GB-7
LOOP
’ port.
Page 28

DSB-A200C
Remote Control Unit
DSB-A200C
DESCRIPTION DESCRIPTION
NNoo tt ee : When inserting batteries,
make sure that the polarity(+/-) is correct.
1. POWER
This is for switching the receiver
ON/STANDBY mode.
2. 0-9 NUMERICAL keys
These keys are to enter numeric values and
to select the channel directly by entering its
number.
3. PG+/PG-
These keys are for moving up or down pages on
the menu and TV/Radio list.
4. TV/RADIO
This key is for toggling between the TV channel
and Radio channel.
5. MUTE
This key is for toggling between
normal & muted audio.
6. FAV
Use the key to switch between favorite lists.
7. EPG
Electronic Program Guide key displays the
TV/Radio Program guide.
8. LAST
This key is for calling up directly whatever
channel you were watching from the list.
9. TEXT(GREEN)
This key is for selecting the subtitle mode.
This key functions same as the GREEN
key on the menu.
Press it once and subtitle appears. You can
select the language you want using the
channel up/down keys.
Press twice it. Then Teletext will be displayed
on TV Screen without operating anything on TV.
This Teletext can be displayed on TV which
doesn’t support Teletext functionality.
Press three times it. Then Teletext will be
available on TV. It means that Teletext can be
chosen by TV with TV RCU.
10. ALT(YELLOW) This key is for selecting the soundtrack list for the current service.
This key functions same as the YELLOW key on the menu.
Press it once and sound track appears.
Press it twice and video track appears.
The sound and video track services are not provided for every
channel and depend on the conditions the operator is in.
This key is for displaying the help message in the sub-menu.
11. AUDIO(BLUE) This key is for changing the Audio to the left, right or both channels,
This key functions same as the BLUE key on the menu.
12.
i (INFORMATION) This key is for displaying the program information box in the screen.
(RED) This key functions same as the RED key on the menu.
Press it once and you can get simple information on the program.
Press it twice and you can get detailed information on the channel in
text box.
13. MENU This key is for opening up the menu or returning to the previous menu.
14. EXIT This key is for exiting a menu or returning to the previous menu or exiting
some banners.
15. OK This key is for entering and confirming any data to the receiver in the
menu system. This key is for selecting the item. Press while viewing
TV and a list of channels is displayed.
/ / /
16.
These keys are for moving the highlight bar for selecting
options on the menu.
17. CH /CH These keys are for changing channels.
18. VOL+/VOL- These keys are for increasing or decreasing the volume.
19. TIMER This key is for reserving events(programs) into timer(s) in EPG. If a event is
set in timer, it will be turned on/off automatically based on start/end time of
event. This key activates/deactivates timer(s) in EPG as toggle type.
After activating EPG screen by pressing ‘EPG’ key, you can select the
interesting event (program) using the
/
keys and / keys. Then,
press ‘timer’ key. If this event is reserved in the timer, ® is displayed
on the right corner of this event name. ‘EPG’ on ‘Event Repetition’ in
‘Time & Timer Settings’ menu is displayed, too.
However, if there is no event on EPG for the channel, this Timer can’t
be supported.
GB
GB-8
DIGITAL SATELLITE RECEIVER
GB-9
Page 29

DSB-A200C
DSB-A200C
BASIC FUNCTIONS
BASIC FUNCTIONS
1. Display Screen
Before you can view the television program, you must perform the installation.
Therefore you will see only menu images at first.
After the television channels have been programmed, you will see the following
picture(banner) each time you switch channels:
Channel Number
Program Information Current FavoriteSignal Status
● Press the RED( i ) key in view mode.
● Select the channel by pressing NUMERICAL (0~9) keys or
TV/RADIO key to move to TV or Radio channel.
You will also see this picture each time you change channels.
When you press TV/RADIO key on the Remote Control Unit, TV and RADIO program are toggled.
Detailed program information
● Press the RED( i ) key twice while you are viewing a program.
The number of soundtrack in current channel
/
keys and select
3. Select Soundtrack
● Press YELLOW(ALT) key to see the soundtrack list.
● Press
/
and OK key to select one.
4. Select Videotrack
● Press YELLOW(ALT) key twice to see
the videotrack list.
● Press
/
and OK key to select one.
5. Sub channel List
When subchannels are available on current channel (program)
after changing channel, [C] is displayed at the right corner
on the banner. In this case, press the YELLOW(ALT) key.
Then you can get all subchannel list.
Select subchannel which you want among subchannel list.
GB
First you will see the banner described above.
After the RED( i ) key is pressed in the second time, detailed information for current program can
be displayed on another banner, if there is more information. When this information is more than
one page, PG+/PG- keys can be used for page up and down.
NNoottee
: This service depends on service provider.
2. Volume Control
To control the volume level :
● Press
● Press MUTE key to turn to silence mode.
● Press MUTE key again or
/
, VOL- or VOL+
keys to adjust the volume level.
/
keys in order to cancel the mute function.
GB-10
DIGITAL SATELLITE RECEIVER
6. Service List
● Press OK key to while you are viewing a program.
● Select list by pressing TV/RADIO or FAV key.
The icon behind the channel name symbolises
scrambled channel, and the icon behind the
channel name shows parental lock channel.
● Select the channel by pressing
● Press OK key to watch that channel.
The colour key corresponds the following service list.
● Green(TEXT) key : Favorites
● Yellow(ALT) key : Alphabetical
● Blue(AUDIO) key : Provider
● Red( i ) key : Transponder
/
, PG+/PG-.
GB-11
Page 30

DSB-A200C
DSB-A200C
BASIC FUNCTIONS BASIC FUNCTIONS
6.1 Service Favorites
● Press the GREEN(TEXT) key on the control unit to select the
Favorites list.
● Press the GREEN(TEXT) key to switch between favorite list
and channel list.
● Use the
/
, PG+/PG- keys to select a favorite group or a
channel that you want.
6.2 Service Alphabetical
● Press the YELLOW(ALT) key on the remote control unit to
select the Alphabetical list.
● Press the YELLOW(ALT) key to switch between alphabet list
and channel list.
● Use the
/
, PG+/PG- keys to select a Alphabetical group
or a channel that you want.
6.3 Service Provider
● Press the BLUE(AUDIO) key on the remote control unit to
select the Provider list.
● Press the BLUE(AUDIO) key to switch between Provider list
and channel list.
● Use the
channel that you want.
/
, PG+/PG- keys to select a Provider group or a
7. Program Information
EPG-Electronic Program Guide
The electronic program guide gives you information
for the channels.
NNoottee
: 1. This service depends on service provider.
2. After receiver recognized the GMT-time
from the signal which takes few seconds,
it can display correct EPG information.
● Press EPG key while you are viewing a program.
This function is displayed on the screen by using only time.
You will see “EPG” in the LED display of the receiver.
● GREEN(TEXT) key: Green key is for moving back to the previous date.
● YELLOW(ALT) key: Yellow key is for moving to the next coming date.
● BLUE(AUDIO) key can be used for page up, if there is more information than one page.
● RED( i ) key can be used for page down, if there is more information than one page.
Time interval can be adjusted by press keys as followings on EPG screen:
1 key: 1 hour and 30 minutes 2 key: 30 minutes 3 key: 15 minutes
With the TV/RADIO or FAV key you can browse among the various programs lists.
● Select the channel by pressing
Current event can be returned by pressing LAST key during moving events on this channel.
● When the TIMER key on the remote control is pressed in the EPG screen, if the current channel
involves an event, timer is set immediately and the set timer is indicated on the EPG screen. A
program that has been set in this way is indicated on Timer Field of Time & Timer Setting.
/
, PG+/PG- keys and press OK key to watch this channel.
GB
6.4 Service Transponder
● Press the RED( i ) key on the remote control unit to select the
Transponder list.
● Press the RED( i ) key to switch between Transponder list and
channel list.
● Use the
or a channel that you want.
/
, PG+/PG- keys to select a Transponder group
GB-12
8. Subtitle
When the current broadcasting program provides subtitle,
press the GREEN(TEXT) key to see the current subtitle
language list. If Subtitle is available on current program,
is displayed on the banner after changing program(channel)
or pressing RED( i ) key.
To change the subtitle language:
● Press the GREEN(TEXT) key to see the subtitle language List.
● Use the
● Press the OK key and then the subtitle language you want is displayed.
The menu display is carefully created and user friendly to assure the easy operation
of the receiver by the user.
DIGITAL SATELLITE RECEIVER
/
keys to select a subtitle language you want.
GB-13
Page 31

DSB-A200C
DSB-A200C
BASIC FUNCTIONS BASIC FUNCTIONS
9. Teletext OSD
When the current broadcasting program provides Teletext , press
the GREEN(TEXT) key twice to see the current language list for
Te letext in order to get teletext in OSD regardless of TV type.
[T] at the right corner on the banner shows that Teletext is available
on this event(program). Even [T] is displayed on the banner,
Te letext may not be available due to broadcasting.
To change the Teletext OSD:
● Use the
● Press the OK key and then the Teletext OSD you want is displayed on the screen.
/
keys to select a Teletext OSD you want.
10. Teletext VBI
When the current broadcasting program provides
Teletext VBI, press the GREEN(TEXT) key three times
to see the current language list for Teletext.
This Teletext will be displayed to the screen by TV, which supports
Teletext.
[T] at the right corner on the banner shows that Teletext is
available on this event(program). Even [T] is displayed on the
banner, Teletext may not be available due to broadcasting
12. Near Video on Demand (NVOD)
If the changed channel is a NVOD service channel,
[N] is displayed at the right corner on the banner. In this case,
press the YELLOW(ALT) key.
Then you can get all NVOD list.
Select NVOD program among those lists.
Select the desired time to watch using the
/
keys,
and then press the OK key to watch the desired program.
13. Multi feed channel or subchannel
If the changed channel is a multi feed service channel,
[C] is displayed at the right corner on the banner.
In this case, press the YELLOW(ALT) key.
Then you can get all subchannel list.
Select a program among those list, using the / keys,
and then press the OK key to watch the selected program.
GB
To change the Teletext VBI:
● Use the
● Press the OK key and then the Teletext VBI you want is displayed on the screen.
/
keys to select a Teletext VBI you want.
11. Audio Mode
You can choose a mode among left, right or stereo using the
BLUE(AUDIO) key.
To change the audio mode:
● Press the BLUE(AUDIO) key to select the left, right or stereo.
● Press the EXIT key to save and escape from this menu.
GB-14
DIGITAL SATELLITE RECEIVER
GB-15
Page 32

DSB-A200C
DSB-A200C
OPERATING THE RECEIVER
OPERATING THE RECEIVER
Main Menu
After installing your antenna system and STB with appropriate connectors.
● Plug in the AC main power and switch on the receiver.
● Press MENU key to bring up the main menu.
“
The LED display will show
MENU”.
The following on screen display will appear:
The sub menu topics will be displayed.
For the sub-menus Installation, Channel Organising and
Parental Lock you need the PIN Code.
Before you begin with the “Installation” menu,
you should check in the 4th menu “System Setup”
whether all the information there is applicable for you.
● To see the help message, press the YELLOW(ALT) key.
1. Installation
1.1 LNB Setting
You can select the satellite and LNB setting conditions
to execute channel search and you can alter the settings
for 22KHz tone. The parameters set in this menu are
needed for programming the channels for the “Auto scanning”
and “Manual scanning”.
The necessary information can be found at your
antenna and LNB brochures, or you can ask your dealer.
● Select LNB power supply “On”.
● Select the desired satellite name.
● Select the LNB type (frequency).
● Select the DiSEqC Mode
(Off, DiSEqC A, DiSEqC B, DiSEqC C, DiSEqC D, Tone Burst A, Tone Burst B)
If you are using a Positioner, select Positioner DiSEqC1.2 (“Yes” or “No”)
22KHz: In case you are using a dual LNB or two antennas connected to a 22KHz tone
switch box, with the 22 KHz tone switch (“On”, “Off” or “Auto”) you can switch
between both LNB or antennas.
0/12V: When you use two LNBs or antennas is switched to 0/12V, select what LNB and
antenna are used enable or disable. 0/12V terminal is located on the rear of STB.
GB
The menu provides settings for customizing, adding new
services and displaying the status of the receiver.
● Select “Installation” in the main menu mode to select the
sub menu.
● Enter the PIN Code.
If you have not entered your own PIN Code then the
PIN Code 0000 applies, which was set at the factory.
1.2 Positioner Setting
If you have a DiSEqC 1.2 motorized system
which is fully compatible with DiSEqC1.2, then you can
take advantage of the DiSEqC 1.2 functions available.
● Select Satellite.
● Select any transponder from above satellites and
check out the Frequency, Symbol Rate, FEC and Polarity.
In case problems arise, ask your dealer.
Sometimes this transponder may not exist due to broadcasting.
It is better to select main transponder among them for the
desired satellite.
● Select from Menu Mode:
“User” mode : Enables control of basic positioner function
recommended for beginners. General user uses “User” mode.
“Installer” mode : This is used to search for the position of a satellite manually.
GB-16
DIGITAL SATELLITE RECEIVER
GB-17
Page 33

DSB-A200C
DSB-A200C
OPERATING THE RECEIVER
1.2.1 User Mode
● Select Driving Mode:
You have an option to choose the positioner’s movement
type: Continuous, Step or Time.
● Position the antenna with north, south, east and west and
use the/ / / key to drive motor.key drives to west,
key drives to east,key drives to north andkey drives
to south.
● If you finished driving of motor, select “Store current Position.”
and press OK key, to reset new driving motor.
NNoottee
: The level indicated in the “Signal Status” is only for reference.
The signal quality may be adequate even though the level indicated is not maximum.
● Go to Stored Position.
When the stored position is reached then screen displays “Stop”,
you can now continue with the further operations.
● Select the Calculate Sat Positions to recalculate the satellite position and OK key.
OPERATING THE RECEIVER
1.3 Solarsat Setting
This menu is only for the Solarsat antenna.
When you press this menu, you will get this message,
“This menu is only for the Solarsat antenna.
If you have one-press OK, otherwise-press EXIT.”
You can set the value according to your location.
● To set the Value of Date and Time, use the PG+/PG- keys
to change the value.
● Use the
● Use the
/
keys to change position.
/
keys to move each filed.
1.4 Auto Scanning
The sub menu “Auto Scanning” will enable download the
channels automatically from the preprogrammed satellites.
To download channels automatically:
You can select All/Off/Only Free option mode with the the
/
keys in each satellite, which can be displayed more by
the PG+/PG- keys .
GB
1.2.2 Installer Mode
After checking the positioner’s state, installer should use this menu.
He should set the “Disable Limits” before using User mode.
● Select the Drive Motor West/East and use the
/
keys
to drive motor.
key drives to west andkey drives to east.
● Select “Enable Limit”, in order to enable “Set Limit”.
● Select “Disable Limit”, in order to disable “Set Limit”.
● Select “Reset Positioner” and OK key to reset positioner.
Off : No Scan
All : Scan all the channels
Only Free : Scan free channels
● Press OK key.
Auto Scanning menu will be displayed.
All the channels in the list from the selected satellite will be
automatically downloaded.
After scanning you will see “Your digital receiver found...”.
Then, you should press OK key to store all channels into STB.
GB-18
DIGITAL SATELLITE RECEIVER
GB-19
Page 34

DSB-A200C
DSB-A200C
OPERATING THE RECEIVER
1.5 Manual Scanning
To tune-in new channels and weak signals, the STB has
been provided with the option “Manual Scanning” where
the channel data can be entered by the user.
After selecting the “Manual Scanning” from the Installation Menu,
the following screen will be displayed:
● Select the target satellite for manual search. In order to scan
programs from the satellite which is not listed on this menu,
select ‘Satellite 1’, ‘Satellite 2’ or ‘Satellite 3’.
In case of ‘Satellite 1’, ‘Satellite 2’ or ‘Satellite 3’,
all information about the satellite which you are interested in should be put.
● Load a transponder.
This option will enable the user to load any transponder from the preprogrammed list
available within the receiver.
NNoottee
: Especially on New transponder at Load TR, this new transponder can be added
into transponder list so that you can use it on Auto Scanning later, only if at least
one channel is found with this new transponder. In order to save it, press OK key.
In order to get ‘NEW’ as new transponder at Load TR, enter ‘0’ at Load TR or go to
‘NEW’ using the / keys.
● Input the frequency of the transponder you want to find.
● Input the symbol rate of the transponder you want to find.
● Select the FEC(Forward Error Correction)of the transponder you want to find.
You can select the value of 1/2, 2/3, 3/4, 5/6, 7/8 or Auto.
● Select the polarization of the transponder you want to find.
(Horizontal/Vertical/Circular Left/Circular Right)
In the case of horizontal, 18V and in the case of vertical, 13V are output through LNB line.
● Select Scan Mode “All” or “Only Free”.
● Set “Yes” on Network Search. You can get more channels from transponder using
the homing transponder. Additionally, you can get ‘Net Name’ on the screen. This service
depends on the information from broadcasting signal.
● Select PID searching “Yes”. only if you are interested in SCPC program. You can manually
search by entering individual PID(Packet Identifier)(Video/Audio/PCR) values.
● After select option, press OK key to start the scan process.
OPERATING THE RECEIVER
1.6 SMATV Scanning
In case that several generations use Antenna and LNB
in common, search the service the from 950 to 2150MHz.
● Select Searching Type “Automatic”or “Manual”.
● Select Scan Mode “All” or “Only Free”.
● You can input alternative symbol rate from 1st to 4th.
NNoottee
: 1. When your searching type is set to Automatic
during SMATV scanning, you have only to enter
the alternative symbol rate(1~4) you want.
2. When your searching type is set to Manual
during SMATV scanning, you must enter both
frequency and symbol rate.
3. DiSEqC switch can be supported for SMATV on
‘LNB Settings’. SMATV as the satellite on
‘LNB Settings’ should be selected for supporting
DiSEqC switch.
When you select “Automatic”, STB will search all available
channels based on symbol rates over whole frequencies.
On the other hand, it will scan channels with exact
information for symbol rate and frequency on “Manual”.
1.7 Reset to Factory Defaults
This is to recover the Factory set values in case the user has
encountered some problems after changing any values of
channel data and others which may be in error.
The screen display will be as follows:
At the request window,
if you press OK key, the receiver will be reset to factory default
settings automatically.
NNoottee
: This cause your previous settings to be deleted!
All settings and information including channel data will be deleted.
GB
GB-20
DIGITAL SATELLITE RECEIVER
GB-21
Page 35

DSB-A200C
DSB-A200C
OPERATING THE RECEIVER
2. Channel Organising
The “Channel Organising” menu has seven functions:
This menu is for removing some channels from channel list
which are related with designated Satellite or Transponder.
And it provides making favorite list and moving channel position
as you want.
● Enter the PIN Code.
If you have not entered your own PIN Code 0000 applies,
which was set at the factory.
2.1 Delete Satellite
● Select the desired satellite list you want to delete by
pressing RED( i ) key.
● Press OK key for confirmation.
OPERATING THE RECEIVER
2.4 Delete All Channel
At the request window, press OK key to delete
all channels and press MENU / EXIT to exit.
2.5 Delete Scrambled Channels
At the request window, press OK key to delete
scrambled channels and press MENU / EXIT to exit.
GB
NNoottee
: This feature doesn’t delete satellite itself but
deletes the list of channels registered at the
selected Satellite.
2.2 Delete Transponder
● Select the desired transponder list you want to delete by
pressing RED( i ) key.
● Press OK key for confirmation.
NNoottee
: This feature doesn’t delete transponder itself but
deletes the list of channels registered at the
selected transponder.
2.3 Delete Channel
● Select the desired channel you want to delete by pressing
RED( i ) key.
● Press OK key for confirmation.
2.6 Favorite Channels
You can immediately register the present channel to
the desired Favorite Group.
In addition, you can register a channel to multiple favorite
groups.
● Select the desired Favorite Group(FAV1~FAV9)
using the FAV key.
● Select the desired channel list using the
keys or numeric keys at the TV or RADIO list window.
● Press the RED( i ) key and then register the selected
channel at the Favorite Group.
● Then press the OK key for confirmation.
You can change TV list or Radio list by the TV/RADIO key and
change favorite list by the FAV key.
● When you press the TV/RADIO key, TV list and Radio list are toggled.
● Press the FAV key to select another favorite list.
To delete channels from Favorite Group:
● Select a channel list to delete with
● Press the RED( i ) key to delete the selected channel from the favorite channels.
/
or PG+/PG-
/
or PG+/PG- keys or numeric keys.
GB-22
NNoottee
: One favorite list can contain max. 200 channels.
DIGITAL SATELLITE RECEIVER
GB-23
Page 36

DSB-A200C
DSB-A200C
OPERATING THE RECEIVER
2.7 Move & Edit Channel
● Select the TV/RADIO list with
● Select a channel in the TV or Radio list with
PG+/PG- keys or numeric keys.
● Select channel by pressing the RED( i ) key.
● Press the
/
or PG+/PG- keys to change the position of
the channel you want, and press the OK key for confirmation.
● If you want to return the channel to the initial position,
do not press the OK key but press the BLUE(AUDIO) key.
To edit Channel Name
● Select the TV/RADIO list with
● Select a channel to rename with
numeric keys.
● Press GREEN(TEXT) key. Font Table will be displayed.
● Select desired font table using the Num.1~6 keys.
● Select desired character with
the OK key to paste character to the string.
NNoottee
: RED key : Backspace.
EXIT key : To exit font table without changing channel name.
PG+/PG- key : To move the highlight “Move & Edit Channel”
is applied on the all channel list.
● Press the MENU key and then press the OK key
to save the set data.
/
or TV/RADIO key.
/
or TV/RADIO key.
/
or PG+/PG- keys or
/ / /
/
or
and then press
OPERATING THE RECEIVER
3. Parental Lock
This “Parental Lock” feature sets viewing restrictions and
prevents unauthorized access to your STB through the PIN
(Personal Identification Number), which is a 4 digit number.
(The factory preset PIN Code : 0000)
On selecting this menu, you will have two options:
to set lock for any desired channel and to change your
PIN value.
● Enter PIN Code.
If you have not entered your own PIN Code then the
PIN Code 0000 applies, which was set at the factory.
3.1 Set Channel Lock
● Select the channel by pressing
numeric keys.
● When you press the TV/RADIO key, TV list and Radio list
are toggled.
● Select the channel lock by pressing RED( i ) key.
● Press OK key for confirmation.
This will lock the channel. Whenever you need to view
the channel, you will have to enter the PIN at the request
window.
After entering PIN Code to able to access a parental locked
channel, it will work on all parental locked channels.
It means that you can access all parental locked
channels with entering PIN Code on any parental locked
channel successfully.
/
, PG+/PG-, / or
GB
GB-24
To cancel the lock :
● Press RED( i ) key again in order to cancel the lock.
DIGITAL SATELLITE RECEIVER
GB-25
Page 37

DSB-A200C
DSB-A200C
OPERATING THE RECEIVER
3.2 Change PIN Code
To change the PIN Code, select the second option “Change PIN Code”.
This will take you to the following menu:
In this option, you need to enter the current PIN Code at
the first cursor, and at the second cursor enter the desired
PIN Code.
To confirm, you need to enter the new PIN Code again.
Please remember the PIN Code should be a 4 digit numerical
value.
THE FACTORY PRESET PIN Code : 0 0 0 0.
NNoottee
: If you forget the PIN Code, refer to ‘System information’ part.
Once you change password, please do not forget and keep well.
4. System Setup
This option enables you to change the factory preset
system settings as per your requirements.
OPERATING THE RECEIVER
4.2 OSD Setting
You can set the OSD transparency, the display time,
Color Scheme and OSD Position.
● Select OSD Transparency level.
The OSD Transparency level from 0 to 100%.
Setting is made with the numeric keys, / keys or
PG+/PG- keys.
/
keys : Setting in increment of 1%.
PG+/PG- keys : Setting in increment of 10%.
NNoottee
: This transparency is NOT applied to color scheme with
“User Defined” option.
● Set the display duration of the information(banner) box
displayed in the screen.
The time ranges from 0.5 to 60.0 seconds.
Setting is made with the numeric keys,
/
keys : Adjusting in increment of 0.5sec.
PG+/PG- keys : Adjusting in increment of 1 sec.
/
keys or PG+/PG- keys.
GB
4.1 Language Selection
The “Language Selection” option allows the user to select
the desired language of the OSD, Soundtrack, Teletext,
Subtitle or EPG. However, these languages for Soundtrack,
Teletext, Subtitle and EPG depend on broadcasting.
For example, even the language for Subtitle can be selected,
it may not be supported because of no Subtitle on the program.
● To accommodate user from different regions speaking
different languages, OSD languages are available
20 languages.
● To select the desired language menu, press
change language and press OK.
● The OSD Language, Soundtrack, Teletext, Subtitle,
or EPG will vary according to the selected language.
/
keys to
● Set the Color Scheme :
You can change color according to your preference.
(i.e background, text, symbol, line, etc)
/
keys : select the color scheme mode.
Color scheme 1: changes the menu to sky blue color.
Color scheme 2: changes the menu to green color.
Color scheme 3: changes the menu to dark brown color.
User defined: Sets the color according to user preference.
EPG colors: Sets the color in the EPG menu.
NNoottee
: Color scheme 1, 2 and 3 may be changed in the future
by upgrading software.
GB-26
DIGITAL SATELLITE RECEIVER
GB-27
Page 38

DSB-A200C
DSB-A200C
OPERATING THE RECEIVER
To set User defined mode or EPG color mode
● Press the GREEN(TEXT) key.
The item which you want to change will appear.
● Move the item which you want to change using the
● Set the color you want using the
● Press the OK key to set.
/
keys.
/
To see the help message, press the YELLOW(ALT) key.
OSD Position
● Place the cursor on the position you want, and press the
/
keys or / keys until the screen moves to the position you want.
The screen will move to the position you want.
4.3 Media Settings
You can set the various media settings you want.
Place the cursor on this sub menu and press OK.
keys.
OPERATING THE RECEIVER
4.4 Modem Settings
This is only for supporting PPV service via a CONAX
programmes.
● Modem Type: Please choose your modem type :
External or Advanced External.
● Prefix: When you are using extension line,
if necessary, to call outside, please
enter prefix number. To enter prefix
number or configuration string,
press GREEN(TEXT) key.
● Dialing: Please choose between Tone and Pulse.
NNoott ee :
External modem
is only distributed by service Providers
and special distributors, not by SAMSUNG.
4.5 Time & Timer Setting
1) Time
GB
● Press the
/
● Press the OK key to confirm.
● Press the MENU/EXIT keys to exit the menu.
● Select the TV system : PAL, SECAM, NTSC, PAL ➔
/
keys to move the sub items and press the
keys to select the option.
(auto)NTSC, SECAM ➔ (auto)NTSC, NTSC ➔
(auto)PAL or NTSC ➔ (auto)PAL
● Select the TV type according to your TV: STANDARD
4: 3 ratio or WIDE SCREEN 16 : 9 ratio type.
● Select the aspect ratio conversion :
Letter box, Pan & Screen, Mixed or Full
● Select the Video Signal Type :
Composite, Composite + RGB, Composite + YUV or S-Video
● Select the RF Channel : Ch 21~Ch 69
● Select Broadcasting System : B/G, I or D/K
● Place the cursor on this sub menu and press OK.
● Press
/
keys to change local time in Time Zone.
The local time will be changed according to your location.
GMT is referred to the standard time of Greenwich by
broadcasting signal. This cannot be changed.
2) Timer
15 timers are supported including timer(s) from EPG.
● Select the timer number on ‘Timer’ using
● Press the
/
keys to choose event repetition you want to
/
keys from 1 to 15.
reserve : Daily, Every Sunday, Every Monday, Every Tuesday,
Every Wednesday, Every Thursday, Every Friday, Every Saturday, Once.
If the timer is set from EPG screen, EPG is displayed on ‘Event Repetition’.
● Press the Numerical (0~9) keys to set the time you want and press the
/
keys to choose a switch time you want to reserve. If set time on ‘Switch-on
Time’ is same as one on ’Switch-off Time’, this timer works for 24 hours.
● Select TV program to set the event program by pressing
/
keys.
When you press the TV/RADIO key, TV program and Radio program are toggled.
● Even you can set timers on Daily and Every Monday or Every Sunday, etc.
The priority has the repetition event which is less. For example, when you set timers
on Once and daily, ‘Once’ will work in stead of ‘Daily’ at that day. If the timer is
running, ‘Running’ message with a timer number is displayed on ‘Timer’.
GB-28
DIGITAL SATELLITE RECEIVER
GB-29
Page 39

DSB-A200C
DSB-A200C
OPERATING THE RECEIVER
4.6 System Information
If you have to contact your service provider or a service center
they might ask for information available from this menu.
Place the cursor on this sub menu and press the OK key.
The following will be the on-screen display.
NNoottee
: If you forgot PIN Code, press ‘0’ key four times.
Then, current PIN Code is displayed.
Keep in mind that your children or other people can
get this PIN Code using this method.
4.7 Software Upgrade
You can download and upgrade the software of this STB
through ASTRA and Hotbird or Sirius satellite when the new
software is released.
NNoottee
: These satellites for upgrading software on Samsung
Brand can be changed in the future.
During downloading don’t turn off the STB.
If there is a new version of software to download, you are
asked if you will update or not.
If you press OK key, the update starts right away.
In case update is impossible, you get this message “You can’t update software!”
Or in case you don’t need to update, “You don’t need to update software!” will be displayed.
If you get information that a Transponder is changed to different one for Samsung software,
you should select ‘User Advanced Mode’ at Menu mode by using the
Then you should set exact parameters for the new transponder for Samsung.
/
key.
OPERATING THE RECEIVER
4.8 Copy Channel Data
If you want to copy the channel data from one receiver
to another, please follow the instruction below.
Please make your own channel data, such as favorite
& lock channel with your own master box.
Then take your master box when you install another box.
1. Plug on both master & slave receivers
2. Master Box(Installed Box) : Stand-by Mode
3. Slave Box(Installing Box) : Menu Mode
4. Connect 2 Boxes with RS232 serial cable
(Both end should have male connector with crossed signals)
5. Select the ‘System Setup’ and press the OK key.
6. Select the ‘Copy Channel Data’ with the
7. Press ‘OK’ to start channel data copy
NNoottee
: Use this function after removing SMART CARD or CAM modules.
/
keys.
5. Common Interface
This STB is equipped with two PCMCIA slots, which enable
the use of two CI-CAMS.
When a Common Interface CAM is inserted inside the PCMCIA
slot, the system detects the type of the CAM automatically and
display in the main menu.
On choosing this menu, you will be able to access the different
options available with the type of the CAM like authorizations,
pre-booking, package details etc.,
NNoottee
: The menu differs according to each inserted CAM.
If the module has not been installed yet, the phase
“Not Installed” will be accordingly indicated.
GB
GB-30
During inserting any CAM, you may have distorted video or audio.
It doesn’t mean STB is wrong.
DIGITAL SATELLITE RECEIVER
GB-31
Page 40

DSB-A200C
DSB-A200C
TROUBLESHOOTING
Problem Possible cause Solution of the problem
No display LED on Power cord Power cord plug in correctly
the front panel; not plugged in correctly
No power supply
No pictures on the screen Receiver in Standby mode; Set receiver to “On”;
Scart not connected tightly Check connection and correct;
to video output of television;
incorrect channel or video Check channel and video output and
output selected on television correct (TV instruction manual)
No sound Audio cord connected Check connection and correct;
incorrectly;
Loudness level = 0; Increase loudness on television set;
Muting active Press the MUTE key
Remote Control does not incorrect operation; Point remote control
operate directly towards the Receiver.
Batteries dead or inserted Replace batteries or insert correctly
incorrectly
Poor picture quality Signal strength to low Check all wire connections. Check the
signal strength in the “Auto Scanning” menu, correct
alignment of your antenna
On-Screen Error Message Antenna cable not connected Check connection and correct;
“Searching for signal” or not tight;
LNB defective; Change LNB;
incorrect position of the Check position and correct,
satellite antenna; Check the signal strength in
LNB is set to "OFF" in the “Auto Scanning” menu
LNB Setting menu
On-Screen Error Message Satellite not yet set Scan of in “Automatic scanning”
“Channel data or “Manual scanning” menu
does not exist.”
On-Screen Error Messages: Smartcard: (depend on model)
“Please check the - not plugged in correctly; Check the Smartcard.
Smartcard”; - not plugged in. “Insert the Smartcard.”
“Please insert the
Smartcard”.
There is no component
picture(Y, Pb, Pr) or RGB
picture.
Selecting RGB video signal out,
YUV(YPbPr) video out turns off.
Selecting composite+YUV video signal
out, YUV(YPbPr) video out turns on.
Select the video signal type to media
setting menu : Composite, Composite +
RGB, Composite + YUV or S-Video.
TECHNICAL SPECIFICATIONS
Power supply
Type : SMPS
Input voltage : AC 100-240V~, 50/60 Hz
Fuse rating : 250 V/T1.6AH
Tuner
Freq. Range : 950 ~ 2150 MHz
Input signal level : -65 ~ -25 dBm
Channel selection : PLL frequency synthesizer
Input impedance : 75 Ω unbalanced
Connector type : F type female
LNB power control : 13 V/18 V, 22 kHz tone
DiSEqC : 1.2 supported
Demodulator
Type : QPSK DEMODULATION (DVB-S)
Symbol rate : 2 ~ 45 Ms/s
Inner FEC : Viterbi Convolutional
Coding Rate - 1/2,2/3,3/4,5/6,7/8
Outer FEC : Reed Solomon Coding (204,188), t = 8
Video decoder
System decoding : MPEG 2 ISO/TEC 13818
(transport stream)
Profile and level : MPEG 2 MP@ML (4:2:2)
Data rate : 1~ 15 Mb/s
Video formats : 4:3 (normal) & 16:9 (widescreen)
Picture resolution : 720(H) x 576(V) x 50 fields/sec
Audio Decoder
System decoding : MPEG 1 ISO/TEC 11172~3 layer I & II
Audio mode : mono, dual, stereo, joint stereo
Sampling frequency : 32, 44.1, 48 kHz
GB
DISPOSAL
The device, packaging material (e.g. Styrofoam) and the batteries must never be disposed of with
household refuse. Please obtain appropriate information about the regulations in your community,
and dispose of all refuse in accordance with regulations at the separate locations provided.
GB-32
DIGITAL SATELLITE RECEIVER
GB-33
Page 41

DSB-A200C
DSB-A200C
TECHNICAL SPECIFICATIONS
A/V output
TV SCART : VIDEO (CVBS, RGB), AUDIO R&L
VCR SCART : VIDEO (CVBS), AUDIO R&L
RCA JACK : VIDEO (CVBS), AUDIO R&L
SPDIF : Digital Audio Output
Component( Y, Pb, Pr) Output : Y output level :1Vp-p(75
Pb/Pr output level : 0.684Vp-p(75Ω)
RF modulator
Modulator output : CH 21_69 (preset to CH 21)
Video type : PAL B/G, K, I (preset to PAL B/G)
UHF output level : 70 ± 5 dBµV
Output connector : IEC male
Ant. O/P connector : IEC female
Tuning method : PLL frequency synthesizer
Serial data interface
Standard : RS232C, Max. 115.2 kB
Connector type : 9 pin D-type female
Ω
)
MEMO
GB
Common Interface
Module Type : PCMCIA TYPE II x 2
Available CAM : VIACCESS, IRDETO, NAGRAVISION,
CRYPTOWORKS, CONAX, SECA, Etc.
GB-34
DIGITAL SATELLITE RECEIVER
GB-35
 Loading...