

Samsung SIRU200I User Manual
DIGITAL TERRESTRIAL
RECEIVER
SIR-U200i
Owner’s Instructions
Before operating the unit,
please read this manual thoroughly,
and retain for future reference.
English-2
Safety Instructions
This Set Top Box (STB) has been manufactured to satisfy international safety standards. Please read the
following recommended safety precautions carefully.
For more information regarding installation, operation and safety of the STB, please contact the
technical help desk at 0870-242-0303
or dttvsupport@seri.co.uk
◆ Do not place the STB on an unstable cart, stand, tripod, bracket, table, or floor where it can fall.
◆ Do not place the STB on newspaper or soft carpet as it can cause a fire.
◆ Do not expose the STB to extreme temperature conditions or to humidity conditions.
◆ Place the STB at least 50mm from the wall.
◆ Do not expose the STB to direct sunlight.
◆ Do not install on top of anything that emits heat.
◆ Do not expose the STB to any liquids, and do not place a water-containing vessel on the STB.
◆ Never put objects of any kind into the STB.
◆ During storm conditions (especially during lightening storms) unplug the STB from the mains and
aerial sockets.
◆ Do not touch the electric plug with wet hands as this can cause electric shock.
◆ Do not step on or twist the power cord.
◆ Do not overload wall sockets or power extension cords as this may result in a risk of fire or
electric shock.
◆ Disconnect the power cord when not in use for long period of time. Thick dust can cause heat
generation, which may ignite and lead to fire.
◆ Please use a soft and dry cloth when you clean the STB.
◆ If the STB is broken, do not try to repair it yourself. Contact qualified service personnel.
◆ If the remote control is not used for a long period of time, remove the batteries and store it in a
cool, dry place.
◆ Do not drop the remote control.
CAUTION: TO PREVENT ELECTRICAL SHOCK, DO NOT
REMOVE REAR COVER, NO USER SERVICEABLE PARTS
INSIDE. REFER SERVICING TO QUALIFIED SERVICE
PERSONNEL.
RISK OF ELECTRIC SHOCK
DO NOT OPEN
CAUTION
WARNING:
TO PREVENT DAMAGE WHICH MAY RESULT IN
FIRE OR SHOCK HAZARD, DO NOT EXPOSE THIS APPLIANCE TO
RAIN OR MOISTURE.
The lightning flash and arrow
head within the triangle is a
warning sign alerting you of
“dangerous voltage” inside the
product.
The exclamation point within
the triangle is a warning sign
alerting you of important
instructions accompanying the
product.
☛
Mains Supply : 220 - 240V~, 50/60Hz
Cautions
English-3
Contents
◆ FOREWORD
■ Safety Instructions ........................................................................................... 2
■ Caution ............................................................................................................ 2
◆ CONNECTING AND PREPARING YOUR SET TOP BOX
■ Viewing your Set Top Box................................................................................ 4
■ Connecting the Aerial ...................................................................................... 5
■ Connecting the Set Top Box to a TV and a VCR ............................................ 5
■ Becoming Familiar with the Remote Control................................................... 6
■ Inserting the Batteries in the Remote Control ................................................. 7
■ Switching On and Off....................................................................................... 8
■ Placing in Standby Mode................................................................................. 8
■ Storing Channels Automatically....................................................................... 9
■ Previewing the On-Screen Menu System ....................................................... 10
■ Viewing the Demonstration.............................................................................. 11
■ Programme Information................................................................................... 12
■ Viewing Channel Lists ..................................................................................... 12
■ Checking the Signal Information ..................................................................... 13
◆ SETTING THE CHANNELS
■ Updating the Channel List ............................................................................... 13
■ Editing Your Favourite Channels ..................................................................... 14
■ Selecting Channel Lists ................................................................................... 15
◆ USING YOUR SET TOP BOX
■ Viewing EPG (Electronic Programme Guide) Information............................... 16
■ Viewing All Channels and Favourite Channels................................................ 18
■ Selecting Categories Colours .......................................................................... 19
■ Setting The Default Guide Style ...................................................................... 19
■ Using the Preferences ..................................................................................... 20
-
Changing the TV Screen Format
-
Using the Zoom Mode
-
Selecting a Video Output
-
Selecting a Audio Output
-
Adjusting the Translucency Level
■ Selecting the Preferred Language (Subtitle or Audio)..................................... 21
■ Using Digital Text............................................................................................. 21
◆ VIEWING THE SYSTEM INFORMATION
■ Viewing Product Information............................................................................ 22
■ Upgrading the Software................................................................................... 23
■ Resetting.......................................................................................................... 24
◆ RECOMMENDATIONS FOR USE
■ Problems and Solutions................................................................................... 25
■ Technical Specifications .................................................................................. 26
■ Wiring the Mains Power Supply Plug (UK Only) ............................................. 27
☛
➢
Press Important Note
Symbols
English-4
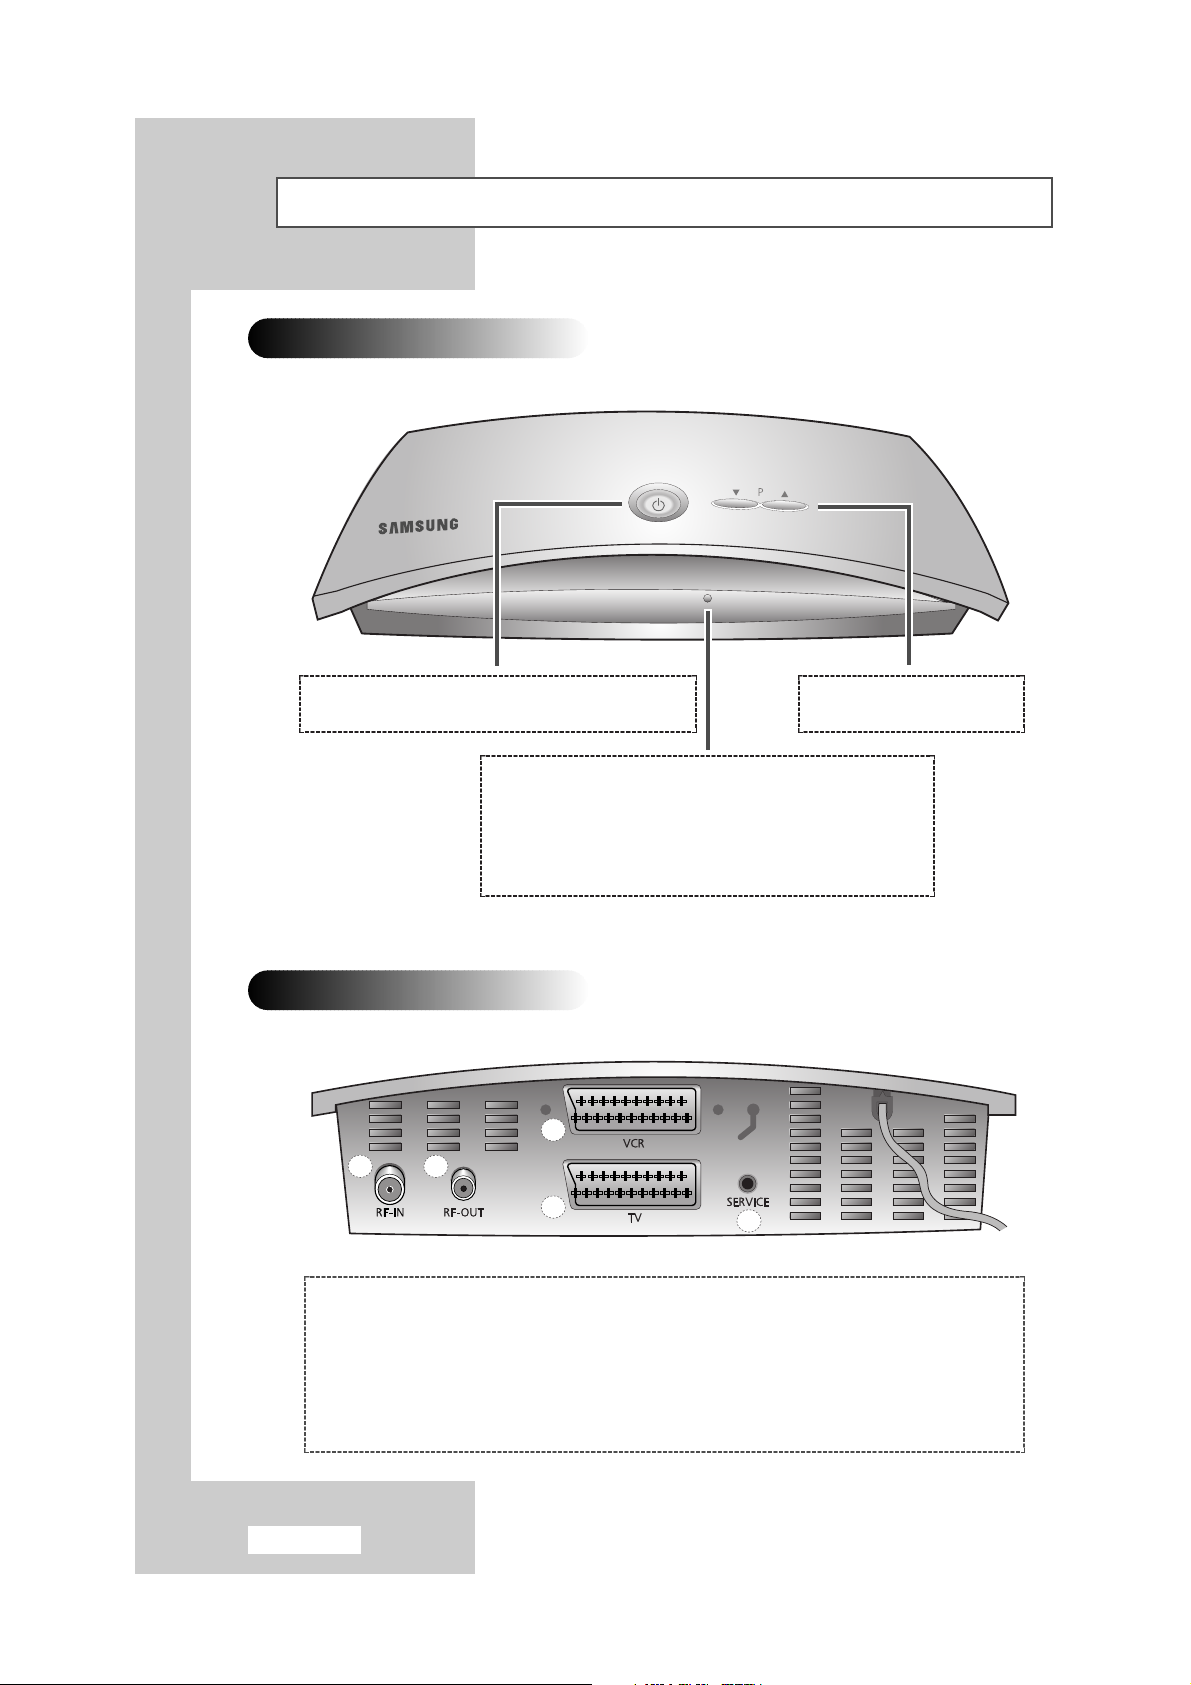
Viewing your Set Top Box
Front Panel
Rear Panel
a
d
c
b
e
Stand by
Switches between operation and standby mode.
Indicator
The indicator light flickers when your STB is receiving a signal
from your remote control.
- Red; In standby.
- Green: Running.
- Amber: Initialising.
▼ P ▲
Channel selection.
a) RF-IN
Connects to your TV aerial cable.
b) RF-OUT
Connects to the aerial input on your TV.
c) VCR
Connects to a VCR via SCART cable.
d) TV
Connects to a TV via SCART cable.
e) SERVICE
NEVER connect anything here.
English-5
You can connect TV/VCR to the Set Top Box using a SCART Cable.
1 Plug the aerial input cable to the appropriate socket on the
TV/VCR.
2 Connect a coaxial cable to the:
◆ TV/VCR aerial output socket
◆ Set Top Box aerial input socket
3 Connect your STB to a TV or VCR with SCART.
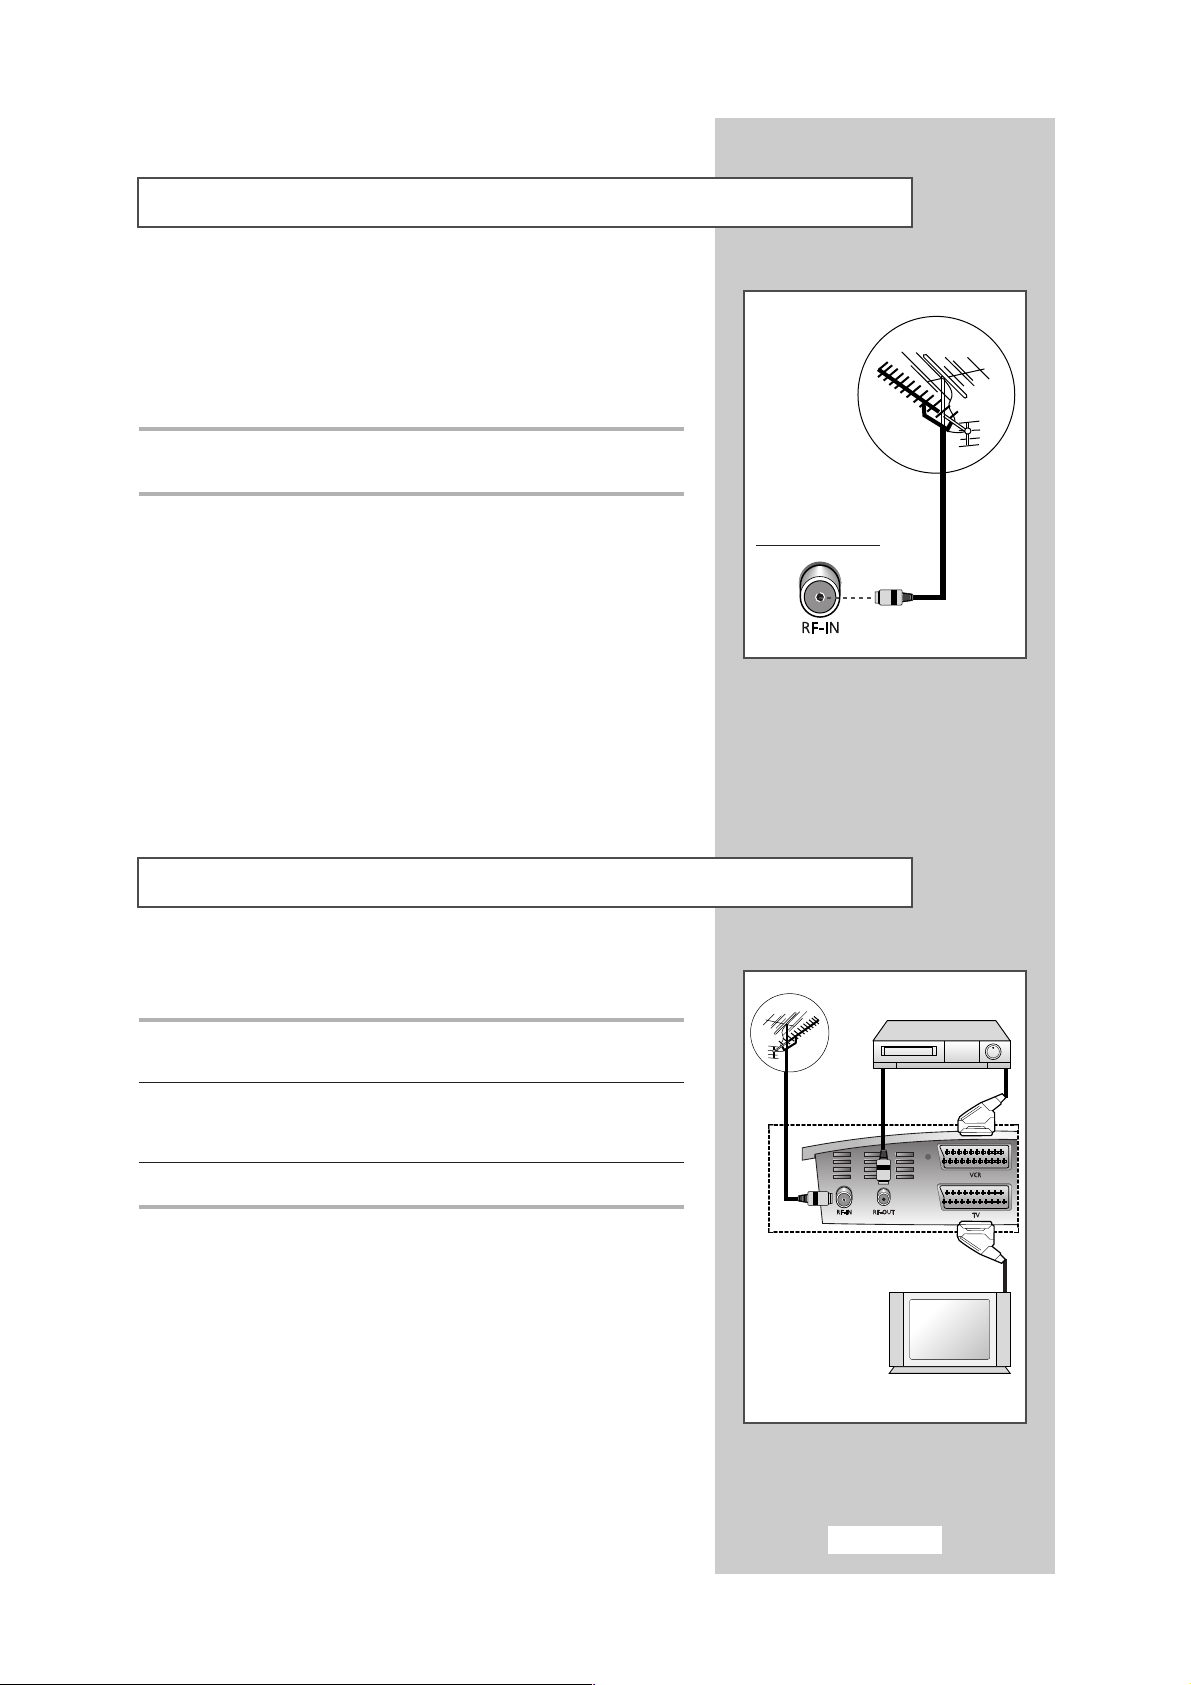
Connecting the Aerial
To view digital TV channels correctly, a signal must be received by
the STB from one of the following sources:
◆ An outdoor aerial
◆ An indoor aerial (not recommended)
Connect the aerial input cable to the 75Ω coaxial socket on the rear of
the STB.
Connecting the Set Top Box to a TV and a VCR
Rear of the STB
VCR
Television
English-6
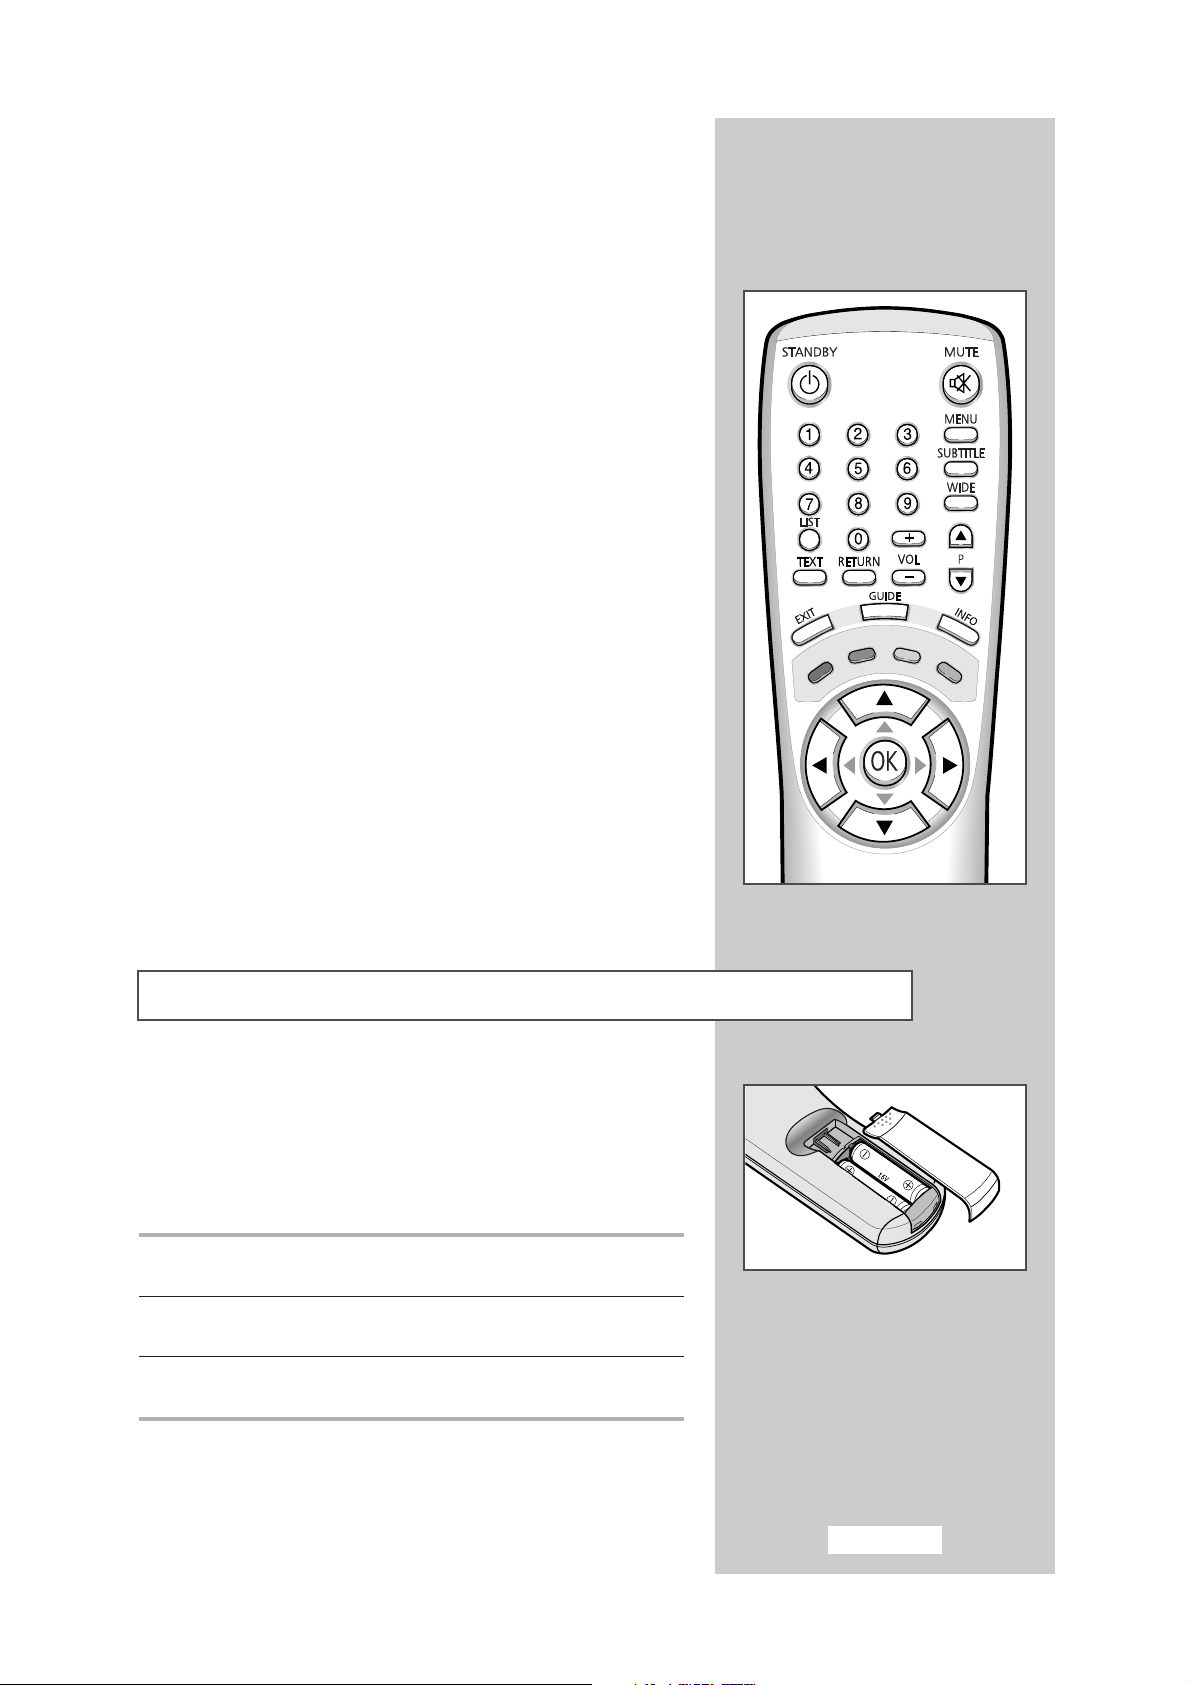
Becoming Familiar with the Remote Control
The remote control is used mainly to:
◆ Change channels and adjust the various settings
◆ Use the Electronic Programme Guide (EPG)
◆ Set up the STB using the on-screen menu system
The following table presents frequently used buttons and their functions.
“Refer to the illustration on opposite page to find where they are on the remote control.”
Button Viewing Mode EPG Mode On-Screen Menu Mode
STANDBY Switches off (Standby mode) and on.
MUTE Switch sound on/off.
MENU Displays the on-screen Displays the on-screen Displays the previous menu level
menu system. menu system. or returns to normal viewing.
SUBTITLE Digital subtitle display on – –
and off.
WIDE Adjusts the zoom mode ––
(
Letterbox, Centre Cut-Out).
0 to 9 Changes the selected channel. ––
LIST Displays the channel list. ––
TEXT Displays digital text. ––
RETURN Returns to the previously Returns to the previous Returns to the previous menu.
selected channel. setting and closes the EPG.
+
Adjusts the volume. ––
VOL
–
▲ Channel up and down. Display the previous and –
P next channels respectively.
▼
EXIT – Exit the EPG. Returns immediately to viewing
mode.
GUIDE Displays the EPG. Hides the EPG. Displays the EPG;
otherwise, has no effect.
INFO Displays program. Displays detailed program –
information. information.
▲ – When pressed in any of the four directions:
œ √ ◆ Move to the required menu option.
▼ ◆ Decrease and increase an option value respectively.
OK – When pressed, selects the highlighted item.
Colour – Display the EPG features Edit your favourite channels.
buttons (refer to page 16 ~19) (refer to page 14 ~15)
English-7
Inserting the Batteries in the Remote Control
You must insert or replace the batteries in the remote control when
you:
◆ Purchase the STB
◆ Find that the remote control is no longer operating
correctly
1 Remove the cover on the rear of the remote control by pressing the
symbol downwards and then pulling firmly to remove it.
2 Insert two R6, 1.5V, “AA” or equivalent batteries, taking care to
respect the
+
and -polarities.
3 Replace the cover by aligning it with the base of the remote control
and sliding it back into place.
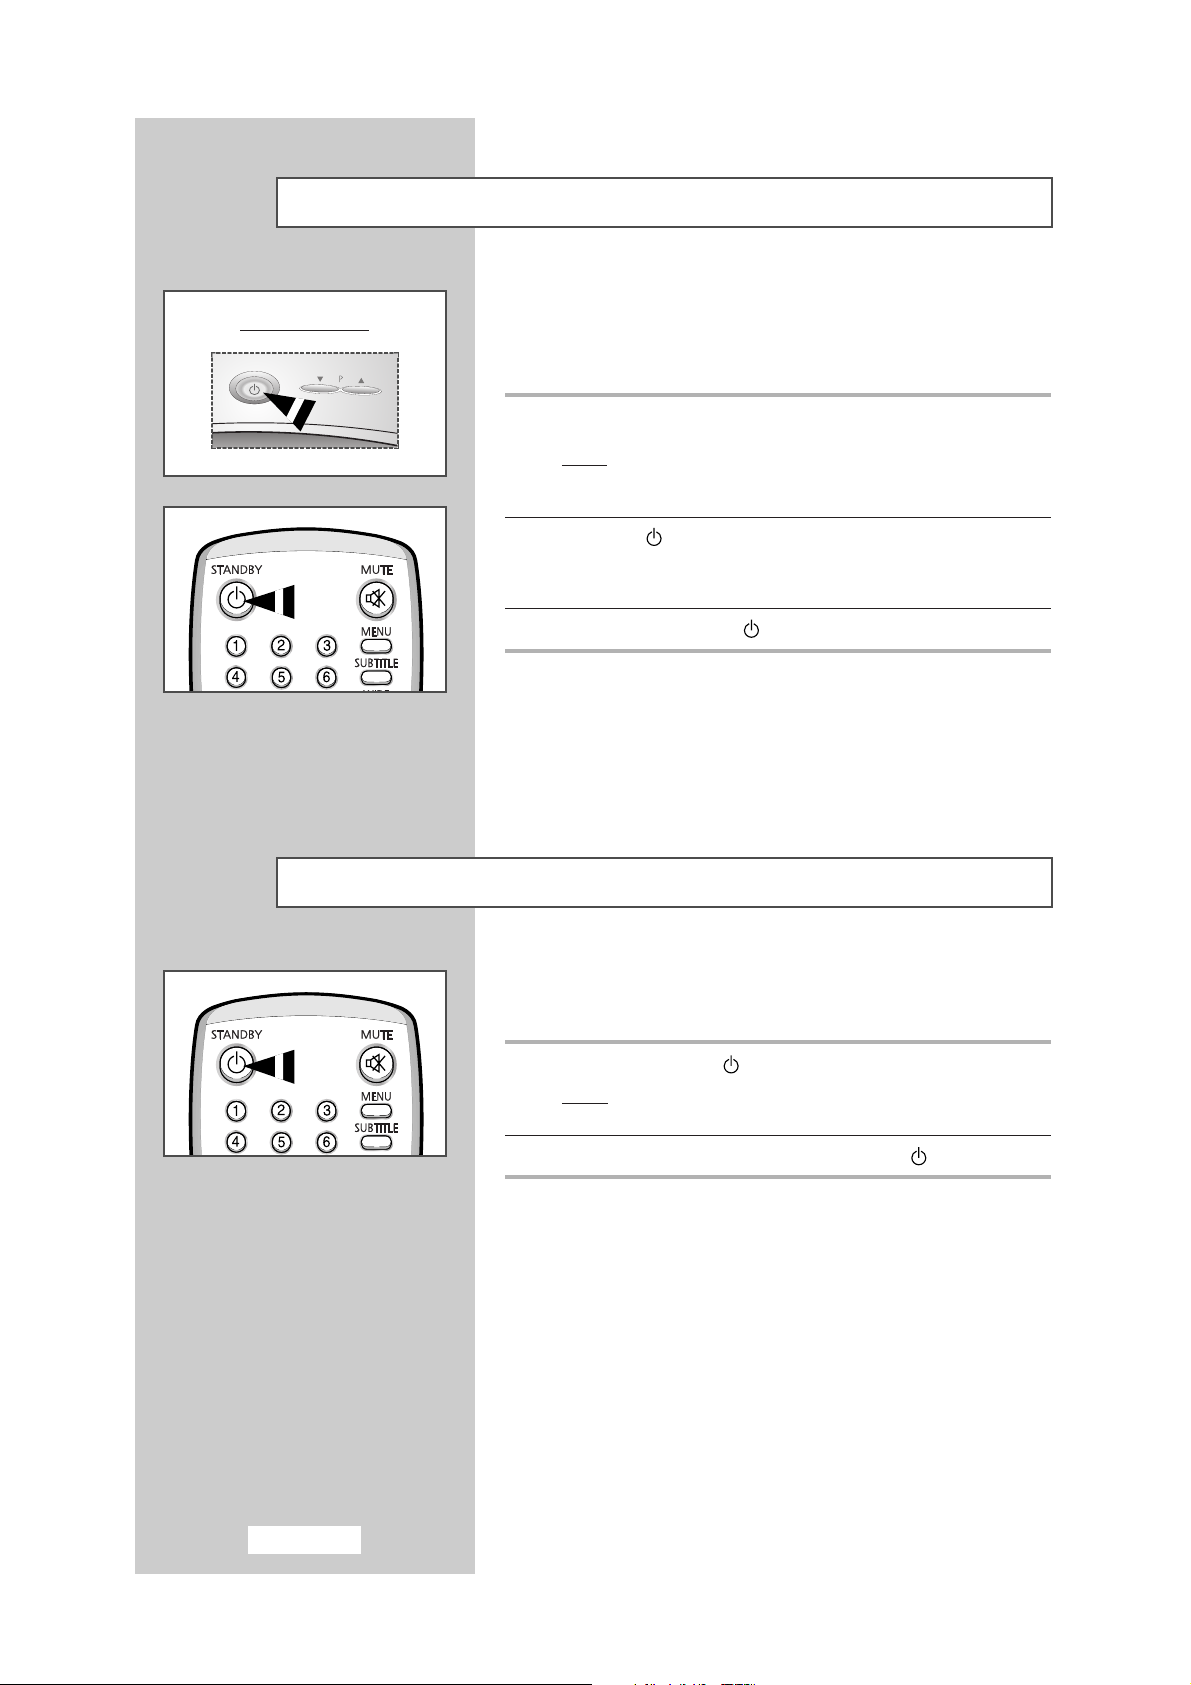
English-8
Switching On and Off
The mains lead is attached to the rear of the STB.
☛
If you have purchased this STB in the United Kingdom,
refer to page 27 for further instructions on plug wiring.
1 Plug the mains lead into an appropriate power socket.
Result
: The Standby indicator on the front of the STB lights up.
➣
Mains voltage : 220 - 240V~, 50/60Hz.
2 Press the “ ” button on the front of the STB to switch on.
➢ The LED will be amber when the STB initialises. The LED will
be green when ready to use.
3 To switch off, press the “”button again.
Placing in Standby Mode
Your STB can be placed in Standby mode, in order to reduce the
Power consumption.
1 Press the STANDBY ( ) button on the remote control.
Result
: The screen is turned off and the red standby indicator
on the front of the STB lights.
2 To switch back on, simply press the STANDBY ( ) button again.
Front of the STB
English-9
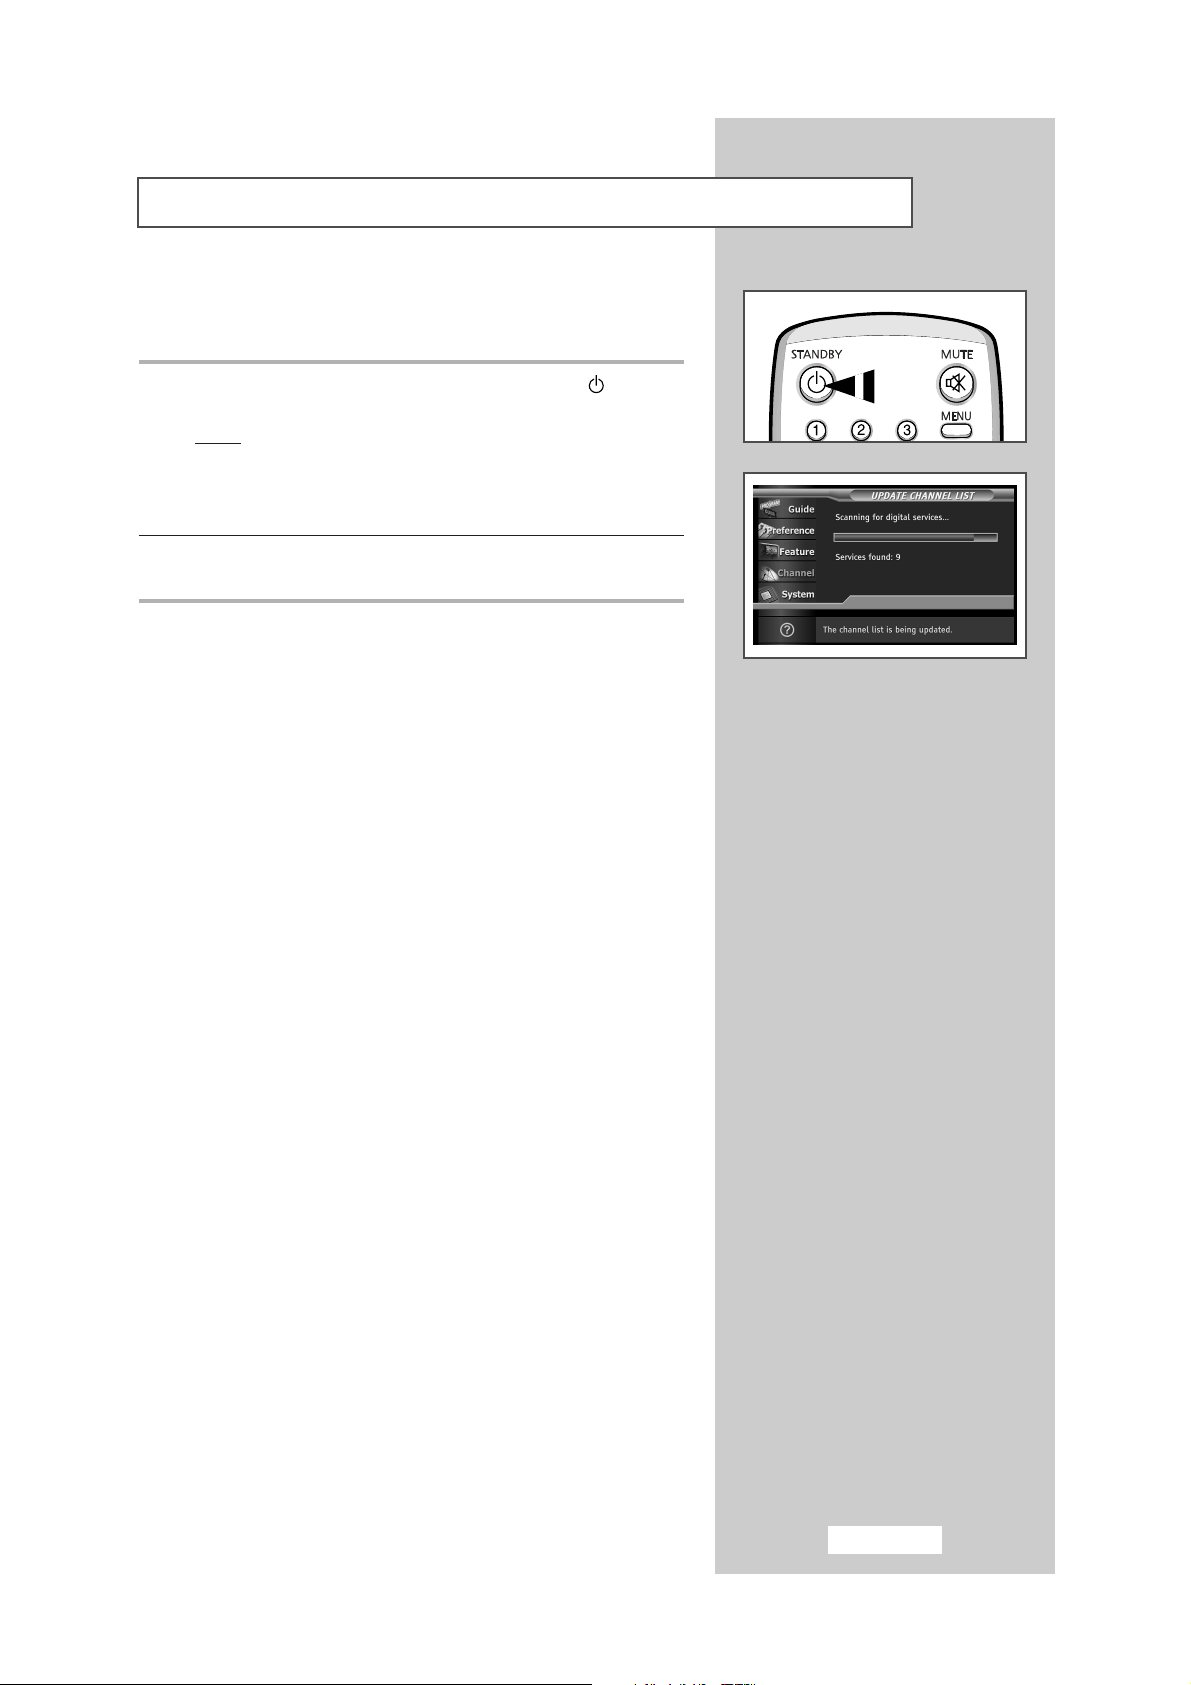
Storing Channels Automatically
When the STB is powered on for the first time it will automatically
perform a channel scan operation.
1 If the STB is in Standby mode, press the STANDBY ( ) button on
the remote control.
Result
: The UPDATE CHANNEL LIST dialog is displayed.
The progress bar shows how much of the scan is
complete. The scan will end automatically and the
channels are sorted and stored. The first channel from
the list will be displayed.
2 After the channels have been stored, you may edit (add, move,
renumber or delete) favourite channels (see page 14~15).
➣
In the event that no channels are found, check the aerial
connections or if the antenna have been pointing at a
transmitting station direction.
 Loading...