

Samsung SIR-TS360 - Satellite TV Receiver, SIRT351 Owner's Manual

MF68-00298A-00
Owner’s Manual
Manual del propietario
DIRECTV®HD Receiver
Receptor HD DIRECTV
®
................................................................................................................
.............
SIR-TS360
Samsung Electronics America inc.
SERVICE DIVISION
400 Valley Road, Suite 201
Mount Arlington, NJ 07856
TEL: 1-800-SAMSUNG (1-800-726-7864)
www.samsungusa.com
Owner’s Manual
DIRECTV®HD Receiver
................................................................................................................
.............
SIR-TS360
32
Important Safety Information
1) Read these instructions.
2) Keep these instructions.
3) Heed all warnings.
4) Follow all instructions.
5) Do not use this apparatus near water.
6) Clean only with dry cloth.
7) Do not block any ventilation openings, Install in accordance with the manufacturer’s instructions.
8) Do not install near any heat sources such as radiators, heat registers, or other apparatus
(including amplifiers) that produce heat.
9) Do not defeat the safety purpose of the polarized or grounding-type plug. A polarized plug has
two blades with one wider than the other. A grounding type plug has two blades and a third
grounding prong. The wide blade or the third prong are provided for your safety.
If the provided plug does not fit into your outlet, consult an elec trician for replacement of the
obsolete outlet.
10) Protect the power cord from being walked on or pinched particu
larly at plugs, convenience receptacles, and the point where they
exit from the apparatus.
11) Only use attachments/accessories specified by the manufacturer.
12) Use only with cart, stand, tripod, bracket, or table specified by
the manufacturer, or sold with the apparatus. When a used,
caution when moving the cart/apparatus combination to avoid
injury from tip-over.
13) Unplug this apparatus during lightning storms or when unused
for long periods of time.
14) Refer all servicing to qualified service personnel. Servicing is
required when the apparatus has been damaged in any way, such
as power-supply cord or plug is damaged, liquid has been spilled or
objects have fallen into the apparatus, the apparatus has been exposed
to rain or moisture, does not operate normally, or has been dropped.
This device complies with part 15 of the FCC Rules.
Operation is subject to the following two conditions:
(1) This device may not cause harmful interference, and
(2) This device must accept any interference that may cause undesired operation.
This satellite receiver provides display of television closed captioning in
accordance with §15.119 of the FCC rules.
Note you should use the Telephone line cord which is supplied with the machine.
If you are replacing it with the other vendor's part, it should be minimum AWG #26 or larger
gage.
®
HD Receiver.
CAUTION
This symbol indicates high voltage is
present inside. It is dangerous to make
any kind of contact with any inside
part of this product.
This symbol alerts you that important
literature concerning operation and
maintenance have been included with
this product.

54
®
Pay Per View
®
HD
Program Recording Restrictions
All other taping is expressly prohibited. Some programming may not be taped.
An additional taping fee may be applied. Call your program provider for details.
High definition broadcast copyright limitations
Due to copyright restrictions, you may not be able to view some high definition programs
in high definition format using this product. (Also, whenever possible you should connect
both HD and SD interfaces to permit SD viewing of programs if HD viewing is restricted
due to copyright restrictions.)
Owner's Record
The model number, serial numbers, Access Card Number and Receiver ID are located on
the rear panel of the DIRECTV
®
HD Receiver. The number for the Access Card is on the
back of the card and on the carton label. Record these numbers for reference when calling
your sales or service representative regarding this product.
Model Number: ____________________________________
Serial Number: ____________________________________
Access Card Number: _______________________________
Receiver ID: ________________________________________
Customer Support
For DIRECTV®Programming
For subscription information, or to resolve problems related to programming, call:
DIRECTV at 1-800-DIRECTV (1-800-347-3288) or visit the DIRECTV Web site
(DIRECTV.com).
For Installation
To arrange for the installation of your DIRECTV
®
HD Receiver, call the dealer from whom
you purchased your system.
For Hardware
To resolve problems related to this DIRECTV
®
HD Receiver, call Samsung Customer Support
at 1-800-522-2946.

76
One (1) Year Parts and Labor*
(*90 Days Parts and Labor for Commercial Use)
THERE ARE NO EXPRESS WARRANTIES OTHER THAN THOSE LISTED AND DESCRIBED
ABOVE, AND NO WARRANTIES WHETHER EXPRESS OR IMPLIED, INCLUDING, BUT
NOT LIMITED TO, ANY IMPLIED WARRANTIES OF MERCHANTABILITY OR FITNESS
FOR A PARTICULAR PURPOSE, SHALL APPLY AFTER THE EXPRESS WARRANTY
PERIODS STATED ABOVE, AND NO OTHER EXPRESS WARRANTY OR GUARANTY
GIVEN BY ANY PERSON, FIRM OR CORPORATION WITH RESPECT TO THIS PRODUCT
SHALL BE BINDING ON SAMSUNG. SAMSUNG SHALL NOT BE LIABLE FOR LOSS OF
REVENUE OR PROFITS, FAILURE TO REALIZE SAVINGS OR OTHER BENEFITS, OR ANY
OTHER SPECIAL, INCIDENTAL OR CONSEQUENTIAL DAMAGES CAUSED BY THE USE,
MISUSE OR INABILITY TO USE THIS PRODUCT, REGARDLESS OF THE LEGAL THEORY
ON WHICH THE CLAIM IS BASED, AND EVEN IF SAMSUNG HAS BEEN ADVISED OF
THE POSSIBILITY OF SUCH DAMAGES. NOR SHALL RECOVERY OF ANY KIND
AGAINST SAMSUNG BE GREATER IN AMOUNT THAN THE PURCHASE PRICE OF THE
PRODUCT SOLD BY SAMSUNG AND CAUSING THE ALLEGED DAMAGE. WITHOUT
LIMITING THE OREGOING, PURCHASER ASSUMES ALL RISK AND LIABILITY FOR LOSS,
DAMAGE OR INJURY TO PURCHASER AND PURCHASER’S PROPERTY AND TO OTHERS
AND THEIR PROPERTY ARISING OUT OF THE USE, MISUSE OR INABILITY TO USE THIS
PRODUCT SOLD BY SAMSUNG NOT CAUSED DIRECTLY BY THE NEGLIGENCE OF
SAMSUNG. THIS LIMITED WARRANTY SHALL NOT EXTEND TO ANYONE OTHER THAN
THE ORIGINAL PURCHASER OF THIS PRODUCT, IS NONTRANSFERABLE AND STATES
YOUR EXCLUSIVE REMEDY.
Some states do not allow limitations on how long an implied warranty lasts, or the
exclusion or limitation of incidental or consequential damages, so the above limitations
or exclusions may not apply to you. This warranty gives you specific legal rights, and you
may also have other rights which vary from state to state.
To obtain warranty hardware ser vice, please contact SAMSUNG at:
SAMSUNG CUSTOMER SERVICE
400 VALLEY ROAD, SUITE 201, MT ARLINGTON, NJ 07856,
TEL: 973-601-6000, FAX: 973-601-6001
1-800-522-2946 and SAMSUNGUSA.COM

98
What are Analog TV, DTV, NTSC, ATSC, SDTV, and HDTV? . . . . . .10
What kinds of TV programming can I watch
with the DIRECTV®HD Receiver? . . . . . . . . . . . . . . . . . . . . . . . . . .11
What equipment is required to view HDTV programming? . . . . . . . .11
Resolution and interlacing . . . . . . . . . . . . . . . . . . . . . . . . . . . . . . .12
Video output/input options . . . . . . . . . . . . . . . . . . . . . . . . . . . . . .12
Aspect ratio . . . . . . . . . . . . . . . . . . . . . . . . . . . . . . . . . . . . . . . . .15
Screen formats . . . . . . . . . . . . . . . . . . . . . . . . . . . . . . . . . . . . . . .15
Dolby®Digital 5.1 . . . . . . . . . . . . . . . . . . . . . . . . . . . . . . . . . . . . .19
Box contents . . . . . . . . . . . . . . . . . . . . . . . . . . . . . . . . . . . . . . . . .20
Front panel controls and lights . . . . . . . . . . . . . . . . . . . . . . . . . . . .21
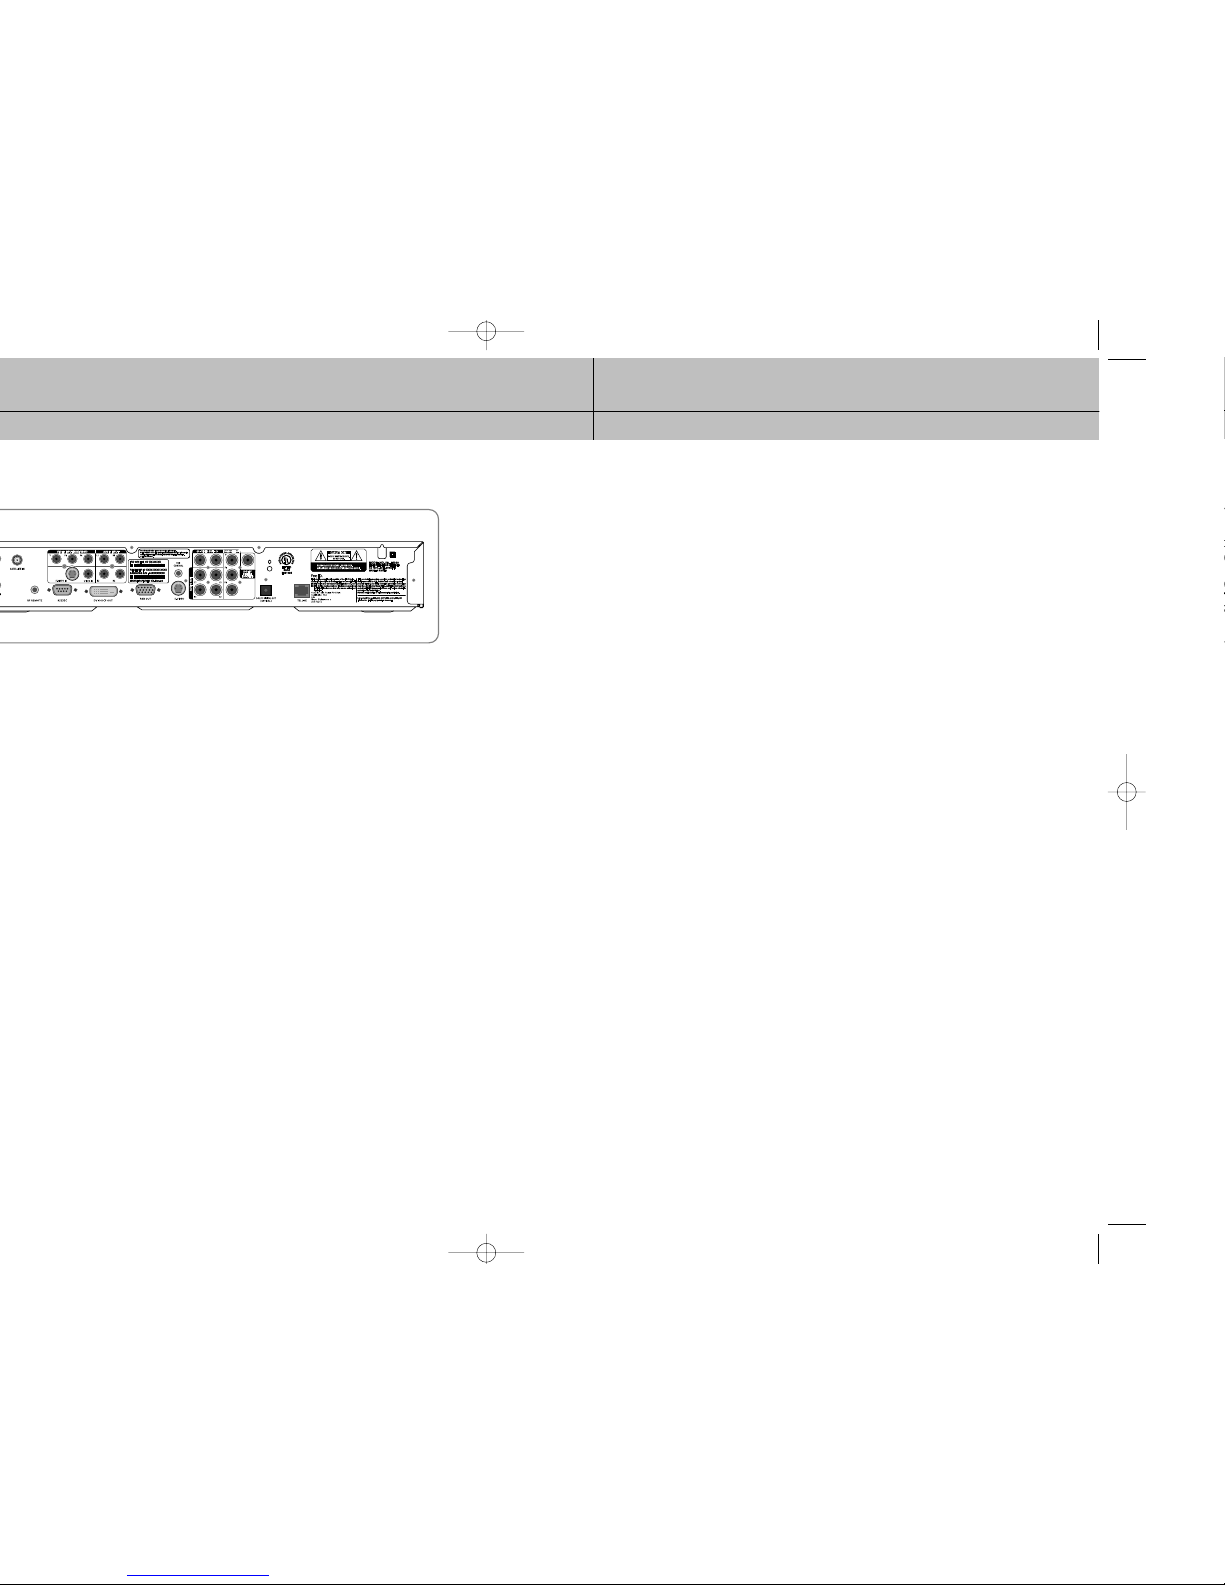
Back of the DIRECTV
®
HD Receiver . . . . . . . . . . . . . . . . . . . . . . . . .22
Installing the batteries in the remote control . . . . . . . . . . . . . . . . . . .24
Inserting the Access Card . . . . . . . . . . . . . . . . . . . . . . . . . . . . . . .25
Before making connections . . . . . . . . . . . . . . . . . . . . . . . . . . . . . .26
Jacks and cables . . . . . . . . . . . . . . . . . . . . . . . . . . . . . . . . . . . . . .27
Connecting your DIRECTV®HD Receiver . . . . . . . . . . . . . . . . . . . . .31
Connecting the VCR control cable . . . . . . . . . . . . . . . . . . . . . . . . .36
Tur ning on the DIRECTV®HD Receiver for the first time . . . . . . . . . . .37
Memorizing Channels . . . . . . . . . . . . . . . . . . . . . . . . . . . . . . . . . .37
Acquiring the correct dish pointing angles . . . . . . . . . . . . . . . . . . . .38
Checking the satellite signal strength . . . . . . . . . . . . . . . . . . . . . . . .39
Setting the dish type . . . . . . . . . . . . . . . . . . . . . . . . . . . . . . . . . . .40
Using Auto Detection to set the dish type . . . . . . . . . . . . . . . . . . . . .42
Testing the DIRECTV®HD Receiver . . . . . . . . . . . . . . . . . . . . . . . . .43
Testing the Signal Strength . . . . . . . . . . . . . . . . . . . . . . . . . . . . . . .44
Setting up local networks . . . . . . . . . . . . . . . . . . . . . . . . . . . . . . . .44
Scanning off-air and cable TV channels . . . . . . . . . . . . . . . . . . . . .46
Activating your DIRECTV account . . . . . . . . . . . . . . . . . . . . . . . . . .47
Upgrades . . . . . . . . . . . . . . . . . . . . . . . . . . . . . . . . . . . . . . . . . . .47
Remote control overview . . . . . . . . . . . . . . . . . . . . . . . . . . . . . . . .48
Changing channels . . . . . . . . . . . . . . . . . . . . . . . . . . . . . . . . . . . .50
Adjusting the volume . . . . . . . . . . . . . . . . . . . . . . . . . . . . . . . . . . .50
Getting help . . . . . . . . . . . . . . . . . . . . . . . . . . . . . . . . . . . . . . . . .50
Getting information on the TV program you are watching . . . . . . . .51
Finding out what’s on: the Guides . . . . . . . . . . . . . . . . . . . . . . . . .54
Searching for programs in the Guide . . . . . . . . . . . . . . . . . . . . . . .63
Choosing an alternate audio format for a program . . . . . . . . . . . . .65
Changing the User setting . . . . . . . . . . . . . . . . . . . . . . . . . . . . . . .66
Pay per view programs . . . . . . . . . . . . . . . . . . . . . . . . . . . . . . . . .66
TABLE OF C ONTENTS
Chapter 5: Program reminders and recording timers . . . . . . . . . . . . . . . . . . . . . . . . . . . . . . .70
Setting up the VCR control . . . . . . . . . . . . . . . . . . . . . . . . . . . . . . .70
Scheduling program reminders and recording timers . . . . . . . . . . . .71
Reviewing and modifying reminders and recording timers . . . . . . . .72
Chapter 6: User profiles . . . . . . . . . . . . . . . . . . . . . . . . . . . . . . . . . . . . . . . . . . . . . . . . . . . . . 74
User profiles basics . . . . . . . . . . . . . . . . . . . . . . . . . . . . . . . . . . . .74
Editing user profile names . . . . . . . . . . . . . . . . . . . . . . . . . . . . . . .76
Editing channel lists . . . . . . . . . . . . . . . . . . . . . . . . . . . . . . . . . . . .77
Setting ratings limits . . . . . . . . . . . . . . . . . . . . . . . . . . . . . . . . . . . .78
Allowing or blocking pay per view purchases . . . . . . . . . . . . . . . . .82
Setting a pay per view spending limit . . . . . . . . . . . . . . . . . . . . . . .83
Setting the screen color and translucency . . . . . . . . . . . . . . . . . . . .84
Setting the current user profile . . . . . . . . . . . . . . . . . . . . . . . . . . . .84
Locking and unlocking your DIRECTV®System . . . . . . . . . . . . . . . . .85
Chapter 7: Settings, preferences, upgrades, and extras . . . . . . . . . . . . . . . . . . . . . . . . . . . . . 86
Reading your mail . . . . . . . . . . . . . . . . . . . . . . . . . . . . . . . . . . . . .86
Setting system preferences . . . . . . . . . . . . . . . . . . . . . . . . . . . . . . .87
Reviewing and controlling caller ID . . . . . . . . . . . . . . . . . . . . . . . . .97
Setting the Local Time options . . . . . . . . . . . . . . . . . . . . . . . . . . . . .99
Adjusting the Raster(Picture) Centering . . . . . . . . . . . . . . . . . . . . .100
Installing a new Access Card . . . . . . . . . . . . . . . . . . . . . . . . . . . .101
Setting Remote control type . . . . . . . . . . . . . . . . . . . . . . . . . . . . .102
Setting RF Remote control ID (Optional) . . . . . . . . . . . . . . . . . . . . .104
Viewing important information and a list of features
supported by your DIRECTV®HD Receiver . . . . . . . . . . . . . . . . . .105
Viewing information on automatic system upgrades . . . . . . . . . . .105
Viewing fun system extras . . . . . . . . . . . . . . . . . . . . . . . . . . . . . .105
Testing the DIRECTV®HD Receiver . . . . . . . . . . . . . . . . . . . . . . . .105
Chapter 8: Programming the remote control . . . . . . . . . . . . . . . . . . . . . . . . . . . . . . . . . . . . .106
Programming the IR remote control . . . . . . . . . . . . . . . . . . . . . . . .106
Operating a device with your programmed remote control . . . . . .107
Programming the RF remote control (optional) . . . . . . . . . . . . . . . .108
Operating a device with your programmed remote control (RF) . . .109
Code lists . . . . . . . . . . . . . . . . . . . . . . . . . . . . . . . . . . . . . . . . . .110
Appendix: Troubleshooting and specifications . . . . . . . . . . . . . . . . . . . . . . . . . . . . . . . . . . . . 116
Troubleshooting . . . . . . . . . . . . . . . . . . . . . . . . . . . . . . . . . . . . .116
Specifications . . . . . . . . . . . . . . . . . . . . . . . . . . . . . . . . . . . . . . .118
11
CHAPTER 1
Technical overview
1
1
®
HD Receiver, and provides
®
HD Receiver?
Digital 5.1
What kinds of TV programming can I watch with the DIRECTV®HD
Receiver?
The DIRECTV®HD Receiver provides you with the ability to receive television programs from
a wide range of sources, and to display them on virtually any TV or monitor.
Using the Air In, Satellite In, and Cable In jacks on the back of the DIRECTV®HD Receiver,
you can receive television programs from:
HDTV and SDTV DIRECTV®programming via digital satellites (through the Satellite In jack).
Local off-air analog television broadcasts (NTSC), and local off-air digital broadcasts (ATSC) (through the Air In jack).
Unscrambled analog cable TV services for unscrambled cable programming (through the Cable In jack).
To view cable TV or DIRECTV®programming, programming subscriptions are also required.
What equipment is required to view HDTV programming?
To view HDTV programming, in addition to your DIRECTV®HD Receiver, you will need an
HDTV monitor or television set.
For DIRECTV®High-Definition programming, you’ll also need an oval triple LNB multi-satellite
dish, including a Sat C LNB (a dish that can receive signals from all 3 of the satellite
locations providing DIRECTV programming).
To receive analog and digital off-air television broadcasts, you’ll need an off-air antenna.
To receive cable TV programming, you’ll need a cable TV connection (provided by your local
cable TV service provider).
13
CHAPTER 1
Technical overview
1
1
each frame of a video image. The more lines of resolution used to draw each frame of video, the more detailed
and sharp the picture will be. Standard TV resolution uses 480 horizontal lines to make up each frame of video.
HDTV uses either 720 lines, or 1080 lines to make each video frame.
frames per second, depending on the TV and broadcast). Interlacing refers to whether each of those frames contains
all of the lines of video for each frame or every other line. Interlaced signals take every other line from 2 frames of
video (each lasting 1/60th of a second), and combine them into one frame lasting 1/30th of a second. In this way,
interlacing tricks your eye into thinking it is seeing twice the resolution that is actually being displayed.
In non-interlaced video, (referred to as progressive scan video), video frames are displayed every 1/60th of a second
containing all of the lines of video information for each frame.
®
HD Receiver is able to receive broadcasts in any of the resolutions
®
HD Receiver to handle the combinations of incoming video
®
HD Receiver will then do the appropriate conversion from input signal
The table below details the results you get with each combination of input signal format
and TV display format.
HDTV and SDTV DIRECTV®programming via digital satellites (through the Satellite In jack).
Local off-air analog television broadcasts (NTSC), and local off-air digital broadcasts (ATSC) (through the Air In jack).
Unscrambled analog cable TV services for unscrambled cable programming (through the Cable In jack).
Various external input signals received through the external input terminal (i.e., DVD, DVHS)
The DIRECTV®HD Receiver provides several display formats as shown in the following
table. It also shows the formats available at each output terminal.
When you press the Resolution button on the front panel or the remote control, the display
format will be switched between 1080i, 720p, 480p/i, Native 1, Native 2 and Native 3.
All input signal formats in the 1080i, 720p and 480p/i modes will be converted to the
selected display format. The output display format in the Native 1, Native 2 and Native 3
modes will be automatically changed according to the input signal format as shown in the
above table.
With the Resolution
button set to :
1080i mode
720p mode
480p/i mode
Native 1 mode
Native 2 mode
Native 3 mode
Input Signal format
all formats
all formats
all formats
480p/i
720p
1080i
480p/i
720p
1080i
480p/i
720p
1080i
Output Display format
1080i
720p
480p/i
480p/i
720p
1080i
480p/i
1080i
480p/i
720p
Output Connection
YPbPr
RGB
DVI
S-Video
Video
Available Formats
1080i/720p/480p/i/Native1/ Native2/ Native3
1080i/720p/480p/i/Native1/ Native2/ Native3
1080i/720p/480p/i/Native1/ Native2/ Native3
480i
480i
15
CHAPTER 1
Technical overview
1
1
®
HD Receiver at any resolution would be
®
HD Receiver. For example, if you have a High Definition TV capable of
®
HD Receiver to your TV.
®
HD Receiver’s RESOLUTION button set to either 720p
Aspect ratio
In addition to resolution and interlacing, HDTV is also defined by the aspect ratio of its
broadcasts.
Aspect ratio means the shape of the screen as defined by the ratio of the screen’s width
to its height. For analog TV and SDTV, the aspect ratio is 4 units wide by 3 units high
(usually written 4:3).
This is the familiar shape of conventional TVs — slightly wider than they are tall.
For HDTV broadcasts, the aspect ratio is 16:9 (nearly twice as wide as it is tall).
This is, not coincidentally, more like the shape of movies shown in theaters.
This makes HDTV an ideal format for broadcasting and viewing movies on a TV.
But what happens if you are watching a nearly square-shaped 4:3 broadcast on a
rectangular 16:9 TV, or vice-versa? The DIRECTV®HD Receiver allows you to choose from
a variety of screen formats to help you deal with those scenarios.
Screen formats
To deal with the mismatches that can occur between the shapes of TVs and the aspect
ratios of program broadcasts, the DIRECTV®HD Receiver provides you with a set of screen
format controls.
These controls allow you to pick a format to use for both 4:3 TVs showing 16:9 programs,
and for 16:9 TVs showing 4:3 programs.
Here is an explanation of the options. (Details for setting this preference are included in
Chapter 7.)
17
CHAPTER 1
Technical overview
1
1
®
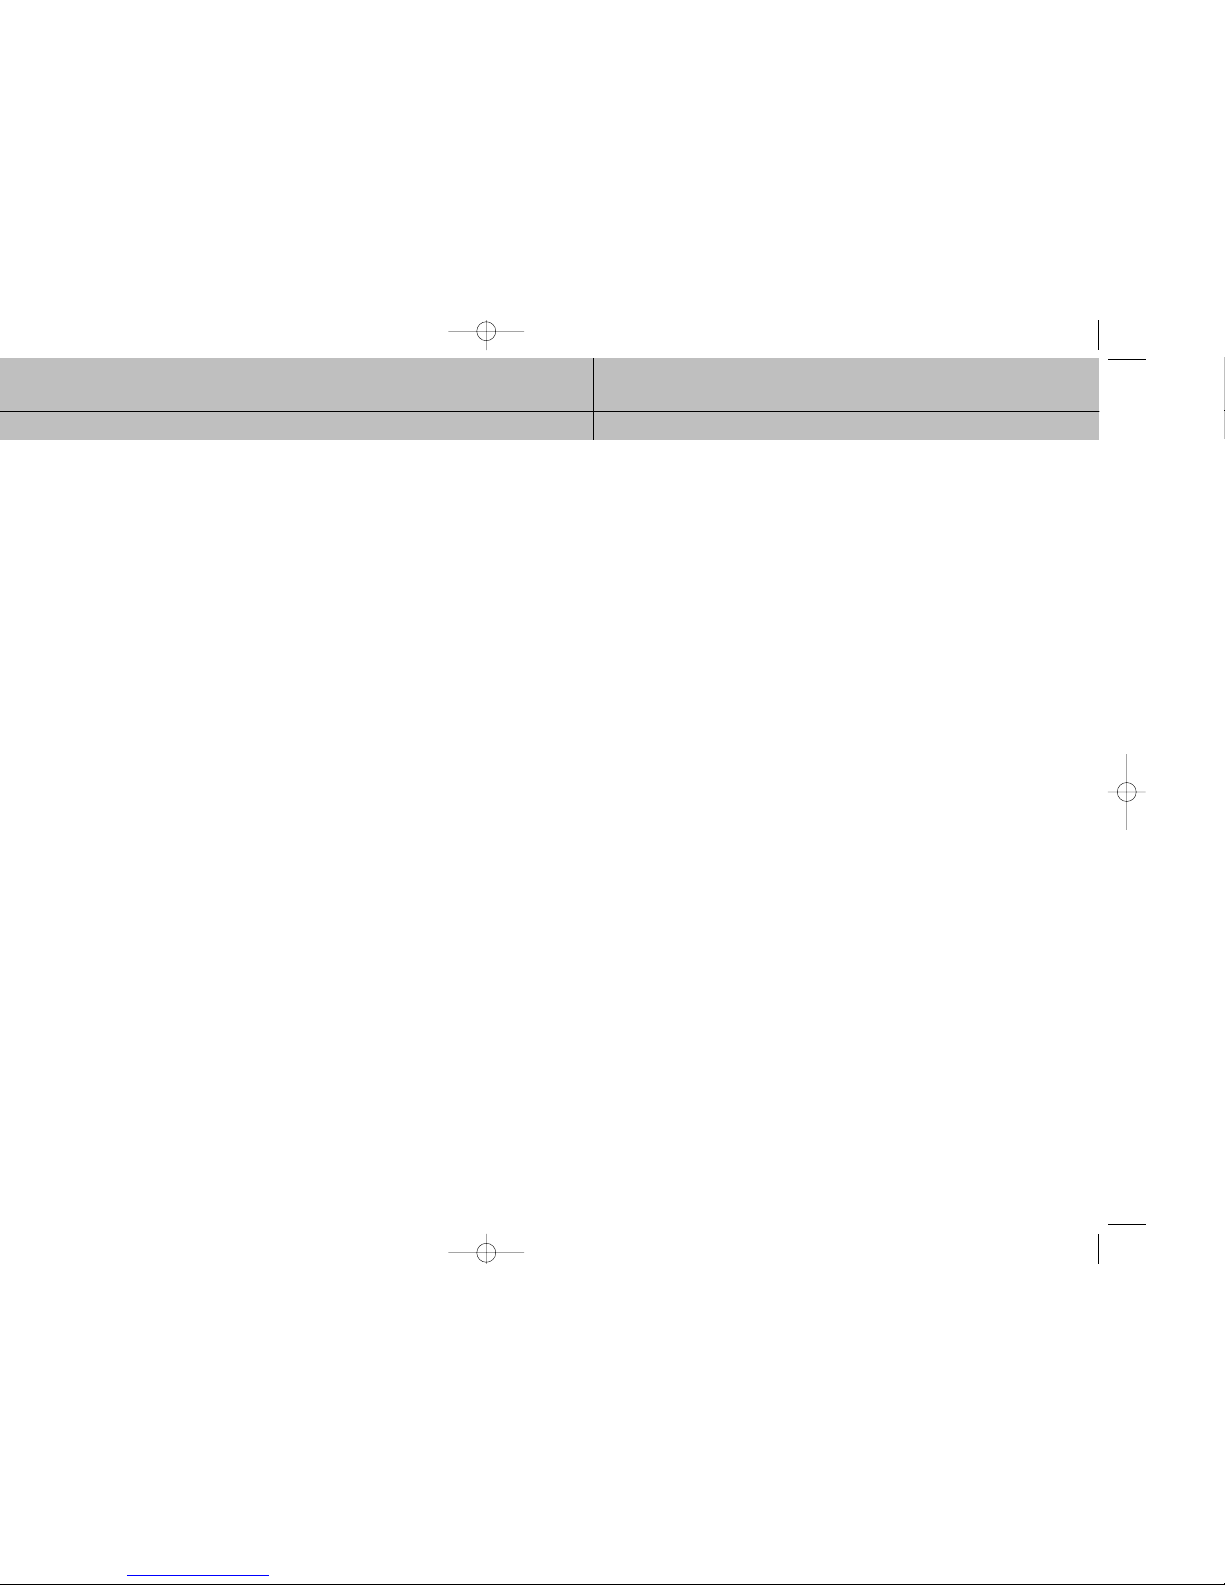
HD Receiver gives you 4 ways to fix the problem:
until the entire width of the program fits on your TV.
Since the aspect ratio of the program is maintained, the image
is no longer tall enough to fill your screen, so black/gray bars
are seen at the top and bottom of the screen.
®
HD Receiver to the Full setting, 16:9
images are stretched to fit the height of the screen, like in the
Letter box format. But instead of applying black/gray bars to
the top and bottom of the screen, the program image is stretched
vertically until it is tall enough to fill your screen.
Your entire TV screen is full, but the program images are a little
stretched to compensate for the program – to – screen mismatch.
an equal ratio, keeping the 16:9 aspect ratio intact.
The left and right portions of the image will be cut.
and bottom edges more than the left and right edges of the
image to view less distorted image than the one in Zoom1.
The top, bottom, left and right portions of the image will be
cut, but less than Zoom 1.
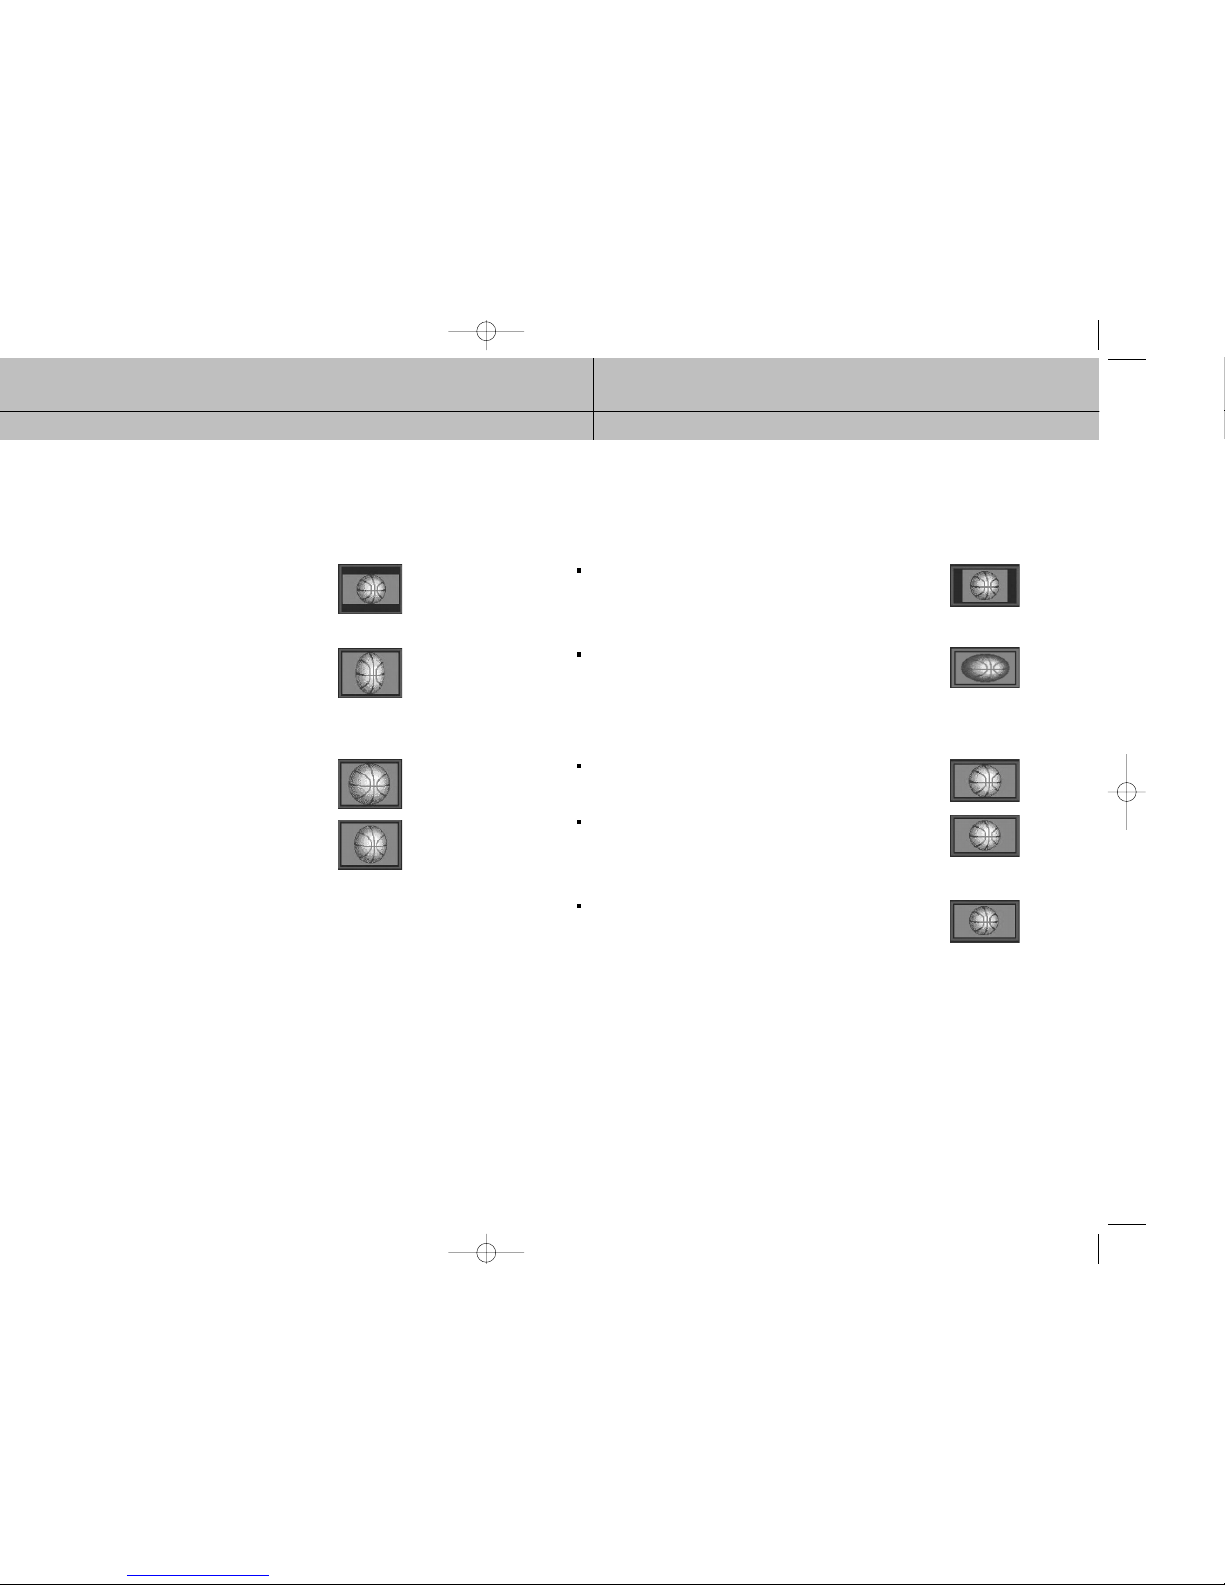
16:9 TVs showing 4:3 programs
For a wide screen 16:9 TV showing a standard 4:3 TV program, the program is too tall
to fit on the screen. The DIRECTV®HD Receiver gives you 5 ways to fix the problem:
Pillar box: If you choose the pillar box format, the 4:3 image is shrunk until
the entire height of the program fits on your TV. Since the aspect
ratio of the program is maintained, the image is no longer wide
enough to fill your screen, so black/gray bars are seen at the
left and right edges of the screen.
Full: If you set your DIRECTV
®
HD Receiver to the Full setting, 4:3
images are stretched to fit the width of the screen, like in the
Pillar box format. But instead of applying black/gray bars to
the sides of the screen, the program image is stretched
horizontally until it is wide enough to fill your screen.
Your entire TV screen is full, but the program images are a little
stretched to compensate for the program – to – screen mismatch.
Zoom 1: This format stretches the left and right edges of the image at an
equal ratio, keeping the 4:3 aspect ratio intact.
The top and bottom portions of the image will be cut.
Zoom 2: This format breaks the 4:3 aspect ratio and stretches the left and
right edges more than the top and bottom edges of the image to
view less distorted image than the one in Zoom1.
The top, bottom, left and right portions of the image will be cut,
but less than Zoom 1.
Panorama: This format stretches the left and right edges of the image at a
certain ratio, keeping the center of the image intact.
The center of the screen will keep the equal ratio and the
expansion ratio increases toward the horizontal direction at
both sides.
19
CHAPTER 1
Technical overview
1
1
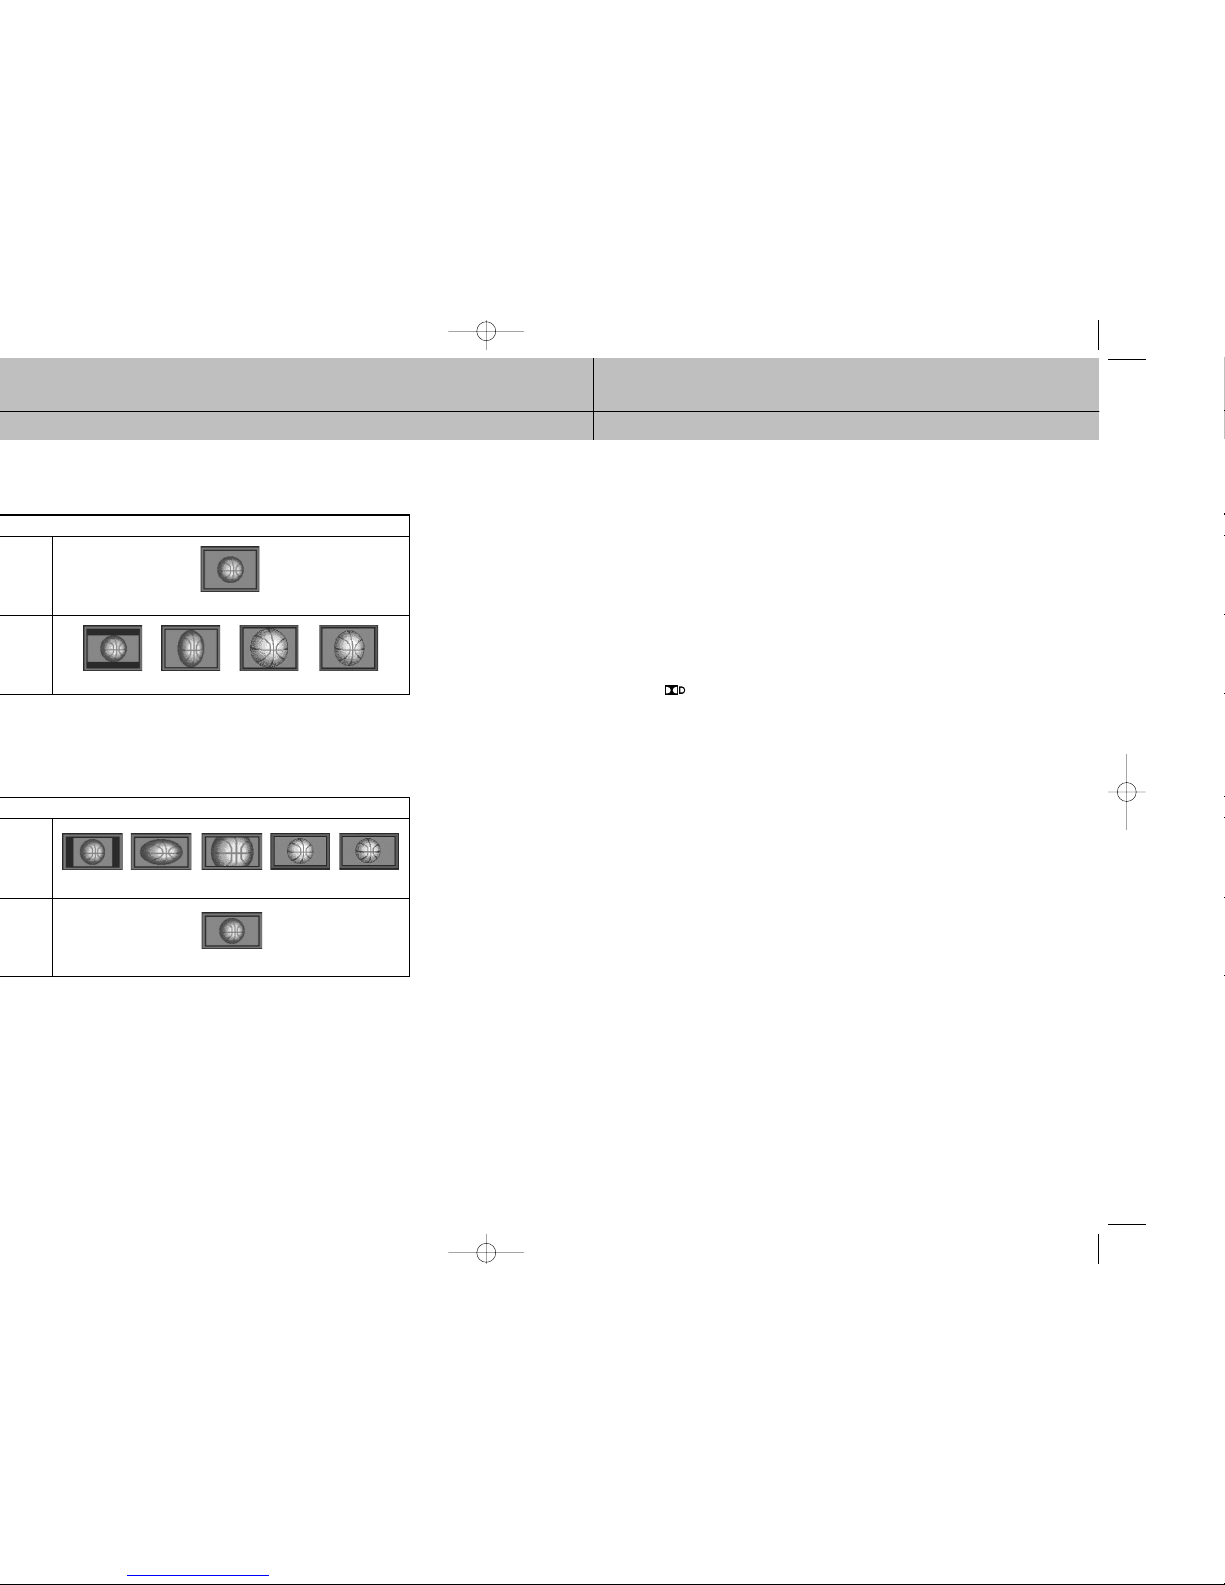
Full
Full
*Letter box Full Zoom 1 Zoom 2
Pillar box Full Zoom 1 Zoom 2 Panorama
Dolby®Digital 5.1
Just as the ATSC has specified 1080i or 720p as the video formats required for HDTV,
they have also specified a recommended audio format: Dolby Digital 5.1.
Dolby Digital 5.1 provides 5 discrete channels of digital audio information for use by
A/V receivers capable of decoding the 5.1 channel signal.
The audio signals are broken into left-front, center, right-front, left-rear, right-rear and a
low-frequency effects channel (designed for subwoofers).
The result when connected to a compatible Dolby Digital 5.1 channel A/V receiver and
speaker setup is a home theater experience that provides much of the dynamic range,
360-degree imaging, and sonic excitement of a real theater.
Not all Digital TV programming is broadcast using Dolby Digital 5.1.
For DIRECTV
®
programming, you can see which programs are broadcast using this
high-quality audio standard by checking the Info Banners and Program Guides for the
Dolby Digital icon ( ).
To take full advantage of the Dolby Digital 5.1 capabilities of the DIRECTV
®
HD Receiver,
you will need a Dolby Digital 5.1 compatible A/V receiver connected to the DIRECTV®HD
Receiver through the Dolby Digital Optical jack or the Dolby Digital Coaxial jack.
21
CHAPTER 2
Getting started
2
2
®
HD Receiver. It includes information on:
®
HD Receiver
®
HD Receiver is to unpack the box and
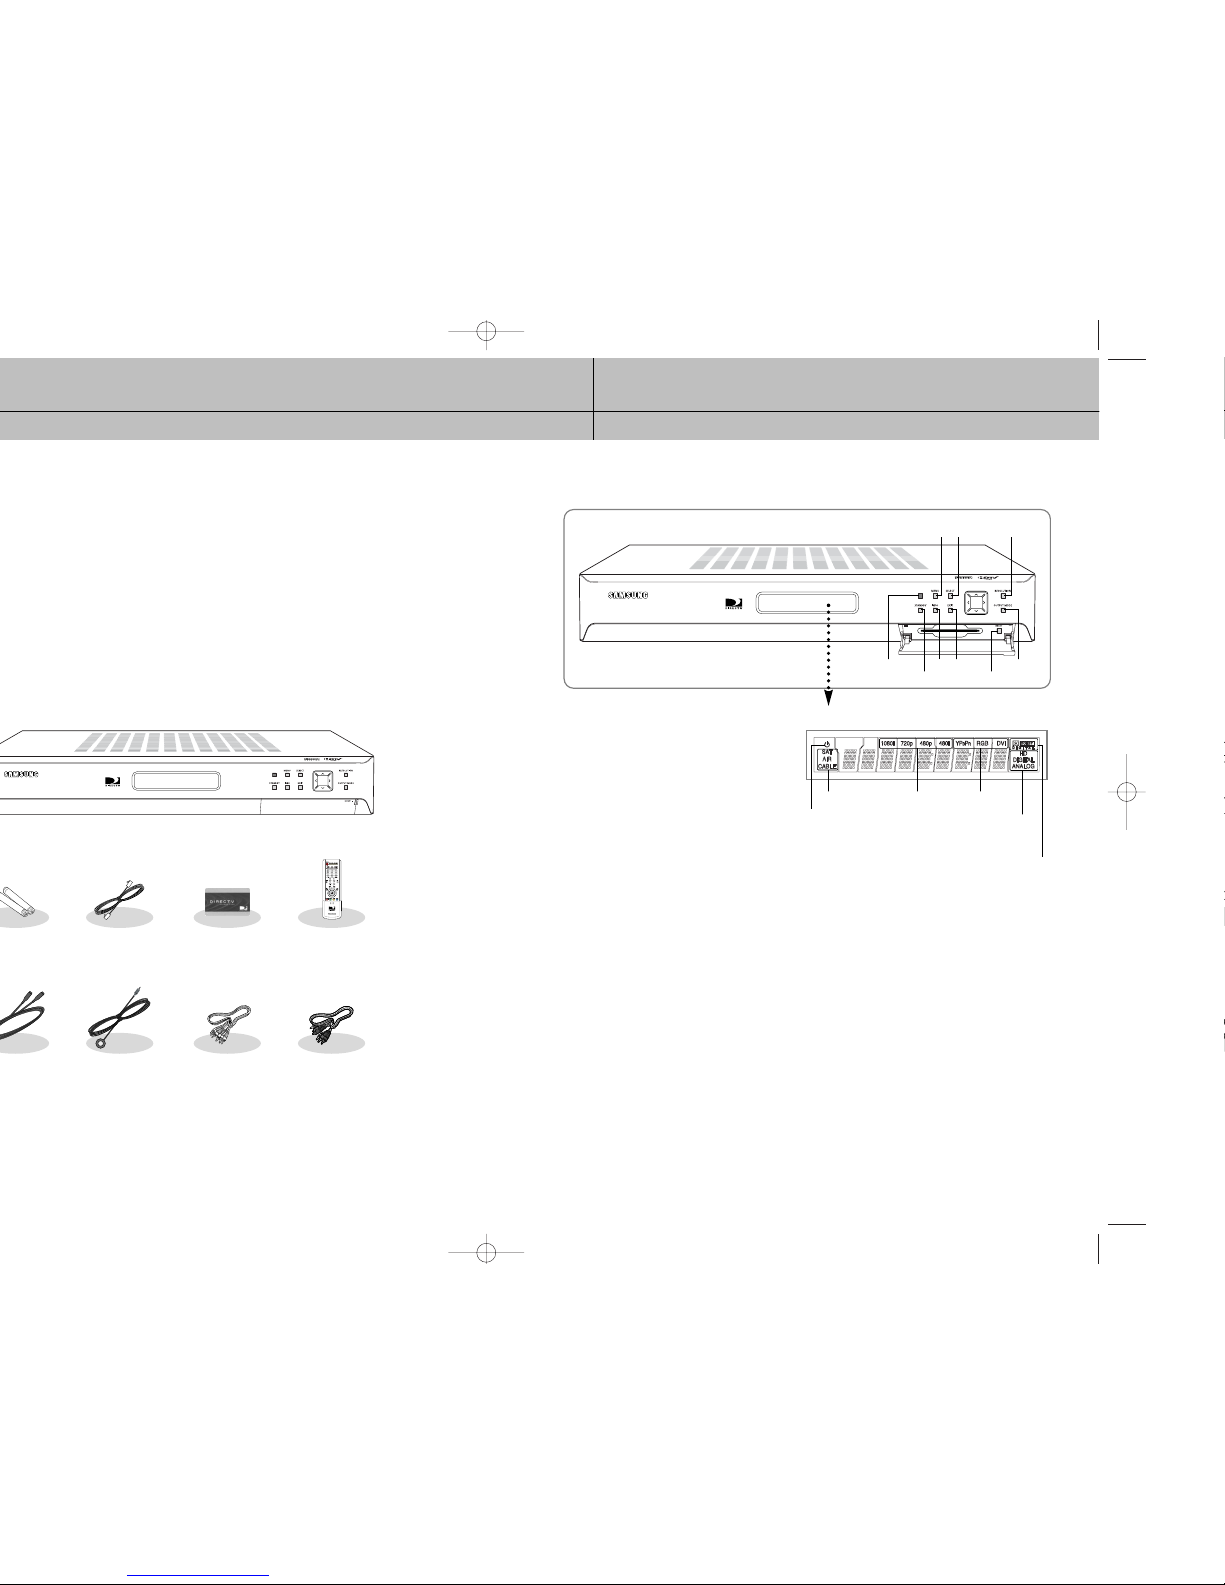
< DIRECTV®HD Receiver >
AAA size
batteries
RJ-11
Telephone cord
Access Card
Component cable
(Y/P
B/PR cable)
Remote control (IR)
Display Window
Displays information about your Digital Satellite Receiver.
Remote Control Sensor
Point your remote control at this sensor when operating your receiver.
STANDBY
Turns your Digital Satellite Receiver on and off.
MENU
displays the Main Menu.
INFO
displays TV program information.
SELECT
selects highlighted items on Guide and Menu screens.
EXIT
clears on-screen displays and return to TV program viewing.
ARROW
The arrow buttons navigate in the on-screen Guide and menu system.
RESOLUTION
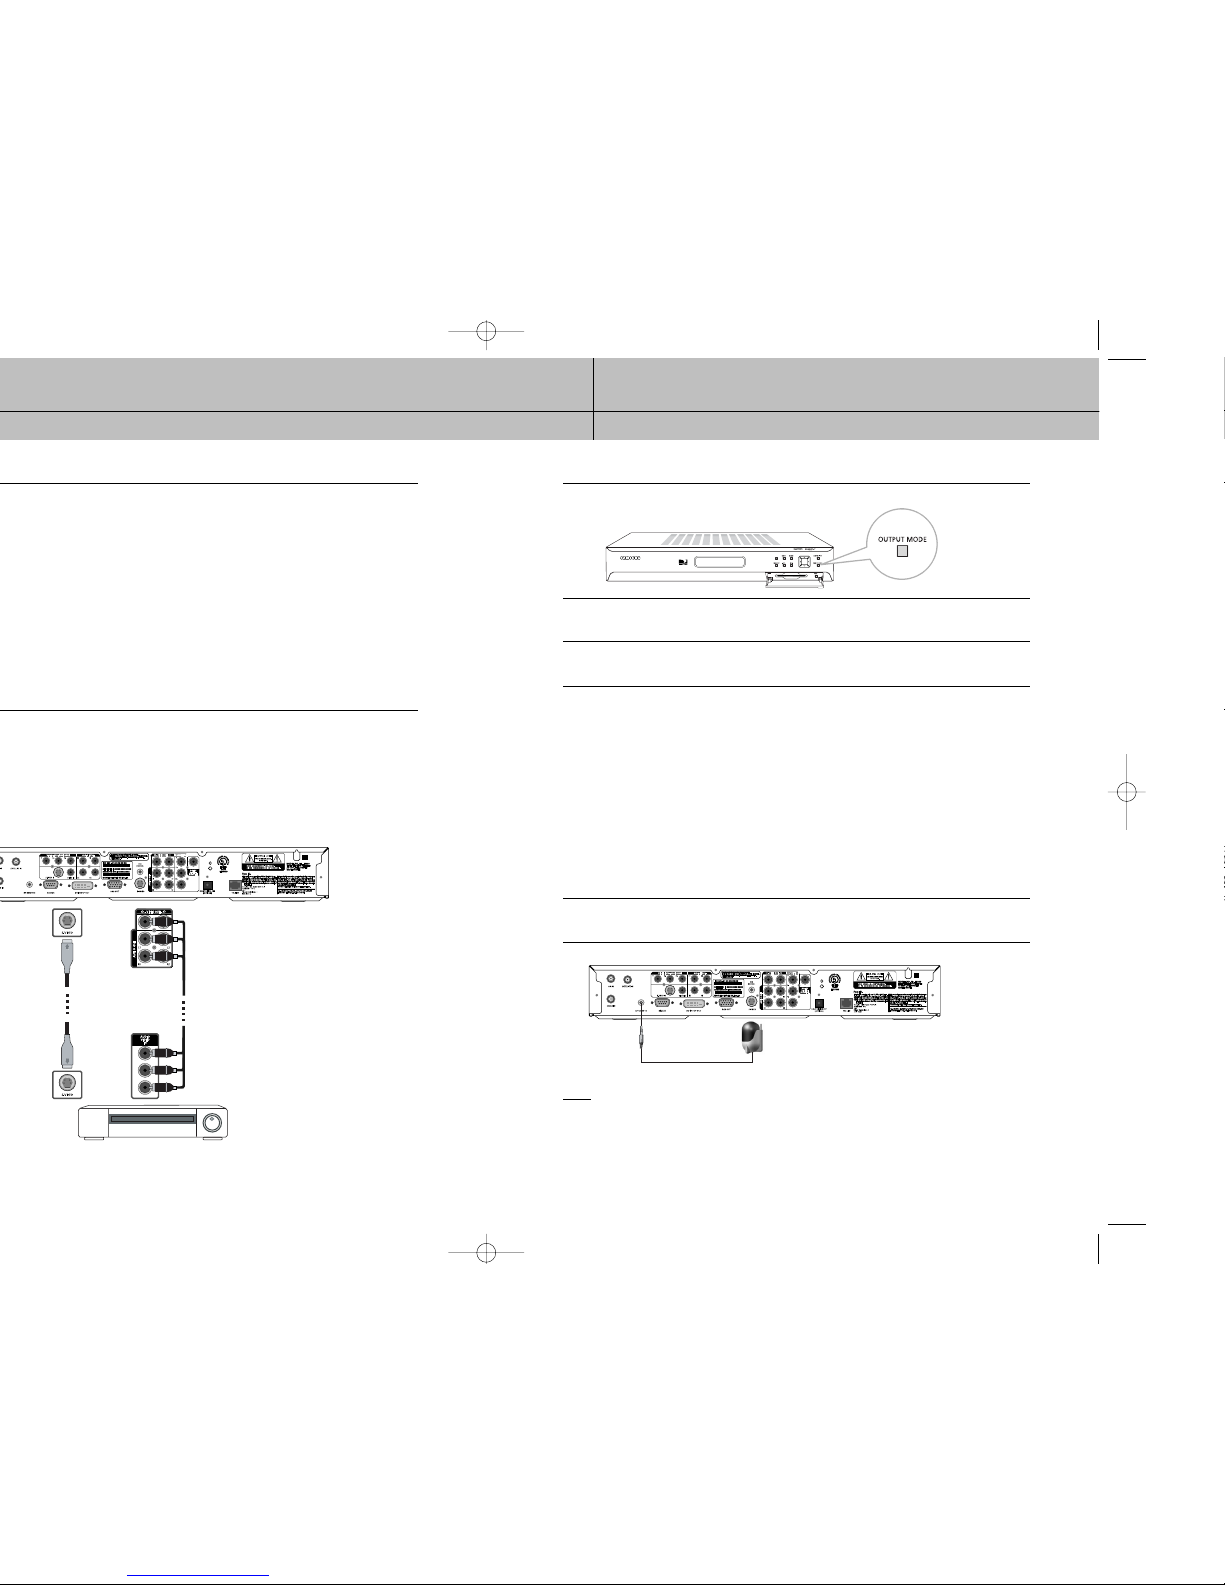
Sets the video resolution output by the DIRECTV®HD Receiver to match the resolution of your TV or monitor (480p/i).
Affects the signal output from the COMPONENT OUT, RGB OUT, and DVI/HDCP OUT jacks.
OUTPUT MODE
This button determines the signal type output by either DVI/HDCP OUT and RGB OUT, or COMPONENT OUT jacks.
Access Card slot
This slot holds the Access Card (which allows you to view DIRECTV®programming).
RESET
Resets your Digital Satellite Receiver.
Front panel controls and lights
< Display Window >
Stand by mode indicator
Remote Control Sensor
STANDBY RESET
INFO
MENU
SELECT RESOLUTION
EXIT OUTPUT MODE
Signal antenna indicator
Dolby Digital indicator
Display format
indicator
Display Interface
indicator
Broadcaster
signal
indicator
23
CHAPTER 2
Getting started
2
2
®
HD Receiver from TV, digital monitor, DVD, VCR, or other audio equipment.
B
or PR).
®
HD Receiver to a TV that accepts the unconverted DVI signal from a HD digital
®
HD Receiver to a TV that accepts HD RGB video input.
®
HD Receiver to a TV or VCR that accepts S-Video input.
®
HD Receiver
VIDEO OUT
Using standard video cables, these jacks connect your DIRECTV®HD Receiver to your TV or VCR.
AUDIO OUT(L1,R1,L2,R2)
Using standard stereo audio cables, these jacks provide an A/V receiver capable of Dolby Prologic decoding with
the left, right, center, and surround audio channel signals.
COMPONENT OUT(YPBPR)
Using standard A/V cables, these jacks connect your DIRECTV®HD Receiver to a TV or VCR that accepts
HD component video input.
DOLBY DIGITAL(COAXIAL)
Using a coaxial digital audio cable, this jack allows you to connect your DIRECTV®HD Receiver to an A/V receiver that
accepts coaxial digital audio input.
DOLBY DIGITAL OUT(OPTICAL)
Using an optical digital audio cable, this jack allows you to connect your DIRECTV®HD Receiver to an A/V receiver
that accepts optical digital audio input.
TEL LINE
A telephone line connected to this jack allows you to order pay per view programming.

25
CHAPTER 2
Getting started
2
2
Inserting the Access Card
The next step is to insert your Access Card into your receiver. (You will not be able to view
DIRECTV®programming unless the Access Card is properly inserted into the DIRECTV®HD
Receiver.)
For some receivers, the card may already be inserted when you unpack the box.
1
Locate the ACCESS CARD slot.
The slot is located on the front of the DIRECTV®HD Receiver.
2
Insert the Access Card.
Make sure the side with the bar code is facing down, and the arrow is pointing away from
you.
The Access Card should only be removed when replacing the card with a new one provided by
DIRECTV or your program provider.
Access Card
(Top view)
27
CHAPTER 3
Setting up and connecting
3
3
®
HD Receiver.
®
HD Receiver
®
HD Receiver for the first time
®
HD Receiver
®
HD Receiver, TV, and any other components before connecting or
®
HD Receiver, or any other components.
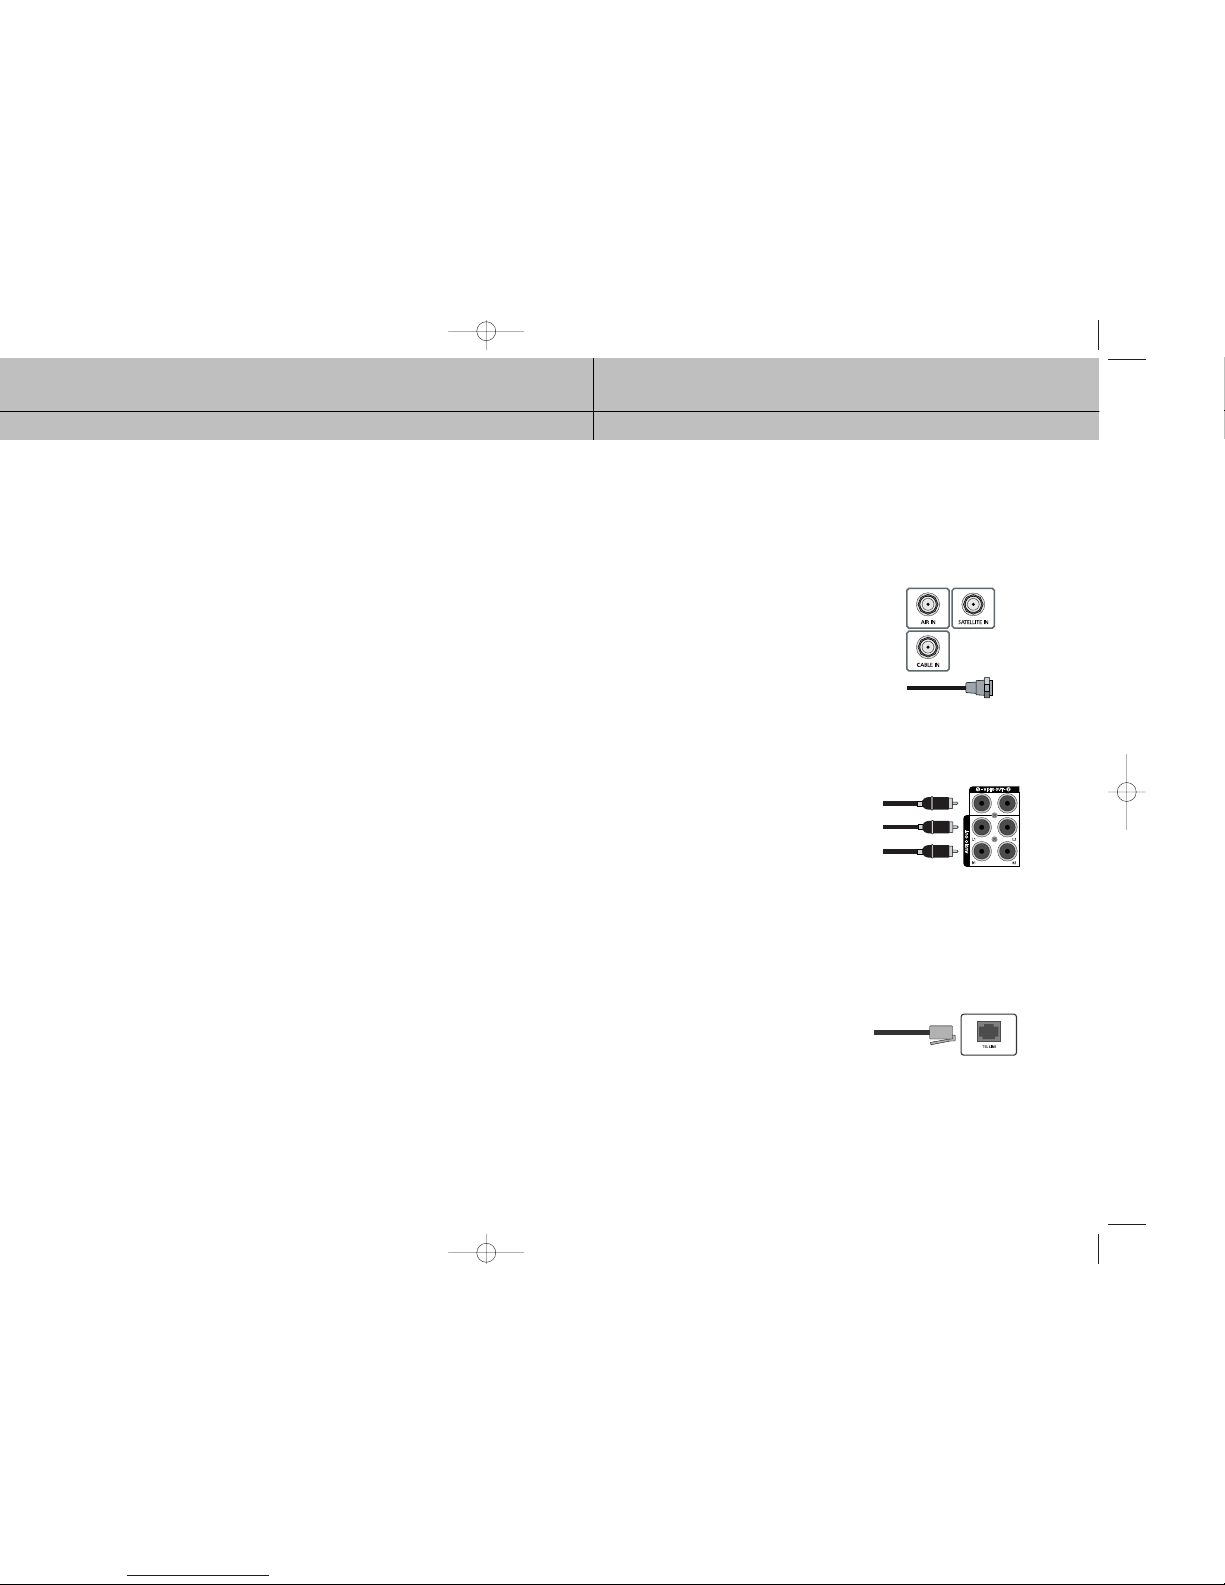
Jacks and cables
The illustrations in this section show the various types of jacks and cables used to connect
your DIRECTV®HD Receiver.
ANTENNA terminals (cable not included)
Use AIR IN and CABLE IN terminals to receive a signal
from VHF/UHF antennas or your cable system using an
RG-6 coaxial cable, SATELLITE IN terminals can be used
to connect Satellite dish input.
Audio/Video out jacks and cables (RCA-type)
Use these jacks and cables to connect your receiver
to a TV, VCR, or to other components such as a stereo
receiver or amplifier. The Video out jacks provide a
basic quality composite video signal using RCA-type
cables. Audio jacks can be used to connect the
DIRECTV
®
HD Receiver to an A/V receiver.
The audio/video jacks on the back of the receiver
and the audio/video cable connectors are color coded
(yellow for video, red for right audio, and white for
left audio).
Telephone jack and cord
The TEL LINE jack and the included telephone cord
connect your DIRECTV
®
HD Receiver to a phone line.
If your home does not have RJ-11 type phone jacks,
please contact your phone company to get one installed.
A continuous land-based phone line connection is
required for DIRECTV
®
Pay Per View functionality and
DIRECTV subscriptions. Any calls generated by the
DIRECTV®HD Receiver are toll-free.
These calls are typically made in the middle of the night;
your phone is in use for approximately 30 seconds.
29
CHAPTER 3
Setting up and connecting
3
3
B, PR”) are used to
®
HD Receiver to TVs, VCRs, and A/V
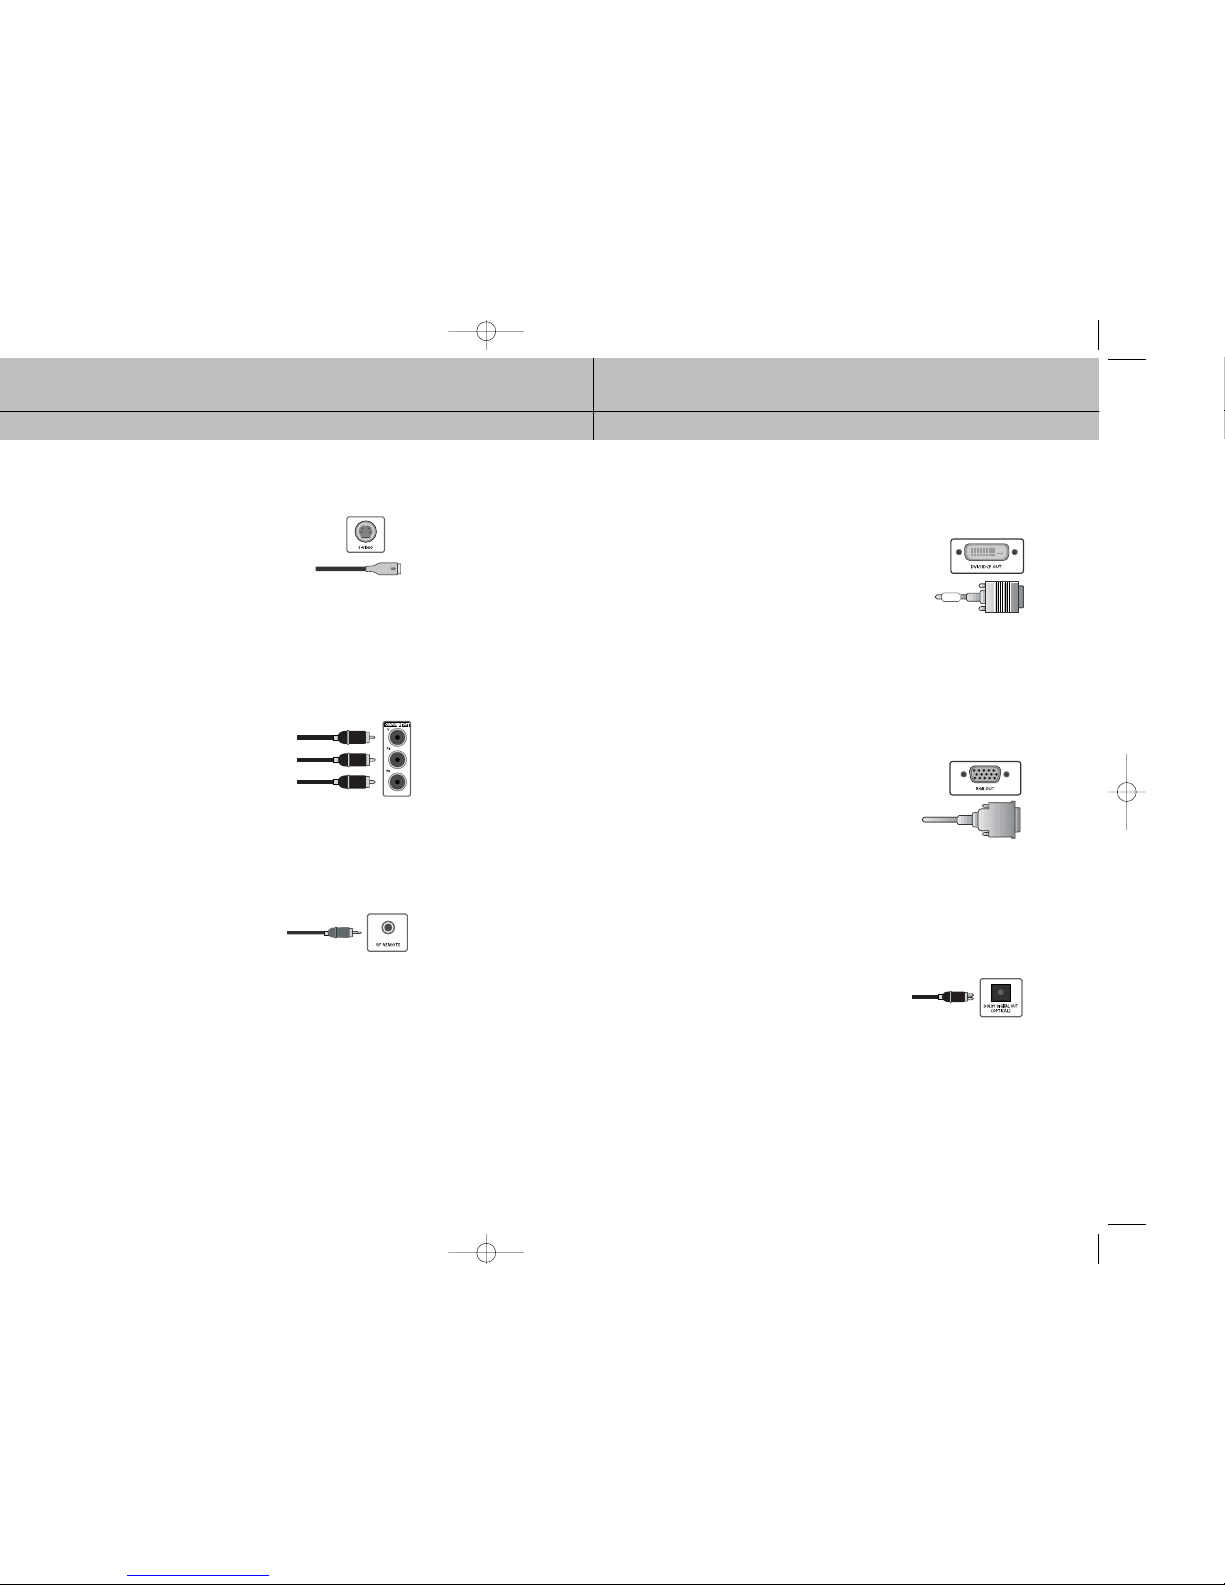
DVI jack and cable (cable not included)
Using the DVI jack and a digital DVI cable, your DIRECTV
®
HD
Receiver can provide the unconverted digital signal from digital
off-air, cable, or DIRECTV®programming directly to A/V devices
that are capable of decoding the digital video information.
The DVI jack uses HDCP content protection to allow you to view
HD programming that has been encoded using the HDCP
protection system.
For the best access to HD programming at the highest available
resolution, connect this to a HDTV that supports HDCP technology.
(This cable carries video only; use with audio cables for the audio
signal.)
RGB OUT jack and cable (cable not included)
RGB OUT jack and cable use a computer-standard 15-pin VGA
video connection.
Each main video color, Red, Green, and Blue uses a separate
pin; and other pins are used to carry vertical and horizontal
sync signals.
Using the RGB OUT jack and an RGB cable, you can connect
your DIRECTV
®
HD Receiver to devices equipped with RGB input
jacks (computer monitors, for example).
The RGB Out jack can carry any of the Digital TV and HDTV
video resolutions. (This cable carries video only; use with audio
cables for the audio signal.)
Optical digital audio jack and cable (cable not included)
Optical digital jack and cable use light to send digital audio
data to A/V receivers equipped to receive and interpret this
data. The jack and cable must be aligned before you plug
in the cable.
The jack and cable may also be covered by protective caps
which you must remove before making connections.
31
CHAPTER 3
Setting up and connecting
3
3
®
®
HD
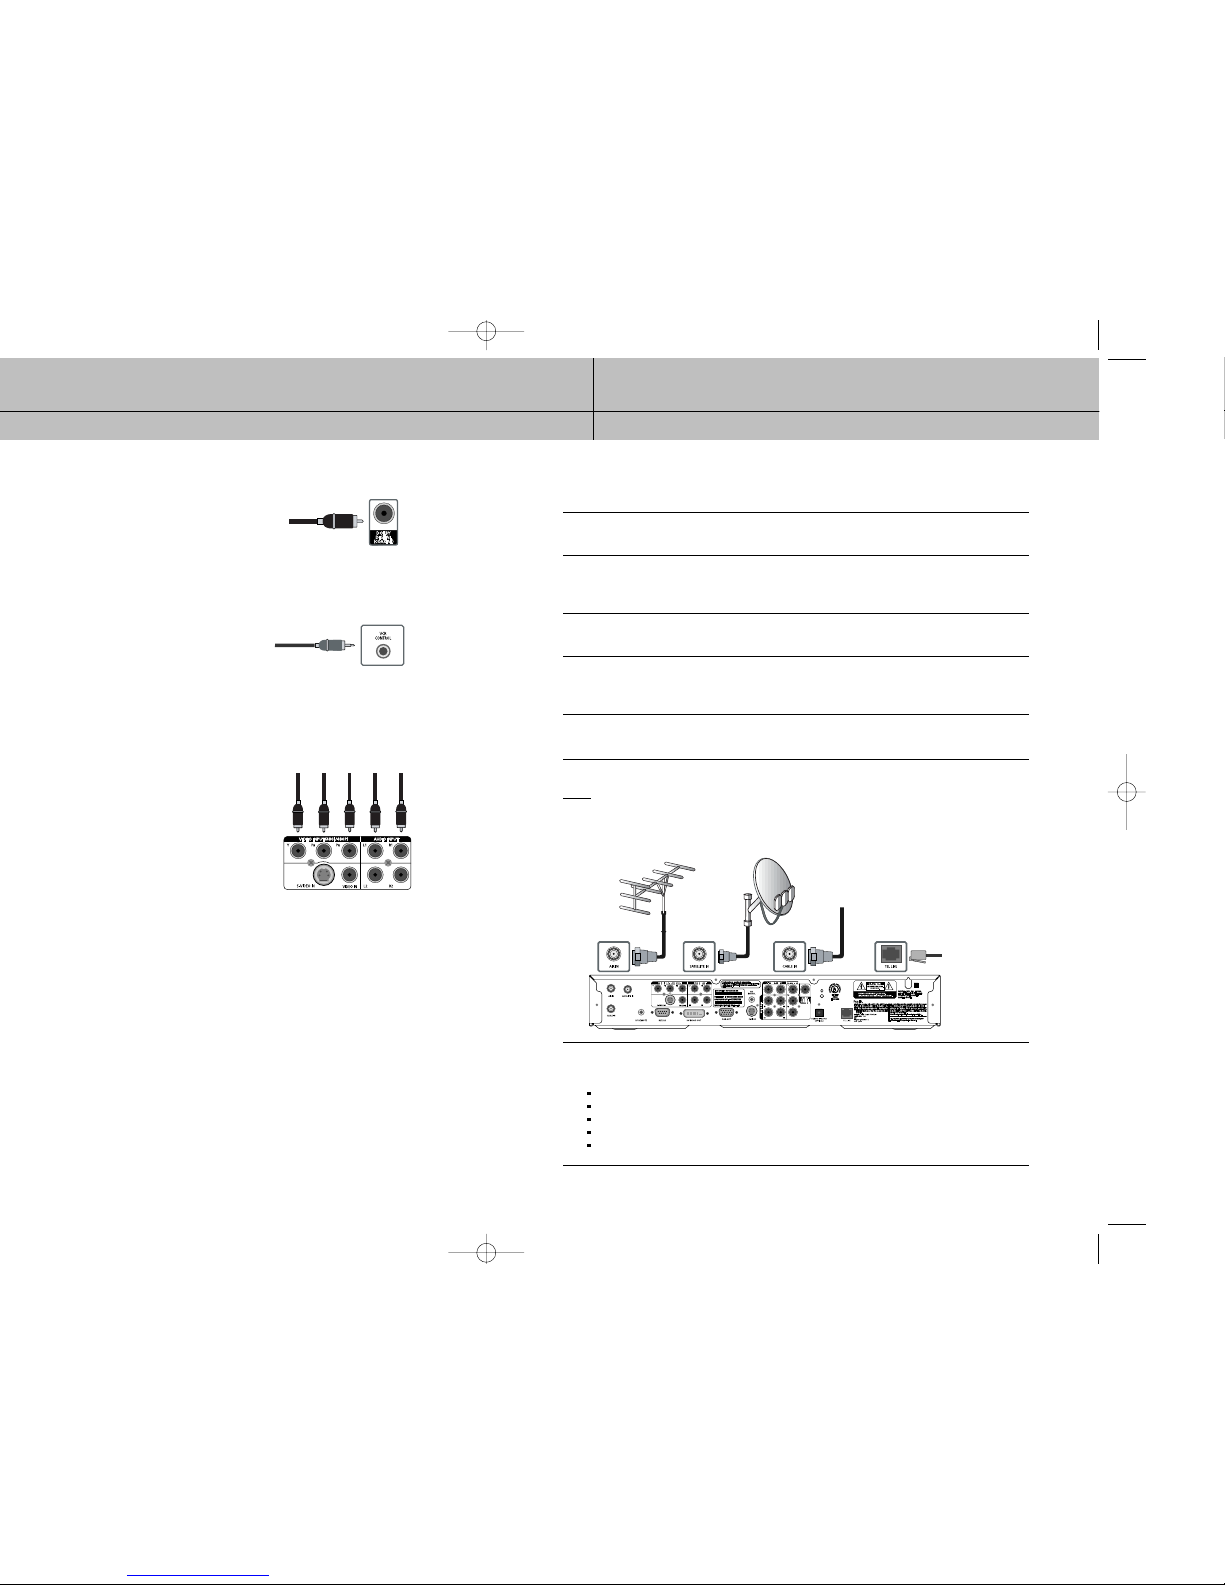
Connecting your DIRECTV®HD Receiver
1
Make sure your TV, A/V receiver, and DIRECTV®HD Receiver are turned off and unplugged.
2
If you plan to use the DIRECTV®HD Receiver to watch DIRECTV®programming, connect the
RG-6 coaxial cable running from your satellite dish to the SATELLITE IN jack on the back of
your DIRECTV®HD Receiver.
3
If you plan to watch cable TV programming, connect the coaxial cable running from your
cable TV system to the CABLE IN jack on the back of the DIRECTV®HD Receiver.
4
If you plan to watch off-air TV programming (analog or digital), connect the coaxial cable
running from your off-air TV antenna to the AIR IN jack on the back of the DIRECTV®HighDefinition Receiver.
5
Connect the supplied phone cord to a telephone wall jack and to the TEL LINE jack on the
back of the DIRECTV®HD Receiver.
NOTE
A triple LNB multi-satellite dish antenna including a Sat C LNB is required to receive HD
programming from DIRECTV.
6
Make video connections to your TV.
Your DIRECTV®HD Receiver supports the following kinds of video connections:
DVI
RGB
component (Y, PB, PR)
S-Video
composite (standard A/V jacks)
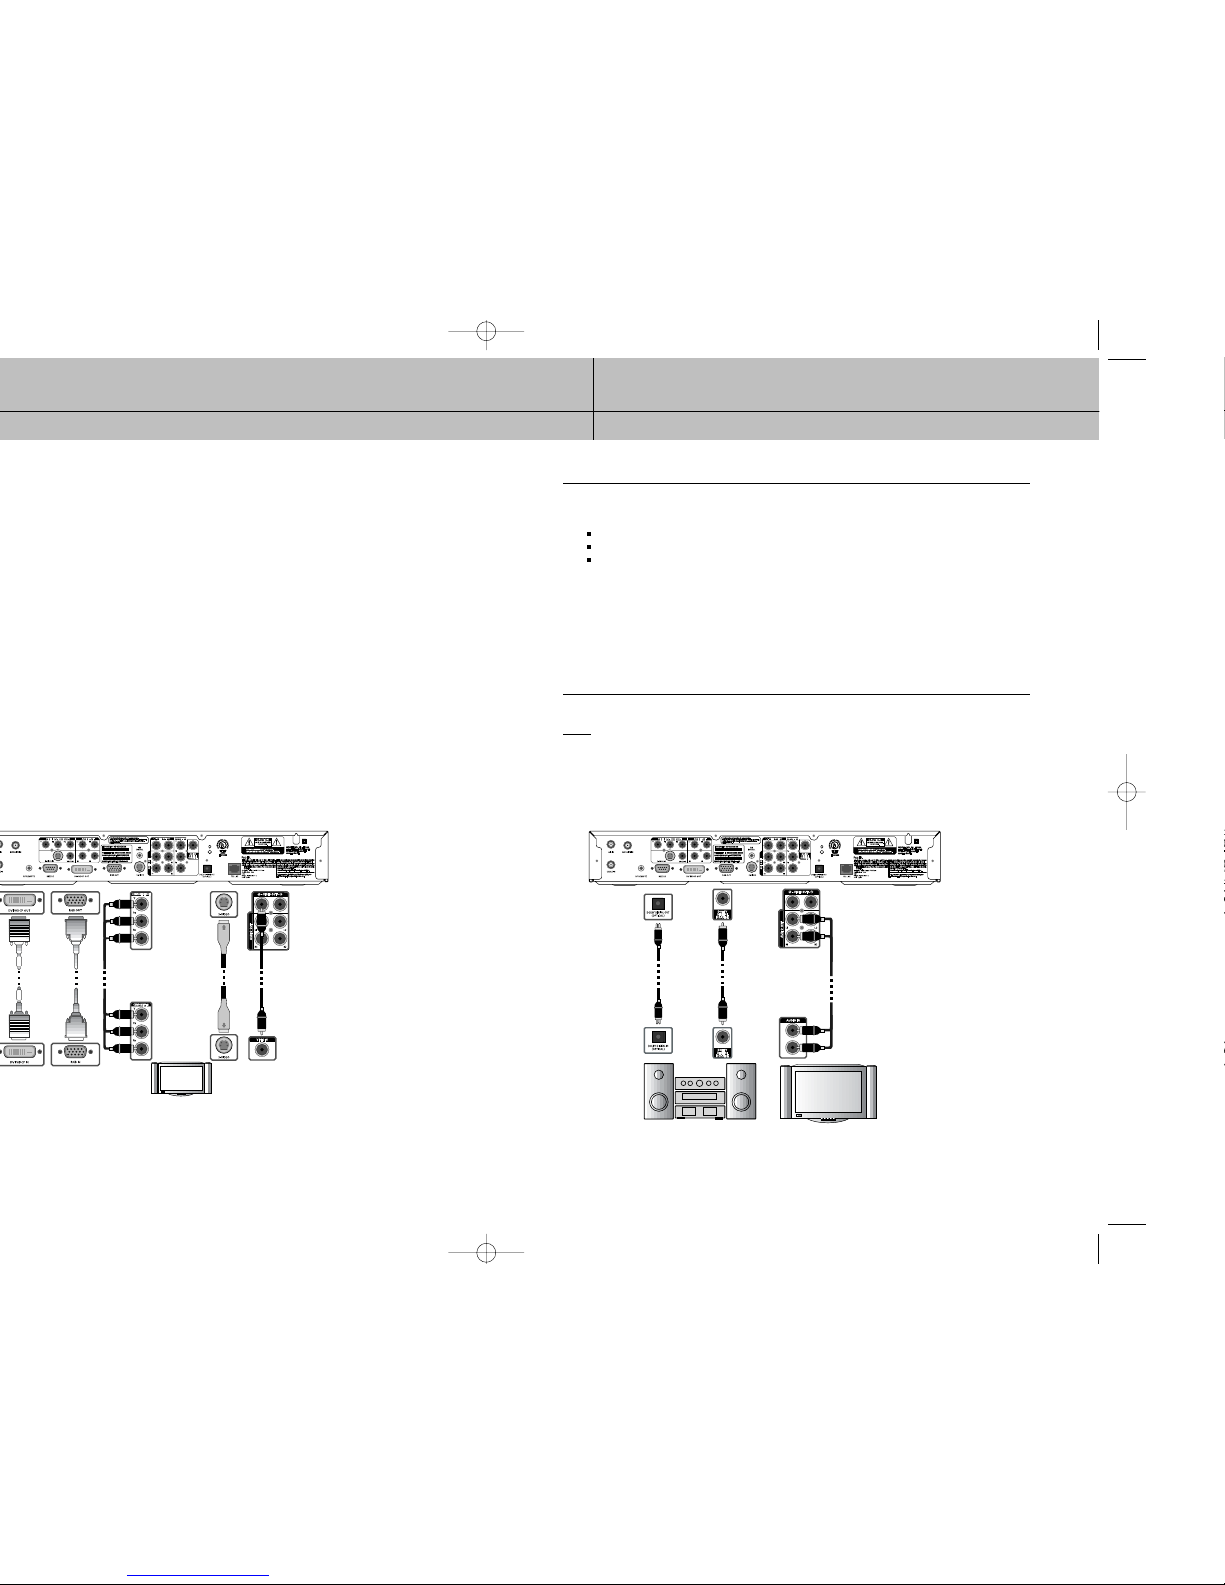
33
CHAPTER 3
Setting up and connecting
3
3
®
HD Receiver.
7
Make audio connections to your TV or A/V receiver.
Your DIRECTV®HD Receiver supports the following kinds of audio connections:
optical digital
coaxial digital
standard A/V audio jacks
Choose the highest quality connection that your TV (or A/V receiver, if you are using one)
supports (see your TV or A/V receiver owner’s manual for information). The optical and
coaxial digital audio outputs provide the highest quality audio (see Dolby Digital 5.1 in
Chapter 1). The standard A/V audio jacks provide the next best audio quality.
Whichever connection you choose, connect one end of the audio cable(s) to the appropriate
OUT jack(s) on the back of the DIRECTV®HD Receiver. Connect the other end of the audio
cable(s) to the audio input(s) on your TV.
NOTE
If you use the OPTICAL DIGITALAUDIO OUT jack, remove the protective plug from the jack
before making connections. RGB, Component, DVI and S-Video jacks do not output audio.
HD CONNECTIONS
OR OR OR
SD CONNECTIONS
AV Receiver TV Monitor
OR OR
35
CHAPTER 3
Setting up and connecting
3
3
®
HD Receiver, you can use
®
HD Receiver. Connect the other
9
If you connected your TV using RGB/DVI or YPBPRoutput, press the output mode button to
select RGB/DVI or YPBPRoutput mode.
10
(Optional) follow the instructions on the next page if you have a VCR and
want to hook up the VCR control.
11
Plug in the power cords for your TV, A/V receiver, and DIRECTV®HD Receiver.
Setting your TV input button
To view any of the programming from your DIRECTV®HD Receiver (satellite, cable, or
off-air), set your TV to display the input from the video input jack you used to connect the
DIRECTV®HD Receiver. (This is a setting on your TV usually controlled by a Video, Input,
or Mode button. See your TV manual for help.)
Also, if necessary, set your A/V receiver to play the audio from the audio input jack you
used to make the audio connection. See your A/V receiver manual for help.
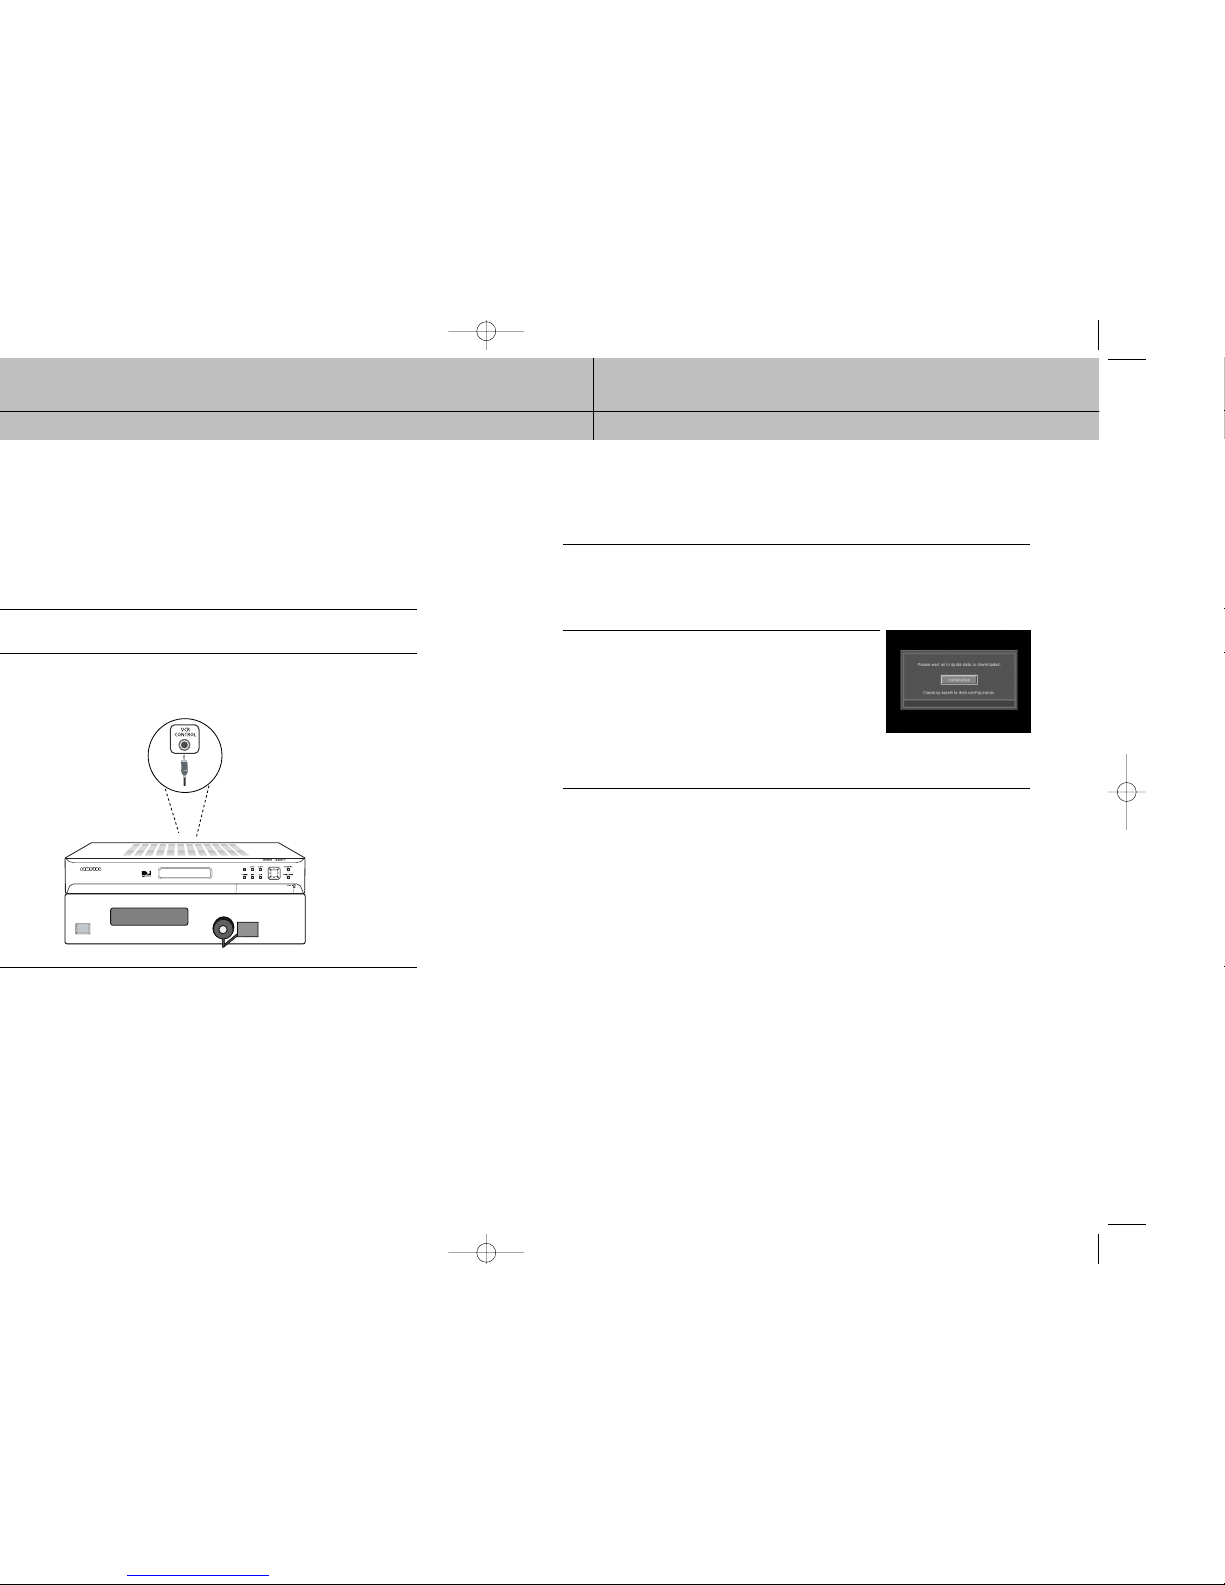
Connecting the RF remote cable with RF receiver.
You can operate the Digital Satellite Receiver when installed in a cabinet or from another
room in your house using the RF remote control. (Optional)
1
Connect the RF Receiver to the RF REMOTE jack of the Digital Satellite Receiver.
NOTE
The operating range of the remote control is about 100 feet when connecting the RF receiver.
This may decrease due to ambient reception conditions, weak batteries, obstacle, etc...
VCR
37
CHAPTER 3
Setting up and connecting
3
3
®
HD Receiver to automatically program your
®
HD Receiver, follow these steps:
®
HD Receiver.
Turning on the DIRECTV®HD Receiver for the first time
You have completed the connection steps and are ready to start using your DIRECTV®HD
Receiver. The first step is to turn on the DIRECTV®HD Receiver.
1
Turn on your TV and set it to display the signal from your DIRECTV®HD Receiver.
If you connected the DIRECTV®HD Receiver to video input jacks on your TV, you will need to
set your TV to display the input from these jacks.
Usually this is done by pressing a Video, Input, or Mode button on your TV’s remote control.
(See the manual for your TV if you need help.)
2
Press the POWER button on the DIRECTV®HD Receiver’s
remote control or on the front of the DIRECTV®HD Receiver.
Characters will be displayed on the VFD in the front panel.
If this is the first time you have turned on your DIRECTV®HD
Receiver, it will take a few moments to acquire the program
guide from the satellite. During this process, the Progress
screen appears. When the program guide has been fully
acquired, the Progress screen clears and the TV screen is
displayed. You are ready to continue setting up your
DIRECTV System.
Memorizing Channels
If your DIRECTV®HD Receiver is able to acquire the program guide and display TV
programs, your satellite dish is setup and working.
You can skip ahead to the section on Setting the dish type.
If your DIRECTV®HD Receiver cannot acquire the program guide, and you intend to watch
DIRECTV®programming, you may need to adjust the way your satellite dish is installed.
To do this, first make sure your TV and DIRECTV®HD Receiver are turned on and
connected to each other properly.
Then follow the instructions below to use your DIRECTV®HD Receiver’s Menu system to
set up your satellite dish.
39
CHAPTER 3
Setting up and connecting
3
3
®
HD Receiver what kind of
7
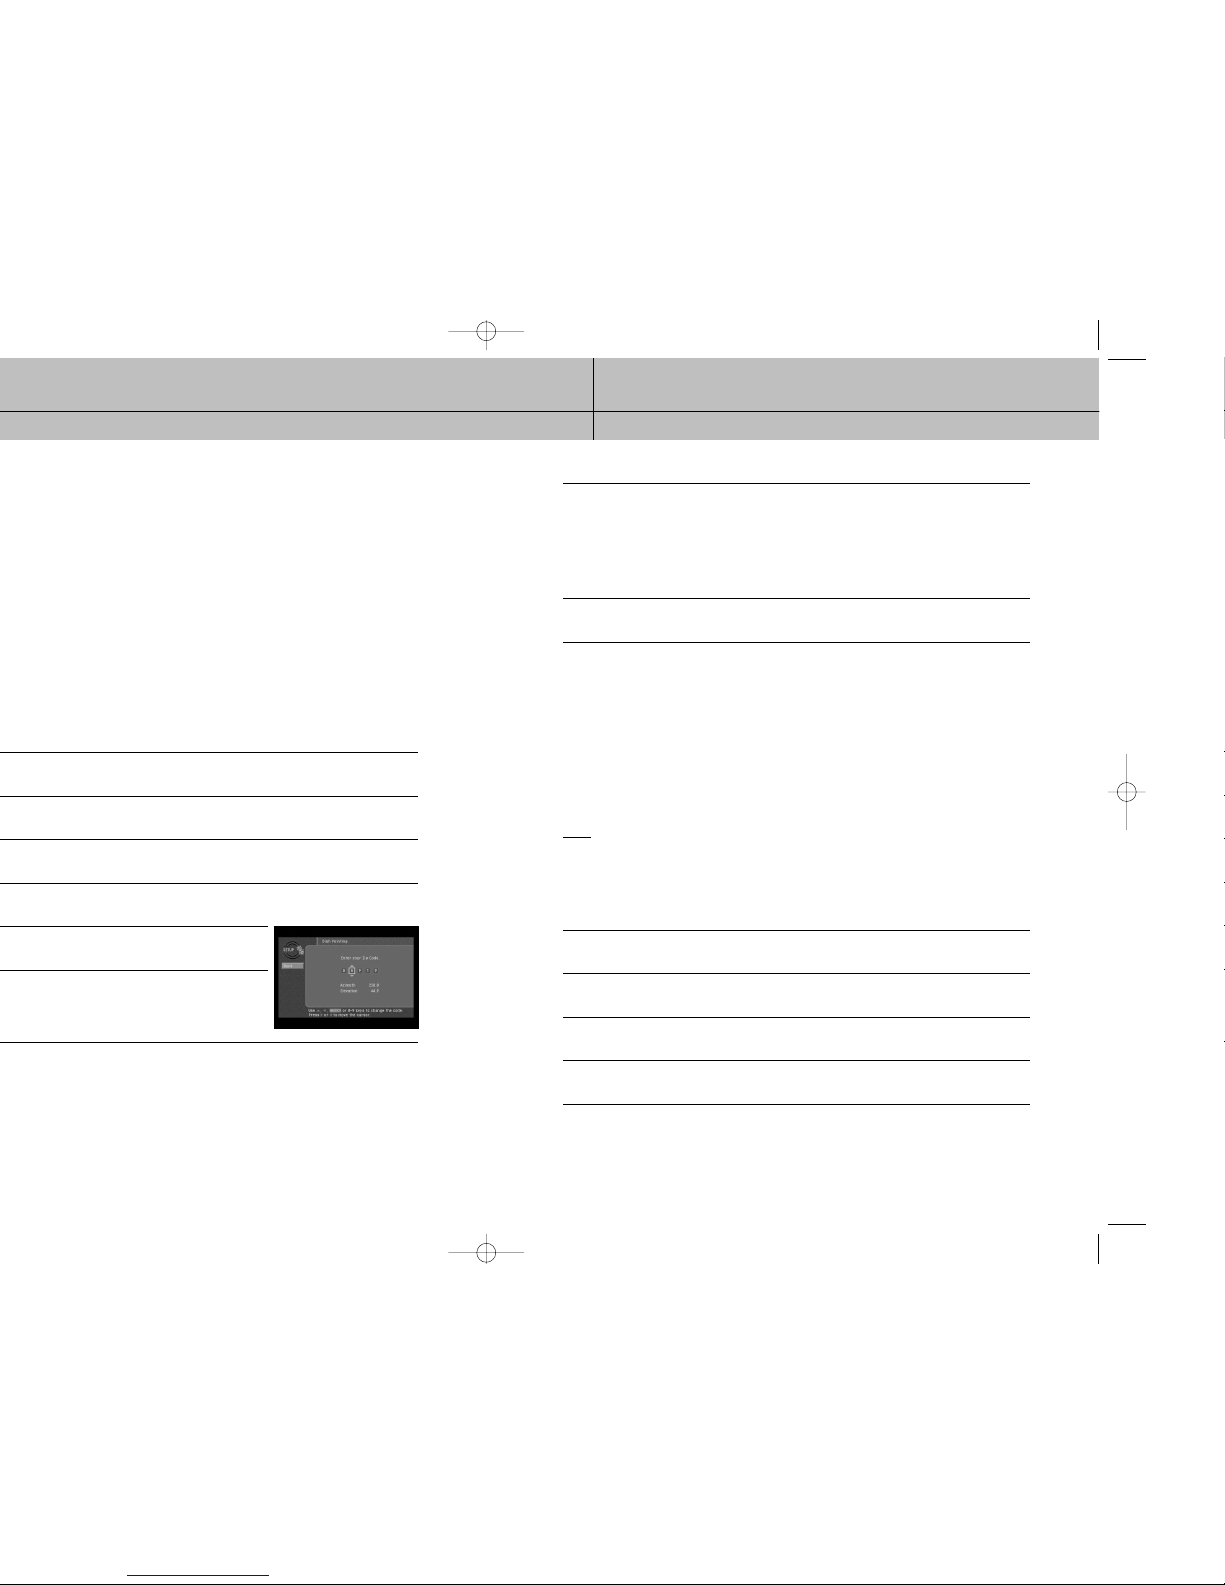
Use the 0 - 9 buttons on your remote control to enter your five-digit ZIP code.
When you have entered all five digits, the screen updates to display the correct azimuth,
elevation, and (for oval dish types only) tilt.
Azimuth refers to the left-to-right angle to which you should point your dish.
Elevation refers to the up-and-down angle to which you should point your dish.
Tilt (for oval dishes only) refers to the amount off-horizontal you should twist the dish on its axis.
Write down these numbers and use them to accurately point your satellite dish.
8
To return to the Set Dish menu, press the BACK button on your remote control.
To exit the Menu system, press the EXIT button on your remote control.
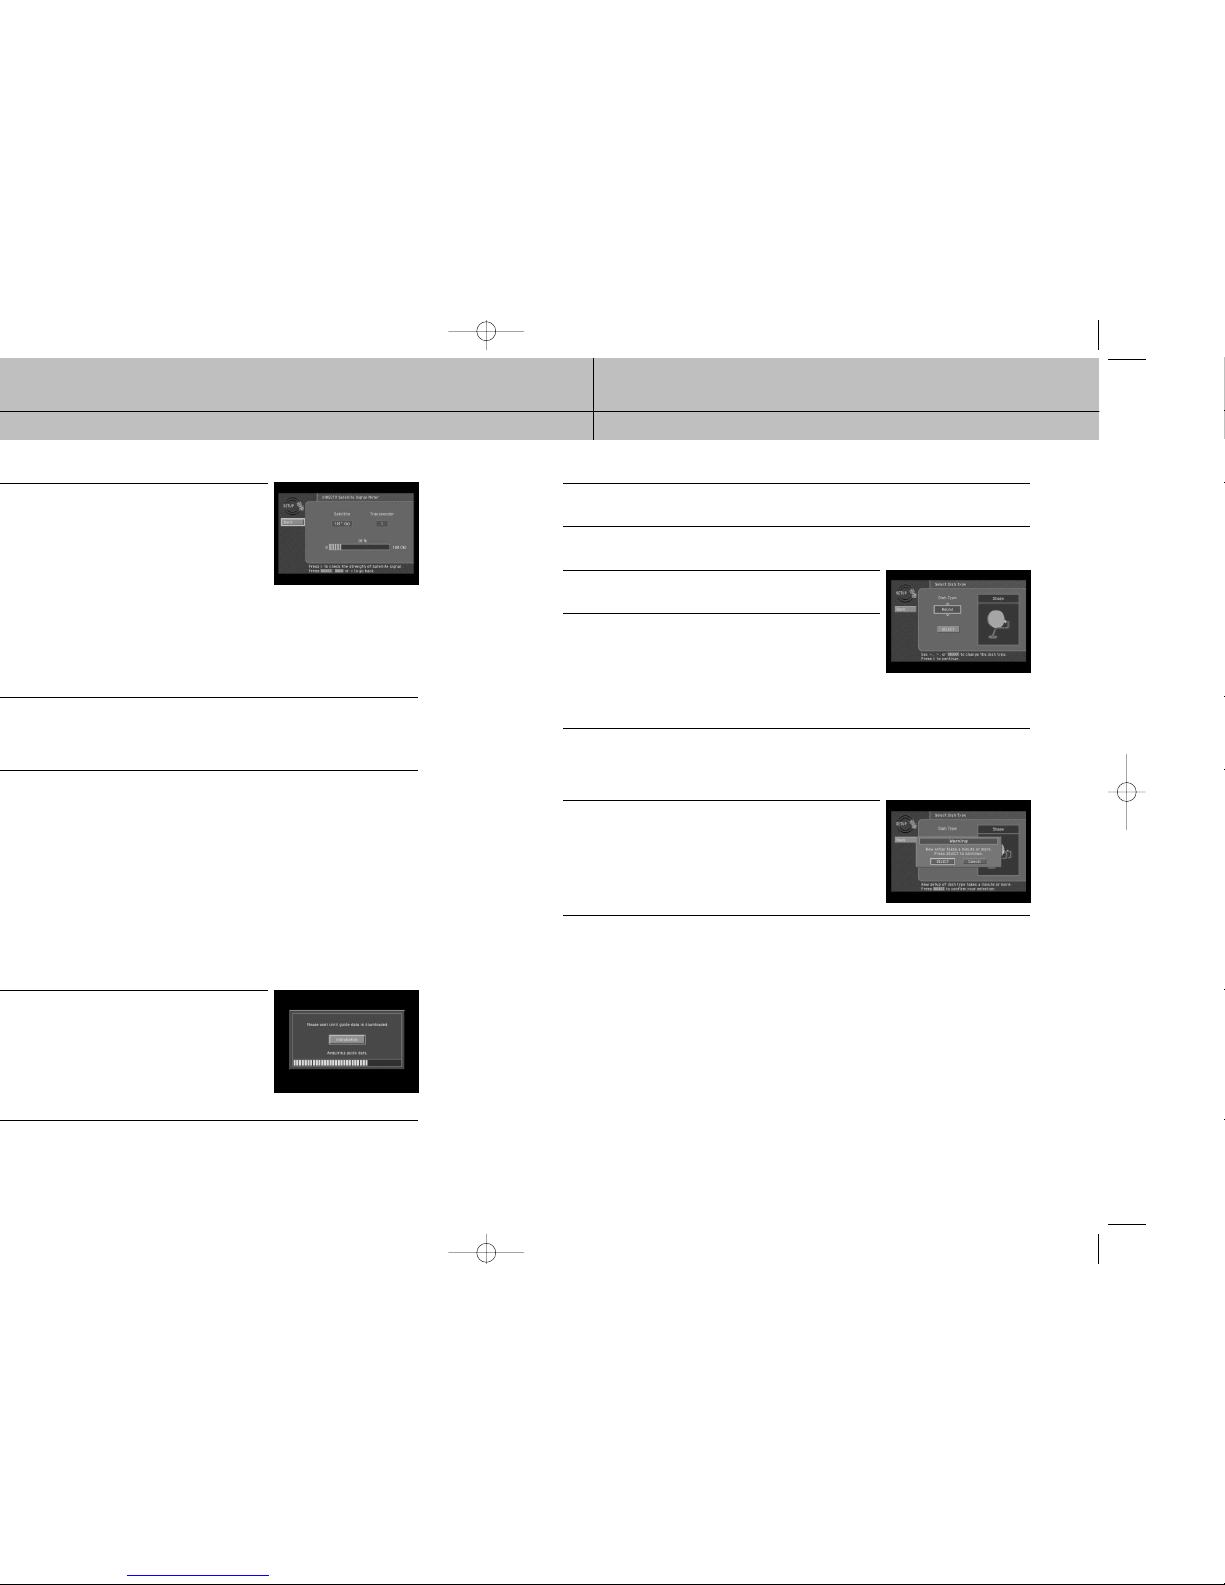
Checking the satellite signal strength
The Signal Meter allows you to check the strength of the signal from the satellite to your
satellite dish.
This is useful while setting up your satellite dish, and while troubleshooting any reception
problems you may encounter.
Satellite signal strength can be affected by how accurately you have pointed the satellite
dish, and by any obstructions between the satellite and the satellite dish (tree limbs, for
example).
NOTE
If you connected your DIRECTV®HD Receiver to an off-air antenna, you can check the strength of
any digital signals received by that antenna using the Digital Off-Air Signal Strength meter.
Follow the instructions in Programming local channels later in this chapter.
To check your satellite signal strength, follow these steps:
1
Press the MENU button on your remote control.
2
Highlight the Setup menu item, then press the SELECT button.
3
Highlight the Installation menu item, then press the SELECT button.
4
Highlight the Set Dish menu item, then press the SELECT button.
41
CHAPTER 3
Setting up and connecting
3
3
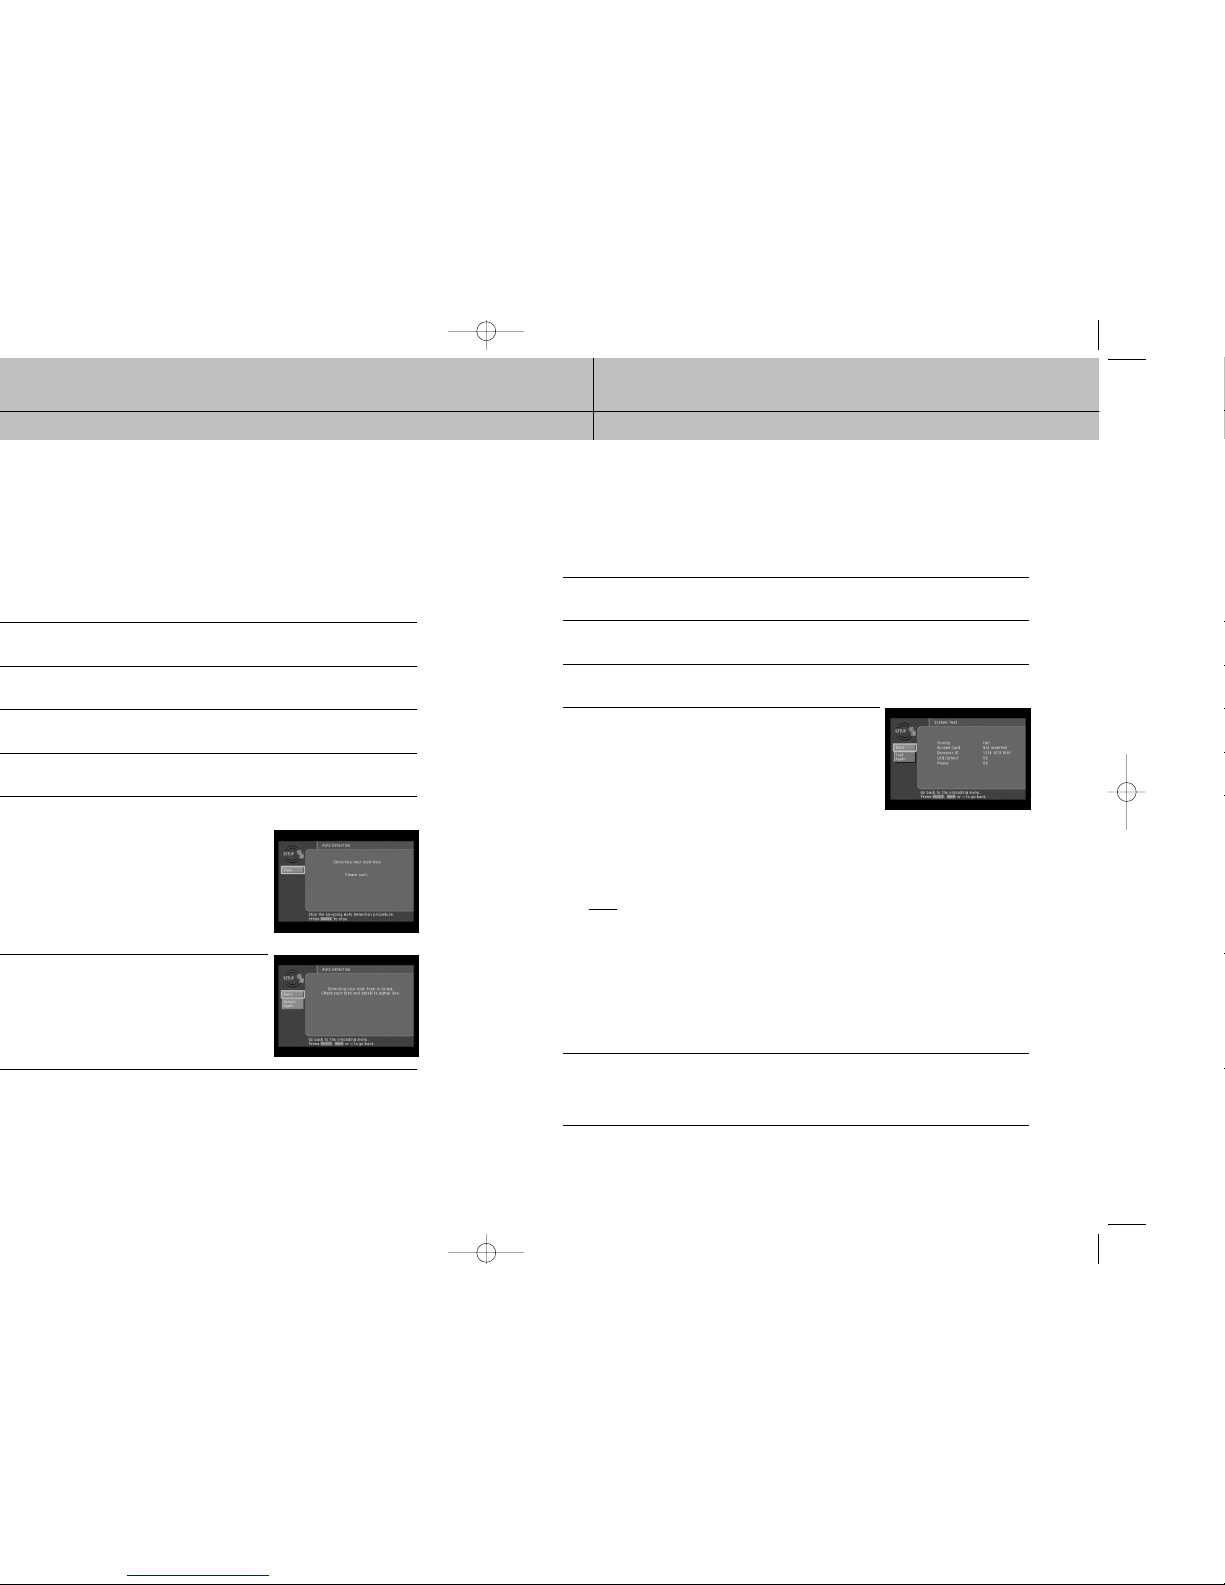
®
HD Receiver needs to know what type of satellite
®
High-Definition programming, you will need an oval triple LNB satellite dish antenna.
2
Highlight the Set Dish menu item, then press the SELECT button. The Set Dish menu appears.
3
Highlight the Select Dish Type menu item, then press the SELECT button.
The Select Dish Type screen appears.
4
Use the right-arrow button on your remote control to highlight
the Dish Type option on the Select Dish Type screen.
5
Use the up- and down-arrow buttons on your remote control
to display the dish type you are using (Round, Oval-2, Oval-3,
or No Dish). As you display each dish type, the on-screen
pictures update showing you what each of these dish types
look like. If you plan to use your DIRECTV®HD Receiver for
local off-air or cable TV programs, but do not plan to receive
DIRECTV®programming, select No Dish.
6
A message appears warning you that your DIRECTV®HD Receiver needs to reboot (turn itself
off and on) for the Dish Type setting to take effect. When you have displayed the correct dish
type, use the right-arrow button on your remote control to highlight the on-screen SELECT
button, then press the SELECT button.
7
To change the Dish Type to the new setting, highlight the
on-screen SELECT button, then press the SELECT button.
To leave the Dish Type setting unchanged, highlight the
on-screen Cancel button, and press the SELECT button.
After you select the on-screen SELECT button, the DIRECTV®HD Receiver will reboot.
If you selected No Dish, the DIRECTV®HD Receiver will perform an auto-scan to put your
cable and off-air channels into its memory so you can tune them and see them in the
on-screen Guide.
43
CHAPTER 3
Setting up and connecting
3
3
®
HD Receiver needs to know what type of satellite
®
HD Receiver must be receiving a strong signal from the satellite (that is,
®
HD Receiver starts attempting to identify the
®
HD Receiver will
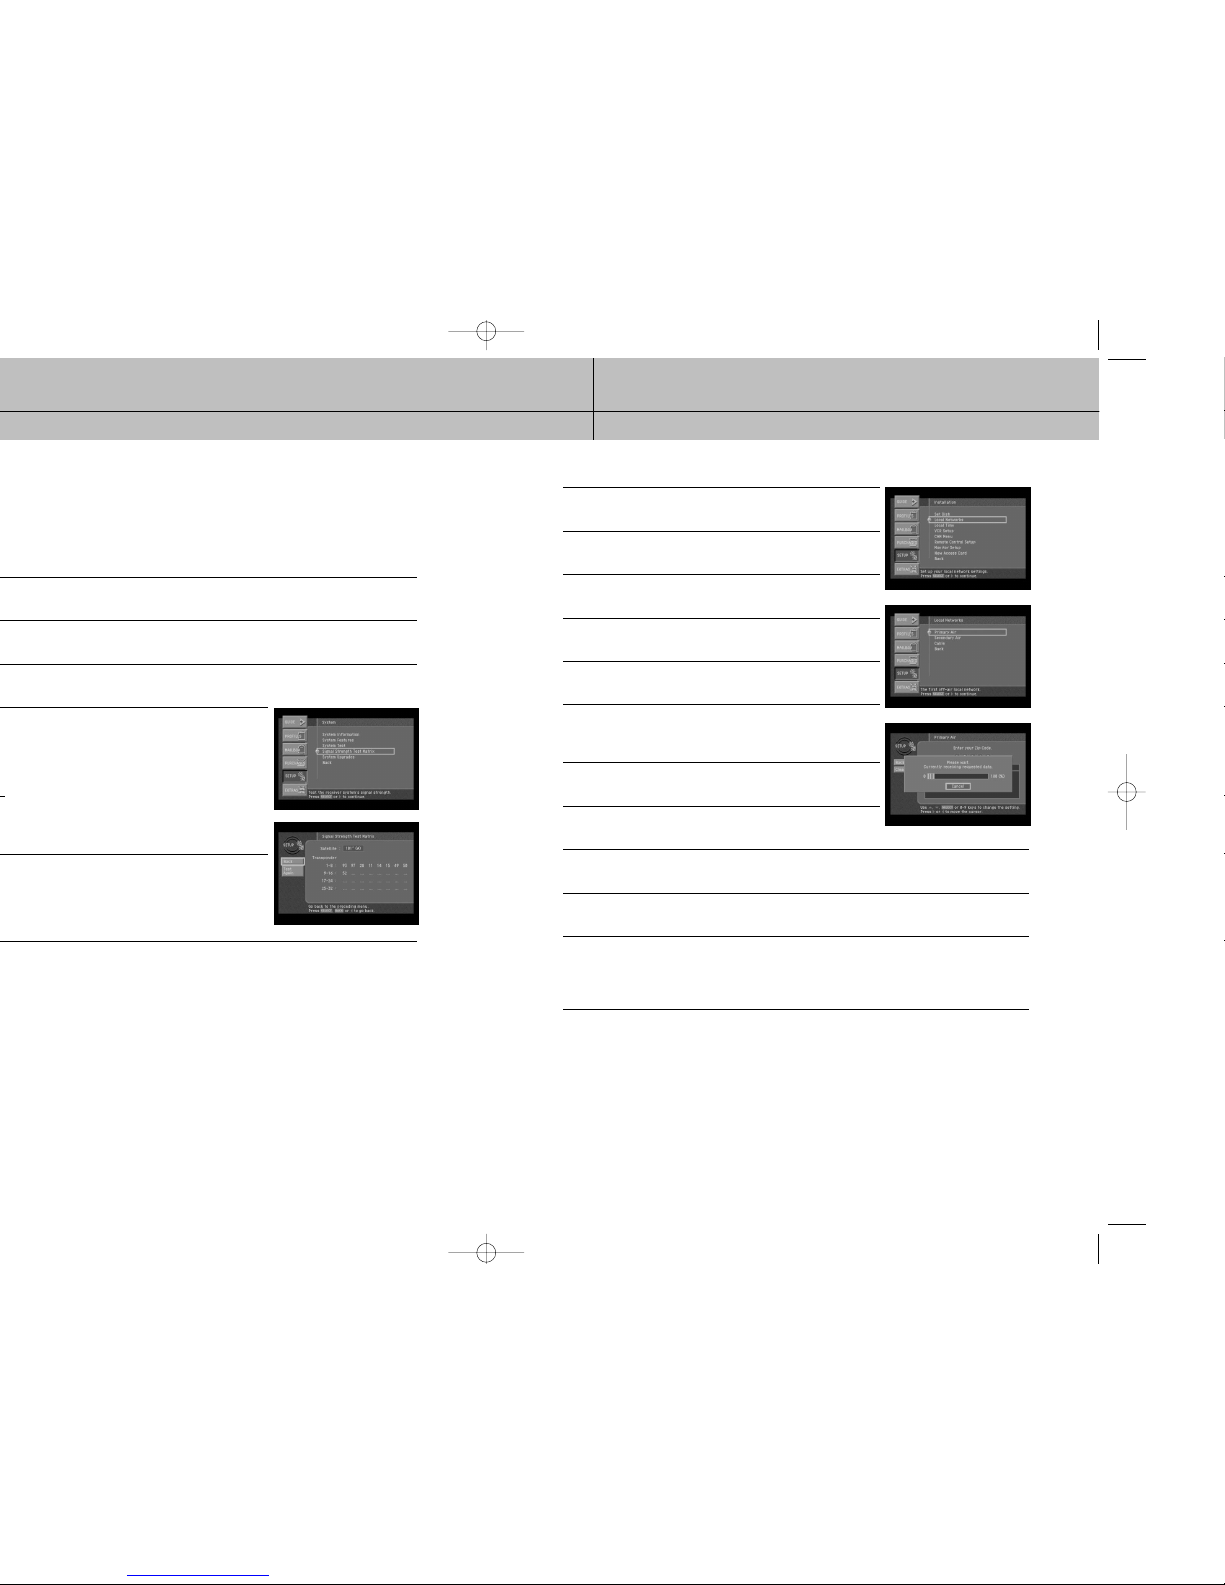
Testing the DIRECTV®HD Receiver
The System Test feature allows you to quickly check the status of the satellite signal, your
Access Card, Receiver ID, LNB Output, and your Phone line connection. This is helpful
while troubleshooting any problem you may experience with your DIRECTV®HD receiver.
To start the System Test, follow these steps:
1
Press the MENU button on your remote control.
2
Highlight the Setup menu item, then press the SELECT button.
3
Highlight the System menu item, then press the SELECT button.
4
Highlight the System Test menu item, then press the SELECT
button. The System Test screen appears.
The test will begin as soon as the screen appears.
Results are displayed in a moment.
If the test discovers a problem with the satellite tuning, check
that the satellite dish is pointed properly, and that nothing is
obstructing the direct view to the satellite.
If the test discovers a problem with the Access Card, check
that the card is properly inserted. (See Inserting the Access
Card in Chapter 2 for details.)
If the test discovers a problem with the Receiver ID, contact an authorized call center.
NOTE
The Receiver ID is printed on the rear panel of your receiver and consists of twelve digits.
If the test discovers a problem with the LNB output, check an antenna signal operates before
contacting an authorized call center.
For problems with the phone line connection, be sure that the DIRECTV®HD Receiver is
connected to a phone line, and that the phone line is working. (Try plugging a telephone into
the line you are using for the DIRECTV®HD Receiver; check to see if the phone gets a dial
tone. If so, the line is working.)
5
When you have finished the Signal Strength test, you can run the test again using the on-screen
Test Again button, exit the Menu system by pressing the EXIT button on your remote control,
or use the arrow keys to highlight on-screen BACK button, then press the SELECT button to
return to the System menu.
45
CHAPTER 3
Setting up and connecting
3
3
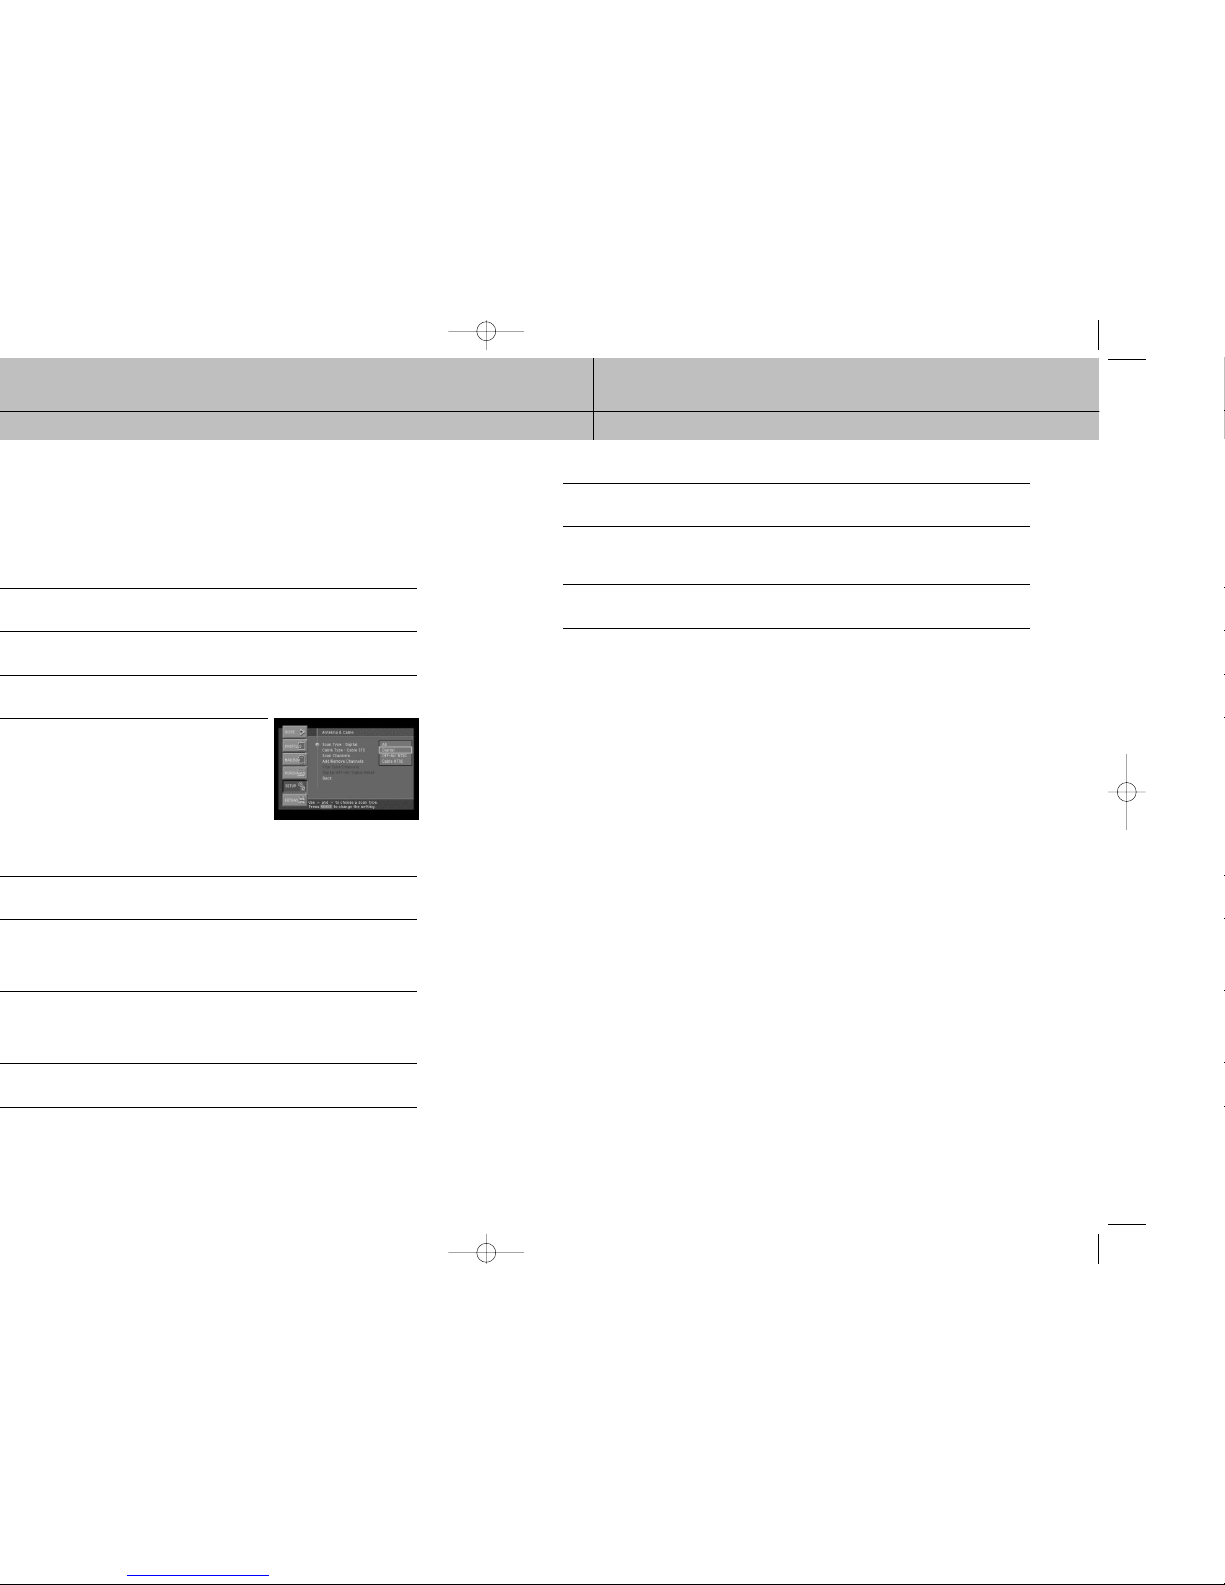
®
HD Receiver to receive Guide information via satellite for
®
®
HD Receiver to a satellite dish and subscribe to
programming, you can still add local channels to the Guide by following the instructions
To set up the Local Networks menu option:
1
Press the MENU button on your remote control.
2
Highlight Setup, and press the SELECT button.
3
Highlight Installation, and press the SELECT button.
4
Highlight Local Networks, and press the SELECT button.
5
Highlight Primary Air, and press the SELECT button.
6
Highlight the first box in the ZIP code area, then use the
number buttons on your remote control to enter your ZIP code.
After a while, a list of cities appears below your ZIP code.
7
Highlight the name of the city from which your local channels
are broadcast, and press the SELECT button.
8
Highlight the on-screen BACK button, and press the SELECT
button. You return to the Local Networks screen.
9
(Optional) If you receive off-air broadcasts from a second city, highlight Secondary Air, and
press the SELECT button. Repeat steps 6 - 8 for the second city.
10
(Optional) If you receive programming from a cable TV service, highlight Cable, and press
the SELECT button. Repeat steps 6 - 8 for the cable service.
11
When you have finished entering your local broadcast and cable TV information, press the
EXIT button on your remote control. The DIRECTV®HD Receiver will reboot (turn itself off
and then back on). After rebooting, the DIRECTV®HD Receiver will acquire and provide
Guide information for your local off-air and cable TV channels.
47
CHAPTER 3
Setting up and connecting
3
3
®
HD Receiver can also add off-air
®
HD Receiver.
®
HD Receiver to automatically scan for
®
HD
®
HD Receiver, then press the SELECT button.
®
HD Receiver automatically starts looking
9
If any of the off-air antenna channels appear out-of-tune, you can fine tune them using the Fine
Tune Channels item in the Antenna & Cable menu.
10
If you have added digital channels from an off-air antenna, you can check the signal
strength for that channel by using the Digital Off-Air Signal Strength menu item in the
Antenna & Cable menu.
11
To exit the Menu system press the EXIT button on your remote control.
Activating your DIRECTV account
After you have installed and connected the the satellite dish and DIRECTV®HD Receiver,
you must contact your service provider to create an account.
To order programming from DIRECTV, please call 1-800-DIRECTV (1-800-347-3288).
Check with your retailer or visit www.DIRECTV.com for information on availability of local
channels from DIRECTV in your area.
DIRECTV®programming is provided in accordance with the terms and conditions of the
DIRECTV Customer Agreement, which is provided at DIRECTV.com or with your first
DIRECTV bill.
Activation of programming may be subject to credit approval and requires valid service
address, social security number and/or major credit card. Deposit or prepayment may be
required.
Programming subject to change.
You must be physically located in the U.S. to receive DIRECTV service.
DIRECTV services not available outside the U.S.
DIRECTV programming is sold separately and independently of DIRECTV®System
hardware.
A valid programming subscription is required to operate DIRECTV System hardware.
Upgrades
Your digital satellite receiver is able to receive upgrades or modifications to some of its
features and functions.
These modifications will occur automatically, usually at times when the receiver would
likely be turned off.
If your receiver is on when an upgrade or modification is sent, you may experience a
disruption in reception for a minute or two.
Your reception should return to normal after the modification is complete.
Your receiver must be plugged in to receive any upgrades.
Do not unplug your receiver while an upgrade is in progress.
Please consult the System Upgrades menu item (in the System section of the Setup menu)
to find a schedule of upgrades or modifications planned by DIRECTV.
49
CHAPTER 4
Watching TV
4
4
®
HD Receiver’s remote control.
POWER
Turns the device you are controlling on or off.
SET
Use this button when programming your remote control to operate
your TV, VCR, DVD player, or an auxiliary device (AUX). See Chapter
8, Programming the remote control.
MODE
These buttons tell the current state of your remote control.
Selects a target device to be controlled i.e., TV, VCR, DVD, AUX,
DIRECTV. These buttons work only after the remote control has been
programmed.
VOL+/-
Adjust the volume level of your TV (once the remote control has been
programmed). You can control the volume when in TV, DIRECTV, or
VCR mode.
MUTE
Mute or unmute the TV audio (once the remote control has been
programmed).
TV/VIDEO
Button the TV between its video input modes (Once the remote
control has been programmed) if the TV mode is selected.
In the DIRECTV mode, it will be used for external input switching.
CH
Change channels on your DIRECTV HD Receiver or your TV
(once the remote control has been programmed).
INFO
Display the Channel Banner and information about the current
program.
HELP
Display instructions about the screen or menu currently displayed.
WHO
Press to change the current user profile.
QUICK
Press this button to view the Quick Guide.
MENU
Press this button to display the on-screen Menu.
GUIDE
Press to view the on-screen Program Guide.
Up/Down/Left/Right arrows
These buttons move the highlight to any on-screen Guide or Menu
selection.
SELECT
Select highlighted items in the on-screen Menu or Guide.
BACK
Return to the channel you were last watching, or return to a previous
Menu.
EXIT
Exit any Guide or Menu screen and return to the TV program you
were watching.
CALLER ID (red button)
Displays the phone numbers of callers who called you on the phone
line connected to your DIRECTV
®
HD Receiver (works only if you
subscribe to your telephone service’s caller ID service).
While in the Guide, this button lets you change the Guide style.
FREEZE (green button)
Takes a still picture of the TV screen. Press it again to resume the
program you were watching. In the Guide, this button lets you see
program listings for different times.
AUDIO (yellow button)
While watching TV, press this button to select an alternate audio
track. While in the Guide, this button lets you view programs in
selected categories.
SEARCH (blue button)
Press this button to search for a program listing in the Guide.
Number and delimiter buttons (0-9, – )
Press the number buttons to tune to a channel or to enter numbers
on Menu screens. Press the delimiter button (-) to separate parts of a
number.
GAME
Accesses games you can play.
FORMAT
Cycles through the formats available for your display type.
CC
Displays and hides Closed Caption text.
VCR control buttons
VCR control buttons operate your VCR with the Play, Rewind,
Fast-Forward, Record, Stop and Pause buttons (once the remote
control has been programmed).
RES
Changes the screen resolution.
RESET
Resets the remote control.
VCR Control Buttons
œœ
Used for rewinding
√
Plays the videotape or DVD disc
√√
Used for fast-forwarding
●
Saves the current channel to the VCR
■
Used for stopping play
❙❙
To pause or play video.
51
CHAPTER 4
Watching TV
4
4
HD Receiver can receive.)
®
HD Receiver’s remote control to adjust
Getting information on the TV program you are watching
Your DIRECTV®HD Receiver provides several layers of information about the TV programs
you watch.
The Channel Banner
As you change channels you will see a Channel Banner on each channel you tune to.
After a few seconds, the Channel Banner disappears. If you want to clear it right away,
press the EXIT button on your remote control.
The Channel Banner provides the following information:
The Full Channel Banner
The Channel Banner provides quick information as you button channels on your DIRECTV
®
HD Receiver. If you want to see information about the channel you are currently watching,
simply press the INFO button on your DIRECTV®HD Receiver’s remote control. Pressing the
INFO button displays the Full Channel Banner.
The Full Channel Banner displays all the
information in the Channel Banner, plus
more details about the program.
For example, the Full Channel Banner for
a movie might display the category for the
movie (drama, comedy, action/adventure,
etc.), the cast, the year it was released, and
a short description of the plot. You can clear
the Full Channel Banner from your screen by
pressing the EXIT button on your remote
control.
Channel number and name
Channel logo Program start
and end times
Program rating Information icons
(See next page for details.)
Current time and date
Current user profile
Signal type and
audio format
Program title
53
CHAPTER 4
Watching TV
4
4
®
HD Receiver. Here are descriptions of each icon:
Multi-language
This icon appears when additional audio tracks are available.
Press the yellow AUDIO button to choose an alternate audio track.
Locked
This icon appears when the system is locked.
Unlocked
This icon appears when the system is temporarily unlocked.
Mail
This icon appears when there are unread mail messages from DIRECTV in your system mailbox.
Music channel
This icon appears when the channel is a music-only channel.
Pay per view program
This icon appears when the program is a pay per view program.
Closed caption
This icon appears when closed captioning is available for a program.
Dolby®Digital
This icon indicates that the current program is being broadcast using a Dolby Digital audio track.
Because all high-definition broadcasts use Dolby Digital audio, the icon does not appear for HDTV broadcasts.
Letterbox
This icon indicates that the current program is being broadcast using the letterbox widescreen video format.
High definition
This icon indicates that the current program is a High Definition broadcast (HDTV).
All Day Ticket
This icon will appear when you purchase All Day Ticket.
To view the Program Detail Screen:
1
While watching a TV program, press the INFO button on your remote control.
The Full Channel Banner appears.
2
Press the INFO button again.
The Program Detail Screen appears.
Another way to view the Program Detail screen is to enter the Program Guide, highlight the
program listing you are interested in, then press the INFO button.
Program Detail Screen actions
In addition to a description of the program you are watching, the Program Detail Screen
provides a list of actions you can take related to that program. Here are descriptions of
the actions that might be available for a program.
NOTE
not all actions are available for every program.
Back: Displays the last screen you viewed before entering the Program Detail Screen.
Exit: Clears the screen and displays the last channel you were viewing.
Buy $(Price): For pay per view programs, allows you to purchase the program.
Cancel $(Price): For pay per view programs that you have previously purchased but that have
not yet aired, lets you cancel your purchase.
View: Displays the channel airing the program described.
Schedule: For future programs, allows you to set your DIRECTV HD Receiver to remind
you when the program is about to start, or to set your DIRECTV®HD Receiver
and VCR to record the program.
Unschedule: For programs you have previously scheduled for a reminder or recording,
allows you to cancel the reminder or recording.
Episodes: For programs broadcast as episodes, allows you to view a list of other
episodes in that program’s series.
Show Times: Displays a list of times and channels for viewing the program.
Similar: Displays a list of programs that have aspects in common with the program.
Actions list
Select this arrow and press the
SELECT button to scroll down.
55
CHAPTER 4
Watching TV
4
4
Setting the default Guide style
The Guide menu item allows you to set which style of Guide is displayed when you
press the GUIDE button on your remote control. Here’s how:
1
Press the MENU button on your remote control.
The Main menu appears on your screen.
When you display the Main menu, the Guide item is highlighted.
2
Press the SELECT button.
The Guide menu appears.
3
Use the up- and down-arrow buttons on your remote control to
highlight the Set Guide menu item. The page icon to the right
of the Set Guide item indicates selecting this item will display
a list of options.
4
Press the SELECT button on your remote control.
A list of Guide Styles appears.
5
Highlight the Guide style you wish to have displayed anytime
you press the GUIDE button, then press the SELECT button.
The list of Guide styles disappears, and the style you chose
is displayed in the Set Guide menu item.
6
To exit the Menu, press the EXIT button on your remote control.
Pressing the GUIDE button will now display the Guide style you selected.

57
CHAPTER 4
Watching TV
4
4
Using the Grid Guide
The Grid Guide displays a Channel Banner and a channel list. It provides access to the
complete set of Guide features including the ability to search for programs, schedule
reminders and recordings, etc.
Displaying and clearing the Grid Guide
To display or clear the Grid Guide:
1
To display the Grid Guide, press the GUIDE button on your remote control.
The Grid Guide appears. (Pressing the GUIDE button displays the Guide style — Grid Guide,
Grid Guide (Name), or Logo Guide — established in the Set Guide option in the Guide menu.
The default setting is Grid Guide).
2
You can also display the Grid Guide by pressing the MENU button on your remote control.
Then highlight Guide and press the SELECT button. Then highlight Grid Guide and press the
SELECT button again.
3
To clear the Grid Guide from your screen, press the EXIT button on your remote control.
Grid Guide overview
This diamond marks the current time
(so you can see how close you are
to a program start or end time).
Title of the highlighted
program or channel
This Banner shows information
about the channel or program
highlighted in the Guide.
Picture-inGuide
shows you
the program
you are
watching.
The program
currently highlighted.
Icons to remind you about the Guide functions of
the red, green, yellow, and blue buttons on your
remote control.
Current time and date
Signal type
The program list;
use the arrow buttons
on your remote control
to highlight different
areas.
 Loading...