

Page 1

Samsung Electronics America inc.
105 Challenger Road, Ridgefield Park, N.J. 07660
SERVICE DIVISION
TEL: 1-800-SAMSUNG (1-800-726-7864)
SIR-T150
................................................................................................................
DIGITAL TV SET TOP BOX
AA68-01291A(ENG)
.............
Owner’s
Instructions
Page 2
Warning! Important Safety Instructions
CAUTION
RISK OF ELECTRIC SHOCK
DO NOT OPEN
CAUTION: TO REDUCE THE RISK OF ELECTRIC SHOCK, DO NOT REMOVE COVER
(OR BACK). NO USER SERVICEABLE PARTS INSIDE. REFER SERVICING TO QUALIFIED
SERVICE PERSONNEL.
This symbol indicates high voltage is present inside. It is
dangerous to make any kind of contact with any inside part of this
product.
This symbol alerts you that important literature concerning operation
and maintenance has been included with this product.
Note to CATV system installer: This reminder is provided to call CATV system
installer’s attention to Article 820-40 of the National Electrical Code (Section 54 of
Canadian Electrical Code, Part I), that provides guidelines for proper grounding and, in
particular, specifies that the cable ground shall be connected to the grounding system of
the building as close to the point of cable entry as practical.
Caution: FCC regulations state that any unauthorized changes or modifications to this
equipment may void the user’s authority to operate it.
Caution: To prevent electric shock, match the wide blade of plug to the wide slot, and
fully insert the plug.
Attention: pour eviter les chocs electriques, introduire la lame le plus large de la fiche
dans la borne correspondante de la prise et pousser jusqu’au fond.
Important: One Federal Court has held that unauthorized recording of
copyrighted TV programs is an infringement of U.S. copyright laws.
Certain Canadian programs may also be copyrighted and any unauthorized recording
in whole or in part may be in violation of these rights.
To prevent damage which may result in fire or electric shock
hazard, do not expose this appliance to rain or moisture.
Page 3

Thank You for Choosing Samsung
Thank you for choosing Samsung! Your new Samsung Digital TV receiver represents the latest in DTV
IRD technology. We designed it with easy-to-use on-screen menus and closed captioning capabilities,
making it one of the best products in its class. We are proud to offer you a product that will provide
convenient, dependable service and enjoyment for years to come.
Important Safety Information
Always be careful when using your product. To reduce the risk of fire, electrical shock, and other
injuries, keep these safety precautions in mind when installing, using, and
maintaining your machine.
• Read all safety and operating instructions before operating your product.
• Keep the safety and operating instructions for future reference.
• Heed all warnings on the product receiver and in the operating instructions.
• Follow all operating and use instructions.
• Unplug the product from the wall outlet before cleaning. Use a damp cloth; do not use liquid or
aerosol cleaners.
• Never add any attachments and/or equipment without approval of the manufacturer. Such additions can increase the risk of fire, electric shock, or other personal injury.
• Do not use the product where contact with or immersion in water is a possibility, such as near
bath tubs, sinks, washing machines, swimming pools, etc.
• Do not place the product on an unstable cart, stand, tripod, bracket,
or table where it can fall. A falling product can cause serious injury to
a child or adult, and serious damage to the appliance. Use only with
a cart, stand, tripod, bracket, or table recommended by the manufacturer or sold with the product. Follow the manufacturer’s instructions
when mounting the unit, and use a mounting accessory recommended
by the manufacturer. Move the product and cart with care. Quick
stops, excessive force, and uneven surfaces can make the unit and
cart unsteady and likely to overturn.
• Provide ventilation for the product. The unit is designed with slots in the cabinet for ventilation to
protect it from overheating. Do not block these openings with any object, and do not place the
product on a bed, sofa, rug, or other similar surface. Do not place it near a radiator or heat register. If you place the product on a rack or bookcase, ensure that there is adequate ventilation
and that you’ve followed the manufacturer’s instructions for mounting.
• Operate your product only from the type of power source indicated on the marking label. If you
are not sure of the type of power supplied to your home, consult your appliance dealer or local
power company.
• Use only a grounded or polarized outlet. For your safety, this product is equipped with a polarized alternating current line plug having one blade wider than the other. This plug will fit into the
power outlet only one way. If you are unable to insert the plug fully into the outlet, try reversing
the plug. If the plug still does not fit, contact your electrician to replace your outlet.
S
1
AFETY
Page 4

• Protect the power cord. Power supply cords should be routed so that they won’t be walked on or
pinched by objects placed on or against them. Pay particular attention to cords at plugs, convenience receptacles, and the point where they exit from the unit.
• Unplug the product from the wall outlet and disconnect the antenna or cable system during a
lightning storm or when left unattended and unused for long periods of time. This will prevent
damage to the unit due to lightning and power-line surges.
• Avoid overhead power lines. An outside antenna system should not be placed in the vicinity of
overhead power lines or other electric light or power circuits or where it can fall into such power
lines or circuits. When installing an outside antenna system, be extremely careful to keep from
touching the power lines or circuits. Contact with such lines can be fatal.
• Do not overload the wall outlet or extension cords. Overloading can result in fire or electric
shock.
• Do not insert anything through the openings in the unit, where they can touch dangerous voltage
points or damage parts. Never spill liquid of any kind on the product.
• Ground outdoor antennas. If an outside antenna is connected to the product, be sure the antenna is grounded so
as to provide some protection against voltage surges and
built-up static charges. Section 810 of the National Electrical Code, ANSI/NFPA No.70-1984, provides information about proper grounding of the mast and supporting
structure, grounding of the lead-in wire to an antenna discharge unit, size of grounding conductors, location of
antenna discharge unit, connection to grounding electrodes, and requirements for the grounding electrode.
EXAMPLE OF
ANTENNA GROUNDING
GROUND CLAMP
ELECTRIC
SERVICE
EQUIPMENT
NEC — NATIONAL ELECTRICAL CODE
ANTENNA
LEAD IN WIRE
ANTENNA
DISCHARGE UNIT
(NEC SECTION 810-20)
GROUNDING
CONDUCTORS
(NEC SECTION 810-21)
GROUND CLAMPS
POWER SERVICE GROUNDING
ELECTRODE SYSTEM
(NEC ART 250, PART H)
• Do not attempt to service the product yourself. Refer all servicing to qualified service personnel.
Unplug the unit from the wall outlet and refer servicing to qualified service personnel under the
following conditions:
- when the power-supply cord or plug is damaged
- if liquid has been spilled on the unit or if objects have fallen into the unit
- if the product has been exposed to rain or water
- if the product does not operate normally by following the operating instructions
- if the product has been dropped or the cabinet has been damaged
- when the product exhibits a distinct change in performance
• If you make adjustments yourself, adjust only those controls that are covered by the operating
instructions. Adjusting other controls may result in damage and will often require extensive work
by a qualified technician to restore the product to normal.
• When replacement parts are required, be sure the service technician uses replacement parts
specified by the manufacturer or those that have the same characteristics as the original part.
Unauthorized substitutions may result in additional damage to the unit.
2S
AFETY
• Upon completion of any service or repairs to this product, ask the service technician to
perform safety checks to determine that the product is in a safe operating condition.
This device complies with part 15 of the FCC Rules. Operation is subject to the following two
conditions:
(1) This device may not cause harmful interference, and
(2) This device must accept any interference that may cause undesired operation.
This television receiver provides display of television closed captioning in accordance with
§15.119 of the FCC rules.
Page 5

CONTENTS
Chapter 1: Connecting the Set Top Box . . . . . . . . . . . . . . . . . . . . . . . . . . . . . . . . . . . . . . . . . .1.1
Front Panel Controls and LEDs . . . . . . . . . . . . . . . . . . . . . . . . . . . .1.1
Rear Panel Jacks . . . . . . . . . . . . . . . . . . . . . . . . . . . . . . . . . . . . .1.2
Connecting the Set-Top Box to a TV Set . . . . . . . . . . . . . . . . . . . . .1.3
Connecting the Set-Top Box to a Computer Monitor . . . . . . . . . . . .1.4
Chapter 2: Remote Control and On-Screen Menus . . . . . . . . . . . . . . . . . . . . . . . . . . . . . . . . . 2.1
Remote Control . . . . . . . . . . . . . . . . . . . . . . . . . . . . . . . . . . . . . .2.1
Installing the Batteries . . . . . . . . . . . . . . . . . . . . . . . . . . . . . . . . . .2.3
Programming the Remote Control . . . . . . . . . . . . . . . . . . . . . . . . .2.3
The On-screen Menu System . . . . . . . . . . . . . . . . . . . . . . . . . . . . .2.4
Using the On-Screen Help . . . . . . . . . . . . . . . . . . . . . . . . . . . . . .2.5
Viewing the Display . . . . . . . . . . . . . . . . . . . . . . . . . . . . . . . . . . .2.6
Chapter 3: Operation . . . . . . . . . . . . . . . . . . . . . . . . . . . . . . . . . . . . . . . . . . . . . . . . . . . . . .3.1
Memorizing Channels . . . . . . . . . . . . . . . . . . . . . . . . . . . . . . . . .3.1
Adding and Deleting Channels . . . . . . . . . . . . . . . . . . . . . . . . . . .3.2
Changing Channels . . . . . . . . . . . . . . . . . . . . . . . . . . . . . . . . . . .3.3
How to Set Your Favorite Channels . . . . . . . . . . . . . . . . . . . . . . . .3.4
Checking Digital-Signal Reception . . . . . . . . . . . . . . . . . . . . . . . . .3.5
Setting the Time and Date . . . . . . . . . . . . . . . . . . . . . . . . . . . . . . .3.6
Chapter 4: Special Features . . . . . . . . . . . . . . . . . . . . . . . . . . . . . . . . . . . . . . . . . . . . . . . . . .4.1
Changing the Screen Format . . . . . . . . . . . . . . . . . . . . . . . . . . . .4.1
Choosing a Sound “Multitrack” . . . . . . . . . . . . . . . . . . . . . . . . . . .4.3
Choosing a Digital Sound Format (AC3 or PCM) . . . . . . . . . . . . . .4.4
Setting Up Captions (On-screen Text Messages) . . . . . . . . . . . . . . .4.5
Rating Control Menu . . . . . . . . . . . . . . . . . . . . . . . . . . . . . . . . . .4.6
Electronic Program Guide . . . . . . . . . . . . . . . . . . . . . . . . . . . . . . .4.9
Using the EPG (Electronic Program Guide) . . . . . . . . . . . . . . . . . .4.10
Programming the Remote Control for Other Components . . . . . . .4.11
Appendix . . . . . . . . . . . . . . . . . . . . . . . . . . . . . . . . . . . . . . . . . . . . . . . . . . . . . . . . . . . . . . . .A.1
Troubleshooting . . . . . . . . . . . . . . . . . . . . . . . . . . . . . . . . . . . . . .A.1
Care and Maintenance . . . . . . . . . . . . . . . . . . . . . . . . . . . . . . . .A.2
Specifications . . . . . . . . . . . . . . . . . . . . . . . . . . . . . . . . . . . . . . .A.3
Manufactured under license from Dolby Laboratories.
“Dolby” and the double-D symbol are trademarks of Dolby Laboratories.
Confidential unpublished works. © 1992-1997 Dolby Laboratories All rights
reserved.
C
ONTENTS
1
Page 6
CHAPTER ONE
CHAPTER ONE
Connecting The Set-T op Box
Connecting The Set-T op Box
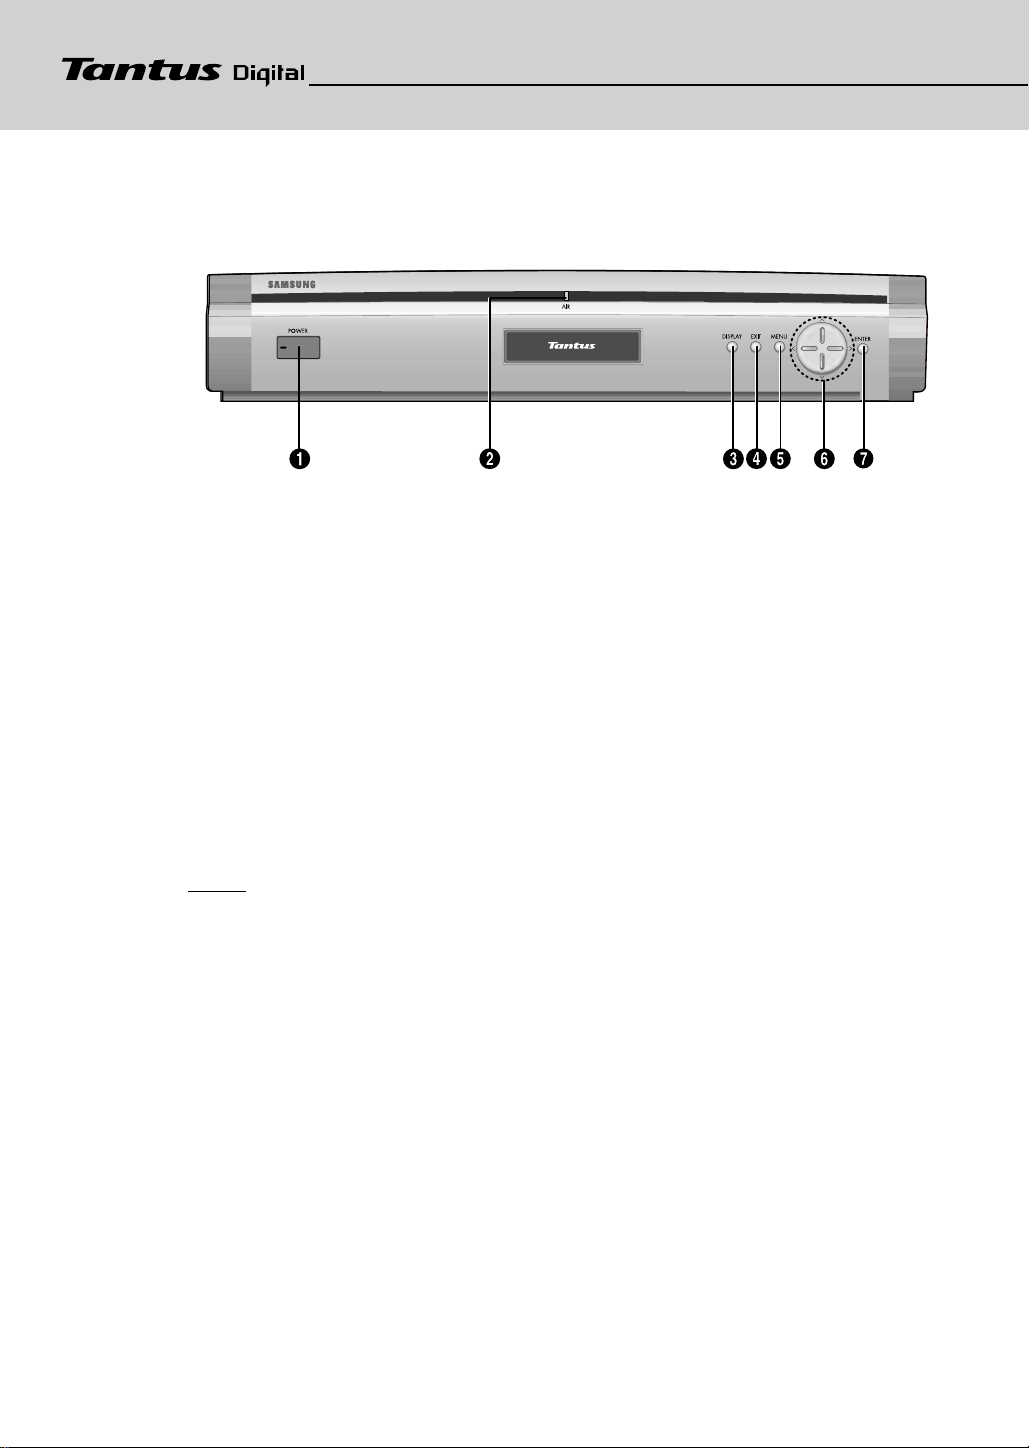
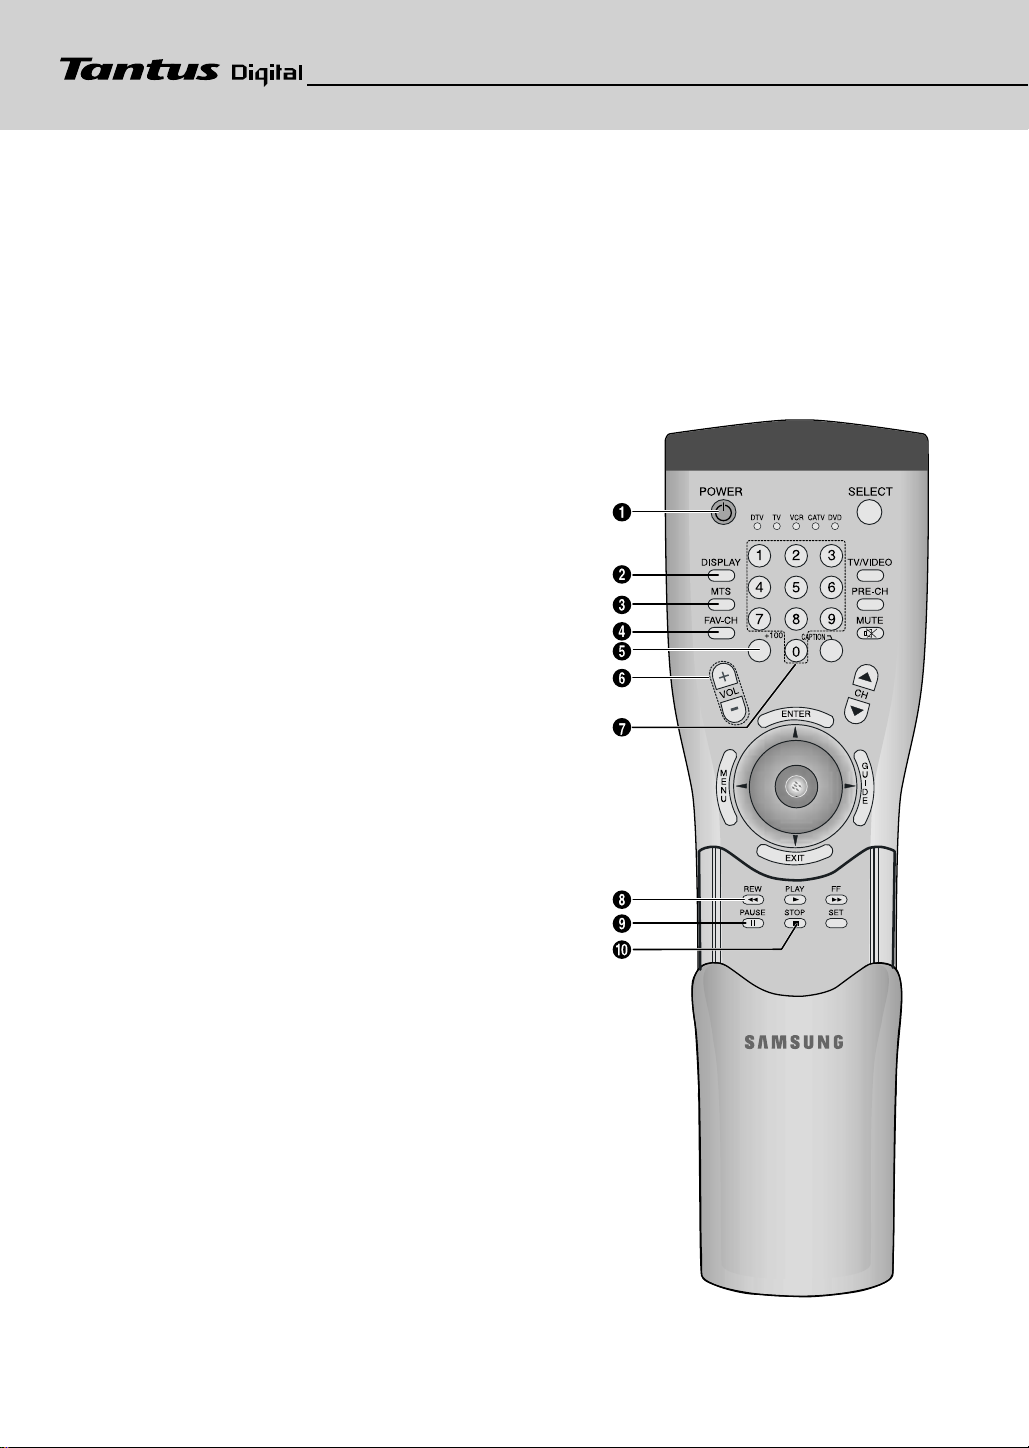
Front Panel Controls and LEDs
ΠPOWER
Press to turn the power on or off.
´ AIR (LED)
When a digital signal is received, the LED indicator lights
Green. Otherwise, it lights Red.
ˇ DISPLAY
Press to display information about the current box settings and
program: Channel number, Time, Program title, Program duration, Caption, Rating control, Digital picture grade, and MTS
language.
¨ EXIT
Press to completely exit all the on-screen menus.
ˆ MENU
Press to display the on-screen menus.
Ø Menu Left/Right/Up/Down
Use to change channels or to move the “arrow” pointer (when
using the on-screen menus).
∏ ENTER
Press to activate a selection when using the on-screen menus.
NOTES
In this instruction book, the terms “Set-Top Box” and “DTV” are equivalent.
Both terms appear in this instruction book, on the remote control markings, and
on the On-Screen display.
1.1
Page 7

1
1
CHAPTER ONE
Connecting The Set-T op Box
Rear Panel Jacks
ΠRF INPUT (75 Ohm)
Connect the antenna here.
´ RF THROUGHOUT
Connect a coaxial cable between the antenna throughout
terminal on the set-top box and the antenna terminal on
the TV.
ˇ RESOLUTION SELECT
Switches between 1080i (interlaced scanning), 720p
(progressive scanning), 480p (progressive scanning),
and 480i (interlaced scanning) formats. (For HDTV
broadcasts, 1080i is usually the best setting.)
¨ DTV OUT SELECT
(Y, PB,PR/ R,G,B FORMAT)
Connect to the Y-PB-PR/RGB digital video input of a digital-compatible TV set (or the Y-P
other video component).
ˆ DOLBY DIGITAL OUT (fiber optic connector)
Connect this terminal to the digital audio input of a TV
set (i.e., to a TV set that has a fiber-optic connector for
digital audio). Or, connect this terminal to the digitalaudio input of a separate component (i.e., AC3-AMP ...).
B-PR
/RBG inputs of some
∏ DTV OUT COMPONENT (Y, PB, PRformat)
Connect to the Y-PB-PRdigital video input of a digitalcompatible TV set (or the Y-P
video component).
” Lt/Rt ANALOG-AUDIO OUTPUTS
Connect these terminals to the analog audio inputs of a
TV set (i.e., to a TV that has jacks for L/R inputs).
Or, connect these terminals to the L/R inputs of a separate audio component.
’ S-VIDEO OUTPUT
Provides good picture quality. If your TV or monitor has
S-Video capability, use this jack along with the
Audio/Video jacks to connect the Set-Top Box to your
receiver.
˝ VIDEO OUT
If your TV or monitor has Audio/Video capability, connect this jack to the AV Input jack on your TV or monitor
using an Audio/Video cable.
Ô DOLBY DIGITAL OUTPUT (Coaxial)
Connect this terminal to the digital audio input of a TV
set.
B-PR
inputs of some other
1.2
Ø DTV OUT (R,G,B FORMAT)
Connect to the R, G, B inputs of a TV set, computer monitor, or some other video component.
Page 8
1
1
CHAPTER ONE
Connecting The Set-T op Box
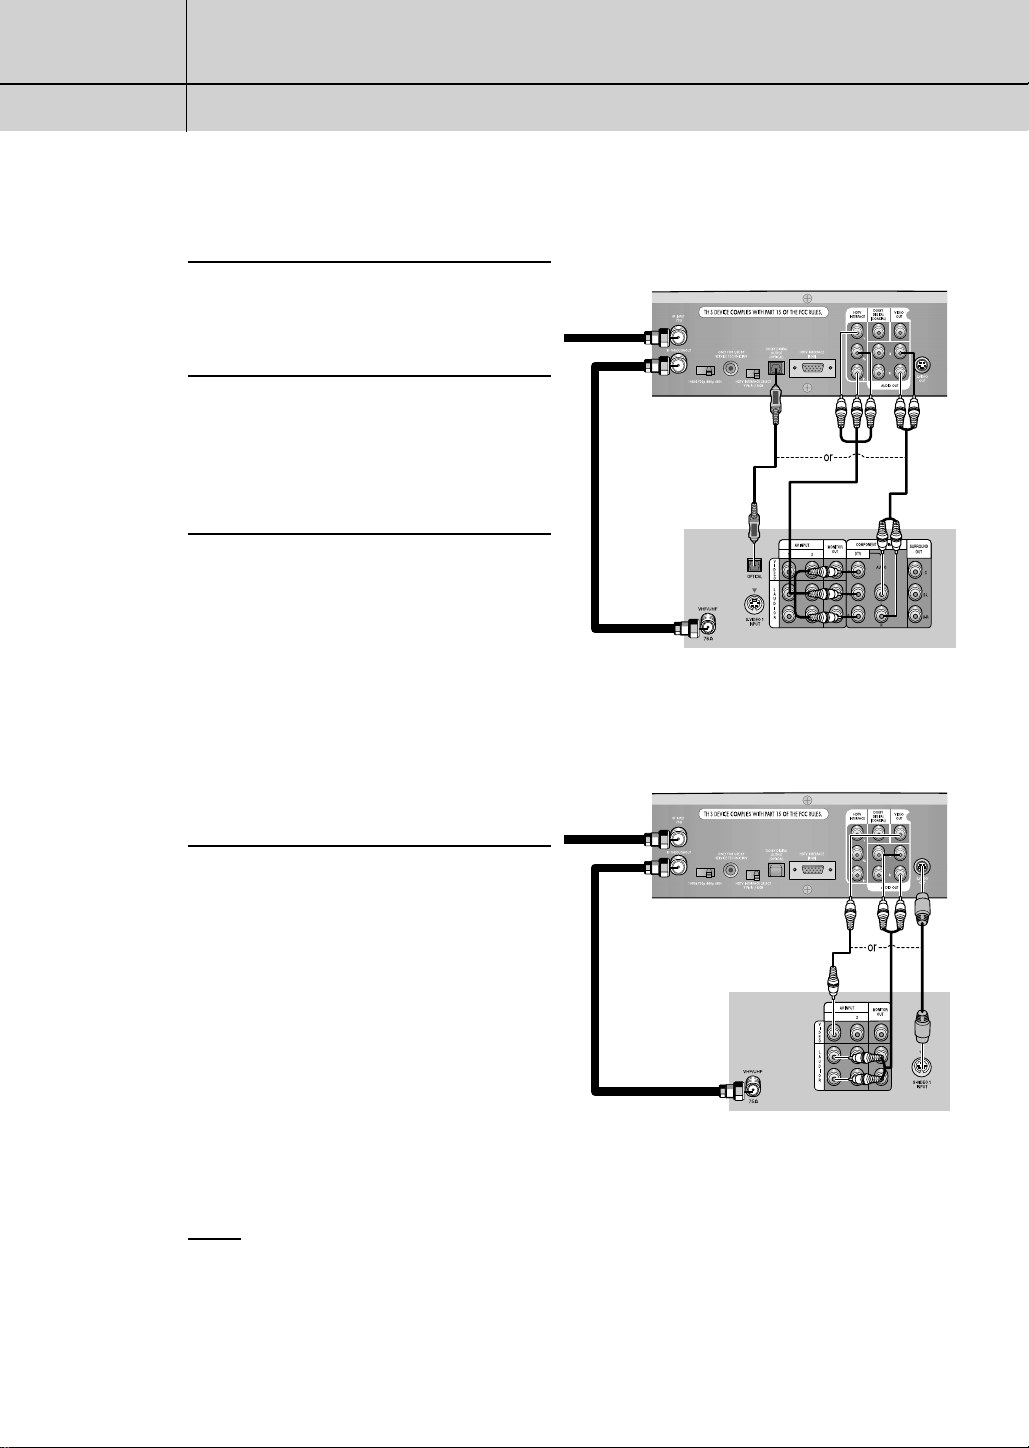
Connecting the Set-Top Box to a TV Set
Connect an Antenna cable to the RF Input
jack on the Set-Top Box.
1
Connect a coaxial cable between the
antenna throughout terminal on the
2
Set-Top Box and the antenna terminal
on the TV.
Connect the Video cables
Digital Ready TV: Connect a Video cable
3
between the HDTV Interlace jacks (Y, PB,
PR) on the Set-Top Box and the DTV Input
jacks on the TV.
Normal TV: Connect a Audio/Video
cable between the Video Out jack on
the Set-Top Box and the Video Input jack
on the TV. Or, connect a S-video cable
between the S-Video Output jack on the
Set-Top Box and the S-Video Input jack
on the TV.
Set-top box Rear Panel
From Antenna
TV Rear Panel
<DTV Ready TV>
Set-top box Rear Panel
From Antenna
Connect the Audio cables
Digital Ready TV: Connect an Audio
4
cable between the Dolby Digital Output
jack (fiber optic connector) on the set-top
box and the Optical jack on the TV. Or,
connect an Audio/Video cable between
the Lt/Rt Analog Audio Output jacks on
the Set-Top Box and the L/R Audio IN
jacks on the TV.
Normal TV: Connect an Audio cable
between the Audio Out jacks on the
Set-Top Box and the Analog Left/Right
jacks on the TV.
TV Rear Panel
<Normal TV>
NOTE
The TV set must be "digital compatible" (i.e., it must have the appropriate audio and digital-video terminals).
When 1080i, 720p or 480p (DTV) is selected from the Resolution Select on the rear,
the On Screen Displays (MENU, Electronic Program Guide...) are not supported for Video
OUT and S-Video OUT. The OSDs (MENU, EPG...) for Video OUT and S-Video OUT are
supported only when 480i (Analog) is selected.
1.3
Page 9
1
1
CHAPTER ONE
Connecting The Set-T op Box
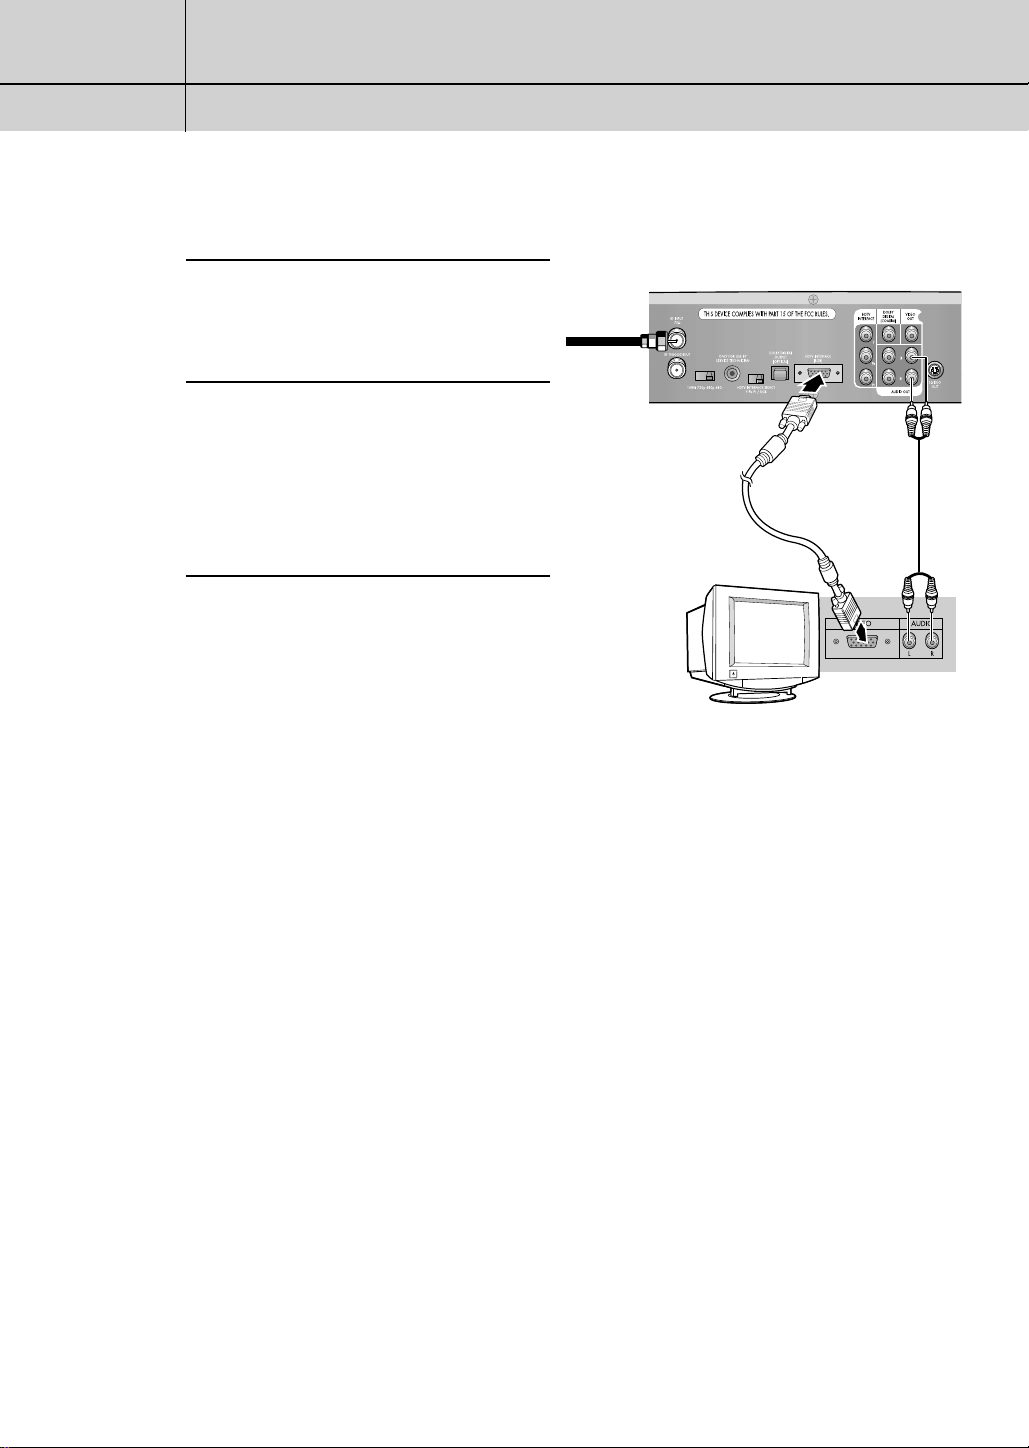
Connecting the Set-Top Box to a Computer Monitor
Connect an Antenna cable to the RF Input
jack on the Set-Top Box.
1
Connect a Computer Video Monitor
cable between the Video Out jack
2
(R,G,B format) on the Set-Top Box and
the Video IN jack on the Computer
Monitor.)
Connect an Audio cable between the
Lt/Rt Audio Out jacks on the Set-Top Box
3
and the L/R Audio IN jacks on the
Computer Monitor.
Set-Top Box Rear Panel
From Antenna
Computer Monitor
Rear Panel
1.4
Page 10
CHAPTER TWO
CHAPTER TWO
Remote Control and On-Screen Menu
Remote Control and On-Screen Menus
Reviewing the Remote Control
The Set-Top Box remote control and on-screen menu system work together to make operating the Set-Top Box as simple as possible. Understanding the relationship between the
remote control’s unique I-Point “joystick” and the menus allow you to operate the Set-Top
Box with ease.
If you need some assistance while using the remote control and the menus, Samsung has
provided an on-screen help feature. See “Using the On-screen Help” on page 2.5.
ΠPOWER
Press to turn the power on or off.
´ DISPLAY
Press to display information about the current box settings and program:
Channel number, Time, Program title, Program duration, Caption, Rating
control, Digital picture grade, and MTS language.
ˇ MTS (Multitrack Sound)
Press to select among the available “multitracks” (for example, depending
on the particular broadcast, one or more foreign-language
translations might be available).
¨ FAV-CH (Favorite Channel)
Press to switch among your favorite channels.
ˆ +100
#2
Press to select cable-TV channels over 100.
Ø VOLUME UP/DOWN
Press to increase or decrease the volume.
∏ Channel-Number Buttons
Press to tune to directly tune to a particular channel.
” REW (Rewind)
Press to rewind a videocassette or reverse search a DVD.
’ PAUSE
Press to temporarily stop a videocassette or DVD.
(A freeze-frame is displayed.)
˝ STOP
#3, #5
Press to stop the videocassette or DVD.
#3, #5
#3, #5
#1
#2
#1, #2, #3, #4
2.1
Page 11
2
2
CHAPTER TWO
Remote Control and On-Screen Menus
Remote Control
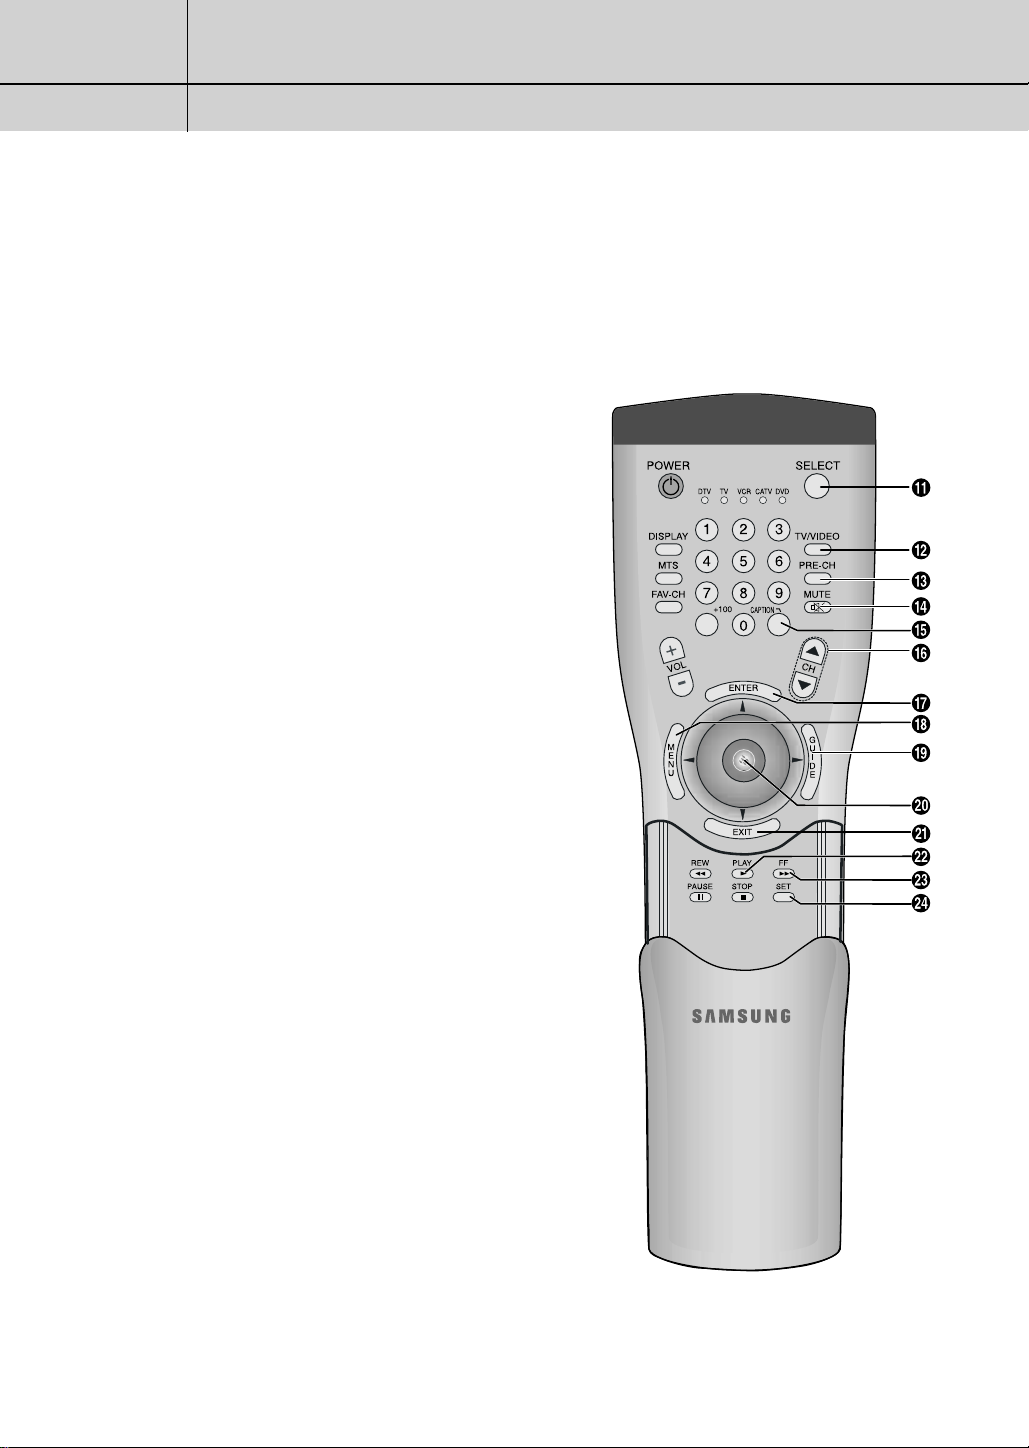
Ô SELECT
Press to choose a particular component to be controlled by the
remote. When you press SELECT, a green light will blink under the
component that is being controlled (DTV, TV, VCR, CATV, or DVD).
See “Programming the Remote Control,” below.
TV/VIDEO
Press to view the signal sources that are available for display on
your TV.
Ò PRE-CH (Previous Channel)
Press to alternate between the current channel and the last channel
that was displayed.
Ú MUTE
Press to temporarily cut off the sound.
Æ CAPTION
When a digital signal is received, only available languages can be
selected. When an analog signal is received, either CC1, CC2, CC3
CC4 can be selected.
ı CH ▼,▲ (Channel Up and Down)
Press to change channels.
˜ ENTER
While using the on-screen menus, press ENTER to activate (or
change) a particular item.
¯ MENU
Press to display the on-screen menus, or to switch back to the previous menu-screen that was displayed.
#2
#1
#2
#1, #2, #3, #4
2.2
˘ GUIDE
Press to display the on-screen, Electronic Program Guide (EPG).
¿ I-Point control
Use to move the on-screen pointer left, right, up or down.
¸ EXIT
Press to completely exit all the on-screen menus.
˛ PLAY
◊ FF (Fast Forward)
± SET
#3, #5
Press to play a videocassette or DVD.
#3, #5
Press to fast forward a videocassette or forward search a DVD.
Use to program the remote control for other components.
(See to Operate other components, page 4.11)
Page 12
2
2
CHAPTER TWO
Remote Control and On-Screen Menus
Special Notes:
#1 The Channel buttons (CH ▲▼, FAV-CH):
To use these buttons, the available channels must first be memorized. (See page 3.1)
#2 The “TV” buttons (VOL +-, Mute, TV/Video and +100 ):
To use these buttons, you must first switch the remote control to “TV” mode.
(Use the SELECT button on the remote control to select “TV.”)
#3 The “VCR” buttons (FF, REW, PLAY, STOP, PAUSE):
To use these buttons, you must first switch the remote control to “VCR” mode.
(Use the SELECT button on the remote control to select “VCR.”)
#4 The “CATV” buttons
To use the CABLE Set-Top Box, you must first switch the remote control to “CATV”
mode. (Use the SELECT button on the remote control to select “CATV.”)
#5 The “DVD” buttons (FF, REW, PLAY, STOP, PAUSE):
To use these buttons, you must first switch the remote control to “DVD” mode.
(Use the SELECT button on the remote control to select “DVD.”)
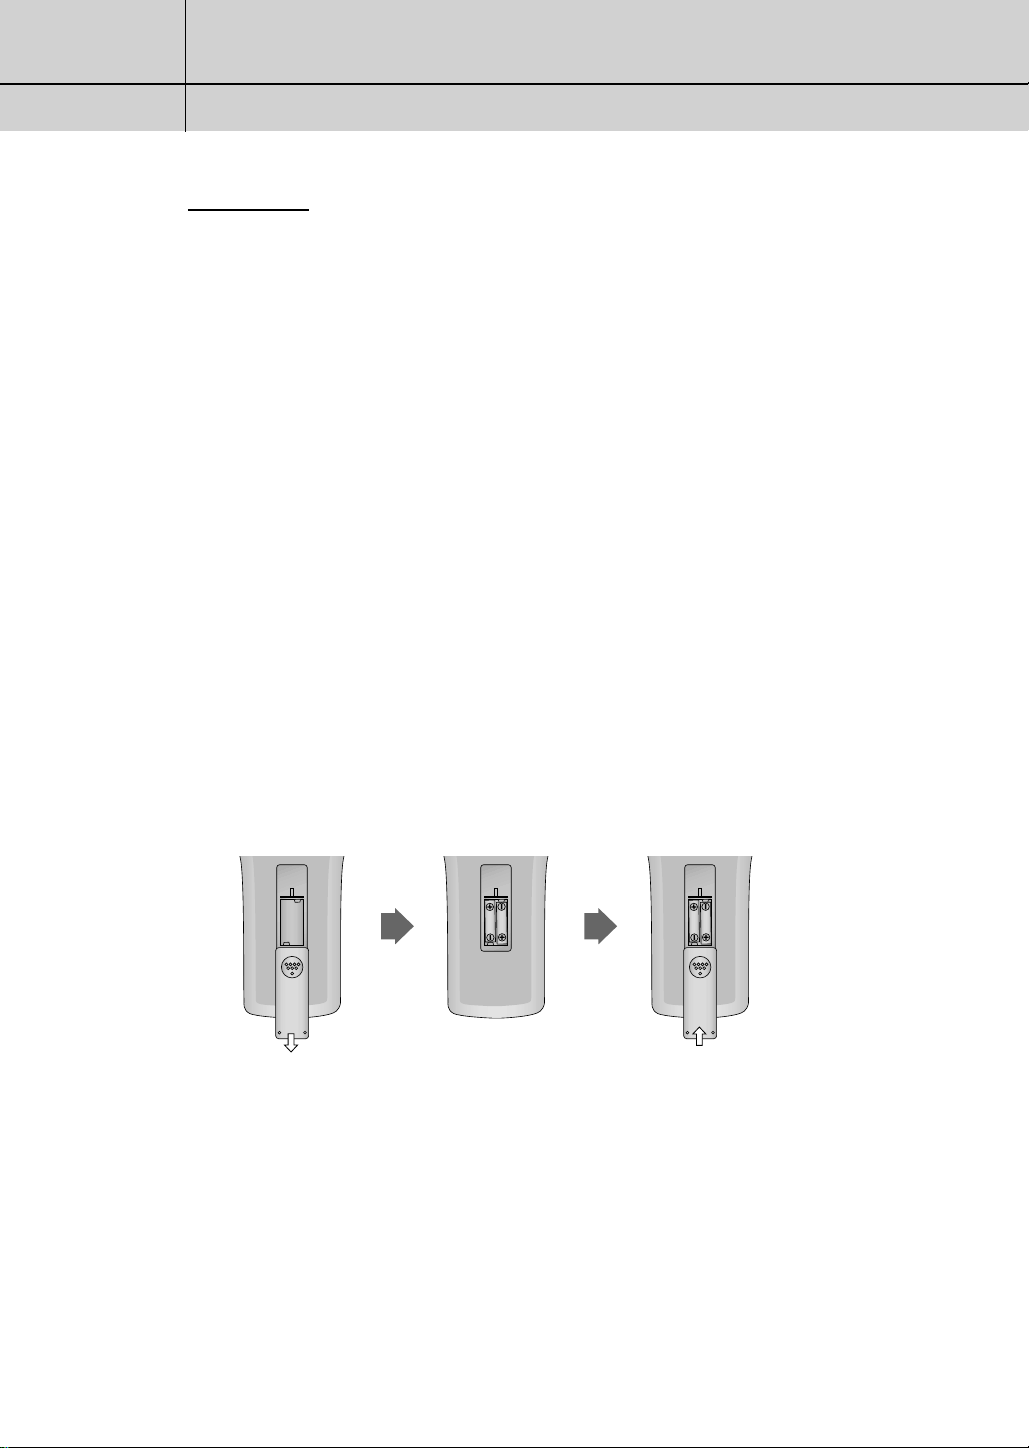
Installing the Batteries
Press and remove the battery cover on the back of the remote control.
Put two AAA batteries into the compartment and replace the battery cover.
Programming the Remote Control
To program the remote control to operate a VCR, Cable Box, TV or DVD player, see
“Programming the Remote Control to Operate Other Components” (See page 4.11).
2.3
Page 13

2
2
CHAPTER TWO
Remote Control and On-Screen Menus
The On-Screen Menu System
The five menu controls are located in the center of the
remote control: MENU, ENTER, EXIT, GUIDE, and “I-POINT”
(a joystick-type control that moves the on-screen
“arrow” pointer).
Push the I-Point control up, down, left or right to move
the arrow-pointer. As the on-screen pointer passes
over a particular icon, the icon is highlighted.
The menu system has three different levels. The four
icons on the left side of the screen are the “first level”
menu: Guide, Channel, Setup and Help/On(or Off).
When you activate one of these four icons, the onscreen display presents a “second-level” sub-menu
(which often leads to a “third-level” sub-menu).
Main Menu, “Level 1”
Sub-menu, “Level 2”
Example:The “Setup” sub menu
Sub-menu, “Level 3”
Example: ”Rating Control”
2.4
Page 14

2
2
CHAPTER TWO
Remote Control and On-Screen Menus
Using the On-screen Help
To turn the on-screen help on:
Press the MENU button on the remote control.
1
Push the I-Point control up/down
to highlight the Help/Off icon
2
and press ENTER.
The Help/Off icon changes to Help/On and the on-screen help
appears.
3
Feel free to take a tour of the menus. Try moving the pointer
over each of the icons and reading a description of the
features that each icon represents.
Once you are comfortable moving the pointer, highlight
any icon and press ENTER. You will see the contents of that
icon’s menu. You can press EXIT at any time and the menus will
disappear from the screen.
To turn the on-screen help off:
Highlight the Help/On icon and press ENTER.
The icon changes to Help/Off and the on-screen help
disappears.
2.5
Page 15

2
2
CHAPTER TWO
Remote Control and On-Screen Menus
Viewing the Display
You can quickly check the status of many of the Set-Top Box
features and options by using the Display.
The Display shows:
• The major channel number and the minor channel number
if you are viewing a digital channel.
• The current time and date. See page 3.6
• Program title.
• Program duration.
• The status of closed captions (if the broadcast includes
them, and if you have turned on the closed captions feature). See page 4.5.
• Rating control settings. See page 4.6.
• The digital picture grade, such as HD (High Definition) or
SD (Standard Definition).
• The audio track language (English, French, etc.).
See page 4.3.
To view the Display:
Press DISPLAY on the remote control.
To hide the Display:
Press DISPLAY again or wait 10 seconds and the display will disappear.
2.6
Page 16

CHAPTER THREE
Operation
Memorizing Channels
Before you can use any of the special channel buttons (CH ▲▼, FAV-CH), the available
channels must first be scanned and memorized. This is an easy, automatic process that
typically takes two minutes. To memorize channels:
Press the MENU button on the remote control.
1
Push the I-point control up or
down to highlight the Channel
2
icon and press ENTER.
Push the I-point control up or
down to highlight Memorize
Channels and press ENTER.
That’s it! The Set-Top Box will automatically scan and store all of the
3
digital (DTV) channels that are
available in your local area.
Press EXIT when channel memorization is complete.
4
NOTES
The Set-Top Box MUST be connected to an antenna in order to receive digital TV signals.
Even if a particular channel is deleted from the memory, you can always tune to that chan-
nel directly by using the number buttons on the remote control.
3.1
Page 17

3
3
CHAPTER THREE
Operation
Adding and Deleting Channels
To add channels that were not memorized (or to delete unwanted channels from the
memory):
Enter the digits of the channel to be added or deleted.
1
Press the MENU button on the remote control.
Push the I-point control up or down to highlight the Channel icon
2
and press ENTER.
Push the I-point control up or
down to highlight Add/Delete
3
Channels and press ENTER.
3.2
Repeatedly pressing ENTER will
alternate between Add channel
4
(Message: “the channel is in
memory”), and Delete channel
(Message: “The channel is not in
memory.”)
Press the number buttons (or CH ▲▼ buttons) to switch to
the appropriate channel, and then repeat step 4. Press EXIT.
Page 18

3
3
CHAPTER THREE
Operation
Changing Channels
Number buttons
Press the number buttons (0 – 9) to enter channel numbers.
NOTES
When the channel you selected contains one or more “minor” channels,
the list of the channels will be displayed on the screen. To select one of
them, position the “arrow” on the channel you want using CH
point and press ENTER.
PRE-CH button
Press to return to the previous channel you viewed. For example,
if the box is tuned to channel 55 and then you change to channel 56, pressing PRE-CH will return to channel 55.
▲,▼
or I-
FAV-CH button
Press to switch among your favorite channels. (See page 3.4)
CH ▲ and ▼ button
Press CH ▲ or ▼ to move up or down to the next available
channel. Press and hold CH ▲ or ▼ to cycle quickly through the
channels.
NOTES
You must first do the “Memorize Channels” procedure (See page 3.1)
before you can use the CH
▲
and ▼, FAV-CH buttons.
3.3
Page 19

3
3
CHAPTER THREE
Operation
How to Set Your Favorite Channels
Press the MENU button on the remote control.
1
Push the I-Point control up or
down to highlight “Channel”
2
icon and press ENTER.
Push the I-Point control up or
down to highlight “Set Favorite
Channels” and press ENTER.
To designate a particular channel
as a “Favorite Channel,”
3
highlight the channel number
and press ENTER.
For each Favorite Channel,
a yellow dot icon will appear
next to the channel number.
(When more than six favorite channels exist, press the arrow
buttons to add channels.)
Press EXIT.
4
You can now jump from one favorite channel to another by pressing the FAV-CH button.
5
3.4
Page 20

3
3
CHAPTER THREE
Operation
Checking the Digital-Signal Reception
Unlike analog channels, which can vary in reception quality from “snowy” to clear, digital (HDTV) channels have either perfect reception quality or you will not receive them at
all. So, unlike analog channels, you cannot fine tune a digital channel. But you can adjust
your antenna to improve reception of the available digital channels.
Press the MENU button on the remote control.
1
Push the I-Point control to highlight the “Channel” icon and
2
press ENTER.
Push the I-Point control to
highlight “Check Signal
Reception” and press ENTER.
If the signal strength meter indicates that the signal is weak,
3
physically adjust your antenna to
increase the signal strength.
Continue to adjust the antenna
until you find the best position
with the strongest signal.
When you have finished adjusting your antenna, push the I-Point
control to highlight “Done” and press ENTER.
4
3.5
Page 21

3
3
CHAPTER THREE
Operation
Setting the Time and Date
First of all, select a channel that has a Digital Signal.
Press the MENU button on the remote control.
1
Push the I-Point control to highlight the “Setup” icon and
2
press ENTER.
Push the I-Point control to highlight
“Clock Options” and press
ENTER.
You will be asked if your
local area observes Daylight
4
Savings Time. Push the I-Point
control up or down to highlight
Yes or No, as appropriate, and
press ENTER.
Push the I-Point control right or
left to highlight the time zone for
5
your local area (move the
arrow-pointer to the appropriate
time zone on the map of the
United States). Press ENTER.
That’s it! Because you are receive a digital signal,
the time will be set automatically.
Press EXIT
6
3.6
Page 22

CHAPTER FOUR
Special Features
Changing the Screen Format
Your selection in the Screen Format menu depends on the type of TV or monitor you are
using with your Set-Top Box.
Press the MENU button on the remote control.
1
Push the I-Point control up or
down to highlight the “Setup”
2
icon and press ENTER.
Push the I-Point control up or
down to highlight “Screen
Format” and press ENTER.
Repeatedly press ENTER to select
your TV screen size.
3
Push the I-Point control up, down,
right or left to highlight the
4
screen format and press ENTER.
Press EXIT.
5
Continued...
4.1
Page 23

4
4
CHAPTER FOUR
Special Features
With a 4:3 Ratio TV or Monitor
If you are using a 4:3 ratio TV or monitor and receive an image with a 16:9 ratio, you
need to specify how the image is displayed.
Letter box
Choose this when receiving a 16:9 image and you want to see the original wide format.
Letter boxing shrinks the picture so the entire image will fit on the screen. Blank panels
appear at the top and bottom of the screen.
Full
Choose this when you want the television to adjust the 16:9 image vertically so it fills your
4:3 screen. No blank panels will be added, and the image is horizontally unaltered.
Zoom
Choose this when receiving a 16:9 image and you want the wide movie format to fill the
entire screen. Left and right portions of the picture are cropped, or cut.
With a 16:9 Ratio TV or Monitor
If you are using a 16:9 ratio TV or monitor and receive an image with a 4:3 aspect ratio,
the image will be displayed at the 4:3 ratio on your monitor unless you specify otherwise.
The Screen Format menu allows you to adjust the image through the following options:
Pillar box
Choose this when receiving a 4:3 image and you want the on-screen appearance of the
video to be a centered picture with blank panels on the right and left sides.
Full
Choose this when you want the television to adjust the 4:3 image horizontally so it fills
your 16:9 screen. No blank panels will be added, and the image is vertically unaltered.
This setting is especially useful for viewing 4:3 formatted DVDs.
Zoom
Choose this when receiving a 4:3 image and you want to maintain the correct image proportion. Top and bottom portions of the picture are cropped, or cut.
NOTE
The availability of the Changing the Screen Format feature depends on the Resolution
Select and current broadcasting signal format.
4.2
Page 24

4
4
CHAPTER FOUR
Special Features
Choosing a Sound “Multitrack”
The digital-TV transmission system is capable of simultaneous transmission of many audio
tracks (for example, simultaneous translations of the program into foreign languages). The
availability of these additional “multitracks” depends upon the particular program. To
select a sound multitrack:
Press the MENU button on the remote control.
1
Push the I-Point control up or
down to highlight the “Setup”
2
icon and press ENTER.
Push the I-Point control up or
down to highlight “Sound
Options” and press ENTER.
Push the I-Point control up or
down to highlight “Multi Track
3
Sound”.
Repeatedly press enter until the appropriate language appears
(the available languages will vary, depending on the particular
4
program).
Press EXIT.
5
NOTES
The Multitrack Sound Selection feature on the menu allows you to select any of available
languages on your preference. But you can switch only between the current receiving multitrack sounds by using the MTS button on the remote control.
ex) When 'French' is selected from the menu during the English and Spanish broadcasting:
Press the MTS button on the remote control and only English ↔Spanish will be available.
4.3
Page 25

4
4
CHAPTER FOUR
Special Features
Choosing a Digital Sound Format (AC3 or PCM)
Both audio and digital sound are available from the rear-panel connectors of the Set-Top
Box. The digital audio output is an optical connector labeled “Dolby Digital Output.”
After connecting the optical digital-audio component, you must specify the transmission format (PCM or AC-3, as appropriate to your particular equipment).
Press the MENU button on the remote control.
1
Push the I-Point control up or
down to highlight the “Setup”
2
icon and press ENTER.
Push the I-Point control up or
down to highlight “Sound
Options” and press ENTER.
Push the I-Point control up or
down to highlight “Dolby Digital
4
Output”.
Repeatedly press ENTER until the appropriate format appears
(PCM or AC3).
5
Press EXIT.
6
4.4
Page 26

4
4
CHAPTER FOUR
Special Features
Setting Up Captions (On-Screen Text Messages)
A “caption” is text that is sometimes broadcast with a digital TV program.
(Example: A printed version of the dialogue, additional narration, or a translation into a
foreign language.)
How to Activate or Deactivate the On-screen Captions
Press the MENU button on the remote control.
1
Push the I-Point control up or
down to highlight the “Setup”
2
icon and press ENTER.
Push the I-Point control up or
down to highlight “Closed
3
Caption” and press ENTER.
Repeatedly press enter to
alternate between “On” and
“Off”.
Press EXIT.
4
(Note: Availability of captions depends on the particular program being broadcast.)
NOTES
In Caption On, press the CAPTION button on the remote control to
choose an available language or CC1, CC2, CC3, or CC4.
(See page 2.2).
4.5
Page 27

4
4
CHAPTER FOUR
Special Features
Rating Control Menu
Access to channels and programs is controlled by a password (i.e., a 4-digit secret code
that is defined by the user). The on-screen menu will instruct you to assign a password
(Later on, if necessary, you can change it.)
How to Change Your Password
Press the MENU button on the remote control.
1
Push the I-Point control up or
down to highlight the “Setup”
2
icon and press ENTER.
Push the I-Point control up or
down to highlight “Rating
Control” and press ENTER.
Push the I-Point control up or
down to highlight “Change”
3
and press ENTER.
Use the number buttons on the
remote control (0 – 9) to enter
your current secret code.
Use the number buttons on the
remote control to enter a
4
changed password.
Re-enter the new password
when prompted by the
5
on-screen menu.
Your new password is active. Press EXIT.
6
NOTES
Password Error
• If you forget the password, re-do steps 1~3.
At step 3 when the display asks you to enter the current password,
press DISPLAY, 1, 8, and 2.
Enter a new password, and proceed with steps 5-6.
4.6
Page 28

4
4
CHAPTER FOUR
Special Features
How to Lock Programs Using the TV (FCC) or MPAA Ratings
Press the MENU button on the remote control.
1
Puss the I-Point control up or
down to highlight the “Setup”
2
icon and press ENTER.
Push the I-Point control up or
down to highlight “Rating
Control” and press ENTER.
Enter a correct password when
prompted by the on-screen
3
display.
After you enter your password,
the screen will display the rating
4
control menu.
This menu lists both MPAA and TV (FCC) Parental Ratings. You can
independently lock the MPAA and TV Ratings
* The MPAA ratings that are unlocked disappear as the symbol .
(Ratings that are locked are indicated by the symbol .)
* TV (FCC) ratings that are unlocked are indicated by the symbol .
(Ratings that are locked are indicated by the symbol .)
Use the on-screen “arrow” pointer and the ENTER button to activate the appropriate restrictions for either the MPAA or TV ratings
5
systems.
Press EXIT.
6
4.7
Page 29

4
4
CHAPTER FOUR
Special Features
Some Important Notes About Parental Locks (“P.Locks”)
Explanation of the MPAA and TV (FCC) Rating Codes:
TV (FCC)
TV-MA Mature audiences only. This pro-
gram may contain mature themes, profane
language, graphic violence and explicit
sexual content.
TV-14 Parents strongly cautioned. This program may contain sophisticated themes,
sexual content, strong language and more
intense violence.
TV-PG Parental guidance suggested. The
program may contain infrequent coarse language, limited violence, some suggestive
sexual dialogue and situations.
TV (FCC) Sub-categories for content:
V Violence.
S Sexual content.
L Offensive language.
D Dialogue...sexual innuendo.
FV Fantasy or cartoon violence.
Age Categories
TV-G General audience. It contains little
or no violence, no strong language, and little or no sexual dialogue or situations.
TV-Y7 Directed to older children. Themes
and elements in this program may include
mild physical or comedic violence, or may
frighten children under the age of seven.
TV-Y All children. The themes and elements
in this program are specifically designed
for a very young audience, including children from ages two – six.
The MPAA Rating System (Movies)
G General audience. No restriction.
PG Children under 13 should be
accompanied by an adult.
PG-13 Parental guidance suggested.
Children under 13 should be
accompanied by an adult.
R Restricted. Viewers should be 17
or older.
NC-17 Not classified. Viewers should be
17 or older.
X Adults only.
4.8
* TV (FCC) Guidelines: The particular rating that you select will be locked (indicated by a red “L”
on a blue background). Also, within the particular group (i.e., “group 1” or “group 2”) all of the
more-restrictive ratings will also be locked.
Suppose, for example, the TV-G rating and all of its V, S, L, and D sub-categories are locked. In
that case, all of the “more restrictive” ratings (TV-PG, TV-14 and TV-MA) and all of their V, S, L,
and D sub-categories are automatically locked out as well.
* MPAA ratings: The particular rating that you select will be locked (field changes to red color). In
addition, any ratings that are more restrictive will also be blocked.
* Neither the TV (FCC) nor MPAA ratings apply to news broadcasts.
Page 30

4
4
CHAPTER FOUR
Special Features
Electronic Program Guide
Your Set-Top Box has an Electronic
Program Guide (EPG) to help you
navigate through all the possible
viewing options. The Program Guide
supplies information such as program listings and start and end times
for all available channels. In addition, detailed information about the
program is often available in the
EPG (the availability and amount of
these program details will vary,
depending on the particular broadcaster).
Viewing the Electronic Program Guide (EPG)
A Scrolls up through all the available channels. Highlight ▲ and repeatedly press
ENTER until the appropriate channel is displayed.
B Displays which channel is currently selected to show program information in the
Channel Guide.
C Scrolls down through all the available channels. Highlight ▼ and repeatedly
press ENTER until the appropriate channel is displayed.
D Scrolls backwards quickly (2-hour jumps) through the program times. Highlight
and repeatedly press ENTER until the appropriate time is displayed.
E Scrolls back through program times in 1-hour jumps. Highlight and repeated-
ly press ENTER until the appropriate time is displayed.
F Displays titles and other details about upcoming programs for particular chan-
nels. Highlight the program and press ENTER to see additional, detailed information (availability of this additional detail depends on the particular broadcaster).
G Exits the Program Guide and returns to normal viewing mode.
H Scrolls forward in 1-hour jumps. Highlight and repeatedly press ENTER until
the appropriate time is displayed.
I Scrolls forward quickly 2-hour jumps. Highlight and repeatedly press
ENTER until the appropriate time is displayed.
J Displays the program times (arranged in 1-hour time blocks).
K Displays the current time and date.
NOTES
•When you press the GUIDE button, the Set-Top Box displays the Electronic Program
Guide (EPG). Also, the EPG begins its list with the particular channel that is currently
active.
4.9
Page 31

4
4
CHAPTER FOUR
Special Features
Using the EPG (Electronic Program Guide)
Press MENU on the remote control.
1
Push the I-Point control up or
down to highlight the “Guide”
2
icon and press ENTER.
Push the I-Point control up or
down to highlight ▲ or ▼ on
3
the EPG screen (see “A” and
“C,” to the right) and
repeatedly press ENTER until
the appropriate channel is
displayed.
Push the I-Point control up or down to highlight
4
5
NOTES
You can quickly switch to a GUIDE mode by pressing the GUIDE button on the remote control.
When you display EPG after selecting DTV (1080i, 720p, 480p) from Resolution Select, no video is
output through the Video Out jack, S-Video jack.
,
time is displayed.
You may now:
•
Jump directly to a channel. Push the I-Point control up
or down to highlight the channel number (in the leftmost column) and press ENTER.
•
Obtain additional program details: Push the I-Point control
up, down, right or left to highlight a program title and press
ENTER.
•
Exit the Program Guide and return to normal viewing mode:
Push the I-Point control up, down, right or left to highlight the
EPG on-screen EXIT button and press ENTER.
and repeatedly press ENTER until the appropriate
, ,
4.10
Page 32

4
4
CHAPTER FOUR
Special Features
Programming the Remote Control for Other Components
The remote control is pre-programmed to operate your Set-Top Box. However, you can
also program the remote control to operate other components, such as a cable TV box, a
VCR or a DVD (even if they are made by a manufacturer other than Samsung).
Press the SELECT button on order to activate the appropriate com-
ponent (VCR, TV, Cable, DVD, etc.)
1
For example, if you are programming the remote control to
operate your VCR, press SELECT on the remote control so that
the VCR indicator is illuminated.
Press the SET button on the remote control. The LED for the active
component will light for 30 seconds. While the LED is illuminated,
2
use the number buttons to enter the code number for the particular
manufacturer (see table, on page 4.12~4.14).
Each code numbers must be three digits long. For example, to
enter the code “6,” press 0, 0 and 6. To enter the code “76,”
press 0, 7 and 6.
If the number is correct, the indicator will blink three times. If the
indicator does not blink three times, repeat step1,2 and try
another code number.
Refer to the remote-control code tables on the following
pages to find the appropriate code for your particular
component. If more than one number is listed, try each one
separately until you find the one that works.
4.11
Page 33

4
CATV Remote Control Codes
RCA
Regal
Regency
SA
Samsung
Scientific Atlanta
Signature
Sprucer
Starcom
Stargate 2000
Sylvania
Texscan
Tocom
Unika
Universal
Viewstar
Warner Amex
Zenith
0, 27, 66
3, 12, 13
2, 33
70, 71, 72
44, 3, 22, 63, 64
70, 71, 72
46
27
46
58
11, 59
11, 59
17, 21, 49, 50, 55, 73
31, 32, 41
51, 52
7, 8, 19, 21, 26, 28, 29, 32, 33, 40, 41
44
14, 42, 57, 61, 75, 76
Anvision
Cable Star
Eagle
Eastern International
General Instrument
GI
Hamlin
Hitachi
Jerrold
Macom
Magnavox
NSC
Oak
Osk Sigma
Panasonic
Philips
Pioneer
Randtek
7, 8
7, 8
7, 8
12
46
4, 5, 15, 23, 24, 25, 30, 36, 67, 68, 69
3, 12, 13, 34, 48
37, 43, 46
4, 5, 15, 23, 24, 25, 30, 36, 46, 62, 65
37, 43
7, 8, 19, 21, 26, 28, 29, 32, 33, 40, 41
9
16, 38
16
3, 27, 39, 61, 73, 74
7, 8, 19, 21, 26, 28, 29, 32, 33, 40, 41
18, 20, 44, 74, 77
7, 8
DVD Remote Control Codes
ProScan
RCA
Toshiba
5
5
8
Philips
Sony
Samsung
Panasonic
0
2
1
9
4
CHAPTER FOUR
Special Features
4.12
Page 34

4
VCR Remote Control Codes
MTC
Multitech
NEC
Optimus
Panasonic
Pentax
Pentex Research+
Philco
Philips
Pioneer
Portland
ProScan
Quartz
Quasar
Radio Shack/Realistic
RCA
Samsung
Sansui
Sanyo
Scott
Sears
Sharp
Shintom
Signature
Sony
Sylvania
Symphonic
Tandy
Tashiko
Tatung
Teac
Technics
Teknika
TMK
Toshiba
Totevision
Unitech
Vector Research
Victor
Video Concepts
Videosonic
Wards
Yamaha
Zenith
7, 15
7, 15, 31, 32
2, 14, 16, 30, 46, 61, 64
6
8, 53, 75, 77
5, 35
46
8, 29, 53, 56
8, 29
5, 16, 33, 50
44, 45, 52
0
2
8, 53
2, 6, 8, 9, 12, 15, 19, 27, 43, 53
0, 5, 7, 8, 28, 35, 37, 54, 69
7, 13, 22, 32, 42
16
2, 12
13, 41, 49, 68
2, 5, 9, 12, 18, 19, 35, 43, 48
6, 27, 39, 45
17, 26, 31, 55
15
17, 26, 38
8, 15, 29, 53, 56
15
2, 15
9
30
15, 30, 69
8
8, 9, 15, 21
67
5, 13, 19, 48, 49
7, 9
7
14, 16
16
14, 16
7
5, 6, 7, 8, 9, 12, 13, 15, 27, 31, 35
2, 14, 16, 30, 46
11, 17, 26, 79
Admiral
Aiwa
Akai
Audio Dynamics
Bell & Howell
Broksonic
Candle
Canon
Citizen
Colortyme
Craig
Curtis-Mathes
Daewoo
DB
Dimensia
Dynatech
Electrohome
Emerson
Fisher
Funai
General Electric
Go Video
Goldstar
Harman Kardon
Hitachi
Instant Replay
JC Penney
JCL
Kenwood
KLH
Lloyd
Logik
LXI
Magnavox
Marantz
Marta
MEI
Memorex
MGA
Midland
Minolta
Mitsubishi
Montgomery Ward
6, 79
15
17, 22, 23
14, 16
2
10
7, 9, 13, 45, 46, 52
8, 53
7, 9, 13, 45, 46, 52
14
7, 12
0, 7, 8, 14, 15, 46, 53, 64, 67
13, 45, 76
14, 16
0
15
27
8, 9, 10, 13, 15, 20, 23, 27, 34, 41,
42, 47, 49, 57, 62, 65, 67, 68, 70
2, 12, 18, 19, 43, 48, 58
15
0, 7, 8, 32, 53
7
9, 14, 46, 60
14
5, 15, 35, 36
8
2, 5, 7, 8, 14, 16, 30, 35, 51, 53
8, 2, 14, 16, 30, 46
2, 14, 16, 30, 46
73
15
31
15
8, 29, 53, 56
2, 8, 14, 16, 29, 30, 46, 61
9
8
8, 9, 12, 15
27
32
5, 35
5, 27, 35, 40
6
4
CHAPTER FOUR
Special Features
4.13
Page 35

4
TV Remote Control Codes
MTC
NEC
Nikei
Onking
Onwa
Optonica
Panasonic
Penney
Philco
Philips
Pioneer
Portland
Proton
Quasar
Radio Shack
RCA
Realistic
Sampo
Samsung
Sanyo
Scott
Sears
Sharp
Signature
Sony
Soundesign
Spectricon
SSS
Sylvania
Symphonic
Tatung
Techwood
Teknika
Telefunken
Telerent
TMK
26, 15, 6, 49, 93, 20, 8, 75
25, 75, 20, 8, 6, 5, 1, 1
50
50
50
69
64, 72, 58, 82
61, 6, 49, 66, 18, 90, 50, 77, 25
1, 8, 88, 61, 6, 90, 50, 12, 98, 92, 100, 82, 20
88, 1, 61, 6, 90, 12, 98, 92, 82, 20, 5, 57
65, 26
88, 6, 90
1, 31, 6, 90, 77, 78
72, 58
50, 92, 25, 90
61, 6, 71, 66, 87, 20, 90, 1, 62
8, 49, 50, 25
1, 20, 90, 6, 19, 26, 49
88, 1, 61, 28, 43, 29, 81, 48, 49, 90, 92, 51
89, 80, 62, 78, 13, 14
1, 50, 19, 90, 6
88, 61, 6, 8, 90, 91, 89, 80, 15, 19
88, 90, 85, 24, 25, 69
84, 6, 114
77, 74
1, 50, 12, 6, 19
37
6, 50
1, 61, 6, 12, 98, 92, 20, 100, 82
2, 6, 90, 12, 20
72, 69
6, 59
88, 46, 6, 90, 50, 12, 19, 94, 84
96, 97
84
1, 6, 90
A-Mark
Admiral
Akai
Anam
Aoc
Bell & Howell
Broksonic
Candle
Centrion
Citizen
Classic
Concerto
Contec
Coronado
Craig
Croslex
Crown
Curtis-Mathes
CXC
Daewoo
Daytron
Dynasty
Emerson
Fisher
Funai
General Electric
Goldstar
Hitachi
Infinity
JBL
JC Penney
JVC
Kloss
KMC
KTV
88, 37, 90
55
20, 6
37, 47, 64, 41, 50
6, 37, 20, 56
67
68
6, 12, 20, 46, 50
45
20, 46, 6, 50, 12, 90, 45, 9, 10
50
6
50, 78, 83, 81
88, 90
7, 49, 50
30
50
1, 6, 20, 90, 17, 31
50
88, 1, 93, 31, 32, 33, 38, 52, 2, 3, 92,
34, 46, 50, 35, 36, 4, 5, 6, 8
1, 6, 20
50
88, 1, 90, 50, 83, 19, 30, 81, 20, 6, 25, 55, 23, 36
8, 80, 61, 15, 125
50, 19, 69, 6
1, 61, 72, 50, 58, 17, 18, 6, 49, 19, 90
88, 27, 1, 37, 10, 11, 42, 90, 39, 40, 92, 99
88, 6, 90, 71, 77, 70, 21, 22, 23, 25
82
82
91, 92, 17, 20
60, 16, 128, 129
92
88, 90, 13
88, 90, 50, 61, 20
4
CHAPTER FOUR
Special Features
4.14
Page 36

APPENDIX
Troubleshooting
Before you call a service technician, please scan this list of problems and possible solutions. It may save you time and money.
Problem Possible Solution
Poor picture quality. Try another channel.
Adjust the antenna.
Check all wire connections.
Poor sound quality or no sound. Try another channel.
Adjust the antenna.
Make sure the “MUTE” button is off.
No picture or sound. Try another channel.
Make sure the Set-Top Box is plugged in.
Check the antenna connections.
No color or wrong colors. Make sure the program is broadcasted in color.
Picture rolls vertically. Adjust the antenna.
Check all wire connections.
Remote control failure. Press the “SELECT” button to put your remote
control into “DTV” mode.
Make sure the remote has batteries.
Set-Top Box won’t switch on. Make sure the wall outlet is working.
Make sure the remote has batteries.
A.1
Page 37

A
A
APPENDIX
Care and Maintenance
With proper care, your Set-Top Box will give you many years of service.
Please follow these guidelines to get the maximum performance.
Placement
• Do not put the Set-Top Box near extremely hot, cold, humid or dusty places.
• Do not put the Set-Top Box near appliances that create magnetic fields.
Liquids
• Do not handle liquids near or on the Set-Top Box.
Cabinet
• Never open the cabinet or touch the parts inside.
• Wipe your Set-Top Box with a clean, dry cloth. Never use water, cleaning fluids, wax,
or chemicals.
• Do not put heavy objects on top of the cabinet.
Temperature
• If your Set-Top Box is suddenly moved from a cold to a warm place, unplug the power
cord for at least two hours so that moisture that may have formed inside the unit can
dry completely.
A.2
Page 38

A
A
APPENDIX
Specifications
General Specifications
BroadCasting standard DTV (ATSC)
Power requirement AC 120 V, 60 Hz
Power consumption 40 watts / In standby: 2 watts
Dimensions (W x D x H) 16.54 x 14.21 x 3.07 in
Weight 1.72 lbs
RF Specification
Tuning system type F/S
Band coverage VHF 2 ~ 13
UHF 14 ~ 69
Antenna 75-ohm external antenna terminal for
VHF/UHF
Number of inputs/outputs 75-ohm V/UHF In/Out
DTV Out component ( Y PBPR)
DTV Out (RGB)
Video Out
S-Video Out
Dolby Digital Out (Optical)
Dolby Digital Out (Coxial)
2 Analog Audio Out (Rt/Lt)
Resolution Select Switch
DTV Out Select Switch
A.3
 Loading...