

Page 1
GC68-00349BED:01
SEOUL COMMTECH CO., LTD.
448-11, Seongnea3dong, Kangdong-Ku, Seoul, Korea
Post Code : 133-034
Phone : +82-2-2225-6709
Fax : +82-2-2225-6073
Homepage : www.scommtech.co.kr
The safety precautions contained herein are served to protect the user and prevent material loss.
Please make sure to read this manual carefully to ensure proper product usage.
Intelligent Digital Door Lock EZOn
SHS-DS10
Manual
Page 2

Table of Contents
Prior to Use
User Instruction
Miscellaneous
Safety Precautions
................................................................................................................................
4
Product Installation
................................................................................................................................
7
Product Setup
........................................................................................................................................
9
Product Name & Functions
...................................................................................................................
11
Prior to Use
Initialization (Pass word, Card, Key-Tag)
..............................................................................................
14
Registration (Modi cation) & Deletion
Password
....................................................................................................................................................................
15
Key-Tag (Card)
............................................................................................................................................................
16
Usage
Password
....................................................................................................................................................................
18
Key-Tag (Card)
............................................................................................................................................................
19
Automatic/Manual Lock Usage
.............................................................................................................
20
Sound Programming & Can cellation
...................................................................................................
21
Alarm/Emerge ncy Sounds
...................................................................................................................
22
Dual Lock Usage
..................................................................................................................................
24
Opening the Door fro m the Inside
.......................................................................................................
25
Battery Usage
......................................................................................................................................
26
Usage Summary
..................................................................................................................................
28
Usage Precautions
...............................................................................................................................
32
Troubleshooting
....................................................................................................................................
33
Page 3
4
Prior to Use
5
Safety Precautions
Please review the content below to ensure safe and precise product usage.
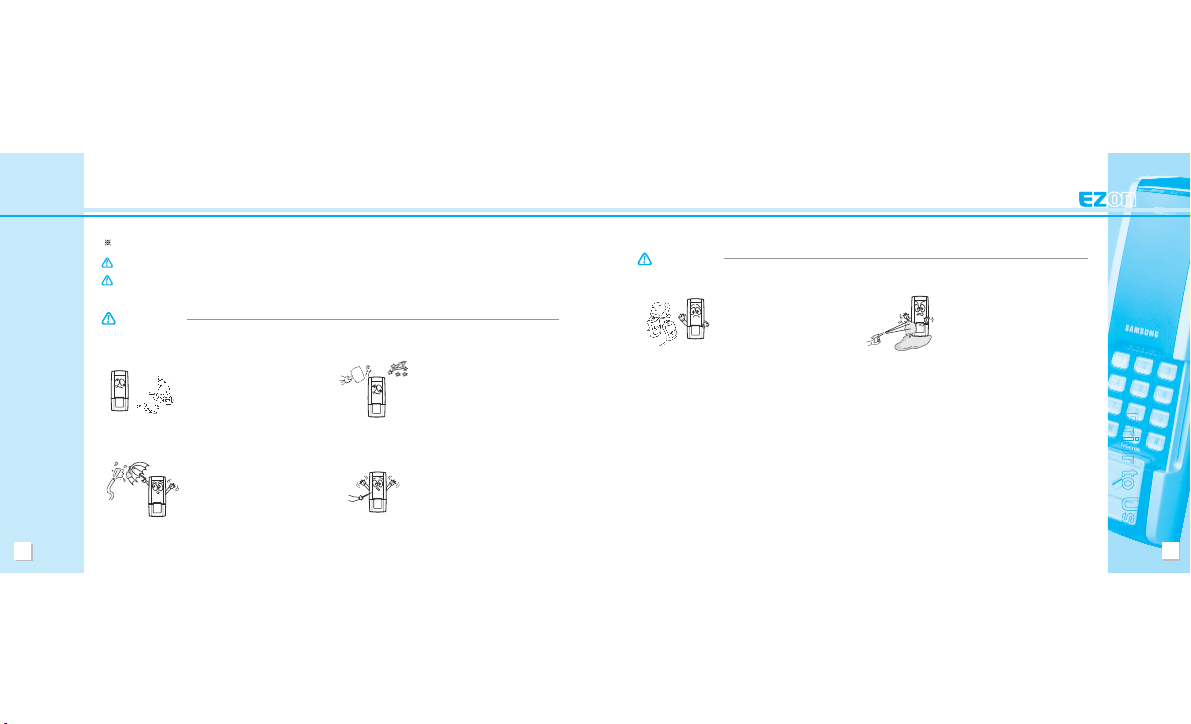
WARNING
Do not disassemble, install, or repair this
product on your own accord.
●Contact the customer support center for
any repair needs. Unauthorized handling
can result in product damage and/or
malfunction.
Do not let the product subjected to any
heavy shock such as rapping against a
hard object (hammer, etc.).
●Doing so can result in product damage
and/or malfunction.
When cleaning the entry way, make
sure to prevent water from entering
the product.
●Water penetration can result in
product damage and/or malfunction.
Do not use pins or any sharp, pointy
objects to press buttons or insert into
holes.
●Doing so can result in product
damage and/or malfunction.
When cleaning, do not use wet cloths
or volatile substances such as alcohol,
benzene, thinner, etc.
●Doing so can result in product
damage and/or malfunction.
Do not allow water or any liquid enter
the product interior.
●Doing so can result in product
damage and/or malfunction.
WARNING
Safety Precautions
WARNING
Neglect to follow directions can result in death or serious injury.
CAUTION
Neglect to follow directions can result in injury or material loss.
Page 4
6
Prior to Use
7
Safety Precautions
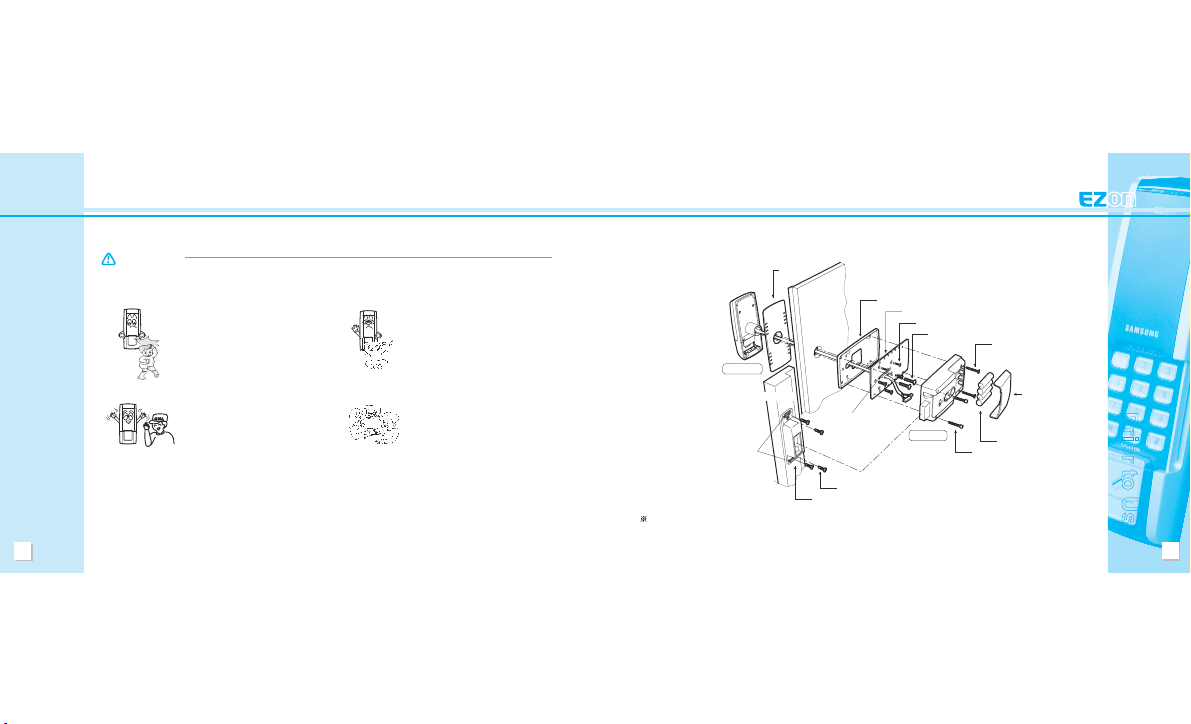
Be careful of the lower product portion
when standing up after sitting.
●Injury can be caused from bumping
of the head.
Do not hang or pull the product.
●In particular, do not allow young children
to hang from the product.
They may break off the product and
receive an injury from a fall.
CAUTION
After the service, make sure to ask the
technician to perform an operational
safety inspection of the product.
●Neglecting a safety inspection following
any repair can result in injury upon
operation.
When moving, make sure to pass
on this manual.
●To help the new resident, passing on
this manual can prevent incorrect usage.
Product Installation
1. Assembly Diagram
Reference to the installation sheet provides information that may facilitate more careful and precise
installation.
Exterior Rubber
Pad
Interior Rubber Pad
Fixed Panel
Connecting Bolts BH, + 4.2x20 (5)
Bolts, TH + M5x30 (2)
Bolts, OH + M4x30 (2)
Battery Cover
Batteries, LR6 (4)
Hexagonal Rabbet Bolts,
M4x33 (2)
Connecting Bolts, BH + 4.2x20 (4)
Mounting Plate (Strike)
Wide Slot
Door
Doorframe
Exterior Unit
Wide Slot
Interior Unit
Page 5
8
Prior to Use
9
Product Installation
1) Product installation must be performed by a sales agent and/or authorized installation technician.
(
Self installation or disassemble, qualies as customer negligence.)
2) When moving, please contact the sales agent from where the product was purchased or the customer
service center.
2. Notes for Product Installation
Product Setup
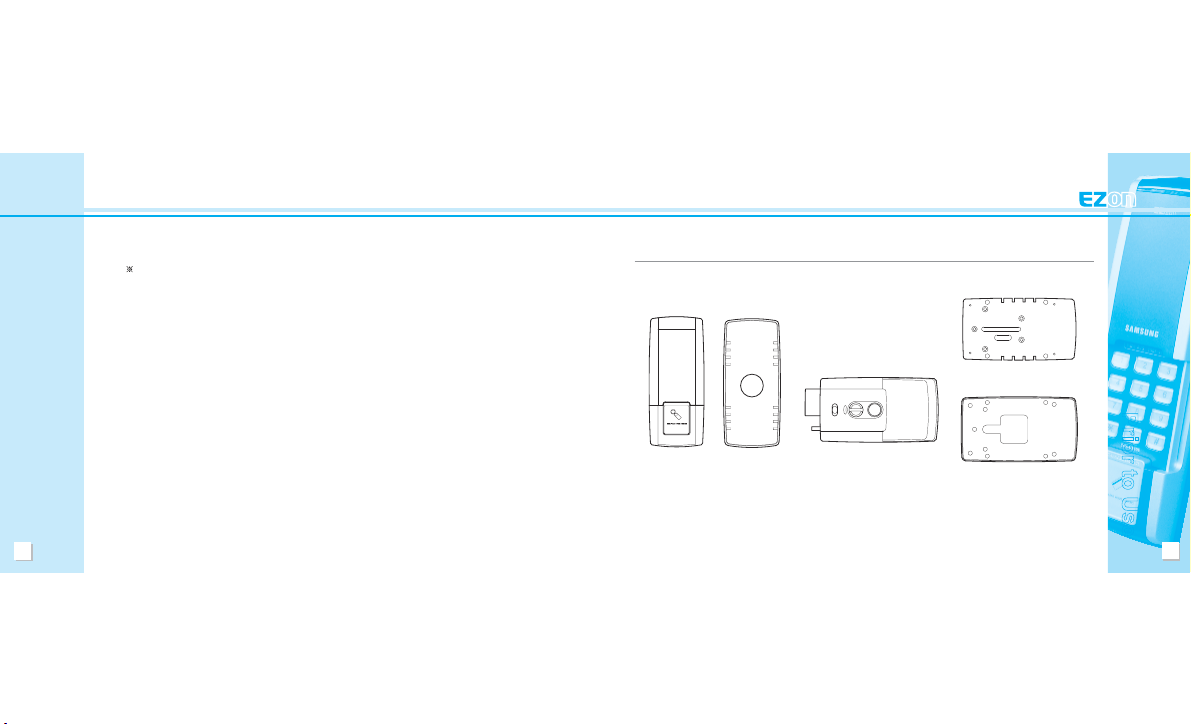
1. Main Unit
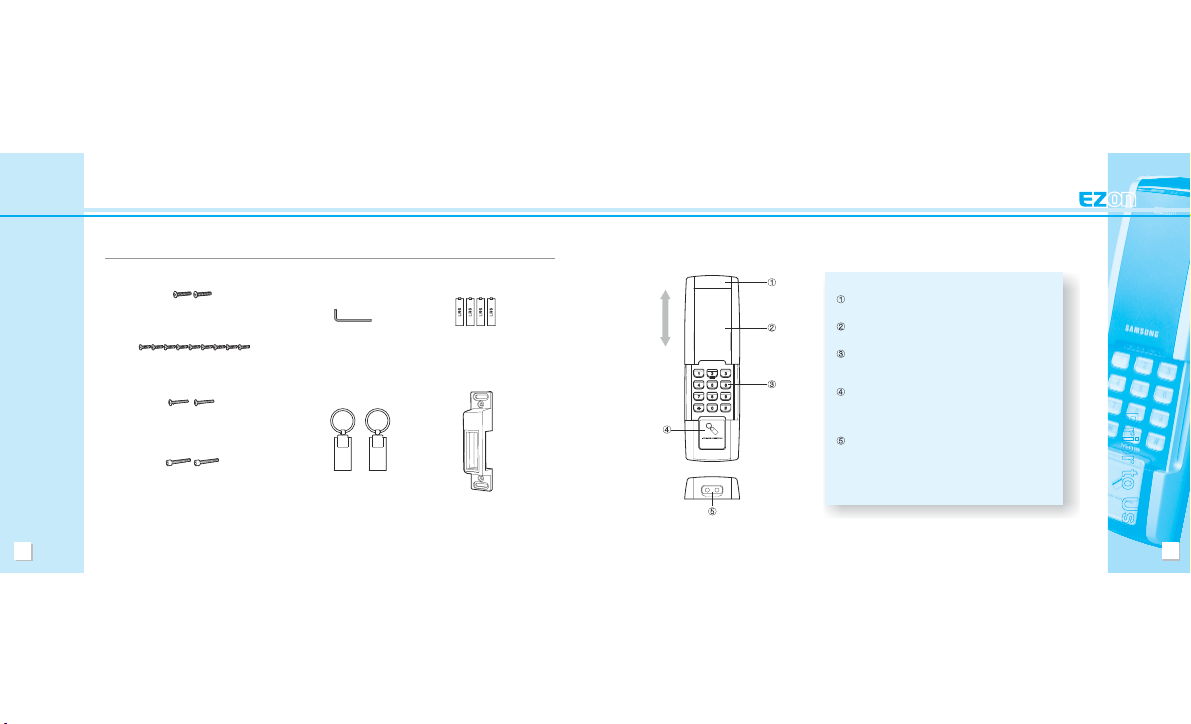
Exterior Unit Exterior Rubber Pad Interior Unit Interior Rubber Pad
Fixed Panel
Page 6
10
Prior to Use
11
Fixed Panel and Exterior Unit Screws
(SCREW TH+ M5x30)
Key-Tags
Doorframe Mounting Plate
(Strike)
Product Setup
2. Fittings
Strike, Fixed Panel Connecting Screws
(SD-SCREW BH+ #8(4.2) x20)
Interior Unit Screws
(SCREW OH+ M4x30)
Interior Unit Screws
(SCREW Hexagonal Rabbet M4x33)
L-Wrench(3mm)
‘AA’ Batteries (LR6)
1. Exterior Unit
Product Name & Functions
Indication Lamp Cover - During card recognition
or operation, this lamp turns blue.
Keypad Protection Cover - This cover protects the
keypad.
Keypad - You can use this to register/modify/delete
your password. Inputting the registered password
releases the lock.
Card Recognition Device and Button -
After pressing the button, placing a registered card
or key-tag against the recognition device or inputting
the password releases the lock.
External Power Contacts - When batteries have
run out of power, placing an emergency battery on
the contacts can initiate operational power.
(for use with a DC 9V battery)
Close
Open
Page 7
12
Product Name & Functions
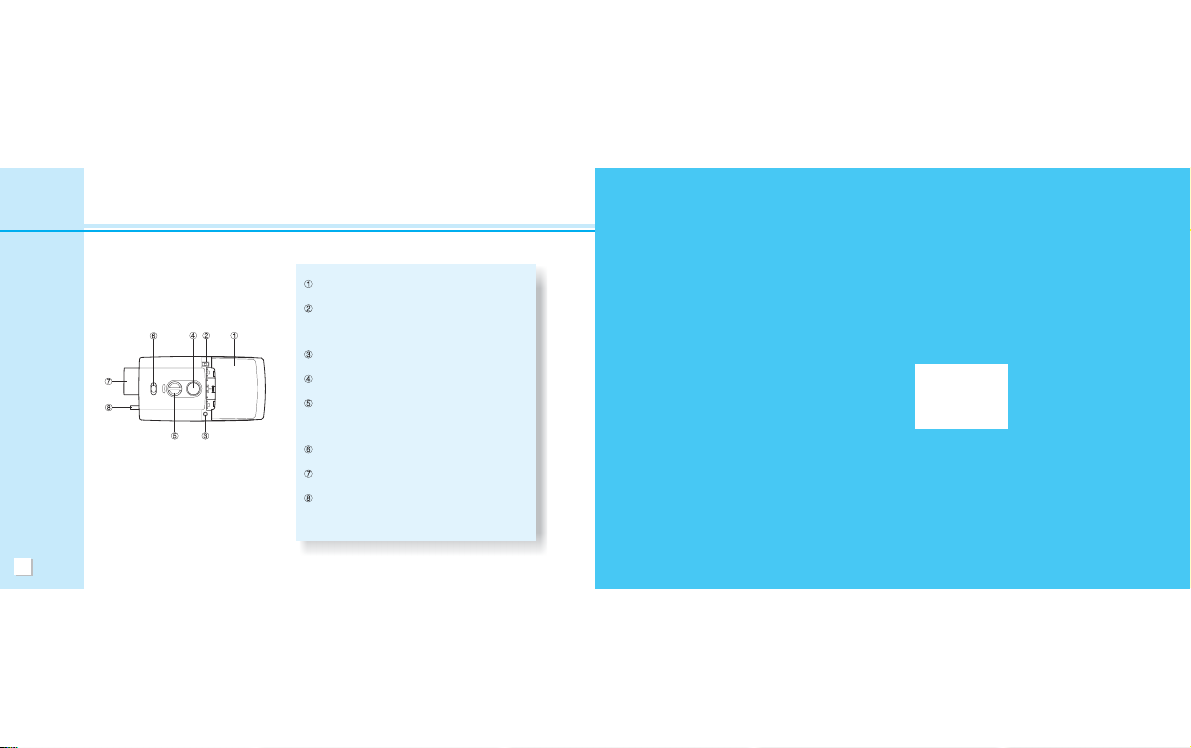
2. Interior Unit
Battery Cover - This cover, covers the battery casing
and all registration buttons.
Auto / Manu switch - Placing this switch on
‘Automatic’, results in automatic door locking upon
closing the door. The door remains unlocked even
the door is closed if this switch is set on 'Manual'.
Registration Button - Use this button when
registering or cancelling passwords or cards.
OPEN Button - This one-touch button is used from
the inside to lock/unlock the door.
Emergency Open/Close Lever - This button can be
used in emergencies or when circuits are not
functioning to manually lock/unlock the door from the
inside. (left/right: locked, middle: unlocked)
Dual Lock Lever - Dual lock activation makes it
impossible to release the lock, both in & outside.
Deadbolt - The deadbolt fastens the door to the
doorframe, to provide a locking function.
Door Ajar Sensor - When set to automatic locking,
the door ajar sensor signals whether the door is open
or closed.
User Insturction
Page 8
14
User Instruction
15
Registration (Modication) & Deletion
Original factory settings set the password to ‘1234’. For complete safety, clear all registration rst, and then program and use a new password.
(Refer to Initialization, P. 14)
Be careful not to reveal an active password to others.
Using the same password over a long period of time raise the issue of disclosure. It is recommended that passwords be changed on a periodic basis.
CAUTION
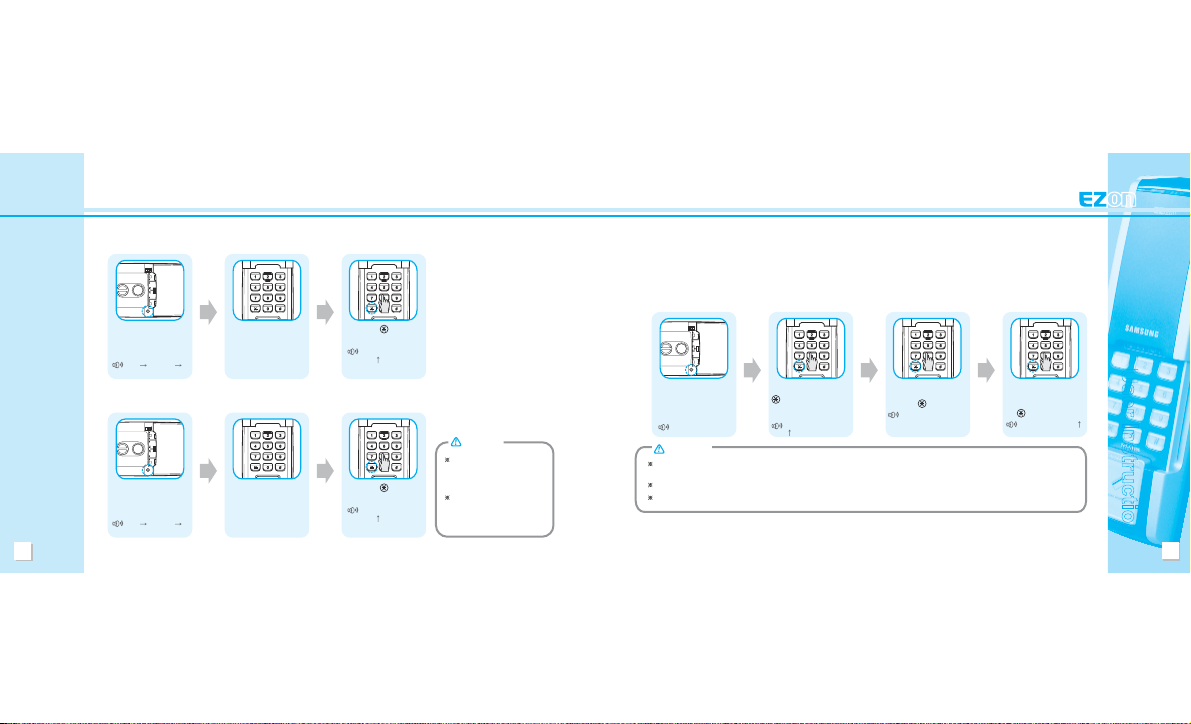
1. Password
1) Registration (Modication) Method
The password is used with the exterior keypad to release the door lock.
The password can be any single number of 4 ~ 12 digits in length.
Open the battery cover
in the interior unit and
press the registration
button once.
Beep
Input the previously registered
password, and then press the
(star) button. (If operating
for the rst time, the default
password is ‘1234’.)
Beep, Beep, Beep, Beep
(
) + Beep, Beep
Input the new password
for registration, and then
press the
(star) button.
Beep, Beep
To complete registration,
input the new password
once again, and then press
the
(star) button.
Beep, Beep, Beep, Beep ( )
Initialization (Password, Card, Key-Tag)
(1) Password Known
Press the (star)
button.
Beep, Beep, Beep,
Beep (
)
(2) Password Unknown
Open the battery cover in the
interior unit and press and
hold the registration button for
approximately ten seconds.
Beep Beep, Beep
Beep, Beep, Beep, Beep
Enter the code
‘4560852580’.
Press the (star)
button.
Beep, Beep, Beep,
Beep (
)
Initialization results in the deletion
of all registration information,
and the password is automatically
set to ‘1234’.
After selecting initialization,
please wait until the light turns
off. The memory clearing process
requires some time.
CAUTION
Open the battery cover in the
interior unit and press and
hold the registration button for
approximately ten seconds.
Beep Beep, Beep
Beep, Beep, Beep, Beep
Enter the password.
Page 9
16
User Instruction
17
As deletion has been completed, all previously registered cards are rendered invalid and are not able to release the lock.
(after deletion, refer to P. 15 for registration procedures)
To release the lock from the outside, use the password.
CAUTION
Registration (Modication) & Deletion
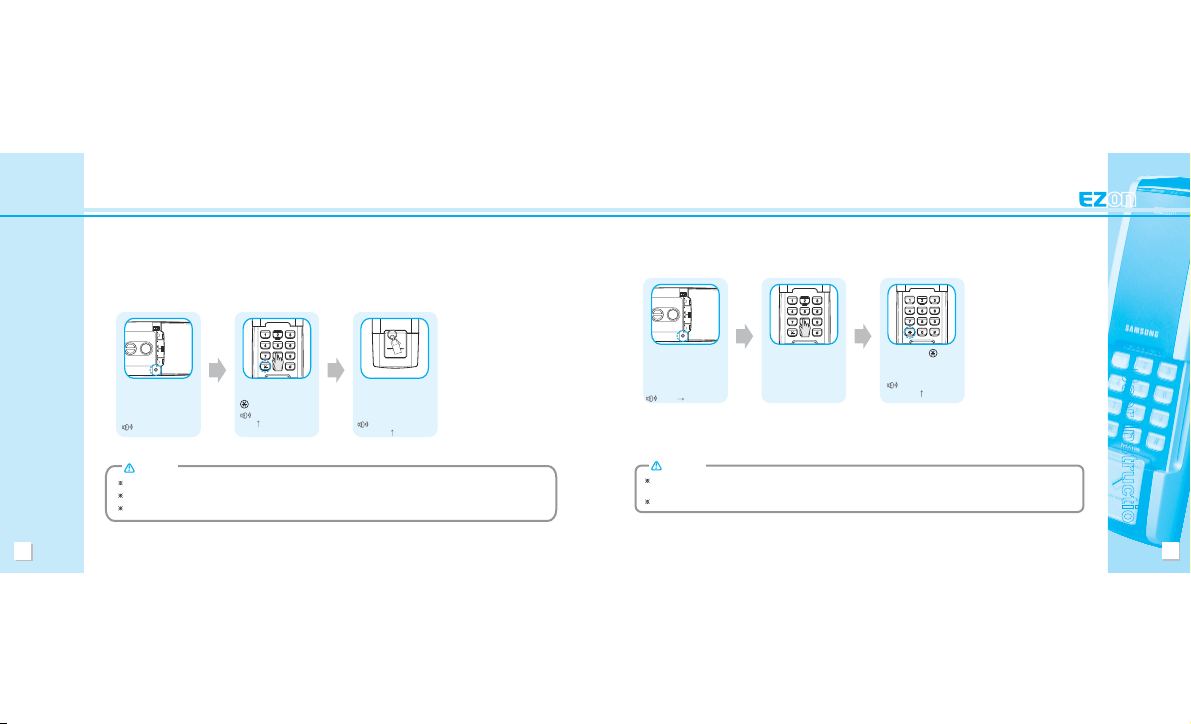
2) Complete Card Deletion Method
Open the battery cover in
the interior unit and press
and hold the registration
button for approximately
ve seconds.
Beep Beep, Beep
Enter the password.
Pressing the (star)
button deletes all card
registration.
Beep, Beep, Beep,
Beep (
)
Registration (Modication) & Deletion
To register more than one card at once time, after registering the rst card, place the next card(s) on the card recognition device within ve seconds.
To conrm card registration, carry an emergency key, open the door, make sure the deadbolt is extended, and follow directions on card usage.
Follow the process outlined above to register additional card(s) at any time.
CAUTION
Open the battery cover
in the interior unit and
press the registration
button once.
Beep
After inputting the
password, press the
(star) button.
Beep, Beep, Beep, Beep
(
) + Beep, Beep
Place the key-tag to be
registered in contact with
the card recognition device
on the exterior unit.
Beep, Beep, Beep,
Beep (
)
2. Key-Tag (Card)
1) Registration Method
The card, key-tag is used from the outside to release the door lock. Only credit cards that can act as
transportation cards can be registered. A maximum of 20 cards, including key-tags, can be registered.
(Registration of certain T-money cards may not be possible.)
Page 10
18
User Instruction
19
Usage
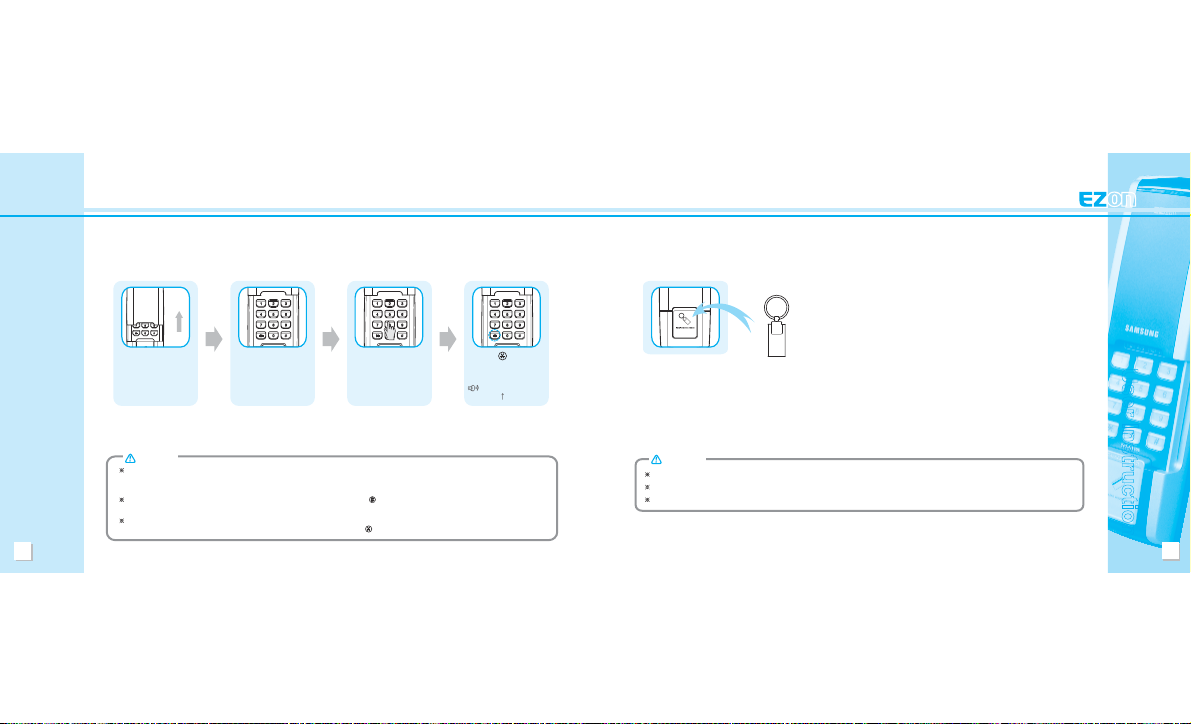
Make sure the keypad cover is fully closed before using a card to unlock the door.
For proper operation, hold a card within 30mm and a key-tag within 20mm of the card recognition device.
The distance from which recognition is possible may vary with card type and maker.
CAUTION
2. Key-Tag (Card)
After pressing the card recognition button, place a registered key-tag (card)
on the card recognition device of the exterior unit for about one second.
Placing an unregistered key-tag (card) or damaged key-tag (card) will
produce a prolonged “beep”. Successful recognition will release the lock
and emit the completion sound, Beep, Beep, Beep, Beep (in rising key).
Inputting the wrong password three times consecutively results in the sounding of a warning signal for ten seconds, and the unit shuts down for one minute.
During shutdown, a “beep” sound will be emitted every ten seconds.
The system returns to normal if a registered card is recognized or after a series of “beeps” signals the end of one minute.
If you make a mistake when inputting the password and would like to cancel, press the (sharp) button.
(Executing this procedure and pressing the # sharp button three times consecutively will activate the foul play prevention warning.)
The password must be entered while the keypad is lighted.
If you wish to enter the password after the light has gone out, you must rst press the
(star) button.
CAUTION
Usage
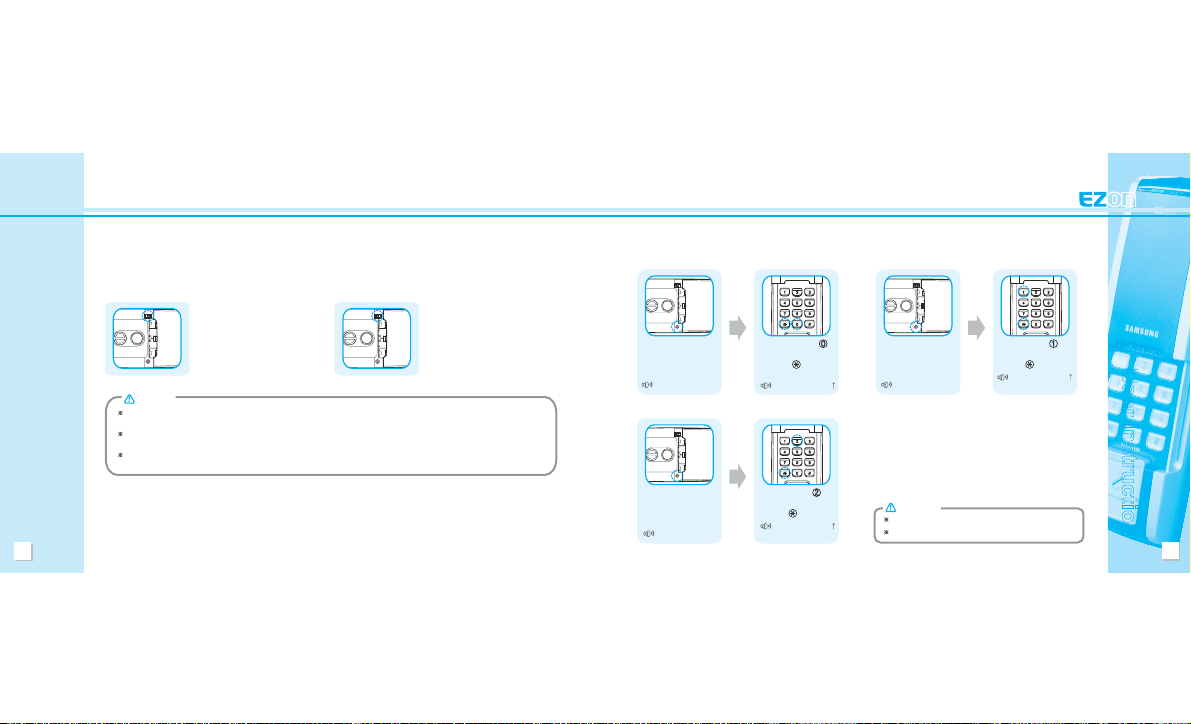
1. Password
Slide the keypad cover
upward.
The keypad
automatically turns
blue.
Enter the registered
password before the
light goes out.
Press the (star) button
or close the keypad cover
to release the door lock.
Beep, Beep, Beep,
Beep (
)
OPEN
Page 11
20
User Instruction
21
Sound Programming & Cancellation
1. Keypad, General Sound Muting 2. General Sound Muting
Original factory settings have all sounds activated.
Essential sounds like alarm/emergency sounds cannot be muted.
CAUTION
The sounds for keypad operation, door locking, and lock releasing can be programmed.
Open the battery cover
in the interior unit and
press the registration
button once.
Beep
After pressing the
button on the keypad,
press the
(star)
button.
Beep, Beep, Beep, Beep ( )
Open the battery cover
in the interior unit and
press the registration
button once.
Beep
After pressing the
button on the keypad,
press the
(star) button.
Beep, Beep, Beep, Beep ( )
3. All Sound Muting
Open the battery cover
in the interior unit and
press the registration
button once.
Beep
After pressing the
button on the keypad,
press the
(star) button.
Beep, Beep, Beep, Beep ( )
Automatic/Manual Lock Conrmation Method – With the door open, if the deadbolt automatically extends after pressing the door ajar sensor,
the automatic lock is engaged.
When the door is closed and the lock has been released (via password, card, remote control, etc.), if the handle is not turned and the door opened
within seven seconds, the door lock automatically engages again.
If automatic locking is engaged and the door is kept open, a warning sound will be emitted twice every 15 seconds.
(No warning sound emitted when manual locking is engaged.)
CAUTION
Automatic/Manual Lock Usage
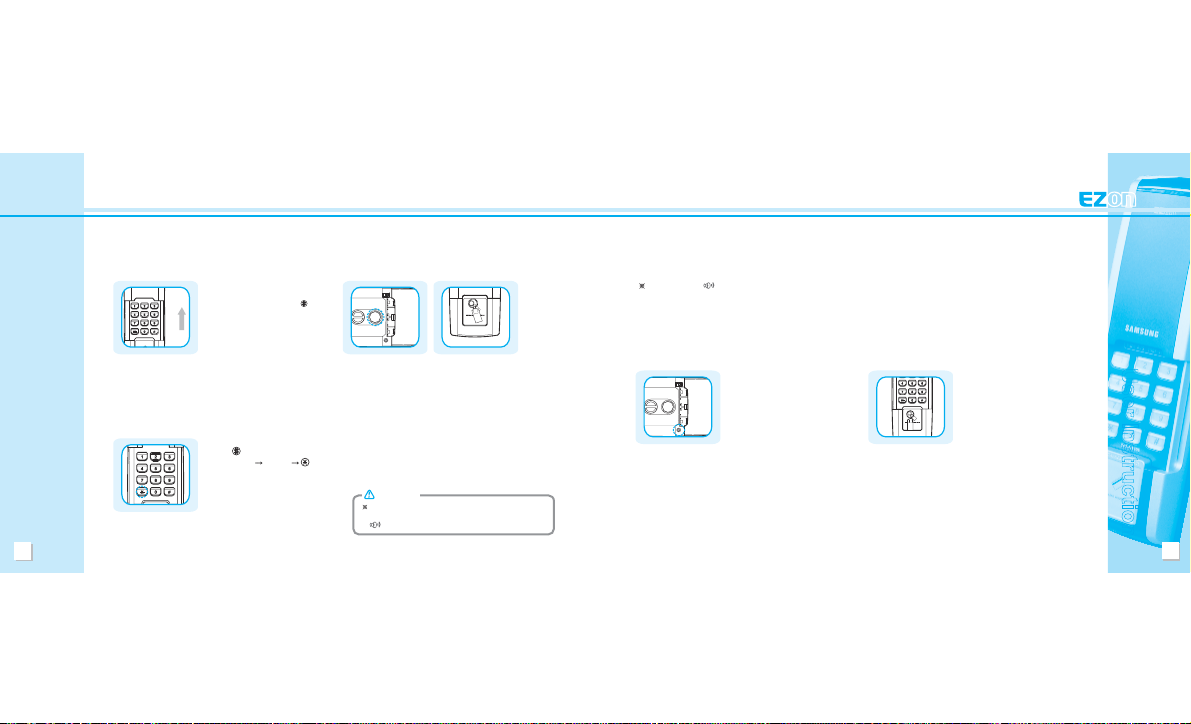
Automatic locking of the door upon closing can be programmed.
1. Automatic Locking
Setting the auto / manu switch to
automatic will automatically engage the
lock upon closing the door.
2. Manual Locking
Setting the auto / manu switch to
manual will not engage the lock upon
closing the door. To lock the door when
closed, from the outside, you must
press the card recognition button, and
from the inside, you must press the
OPEN button.
Page 12
22
User Instruction
23
1. Foul Play Prevention
Alarm/Emergency Sounds
To prevent operation from foul play, if an
unregistered card or password is entered
three times consecutively or if the
(sharp)
button is pressed three times consecutively,
an alarm is sounded for ten seconds, and the
door lock unit shuts down for one minute.
(During shutdown, a “beep” sound is emitted
every ten seconds, and the system returns to
normal after a series of “beeps” signals the
end of one minute.)
1) Alarm Sounding
To cancel the alarm sound from the inside, press
the OPEN button on the interior unit, or extract the
batteries. To cancel the alarm sound from the outside,
place a registered card on the card recognition unit.
2) Alarm Sound Cancellation
2. Crime Prevention
While the door is locked, from the outside,
press the
(sharp) button on the keypad
for three seconds
password (star)
button to activate the crime prevention mode.
- From the inside, attempting to disengage
the lock by using the OPEN button or the
Emergency Open/Close Lever will produce
an emergency sound.
(intrusion detection using the OPEN button)
1) Activation
From the inside, press the registration button on the
interior unit or extract the batteries to deactivate the crime
prevention mode. From the outside, opening the door by
entering a registered password or using a registered card
will automatically deactivate the crime prevention mode.
2) Deactivation
Pressing the OPEN button from the inside produces an
emergency sound.
Beep…Beep…Beep (prolonged beeps for ve minutes)
CAUTION
Alarm/Emergency Sounds
3. Intruder Prevention
Pressing the registration button on the
interior unit or extracting the batteries will
cancel the emergency sound.
4. Emergency Sound Cancellation
Any forced opening of the door will produce an emergency sound.
Emergency Sound Beep…Beep…Beep (prolonged beeps for ve minutes)
1) From the Inside 2) From the Outside
Entering the registered password
or placing a registered card on the
card recognition unit will cancel the
emergency sound.
OPEN
Page 13
24
User Instruction
25
Dual Lock Usage
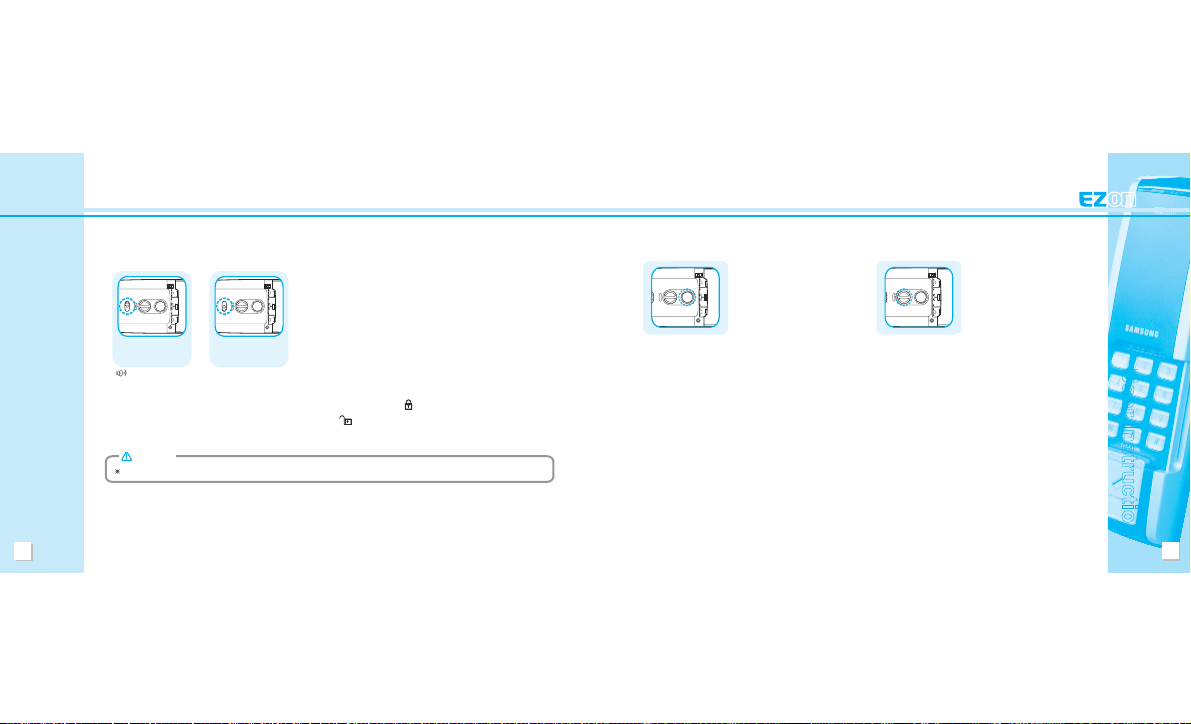
The dual lock function is used to not allow lock release from the outside.
Setting the lever so as to show a red background activated the dual lock
function. If electronic door lock operation (via password, card, OPEN button,
etc.) is attempted while the dual lock function is activated, a signal (three short
beeps twice) indicating the active dual lock status is emitted.
Also, when activated, any mechanical door lock operation (emergency open/
close lever, etc.) cannot release the lock, and no signal is emitted.
Dual Lock Deactivated
Beep, Beep, Beep…
Beep, Beep, Beep
1) Dual Lock Activation : When the door is closed, turn the dual lock lever so as the red ( ) background is fully visible.
2) Dual Lock Deactivation: Turn the dual lock lever so as the green (
) background is fully visible.
Opening the Door from the Inside
Dual Lock Activated
1. Electronic Method
When the door is locked, pressing
the OPEN button on the interior unit
releases the lock. Pressing the OPEN
button alternates between locking and
unlocking the door.
(lock cannot be released when
batteries are uncharged)
2. Mechanical Method
The lock can be engaged and
disengaged by rotating the emergency
open/close lever left and right.
(regardless of battery condition)
When the dual lock function is activated, the lock cannot be released from the outside.
CAUTION
Page 14
26
User Instruction
27
Battery Usage
1. Battery Replacement Timing
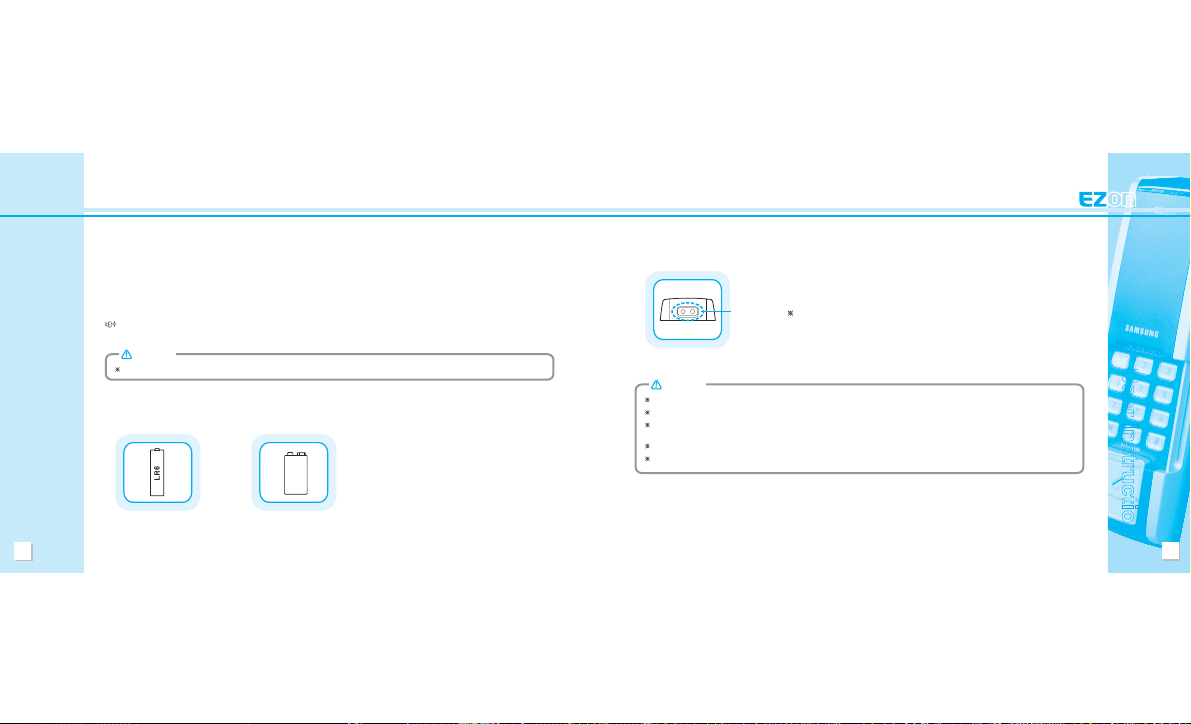
Upon operating the door via a password, a warning sound like a siren is emitted, it is time to replace the
batteries. Batteries should be replaced within one week of this initial warning.
As batteries lose power over long periods of time, make sure to check manufactured dates before purchase.
According to main unit usage standards of ten times per day with four 1.5V AA batteries, battery life averages
over one year.
Sound: Beep, Beep (like a siren)
1) Main Unit 2) External Power
4 “AA” Size x 4
(Alkaline LR6)
9V (6LF22)
2. Batteries Used
Battery Usage
3. External Power
If batteries are not replaced when necessary, the door cannot be opened via the password
or card. In such cases, a 9V (6LF22) battery can be placed on the external power contacts
to restore temporary operational power.
The emergency battery must be 9V.
External Power
Supply
Replacement intervals may vary according to varying battery manufacturers, manufactured dates, and usage environments.
CAUTION
Make sure to use alkaline batteries. Do not use regular manganese or rechargeable batteries. Doing so can result in the inability to unlock the door.
Use of batteries that require replacement results in loss of operability, and replacement within a one-week period is recommended.
If batteries are placed in erroneous positions, operation is not possible.
Refer to the positional diagram on the battery case to accurately position the batteries.
Any battery leakage can result in product damage. Periodic checks (every six months) are recommended.
Battery features may differ according to manufacturer.
CAUTION
Page 15
28
User Instruction
29
Usage Summary
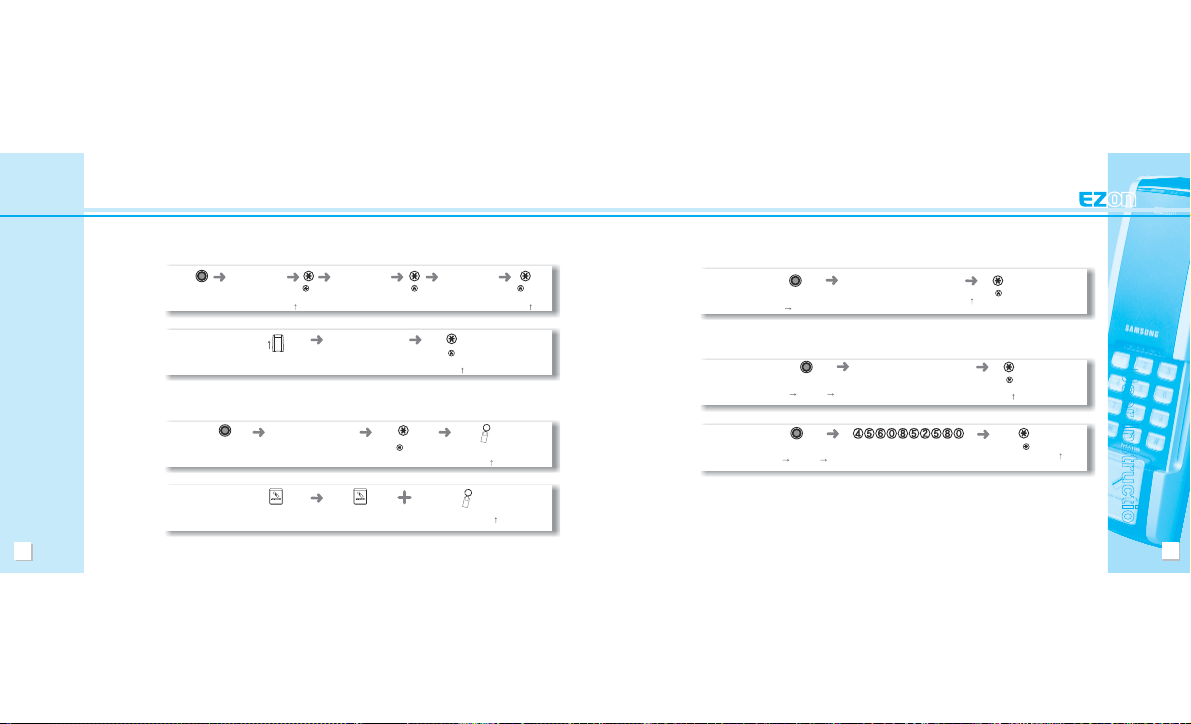
1. Password
Press the (Star) Button
Beep, Beep, Beep,
Beep (
)
1) Registration
Press the Registration
Button Once
Beep
Enter the Registered
Password(4 ~ 12 Digit.s)
“Initial Password is 1234.”
Enter the New Password
(4 ~ 12 Digits)
Enter the New Password
Again (4 ~ 12 Digits)
Press the
(Star) Button
Beep, Beep
Press the (Star) Button
Beep, Beep, Beep, Beep
(
) + Beep, Beep
2) Usage
Enter the Registered
Password (4 ~ 12 Digits)
Press the
(Star) Button
Beep, Beep, Beep,
Beep (
)
Usage Summary
1) Deletion
3. Initialization (Password, Card, Key-Tag)
2. Key-Tag (Card)
Key-Tag Recognition
Beep, Beep, Beep,
Beep (
)
1) Registration
Press the Registration
Button Once
Beep
Enter the Registered
Password (4 ~ 12 Digits)
Press the
(Star) Button
Beep, Beep
2) Usage
Press the Key-Tag
Recognition Button
Key-Tag Recognition
Beep, Beep, Beep, Beep ( )
PlaceKey-Tagon
RecognitionDevice
Enter the code 4560852580
Press the Registration
Button for Ten Seconds
Beep Beep,Beep
Beep,Beep,Beep,Beep
EntertheRegistered
Password(4~12Digits)
Press the Registration
Button for Five Seconds
Beep Beep,Beep
EntertheRegistered
Password(4~12Digits)
Press the
(Star) Button
Beep, Beep, Beep, Beep
(in rising key) key)
Raise the Keypad Cover
3)
Complete Card
Registration
Deletion
(1) When knowing
the password
(2) When not
knowing the
password
Press the
(Star) Button
Beep, Beep, Beep, Beep
(
)
Press the (Star) Button
Beep, Beep, Beep, Beep ( )
Press the Registration
Button for Ten Seconds
Beep Beep,Beep
Beep,Beep,Beep,Beep
Page 16

Miscellaneous
Page 17
32
Miscellaneous
33
Usage Precautions
Protect the password.
- As the standard password can be exposed during installation, make sure to delete all registration content prior to
new password and card registration and usage.
Register and modify the password on a periodic basis.
- Registering modied passwords on a periodic basis assists in preventing password exposure and crime and
promoting safety. (refer to Password Registration, P. 14)
Take care when cleaning with water.
- Penetration of water into the interior of the product can result in damage.
Do not disassemble the product.
- As the inner workings are very ne and complicated, re-assembly may not be possible and more severe damage
may be caused.
After the rst battery replacement signal, make sure to replace batteries within one week.
Troubleshooting
I can’t change the password.
- This may be caused by taking excessive time when modifying the password.
(During modication, entrance of numbers should be no more than ve seconds apart, and the signal light should
be off.)
- Try repeating the password modication process referring carefully to the manual.
The automatic lock function does not work.
- Check to see if the auto / manu switch is set to automatic.
- Open the door. If the deadbolt automatically extends after pressing the door ajar sensor, the function is operational.
Any malfunction is due to an installation defect, and the installation center should be contacted.
- Check to see if the batteries may lack power.
Although recognition works ne, the door will not open.
- The lock mechanism may be defective. Please contact the customer service center.
The power does not come on.
- Check to see if one or more of the buttons on the keypad are jammed.
- Check the status of the batteries to see if they are defective or possible misaligned.
- Check to see if any batteries have become dislodged, or if the batteries need replacement.
The door will not open after I enter the password and press the (star) button.
- The dual lock function may be activated.
- If the light goes off during use, input is not recognized. Enter the password while the light is on.
The light goes off after a set period of time.
When operating, a strange siren-like sound continues to be emitted.
- This is the signal for the need to replace the batteries. Please replace the batteries.
Page 18
34
MEMO
35
MEMOProduct Warranty
Seoul Commtech Products are supplied with one(1) year warranty base from the date of purchase, we’ll repair or replace the defective
product with a new or factory rebuilt replacement.
Subject of Warranty
1. This warranty applies to the original purchase only.
2. All warranty will be invalid if unauthorized repair or modication are made to the unit or in any case of accident, misuse,
damage caused by improper installation and altered serial numbers.
3. If you need a warranty service, you should send the product to customer Dep’t or dealer ofce, the product in all cases must be
accompanied by the following items;
Customer name, address, telephone number, the serial numbers, copy of customer sales receipt showing the purchase date and place
The Model number is on the box and front of the manual. The serial number is on the unit. Record the Model and serial numbers in the
spaces provided below. Refer to these numbers for warranty service.
Model No. Serial No.
 Loading...