

Page 1

SGH-T528G
MOBILE PHONE
User Manual
Please read this manual before operating your
phone, and keep it for future reference.
Page 2

Intellectual Property
All Intellectual Property, as defined below, owned by or which is otherwise the
property of Samsung or its respective suppliers relating to the SAMSUNG Phone,
including but not limited to, accessories, parts, or software relating there to (the
“Phone System”), is proprietary to Samsung and protected under federal laws, state
laws, and international treaty provisions. Intellectual Property includes, but is not
limited to, inventions (patentable or unpatentable), patents, trade secrets,
copyrights, software, computer programs, and related documentation and other
works of authorship. You may not infringe or otherwise violate the rights secured by
the Intellectual Property. Moreover, you agree that you will not (and will not attempt
to) modify, prepare derivative works of, reverse engineer, decompile, disassemble,
or otherwise attempt to create source code from the software. No title to or
ownership in the Intellectual Property is transferred to you. All applicable rights of
the Intellectual Property shall remain with SAMSUNG and its suppliers.
Samsung Telecommunications America (STA),
LLC
Headquarters:
1301 E. Lookout Drive
Richardson, TX 75082
Toll Free Tel:
Internet Address:
©
2011 Samsung Telecommunications America, LLC is a registered trademark of
Samsung Electronics America, Inc. and its related entities.
Do you have questions about your Samsung Mobile Phone?
For 24 hour information and assistance, we offer a new FAQ/ARS System
(Automated Response System) at:
http://www.samsung.com/us/support
http://www.samsungusa.com
Customer Care Center:
1000 Klein Rd.
Plano, TX 75074
1.888.987.HELP (4357)
TracFone_T528G_UDKC2_MM_031011_F9
Page 3

GH68-32644A
Printed in China
Nuance®, VSuite™, T9® Text Input, and the Nuance logo are trademarks or
registered trademarks of Nuance Communications, Inc., or its affiliates in the United
States and/or other countries.
Open Source Software
Some software components of this product incorporate source code covered under
GNU General Public License (GPL), GNU Lesser General Public License (LGPL),
OpenSSL License, BSD License and other open source licenses. To obtain the
source code covered under the open source licenses, please visit:
http://opensource.samsung.com
.
SAR Information
Your wireless phone is a radio transmitter and receiver. It is designed and
manufactured not to exceed the emission limits for exposure to radio frequency (RF)
energy set by the Federal Communications Commission (FCC) of the U.S.
Government. These limits are part of comprehensive guidelines and establish
permitted levels of RF energy for the general population. The guidelines are based
on the safety standards that were developed by independent scientific organizations
through periodic evaluation of scientific studies.
The standards include a substantial safety margin designed to assure the safety of
all persons, regardless of age and health.
The exposure standard for wireless phones employs a unit of measurement known
as Specific Absorption Rate (SAR). The SAR limit set by the FCC is 1.6 W/kg. The
highest SAR values for this model phone were Head: 0.67 W/kg,
Body-worn: 1.08 W/kg.
Page 4

Disclaimer of Warranties; Exclusion of Liability
EXCEPT AS SET FORTH IN THE EXPRESS WARRANTY CONTAINED ON THE
WARRANTY PAGE ENCLOSED WITH THE PRODUCT, THE PURCHASER TAKES THE
PRODUCT "AS IS", AND SAMSUNG MAKES NO EXPRESS OR IMPLIED WARRANTY OF
ANY KIND WHATSOEVER WITH RESPECT TO THE PRODUCT, INCLUDING BUT NOT
LIMITED TO THE MERCHANTABILITY OF THE PRODUCT OR ITS FITNESS FOR ANY
PARTICULAR PURPOSE OR USE; THE DESIGN, CONDITION OR QUALITY OF THE
PRODUCT; THE PERFORMANCE OF THE PRODUCT; THE WORKMANSHIP OF THE
PRODUCT OR THE COMPONENTS CONTAINED THEREIN; OR COMPLIANCE OF THE
PRODUCT WITH THE REQUIREMENTS OF ANY LAW, RULE, SPECIFICATION OR
CONTRACT PERTAINING THERETO. NOTHING CONTAINED IN THE INSTRUCTION
MANUAL SHALL BE CONSTRUED TO CREATE AN EXPRESS OR IMPLIED WARRANTY
OF ANY KIND WHATSOEVER WITH RESPECT TO THE PRODUCT. IN ADDITION,
SAMSUNG SHALL NOT BE LIABLE FOR ANY DAMAGES OF ANY KIND RESULTING
FROM THE PURCHASE OR USE OF THE PRODUCT OR ARISING FROM THE BREACH
OF THE EXPRESS WARRANTY, INCLUDING INCIDENTAL, SPECIAL OR
CONSEQUENTIAL DAMAGES, OR LOSS OF ANTICIPATED PROFITS OR BENEFITS.
TracFone_T528G_UDKC2_MM_031011_F9
Page 5

Table of Contents
Section 1: Getting Started .....................................................5
Setting Up Your Phone . . . . . . . . . . . . . . . . . . . . . . . . . . . . . . . . . . . . . . . . . . 5
Charging the Battery . . . . . . . . . . . . . . . . . . . . . . . . . . . . . . . . . . . . . . . . . . . . 7
Switching the Phone On or Off . . . . . . . . . . . . . . . . . . . . . . . . . . . . . . . . . . . . 8
Locking the Touch Screen . . . . . . . . . . . . . . . . . . . . . . . . . . . . . . . . . . . . . . . 8
Setting Up Voice Mail . . . . . . . . . . . . . . . . . . . . . . . . . . . . . . . . . . . . . . . . . . . 9
Section 2: Understanding Your Phone ................................11
Features . . . . . . . . . . . . . . . . . . . . . . . . . . . . . . . . . . . . . . . . . . . . . . . . . . . . 11
Front View . . . . . . . . . . . . . . . . . . . . . . . . . . . . . . . . . . . . . . . . . . . . . . . . . . 12
Side Views . . . . . . . . . . . . . . . . . . . . . . . . . . . . . . . . . . . . . . . . . . . . . . . . . . 14
Rear View . . . . . . . . . . . . . . . . . . . . . . . . . . . . . . . . . . . . . . . . . . . . . . . . . . . 15
Display Layout . . . . . . . . . . . . . . . . . . . . . . . . . . . . . . . . . . . . . . . . . . . . . . . 16
Menu Navigation . . . . . . . . . . . . . . . . . . . . . . . . . . . . . . . . . . . . . . . . . . . . . 19
Widgets . . . . . . . . . . . . . . . . . . . . . . . . . . . . . . . . . . . . . . . . . . . . . . . . . . . . 23
Widget List Navigation . . . . . . . . . . . . . . . . . . . . . . . . . . . . . . . . . . . . . . . . . 28
Understanding the Events Widget . . . . . . . . . . . . . . . . . . . . . . . . . . . . . . . . . 30
Section 3: Call Functions .....................................................32
Displaying Your Phone Number . . . . . . . . . . . . . . . . . . . . . . . . . . . . . . . . . . 32
Making a Call . . . . . . . . . . . . . . . . . . . . . . . . . . . . . . . . . . . . . . . . . . . . . . . . 32
Making a Call from the Address Book . . . . . . . . . . . . . . . . . . . . . . . . . . . . . . 34
Answering a Call . . . . . . . . . . . . . . . . . . . . . . . . . . . . . . . . . . . . . . . . . . . . . 34
Dialing Options . . . . . . . . . . . . . . . . . . . . . . . . . . . . . . . . . . . . . . . . . . . . . . . 35
Recent Calls . . . . . . . . . . . . . . . . . . . . . . . . . . . . . . . . . . . . . . . . . . . . . . . . . 36
Call Time . . . . . . . . . . . . . . . . . . . . . . . . . . . . . . . . . . . . . . . . . . . . . . . . . . . 36
Data Counter . . . . . . . . . . . . . . . . . . . . . . . . . . . . . . . . . . . . . . . . . . . . . . . . 36
Options During a Call . . . . . . . . . . . . . . . . . . . . . . . . . . . . . . . . . . . . . . . . . . 37
Section 4: Entering Text ......................................................41
Keys . . . . . . . . . . . . . . . . . . . . . . . . . . . . . . . . . . . . . . . . . . . . . . . . . . . . . . . 41
Using the QWERTY Keypad . . . . . . . . . . . . . . . . . . . . . . . . . . . . . . . . . . . . . . 42
1
Page 6

Changing the Text Input Mode . . . . . . . . . . . . . . . . . . . . . . . . . . . . . . . . . . .44
Using T9 Mode . . . . . . . . . . . . . . . . . . . . . . . . . . . . . . . . . . . . . . . . . . . . . . . 44
Using Abc In Portrait Mode . . . . . . . . . . . . . . . . . . . . . . . . . . . . . . . . . . . . . . 47
Using Numeric In Portrait Mode . . . . . . . . . . . . . . . . . . . . . . . . . . . . . . . . . . 48
Using Symbols . . . . . . . . . . . . . . . . . . . . . . . . . . . . . . . . . . . . . . . . . . . . . . . 48
Using Emoticon (EMO) Mode . . . . . . . . . . . . . . . . . . . . . . . . . . . . . . . . . . . . . 49
Section 5: Contacts and Your Address Book ......................50
Adding a New Contact . . . . . . . . . . . . . . . . . . . . . . . . . . . . . . . . . . . . . . . . . 50
Using Contacts . . . . . . . . . . . . . . . . . . . . . . . . . . . . . . . . . . . . . . . . . . . . . . . 53
Address Book Options . . . . . . . . . . . . . . . . . . . . . . . . . . . . . . . . . . . . . . . . . . 54
FDN Mode . . . . . . . . . . . . . . . . . . . . . . . . . . . . . . . . . . . . . . . . . . . . . . . . . . 55
Groups . . . . . . . . . . . . . . . . . . . . . . . . . . . . . . . . . . . . . . . . . . . . . . . . . . . . . 56
Favorites . . . . . . . . . . . . . . . . . . . . . . . . . . . . . . . . . . . . . . . . . . . . . . . . . . . . 56
Section 6: Multimedia ..........................................................59
Music Player . . . . . . . . . . . . . . . . . . . . . . . . . . . . . . . . . . . . . . . . . . . . . . . . . 65
Video Player . . . . . . . . . . . . . . . . . . . . . . . . . . . . . . . . . . . . . . . . . . . . . . . . . 68
Pictures . . . . . . . . . . . . . . . . . . . . . . . . . . . . . . . . . . . . . . . . . . . . . . . . . . . . 69
Camera . . . . . . . . . . . . . . . . . . . . . . . . . . . . . . . . . . . . . . . . . . . . . . . . . . . . . 71
Using the Camera . . . . . . . . . . . . . . . . . . . . . . . . . . . . . . . . . . . . . . . . . . . . . 71
Camera and Camcorder Options . . . . . . . . . . . . . . . . . . . . . . . . . . . . . . . . . .73
Using the Camcorder . . . . . . . . . . . . . . . . . . . . . . . . . . . . . . . . . . . . . . . . . .80
Games . . . . . . . . . . . . . . . . . . . . . . . . . . . . . . . . . . . . . . . . . . . . . . . . . . . . . 83
Section 7: Messaging ..........................................................84
Types of Messages . . . . . . . . . . . . . . . . . . . . . . . . . . . . . . . . . . . . . . . . . . . . 84
Creating and Sending Messages . . . . . . . . . . . . . . . . . . . . . . . . . . . . . . . . . . 84
Additional Message Options . . . . . . . . . . . . . . . . . . . . . . . . . . . . . . . . . . . . . 85
Viewing New Received Messages . . . . . . . . . . . . . . . . . . . . . . . . . . . . . . . . . 87
Using Message Options . . . . . . . . . . . . . . . . . . . . . . . . . . . . . . . . . . . . . . . . . 88
Using Email . . . . . . . . . . . . . . . . . . . . . . . . . . . . . . . . . . . . . . . . . . . . . . . . . 89
Using Exchange Email . . . . . . . . . . . . . . . . . . . . . . . . . . . . . . . . . . . . . . . . . . 89
Voicemail . . . . . . . . . . . . . . . . . . . . . . . . . . . . . . . . . . . . . . . . . . . . . . . . . . . 90
Messaging Settings . . . . . . . . . . . . . . . . . . . . . . . . . . . . . . . . . . . . . . . . . . .90
2
Page 7

Templates . . . . . . . . . . . . . . . . . . . . . . . . . . . . . . . . . . . . . . . . . . . . . . . . . . 90
Deleting Messages . . . . . . . . . . . . . . . . . . . . . . . . . . . . . . . . . . . . . . . . . . . . 90
Used Space . . . . . . . . . . . . . . . . . . . . . . . . . . . . . . . . . . . . . . . . . . . . . . . . . 91
Section 8: Change Your Settings .........................................92
Sound Profile . . . . . . . . . . . . . . . . . . . . . . . . . . . . . . . . . . . . . . . . . . . . . . . . 92
Display and Light Settings . . . . . . . . . . . . . . . . . . . . . . . . . . . . . . . . . . . . . . 95
Time and Date . . . . . . . . . . . . . . . . . . . . . . . . . . . . . . . . . . . . . . . . . . . . . . . 97
Phone Settings . . . . . . . . . . . . . . . . . . . . . . . . . . . . . . . . . . . . . . . . . . . . . . . 97
Call Settings . . . . . . . . . . . . . . . . . . . . . . . . . . . . . . . . . . . . . . . . . . . . . . . . . 99
Connectivity . . . . . . . . . . . . . . . . . . . . . . . . . . . . . . . . . . . . . . . . . . . . . . . . 101
Applications Settings . . . . . . . . . . . . . . . . . . . . . . . . . . . . . . . . . . . . . . . . . 102
Memory Management . . . . . . . . . . . . . . . . . . . . . . . . . . . . . . . . . . . . . . . . 104
Section 9: Connections ......................................................105
Browser . . . . . . . . . . . . . . . . . . . . . . . . . . . . . . . . . . . . . . . . . . . . . . . . . . . 105
Bluetooth . . . . . . . . . . . . . . . . . . . . . . . . . . . . . . . . . . . . . . . . . . . . . . . . . . 106
PC Connections . . . . . . . . . . . . . . . . . . . . . . . . . . . . . . . . . . . . . . . . . . . . . 109
Section 10: Applications ....................................................111
Accessing the Applications Menu . . . . . . . . . . . . . . . . . . . . . . . . . . . . . . . . 111
My Space . . . . . . . . . . . . . . . . . . . . . . . . . . . . . . . . . . . . . . . . . . . . . . . . . . 111
Facebook . . . . . . . . . . . . . . . . . . . . . . . . . . . . . . . . . . . . . . . . . . . . . . . . . . 112
Browser . . . . . . . . . . . . . . . . . . . . . . . . . . . . . . . . . . . . . . . . . . . . . . . . . . . 112
Section 11: My folders .......................................................113
My folders Functions . . . . . . . . . . . . . . . . . . . . . . . . . . . . . . . . . . . . . . . . . 113
Applications . . . . . . . . . . . . . . . . . . . . . . . . . . . . . . . . . . . . . . . . . . . . . . . . 115
Audio . . . . . . . . . . . . . . . . . . . . . . . . . . . . . . . . . . . . . . . . . . . . . . . . . . . . . 115
Games . . . . . . . . . . . . . . . . . . . . . . . . . . . . . . . . . . . . . . . . . . . . . . . . . . . . 116
Pictures . . . . . . . . . . . . . . . . . . . . . . . . . . . . . . . . . . . . . . . . . . . . . . . . . . . 116
Tools . . . . . . . . . . . . . . . . . . . . . . . . . . . . . . . . . . . . . . . . . . . . . . . . . . . . . 117
Other Files . . . . . . . . . . . . . . . . . . . . . . . . . . . . . . . . . . . . . . . . . . . . . . . . . 117
Used Space . . . . . . . . . . . . . . . . . . . . . . . . . . . . . . . . . . . . . . . . . . . . . . . . 117
Section 12: Tools ...............................................................118
Tools . . . . . . . . . . . . . . . . . . . . . . . . . . . . . . . . . . . . . . . . . . . . . . . . . . . . . 118
3
Page 8

Camera . . . . . . . . . . . . . . . . . . . . . . . . . . . . . . . . . . . . . . . . . . . . . . . . . . . . 118
Music Player . . . . . . . . . . . . . . . . . . . . . . . . . . . . . . . . . . . . . . . . . . . . . . . . 118
Voice Recognition . . . . . . . . . . . . . . . . . . . . . . . . . . . . . . . . . . . . . . . . . . . . 118
Record Audio . . . . . . . . . . . . . . . . . . . . . . . . . . . . . . . . . . . . . . . . . . . . . . . 120
Alarms . . . . . . . . . . . . . . . . . . . . . . . . . . . . . . . . . . . . . . . . . . . . . . . . . . . . 121
Calendar . . . . . . . . . . . . . . . . . . . . . . . . . . . . . . . . . . . . . . . . . . . . . . . . . . . 122
Recent Calls . . . . . . . . . . . . . . . . . . . . . . . . . . . . . . . . . . . . . . . . . . . . . . . . 124
Memo . . . . . . . . . . . . . . . . . . . . . . . . . . . . . . . . . . . . . . . . . . . . . . . . . . . . . 124
Tasks . . . . . . . . . . . . . . . . . . . . . . . . . . . . . . . . . . . . . . . . . . . . . . . . . . . . . 125
Calculator . . . . . . . . . . . . . . . . . . . . . . . . . . . . . . . . . . . . . . . . . . . . . . . . . . 125
Tip Calculator . . . . . . . . . . . . . . . . . . . . . . . . . . . . . . . . . . . . . . . . . . . . . . .126
Converter . . . . . . . . . . . . . . . . . . . . . . . . . . . . . . . . . . . . . . . . . . . . . . . . . . 126
World Clock . . . . . . . . . . . . . . . . . . . . . . . . . . . . . . . . . . . . . . . . . . . . . . . . 127
Timer . . . . . . . . . . . . . . . . . . . . . . . . . . . . . . . . . . . . . . . . . . . . . . . . . . . . . 128
Stopwatch . . . . . . . . . . . . . . . . . . . . . . . . . . . . . . . . . . . . . . . . . . . . . . . . .129
Section 13: Health and Safety Information .......................130
Exposure to Radio Frequency (RF) Signals . . . . . . . . . . . . . . . . . . . . . . . . . . 130
Specific Absorption Rate (SAR) Certification Information . . . . . . . . . . . . . . . 136
Smart Practices While Driving . . . . . . . . . . . . . . . . . . . . . . . . . . . . . . . . . . . 138
Battery Use and Safety . . . . . . . . . . . . . . . . . . . . . . . . . . . . . . . . . . . . . . . . 139
Samsung Mobile Products and Recycling . . . . . . . . . . . . . . . . . . . . . . . . . . 141
UL Certified Travel Charger . . . . . . . . . . . . . . . . . . . . . . . . . . . . . . . . . . . . . 143
Display / Touch-Screen . . . . . . . . . . . . . . . . . . . . . . . . . . . . . . . . . . . . . . . . 143
GPS & AGPS . . . . . . . . . . . . . . . . . . . . . . . . . . . . . . . . . . . . . . . . . . . . . . . . 144
Emergency Calls . . . . . . . . . . . . . . . . . . . . . . . . . . . . . . . . . . . . . . . . . . . . . 145
Care and Maintenance . . . . . . . . . . . . . . . . . . . . . . . . . . . . . . . . . . . . . . . . 146
Responsible Listening . . . . . . . . . . . . . . . . . . . . . . . . . . . . . . . . . . . . . . . . . 147
Operating Environment . . . . . . . . . . . . . . . . . . . . . . . . . . . . . . . . . . . . . . . .149
Restricting Children's Access to Your
Mobile Device . . . . . . . . . . . . . . . . . . . . . . . . . . . . . . . . . . . . . . . . . . . . . 151
FCC Notice and Cautions . . . . . . . . . . . . . . . . . . . . . . . . . . . . . . . . . . . . . . . 152
Other Important Safety Information . . . . . . . . . . . . . . . . . . . . . . . . . . . . . . . 152
4
Page 9

Section 1: Getting Started
PWR
END
This section explains how to start using your phone by charging your battery, setting
up your voice mail and installing a memory card.
Setting Up Your Phone
SIM Card
Your phone comes with a pre-installed SIM card.
Removing the Battery Cover
1. If the phone is turned on, press and hold until the phone turns off.
2. Remove the battery cover by placing your thumbnail into the slot at the
bottom of the phone (1). If you have fragile nails, use a pointed object.
3. Lift the cover up and off the phone (2).
Getting Started 5
Page 10

Installing the Battery
1. Insert the battery into the opening on the back of the phone, making sure the
gold contacts align (1).
2. Gently press down to secure the battery (2).
Note:
Make sure the battery is properly installed before switching on the phone.
Replacing the Batter y Cover
1. Place the battery cover on the back of the phone and press down (1).
2. Press down on the bottom of the phone (2) until you hear a light click.
6
Page 11

Charging the Battery
Correct
Incorrect
Your phone is powered by a rechargeable Li-ion battery. The Travel Adapter used to
charge the battery is included with your phone. Use only Samsung-approved
batteries and chargers.
Note:
Before using your phone for the first time, you must fully charge the battery. A discharged
battery requires approximately 4 hours to recharge fully.
Although you can use the phone while the battery is charging, doing so requires
additional charging time.
Long backlight settings, searching for service, vibrate mode, browser use, and other
variables may reduce the battery’s talk and standby times.
Using the Travel Adapter
1. With the battery installed, lift and rotate the plastic cover of the Power/
Accessory Interface connector at the top of the phone.
Important!:
Verify that the battery is properly installed prior to connection. If the battery is not
properly installed and the wall charger is connected, the handset may power off and on
continuously, preventing proper operation.
2. Plug the travel adapter connector into the jack on your phone.
Getting Started 7
Page 12

3.
PWR
END
Plug the travel adapter power plug into a standard AC wall outlet.
4. When the battery is fully charged, the phone displays a message telling you
the battery is full. Remove the connector from the phone.
Note:
Failure to unplug the wall charger before you remove the battery can cause damage to the
phone.
Warning!:
If your handset has a touch screen display, please note that a touch screen responds
best to a light touch from the pad of your finger. Using excessive force when pressing on
the touch screen may damage the tempered glass surface and void the warranty.
Low Battery Indicator
When the battery is weak and only a few minutes of talk time remain, the battery
icon ( ) blinks and the device sounds a warning tone at regular intervals. In
this condition, your phone conserves its remaining battery power, not by turning off
the backlight, but by entering the dimming mode. For a quick check of your battery
level, glance at the battery charge indicator located in the upper-right corner of your
device’s display. Five bars ( ) indicate a full charge.
When the battery level becomes too low, the phone automatically turns off.
Switching the Phone On or Off
1. To turn on, press and hold until the phone switches on. The phone
PWR
END
launches the activation splash screen and searches for the network. Once the
network is found, you can make or receive calls.
2. To turn off, press and hold until the phone switches off.
Locking the Touch Screen
1. Press the Lock Key on the upper right side of the phone to lock the
touch screen.
8
Page 13

Press and hold the Lock Key to unlock the touch screen.
2.
– or –
Touch and hold on the Idle screen
to unlock the touch screen.
Setting Up Voice Mail
1. In Idle mode, press , then touch and hold .
You may be prompted to enter a password.
Note:
You can also access your voicemail from the on-screen keypad by touching then
SEND
pressing or touch
Call
.
2. Follow the tutorial to create a password, record a greeting, and record your
name.
Note:
These steps may be different depending on your network.
Accessing Voice Mail
1. In Idle mode, press , then touch and hold .
2. When connected, follow the voice prompts from the voice mail center.
Accessing Voice Mail From Another Phone
1. Dial your wireless phone number.
2. When you hear your voicemail greeting, press (the asterisk key on the
phone you are using).
3. Enter your passcode using the on-screen keypad.
Getting Started 9
Page 14
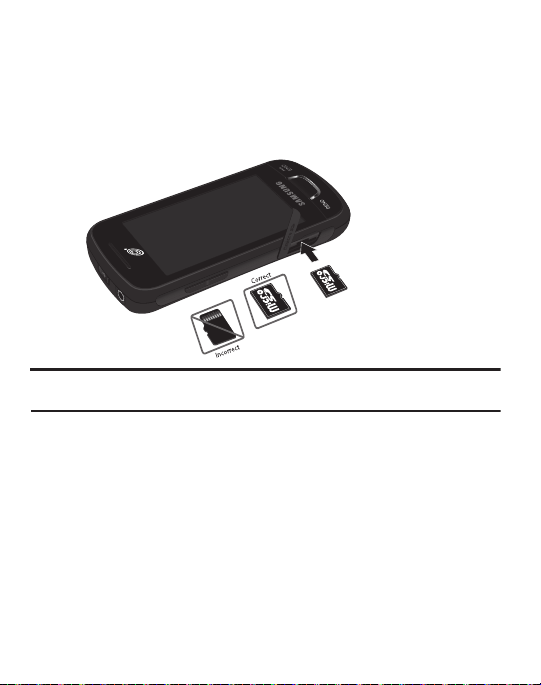
Installing the Memory Card
Your phone also supports the use of a memory card (microSD™) for storage of
data, music, pictures, and video files. Your phone supports up to a 16 GB memory
card.
䊳
Push the microSD card into the slot until it clicks.
Note:
Make sure the microSD gold contact pins are oriented as shown and the card is securely
inserted.
10
Page 15

Section 2: Understanding Your Phone
This section outlines some key features of your phone. It also describes the screen and
the icons that appear when the phone is in use.
Features
Your phone is lightweight and easy to use, and it offers many useful features. The
following list outlines a few of the features included in your phone.
•
Touch screen with menu driven access to features and options
•
Widgets
•
Bluetooth® Wireless Technology
•
Camera/Camcorder
•
Mobile Email
•
Browser
•
Memory Card slot for optional microSDTM card
•
Tools feature provides access to Camera, Music Player, Voice recognition, Record Audio,
Alarms, Calendar, Recent Calls, Memo, Tasks, Calculator, Tip Calculator, Converter,
World Clock, Timer and Stopwatch.
Understanding Your Phone 11
Page 16

Front View
SEND
END
PWR
7
3
2
1
4
5
8
9
6
1.
External speaker
: allows you to hear the caller.
2. Display: shows the information needed to operate your phone, such as the
received signal strength, phone battery level, time, and so on.
3. Widget tab: allows you to open the Widget toolbar.
4. Contacts key: allows you to access your current Contacts, Groups, and
Favorites lists.
5. Dial key: allows you to access the Phone Functions menu, such as Dialer,
Contacts, and Create message screen.
12
Page 17

Talk/Send key: allows you to power on the phone, make or answer a call,
6.
and access your call history, Call Manager, and Block Caller features. Press
and hold to redial the last phone number.
7. Back key: allows you to return to the previous menu while in menu mode.
While in the Web browser, allows you to return to the previous page. In Idle
mode, allows you to launch the Prepaid menu.
8. Power/End key: ends a call. Press and hold to turn the phone on or off. While
in a menu, pressing this key once cancels the current input and twice returns
the phone to Idle mode.
9.
Menu key
: allows you to access your phone menus and widgets in Idle mode.
While in the Menu screen, the
Message
key allows you to create new text or multimedia messages.
Menu
key is replaced with the
Message
key. The
Understanding Your Phone 13
Page 18
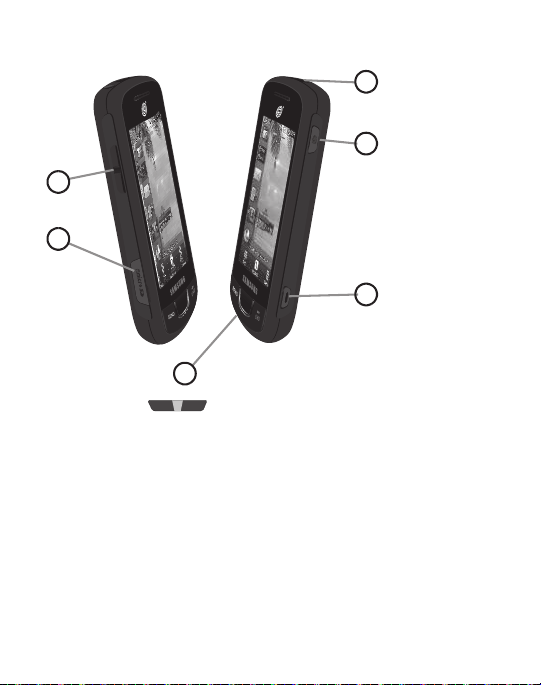
Side Views
1
2
3
4
5
6
1.
Volume key
standby mode or adjust the voice volume during a call. When receiving an
incoming call, briefly press down either end of the volume key to mute the
ring tone. Press and hold either end of the volume key to reject the call and
: ( ) allows you to adjust the ringer volume while in
send it directly to voicemail. Adjusts text size when reading a message or
using the browser in the Applications folder.
2. Memory Card Slot: allows you to plug in an optional microSD memory card
for additional multimedia file storage.
3.
Microphone
: allows other callers to hear you when you are speaking to them.
14
Page 19

Camera/Camcorder key
1
2
4.
: ( ) allows you to take pictures or videos when
you are in camera or camcorder mode. In Idle mode, press to launch the
camera/camcorder.
5. Lock key: ( ) lets you lock or unlock the touch screen. For more
information on locking your phone, see “Locking and Unlocking the Phone”
on page 19.
6. Power/Accessory Interface connector: allows you to connect a Travel
Charger or other optional accessories such as a USB/data cable or a handsfree headset.
Rear View
1.
Camera lens
2.
External speaker
: is used to take pictures and shoot videos.
: allows you to hear when the Speakerphone is turned on.
Understanding Your Phone 15
Page 20

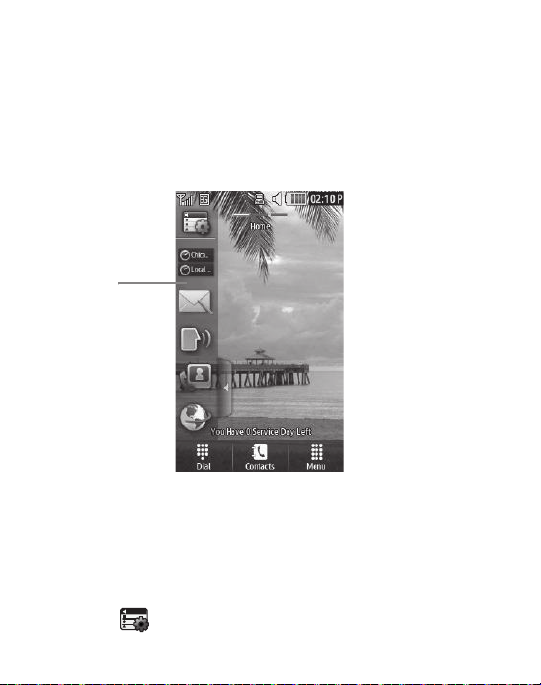
Display Layout
Indicators
Widget List
Main Display
Area
Function
Categories
Your display screen provides a wealth of information about phone status and
options, as well as providing access to the Widget List. For more information about
the Widget List, see “Widgets” on page 23.
The display has four main areas:
Function Categories
Function categories are shortcuts to
accessing the contacts list, and
Dial
for dialing a number,
Menu
for displaying the icons for application and
folder access. While viewing the Main Menus, the
Message
, which can be used to view and create messages.
16
Menu
category changes to
Contacts
for
Page 21
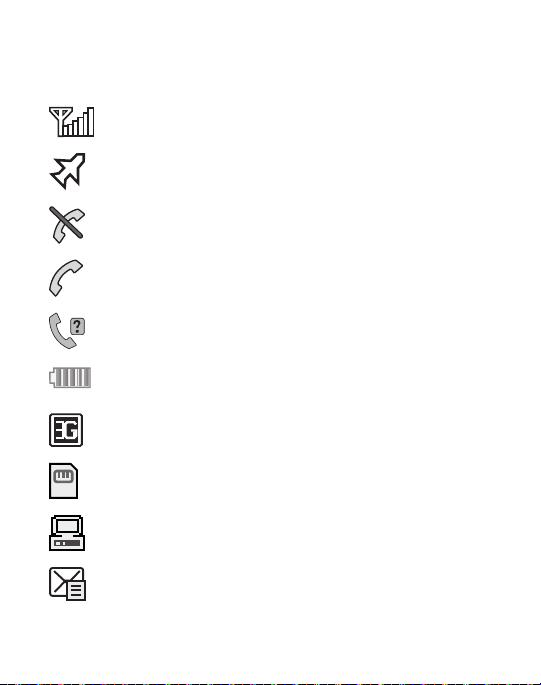
Icons
This list identifies the icons that appear in your phone display and Indicator area:
Displays your current signal strength. The greater the
number of bars, the stronger the signal.
Indicates that the Airplane Mode is active. You cannot
send or receive any calls or access online information.
Displays when you are out of your service area.
Displays when a call is in progress.
Displays within the lock screen when a call has been
missed.
Displays your battery’s charge level. The more bars you
see, the more power you have remaining.
Displays when your connection to a 3G network is
active.
Displays when an internal microSD memory card is
detected.
Displays when the phone is connected to a computer
with a supported USB cable connection.
Displays within the Indicators area when a new text
message is received.
Understanding Your Phone 17
Page 22
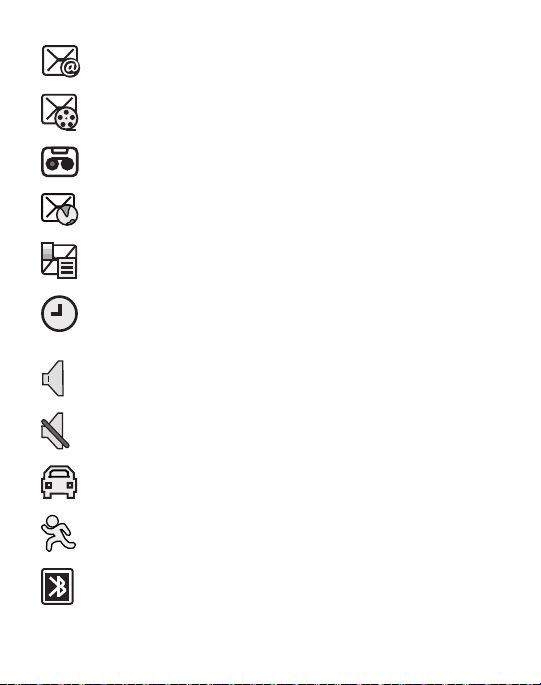
Displays within the Indicators area when a new email
message is received.
Displays within the Indicators area when a new
multimedia message is received.
Displays within the Indicators area when a new voice
mail is received.
Displays within the Indicators area when a new WAP
message is received.
Displays when Inbox is full - Text Message.
Displays when you set an alarm to ring at a specified
time. For more information, refer to “Alarms” on
page 121.
Displays when the Sound profile is set to Normal.
Displays when Silent Mode is activated.
Displays when the Sound profile is set to Driving.
Displays when the Sound profile is set to Outdoor.
Displays when Bluetooth is activated.
18
Page 23

Displays when a Bluetooth stereo headset has been
paired with the phone.
Displays when a TTY device has been inserted.
Displays when your Address Book is synchronizing
with the Address Book, the network backup service.
Menu Navigation
This section explains the menu navigation for your phone.
•
Touching an on-screen option activates the feature.
•
Menu lists can be viewed by using your fingertip to scroll up or down the on-screen list or
by pressing the volume key up or down.
Locking and Unlocking the Phone
When your phone is locked, there are two ways to unlock your phone:
• Press and hold the Lock Key
•
Touch and hold on the Idle screen.
located on the upper right side of your phone.
Understanding Your Phone 19
Page 24

Navigating Through the Main Menus
Menu
SEND
END
PWR
Your phone originally has three main menus. Some icons can be deleted and
replaced with new icons.
1. From the Idle screen, touch . Main Menu 1 is displayed.
2. Drag your finger across the Main Menus to scroll through the three Main
Menus. You can scroll in either direction.
The icons initially contained in the three Main Menus are shown below.
20
Page 25

Opening an Application
PWR
END
Menu
䊳
Tap the associated on-screen icon.
•
Press to exit from the current menu and return to the previous screen.
•
Press to exit from the current location or function, cancel your input, and return to
the Idle screen.
Navigating Through Menus
As you navigate through a menu, options display on the screen as scrollable lists.
Function categories, located at the bottom of most screens, provide access to
additional screen options.
To navigate a scrollable list:
1. From the Idle screen, touch .
2. Scroll through the main menus and press an icon to make your selection.
3. You can perform the following operations:
•
Touch an on-screen entry field to activate it.
•
Firmly press and slide your finger up or down the screen to scroll through lists of menu
items.
•
Navigate through a long list by pressing the volume key up or down.
Scrolling Through Field Entries
Some screens ask you to assign a value to an on-screen field by either touching the
up or down selection arrows or by quickly sliding through these values by using
your fingertip. An example of these actions can be found on the Alarm page.
1. Touch ➔
2. Touch the
Minute
Too ls
➔
Alarms
➔
Menu
Alarm Time
field and use the
Create Alarm
Keypad
, and AM/PM values manually or the
.
mode to adjust the
Wheel
mode by using the + (up)
Hour
,
or- (down) buttons or by quickly sweeping your fingertip over the numbers.
Understanding Your Phone 21
Page 26

Menu Navigation Notation
Menu
The following notation shows an example of a statement used in this manual to
direct you to a menu, submenu or menu item.
䊳
In Idle mode, touch ➔ My folders ➔ To ols
➔ Calendar.
This notation directs you to perform the following operations:
•
Touch the
Menu
soft key.
•
Touch the
My folders
icon.
•
Scroll to and touch
•
Scroll to and touch
Too ls
in the My folders menu.
Calendar
in the Tools menu.
According to the selections you make, soft keys display to provide more options:
Touch More ➔ Calendar Settings ➔ View by.
This notation directs you to perform the following operations:
•
Touch the
More
soft key.
•
•
22
Scroll to and touch
Scroll to
Calendar Settings
View by
in the Calendar Settings list.
in the list of options.
Page 27
Widgets
Widget
List
A Widget List is located on the left of the Idle screen providing access to the
following programs: Widget Setting, Analog Clock, Digital Clock, Dual Clock, Create
Message, Buddy List, Voice Recognition, Browser, Today, Calendar, Pictures,
Games, Widget Memo 1, 2, and 3, Message Inbox, Record Audio, Memo, Timer, Go
on a Diet, Birthday, Sound Profile, Bluetooth, Calculator, Video, Google Search, AP
Mobile, MySpace, Facebook, Twitter, Samsung Apps and AccuWeather.com.
You can customize the Widget List by keeping the widgets docked in the list or by
dragging them anywhere on the Idle screen.
Displaying and Hiding Widgets
To select the items that are displayed or hidden in the Widget List:
1. From Idle mode, touch the Widget List to open it.
2. Touch to display the Widget menu.
Understanding Your Phone 23
Page 28

3.
07:27P
zone1
zone2
Touch the box to place a check mark next to each Widget you want to display.
– or –
Touch the box to remove the check mark from Widgets you want to hide.
The following table contains descriptions of available Widgets.
Widget Manager
: allows you to choose which
widgets to display on the Widget List.
Analog Clock
: displays the current time on an
analog clock.
Digital Clock
: displays the current time on a digital
clock.
Dual Clock
: displays current time in other user-
defined international locations.
For more information, refer to “World Clock” on
page 127.
Music Player
: allows you to play music files stored
on the phone and external card and control the
playback.
Create Message
: allows you to create new text or
picture messages. For more information, refer to
“Creating and Sending Messages” on page 84.
24
Page 29

Buddy List
Monday
9 Jan 2009
Monday
9 Jan 2009
: displays the Favorites list. You can use
the pull-down Contacts menu to select all Contacts
and Groups.
• Drag and drop the Buddy List onto the desktop
to view the contacts by Favorites, Groups, or
by all Contacts. These favorites are listed and
can be edited in
Voice Recognition
Address Book ➔ Favorites
.
: allows you to use your voice to
dial, look up contacts, launch applications, and
navigate phone menus. Follow the on-screen
tutorial.
Browser
: opens the Mobile Web home page.
Tod ay
: displays the current date (month/day/year).
Calendar
: allows you to access the Calendar
feature.
With the Calendar feature, you can:
• Consult the calendar by month, week, or day.
• Set schedules and note anniversaries.
• Write memos to keep track of your schedule.
• Set an alarm to act as a reminder.
Pictures
: allows you to view the list of photos
downloaded from the web server, received in
messages, or taken by the camera. You can assign
an image as wallpaper.
Understanding Your Phone 25
Page 30

Games
: allows you to access your Games folder.
Widget Memo 1
: allows you to write a short memo
to keep on your Widget List or main display. The
Widget Memo is limited to 80 characters.
Widget Memo 2
: allows you to write a short memo
to keep on your Widget List or main display. The
Widget Memo is limited to 80 characters.
Widget Memo 3
: allows you to write a short memo
to keep on your Widget List or main display. The
Widget Memo is limited to 80 characters.
Message Inbox
Record Audio
Memo
Timer
Go on a Diet
: allows you to access your inbox.
: allows you to record voice memos.
: allows you to access the Memo feature.
: allows you to access your Timer.
: allows you to see how many days have
pasted since starting a diet. Touch the icon and
Start
touch
26
to start keeping track of days.
Page 31

Birthday
: displays an on-screen alert for up to 5
upcoming birthdays, according to information
entered in the Address Book for a contact birthday.
Sound Profile
: allows you to quickly modify your
current sound profile.
Bluetooth
: From this application you can activate
Bluetooth and configure it so other Bluetooth
devices can see your device by name.
Calculator
: allows you to use the built-in calculator.
Video
: allows you to play videos stored on
the phone.
Google Search
: allows you to perform Google
searches on the Mobile Web.
AP Mobile
: provides access to international,
national and local news.
MySpace
: allows you to sign up for an account and
to create and customize your profile with photos,
videos.
Facebook
: allows you to sign up for an account and
to create and customize your profile with photos,
videos.
Understanding Your Phone 27
Page 32

Twi tt e r
: allows you to sign up for an account and to
create and customize your profile with photos,
videos.
Samsung Apps.
: allows you to access Samsung
Apps.
AccuWeather.com
: allows you to access
AccuWeather.com using your browser.
Widget List Navigation
You can drag the widgets to any of the three Idle screens to use the application or
feature, then drag it back to the Widget List when you are finished. There are three
different widget Idle screens you can use. You can have different widgets on all
three Idle screens.
Accessing the Widget List
1. Tap the Widget List tab, located on the left side of the main display, to open
the Widget (quick access) Bar.
2. Tap the Widget List tab or anywhere on the Idle screen to close the Widget
List.
Undocking Widgets
You can easily customize the Widget List by either keeping these mini-apps docked
within the bar itself or undocking them by dragging onto your Main display screen.
1. Touch and hold the widget.
2. While still holding the icon, in a single motion, drag it over to the new location
and release your finger from the screen. The application is now located on
the Idle screen.
28
Page 33

Note:
You can drag a widget to a location of your choice on the Idle screen or just touch the widget
on the Widget List and it displays in the center of the Idle screen.
Rearranging Widgets
You can customize the Widget List by moving the widgets. You can place your
frequently used widgets at the top of the list.
1. Touch and hold the widget.
2. While still holding the icon, drag it away from the Widget List and drop it on
the main screen. Then drag it back into its new location in the list.
Activating a Widget
1. Locate your widget. If the widget is on the Widget List, touch it to move it to
an Idle screen.
2. Touch the icon to activate the mini-application (widget).
Scrolling Through the Widget List
Although the Widget List contains a number of widgets, it can only display six
widget icons at one time on the bar.
䊳
Use your fingertip to scroll up and down along the Widget List.
Understanding Your Phone 29
Page 34

Accessing Multiple Widget Idle Screens
SEND
END
PWR
SEND
END
PWR
SEND
END
PWR
214-555-8374
䊳
Drag your finger along the three bars at the top of the Idle screen to scroll
through the three widget Idle screens. You can scroll in either direction.
Understanding the Events Widget
The Event Widget is an area that displays on the screen to inform you of calendar
events, missed calls, or when new messages have been sent to the phone.
30
Page 35

The following is a description of these on-screen notification tabs:
PWR
END
Displays when the Event Widget is parked on the
Widget List.
Displays as a tab within the Event Widget when a call
has been missed.
Displays as a tab within the Event Widget when a new
voice mail message is received.
Displays as a tab within the Event Widget when a new
message is received.
Displays as a tab within the Event Widget when a new
chat message is received.
Displays as a tab within the Event Widget when a new
email message is received.
Displays as a tab within the Event Widget when a
scheduled event has been missed.
Note:
When you drag the Event Widget to the Idle screen, it will remain there until you drag it back
to the Widget List. When the Event Widget automatically appears on the Idle screen after an
event has taken place, it will automatically return to the Widget List after you have confirmed
the event or pressed .
Understanding Your Phone 31
Page 36

Section 3: Call Functions
Menu
Call
SEND
Call
This section describes how to make or answer a call.
Displaying Your Phone Number
䊳
Touch ➔
Show Number
Making a Call
1. From the Idle screen, touch and use the on-screen keypad to enter the
number you want to dial.
2. Touch or press .
Note:
When you activate the
redials up to 10 times when the person does not answer the call or is already on the phone.
For more information, refer to “Call Settings” on page 99.
Making an International Call
1. Touch , then touch and hold . The + character appears.
2. Use the on-screen keypad to enter the country code, area code, and
phone number.
•
If you make a mistake, touch until the desired numbers have been deleted.
3. Touch or press .
Settings ➔ Calls ➔ General ➔ Show My Number
.
Auto Redial
option in the Voice Call menu, the phone automatically
SEND
➔
32
Page 37

Manual Pause Dialing
Call
SEND
To manually call a number with pause(s) without storing it in your Contacts list:
1. Touch and use the on-screen keypad to enter the phone number.
2. Press and hold to add a two-second pause. Use the keypad to enter
the additional numbers.
Tip:
You can create pauses longer than two seconds by entering multiple P pauses.
3. Touch or press .
Correcting an Entered Number
Use the following steps to correct an entry when dialing.
䊳
Touch
Ending a Call
䊳
Press the key to end a call.
to delete the previous character entered.
PWR
END
Dialing a Recent Number
All incoming, outgoing, and missed calls are recorded in the Calls menu. If
the number or caller is listed in your Address Book, the associated name is
also displayed.
1. From the Idle Screen, briefly press .
SEND
2. Find the number by touching the drop down arrow to the right to view the call
logs from the various options screens. Choose from: All, Missed, Made
and Received
.
Call Functions 33
Page 38

3.
SEND
SEND
PWR
END
PWR
END
Touch next to the desired phone number or entry name, if already in
your Address Book.
– or –
Select the log to enter the
Details
page, then touch
Call
or press to dial
the number.
Making a Call from the Address Book
You can store phone numbers that you use regularly on the SIM card or in the
phone’s memory. These entries are collectively called the Address Book.
Answering a Call
When a call is received the phone rings and displays the caller’s phone number or
name, if stored in the Address Book.
1. At the incoming call screen, press and hold
Accept
to answer the call.
– or –
Press to answer the call.
•
If the
Any Key
Call Answer
), you can press any key to answer a call except .
2. Touch and hold
3. Touch and hold
option is activated (
Reject
Reject + Msg
Menu
➔ Settings
➔ Calls
to reject the call and send it to your Voice Mail.
to reject the call, send it to your Voice Mail, and
create a message to send the caller. There are also prepared messages you
can choose and quickly send to the caller.
4. Press to end the call.
Note:
You can answer a call while using the Address Book or any other menu feature. After ending
the call, the phone returns to the previously active function screen.
34
➔ General
➔
Page 39

Other Answering Options
Call
More
When receiving an incoming call, press and hold either end of the volume key to
reject the call and send it directly to Voice Mail.
Dialing Options
From the Idle screen and Main menu, you have the option to access the Dialer and
initiate a call by touching . When you manually enter numbers from the onscreen keypad, you see three icons displayed on the bottom of the screen.
Call
: Press
Call
to dial the current number entered
using the on-screen keypad.
More
: displays a menu of options:
Save to Address Book
. Press
Send Message
Send Message
and
to create
a new text message and address it to the manually
entered number. Press
Save to Address Book
to add or
update an Address Book entry.
Delete key
: after entering a number, touch to erase a
single character or press and hold to erase the entire
string of numbers.
After you start entering numbers, possible contact names and numbers appear in a
box under the number. If the number you intend to enter displays, touch the box to
complete the number automatically.
Call Functions 35
Page 40

Recent Calls
Menu
The phone stores the numbers of the calls you have dialed, received, or missed in
the Calls menu. You can access this menu by from the Idle screen by doing one of
the following:
1. Briefly press .
SEND
– or –
Touch ➔
2. Touch the drop-down list located at the top right of the screen to select from
All, Missed, Made
Tools
and
➔
Recent Calls
Received
.
. If the number or caller is listed in your
Address Book, the associated name is displayed.
You can select a recent call to view details, return the call, save to your address
book, send a message or delete the call.
Call Time
The Call Time menu shows the call time for the following: Last Call Duration, Total
Dialed, Dialed Voice Calls, Dialed Data Calls, Total Received, Received Voice Calls,
Received Data Calls and Total Call Duration. After reviewing you can select Reset
All.
䊳
Touch ➔
Menu
Tools
➔
Recent Calls ➔ Call Manager
➔ Call Time.
Data Counter
Data counter refers to the amount of data (volume) to and from the phone. The
following data items are displayed: Last Sent, Last Received, Total Sent and Total
Received. Touch
䊳
Reset
Touch ➔
Menu
to set these counters back to zero.
Tools
➔
Recent Calls ➔ Call Manager
➔ Data Counter.
36
Page 41

Options During a Call
Your phone provides a number of control functions that you can use during a call.
Adjusting the Call Volume
During a call, to adjust the earpiece volume, use the
Volume
key on the left side of
the phone.
䊳
Press Up (top area of the volume key) to increase the volume level and press
Down
(bottom area of the volume key) to decrease the volume level.
In Idle mode, press the
Volume
key Up or
Down
to adjust the ringer volume.
In-Call Options
During an active call there are several functions available by touching a
corresponding on-screen button.
•
Speaker On/Off
: routes the phone audio through either the speaker or through
the earpiece.
–
Slide
Speaker
to
On
volume using the volume key.)
–
Slide
Speaker
an Active Call”
•
Mute/Unmute
–
Touch and hold the on-screen
–
Touch and hold the on-screen
•
Dial:
to display the on-screen keypad where you can choose to initiate a New call or display
to route the audio through the speaker. (You can adjust the speaker
to
Off
to use the phone’s earpiece (see
on page 39.)
“Using the Speakerphone During
: turns the onboard microphone either on or off.
Mute
button during a call to mute the microphone.
Unmute
button during a call to unmute the microphone.
your Contacts
•
Hold/Resume
: to place the current active call on hold or to resume the call after it has been
placed on hold.
•
More
: to access additional in-call options such as:
–
Address Book:
–
Save to Address Book
already saved.
to display your current Address Book entries.
: to save the current phone number into your Address Book if it is not
Call Functions 37
Page 42

Send Message: to send a new text message.
Hold
Resume
Hold
More
Dial
Call
SEND
PWR
END
–
–
Memo: to write a memo concerning this call.
Placing a Call on Hold
You can place the current call on hold at any point during a conversation. You can
also make another call while you have a call in progress, if your network supports
this service.
1. While on a call, touch . This action places the current caller on hold
and displays
Held
.
2. You can later reactivate this call by touching .
To make a new call while you have a call in progress
1. Touch .
2. Touch ➔
Address Book
to look up a number in the Address Book.
– or –
Touch ➔ enter the new number ➔ .
3. Press to dial the second number. Once connected, each call is displayed
within either an
within the
On Hold
In Call
tab.
or
On Hold
tab. The caller currently on hold appears
Switching Between Calls
When you have an active call and a call on hold, you can switch between the
two calls by touching . Press when you are ready to end the
Swap
active call.
38
Page 43

Using the Speakerphone During an Active Call
Menu
SEND
PWR
END
While in an active call, you can activate the speakerphone by sliding the Speaker on
bar to the right.
1. Use the
Volume
key (located on the left side of your phone) to adjust
the volume.
2. To deactivate the speakerphone, slide the
Speaker off
bar to the left.
Switching Off the Microphone (Mute)
You can temporarily switch your phone microphone off, so that the other person
cannot hear you.
Call Waiting
The Call Waiting feature allows you to answer an incoming call while you have a
call in progress, if this service is supported by the network, and you have set the
➔ Settings ➔ Call
s
➔
Voice Call
➔
Call Waiting
menu to Activated.
You are notified of an incoming call by a call waiting tone.
To answer a call while you have a call in progress
1. Touch and hold
Accept
or to answer the next incoming call. The first call
is automatically put on hold.
2. To switch between the two calls, touch Swap, which places the current call
on hold and then activates the previous call.
To end a call on hold
1. Touch the
On Hold
tab and touch adjacent to the caller you want to
disconnect.
2. Press to end the current active call.
Call Functions 39
Page 44

3-Way Calling (Multi-Party Calling)
SEND
SEND
Dial
SEND
PWR
END
The 3-Way or Multi-Party feature allows you to answer a series of incoming calls
and place them on hold.
If this service is supported by the network, and the SIM has the feature enabled, all
calls can be joined together. You are notified of an incoming call by a call waiting
tone. To activate the call waiting feature, see “Call Waiting” on page 39.
1. Press or
2. Press or
Accept
to answer the first incoming call.
Accept
to answer the next incoming call. The first call is
automatically put on hold.
3. Press ➔ ➔ to join with both of your callers, the active call
and the call on hold, in a single multi-party call.
4. Press to end the call.
40
Page 45

Section 4: Entering Text
Create New Message
Portrait Keypad
This section outlines how to select the desired text input mode when entering
characters into your phone. This section also describes how to use the T9 predictive
text entry system to reduce the number of key strokes associated with entering text.
Your phone comes equipped with an orientation detector that can tell if the phone is
being held in an upright (portrait) or sideways (landscape) orientation. This is useful
when entering text. If the phone is sideways, an on-screen, QWERTY keypad is
displayed. When upright, the alphanumeric keypad is displayed.
Keys
You can enter characters into your phone by using an on-screen portrait keypad or a
landscape QWERTY keypad. Depending on which format you use, the keys are
associated with different letters, special characters, or numbers. Refer to the
following layouts to determine which keys are associated with letters, special
characters, or numbers.
Entering Text 41
Page 46

From a screen where you can enter text, rotate your phone counterclockwise to a
Create New Message
Landscape Keypad
SEND
32
1
4 5 6 7
Landscape orientation and the on-screen QWERTY keypad displays.
By default, the first letter of an entry is capitalized and all consecutive letters are
kept in lowercase unless you touch the
Shift
key. After entering a character, the
cursor automatically advances to the next space after two seconds or when you
enter a character on a different key.
Using the QWERTY Keypad
This phone also offers the convenience of an on-screen QWERTY keypad. Using the
QWERTY keypad to type letters, numbers, punctuation, and other special characters
into text entry fields or other applications should be simpler and faster than using
the portrait keypad.
42
Page 47

The following keys perform special functions when entering text:
1.
Shift:
Press to switch between uppercase and lowercase characters.
2.
123Sym:
Press once to type special characters and numbers that appear on
the QWERTY keys. Examples: $, @, #, !, 1, 2. Press again to deactivate this
function. Touch either or on the button to cycle through
1/21/2
additional keys.
3.
T9
: Press to activate the T9 mode in either
(where the keys default to lowercase until the
abc
(all lower case) or
Shift
key is touched
[activated]). This is achieved by repeatedly pressing the button to toggle the
current state.
Note:
The
EMO
option is available only when
EMO
: Press to display Emoticons. Touch a character on the screen. After all
characters have been selected, press OK,
4.
Space
: Press to insert an empty space. Press twice to insert a period and a
123Sym
mode has been selected.
Abc
, or
123Sym
.
space to begin a new sentence.
5.
Enter:
Press to move the insertion point to the next line in a message.
6.
OK
: Press to accept the choices offered when navigating through a menu.
7.
Backspace
: Press to delete the previous character, similar to the backspace
key on a computer keyboard.
The keypad provides keys labeled with alphabetic characters. Touch the key
corresponding to the character you want to enter.
Entering Text 43
Page 48

Changing the Text Input Mode
To enter text when storing a name in your Address Book, creating your personal
greeting or scheduling events on your calendar, you can enter alphanumeric
characters by using your phone keypad in portrait mode or in qwerty mode. Tape
the text entry screen to display the on-screen keypad.
Your phone has the following text input modes:
•
T9 Abc
: allows you to enter words with only one keystroke per letter. The T9 mode
automatically compares the series of keystrokes you make with an internal linguistic
dictionary to determine the most likely word, thus requiring fewer keystrokes than the
traditional Abc mode.
•
T9 ABC
: allows you to enter all capital alpha characters in T9 mode.
•
T9 abc
: allows you to enter lower case alpha characters in T9 mode.
•
Abc
: allows you to enter initial caps alpha characters.
•
ABC
: allows you to enter alpha characters in all caps.
•
abc
: allows you to enter lower case alpha characters.
•
Numeric
: allows you to enter numbers.
•
Symbols
: allows you to enter symbols, such as punctuation marks.
•
Emoticons
: allows you to enter Emoticons.
Note:
When characters can be entered in a field, the text input mode indicator displays on the top
right portion of the screen.
Using T9 Mode
T9 is a predictive text input mode that allows you to key in any character using
single keystrokes. This text input mode is based on a built-in dictionary.
To enter a word in T9 mode while in Portrait Mode:
1. Start entering a word by pressing the 2 through 9 keys. Touch each key only
once for each letter.
44
Page 49

Example:
To enter “Hello” in T9 mode, touch the 4, 3, 5, 5, and 6 keys.
The word that you are typing displays on the screen. It may change with each
consecutive key that you touch.
2. Enter the whole word before editing or deleting the keystrokes.
3. When the word correctly displays, go to Step 4.
If the word does not display correctly, touch the
Next
key to display other word
choices from which you can choose. If these choices do not include the word
you want to use, switch to
Example:
Both the words “Of” and “Me” use the 6 and 3 keys. The phone displays the most
commonly used choice first.
4. Press
Space
to insert a space and start the next word.
Abc
mode and enter the word you want.
To enter a word in T9 mode while in Landscape Mode:
1. Begin typing a word by pressing the A through Z keys. Touch a key for each
letter.
2. The word that you are typing displays on the screen. A list of word options
displays and includes a number indicating the number of words available. The
word and list of words may change as you type it.
Entering Text 45
Page 50

3.
Touch to see list.
Number of words
in list.
Scroll up and down,
and touch the
correct word.
Scroll up and down in the word options box to select the desired word.
4. If these choices do not include the word you want to use, add a new word into
the T9 dictionary.
To add a new word into the T9 dictionary:
1. If the word does not display in the alternate choices, touch the pull-down
menu (Landscape Mode), scroll to the end of the list, and select
2. Enter the word you want to add using
Abc
mode. For more information, refer
Add word
to “Changing the Text Input Mode” on page 44.
3. Touch OK to accept the newly added word. The word is added to the T9
dictionary and becomes a word for the associated key press series.
Note:
The
Add word
feature may not be available for some languages.
To enter periods, hyphens, and other special characters while in Portrait Mode:
1. Touch
T9Ab
➔
Symbols
and then touch the corresponding key. If the symbol
does not display on the initial screen, touch the left or right key
to display the next set of symbols.
2. Tou ch
SYM
➔
T9 Abc
46
to return to the
T9Abc
input mode.
.
Page 51

To shift case in T9 mode:
1. Touch
2. Touch the desired letter on the keypad. There are three cases: Initial capital,
Shift.
Capital lock, and Lower case.
To delete letters:
1. Touch .
2. Touch and hold to clear the display.
To move the insertion point to the next line in a message:
䊳
Touch .
To navigate within existing text in Portrait Mode:
1. Touch to display the navigation keys.
2. Touch , , , or to move the cursor in the indicated
direction.
3. Touch to return to text entry mode.
Touch OK to complete the message and return to the previous screen.
Using Abc In Portrait Mode
If you choose not to use Predictive Text (T9):
1. Touch
2. Use the 2 through 9 keys to enter text.
3. Touch the key, labeled with the letter you want. Once for the first letter, twice
T9Ab
➔
Abc.
for the second letter, and so on.
Entering Text 47
Page 52

Using Numeric In Portrait Mode
.@,.@,
Use the
Numeric
mode to enter numbers into a text message.
1. Touch
2. Touch the keys corresponding to the digits you want to enter.
T9Ab
➔
Numeric.
Using Symbols
Symbols mode enables you to insert symbols and punctuation marks into text.
To enter symbols in Portrait Mode:
1. Touch
2. Touch the desired symbol key.
3. Touch the left or right key to display the next set of symbols, if
T9Ab
➔
Symbols
to display a list of symbols.
the symbol does not display on the initial screen.
4. To clear the symbol(s), touch .
5. Tou ch
SYM
➔
Abc
to return to the
6. To enter a period, comma, hyphen, question mark, exclamation point, @,
Abc
input mode.
colon, left and right parentheses, apostrophe, slash, or the number 1, touch
. ABC mode applies grammar rules to ensure correct punctuation.
To enter symbols in Landscape Mode:
1. Touch the
123Sym
key and touch the symbol on the key that displays the
symbol you need.
2. Touch to clear the symbol(s). Touch and hold to clear the display.
Tip:
The cursor moves to the right when you touch a different key. When entering the same letter
twice or a different letter on the same key, wait for a few seconds for the cursor to
automatically move to the right, and then select the next letter.
48
Page 53

Using Emoticon (EMO) Mode
EmoEmo
1. Rotate your phone counterclockwise to a Landscape orientation.
Note:
The
EMO
option is available only when
2. Touch the Text Input Mode button at the bottom of the screen and
123Sym
mode has been selected.
touch .
3. After all characters have been selected, press
OK, Abc
To enter Emoticons into a text message in Portrait Mode:
1. Touch
2. Touch the or key to display the three Emoticon screens.
3. After all characters have been selected, press
T9Ab
➔
Emoticons.
OK
or
, or
EMO
123Sym
.
.
Entering Text 49
Page 54

Section 5: Contacts and Your Address Book
This section allows you to manage your daily contacts by storing their name and
number in your Address Book.
Adding a New Contact
Use the following procedure to store a new contact to your Address Book.
1. Touch ➔
2. Touch the image icon and assign a picture to the new entry by choosing one
of three options:
• Reset
•Take Photo
• Caller Image
to this entry. Select an image and touch to assign the image and return to the
previous
3. Touch the
enter names for the new entry, and touch OK.
4. Touch the
number for the entry, and touch OK.
Touch if you want to change the category type of the entry. Choose from
the following:
5. Use your fingertip to scroll down the screen and touch any of the remaining
fields to update their information. Touch
Available fields consist of:
•Home
•Email
•Group
50
Contacts
Create Contact
. This opens the Add New Contact screen.
: although not an option with a new entry, deletes any previously assigned image.
: to use the camera to take a new picture and assign it to this entry.
: to retrieve a previously stored image from your Pictures folder and assign it
Add New Contact
First Name
Mobile
Home, Work, Fax
screen.
and
Last Name
fields and use the on-screen keypad to
field and use the on-screen keypad to enter the phone
, or
Others
.
OK
, if required, to save your updates.
: allows you to enter the contact’s home phone number.
: adds a contact email address for this entry.
: assigns this contact to a group. Touch a group type to complete the assignment.
Page 55

• Ringtone
: assigns a ringtone for this contact information. Choose from
Recorded Audio
categories. Touch a music file to play a short sample and then touch
to complete the assignment.
• Birthday
: assigns a calendar date for the contact’s birthday. Touch
date. For more information, refer to
•Note
: allows you to enter notes associated with this contact. For more information, refer to
“Entering Text”
6. To add more fields to your contact, touch
on page 41.
“Scrolling Through Field Entries”
Add More Fields
optional fields display:
• Mobile
: adds an additional Mobile number field for the entry.
•Home
: adds an additional Home number field for the entry.
•Work
: adds an additional Work number field for the entry.
•Fax
: adds an additional Fax number field for the entry.
•Others
: adds an Others field for the entry.
•Email
: adds an additional contact Email address field for this entry.
•URL
: adds a website’s URL to the entry.
•DTMF
: adds a DTMF tone string for use with this entry.
•Group
: creates an additional group field for group assignment.
• Message Tone
: adds a field used to assign a message tone that sounds when messages
are received from this contact.
• Nickname
: adds a field that can be used to enter a nickname for the entry. The Nickname
is not displayed when calls are made to or received from the contact.
•Company
: adds a Company field for this entry.
•Job Title
: adds a Job Title field for this entry.
• Address - Home
• Address - Work
: adds a field used to assign a physical home address for this entry.
: adds a field used to assign a physical work address for this entry.
Ton es, Music
Set
to store the new
on page 21.
. The following
, or
Contacts and Your Address Book 51
Page 56

7.
SEND
Touch the box next to an individual field to add that field.
– or –
Touch
All
to select all fields.
8. Touch
Done
to store the new fields to the entry and return to the previous
screen.
9. Touch the new fields to enter information.
10. Touch
Save
to store the new entry into the Address Book.
Saving a Number Before a Call
1. Touch and use the on-screen keypad to enter your number.
2. Touch
More
➔
Save to Address Book ➔ New
.
– or –
Select
Update
to edit an existing contact.
Saving a Number After a Call Has Ended
1. Press to bring up the recent calls screen.
– or –
Touch ➔
2. Touch a phone number from the list to reveal the Details page for the phone
Menu
Tools
➔
Recent Calls
.
entry.
3. Touch
Add to Phonebook
➔
New
.
– or –
Select
Update
to edit an existing contact.
52
Page 57

Adding Pauses to Contact Numbers
Contacts
When you call automated systems, you are often required to enter a password or
account number. Instead of manually entering the numbers each time, you can store
the numbers in your Contacts along with special characters called pauses.
To add a pause to a Contact:
1. Touch , and then touch the name to open the Contact.
2. Touch
3. Touch the screen at the place where the additional numbers need to be
Edit
and then touch the
Phone Number
field.
added.
4. Press and hold to add a two-second pause, and use the keypad to
enter the additional numbers.
Note:
If more than a two-second pause is required, press and hold as many times as needed
to add additional two-second pauses.
5. Touch
OK
. Touch
Save
to store your changes.
Using Contacts
Dialing a Number from Address Book
Once you have stored phone numbers in the Address Book, you can dial them easily
and quickly by either using their SIM card location number or by using the Search
field to locate the entry.
Finding an Address Book Entry
You can store phone numbers and their corresponding names to your SIM card and
to your phone onboard memory. Your Address Book refers to the information stored
in one or both of these locations.
Contacts and Your Address Book 53
Page 58

1.
To access your Address Book in Idle mode, touch ➔
Menu
Contacts
Address Book window displays.
2. In the Address Book window, touch
3. Select
Contacts
in the drop down menu in the upper right corner of the
Contacts
to see your contacts list.
display. Additional entry categories include Groups and Favorites.
4. In the Contacts list, drag the
Power Search
tab on the left side of the display to
search your contacts alphabetically. When you get to the first letter of the first
name you are looking for, release the tab and scroll to your selection.
5. Touch adjacent to the selected entry to make the call.
Address Book Options
1. Touch and touch an Address Book name from the list.
2. Touch to reveal your options:
Contacts
•Call:
allows you to call a currently selected entry.
• Send Message: allows you to send a text message or a multimedia message to the
selected entry.
3. Press to return to the previous Entry Options page.
4. Touch
5. Touch
Edit
to alter the properties of the current entry such as: Name, Mobile
number, Home number, or Email address. Touch
Delete
to delete the current address book entry from the Phone or the
Save
to store your changes.
SIM card.
6. Touch
More
to reveal the following options:
• Mark as Default
: allows you to select a default number if more than one number is listed
for contact.
• Print via Bluetooth
: allows you to send the selected contact entry information to a
Bluetooth compatible printer.
54
. The
Page 59

• Send Business Card via
Menu
Menu
: allows you to send a message to the selected entry that
contains the information from an Address Book Business Card entry that you have on file.
This can be sent as either a message or by way of Bluetooth.
• Add to Favorites
: allows you to add the selected contact to your favorites.
FDN Mode
FDN (Fixed Dialing Number) mode, if supported by your SIM card, restricts your
outgoing calls to a limited set of phone numbers. When this feature is enabled, you
can make calls only to phone numbers stored in the FDN list on the SIM card.
Note:
FDN Mode must be set to On in the
mode
option before you can add, change, or delete contacts on the FDN List.
Menu
➔
Settings
➔
Phone
➔
Security
➔
Fixed dialing
Changing the FDN Mode Status
1. In Idle mode, touch ➔
2. Scroll down to the
dialing) or
Off
to disable the option.
Important!:
While Fixed Dial Mode is enabled, you will NOT be able to dial any number other than a
created Fixed Dial Number.
Settings
Fixed dialing mode
➔
Phone
➔
Security
.
field and touch On(to enable fixed
Creating New FDN Numbers
With the Fixed Dial mode On, follow these procedures:
1. In Idle mode, touch ➔
Note:
If FDN is Off: touch
Create FDN
Menu
. Then follow Steps 2-7.
➔
Contacts
Contacts ➔ FDN C
➔
Address Book Settings
ontacts
➔ Create FDN
➔
Fixed Dial Contacts
.
➔
2. Enter your PIN2 password and touch
by your Service Provider.
Confirm
. This number is provided to you
Contacts and Your Address Book 55
Page 60

3.
PWR
END
Menu
Touch
Name
and use the on-screen alphanumeric keypad to enter a name for
this FDN contact. Touch OK.
4. Touch
Phone number
and use the on-screen numeric keypad to enter a
contact phone number for this FDN contact. Touch OK.
5. Touch the SIM card location field to then use the on-screen numeric keypad
to enter a location value for the entry on the SIM card. Touch OK.
6. Touch
Save
to store the new FDN entry.
7. Press to return to Idle mode.
Groups
Creating New Group
You can manage your contacts by forming groups and customizing alerts.
䊳
In Idle mode, touch ➔
Contacts ➔ Groups ➔ Create Group
Menu
.
Favorites
Once you have stored phone numbers in the Address Book, you can add them to
your Favorites list.
Adding Favorites to Your Address Book
1. In Idle mode, touch ➔
2. Touch
Add
.
Contacts ➔ Favorites
.
3. Touch the Contact you want to add to your Favorites.
Removing Favorites from Your Address Book
1. In Idle mode, touch ➔
2. Touch
Remove
.
Contacts ➔ Favorites
Menu
.
56
Page 61

To select, touch the
Menu
Menu
Menu
3.
Wastebasket
icon in front of the Contact you want to
remove from your Favorites.
4. Touch
OK
. The contact is removed from your Favorites.
Changing the Order of Your Favorites
1. In Idle mode, touch ➔
2. Touch
3. Drag the entry to the desired location in your Favorites.
4. Touch
Change Order
OK
.
.
Contacts ➔ Favorites
.
Finding My Own Phone Number
This menu allows you to access your own phone number.
䊳
In Idle mode, touch ➔
Number
➔
<voice line #>
Contacts
➔
Address Book Settings
. Your number displays.
➔
Own
Checking the Address Book Used Space
You can check how many names and numbers are stored in the Address Book, in
both the SIM card and the phone memory and the capacity for both.
1. In Idle mode, touch ➔
• Phone
: indicates how many Address Book entries out of a possible 2000 are in use.
•USIM
: indicates how many entries out of a possible 250 are in use on your SIM card.
–
Additional No. 1
Contacts ➔ Address Book Settings ➔ Used Space.
: if you have added additional numbers to contacts saved on the SIM card, this
is a counter of the number of SIM contacts with a second number saved on your SIM card.
–
Additional No. 2
:if you have added additional numbers to contacts saved on the SIM card, this
is a counter of the number of SIM contacts with a third number saved on your SIM card.
–
Additional No. 3
:if you have added additional numbers to contacts saved on the SIM card, this
is a counter of the number of SIM contacts with a forth number saved on your SIM card.
–
Email
: indicates how many email addresses exist on your SIM card.
Contacts and Your Address Book 57
Page 62

•FDN
PWR
END
: indicates how many entries out of a possible 40 are in use on your FDN SIM
memory.
Note:
Depending on the SIM card, the number of entries may differ.
2. Press to return to Idle mode.
58
Page 63

Section 6: Multimedia
This section explains how to use the multimedia features of your phone, including
Music, Music Player, Video Player, Gallery, Camera, and Camcorder.
Adding Music to Your Handset
Music files (ringtones and full tracks) can be added to your handset by using one or
more of the following methods:
•
Purchase and download music and ringtones directly to your handset over your wireless
carrier’s network by using the Music – Shop Music feature (also accessible from My
folders).
Note:
Audio files smaller than 300 KB are treated as ringtones, whereas audio files larger
than 300 KB are stored in the Music Folder. To listen to music smaller than 300 KB,
Menu➔My folders
go to
300 KB as a ringtone.
•
Transfer music files from a personal computer using a media player application and an
optional USB Data Cable and an optional microSDTM Memory Card.
Note:
When the Bluetooth feature is active on your handset, USB communication is not available.
To transfer files to your handset, turn off the Bluetooth functionality (
or
Menu
➔
Settings
Note:
The maximum number of songs you can synchronize between your phone and your PC
is 1500.
Transferring Music from a Personal Computer
In order to download music from the computer to your handset, a microSD card and
USB data cable are required. These items are sold separately.
1. Using your computer, open your preferred Windows Media Digital Rights
Management (WMDRM) PC music management client.
➔
Connectivity
➔
Audio
➔
Music
. You can not assign an MP3 file larger than
➔
Bluetooth
).
Menu
➔
Bluetooth
Multimedia 59
Page 64

2.
Download the selected song to your library.
Note:
If the music file is protected, Media Player blocks the playing or synching of that file.
3. Verify the pre-insertion of the microSD card into the handset. For more
information, refer to “Installing the Memory Card” on page 10.
4. Use the USB adapter cable to connect the handset to the target PC. When an
active connection has been established, a USB icon ( ) appears on the
phone.
Note:
If the target computer does not detect the newly connected handset or provide an MTP
Player dialog window on the PC screen, please follow steps 6 - 9.
5. Touch ➔
Settings ➔ Connectivity ➔ Select USB mode ➔ Media player
Menu
For more information, refer to “Configuring Your Phone USB Settings” on
page 109.
6. Once the USB connection has been established, the handset displays
“
Connected
” and the computer screen then shows your device. If the
detection occurs, skip to step 8.
7. Locate the song on your computer and using your right mouse button, click
Copy
.
8. Open the Removable Disk drive corresponding to the microSD card location
on the phone.
9. Open the
Music
folder (for example, ...\Card\Music) you want to upload from
the handset.
10. Using your right mouse button, click
Paste
. This step begins the download
process.
60
.
Page 65

Note:
The Music Player does not necessarily support all features of a particular file format nor all
the variations of those formats. The Music Player includes support for Windows Media Digital
rights Management (WMDRM), which allows you to play some purchased or subscription
content. Copyright protections may prevent some images, music (including ringtones), and
other content from being copied, modified, transferred, or forwarded.
Playing Music Through a Stereo Bluetooth Device
Your device supports the Stereo Bluetooth profile (A2DP), and, when connected to a
stereo Bluetooth headset, plays back music in stereo from the phone through the
headset.
1. Pair and connect your handset to a stereo Bluetooth device. For more
information, refer to “Connecting to Other Bluetooth Devices” on page 107.
2. From the list of compatible devices, select the previously paired Bluetooth
headset to begin listening to your song through the headset.
3. Touch ➔
4. Select a song to play within the Music Player.
Too ls ➔ Music Player
Menu
➔
All music
.
Playing Music While Using the Phone
The Music Player allows you to play music in the background while performing
other tasks on your phone. The music pauses when an incoming call is accepted
and resumes when the call is ended. Music continues to play when you receive a
Text Message, a Multimedia Message, or an Instant Message.
The other functions you can use are:
•
Call
: make or receive a call (music player is paused)
•
Messaging
: send or receive a text or multimedia message. Music continues to play unless
an audio clip is received as a part of a multimedia message.
•
Browser
: browse the web (music continues to play).
Multimedia 61
Page 66

•
PWR
END
Menu
Music Player
: turns on Music Player, or allows you to use full-screen controls of the music
player.
•
Games
: lets you play games while listening to music.
Important!:
When you are finished using the Music Player function, you must press to stop
the function to prevent the battery from losing its charge. Pausing the player
continues to use the battery.
Music Player Settings
1. Touch ➔
2. Touch
Tools ➔ Music Player ➔ Settings
On
or
Off
to either activate or deactivate the Background playing
.
option. This determines whether you want the music to play in the
background while outside of the player.
3. Touch
Save
.
Using Playlists
Playlists are used to assign songs to a list of preferred media, which can then be
grouped into a list for later playback. These Playlists can be created using either the
handset’s Music Player options menu or from within a third party music application
(such as Windows Media Player) and then downloaded to the handset.
Creating a Playlist
䊳
Touch ➔
Tools ➔ Music Player
Menu
➔
Playlists ➔ Create playlist
Adding Songs to a Playlist
䊳
Touch ➔
Tools ➔ Music Player
Menu
➔
Playlists
.
Changing the order of songs in a Playlist
1. Touch ➔
Tools ➔ Music Player
Menu
➔
Playlists
.
2. Touch a previously created playlist.
3. Touch
More ➔ Change Order
.
62
.
Page 67

Touch a song.
Menu
4.
5. Touch the new location. The first song is moved to the new location.
6. Touch
Removing songs from a Playlist
1. Touch ➔
2. Touch a previously created playlist.
3. Touch
4. Touch the box next to any available music file you want to remove.
OK
when all changes have been made.
Too ls ➔ Music Player
Remove Tracks
.
➔
Playlists
.
– or –
Touch
Select All
to select all available songs in the list.
5. Touch
Remove
and wait for the songs to be deleted from the current playlist.
Transferring Music Using a Media Application
A USB cable, microSD card, and a current version of a media application (such as
Napster® or Windows Media Player®) are required for this procedure.
1. Open the media player on your personal computer (if you are using Windows
Media Player, use version 10.0 or higher).
Note:
The Napster application can be downloaded at www.napster.com. Subscription fees
may apply.
2. Touch ➔
Settings ➔ Connectivity ➔ Select USB mode ➔ Media player.
Menu
For more information, refer to “Configuring Your Phone USB Settings” on
page 109.
Multimedia 63
Page 68

3.
Use the USB adapter cable to connect the handset to the target PC. When
an active connection has been established, a USB icon ( ) appears on
the phone.
4. Once the USB connection has been established, the handset displays
“
Connected
” and the computer screen then shows your phone.
Note:
The following steps reflect the procedure used with Windows Media Player. If you are using
either Napster or some other form of media player, you should refer to that application’s
Help files for specific directions.
5. If this is your first time connecting your phone to Windows Media Player you
need to enter a unique name for this phone connection. This assigns a name
to both the phone (when recognized) and to the internal microSD card.
6. Click
Finish
to continue to the application. You should then notice that the
Sync tab is active and displaying a connection with the phone and displaying
the name you created.
7. From within the Windows Media Player application, click on the Sync tab.
Available songs are then listed on the left side of the application.
8. If not already active, click the
9. Choose the destination location for the media files. The
Sync
tab.
Card
entry you named
appears in a drop-down list on the left side of the screen.
10. Click on the
Library
entry (from the left column) and select a category to
reveal available songs.
11. Click a song from the center column and drag it into the Sync List section of
the current page. This then places the current song on a “wait list” for update
to the target location within the phone.
64
Page 69

Click the Start Sync button (at the bottom of the Sync List) to begin uploading
12.
the selected songs to your handset. A “synchronization in progress”
message appears on the application. Do not unplug the handset during this
process. Once complete, a
Sync Results
folder then appears below the device
entry to indicate sync status.
13. It is now safe to unplug the USB connector from the handset.
Importing a Playlist from Windows Media Player
1. Open Windows Media Player on your computer (version 10.0 or higher).
2. Use the USB adapter cable to connect the handset to the target PC. When
an active connection has been established, a USB icon ( ) appears on
the phone.
3. Once the USB connection has been established, the handset displays
“
Connected
” and the computer screen then shows your phone.
4. If not already active, click the
5. Locate the Playlists section (upper-left).
6. Right-click a playlist entry and select
7. Click the Start Sync button (at the bottom of the Sync List) to begin uploading
Sync
tab.
Add to ‘Sync List’.
the selected playlist to your handset.
8. It is now safe to unplug the USB connector from the handset.
Music Player
The Music Player is an application that can play music files. The music player
supports files with extensions AAC, AAC+, eAAC+, MP3, WMA, 3GP, MP4, and M4A.
Launching the Music Player allows you to navigate through your music library, play
songs, and create playlists (music files bigger than 300 KB are displayed).
Multimedia 65
Page 70

Using the Music Player
NORMNORM
1. Touch ➔
Tools ➔ Music Player
Menu
.
– or –
Drag from the Widget List and touch it.
2. Touch a library category (All music, Artist, Album, Genre, or Playlists) to view
the available music files.
3. Scroll through the list of songs and touch an entry to begin playback.
Music Player Functions
1. Touch any of the following on-screen buttons during playback to activate
their features:
Shuffle mode button:
• Shuffle On: the current list of songs are
randomly shuffled for playback.
• Shuffle Off: songs play in order and are not
shuffled.
Equalizer button:
Equalizer presets include: NORM (normal),
ROCK, POP, DANC (dance), CLAS (classical),
JAZZ, WIDE, DYNA (dynamic), and SURR
(surround). Your phone is using the SRS™
solution. WIDE = WOWHD (Voice), and DYNAMIC
= WOWHD.
66
Page 71

Repeat button:
• Repeat one: repeats the currently playing
song.
• Repeat all: replays the current list when the
list ends.
• Play All: plays the current song list once.
• Touch quickly to move to the beginning of
the current song.
• Touch and hold to play the previous song.
• Touch once to play the current song.
• Touch once to pause the current song.
• Advances to the next song.
• Touch and hold to fast forward through the
current song.
Touch the player menu options at the bottom of the screen to reveal additional
2.
menu functions:
•Library
: displays the Music Player library view (Now playing, All music, Artist, Album,
Genre, and Playlists).
• Minimize
: reduces the player a nd leaves it running in the background so you ca n navigate
to other programs or activities.
Multimedia 67
Page 72

•More
1
x
: provides access to options such as:
–
Add to playlist
–
Send via
: allows you to add the current audio file to a selected playlist.
: allows you to send the current file via a message attachment or as a data file
delivered to a Bluetooth-capable device.
–
Settings
: allows you to access the Background playing Settings menu.
–
Properties
: allows you to view basic information for the current song such as Name, Format,
Size, Forwarding, Date created, and Location. This option also allows you to view media
information such as Artist, Title, Album, Track length, Genre, Recording date, and Format.
Video Player
The Video Player application plays video files stored on your microSD card.
1. Touch ➔
Menu
Video
.
All videos that you have on your memory card display.
2. Touch the video that you want to play.
The video begins to play and the following video controls are available:
Pause the video.
Start the video after being paused.
Rewind the video.
Fast-forward the video.
Original screen size view (Landscape
mode only).
Full-screen view (Landscape mode only).
68
Page 73

Pictures
The Pictures menu is where you view photos. You can also perform basic editing
tasks, view a slide show, set photos as wallpaper or contact image, and share as a
picture message.
䊳
Touch ➔
Menu
Pictures
.
From the Pictures page you can access the following menu options:
•
Create Folder
•
Manage
•
More
: create a new folder on either the Phone or Memory Card.
: allows you to move or copy an existing unlocked folder or file.
: provides you with the ability to Delete, Rename, Sort by, Send via Bluetooth,
Bluetooth Visibility, and Lock or Unlock certain files or folders.
Image Features
Touch a graphic from the Pictures page to display the image. From the image viewer
page, you have access to both macro functions (Zoom) and menu options. If the
icons and options do not appear when the picture displays, touch the screen below
the picture.
•
Up and Down Arrows
: allow you to magnify the current image. Touch and hold the picture
and drag it up and down to zoom out.
•
Send
: lets you send the currently active image as part of a new multimedia message or to
an external device via Bluetooth.
•
Set as
: allows you to assign the current image as either your current Wallpaper or as a
display Caller Image used by a specific entry within your Address Book.
•
More
: allows you to choose from the following image options:
–
Delete
: allows you to delete the current picture.
–
Rename
: allows you to rename the current picture.
–
Slide show
: allows you to play a slide show using the pictures currently available from within
the Pictures folder. Touch the screen and touch
show. Touch
–
Edit
information, refer to
Previous
or
Next
: allows you to edit the current image by applying various image effects. For more
to navigate through the pictures.
“Editing Images”
Pause
on page 70.
or
Play
to stop or resume the slide
Multimedia 69
Page 74

Bluetooth Visibility
Menu
–
–
Print via
–
Properties
size, and so on.
Note:
Editing is only available for unlocked images or non-DRM images.
: allows you to turn on or off the Bluetooth visibility.
: allows you to make a selected graphic printable by a Bluetooth printer.
: displays a listing of the image’s properties such as: name, format, resolution,
Editing Images
1. Touch ➔
2. Touch
Pictures ➔ <image>
More
➔
Edit
➔
File
➔
Open
.
or
Save as
this image).
– or –
Touch
More
➔
Edit
and select from any of the following:
• Effects
: allows you to choose from among several effects such as:
Partial Blur
.
• Adjust
: allows you to adjust
• Undo
: allows you to reverse the previous change.
3. Touch the tab above
Rotate
and
Flip
Auto Level, Brightness/Contrast
Undo
to display the following additional options:
the picture. Touch the buttons to
rotate or flip (left to right or top to bottom) the
current picture.
Resize
the image. Touch the new size and touch
OK
.
Crop
the image. Drag the frame to position it.
Touch OK to crop the area.
(to save a renamed copy of
Filter, Style, Warp
, and
Color
.
, or
70
Page 75

Insert Text
on the image. Drag the text to position it.
Insert Image
on the current image. Drag the frame
to position the inserted picture.
Insert
Emoticon
on the current image. Touch either
end of the emoticon list to scroll through the
possibilities and touch an emoticon. Drag the
emoticon to position it.
Insert
Clip Art
on the image.Touch either end of the
clip art list to scroll through the possibilities and
touch an item. Drag the emoticon to position it.
Camera
This section explains how to use the camera on your phone. You can take
photographs and shoot video by using the built-in camera functionality. Your 2.0
megapixel camera produces photos in JPEG format.
Important!:
Do not take photos of people without their permission.
Do not take photos in places where cameras are not allowed.
Do not take photos in places where you may interfere with another person’s privacy.
Using the Camera
Taking Photos
Taking pictures with your device’s built-in camera is as simple as choosing a
subject, pointing the camera, then pressing the camera key.
Note:
When taking a photo in direct sunlight or in bright conditions, shadows may appear on the
photo.
Multimedia 71
Page 76

1.
In Idle mode, press the Camera key to activate the camera mode.
2. Using the phone’s main display screen as a viewfinder, adjust the image by
aiming the camera at the subject.
3. Press the Up or Down Volume keys to adjust the zoom of your image. (Zoom
is not available when the resolution is set to the maximum setting.)
4. Press the Camera key until the shutter sounds. (The picture is automatically
stored in your designated storage location. If no microSD is installed, all
pictures are stored on the Phone.) For more information, refer to “Camera
and Camcorder Options” on page 73.
Note:
The number of JPEG pictures taken and the number of pictures remaining on the selected
media appears in the top center part of the screen. The remaining number of pictures is an
approximate number based on the current image size.
5. If desired, before taking the photo, you can touch on-screen icons to access
various camera options.
6. When viewing a picture after you have taken it,
zoom in on an area of the picture
7. Press to return to the viewfinder.
. You can magnify the picture up to x2.0.
touch and hold the picture to
72
Page 77

Camera and Camcorder Options
Options are represented by icons across both sides of the screen.
Note:
The options disappear after a few seconds. Touch the screen to make them reappear.
Camera, Camcorder
: allows you to take a photo or record a
video. Once you change the mode, the corresponding
indicator appears at the top left of the display. Choose
Camera or Camcorder.
Recording Mode
: allows you to set the Recording mode to
either Normal (limited only by available space on
destination location) or Limit for MMS (limited by MMS size
restrictions). (Recording mode is only available in
Camcorder mode).
Shooting Mode
: allows you to set the shooting mode.
Options are:
•
Single
: take a single photo and view it before returning
to the shooting mode.
•
Continuous
: take a succession of consecutive photos
by pressing and holding the Camera key.
Multimedia 73
Page 78

•
320320
240240
Panor ama
: take a landscape photo by taking an initial
photo and then adding additional images to itself. The
guide box lets you view the area where the second
part of the panoramic picture should fall within by
highlighting the box in yellow. If you hold the camera
still when it turns yellow, the picture is automatically
taken. Repeat this step for up to six segments. When
you are done, press the Camera key.
•
Smile Shot
: the camera focuses on the face of your
subject. Once the camera detects the person’s smile,
it takes the picture.
•
Mosaic
: take multiple photos and then group them
together into a single final photo.
•
Frame
: allows you to choose a custom frame border
for your image. Choose from one of the 20 available
frames.
Camera Resolution
: allows you to set the image size to
either: 2M (1600 x 1200), 1.3M (1280 x 960),
0.3M (640 x 480), or 320 x 240.
Camcorder Resolution
: allows you to set the video size to
either: 320 x 240 or 176 x 144.
74
Page 79

Settings (lower left corner)
: allows you to customize your
camera and camcorder settings. Choose from the following
options:
Camera and Camcorder
•
Effects
: allows you to change the color tone or apply
:
special effects to the photo. Options include: None,
Black and white, Sepia, Negative, or Watercolor.
Camera
:
•
Exposure Meter
: allows you to set how the camera
measures or meters the light source: Matrix,
Center-weighted, or Spot.
•
Night Mode
: allows you to turn On or Off the Night
mode depending on the lighting conditions.
•
Image Quality
: allows you to set the image quality to:
Superfine, Fine, or Normal.
Camcorder
:
•
Video Quality
: allows you to set the video quality to:
Superfine, Fine, or Normal.
Multimedia 75
Page 80

Camera and Camcorder Settings tab (upper right corner)
The following are additional camera and camcorder
settings.
•
Guidelines
: allows you to turn the guidelines On or Off.
•
Review
: allows you to activate the instant review
feature where images are displayed immediately after
review (On or Off).
•
Shutter Sound
: allows you to set the Shutter sound to
three different shutter sound or to turn it off. (Only
available in Camera mode.)
•
Audio Recording
: allows you to record audio while
recording video. Selecting Off, temporarily mutes the
microphone and records only video.
(Only available in Camcorder mode).
•
Storage
: allows you to configure the default storage
location for images and videos as either Phone or
Memory card (if inserted).
•
White Balance
: allows you to set this option to one of
the following choices: Auto, Daylight, Incandescent,
Fluorescent, or Cloudy.
•
Timer
: allows you to set a timer for how long to wait
before taking a picture or video. Options include: Off, 2
Seconds, 5 Seconds, and 10 Seconds.
:
76
Page 81

Brightness
: allows you to adjust the brightness level by
moving the slider across the page.
Quickview
: allows you to access the options page for a
selected image or video. Options include: Send (Via
Message or Bluetooth), Delete, and More (Set as, Edit, Slide
show, Rename or Properties).
Pictures and Videos Folder Options
After you take a photo or shoot a video, you can access various options from the
Pictures and Videos Folder page.
Touch
•
Send
➔ and then touch one of the available options:
: lets you send the currently active image as part of a new multimedia message or to
an external device via Bluetooth.
•
Delete
: erases the currently selected image or video.
•
More
: touch this option to display the following options:
–
Set as
: allows you to assign the current image as either your current Wallpaper or as a
display Caller Image used by a specific entry within your Address Book.
–
Slide show
–
: allows you to view your pictures and videos in a slide show.
Edit
: allows you to edit the current image using any of the following options:
• File
: allows you to open another picture folder and picture or to save the current picture
under a new name.
• Effects
: allows you to choose from among several effects.
• Adjust
: allows you to adjust
• Undo
: allows you to reverse the previous change. Touch the tab above
Auto level, Brightness/Contrast
, and
Color
.
Undo
to display
additional options.
–
Rename
: allows you to rename the picture using the on-screen keypad.
Multimedia 77
Page 82

Properties
Menu
–
: Displays Basic Info and Media Info about the current picture or video, such as
name, format, resolution, size, and so on.
Note: Edit
and
Set as
features are not available when the camcorder mode is active.
Press to return to the previously active camera or camcorder page where
you can take another photo or shoot a new video.
Accessing the Pictures Folder
1. Touch ➔
2. Touch a photo to open it in the viewer.
Pictures
.
Options available from the main Pictures folder before you select a picture are:
•
Create Folder
•
Manage
–
Touch the box next to each picture you want to move or copy or touch
: create a new folder on either the Phone or Memory Card.
: allows you to
Move
or
Copy
an existing, unlocked picture or pictures.
Select All
to move or
copy all pictures
–
Touch
Move
or
Copy
–
Select the folder to which the pictures should be moved or copied or create a new folder.
•
More
: provides the following options:
–
Delete
: allows you to delete one or more pictures.
–
Rename
–
Sort by
: allows you to sort pictures by Date, Type, Name, or Size.
–
Send via Bluetooth
–
Bluetooth Visibility
.
: allows you to rename pictures.
: allows you to send one or more pictures to a Bluetooth device.
: allows you to make the one or more pictures visible to Bluetooth
devices. This option only appears on photographs taken with your camera.
–
Lock/Unlock
: allows you to lock or unlock one or more pictures to prevent deletion. Lock
prevents a picture from being deleted. Unlock allows the picture to be deleted.
78
Page 83

Selecting and Using the Pictures Folder
Menu
Touch a picture from the Pictures page to display the image. From the image viewer
page, you have access to both macro functions (Zoom) and menu options.
•
Zoom
: Touch and hold the picture to zoom in on an area of the picture. Touch and drag the
picture to move the area of the picture that is visible. Use the inset image to navigate
around the picture.
•
Send
: lets you send the currently active image as part of a new multimedia message or to
an external device via Bluetooth.
•
Set as
: allows you to assign the current image as either your current Wallpaper or as a
display Caller Image used by a specific entry within your Address Book.
•
More
: allows you to choose from the following image options:
–
Delete
: allows you to delete the current picture.
–
Rename
: allows you to rename the current picture.
–
Slide show
: allows you to play a slide show using the pictures currently available from within
the Pictures folder. Touch the screen and touch
show. Touch
–
Edit
–
Print via
–
Properties
size, and so on.
Previous
or
Next
: allows you to edit the current image by applying various image effects. ?
: allows you to make a selected graphic printable by a Bluetooth printer.
: displays a listing of the image’s properties such as: name, format, resolution,
to navigate through the pictures.
Pause
or
Play
to stop or resume the slide
Assigning an Image as a Wallpaper
1. Touch ➔
2. Touch
3. Touch the screen to reveal the adjustment tools:
•
Touch and hold the picture to zoom in on an area of the picture. Touch and drag the
Pictures ➔ <image>
Set as
➔
Wallpaper
.
.
picture to move the area of the picture that is visible. Use the inset image at the bo ttom left
of the screen to navigate around the picture.
•Rotate
: orients the current image in either a landscape or portrait orientation.
4. Touch
Set
to store the new settings and assign the wallpaper image.
Multimedia 79
Page 84

Assigning an Image to an Address Book Entry
1. Touch ➔
2. Touch
touch
Pictures ➔ <image>
Menu
Set as
➔
Caller Image
Save
.
.
➔
Search Contact
, touch an entry, and
– or –
Touch
Set as
➔
Caller Image
➔
Create Contact
and create a new Address
Book entry with the image already assigned.
Using the Camcorder
In addition to taking photos, the camera also doubles as a camcorder allowing you
to also record, view, and send videos.
Shooting Video
Tip:
When shooting video in direct sunlight or in bright conditions, it is recommended that you
provide your subject with sufficient light by having the light source behind you.
1. In Idle mode, press the Camera key located on the lower right-hand
side of the phone to activate the camera mode.
2. Touch then touch
3. Using the phone’s main display screen as a viewfinder, adjust the image by
Camcorder
().
aiming the camera at the subject.
4. Press the Camera key again to begin shooting video.
5. Touch or the Camera key to stop the recording and save the video file to
your Videos folder.
6. Once the file has been saved, touch to play back your video for review.
7. Press to return to the viewer.
80
Page 85

Camcorder Options
Menu
Camcorder options are represented by icons across both sides of the screen.
For more information, refer to “Camera and Camcorder Options” on page 73.
Camcorder Options after a Video is Taken
After you finish shooting a video, you can use various options that appear as icons
on the screen. Touch an icon to activate the function.
䊳
Touch
•
Send
: lets you send the currently active video as part of a new multimedia message or to an
➔ and then touch one of the available options:
external device via Bluetooth.
•
Delete
: erases the currently selected video.
•
More
: allows you to choose from the following video options:
–
Slide show
–
–
Note: Edit
: allows you to view your pictures and videos in a slide show.
Rename
: allows you to rename the video.
Properties
: displays file information such as name, format, resolution, size, and so on.
and
Set as
are not available features when the camcorder mode is active.
Press to return to the previously active camera or camcorder page where
you can shoot a new video.
Accessing the Video Folder
䊳
Touch ➔
My folders
➔
Video
.
Options available from the main Video folder before you select a video are:
•
Create Folder
•
Manage
–
: create a new folder on either the Phone or Memory Card.
: allows you to
Move
or
Copy
an existing, unlocked video or videos.
Touch the box next to each video you want to move or copy or touch
Select All
copy all videos.
–
Tou ch
Move
or
Copy
.
–
Select the folder to which the videos should be moved or copied or create a new folder.
to move or
Multimedia 81
Page 86

•
1
x
More
: provides you with the options Delete, Rename, Sort by, Send via Bluetooth, Bluetooth
Visibility, and Lock/Unlock for certain videos.
–
Delete
: allows you to delete one or more videos.
–
Rename
: allows you to rename videos.
–
Sort by
: allows you to sort video clips by Date, Type, Name, or Size.
–
Send via Bluetooth
–
Bluetooth Visibility
–
Lock/Unlock
: allows you to send one or more videos to a Bluetooth device.
: allows you to make one or more videos visible to Bluetooth devices.
: allows you to lock or unlock one or more videos to prevent deletion. Lock
prevents a video clip from being deleted. Unlock allows the video clip to be deleted.
Once you have selected the video to play, your options are (touch for options in
landscape mode):
•
Send via
: allows you to send the video clip as part of a new multimedia message or to an
external Bluetooth device.
•
Properties
: displays file information such as name, format, resolution, size, and so on.
Touch the icon in the upper right corner of the display screen to change the Display
Mode from original size to full screen or full screen in ratio.
•
Original Size
•
Full-Screen View
( ): allows you to change the display mode to the original size.
( ): allows you to change the display mode to the full-screen option
while the video is playing. The entire screen is used, which may cause some minor
distortion.
•
Pause /Resume
: (
/ )
allows you to pause the video being played and then
resume playing.
•
Previous/Next
: (
/ )
touch briefly to jump to either the previously played video or
the next file in the Videos folder. Touch and hold to rewind or fast forward.
•
Exit
: takes you back to the Videos page.
82
Page 87

Games
The
Games
games and then save them to the
Note:
menu option allows you to shop for games. You can download new
Games
folder.
1. Touch ➔
2. From the
3. Follow the on-screen instructions.
Service charges and subscription purchase may be required.
Menu
Games
Games
.
menu, touch
Buy Games
to launch the browser.
Multimedia 83
Page 88

Section 7: Messaging
Message
This section describes how to send or receive different types of messages. It also
includes the features and functionality associated with messaging.
Types of Messages
Your phone provides the following message types:
•
Text Messages
•
Multimedia (Pictures and Video) Messages
•
Email Messages
The Short Message Service (SMS) lets you send and receive text messages to and
from other mobile phones or email addresses. To use this feature, you may need to
subscribe to your service provider’s message service.
The Multimedia Messaging Service (MMS) lets you send and receive multimedia
messages (such as picture messages and video messages) to and from other
mobile phones or email addresses. To use this feature, you may need to subscribe
to your service provider’s multimedia message service.
Important!:
When creating a message, adding an image, a sound file, or a video clip to a text
message changes the message from a text message to a multimedia message.
Messaging icons are displayed at the top of the screen and indicate when
messages are received and their type. For more information, refer to “Icons” on
page 17.
Creating and Sending Messages
1. Touch ➔
– or –
While in a Main menu, touch at the bottom of the display.
Messaging ➔ Create Message
Menu
.
84
Page 89

Add a recipient by touching
2.
Tap to add recipient
and then selecting an
associated option:
• Enter manually
• Recent contacts
•Contacts
: to manually enter a destination using a valid cellular phone number.
: to select a recipient from a list of recently sent messages.
: to select a recipient from your Contacts list (valid entries must have a wireless
phone number or email address).
•Group
: to select a recipient from the Group list.
•FDN contacts
: to select a recipient from your Fixed Dial Contacts list (if FDN mode has
been turned on).
3. Touch the empty text field and use the on-screen keypad to enter a message.
– or –
Rotate the phone counterclockwise on its side to display the QWERTY keypad.
4. Touch
OK
(on-screen keypad mode) to save your text and return to the
message screen.
5. Add more recipients by touching the recipient field.
6. Review your message and touch
Send
.
Additional Message Options
1. Touch
Insert
to perform one of the following options:
•Picture
: allows you to choose an existing image from the Pictures list, then add it to your
message by touching .
•Video
: allows you to choose an existing video from the Videos list, then select .
• Audio
: allows you to choose an existing audio file from the Audio list, then add it to your
message by touching .
• Text templates
: allows you to insert one of the preset message templates to the text (for
example, “Where is the meeting?”).
• Take picture
: allows you to temporarily exit the message, take a photo with the phone’s
built-in camera, and then add it to your message by touching
Add
.
Messaging 85
Page 90

• Record video
: allows you to temporarily exit the message, record a video clip using the
phone’s built-in camcorder, and then add it to your message by touching
• Record Audio
phone’s microphone, and then add it to your message by touching
•Favorites URL
: allows you to temporarily exit the message, record an audio clip using the
Add to message
: allows you to temporarily exit the message, access your Favorites list,
select the URLs you would like to add to the current message by touching the box next to
the URL, and then touching
•Contact Info
: allows you to choose an existing Address Book entry, select any or all
Add
.
information by touching the box next to the field, and then add it to your message by
touching
Insert
.
2. Touch
More
• Attach Files
to perform one of these additional options:
: allows you to add either a file, card, or other information such as a calendar
entry, task, or note.
–
File
: allows you to insert an audio file, graphic, or video clip to your message as an attached file.
–
Business card
directly to your message as an attached file.
–
Event
attached file.
–
Tas k s
message as an attached file.
–
Memo
–
Favorites URL
attachment to the message.
• Add subject
: allows you to insert the contact information for an entry from Address Book
: allows you to insert an Event entry from your calendar directly to your message as an
: allows you to insert an entry from your calendar tagged as a Task directly to your
: allows you to insert a presaved Memo (text) directly to your message as an attached file.
: allows you to add a web address from your Favorites list of Internet sites as an
or
Remove subject
: allows you to either add or delete a subject field for the
new message (multimedia messages only).
• Save to Drafts
• Save as Template
: saves the current message to the Drafts folder.
: allows you to save the message as a template so you can use it again
later.
• Delivery Options
: allows you to configure the options associated with sending the
message.
Add
.
.
86
Page 91

When you have finished composing your message, touch Send to and
3.
confirm the recipient(s) or add additional recipients.
4. Touch
Send
to deliver the message to the selected recipients.
Attaching a Business Card to a Message
To attach your Business Card to an outgoing message, follow these steps:
1. Touch ➔
2. Create your Business Card by entering the information that you want and
touch
3. Touch
4. Enter your message and touch
5. Add recipient(s) and touch
Contacts
➔
Menu
Save
.
Address Book Settings ➔ My Business Card
More ➔ Send Business Card via ➔ Message
OK
.
Send
.
.
Viewing New Received Messages
1. In Idle mode, new messages are indicated by icons and a
New Messages
up.
2. Touch the
Note:
Once you view the message, it is removed from this notification screen. Go to
Messaging
3. Touch a message you want to view. The selected message appears in the
View all
button from the New Messages pop-up.
➔
Inbox
to access your messages.
display.
Tip:
When viewing a text message, press the volume key Up or
font size of the message text.
Down
to increase or decrease the
Menu
.
pop-
➔
Messaging 87
Page 92

4.
To play a multimedia message, touch or Retrieve.
•
To pause playback of the multimedia message, touch
•
To stop playback of the multimedia message, touch
5. To scroll through the message (if additional text pages have been added),
Stop
.
.
touch the screen and in a single motion, scroll up or down the page.
6. When you have finished, press .
Using Message Options
Message options at the Inbox level differ according to the message type, what you
have done with the message, and whether you are viewing the message. Some of
the main message category types include:
•
Inbox
: stores any incoming message (text or multimedia).
•
Outbox
: stores a copy of the messages you have sent.
•
Drafts
: stores unsent messages that you want to edit or send later.
䊳
With the list of current message displayed, use any of the following menu
options:
•List by
: sort the current list based on one of the following criteria (the criteria is different
depending on the type of message):
–
Date, Sender, Recipient, Read/Unread, Message type, Subject, Size, or Lock/Unlock status.
•Delete
: deletes one or more messages. Touch the box next to each entry you want to
delete or touch
䊳
With a message open for reading, use any of the following menu options:
•Reply / Reply to
reads
Select All
to select all entries. Touch
Delete
to complete the process.
: allows you to compose and send a reply to the message. This option
Reply
when replying to an SMS (Text) message or
Reply to
when replying to an
MMS (Multimedia) message.
•Delete
: deletes the current message.
88
Page 93

•More
: provides these additional message functions:
–
Forward
: allows you to forward the message.
–
Save to Address Book
: allows you to save the recipient or sender’s information from the
message to your Address Book as either a New or Updated entry. For more information, refer to
“Contacts and Your Address Book”
–
Move to phone/Move to SIM
on page 50.
: if a message is stored in the SIM card, it is saved to the phone’s
memory. If a message is stored in the phone’s memory, it is then saved to the SIM card.
–
Backup to memory card
–
Save as Template
–
Save to
: allows you to save the message as an Event or a Memo.
–
Save Attachment
: allows you to save the message to your memory card.
: allows you to save text and multimedia as a template.
: allows you to save any selected attachments. If the
filename matches
one you already have in your folder, you are prompted to rename the filename. This option only
appears for multimedia messages.
–
Print via Bluetooth
: allows you to print the contents of the message on a Bluetooth compatible
printer.
–
Properties
: allows you to see properties of a message such as Subject, Date, From, To,
Size, Priority, Delivery report, and Read report.
This option only appears for multimedia
messages.
–
Lock/Unlock
: allows you to secure a selected message by protecting it from accidental
This option only appears for multimedia messages.
alterations.
Using Email
To sign into your Email, follow the on-screen prompts in the Email setup wizard to
configure your phone for your email account.
䊳
Touch ➔
Messaging ➔ Email
Menu
.
Using Exchange Email
Configure your Exchange Email by entering your information in the fields at the onscreen prompts: Server URL, User Name, Password, Domain, turn on or off Use SSL.
Messaging 89
Page 94

Voicemail
Menu
The Voicemail selection allows you to set up voicemail for your phone and to access
your voice messages.
䊳
Touch ➔
Messaging ➔ Voicemail
Menu
.
Messaging Settings
The Messaging Settings menu allows you to configure the settings for Auto Delete
Inbox, Text Messages, Multimedia Messages, Email and Voicemail.
䊳
Touch ➔
Menu
Messaging
➔
Messaging Settings
.
Templates
Besides entering text in your message by using the keypad keys, you can include
preloaded Templates and create your own. You can also create and store
multimedia templates.
䊳
Touch ➔
Messaging ➔ Tem pl at es
Menu
.
Select Text templates or Multimedia templates to add a stored template to your
message or to create a new template.
Deleting Messages
When your phone memory is full, use the Delete by Folder option to erase obsolete
messages and free memory for new messages. You can delete messages in these
folders: Inbox, Read, Unread, Email, Outbox and Drafts.
䊳
Touch ➔
Messaging
➔
Delete by Folder
.
90
Page 95

Used Space
You can check the amount of the memory being used and the memory remaining for
Multimedia, Email and Text messages. The display shows the total space including
the used and free space. You can also view how much space is currently occupied
by each message box.
1. Touch ➔
2. Touch a particular folder for review using the drop-down list box.
3. Touch the box next to a message to delete messages based on size.
Messaging ➔ Used Space
Menu
.
– or –
Touch
Select All
to select all messages in the list.
4. Touch
5. Press to return to the main menu.
Delete
.
Messaging 91
Page 96

Section 8: Change Your Settings
Menu
This section includes tips on how to use your phone’s features, as well as how to
change and customize the display settings, call handling, security settings, and
other settings associated with your phone.
Sound Profile
This menu allows you to specify how you are informed of incoming calls and
messages as well as other notification sounds your phone can make.
Selecting a Profile
1. Touch ➔
2. Touch the radio button next to the profile name. The selected profile
activates. Choices include:
•Normal
to Vibration & Melody.
•Silent
theater for example.
•Driving
type when the associated notification is activated.
• Outdoor
you need an increased volume in order to hear the phone. For example, you might be
jogging and need the phone to vibrate and ring loudly.
Silent Profile
Turn on the Silent profile by one of the following methods:
䊳
Touch ➔
– or –
From the on-screen dial pad, touch and hold the key.
is displayed. Touch and hold again, to change back to Normal profile.
Settings ➔ Sound Profile
Menu
.
: The phone’s profile defaults to Normal where the incoming Call alert type is set
: This mode is convenient when you want to stop the phone from making noise, in a
: In this mode, the speaker is active and launches the currently selected Call alert
: Use this mode if you are outdoors, and might not be able to hear the phone, or
Settings ➔ Sound Profile ➔ Silent
.
Silent profile on
92
Page 97

Editing the Profiles
The four sound profiles have settings for incoming calls, messages, and other
notification sounds your phone can make.
1. Touch to the right of the radio button of the profile you want to edit.
2. Touch the drop-down menu (upper-right of the screen) and select the settings
you want to change:
Note:
Some
Call, Message
Editing Call Settings
1. Select the
•Melody
: the phone rings using the ring melody selected in the Voice Call Ringtone menu.
• Vibration then Melody
• Vibration & Melody
2. Touch the
3. Drag the
Ringtone Volume
Call, Message, Email
, and
Phone
Call Alert Type
settings may not be available for each profile type.
field and select one of the following and touch
, or
Phone
: the phone vibrates and then starts ringing.
: the phone vibrates and plays a melody simultaneously.
Voice Call Ringtone
field, touch to select a ringtone and touch
slider to the volume level you desire
.
(range is 1 through 7).
4. Touch
Editing Message Settings
1. Touch the
2. Touch the
Save
to return to the Sound Profile menu.
Message Alert Type
•Melody
: the phone rings using the ring melody selected in the Message Alert Tone menu.
•Vibration
: the phone vibrates 2 times.
• Vibration & Melody
•Mute
: the phone is silent and does not play a melody or vibrate.
Message Alert Tone
Postman, Sherbet, Stepping stones
field, select one of the following and touch
: the phone vibrates and plays a melody simultaneously.
field, then touch to select
or
Transparent piano
Cloud, Haze, Postbox,
, and touch
Change Your Settings 93
Save
Save
Save
.
Save
:
.
:
Page 98

3.
Touch the
Message Alert Repetition
options and touch
•Once
: repeats the message alert once.
•Every 2 Min
4. Drag the
: repeats the message every two minutes.
Alert Tone Volume
1 through 7).
5. Touch
Editing Email Settings
1. Touch the
Save
to return to the Sound Profile menu.
Email Alert Type
•Melody
: the phone rings using the ring melody selected in the Message Alert Tone menu.
•Vibration
: the phone vibrates 2 times.
• Vibration & Melody
•Mute
: the phone is silent and does not play a melody or vibrate.
2. Touch the
Email Alert Tone
Postman, Sherbet, Stepping stones
Note:
For additional options, touch
pull-down and select one of the following
Save
:
slider to the volume level you desire (range is
field, select one of the following and touch
: the phone vibrates and plays a melody simultaneously.
field, then touch to select
or
Transparent piano
Ton es
to choose from a list of MP3 files, then touch
Cloud, Haze, Postbox,
, and touch
Save
Save
Save
.
.
:
3. Touch the
options and touch
•Once
•Every 2 Min
4. Drag the
1 through 7).
5. Touch
94
Email Alert Repetition
Save
pull-down and select one of the following
:
: repeats the message alert once.
: repeats the message every two minutes.
Alert Tone Volume
Save
to return to the Sound Profile menu.
slider to the volume level you desire (range is
Page 99

Editing Phone Settings
Menu
1. Touch the
touch
Keypad Tone
Save
:
pull-down and select one of the following tones and
•Beep
•Glossy
•Mute
2. Touch the
3. Touch the
4. Drag the
Power On Type
•Melody
: the phone rings using the ring melody.
•Vibration
: the phone vibrates but does not play a melody.
• Vibration & Melody
•Mute
: the phone is silent and does not play a melody or vibrate.
Power Off Type
•Melody
: the phone rings using the ring melody.
•Vibration
: the phone vibrates but does not ring.
• Vibration & Melody
•Mute
: the phone is silent and does not play a melody or vibrate.
Phone Sound Volume
field, select one of the following and touch
: the phone vibrates and plays a melody simultaneously.
field, select one of the following and touch
: the phone vibrates and plays a melody simultaneously.
slider to the volume level you desire (range is
0 through 7).
Touch
Save
to return to the Sound Profile menu.
Display and Light Settings
In this menu, you can change various settings for the display or backlight.
1. Touch ➔
2. Select one of the following options:
•
Wallpa per
•
Widget
Settings
➔
Display and Light
.
Save
Save
:
:
Change Your Settings 95
Page 100

•
Menu
Font Type
•
Brightness
•
Backlight Time
Wallpaper
This menu allows you to change the background image displayed on the Main
screens.
1. Touch ➔
2. Touch a panel that corresponds to the Main screen that you want to change.
3. Touch
Settings
➔
Menu
Pictures
, scroll through the pictures, and touch the name area of a
Display and Light
➔
Wallpaper.
picture to view a full screen image.
4. Touch one of the following options:
•
Set
: assigns the current image as the new wallpaper image that appears for the Main
screen selected.
•Rotate
: allows you to rotate the image clockwise 90 degrees for each touch.
5. Touch to the left of a picture name to immediately apply it as wallpaper.
Widget
The Widget settings menu allows you to select the widget applications that appear
docked on the Idle screen.
For more information, refer to “Widgets” on page 23.
Font Type
You can select one of three font options for the text style in the phone display.
1. Touch ➔
2. Select
Settings
Typ e1, Typ e2
, or
➔
Typ e3
Display and Light
and touch
Save
➔
.
Font Type
.
96
 Loading...