

Samsung SGH-T356 series User Manual

SGH-T356 Series
PORTABLE
QUAD-BAND
MOBILE PHONE
User Manual
Please read this manual before operating your
phone, and keep it for future reference.
GH68-29679A

Intellectual Property
All Intellectual Property, as defined below, owned by or which is
otherwise the property of Samsung or its respective suppliers relating
to the SAMSUNG Phone, including but not limited to, accessories,
parts, or software relating there to (the “Phone System”), is proprietary
to Samsung and protected under federal laws, state laws, and
international treaty provisions. Intellectual Property includes, but is not
limited to, inventions (patentable or unpatentable), patents, trade
secrets, copyrights, software, computer programs, and related
documentation and other works of authorship. You may not infringe or
otherwise violate the rights secured by the Intellectual Property.
Moreover, you agree that you will not (and will not attempt to) modify,
prepare derivative works of, reverse engineer, decompile,
disassemble, or otherwise attempt to create source code from the
software. No title to or ownership in the Intellectual Property is
transferred to you. All applicable rights of the Intellectual Property shall
remain with SAMSUNG and its suppliers.
©2010 Samsung Electronics Canada, Inc. SAMSUNG is a registered
trademark of Samsung Electronics Co., Ltd. and its related entities.
T9 Text Input is licensed by Tegic Communications and is covered by
U.S. Pat. 5,818,437; U.S. Pat. 5,953,541; U.S. Pat. 6,011,554 and
other patents pending.
®
ACCESS
and NetFront™ are trademarks or registered trademarks of
ACCESS Co., Ltd. in Japan and other countries.

The Bluetooth® word mark, figure mark (stylized “B Design”), and
combination mark (Bluetooth word mark and “B Design”) are registered
trademarks and are wholly owned by the Bluetooth SIG.
microSD™ and the microSD logo are Trademarks of the SD Card
Association.
Some software components of this product incorporate source code
covered under GNU General Public License (GPL), GNU Lesser
General Public License (LGPL), OpenSSL License, BSD License and
other open source licenses. To obtain the source code covered under
the open source licenses, please visit:
http://opensource.samsungmobile.com/index.jsp.
The privacy and copyright laws of Canada govern the disclosure,
reproduction and distribution of data, media and other content,
including music and video content. Certain activities, including
downloads or transfer by any means (including, via cable, Bluetooth®
or otherwise) of such content may be an infringement of privacy or
copyright law. Neither Samsung Electronics Canada Inc. nor any of its
affiliates shall be liable or responsible for any data or content
disclosed, reproduced, downloaded or distributed by the user of this
equipment.

Disclaimer of Warranties; Exclusion of
Liability
EXCEPT AS SET FORTH IN THE EXPRESS WARRANTY
CONTAINED ON THE WARRANTY PAGE ENCLOSED WITH THE
PRODUCT, THE PURCHASER TAKES THE PRODUCT "AS IS", AND
SAMSUNG MAKES NO EXPRESS OR IMPLIED WARRANTY OF
ANY KIND WHATSOEVER WITH RESPECT TO THE PRODUCT,
INCLUDING BUT NOT LIMITED TO THE MERCHANTABILITY OF
THE PRODUCT OR ITS FITNESS FOR ANY PARTICULAR
PURPOSE OR USE; THE DESIGN, CONDITION OR QUALITY OF
THE PRODUCT; THE PERFORMANCE OF THE PRODUCT; THE
WORKMANSHIP OF THE PRODUCT OR THE COMPONENTS
CONTAINED THEREIN; OR COMPLIANCE OF THE PRODUCT
WITH THE REQUIREMENTS OF ANY LAW, RULE, SPECIFICATION
OR CONTRACT PERTAINING THERETO. NOTHING CONTAINED
IN THE INSTRUCTION MANUAL SHALL BE CONSTRUED TO
CREATE AN EXPRESS OR IMPLIED WARRANTY OF ANY KIND
WHATSOEVER WITH RESPECT TO THE PRODUCT. IN ADDITION,
SAMSUNG SHALL NOT BE LIABLE FOR ANY DAMAGES OF ANY
KIND RESULTING FROM THE PURCHASE OR USE OF THE
PRODUCT OR ARISING FROM THE BREACH OF THE EXPRESS
WARRANTY, INCLUDING INCIDENTAL, SPECIAL OR
CONSEQUENTIAL DAMAGES, OR LOSS OF ANTICIPATED
PROFITS OR BENEFITS.

Table of Contents
Section 1: Getting Started ...............................................1
Activating Your Phone ............................................................................. 1
Switching the Phone On or Off .............................................................. 10
Setting Up Your Voice Mail ................................................................... 11
Section 2: Understanding Your Phone ........................12
Features of Your Phone ........................................................................ 12
Front View of Your Phone ..................................................................... 13
Keys ...................................................................................................... 13
Back View of Your Phone ..................................................................... 16
Side Views of Your Phone .................................................................... 17
Display Layout ....................................................................................... 18
View Tab ............................................................................................... 18
Menu Navigation ................................................................................... 20
Backlight ................................................................................................ 21
Section 3: Call Functions ..............................................23
Making a Call ........................................................................................ 23
Adjusting the Call Volume ..................................................................... 25
Answering a Call ................................................................................... 25
Call History ............................................................................................ 26
Vibration Profile ..................................................................................... 28
Selecting Functions and Options .......................................................... 29
Section 4: Entering Text ................................................37
Using the QWERTY Keyboard .............................................................. 37
Changing the Text Input Mode .............................................................. 39
Using T9 Mode ...................................................................................... 40
Using ABC mode ................................................................................... 41
i

Using Numeric Mode ............................................................................. 42
Using Symbol Mode .............................................................................. 42
Section 5: Contacts .......................................................43
Add New Contact ..................................................................................43
Finding a Contact Entry .........................................................................45
Groups ...................................................................................................47
Editing a Caller Group ...........................................................................48
Speed dialing ......................................................................................... 49
Management ......................................................................................... 50
Section 6: Messaging ....................................................53
Types of Messages ...............................................................................53
Display Icons for Messages .................................................................. 53
Text Messages ...................................................................................... 54
Picture Messages .................................................................................. 57
Inbox ...................................................................................................... 60
Sentbox .................................................................................................65
Drafts .....................................................................................................65
My folders .............................................................................................. 66
Templates .............................................................................................. 67
Voice mail ..............................................................................................68
Settings ................................................................................................. 69
Section 7: Media ............................................................75
Photos ...................................................................................................75
Music .....................................................................................................77
Images ................................................................................................... 82
Sounds .................................................................................................. 84
Videos ...................................................................................................87
Games and Apps ................................................................................... 89
Other files .............................................................................................. 89
ii

Memory Status ..................................................................................... 90
Section 8: Changing Your Settings ..............................91
Sound profiles ....................................................................................... 91
Display settings ..................................................................................... 96
Phone settings ...................................................................................... 99
Messaging key .................................................................................... 104
Memory settings .................................................................................. 104
Language ............................................................................................ 106
Greeting message ............................................................................... 106
Time and date ..................................................................................... 107
Bluetooth ............................................................................................. 108
Call settings ......................................................................................... 111
Advanced ............................................................................................ 117
Reset settings ..................................................................................... 118
Section 9: Tools ...........................................................119
Alarm ................................................................................................... 119
Tasks ................................................................................................... 121
Memo .................................................................................................. 122
Calculator ............................................................................................ 122
Tip calculator ....................................................................................... 123
World clock .......................................................................................... 123
Converter ............................................................................................ 124
Timer ................................................................................................... 125
Stopwatch ........................................................................................... 125
Section 10: Browser ....................................................126
Home ................................................................................................... 126
Enter URL ........................................................................................... 128
Bookmarks .......................................................................................... 129
Saved pages ....................................................................................... 130
iii

History .................................................................................................130
Browser settings ..................................................................................130
Section 11: Photos ......................................................132
Using the Camera ............................................................................... 132
Using the Camcorder .......................................................................... 138
Section 12: Calendar ...................................................143
Month view ..........................................................................................143
Week view ........................................................................................... 144
Day view .............................................................................................. 145
Event list .............................................................................................. 146
Missed alarm events ........................................................................... 146
Memory status ..................................................................................... 147
Section 13: Health and Safety Information ...............148
Safety Warnings .................................................................................. 148
Safety Precautions ..............................................................................150
Warranty Disclaimer: Proper use of a touch screen handset .............. 152
UL Certified Travel Adapter ................................................................. 153
Important usage information ................................................................ 154
Radio frequency safety ........................................................................156
Section 14: Warranty Information ..............................159
Standard Limited Warranty .................................................................. 159
iv

Section 1: Getting Started
This section explains how to start using your phone by configuring your
hardware, activating your service, and then setting up your voice mail.
Activating Your Phone
When you subscribe to a wireless network, you are provided with a
plug-in SIM card loaded with your subscription details, such as your
PIN, available optional services, and other features.
Installing the SIM Card
Important!:
The plug-in SIM card and its contacts can be easily damaged by
scratching or bending, so be careful when handling, inserting, or
removing the card. Keep all SIM cards out of reach of small children.
If necessary, power off the phone by holding down the key until
the power-off image displays.
1
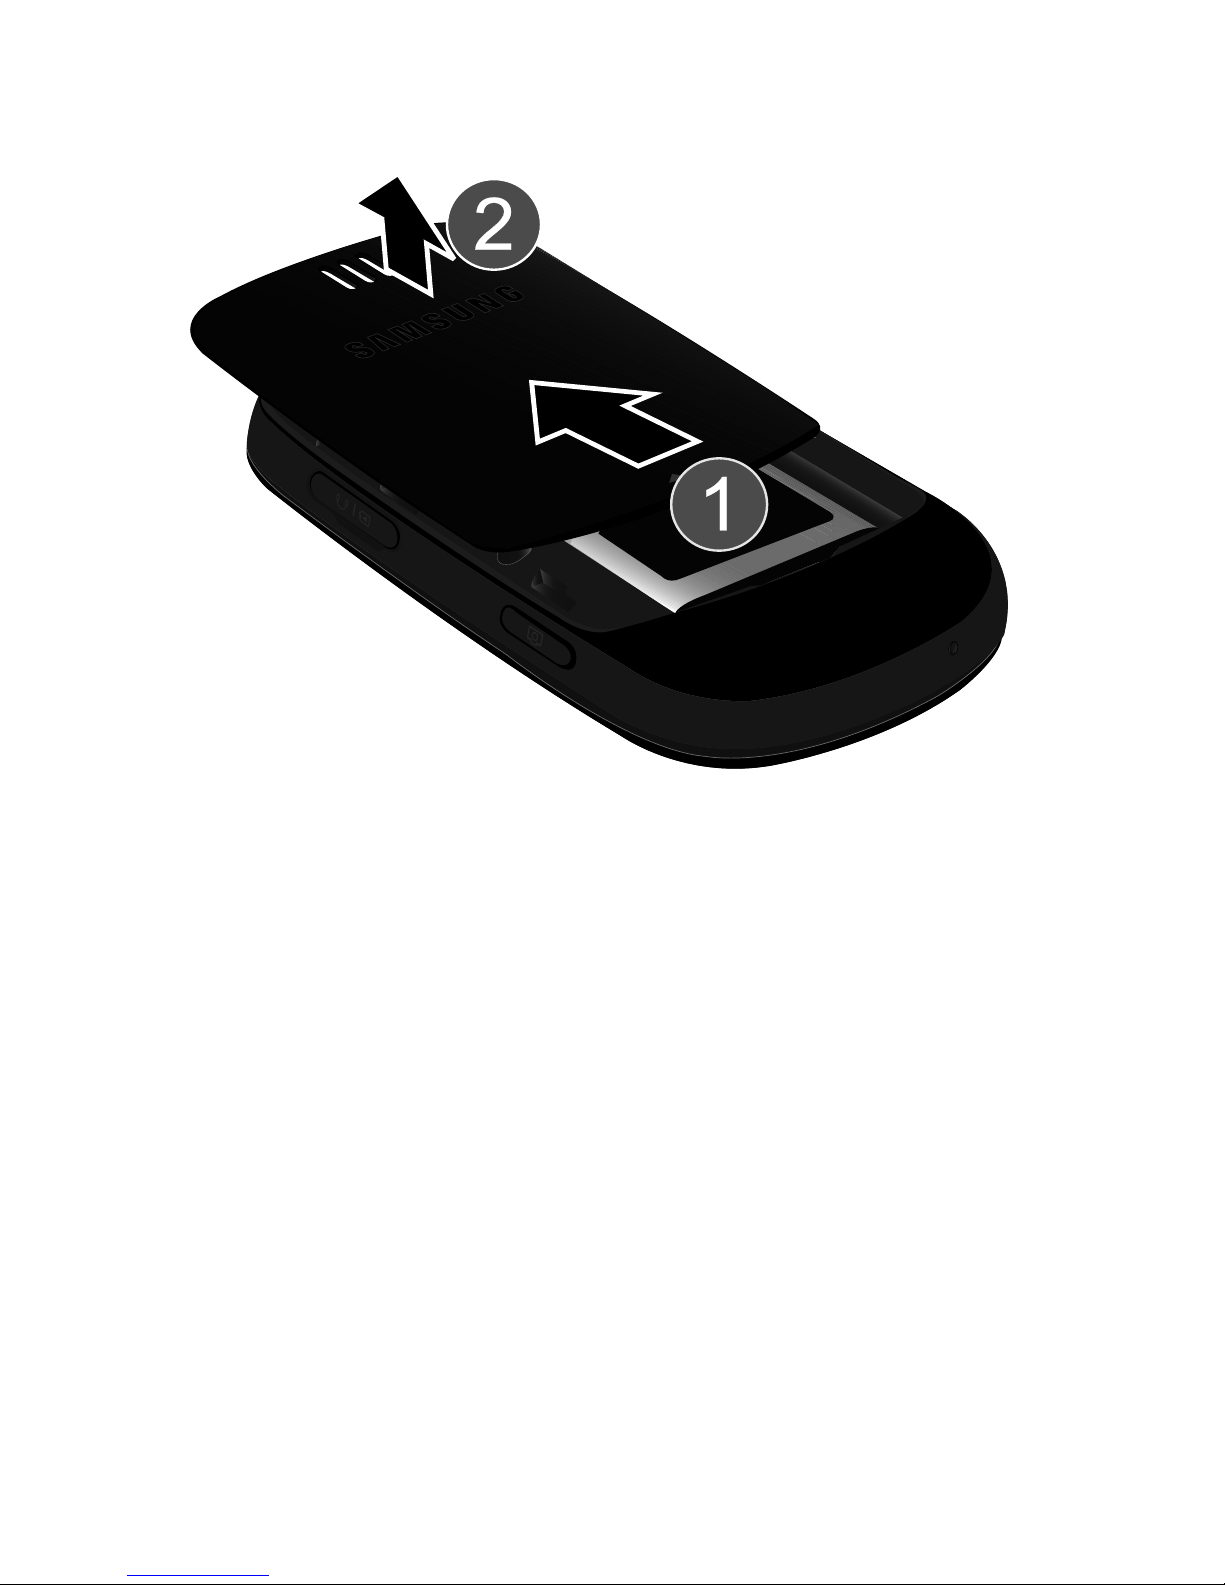
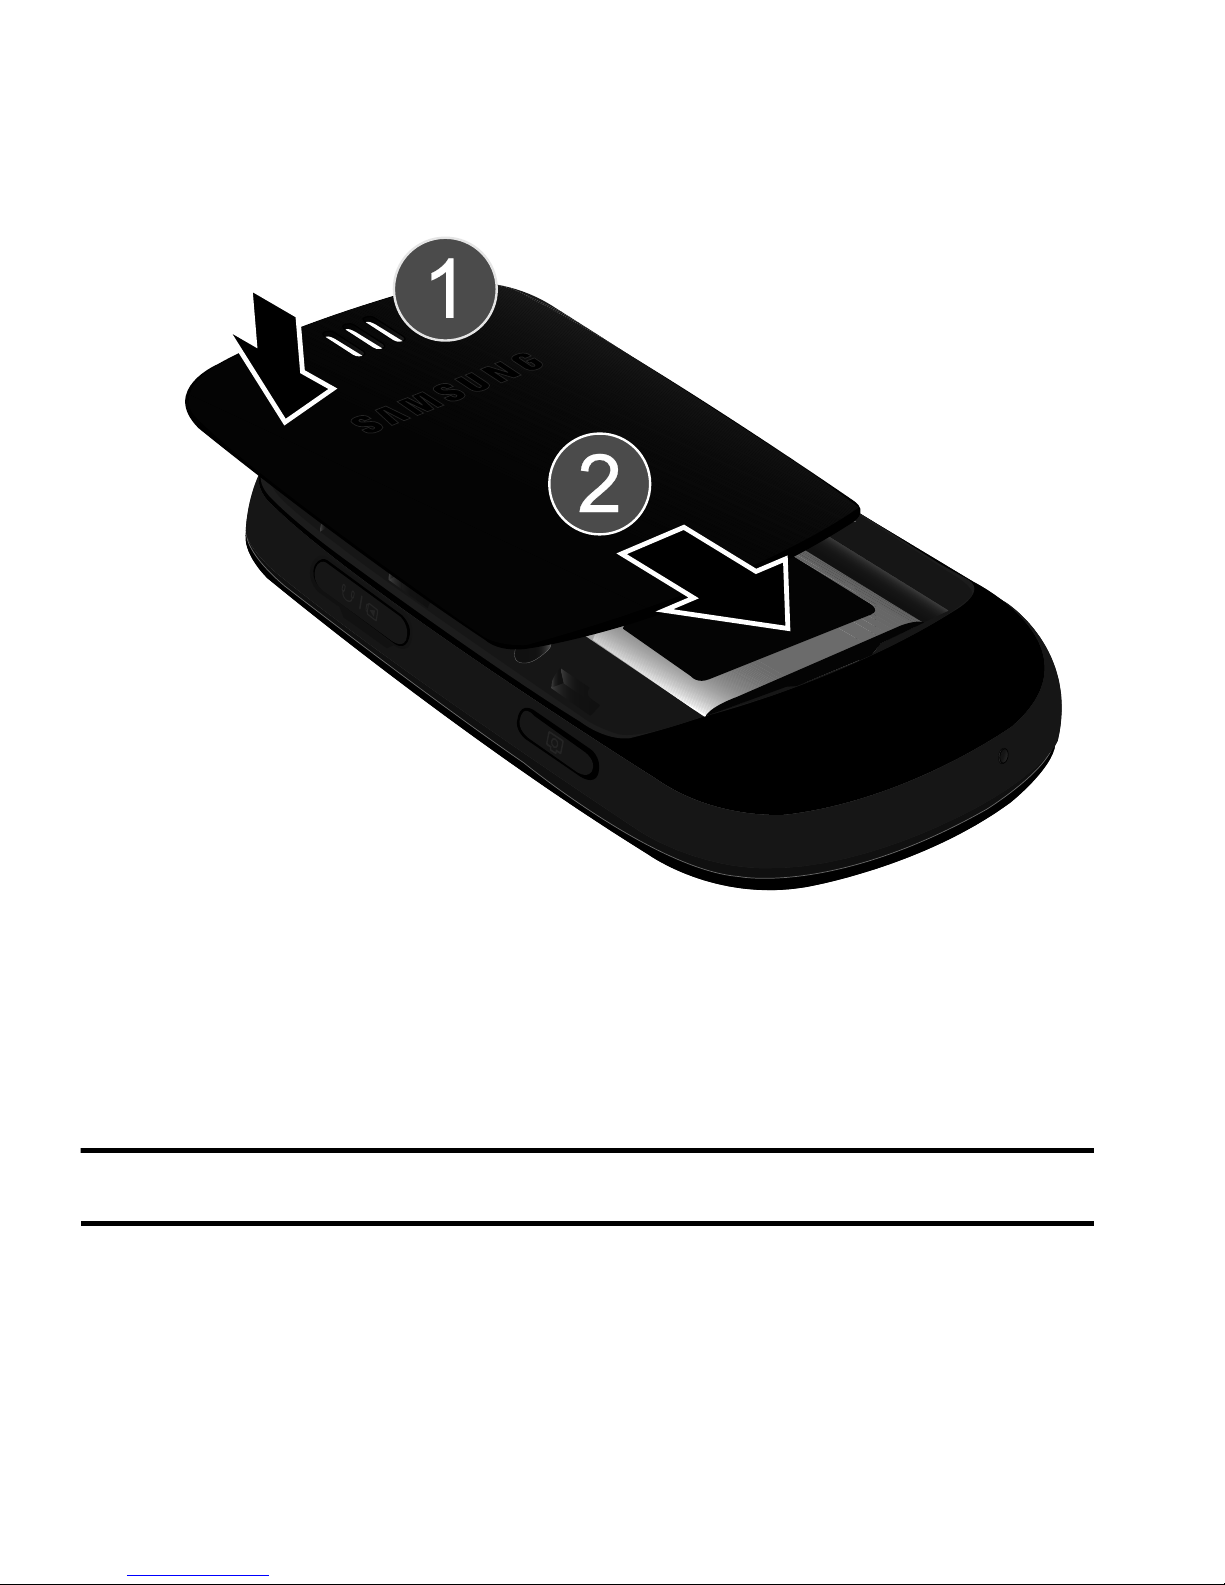
1.
Remove the battery cover by sliding the battery cover in the
direction of the arrow.
2. Carefully lift the battery cover away from the bottom of the
phone.
2
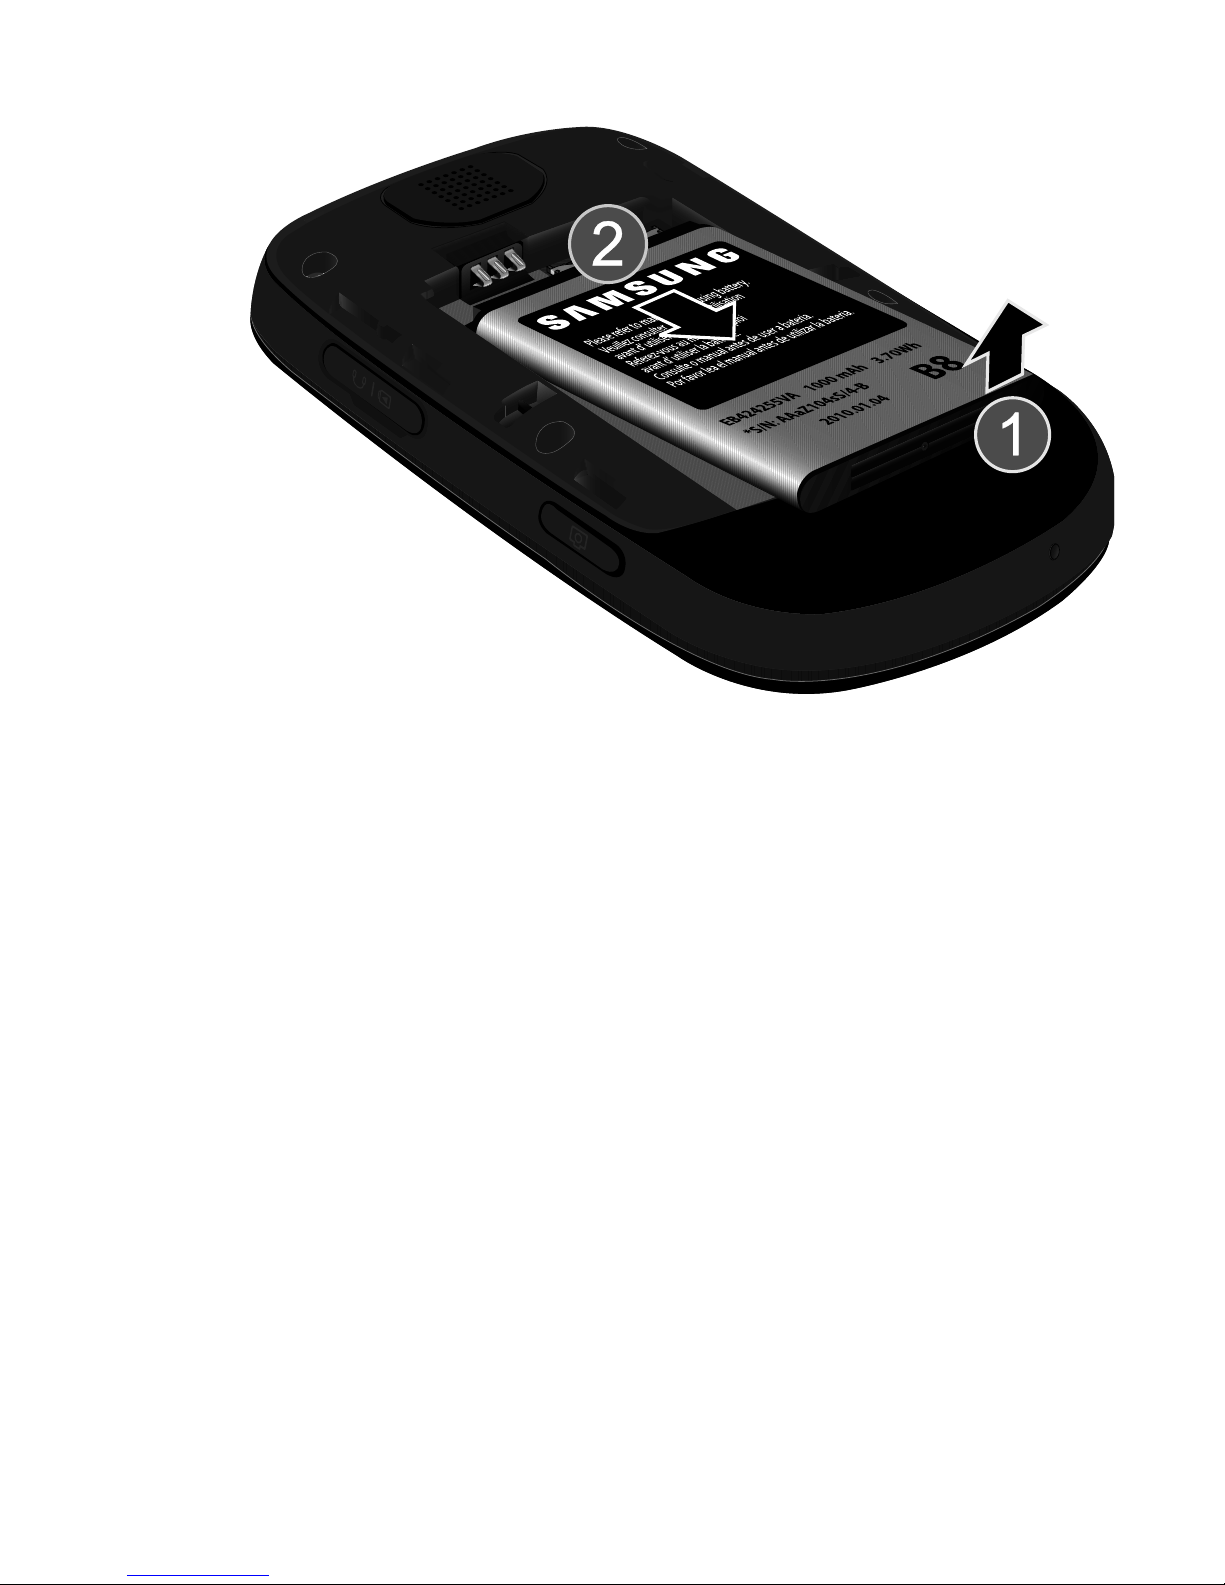
3.
Lift up and remove the battery.
3
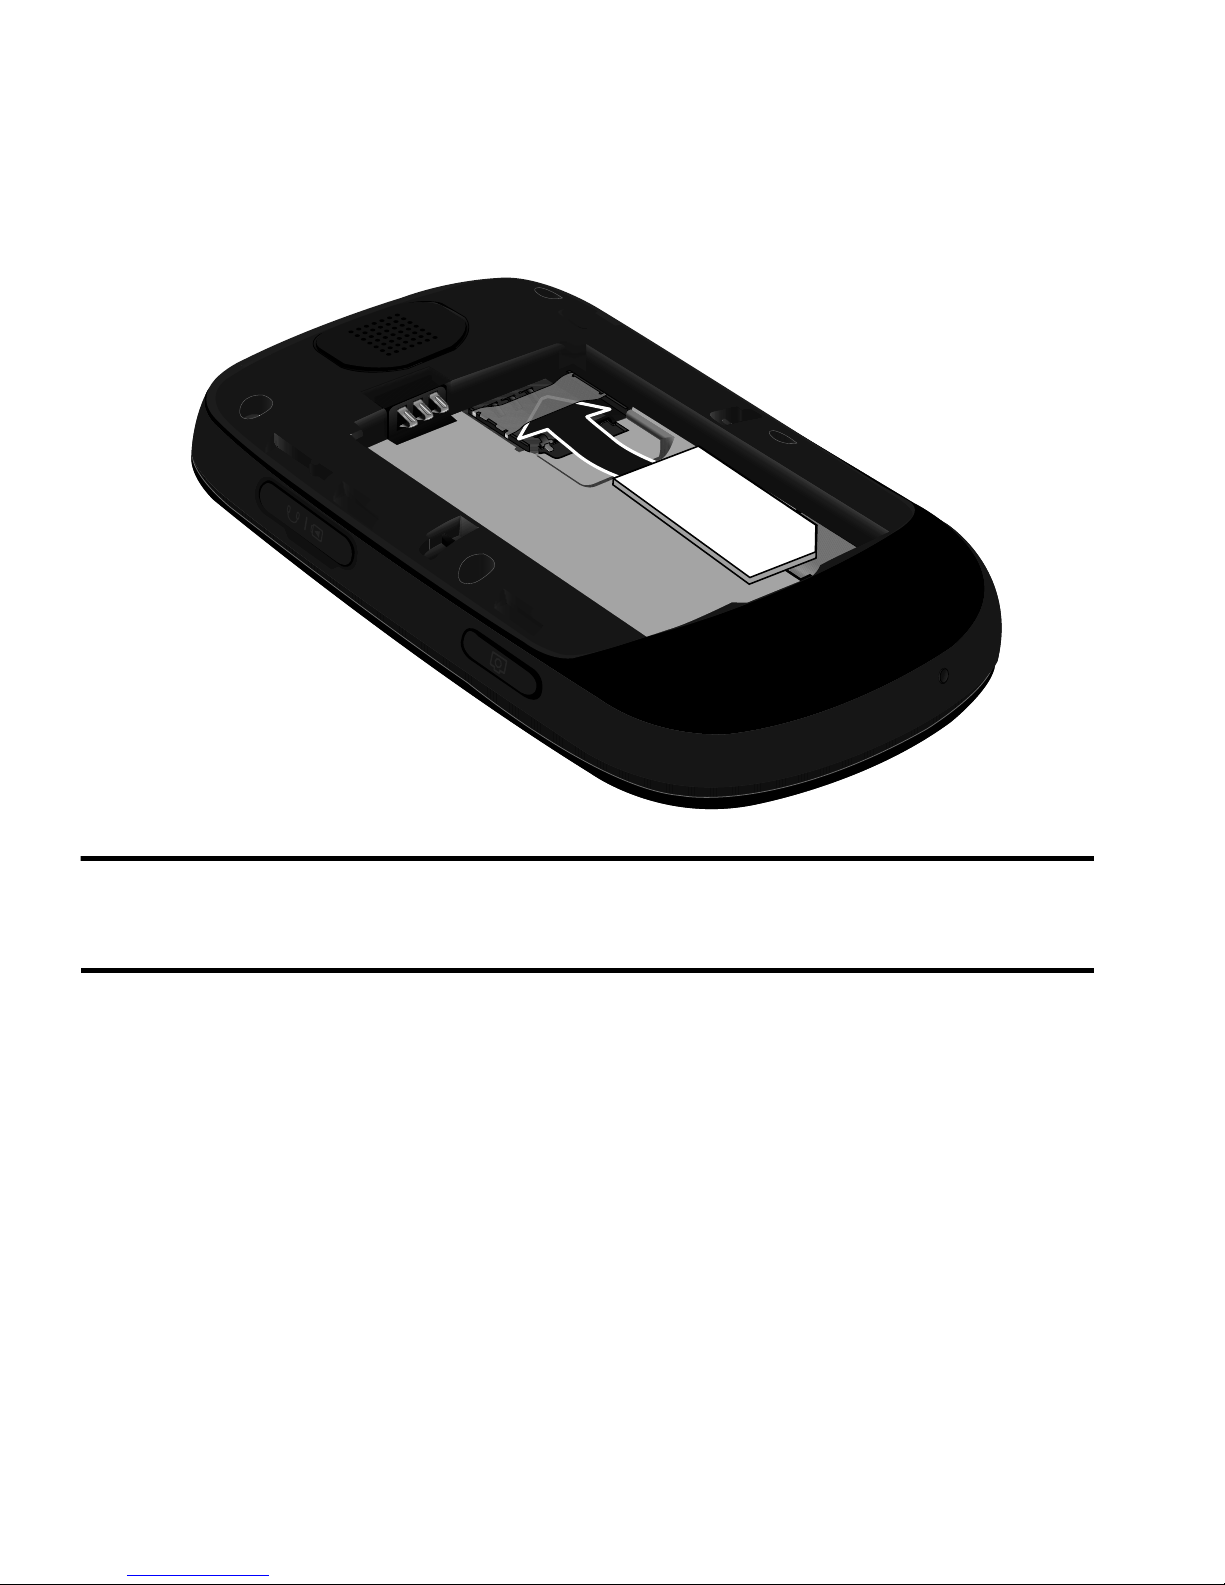
4.
Carefully slide the SIM card under the metal bracket and into the
SIM card socket until the card locks into place. Make sure that
the card’s gold contacts face into the phone and that the upperleft angled corner of the card is positioned as shown below.
Note:
If the SIM card is not installed correctly, the phone will not detect the SIM
card. Remove the battery and reinstall the card.
5. Replace the battery:
• Slide the battery back into the compartment with tabs on the
end aligned with slots in the phone.
4
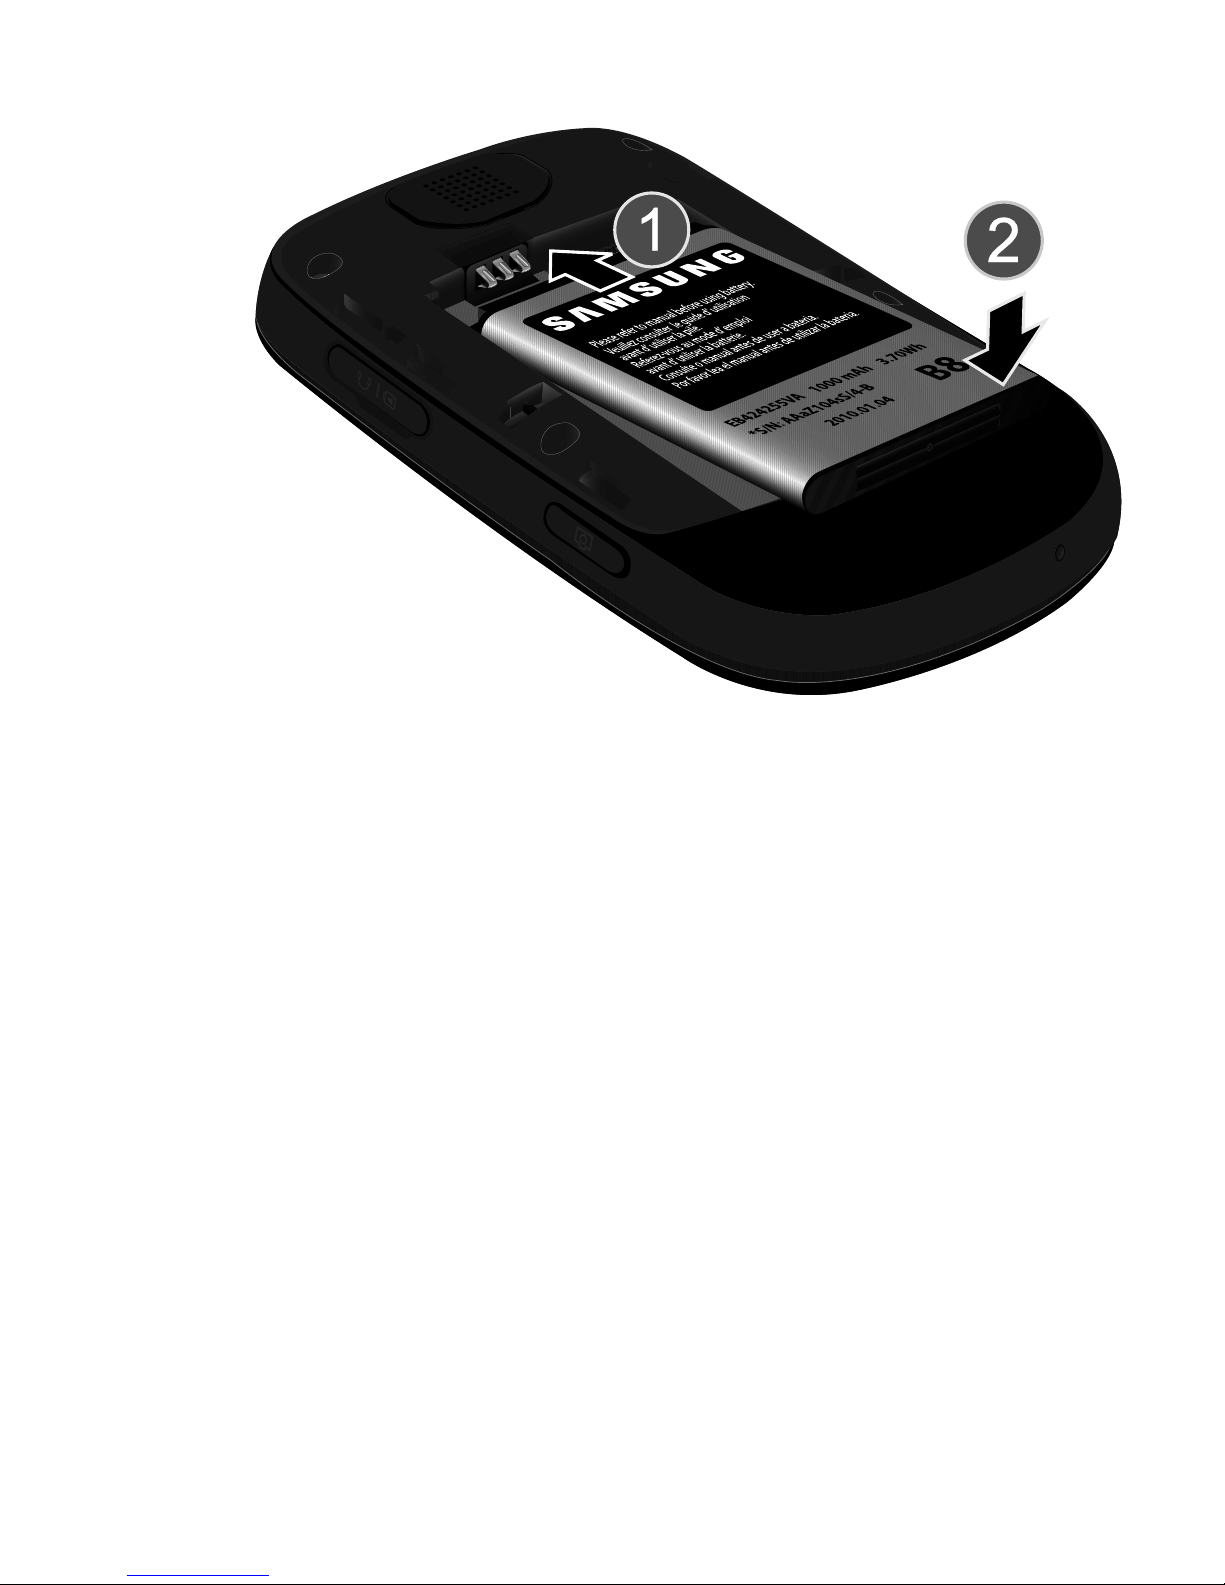
• Press the battery down until it clicks into place.
5
6.
Reinstall the battery cover by sliding it back onto the phone until
you hear it securely click. Make sure the battery is properly
installed before switching on the phone.
Installing or Removing the Memory Card
Your phone supports an optional memory card (microSD™) for data
storage of such things as music, pictures, video, or other files.
Note:
6
This phone supports memory cards of up to 16 GB capacity.
1. Use your fingernail to lift the memory card cover, then rotate it
downward.
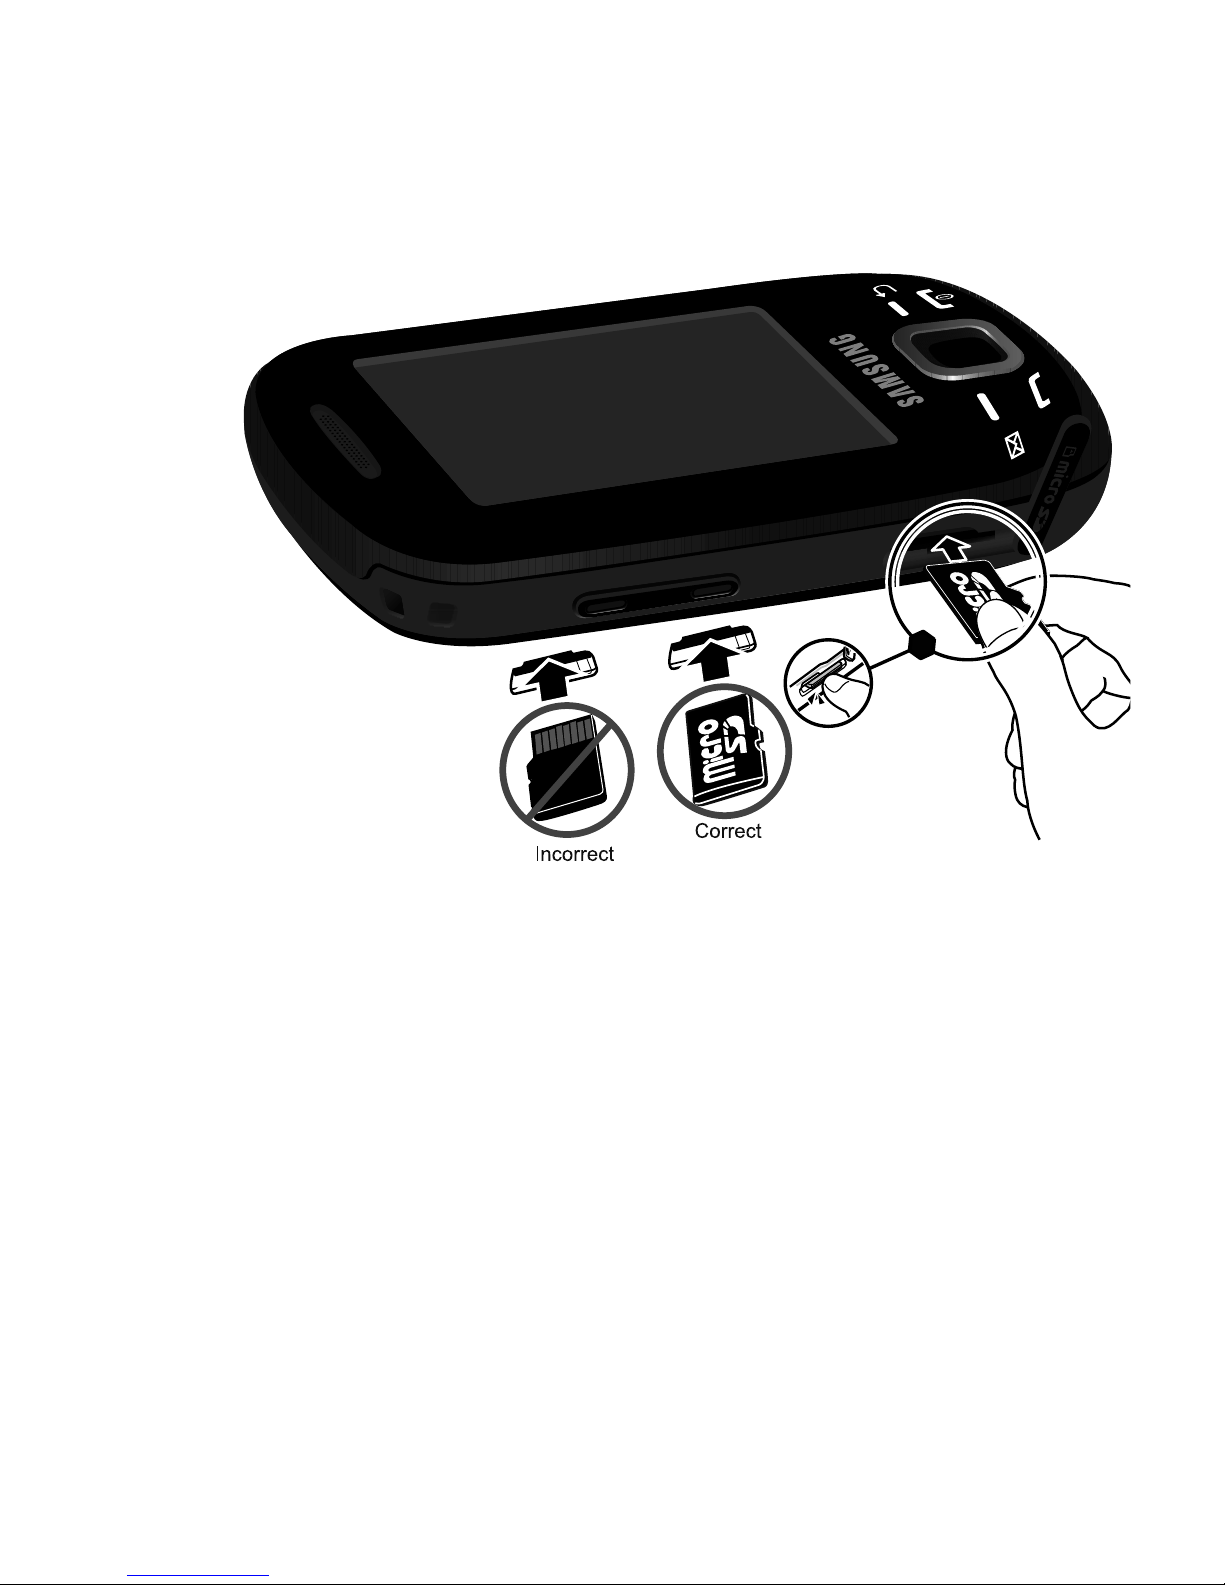
2.
Insert the microSD card into the slot with the gold contact pins
facing downward and the indentations on the card at the right
side (as shown below). Push lightly with your thumb or finger
until you hear a light click sound.
3. Rotate the memory card cover back to the closed position and
press it lightly.
To eject the microSD card from the slot, push the card in with your
thumb or finger until it releases.
7

Charging a Battery
Your phone is powered by a rechargeable Li-ion battery. A travel
adapter for charging the battery is included with your phone. Use only
approved batteries and chargers. Ask your local Samsung dealer for
further details.
You can use the phone while the battery is charging, but doing so
requires additional charging time.
Note:
You must fully charge the battery before using your phone for the first time. A
discharged battery recharges fully in approximately 4 hours.
1. With the battery installed, open the plastic cover on the right
side of the phone and plug the travel adapter’s connector into
the jack.
Important!:
Verify that the handset battery is installed prior to connecting the travel
adapter. If the battery is not installed and the travel adapter is
connected the handset continuously power cycles and prevents proper
operation.
8
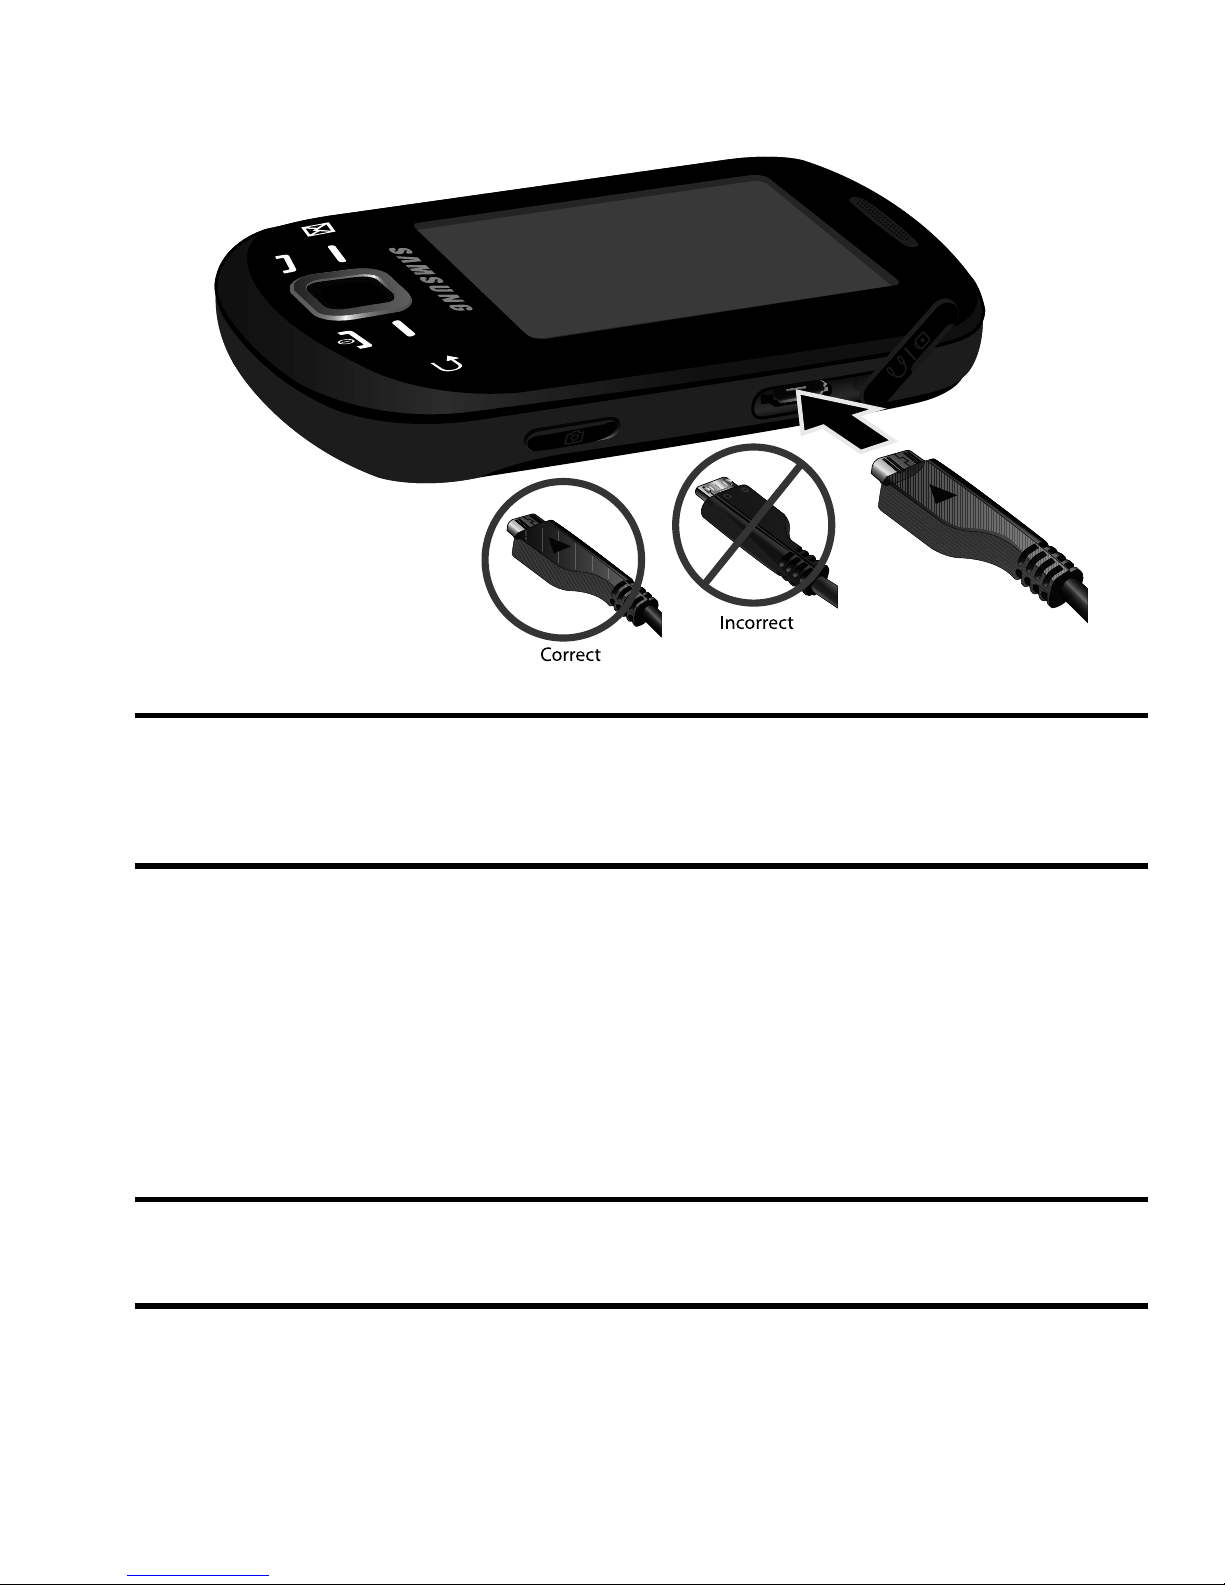
Note:
The previous illustration displays the incorrect method for connecting the
charger. If attempted, damage to the accessory port can occur, voiding the
phone’s warranty.
2. Plug the adapter’s power plug into a standard AC wall outlet.
3. When charging is finished, unplug the adapter’s power plug from
the AC wall outlet and then disconnect the travel adapter’s
connector from the phone.
4. Resecure the plastic cover over the interface jack on the phone.
Warning!:
Failure to unplug the travel adapter before you remove the battery can
damage the phone.
9
Low Battery Indicator
When the battery is weak and only a few minutes of talk time remain; a
warning tone sounds and the “Battery low” message repeats at regular
intervals on the display. In this condition, your phone conserves its
remaining battery power by dimming the screen.
When the battery level becomes too low, the phone automatically turns
off.
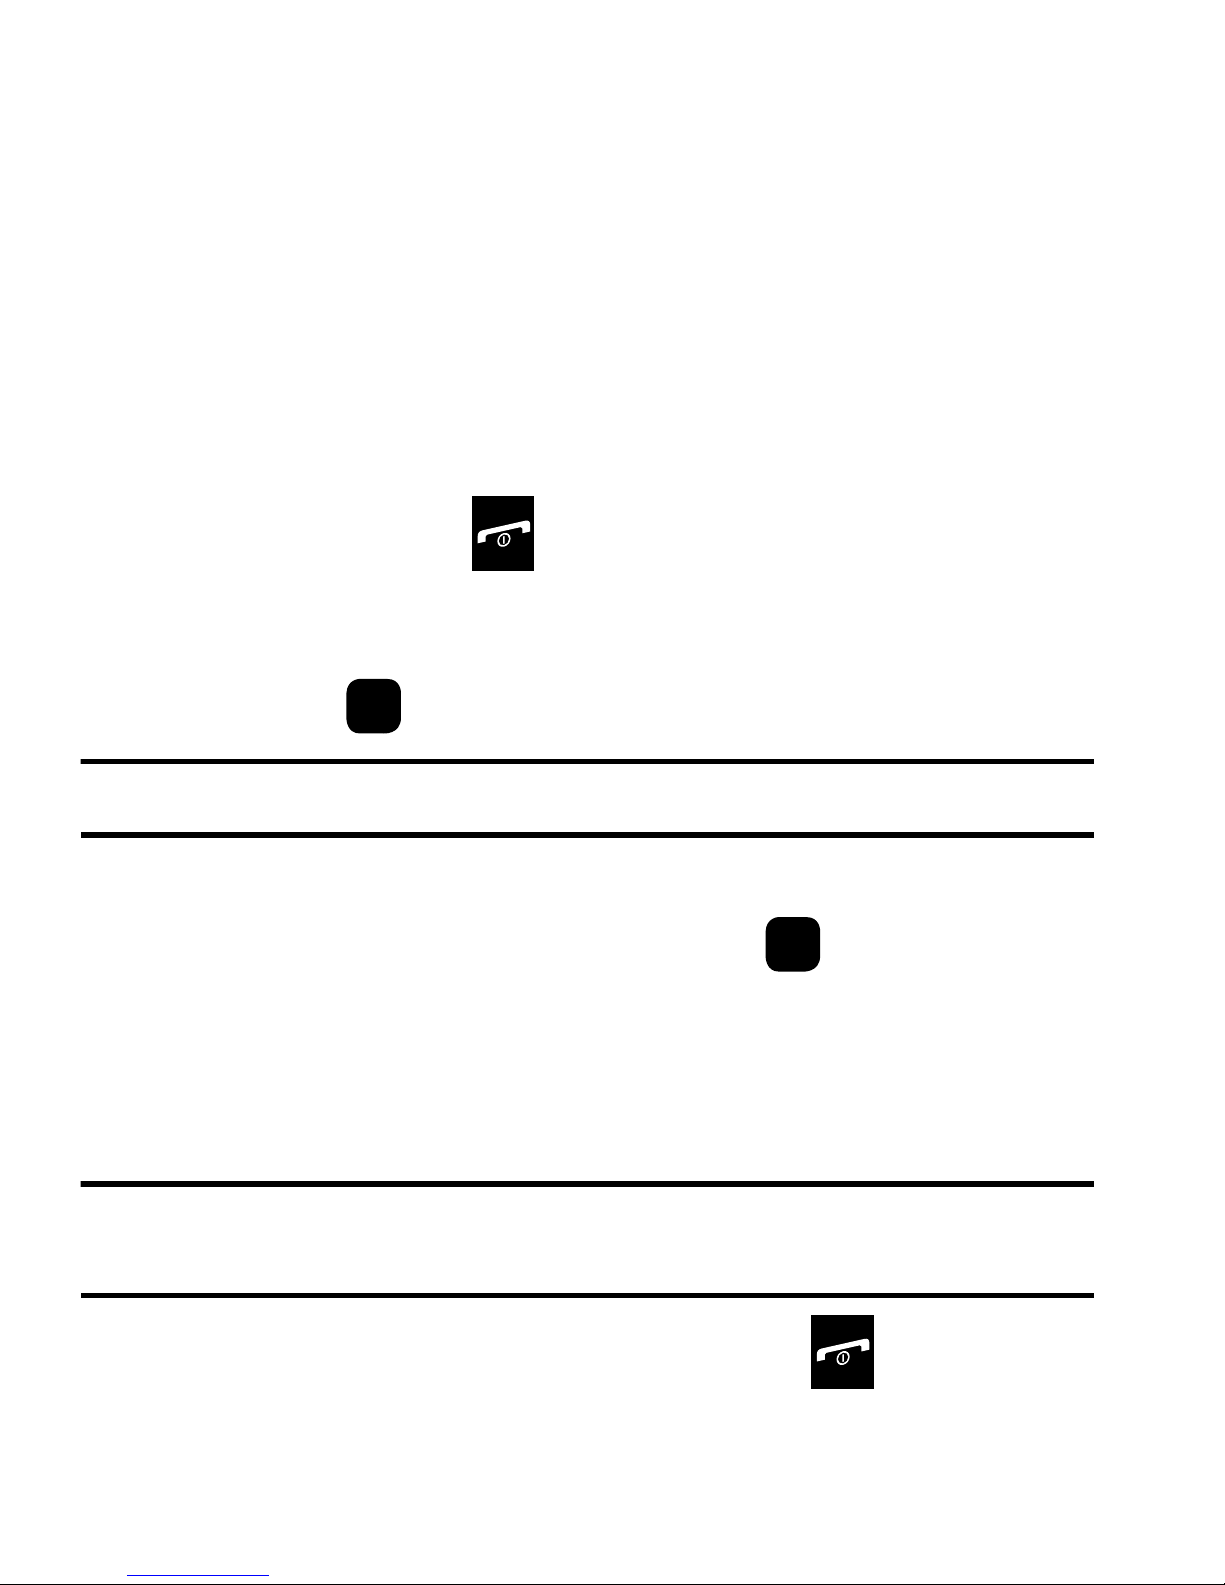
Switching the Phone On or Off
1. Press and hold the key until the phone switches on.
2. If the phone asks you to enter the phone password, use the
keypad to enter the password and press either the Confirm soft
key or the key.
Note:
For more information, refer to “Change phone password” on page 101.
3. If the phone asks for a PIN, use the keypad to enter the PIN and
press either the Confirm soft key or the key. For further
details, see “Check PIN code” on page 101.
The phone searches for your network and after finding it, you
can make or receive calls.
Note:
The display language is preset to Automatic at the factory. To change the
language, see “Language” on page 106.
4. To switch off the phone, press and hold the key until the
power-off image displays.
10

Setting Up Your Voice Mail
To set up voice mail:
1. From Idle mode, press and hold the key on the keypad.
You may be prompted to enter a password.
2. Follow the tutorial to enter your name and center address.
Note:
These steps may be different depending on your network.
Accessing Your Voice Mail
Press and hold the key on the keypad or use the phone’s menu to
access your voice mail. To access voice mail using the menu:
1. From Idle mode, press Menu and select Messaging → Voice
mail. Your phone dials the specified voice mail number.
2. When connected, follow the voice prompts from the voice mail
center.
11

Section 2: Understanding Your Phone
This section outlines some key features of your phone. It also displays
the screen and the icons that display when the phone is in use.
Features of Your Phone
Your phone is lightweight, easy to use, and offers many significant
features. The following list outlines a few of the features included in
your phone.
• Partial QWERTY keypad
• 1.3 Megapixel camera and camcorder with continuous 2x digital
zoom
• Bluetooth
• Text messaging and picture messaging capability
• MP3 player
• Web enabled
• Tools feature provides alarms, tasks, memo, calculator, tip calculator,
®
wireless technology
world clock, converter, timer, stopwatch.
12
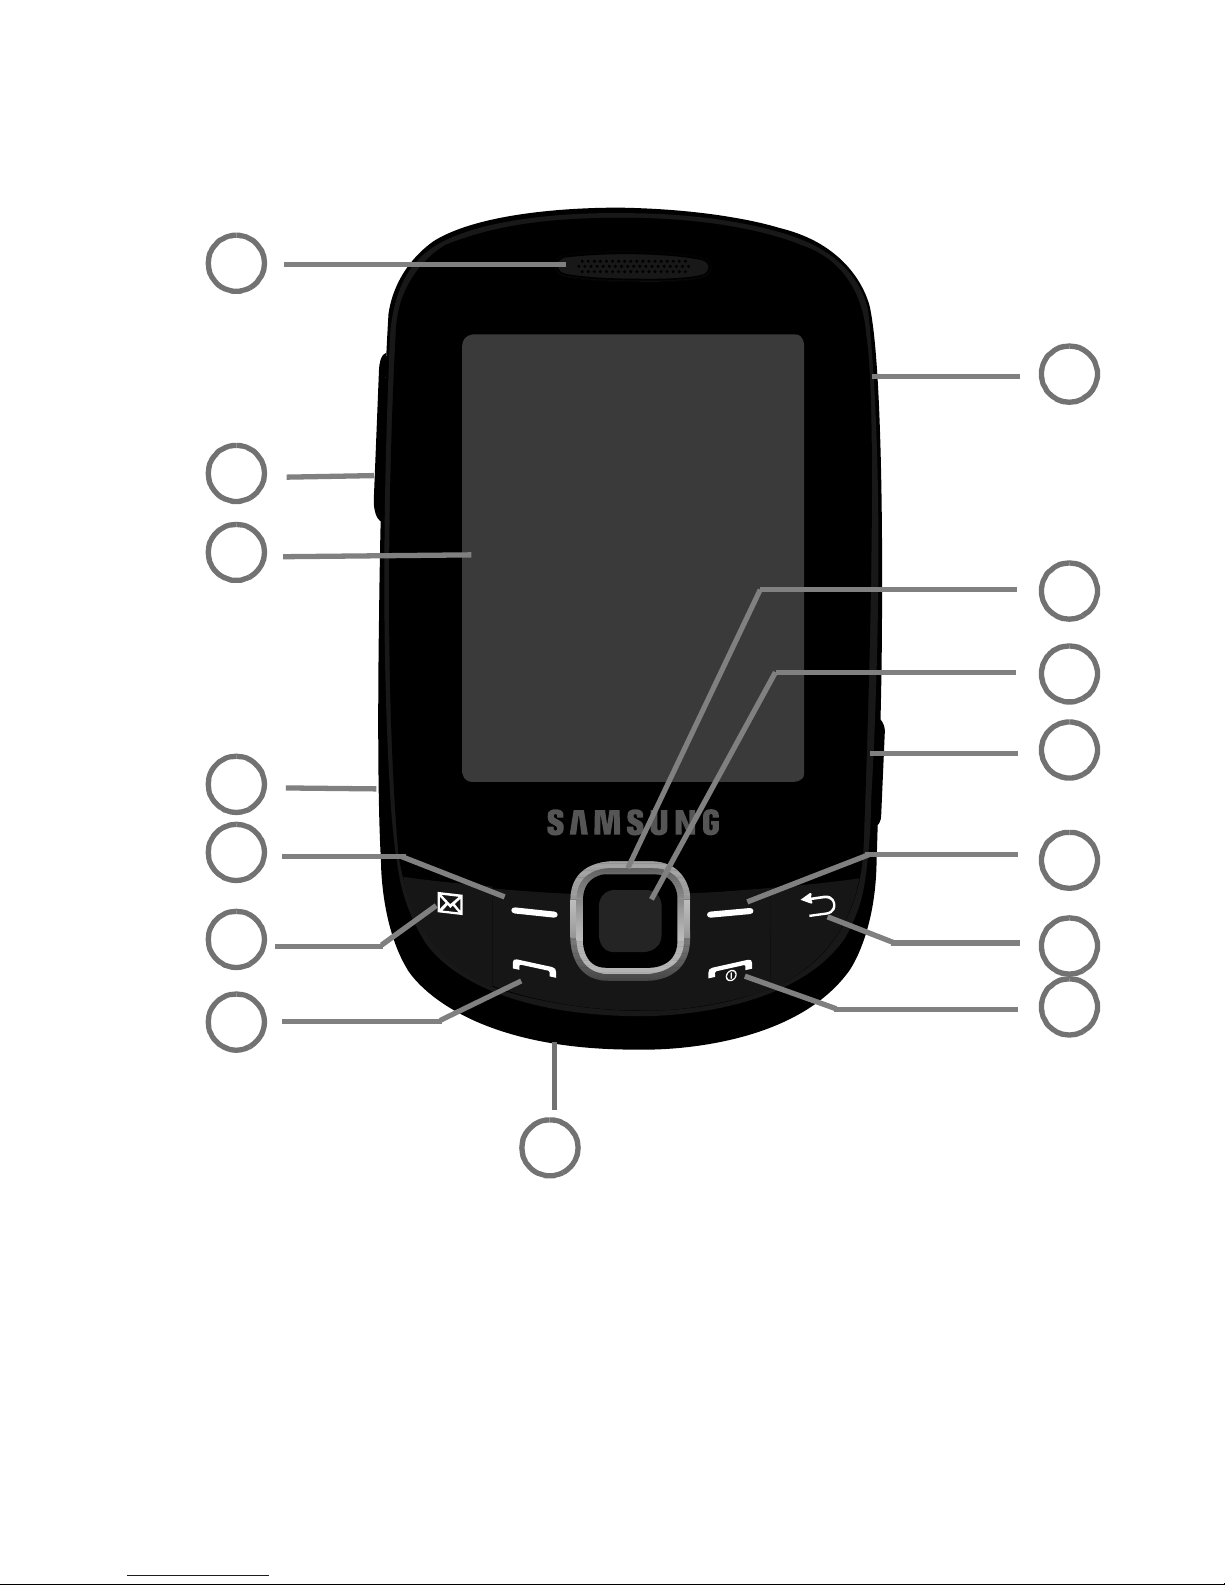
Front View of Your Phone
6
7
11
12
5
4
3
2
1
15
10
13
14
9
8
The following illustrations show the main elements of your phone:
Keys
The following list correlates to the illustrations.
1. Earpiece allows you to hear the other caller and the different
ring tones or sounds offered by your phone.
13

2.
Volume keys allow you to adjust the ringer in standby mode
(with the phone open) or adjust the speaker volume during a
call.
When receiving an incoming call, press to mute the ring
tone. Press and hold to reject a call.
3. Display shows all the information needed to operate your
phone, such as the received signal strength, phone battery
level, and time.
4.
Memory card slot
accepts optional microSD™ memory card for
additional data storage.
5. Left Soft key allows you to select soft key actions or menu
items corresponding to the bottom left line on the display screen.
6.
Messaging key
can be programmed as a shortcut to your favorite
messaging tool. You can reprogram the key at any time.
7. Send key allows you to make or answer a call. From Idle mode,
recalls the last number dialed or received when held down.
8.
Microphone
allows callers to hear you when you are speaking
to them. Also used in making voice note recordings.
9. Power On/Off (Exit) key ends a call. Press and hold for two
seconds to turn your phone on or off. While in the Menu mode, it
returns the phone to Idle mode and cancels your input.
10. Cancel/Clear
key
deletes characters from the display when
entering text. In Menu mode, it returns you to the previous menu
level.
11. Right Soft key allows you to select soft key actions or menu
items corresponding to the bottom right line on the display
screen.
14

12.
Camera key launches the camera and takes pictures when you
are in camera mode.
13. OK (Select) key allows you to accept the choices offered when
navigating through a menu.
14. Navigation key scrolls through the phone’s menu options and
acts as a shortcut key from Idle mode.
In Idle mode:
• Up key: accesses Call history.
• Down key: accesses Browser.
• Left key: accesses the Create Message screen.
• Right key: accesses the Messaging Inbox.
15. Power/Accessory Interface connector allows you to connect
a power cable or optional accessories, such as a USB/data
cable or a hands-free headset.
Note:
Your phone supports memory cards up to 16G capacity.
15
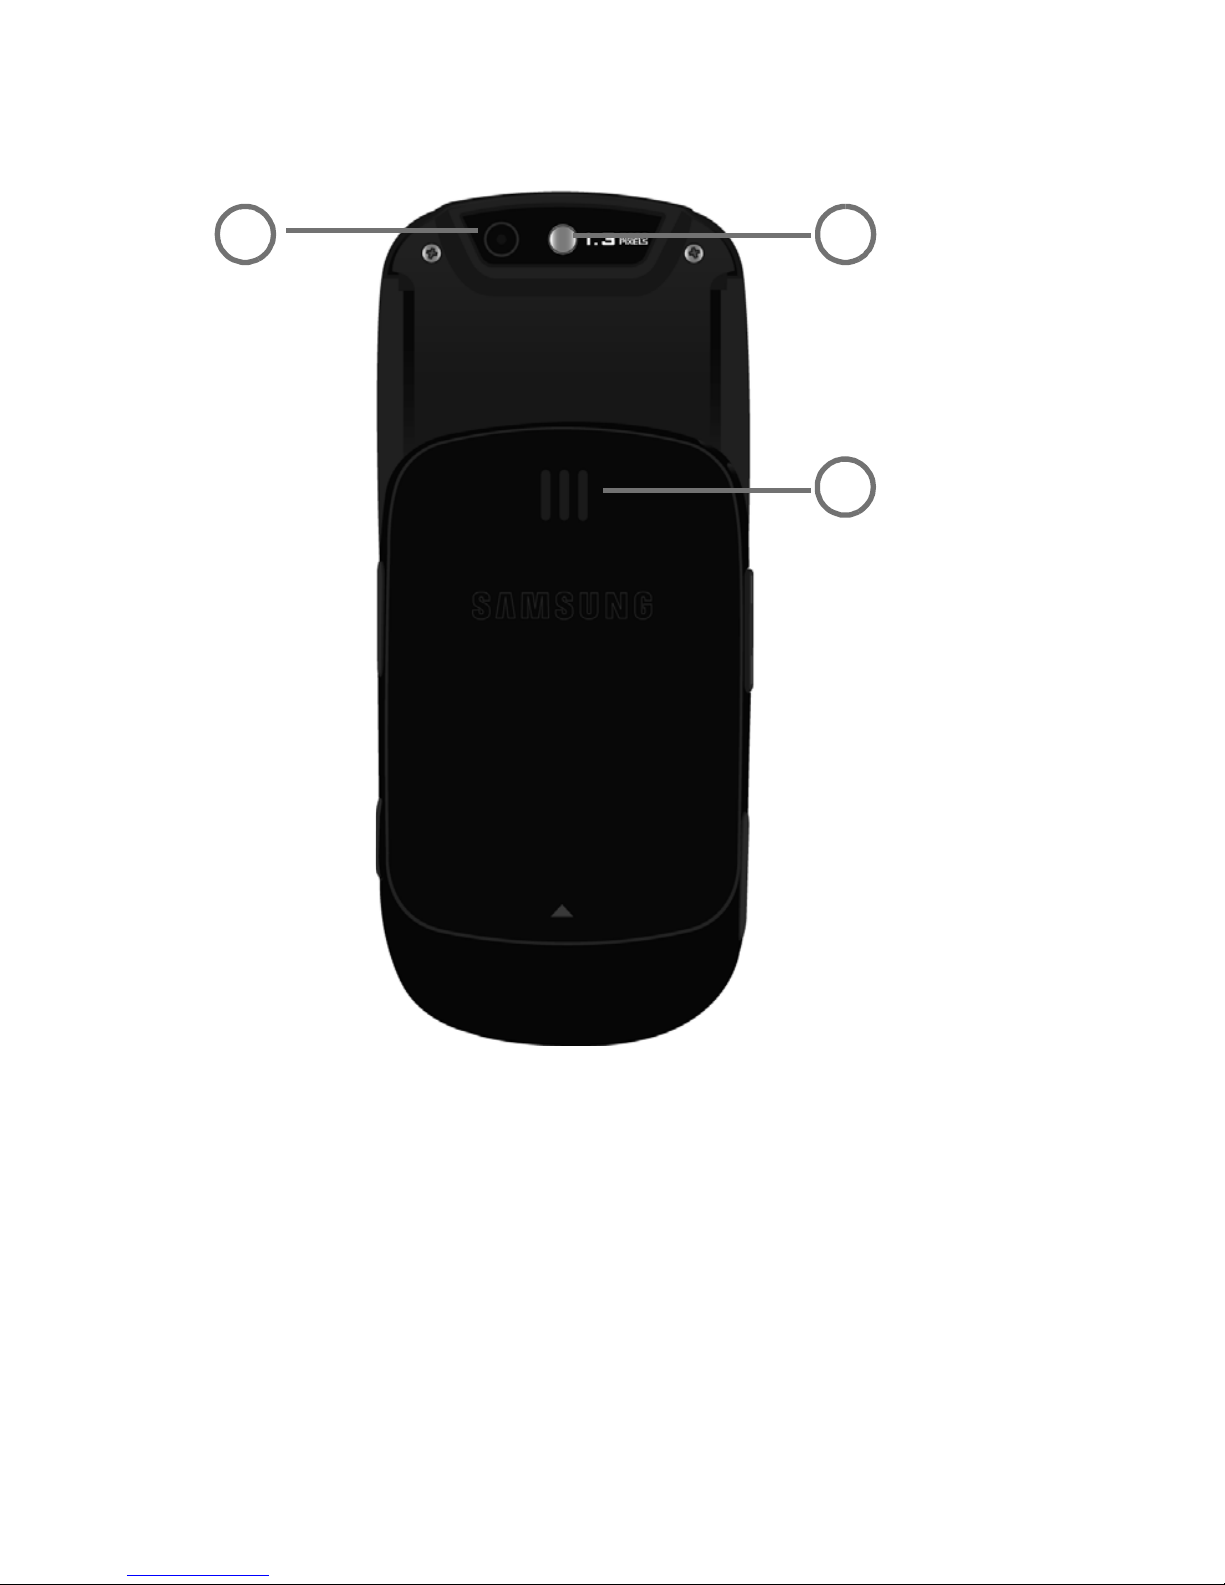
Back View of Your Phone
2
1
3
The following illustration shows the back, open view of the phone.
1.
2.
3.
Camera lens
Mirror
allows you to center the camera lens for self-portraits.
Speaker
allows you to take photos and videos.
allows you to hear the camera sounds and music
played on the phone.
16
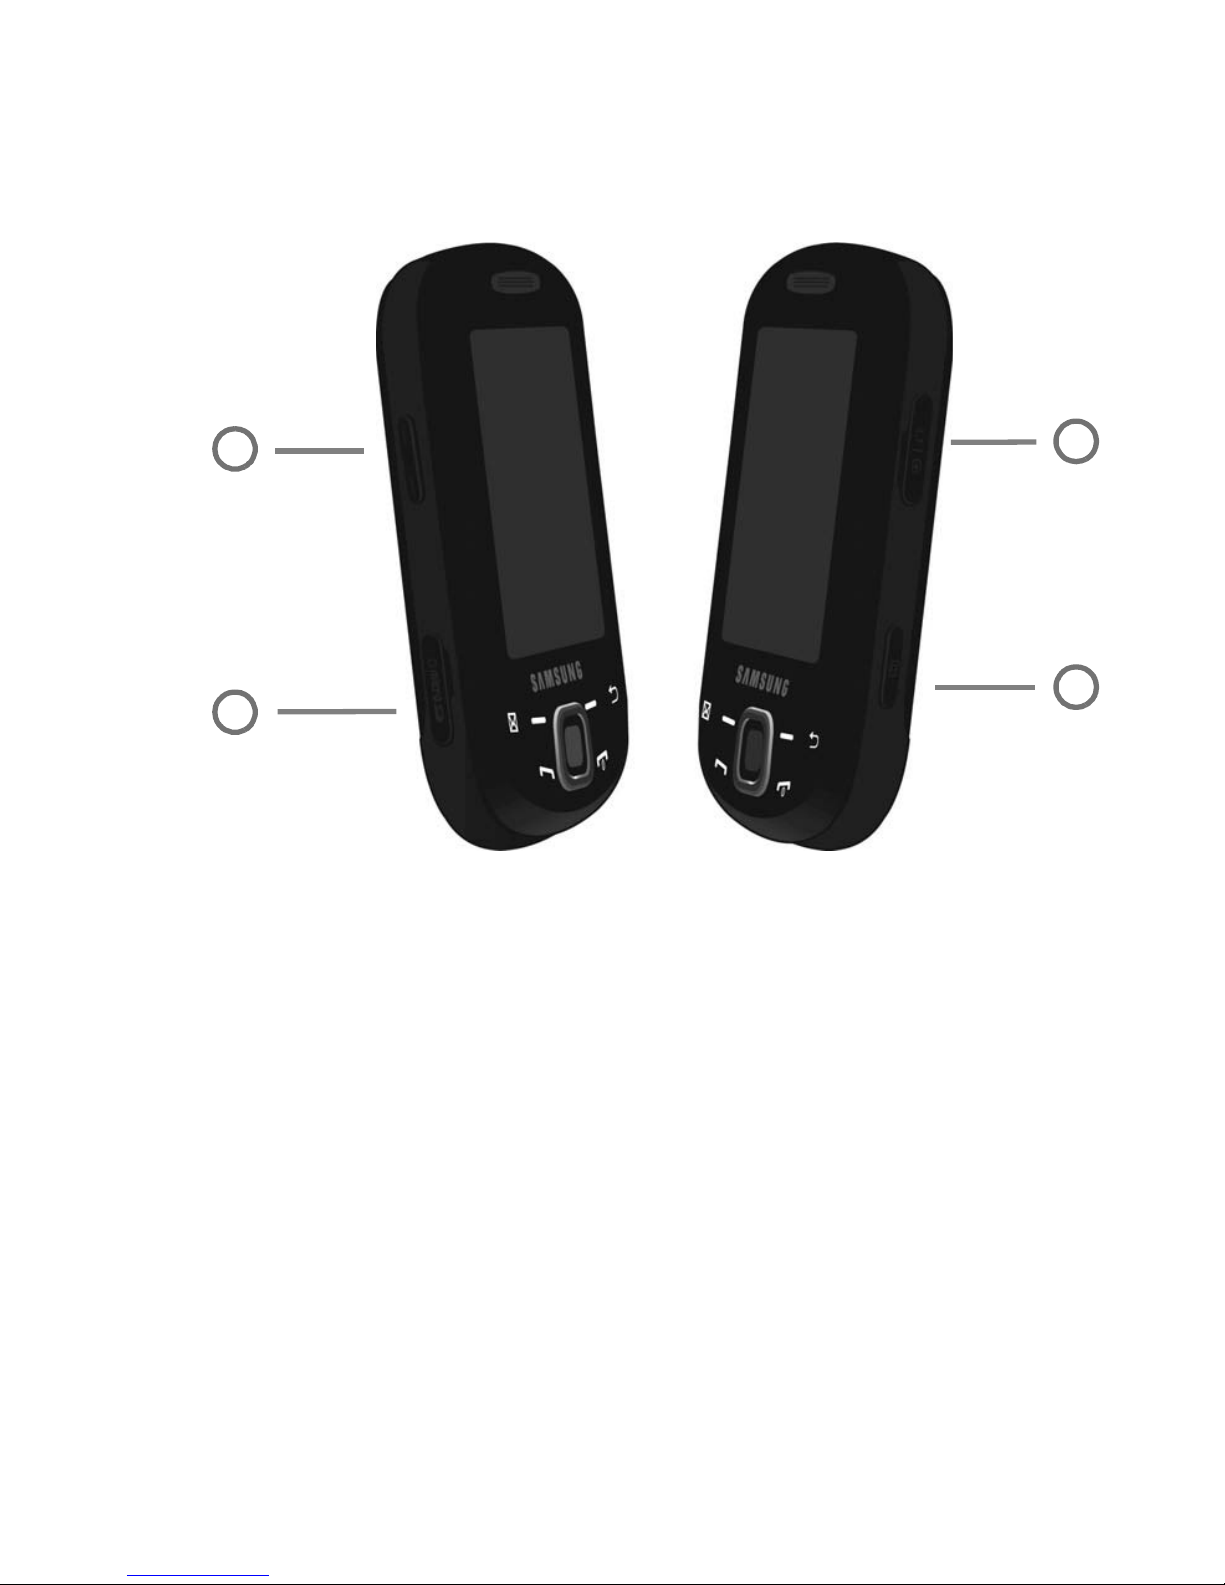
Side Views of Your Phone
4
3
2
1
The following illustrations show the external elements of your phone
1.
Volume keys allow you to adjust the ring volume in standby
mode (with the phone open) or adjust the speaker volume
during a call.
When receiving an incoming call, it mutes the ring
tone. Press and hold to reject a call.
2.
3. Power/Accessory Interface connector allows you to connect
Memory card slot
used to install an optional microSD™
(memory) card for additional data storage.
a power cable or optional accessories, such as a USB/data
cable or a hands-free headset.
4. Camera key launches the camera and allows you to take
pictures when you are in camera mode.
17
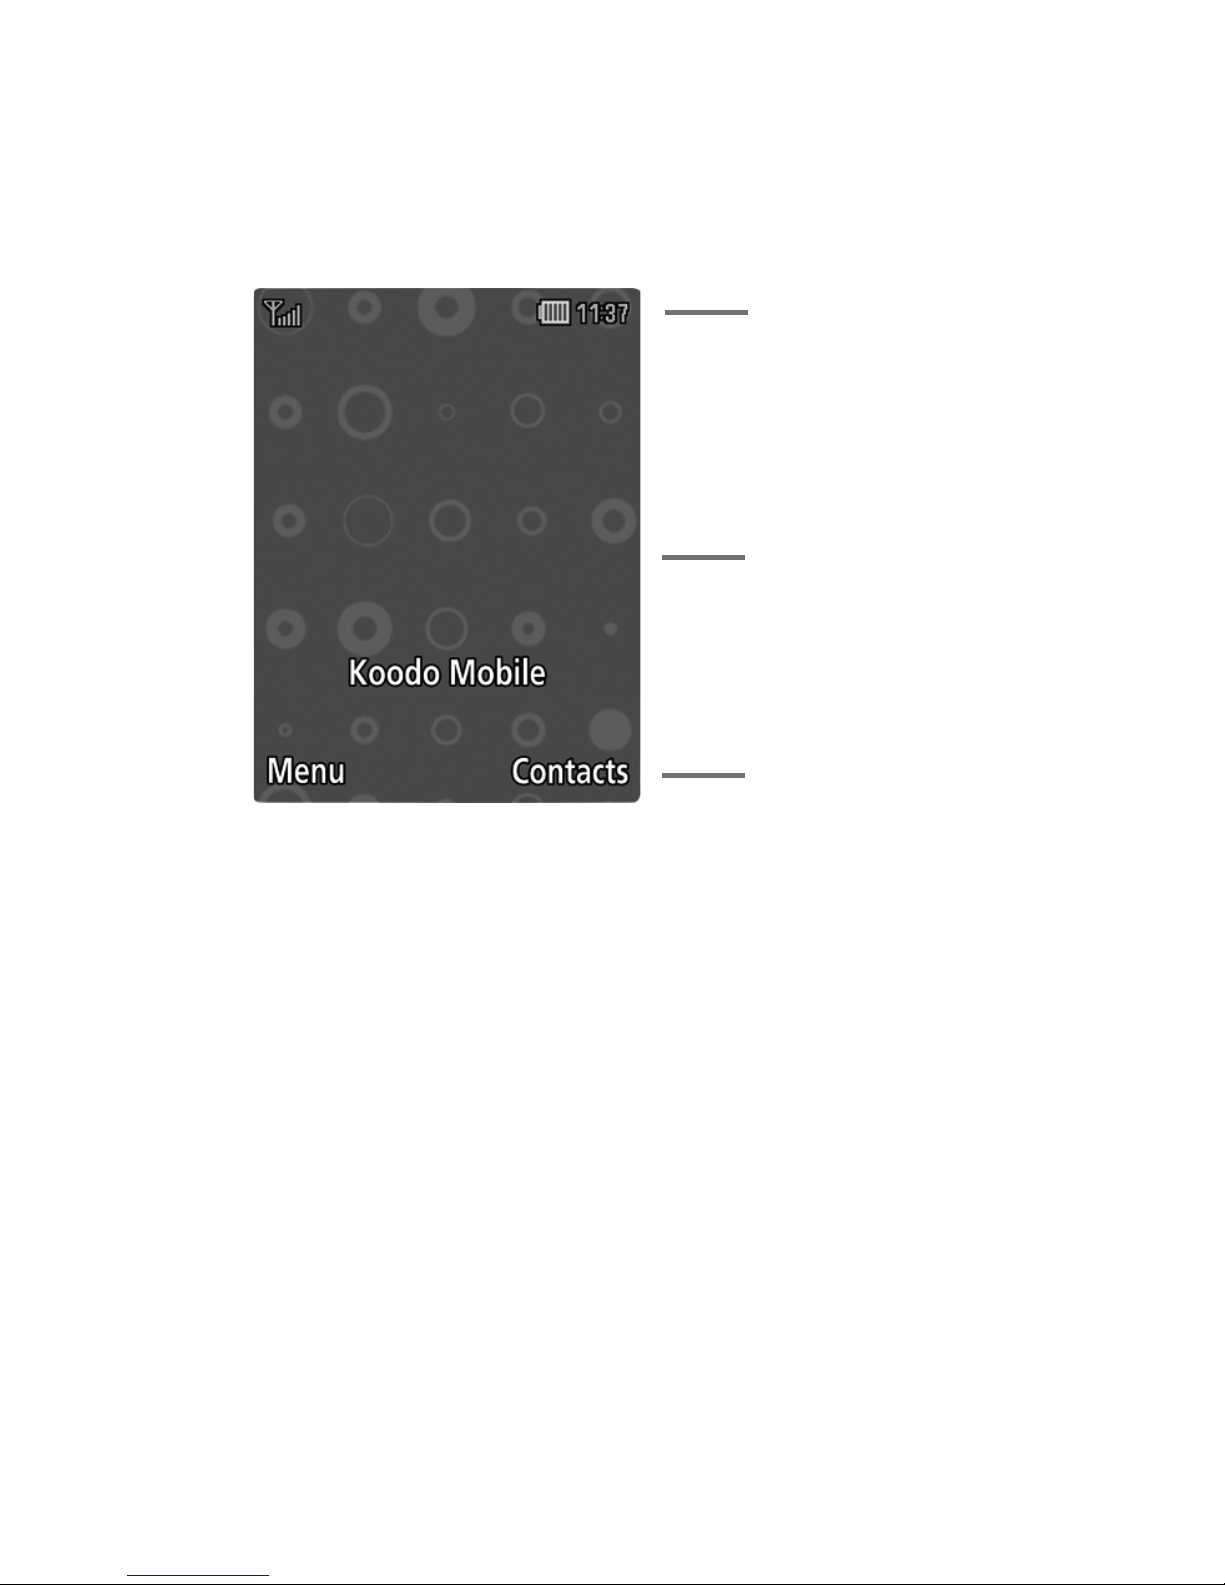
Display Layout
Icons
Text
Soft function
Keys
Your phone’s display screen provides a wealth of information about
your phone’s status and options. The display has three areas:
View Tab
When you receive new messages, icons display in two locations on the
phone’s screen: the Messages tab and in the icon bar at the top of the
screen.
18
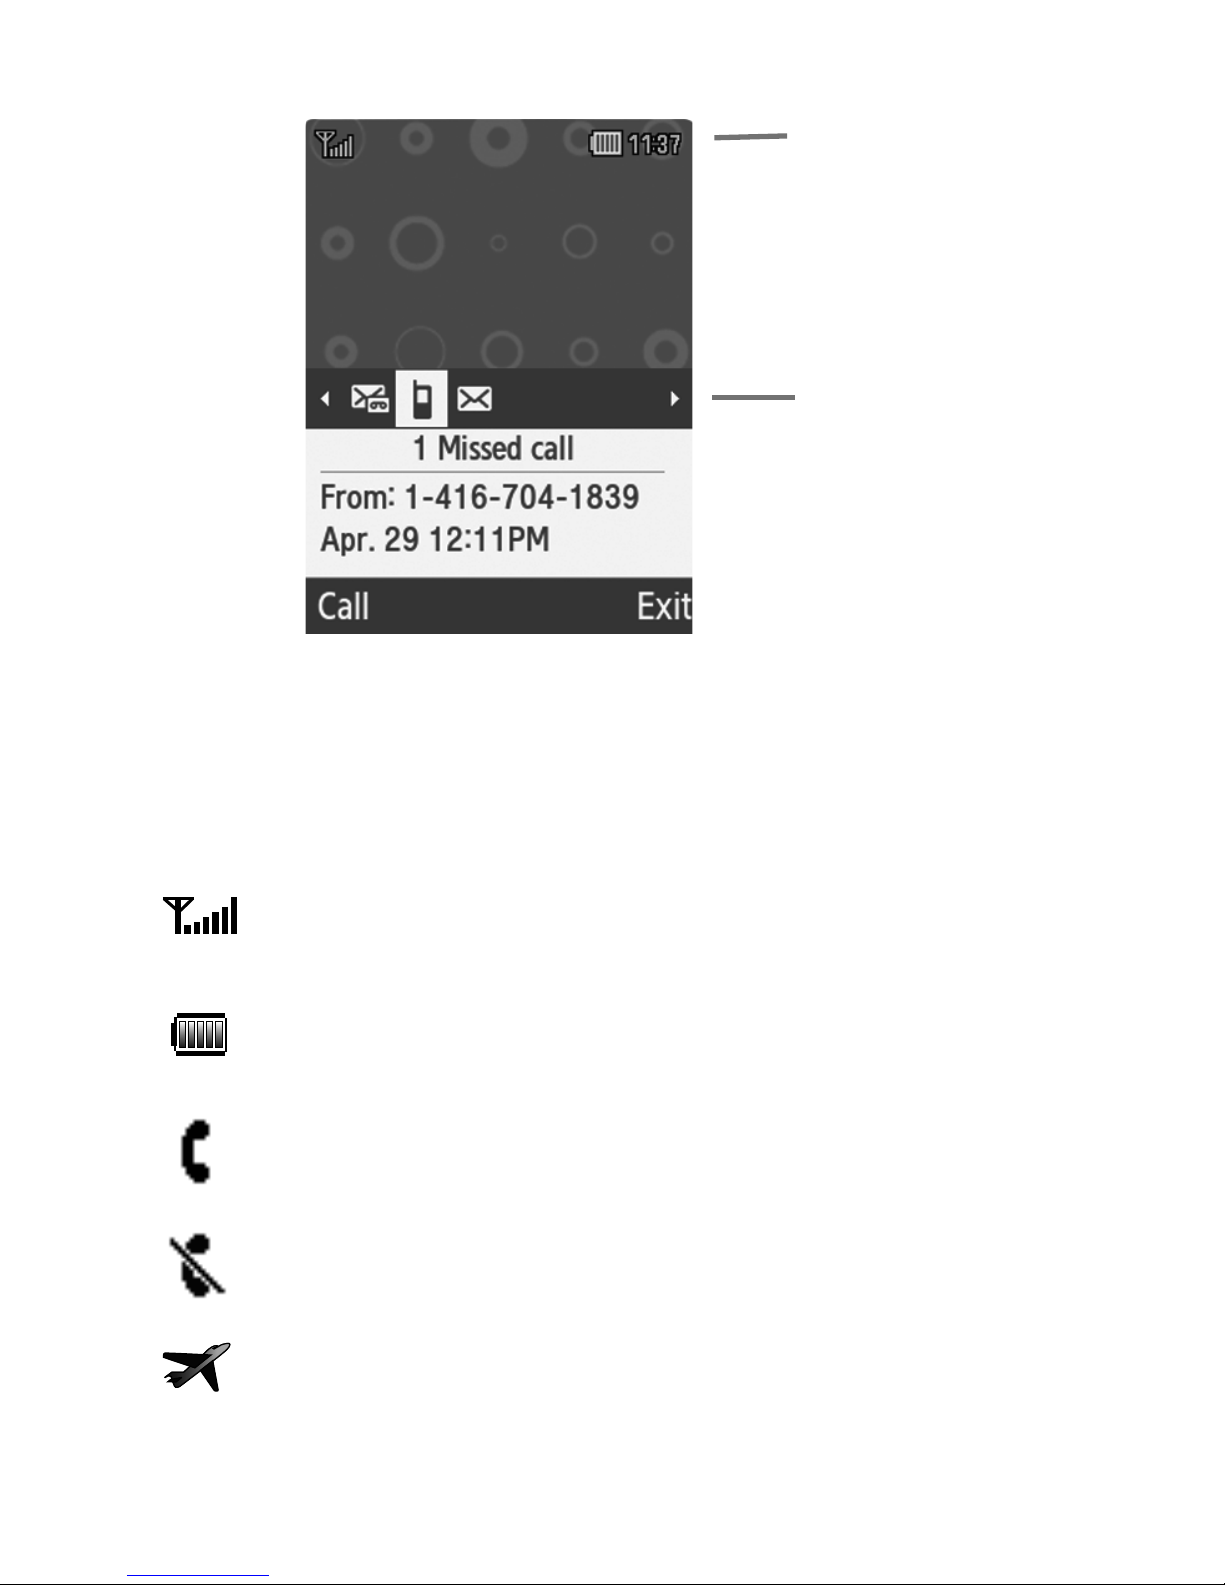
Icons
Message icons
Messages
tab
display here
This list identifies symbols you’ll see on your phone’s display screen:
Shows the received signal strength. The greater the number of
bars, the stronger the signal.
Shows the level of your battery. The more bars you see, the more
power remains.
Displays when a call is in progress.
Displays when the phone is not receiving a signal.
Displays when the phone is in Airplane mode.
19
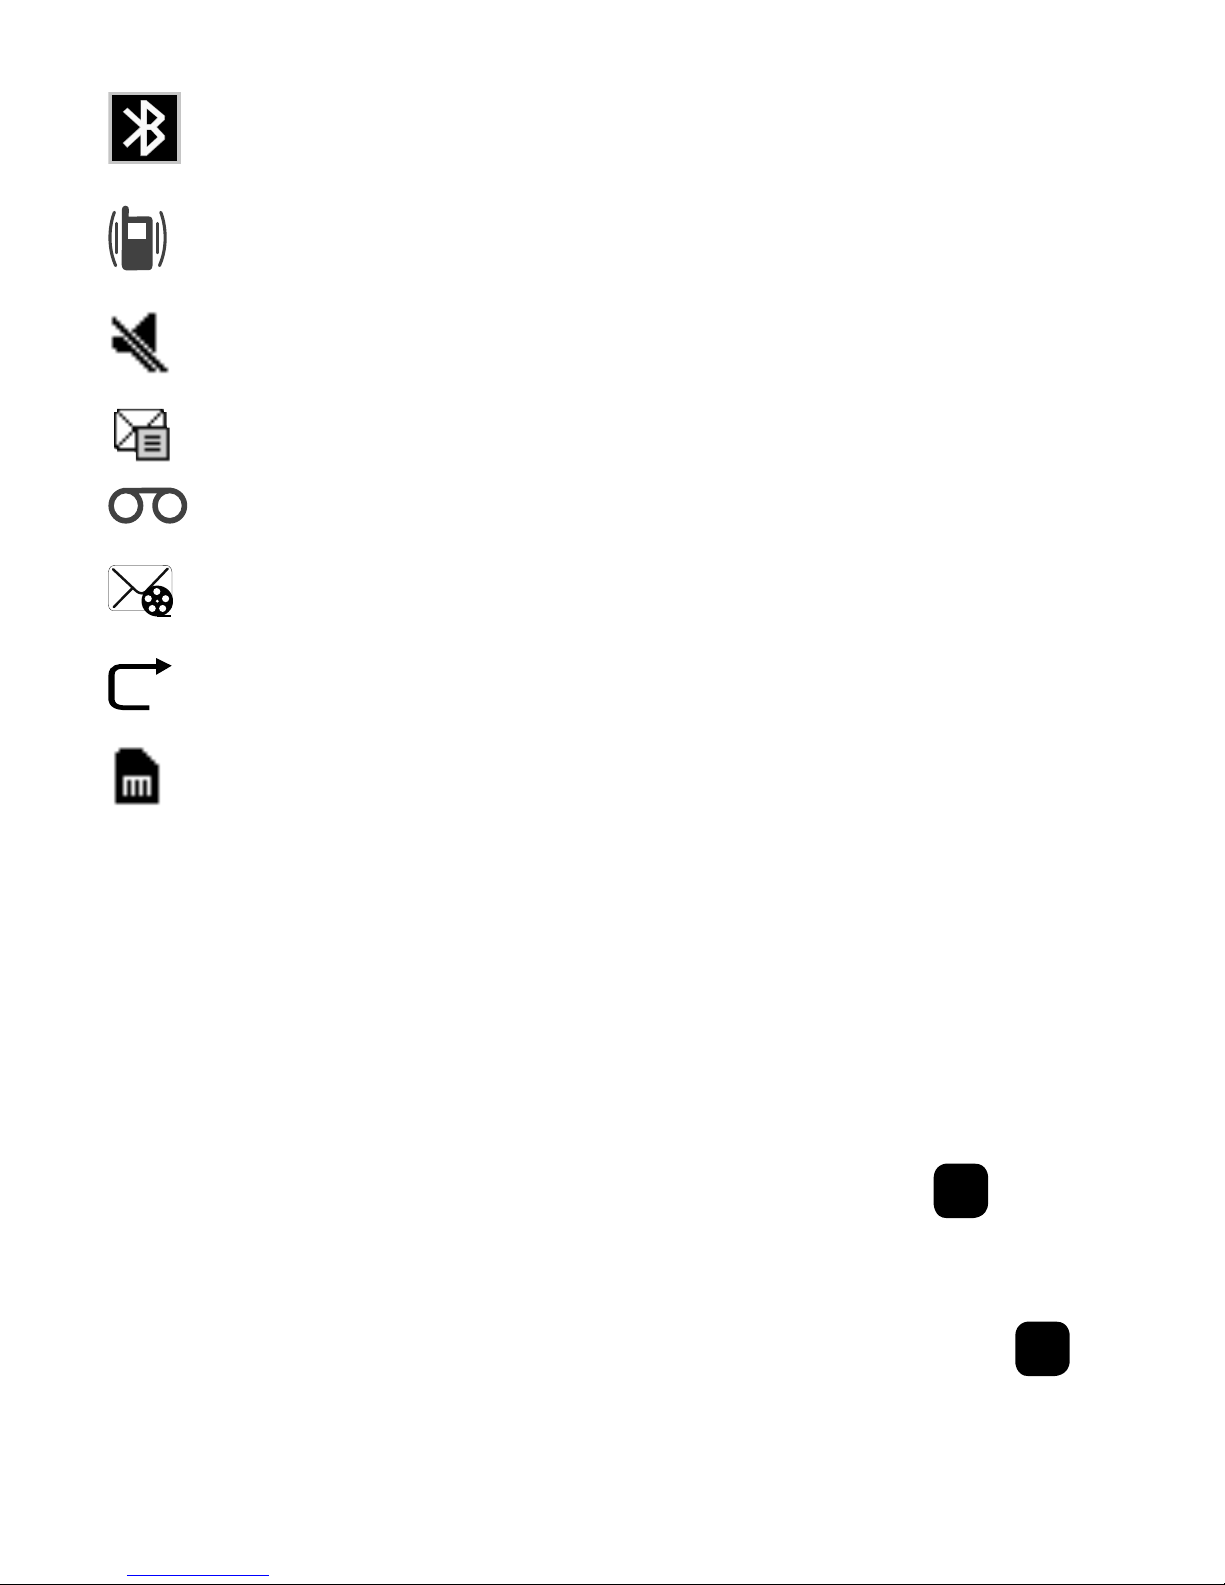
Displays when Bluetooth wireless technology is active.
Displays when Vibration Mode is active.
Silent profile is active.
Displays when a new text message is received.
Displays when a new voice mail is received.
Displays when a new picture message is received.
Displays when the Call Forwarding feature is active.
Memory card is inserted.
Menu Navigation
To navigate the phone’s menus and sub-menus, scroll using the
Navigation keys.
1. From Idle mode, press Menu.
2. Scroll using the Navigation keys to reach the desired menu (for
example, Settings). Press the Select soft key or the key to
enter the menu.
3. If the menu contains sub-menus, (for example, Personalize),
highlight a sub-menu and press the Select soft key or the
key to access it.
20

If the menu you selected contains further options, repeat this
step.
4. To scroll through the menus, press the Up or Down Navigation
keys.
5. To confirm the chosen setting, press the Select soft key or the
key.
6. To return to the previous menu level, press the Back soft key or
the key.
7. To exit the menu without changing the settings, press the
key.
Backlight
A backlight illuminates the internal display and the keypad whenever a
key is pressed. It dims and then turns off when no keys are pressed for
a specified period of time, depending on the settings within the
Backlight
menu.
The On setting determines how long the keypad backlight is on at full
brightness. The Dim option determines how long the keypad backlight
remains on in the dimmed state.
To specify the length of time the backlight is active, access the
Backlight time
1. From Idle mode, press Menu and select Settings →
Personalize
menu:
→ Display settings → Backlight time.
2. Highlight On and press . Select the duration from the
field. Choose between 5 seconds, 15 seconds, or
On
30 seconds
.
21

3.
Press the
Down
key to set the Dim option. Select the time the
Dimming mode is on. Choose between Off,
5 seconds, 15 seconds, or 30 seconds.
4. Press the Save soft key to retain your settings.
Brightness
You can adjust the display brightness to aid visibility in different lighting
conditions.
1. From Idle mode, press Menu and select Settings →
Personalize
1. Press the Left or Right Navigation keys to adjust the brightness
→ Display settings → Brightness.
level (1 to 5).
2. Press Save to save your changes or Back to cancel.
22
 Loading...