

Page 1

SGH-N105
PORTABLE CELLULAR
TELEPHONE
User’s Guide
Please read this manual before operating your
phone, and keep it for future reference.
Page 2

2 SGH-N105 July 23, 2001
Page 3

Intellectual Property
All Intellectual Property, as defined below, owned by or which is
otherwise the property of Samsung or its respective suppliers
relating to the SAMSUNG Phone, including but not limited to,
accessories, parts, or software relating thereto (the “Phone
System”), is proprietary to Samsung and protected under federal
laws, state laws, and international treaty provisions. Intellectual
Property includes, but is not limited to, inventions (patentable
or unpatentable), patents, trade secrets, copyrights, software,
computer programs, and related documentation and other
works of authorship. You may not infringe or otherwise violate
the rights secured by the Intellectual Property. Moreover, you
agree that you will not (and will not attempt to) modify, prepare
derivative works of, reverse engineer, decompile, disassemble, or
otherwise attempt to create source code from the software. No
title to or ownership in the Intellectual Property is transferred to
you. All applicable rights of the Intellectual Property shall
remain with SAMSUNG and its suppliers.
Samsung Telecommunications America (STA),
Inc.
Headquarters: Customer Care Center:
1130 E. Arapaho Road 1601 E. Plano Parkway, Suite 150
Richardson, TX 75081Plano, TX 75074
Tel: 972.761.7000Toll Free Tel: 1.888.987.HELP (4357)
Fax: 972.761.7001Fax: 972.761.7501
Internet Address: http://www.samsungusa.com/wireless
©2001 Samsung Telecommunications America, Inc. All rights
reserved. No reproduction in whole or in part allowed without
July 23, 2001 SGH-N105 3
Page 4

prior written approval. Samsung Telecommunications America,
Inc. is a trademark of Samsung Electronics Corporation, Ltd.
®
Openwave
®
RSA
T9
is a registered Trademark RSA Security, Inc.
®
Word Text Input is licensed by Tegic Communications and
is a registered Trademark of Openwave, Inc.
is covered by U.S. Pat. 5,818,437, U.S. Pat. 5,953,541, U.S. Pat.
6,011,554 and other patents pending.
English: 2001:1:31. Version A
Printed in South Korea
User Guide GH68-02140A
DISCLAIMER OF WARRANTIES;
EXCLUSION OF LIABILITY
Except as set forth in the express warranty contained on the
warranty page enclosed with the product, the purchaser takes
the product “as is”, and Samsung makes no express or implied
warranty of any kind whatsoever with respect to the product,
including but not limited to the merchantability of the product
or its fitness for any particular purpose or use; the design,
condition or quality of the product; the performance of the
product; the workmanship of the product or the components
contained therein; or compliance of the product with the
requirements of any law, rule, specification or contract
pertaining thereto. nothing contained in the instruction manual
shall be construed to create an express or implied warranty of
any kind whatsoever with respect to the product. in addition,
Samsung shall not be liable for any damages of any kind
resulting from the purchase or use of the product or arising
from the breach of the express warranty, including incidental,
special or consequential damages, or loss of anticipated profits
or benefits.
4 SGH-N105 July 23, 2001
Page 5

Introduction To Your Samsung SGH-N105
Series Phone
Congratulations on the purchase of your Samsung SGH-N105
Dual Mode Phone
. Using the latest digital technology, the
Samsung SGH-N105 Phone operates similar to other GSM
phones, while providing superior resonance and tone quality.
Your Samsung SGH-N105 GSM phone is packed with productive
features that are easy to use. Here are some of them:
• Operates in GSM900 and GSM1900.
• Internet Access via WAP 1.1 /UP 4.1
• One Touch Internet Access
• Electronic Administrator (PIM)
• Games - 11 options
• Answer or hang up calls just by opening and closing the
flip on the phone.
• User friendly display with dedicated icons for signal
strength, service, messages, vibrator, and battery
• 3 Customizable Melodies
• 4 Alert Types and 47 Ring Tones.
• Distinctive ringer types for voice, message, and alarm
calls
• Voice Dial/Voice Command/Voice Memo
• 100 Phone Book entries plus up to 250 SIM Card
entries.(SIM Card Dependent).
• Call Logs – 10 Locations each for outgoing, incoming,
and missed calls.
• Two-way Short Message Services (SMS) and Voicemail
notification
• T9 text entry
• Internet MiniBrowser
July 23, 2001 SGH-N105 5
Page 6

• Pause Dialing for tele-services
• Alarm clock with three programmable alarms
• Last number redial – last 10 Numbers
• Tri-Lingual - English, Spanish, and French.
• Easily mute the microphone during conversation
How To Use This Manual
This user guide explains your Samsung SGH-N105 phone
operations through easy-to-follow instructions and illustrations.
We’ve included some important safety and usage information
that you should know before using your phone. If you still have
questions, we’ll be happy to answer them. Just call our Samsung
Customer Care Center toll-free at 1.888.987.HELP (4357).
We hope you enjoy using your new Samsung SGH-N105 Phone,
and thanks for choosing Samsung.
6 SGH-N105 July 23, 2001
Page 7

Table of Contents
Table of Contents .........................................................7
Your Consumer Package . ...... ...... ....... ...... ....... ...... ....13
Accessories ................................................................................14
Front View of the SGH-N105 .................... .................16
SoftKeys .....................................................................................17
Navigation Button .......................................................................17
Menu Browse Keys ....................................................................17
Send/End Keys ...........................................................................17
Keypad .......................................................................................18
Antenna ......................................................................................19
Screen Backlight ................................................................... .....19
Display Screen ...........................................................................20
Top...........................................................................................20
Middle ......................................................................................21
Bottom......................................................................................21
Volume Buttons .................................. ........................... .............21
Service Li g h t In d i cator ...................... ................................... .......22
Flip Cover ...................................................................................22
Menu Tree ...................................................................23
SIM Card ......................................................................31
Installing the SIM Card ............................. ................... ...............31
Installing/Removing the Battery ...............................33
Charging the Battery ... ........................... ........................... .........33
To charge the battery...............................................................33
Low Batter y Indicator .............................. ........................... .........34
Turning the Phone On/Off ....................................... .. .. .. .. .. .... .. ...34
Selecting Functions and Options .............................35
Call Functions .............................. ....... ...... ....... ...... .... 37
Making a Call ..............................................................................37
July 23, 2001 SGH-N105 7
Page 8

International Calls .......................................................................37
Correcting a Number ..................................................................37
Ending a Call ..............................................................................38
Making a Call using the Phone Book .........................................38
Voice Dialing ..............................................................................39
Last Number Redial ....................................................................39
Adjusting the Volume..... ...... ..... ..... ..... ........................... ..........39
Adjusting The Volu me ................. ................... ................... .........40
Answering a Call ..................... ................... ................... .............40
Viewing Missed Calls .................................................................41
Editing Missed Call Numbers...................................................41
Deleting a MIssed Call.............................................................42
InUse Menu .................................................................43
Hold ............................................................................................43
Mute ...........................................................................................43
To mute the caller:...................................................................43
To un-mute the caller:..............................................................44
Phone book . ...............................................................................44
Muting Keys ...................................... ................................... .......44
To Un-mute the Keys...............................................................45
SMS Service ...............................................................................45
Call Waiting .......... ................... ................... ................... .............45
Setup Call Waiting ...................................................................45
Conference Calling .....................................................................46
Making a Multi-party Call.........................................................46
Private Conversation on a Multi-party Call ..............................47
Dropping a Single Participant ..................................................47
Entering Information ..................................................48
T9 Entry ............................. ........................... ........................... ...48
ABC Entry ...................................... ............................ .................49
List of Characters Available.....................................................49
Symbol Ent ry ............................................ ..................................50
Number Entr y .......................... ........................... ........................50
Changing the Entry Mode ...........................................................50
8 SGH-N105 July 23, 2001
Page 9

Phone Book ................................................................51
Storing a New Number ...............................................................51
Phone Book Options ..................................................................52
Accessing Options ...................................................................52
Voice Record ...........................................................................52
Play Voice................................................................................53
Voice Delete.............................................................................53
Paste........................................................................................54
Edit...........................................................................................54
Erase........................................................................................55
Copy.........................................................................................55
Memory Status.........................................................................56
Alert..........................................................................................56
Searching and Dialing a Number . ..............................................57
Searching and Dialing..............................................................57
Menu Functions ..........................................................59
Call Records ...............................................................................59
Missed Calls.............................................................................59
Incoming Calls .........................................................................60
Outgoing Calls .........................................................................60
Call Time..................................................................................61
Call Cost (SIM Card Dependent) .............................................62
Messaging ..................................................................................62
Voice Mail Messages...............................................................63
Reading Text Messages..........................................................63
Write Messages .......................................................................65
Preset Message List ................................................................66
Setup .......................................................................................67
Broadcast (SIM Card Dependent)............................................68
Voice Functions .......................................................................... 69
Voice Dial.................................................................................69
Voice Command......................................................................72
Voice Memo.............................................................................73
Answer Phone..........................................................................74
Tones .........................................................................................75
Ring Tone . ...............................................................................75
Melody Composer..... ..... ..........................................................76
Ring Volume ... ..... ..... ..... ...... ....................................................78
Alert Type.................................. ...............................................79
Keypad Tone............................................................................80
Message Tone .........................................................................80
July 23, 2001 SGH-N105 9
Page 10

Error Tone................................................................................81
Minute Minder..........................................................................81
Connect Tone ..........................................................................82
Settings ......................................................................................83
Phone Settings ........................................................................83
Network Services........................... ..........................................89
Security Settings......................................................................93
LCD Settings............................................................................96
Organizer ....................................................................................98
Scheduler.................................................................................98
Alarm .....................................................................................100
Calculator...............................................................................101
To Do List ..............................................................................102
Calendar................................................................................103
World Time ............................................................................104
Clock......................................................................................105
Games ...................................................................................... 106
WWW Services ........................................................................107
Launching the browse r ............. ..................... ..... ..... ...... ..... ...107
Navigating in the Browser......................................................107
Usage guidelines:
all about performance and safety ...........................109
Understanding Signal Strength ................................................109
Specifications are Subject to Change .... .... .. .. .... ..... .... .. .. .... .. .. .109
Exposure To Radio Frequency Signals ....................................109
Antenna Care .............................................................. .... .... .. ...110
Phone Operation ......................................................................110
Operating a Motor Ve h i cle ....... ................... ........................... ...111
Electronic Devices ....................................................................111
Pacemakers...........................................................................111
Other Medical Devices... ...... ............................................... ...112
Vehicles.................................................................................112
Posted Facilities.....................................................................112
Aircraft ......................................................................................112
Blasting Ar e a s ........ ................... .................................... ...........113
Potentially Explosive Atmospheres ..........................................113
For Vehicles Equipped with an Air bag ....................................113
Storing your phone ...................................................................114
10 SGH-N105 July 23, 2001
Page 11

Cautions ...................................................................................114
Voice Memo .............................................................................114
Informat i o n to User ........ ........................... ........................... .....116
Your Phone as a Network Device ...........................117
FCC and Industry Canada Notice ...........................118
Cautions ...................................................................................118
FCC Compliance Information ........... .................. ................... ...118
Owner's Record ..................... ........................... ........................119
Safety Information ....................................................120
Index ..................... .....................................................127
July 23, 2001 SGH-N105 11
Page 12

12 SGH-N105 July 23, 2001
Page 13
1
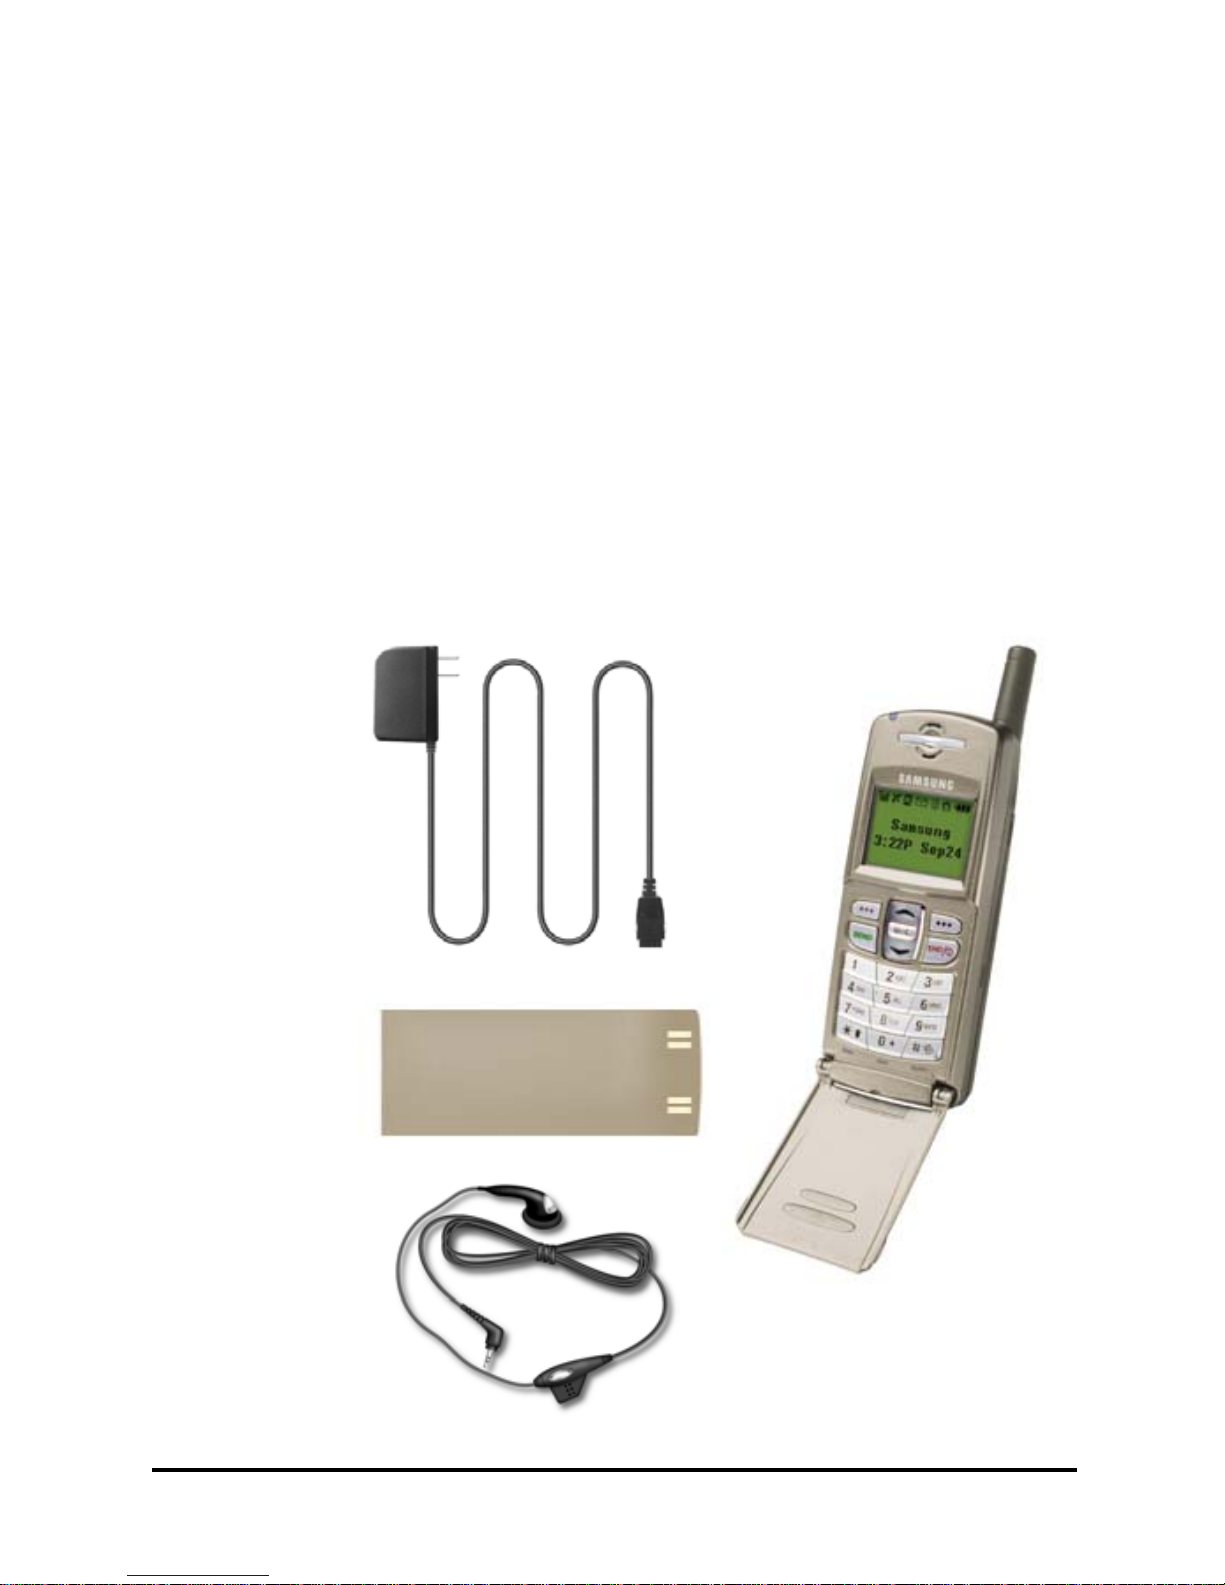
Your Consumer Package
Your consumer package includes the following
items:
• Phone
• Travel Charger
• Battery
• User Manual
• Hands-Free Headset
July 23, 2001 SGH-N105 13
Page 14

Your Consumer Package SGH-N105 User Manual
Accessories
The following optional accessories are available for
the SGH-N105:
• Car Power Charger (17140000011)
• Hands-free Car Kit (HKT059NBEG/XAR)
• Standard Battery (BST0599GEB/XAR)
• Data Kit (PKT059LBEC/XAR)
• Desktop Charger Kit (DKT059JBEB/XAR)
• Holster
• Hands Free Headset (EP010GBK/XAR)
• Leather Pouch (17200000027)
• Sport Pouch (17200000014)
Contact your local Samsung dealer for more
information or visit us on the web at:
http://www.samsungusa.com/wireless
The use of any other power accessory will
invalidate any approval or warranty applying to the
phone, and may be dangerous.
When you disconnect the power cord of any
accessory, grasp and pull the connector, not the
cord.
It is extremely important that only genuine
samsung authorized accessories be utilized with
your samsung phone. This is because accessories
might appear to be a perfect match, and labeled
suitable for your samsung phone, but they can
charge at different current rates. The current
provided through the accessory may not match the
current that is required by your samsung phone
and the result of using an unauthorized accessory
14 SGH-N105 July 23, 2001
Page 15

Chapter 1 Accessories
may be a battery or phone melt down. your
warranty of course, would be null and void.
July 23, 2001 SGH-N105 15
Page 16
Front View of the SGH-N105 SGH-N105 User Manual
Front View of the SGH-N105
16 SGH-N105 July 23, 2001
Page 17

Chapter 1 SoftKeys
SoftKeys
Softkeys are used as navigation controls to display
the desired menu options displayed on the screen.
By using the softkeys, you can quickly navigate to
the desired screen function. The softkeys are
positioned on the phone under the choices
displayed on the screen. To see the softkey’s
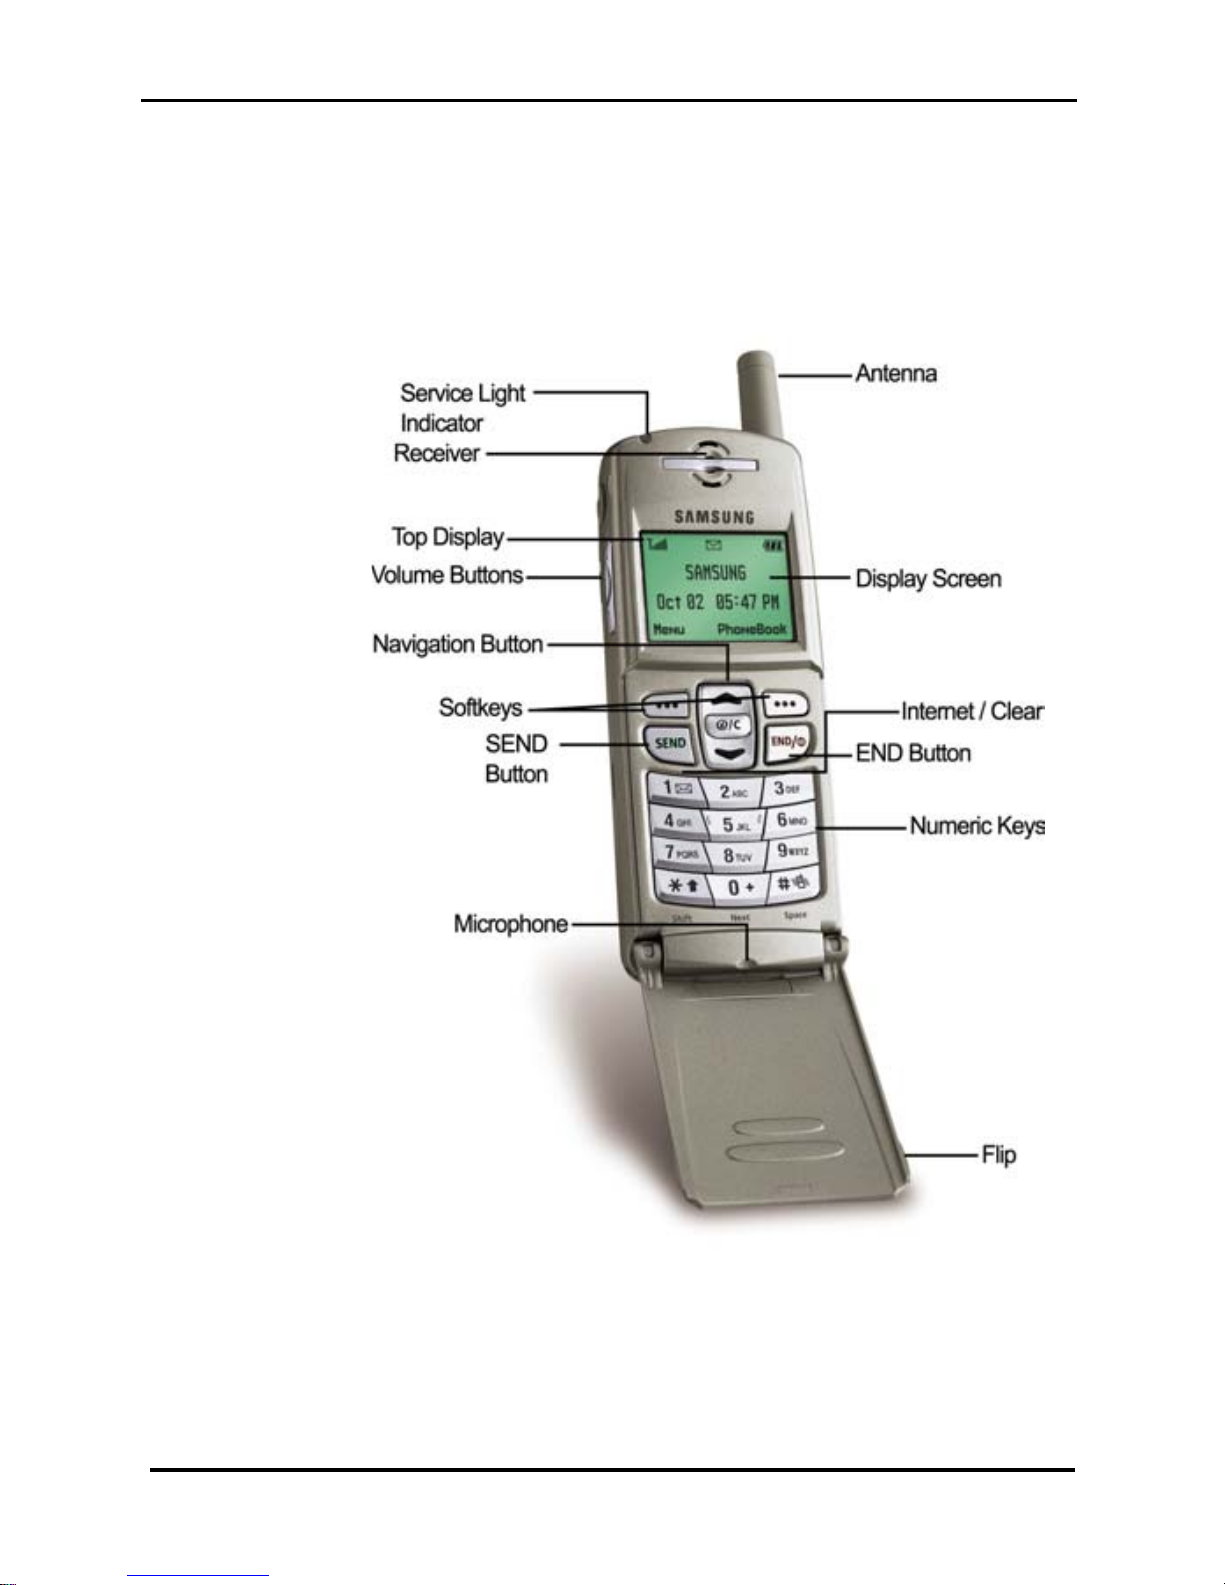
location on the phone, see “Front View of the
SGH-N105” on page 16.
Navigation Button
The navigation button is located between the Send
and End keys. It has an up and down arrow with
another button in the center used to access the
Internet browser. If you open the flip and press the
Up or Down arrow, the phone book is displayed.
The navigation button is used to highlight the
different menu choices.
Menu Browse Keys
Menu browse keys are used to cycle through the
available menu options displayed in each function.
Once the desired menu choice is found, you press
a softkey as mentioned above to select the choice.
To see the Menu Browse key’s location on the
phone, look at the illustration on See “Front View
of the SGH-N105” on page 16.
Send/End Keys
The Send and End keys are used to place and end
calls on the phone. To place a call, you enter the
desired number on the keypad and press the Send
key. When the call is finished, the End key is
July 23, 2001 SGH-N105 17
Page 18

Front View of the SGH-N105 SGH-N105 User Manual
pressed to hang up or end the call. The End key
can also be used to clear whatever screen is
displayed and return the phone to the main
screen.
Note: The Send key can also be used to answer an
incoming call while on an existing call. It flashes to
the other line to answer the call.
The End key is also used to turn the phones power
On or Off. For more information on powering the
phone On or Off, see “Turning the Phone On/
Off” on page 34
Keypad
The phones keypad is used to enter information
into the phone. The keypad consists of a standard
numeric keypad with the numbers 0-9, shift, and
space. The keypad can also enter alpha characters
by using one of the different modes associated
with entering data. The different modes are:
• ABC - Uses the standard letters and
numbers associated with the keypad. The
choices are cycled each time the key is
pressed.
• Number - Uses only the numeric side of the
keypad. No letters are available in this
mode.
• English - The numbers and letters are
entered in English.
18 SGH-N105 July 23, 2001
• Español - In this mode, some characters
appear in Spanish format.
• Français - In this mode, some characters
appear in French format.
Page 19

Chapter 1 Antenna
• Symbolic - Allows you to enter a standard
set of commonly used symbols by pressing
the keypad. The choices are cycled each
time a key is pressed.
Antenna
A device for transmitting or receiving signals. The
shape and size of the antenna is determined, in
part, by the operating frequency of the handset.
Screen Backlight
The backlight illuminates the screen allowing for
better viewing of the information being displayed.
When a key is pressed, the backlight is turned On.
It remains On for a predetermined amount of
time before automatically turning itself Off. This
saves the battery from being discharged too
quickly. The backlight can be configured to
remain Off, On a short time, or On for a long
amount of time. If the phone is being used with a
hands free car kit, the light remains On by default.
July 23, 2001 SGH-N105 19
Page 20

Front View of the SGH-N105 SGH-N105 User Manual
Display Screen
The display screen contains three different areas.
They are:
•Top
• Middle
• Bottom
Top
Displays several different function icons about the
phone status. These functions include:
• Signal Strength Indicator - The signal
strength is measured in bars that extend
upward. The more bars displayed, the
stronger the signal. Six bars indicates
maximum signal strength.
• Service Indicator - The service indicator is
displayed when a call is in progress or
airtime is being used. If the indicator is
displayed, you are being charged for
airtime.
• New Message Indicator - The new message
indicator is displayed when a new text
message is received.
• New Voice Mail Indicator - The new voice
mail indicator is displayed when a new
voice mail message has been delivered to
your Inbox. If the voicemail is full, the
voicemail icon begins blinking.
20 SGH-N105 July 23, 2001
• Vibrate On - The vibrate icon is displayed if
the phone is set to vibrate mode. When
vibrate mode is On, no ringer is heard. The
Page 21

Chapter 1 Volume Buttons
phone vibrates to indicate an incoming
call.
• Alarm On - The alarm icon is displayed
when you set an alarm.
• Battery Strength Indicator - The battery
strength indicator displays the amount of
available charge left in the battery. The
charge is measured with a series of black
bars. The more bars that are displayed, the
better the charge. Three bars indicates a
maximum charge.
Middle
The middle of the display screen is used to display
messages, instructions, and any other information
that you enter. Mainly text and graphics are
displayed in the middle of the screen. For
example, when you dial a phone number, the
digits are displayed in the middle of the screen.
Bottom
The bottom of the screen is used to display banner
messages, softkey assignments, or to indicate that a
specific function has been setup.
Volume Buttons
During a call, the volume buttons are used to
adjust the receiver volume. It can also be used to
set the keypad volume when the phone is in idle
mode.
July 23, 2001 SGH-N105 21
Page 22

Front View of the SGH-N105 SGH-N105 User Manual
Service Light Indicator
The Service Light Indicator flashes when the
phone is in service. It is located on the top left side
of the phone.
Note: There is an option that allows you to turn
Off the Service Indicator Light. For more
information, see “Service Light” on page 86.
Flip Cover
The flip can be used to answer or end a call when
it is opened or closed. It can also be configured to
initiate the voice dial/voice command option.
22 SGH-N105 July 23, 2001
Page 23

Chapter 1 Flip Cover
Menu Tree
1. Call Records
1: Missed Calls
2: Incoming Calls
3: Outgoing Calls
4: Call Time
1: Last Call
2: Total Outgoing
3: Total Incoming
4: Reset Timers
5: Call Cost (SIM Card Dependent)
2. Messages
1: Voice Mail
1: Connect to Voicemail
2: Voice Server Number
2: Read Messages
3: Write Messages
4: Preset Message List
5: Setup
1: Service Center
2: Default Type
1: Text
2: Voice
3: Fax
4: X400
5: Email
6: ERMES
3: Default Validity
1: One Hour
2: 6 Hours
3: 24 Hours
4: One Week
5: Maximum
6: Broadcast
1: Read
2: Receive
1: Disable
2: Enable
July 23, 2001 SGH-N105 23
Page 24

Menu Tree SGH-N105 User Manual
3: Channel List
1: All Channels
2: Enter Channel
4: Language
1: All
2: English
3: Espanol
4: Francais
3. Voice Functions
1: Voice Dial
1: Record
2: Activate
3: Delete One
4: Play All
5: Delete All
2: Voice Command
1: Record
2: Activate
3: Play All
4: Delete All
3: Voice Memo
1: Record
2: Replay
3: Delete One
4: Delete All
4: AnswerPhone
1: AnswerPhone
1: Disable
2: Enable
2: Message Record
3: Message Select
1: User Message
2: Default 1
3: Default 2
4. Tones
1: Ring Tone
2: Melody Composer
3: Ring Volume
4: Alert Type
24 SGH-N105 July 23, 2001
Page 25

Chapter 1 Flip Cover
1: Light Only
2: Melody
3: Vibration
4: Vibra+Melody
5: Keypad Tone
1: Off
2: Tone
3: Beep
6: Message Tone
1: Off
2: Light Only
3: Single
4: Periodic
7: Error Tone
1: Off
2: On
8: Minute Minder
1: Off
2: On
9: Connect Tone
1: Off
2: On
5. Settings
1: Phone Settings
1: Greeting Message
2: Own Number
3: Language
1: Text Language
1: English
2: Espanol
3: Francais
2: Voice Language
1: English
2: Espanol
3: Francais
4: No Voice
3: Input Mode
1: ABC Mode
2: Number
July 23, 2001 SGH-N105 25
Page 26

Menu Tree SGH-N105 User Manual
3: English
4: Espanol
5: Francais
4: Any-key Answer
1: Off
2: On
5: Backlight
1: Off
2: Short
3: Long
6: Service Light
1: Off
2: On
7: Auto Redial
1: Off
2: On
8: Car Kit Answer
1: Off
2: 3 Seconds
3: 5 Seconds
4: 10 Seconds
9: Caller ID
1: Default
2: Hide Number
3: Send Number
0: Flip Function
1: Answer Only
2: Voice Dial
3: Voice Command
*: Reset Settings (Password Required)
2: Network Services
1: Call Forwarding
2: Call Waiting
26 SGH-N105 July 23, 2001
1: Forward Always
2: Unavailable
3: Cancel All
1: Voice Calls
2: Fax Calls
3: Data Calls
Page 27

Chapter 1 Flip Cover
4: Cancel All
3: Network Selection
1: Automatic
2: Manual
4: Line Identification
1: CLIP
2: CLIR
3: COLP
4: COLR
3: Security Settings
1: PIN Check
1: Enable
2: Disable
2: Change PIN
3: Phone Lock
1: Disable
2: Enable
4: Change Password
5: SIM Lock
1: Disable
2: Enable
6: FDN Mode (SIM Dependent)
1: Disable
2: Enable
7: Change PIN 2 (SIM Dependent)
4: LCD Settings
1: Screen Mode
1: Normal Mode
2: Image Display
2: Select Image
1: Flying Bird
2: Flowers
3: Trees
4: Moon
5: Ant
3: LCD Contrast
6. Organizer
1: Scheduler
1: OK
July 23, 2001 SGH-N105 27
Page 28

Menu Tree SGH-N105 User Manual
1: Reminder
2: Call
3: Meeting
4: Birthday
2: Options
1: Go to Date
2: View All
3: Delete All
2: Alarm
1: Daily Alarm
1: Set Alarm
2: Remove Alarm
2: Once Alarm
1: Set Alarm
2: Remove Alarm
3: Weekly Alarm
1: Set Alarm
2: Remove Alarm
4: Alarm Tone
1: Alarm Tone 1-5
3: Calculator
4: To Do List
5: Calendar
6: World Time
7: Clock
1: Set Time
2: Set Date
3: Date Format
4: Time Format
7. Games
1: Casino
1: Play
2: Configuration
3: Instructions
4: High Score
2: Roulette
1: Play
28 SGH-N105 July 23, 2001
1: Backlight On/Off
2: Sound On/Off
Page 29

Chapter 1 Flip Cover
2: Configuration
1: Backlight On/Off
2: Sound On/Off
3: Instructions
4: High Score
3: Black Jack
1: Play
2: Configuration
1: Backlight On/Off
2: Sound On/Off
3: Instructions
4: High Score
4: Racing
1: Play
2: Configuration
1: Backlight On/Off
2: Sound On/Off
3: Instructions
4: High Score
5: Sniper
1: Play
2: Level
3: Configuration
1: Backlight On/Off
2: Sound On/Off
4: Instructions
5: High Score
6: Snake
1: Play
2: Level
3: Configuration
1: Backlight On/Off
2: Sound On/Off
4: Instructions
5: High Score
7: Mole
1: Play
2: Configuration
1: Backlight On/Off
2: Sound On/Off
July 23, 2001 SGH-N105 29
Page 30

Menu Tree SGH-N105 User Manual
3: Instructions
4: High Score
8: Othello
1: Play
2: Configuration
1: Backlight On/Off
2: Sound On/Off
3: Instructions
4: High Score
9: Hexa
1: Play
2: Level
3: Configuration
1: Backlight On/Off
2: Sound On/Off
4: Instructions
5: High Score
10: Puzzle I
1: Play
2: Configuration
1: Backlight On/Off
2: Sound On/Off
3: Instructions
4: High Score
11: Vacteria
1: Play
2: Configuration
1: Backlight On/Off
2: Sound On/Off
3: Instructions
4: High Score
8. WWW Services
30 SGH-N105 July 23, 2001
Page 31

2
SIM Card
A SIM card or Subscriber Identity Module, is used
as the key to the GSM network. It stores all the vital
information about you and your phone. In fact, it
is your SIM card (and not your handset) that
determines your phone number.
The SIM card also allows you to store information,
such as telephone numbers or other networks.
This is handy if you travel abroad.
Installing the SIM Card
The SIM card is installed underneath the battery
into the phone. Please take the following
precautions when installing the SIM card:
• Keep out of reach of small children, the
SIM cards can present a choking hazard.
• The SIM card contacts can be damaged by
scratches or bending due to installing
improperly.
• Make sure the phone is switched off prior
to installing the SIM card.
1. Turn the phone Off by pressing and holding
the “End” button. A ”Bye Bye” message is
displayed.
2. Remove the battery from the phone.
3. Slide the SIM card lock and hold in the
July 23, 2001 SGH-N105 31
unlocked position.
Page 32

SIM Card SGH-N105 User Manual
4. Insert the SIM card insuring that the cutoff
corner is located in the top right and the gold
contacts are facing into the phone.
5. Hold the SIM card into position and release
the SIM card lock slowly to lock into place.
6. Replace the battery.
7. Turn the phone On by pressing and holding
the “End” button.
32 SGH-N105 July 23, 2001
Page 33

Chapter 2 Charging the Battery
Installing/Removing the
Battery
To install the battery:
1. Insert the contact end on the bottom of the
battery into the slots on the bottom of the
phone.
2. Press the battery down until you hear it lock
into place
To remove the battery:
1. Turn the phone off (by pressing and holding
“End” until the closing animation sequence
begins.)
2. Push the button on top of the battery and
remove the battery from the phone
Charging the Battery
The SGH-N105 is powered by a Li-Ion battery
capable of being recharged using a Samsung
desktop or travel charger. The phone can be used
while the phone is being charged.
Note: You must fully charge the battery prior to
using the phone the very first time. A full charge
takes approximately 90 minutes.
To charge the battery
1. Connect the travel charger adapter to the
July 23, 2001 SGH-N105 33
port located on the bottom of the phone.
Page 34

Installing/Removing the Battery SGH-N105 User Manual
Low Battery Indicator
When the battery becomes too weak to sufficiently
power the phone, a warning tone is heard and a
low battery indicator is displayed on the screen.
The message continues to flash on the screen,
until the phone is placed into a charger or the
power runs out and the phone automatically shuts
Off.
Turning th e P h on e O n /Off
1. Open the flip cover and press and hold the
“End” button for 2-3 seconds.
2. If the phone prompts you for a password,
enter “0000” and press the “OK” softkey.
3. If the phone prompts you for a PIN number,
enter “1234” and press the “OK” softkey.
Note: The display language is determined by the
SIM card. To change the language, use the
language menu option.
4. To turn the phone Off, press and hold the
“End” button down for 2-3 seconds.
34 SGH-N105 July 23, 2001
Page 35
3
Selecting Functions and
Options
Your phone contains several functions that can be
customized to allow easier usability. These
functions are arranged in menus and sub-menus,
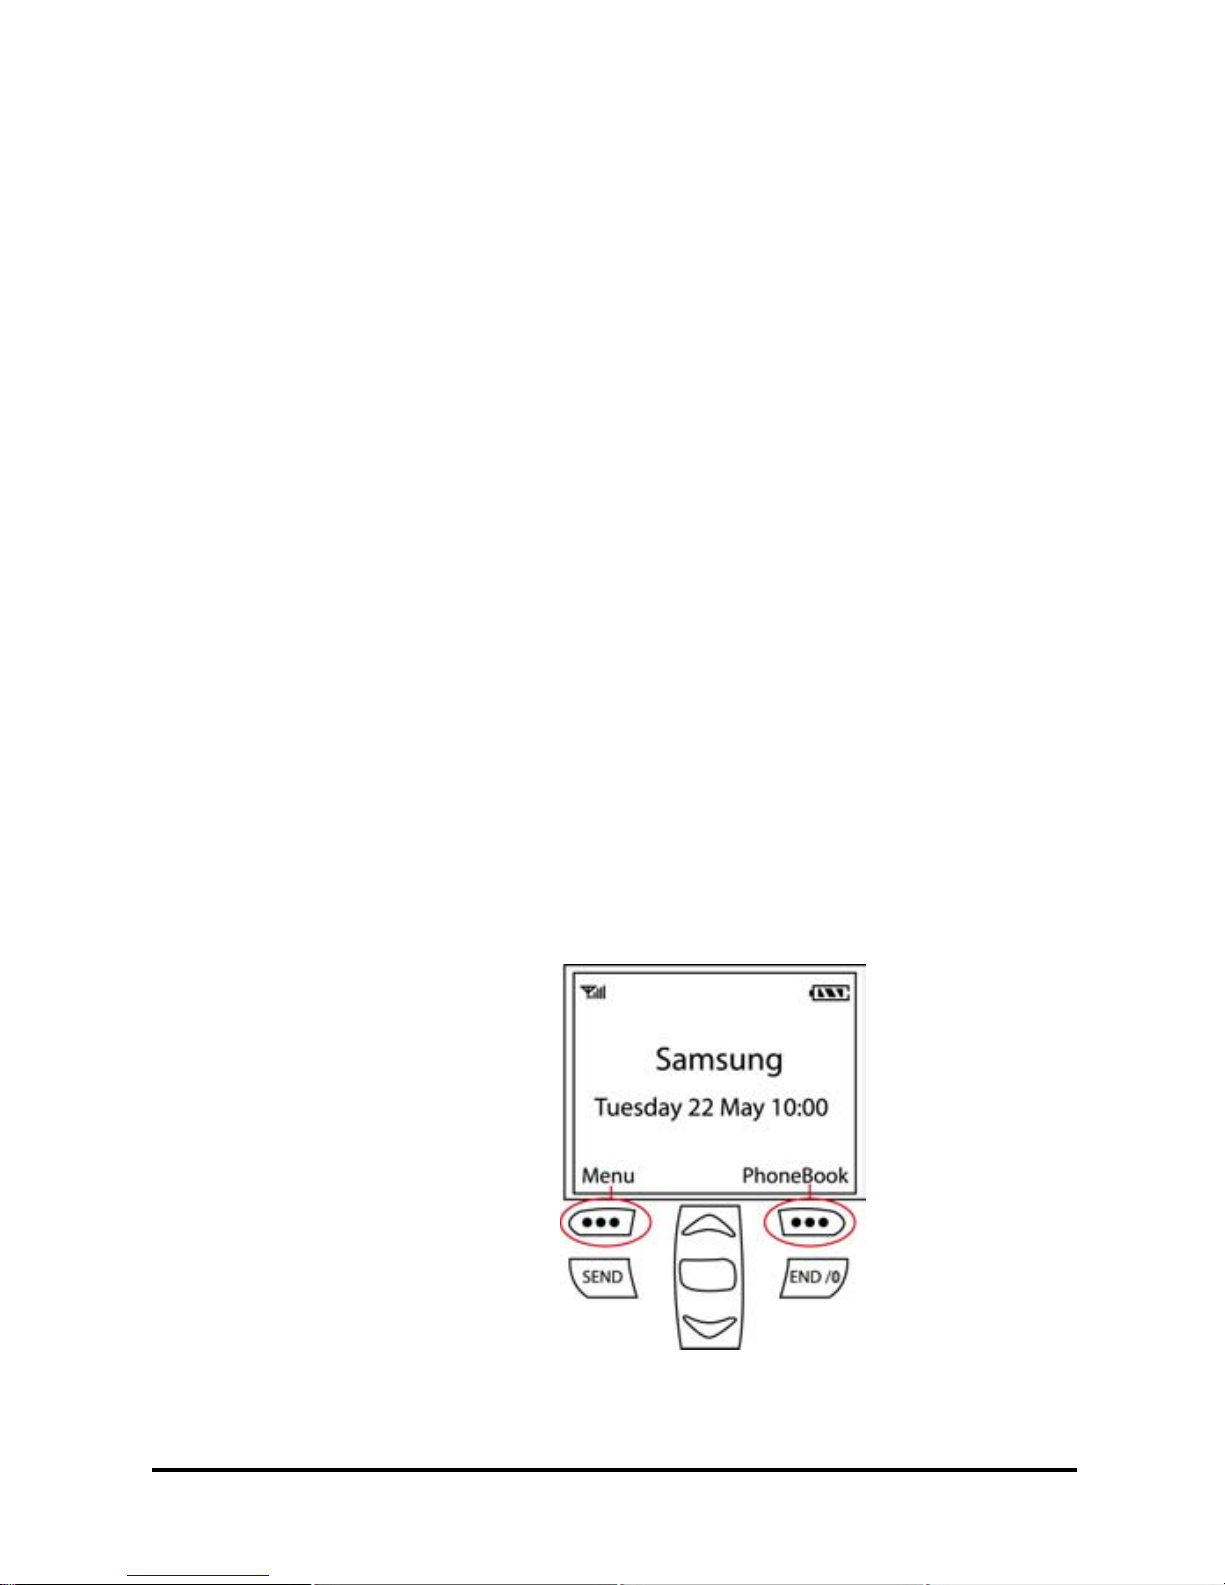
accessed via two softkeys on the phone above the
standard keypad. By using the softkeys, you can
navigate through the menu structure by selecting
the desired usability option. In each menu, there
are settings that modify a particular function
installed in the phone.
The roles of the softkeys change depending on the
menu being displayed. A keyword is displayed on
the bottom of the display screen above each of the
two keys that define what role they are playing at
any given time.
July 23, 2001 SGH-N105 35
Page 36
Selecting Functions and Options SGH-N105 User Manual
Press the left softkey to choose “Menu”. Press the
right softkey to choose “PhoneBook”.
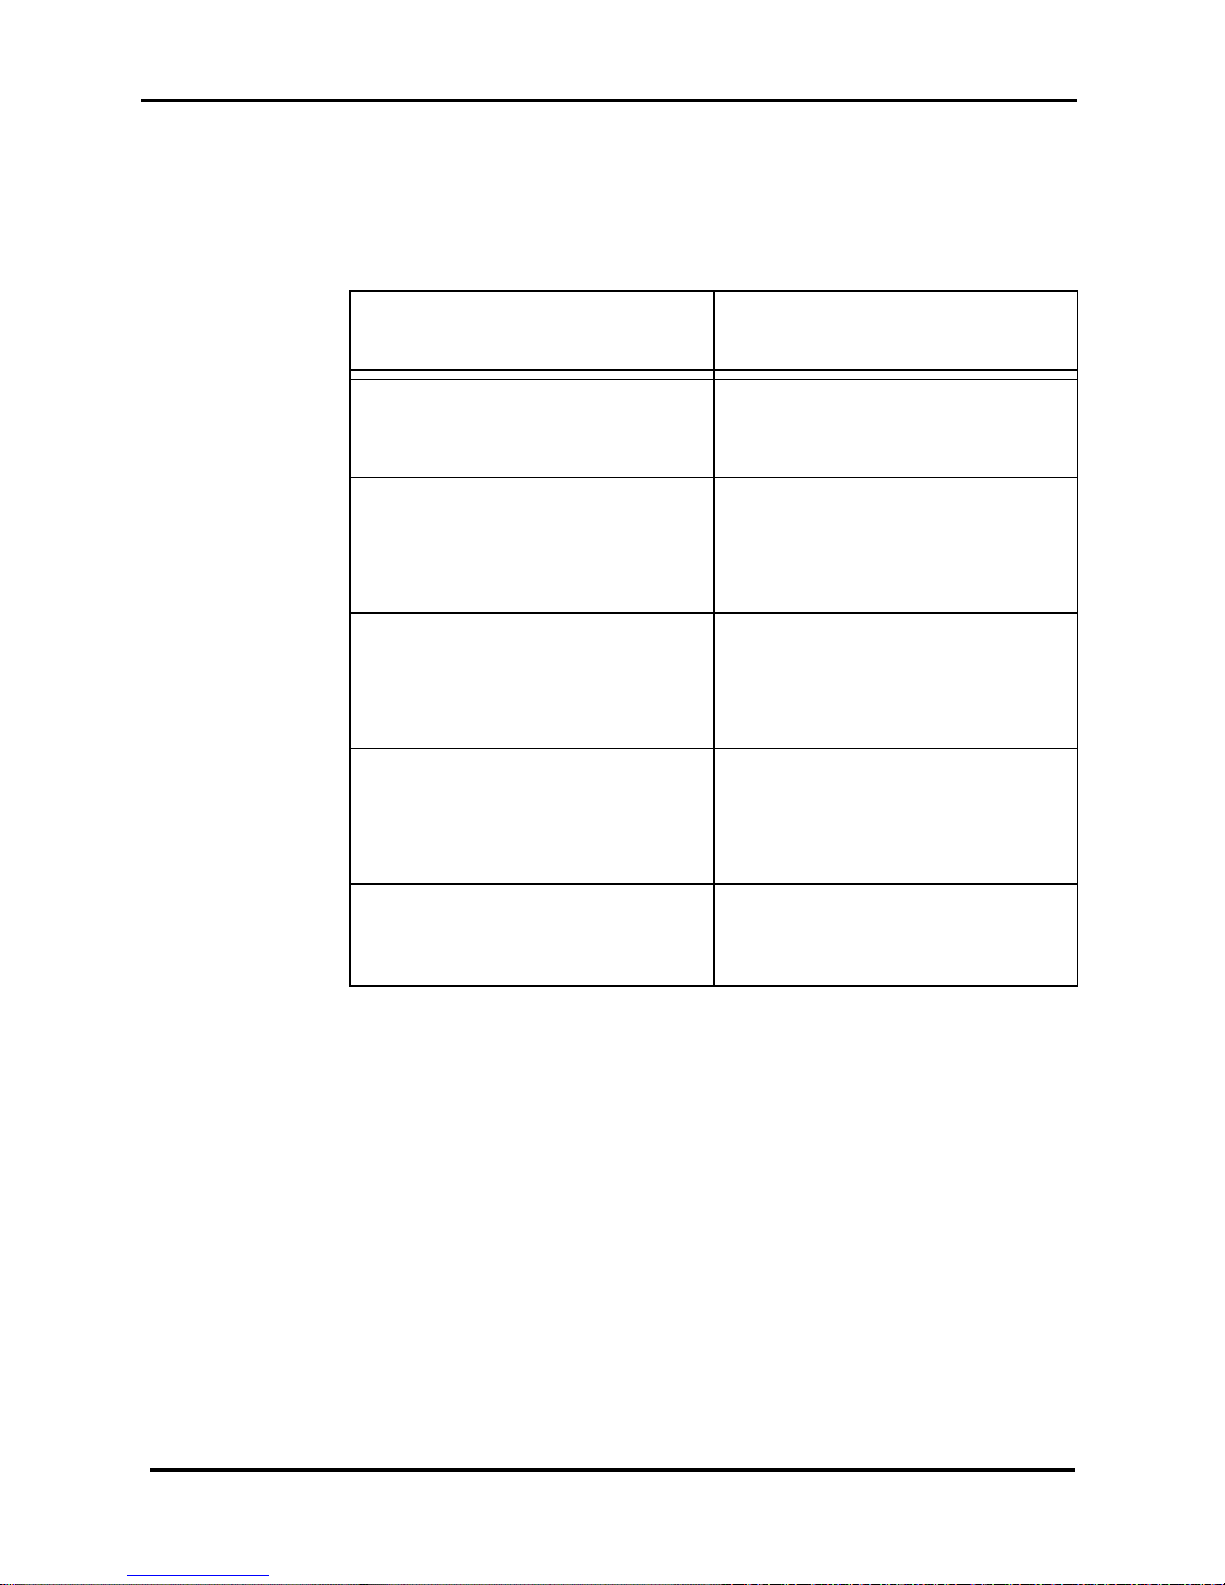
To Then
Select the function or
option highlighted.
View the next function or highlight the
next option in a list.
Move back to the previous function or
option in a list.
Move back up one
level in the menu
structure.
Exit the menu without
changing any settings.
Press the Left Softkey.
Press the down arrow.
Press the up arrow.
Press the right softkey.
Press the End key.
Note: For some of the functions listed above, you
may be asked for a password or PIN. Enter the
requested information and press the “Send” key.
36 SGH-N105 July 23, 2001
Page 37

4
Call Functions
Making a regular call is similar to using a standard
land-line phone. The call is dialed using the
keypad and the Send button is pressed to connect
the call.
Making a Call
1. Turn the phone On.
2. Enter the 10 digit number using the keypad.
3. Press the “Send” button.
Intern a t io n a l C a lls
To dial an international number, you perform
almost the same procedure as listed above. The
only difference is, the international prefix is
required before the number is dialed.
1. Press and hold “0”. The international prefix is
enabled and a “+” sign is displayed on the
screen.
2. Key in the country code prefix, followed by
the area code and phone number.
3. Press the “Send” button to complete the call.
Correcting a Number
There are a number of different ways to correct a
number that has been entered incorrectly, without
having to completely start over.
July 23, 2001 SGH-N105 37
Page 38

Call Functions SGH-N105 User Manual
Problem Solution
The Last digit is in
correct.
Any other digit in the
number is incorrect.
The whole number is
incorrect.
Press the back arrow
softkey.
Use the Up & Down
arrow buttons on the
phone to move the
cursor to the right of
the incorrect digit.
Press the back arrow
softkey.
Hold down the back
arrow softkey for a few
seconds. The number
is automatically
erased.
Ending a Call
1. When you have finished with the call, press
the “End” button or close the flip.
2. The call is completed and the phone returns
to idle mode.
Making a Call using the Phone Book
Phone numbers can be stored on the phone using
the SIM card and phone memory. The phone
book allows you to keep all your commonly used
numbers with you. For more information, see
“Phone Book Options” on page 52.
38 SGH-N105 July 23, 2001
Page 39

Chapter 4 Voice Dialing
Voice Dialing
Voice dialing allows you to speak a name to dial a
phone number saved in the phone book. The
voice dialing feature is used to avoid dialing a
number manually. For more information on voice
dialing, see “Voice Dial” on page 69.
Last Number Redial
The SGH-N105 has the ability to automatically dial
the last number called by simply pressing the
“Send” button. The phone stores the last 10
numbers dialed in a log file. To recall any of these
numbers:
1. Press the “Send” button to access the list.
2. Use the arrow buttons on the phone to scroll
up or down through the list. Stop on the
desired number.
3. Press “Send” to dial the number.
Adjusting the Volume
During a call, you might need to adjust the volume
depending on the local surroundings.
1. The buttons on the side of the phone are
volume buttons. Press the buttons to adjust
the desired volume level.
Note: With the flip open and the phone in idle
mode, you can adjust the key tone volume using
the same buttons.
July 23, 2001 SGH-N105 39
Page 40

Call Functions SGH-N105 User Manual
Adjusting The Volume
To adjust the speaker volume during a call, use the
volume buttons located on the side of the phone.
When the phone is in Idle mode, the key tone
volume can be adjusted using the same buttons.
The display screen indicates what volume option is
being set. To see the location of the volume
buttons on the phone, see “Front View of the SGHN105” on page 16.
Answering a Call
When you receive a call, the phone either rings or
vibrates and the service light flashes. There is also
a phone icon that moves on the screen to indicate
the incoming call. If the caller can be identified,
the number is displayed on the screen. If not, the
phone icon just flashes.
To answer the call:
1. Open the flip cover. If necessary, press “Send”
or the “Accept” softkey.
2. End the call by closing the flip or pressing the
“End” key.
To reject the call:
• Press and hold the volume key or
• Press “End” or
The call is then forwarded to voice mail.
Note: You can also answer a call while in the
phone book or menu features.
40 SGH-N105 July 23, 2001
• Press the “Reject” softkey
Page 41

Chapter 4 Viewing Missed Calls
Viewing Missed Calls
A missed call log saves the last 10 numbers on the
phone. The number of missed calls is displayed on
the screen.
To view the missed calls:
1. Open the flip and press the “View” softkey.
2. Choose one of the following:
• Scroll through the list of missed calls
using the navigation buttons.
• Call the number displayed by pressing
the “Send” button.
• Edit or delete the missed call number by
pressing the “Options” softkey.
Editing Missed Call Numbers
1. Press the “Options” softkey.
2. Press the ‘Select” softkey.
3. Change the number. Press the Up or Down
arrow button to scroll through the number.
4. Choose one of the following options:
• Call the number by pressing the “Send”
button.
• Store the number by pressing the “Save”
softkey. Enter the name and location to
5. Press the “End” button to exit.
July 23, 2001 SGH-N105 41
store the number.
Page 42

Call Functions SGH-N105 User Manual
Deleting a MIsse d C all
1. Press the “Options” softkey.
2. Highlight “Delete”
3. Press the “Select” softkey.
Note: You can press the “End” button at any time
to exit.
42 SGH-N105 July 23, 2001
Page 43

Chapter 4 Hold
InUse Menu
The following options are available in the Options
menu. They are:
• Hold
• Mute/Unmute
• Phone book
• Mute/Send Keys
• SMS Service
Hold
A caller can be placed on hold at anytime during a
call. This feature allows you to place one caller on
hold and then place a call to a second caller. Once
connected, you can switch back and forth between
the two or connect everyone together.
To place a call on hold:
1. Press the “Options” softkey.
2. Scoll down to the “Hold” option using the
Up/Down arrow button.
3. Press the “OK” softkey.
To return to the call, press the “Retrieve” softkey.
Mute
The microphone can be switched Off. This allows
you to speak with another individual without the
caller hearing you.
To mute th e cal l er :
1. Press the “Options” softkey.
July 23, 2001 SGH-N105 43
Page 44

InUse Menu SGH-N105 User Manual
2. Scroll to the “Mute” function using the
navigation button.
3. Press the “OK” softkey.
To un-mute t he caller:
1. Press “Options”.
2. Scroll to the “Unmute” function using the
Up/Down arrow button.
3. Press the “OK” softkey.
Phone book
During a call, you can search through your phone
book to find a desired entry.
1. Press the “Options” softkey.
2. Scroll to the “Phone book” option using the
Up/Down arrow button.
3. Press the “OK” softkey.
4. Enter the first few letters of the name and
press the “Find” button.
Note: If the Find button is pressed without any
information, the entire phone book is displayed.
5. To review the highlighted entry, press the
“View” button.
Muting Key s
The key tones can be muted to avoid tones being
heard when the numeric keys are pressed.
To mute the tones:
1. Press the “Options” softkey.
2. Scoll down to the “Mute Keys” option using
44 SGH-N105 July 23, 2001
the Up/Down arrow button.
Page 45

Chapter 4 SMS Service
3. Press the “OK” softkey.
To Un-mute th e Keys
1. Press the “Options” softkey.
2. Scroll to the “Send Keys” option using the
Up/Down arrow button.
3. Press the “OK” softkey.
SMS Service
You can view or compose a new SMS Message
during a call.
To view or compose:
1. Press the “Options” softkey.
2. Scoll down to the “SMS Messaging” option
using the navigation button.
3. Press the “OK” softkey.
Call Waiting
You can answer an incoming call while already on
an existing call. The Call Waiting option must be
set in the phone settings for this feature to work
correctly.
Note: Make sure Call Waiting is supported by your
carrier’s network.
Setup Call Waiting
To activate the call waiting feature:
1. Open the flip and press the “Menu” softkey.
2. Press “5” for “Settings”.
3. Press “2” for “Network Services”.
4. Press “2” for “Call Waiting”.
5. The following choices are available:
July 23, 2001 SGH-N105 45
Page 46

InUse Menu SGH-N105 User Manual
1 Voice Calls
2 Fax Calls
3 Data Calls
4 Cancel All
6. Press “1” for Voice Calls.
7. Press the softkey to Activate or Deactivate Call
Waiting.
Conference Calling
You can have a conference call with up to six other
people by using the Multi-party Calling option.
Multi-party Calling allows all parties in the
coversation to talk to one another.
Note: Make sure that Multi-party calling is
supported by your carriers network.
Making a Multi-party Call
1. Call the first person the normal way by dialing
their number and pressing the “Send” key.
2. Call the second person in the normal way.
(The first caller is automatically placed on
hold).
Note: To avoid the first caller from hearing the key
tones, you can mute the key tones using the InUse
menu options.
3. To join the first and second callers together,
4. To add additional callers, use the “Join”
46 SGH-N105 July 23, 2001
press the “Options” softkey and select “Join”.
option.
Page 47

Chapter 4 Conference Calling
Note: Incoming callers can also be added by
answering the call and selecting the “Join” option.
Private Conversation on a Multi-party Call
1. Press the “Options” softkey and select the
“Select One” option.
2. A list of participants is displayed. Highlight
the desired caller and press “Select” softkey.
3. Highlight “Private” and press the “OK”
softkey.
Now you are connected privately with the selected
person. Other participants can continue the
conversation while you are in private mode.
4. To exit the private call and return to the
multi-party call, press the “Options” softkey
and select “Join”.
All multi-party callers are reconnected with each
other.
Dropping a Single Participant
1. Press the “Options” softkey and select the
“Select One” option.
2. A list of participants is displayed. Highlight
the desired caller and press “Select” softkey.
3. Highlight “Remove” and press the “OK”
softkey.
The call is dropped with that participant, but the
other callers are still connected.
4. End the multi-party call by closing the flip
July 23, 2001 SGH-N105 47
cover or pressing “End”.
Page 48

Entering Information SGH-N105 User Manual
Enterin g Information
When you store a name in the Phone Book, create
a personal greeting, or schedule events in the
calendar, text is entered into the phone using the
keypad. There are several different text entry
modes available to enter this information.
They are:
•T9
•ABC
• Symbol
• Number
T9 Entry
This mode allows you to enter words with fewer
key strokes. Each key has several letters or a
number associated with it when it is pressed. T9
automatically compares the keystrokes with a
linguistic database to determine the correct word.
For example, if you press 4, 3, 5, 5, 6, the word
“Hello” is displayed. If the desired word is not
displayed, you can press the “0” or “Volume keys”
to scroll through a list of possible matches.
To delete a character, press the “Internet/Clear”
key located in the middle of the “Up/Down” key.
To delete the entire screen, press and hold the
“Internet/Clear” key.
To make capital letters, you can use the “Shift” key.
There are three states of capitalization, they are:
Lowercase, Initial Cap, and Cap Lock. Press the
48 SGH-N105 July 23, 2001
Page 49

Chapter 4 ABC Entry
Shift key one or more times to get the desired
mode.
Note: To exit without saving at anytime, press the
“End” key.
ABC Entry
This mode allows you to enter desired letters or
numbers based on the number of times a key is
pressed. Each key has several letters and a number
associated with it when it is pressed. To cycle
through the available letters, the key is pressed
until the desired letter is displayed.
List of Characters Available
Key Lower Case Upper Case
1 . , ? ! 1 - ‘ @ : ; ¿ i 1 = “ /
2 a b c 2 à ä æ å Ç A B C 2 Ä Æ Å G
3 d e f 3 è é D E F 3 É D
4 g h i 4 ì G H I 4 Q
5 j k l 5 J K L 5 L
6 m n o 6 ñ ò ö ø M N O 6 Ñ Ö Ø X
7 p q r s 7 ß P Q R S 7 Õ å
8 t u v 8 ù ü T U V 8 Ü F
July 23, 2001 SGH-N105 49
Page 50

Entering Information SGH-N105 User Manual
Key Lower Case Upper Case
9 w x y z 9 W X Y Z 9 Y W
0 0 + ( ) & _ $
0 * < > % #
£
Symbol Entry
This mode is similar to ABC mode, except it enters
special characters instead of letters and numbers.
You use the Symbol text entry the same way as ABC
mode. Press a key until the desired character is
displayed.
Number Entry
This mode allows you to enter just numbers that
are associated with the keypad. No letters can be
entered using this mode.
Changing the Entry Mode
The text entry mode is displayed in the lower right
corner of the display. To change the mode:
1. Press the right softkey.
2. The available modes are displayed. Scroll to
the desired mode and press the “Select”
softkey.
50 SGH-N105 July 23, 2001
Page 51

Chapter 4 Storing a New Number
Phone Book
Your phone has a phone book that allows you to
store names and numbers of commonly called
people. The phone book is stored in two different
places, the SIM card and the memory located in
the phone. Even though the memory locations are
located in two separate places, the phone book
uses the memory as if it was one large block. Up to
350 different entries can be stored in the phone
book (depending on the SIM card).
Storing a New Number
When you start to dial a number using the keypad,
the word “Save” is displayed in the bottom left of
the screen.
1. Enter the number using the keypad that is
going to be saved.
2. Press the “Save” softkey.
3. Enter the name of the entry using the desired
text entry mode. For more information about
entering text, see “Entering Information” on
page 48.
Note: The maximum length of the name depends
on the SIM card installed in the phone.
4. When finished entering the name, press the
“Save” softkey. The first available memory
5. Press the right softkey to cycle between the
July 23, 2001 SGH-N105 51
location is displayed.
SIM card and the Phone memory.
Page 52

Phone Book SGH-N105 User Manual
6. Press the “OK” softkey to save the number to
the available memory location. To cancel
without saving the name and number, press
the “End” key.
Phone Book Options
When storing or viewing the phone book entries,
“Options” is displayed in the lower left side of the
screen.
The following options are available:
• Voice Record
• Paste
•Edit
• Erase
• Copy
• Memory Status
• Alert
Accessing Opt io ns
1. Press the “Options” softkey to display the
available options for the phone book entry.
2. Scroll up or down through the options using
the arrow key or press the corresponding
number on the keypad to select.
Voice Re cord
The Voice Record option allows you to record a
voice tag to the number. Follow the voice prompt
instructions to setup this feature correctly.
Note: This option is displayed only when there has
not been a name recorded.
52 SGH-N105 July 23, 2001
Page 53

Chapter 4 Phone Book Options
Once the voice tag is accepted, you can use it to
automatically dial the phone book entry using
Voice Dialing.
To record a name:
1. View the desired phone book entry that has a
voice tag associated.
2. Press the “Options” softkey.
3. Press “1” for “Voice Record”.
4. Follow the automated voice prompts.
Play Voice
Once a voice tag has been saved, the Voice Record
option is replaced with the Voice Play option. This
option plays back the name that is associated with
the phone book entry.
To play the voice tag:
1. View the desired phone book entry that has a
voice tag associated.
2. Press “1” for “Play Voice”.
3. The voice tag associated with the entry is
played.
Voice Delete
This option allows you to delete a voice tag from
the phone book entry. To delete a voice tag:
1. View the desired phone book entry that has a
voice tag associated.
2. Press the “Options” softkey.
3. Press “2” for “Voice Delete”.
4. Press the “OK” softkey to delete.
July 23, 2001 SGH-N105 53
Page 54

Phone Book SGH-N105 User Manual
Paste
This option allows you to paste the phone book
number into the normal dialing mode. This is
helpful if you need to dial a number similar to the
one stored in the phone book. Use the back arrow
softkey to edit the number.
To paste a number:
1. View the desired phone book entry.
2. Press the “Options” softkey.
3. Press “3” to “Paste” the number.
4. The number is displayed on the screen. Use
the right softkey to delete one number at a
time.
Edit
This option allows you to edit the existing phone
book entry.
To edit the entry:
1. View the desired phone book entry.
2. Press the “Options” softkey.
3. Press “4” to “Edit”.
4. The name of the entry is displayed. Edit the
name or press the “Save” softkey to continue.
5. The number of the entry is displayed. Edit the
number or press the “Save” softkey to
continue.
6. The entry is automatically saved.
54 SGH-N105 July 23, 2001
Page 55

Chapter 4 Phone Book Options
Erase
This option allows you to erase the phone book
entry. A confirmation message is displayed to
make sure that you want to permanently delete the
message.
To delete an entry:
1. View the desired phone book entry.
2. Press the “Options” softkey.
3. Press “5”.
4. Press the “Yes” softkey to delete the entry or
“Cancel” to cancel the deletion.
Copy
This option allows you to copy a phone number to
a different location. Use this option to copy and
paste an existing number into a new entry and
then modify the number. Store the new number
on the SIM or in the phone’s memory.
To copy and edit an entry:
1. View the desired phone book entry.
2. Press the “Options” softkey.
3. Press ““6” for “Copy”.
4. Select the desired memory location to copy
the number into.
5. The phone book list is displayed with a
duplicate entry.
6. Highlight the duplicate entry and press the
7. Press the “Options” softkey.
8. Press “3” to edit the entry.
July 23, 2001 SGH-N105 55
“View” softkey.
Page 56

Phone Book SGH-N105 User Manual
Memory Status
The memory status displays the amount of names
and numbers currently stored in the phone’s
memory. This includes the SIM card and Phone
memory.
To display the current memory status:
1. View the desired phone book entry.
2. Press the “Options” softkey.
3. Press “7” for “Memory Status”.
4. The Card Memory is displayed. To view the
Phone memory, press the down arrow.
Alert
The alert feature allows you to link a desired
ringer tone to a number stored in the phone book.
Note: There is a maximum of 5 alert tones
available at any time. If you try and assign more
than 5, a “Memory Full” error is displayed.
The ringer can be selected from several different
ringers stored in the phone. When the number
matching the one stored in the phone book calls
the phone, the desired ringer is played.
To set the desired ringer:
1. View the desired phone book entry.
2. Press the “Options” softkey.
3. Press “8” for “Alert”.
4. Select the desired ringer from the list.
5. Press the “OK” softkey to save the ringer.
56 SGH-N105 July 23, 2001
Page 57

Chapter 4 Searching and Dialing a Number
Searching and Dialing a Number
One of the most convenient features about the
phone is the ability to save common names and
phone numbers to allow easy dialing. No more
looking up numbers in a day timer or regular
phone book. Depending on the SIM card, the
phone can store up to 350 different names and
numbers. This allows you to keep all your friends
and family’s phone numbers with you at all times.
Note: You can also use the navigation button to
display the phone book entries by pressing the up/
down arrow when the flip is open and the phone is
in idle mode.
Searching and Dialing
1. Open the flip cover of the phone and press
the “PhoneBook” softkey.
2. The following two choices are displayed:
• Find Entry - This allows you to search the
entries currently saved in the SIM Card
and phone memory.
• Service Directory - This option displays
the service directory. Important phone
numbers associated with the service
carrier are saved in this location.
3. Highlight the “Find Entry” option and press
4. Enter the first few letters of the name you are
5. Press the “Find” softkey.
July 23, 2001 SGH-N105 57
the “OK” softkey.
looking for using the keypad.
Page 58

Phone Book SGH-N105 User Manual
Note: To display the entire contents of the phone
book, just press the “Find” softkey without
entering any search criteria.
6. Highlight the desired entry from the list and
press the “Send” button.
58 SGH-N105 July 23, 2001
Page 59

5
Menu Functions
As outlined in the menu tree(“Menu Tree” on
page 23), your phone is equipped with the
following menus:
• Call Records
• Messages
• Voice Functions
• Tones
• Settings
• Organizer
•Games
• WWW Services
Call Records
Call records are used to keep a list of missed,
incoming, and outgoing calls on your phone. The
time, date, and caller ID is displayed if available.
Missed Calls
The last 10 missed calls are saved when you are
away from your phone or just unable to answer an
incoming call. A missed call is logged even if the
caller leaves a voice mail message. When a missed
call is received, a message is displayed to alert you
that you missed the call. If the memory is already
full, the oldest one is deleted to make room.
To view missed calls:
1. Open the flip and press the “Menu” softkey.
2. Press “1” for “Call Records”.
July 23, 2001 SGH-N105 59
Page 60

Menu Functions SGH-N105 User Manual
3. Press “1” for Missed Calls”
4. The missed call list is displayed. Use the arrow
keys to cycle through the missed calls.
When viewing missed calls with the “Answer
Phone” option enabled, when a caller leaves a
message, a speaker icon is displayed next to the
message indicating that there is a new message
available. To listen to the message:
1. Open the flip and press the “Menu” softkey.
2. Press “1” for “Call Records”.
3. Press “1” for “Missed Calls”.
4. Press “1” for “Listen”.
Note: When there is no message associated with
the call, the “Listen” option is not available.
Incoming Calls
The last 10 calls that are received and answered
are saved in this log. The time, date, phone
number, and caller name are all saved if available.
If the memory is already full, the oldest incoming
call entry is deleted to make room.
To view the incoming call list:
1. Press the “Menu” softkey.
2. Press “1” for “Call Records”.
3. Press “2” for “Incoming Calls”.
4. Use the arrow keys to cycle through the
incoming calls.
Outgoing Calls
A record of the last 10 outgoing calls are saved in
the Outgoing call log. The time, date, phone
60 SGH-N105 July 23, 2001
Page 61

Chapter 5 Call Records
number and caller name is saved if available. If the
memory is already full, the oldest outgoing call is
deleted to make room.
To view outgoing calls:
1. Press the “Menu” softkey.
2. Press “1” for “Call Records”.
3. Press “3” for “Outgoing Calls”.
4. Use the arrow keys to cycle through the
incoming calls.
Note: In all Call Records (Missed, Incoming, and
Outgoing), you can press the “Send” key to return
or place a call if the caller ID information was
saved.
Call Time
The amount of time spent on the phone is
measured and saved. The following call times can
be displayed:
• Last Call - Displays the call time of the last
call made.
• Total Outgoing - Displays the total call time
of all outgoing calls made from the phone.
• Total Incoming - Displays the total call time
of all incoming calls.
To access the call time:
1. Press the “Menu” softkey.
2. Press “1” for “Call Records”.
3. Press “4” for “Call Time”.
4. Press one of the following:
July 23, 2001 SGH-N105 61
• “1” for “Last Call”.
• “2” for “Total Outgoing”.
Page 62

Menu Functions SGH-N105 User Manual
• “3” for “Total Incoming”.
There is also a setting that resets all the timers
back to zero.
To reset the call timers:
1. Press the “Menu” softkey.
2. Press “1” for “Call Records”.
3. Press “4” for “Call Time”.
4. Press “4” for “Reset”.
5. Enter your password and press the “OK”
softkey.
Call Cost (SIM Card Dependent)
This feature displays the amount of time and the
estimated cost of the call.
To access call cost:
1. Press the “Menu” softkey.
2. Press “1” for “Call Records”.
3. Press “5” for “Call Cost”.
Messaging
Your phone is capable of receiving voice mail
notifications and text messaging. Each of these
services is offered through your local carrier. For
service information, please contact your carrier.
When a voice mail or text message is received, a
notification is displayed on the screen and a tone is
played to alert you that there is a new message
available.
A text message is represented by an envelope icon.
The voice mail message is represented by a reel-toreel icon. If the message memory is full, the
62 SGH-N105 July 23, 2001
Page 63

Chapter 5 Messaging
voicemail icon starts blinking and an error
message is displayed. You cannot receive any new
messages until the old messages are deleted.
Voice Mail Messages
Voice mail messages are stored on the carrier’s
network. A notification message is sent by the
network to your phone to alert you of a new
message.
When you first contact the voice mail system, you
are asked some simple questions to set up the new
voice mail account. You must record your first and
last name and assign a password between 4 - 7
digits long. Follow the instruction prompts to
properly set up the account.
Connecting to Voice mail:
1. Open the flip and press the “Menu” softkey.
2. Press “2” for “Voice Mail”.
3. Press “1” to connect.
4. Press “1” again or the “OK” softkey to confirm
connection.
5. Follow the voice prompts.
Note: To connect to the voice mail system quickly,
you can press and hold the “1” key with the
envelope icon.
Reading Text Mes sages
When a text message is received, an alert is
displayed on the screen. If the alert is dismissed,
you can read your text messages by opening the
“Read Messages” menu. When the Read Messages
menu is opened, the header of the message is
July 23, 2001 SGH-N105 63
Page 64

Menu Functions SGH-N105 User Manual
displayed. The following information is displayed
in the information header:
• Message Number
• Message Status (New, Old, Not Sent, Sent)
To read messages:
1. Press the “Menu” softkey.
2. Press “2” for “Messages”.
3. Press “2” for “Read Messages”.
4. The header information of the first message is
displayed. Press the “View” softkey to display
the body of the message.
5. Press the Up/Down arrow to scroll through
the message.
Message Options
The following options are available in the Read
Messages menu:
• Delete - Allows you to delete old messages
that are no longer needed to free up
memory.
• Send - Allows you to send a message that
has not yet been sent.
• Text Reply - This option allows you to reply
by sending a new text message. You can
also change the SMS number, send the
message, save and send the message, save
but not send the message.
64 SGH-N105 July 23, 2001
• Call Back - Allows to call the sender of the
message.
Page 65

Chapter 5 Messaging
• Cut Number - Allows you to extract the
phone number from the message text. The
number can be saved in the phone book or
called back.
Note: These options vary depending on the type of
message. (New, Old, Not Sent, Sent).
Writ e Messages
Your phone is equipped with Short Message
Service (SMS). This allows you to send and receive
text messages from your phone. In the Write
Messages menu you can write and edit text
messages with up to 160 characters.
To write a new message:
1. Press the “Menu” softkey.
2. Press “2” for “Messages”.
3. Press “3” for “Write Messages”.
4. Enter the body of the message using the
keypad. Select the desired mode of entry by
pressing the right softkey.
5. Press the “OK” softkey when finished.
6. Highlight one of the following options by
pressing the corresponding numeric key:
• 1. Send Only
• 2. Save and Send
7. Press the “Select” softkey.
July 23, 2001 SGH-N105 65
• 3. Save Only
Page 66

Menu Functions SGH-N105 User Manual
8. Enter the destination number or select it from
the phone book by pressing the “PhoneBook”
softkey.
9. Press the “OK” softkey to send the message.
Preset Message List
Using this menu you can save up to five different
messages that are used frequently. You can scroll
through the list by using the Up/Down arrow key.
The following options are available in the Preset
Message List:
• Edit - Allows you to write a new message or
edit the selected preset message.
• Send Message - Allows you to send the
selected preset message.
• Delete - Allows you to delete the selected
preset message.
The following preset messages are defaulted in the
phone:
• Call me when you get this message.
• When can we meet?
• Where are you?
• Where is the meeting?
• Talk to you soon.
To view the Preset Message List:
1. Press the “Menu” softkey.
2. Press “2” for “Messages”.
3. Press “4” for “Preset Message List”.
Note: If there are no preset messages, you can
create new messages by pressing the “Options”
softkey.
66 SGH-N105 July 23, 2001
Page 67

Chapter 5 Messaging
Setup
All the default set up information for SMS is
configured using this menu. There are three
different menus in the Setup menu. They are:
• Service Center - Allows you to save or
change the phone number of the SMS
center required for sending messages. This
number is obtained from your local carrier.
• Default Type - Allows you to set the default
message type. (Text, Voice, Fax, X-400,
Email, and ERMES). The network converts
the message into the selected format.
• Default Validity - Allows you to set the
default time period for saving messages in
the SMS center while they are attempting
delivery. Possible values are; one hour, 6
hours, 24 hours, and one week.
To access the Setup menu:
1. Press the “Menu” softkey.
2. Press “2” for “Messages”.
3. Press “5” for “Setup”.
4. Use the Up/Down key to cycle between menu
options.
July 23, 2001 SGH-N105 67
Page 68

Menu Functions SGH-N105 User Manual
Broadcast (SIM Card Dependent)
This service allows you to receive text messages on
various topics, such as the weather, sports, or stock
quotes. Text messages are displayed with the
requested information when they are received. If
the message is long, press the volume keys or
navigation button to scroll up or down.
The last five messages received are saved for later
viewing. For more information, please contact
your local carrier. The following options are
available in the Broadcast menu:
• Read - Allows you to view the new broadcast
message. Use the Up/Down arrow key to
scroll through the message.
• Receive - This option enables or disables
the broadcast option. This option must be
enabled for you to receive broadcast
messaging.
• Channel List - This lists all the available
channels. Channels currently selected are
marked using an asterisk (*). When
selected, you can edit, enable, disable, or
delete the channel. The “Enter Channel”
option allows you to enter a new channel to
the list. Enter the channel ID and title for
the new channel.
• Language - Allows you to select your
desired language. The broadcast messages
68 SGH-N105 July 23, 2001
are sent in the language selected.
Page 69

Chapter 5 Voice Functions
Voice Functions
The Voice Function feature is used to perform the
following functions:
• Voice Dial
• Voice Command
• Voice Memo
• Answer Phone
Voice Dial
Voice dial allows you to make outgoing calls by
speaking a name or voice tag defined in the voice
dial setup. Any word can be used as a voice tag.
Before using the voice dialing feature, remember
the following:
• Voice tags are language dependent. They
depend on the speakers voice.
• Voice tags are sensitive to background
noise. If possible, record voice tags or make
calls in a quiet environment.
• When recording a voice tag or making a
call, hold the phone in a normal position.
Speak in a clear normal voice.
• The maximum length for a voice tag is
about 1.5 seconds. Very short names are
not recorded.
• You can store up to 20 different voice tags
in memory.
July 23, 2001 SGH-N105 69
Page 70

Menu Functions SGH-N105 User Manual
To open the Voice Dial menu:
1. Press the “Menu” softkey.
2. Press “3” for “Voice Functions”
3. Press “1” for “Voice Dial”.
4. Select one of the following choices:
• Record
• Activate
• Delete One
• Play All
• Delete All
5. Press the “Select” softkey.
6. Follow the instructions given for the selected
choice.
Voice Dial Record
Allows you to record and assign to entries stored in
the phone book.
To record a voice tag:
1. Press “1” for “Record” from the Voice Dial
menu.
2. Say the desired name into the phone. A voice
prompt requests that the name is spoken
again.
3. If the name is accepted, the desired phone
70 SGH-N105 July 23, 2001
number is requested. Enter the phone
number using the keypad.
Page 71

Chapter 5 Voice Functions
4. Press the “OK” softkey to save.
Voice Dial Activate
This option activates voice dialing.
To activate:
1. Press “2” for “Record” from the Voice Dial
menu.
2. Say the desired name into the phone. If the
name is not understood, a voice prompt
requests that you say the name again.
3. The phone automatically calls the number
associated with the voice tag.
Voice Dial Delete One
Allows you to delete a specific voice tag. The
phone number associated with the tag is not
deleted and remains in the phone book.
To delete one voice tag:
1. Press “3” for “Delete One” from the Voice Dial
menu.
2. Press the “OK” softkey to delete the selected
entry.
Voice Dial Play All
Plays all the voice tags stored in the phone.
To play all voice tags:
1. Press “4” for “Play All” from the Voice Dial
2. All voice tags in the phone are played.
July 23, 2001 SGH-N105 71
menu.
Page 72

Menu Functions SGH-N105 User Manual
Voice Dial Delete All
Deletes all the voice tags in the phone.
To delete all voice tags:
1. Press “5” for “Delete All” from the Voice Dial
menu.
2. Press the “OK” softkey to confirm the
deletion.
Voice Command
This menu allows you to get quick access to the
frequently used menus by saying your own voice
command.
The following functions can be selected:
• Voice Command Record - The 20 most
frequently used menu functions are
programmable with your own voice
commands. The menus are defaulted to
Off at the factory. When the voice
commands are recorded successfully, they
are turned On.
• Voice Command Activate - Use this menu
to access the recorded voice commands
menu.
• Voice Command Play All - Plays all voice
command that are stored in the phone’s
memory.
• Voice Command Delete All - Deletes all the
commands that are stored in the phone’s
To access the Voice Command menu:
1. Press the “Menu” softkey
72 SGH-N105 July 23, 2001
memory.
Page 73

Chapter 5 Voice Functions
2. Press “3” for “Voice Dial”.
3. Press “2” for “Voice Command”.
4. Select the desired option and press the
“Select” softkey.
Voice Memo
The voice memo feature allows you to record
personal memos to remind you of important
appointments or events. The voice memo feature
stores up to 3 memos in the phone’s memory.
The following functions can be selected:
• Voice Memo Record - Allows you to record
a personal memo. The screen displays the
memo location, date and time the memo
was recorded and recording time counter.
The maximum recording time is about 35
seconds. To record longer memos, press
the “Continue” softkey. The memo is split
and allows you to continue. To stop
recording, press the “Stop” softkey.
• Voice Memo Replay - Allows you to play
back the personal memos. The most recent
is played first followed by the rest.
• Voice Memo Delete One - Allows you to
delete a specific memo stored in memory.
All memos recorded are played back to
allow you to delete the correct one.
• Voice Memo Delete All - Allows you to
To access the Voice Memo menu:
July 23, 2001 SGH-N105 73
delete all memo that are stored in memory.
Press the “OK” softkey to confirm the
deletion.
Page 74

Menu Functions SGH-N105 User Manual
1. Press the “Menu” softkey.
2. Press “3” for “Voice Dial.
3. Press “3” for “Voice Memo”.”
4. Select the desired option and press the
“Select” softkey.
Answer Phone
You can set up the phone to answer calls with your
own recorded messages. Messages can be used to
inform callers of your current situation and urge
them to leave a voice mail. While the message is
being played, you can answer the call by pressing
the “Accept” softkey.
The following options are available:
• AnswerPhone - This option enables and
disables the answer phone feature.
• Message Record - You can record up to 3
messages at 35 seconds each. To stop
recording before time expires, press the
“Stop” softkey. To change the message, use
the “Delete” option and record a new one.
• Message Select - The phone offers two
default messages and one custom message
that is defined by you. You can select “User
Message” only when you have recorded
your own message.
To access the AnswerPhone option:
1. Press the “Menu” softkey.
2. Press “3” for “Voice Dial”.
3. Press “4” for “AnswerPhone”.
4. Select the desired option and press the
74 SGH-N105 July 23, 2001
“Select” softkey.
Page 75

Chapter 5 Tones
Tones
The tones menu is used to choose desired ringer
types, compose melodies for custom ringers, and
setup volume levels for the different tones
available in the phone. The following options are
available:
• Ring Tone
• Melody Composer
• Ring Volume
•Alert Type
• Keypad Tone
• Message Tone
• Error Tone
• Minute Minder
• Connect Tone
Ring Tone
This option allows you to select the type of ringer
tone that you want to play for incoming calls and
messages. Each time a tone is selected, it plays a
sample ringer.
To access the ring tone:
1. Press the “Menu” softkey.
2. Press “4” for “Tones”
3. Press “1” for “Ring Tone”.
4. Use the Up/Down arrow key to scroll through
5. Press the “Select” softkey to save the tone as
July 23, 2001 SGH-N105 75
the available tones.
the new ringer.
Page 76

Menu Functions SGH-N105 User Manual
Melody Composer
The melody composer allows you to create your
own custom ringer by composing notes. The notes
are composed by pressing the keypad and then
using the Up/Down arrow to change the octave or
pitch of the note. Three different octaves are
available with a maximum of 100 notes. You can
also adjust the rest and length of the note.
To compose a melody:
1. Press the “Menu” softkey.
2. Press “4” for “Tones”.
3. Press “2” for “Melody Composer”.
4. Select a memory location or existing melody
from the list. Press the “Select” softkey.
5. The composer screen is displayed. Use the
chart to compose the desired melody.
Key Note
1 “C” - The first note in the musical scale.
2“D”
3“E”
4“F”
5“G”
6“A”
76 SGH-N105 July 23, 2001
Page 77
Chapter 5 Tones
Key Note
7 “B”
8 Raise an octave higher or lower
9 Not Used
0 Enters a note rest. Press until you find
the desired length.
# To raise one semi-tone above the tone
that was entered. This achieves a sharp
note.
/C Clears the last note.
Up/
Down
Move the note to the next semi-tone
higher or lower.
Arrow
* Adjust the length of a note.
Note: Use the “Next” softkey to select the previous
notes when trying to modify.
6. Listen to the new melody by pressing the
“Listen” softkey.
7. Press the “Yes” softkey to indicate that you are
satisfied with the melody.
8. Enter a name for the new tone.
9. Press the “Save” softkey to save.
July 23, 2001 SGH-N105 77
Page 78

Menu Functions SGH-N105 User Manual
10. Press the “yes” softkey to save the new tone as
the ring tone or “No” to just save in memory
without changing the existing ring tone.
Deleting a Melody
1. Select the melody that you want to delete
from the melody composer list. Press the
“Select” softkey.
2. The composer screen is displayed with the
notes.
3. Press the “Internet/Clear” button located in
the middle of the “Up/Down” arrow for a few
seconds.
4. All notes are deleted. Press the “Listen”
softkey. A message is displayed confirming the
deletion.
5. Press the “Yes” softkey.
Ring Volume
This setting allows you to adjust the desired ringer
volume of the phone. There are seven different
levels of ringer volume. Use the volume keys or
navigation button to move the volume up or down.
Setting the ringer volume:
1. Press the “Menu” softkey.
2. Press “4” for “Tones”.
3. Press “3” for “Ring Volume”.
4. Use the Volume button located on the side of
5. Press the “OK” softkey to save desired volume
78 SGH-N105 July 23, 2001
the phone to adjust the levels up or down.
level.
Page 79

Chapter 5 Tones
Alert Type
Allows you to configure how to be informed when
new incoming calls are received. The following
options are available:
• Light Only - Just the backlight is switched
On with the caller ID information if
available. The phone does not ring or
vibrate.
• Melody - The phone rings using the
selected melody.
• Vibration - The phone vibrates when an
incoming call is received. No ringer is
heard.
• Vibra+Melody - The phone vibrates three
times and then rings when a new call is
received.
To set the alert type:
1. Press the “Menu” softkey.
2. Press “4” for “Tones”.
3. Press “4” for “Alert Type”.
4. Select the desired option and press the
“Select” softkey.
Note: Press and hold the “#” key to toggle the
vibrate mode On/Off.
July 23, 2001 SGH-N105 79
Page 80

Menu Functions SGH-N105 User Manual
Keypad Tone
Allows you to select the type of tone generated
when different keys are pressed on the keypad.
The following options are available:
• Off - No sounds are made when the keys
are pressed.
• Tone - Each key makes a unique sound
when pressed. (Standard phone tones).
• Beep - each key makes the same beep noise
when pressed.
To set the type of keypad tone:
1. Press the “Menu” softkey.
2. Press “4” for “Tones”.
3. Press “5” for “Keypad Tone”.
4. Select the desired option and press the
“Select” softkey.
Message Tone
This setting allows you to select how the phone
informs you that a new message has been received.
The following options are displayed:
• Off - No ringers or vibrating when new
messages are received.
• Light Only - Just the service light flashes
indicating a new message has been
received. No ring or vibrate.
• Single - The phone vibrates or the selected
To set the message tone:
80 SGH-N105 July 23, 2001
SMS tone is heard one time.
• Periodic - The phone vibrates or the
selected SMS tone sounds periodically.
Page 81

Chapter 5 Tones
1. Press the “Menu” softkey.
2. Press “4” for “Tones”.
3. Press “6” for “Message Tone”.
4. Select the desired option and press the
“Select” softkey.
Error Tone
This setting allows you to select how the phone
informs you when you make a mistake.
The following options are available:
• Off - The phone does not beep when an
error occurs.
• On - The phone sounds a beep tone when a
mistake is made.
To set the error tone:
1. Press the “Menu” softkey.
2. Press “4” for “Tones”.
3. Press “7” for “Error Tones”.
4. Select the desired option and press the
“Select” softkey.
Minute Minder
This setting allows you to have the phone beep
every minute when you are on an outgoing call.
This helps keep you informed of the length of the
call.
The following options are available:
To set the minute minder:
1. Press the “Menu” softkey.
July 23, 2001 SGH-N105 81
• Off - The phone does not beep.
• On - The phone beeps every minute.
Page 82

Menu Functions SGH-N105 User Manual
2. Press “4” for “Tones”.
3. Press “8” for “Minute Minder”.
4. Select the desired option and press the
“Select” softkey.
Connect Tone
This setting allows you to have the phone beep
when it connects to the network.
The following options are available:
• Off - The phone does not beep.
• On - The phone beeps when your call is
accepted.
To set the connect tone:
1. Press the “Menu” softkey.
2. Press “4” for “Tones”.
3. Press “9” for “Connect Tone”.
4. Select the desired option and press the
“Select” softkey.
82 SGH-N105 July 23, 2001
Page 83

Chapter 5 Settings
Settings
The settings menu allows you to configure the
phone preferences to make the phone easier to
use. The following options are available in the
settings menu:
• Phone Settings
• Network Services
• Security Settings
• LCD Settings
Phone Settings
The phone setting menu allows you to setup the
following functions:
• Greeting Message
• Own Number
• Language
• Any-Key Answer
• Backlight
• Service Light
• Auto Redial
• Car Kit Answer
• Caller ID
• Flip Function
• Reset Settings
July 23, 2001 SGH-N105 83
Page 84

Menu Functions SGH-N105 User Manual
Greeting Message
The greeting message allows you to set up a
greeting message that displays for a few seconds
when the phone is turned On.
To enter a greeting message:
1. Press the “Menu” softkey.
2. Press “5” for “Settings”.
3. Press “1” for “Phone Settings”.
4. Press “1” for “Greeting Message”.
5. Enter the desired message using the keypad.
Press the “OK” softkey to save.
Own Number
This menu allows you to enter your own name and
number.
The following options are available:
• Erase - Allows you to erase your name and
number.
• Edit - Allows you to edit the name and
number.
To access the own number menu:
1. Press the “Menu” softkey.
2. Press “5” for “Settings”.
3. Press “1” for “Phone Settings”.
4. Press “2” for “Own Number”.
84 SGH-N105 July 23, 2001
Page 85

Chapter 5 Settings
Language
Your phone supports different languages in
addition to English. The text and voice features
are changed when the language setting is changed.
The languages that are supported depends on the
SIM card installed.
To access the language menu:
1. Press the “Menu” softkey.
2. Press “5” for “Settings”.
3. Press “1” for “Phone Settings”.
4. Press “3” for “Language”.
Any-Key Answer
The any-key answer setting allows you to set up the
phone to answer by pressing any key on the
keypad. The only exception are:
• Pressing the “End” key
• Pressing and holding the volume key
• Pressing the “Reject” softkey.
Once the call is rejected, it is automatically
forwarded to your voicemail.
The following anykey options are available:
• On - Enables the any-key answer option.
Any key can be used to answer the phone.
• Off - The option is disabled and you must
press the “Send” or “Accept” softkey or
open the flip to answer an incoming call.
Note: Opening the flip answers all calls.
To access the any-key answer menu:
1. Press the “Menu” softkey.
July 23, 2001 SGH-N105 85
Page 86

Menu Functions SGH-N105 User Manual
2. Press “5” for “Settings”.
3. Press “1” for “Phone Settings”.
4. Press “4” for “Any-Key Answer”.
Backlight
This menu allows you to set the backlight settings
for the phone. If you turn off the backlight, there
is an increase in talk time.
The following options are available:
• Short - The backlight is turned On when
you press a key or receive a call. It turns Off
10 seconds after the last key is pressed.
• Long - The backlight is turned On when
you press a key or a call is received. It turns
Off 20 seconds after the last key is pressed.
• Off - The backlight is not used.
To access the backlight menu:
1. Press the “Menu” softkey.
2. Press “5” for “Settings”
3. Press “1” for “Phone Settings”.
4. Press “5” for “Backlight”.
Service Light
This setting allows you to turn On or Off the
service light located on the top of the phone. The
service light normally flashes to indicate an
incoming call.
The following options are available:
86 SGH-N105 July 23, 2001
• On - The service light flashes when an
incoming call is received.
• Off - The service light is not used.
Page 87

Chapter 5 Settings
To access the service light menu:
1. Press the “Menu” softkey.
2. Press “5” for “Settings”.
3. Press “1” for “Phone Settings”.
4. Press “6” for “Service Light”.
Auto Redial
This setting configures the phone to make up to
10 attempts to redial a number that is busy or not
available.
The following options are available:
• On - The option is enabled. The number is
re-dialed automatically.
• Off - The option is disabled.
To access the auto redial menu:
1. Press the “Menu” softkey.
2. Press “5” for “Settings”.
3. Press “1” for “Phone Settings”.
4. Press “7” for “Auto Redial”.
Car Kit Answer
This setting configures the phone to automatically
answer an incoming call after 3, 5, or 10 seconds.
Note: This feature is only available with the Hands
Free Car Kit accessory.
The following options are available:
• On - The option is enabled. The phone
To access the Car Kit answer menu:
1. Press the “Menu” softkey.
July 23, 2001 SGH-N105 87
automatically answers incoming calls.
• Off - The option is disabled.
Page 88

Menu Functions SGH-N105 User Manual
2. Press “5” for “Settings”.
3. Press “1” for “Phone Settings”.
4. Press “8” for “Car Kit Answer”.
Caller ID
This setting allows you to prevent your number
from being displayed on the phone of the other
person.
The following options are available:
• Default - The default setting provided by
the network is used.
• Hide Number - Your number is not
displayed on the other persons phone.
• Send Number - Your number is sent each
time a call is made.
To access the caller ID menu:
1. Press the “Menu” softkey.
2. Press “5” for “Settings”.
3. Press “1” for “Phone Settings”.
4. Press “9” for “Caller ID”.
Flip Func ti o n
This setting automatically enables the voice dial or
voice command mode when the flip is opened.
The following options are available:
• None - The voice dial or voice command
mode must be activated manually.
88 SGH-N105 July 23, 2001
• Voice Dial - The voice dial mode is
activated when the flip is opened.
• Voice Command - The voice command
mode is activated when the flip is opened.
Page 89

Chapter 5 Settings
To access the flip function option:
1. Press the “Menu” softkey.
2. Press “5” for “Settings”.
3. Press “1” for “Phone Settings”.
4. Press “0” for “Flip Function”.
Reset Settings
This setting is used to reset the phone to the
original factory settings. Before you reset, the
phone requests a 4 digit password.
Note: The password is preset to “0000”.
To access the reset menu:
1. Press the “Menu” softkey.
2. Press “5” for “Settings”.
3. Press “1” for “Phone Settings”.
4. Press “*” for “Reset Settings”.
5. Enter the password and press the “OK”
softkey.
6. Press the “OK” softkey to reset the phone.
Network Servi ces
This menu contains the settings for the network
that your phone is using. Please contact your local
carrier to make sure they are supported.
The following options are available is the network
services menu:
July 23, 2001 SGH-N105 89
• Call Forwarding
• Call Waiting
• Network Selection
• Line Identification
Page 90

Menu Functions SGH-N105 User Manual
Call Forwarding
This setting allows you to forward your incoming
calls to another number. When the call forwarding
option is enabled, the phone does not ring or
accept incoming calls. You can still make outgoing
calls without any problems.
The following options are available:
• Forward Always - All incoming calls are
forwarded to the specified number.
• Unavailable - Calls are forwarded if you are
busy on an existing call.
• Cancel All - All call forwarding options are
cancelled and the phone is returned to
normal operation.
To set up call forwarding:
1. Press the “Menu” softkey.
2. Press “5” for “Settings”.
3. Press “2” for “Network Services”
4. Press “1” for “Call Forwarding”.
5. Press “1” for “Forward Always”.
6. The following options are displayed:
• Voice Calls
• Fax Calls
• Data Calls
7. Press “1” for “Voice Calls”.
8. Press the “Activate” softkey.
9. Enter the phone number where the calls are
90 SGH-N105 July 23, 2001
going to be forwarded.
Page 91

Chapter 5 Settings
10. Press the “OK” softkey.
Call Waiting
This setting allows you to be informed when
another person is calling when you are already on
an existing call.
The following options are available:
• Voice Calls
• Fax Calls
• Data Calls
• Cancel All
To set up call waiting:
1. Press the “Menu” softkey.
2. Press “5” for “Settings”.
3. Press “2” for “Network Services”
4. Press “2” for “Call Waiting”.
5. Press “1” for “Voice Calls”.
6. Press the “Active” softkey.
July 23, 2001 SGH-N105 91
Page 92

Menu Functions SGH-N105 User Manual
Network Selection
This setting allows you to select the proper
network for the phone. If you switch between
multiple networks, they can be saved in one of 10
memory locations.
The following options are available:
• Automatic - Automatically searches to find
the network.
• Manual - A list where you can store
multiple networks by entering the specific
codes and information required.
To access the network selection menu:
1. Press the “Menu” softkey.
2. Press “5” for “Settings”.
3. Press “2” for “Network Services”.
4. Press “3” for “Network Selection”.
Line Identification
This setting allows you to view the line
information.
The following options are available:
• CLIP/COLP - (Call Line Identification
Presentation/Connected Line
Identification Presentation) If these
network functions are active, the callers
number is displayed during a call. If the
phone number matches one that is stored
92 SGH-N105 July 23, 2001
in the phone book, the callers name is
displayed in addition to their phone
number.
• CLIR/COLR - (Calling Line Identification
Restriction/Connected Line Identification
Page 93

Chapter 5 Settings
Restriction) If these network functions are
active, your phone number is not displayed
on the other persons phone.
To access the line identification menu:
1. Press the “Menu” softkey.
2. Press “5” for “Settings”.
3. Press “2” for “Network Services”.
4. Press “4” for “Line Identification”.
Security Settings
The security menu allows you to restrict the usage
of your phone to:
• The people of your choice
• The types of calls of your choice
Different codes and passwords are used to protect
the features of the phone.
The following options are available in the security
menu:
• PIN Check
• Change PIN
• Phone Lock
• Change Password
• SIM Lock
• FDN Mode (SIM Card Dependent)
• Change PIN 2 (SIM Card Dependent)
July 23, 2001 SGH-N105 93
Page 94

Menu Functions SGH-N105 User Manual
PIN Check
When the PIN check feature is enabled, the phone
requires a PIN number whenever the phone is
turned On. The PIN is defaulted to “1234”. If the
incorrect PIN is entered, the phone will not power
On.
The following options are available:
• Enable - You must enter a PIN each time
the phone is turned On.
• Disable - The phone power On normally
without requesting a PIN.
To access the PIN Check menu:
1. Press the “Menu” softkey.
2. Press “5” for “Settings”.
3. Press “3” for “Security Settings”.
4. Press “1” for “PIN Check”.
Change PIN
This setting allows you to change the PIN number.
The PIN feature must be enabled to access this
option. A current PIN must be entered before it
can be changed.
To access the change PIN menu:
1. Press the “Menu” softkey.
2. Press “5” for “Settings”.
3. Press “3” for “Security Settings”
4. Press “2” for “Change PIN”.
Phone Lock
When this setting is enabled, the phone is locked
and requires you to enter a 4 digit password each
94 SGH-N105 July 23, 2001
Page 95

Chapter 5 Settings
time the phone is powered On. The password is
defaulted to “0000” from the factory. Once the
correct password is entered, the phone can be
used normally until it is switched Off.
The following options are available:
• Enable - A password is required when the
phone is powered On.
• Disable - Phone operates normally, no
passwords are required when the phone is
powered On.
To access the phone lock menu:
1. Press the “Menu” softkey.
2. Press “5” for “Settings”.
3. Press “3” for “Security Settings”.
4. Press “3” for “Phone Lock”.
Change Password
This setting allows you to change the current
password in the phone. The current password
must be entered before it can be changed. The
password is defaulted to “0000” from the factory.
To access the change password menu:
1. Press the “Menu” softkey.
2. Press “5” for “Settings”.
3. Press “3” for “Security Settings”.
4. Press “4” for “Change Password”.
SIM Lock
When the SIM lock feature is enabled, your phone
only works with the current SIM card installed. If
the SIM Card is removed, the phone will not work,
even if a different SIM card is used.
July 23, 2001 SGH-N105 95
Page 96

Menu Functions SGH-N105 User Manual
The following options are available:
• Enable - SIM lock is enabled and a
password is assigned to the SIM card.
• Disable - The SIM lock is disabled. A
password is required to disable SIM lock.
To access the SIM lock menu:
1. Press the “Menu” softkey.
2. Press “5” for “Settings”.
3. Press “3” for “Security Settings”.
4. Press “5” for “SIM Lock”.
LCD Settings
The LCD menu allows you to configure the
features of the LCD screen on the phone.
The following options are available in the LCD
settings menu:
• Screen Mode
• Select Image
• LCD Contrast
Screen Mode
This setting allows you to select the screen
displayed while the phone is idle mode.
The following options are available:
• Normal - The LCD displays the local carrier
name with the date and time.
• Image Display - When the flip cover is
To access the screen mode:
96 SGH-N105 July 23, 2001
closed, the screen displays the image
selected. With the flip cover open, the
normal screen is displayed.
Page 97

Chapter 5 Settings
1. Press the “Menu” softkey.
2. Press “5” for “Settings”.
3. Press “4” for “LCD Settings”.
4. Press “1” for “Screen Mode”.
Select Image
This setting allows you to select the desired image
that is displayed in the image display setting found
in the screen mode menu. There are 5 different
images to choose from.
To access the select image menu:
1. Press the “Menu” softkey.
2. Press “5” for “Settings”.
3. Press “4” for “LCD Settings”
4. Press “2” for “Select Image”.
LCD Contrast
This setting changes the contrast setting of the
screen. Use the Up/Down arrow button to change
to the desired level. There are 15 different levels of
contrast.
To access the LCD contrast menu:
1. Press the “Menu” softkey.
2. Press “5” for “Settings”.
3. Press “4” for “LCD Settings”
4. Press “3” for “LCD Contrast”.
July 23, 2001 SGH-N105 97
Page 98

Menu Functions SGH-N105 User Manual
Organizer
The organizer feature allows you to schedule
events, create a to do list, view a calendar, set the
current date and time, set an alarm, and find out
what time it is in other cities around the world.
The following options are available in the
organizer menu:
• Scheduler
• Alarm
• Calculator
• To Do List
• Calendar
• World Time
• Clock
Scheduler
The scheduler option allows you to keep track of
important events and reminders. The phone
sounds an alarm when the reminder date is
reached.
The following options are available:
• Go To Date - Allows you to schedule an
event on a specific date.
• View All - Displays all the scheduled events
stored in the scheduler.
• Delete All - Deletes all the scheduled events
in the scheduler.
To create a new schedule:
1. Press the “Menu” softkey.
2. Press “6” for “Organizer”.
3. Press “1” for “Scheduler”.
98 SGH-N105 July 23, 2001
Page 99

Chapter 5 Organizer
4. The “Calendar” screen is displayed. Select the
desired month by using the Navigation key.
Note: Press the “End” key to exit the calendar
screen and return to Organizer.
5. Press the “OK” softkey.
6. The following options are displayed:
• Reminder - Requires that you enter a
time and label.
• Call - Requires a phone number and a
time.
• Meeting - Requires that you enter a time
and label.
• Birthday - Requires a name and time.
7. Select the desired option and press the
“Select” softkey. (You can also press the
corresponding number key).
8. When prompted to set an alarm for the event,
press the “Yes” softkey to have the phone
sound a reminder when the event is due.
A date that has a schedule already associated is
displayed in bold. The contents of the date are
displayed when you create a new event.
If two schedules are created for the same day, use
the Navigation key to cycle between them. Some of
the available options in the scheduler are:
July 23, 2001 SGH-N105 99
• Add - Allows you to add new contents to an
event.
Page 100

Menu Functions SGH-N105 User Manual
• Delete - Deletes the scheduled event.
• Move - Moves the scheduled event to a
different date.
• Copy - Copies the scheduled event to a new
date.
• Delete Day - Deletes all scheduled events
for a specific day.
Alarm
This setting allows you to set up an alarm to ring at
a desired time. The following alarms are available:
• Daily Alarm - The alarm sounds at the same
time every day.
• Once Alarm - The alarm sounds only one
time and is not repeated.
• Weekly Alarm - The alarm sounds at the
same time every week.
• Alarm Tone - Allows you to select a specific
alarm tone from the ringer list.
To access the alarm menu:
1. Press the “Menu” softkey.
2. Press “6” for “Organizer”.
3. Press “2” for “Alarm”.
4. Press:
• “1” for “Daily Alarm”.
• “2” for “Once Alarm”.
• “3” for “Weekly Alarm”.
Once an alarm is set, an alarm icon (bell) is
displayed on the screen. To cancel the alarm when
it sounds, open and close the flip.
100 SGH-N105 July 23, 2001
• “4” for “Alarm Tone”
 Loading...