

Samsung SGH-i718 User Manual

Pocket PC Phone
SGH-i718 Series
User’s Guide
Please read this guide before operating your
phone, and keep it for future reference.

Contents
Important safety precautions . . . . . . . . . 4
CHAPTER 1: Getting started
What’s in the box? . . . . . . . . . . . . . . . . 6
Getting to know your phone . . . . . . . . . . 7
Installing the SIM card . . . . . . . . . . . . .10
Installing the battery . . . . . . . . . . . . . . .11
Charging your phone . . . . . . . . . . . . . . .12
Switching the phone on or off . . . . . . . . .12
Conserving battery power . . . . . . . . . . .13
CHAPTER 2: The basics
Using the Today screen . . . . . . . . . . . . .16
Customising your phone . . . . . . . . . . . .21
Using the Application Launcher . . . . . . . .26
Searching for items . . . . . . . . . . . . . . . .27
Using an optional memory card . . . . . . .27
Adding and removing programs . . . . . . .29
Resetting your phone . . . . . . . . . . . . . .32
Managing memory . . . . . . . . . . . . . . . .33
Managing certificates . . . . . . . . . . . . . . 34
Using online help . . . . . . . . . . . . . . . . . 35
CHAPTER 3: Entering information
Entering text using the input panel . . . . . 36
Writing on the screen . . . . . . . . . . . . . .41
Drawing on the screen . . . . . . . . . . . . . 43
Recording a message . . . . . . . . . . . . . . 45
CHAPTER 4: Synchronising
information
Installing ActiveSync . . . . . . . . . . . . . .47
Customising connection settings . . . . . . 47
Connecting your phone to a computer . . 47
Synchronising information . . . . . . . . . . . 49
Customising synchronisation settings . . . 49
1

Contents
CHAPTER 5: Call functions
Entering your PIN . . . . . . . . . . . . . . . . .52
Checking you are connected . . . . . . . . . .52
Turning the phone functions off or on . . .53
Using the Dialling screen . . . . . . . . . . . .53
Making a call . . . . . . . . . . . . . . . . . . . .54
Advanced calling features . . . . . . . . . . .55
Answering or rejecting a call . . . . . . . . .57
Adjusting the ringer volume . . . . . . . . . .57
Options during a call . . . . . . . . . . . . . . .57
Call-related features . . . . . . . . . . . . . . .60
Customising your phone functions . . . . .63
CHAPTER 6: Message, Internet,
and Messenger
Messaging . . . . . . . . . . . . . . . . . . . . . .73
Internet Explorer . . . . . . . . . . . . . . . . .82
Pocket MSN . . . . . . . . . . . . . . . . . . . . .85
CHAPTER 7: Organiser
Contacts . . . . . . . . . . . . . . . . . . . . . . .90
Calendar . . . . . . . . . . . . . . . . . . . . . . .9 3
Notes . . . . . . . . . . . . . . . . . . . . . . . . .95
2
Tasks . . . . . . . . . . . . . . . . . . . . . . . . . 96
Alarms . . . . . . . . . . . . . . . . . . . . . . . . 98
CHAPTER 8: Multimedia
Camera . . . . . . . . . . . . . . . . . . . . . . . . 99
Windows Media Player . . . . . . . . . . . . 103
Mini player . . . . . . . . . . . . . . . . . . . . 109
Contents Manager . . . . . . . . . . . . . . . 109
CHAPTER 9: Extra programs
Games . . . . . . . . . . . . . . . . . . . . . . . 113
Java . . . . . . . . . . . . . . . . . . . . . . . . . 114
Calculator . . . . . . . . . . . . . . . . . . . . . 114
Smart Converter . . . . . . . . . . . . . . . . 115
BCR . . . . . . . . . . . . . . . . . . . . . . . . . 115
Download Agent . . . . . . . . . . . . . . . . . 117
Excel Mobile . . . . . . . . . . . . . . . . . . . 117
Word Mobile . . . . . . . . . . . . . . . . . . . 119
PowerPoint Mobile . . . . . . . . . . . . . . . 120
File Explorer . . . . . . . . . . . . . . . . . . . 122
Task Manager . . . . . . . . . . . . . . . . . . 122
SIM Manager . . . . . . . . . . . . . . . . . . . 123
GPS . . . . . . . . . . . . . . . . . . . . . . . . . 124
SIM Application Toolkit . . . . . . . . . . . . 124

CHAPTER 10: Getting connected
Beaming with Bluetooth . . . . . . . . . . . .125
Internet Sharing . . . . . . . . . . . . . . . . . 128
Connecting to the Internet or your network
129
CHAPTER 11: Troubleshooting
General problems . . . . . . . . . . . . . . . . 131
Call problems . . . . . . . . . . . . . . . . . . .133
Power and charging problems . . . . . . .134
Program problems . . . . . . . . . . . . . . . 136
CHAPTER 12: Health and safety
information
SAR certification information . . . . . . . . 139
Precautions when using batteries . . . . .140
Road safety . . . . . . . . . . . . . . . . . . . .141
Operating environment . . . . . . . . . . . . 141
Electronic devices . . . . . . . . . . . . . . . .141
Potentially explosive Environment . . . . .143
Emergency calls . . . . . . . . . . . . . . . . .143
Other important safety information . . . .144
Care and maintenance . . . . . . . . . . . . . 145
Microsoft End User License Agreemen t .146
Contents
3

Important safety precautions
Read these guidelines before using your
wireless phone. Failure to comply with them
may be dangerous or illegal.
Drive safely at all times
Do not use a hand-held phone while driving;
park your vehicle first.
Switching off when refuelling
Do not use the phone at a refuelling point
(service station) or near fuels or chemicals.
Switching off in an aircraft
Wireless phones can cause interference.
Using them in an aircraft is both illegal and
dangerous.
4
Switching off near all medical
equipment
Switch your phone off near medical
equipment. Hospitals or health care facilities
may be using equipment that could be
sensitive to external RF energy. Follow any
regulations or rules in force.
Interference
All wireless phones may be subject to
interference, which could affect their
performance.
Special regulations
Meet any special regulati on s in for ce in an y
area and always switch off your phone
whenever it is forbidden to use it, or when it
may cause interference or danger (in a
hospital for example).
Water resistance
Your phone is not water-resistant. Keep it
dry.

Sensible use
Use only in the normal position (held to your
ear). Avoid unnecessary contact with the
antenna when the phone is switched on.
Emergency call
Key in the emergency number for your
present location, then press . Give all
the necessary information as accurately as
possible. Do not end the call until given
permission to do so.
Keeping small children away from
your phone
Keep the phone and all its parts including
accessories out of reach of small children.
Accessories and batteries
Use only Samsung-approved batteries and
accessories such as headsets and PC data
cables. Use of any unauthorised accessories
could damage you or your phone and may
be dangerous.
CAUTION:
• RISK OF EXPLOSION IF A BATTERY IS
REPLACED BY AN INCORRECT TYPE.
• DISPOSE OF USED BATTERIES ACCORDING
TO THE INSTRUCTIONS.
At very high volumes, prolonged
listening to a headset can damage
your hearing.
Use of authorised software
Use only Samsung-authorised software. The
use of any unauthorised software could
damage your phone.
Qualified service
Only qualified service personnel may repair
your phone.
For more detailed safety information, see
“Health and safety information” on
page 139.
5

Getting started
1
Congratulations on the purchase of your
new Pocket PC Phone! This chapter helps
you set up your phone, charge the phone’s
batteries, and familiarise yourself with the
different components of your phone.
What’s in the box?
Your package contains the following items:
•Handset
• Battery
• Travel adapter
•CD-ROM
• Quick Reference Guide
• Extra stylus pen
•PC data cable
* One CD-ROM contains Microsoft ActiveS ync software,
Add-on software and applications, and the other
contains User’s Guide in PDF format.
6
*
In addition, you can obtain the following
accessories for your phone from your local
Samsung dealer:
• PC link CD
•PC data cable
• Travel adapter
•Desktop charger
• Straight headset
• Memory card (microSD)
• Car charger/adapter
•Stylus pen
• Simple hands-free car kit
• Standard battery
Note
: The items supplied with your phone and
the accessories available at your
Samsung dealer may vary, depending
on your country or service provider.

Getting to know your phone
Front view
LED indicator
Volume keys
Headset/
Adapter jack
Confirm key
Left soft key
Start menu/
Launcher key
(Button 2)
Send/
Speakerphone
key
Earpiece
Touch screen
Navigation keys
(Up/Down/Left/
Right)
Right soft key
Cancel/Task
Manager key
(Button 3)
End/Phone
lock key
Microphone
Rear view
Speaker
Power on/off
key
RESET key
Mini player/
Voice memo key
(Button 1)
Memory card
slot
Camera key
Getting started
Camera
lens
Stylus pen
Battery
cover
7
Getting started
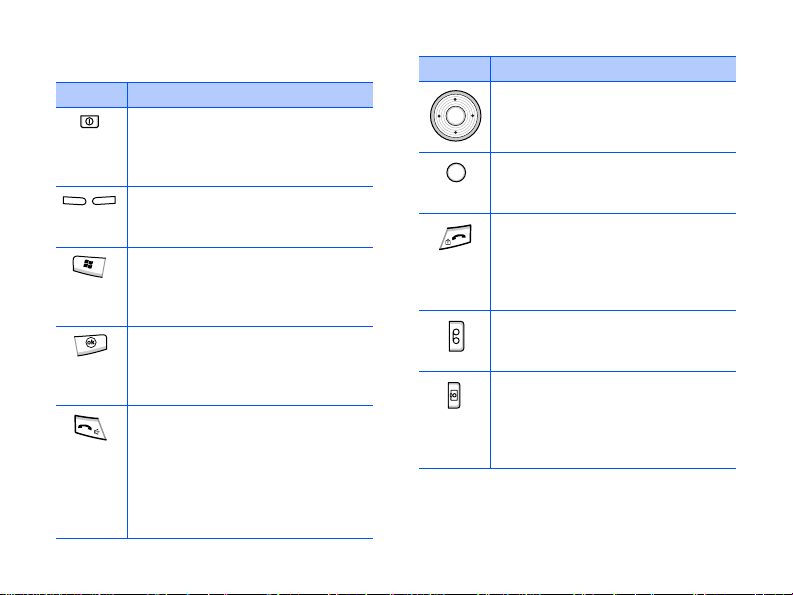
Keys of your phone
Key Description
• Press and hold to turn on or
off your phone’s power.
• Press to activate or
deactivate Sleep mode.
Press to perform the command
shown on the screen
immediately above the key.
• Press to open the
from any application.
• Press and hold to open the
Application Launcher.
• Press to return to the
previous screen.
• Press and hold to open the
Task Manager.
• Press to open the Dialling
screen.
• Press to make or answer a
call.
• Press and hold to activate the
speakerphone feature during
a call.
8
Start
menu
Key Description
• Press to move the cursor in a
text input field.
• Press to scroll through a list.
Press to confirm your selection
or execute the selected
application.
• Press to end a call.
• Press to return the display to
the Today screen.
• Press and hold to lock the
phone.
• Press to open the Mini player.
• Press and hold to record a
voice memo.
• Press and hold to turn on the
camera.
• Press to take a photo in
Camera mode or record a
video in Camcorder mode.

Key Description
• Press to adjust the system
volume.
• Press to adjust the voice
volume during a call.
• Press to mute the call ringer
when a call comes in.
Using a stylus pen
Your phone’s main screen is a touch screen,
which lets you just touch on the screen to
select items or command the phone to
perform specific functions.
Pull the stylus pen out of the stylus pen
holder. When you are not using the stylus
pen, insert it back into the stylus pen holder .
Stylus pen
holder
Getting started
Use the stylus pen to:
Tap
: Softly touch the screen once with the
stylus pen to select or execute an
application or command. Tapping works like
a mouse click on a computer.
Drag
: Hold the stylus pen on the screen
and drag it across the screen to select
several items or text, or move a progress
bar or scroll bar.
Tap-and-hold
: T ap and hold the stylus pen
on an item to see a list of actions available
for that item. Tap the action you want to
perform on the pop-up menu that appears.
Note
: To prevent scratches, do not use an
actual pen, pencil or other sharp
objects to tap or write on the screen.
9
Getting started
Installing the SIM card
When you subscribe to a cellular network,
you are provided with a plug-in SIM card
loaded with your subscription details, such
as your PIN, any optional services available,
and many others details.
• Keep all miniature SIM cards out of the
reach of small children.
• The SIM card and its contacts can be
easily damaged by scratches or bending,
so be careful when handling, inserting, or
removing the card.
• When you insert or remove the SIM card,
always make sure that the phone’s power
is switched off.
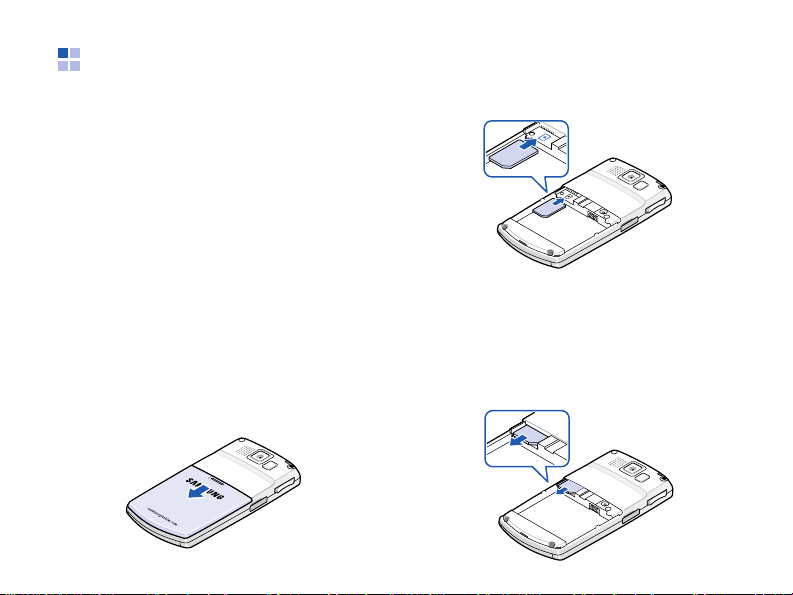
Inserting the SIM card
1. Remove the battery cover.
10
2. Insert the SIM card, as shown, ensuring
that the gold-coloured contacts of the
card are face down.
Continue to install the battery. See the
next page.
Removing the SIM card
To remove the S IM card, slide the card out
of the holder.

Installing the battery
Your phone is powered by a rechargeable
Li-ion battery. Use only approved batteries
and travel adapters. Ask your local
Samsung dealer for further details.
Installing the battery
1. Remove the battery cover.
2. Insert the battery into the battery
compartment, as shown.
Make sure that the battery is securely
locked before switching the phone on.
Getting started
3. Reattach the battery cover.
Removing the battery
1. If necessary, switch off the phone by
pressing and holding until the poweroff image displays.
2. Remove the battery co v er.
3. Lift the battery away from the phone.
11

Getting started
Charging your phone
While charging your phone, the Charging
icon ( ) displays on the status bar of the
screen.
Using the travel adapter
1. Plug the connector of the travel adapter
into the left side of the
2. Plug the adapter into a standard AC
power outlet.
3. When charging is finished, unplug the
adapter from the AC power outlet.
12
phone
.
4. Remove the travel adapter from the
phone.
Note
: Do not remove the battery while
charging. It may cause malfunctions
and may damage the phone.
Switching the phone on or off
Press and hold on the top of the phone
to turn on your phone. The phone is logged
into your home network and receives the
signal from the network. You can now make
or answer a call and use programs on the
phone.
When you turn on the phone’s power for the
first time or after you perform a ha rd r ese t,
you are guided through the alignment
process and setting the time and date.
To turn off the phone, press and hold .
Conserving battery power
You can conserve power by the following
methods:
• Switch to Sleep mode by pressing .
The phone will turn off the display and
stop the CPU operation.
Note
: You can deactivate Sleep mode by
pressing
on the
From the
Settings
Up Button.
• Adjust the power settings and backlight
settings. For details, see page 14.
or any key depending
Wake Up Button
Start
menu, tap
→
Personal
setting.
tab
→
Wake
Getting started
• Close multiple applications running on
your phone. Multitasking will consume
your battery faster and can cause your
phone’s system to react slowly.
Note
: Closing multimedia ap p lic atio n s ,
such as camera or Media player,
allows your phone to recover some
of its battery.
Low battery warning
Your phone displays the Battery Very Low
icon ( ) and a warning message when the
battery gets low. If this happens, charge the
battery .
When the battery gets very low, the phone
turns off the backlight to reduce the power
consumption.
If the phone is nearly out of battery power,
it shows the “Main Battery Very Low”
message.
13

Getting started
Adjusting the power settings
You can conserve battery power by
adjusting the
standby, the phone goes to Sleep mode
after a specified period of time of inactivity,
so very little power is being consumed. This
helps to preserve program and data stored
in the RAM.
A lower setting increases th e usable battery
time. A higher setting decreases the usable
battery time and allocates it for standby
usage.
To adjust the power settings:
1. From the
System
2. Select the power settings:
In the
amount of battery power.
In the
the phone switches to Sleep mode after
the specific period of time when the
phone is inactive and the main battery is
being used as the power source, or when
connected to an external power.
14
Power
settings. During
Start
menu, tap
tab →
Power
.
Battery
tab, check the remaining
Advanced
tab, set whether or not
Settings
→
In the
Economy
activate Power Save mode, if the phone
is not used for the specified period of
time. The phone will dim the display and
the CPU of the phone will operate at low
speed. You can set when the backlight
turns off in the
the next section.
In the
LCD Off
the display stays on after a call is
established. After the specified time, the
display turns off.
3. Tap .
tab, set the phone to
Backlight
tab, set the length of time
setting. See
Adjusting the backlight setting s
You can turn off or on the backlight of the
screen to reduce the power consumption.
To adjust the backlight settings:
1. From the
2. In the
Start
System
menu, tap
tab, tap
Settings
Backlight
.
.

3. Select the backligh t settings:
In the
Battery Power
tab, set whether
or not the phone turns off the backlight
automatically, if the phone is not used for
the specified period of time.
In the
External Power
tab, set whether
or not the phone turns off the backlight
automatically, if the phone is not used for
the specified period of time, when
connected to an external power.
In the
Keyboard
tab, set whether or not
the keypad backlight turns off
automatically, if the phone is not used for
the specified period of time. You can also
set the keypad backlight to turn off in
daytime.
In the
Brightness
tab, select the
brightness level.
4. Tap .
Getting started
15
The basics
2
This chapter explains basic information
about using your phone, such as
customising your phone and using online
help.
Using the Today screen
You will see the Today screen when you first
turn on your phone’s power. You can also
display it by tapping
any application.
On the T od ay screen, you can see important
information for the day, such as the current
date and time, unread messages, and for
your phone, at a glance.
16
Start
→ Today
from
Status bar
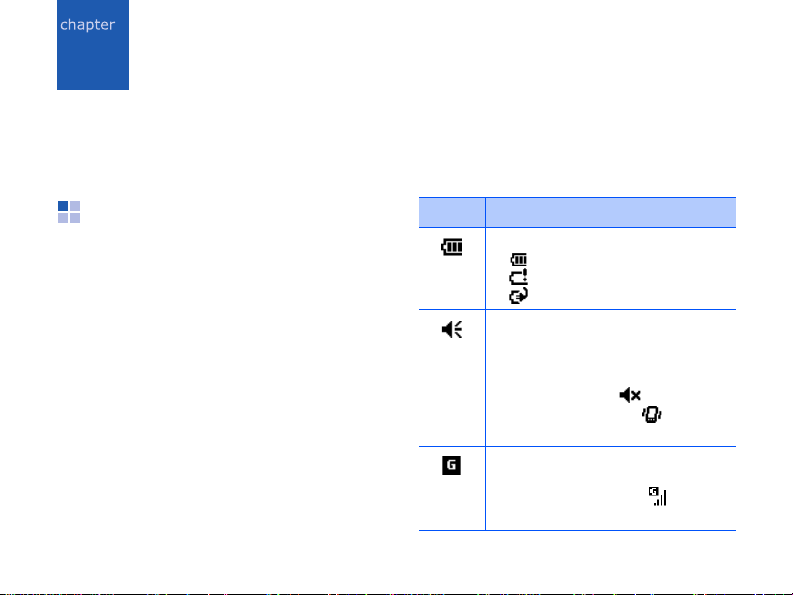
On the top line of the screen, the status ba r
displays icons to show your phone’s current
status. The following icons may appear:
Icon Description
Shows the battery status:
• : Main battery is full.
• : Main battery is very low.
• : Main battery is charging.
Adjusts the levels of the system
volume and the ringer volume.
You can also turn the sound off
or switch to Vibration mode.
If you select
you select
appears.
Appears when GPRS network is
available. When a GPRS
connection is active,
appears.
Off
, appears. If
Vibrate
,

The basics
Icon Description
Appears when EDGE network is
available. When an EDGE
connection is active,
appears.
Appears when you’re roaming
outside of your home area and
logged onto a different network.
Shows the signal strength .
Tapping this icon shows the
network connection status:
• : You are outside a service
area or in a limited service
area.
• : The phone functions are
turned off.
Appears when you are outside a
service area. When it appears,
you cannot make or receive
calls. When the SIM card is not
installed in your phone, this
icon is greyed and appears.
Icon Description
Appears when a connection with
a computer is active. When you
tap this icon, a pop-up message
shows the connection to your
computer is on and customise
the connection settings.
Appears when synchronisation
is processing.
You can view the following icons
depending on the network type:
• : synchronisation in the
GPRS network.
• : synchronisation in the
EDGE network.
Appears when connection with
another device or a network is
inactive.
Indicates that a new instant
message has been received.
17

The basics
Icon Description
Appears when a new e-mail or
SMS message has been
received.
Appears when a new MMS
message has been received.
Appears when a voice call is in
progress.
Appears when a data call is in
progress.
Appears when there is a call you
have missed. Tap to view the
details of the missed call.
Appears when there is a call on
hold.
Appears when more status
icons need to be displayed than
there is room to display them.
Tap to view all of status icons.
18
Icon Description
Appears when your phone has
some problem; for example,
when you have entered an
incorrect number . Tap to show a
command.
Accessing information from the
Today screen
From the Today screen, you can view:
• the current time and date
• the status of the network connection or
Bluetooth
• photo contacts
• unread SMS or MMS messages
• tasks that need to be comple ted
• upcoming appointments
• the phone lock status
For more information on changing the items
displayed, see “Customising the Today
screen information.”

Customising the Today screen
You can customise the Today screen
according to your preferences.
Changing the background image
1. From the
Personal
tab.
2. Select the desired th eme for the
background.
To use your own background image, tap
the
background
to locate the file you want. Choose a
folder and a file type. Then tap the image
you want to use.
3. Tap .
Customising the Today screen
information
1. From the
Personal
Start
menu, tap
tab
→ Today → Appearance
Use this picture as the
check box and tap
Start
menu, tap
tab → Today
Settings
Settings
.
Browse
→
→
The basics
2. In the
3. Tap .
Items
tab:
• clear a check box to remove its
information from the Today screen.
• select an item and tap
Move Down
• customise the further task and
appointment information by tapping
Options...
to change its position.
Move Up
or
Changing the clock type
1. On the Today screen, tap and hold the
clock.
2. Tap
Options...
3. Select a clock type in the
When you set a digital clock, you can
display the dual clock and change a time
format, 12 hours or 24 hours.
4. Tap .
Clock
field.
19
The basics
Setting up photo contacts
You can display caller ID images for contacts
to make calls or send messages directly
from the Today screen.
To set up a photo contact:
1. On the Today screen, tap
set photo contact → Photo
Tap here to
tab.
5. Tap .
To use photo contacts:
On the Today screen, tap the photo contact
you want. The phone performs the action
you have set. Y ou can also tap and hold the
photo contact and select another action for
the contact number.
Note
: You can change the photo contact
settings by tapping the option icon
next to the photo contact. You can
also tap and hold a photo contact
2. Tap
and select
New
Options...
.
3. Select a contact with a caller ID image.
4. If the contact has more than one item,
select a number or e-mail address.
Note
: In the
Detail
tab, you can select a
default action you want to perform
when tapping the photo on the Today
screen.
20
Creating your own Today screen
1. From the
Personal
2. Tap
New
Start
tab →
.
menu, tap
Settings
Multiple Today
→
.
3. Enter the screen name and select a
theme from the theme drop-list.
4. Tap the information to be displayed on
the Today screen.
5. Tap to save the settings.
6. Tap
Apply
.

Customising your phone
You can customise the phone settings to suit
the way you work.
Regional settings
You can change region, number, currency,
and time and date formats appropriate to
the countries in question.
Note
: For details about using Regional
Settings, see the online help.
From the
System
T ap the tabs at the bottom of the sc reen and
select the option you want in each field. The
items available are determined by the
region selected on the
Start
menu, tap
tab →
Regional Settings
Settings
Region
tab.
→
.
The basics
Time and date settings
When you turn on your phone’s power for
the first time, you are guided through
setting the time. Set the time again if:
• the battery is completely discharged.
• you perform a hard reset of your phone.
1. From the
System
tab.
2. Select your time zone from the dropdown list.
3. Tap the hour, minutes, or seconds, then
tap the up or down arrow to change the
time setting.
Notes
• You can change the time and date format in
Regional Settings
• You can set the current time to be displayed
on the status bar by selecting
clock on the title bar in all programs
the
:
More
Start
tab →
tab.
menu, tap
Clock & Alarms
. See page 21.
Settings
Display the
→
→ Time
in
21
The basics
4. Tap the down arrow in the date field to
display a calendar.
5. Tap a day on the calendar to select the
current date.
You can tap the left or right arrow at th e
top of the calendar to move backward or
forward through the calendar.
6. Tap .
7. Tap
Yes
to save your time and date
settings.
You can se t the ti m e an d d ate f or a loca tion
you’re visiting by selecting the
option.
Visiting
Operator settings
You can change your service provider as
your needs. When the service provide has
been changed, WAP, MMS, Internet
Connection Settings will be automatically
changed according to the selected provider.
1. From the
System
22
Start
menu, tap
tab →
Operator Settings
Settings
→
.
2. Select a service provider you want and
tap
Apply
.
3. Tap .
Owner information
Owner information identifies the owner or
user of the phone. Name, company,
address, phone number, e-mail address,
and note information fields are available.
1. From the
Personal
2. In the
user’s informatio n.
3. If you want to attach notes, tap the
Notes
4. Tap .
Note
Start
menu, tap
tab →
Owner Information
Identification
tab and enter notes.
: You can display the owner information
or notes, or both when you are back
from Sleep mode or when you turn on
the phone’s power. In the
tap the item you want.
Settings →
tab, enter the
Options
.
tab,

Error reporting setting
Your phone has the Error Reporting function
which informs you of errors in a program
that can give a crash to the phone system.
You can enable or disable this function.
1. From the
System
2. Select
Disable error reporting
3. Tap .
Start
menu, tap
tab →
Error Reporting
Enable error reporting
Settings →
.
.
or
Phone lock setting
With the phone lock setting, you can protect
your phone from unauthorised use.
Automatic phone lock se ttin g
You can assign a security passw ord to lock
your phone.
Once a password setting is enabled, the
password is required each time you access
the password setting option, wake up your
phone, reboot the system, or synchronise
information using Acti veSync.
The basics
To set the password:
1. From the
Personal
2. Tap the
check box and select
of inactivity the phone waits before
asking you for the password.
You can choose from 0 minute to 24
hours.
3. Select a password type in the
type
4. Enter a password in the
5. Re-enter the password in the
field.
6. If necessary , tap the
password hint in case you forget your
password.
7. Tap .
8. When a confirmation message displays,
tap
Start
menu, tap
tab →
Lock → Password
Prompt if device unused for
field.
Yes
.
Settings
the length of time
Password
Hint
tab and enter a
→
tab.
Password
field.
Confirm
23

The basics
Manual phone lock setting
When your phone is locked, you cannot tap
the screen and press any key, exc ept for
.
T o lock the phone, tap
Device unlocked
press and hold on the Today screen.
To unlock the phone, tap
Today screen and then tap
Unlock
Unlock
on the
.
Sound and notification settings
Your phone reminds you in various ways
when you have something to do, receive an
incoming call or message, tap the screen, or
press the buttons on the phone. For
example, if you’ve set up an appointment in
Calendar
you are notified in any of the following
ways:
• A message box appears on the screen.
• A sound, which you can specify , is pla y ed.
• The LED indicator flashes.
•Your phone vibrates.
24
, or an alarm in
Clock & Alarms
or
To choose reminder types and sounds:
1. From the
Personal
Notifications
Start
tab →
.
menu, tap
Sounds &
2. Choose the options. The options you
choose here apply throughout the phone.
In the
Sounds
tab, select the actions for
which you want to hear sounds.
In the
Notifications
tab, set the
notifications for different events.
3. Tap .
Notes
:
• You can adjust the system volume by
,
tapping on the status bar and then move
the slider under the icon.
• You can switch to Vibration mode by tapping
on the status bar and select
can also tap and hold # from the Dialling
screen.
Settings
Vibrate
→
. You

Screen realignment
When you turn on your phone’s power for
the first time, you are guided through the
alignment process. Realign your screen if:
• your phone does not respond accurately
to your screen taps.
• you perform a hard reset of your phone.
To realign the screen:
1. From the
System
2. Tap
realignment process.
3. Tap the cross-hair object as it appears at
each location. Be precise when you tap
the cross-hair object.
4. Tap .
Start
menu, tap
tab → Screen →
Align Screen
Settings →
General
to begin the
tab.
The basics
Application button settings
Customising the application buttons allows
you to associate different applications with
the programmable buttons on your phone.
To reassign a button:
1. From the
Personal
Buttons
2. Tap the button you want to reassign.
3. Select the application you want to assign
to the selected button from the Button
assignment drop-down list.
4. Tap .
Tap the
the delay and repeat rates of the Up/Down
control.
For details, see the online help.
Start
menu, tap
tab →
Buttons →
tab.
Up/Down Control
Settings →
Program
tab to adjust
25

The basics
Using the Application Launcher
Your phone provides you with Application
launcher, which allows you to access
shortcuts to your favourite programs,
website, files or folders, and quickly access
them.
To open the Application Launcher:
Tap
Launcher
press and hold . You can also access
this application by tapping the
tap
Programs →
Accessing items
From the Application Launcher screen,
select a category → a program.
Adding your favourite items
You can set up the application list of your
favourite items.
26
from the Today screen or
Start
Launcher
.
menu,
Adding your favourite items
1. From the Application Launcher screen,
tap
Favorites
2. Tap
Menu
added.
3. Select a program, select a URL address,
or select a file or folder.
4. If necessary, tap
5. Repeat steps 2 and 3 to add other items.
().
→
Add
→ a type of item to be
Select
.
Changing the order of your favourite
items
1. From the Favourites folder, move to the
item you want.
2. Tap
Menu
→
Move
.
3. Tap the up or down arrow next to the
selected item.
4. When you have finished, tap
Done
.

Deleting your favourite items
1. From the Favourites folder, move to the
item you want.
2. Tap
Menu
→
Delete
or
Delete all
3. Tap OK to confirm the deletion.
.
The basics
Using an optional memory card
Your phone has an expansion slot
compatible with microSD memory cards,
which are primarily used to back up or
transfer files and data.
Searching for items
The
Search
you to quickly locate data items.
1. From the
Search
2. Enter the data name you want to find in
the
type by tapping the
3. Tap
The name of the item will appear in the
box entitled
4. Tap an item you want to view.
application on your phone helps
Start
.
Search for
Search
to start the search.
Results
menu, tap
field and select a data
Type
.
Programs
field.
→
Inserting a memory card
1. Make sure that the phone is not Sleep
mode.
2. Insert the memory card into the slot with
the label side face down until it clicks into
place. The card is secure when it is not
protruding from the phone.
Note
: Use only compatible memory cards with
your phone. Using in c ompatible
memory cards, such as Secu re digita l
(SD) cards, may damage the cards, as
well as the phone, and data stored on
the card.
27

The basics
Removing the memory card
To remove the card, push it in and release
so that it is disengaged from the slot. Then
slide the card out.
28
Guidelines for using a memory
card
Follow the instructions that come with the
memory card or contact your memory card
manufacturer for more information.
• Some memory cards consume larger
amounts of power. To avoid draining the
battery completely when using a memory
card, connect your phone to an AC power
outlet whenever possible.
• If the battery is very low, do not save
data to a memory card . This may res ult in
the loss of data.
• Do not turn your phone off when you are
in the middle of performing an operation,
such as saving data to your memory card.
• Keep your memory card in a protective
case when not in us e to protect it from
dirt and moisture.

Adding and removing programs
Programs added to your phone at the
factory are stored in ROM (Read Only
Memory). You cannot remov e this software,
and you’ll never accidentally lose ROM
contents. ROM programs can be updated
using special installation programs with a
*.cab.pkg, *.cab.pku, or *.cab.pks
extension. All other programs and data files
added to your phone after factory
installation are stored in RAM (Random
Access Memory).
You can install any program created for your
phone, as long as your phone has enough
memory. The most popular place to find
software for your phone is on the Microsoft
website (http://www.microsoft.com/
windowsmobile).
The basics
Adding programs using
ActiveSync
You can install a program downloaded from
the Internet or included on the supplied
software CD-ROM by performing a
synchronisation between your phone and
the computer.
First you need to determine what your
phone and processor type are so that you
know which version of the software to
install.
1. From the
System
2. In the
information in the
3. Download the program to your computer
from the Internet or insert the CD-ROM
that contains the program into your
computer.
Start
tab
→
Version
menu, tap
About
tab, make a note of the
Settings
.
Processor
field.
→
29
 Loading...