

Samsung SGHI718 Users Manual

Draft 01
2006. 09. 30
Pocket PC Phone
SGH-i718 Series
User’s Guide
Please read this guide before operating
your phone, and keep it for future
reference.

* Depending on the software installed or your service provider or country,
some of the descriptions in the guide may not match your phone exactly.
* Depending on your country, your phone and accessories may appear
different from the illustrations in this guide.

Contents
Important safety precautions . . . . . . . . . . . . 4
CHAPTER 1: Getting started
What’s in the box? . . . . . . . . . . . . . . . . . . . 6
Getting to know your phone . . . . . . . . . . . . 7
Installing the SIM card . . . . . . . . . . . . . . . 10
Installing the battery . . . . . . . . . . . . . . . . 12
Switching the phone on or off . . . . . . . . . . 13
Charging your phone . . . . . . . . . . . . . . . . 13
CHAPTER 2: The basics
Using the Today screen . . . . . . . . . . . . . . . 19
Customising your phone . . . . . . . . . . . . . . 24
Using the Application Launcher . . . . . . . . . 30
Using an optional memory card . . . . . . . . . 30
Adding and removing programmes . . . . . . . 32
Resetting your phone . . . . . . . . . . . . . . . . 36
Managing memory . . . . . . . . . . . . . . . . . . 37
Managing certificates . . . . . . . . . . . . . . . . 38
Using the online help . . . . . . . . . . . . . . . . 39
CHAPTER 3: Entering information
Entering text using the input panel . . . . . . . 40
Writing on the screen . . . . . . . . . . . . . . . . 48
Drawing on the screen . . . . . . . . . . . . . . . 51
Recording a message . . . . . . . . . . . . . . . . 53
Using My Text . . . . . . . . . . . . . . . . . . . . . 54
1

Contents
CHAPTER 4: Synchronising
information
Installing ActiveSync . . . . . . . . . . . . . . . . 57
Customising connection settings . . . . . . . . 57
Connecting your phone to a computer . . . . 58
Synchronising information . . . . . . . . . . . . . 59
Customising synchronisation settings . . . . . 60
CHAPTER 5: Navigating through
applications
Using the status bar and command bar . . . . 63
Using pop-up menus . . . . . . . . . . . . . . . . . 64
Using the application buttons . . . . . . . . . . . 64
Finding information . . . . . . . . . . . . . . . . . 64
CHAPTER 6: Your phone
Entering your PIN . . . . . . . . . . . . . . . . . . . 66
Checking you are connected . . . . . . . . . . . 66
2
Turning the phone functions off or on . . . . . 67
Using the Dialler screen . . . . . . . . . . . . . . 67
Making a call . . . . . . . . . . . . . . . . . . . . . . 68
Advanced calling features . . . . . . . . . . . . . 68
Answering or rejecting a call . . . . . . . . . . . 71
Ending a call . . . . . . . . . . . . . . . . . . . . . . 71
Adjusting the ringer volume . . . . . . . . . . . . 71
Options during a call . . . . . . . . . . . . . . . . . 72
Call-related features . . . . . . . . . . . . . . . . . 73
Customising your phone functions . . . . . . . 77
CHAPTER 7: Message, Internet, and
Messenger
Messaging . . . . . . . . . . . . . . . . . . . . . . . . 88
Internet Explorer . . . . . . . . . . . . . . . . . . . 99
Pocket MSN . . . . . . . . . . . . . . . . . . . . . . 102
CHAPTER 8: Pocket outlook
Contacts . . . . . . . . . . . . . . . . . . . . . . . . 107

Contents
Calendar . . . . . . . . . . . . . . . . . . . . . . . . 111
Notes . . . . . . . . . . . . . . . . . . . . . . . . . . 115
Tasks . . . . . . . . . . . . . . . . . . . . . . . . . . 116
Time Manager . . . . . . . . . . . . . . . . . . . . 118
CHAPTER 9: Multimedia
Camera . . . . . . . . . . . . . . . . . . . . . . . . . 120
Windows Media Player . . . . . . . . . . . . . . 124
Mini Player . . . . . . . . . . . . . . . . . . . . . . 130
Contents Manager . . . . . . . . . . . . . . . . . 131
CHAPTER 10: Extra programmes
Games . . . . . . . . . . . . . . . . . . . . . . . . . 135
Calculator . . . . . . . . . . . . . . . . . . . . . . . 136
Smart Converter . . . . . . . . . . . . . . . . . . 137
BCR . . . . . . . . . . . . . . . . . . . . . . . . . . . 13 8
Voice Assist . . . . . . . . . . . . . . . . . . . . . . 140
Picsel Browser . . . . . . . . . . . . . . . . . . . . 142
Download Agent . . . . . . . . . . . . . . . . . . . 148
Excel Mobile . . . . . . . . . . . . . . . . . . . . . . 149
Word Mobile . . . . . . . . . . . . . . . . . . . . . 151
PowerPoint Mobile . . . . . . . . . . . . . . . . . 155
Terminal Services Client . . . . . . . . . . . . . 157
File Explorer . . . . . . . . . . . . . . . . . . . . . 159
Task Manager . . . . . . . . . . . . . . . . . . . . 159
SIM Manager . . . . . . . . . . . . . . . . . . . . . 160
SIM Application Toolkit . . . . . . . . . . . . . . 161
CHAPTER 11: Getting connected
Beaming with Bluetooth . . . . . . . . . . . . . 162
Internet Sharing . . . . . . . . . . . . . . . . . . . 166
Connecting to the Internet or your network 167
CHAPTER 12: Appendix
Troubleshooting . . . . . . . . . . . . . . . . . . . 169
Health and safety information . . . . . . . . . 171
3

Important safety precautions
Read these guidelines before using your
wireless phone. Failure to comply with them
may be dangerous or illegal.
Switching off near all medical equipment
Switch your phone off near medical equipment.
Hospitals or health care facilities may be using
equipment that could be sensitive to external RF
energy. Follow any regulations or rules in force.
Drive safely at all times
Do not use a hand-held phone while driving;
park the vehicle first.
Switching off when refuelling
Do not use the phone at a refuelling point
(service station) or near fuels or chemicals.
Switching off in an aircraft
Wireless phones can cause interference. Using
them in an aircraft is both illegal and
dangerous.
6
Interference
All wireless phones may be subject to
interference, which could affect their
performance.
Special regulations
Meet any special regulations in force in any area
and always switch off your phone whenever it is
forbidden to use it, or when it may cause
interference or danger (in a hospital for
example).
Water resistance
Your phone is not water-resistant. Keep it dry.
Sensible use
Use only in the normal position (held to the
ear). Avoid unnecessary contact with the
antenna when the phone is switched on.
Emergency call
Key in the emergency number for your present
location, then press . Give all the necessary
information as accurately as possible. Do not
end the call until given permission to do so.
Keeping small children away from your
phone
Keep the phone and all its parts including
accessories out of reach of small children.
Accessories and batteries
Use only Samsung-approved batteries and
accessories such as headsets and PC data
cables. Use of any unauthorised accessories
could damage you or your phone and may be
dangerous.
CAUTION:
• RISK OF EXPLOSION IF A BATTERY IS REPLACED BY
AN INCORRECT TYPE.
• DISPOSE OF USED BAT TERIES ACCORDING TO THE
INSTRUCTIONS.
At very high volumes, prolonged listening
to a headset can damage your hearing.
Use of authorised software
Use only Samsung-authoriesed software. The
use of any unauthoriesed software could
damage your phone.
Qualified service
Only qualified service personnel may repair your
phone.
For more detailed safety information, see
page 173.
7
1
Getting started
Congratulations on the purchase of your new
Pocket PC Phone! This chapter helps you set up
your phone, charge the phone’s batteries, and
familiarise yourself with the different
components of your phone.
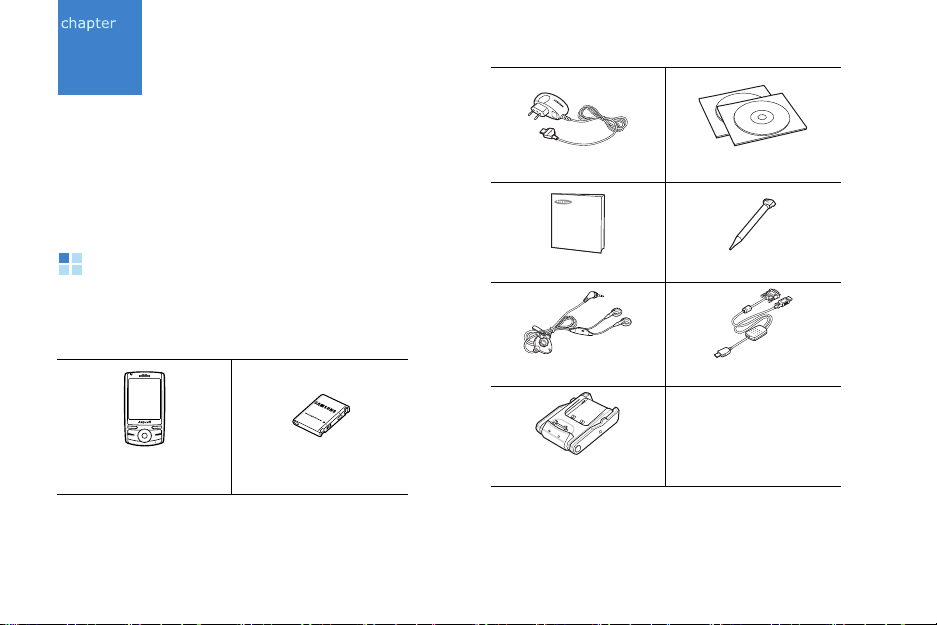
Travel adapter
CD-ROMs
*
What’s in the box?
Your package contains the following items;
Some accessories may not match your package.
8
PDA phone with
stylus pen
a
Battery
Quick Reference Guide
Headset
Desktop charger
*. One CD-ROM contains Microsoft ActiveSync
software, Add-on software and applications, and
the other contains User’s Guide in PDF format.
Extra stylus pen
PC Link data cable
Getting started
In addition, you can obtain the following
accessories for your phone from your local
Samsung dealer:
• PC link CD • PC data link cable
• Travel adapter • Desktop charger
• Memory card (microSD) • Car charger/adapter
• Stylus pen • TV out cable
• Simple hands-free car kit
• Standard/Extended batteries
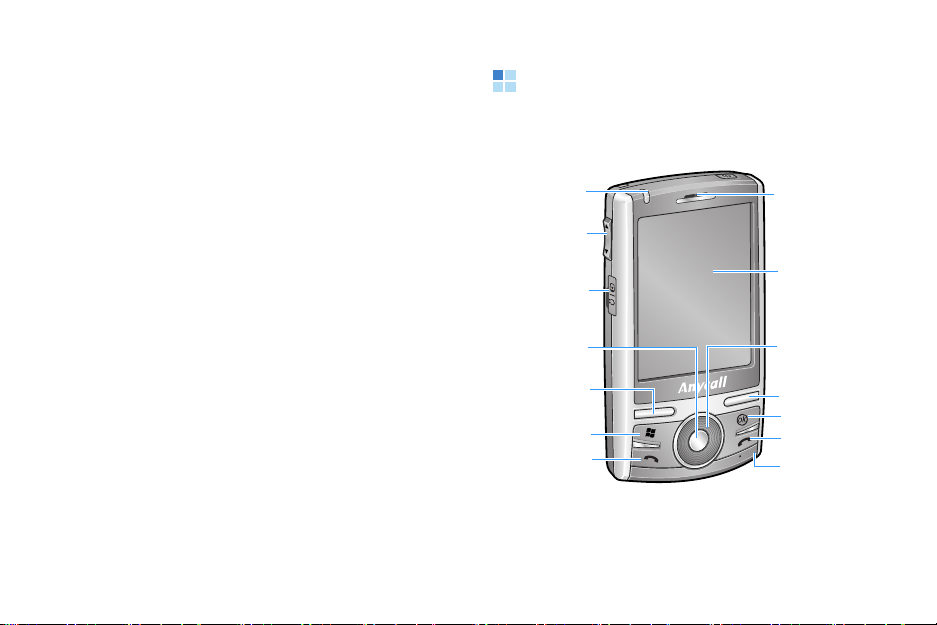
Getting to know your phone
Front view
LED indicator
Volume keys
Headset/
Adapter jack
Confirm key
Left soft key
Start menu
key
Send key
Earpiece
Touch screen
Navigation keys
(Up/Down/Left/
Right)
Right soft key
Cancel key
End key
Microphone
9

Getting started
Rear view Keys of your phone
Voice memo
Memory card
Camera key
10
Speaker
Power key
RESET key
key
slot
Camera lens
Stylus pen
Battery lock
Key Description
• Turns on or off your phone’s
power when held down.
• Activates or deactivates Sleep
mode.
Press to perform the command
shown on the screen immediately
above the key.
Opens the Application La un ch er.
Returns to the previous level or
delete items in an application.
• Opens the Dialler screen.
• Sends or answers a call.
• Activates the Speakerphone
feature when held down during a
call.

Getting started
Key Description
Moves up or down and left or right
through any of the applications,
records, or options.
Confirms your selection or executes
the selected application.
• Ends a call.
• Returns the phone to Idle mode.
• Press and hold to turn the phone
functions off or on.
• Opens the voice recorder
application to allow you to record
a voice memo.
• Records a voice memo when
held down.
• Turns on the camera.
• T akes a photo in Camera mode or
records a video in Camcorder
mode.
Key Description
• Adjusts the system volume.
• Adjusts the voice volume during a
call.
• Adjusts the media volume in
Media player.
• Mutes the call ringer when a call
comes in.
Desktop charger
Phone
support
Data
connector
Phone
charge LED
Battery charge LED
Battery
compartment
Charging/
Communication
port
Mini USB
cable port
11
Getting started
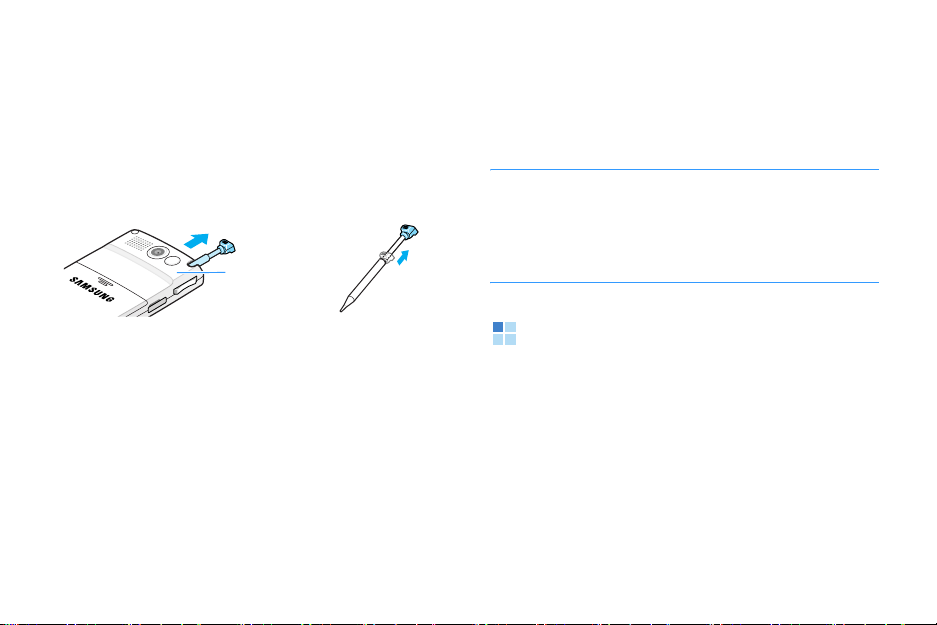
Using a stylus pen
Your phone’s main screen is a touch screen,
which lets you just touch on the screen to select
items or command the phone to perform
specific functions.
Pull the stylus pen out of the stylus pen holder.
Stylus pen
holder
When you are not using the stylus pen, insert it
back into the stylus pen holder.
Use the stylus pen to:
Tap
: Softly touch the screen once with the
stylus pen to select or execute an application or
command. Tapping works like a mouse click on
a computer.
Drag
: Hold the stylus pen on the screen and
drag it across the screen to select text or move
a progress bar or scroll bar.
12
Tap-and-hold
: Tap and hold the stylus pen on
an item to see a list of actions available for that
item. T ap the action you want to perform on the
pop-up menu that appears.
Note
: T o prevent scratches, do not use an actual pen,
pencil or other sharp objects to tap or write on
the screen. The stylus pen tip can also be used
RESET
to press the
key for resetting the
phone.
Installing the SIM card
When you subscribe to a cellular network, you
are provided with a plug-in SIM card loaded
with your subscription details, such as your PIN,
any optional services available, and many
others details.
• Keep all miniature SIM cards out of the reach
of small children.
Getting started
• The SIM card and its contacts can be easily
damaged by scratches or bending, so be
careful when handling, inserting, or removing
the card.
• When you insert or remove the SIM card,
always make sure that the phone’s power is
switched off.
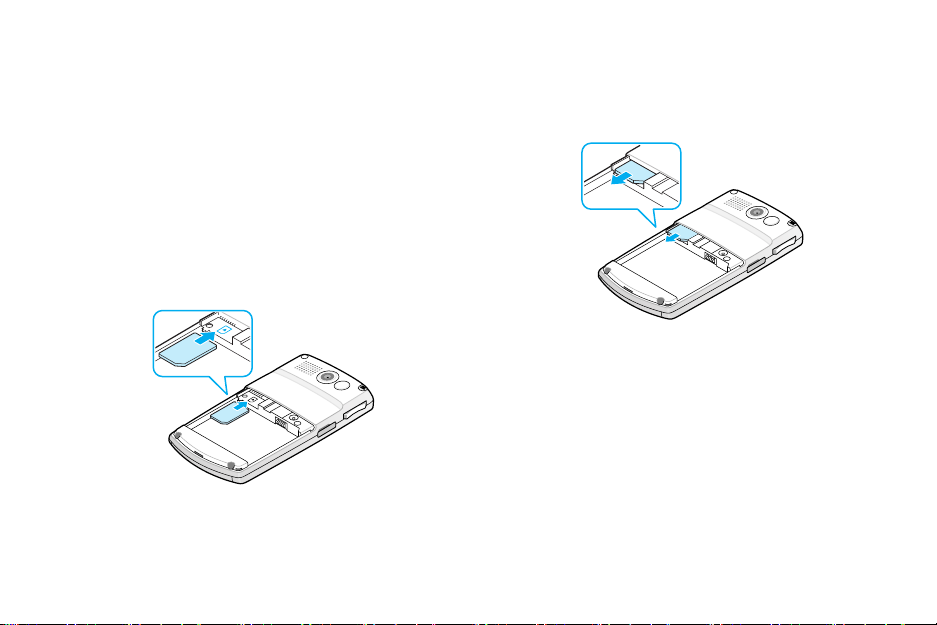
Inserting the SIM card
1. Remove the battery cover.
2. Insert and slide the SIM card, as shown,
ensuring that the gold-coloured contacts of the
card are face down.
Removing the SIM card
To remove the SIM card, slide the card out of
the holder, as shown.
13
Getting started
Installing the battery
Your phone is powered by a rechargeable Li-ion
battery. Use only approved batteries and travel
adapters. Ask your local Samsung dealer for
further details.
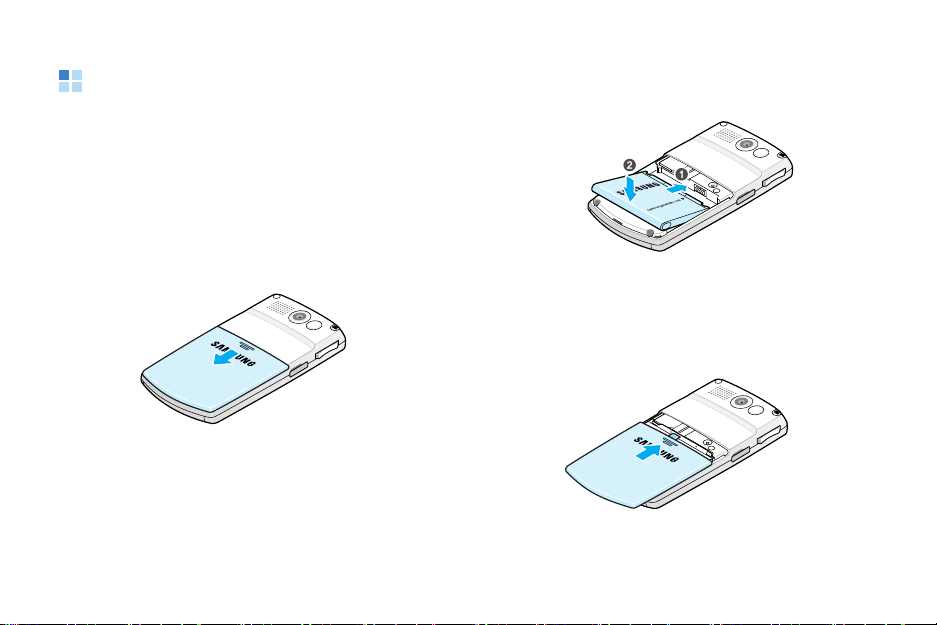
Installing the battery
1. Remove the battery cover, if necessary.
14
2. Insert the battery into the battery
compartment, as shown.
Make sure that the battery is securely locked
before switching the phone on.
3. Reattach the battery cover.
Getting started
Removing the battery
1. If necessary, switch off the phone by pressing
and holding until the power-off image
displays.
2. Remove the battery cover.
3. Lift the battery away from the phone.
Note
: Your phone has a built-in backup battery that
maintains data storag e when the ma in batte ry
is removed. When fully charged, the backup
battery will maintain sto red d a ta for 1 hou r. If
the main battery is removed from the phone
for more than 1 hour, your data which are not
backed up will be lo st. For details about the
backup, see page 37.
Switching the phone on or off
Press and hold xx to turn on your phone. The
phone is logged into your home network and
receives the signal from the network. You can
now make or answer a call and use programs on
the phone.
T o turn off the phone, press and hold on the
top of the phone.
Charging your phone
While charging your phone, the system sounds
the charging alert tone. Then the Charging icon
() displays on the status bar of the screen.
15
Getting started
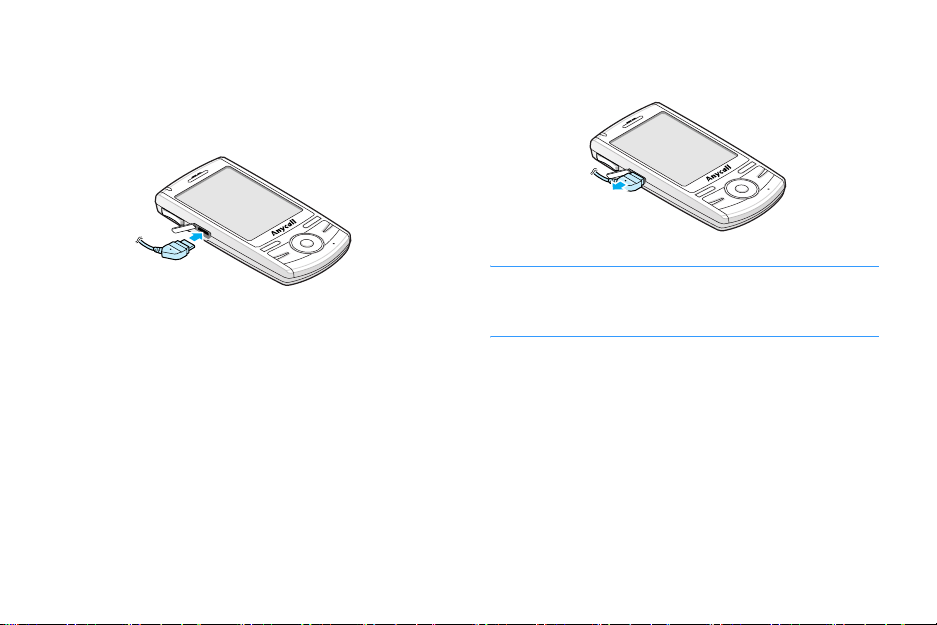
Using the travel adapter
1. Plug the connector of the travel adapter into
phone
the left side of the
2. Plug the adapter into a standard AC power
outlet.
3. When charging is finished, unplug the adapter
from the AC power outlet.
16
.
4. Remove the travel adapter from the phone.
Note
: Do not remove the battery while charging. It
may cause malfunctions and may damage the
phone.
Conserving battery power
You can conserve power by the following
methods:
• Switch the phone to Sleep mode when you do
not use it. Press and hold the
activate Sleep mode.
Power
key to
Getting started
• Turn off the backlight by pressing the
key.
• Adjust the power settings and backlight
settings. For details, see page 18 and page
19.
• Close multiple applications running on your
phone. Multitasking will consume your battery
faster and can cause your phone’s system to
react slowly.
Note
: Closing multimedia a pplications, such as
camera or Media player, allows your phone to
recover some of its battery.
Power
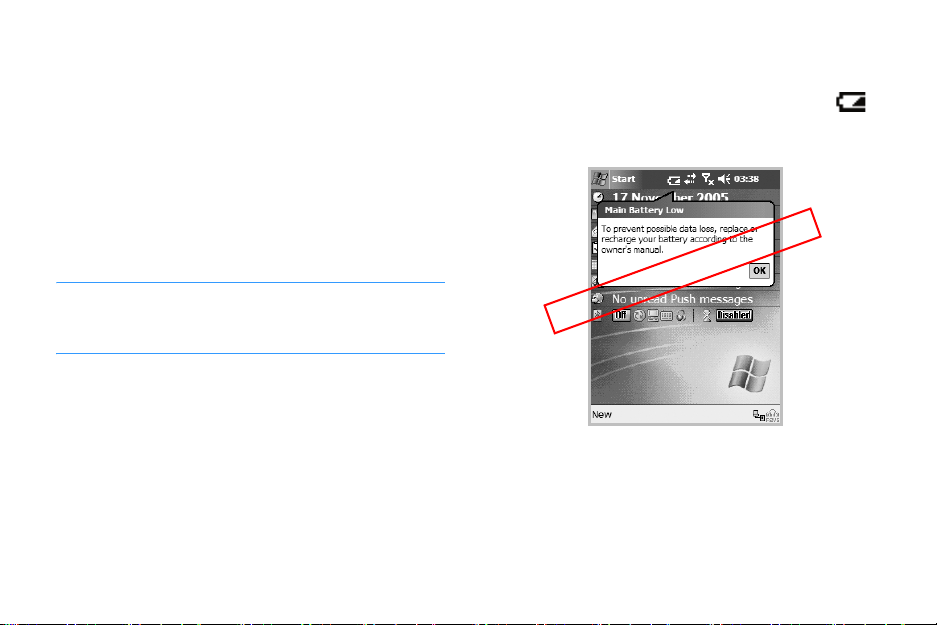
Low battery warning
Your phone displays the Battery Low icon ( )
and a warning message when the battery gets
low. If this happens, charge the battery.
y
l
n
o
n
o
i
t
i
s
o
P
When the battery gets very low, the phone
turns off the backlight to reduce the power
consumption.
17
Getting started
If the phone is nearly out of battery power, it
shows the “Main Battery Very Low” message. In
this case, you cannot perform a synchronisa tion
without connecting the phone to a power source
and the phone doesn’t give you any instructions
for saving data. Connect the adapter to the
phone immediately.
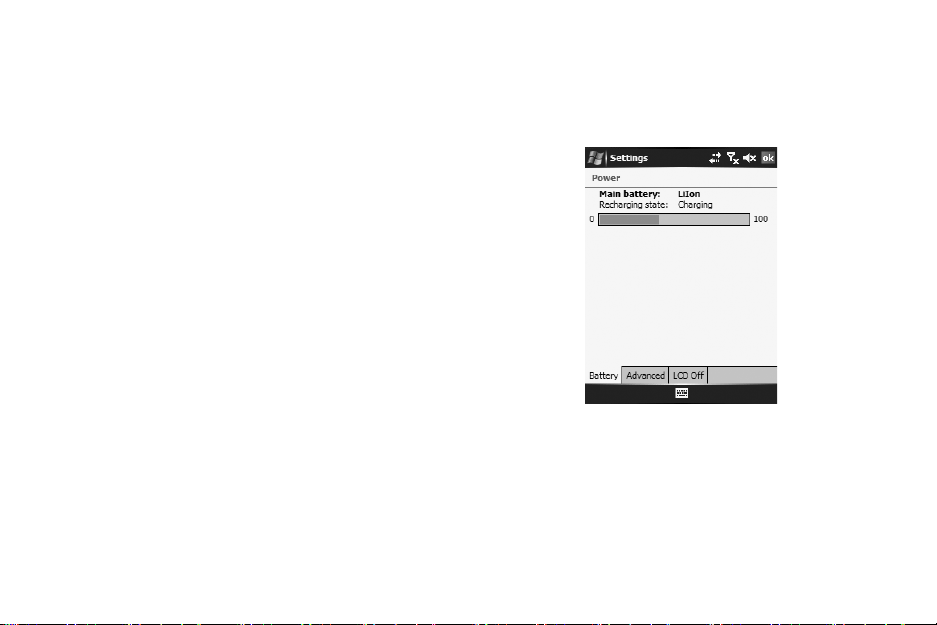
Adjusting the power settings
You can conserve battery power by adjusting
Power
the
goes to Sleep mode after a specified period of
time of inactivity, so very little power is being
consumed. This helps to preserve programmes
and data stored in the RAM.
A lower setting increases the usable battery
time. A higher setting decreases the usable
battery time and allocates it for standby usage.
To adjust the power setting:
1. From the
18
settings. During standby, the phone
Start
tab
→
Power
menu, tap
.
Settings → System
2. Select the power settings:
In the
Battery
amount of battery power.
Advanced
In the
phone turns off the backlight after the specific
period of time when the phone is inactive and
the main battery is being used as the power
tab, check the remaining
tab, set whether or not the
Getting started
source, or when connected to an external
power.
In the
LCD Off
tab, set the length of time the
display stays on after a call is establ ished. After
the specified time, the display turns off.
For details, see the online help.
3. Tap .
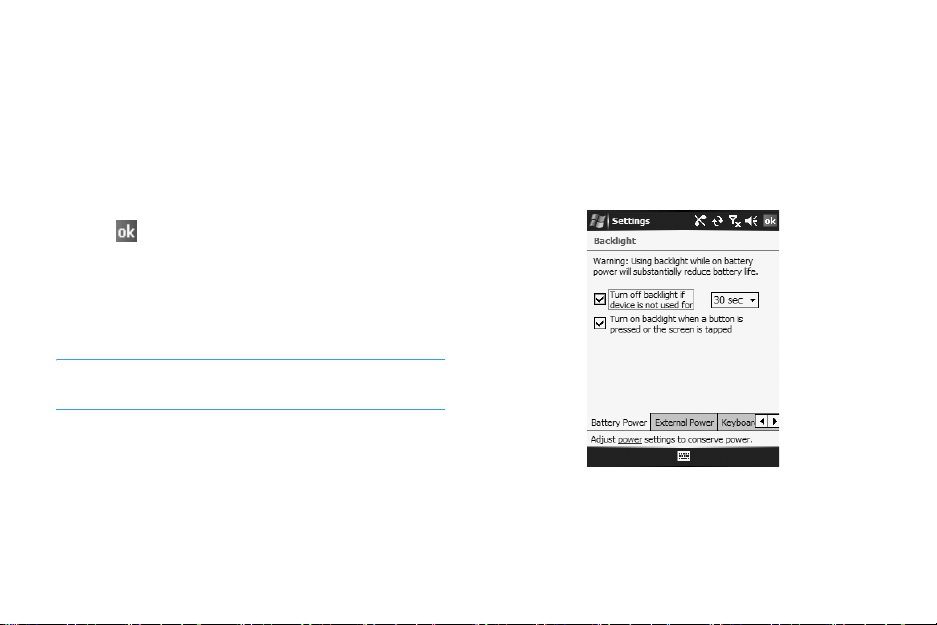
Adjusting the backlight settings
You can turn off or on the backlight of the
screen to reduce the power consumption.
Note
: Pressing the
in or out of Sleep mode.
Power
key will force your phone
To adjust the backlight settings:
1. From the
2. In the
Start
System
menu, tap
tab, tap
Settings
Backlight
3. Select the backlight settings:
.
.
19

Getting started
In the
Battery Power
tab, set whether or not
the phone turns off the backlight automatically ,
if not used for the specified period of time.
In the
External Power
tab, set whether or not
the phone turns off the backlight automatically ,
if not used for the specified period of time,
when connected to an external power.
In the
Keyboard
tab, set whether or not the
keypad backlight turns off automatically, if not
used for the specified period of time. You can
also set the keypad backlight to turn off in
daytime, defined as 7 am ~ 6 pm.
In the
Brightness
tab, select the brightness
level.
For details, see the online help.
4. Tap .
20
2
The basics
This chapter explains basic information about
using your phone, such as customising your
phone and using online help.
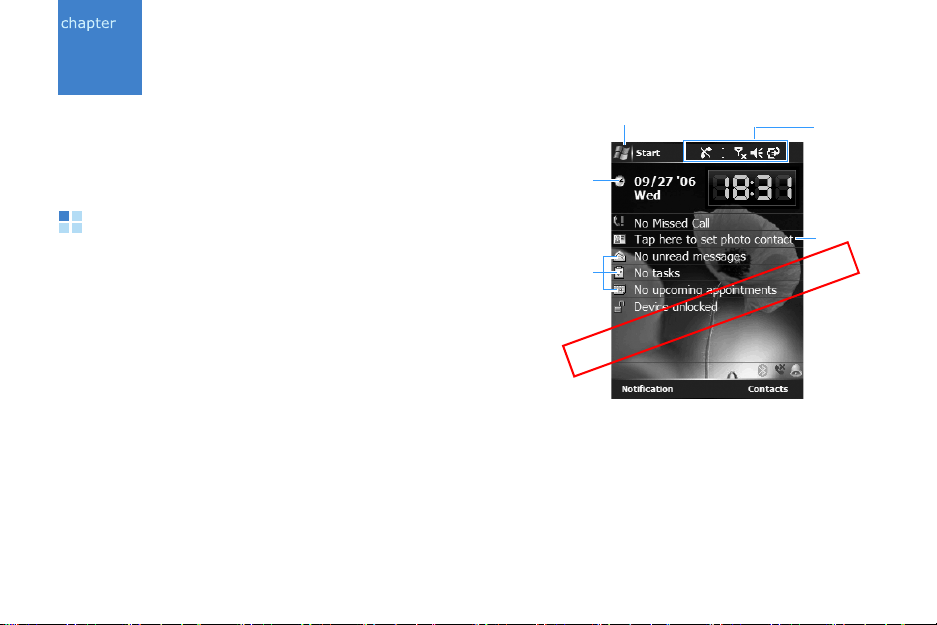
Using the Today screen
You will see the Today screen when you first
turn on your phone’s power. You can also
Start
→
Today
display it by tapping
application.
On the Today screen, you can see important
information for the day, at a glance.
from any
Tap to open the
and switch to a programme.
Tap to open
the Clock &
Alarms screen.
Tap to view
your day
information a t
a glance.
P
Start
o
s
t
i
menu
n
o
i
Status icons
show a
specific
status of
your phone.
Tap to set
up photo
contacts.
You can dial
y
l
n
o
a number
by tapping
the photo.
21
The basics
Status bar
On the top line of the screen, the status bar
displays icons to show your phone’s current
status. The following icons may appear:
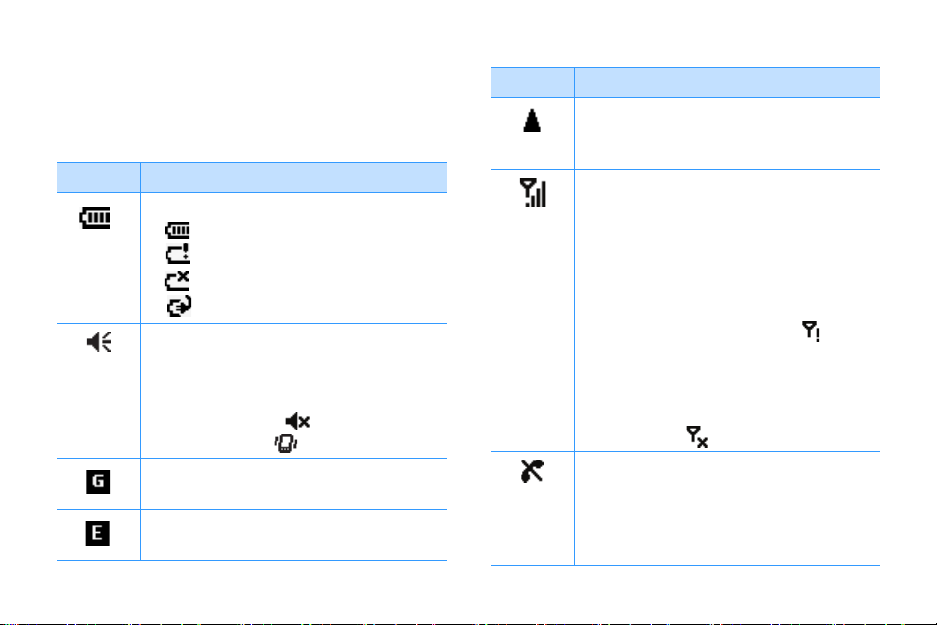
Icon Description
Shows the battery status:
• : Main battery is full.
• : Main battery is low.
• : Main battery is very low.
• : Main battery is charging.
Adjusts the levels of the system
volume and the ringer volume. You
can also turn the sound off or switch
to Vibration mode.
Off
, appears. If you
, appears.
22
If you select
Vibrate
select
Appears when GPRS network is
available.
Appears when EDGE network is
available.
Icon Description
Appears when you’re roaming
outside of your home area and
logged onto a different network.
Shows the signal strength. When you
tap this icon, you can show the
connection to your mobile phone
service provider is on and customise
the connection settings. You can also
turn on or off the phone functions.
When you are outside a service area
or in a limited service area,
appears. In that case, you cannot
use mobile services, but you can
make emergency calls.
When the phone functions are
switched off, appears.
Appears when you are outside a
service area. When it appears, you
cannot make or receive calls. When
the SIM card is not installed in your
phone, this icon is greyed.
The basics
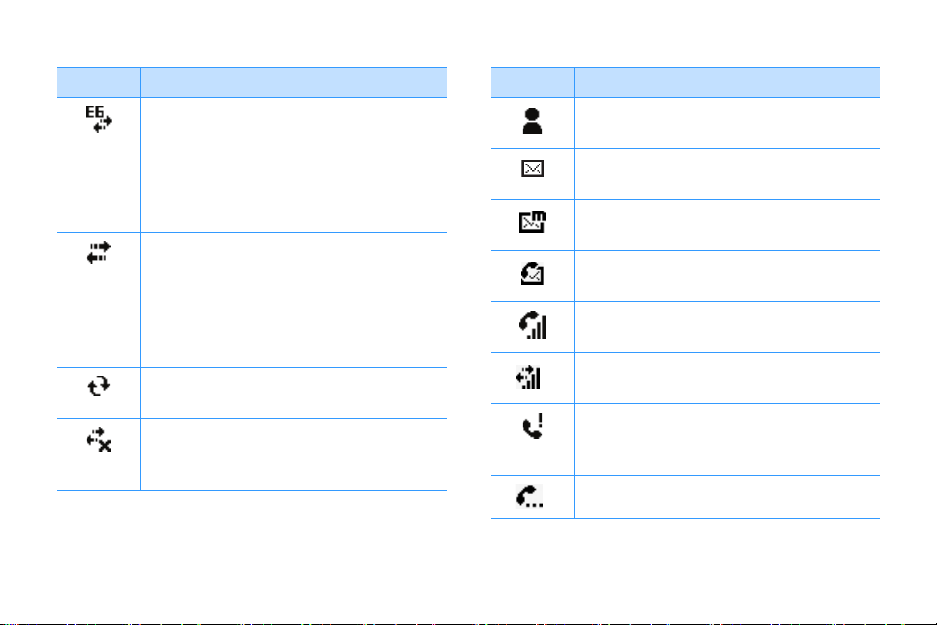
Icon Description
Appears when connection with a
GPRS network is active. When you
tap this icon, a pop-up message
shows the connection profile you are
currently using and customise the
connection settings.
Appears when connection with a
computer is active. When you tap
this icon, a pop-up message shows
the connection to your computer is
on and customise the connection
settings.
Appears when synchronisation is
processing.
Appears when connection with
another device or a network is
inactive.
Icon Description
Indicates that a new instant message
has been received.
Appears when a new e-mail or SMS
message has been received.
Appears when a new MMS message
has been received.
Indicates that your phone is
charging.
Appears when a voice call is in
progress.
Appears when a data call is in
progress.
Appears when there is a call you
have missed. Tap to view the details
of the missed call.
Appears when there is a call on hold.
23
The basics
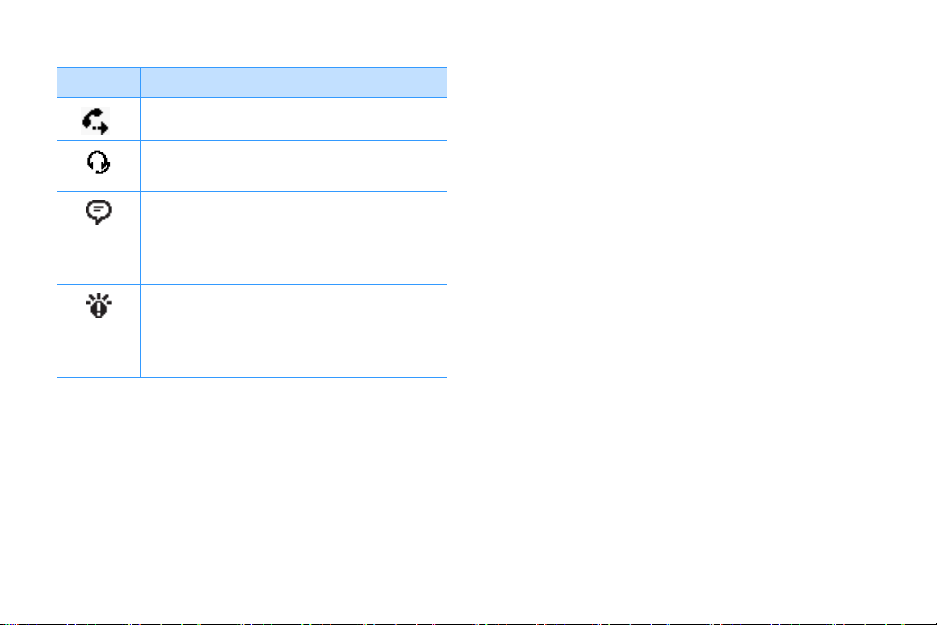
Icon Description
24
Appears when a call is forwarded.
Appears when a Bluetooth headset is
connected to your phone.
Appears when more status icons
need to be displayed than there is
room to display them. Tap to view all
of status icons.
Appears when your phone has some
problem; for example, when you
have entered an incorrect number.
Tap to show a command.
Accessing information from the Today
screen
From the Today screen, you can:
•view time and date
• view photo contacts(??)
• view unread SMS or MMS messages
• view tasks that need to be completed
• view upcoming appointments
• view the phone lock status
For more information on changing the items
displayed, see page 25.
Customising the Today screen
You can customise the Today screen in the
following ways: change the background image
(wallpaper) and select the information you want
displayed and in what order.
The basics
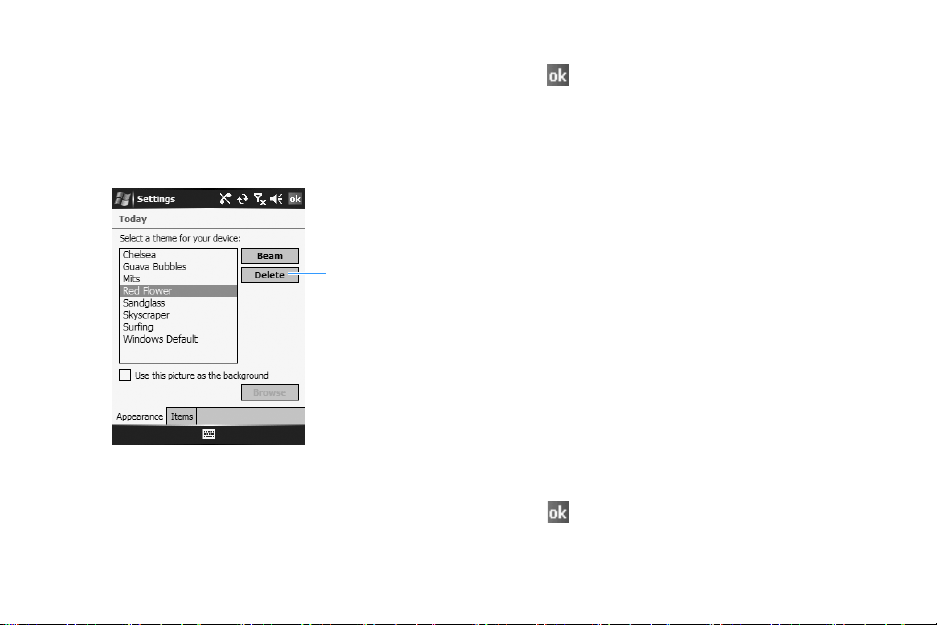
Changing the background image
1. From the
Personal
Start
menu, tap
tab
→ Today → Appearance
Settings
→
tab.
2. Select the desired theme for the background.
Tap to delete
the selected
theme.
To use your own background image, tap the
Use this picture as the background
box and tap
Browse
to locate the file you
check
want. Choose a folder and a file type. Then tap
the image you want to use.
3. Tap .
Customising the information you want
displayed
1. From the
Personal
2. In the
Start
tab → Today
Items
tab:
menu, tap
.
Settings
→
• clear a check box to remove its information
from the Today screen.
• select an item and tap
to change its position.
Down
Move Up
or
Move
• customise the further task and appointment
information by tapping
• tap the
Today timeout
Options...
check box and then
select the number of hours from the dropdown list. If you do not use your phone after
the specified length of time has elapsed, the
screen switches to the Today screen.
3. Tap .
25
The basics
Creating your own Today screen
1. From the
Personal
2. Tap
3. Enter the screen name and tap
New
Start
tab →
.
menu, tap
Settings
Multiple Today
.
OK
→
.
4. Select a theme from the theme drop-list.
5. Tap the information to be displayed in the
Today screen.
6. Tap to save the settings.
Apply
7. Tap
.
Customising your phone
You can cust omise the phone settings to suit the
way you work.
26
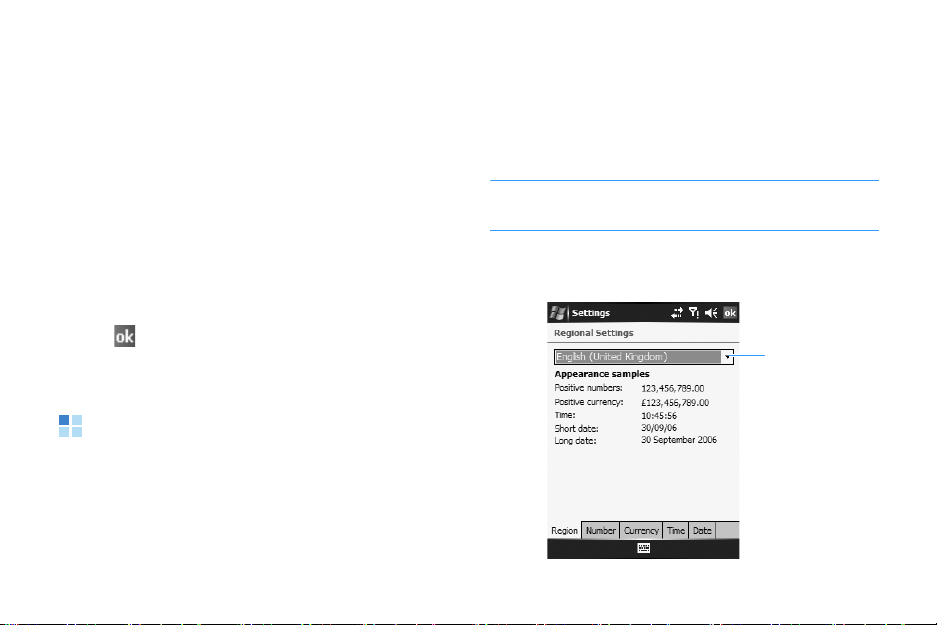
Changing
Regional Settings
You can change number, currency , and time and
date formats appropriate to the countries in
question.
Note
: For details abou t u s in g Regional Settings, see
the online help.
From the
tab →
Start
menu, tap
Regional Settings
Settings
.
→
System
Tap to select
your region to
set the default
number
formats.
The basics
Tap the tabs at the bottom of the screen and
select the option you want in each field. The
items available are determined by the region
Region
selected on the
tab.
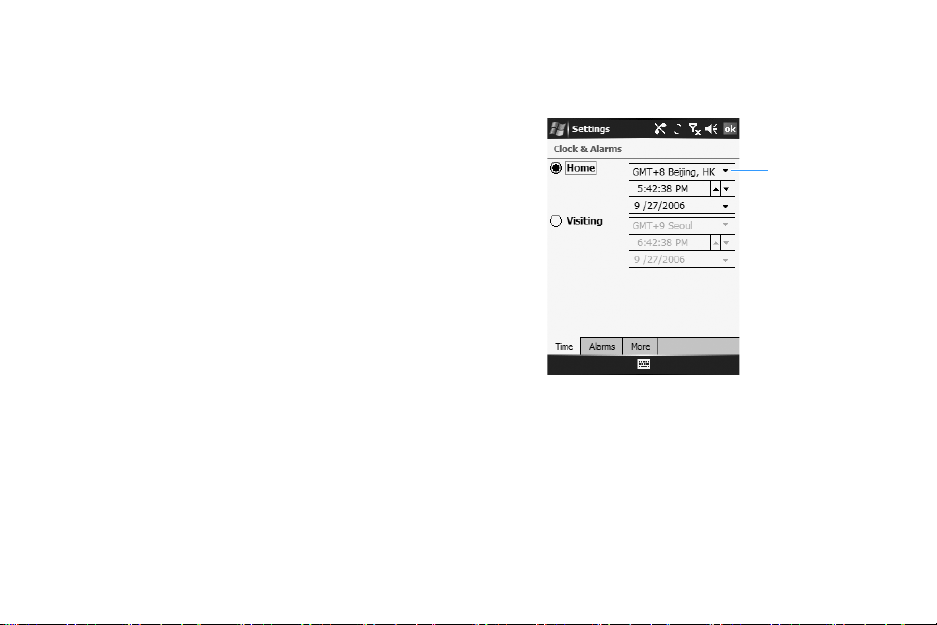
Setting the time and date
When you turn on your phone’s power for the
first time, you are guided through setting the
time. Set the time again if:
• the battery is completely discharged.
• you perform a hard reset of your phone.
1. From the
tab
Start
menu, tap
→
Clock & Alarms
Settings
→ Time
tab.
→
System
2. Select your location and time zone from the
drop-down list.
3. T ap the hour, minutes, or seconds, then tap the
up or down arrow to change the time setting.
Tap to select
your location
and time zone.
27
The basics
Notes
:
• You can change the time and date format in
Regional Settings
. See page 26.
• You can set the current time to be displayed on the
status bar by selecting
title bar in all programs
Display the clock on the
in the
More
tab.
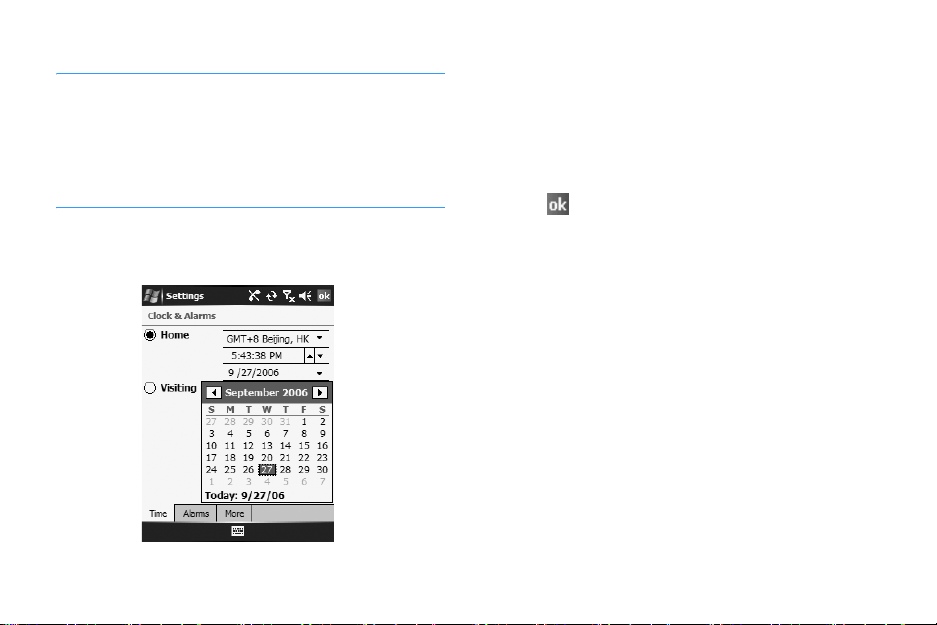
4. Tap the down arrow in the Date field to display
a calendar.
28
5. Tap a day on the calendar to select the current
date.
You can tap the l eft or right arrow at the top of
the calendar to move backward or forward
through the calendar.
6. Tap .
Yes
7. Tap
to save your time and date settings.
You can set the time and date for a location
you’re visiting by selecting the
Visiting
option.
Entering owner information
Owner information identifies the owner or user
of the phone. Name, company, address, phone
number, e-mail address, and note information
fields are available.
1. From the
Personal
2. From the
field.
Start
menu, tap
tab →
Owner Information
Identification
Settings →
.
tab, fill in each input

The basics
3. If you want to attach notes, tap the
Notes
tab
and enter notes.
4. Tap .
Note
: You can display the owner information or
notes, or both when you are back from Sleep
mode or when you turn on the phone’ s pow e r.
In the
Options
tab, tap the item you want.
Changing Error reporting setting
Your phone has the Error Reporting function
which informs you of errors in a program that
can give a crash to the phone system. You can
enable or disable this function.
1. From the
tab
2. Select
error reporting
3. Tap .
Start
menu, tap
→
Error Reporting
.
Enable error reporting
.
Settings →
or
Disable
System
Using a security password
You can assign a security password to protect
your phone from unauthorised use.
Once a password is enabled, the password is
required each time you access the Password
application, wake up your phone, reboot the
system, or synchronise information using
ActiveSync.
To set the password:
1. From the
Personal
2. Tap the
box and select
the phone waits before asking you for the
password.
You can choose from 0 minute to 24 hours.
3. Select a password type in the
field.
4. Enter a password in the
Start
menu, tap
tab →
Lock → Password
Settings
Prompt if device unused for
the length of time of inactivity
Password type
Password
→
tab.
check
field.
29
The basics
5. Re-enter the password in the
6. If necessary, tap the
Hint
Confirm
field.
tab and enter a
password hint in case you forget your
password.
7. Tap .
8. When a confirmation message displays, tap
Yes
.
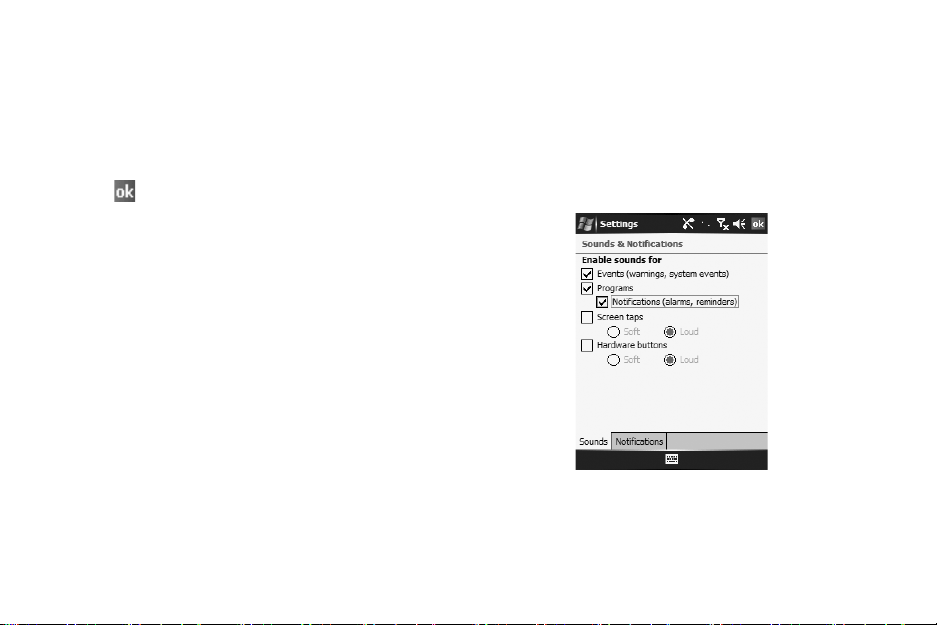
Setting sounds and notifications
Your phone reminds you in various ways when
you have something to do, receive an incoming
call or message, tap the screen, or press the
buttons on the phone. For example, if you’ve set
up an appointment in
Clock & Alarms
Calendar
, you are notified in any of the
following ways:
• A message box appears on the screen.
• A sound, which you can specify, is played.
• The LED indicator flashes.
• Your phone vibrates.
30
, or an alarm in
To choose reminder types and sounds:
1. From the
Personal
Start
menu, tap
tab →
Sounds & Notifications
Settings
→
.
2. Choose the options. The options you choose
here apply throughout the phone.
In the
Sounds
tab, select the actions for which
you want to hear sounds.
 Loading...