

Samsung SGHI700 Users Manual

SGH-i700 Series
Pocket PC Phone
User’s Guide
Please read this manual before operating your
phone, and keep it for future reference.
Intellectual Property
2nd version
(2003,09, 15)

All Intellectual Property, as defined below, owned by or which is
otherwise the property of Samsung or its respective suppliers
relating to the SAMSUNG Phone, including but not limited to,
accessories, parts, or software relating thereto (the “Phone
System”), is proprietary to Samsung and protected under federal
laws, state laws, and international treaty provisions. Intellectual
Property includes, but is not limited to, inventions (patentable
or unpatentable), patents, trade secrets, copyrights, software,
computer programs, and related documentation and other works of
authorship. You may not infringe or otherwise violate the rights
secured by the Intellectual Property. Moreover, you agree that you
will not (and will not attempt to) modify, prepare derivative works of,
reverse engineer, decompile, disassemble, or otherwise attempt to
create source code from the software. No title to or ownership in the
Intellectual Property is transferred to you. All applicable rights of the
Intellectual Property shall remain with SAMSUNG and its suppliers.
Samsung Telecommunications America (STA), Inc.
Headquarters:
1130 E. Arapaho Road
Richardson, TX 75081
Tel: 972-761-7000
Fax: 972-761-7001
Customer Care Center:
1601 E. Plano Parkway
Suite 150
Plano, TX 75047
Tel: 888-987-HELP (4357)
Fax: 972-761-7501
Internet Address:
http://www.samsungtelecom.com
©2002-2003 Samsung Telecommunications America, Inc. All rights
reserved. No reproduction in whole or in part allowed without prior
written approval. Samsung Telecommunications America, Inc. is a
trademark of Samsung Electronics Corporation, Ltd.
2
3

Contents
C
HAPTER
What’s in the Box? . . . . . . . . . . . . . . . . . . . . . . . 8
Getting to Know Your Pocket PC Phone . . . . . . . . . 9
Installing the SIM Card . . . . . . . . . . . . . . . . . . . 13
Installing the Battery . . . . . . . . . . . . . . . . . . . . . 14
Charging Your Pocket PC Phone . . . . . . . . . . . . . 16
With the Desktop Charger . . . . . . . . . . . . . . . . . 17
Installing ActiveSync . . . . . . . . . . . . . . . . . . . . . 23
C
HAPTER
Using the Today Screen . . . . . . . . . . . . . . . . . . . 25
Customizing Your Phone . . . . . . . . . . . . . . . . . . . 31
Using an Option SD Card . . . . . . . . . . . . . . . . . . 38
Adding and Removing Programs . . . . . . . . . . . . . 39
Resetting the Pocket PC Phone . . . . . . . . . . . . . . 44
Connection Settings . . . . . . . . . . . . . . . . . . . . . . 46
Using Online Help . . . . . . . . . . . . . . . . . . . . . . . 51
1:
Getting Started
2:
The Basics
C
HAPTER
Entering Text Using the Input Panel . . . . . . . . . . 52
Writing on the Screen . . . . . . . . . . . . . . . . . . . . 60
Drawing on the Screen . . . . . . . . . . . . . . . . . . . 64
Recording a Message . . . . . . . . . . . . . . . . . . . . . 66
C
HAPTER
Using ActiveSync . . . . . . . . . . . . . . . . . . . . . . . . 69
Synchronizing Information . . . . . . . . . . . . . . . . . 76
Synchronizing Using an Infrared Connection . . . . . 78
ActiveSync Errors . . . . . . . . . . . . . . . . . . . . . . . 79
C
HAPTER
3:
Entering Information
4:
Synchronizing Information
5:
Navigating Through the
Applications
Navigating Bar and Command Bar . . . . . . . . . . . . 81
Pop-up Menus . . . . . . . . . . . . . . . . . . . . . . . . . . 82
Customizing the Application Buttons . . . . . . . . . . 83
Finding Information . . . . . . . . . . . . . . . . . . . . . . 83
4
5

C
HAPTER
6:
Your Phone
Entering Your PIN . . . . . . . . . . . . . . . . . . . . . . . 85
Checking You Are Connected . . . . . . . . . . . . . . . 86
Turning the Phone On and Off . . . . . . . . . . . . . . . 87
Dialer Screen . . . . . . . . . . . . . . . . . . . . . . . . . . 88
Making a Call . . . . . . . . . . . . . . . . . . . . . . . . . . 90
Answering or Rejecting a Call . . . . . . . . . . . . . . . 97
Ending a Call . . . . . . . . . . . . . . . . . . . . . . . . . . 98
Options During a Call . . . . . . . . . . . . . . . . . . . . . 98
Call Related Features . . . . . . . . . . . . . . . . . . . . 104
Customizing Your Phone . . . . . . . . . . . . . . . . . . 111
C
HAPTER
7:
Message, Internet and
Messanger
Inbox: Sending and Receiving E-mail or SMS . . . 123
Internet Explorer . . . . . . . . . . . . . . . . . . . . . . . 132
jBrowser 3.0 . . . . . . . . . . . . . . . . . . . . . . . . . . 140
MSN Messenger . . . . . . . . . . . . . . . . . . . . . . . 149
jMMS . . . . . . . . . . . . . . . . . . . . . . . . . . . . . . . 154
C
HAPTER
9:
Multimedia
Camera . . . . . . . . . . . . . . . . . . . . . . . . . . . . . 187
Windows Media Player . . . . . . . . . . . . . . . . . . . 195
Games . . . . . . . . . . . . . . . . . . . . . . . . . . . . . . 202
C
HAPTER
10:
Programs
Calculator . . . . . . . . . . . . . . . . . . . . . . . . . . . . 203
Microsoft Reader . . . . . . . . . . . . . . . . . . . . . . . 205
Pocket Excel . . . . . . . . . . . . . . . . . . . . . . . . . . 208
Pocket Word . . . . . . . . . . . . . . . . . . . . . . . . . . 212
SIM Contacts . . . . . . . . . . . . . . . . . . . . . . . . . 219
Terminal Services Client . . . . . . . . . . . . . . . . . . 223
File Explorer . . . . . . . . . . . . . . . . . . . . . . . . . . 226
Infrared Receive . . . . . . . . . . . . . . . . . . . . . . . 228
Modem Link . . . . . . . . . . . . . . . . . . . . . . . . . . 230
C
HAPTER
C
HAPTER
•:
Appendix A: Letter Recognizer
•:
Appendix B: Troubleshooting
C
HAPTER
8:
Scheduler
C
HAPTER
•:
Appendix C: Regulatory Notices
Calendar . . . . . . . . . . . . . . . . . . . . . . . . . . . . 169
Contacts . . . . . . . . . . . . . . . . . . . . . . . . . . . . 174
Notes . . . . . . . . . . . . . . . . . . . . . . . . . . . . . . . 180
HAPTER
cations
•:
Appendix D: Hardware Specifi-
C
Tasks . . . . . . . . . . . . . . . . . . . . . . . . . . . . . . . 182
6
7
chapter
1
Getting Started
Congratulations on the purchase of your new Pocket PC
Phone! This chapter helps you set up your phone, charge
the phone’s batteries, and familiarize yourself with the
different components of your phone.
Getting Started
Getting to Know Your Pocket PC
Phone
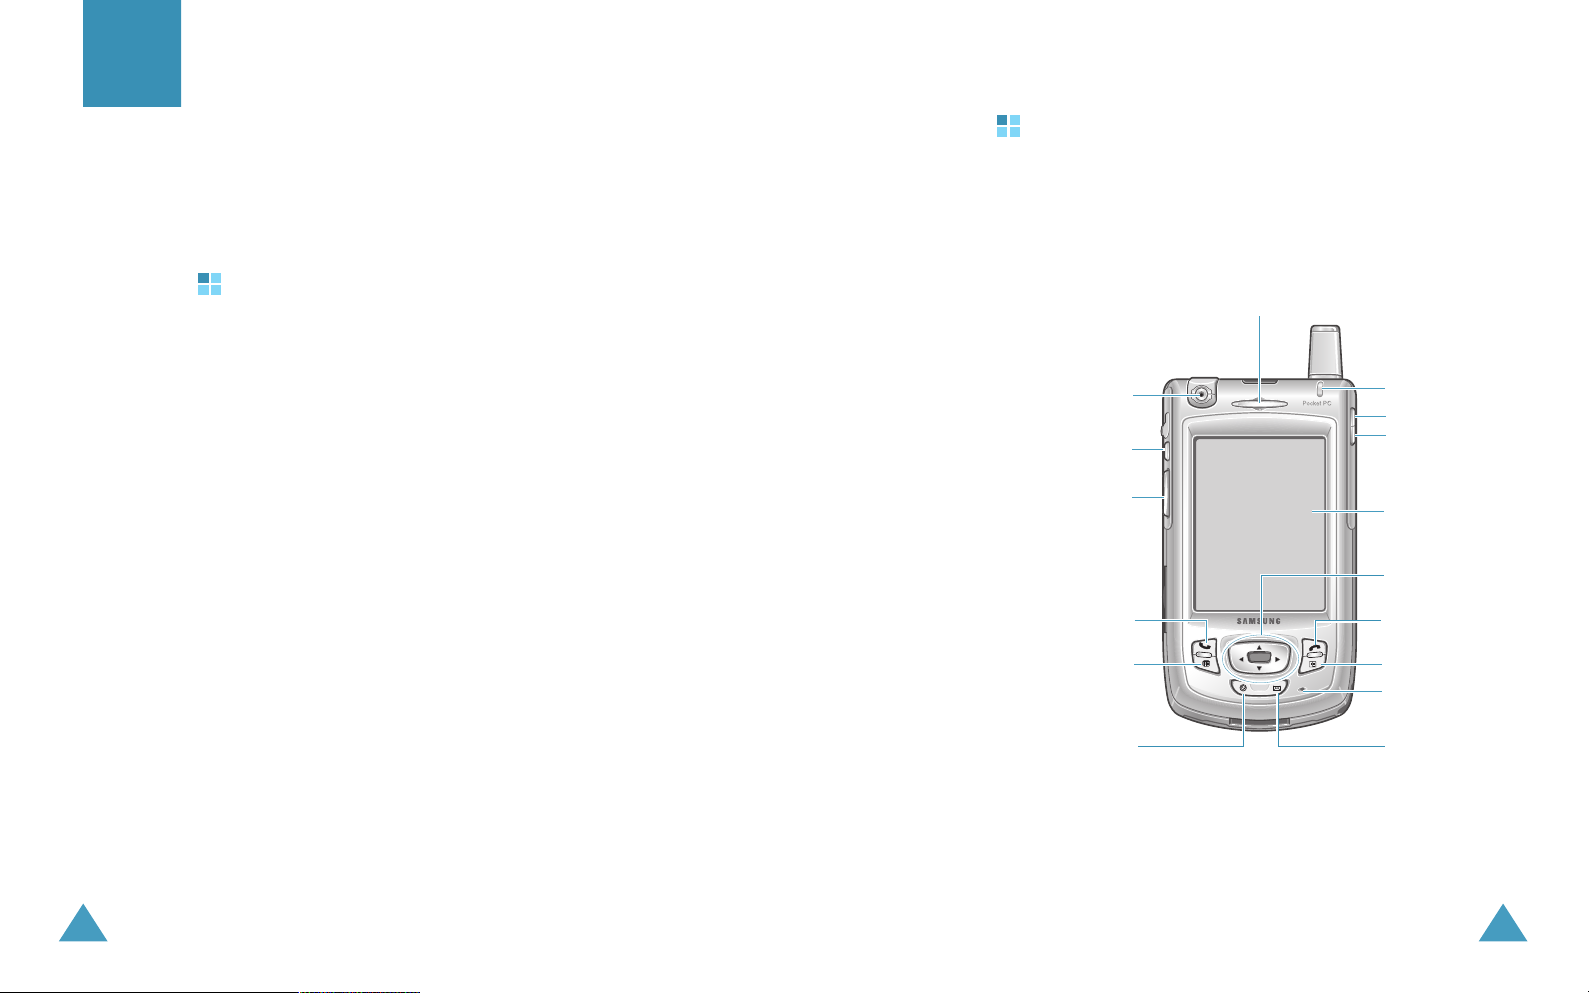
Front View
What’s in the Box?
Your Pocket PC Phone comes with:
• Extra stylus
• Travel adapter
• Desktop charger with ActiveSync feature
• Batteries
• Ear-microphone
• Handstrap
• User’s guide
• CD-ROM which contains Microsoft ActiveSync software,
Add-on software and applications, User’s guide in the PDF
format.
In addition, you can obtain the following accessories for
your phone from your local Samsung dealer:
• Simple hands-free kit
• Car holder
• Cigarette lighter charger
• Leather/Plastic Case
Camera
Program button 1
(Recording)
Volume buttons
Dialer/Send
button
Program button 2
(Calendar)
Program button 4
(Internet Explorer)
Speaker
LED Indicator
Power button
Backlight button
Touch screen
Navigation/OK
buttons
End button
Program button 3
(Contacts)
Microphone
Program button 5
(Inbox)
8
9
OK
Getting Started
10
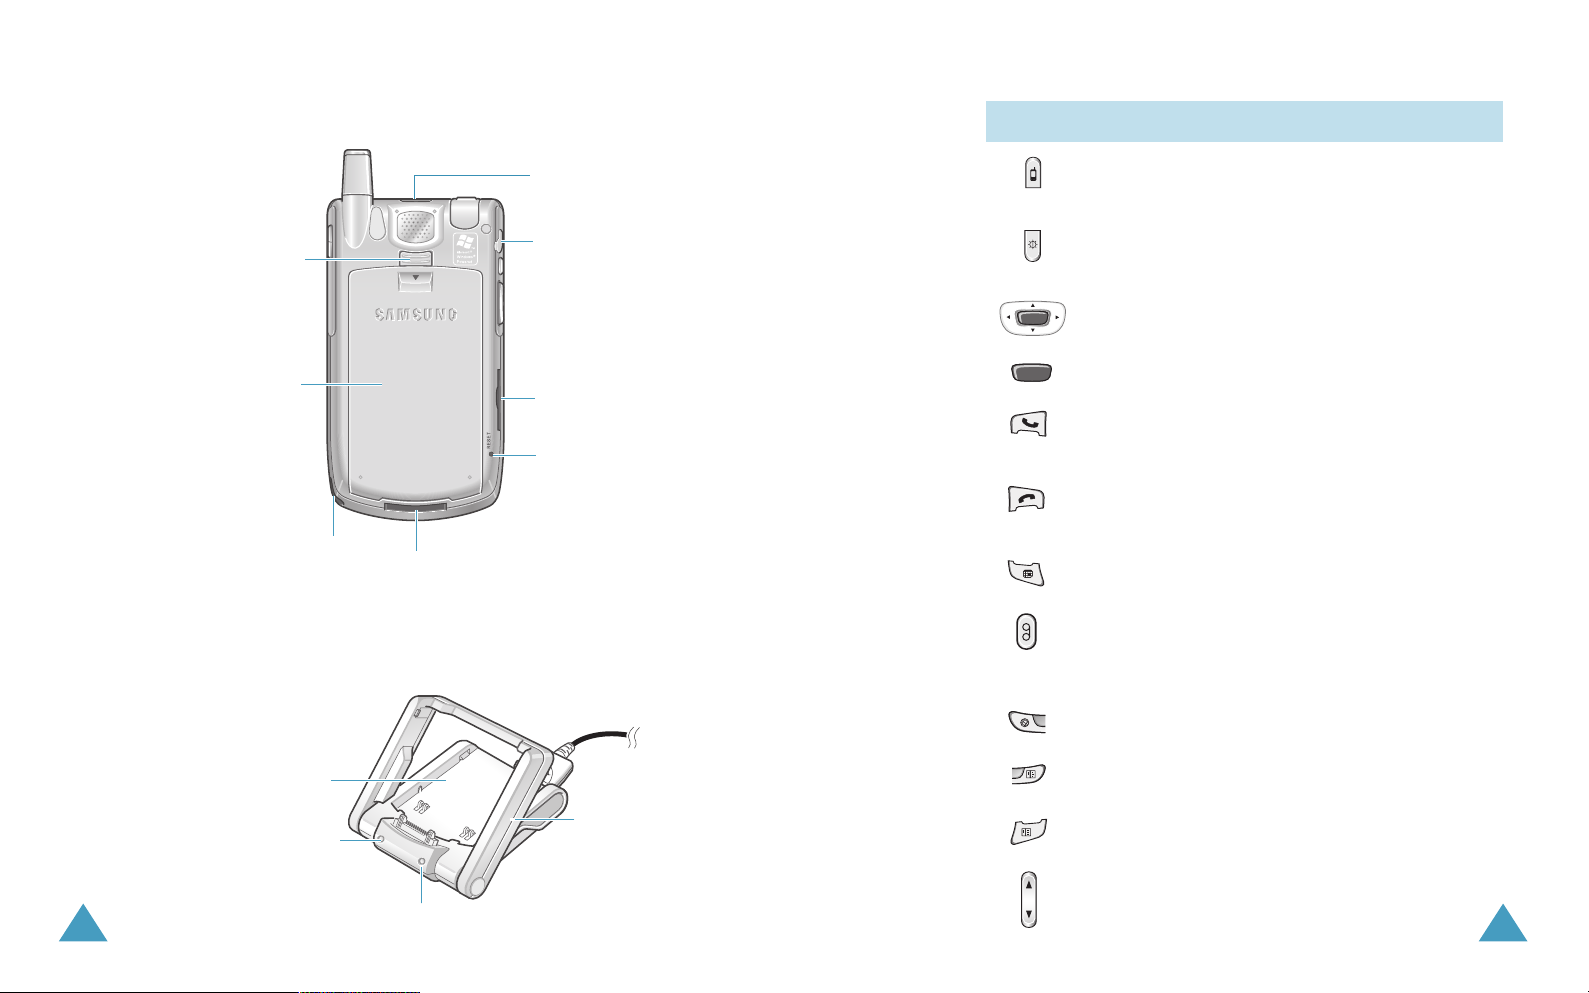
Rear View
Battery lock
Battery
Stylus holder
Desktop Charger
Battery
compartment to
hold battery only.
Phone charge
indicator
Battery charge indicator
Charging/
Communication port
Infrared port for
exchanging data with
other device wirelessly.
Ear-microphone
Jack
Expansion slot for an
option SD card
RESET button. Push
this button with the
stylus to reset your
phone.
Support to hold the
Pocket PC Phone
with battery
attached.
Key Description
Power
button. Press to turn your Pocket PC
Phone on or off. Press and hold to turn the
phone’s power on or off.
Backlight button. Press to turn the backlight
on or off. Press and hold to force the Pocket PC
Phone in or out of the Sleep mode.
Navigation buttons allow you to scroll
through a list.
button. Press to confirm your selection.
Phone/Send button. Press to open Phone.
In the Phone mode, press to send or answer a
call.
End button. In the Phone mode, press to end a
call. Press and hold to turn your phone on or
off.
Programmable application button 2. Default
setting is
Programmable application button 1. Default
setting is
Calendar .
Record . Press to view the list of
Recordings in
a message.
Programmable application button 4.
Default setting is
Programmable application button 3.
Default setting is
Programmable application button 5.
Default setting is
Volume button. Press to adjust the volume.
Getting Started
Notes . Press and hold to record
Internet Explorer .
Contacts .
Inbox .
11
Getting Started
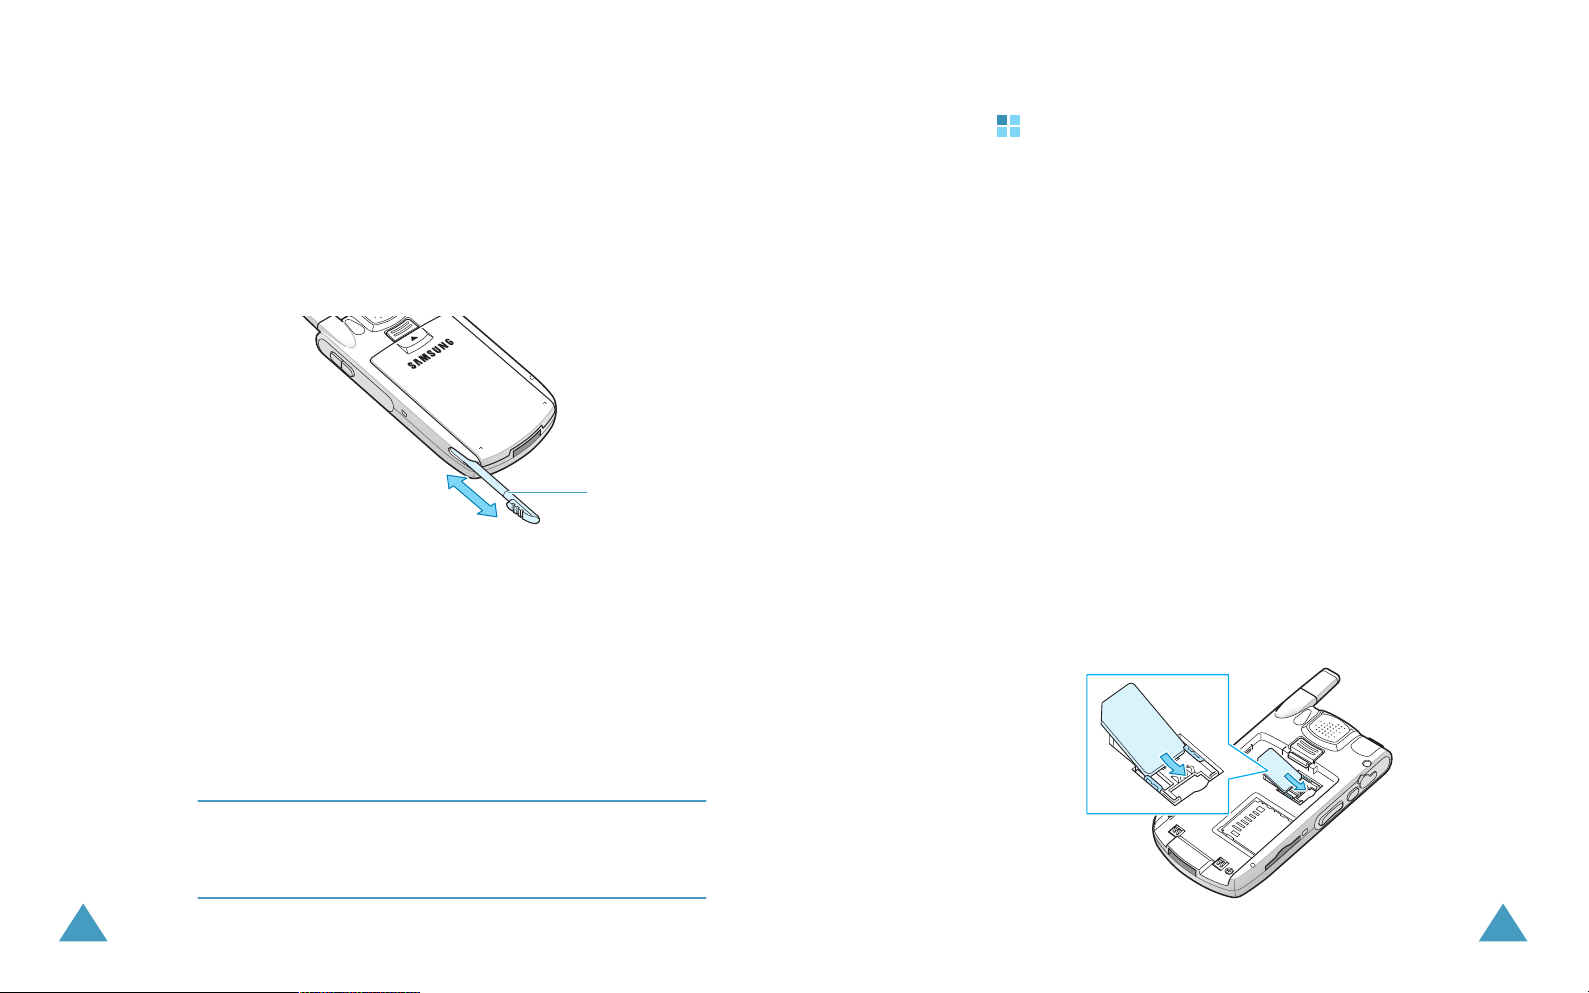
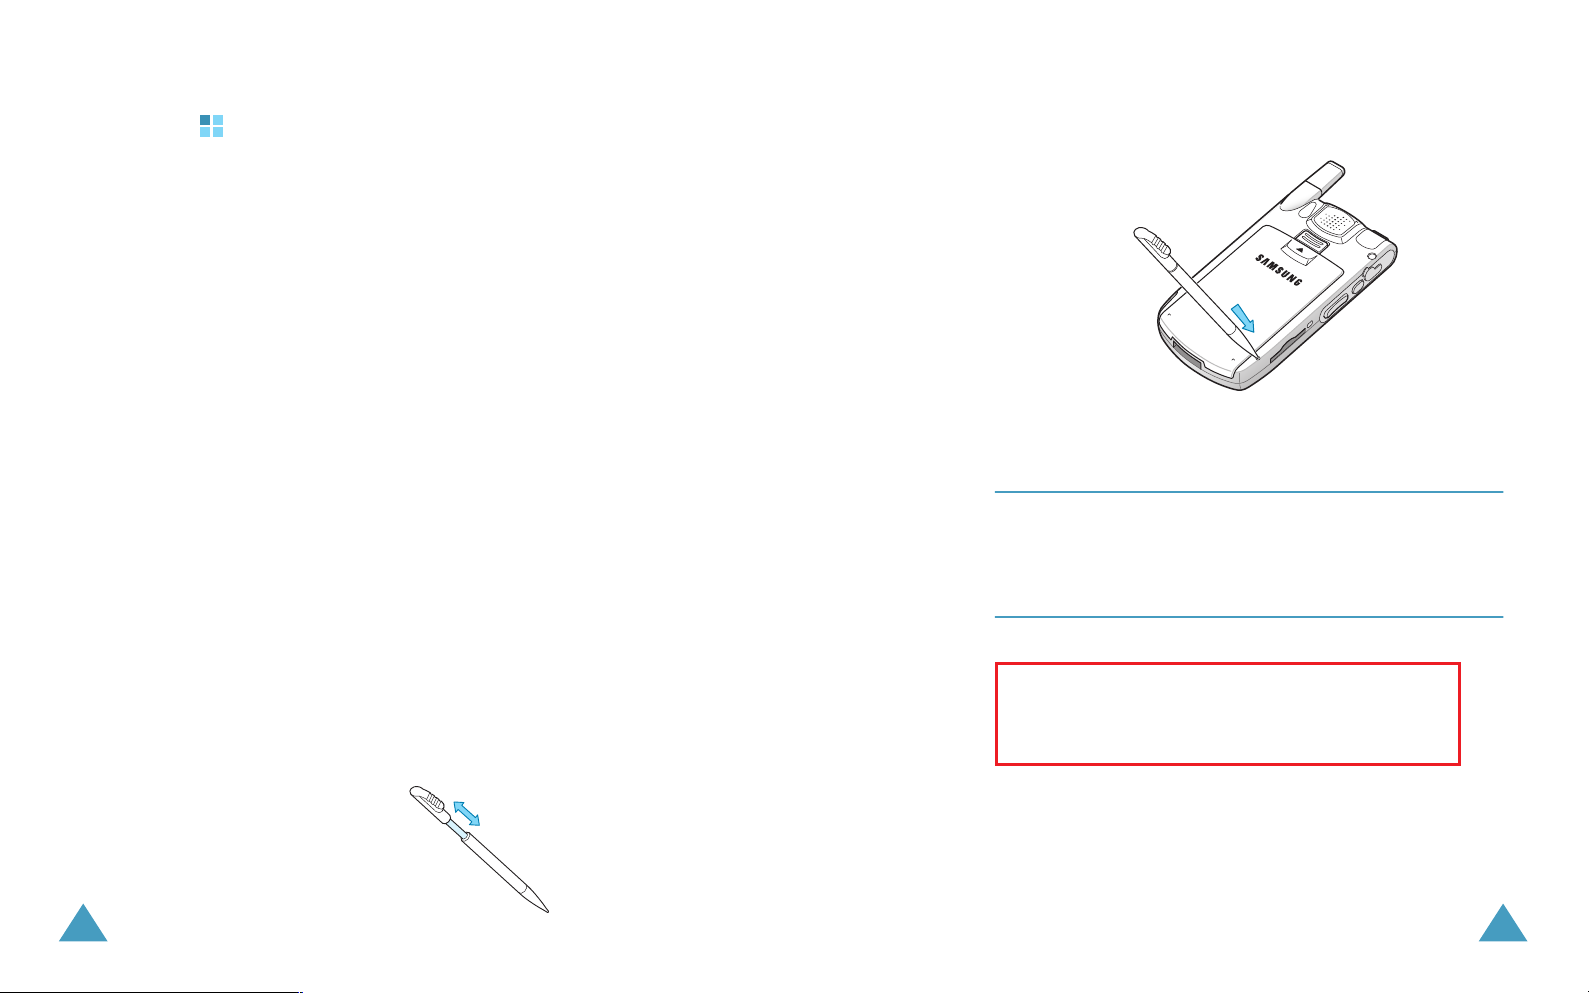
Using the Stylus Pen
Your Pocket PC Phone has many of the same functions
as a portable personal computer, but does not have a
keyboard or a mouse. Use the stylus provided with your
phone to access, run, or enter information through the
touch-screen LCD display.
Pull the stylus out of the stylus holder. When you do not
use the stylus, insert it into the stylus holder.
Stylus holder
Use the stylus to:
Tap : Softly touch the screen once with the stylus to
select or execute an application or command. Tap works
like a mouse click on a computer.
Drag : Hold the stylus on the screen and drag it across
the screen to select text.
Tap-and-hold : Tap and hold the stylus on an item to
see a list of actions available for that item. Tap the
action you want to perform on the pop-up menu that
appears.
Getting Started
Installing the SIM Card
When you subscribe to a cellular network, you are
provided with a plug-in SIM card loaded with your
subscription details, such as your PIN, any optional
services available and many others.
• Keep all miniature SIM cards out of the reach of small
children.
• The SIM card and its contacts can easily be damaged by
scratches or bending, so be careful when handling,
inserting or removing the card.
• When installing the SIM card, always make sure that the
phone is switched off before you remove the battery.
Inserting the SIM Card
1. If necessary, remove the battery by referring to
“Removing the Battery” on page xx.
2. Insert and slide the SIM card under the two tabs,
ensuring that the notched corner is the bottom left and
the gold contacts of the card face down into the phone.
12
Note
: To prevent scratches, do not use an actual pen, pencil
or other sharp objects to tap or write on the screen.
The stylus tip can also be used to press the
RESET
button. For details about resetting, see page xx.
13
Getting Started
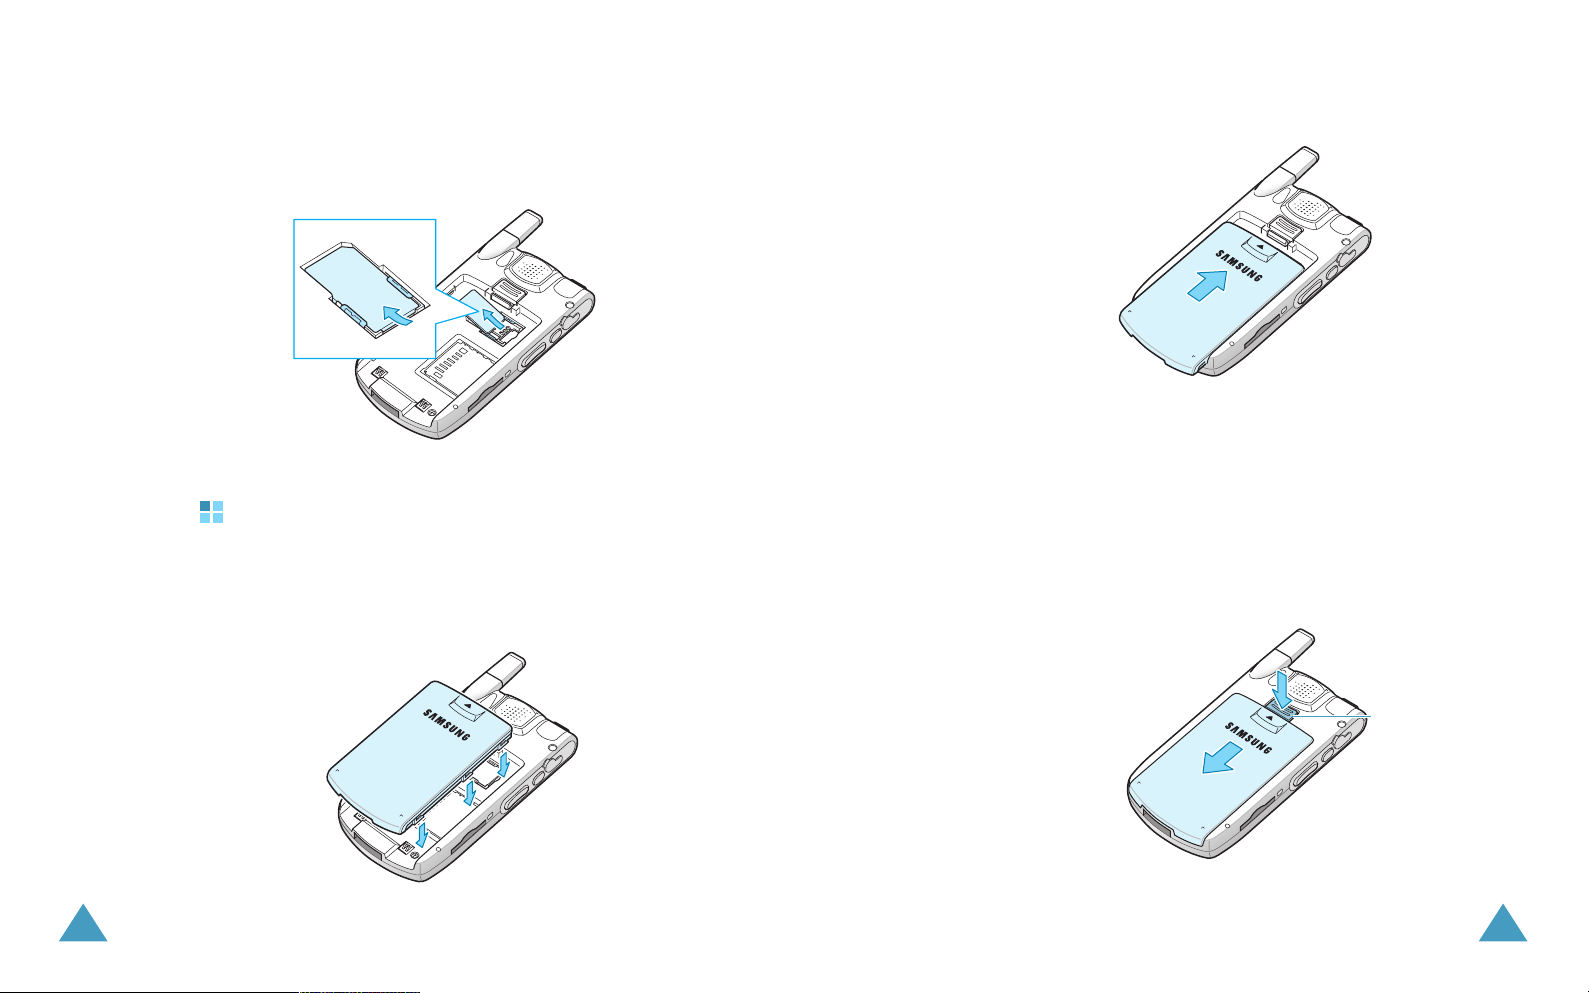
Removing the SIM Card
To remove the SIM card, slide the card out of the holder,
as shown.
Installing the Battery
Installing the Battery
1. Put the battery on the back of the phone.
Getting Started
2. Slide the battery up until it clicks into place.
Make sure that the battery is securely locked before
switching the phone on.
Removing the Battery
1. To remove the battery, press and hold the battery lock
button, with the back of the phone facing you.
2. Slide the battery off the phone, as shown.
14
Battery lock
button
15
Support
Base
Getting Started
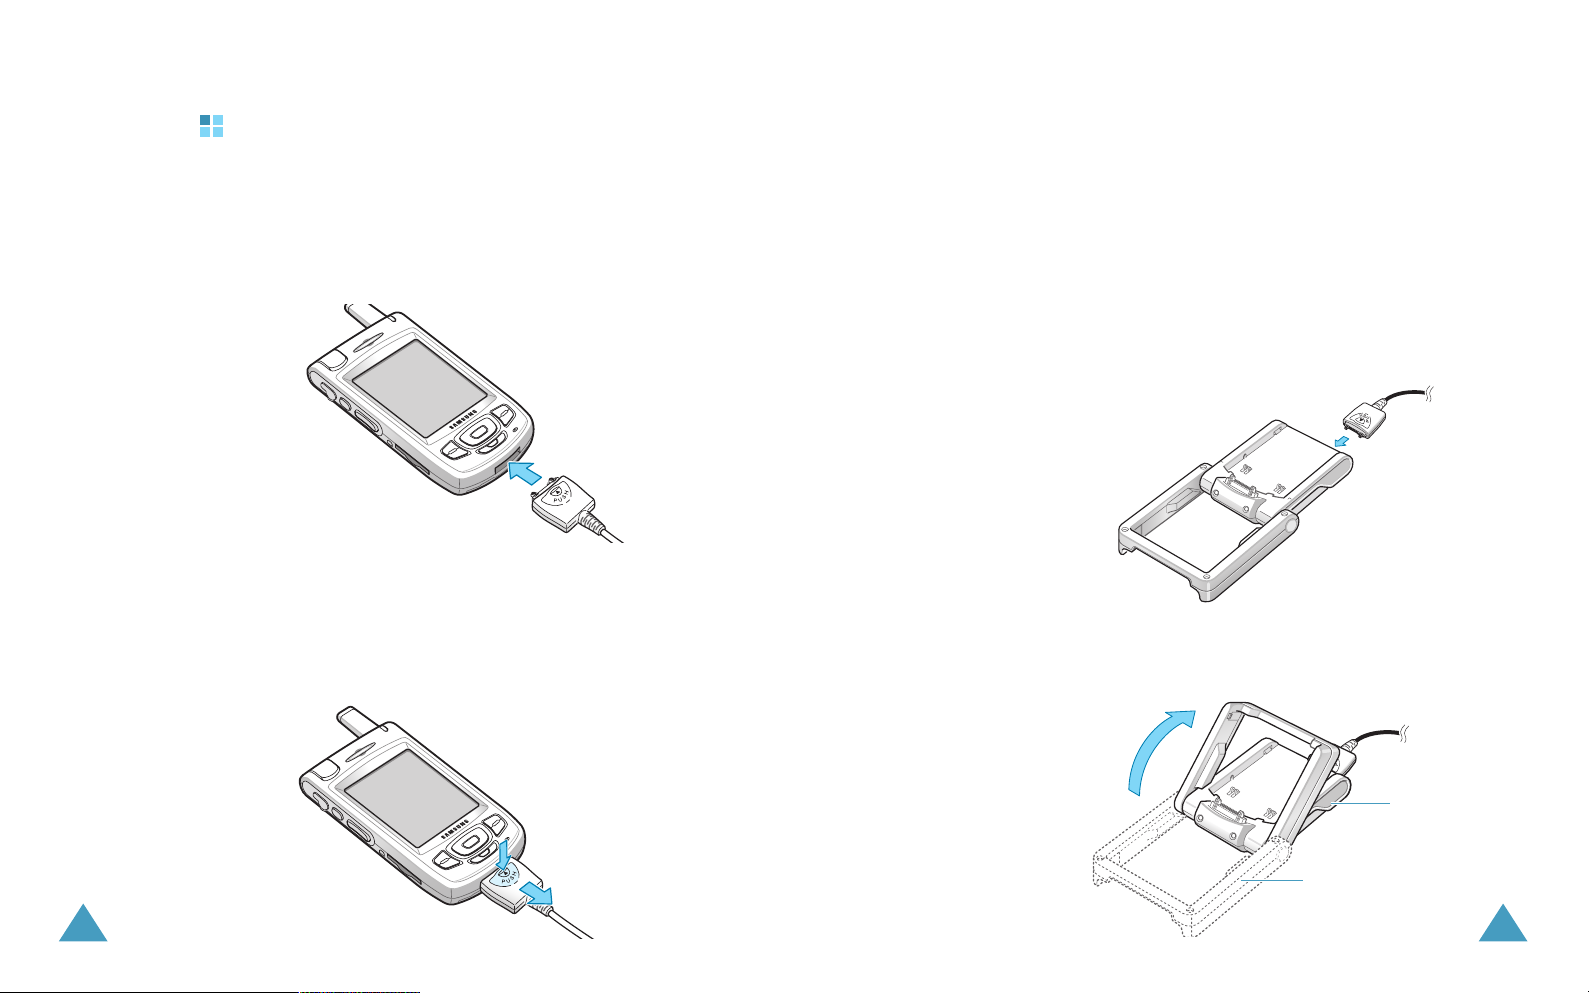
Charging Your Pocket PC Phone
With the Travel Adapter
1. Plug the connector of the travel adapter into the bottom
of the phone. Check that the arrow on the connector is
facing toward the front of the phone.
2. Plug the adapter into a standard AC wall outlet.
3. When charging is finished, unplug the adapter from the
power outlet and from the phone by pressing the
button on the connector and pulling the connector out.
PUSH
Getting Started
With the Desktop Charger
You can use the desktop charger to charge the phone’s
battery and synchronize your Pocket PC Phone to your
PC. For information about synchronizing your Pocket PC
Phone, see page xx.
To charge the battery with the desktop charger:
1. Connect the travel adapter to the adapter jack on the
back of the desktop charger and plug the travel adapter
into a standard AC outlet.
2. Lift the frame towards the base so that it is at a 45°
angle and cannot move back any further.
16
17

Getting Started
3. Select one of the following ways:
Place the entire phone with battery attached into the
desktop charger, bottom first, so that the data
connector is inserted.
Then push the phone backwards into the frame until you
hear a click.
Slide a single battery alone, not attached to the phone,
into the base compartment of the desktop charger; first,
insert the bottom of the battery under the two tabs of
the charger and then push the battery until you hear a
click.
Getting Started
4. The charge indicators on the front of the charger come
on.
The indicator light shows the status of the battery being
charged.
• Red: the battery is charging.
• Green: the battery is fully charged.
• Orange: the battery is not seated correctly on the
desktop charger or the travel adapter is not plugged in
correctly. Check the battery and the adapter.
Phone charge indicator
Battery charge indicator
5. When the indicator light turns green, remove the phone
or battery from the charger. To remove the phone, first
pull the phone towards you slightly and then lift up.
18
You can charge the phone and the single battery
together.
19
Getting Started
This picture will be updated in the next version.
Once the battery is charged, you can use the phone in
the desktop charger or out of the charger for all
functions. If you have purchased an extra battery, you
can charge it in the charger while you are using the
phone.
Using Backlight
The backlight button (
the phone. Simply pressing the backlight button will turn
the backlight on or off.
Pressing and holding the button for approximately 2
seconds will force your Pocket PC Phone in and out of
the Sleep mode.
) is located on the right side of
Low Battery Warning
If the battery gets very low, your Pocket PC Phone
displays a warning message. When this happens, save
any unsaved data you are working on, perform a
synchronization with your PC, then turn off your Pocket
PC Phone. Don’t try to restart your Pocket PC Phone
until you have connected to an external power source. If
your Pocket PC Phone shuts down, the backup portion of
your battery will protect your data for about 72 hours.
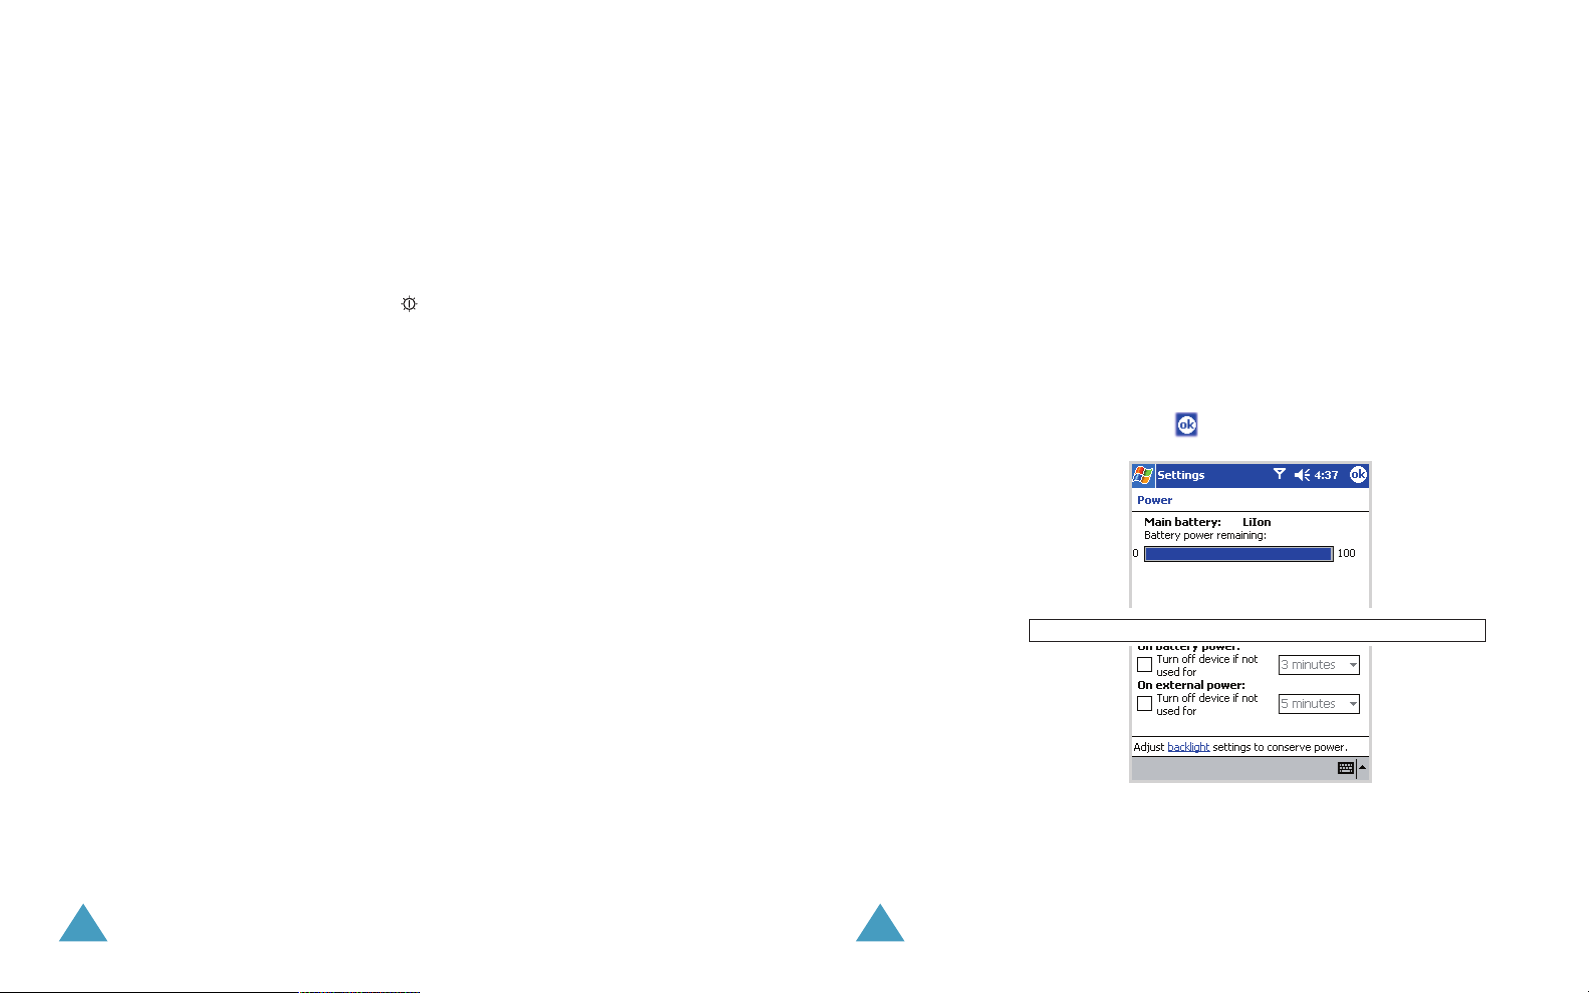
A lower setting increases the usable battery time. A
higher setting decreases the usable battery time and
allocates it for standby usage.
You can also adjust the
Battery setting to conserve
more battery power.
To adjust the Power setting:
1. From the Start menu, tap Settings .
2. In the
System tab, tap Power .
3. Put a checkmark on the box and select time setting from
the list. Then tap .
Saving Battery Power
You can conserve more battery power time by adjusting
Power settings. During standby, the unit turns off so
very little power is being consumed. This helps to
preserve programs and data stored in the RAM.
20
21
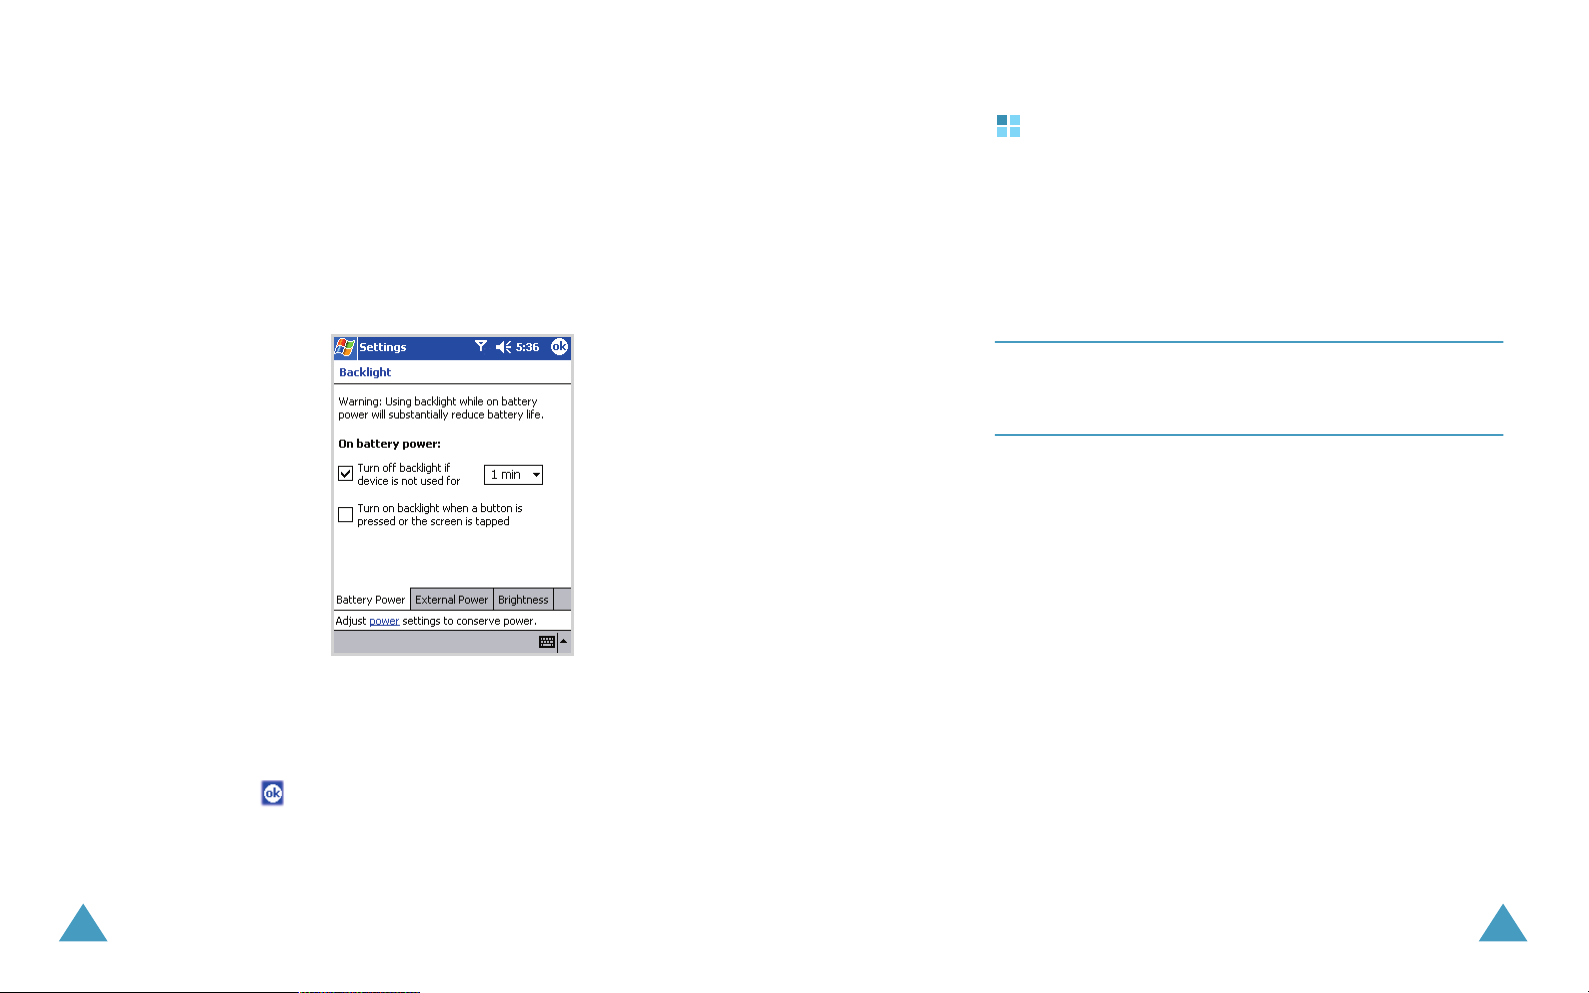
Getting Started
To adjust the Backlight setting:
1. From the Start menu, tap Settings .
2. In the
System tab, tap Backlight .
3. Select the backlight settings.
In the
Battery Power tab, select when to use the
backlight on battery power.
Getting Started
Installing ActiveSync
When using Microsoft® ActiveSync®, you can synchronize
information on your desktop computer and/or a Microsoft®
Exchange Server with the information on your Pocket PC
Phone. ActiveSync compares the information on your
Pocket PC Phone with the information on your desktop
computer and/or the server and updates all locations,
keeping you up-to-date with the most recent information.
Note : Using Server ActiveSync®, you can synchronize
information directly with a Microsoft® Exchange Server if
your company is running Microsoft® Mobile Information
Server 2002 or later.
Before you can begin synchronization with your desktop
computer, you must install ActiveSync on your desktop
computer from the supplied CD-ROM.
To install ActiveSync on your desktop computer:
1. Insert the CD-ROM into the CD-ROM drive of your
desktop computer.
22
In the
External Power tab, select when to use the
backlight on external power.
Brightness tab, select the brightness level.
In the
4. Tap .
2. Follow the instructions on the screen for installing
Microsoft ActiveSync.
For more help, click on the Microsoft Active Help
button during installation.
23

Getting Started
3. After installation is complete, the ActiveSync New
Partnership Wizard helps you connect your phone to
your desktop computer, set up a partnership so that you
can synchronize information between your phone and
your desktop computer and/or server, and customize
your synchronization settings.
Your first synchronization process will automatically
begin when you finish using the wizard.
Important : To prevent synchronization problems, select
Synchronize with Microsoft Mobile Information Server
and/or this desktop computer
only if you are certain that your
company is running Microsoft Mobile Information Server 2002 or
later, and you know the server name. Otherwise, select
Synchronize with this desktop computer instead. For more
information, contact your network administrator or service
provider.
After the first synchronization, take a look at Calendar,
Contacts, and Tasks on your Pocket PC Phone. You will
notice that your information has been copied to the phone.
Disconnect the phone from the desktop computer and you
are ready to go!
24
For more information about ActiveSync, see Chapter 4,
“Synchronizing Information.”

chapter
Tap to
change time
and date.
Tap to open
an item.
Tap to view
your day at
a glance.
2
The Basics
This chapter explains basic information about using your
phone, such as customizing your phone and using on-line
help.
Using the Today Screen
You will see the Today screen when you first turn on your
Pocket PC Phone. You can also display it by tapping
Start
→
Today
.
On the Today screen, you can see important information
for the day, at a glance.
Tap to switch to
a program.
Tap to turn on/off the
phone’s power.
Tap to change volume
or mute all sounds.
Tap to create a new item.
25
The Basics
The Basics
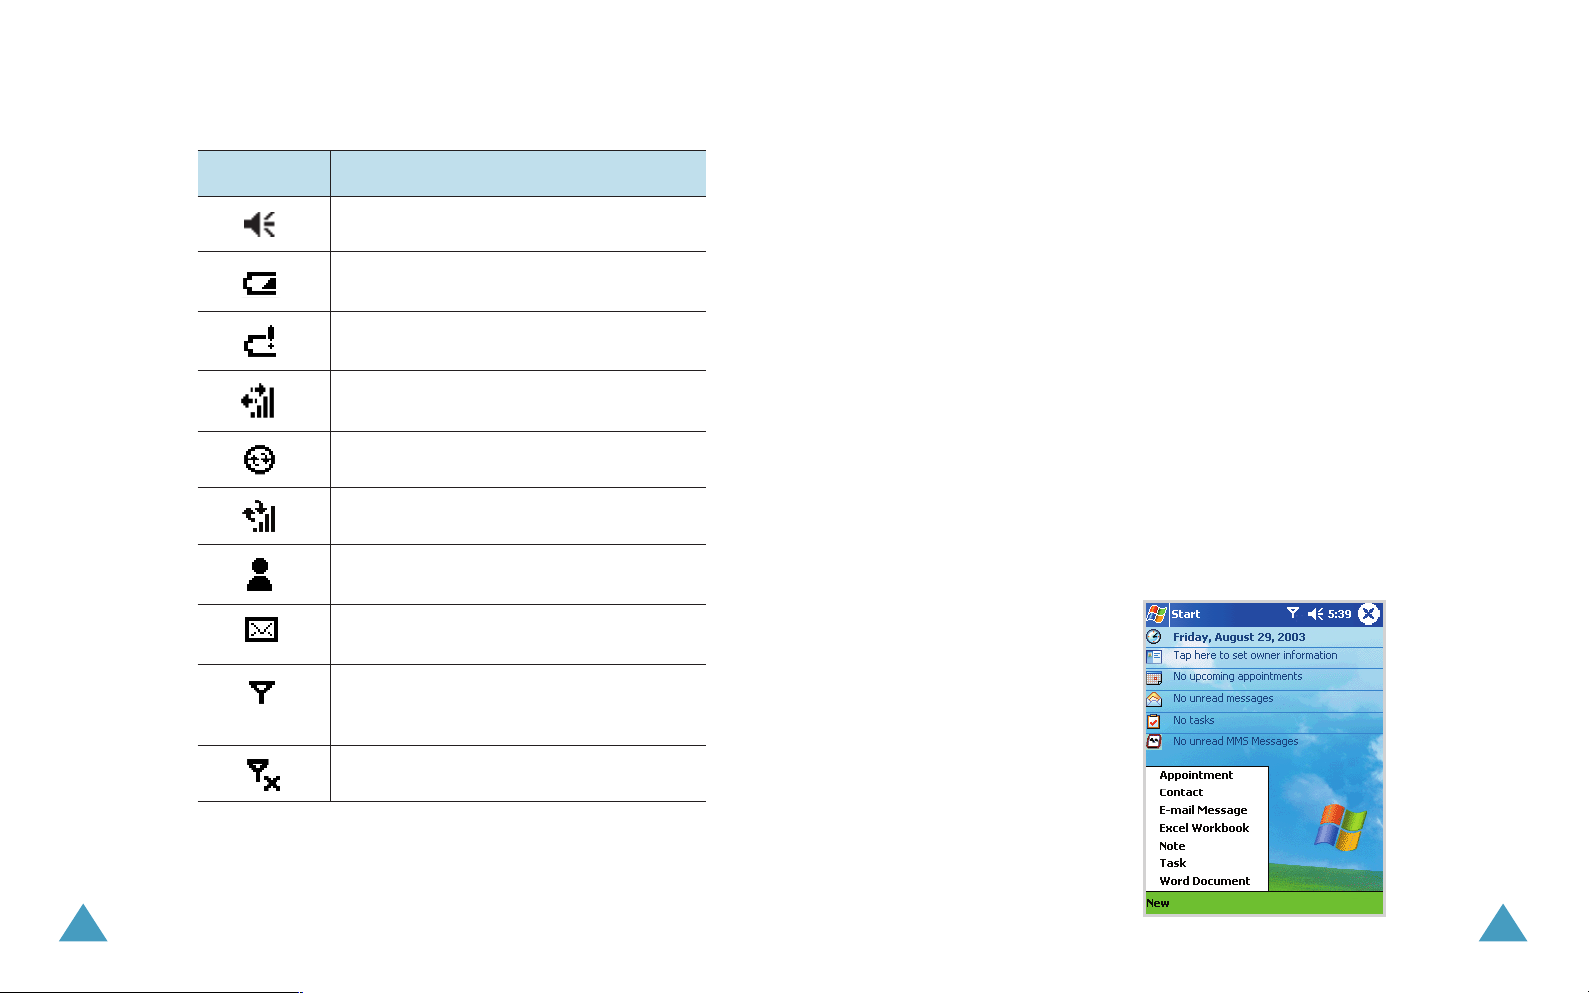
Following are some of the status icons you may see:
Status Icon Description
Turns all sounds on and off.
Main battery is low.
Main battery is very low.
Connection is active.
Synchronization is beginning or ending.
Synchronization is occurring.
Notification that one or more instant
messages have been received.
Notification that one or more e-mail/
SMS/MMS messages have been received.
Shows the connection to your mobile
phone service provider is on and the
strength of the signal.
Creating New Information from the Today
Screen
From the Today screen, you can create new information,
including:
• Appointment
• Contact
• E-mail message
• Excel workbook
• Note
•Task
• Word document
For more information on creating these items, see the
appropriate instructions for each task in this guide. For
example, to create a new appointment, see “Calendar:
Scheduling Appointments and Meetings” on page xx.
New
On the Today screen, tap
screen, and then tap the menu you want to create a
new item.
on the bottom of the
26
Indicates your phone is switched off.
27

The Basics
The Basics
Changing Information from the Today
Screen
From the Today screen, you can change information,
including;
• owner information
• upcoming appointments
• unread and unsent messages
• tasks that need to be completed
• unread MMS messages
For more information on changing these items, see the
appropriate instructions for each task in this guide.
1. On the Today screen, tap the information you want to
change.
2. Enter or change the information.
3. Tap to save changes and return to the Today screen.
Customizing the Today Screen
You can customize the Today screen in the following
ways: change the background picture, select the
information you want displayed and in what order, and
further customize to show future appointments.
To change the background:
1. From the Start menu, tap Settings → Personal →
Today.
2. In the Appearance tab, select the desired theme for
the background. To use your own background, select
Use this picture as the background and tap the
Browse button to locate the file you want.
28
3. Choose a folder and type.
4. Tap the picture you want to use and then tap .
29
The Basics
The Basics
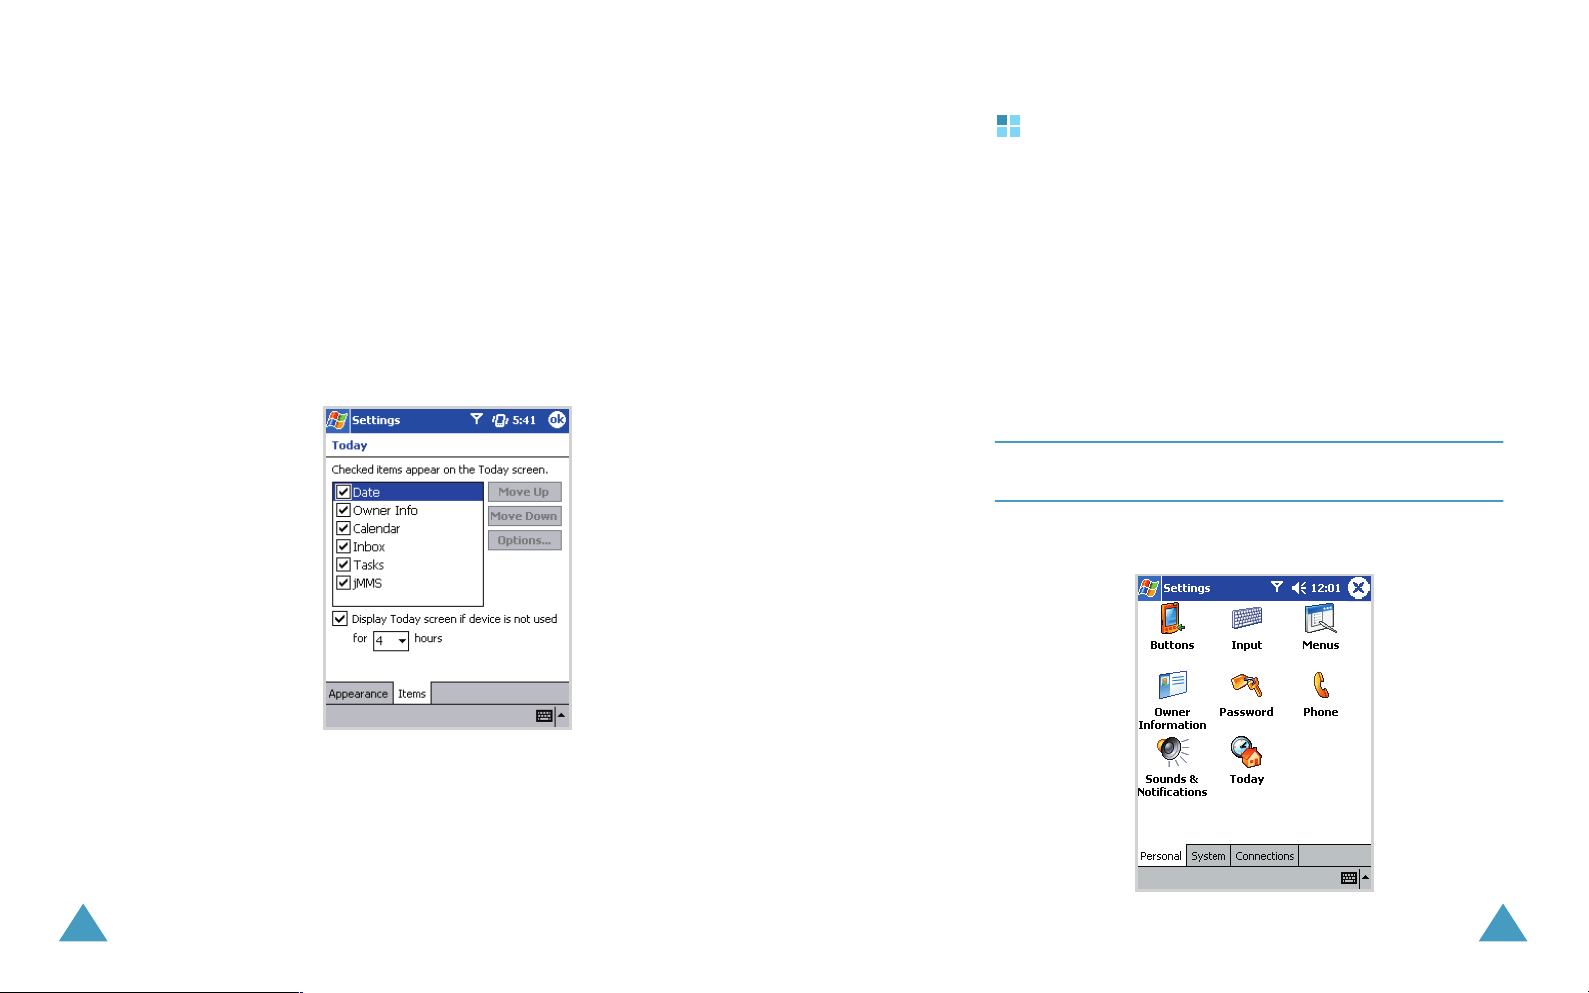
To customize the information you want displayed:
1. From the Start menu, tap Settings → Personal →
Today.
2. In the Items tab:
• uncheck a box to remove its information.
• select an item and tap Move Up or Move Down to
change its position.
• choose to select or deselect Display Today screen if
device is not used for, and then select a number of
hours from the box below.
Customizing Your Phone
You can customize the Pocket PC Phone settings to suit
the way you work.
Setting Time and Date
When you turn on your Pocket PC Phone for the first
time, you are guided through setting the time. Set the
time again if:
• the battery completely discharges.
• you perform a hard reset of your Pocket PC Phone.
Note
: You can also change the time on the Today screen by
tapping the clock icon on the top of the screen.
1. From the Start menu, tap Settings.
30
31
The Basics
The Basics
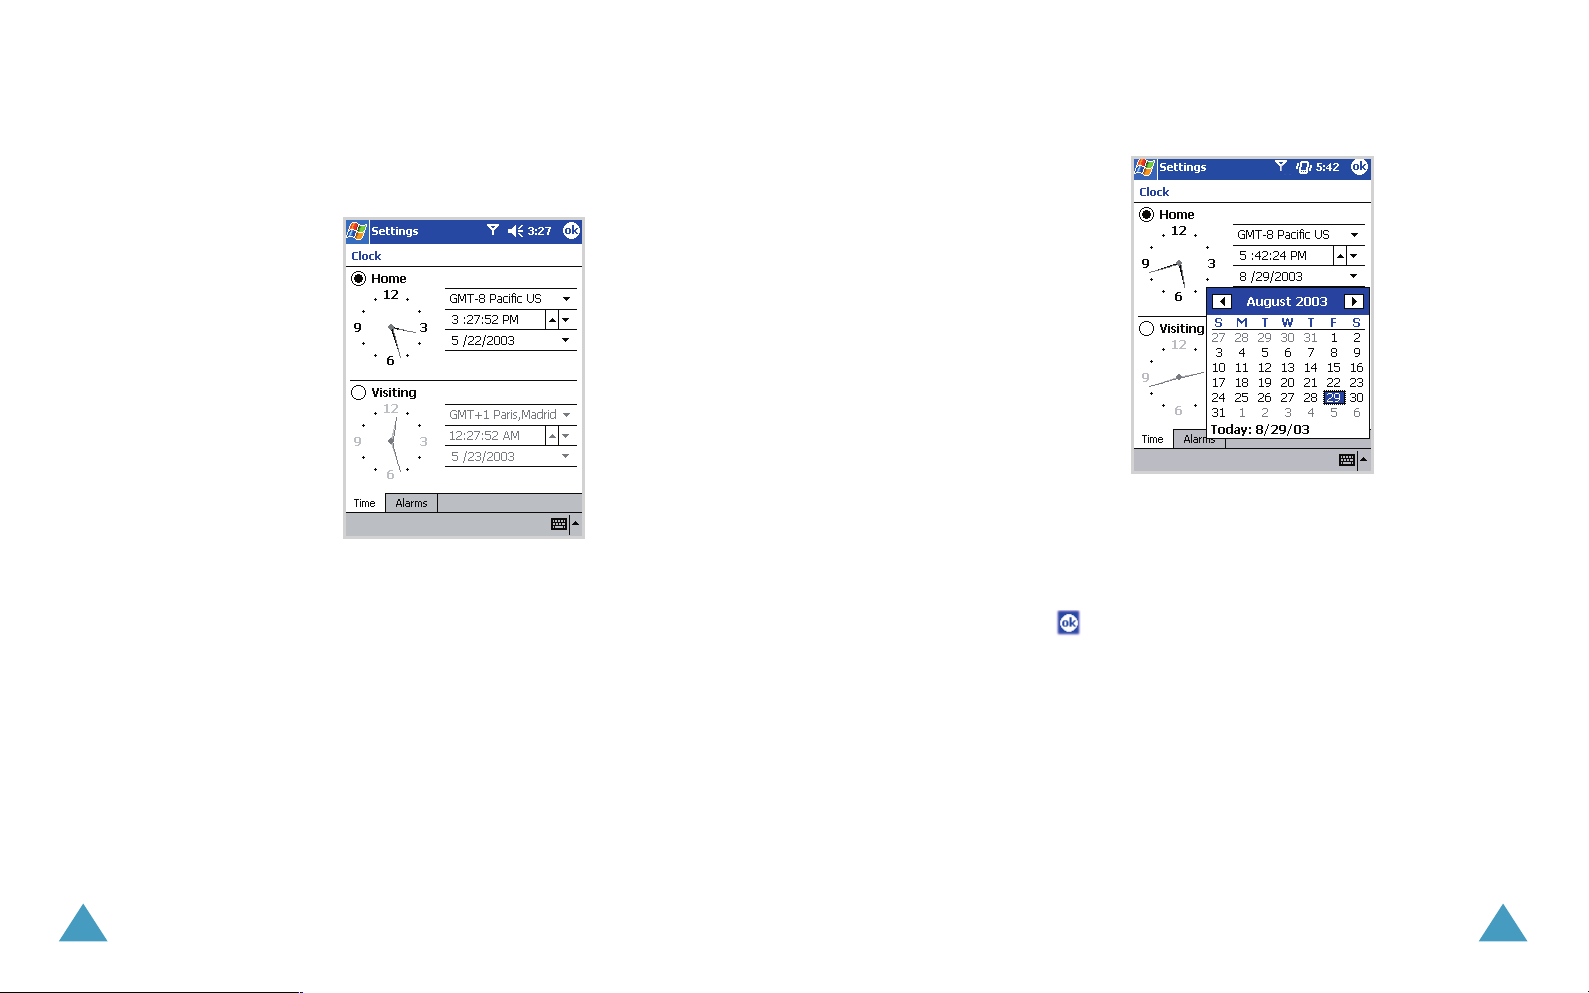
2. In the System tab, tap Clock, and then Home.
3. Tap the time-zone down arrow to select your location
and time zone.
4. Tap the hour, minutes, or seconds to select the time you
want to adjust, then tap the up or down arrow to change
hour, minute, or second.
Or, move the hands of the clock with the stylus to adjust
the time.
Tap AM or PM to change the time to PM or AM.
5. Tap the date down arrow to see a calendar.
6. Tap the left or right arrow on the top of the calendar to
move backwards or forwards through the calendar.
7. Tap a day to select the date.
8. Tap .
9. Tap Yes to save your clock settings.
You can also set the time for a location you’re visiting by
selecting
Visiting
on the
Clock
setting.
32
33
The Basics
The Basics
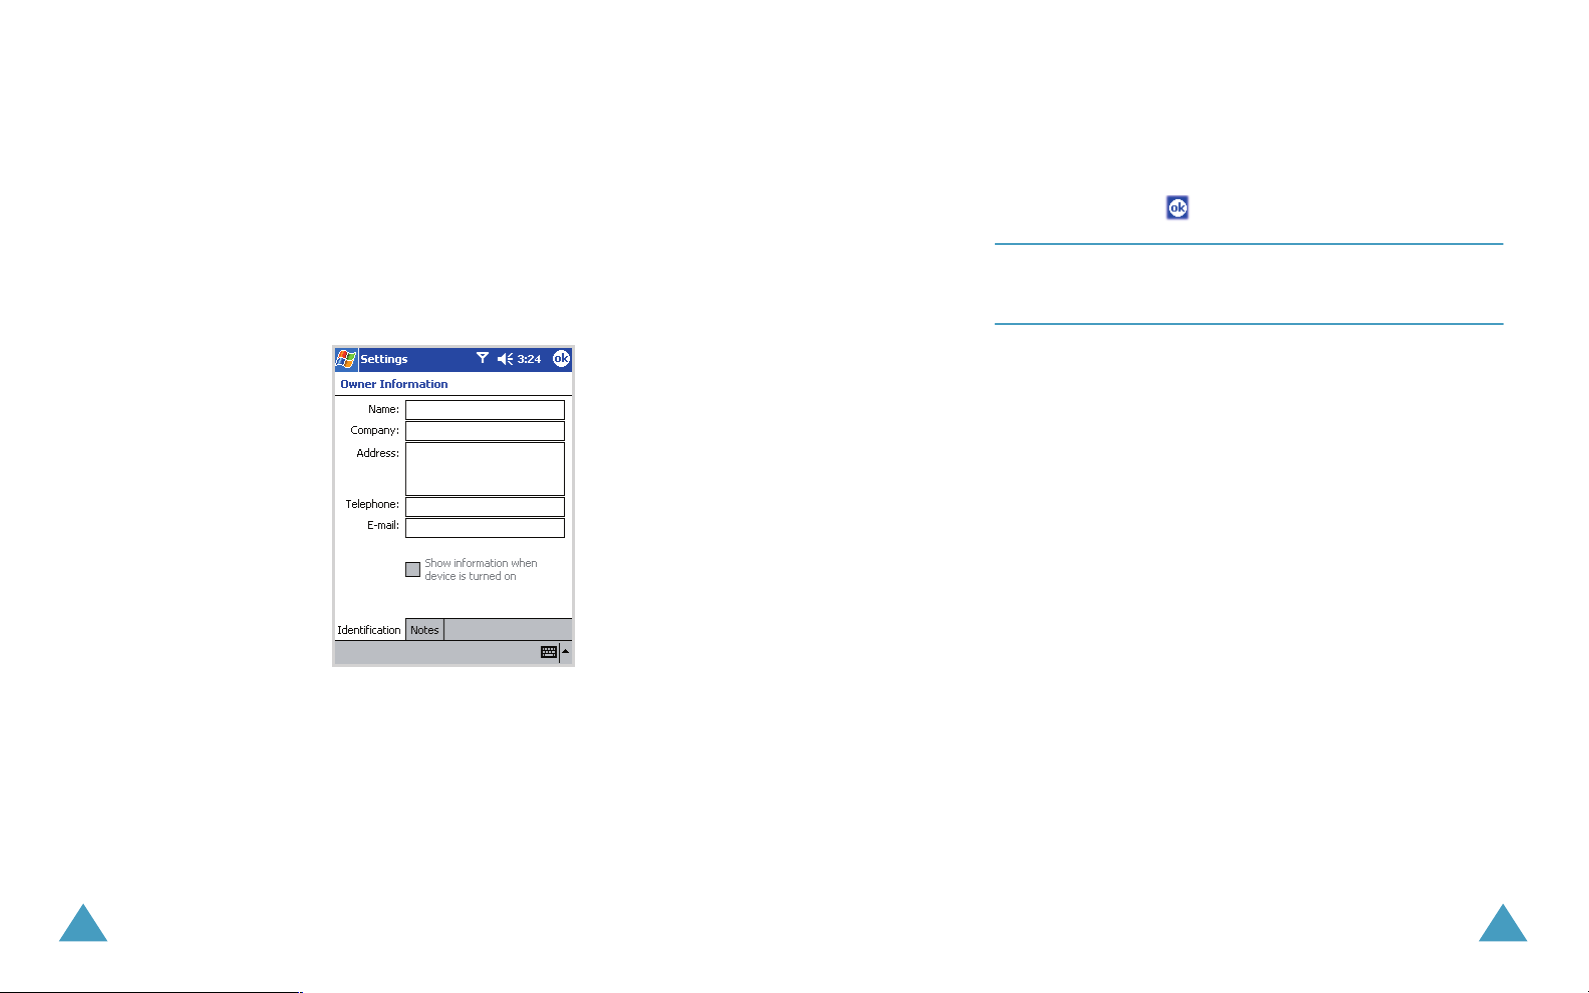
Entering Owner Information
The owners information identifies the owner or user of
the Pocket PC Phone. Name, company, address, phone
number, e-mail address, and note information fields are
available.
1. From the Start menu, tap Settings.
2. In the Personal tab, tap Owner Information.
6. If you want to attach notes, tap the Notes tab and
enter notes.
7. When you are finished entering all the desired
information, tap .
Note
: When you turn on your device for the first time, you
can also enter the owner information by tapping on
Tap here to set owner information
.
Changing a Security Password
The
Password
password.
When a password is configured, there is a
device unused for
range from 0 minute to 24 hours. When this option is
set, you can continue to use your device until the screen
turns off due to inactivity. If your device is inactive for a
greater amount of time than specified in the unused
setting, a password must be entered when you turn the
device back on.
To set the password:
option allows you to enable or disable a
Prompt if
option that allows a length of time
34
3. Tap the Name box. Input panel appears.
4. Enter name. For details on entering characters, see
page xx.
5. Tap the other desired information boxes and enter the
information.
1. From the Start menu, tap Settings → Personal →
Password.
2. Tap the password option you want and enter the
password.
3. If desired, set the “Prompt if device unused for” time
by tapping the drop down arrow and selecting the
proper time increment.
35
The Basics
The Basics
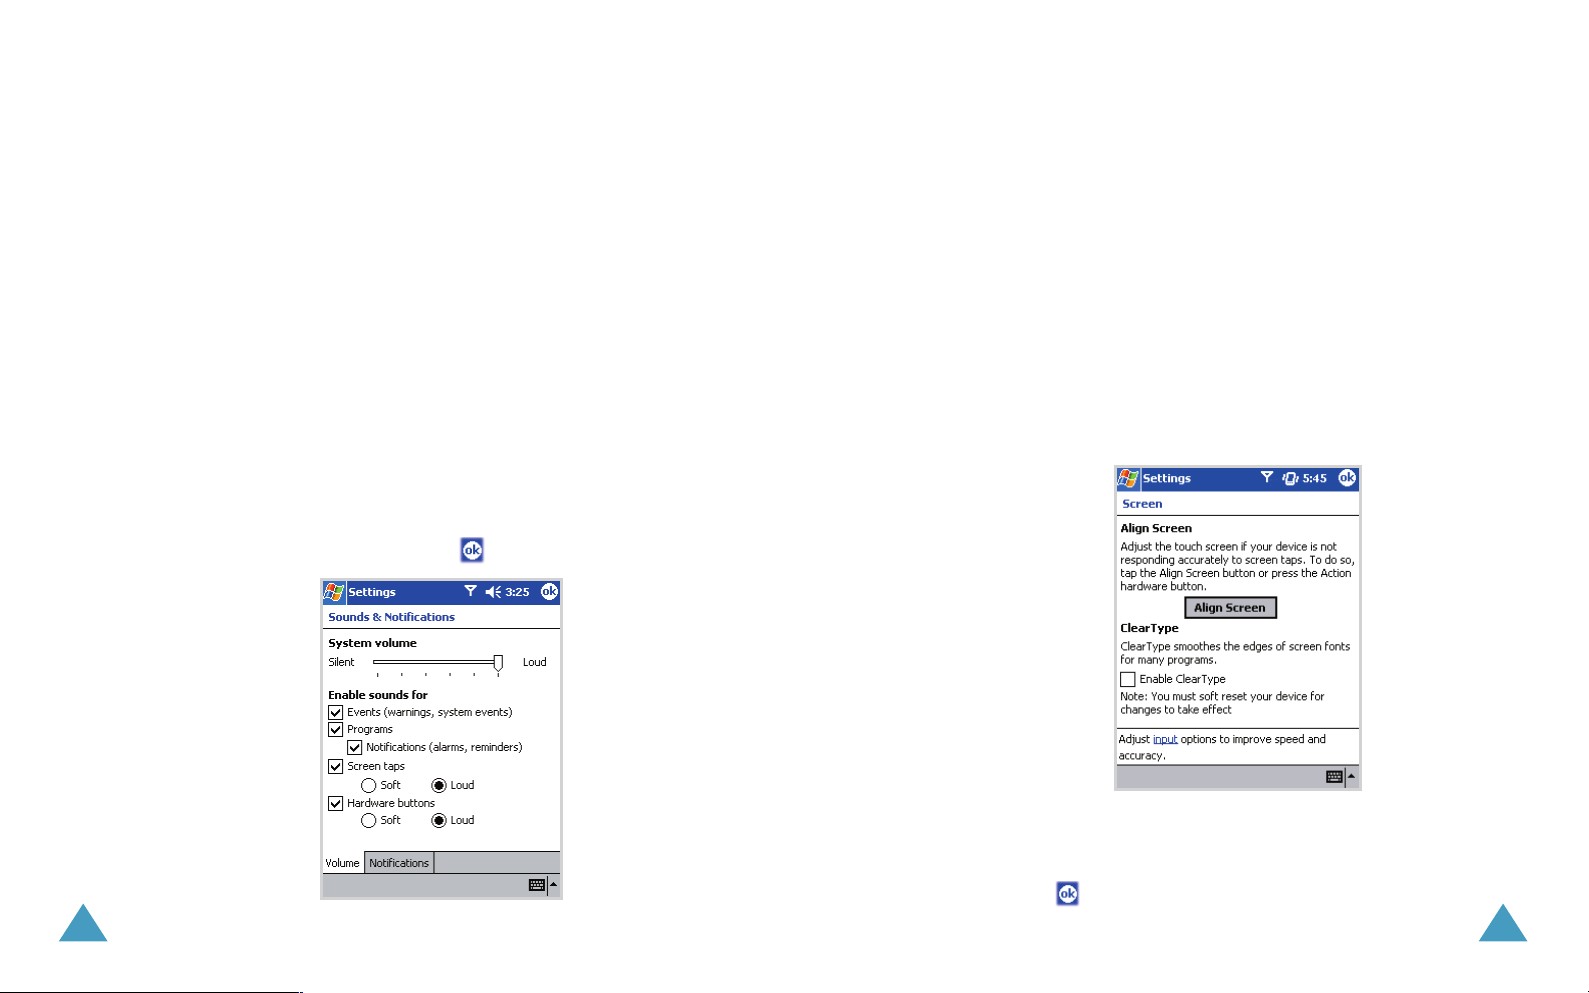
Setting Sounds & Notification
Your Pocket PC Phone reminds you in various ways when
you have something to do or receive a message. For
example, if you’ve set up an appointment in
Clock
or an alarm in
, you’ll be notified in any of the
Calendar
following ways:
• A message box appears on the screen.
• A sound, which you can specify, is played.
• A light flashes on your Pocket PC Phone.
• Your Pocket PC Phone vibrates.
To choose reminder types and sounds:
1. From the Start menu, tap Settings → Sounds &
Notifications.
2. Choose the options. The options you choose here apply
throughout the phone. Tap to save the setting.
,
Realigning the Screen
When you turn on your Pocket PC Phone for the first
time, you are guided through the alignment process.
Realign your screen if:
• your Pocket PC Phone does not respond accurately to
your screen taps.
• you perform a hard reset of your Pocket PC Phone.
1. From the Start menu, tap Settings.
2. In the System tab, tap Screen.
3. Tap the Align Screen button to begin the realignment
process.
36
4. Tap the cross-hair object at each location to realign the
screen. Be precise when you tap the cross-hair object.
5. Tap .
37
The Basics
The Basics
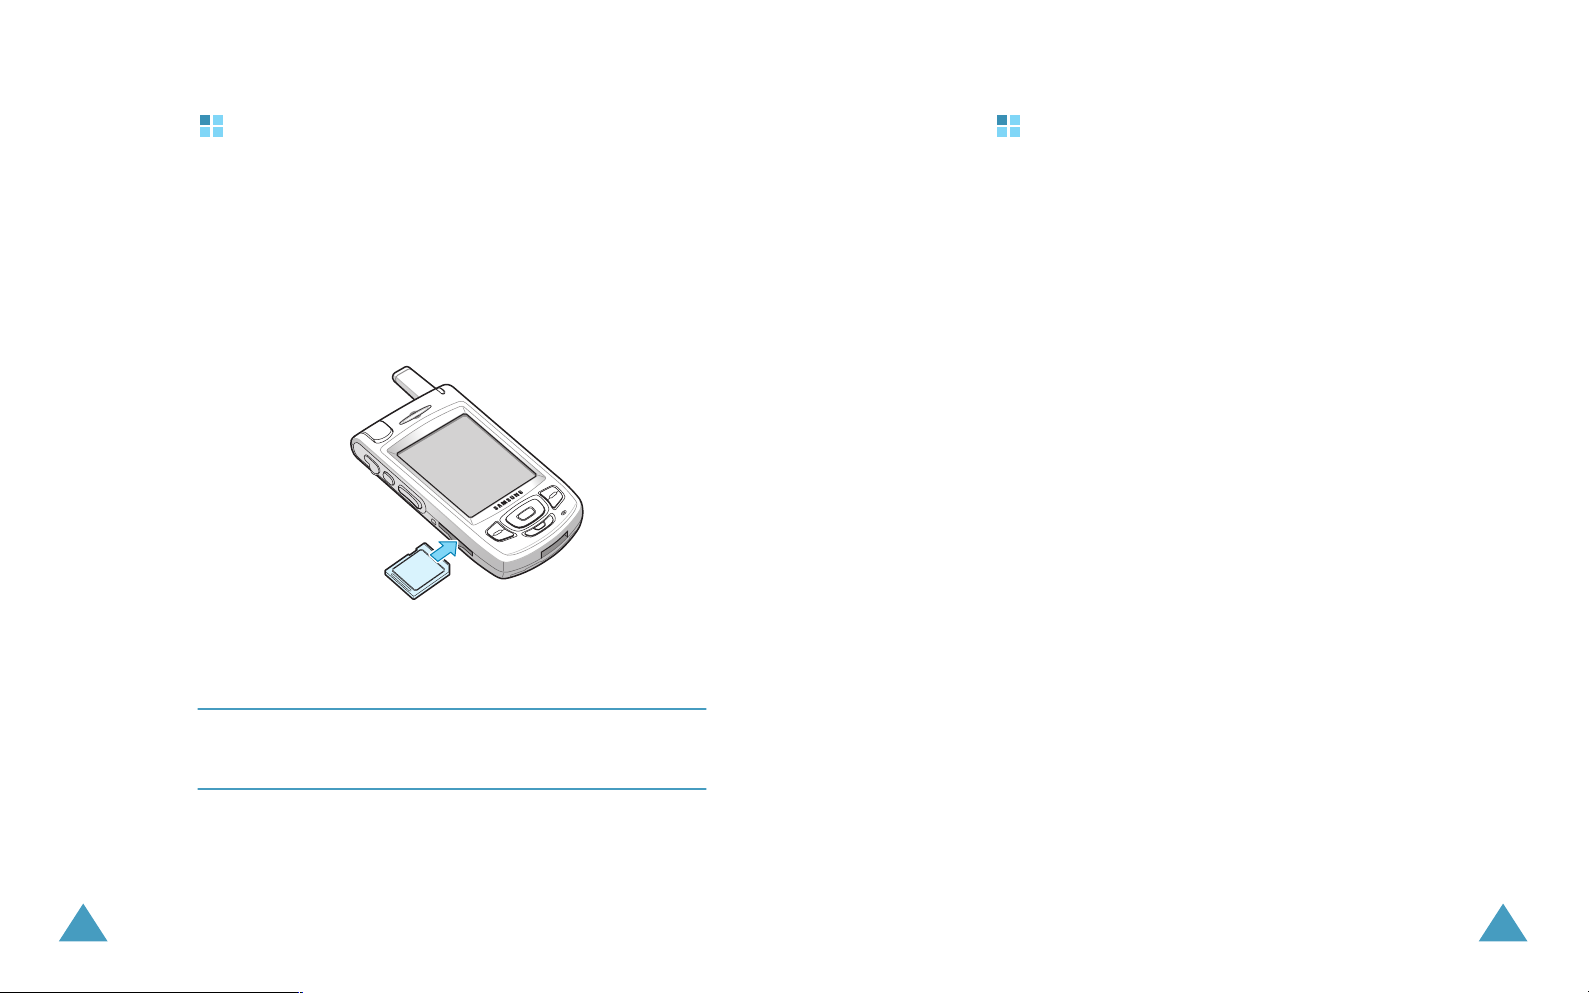
Using an Option SD Card
Your Pocket PC Phone has an expansion slot compatible
with a range of SD and MMC Memory cards, which are
primarily used to backup or transfer files and data.
To insert or remove a memory card:
1. Push the memory card into the slot until it clicks into
place. The card is secure when it is not protruding from
the base.
2. To remove the card, push it in and then release, letting
the card spring out.
Adding and Removing Programs
Programs added to your Pocket PC Phone at the factory
are stored in ROM (Read Only Memory). You cannot
remove this software, and you’ll never accidentally lose
ROM contents. ROM programs can be updated using
special installation programs with a *.xip extension. All
other programs and data files added to your Pocket PC
Phone after factory installation is stored in RAM
(Random Access Memory).
You can install any program created for your Pocket PC
Phone, as long as your device has enough memory. The
most popular place to find software for your device is on
the Pocket PC Web site (http://www.microsoft.com/
mobile/pocketpc).
Adding Programs Using ActiveSync
You’ll need to download the appropriate software for
your Pocket PC Phone to your PC before installing it on
your phone.
1. Determine what your Pocket PC Phone and processor
type is so that you know which version of the software
to install.
38
Note
: When you receive your Pocket PC Phone, there will be a
piece of plastic in the slot; remove as described in the
step 2 above.
2. From the Start menu, tap Settings → System →
About.
3. In the Version tab, make a note of the information in
Processor.
39

The Basics
The Basics
4. Download the program to your PC (or insert the CD or
disk that contains the program into your PC). You may
see a single *.xip, *.exe, or *.zip file, a Setup.exe file,
or several versions of files for different device types and
processors. Be sure to select the program designed for
the Pocket PC and your unit processor type.
5. Read any installation instructions, Read Me files, or
documentation that comes with the program. Many
programs provide special installation instructions.
6. Connect your Pocket PC Phone to your PC.
7. Double click the *.exe file.
If the file is an installer, the installation wizard will
begin. Follow the instructions on the screen. Once the
software has been installed on your PC, the installer will
automatically transfer the software to your Pocket PC
Phone.
If the file is not an installer, you will see an error
message stating that the program is valid but it is
designed for a different type of PC. You will need to
move this file to your phone. If you cannot find any
installation instructions for the program in the Read Me
file or documentation, use ActiveSync Explore to copy
the program file to the Program Files folder on your
phone. For more information on copying files using
ActiveSync, see ActiveSync Help.
Adding a Program Directly from the
Internet
1. Determine what your Pocket PC Phone and processor
type is so that you know which version of the software
to install.
2. From the Start menu, tap Settings → System →
About.
3. In the Version tab, make a note of the information in
Processor.
4. Download the program to your Pocket PC Phone straight
from the Internet using Internet Explorer on your Pocket
PC Phone. You may see a single *.xip, *.exe, or *.zip
file, a setup.exe file, or several versions of files for
different device types and processors. Be sure to select
the program designed for the Pocket PC and your unit
processor type.
5. Read any installation instructions, Read Me files, or
documentation that comes with the program. Many
programs provide special installation instructions.
6. Tap the file, such as a *.xip or *.exe file. The installation
wizard will begin. Follow the directions on the screen.
40
8. Once installation is complete, tap Start → Programs,
and then tap the program icon to switch to it.
41
The Basics
The Basics
Adding a Program to the Start Menu
1. From the Start menu, tap Settings → Menus.
2. Select the check box for the program you want to add to
the Start menu.
If you do not see the program listed, you can either use
File Explorer on your unit to move the program to the
Start Menu folder, or use ActiveSync on the PC to
create a shortcut to the program and place the shortcut
in the Start Menu folder.
Removing Programs
1. From the Start menu, tap Settings.
2. In the System tab, tap Remove Programs.
3. Select the program you want to delete, and then tap the
Remove button.
If the program does not appear in the list of installed
programs, use your device to locate the program, tap
and hold the program, and then tap
up menu.
Delete
on the pop-
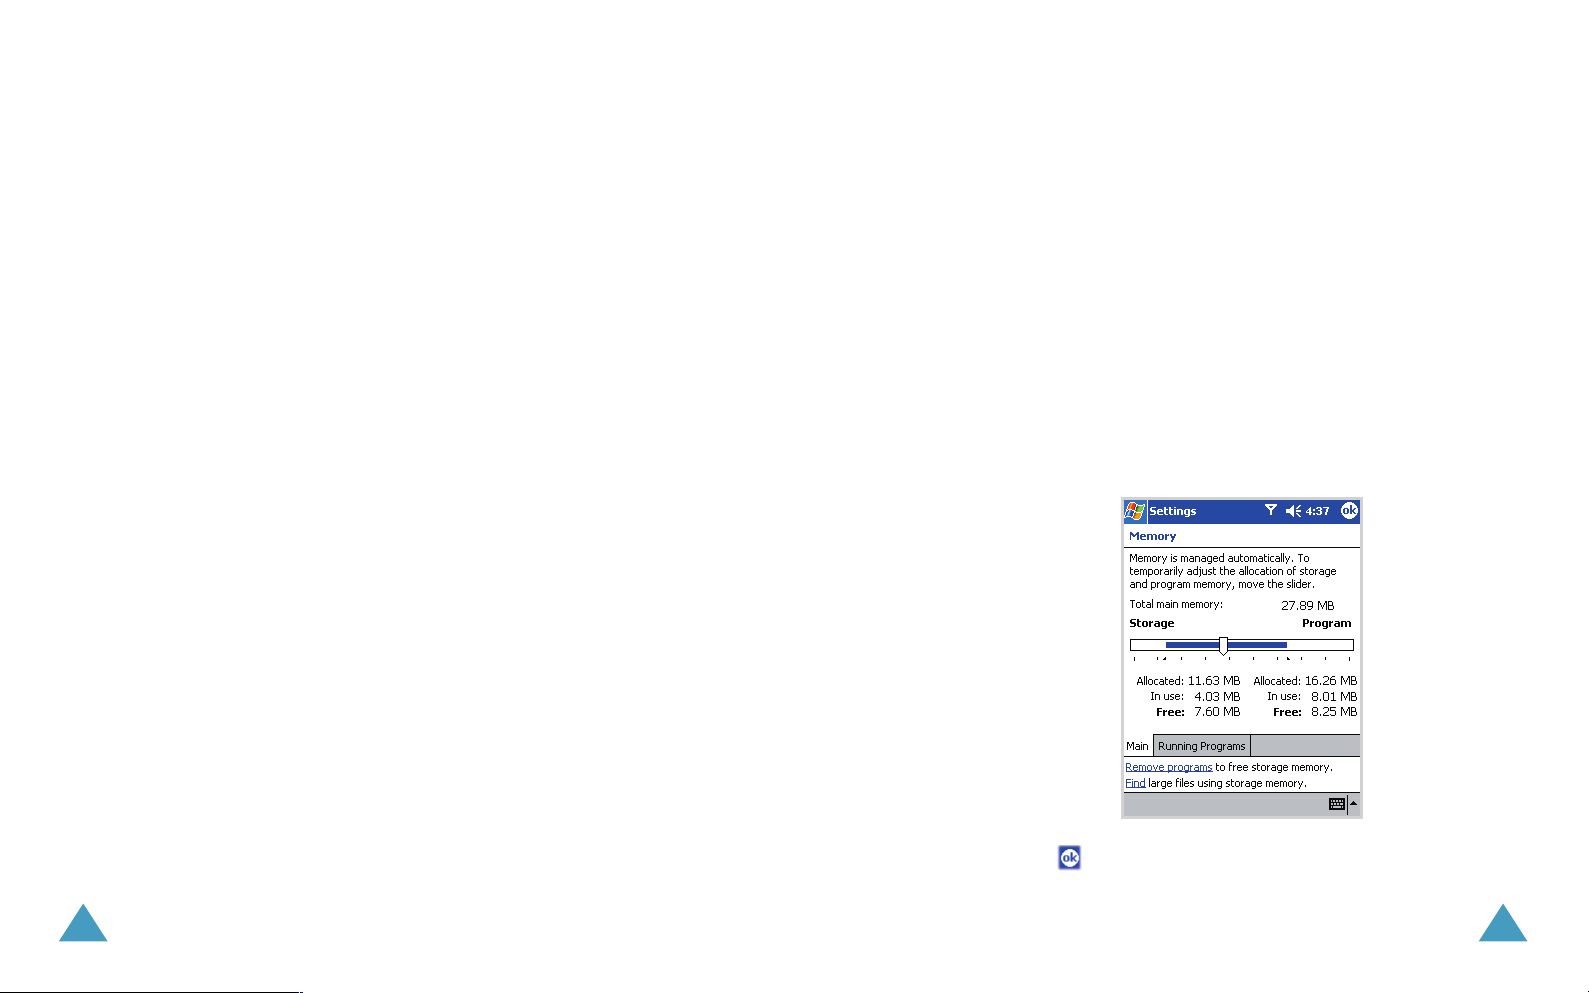
Managing Memory
The Memory on your Pocket PC Phone is shared between
storage memory and program memory. Storage
memory is used to store the information you create and
the programs you install. Program memory is used to
run programs on your Pocket PC Phone.
Pocket PC Phone automatically manages the allocation
between storage and program memory.
To view memory allocation and availability:
1. From the Start menu, tap Settings.
2. In the System tab, tap Memory.
3. Adjust the memory by moving the slider.
42
4. Tap to save the setting.
43
The Basics
How to do???
The Basics
Resetting the Pocket PC Phone
You can perform a soft reset or a full reset – a soft reset
restarts your Pocket PC Phone and a full reset switches
the battery off. The result of a soft reset is that some
data may be lost in programs that are open, however,
the result of cutting power (a full reset) is to wipe out all
the data and new programs you have added, and return
the device to its factory setting – i.e. it will only have
the software that was present when you bought it.
It is important not to think about a full reset restarting,
shutting down or even improperly switching off your
desktop, but rather like a complete crash requiring you
to have to wipe out your OS. The importance of backing
up data to an SD card or your computer cannot be
stressed enough - in the event you have to perform a
full reset your data will not be lost.
Performing a Soft Reset
If your Pocket PC Phone responds slowly, stops
responding or freezes, try a soft reset. A soft reset
causes the Pocket PC Phone to restart and re-adjust
memory allocation. Unsaved data in open windows may
be lost.
To perform a soft reset:
2. Press the Reset button in the hole with the end of the
top-half of your stylus.
Perform a Full Reset
Note
: A full device reset clears memory, deletes all data and
restores the Pocket PC Phone to its default settings.
Programs installed at the factory remain, while data
you have created and programs you have installed are
erased.
1. Unscrew the stylus.
44
45
The Basics
The Basics
Connection Settings
Connection settings enable you to set up connections so
you can connect to the Internet or your corporate
network.
Connect to the Internet or Your Network
To send and receive e-mail with Inbox and view Web
sites with Internet Explorer, you must set up a remote
connection using a modem card or an Ethernet/LAN
card.
To disconnect, remove the card from your Pocket PC
Phone.
Using a Modem Card
To connect to the Internet with a modem card, you need
a phone line, a dial-up Internet Service Provider, and an
optional Single-Slot or Dual-Slot PC Card Expansion
Pack, Expansion Pack Plus, or CompactFlash (CF) Card
Expansion Pack.
Note
: Insert your modem card before trying to set up a
modem connection.
1. Insert your modem card into the option card slot in your
Pocket PC Phone.
Most of the popular modem card drivers are included on
your Pocket PC, so your modem card should be
recognized.
If your modem card is not recognized, follow your
modem manufacturer’s instructions to install the
modem card driver on your computer.
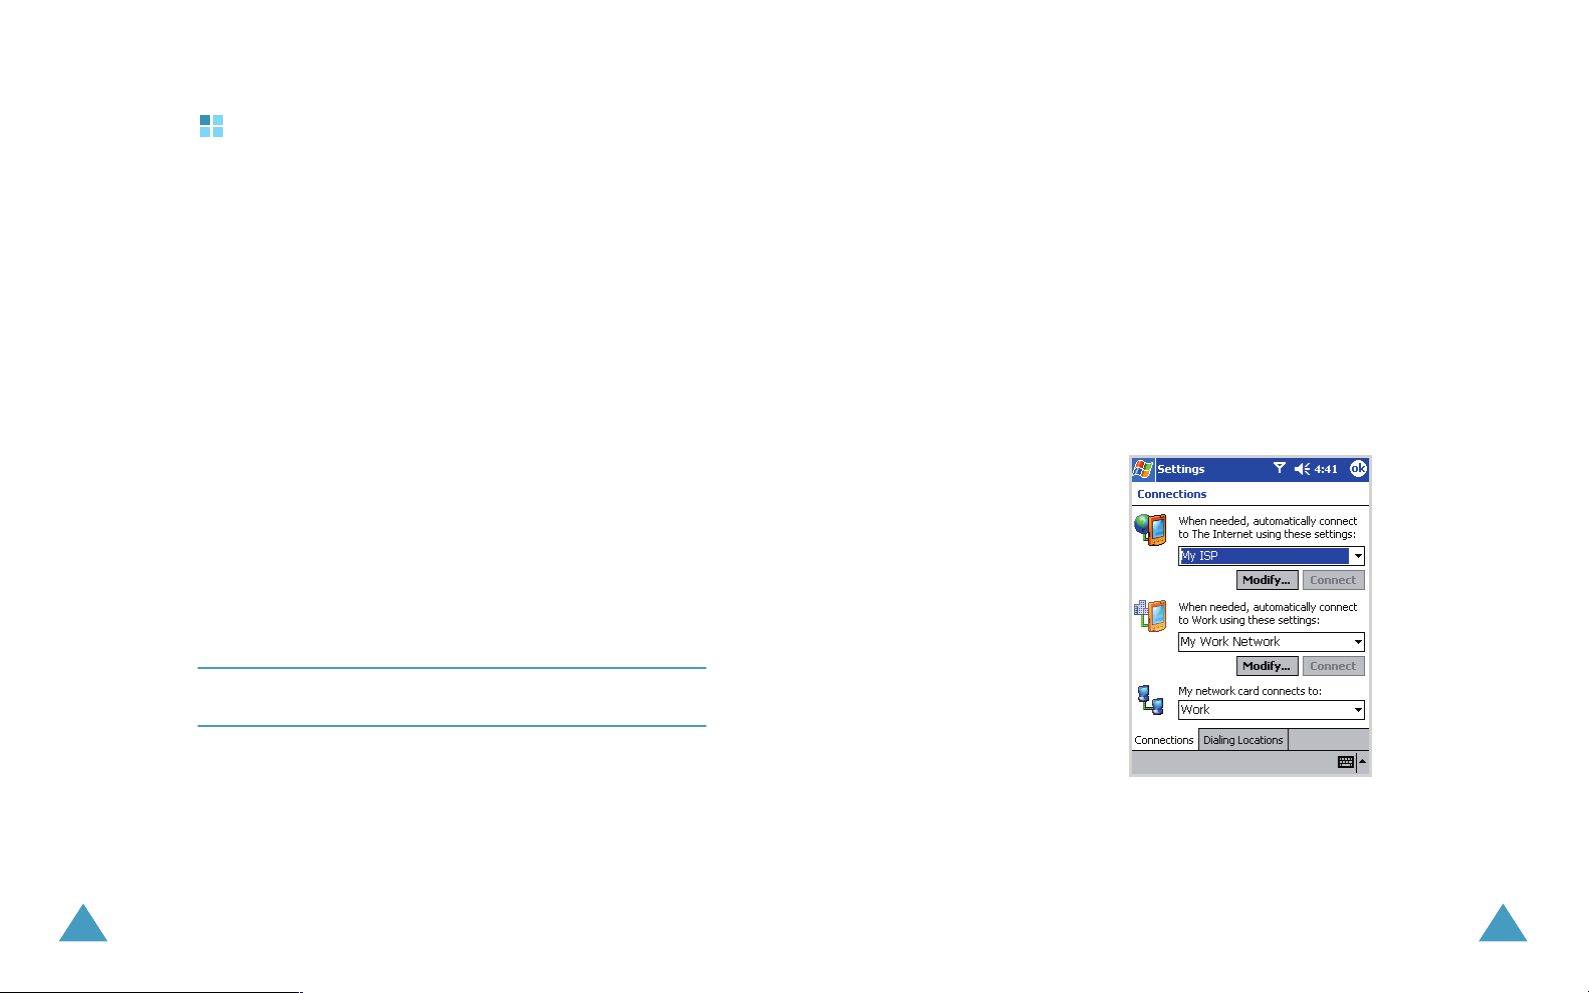
2. From the Start menu, tap Settings.
3. Tap the Connections tab.
4. Tap Connections.
46
5. Make sure your internet setting is selected.
6. Tap the Modify button.
47
The Basics
The Basics
7. Tap New.
8. Enter a name for the connection, select the modem
type, then select the correct baud rate for that modem.
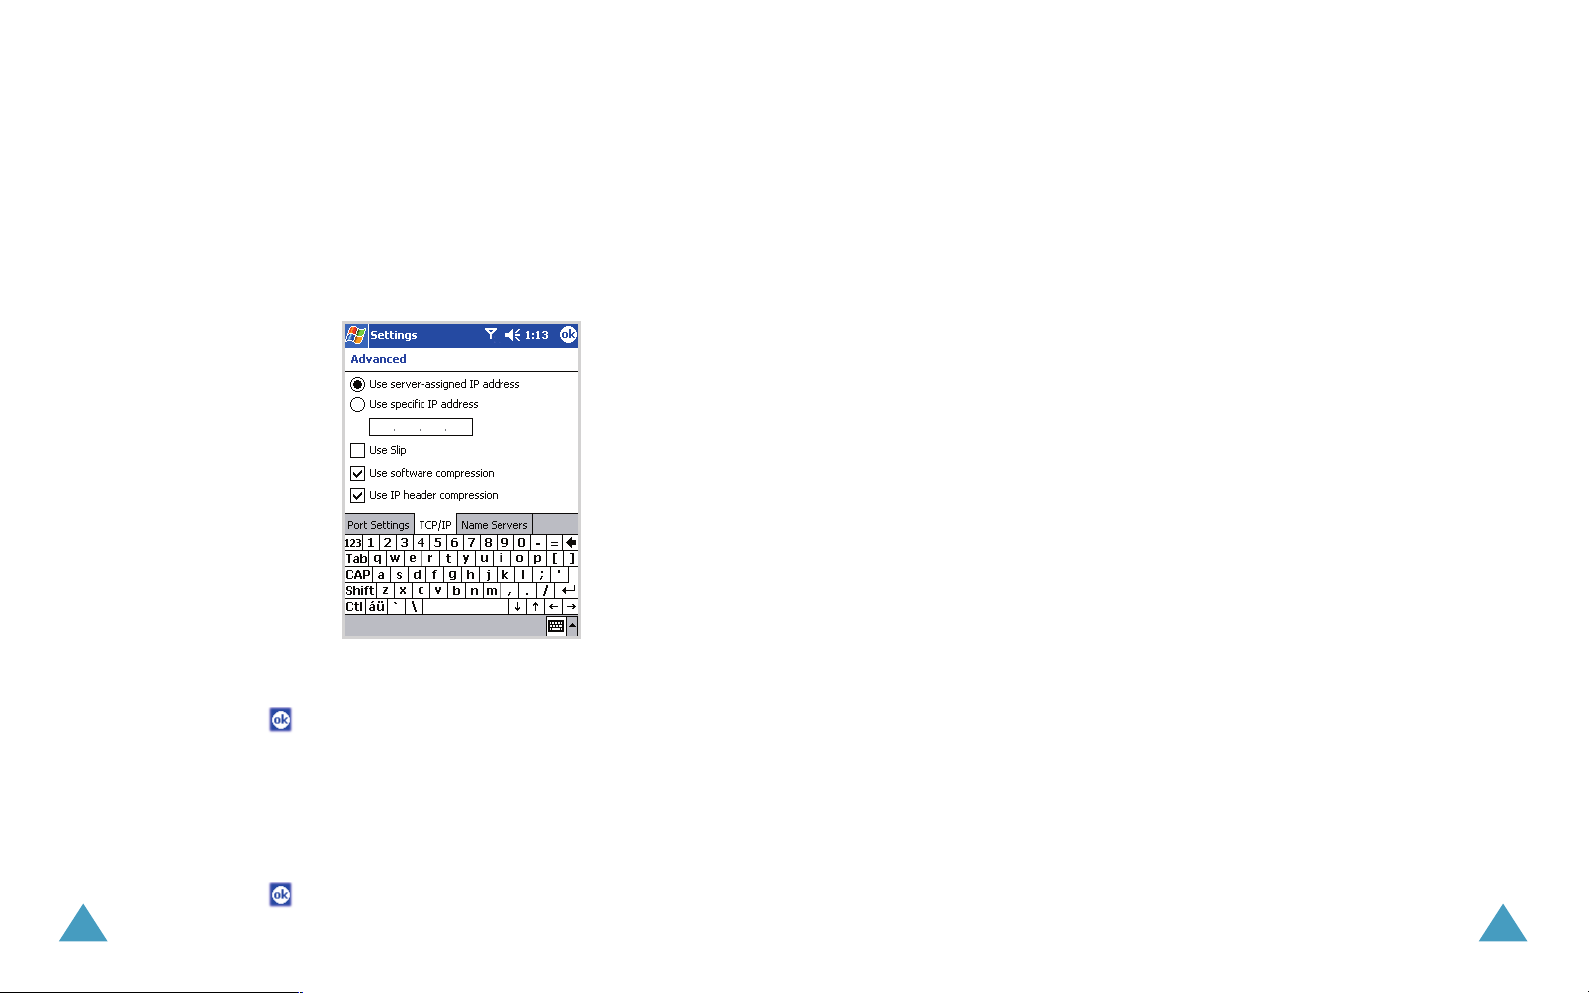
9. If you need to enter the TCP/IP settings, tap Advanced,
then tap TCP/IP.
10. Select Use specific IP address.
11. Enter your IP address.
Using an Ethernet/LAN Card
To connect to the Internet or to your network using an
Ethernet/LAN card, you need:
• a computer with an Ethernet card.
• a computer set up for TCP/IP and a client for Microsoft
Networks.
• an Ethernet hub or a crossover cable to plug in your
Pocket PC.
• a Single-Slot or Dual-Slot PC Card Expansion Pack or a
CompactFlash (CF) Card Expansion Pack.
Insert your Ethernet/LAN card into your Pocket PC
Phone.
If your Ethernet/LAN card is not recognized, follow your
Ethernet card manufacturer’s instructions to install the
Ethernet card driver.
Do one of the following:
• If you are using a DHCP server, the network settings
should be entered for you automatically.
• If you are not using a DHCP server, enter your network
settings.
1. From the Start menu, tap Setting.
48
12. Tap .
13. Tap Next.
14. Enter the phone number for your Internet service
provider, then tap Finish to set up the modem
connection.
15. Tap to save the setting.
2. Tap the Connections tab, then tap Network
Adapters.
49
The Basics
The Basics
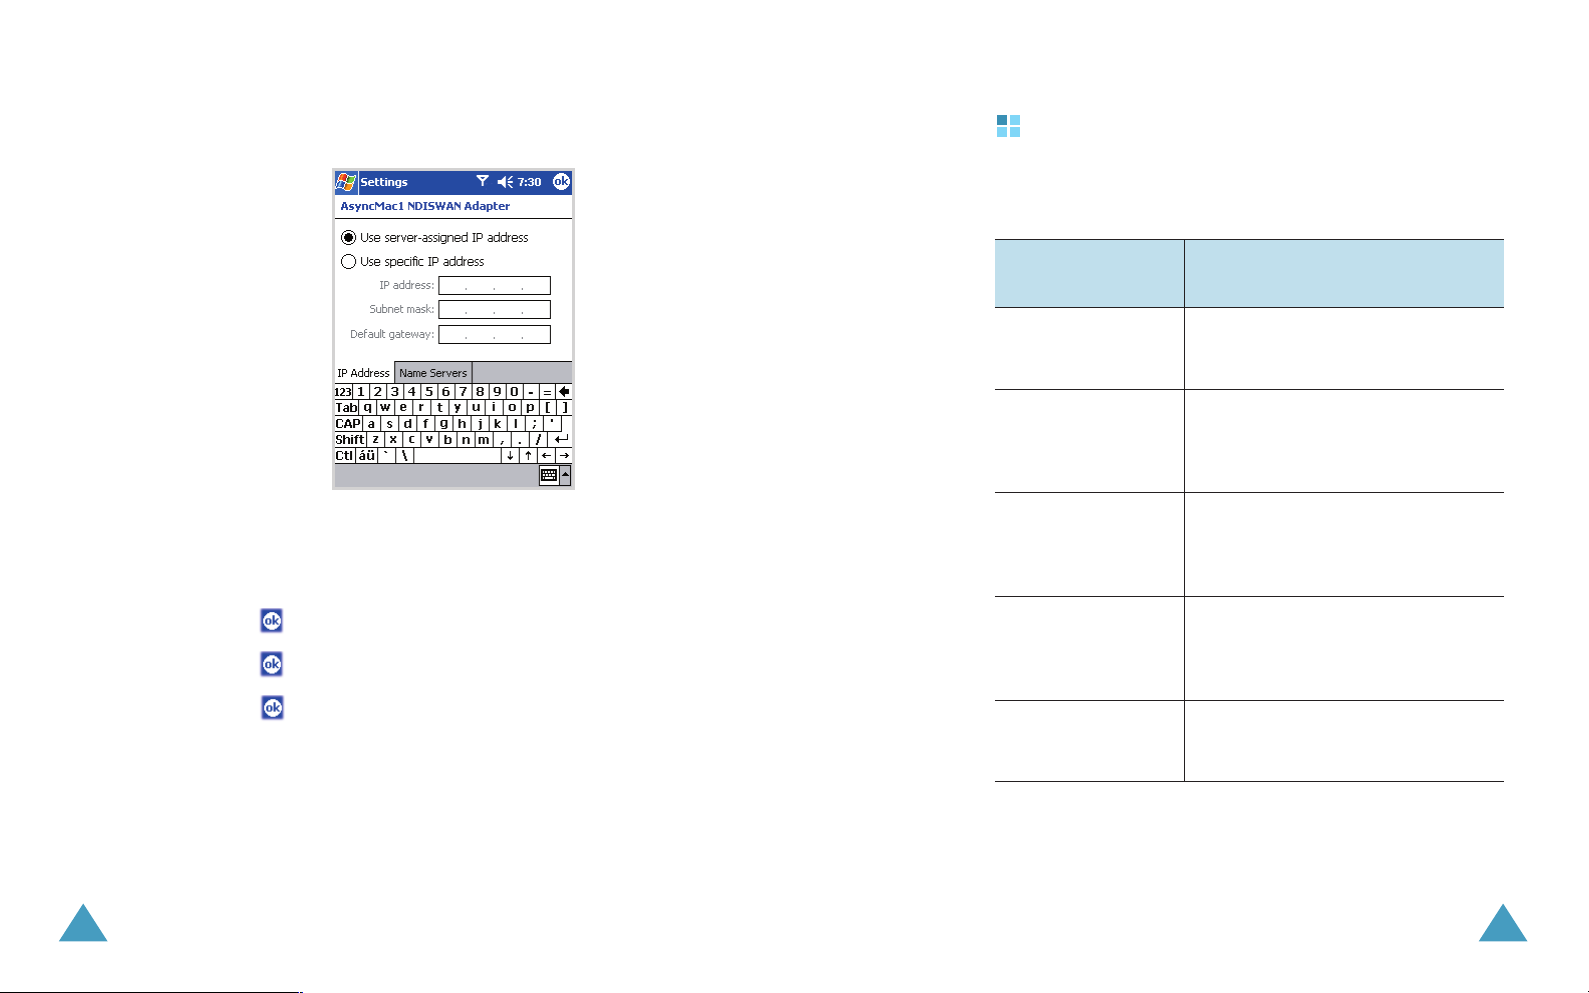
3. Tap the name of your Ethernet driver, then tap the
Properties button.
4. Tap the Name Servers tab.
5. Enter the server information.
6. Tap to save the server information.
7. Tap to save the network settings.
8. Tap to exit.
Using Online Help
Your Pocket PC Phone is supported by additional
information when using the unit.
For information
on:
Programs on your
Pocket PC Phone
Additional
programs that can
be installed on y
Pocket PC Phone
Connecting to and
synchronizing with
a PC
Last-minute
updates and
detailed technical
information
Up-to-date
information on your
Pocket PC Phone
See this source:
The User’s Guide and on-line Help.
To view Help, tap Start and then
Help.
The supplied CD-ROM.
our
The User’s Guide or ActiveSync
Help on your PC. To view Help,
click Help and then Microsoft
ActiveSync Help.
The Read Me files, located in the
Microsoft ActiveSync folder on
the PC and on the Pocket PC
Companion CD.
http://www.microsoft.com/mobile/
pocketpc.
50
51
chapter
3
Entering Information
You have several options for entering new information:
• Use the input panel to enter typed text, either by using
the on-screen keyboard or other input method.
• Write directly on the screen.
• Draw pictures on the screen.
• Speak into your Pocket PC Phone’s microphone to record
a message.
• Use Microsoft ActiveSync to synchronize or copy
information from your PC to your Pocket PC Phone. For
more information on ActiveSync, see ActiveSync Help on
your PC.
Entering Text Using the Input Panel
Entering Information
• Use the input panel to enter information in any program
on your Pocket PC Phone. You can either type using the
on-screen keyboard or write using Block Recognizer,
Letter Recognizer, or Transcriber. In either case, the
characters appear as typed text on the screen.
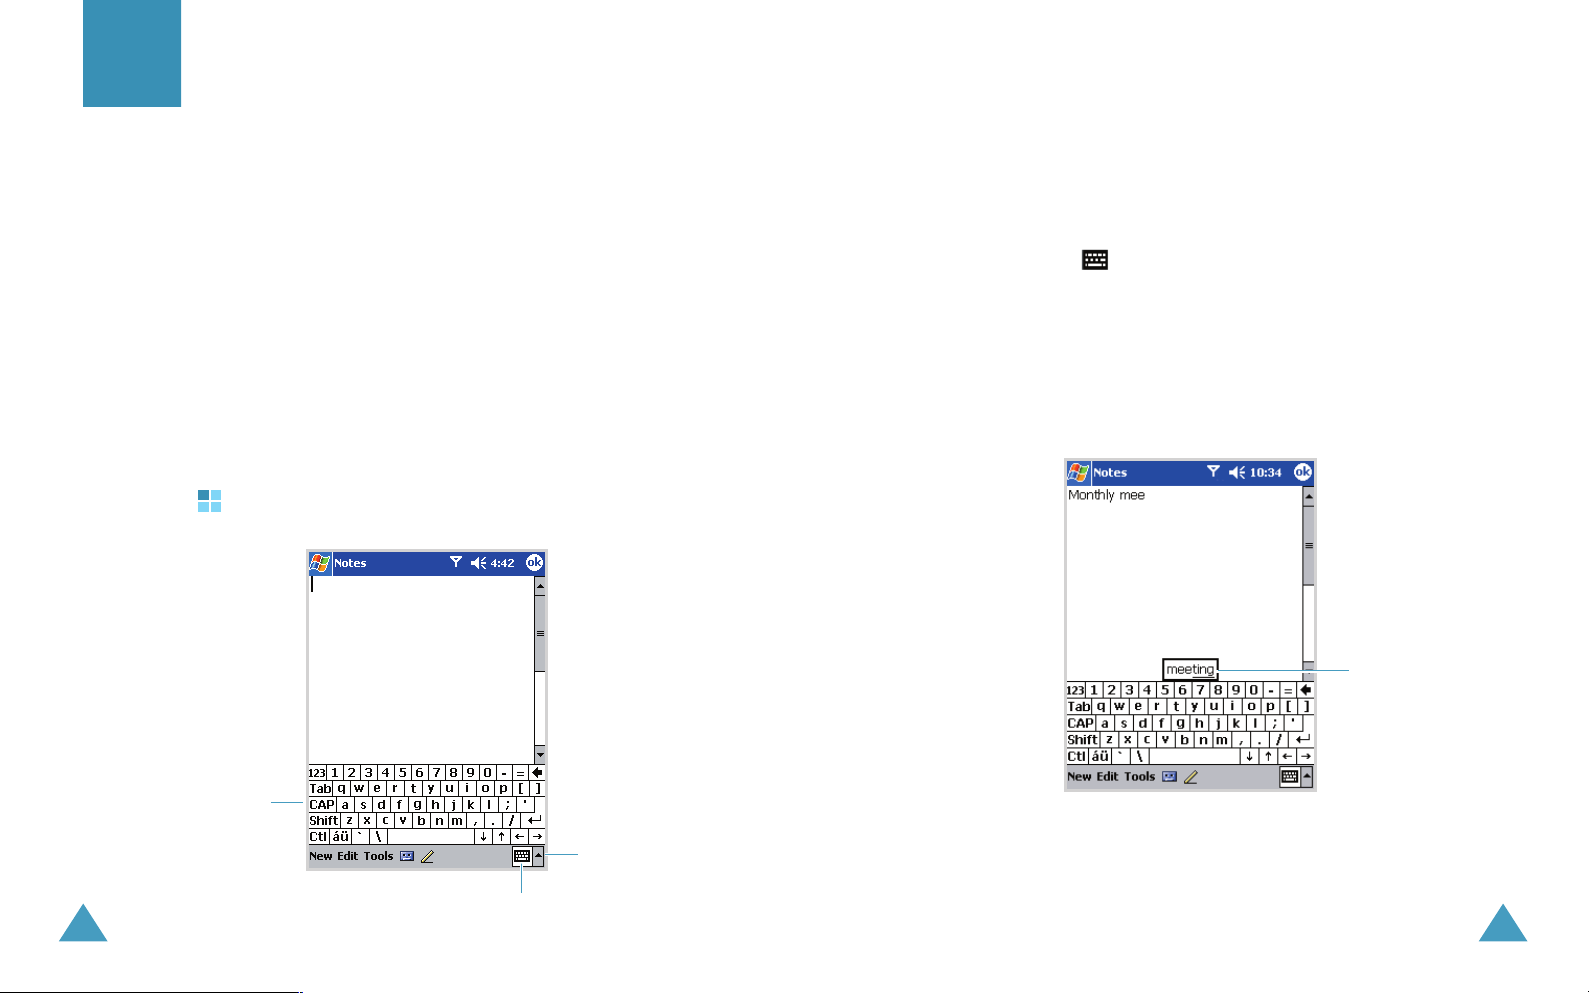
• To show or hide the input panel, tap the Input Panel
button ( ) on the command bar. Tap the arrow next to
the Input Panel button to change the input method.
• When you use the input panel, your Pocket PC Phone
anticipates the word you are typing or writing and
displays it above the input panel. When you tap the
displayed word, it is inserted into your text at the
insertion point. The more you use your Pocket PC Phone,
the more words it learns to anticipate.
52
Tap here if this is
the right word.
On-screen
keyboard
Tap it to
change the
input method.
Input Panel button
53
Entering Information
Entering Information
Typing with the On-screen Keyboard
You can enter typed text directly on the screen by
tapping letters, numbers, and symbols on the keyboard.
Note
: To see the symbols, tap the
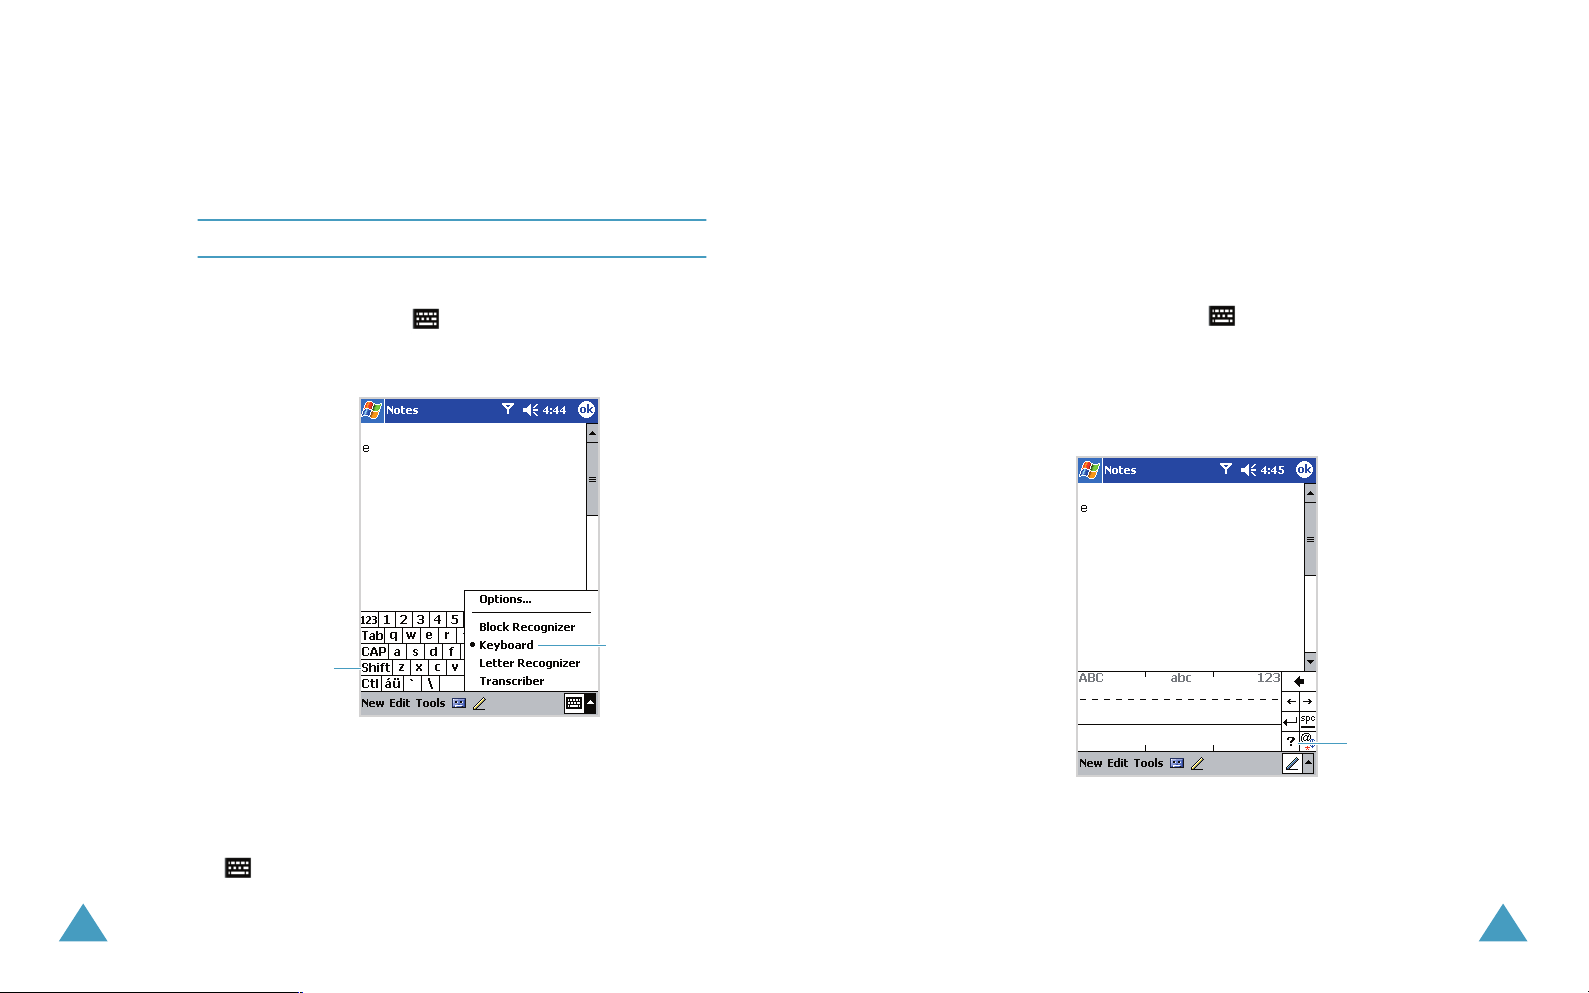
1. From any application, tap the up arrow next to the
Input Panel button ( ).
2. Tap Keyboard to display a keyboard on the screen.
Tap to type a
single uppercase
letter or symbol.
123
or
Shift
key.
Select an input
method.
Writing with the Stylus and Letter
Recognizer
Write letters, numbers, and symbols on the screen using
the stylus and
Letter Recognizer
sentences by writing in upper case (
abc
), and symbols (
(
123
) in specific areas.
1. From any application, tap the up arrow next to the
Input Panel button ( ).
2. Tap Letter Recognizer to see a writing area.
3. Write a letter or symbol between the dashed line and
baseline for Letter Recognizer to work effectively.
. Create words and
ABC
), lower case
54
3. Tap a letter, symbol, or number to enter information.
To type a single uppercase letter, tap the Shift key. To
tap multiple uppercase letters, tap the CAP key.
If you want to use larger keys, tap the up arrow next to
, tap Options, select Keyboard in Input Method,
and then select Large Keys.
Tap it to view
specific
instructions.
Write a letter between the hatchmarks labeled ABC to
type text in upper case.
55
Entering Information
Entering Information
Write a letter between the hatchmarks labeled abc to
type text in lower case.
Write a number or symbol between the hatchmarks
labeled 123 to type symbols.
4. What you write on the screen will be converted to text.
Writing with the Stylus and Block
Recognizer
Write letters, numbers, and symbols using the stylus
and the
Block Recognizer
by writing letters and numbers in specific areas.
1. From any application, tap the up arrow next to the
Input Panel button ( ).
2. Tap Block Recognizer to see a writing area.
. Create words and sentences
3. Write a word, letter, or symbol between the hatchmarks.
Write a letter between the hatchmarks labeled abc to
type text.
Write a number or symbol between the hatchmarks
labeled 123 to type a number or symbol.
What you write on the screen will be converted to text.
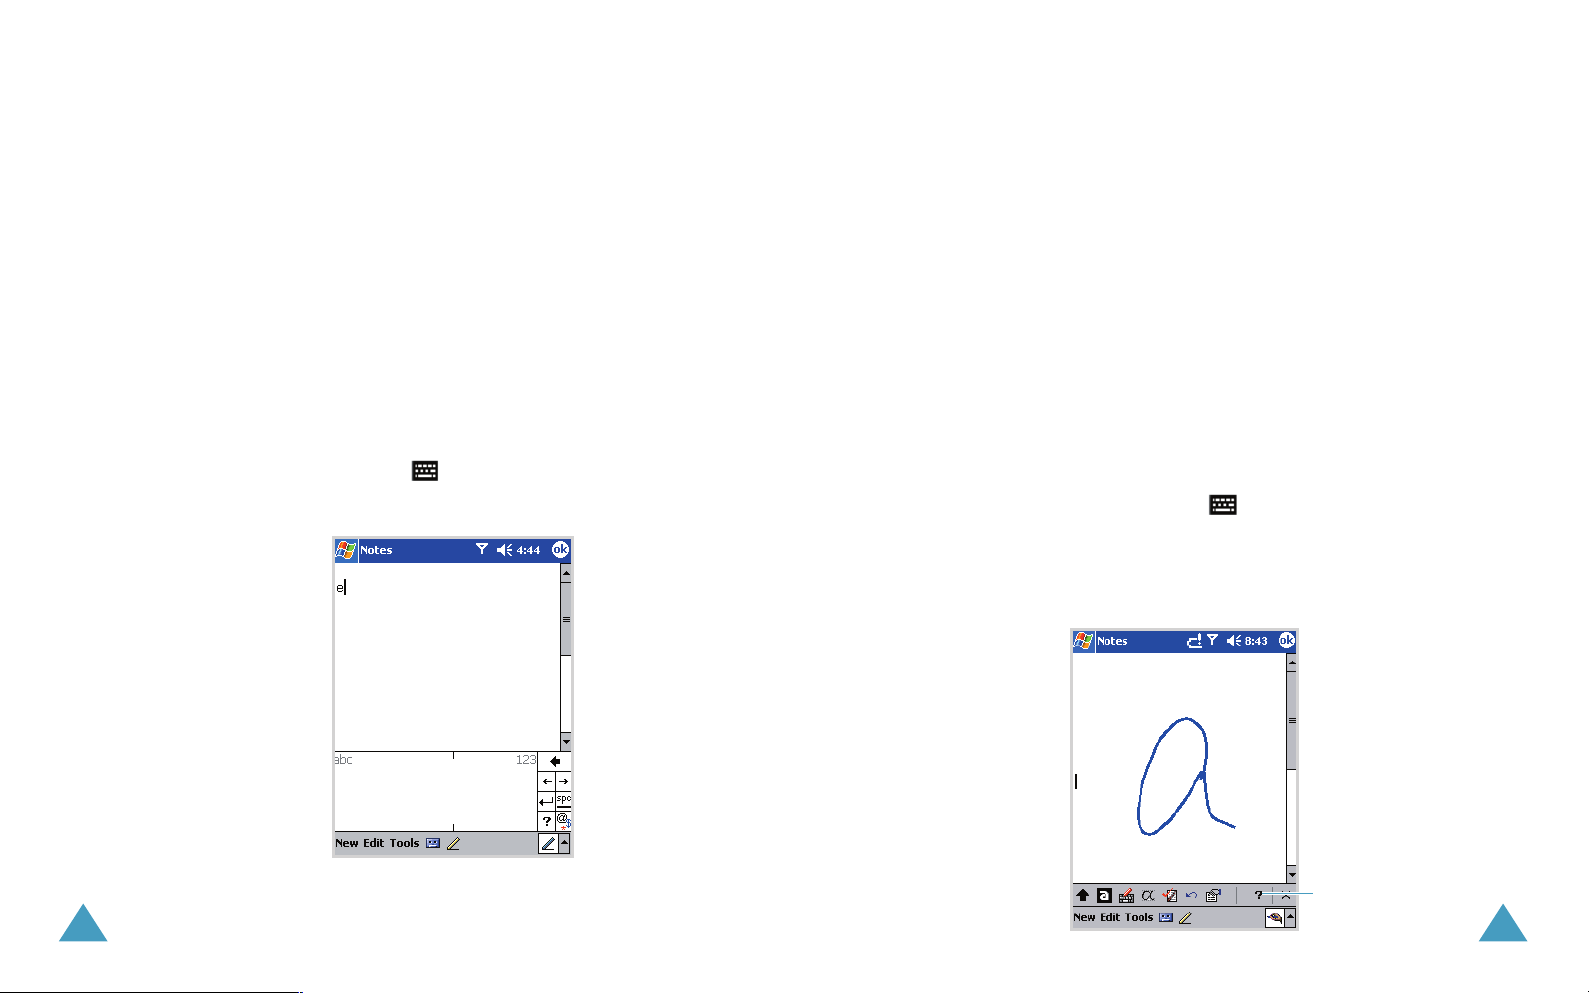
Writing with the Stylus and Transcriber
With Transcriber, you can write anywhere on the screen
using the stylus just as you would on paper. Unlike
Letter Recognizer
let Transcriber change the written characters to typed
characters.
1. From any application, tap the up arrow next to the
Input Panel button ( ).
2. Tap Transcriber.
3. Write anywhere on the screen. What you write on the
screen will be converted to text.
, you can write a sentence. Pause and
56
Tap it to view specific
instructions on using
Transcriber.
57
 Loading...