

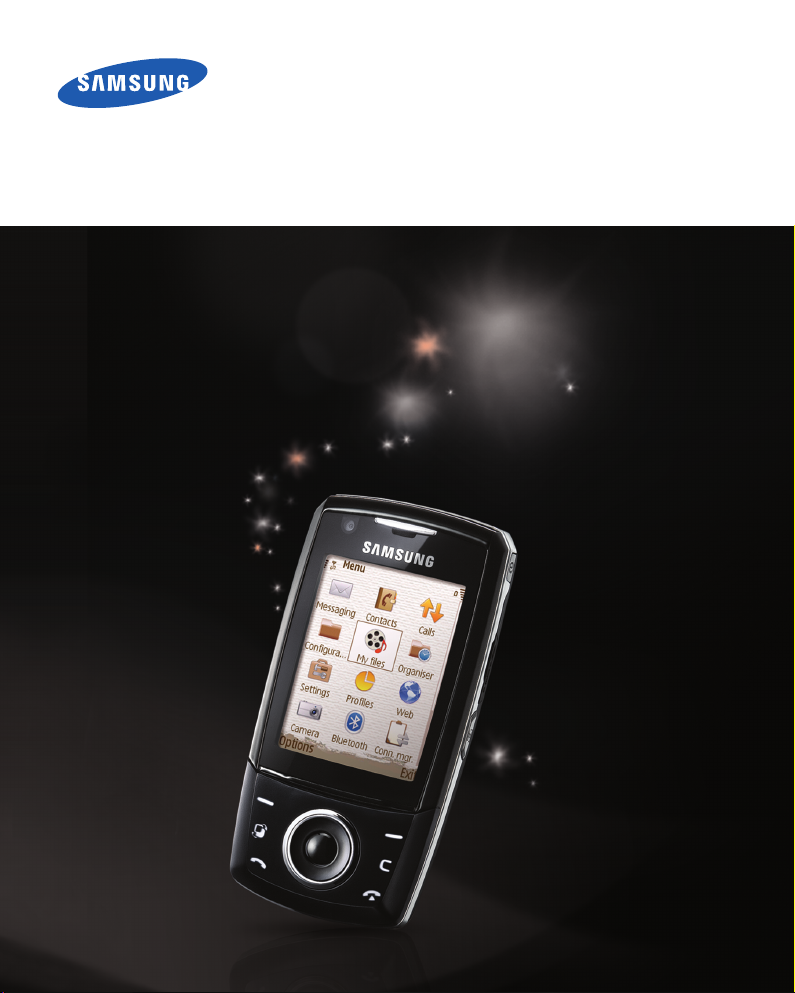
SGH-i520
User’s Guide
* Depending on the software installed or your service provider or country, some of
the descriptions in this guide may not match your phone exactly.
* Depending on your country, your phone and accessories may appear different
from the illustrations in this guide.
* Bluetooth QD ID: B012404
This product includes software licensed from Symbian Ltd. © 1998-2007. Symbian
and Symbian OS are trademarks of Symbian Ltd.
Java™ and all Java-based marks are trademarks or registered trademarks of Sun
Microsystems, Inc.
2

Contents
Important safety precautions ........................................... 6
C
HAPTER
1:
Getting started
What’s in the box? .......................................................... 9
Getting to know your phone ............................................10
Inserting the USIM/SIM card ...........................................13
Attaching the battery .....................................................14
Charging the battery ......................................................15
Switching the phone on or off..........................................16
Using an optional memory card .......................................17
C
HAPTER
2:
General information
Indicators related to actions ............................................20
Menu screen .................................................................21
Actions common to all applications...................................24
Key lock mode ..............................................................26
Entering text.................................................................27
Using PC Studio.............................................................30
C
HAPTER
3:
Call functions
Making a call.................................................................31
Answering a call ............................................................34
Using options during a call ..............................................35
Viewing call logs ............................................................36
C
HAPTER
4:
Contacts and Calendar
Contacts.......................................................................39
Calendar ......................................................................45
3

C
HAPTER
C
HAPTER
C
HAPTER
5:
Entertainment
Camera ........................................................................50
Music player..................................................................55
RealPlayer ....................................................................57
Gallery .........................................................................60
Flash Player ..................................................................65
6:
Message services
Messaging ....................................................................66
Voicemail......................................................................89
IM (Instant Messaging)...................................................89
7:
Extra programs
Notes ...........................................................................96
Calculator .....................................................................96
Converter .....................................................................98
Recorder ....................................................................100
Quickoffice.................................................................. 101
Adobe PDF.................................................................. 103
Clock .........................................................................104
GPS data ....................................................................107
Landmarks.................................................................. 109
Contents
C
HAPTER
C
HAPTER
8:
Web
Making a connection ....................................................111
Viewing bookmarks......................................................111
Browsing .................................................................... 112
Changing browser settings ............................................ 115
9:
Settings
Profiles....................................................................... 117
Themes ...................................................................... 119
Settings .....................................................................120
4

C
HAPTER
C
HAPTER
A
PPENDIX
A
PPENDIX
10:
Managers
File manager............................................................... 136
Application manager ....................................................138
Device manager ..........................................................140
Activation key manager ................................................142
Memory card manager..................................................143
11:
Connectivity
Bluetooth ...................................................................145
USB ...........................................................................148
Remote synchronisation................................................149
Connection manager .................................................... 151
A:
Troubleshooting
General problems ........................................................153
Call problems .............................................................. 155
Power and charging problems........................................ 156
Application problems.................................................... 158
B:
Health and safety information
SAR certification information ......................................... 162
Precautions when using batteries ...................................163
Road safety ................................................................164
Operating environment................................................. 165
Electronic devices ........................................................ 165
Potentially explosive environments................................. 167
Emergency calls ..........................................................167
Other important safety information ................................168
Care and maintenance.................................................. 169
Contents
5

Important safety precautions
Read these guidelines before using your wireless phone.
Failure to comply with them may be dangerous or illegal.
Drive safely at all times
Do not use a hand-held phone while driving. Park your vehicle
first.
Switch off
Do not use the phone at a refuelling point (service station) or
near fuels or chemicals.
the
phone when refuelling
Switch off in an aircraft
Wireless phones can cause interference. Using them in an
aircraft is both illegal and dangerous.
Switch off the phone near all medical equipment
Hospitals or health care facilities may be using equipment that
could be sensitive to external radio frequency energy. Follow
any regulations or rules in force.
Interference
All wireless phones may be subject to interference, which
could affect their performance.
Be aware of special regulations
Meet any special regulations in force in any area and always
switch off your phone whenever it is forbidden to use it, or
when it may cause interference or danger.
6

Water resistance
Your phone is not water-resistant. Keep it dry.
Sensible use
Use only in the normal position (held to your ear). Avoid
unnecessary contact with the antenna when the phone is
switched on.
Emergency calls
Key in the emergency number for your present location, then
press .
Keep your phone away from small children
Keep the phone and all its parts, including accessories, out of
the reach of small children.
Accessories and batteries
Use only Samsung-approved batteries and accessories, such
as headsets and PC data cables. Use of any unauthorised
accessories could damage you or your phone and may be
dangerous.
CAUTION
• The phone could explode if the battery is replaced with an
incorrect type.
• Dispose of used batteries according to the manufacturer’s
instructions.
:
At very high volumes, prolonged listening to a headset
can damage your hearing.
7

Qualified service
Only qualified service personnel may install or repair your
phone. Failure to do so may invalidate the warranty.
For more detailed safety information, see “Health and safety
information” on page 162.
Notes
:
• While using your phone, data may be deleted or corrupted due
to system malfunctions or operating mistakes. Back up your
important data using external storage devices.
• Be careful not to remove the battery while storing data. Doing
this may delete or corrupt your data.
• Extremely high or low temperatures may cause errors in the
screen display or a system malfunction. The phone functions
best in a normal temperature range.
8

1
Getting started
Congratulations on the purchase of your new Smartphone! This
chapter helps you set up your phone, charge the phone’s
batteries, and familiarise yourself with its different
components.
What’s in the box?
Your package contains the following items:
• Phone
• Battery
• Travel adapter
• PC data cable
• Headset
• Quick Reference Guide
• PC Studio CD
In addition, you can obtain the following accessories for your
phone from your local Samsung dealer:
• Standard/Extended battery • Headset
• PC data cable • PC Studio CD
• Travel adapter • Hand strap
• Car cradle • Memory card
• Stylish hands-free car kit
1
Note
: The items supplied with your phone and accessories
available at your Samsung dealer may vary, depending on
your country or service provider.
1. The PC Studio CD contains PC Studio, Add-on software, and applications.
9
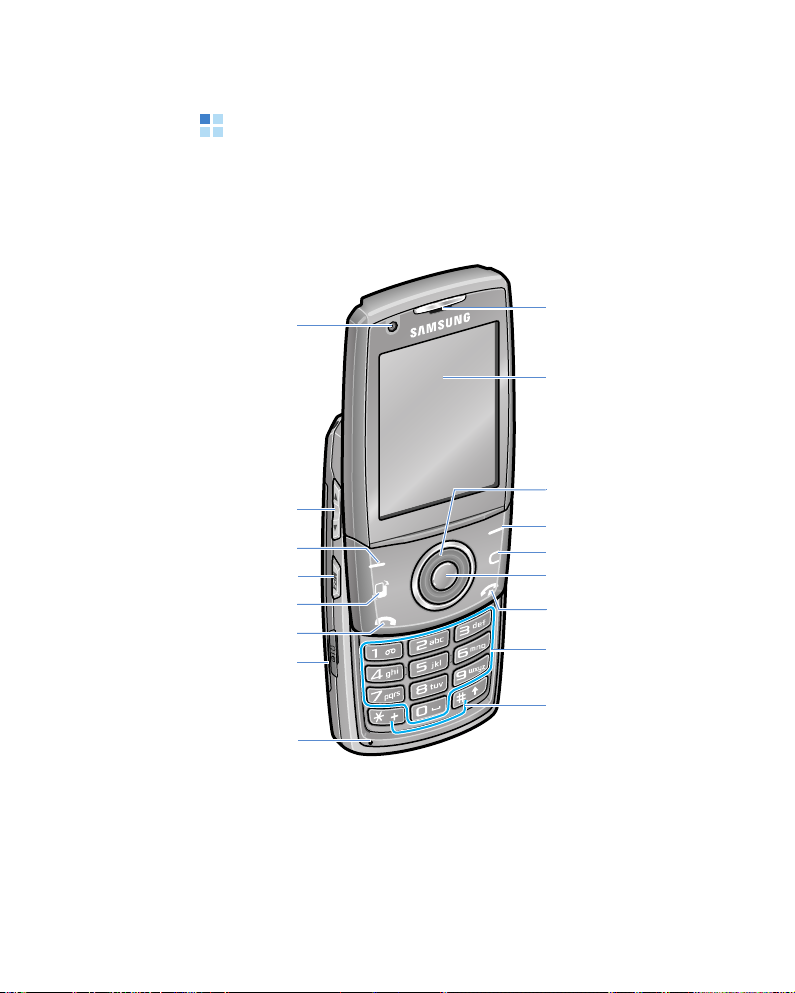
Getting to know your phone
Front view
Getting started
Front
camera lens
Volume keys
Left soft key
Music player key
Menu access key
Tal k k e y
Multi-function
jack
Mouthpiece
Earpiece
Display
Navigation keys
(Up/Down/Left/Right)
Right soft key
Delete key
Confirm key
End key
Alphanumeric keys
Special
function keys
10
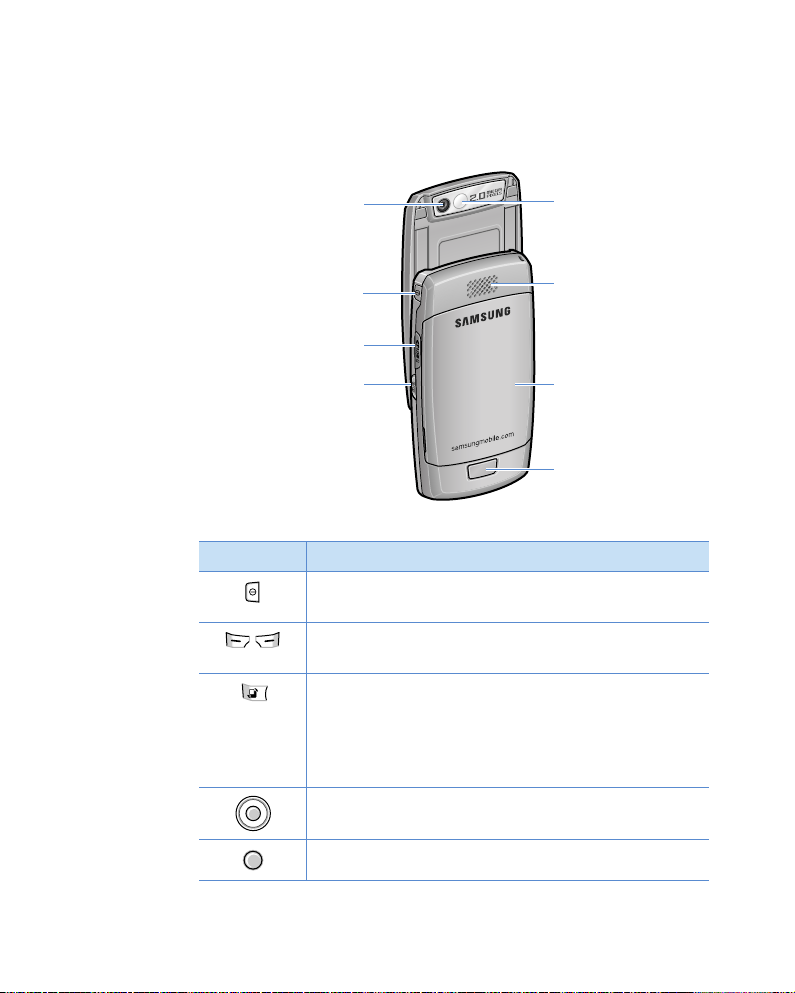
Rear view
Getting started
Rear camera
Memory card slot
Camera/Unlock key
lens
Power key
Key Description
• Press and hold to turn the phone on or off.
•
Press to
Press to perform the command shown on the
screen immediately above the keys.
• Press to open the main menu screen, which
contains a list of available features and
applications.
• Press and hold to open a window which shows
all of the currently running applications.
• Press to scroll through items on a screen.
• Press to move the cursor in a text input field.
Press to confirm your selection.
Mirror
Speaker
Battery
Battery lock
access the Quick Menu list.
11

Key Description
• Press to make or answer a voice call.
• Press to access call logs.
• Press to delete characters in a text field.
• Press to delete contents in any application or
remove add-on applications.
Press to end a call or exit an application.
• Press to enter numbers and characters.
• Press and hold to access the voicemail
server in Standby mode.
• Press to enter an international call prefix or
pauses when entering a phone number.
• Press and hold to display a list of symbols in a
text input field.
• Press to change the text input mode or case
in a text input field.
• Press and hold to activate or deactivate the
Silent profile.
• Press to adjust the key tone volume in
Standby mode.
• Press to adjust the earpiece volume during a
call.
Press and hold to launch the music player.
Getting started
• Press and hold to turn on the camera.
• Press to take a photo or record a video in
Camera mode.
• Press to unlock the exposed keys when the
phone is closed.
12
Getting started
Inserting the USIM/SIM card
When you subscribe to a cellular network, you are provided
with a plug-in USIM/SIM card loaded with your subscription
details, such as your PIN, any optional services available, and
much more.
• Keep all USIM/SIM cards out of the reach of small children.
• The USIM/SIM card and its contacts can easily be damaged
by scratches or bending, so be careful when handling the
card.
• When installing the USIM/SIM card, make sure that your
phone is switched off before removing the battery.
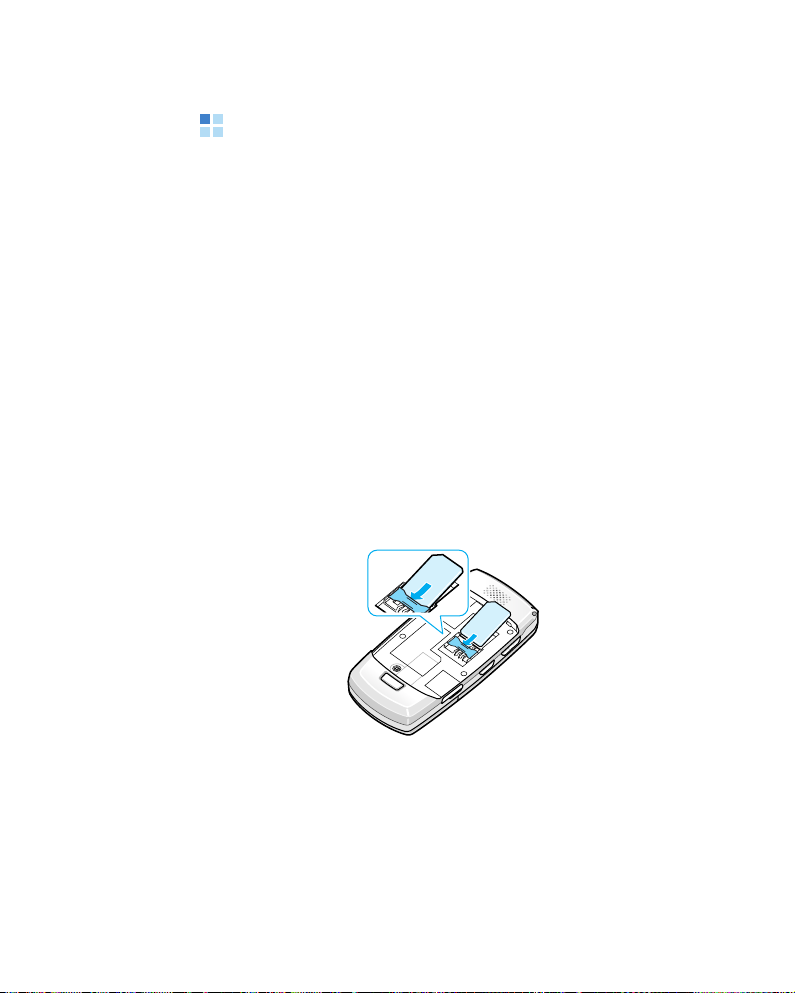
Inserting the USIM/SIM card
1. Remove the battery, if necessary. See page 15.
2. Insert the USIM/SIM card into the card holder, as shown.
13
Getting started
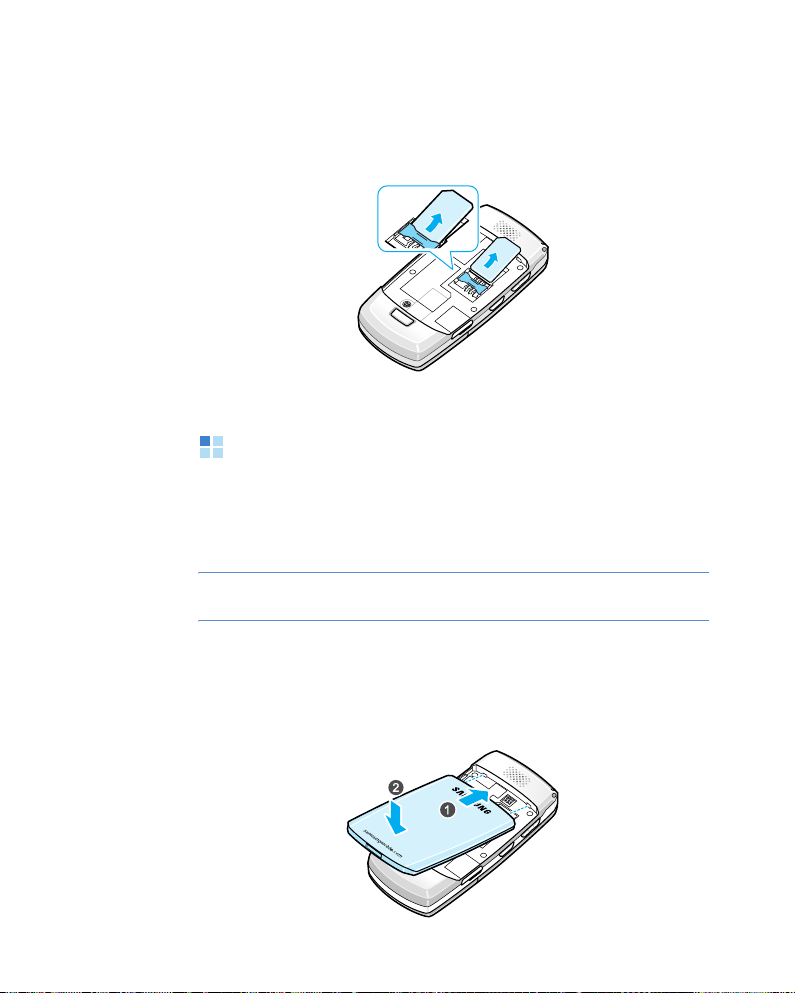
Removing the USIM/SIM card
Remove the card from the holder, as shown.
Attaching the battery
Your phone is powered by a rechargeable Li-ion battery. Use
only approved batteries and adapters. Ask your local Samsung
dealer for further details.
Note
: You must fully charge the battery before using your phone
for the first time. See page 15.
Attaching the battery
Place the battery on the back of the phone and press the
battery until it clicks into place.
14
Getting started
Make sure that the battery is securely locked before switching
on the phone.
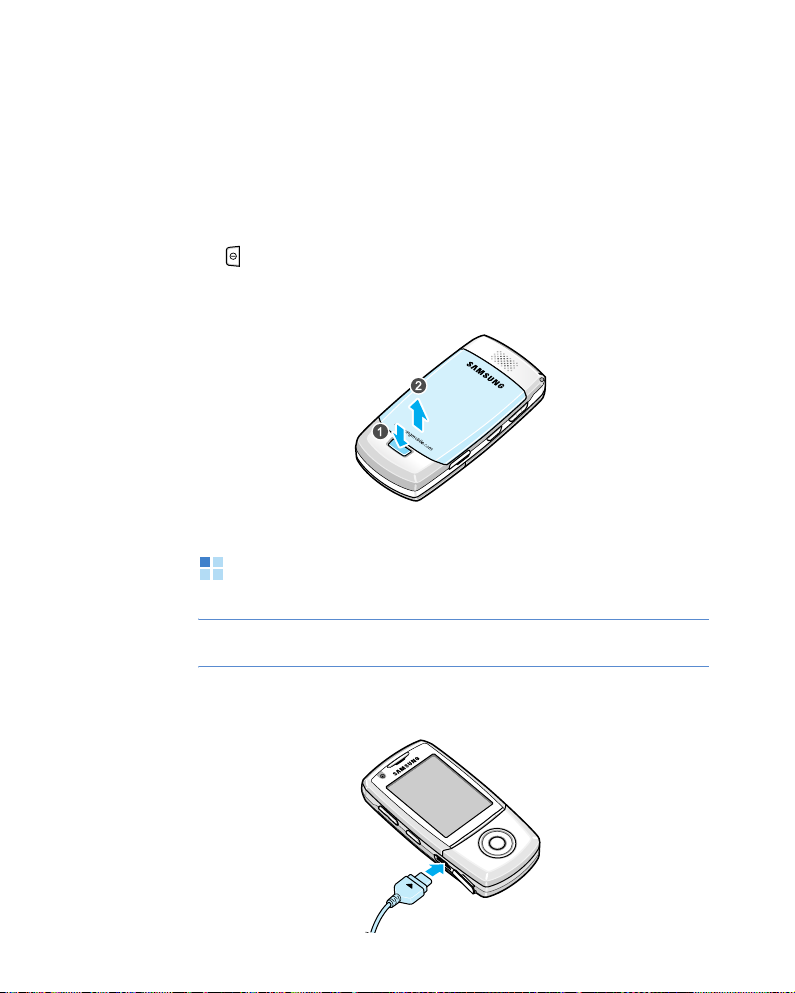
Removing the battery
1. If necessary, switch off the phone by pressing and holding
until the power-off image displays.
2. Press the battery lock and lift the battery away from the
phone.
Charging the battery
Note
: The phone can be used while the battery is being charged,
but this causes the battery to charge more slowly.
1. Plug the connecter of the travel adapter into the jack on the
phone.
15

Getting started
2. Plug the travel adapter into a standard AC power outlet.
3. When the battery is fully charged, unplug the travel adapter
from the power outlet and then remove it from the phone.
Switching the phone on or off
1. Press and hold until the power-on image displays.
2. If the phone asks for a PIN, enter the PIN supplied with
your USIM/SIM card and press the
3. If the phone asks for a lock code, enter the code and press
the
OK
soft key. The default lock code is
change the lock code, see page 123.
If you turn on the phone for the first time, the first setup
procedure begins.
OK
soft key.
00000000
. To
4. Select your region.
5. Select your city.
6. Enter the current date and press the
OK
soft key.
16

Getting started
7. Enter the current time and press the OK soft key. To
change to AM or PM for 12-hour format, press the Up or
Down key, or any number key.
The phone searches for your network, and after finding it,
the standby screen appears on the display. Now, you can
make or receive a call.
Note
: To change the display language, use the
option in
further details, see page 122.
8. To switch off the phone, press and hold until the poweroff image displays.
Note
: If you have cancelled before finishing the region and time
setup, the setup procedure will start again the next time
you turn on the phone.
Settings →
General → Personalisati...
Language
For
Using an optional memory card
Using a memory card, you can store multimedia files, such as
video clips, music and sound files, photos, and messaging
data, and back up information from your phone’s memory.
Your phone is compatible with a microSD card.
Important!
Using incompatible memory cards, such as Secure Digital (SD)
cards, may damage the card, as well as the phone, and data
stored on the card.
Use only compatible memory cards with your phone.
17

Getting started
Inserting a memory card
1. Insert the card into the memory card slot with the label
facing up.
2. Push the card in until it locks into place. You will hear a
beep.
3. Close the memory card cover.
Removing the memory card
1. Press and select
2. Press the
3. Open the card cover and push the card in to release it.
Then remove the card from the card slot.
Yes
Remove memory card
soft key to confirm.
.
18

Getting started
4. Press the OK soft key.
WARNING!
• Removing the memory card without following the procedure
above may cause damage to your data and memory card.
• If you need to reboot the phone while installing an application on
the memory card, do not remove the card until the reboot is
complete; otherwise the application files may be lost.
19

2
General information
Your phone provides various functions which are very handy for
daily use and for entertainment. This chapter gives you general
information for using the functions.
Indicators related to actions
One or more of the following icons may be shown when the
phone is in Standby mode:
Indicator Meaning
Shows the received signal status. The greater
the number of bars, the stronger the signal.
• : GSM/GPRS network
• : WCDMA network
• : HSDPA network
Indicates that you have an active alarm.
Indicates that a new message has been
received.
• : Message
• : Voicemail
• : Email
Appears when your phone is trying to send a
message.
Appears when a call diverting option is active.
If you have two phone lines, the appropriate
number appears on the indicator.
Indicates the currently selected line.
20

Indicator Meaning
Appears when you missed a call.
Appears when Bluetooth is active.
Appears when a stereo headset is connected to
your phone.
Appears when a mono headset is connected to
your phone.
Appears when your phone is connected to a PC
via USB.
Appears when you are in Home Zone, if
registered to an appropriate service.
Appears when the keypad is locked.
Appears when a memory card is inserted into
your phone.
Shows the remaining battery power level.
General information
Menu screen
From the Menu screen, you can access all of the applications
for your phone. Press to open the Menu screen.
Opening applications or folders
Scroll to an application or a folder using the Navigation keys
and press to open it.
21

General information
Closing applications
• Press ,
• Press the
• Select
• Press the
return to Standby mode. Any unsaved data is saved
automatically.
Exit
soft key,
Options →
Back
soft key as many times as you need to
Exit
, or
Rearranging applications
You can rearrange applications or folders on the Menu screen,
and move applications into folders.
To change the location of an application on the Menu screen:
1. On the Menu screen, scroll to the application you want to
move.
2. Select
3. Move the selection to a desired location and press the
To move an application to a folder:
1. On the Menu screen, scroll to the application you want to
2. Select
3. Select a folder.
4. Press the
Note
Options →
A check mark is placed on the selected application.
soft key.
move.
Options →
Move
: You can add a new folder by selecting
folder
.
Move
.
Move to folder
soft key.
.
Options →
OK
New
22

General information
Switching between applications
Your phone is a multi-tasking device, which means that it can
run multiple applications at the same time. If you switch to
another applications without closing the application you were
using, the previous one is inactive but still running.
If you have several applications open and want to switch from
one to another, press and hold . The application switching
window opens, showing applications that are currently
running.
Scroll to an application and press the
it or press to close it.
Select
soft key to go to
Adding applications
You can add applications to the Menu screen by downloading
its installation files from the wireless web.
To download an application, select
applications
bookmark for a preset website for download or enter the URL
address of the website. After accessing the web site, search
for an application and follow the onscreen instructions.
You can also download applications to your PC and install them
in the phone using the PC Studio tool. Refer to the included
CD-ROM for the program.
from the Menu screen. You can select a
Options → Download
23

General information
Actions common to all applications
Adding items
When you are in an application, select
option for creating a new item, such as
New contact, New entry
an item are different in each application.
For details on how to enter letters and numbers, see “Entering
text” on page 27.
, or
New note
Options
Create message
and then an
. Options for creating
,
Opening items
To open an item on a list of files or folders, scroll to it and
press or select
Options →
Open
.
Editing items
To edit an item, you may need to first open it for viewing. Then
select
Options →
Edit
and change its contents.
Renaming items
To give a new name to a file or folder, scroll to it and select
Options →
Rename
.
Removing or deleting items
Scroll to the item and select
To delete multiple items at one time, you first need to mark
them. See the next section, “Marking items.”
Options → Delete
or press .
24

General information
Marking items
There are several ways to select items on a list:
• To select one item at a time, scroll to it and select
→
Mark/Unmark →
the item.
• To select all of the items on the list, select
Mark/Unmark →
• To unmark an item, scroll to it and select
Mark/Unmark → Unmark
• To unmark all of the items, select
Mark/Unmark → Unmark all
Mark
Mark all
. A check mark is placed next to
Options →
.
Options →
.
Options →
.
Options
Sending items
You can send items, such as contact information, pictures,
sounds, and calendar entries, via one of messaging services or
via Bluetooth connections.
1. Open an item and select
business card
2. Select a method; the choices are
multimedia
• To send the item in a text message, see page 67.
• To send the item in a multimedia message, see page 68.
• To send the item via Bluetooth, see page 147.
.
, and
Options → Send
Via Bluetooth
or
Send
Via text message, Via
.
25

General information
Arranging items
You can arrange items, such as pictures, sounds, and
messages, into folders.
Creating folders
1. Select
2. Enter a folder name and press
Options →
New folder
.
OK
soft key.
Moving items to an application folder
1. Scroll to an item and select
(shown only if there are folders available).
2. Select a subfolder, if necessary.
3. Scroll to the location to which you want the item moved
and press the
Move
soft key.
Options →
Move to folder
Key lock mode
When you close the phone, it locks the exposed keys to
prevent any unwanted phone operations, from accidentally
pressing any of the keys.
To unlock the keypad, press and then .
Note
: You can set the phone to continue the current operation
when you close the phone by changing the
setting in
Settings →
Phone →
Call
Slide down
.
26

General information
Entering text
You can enter text in two different ways: using the Traditional
text input mode traditionally used in mobile phones-pressing a
key repeatedly until the desired character displays, or
Predictive text input mode using the built-in dictionary.
Changing the text input mode
You can change the text input mode by pressing , as
follows:
• To select Traditional text input mode, press until the
indicator
select
• To select Predictive text input mode, press until the
indicator
select
• To select Number mode, press until the indicator
123
Number mode
• To select Symbol mode, press and hold . Alternatively,
press
Abc
displays. Alternatively, press and
Predictive text →
Abc
displays. Alternatively, press and
Activate predictive text
displays. Alternatively, press and select
.
and select More symbols
Off
.
.
.
Using Traditional text input mode
1. Press a number key until the character you want appears.
Note that there are more characters available for a number
key than are printed on the key.
2. Select the other letters in the same way.
Note
: If the next letter is located on the same key as the present
one, wait until the cursor appears or press the Right key to
end the time-out period, and then enter the letter.
27
General information
Other Traditional text input operations
• To change cases,
and
abc
(Lowercase), press .
• To remove a character, press . Press and hold to
clear more than one character.
• Press to enter symbols.
• To insert a number quickly, press and hold the
corresponding number key.
• To insert a space, press .
ABC
(Uppercase),
Abc
(Initial capital),
Using Predictive text input mode
1. Enter the desired word by pressing the keys to .
Press each key only once for one letter. The word changes
each key press.
Note
: The word match is evolving. Wait until you have entered
the entire word before you check the result.
2. When you have finished entering the word, check that it is
correct.
• If the word is correct, go to the next step.
• If the word is not correct, press to view other
matching words that the dictionary has found, one by
one.
To add a word to the dictionary, press the
enter the word using Traditional text input, and press the
OK
soft key.
Spell
soft key,
3. When the correct word displays, press or the Right key
so that the word is complete.
28

General information
Other Predictive text mode operations
• To change cases,
and
abc
(Lowercase), press .
ABC
(Uppercase),
Abc
(Initial capital),
• To remove a character, press . Press and hold to
clear more than one character.
• To insert a number, press and hold the corresponding
number key.
• Press and then to enter the desired punctuation
marks.
Tip
: T9 mode tries to guess which commonly used punctuation
mark (
. , ? ! ’
) is needed. The order and availability of the
punctuation marks depend on the language being used.
• To view matching words that the dictionary has found one
by one, press when a word is active (underlined).
Copying and pasting text
1. Press and select
Copy
.
2. Press the Left or Right key to move the cursor to the
position you want.
3. Press the
Start
soft key.
4. Press the Left or Right key to highlight the text you want.
Copy
5. Press the
soft key.
6. Move the cursor to the position you want.
Paste
7. Press and select
to insert the text.
29

General information
Using PC Studio
PC Studio, which is contained on the PC Studio CD-ROM, is a
Windows-based PIM (Personal Information Management) and
Sync Manager program. Using this program, you can manage
your contacts and schedule, synchronise your data between
the phone and the PC, and explore the phone’s file directory.
For further information on how to use the program, see the PC
Studio help.
Notes
:
• You need to set your phone’s USB mode to
148.
• PC Studio does not fully support Bluetooth dongles using the IVT
protocol stack. If you have problems using PC Studio with your
Bluetooth software on the PC, please check with the Bluetooth
dongle or PC manufacturer’s website for updates.
Installing PC Studio
1. Insert the PC Studio CD into the CD-ROM drive of your
compatible PC.
PC Studio
. See page
2. Select the language you want and follow the instructions on
the installation wizard screen.
Note
: The USB driver is automatically installed during PC Studio
installation.
30
 Loading...