

Samsung SGH-C3200 User Guide

GT-C3200
user manual
Using this manual
This user manual has been specially designed to
guide you through the functions and features of
your mobile phone. To get started quickly, refer to
"Introducing your mobile phone," "Assembling and
preparing your mobile phone," and "Using basic
functions."
Instructional icons
Note: notes, usage tips, or additional
information
Followed by: the order of options or menus
you must select to perform a step; for example:
In Menu mode, select Messages → Create
→
message (represents Messages, followed by
Create message)
Square brackets: phone keys; for example:
[ ]
< >
►
2
] (represents the Power/End key)
[
Angled brackets: softkeys that control different
functions at each screen; for example: <OK>
(represents the OK softkey)
Refer to: pages with related information; for
example: ► p. 12 (represents "see page 12")
Copyright information
Rights to all technologies and products that
comprise this phone are the property of their
respective owners:
®
Bluetooth•
is a registered trademark of the
Bluetooth SIG, Inc. worldwide.
Oracle and Java are registered trademarks of •
Oracle and/or its affiliates. Other names may be
trademarks of their respective owners.
This product includes certain free/open source •
software.The exact terms of the licenses,
disclaimers, acknowledgements and notices
are available on the Samsung's website http://
opensource.samsung.com.
3

Contents
Introducing your mobile phone ...............................6
Phone layout ...............................................................6
Icons ............................................................................8
Assembling and preparing your mobile phone ...10
Install the SIM card and battery ................................10
Charge the battery ....................................................11
Insert a memory card (optional) ................................ 12
Using basic functions.............................................13
Turn your phone on or off ..........................................13
Access menus ...........................................................13
Customise your phone .............................................. 14
Use basic call functions ............................................17
Send and view messages ......................................... 18
Enter text ................................................................... 19
Add and nd contacts ...............................................20
Use basic camera functions ......................................21
Listen to music ..........................................................23
Browse the web.........................................................25
Using advanced functions .....................................26
Use advanced call functions .....................................26
Use advanced phonebook functions ........................30
Use advanced messaging functions ......................... 30
Use advanced camera functions ..............................32
Use advanced music functions .................................35
4

Using tools and applications ................................. 38
Use the Bluetooth wireless feature ........................... 38
Activate and send an SOS message ........................ 40
Activate the mobile tracker ........................................41
Make fake calls .........................................................42
Record and play voice memos .................................43
View photos and videos on the web .........................43
Use Java-powered games and applications .............44
Create a world clock .................................................44
Set and use alarms ...................................................45
Use the calculator .....................................................46
Convert currencies or measurements ......................46
Set a countdown timer ..............................................46
Use the stopwatch ....................................................47
Create a text memo ..................................................47
Manage your calendar ..............................................48
Back up your data .....................................................49
Troubleshooting ......................................................50
Safety and usage information ...............................56
5
Introducing your mobile phone
In this section, learn about your mobile phone’s
layout, keys, and icons.
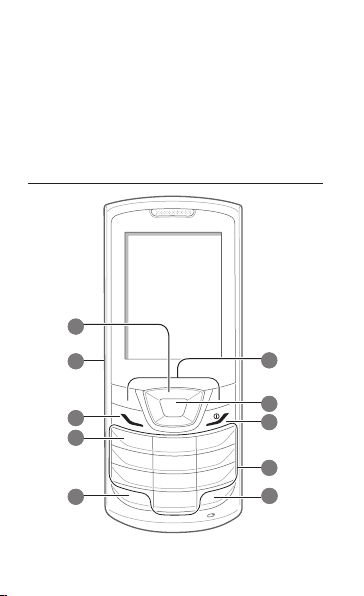
Phone layout
1
2
6
3
4
5
6
7
8
9
10

1
4-way navigation key
In ldle mode, access user-
dened menus; Make a fake
call (down); In Menu mode,
scroll through menu options
Depending on your service
provider, pre-dened menus
may differ
►
" Make fake calls"
2
Volume key
In Idle mode, adjust the key
tone volume; Send an SOS
message
Activate and send an SOS
►
message
3
Dial key
Make or answer a call; In Idle
mode, retrieve recently dialled,
missed, or received numbers
4
Voice mail service key
In ldle mode, access voice
mails (press and hold)
5
Keypad lock key
In Idle mode, lock the keys
6
Softkeys
Perform actions indicated at
the bottom of the display
7
Conrm key
Select the highlighted menu
option or conrm an input;
In Idle mode, access Menu
mode or launch the web
browser
Depending on your service
provider or region, the key may
perform differently
8
Power/End key
Turn the phone on or off
(press and hold); End a call; In
Menu mode, cancel input and
return to Idle mode
9
Alphanumeric keys
10
Silent prole key
In ldle mode, activate or
deactivate the silent prole
(press and hold)
7
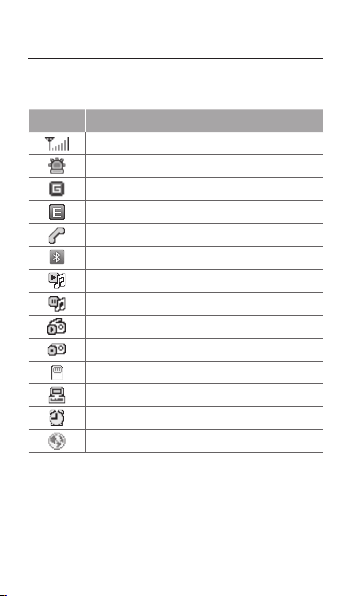
Icons
Icons shown on the display may vary depending
on your region or service provider.
Icon Denition
Signal strength
SOS message feature activated
GPRS network connected
EDGE network connected
Call in progress
Bluetooth activated
Music playback in progress
Music playback paused
FM radio on
FM radio suspended
Memory card inserted
Connected with PC
Alarm activated
Browsing the web
8
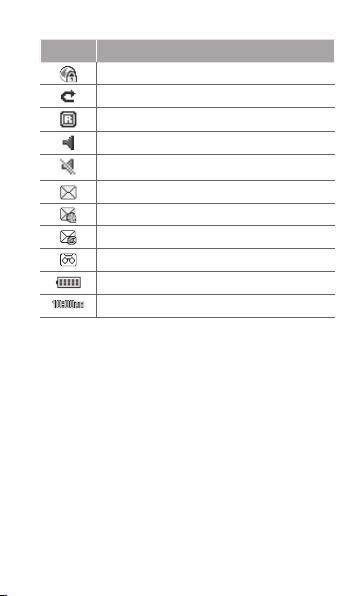
Icon Denition
Connecting to secured web page
Call diverting activate
Roaming (outside of normal area)
Normal prole activated
Silent prole activated
New text message (SMS)
New multimedia message (MMS)
New email message
New voice mail message
Battery power level
Current time
9
Assembling and preparing your mobile phone
Get started by assembling and setting up your
mobile phone for its first use.
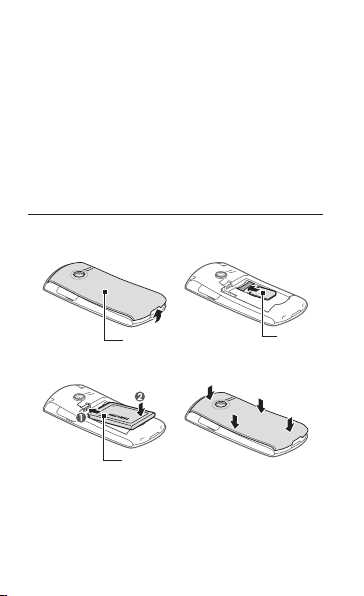
Install the SIM card and battery
Remove the back cover and insert the SIM 1.
card.
Back cover
Insert the battery and replace the back cover.2.
Battery
10
SIM card
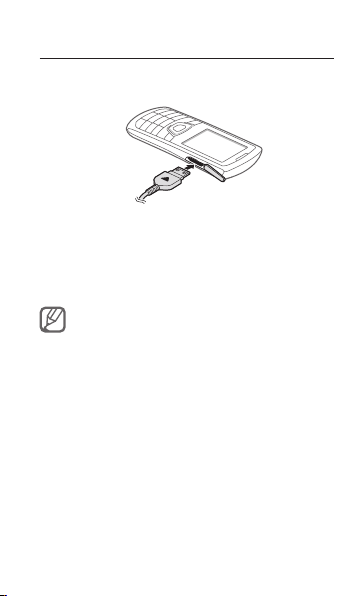
Charge the battery
Plug the small end of the supplied travel 1.
adapter into the multifunction jack.
Plug the large end of the travel adapter into a 2.
power outlet.
When charging is finished, unplug the travel 3.
adapter.
Do not remove the battery from the phone before
unplugging the travel adapter rst. Otherwise, the
phone may be damaged.
11

Insert a memory card (optional)
Your phone accepts microSD™ or microSDHC™
memory cards up to 8 GB (depending on memory
card manufacturer and type).
Formatting the memory card on a PC may cause •
incompatibility with your phone. Format the
memory card only on the phone.
Frequent writing and erasing of data will shorten •
the lifespan of memory cards.
Open the cover to the memory card slot on the 1.
left side of the phone.
Insert a memory card with the gold-coloured 2.
contacts facing down.
Memory card cover
Memory card
Push the memory card into the memory card 3.
slot until it locks in place.
12

Using basic functions
Learn how to perform basic operations and use the
main features of your mobile phone.
Turn your phone on or off
To turn your phone on,
Press and hold [1.
Enter your PIN and press <2. OK> (if necessary).
When the setup wizard opens, customise your 3.
phone as desired by following the screen.
To turn your phone off, repeat step 1 above.
Access menus
To access your phone's menus,
In Idle mode, press <1. Menu> to access Menu
mode.
You may need to press the Conrm key to access
Menu mode depending on your region or service
provider. When you are using the smart home
screen, you cannot use the Conrm key to access
Menu mode.
].
13

Use the Navigation key to scroll to a menu or 2.
option.
Press <3. Select>, <Save>, or the Confirm key to
confirm the highlighted option.
Press <4. Back> to move up one level; Press
[
] to return to Idle mode.
When you access a menu requiring the PIN2, •
you must enter the PIN2 supplied with the SIM
card. For details, contact your service provider.
Samsung is not responsible for any loss of •
passwords or private information or other
damages caused by illegal software.
Customise your phone
To switch to or from the silent prole
In Idle mode, press and hold [ ] to silence or
unsilence your phone.
To set the sound prole
To switch to sound profile,
In Menu mode, select 1. Settings → Sound
profiles.
Select a profile you want.2.
14
To edit a sound profile,
In Menu mode, select 1. Settings → Sound
profiles.
Scroll to a user profile and press <2. Edit>.
Customise the sound settings as desired.3.
To set menu shortcuts
In Menu mode, select 1. Settings → Phone →
Shortcuts.
Select a key to use as a shortcut.2.
Select a menu to assign to the shortcut key.3.
When you are using the smart home screen, the
Navigation keys do not work as shortcuts.
To use the recycle bin
With the recycle bin, the data you deleted, such as
messages, contacts, organiser, and my files, will
be sent to the recycle bin instead of being deleted
permanently. You can later restore the data or
empty your recycle bin to permanently delete.
To move an item to the recycle bin, you must
delete one item at a time.
15

To activate the recycle bin,
In Menu mode, select 1. Settings → Recycle
bin.
Press <2. Options> → Recycle bin activation.
Scroll to an application you want and press the 3.
Confirm key.
Press <4. Save>.
To restore the deleted data,
In Menu mode, select 1. Settings → Recycle
bin.
Scroll to an application you want.2.
Press the Confirm key to restore your data.3.
To empty the recycle bin,
In Menu mode, select 1. Settings → Recycle
bin.
Scroll to an application you want.2.
Press <3. Options> → Empty Recycle bin →
<Yes>.
16

Use basic call functions
To make a call
In Idle mode, enter an area code and a phone 1.
number.
Press [2.
To end the call, press [3.
To answer a call
When a call comes in, press [1. ].
To end the call, press [2.
To adjust the volume of voice during a call
While a call is in progress, press [ / ] to adjust the
volume.
To use the speakerphone feature
During a call, press the Confirm key → <1. Yes>
to activate the speaker.
To switch back to the earpiece, press the 2.
Confirm key again.
] to dial the number.
].
].
In noisy environments, you may have difculty
hearing the calls while using the speakerphone
feature. For better audio performance, use the
normal phone mode.
17

To use the headset
By plugging the supplied headset into the
multifunction jack, you can make and answer calls:
To redial the last call, press and hold the •
headset button.
To answer a call, press the headset button.•
To end a call, press and hold the headset •
button.
Send and view messages
To send a text or multimedia message
In Menu mode, select 1. Messages → Create
message.
Enter a recipient number and scroll down.2.
Enter your message text. ► p. 3. 19
For sending as a text message, skip to step 5.
For attaching multimedia, continue with step 4.
Press <4. Options> → Add multimedia and add
an item.
Press the Confirm key to send the message.5.
To view text or multimedia messages
In Menu mode, select 1. Messages → Inbox.
Select a text or multimedia message.2.
18

Enter text
You can enter text by pressing keys on the keypad.
Available text input modes may vary depending
on your region.
To change the text input mode
Press and hold [• ] to switch between T9 and
ABC modes.
Press [•
] to change case or switch to Number
mode.
Press [•
] to switch to Symbol mode.
Press and hold [•
change the input language.
T9 mode
Press appropriate alphanumeric keys to enter 1.
an entire word.
When the word displays correctly, press [2. 0]
to insert a space. If the correct word does not
display, press the Navigation key up or down to
select an alternate word.
ABC mode
Press an appropriate alphanumeric key until the
character you want appears on the display.
] to select an input mode or
19
Number mode
Press an appropriate alphanumeric key to enter a
number.
Symbol mode
Press an appropriate alphanumeric key to enter
a symbol.
To move the cursor, press the Navigation key.•
To delete characters one by one, press <• Clear>.
To quickly delete characters, press and hold
<Clear>.
To insert a space between characters, press [• 0].
To enter punctuation marks, press [• 1].
Add and nd contacts
The memory location to save new contacts may
be preset depending on your service provider.
To change the memory location, in Menu mode,
select Contacts → <Options> → Settings →
Save new contact to → a memory location.
To add a new contact
In Idle mode, enter a phone number and press 1.
<Options>.
20

Select 2. Add to Contacts → Create contact →
a memory location (if necessary).
Select a number type (if necessary).3.
Enter contact information.4.
Press the Confirm key to add the contact to 5.
memory.
To nd a contact
In Menu mode, select 1. Contacts.
Enter the first few letters of the name you want 2.
to find.
Select the contact’s name from the contact list.3.
Use basic camera functions
To capture photos
In Menu mode, select 1. Camera to turn on the
camera.
Aim the lens at the subject and make any 2.
adjustments.
Press the Confirm key to take a photo. The 3.
photo is saved automatically.
Press <4. Back> to take another photo (step 2).
21
 Loading...