

Samsung SGH-A796 User Manual

QUAD BAND Series
SGH-A796
Portable Digital Mobile Phone
User Manual
Please read this manual before operating your phone,
and keep it for future reference.

Intellectual Property
All Intellectual Property, as defined below, owned by or which is otherwise the
property of Samsung or its respective suppliers relating to the SAMSUNG Phone,
including but not limited to, accessories, parts, or software relating thereto (the
“Phone System”), is proprietary to Samsung and protected under federal laws, state
laws, and international treaty provisions. Intellectual Property includes, but is not
limited to, inventions (patentable or unpatentable), patents, trade secrets,
copyrights, software, computer programs, and related documentation and other
works of authorship. You may not infringe or otherwise violate the rights secured by
the Intellectual Property. Moreover, you agree that you will not (and will not attempt
to) modify, prepare derivative works of, reverse engineer, decompile, disassemble,
or otherwise attempt to create source code from the software. No title to or
ownership in the Intellectual Property is transferred to you. All applicable rights of the
Intellectual Property shall remain with SAMSUNG and its suppliers.
©2010 Samsung Electronics Canada, Inc. SAMSUNG is a registered trademark of
Samsung Electronics Co., Ltd. and its related entities.
The Bluetooth® word mark and logos are owned by the Bluetooth SIG, Inc. and any
use of such marks by Samsung Electronics Canada, Inc. is under license. Other
trademarks and trade names are those of their respective owners.
T9 Text Input is licensed by Tegic Communications.
ACCESS® and NetFront™ are trademarks or registered trademarks of ACCESS
Co., Ltd. in Japan and other countries.
The Bluetooth® word mark, figure mark (stylized “B Design”), and combination mark
(Bluetooth word mark and “B Design”) are registered trademarks and are wholly
owned by the Bluetooth SIG.
microSD™ and the microSD logo are Trademarks of the SD Card Association.
Openwave® is a registered Trademark of Openwave, Inc.
Some software components of this product incorporate source code covered under
GNU General Public License (GPL), GNU Lesser General Public License (LGPL),
OpenSSL License, BSD License and other open source licenses. To obtain the
source code covered under the open source licenses, please visit: http://
www.samsungnetwork.com/Home/opensource.

Table of Contents
Important Safety Precautions ................................................................1
Getting Started ........................................................................................3
Setting Up Your Phone ....................................................................................... 3
Switching the Phone On and Off ......................................................................... 8
Locking the Touch Screen .................................................................................. 8
Access Codes ..................................................................................................... 9
Your Phone ............................................................................................ 11
Features of Your Phone .................................................................................... 11
Phone Layout .................................................................................................... 12
Side Views of Your Phone ............................................................................... 14
Unlocking the Phone ......................................................................................... 16
Display .............................................................................................................. 17
Using Menus .........................................................................................20
Menu Navigation ............................................................................................... 20
Shortcuts ........................................................................................................... 23
Using the Multitasking Menu ............................................................................. 25
Menu Structure ................................................................................................. 26
Call Functions ....................................................................................... 27
Making a Call .................................................................................................... 27
Answering a Call ............................................................................................... 30
Quick Reply ....................................................................................................... 31
Dialing Options .................................................................................................. 32
Call History ........................................................................................................ 32
Call Time ........................................................................................................... 36
Options During a Call ........................................................................................ 36
Making a Multi-party Call .................................................................................. 40
Entering Text .........................................................................................42
Using the QWERTY Keyboard .......................................................................... 42
Changing the Text Input Mode .......................................................................... 43
Using the Alphanumeric Keypad ....................................................................... 47
Using Handwriting Recognition ......................................................................... 49
Transferring Files ................................................................................. 53
Transferring Files via USB Cable ...................................................................... 53
Transferring Files via Bluetooth ........................................................................ 55
i

Transferring Files via microSD Card ................................................................. 56
Transferring Music Using Media Player ............................................................56
Contacts .................................................................................................58
Add New Contact ..............................................................................................58
Using Contacts .................................................................................................. 62
Groups .............................................................................................................. 65
Favourites ......................................................................................................... 67
Managing Contacts ...........................................................................................68
Contact Settings ................................................................................................ 70
My Account ...........................................................................................73
Shop ......................................................................................................74
Internet ...................................................................................................75
Open the Browser .............................................................................................75
Browser Navigation ........................................................................................... 75
Access a Web Site ............................................................................................ 78
Bookmarks ........................................................................................................ 78
Browser Settings ............................................................................................... 81
Messages ...............................................................................................85
Types of Messages ........................................................................................... 85
Creating and Sending Messages ...................................................................... 85
Additional Message Options ............................................................................. 86
View Received Messages ................................................................................. 88
MobileMail ......................................................................................................... 91
IM ...................................................................................................................... 91
Friends .............................................................................................................. 91
Templates ......................................................................................................... 91
Voice Mail .......................................................................................................... 93
Messages Settings ............................................................................................ 93
Delete by Folder ................................................................................................ 97
Memory Status .................................................................................................. 97
Media ......................................................................................................98
Create a New Folder ......................................................................................... 98
Manage Files and Folders ................................................................................. 98
File and Folder Options ..................................................................................... 99
Audios ............................................................................................................... 99
Pictures ........................................................................................................... 102
Videos ............................................................................................................. 105
ii

Other Files ...................................................................................................... 106
Memory Status ................................................................................................ 107
Document Viewer ............................................................................................ 107
Games & Apps ....................................................................................109
Games ............................................................................................................ 109
Get New Applications ...................................................................................... 109
Tools ............................................................................................................... 110
Ringbacks ........................................................................................... 139
IM .........................................................................................................140
MobileMail ..........................................................................................141
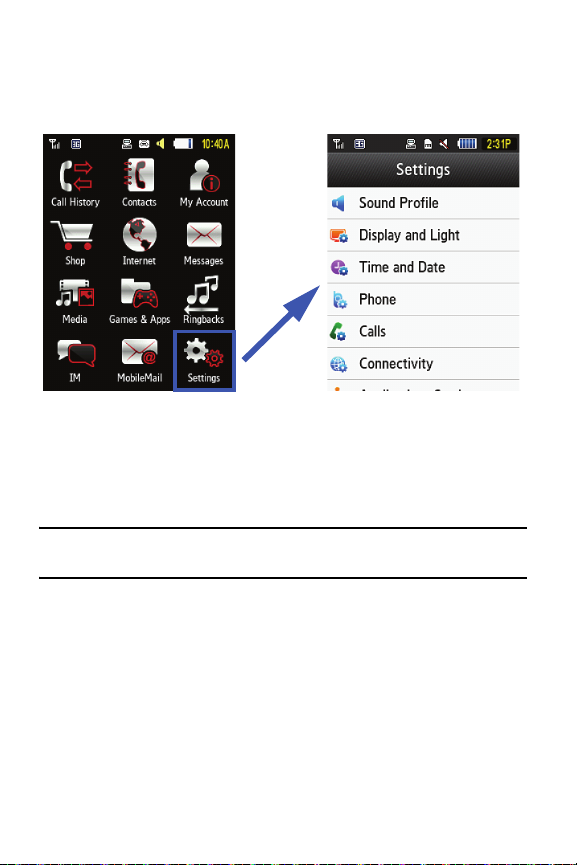
Settings ................................................................................................142
Sound Profile .................................................................................................. 142
Display and Light ............................................................................................ 144
Time and Date ................................................................................................ 147
Phone .............................................................................................................. 148
Calls ................................................................................................................ 153
Connectivity .................................................................................................... 156
Applications Settings ....................................................................................... 160
Memory Management ..................................................................................... 161
Phone Status .................................................................................................. 162
Solving Problems ............................................................................... 163
Health and Safety Information ........................................................... 166
Warning Regarding Display ............................................................................ 166
Exposure to Radio Frequency (RF) Signals ................................................... 166
For Body Operation ......................................................................................... 167
Precautions When Using Batteries ................................................................. 168
Operating Environment ................................................................................... 169
Electronic Devices .......................................................................................... 170
Potentially Explosive Environments ................................................................ 171
Emergency Calls ............................................................................................. 172
Other Important Safety Information ................................................................. 173
Care and Maintenance .................................................................................... 174
FCC Notice ..................................................................................................... 175
Appendix A: Certification Information (SAR) ................................................... 176
Appendix B: Safe and Responsible Wireless Phone Use ............................... 179
Appendix C: Consumer Update on Wireless Phones ..................................... 182
iii

STANDARD LIMITED WARRANTY .....................................................191
Index .....................................................................................................196
iv

Important Safety Precautions
Please read these guidelines before using your wireless phone. Failure to
comply with them may be dangerous or illegal.
Road Safety
Do not use a hand-held phone while driving; park the vehicle first.
Switch Off When Refueling
Do not use the phone at a refueling point (service station) or near fuels or
chemicals.
Switch Off in Aircraft
Wireless phones can cause interference. Using them in aircraft is both
illegal and dangerous.
Switch Off in Hospitals
Switch your phone off near medical equipment. Follow any regulations or
rules in force.
Special Regulations
Follow any special regulations in force in any area and always switch your
phone off whenever it is forbidden to use it, or when it may cause
interference or danger (for example, in a hospital).
Sensible Use
Use the phone only in the normal position (held to the ear).
Important Safety Precautions
1

Emergency Call
Ensure the phone is switched on and in service. Touch Keypad, key in the
emergency number for your present location, then touch Call. You must
deactivate any unnecessary features before you can make an emergency
call. Give all the necessary information as accurately as possible. Do not
end the call until given permission to do so.
Water Resistance
Your phone is not water-resistant. Keep it dry.
Accessories and Batteries
Use only Samsung-approved accessories and batteries. Use of any
unauthorized accessories could damage your phone and may be
dangerous.
Qualified Service
Only qualified service personnel may repair your phone.
For more detailed safety information, see “Health and Safety Information”
on page 166.
Important Safety Precautions
2
Getting Started
This section explains how to start using your phone by first configuring your
hardware, activating your service, and then setting up your voice mail.
Setting Up Your Phone
When you subscribe to a cellular network, you receive a plug-in SIM
(Subscriber Identity Module) card loaded with your subscription details,
such as your PIN, and optional services you have selected.
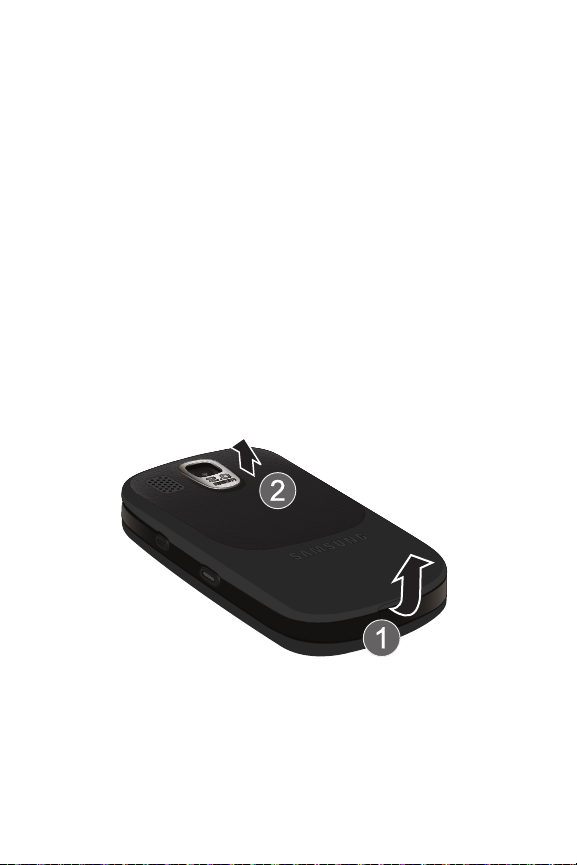
Prior to using your phone it is necessary to install both the battery and SIM
into their corresponding internal compartments. The microSD card slot is
also located in this same internal area.
1. Remove the battery cover by placing your thumbnail into the slot at the
bottom of the phone (1) and lifting up.
2. Lift the cover away from the phone (2).
Getting Started
3
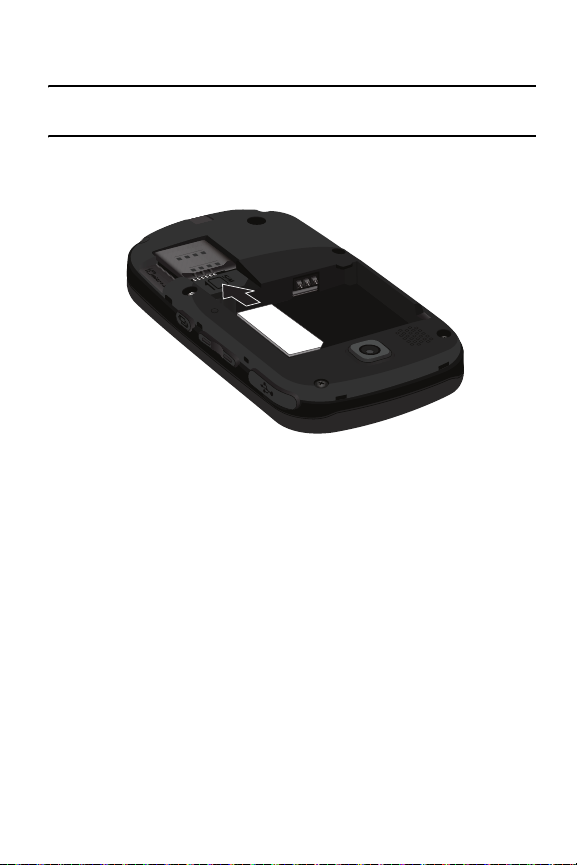
Installing the SIM Card
Important! The plug-in SIM card and its contacts can be easily damaged by scratches or
bending. Use caution when inserting or removing the card and keep it out of reach of children.
Position the SIM card as indicated on the SIM card slot (angled corner at
the lower right edge), then carefully slide the card into the socket.
Installing the Memory Card
Your phone also supports the use of a microSD™ memory card for data
storage such things as music, pictures, and video files.
1. Position the microSD card as indicated on the phone (gold contact pins
facing upward and toward the slot).
2. Slide the microSD card into the slot then press in with your fingertip
until it locks into position with an audible click.
Getting Started
4

Note: The Samsung a796 has been tested to support cards up 16GB capacity.
Incorrect
Correct
Installing the Battery
1. Align the top edge of the battery under the tabs at the top edge of the
battery chamber with the arrow on the battery pointing toward the
battery contacts (1).
2. Press the battery down until it is seated in the battery chamber (2).
Getting Started
5
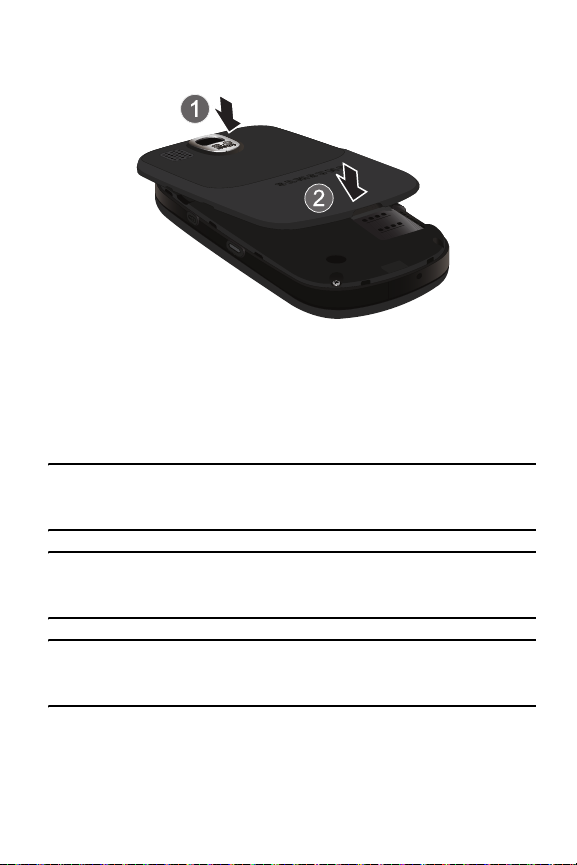
3. Replace the battery cover on the back of the phone (1) and press down
until a click indicates that the cover has locked into position (2).
Charging the Battery
Your phone is powered by a rechargeable Li-ion (lithium ion) battery. Use
the travel charger supplied with your phone to charge the battery, and use
only Samsung approved batteries and chargers.
Note: Fully charge the battery before using your phone for the first time. A discharged battery
recharges fully in approximately four hours. You can use the phone while the battery is charging,
but this causes the phone to charge more slowly.
Warning! For connection to an electrical supply not located in North America, you must use a
charger of the proper configuration for the power outlet. Use of the wrong charger could damage
your phone and void your warranty.
Important! Verify that the phone battery is installed prior to connection. If the battery is not
properly installed when the charger is connected, the phone may power off and on continuously,
preventing proper operation.
1. Open the cover over the jack on the upper left side of the phone and
plug the connector of the travel charger into the jack
Getting Started
6

Note: The charger’s connector attaches to the phone at a slight angle toward the top of the
phone.
2. Plug the charger into a standard AC wall outlet. If the phone is off, the
display indicates that the phone is charging. If the phone is on, a bar in
the battery icon flashes to indicate charging.
3. When the phone is fully charged, the message “Battery Full” appears
on the display or the bars in the battery icon stop flashing. Unplug the
adapter from the power outlet and disconnect it from the phone by
gently pulling the connector out of the jack.
Note: To avoid damaging the phone, unplug the adapter before removing the battery from the
phone.
Note: The phone is also charged when connected to the USB port of a PC using the USB cable.
Getting Started
7

Low Battery Indication
When only a few minutes of talk time remain, the empty battery icon
flashes and a warning tone sounds at regular intervals. The backlight dims
to conserve the remaining battery power. When the battery level becomes
too low, the phone automatically turns off. Recharge the battery to restore
phone operation.
Switching the Phone On and Off
To switch the phone on:
1. Press and hold
2. If prompted, enter the password and touch OK. For further details, see
the Lock Phone option in “Phone” on page 148.
3. If prompted, enter the PIN and touch OK. For further details, see the
Check PIN Code section in “Phone” on page 148.
The phone searches for your network and, after finding it, the Idle
screen appears on the display. You can now make and receive calls.
The default display language setting is Automatic, which is dependent
on the setting programmed into your SIM. For further details or to
change the language, see the Language section in “Phone” on
page 148.
To switch the phone off, press and hold
displayed.
or until the phone switches on.
until the power-off image is
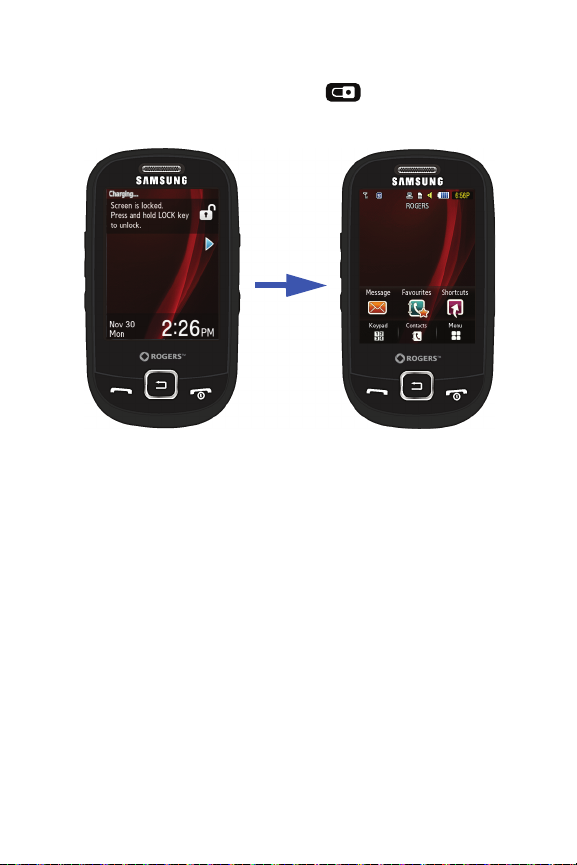
Locking the Touch Screen
To lock the touch screen and prevent accidental presses, press (on
the right side of the phone). Press and hold to unlock the touch
screen.
Getting Started
8

Access Codes
There are several access codes used by your phone and its SIM card.
These codes help protect the phone against unauthorized use.
When requested to enter any of the codes, enter the code and touch OK.
Except for the PUK and PUK2 codes, access codes can be changed using
the Security menu (see the Security section in “Phone” on page 148).
Important! Avoid using access codes that are similar to emergency numbers, such as 911, to
prevent accidentally dialing an emergency number.
Phone Password
The Lock Phone feature allows you to set a password to protect your
phone against unauthorized use. For instructions, see the Security section
in “Phone” on page 148.
PIN
The 4 to 8 digit PIN (Personal Identification Number) protects your SIM
card against unauthorized use. It is usually supplied with the card.
If you enter an incorrect PIN three times in succession, the code is disabled
and cannot be used until you re-enable it by entering the PUK (see below).
For instructions on activating or deactivating the PIN Check feature and
changing the PIN, see the Security section in “Phone” on page 148.
PUK
The 8-digit PUK (PIN Unblocking Key) is required to change a disabled PIN. If a
PUK was not supplied with your SIM card, contact your service provider.
To re-enable your PIN:
1. Enter the PUK and touch OK.
Getting Started
9

2. Enter a new PIN of your choice and touch OK.
3. When the Confirm PIN Code message displays, enter the same code
again and touch OK.
If you enter an incorrect PUK ten times in succession, the SIM card
becomes invalid. Contact your service provider for a new card.
PIN2
A 4 to 8 digit PIN2 is supplied with some SIM cards to allow access to
specific functions supported by those cards.
If you enter an incorrect PIN2 three times in succession, the code is
disabled and you cannot access the functions until you re-enable it by
entering the PUK2.
To change the PIN2, see the Security section in “Phone” on page 148.
PUK2
An 8-digit PUK2 (PIN Unblocking Key 2) is required to change a disabled
If a PUK was not supplied with your SIM card, contact your service
PIN2.
provider.
To re-enable your PIN2:
1. Enter the PUK2 and touch OK.
2. Enter a new PIN2 of your choice and touch OK.
3. When the Confirm PIN2 Code message displays, enter the same code
again and touch OK.
If you enter an incorrect PUK2 ten times in succession, the SIM card
becomes invalid. Contact your service provider for a new card.
Getting Started
10

Your Phone
The section outlines some key features of your phone. It also explains the
screens and the icons that appear when the phone is in use.
Features of Your Phone
Your phone is lightweight, easy-to-use and offers many valuable features.
The following list outlines a few of the features included in your phone.
Touch screen provides quick response to menus and options
Multitasking
User friendly, menu driven access to features and options
Ready access to the Internet
Built-in Bluetooth technology
Instant Messaging capability
microSD card compatibility for additional data storage
Camera
Your Phone
11

Phone Layout
1
1
1
1
8
1
12
6
1
7
1
3
1
2
1
9
1
13
1
4
1
5
1
11
1
10
1
14
1
15
1
16
1
17
The following illustrations show the main elements of your phone.
Front View of Your Phone
1. Speaker: Allows you to hear the caller.
2. Touch screen: Display screen that responds to touch. Provides all
information needed to operate your phone.
3. Message button: Accesses the Create Message screen.
4. Keypad button: Accesses the Phone Functions screen, where you
can enter a phone number and place a call, send a message or open
your contact list.
Your Phone
12

5. Contacts button: Accesses your current Contacts, Groups and
Favourite lists.
6. Talk/Send key: Allows you to power on the phone, make or answer a
call, and access the Call History list. Press and hold to redial the last
phone number.
7. Voicemail key: Press and hold to automatically dial your voicemail.
8. QWERTY Keyboard: Allows you to enter numbers, letters, and
characters using a full QWERTY interface.
9. Messaging key: Accesses the Create Message screen.
10. Microphone: Sensor that converts sound into an electrical signal
during phone calls and voice recordings.
11. Silent Mode key: Press and hold to place the phone in silent mode.
When entering text, press to add a space.
12. Directional keys: Allow you to scroll up, down, left, and right while
navigating menus and the Web browser.
13. Power/End key: Ends a call. Press and hold for three seconds to turn
the phone on or off. While in a menu, press to return to Idle mode.
14. Back key: Returns to the previous menu or Web page.
15. Menu button: Accesses the phone’s Main Menu screen.
16. Shortcuts button: Allows you to create shortcuts to your favourite
applications, tools, or features.
17. Favourites button: Allows you to access and maintain a list of
favourite contacts.
Your Phone
13
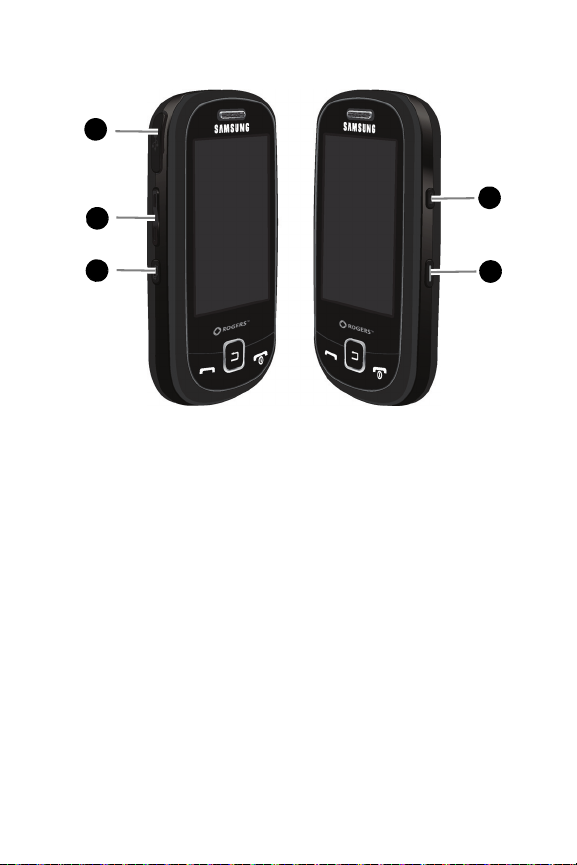
Side Views of Your Phone
1
1
1
4
1
2
1
5
1
3
1. Power/Accessory Interface connector: Allows you to connect a
travel charger or other optional accessories such as a USB/data cable
or hands-free headset.
2. Volume keys: Adjust ringer volume in standby mode, mute ringer
when receiving a call, adjust volume during a call and adjust text size
when reading a message or using the browser.
3. Multitask key: Launches the multitask menu, which provides ready
access to several commonly used features: Messages, IM, MobileMail,
Friends, Shop. You can also select End all? to close all running
features and return to the Idle screen.
4. Camera key: In Idle mode, press and hold to launch the camera. In
Camera mode, press to take a picture or video.
Your Phone
14
5. Lock key: Lets you lock and unlock the touch screen. If you receive an
1
1
1
2
incoming call while the screen is locked, you can answer it without
unlocking the screen.
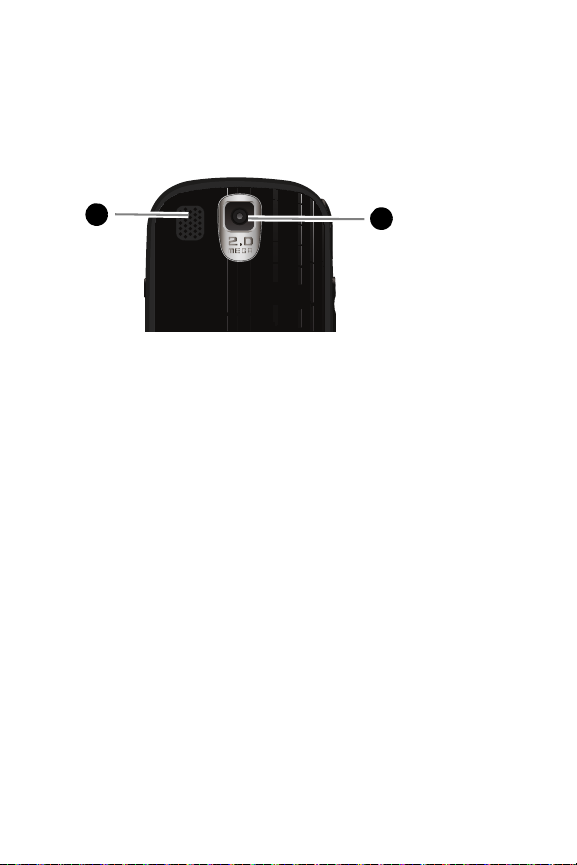
Rear View of Your Phone
1. Speaker: Allows you to hear music and other audio signals.
2. Camera lens: Used to take pictures and videos.
Your Phone
15
Unlocking the Phone
When the A796 is locked, press and hold (on the right side of the
phone) to unlock the phone and display the Idle screen.
Your Phone
16
Display
To be replaced
Indicators
Main display area
Function categories
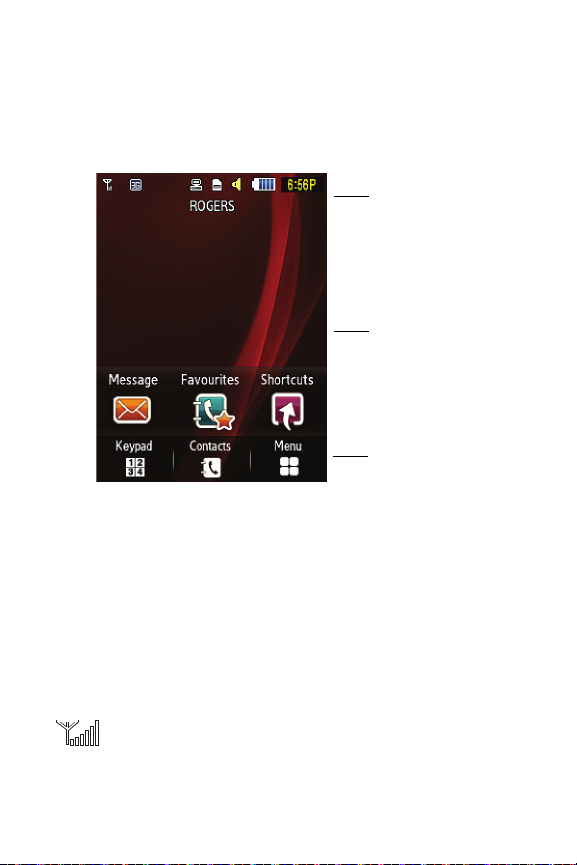
Display Layout
Your display screen provides information about the phone’s status and
options.The display has three main areas:
Function Categories
Function Categories are shortcuts to Keypad (for dialing a number),
Contacts (accessing the Contacts list), Menu (displays the icons for
application access), Message (takes you to the Create Message screen),
Favourites (displays your Contact favourites), and Shortcuts (displays
shortcuts that you have set up to easily access your favourite applications).
Icons
Received signal strength. The more bars, the stronger the
signal.
Your Phone
17
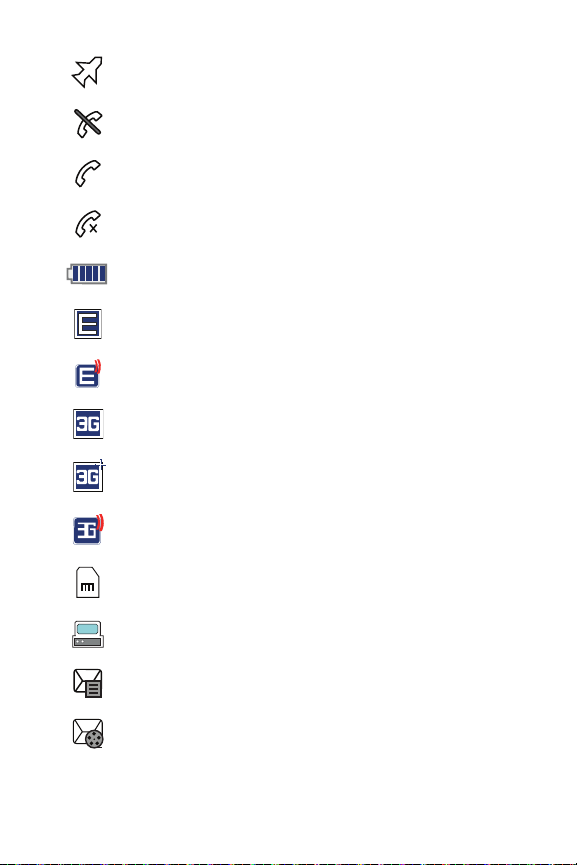
Indicates that the Airplane Mode is active. You cannot send
or receive calls or access online information.
No network coverage available.
Call in progress.
Displays on the Lock screen when a call has been missed.
Battery level. The more bars, the more power remaining.
Connection to an Edge network is active.
Phone is communicating with an Edge network.
Connection to a 3G (HSDPA) network is active.
Phone is accessing services on a 3G (HSDPA) network.
Phone is communicating with a 3G (HSDPA) network.
A microSD memory card is inserted.
Phone is connected to a computer via USB cable connection
Your Phone
18
Displays in the Indicators area when a new text message has
been received.
Displays in the Indicators area when a new picture message
has been received.
Displays in the Indicators area when a new voice mail has
been received.
Displays in the Indicators area when a new WAP message
has been received.
Text message inbox is full.
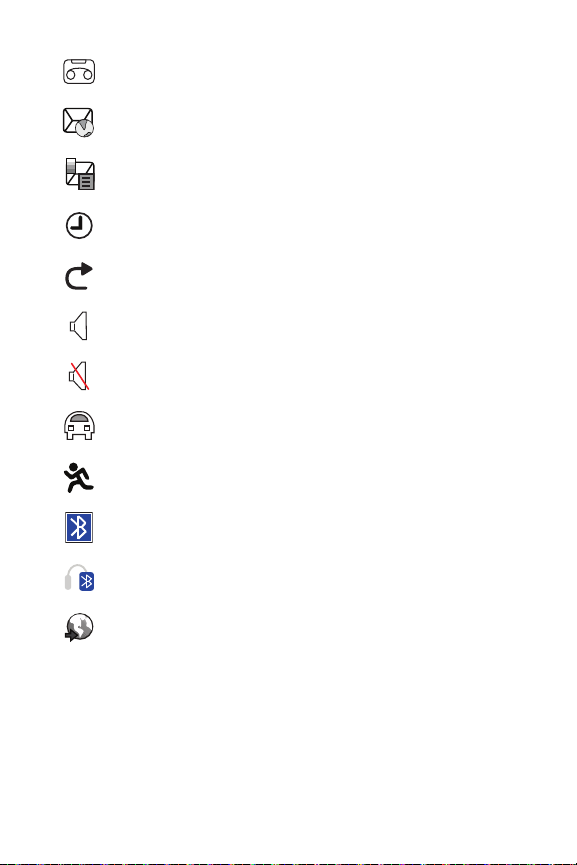
An alarm is set. For details, see “Alarms” on page 126.
Call Forwarding feature is active. For details, see “Call
Forwarding” on page 155.
Sound profile is set to Normal.
Sound profile is set to Silent or the volume has been lowered
to level 0.
Sound profile is set to Driving.
Sound profile is set to Outdoor.
Bluetooth is activated.
Bluetooth headset has been paired with the phone.
Displays when browsing the Web.
Your Phone
19
Using Menus
This section explains how to use your phone’s menus. The A796 is
completely navigable by either an onscreen touch or by using the
QWERTY keypad.
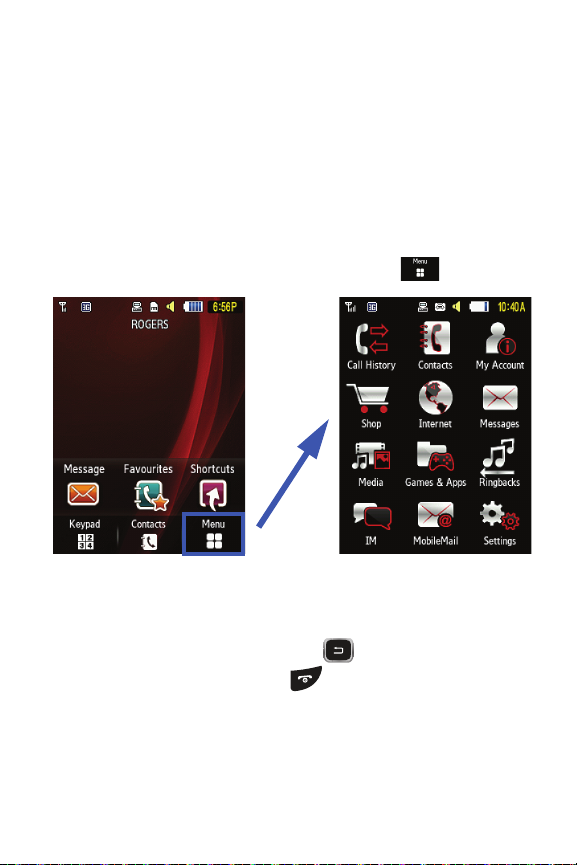
Menu Navigation
Accessing the Main Menu
To access the Main menu from the Idle screen, touch
Opening and Closing an Application
To open any phone application, touch the associated screen icon.
To return to the previous screen, press .
To return to the Idle screen, press .
Using Menus
20
.
Navigating Lists
When you open a menu, the menu options display on the screen as a
scrollable list.
To activate a list item, touch it.
To scroll through the list, firmly press and slide your finger up or down
the screen.
To move up or down by a full screen, press the volume keys.
Note: Scrolling requires that you press firmly on the screen and then drag. When scrolling
through a list do not touch or press individual entries on the list as this will open the list entry.
Using Menus
21
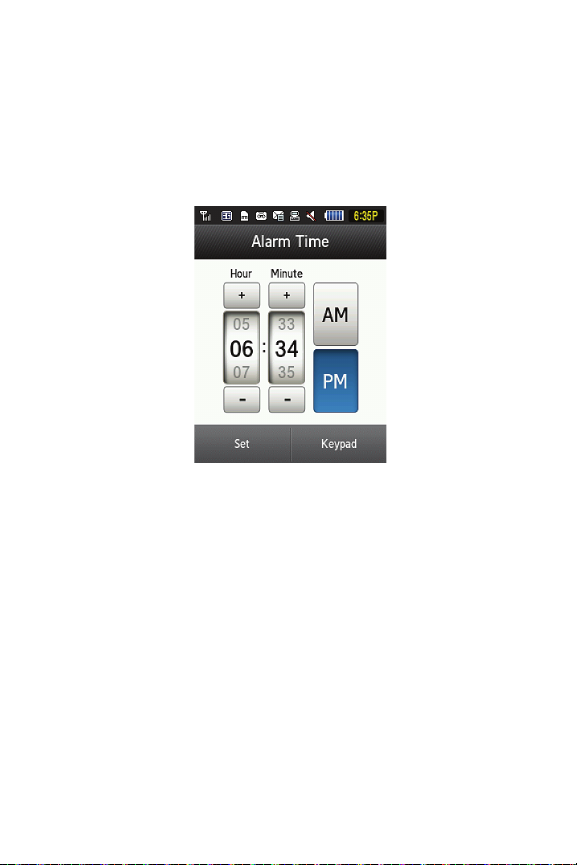
Scrolling Through Field Entries
Some screens will ask you to assign a value to an onscreen field by either
touching up/down selection arrows or by quickly sliding through the values
using your fingertip. An example of these actions is the Jog screen on the
Alarm page, where you can set the time by touching the + and - buttons or
by quickly sliding your fingertip over the numbers.
Using Menus
22
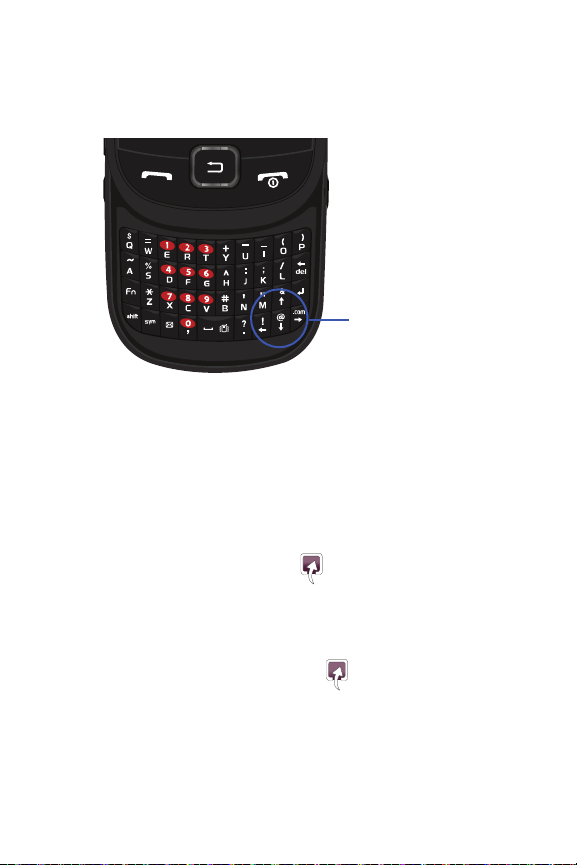
Scrolling Using the Directional Keys
Directional Keys
(Up, Down, Left, Right)
Besides use touch when scrolling through a menu or using the Browser,
you can also use the directional keys on the QWERTY keyboard.
Shortcuts
The Shortcuts option allows you quick access to your favourite
applications, features, and tools. You can Add, Change, and Remove
Shortcuts.
Accessing the Shortcuts Menu
From the Idle screen, touch Shortcuts .
The menu listing your Shortcuts displays.
Adding Shortcuts
1. From the Idle screen, touch Shortcuts .
Using Menus
23
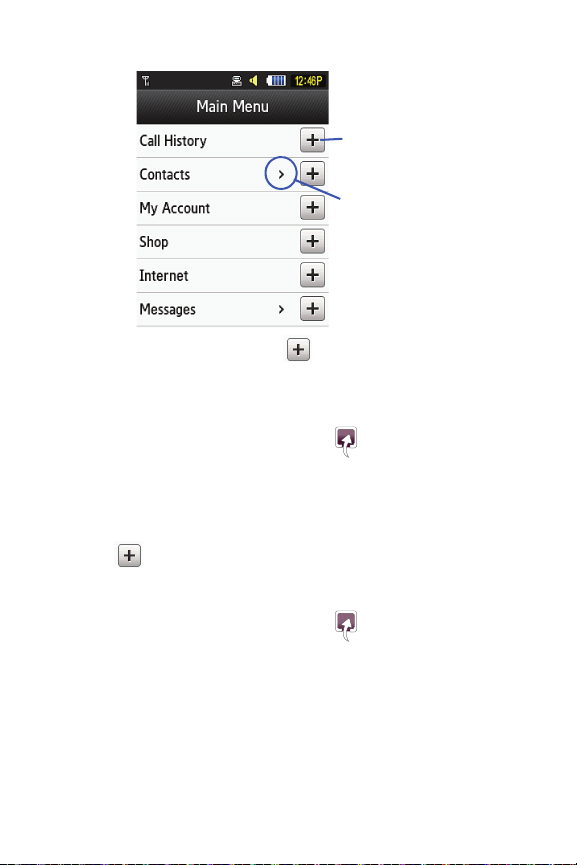
Touch Add.
Touch to expand menu
Touch to add shortcut
2. Select an application and touch to add it to your shortcuts. Submenus are indicated by > next to the item. Touch > to expand the menu.
Changing Shortcuts
1. From the Idle screen, touch Shortcuts .
2. Touch Change.
3. Touch the Shortcut that you would like to replace.
4. Select an application that you would like to be added in its place and
touch .
Removing Shortcuts
1. From the Idle screen, touch Shortcuts .
2. Touch Remove.
3. Touch the check box next to each application you want to remove from
your Shortcut list to place a check mark in the box. You can also touch
All to place a check mark next to every entry.
4. Touch Remove.
Using Menus
24
 Loading...