

7. Function and Directions
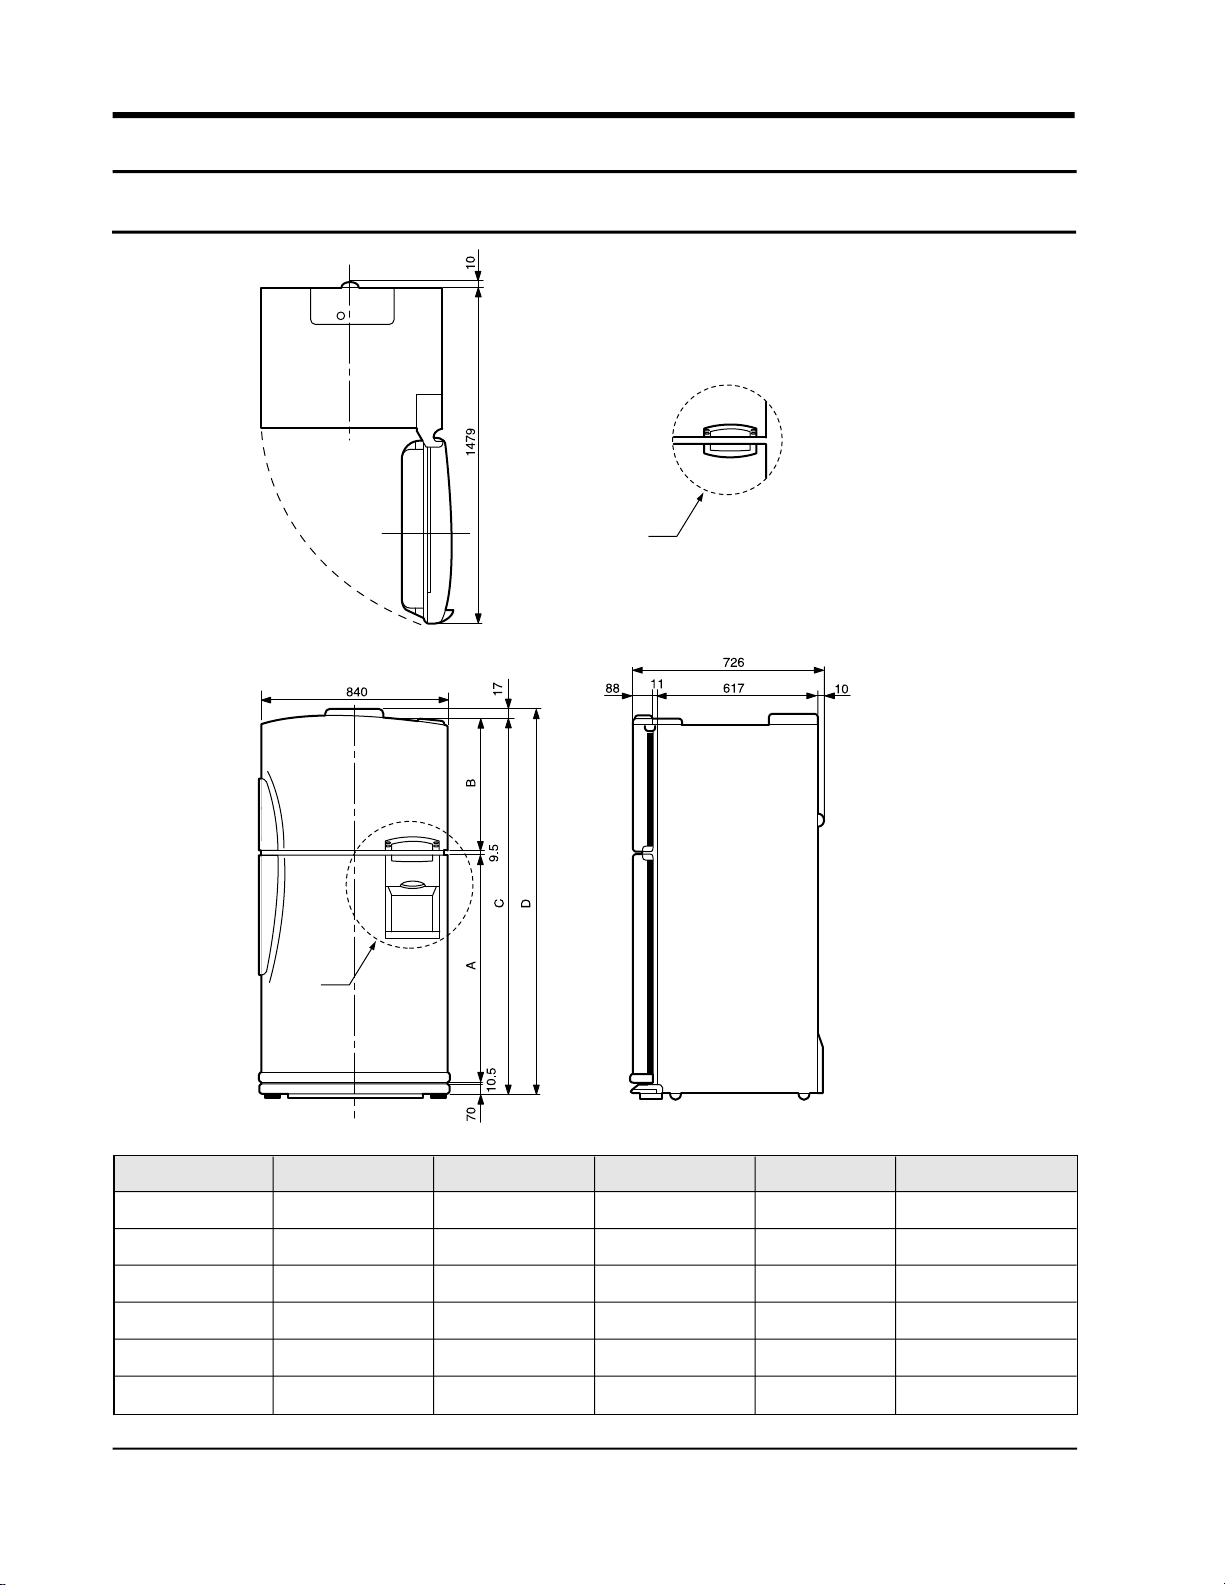
7-1 The outer size
a
b
Model A B C D Remark
SR-606EA 1066.5 580 1736.5 1753.5 ‘a’ applied
SR-608EA 1066.5 580 1736.5 1753.5 ‘b’ applied
SR-646EA 1096.5 600 1766.5 1803.5 ‘a’ applied
SR-648EA 1096.5 600 1766.5 1803.5 ‘b’ applied
SR-686EA 1140.5 600 1810.5 1847.5 ‘a’ applied
SR-688EA 1140.5 600 1810.5 1847.5 ‘b’ applied
8 Samsung Electronics
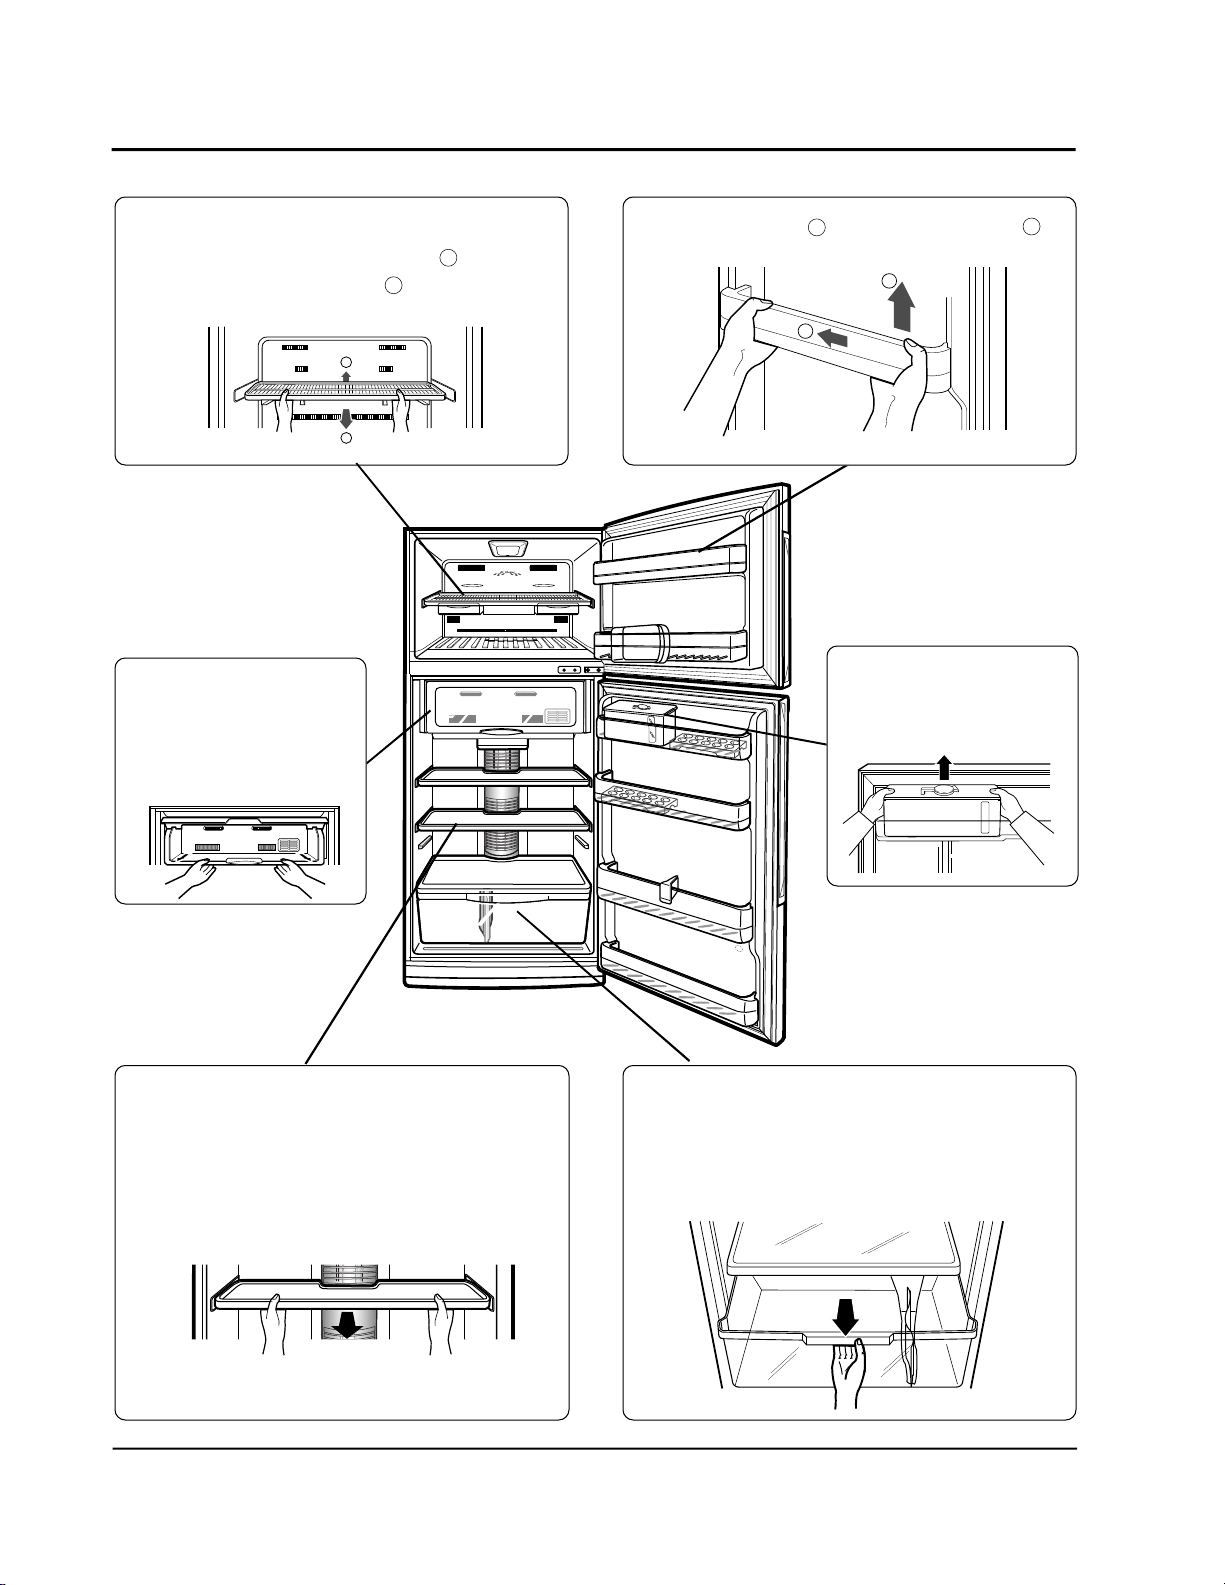
7-2 The name of each parts and disassemble method
Freezer shelf
• Up the front of shelf to direction then
pull and apart to direction .
1
2
1
2
Chilled room shelf
• Pull to the arrow direction
then up and apart at the
locking point.
• Push to direction and apart to direction .
1
2
1
2
• Up and apart as showed.
(concerned model : SR-
5066/5466/5866)
Shelf REF.
• Pull with both hands as showed.
• The height can be adjusted according to the
stored bowls.
Vegetable box and cover
• Up the cover and apart then pull out the
vegetable box at the mid-point and up and
and pull to apart.
Samsung Electronics 9
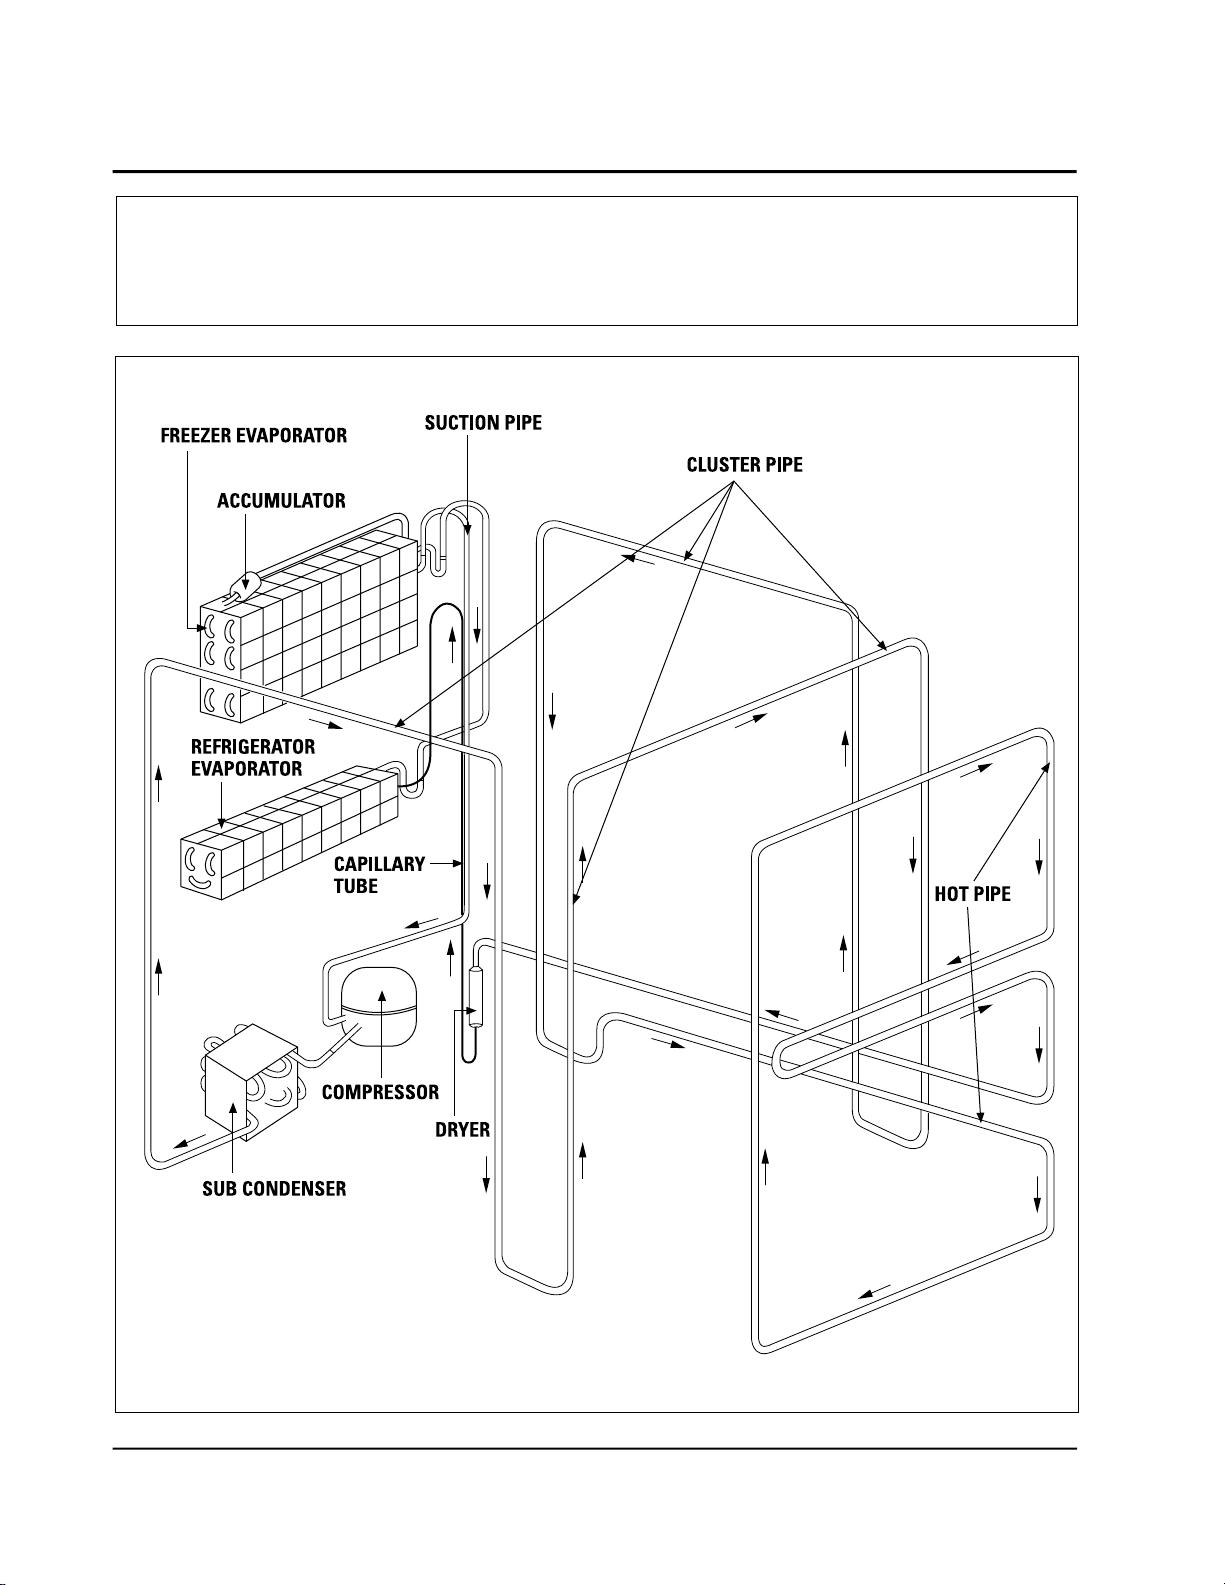
7-3 Freezing cycle
COMPRESSOR → SUB CONDENSER → CLUSTER PIPE → HOT PIPE → DRYER →CAPILLARY
TUBE →REFRIGERATOR EVAPORATOR → FREEZER EVAPORATOR → A C C U M U L A T O R
→SUCTION PIPE → COMPRESSOR
10 Samsung Electronics

7-4 PANEL display
QUICK REF.
FRE
CONTROL
DOOR
ALARM
DOOR
FREE
QUICK
FRE.
FRE, CONTROL
LO
HI
LO
HI
7-5 Temperature control
1) Freezer temperature control
1. It consists of five steps as follows and selected by one button.
Mid Æ Mid.High Æ High Æ Low Æ Low.Mid
2. It is circulated and displayed one by one by pressing the button.
3. At first power on it is selected ”Mid”
Category
Indicator Lamp
Initial power on
Mid
Pressed once
Mid·High
Pressed twice
High
QUICK
FRE.
Pressed 3 times
Low
HI-MOISTURE
Pressed 4 times
Low·Mid
QUICK REF.
REF.
CONTROL
Remark
Reference Temp.
–18˚C –19.5˚C
–21˚C
–15˚C
–16.5˚C
2) Temperature control in the refrigerating compartment
1) Select the 5 stages of ‘Mid’–‘Mid · High’–‘High’–‘Low’–‘Low · Mid’ with a button.
2) Whenever the temperature control button of refrigerator is pressed, it continues of light from
‘Mid’–‘Mid · High’–‘High’–‘Low’–‘Low · Mid’.
3) When power turns on “Mid” is automatically selected.
Category
Indicator Lamp
Reference Temp.
Initial power on
Mid
3˚C 1˚C
Pressed once
Mid·High
Pressed twice
High
–1˚C
Pressed 3 times
Low
6˚C
Pressed 4 times
Low·Mid
4.5˚C
Remark
Samsung Electronics 11

7-6. Power freeze and Power
• Selected by additional quick freeze & refrigeration button.
• The lamp of quick freeze and refrigeration circulated ever ytime it pushed.
• No change of setting temperature occured during quick free ze and refrigeration selected.
• Te m p e r a t u re of freezer and r e f r i g e r a t o r can be re-setted while quick freeze and refrigeration opera tes.
1) Quick freeze
(1)Comp. and F-fan runs continuously for two and a half hour s when quick freeze selected. ( one
minute after selection )
(2) During quick freezing the refrigerator controlled by se tted notch.
2) Quick refrigeration
(1) Comp. and R-fan runs until the temperature of refrigerat or reaches -4 ˚C when quick refrigeration
selected.
(2) After the temperature reaches -4 ˚C the ’HIGH ’ notch runs for an hour and finish quick
refrigeration.
(3) Unless the temperature of refrigerator reaches -4 ˚C within two and a half hours quick
refrigeration stopped.
3) When quick freeze and refrigeration selected at the same time
(1) Each function applied at the same time. Quick freeze ru ns Comp. and F-fan for two and a half
hours and quick refrigeration runs Comp. and R-fan for two a nd a half hours with no relation of
each other.
7-7 Alarming
1) Button touch ( ”Ding-Dong ” sound)
(1)Everytime the button pushed, the input confirmation, ”Ding-Dong ”, sounds.
(2) Not sounds, if two keys are pushed at the same time or w rongly handled.
2) Door-Open warning ( ”Ding-Dong ” sound)
(1)Two minutes after door opened, ten times of alarming soun ds.
(2) If door opened continuously, ten times of alarming sound s with one minute cycle.
(3)Alarming stopped just after door closed.
3) Forced operating and defrosting ( ”Beep” sound)
(1) If forced function selected the ”beep” sounds.
(2) Alarming sounds untill the forced operating canceled by automatically ( 24Hr ) or manualy.
(3) Alarming sounds untill the forced defrosting canceled by automatically ( 24Hr ) or manualy.
12 Samsung Electronics

7-8 Defrosting
1) From the first power on, defrosting started after 4 hours of total Comp on time.
2) After that defrosting cycle can be varied from 6 hours to 32hours. (Comp on time)
7-9 Testing
• Testing is for PCB, product, function and service.
• After testing, turn the power on to start self diagnosis.
1) Forced operating
(1) As the button on PCB pushed once, Comp starts immediately without 5 minutes delay.
(2)If forced operating selected the notch of freezer and refrigerator fixed to ”HIGH” and ”MID-
HIGH”. Then Comp and F-fan is controlled to pull-down and R-fan is controlled to ”MID-HIGH”
notch.
(3) Pull-down maintained just for 24 hours during forced operating, after that automatically defrost
freezer and refrigerator and then starts normal operating.
(4) Turn the power off or select test cancel mode to cancel the forced operating.
(5)Alarming (0.25 sec on/0.75 sec off) continues until the forced operating finished. It continues
without any relations to alarming key selection or cancel.
2) Forced defrosting
(1) Push the test button one more time to run the forced defrosting of refrigerator.
(2) One more push in the above status will run defrosting of freezer and refrigerator simultaneously.
(3) Forced operating cancelled automatically by starting foced defrosting and return to normal
operating after completion of defrosting.
3) Test cancel mode
(1) One more push in the status of forced defrosting of F/R will run normal operating.
(2) Alarming stopped in the test cancel mode.
7-10 Self diagnosis
1) Self diagnosis at first power on
(1) As the power applied to the refrigerator first time, all displays show and run the self diagnosis.
(2) If no problems founded display returns to normal model.
(3) If problem is founded, on and off the related display lamp and start alarming.
(4) Lamp displayed until the problem solved or self diagnosis cancelled.
(5) After problem solved the display mode return to normal.
Samsung Electronics 13

(6) When refrigerator repaired, sure to power off and on to run self diagnosis.
(7) Refer to belows for problems and related displays.
No
1
R1-Sensor
2
R2-Sensor
3
RD-Sensor
4
Room-Temp.
Sensor
Item
Display LED
Refrigerator “Low”
Refrigerator
“Low · Mid”
Refrigerator “Mid”
Freezer “Low”
Symptom
• R-room left sensor housing
disconnection.
• Faulty connection.
• Wire open or short.
• Faulty sensor.
• R-room left right sensor
housing disconnection.
• Faulty connection.
• Wire open or short.
• Faulty sensor.
• R-room defrost sensor
housing disconnection.
• Faulty connection.
• Wire open or short.
• Faulty sensor.
• Room-Temp sensor housing
disconnection.
• Faulty connection.
• Wire open or short.
• Faulty sensor.
Remark
R1-Sensor temperature is
over +50˚C or below –50˚C.
R2-Sensor temperature is
over +50˚C or below –50˚C.
RD-Sensor temperature is
over +50˚C or below –50˚C.
Room-Temp Sensor
temperature is over +50˚C
or below –50˚C.
5
F-Sensor
6
FD-Sensor
7
GearedMotor
Freezer “Low”
Freezer “Mid”
Refrigerator “High”
(Self-diagnosis Display Table)
• F-room sensor housing
disconnection.
• Faulty connection
• Wire open or short.
• Faulty sensor.
• R-room defrost sensor
housing disconnection.
• Faulty connection.
• Wire open or short.
• Faulty sensor.
• Faulty geared-motor
• Faulty reed-switch
housing disconnection.
• Faulty connection.
F-Sensor temperature is
over +50˚C or below –50˚C.
F-Sensor temperature is
over +50˚C or below –50˚C.
Square wave not detected
by reed-S/W.
14 Samsung Electronics

7-11 Load status display
1) Press power F/R key for five seconds then press temperature control key in the refrigerator after
temperature display lamps on and off three times.
2) This mode shows which load is being sourced signal from MICOM currently. This doesn’ t mean
the load is operating but just show MICOM signal output. The Compressor may not operate due
to the open wire or relay missing though the display shows the Compressor operating.
3) Load status display return to normal mode after sixty seconds.
4) Follows are load status and related display.
No
Freezer Subordinate
1
COMP
2
F-FAN
3
Freezer defrost Heater
4
Freezer bulb
5
COMP. Cooling Fan
Refrigerator Subordinate
6
R-FAN
Refrigerator defrost
7
Heater
8
Refrigerator bulb
Item
Display LED
Freezer “Low”
Freezer “Low · Mid”
Freezer “Mid”
Freezer “Mid · High”
Freezer “High”
Refrigerator
“Low · Mid”
Refrigerator “Mid”
Refrigerator
“Mid · High”
Display
Relevant LED ON during
Compressor operation
Relevant LED ON during F-FAN
operation
Relevant LED ON during freezer
defrost heater on
Relevant LED ON during freezer
bulb ON
Relevant LED ON during
Compressor Cooling Fanoeration
Relevant LED ON during F-FAN
operation
Relevant LED ON during
refrigerator defrost
Relevant LED ON during
refrigerator bulb ON
Remark
9
GEARED-Motor
Mode Display
10
Initial Mode
11
Overload
12
Low temp.
Samsung Electronics 15
Refrigerator “High”
Quick Freezing
Quick Refrigeration
High humidity
refrigeration
(Load Status Display Table)
Relevant LED ON during
refrigerator brade rotation
Relevant LED ON with initial
power input
Relevant LED ON when ROOM
temperature is over 35˚C
Relevant LED On when ROOM
temperature is below 20˚C
 Loading...