

Page 1

Msys 830/835P
SF-830/835P
Page 2

About the User’s Guide
Your product comes with three user’s guide:
This Laser Facsimile User’s Guide provides information on
using this product as a fax machine. You will find how to send
and receive a fax, and how to set fax-related options.
Laser MFP User’s Guide provides information you will need to
set this product and install the supplied software. And this guide
provides all of the detailed instructions to use this product as a
printer, scanner and copier. You will also find information to
maintain and troubleshoot your product.
SmarThru 3 User’s Guide provides the basic description on
using the multi-funtion application. Samsung SmarThru allows
you to scan and edit images, scan to copy, PC fax and send email on your computer. You will also find a brief description on
the automatic text recognition program, AnyPage.
i
Page 3

C
ONTENTS
Chapter 1:
Chapter 2:
NSTALLATION
I
Unpacking ......................................................... 1.2
Component Location ........................................... 1.4
Front View .................................................... . 1.4
Side View ..................................................... . 1.5
Control Panel Functions ...................................... 1.6
Making Connections ............................................ 1.9
Installing Drum and Toner Cartridges ................... 1.11
Turning the Product On ...................................... 1.14
Loading Paper ................................................... 1.15
Using Paper Supports ......................................... 1.19
G
ETTING
Changing the Display Language ............................ 2.2
Setting System ID .............................................. 2.2
Entering Characters Using the Number Keypad .. . 2.3
Setting Date and Time ......................................... 2.5
Setting the Paper Size ......................................... 2.6
Setting Sounds ................................................... 2.7
Ringer Volume, Alarm Sound, Key Sound,
Speaker Control ............................................ . 2.7
Speaker Volume ............................................ . 2.8
Using Save Mode ................................................ 2.8
Toner Save ................................................... . 2.8
Paper Save ................................................... . 2.9
Power Save ................................................... . 2.9
Toll Save ...................................................... 2.10
S
TARTED
ii
Page 4

Chapter 3:
Chapter 4:
OPYING
C
Selecting Print Media ........................................... 3.2
Paper Guidelines ................................................. 3.3
Loading Paper in Tray .......................................... 3.4
Using the Bypass Tray ......................................... 3.6
Setting the Paper Size for Copying ........................ 3.9
Selecting Paper Tray .......................................... 3.10
Setting Paper Type ............................................ 3.10
Copying a Document .......................................... 3.11
Setting Copy Options ......................................... 3.12
Image .......................................................... 3.12
Contrast ....................................................... 3.12
Copy Page .................................................... 3.13
Reduced/Enlarge Copy ................................... 3.13
Collation Copy ................................................... 3.14
Duplex Copy ..................................................... 3.15
Paper Save Copying (2-up Copy) ......................... 3.16
ENDING
S
Preparing Documents for Faxing ........................... 4.2
How to Send a Fax .............................................. 4.2
Adjusting Document Settings ............................... 4.4
Resolution .................................................... . 4.4
Contrast ....................................................... . 4.5
Image .......................................................... . 4.5
Sending a Fax Automatically ................................ 4.5
Sending a Fax Manually ....................................... 4.6
Confirming Transmission ..................................... 4.7
Using Toll Save Transmission ............................... 4.7
A
AX
F
Chapter 5:
ECEIVING
R
About Receive Mode ............................................ 5.2
Receiving Automatically in FAX Mode ..................... 5.3
Receiving Automatically in ANS/FAX Mode .............. 5.4
Receiving Manually in TEL Mode ............................ 5.5
Receiving Manually Using an Extension Telephone ... 5.5
Receiving Fax in Memory ..................................... 5.6
A
AX
F
iii
Page 5

Chapter 6:
Chapter 7:
UTOMATIC
A
One-Touch Dialling ............................................. 6.2
Storing a Number for One-Touch Dialling .......... . 6.2
Sending a Fax using a One-Touch Number ........ . 6.3
Using the One-Touch Sheet ............................. . 6.4
Speed Dialling .................................................... 6.5
Storing a Number for Speed Dialling ................. . 6.5
Sending a Fax using a Speed Number ............... . 6.6
Group Dialling .................................................... 6.7
Setting Group Dial ......................................... . 6.7
Editing Group Dial Numbers ............................ . 6.8
Sending a Fax Using Group Dialling
(Multi-Address Transmission) .......................... . 6.9
Searching for a Number in the Memory ................. 6.10
Searching Sequentially through the Memory ...... 6.10
Searching with a Particular First Letter ............. 6.10
THER
O
Redial ............................................................... 7.2
Delayed Transmission ......................................... 7.2
Memory Transmission ......................................... 7.4
Priority Transmission ........................................... 7.5
Polling ............................................................... 7.6
What is Polling? ............................................. . 7.6
TX Poll ......................................................... . 7.6
Delay RX Poll ................................................ . 7.7
Confidential Transmission .................................... 7.9
Confidential Receiving ........................................ 7.10
Setting up Mailbox for Confidential Receiving ..... 7.10
Printing Received Confidential Documents ......... 7.11
Adding Documents To a Scheduled Operation ........ 7.12
Cancelling a Scheduled Operation ........................ 7.12
Monitoring a Dual Job Status ............................... 7.13
Sending a Flash/Recall/R .................................... 7.13
Department Control Mode ................................... 7.14
Setting Department ....................................... 7.14
Printing Department Journal ............................ 7.15
Managing Department .................................... 7.16
W
AYS
IALLING
D
O
T
F
AX
iv
Page 6

Chapter 8:
Chapter 9:
DDITIONAL
A
Printing Reports ................................................. 8.2
Printing List .................................................. . 8.3
System Data Settings .......................................... 8.4
Setting System Data Option ............................ . 8.4
System Data Options ..................................... . 8.5
Setting Prefix Dial Number ................................... 8.7
Setting Fax Duplex ............................................. 8.7
Clearing Memory ................................................ 8.8
AINTENANCE
M
Expected Cartridge Life ....................................... 9.2
Replacing the Toner Cartridge .............................. 9.2
Setting to Notify Toner Low .................................. 9.6
Adjusting Shading ............................................... 9.6
Cleaning the Drum .............................................. 9.7
Replacing the Drum Cartridge .............................. 9.7
Consumables and Replacement Parts ................... 9.10
Replacing ADF Rubber Pad .................................. 9.11
EATURES
F
Chapter 10:
Chapter 11:
ROUBLESHOOTING
T
Document Jams ................................................. 10.2
Input Misfeed ................................................ 10.2
Paper Jams ....................................................... 10.3
Paper Feed Area ............................................ 10.3
Fuser Area .................................................... 10.5
Paper Exit Area ............................................. 10.8
Duplex Jam ................................................. 10.10
Bypass Jam ................................................ 10.10
Paper Jam in the Optional Tray 2 .................. . 10.11
LCD Error Messages ......................................... 10.13
Solving Problems ............................................. 10.16
Copier Problem Solution Chart ...................... . 10.16
Fax Problem Solution Chart .......................... . 10.18
Printing Problem Solution Chart ..................... 10.20
Scanning Problem Solution Chart ................... 10.23
A
PPENDIX
General Specifications ........................................ 11.2
Facsimile Specifications ..................................... 11.4
Installing Option Tray ......................................... 11.5
v
Page 7

Important Precautions and Safety Information
When using this product, these basic safety precautions should always be followed to
reduce risk of fire, electric shock, and injury to persons:
1. Read and understand all instructions.
2. Use common sense whenever operating electrical appliances.
3. Follow all warnings and instructions marked on the product and in the literature
accompanying the product.
4. If an operating instruction appears to conflict with safety information, heed the
safety information. You may have misunderstood the operating instruction. If you
cannot resolve the conflict, contact your sales or service representative for
assistance.
5. Unplug the product from the AC wall socket and/or telephone jack before
cleaning. Do not use liquid or aerosol cleaners. Use only a damp cloth for
cleaning.
6. Do not place the product on an unstable cart, stand, or table. It may fall, causing
serious damage.
7. Your product should never be placed on, near, or over a radiator, heater, air
conditioner, or ventilation duct.
8. Do not allow anything to rest on the power. Do not locate your product where the
cords will be abused by persons walking on them.
9. Do not overload wall outlets and extension cords. This can diminish performance,
and may result in the risk of fire or electric shock.
10. Do not allow pets to chew on the AC power, telephone, or PC interface cords.
11. Never push objects of any kind into the product through case or cabinet openings.
They may touch dangerous voltage points, creating a risk of fire or shock. Never
spill liquid of any kind onto or into the product.
12. You product may have a heavy cover for optimal pressure on the document for
the best scanning and/or faxing (usually the flatbed-type product). In this case,
replace the cover after placing document on the scan glass, by holding and
moving it down slowly until it seats on its location.
13. To reduce the risk of electric shock, do not disassemble the product. Take it to a
qualified service technician when repair work is required. Opening or removing
covers may expose you to dangerous voltages or other risks. Incorrect
reassembly could cause electric shock when the unit is subsequently used.
vi
Page 8

14. Unplug the product from the telephone jack, PC and AC wall outlet, and refer
servicing to qualified service personnel under the following conditions:
•When any part of the power cord, plug, or connecting cable is damaged or
frayed.
•If liquid has been spilled into the product.
•If the product has been exposed to rain or water.
• If the product does not operate properly after instructions have been followed.
•If the product has been dropped, or the cabinet appears damaged.
•If the product exhibits a sudden and distinct change in performance.
15. Adjust only those controls covered by the operating instructions. Improper
adjustment of other controls may result in damage, and may require extensive
work by a qualified service technician to restore the product to normal operation.
16. Avoid using this product during a lightning storm. There may be a remote risk of
electric shock from lightning. If possible, unplug the AC power and telephone cord
for the duration of the lightning storm.
17. SAVE THESE INSTRUCTIONS.
Laser Safety Statement
The printer is certified in the U.S. to conform to the requirements of DHHS 21 CFR,
chapter 1 Subchapter J for Class I(1) laser products, and elsewhere is certified as a
Class I laser product conforming to the requirements of IEC 825.
Class I laser products are not considered to be hazardous. The laser system and
printer are designed so there is never any human access to laser radiation above a
Class I level during normal operation, user maintenance, or prescribed service
condition.
WARNING
Never operate or service the printer with the protective cover removed from Laser/
Scanner assembly. The reflected beam, although invisible, can damage your eyes.
CAUTION - INVISIBLE LASER RADIATION WHEN THIS COVER OPEN.
DO NOT OPEN THIS COVER.
VORSICHT - UNSICHTBARE LASERSTRAHLUNG, WENN ABDECKUNG
GEÖFFNET. NICHT DEM STRAHL AUSSETZEN.
ATTENTION - RAYONNEMENT LASER INVISIBLE EN CAS D’OUVERTURE.EXPOSITION
DAN GEREUSE AU FAISCEAU.
vii
Page 9

ATTENZIONE -RADIAZIONE LASER INVISIBILE IN CASO DI APERTURA. EVITARE
L’ESPOSIZIONE AL FASCIO.
PRECAUCION -RADIACION LASER IVISIBLE CUANDO SE ABRE. EVITAR EXPONERSE
AL RAYO.
ADVARSEL - USYNLIG LASERSTRÅLNING VED ÅBNING NÅR SIKKERHEDSBRYDERE
ER UDE AF FUNKTION. UNDGÅ UDSAETTELSE FOR STRÅLNING.
ADVARSEL - USYNLIG LASERSTRÅLNING NÅR DEKSEL ÅPNES. STIRR IKKE INN I
STRÅLEN. UNNGÅ EKSPONERING FOR STRÅLEN.
VARNING - OSYNLIG LASERSTRÅLNING NÄR DENNA DEL ÄR ÖPPAND OCH SPÄRREN
ÄR URKOPPLAD. BETRAKTA EJ STRÅLEN. STRÅLEN ÄR FARLIG.
VARO! - AVATTAESSA JA SUOJALUKITUS OHITETTAESSA OLET ALTTIINA
NÄKYMÄTTÖMÄLLE LASERSÄTEILYLLE ÄLÄ KATSO SÄTEESEEN.
Ozone Safety
Power Saver
During normal operation, this product produces ozone. The
ozone produced does not present a hazard to the operator.
However, it is advisable that the product be operated in a well
ventilated area.
If you need additional information about ozone, please request
your nearest Samsung dealer.
This product contains advanced energy conservation
technology that reduces power consumption when it is not
in active use.
When the product does not receive data for an extended
period of time, power consumption is automatically
lowered.
The energy star emblem does not represent EPA
endorsement of any product or service.
viii
Page 10

Radio Frequency Emissions
FCC Information to the User
This equipment has been tested and found to comply with the limits for a Class A
digital device, pursuant to Part 15 of the FCC Rules. These limits are designed to
provide reasonable protection against harmful interference when the equipment is
operated in a commercial environment. This equipment generates, uses and can
radiate radio frequency energy and, if not installed and used in accordance with the
instruction manual, may cause harmful interference to radio communications.
Operation of this equipment in a residential area is likely to cause harmful
interference in which case the user will be required to correct the interference at his
own expense.
Canadian Radio Interference Regulations
This digital apparatus does not exceed the Class A limits for radio noise emissions
from digital apparatus as set out in the interference-causing equipment standard
entitled “Digital Apparatus”, ICES-003 of the Industry and Science Canada.
Cet appareil numérique respecte les limites de bruits radioélectriques applicables aux
appareils numériques de Classe A prescrites dans la norme sur le matériel brouilleur:
“Appareils Numériques”, ICES-003 édictée par l’Industrie et Sciences Canada.
Fax Branding
The Telephone Consumer Protection Act of 1991 makes it unlawful for any person to
use a computer or other electronic device to send any message via a telephone
facsimile machine unless such message clearly contains in a margin at the top or
bottom of each transmitted page or on the first page of the transmission the following
information:
(1) the date and time of transmission
(2) identification of either business, business entity or individual sending the
message; and
(3) telephone number of either the sending machine, business, business entity or
individual.
Refer to the Facsimile User’s Guide for instructions on how to enter this information
into your product’s memory.
ix
Page 11

The Telephone Company may make changes in its communications facilities,
equipment operations, or procedures where such action is reasonably required in the
operation of its business and is not inconsistent with the rules and regulations in FCC
Part 68. If such changes can be reasonably expected to render any customer terminal
equipment incompatible with telephone company communications facilities, or
require modification or alteration of such terminal equipment, or otherwise materially
affect its use or performance, the customer shall be given adequate notice in writing,
to allow the customer an opportunity to maintain uninterrupted service.
Ringer Equivalence Number
The Ringer Equivalence Number and FCC Registration Number for this product may
be found on the label located on the bottom or rear of the product. In some instances
you may need to provide these numbers to the telephone company.
The Ringer Equivalence Number (REN) is a measure of the electrical load placed on
the telephone line, and is useful for determining whether you have “overloaded” the
line. Installing several types of equipment on the same telephone line may result in
problems making and receiving telephone calls, especially ringing when your line is
called. The sum of all Ringer Equivalence Numbers of the equipment on your
telephone line should be less than five in order to assure proper service from the
telephone company. In some cases, a sum of five may not be usable on your line. If
any of your telephone equipment is not operating properly, you should immediately
remove it from your telephone line, as it may cause harm to the telephone network.
WARNING:
FCC Regulations state that changes or modifications to this equipment not expressly
approved by the manufacturer could void the user’s authority to operate this
equipment. In the event that terminal equipment causes harm to the telephone
network, the telephone company should notify the customer that service may be
stopped. However, where prior notice is impractical, the company may temporarily
cease service, providing that they:
a) Promptly notify the customer.
b) Give the customer an opportunity to correct the equipment problem.
c) Inform the customer of the right to bring a complaint to the Federal
Communication Commission pursuant to procedures set out in FCC Rules and
Regulations Subpart E of Part 68.
x
Page 12

You should also know that:
• Your product is not designed to be connected to a digital PBX system.
• If you intend to use a computer modem or fax modem on the same phone line as
your product, you may experience transmission and reception problems with all
the equipment. It is recommended that no other equipment, except for a regular
telephone, share the line with your product.
• If your area experiences a high incidence of lightning or power surges, we
recommend that you install surge protectors for both the power and the telephone
lines. Surge protectors can be purchased from your dealer or telephone and
electronic specialty stores.
• When programming emergency numbers and/or making test calls to emergency
numbers, use a non-emergency number to advise the emergency service
dispatcher of your intentions. The dispatcher will give you further instructions on
how to actually test the emergency number.
• This product may not be used on coin service or party lines.
• This product provides magnetic coupling to hearing aids.
• You may safely connect this equipment to the telephone network by means of a
standard modular jack, USOC RJ-11C.
Declaration of Conformity (European Countries)
Approvals and Certifications
The CE marking applied to this product symbolises Samsung Electronics Co., Ltd.
Declaration of Conformity with the following applicable 93/68/EEC Directives of the
European Union as of the dates indicated:
January 1, 1995 : Council Directive 73/23/EEC Approximation of the laws of the
member states related to low voltage equipment.
January 1, 1996 : Council Directive 89/336/EEC (92/31/EEC), approximation of the
laws of the Member States related to electromagnetic compatibility.
March 9, 1999 : Council Directive 1999/5/EC on radio equipment and
telecommunications terminal equipment and the mutual recognition of their
conformity.
A full declaration, defining the relevant Directives and referenced standards can be
obtained from your Samsung Electronics Co., Ltd. representative.
xi
Page 13

EC Certification
Certification to 1999/5/EC Radio Equipment & Telecommunications
Terminal Equipment Directive (FAX)
This Samsung product has been self-certified by Samsung for pan-European single
terminal connection to the analogue public switched telephone network (PSTN) in
accordance with Directive 1999/5/EC. The product has been designed to work with
the national PSTNs and compatible PBXs of the European countries:
In the event of problems, you should contact the Euro QA Lab of Samsung Electronics
Co., Ltd. in the first instance.
The product has been tested against TBR21. To assist in the use and application of
terminal equipment which complies with this standard, the European
Telecommunication Standards Institute (ETSI) has issued an advisory document (EG
201 121) which contains notes and additional requirements to ensure network
compatibility of TBR21 terminals. The product has been designed against, and is fully
compliant with, all of the relevant advisory notes contained in this document.
Replacing the Fitted Plug (for UK Only)
I
MPORTANT
The mains lead for this machine is fitted with a standard (BS 1363) 13 amp plug and
has a 13 amp fuse. When you change or examine the fuse, you must re-fit the correct
13 amp fuse. You then need to replace the fuse cover. If you have lost the fuse cover,
do not use the plug until you have another fuse cover.
Please contact the people from you purchased the machine.
The 13 amp plug is the most widely used type in the UK and should be suitable.
However, some buildings (mainly old ones) do not have normal 13 amp plug sockets.
You need to buy a suitable plug adaptor. Do not remove the moulded plug.
W
ARNING
If you cut off the moulded plug, get rid of it straight away.
You cannot rewire the plug and you may receive an electric shock if you plug
it into a socket.
xii
Page 14

I
MPORTANT WARNING
: You must earth this machine.
The wires in the mains lead have the following colour code:
• Green and Yellow: Earth
• Blue: Neutral
• Brown: Live
If the wires in the mains lead do not match the colours marked in your plug, do the
following:
You must connect the green and yellow wire to the pin marked by the letter `E', or
by the safety `Earth symbol' or coloured green and yellow or green.
You must connect the blue wire to the pin which is marked with the letter `N' or
coloured black.
You must connect the brown wire to the pin which is marked with the letter `L' or
coloured red.
You must have a 13 amp fuse in the plug, adaptor, or at the distribution board.
xiii
Page 15

xiv
Page 16

1
INSTALLATION
This chapter provides step-by-step instructions on
setting up the product.
This chapter includes:
• Unpacking
• Component Location
• Control Panel Functions
• Making Connections
• Installing Drum and Toner Cartridges
• Turning the Product On
• Loading Paper
• Using Paper Supports
Page 17

Unpacking
1
Remove the shipping tapes from the front, back, and sides
of the product. Remove the cushion.
Tape
cushion
2
Pull open the tray and remove the packing material from
the tray.
3
Ensure that you have the following:
1.2
I
NSTALLATION
USB Cable*
Telephone Line Cord
2
*
AC Power Cord
1
*
TAM Lead
(For UK only)
1
Page 18

1
This User’s Guide,
Quick Install Guide,
MFP User’s Guide*
SmarThru User’s Guide*
Toner Cartridge Drum Cartridge
Adress Paper
2
,
2
Software CD*
2
*1 The appearance of the power cord and the telephone line cord vary
according to countries.
2
*
These items are provided with Msys 835P/SF-835P only.
I
NSTALLATION
1.3
Page 19

Component Location
Take a moment to familiarise yourself with the main components
of your product.
Front View
Document
Output Tray
Control Panel
Automatic
Document Feeder
Document Input Tray
Document
Guides
Side Cover
Bypass Tray
1.4
Tray
I
NSTALLATION
Front Cover
Release
Lever
Tray2
(Option)
Page 20
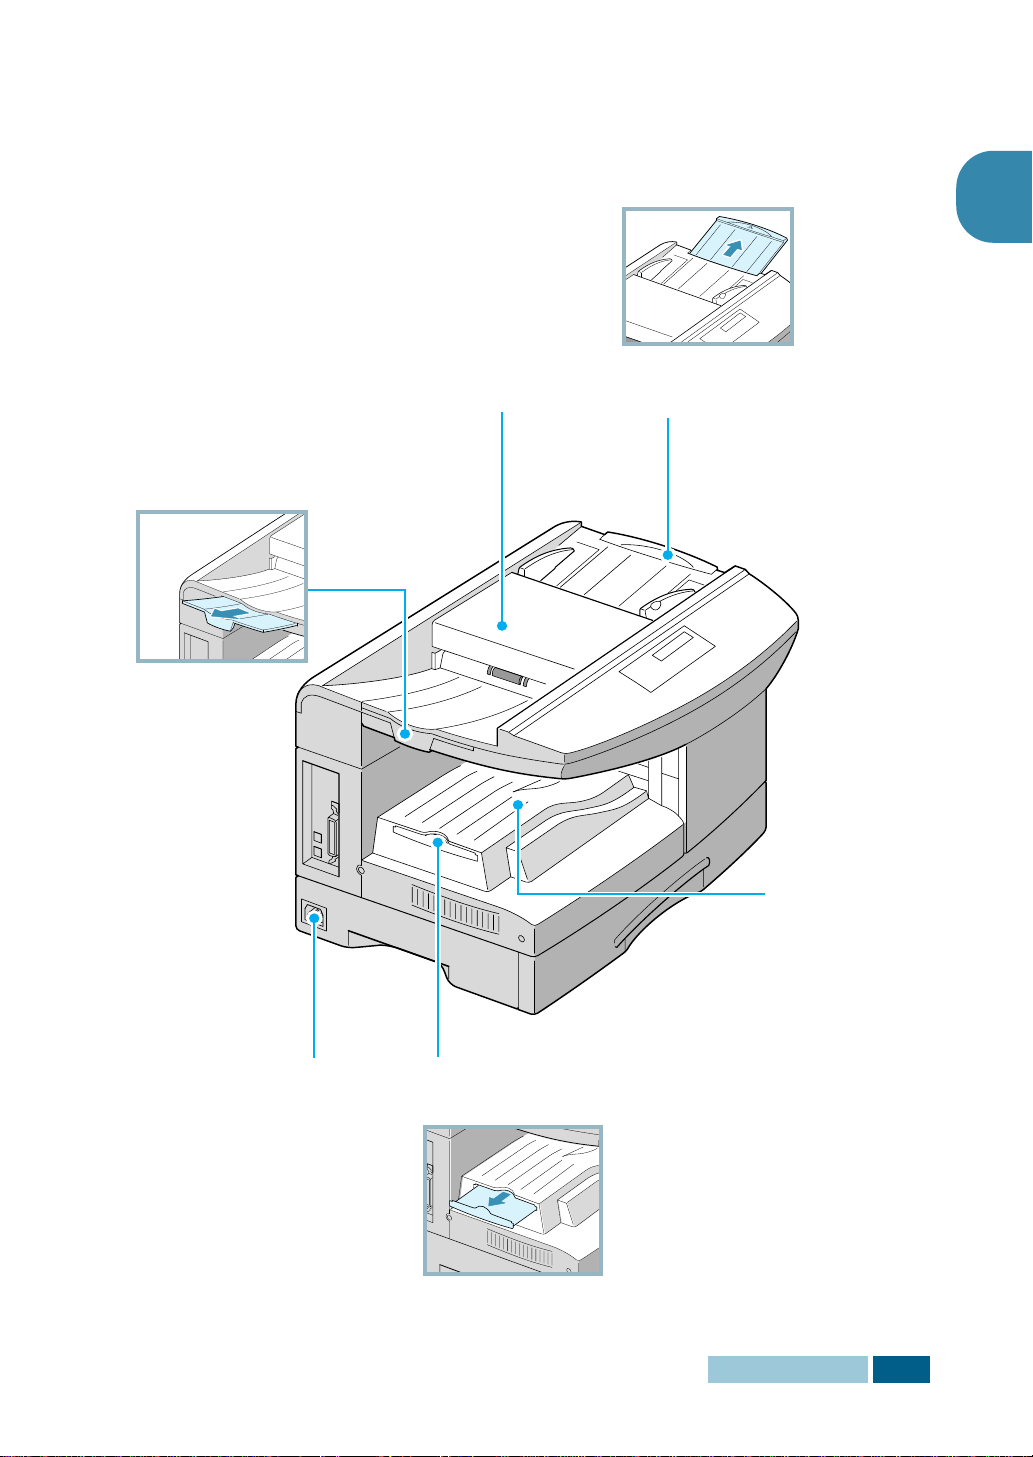
Side View
1
Document Output
Support
Printer cable
Connectors
(Msys 835P/
SF-835P only)
Telephone
Connections
Automatic
Document Feeder
Document Input
Support
Paper
Output
Tray
AC Power Cord
Connector
Paper Output
Support
I
NSTALLATION
1.5
Page 21
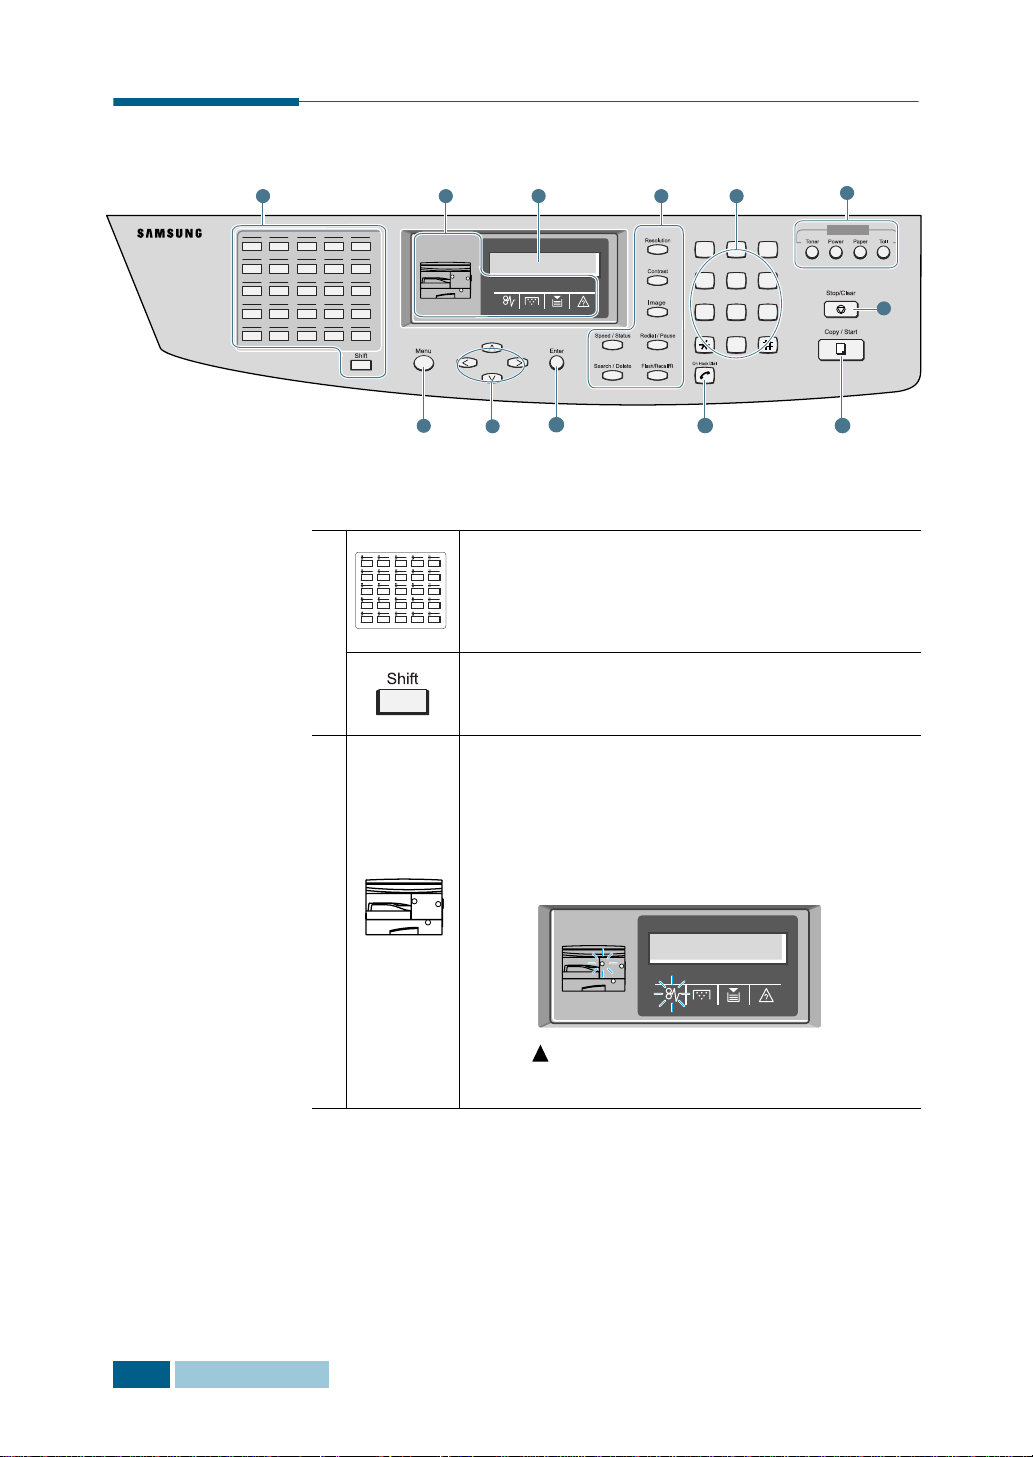
Control Panel Functions
VE
260127022803290430
310632073308340935
361137123813391440
411642174318441945
462147224823492450
1
2 51 4
05
10
15
20
25
7
3
ABC DEF
123
JKLGHI MNO
456
TUVPQRS WXYZ
789
Symbols
0
8
9
6
SAVE
12
1110
Use to store frequently dialled fax number and
dial them with a touch of the buttons. Also use
in conjunction with the
Menu
button to access
the corresponding menu functions.
Allows you to shift one-touch buttons to the
locations 26 through 50.
When an error occurs, the lamp in the
corresponding location on the Status map turns
on as well as the error indicator, and the error
message appears on the display so that you can
locate the error. For details on the meaning of
the error messages, see page 10.13.
1.6
I
NSTALLATION
2
(status map)
DUPLEX JAM 2
CHECK INSIDE
ex) The paper is jammed in the
exit area.
Page 22

2
(Error
indicators)
Turns on when a paper jam occurs. To clear
the jam, see page 10.3.
Turns on when the toner or drum almost
runs out. To replace the toner or drum
cartridge, see page 9.2 and page 9.7.
Turns on when the input tray you are
using is empty. To load paper, see page
1.15.
Turns on when an error occurs on the
system.
1
3
4
Displays the current status and prompts during
operation.
Adjust the resolution of the documents for the
current job.
Use to adjust the contrast of the documents for
the current job.
Use to select the text type for the current job.
Use to search for number in memory. Also use
to delete digit in the edit mode.
Use to store frequently dialled fax number and
dial them using the speed number. Also use to
display alternatively the currently active and
pending jobs.
Redials the last number in Standby mode or
insert a pause into a fax number in the edit
mode.
Use to perform a switch-hook operation such as
call waiting.
5
Use to dial a number or enter alphanumeric
characters.
I
NSTALLATION
1.7
Page 23

6
Allows you to save toner by using less toner to
print a document.
Allows you to save power by reducing power
consumption when not printing.
8
S
A
V
E
7
9
Allows you to save paper by printing 2 pages on
a single sheet of paper (available in the Copy
mode only).
Allows you to save on call costs by sending a
fax during a preset toll save time. By using this
feature, you can take advantage of lower long
distance rates at night, for example.
Enters the menu functions in conjunction with
the one-touch buttons. Also backs you up to the
previous menu level or exits the menu.
Scrolls though the menu items.
*
Scrolls though the option available for the
selected menu item. In the Copy mode,
allows you to change the zoom rate and to
change the number of copies.
Confirms the selection on the display.
1.8
I
NSTALLATION
10
11
12
*Navigation buttons
Engages the telephone line.
Use to start a job. And, shows the copy options
if you press this button after loading document.
Use to
stop an operation at any time.
Page 24

Making Connections
1
Connect the supplied telephone line to the LINE jack and
the other end to the wall jack.
2
If you want to use your product for receiving both faxes and
voice calls, you will need to connect a telephone and/or
answering machine to your product.
Plug the cord of your extension phone or answering
machine into the EXT jack.
1
N
OTES
:
• For UK users, it is strongly recommended to use the TAM lead
and the telephone line cord supplied with your product.
• If you are replacing the line cord with other manufacturer’s, it
should be AWG #26 or lower guage.
I
NSTALLATION
1.9
Page 25

3
(For Msys 835P/SF-835P Users only) Connect the USB
cable which came with your product.
If you want to use a parallel printer cable, purchase only
IEEE-1284 compliant parallel cable and connect it to the
parallel connector on your product.
1.10
I
NSTALLATION
N
OTES
:
• You only need to connect one of the above cables.
• If you are using a USB cable, you must be running Windows 98/
Me/2000/XP.
• When using USB connection, your product provides two USB
modes: Fast and Slow. Fast is the default mode. Some PC user
may experience poor USB implementation in the default mode. If
this occurs, select Slow mode to achieve successful results. For
details on changing USB mode, see page 10.21.
Page 26
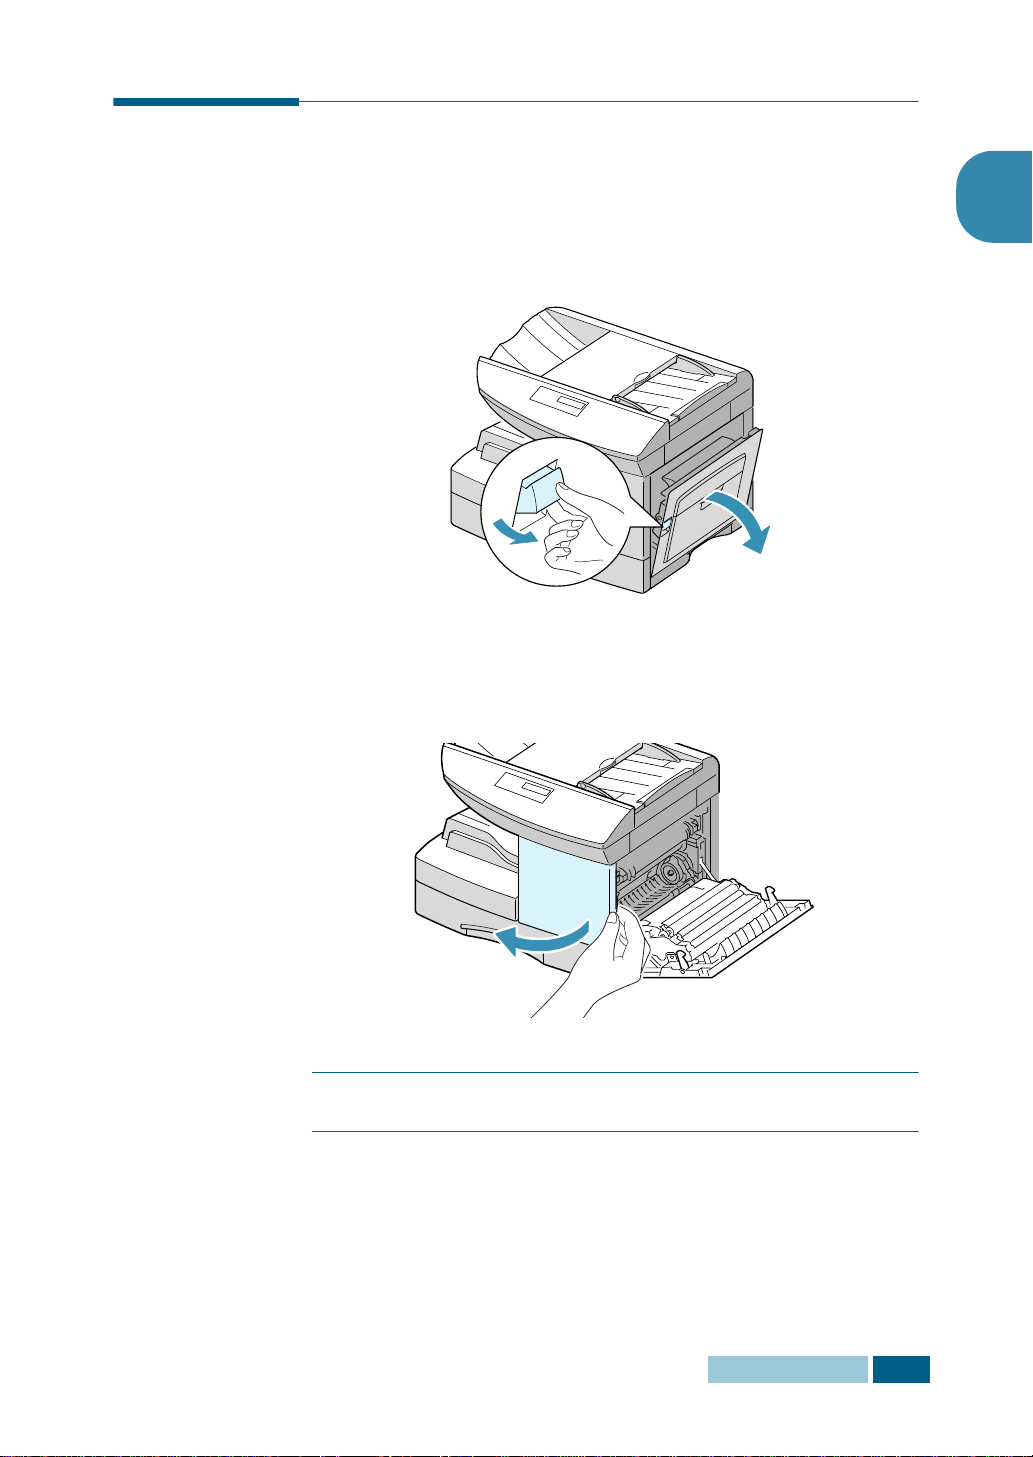
Installing Drum and Toner Cartridges
1
Pull the release lever to open the side cover.
2
Open the front cover.
1
C
AUTION
front cover.
:
Ensure that the side cover is open before opening the
I
NSTALLATION
1.11
Page 27

3
If the cartridge locking lever is on the lower position, turn
the lever upward until it locks into place.
4
Remove the drum cartridge from its bag and slide it into the
product firmly until it locks into place completely.
1.12
I
NSTALLATION
5
Remove the toner cartridge from its bag. Gently shake the
cartridge to loosen the toner.
Thoroughly shaking the cartridge will assure maximum
copies per cartridge.
Page 28

6
Slide the toner cartridge into the product aligning the
cartridge to the left of the slot until it locks into place
completely.
7
Turn the cartridge locking lever downwards until it locks into
place.
1
8
Close the front cover first and then the side cover next.
2
1
I
NSTALLATION
1.13
Page 29

N
OTE
:
When the drum or toner cartridge needs to be replaced,
the display indicates the corresponding message with the error
indicator. Refer to the list of error messages on page 10.13.
To replace the drum and toner cartridges, see page 9.2 and page
9.7 respectively.
Turning the Product On
Plug one end of the supplied three-wire electrical grounding type
cord into the AC socket on the product and the other end into a
properly grounded AC outlet.
1.14
I
NSTALLATION
“WARMING UP PLEASE WAIT...” appears on the display
indicating the product is on.
To view your display text in another language, see page 2.2.
Page 30
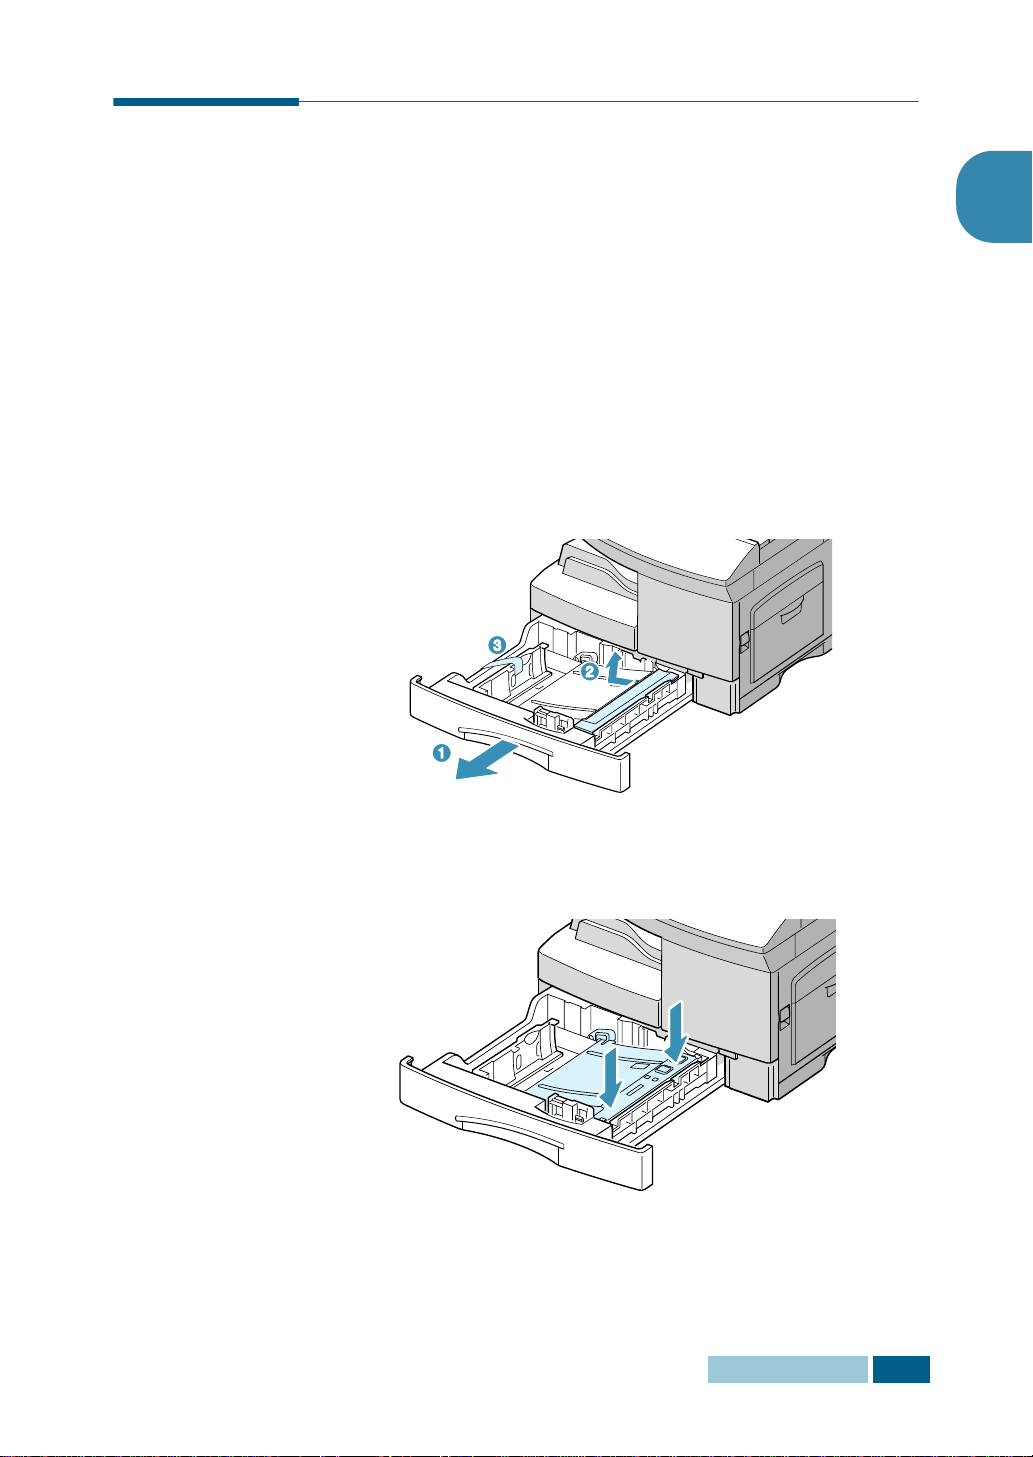
Loading Paper
The tray (Tray 1) can hold a maximum of 550 sheets of 20lb
plain paper. You can use A4-, letter-, folio- and legal-size paper.
If you purchase an optional tray (Tray 2) and attach it below the
Tray 1, you can also load paper in the Tray 2.
Using Tray 1
1
Pull open the Tray 1. Remove the cushion and the shipping
tape.
1
2
Push down on the pressure plate until it locks in position.
I
NSTALLATION
1.15
Page 31

3
LGL
FOLIO
A4
LTR
Adjust the rear paper guide to the desired paper length. It
is preset to Letter or A4 size depending on country. To load
another size, lift and insert the rear guide into the
corresponding position.
Rear guide
To remove and insert the rear guide, turn it slightly to your
right side then lift it. While holding the rear guide at 70
angle, insert it into the corresponding position and push it
to your left side until it stands up completely.
o
1.16
I
NSTALLATION
4
Prepare a stack of paper or envelope for loading by flexing
or fanning them back and forth. Straighten the edges on a
level surface.
Page 32

5
Fan the paper and insert it into the tray.
6
Ensure that the paper corners are under the corner
snubbers.
1
Do not fill above the max fill line.
Max Fill Line
Corner
snubber
I
NSTALLATION
1.17
Page 33

7
While squeezing the side guide as shown, move it toward
the stack of paper until it lightly touches the side of the
stack. Do not too tightly to press the guide the edge of the
paper; the guide may bend the paper.
Side guide
8
Close the Tray 1.
Using Tray 2(Option)
The optional tray can also hold a maximum of 550 sheets of 20lb
plain paper.
To load paper in the Tray 2, follow the instruction to load paper
in the Tray 1 on page 3.4.
1.18
I
NSTALLATION
Page 34

Using Paper Supports
The following supports are built in the product. Pull them out to
support the paper. You can fold them in to save space when not
in use.
Document Input Support
supports the document loaded in the document input tray.
Document Output Support
supports the documents stacked in the document output tray.
1
Paper Output Support
supports the paper stacked in the paper output tray.
I
NSTALLATION
1.19
Page 35

N
OTE
1.20
I
NSTALLATION
Page 36

2
GETTING STARTED
The following topics are included:
• Changing the Display Language
• Setting System ID
• Setting Date and Time
• Setting the Paper Size
• Setting Sounds
• Using Save Mode
Page 37

Changing the Display Language
1
Press Menu and then or repeatedly until “SYSTEM
SETUP” appears on the display, then press Enter.
2
Press or until you see “SELECT LANGUAGE” on the
display. The current setting is displayed on the lower line.
3
Press or to display the desired language.
4
Press Enter to save the selection.
5
To return to Standby mode, press Stop/Clear.
Setting System ID
In some countries you are required by law to indicate your fax
number on any fax you send. The System ID, containing your
telephone number and name (or company name), will be printed
at the top of each page sent from your product.
2.2
G
ETTING STARTED
1
Press Menu and then or repeatedly until “SYSTEM ID”
appears on the display, then press Enter. The LCD display
asks you to enter the fax number.
If there is a number already set, the number appears.
Enter your fax telephone number using the number keypad.
You can include the + symbol in the phone number by
pressing the button and insert a space by pressing the #
button.
N
OTE
:
If you make a mistake while entering numbers, press at
the end of the entries to delete the last digit or press Search/
Delete to delete all digits you entered.
When the cursor is in the first digit or in the middle of the number,
you can use or to move the cursor under the wrong digit
to correct.
Page 38

2
Press Enter when the number on the LCD display is correct.
The LCD display asks you to enter the ID.
3
Enter your name or company name by using the number
keypad.
You can enter alphanumeric characters using the number
keypad, and include special symbols by pressing 0
repeatedly.
For details on how to use the number keypad to enter
alphanumeric characters, see “Entering Characters Using
the Number Keypad” on page 2.3.
If you want to enter the same letter or number in
succession (e.g. SS, AA, 777), enter one digit, move the
cursor by pressing the
If you want to insert a space in the name, you can also use
the
button to move the cursor to skip the position.
button, and enter the next digit.
2
4
Press Enter when the name on the LCD display is correct.
5
Press Stop/Clear to return to Standby mode.
Entering Characters Using the Number Keypad
As you perform various tasks, you’ll need to enter names and
numbers. For example, when you set up your product, you enter
your name (or your company’s name) and telephone number.
When you store one-touch, speed dial or group dial number, you
may also enter the corresponding names.
To enter alphanumeric characters:
1
When prompted to enter a letter, locate
the button labelled with the character
you want. Press the button repeatedly
until the correct letter appears on the
LCD display.
For example, to enter the letter O,
press 6, (labelled MNO).
G
ETTING STARTED
2.3
Page 39

Each time you press 6, the LCD display shows a different
letter, first M, then N and O, and finally 6.
You can enter special characters (space, plus sign, etc.). For
details, see “Keypad Character Assignment” on page 2.4.
2
To enter additional letters, repeat Step 1.
If the next letter is printed on the same button, move the
cursor by pressing
and then press the button labelled
with the letter you want. The cursor moves right and the
next letter appears on the LCD display.
3
When you finish entering letters, press Enter.
Keypad Character Assignment
Key Assigned numbers, letters or characters
Space 1
1
A B C 2
2
D E F 3
3
G H I 4
4
J K L 5
5
M N O 6
6
P Q R S 7
7
T U V 8
8
W X Y Z 9
9
+ - , . ‘ / * # & 0
0
Editing Numbers or Names
If you make a mistake while entering number or name, press
at the end of the entries to delete the last digit or press Search/
Delete to delete all digits you entered. Then enter correct
numbers or characters.
When the cursor is in the first digit or in the middle of the
number, you can use or to move the cursor under the
wrong digit to correct.
2.4
G
ETTING STARTED
Page 40

Inserting a Pause
With some telephone systems, you must dial an access code (9
for example) and listen for a second dial tone. In such cases,
you must insert a pause in the telephone number. You can insert
a pause while you are setting up one-touch dial, or speed dial
number.
To insert a pause, press Redial/Pause at the appropriate place
while entering the telephone number. A “–” will appear on the
LCD display at the corresponding location.
Setting Date and Time
The current time and date are shown on the LCD display when
the product is on and ready for fax (Standby mode). The time
and date are printed on all faxes you send.
Note: If power to the product is cut off for over 30 minutes, when
power is restored, the product prompts you to reset time and date.
2
1
Press Menu and then or repeatedly until “DATE &
TIME” appears on the display, then press Enter.
2
Enter the correct time and date using the number keypad.
Day = 01 ~ 31
Month = 01 ~ 12
Year = requires the four digits
Hour = 00 ~ 23(24-hour mode)
01 ~ 12(12-hour mode)
Minute = 00 ~ 59
You can also use or to move the cursor under the digit
you want to correct, and enter a new number.
3
To select AM or PM for 12-hour format, press or .
You can change the clock mode to 24-hour format (e.g.
01:00 PM as 13:00). For details, see page 8.6.
G
ETTING STARTED
2.5
Page 41

4
Press Enter when the time and date on the LCD display is
correct.
If you enter an invalid number, the product beeps and does
not proceed to the next step. If this happens, just re-enter
the correct number.
The USA format will be displayed in the order of month,
day, then year. But Europe format will be displayed in the
order of day, month, year.
The LCD display shows the time and date you have set, and
returns to Standby mode.
Current date
MAR-20-2002 100%
09:00AM FAX
Current time
Remaining memory
Appears in
12-hour format.
Fax receive mode.
For details, see
page 5.2.
Setting the Paper Size
After loading paper in the Tray1, you have to set the paper size
using the control panel buttons.
1
Press Menu and then or repeatedly until “SYSTEM
DATA” appears on the display, then press Enter.
The display shows “TRAY PAPER” on the top line and the
available options on the bottom line.
2
Use
or
Enter to save the selection.
You can press the corresponding number shown on the
display to select the paper size.
3
To return to Standby mode, press Stop/Clear.
to select the paper size you are using, and press
2.6
G
ETTING STARTED
Page 42

Setting Sounds
You can control the following sounds:
• Ringer Volume - You can adjust the ringer volume.
• Alarm Sound - You can turn the alarm sound on or off. With
this option set to “ON,” alarm tone sounds when an error
occurs or fax communication ends.
• Key Sound - With this option set to “ON,” key tone sounds
each time any key is pressed.
• Speaker Control - You can turn on or off the speaker. With
this option set to “COM,” the speaker is on until the remote
machine answers.
• Speaker Volume - You can adjust the volume of the speaker
to the desired loudness.
Ringer Volume, Alarm Sound, Key Sound, Speaker Control
1
Press Menu and then or repeatedly until “SYSTEM
SETUP” appears on the display, then press Enter.
2
2
Press or to scroll through the options. Press until you
see the desired option, then press Enter.
3
Press or to display the desired status or loudness for
the option you have selected.
You’ll see the selection on the lower line of the LCD display.
For ringer volume, 10 levels are available. You’ll also hear
the selected loudness. Setting to the left end turns the
ringer off. The product will work normally even if the ringer
is set to off.
4
Press Enter to save the selection. The next system setup
option appears.
5
If necessary, repeat steps 2 to 4. To return to Standby
mode, press Stop/Clear.
G
ETTING STARTED
2.7
Page 43

Speaker Volume
1
Press On Hook Dial. You’ll hear dial tone.
2
Press or repeatedly until you find the desired
loudness. You can select the level from 0 to 7. The LCD
display shows the current volume level.
The setting will be stored automatically.
3
Press Stop/Clear to return to Standby mode.
Using Save Mode
Toner Save
Toner Save feature allows the printer to use less toner on each
page. Activating this mode will extend the life of the toner
cartridges longer than normal mode, but will reduce the print
quality.
To turn the Toner Save mode on, take the following steps:
1
Press SAVE Toner. The display shows the current setting
on the bottom line.
2
Press SAVE Toner or use the navigation buttons to change
the setting.
To enable the Toner Save mode on, select “ON.” The button
backlight is on. To disable the mode, select “OFF.” The
button backlight is off.
3
Press Enter to save the selection.
2.8
G
ETTING STARTED
Page 44

Paper Save
If you press the SAVE Paper button before pressing Copy/
Start, the product prints 2 pages on a single sheet of paper to
save paper. To turn this feature on, take the following steps:
1
Press SAVE Paper. The display shows the current setting
on the bottom line.
2
Press SAVE Paper or use the navigation buttons to change
the setting. To enable the Paper Save mode, select “ON.” Or
select “OFF” to disable the mode.
3
Make the desired copy setting, and press Copy/Start.
If no copy job is implemented in some minutes after you
enable the Paper Save mode, the product automatically
clears 2-up copy mode and get into the normal copy mode.
Power Save
The Power Save mode allows the printer to reduce power
consumption when it is not in actual use. To turn the Power Save
mode on, take the following steps:
2
1
Press SAVE Power. The display shows the current setting
on the bottom line.
2
Press SAVE Power or use the navigation buttons to change
the setting. To enable the Power Save mode, select “ON.” Or
select “OFF” to disable the mode.
You can further select the length of time the product waits after
a job is printed before it switches to a reduced power state.
1
Press and hold the SAVE Power button.
2
The available time settings appear on the display and the
current setting blinks. The available options are 5, 10, 15,
30, and 45 (minutes). Press
desired time blinks.
3
Press Enter to save the selection.
4
To return to Standby mode, press Stop/Clear.
the navigation buttons
until the
G
ETTING STARTED
2.9
Page 45

Toll Save
The Toll Save mode allows you to save the toll for the telephone
call by transmitting the document stored in memory during the
time slot when the call charge is discounted.
To use the toll save transmission, you must preset the toll save
time and then send a fax by using the SAVE Toll button.
For details, see see “Using Toll Save Transmission” on page 4.7.
2.10
G
ETTING STARTED
Page 46

3
COPYING
This chapter introduces you to the basics of selecting print
media and loading print media into your product.
This chapter includes:
• Selecting Print Media
• Paper Guidelines
• Loading Paper in Tray
• Using the Bypass Tray
• Setting the Paper Size for Copying
• Selecting Paper Tray
• Setting Paper Type
• Copying a Document
• Setting Copy Options
• Collation Copy
• Duplex Copy
• Paper Save Copying (2-up Copy)
Page 47

Selecting Print Media
Always use print media that meets the guidelines for use with
this product. Using a print media that is not recommended may
cause paper jams or print quality problems.
Media Size Input Sources and Capacities
Media Size
Plain paper
Letter (8.5 x 11 in.)
Legal (8.5 x 14 in.)
Executive (7.25 x 10.5 in.)
A4 (210 x 297 mm)
B5 (182 x 257 mm)
A5 (148 x 210 mm)
Folio (8.5 x 13 in.)
Envelopes
No. 10 (4.12 x 9.5 in.)
C5 (162 x 229 mm)
DL (110 x 220 mm)
B5 (176 x 250 mm)
Monarch (3.87 x 7.5 in.)
Labels
b
Letter (8.5 x 11 in.)
A4 (210 x 297 mm)
Transparency films
b
Letter (8.5 x 11 in.)
A4 (210 x 297 mm)
Input Source/Capacity
Tray1 or Tray2 Bypass Tray
YES/550
YES/550
NO/0
YES/550
NO/0
NO/0
YES/550
NO/0
NO/0
NO/0
NO/0
NO/0
NO/0
NO/0
NO/0
NO/0
YES/100
YES/100
YES/100
YES/100
YES/100
YES/100
YES/100
YES/10
YES/10
YES/10
YES/10
YES/10
YES/10
YES/10
YES/30
YES/30
a
3.2
C
OPYING
Card stocks
A6 (4.13 x 5.88 in.)
Post Card (4 x 6 in.)
Hagaki (5.83 x 8.27 in.)
a. Depending on paper thickness, maximum capacity may be reduced.
b. If you are experiencing excessive jamming, feed one sheet at a time through
the Bypass Tray.
b
NO/0
NO/0
NO/0
YES/10
YES/10
YES/10
Page 48

Paper Guidelines
When selecting or loading paper, envelopes, or other special
media, keep these guidelines in mind:
• Attempting to print on damp, curled, wrinkled, or torn paper
can cause paper jams and poor print quality.
• Use only high quality copier grade paper. Avoid paper with
embossed lettering, perforations, or texture that is too
smooth or too rough.
• Store paper in its ream wrapper until ready to use. Place
cartons on pallets or shelves, not on the floor. Do not place
heavy objects on top of the paper, whether it is packaged or
unpackaged. Keep it away from moisture, or other conditions
that can cause it to wrinkle or curl.
• During storage, moisture-proof wrap (any plastic container or
bag) should be used to prevent dust and moisture from
contaminating your paper.
• Always use paper and other media that conform with those
listed on page 3.2.
• Use only well-constructed envelopes with sharp, well creased
folds.
- DO NOT use envelopes with clasps and snaps.
- DO NOT use envelopes with windows, coated lining,
self-adhesive seals, or other synthetic materials.
- DO NOT use damaged or poorly made envelopes.
3
• It is recommended that you feed special paper types one
sheet at a time.
• Only use the special media recommended for use in laser
printers.
• To prevent special media such as transparencies and label
sheet sticking together, remove them from the exit tray as
they are printed.
• Place transparencies on a flat surface after removing them
from the product.
• Do not leave the film in the paper tray for long periods of
time. Dust and dirt may accumulate on the film resulting in
spotty printing.
• To avoid smudging caused by fingerprints, handle
transparency film and coated paper carefully.
• To avoid fading, do not expose the printed film to prolonged
sunlight.
C
OPYING
3.3
Page 49

• Store unused media at temperatures between 59oF and 86oF
o
(15
C to 30oC). The relative humidity should be between 10%
and 70%.
• Do not load more than 10 sheets of special media into the
Bypass Tray at a time.
• Verify that the labels’ adhesive material can tolerate fusing
temperature of 392
o
F (200oC) for 0.1 second.
• Make sure that there is no exposed adhesive material
between the labels. Exposed areas can cause labels to peel
off during printing, which can cause paper jams. Exposed
adhesive can also cause damage to product components.
• Do not feed a sheet of labels through the product more than
once. The adhesive backing is designed for one pass through
the product.
• Do not use labels that are separating from the backing sheet
or are wrinkled, bubbled, or otherwise damaged.
Loading Paper in Tray
The Tray 1 can hold a maximum of 550 sheets of 20lb plain
paper. You can use A4-, letter-, folio and legal-size paper.
If you purchase an optional tray and attach it below the standard
Tray 1, you can also load paper in the optional Tray 2.
To load paper, pull open the Tray 1 or the tray 2 and load paper
with the print side facing up.
3.4
C
OPYING
Page 50

You can load letterhead paper with the design side facing up.
The top edge of the sheet with the logo should be placed at the
right side.
For details on loading paper in the tray, see page 3.4.
After loading paper in the tray, you have to set the correct paper
size using the control panel buttons. See page 3.9.
3
N
OTES
:
• If you experience problems feeding paper, place the paper in the
Bypass tray.
• When printing on the used
paper from the tray, you can
load up to 300 sheets. The
printed side should be facing
down and the edge without curl
at the right side. If you
experience problems on
feeding paper, turn the paper
around. Note that the print
quality is not guaranteed.
C
OPYING
3.5
Page 51

Using the Bypass Tray
The Bypass tray is located at the right side of your product. It
can be closed when you are not using it, making the product
more compact.
Use the bypass tray to print transparencies, labels, envelopes or
postcards in addition to making quick runs of paper types or
sizes that are not currently loaded in the tray.
Acceptable print media are plain paper with sizes ranging from
3x5, to Legal 8.5 x 14 inch, the largest size acceptable, and
weighing between 16lb and 43lb.
The following table summarizes the print media allowed as well
as their stacking height limit.
Paper Type Stacking Height Limit
Plain Paper
Envelope
Transparency
Label
Cardstock
a.The height is measured with the stack of sheets laid, without being touched
by hands, on a flat surface.
Notes:
• Always load only the print media specified in Specifications to
avoid paper jams and print quality problems.
• Do not hit the bypass tray or rest your hands on it; otherwise the
tray may be damaged or detached from the product.
• Remove any curl on postcards, envelopes, and labels before
loading them into the multi-sheet bypass feeder.
100 sheets or 9mm (max)
10 envelopes or 9mm (max)
30 sheets or 9mm (max)
10 sheets or 9mm (max)
10 sheets or 9mm (max)
a
a
a
a
a
3.6
C
OPYING
Page 52

To load print media in the Bypass tray:
1
Lower the Bypass tray, located on the right side of the
product. Unfold the paper support extension as shown.
Paper support
Bypass tray
2
Prepare a stack of paper or envelope for loading by flexing
or fanning them back and forth. Straighten the edges on a
level surface.
3
For transparencies; hold the transparencies by the edges
and avoid touching the print side. Oils from your fingers
that are deposited on the transparency can cause print
quality problems. If you are using the transparencies with
paper backing, insert a sheet of plaing paper on the tray
before loading transparencies. Doing so prevents paper
jams while feeding.
3
Load the print material with the print side facing down and
against the right edge of the tray.
C
OPYING
3.7
Page 53

4
Adjust the paper guide to the width of the stack of print
material.
Make sure that you have not loaded too much print media.
The stack should be under the max. fill line. The print media
buckles if you load a stack that is too deep, or push it in too
far.
N
OTE
:
When printing on the
used paper from the bypass tray,
the printed side should be facing
up and the edge without curl at
the left side. If you experience
problems feeding paper, turn the
paper around.
Max. fill line
3.8
C
OPYING
Page 54

Setting the Paper Size for Copying
After loading paper in the Tray1 and 2 or the bypass tray, you
have to set the correct paper size using the control panel
buttons.
To set the paper size for tray 1 and 2, take the following steps:
1
Press Menu and then or repeatedly until “SYSTEM
DATA” appears on the display, then press Enter.
The display shows “TRAY PAPER” on the top line and the
available options on the bottom line. The current setting
blinks.
2
Use
or
Enter to save the selection.
3
To return to Standby mode, press Stop/Clear.
to select the paper size you are using, and press
3
To set the paper size for the bypass tray, take the following
steps:
1
Press Menu and then or repeatedly until “SYSTEM
DATA” appears on the display, then press Enter.
The display shows “TRAY PAPER” on the top line and the
available options on the bottom line.
2
Use
to display “BYPASS PAPER” on the top line. The
available options appears on the bottom line and the
current setting blinks.
3
Use
or
Enter to save the selection.
4
To return to Standby mode, press Stop/Clear.
to select the paper size you are using, and press
C
OPYING
3.9
Page 55

Selecting Paper Tray
You can select the paper tray you want. To select the paper tray,
take the following steps:
1
Feed the documnent face down into the ADF and adjust the
document guides to the document size.
2
Press Copy/Start on the front panel.
3
Customise the copy settings including copy contrast,
number of copies, and copy size if necessary. See “Setting
Copy Options” on page 3.12.
4
Press or repeatedly until “PAPER TRAY” appears in
the LCD display.
5
Press or button repeatedly to select the desired paper
tray.
If you installed an optional tray, you can choose between
BYPASS, TRAY 1, TRAY 2, and AUTO. If not, you can choose
between BYPASS, TRAY and AUTO.
3.10
C
OPYING
Setting Paper Type
After loading paper in the trays, you have to set the correct
paper type using the control panel buttons.
To set the paper type for the trays, take the following steps:
1
Press Menu and then or repeatedly until “SYSTEM
SETUP” appears on the display, then press Enter.
2
Press or repeatedly until “PAPER TYPE” appears in the
LCD display.
3
Press or button repeatedly to select paper type.
You can set paper type between PLAIN PAPER, BOND,
TRANSPARENCY, CARD STOCK, LABELS, PREPRINTED,
COLORED, and ENVELOPE.
Page 56

Copying a Document
Using the ADF(Automatic Document Feeder), you can load up to
30 documents in one job. Ensure documents are in good
condition, have the same thickness and weight, and that all
staples and paper clips have been removed.
1
Feed the document (up to 50 pages) face down into the ADF
and adjust the document guides to the document size.
3
2
Press Copy/Start to enter the copy mode.
3
Customise the copy settings including copy contrast,
number of copies, and copy size if necessary. See “Setting
Copy Options” on page 3.12.
4
If necessary, you can use special copy features such as
collation and duplex copy.
5
Press Copy/Start to begin copying. The display shows the
copy processing.
Note:
If you want to cancel the copy job, press
during copying or pull out the document from the ADF before
pressing
Copy/Start
button.
Stop/Clear
C
OPYING
3.11
Page 57

Setting Copy Options
After you access the copy mode, you can set the following
options for the current copy job.
Image
Image setting is used to select the text type for the current copy
job. To select the image type, take the following steps:
1
Press Image. You can see the current setting on the
bottom line of the display.
2
Press Image repeatedly or use the navigation buttons to
change the setting. You can choose from:
TEXT: Use for documents containing mostly text.
MIXED: Use for documents with mixed text and graphics.
PHOTO: Use when the originals are photographs.
3
Press Enter to save the selection.
3.12
C
OPYING
Contrast
You can adjust the contrast for an original document containing
paint markings or dark images.
To adjust the contrast, take the following steps:
1
In the Copy mode, press Contrast.
2
Press Contrast repeatedly or use the navigation buttons to
change the setting. You can choose from 5 contrast
settings.
Each time you press the button, the selection block on the
display moves to the left or to the right. As the selection
block moves to the right, the contrast becomes darker.
Selection block
Page 58

Copy Page
You can select the number of copies you want from 1 to 999. To
change the number of copies:
1
Check if the triangle symbol on the middle of the top line
heads for the number of copies. If not, press
Make sure that this triangle
symbol heads for the copy page.
Copy page
or
.
2
Enter the desired number of copies using the number
keypad or the navigation buttons. The selected number
appears on the display.
Reduced/Enlarge Copy
You can select the zoom rate of copies you want from 25% to
200%. To change the rate of copies:
1
Press
or
top line heads for the zoom rate.
Copy size
2
Enter the desired number of rate using the number keypad
or the navigation buttons. The selected number appears on
the display.
to set the triangle symbol on the middle of the
Make sure that this triangle
symbol heads for the copy size.
3
C
OPYING
3.13
Page 59

Collation Copy
When the collation copy feature is on your product sorts the
copy job. For example, 2 copies of a 3 page job will print one
complete document followed by the second complete document
(e.g. 1,2,3, then 1,2,3).
1
Load the documents to be copied in the ADF.
2
Press Copy/Start on the front panel.
3
Customise the copy settings including copy contrast,
number of copies, and copy size if necessary. See “Setting
Copy Options” on page 3.12.
4
Press or repeatedly until “COPY COLLATION” appears
in the LCD display.
5
Press or button to select “ON”. The product collates
the copy job.
The “OFF” setting disables the collation. The product will
print all the copies of one page and then the next page.
6
Press Copy/Start to begin copying.
3.14
C
OPYING
Page 60

Duplex Copy
Duplex copy allows you to print on both sides of the paper.
Duplex copy is available only when you load documents in the
ADF.
Before printing in the duplex mode, decide on which edge you
will bind your finished document. The binding options are:
LONG EDGE, which is the conventional layout used in book
binding.
SHORT EDGE, which is the type often used with calendars.
Long Edge
Short Edge❿
3
1
Load the documents to be copied in the ADF. Make sure that
the original document is single-sided.
2
Press Copy/Start on the front panel.
3
Customise the copy settings including copy contrast,
number of copies, and copy size if necessary. See “Setting
Copy Options” on page 3.12.
4
Press or repeatedly until “DUPLEX COPY” appears in
the LCD display.
5
Press or button to select the binding orientation. If
you select “OFF”, you cannot use duplex copying.
6
Press Copy/Start to begin copying.
C
OPYING
3.15
Page 61

Paper Save Copying (2-up Copy)
If you press SAVE Paper before copying starts, the product
prints 2 pages on one sheet.
For details on using the Paper Save feature, see page 2.9.
3.16
C
OPYING
Page 62

4
SENDING A FAX
The following topics are included:
• Preparing Documents for Faxing
• How to Send a Fax
• Adjusting Document Settings
• Sending a Fax Automatically
• Sending a Fax Manually
• Confirming Transmission
• Using Toll Save Transmission
Page 63

Preparing Documents for Faxing
,
Use the following guidelines to prepare your documents for
faxing:
• Do not attempt to feed the following types of documents into
the Automatic Document Feeder:
- carbon-paper or carbon-backed paper
- coated paper
- onion skin or thin paper
- wrinkled or creased paper
- curled or rolled paper
- torn paper
• Remove all staples and paper clips before feeding the
document.
• Make sure any glue, ink or correction fluid on the paper is
completely dry before loading the document.
• Do not load documents containing different sizes or weights
of paper.
How to Send a Fax
1
Adjust the document guide on the ADF to match the width
of the document.
Document
guides
If necessary
pull out this
support.
4.2
S
ENDING A FAX
Page 64

2
Slide the document face down into the ADF. You can insert
up to 50 sheets at a time.
3
You can adjust the following document settings to suit your
fax needs (see page 4.4) :
• Resolution – to select resolution.
• Contrast – to adjust contrast.
4
Use the number keypad to dial the number of the remote
fax machine.
4
To enter the number, you can also press a one-touch button
or press Speed/Status and enter a speed dial number
including a group dial number. For details, see “Automatic
Dialling” on chapter 6.
5
Press Copy/Start or Enter.
S
ENDING A FAX
4.3
Page 65

Adjusting Document Settings
When setting typical text based documents, the default
document settings produce good results.
However, if you send documents that are of poor quality, or
contain photographs, you can adjust the following features to
ensure a higher quality.
Resolution
1
Press Resolution to increase sharpness and clarity.
2
By pressing Resolution repeatedly or using the navigation
buttons, you can choose between STANDARD, FINE, and
SUPER FINE.
The document types recommended for resolution settings are
described in the table below.
Mode Recommended for:
STANDARD
FINE
SUPER FINE
Notes
• The SUPER FINE resolution is not available if the Send from
• If the product is set to the SUPER FINE resolution and the
:
Memory option is set to “ON”. If the Send From Memory option is
set to “ON”, the SUPER FINE resolution is automatically
converted to the FINE resolution when the document is scanned
into memory.
remote fax machine does not support the SUPER FINE
resolution, your product will transmit using the highest
resolution mode supported by the remote fax machine.
Documents with normal sized characters.
Documents containing small characters or
thin lines, or for sending documents printed
using a dot-matrix printer.
Documents containing extremely fine detail.
Super Fine mode is enabled only if the
remote machine also supports Super Fine
resolution. (See the Note below.)
4.4
S
ENDING A FAX
Page 66

Contrast
1
Press Contrast to compensate for the brightness or
darkness of your faxed document.
2
By pressing Contrast repeatedly or using the navigation
buttons, you can choose from 5 contrast levels.
Set to darker mode when the document contains faint
pencil markings or light print.
Set to lighter mode for dark print.
Image
Image setting is used to select the text type for the current copy
or fax job. To select the image type, take the following steps:
1
Press Image. You can see the current setting on the
bottom line of the display.
2
Press Image or the navigation buttons repeatedly until the
desired mode appears. You can choose from:
TEXT: Use for documents containing mostly text.
MIXED: Use for documents with mixed text and graphics.
PHOTO: Use when the originals are photographs.
4
Sending a Fax Automatically
1
Feed the document(s) face down into the ADF.
2
Adjust the document settings if necessary. For details, see
“Adjusting Document Settings” on page 4.4.
3
Enter the remote fax phone number using the number
keypad.
To enter the number you can also press a one-touch button,
or press Speed/Status and enter a speed dial number
including a group dial number.
S
ENDING A FAX
4.5
Page 67

4
Press Enter or Copy/Start.
5
If the SEND FROM MEMORY feature is set to ON (default
setting), the document is scanned into memory and the
display shows the memory capacity and the number of
pages being stored in memory.
N
OTE
:
If you want to cancel the fax, press Stop/Clear at any
time during the transmission.
Sending a Fax Manually
1
Feed the document(s) face down into the ADF.
2
Adjust the document settings if necessary. For details, see
“Adjusting Document Settings” on page 4.4.
3
Press On Hook Dial button on the control panel. You hear a
dial tone if the telephone line is correctly connected.
4
Enter the remote fax phone number using the number
keypad.
5
When you hear the high-pitched fax signal of the other
party’s fax machine, press Copy/Start.
N
OTE
:
If you want to cancel the fax, press Stop/Clear at any
time during the transmission.
4.6
S
ENDING A FAX
Page 68

Confirming Transmission
When the last page of your document has been sent
successfully, the product beeps and returns to Standby mode.
If something went wrong during your fax transmission, an error
message appears on the LCD display. For a listing of error
messages and their meanings, see page 10.13. If you receive an
error message, press Stop/Clear to clear the message and try
to send the document again.
You can set your product to print out a confirmation report
automatically each time sending is completed. For details, see
“Message Confirmation” on page 8.2.
Using Toll Save Transmission
If you have set a specific toll save time, you can quickly set your
document(s) to be sent at the preset time using the SAVE Toll
button on the front panel. Using this feature, you can take
advantage of lower long distance rates at night, for example.
4
The toll save end time is fixed to midnight (12:00 PM). Therefore
the toll save time slot is determined by the start time you
specify. If you have set 9:00 PM for the start time, the document
you set to use the toll save feature will be transmitted during the
toll save time slot (9:00PM-12:00PM).
To set the Toll save start time:
1
Press and hold the SAVE Toll button on the control panel.
The LCD display prompts you to enter the time.
2
Enter the specific start time using the number keypad, then
press Enter to save the setting.
To send a fax using the Toll save feature:
1
Press SAVE Toll on the control panel briefly. “ON” or “OFF”
appears on the bottom line.
2
To activate the toll save feature, select “ON” by using the
SAVE Toll button or the navigation buttons.
S
ENDING A FAX
4.7
Page 69

3
Load the document(s) face down into the ADF until
“DOCUMENT READY” appears in the display.
4
You can adjust the resolution and the contrast to suit your
fax needs. For details, see page 4.4.
5
Enter the number of the remote fax machine using the
number keypad.
You can also use a one-touch button or press Speed/
Status then use a speed dial number.
6
Press Enter to confirm the number.
4.8
S
ENDING A FAX
Page 70

5
RECEIVING A FAX
The following topics are included:
• About Receive Mode
• Receiving Automatically in FAX Mode
• Receiving Automatically in ANS/FAX Mode
• Receiving Manually in TEL Mode
• Receiving Manually Using an Extension Telephone
• Receiving Fax in Memory
Page 71

About Receive Mode
Your product has three reception modes:
• In FAX mode, the product answers an incoming call and
immediately goes into fax receive mode.
• In TEL mode, you can receive a fax by picking up the handset
of the extension phone and then pressing the remote receive
code (see page 5.5), or press On Hook Dial (you can hear
voice or fax tone from the remote machine) and then
pressing Copy/Start on the control panel of your product.
• In ANS/FAX mode, the answering machine answers an
incoming call, and the caller can leave a message on the
answering machine. If the fax machine senses a fax tone on
the line, the call automatically switches to Fax mode.
N
OTE
:
To use the ANS/FAX mode, attach an answering machine
to the EXT jack on the back of your product.
The current receive mode is displayed when the product is in
Standby mode.
5.2
R
ECEIVING A FAX
MAR-20-2002 100%
09:00AM FAX
Current
receive mode
If you seldom use the fax line for voice conversations, set your
product to receive a fax automatically by selecting the FAX
mode.
Page 72

Receiving Automatically in FAX Mode
Your product is preset to FAX mode at the factory. If you have
changed the fax mode, take the following steps to receive faxes
automatically:
1
Press Menu and then or repeatedly until “SYSTEM
SETUP” appears on the display, then press Enter.
The display shows “RECEIVE MODE” on the top line and the
current setting on the lower line.
2
Press or until you see “FAX” on the lower line, then
press Enter to save the selection.
3
When you receive a call, the product answers the call on a
specified number of rings and receives a fax automatically.
To change the number of rings,
on page 8.5.
see “System Data Options”
5
R
ECEIVING A FAX
5.3
Page 73

Receiving Automatically in ANS/ FAX Mode
For this mode, you must attach an answering machine to the
EXT jack on the back of your product.
1
Press Menu and then or repeatedly until “SYSTEM
SETUP” appears on the display, then press Enter.
The display shows “RECEIVE MODE” on the top line and the
current setting on the lower line.
2
Press or until you see “ANS/FAX” on the lower line,
then press Enter to save the selection.
3
When you receive a call, the answering machine will
answer.
If the caller leaves a message, the answering machine
stores the message as it would normally. If your product
hears a fax tone on the line, it automatically starts to
receive fax.
5.4
R
ECEIVING A FAX
N
OTES
:
• If you have set your product to ANS/FAX mode and your
answering machine is switched off, or no answering machine is
connected to your product, your product will automatically go
into FAX mode after a predefined number of rings.
• If your answering machine has a ‘user-selectable ring counter’,
set the product to answer incoming calls within 1 ring.
• If you are in TEL mode (manual reception) when the answering
machine is connected to your product, you must switch off the
answering machine, or the outgoing message from the
answering machine will interrupt your phone conversation.
Page 74

Receiving Manually in TEL Mode
1
Press Menu and then or repeatedly until “SYSTEM
SETUP” appears on the display, then press Enter.
The display shows “RECEIVE MODE” on the top line and the
current setting on the lower line.
2
Press or until you see “TEL” on the lower line, then
press Enter to save the selection.
3
When the ringer sounds, press On Hook Dial.
4
If you hear a fax tone, press Copy/Start. The product
begins receiving a fax.
Receiving Manually Using an Extension Telephone
5
This features works best when you are using an extension
telephone connected to the EXT jack on back of your product.
You can receive a fax from someone you are talking to on the
extension telephone without having to go to the fax machine.
When you receive a call on the extension phone and hear fax
tones, press the buttons “*9*” (star nine star) on the extension
telephone.
The product receives the document.
Press the buttons slowly in sequence. If you still hear the fax
tone from the remote machine, try pressing “*9*” once again.
“*9*” is the remote receive code preset at the factory. The first
and the last asterisks are fixed, but you can change the middle
number to whatever you choose. For details on changing the
code, see page 8.5.
R
ECEIVING A FAX
5.5
Page 75

Receiving Fax in Memory
Since your product is a multitasking device, it can receive faxes
while you are making copies or printing. If you receive a fax
while you are copying or printing, your product stores the
incoming fax in memory. Then, as soon as you finish copying or
printing, the product automatically prints the fax.
5.6
R
ECEIVING A FAX
Page 76

6
AUTOMATIC DIALLING
The following topics are included:
• One-Touch Dialling
• Speed Dialling
• Group Dialling
• Searching for a Number in the Memory
Page 77

One-Touch Dialling
The 25 one-touch buttons on the control panel lets you store
frequently used fax numbers and automatically dial a number
with one touch of a button.
Using the Shift button, you can store up to 50 fax numbers on
the one-touch buttons.
Storing a Number for One-Touch Dialling
1
Press and hold one of the one-touch dial buttons for about 2
seconds.
If you want to use one-touch dial buttons from 26 to 50,
press Shift and press and hold the one-touch dial buttons
for about 2 seconds.
The LCD display asks you to enter the fax number.
“T” signifies you are assigning a one-touch number and “xx”
designates the selected one-touch button.
If a number is already stored in the location you chose, the
LCD display shows the number to allow you to change the
number. To start over with another one-touch button, press
Stop/Clear.
2
Enter the number you want to store by using the number
keypad and then press Enter.
To insert a pause between numbers, press Redial/Pause
and a “–” appears on the LCD display.
If you make a mistake while entering a number, press
Search/Delete and re-enter the correct number.
3
To assign a name to the number, enter the desired name.
For details on how to enter names, see “Entering Characters
Using the Number Keypad” on page 2.3.
Or,
If you do not want to assign a name, skip this step.
6.2
A
UTOMATIC DIALLING
Page 78

4
Press Enter when the name appears correctly or simply
without entering a name.
5
To store more telephone numbers, press the desired onetouch button and repeat steps 2 through 4.
Or
To return to Standby mode, press
Stop/Clear.
Sending a Fax using a One-Touch Number
1
Feed the document(s) face down into the ADF.
2
Adjust the resolution and the contrast to suit your fax needs
if necessary. For details, see “Adjusting Document Settings”
on page 4.4.
3
Press the one-touch button where you stored a number. The
document scans into memory.
4
The fax number stored in the one-touch dial location will be
automatically dialled and then the document will be sent
when the remote fax machine answers.
6
A
UTOMATIC DIALLING
6.3
Page 79

Using the One-Touch Sheet
A one-touch sheet is included with your product. Once you store
numbers in one-touch dial buttons, make a note of the numbers
on the sheet to remind you which number is stored in each
button.
1
Remove the clear cover and label.
2
Write information on the sheet and replace the sheet and
cover.
You may want to use pencil in case you wish to change
these numbers later.
3
Replace the label and clear cover.
6.4
A
UTOMATIC DIALLING
Page 80

Speed Dialling
You can store up to 200 numbers in Speed Dial locations (1-
200).
Storing a Number for Speed Dialling
1
Press and hold Speed/Status on the control panel for
about 2 seconds.
_
2
Enter a speed dial number by using the number keypad and
press Enter.
If a number is already stored in the location you chose, the
LCD display shows the number to allow you to change the
number. To start over with another speed-dial number,
press Stop/Clear.
6
3
Enter the number you want to store by using the number
keypad and press Enter.
To insert a pause between numbers, press Redial/Pause
and a “-” appears on the LCD display.
N
OTE
:
If you make a mistake while entering numbers, press at
the end of the entries to delete the last digit or press Search/
Delete to delete all digits you entered.
When the cursor is in the first digit or in the middle of the number,
you can use or to move the cursor under the wrong digit to
correct.
4
To assign a name to the number, enter the desired name.
For details on how to enter names, see “Entering Characters
Using the Number Keypad” on page 2.3.
Or,
If you do not want to assign a name, skip this step.
A
UTOMATIC DIALLING
6.5
Page 81

5
Press Enter when the name appears correctly or simply
without entering a name.
6
To store more telephone numbers, repeat steps 2 through
5.
Or
To return to Standby mode, press Stop/Clear.
Sending a Fax using a Speed Number
1
Feed the document(s) face down into the ADF.
2
Adjust the document settings if necessary. For details, see
“Adjusting Document Settings” on page 4.4.
3
Press Speed/Status on the control panel.
4
Enter the speed dial number.
5
When the desired number appears on the LCD display,
press Enter. The document scans into memory.
6
The fax number stored in the speed dial location will be
automatically dialled, then the document will be sent when
the remote fax machine answers.
6.6
A
UTOMATIC DIALLING
Page 82

Group Dialling
If you frequently send the same document to several
destinations, you can create a group of these destinations and
set them under a group dial location. This enables you to use a
single speed dialling to send the same document to all the
destinations in the group.
Setting Group Dial
1
Press Menu and then or repeatedly until “GROUP
DIAL” appears on the display, then press Enter.
2
Press Enter to access “NEW”.
3
Enter the desired group number between speed dial
location numbers from 1 to 200, and press Enter.
N
OTE
:
If the number is already used for group dial, “DELETE?
Gxxx: ID” (where “xxx” designates the selected group dial
number) appears on the LCD display. Press Enter to delete the
contents in the selected number and continue, or
the old number and start over with a different number.
4
The LCD display asks you to enter one-touch or speed dial
number. Press a one-touch button or enter the speed dial
number you want to include in the group.
5
Press Enter. Repeat from step 4 to enter other one-touchs
or speed dial numbers into the group.
Menu to keep
6
6
Press Menu when you have entered all the desired
numbers. The LCD display asks you to enter ID.
7
To assign a name to the group, enter the desired name.
Or
If you do not want to assign a name, skip this procedure.
8
Press Enter when the name appears correctly or simply
without entering a name.
A
UTOMATIC DIALLING
6.7
Page 83

9
If you want to assign another group, repeat from step 3.
Or
To return to Standby mode, press Stop/Clear.
N
OTE
:
You cannot include one group dial number in another
group dial number.
Editing Group Dial Numbers
You can delete a specific one-touch or speed dial number from
a selected group or add a new number to the selected group.
1
Press Menu and then or repeatedly until “GROUP
DIAL” appears on the display, then press Enter.
2
Press or to select “EDIT” and then press Enter.
3
Enter the group number you want to edit, and press Enter.
The LCD display prompts you to enter a one-touch or speed
dial number.
4
If you want to delete a specific speed dial number or onetouch dial number from the group, enter the speed dial
number or press the one-touch button (If necessary, press
Shift and one-touch button.) The LCD display shows
“DELETE?”.
If you want to add a new speed dial number or one-touch
dial number, enter the desired speed dial number or press
the one-touch button (If necessary, press Shift and onetouch button.) The LCD display shows “ADD?”.
5
Press Enter. Repeat steps 4 and 5 to complete the edition.
6
Press Menu when you finish editing. If there is a name
assigned to the group, the name appears on the upper line
of the LCD display. Change the name if necessary, and
press Enter.
7
To return to Standby mode, press Stop/Clear.
6.8
A
UTOMATIC DIALLING
Page 84

Sending a Fax Using Group Dialling (Multi-Address Transmission)
You can use Group Dialling for Memory transmission, or Delayed
transmission.
Follow the procedure of the desired operation (Memory
transmission - page 7.4, Delayed transmission - page 7.2).
When you come to a step in which the LCD display requests you
to enter the remote fax number, press Speed/Status and enter
the group dial number. You can use only one group number for
one operation. Then continue the procedure to complete the
desired operation.
Your product automatically scans the document loaded in the
document tray into the memory, and the product will dial each
of the numbers included in the Group.
6
A
UTOMATIC DIALLING
6.9
Page 85

Searching for a Number in the Memory
There are two ways to search for a number in the memory. You
can either scan from A to Z sequentially. Or you can search using
the first letter of the name associated with the number.
Searching Sequentially through the Memory
1
Press Search/Delete.
2
Press or to scroll through the memory until you see
the name and number you want to dial. You can search
downward or upward through the entire memory in
alphabetical order (from A to Z).
While searching through the product’s memory, you will see
that each entry is preceded by one of three letters: “T” for
one-touch dial, “S” for speed, or “G” for group dial number.
These letters tell you how the number is stored.
3
When the name and number you want appears on the LCD
display, press Copy/Start or Enter to dial.
Searching with a Particular First Letter
1
Press Search/Delete.
2
Press the button labelled with the letter you want to search
for. A name beginning with the letter appears on the LCD
display.
3
For example, if you want to find the name “MOBILE”, press
the 6 button, which is labelled with “MNO”.
4
Press or to display the next name in the list.
5
When the name and number you wan appear on the LCD
display, press Copy/Start or Enter to dial.
6.10
A
UTOMATIC DIALLING
Page 86

7
OTHER WAYS TO FAX
The following topics are included:
• Redial
• Delayed Transmission
• Memory Transmission
• Priority Transmission
• Polling
• Confidential Transmission
• Confidential Receiving
• Adding Documents To a Scheduled Operation
• Cancelling a Scheduled Operation
• Monitoring a Dual Job Status
• Sending a Flash/Recall/R
• Department Control Mode
Page 87

Redial
To redial the number last called:
1
Press Redial/Pause briefly.
If a document is loaded in the ADF, the product
automatically begins to send.
To search through Redial memory:
1
Press and hold Redial/Pause for about 2 seconds.
The Redial memory in your product retains the last 10
numbers called. If you have dialled the same number
multiple times, the product does not count the duplicates.
2
Press or to search through the memory until you see
the number you want on the LCD display.
3
Press Copy/Start or Enter to dial. If a document is loaded
in the ADF, the product automatically begins to send.
7.2
O
THER WAYS TO FAX
Delayed Transmission
You can set your product to send a fax at a later time when you
will not be present.
1
Feed the document(s) face down into the ADF.
2
Adjust the document settings if necessary. For details, see
“Adjusting Document Settings” on page 4.4.
3
Press Menu and then or repeatedly until “DELAY TX”
appears on the display, then press Enter.
Page 88

4
Enter the number of the remote machine using the number
keypad.
To enter the number, you can also press a one-touch
button, or press Speed/Status and enter a speed dial
number including a group dial number.
5
Press Enter to confirm the number on the LCD display. The
display asks you to enter another fax number to send the
document.
6
To enter another fax number, select “1.YES” and repeat step
from 4. You can add up to 25 destinations.
Note that you cannot use Group dial numbers for another
fax number.
7
To send to one location or when you complete the last fax
number setting, select “2.NO”.
8
The LCD display asks you to enter a name. If you want to
assign a name to the transmission, enter the name. If not,
skip over this step.
For details on how to enter the name using the number
keypad, see “Entering Characters Using the Number
Keypad” on page 2.3.
9
Press Enter. The display shows the current time and asks
you to enter the start time when the fax is to be sent.
10
Enter the time by using the number keypad.
To select AM or PM for 12-hour format, press or . If
you set a time earlier than the current time, the document
will be sent at that time on the following day.
11
Press Enter when the start time displays correctly.
12
The document will be scanned into the memory before
transmission. The display shows the memory capacity and
the number of pages being stored in the memory.
13
The product returns to Standby mode and the LCD display
reminds you that you are in Standby mode and that
Delayed Transmission is set.
7
O
THER WAYS TO FAX
7.3
Page 89

Memory Transmission
Documents are automatically stored in memory and sent to a
remote station. Use this feature to send your documents to
multiple locations. After transmission, the documents are
automatically erased from the memory.
1
Feed the document(s) face down into the ADF.
2
Adjust the document settings if necessary. For details, see
“Adjusting Document Settings” on page 4.4.
3
Press Menu and then or repeatedly until “MEMORY
TX” appears on the display, then press Enter.
4
Enter the number of the remote machine using the number
keypad.
To enter the number, you can also press a one-touch
button, or press Speed/Status and enter a speed dial
number including a group dial number.
5
Press Enter to confirm the number. The display asks you to
enter another fax number to send the document.
N
OTE
:
A single broadcast (sending to multiple destinations) is
available for your product, so the “ANOTHER NO.” prompt does not
appear if any broadcast is currently set up and is not completed.
6
To enter another fax number, select “1.YES” and repeat
from step 4. You can add up to 25 destinations.
Note that you cannot use Group dial numbers for another
fax number.
7
To send to one location or when you complete the last fax
number setting, select “2.NO”.
8
The document will be scanned into the memory before
transmission. The LCD display shows the memory capacity
and the number of pages being stored in the memory.
9
The product begins sending the document in order of the
numbers you entered.
7.4
O
THER WAYS TO FAX
Page 90

Priority Transmission
When the Priority Transmission is enabled, a high priority
document can be transmitted ahead of reserved operations. The
document is scanned into the memory, and transmitted when
the current operation is concluded. In addition, the Priority Send
will interrupt a broadcast operation between stations (i.e., when
transmission to station A ends, before transmission to station B
begins) or between redial attempts.
1
Feed the document(s) face down into the ADF.
2
Adjust the document settings if necessary. For details, see
“Adjusting Document Settings” on page 4.4.
3
Press Menu and then or repeatedly until “PRIORITY
TX” appears on the display, then press Enter.
4
Enter the number of the remote machine using the number
keypad.
To enter the number, you can also press a one-touch
button, or press Speed/Status and enter a speed dial
number.
5
Press Enter to confirm the number. The display asks you to
enter a name.
6
If you want to assign a name to the transmission, enter the
name. If not, skip over this step.
For details on how to enter a name using the number
keypad, see “Entering Characters Using the Number
Keypad” on page 2.3.
7
Press Enter.
The document will be scanned into the memory before
transmission. The display shows the memory capacity and
the number of pages being stored in the memory.
8
The product shows the number being dialled and the total
pages of the document, and begins sending the document.
O
THER WAYS TO FAX
7
7.5
Page 91

Polling
What is Polling?
Polling is used when one fax machine requests another to send
a document. This is useful when the person with the original
document to be sent is not in the office. The person who wants
to receive the document calls the machine holding the original
and requests that the document be sent. In other words, it
“polls” the machine holding the original.
TX Poll
You can program your product to send documents in your
absence when polled by a remote fax machine. It is possible to
use a poll code to prevent unauthorised polling of your fax
machine. When you secure your product in this manner, only
those who know the poll code can poll your product.
1
Feed the document(s) face down into the ADF.
2
Adjust the document settings if necessary. For details, see
“Adjusting Document Settings” on page 4.4.
3
Press Menu and then or repeatedly until “POLLING”
appears on the display, then press Enter.
4
Press Enter when you see “TX POLL” on the LCD display.
The LCD display asks you to enter a 4-digit TX poll code.
The poll code is preset to 0000 at the factory, which
represents no poll code.
5
If you want to use a poll code, enter the desired 4-digit
code (except for 0000), and press Enter.
Or
If you do not want to secure the transmission with a poll
code, press Enter when the display shows “0000” for the
poll code, or enter 0000.
7.6
O
THER WAYS TO FAX
Page 92

6
The display asks you to store the document in the product’s
bulletin memory.
7
Press or to select “ON” or “OFF”. Then press Enter.
Select “ON” if you want store the document in the bulletin
board memory. More than one remote station can poll that
document from your product.
If not, select “OFF”. The document will be automatically
erased after being polled by a remote machine.
8
The product stores the document in the memory. The
display counts the number of pages being stored in the
memory and the memory capacity remaining.
9
The LCD display shows that the machine has a Poll sending
job and returns to Standby mode.
N
OTE
:
If you have previously set the receive mode to other than
FAX mode, the product automatically switches to FAX mode
(automatic receiving) when set to be polled.
Delay RX Poll
You can set your product to automatically receive documents
from the unattended remote fax machine now, or at a later time.
This feature permits unattended polling in the evening hours
when telephone rates are lower.
N
OTE
:
The remote machine must be ready for polling.
1
Press Menu and then or repeatedly until “POLLING”
appears on the display, then press Enter.
2
Press or to select “DELAY RX POLL” and press Enter.
The LCD display asks you to enter the number of the
remote fax machine.
3
Enter the number of the remote fax machine using the
number keypad.
To enter the number, you can also press a one-touch
button, or press Speed/Status and enter a speed dial
number.
7
O
THER WAYS TO FAX
7.7
Page 93

4
Press Enter to confirm the number. The display asks you to
enter another fax number to receive the document.
N
OTE
:
A single broadcast (sending to multiple destinations) is
available for your product, so the “ANOTHER NO.” prompt does not
appear if any broadcast is currently set up and is not completed.
5
To enter another fax number, select “1.YES” and repeat step
from 4. You can add up to 25 destinations.
Note that you cannot use Group dial numbers for another
fax number.
6
To receive from one location or when you complete the last
fax number setting, select “2.NO”.
The display asks you to enter the time when your product
calls the remote machine.
7
Enter the time using the number keypad. Use or to
select AM or PM in 12-hour mode. If you set a time earlier
than the current time, your product call the number at that
time on the following day.
Or
To call the remote fax machine(s) immediately, skip over
this step.
8
Press Enter when the time appears correctly on the display
or without entering the time. The display asks you to enter
a 4-digit code. Poll code “0000” represents no code.
If the remote machine is secured with a Poll code, you must
enter the correct code, and press Enter.
Or
If the remote machine is not secured with a Poll code, press
Enter to accept ‘0000’ which represents no code, or enter
0000.
9
If you have entered a specific start time, the product will
dial, and receive a document from the remote machine at
the time.
If not, the product dials the remote machine immediately.
7.8
O
THER WAYS TO FAX
Page 94

Confidential Transmission
A document can be transmitted confidentially by using a mailbox
that is established in memory of the product.
The transmitted mail will not be printed immediately, but will be
stored in momory of the remote fax machine until being
accessed by someone who has the proper security code for that
mailbox.
1
Feed the document(s) face down into the ADF.
2
Adjust the document settings if necessary. For details, see
“Adjusting Document Settings” on page 4.4.
3
Press Menu and then or repeatedly until
“CONFIDENTIAL TX” appears on the display, then press
Enter.
4
The fax machine prompts you to enter a two-digit mailbox
number. Enter the mailbox number using the number
keypad and press Enter.
Note
: A mailbox must be pre-assigned at the remote fax
machine, and the remote machine must be Samsung product.
5
Dial to the remote fax number using the number keypad.
To enter the number, you can also press a one-touch
button, or press Speed/Status and enter a speed dial
number.
6
Press Enter. If you want to identify this operation, enter a
proper name using the number keypad.
7
Press Enter. If you want to send it at a later time, enter the
time you want your product to send the document.
If not, press Enter without entering the time. The product
dials and sends the document immediately after being
scanned into memory.
8
Press Enter, then the document will be scanned into the
memory. The product returns to Standby mode.
7
O
THER WAYS TO FAX
7.9
Page 95

N
OTES
:
• Confidential transmission feature is a non-standard feature,
dependent on the remote machine’s capability.
• Your product also have mailbox capabilities. See “Confidential
Receiving” on page 7.10.
• If you want to can cancel the confidential transmission, see
“Cancelling a Scheduled Operation” on page 7.12.
Confidential Receiving
Before receiving confidential documents, you have to set up the
following
• Confidential mailboxes. You can have up to 10 confidential
mailboxes.
• The password for each mailbox.
• The names for each mailbox. If you do not want to assign the
name, you can skip this setup.
Setting up Mailbox for Confidential Receiving
1
Press Menu, and then or repeatedly until “MAIL BOX”
appears on the display, then press Enter. The LCD prompts
you to set up or print a mail box.
2
Press 1 to set up information for confidential receiving. The
LCD prompts you to enter a number (1-10) of the
confidential mailbox.
3
Enter a number of the confidential mailbox using the
number keypad.
If you enter a box number which has already been
registered, the fax machine displays ‘DELETE?’. Press 1 to
cancel the number already registered, and 2 to keep the
number already registered and try with a different number.
7.10
O
THER WAYS TO FAX
If there is any message received in the box you chosen,
‘NOT AVAILABLE’ is displayed.
Page 96

4
Press Enter when the number appears correctly in the
display. The LCD prompts you to enter a 4-digit password.
5
Enter a 4-digit security password.
After you enter the password, it cannot be verified. Write it
down and keep it in a secure location for your reference. To
change the password, cancel the mailbox and setup new
mailbox with a new password.
This password must be used to print the confidential
documents.
6
Press Enter when the password number appears correctly.
The LCD prompts you to enter a mailbox name.
7
To assign a name to the mailbox, enter the name. If not,
skip over this step.
8
Press Enter. The LCD returns to Standby mode.
Printing Received Confidential Documents
When you receive a confidential document, the fax machine
displays ‘MAIL’, total number received, and the mailbox name in
the lower line of the display.
1
Press Menu, and then or repeatedly until “MAIL BOX”
appears on the display, then press Enter. The LCD prompts
you to set or print a mailbox.
2
Press 2 to print the received mail. The LCD prompts you to
enter the mailbox number.
3
Enter the desired number using the number keypad. The
LCD prompts you to enter the password.
4
Enter the password.
If the password is correct, the machine will start printing.
If you enter a wrong password, the LCD asks to enter the
password again.
7
O
THER WAYS TO FAX
7.11
Page 97

Adding Documents To a Scheduled Operation
You can add documents to the delayed transmission previously
reserved in your product’s memory.
1
Feed the document(s) face down into the ADF.
2
Adjust the document settings if necessary. For details, see
“Adjusting Document Settings” on page 4.4.
3
Press Menu and then or repeatedly until “ADD/
CANCEL” appears on the display, then press Enter.
4
Press Enter to access “ADD”. The LCD display shows the
last job reserved in the memory.
5
Press or repeatedly until you see the operation to
which you want to add documents, and press Enter.
The product automatically stores the documents in the
memory, and the display shows the memory capacity and
the number of pages.
7.12
O
THER WAYS TO FAX
6
After storing, the product displays the numbers of total
pages and added pages for about 2 seconds, and then
returns to Standby mode.
Cancelling a Scheduled Operation
1
Press Menu and then or repeatedly until “ADD/
CANCEL” appears on the display, then press Enter.
2
Press or to select “CANCEL”, and press Enter. The
display shows the last job reserved in memory.
3
Press or repeatedly until you see the operation you
want to cancel, and press
the selection.
Enter
. You are asked to confirm
Page 98

4
Select “1.YES” to confirm your selection. The selected job is
cancelled.
Or
Select “2.NO” to cancel your selection, and returns to step
2.
5
Press Stop/Clear, and the product returns to Standby
mode.
Monitoring a Dual Job Status
Your product can perform more than one of many functions
simultaneously. For example, you can:
• Receive a fax into the memory while making a copy.
• Store a fax document for later transmission while printing an
incoming fax.
While the product performs dual tasks, press Speed/Status to
see the current status on the display of the other operation.
Each time you press Speed/Status, the current status of the
two operations displays alternatively.
Sending a Flash/Recall/R
Some special phone services require a switch-hook signal for
proper operation. For example, if you have call-waiting, you can
put a call on hold and take a second call on the same line by
pressing the Flash/Recall/R button.
1
When you are on the telephone and hear the call waiting
signal, press Flash/Recall/R. The first caller is on hold
and you are speaking to the second caller.
2
Press Flash/Recall/R again to talk to the first caller again.
Note
: If you do not have a special service that uses the switchhook signal, do not press
do, you could disconnect the line.
Flash/Recall/R
O
during a call. If you
THER WAYS TO FAX
7.13
7
Page 99

Department Control Mode
For usage management, your product is equipped with
Department Control Mode. This is a security function, and can
restrict use with Department Codes. If codes do not match, this
mode prevents operation. You can also find out how long and by
which department the product was used.
Setting Department
Before using the department control mode, you have to register
the master code, and the department code and ID name for
each department who will share the product.
Master code: 5-digit security code for the master who
maneges to control all departments registered.
Department number: a number to manage that department.
Department code: 1 to 8 digit number for the department.
Unless correct department code is entered, fax machine’s
operation except automatic receiving can not be accessed.
1
Press Menu and then or repeatedly until
“DEPARTMENT CODE” appears on the display, then press
Enter.
2
Enter the desired master code using the number keypad.
Press Enter then re-enter the master code to confirm the
code is correct.
If you have registered the master code, enter the code. If
you enter the wrong code, the LCD prompts you to enter
the Master code again.
3
When “SET” is displayed on the lower line of the display,
press Enter.
4
Enter the desired department number(1-100) using the
number keypad, then press Enter.
If the department number already exists in your memory,
the LCD displays “DEPARTMENT NO. ALREADY EXISTS!” and
prompts you to enter the department number again.
5
Enter the proper name for the department, then press
Enter.
7.14
O
THER WAYS TO FAX
Page 100

6
Enter 8-digit password(Department code), and press Enter.
The department code will be used to access the machine’s
operation when executing the department control mode.
7
To return to Standby mode, press Stop/Clear.
Printing Department Journal
You can confirm the contents of the department registration with
the Depratment Code list, and the contents of the department
management with the Department Journal. To print the lists, do
the following:
1
Press Menu and then or repeatedly until
“DEPARTMENT CODE” appears on the display, then press
Enter.
2
Enter the master code using the number keypad, then press
Enter.
If you enter wrong code, “CODE MISMATCH! TRY AGAIN”
appears in the display. Try again with the correct code.
3
Press or repeatedly until “PRINT” appears on the
display, and press Enter.
4
If you want to print Department Code list, press Enter
when “DEPT. CODE” is displayed on the lower line.
The Department Code list shows all the Department codes
and names. After printing, the machine returns to Standby
mode.
If you want to print Department Journal list, press Enter
when “DEPT. JOURNAL” is displayed on the lower line.
The Department Journal list shows the total elasped
transmission time, total page numbers sent or copied, and
distribution ratio for each department.
5
To return to standby mode, press Stop/Clear.
7
O
THER WAYS TO FAX
7.15
 Loading...