

Samsung SF-6750 User Manual

Laser Facsimile
User’s Guide
Msys 6750

Trademarks
• Windows is a trademark of Microsoft Corporation.
• IBM is a trademark of International Business Machines.
• Centronics is a trademark of Centronics Data Computer.
• Other names and trademarks mentioned in this manual are trademarks of their respective
holders.

Contents
Chapter 1
Getting Started
Setting up your machine ________________________________ 1.2
Unpacking ____________________________________________ 1.2
Control locations and functions __________________________ 1.3
Front view ___________________________________________ 1.3
Rear view ___________________________________________ 1.4
Inside _______________________________________________ 1.4
Choosing a location ____________________________________ 1.5
Setting up your machine ________________________________ 1.5
Installing the toner cartridge ___________________________ 1.5
Loading paper into the cassette _________________________ 1.8
To load a stack of paper _____________________________ 1.8
How to adjust paper guides __________________________ 1.11
Manually feeding paper _____________________________ 1.13
Guidelines for the paper _______________________________ 1.14
Telephone line _______________________________________ 1.15
Extension phone _____________________________________ 1.15
AC power cord _______________________________________ 1.16
Document tray _______________________________________ 1.16
Document exit tray ___________________________________ 1.17
Printer exit tray ______________________________________ 1.17
System setup __________________________________________ 1.18
Ringer volume _______________________________________ 1.18
Home resolution and home contrast_____________________ 1.18
Sound control ________________________________________ 1.20
Remote diagnosis protection ___________________________ 1.20
Select language _______________________________________ 1.21
Econo mode setting ___________________________________ 1.21
Adjusting speaker volume _______________________________ 1.22
Setting the date and time ________________________________ 1.22
Setting the system ID
(Your number and name) ________________ 1.23
i

1 Getting Started
Chapter 2
Operation
Using the control panel _________________________________ 2.2
Using the number keypad _______________________________ 2.4
Entering alphanumeric characters _______________________ 2.4
Entering numbers _____________________________________ 2.6
Editing numbers or names _____________________________ 2.6
Inserting pause _______________________________________ 2.6
Sending a fax ___________________________________________ 2.7
Preparing documents for faxing or copying ________________ 2.7
Setting document resolution and contrast _________________ 2.8
Resolution ___________________________________________ 2.8
Contrast _____________________________________________ 2.8
Loading document _____________________________________ 2.9
Sending a fax automatically _____________________________ 2.10
Canceling transmission ________________________________ 2.10
Confirming transmission ______________________________ 2.10
Automatic redial ______________________________________ 2.11
Voice request __________________________________________ 2.11
Sending a voice request _______________________________ 2.11
Answering a voice request _____________________________ 2.11
Delayed transmission ___________________________________ 2.12
Memory transmission (Broadcasting) ________________________ 2.14
Priority transmission ___________________________________ 2.15
Adding documents to a standby operation ________________ 2.16
Canceling a standby operation ___________________________ 2.16
2 Operation
3 Troubleshooting
Appendix
Receiving a fax _________________________________________ 2.17
Receiving modes _______________________________________ 2.17
Receiving automatically in FAX mode ____________________ 2.18
Receiving automatically in TEL/FAX mode _______________ 2.18
Receiving automatically in ANS/FAX mode _______________ 2.19
Receiving manually in TEL mode ________________________ 2.19
Receiving a fax when the machine is out of paper ________ 2.20
Distinctive ring pattern detection (DRPD) _______________ 2.20
ii

Chapter 2
Operation (Continued)
Mail box ______________________________________________ 2.21
Confidential transmission _____________________________ 2.21
Setting up mail box for confidential receiving ____________ 2.23
Printing received confidential document ________________ 2.24
Polling ________________________________________________ 2.25
What is polling? ______________________________________ 2.25
Being polled by a remote machine (TX poll) ______________ 2.25
Adding documents to the job to be polled _______________ 2.26
Canceling a jab already in memory witch is waiting
to be polled __________________________________________ 2.27
Polling one or more remote machines (RX poll) __________ 2.27
Making a copy _________________________________________ 2.29
Making a copy _________________________________________ 2.29
Automatic dialing ______________________________________ 2.31
One-touch dialing ______________________________________ 2.31
Storing a number for one-touch dialing _________________ 2.31
Using a one-touch number ____________________________ 2.32
Using one-touch label ________________________________ 2.32
Speed dialing __________________________________________ 2.33
Storing a number for speed dialing _____________________ 2.33
Using a speed number ________________________________ 2.33
Group dialing (for multi-address transmission) ____________ 2.34
Storing one-touch or speed dial numbers for
group dialing ________________________________________ 2.34
Editing one-touch dial or speed dial numbers
in a group dial _______________________________________ 2.35
Assigning a group to a one-touch button ________________ 2.36
Using group dialing (multi-address transmission) ________ 2.36
Searching for a number in memory _______________________ 2.37
Searching sequentially through memory ________________ 2.37
Searching by the first letter ____________________________ 2.37
iii

Chapter 2
Operation (Continued)
Other functions _________________________________________ 2.38
Using function buttons _________________________________ 2.38
Redial _______________________________________________ 2.38
Flash ________________________________________________ 2.39
Status _______________________________________________ 2.39
Printing reports ________________________________________ 2.40
User options ___________________________________________ 2.41
Setting an option _____________________________________ 2.41
Selectable options ____________________________________ 2.42
Maintenance ___________________________________________ 2.47
Cleaning drum _______________________________________ 2.47
Adjust shading _______________________________________ 2.47
Notify toner Low _____________________________________ 2.48
Chapter 3
Troubleshooting
Troubleshooting ________________________________________ 3.2
Clearing jams __________________________________________ 3.2
Document jams while sending a fax _____________________ 3.2
Paper jams while the machine is printing ________________ 3.3
Tips for avoiding paper jams ___________________________ 3.5
LCD error messages ____________________________________ 3.6
Fixing problems ________________________________________ 3.8
Fax problems_________________________________________ 3.8
Maintenance ___________________________________________ 3.10
Clearing memory ______________________________________ 3.10
Cleaning the document scanner __________________________ 3.11
Managing toner cartridge _______________________________ 3.13
Expected cartridge life ________________________________ 3.13
Replacing toner cartridge ______________________________ 3.13
iv

Appendix
FCC regulations ––––––––––––––––––––––––––––––––––––––––– 4.2
Canadian radio interference regulations –––––––––––––––––––– 4.2
EC declaration of conformity ––––––––––––––––––––––––––––– 4.3
Laser safety statement ––––––––––––––––––––––––––––––––––– 4.4
Safety information ––––––––––––––––––––––––––––––––––––––– 4.5
Power saver
Specifications ––––––––––––––––––––––––––––––––––––––––––– 4.7
Index –––––––––––––––––––––––––––––––––––––––––––––––––– 4.8
–––––––––––––––––––––––––––––––––––––––––––– 4.6
v

Important Precautions and Safety Information
When using this fax machine, these basic safety precautions should always be followed to
reduce risk of fire, electric shock, and injury to persons:
1. Read and understand all instructions.
2. Use common sense whenever operating electrical appliances.
3. Follow all warnings and instructions marked on the product and in the literature
accompanying the product.
4. If an operating instruction appears to conflict with safety information, heed the safety
information. You may have misunderstood the operating instruction. If you cannot resolve
the conflict, contact your sales or service representative for assistance.
5. Unplug the fax machine from the AC wall socket and telephone jack before cleaning. Do not
use liquid or aerosol cleaners. Use only a damp cloth for cleaning.
6. Do not place the fax machine on an unstable cart, stand, or table. It may fall, causing serious
damage.
7. Your fax machine should never be placed on, near, or over a radiator, heater, air conditioner,
or ventilation duct.
8. Do not allow anything to rest on the AC power, telephone, or PC interface cords. Do not
locate your fax machine where the cords will be abused by persons walking on them.
9. Do not overload wall outlets and extension cords. This can diminish performance, and may
result in the risk of fire or electric shock.
10. Do not allow pets to chew on the AC power, telephone, or PC interface cords.
11. Never push objects of any kind into the fax machine through case or cabinet openings.
They may touch dangerous voltage points, creating a risk fire or shock. Never spill liquid
of any kind onto or into the fax machine.
12. To reduce the risk of electric shock, do not disassemble the fax machine. Take it to a
qualified service technician when repair work is required. Opening or removing covers
may expose you to dangerous voltages or other risks. Incorrect reassembly could cause
electric shock when the unit is subsequently used.
13. Unplug the machine from the telephone jack, PC, and AC wall outlet, and refer servicing to
qualified service personnel under the following conditions:
• When any part of the power cord, plug, or connecting cable is damaged or frayed.
• If liquid has been spilled into the product.
• If the product has been exposed to rain or water.
• If the product does not operate properly after instructions have been followed.
• If the product has been dropped, or the cabinet appears damaged.
• If the product exhibits a sudden and distinct change in performance.
14. Adjust only those controls covered by the operating instructions. Improper adjustment of
other controls may result in damage, and may require extensive work by a qualified service
technician to restore the product to normal operation.
15. Avoid using this fax machine during a lightning storm. There may be a remote risk of
electric shock from lightning. If possible, unplug the AC power, telephone, and PC
interface cords for the duration of the lightning storm.
16. Never dispose of batteries or battery packs in a fire. There is a serious risk of explosion
and/or the release of highly toxic chemicals.
17. SAVE THESE INSTRUCTIONS.
vi

1
Getting Started
1.1
Setting up
01 02 03 04 05
06 07 08 09 10
11 12 13 14 15
16 17 18 19 20
your machine
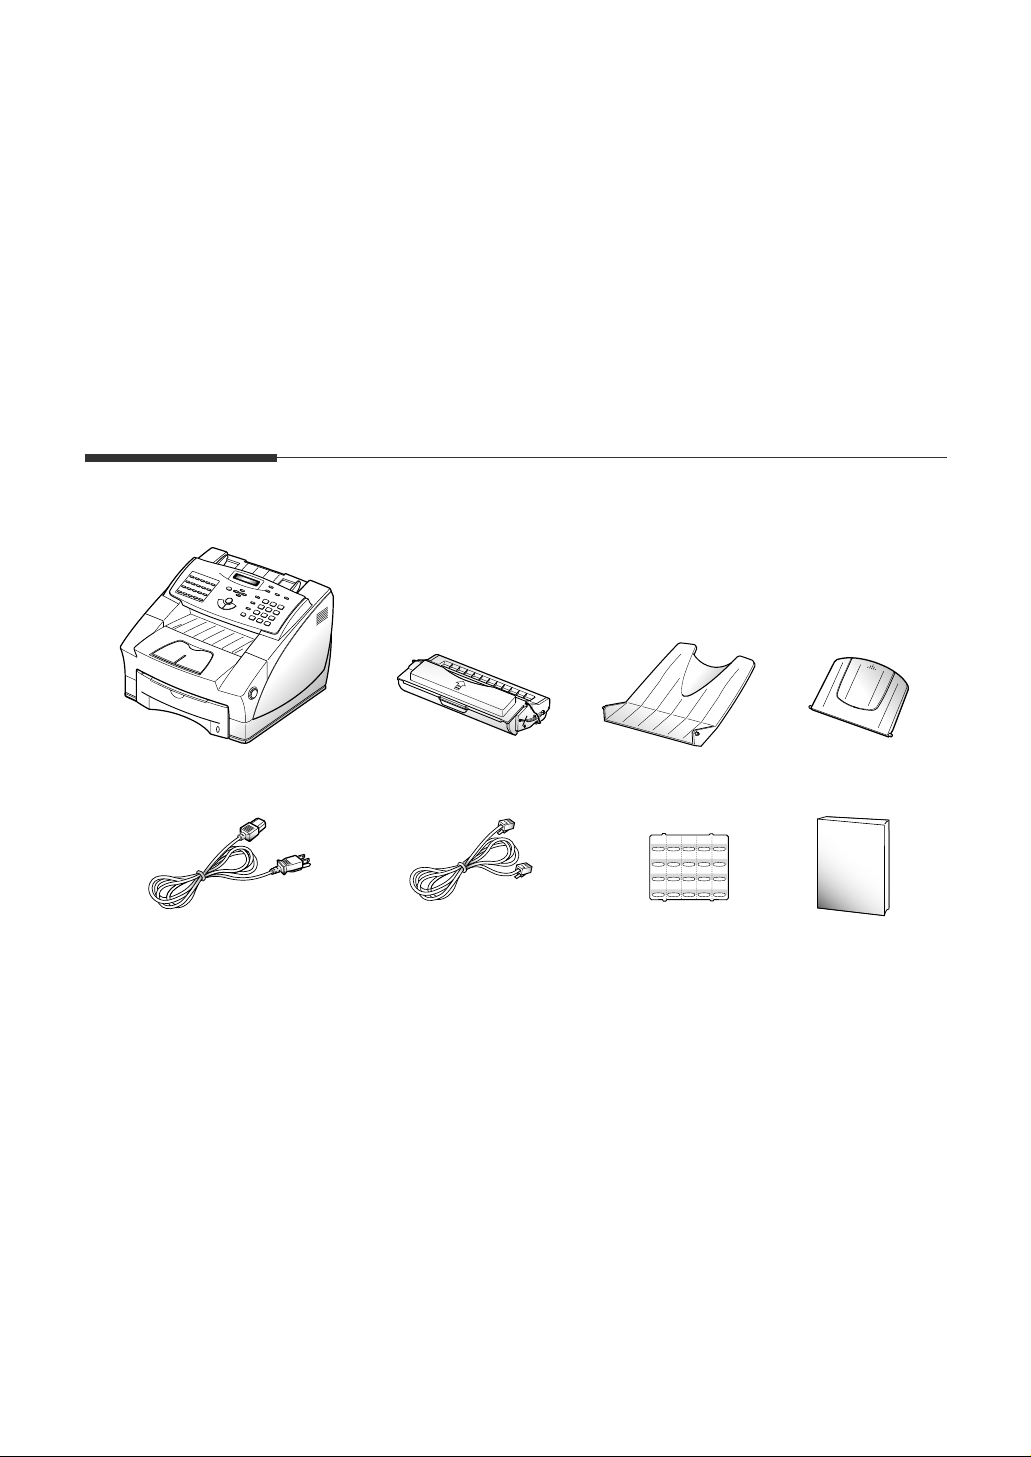
Unpacking
Machine Toner cartridge
AC power cord *
*1 The shape of AC power and telephone line cord plugs may differ, depends on your country.
1
T elephone/modem
line cord *
1
Printer exit tray
One-touch
label
Document tray
Laser facsimile
user’s guide
1.2
Setting up your machine

Front view
Control panel
Control locations and functions
Take a moment to familiarize yourself with the main components and
understand their functions.
Caution : Use of controls or adjustments other than those specified herein
may result in radiation exposure.
Document tray
Document guide
Printer exit tray
1 Getting Started
Cassette
Document exit tray
Manual feed tray
Note: Your machine may look slightly different from the illustration.
Paper level indicator
Setting up your machine
1.3
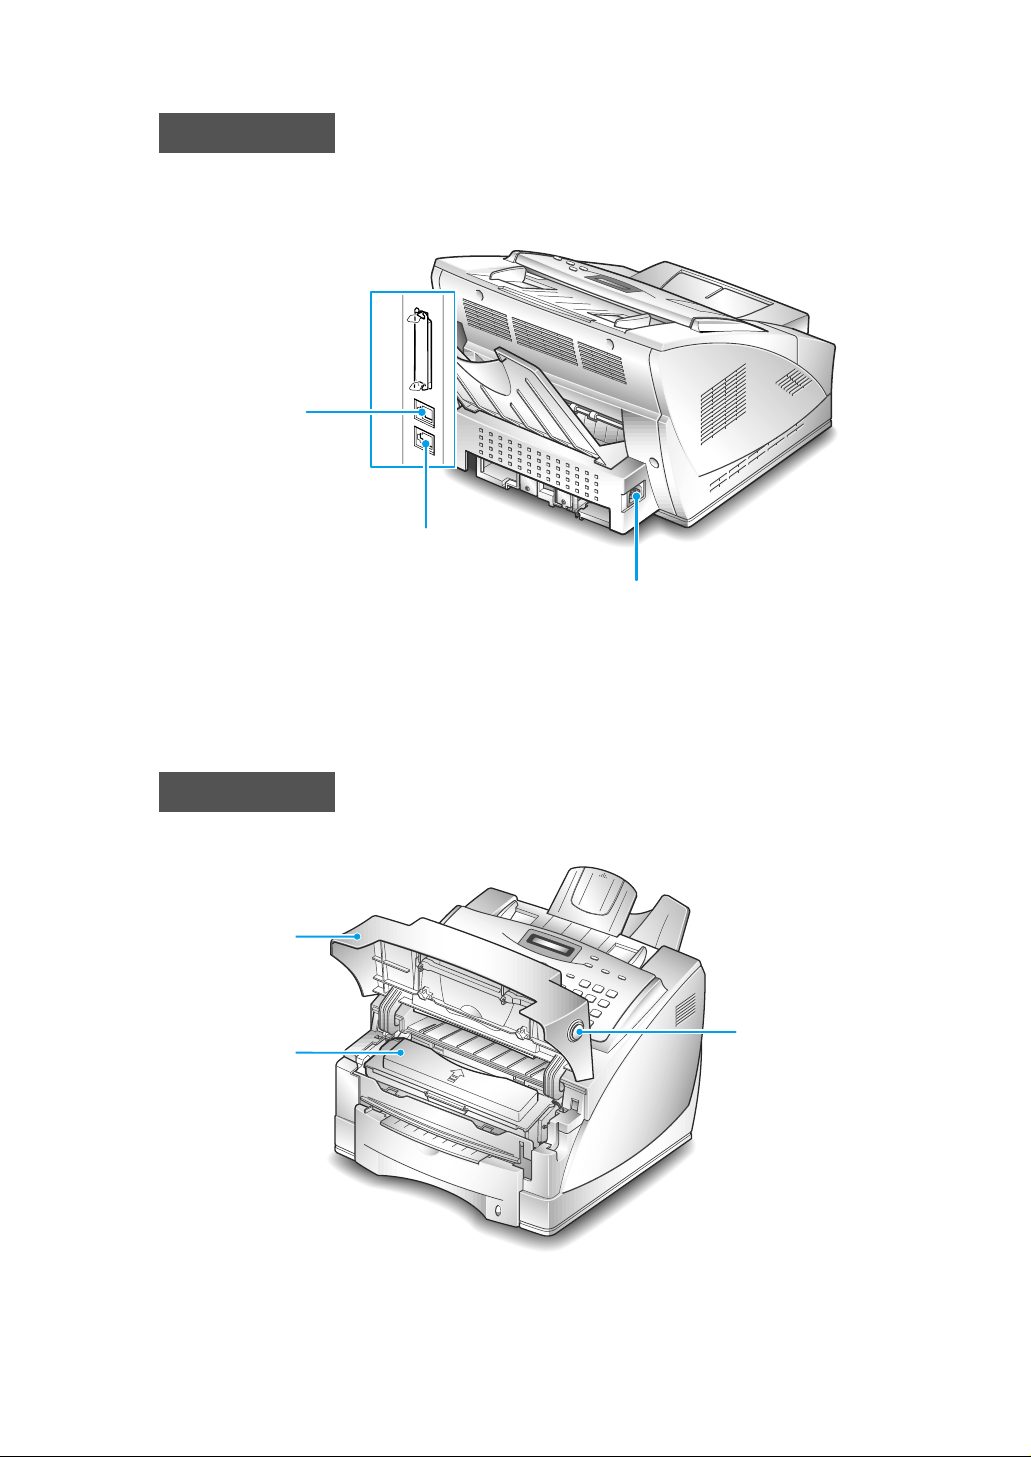
Rear view
Telephone line jack
L
IN
E
T
E
L
Extension telephone jack
Power cord connector
Inside
Cover
Toner cartridge
Cover release button
1.4
Setting up your machine

Choosing a location
To help guarantee trouble-free operation of your machine, place it on a flat,
stable surface near your workstation. Leave enough space to allow for easy
paper loading, paper out and opening the front cover.
Do not place your machine:
- In direct sunlight.
- Near heat sources or air conditioners.
- In dusty or dirty environments.
Setting up your machine
Installing the toner cartridge
1. Open the cover by pressing the cover release button.
1 Getting Started
2. Raise the cover.
Setting up your machine
1.5

3. Unpack the toner cartridge. Grip the cartridge firmly and pull the sealing
tape slowly from the cartridge. You may feel some initial resistance.
Green cap
As the tape will have a small amount of toner on both sides, take care
not to get toner on your clothes.
Remove the green cap from the right side of the cartridge.
4. Gently shake the cartridge from side to side 5 or 6 times to distribute the
toner evenly inside the cartridge.
1.6
Setting up your machine
5. Find the cartridge slots inside the machine, one on each side.

6. Grasp the handle and slide the cartridge down between the cartridge
slots, until it drops into place.
7. Close the cover. Make sure that the cover is securely closed.
1 Getting Started
Notes:
• Do not expose the cartridge to direct sunlight or strong room light.
• To avoid damaging the photo-sensitive drum, never open the drum shutter.
• To avoid damaging the cartridge, complete cartridge installation as quickly as
possible.
• If toner gets on your clothing, wipe it off with a dry cloth and wash clothing in
cold water.
• When printing text at 5% coverage, you can expect a toner cartridge life of
approximately 6,000 sheets.
Setting up your machine
1.7
Loading paper into the cassette
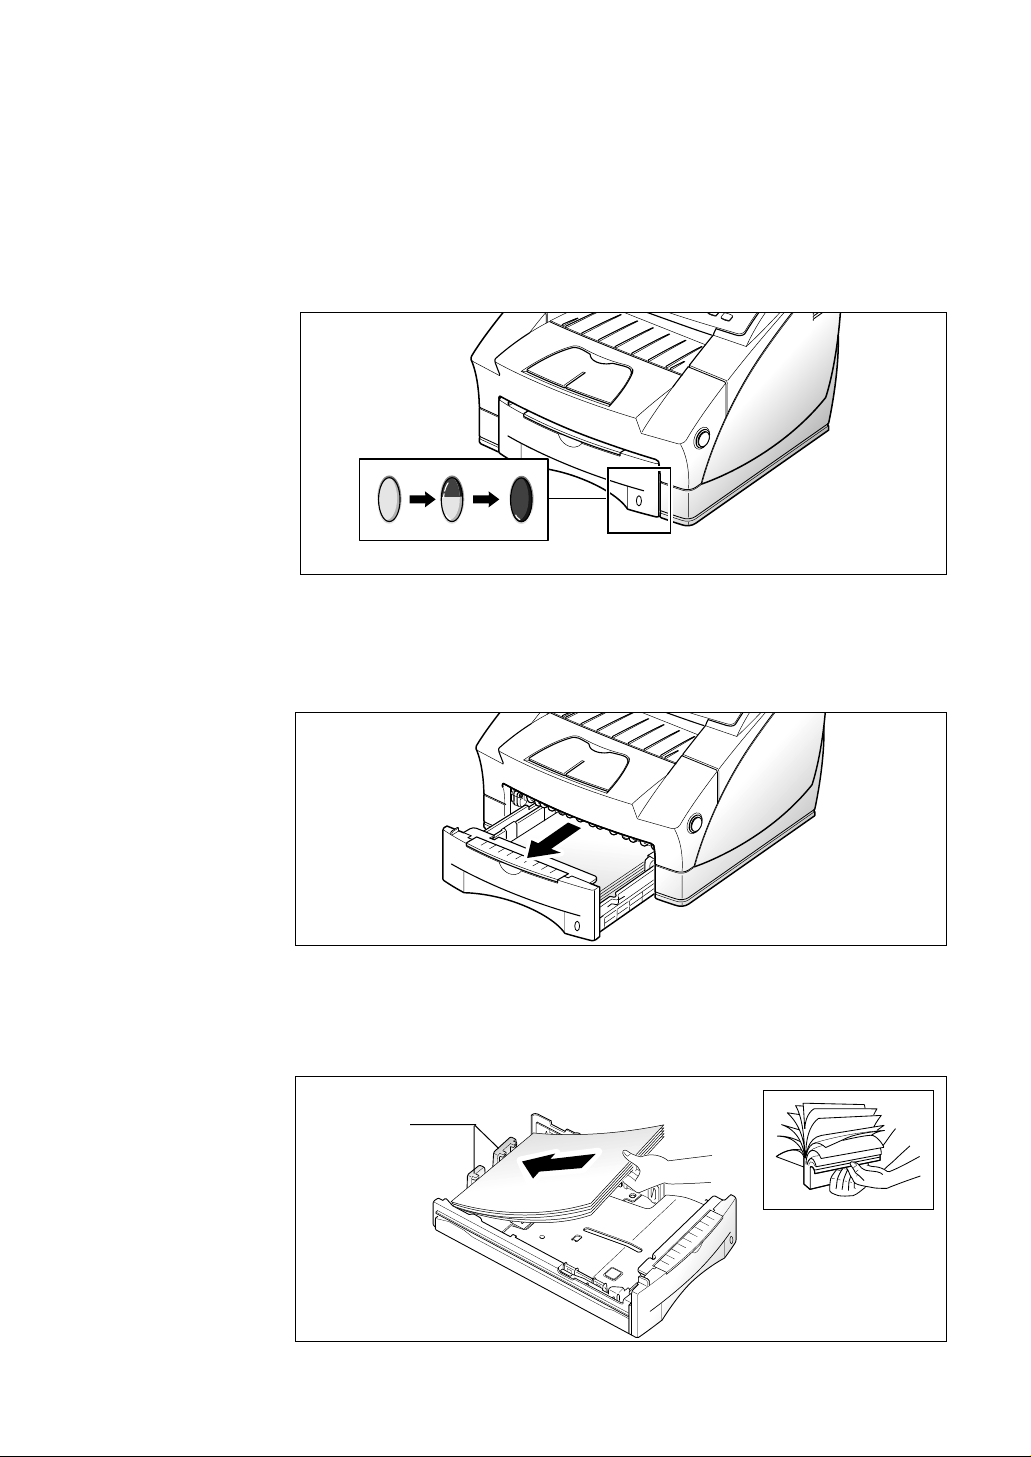
You can load approximately 250 sheets of paper in the paper cassette.
The window on the front of the paper cassette shows the amount of paper
currently left in the cassette. When the cassette becomes empty, the window
turns into red.
Paper full Paper Empty
To load a stack of paper
1. Remove the paper cassette by pulling it toward you.
1.8
Setting up your machine
2. Fan the paper and load the paper in the cassette under the guides with
the print side face down. The print side is usually indicated on the paper
package.
Guides
If you are using a preprinted stock, such as letterhead, place the printed
LETTERHEAD
side face down with the top edge of the page toward the front of the
cassette.
1 Getting Started
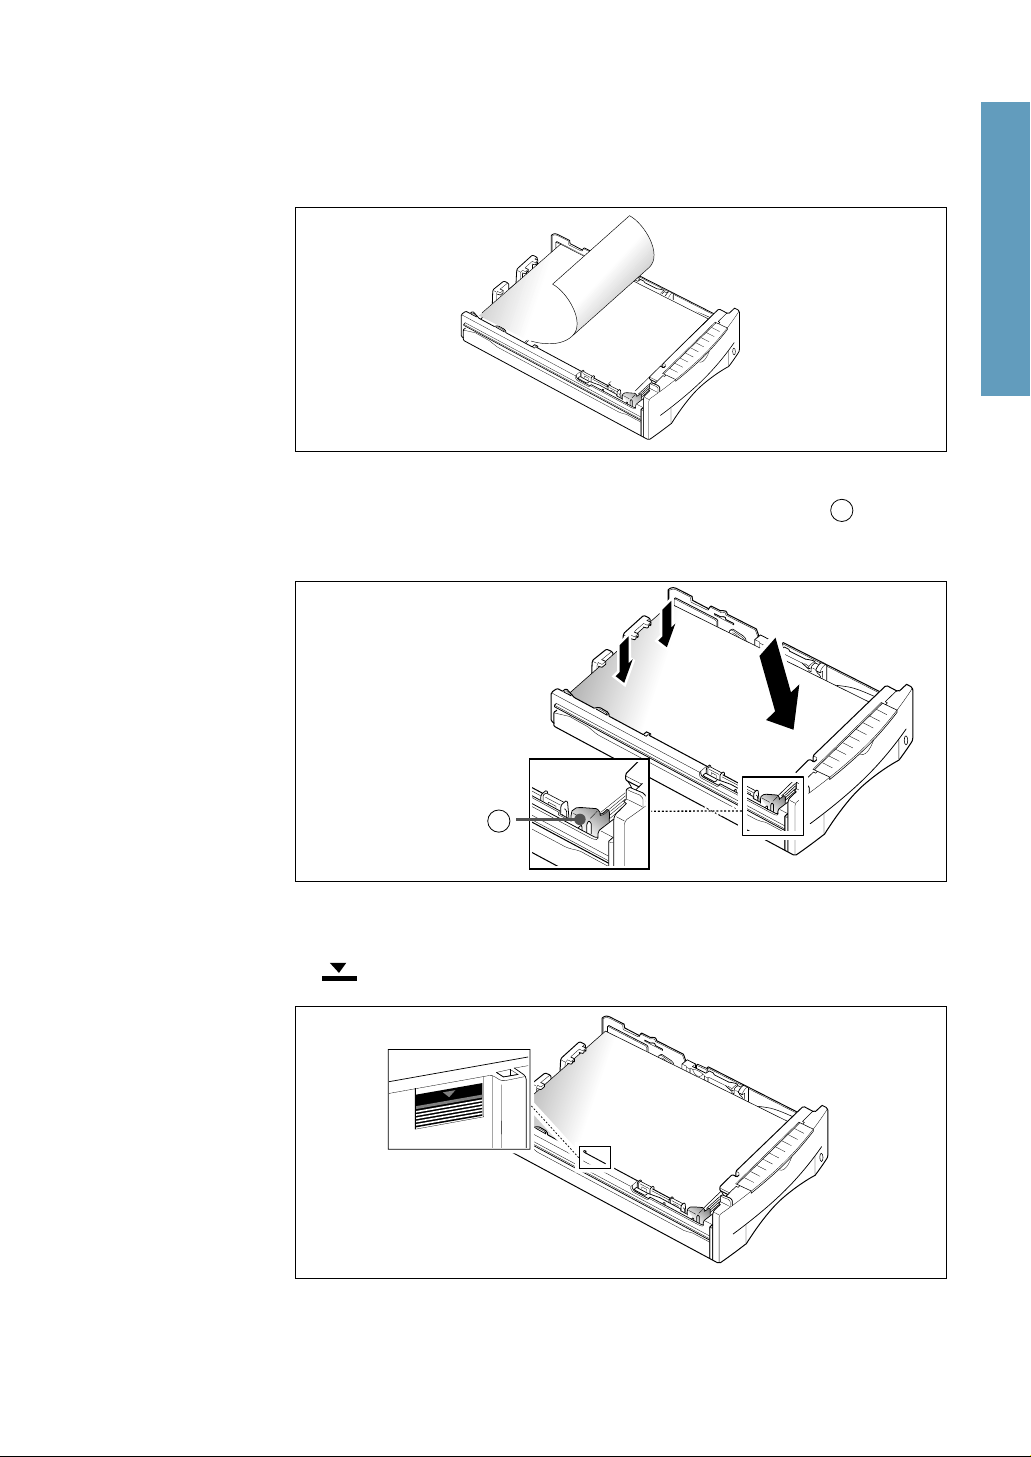
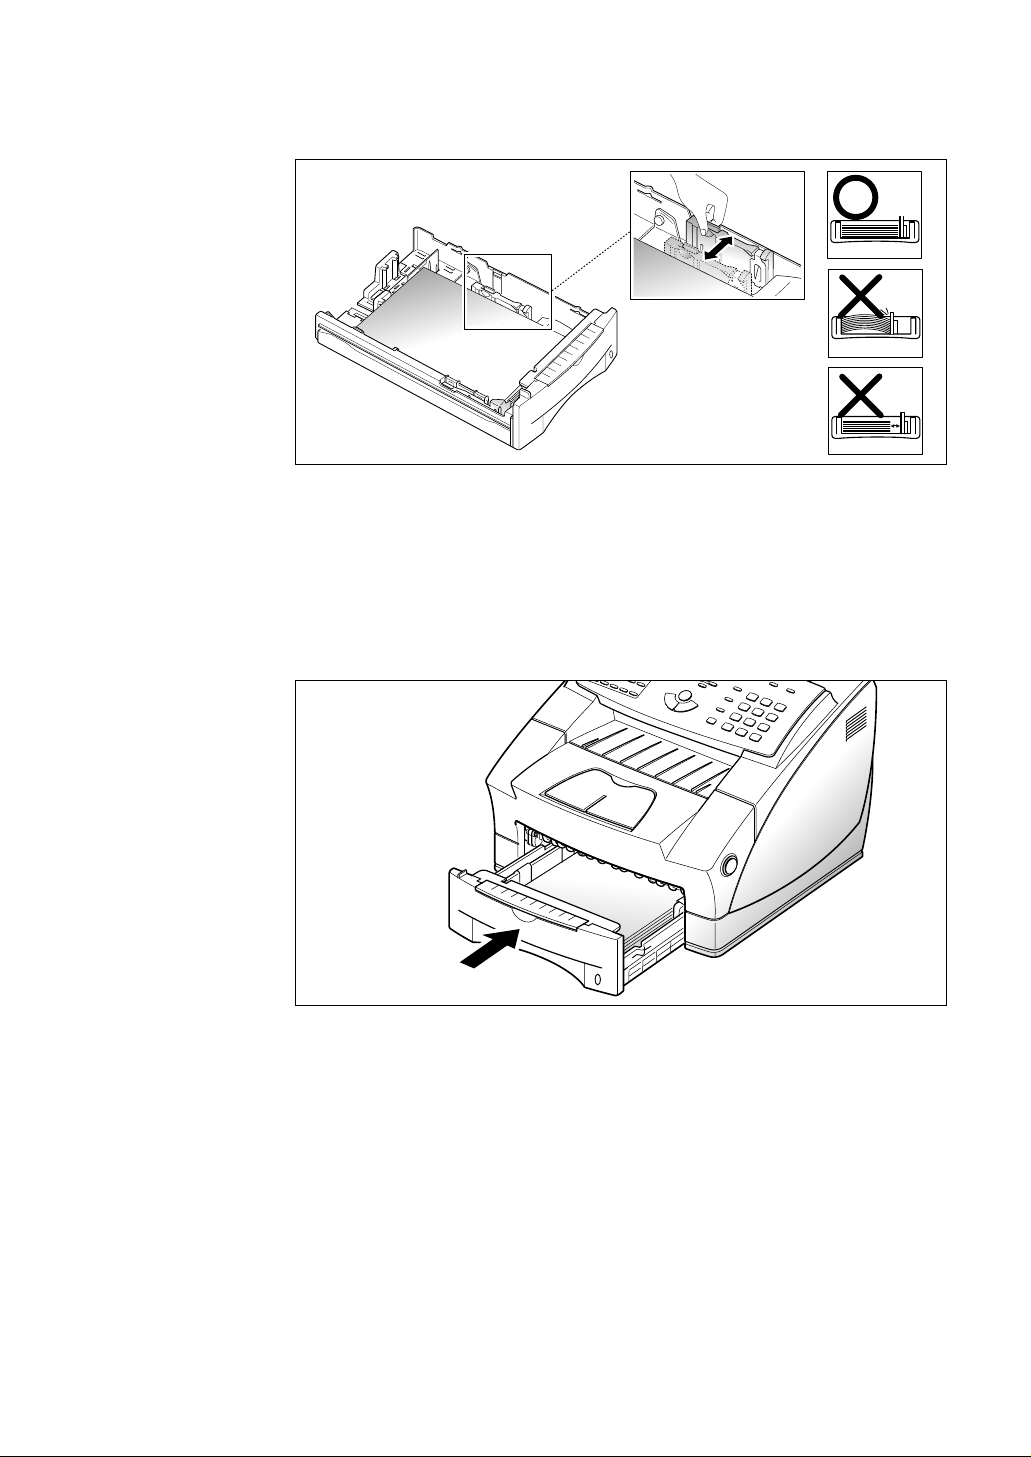
3. Make sure that the stack goes under the metal retaining clip . Paper
overloading may cause paper jams.
Make sure that paper is
under this metal clip.
4. Make sure that the stack of paper does not exceed the line indicated
by mark on the left inside wall of the cassette.
A
A
Setting up your machine
1.9
5. Pinch the side guide as shown below to adjust it to proper paper width.
The paper cassette is preset to load letter size paper. If you want to load
A4 or legal size paper, adjust the cassette for the paper you want to load.
For details on how to adjust the paper cassette, see ‘How to adjust paper
guides’ on page 1.11.
6. Insert the cassette back into the printer.
1.10
Setting up your machine
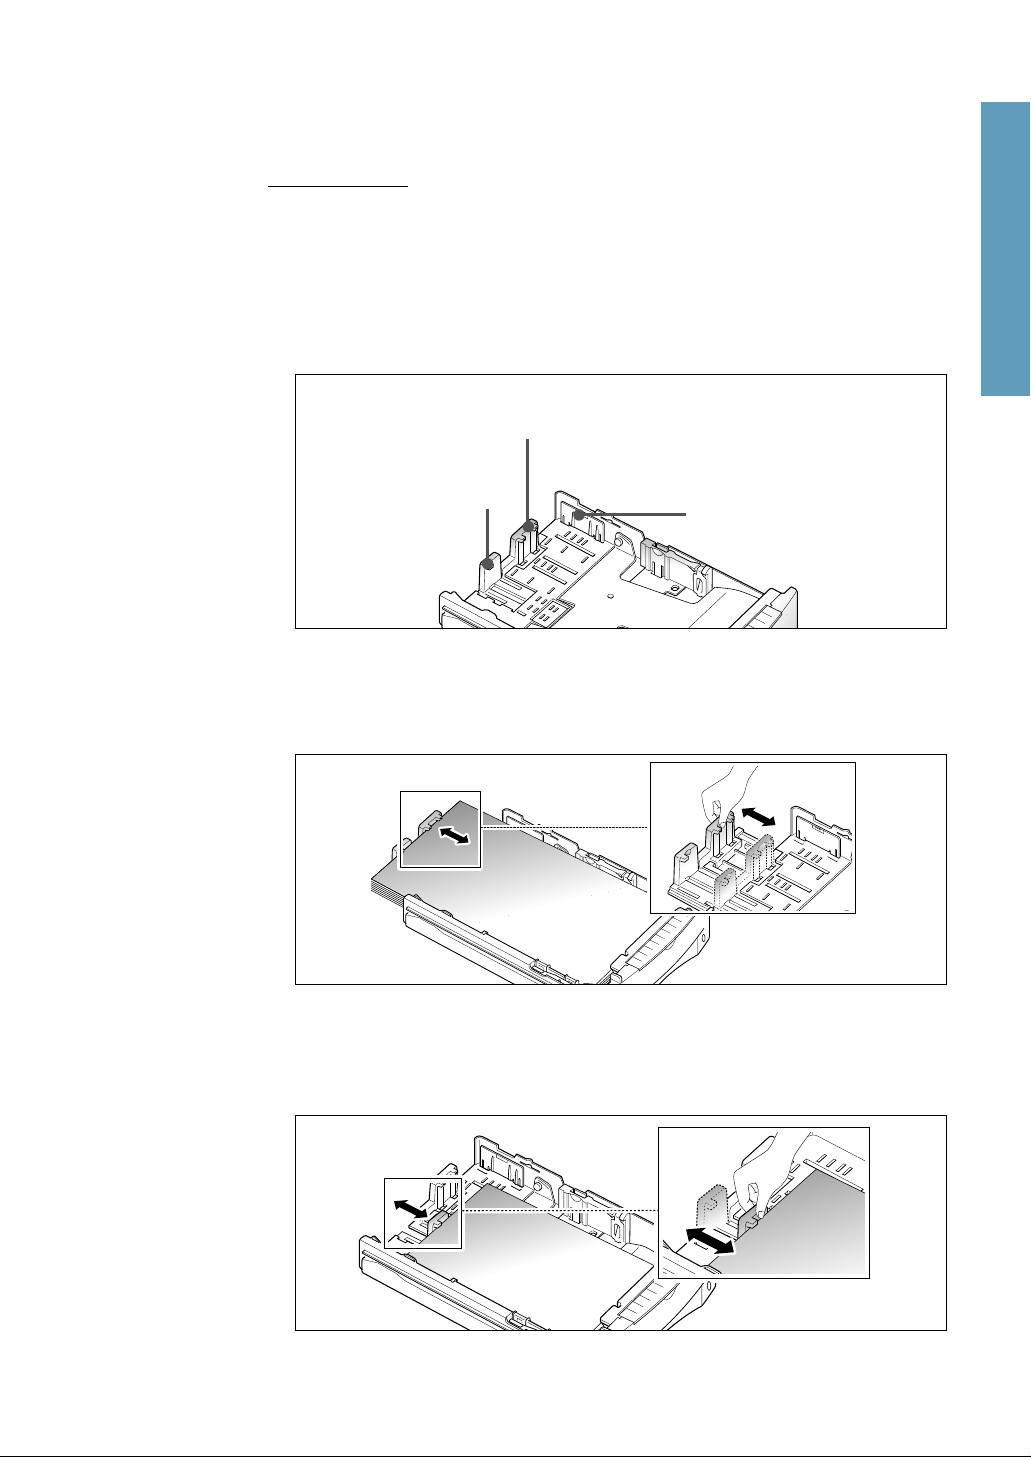
How to adjust paper guides
Length guides
There are two main guides and one auxiliary guide as shown below to
adjust for the paper length. One of main guide is for legal, A4, or folio size,
and the other is for letter (LTR), executive (EXEC), or B5 size paper. When
you load letter size paper, it is recommended that you use the auxiliary
guide on the upper right corner of the cassette with the appropriate main
guide.
Use for A4, legal,
Folio size paper
Use for letter,
executive,
B5 size paper
Auxiliary guide for
letter size paper
To adjust for legal, or folio size paper, pinch the right guide, then slide the
guide until it lightly rests against the edge of the paper stack.
1 Getting Started
To adjust for letter (LTR), executive (EXEC), JIS B5, or ISO B5 size paper,
squeeze the left guide and slide it until it lightly rests against the paper
stack.
Setting up your machine
1.11

1
2
When you load letter, executive, or B5 size paper, it is recommended that
you use the auxiliary guide with the main guide before loading paper.
To adjust the auxiliary guide, remove the guide , then insert it to the
appropriate position .
2
1
LTR
EXEO
JIS B5
ISO B5
LTR
EXEO
JIS B5
ISO B5
Width guide
Squeeze the guide as shown and slide the guide to the left until it lightly
rests against the edge of the paper stack.
1.12
Setting up your machine
Note: Do not push the width guide far enough to cause the paper to bend. If
you do not adjust the width guide, it may cause paper jams.
Width
guide
Paper

Manually feeding paper
When you copy on heavier weight papers, transparencies, you must
manually feed them one sheet at a time through the manual feed slot. The
manual feed slot is located on the top of the paper cassette.
Manual feed slot
1. Pull out the paper cassette, raise and then lower the manual feed tray
toward you.
1 Getting Started
Manual feed tray
2. Load the desired print material in the manual feed slot with the left edge
to the far left of the slot. You must feed one sheet at a time.
Setting up your machine
1.13

Guidelines for the paper
When selecting or loading paper, or other special media, keep these
guidelines in mind:
• Attempting to print on damp, curled, wrinkled, or torn paper can cause
paper jams and poor print quality.
• Use cut-sheet paper only. You cannot use multiparty paper.
• Use only high quality, copier grade paper. Avoid paper with embossed
lettering, perforations, or textures that are too smooth or too rough.
• Colored paper should be of the same high quality as white photocopy
paper. The pigments must withstand the printer’s fusing temperature of
392 oF (200 oC) for 0.1 second without deterioration. Do not use paper
with a colored coating that was added after the paper was produced.
• Pre-printed forms must be printed with non-flammable, heat-resistant
inks that do not melt, vaporize, or release hazardous emissions when
subject to the printer ’s approximately 392 oF (200 oC) fusing temperature
for 0.1 second.
• Store paper in its ream wrapper until ready to use. Place cartons on
pallets or shelves, not on the floor. Do not place heavy objects on top of
the paper, whether it is packaged or unpackaged. Keep paper away from
moisture, or other conditions that can cause it to wrinkle or curl.
1.14
Setting up your machine
• During storage, moisture-proof wraping (any plastic container or bag)
should be used to prevent dust and moisture from contaminating your
paper.
• Always use paper and other media that conform with those listed under
‘Specifications’ on page 4.7.

Telephone line
Plug one end of the telephone line cord into the LINE jack and the other
end into a standard phone wall jack.
LIN
E
T
E
L
To a
standard
phone wall
jack
Extension phone
1 Getting Started
If you want to use a regular phone or answering machine with your
machine, connect the phone into the TEL jack.
Plug the cord of your regular phone or answering machine into the socket
marked TEL on the back of the machine.
LIN
E
T
E
L
To a
regular
phone or
answering
machine
Setting up your machine
1.15
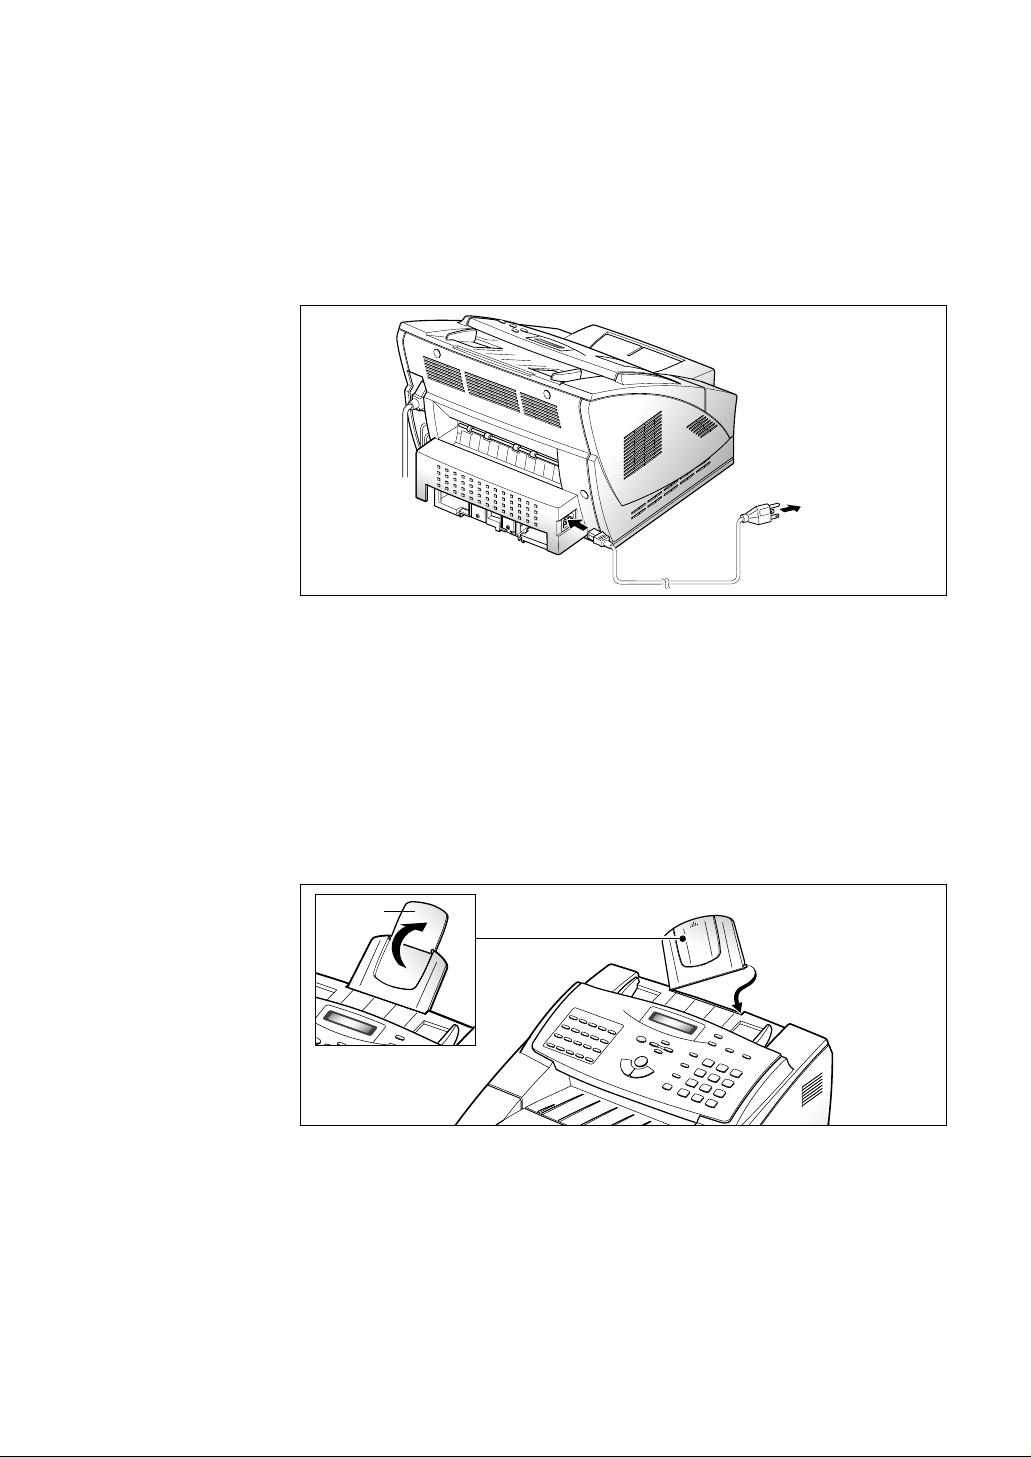
AC power cord
Plug one end of the cord into the back of the machine and the other end
into a standard AC power outlet (use 120 Volt only).
The machine turns on. If there is no cartridge installed, or no paper, the
display shows ‘DOOR OPEN OR NO TONER CARTRIDGE’ or ‘[NO
PAPER]’.
To AC
outlet
If you want to turn it off, unplug the power cord.
Document tray
Holding the document tray with both hands, push the tab on one end of
the tray into the hole as show. Gently squeeze the other side of the tray
toward the middle so the tab on the other end can be easily placed into the
other hole. Fold out the extender, if necessary.
Extender
1.16
Setting up your machine

Document exit tray
Fold out the document exit tray, if necessary.
Document
exit tray
Printer exit tray
Holding the rounded end, insert the two tabs into the corresponding slots
on the back of the machine.
1 Getting Started
Place the printer exit tray up or down depending on the type of the paper.
For transparencies such as OHP film, lay it down as show at up. When the
printing is finished, replace the tray.
Setting up your machine
1.17

System setup
Ringer volume
You can adjust the volume of the ringer to the desired loudness.
1. Press Menu, then press System Setup on the one-touch keypad.
The display shows ‘RINGER VOLUME ?’.
2. Press Start/Enter, then use "or ❷to choose the desired loudness of the
ringer.
The selected ringer sounds and the display shows the loudness level with
> symbol.
No > symbol turns the ringer off. The machine will work normally even
if the ringer is turned off.
RINGER VOLUME
[>>>>>>>> ]
3. Press Start/Enter when the desired volume level is selected. The display
shows the next setup menu ‘DEFAULT SETTINGS ?’ For details on
menu, see below.
4. To return to standby mode, press Stop.
Home resolution and home contrast
The print resolution and contrast can be set to their most frequently used
modes. Whenever a document is sent or copied, the home contrast and
resolution mode will be activated unless otherwise changed by using
Resolution or Contrast button on the control panel. See page 2.8 for
details.
1. Press Menu, then press System Setup on the one-touch keypad.
The display shows ‘RINGER VOLUME ?’.
2. Press "or ❷until you find ‘DEFAULT SETTINGS ?’.
1.18
Setting up your machine

3. Press Start/Enter. The display asks you to choose the home resolution
mode.
HOME RESOLUTION
[ STANDARD ]
4. Press ➛or ❿repeatedly until you find the desired mode:
•STANDARD–use with most documents.
•FINE–use for documents with fine detail, such as small print.
•SUPER FINE–use for documents that have extremely fine detail.
5. Press Start/Enter when you find the mode. The display asks you to
choose the home contrast mode.
HOME CONTRAST
[ NORMAL ]
6. Press ➛or ❿repeatedly until you find the desired mode:
•NORMAL–use with documents of average or normal contrast.
•DARKEN–use with documents with low contrast or light images.
1 Getting Started
•LIGHTEN–use with documents with high contrast or dark images.
•PHOTO–for obtaining maximum image quality with documents that
contain pictures or photographs with shades of gray.
7. Press Start/Enter when you find the mode. The display shows the next
setup menu ‘SOUND CONTROL ?’. For details on ‘Sound control’ menu,
see the next page.
8. To return to standby mode, press Stop.
Setting up your machine
1.19

Sound control
You can choose an alarm tone to sound when an error occurs (ALARM
SOUND) or any key is pressed (KEY SOUND).
1. Press Menu, then press System Setup on the one-touch keypad.
The display shows ‘RINGER VOLUME ?’.
2. Press "or ❷until you find ‘SOUND CONTROL ?’.
3. Press Start/Enter. The display prompts you to turn ON or OFF the
alarm sound.
4. Press 1 to turn the sound ON, or 2 to turn it OFF. You can also use ➛or
❿
button to choose ‘ON’ or ‘OFF’, then press Start/Enter to confirm.
5. The display asks you to turn ON or OFF the key sound. Press 1 to turn
the sound ON, or 2 to turn it OFF.
6. The display shows the next setup menu. To return to standby mode,
press Stop.
Remote diagnosis protection
Remote diagnosis feature allows your machine to be checked by a service
company from a remote place through the phone line.
If you do not want to use the remote diagnosis feature and want to protect
your machine from being opened by an unauthorized person, you can
enable this remote diagnosis protection feature.
1. Press Menu, then press System Setup on the one-touch keypad.
The display shows ‘RINGER VOLUME ?’.
2. Press " or ❷ until you find ‘REMOTE DIAGNOSIS PROTECTION ?’,
then press Start/Enter.
3. The display asks you to turn the feature ON or OFF. Press 1 to turn it
ON, or 2 to turn it OFF.
4. The display shows the next setup menu. To return to standby mode,
press Stop.
1.20
Setting up your machine

Select language
You can select the LCD display language between english, german, etc.
1. Press Menu, then press System Setup on the one-touch keypad.
The display shows ‘RINGER VOLUME ?’.
2. Press " or ❷ until you find ‘SELECT LANGUAGE ?’, then
press Start/Enter.
3. Press " or ❷ to choose the desired display language, then
press Start/Enter. You can also press the number of the language in the
display.
4. The display shows the next setup menu. To return to standby mode,
press Stop.
Econo mode setting
To get the most from your toner supply, set the econo mode to on. If set to
on, you can preserve the toner supply. The print quality may be reduced.
1. Press Menu, then press System Setup on the one-touch keypad.
The display shows ‘RINGER VOLUME ?’.
1 Getting Started
2. Press " or ❷ until you find ‘ECONO MODE SETTING ?’, then
press Start/Enter.
3. The display asks you to set the mode to ON or OFF. Press 1 to set ON, or
2 to set OFF.
4. The display shows the next setup menu. To return to standby mode,
press Stop.
Setting up your machine
1.21

Adjusting speaker volume
1. Press OHD1)/V.Req. to adjust the speaker volume. If you cannot hear a
dial tone, check the phone line connection.
2. Press "or ❷repeatedly until you find the desired loudness. The display
shows the current volume level.
3. After choosing the desired volume level, press OHD1)/V.Req..
Note : 1)OHD : On Hook Dial
Setting the date and time
The current date and time are shown in the display window when the
machine is on and ready for use (standby mode). The date and time are
printed on all faxes you send.
1. Press Menu, then press Date & Time on the one-touch keypad.
The display shows the currently set date and time.
2. Using the number keypad, enter the current date in MMDDYYYY format.
If you make a mistake, use the ➛or ❿buttons to move the cursor to the
digit you wish to change.
05-03-1999
08:36 (PM)
After entering the date the flashing cursor will move into the first digit of
the time.
3. Using the number keypad, enter the current time. You can choose 12 or
24 hour format. Refer to the previous section, for the details see page 2.46
clock mode.
Note : AM or PM is selected by pressing the "or ❷buttons.
4. Press Start/Enter when the date and time in the display is correct.
The display shows the date and time you have set, then returns to
standby mode.
Note : If you enter an invalid number, the machine beeps and will not proceed to
the next step. If this happens, just reenter the correct number.
1.22
Setting up your machine
 Loading...