

Page 1
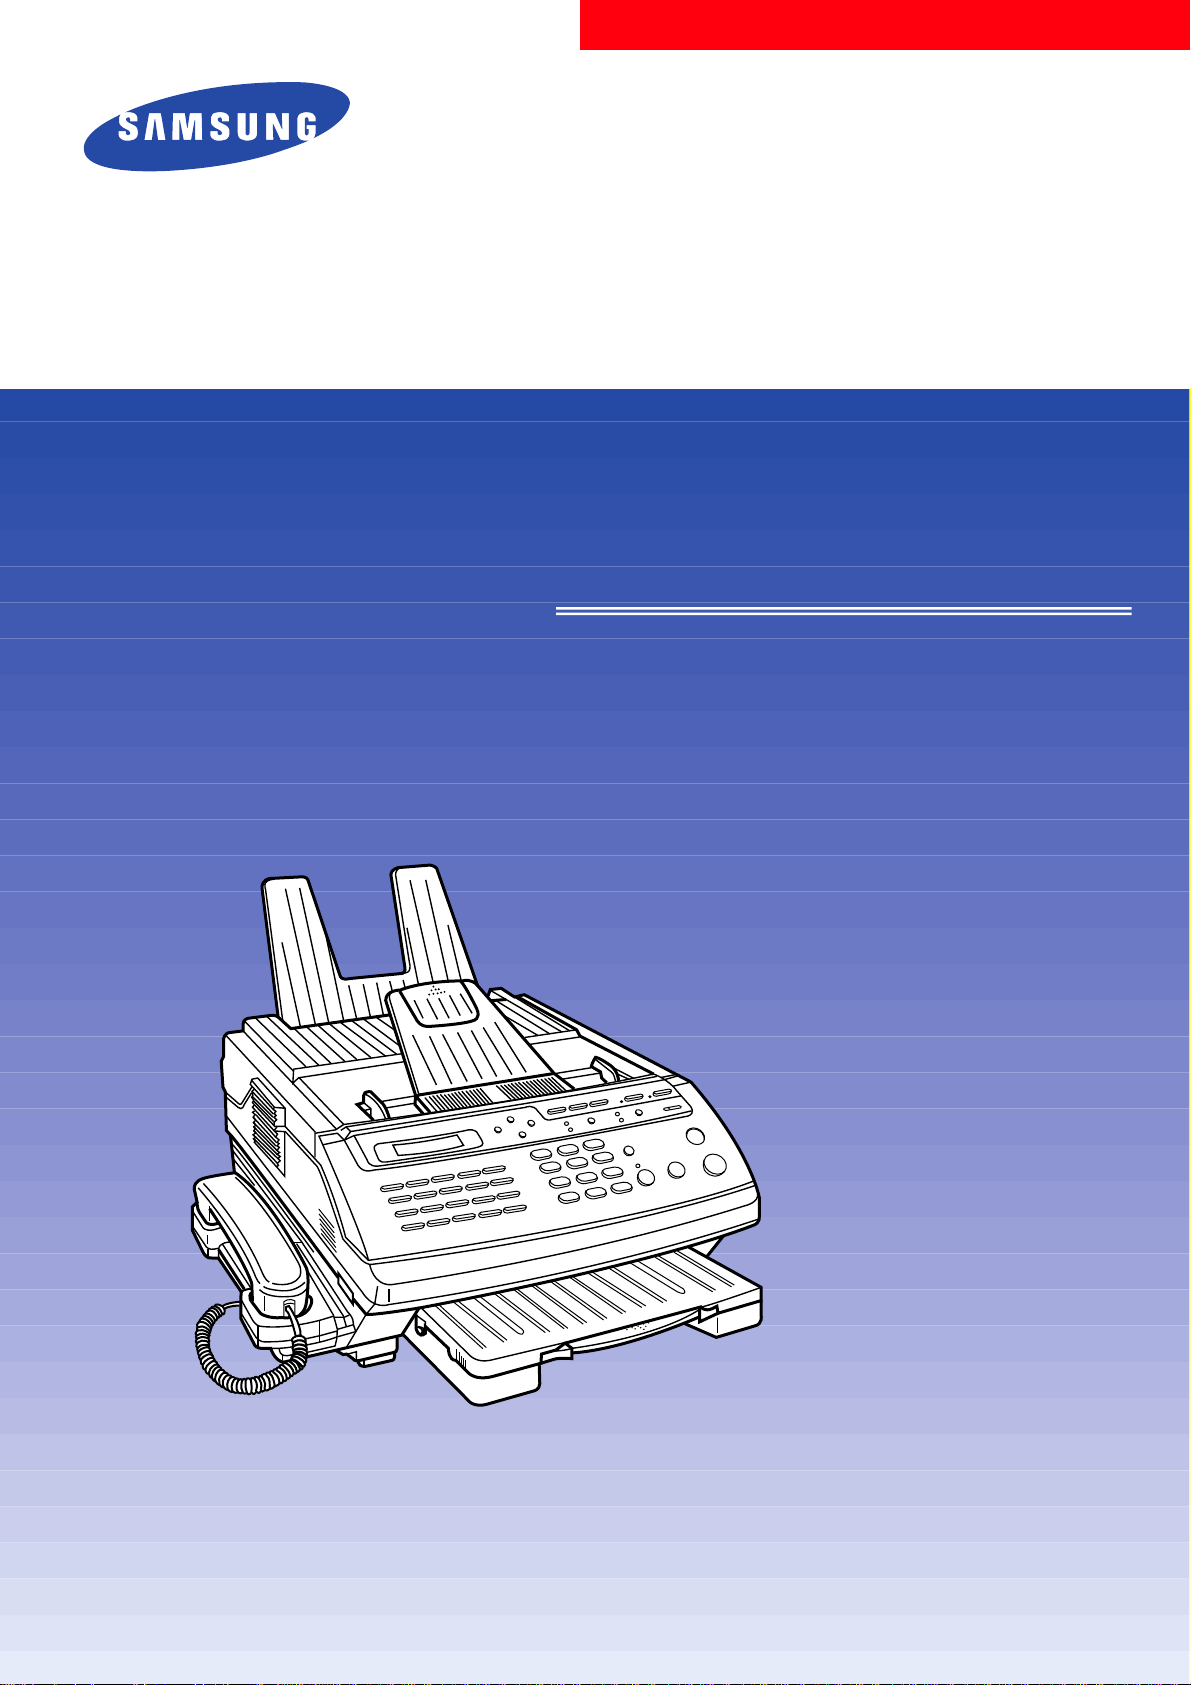
Model : SF5500
Model : SF5500M
Model : SF5600
Installation and Operation
Page 2

FCC INFORMATION
The following information is applicable only to
facsimile machines installed in United States.
Label Identification
This equipment complies with Part 68 of the FCC rules. On the
bottom of this equipment is a label that contains, among other
information, the FCC registration Number and Ringer Equivalence
Number (REN) for this equipment. You may need to provide this
information to your telephone company.
Type of Service
This equipment is designed to be used on standard device
telephone lines. Connection to telephone company-provided coin
service (central office implemented system) is pr o h i b i t e d .
Connection to party-line service is subject to state tariffs.
Telephone Company Procedures
The goal of the telephone company is to provide you with the best
service it can. In order to do this, it may occasionally be necessary
for it to make changes in its equipment, operation, or procedures. If
these changes affect your service or the operation of the equipment,
the telephone company will give you notice, in writing, to allow
you to make any changes necessary to maintain uninterru p t e d
service.
If you have any questions about your telephone line, such as how
many pieces of equipment you can connect to it, the telephone
company will provide this information upon request.
In certain circumstances, it may be necessary for the telephone
company to request information from you concerning the
equipment which you have connected to your telephone line. Upon
request of the telephone company, provide the FCC r e g i s t r a t i o n
number and the Ringer Equivalence Number (REN) of the
equipment which is connected your line; both of these items are
listed on the equipment label and in the Service information
chapter of this guide. The sum of all of the RENs on your telephone
line should be less than five in order to assure proper service from
the telephone company. In some cases, a sum of five may not be
usable on a given line.
SAMSUNG ELECTRONICS CO., LTD 1
Page 3

About interference
This equipment has been tested and found to comply with the
limits for a Class B digital device, pursuant to Part 15 of the FCC
Rules. These limits are designed to provide reasonable pro t e c t i o n
against harmful interference in a residential installation. This
equipment generates, uses, and can radiate radio frequency energy
and, if not installed and used in accordance with the instructions,
may cause harmful interference to radio communications.
However, there is no guarantee that interference will not occur in a
particular installation. If this equipment does cause harmful
i n t e r f e rence to radio or television reception, which can be
determined by turning the equipment off and on, the user is
encouraged to try to correct the interference by one or more of the
following measures:
• Reorient or relocate the receiving antenna. Increase the
separation between the equipment and the receiver.
• Increase the separation between the equipment and the receiver.
• Connect the equipment into an outlet on a circuit different from
that to which the receiver is connected.
• Consult the dealer or an experienced radio/TV technician for
help.
The Telephone Consumer Protection Act of 1991 makes it unlawful
for any person to use a computer or other electronic device to send
any message via a telephone fax machine unless such message
clearly contains in a margin at the top or transmission, the date and
time it is sent and an identification of the business or other entity,
or other individual sending the message and the telephone number
of the sending machine or such business, other entity, or
individual.
In order to program this information into your fax machine, you
should complete the following steps on page 2-5.
If a Problem Arises
If any of your telephone equipment is not operating properly, you
should immediately remove it from your telephone line, as it may
cause harm to the telephone network. If the telephone company
notes a problem, it may temporarily discontinue service. When
practical, the telephone company will notify you in advance of the
disconnection. If advance note is not feasible, you will be notified
as soon as possible. When you are notified, you will be given the
opportunity to correct the problem and informed of you right to
file a complaint with the FCC.
2 SAMSUNG ELECTRONICS CO., LTD
Page 4

Hearing Aid Compatible
The telephone handset attached to the facsimile is hearing aid
compatible.
L i g h t n i n g
Your unit has built-in protection circuits, which meet or exceed
FCC re q u i rements, to reduce the risk of damage from surges in
telephone line currents. However, lightning striking near or on
these lines can cause an excessive surge of voltage that can damage
the phone.
Lightning damage is uncommon. However, if you are concerned
about it or live in an area with frequent and/or severe electrical
storms, we suggest that you unplug your electronic equipment
during the storms.
SAMSUNG ELECTRONICS CO., LTD 3
Page 5

DOC Information
The following information is applicable only to facsimile
machines installed in Canada.
N o t i c e s
The Canadian Department of Communications (DOC) label
identifies certified equipment. This certification means that the
equipment meets certain telecommunications network pro t e c t i v e ,
operational and safety r e q u i rements. The Department does not
guarantee the equipment will operate to the user’s satisfaction.
B e f o re installing this equipment, users should ensure that it is
permissible to be connected to the facilities of the local
telecommunications company. The equipment must also be
installed using an acceptable method of connection. In some case,
the company’s inside wiring associated with a single line
individual service may be extended by means of a certified
connector assembly (telephone extension cord). The customer
should be aware that compliance with the above conditions may
not prevent degradation of service in some situations. Repairs to
certified equipment should be made by an authorized Canadian
maintenance facility designated by the supplier. Any repairs or
alterations made by the user to this equipment, or equipment
malfunctions, may give the telecommunications company cause to
request the user to disconnect the equipment.
Users should ensure for their own protection that the electrical
g round connections of power utility, telephone lines and internal
metallic water pipe system, if present, are connected together. This
precaution may be particularly important in rural areas.
4 SAMSUNG ELECTRONICS CO., LTD
Page 6

Caution:
Users should not attempt to make such connections themselves,
but should contact the appropriate electric inspection authority, or
electrician, as appropriate. The Load Number (LN) assigned to
each terminal device denotes the percentage of the total load to be
connected to a telephone loop which is used by the device, to
prevent overloading. The termination on a loop may consist of any
combination of devices subject only to the r e q u i rement that the
total of the load numbers of all the devices does not exceed 100.
The Load Number of this unit is #5.
Class A
This Digital Apparatus does not exceed the Class A limits for Radio
F requency noise from Digital Apparatus set out in the Radio
i n t e r f e rence Regulations of the Canadian Department of
Communications.
SAMSUNG ELECTRONICS CO., LTD 5
Page 7
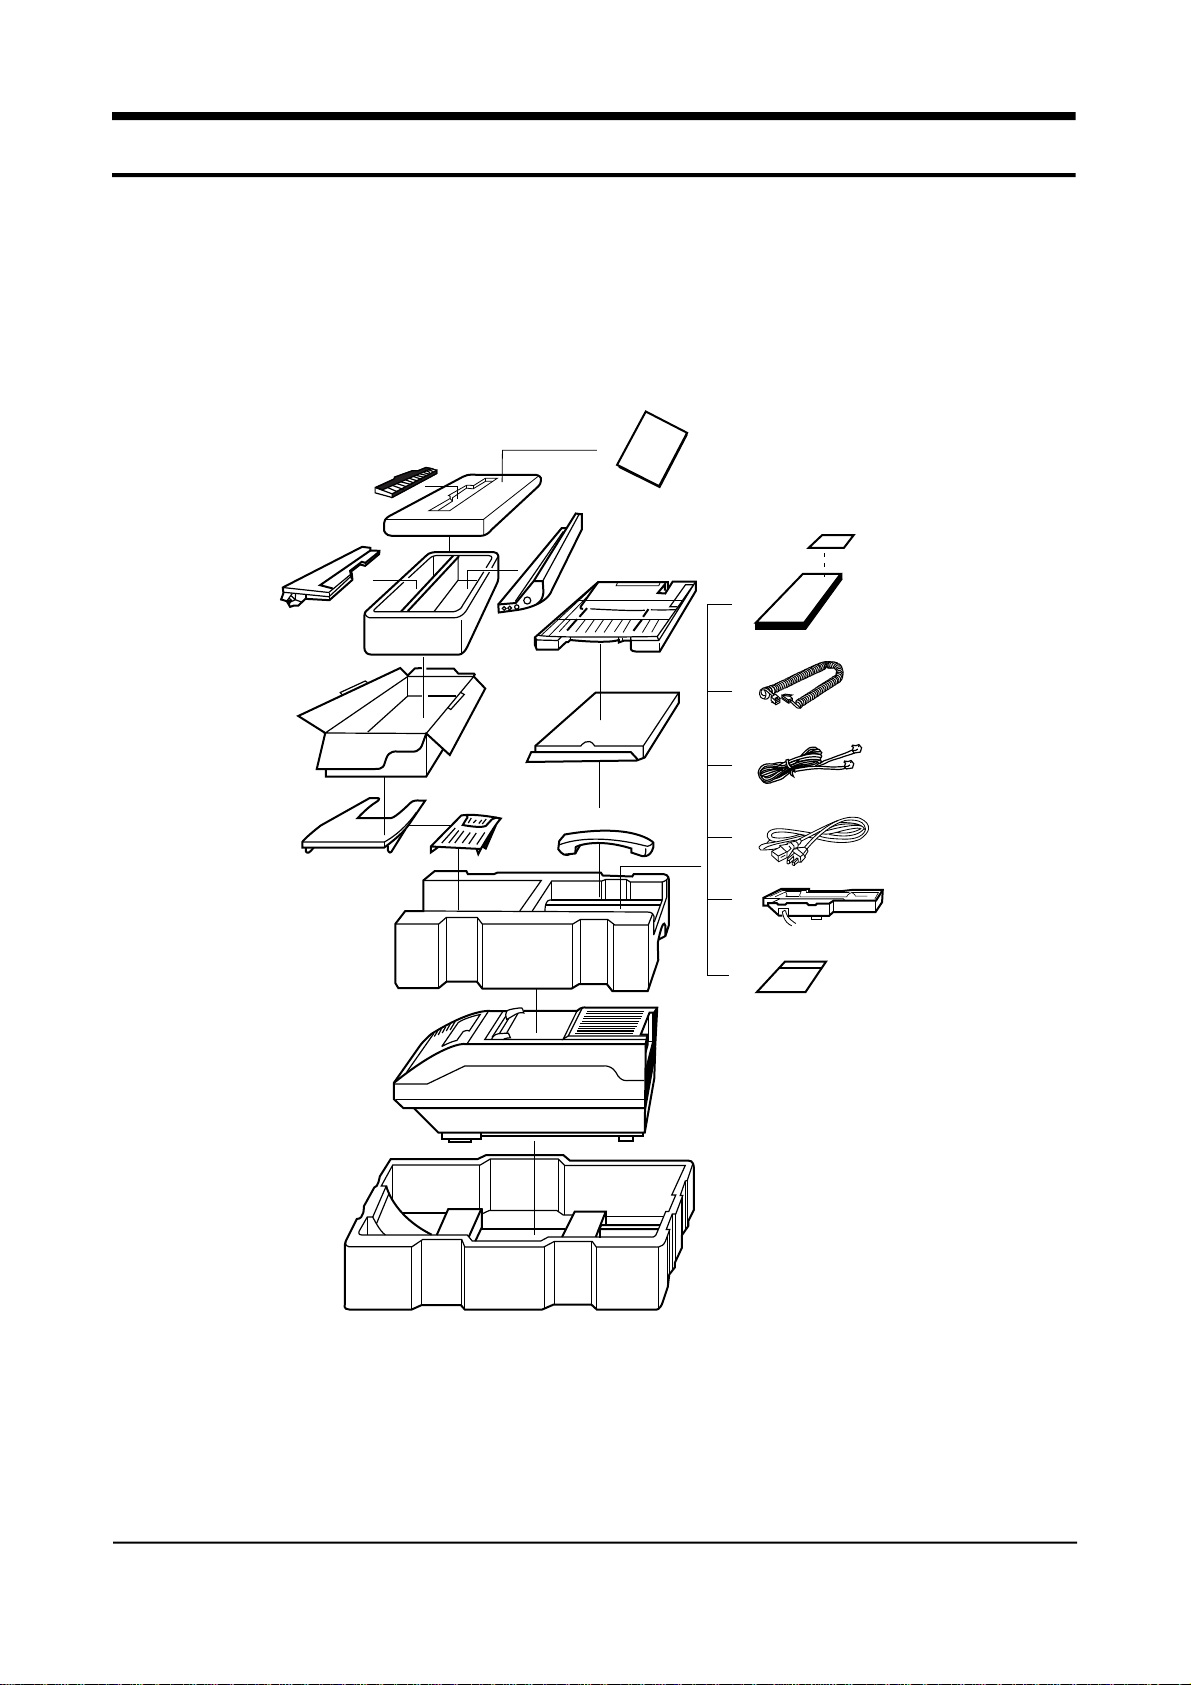
Unpacking
Open the shipping carton and check for the following:
Cleaning Felt
Toner Unit
Paper Cassette
Drum Unit
(with built-in Document
exit tray)
The Consumables
Instruction
Address Label
Operation
Manual
Telephone Cord
Recording Paper
Exit Tray
Facsimile Machine
Document
Feeder
Line Cord
Handset
Power Cord
Handset Crdle
Quick Reference
Guide
6 SAMSUNG ELECTRONICS CO., LTD
Page 8

TABLE OF CONTENTS
Chapter 1 Installation
A QUICK LOOK AT YOUR MACHINE …………………………………………1-1
INSTALLATION ……………………………………………………………………1-4
Choosing a Proper Location ………………………………………………………1-4
1 Install Toner Unit ……………………………………………………………………
2 Install Cleaning Felt………………………………………………………………1-7
3 Install Drum Unit …………………………………………………………………1-8
4 Install Handset and Handset Cradle …………………………………………1-10
5 Install Paper Cassette …………………………………………………………1-11
6 Install Document Feeder Tray…………………………………………………1-12
7 Install Document Exit Tray ……………………………………………………1-12
8 Install Recording Paper Tray …………………………………………………1-13
9 Connect Phone Line ……………………………………………………………1-13
10 Connect Extension Telephone or Answering Machine……………………1-14
11 Connect Power Cord …………………………………………………………1-14
12 Turn On Power ………………………………………………………………1-15
13 Initialize New Toner Unit ……………………………………………………1-16
14 Adjust Ringer Volume…………………………………………………………1-16
Control Panel ……………………………………………………………………1-2
Chapter 2 Initial Setup
USING HELP LIST AND FUNCTION MENU……………………………………2-1
How To Print Out Help List ………………………………………………………2-1
Using Function Menu ……………………………………………………………2-2
INITIAL SETUP ……………………………………………………………………2-3
Setting Date and Time ……………………………………………………………2-3
Setting Terminal ID ………………………………………………………………2-5
Setting System Data ………………………………………………………………2-8
Print Confirmation Report ……………………………………………………2-8
Print Journal Report ……………………………………………………………2-8
Remote Receive Code …………………………………………………………2-9
Silence Detection Time ………………………………………………………2-9
Automatic Turnaround Polling …………………………………………………2-9
Power Save Mode ……………………………………………………………2-10
SAMSUNG ELECTRONICS CO., LTD 7
Page 9

Chapter 3 Basic Operation
Dial Mode ………………………………………………………………………2-10
Security Communication(For SF5500M/SF5600) …………………………2-11
Error Correction Mode ………………………………………………………2-11
Automatic Reduction …………………………………………………………2-11
Automatic Discard ……………………………………………………………2-12
Automatic Redial Interval ……………………………………………………2-12
Automatic Redial Number ……………………………………………………2-12
Ring Before Answer …………………………………………………………2-13
USING THE AUTO DIALER ……………………………………………………2-14
Registering One-Touch Dial Numbers …………………………………………2-14
Using Address Label …………………………………………………………2-15
Changing or Cancelling One-Touch Dial Numbers …………………………2-16
Registering Speed Dial Numbers ………………………………………………2-17
Changing or Cancelling Speed Dial Numbers ………………………………2-19
Searching Auto dialer Memory …………………………………………………2-21
Scanning the Fax Directory …………………………………………………2-21
Searching with a Character …………………………………………………2-22
SENDING DOCUMENTS …………………………………………………………3-1
Preparing Documents ……………………………………………………………3-2
Acceptable Documents ………………………………………………………3-2
Documents You Cannot Send …………………………………………………3-2
Loading Documents ………………………………………………………………3-3
Setting Resolution and Contract of Document …………………………………3-4
Dialling a Number …………………………………………………………………3-5
One-Touch Dialing ……………………………………………………………3-5
Two Digit Speed Dialing ………………………………………………………3-5
Fax Digit Dialing ………………………………………………………………3-5
Manual Dialing Using the Keypad ……………………………………………3-6
Manual Dialing Using the Handset ……………………………………………3-6
On-Hook Dialing ………………………………………………………………3-7
Confirming a Transmission ………………………………………………………3-8
Confirmation Report ……………………………………………………………3-8
Cancelling a Transmission ………………………………………………………3-9
Printing TTI …………………………………………………………………………3-9
CONVENIENT SENDING FEATURES ………………………………………3-10
Redial ………………………………………………………………………………3-10
Automatic Redial ………………………………………………………………3-10
Immediate Redial ……………………………………………………………3-10
Last Number Redial …………………………………………………………3-10
Memory Transmission ……………………………………………………………3-11
MAKING A COPY ………………………………………………………………3-12
8 SAMSUNG ELECTRONICS CO., LTD
Page 10

RECEIVING DOCUMENTS ……………………………………………………3-13
Selecting Receiving Mode ………………………………………………………3-13
Automatic Receiving Mode ……………………………………………………3-13
Manual Receiving Mode …………………………………………………………3-13
Ans/Fax Mode ……………………………………………………………………3-14
Voice Request ……………………………………………………………………3-15
Recording an Outgoing Message ………………………………………………3-16
Printing Out Documents Received in Memory ………………………………3-17
Recording Area …………………………………………………………………3-17
Chapter 4 Advanced Operation
DUAL ACCESS (For SF5500M/SF5600) ………………………………………4-1
ADVANCED TRANSMISSION …………………………………………………4-2
Delay Transmission ………………………………………………………………4-2
Relay Transmission Request ……………………………………………………4-4
Confidential Transmission ………………………………………………………4-8
POLLING …………………………………………………………………………4-10
Polling Transmission ……………………………………………………………4-10
Polling Reception …………………………………………………………………4-12
Adding Documents To or Cancelling the Original To Be Polled …………4-11
Delay Polling …………………………………………………………………4-12
Daily Polling (For SF5500/SF5500M) ………………………………………4-14
Turnaround Polling ……………………………………………………………4-15
Continuous Polling (For SF5600) ……………………………………………4-16
ADVANCED FEATURES ………………………………………………………4-18
Adding Documents to a Programmed Operation ……………………………4-18
Cancelling an Operation …………………………………………………………4-19
One-Touch Programs ……………………………………………………………4-20
Security Communication (For SF5500M/SF5600) ……………………………4-21
ADVANCED DIALING ……………………………………………………………4-22
Registering Group Numbers …………………………………………………4-22
Cancelling Group Numbers …………………………………………………4-22
Storing a Group Into One-Touch Key ………………………………………4-25
Group Number Dialing ………………………………………………………4-26
Chain Dialing ……………………………………………………………………4-27
ADVANCED RECEPTION ………………………………………………………4-28
Receiving Using an Extension Telephone ……………………………………4-28
Confidential Reception (For SF5600 Only) ……………………………………4-29
Registering Information for Confidential Receiving ………………………4-29
Printing Out Confidential Documents You Receive ………………………4-30
SAMSUNG ELECTRONICS CO., LTD 9
Page 11

DEPARTMENT CONTROL MODE (For SF5600 only) ………………………4-31
Registering Department Code …………………………………………………4-31
To delete or Change Department Code ……………………………………4-32
Printing Department Journal ……………………………………………………4-33
Department Code List ………………………………………………………4-34
Department Journal …………………………………………………………4-34
Setting Department Control Mode ……………………………………………4-35
Changing Master Code …………………………………………………………4-36
Clearing Department Mode Information ………………………………………4-37
Operating When Executing Department Control ……………………………4-38
REPORTS …………………………………………………………………………4-39
How to Print Reports ……………………………………………………………4-39
Delayed Dial List …………………………………………………………………4-40
Telephone Number List …………………………………………………………4-40
System Data List …………………………………………………………………4-41
Message Confirmation …………………………………………………………4-41
Transmission Journal ……………………………………………………………4-42
Multi-Communication Report ……………………………………………………4-43
Call Back Message ………………………………………………………………4-43
Power Fail Report ………………………………………………………………4-44
Return Report ……………………………………………………………………4-45
CLEARING MEMORY …………………………………………………………4-46
Chapter 5 Troubleshooting and Maintenance
TROUBLESHOOTING ……………………………………………………………5-1
Clearing a Document Jam ………………………………………………………5-1
Clearing a Paper Jam ……………………………………………………………5-2
To Clear Jam 0 …………………………………………………………………5-2
To Clear Jam 1 …………………………………………………………………5-3
To Clear Jam 2 …………………………………………………………………5-4
Troubleshooting Guide ……………………………………………………………5-5
Transmission Problems ………………………………………………………5-5
Reception Problems ……………………………………………………………5-7
Other ……………………………………………………………………………5-9
Error Messages …………………………………………………………………5-10
MAINTENANCE …………………………………………………………………5-13
Cleaning the Document Scanner ………………………………………………5-13
Cleaning the Corona Wire and LED Array ……………………………………5-15
Replacing the Recording Paper ………………………………………………5-19
Replacing the Consumable Components ……………………………………5-20
SPECIFICATIONS ………………………………………………………………5-22
1 0 SAMSUNG ELECTRONICS CO., LTD
Page 12
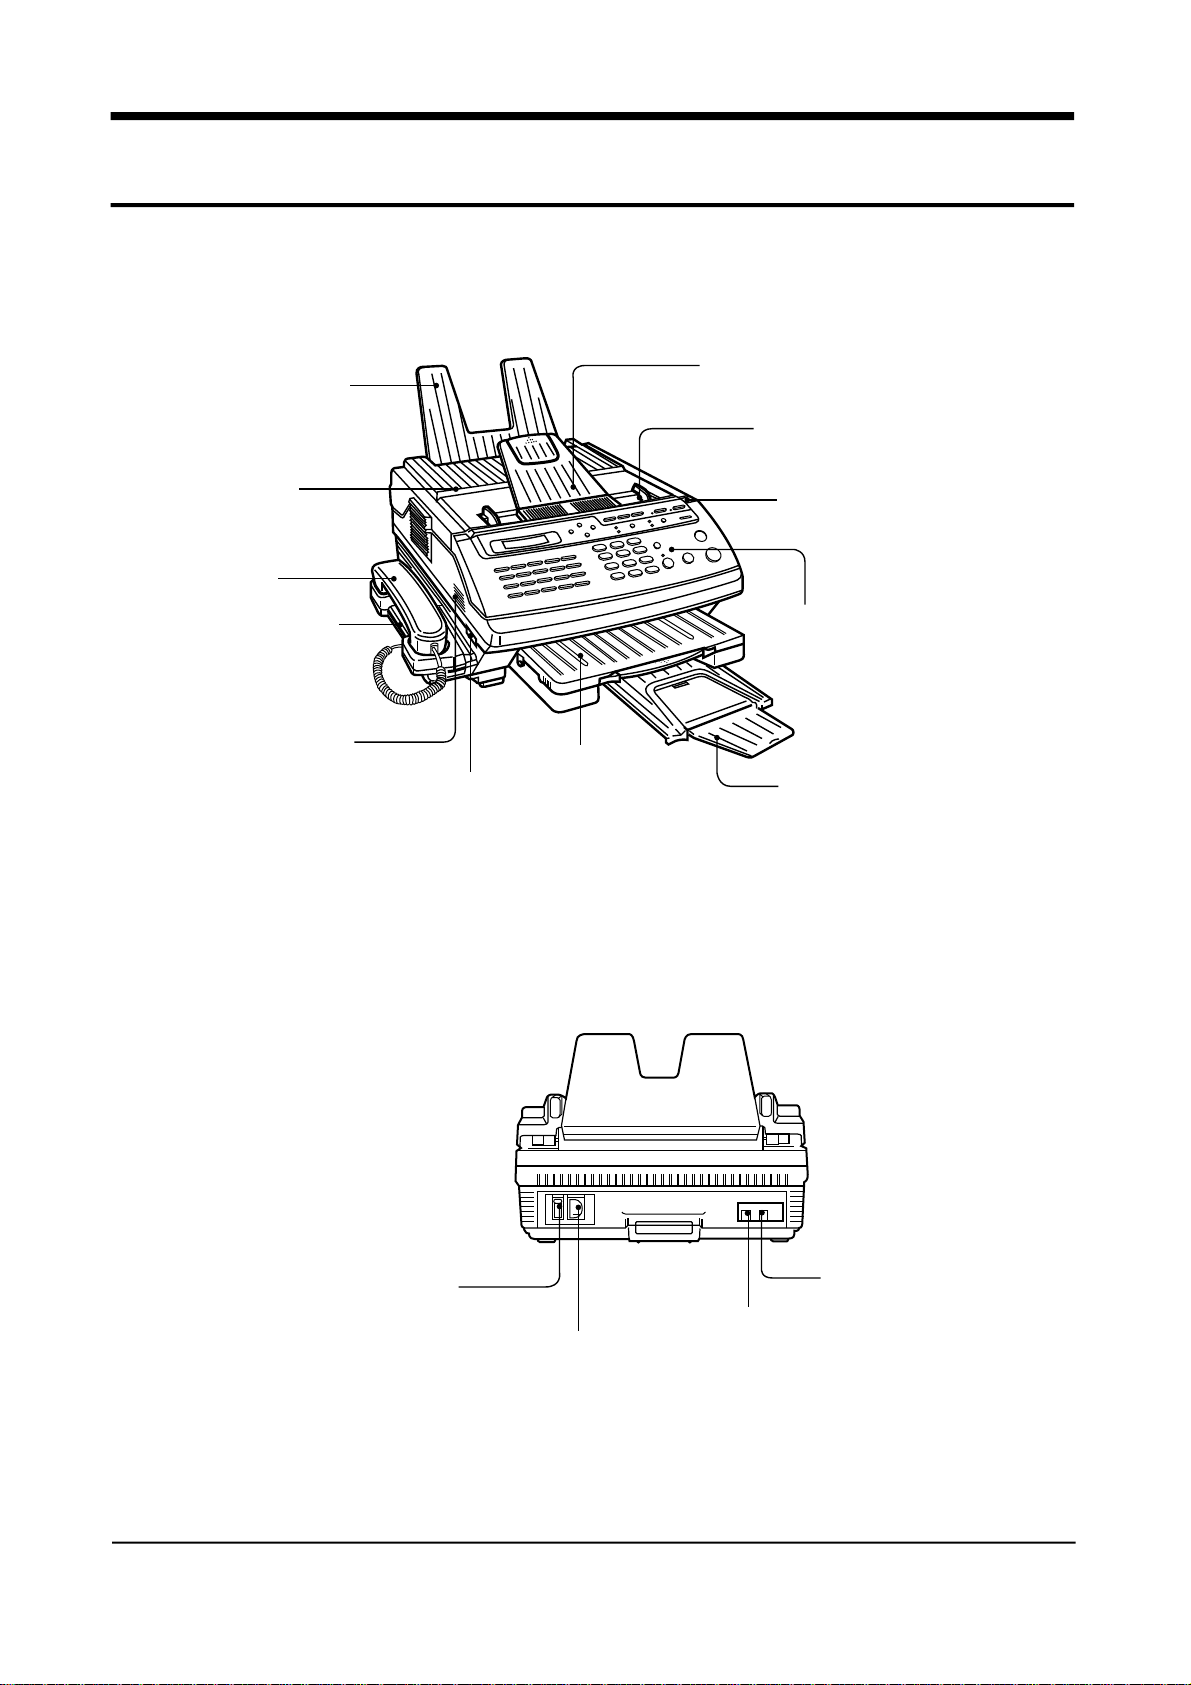
A Quick Look At Your Machine
Front View
Recording Paper
Exit Tray
Take a few minutes and familiarize yourself wit the
layout of your fax machine. Don’t worry about
remembering where everything is at this time.
Document Feeder Tray
Document Guide
Top Cover
Handset
Handset Cradle
Speaker
Rear View
Paper Cassette
Speaker Volume Control
Cover Release
Button
Control Panel
Document Exit
Tray
EXT. TEL(Extension Telephone)
Power Switch
LINE(Telephone Line) Jack
Power Receptacle
Jack
SAMSUNG ELECTRONICS CO., LTD 1 - 1
Page 13
CONTROL PANEL
POLLSEARCH FUNCTION MEMORY TX
RCV.MODE
1 2 3 4 5
6 7 8 9 10
11 12 13 14 15
16 17 18 19 20
YES NO
SCROLL
ABC
1 2 3
JKL
GHI
FINE
S.FINE
RESOLUTION
DEF
MNO
LIGHT
PHOTO/HSP
REDIAL/PAUSE
CONTRAST
ALARM
STOP
4 5 6
TUV
PRS
7 8 9
OPER
WXY
OHD/V.REQUEST
COPY/REPORT
START
0 #
TONE
FUNCTION Key
Used to set various functions.
SEARCH Key
Used to search a number according to alphabetical order from the
dialer memory.
auto
SCROLL Key ( , )
Used to display the previous or the next number store d .
SCROLL Key ( , )
Used to scroll backward or forward through the display.
LCD Display
Shows date and time, or the current operation.
One-Touch Dial Key
Allows you to make calls and send documents simply by pre s s i n g
single key.
YES Key
This button confirms the selection made in the display.
NO Key
This button is used to exit displays and to clear the information in the
d i s p l a y .
TONE Key
Used to produce touch tone for special tone service (when you have
pulse service).
1 - 2 SAMSUNG ELECTRONICS CO., LTD
Page 14

Dial Keypad
Used to dial telephone numbers.
MEMORY TX Key (For SF5500)
Used to first store a document into memory, then send to remote party
without operator assistance.
MEMORY TX /DUAL Key (For SF5500M/SF5600)
Used to first store a document into memory, then send to remote party
without operator assistance. When using dual access feature, this key
alternates between the two operations.
POLL Key and Indicator
Used to set polling operations.
RCV. MODE Key and Indicator
Used to select proper receiving mode. The indicator lights in automatic
receiving mode, and turns off in manual receiving mode.
ALARM Indicator
Lights when an abnormal condition occurs.
CONTRAST Key and Indicators
Used to set the light or photo contrast. A corresponding indicator lights
to indicate which setting has been selected. When you select HSP
mode, the indicator flickers. When both indicators are off, you are in
the standard setting.
STOP Key
Used to stop an operation or clear a setting.
START Key
Used to start an operation.
COPY/REPORT Key
Used to make copies, or print re p o r t s .
REDIAL/PAUSE KEY
Used to start redialing, or to enter a pause when storing or dialing a
telephone number.
OHD/V.REQUEST Key and Indicators
Allows you to dial a number without picking up the handset. Also
used to make a voice call after sending or receiving documents.
RESOLUTION Key and Indicators
Used to set the fine or super fine resolution. A corresponding indicator
lights to indicate which setting has been selected. When both indicators
a re off, you are in the standard setting.
#(SPEED DIAL)Key
Allows you to make calls and send documents simply by entering the
2-digit location number for the number which was assigned to that
l o c a t i o n .
SAMSUNG ELECTRONICS CO., LTD 1 - 3
Page 15
I N S T A L L A T I O N
CHOOSING A PROPER LOCATION
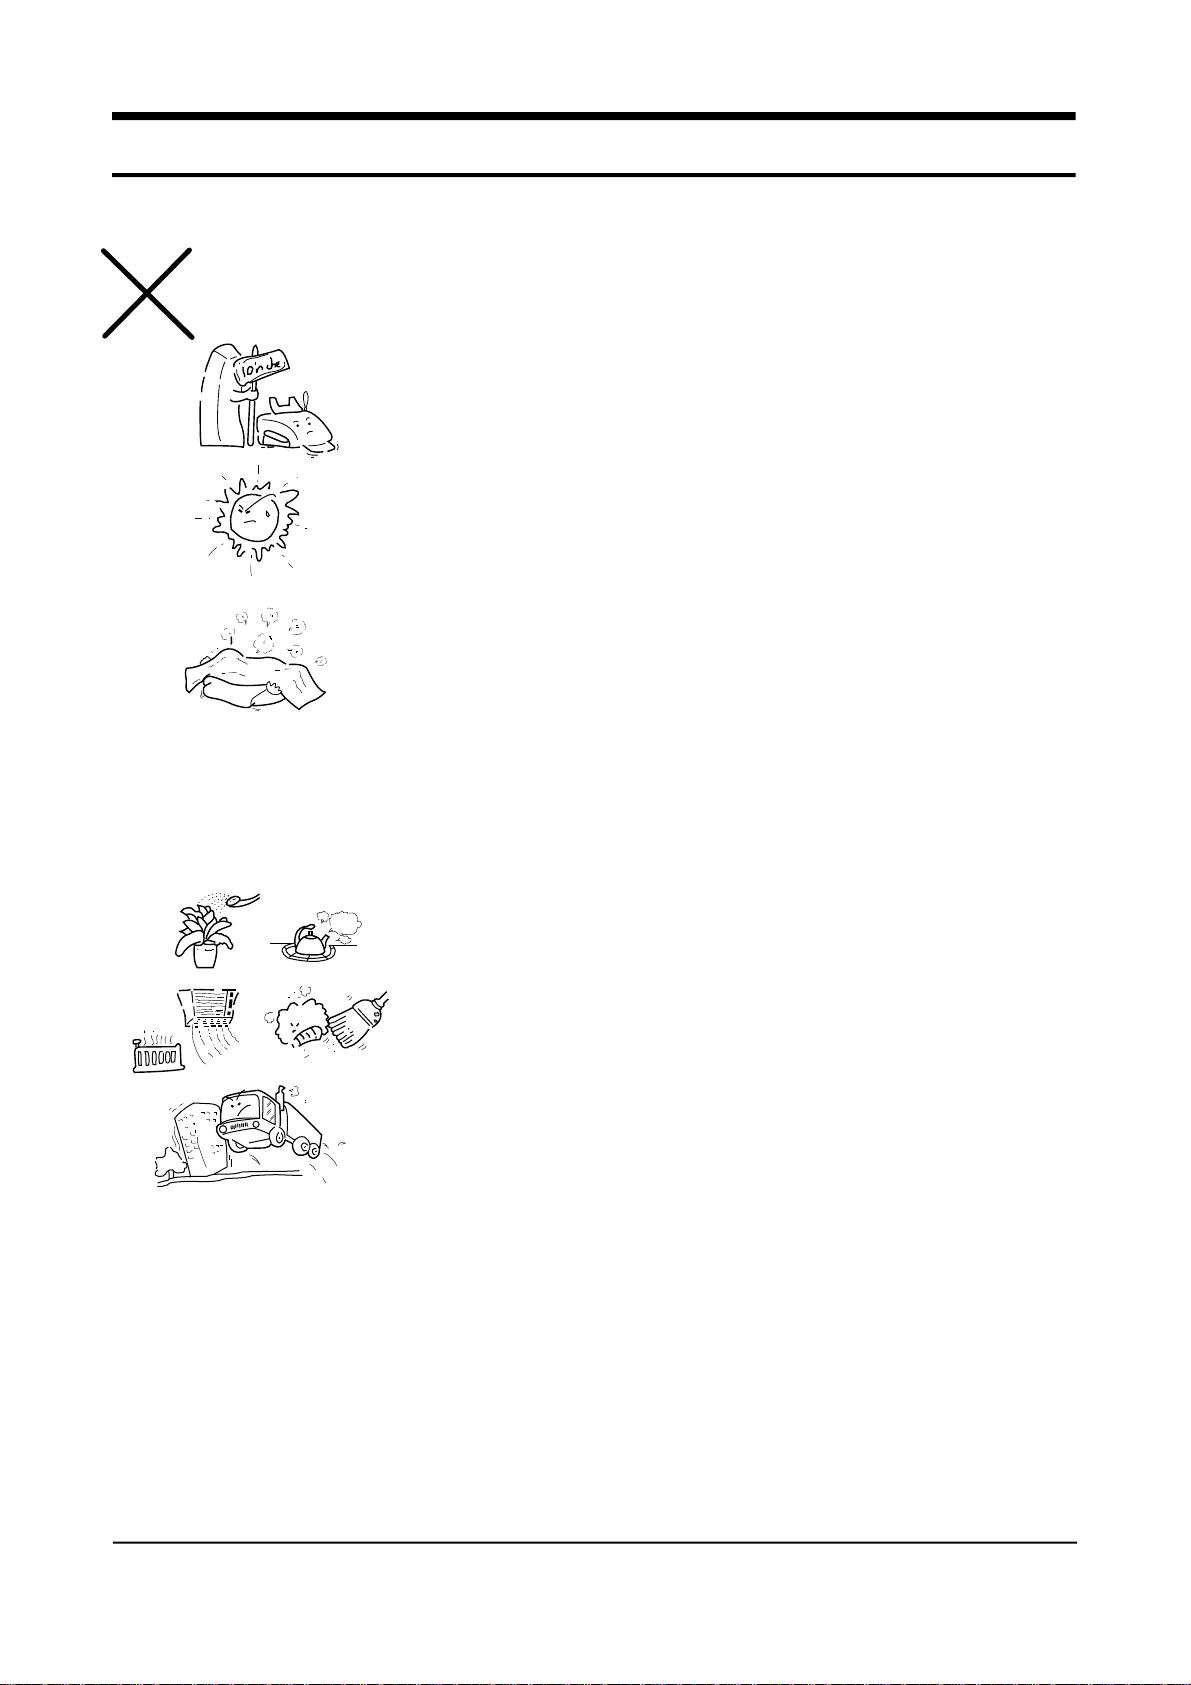
Please do not install your facsimile machine where there is a danger of:
1 Overheating
• Allow at least 10 inches clearance from the top and the side of
your fax machine.
• Do not install your fax machine in direct sunlight.
2 Improper Ventilation
• Do not block the ventilation openings or the exhaust fan.
3 Others
• Do not place it in air tight room
• Do not place it where water or chemical splashes may occur.
• Do not place it near an air conditioner, or in a dusty enviro n m e n t .
• Keep your fax machine on a level, vibration-free surface.
Note : Protect your fax machine from excessive heat and humidity. Use it
in a normal room temperature (50˚F-86˚F, 30%-80% RH).
1 - 4 SAMSUNG ELECTRONICS CO., LTD
Page 16

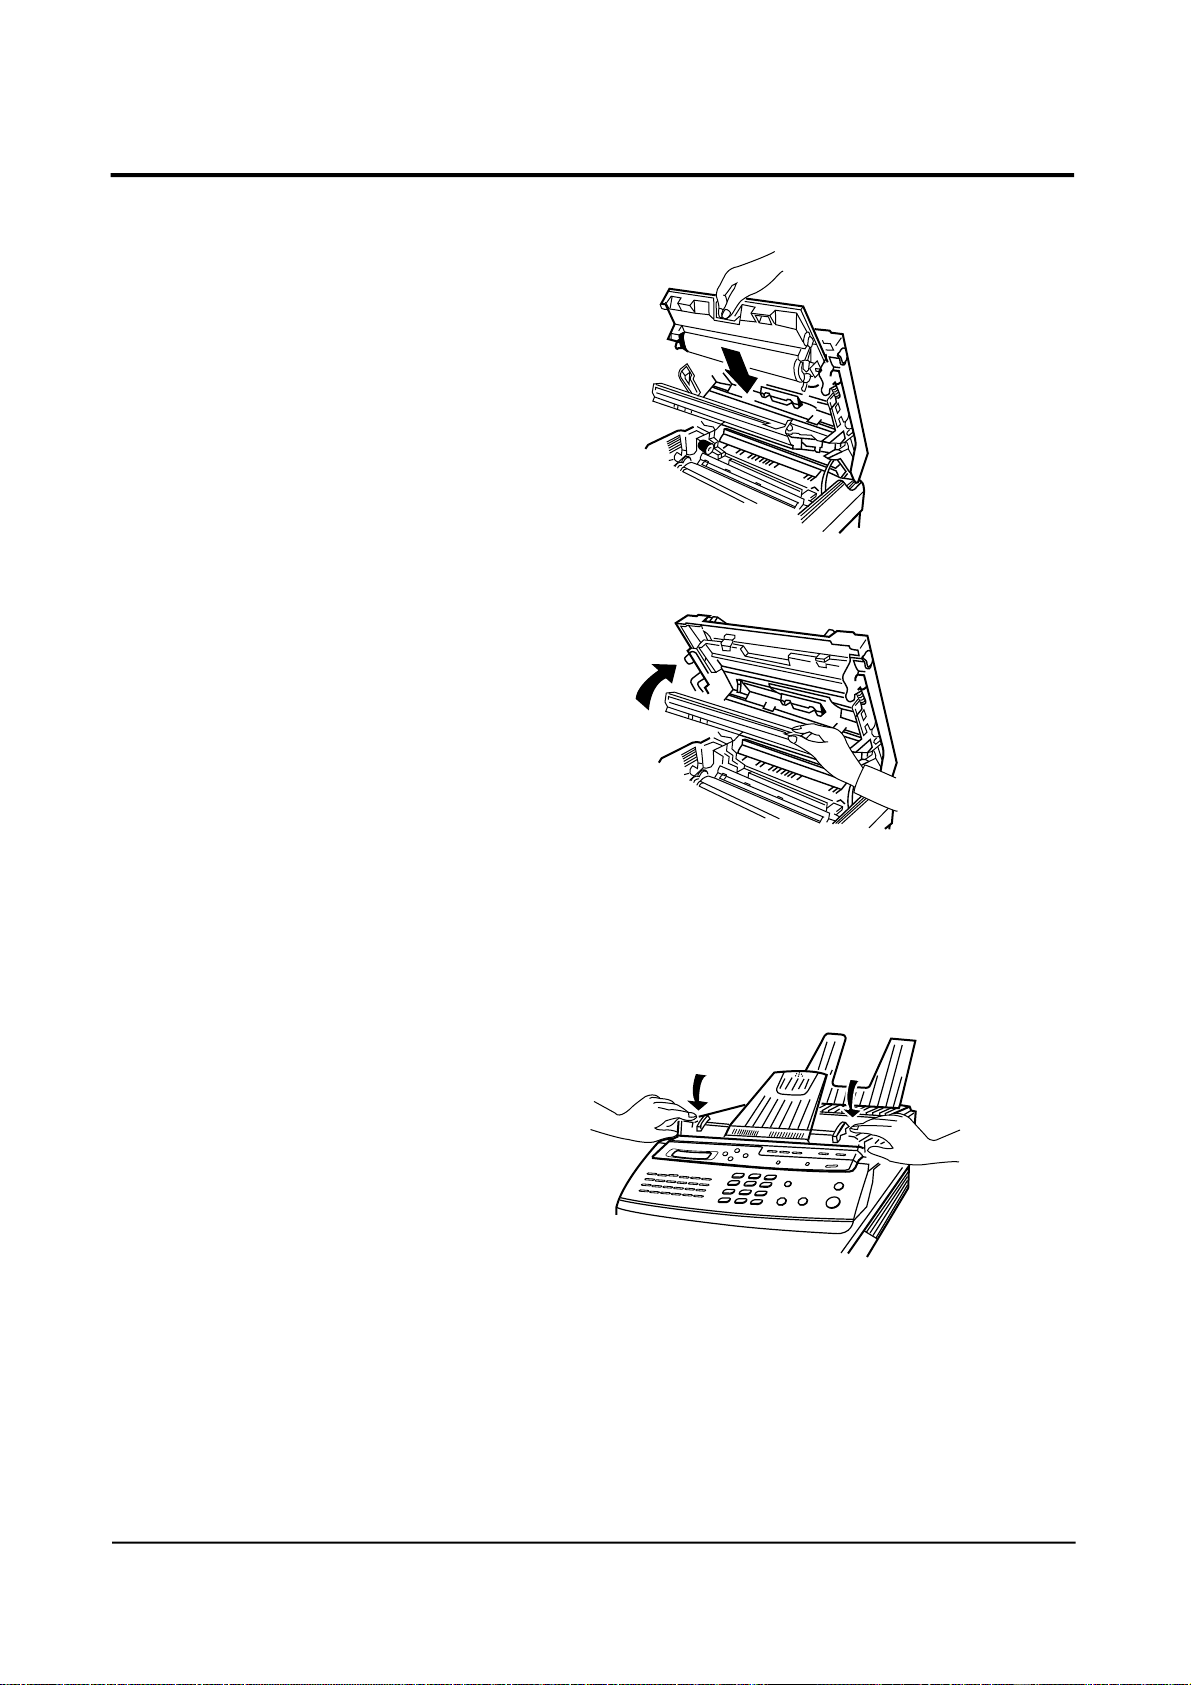
1 INSTALL TONER UNIT
1 Remove the adhesive tape and take the toner unit out of its
protective bag.
2 Remove the green shield cover from the toner unit.
Shied Cover
3 Remove the sealing tape at the left of the toner unit as shown
by pulling it straight out completely. Be careful not to tear it off.
4 Hold the toner unit by the green tabs on the unit and gently
shake it one side up, the other side down, and vice versa
several times to distribute the toner evenly inside the unit.
Hold it with hand
Do not stand it on end or
turn it up side down.
SAMSUNG ELECTRONICS CO., LTD 1 - 5
Page 17
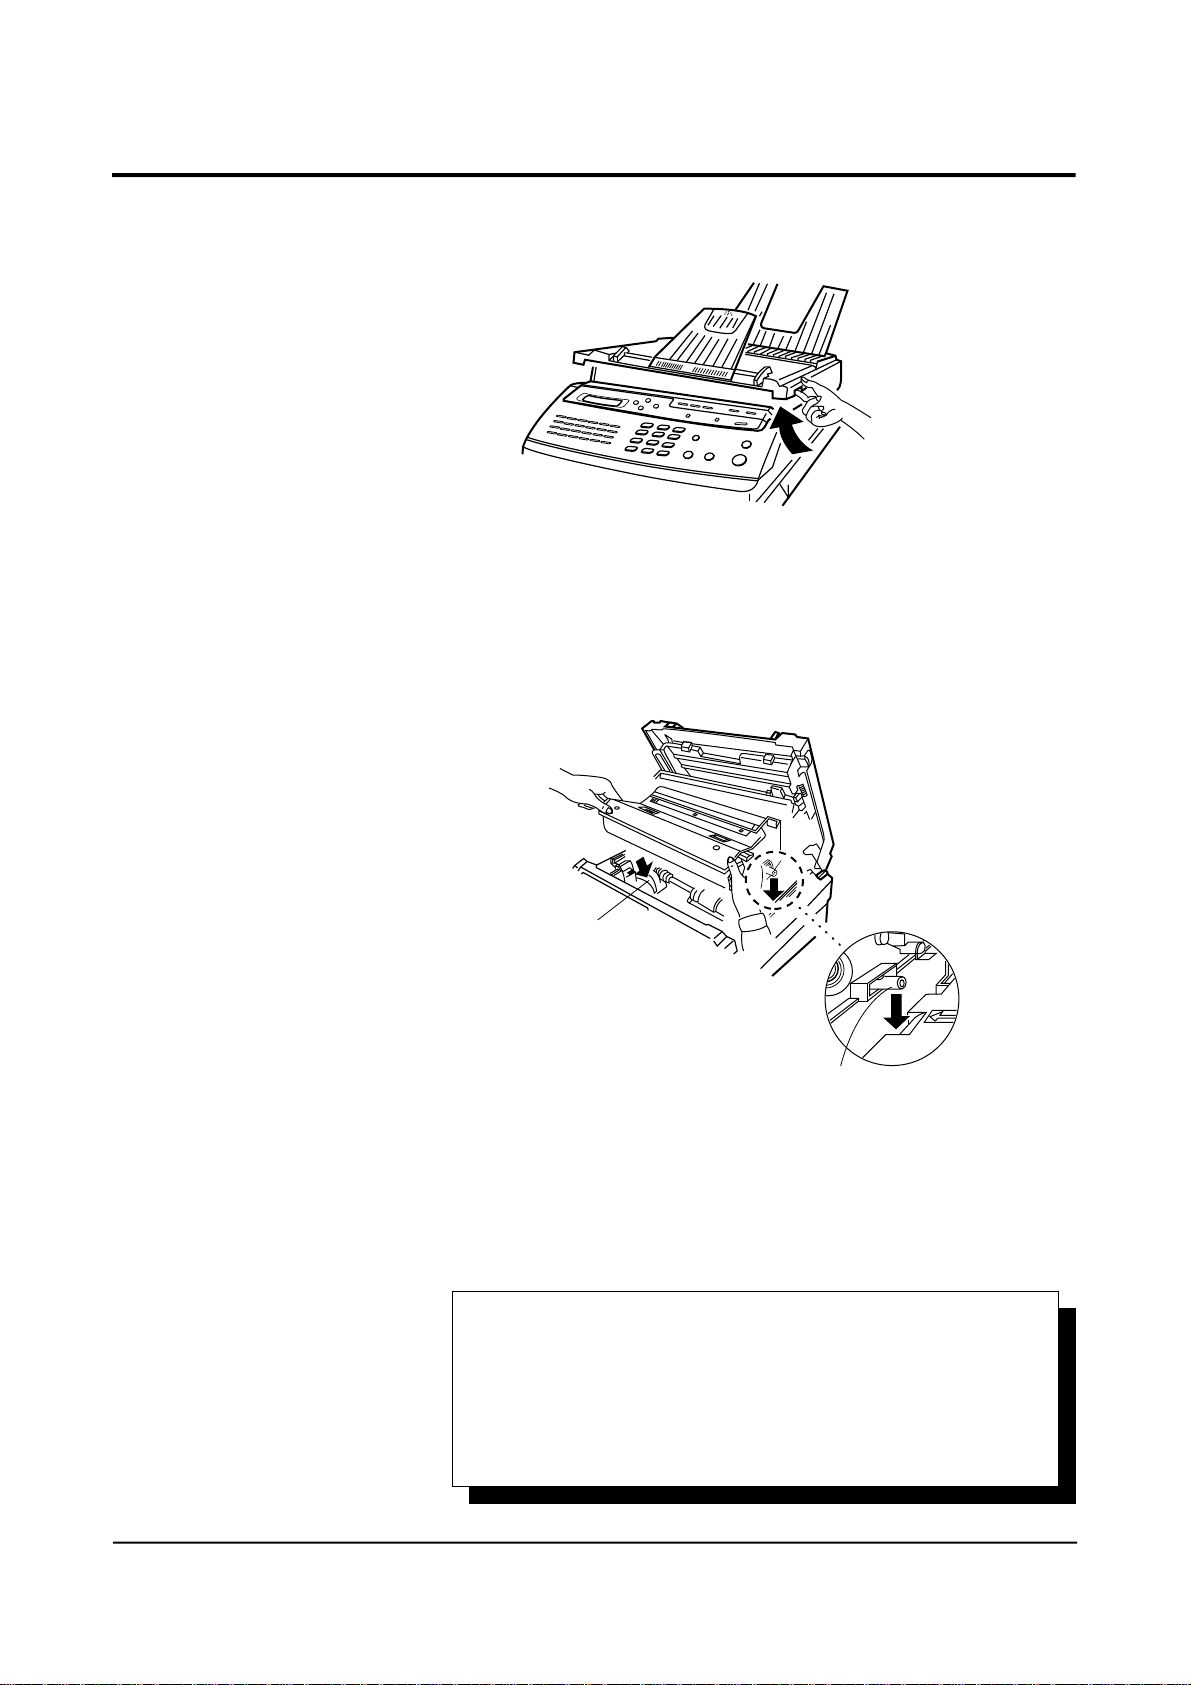
5 Open the top cover by lifting up the cover release lever.
Lift it up.
6 Holding the toner unit in both hands, fit the two tabs (marked
by green arrow label) on the bottom of the unit into the grooves
(marked by green arrow label) on both sides of the
compartment, and slide it down into your fax machine.
Groove
Fit it into the groove.
7 Proceed to install a cleaning felt as described on the next page.
IMPORTANT: Whenever you install a new toner unit, you must:
• Perform toner initialization. See “Initialize New Toner Unit” on
page 1-16.
• Install a new drum. See “Install Drum Unit” on page 1-8.
1 - 6 SAMSUNG ELECTRONICS CO., LTD
Page 18
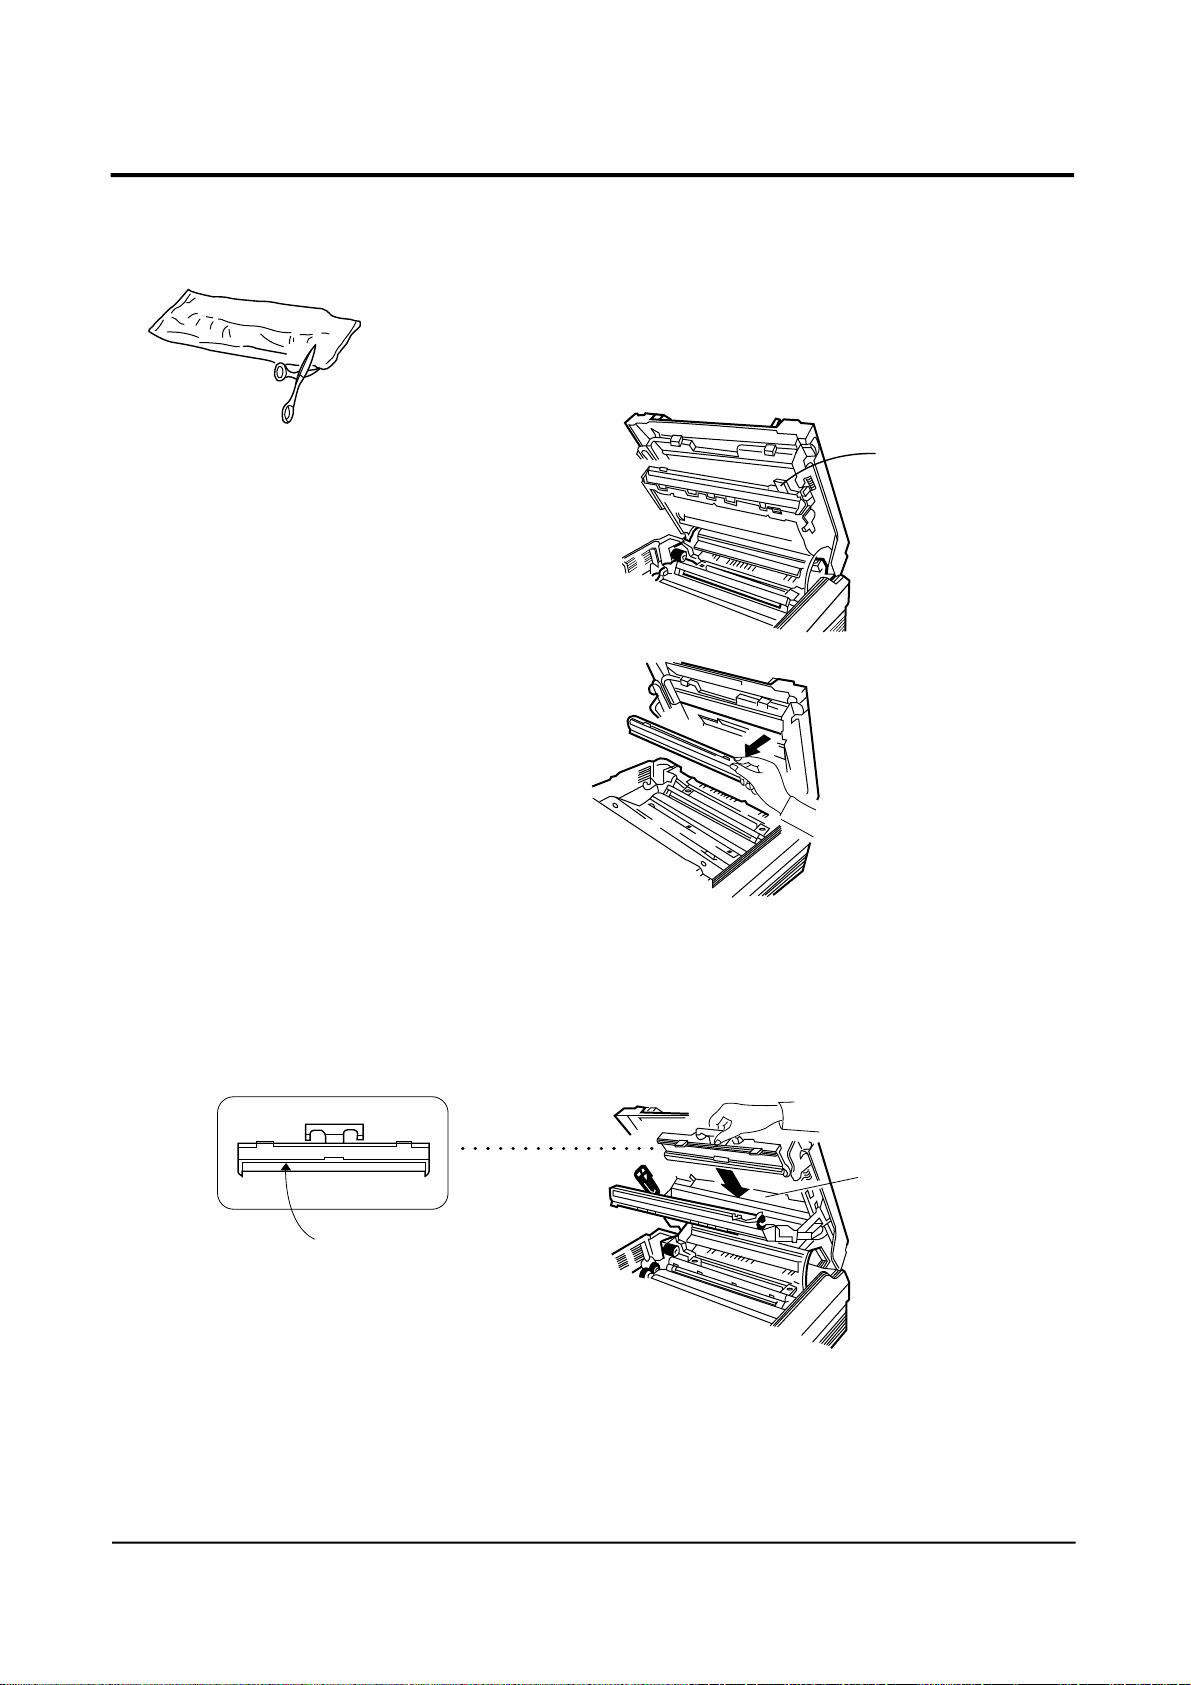
2 INSTALL CLEANING FELT
1 Take the cleaning felt out of its protective bag.
2 Grasp the tab as shown and pull it towards you.
Flip it down.
The holder flips down.
White felt
3 Holding the handle of the cleaning felt with the white felt faced
out, insert it into the slot as shown below(next to Caution
label).
Insert the cleaning felt
here
4 Slide it down until it snaps in place. Then proceed to install a
drum unit as described on the next page.
SAMSUNG ELECTRONICS CO., LTD 1 - 7
Page 19
3 INSTALL DRUM UNIT
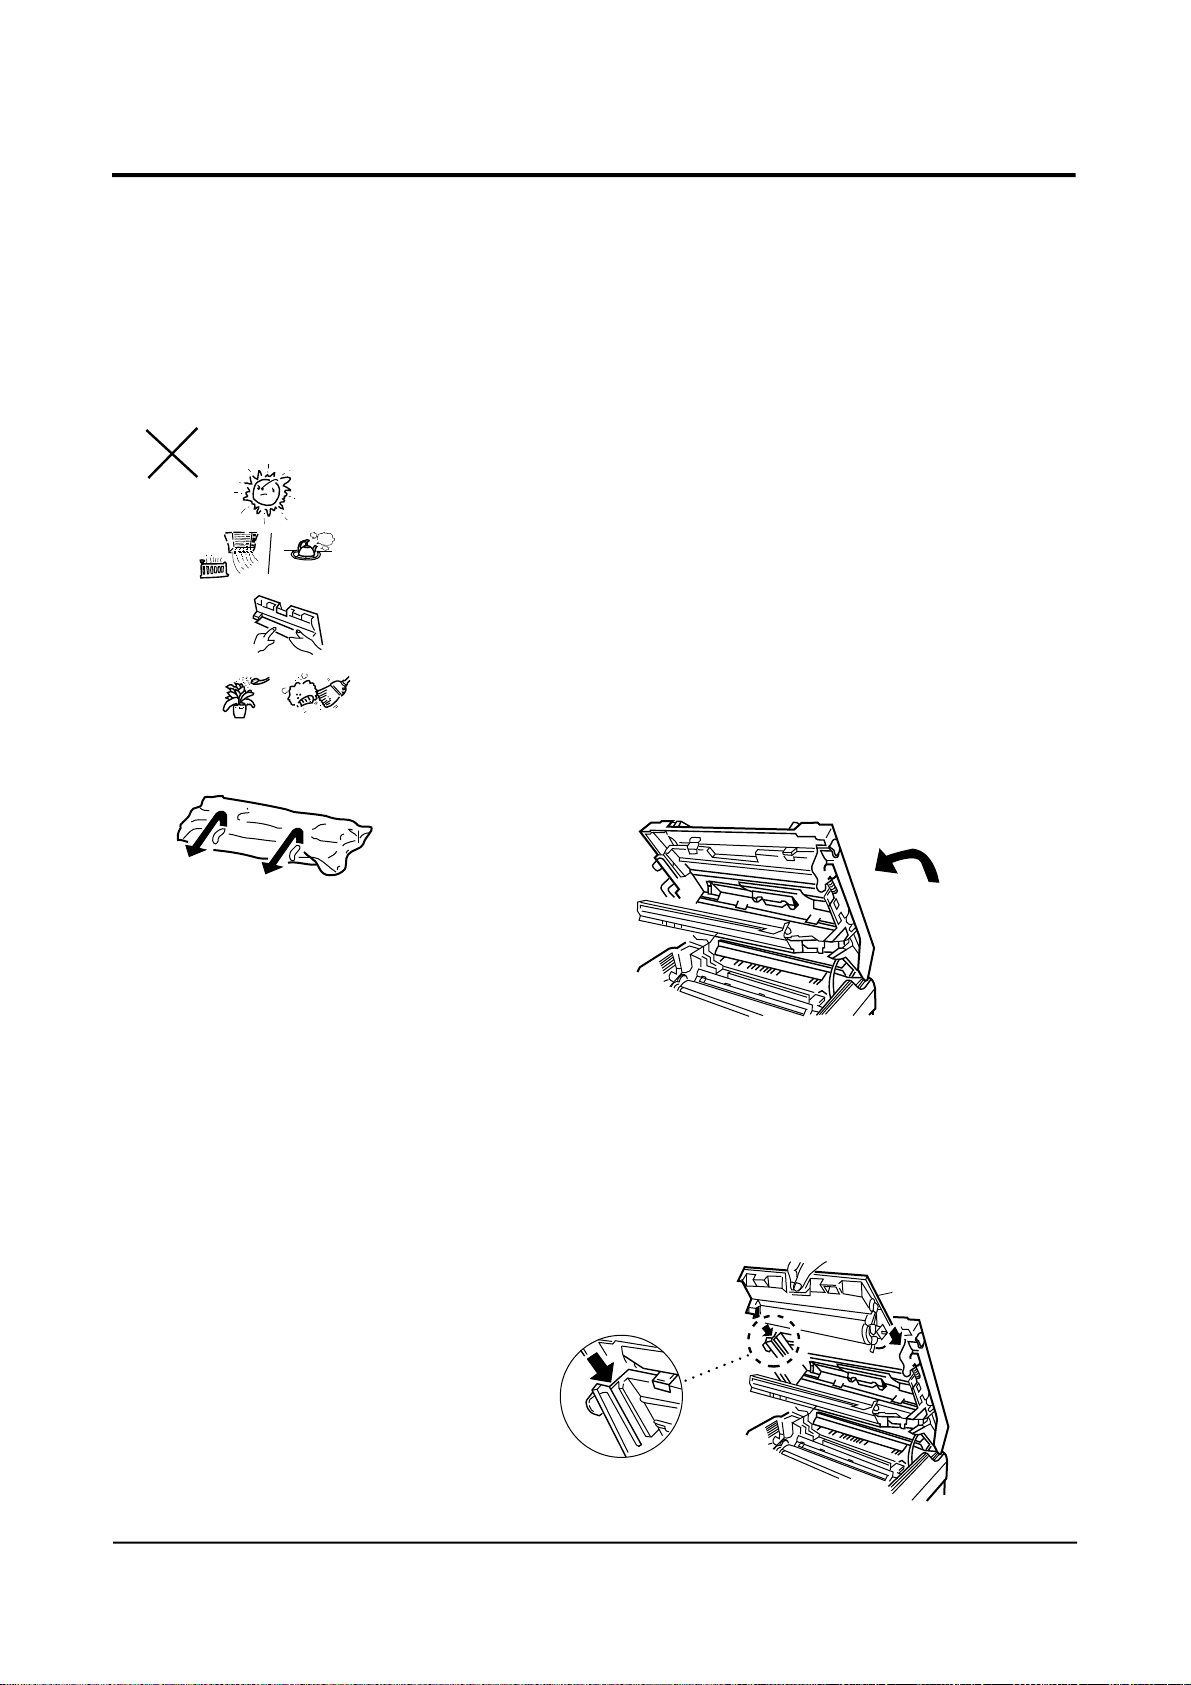
The drum unit is photosensitive. Exposing it to light may damage
the drum and result in poor print quality. Do not open the drum
unit’s protective bag until you have read the following instructions
and are ready to install the drum.
Warning!
• Do not expose the drum unit to direct room light or sunlight for
more than a few minutes.
• Do not place the drum unit near a window or in an area subject
to high heat(above 122˚F) or high humidity (above 80% RH).
• Do not touch the drum surface. Lift the drum unit by the handle
only.
• Keep the drum unit away from dust and dirt.
1 Remove the adhesive tape and take the drum unit out of its
protective bag.
2 Lower the top cover half-way. It makes the drum unit easier to
install.
3 Holding the handle of the drum unit, fit the narrow tabs
(marked by green arrow label) at both ends of the unit into the
grooves (marked by green arrow label) of the machine as
shown.
Fit it into the groove
Groove
1 - 8 SAMSUNG ELECTRONICS CO., LTD
Page 20
Carefully slide it down until it locks into place.
4 Close the holder.
Note : When you move the fax machine,
do not move it with the drum and toner
unit installed in the machine. First
remove the drum and toner unit, then
transport then separately.
Be careful not to expose the drum to
d i rect sunlight, and place it on a
v i b r a t i o n - f ree surface.
5 Close the top cover. Press firmly to be sure both sides of the
cover are securely latched.
Press firmly
SAMSUNG ELECTRONICS CO., LTD 1 - 9
Page 21
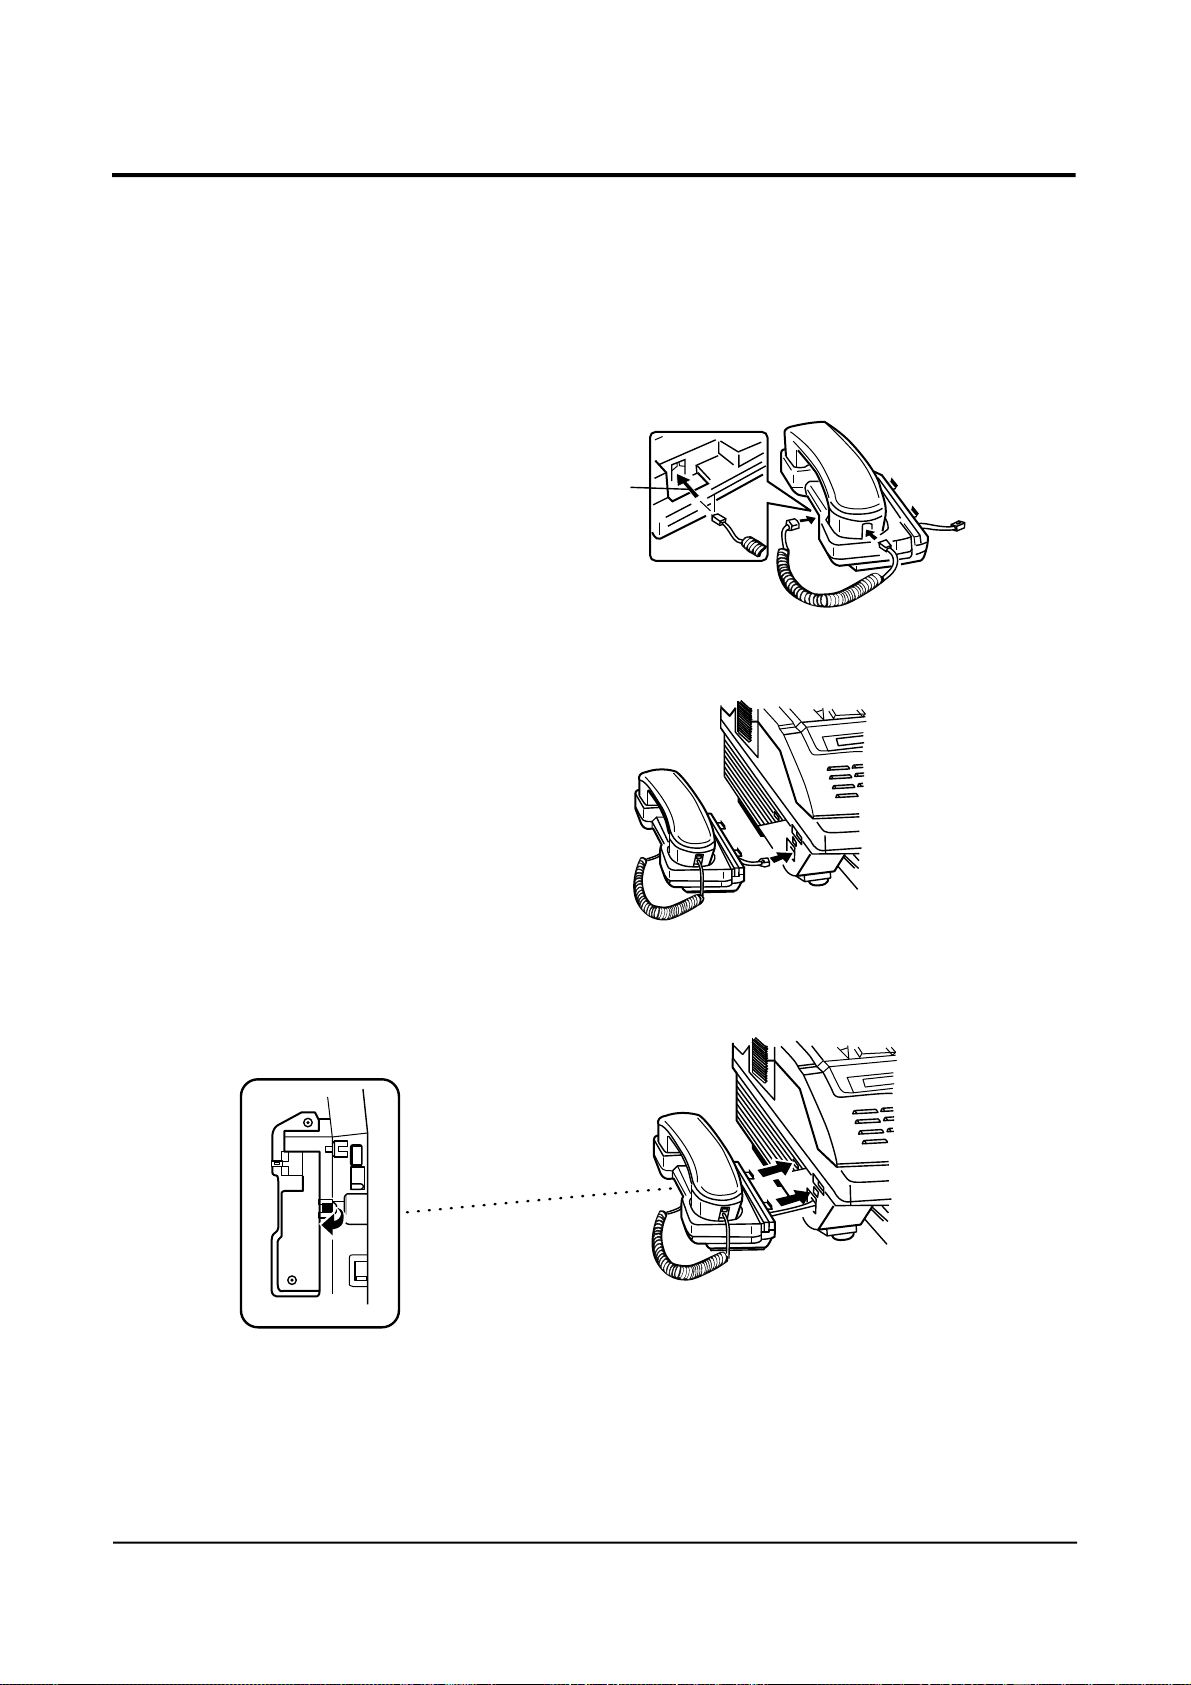
4 INSTALL HANDSET AND
HANDSET CRADLE
1 Plug one end of the coiled cord into the handset. Then, plug the
other end into the modular jack on the bottom of the handset
cradle.
Bottom View
Route the cord
through here.
2 Plug the cradle’s modular cord into the modular jack on the left
side of your fax machine.
If you want to remove the cradle,
lift the front of the fax machine
and release the hooked tab on the
bottom of the crate from the fax
machine before you release the
upper two tabs on the cradle.
Bottom View
3 With the cradle held at a slightly downward angle, insert the
two tabs on it into the slots on the left side of your fax machine
and lower the cradle.
Push the cradle sightly towards the
fax machine while feeding inthe cord.
1 - 1 0 SAMSUNG ELECTRONICS CO., LTD
Page 22
Press it down
Do not load above this line.
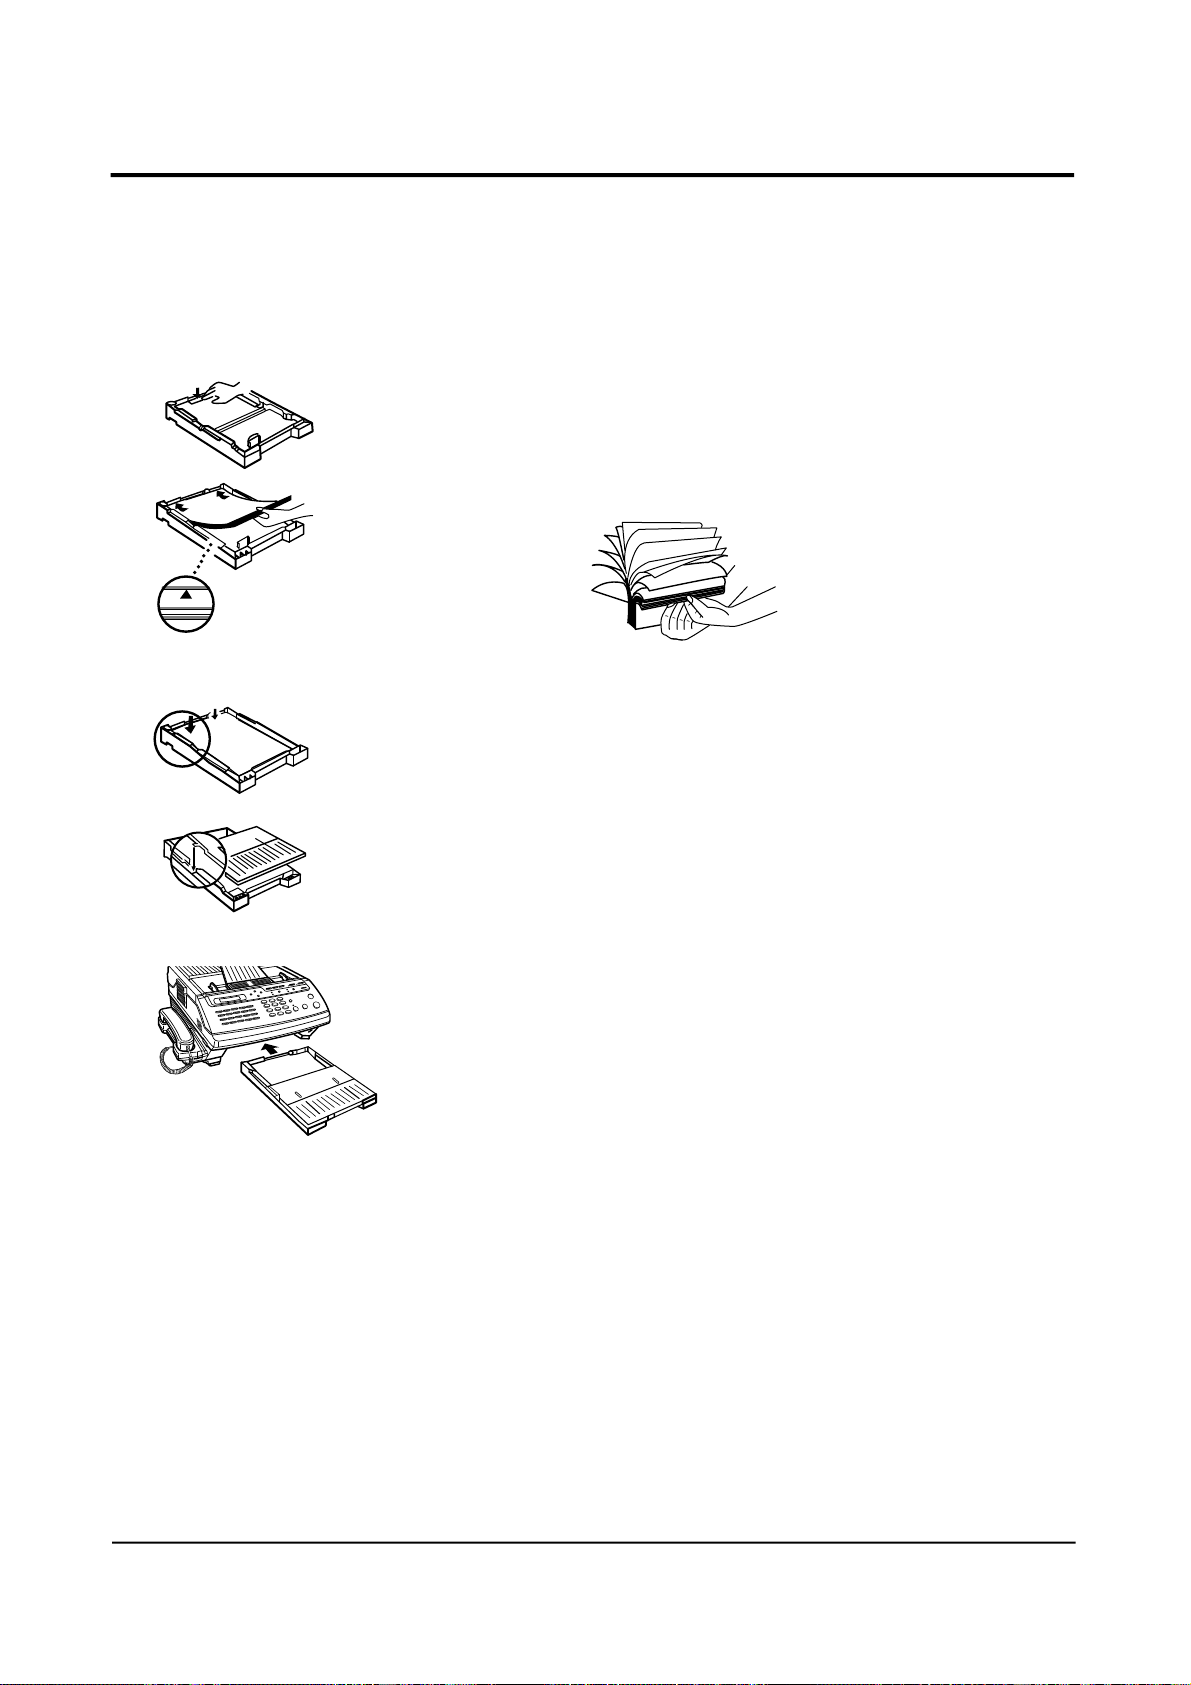
5 INSTALL PAPER CASSETTE
The letter size paper cassette holds up to 250 (SF5500/SF5500M) or
500 (SF5600) sheets of paper with a weight of 20 lbs.
1 To load the paper into the cassette, remove the cassette cover.
Then, press down and latch the metal plate in the cassette.
2 Fan the paper and load it in the cassette with the side to be
printed facing up.
Make sure that the stack of paper does not exceed the limit mark
on the side of the cassette.
3 Gently press the upper corners of the paper down under the
cassette tabs.
3 Make sure that the paper stack stays beneath the tabs as shown
at left.
4 Replace the cassette cover by inserting hinge pins on the cover
into the slots on the cassette, then lowering the cover.
5 Insert the cassette into the port on the front of the machine until
it stops.
Note : Make sure that no obstacles are in the port when you insert the
cassette
SAMSUNG ELECTRONICS CO., LTD 1 - 1 1
Page 23

For long documents, fold out
this extension tray.
6 INSTALL DOCUMENT FEEDER TRAY
Insert two tabs on the document tray into the slots at the top of
your fax machine.
7 INSTALL DOCUMENT EXIT TRAY
The document exit tray is built in the cover of the paper cassette.
1 Pull out the document exit tray from the cassette cover.
2 Fold out an extension tray as shown.
Extension tray
Press down the marked point ( ) to
fold out out the extension tray.
1 - 1 2 SAMSUNG ELECTRONICS CO., LTD
••••
•••
•
Note : When you do not copy or send documents, you can fold it back and
slide into the cassette cover anytime you desire.
Page 24

8 INSTALL RECORDING PAPER TRAY
Place the holes in the two tabs on the paper tray onto the pro j e c t i o n s
at the upper back of your fax machine, so that the raised bumps on
the tabs engage into place.
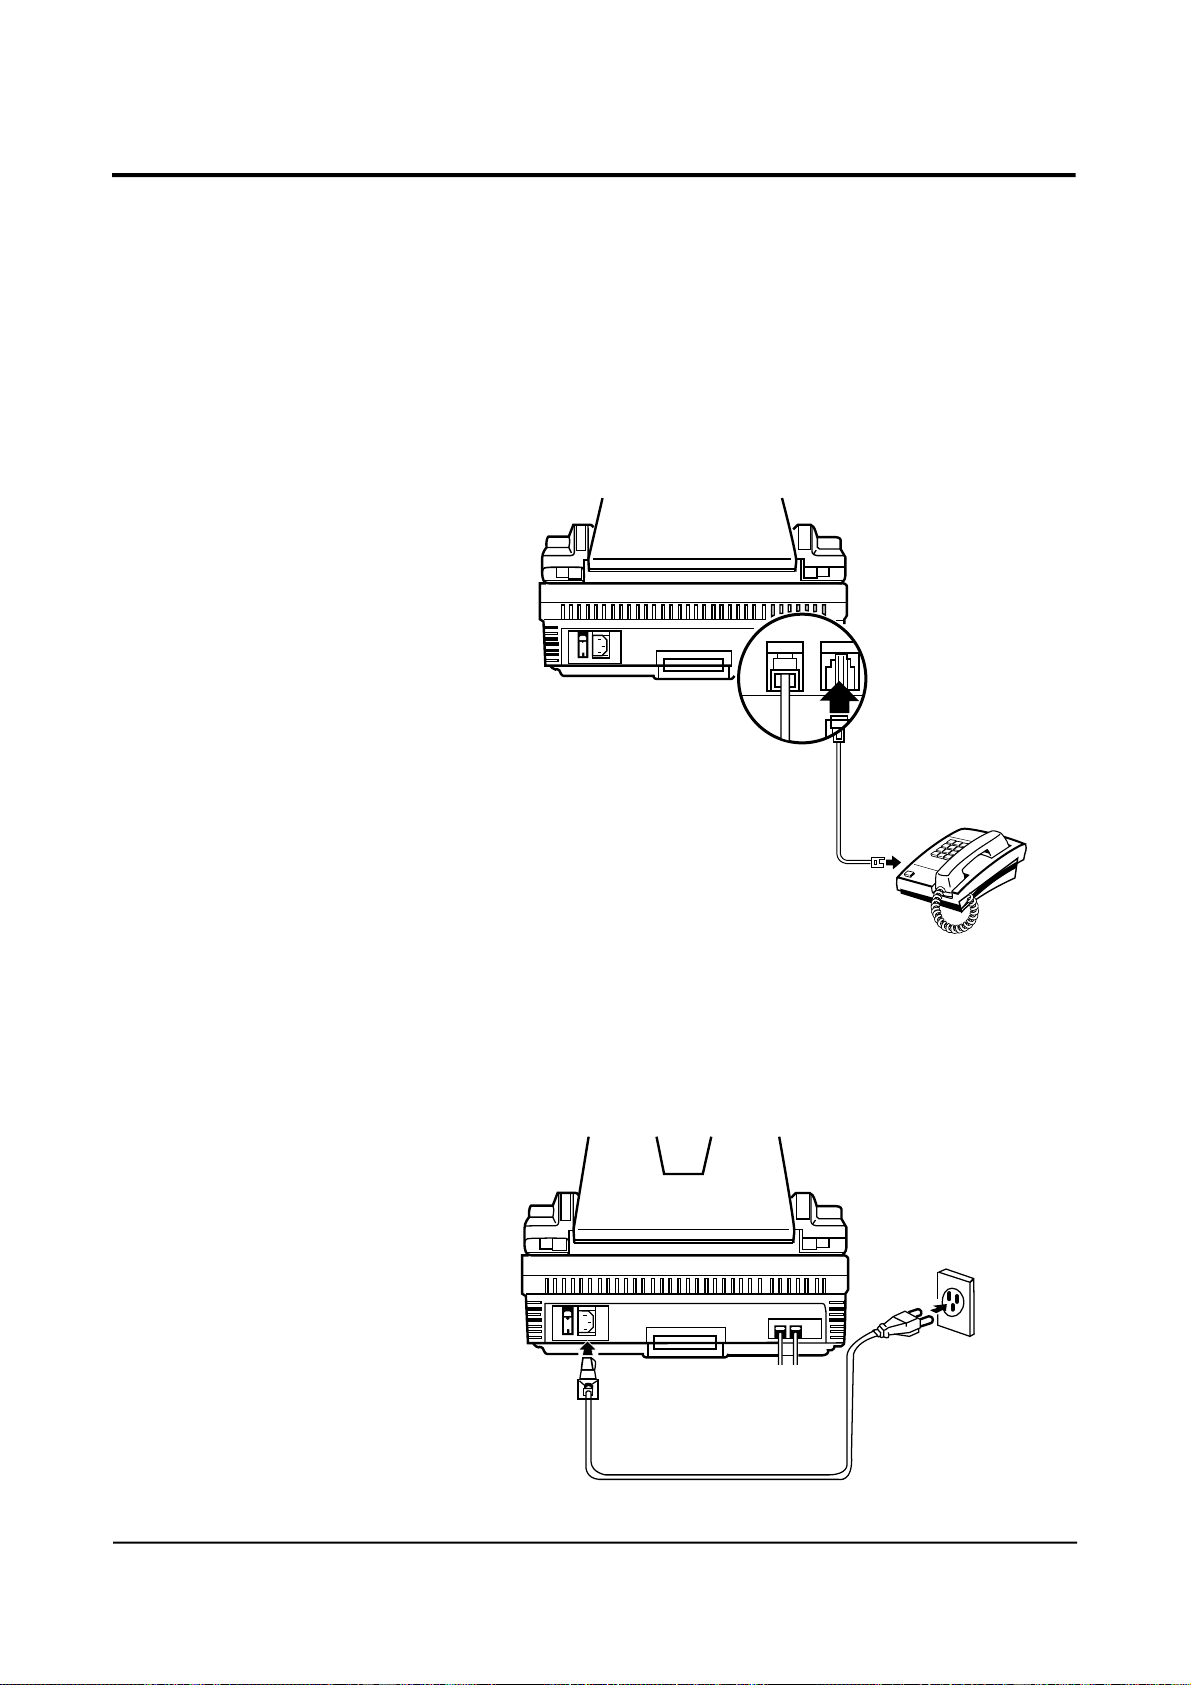
9 CONNECT PHONE LINE
Plug one end of the line cord into the LINE jack on the machine
and the other end into a standard telephone wall jack.
LINE
SAMSUNG ELECTRONICS CO., LTD 1 - 1 3
EX
Page 25
10 CONNECT EXTENSION
TELEPHONE or ANSWERING
MACHINE (if necessary)
Plug one end of the modular cord into the EXT.TEL jack on the rear
of your machine. Plug the other end of the cord into a modular jack
on a telephone answering device or a regular telephone you wish
to use as an extension.
LINE
EXLTEL
Answering machine
or regular Phone
11 CONNECT POWER CORD
Plug the female end of the power cord into the receptacle on the re a r
of the fax machine. Plug the other end into a standard AC outlet.
Wall AC Outlet
1 - 1 4 SAMSUNG ELECTRONICS CO., LTD
Page 26
12 TURN ON POWER
Press the power switch to the up (-) position to turn the power on.
When the fax machine is first powered on, all indicators light and
your fax machine prompts you to wait until the fax machine
warms up, through the LCD window.
If there is a document loaded in the feeder, the machine
automatically pulls it out.
When time and date appear on the window, you can set up the fax
machine. This mode is called “stand by mode.”
Pick up the handset and hear a dial tone to be sure the fax machine
is properly connected to the telephone network.
Notes:
• You can change the date and time. See “Setting Date and Time” on
page 2-3.
• If there are documents lost from memory after a power failure the
fax machine automatically prints out a report after you turn the
power back ON. For details on the list, see page 4-44.
• To change the receiving mode, press RCV.MODE. For more
information on the receiving mode, see “Receiving Documents” on
page 3-13.
SAMSUNG ELECTRONICS CO., LTD 1 - 1 5
Page 27

RINGER, TONER or
SYSTEM SETUP ? Y/N
13 INITIALIZE NEW TONER UNIT
Whenever you install a new toner unit, you must perform the
following procedure before operating your fax machine.
DO NOT perform this procedure unless a new toner unit has been
installed. Poor image quality may result.
1 Press FUNCTION, then 7.
2 Press YES, then NO.
NEW TONER UNIT ?
Y/N
ARE YOU SURE ?
Y/N
NEW TONER UNIT ?
INITIALIZING…
RINGER, TONER or
SYSTEM SETUP ? Y/N
3 Press YES.
4 Press YES when you are sure that you are ready to initialize the
toner.
Your fax machine will initialize the new toner unit for a few
minutes. The fax machine is ready for use when the date and time
is displayed.
Note : An image quality may be poor when the new drum prints the first
15 sheets; after that, the image quality will stabilize.
14 ADJUST RINGER VOLUME
You can adjust the volume of the ringer to the desired loudness, if
necessary.
1 Press FUNCTION , then 7.
2 Press YES.
3 Press YES.
ADJUST RINGER
VOLUME ? Y/N
RINGER VOLUME
>>>>>>>>>>
4 The machine displays the current volume scale.
Use SCROLL to increase the volume, or SCROLL to
decrease
the volume.
Each time you press SCROLL or SCROLL to decrease
the volume.
5 P ress YES when a proper volume has been selected. The fax
RINGER VOLUME
>>>>>
1 - 1 6 SAMSUNG ELECTRONICS CO., LTD
machine returns to the standby mode. If you want to cancel the
volume setting, press STOP.
Page 28
USING HELP LIST AND FUNCTION MENU
Once you become familiar with the basic operation of
your fax machine, use the Help Lists supplied by your
fax machine. The Help Lists will serve as an easy
reminder of how to operate your fax machine. The
function menu acts as an extremely concise manual.
Your fax machine offers you four kinds of help lists; Function,
Basic, Data Set-up, and Advanced.
• Function : contains information on how to enter various function
modes.
• Basic : contains information on basic sending and receiving.
• Data Set-up : contains information on how to set up your
machine with various administrative data.
• Advanced : contagions information on advanced ways of
sending and receiving.
HOW TO PRINT OUT HELP LIST
1 Press FUNCTION, and *.
PRINT
HELP LIST ? Y/N
HELP LIST
FUNCTION ? Y/N
HELP LIST
BASIC ? Y/N
2 Press YES.
3 Press YES to print out a Help list for various function settings.
The fax machine will print out a list of 2 pages with letter-size
paper. After printing, the fax machine returns to the standby
mode.
3. If you press NO, the next menu displays.
4 P ress YES to print out a Help list for basic sending and
receiving operation. The fax machine will print out a list of 3
pages with letter-size paper. After printing, the fax machine
returns to the standby mode.
If you press NO, the next menu displays.
SAMSUNG ELECTRONICS CO., LTD 2 - 1
Page 29

HELP LIST
DATA SET-UP ? Y/N
5 P ress Y E S to print out a Help list for various data set-up
information. The fax machine will print out a list of 3 pages
with letter-size paper. After printing, the fax machine returns to
the standby mode.
If you press NO, the next menu displays.
HELP LIST
ADVANCED ? Y/N
HELP LIST
ALL ? Y/N
6 P re s s Y E S to print out a Help list for advanced sending and
receiving operations. The fax machine will print out a list of 5
page with letter-size paper. After printing, the fax machine
returns to the standby mode.
If you press NO, the next menu displays.
7 P ress Y E S to print out all the Help lists at one time. The fax
machine will print out a list of 13 pages with letter-size paper.
After printing, the fax machine returns to the standby mode.
If you press N O, the fax machine displays the first pro m p t ,
HELP LIST BASIC ? again
USING FUNCTION MENU
The fax machine’s function menu acts as an extremely concise
manual. Just press FUNCTION. The fax machine briefly displays
each function and how to use it.
If a valid key is pressed while the fax machine displays the
function menu, the fax machine goes to the indicated function
setup mode - for example, press 0 to set up the current time.
If a valid key is pressed while the fax machine displays each
function sequentially twice and returns to the standby mode.
This feature is useful when you are already familiar with the fax
machine but have forgotten how to start a particular feature.
2 - 2 SAMSUNG ELECTRONICS CO., LTD
Page 30

INITIAL SETUP
H e re are a few points to remember about using the setup
procedures in this manual with your facsimile.
• P ro c e d u res are arranged with the displayed message on the
left of the page and your action or an explanation on the
right.
• Your fax machine has been designed to take you smoothly
t h rough all pr o c e d u res step by step, by responding with
messages to your setting or asking you questions to prompt
you to the next step.
• The NO key has two basic functions:
- Giving a negative response to a prompt from your fax
machine and either skipping on to the next prompt or
returning to the previous one.
Making corrections to mis-entries if the entry is still displayed
in the LCD window and if you have not pressed YES to
actually register the entry. If the entry has been re g i s t e red in
the fax machine by pressing YES, press STOP then start over
again.
SET TIME, ID, or
SYSTEM DATA ? Y/N
SET DATE & TIME ?
Y/N
SETTING DATE AND TIME
The current date and time are shown in the display when the
machine is ready for operation (standby mode). The date and time
is also printed on documents you send. To set the correct date and
time, perform the following steps:
1 Press FUNCTION, then 0
2 Press YES.
3 Press YES.
SAMSUNG ELECTRONICS CO., LTD 2 - 3
Page 31

MMDDYYHHMM
0 0 0 0 0 0 0 0 0 0
4 C u r rent date and time is displayed in the lower line of the
display-Enter correct date and time using the dial keypad. Use
24-hour format to select time (Military Time).
For example, if you want to set the date and time at April 15,
1994, 3:30 p.m., you need to enter number 04 for the month, 15
for the day, 94 for the year, 15 for 3 p.m., 30 for 30 minutes.
If you want to correct a digit, use S C R O L L keys to move the
cursor under the digit, then enter a correct number.
If you should enter an invalid number, a 2-second alarm tone
will sound.
MMDDYYHHMM
0 4 1 5 9 4 1 5 3 0
APR - 15 15:30 FRI
5 When the date and time are correctly displayed, press YES.
The LCD display briefly shows the date and time curre n t l y
registered in your fax machine, then switches to the SET TERM
ID prompt.
If you want to set a terminal identification, press Y E S a n d
proceed to “Setting Terminal ID” on the next page. If not, press
STOP to return the fax machine to the standby mode.
2 - 4 SAMSUNG ELECTRONICS CO., LTD
Page 32

SETTING TERMINAL ID (number and name)
Your fax machine can print your name and facsimile telephone
number on all documents you send. This enables remote parties to
identify your documents easily.
SET TERM. ID ?
TEL)_
TEL) 800-123-5678
ID)_
PRESS KEY THEN >
Y/N
To set the terminal ID immediately after setting the date and time,
p ress Y E S when the LCD display reads SET TERM ID ?. Then
follow the steps below.
To set the terminal ID starting from the standby mode, pr e s s
FUNCTION, 0, YES, NO, then YES in sequence.
1 Enter your fax number using the dial keypad, then press YES
Up to 20 digits can be entered.
Use REDIAL/PAUSE key to insert hyphen between numbers to
improve the readability as shown at left.
2 Enter your name (or business name or any other message)
using the dial keypad. Both numbers and letters can be
entered, up to 20 characters for the name.
Press a number key labeled with the character you want. Each
time you press a key, the characters labeled on the key appears
in the display. When the character you want appears, pre s s
SCROLL to move the blinking cursor to the next position at
right. Select the next character you want in the same way. See
page 2-7 for example to enter name.
ID) SMITH_
SAMSUNG ELECTRONICS CO., LTD 2 - 5
3 When the name appears correctly in the display, press YES.
N o w, the fax machine displays SET SYSTEM DATA ? If you
want to
set system data, press Y E S and proceed to “Setting System
Data”
on page 2-8. If not, press STOP. The fax machine returns to the
standby mode.
Page 33

Notes:
Special marks are assigned to the 0 key. Each time you press 0,0,
space, comma(,), dot (.), dash (/), plus (+), asterisk(✽), and (&)marks
are displayed. When desired mark appears, press SCROLL .
• Q and Z can be entered by pressing 7 and 9 respectively.
• If you make a mistake while you enter a number or name, press NO
to backspace and cancel the last entry then re-enter the corre c t
number. To correct a digit in the middle, use SCROLL or to
move the cursor under the digit, then enter a correct number.
• If there is a number or name already assigned, the fax machine
displays the number or name in the upper line and ED:1 DEL:2
NEXT:3 in the bottom line.
• Press 1 to edit the number and/or name. The first digit flickers in
the display.
• Press 2 to delete the number and/or name. The machine deletes the
number and/or name then proceeds to the next Step.
KeyPad
1st Press
2nd Press
3rd Press
4th Press
5th Press
6th Press
7th Press
8th Press
• P ress 3 to maintain the number and/or name and skip over the
current procedure.
1
2
3
4
5
6
7
8
1
2
3
4
5
6
7
8
A
D
G
J
M
P
T
B
E
H
K
N
Q
U
C
F
I
L
O
R
V
S
W
9
0
9
0
Space
,
X
.
Y
/
Z
+
*
&
2 - 6 SAMSUNG ELECTRONICS CO., LTD
Page 34

E X A M P L E
Let’s take “MY CO.”, for example, to enter a name.
ID)_
PRESS KEY THEN >
ID)M
ID)M_
ID)MY
ID)MY_
ID)MY_
1 Press 6 two times.
2 When M appears in the display, press SCROLL .
3 Press 9 four times.
4 When Y appears on the display, press SCROLL .
5 Press 0 two times to insert a space between “MY” and “CO.”,
6 When the cursor move at right, press SCROLL .
ID)MY _
ID)MY C
ID)MY C_
ID)MY CO
ID)MY CO_
ID)MY CO _ .
7 Press 2 four times.
8 When C appears in the display, press SCROLL .
9 Press 6 four times.
10 When O appears in the display, press SCROLL .
11 Press 0 four times.
12 When • appears in the display, press SCROLL
SAMSUNG ELECTRONICS CO., LTD 2 - 7
Page 35

SETTING SYSTEM DATA
Your fax machine has various user-selectable functions. These
functions are usually selected during the initial setup of the
machine, and there should be little need to change them thereafter.
Note: Before you begin, print out the system data list to see the
current settings. See “Reports” on page 4-39.
1 Press FUNCTION, 0, YES then NO twice, in sequence.
SET SYSTEM DATA ?
Y/N
TO SKIP TO NEXT
PRESS SCROLL V
PRINT MESSAGE
CONFIRMATION ? (N)
The currently selected settings are
shown with in the parenthesis in
the display.
AUTO PRINT
JOURNAL ? (Y)
2 Press YES.
The fax machine will show you the user-selectable functions.
Press YES or NO, or enter the desired number to select proper
setting. If you do not wish to change the option shown in the
display, press SCROLL to skip to the next menu.
Print Confirmation Report
You can set the fax machine to automatically print out a
Message Confirmation report every time you send a document.
The report shows whether the transmission was successful or
not, how many pages were sent, etc.
P ress YES if you want the report printed out after every
document you send.
Press NO if you do not want the Message Confirmation report.
Print Journal Report
You fax machine keeps records of communications. You can get
a transmission or reception journal printout manually or
automatically.
P re s s Y E S if you want the communication (send and r e c e i v e )
journal printed out automatically after every 50 transmissions
and receptions.
P ress N O if you do not want the journal printed out
automatically. To print out the journal manually, see “Reports”
on page 4-39.
2 - 8 SAMSUNG ELECTRONICS CO., LTD
Page 36

REMOTE RCV CODE?
[ 0-9 ] > (*2*)
Remote Receive Code
(Used with Extension Telephone)
If you use an extension telephone which is connected to the fax
machine (see page 1-14), you can control the fax machine to begin
receiving a fax by entering a remote receive code on the extension
telephone.
The code is made up of * 2 *. The first and the last * are fixed, but
you can change the middle digit from 0 to 9. Enter the desir e d
number, then press YES.
For more information on “Receiving Using an Extension
Telephone” , see page 4-28
SILENCE DETECT.
TIME ? (UNLIMIT : N)
AUTO TURNAROUND
POLLING ? (N)
Silence Detection Time
(Used in ANS/FAX mode only)
In ANS/FAX mode, after a call is picked up by the answering
machine, your fax machine monitors the line.
When your fax machine detects a certain time period of silence or
that the line has been released by the answering machine, the call
will be treated as a fax message and your machine can begin to
receive a fax.
You can limit the silence detection time to 12 seconds or select
unlimited time.
Press YES if you want to limit the time to 12 seconds.
Press No if you want to select unlimited silence detection time.
Automatic Turnaround Polling
You can set your fax machine to turnaround poll another machine.
Press YES to poll a remote machine everytime you send documents
to the remote machine. For more information on “Tu r n a ro u n d
Polling”, see page 4-15.
Press NO if you do not want turnaround polling
If you have selected turnaround polling, the fax machine prompts
TURNAROUND
POLL CODE=0000
SAMSUNG ELECTRONICS CO., LTD 2 - 9
you to enter a 4-digit turnaround poll code. This code is required to
access a remote fax machine secured with a poll code.
Page 37

Power Save Mode
POWER SAVE MODE ?
(N)
SET TIME ? Y/N
( 17:00 ➔ 09:00 )
SAVE START TIME
17 : 00
If you want to set your machine to power save mode, press YES.
This setting allows your fax machine to shut off the machine’ s
printer heater automatically after a document is printed, and to
conserve electricity and reduce your utility bills. The fax machine
automatically turns on the printer again when it receives a
document or is instructed to make a copy. In the power save mode,
it takes the machine a little longer to print out fax messages or
copies, because it must first re-heat the printer.
If you press N O, the machine’s printer heater remains on all the
time so the machine can start printing copies sooner.
If you want to set the time duration that the machine activates the
power save mode, press YES. The machine goes to the power save
mode from a specified start time to a specified end time every day.
If not, press NO. The machine activates the power save mode all
the time.
The machine displays the currently selected start time at which the
fax machine goes to the power save mode.
SAVE END TIME
09 : 00
DIAL MODE? (TONE)
TONE : Y PULSE : N
Enter the desired start time using the dial keypad. Use 24-hour
format to select time (Military time).
When the time appears correctly in the display, press YES.
The machine displays the currently selected end time at which the
fax machine exits from the power save mode.
Enter the desired end time using the dial keypad. Use 24-hour
format to select time (Military time).
When the time appears correctly in the display, press YES.
Dial Mode
Select the type of dial mode your fax machine is connected to.
Press YES if the fax machine is connected to a tone dial telephone
line.
Press NO if the fax machine is connected to a pulse dial telephone
line.
2 - 1 0 SAMSUNG ELECTRONICS CO., LTD
Page 38

SECURITY COMM. ?
SECURITY
COMM.=0000
(N)
Security Communication (For SF550M/SF5600)
The feature allows your fax machine to send and r e c e i v e
documents only to and from predetermined locations where fax
machines have the security code that matches your security code.
For more information, see “Security Communication” on page 4-21.
P ress Y E S if you want your fax machine to send or r e c e i v e
documents in the security communication mode.
Press NO if you want normal communication mode.
If you have selected Security Communication, the fax machine
prompts you to enter a 4-digit security code.
The code is used to identify participating stations as members of
the closed network. This ensures only authorized parties can
communicate with your machine.
When the code appears correctly in the display, press YES.
Error Correction Mode
ECM ENABLE ?
(Y)
AUTO REDUCTION ?
(Y)
E r ror Correction Mode (ECM) compensates for poor line quality
and ensures accurate, error-free transmission with any other ECMequipped facsimile machine.
If the line quality is poor, transmission time may be increased when
ECM is enabled.
Press YES to enable ECM.
Press NO to disable ECM.
Automatic Reduction
When receiving or copying a document as long as or longer than
the paper installed into your fax machine, the fax machine can
reduce the data of the document to fit on a standard letter
(8.5”x11”) size paper. The rate of the reduction is as follows:
Transmitted or
copied document
Letter size
( 81/2” X 11”)
Printout
Reduced
to 95%
A4 size
(81/4” X 11 11/16”)
SAMSUNG ELECTRONICS CO., LTD 2 - 1 1
Reduced
to 85%
Page 39

SET DISCARD SIZE
[ 00-33 ]> ( 15 )
If the fax machine can not reduce the data to fit on one page with
the feature enabled, the data is divided and printed out in actual
size on two sheets or more if needed.
Press YES if you want to reduce the incoming page that may need
to be divided into two pages with only a few centimeters on the
second page.
P ress N O if you do not want to reduce the receiving document.
The overflowed date will be printed out on a second page.
Automatic Discard
When receiving or copying a document as long as or longer than a
standard letter size paper installed into your fax machine, you set
the fax machine to discard any excess image at the bottom of the
page to fit on a standard letter size page.
If the received page is outside the margin you set, it will be printed
on two sheets of paper at the actual size.
If the data is within the margin, and Auto Reduction is turned on,
it will be reduced to fit on the appropriate size paper (Discard does
not take place). If Auto Reduction is turned OFF or fails, the data
within the margin will be discarded.
SET RDIAL INTERVAL
[ 0-7 ]> ( 3 )
SET RDIAL
ATTEMPT[0-7]> (3)
If the margin is set to 00, a second blank sheet may be printed.
Enter the desired discard size, using the dial keypad, then press Y E S.
Automatic Redial Interval
Your fax machine can automatically redial a remote fax machine if
it does not answer the first call or if it was busy.
Enter the number of minutes (from 0 to 7 minutes), using the dial
keypad, to wait before redialing the number that was busy on the
last try. Then press YES.
Note : If you enter 0, the fax machine will not wait. redial the number
immediately following the preceding try.
Automatic Redial Number
1 Enter the number of attempts (from 0 to 7 times) to redial the
number before giving up. Then press YES.
Note : If you enter 0, the fax machine will not redial at all
2 - 1 2 SAMSUNG ELECTRONICS CO., LTD
Page 40

ANSWER ON NO. OF
SINGS [ 1-7 ]> ( 1 )
Ring Before Answer
Enter the number of rings (from 1 to 7) your fax machine should
wait before it answers an incoming call. Then press YES.
If you enter 3, the fax machine will answer calls on the third ring.
To give you time to manually answer your calls when you are
present, set this option for at least four rings.
To return to the standby mode, press STOP.
To verify your setting, print the System Data list. See “Reports” on
page 4-41.
SAMSUNG ELECTRONICS CO., LTD 2 - 1 3
Page 41

USING THE AUTODIALER
REGISTERING ONE-TOUCH DIAL NUMBERS
You can register a maximum of 20 fax numbers as One-T o u c h
dialing numbers. After a fax number is registered as a One-touch
Dial number, it can be dialed by pressing its corresponding One-
touch key (1-20). The name of the receiving party can also be
registered for each One-touch Dial station.
1 Press FUNCTION, then 4.
You can store frequently called fax numbers as One-Touch or Speed
Dial stations, then dial the number by pressing only one or two keys.
The autodial numbers are also accessible through the Fax Directory.
SET AUTO DIALER
or PROGRAM ? Y/N
SET ONE-TOUCH
DIAL ? Y/N
PRESS ONE-TOUCH
KEY [ 1-20 ]
TEL)_
2 Press YES.
3 Press YES.
4 Press One-touch key to which a fax number will be assigned.
If a fax number is already assigned to the station, the fax
machine displays the number. See “Changing or Cancelling
One-touch Dial Numbers” on page 2-16.
5 Enter the fax number of the remote fax machine you want to
register, using the dial keypad.
A pause can be entered in the dialing sequence (e.g., when
dialing an outside number through a PBX system) by pressing
REDIAL/PAUSE. The pause will appear as a hyphen (-) in the
display.
If you make a mistake, press NO to backspace and cancel the
last entry, then re-enter the correct number. To correct a digit in
the middle, use S C R O L L keys to move the cursor under the
digit, then enter a correct number.
TEL)800-123-5678
2 - 1 4 SAMSUNG ELECTRONICS CO., LTD
When the correct number appears in the display, press YES.
Page 42

ID) _
PRESS KEY THEN >
6 Enter an ID name for the receiving party.
Press a number key labeled with the character you want. Each
time you press a key, the character labelled on the key appears
in the display. When the character you want appears, pre s s
SCROLL to move the blinking cursor to the next position at
right. Select the next character you want in the same way.
ID) SMITH_
SET ONE-TOUCH
DIAL ? Y/N
Press YES when the name appears correctly in the display.
The name will be displayed when you search Autodialer
memory and dial the number, and will be printed on various
reports your fax machine generates.
7 To register other One-touch Dial numbers, press YES and
repeat Steps 4 through 7.
Press NO when you have no more fax numbers to register. The
fax machine prompts SET SPEED DIAL ? If you want to
register Speed Dial numbers, press YES and proceed to
“Registering Speed Dial
Numbers.”
If you want to end registration, press STOP to return the
machine to the standby mode.
USING ADDRESS LABEL
There is an address label sheet together with your fax machine. As
you store numbers in One-touch Dialing station, make a note of the
number on the address label to remind you of what fax number is
stored in each position.
Write information on the label, peel it off, then attach it to the paper
position over the corresponding One-touch key as shown below.
1
5
4
3
2
1
6
11
16
8
7
13
12
18
17
SAMSUNG ELECTRONICS CO., LTD 2 - 1 5
10
9
15
14
20
19
Page 43

CHANGING OR CANCELLING ONETOUCH DIAL NUMBERS
The numbers re g i s t e red to the One-touch Dial station can be
changed by following the same pro c e d u re as registering a new
number.
1 Press FUNCTION, then 4.
SET AUTO DIALER
or PROGRAM ? Y/N
SET ONE-TOUCH
DIAL? Y/N
SET ONE-TOUCH
KEY [ 1-20 ]
TEL) 760084
ED : 1 DEL:2 NEXT
2 Press YES.
3 Press YES.
4 Press the One-touch key of the station you wish to change.
5 The fax number of the entered station will be displayed in the
upper line and the machine prompts you to select desire d
mode.
P ress 1 to edit the number and/or name. The first digit is
highlighted in the display. Go to Step 6.
Press 2 to delete the number and name. The machine prompts
you to enter a new one.
P ress 3 to maintain the number and name and skip over the
current procedure.
TEL) _ 4 0 0 8 4
TEL) 7 4 0 0 5 4
2 - 1 6 SAMSUNG ELECTRONICS CO., LTD
6 Changes can be made to the number by using SCROLL keys to
position the cursor under the digit to be changed and entering
the correct digit.
For example, if you wish to change 8 to 5, move the cursor
under 8,
then enter 5 as shown in the display at left.
7 When the number is correct, press YES.
Page 44

ID)_ AST SALES
8 The first digit in the current ID is highlighted. Use SCROLL
keys to position the cursor under the digit to be changed and
enter a correct character.
Press a number key labeled with the character you want. Each
time you press a key, the characters labeled on the key appear
in the display. When the character you want appears, move the
cursor under the other digit you want to change.
ID)WEST SALES
SET ONE-TOUCH
DIAL? Y/N
SET AUTO DIALER
or PROGRAM ? Y/N
9 When the name is displayed correctly, press YES.
10 The fax machine displays the next prompt. To return the
machine to the standby mode, press STOP.
REGISTERING SPEED DIAL NUMBERS
You can register a maximum of 50 (SF5500/SF5500M), 80(SF5600)
fax numbers as Speed Dialing numbers. (Group numbers are also
included in Speed Dialing numbers). After registering, the fax
number will be dialed by pressing SEARCH and scrolling through
the Auto dialer memory or by pressing SPEED DIAL (# key on
Key Pad) and using Key Pad to enter two-digit location number.
The name of the receiving party can also be r e g i s t e red for each
Speed Dial station.
1 Press FUNCTION, then 4.
2 Press YES.
SET ONE-TOUCH
DIAL? Y/N
SET SPEED DIAL?
Y/N
SET LOCATION
NO. [00-49]
(SF5500/SF5500M)
SET LOCATION
NO. [00-79]
(SF5600)
SAMSUNG ELECTRONICS CO., LTD 2 - 1 7
3 Press NO.
4 Press YES.
5 Enter a 2-digit location number to which a fax number will be
assigned using the dial keypad, then press YES.
Page 45

TEL)_
6 Enter the fax number you want to register using the dial
keypad.
A pause can be entered in the dialing sequence (e.g., when
dialing an outside number through a PBX system) by pressing
REDIAL/PAUSE. The pause will appear as a hyphen (-) in the
display.
If you make a mistake, press NO to backspace and cancel the
last entry then re-enter the correct number. To correct a digit in
the middle, use S C R O L L keys to move the cursor under the
digit, then enter a correct number.
TEL) 8 0 0 - 1 2 3 - 5 6 7 8
_
ID)_
PRESS KEY THEN >
ID)JANE_
When the correct number appears in the display, press YES.
7 Enter an ID name for the receiving party.
Press a number key labeled with the character you want. Each
time you press a key, the character labeled on the key appears
in the display. When the character you want appears, pr e s s
SCROLL to move the blinking cursor to the next position at
right. Select the next character you want in the same way.
The Fax Directory lists all re g i s t e red Auto dialer stations
a c c o rding to the names in alphabetical ord e r. The name will
also be printed on various reports your machine generates.
If you make a mistake, press NO to backspace and cancel the
last entry then re-enter the correct character. To correct a digit in
the middle, use SCROLL keys to move the cursor under the
digit, then enter a correct character.
SET SPEED DIAL ?
Y/N
8 To register other Speed Dial numbers, press Y E S and re p e a t
Steps 4 through 8.
Press NO when you have no more fax numbers to register. The
fax machine displays the next available menu. To return the
machine to the standby mode, press STOP.
2 - 1 8 SAMSUNG ELECTRONICS CO., LTD
Page 46

CHANGING OR CANCELLING SPEED
DIAL NUMBERS
The numbers re g i s t e red to Speed Dial station can be changed by
following the same procedure as registering a new number.
1 Press FUNCTION, then 4.
SET AUTO DIALER
or PROGRAM ? Y/N
SET ONE-TOUCH
DIAL ? Y/N
SET SPEED DIAL ?
Y/N
ENTER LOCATION
NO . [00-49]
(For SF5500/SF5500M)
ENTER LOCATION
NO . [00-79]
(For SF5600)
2 Press YES.
3 Press NO.
4 Press YES.
5 Enter a 2-digit location number of the Speed Dial station you
wish to change using the dial keypad.
TEL) 7 4 5 0 0 8 4
ED : 1 DEL : 2 NEXT : 3
TEL)_4 5 0 0 8 4
6 The fax number of the entered station will be displayed in the
upper line and the machine prompts you to select the desired
mode.
P ress 1 to edit the number and/or name. The first digit is
highlighted in the display. Go to Step 7.
Press 2 to delete the number and name. The machine prompts
you to enter new one.
P ress 3 to maintain the number and name and skip over the
current procedure.
7 Changes can be made to the number by using SCROLL and
n n nkeys to position the cursor under the digit to be changed
and entering the correct digit.
SAMSUNG ELECTRONICS CO., LTD 2 - 1 9
Page 47

For example, if you wish to change 8 to 5, move the cursor
under 8, then enter 5 as shown in the display at left.
TEL)7450054
ID)_AST SALES
ID) WEST SALES
SET SPEED DIAL ?
Y/N
8 When the number is correct, press YES.
9 The first digit in the current ID is highlighted. Use S C R O L L
keys to position the cursor under the digit to be changed and
enter a correct character.
Press a number key labeled with the character you want. Each
time you press a key, the characters labeled on the key appear
in the display. When the character you want appears, move the
cursor under the other digit you want to change.
10 When the name is displayed correctly, press YES.
11 The fax machine displays the next prompt. To return the
machine to the standby mode, press STOP.
2 - 2 0 SAMSUNG ELECTRONICS CO., LTD
Page 48

SEARCHING AUTODIALER MEMORY
(Fax Directory)
This feature enables you to alphabetically search for the fax
numbers stored in your fax machine’s Auto dialer memory.
Scanning the Fax Directory
To begin scanning the entire Fax Directory, follow the steps below:
SEARCH
PRESS , ,0-9
S: DETROIT SALES
800-313-555-1212
G : MARKETING
800-555-1234
O : NEW YOUR/KK
123-456-7890
1 Press SEARCH.
The fax machine prompts you to press one of ten keys or
SCROLL or key.
2 Press SCROLL or repeatedly until you find the desired
number.
Each time you press SCROLL , the fax machine scroll the
entire memory downward in alphabetical order (from A to Z);
while, pressing SCROLL allows the fax machine to scroll
the memory upward (from Z to A).
Continuous depression of either SCROLL or key will
scan through the entire memory with each number displayed
for approximately 0.2 seconds. Once you have reached the
d e s i red number in the memory, release the SCROLL or
vvvkey.
Note: Empty memory location will be skipped during the searc h
procedure.
3 If the name and/or number in the display is longer than 16
digits, use SCROLL or keys to see the hidden characters
or numbers in the display.
Each time you press SCROLL , the first digit in the display
will disappear off the left side of the display, and the hidden
digit will appear in the right side of the display.
Each time you press SCROLL , the last digit in the display
will disappear off the right side of the display, and the hidden
digit will appear in the left side of the display.
4 When you find the name and the number you want, pr e s s
START to dial the number.
With a document loaded, your fax machine begins
transmission.Otherwise, your fax machine makes a phone call.
Note: O, S, or G before the names in the display stands for One-touch
Dial number, Speed Dial number, or Group Dial number.
SAMSUNG ELECTRONICS CO., LTD 2 - 2 1
Page 49

Searching With A Character
You can scan the Autodialer memory for a desired number with a
name which was stored beginning with a desired number or letter.
You can search with the first character of the name. This search can
retrieve all entries beginning with the same initial character.
SEARCH
PRESS , ,0-9
S : EMERSON
1234567890
0 :EMI
1112222333
1 Press SEARCH.
2 Enter a name by which you need to search for a phone number.
Press a number key labeled with the character you want. Each
time you enter a character of the station, the first station with a
name starting with the entered character will be displayed.
3 If the name shown in the display is not the name you want,
press SCROLL repeatedly until you find the desired name.
It scrolls name downward in alphabetical ord e r. To scan
upward, use SCROLL .
4 When you find the name and number and number you want,
press START to dial the number.
With a document loaded, your fax machine begins transmission.
Otherwise, your fax machine makes a phone call.
Note:
• If no name is stored with the assigned character, a warning tone
sounds.
• Press SCROLL or if you want to see the hidden characters or
numbers in the display.
2 - 2 2 SAMSUNG ELECTRONICS CO., LTD
Page 50

SENDING DOCUMENTS
This section shows you how to prepare and send
documents. Other more sophisticated ways to send
documents are described in “Advanced Operation.”
This section shows you how to send faxes and control the functions
that affect the way you send faxes.
When you send a document, follow the steps below:
1 P re p a re an original document. The document should be
acceptable for feeding into the fax machine (see page 3-2).
2 Load the document properly (see page 3-3).
3 Adjust the resolution and contrast, if necessary (see page 3-4).
4 Dial the remote fax machine’ s number (see page 3-5). You can
use On-hook Dialing, One-touch Dialing, or Fax Dire c t o r y
Dialing.
If you wish to send it at a later time or send to more than one
location, see “Advanced Transmission” on page 4-2.
SAMSUNG ELECTRONICS CO., LTD 3 - 1
Page 51

PREPARING DOCUMENTS
Certain re q u i rements and precautions must be observed before
sending your documents. This is ensure that all your documents
a re sent with the highest quality and fed through the feeder
properly.
Acceptable Documents
SINGLE SHEET 2 OR MORE SHEETS
Document
Size
Effective
Scanning width
Number of
sheets which can
be set at a time
M a x
M i n
5.83 in (W) x 5.04 in (W)
(210mm)
8.5 in (W) x 11.7 in (L)8.5 in (W) x 14.0 (L)
8.3 in
up to 30 (Letter size)
Thickness of
document
Quality of
document paper
0.0028 to 0.0059 in
Uncoated on both sides
0.0028~0.0047 in
Note : For multiple sheets, the document must be the same size and paper
type.
Documents You Cannot Send
Do not try to send documents that are:
-went
-covered with wet ink or paste
-wrinkled, curled, or folded
-too thin (less than 0.0028 in thick - onionskin, airmail paper, etc)
-too thick (over than 0.0059 in thick)
-chemically processed (pre s s u re-sensitive paper, carbon-coated
paper, etc.)
-coated (glossy paper, etc.)
-too small or short (such as a label, voucher, etc.)
-made of cloth or metal
To send these documents, use an office copier to make a photocopy
first,and then send the copy
3 - 2 SAMSUNG ELECTRONICS CO., LTD
Page 52

APR-15 15:30 FRI
DOCUMENT READY
LOADING DOCUMENTS
You can stack up to 30 sheets on the document feeder at one time.
Place the document face down in the document feeder.
Adjust the sliding document guides to ensure that the document is
centered on the document feeder.
Gently insert the leading edge of the paper into the fax machine.
If you are sending two or more pages, be sure that the bottom sheet
enters first.
If you want to send more pages, place them on top of the last page
on the document feeder after a sheet finishes transmission. Do not
place more than 30 sheets on the document feeder at a time.
Note:
• Be sure that your document is free of staples, paper clips, and other
foreign objects.
• Since your fax machine use a pre-scanning method, it is not
recommended to feed one sheet after another when you have two or more
pages to send or copy. Place a batch of sheets (up to 30 pages) in the
feeder.
SAMSUNG ELECTRONICS CO., LTD 3 - 3
Page 53

SETTING RESOLUTION AND
CONTRAST OF DOCUMENTS
You can adjust the resolution and/or contrast to send a highquality transmission of documents with unusual contrast
characteristics, including photographs. The higher the re s o l u t i o n ,
the longer it takes to send, but the results will look better at the
receiving end.
When you send normal, ordinary documents, you need not adjust
the resolution and the contrast.
You can choose from the following resolution settings:
• FINE : Documents containing small characters or lines, or print
from a dot-matrix printer.
• SUPER FINE : Documents containing very detailed print, or
documents with intricate drawing.
The contrast control on your fax machine lets you add half-tone
shading for sending photographs or documents printed in color.
The following contrast settings are available:
• LIGHT : Documents with light or faint print or with pencil
• PHOTO : Photographs or other documents containing many
levels of gray or colored areas.
• HSP (High-Speed Photo) : If you want to send a photograph or
other documents containing a photograph at a higher speed
(than in a PHOTO mode), you can use this mode to reduce cost.
To select the desired resolution, press R E S O L U T I O N so that the
corresponding mode indicator will be lit.
To select the desired contrast, press C O N T R A S T so that the
corresponding mode indicator will be lit.
To select the HSP mode, press C O N T R A S T so that the P H O T O
indicator will flicker.
To find out which resolution and contrast settings are best for your
document, use your fax machine to make a copy with whatever
setting you like. The copy will show how your document would
appear at the receiving end.
3 - 4 SAMSUNG ELECTRONICS CO., LTD
Page 54

DIALING A NUMBER
One-Touch Dialing
If you have stored frequently used numbers for One-touch Dialing,
and if the remote party you are calling is set to receive documents
automatically, you can send a document with a single keystroke.
For more information on storing numbers for One-touch Dialing,
see “Registering One-Touch key for the number you want to call.
O : SAMS
81-92-1234567
DIALING 8192123
4567
ENTER LOCATION
NO . [00-49]>_
(SF5500/SF5500M)
ENTER LOCATION
NO. [00-79]
(SF5600)
DIALING ABC CO.
Press the One-touch key for the number you want to call.
The name and number of the remote party appears in the display,
and the fax machine automatically dials the number, confirms the
connection, and sends the document. The messages in the display
tell you what step is being performed.
Two Digit Speed Dialing
If you have stored telephone numbers into the fax machine’s Auto
dialer memory (and if the remote party you are calling is set to
receive documents automatically), you can send a document using
this method
1 Press SPEED DIAL (#).
2 Enter the 2-digit location number for the telephone number you
want to call.
3 The fax machine automatically dials the number, confirms the
DIALING 1 2 3 4 5 6 7
connection, and sends the document.
Fax Directory Dialing
If you have stored telephone numbers into the fax machine’s Auto
dialer memory, and if the remote party you are calling is set to
receive documents automatically, you can send a document using
this method.
1 Press SEARCH.
SAMSUNG ELECTRONICS CO., LTD 3 - 5
Page 55

SEARCH
PRESS , 0-9
2 P ress SCROLL °Âor °„repeatedly to search the Autodialer’ s
memory for the number you want to call.
You can search with the first character of the name. Press a
number key labeled with the character you want. This searc h
can retrieve all entries beginning with the same initial character.
If the name shown in the display is not the one you want, press
SCROLL °Ârepeatedly until you find the desired name.
For more information on searching the Fax Directory, see page
2-21.
S : ABC CO
123 - 4567
DIALING ABC CO
TEL)05511234567
3 When the number you want to call is shown in the display,
press START.
The fax machine automatically dials the number, confirms the
connection and sends the document.
Manual Dialing Using the Keypad
When the party you are sending a document to has the fax machine
set to receive documents automatically, you can enter the re m o t e
party’s telephone number using the dial keypad.
1 Enter the remote party’s number using the dial keypad.
As you enter the number, it appears in the display. If the
number does not appear correctly in the display, use the NO
key to correct the number.
2 Press START to send the document.
The fax machine dials the number, confirms the connection,
and sends the document.
Manual Dialing Using the Handset
You should dial the remote party°Øs number using the handset if
you are not sure whether they have a fax machine ready to receive
documents.
If a person answers the telephone instead of a fax machine, you can
talk to that person through your handset.
1 Pick up the handset and listen for the dial tone.
2 Dial the remote party°Øs number, using the dial keypad.
Note: One-touch Dialing is also available using the One-touch key.
3 - 6 SAMSUNG ELECTRONICS CO., LTD
Page 56

0 5 5 1 1 2 3 4 5 6 7
3 Listen on the handset as the telephone rings. If the remote fax
answer the call, you will hear its answering tone.
If a person answers the telephone, ask them to press the START
key on their fax machine so you can send a document.
Listen for the high-pitched answering tone from the remote party
4 When you hear the answering tone, press STA RT to send the
document.
5 Replace the handset.
On-Hook Dialing
You can send your documents with On-hook dialing, using the
monitor speaker to confirm the answering tone from the remote fax
machine.
1 Press OHD/V.REQUEST Dial tone will be heard.
2 Dial the remote party’s number using the dial keypad. If a
w rong number is entered in the process, press O H D /
V.REQUEST and retry the procedure
Note : One-touch Dialing is also available using the One-touch key.
3 When the answering tone is heard, press START.
If the remote party answers the phone, pick up the handset.
Inform the remote party that you are going to send a document
and ask them to get ready to receive. Then press STA RT and
replace the handset.
When you monitor a dialing process through the speaker, you can
adjust the loudness of speaker volume, if necessary. Slide the switch
on the left side of the fax machine.
SAMSUNG ELECTRONICS CO., LTD 3 - 7
Page 57

CONFIRMING THE TRANSMISSION
An ending tone sounds when the transmission is completed and
the date and time reappears in the LCD display.
If your document is not sent successfully, CDMM ERROR appears
in the display. Press S T O P to clear the error message, and try to
send the document again.
Note : If a document has jammed, see “Clearing a Document Jam” on
page 5-1.
Confirmation Report
You can confirm the transmission result with a Confirmation
report. This tells you whether the transmission was successful or
not, how many pages were sent, etc.
If you have set up your fax machine not to print the report (see
“Setting System Data” on page 2-8) and you want to print the
report manually, use the COPY key. Follow the procedure below:
MESSAGE CONFIRM.
REPORT ? Y/N
1 Press COPY when you finish sending.
Note : Make sure no document is loaded in the document feeder. If
t h e re is a document in the fax machine, the fax machine goes to
“copy” mode when you press COPY.
2 Press YES.
The fax machine prints your last transmission result. If you
press NO, the fax machine prompts you to print other reports.
Select a desired report by pressing YES or NO.
Note : In case there is no record of the last transmission (due to a power
f a i l u re, for example), the MESSAGE CONFIRMATION REPORT ?
message does not appear when you press COPY. The fax machine directly
switches to the other reports printout mode. See °∞Reports°±on page 4-39.
3 - 8 SAMSUNG ELECTRONICS CO., LTD
Page 58

CANCELLING A TRANSMISSION
If you do not want to finish sending a document, you can cancel at
any time.
IN USE ! PRESS
“STOP” TO CANCEL
Stop sending the document by pressing STOP twice.
Your machine disconnects the line and ejects the remaining pages
of your document before returning to the standby mode.
PRINTING TTI
Your fax machine can automatically print your ID name and
facsimile number (TTI) on the top of each page you send. When the
remote party receives a fax from you, the TTI appears as shown in
the example below.
APR-15-94 20:25 FROM : SAMSUNG TO : 1234 PAGE : 01
SAMSUNG ELECTRONICS CO., LTD 3 - 9
Page 59

CONVENIENT SENDING FEATURES
REDIAL
Automatic Redial
When a dialed One-touch or Speed Dial station is busy or does not
a n s w e r, the number will be automatically redialed appro x i m a t e l y
every three minutes up to 3 times. The number of redial attempts
and the redial interval are set through System Data Setup. Setting
System Data” on page 2-8.
Immediate Redial
BUSY! REDIAL ?
TEL MODE
The number can also be redialed at any time during the automatic
redial cycle by pressing YES while the display is shown at at left.
Last Number Redial
Manually dialed numbers can be redialed by pre s s i n g
REDIAL/PAUSE.
The last number will be dialed.
3 - 1 0 SAMSUNG ELECTRONICS CO., LTD
Page 60

APR-15 15:30 FRI
DOCUMENT READY
MEMORY TRANSMISSION
A document can first be scanned into memory, then transmitted to
a remote station without operator assistance. After the
transmission is completed, the document is automatically erased
from memory.
1 Load a document face down into the feeder.
2 Press M E M O RY TX (MEMORY TX/DUAL in SF5500M/SF5600) .
TEL)_
TEL) 0 5 5 1 1 2 3 4 5 6 7
ANOTHER FAX
NUMBER ? Y/N
3 Enter the fax number of the remote machine, using the dial
keypad, One-touch key, or 2-digit Speed Dial number or Group
number.
When the number appears correctly in the display, press YES.
For more information on Group numbers, see page 4-22.
4 Press NO if you do not want to send the document to multiple
locations. Go to Step 5.
P ress Y E S if you want to send the documents to multiple
locations. The machine prompts you to enter another fax
number of remote party to which you want to send the same
document. Enter the next number, then press YES.
Repeat as necessary. When you have entered all the numbers,
press NO.
N o t e : A single broadcasting is available for your machine. If any
multi- address transmission is currently set up in your machine, the
ANOTHER FAX NUMBER ? prompt does not appear until the
currently set broadcasting is completed.
TO MEMORY P. 01
MEMORY USED= 16%
SAMSUNG ELECTRONICS CO., LTD 3 - 1 1
prior to transmission, then dials the number, confirms the
connection, and sends the document. The messages in the
display tell you what step is being performed.
5 The machine automatically scans the document into memory
Page 61

MAKING A COPY
You can also use your fax machine as a personal copier. Up to 30
pages can be copied at a time, and 99 copies (SF5500M/SF5600), 50
copies (SF5500) of the document can be made. The resolution is
automatically set to FINE while the copy feature is in use, however,
the contrast and resolution can be changed to produce the best
quality.
1 Load a document face down into the document feeder.
For more information, see “Loading Documents” on page 3-3
and “Setting Resolution and Contrast of Documents” on page
3-4.
APR-15 15:30 FRI
DOCUMENT READY
ENTER NUMBER OF
COPIES [1-99] >1
(For SF5500M/SF5600)
ENTER NUMBER OF
COPIES [1-50] >1
(For SF5500)
COPY
P . 3
2 Press COPY.
3 Enter the number of copies if you need two or more copies,
Using the dial keypad, then go to Step 4.
If you want only one copy, you need not enter the number of
copies.
If no key is entered within 3 seconds after you press COPY, the
fax machine starts copying.
4 Press COPY again or press YES.
Data from the first page is scanned into memory. After the first
page is scanned into memory, copying automatically starts.
When copies of the first page are completed, the next page is
fed into the feeder, scanned into memory, and printed, just as
the first.
The display will show the number of copies in the upper line
COPY 12/20
P . 3
and the document page number in the bottom line.
These numbers will increase as each page is copied the required
number of times.
Note : In the event the recording paper has run out or jammed, the
printer stops. When you correct the fault, the fax machine will
continue to print the rest of copies.
3 - 1 2 SAMSUNG ELECTRONICS CO., LTD
Page 62

RECEIVING DOCUMENTS
SELECTING RECEIVING MODE
You can select any receiving mode desired. Press RCV. M O D E
repeatedly until the desired receiving mode appears in the display.
Your fax machine has four receiving modes; FAX, TEL, TEL/FAX,
ANS/FAX
AUTOMATIC RECEIVING MODE
Select FAX mode if you have not re c o rded an outgoing message
APR-15 15:30 FRI
FAX MODE
(OGM).
In this mode, do not answer the phone when it rings. Your fax
machine will answer automatically.
Otherwise, re c o rd your outgoing message and select TEL/F A X
mode. This mode is available only if you have recorded an OGM.
This section shows you how to receive faxes and control
the functions that affect the way you receive.
APR-15 15:30 FRI
TEL/FAX MODE
APR-15 15:30 FRI
TEL MODE
For more information on re c o rding an OGM, see “Recording an
Outgoing Message (OGM)” on page 3-16.
In TEL/FAX mode, your fax machine operates as it does in FA X
mode, except that your fax machine plays the OGM to callers
before attempting to receive a fax. When a call is received from an
automatic fax machine, your fax machine does not play the OGM,
and automatically detects the sending fax machine and receives the
fax.
MANUAL RECEIVING MODE
Select TEL mode.
In this mode, you must answer the phone manually before you can
receive a fax. When the telephone rings, pick up the handset and
answer it. If the remote party asks you to receive a document or if
you hear a fax tone, pre s s S TA RT and replace the handset in its
cradle.
Use this mode if you typically use fax machine to receive both calls
and faxes.
SAMSUNG ELECTRONICS CO., LTD 3 - 1 3
Page 63

ANS/FAX MODE
APR-15 15:30 FRI
ANS/FAX MODE
Select ANS/FAX mode.
In this mode, the fax machine can share the same telephone line
with an answering machine. The ANS/FAX mode is available only
when connecting an answering machine to the EXT.TEL jack on
your fax machine.
When a call is received, the answering machine answers and plays
the outgoing message recorded on the answering machine.
If a fax tone or a certain time period of silence is detected on the
line by your fax machine-the call automatically switches over to the
fax machine and reception begins, overriding the answering
machine’s announcement.
If someone wants to speak with you - your fax machine ignores the
call. The caller can leave a voice message on the answering
machine.
Notes:
• If you have trouble receiving faxes in the ANS/FAX mode, change the
silence detection time mode as described in “Setting System Data” in
chapter 2. This feature in the user options will ensure fax re c e p t i o n
when a fax tone is not detected on the line by your fax machine.
• If the answering machine does not answer within several rings for such
reasons as the recording message is full on the tape or the answering
machine is switched off, your fax machine automatically receives the
document. If the answering machine has a user-selectable ring counter,
set the machine to answer an incoming call within 4 rings.
• When you are using the manual receiving mode and an answering
machine is installed, be sure to switch off the answering machine,
otherwise the OGM from the answering machine might disrupt your
telephone conversation.
• Set your answering machine to VOX mode (if applicable). VOX stands
for “Voice Operated” which allows disconnection when a period of
silence is detected by the answering machine.
3 - 1 4 SAMSUNG ELECTRONICS CO., LTD
Page 64

VOICE REQUEST
When you are sending or receiving documents, if you want to talk
to the remote party over the phone, follow the steps below.
1 Press OHD/V.REQUEST while you are sending or receiving a
document. The indicator will light to confirm your re q u e s t .
After the last page is sent or received, the call signal is sent to
the remote fax machine.
2 When the person at the remote fax machine answers, you will
hear a ringing tone.
3 Pick up the handset and speak.
Notes:
• You can cancel the voice request by pressing the OHD/ V. R E Q U E S T
key again while you are sending or receiving a document.
• If the remote operator does not answer your request, your fax machine
automatically hangs up and returns to the standby mode.
If the remote party tries to contact you after sending or receiving
documents, your fax machine will emit a ringing tone. Then pick
up the handset. You will hear fax tones. When the remote party
answers, you can speak.
If you do not answer the call, your fax machine prints out a Call
Back message list which shows the time and date the voice request
was made and the telephone number of the remote fax machine.
Note : Voice Request is an available feature on your fax machine. Verify
that the remote machine is also equipped with voice request capability if
problems occur.
CALL BACK MESSAGE APR-15-94 20:25
FAX NUMBER : 555-1212
NAME : SAMSUNG
PLEASE CALL BACK………
PHONE NUMBER : 12332444
SAMSUNG ELECTRONICS CO., LTD 3 - 1 5
Page 65

PLAY OGM RECORD
PLAY OGM RECORD
PLAY OGM RECORD
OGM? Y/N
OGM? Y/N
OGM? Y/N
RECORDING AN OUTGOING MESSAGE (OGM)
You can re c o rd an outgoing message (OGM) to answer callers
during your absence. In the TEL/FAX mode, when your machine
answers a call from a voice caller or the operator of a manual fax
machine, the OGM instructs the caller to press the START key on
his/her machine. To record an OGM;
1 Pick up the handset.
2 Press FUNCTION, then 8.
3 Press YES.
PLAY OUTGOING
MESSAGE ? Y/N
RECORD OUTGOING
MESSAGE ? Y/N
RECORDING…
>>>>>>>>
4 Press YES if you want to hear the current voice message. If an
outgoing message has been already recorded, it will be played
back.
If no message has been r e c o rded, the machine displays NO
MESSAGE, then displays the next prompt.
If you press NO, the next prompt also displays.
5 Press YES and begin speaking into the handset.
If you try to re c o rd with the handset down, the fax machine
displays PICK UP THE HANDSET. When you pick up the
handset, the fax machine starts to record your message.
The remaining time is visible through the display.
When the time expires, the OGM is played back automatically.
If you are not happy with the OGM, simply repeat the above
procedure.
PLAYING…
Note: If you unplug your fax machine, or if there is a power failure, your
OGM will be erased. Restore power to your fax machine and record a new
OGM.
Suggested message
“Hello. This is (your company, or business name). I am away
for a few minutes. To fax to me, press the START key on your
fax machine. If you want to speak with me, please call me at
another time.”
3 - 1 6 SAMSUNG ELECTRONICS CO., LTD
Page 66

NO PAPER
MEMORY RECEIVED
PRINTING OUT DOCUMENTS
RECEIVED IN MEMORY
If the fax machine is set to receive documents automatically and
then recording paper has run out, a paper jam has occurred, or the
top cover has been opened, any incoming documents are stored in
the fax machine’s memory. After receiving documents, the fax
machine displays MEMORY RECEIVED and the cause, NO PAPER
for example.
You must clear the problem by loading new paper, closing the
cover, or clearing the jam. Then your fax machine will print out the
contents of the memory reception automatically.
If you clear the problem while the fax machine receives documents
into memory, the fax machine will print out the stored document
immediately.
SAMSUNG ELECTRONICS CO., LTD 3 - 1 7
Page 67

RECORDING AREA
The machine can use letter size paper. The effective recording area
is inside the shaded area as follows.
3 mm
Original Recording Paper
Recording paper
Area
4 mm
4 mm
3 mm
Effective
Recording
Area
When the document to be received or to be copied is shorter than
or the same length as the effective re c o rding area, it will be
recorded in its actual size.
When the document to be received or to be copied is longer than
the effective area:
1 Usually it will be recorded in the reduced size as shown on the
left (vertical reduction). When the document can not be
re c o rded on one sheet even if reduced, it will be divided into
two sheets (not reduced).
2 If you wish paintings without reduction or excessive paper
usage, set a proper DISCARD SIZE through system data setup
procedure (see “Setting System Data” in Chapter 2). The lower
part of the document may be lost in some cases. If you have set
the AUTO REDUCTION function to OFF through the system
data setup procedure, the document will be recorded on two or
more sheets.
3 - 1 8 SAMSUNG ELECTRONICS CO., LTD
Page 68

DUAL ACCESS (FOR SF5500M/SF5600)
This feature is available for SF5500M/SF5600 only.
The Dual Access feature of your fax machine can save both time
and money, and enhance fax productivity.
Operations can be reserved when the fax machine is receiving a
document into memory or transmitting a document from memory.
The reserved operation will begin when the current operation
concludes.
To reserve a transmit operation while the fax machine is receiving a
document or transmitting a document from memory, place the new
document you want to send in the feeder. Press M E M O RY
T X / D U A L (or F U N C T I O N then 1) and then enter the re m o t e
station’s number using the Autodialer, ten keypad, or via the
p rogrammed One-touch key. The document will be scanned into
memory when MEMORY TX/DUAL key or a One-touch key, that
was assigned a group, is selected. Otherwise the document will
remain in the feeder until thereserve operation is started.
The Dual Access feature also allows the registration of user
selectable functions such as setting the Autodialer, copying, or
report printing. The user-selectable functions can be re g i s t e red by
p ressing F U N C T I O N and the number key corresponding to the
re q u i red operation. Copies or reports can be printed by pr e s s i n g
the COPY/REPORTkey.
The Dual function of the MEMORY TX/DUAL key is to toggle the
display between the operation you are entering and the operation
that is currently taking place. Each time you press M E M O RY
T X / D U A L, the fax machine’s display alternates between the two
operations.
The chart below shows the newly accessible operations while one operation is currently being performed.
NEXT
OPERATION
CURRENT
OPERATION
Memory Transmit YES YES YES YES
Memory Input YES YES
Memory Receive YES YES
List Output YES YES
User’s Operation YES YES
Copy Function YES YES
Memory Memory Memory List User’s Copy
Transmit Input Receive Output Operation Function
Note : While OGM recording is being performed, other operations are not possible.
SAMSUNG ELECTRONICS CO., LTD 4 - 1
Page 69

ADVANCED TRANSMISSION
General Note: A maximum of 15 different timer related operations
can be reserved in your fax machine within a 24-hour period. One of
these operations can be set to call up to 10 remote locations
(broadcasting) in a single operation.
DELAY TRANSMISSION
(SENDING AT A PRESET TIME TO ONE OR MORE LOCATIONS)
The delay transmission feature allows you to program the fax
machine to automatically send a document at a later time. This
f e a t u re permits unattended transmission of documents in the
evening hours when telephone rates are lowest.
This section explains the many different network and
timer related features that can help you increase the
efficiency of your facsimile communication. You will
learn how to save to maintain the privacy of sensitive
documents, and how to save time when sending the
same documents to many different locations.
APR-15 15 : 30 FRI
DOCUMENT READY
DELAY TX ?
Y/N
TEL)
TEL) 8001234567_
1 Load a document face down into the document feeder.
For more information, see “Loading Documents” and “Setting
Resolution and Contrast of Documents” in chapter 3.
2 Press FUNCTION, then 1.
3 Press YES.
4 Enter the telephone number of the remote fax machine, using
the dial keypad, One-touch key, or 2-digit Speed Dial number
or Group number.
When the number appears correctly in the display, press YES.
For more information on Group numbers, see “Advanced
Transmission” in this Chapter.
4 - 2 SAMSUNG ELECTRONICS CO., LTD
Page 70

ID)_
PRESS KEY THEN >
5 If you want to identify this operation, enter a proper name
using the dial keypad.
Press a number key labelled with the character you want. Each
time you press a key, the characters labelled on the key appear
in the display. When the character you want appears, pre s s
SCROLL to move the blinking cursor to the next position at
right. Select the next character you want in the same way.
ID)PIPPY_
ANOTHER FAX
NUMBER ? Y/N
ENTER TIME
HH : MM
ENTER TIME
23 : 50
When the name appears correctly in the display, press YES.
6 If you want to send the documents to more than one location,
p ress Y E S. The fax machine prompts you to enter the next
telephone number to which you want to send the document,
press YES, and repeat. Press NO when you have entered all the
telephone numbers.
If you do not want to send the documents to multiple sites,
press NO. The fax machine proceeds to Step 7.
N o t e : A single broadcast is available for your fax machine, so the
“ANOTHER FAX NUMBER ?” prompt does not appear if any
broadcast currently set up in your fax machine is not completed.
7 Enter the time you want your fax machine to send the
document, using the dial keypad.
Enter the time in 24-hour format. For example, enter 2350 for
11:50 p.m.
When the time appears correctly in the display, press YES.
Note: If you set a time earlier than the current time, the document will
be sent at that time on the following day.
TO MEMORY? Y/N
MEMORY USED = 10%
8 Press YES. The fax machine scans all documents into memory,
then displays the total pages of the document.
If you do not want to store the documents into memory, press
NO. The fax machine proceeds to Step 9.
N o t e : When the document is to be broadcasted in Step 6, the fax
machine automatically scans all documents into memory.
(TO MEMORY? Y/Ndoes not display.)
SAMSUNG ELECTRONICS CO., LTD 4 - 3
Page 71

APR-15 15 : 30 FRI
DELAY TX 23 : 50
9 Your fax machine returns to the standby mode and will dial the
number at the specified time.
Notes:
• If you want to cancel the delay transmission, see “Cancelling an
Operation” in Chapter 4.
• If the amount of pages is too great, the fax machine’s memory may
be filled. Your fax machine will display MEMORY FULL, and then
display CANCEL Y/N? If you press YES, then memory will be
erased. You should then divide your pages into two separate
transmissions, or transmit them from the feeder. If you press NO,
the pages which were stored will be sent. You should send the
remaining pages later when memory is available.
RELAY TRANSMISSION REQUEST
(SENDING THROUGH A RELAY STATION)
Relay transmission is a powerful function that takes advantage of
the remote “hub” fax machine’s memory to reduce your total
equipment and communication costs.
The relay transmission concept is shown below. Suppose Operator
1 in Los Angles wishes to send a batch of documents to facsimiles 2
t h rough 5 in Chicago. Of course, Operator 1 could send the
documents to each of the other destinations individually, as
indicated by the dashed lines in the figure. The transmission cost
would then be the cost of the Los Angelesto-Chicago transmission
times four.
Now suppose that one of the facsimiles in Chicago is a fax machine
which can serve as the “hub” in a relay system. Using r e l a y
transmission request, a machine the fax machine at Los Angeles
can call the remote “hub” in Chicago and instruct it to relay the
documents to the other facsimiles in the Chicago area.
The transmission cost now would be the cost of one Los Angelesto-Chicago transmission plus the local charges in Chicago, a
significantly lower cost. Furthermore, this is done automatically,
without any intervention by an operator of “hub” machine in
Chicago. When the transaction is complete, Operator 1 will receive
a report from the “hub” indicating which relay stations were
contacted and which were not.
4 - 4 SAMSUNG ELECTRONICS CO., LTD
Page 72

Relay transmission fro, Hub to
End destinations at lower rates
e
n
O
Los
Angeles
Operator 1
If your fax machine is SF5500/SF5500M, it cannot be a relay “hub”,
but you can send documents to a remote fax machine that is able to
operate as a relay “hub”. If your machine is SF5600, it is capable of
acting as a relay “hub” as well as sending your document through a
relay “hub”, such as another SF5600.
B e f o re sending through a relay unit, the Group number that
contains the end “destinations” (i.e. the fax machines that will
receive the relayed documents) and your fax number must be
stored into the remote relay station’s Autodialer location number.
END 2
Chicago
l
l
a
C
e
c
n
a
t
s
i
D
-
g
n
o
L
HUB
END 3
END 5
END 4
To request relay transmission, perform the following procedure:
1 Load a document face down into the document feeder.
For more information, see “Loading Documents” on page 3-3
and “Setting Resolution and Contrast of Documents” on page
3-4.
APR-15 15 : 30 FRI
DOCUMENT READY
CONF. TX or
RELAY TX ? Y/N
SAMSUNG ELECTRONICS CO., LTD 4 - 5
2 Press FUNCTION, then 3.
3 Press YES.
Page 73

CONFIDENTIAL
TRANSMISSION? Y/N
4 Press NO.
RELAY TX ?
ENTER
END GROUP NO.
ENTER RETURN
LOCATION NO.
5 Then, press YES.
Y/N
6 Your fax machine prompts you to enter a two-digit Gro u p
number for the end destinations that will ultimately r e c e i v e
your document.
Note: This number must be the location number that has been stored
into the remote relay station’s Autodialer.
Enter the two-digit group number, then press YES.
7 Your fax machine prompts you to enter a two-digit location
number for the return location that the remote fax machine will
report the result of the transmission to (it may be your fax
number).
Note: This number must be the location number that has been stored
into the remote relay station’s Autodialer.
TEL)
TEL)8001234567_
ID)_
PRESS KEY THEN >
ID)JAMES_
Enter the two-digit number, the press YES.
8 Enter the telephone number of the remote fax machine, using
the dial keypad, One-touch key, or 2-digit Speed Dial number.
When the number appears correctly in the display, press YES.
9 If you want to identify this operation, enter a proper name
using the dial keypad.
Press a number key labelled with the character you want. Each
time you press a key, the characters labelled on the key appear
in the display. When the character you want appears, pre s s
SCROLL to move the blinking cursor to the next position at
right. Select in next character you want in the same way.
When the name appears correctly in the display, press YES.
If you do not want to enter a name, press NO.
4 - 6 SAMSUNG ELECTRONICS CO., LTD
Page 74

ENTER TIME
HH : MM
ENTER TIME
23 : 50
10 If you want to send it at a later time, enter the time you want
your fax machine to send the document to the relay station,
using the dial keypad.
Enter the time in 24-hour format(Military Time). For example,
enter 2350 for 11:50 p.m.
When the time appears correctly in the display, press YES.
If not, press NO. The fax machine dials and sends the document
immediately after being scanned into memory
TO MEMORY ? Y/N
MEMORY USED = 10%
TO MEMORY ? P.01
MEMORY USED = 16%
APR-15 15 : 30 FRI
RELAY TX 23 : 50
11 Press YES. The fax machine scans the document into memory.
If you do not want to store the document into memory, pr e s s
NO.
The document feeder is not available until the re l a y
transmission is completed.
12 Your fax machine returns to the standby mode and will dial the
number at the specified time.
Notes:
• If you want to cancel the relay transmission, see “Cancelling an
Operation” on page 4-19.
• If the amount of pages is too great, the fax machine’s memory may be
filled. Your fax machine will display MEMORY FULL, and then
display CANCEL Y/N?. If you press YES, then memory will be
erased. You should then divide your pages into two separate
transmissions, or transmit them from the feeder. If you press NO the
pages which were stored will be sent. You should send the remaining
pages later when memory is available.
SAMSUNG ELECTRONICS CO., LTD 4 - 7
Page 75

CONFIDENTIAL TRANSMISSION
A document can be transmitted confidentially by using a
“mailbox” that is established in a remote “hub” machine.
The transmitted mail will not be printed immediately, but will be
stored in memory of the remote fax machine until being accessed
by someone who has the proper security code for that mailbox.
APR-15 15 : 30 FRI
DOCUMENT READY
CONF. TX or
RELAY TX ? Y/N
CONFIDENTIAL
TRANSMISSION? Y/N
ENTER 2-digit
BOX NO. [01-10]
1 Load a document face down into the document feeder.
For more information, see “Loading Documents” on page 3-3
and “Setting Resolution and Contrast of Documents” on page
3-4.
2 Press FUNCTION, then 3.
3 Press YES.
4 Press YES.
5 The fax machine prompts you to enter a two-digit mailbox
n u m b e r. When the number appears correctly in the display,
press YES.
Note: A mailbox must be pre-assigned at a remote SF5600.
TEL)
TEL)8001234567_
ID)_
PRESS KEY THEN >
4 - 8 SAMSUNG ELECTRONICS CO., LTD
6 Enter the fax number of the remote machine, using the dial
keypad, One-touch key, or 2-digit Speed Dial number.
When the number appears correctly in the display, press YES.
7 If you want to identify this operation, enter a proper name
using the dial keypad.
Press a number key labelled with the character you want. Each
time you press a key, the characters labelled on the key appear
in the display. When the character you want appears, pre s s
SCROLL to move the blinking cursor to the next position at
right. Select the next character you want in the same way.
Page 76

ID)ABC CO._
The operation name will be printed on various reports.
When the name appears correctly in the display, press YES.
If you do not want to enter a name, press NO.
ENTER TIME
HH : MM
TO MEMORY ? Y/N
MEMORY USED = 10%
TO MEMORY P.01
MEMORY USED = 16%
8 If you want to send it at a later time, enter the time you want
your fax machine to send the document, using the dial keypad.
Enter the time in 24-hour format. For example, enter 2350 for
11:50 p.m.
When the time appears correctly in the display, press YES.
If not, press NO. The fax machine dials and sends the document
immediately after being scanned into memory.
9 Press YES. The fax machine scans the document into memory.
If you do not want to store the document into memory, pr e s s
NO.
The document feeder is not available if the confidential
transmission is not completed.
10 Your fax machine returns to the standby mode and will dial the
number at the specified time.
Notes:
• Confidential transmission feature is a non-standard featur e ,
dependent on the remote machine’s capability.
• Your fax machine does not have mailbox capabilities, but you can
send document to the mailbox of a remote “hub” machine.
• If you want to cancel the confidential transmission, see “Cancelling
an Operation” on page 4-19.
• If the amount of pages is too great, the fax machine’s memory may
be filled. Your fax machine will display MEMORY FULL, and then
display CANCEL? Y/N. If you press YES, then memory will be
erased. You should then divide your pages into two separate
transmissions, or transmit them from the feeder. If you press NO,
the pages which were stored will be sent. You should send the
remaining pages later when memory is available.
SAMSUNG ELECTRONICS CO., LTD 4 - 9
Page 77

P O L L I N G
Polling is when one fax machine requests another fax machine to send a
document.
This feature is useful when the party will the party with the
original document is not in the office but the document must be
sent out. Instead, another party who wants to receive the document
dials the fax machine holding the document and requests that it be
sent. In other words, it “polls” the remote fax machine with the
document.
The party with the original document must make sure that it is
properly fed into their fax machine so that the other party can poll.
Note: You can use a poll code to prevent unauthorized polling of your fax
machine. When you secure your fax machine in this manner, only those
who know the poll code can poll your fax machine. Note, however, that
only another SF5500/SF5500M/SF5600 can recognize the poll code. If you
want to allow your fax machine to be polled by any other fax machine,
regardless of its brand or manufacturer, do not secure your fax machine
with a poll code.
APR-15 15 : 30 FRI
DOCUMENT READY
POLL CODE ?
Y/N
POLLING TRANSMISSION
(ALLOWING OTHERS TO POLL YOUR MACHINE)
This mode lets you program your fax machine to send a document
to a remote fax machine when it requests (polls for) the document.
1 Load a document face down into the document feeder.
For more information, see “Loading Documents” on page 3-3
and “Setting Resolution and Contrast of Documents” on page
3-4.
2 Press POLL.
3 If you do not want to secure the transmission with a poll code,
press NO. The fax machine proceeds to Step 5.
If you do want to use a poll code, press YES.
4 - 1 0 SAMSUNG ELECTRONICS CO., LTD
Page 78

POLL CODE = 0000
4 The display shows the last used poll code. To change the code,
enter a new four-digit number (0001-9999) using the dial
keypad.
POLL CODE = 1234
BULLETIN ?
Y/N
(For SF5500M/SF5600)
TO MEMORY P.01
MEMORY USED = 18%
When the code appears correctly in the display, press YES.
5 If you want to hold the document in the fax machine’s bulletin
b o a rd memory, press YES. It allows more than one re m o t e
station to poll a document from your fax machine.
If you do not want to hold the document in the bulletin board
m e m o r y, press N O. The file will be automatically erased after
being polled by a remote machine.
6 The document is scanned into memory prior to sending.
7 The document stored in memory will be sent automatically
when a remote party with a matching poll code requests it.
Adding Documents To Or Cancelling the
Original To be Polled
1 If you want to add documents to the original documents stored
in memory to be polled, load a document face down into the
document feeder.
APR-15 15 : 30 FRI
DOCUMENT READY
POLL CODE ?
Y/N
POLL CODE = 1234
ADD DOCUMENT ?
Y/N
CANCEL ?
Y/N
2 Press POLL.
3 Press YES.
4 The display shows the poll code you have entered to secure the
transmission.
Press YES to confirm it.
5 If you want to add documents, press Y E S. The document is
scanned into memory and added to the original.
If you want to erase the original currently stored in memory,
press NO. CANCEL ? appears in the display.
Press YES.
6 After scanning the additional documents or cancelling the
original documents, the machine returns to the standby mode.
SAMSUNG ELECTRONICS CO., LTD 4 - 1 1
Page 79

POLLING RECEPTION (REQUESTING DOCUMENTS
FROM OTHER FAX MACHINE)
This mode lets you request documents from an unattended remote
fax machine. If the document is secured with a poll code, you must
enter a poll code that matches the poll code stored in the r e m o t e
fax machine to poll the documents.
1 Lift handset or press OHD/V.REQUEST and place a call to the
remote fax machine.
2 P ress P O L L when the remote fax machine answers. You will
hear a fax tone.
POLL CODE ?
Y/N
RX
DELAY or DAILY
POLLING ? Y/N
(SF5500M/SF5500M)
3 If the remote fax machine is secured with a poll code, you must
enter the same code.
Press YES and enter the 4-digit code, then press YES.
If not, press NO.
4 Your fax machine receives a document from the remote fax
machine.
Delay Polling
This mode allows you to program your fax machine to
automatically poll one or more unattended fax machines now or at
a later time. This feature permits unattended polling in the evening
hours when telephone rates are lowest.
1 Press FUNCTION, then 2
2 Press YES.
DELAY or CONTINU
OUS POLLING ? Y/N
(SF5600)
DELAY POLLING ?
Y/N
3 Press YES.
4 Enter the fax number of the remote fax machine, using the dial
TEL)
TEL)8001234567_
4 - 1 2 SAMSUNG ELECTRONICS CO., LTD
keypad, One-touch key, or 2-digit Speed Dial number or Group
number.
When the number appears correctly in the display, press YES.
For more information on Group numbers, see page 4-22.
Page 80

ID)
PRESS KEY THEN >
5 If you want to identify this operation, enter a proper name
using the dial keypad. Press a number key labelled with the
character you want. Each time you press a key, the characters
labelled on the key appear in the display. When the character
you want appears, press SCROLL to move the blinking cursor
to the next position at right.
ID)ABD CO_
ANOTHER FAX
NUMBER ? Y/N
TEL)
ENTER 4-digit
POLL CODE
When the name appears correctly in the display, press YES.
If you do not want to enter a name, press NO.
6 If you want to poll more than one fax machine in this operation,
press YES. The fax machine prompts you to enter the next fax
number of the remote party you want to poll. Enter the fax
number, press YES, and repeat. When you have entered all the
fax numbers, press NO.
If you do not want to poll documents from multiple sites, press
NO. The fax machine proceeds to Step 7.
Note: A single broadcasting is available for your fax machine, so the
ANOTHER FAX NUMBER ? prompt does not appear if any
broadcasting currently set up in your fax machine is not completed.
7 If the remote fax machine is secured with a poll code, you must
enter the same code. Press YES and enter the 4-digit code, then
press YES.
ENTER TIME
HH : MM
ENTER TIME
23 : 30
If not, press NO.
8 If you want to poll the remote fax machine(s) at a later time,
enter the time you want to retrieve the document from the fax
machine(s).
Enter the time in 24-hour format. For example, enter 2350 for
11:50 p.m.
If you press N O, your fax machine dials, and retrieves the
document from the remote fax machine(s) immediately.
9 Press YES. The fax machine will dial and retrieve documents at
the specified time.
Note: To cancel the delay polling, see “Cancelling an Operation” on
page 4-19.
SAMSUNG ELECTRONICS CO., LTD 4 - 1 3
Page 81

Daily Polling (For SF5500/SF550M)
This mode allows you to program your fax machine to
automatically poll one or more unattended fax machines on a daily
basis at the same time every day.
1 Press FUNCTION, then 2.
DELAY or DAILY
POLLING ? Y/N
DELAY POLLING ?
Y/N
DELAY POLLING ?
Y/N
TEL)
ID)
PRESS KEY THEN >
2 Press YES.
3 Press NO.
4 Press YES.
5 Enter the fax number of the remote fax machine, using the dial
keypad, One-touch key, or 2-digit Speed Dial number or Group
number.
When the number appears correctly in the display, press YES.
For more information on Group numbers, see page 4-22.
6 If you want to identify this operation, enter a proper name
using the dial keypad. Press a number key labelled with the
character you want. Each time you press a key, the characters
labelled on the key appear in the display. When the character
you want appear, press SCROLL to move the blinking cursor
to the next position at right.
Select the next character you want in the same way.
ID)ABC CO_
ANOTHER FAX
NUMBER ? Y/N
TEL)
4 - 1 4 SAMSUNG ELECTRONICS CO., LTD
When the name appears correctly in the display, press YES.
If you do not want to enter a name, press NO.
7 If you want to poll more than one fax machine in this
operation, press Y E S. The fax machine prompts you to enter
the next fax number of the remote party you want to poll. Enter
the fax number, press YES, and repeat. When you have entered
all the fax number, press NO.
If you do not want to poll documents from multiple sites, press
NO. The fax machine proceeds to Step 8.
Page 82

Note: A single broadcasting is available for your fax machine, so the
ANOTHER FAX NUMBER ? prompt does not appear if any
broadcasting currently set up in your fax machine is not completed.
ENTER 4-DIGHT
POLL CODE
ENTER TIME
HH : MM
8 If the remote fax machine is secured with a poll code, you must
enter the same code. Press YES and enter the 4-digit code, then
press YES.
If not, press NO.
9 Enter the time at which you want to poll everyday, in 24-hour
format. For example, enter 2350 for 11:50 p.m.
When the time appears correctly in the display, press YES.
The fax machine will return to the standby mode and start daily
polling at the specified time.
Note: To cancel the daily polling, see “Cancelling an Operation” on
page 4-19.
Turnaround Polling
With the turnaround polling feature, you can send documents to a
remote fax machine, and then without making a separate call, poll
that fax machine and receive documents from it.
To Use Turnaround Polling:
• The remote fax machine must be loaded with a document and set
in its polling transmission mode at the time you send your
document to the remote fax machine.
• You must select the turnaround polling option and enter a 4-digit
t u r n a round poll code when you set system data. See “Setting
System Data” on page 2-8.
SAMSUNG ELECTRONICS CO., LTD 4 - 1 5
Page 83

Continuous Polling (For SF5600)
This mode allows you to program your fax machine to
automatically poll one or more unattended fax machines as many
times a day as you like at regular intervals every day.
1 Press FUNCTION, then 2.
DELAY or CONTINU
OUS POLLING? Y/N
DELAY POLLING ?
Y/N
CONTINUOUS
POLLING ? Y/N
TEL)
TEL)8001234567_
ID)_
PRESS KEY THEN >
2 Press YES.
3 Press NO.
4 Press YES.
5 Enter the fax number of the remote fax machine, using the dial
keypad, One-touch key, or 2-digit Speed Dial number or Group
number.
When the number appears correctly in the display, press YES.
For more information on Group number, see page 4-22.
6 If you want to identify this operation, enter a proper name
using the dial keypad. Press a number key labelled with the
character you want.
Each time you press a key, the characters labelled on the key
appear in the display. When the character you want appears,
p ress SCROLL to move the blinking cursor to the next
position at right. Select the next character you want in the same
way.
ID)IBM_
4 - 1 6 SAMSUNG ELECTRONICS CO., LTD
When the name appears correctly in the display, press YES.
If you do not want to enter a name, press NO.
Page 84

ANOTHER FAX
NUMBER ? Y/N
7 If you want to poll more than one fax machine in this operation,
press YES. The fax machine prompts you to enter the next fax
number of the remote party you want to poll. Enter the fax
number, press YES, and repeat. When you have entered all the
fax number, press NO.
If you do not want to poll documents from multiple sites, press
NO. The fax machine proceeds to Step 8.
Note: A single broadcasting is available for your fax machine, so the
ANOTHER FAX NUMBER ? prompt does not appear if any
broadcasting currently set up in your fax machine is not completed.
ENTER 4-digit
POLL CODE
ENTER START TIME
HH : MM
ENTER START TIME
09 : 00
ENTER END TIME
HH : MM
ENTER END TIME
18 : 00
ENTER INTERVAL
TIME HH : MM
8 If the remote fax machine is secured with a poll code, you must
enter the same code. Press YES and enter the 4-digit code, then
press YES.
If not, press NO.
9 Enter the time at which you want to start polling everyday, in
24-hour format.
For example, enter 09:00 for 9:00 a.m.
When the time appears correctly in the display, press YES.
10 Enter the time at which you want to end polling everyday, in
24-hour format.
For example, enter 18:00 for 6:00 p.m.
When the time appears correctly in the display, press YES.
11 Enter the desired time to wait before attempting the next
polling.
ENTER INTERVAL
TIME 00 : 30
For example, if you want to set your fax machine to poll the
remote machine at 30-minute intervals, enter 0030.
When the time appears correctly in the display, press YES.
12 The fax machine returns to the standby mode and perform
polling from the specified start time to end time at a specified
time intervals everyday.
N o t e : To cancel the continuous polling, see “Cancelling an
Operation” on page 4-19.
SAMSUNG ELECTRONICS CO., LTD 4 - 1 7
Page 85

ADVANCED FEATURES
ADDING DOCUMENTS TO A
PROGRAMMED OPERATION
Additional documents can added to any operation (delay
transmission, relay transmission, etc.) previously programmed in
the fax machine’s memory. Prior to performing this pro c e d u re ,
make a printout of Delay Dial list (see “Reports” on page 4-39) and
confirm the operation(s) to which your document will be added.
See the next page for example to verify the operation number.
1 Load a document face down into the document feeder.
For more information, see “Loading Documents” on page 3-3
and “Setting Resolution and Contrast Documents” on page 3-4.
APR-15 15 : 30 FRI
DOCUMENT READY
CANCEL OPERATION
or ADD DOC . ? Y/N
ADD DOCUMENT ?
Y/N
ENTER 2-digit
OPERATION NO.
ADD TO 02 ?
Y/N
2 Press FUNCTION, then 5.
3 Press YES, then NO.
4 Press YES.
5 Using the dial keypad, enter the operation number to which
your document will be added. Then press YES.
6 If you are certain you want to add the documents to the
operation appearing in the display, press YES. The fax machine
scans the document into memory and returns to the standby
mode.
4 - 1 8 SAMSUNG ELECTRONICS CO., LTD
Page 86

Assume that you have programmed the fax machine to r e q u e s t
relay sending of a single page of your document to CHICAGO SVC
at 7:00 p.m. and now you have one more document that you wish
to be relayed by the CHICAGO SVC.
You must print out the Delayed Dial list.
Verify the operation is programmed with a number “02.” Then
follow the above procedure to add the document.
CANCELLING AN OPERATION
This feature lets you cancel a previously programmed delay
transmission or delay polling. Prior to performing this procedure,
make a printout of the Delayed Dial list (see “Reports” on page 4-
39) and confirm the operation(s) that you want to cancel.
1 Press FUNCTION, then 5.
CANCEL OPERATION
or ADD DOC . ? Y/N
CANCEL
OPERATION ? Y/N
ENTER 2-digit
OPERATION NO.
CANCEL 01 ?
Y/N
2 Press YES.
3 Press YES.
4 Using the dial keypad, enter the operation number you want to
cancel, then press YES.
The operation number is listed in the Delayed Dial list. The
sample list is shown on page 4-40.
5 If you are certain you want to cancel the operation appearing in
the display, press Y E S. The fax machine will cancel the
operation and return to Step 1.
If you should decide not to cancel the operation, press NO. The
fax machine will return to Step 4. You may enter a dif f e re n t
operation number.
6 To end this procedure, press STOP. The fax machine returns to
the standby mode.
SAMSUNG ELECTRONICS CO., LTD 4 - 1 9
Page 87

ONE-TOUCH PROGRAMS
Complicated or frequently used operations can be stored as Onetouch programs, which can be initiated by pressing the
corresponding One-touch key.
Programmable operations are:
• Delay Transmission
• Delay Polling Reception
• Confidential Transmission
• Relay Transmission Request
N o t e : Only 5(SF5500/SF5500M), 10(SF5600) One-touch keys may be
programmed.
To program a particular operation into a One-touch key, follow the
procedure below.
SET AUTODIALER
or PROGRAM ? Y/N
SET ONE-TOUCH
DIAL ? Y/N
PROGRAM
OPERATION ? Y/N
PRESS ONE-TOUGH
KEY TO PROGRAM
PROGRAM TO ONETOUCH KEY12? Y/N
1 : TX 2 : POLL
3 : CONF. 4 : RELAY
1 Press FUNCTION, then 4.
2 Press YES.
3 Press NO repeatedly until PROGRAM OPERATION ? appears
in the display.
4 Press YES.
5 Press One-touch key to which you wish to grogram the desired
function.
6 The fax machine displays the number of the selected One-touch
key. Press YES to confirm it.
The fax machine prompts you briefly to enter a designated
function number.
7 Then the fax machine prompts you to select the desir e d
function.
Enter the number of the desired function.
For example, press 1 to program a Delay transmission.
4 - 2 0 SAMSUNG ELECTRONICS CO., LTD
Page 88

DELAY TX ?
Y/N
8 The fax machine goes to the selected function mode. Follow the
p ro c e d u res for performing the operation by entering data and
selecting functions and settings. Each keystroke is programmed
as it is entered.
9 When the operation has been completed, the machine displays
SET ONE-TOUCH DIAL.
To program other operations, repeat Steps 3 through 8.
To end programming, press STOP. The fax machine returns to
the standby mode.
You can confirm this setting with the Telephone Numbers list.
See “Reports” on page 4-39 to print out the list.
Note: If you want to cancel the program, follow the same procedure
ass programming. When you come to the step that prompts you to
cancel, press YES.
SECURITY COMMUNICATION
-Closed Network (For SF5500M/SF5600)
You can set up your fax machine to use security communication so
that your fax machine is only able to send to, or receive from, other
fax machines with a security communication mode activated. Use
this feature for closed networks or if “junk fax” receptions are
problem.
To activate a security communication, you have to set Security
Communication option to YES and enter a 4-digit security code
through “Setting System Data” on page 2-8.
SAMSUNG ELECTRONICS CO., LTD 4 - 2 1
Page 89

ADVANCED DIALING
MULTI-ADDRESS TRANSMISSION
USING GROUP DIAL
N u m e rous One-touch and Speed Dial numbers can be re g i s t e re d
together as a Group. By using the group number, you can send a
document to multiple remote parties in a single operation. This
means you only have to feed the document once. The fax machine
then automatically sends it to the remote stations of the group.
Before you can use this feature, you must coordinate and store the
group number desired.
Registering Group Numbers
1 Press FUNCTION, they 4.
SET AUTODIALER
or PROGRAM ? Y/N
SET ONE-TOUCH
DIAL ? Y/N
SET GROUP DIAL ?
Y/N
ENTER GROUP NO.
[00-49]
(SF5500/SF5500M)
ENTER GROUP NO.
[00-79]
(SF5600)
2 Press YES.
3 Press NO twice.
4 Press YES.
5 Enter a 2-digit location number that will be the Group, using
the dial keypad, then press YES.
If the machine displays GROUP nn USED in the upper line and
CANCEL ? in the bottom, a number is already assigned to the
location you entered. If you want to select another location,
press NO then re-enter another location number.a
4 - 2 2 SAMSUNG ELECTRONICS CO., LTD
Page 90

ENTER ONE-TOUCH
or SPEED DIAL NO
6 Enter a 2-digit Speed Dial number or press One-touch key of the
remote party you wish to include in the Group, then press Y E S.
The display will briefly show the name re g i s t e red to the
location you entered.
Notes:
• You cannot include one Group in another Group.
• If there is no telephone number re g i s t e red under the location you
entered, the machine displays NO.NOT ASSIGNED and returns to
Step 6.
ENTER ONE-TOUCH
or SPEED DIAL NO
ID)_
PRESS KEY THEN >
7 Repeat Step 6 to enter more destination numbers into the
selected Group.
When you have entered all the desired One-touch Dial and
Speed Dial stations for that Group, press NO twice.
8 Enter a name to identify the Group.
Press a number key labelled with the character you want. Each
time you press a key, the characters labelled on the key appear
in the display. When the character you want appears, pre s s
SCROLL to move the blinking cursor to the next position at
right. Select the next character you want in the same way.
When the name appears correctly in the display, press YES.
The Group name will be displayed when you search Autodialer
memory or dial the number, and will be printed on various
reports your fax machine generates.
If you make a mistake, press N O to backspace and cancel the
last entry, then re-enter the correct character. To correct a digit in
the middle, use S C R O L L keys to move the cursor under the
digit, then enter a correct character.
ID)ABC CO.
SET GROUP DIAL ?
Y/N
SAMSUNG ELECTRONICS CO., LTD 4 - 2 3
9 If you like, you can register additional Groups by pressing YES,
then repeating the procedure from Steps 5 through 9.
After all Groups have been registered, press STOP to return the
fax machine to the standby mode.
10 You can confirm the Group setting with the T e l e p h o n e
Numbers list. See “Reports” on page 4-39 to print out the list.
Page 91

Cancelling Group Numbers
Before you cancel a Group, print out the Telephone Numbers list to
check the contents of the group. See “Reports” on page 4-39 to
print out the list.
1 Press FUNCTION, then 4.
SET AUTODIALER
or PROGRAM ? Y/N
SET ONE-TOUCH ?
DIAL ? Y/N
SET GROUP DIAL ?
Y/N
ENTER GROUP NO.
[00-49]
(SF5500/SF5500M)
ENTER GROUP NO.
[00-79]
(SF5600)
2 Press YES.
3 Press NO twice.
4 Press YES.
5 Enter the Group number you wish to cancel, then press Y E S.
The machine displays the group number and CANCEL
prompt.
GROUP nn USED
CANCEL ? Y/N
SET GROUP DIAL ?
Y/N
6 Press YES.
7 The machine prompts to set another Group number. If you
want to set another Group Dial number, press YES.
To return the fax machine to the standby mode, press STOP.
Note: You cannot add or delete individual stations from a Group once
it has been registered.
4 - 2 4 SAMSUNG ELECTRONICS CO., LTD
Page 92

Storing a Group into One-Touch Key
If you would like to register a Group number as a One-touch
Dialing number, and to access the Group by pressing only the Onetouch key, do the following.
N o t e : B e f o re you can use this feature, you must first register Gro u p
numbers.
1 Press FUNCTION, they 4.
SET AUTODIALER
or PROGRAM ? Y/N
SET ONE-TOUCH
DIAL ? Y/N
PRESS ONE-TOUCH
KEY [1-20]
TEL)_
SET ONE-TOUCH
DIAL ? Y/N
2 Press YES.
3 Press YES.
4 Press the One-touch key under which you want to register the
Group.
5 Enter 2-digit Group number, then press YES.
The display will briefly show the ID name r e g i s t e red to the
Group.
6 If you wish to register move Groups as One-touch Dialing
stations, press Y E S and repeat the pr o c e d u re from Steps 4
through 6.
If you want to end the registration, press S T O P to return the
machine to the standby mode.
SAMSUNG ELECTRONICS CO., LTD 4 - 2 5
Page 93

Group Number Dialing
You can use Group Dialing for the following operations:
• Memory transmission
• Delay transmission
• Polling remote machines
Notes:
• Before you can use this feature, you must first register Group numbers.
• The parties you are calling must have the fax machine ready to receive
documents automatically.
1 Follow the procedure of the desired operation.
TEL)_
2 When you come to a step that asks to enter the remote fax
number, press the One-touch key under which you stored the
Group or press the 2-digit Group number (if not assigned to a
One-touch key).
3 Continue the remaining pro c e d u re to complete setting the
desired operation.
4 Your machine automatically reads the document into memory.
Then the machine will dial the remote numbers in store d
sequence.
If a facsimile number is busy, your machine will dial the next
location.
After dialing all locations, it will automatically redial any
number previously busy.
N o t e : If you use this function, sending operations are not available
until Group Dialing transmission is completed.
4 - 2 6 SAMSUNG ELECTRONICS CO., LTD
Page 94

CHAIN DIALING
When using special services, such as alternate long-distance or
bank-by-phone, you must dial the telephone number of the service
and wait for the computer to answer before continuing.
Dial the phone number of the special service first. Then, when the
computer answers, dial the rest of the information, such as a longdistance number. We call this procedure Chain dialing.
You can combine regular dialing using dial keypad and/or Onetouch Dialing for chain dialing.
N o t e : You can not use 2-digit Speed Dialing. Group Dialing, and/or
redialing number for chain dialing.
The length of time before the computer answers varies, so we
suggest you do not use a pre p rogrammed pause after a service
number.
If you have pulse-dialing service, be sure to include a pulse to-tone
mode change in front of the numbers that you want to dial after the
computer service answers. (Use TONE key on the control panel)
1 If you want to send a document using chain dialing, load a
document face down into the document feeder.
If not, go to Step 2.
2 Pick up the handset or press OHD/V.REQUEST.
3 Enter a telephone number, for example, your long-distance
c a r r i e r’s number, using either dial keypad or One-touch key.
Your fax machine dials the number.
4 When the service answers (if you must wait for a second dialing
tone before continuing. If not, you can simply dial the numbers
one after the other), enter the additional numbers using dial
keypad or Onetouch key.
5 Press START to send the document.
SAMSUNG ELECTRONICS CO., LTD 4 - 2 7
Page 95

ADVANCED RECEPTION
RECEIVING USING AN EXTENSION
TELEPHONE
If an extension telephone is connected to the EXT.TEL jack on your
machine, you can control your fax machine from the extension
telephone, so that the fax machine can receive a fax.
1 Make a call or receive a call on the extension telephone.
Speak with the person on the other end of the line.
If a fax tone is heard when you pick up the handset, go to Step 3.
PRESS *, 2, * ON
EXT . PHONE TO RX
2 To receive a fax on the same call after the conversation, ask the
remote operator to press the START key on his/her machine.
Your fax machine displays PRESS *, 2, * ON EXT. PHONE TO
RX when using the extension phone.
3 When a fax tone is heard, press *, 2 * keys on the extension
telephone slowly in sequence. If you still hear the fax tone from
the remote machine, press *, 2, * once again.
*, 2, * is a remote receive start code which is preset at the
f a c t o r y. The first and the last asterisks are fixed, but you can
change the middle digit 2 t h rough the system data setup. See
“Setting System Data” on page 2-8.
4 The call is transferred to your fax machine and r e c e p t i o n
begins. Hang up the handset.
Notes:
• When answering a call on the extension phone and you want to control
the fax reception on your fax machine, pick up the handset of the fax
machine and press START, then replace the extension phone’s handset.
• If your fax machine occasionally fails to detect the remote receive start
code, change the code to another number.
4 - 2 8 SAMSUNG ELECTRONICS CO., LTD
Page 96

CONFIDENTIAL RECEPTION
(For SF5600)
Your fax machine has a confidential mailbox capability that stores a
confidential document sent from remote fax machine. The
document can only be printed out after the correct secret password
is supplied.
Registering Information for Confidential
R e c e i v i n g
Before receiving confidential documents, you have to register the
following:
• You can register up to 10 confidential mailboxes.
• The passwords for each mailbox.
• The names for each mailbox.
The following pro c e d u re shows you how to register this information.
SET AUTODIALER
or PROGRAM ? Y/N
SET ONE-TOUCH
DIAL ? Y/N
SET MAILBOX ?
Y/N
ENTER 2-digit
BOX NUMBER
1 Press FUNCTION, then 4.
2 Press YES.
3 P ress N O repeatedly until SET MAILBOX ? appears in the
display.
4 Press YES.
5 Enter a 2-digit number (01 to 10) of the confidential mailbox,
and press YES.
If you enter a box number which has already been re g i s t e re d ,
the fax machine displays CANCEL ? . Press Y E S to erase the
c u r rent number assignment, then the fax machine goes to the
standby mode.
P ress N O if you do not want to cancel the number, and re t r y
with a different number.
ID) PRESS KEY THEN >
SAMSUNG ELECTRONICS CO., LTD 4 - 2 9
6 Enter the mailbox name, and press YES.
You can use the name to help you identify the mailbox when
you receive a confidential mail. To enter a name, press a
number key labelled with the character you want.
Page 97

Each time you press a key, the characters labelled on the key
appear in the display. When the character you want appears,
p ress SCROLL to move the blinking cursor to the next
position at right. Select the next character you want in the same
w a y.
ENTER 4-digit
PASSWORD
SET ONE-TOUCH
DIAL ? Y/N
7 Enter a 4-digit security password (0000 to 9999), then press Y E S.
Each mailbox must have a diff e rent password. After you
register the password, it cannot be verified. Write it down and
keep it in a secure location for your reference.
This password must be used when you print out the
confidential documents.
8 If you want to set more mailboxes in the memory, repeat fr o m
Step 3.
After all mailboxes are registered, press STOP to return the fax
machine to the standby mode.
Printing Out Confidential Documents
You Receive
When you receive a confidential document, the fax machine
displays MAIL, total mail number received, and a mailbox name in
the lower line of the display. Do the following procedure to print
out confidential documents.
APR-15 15 : 30 FRI
MAIL (3) JANE
1 If you want to check that your mails are there, press SCROLL .
The mailbox names will be displayed in the order of the
mailbox number each time you press the key.
Use SCROLL to search in reverse order.
APR-15 15 : 30 FRI
MAIL (3) KING
2 When your mail is displayed, press SCROLL .
The mailbox name and number briefly appear in the display.
ID)KING
BOX : 05
ENTER 4-digit
PASSWORD
PRINTING . . .
3 Enter the 4-digit password for the mailbox, and press YES.
The fax machine starts printing the document. The document
are erased after it is printed out.
If you enter wrong password, a warning tone sounds and the
fax machine prompts you to enter a password again.
Press STOP to return to the standby mode.
4 - 3 0 SAMSUNG ELECTRONICS CO., LTD
Page 98

D E P A R T M E N T
CONTROL MODE
(For SF5600 only)
For usage management, your fax machine is equipped with Department
Control Mode. This is a security function, and can restrict use with Department
Codes. If codes do not match, this mode prevents operation. You can also find
out how long and by which department your fax machine was used.
REGISTERING DEPARTMENT CODE
Before using the department control mode, you have to register the
master code, and the department code and ID name for each
department who will share the fax machine.
Master code: 4 to 8-digit security code for the master who manages
to control all departments registered.
Department number: 2-digit number to manage that department.
Department code: 4-digit number for the department. Unless
correct department code is entered, fax machine’s operation except
automatic receiving cannot be accessed.
1 Press FUNCTION, and START.
ENTER MASTERCODE
_
RE-ENTER MASTER
CODE _
MASTER CODE
REGISTERED !
1 : SET 2 : PRINT
3 : MANAGEMENT
2 Enter the desired Master code using the number keypad, then
press YES.
When you purchase the unit, the Master code is not fixed.
Enter any 4 to 8-digit number you want to use as the Master
code.
3 Re-enter the Master code to confirm the code is correct, then
press YES.
MASTERCODE REGISTERED ! appears briefly in the display.
If you have not entered the same code as the code entered in
Step 2, CODE MISMATCH ! TRY AGAIN appears in the
display. Try again with the correct code.
Once you have registered the Master code, the message shown
in Step 3 does not appear. You can skip over Step 3 and proceed
to Step 4.
4 Press 1.
ENTER 2-digit
DEPT. NO [00-49]
SAMSUNG ELECTRONICS CO., LTD 4 - 3 1
5 Enter 2-digit Department number (between 00 to 49) using the
number keypad, then press YES.
Page 99

ID)_
PRESS KEY THEN >
6 Enter proper name for the department, then press YES.
For information on entering name, see page 2-7.
ENTER 4-digit
DEPT. CODE)_
ENTER ANOTHER
DEPT. CODE ? Y/N
1 : SET 2 : PRINT
3 : MANAGEMENT
DEPT. CODE)1234
ED : 1 DEL : 2 NXT : 3
7 Enter 4-digit Department code using the number keypad, then
press YES.
The Department code will be used to access the machine’s
operation when executing the department control mode.
8 If you want to continue entering another Department code,
repeat Steps 5 to 7.
If not, press N O. The machine displays the menu message
shown left in Step 4.
To return to Standby mode, press STOP.
To Delete or Change Department Code
If you enter a Department number already assigned in Step 5, the
fax machine displays the Department code assigned to the
department number in the upper line and asks you to edit or delete
the code.
Press 1 to change the 4-digit Department code and/or Department
name. The first digit is blinking in the display. Move the cursor
under the digit you want to change by using SCROLL keys, then
enter the correct number.
P ress 2 to delete the currently assigned Department code and
name.
The information on the Department code and name for the
Department Code List and Journal will also be cleared.
Press 3 to maintain the number and name. The machine prompts
you to enter new one.
4 - 3 2 SAMSUNG ELECTRONICS CO., LTD
Page 100

PRINTING DEPARTMENT JOURNAL
You can confirm the contents of department registration with the
Department Code list, and the contents of department management
with the Department Journal. To print the lists, do the following:
1 Press FUNCTION, and START.
ENTER MASTERCODE
_
1 : SET 2 : PRINT
3 : MANAGEMENT
PRINT DEPT.
CODE LIST ? Y/N
PRINT DEPT.
JOURNAL ? Y/N
2 Enter the Master code using the number keypad, then pr e s s
YES.
If you enter wrong code, CODE MISMATCH! TRY AGAIN
appears
in the display. Try again with the correct code.
3 Press 2.
4 If you want to print Department Code list, press YES.
If not, press NO, and go to Step 5.
The Department Code list shows all the Department codes and
names. See page 4-34 for the list sample. After printing, the
machine returns to Standby mode.
5 If you want to print Department Journal list, press YES.
If you want to print Department Journal list shows the total
elapsed transmission time, total page numbers sent or copied,
and distribution ratio for each department. See page 4-41 for the
list sample. After printing, the machine returns to Standby
mode.
1 : SET 2 : PRINT
3 : MANAGEMENT
SAMSUNG ELECTRONICS CO., LTD 4 - 3 3
If you press N O, the machine displays the menu message
shown left in Step 3.
To return to Standby mode, press STOP.
 Loading...