

Samsung SF-5312F User Manual


About This User’s Guide
Your product is packaged with two or three User’s Guides:
• Your MFP User’s Guide(s), which provides you with all of the detailed
information you will need to install, and use the product as a printer, scanner,
copier, and fax (Available features vary depending on your MFP type.) This
Guide also provides information to maintain and troubleshoot your product.
•
This User’s Guide, which provides the basic description on using the supplied
multifunctional application,
edit images, and send e-mail and fax on your computer. You will also find a brief
description on the automatic text recognition programme, AnyPage.
Samsung SmarThru, which allows you to scan and
Trademarks
• SmarThru, MailBox, Image Manager, Scan Manager, Copy Manager, Image Viewer, AnyPage
are trademarks of Samsung Electronics.
• Acrobat Reader is a trademark of Adobe Systems Inc.
• Other names and trademarks mentioned in this guide are trademarks of their respective
holders.

Contents
Getting Started
1
Samsung SmarThru
Introduction
Programmes within Samsung SmarThru
Running Samsung SmarThru
Getting Help
Scan Wizard
2
–––––––––––––––––––––––––––––––––––––––––– 1.1
–––––––––––––––––
––––––––––––––––––––––––––
–––––––––––––––––––––––––––––––––––––––––
1.2
1.3
1.6
Scan Wizard
Overview
Scanning
Overview
Scanning with the Scan Manager
Features of the Scan Manager Window
Selecting Scan Options
Features of the Samsung TWAIN Window
Copying
Copying a Document
Scanning to E-mail
Scanning a Document to E-mail
Scanning to Fax
Scanning a Document to Fax
Scanning to Web
Scanning Images for Publishing to the Web
Scanning to OCR
Scanning with Automatic Text Recognition
Configuring Automatic Text Recognition
–––––––––––––––––––––––––––––––––––––––––––––
–––––––––––––––––––––––––––––––––––––––––––––
–––––––––––––––––––––––––
––––––––––––––––––––
–––––––––––––––––––––––––––––––––
–––––––––––––––––––––––––––––––––
–––––––––––––––––––––––
–––––––––––––––––––––––––––
––––––––––––––––––
2.10
2.14
2.17
–––––––––––––
––––––––––––––––
––––––––––––––––––
2.23
2.27
2.30
2.1
2.3
2.4
2.7
2.8
2.9
II

Scanning to SmartMedia
Samsung SmartMedia
Scanning to SmartMedia
Remote Scan Service
Remote Scan Service
Setting Up a Server Station
Setting Up a Client Station
Image Manager
3
Working with Image Manager
Overview
Opening the Image Manager Window
Using Programs Bar in the Image Manager
Image Manager Toolbar Overview
Editing Images
Working with Images In Browse Mode
––––––––––––––––––––––––––––––––
––––––––––––––––––––––––––––––
–––––––––––––––––––––––––––––––––
–––––––––––––––––––––––––––
––––––––––––––––––––––––––––
–––––––––––––––––––––––––––––––––––––––––––––
–––––––––––––––––––––
––––––––––––––––
––––––––––––––––––––––––
––––––––––––––––––––––––––––––––––––––––
–––––––––––––––––––
2.32
2.32
2.34
2.35
2.38
3.1
3.2
3.4
3.6
3.8
3.14
Web Publisher
Overview
Creating a New Project
Samsung Web Publisher Window
Creating Upload Account
Uploading a Project
Image Viewer
Overview
Viewing Images with the Image Viewer
Associating File Types with the Image Viewer
––––––––––––––––––––––––––––––––––––––––––––
––––––––––––––––––––––––––––––––
––––––––––––––––––––––––
–––––––––––––––––––––––––––––––
–––––––––––––––––––––––––––––––––––
––––––––––––––––––––––––––––––––––––––––––––
––––––––––––––––––
–––––––––––––
3.17
3.18
3.18
3.19
3.20
3.21
3.21
3.22
III

Mailbox
4
Mailbox
Overview –––––––––––––––––––––––––––––––––––––––––––– 4.1
Activating the SmarThru E-Mail Service
Activating the SmarThru Fax Service
Features of the Mailbox Window
Working with E-mail Messages
New Message Window –––––––––––––––––––––––––––––––– 4.12
Creating and Sending E-mail Messages
New Message Toolbars
Using Message Template
Using HTML Stationery Template
Reading Incoming Message
Browsing E-mail Messages
Finding Messages
Using Address Book
Overview ––––––––––––––––––––––––––––––––––––––––––– 4.26
Address Book Objects
Opening the Address Book
Adding Contact Information to Address Book
Organising Address Book Items
––––––––––––––––––––––––––––––– 4.16
––––––––––––––––––––––––––––– 4.17
–––––––––––––––––––––––––––––––––––– 4.25
–––––––––––––––––––––––––––––––– 4.27
–––––––––––––––––––––––– 4.9
–––––––––––––––––––––– 4.18
––––––––––––––––––––––––––– 4.22
–––––––––––––––––––––––––––– 4.23
––––––––––––––––––––––––––– 4.28
––––––––––––––––––––––– 4.32
––––––––––––––––– 4.3
––––––––––––––––––– 4.6
–––––––––––––––– 4.14
––––––––––– 4.30
IV
Working with Fax Messages
Overview ––––––––––––––––––––––––––––––––––––––––––– 4.33
Creating and Sending a Fax
Sending a Fax from a Windows Application
Browsing Fax Messages
Using Fax Cover Page Editor
Remote Fax Service (SmarThru networking only)
Fax Log Viewer
Fax Queue Browser
–––––––––––––––––––––––––––––––––––––– 4.49
–––––––––––––––––––––––––––––––––– 4.50
–––––––––––––––––––––––––– 4.34
––––––––––––– 4.40
–––––––––––––––––––––––––––––– 4.41
–––––––––––––––––––––––––– 4.42
––––––– 4.43

Additional Mailbox Features
Viewing News on Internet News Servers ––––––––––––––– 4.51
Creating Message Digests
Using Message Collections
Using Conversation Threads
SmarThru Status Window
Automatic Message Processing
All SmarThru Data Backup
SmarThru Configuration
Opening the SmarThru Configuration Dialogue Box ––––– 4.61
–––––––––––––––––––––––––––– 4.54
–––––––––––––––––––––––––––– 4.56
–––––––––––––––––––––––––– 4.57
–––––––––––––––––––––––––––– 4.57
–––––––––––––––––––––––– 4.58
–––––––––––––––––––––––––––– 4.60
Using AnyPage Lite
5
Appendix
6
Overview
Running AnyPage Lite
How To Recognise a Text or Table
AnyPage Lite Window Overview
Troubleshooting
Index
–––––––––––––––––––––––––––––––––––––––––––––
––––––––––––––––––––––––––––––––––––––––––––––––
OCR Application
5.1
––––––––––––––––––––––––––––––––––
––––––––––––––––––––––––
––––––––––––––––––––––––
–––––––––––––––––––––––––––––––––––––––
5.2
5.3
5.10
6.1
6.3
V

chapter
1
1
Getting Started
Getting Started
Samsung SmarThru is the accompanying software for
Samsung multi-function product (MFP). This chapter
introduces you to the Samsung SmarThru software. Topics
included in this chapter are:
Samsung SmarThru
◆ Introduction
◆ Programmes within Samsung SmarThru
◆ Running Samsung SmarThru
◆ Getting Help
Note
To use the Samsung SmarThru software, you must
install the SmarThru CD-ROM that was shipped with
your MFP. For information on installing the SmarThru
CD-ROM, refer to the Product User’s Guide.

Samsung SmarThru
Introduction
SmarThru is the accompanying software for Samsung multifunction
product (MFP). With the SmarThru, you can enjoy all the MFP
capabilities, such as printing, multi-page scanning, and copying. If you
activate the SmarThru e-mail or fax services, you can send or receive
e-mail or fax messages using your SmarThru system. The SmarThru
system gives you the ability to keep your e-mail and fax correspondence
in a single place, and to send the same messages via fax and over the
Internet at the same time.
With the SmarThru, scanning becomes a pleasure. You can save scanned
images in a dedicated storage area for subsequent editing, sending via
e-mail or fax, printing, and processing by other programmes of your
choice.
The SmarThru contains a powerful image editor that allows to alter
images: applying various visual effects, changing colours, adding
annotations, etc.
AnyPage OCR software (included in the package) gives you the ability to
convert scanned images into text documents, suitable for editing with
your favorite text editor. Using AnyPage OCR, you can automatically
recognise all incoming fax messages.
Getting Started
1.1

Programmes within Samsung SmarThru
Here you can find a quick reference to SmarThru software. The main
SmarThru programme integrates three components: Image Manager,
Scan Wizard, and Mailbox if activated.
Image Manager
Image Manager is intended for storing and editing images.
Scan Wizard
Scan Wizard is intended for the quick launch of several scanning
procedures.
Scan Manager
It scans documents to the Image Manager’s database.
Copy Manger
It copies documents by scanning and subsequent printing.
AnyPage
AnyPage is an optical character recognition(OCR) programme. Using the
AnyPage you can convert scanned document to a text file, which can be
edited afterwards.
Mailbox (available only when you activate the SmarThru message system.)
Mailbox is intended for storing fax and e-mail messages sent and received
using the SmarThru system.
New Message (available only when you activate the SmarThru message system.)
This programme is intended for creating, editing, and sending e-mail
and/or fax messages, and for reading incoming messages.
Fax Manager (available only when activate the SmarThru fax service.)
This is a wizard for creating and sending fax messages.
Fax Cover Page Editor (available only when activate the SmarThru fax service.)
The editor is intended for creating and editing fax cover pages (the very
first page of a fax). Cover pages contain information specific to a
particular message, such as recipient’s name, phone number, subject, etc.
SmarThru Engine (available only when you activate the SmarThru message system.)
SmarThru engine is the core of SmarThru message system. It must be
running to send and receive fax and e-mail messages.
1.2
Getting Started
Running Samsung SmarThru
Image Manager, Scan Wizard, and Mailbox if activated, are integrated in
the Samsung SmarThru 3 window.
To open the Image Manager, the Scan Wizard, or the Mailbox, run the
SmarThru 3 in the following ways:
• From the desktop window,
double-click the
icon.
SmarThru 3
Double click.
Toolbar
Plugin Bar
Image Manager
Scan Wizard
• From the
Start menu, click Programs, select Samsung SmarThru
and then SmarThru 3.
The Samsung SmarThru 3 window opens.
Status Bar
Getting Started
1.3
To open the Scan Wizard:
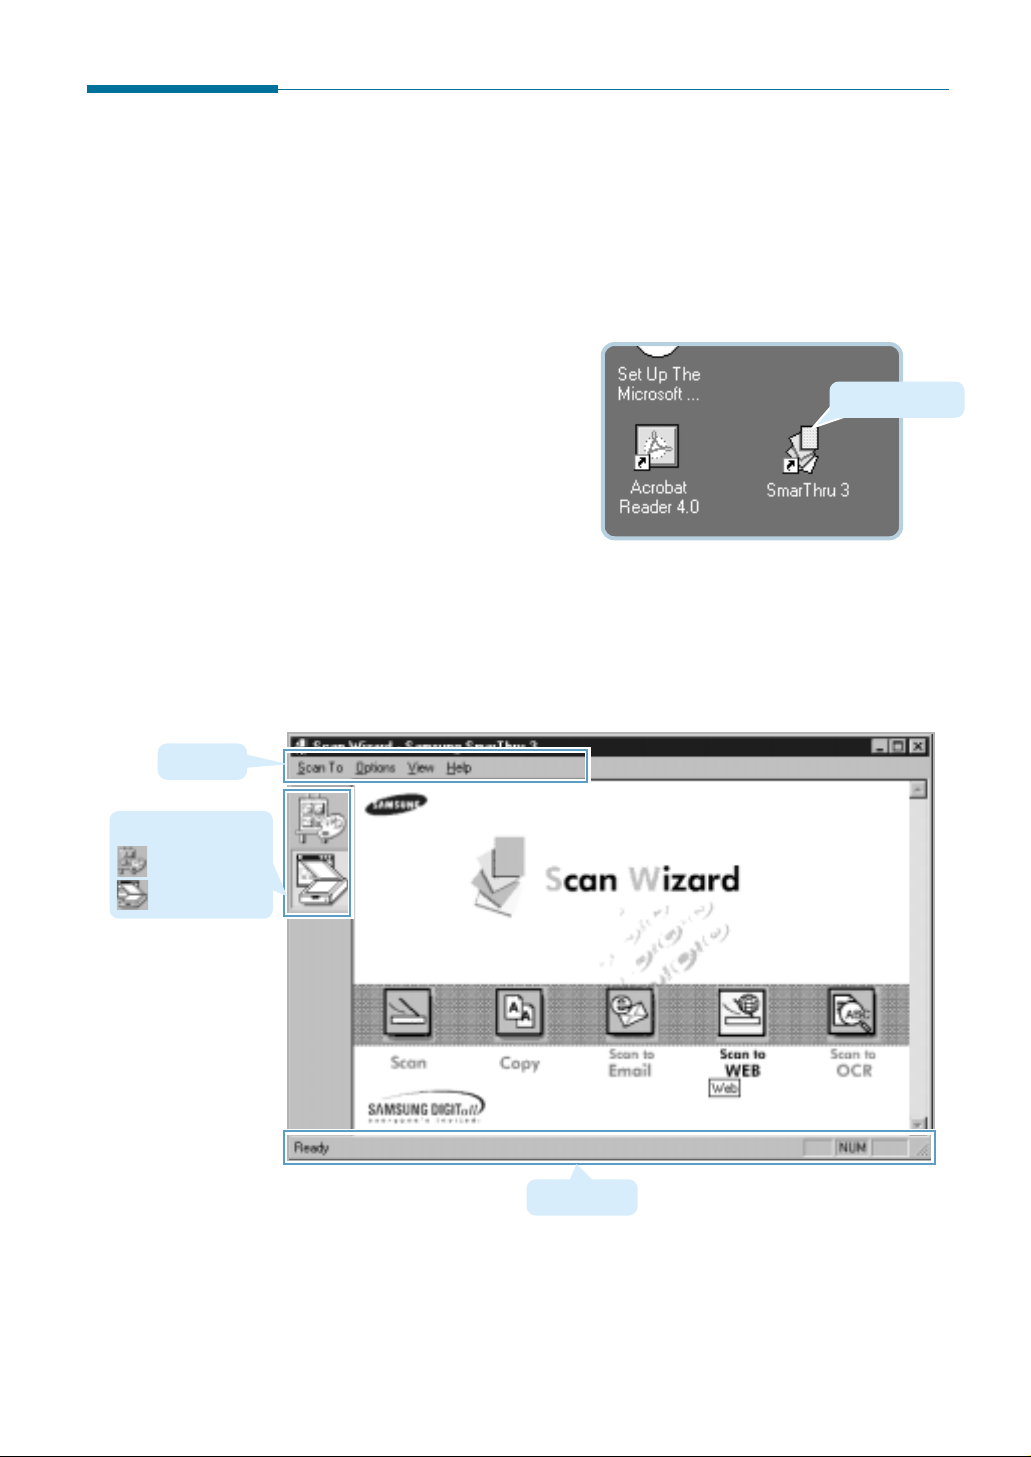
Select one of the following:
• In the Samsung SmarThru 3 window, click the Scan Wizard icon in
the plugin bar on the left of the SmarThru window.
• In the Samsung SmarThru 3 window, click the
View menu, click
Switch to and then select Scan Wizard.
• From the Start menu, click Programs, select Samsung SmarThru
and then Scan Wizard.
See the previous page to view the Scan Wizard window. For further
information on the Scan Wizard, see chapter 2 “Scan Wizard”.
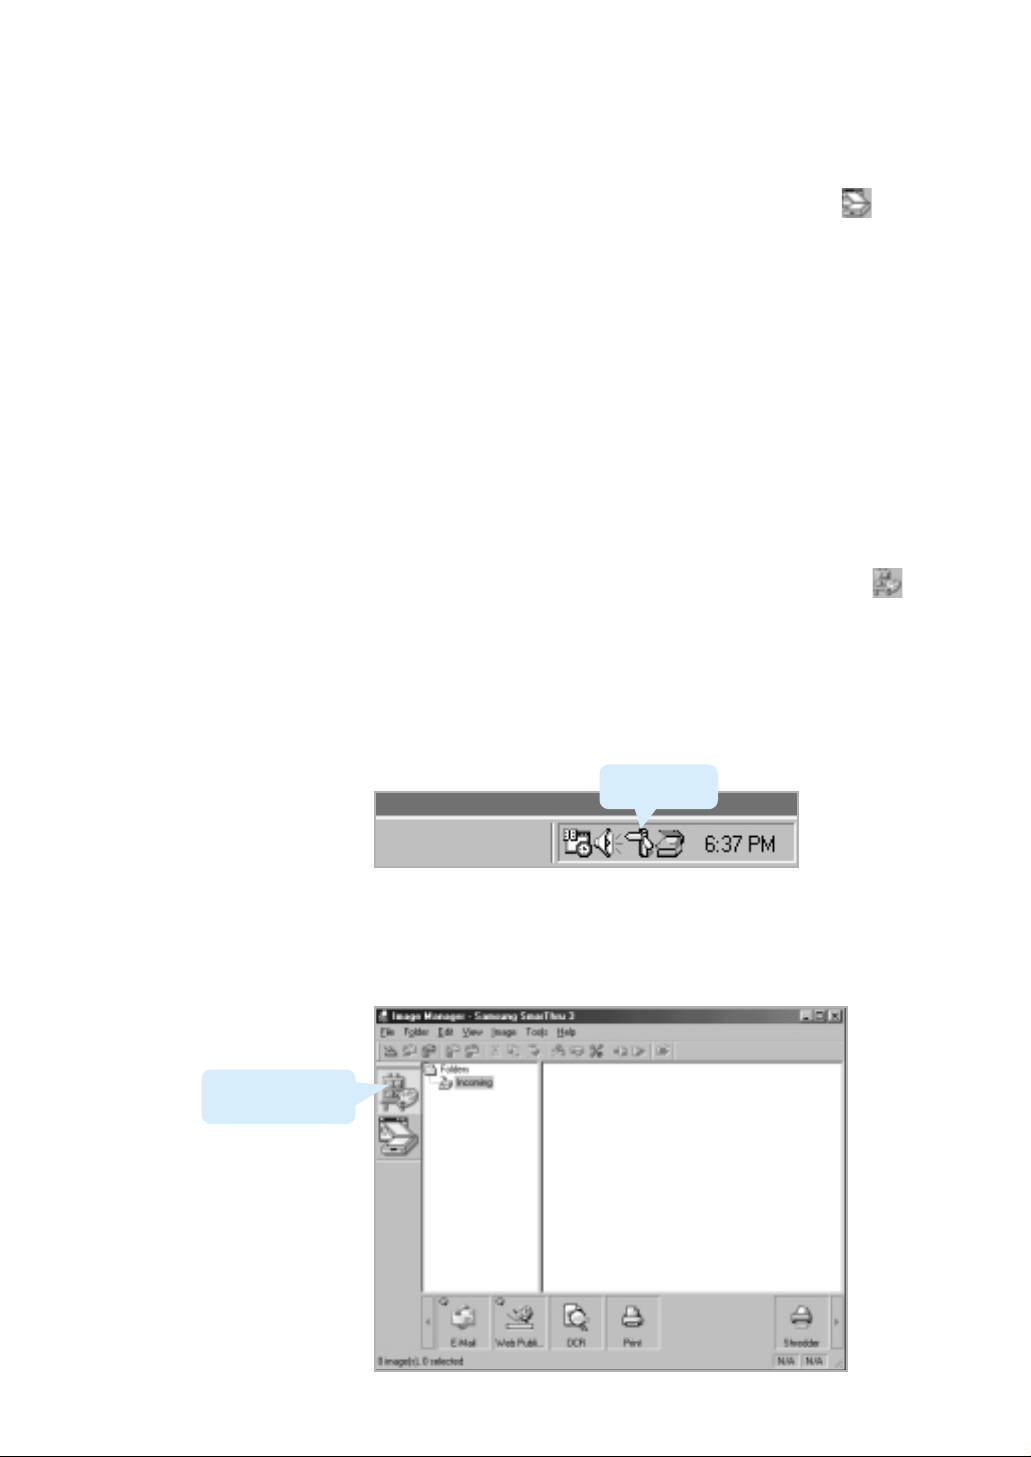
To open the Image Manager:
Select one of the following:
• In the Samsung SmarThru 3 window, click the Image Manager icon
in the plugin bar on the left of the SmarThru window.
• In the Samsung SmarThru 3 window, click the
View menu, click
Switch to and then select Image Manager.
• From the taskbar at the bottom right corner of the desktop window,
right-click on the SmarThru mail engine icon and select
Image
Manager from the pop-up menu.
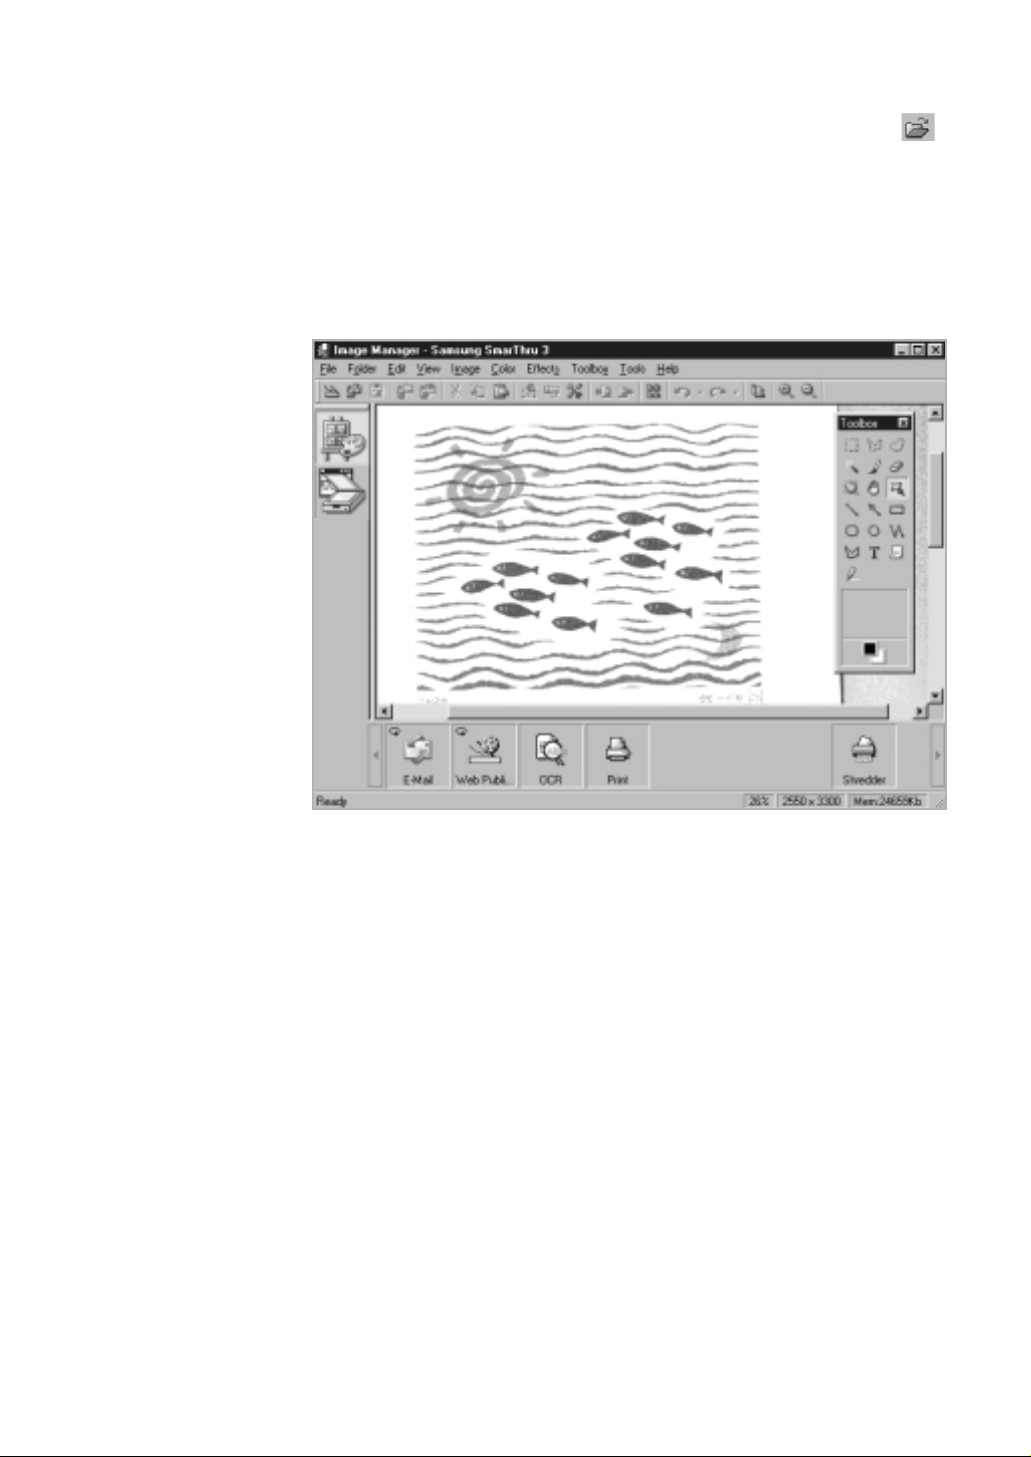
The Image Manager window appears as shown below. For further
information on the Image Manager, see chapter 3 “Image Manager.”
Click it to open the
Image Manager.
SmarThru mail
engine icon
1.4
Getting Started
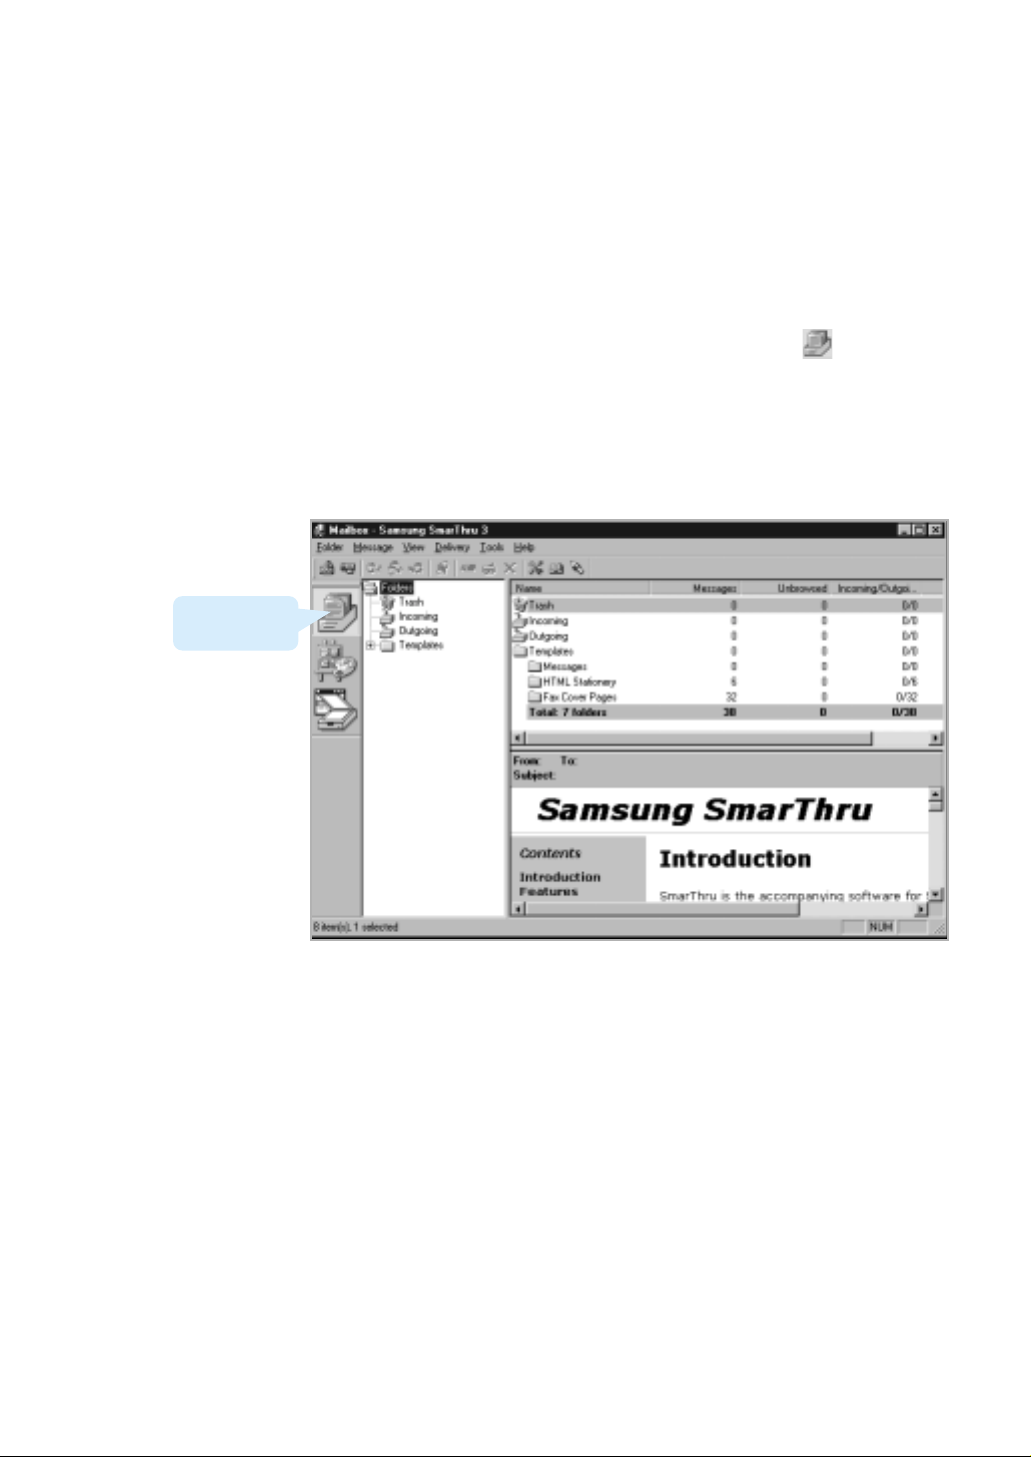
Click it to open
the Mailbox.
If you want to use the SmarThru e-mail or fax message system, you
have to enable the services and configure the Internet or Fax gate. See
page 4.3. After you activate the service(s), you can see the Mailbox in
the SmarThru 3 window.
To open the Mailbox:
Select one of the following:
• In the Samsung SmarThru 3 window, click the Mailbox icon in the
plugin bar on the left of the SmarThru window.
• In the Samsung SmarThru 3 window, click the
View menu, click
Switch to and then select Mailbox. The Mailbox window appears as
shown below. For further information on the Mailbox, see “Mailbox” on
page 4.1.
Getting Started
1.5
Getting Help
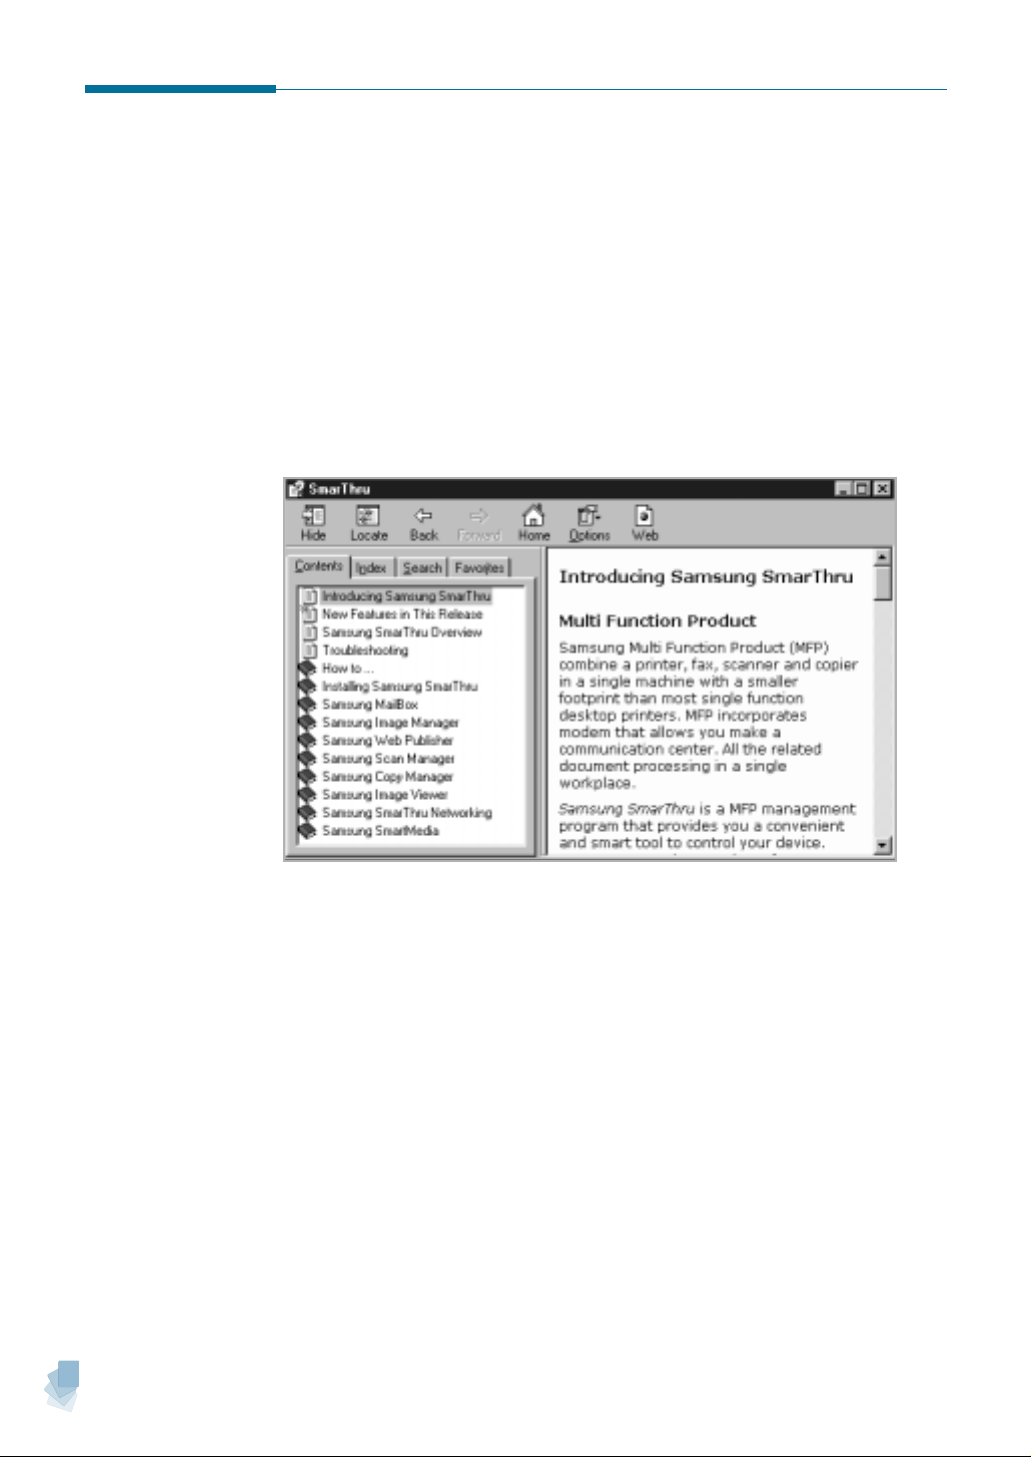
Samsung SmarThru contains a detailed on-line help document. If you
encounter problems while using the SmarThru, please consult the on-line
help. SmarThru Help is accessible on every SmarThru programme
window and dialogue box.
Help on the menu bar of the programme windows and the dialogue
Click
boxes.
When you access the SmarThru Help, you can further select
view, Index view or Search view to find the desired item quickly.
Contents
1.6
Getting Started

chapter
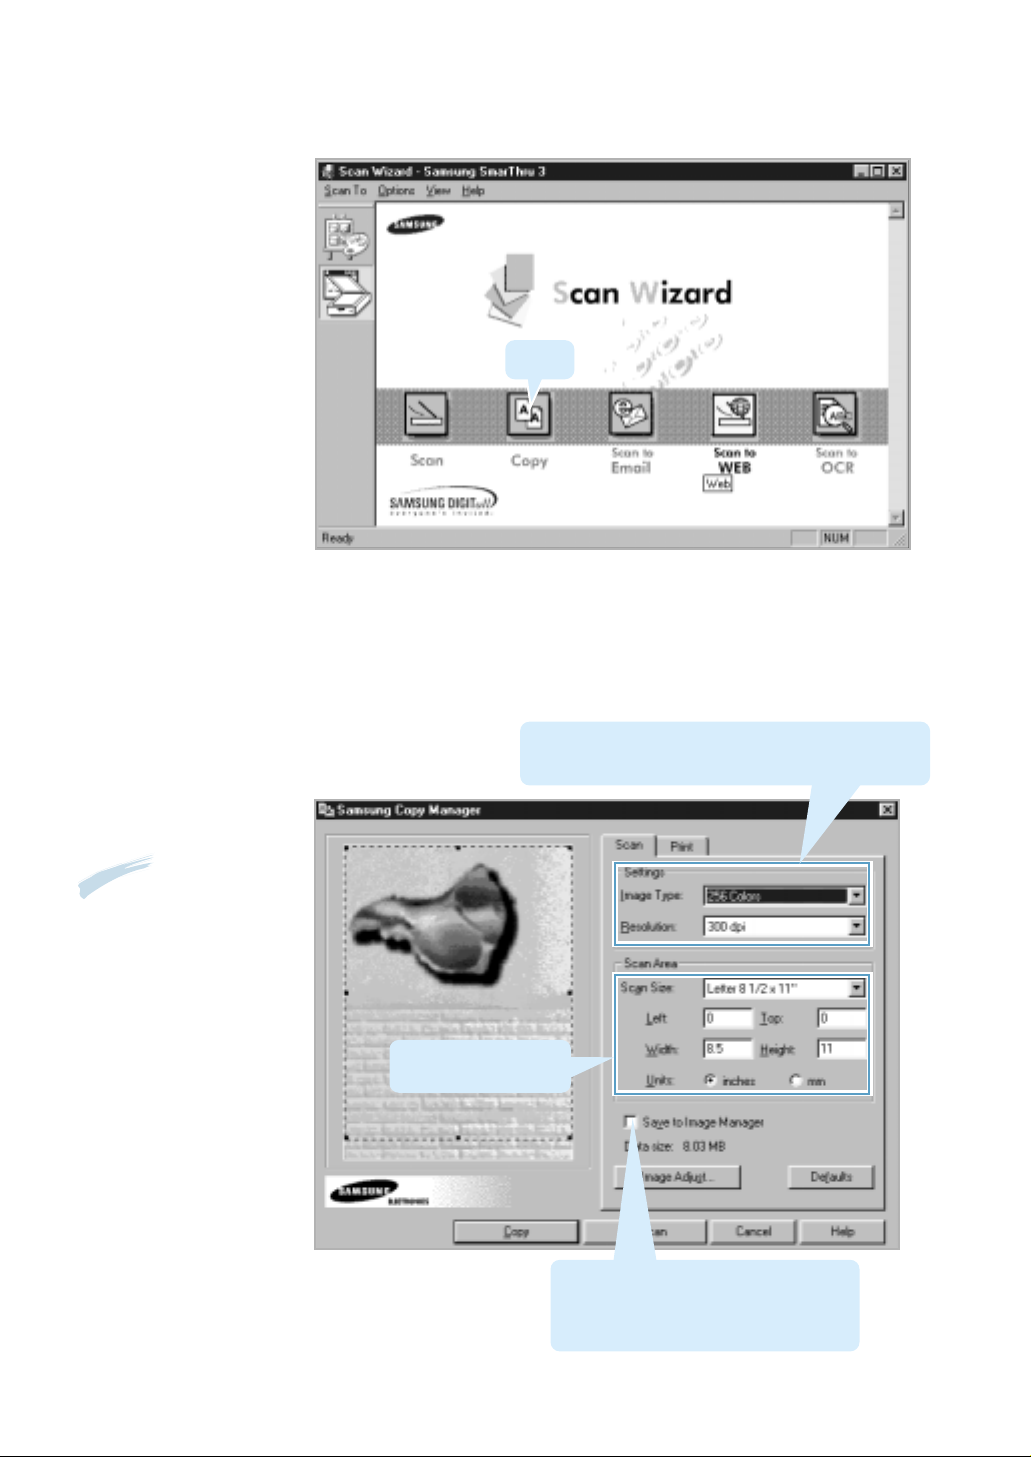
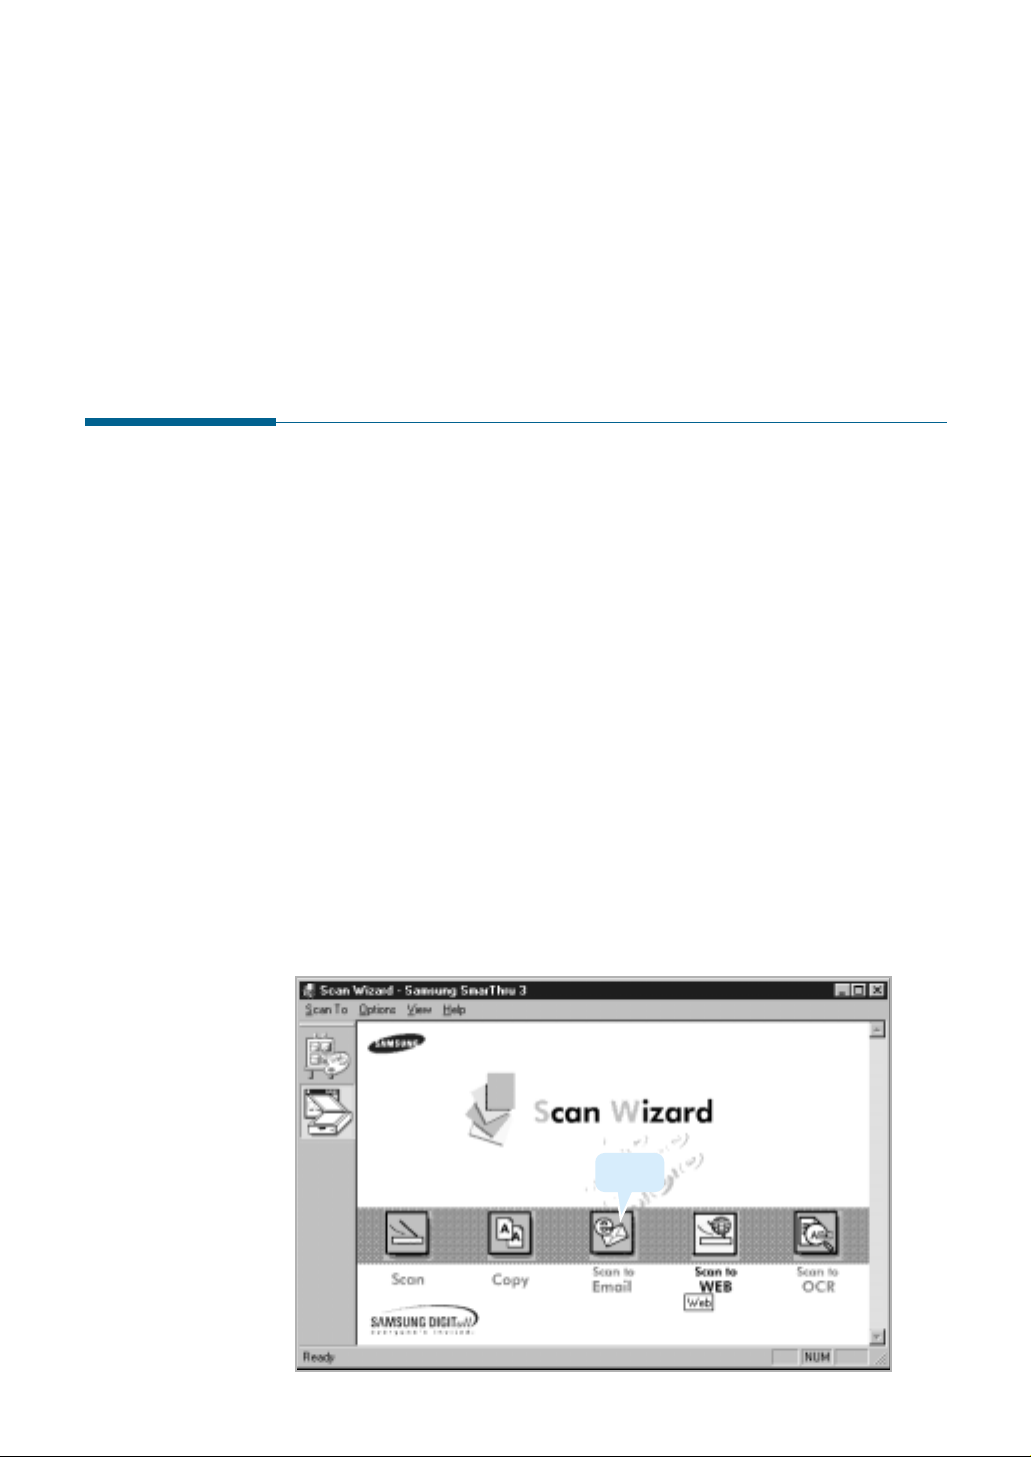
2
2
Scan W
Scan W
Scan Wizard is an easy-to-use and convenient tool to
manage your scan work. This chapter provides
information on the following topics:
Scan Wizard
◆ Overview
Scanning
◆ Overview
◆ Scanning with the Scan Manager
◆ Features of the Scan Manager Window
◆ Selecting Scan Options
◆ Features of the Samsung TWAIN Window
Copying
◆ Copying a Document
Scanning to E-mail
◆ Scanning a Document to E-mail
Scanning to Fax
◆ Scanning a Document to Fax
izard
izard
Scanning to Web
◆ Scanning Image for Publishing to the Web
Scanning to OCR
◆ Scanning with Automatic Text Recognition
◆ Configuring Automatic Text Recognition
Scanning to SmartMedia
◆ Samsung SmartMedia
◆ Scanning to SmartMedia
Remote Scan Service
◆ Remote Scan Service
◆ Setting Up a Server Station
◆ Setting Up a Client Station
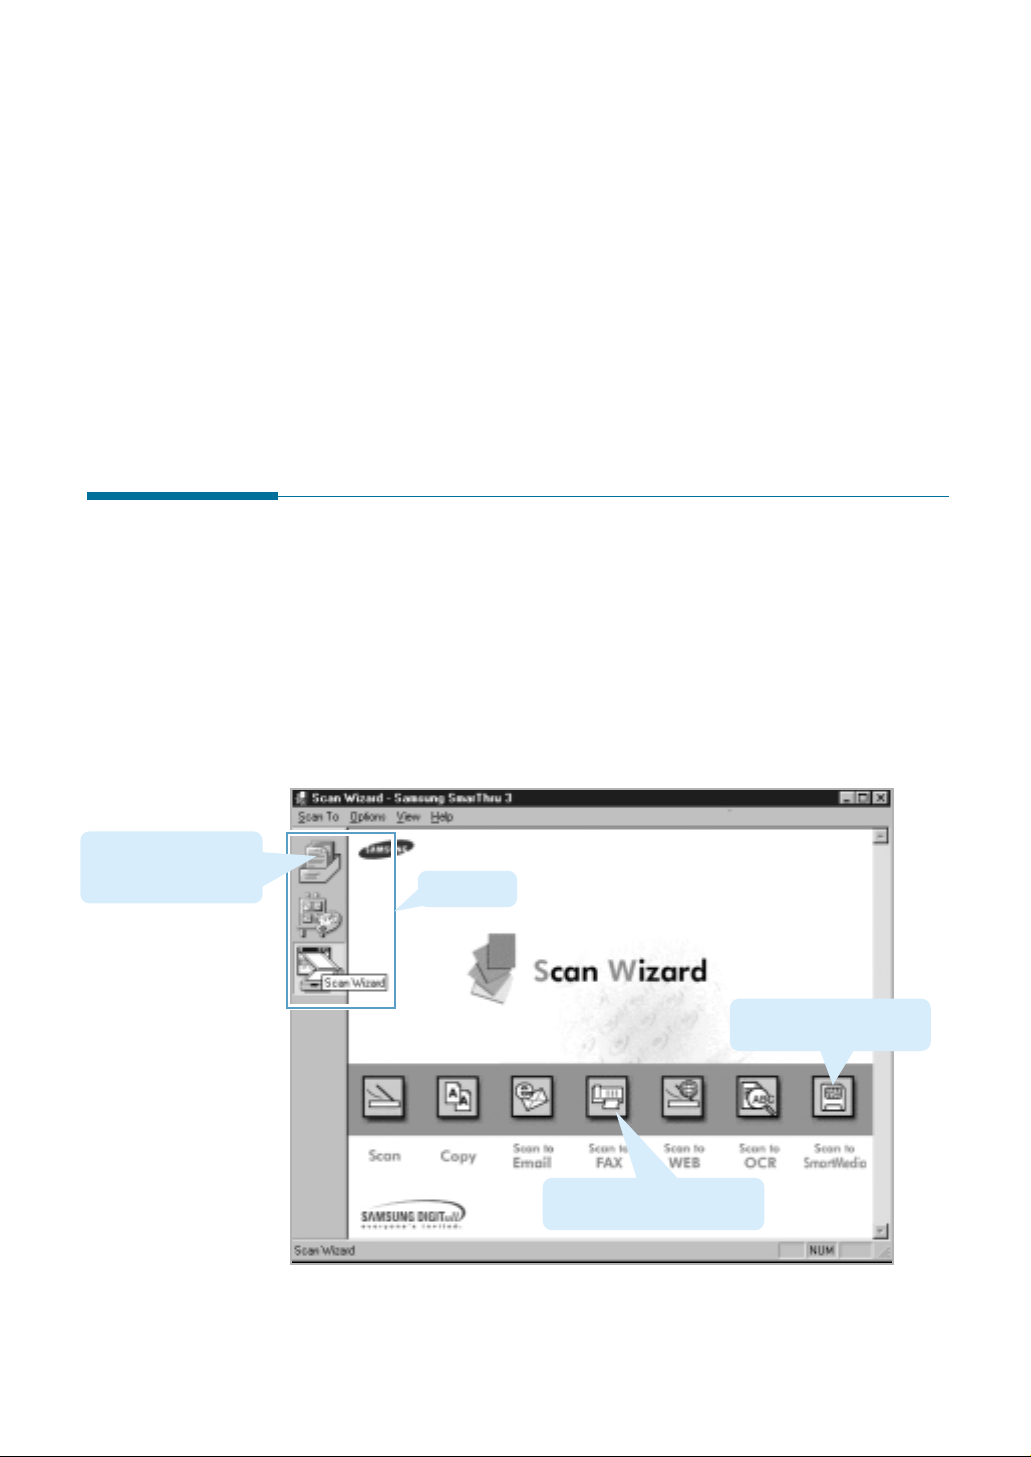
Scan Wizard
Overview
Samsung Scan Wizard is an easy-to-use and convenient tool to manage
your work.
To launch the Scan Wizard, run the SmarThru 3 by double-clicking the
SmarThru 3 icon in the desktop window and then click the Scan Wizard
icon in the plugin bar on the left pane of the SmarThru 3 window. For
further details, see page 1.4.
Appears only if you
activate the SmarThru
e-mail or fax services.
Plugin Bar
Appears only if your MFP
supports SmartMedia.
Appears only if you activate
the SmarThru fax services.
Scan Wizard
2.1
Samsung Scan Wizard contains the following services:
Scan Manager which lets you scan documents and images
quickly and easily.
Copy Manager which lets you use your MFP as a copier device.
Scan Manager which lets you scan documents and then
launches the mail program currently configured in your PC to
send just scanned documents via e-mail. If you activate the
SmarThru e-mail service, the SmarThru mail system launches.
Scan Manager which lets you scan documents and then
launches the SmarThru fax system which helps you send
electronic faxes.
Scan Manager which lets you scan images for further publishing
to the Web.
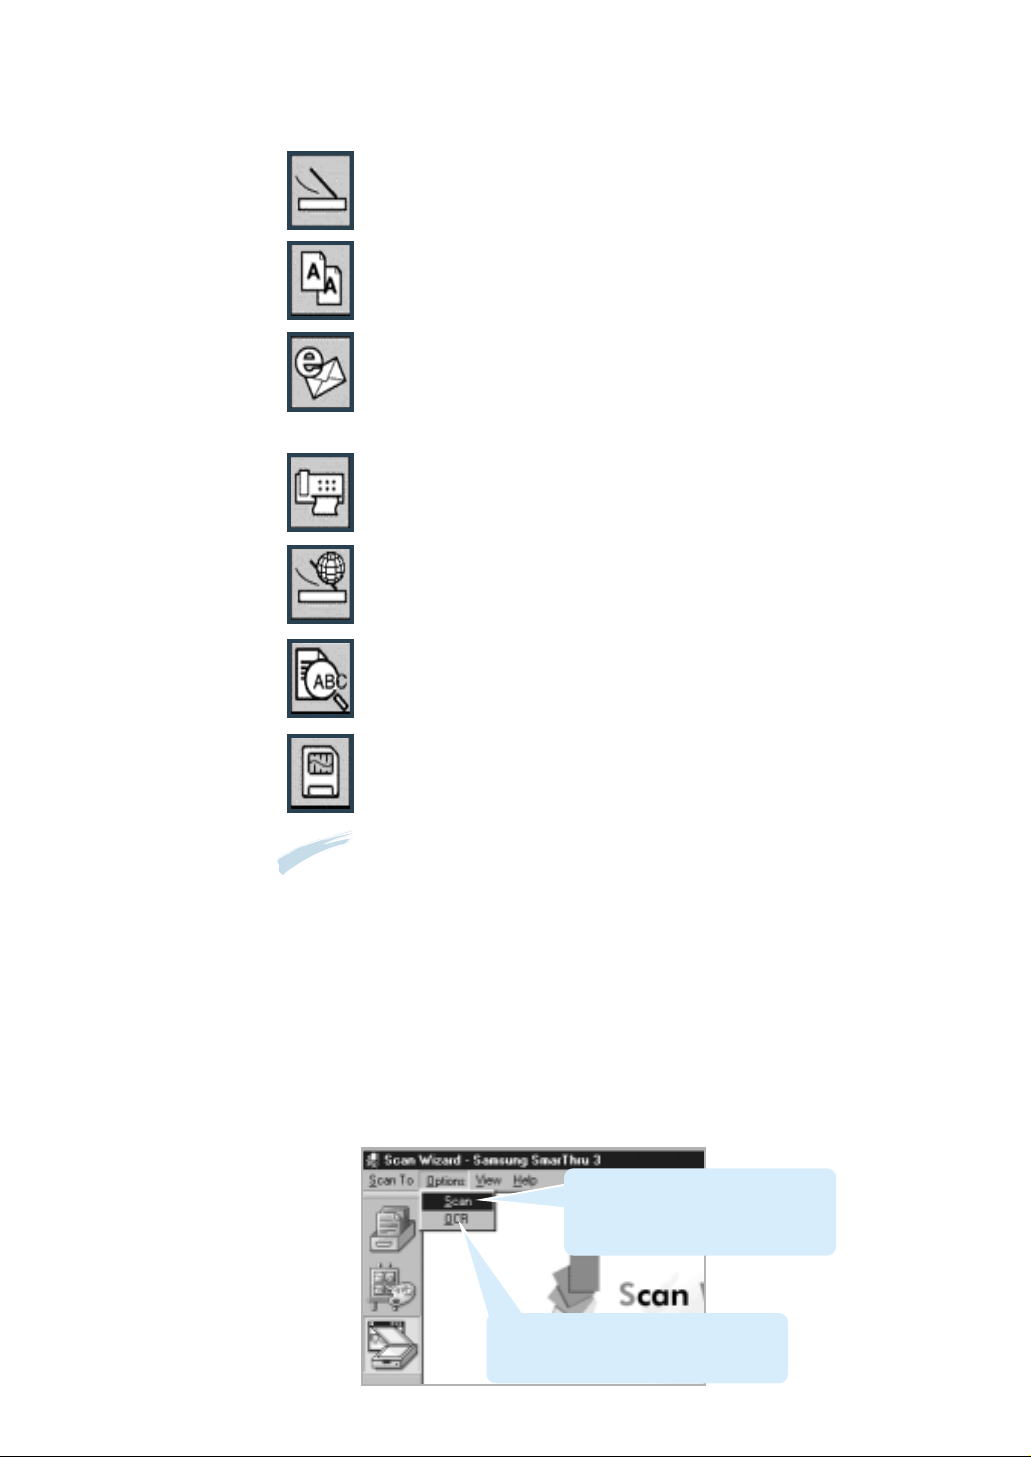
If the scanned document should be passed to the OCR
programme for text recognition, click Scan to OCR.
2.2
Scan Wizard
Allows you to scan an image and save it into a Samsung
SmartMedia device.
Notes:
• The
Scan to OCR
service and the
OCR Options
menu are available only if
you have the OCR programme installed.
Scan to SmartMedia
• The
service is available only if your MFP supports
Samsung SmartMedia devices.
• The
Scan to FAX
service is available only if you activated the SmarThru
fax service.
Additionally the Options menu of the Scan Wizard window provides
access to the following items:
Opens the SmarThru Configuration
window and shows the Scan Options
dialogue which allows you to select
scan source, etc.
Invokes the Automatic Recognition
Configuration dialogue box that lets you
change the text recognition parameter.

Scanning
Note:
Colour scan function may be unavailable depending on the type of your product.
Overview
Scanning is the process of converting an image into computer-usable
information by digitising the image. Scanners and digital cameras are
devices that have the technology to transfer an external image to digital
information, that can be saved as a file, printed, faxed, or otherwise
manipulated on your computer.
To scan a document, insert the document into MFP, and run the Scan
Manager module. You can do it either from the Scan Wizard programme,
or from the Image Manager. In the Scan Wizard, click the
In the Image Manager, select
scanned images will be stored in the Image Manager database.
The type of documents you can scan include photos, drawings, magazine
pages, newspaper articles, and any type of single page image.
Scan... from the File menu. In both cases,
Scan button.
Scan Wizard
2.3
Scanning with the Scan Manager
The Scan Manager can convert a photo or paper document into a digital
image. To scan a document with the Scan Manager, use the following
steps:
1. Load a document(s) you want to scan into your MFP.
2. Run the SmarThru 3 and open the Scan Wizard. See page 1.4.
3. Select
Scan in the Scan Wizard window.
Click.
4. Choose the scan settings and then click Scan. For more information
on the scan settings, refer to “Features of the Scan Manager Window”
on page 2.7.
Note:
If the system
is short of memory,
high resolution
scanning may not
be achieved. Lower
the resolution and
try again.
2.4
Scan Wizard
Choose appropriate scan settings.
5. A progress bar informs you of the scan progress. When the scan is
completed, the scanned image is briefly displayed in the preview area.
Preview area
6. The Scan Manger window closes automatically and the Image Manager
is automatically launched.
The scanned image is saved in the
Incoming folder of the Image
Manager with a system-assigned name.
For information on working with the images in this browse mode, see
page 3.14.
Scan Wizard
2.5
7. To open the image for editing, double-click on the image, or click
on the toolbar. The opened image will replace the contents of the
current folder.
For information on editing images with the Image Manager, refer to
“Working with Image Manager” on page 3.1.
2.6
Scan Wizard
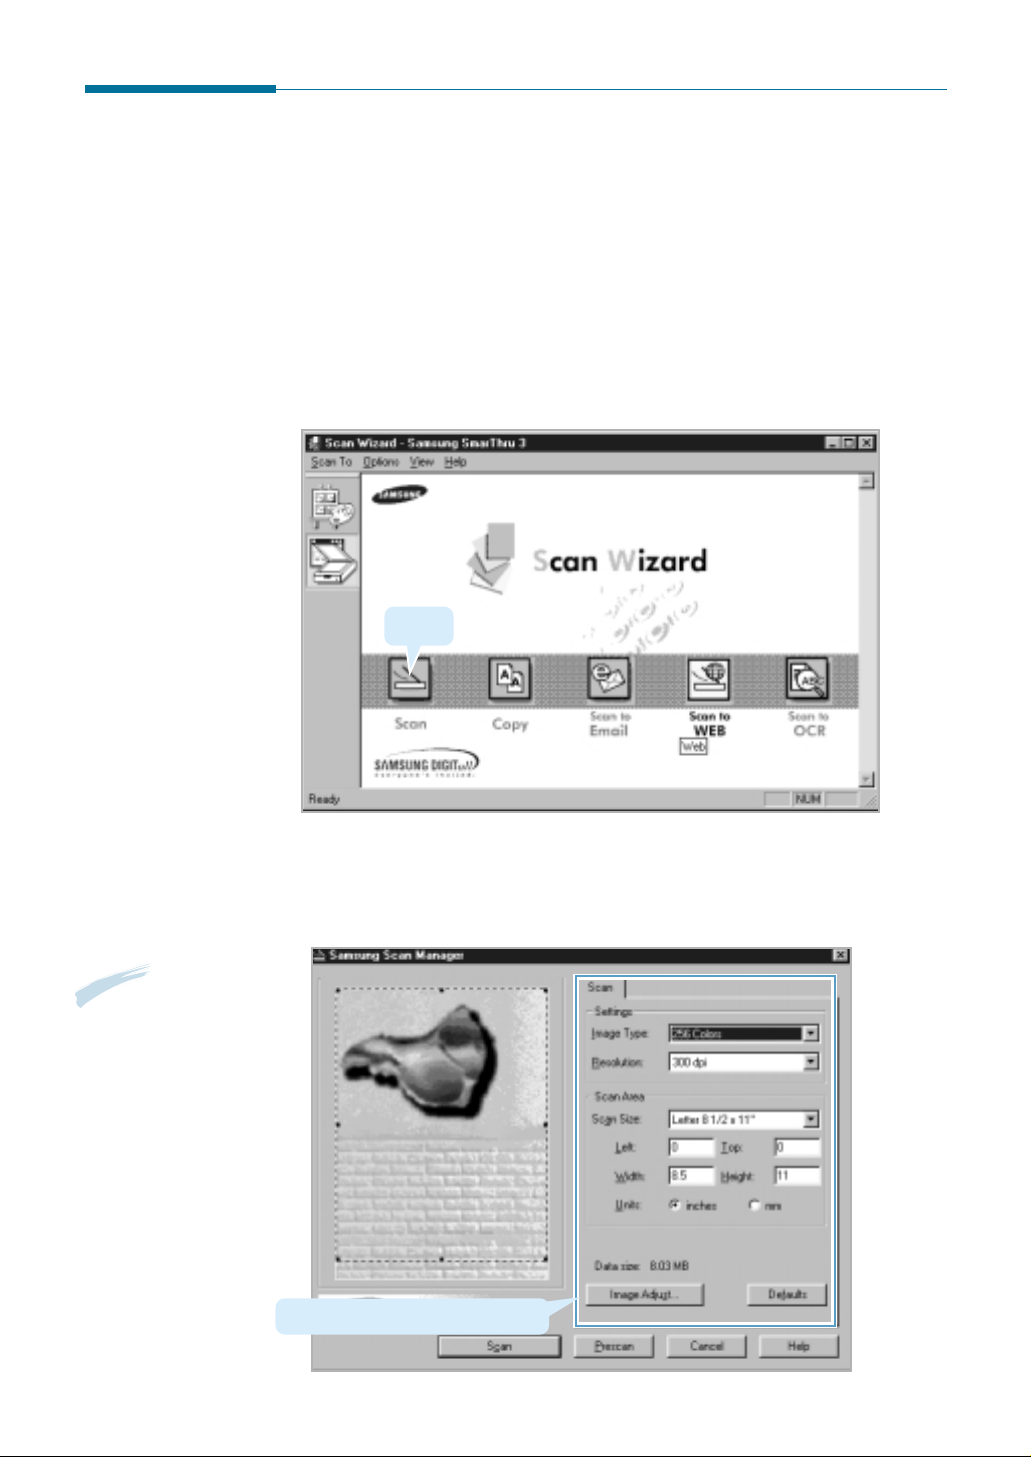
Features of the Scan Manager Window
The Samsung Scan Manager window is used to preview and scan
images. The controls of the Scan Manager window are described below.
Note:
If you define
the scan size too
small, multi-page
scanning cannot be
properly made.
Preview area: Contains a sample picture or
the prescanned image. It also contains a dotted
rectangle that defines size and position of the
image area where the scanned picture should
appear. The heading of this area displays a
name of the currently selected scanner.
Scan size: Selects the size of the image being scanned. You may select one of the
predefined sizes, or Custom to enter the dimensions manually. You may also change the
scan area using the mouse: drag one of the marquee handles (small black squares) to resize
the marquee, or place the mouse cursor inside the marquee (the cursor turns into a fourheaded arrow) and drag it to change the marquee position. If you change the dimensions
after selecting one of the predefined sizes, this setting automatically changes to Custom.
Left, Top: These settings define a position of the top left corner of the scan area.
Width, Height: These settings define the size of the scan area.
Units: Lets you select measurement units that will be used for specifying scan area
dimensions.
Image type: Selects the image type
used for scanning.
Resolution: Selects the resolution used
for scanning.
Scan: Click this button to start scanning.
Prescan: Click this button to scan an image at low
resolution. This is useful for preliminary testing of scanner
setup etc. The scanned image will replace the picture in the
sample picture area.
Cancel: Click this button to exit the Scan Manager.
Help: Click this button to bring up the help system.
Image Adjust...: Click this button to
bring up the Image Adjust window to
adjust image brightness and contrast.
Defaults: Click this button to return all
the settings to their default values.
Scan Wizard
2.7
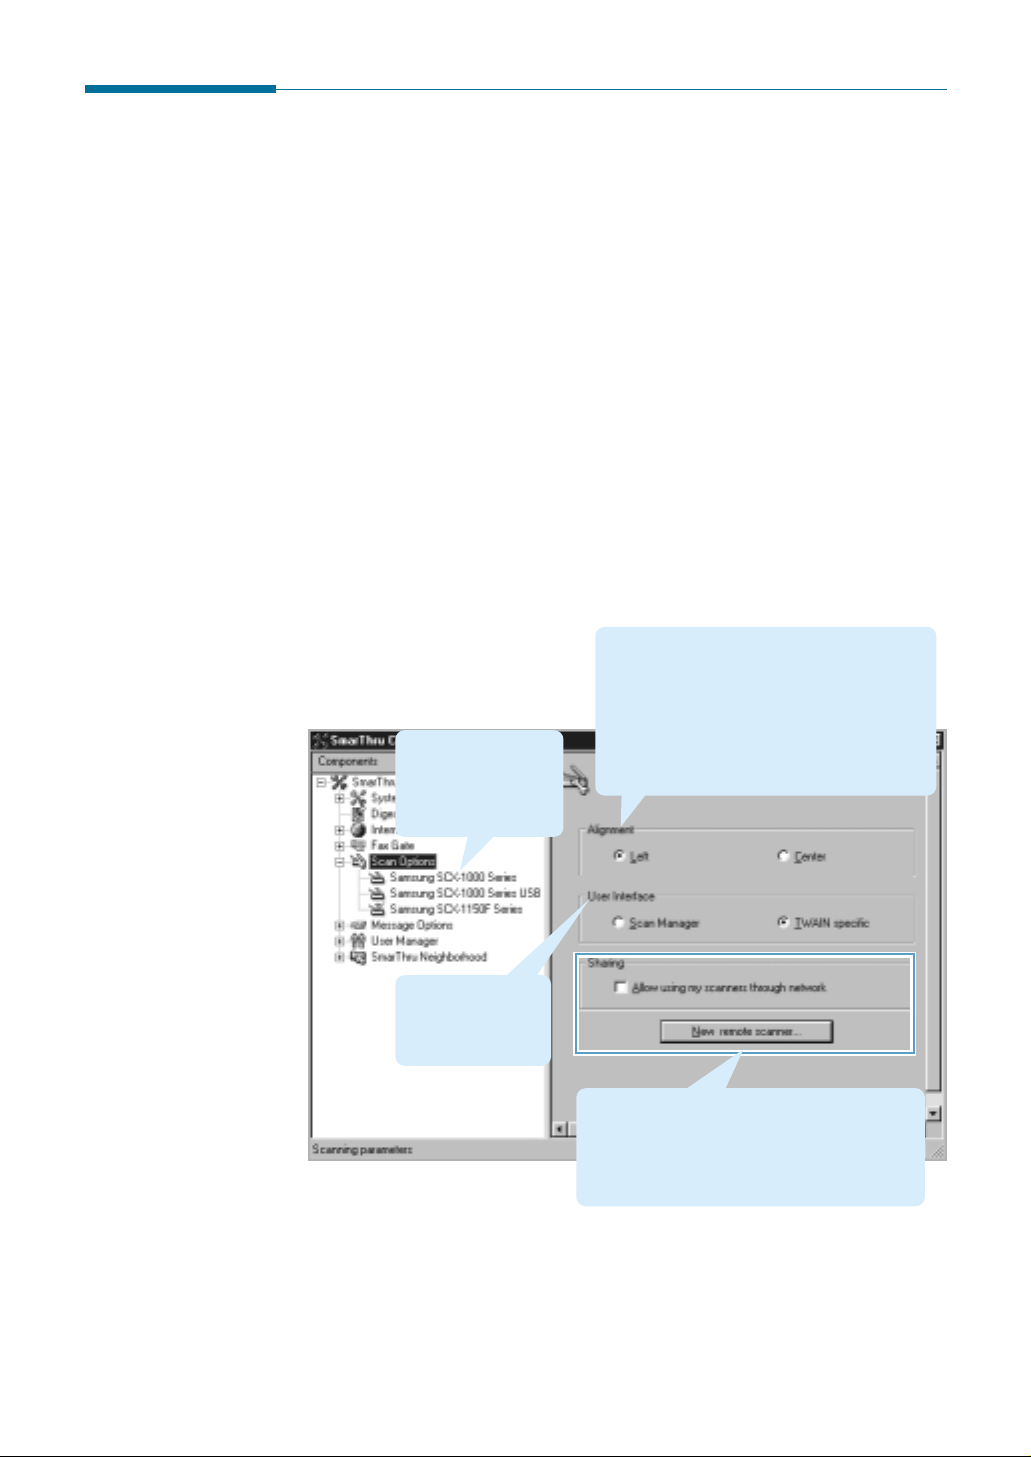
Selecting Scan Options
You can use the standard TWAIN window instead of the Samsung Scan
Manager window to scan an image. Also, if you have another scanner
driver installed on your computer, you can select the desired driver.
1. To open the Scan Option dialogue, select one of the following:
• In the Scan Wizard window, click the
Options menu and then click
Scan.
• In the Image Manager window, click the
File menu and then click
Scan Options.
• Open the SmarThru Configuration (see page 4.61) and then click
Scan Options in a tree on the left of the SmarThru Configuration
window.
2. The Scan Options dialogue allows you to set general options general for
all the scanners on your system.
Controls the scanning software behaviour,
when a document being scanned is smaller
than your scanner viewport area.
Left, if the document will be placed
Select
You can select the
scanner driver. The
model names differ
depending on the
products.
along the left edge of your scanner viewport
area. Select
centred across the viewport area.
Center, if the document will be
2.8
Select the scanner
user interface you
wish to use when
you scan.
Once SmarThru Networking option is selected
when you install SmarThru software, you can
use these options to share the scanner over
a LAN. For details on these options, see
“Remote Scan Service” on page 2.34.
3. Save the currently changed scan option configuration.
Scan Wizard
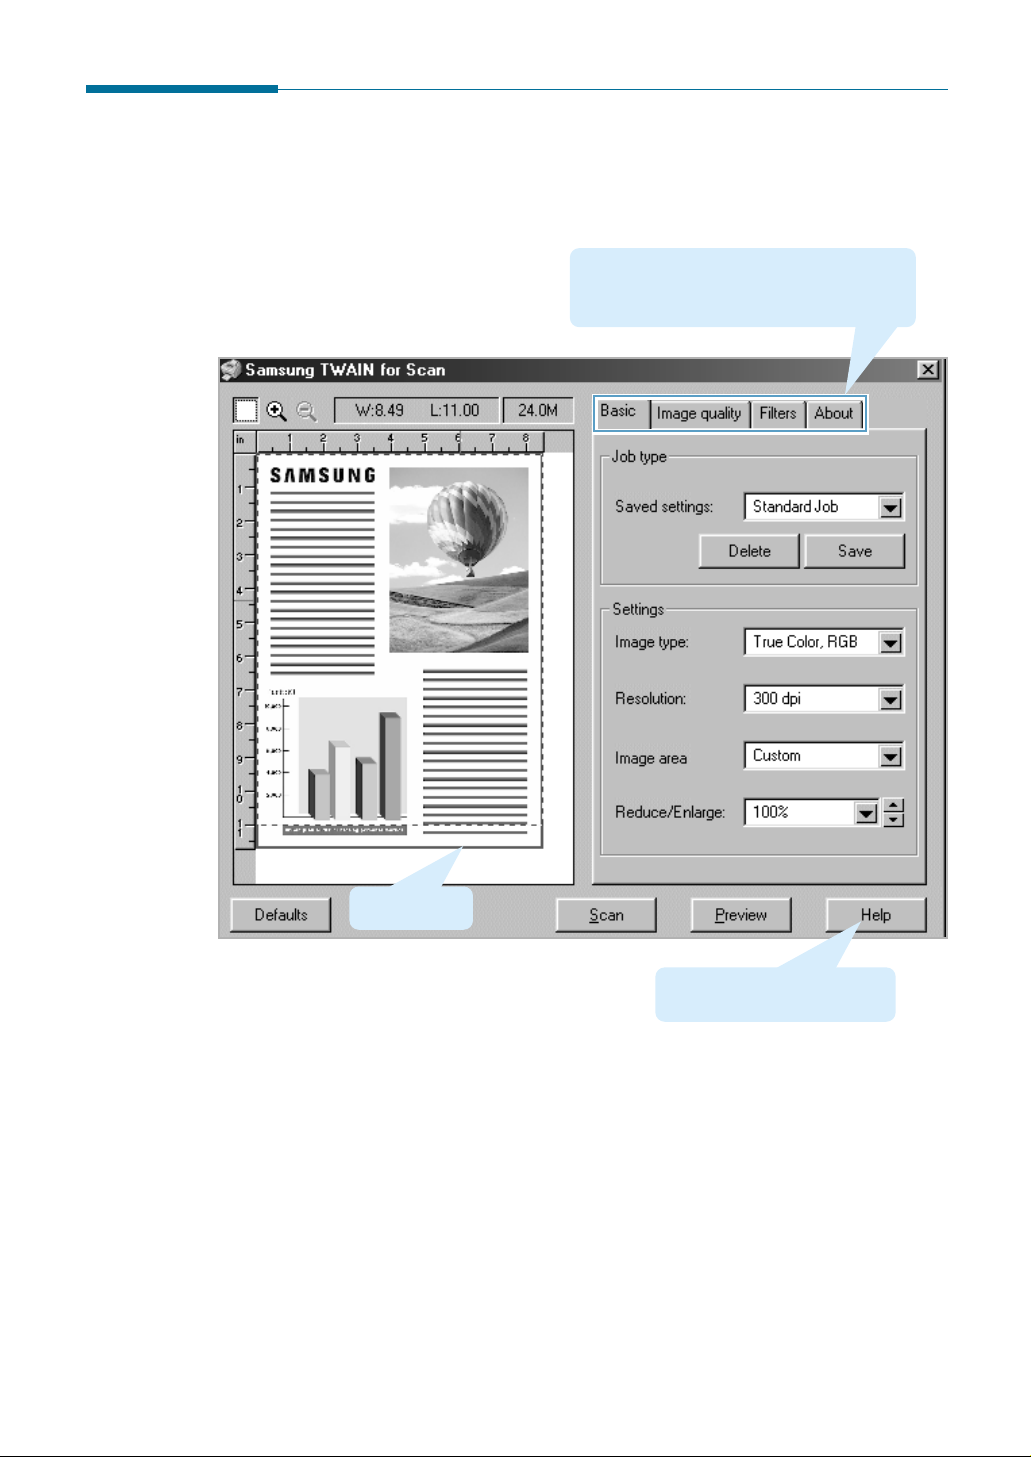
Features of the Samsung TWAIN Window
Brief descriptions for the controls of the Samsung TWAIN window are
provided below.
Settings Tabs: Each tab (Basic, Image
quality
, Filters, and the About tab) contains
settings to adjust the scan image.
Preview area
Use Help for further details on
settings in this TWAIN window.
Scan Wizard
2.9

Copying
Note:
Colour copy function may be unavailable depending on the type of your MFP.
Copying a Document
With the Samsung Copy Manager, you can
• Quickly make copies of scanned images.
• Adjust the brightness and contrast of the resulting image.
• Change the resolution and the colour mode used for copying.
• Set the number of copies.
• Scale the resulting image.
To copy a document using the Samsung Copy Manager:
1. Load a document(s) you want to copy into your MFP.
2. Run the SmarThru 3 and open the Scan Wizard. See page 1.4.
2.10
Scan Wizard
3. Select Copy in the Scan Wizard.
Click.
4. The Samsung Copy Manager window opens. Adjust the scan settings.
Note:
If the system
is short of memory,
high resolution
scanning may not
be achieved. Lower
the resolution and
try again.
Image type: Selects the image type used for scanning.
Resolution: Selects the resolution used for scanning.
Selects the size of the
image being copied.
Check this box if you want the scanned
image to be saved into the Incoming
folder of the Image Manager database
for future reference.
Scan Wizard
2.11
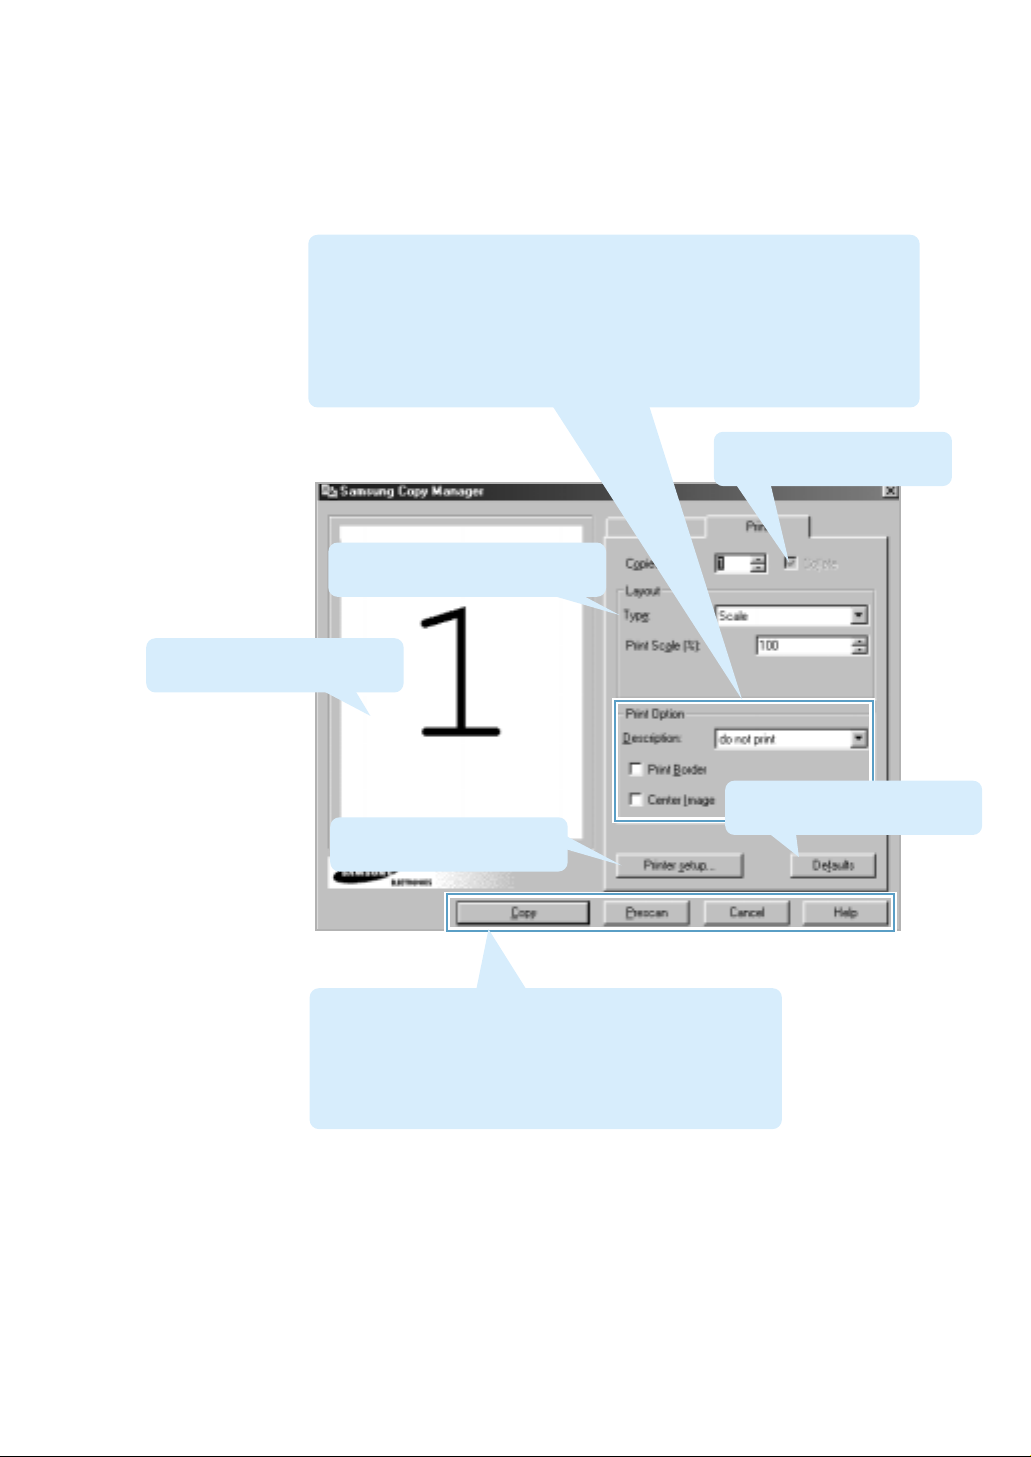
5. To select printing mode, click the Print tab at the top of the Samsung
Copy Manager window.
Description: Select on the bottom to print image descriptions below
images,
turn printing image descriptions off.
Print Border: Check this box to print a border around images.
Center Image: Check this box to centre printed images. If the image is
larger than one page, the image will be centred across all the pages it spans.
Preview area: This area shows
image(s) that will be printed.
on the top to print image descriptions above, or do not print to
Lets you choose one of five printing
methods. For details, see page 2.13.
Check this box if the copies
should be collated.
Click this button to return all
Brings up the standard printer
setup dialogue box.
settings to their default values.
Copy: Click this button to start the copying process.
Prescan: Click this button to scan an image at low resolution.
Cancel: Click this button to exit the Copy Manager.
Help: Click this button to bring up the help system.
2.12
Scan Wizard

Samsung Copy Manager provides the following five printing methods:
Scale The printed image will be scaled. Enter the scaling
factor in the Print Scale(%) field.
Fit to Page Selecting this option will result in scaling the printed
image to fill the entire page. You may select the desired
page size using the
Multiple Page If your scanner supports successive scanning of
per Side multiple images, you may use this option to print
several images on a single page. The images will be
successively placed on a page one by one; when the
page is full, the programme will proceed to the next
page, and so on. The
the number of images to be placed on each page.
Clone This option is used for printing several copies of the
same image on a single page. The Images per Sheet
option defines the number of images to be placed on
each page.
Fit to Paper drop-down list box.
Images per Sheet option defines
Poster This option allows you to print a single image on several
pages. Later you will have to join them together to have
a whole printed image. The Target Size option selects
the size of the resulting image. Choose one of the
predefined sizes, or choose
overlap width and scaling factor using the Overlap and
Size(%) fields, respectively.
Custom and select the
6. To configure your printer, click Printer Setup on this window to bring
up a standard printer setup dialogue box.
7. Press
Copy to start the copying process. The document will be
scanned and scaled, and the desired number of copies printed.
Scan Wizard
2.13
Scanning to E-mail
Scanning a Document to E-mail
The Scan Wizard window contains the Scan to Email service which lets
you scan documents, and then launches the mail program currently
configured in your PC to send just scanned documents attached to an
e-mail.
If you activated the SmarThru e-mail service, the SmarThru e-mail
system runs to send the scanned documents. For details, see page 4.3.
To scan to e-mail, take the following steps:
1. Load a document(s) you want to send into your MFP.
2. Run the SmarThru 3 and then open the Scan Wizard. See page 1.4.
3. Select
Scan to Email in the Scan Wizard window.
Click.
2.14
Scan Wizard

Note:
If the system
is short of memory,
high resolution
scanning may not
be achieved. Lower
the resolution and
try again.
4. The Samsung Scan Manager for Email window opens. Specify the scan
settings. For more information on the scan settings, see page 2.7.
Choose scan settings.
Preview area
If you check this box, the scanned
image will be saved into the Incoming
folder of the Image Manager database.
5. Click the Scan button.
When scanning is complete, the scanned document is displayed in the
preview area. The mail program in your PC (e.g. MS Outlook) is then
automatically launched. If you activated the SmarThru e-mail service,
the following screen appears.
You’ll find the scanned
document is attached as an
image file format to the mail.
Scan Wizard
2.15

6. Fill in each field. For details on the controls of this window, see page
4.13.
7. When you are ready to send, click .
The message is automatically saved in the
Outgoing folder of the
Mailbox window.
For further details about working with e-mail messages in the
SmarThru system, see page 4.12.
2.16
Scan Wizard
 Loading...