

Page 1
Samsung Electronics 1-1
PROBLEM ITEMS TO BE CHECKED HOW TO SOLVE
6. REPAIR
6-1. SCANNER
Black data when
you scan or copy
Bright image
Dark image
Lamp blinks
Cannot turn on the
lamp
Overlapped or omitted image when you
scan or copy
Black in whole
when you scan or
copy
White lines when
you scan/copy.
Does the lamp operate normally while
shuttle module operates?
Check if white ref. panel is too dirty.
1. Is the lamp supplied with appropriate power when the scanner operates?
2. Does the output of module satisfy
specifications?
3. Does (-)Vref value satisfy specifications?
Check power of the lamp. (12V serial
connection)
Check the power of the lamp. (12V
serial connection)
Check scan connector on circuit board.
Check if screws of CR fixing part are
loose.
Check if LF connector is properly
connected.
Check the scanner of the main board.
Check scanner cable.
Check the scanner.
Check if there is foreign substances on
LABEL(P)-REFERENCE.
- Check module lamp.
- Check FPC of the main board & module.
(J1-1<=> CON2-1: LAMP ON)
- Check the path of the main board.
(U17[#10]->R185[1K]-Q8->R262->Q7> CON2[#1])
- Replace module.
- Replace the main board.
- Clean white ref. panel.
- Replace white ref. panel.
1. Check the lamp-on level of module
and the main board.(+11.75V/ + 5V)
(J1-1<=> CON2-1: LAMP ON)
2. Check video signal output of module
and main board.
3. Check (-) Vref value.
Replace FPC-SCAN connecting power
of the lamp.
Replace the scanner.
Check the power of the lamp.
Replace the scanner. Connect the
connector.
Screw down
Connect LF connector.
Replace the main board.
Replace FPC-SCAN.
Replace the scanner.
Wipe LABEL(P)-REFERENCE.
Page 2

1-2 Samsung Electronics
PROBLEM ITEMS TO BE CHECKED HOW TO SOLVE
6-2. SENSOR
Black data when
you scan/copy
CanÕt print/copy
with No Paper displayed
Does the carriage operate normally and
go to the initial place, when you turn it
on with the carriage placed in the
middle?
- Is No Paper cleared when you press
No Paper sensor on ASF?
- Does the level of CON7-#2 turn from
H to L when you press No Paper
sensor on ASF?
- Check connection between the sensor
board of the carriage and the main
and check if FPC cable is damaged.
- Check if FPC is connected properly
with CN1 of the sensor board.
- Check if the signal of the sensor is
delivered well to CN1-#2 of the sensor
board.
- Replace FPC cable.
- Replace the sensor board.
- Check connection with CON7 of the
main board.
- Replace No Paper sensor on ASF.
PROBLEM ITEMS TO BE CHECKED HOW TO SOLVE
6-3. PAPER FEED
Automatic sheet
feeder feeds paper
but paper is not supplied to the engine.
Automatic sheet
feeder cannot feed
paper.
CanÕt feed envelopes
Tilted Printing
- Check if actuator feed operates perfectly.
- Check if paper sensing optical sensor
is normal.
- Check if stopper clutch operates
perfectly.
- Check if too much paper has been
supplied.
- Check if pickup roller rubber of the
automatic sheet feeder is worn out.
- Check the location of the envelope
guide of automatic sheet feeder.
- Check if paper guide of the automatic
sheet feeder is adjusted to the size of
paper.
- Replace actuator feed, spring, or other
defective parts.
- Replace the paper sensing optical
sensor.
- Replace stopper clutch assembly.
- Supply appropriate amount of
paper(100 sheets of normal copying
paper).
- Replace pickup roller rubber.
- Open the envelope guide when you
feed envelopes.
- Adjust paper guide to the size of
paper.
Page 3
Samsung Electronics 1-3
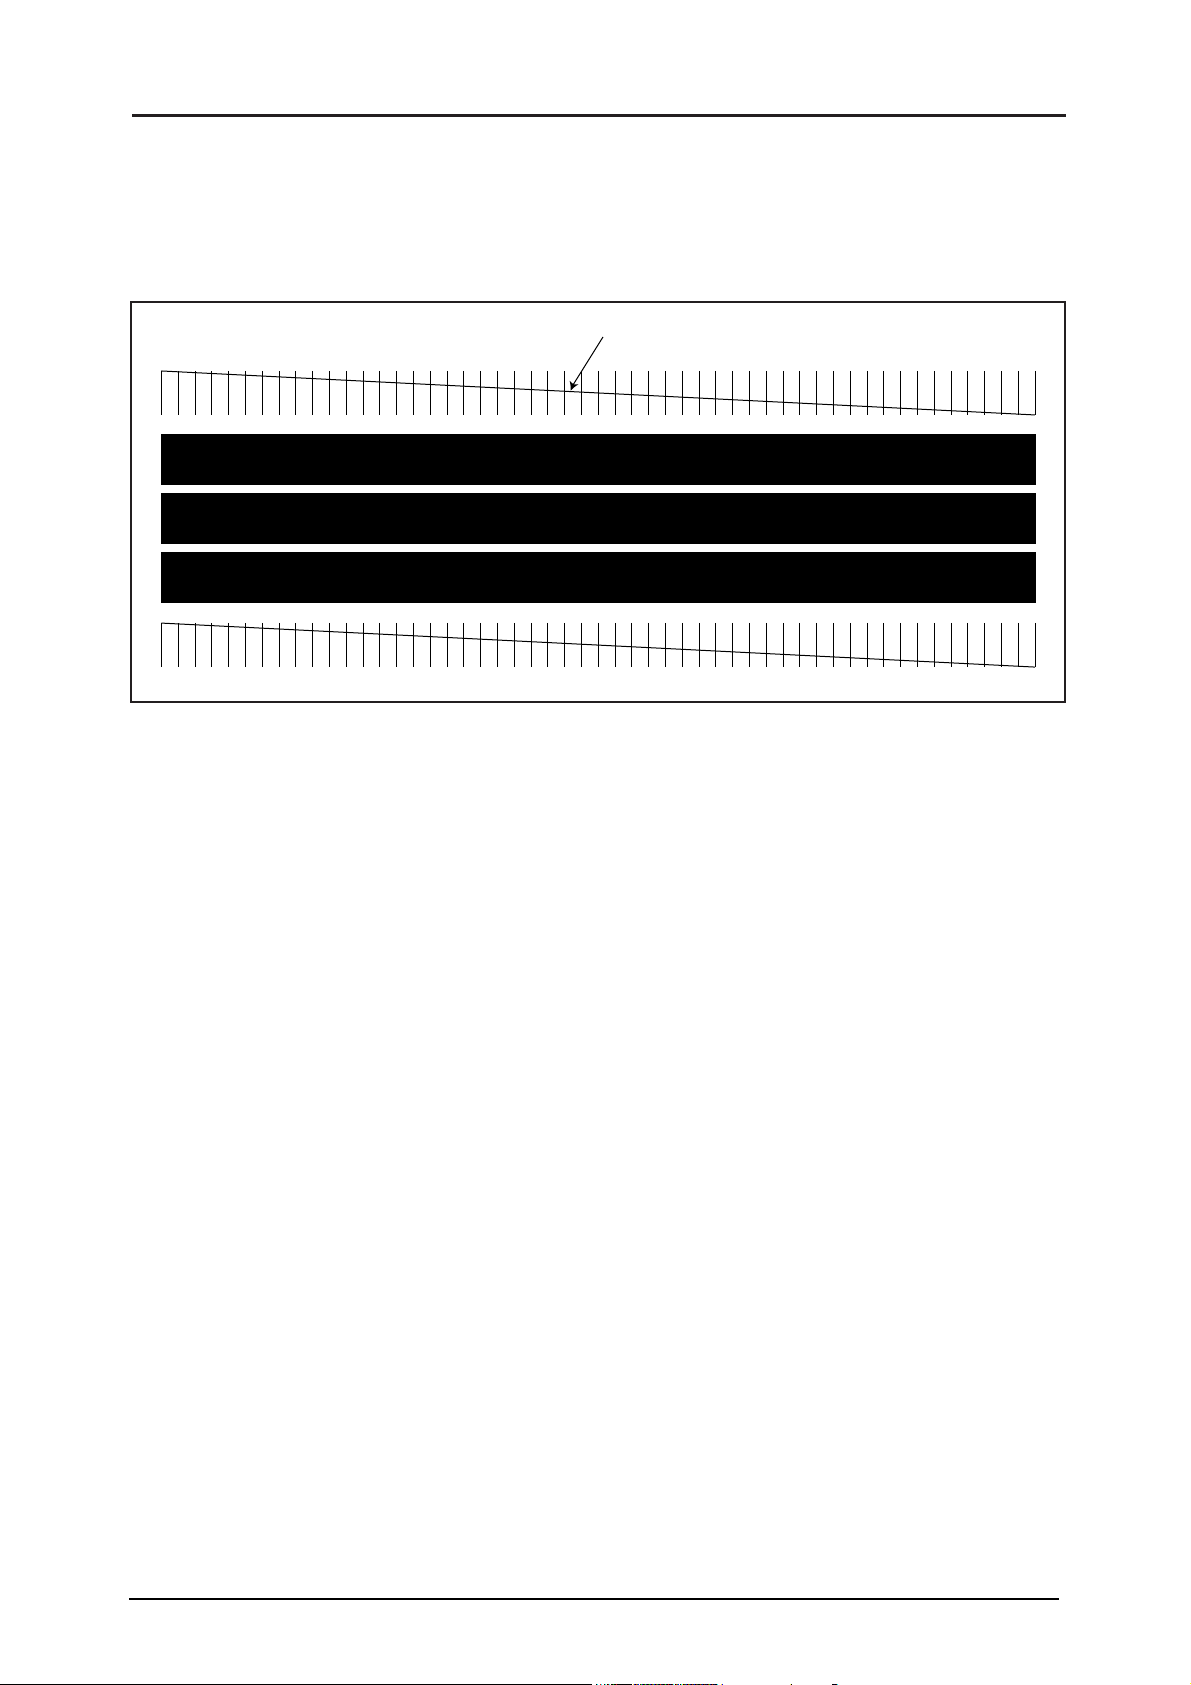
6-4-1 White lines on letters or graphics.
■ Cause
If nozzles in print head has a probkem, white lines are marked on the print.
ÔSelf-diagnostic printingÕ will let you know if nozzles have problems.
6-4. PRINTING QUALITY
If this line is broken, it confirms that
nozzles have problems.
■ Solution
1) Run Ôprint control panelÕ to Òclean cartridgeÓ and check if nozzles have been blocked.
2) Wipe with soft cloth the contact surfaces of ink cartridge and carriage, and check if nozzles have been
cleaned properly.
3) Separate ink cartridge from carriage and combine them. Repeat it about 5 to 6 times and check if connection is proper.
4) Replace ink cartridge and check whether thereÕs a problem with thehead.
5) Check if head cable is inserted well into the main circuit board and then check if nozzles have problems.
6) Check if head cable is broken or torn and then check if nozzles have problems.
7) Replace the main circuit board with a new one and check if nozzles have problems.
Page 4

1-4 Samsung Electronics
6-4-2 When perpendicular lines are printed crookedly
■ Cause : Perpendicular lines are printed crookedly if you do not Òalign perpendicular linesÓ on the
printer.
■ Solution
1) Run print control panel to Òalign perpendicular linesÓ, and
2) Select the best one of the above samples and enter the number.
3) This function to align perpendicular lines is available both for mono and color cartridges.
6-4-3 When ink spreads on transparent film
■ Cause : You selected a wrong medium on the driver or you did not use transparent film designated for
inkjet.
■ Solution
1) Use only transparent film designated for inkjet when you print on transparent film by an inkjet
printer.
2) Run ÒWindows driverÓ and select Òtransparent filmÓ as the kind of paper if you print on Windows.
12 3 45
6-5. Setting a PC BIOS to invoke ECP Mode
SMARTJET use ECP mode of Nibble mode when SMARTJET are transferring scanned data to a PC through
a centronics cable. Depending upon a parallel port connection (P1284) mode, scan speed of our unit can vary
in great deal, and sometimes unexpected problems like SIO chip detection problem might come up due to a
mode difference between a host PC and our unit.
When a PC is booting, a PC BIOS initializes the SIO chip of PC in parallel port and sets the mode of parallel
port. But when parallel port is set in a nibble mode, a SIO chip in some certain PCs prohibit PC software(the
twain driver) from changing the mode of parallel port. In order to enhance the speed of parallel port and to
solve some parallel port connection problems it is strongly recommended that the service man who has
encounterde these problems must set the parallel port connection(P1284) mode to a ECP mode in a PC BIOS.
Page 5
Samsung Electronics 1-5
PROBLEM ITEMS TO BE CHECKED HOW TO SOLVE
6-6. Defective Operation
ÒReadyÓ LED wonÕt
light up.
LF motor does not
operate.
CR motor does not
operate.
Paper Jam
Document Jam
No Paper
No Document
No Cartridge
Ink low
1. No Power?
2. VCC(+5V) ³ +4.5V?
3. U15-130(/POR) is HIGH? (+4.5V or
over)
4. U15-153(/RST_OUT) is HIGH? (+4V
or over)
1. Check control signal of U15-141 - 145.
2. Check driving output and input signal of U27 and U28.
1. Check control signal of U15-31 - 36.
2. Check driving output and input signal of U25 and U26.
Check sheet feeder and ejector.
Check manual document feeder.
1. No paper?
2. U17-24 is HIGH? (+4V or over)
1. No document?
2. U15-125 is HIGH? (+4V or over)
1. Check if ink cartridge is mounted.
2. Check contacted part of the head.
3. Check head checking circuit and driver.: Check U15-8,9,10,128,154,156,
U17-23 control signals and head data.
Check the amount of ink.
1. Check power(SMPS).
1) Cord connection
2) Check each power channel.
(+5V, +11.75V, +30V)
2. Check power.
3. Check the circuit around U16.
4. Check data bus of U15. Exchange the
main PBA.
1. Replace the main PBA if control signal is not generated though the other
functions of the system are normal.
2. Replace U27 and U28 if driving output is defective though input signal is
normal.
1. Replace the main PBA if control signal is not generated though the other
functions of the system are normal.
2. Replace U25 and U26 if driving output is defective though input signal is
normal.
Get rid of jammed paper.
Remove jammed documents and insert
it again.
1. Feed paper.
2. If high, replace the paper empty
sensor. If low, replace the main PBA.
1. Insert documents.
2. If high, check SEN1 and the surrounding circuit. If low, replace the
main PBA.
1. Mount ink cartridge.
2. Clean it.
3. Replace the main PBA.
Replace ink cartridge.
After replacing it, press Ôink replacementÕ key for over 3sec to inform the
system of new ink.
Page 6

1-6 Samsung Electronics
PROBLEM ITEMS TO BE CHECKED HOW TO SOLVE
CanÕt copy
CanÕt PRINT
1. Refer to Ôproblems of scanner.Õ
2. Poor quality of printed image : Print
test pattern and check if nozzles have
fallen out.
3. CanÕt print.: Check U17-34, 36 signals.(LOW ACTIVE)
1. Check centronics cable connection.
2. Is ÔStandbyÕ LED of the system on?
3. Check how print driver has been
installed.
4. Check I/F part of parallel port.
1) Check the initial state of print con-
trol signal of CON8.: No.1, 10 ~14,
31, 32, 36
2) Check input and output signal of
U14.
3) Check input and output signals of
U15-43~51 and U15-53~61.
5. Refer to 2 and 3 of 6-4 ÔPRINGTING
QUALITYÕ.
1. Check CON3(main PBA), main LIU
harness, and P1(LIU PBA).
2. 1) Is external telephone hooked off?
2) Output of U2-4(LIU PBA) is LOW?
3. Check HOOK-OFF. (Line connection):
U17-8(/CML1) is HIGH?
4. Check the signals of U15-122, 123.
5. Check transmission path: Check output of U21-44(main PBA) and input of
U3-3(LIU PBA).
6. Check reception path: Check output
of U3-40(LIU PBA) and input of
U21-45(main PBA).
1. Refer to Ôproblems of scanner.Õ
2. 1) Check contact between ink cartridge and the head.: Clean it.
2) Check print control signals of U151~10, U15-158 - 160, U15-12~19,
and U15-21~28. Check input and
output signals of U19,20,23, and
24. Replace the main PBA.
3. Replace the main PBA.
1. Connect it correctly.
2. Press ÔstandbyÕ key to keep the standby mode.
3. Install the print driver again and
reboot the system.
4. Replace the main PBA.
5. Refer to 2 and 3 of 6-4 ÔPRINGTING
QUALITYÕ.
1. Replace defective parts.
2. 1) Hook on external telephone
correctly.
2) If low, replace LIU PBA.
3. If low, replace main PBA. If it is
not hooked off though it is normal,
replace LIU PBA.
4. If the signals of U15-122(LIU_TXD)
are abnormal, replace main PBA. If
the signals of U15-123(LIU_RXD) are
abnormal, replace LIU PBA.
5. If it is abnormal, replace main PBA.
6. If the output of U3-40(LIU PBA) is
not confirmed, replace LIU PBA. If
the output of U3-40(LIU PBA) is confirmed but the input of U21-45(main
PBA) is not confirmed, check the
circuit around U6(main PBA).
Defective
Transmission
/ Reception
In case
PC
controls
Page 7
Samsung Electronics 1-7
PROBLEM ITEMS TO BE CHECKED HOW TO SOLVE
Automatic
Reception Failure
MF dial is possible
but not DP dial.
1. Check CON3(main PBA), main LIU
harness, and P1(LIU PBA).
2. Output of U2-4(LIU PBA) is HIGH?
(+4V or over)
3. Refer to 3,4,5 and 6 of ÔDefective
Transmission/ReceptionÕ in ÔIn case
PC controlsÕ.
1. Can you check ring? Check ring pattern of U17-18(main PBA).
2. Refer to ÔDefective Transmission/
ReceptionÕ.
1. Check the part around R2 and Q6 of
LIU PBA.
2. Check connection of R43 of LIU PBA.
1. Replace defective parts.
2. If high, check the surrounding circuit
and replace LIU PBA.
3. Refer to 3,4,5 and 6 of ÔDefective
Transmission/ReceptionÕ in ÔIn case
PC controlsÕ.
1. If not, replace LIU PBA.
2. Refer to ÔDefective Transmission/
ReceptionÕ.
1. Replace LIU PBA.
2. Replace LIU PBA.
PROBLEM ITEMS TO BE CHECKED HOW TO SOLVE
6-7. Other Problems
ÔInk LowÕ continues
to be displayed or
warning voice
sounds though ink
has been
replaced.
Printed color is
extremely different
from the color on
the screen of PC.
PC cannot check the
status of the printer.
Windows goes in
error and the computer gets down
after a diskette is
installed.
- Check if you reset ÔInk Low CounterÕ
when you replaced ink.
- Check by self diagnostic printing if
specific color ink is used up.
- Check if device driver has not been
installed or incorrectly installed.
- Check Ôvirtual memoryÕ of control
panel in the basic program group.
- Reset Ink Low Counter by pressing
Ôink replacementÕ button for more than
3 seconds when you replace ink using
the button.
- Reset Ink Low Counter by pressing
Ônew cartridge replacementÕ button
when you replace ink using PC.
- Replace color ink cartridge.
- Add Device=C: \ Myjet \ Mjtsr.exe to
Config.sys file and reboot the computer.
- Optimize PC memory by running
ÒMemmakerÓ.
- Press the 386 expansion icon of control
panel to change Ôvirtual memoryÕ from
temporary to permanent.
In case
you use
external
tele-
phones
Note) 1) Refer to 5. ÔCIRCUITÕ for the details about the signals mentioned above.
2) Unplug power cord and insert it again to cancel all operations (all operations being performed,
error, etc.) and initialize the system.
 Loading...