

Samsung SF4000, SF4100, SF4200 User Manual
Operator’s Guide
SAMSUNG FACSIMILE
SF4000/SF4100/SF4200
Please read this guide before you use this equipment.
0
0
0
0
0
0
0
0
0
0
0
0
0
0
0
0
0
0
0
0
0
0
0
0
0
0
0
0
0
0
0
0
0
0
0
0
0
0
0
0
J-Chapter 1(US) 4/16/98 8:23 AM Page 1

Thank You for Choosing Samsung
Thank you for choosing Samsung! Your new machine represents the very latest
technology. It is a full-featured, high-performance machine built to strict quality
standards set by Samsung
-
the highest in the industry. WeÕre proud to offer you a
product that will provide convenient, dependable service for years to come.
Important Safety Information
Always be careful when using the machine. To reduce the risk of fire, electrical shock,
and other injuries, keep these safety considerations in mind when installing, using,
and maintaining your machine:
¥ Stability. Place the machine on a secure, stable surface. The machine can cause serious
damage if it falls.
¥ Power Supply. Provide the correct power to the machine, as listed on its back. If you
arenÕt sure of the type of power thatÕs supplied to your home or office, call your
electric company.
¥ Grounding. If the plug has three prongs, it must be plugged into a grounded
(threehole) outlet. Grounded plugs and outlets are designed for your safety
-
donÕt try
to make a three-prong plug fit into a two-prong outlet by modifying the plug or outlet
in any way. If you canÕt insert the plug into your wall outlet easily, the outlet should
be inspected by a qualified electrician.
¥ Overload. DonÕt plug too many electrical devices into a wall outlet or extension cord.
An overloaded outlet is a fire and electrical shock hazard.
¥ Cleaning. Before cleaning the machine, unplug it from both the power outlet and the
telephone jack. Clean exposed parts with a soft cloth slightly dampened with water.
DonÕt use aerosol cleaners.
¥ Thunderstorms. Unplug electrical appliances during thunderstorms. Avoid using any
telephone (except a cordless model) during a thunderstorm, since thereÕs a small
chance you could get an electrical shock from lightning.
¥ Gas Leaks. Never use any telephone close to a gas leak. If you think gas is leaking,
call the gas company immediately, but use a telephone far away from the leak area.
A small electrical spark in the telephone could cause a fire.
J-Chapter 1(US) 4/16/98 8:23 AM Page 3

Chapter 1 Your New Machine
List of Features .................................................................................................................. 1.1
Parts ..................................................................................................................................... 1.2
Common Parts ................................................................................................................ 1.2
Familiarizing Yourself with Your New Machine .......................................................... 1.4
Front View ....................................................................................................................... 1.4
Rear View ........................................................................................................................ 1.5
Control Panel .................................................................................................................. 1.6
Fax Theory .......................................................................................................................... 1.8
Multi-function machine ................................................................................................ 1.9
Chapter 2 Installation and Setup
Choosing a Location ......................................................................................................... 2.1
Connections ........................................................................................................................ 2.1
Connection Diagram ..................................................................................................... 2.1
Handset and Handset Cradle ...................................................................................... 2.2
Document Tray ............................................................................................................... 2.3
Document Exit Tray ....................................................................................................... 2.4
Printer Exit Tray ............................................................................................................. 2.4
Telephone Line ............................................................................................................... 2.5
Extension Phone (Optional) ......................................................................................... 2.5
AC Power Cord .............................................................................................................. 2.5
Loading Paper .................................................................................................................... 2.6
Paper Type and Sizes ..................................................................................................... 2.7
Installing Print Cartridge ................................................................................................. 2.7
Print Cartridge Storage Unit (SF4100, SF4200) ........................................................ 2.10
Storing a Print Cartridge in the Storage Unit .......................................................... 2.10
Running Self-Test ............................................................................................................. 2.11
Connecting to Your PC (SF4100, SF4200) .................................................................... 2.13
Connecting SF4200 to Your PC .................................................................................. 2.13
Connecting SF4100 to Your PC .................................................................................. 2.14
Setting Up Printer (SF4100, SF4200) ............................................................................. 2.15
Installing the Windows Printer Driver Software .................................................... 2.15
Running Windows Printer Software ......................................................................... 2.17
Installing the DOS Printer Software ......................................................................... 2.19
Using the DOS Printer Software ................................................................................ 2.20
Making a Copy ................................................................................................................ 2.21
Setting the Date and Time ............................................................................................. 2.23
Setting the Terminal ID (Your Name and Number) .................................................. 2.25
Using the Keypad to Enter Letters ............................................................................ 2.27
Keypad Character Assignments ................................................................................ 2.28
Adjusting Ringer Volume ........................................................................................... 2.28
Selecting Tone or Pulse Service .................................................................................. 2.28
CONTENTS
C
ONTENTS
1
J-Chapter 1(US) 4/16/98 8:23 AM Page 4

CONTENTS
Chapter 3 Automatic Dialling
One-Touch Dialling ........................................................................................................... 3.1
Storing a Number for One-Touch Dialling ................................................................ 3.1
Dialling One-Touch Number ....................................................................................... 3.3
Speed Dialling .................................................................................................................... 3.4
Storing a Number for Speed Dialling ......................................................................... 3.4
Dialling a Speed Number ............................................................................................. 3.6
Group Dialling ................................................................................................................... 3.7
Storing One-touch or Speed Dial Numbers for Group Dialling ............................ 3.7
Using Group Dialling (Multi-address transmission) ............................................... 3.9
Searching for a Number in Memory (Directory Dialling) ........................................ 3.10
Searching Sequentially through Memory ................................................................ 3.10
Searching for a Particular First Letter ....................................................................... 3.11
Chapter 4 The Fax Machine
Sending a Fax ..................................................................................................................... 4.1
Acceptable Documents .................................................................................................. 4.1
Setting Document Resolution and Contrast .............................................................. 4.2
Loading Document ........................................................................................................ 4.3
Using Quick Scan ........................................................................................................... 4.4
Sending a Fax Automatically ....................................................................................... 4.4
Sending a Fax After Talking ......................................................................................... 4.5
Confirming Transmission ............................................................................................. 4.6
Cancelling Transmission ............................................................................................... 4.6
Automatic Redial .............................................................................................................. 4.6
Receiving a Fax .................................................................................................................. 4.7
Reception Modes ............................................................................................................ 4.7
Receiving in FAX Mode ................................................................................................ 4.8
Receiving in TEL/FAX Mode ...................................................................................... 4.8
Receiving in ANS/FAX Mode ..................................................................................... 4.9
Receiving Manually (in TEL Mode) ............................................................................ 4.9
Cancelling Reception ................................................................................................... 4.10
Using an Extension Telephone ................................................................................... 4.11
Recording Area ............................................................................................................. 4.11
Voice Request ................................................................................................................... 4.12
Sending a Voice Request ............................................................................................. 4.12
Answering a Voice Request ........................................................................................ 4.13
Chapter 5 Advanced Operations
Memory Transmission (Broadcasting) ........................................................................... 5.1
Delayed Transmission ...................................................................................................... 5.3
Polling ................................................................................................................................. 5.6
Being Polled By a Remote Machine ............................................................................ 5.6
Polling a Remote Machine ............................................................................................ 5.8
Adding Documents To a Standby Operation ............................................................... 5.9
Confirming the Operation Number ............................................................................ 5.9
Adding Document To a Standby Operation in Memory ....................................... 5.10
Cancelling a Standby Operation ................................................................................... 5.12
2 C
ONTENTS
J-Chapter 1(US) 4/16/98 8:23 AM Page 5

C
ONTENTS
3
CONTENTS
Chapter 6 Special Features
Using REDIAL/PAUSE .................................................................................................... 6.1
Using TONE (Switching from Pulse to Tone) ............................................................... 6.2
Using FLASH (on a PABX system) ................................................................................. 6.3
Chain Dialling a Memory Number ................................................................................ 6.4
Help List ............................................................................................................................. 6.5
Dual Access ........................................................................................................................ 6.5
User Reports ....................................................................................................................... 6.6
Selectable Reports .......................................................................................................... 6.6
Printing Reports ............................................................................................................. 6.6
User Options ...................................................................................................................... 6.8
Setting an Option ........................................................................................................... 6.8
Selectable Options .......................................................................................................... 6.9
Clearing Memory ............................................................................................................ 6.11
Chapter 7 Care and Maintenance
Cleaning the Document Scanner .................................................................................... 7.1
Printer Cartridge Maintenance ....................................................................................... 7.3
Check Ink Level ................................................................................................................. 7.3
Run Nozzle Test ................................................................................................................. 7.5
To run the nozzle test .................................................................................................... 7.5
Wiping the Print Nozzles and Contacts ........................................................................ 7.7
Cleaning the Cartridge Carrier Contacts and Deflector .......................................... 7.8
Replacing the Print Cartridge ....................................................................................... 7.10
Chapter 8 Troubleshooting
Clearing Jams ..................................................................................................................... 8.1
Document Jams During Transmission ........................................................................ 8.1
When to Replace Parts for Automatic Document Feeding ...................................... 8.1
Paper Jams During Printing ......................................................................................... 8.2
LCD Error Messages ......................................................................................................... 8.4
Fixing Problems ................................................................................................................. 8.7
Fax Problems .................................................................................................................. 8.7
Print Quality Problems ................................................................................................. 8.9
Printing Problems ........................................................................................................ 8.10
Paper Feeding Problems ............................................................................................. 8.11
Specifications ................................................................................................................... 8.12
General .......................................................................................................................... 8.12
Fax .................................................................................................................................. 8.12
Printer ............................................................................................................................ 8.13
J-Chapter 1(US) 4/16/98 8:23 AM Page 6

Chapter One
YOUR NEW MACHINE
J-Chapter 1(US) 4/16/98 8:23 AM Page 7

Chapter One
YOUR NEW MACHINE
This chapter will familiarize you with your new MultiJet machine.
List of Features
SamsungÕs MultiJet machines were designed using the latest technology. The machines
are full-featured, high-performance machines that not only meet, but exceed, industry
standards. The following is a list of their many exciting features:
¥ Stand-alone, full-function plain-paper fax machine
¥ Convenient copier
¥ Single/multi-page copy up to 99 pages
¥ Multi-tasking capability
¥ 20 One-Touch and 50 Speed-Dialling locations
¥ Group Dialling
¥ Ring volume adjustment
¥ Choice of tone or pulse dialling
¥ Choice of four reception modes
¥ Transmission confirmation
¥ Memory/Delayed Transmission, Voice Request, and Polling features
¥ Extension telephone jack and external answering machine interface
¥ Special Help features
¥ Single/multi-redial features
¥ Printed reports and lists
¥ Quick Scanning
¥ High speed PC-printer features (for SF4100, SF4200)
¥ Windows driver supplied (for SF4100, SF4200)
¥ Printing support for DOS applications (for SF4100, SF4200)
¥ Powerful print quality enhancement technology (for SF4100, SF4200)
¥ True color printing (for SF4100, SF4200)
¥ TWAIN standard compatible PC-scanning feature (for SF4200)
¥ PC-faxing by class 1 interface (for SF4200)
¥ The bundled PC application package supplied (for SF4200)
C
HAPTER ONE : YOUR NEW MACHINE
1.1
J-Chapter 1(US) 4/16/98 8:23 AM Page 1.1
YOUR NEW MACHINE
1.2 C
HAPTER ONE : YOUR NEW MACHINE
1
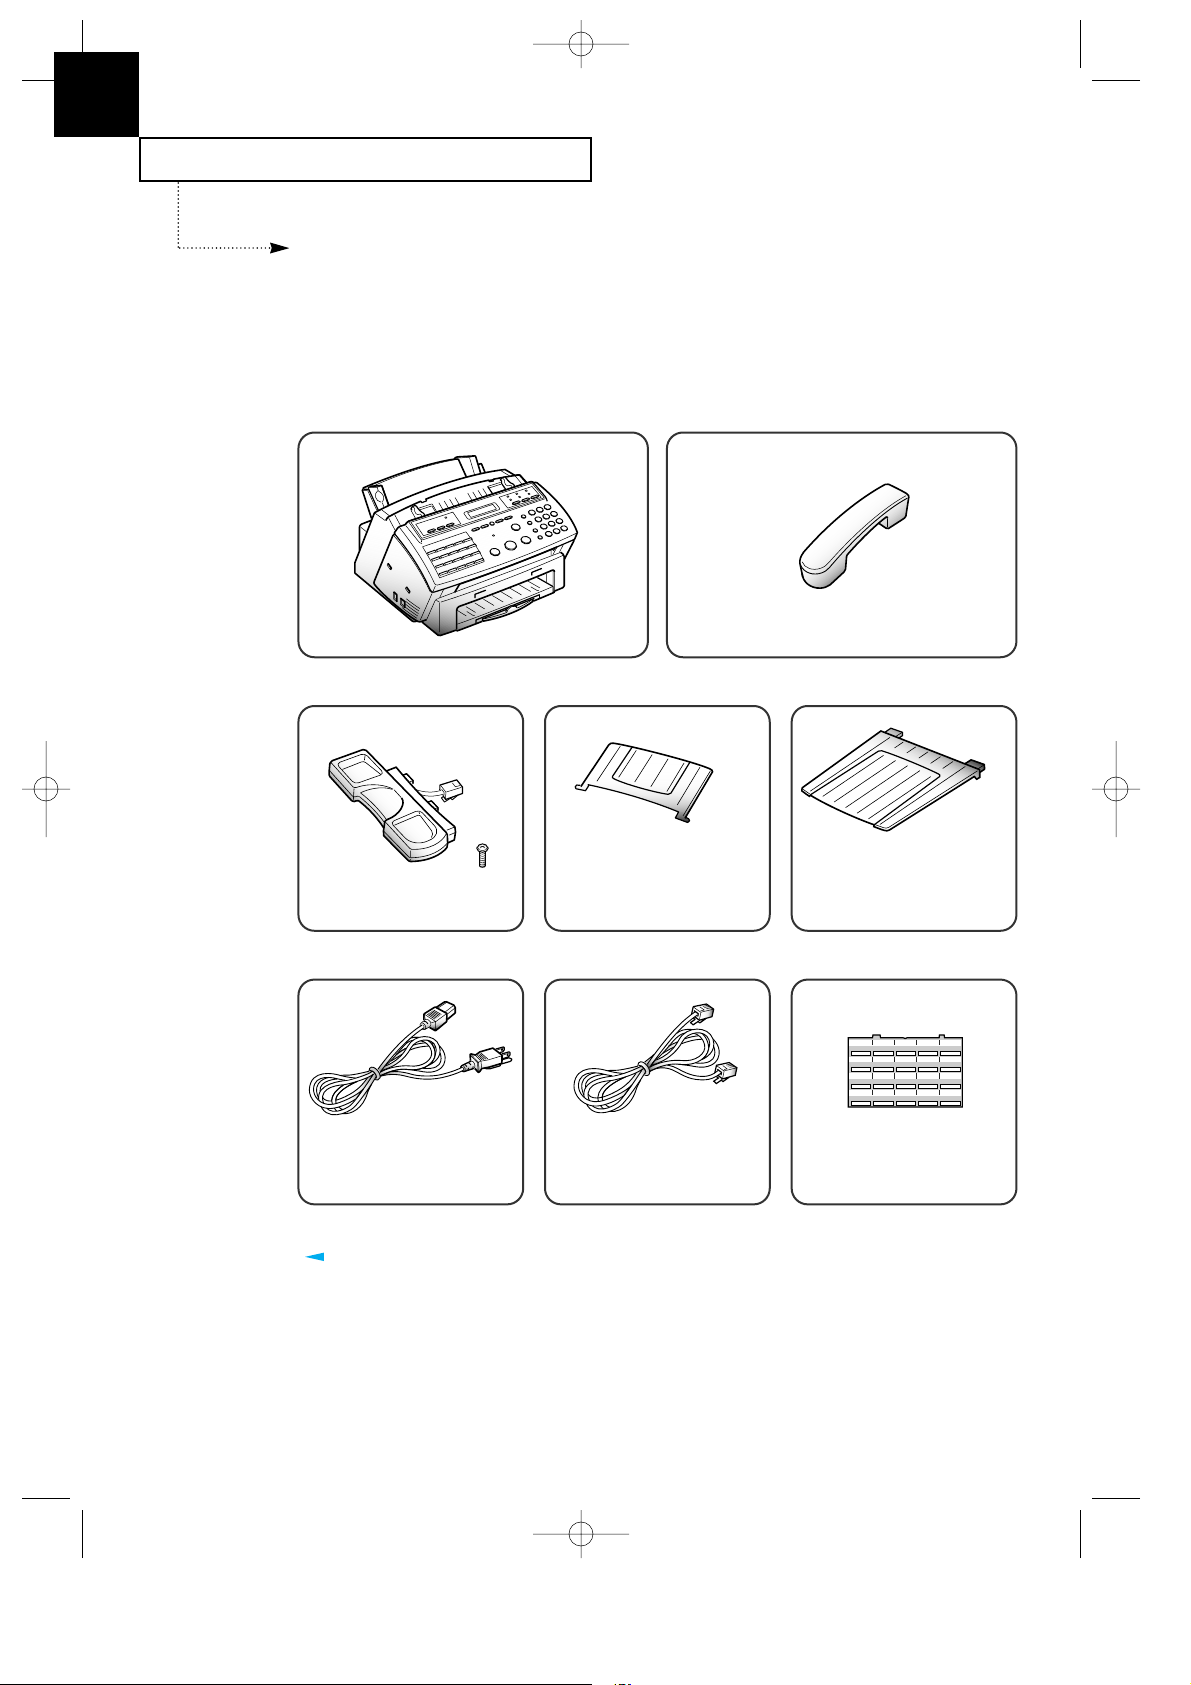
Parts
Once you have unpacked your MultiJet machine, check to make sure that you have all
the parts shown here. If any piece is missing or broken, call your dealer.
Common Parts
Machine
Handset
Cradle & Screw
Document Exit TrayDocument Tray
01
02 03 04 05
06
07 08 09 10
11
12 13 14 15
16
17 18 19 20
AC Power Cord
Address LabelTelephone Line Cord
The shape of power and telephone line cord plugs may differ, depending on your country.
J-Chapter 1(US) 4/16/98 8:23 AM Page 1.2
YOUR NEW MACHINE
C
HAPTER ONE : YOUR NEW MACHINE
1.3
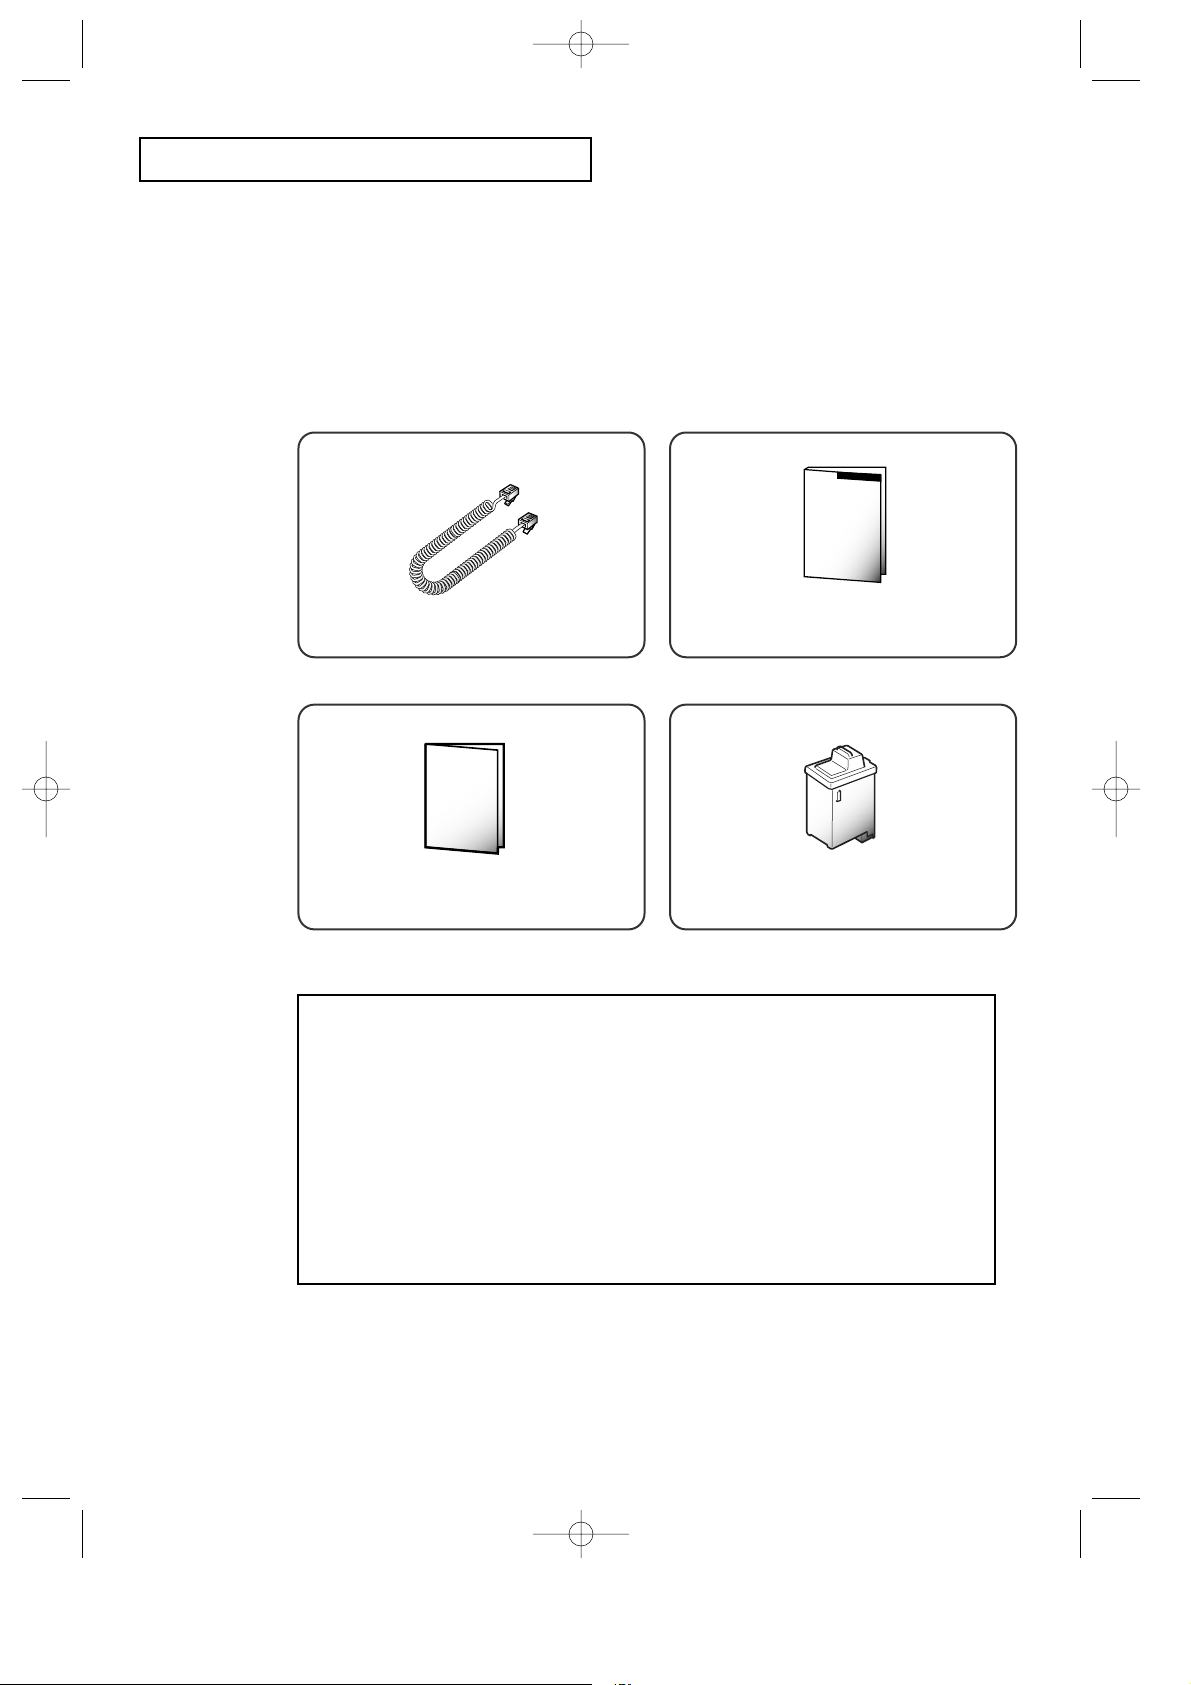
Quick Reference Guide
This Manual
Others
¥ Color Print Cartridge (supplied for SF4200, option for SF4100)
¥ Printer Setup Diskette (supplied for SF4100, SF4200 only)
¥ Print Cartridge Storage Unit (supplied for SF4100, SF4200 only)
¥ WinFaxLITE Setup Diskettes (supplied for SF4200 only)
¥ Manual for WinFaxLITE (supplied for SF4200 only)
¥ Parallel Printer Cable (supplied for SF4100, SF4200 only)
¥ RS-232C Serial Cable (supplied for SF4200 only)
Coiled Handset Cord
Mono Print Cartridge
J-Chapter 1(US) 4/16/98 8:23 AM Page 1.3
0
0
0
0
0
0
0
0
0
0
0
0
0
0
0
0
0
0
0
0
0
0
0
0
0
0
0
0
0
0
0
0
0
0
0
0
0
0
0
0
YOUR NEW MACHINE
1.4 C
HAPTER ONE : YOUR NEW MACHINE
1
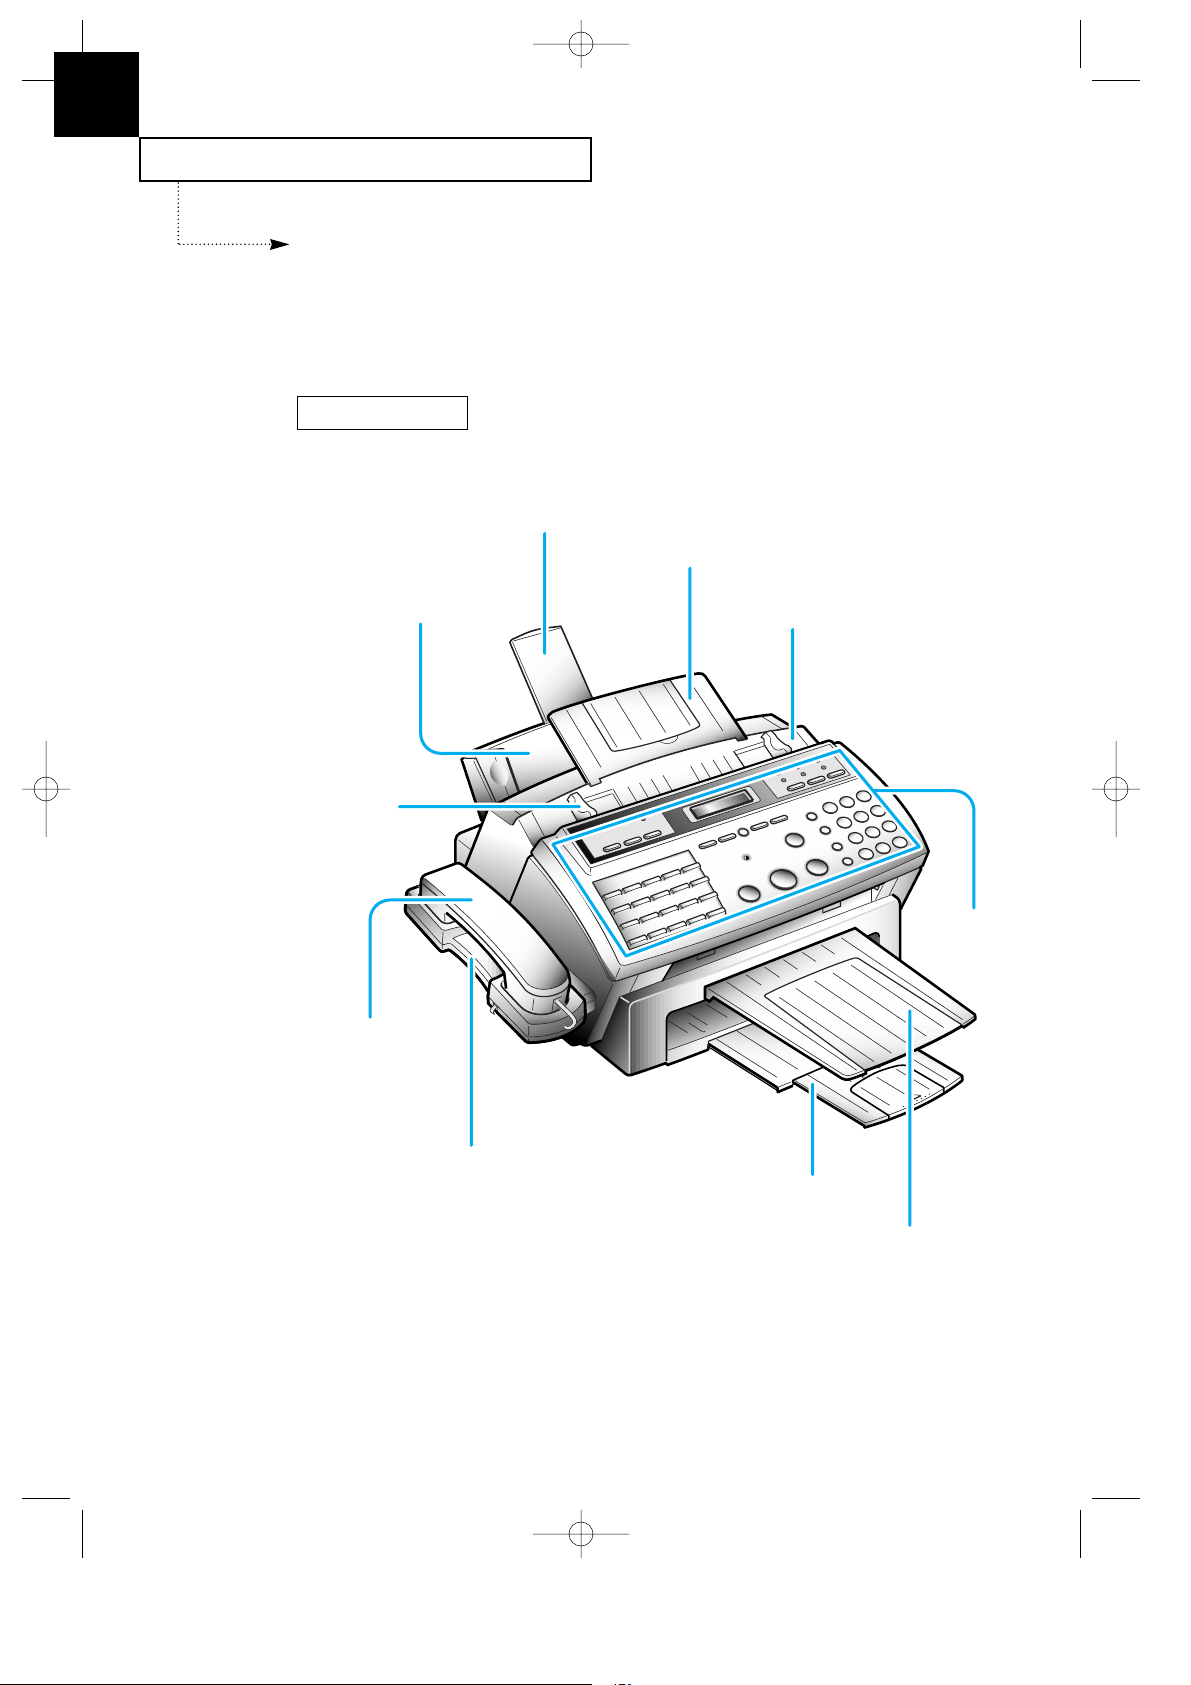
Familiarizing Yourself with Your New
Machine
Take a moment to familiarize yourself with your new machine by looking at the pictures
on the next few pages.
Paper Support
Document Tray
Top Cover
Paper Bin
Document
Guide
Handset
Handset Cradle
Printer Exit Tray
Document Exit
Tray
Control
Panel
Front View
J-Chapter 1(US) 4/16/98 8:23 AM Page 1.4
YOUR NEW MACHINE
C
HAPTER ONE : YOUR NEW MACHINE
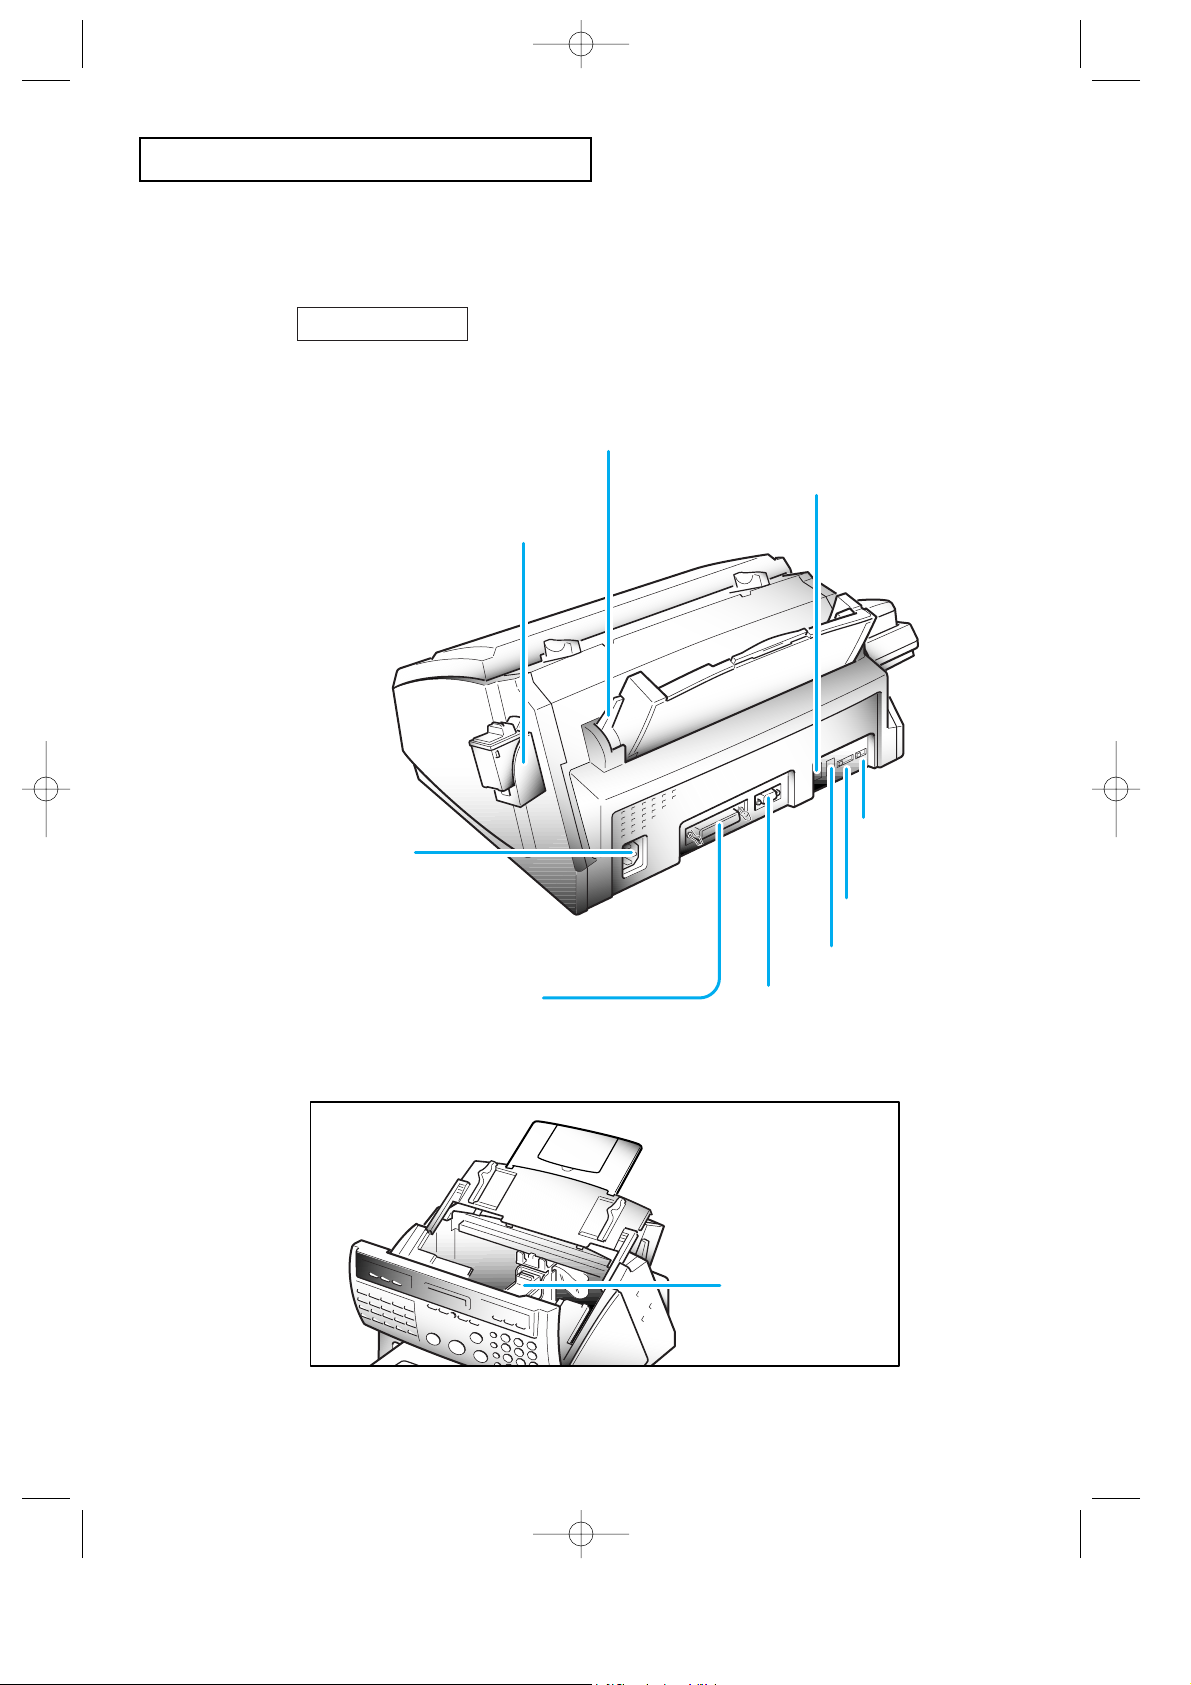
1.5
Paper Load Lever
Tel. Line Jack
Ext. Line Jack
Serial Cable Connector
(for SF4200 only)
Dial mode switch
Ringer volume switch
Parallel Printer
Cable Connector
(for SF4100, SF4200 only)
AC Power
Socket
Print Cartridge
Print Cartridge
Storage Unit
(for SF4100, SF4200 only)
Rear View
J-Chapter 1(US) 4/16/98 8:23 AM Page 1.5

SEARCH/DELETE
ALARM
BUSY
FORM FEED
CARTRIDGEPRINTER RESET
01 02 03 04 05
STOP
OHD/V.RCOPY
START/
ENTER
01 02 03 04 05
06 07 08 09 10
11 12 13 14 15
16 17 18 19 20
MEMORY TX.
SET
DELAY TX. POLLING ADD/CANCEL SELF-TEST
GROUP DIAL SYSTEM ID DATE & TIME OPTION
TX. CONFIRM STANDBY DIAL LIST OPTION JOURNAL
HELP LIST
PRINT
Q.SCAN
YOUR NEW MACHINE
1.6 C
HAPTER ONE : YOUR NEW MACHINE
1
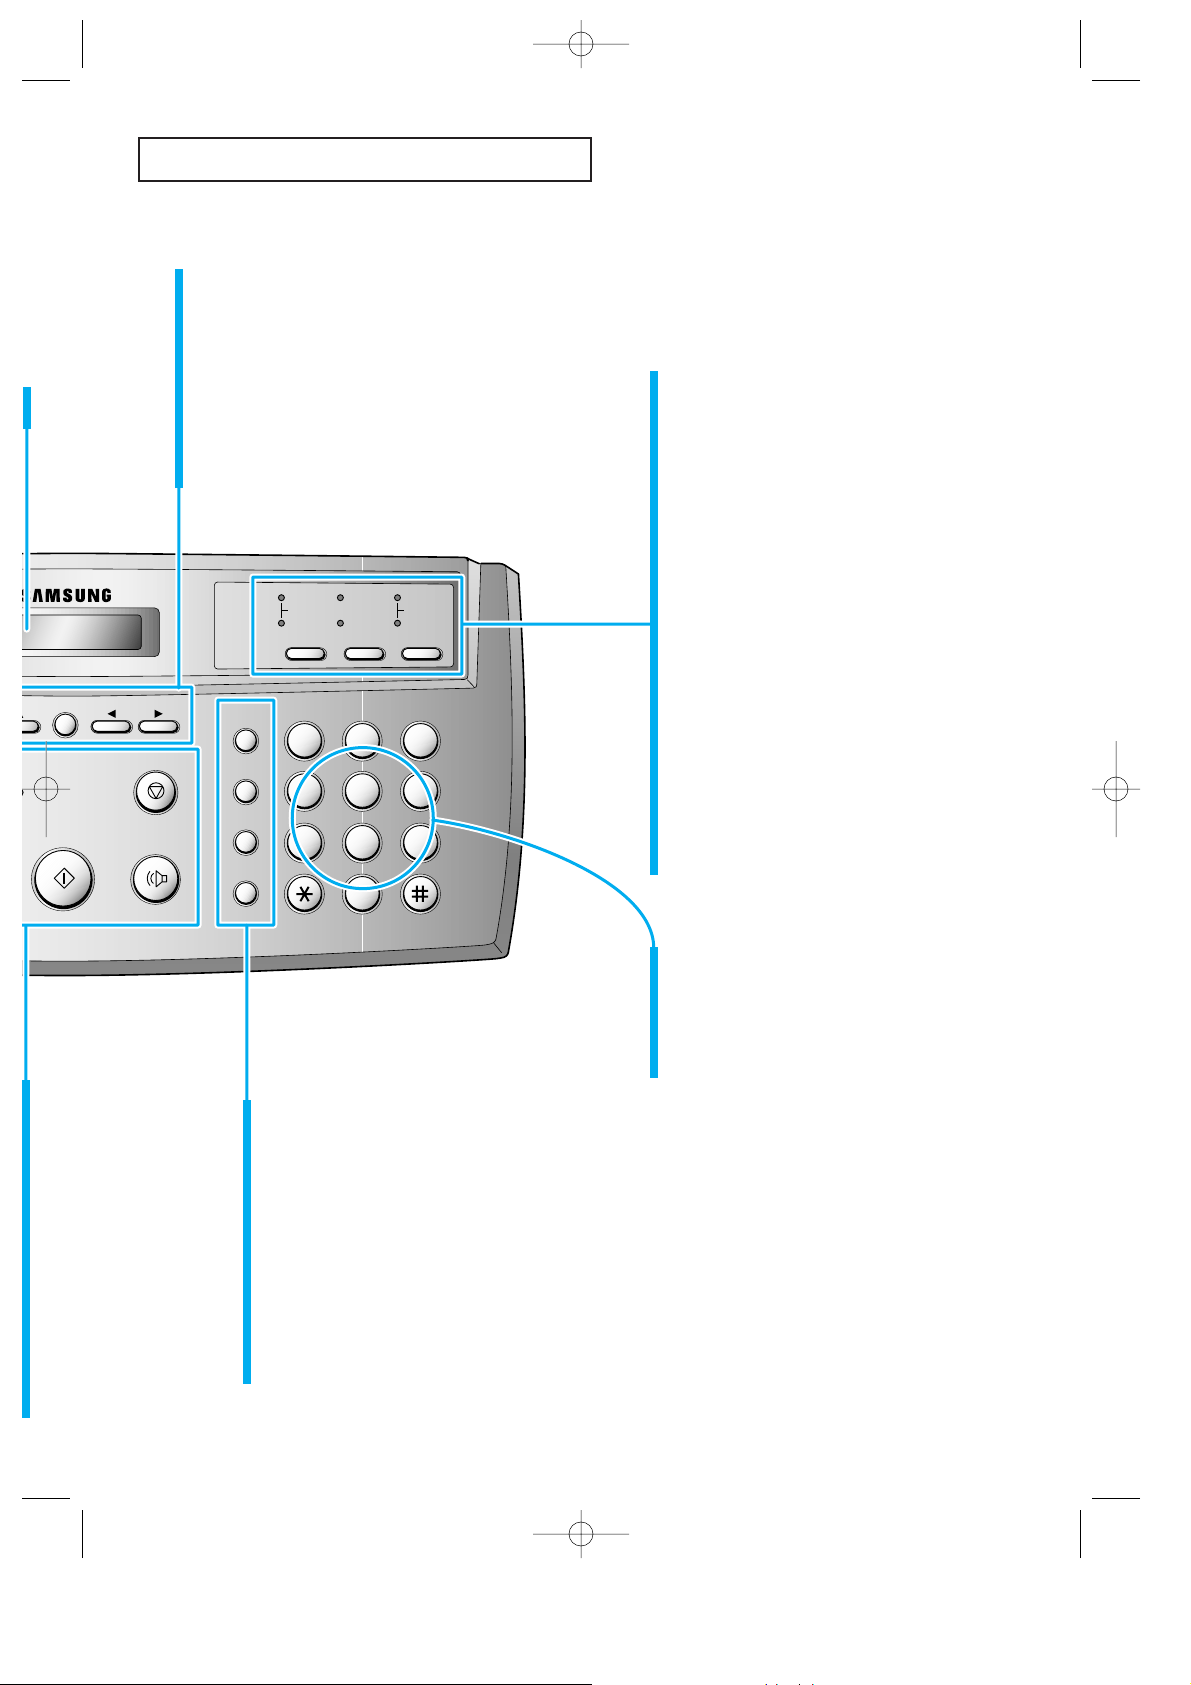
BUSY Lamp
(for SF4100, SF4200 only)
Lights while printing a PC file.
PRINTER RESET Button
(for SF4100, SF4200 only)
Use to reset the machine from paper
jam and catastrophic printer error.
CARTRIDGE Button
Use when replacing the print
cartridge. This button permits you to
position the print cartridge carrier so
that you may easily remove or
replace the print cartridge.
FORM FEED Button
(for SF4100, SF4200 only)
Use to eject paper from the
printer if the paper is not
fed out after printing is
completed. Also, use to load
paper in place when the paper
has run out while PC printing.
One-Touch Dial and
special function Buttons
Use to call most frequently used
numbers with one button. Also, use
these buttons with MENU button to
set special functions or print lists.
LCD Display
Displays information.
COPY Button
Use to copy a document.
START and ENTER Button
Use to start a job. Also use to confirm the
selection made in the display.
OHD (On-Hook Dial) and V.REQ (Voice Request) Button
Use to dial numbers without picking up the handset. Also use
it to make a voice call after sending and receiving documents.
STOP Button
Use to stop an operation at any time.
ALARM Lamp
Lights when something is wrong during fax
communication. It flickers when a printer error occurs.
Control Panel
I-Control Panel(US) 4/16/98 8:26 AM Page 2
32
PQRS
GHI
ABC
MENU
SEARCH/DELETE
STOP
OHD/V.REQ.
START/
ENTER
FLASH
SPEED
/DUAL
REDIAL/
PAUSE
DEF
JKL MNO
TUV WXYZ
RCV.MODE
FAX
ANS/FAX
TEL/FAX
FINE
S. FINE
LIGHTEN
PHOTO
DARKEN
RESOLUTION CONTRAST
1
465
798
0
and¹(down/up) Buttons
Use to display or the next or last menu item.
SEARCH/DELETE Button
Use to search for a number in memory.
Or use to delete digits in the edit mode.
Ã
and¨(left/right) Buttons
Use to move cursor right or left through the display.
RCV.MODE (Receive Mode) Button
Use to choose which receive mode you
want to use. The lamps will light up to
show you which setting you have
chosen. When both lamps light up,
you are in ANS/FAX mode. When no
lights are showing, you are in TEL
mode.
RESOLUTION Button and Lamps
Use to choose the resolution.
The lamps will light up to show you
which setting you have chosen.
When no lights are showing, you are
in STANDARD mode.
CONTRAST Button and Lamps
Use to choose the contrast of copied
or transmitted documents. The lamps
will light up to show you which
setting you have chosen. When both
lamps light up, you are in PHOTO
mode.
MENU Button
Use to choose special functions.
FLASH Button
Use this to transfer a call in a PABX (Private Automatic Branch
Exchange).
SPEED/DUAL Button
Use to make calls and send documents by entering a 2-digit
number. Also use it to confirm dual operation.
REDIAL/PAUSE Button
Use this to redial the last phone number you called. You can also
use it to add a pause when you store a number in memory.
Number Keypad
Use to dial numbers manually.
∗
Button
Press to temporarily switch from pulse
to tone dialling.
YOUR NEW MACHINE
C
HAPTER ONE : YOUR NEW MACHINE
1.7
I-Control Panel(US) 4/16/98 8:26 AM Page 3
YOUR NEW MACHINE
1.8 C
HAPTER ONE : YOUR NEW MACHINE
1
Fax Theory
Thank you for your purchase of this SAMSUNG multi-function fax machine. We want
you to get maximum use from your new equipment, therefore we would like to explain a
little bit about FAX machines and how they work. This will help when reading the rest of
this manual and becoming acquainted with FAX machines in general, plus all the
features available with your new machine.
Most people donÕt realize it, but the fax machine has been around in various forms since
the time of the invention of the telegraph in the mid-nineteenth century. Early fax
machines were large, slow, and difficult to operate. Equipment and techniques for
sending copies of documents across long distances have improved over the years, and
todayÕs fax machine is small, fast, and easy to operate.
A fax machine may appear complex, but in reality, modern fax machines are merely a
combination of several very familiar machines.
First of all, faxing makes use of processes very much like an office copier. When you
send a fax document to someone, the machine makes an internal copy of it (a facsimile,
hence the term ÒfaxÓ), and converts that copy to electronic signals which we call ÒdataÓ.
The data is then sent out over the telephone line as a series of audible tones. When you
receive a fax from someone else, the copy process simply converts these tones from the
telephone line back to data, and then to printed output.
Fax machines depend very much on telephone technology, since they must dial
telephone numbers, answer calls, and exchange fax data (their version of ÒspeechÓ) over
the phone line with other fax machines.
To send a fax document, you tell the fax machine the telephone number to call by
entering the number on a Touch-Tone keypad, just like a telephone. You may also store
frequently-called numbers in the machineÕs various memory locations. This makes
dialling faster, more accurate, and allows your machine to ÒrememberÓ telephone
numbers for performing many automatic functions.
After dialling the number, the fax machine you are calling answers the call and, just as
people do, the machines introduce themselves and make sure they have compatible
features and speak the same ÒlanguageÓ (fax engineers call this process ÒhandshakingÓ).
The machines also determine the quality of the sound over the telephone line and decide
whether they should continue, or perhaps ÒtalkÓ slower in the case of noise or low
volume. They may even refuse to speak to each other and will hang up, rather than
waste time when it is not possible to have a ÒconversationÓ (just like people!). In this
case, they often try the call again later, when the telephone connection may be better.
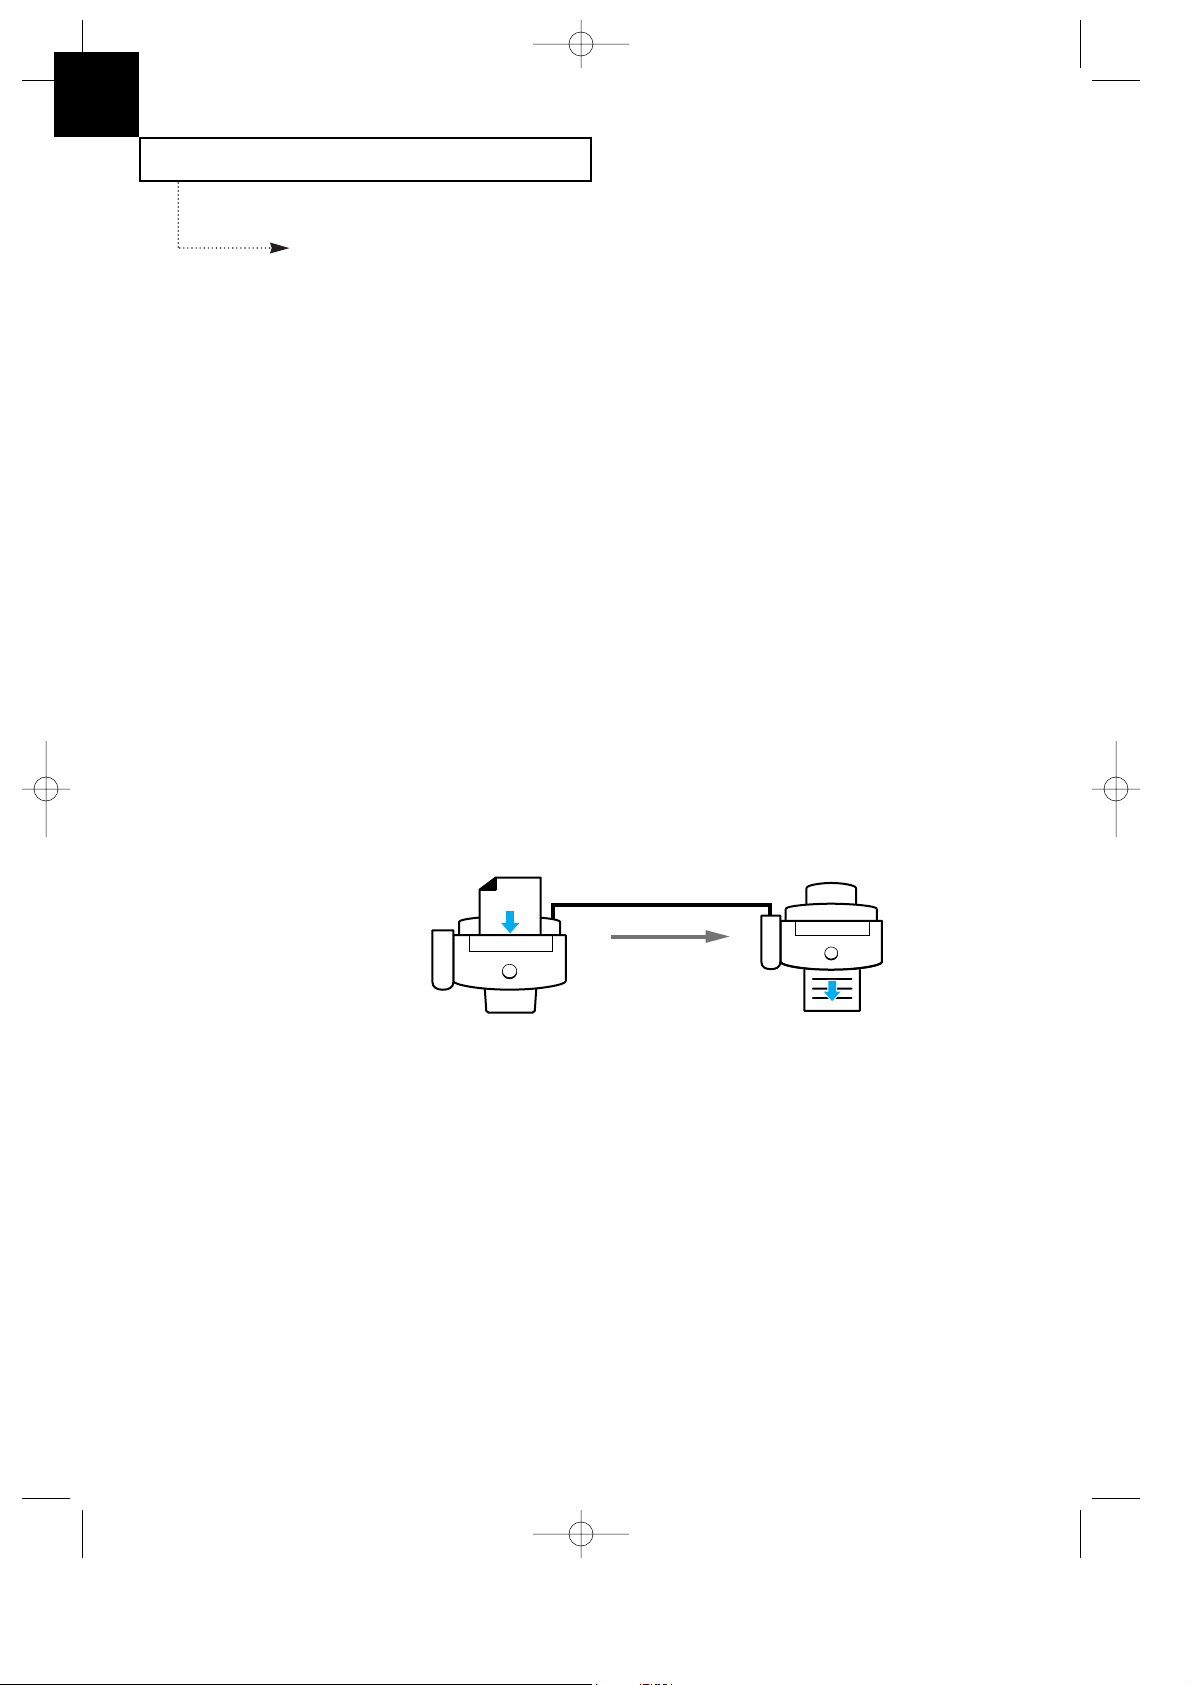
Basic FAX Operation
TELEPHONE LINE
SEND
DOCUMENT
RECEIVE
DOCUMENT
FAX MODE
J-Chapter 1(US) 4/16/98 8:24 AM Page 1.8
YOUR NEW MACHINE
C
HAPTER ONE : YOUR NEW MACHINE
1.9
After a few seconds exchanging pleasantries (handshaking), the machines decide to get
down to the business of the call: sending and receiving a fax document.
A fax document is one or more sheets of paper which have been placed in the
transmitting (sending or TX) machine. As soon as the machines have finished with their
ÒintroductionsÓ, the document begins to move through the transmitting machine where
it is read and converted to a data signal, exactly as in a copier. The difference here is that
the print mechanism of the copying process is not located in the same machine as the
reading mechanism. It is several miles, or even several thousand miles, away, and prints
the data signals which arrive over the telephone line in the form of tones.
As far as it goes, this description of the fax process is accurate, and should be kept in
mind whenever using any fax machine.
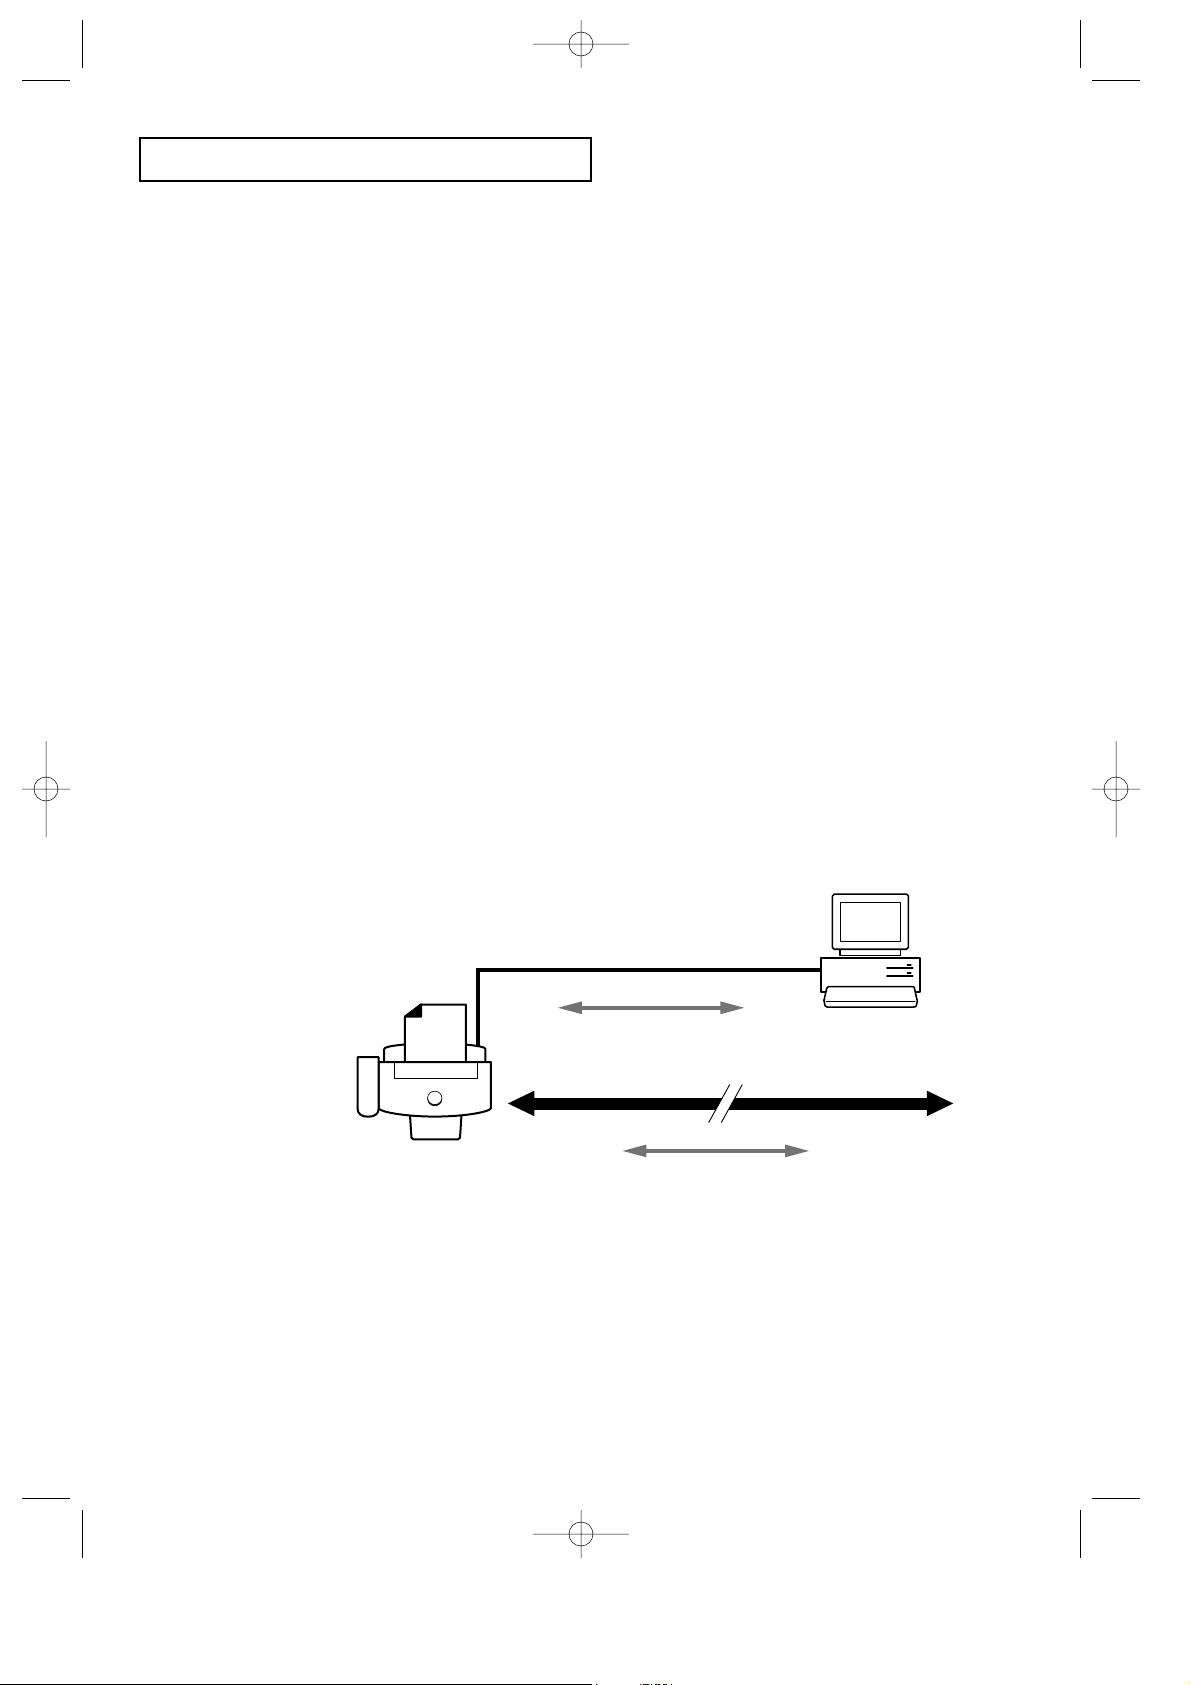
Multi-function machine
But...your new SAMSUNG multi-function machine provides features far beyond those of
the basic fax. The multi-function fax machine package, consisting of the SF4100 or SF4200
series fax machine and the software for your PC, are designed to work together to
effectively combine the utility of the fax machine with the power of the Personal
Computer, thus providing a spectrum of useful features not possible with either unit
alone.
Your PC utilizes the SAMSUNG multi-function machine as an input and output device,
very much like any other attachment you may currently have connected to your
computer. This package will enable you to scan text and graphic documents and store or
edit them in your PC. You may also print any document contained in your PC, in color,
on your multi-function machine.
Additionally, your PC serves as a versatile control unit for your multi-function machine.
You will see how to receive faxes directly into your PC, send documents directly from
word processing or graphics applications, even control your multi-function machine
remotely, a very useful feature when traveling out of the office to other locations.
The remainder of this manual will show you how to use each of these features to save
time and money.
INTERFACE CABLE
TELEPHONE LINE TO REMOTE FAX MACHINE
CONTROL
SIGNALS
FAX DATA
Multi-function machine operation
J-Chapter 1(US) 4/16/98 8:24 AM Page 1.9

Chapter Two
INSTALLATION AND SETUP
G-Chapter 2(US) 4/16/98 8:30 AM Page 1
Chapter Two
INSTALLATION AND SETUP
Please review the safety informations at the front of this manual, then follow the
directions in this chapter to connect your machine and set it up for use.
Choosing a Location
To help guarantee trouble-free operation of your machine, place it in a spot where:
¥It is not in direct sunlight or in excessive humidity.
¥It is not too close to heating or air conditioning vents.
¥Its ventilation openings arenÕt blocked.
¥It is at least 4 inches away from other objects.
¥Its cords wonÕt get in the way.
¥It canÕt be easily knocked off a table or dropped.
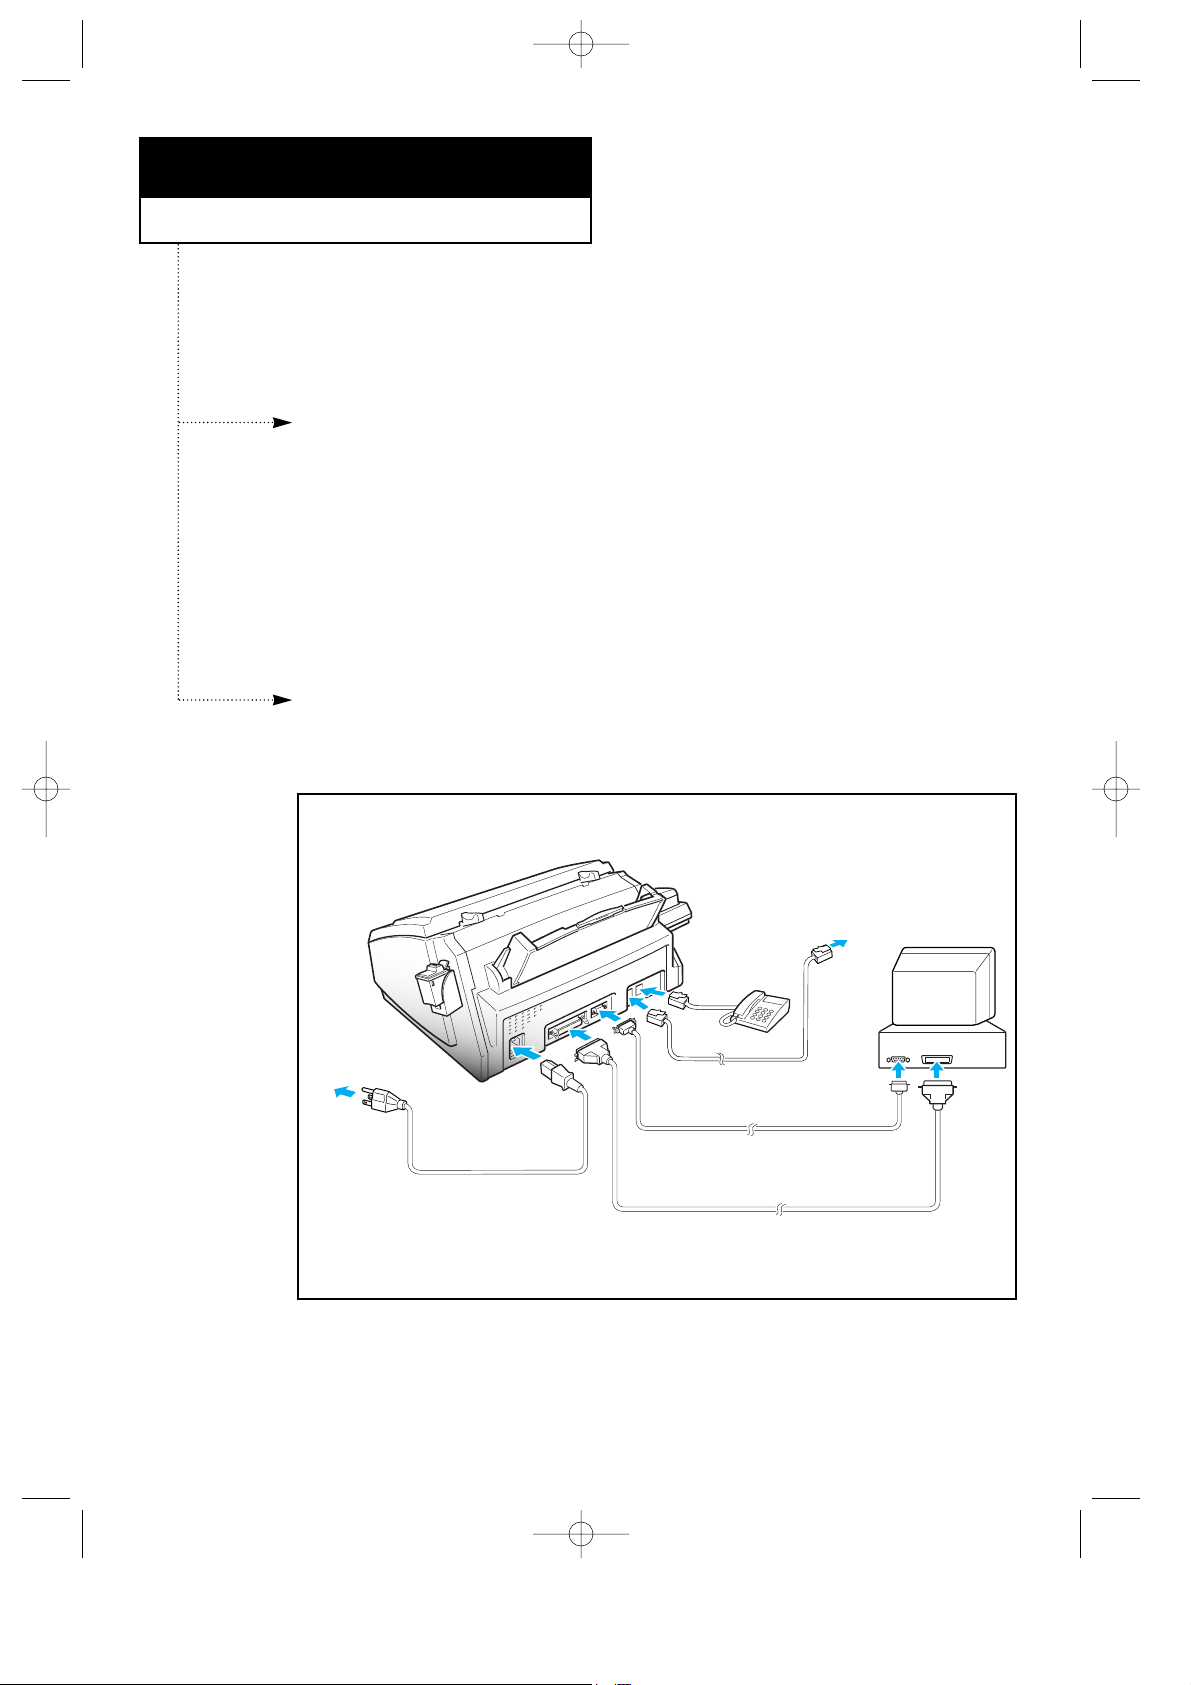
Connections
Connection Diagram
C
HAPTER TWO : INSTALLATION AND SETUP
2.1
Extension
phone
PC
Phone line cord
RS232-C serial cable
(SF4200)
Parallel printer cable
(SF4100/SF4200)
AC power cord
G-Chapter 2(US) 4/16/98 8:30 AM Page 2.1
INSTALLATION AND SETUP
2.2 C
HAPTER TWO : INSTALLATION AND SETUP
2
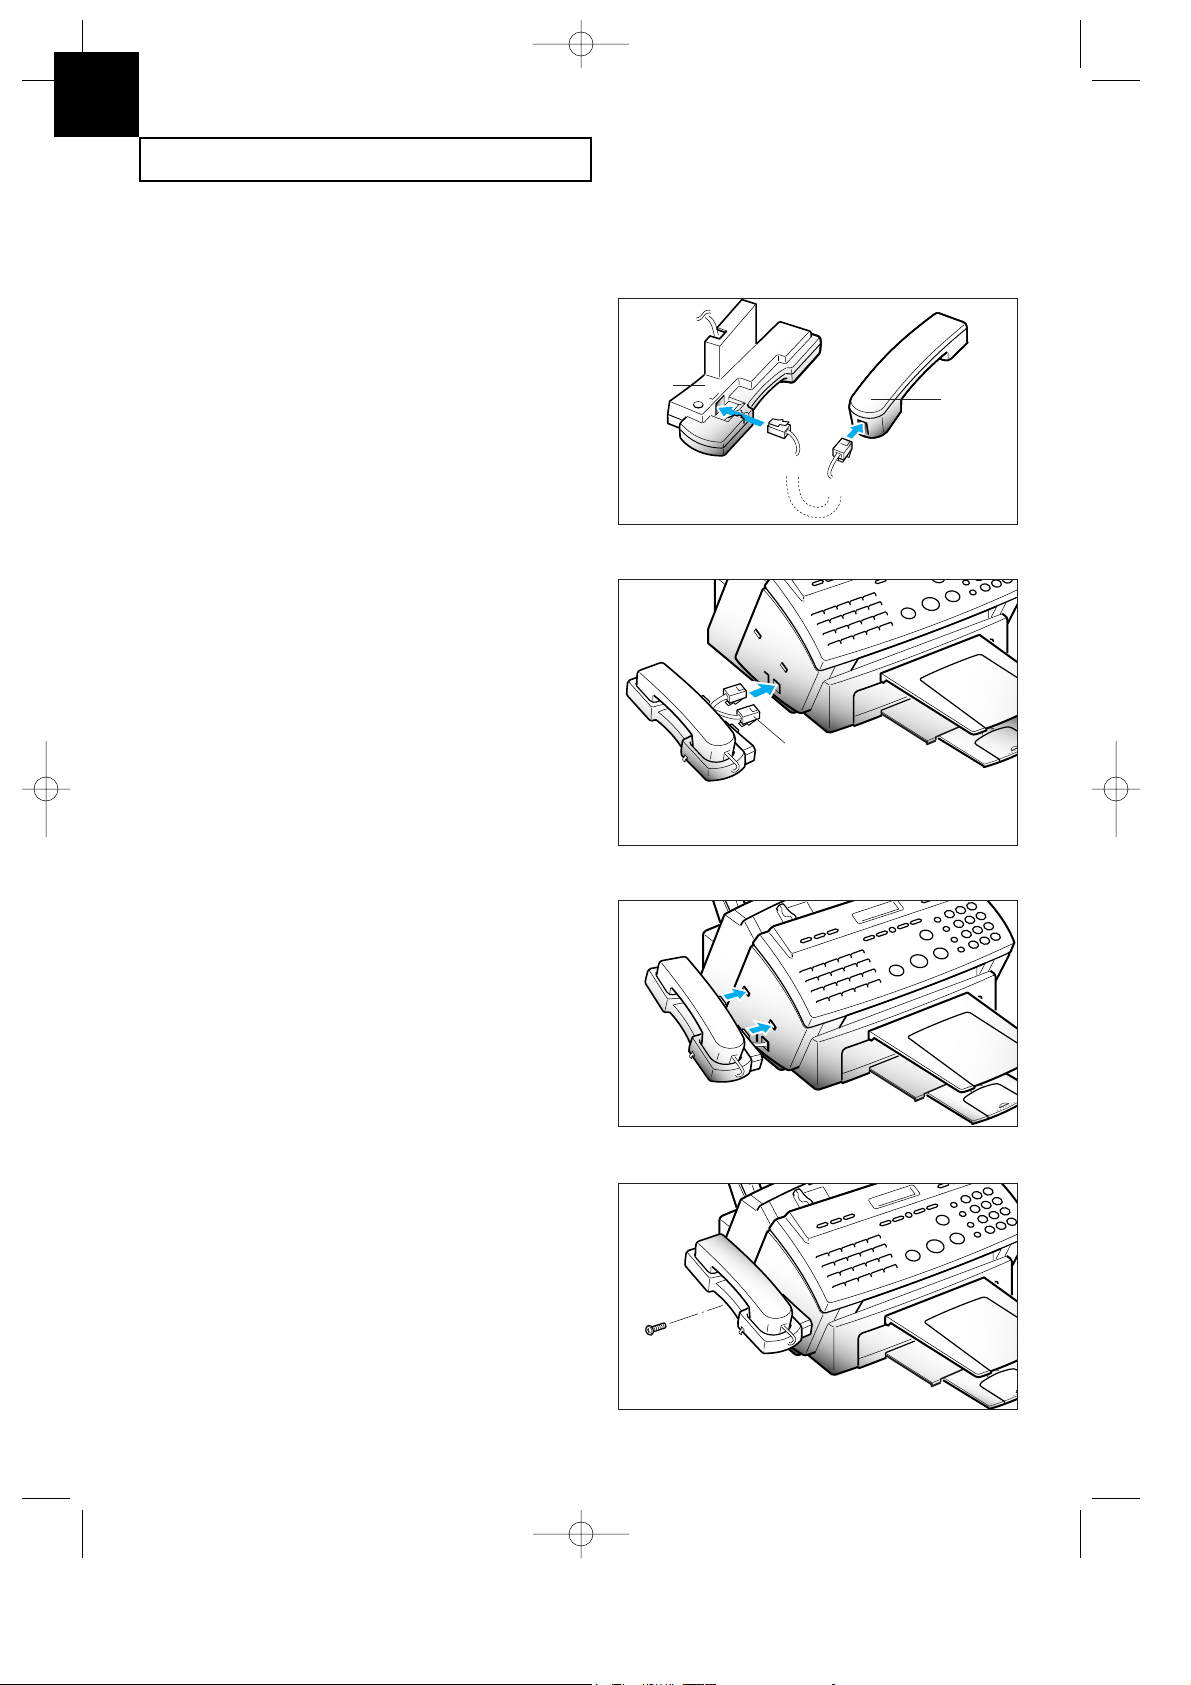
Handset and Handset Cradle
1. Plug one end of the coiled cord into the
jack on the handset. Then plug the other
end into the modular jack on the bottom
of the handset cradle.
0000000
000000
2. Plug the cradleÕs modular cord(s) into
the modular jack(s) on the left side of
your machine.
(The number of modular cord may
differ, depending on your country.)
0
0
0
0
0
0
0
0
0
0
0
0
0
0
0
0
0
0
0
0
0
0
0
0
0
0
0
0
0
0
0
0
0
0
0
0
0
0
0
3. Attach the handset cradle to the main
body. Insert two tabs of the cradle into
the slots on the left side of the main
body as shown, and push them down.
0
0
0
0
0
0
0
0
0
0
0
0
0
0
0
0
0
0
0
0
0
0
0
0
0
0
0
0
0
0
0
0
0
0
0
0
0
0
0
0
0
0
0
0
0
0
0
0
0
0
0
0
0
0
0
0
0
0
0
0
0
0
0
0
0
4. Secure the cradle using the supplied
screw.
Place the handset in the cradle.
0
0
0
0
0
0
0
0
0
0
0
0
0
0
0
0
0
0
0
0
0
0
0
0
0
0
0
0
0
0
0
0
0
0
0
0
0
0
0
0
0
0
0
0
0
0
0
0
0
0
0
0
0
0
0
0
0
0
0
0
0
0
0
0
0
Handset
Cradle
If you have two jacks, be
sure to insert ivory-coloured
jack into the right hole.
G-Chapter 2(US) 4/16/98 8:30 AM Page 2.2

INSTALLATION AND SETUP
C
HAPTER TWO : INSTALLATION AND SETUP
2.3
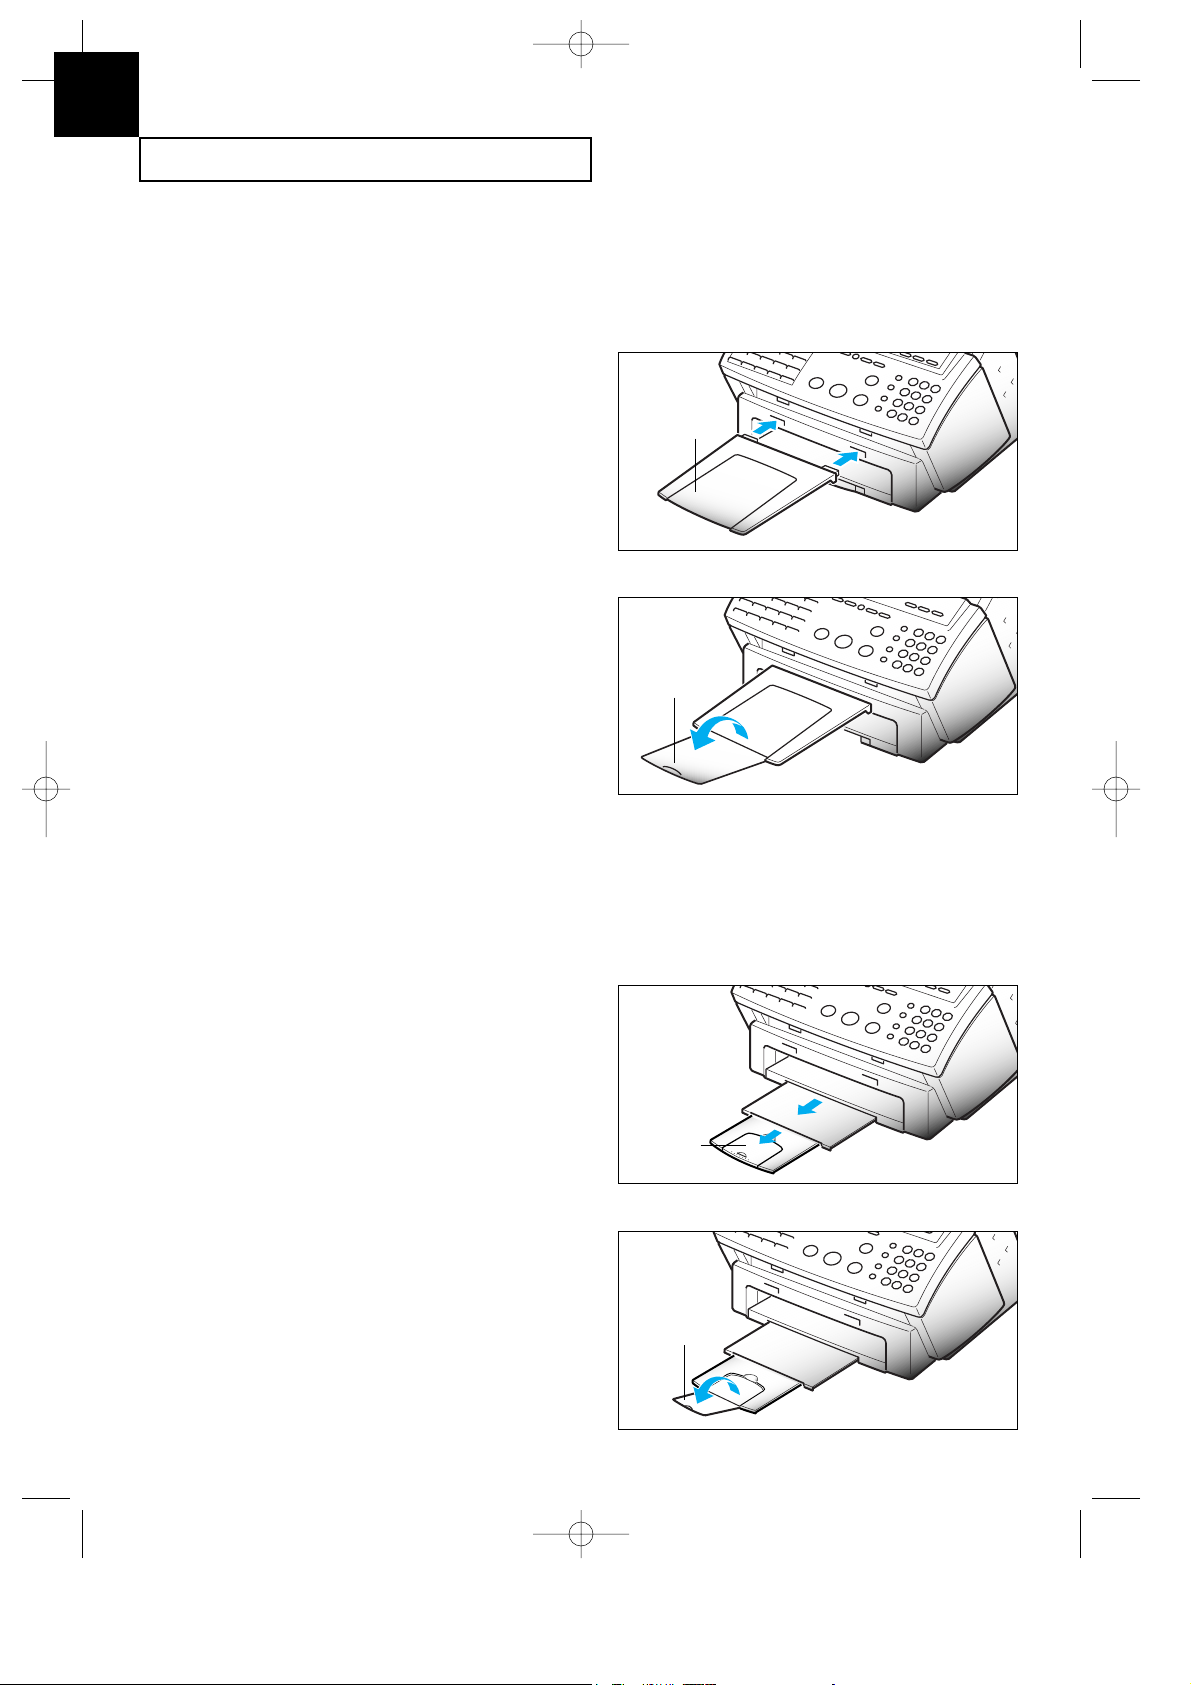
Document Tray
1. Hold the document tray with both hands
and insert one end of the tray into the
corresponding slot as shown.
2. Gently flex the tray in the middle, until
the other end of tray clears the
corresponding slot on the machine.
3. Insert the other end of the tray into the
corresponding slot as shown.
4. Fold out the extender on the document
tray, if necessary.
Document
tray
Extender
G-Chapter 2(US) 4/16/98 8:30 AM Page 2.3
INSTALLATION AND SETUP
2.4 C
HAPTER TWO : INSTALLATION AND SETUP
2
Document Exit Tray
The document exit tray catches documents fed through the machine from the document
feeder.
1. Insert two tabs on the document exit
tray into the slots on the front of your
machine.
2. Fold out the extender, if necessary.
Document
exit tray
Extender
Printer Exit Tray
The printer exit tray is built in the bottom cover of the machine and catches paper fed
through the machine from the printer automatic sheet feed. To extend the printer exit tray:
1. Gently pull the printer exit tray toward
you to the desired paper length.
Printer
exit tray
2. Fold out the extender, if necessary.
Remove any obstacles in front of the
paper exit to prevent paper jams.
Extender
G-Chapter 2(US) 4/16/98 8:30 AM Page 2.4
INSTALLATION AND SETUP
C
HAPTER TWO : INSTALLATION AND SETUP
2.5
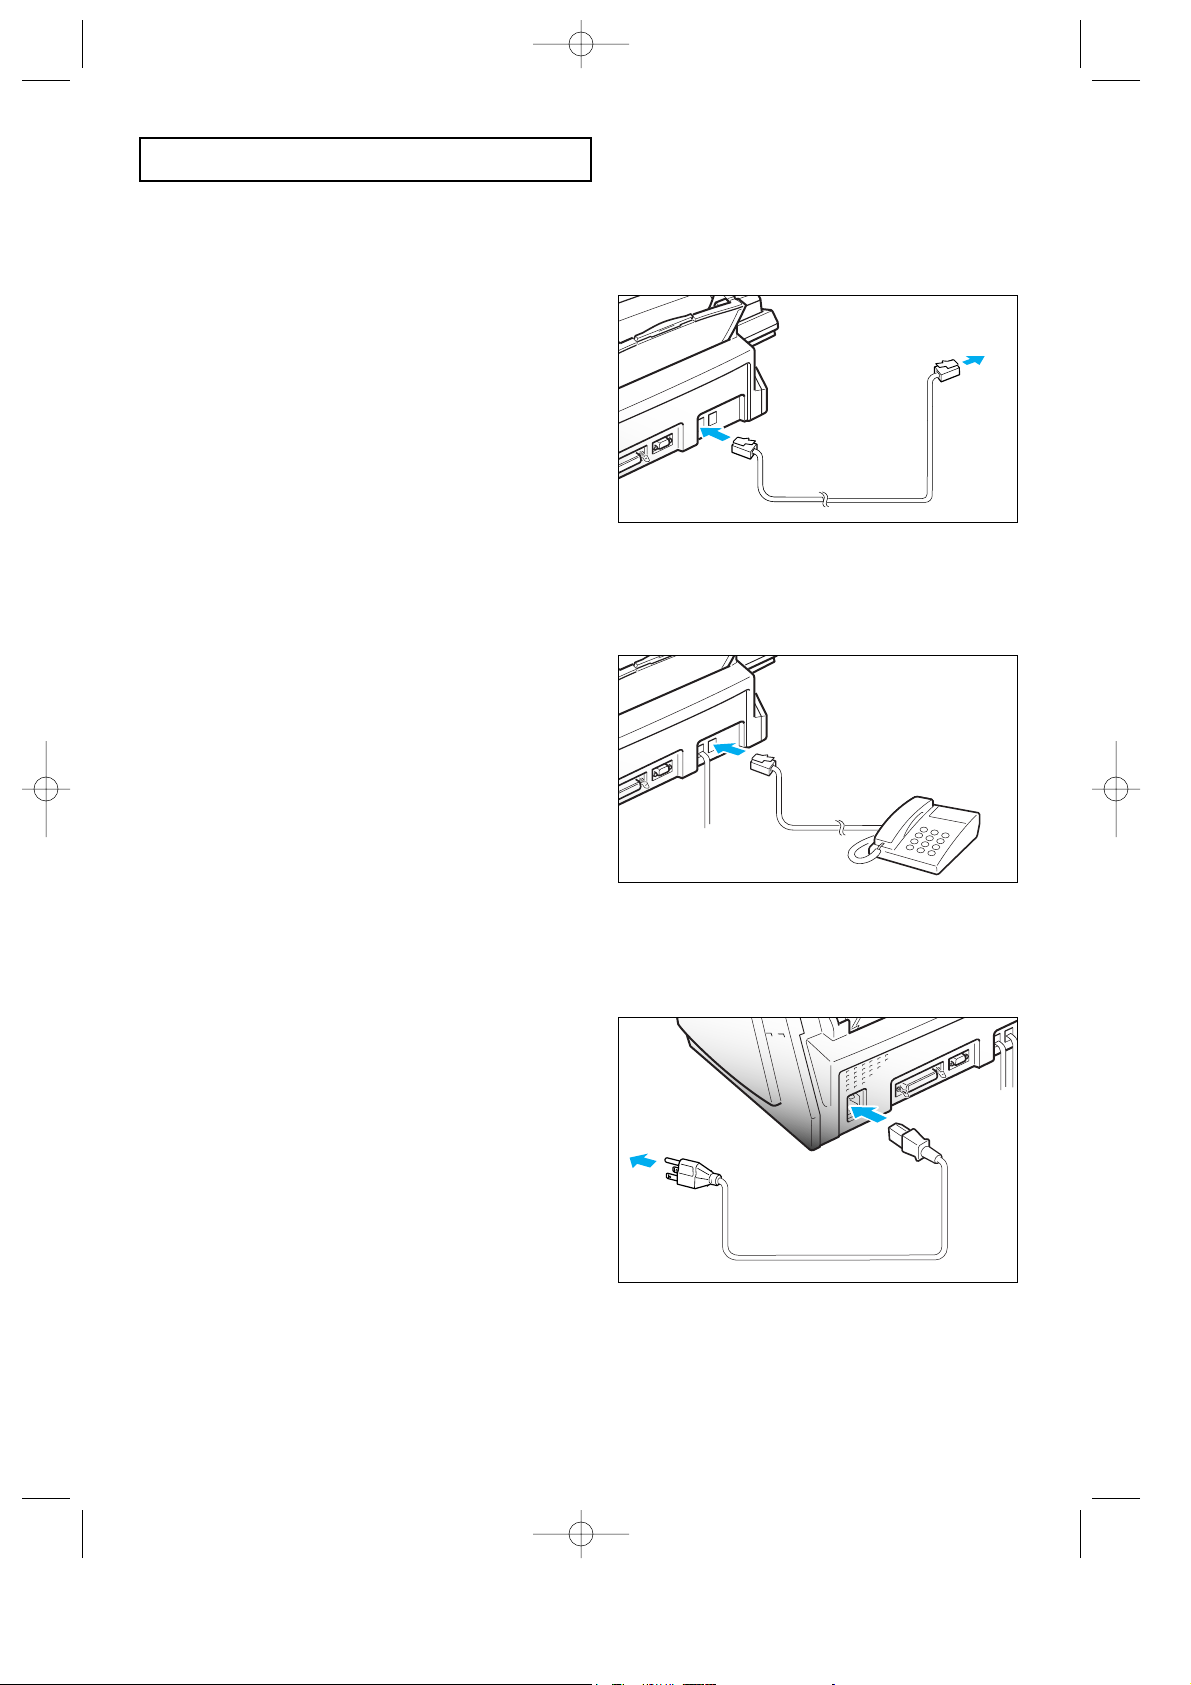
Telephone Line
Plug one end of the telephone line cord into
the TEL LINE jack and the other end into a
standard phone wall jack.
To select your dialling type, see page
2.28.
Extension Phone (Optional)
Plug one end of the modular cord into the
EXT. LINE jack on the back of your
machine.
Plug the other end of the cord into a
modular jack on a telephone answering
device or a regular telephone to use as an
extension.
AC Power Cord
Plug one end of the cord into the back of
the machine and the other end into a
standard AC power outlet.
The machine turns on. All lamps on
the control panel light up and the
LCD displays ÔSYSTEM INITIALÕ then
ÔPAPER OUT.Õ Load the paper as
described on page 2.6
If you want to turn off, unplug the
power cord.
Note : If there are documents lost from memory due to a power failure, the machine
automatically prints out a report after power is supplied.
G-Chapter 2(US) 4/16/98 8:30 AM Page 2.5
INSTALLATION AND SETUP
2.6 C
HAPTER TWO : INSTALLATION AND SETUP
2
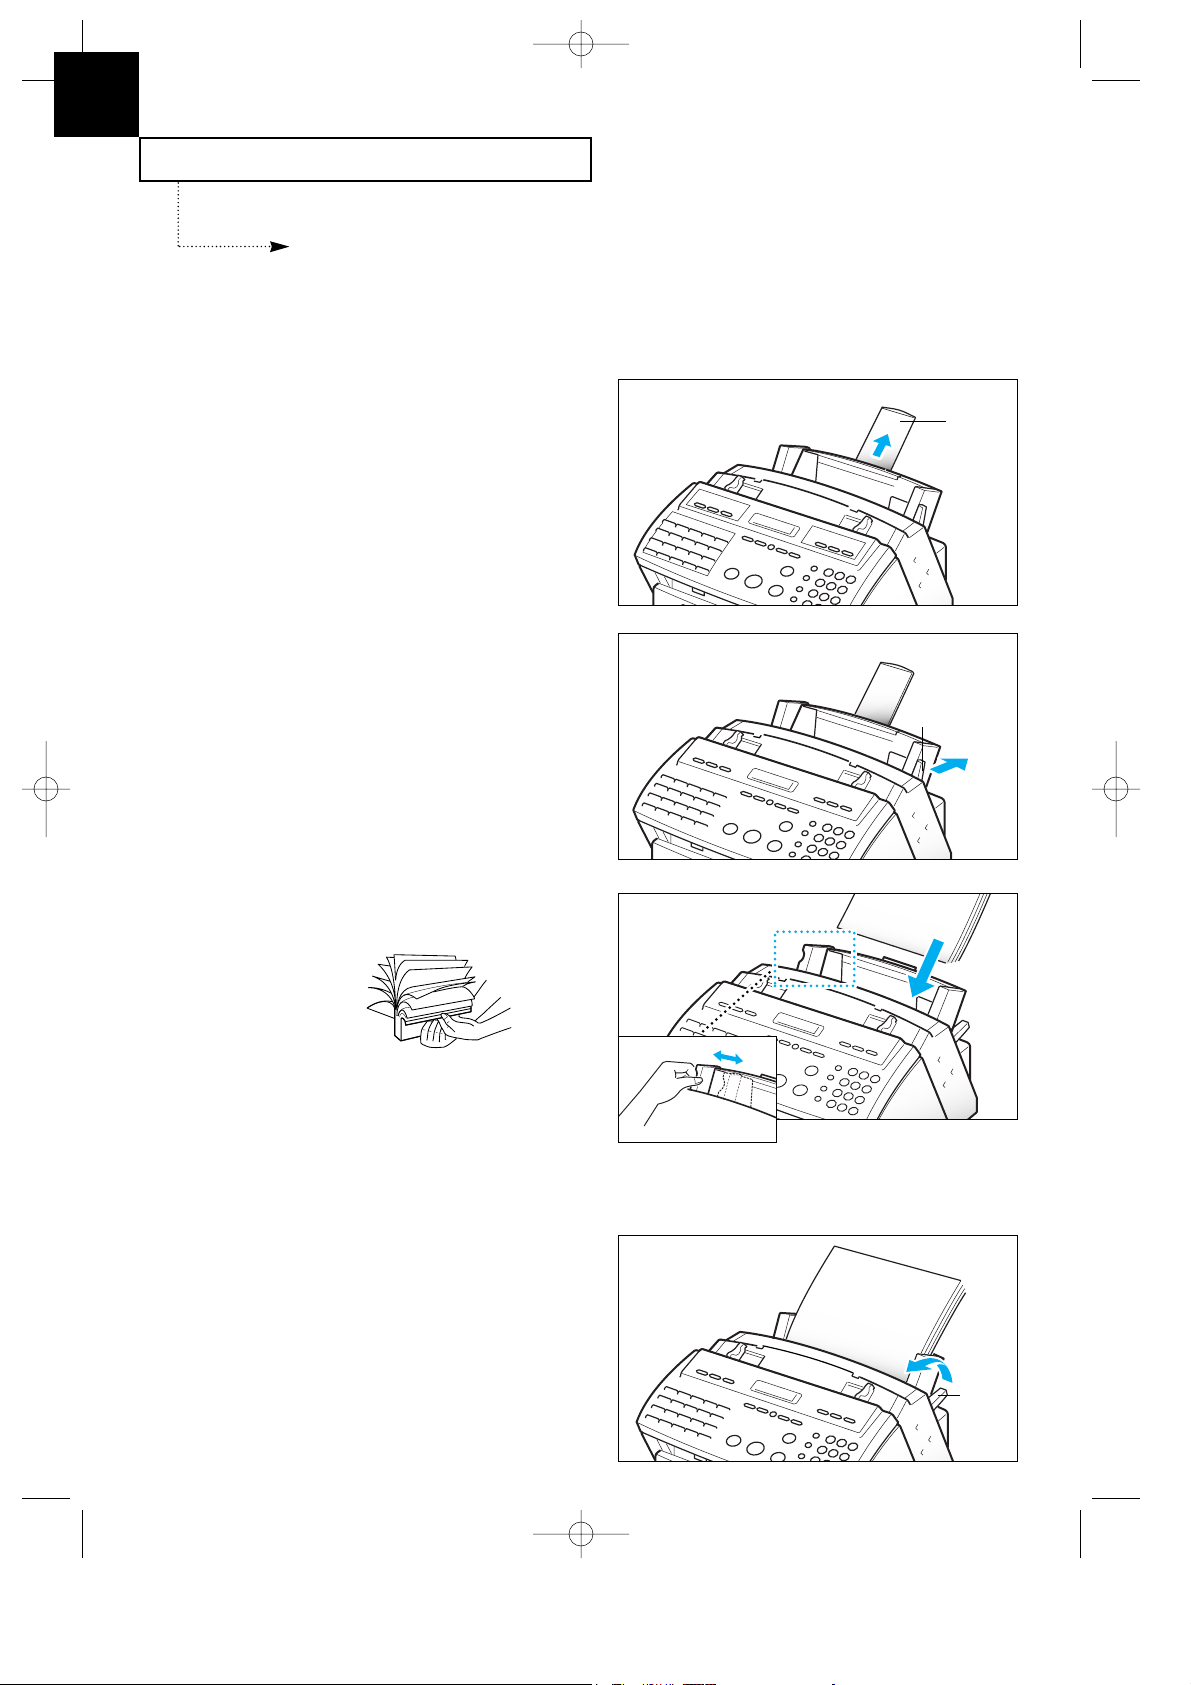
Loading Paper
1. Pull the paper support on the paper bin
all the way up.
The LCD displays ÔPAPER OUTÕ when no paper is loaded. You can load approximately 100
sheets of paper.
Paper
support
2. Push the paper load lever away from
you to open the sheet feeder.
Warning beeps sound for about 30
seconds and the LCD displays
ÔCHECK LOAD LEVERÕ and the
paper size selected through user
options on page 6.8. If you want to
install a different-sized paper,
change the option after loading paper.
Paper load
lever
3. Fan the paper and insert the paper with
the print side facing you.
Hold the left paper guide and move
it to the right to match the width of
the paper.
Note: If you donÕt either fan the
paper or adjust the paper guide, it
may cause multi-paper feeding.
4. Pull the paper load lever toward you to
close the sheet feeder.
Paper Guide
Paper
load
lever
G-Chapter 2(US) 4/16/98 8:30 AM Page 2.6
INSTALLATION AND SETUP
C
HAPTER TWO : INSTALLATION AND SETUP
2.7
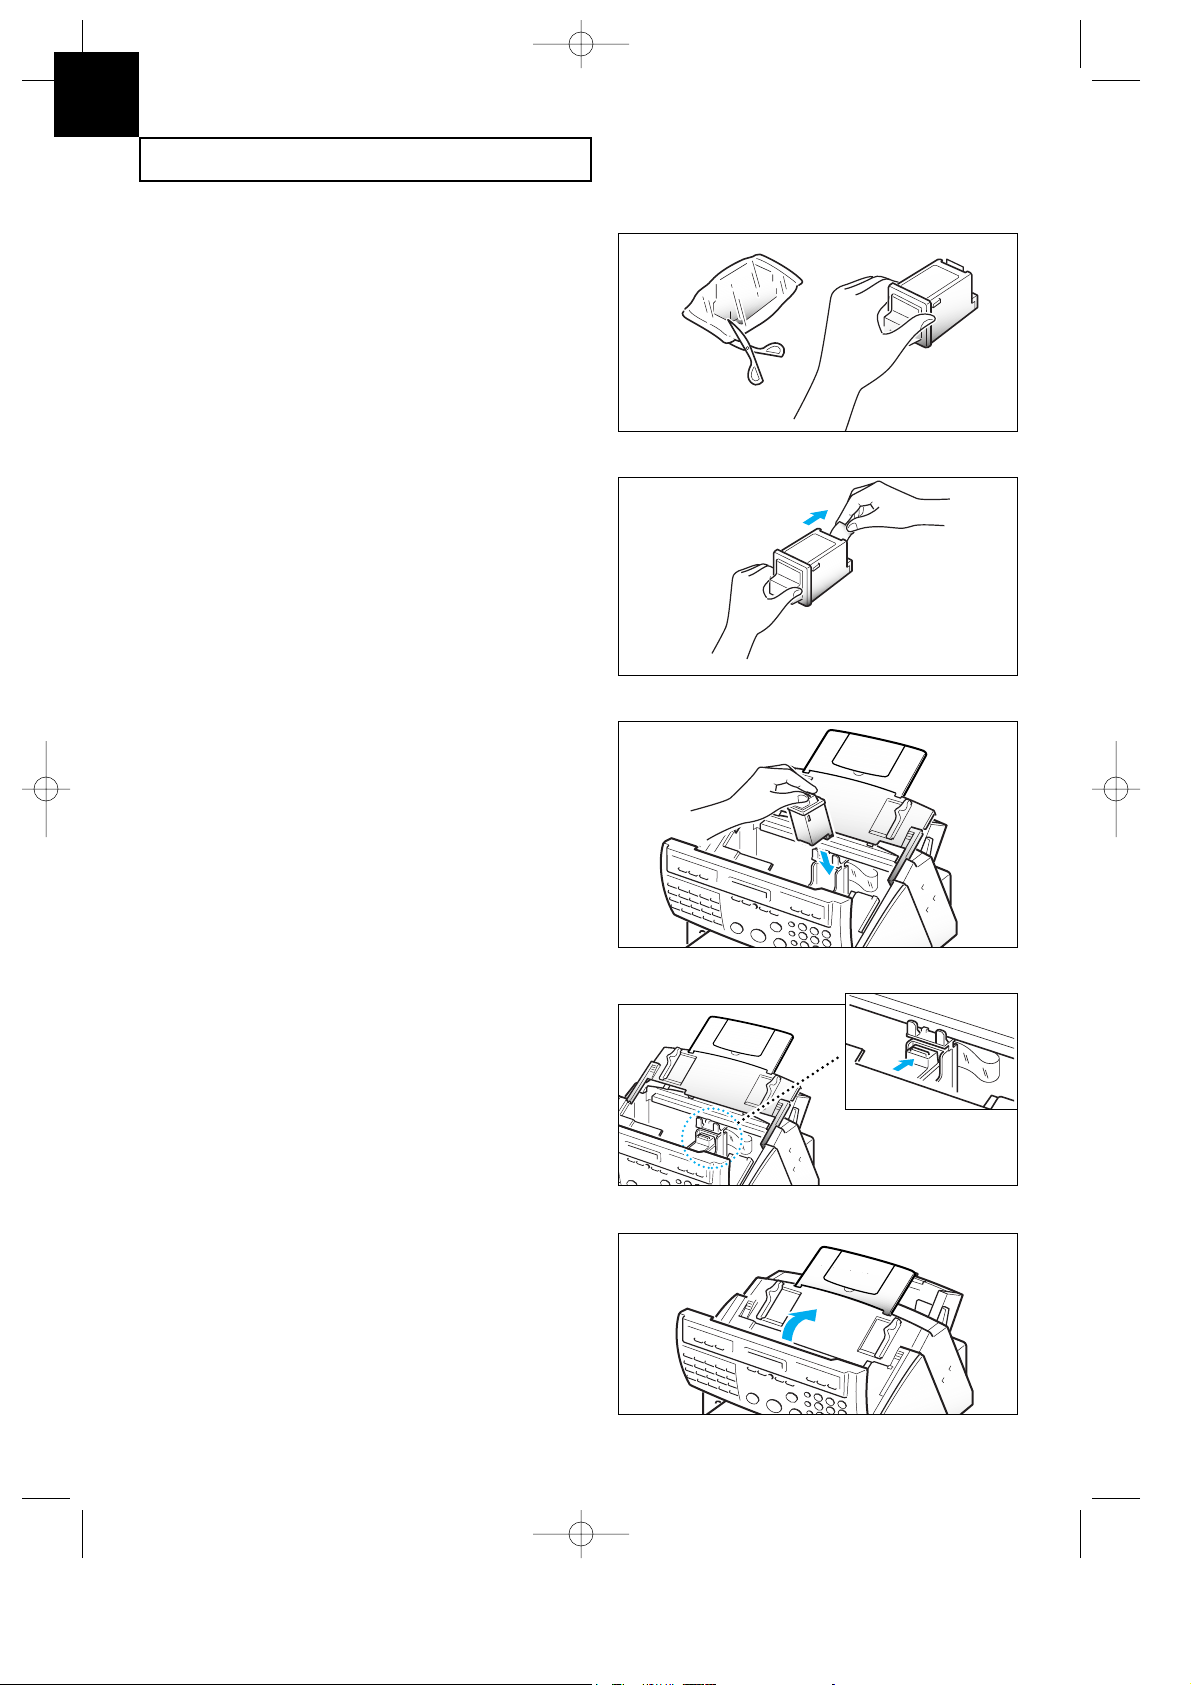
Installing Print Cartridge
When you install a new print cartridge, perform all of the following steps:
1. Press the CARTRIDGE button on the control panel. The LCD displays ÔCHECK CARTRIDGE ! PLEASE
INSTALLÕ, and the print cartridge moves to the load position.
If you install a color cartridge, use ÔInstall CartridgeÕ tab in the SAMSUNG
MFP4100/4200 Control Program on your PC.
2. Lift the control panel with your hand
and slide the top cover up, by pushing
on position A, until it clicks and the ink
cartridge is in full view.
A
A
Top cover
Control
panel
Paper Type and Sizes
Because all paper varies in physical characteristics, you can receive mixed results from
different packages of paper even though the packages contain the same type of paper. If you
encounter undesirable results, try the other side of the paper, a different type, or another
package of the same kind of paper.
Do not use the following types of paper with the printer:
¥ Continuous form feed paper
¥ Synthetic paper
¥ Thermal paper
¥ Multi-sheet forms and documents
¥ Chemically treated paper (carbonless paper)
¥ Papers with raised, embossed lettering
To load paper with a preferred print side:
¥ If youÕre using xerographic paper, load the paper with the preferred print side facing
down.
¥ If youÕre using letterhead or bond paper, load the paper with the preferred side facing up.
The following paper sizes can be used in your machine for fax:
Note : To print on card stock, load the stock with the envelope guide in an upright
position.
Use paper that meets these specifications:
Paper size mm inches
Letter 216 X 279 8.5 X 11.0
Legal 216 X 356 8.5 X 14.0
A4 210 X 297 8.3 X 11.7
Length 127 to 364 mm (5.0 to 14.33 in)
G-Chapter 2(US) 4/16/98 8:30 AM Page 2.7
INSTALLATION AND SETUP
2.8 C
HAPTER TWO : INSTALLATION AND SETUP
6. Push the cartridge firmly in the
direction of the arrow until it clicks
into place.
7. After installing the print cartridge,
replace the top cover and the control
panel to their normal positions.
4. Carefully remove the tape covering the
printhead. Be sure to remove all the
tape.
Do not touch the copper area.
5. Insert the print cartridge in the carrier.
3. Remove the print cartridge from its
packaging. Hold the print cartridge by
the black areas or colored top only.
Do not touch the copper area.
2
G-Chapter 2(US) 4/16/98 8:30 AM Page 2.8
INSTALLATION AND SETUP
C
HAPTER TWO : INSTALLATION AND SETUP
2.9
8. Press the CARTRIDGE or ENTER button.
Use ÔInstall CartridgeÕ tab on your
PC for a color cartridge.
The LCD displays ÔCARTRIDGE IS
1:NEW 2:USED.Õ
10. Press the ENTER or CARTRIDGE button.
The LCD displays briefly ÔMONO
INSTALLEDÕ (or ÔCOLOR INSTALLEDÕ
for color print cartridge).
Use ÔInstall CartridgeÕ tab on your
PC for a color cartridge.
If the cartridge is not installed
properly, the LCD displays
ÔCHECK CARTRIDGE! PLEASE
INSTALL.Õ Remove the cartridge
and retry to insert it.
Notes:
¥ If you received fax with the color cartridge installed, you cannot get the fax printed
until replacing it with mono cartridge.
¥ When you install a new cartridge, you must choose Ô1:NEW.Ô When you install a
used cartridge, select Ô2:USEDÕ, which helps you check the amount of ink remaining.
If you mix up several used cartridges, it will be difficult to check the amount of ink
remaining. Once a new print cartridge is installed, use it until it has completely run
out of ink.
¥ If the new cartridge does not give excellent printing quality, consult the ÔPrinter
Cartridge MaintenanceÕ section.
¥ If you want to install a color cartridge to print a file on your PC, you should use
ÔInstall CartridgeÕ tab in the SAMSUNG MFP4100/4200 Control Program on your
PC. If you use the CARTRIDGE button on this machine, the machine beeps a
warning tone and briefly displays ÔRE-INSTALL COLOR USING PC-DRIVER.Õ Press
ÔInstall CartridgeÕ tab on your PC, or the file may print using composite black.
FORM FEED
CARTRIDGEPRINTER RESET
BUSY
SPEED
/
9. Choose Ô1:NEWÕ by using the or
button, or by pressing the 1 button.
G-Chapter 2(US) 4/16/98 8:30 AM Page 2.9
15
JOURNAL
20
ALARM
SEARCH/DELETE
START/
STOP
ENTER
MENU
1
GHI
FLASH
4
SPEED
PQRS
/DUAL
OHD/V.REQ.COPY
/DUAL
REDIAL
PAUSE

INSTALLATION AND SETUP
2.10 C
HAPTER TWO : INSTALLATION AND SETUP
TO REMOVE A PRINT CARTRIDGE FROM THE STORAGE UNIT
Hold the print cartridge and pull it firmly
in the direction of arrow.
Push down the cartridge and pull it toward
you.
cartridge
storage unit
Print
Cartridge
storage
unit
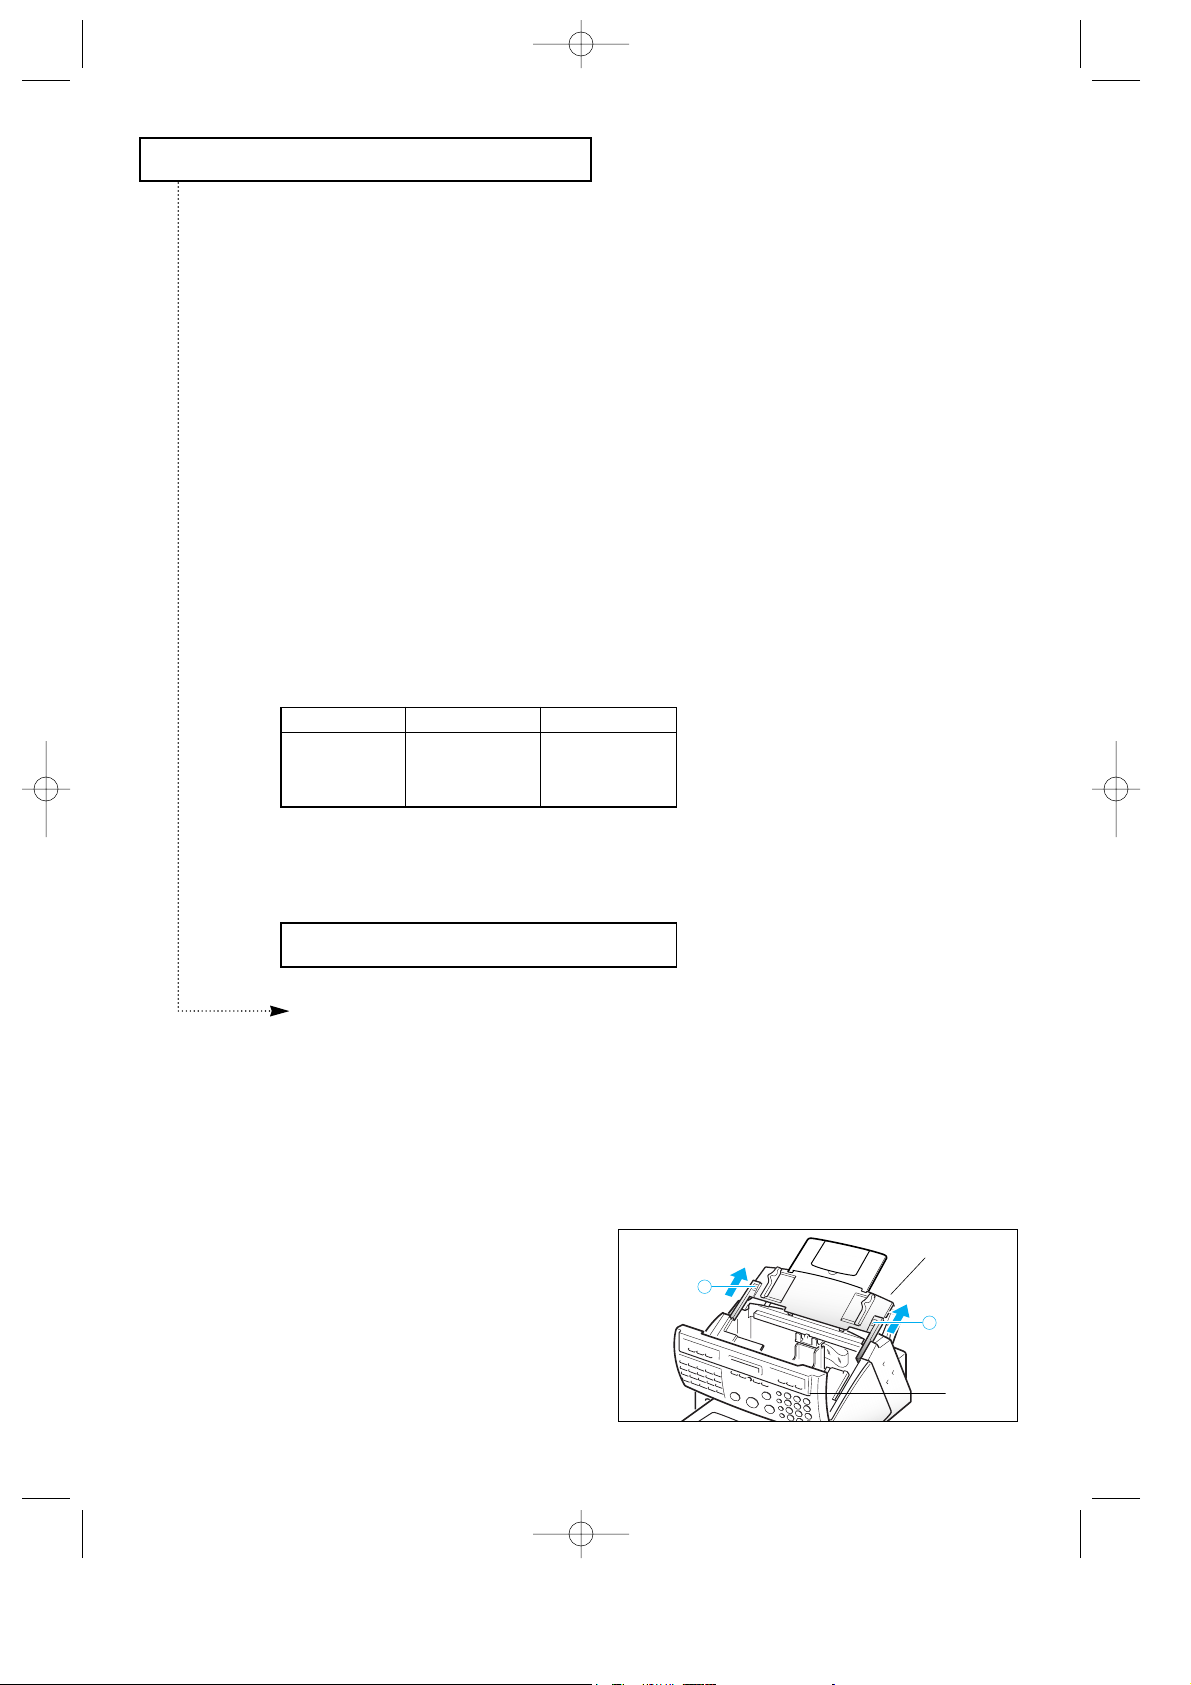
Storing a Print Cartridge in the Storage Unit (SF4100, SF4200)
When switching between the color and black print cartridges, keep the unused one in the
print cartridge storage unit. The storage unit prevents the print cartridge from drying out
while providing easy access to it.
T
O STORE A PRINT CARTRIDGE IN THE STORAGE UNIT
1. Holding the print cartridge, insert it
into the storage unit.
2. Push firmly in the direction of arrow
until it clicks into place.
Print Cartridge Storage Unit (SF4100, SF4200)
The print cartridge storage unit provides a convenient place to store an extra black or color
print cartridge, and prevents an opened cartridge from drying out.
Attach the storage unit by inserting its
three tabs into the slots on right side of
the main body and lowering it until it
clicks into place.
storage
unit
slot
2
G-Chapter 2(US) 4/16/98 8:30 AM Page 2.10

INSTALLATION AND SETUP
C
HAPTER TWO : INSTALLATION AND SETUP
2.11
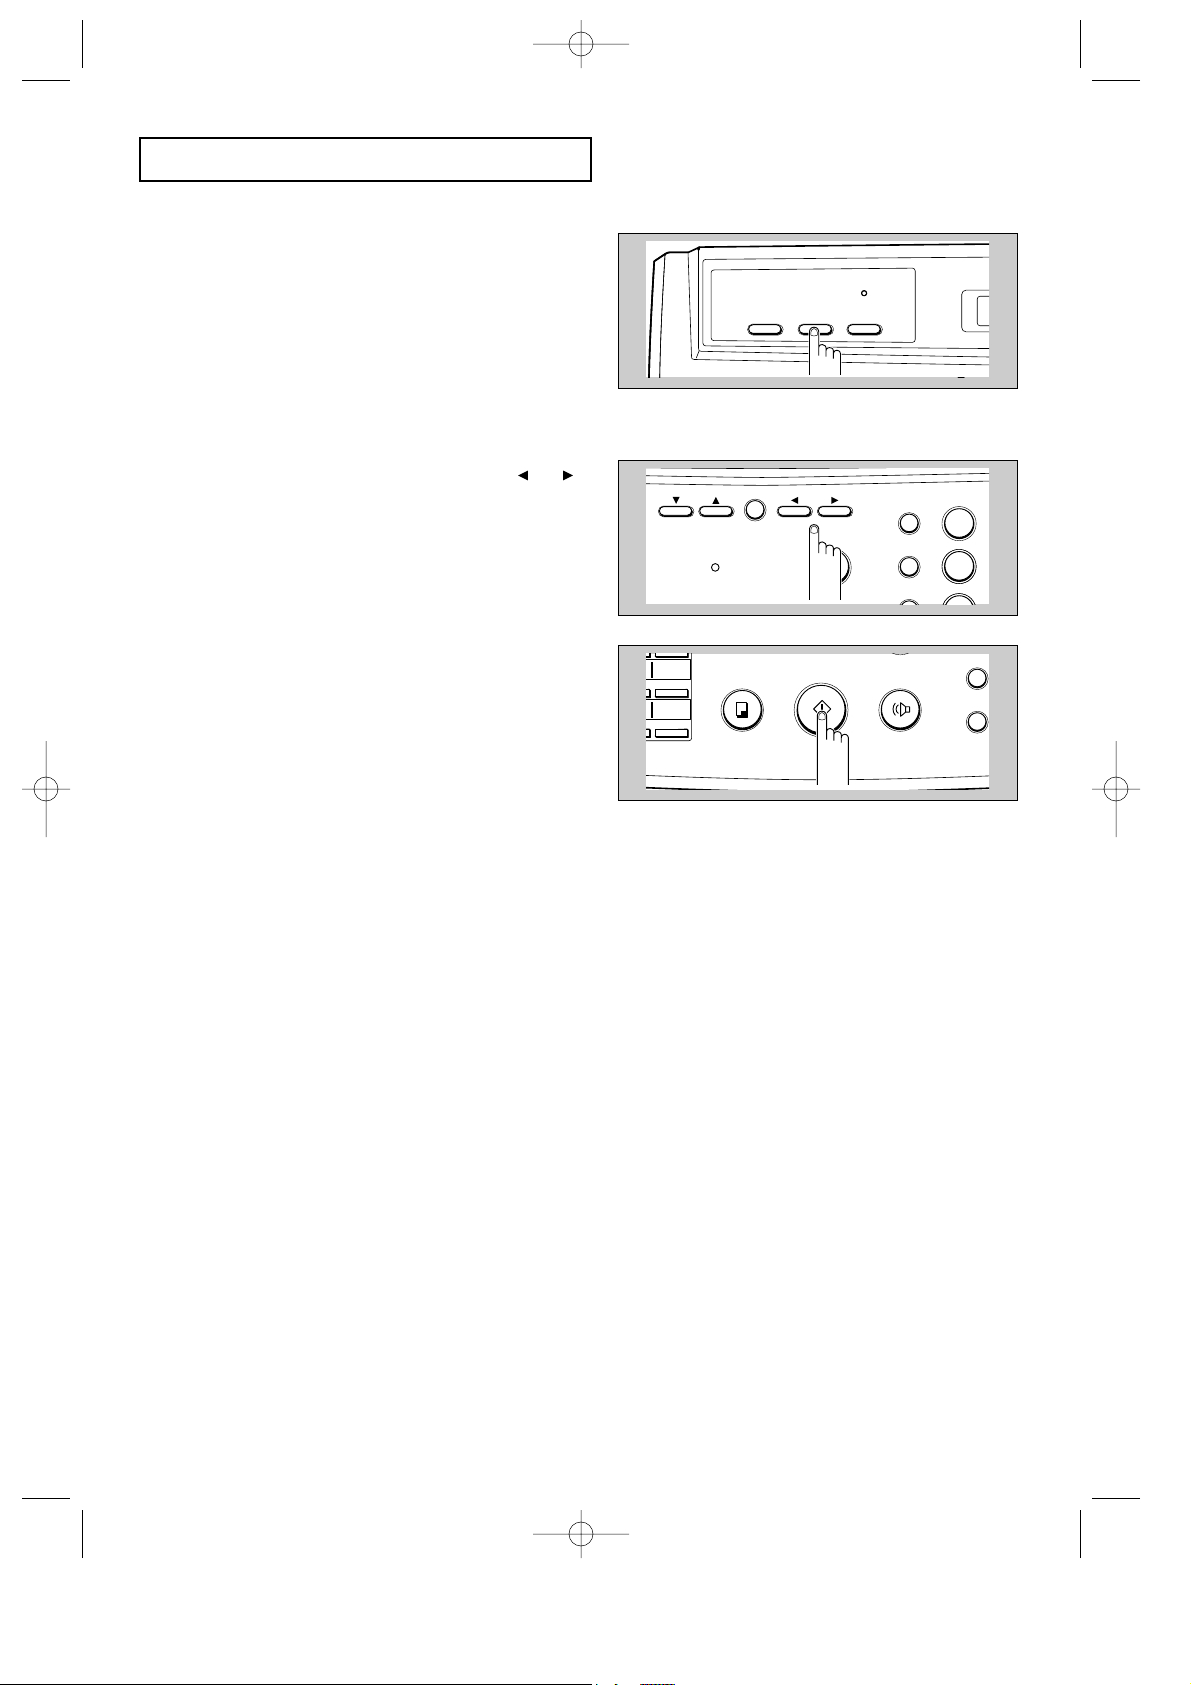
3
Press ENTER to perform
the printer test.
OHD/V.REQ.COPY
START/
ENTER
The LCD asks if you want
to run Self-Test.
SELF TEST ?
( ENTER/ )
If you press , you can choose
another menu item.
4
Press ENTER to run the
printer Self-Test.
OHD/V.REQ.COPY
START/
ENTER
2
Press 05, SELF-TEST, on
the one-touch keypad.
01 02 03 04 05
06 07 08 09 10
11 12 13 14 15
MEMORY TX. DELAY TX. POLLING ADD/CANCEL SELF-TEST
GROUP DIAL SYSTEM ID DATE & TIME OPTION
TX. CONFIRM STANDBY DIAL LIST OPTION JOURNAL
Q.SCAN
One-touch buttons 01-16 perform
specific functions when used with the
MENU button. Each button provides
access to a selected function.
If you choose , you can choose
another menu item. Pressing STOP
returns you to Standby mode.
The LCD asks you to
press the desired function
button.
PRESS
F UNCT I ON BUTTON
The LCD asks if you want
to perform the printer
test.
PR I NTER TEST ?
(ENTER/ /STOP )
Running Self-Test
Each time you install a new print cartridge, run Self-Test to check if the printer mechanism
is functioning properly.
1
Press MENU.
2
PQRS
GHI
ABC
MENU
STOP
FLASH
SPEED
/DUAL
JKL
TUV
1
45
G-Chapter 2(US) 4/16/98 8:30 AM Page 2.11

V1.0 04/13/96
Quality : LQ Bidi Print : OFF Paper : A4
Top Margin : 0.55" Ink Saver : No
Transpar. : NO Pitch : 10 CPI Font : Courier
Orient : Portrait Autowrap : OFF CR Def. : CR=CR
Lines : 64 Character : PC-8
Name
Courier
Courier
Courier
Courier
LT Gothic
LT Gothic
LT Gothic
CG Times
5
10
16.67
20
6
12
24
Prop.
ABCDEFGHIJKLM
ABCDEFGHIJKLMOPQRSTUVWXYZ
ABCDEFGHIJKLMOPQRSTUVWXYZ
ABCDEFGHIJKLMOPQRSTUVWXYZ
ABCDEFGHIJKLMN
ABCDEFGHIJKLMOPQRSTUVWXYZ
ABCDEFGHIJKLMOPQRSTUVWXYZ
ABCDEFGHIJKLMOPQRSTUVWXYZ
Pitch Sample Char.
INSTALLATION AND SETUP
2.12 C
HAPTER TWO : INSTALLATION AND SETUP
<Sample of test pattern>
5
Prees STOP twice to
return to Standby mode.
ALARM
STOP
OHD/V.REQ.
START/
ENTER
FLASH
SPEED
/DUAL
REDIAL/
PAUSE
The machine prints out a
test pattern to show the
status of the printer
mechanism.
PLEASE WAIT
PRINTING. . .
6
Examine the test pattern
and look for a break in the
diagonal line. A broken
line shows any clogged
nozzles. Run the nozzle
test. See page 7.5.
If the diagonal lines are
not broken and the black
(or color) bars are clear,
the printer mechanism is
functioning properly. See
the pattern sample below.
2
G-Chapter 2(US) 4/16/98 8:30 AM Page 2.12
INSTALLATION AND SETUP
C
HAPTER TWO : INSTALLATION AND SETUP
2.13
Note : Make sure you turn the power off by plugging out the power cord before connecting
the machine to your PC. When the connection is completed, turn the power on.
Connecting to Your PC (SF4100, SF4200)
Connecting SF4200 to Your PC
Use the serial cable and the parallel print cable that supports bidirectional communications
to connect your machine and the computer.
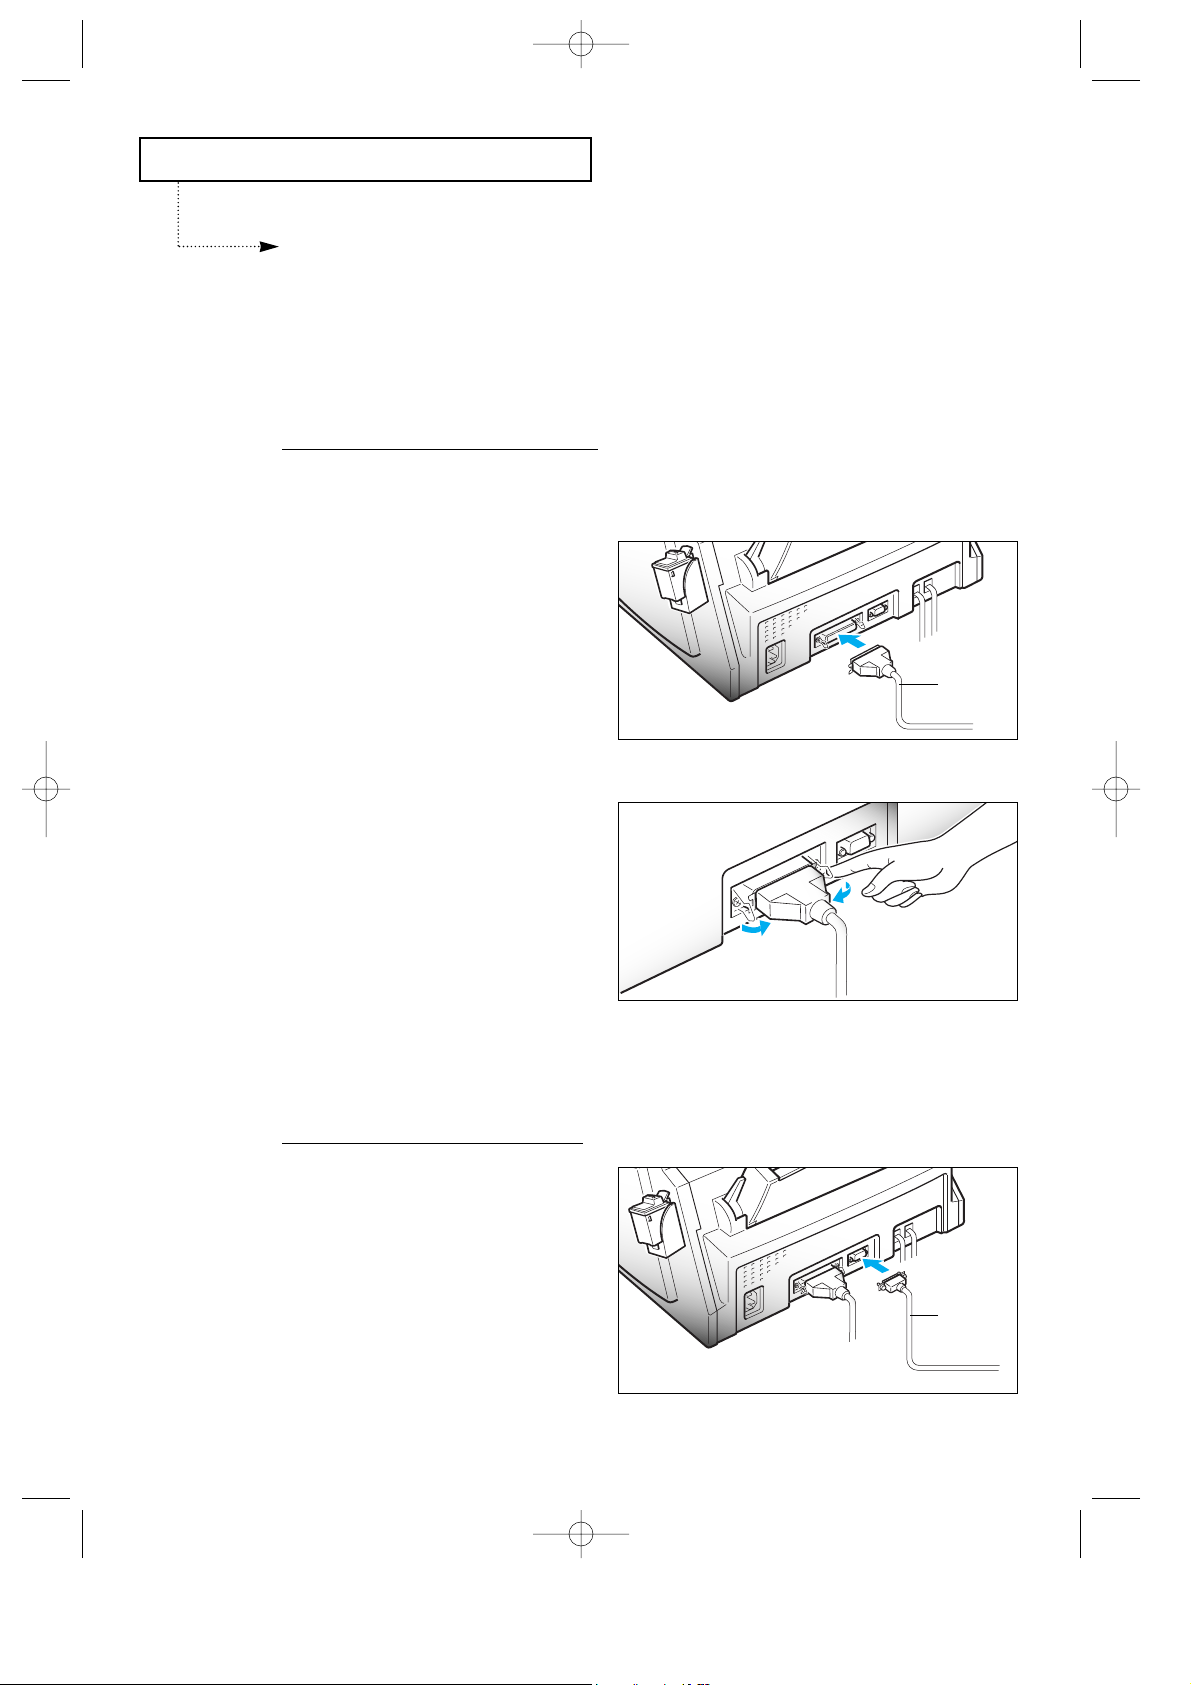
CONNECTING THE PRINTER CABLE
1. Connect the parallel printer cable to the
36 pin printer jack on your machine.
You must use a parallel cable that
supports IEEE-P1284 bidirectional
communications.
2. Fasten the metal clips to the parallel
cable.
3. Connect the other end of the parallel
cable to your computer.
Refer to the instruction manual
that came with your computer to
connect the other end of the printer
cable to your computer.
CONNECTING THE SERIAL
CABLE
4. Connect the supplied RS232-C serial
cable to the computer.
Fix the serial cable with screws.
Connect the other end of the serial cable
to your computer.
Refer to the instruction manual
that came with your computer to
connect the other end of the serial
cable to your computer.
Printer
cable
Serial
cable
G-Chapter 2(US) 4/16/98 8:30 AM Page 2.13
INSTALLATION AND SETUP
2.14 C
HAPTER TWO : INSTALLATION AND SETUP
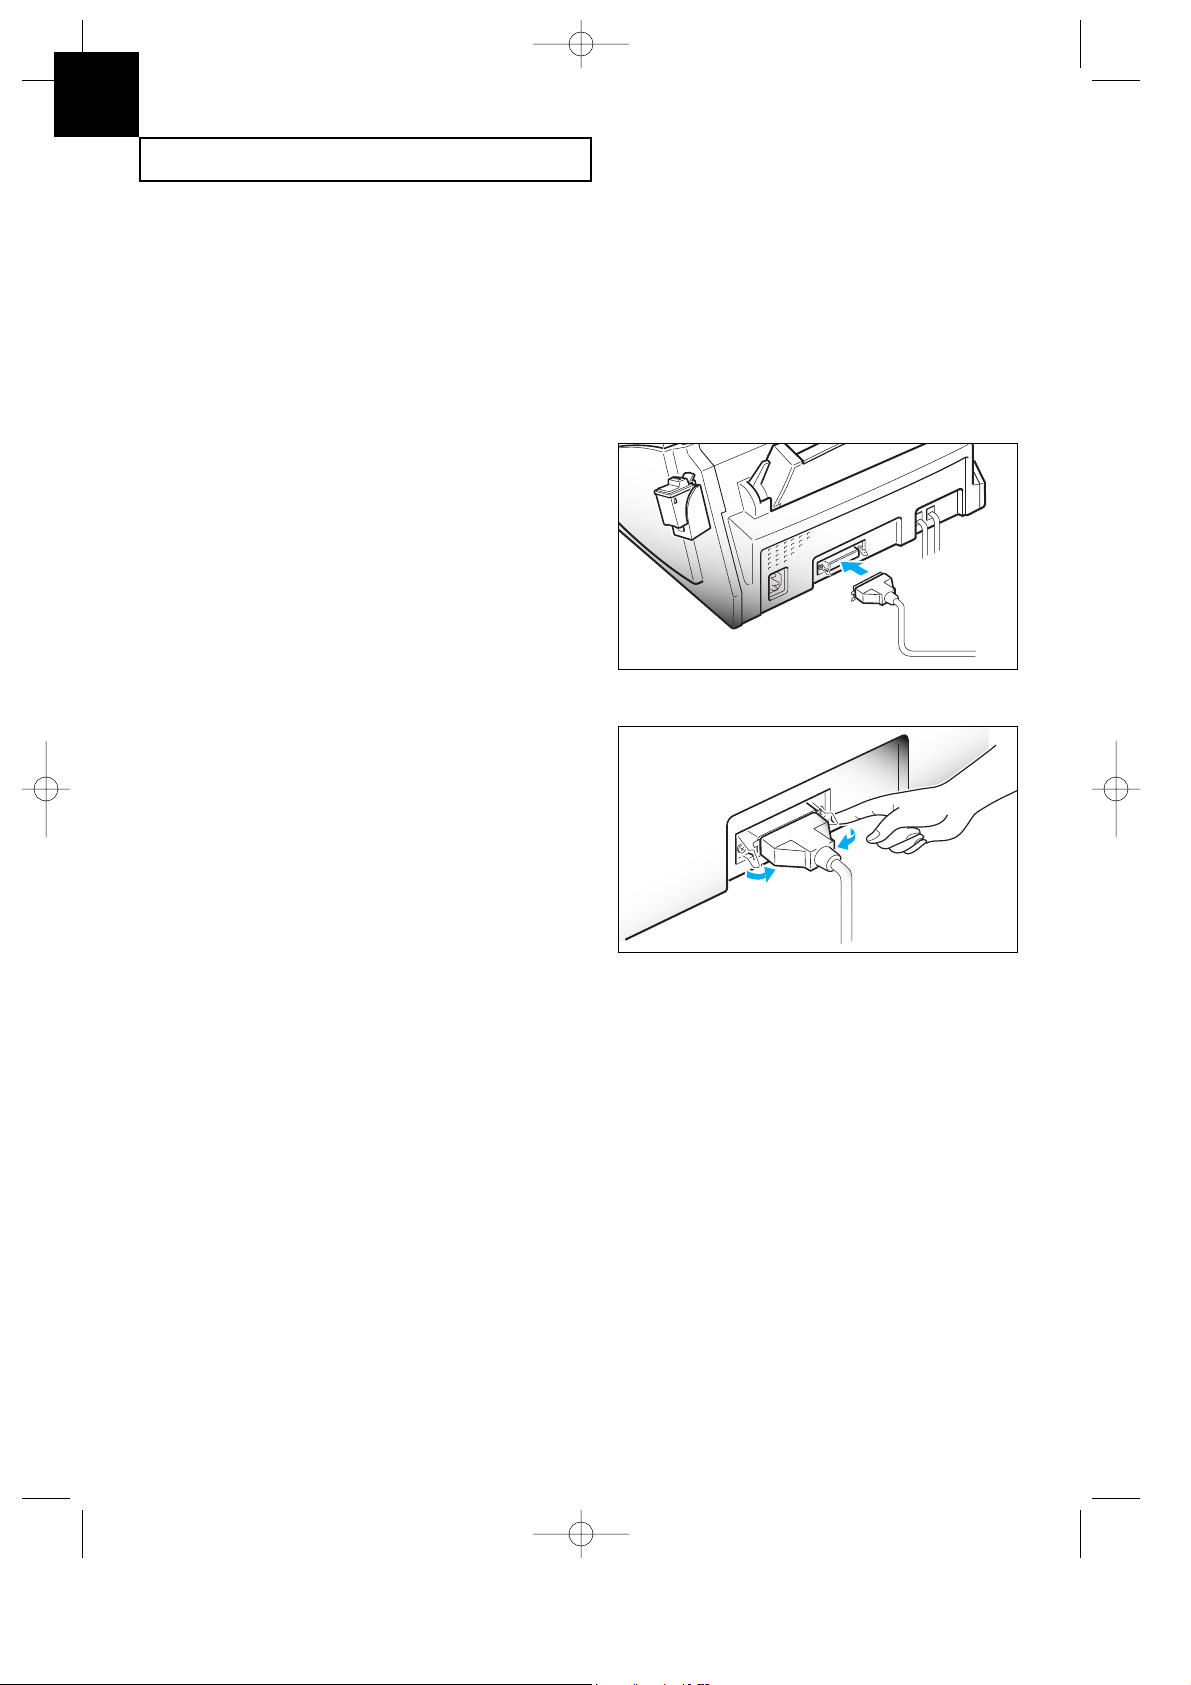
1. Connect the parallel printer cable to the
36 pin printer jack on your machine.
You must use a parallel cable that
supports IEEE-P1284 bidirectional
communications.
2. Fasten the metal clips to the parallel
cable.
3. Connect the other end of the parallel
cable to your computer.
Refer to the instruction manual that
came with your computer to
connect the other end of the printer
cable to your computer.
Connecting SF4100 to Your PC
Use the printer cable that supports bidirectional communications to connect your machine
and the computer.
Note : Make sure you turn the power off by plugging out the power cord before connecting
the machine to your PC. When the connection is completed, turn the power on.
2
G-Chapter 2(US) 4/16/98 8:30 AM Page 2.14
 Loading...