

Page 1
Operator’s Guide
SAMSUNG FACSIMILE
SF4000/SF4100/SF4200
Please read this guide before you use this equipment.
0
0
0
0
0
0
0
0
0
0
0
0
0
0
0
0
0
0
0
0
0
0
0
0
0
0
0
0
0
0
0
0
0
0
0
0
0
0
0
0
J-Chapter 1(US) 4/16/98 8:23 AM Page 1
Page 2

Thank You for Choosing Samsung
Thank you for choosing Samsung! Your new machine represents the very latest
technology. It is a full-featured, high-performance machine built to strict quality
standards set by Samsung
-
the highest in the industry. WeÕre proud to offer you a
product that will provide convenient, dependable service for years to come.
Important Safety Information
Always be careful when using the machine. To reduce the risk of fire, electrical shock,
and other injuries, keep these safety considerations in mind when installing, using,
and maintaining your machine:
¥ Stability. Place the machine on a secure, stable surface. The machine can cause serious
damage if it falls.
¥ Power Supply. Provide the correct power to the machine, as listed on its back. If you
arenÕt sure of the type of power thatÕs supplied to your home or office, call your
electric company.
¥ Grounding. If the plug has three prongs, it must be plugged into a grounded
(threehole) outlet. Grounded plugs and outlets are designed for your safety
-
donÕt try
to make a three-prong plug fit into a two-prong outlet by modifying the plug or outlet
in any way. If you canÕt insert the plug into your wall outlet easily, the outlet should
be inspected by a qualified electrician.
¥ Overload. DonÕt plug too many electrical devices into a wall outlet or extension cord.
An overloaded outlet is a fire and electrical shock hazard.
¥ Cleaning. Before cleaning the machine, unplug it from both the power outlet and the
telephone jack. Clean exposed parts with a soft cloth slightly dampened with water.
DonÕt use aerosol cleaners.
¥ Thunderstorms. Unplug electrical appliances during thunderstorms. Avoid using any
telephone (except a cordless model) during a thunderstorm, since thereÕs a small
chance you could get an electrical shock from lightning.
¥ Gas Leaks. Never use any telephone close to a gas leak. If you think gas is leaking,
call the gas company immediately, but use a telephone far away from the leak area.
A small electrical spark in the telephone could cause a fire.
J-Chapter 1(US) 4/16/98 8:23 AM Page 3
Page 3

Chapter 1 Your New Machine
List of Features .................................................................................................................. 1.1
Parts ..................................................................................................................................... 1.2
Common Parts ................................................................................................................ 1.2
Familiarizing Yourself with Your New Machine .......................................................... 1.4
Front View ....................................................................................................................... 1.4
Rear View ........................................................................................................................ 1.5
Control Panel .................................................................................................................. 1.6
Fax Theory .......................................................................................................................... 1.8
Multi-function machine ................................................................................................ 1.9
Chapter 2 Installation and Setup
Choosing a Location ......................................................................................................... 2.1
Connections ........................................................................................................................ 2.1
Connection Diagram ..................................................................................................... 2.1
Handset and Handset Cradle ...................................................................................... 2.2
Document Tray ............................................................................................................... 2.3
Document Exit Tray ....................................................................................................... 2.4
Printer Exit Tray ............................................................................................................. 2.4
Telephone Line ............................................................................................................... 2.5
Extension Phone (Optional) ......................................................................................... 2.5
AC Power Cord .............................................................................................................. 2.5
Loading Paper .................................................................................................................... 2.6
Paper Type and Sizes ..................................................................................................... 2.7
Installing Print Cartridge ................................................................................................. 2.7
Print Cartridge Storage Unit (SF4100, SF4200) ........................................................ 2.10
Storing a Print Cartridge in the Storage Unit .......................................................... 2.10
Running Self-Test ............................................................................................................. 2.11
Connecting to Your PC (SF4100, SF4200) .................................................................... 2.13
Connecting SF4200 to Your PC .................................................................................. 2.13
Connecting SF4100 to Your PC .................................................................................. 2.14
Setting Up Printer (SF4100, SF4200) ............................................................................. 2.15
Installing the Windows Printer Driver Software .................................................... 2.15
Running Windows Printer Software ......................................................................... 2.17
Installing the DOS Printer Software ......................................................................... 2.19
Using the DOS Printer Software ................................................................................ 2.20
Making a Copy ................................................................................................................ 2.21
Setting the Date and Time ............................................................................................. 2.23
Setting the Terminal ID (Your Name and Number) .................................................. 2.25
Using the Keypad to Enter Letters ............................................................................ 2.27
Keypad Character Assignments ................................................................................ 2.28
Adjusting Ringer Volume ........................................................................................... 2.28
Selecting Tone or Pulse Service .................................................................................. 2.28
CONTENTS
C
ONTENTS
1
J-Chapter 1(US) 4/16/98 8:23 AM Page 4
Page 4

CONTENTS
Chapter 3 Automatic Dialling
One-Touch Dialling ........................................................................................................... 3.1
Storing a Number for One-Touch Dialling ................................................................ 3.1
Dialling One-Touch Number ....................................................................................... 3.3
Speed Dialling .................................................................................................................... 3.4
Storing a Number for Speed Dialling ......................................................................... 3.4
Dialling a Speed Number ............................................................................................. 3.6
Group Dialling ................................................................................................................... 3.7
Storing One-touch or Speed Dial Numbers for Group Dialling ............................ 3.7
Using Group Dialling (Multi-address transmission) ............................................... 3.9
Searching for a Number in Memory (Directory Dialling) ........................................ 3.10
Searching Sequentially through Memory ................................................................ 3.10
Searching for a Particular First Letter ....................................................................... 3.11
Chapter 4 The Fax Machine
Sending a Fax ..................................................................................................................... 4.1
Acceptable Documents .................................................................................................. 4.1
Setting Document Resolution and Contrast .............................................................. 4.2
Loading Document ........................................................................................................ 4.3
Using Quick Scan ........................................................................................................... 4.4
Sending a Fax Automatically ....................................................................................... 4.4
Sending a Fax After Talking ......................................................................................... 4.5
Confirming Transmission ............................................................................................. 4.6
Cancelling Transmission ............................................................................................... 4.6
Automatic Redial .............................................................................................................. 4.6
Receiving a Fax .................................................................................................................. 4.7
Reception Modes ............................................................................................................ 4.7
Receiving in FAX Mode ................................................................................................ 4.8
Receiving in TEL/FAX Mode ...................................................................................... 4.8
Receiving in ANS/FAX Mode ..................................................................................... 4.9
Receiving Manually (in TEL Mode) ............................................................................ 4.9
Cancelling Reception ................................................................................................... 4.10
Using an Extension Telephone ................................................................................... 4.11
Recording Area ............................................................................................................. 4.11
Voice Request ................................................................................................................... 4.12
Sending a Voice Request ............................................................................................. 4.12
Answering a Voice Request ........................................................................................ 4.13
Chapter 5 Advanced Operations
Memory Transmission (Broadcasting) ........................................................................... 5.1
Delayed Transmission ...................................................................................................... 5.3
Polling ................................................................................................................................. 5.6
Being Polled By a Remote Machine ............................................................................ 5.6
Polling a Remote Machine ............................................................................................ 5.8
Adding Documents To a Standby Operation ............................................................... 5.9
Confirming the Operation Number ............................................................................ 5.9
Adding Document To a Standby Operation in Memory ....................................... 5.10
Cancelling a Standby Operation ................................................................................... 5.12
2 C
ONTENTS
J-Chapter 1(US) 4/16/98 8:23 AM Page 5
Page 5

C
ONTENTS
3
CONTENTS
Chapter 6 Special Features
Using REDIAL/PAUSE .................................................................................................... 6.1
Using TONE (Switching from Pulse to Tone) ............................................................... 6.2
Using FLASH (on a PABX system) ................................................................................. 6.3
Chain Dialling a Memory Number ................................................................................ 6.4
Help List ............................................................................................................................. 6.5
Dual Access ........................................................................................................................ 6.5
User Reports ....................................................................................................................... 6.6
Selectable Reports .......................................................................................................... 6.6
Printing Reports ............................................................................................................. 6.6
User Options ...................................................................................................................... 6.8
Setting an Option ........................................................................................................... 6.8
Selectable Options .......................................................................................................... 6.9
Clearing Memory ............................................................................................................ 6.11
Chapter 7 Care and Maintenance
Cleaning the Document Scanner .................................................................................... 7.1
Printer Cartridge Maintenance ....................................................................................... 7.3
Check Ink Level ................................................................................................................. 7.3
Run Nozzle Test ................................................................................................................. 7.5
To run the nozzle test .................................................................................................... 7.5
Wiping the Print Nozzles and Contacts ........................................................................ 7.7
Cleaning the Cartridge Carrier Contacts and Deflector .......................................... 7.8
Replacing the Print Cartridge ....................................................................................... 7.10
Chapter 8 Troubleshooting
Clearing Jams ..................................................................................................................... 8.1
Document Jams During Transmission ........................................................................ 8.1
When to Replace Parts for Automatic Document Feeding ...................................... 8.1
Paper Jams During Printing ......................................................................................... 8.2
LCD Error Messages ......................................................................................................... 8.4
Fixing Problems ................................................................................................................. 8.7
Fax Problems .................................................................................................................. 8.7
Print Quality Problems ................................................................................................. 8.9
Printing Problems ........................................................................................................ 8.10
Paper Feeding Problems ............................................................................................. 8.11
Specifications ................................................................................................................... 8.12
General .......................................................................................................................... 8.12
Fax .................................................................................................................................. 8.12
Printer ............................................................................................................................ 8.13
J-Chapter 1(US) 4/16/98 8:23 AM Page 6
Page 6

Chapter One
YOUR NEW MACHINE
J-Chapter 1(US) 4/16/98 8:23 AM Page 7
Page 7

Chapter One
YOUR NEW MACHINE
This chapter will familiarize you with your new MultiJet machine.
List of Features
SamsungÕs MultiJet machines were designed using the latest technology. The machines
are full-featured, high-performance machines that not only meet, but exceed, industry
standards. The following is a list of their many exciting features:
¥ Stand-alone, full-function plain-paper fax machine
¥ Convenient copier
¥ Single/multi-page copy up to 99 pages
¥ Multi-tasking capability
¥ 20 One-Touch and 50 Speed-Dialling locations
¥ Group Dialling
¥ Ring volume adjustment
¥ Choice of tone or pulse dialling
¥ Choice of four reception modes
¥ Transmission confirmation
¥ Memory/Delayed Transmission, Voice Request, and Polling features
¥ Extension telephone jack and external answering machine interface
¥ Special Help features
¥ Single/multi-redial features
¥ Printed reports and lists
¥ Quick Scanning
¥ High speed PC-printer features (for SF4100, SF4200)
¥ Windows driver supplied (for SF4100, SF4200)
¥ Printing support for DOS applications (for SF4100, SF4200)
¥ Powerful print quality enhancement technology (for SF4100, SF4200)
¥ True color printing (for SF4100, SF4200)
¥ TWAIN standard compatible PC-scanning feature (for SF4200)
¥ PC-faxing by class 1 interface (for SF4200)
¥ The bundled PC application package supplied (for SF4200)
C
HAPTER ONE : YOUR NEW MACHINE
1.1
J-Chapter 1(US) 4/16/98 8:23 AM Page 1.1
Page 8
YOUR NEW MACHINE
1.2 C
HAPTER ONE : YOUR NEW MACHINE
1
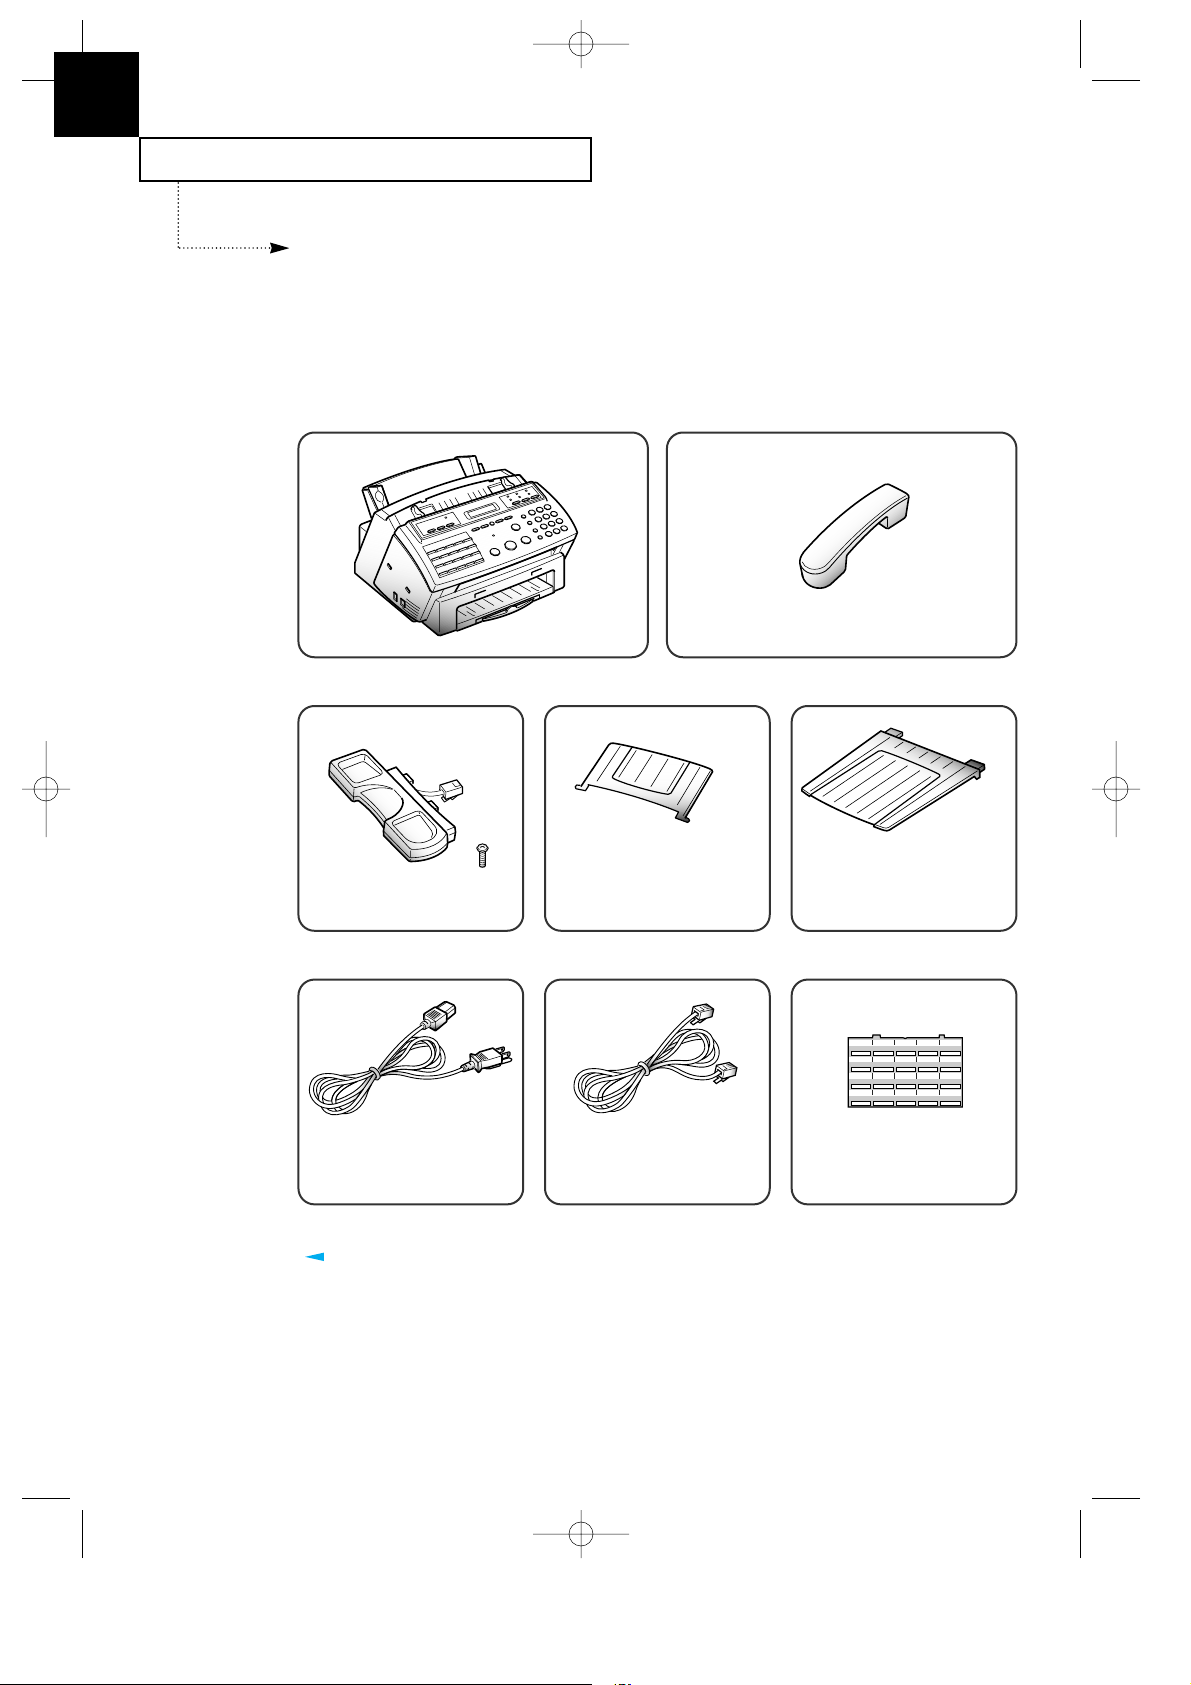
Parts
Once you have unpacked your MultiJet machine, check to make sure that you have all
the parts shown here. If any piece is missing or broken, call your dealer.
Common Parts
Machine
Handset
Cradle & Screw
Document Exit TrayDocument Tray
01
02 03 04 05
06
07 08 09 10
11
12 13 14 15
16
17 18 19 20
AC Power Cord
Address LabelTelephone Line Cord
The shape of power and telephone line cord plugs may differ, depending on your country.
J-Chapter 1(US) 4/16/98 8:23 AM Page 1.2
Page 9
YOUR NEW MACHINE
C
HAPTER ONE : YOUR NEW MACHINE
1.3
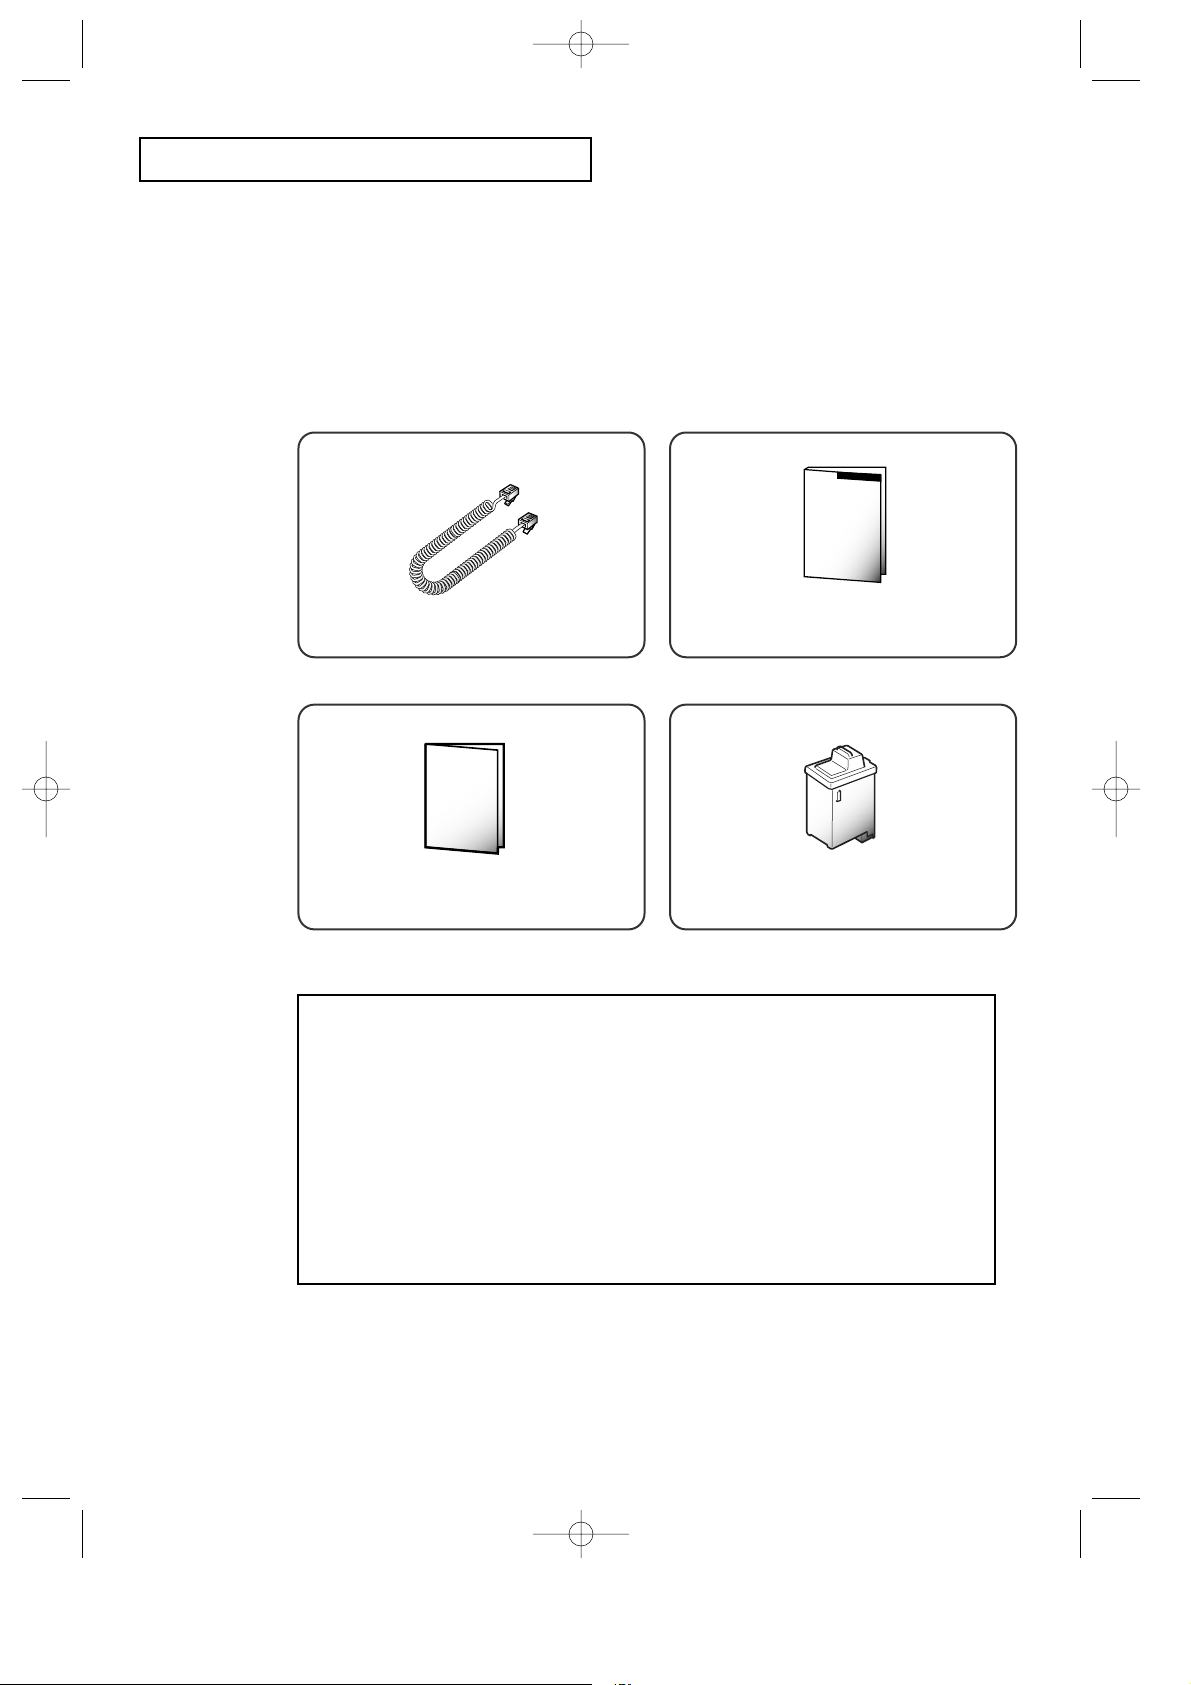
Quick Reference Guide
This Manual
Others
¥ Color Print Cartridge (supplied for SF4200, option for SF4100)
¥ Printer Setup Diskette (supplied for SF4100, SF4200 only)
¥ Print Cartridge Storage Unit (supplied for SF4100, SF4200 only)
¥ WinFaxLITE Setup Diskettes (supplied for SF4200 only)
¥ Manual for WinFaxLITE (supplied for SF4200 only)
¥ Parallel Printer Cable (supplied for SF4100, SF4200 only)
¥ RS-232C Serial Cable (supplied for SF4200 only)
Coiled Handset Cord
Mono Print Cartridge
J-Chapter 1(US) 4/16/98 8:23 AM Page 1.3
Page 10
0
0
0
0
0
0
0
0
0
0
0
0
0
0
0
0
0
0
0
0
0
0
0
0
0
0
0
0
0
0
0
0
0
0
0
0
0
0
0
0
YOUR NEW MACHINE
1.4 C
HAPTER ONE : YOUR NEW MACHINE
1
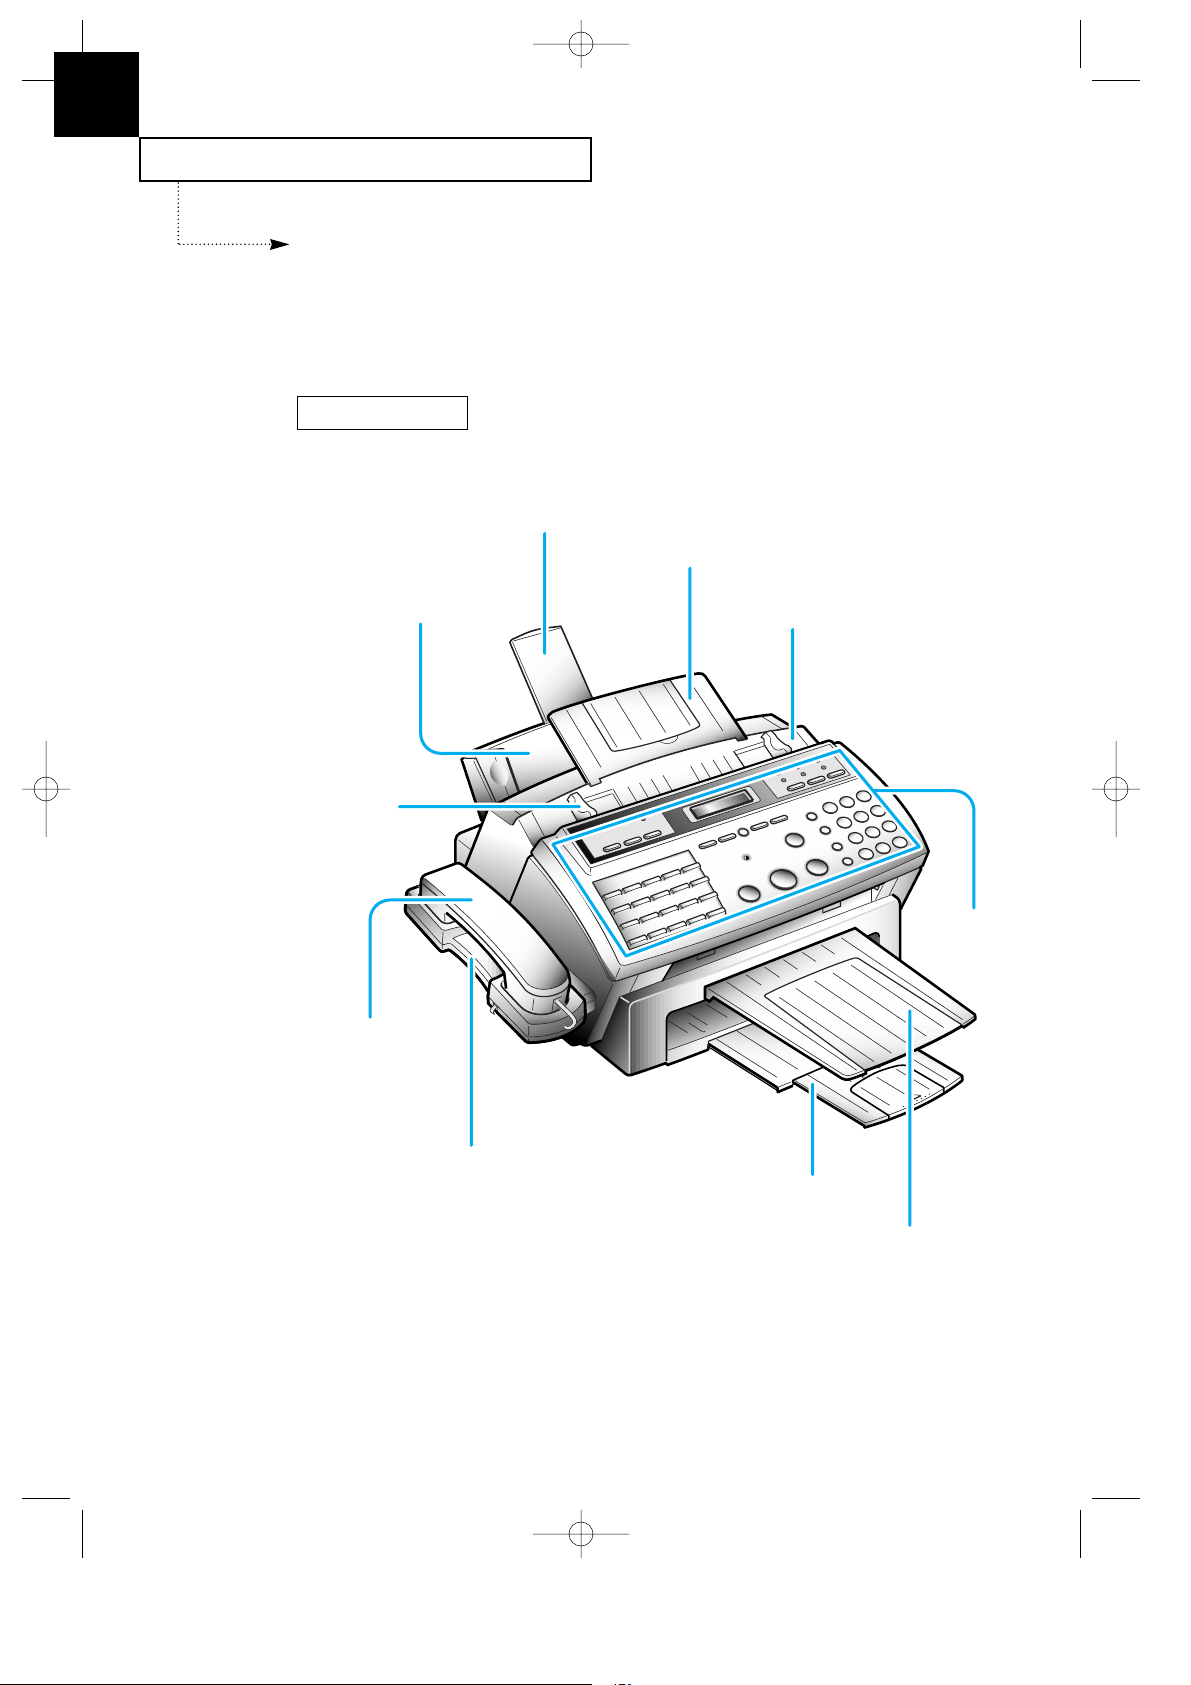
Familiarizing Yourself with Your New
Machine
Take a moment to familiarize yourself with your new machine by looking at the pictures
on the next few pages.
Paper Support
Document Tray
Top Cover
Paper Bin
Document
Guide
Handset
Handset Cradle
Printer Exit Tray
Document Exit
Tray
Control
Panel
Front View
J-Chapter 1(US) 4/16/98 8:23 AM Page 1.4
Page 11
YOUR NEW MACHINE
C
HAPTER ONE : YOUR NEW MACHINE
1.5
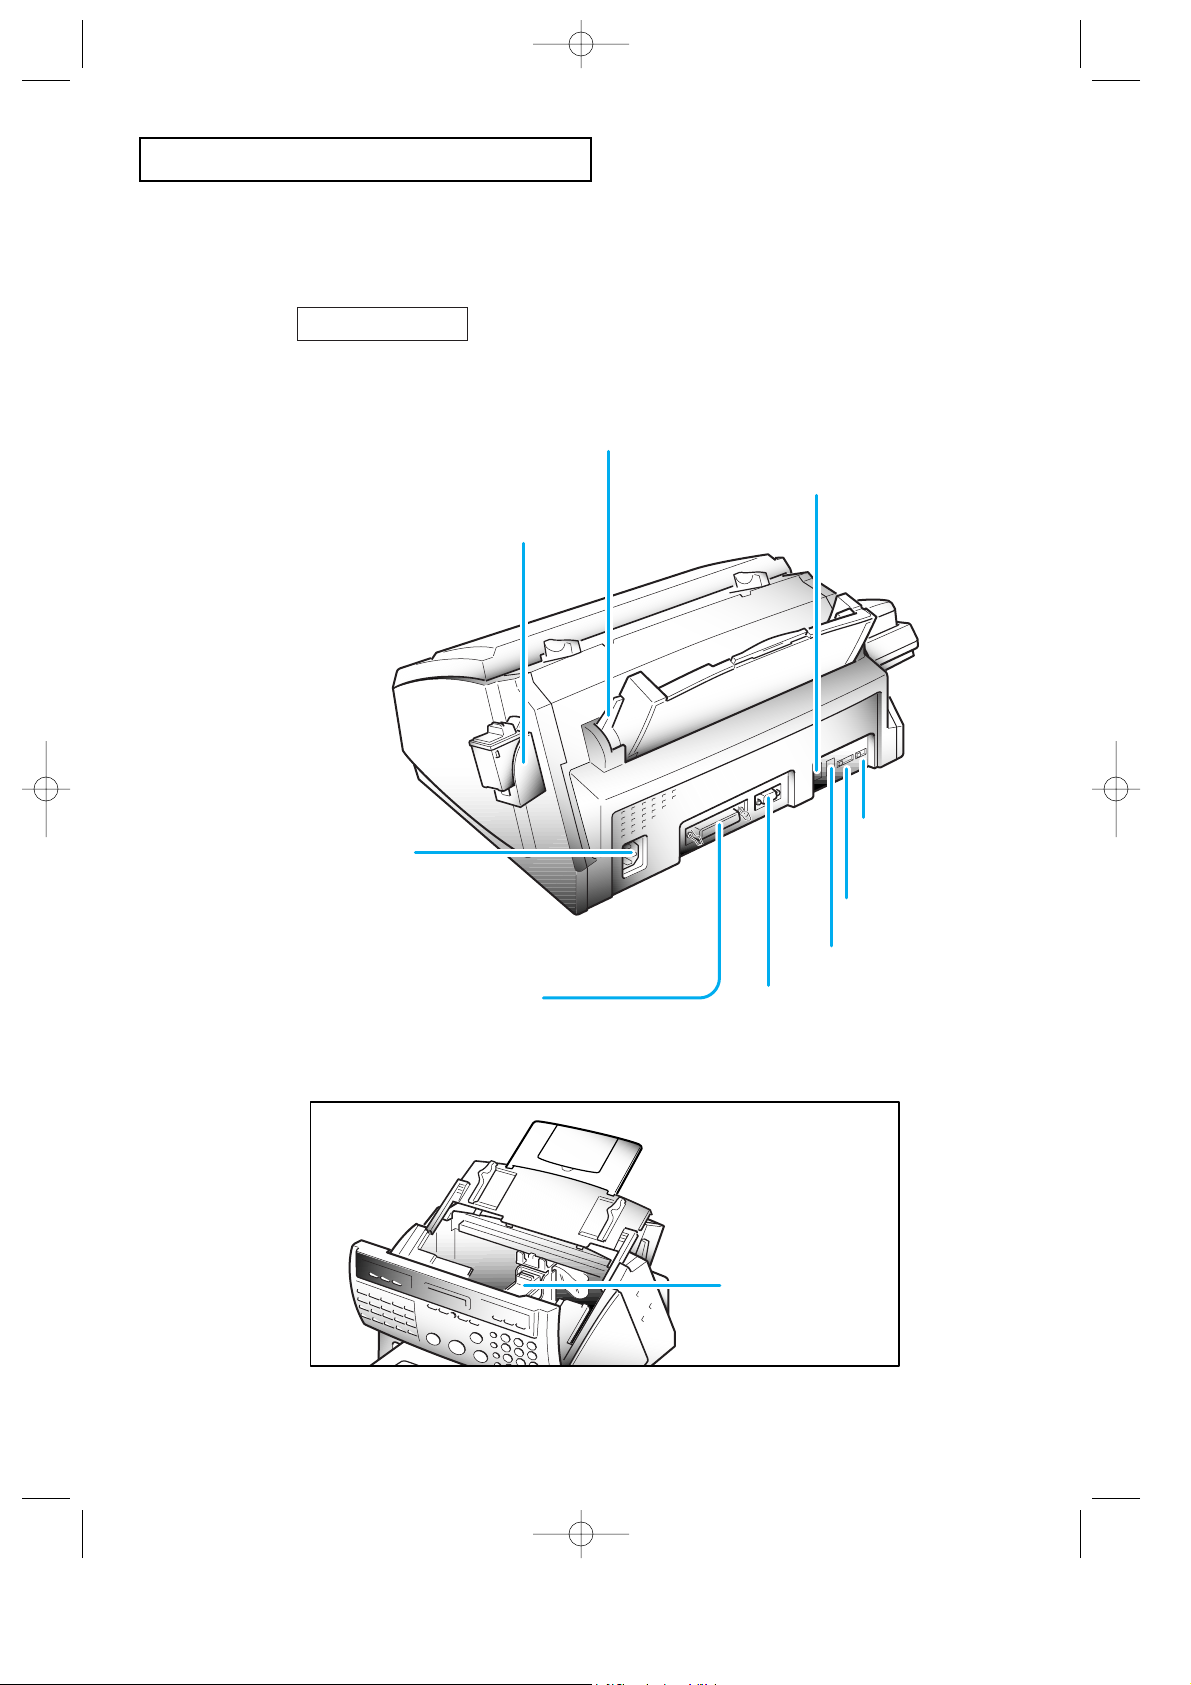
Paper Load Lever
Tel. Line Jack
Ext. Line Jack
Serial Cable Connector
(for SF4200 only)
Dial mode switch
Ringer volume switch
Parallel Printer
Cable Connector
(for SF4100, SF4200 only)
AC Power
Socket
Print Cartridge
Print Cartridge
Storage Unit
(for SF4100, SF4200 only)
Rear View
J-Chapter 1(US) 4/16/98 8:23 AM Page 1.5
Page 12

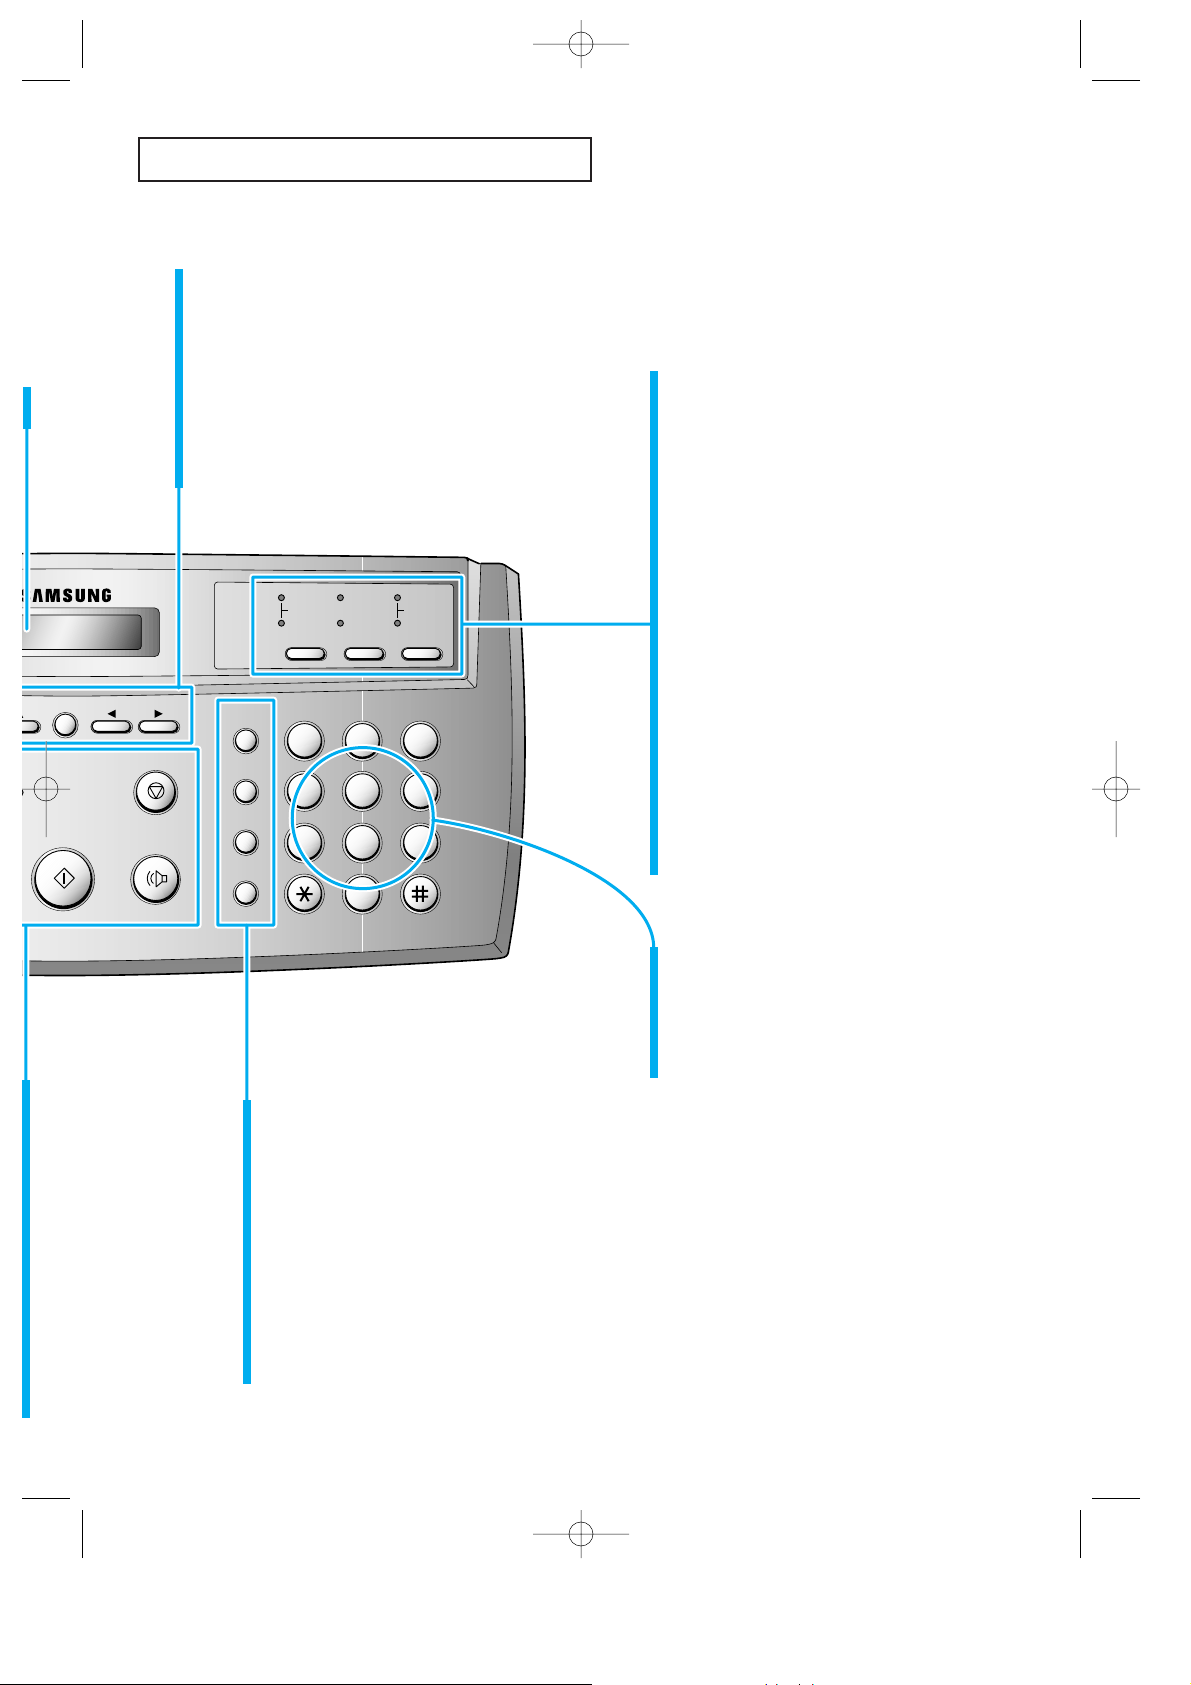
SEARCH/DELETE
ALARM
BUSY
FORM FEED
CARTRIDGEPRINTER RESET
01 02 03 04 05
STOP
OHD/V.RCOPY
START/
ENTER
01 02 03 04 05
06 07 08 09 10
11 12 13 14 15
16 17 18 19 20
MEMORY TX.
SET
DELAY TX. POLLING ADD/CANCEL SELF-TEST
GROUP DIAL SYSTEM ID DATE & TIME OPTION
TX. CONFIRM STANDBY DIAL LIST OPTION JOURNAL
HELP LIST
PRINT
Q.SCAN
YOUR NEW MACHINE
1.6 C
HAPTER ONE : YOUR NEW MACHINE
1
BUSY Lamp
(for SF4100, SF4200 only)
Lights while printing a PC file.
PRINTER RESET Button
(for SF4100, SF4200 only)
Use to reset the machine from paper
jam and catastrophic printer error.
CARTRIDGE Button
Use when replacing the print
cartridge. This button permits you to
position the print cartridge carrier so
that you may easily remove or
replace the print cartridge.
FORM FEED Button
(for SF4100, SF4200 only)
Use to eject paper from the
printer if the paper is not
fed out after printing is
completed. Also, use to load
paper in place when the paper
has run out while PC printing.
One-Touch Dial and
special function Buttons
Use to call most frequently used
numbers with one button. Also, use
these buttons with MENU button to
set special functions or print lists.
LCD Display
Displays information.
COPY Button
Use to copy a document.
START and ENTER Button
Use to start a job. Also use to confirm the
selection made in the display.
OHD (On-Hook Dial) and V.REQ (Voice Request) Button
Use to dial numbers without picking up the handset. Also use
it to make a voice call after sending and receiving documents.
STOP Button
Use to stop an operation at any time.
ALARM Lamp
Lights when something is wrong during fax
communication. It flickers when a printer error occurs.
Control Panel
I-Control Panel(US) 4/16/98 8:26 AM Page 2
Page 13
32
PQRS
GHI
ABC
MENU
SEARCH/DELETE
STOP
OHD/V.REQ.
START/
ENTER
FLASH
SPEED
/DUAL
REDIAL/
PAUSE
DEF
JKL MNO
TUV WXYZ
RCV.MODE
FAX
ANS/FAX
TEL/FAX
FINE
S. FINE
LIGHTEN
PHOTO
DARKEN
RESOLUTION CONTRAST
1
465
798
0
and¹(down/up) Buttons
Use to display or the next or last menu item.
SEARCH/DELETE Button
Use to search for a number in memory.
Or use to delete digits in the edit mode.
Ã
and¨(left/right) Buttons
Use to move cursor right or left through the display.
RCV.MODE (Receive Mode) Button
Use to choose which receive mode you
want to use. The lamps will light up to
show you which setting you have
chosen. When both lamps light up,
you are in ANS/FAX mode. When no
lights are showing, you are in TEL
mode.
RESOLUTION Button and Lamps
Use to choose the resolution.
The lamps will light up to show you
which setting you have chosen.
When no lights are showing, you are
in STANDARD mode.
CONTRAST Button and Lamps
Use to choose the contrast of copied
or transmitted documents. The lamps
will light up to show you which
setting you have chosen. When both
lamps light up, you are in PHOTO
mode.
MENU Button
Use to choose special functions.
FLASH Button
Use this to transfer a call in a PABX (Private Automatic Branch
Exchange).
SPEED/DUAL Button
Use to make calls and send documents by entering a 2-digit
number. Also use it to confirm dual operation.
REDIAL/PAUSE Button
Use this to redial the last phone number you called. You can also
use it to add a pause when you store a number in memory.
Number Keypad
Use to dial numbers manually.
∗
Button
Press to temporarily switch from pulse
to tone dialling.
YOUR NEW MACHINE
C
HAPTER ONE : YOUR NEW MACHINE
1.7
I-Control Panel(US) 4/16/98 8:26 AM Page 3
Page 14
YOUR NEW MACHINE
1.8 C
HAPTER ONE : YOUR NEW MACHINE
1
Fax Theory
Thank you for your purchase of this SAMSUNG multi-function fax machine. We want
you to get maximum use from your new equipment, therefore we would like to explain a
little bit about FAX machines and how they work. This will help when reading the rest of
this manual and becoming acquainted with FAX machines in general, plus all the
features available with your new machine.
Most people donÕt realize it, but the fax machine has been around in various forms since
the time of the invention of the telegraph in the mid-nineteenth century. Early fax
machines were large, slow, and difficult to operate. Equipment and techniques for
sending copies of documents across long distances have improved over the years, and
todayÕs fax machine is small, fast, and easy to operate.
A fax machine may appear complex, but in reality, modern fax machines are merely a
combination of several very familiar machines.
First of all, faxing makes use of processes very much like an office copier. When you
send a fax document to someone, the machine makes an internal copy of it (a facsimile,
hence the term ÒfaxÓ), and converts that copy to electronic signals which we call ÒdataÓ.
The data is then sent out over the telephone line as a series of audible tones. When you
receive a fax from someone else, the copy process simply converts these tones from the
telephone line back to data, and then to printed output.
Fax machines depend very much on telephone technology, since they must dial
telephone numbers, answer calls, and exchange fax data (their version of ÒspeechÓ) over
the phone line with other fax machines.
To send a fax document, you tell the fax machine the telephone number to call by
entering the number on a Touch-Tone keypad, just like a telephone. You may also store
frequently-called numbers in the machineÕs various memory locations. This makes
dialling faster, more accurate, and allows your machine to ÒrememberÓ telephone
numbers for performing many automatic functions.
After dialling the number, the fax machine you are calling answers the call and, just as
people do, the machines introduce themselves and make sure they have compatible
features and speak the same ÒlanguageÓ (fax engineers call this process ÒhandshakingÓ).
The machines also determine the quality of the sound over the telephone line and decide
whether they should continue, or perhaps ÒtalkÓ slower in the case of noise or low
volume. They may even refuse to speak to each other and will hang up, rather than
waste time when it is not possible to have a ÒconversationÓ (just like people!). In this
case, they often try the call again later, when the telephone connection may be better.
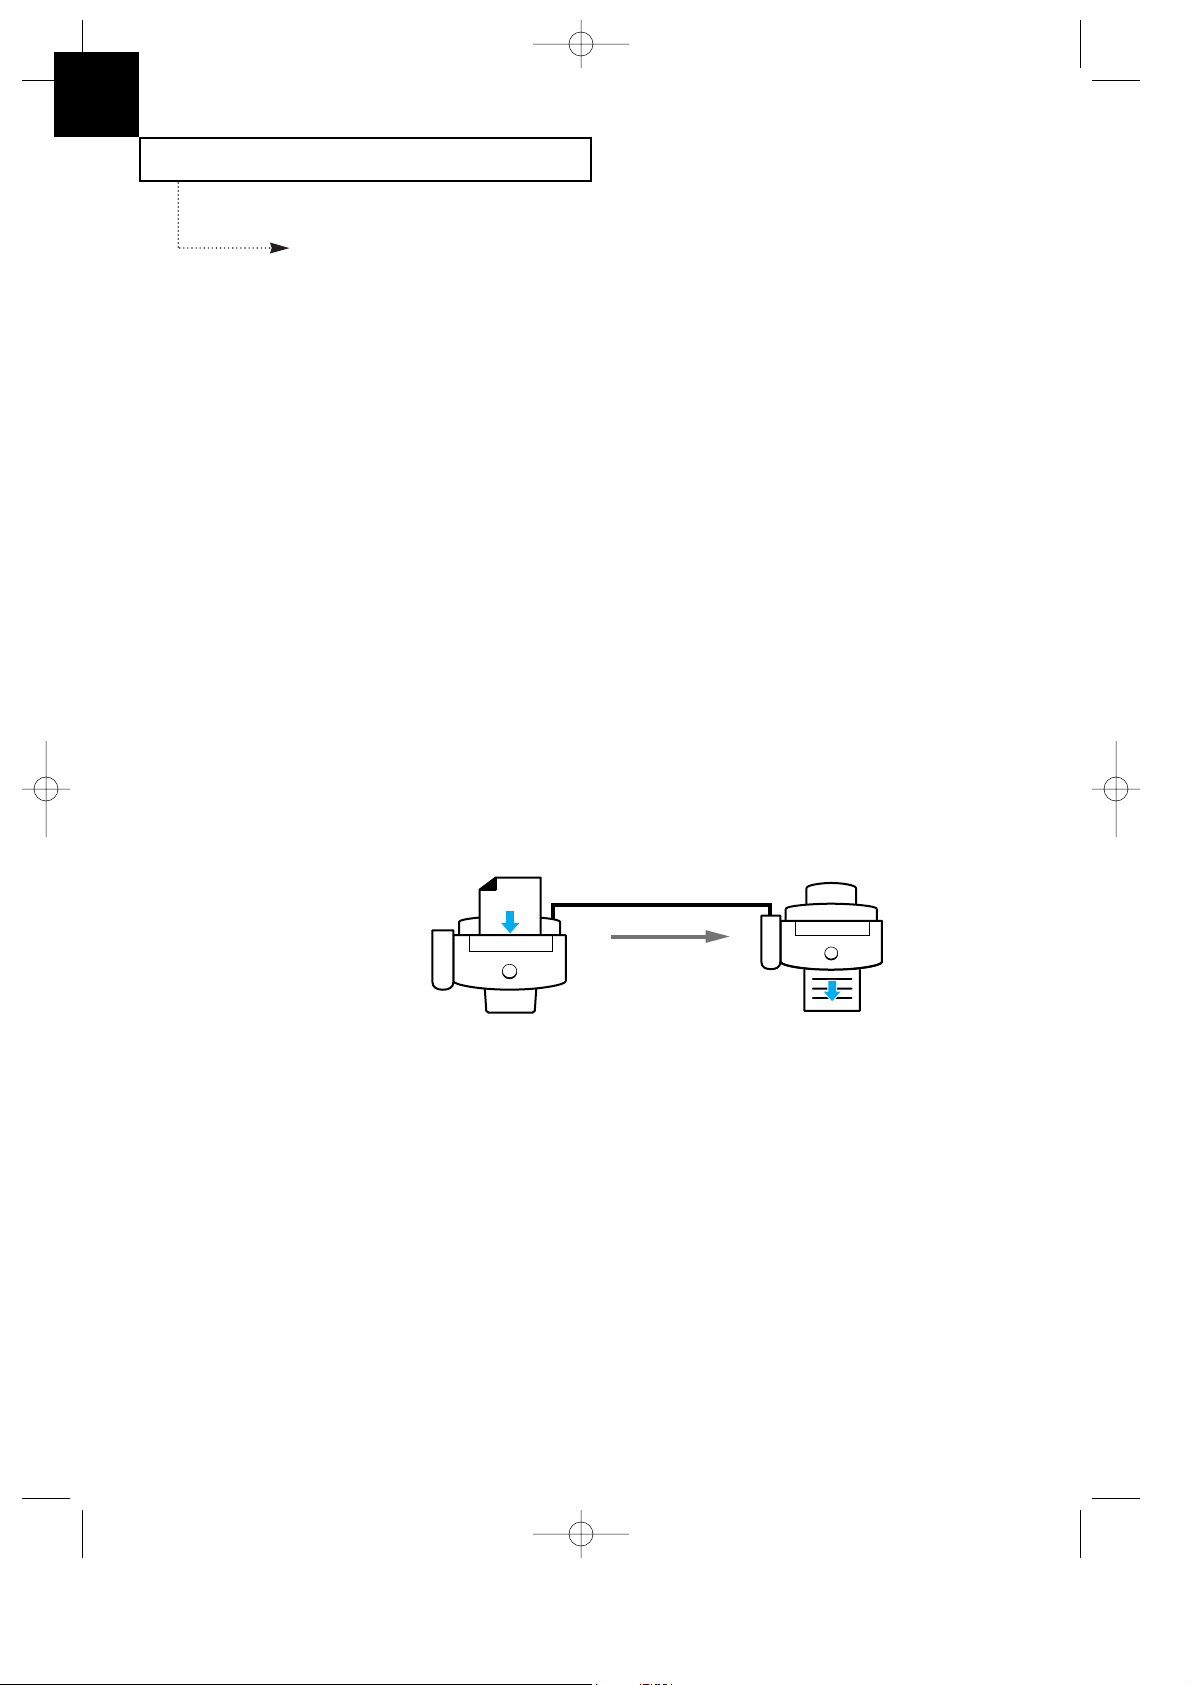
Basic FAX Operation
TELEPHONE LINE
SEND
DOCUMENT
RECEIVE
DOCUMENT
FAX MODE
J-Chapter 1(US) 4/16/98 8:24 AM Page 1.8
Page 15
YOUR NEW MACHINE
C
HAPTER ONE : YOUR NEW MACHINE
1.9
After a few seconds exchanging pleasantries (handshaking), the machines decide to get
down to the business of the call: sending and receiving a fax document.
A fax document is one or more sheets of paper which have been placed in the
transmitting (sending or TX) machine. As soon as the machines have finished with their
ÒintroductionsÓ, the document begins to move through the transmitting machine where
it is read and converted to a data signal, exactly as in a copier. The difference here is that
the print mechanism of the copying process is not located in the same machine as the
reading mechanism. It is several miles, or even several thousand miles, away, and prints
the data signals which arrive over the telephone line in the form of tones.
As far as it goes, this description of the fax process is accurate, and should be kept in
mind whenever using any fax machine.
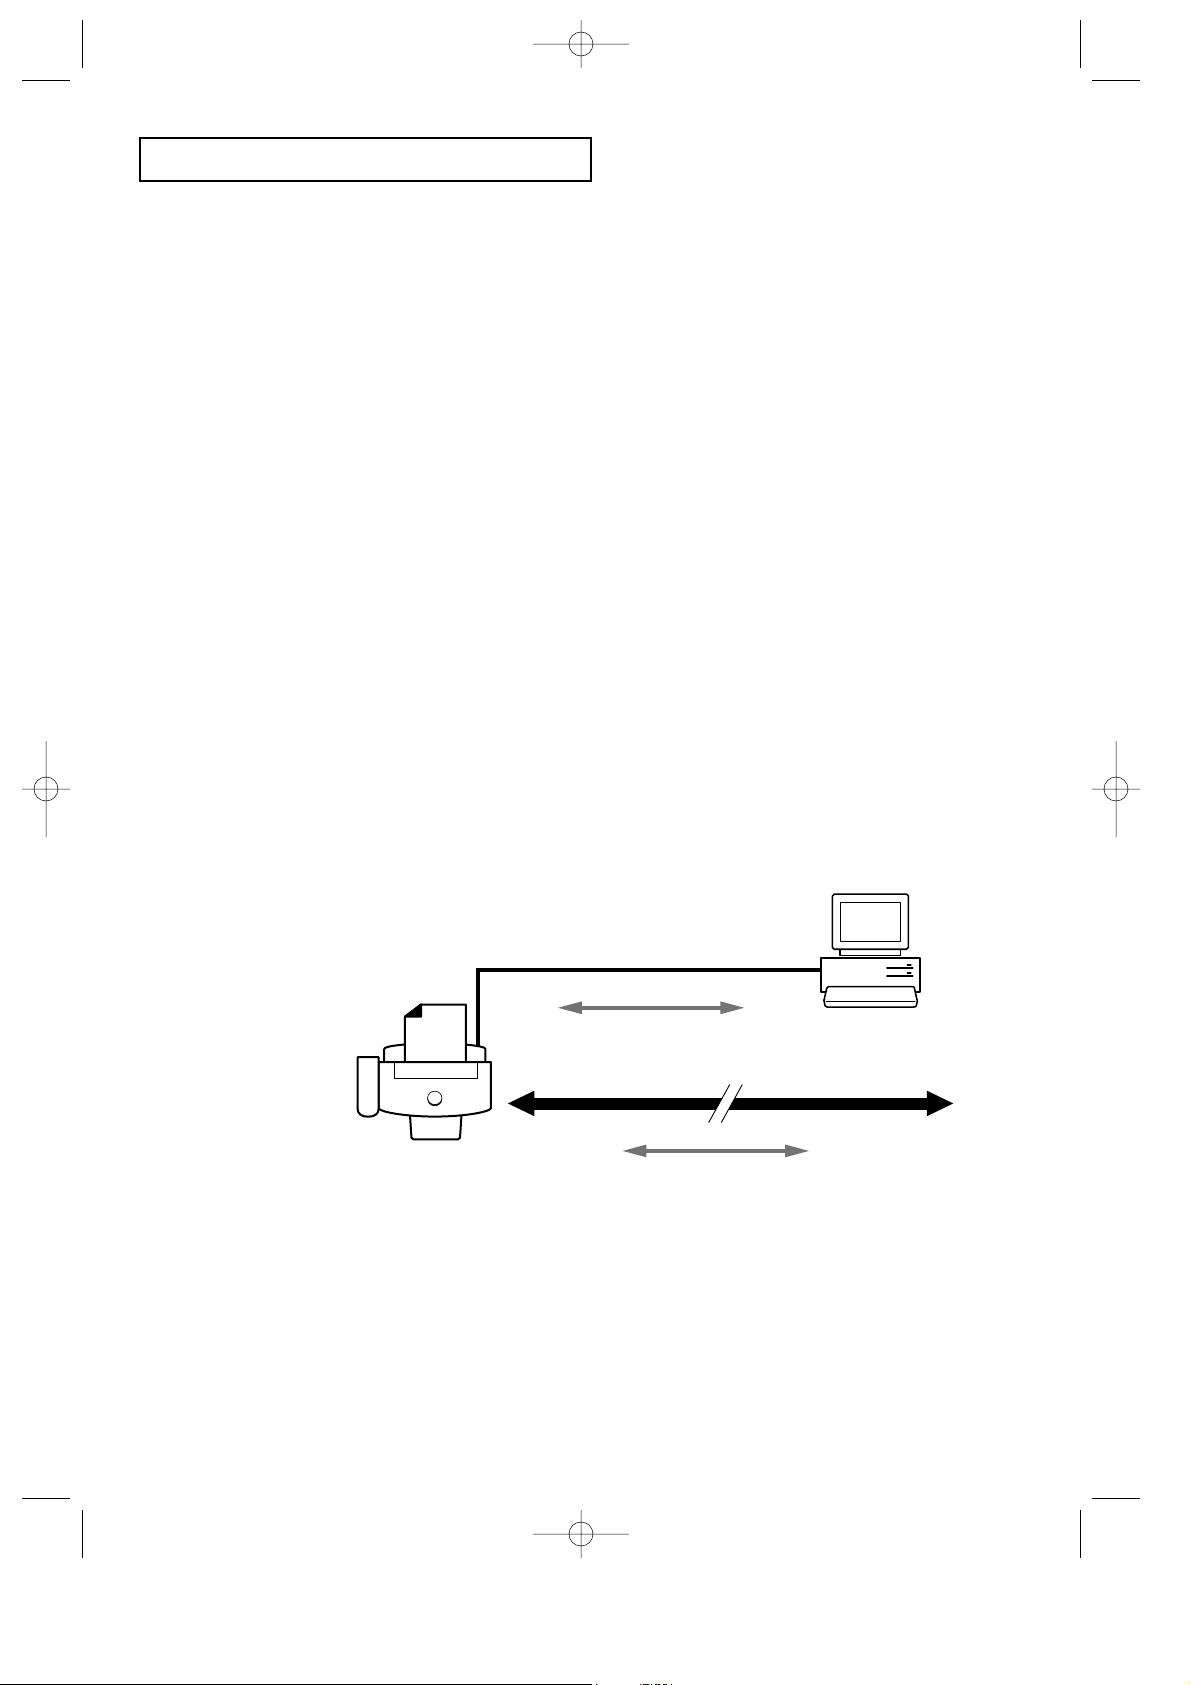
Multi-function machine
But...your new SAMSUNG multi-function machine provides features far beyond those of
the basic fax. The multi-function fax machine package, consisting of the SF4100 or SF4200
series fax machine and the software for your PC, are designed to work together to
effectively combine the utility of the fax machine with the power of the Personal
Computer, thus providing a spectrum of useful features not possible with either unit
alone.
Your PC utilizes the SAMSUNG multi-function machine as an input and output device,
very much like any other attachment you may currently have connected to your
computer. This package will enable you to scan text and graphic documents and store or
edit them in your PC. You may also print any document contained in your PC, in color,
on your multi-function machine.
Additionally, your PC serves as a versatile control unit for your multi-function machine.
You will see how to receive faxes directly into your PC, send documents directly from
word processing or graphics applications, even control your multi-function machine
remotely, a very useful feature when traveling out of the office to other locations.
The remainder of this manual will show you how to use each of these features to save
time and money.
INTERFACE CABLE
TELEPHONE LINE TO REMOTE FAX MACHINE
CONTROL
SIGNALS
FAX DATA
Multi-function machine operation
J-Chapter 1(US) 4/16/98 8:24 AM Page 1.9
Page 16

Chapter Two
INSTALLATION AND SETUP
G-Chapter 2(US) 4/16/98 8:30 AM Page 1
Page 17
Chapter Two
INSTALLATION AND SETUP
Please review the safety informations at the front of this manual, then follow the
directions in this chapter to connect your machine and set it up for use.
Choosing a Location
To help guarantee trouble-free operation of your machine, place it in a spot where:
¥It is not in direct sunlight or in excessive humidity.
¥It is not too close to heating or air conditioning vents.
¥Its ventilation openings arenÕt blocked.
¥It is at least 4 inches away from other objects.
¥Its cords wonÕt get in the way.
¥It canÕt be easily knocked off a table or dropped.
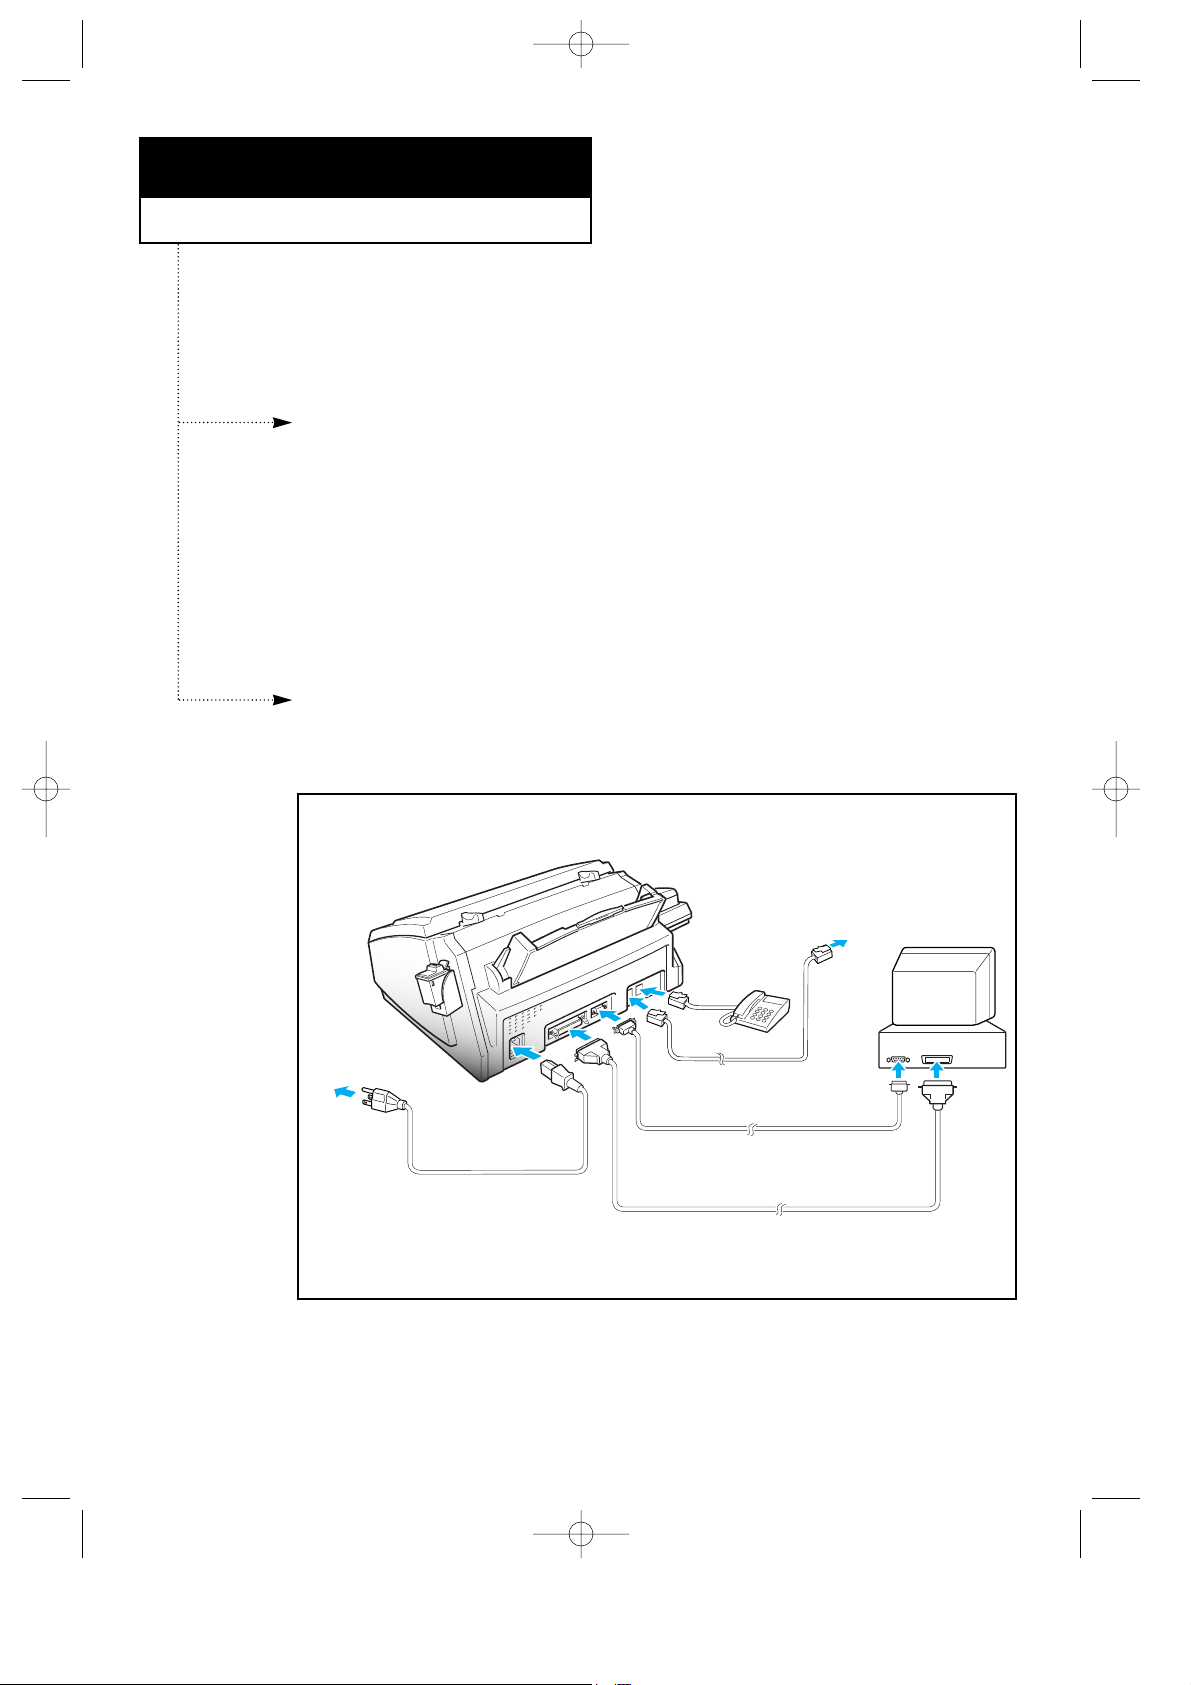
Connections
Connection Diagram
C
HAPTER TWO : INSTALLATION AND SETUP
2.1
Extension
phone
PC
Phone line cord
RS232-C serial cable
(SF4200)
Parallel printer cable
(SF4100/SF4200)
AC power cord
G-Chapter 2(US) 4/16/98 8:30 AM Page 2.1
Page 18
INSTALLATION AND SETUP
2.2 C
HAPTER TWO : INSTALLATION AND SETUP
2
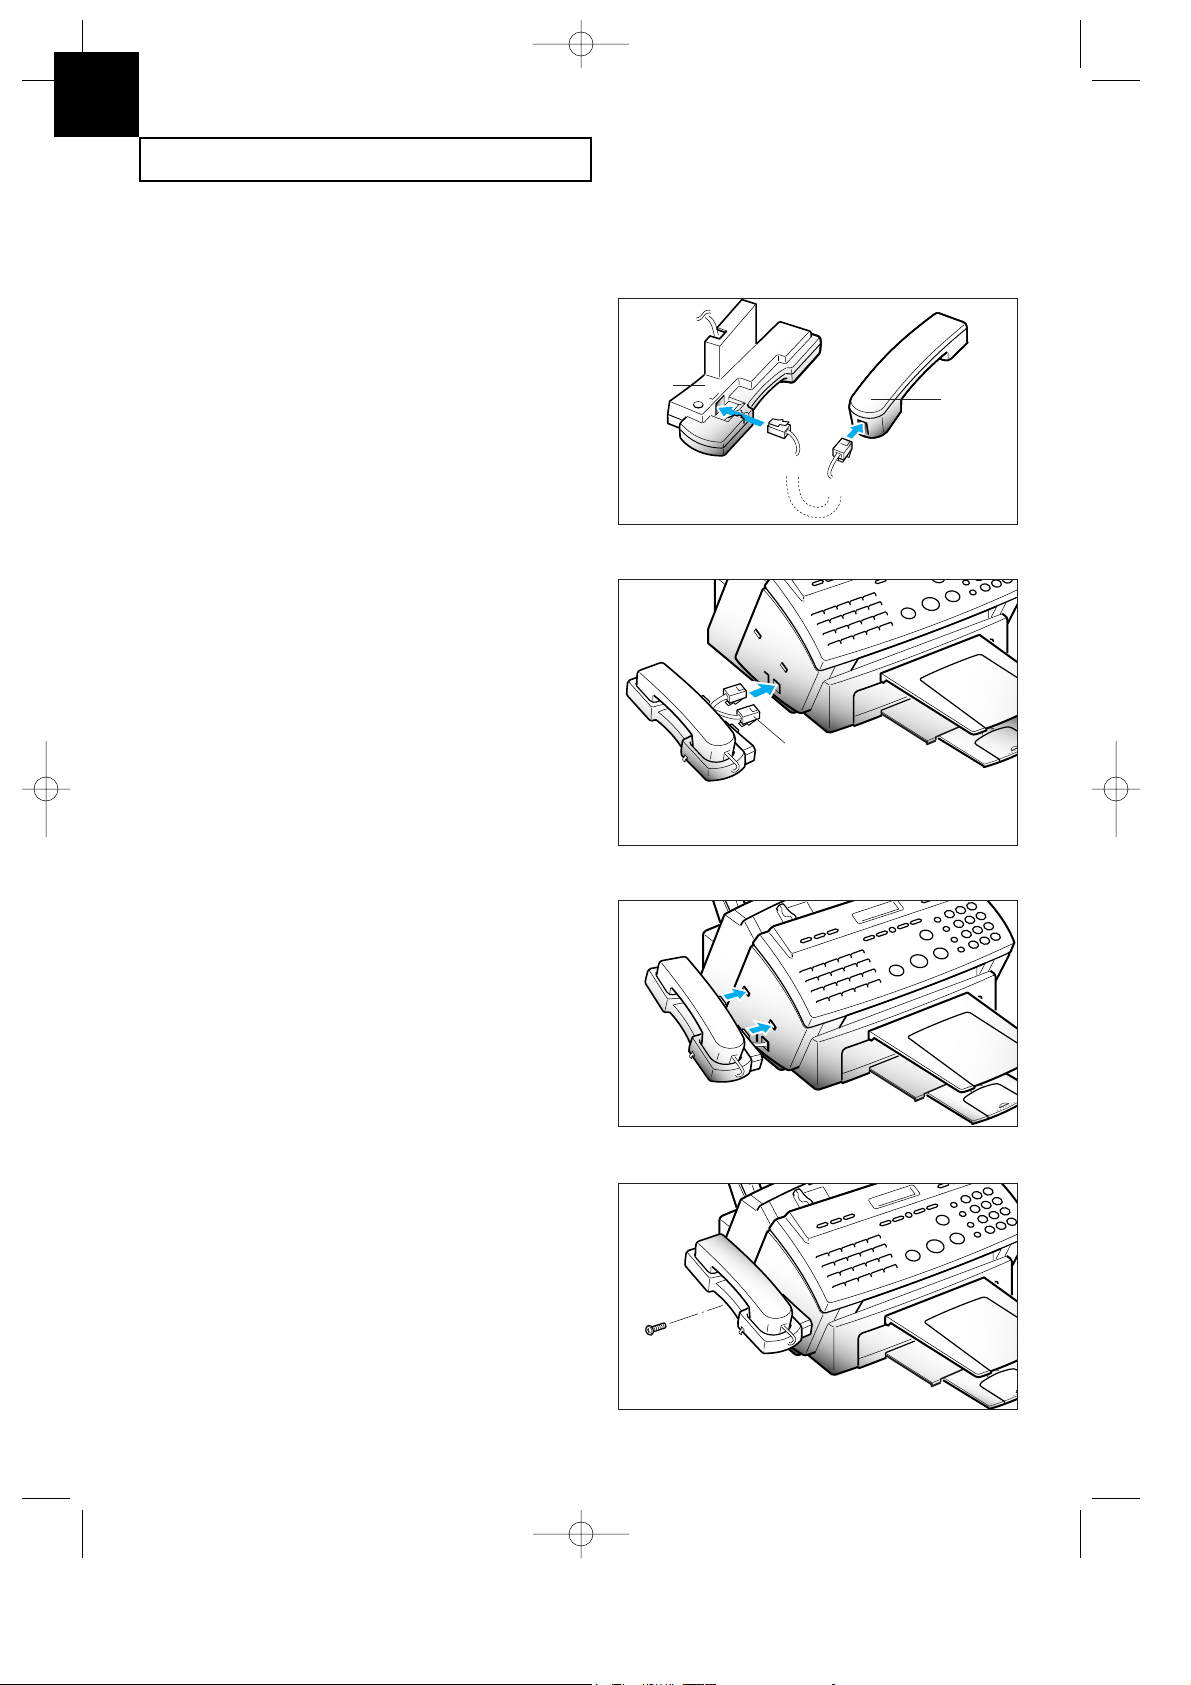
Handset and Handset Cradle
1. Plug one end of the coiled cord into the
jack on the handset. Then plug the other
end into the modular jack on the bottom
of the handset cradle.
0000000
000000
2. Plug the cradleÕs modular cord(s) into
the modular jack(s) on the left side of
your machine.
(The number of modular cord may
differ, depending on your country.)
0
0
0
0
0
0
0
0
0
0
0
0
0
0
0
0
0
0
0
0
0
0
0
0
0
0
0
0
0
0
0
0
0
0
0
0
0
0
0
3. Attach the handset cradle to the main
body. Insert two tabs of the cradle into
the slots on the left side of the main
body as shown, and push them down.
0
0
0
0
0
0
0
0
0
0
0
0
0
0
0
0
0
0
0
0
0
0
0
0
0
0
0
0
0
0
0
0
0
0
0
0
0
0
0
0
0
0
0
0
0
0
0
0
0
0
0
0
0
0
0
0
0
0
0
0
0
0
0
0
0
4. Secure the cradle using the supplied
screw.
Place the handset in the cradle.
0
0
0
0
0
0
0
0
0
0
0
0
0
0
0
0
0
0
0
0
0
0
0
0
0
0
0
0
0
0
0
0
0
0
0
0
0
0
0
0
0
0
0
0
0
0
0
0
0
0
0
0
0
0
0
0
0
0
0
0
0
0
0
0
0
Handset
Cradle
If you have two jacks, be
sure to insert ivory-coloured
jack into the right hole.
G-Chapter 2(US) 4/16/98 8:30 AM Page 2.2
Page 19

INSTALLATION AND SETUP
C
HAPTER TWO : INSTALLATION AND SETUP
2.3
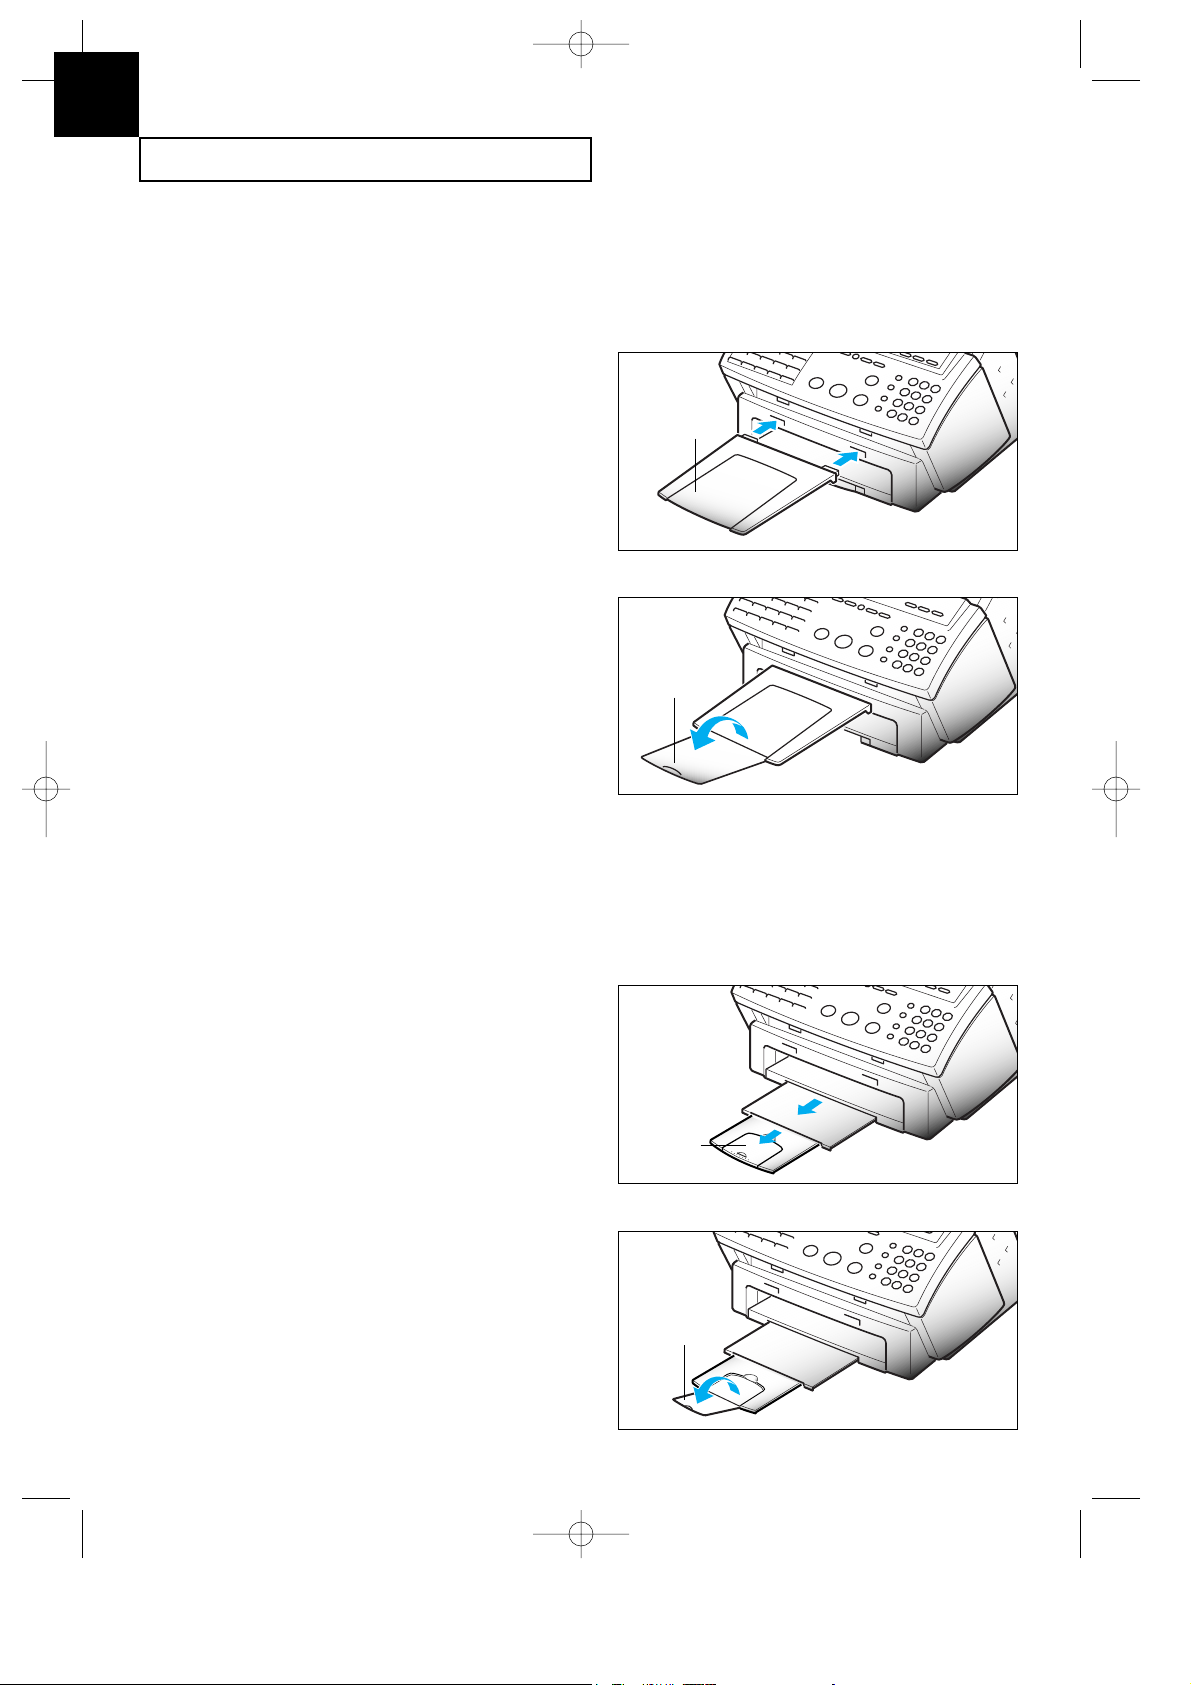
Document Tray
1. Hold the document tray with both hands
and insert one end of the tray into the
corresponding slot as shown.
2. Gently flex the tray in the middle, until
the other end of tray clears the
corresponding slot on the machine.
3. Insert the other end of the tray into the
corresponding slot as shown.
4. Fold out the extender on the document
tray, if necessary.
Document
tray
Extender
G-Chapter 2(US) 4/16/98 8:30 AM Page 2.3
Page 20
INSTALLATION AND SETUP
2.4 C
HAPTER TWO : INSTALLATION AND SETUP
2
Document Exit Tray
The document exit tray catches documents fed through the machine from the document
feeder.
1. Insert two tabs on the document exit
tray into the slots on the front of your
machine.
2. Fold out the extender, if necessary.
Document
exit tray
Extender
Printer Exit Tray
The printer exit tray is built in the bottom cover of the machine and catches paper fed
through the machine from the printer automatic sheet feed. To extend the printer exit tray:
1. Gently pull the printer exit tray toward
you to the desired paper length.
Printer
exit tray
2. Fold out the extender, if necessary.
Remove any obstacles in front of the
paper exit to prevent paper jams.
Extender
G-Chapter 2(US) 4/16/98 8:30 AM Page 2.4
Page 21
INSTALLATION AND SETUP
C
HAPTER TWO : INSTALLATION AND SETUP
2.5
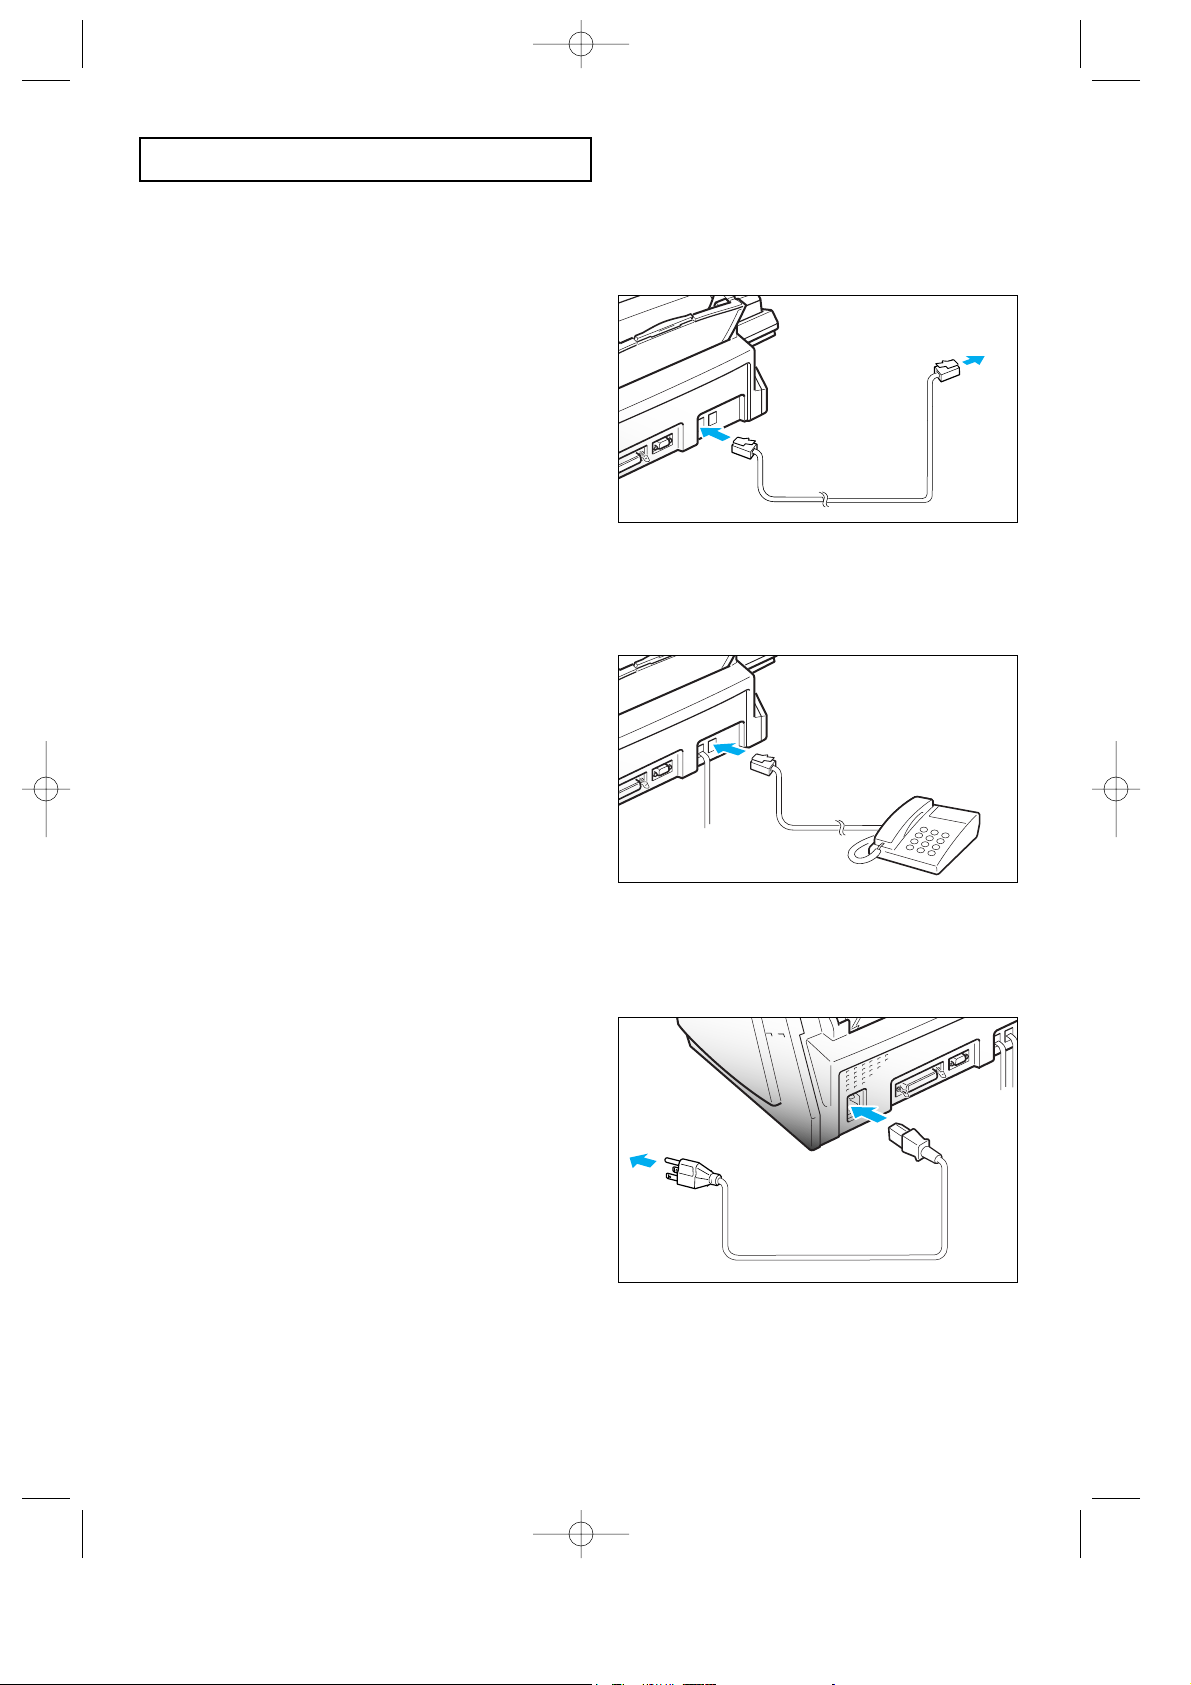
Telephone Line
Plug one end of the telephone line cord into
the TEL LINE jack and the other end into a
standard phone wall jack.
To select your dialling type, see page
2.28.
Extension Phone (Optional)
Plug one end of the modular cord into the
EXT. LINE jack on the back of your
machine.
Plug the other end of the cord into a
modular jack on a telephone answering
device or a regular telephone to use as an
extension.
AC Power Cord
Plug one end of the cord into the back of
the machine and the other end into a
standard AC power outlet.
The machine turns on. All lamps on
the control panel light up and the
LCD displays ÔSYSTEM INITIALÕ then
ÔPAPER OUT.Õ Load the paper as
described on page 2.6
If you want to turn off, unplug the
power cord.
Note : If there are documents lost from memory due to a power failure, the machine
automatically prints out a report after power is supplied.
G-Chapter 2(US) 4/16/98 8:30 AM Page 2.5
Page 22
INSTALLATION AND SETUP
2.6 C
HAPTER TWO : INSTALLATION AND SETUP
2
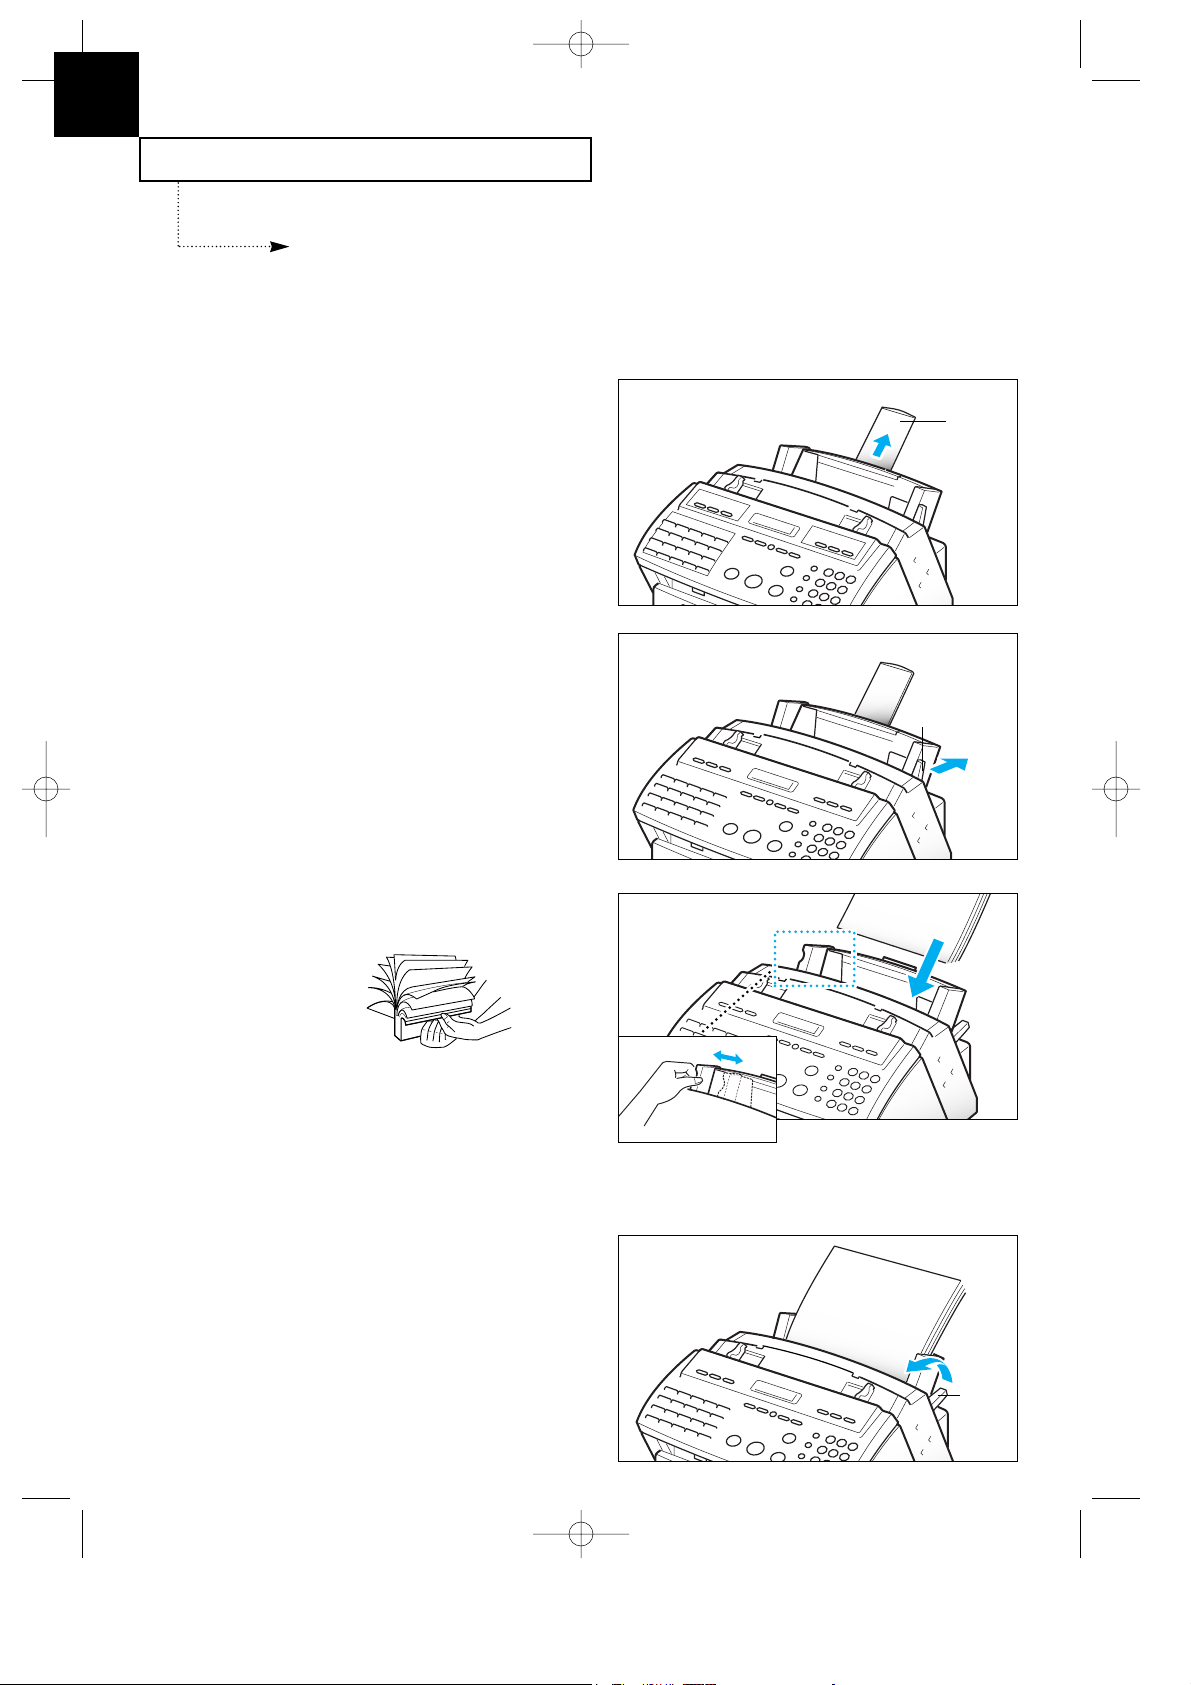
Loading Paper
1. Pull the paper support on the paper bin
all the way up.
The LCD displays ÔPAPER OUTÕ when no paper is loaded. You can load approximately 100
sheets of paper.
Paper
support
2. Push the paper load lever away from
you to open the sheet feeder.
Warning beeps sound for about 30
seconds and the LCD displays
ÔCHECK LOAD LEVERÕ and the
paper size selected through user
options on page 6.8. If you want to
install a different-sized paper,
change the option after loading paper.
Paper load
lever
3. Fan the paper and insert the paper with
the print side facing you.
Hold the left paper guide and move
it to the right to match the width of
the paper.
Note: If you donÕt either fan the
paper or adjust the paper guide, it
may cause multi-paper feeding.
4. Pull the paper load lever toward you to
close the sheet feeder.
Paper Guide
Paper
load
lever
G-Chapter 2(US) 4/16/98 8:30 AM Page 2.6
Page 23
INSTALLATION AND SETUP
C
HAPTER TWO : INSTALLATION AND SETUP
2.7
Installing Print Cartridge
When you install a new print cartridge, perform all of the following steps:
1. Press the CARTRIDGE button on the control panel. The LCD displays ÔCHECK CARTRIDGE ! PLEASE
INSTALLÕ, and the print cartridge moves to the load position.
If you install a color cartridge, use ÔInstall CartridgeÕ tab in the SAMSUNG
MFP4100/4200 Control Program on your PC.
2. Lift the control panel with your hand
and slide the top cover up, by pushing
on position A, until it clicks and the ink
cartridge is in full view.
A
A
Top cover
Control
panel
Paper Type and Sizes
Because all paper varies in physical characteristics, you can receive mixed results from
different packages of paper even though the packages contain the same type of paper. If you
encounter undesirable results, try the other side of the paper, a different type, or another
package of the same kind of paper.
Do not use the following types of paper with the printer:
¥ Continuous form feed paper
¥ Synthetic paper
¥ Thermal paper
¥ Multi-sheet forms and documents
¥ Chemically treated paper (carbonless paper)
¥ Papers with raised, embossed lettering
To load paper with a preferred print side:
¥ If youÕre using xerographic paper, load the paper with the preferred print side facing
down.
¥ If youÕre using letterhead or bond paper, load the paper with the preferred side facing up.
The following paper sizes can be used in your machine for fax:
Note : To print on card stock, load the stock with the envelope guide in an upright
position.
Use paper that meets these specifications:
Paper size mm inches
Letter 216 X 279 8.5 X 11.0
Legal 216 X 356 8.5 X 14.0
A4 210 X 297 8.3 X 11.7
Length 127 to 364 mm (5.0 to 14.33 in)
G-Chapter 2(US) 4/16/98 8:30 AM Page 2.7
Page 24
INSTALLATION AND SETUP
2.8 C
HAPTER TWO : INSTALLATION AND SETUP
6. Push the cartridge firmly in the
direction of the arrow until it clicks
into place.
7. After installing the print cartridge,
replace the top cover and the control
panel to their normal positions.
4. Carefully remove the tape covering the
printhead. Be sure to remove all the
tape.
Do not touch the copper area.
5. Insert the print cartridge in the carrier.
3. Remove the print cartridge from its
packaging. Hold the print cartridge by
the black areas or colored top only.
Do not touch the copper area.
2
G-Chapter 2(US) 4/16/98 8:30 AM Page 2.8
Page 25
INSTALLATION AND SETUP
C
HAPTER TWO : INSTALLATION AND SETUP
2.9
8. Press the CARTRIDGE or ENTER button.
Use ÔInstall CartridgeÕ tab on your
PC for a color cartridge.
The LCD displays ÔCARTRIDGE IS
1:NEW 2:USED.Õ
10. Press the ENTER or CARTRIDGE button.
The LCD displays briefly ÔMONO
INSTALLEDÕ (or ÔCOLOR INSTALLEDÕ
for color print cartridge).
Use ÔInstall CartridgeÕ tab on your
PC for a color cartridge.
If the cartridge is not installed
properly, the LCD displays
ÔCHECK CARTRIDGE! PLEASE
INSTALL.Õ Remove the cartridge
and retry to insert it.
Notes:
¥ If you received fax with the color cartridge installed, you cannot get the fax printed
until replacing it with mono cartridge.
¥ When you install a new cartridge, you must choose Ô1:NEW.Ô When you install a
used cartridge, select Ô2:USEDÕ, which helps you check the amount of ink remaining.
If you mix up several used cartridges, it will be difficult to check the amount of ink
remaining. Once a new print cartridge is installed, use it until it has completely run
out of ink.
¥ If the new cartridge does not give excellent printing quality, consult the ÔPrinter
Cartridge MaintenanceÕ section.
¥ If you want to install a color cartridge to print a file on your PC, you should use
ÔInstall CartridgeÕ tab in the SAMSUNG MFP4100/4200 Control Program on your
PC. If you use the CARTRIDGE button on this machine, the machine beeps a
warning tone and briefly displays ÔRE-INSTALL COLOR USING PC-DRIVER.Õ Press
ÔInstall CartridgeÕ tab on your PC, or the file may print using composite black.
FORM FEED
CARTRIDGEPRINTER RESET
BUSY
SPEED
/
9. Choose Ô1:NEWÕ by using the or
button, or by pressing the 1 button.
G-Chapter 2(US) 4/16/98 8:30 AM Page 2.9
15
JOURNAL
20
ALARM
SEARCH/DELETE
START/
STOP
ENTER
MENU
1
GHI
FLASH
4
SPEED
PQRS
/DUAL
OHD/V.REQ.COPY
/DUAL
REDIAL
PAUSE
Page 26

INSTALLATION AND SETUP
2.10 C
HAPTER TWO : INSTALLATION AND SETUP
TO REMOVE A PRINT CARTRIDGE FROM THE STORAGE UNIT
Hold the print cartridge and pull it firmly
in the direction of arrow.
Push down the cartridge and pull it toward
you.
cartridge
storage unit
Print
Cartridge
storage
unit
Storing a Print Cartridge in the Storage Unit (SF4100, SF4200)
When switching between the color and black print cartridges, keep the unused one in the
print cartridge storage unit. The storage unit prevents the print cartridge from drying out
while providing easy access to it.
T
O STORE A PRINT CARTRIDGE IN THE STORAGE UNIT
1. Holding the print cartridge, insert it
into the storage unit.
2. Push firmly in the direction of arrow
until it clicks into place.
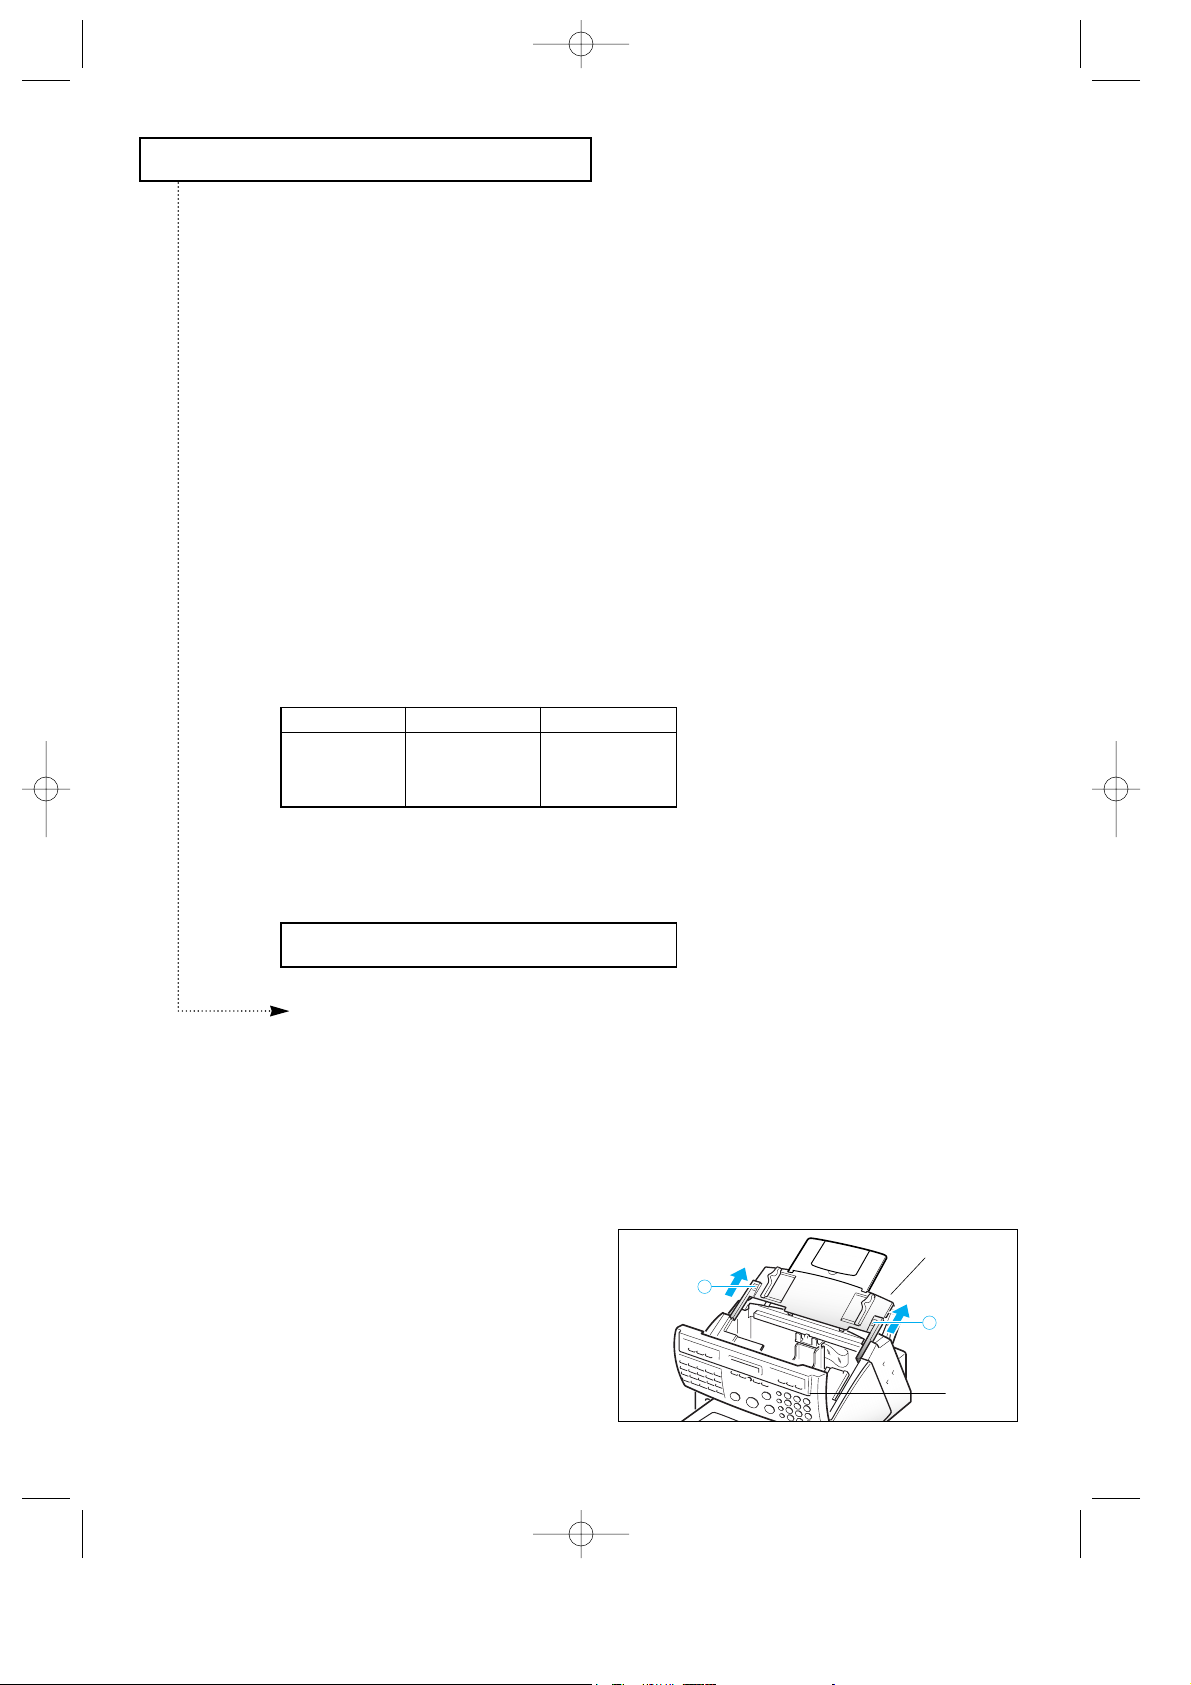
Print Cartridge Storage Unit (SF4100, SF4200)
The print cartridge storage unit provides a convenient place to store an extra black or color
print cartridge, and prevents an opened cartridge from drying out.
Attach the storage unit by inserting its
three tabs into the slots on right side of
the main body and lowering it until it
clicks into place.
storage
unit
slot
2
G-Chapter 2(US) 4/16/98 8:30 AM Page 2.10
Page 27

INSTALLATION AND SETUP
C
HAPTER TWO : INSTALLATION AND SETUP
2.11
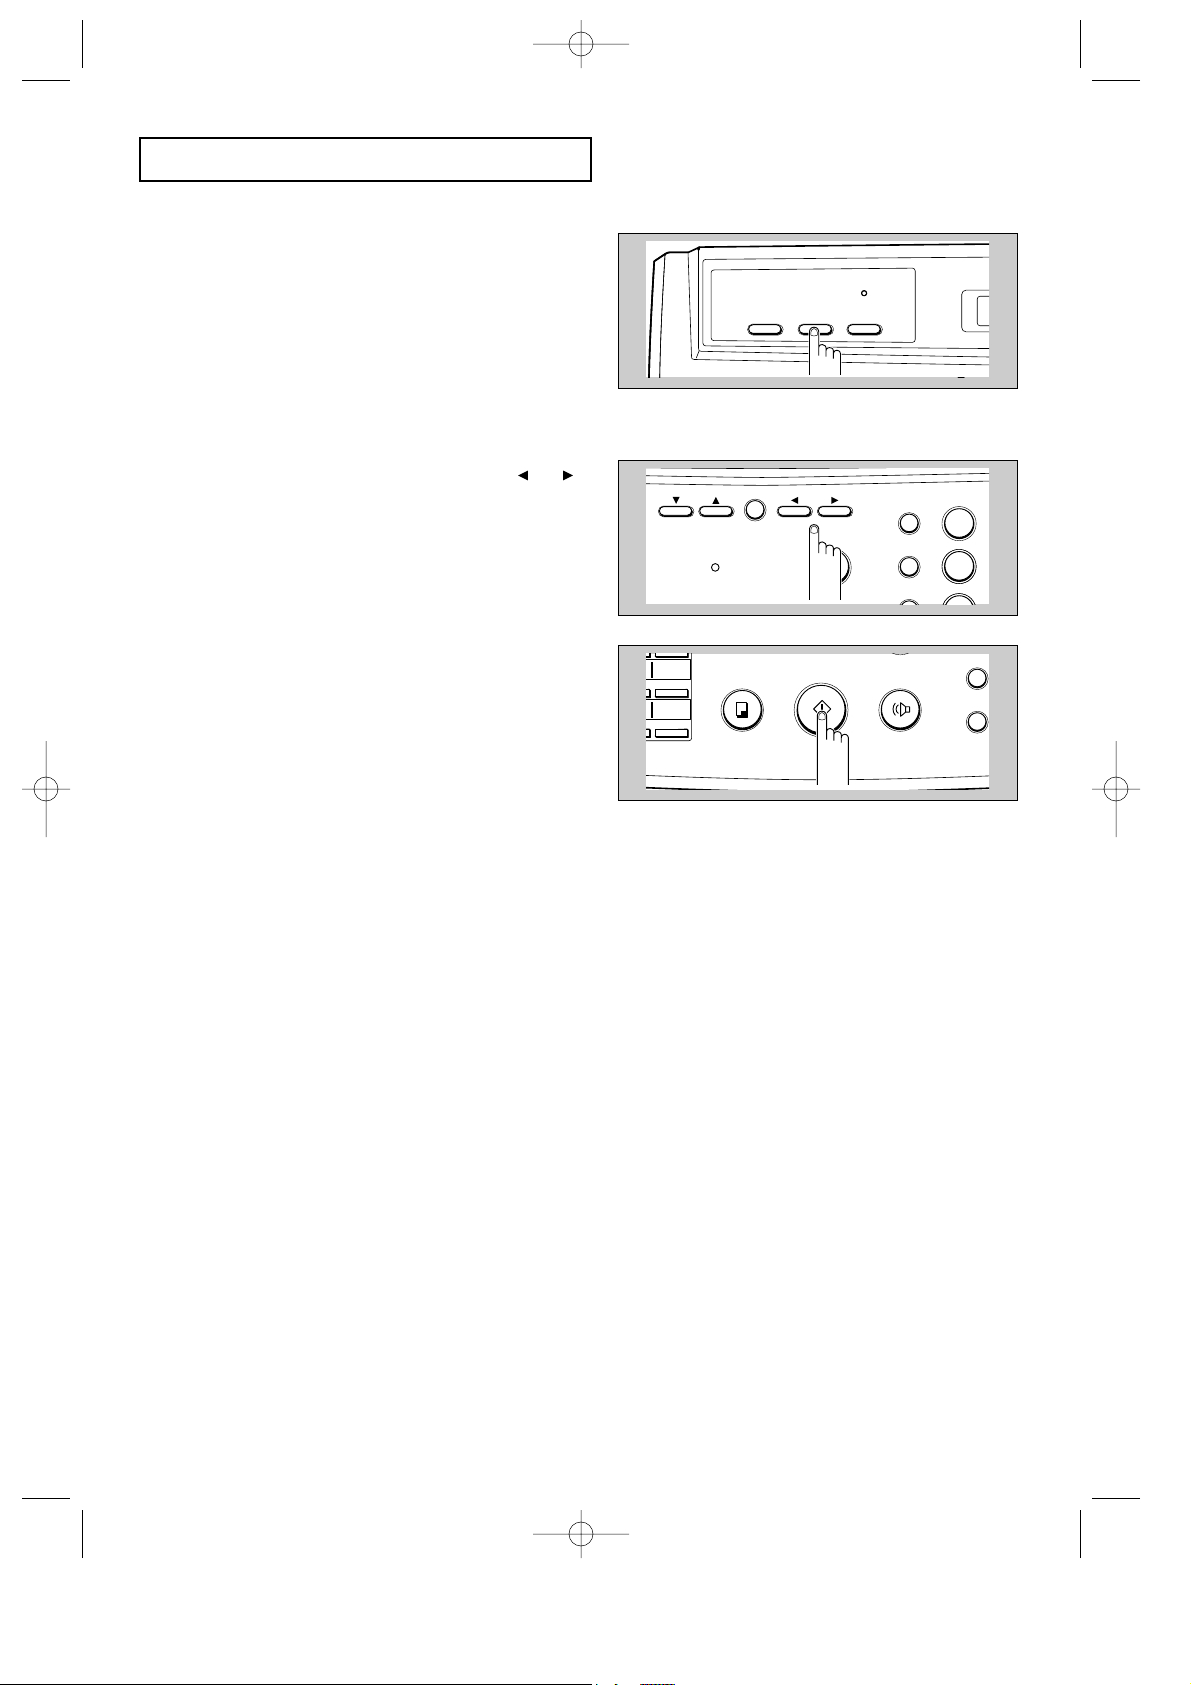
3
Press ENTER to perform
the printer test.
OHD/V.REQ.COPY
START/
ENTER
The LCD asks if you want
to run Self-Test.
SELF TEST ?
( ENTER/ )
If you press , you can choose
another menu item.
4
Press ENTER to run the
printer Self-Test.
OHD/V.REQ.COPY
START/
ENTER
2
Press 05, SELF-TEST, on
the one-touch keypad.
01 02 03 04 05
06 07 08 09 10
11 12 13 14 15
MEMORY TX. DELAY TX. POLLING ADD/CANCEL SELF-TEST
GROUP DIAL SYSTEM ID DATE & TIME OPTION
TX. CONFIRM STANDBY DIAL LIST OPTION JOURNAL
Q.SCAN
One-touch buttons 01-16 perform
specific functions when used with the
MENU button. Each button provides
access to a selected function.
If you choose , you can choose
another menu item. Pressing STOP
returns you to Standby mode.
The LCD asks you to
press the desired function
button.
PRESS
F UNCT I ON BUTTON
The LCD asks if you want
to perform the printer
test.
PR I NTER TEST ?
(ENTER/ /STOP )
Running Self-Test
Each time you install a new print cartridge, run Self-Test to check if the printer mechanism
is functioning properly.
1
Press MENU.
2
PQRS
GHI
ABC
MENU
STOP
FLASH
SPEED
/DUAL
JKL
TUV
1
45
G-Chapter 2(US) 4/16/98 8:30 AM Page 2.11
Page 28

V1.0 04/13/96
Quality : LQ Bidi Print : OFF Paper : A4
Top Margin : 0.55" Ink Saver : No
Transpar. : NO Pitch : 10 CPI Font : Courier
Orient : Portrait Autowrap : OFF CR Def. : CR=CR
Lines : 64 Character : PC-8
Name
Courier
Courier
Courier
Courier
LT Gothic
LT Gothic
LT Gothic
CG Times
5
10
16.67
20
6
12
24
Prop.
ABCDEFGHIJKLM
ABCDEFGHIJKLMOPQRSTUVWXYZ
ABCDEFGHIJKLMOPQRSTUVWXYZ
ABCDEFGHIJKLMOPQRSTUVWXYZ
ABCDEFGHIJKLMN
ABCDEFGHIJKLMOPQRSTUVWXYZ
ABCDEFGHIJKLMOPQRSTUVWXYZ
ABCDEFGHIJKLMOPQRSTUVWXYZ
Pitch Sample Char.
INSTALLATION AND SETUP
2.12 C
HAPTER TWO : INSTALLATION AND SETUP
<Sample of test pattern>
5
Prees STOP twice to
return to Standby mode.
ALARM
STOP
OHD/V.REQ.
START/
ENTER
FLASH
SPEED
/DUAL
REDIAL/
PAUSE
The machine prints out a
test pattern to show the
status of the printer
mechanism.
PLEASE WAIT
PRINTING. . .
6
Examine the test pattern
and look for a break in the
diagonal line. A broken
line shows any clogged
nozzles. Run the nozzle
test. See page 7.5.
If the diagonal lines are
not broken and the black
(or color) bars are clear,
the printer mechanism is
functioning properly. See
the pattern sample below.
2
G-Chapter 2(US) 4/16/98 8:30 AM Page 2.12
Page 29
INSTALLATION AND SETUP
C
HAPTER TWO : INSTALLATION AND SETUP
2.13
Note : Make sure you turn the power off by plugging out the power cord before connecting
the machine to your PC. When the connection is completed, turn the power on.
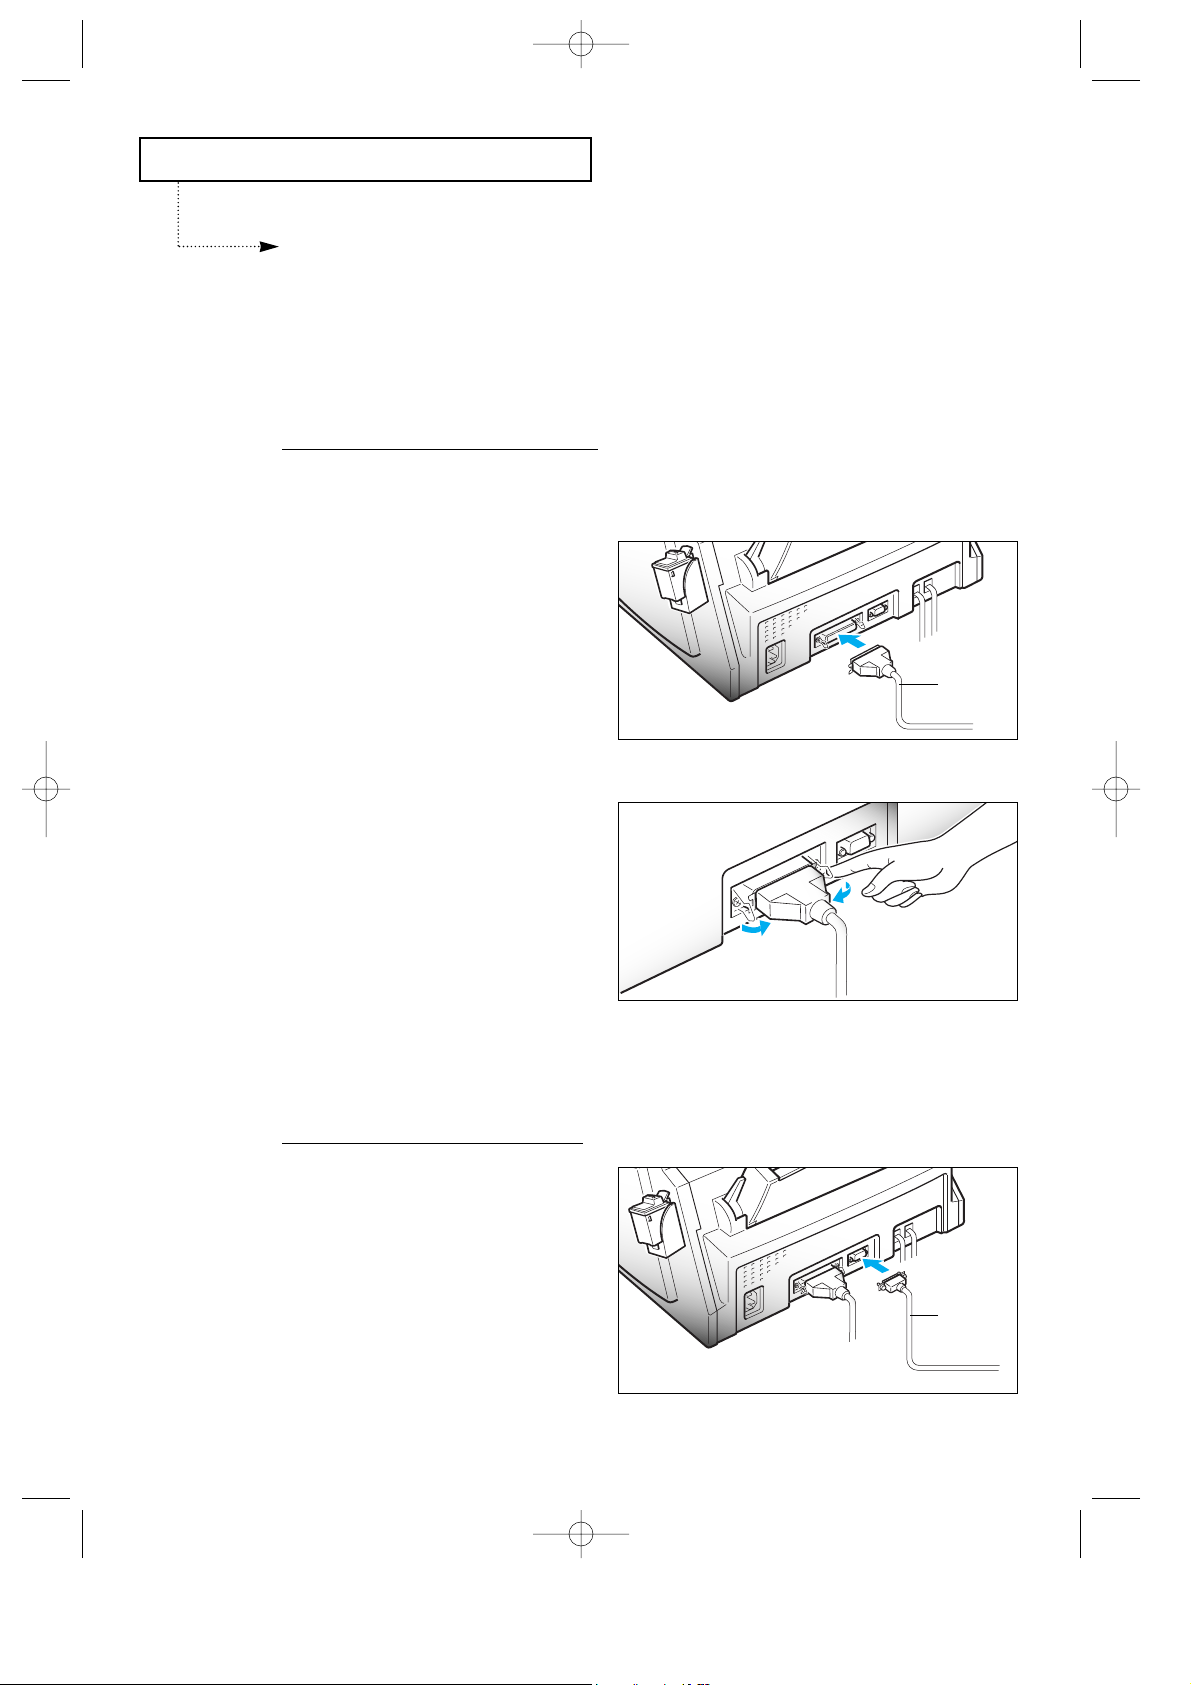
Connecting to Your PC (SF4100, SF4200)
Connecting SF4200 to Your PC
Use the serial cable and the parallel print cable that supports bidirectional communications
to connect your machine and the computer.
CONNECTING THE PRINTER CABLE
1. Connect the parallel printer cable to the
36 pin printer jack on your machine.
You must use a parallel cable that
supports IEEE-P1284 bidirectional
communications.
2. Fasten the metal clips to the parallel
cable.
3. Connect the other end of the parallel
cable to your computer.
Refer to the instruction manual
that came with your computer to
connect the other end of the printer
cable to your computer.
CONNECTING THE SERIAL
CABLE
4. Connect the supplied RS232-C serial
cable to the computer.
Fix the serial cable with screws.
Connect the other end of the serial cable
to your computer.
Refer to the instruction manual
that came with your computer to
connect the other end of the serial
cable to your computer.
Printer
cable
Serial
cable
G-Chapter 2(US) 4/16/98 8:30 AM Page 2.13
Page 30
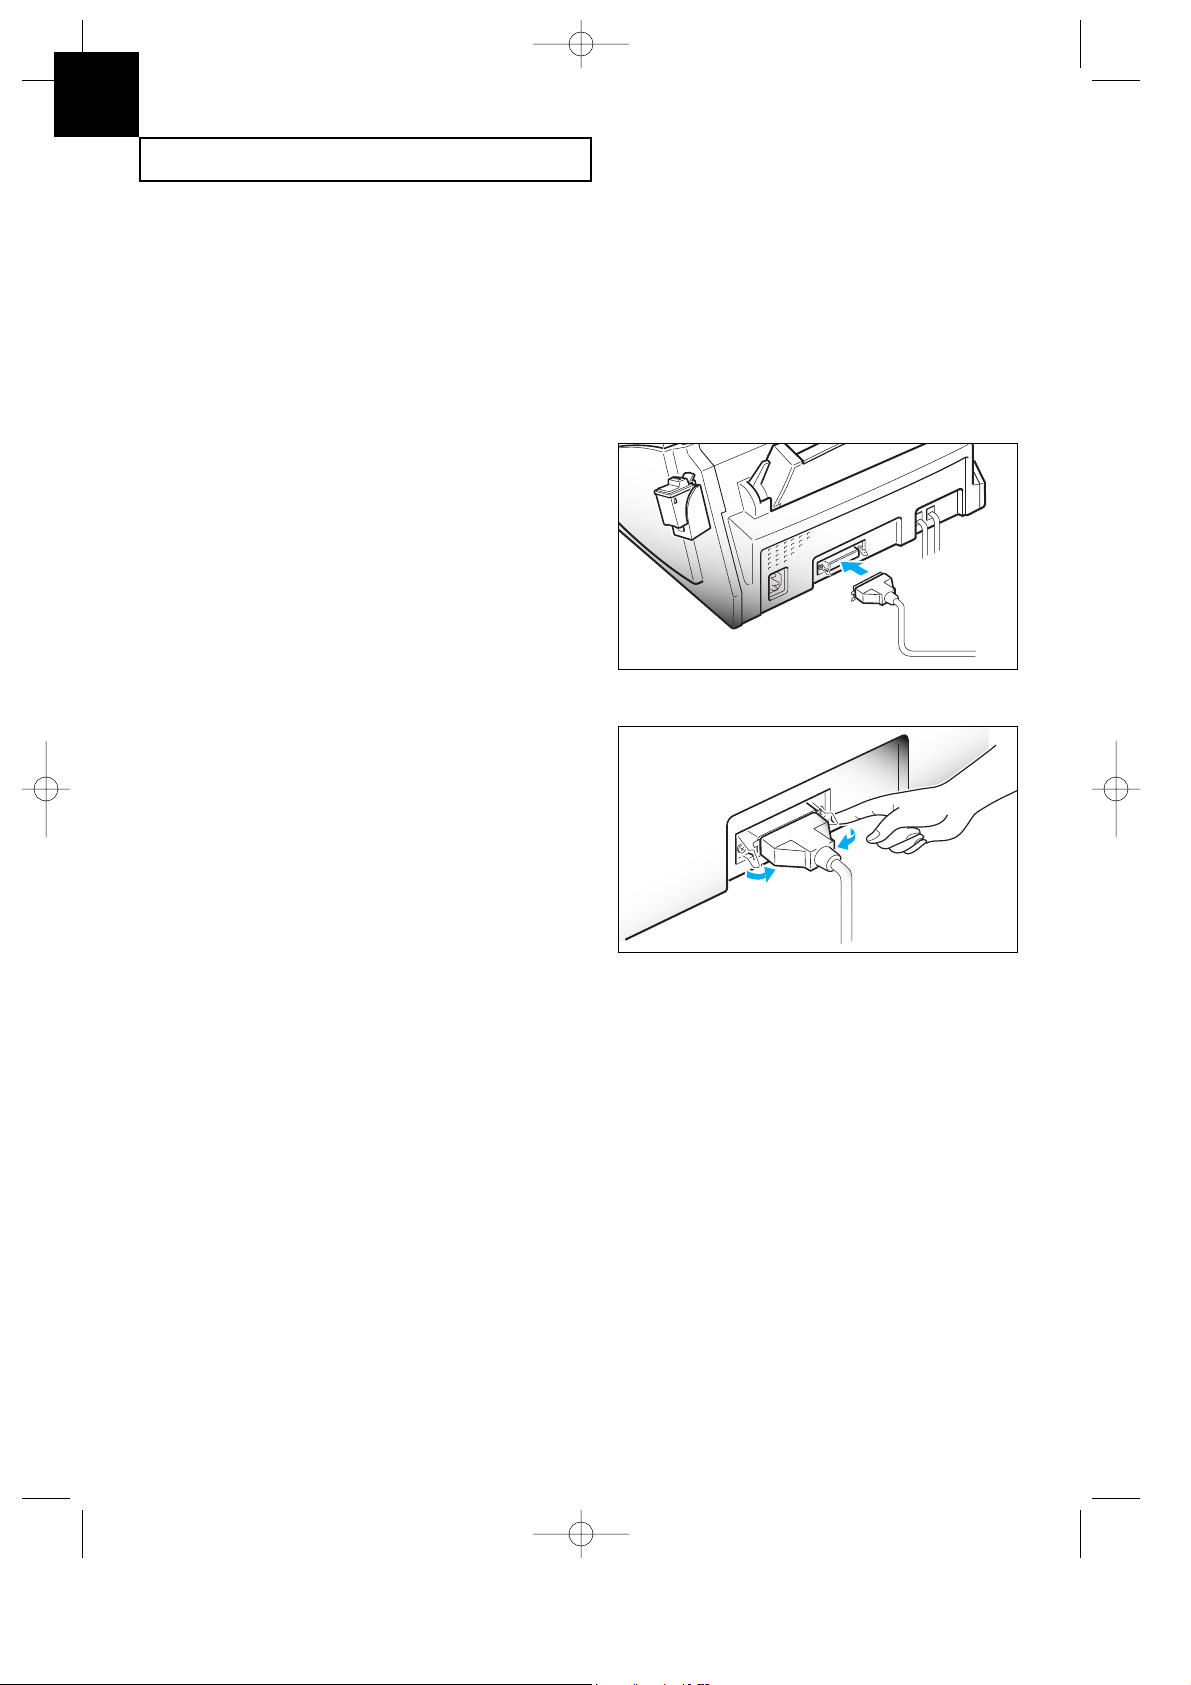
INSTALLATION AND SETUP
2.14 C
HAPTER TWO : INSTALLATION AND SETUP
1. Connect the parallel printer cable to the
36 pin printer jack on your machine.
You must use a parallel cable that
supports IEEE-P1284 bidirectional
communications.
2. Fasten the metal clips to the parallel
cable.
3. Connect the other end of the parallel
cable to your computer.
Refer to the instruction manual that
came with your computer to
connect the other end of the printer
cable to your computer.
Connecting SF4100 to Your PC
Use the printer cable that supports bidirectional communications to connect your machine
and the computer.
Note : Make sure you turn the power off by plugging out the power cord before connecting
the machine to your PC. When the connection is completed, turn the power on.
2
G-Chapter 2(US) 4/16/98 8:30 AM Page 2.14
Page 31

INSTALLATION AND SETUP
C
HAPTER TWO : INSTALLATION AND SETUP
2.15
Setting Up Printer
(SF4100, SF4200)
Installing the Windows Printer Driver Software
If your computer operates with Windows 3.1 or Windows for Workgroups, follow the
instructions below to install the printer software.
If your computer operates with Windows 95, see page 2.16.
WITH WINDOWS 3.1
1. Start Windows.
2. Insert the setup diskette into drive A (or B).
3. In Windows Program Manager, click on ÔFileÕ, then choose ÔRunÕ.
4. In the command line dialog box, type a:setup (or b:setup), then click ÔOKÕ.
5. Follow the instructions on the installation screens.
For the latest information on installing and using the printer with Windows
applications, consult the Read Me and Online Help files in the Samsung
MFP4100/4200 program group window.
G-Chapter 2(US) 4/16/98 8:30 AM Page 2.15
Page 32

INSTALLATION AND SETUP
2.16 C
HAPTER TWO : INSTALLATION AND SETUP
WITH WINDOWS 95
To install the printer software with Windows 95:
1. Start Windows.
2. Insert the setup diskette into drive A (or B).
3. Click ÔStartÕ on the desktop, and then choose ÔRunÕ.
4. In the Run dialog box, type Ôa:setup (or b:setup)Õ, then click ÔOKÕ.
5. Follow the instructions on the installation screens.
Note (SF4100/SF4200):
After rebooting the PC following installation of the printer software, you will be asked
to re-install it due to the PnP (Plug & Play) feature of Windows95.
It is recommended to click Cancel, and terminate the installation at this point.
2
G-Chapter 2(US) 4/16/98 8:30 AM Page 2.16
Page 33

INSTALLATION AND SETUP
C
HAPTER TWO : INSTALLATION AND SETUP
2.17
Running Windows Printer Software
The Samsung MFP 4100/4200 Control program lets you:
¥ Monitor your print jobs.
¥ Watch a print job progress.
¥ Monitor print cartridge ink level.
¥ Install or replace a print cartridge.
¥ Perform print cartridge maintenance.
¥ Access the Windows Printing dialog boxes to change printer settings.
¥ Print from Windows-based applications.
¥ Test your printer.
¥ Change the print queue parameters.
ST
ARTING THE SOFTWARE FROM WINDOWS
1. To start the Printer Control Program, double-click the Samsung Control Program icon.
2. Click the Windows Printing tab, then the Windows Driver Setup button in the Samsung Control
Program to browse through the available options.
G-Chapter 2(US) 4/16/98 8:30 AM Page 2.17
Page 34

INSTALLATION AND SETUP
2.18 C
HAPTER TWO : INSTALLATION AND SETUP
BEFORE YOU PRINT
Make sure Samsung MFP 4100/4200 is listed as your default printer in the Windows
Control Panel (the Setup Program does this automatically during installation).
Print as you normally would
_
for example, by choosing Print from your applicationÕs File
menu.
CHANGING PRINTER SETTINGS
Before printing, you may want to change some printer settings. The Samsung MFP
4100/4200 dialog box lets you make changes to options such as paper size, image settings,
print quality, and halftoning.
You can open the Samsung MFP 4100/4200 dialog box from:
¥ a Windows-based application
_
If you open the Samsung dialog box from an
applicationÕs Print command, your choices apply only to that print job. The next time
you print, you have to choose the print settings again. If you open the Samsung dialog
box from an applicationÕs Print Setup command, the application stores the settings with
your document. The document prints with the settings until you change them.
¥ the Windows Control Panel
_
These settings will apply to all print jobs and applications
until you change the settings.
¥ the Samsung MFP 4100/4200 Control Program
_
These settings will apply to all print
jobs and applications until you change the settings.
2
G-Chapter 2(US) 4/16/98 8:30 AM Page 2.18
Page 35

INSTALLATION AND SETUP
C
HAPTER TWO : INSTALLATION AND SETUP
2.19
CHOOSING PRINT OPTIONS FROM WINDOWS-BASED APPLICATIONS
The following steps are general instructions. Your Windows-based application may require
a slight variation from this procedure. For example, in step 3, your application may have a
Printer button in the Print Setup dialog box instead of an Options button.
1. Open the applicationÕs File menu.
2. Choose Print (or Printer) Setup.
3. In the Print Setup dialog box, choose Options to open the Samsung MFP 4100/4200 dialog box.
4. Use the tabs to browse through the available options.
After choosing print options, you are ready to print.
CHOOSING PRINT OPTIONS FROM WINDOWS CONTROL PANEL
1. In the Windows Main group window, double-click the Control Panel icon.
2. From the Control Panel, double-click the Printers icon to open the Printers dialog box.
3. From the list of installed printers, select the Samsung MFP 4100/4200.
4. Click the Setup button to open the Samsung MFP 4100/4200 dialog box.
After choosing options, you are ready to print.
CHOOSING PRINT OPTIONS FROM THE CONTROL PROGRAM
1. Double-click the Samsung MFP 4100/4200 Control Program icon to open the Samsung MFP
4100/4200 Control Program.
2. Choose the Windows Printing tab.
3. Choose the Windows Driver Setup button.
4. Use the tabs in the dialog box to browse through the options.
After choosing options, you are ready to print.
Online Help
The MFP 4100/4200 software has extensive online Help with detailed information about your
machine. You can access online Help from any dialog box. Just choose the Help button or press the
F1 key.
Within online Help, you will find underlined words or Òhot text.Ó Click the hot text to instantly
view more information on a related topic.
Installing the DOS Printer Software
If you will be printing from DOS applications, follow the steps below:
1. Insert the Setup diskette in drive A.
2. From the DOS prompt, type a:install.
3. Follow the instructions on the screen.
4. When the installation is complete, remove the diskette from the drive.
G-Chapter 2(US) 4/16/98 8:30 AM Page 2.19
Page 36

INSTALLATION AND SETUP
2.20 C
HAPTER TWO : INSTALLATION AND SETUP
Using the DOS Printer Software
PRINTING FROM DOS APPLICATIONS
When you print from a DOS (not Window based) application, your printer uses PCL 3
emulation. You must install a printer driver for PCL 3 emulation printing in each DOS
application.
1. Start your DOS application.
2. Install the HP Deskjet 500C as the current printer in the DOS application from which you are
printing.
Some applications offer a color or black (mono) version of the HP Deskjet 500C driver.
Choose the color version if you are printing color documents. Choose the black version if
you are printing black and white documents.
If your application does not offer the HP Deskjet 500C printer driver, install the HP
Deskjet 500C printer driver. You will not be able to print in color with the Deskjet 500
driver.
For help installing a printer driver, see your application userÕs documentation.
CHOOSING PRINT OPTIONS FROM DOS
The MJPANEL.EXE program lets you choose print options for your DOS applications.
You must start the MJPANEL.EXE program from your DOS prompt.
To choose print options for DOS applications:
1. From your application, go to the DOS prompt.
2. From the DOS prompt, type MJPANEL and press ENTER.
3. From the Remote Control Panel, use the arrow keys to select an Options button. Press ENTER.
This highlights a setting in the right-hand (Settings) column.
4. Use the arrow key to select a setting from the Settings column of the Remote Control Panel.
Press ENTER to choose the setting.
5. Press the Tab key to return to the Options buttons.
6. Choose the Exit button to return to your application.
Notes:
¥ After you install the Printer Driver Software with Windows 3.1 or DOS, if the printer
does not work properly, check your PC configuration (CONFIG. SYS).
¥ If you want to use another printer and it does not work properly, make sure that you
deactivate the MFP4100/4200 Drive and reboot your PC.
¥ When you works in DOS Type Writer mode or Landscape mode, fax machine might not
work properly.
2
G-Chapter 2(US) 4/16/98 8:30 AM Page 2.20
Page 37

INSTALLATION AND SETUP
C
HAPTER TWO : INSTALLATION AND SETUP
2.21
Making a Copy
Try copying a document to make sure that the machine is working properly.
1
Choose a page to copy.
For information on preparing a
document, see page 4.1.
2
Turn the page face down
and insert it into the
document feeder.
3
Adjust the document
guide to match the width
of the document.
The LCD displays ÔDOCUMENT
LOADINGÕ then ÔDOCUMENT
READYÕ when the sheet is gripped by
the machine.
4
Feed the document into
the machine.
The machine beeps, and
the automatic document
feeder seizes and pulls in
the page.
The print resolution is
automatically set to FINE when you are
making a copy. Press CONTRAST if the
page you are copying contains faint
markings, dark image, photographs, or
other halftone images. For more
information on resolution and contrast,
see page 4.2.
5
Choose the proper
contrast, if necessary.
ABC
MENU
DEF
RCV. MODE
FAX
ANS/FAX
TEL/FAX
FINE
S. FINE
LIGHTEN
PHOTO
DARKEN
CONTRAST
FINE
S. FINE
RESOLUTION
Document
guide
G-Chapter 2(US) 4/16/98 8:30 AM Page 2.21
Page 38

INSTALLATION AND SETUP
2.22 C
HAPTER TWO : INSTALLATION AND SETUP
6
Press COPY.
COPY
START/
ENTER
415
920
OPTION JOURNAL
7
If you need two or more
copies, enter the desired
number of copies using
the dial keypad.
or
If you want only one copy
of the document, do not
enter any number.
32
PQRS
GHI
ABC
MENU
STOP
FLASH
SPEED
/DUAL
REDIAL/
PAUSE
DEF
JKL MNO
TUV WXYZ
1
465
798
0
The LCD asks you to
enter the number of
copies from 1 to 99.
ENTER NUMBER OF
COP I ES [1-99]>1
8
Press COPY or START
when the number appears
correctly in the display.
COPY
START/
ENTER
415
920
OPTION JOURNAL
Where 1/10, Ô1Õ is the number of
copies that has been made and Ô10Õ is
the total number of copies requested.
81% is the amount of memory
remaining from the scanned image that
is stored while the copies are being
made.
The LCD displays the
number of copies
requested on the upper
line, and the number of
the page that is currently
printing on the bottom
line along with the
memory remaining.
or
In case of single copy,
the LCD displays the page
number that is being
printed.
COPY 1/10
81% PAGE 1
COPY
PAGE 1
2
G-Chapter 2(US) 4/16/98 8:30 AM Page 2.22
Page 39

INSTALLATION AND SETUP
C
HAPTER TWO : INSTALLATION AND SETUP
2.23
Setting the Date and Time
The current date and time are shown in the LCD when the machine is on and ready for use
(Standby Mode). The date and time are printed on all faxes you send.
1
Press MENU.
2
PQRS
GHI
ABC
MENU
STOP
FLASH
SPEED
/DUAL
JKL
TUV
1
45
2
Press 08, DATE & TIME,
on the one-touch keypad.
06 07 08 09 10
11 12 13 14 15
16 17 18 19 20
SET
MEMORY TX. DELAY TX. POLLING ADD/CANCEL SELF-TEST
GROUP DIAL SYSTEM ID DATE & TIME OPTION
TX. CONFIRM STANDBY DIAL LIST OPTION JOURNAL
HELP LIST
Q.SCAN
One-touch buttons 01-16 perform
specific functions when used with the
MENU button. Each button provides
access to a selected function.
The LCD asks you to
press the desired function
button.
PRESS
F UNCT I ON BUTTON
If you select USA, the date format
will be displayed as MMDDYY.
EUROPE will be displayed as
DDMMYY.
The LCD prompts you to
select a date
format.
S E T DATE F ORMAT
1
: USA 2 : EUROPE
The LCD displays the
currently set date and time.
3
Select the format you
want the date to appear
in by pressing 1 to select
USA, or 2 for EUROPE.
or
You can select by
pressing or then
ENTER.
32
PQRS
GHI
ABC
MENU
FLASH
SPEED
/DUAL
DEF
JKL MNO
TUV WXYZ
1
465
MENU
STOP
FLASH
SPEED
SEARCH/DELETE
MM - DD - Y Y HH : MM
0
6-14-96 10:00
G-Chapter 2(US) 4/16/98 8:31 AM Page 2.23
Page 40

INSTALLATION AND SETUP
2.24 C
HAPTER TWO : INSTALLATION AND SETUP
4
Adjust the date and time
by pressing or to
move the blinking cursor
under the number you
want to change.
MENU
STOP
FLASH
SPEED
SEARCH/DELETE
The LCD asks you to
select AM or PM.
MM (Month) = 01~12
DD (Day) = 01~31
YY (Year) = Last two digits
of the year
HH (Hour) = 01~12 (or 00~23)
MM (Minute) = 00~59
6
When the date and time
are correct, press ENTER.
OHD/V.REQ.COPY
START/
ENTER
If you enter an invalid number,
the machine beeps and doesnÕt proceed
to the next step. If this happens, just
reenter the correct number.
If you have entered the time in 24-
hour format, you donÕt have to select
AM or PM. The machine returns to
Standby mode.
5
Enter the correct number
by using the number
keypad.
32
PQRS
GHI
ABC
MENU
FLASH
SPEED
/DUAL
REDIAL/
PAUSE
DEF
JKL MNO
TUV WXYZ
1
465
798
0
SELECT AM/PM
1
:A M 2: P M
The LCD displays the date
and time, then returns to
Standby mode.
7
Select AM or PM by
pressing 1 or 2.
You can select by
pressing or then
ENTER.
32
PQRS
GHI
ABC
MENU
FLASH
SPEED
/DUAL
DEF
JKL MNO
TUV WXYZ
1
465
MENU
STOP
FLASH
SPEED
SEARCH/DELETE
JUN - 14-1996 FR I
10 : 00 AM 100%
2
G-Chapter 2(US) 4/16/98 8:31 AM Page 2.24
Page 41

INSTALLATION AND SETUP
C
HAPTER TWO : INSTALLATION AND SETUP
2.25
Setting the Terminal ID (Your Name and Number)
The terminal ID will be printed at the top of each page sent from your machine.
1
Press MENU.
One-touch buttons 01-16 perform
specific functions when used with the
MENU button. Each button provides
access to a selected function.
2
PQRS
GHI
ABC
MENU
STOP
FLASH
SPEED
/DUAL
JKL
TUV
1
45
2
Press 07, SYSTEM ID, on
the one-touch keypad.
06 07 08 09 10
11 12 13 14 15
16 17 18 19 20
SET
OOG/CCSS
GROUP DIAL SYSTEM ID DATE & TIME OPTION
TX. CONFIRM STANDBY DIAL LIST OPTION JOURNAL
PRINT
Q.SCAN
If you enter a wrong number or
character, simply press DELETE. To
delete all digits, move the cursor to the
first digit, and press and hold DELETE.
You can edit the number
by moving the cursor
with or button
and entering the correct
number.
MENU
STOP
FLASH
SEARCH/DELETE
You can enter up to 20 digits. You
may include special characters (space,
hyphen, or plus sign) in the number to
help improve readability. To enter a
space, press REDIAL/PAUSE. To enter
a hyphen (-), press . To enter a plus
symbol (+), press .
3
Enter the telephone
number to which your
machine is connected.
32
PQRS
GHI
ABC
MENU
STOP
FLASH
SPEED
/DUAL
REDIAL/
PAUSE
DEF
JKL MNO
TUV WXYZ
1
465
798
0
The LCD asks you to
press a function button.
PRE SS
F UNCT I ON BUTTON
The LCD asks you to
enter the telephone
number.
TERM I NAL TEL : _
G-Chapter 2(US) 4/16/98 8:31 AM Page 2.25
Page 42

INSTALLATION AND SETUP
2.26 C
HAPTER TWO : INSTALLATION AND SETUP
The LCD asks you to
enter ID name.
TE RM I NAL I D : _
If there is an ID already set, that ID
name appears in the display. To change
the ID, press or to move the
cursor under the character you want to
change and enter a new character.
5
Enter ID name (up to 40
characters) by using the
number keypad.
32
PQRS
GHI
ABC
MENU
STOP
FLASH
SPEED
/DUAL
REDIAL/
PAUSE
DEF
JKL MNO
TUV WXYZ
1
465
798
0
For information on using the
numeric keypad to enter letters, see
page 2.27.
6
Press ENTER when the
name in the display is
correct.
OHD/V.REQ.COPY
START/
ENTER
4
Press ENTER when the
number in the display is
correct.
OHD/V.REQ.COPY
START/
ENTER
2
G-Chapter 2(US) 4/16/98 8:31 AM Page 2.26
Page 43

INSTALLATION AND SETUP
C
HAPTER TWO : INSTALLATION AND SETUP
2.27
Using the Keypad to Enter Letters
These instructions assume that the LCD is asking you to enter a name.
1
Press the number button
labeled with the letter
you want-press the
button repeatedly until
the letter appears in the
display.
32
PQRS
GHI
ABC
MENU
STOP
FLASH
SPEED
/DUAL
REDIAL/
PAUSE
DEF
JKL MNO
TUV WXYZ
1
465
798
0
2
When the letter you want
appears in the display,
press another number key
labeled with the next
letter you want.
32
PQRS
GHI
ABC
MENU
STOP
FLASH
SPEED
/DUAL
REDIAL/
PAUSE
DEF
JKL MNO
TUV WXYZ
1
465
798
0
For example, if you want to enter
an O, press 6 (labeled MNO). Each time
you press 6 the LCD displays a
different letter-first M, then N, and O,
and finally 6.
For a list of letters and corresponding
buttons, see the table on the following
page.
The letter appears in the
display.
TE RM I NAL I D : 0
If the next letter is printed in the
same number button, move the cursor
by pressing then press the number
button.
3
Select additional letters in
the same way.
32
PQRS
GHI
ABC
MENU
STOP
FLASH
SPEED
/DUAL
REDIAL/
PAUSE
DEF
JKL MNO
TUV WXYZ
1
465
798
0
The blinking cursor moves
right and the next letter
appears in the display.
TE RM I NAL I D : 0P
4
When youÕre finished
entering letters, press
ENTER.
OHD/V.REQ.COPY
START/
ENTER
G-Chapter 2(US) 4/16/98 8:31 AM Page 2.27
Page 44

INSTALLATION AND SETUP
2.28 C
HAPTER TWO : INSTALLATION AND SETUP
Keypad Character Assignments
Key
1
2
3
4
5
6
7
8
9
0
SPACE 1
A B C 2
D E F 3
G H I 4
J K L 5
M N O 6
P Q R S 7
T U V 8
W X Y Z 9
+ - , . Ô / & 0
Assigned numbers, letters, or characters
Adjusting Ringer Volume
Set the machineÕs ringer
volume by using the
RINGER VOLUME switch
on the back of machine.
The fax machine will work
normally even if the switch is set to
OFF (•).
Selecting Tone or Pulse Service
Set the DIAL MODE
switch on the back of
machine to match the
type of service you have.
If you have touch-tone service, set
the switch to TONE ( ). If you have
pulse service, set the switch to PULSE
().
If you arenÕt sure what kind of service
you have,move the DIAL MODE switch
to the TONE. Lift the handset and press
any number (except *, #, or 0) on the
keypad. If the dial tone stops, you have
tone service. If the dial tone continues,
you have pulse service.
2
G-Chapter 2(US) 4/16/98 8:31 AM Page 2.28
Page 45

Chapter Three
AUTOMATIC DIALLING
F-Chapter 3(US) 4/16/98 8:35 AM Page 1
Page 46

Chapter Three
AUTOMATIC DIALLING
One-Touch Dialling
One-Touch Dialling lets you touch any one of the 20 One-Touch buttons located on the
left of the machineÕs control panel to automatically dial a telephone or fax number.
Storing a Number for One-Touch Dialling
C
HAPTER THREE : AUTOMATIC DIALLING
3.1
1
Press and hold the onetouch button (01 through
20) that you want to
assign.
COPY
01 02 03 04 05
06 07 08 09 10
11 12 13 14 15
16 17 18 19 20
SET
MEMORY TX. DELAY TX. POLLING ADD/CANCEL SELF-TEST
GROUP DIAL SYSTEM ID DATE & TIME OPTION
TX. CONFIRM STANDBY DIAL LIST OPTION JOURNAL
HELP LIST
PRINT
Q.SCAN
2
Enter the number you
want to store by using
the number keypad
(up to 34 digits).
32
PQRS
GHI
ABC
MENU
STOP
FLASH
SPEED
/DUAL
REDIAL/
PAUSE
DEF
JKL MNO
TUV WXYZ
1
465
798
0
The LCD asks you to
enter a telephone
number.
If a number is already assigned to
the one-touch button you chose, the
LCD displays the number.
If the one-touch button is already
assigned for Group dial, ÔG01 USED
(GROUP) 1:RENEW 2:OTHERÕ appears
in the display. Press 1 to replace that
number and continue, or 2 to start over
with another one-touch button.
To insert a pause between
numbers, press PAUSE; a ÔPÕ appears in
the display.
If you make a mistake while entering a
number, press or to move the
cursor to the digit and enter a correct
number.
T01:
If you have the number stored in
another one-touch button or speed
location number, the LCD displays
ÔDUPLICATEDÕ, and the other location
number.
The LCD asks you to enter
a name.
3
When the number
appears correctly in the
display, press ENTER.
OHD/V.REQ.COPY
START/
ENTER
NAME :
F-Chapter 3(US) 4/16/98 8:35 AM Page 3.1
Page 47

AUTOMATIC DIALLING
3.2C
HAPTER THREE : AUTOMATIC DIALLING
3
If you assign a name to the
number, you can take advantage of the
Directory Dialling feature of your
machine. For information about
Directory Dialling, see page 3.10.
For more information on how to enter
letters using the number keypad, see
page 2.27.
5
Press ENTER when the
name appears correctly
in the display.
OHD/V.REQ.COPY
START/
ENTER
4
If you want to assign a
name to the number,
enter the name
(up to 20 digits).
or
If you donÕt want to assign
a name, press ENTER
without entering a name.
32
PQRS
GHI
ABC
MENU
STOP
FLASH
SPEED
/DUAL
REDIAL/
PAUSE
DEF
JKL MNO
TUV WXYZ
1
465
798
0
OHD/V.REQ.COPY
START/
ENTER
6
If you want to set
another one-touch
number, press the desired
one-touch button and
repeat steps above.
or
To return to Standby
mode, press STOP.
A
COPY
01 02 03 04 05
06 07 08 09 10
11 12 13 14 15
16 17 18 19 20
SET
MEMORY TX. DELAY TX. POLLING ADD/CANCEL SELF-TEST
GROUP DIAL SYSTEM ID DATE & TIME OPTION
TX. CONFIRM STANDBY DIAL LIST OPTION JOURNAL
HELP LIST
PRINT
Q.SCAN
STOP
OHD/V.REQ.
START/
ENTER
FLASH
SPEED
/DUAL
REDIAL/
PAUSE
The LCD asks you to set
another one-touch
number.
PRESS ANOTHER
ONE - TOUCH NO.
F-Chapter 3(US) 4/16/98 8:35 AM Page 3.2
Page 48

AUTOMATIC DIALLING
C
HAPTER THREE : AUTOMATIC DIALLING
3.3
Dialling One-Touch Number
1
Press a one-touch button
(01 through 20).
A
COPY
01 02 03 04 05
06 07 08 09 10
11 12 13 14 15
16 17 18 19 20
SET
MEMORY TX. DELAY TX. POLLING ADD/CANCEL SELF-TEST
GROUP DIAL SYSTEM ID DATE & TIME OPTION
TX. CONFIRM STANDBY DIAL LIST OPTION JOURNAL
HELP LIST
PRINT
Q.SCAN
2
If you are making a phone
call, pick up the handset
when the other party
answers.
If there is no number stored, ÔNO.
NOT ASSIGNEDÕ appears.
After a number is dialled, if you want
to adjust speaker volume, press or
while you hear tones from the speaker,
and select the desired loudness.
To stop One-Touch Dialling, press
STOP.
The LCD displays the
name, then the number
stored in the selected
one-touch button. The
number will be
automatically dialled. You
hear the dialling process
on the speaker.
DIAL ING SAMSUNG
DIAL ING 714P5551
212
F-Chapter 3(US) 4/16/98 8:35 AM Page 3.3
Page 49

AUTOMATIC DIALLING
3.4 C
HAPTER THREE : AUTOMATIC DIALLING
3
4
When the number
appears correctly in the
display, press ENTER.
OHD/V.REQ.COPY
START/
ENTER
If a number is already assigned to
the location you chose, the LCD
displays the number.
To insert a pause between
numbers, press PAUSE; a ÔPÕ appears in
the display.
If you make a mistake while entering a
number, press DELETE to erase it.
If you want to erase all digits, move the
cursor to the first digit then press and
hold DELETE.
1
Press and hold SPEED.
PQRS
OHD/V.REQ.
FLASH
SPEED
/DUAL
REDIAL/
PAUSE
TUV
45
78
0
2
Enter a 2-digit location
number (01 through 50)
to which you want to
assign the telephone or
fax number.
32
PQRS
GHI
ABC
MENU
STOP
FLASH
SPEED
/DUAL
REDIAL/
PAUSE
DEF
JKL MNO
TUV WXYZ
1
465
798
0
3
Enter the number you
want to store (up to 34
digits).
32
PQRS
GHI
ABC
MENU
STOP
FLASH
SPEED
/DUAL
REDIAL/
PAUSE
DEF
JKL MNO
TUV WXYZ
1
465
798
0
The LCD asks you to
enter the location number
you wish to assign.
ENTER REG I STER
NO . [ 01 - 50 ] >
The LCD displays the
selected location number.
S01:
Speed Dialling
You can store up to 50 telephone or fax numbers into 2-digit speed dial locations.
Storing a Number for Speed Dialling
If you have the number stored in
another speed location or one-touch
button, the LCD displays
ÔDUPLICATEDÕ, and the other location
number.
F-Chapter 3(US) 4/16/98 8:35 AM Page 3.4
Page 50

AUTOMATIC DIALLING
C
HAPTER THREE : AUTOMATIC DIALLING
3.5
5
If you want to assign a
name to the number,
enter the name.
or
If you donÕt want to
assign a name, press
ENTER.
32
PQRS
GHI
ABC
MENU
STOP
FLASH
SPEED
/DUAL
REDIAL/
PAUSE
DEF
JKL MNO
TUV WXYZ
1
465
798
0
OHD/V.REQ.COPY
START/
ENTER
7
If you want to store more
telephone numbers,
repeat steps 2-6.
or
If you want to return to
Standby mode, press
STOP.
32
PQRS
GHI
ABC
MENU
STOP
FLASH
SPEED
/DUAL
REDIAL/
PAUSE
DEF
JKL MNO
TUV WXYZ
1
465
798
0
PQRS
GHI
STOP
OHD/V.REQ.
ENTER
FLASH
SPEED
/DUAL
REDIAL/
PAUSE
1
4
7
If you assign a name to the
number, you can take advantage of
the Directory Dialling feature of your
machine. For information about
Directory Dialling, see page 3.10.
For information on how to enter
letters using the number keypad,
see page 2.27.
The LCD asks you to
enter a name (up to 20
digits).
The LCD asks you to
enter another location
number.
NAME :
ENT E R REG I ST E R
NO . [ 01 - 50 ] >
6
Press ENTER when the
name appears correctly in
the display.
OHD/V.REQ.COPY
START/
ENTER
F-Chapter 3(US) 4/16/98 8:35 AM Page 3.5
Page 51

AUTOMATIC DIALLING
3.6 C
HAPTER THREE : AUTOMATIC DIALLING
3
If a document is loaded in the
document tray, the machine dials and
automatically begins to transmit when
the remote fax machine answers the
phone.
1
Press SPEED.
PQRS
OHD/V.REQ.
SPEED
/DUAL
REDIAL/
PAUSE
TUV
45
78
0
2
Enter a 2-digit speed dial
number.
32
PQRS
GHI
ABC
MENU
STOP
FLASH
SPEED
/DUAL
REDIAL/
PAUSE
DEF
JKL MNO
TUV WXYZ
1
465
798
0
3
If you are making a phone
call, pick up the handset
when the other party
answers.
The LCD asks you to
enter the location
number.
The LCD displays the
name, then the number
stored in the selected
location.
The number will be
automatically dialled. You
hear the dialling process
on the speaker.
Dialling a Speed Number
ENTER LOCAT I ON
NO . [ 01 - 50 ] >
DIALING
SAMSUNG
D I AL I NG 71 4P 555
1212
If there is no number stored, ÔNO.
NOT ASSIGNEDÕ appears.
After a number is dialled, if you want
to adjust speaker volume, press or
while you hear tones from the speaker,
and select the desired loudness.
To stop the dialling, press STOP.
F-Chapter 3(US) 4/16/98 8:35 AM Page 3.6
Page 52

AUTOMATIC DIALLING
C
HAPTER THREE : AUTOMATIC DIALLING
3.7
Group Dialling
You can send a document to multiple parties in a single operation. Before you can use
this feature, you must coordinate and store the group numbers desired.
Storing One-touch or Speed Dial Numbers for Group Dialling
3
Press the one-touch
button you want to use
for Group Dial.
COPY
01 02 03 04 05
06 07 08 09 10
11 12 13 14 15
16 17 18 19 20
SET
MEMORY TX. DELAY TX. POLLING ADD/CANCEL SELF-TEST
GROUP DIAL SYSTEM ID DATE & TIME OPTION
TX. CONFIRM STANDBY DIAL LIST OPTION JOURNAL
HELP LIST
PRINT
Q.SCAN
4
Press ENTER if you want
to use the one-touch
button for Group Dial.
OHD/V.REQ.COPY
START/
ENTER
If the one-touch button is already
used, ÔT01 USED (ONE-T) 1:RENEW
2:OTHERÕ appears in the display. Press
1 to edit the contents, or 2 to select
another one-touch button.
One-touch buttons 01-16 perform
specific functions when used with the
MENU button. Each button provides
access to a selected function.
1
Press MENU.
2
PQRS
GHI
ABC
MENU
STOP
FLASH
SPEED
/DUAL
JKL
TUV
1
45
2
Press 06, GROUP DIAL, on
the one-touch keypad.
06 07 08 09 10
11 12 13 14 15
16 17 18 19 20
SET
MEMORY TX. DELAY TX. POLLING ADD/CANCEL SELF-TEST
GROUP DIAL SYSTEM ID DATE & TIME OPTION
TX. CONFIRM STANDBY DIAL LIST OPTION JOURNAL
HELP LIST
PRINT
Q.SCAN
The LCD asks you to
select the one-touch
button to which you want
to assign the group
number.
SELECT ONE -TOUCH
f o r GROUP [ 01 -20]
The LCD asks you to
confirm the selected
one-touch button.
GROUP NO : T01 ?
F-Chapter 3(US) 4/16/98 8:35 AM Page 3.7
Page 53

AUTOMATIC DIALLING
3.8 C
HAPTER THREE : AUTOMATIC DIALLING
3
5
Press a one-touch button.
or
Press a 2-digit speed dial
number.
ALA
COPY
01 02 03 04 05
06 07 08 09 10
11 12 13 14 15
16 17 18 19 20
SET
MEMORY TX. DELAY TX. POLLING ADD/CANCEL SELF-TEST
GROUP DIAL SYSTEM ID DATE & TIME OPTION
TX. CONFIRM STANDBY DIAL LIST OPTION JOURNAL
HELP LIST
PRINT
Q.SCAN
32
PQRS
GHI
ABC
MENU
STOP
FLASH
SPEED
/DUAL
REDIAL/
PAUSE
DEF
JKL MNO
TUV WXYZ
1
465
798
0
The LCD displays the name and
number stored in the selected
one-touch button or 2-digit speed
number.
For details on how to store fax numbers
in one-touch buttons or 2-digit speed
numbers, see page 3.1 or 3.4.
If the selected one-touch button has
already been used for another group, a
beep sounds and the LCD displays
ÔGROUP DIAL.Õ You cannot select that
one-touch button.
The LCD asks you to
enter the next one-touch
button or speed dial
number.
6
Press ENTER.
OHD/V.REQ.COPY
START/
ENTER
ENTER ONE - TOUCH
or SPEED D IAL NO
The LCD asks you to
enter a one-touch button
or speed dial number you
wish to include in the
group.
ENTER ONE - TOUCH
or SPEED D I AL NO
7
Repeat steps 5-6 to enter
more destination numbers
into the selected group.
8
Press STOP when you
have entered all the
desired destinations.
P
G
STOP
OHD/V.REQ.
START/
ENTER
FLASH
SPEED
/DUAL
REDIAL/
PAUSE
4
7
F-Chapter 3(US) 4/16/98 8:35 AM Page 3.8
Page 54

Using Group Dialling (Multi-address transmission)
You can use a group dial number for Memory Transmission or Delayed Transmission.
Follow the procedure of the desired operation (Memory Transmission
-
p. 5.1, Delayed
Transmission
-
p. 5.3). When you come to a step that requests the remote fax number,
press the one-touch button under which you stored the Group Dial. Then continue the
procedure to complete the desired operation.
Your machine automatically reads the document into memory, and the machine will dial
each of the numbers included in the group.
AUTOMATIC DIALLING
C
HAPTER THREE : AUTOMATIC DIALLING
3.9
9
If you want to assign a
name to the group, enter
the name up to 20 digits.
If not, skip this step.
32
PQRS
GHI
ABC
MENU
STOP
FLASH
SPEED
/DUAL
REDIAL/
PAUSE
DEF
JKL MNO
TUV WXYZ
1
465
798
0
For details on how to enter
letters using the number keypad,
see page 2.27.
10
Press ENTER when the
name appears correctly.
The machine returns to
Standby mode.
OHD/V.REQ.COPY
START/
ENTER
The LCD display asks you
to enter a group name.
GROUP NAME :
F-Chapter 3(US) 4/16/98 8:35 AM Page 3.9
Page 55

AUTOMATIC DIALLING
3.10 C
HAPTER THREE : AUTOMATIC DIALLING
3
Searching for a Number in Memory
(Directory Dialling)
There are two ways to search for a number in memory. You can either scan from A to Z
sequentially, or you can search using the first letter of the name associated with the
number.
Searching Sequentially through Memory
1
Press SEARCH.
ALARM
STOP
SEARCH/DELETE
3
When the number you
want appears in the
display, press START to
dial.
If there is a document
loaded, the machine will
send out the document.
OHD/V.REQ.COPY
START/
ENTER
2
Press or to move
upward or downward
through the directory
until you find the number
you want.
ALARM
STOP
SEARCH/DELETE
While searching through the
machineÕs memory, youÕll see that each
entry is preceded by one of three
letters: ÔTÕ for One-Touch Dial, ÔSÕ for
Speed, or ÔGÕ for Group Dial number.
These letters tell you how the number
is stored. For information on Group
Dial, see page 3.7.
If you press START while a group
number is on the display, an error beep
sounds and the machine returns to
Standby mode.
Pressing allows you to search
downward through the entire memory
in alphabetical order (from A to Z), and
allows you to search upward in
reverse alphabetical order (from Z to
A). Scanning is looped _when you
search past the last number in memory,
youÕll start over again at the beginning.
The LCD asks you to
press or , or to
choose a letter by
pressing a number button.
Each time you press
or , the LCD displays
the number stored in the
next memory.
T01 : SM I TH CO .
1234567
S05 : TA I LER
7654321
TO SEARCH , PRESS
, , A- Z
F-Chapter 3(US) 4/16/98 8:35 AM Page 3.10
Page 56

AUTOMATIC DIALLING
C
HAPTER THREE : AUTOMATIC DIALLING
3.11
Searching for a Particular First Letter
1
Press SEARCH.
ALARM
STOP
SEARCH/DELETE
4
When the name and
number you want appear
correctly in the display,
press START to dial.
OHD/V.REQ.COPY
START/
ENTER
2
Press the button labeled
with the letter you want
to search for.
32
PQRS
GHI
ABC
MENU
STOP
FLASH
SPEED
/DUAL
REDIAL/
PAUSE
DEF
JKL MNO
TUV WXYZ
1
465
798
0
Each entry is preceded by one of
three letters: ÔTÕ for one-touch, ÔSÕ for
speed, ÔGÕ for group. These letters tell
you how the number is stored.
If the machine cannot find a name that
begins with the letter you selected, the
machine beeps and shows the message
ÔNOT FOUND.Õ
For example, if you want to find
the name ÔNew York,Õ press the Ô6Õ
button, which is labeled with ÔMNO.Õ
Pressing searches downward in
alphabetic order. To search upward,
press .
The LCD asks you to
press or , or to
choose a letter by
pressing a number button.
A name beginning with
the letter appears in the
display.
T02 :MOB I LE
1112223333
TO SEARCH , PRESS
, , A- Z
3
If the name appearing in
the display is not the
name you want, press
to display the next name
in the list, or to
display the previous name.
ALARM
STOP
SEARCH/DELETE
F-Chapter 3(US) 4/16/98 8:35 AM Page 3.11
Page 57

Chapter Four
THE FAX MACHINE
E-Chapter 4(US) 4/16/98 8:37 AM Page 1
Page 58

Chapter Four
THE FAX MACHINE
In this chapter, you will learn how to send and receive fax documents, and how to use
the four fax reception modes and the Voice Request feature.
Sending a Fax
Acceptable Documents
NOTE : For multiple sheets, the document must be the same size and paper type.
Do not try to send documents that are :
¥ wet
¥ covered with wet ink or paste
¥ wrinkled, curled, or folded
¥ too thin (less than 0.07 mm thick-onionskin, airmail paper, etc.)
¥ too thick (more than 0.15 mm thick)
¥ chemically processed (pressure-sensitive paper, carbon-coated paper, etc.)
¥ coated (glossy paper, etc)
¥ too small or short (such as a label, voucher, etc.)
¥ made of cloth or metal
To send these documents, use an office copier to make a photocopy first, and then send
the copy.
C
HAPTER FOUR : THE FAX MACHINE
4.1
Single Sheet
210 mmEffective Scanning Width
Uncoated on both sidesQuality of document paper
Document Size
216 mm (W) X 356 mm (L)
-
Automatic Document
Feeder capacity
216 mm (W) X 297 mm (L)
Max
2 or More Sheets
148 mm (W) X 148 mm (L)
Min
0.07 to 0.15 mm
If you use 0.1 mm (20 lbs) thick
paper, you can load 30 pages at a
time.
If you use paper between
0.085 - 0.13 mm thick, you can load
20 pages at a time.
Thickness of document
E-Chapter 4(US) 4/16/98 8:37 AM Page 4.1
Page 59

THE FAX MACHINE
4.2 C
HAPTER FOUR : THE FAX MACHINE
4
Setting Document Resolution and Contrast
We recommend sending documents printed using a typewriter, felt tip pen, black ink, or
laserwriter. The paper should be white or very light, and of normal weight
-
not
cardboard. Blue lines on a ruled pad donÕt fax well.
If you send documents with unusual contrast characteristics, including photographs, you
can adjust the resolution and contrast to send a high-quality transmission of the
documents.
¥ Press RESOLUTION to increase sharpness and clarity. By pressing RESOLUTION
repeatedly, you can choose FINE, SUPER FINE, or STANDARD mode.
STANDARD works well for normal handwritten typed, or printed documents.
When STANDARD is selected, all lamps about the RESOLUTION button are off.
FINE is good for documents containing a lot of detail. When FINE is selected, the FINE
lamp lights.
SUPER FINE works well for documents containing extremely fine detail. When SUPER
FINE is selected, SUPER FINE lamp lights. SUPER FINE works only if the remote
machine also has the SUPER FINE feature.
You can not use SUPER FINE mode for memory transmission.
¥ Press CONTRAST to compensate for the brightness or darkness of your faxed
document. By pressing CONTRAST repeatedly, you can choose between DARKEN,
LIGHTEN, PHOTO, or NORMAL.
DARKEN works with light print or faint pencil markings. When DARKEN is selected,
the DARKEN lamp lights.
LIGHTEN works with dark print. When LIGHTEN is selected, the LIGHTEN lamp
lights.
PHOTO is used when faxing photographs or other documents containing color or
shades of grey. Although your machine wonÕt transmit color, it will print and send up
to 32 shades of grey. When PHOTO is selected, both LIGHTEN and DARKEN lamps
light.
NORMAL works well with standard typed or printed documents. When NORMAL is
selected, both LIGHTEN and DARKEN lamps are off.
E-Chapter 4(US) 4/16/98 8:37 AM Page 4.2
Page 60

THE FAX MACHINE
C
HAPTER FOUR : THE FAX MACHINE
4.3
Loading Document
1
Turn the page face down.
2
Adjust the document
guides to match the
width of the document.
Be sure that your document is
free of staples, paper clips, and other
foreign objects.
You can insert up to 30 sheets at a
time. If you insert more than one sheet,
make sure the bottom sheet enters first.
Stagger the leading edge of the sheets
slightly, and insert the sheets with a
slight push to ensure smooth feeding.
You can choose the
proper document
resolution and contrast,
if necessary.
Now, you can dial the
desired number. See page
4.4.
ABC
MENU
DEF
RCV. MODE
FAX
ANS/FAX
TEL/FAX
FINE
S. FINE
LIGHTEN
PHOTO
DARKEN
CONTRAST
FINE
S. FINE
RESOLUTION
For more information about
document resolution and contrast,
see page 4.2.
3
Slide the sheet down into
the document tray until
itÕs gripped by the
machine.
The machine beeps, and
the automatic document
feeder seizes and pulls in
the page.
If you want to add pages while the fax
is sending, insert them into the loading
slot on top of the already loaded sheets.
Do not place more than 30 sheets in the
feeder at a time.
If youÕre loading pages that are
unusually thick or thin, feed one sheet
at a time.
If the document doesnÕt feed correctly,
open the control panel and remove the
document and try loading it again.
The LCD displays
ÔDOCUMENT LOADINGÕ
then ÔDOCUMENT READY.Õ
MAY-10-1996 FR I
DOC UME NT READY
E-Chapter 4(US) 4/16/98 8:37 AM Page 4.3
Page 61

THE FAX MACHINE
4.4 C
HAPTER FOUR : THE FAX MACHINE
4
You can send or receive a voice
request when you send a fax. For more
information about the Voice Request
feature, see page 4.12.
You can cancel the transmission of
a document at any time by pressing
STOP.
1
Using the number keypad,
enter the number of the
remote fax machine.
32
PQRS
GHI
ABC
MENU
STOP
FLASH
SPEED
/DUAL
REDIAL/
PAUSE
DEF
JKL MNO
TUV WXYZ
1
465
798
0
2
Press START when the
number appears correctly
in the display.
OHD/V.REQ.COPY
START/
ENTER
The LCD displays the
number.
The machine automatically
dials the number and
begins to transmit when
the remote fax machine
answers the phone.
Sending a Fax Automatically
Using Quick Scan
You can send a fax using Quick Scan feature. The machine will quickly scan the
document.
To enable this feature, press MENU and Q.SCAN on the one-touch keypad before
dialling the other machine. The LCD displays ÔQUICK SCAN IS ENABLEDÕ for 2
seconds.
Notes :
¥ To cancel this feature, press MENU and Q.SCAN again before you send a fax.
The LCD displays ÔQUICK SCAN IS DISABLED.Õ
¥ After sending a document, Quick Scan feature is terminated automatically.
¥ If Quick Scan is enabled, the scanning quality may not be good.
¥ Quick Scan feature is only available with STANDARD resolution.
You can store One-Touch or Speed
Dial numbers so that you can dial your
most frequently used numbers with a
touch of a button or 2-digit Speed Dial
number. For more information, see
page 3.1 or 3.4.
If you make a mistake while
entering a number, move the cursor
under the wrong digit by using or ,
and correct the number.
To insert a pause when dialling, press
PAUSE anywhere within the telephone
number. A pause will be
displayed as a ÔPÕ.
TE L : 9P5551212
DIALING 9P
555121
4
TX
E-Chapter 4(US) 4/16/98 8:37 AM Page 4.4
Page 62

If a person answers the telephone,
ask him or her to press START so that
you can send the document.
THE FAX MACHINE
C
HAPTER FOUR : THE FAX MACHINE
4.5
1
Pick up the handset.
2
Using the number keypad,
enter the number of the
remote fax machine.
32
PQRS
GHI
ABC
MENU
STOP
FLASH
SPEED
/DUAL
REDIAL/
PAUSE
DEF
JKL MNO
TUV WXYZ
1
465
798
0
The LCD displays
ÔPHONE.Õ
Sending a Fax After Talking
For hands-off operation, you can
press OHD. To adjust speaker volume,
press or while you hear tones
from the speaker, and select the desired
loudness.
4
Replace the handset.
You can send or receive a Voice
Request when you send a fax. For more
information about the Voice Request
feature, see page 4.12.
You can store One-Touch or Speed
Dial numbers so that you can dial your
most frequently used numbers with a
touch of a button or 2-digit Speed Dial
number. For more information, see
page 3.1 or 3.4.
3
Press START when you
hear the fax tone.
OHD/V.REQ.COPY
START/
ENTER
You can cancel the transmission of
a document at any time by pressing
STOP.
JUN- 14 1996 FR I
PHONE
The LCD displays the
number you are
dialling.
5551212
The LCD displays the
message ÔTXÕ and the
document begins to feed
through the machine.
TX
E-Chapter 4(US) 4/16/98 8:37 AM Page 4.5
Page 63

THE FAX MACHINE
4.6 C
HAPTER FOUR : THE FAX MACHINE
4
If something went wrong during
your fax transmission, an error message
appears in the display. For a listing of
LCD error messages and their
meanings, see page 8.4.
If you receive an error message, press
STOP to clear the message and try to
send the document again.
You can set your machine to print out a
confirmation report automatically. For
more information, see page 6.9.
1
Press STOP at any time
to cancel transmission.
STOP
OHD/V.REQ.
START/
ENTER
FLASH
SPEED
/DUAL
REDIAL/
PAUSE
2
Press STOP again before
the warning message
disappears and the
transmission will stop.
STOP
OHD/V.REQ.
START/
ENTER
FLASH
SPEED
/DUAL
REDIAL/
PAUSE
The machine continues to
send the fax and the LCD
displays a message
warning you that the
machine is in use.
When the last page of
your document has been
sent successfully, the
machine beeps and
returns to Standby mode.
Confirming Transmission
Cancelling Transmission
Automatic Redial
When you send a fax, if the number you have dialled is busy or there is no answer, the
machine will automatically redial the number every three minutes up to three times.
(Automatic Redialling varies by country, i.e., it might occur twice at two-minute
intervals.)
While the machine is redialling, the display will show ÔBUSY! RETRY?.Õ To immediately
redial the number, press START. To stop redialling, press STOP.
JUN- 14 1996 FR I
10 : 30 AM 100%
IN USE ! PRESS
[S TOP ] TO CANCEL
E-Chapter 4(US) 4/16/98 8:37 AM Page 4.6
Page 64

THE FAX MACHINE
C
HAPTER FOUR : THE FAX MACHINE
4.7
Receiving a Fax
Reception Modes
Your multi-function machine has four reception modes:
¥ In TEL mode, automatic fax reception is turned off. You can receive a fax only by
manually pressing START.
¥ In FAX mode, the machine answers an incoming call and immediately goes into receive
mode, waiting for a fax to be sent.
¥ In TEL/FAX mode, the machine answers an incoming call expecting to receive a fax. If
the machine does not sense a fax signal, it will sound another ringing tone to tell you it
is a phone call. If you do not lift the handset during the secondary ringing, the machine
will switch to automatic fax reception mode.
¥ In ANS/FAX mode, the answering machine answers an incoming call, and the caller
can leave a message on the answering machine. If the fax machine senses a fax tone on
the line, the call automatically switches over to the fax machine. To use the ANS/FAX
mode, you have to attach an answering machine to the EXT. LINE socket on your fax
machine (see page 2.5).
The lamps located above the RCV.MODE button indicate the selected reception mode.
If you seldom use the fax line for voice conversations, set the fax machine to receive a fax
automatically by selecting either FAX mode or TEL/FAX mode.
Notes :
¥ The receiving speed varies according to the memory capacity used.
¥ While you print a PC file with this machine (for SF4100, SF4200 only), an incoming fax
will be received in memory. If you have a lot of pages to print, we recommend to stop
PC printing to prevent memory from being full.
E-Chapter 4(US) 4/16/98 8:37 AM Page 4.7
Page 65

THE FAX MACHINE
4.8 C
HAPTER FOUR : THE FAX MACHINE
4
1
Press RCV.MODE
repeatedly until the
FAX lamp lights.
ABC
MENU
DEF
RCV. MODE
FAX
ANS/FAX
TEL/FAX
FINE
S. FINE
LIGHTEN
PHOTO
DARKEN
CONTRAST
FINE
S. FINE
RESOLUTION
2
When you get a call, the
machine answers the call
on the second ring and
receives a fax
automatically.
Receiving in FAX Mode
You can change the number of
rings. For more information, see page
6.9.
To adjust ringer volume, see page 2.28.
When reception is complete, the
machine returns to Standby mode.
You can change the number of
rings. For more information, see page
6.10.
To adjust ringer volume, see page 2.28.
When reception is complete, the
machine returns to Standby mode.
1
Press RCV.MODE until the
TEL/FAX lamp lights.
ABC
MENU
DEF
RCV. MODE
FAX
ANS/FAX
TEL/FAX
FINE
S. FINE
LIGHTEN
PHOTO
DARKEN
CONTRAST
FINE
S. FINE
RESOLUTION
2
When you get a call, the
machine answers the call
on the second ring and
receives a fax
automatically.
Receiving in TEL/FAX Mode
3
If the machine does not
sense a fax signal, your
machine will give another
ringing tone to tell you it
is a phone call.
Lift the handset to answer the call.
If you do not pick up the handset
within about 25 seconds, the machine
will switch to automatic reception
mode.
E-Chapter 4(US) 4/16/98 8:37 AM Page 4.8
Page 66

THE FAX MACHINE
C
HAPTER FOUR : THE FAX MACHINE
4.9
1
Press RCV.MODE until
both FAX and TEL/FAX
lamps light.
ABC
MENU
DEF
RCV. MODE
FAX
ANS/FAX
TEL/FAX
FINE
S. FINE
LIGHTEN
PHOTO
DARKEN
CONTRAST
FINE
S. FINE
RESOLUTION
2
When you get a call, the
answering machine
answers it. If the caller
leaves a message, the
answering machine stores
the message.
If your machine hears a
fax tone on the line, it
starts to receive a fax.
Receiving in ANS/FAX Mode
If you have set your machine to
ANS/FAX and your answering
machine is switched off, or the
answering machine is not connected to
your fax machine, the fax machine will
automatically go into receive mode
after several rings.
If you are in TEL mode (manual
reception) when the answering machine
is connected to your fax machine, you
must switch off the answering machine,
or the outgoing message from the
answering machine will interrupt your
phone conversation.
To use this mode, you have to
attach an answering machine to your
fax machine (see page 2.5).
To adjust ringer volume, see page
2.28.
1
Press RCV.MODE until
both FAX and TEL/FAX
lamps are off.
ABC
DEF
RCV. MODE
FAX
ANS/FAX
TEL/FAX
FINE
S. FINE
LIGHTEN
PHOTO
DARKEN
CONTRAST
FINE
S. FINE
RESOLUTION
2
When the telephone
rings, pick up the handset
and answer it.
3
If you hear a fax tone, or
if the person on the other
end asks you to receive a
document, press START.
OHD/V.REQ.COPY
START/
ENTER
Receiving Manually (in TEL Mode)
E-Chapter 4(US) 4/16/98 8:38 AM Page 4.9
Page 67

THE FAX MACHINE
4.10 C
HAPTER FOUR : THE FAX MACHINE
4
4
Replace the handset.
The machine begins
receiving and returns to
standby mode when the
reception is complete.
1
Press STOP to cancel
reception at any time.
ALARM
STOP
OHD/V.REQ.
START/
ENTER
FLASH
SPEED
/DUAL
REDIAL/
PAUSE
2
Press STOP again before
the LCD message
disappears.
The fax reception is
cancelled and the
machine returns to
standby mode.
ALARM
STOP
OHD/V.REQ.
START/
ENTER
FLASH
SPEED
/DUAL
REDIAL/
PAUSE
The machine continues to
receive the fax and the
LCD displays a message
warning you that the
machine is in use.
Cancelling Reception
IN USE ! PRESS
[S TOP ] TO CANCEL
E-Chapter 4(US) 4/16/98 8:38 AM Page 4.10
Page 68

THE FAX MACHINE
C
HAPTER FOUR : THE FAX MACHINE
4.11
1
When you receive a call
on the extension phone
and hear fax tones, press
the buttons Ô 9 Ô
(star nine star) on the
extension telephone.
The machine receives the
document.
7
8
9
0
2
When you are finished
speaking and the machine
begins receiving
documents, replace the
handset of the extension
telephone.
Using an Extension Telephone
You can receive a fax from someone you are talking to on the extension telephone
without having to go to the fax machine.
Press the buttons slowly in
sequence. If you still hear the fax tone
from the remote machine, try pressing
Ô 9 Ô once again.
Ô 9 Ô is the remote receive start code
preset at the factory. The first and the
last asterisks are fixed, but you can
change the middle character to
whatever you choose. For more
information, see page 6.9.
This feature is available only when you
use an extension telephone connected
to the EXT.LINE jack on the back of the
machine.
Recording Area
The effective recording area is inside the shaded area as follows for all acceptable
recording paper. Portions outside the shaded area may not be recorded.
If there is image at this bottom area, the machine may
reduce the page to fit in the effective recording area
according to the option you have chosen. See page 6.9.
216 mm
6.5mm
12.7 mm
6.5mm
E-Chapter 4(US) 4/16/98 8:38 AM Page 4.11
Page 69

THE FAX MACHINE
4.12 C
HAPTER FOUR : THE FAX MACHINE
4
Voice Request
If youÕre sending or receiving a document and need to speak to the other person during
the same phone call, use Voice Request to alert the person at the remote site.
You can also respond to a Voice Request made by the person at the remote end.
Sending a Voice Request
1
Press V.REQ while a
document is being sent
or received.
OHD/V.REQ.
START/
ENTER
/DUAL
REDIAL/
PAUSE
2
When the phone rings,
pick up the handset and
answer it.
3
When you are finished,
replace the handset.
You canÕt talk with the other
person and send a fax at the exact same
time.
After the fax has finished, you or the
person at the remote end has 15
seconds to pick up the handset. If no
one answers, your machine returns to
Standby mode.
If you canÕt seem to alert the other
person, it may be because the remote
fax machine doesnÕt have the Voice
Request feature.
When youÕve finished talking, if
you have another document to send,
load the document and tell the other
person to press START. When you hear
the fax tones, press START.
You can cancel a Voice Request by
pressing V.REQ. again.
Voice Request signal is
sent to the remote fax
machine after the
document has been
sent or received.
VO ICE REQUEST
TX G3 9 . 6 P : 1
E-Chapter 4(US) 4/16/98 8:38 AM Page 4.12
Page 70

THE FAX MACHINE
C
HAPTER FOUR : THE FAX MACHINE
4.13
Answering a Voice Request
<Call Back Message>
1
When the phone rings,
pick up the handset and
answer it.
2
When you are finished,
replace the handset.
If you donÕt answer the Voice
Request within 15 seconds, the machine
prints out the number that made the
Voice Request, and the time and date
the request was made. See ÔCall Back
MessageÕ below.
If the Voice Request occurred while
receiving, you can resume receiving on
the same line after talking with the
other end by pressing START.
CALL BACK MESSAGE
DATE : JUN-14-1996 FRI 09:04 AM
NAME : SMITH CO.
TEL. : 123-456-7890
PLEASE CALL BACK ......
TEL. : 714-555-1212
If a terminal ID is not programmed in the other machine when it is sending
you a fax, a phone number will not appear on the call back message list.
E-Chapter 4(US) 4/16/98 8:38 AM Page 4.13
Page 71

Chapter Five
ADVANCED OPERATIONS
D-Chapter 5(US) 4/16/98 8:39 AM Page 1
Page 72

Chapter Five
ADVANCED OPERATIONS
In this chapter, you will learn other ways to send and receive faxes to save transmission
costs by sending at preset times, to maintain the privacy of sensitive documents, and to
save time by sending the same documents to many different locations.
Note : You can store a maximum of 20 different sending or polling jobs in memory.
Memory Transmission (Broadcasting)
With Memory Transmission, documents are automatically stored in memory and sent to
a remote station. You can use this feature to send your documents to multiple locations.
After sending, the documents are automatically erased from memory.
C
HAPTER FIVE : ADVANCED OPERATIONS
5.1
1
Load the document.
Choose the resolution and
contrast, if necessary.
2
Press MENU.
2
PQRS
GHI
ABC
MENU
STOP
FLASH
SPEED
/DUAL
JKL
TUV
1
45
3
Press 01, MEMORY TX.,
on the one-touch keypad.
01 02 03 04 05
06 07 08 09 10
11 12 13 14 15
SET
MEMORY TX. DELAY TX. POLLING ADD/CANCEL SELF-TEST
GROUP DIAL SYSTEM ID DATE & TIME OPTION
TX. CONFIRM STANDBY DIAL LIST OPTION JOURNAL
Q.SCAN
ABC
MENU
DEF
RCV. MODE
FAX
ANS/FAX
TEL/FAX
FINE
S. FINE
LIGHTEN
PHOTO
DARKEN
CONTRAST
FINE
S. FINE
RESOLUTION
For details on how to load a
document, see page 4.3.
For details on setting resolution and
contrast, see page 4.2. SUPER FINE
mode is not available in Memory
Transmission.
The LCD asks you to
enter the number of the
remote machine.
TEL :
D-Chapter 5(US) 4/16/98 8:39 AM Page 5.1
Page 73

ADVANCED OPERATIONS
5.2 C
HAPTER FIVE : ADVANCED OPERATIONS
5
The LCD asks if you want
to enter another fax
number to send the same
document to another
location.
ANO TH E R F AX
NUMBE R ?
The machine stores the
document automatically
in memory. The LCD
counts the number of
pages stored in memory
and the memory capacity
remaining.
SCAN TO MEMORY
92% PAGE 1
4
Enter the number of the
remote machine (up to
34 digits).
32
PQRS
GHI
ABC
MENU
STOP
OHD/V.REQ.
FLASH
SPEED
/DUAL
REDIAL/
PAUSE
DEF
JKL MNO
TUV WXYZ
1
465
798
0
You can press a one-touch button,
a 2-digit Speed Dial number, or a
one-touch Group Dial button. The
stored number and name appear in the
display.
5
Press ENTER when the
number appears correctly
in the display.
OHD/V.REQ.COPY
START/
ENTER
6
If you want to send to
more than one location,
press ENTER and repeat
steps 4-5.
or
If you want to send to
one location or when you
complete the another fax
number setting, press
STOP or .
OHD/V.REQ.COPY
START/
ENTER
ARM
STOP
OHD/V.REQ.
START/
ENTER
FLASH
SPEED
/DUAL
REDIAL/
PAUSE
The machine shows the
ÔANOTHER FAX NUMBER?Õ message
repeatedly up to 10 times each time you
enter another fax number using manual
dialling, One-Touch, or 2-digit Speed
Dialling (you can not use a Group
number for another fax number).
But if you have used this multi-address
transmission feature in other
operation(s) currently registered in
memory, the maximum attempt
number of Ô10Õ will be reduced.
If you enter another fax number
already in the another fax number
memory (for example, included in a
group number), the LCD displays
ÔALREADY SET.Õ
If you canÕt fit all the pages in
memory, the LCD displays ÔMEMORY
FULL 1:CANCEL 2:DONEÕ. Select Ô1Õ
to cancel the job, or Ô2Õ to store the
pages already in memory, and send the
remaining pages manually.
The LCD displays the
number being dialled.
Then the machine begins
sending the document.
D I AL I NG 55 512 12
TX
D-Chapter 5(US) 4/16/98 8:39 AM Page 5.2
Page 74

ADVANCED OPERATIONS
C
HAPTER FIVE : ADVANCED OPERATIONS
5.3
3
Press 02, DELAY TX., on
the one-touch keypad.
01 02 03 04 05
06 07 08 09 10
11 12 13 14 15
SET
MEMORY TX. DELAY TX. POLLING ADD/CANCEL SELF-TEST
GROUP DIAL SYSTEM ID DATE & TIME OPTION
TX. CONFIRM STANDBY DIAL LIST OPTION JOURNAL
Q.SCAN
4
Enter the number of the
remote machine (up to
34 digits).
32
PQRS
GHI
ABC
MENU
STOP
OHD/V.REQ.
FLASH
SPEED
/DUAL
REDIAL/
PAUSE
DEF
JKL MNO
TUV WXYZ
1
465
798
0
The LCD asks you to
enter the number of the
remote machine.
1
Load the document.
Choose the resolution and
contrast, if necessary.
2
Press MENU.
2
PQRS
GHI
ABC
MENU
STOP
FLASH
SPEED
/DUAL
JKL
TUV
1
45
ABC
MENU
DEF
RCV. MODE
FAX
ANS/FAX
TEL/FAX
FINE
S. FINE
LIGHTEN
PHOTO
DARKEN
CONTRAST
FINE
S. FINE
RESOLUTION
The LCD asks you to
press the desired function
button.
Delayed Transmission
You can set up your machine to send a fax at a later time when you will not be present.
For details on how to load a
document, see page 4.3.
For details on the resolution and
contrast, see page 4.2. SUPER FINE
resolution is not available in Delayed
Transmission.
You can press a one-touch button,
a 2-digit Speed Dial number, or a
one-touch Group Dial button. The
stored number and name appear in the
display.
PRESS
FUNCT I ON BUTTON
TEL :
One-touch buttons 01-16 perform
specific functions when used with the
MENU button. Each button provides
access to a selected function.
D-Chapter 5(US) 4/16/98 8:39 AM Page 5.3
Page 75

ADVANCED OPERATIONS
5.4 C
HAPTER FIVE : ADVANCED OPERATIONS
5
5
Press ENTER when the
number appears correctly
in the display.
OHD/V.REQ.COPY
START/
ENTER
6
If you want to send to
more than one location,
press ENTER and repeat
steps 4-6.
or
If you want to send to
one location or when you
complete the another fax
number setting, press
STOP or .
OHD/V.REQ.COPY
START/
ENTER
STOP
OHD/V.REQ.
START/
ENTER
FLASH
SPEED
/DUAL
REDIAL/
PAUSE
The LCD asks you if you
want to enter another fax
number to send the same
document to another
location.
ANOTHER FAX
NUMBE R ?
The machine displays the
ÔANOTHER FAX NUMBER?Õ message
repeatedly up to 10 times each time you
enter another fax number using manual
dialling, One-Touch, or 2-digit Speed
Dialling (you can not use Group
number for another fax number).
But if you have used this multi-address
transmission feature in other
operation(s) currently registered in
memory, the maximum attempt
number of Ô10Õ will be reduced.
If you enter another fax number
already in the another fax number
memory (for example, included in a
Group number), the LCD displays
ÔALREADY SET.Õ
7
If you want to assign a
name to the transmission,
enter the name. If not,
skip this step.
32
PQRS
GHI
ABC
MENU
STOP
OHD/V.REQ.
FLASH
SPEED
/DUAL
REDIAL/
PAUSE
DEF
JKL MNO
TUV WXYZ
1
465
798
0
The LCD asks you to
enter a name.
For details on how to enter letters
using the number keypad, see page
2.27.
8
Press ENTER when the
name appears correctly.
OHD/V.REQ.COPY
START/
ENTER
You can press to confirm the
number and proceed to the next.
NAME :
D-Chapter 5(US) 4/16/98 8:40 AM Page 5.4
Page 76

ADVANCED OPERATIONS
C
HAPTER FIVE : ADVANCED OPERATIONS
5.5
9
Enter the time by using
the number keypad.
32
PQRS
GHI
ABC
MENU
STOP
OHD/V.REQ.
FLASH
SPEED
/DUAL
REDIAL/
PAUSE
DEF
JKL MNO
TUV WXYZ
1
465
798
0
10
Press ENTER when the
time appears correctly in
the LCD display.
OHD/V.REQ.COPY
START/
ENTER
11
If you want to store the
document in memory,
press ENTER.
or
Press STOP and the LCD
returns to Standby mode.
OHD/V.REQ.COPY
START/
ENTER
PQ
G
STOP
OHD/V.REQ.
START/
ENTER
FLASH
SPEED
/DUAL
REDIAL/
PAUSE
1
4
7
The LCD displays the
current time on the upper
line and asks you to enter
the start time when the
fax is to be sent.
CURRENT 13 : 30
START HH :MM
The LCD asks if you want
to store the document in
memory until it needs to
be sent.
TO MEMOR Y ?
( R EMA I NED : 75%)
The machine returns to
Standby mode and the
LCD displays a reminder
that a Delayed
Transmission is set.
J UN - 14 19 96 F R I
DE LAY - TX 2 2: 3 0
Enter the time in 24-hour format.
For example, enter 2230 for 10:30 P.M.
If you set a time earlier then the current
time, the document will be sent at that
time on the following day.
The LCD displays the remaining
memory.
If you have entered several fax
numbers in step 8, the message shown
at left does not appear, and the
documents will be stored in memory
automatically.
If you canÕt fit all the pages in memory,
the LCD displays ÔMEMORY FULL
1:CANCEL 2:DONEÕ. Select Ô1Õ to
cancel the job or Ô2Õ to store the pages
already in memory, and send the
remaining pages manually.
D-Chapter 5(US) 4/16/98 8:40 AM Page 5.5
Page 77

ADVANCED OPERATIONS
5.6 C
HAPTER FIVE : ADVANCED OPERATIONS
5
Polling
Polling is when one fax machine requests another to send a document. This is useful
when the person with the original document to be sent is not in the office. The person
who wants to receive the document calls the machine holding the original and requests
that the document be sent. In other words, it ÒpollsÓ the machine holding the original.
Being Polled By a Remote Machine
You can program your fax machine to send documents in your absence when polled by a
remote fax machine. It is possible to use a Poll code to prevent unauthorized Polling of
your fax machine. When you secure your machine in this manner, only those who know
the Poll code can poll your machine.
Note : Once you have set up a Polling Transmission, another Polling Transmission is not possible
until the transmission is completed.
3
Press 03, POLLING, on
the one-touch keypad.
01 02 03 04 05
06 07 08 09 10
11 12 13 14 15
16 17 18 19 20
MEMORY TX. DELAY TX. POLLING ADD/CANCEL SELF-TEST
GROUP DIAL SYSTEM ID DATE & TIME OPTION
TX. CONFIRM STANDBY DIAL LIST OPTION JOURNAL
Q.SCAN
1
Load a document.
Choose the resolution and
contrast, if necessary.
2
Press MENU.
2
PQRS
GHI
ABC
MENU
STOP
FLASH
SPEED
/DUAL
JKL
TUV
1
45
ABC
MENU
DEF
RCV. MODE
FAX
ANS/FAX
TEL/FAX
FINE
S. FINE
LIGHTEN
PHOTO
DARKEN
CONTRAST
FINE
S. FINE
RESOLUTION
The LCD asks you to
press the desired function
button.
For information on loading a
document, see page 4.3.
For details on setting resolution and
contrast, see page 4.2. SUPER FINE
resolution will automatically switch to
FINE to store the Polling job in
memory.
PRESS
FUNCT I ON BUTTON
One-touch buttons 01-16 perform
specific functions when used with the
MENU button. Each button provides
access to a selected function.
D-Chapter 5(US) 4/16/98 8:40 AM Page 5.6
Page 78

ADVANCED OPERATIONS
C
HAPTER FIVE : ADVANCED OPERATIONS
5.7
4
If you want to use a Poll
code, select Ô1:ONÕ by
pressing 1 or by using
or button and
entering a 4-digit Poll
code (except for 0000).
or
If you do not want to
secure the transmission
with a Poll code, select
Ô2:OFFÕ by pressing 2 or
by moving the cursor
using or button.
32
PQRS
GHI
ABC
MENU
FLASH
SPEED
/DUAL
REDIAL/
DEF
JKL MNO
TUV WXYZ
1
465
798
32
PQRS
GHI
ABC
MENU
FLASH
SPEED
/DUAL
REDIAL/
DEF
JKL MNO
TUV WXYZ
1
465
798
The LCD asks if you want
to enter a Poll code.
P OL L CODE
1
:ON 2:OFF
The LCD shows the last used Poll
code.
The Poll code is preset to 0000 at the
factory which represents no Poll code.
5
Press ENTER when the
code appears correctly
in the display.
OHD/V.REQ.COPY
START/
ENTER
The machine stores the
document in memory. The
LCD counts the number
of pages being stored in
memory and the memory
capacity remaining.
If you canÕt fit all the pages in
memory, the LCD displays ÔMEMORY
FULL 1:CANCEL 2:DONEÕ. Select Ô1Õ
to cancel the job, or Ô2Õ to store the
pages already in memory and cancel
the remaining pages.
If memory is not enough, set Polling
again when memory becomes available.
SCAN TO MEMORY
27% PAGE 1
The machine returns to
Standby mode and the
LCD displays a reminder
that a Polling
Transmission is set.
The machine automatically
switches to FAX mode (automatic
receiving) when set to be polled.
J UN - 14 1996 F R I
POLL - TX
D-Chapter 5(US) 4/16/98 8:40 AM Page 5.7
Page 79

ADVANCED OPERATIONS
5.8 C
HAPTER FIVE : ADVANCED OPERATIONS
5
1
Lift the handset or press
OHD, and enter the
number of the remote
machine.
32
PQRS
GHI
ABC
MENU
STOP
OHD/V.REQ.
FLASH
SPEED
/DUAL
REDIAL/
PAUSE
DEF
JKL MNO
TUV WXYZ
1
465
798
0
2
When you hear a fax tone
from the remote machine,
press MENU.
2
PQRS
GHI
ABC
MENU
STOP
OHD/V.REQ.
FLASH
SPEED
/DUAL
JKL
TUV
1
45
78
Polling a Remote Machine
The remote machine must be ready
for your call.
3
Press 03, POLLING, on
the one-touch keypad.
01 02 03 04 05
06 07 08 09 10
11 12 13 14 15
SET
MEMORY TX. DELAY TX. POLLING ADD/CANCEL SELF-TEST
GROUP DIAL SYSTEM ID DATE & TIME OPTION
TX. CONFIRM STANDBY DIAL LIST OPTION JOURNAL
Q.SCAN
The LCD asks if you want
to enter a Poll code.
P OL L CODE
1
:ON 2:OFF
One-touch buttons 01-16 perform
specific functions when used with the
MENU button. Each button provides
access to a selected function.
If the remote machine is not
secured with a Poll code, your machine
starts to receive the document from the
remote machine after you select Ô2:OFF.Õ
4
If the remote machine is
secured with a Poll code,
you must enter the proper
code. Select Ô1:ONÕ by
pressing 1, or by using
or and pressing ENTER.
Then, enter a 4-digit code.
or
If the remote machine is
not secured with a Poll
code, select Ô2:OFFÕ by
pressing 2, or by using
or and pressing ENTER.
32
PQRS
GHI
ABC
MENU
FLASH
SPEED
/DUAL
REDIAL/
DEF
JKL MNO
TUV WXYZ
1
465
798
5
Press ENTER.
Your machine starts to
receive the document
from the remote machine.
OHD/V.REQ.COPY
START/
ENTER
32
PQRS
GHI
ABC
MENU
FLASH
SPEED
/DUAL
REDIAL/
DEF
JKL MNO
TUV WXYZ
1
465
798
D-Chapter 5(US) 4/16/98 8:40 AM Page 5.8
Page 80

ADVANCED OPERATIONS
C
HAPTER FIVE : ADVANCED OPERATIONS
5.9
STANDBY JOB LIST
DATE : APR-09-1996 TUE 08:30 AM
NAME : HEADQUARTERS
TEL. : 714-555-1212
NO TIME POLLCODE TELEPHONE NUMBER NAME
PAGE
MODE
01 10:35 2264523218 HELEN 02 DELAY TX
02 22:15 ONE-TOUCH[01] VACATION SCHEDULE 01 BROADCAST
SPEED[01]
7142262880
03 2580 01 POLL-TX
3
Confirm the operation
number in the Standby
Job List.
operation
number
1
Press MENU.
2
PQRS
GHI
ABC
MENU
STOP
FLASH
SPEED
/DUAL
JKL
TUV
1
45
2
Press 12, STANDBY, on
the one-touch keypad.
11 12 13 14 15
16 17 18 19 20
SET
GROUP DIAL SYSTEM ID DATE & TIME OPTION
TX. CONFIRM STANDBY DIAL LIST OPTION JOURNAL
HELP LIST
PRINT
Q.SCAN
The Standby Job List
prints.
Adding Documents To a Standby Operation
You can add documents to a Delayed or Polling Transmission previously reserved in
your machineÕs memory. Prior to performing this procedure, make a printout of the
Standby Job list and confirm the particular operation to which your document will be
added.
Confirming the Operation Number
STANDBY JOB LI ST
PR I NTI NG . . .
D-Chapter 5(US) 4/16/98 8:40 AM Page 5.9
Page 81

ADVANCED OPERATIONS
5.10 C
HAPTER FIVE : ADVANCED OPERATIONS
5
1
Load a document.
Choose the resolution and
contrast, if necessary.
2
Press MENU.
2
PQRS
GHI
ABC
MENU
STOP
OHD/V.REQ.
FLASH
SPEED
/DUAL
JKL
TUV
1
45
ABC
MENU
DEF
RCV. MODE
FAX
ANS/FAX
TEL/FAX
FINE
S. FINE
LIGHTEN
PHOTO
DARKEN
CONTRAST
FINE
S. FINE
RESOLUTION
For details on how to load a
document, see page 4.3.
For details on setting resolution and
contrast, see page 4.2. SUPER FINE
resolution is not available.
Adding Documents To a Standby Operation in Memory
3
Press 04, ADD/CANCEL,
on the one-touch keypad.
01 02 03 04 05
06 07 08 09 10
11 12 13 14 15
SET
MEMORY TX. DELAY TX. POLLING ADD/CANCEL SELF-TEST
GROUP DIAL SYSTEM ID DATE & TIME OPTION
TX. CONFIRM STANDBY DIAL LIST OPTION JOURNAL
Q.SCAN
4
Move the cursor under
ÔADDÕ by using or ,
or by pressing 1.
MENU
ALARM
STOP
FLASH
SPEED
/DUAL
SEARCH/DELETE
5
Press ENTER.
OHD/V.REQ.COPY
START/
ENTER
The LCD asks you to
choose between ÔADDÕ
and ÔCANCELÕ.
OP E RAT I ON
1
:ADD 2 :CANCEL
D-Chapter 5(US) 4/16/98 8:40 AM Page 5.10
Page 82

ADVANCED OPERATIONS
C
HAPTER FIVE : ADVANCED OPERATIONS
5.11
6
Enter the 2-digit
operation number to
which you want to add
document.
32
PQRS
GHI
ABC
MENU
STOP
OHD/V.REQ.
FLASH
SPEED
/DUAL
REDIAL/
PAUSE
DEF
JKL MNO
TUV WXYZ
1
465
798
0
7
Press ENTER.
OHD/V.REQ.COPY
START/
ENTER
The LCD asks you to
enter a 2-digit operation
number.
The LCD asks you to
confirm the operation
number.
ENTE R 2 -D I G I T
OPE RAT I ON NO. >
ADD TO 02 ?
8
Press ENTER if the
number is correct.
OHD/V.REQ.COPY
START/
ENTER
The machine automatically
stores the documents in
memory, then returns to
Standby mode.
SCAN TO MEMORY
92% PAGE 1
D-Chapter 5(US) 4/16/98 8:40 AM Page 5.11
Page 83

ADVANCED OPERATIONS
5.12 C
HAPTER FIVE : ADVANCED OPERATIONS
5
3
Move the cursor under
ÔCANCELÕ by pressing 2,
or by using or
and pressing ENTER.
Cancelling a Standby Operation
You can cancel a previously set Delayed or Polling transmission. Prior to performing this
procedure, make a printout of the Standby Job list and confirm the operation number
you want to cancel. For details on confirming the operation number, see page 5.9.
32
PQRS
GHI
ABC
MENU
FLASH
SPEED
/DUAL
DEF
JKL MNO
TUV WXYZ
1
465
798
1
Press MENU.
2
PQRS
GHI
ABC
MENU
STOP
FLASH
SPEED
/DUAL
JKL
TUV
1
45
2
Press 04, ADD/CANCEL,
on the one-touch keypad.
01 02 03 04 05
06 07 08 09 10
11 12 13 14 15
SET
MEMORY TX. DELAY TX. POLLING ADD/CANCEL SELF-TEST
GROUP DIAL SYSTEM ID DATE & TIME OPTION
TX. CONFIRM STANDBY DIAL LIST OPTION JOURNAL
Q.SCAN
The LCD asks you to
choose between ÔADDÕ
and ÔCANCELÕ.
OPERATION
1
:ADD 2 :CANCEL
The LCD asks you to
enter a 2-digit operation
number.
ENTER 2-DIGIT
OP E RAT I ON NO . >
4
Enter the 2-digit
operation number you
want to cancel.
32
PQRS
GHI
ABC
MENU
STOP
OHD/V.REQ.
FLASH
SPEED
/DUAL
REDIAL/
PAUSE
DEF
JKL MNO
TUV WXYZ
1
465
798
0
D-Chapter 5(US) 4/16/98 8:40 AM Page 5.12
Page 84

ADVANCED OPERATIONS
C
HAPTER FIVE : ADVANCED OPERATIONS
5.13
The LCD asks you to
confirm the operation
number.
5
Press ENTER.
OHD/V.REQ.COPY
START/
ENTER
6
Press ENTER if the
number is correct.
OHD/V.REQ.COPY
START/
ENTER
CANCEL
02 OPERAT I ON ?
The LCD asks you to
enter another operation
number, if you need.
7
Repeat steps 4-6 to
cancel another standby
operation.
To return to Standby
mode, press STOP.
STOP
OHD/V.REQ.
START/
ENTER
FLASH
SPEED
/DUAL
REDIAL/
PAUSE
ENTE R 2 -D I G I T
OPE RAT I ON NO. >
When all Standby operations have
been CANCELED, ÔTHERE IS NO
ENTRYÕ will be displayed and the
machine will return to Standby mode.
D-Chapter 5(US) 4/16/98 8:40 AM Page 5.13
Page 85

Chapter Six
SPECIAL FEATURES
C-Chapter 6(US) 4/16/98 8:41 AM Page 1
Page 86

Chapter Six
SPECIAL FEATURES
Using REDIAL/PAUSE
The REDIAL/PAUSE button has two functions. It can be used to redial the number you
last called or it can be used to insert a pause in a number when you are setting up a
One-Touch or Speed Dial number. The redial memory in your machine can hold the last
5 numbers called. If you have dialled the same number as one of the 5 last-dialled
numbers, the machine does not count that number as a redial number.
To redial the number you last called
Searching through redial memory
C
HAPTER SIX : SPECIALFEATURES
6.1
1
Press REDIAL.
OHD/V.REQ.
/DUAL
REDIAL/
PAUSE
78
0
The number is dialled
automatically.
If you are making a phone call,
pick up the handset when the other
person answers.
1
Press and hold REDIAL.
OHD/V.REQ.
/DUAL
REDIAL/
PAUSE
78
0
The LCD asks you to
select the desired redial
number.
If a document is loaded in
the document tray, the
machine automatically
begins to SEND.
D I ALI NG 5551212
TX
SELECT REDIAL
PRESS ,
C-Chapter 6(US) 4/16/98 8:41 AM Page 6.1
Page 87

SPECIAL FEATURES
6.2 C
HAPTER SIX : SPECIALFEATURES
6
2
Press or to move
downward or upward
through memory until you
find the number you
want.
ALARM
STOP
SEARCH/DELETE
3
When the number you
want appears in the LCD
display, press START to
dial.
OHD/V.REQ.COPY
START/
ENTER
If a document is loaded in
the document tray, the
machine automatically
begins to SEND.
To stop redialling, press STOP. The
machine returns to Standby mode.
If you press DELETE when you find a
number, that number will be deleted.
When you dial a number, the unit
pauses for about 3 seconds at the point
where you pressed PAUSE.
If you require a longer pause time,
press PAUSE twice.
Each time you press the button,
another one of the 5 last-called
numbers appears in the display.
TX
With some private telephone systems, you must dial an access code (9, for example) and
listen for a second dial tone before dialling an outside number. In such cases, you must
insert a pause in the number.
To insert a pause
1
While entering the
number, press PAUSE.
OHD/V.REQ.
/DUAL
REDIAL/
PAUSE
78
0
Using TONE (Switching from Pulse to Tone)
You may often need to use Touch Tone dial signals to perform special operations by
phone. Bank-by-phone and voice mail are two examples of systems that require these
tone signals. If you have pulse service, you can still send Touch Tone signals by
following these steps.
1
Dial the number using
pulse dialling.
32
PQRS
GHI
ABC
MENU
STOP
OHD/V.REQ.
FLASH
SPEED
/DUAL
REDIAL/
PAUSE
DEF
JKL MNO
TUV WXYZ
1
465
798
0
C-Chapter 6(US) 4/16/98 8:42 AM Page 6.2
Page 88

SPECIAL FEATURES
C
HAPTER SIX : SPECIALFEATURES
6.3
Using FLASH (on a PABX system)
When a call comes in and you want to connect the caller to another party, you can
transfer the call by pressing FLASH and dialling the number of the other party. This is a
timed-break recall facility only, and may not be compatible with some phone system.
Contact your telephone supplier.
3
Dial the remaining
numbers required by
the service.
32
PQRS
GHI
ABC
MENU
STOP
OHD/V.REQ.
FLASH
SPEED
/DUAL
REDIAL/
PAUSE
DEF
JKL MNO
TUV WXYZ
1
465
798
0
2
When the remote phone
answers, press .
Any numbers you now
press will be sent as
Touch Tones for the
remainder of the call.
REDIAL/
PAUSE
798
0
The machine returns to the pulse
mode after you finish the call.
1
When you are on the
telephone and want the
caller to be connected to
another party, press
FLASH.
2
PQRS
GHI
STOP
OHD/V.REQ.
FLASH
SPEED
/DUAL
REDIAL/
JKL
TUV
1
45
78
If you are not subscribed to a
special service that uses the switchhook signal, donÕt press FLASH during
a call-you could disconnect the line.
2
Enter the number of the
other party.
32
PQRS
GHI
ABC
MENU
STOP
OHD/V.REQ.
FLASH
SPEED
/DUAL
REDIAL/
PAUSE
DEF
JKL MNO
TUV WXYZ
1
465
798
0
C-Chapter 6(US) 4/16/98 8:42 AM Page 6.3
Page 89

3
When the computer
answers, dial the other
information by pressing
a one-touch button or
by entering a speed dial
number.
CO
01 02 03 04 05
06 07 08 09 10
11 12 13 14 15
16 17 18 19 20
SET
MEMORY TX. DELAY TX. POLLING ADD/CANCEL SELF-TEST
GROUP DIAL SYSTEM ID DATE & TIME OPTION
TX. CONFIRM STANDBY DIAL LIST OPTION JOURNAL
HELP LIST
PRINT
Q.SCAN
SPECIAL FEATURES
6.4 C
HAPTER SIX : SPECIALFEATURES
6
2
Dial the service number
using the dial keypad.
32
PQRS
GHI
ABC
MENU
STOP
OHD/V.REQ.
FLASH
SPEED
/DUAL
REDIAL/
PAUSE
DEF
JKL MNO
TUV WXYZ
1
465
798
0
32
PQRS
GHI
ABC
MENU
STOP
OHD/V.REQ.
FLASH
SPEED
/DUAL
REDIAL/
PAUSE
DEF
JKL MNO
TUV WXYZ
1
465
798
0
1
Lift the handset or press
OHD.
Chain Dialling a Memory Number
When using special computer services, such as alternate long distance carriers, credit
card calls, or bank-by-phone, you must dial the telephone number of the service and
wait for the computer to answer before continuing. The length of time before the
computer answers can vary, so using a pre-programmed pause after a service number is
not advised.
However, you can store your ID number, for example, in one memory location and the
rest of the information, such as your card number, in another memory location.
Group number can not be used for
chain dial.
C-Chapter 6(US) 4/16/98 8:42 AM Page 6.4
Page 90

SPECIAL FEATURES
C
HAPTER SIX : SPECIALFEATURES
6.5
2
Press 16, HELP LIST, on the
one-touch keypad.
The machine prints the
Help list.
16 17 18 19 20
TX. CONFIRM STANDBY DIAL LIST OPTION JOURNAL
HELP LIST
PRINT
1
Press MENU.
2
PQRS
GHI
ABC
MENU
STOP
OHD/V.REQ.
FLASH
SPEED
/DUAL
JKL
TUV
1
45
Help List
You can print a Help list of the machineÕs basic functions and commands to use as a
quick reference guide.
2
To toggle between the
current operation and the
new operation, press
DUAL.
PQRS
OHD/V.REQ.
FLASH
SPEED
/DUAL
REDIAL/
PAUSE
TUV
45
78
0
1
Perform another
operation while the
machine is in use.
Dual Access
The dual access feature of your machine can save both time and money, and enhance fax
productivity.
When the machine is transmitting a document from memory, other operations can be
reserved. When the current operation concludes, the reserved operation will
automatically begin.
To reserve a transmission while the fax machine is receiving a document in memory or
transmitting a document from memory, place the new document in the feeder. Perform
the procedure as described in ÔMemory Transmission.Õ If Memory Transmission is
enabled, the document will be scanned into memory, and transmitted when the current
operation concludes.
The dual access feature also allows user-selectable functions such as storing numbers in
memory while performing memory operations. The user-selectable operation can be
entered by pressing MENU and the required function buttons on the one-touch keypad.
For example, set the machine to
perform a Delayed Transmission (see
page 5.3) while the machine is receiving
a fax in memory.
The LCD displays alternately the
current operation and the new
operation each time you press DUAL.
C-Chapter 6(US) 4/16/98 8:42 AM Page 6.5
Page 91

SPECIAL FEATURES
6.6 C
HAPTER SIX : SPECIALFEATURES
6
Printing Reports
1
Press MENU.
2
PQRS
GHI
ABC
MENU
STOP
FLASH
SPEED
/DUAL
JKL
TUV
1
45
The LCD asks you to
press the desired function
button.
One-touch buttons 11-16 are
assigned to ÔPRINT LISTÕ functions.
PRESS
FUNCT I ON BUTTON
User Reports
Your fax machine can print reports containing useful information - standby job, option
setting, etc. The following reports are available:
Selectable Reports
¥Confirmation Report - This report can be printed on command or, by selecting the
appropriate user option, automatically after each document you send.
¥Standby Job List - This list shows the currently stored documents for delayed or
polling transmission. The list shows the operation number, starting time, type of
operation, etc.
¥Telephone Number List - This list shows all of the numbers currently stored in the fax
machineÕs memory as One-Touch Dial numbers, Speed Dial numbers, and Group Dial
numbers.
¥Option List - This list shows the status of the user-selectable options. After you change
the settings, print this list to confirm your changes.
¥Tx/Rx Journal List - This list shows the most recent transmission and reception
activities.
¥Help List - This list shows the machineÕs basic functions and commands to use as a
quick reference guide. You can also use the function menu to remind you how to set a
particular function and which buttons to press.
¥Multi-Communication Report - This report is printed out automatically after sending
your document to more than one location.
¥Call Back Message - This report is printed out automatically when you do not respond
to a remote operatorÕs Voice Request.
¥Power Failure Report - This report is printed out automatically when power is resupplied
after a sudden power failure. This report shows erased data (if any) by the power failure.
C-Chapter 6(US) 4/16/98 8:42 AM Page 6.6
Page 92

SPECIAL FEATURES
C
HAPTER SIX : SPECIALFEATURES
6.7
2
Press the function button
(one-touch button 11
through 16) that
corresponds to the list
you want to print.
The selected list is printed.
11 12 13 14 15
16 17 18 19 20
TX. CONFIRM STANDBY DIAL LIST OPTION JOURNAL
HELP LIST
PRINT
11 : TX. CONFIRMATION REPORT
12 : STANDBY JOB LIST
13 : DIAL NO. (telephone
numbers) LIST
14 : OPTION LIST
15 : TX/RX JOURNAL
16 : HELP LIST
C-Chapter 6(US) 4/16/98 8:42 AM Page 6.7
Page 93

SPECIAL FEATURES
6.8 C
HAPTER SIX : SPECIALFEATURES
6
User Options
Your fax machine has various user-selectable features. These options are preset at the
factory, but you may need to change them. To find out how the options are currently set,
print an Option report. For more information on printing a report, see page 6.6.
Setting an Option
1
Press MENU.
2
PQRS
GHI
ABC
MENU
STOP
FLASH
SPEED
/DUAL
JKL
TUV
1
45
The LCD asks you to
press the desired function
buttons.
PRESS
F UNCT I ON BUTTONS
2
Press 09, OPTION, on the
one-touch keypad.
06 07 08 09 10
11 12 13 14 15
16 17 18 19 20
SET
MEMORY TX. DELAY TX. POLLING ADD/CANCEL SELF-TEST
GROUP DIAL SYSTEM ID DATE & TIME OPTION
TX. CONFIRM STANDBY DIAL LIST OPTION JOURNAL
PRINT
Q.SCAN
The LCD displays the
options you may select.
CONTRAST LEVEL
[ 1234
567 ]
For more information about each
option, see ÔSelectable OptionsÕ on
page 6.9.
The blinking digit indicates the
currently selected level.
3
Scroll to the option you
want to set by pressing
or repeatedly until
you find the one you want.
ALARM
STOP
SEARCH/DELETE
You can exit from Setup mode at
any time by pressing STOP. When you
press STOP, the machine stores the
options youÕve already changed and
returns to Standby mode.
4
When the option you
want appears in the
display, enter the number
for that option.
32
PQRS
GHI
ABC
MENU
STOP
OHD/V.REQ.
FLASH
SPEED
/DUAL
REDIAL/
PAUSE
DEF
JKL MNO
TUV WXYZ
1
465
798
0
C-Chapter 6(US) 4/16/98 8:42 AM Page 6.8
Page 94

Selectable Options
These instructions assume youÕve followed the steps above under ÔSetting an OptionÕ
and the machine is asking if you want to change one of the options listed here.
¥ Contrast Level
_
Select the expected normal contrast level. DARKEN and LIGHTEN
will be based on this normal setting.
Enter a number from 1 through 7 on the number keypad. The higher number entered,
the darker normal contrast selected. To adjust the contrast level for PHOTO, you can
enter 1, 4, or 7.
¥ Paper Size
_
Select the paper size you will use for the recording paper.
Press 1 to use letter (LTR) size, 2 to use A4 size, 3 to use legal (LEG) size paper.
¥ Reduction Rate (ADJUST REDUCTION)
_
When receiving or copying a document as
long as or longer than the paper installed in your machine, the machine can reduce the
data of the document to fit on your recording paper size. You can select the reduction
rate as shown below. The machine will reduce the data in vertical according to the
selected reduction rate.
Enter the number of selection you desire.
1 : LTR LTR (4% ~ 10%)
2 : LTR A4 (0% ~ 3%)
3 : A4 LTR (9% ~ 14%)
4 : A4 A4 (3% ~ 8%)
5 : LEG LTR (25% ~ 28%)
6 : LEG A4 (20% ~ 23%)
7 : LEG LEG (4% ~ 8%)
8 : 85%
9 : 80%
0 : 75%
¥ Printing Bottom Area (PRINT BTM. AREA)
_
If there is image within 12.7mm from
the bottom margin, you can select the machine to print the image at the bottom area as
much as possible, or to reduce the page to fit in the effective recording area.
Press 1 to print the image at the bottom area. The image quality might be poor.
Press 2 to reduce the page to fit in the effective recording area.
¥ Rings to Answer (RING COUNT)
_
You can select the number of times your machine
rings before answering an incoming call. If you are using your machine as both a
telephone and a fax machine, we suggest you set the ring count to at least 4 to give you
time to answer.
Enter a number using the number keypad.
¥ Remote Receive Code (REMOTE RCV. CODE)
_
The remote receive code allows you
to initiate fax receive from an extension phone plugged into the EXT.LINE jack. If you
pick up the extension phone and hear fax tones, enter the remote receive code and the
fax will start receiving. The password is preset to 9 at factory.
Enter the desired code 0 to 9 on the number keypad.
¥ Confirmation Report (MESSAGE CONFIRM)
_
A confirmation report shows whether
the transmission was successful or not, how many pages were sent, etc.
Press 1 to print out a confirmation report automatically each time you send a fax.
Press 2 to print out a confirmation report automatically only when an error occurs.
Press 3 to turn off this feature.
SPECIAL FEATURES
C
HAPTER SIX : SPECIALFEATURES
6.9
216 mm
12.7 mm
6.5mm
6.5mm
C-Chapter 6(US) 4/16/98 8:42 AM Page 6.9
Page 95

SPECIAL FEATURES
6.10 C
HAPTER SIX : SPECIALFEATURES
6
¥ ECM Communication (ECM COMM.)_This mode compensates for poor line quality
and ensures accurate, error-free transmission with any other ECM-equipped facsimile
machine. If the line quality is poor, transmission time may be increased when ECM is
enabled.
Press 1 to turn on the error correction feature.
Press 2 to turn off the error correction feature.
¥ Fax Print Quality (PRINT QUALITY)
_
When you select LQ, the machine prints in low
speed with high quality. When you select DRAFT, the machine prints in high speed
with low quality.
Press 1 to select LQ.
Press 2 to select DRAFT.
¥ Fax Ink Saver (INK SAVE MODE)
_
You can save ink when making a photo copy with
this feature.
Press 1 to turn off this feature.
Press 2 to use 25% less ink.
Press 3 to use 50% less ink.
C-Chapter 6(US) 4/16/98 8:42 AM Page 6.10
Page 96

SPECIAL FEATURES
C
HAPTER SIX : SPECIALFEATURES
6.11
Clearing Memory
You can selectively clear information registered in your machineÕs memory.
1
Press MENU.
2
GHI
ABC
MENU
STOP
FLASH
JKL
1
45
2
Press 05, SELF-TEST, on
the one-touch keypad.
01 02 03 04 05
06 07 08 09 10
11 12 13 14 15
SET
MEMORY TX. DELAY TX. POLLING ADD/CANCEL SELF-TEST
GROUP DIAL SYSTEM ID DATE & TIME OPTION
TX. CONFIRM STANDBY DIAL LIST OPTION JOURNAL
Q.SCAN
3
Press .
ALARM
STOP
SEARCH/DELETE
One-touch buttons 01-16 perform
specific functions when used with the
MENU button. Each button provides
access to a selected function.
The LCD asks if you want
to clear memory.
MEMORY CLEAR ?
( ENTER/ /STOP )
The LCD displays the
options you can select
to clear.
1:JOURNAL
2 : TE RMI NAL I D
4
Press ENTER.
OHD/V.REQ.COPY
START/
ENTER
C-Chapter 6(US) 4/16/98 8:42 AM Page 6.11
Page 97

SPECIAL FEATURES
6.12 C
HAPTER SIX : SPECIALFEATURES
6
5
Scroll to the options by
pressing or
repeatedly until you find
the one you want to
clear.
ALARM
STOP
SEARCH/DELETE
The LCD asks if you are
sure of the number.
ARE YOU SURE ?
( ENTER/STOP )
6
When memory you want
appears in the display,
press the number of
memory you selected.
32
PQRS
GHI
ABC
MENU
STOP
OHD/V.REQ.
FLASH
SPEED
/DUAL
REDIAL/
PAUSE
DEF
JKL MNO
TUV WXYZ
1
465
798
0
7
Press ENTER to confirm it.
OHD/V.REQ.COPY
START/
ENTER
The selected memory is
cleared.
MEMO RY
CLEAR ING. . .
8
You can continue to
select another memory to
clear.
To return to Standby
mode, press STOP twice.
32
PQRS
GHI
ABC
MENU
STOP
OHD/V.REQ.
FLASH
SPEED
/DUAL
REDIAL/
PAUSE
DEF
JKL MNO
TUV WXYZ
1
465
798
0
ALARM
STOP
OHD/V.REQ.
START/
ENTER
FLASH
SPEED
/DUAL
REDIAL/
PAUSE
1 : JOURNAL :
clears all records of
transmissions & receptions.
2 : TERMINAL ID :
clears your terminal
identification information.
Your terminal ID number, name
are erased from the machineÕs
memory.
3 : OPTIONS :
restores user-selectable options
to the default value.
4 : DIAL&DELAY :
clears the autodial memory and
the delayed dial operations. All
the numbers currently registered
to One-Touch Dial, Speed Dial
and Group Dial numbers will be
erased from the machineÕs
memory. In addition, all the
delayed time operations you
have reserved are also cancelled.
C-Chapter 6(US) 4/16/98 8:42 AM Page 6.12
Page 98

Chapter Seven
CARE AND MAINTENANCE
B-Chapter 7(US) 4/16/98 8:43 AM Page 1
Page 99

Chapter Seven
CARE AND MAINTENANCE
C
HAPTER SEVEN : CARE AND MAINTENANCE
7.1
Cleaning the Document Scanner
To keep your machine working properly, occasionally clean the white roller, ADF rubber,
and the scanning glass. If they are dirty, documents sent to another fax machine wonÕt be
clear.
Note : Do not turn the power off to clean the scanner, as documents stored in memory
will be lost.
1. Open the control panel.
2. Disassemble the white roller as follows:
Both ends of the white roller have
bushings that are snapped shut with
small tabs, as shown. Push each tab
slightly inward (A) then rotate the
roller (B) until it reaches the slot.
Then pull the roller upward.
Bushing
A
B
3. Wipe the roller surface with a soft cloth
dampened with water.
White roller
B-Chapter 7(US) 4/16/98 8:43 AM Page 7.1
Page 100

CARE AND MAINTENANCE
7.2 C
HAPTER SEVEN : CARE AND MAINTENANCE
7
6. Replace the roller in reverse order, and
then close the control panel firmly until
it clicks into place.
4. Clean the ADF rubber piece also.
ADF rubber
5. Carefully wipe the scanning glass with
a soft, dry cloth.
If the glass is very dirty, first wipe
it with a slightly dampened cloth,
then with a dry cloth. Be very
careful not to scratch the glass
surface.
Scanning glass
B-Chapter 7(US) 4/16/98 8:43 AM Page 7.2
 Loading...