

Page 1
Plasma TV
E-MANUAL
user manual
imagine the possibilities
Thank you for purchasing this Samsung product.
To receive more complete service, please register
your product at
www.samsung.com/register
Model _____________ Serial No. _____________
Page 2
Figures and illustrations in this User Manual are provided for reference only and may differ from actual product appearance.
Product design and specifications may be changed without notice.
Important Warranty Information Regarding Television Format Viewing
✎
See the warranty card for more information on warranty terms.
Wide screen format PDP Displays (with 16:9 aspect ratios, the ratio of the screen width to height) are primarily designed to view wide screen format fullmotion video. The images displayed on them should primarily be in the wide screen 16:9 ratio format, or expanded to fill the screen if your model offers
this feature, with the images constantly in motion. Displaying stationary graphics and images on the screen, such as the dark sidebars on non-expanded
standard format television video and programming, should be limited to no more than 5% of the total television viewing per week.
Additionally, viewing other stationary images and text such as stock market crawls, video game displays, station logos, web sites or computer graphics
and patterns, should be limited as described above for all televisions. Displaying stationary images for more than 5% of total viewing time can cause
uneven aging of your PDP display and leave subtle, but permanent burned-in ghost images in the PDP picture. To avoid this, vary the programming and
images, and primarily display full screen moving images, not stationary patterns or dark bars. On PDP models that offer picture sizing features, use these
controls to view different formats as a full screen picture.
Be careful about the television formats you select and the length of time you view them. Uneven PDP aging as a result of format selection and use, as well
as burned in images, are not covered by your Samsung limited warranty.
• SAMSUNG ELECTRONICS NORTH AMERICAN LIMITED WARRANTY STATEMENT
Subject to the requirements, conditions, exclusions and limitations of the original Limited Warranty supplied with Samsung Electronics (SAMSUNG)
products, and the requirements, conditions, exclusions and limitations contained herein, SAMSUNG will additionally provide Warranty Repair Service
in the United States on SAMSUNG products purchased in Canada, and in Canada on SAMSUNG products purchased in the United States, for the
warranty period originally specified, and to the Original Purchaser only.
The above described warranty repairs must be performed by a SAMSUNG Authorized Service Center. Along with this Statement, the Original Limited
Warranty Statement and a dated Bill of Sale as Proof of Purchase must be presented to the Service Center. Transportation to and from the Service
Center is the responsibility of the purchaser. Conditions covered are limited only to manufacturing defects in material or workmanship, and only those
encountered in normal use of the product.
Excluded, but not limited to, are any originally specified provisions for, in-home or on-site services, minimum or maximum repair times, exchanges or
replacements, accessories, options, upgrades, or consumables.
For the location of a SAMSUNG Authorized Service Center, please call toll-free:
– In the United States : 1-800-SAMSUNG (1-800-726-7864)
– In Canada : 1-800-SAMSUNG
Important User Information
• Screen Image retention
Do not display a still image (such as that from a video game) on the plasma display panel for more than a few minutes. Still images can cause screen
image retention (burn in). To avoid such image retention, reduce the degree of brightness and contrast of the screen when displaying a still image.
• Heat on the top of the Plasma TV
The top side of the TV may become hot after long periods of use as heat dissipates from the panel through the vent hole in the upper part of the TV.
This is normal and does not indicate any defect or operational failure of unit.
However, children should be prevented from touching the upper part of the TV.
• The TV is making a ‘cracking’ noise.
A ‘cracking’ noise may occur when the TV contracts or expands due to a change in the surrounding environment such as temperature or humidity.
This is normal and not a defect.
• Cell Defects
The PDP uses a panel consisting of 2,360,000(HD-level) to 6,221,000(FHD-level) pixels which require sophisticated technology to produce. However,
there may be a few bright or dark pixels on the screen. These pixels will have no impact on the performance of the product.
• Avoid operating the TV at temperatures below 41°F (5°C)
• A still image displayed too long may cause permanent damage to the PDP Panel.
Watching the Plasma TV in 4:3 format for a long period of time may leave traces of the borders on the left, right, top, or bottom of
the screen. Playing a DVD or a game console may have a similar effect.
Damage caused by the above effect is not covered by the warranty.
• After-images on the Screen.
Displaying still images from Video games and PC for longer than a certain period of time may produce partial after-images.
To prevent this effect, reduce the ‘brightness’ and ‘contrast’ when displaying still images for a long time.
• Warranty
Warranty does not cover any damage caused by image retention.
Burn-in is not covered by the warranty.
Page 3
Accessories
✎
Please make sure the following items are included with your TV. If any items are missing, contact your dealer.
✎
The items’ colors and shapes may vary depending on the model.
✎
Check that there are no accessories hidden behind or under packing materials when you open the box.
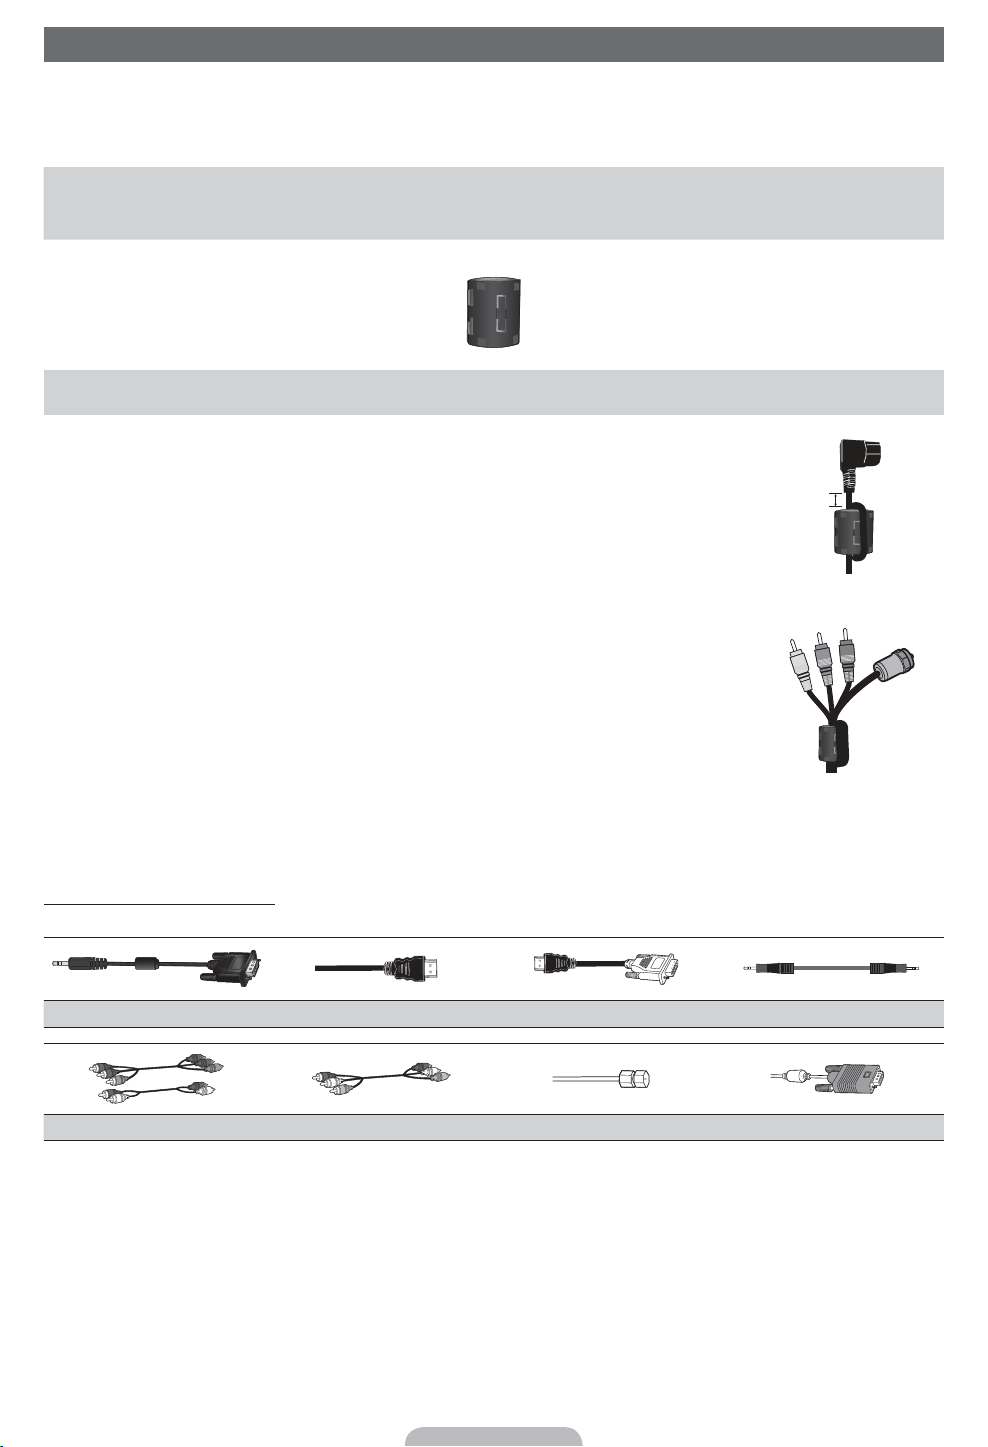
y Remote Control (AA59-00482A) & Batteries (AAA x 2)
y Owner’s Instructions
y Warranty Card / Safety Guide
y Cleaning Cloth (BN63-01798B)
y Power Cord
Ferrite Core (2EA)
(3301-002049)
✎
Ferrite Core for Power Cord: The ferrite cores are used to shield the cables from interference.
When connecting the ferrite core to a cable, open the ferrite core and clip it around the cable
near the plug as shown in the figure.
x
A One ferrite core should be no more than 2 inches from the end of the cord that is
inserted into the TV.
x
A One ferrite core should be no more than 8 inches from the end of the cord that is
inserted into the TV. (51 inches model only)
A
Power Cord
✎
Ferrite Core : The ferrite cores are used to shield the cables from interference. When
connecting a cable, open the ferrite core and clip it around the cable near the plug as shown
in the figure.
Antenna Cable/
Component Cable
(sold separately)
Input Cables (Sold Separately)
To purchase the RS232 cable, contact www.SamsungParts.com.
RS232 (AA39-00311A)
HDMI HDMI-DVI Audio
Component Composite (AV) Coaxial (RF) VGA
Page 4
Viewing the Control Panel
✎
The product color and shape may vary depending on the model.
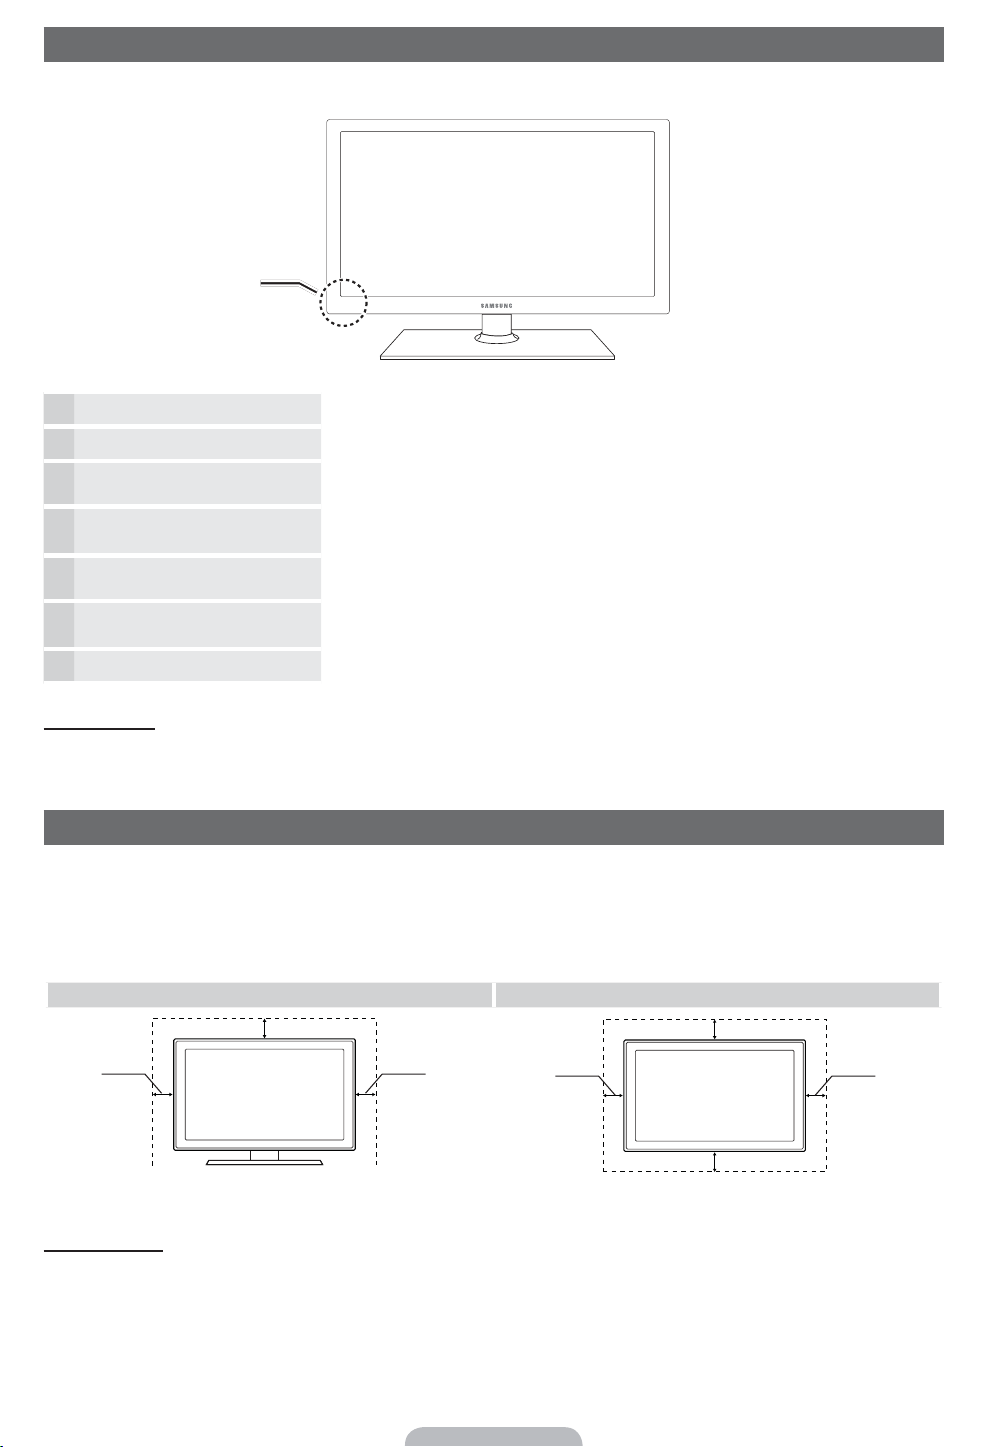
Remote control sensor Aim the remote control towards this spot on the TV.
Power Indicator Blinks and turns off when the power is on and lights up in standby mode.
SOURCE
(
Toggles between all the available input sources. In the on-screen menu, use this
button as you would use the
ENTER( button on the remote control.
MENU Displays an on-screen menu, the OSD (on screen display), which contains controls for
your TV’s features.
\
Adjusts the volume. In the OSD, use the \ buttons as you would use the
and buttons on the remote control.
?
Changes the channels. In the OSD, use the ? buttons as you would use the
and buttons on the remote control.
3
(Power)
Turns the TV on or off.
Standby mode
Your TV enters Standby mode when you turn it off and continues to consume a small amount of electric power. To be safe
and to decrease power consumption, do not leave your TV in standby mode for long periods of time (when you are away on
vacation, for example). It is best to unplug the power cord.
Securing the Installation Space
Keep the required distances between the TV, the wall, and other objects to ensure proper ventilation. Failing to do so may
result in a fire or a problem with the TV caused by an increase in its internal temperature.
✎
When using a stand or wall-mount, use parts provided by Samsung Electronics only.
x
If you use parts provided by another manufacturer, it may result in a problem with the product or an injury due to the
product falling.
Installation with a stand. Installation with a wall-mount.
Other Warnings
✎
The actual appearance of the TV may differ from the images in this manual, depending on the model.
✎
Be careful when you touch the TV. Some parts can be somewhat hot.
4 inches
4 inches
4 inches
4 inches
4 inches
4 inches
4 inches
Control Panel
Page 5
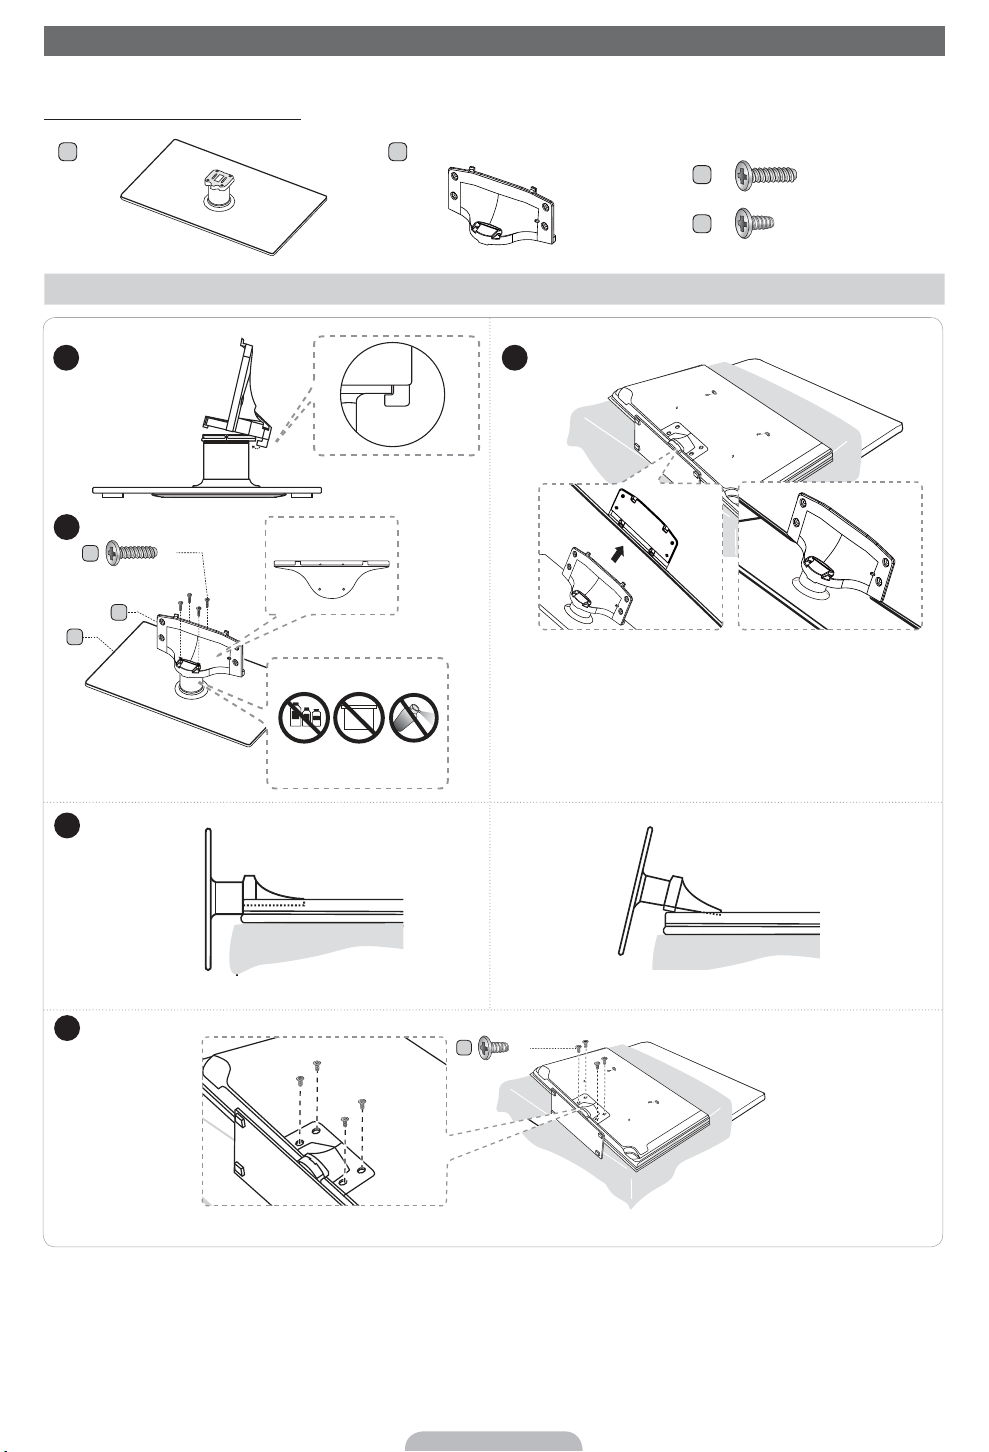
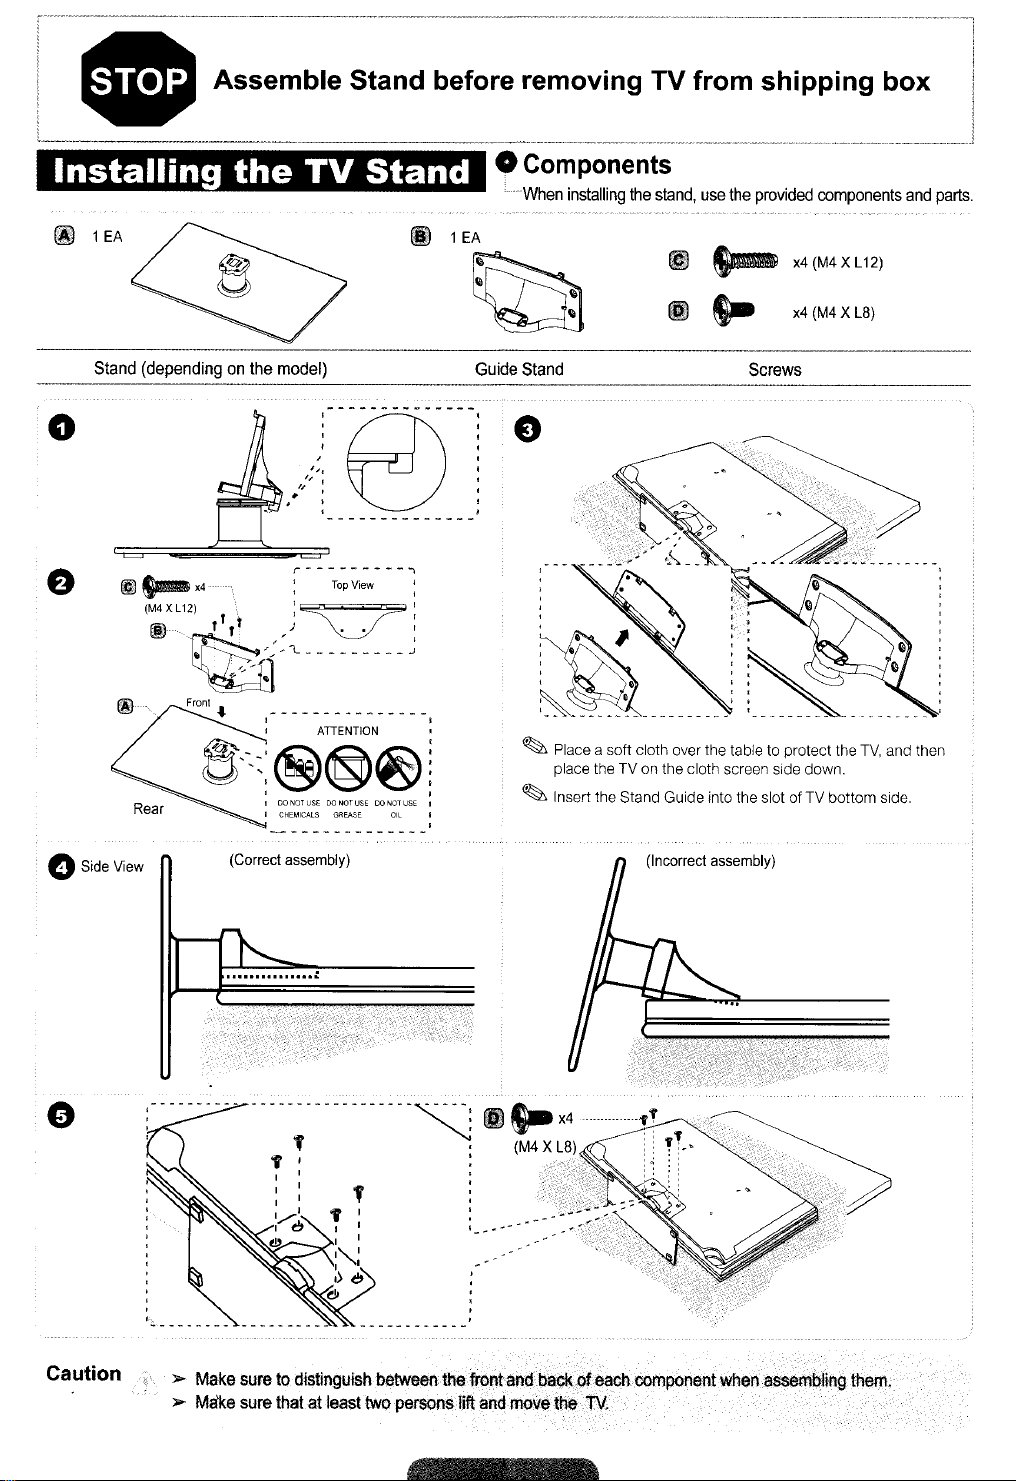
Install the Stand
See the separate stand installation guide for more detailed instructions.
51 inches model only (PN51D550)
Stand (1EA) Guide Stand (1EA) Screws (8EA)
✎
Place a soft cloth over the table to protect the TV,
and then place the TV on the cloth screen side
down.
✎
Insert the Stand Guide into the slot of TV bottom
side.
Page 6
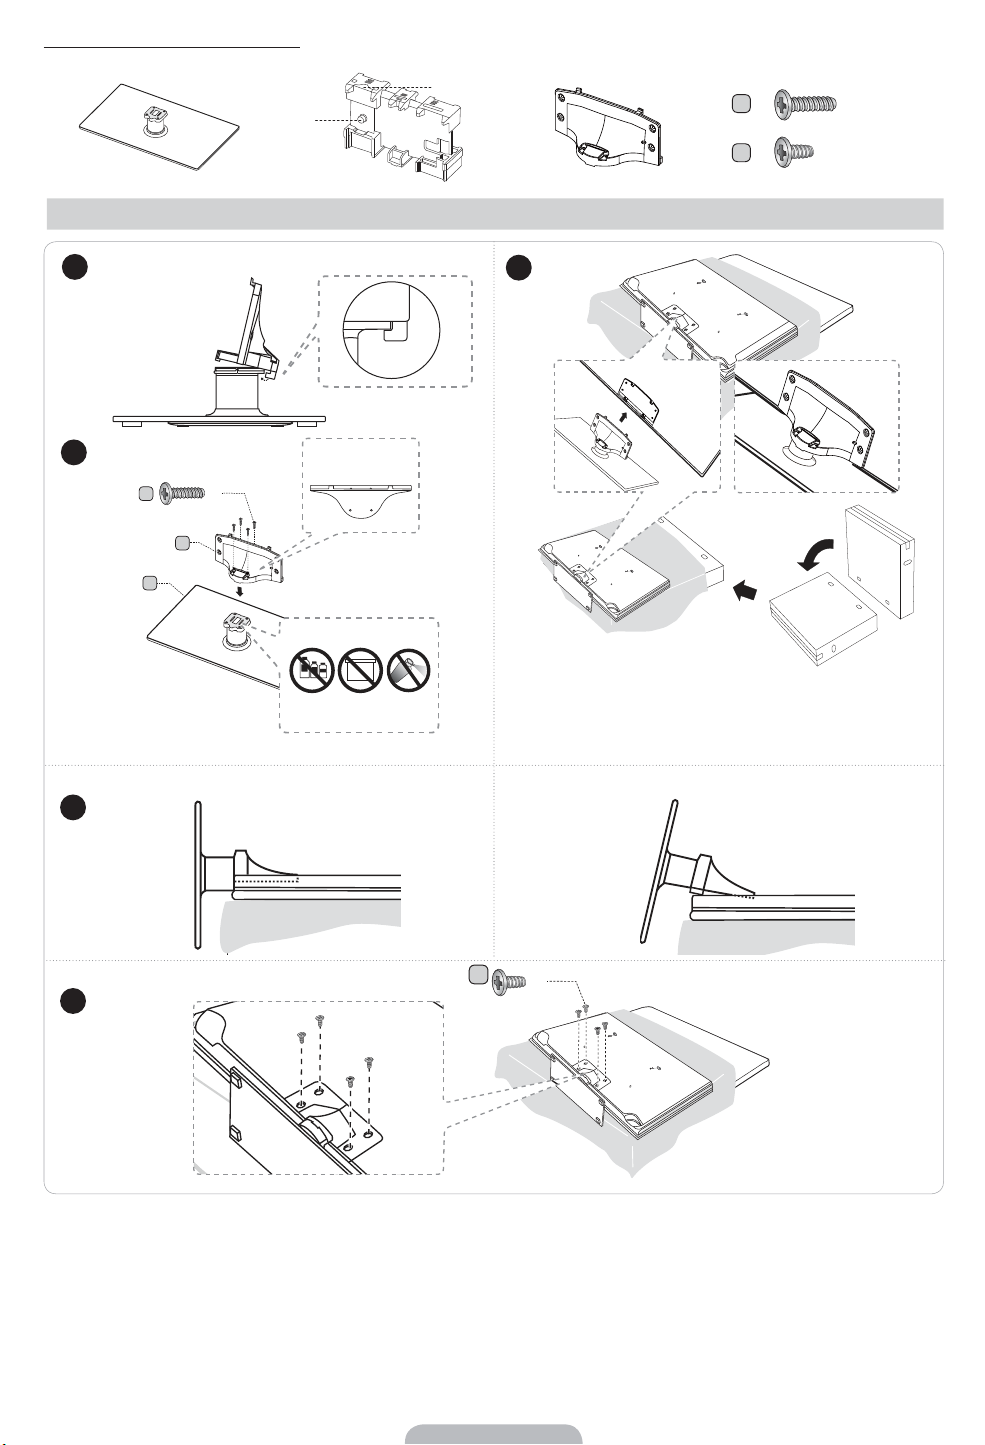
59 inches model only (PN59D550)
A
B
Guide Stand Screws
✎
NOTE
x
Make sure to distinguish between the front and back of the Stand and Guide Stand when assembling them.
x
Make sure that at least two people lift and move the TV.
x
Stand the product up when you fasten the screws. If you fasten the screws with the T V lying down, it may lean to one
side when you stand it up.
)
Do not insert your fingers into the stand base slot of the TV when installing the stand base.
✎
Place a soft cloth over the table to protect the TV,
and then place the TV on the cloth screen side down.
✎
Insert the Stand Guide into the slot of TV bottom
side.
Page 7
Installing the Wall Mount
Installing the Wall Mount Kit
The wall mount kit (sold separately) allows you to mount the TV on the wall.
For detailed information on installing the wall mount, see the instructions provided with the wall mount. We recommend you
contact a technician for assistance when installing the wall mount bracket. Samsung Electronics is not responsible for any
damage to the product or injury to yourself or others if you elect to install the wall mount on your own.
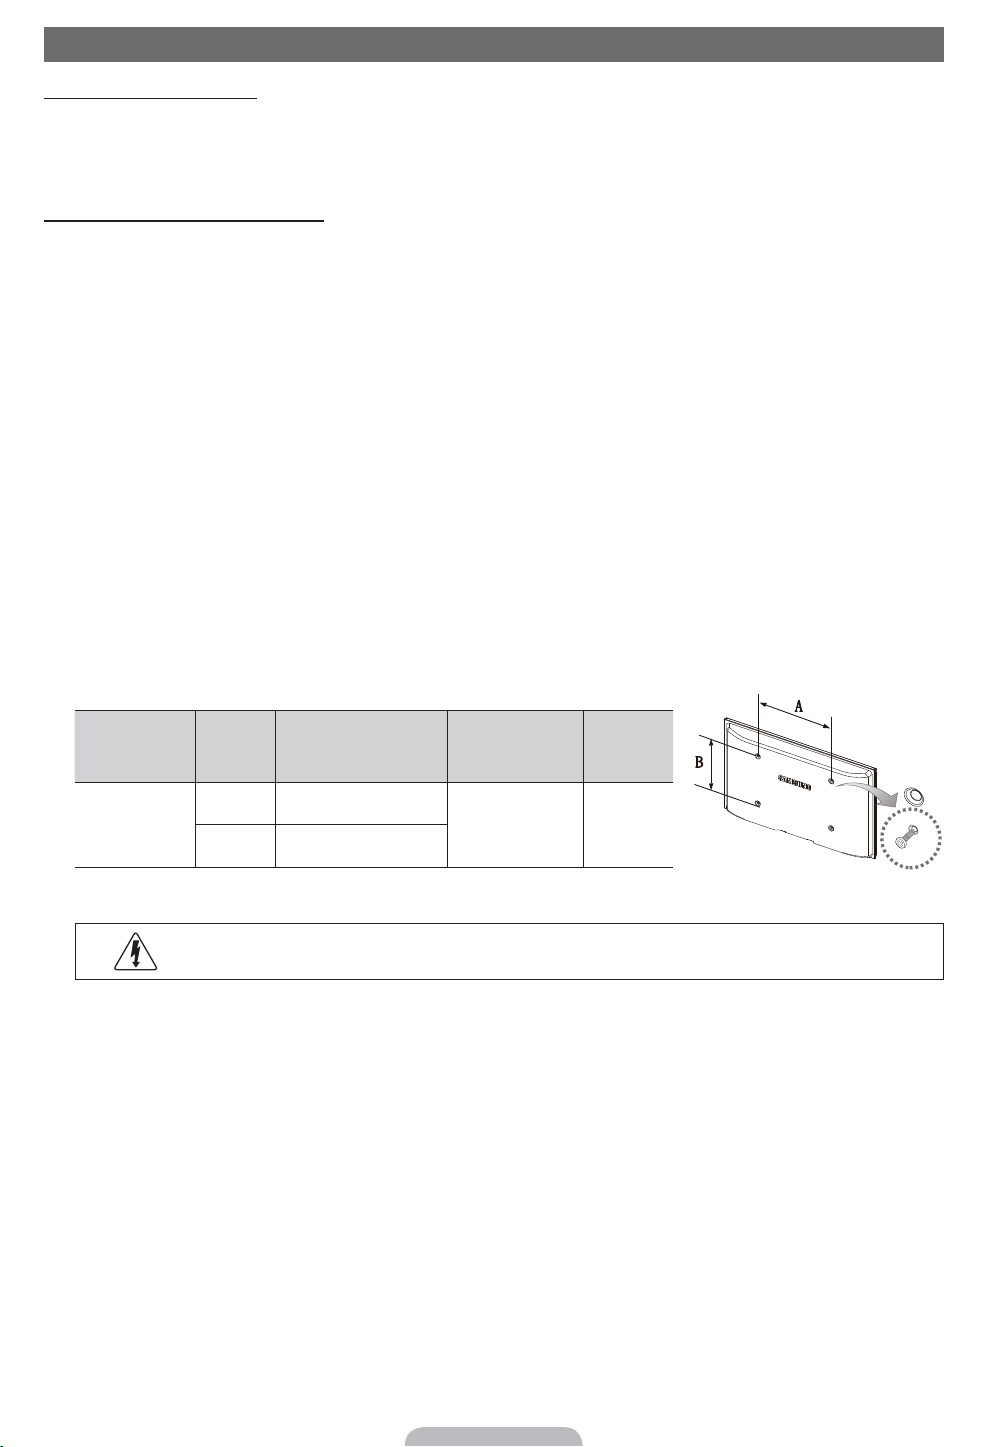
Wall Mount Kit Specifications (VESA)
Install your wall mount on a solid wall perpendicular to the floor. Before attaching the wall mount to surfaces other than plaster
board, please contact your nearest dealer for additional information. If you install the TV on a ceiling or slanted wall, it may fall
and result in severe personal injury.
✎
NOTE
x
Standard dimensions for wall mount kits are shown in the table below.
x
Samsung wall mount kits contain a detailed installation manual and all parts necessary for assembly are provided.
x
Do not use screws that do not comply with the VESA standard screw specifications.
x
Do not use screws that are longer than the standard length or do not comply with the VESA standard screw
specifications. Screws that are too long may cause damage to the inside of the TV set.
x
For wall mounts that do not comply with the VESA standard screw specifications, the length of the screws may differ
depending on the wall mount specifications.
x
Do not fasten the screws too firmly. This may damage the product or cause the product to fall, leading to personal
injury. Samsung is not liable for these kinds of accidents.
x
Samsung is not liable for product damage or personal injury when a non-VESA or non-specified wall mount is used or
the consumer fails to follow the product installation instructions.
x
Our 55” model do not comply with VESA Specifications. Therefore, you should use our dedicated wall mount kit for
this model.
x
Do not mount the TV at more than a 15 degree tilt.
x
Always have two people mount the TV on a wall.
Product Family
TV size in
inches
VESA scew hole
specs (A * B) in
millimeters
Standard Screw Quantity
PDP-TV
43~51 400 X 400
M8 4
59~64 600 X 400
✎
Remove the screws in the mounting holes before you install the wall mount.
Do not install your Wall Mount Kit while your TV is turned on. It may result in personal injury due to
electric shock.
Page 8
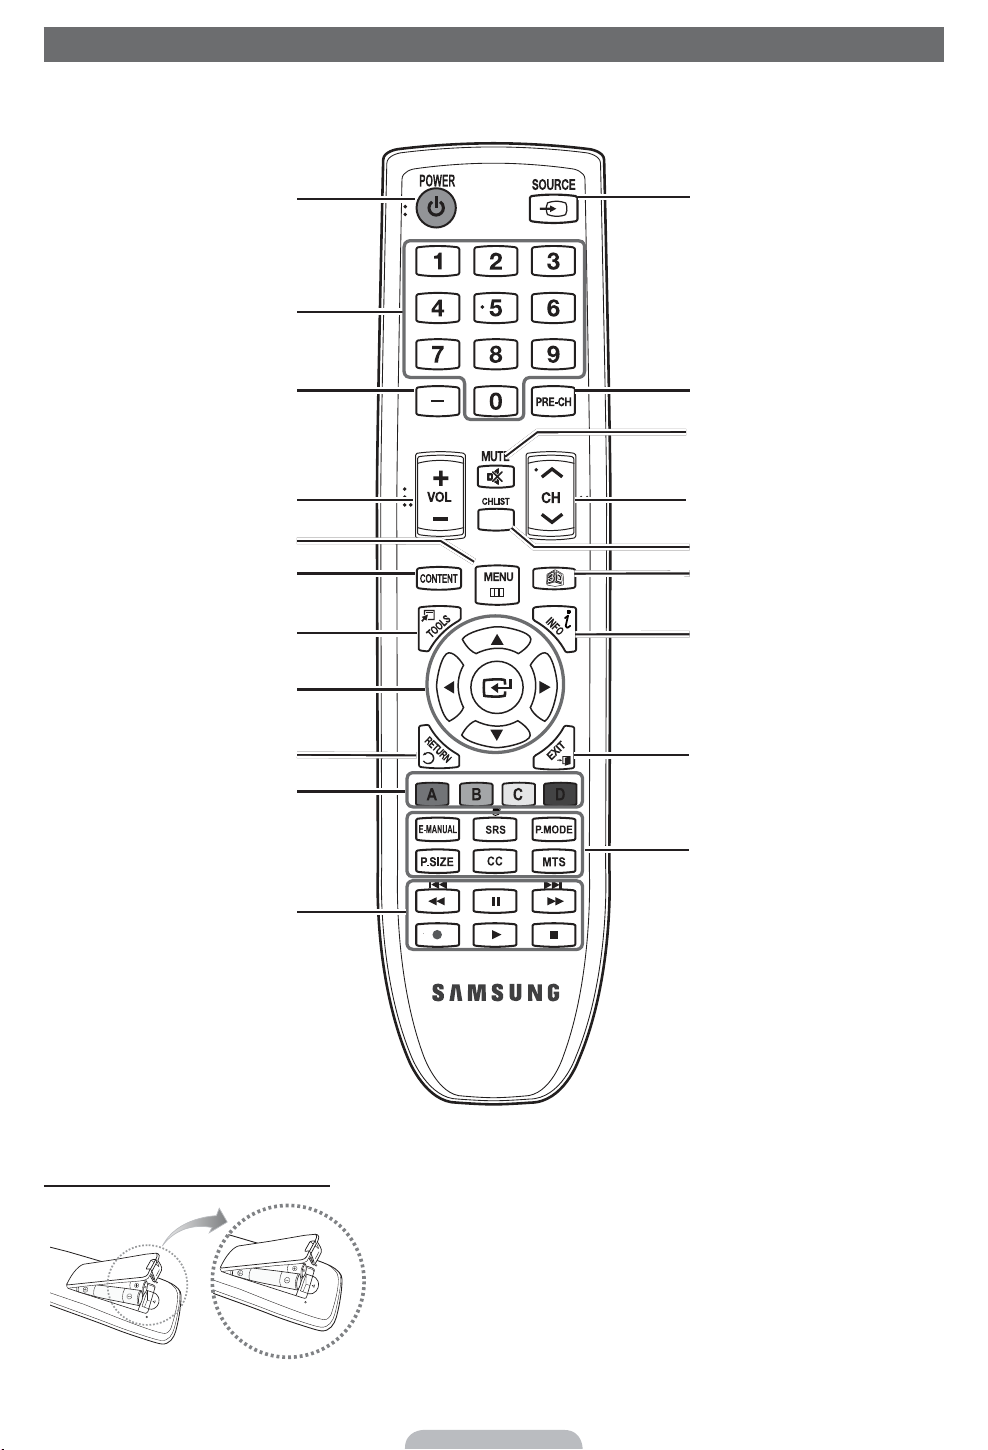
Remote Control Buttons
✎
This remote control has Braille points on the Power, Channel, and Volume buttons and can be used by visually impaired
persons.
Installing batteries (Battery size: AAA)
✎
NOTE
x
Use the remote control within 23 feet of the TV.
x
Bright light may affect the performance of the remote control.
Avoid using when near special fluorescent lights or neon signs.
x
The color and shape may vary depending on the model.
Turns the TV on and off.
Displays and selects the available video
sources.
Returns to the previous channel.
Cuts off the sound temporarily.
Changes channels.
Displays channel lists on the screen.
Turns the 3D image on or off.
Displays information on the TV screen.
Exits the menu.
Gives direct access to channels.
Adjusts the volume.
Press to select additional digital channels
being broadcast by the same station. For
example, to select channel ‘54-3’, press
‘54’, then press ‘-’ and ‘3’.
Opens the OSD.
Displays My Contents, Watch TV and
Source.
Quickly select frequently used functions.
Returns to the previous menu.
Selects the on-screen menu items and
changes the values seen on the menu.
Buttons used in the Channel Manager
or My Contents menu, etc.
Use these buttons in My Contents and
Anynet+ (HDMI-CEC) modes.
E-MANUAL: Displays the e-Manual.
SRS: Lets you select the Sound Mode.
P.MODE: Lets you select the Picture
Mode.
MTS: Press to choose stereo, mono,
or Separate Audio Program (SAP
broadcast).
CC: Displays digital subtitles.
P.SIZE: Lets you choose the Picture
Size.
Page 9
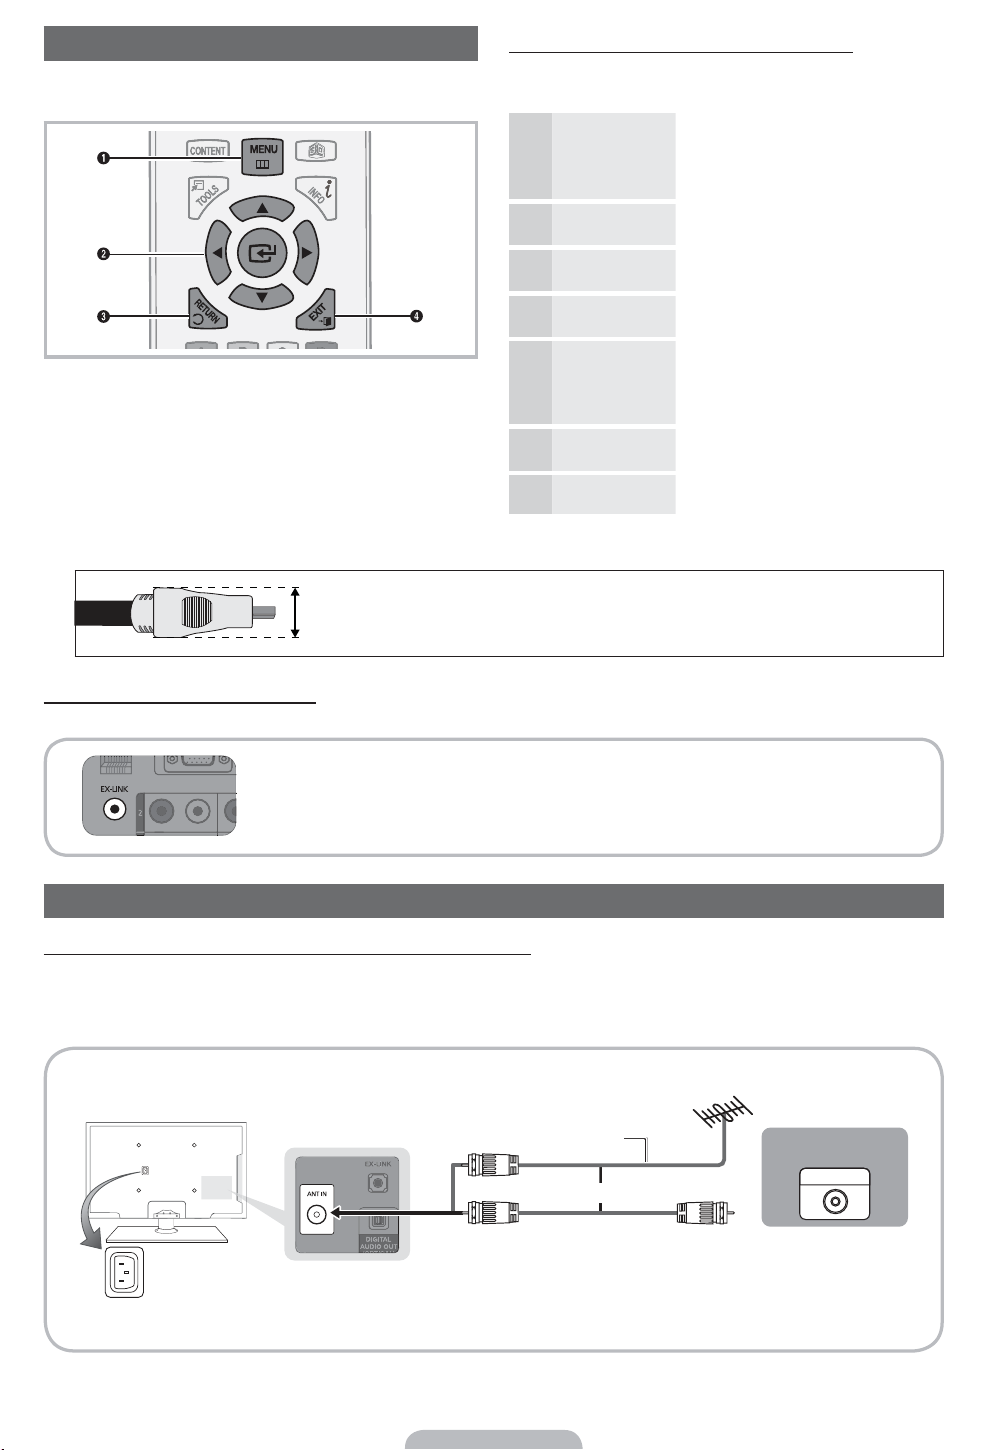
How to Navigate Menus
Before using the TV, follow the steps below to learn how to
navigate the menu and select and adjust different functions.
MENU button: Displays the main on-screen menu.
ENTER
(
/ Direction button: Move the cursor and
select an item. Confirm the setting.
RETURN button: Returns to the previous menu.
EXIT button: Exits the on-screen menu.
How to Operate the OSD (On Screen Display)
The access steps may differ depending on the selected
menu.
1
MENU
The main menu options appear on
the screen:
Picture, Sound, Channel,
Network, System, Support.
2
/ Select an icon or option with the
or button.
3
ENTER
(
Press ENTER(to access the
sub-menus.
4
/
Select the desired submenu with
the or button.
5
/
Adjust the value of an item with the
or button. The adjustment in
the OSD may differ depending on
the selected menu.
6
ENTER
(
Press ENTER( to confirm the
selection.
7
EXIT
H
Press EXIT.
✎
For the best cable connections to this product, be sure to use cables no thicker than 0.55 inches (14mm).
y Maximum thickness - 0.55 inches (14mm)
Using an EX-Link Cable Connection
Available Devices: External devices that support EX-Link.
EX-LINK: Connector for service only.
Connecting to an Antenna or Cable Connection
Connecting the power cord and an antenna or cable connection
✎
The PDP device may interfere with an amateur radio or AM radio.
✎
When using two-way radio mobile and portable units or amateur radio or AM radio near your TV, this may cause the TV
to malfunction.
ANT OUT
VHF/UHF Antenna
Power Input
or
Cable
Page 10
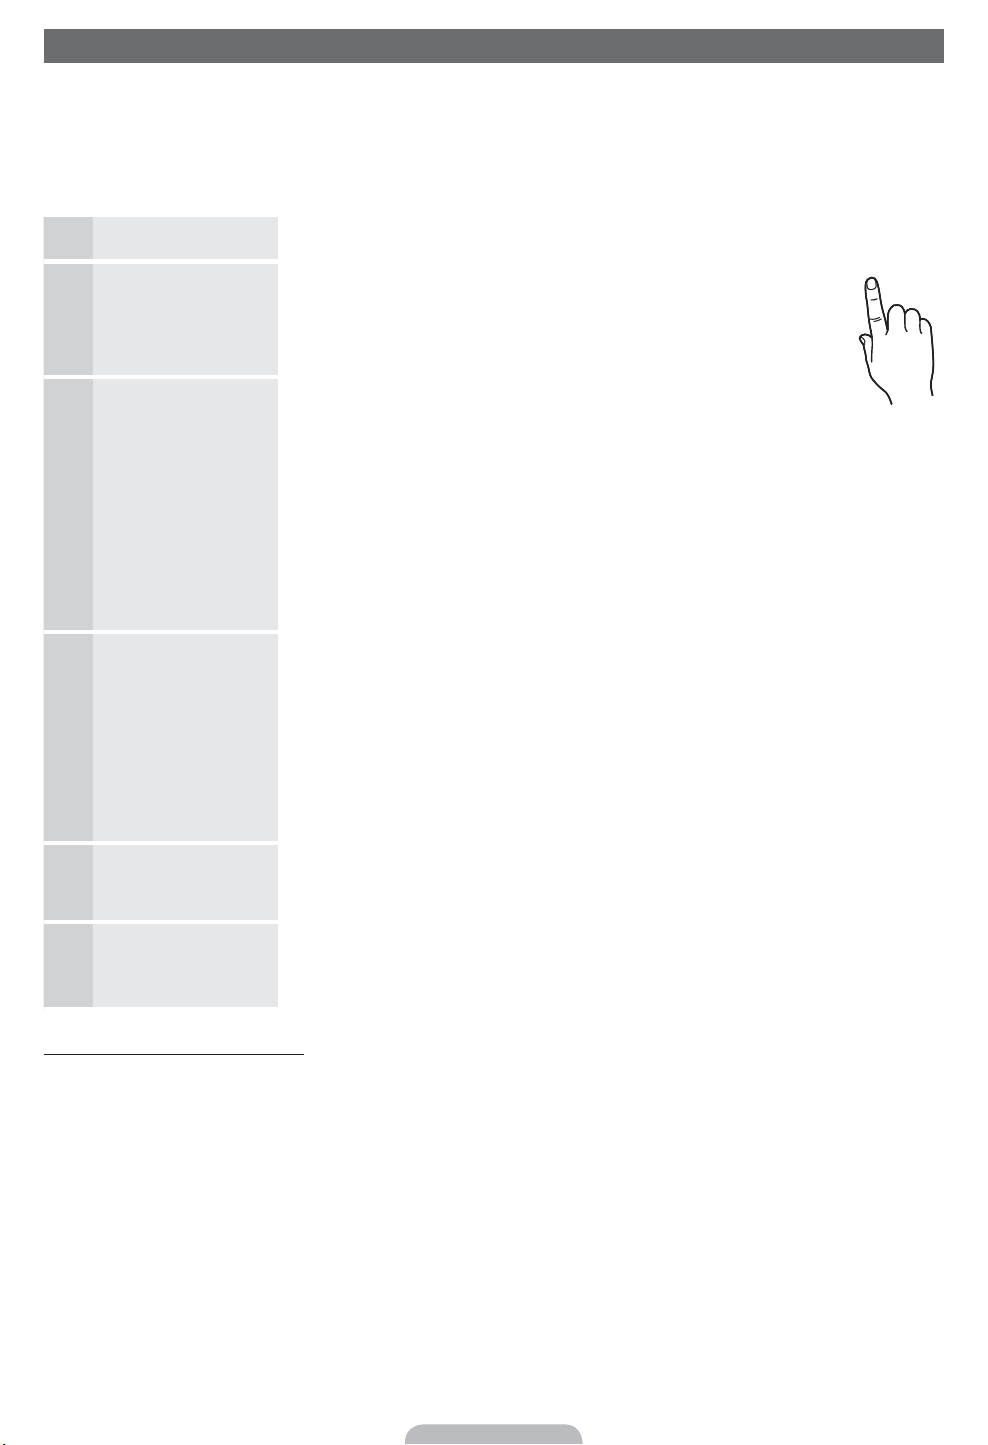
Plug & Play (Initial Setup)
When you turn the TV on for the first time, a sequence of on-screen prompts will assist in configuring basic settings. To turn on
the TV, press the
POWER3 button.
✎
Plug & Play is available only when the Source is set to TV.
✎
To return to the previous step in the Plug & Play sequence, select Previous, and then press ENTER(.
✎
Before turning on the TV, make you have connected the TV to an antenna or cable connection (p. 8).
1
Selecting the OSD
Language
Press the or button to select a language. Press
ENTER( twice
when done.
2
Selecting the usage
mode
Press the or button to select, and then press the
ENTER( button
twice.
y Select the Home Use mode. Store Demo mode is for retail
environments.
3
Setting the Clock
Mode
Press the or button to select Auto or Manual, and then press
ENTER
(
twice.
✎
If you selected Auto, you’ll go to the Time Zone and DST screen. Select Time Zone
or DST, and then press
ENTER(. On the Time Zone screen, use the or
button to select your zone, and then press
ENTER(. On the DST screen, press,
ENTER(, then select whether to turn DST (Daylight Savings Time) on or off. When
done, press
ENTER(.
✎
If you selected Manual, you’ll go to the Date and Time screen. Select Date or Time,
and then press
ENTER(. Then, use the number buttons or the or button to
set the date or time. Use the or button to move between entry fields. When
done setting the Date and Time, select Next, and then press
ENTER(.
4
Selecting search
options for auto tuning
Press the or button to select Air or Cable, and then press
ENTER(. A check
appears on your selection. Select Next, and then press the
ENTER( button. You can
check both if you have both connected.
✎
If you selected Cable, you’ll go to the Cable System screen. Use the or
button to select Digital or Analog, and then press.
ENTER(. Use the or
button to select the correct cable signal format - STD, HRC, or IRC - and then press
ENTER(. Most cable systems use STD. Select the correct cable signal format for
both the Digital and Analog systems.
✎
When done, select Next, and the press ENTER(.
5
Selecting and
memorizing channels
The channel search will start automatically. This can take up to 30 minutes.
For more information, refer to Channel Auto Program in the e-Manual.
✎
Press the ENTER(button at any time to interrupt the memorization process.
6
Network Setting / Enjoy
your TV
If you want to watch a broadcast program, select Enjoy your TV. You can also set up
the Network connection. If you want to set up the network, select Network Settings.
The Network Settings screen will appear. For more detailed information, refer to “Network
Connection” in the e-Manual.
If You Want to Rerun Plug & Play...
"
MENU System Plug & Play ENTER
(
✎
NOTE
y To change the TV’s setting from Store Demo to Home Use when not in Plug & Play, press the volume button on the TV.
When you see the volume bar on the screen, press and hold the
MENU button on the TV for 5 sec.
P
POWER
Page 11
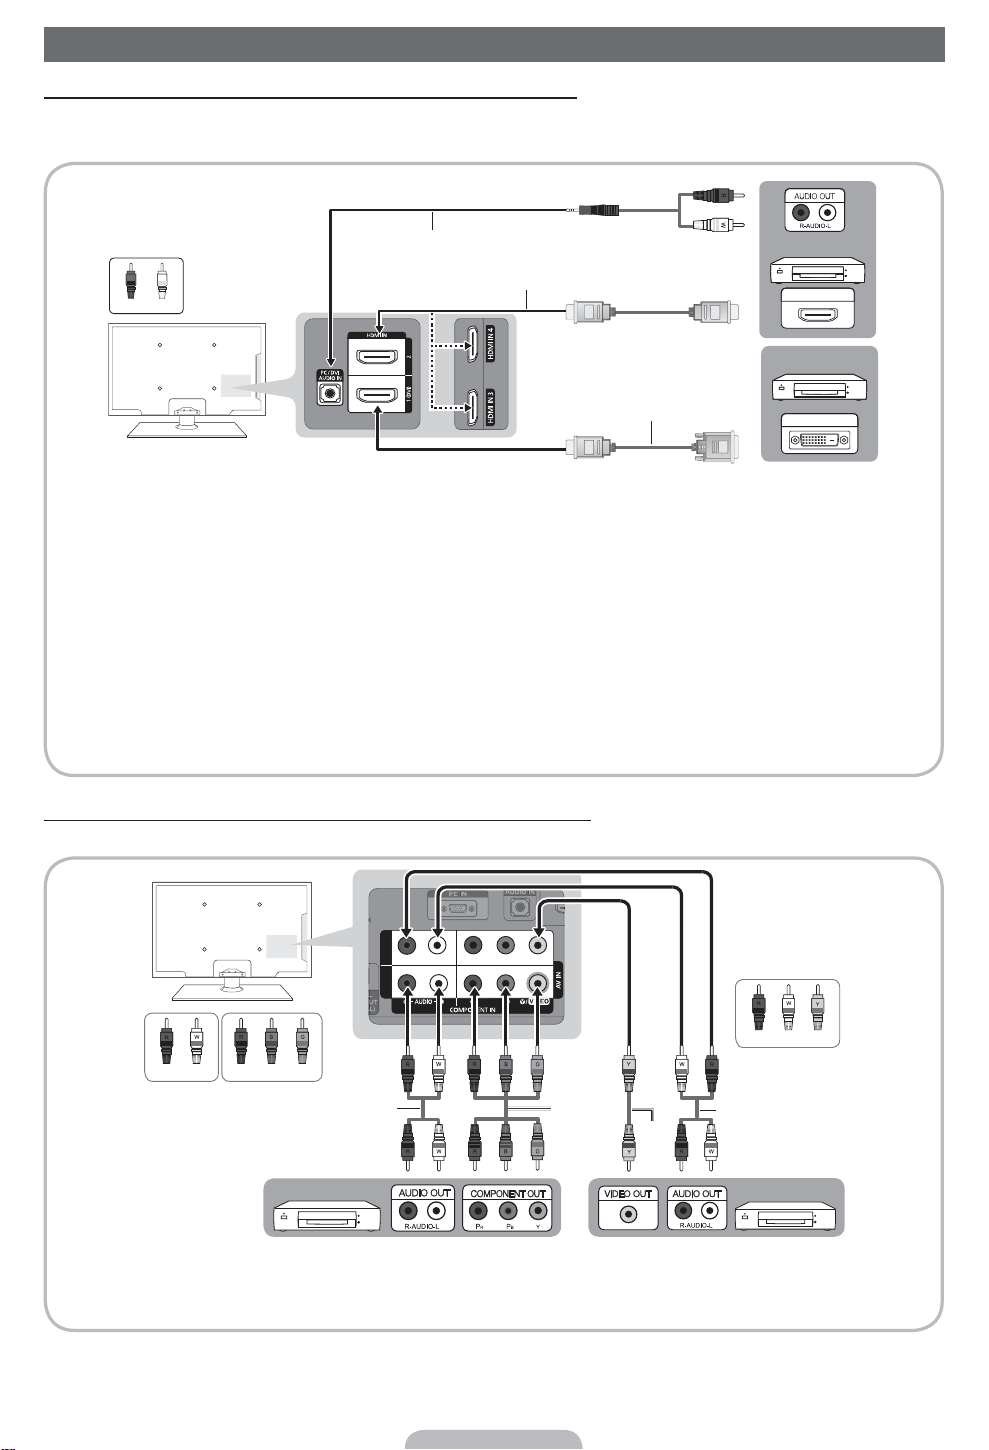
Connecting to an AV Device
Using an HDMI or an HDMI to DVI Cable: HD connection (up to 1080p)
We recommend using the HDMI connection for the best quality HD picture.
Available devices: DVD player, Blu-ray player, HD cable box, HD STB (Set-Top-Box) satellite receiver
✎
HDMI IN 1 (DVI), 2, 3, 4 / PC/DVI AUDIO IN
x
For better picture and audio quality, connect to a digital device using an HDMI cable.
x
An HDMI cable supports digital video and audio signals, and does not require an audio cable.
– To connect the TV to a digital device that does not support HDMI output, use an HDMI/DVI and audio cables.
x
The picture may not display normally (if at all) or the audio may not work if you connect an external device that
uses an older version of HDMI mode is connected to the TV. If such a problem occurs, ask the manufacturer
of the external device about the HDMI version and, if out of date, request an upgrade.
x
Be sure to purchase a certified HDMI cable. Otherwise, the picture may not display or a connection error may
occur.
x
We recommend using a basic high-speed HDMI cable or an HDMI cable that supports Ethernet. Note that this
TV does not support the Ethernet function via HDMI.
Using a Component (up to 1080p) or an Audio to Video (480i only) Cable
Available devices: DVD player, Blu-ray player, cable box, STB satellite receiver, VCR
✎
When connecting to AV IN, the color of the AV IN [Y/VIDEO] jack (green) will not match the video cable (yellow).
✎
For better picture quality, we recommend the Component connection over the A/V connection.
WR
DVI OUT
HDMI OUT
Device
Device
1
2
DeviceDevice
Page 12
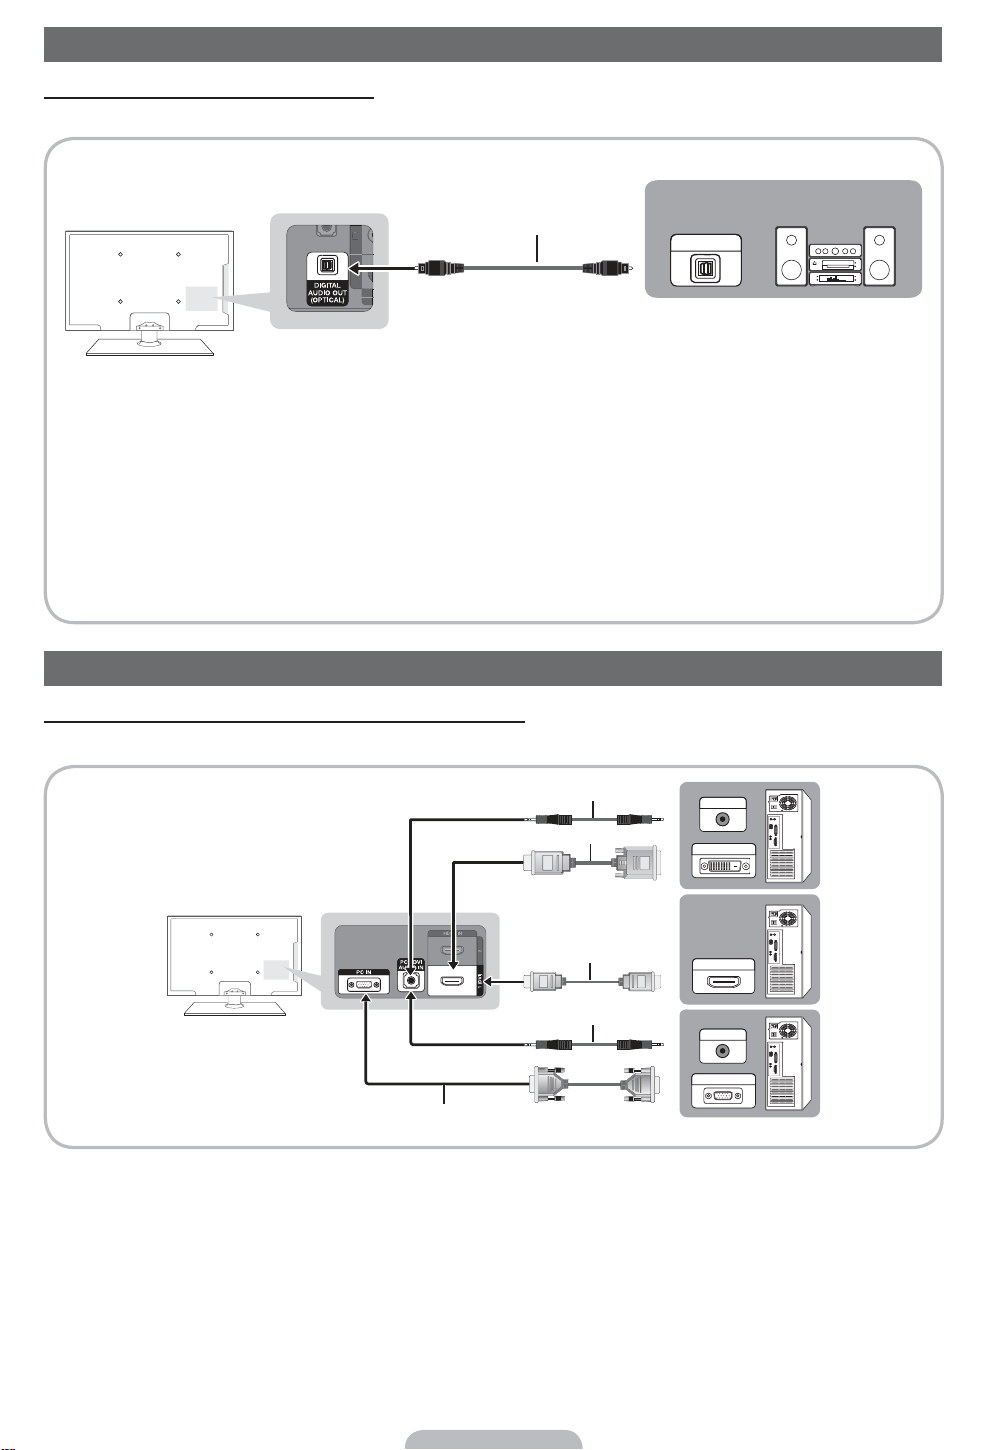
Connecting to an Audio Device
Using an Optical (Digital) Cable Connection
Available devices: Digital Audio System, Amplifier, DVD home theater
✎
DIGITAL AUDIO OUT (OPTICAL)
x
When you connect a Digital Audio System to the DIGITAL AUDIO OUT (OPTICAL) jack, decrease the volume
of both the TV and the system.
x
5.1 CH (channel) audio is available when you connect the TV to an external device supporting 5.1 CH.
x
When the receiver (home theater) is set to on, you can hear sound output from the TV’s optical jack. When the
TV is receiving a DTV signal, the TV will send 5.1 CH sound to the home theater receiver. When the source is
a digital component such as a DVD player / Blu-ray player / cable box / STB (Set-Top-Box) satellite receiver
and you connected it to the TV via HDMI, you will only hear 2 CH audio from the home theater receiver. If you
want to hear 5.1 CH audio, connect the digital audio out jack from your DVD / Blu-ray player / cable box / STB
satellite receiver directly to an amplifier or home theater.
Connecting to a PC
Using an HDMI cable or an HDMI to DVI cable or a D-sub cable
✎
Your PC may not support an HDMI connection.
1
2
1
2
OPTICAL
Digital Audio System
AUDIO OUT
PC OUT
HDMI OUT
DVI OUT
AUDIO OUT
Page 13
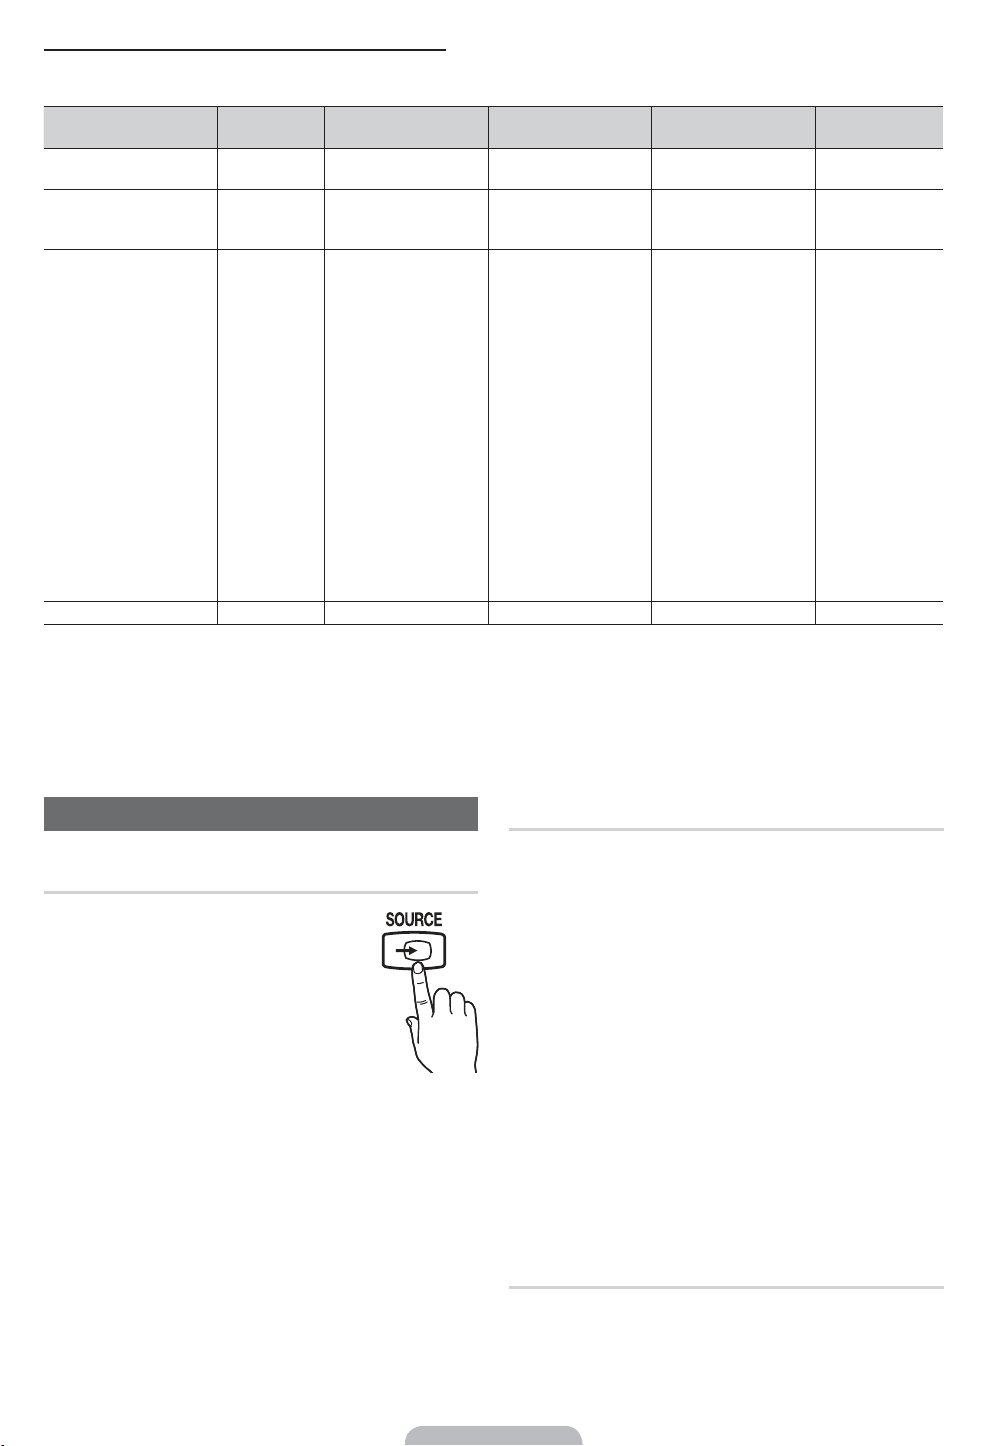
PC Display Modes (D-Sub and an HDMI to DVI Input)
Optimal PC resolution is 1920 x 1080 @ 60 Hz. You can also select one of the standard resolutions listed in the Resolution
column. The TV will automatically adjust to the resolution you choose.
Mode Resolution
Horizontal Frequency
(KHz)
Vertical Frequency
(Hz)
Pixel Clock Frequency
(MHz)
Sync Polarity
(H / V)
IBM
640 x 350
720 x 400
31.469
31.469
70.086
70.087
25.175
28.322
+/-
-/+
MAC
640 x 480
832 x 624
1152 x 870
35.000
49.726
68.681
66.667
74.551
75.062
30.240
57.284
100.000
-/-
-/-
-/-
VESA DMT
640 x 480
640 x 480
640 x 480
800 x 600
800 x 600
800 x 600
1024 x 768
1024 x 768
1024 x 768
1152 x 864
1280 x 1024
1280 x 1024
1280 x 800
1280 x 800
1280 x 960
1360 x 768
1440 x 900
1440 x 900
1680 x 1050
31.469
37.861
37.500
37.879
48.077
46.875
48.363
56.476
60.023
67.500
63.981
79.976
49.702
62.795
60.000
47.712
55.935
70.635
65.290
59.940
72.809
75.000
60.317
72.188
75.000
60.004
70.069
75.029
75.000
60.020
75.025
59.810
74.934
60.000
60.015
59.887
74.984
59.954
25.175
31.500
31.500
40.000
50.000
49.500
65.000
75.000
78.750
108.000
108.000
135.000
83.500
106.500
108.000
85.500
106.500
136.750
146.2500
-/-
-/-
-/+/+
+/+
+/+
-/-
-/+/+
+/+
+/+
+/+
-/+
-/+
+/+
+/+
-/+
-/+
-/+
VESA DMT / DTV CEA 1920 x 1080p 67.500 60.000 148.500 +/+
✎
NOTE
x
For HDMI/DVI cable connection, you must use the HDMI IN 1 (DVI) jack.
x
The interlaced mode is not supported.
x
The set may operate abnormally if you select a non-standard video format.
x
Separate and Composite modes are supported. SOG (Sync On Green) is not supported.
Changing the Input Source
Source
Use to select TV or an external input source
such as a DVD player / Blu-ray player / cable
box / STB satellite receiver.
■ TV / PC / AV / Component1 /
Component2 / HDMI1/DVI / HDMI2 /
HDMI3 / HDMI4 / USB / AllShare
1. Press the
SOURCE button on your
remote.
2. Select a desired external input source.
✎
You can only choose external devices that are
connected to the TV. In Source, connected inputs will
be highlighted.
✎
In Source, PC always stays activated.
Edit Name
Edit Name lets you associate a device name to an input
source. To access Edit Name, press the
TOOLS button In
Source. The following selections appear under Edit Name:
■ VCR / DVD / Cable STB / Satellite STB / PVR STB /
AV Receiver / Game / Camcorder / PC / DVI PC / DVI
Devices / TV / IPTV / Blu-ray / HD DVD / DMA: Name
the device connected to the input jacks to make your
input source selection easier.
✎
If you have connected a PC to the HDMI IN 1 (DVI)
port with an HDMI cable, select PC under Edit Name
to enter a device name.
✎
If you have connected a PC to the HDMI IN 1 (DVI)
port with an HDMI to DVI cable, select DVI PC under
Edit Name to enter a device name.
✎
If you connected an AV device to the HDMI IN 1 (DVI)
port with an HDMI to DVI cable, select DVI Devices
under Edit Name to enter a device name.
Information
You can see detailed information about the selected external
device.
Page 14
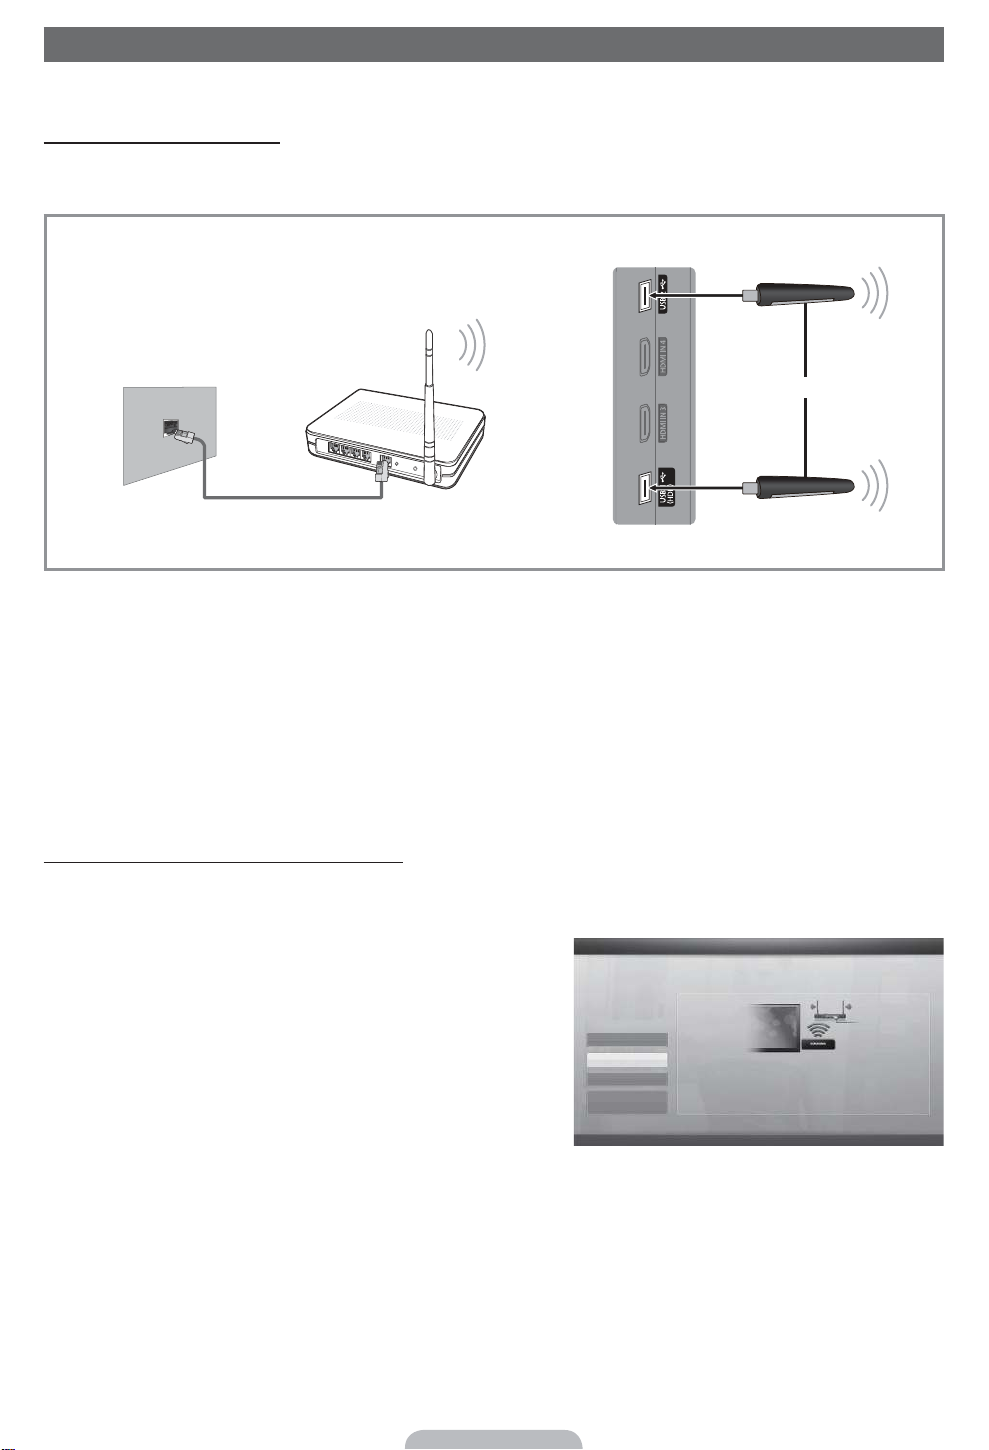
Network Connection
You can set up your TV so that it can access the Internet through your local area network (LAN) using a wired or wireless
connection.
Network Connection - Wireless
You can connect your TV to your LAN through a standard wireless router or modem. To connect wirelessly, you must first
attach a “Samsung Wireless LAN Adapter” (WIS09ABGN, WIS09ABGN2, or WIS10ABGN - sold separately) to either the
USB
port on the back of your TV. See the illustration below.
Samsung’s Wireless LAN adapter is sold separately and is offered by select retailers, Ecommerce sites and Samsungparts.
com. Samsung’s Wireless LAN adapter supports the IEEE 802.11a/b/g and n communication protocols. Samsung
recommends using IEEE 802.11n. When you play video over a IEEE 802.11b/g connection, the video may not play smoothly.
Most wireless network systems incorporate a security system that requires devices that access the network through an access
point or AP (typically a wireless IP Sharer - router or modem) to transmit an encrypted security code called an access key.
Your TV is compatible with the following security protocols:
y Authentication Mode: OPEN, SHARED, WPAPSK, WPA2PSK
y Encryption Type: WEP, TKIP, AES
If you select Pure High-throughput (Greenfield) 802.11n mode is selected and the Encryption type is set to WEP, TKIP or TKIP
AES (WPS2Mixed) on your AP or wireless router, Samsung TVs will not support a connection in compliance with new Wi-Fi
certification specifications.
Configuring the Network Connection - Wireless
The instructions below are for networks that use the Dynamic Host Configuration Protocol (DHCP) to configure network
connections automatically. If your have a Static IP network, see your user’s manual for configuration instructions. To configure
your network connection for a network that uses DHCP, follow these steps:
1. Connect your TV to your network as shown in the illustrations
above.
2. Turn on your TV, press the
MENU button on your remote, and the
select Network Network Settings.
3. Select Wireless(General), press
ENTER
(
, and then press
ENTER( again.
4. The Network function searches for available wireless network.
When done, it displays a list of the available networks.
5. In the list of networks, press the or button to select a
network, select Next, and then press
ENTER
(
.
6 If you have selected a wireless router that has security, the
Security Key screen appears. Enter the Security key (Security key
or PIN), select Next, and then press
ENTER
(
.
✎
When you enter the Security Key (Security Key or PIN), use the /// buttons on your remote to select
numbers and characters.
7 The Network Connection screen appears and verifies the network connection. When the connection has been verified, the
“Internet connection successful.” message appears. Network set up is complete.
✎
For more detailed information, see “Wireless Network Setting” in the e-Manual.
Wireless IP Sharer
(AP having DHCP Server)
Samsung Wireless
LAN Adapter
TV Rear Panel
The LAN Port on the Wall
LAN Cable (Not Supplied)
or
8
(
H
✎
The displayed imange may differ depending
on the model.
Page 15
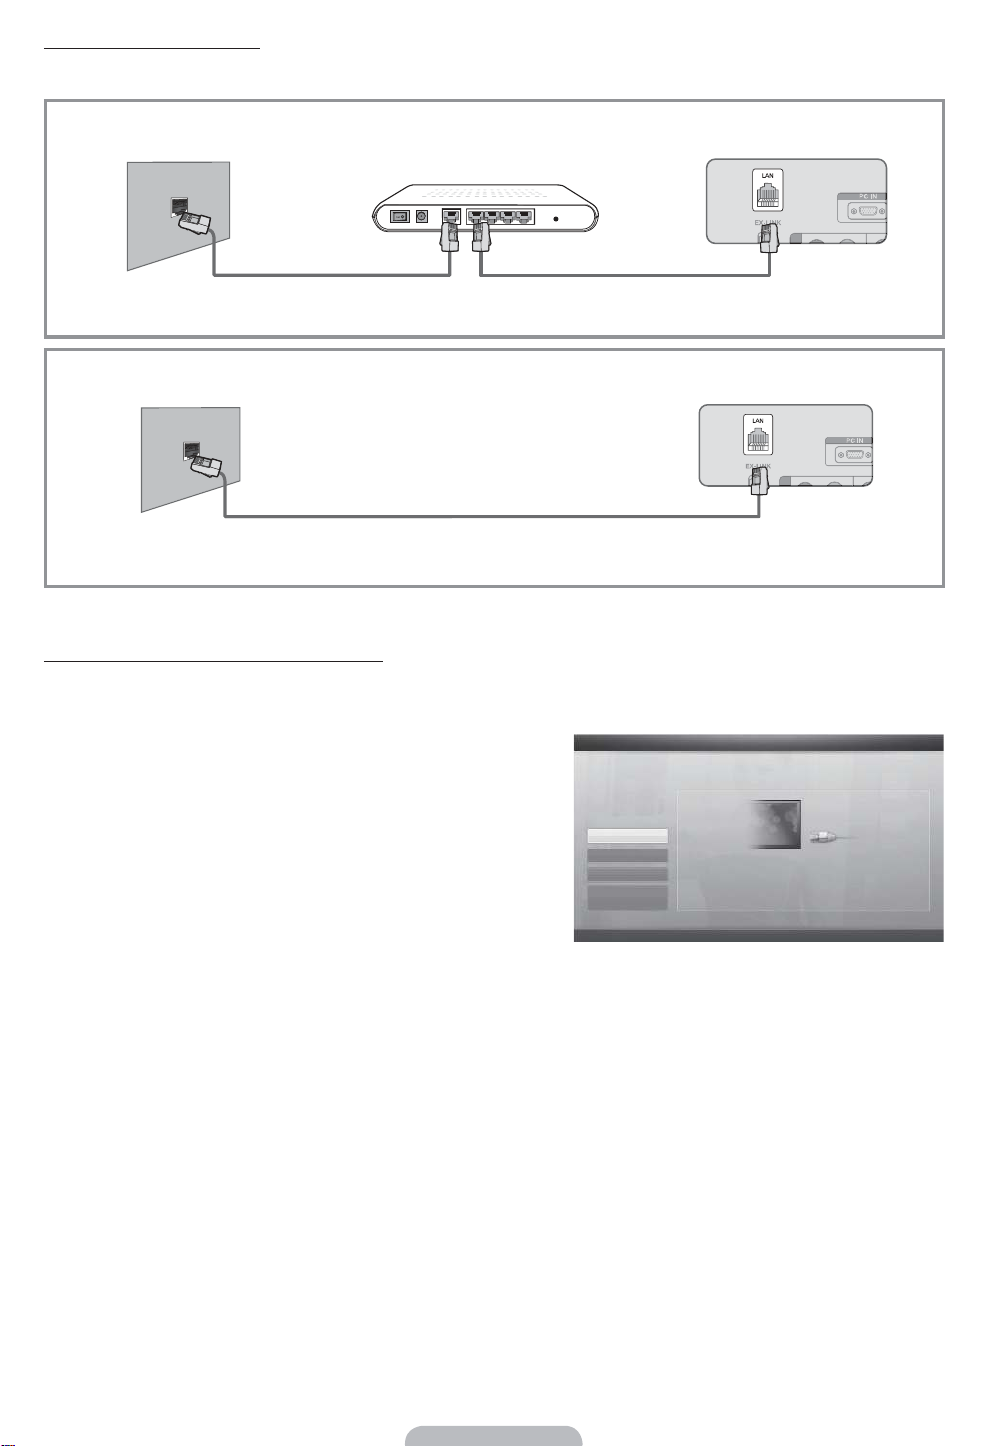
Network Connection - Wired
There are two main ways to connect your TV to your network using cable, depending on your network setup. They are
illustrated below:
✎
A network speed of lower of than 10 Mbps is not supported.
Configuring the Network Connection - Wired
Most home networks use the Dynamic Host Configuration Protocol (DHCP) to configure network connections. Home networks
that support DHCP automatically provide the IP address, subnet mask, gateway, and DNS values your TV needs to access the
Internet so you don’t have to enter them manually.
To configure your network connection for a network that uses DHCP,
follow these steps:
1. Connect your TV to your network as shown in one of the
illustrations above.
2. Turn on your TV, press the
MENU button on your remote, and then
select Network Network Settings. The Network Settings
screen will appear.
3. Select Wired, press
ENTER
(
, and then press ENTER( again.
4. The Network Connection screen appears, and verifies the network
connection. When the connection has been verified, the “Internet
connection successful.” message appears. Network set up is
completed.
✎
If your TV cannot acquire network the connection values
automatically or if you want to set the connection manually,
select IP Settings on the network test screen. Set Internet Protocol Setup to Manual. You must enter the IP
Address, Subnet Mask, Gateway, and DNS Server manually.
✎
For more detailed information, see “Wired Network Connection” in the e-Manual.
The Modem Port on the Wall
TV Rear Panel
LAN Cable (Not Supplied)Modem Cable (Not Supplied)
Extternal Modem
(ADSL / VDSL / Cable TV)
The Modem Port on the Wall
TV Rear Panel
LAN Cable (Not Supplied)
8
(
H
✎
The displayed imange may differ depending
on the model.
Page 16
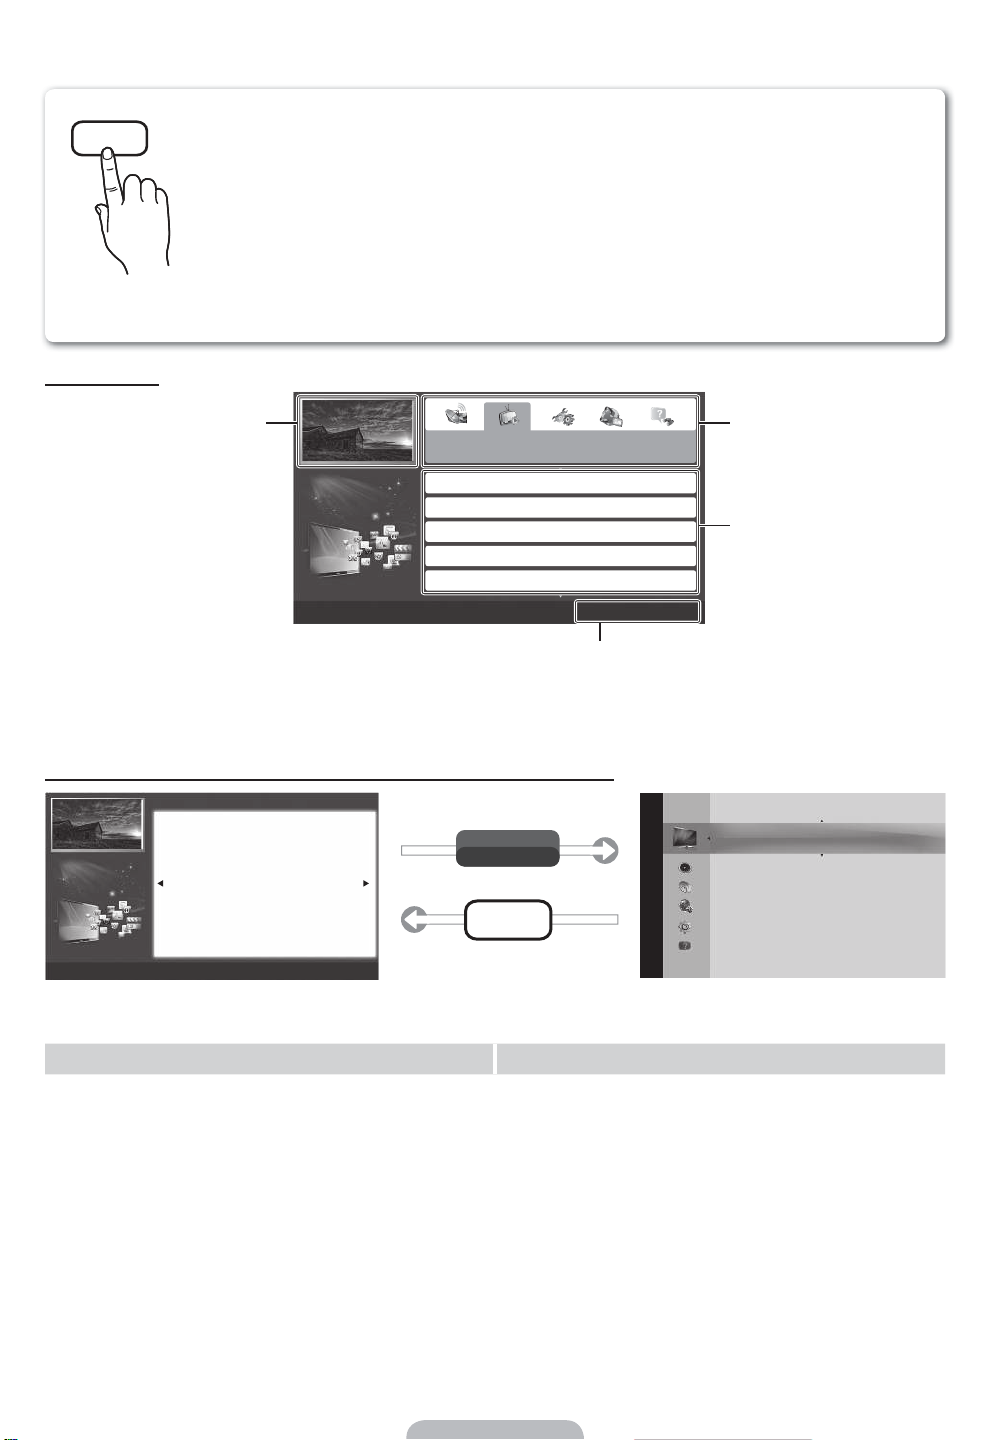
How to view the e-Manual
Screen Display
How to toggle between the e-Manual and the corresponding OSD menu(s).
✎
This function is not enabled in some menus.
Method 1 Method 2
1. If you want to use the menu that corresponds to an
e-Manual topic, press the red button to select Try Now.
2. To return to the e-Manual screen, press the
E-MANUAL
button.
1. Press the
ENTER( button when a topic is displayed.
“Do you want to execute this?” appears. Select Yes,
and then press the
ENTER( button. The OSD window
appears.
2. To return to the e-Manual screen, press the
E-MANUAL
button.
`
(H
You can fi nd instructions for your TV’s features in the e-Manual in your TV. To use,
press the
E-MANUAL button on your remote. Move the cursor using the up/down/
right/left buttons to highlight a category, then a topic, and then press the
ENTER(
button. The e-Manual displays the page you want to see.
You can also access it through the menu:
"
MENUP Support e-Manual ENTER
(
✎
If you want to return to the e-Manual, press the E-MANUAL button on your remote.
✎
You can not use Try Now function if the menu is not activated.
TV Screen: Displays the program,
movie, video, etc. you are currently
watching.
The category list. Press
O
or U
button to select the category you
want.
Displays the sub-menu list. Use the
arrow buttons on your remote to
move the cursor.
Press the
ENTER( button to
select the sub-menu you want.
Operation Buttons:
`
Blue (Index): Displays index screen.
(
Enter: Select a category or sub-menu.
H
Exit: Exit the e-Manual.
E-MANUAL
Try Now
D
E^`/H
U
Changing the Preset Picture Mode
2 MENUP Picture Picture Mode ENTER
(
Picture Mode
Picture modes apply preset adjustments to the picture. Select a mode using the up
and down arrow keys, and then press the
ENTER( button.
1 In PC mode, you can only select Entertain and Standard.
• Dynamic: Suitable for a bright room.
• Standard: Suitable for a normal environment.
• Movie: Suitable for watching movies in a dark room.
• Entertain (In PC mode only): Suitable for watching movies and games.
E-MANUAL
Page 17
Viewing the Contents
Using the Zoom mode
When you are viewing an e-Manual instruction page, press
the
ENTER( button to magnify the screen. You can scroll
through the magnified screen by using the
X
or G buttons.
✎
To return to the screen to normal size, press the
RETURN button.
How to search for a topic on the index page
1. To search for a topic, press the left or right arrow button to select a letter, and then press
ENTER
(
. The Index displays a
list of topics and keywords that begin with the letter you selected.
2. Press the up or down arrow button to select a topic or keyword you want, and then press the ENTER
(
button to select
a topic you want to see.
3. The e-Manual page with the topic appears.
✎
To close the Index screen, press the RETURN button.
D
E^`/H
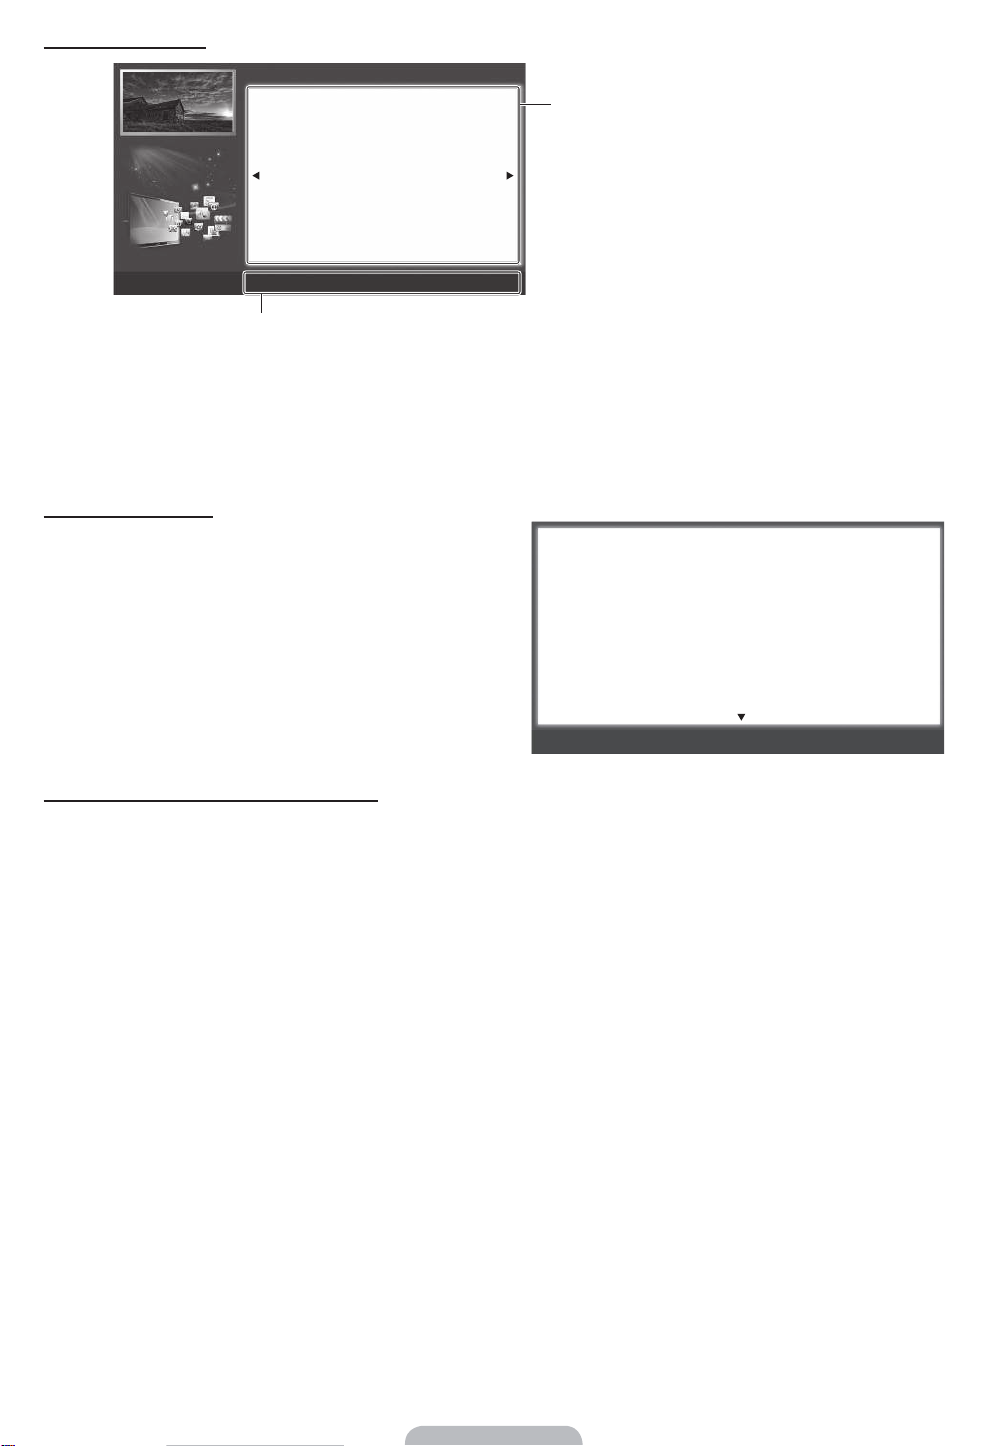
Contents Area: Contains the topic contents
if you selected a sub-menu. To move to the
previous or next page, press the
O
or Ubutton.
Operation Buttons:
D
Red (Try Now): Displays the OSD menu that corresponds to the topic. To return to the e-Manual screen, press
the
E-MANUAL button.
E
Green (Home): Moves to the e-Manual home screen.
^
Yellow (Zoom): Magnifies a screen.
`
Blue (Index): Displays the Index screen.
/
(Page): Moves to previous or next page.
H
(Exit): Exit the e-Manual.
8
5
Changing the Preset Picture Mode
2 MENUP Picture Picture Mode ENTER
(
Picture Mode
Picture modes apply preset adjustments to the picture. Select
a mode using the up and down arrow keys, and then press the
ENTER
(
button.
1 In PC mode, you can only select Entertain and Standard.
• Dynamic: Suitable for a bright room.
• Standard: Suitable for a normal environment.
• Movie: Suitable for watching movies in a dark room.
• Entertain (In PC mode only): Suitable for watching movies
and games.
Changing the Preset Picture Mode
2
MENUP Picture Picture Mode ENTER
(
Picture Mode
Picture modes apply preset adjustments to the picture. Select a mode using the up and
down arrow keys, and then press the ENTER( button.
1 In PC mode, you can only select Entertain and Standard.
• Dynamic: Suitable for a bright room.
• Standard: Suitable for a normal environment.
• Movie: Suitable for watching movies in a dark room.
• Entertain (In PC mode only): Suitable for watching movies and games.
Page 18
Troubleshooting
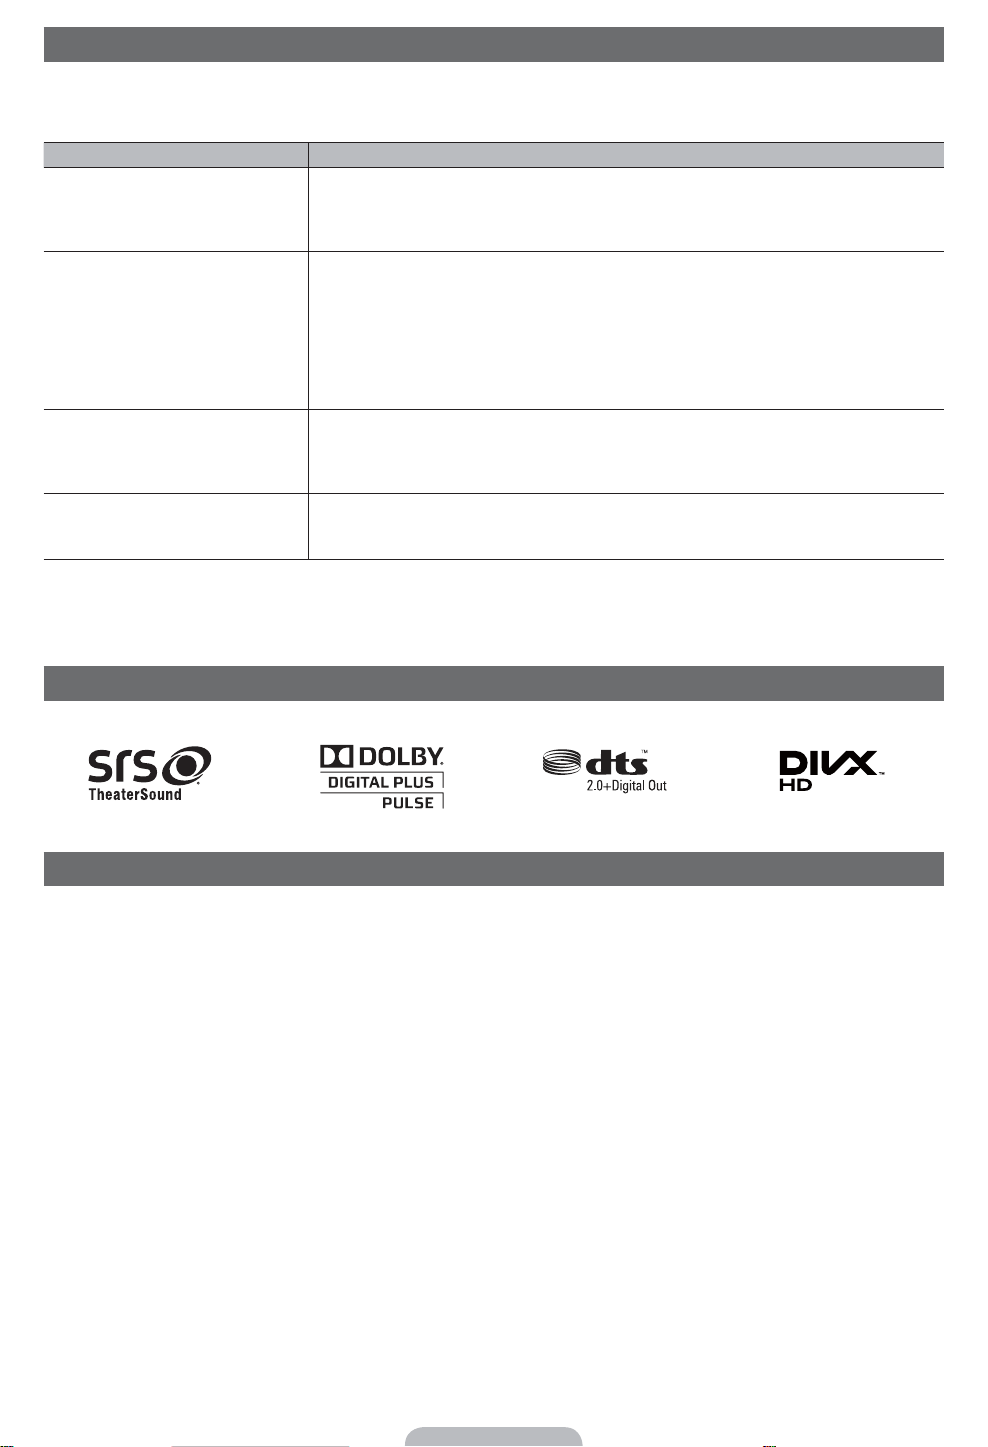
If the TV seems to have a problem, first review this list of possible problems and solutions. Also review the Troubleshooting
section in the e-Manual. If none of the troubleshooting tips apply, visit “www.samsung.com,” and then click on Support, or call
Samsung customer service at 1-800-SAMSUNG.
Issues Solutions and Explanations
The TV won’t turn on. • Make sure the AC power cord is securely plugged in to the wall outlet and the TV.
• Make sure the wall outlet is working.
• Try pressing the
POWER button on the TV to make sure the problem is not the remote. If the TV turns
on, refer to “Remote control does not work” below.
There is no picture/video. • Check the cable connections. Remove and reconnect all cables connected to the TV and external
devices.
• Set the video outputs of your external devices (Cable/Sat Box, DVD, Blu-ray etc) to match the TV
input connections. For example, if an external device’s output is HDMI, it should be connected to an
HDMI input on the TV.
• Make sure your connected devices are powered on.
• Be sure to select the correct input source by pressing the
SOURCE button on the remote control.
• Reboot the connected device by unplugging and then reconnecting the device’s power cable.
The remote control does not work. • Replace the remote control batteries. Make sure the batteries are installed with their poles (+/–) in the
correct direction.
• Clean the sensor’s transmission window on the remote.
• Try pointing the remote directly at the TV from 5~6 feet away.
The cable/set top box remote control
doesn’t turn the TV on or off, or adjust the
volume.
• Program the Cable/Set remote control to operate the TV. Refer to the Cable/Set user manual for the
SAMSUNG TV code.
✎
Some functions and pictures shown in this manual are available on specific models only.
✎
To keep your TV in optimum condition, upgrade to the latest firmware on the Samsung web site by USB (samsung.com
Support Downloads).
License
List of Features
y Excellent Digital Interface & Networking: With a built-in HD digital tuner, your TV lets you watch non-subscription HD
broadcasts without a cable box or STB (Set-Top-Box) satellite receiver.
y 3D: This exciting new feature enables you to view 3D content.
y AllShare™: AllShare™ connects your TV and compatible Samsung mobile phones/devices through a network.
y Anynet+(HDMI-CEC): Allows you to control all connected Samsung devices that support Anynet+ with your Samsung
TV’s remote.
Page 19
Securing the TV to the Wall
Caution: Pulling, pushing, or climbing on the TV may cause the TV to fall. In particular, ensure your
children do not hang over or destabilize the TV. Doing so may cause the TV to tip over, causing serious
injuries or death. Follow all safety precautions provided in the included Safety Flyer with your TV. For
added stability and safety, you can purchase and install the anti fall device as described below.
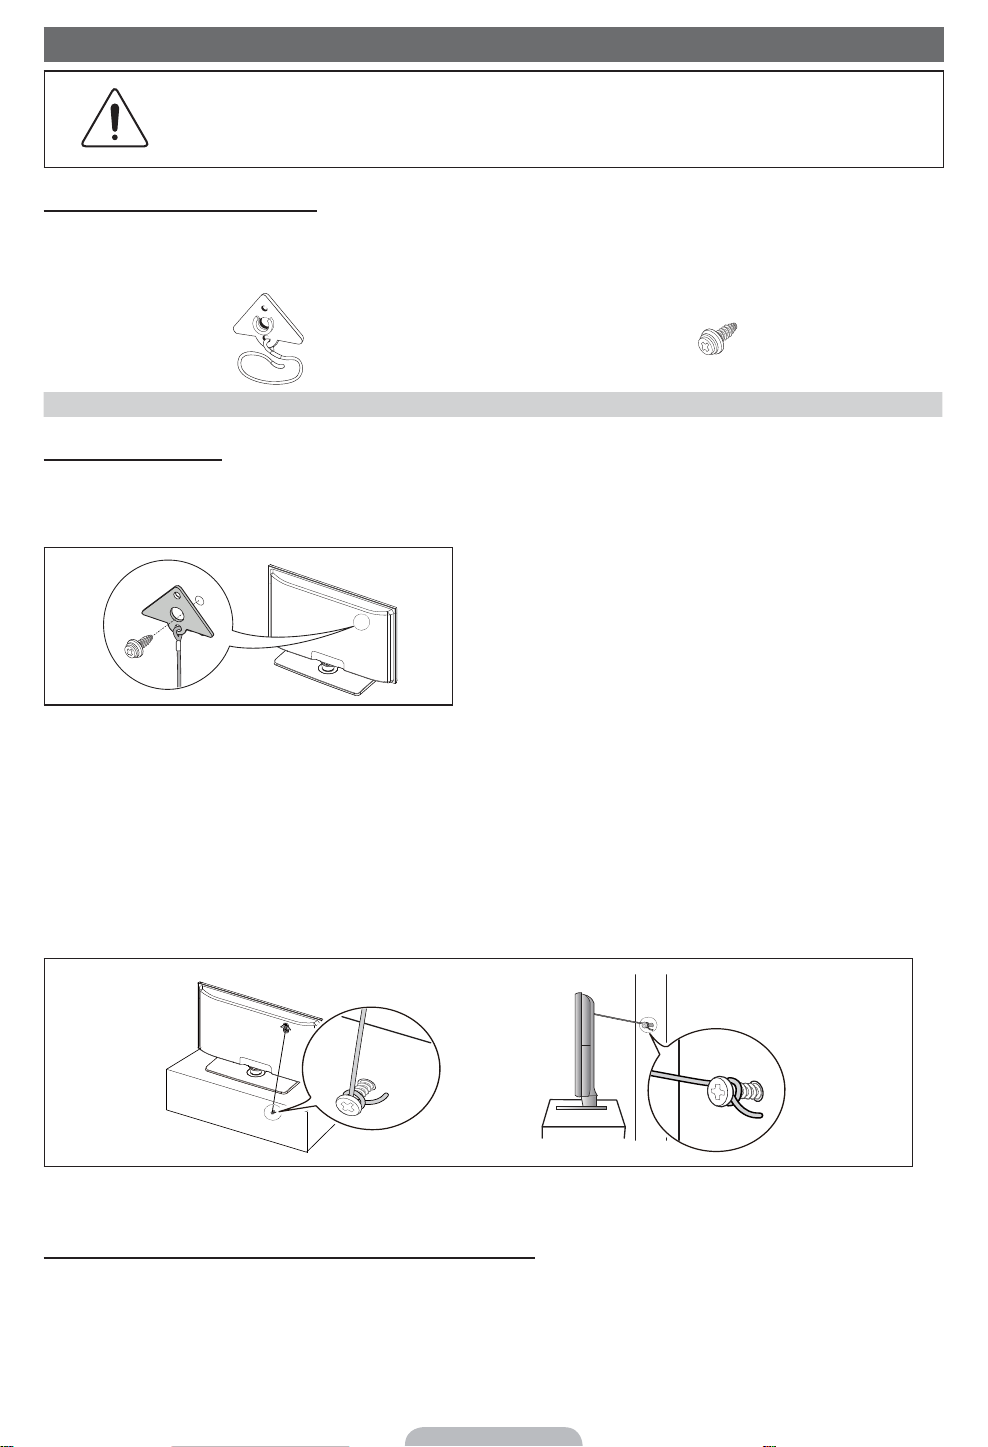
The TV-Holder Kit (Sold Separately):
The parts below are included in the TV Holder kit. In addition, you need to provide a wood screw, screw and molly, or other
screw appropriate for the wall or cabinet you intend to secure the TV-Holder string to. We recommend a size M4xL20 wood
screw.
TV-Holder (BN96-15753A) Screw (M8 X L19)
Installing the TV-Holder
1. Remove the screw attached to the back of your TV, and then connect the TV-Holder to the TV with the screw included in
the TV-Holder Kit that is designated for your TV.
✎
Make sure to use only the appropriate supplied screw. If you use a different screw, you can damage your TV.
2. Firmly fasten the screw you provided (size M4xL20 or similar) to the wall or cabinet where the TV is to be installed.
✎
If you fasten the screw to the wall, we recommend you drive the screw into a stud. If that is not possible, use a
molly to anchor the screw.
3. Tie the TV-Holder cord to the screw fastened on the wall or cabinet so that the TV is fixed. See the illustrations below.
✎
Install the TV close to the wall so that it does not fall.
✎
When attaching the TV-Holder cord to the wall, tie the cord level with the ground or slanted downwards for safety
purposes.
✎
Check the cord occasionally to make sure it is secure.
✎
Before moving the TV, separate the connected cord first.
Wall
4. Verify all connections are properly secured. Periodically check the connections for any sign of fatigue or failure. If you have
any doubt about the security of your connections, contact a professional installer.
To purchase the TV-Holder Kit, contact Samsung Customer Care
–
In the United States: 1-800-SAMSUNG (1-800-726-7864)
–
In Canada: 1-800-SAMSUNG (1-800-726-7864)
Page 20
Storage and Maintenance
✎
If you attached some stickers on the TV screen, it remains some debris after removing the sticker. Please clean it to
watch TV.
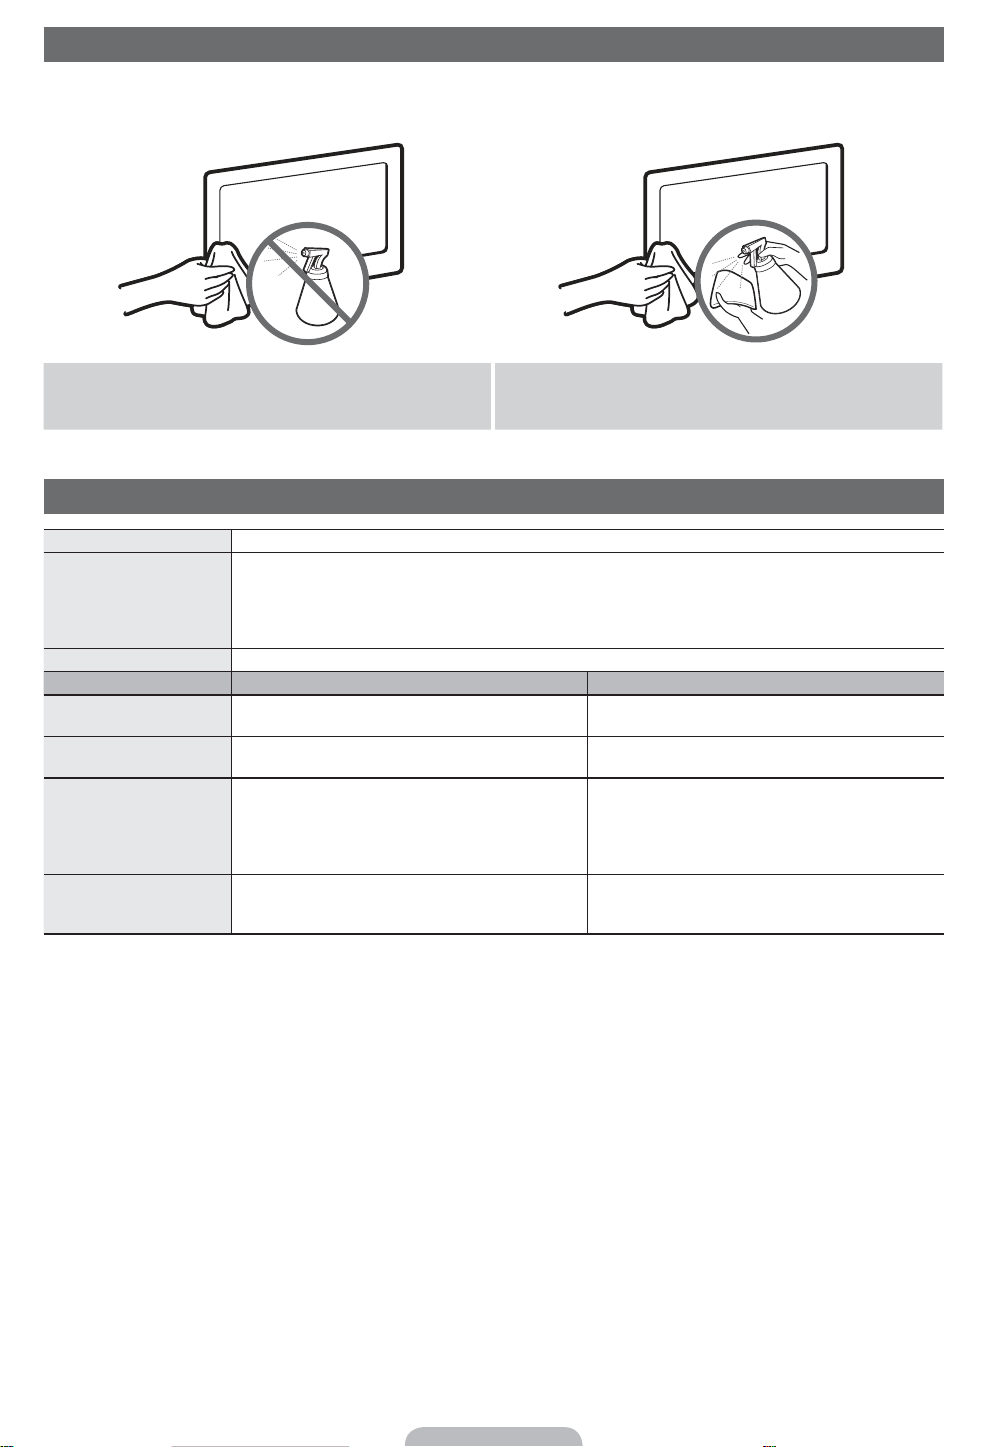
Do not spray water or a cleaning agent directly onto the
product. Any liquid that goes into the product may cause a
failure, fire, or electric shock.
Clean the product with a soft cloth dampened with a small
amount of water.
Specifications
Display Resolution 1920 x 1080
Environmental Considerations
Operating Temperature
Operating Humidity
Storage Temperature
Storage Humidity
50°F to 104°F (10°C to 40°C)
10% to 80%, non-condensing
-4°F to 113°F (-20°C to 45°C)
5% to 95%, non-condensing
Stand Swivel (Left / Right) -20˚ ~ 20˚
Model Name PN51D550 PN59D550
Screen Size
(Diagonal)
51” Class
(50.7” measured diagonally)
59” Class
(59.0” measured diagonally)
Sound
(Output) 10 W X 2 15W x 2
Dimensions (WxDxH)
Body
With stand
47.1 X 2.2 X 28.2 inches
(1196.8 X 57.0 X 715.6 mm)
47.1 X 12.0 X 31.0 inches
(1196.8 X 305.0 X 787.4 mm)
54.3 x 2.2 x 32.5 inches
(1379.4 X 57.0 X 824.4 mm)
54.3 x 13.2 x 35.4 inches
(1379.4 x 335.0 x 899.0 mm)
Weight
Without Stand
With Stand
48.1 Ibs (21.8 kg)
57.5 Ibs (26.1 kg)
66.6 Ibs (30.2 kg)
80.0 Ibs (36.3 kg)
✎
Design and specifications are subject to change without prior notice.
✎
This device is a Class B digital apparatus.
✎
For information about the power supply, and more about power consumption, refer to the label attached to the product.
Dispose unwanted electronics through an approved recycler.
To find the nearest recycling location, go to our website:
www.samsung.com/recyclingdirect Or call, (877) 278 - 0799
Page 21
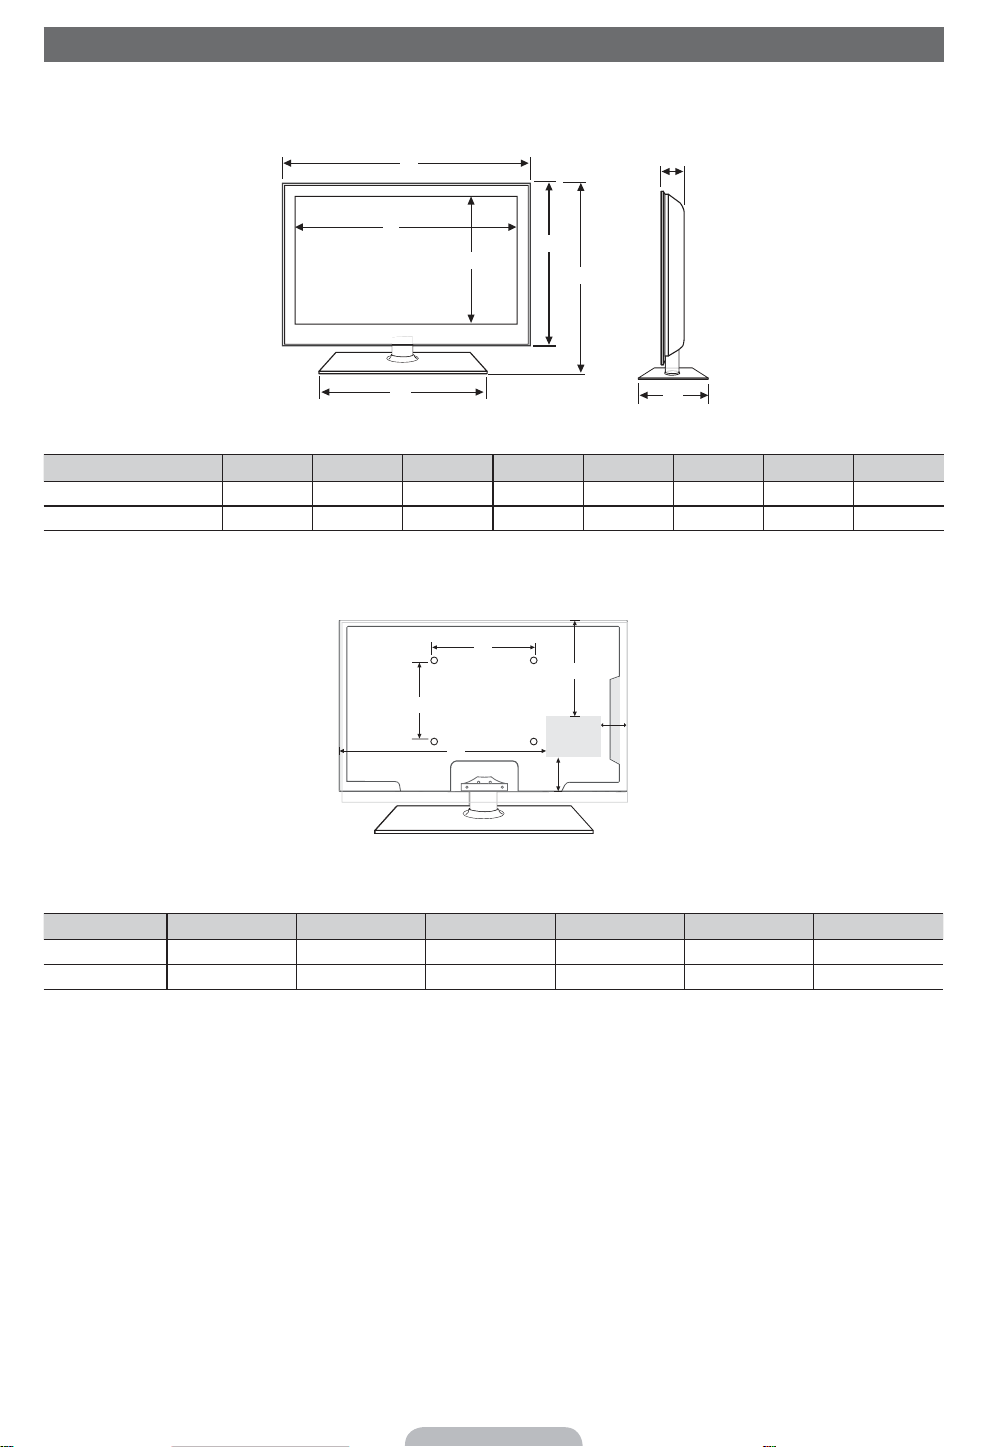
Dimensions
■ Front view / Side view
(Unit: inches)
Model name
PN51D550 47.1 44.6 25.0 20.1 28.2 31.0 2.2 12.0
PN59D550 54.3 51.8 29.2 21.3 32.5 35.4 2.2 13.2
■ Rear view
(Unit: inches)
Model name
PN51D550 15.7 4.2 4.9 36.4 15.7 18.9
PN59D550 15.7 7.0 7.7 40.7 23.6 20.3
NOTE: All drawings are not necessarily to scale. Some dimensions are subject to change without prior notice. Refer to the
dimensions prior to performing installation of your TV. Not responsible for typographical or printed errors.
© 2011 Samsung Electronics America, Inc
Page 22

© 2011 Samsung Electronics Co., Ltd. All rights reserved.
Contact SAMSUNG WORLDWIDE
,I\RXKDYHDQ\TXHVWLRQVRUFRPPHQWVUHODWLQJWR6DPVXQJSURGXFWVSOHDVHFRQWDFWWKH6$0681*FXVWRPHUFDUHFHQWHU
Country
Customer Care Center
Web Site Address
&$1$'$ 6$0681* ZZZVDPVXQJFRP 6DPVXQJ(OHFWURQLFV&DQDGD,QF&XVWRPHU6HUYLFH
6WDQGLVK&RXUW0LVVLVVDXJD2QWDULR/5%
&DQDGD
86$ 6$0681* ZZZVDPVXQJFRP 6DPVXQJ(OHFWURQLFV$PHULFD,QF&KDOOHQJHU
5RDG5LGJH¿HOG3DUN1-
Page 23
._---------------_
..
• Assemble Stand before
@ 1
o
EA
Stand
(dependingonthe
@
...
(M4XL12)
@'"
model)
I
,
,
I
I
I"
" ,
FEf¥j,·
"
:
,..---------,
x4··
\
r . I I
T Tt
~'
~'L
Top
"~'
,)
••
View :
® 1
I
I
I
J
removing
•
Components
L'·When
EA
Guide
Stand
installing
the
TV
stand,
@
~
from
use
the
~
s.-
shipping
provided
Screws
components
x4
(M4X
x4
(M4XL8)
L12)
box
and
parts.
o Side View
..
Front
AnENTloN
5'~::®~@:
I ,
I
DO
NOT
USE OONOTUSE00NOT
I CHEMiCAlS GREASE
(Correct assembly) (Incorrect assembly)
------------------~---:
T
,
USE I
OIl
I
,
~
(I)
~
Place a soft cloth over the table to protect the
place the TV on the cloth screen side down.
~
Insert the Stand Guide into the slot of TV bottom side.
~
9""""
x4
(M4XL8)
T
-.-
TV,
and then
Caution
>
>
Make
suretodistinguish
Make
sure
thatatleast
between
two
persons
the·frontand.backofeach
lift
and
move
the
TV.
component
When
assembling
them.
Page 24

1111111111111111111111111111111111111111111
BN68-03503A-03
Page 25
If you have a problem with your
If you have a problem with your
If you have a problem with your
If you have a problem with your
••
II
~
1. Confirm that all the connections are correct
1. Confirm that all the connections are correct
1. Confirm that all the connections are correct
1. Confirm that all the connections are correct
Review the connection instructions in your user's manual. Confirm that all cables are connected correctly and that the
Review the connection instructions in your user's manual. Confirm that all cables are connected correctly and that the
Review the connection instructions in your user's manual. Confirm that all cables are connected correctly and that the
Review the connection instructions in your user's manual. Confirm that all cables are connected correctly and that the
correctly.
correctly.
correctly.
correctly.
2.
Confirm you have selected the correct video source
2.
Confirm you have selected the correct video source
2.
Confirm you have selected the correct video source
2.
Confirm you have selected the correct video source
Turn
theTVon. Then, press the Source button on the remote and cycle slowly through the listed sources
Turn
theTVon. Then, press the Source button on the remote and cycle slowly through the listed sources
Turn
theTVon. Then, press the Source button on the remote and cycle slowly through the listed sources
Turn
theTVon. Then, press the Source button on the remote and cycle slowly through the listed sources
3.
Reboot theTVand external device
3.
Reboot theTVand external device
3.
Reboot theTVand external device
3.
Reboot theTVand external device
Unplug the
Unplug the
Unplug the
Unplug the
4.
Rerun Plug and Play
4.
Rerun Plug and Play
4.
Rerun Plug and Play
4.
Rerun Plug and Play
Press the Source button on remote
Press the Source button on remote
Press the Source button on remote
Press the Source button on remote
Make sure you select Home Use on the Usage Mode screen. Also, select the correct Antenna source
Make sure you select Home Use on the Usage Mode screen. Also, select the correct Antenna source
Make sure you select Home Use on the Usage Mode screen. Also, select the correct Antenna source
Make sure you select Home Use on the Usage Mode screen. Also, select the correct Antenna source
or Auto, you must also select the correct cable system
or Auto, you must also select the correct cable system
or Auto, you must also select the correct cable system
or Auto, you must also select the correct cable system
5.
Run
5.
Run
5.
Run
5.
Run
Run
Run
Run
Run
Run
Run
Run
Run
If
the
If
the
If
the
If
the
1. RefertoTV's user manual.
1. RefertoTV's user manual.
1. RefertoTV's user manual.
1. RefertoTV's user manual.
2.
RefertoTroubleshooting Tips found on
2.
RefertoTroubleshooting Tips found on
2.
RefertoTroubleshooting Tips found on
2.
RefertoTroubleshooting Tips found on
3.
Visit Samsung.com
3.
Visit Samsung.com
3.
Visit Samsung.com
3.
Visit Samsung.com
Visit us @ www.samsung.com/spstv and view the 'How-to videos' and Troubleshooting Tips.
Visit us @ www.samsung.com/spstv and view the 'How-to videos' and Troubleshooting Tips.
Visit us @ www.samsung.com/spstv and view the 'How-to videos' and Troubleshooting Tips.
Visit us @ www.samsung.com/spstv and view the 'How-to videos' and Troubleshooting Tips.
For Canada, visit http://www.samsung.com/spstvcanada
For Canada, visit http://www.samsung.com/spstvcanada
For Canada, visit http://www.samsung.com/spstvcanada
For Canada, visit http://www.samsung.com/spstvcanada
Run
Run
Run
Run
4.
Upgrade
4.
Upgrade
4.
Upgrade
4.
Upgrade
Download and install the latest
Download and install the latest
Download and install the latest
Download and install the latest
internet
internet
internet
internet
After the installation, you will have
After the installation, you will have
After the installation, you will have
After the installation, you will have
5.
Contact
5.
Contact
5.
Contact
5.
Contact
Call us at 1-800-SAMSUNG (1-800-726-7864)
Call us at 1-800-SAMSUNG (1-800-726-7864)
Call us at 1-800-SAMSUNG (1-800-726-7864)
Call us at 1-800-SAMSUNG (1-800-726-7864)
TV
and external device, let them sit for
TV
and external device, let them sit for
TV
and external device, let them sit for
TV
and external device, let them sit for
Diagnostic Tests
Diagnostic Tests
Diagnostic Tests
Diagnostic Tests
a Picture TestorSound Test on the
a Picture TestorSound Test on the
a Picture TestorSound Test on the
a Picture TestorSound Test on the
Network Status Test. (Menu
Network Status Test. (Menu
Network Status Test. (Menu
Network Status Test. (Menu
st~~~~bove
st~~~~bove
st~~~~bove
st~~~~bove
"SPSTV Apps" on TV's Smart Hub feature (if available on your model).
"SPSTV Apps" on TV's Smart Hub feature (if available on your model).
"SPSTV Apps" on TV's Smart Hub feature (if available on your model).
"SPSTV Apps" on TV's Smart Hub feature (if available on your model).
(Menu-->
(Menu-->
(Menu-->
(Menu-->
you return your TV to the store.
you return your TV to the store.
you return your TV to the store.
you return your TV to the store.
two
minutes, plug them back in, and then turn them on.
two
minutes, plug them back in, and then turn them on.
two
minutes, plug them back in, and then turn them on.
two
minutes, plug them back in, and then turn them on.
to
selectTVmode andgoto
to
selectTVmode andgoto
to
selectTVmode andgoto
to
selectTVmode andgoto
TV.
See your user's manual for details. (Menu
TV.
See your user's manual for details. (Menu
TV.
See your user's manual for details. (Menu
TV.
See your user's manual for details. (Menu
-->
Network --> Network Status)
-->
Network
-->
-->
Network
-->
Network
do
not
resolve
d~
not
resolve
d~
not
resolve
d~
not
resolve
TV
firmware.
TV
firmware.
TV
firmware.
TV
Support --> Software Upgrade --> By Online)
Support
Support
Support
firmware.
-->
Software Upgrade
-->
Software Upgrade
-->
Software Upgrade
to
to
to
to
Network Status)
-->
Network Status)
-->
Network Status)
your
problem,
your
problem,
your
problem,
your
problem,
TV
(Menu-->
TV
(Menu-->
TV
(Menu-->
TV
(Menu-->
You
can download the latest firmware from Samsung.com/support. Also, you can download from yourTVif it is connectedtothe
You
can download the latest firmware from Samsung.com/support. Also, you can download from yourTVif it is connectedtothe
You
can download the latest firmware from Samsung.com/support. Also, you can download from yourTVif it is connectedtothe
You
can download the latest firmware from Samsung.com/support. Also, you can download from yourTVif it is connectedtothe
-->
By Online)
-->
By Online)
-->
for
assistance.
for
assistance.
for
assistance.
for
assistance.
By Online)
reset your video and audio settings.
reset your video and audio settings.
reset your video and audio settings.
reset your video and audio settings.
(STD,
(STD,
(STD,
(STD,
Menu
Menu
Menu
Menu
HRC, or
HRC, or
HRC, or
HRC, or
please
please
please
please
Support
Support
Support
Support
-->
System
-->
-->
-->
IRC)
IRC)
IRC)
IRC)
-->
-->
-->
-->
-->
System
-->
System
-->
System
-->
for Digital Cable System and Analog Cable System. Most cable systems are STD.
for Digital Cable System and Analog Cable System. Most cable systems are STD.
for Digital Cable System and Analog Cable System. Most cable systems are STD.
for Digital Cable System and Analog Cable System. Most cable systems are STD.
follow
follow
follow
follow
Self-Diagnosis
Self-Diagnosis
Self-Diagnosis
Self-Diagnosis
Plug & Play
Plug & Play
Plug & Play
Plug & Play
-->
Support
-->
Support
-->
Support
-->
Support
these
these
these
these
-->
Troubleshooting
-->
Troubleshooting
-->
Troubleshooting
-->
Troubleshooting
-->
-->
-->
-->
-->
-->
-->
-->
steps:
steps:
steps:
steps:
TV,
TV,
TV,
TV,
(TV,
(TV,
(TV,
(TV,
Enter.
Enter.
Enter.
Enter.
(Air,
Cable, or Auto). Auto is used for both Air and Cable. If you selected Cable
(Air,
Cable, or Auto). Auto is used for both Air and Cable. If you selected Cable
(Air,
Cable, or Auto). Auto is used for both Air and Cable. If you selected Cable
(Air,
Cable, or Auto). Auto is used for both Air and Cable. If you selected Cable
Self Diagnosis)
Self Diagnosis)
Self Diagnosis)
Self Diagnosis)
).
).
).
).
follow these steps before
follow these steps before
follow these steps before
follow these steps before
TV
and all external devices are pluggedinand operating
TV
and all external devices are pluggedinand operating
TV
and all external devices are pluggedinand operating
TV
and all external devices are pluggedinand operating
HDMI, Component, etc.)toseeifyou can get a good picture.
HDMI, Component, etc.)toseeifyou can get a good picture.
HDMI, Component, etc.)toseeifyou can get a good picture.
HDMI, Component, etc.)toseeifyou can get a good picture.
Page 26
Si
vous avez des
Si
vous avez des
Si
vous avez des
Si
vous avez des
prob'H/Hlnes
prob'H/Hlnes
prob'H/Hlnes
prob'H/Hlnes
concernant Ie fonctionnement
concernant Ie fonctionnement
concernant Ie fonctionnement
concernant Ie fonctionnement
de votre
de votre
de votre
de votre
retourner I'appareil au magasin.
retourner I'appareil au magasin.
retourner I'appareil au magasin.
aD
•
•
•
1. Assurez-vous que tous les branchements sont bien faits
1. Assurez-vous que tous les branchements sont bien faits
1. Assurez-vous que tous les branchements sont bien faits
1. Assurez-vous que tous les branchements sont bien faits
Ie
Consultez
Consultez
Consultez
Consultez
appareils externes fonctionnent bien.
appareils externes fonctionnent bien.
appareils externes fonctionnent bien.
appareils externes fonctionnent bien.
2.
Assurez-vous que la bonne source video est utilisee
2.
Assurez-vous que la bonne source video est utilisee
2.
Assurez-vous que la bonne source video est utilisee
2.
Assurez-vous que la bonne source video est utilisee
Mettez Ie televiseur sous tension. Ensuite, appuyez sur la touche Source de la telecommande et naviguez lentement entre les differentes sources (Televiseur, HDMI, composantes,
Mettez Ie televiseur sous tension. Ensuite, appuyez sur la touche Source de la telecommande et naviguez lentement entre les differentes sources (Televiseur, HDMI, composantes,
Mettez Ie televiseur sous tension. Ensuite, appuyez sur la touche Source de la telecommande et naviguez lentement entre les differentes sources (Televiseur, HDMI, composantes,
Mettez Ie televiseur sous tension. Ensuite, appuyez sur la touche Source de la telecommande et naviguez lentement entre les differentes sources (Televiseur, HDMI, composantes,
etc.) pour avoir une vue d'ensemble.
etc.) pour avoir une vue d'ensemble.
etc.) pour avoir une vue d'ensemble.
etc.) pour avoir une vue d'ensemble.
3.
RedemarrezIeteleviseur et I'appareil externe
3.
RedemarrezIeteleviseur et I'appareil externe
3.
RedemarrezIeteleviseur et I'appareil externe
3.
RedemarrezIeteleviseur et I'appareil externe
Debranchez
Debranchez
Debranchez
Debranchez
4.
Utilisez de nouveau la fonction Pret-a-I'emploi
4.
Utilisez de nouveau la fonction Pret-a-I'emploi
4.
Utilisez de nouveau la fonction Pret-a-I'emploi
4.
Utilisez de nouveau la fonction Pret-a-I'emploi
Appuyez sur la touche Source de
Appuyez sur la touche Source de
Appuyez sur la touche Source de
Appuyez sur la touche Source de
Selectionnez Home Use (Usage a domicile) a I'ecran de Usage Mode (Mode d'utilisation). Selectionnez la source d'antenne appropriee
Selectionnez Home Use (Usage a domicile) a I'ecran de Usage Mode (Mode d'utilisation). Selectionnez la source d'antenne appropriee
Selectionnez Home Use (Usage a domicile) a I'ecran de Usage Mode (Mode d'utilisation). Selectionnez la source d'antenne appropriee
Selectionnez Home Use (Usage a domicile) a I'ecran de Usage Mode (Mode d'utilisation). Selectionnez la source d'antenne appropriee
utilisee pour Air et Cable.
utilisee pour Air et Cable.
utilisee pour Air et Cable.
utilisee pour Air et Cable.
analogique.
analogique.Laplupart des systemes de cablodistribution utili sent
analogique.Laplupart des systemes de cablodistribution utili sent
analogique.Laplupart des systemes de cablodistribution utili sent
5.
Effectuez les essais de diagnostic
5.
Effectuez les essais de diagnostic
5.
Effectuez les essais de diagnostic
5.
Effectuez les essais de diagnostic
Effectuez un essai d'image ou de son du televiseur. Consultez
Effectuez un essai d'image ou de son du televiseur. Consultez
Effectuez un essai d'image ou de son du televiseur. Consultez
Effectuez un essai d'image ou de son du televiseur. Consultez
Effectuez I'essai de I'etat du reseau. (Menu
Effectuez I'essai de I'etat du reseau. (Menu
Effectuez I'essai de I'etat du reseau. (Menu
Effectuez I'essai de I'etat du reseau. (Menu
~!.,I~J?,~~!?,I~~.!-n'es!.E~~E~sollJ
~!.,I~J?,~~!?,I~~.!-n'es!.E~~E~sollJ
~!.,I~J?,~~!?,I~~.!-n'es!.E~~E~sollJ
~U~J?,~~!?.I~~!.-n'es!.E~~.!:~~ollJ
1. Reportez-vousauguide d'utilisation du televiseur.
1. Reportez-vous
1. Reportez-vous
1. Reportez-vous
2.
Consultez les conseils de depannage figurant surIeteleviseur
2.
Consultez les conseils de depannage figurant surIeteleviseur
2.
Consultez les conseils de depannage figurant surIeteleviseur
2.
Consultez les conseils de depannage figurant surIeteleviseur
3.
VisitezIesite Samsung.com
3.
VisitezIesite Samsung.com
3.
VisitezIesite Samsung.com
3.
VisitezIesite Samsung.com
Visitez notre site www.samsung.com/spstv et consultez les videos et les conseils de depannage. Pour
Visitez notre site www.samsung.com/spstv et consultez les videos et les conseils de depannage. Pour
Visitez notre site www.samsung.com/spstv et consultez les videos et les conseils de depannage. Pour
Visitez notre site www.samsung.com/spstv et consultez les videos et les conseils de depannage. Pour
Executez « SPSTV Apps » de
Executez « SPSTV Apps » de
Executez « SPSTV Apps » de
Executez « SPSTV Apps » de
4.
Mise a niveau
4.
Mise a niveau
4.
Mise a niveau
4.
Mise a niveau
Telechargez la derniere version du micrologiciel du televiseur et installez-Ia. Vous pouvez
Telechargez la derniere version du micrologiciel du televiseur et installez-Ia. Vous pouvez
Telechargez la derniere version du micrologiciel du televiseur et installez-Ia. Vous pouvez
Telechargez la derniere version du micrologiciel du televiseur et installez-Ia. Vous pouvez
depuis votre televiseur a condition qu'il soit connecte a Internet
depuis votre televiseur a condition qu'il soit connecte a Internet
depuis votre televiseur a condition qu'il soit connecte a Internet
depuis votre televiseur a condition qu'il soit connecte a Internet
Apres I'installation, vous devrez reinitialiser vos parametres video et audio.
Apres I'installation, vous devrez reinitialiser vos parametres video et audio.
Apres I'installation, vous devrez reinitialiser vos parametres video et audio.
Apres I'installation, vous devrez reinitialiser vos parametres video et audio.
5.
Contact
5.
Contact
5.
Contact
5.
Contact
Pour obtenir de I'aide, telephonez
Pour obtenir de I'aide, telephonez
Pour obtenir de I'aide, telephonez
Pour obtenir de I'aide, telephonez
guide d'utilisation pour revoir les instructions relativesaubranchement. Assurez-vous que tous les cables sont branches correctement et queIeteleviseur et tous les
Ie
guide d'utilisation pour revoir les instructions relativesaubranchement. Assurez-vous que tous les cables sont branches correctement et queIeteleviseur et tous les
Ie
guide d'utilisation pour revoir les instructions relativesaubranchement. Assurez-vous que tous les cables sont branches correctement et queIeteleviseur et tous les
Ie
guide d'utilisation pour revoir les instructions relativesaubranchement. Assurez-vous que tous les cables sont branches correctement et queIeteleviseur et tous les
Ie
tell~viseur
Ie
tell~viseur
Ie
tell~viseur
Ie
tell~viseur
La
plupart des systemes de cablodistribution utili sent
retourner I'appareil au magasin.
et
I'appareil externe, puis attendez deux minutes avant de les rebrancher et de les mettre sous tension.
et
I'appareil externe, puis attendez deux minutes avant de les rebrancher et de les mettre sous tension.
et
I'appareil externe, puis attendez deux minutes avant de les rebrancher et de les mettre sous tension.
et
I'appareil externe, puis attendez deux minutes avant de les rebrancher et de les mettre sous tension.
fa
telecommande et selectionnezIemode
fa
telecommande et selectionnezIemode
fa
telecommande et selectionnezIemode
fa
telecommande et selectionnezIemode
Si
vous choisissez Cable ou Auto, vous devez selectionner egalementIesysteme de cablodiffusion
Si
vous choisissez Cable ou Auto, vous devez selectionner egalementIesysteme de cablodiffusion
Si
vous choisissez Cable ou Auto, vous devez selectionner egalementIesysteme de cablodiffusion
Si
vous choisissez Cable ou Auto, vous devez selectionner egalementIesysteme de cablodiffusion
au
guide d'utilisation du televiseur.
au
guide d'utilisation du televiseur.
au
guide d'utilisation du televiseur.
fa
fonction Smart Hub du televiseur
fa
fonction Smart Hub du televiseur
fa
fonction Smart Hub du televiseur
fa
fonction Smart Hub du televiseur
au
1-800-SAMSUNG (1-800-726-7864).
au
1-800-SAMSUNG (1-800-726-7864).
au
1-800-SAMSUNG (1-800-726-7864).
au
1-800-SAMSUNG (1-800-726-7864).
teh~viseur,
teh~viseur,
teh~viseur,
teh~viseur,
-t
Reseau-tEtat du reseau).
-t
Reseau-tEtat du reseau).
-t
Reseau-tEtat du reseau).
-t
Reseau-tEtat du reseau).
~pres
le~
~pres
~pres
apres
etapes ci-dessus,
le~
etapes ci-dessus,
le~
etapes ci-dessus,
le~
etapes ci-dessus,
suivez les etapes ci-apres avant de
suivez les etapes ci-apres avant de
suivez les etapes ci-apres avant de
suivez les etapes ci-apres avant de
TV;
allez a Menu-tSysteme-tPret-a-I'emploi-t Entrer.
TV;
allez a Menu-tSysteme-tPret-a-I'emploi-t Entrer.
TV;
allez a Menu-tSysteme-tPret-a-I'emploi-t Entrer.
TV;
allez a Menu-tSysteme-tPret-a-I'emploi-t Entrer.
STD.
STD.
STD.
STD.
Ie
guide d'utilisation pour obtenir plus de details. (Menu-tSupport-tAutodiagnostic).
Ie
guide d'utilisation pour obtenir plus de details. (Menu-tSupport-tAutodiagnostic).
Ie
guide d'utilisation pour obtenir plus de details. (Menu-tSupport-tAutodiagnostic).
Ie
guide d'utilisation pour obtenir plus de details. (Menu-tSupport-tAutodiagnostic).
p~ocedez
p~ocedez
p~ocedez
p~<?cedez
(Menu-t
Support-tAutodiagnostic-tDepannage
(Menu-t
Support-tAutodiagnostic-tDepannage
(Menu-t
Support-tAutodiagnostic-tDepannage
(Menu-t
Support-tAutodiagnostic-tDepannage
(si
disponible sur votre modele).
(si
disponible sur votre modele).
(si
disponible sur votre modele).
(si
disponible sur votre modele).
(Menu-t
Support-tMise a niveau du logiciel-tEn
(Menu-t
Support-tMise a niveau du logiciel-tEn
(Menu-t
Support-tMise a niveau du logiciel-tEn
(Menu-t
Support-tMise a niveau du logiciel-tEn
cgmme suit:
cgmme suit:
cgmme suit:
comme
Ie
faire depuisIesite Samsung.com/support.
Ie
faire depuisIesite Samsung.com/support.
Ie
faire depuisIesite Samsung.com/support.
Ie
faire depuisIesite Samsung.com/support.
sUit;"
Ie
Canada, visitez http://www.samsung.com/spstvcanada
Ie
Canada, visitez http://www.samsung.com/spstvcanada
Ie
Canada, visitez http://www.samsung.com/spstvcanada
Ie
Canada, visitez http://www.samsung.com/spstvcanada
ligne)
ligne)
ligne)
ligne)
(STD,
(STD,
(STD,
(STD,
).
).
).
).
(Air,
Cable, ou Auto).Lafonction Auto est
(Air,
Cable, ou Auto).Lafonction Auto est
(Air,
Cable, ou Auto).Lafonction Auto est
(Air,
Cable, ou Auto).Lafonction Auto est
HRC,ouIRC)
HRC,ouIRC)
HRC,ouIRC)
HRC,ouIRC)
Vous
pouvez aussi faireIetelechargement
Vous
pouvez aussi faireIetelechargement
Vous
pouvez aussi faireIetelechargement
Vous
pouvez aussi faireIetelechargement
pour une diffusion numerique et
pour une diffusion numerique et
pour une diffusion numerique et
pour une diffusion numerique et
1111111111111111111111111111111111111111111
1111111111111111111111111111111111111111111
1111111111111111111111111111111111111111111
1111111111111111111111111111111111111111111
BN68-03608A-01
BN68-03608A-01
BN68-03608A-01
BN68-03608A-01
Page 27
•
•
•
•
•
: "':t
: "':t
: "':t
: "':t
: "':t
•
•
•
•
•
Page 28
This
symbol
This
This
This
This
inside. It is
inside. It is
inside. It is
inside. It is
inside. It is
with
with
with
with
with
indicatcs that high voltage is present
symbol
indicatcs that high voltage is present
symbol
indicatcs that high voltage is present
symbol
indicatcs that high voltage is present
symbol
indicatcs that high voltage is present
dangeroustomake
dangeroustomake
dangeroustomake
dangeroustomake
dangeroustomake
any
internal partofthis product.
any
internal partofthis product.
any
internal partofthis product.
any
internal partofthis product.
any
internal partofthis product.
any kindofcontact
any kindofcontact
any kindofcontact
any kindofcontact
any kindofcontact
CAUTION: TO REDUCE THE RISKOFELECTRIC SHOCK.DONOT
CAUTION: TO REDUCE THE RISK
CAUTION: TO REDUCE THE RISK
CAUTION: TO REDUCE THE RISK
CAUTION: TO REDUCE THE RISK
REMOVE COVER
REMOVE COVER
REMOVE COVER
REMOVE COVER
REMOVE COVER
P,\RTS INSIDE.
P,\RTS INSIDE.
P,\RTS INSIDE.
P,\RTS INSIDE.
P,\RTS INSIDE.
•
•
•
•
•
The
slots
The
slots
The
slots
The
slots
The
slots
apparatus,
apparatus,
apparatus,
apparatus,
apparatus,
Do
not
Do
not
Do
not
Do
not
Do
not
-
-
-
-
Do
not
Do
not
Do
not
Do
not
Do
not
-
-
-
-
-
-
-
-
-
-
Do
not
Do
not
Do
not
Do
not
Do
not
Install
Install
Install
Install
Install
DLP
DLP
DLP
DLP
DLP
*
*
*
*
*
* Products
* Products
* Products
* Products
* Products
* Other products
* Other products
* Other products
* Other products
* Other products
•Donot
•Donot
•Donot
•Donot
•Donot
Do
not
Do
not
Do
not
Do
not
Do
not
•
•
•
•
•
Do
not
Do
not
Do
not
Do
not
Do
not
•
•
•
•
•
near a swimming
near a swimming
near a swimming
near a swimming
near a swimming
Make
suretopull
Make
suretopull
Make
suretopull
Make
suretopull
Make
suretopull
• This appratus
• This appratus
• This appratus
• This appratus
• This appratus
environmental considerations. Please contact your
environmental considerations. Please contact your
environmental considerations. Please contact your
environmental considerations. Please contact your
environmental considerations. Please contact your
Do
not
Do
not
Do
not
Do
not
Do
not
•
•
•
•
•
• Power-supply cords shouldberoutedsothat
• Power-supply cords shouldberoutedsothat
• Power-supply cords shouldberoutedsothat
• Power-supply cords shouldberoutedsothat
• Power-supply cords shouldberoutedsothat
particular atlention
particular atlention
particular atlention
particular atlention
particular atlention
•
•
•
•
•
To
protect this apparatus
To
protect this apparatus
To
protect this apparatus
To
protect this apparatus
To
protect this apparatus
outlet
and
outlet
and
outlet
and
outlet
and
outlet
and
• Before connecting
• Before connecting
• Before connecting
• Before connecting
• Before connecting
local
electrical supply.
local
electrical supply.
local
electrical supply.
local
electrical supply.
local
electrical supply.
• Never insert anything metallic into
• Never insert anything metallic into
• Never insert anything metallic into
• Never insert anything metallic into
• Never insert anything metallic into
To
avoid electric shock. never
To
avoid electric shock. never
To
avoid electric shock. never
To
avoid electric shock. never
To
avoid electric shock. never
•
•
•
•
•
Make
suretoplug
Make
suretoplug
Make
suretoplug
Make
suretoplug
Make
suretoplug
•
•
•
•
•
pulling
pulling
pulling
pulling
pulling
• If this appratus
• If this appratus
• If this appratus
• If this appratus
• If this appratus
- unplugitimmediately
- unplugitimmediately
- unplugitimmediately
- unplugitimmediately
- unplugitimmediately
Be
suretopull
Be
suretopull
Be
suretopull
Be
suretopull
Be
suretopull
•
•
•
•
•
time
(especially
time
(especially
time
(especially
time
(especially
time
(especially
- Accumulated dust can cause
- Accumulated dust can cause
- Accumulated dust can cause
- Accumulated dust can cause
- Accumulated dust can cause
insulationtodeteriorate.
insulationtodeteriorate.
insulationtodeteriorate.
insulationtodeteriorate.
insulationtodeteriorate.
Be
suretocontactanauthorized service center,
Be
suretocontactanauthorized service center,
Be
suretocontactanauthorized service center,
Be
suretocontactanauthorized service center,
Be
suretocontactanauthorized service center,
•
•
•
•
•
humidity, chemical substances
humidity, chemical substances
humidity, chemical substances
humidity, chemical substances
humidity, chemical substances
Failuretodosomay
Failuretodosomay
Failuretodosomay
Failuretodosomay
Failuretodosomay
•
Use
only a properly grounded
•
Use
only a properly grounded
•
Use
only a properly grounded
•
Use
only a properly grounded
•
Use
only a properly grounded
An
improper ground
An
improper ground
An
improper ground
An
improper ground
An
improper ground
-
-
-
-
-
•
•
•
•
•
To
disconnect
To
disconnect
To
disconnect
To
disconnect
To
disconnect
operable.
operable.
operable.
operable.
operable.
Do
not
Do
not
Do
not
Do
not
Do
not
•
•
•
•
•
the
the
the
the
the
• Store
• Store
• Store
• Store
• Store
•
•
•
•
•
Do
not
Do
not
Do
not
Do
not
Do
not
Do
not
Do
not
Do
not
Do
not
Do
not
•
•
•
•
•
•
•
•
•
•
Unplug
Unplug
Unplug
Unplug
Unplug
alcohol, thinners, insecticide, air freshener, lubricant
alcohol, thinners, insecticide, air freshener, lubricant
alcohol, thinners, insecticide, air freshener, lubricant
alcohol, thinners, insecticide, air freshener, lubricant
alcohol, thinners, insecticide, air freshener, lubricant
• Apparatus
• Apparatus
• Apparatus
• Apparatus
• Apparatus
Do
not
Do
not
Do
not
Do
not
Do
not
•
•
•
•
•
•Donot short circuit, disassembleoroverheat
•Donot short circuit, disassembleoroverheat
•Donot short circuit, disassembleoroverheat
•Donot short circuit, disassembleoroverheat
•Donot short circuit, disassembleoroverheat
• Dangerofexplosion ifbatteryisincorrectly replaced. Replace only
• Dangerofexplosion ifbatteryisincorrectly replaced. Replace only
• Dangerofexplosion ifbatteryisincorrectly replaced. Replace only
• Dangerofexplosion ifbatteryisincorrectly replaced. Replace only
• Dangerofexplosion ifbatteryisincorrectly replaced. Replace only
•
WARNING-TO
•
WARNING-TO
•
WARNING-TO
•
WARNING-TO
•
WARNING-TO
FROM
FROM
FROM
FROM
FROM
(OR
rlACK). T1IERF ARE NO
(OR
rlACK). T1IERF ARE NO
(OR
rlACK). T1IERF ARE NO
(OR
rlACK). T1IERF ARE NO
(OR
rlACK). T1IERF ARE NO
REFER
ALL
REFER
ALL
REFER
ALL
REFER
ALL
REFER
ALL
and
openingsinthe
and
openingsinthe
and
openingsinthe
and
openingsinthe
and
openingsinthe
andtoprotectitfrom
andtoprotectitfrom
andtoprotectitfrom
andtoprotectitfrom
andtoprotectitfrom
cover
the
cover
cover
cover
cover
block
block
block
block
block
place
place
place
place
place
the
the
the
the
the
TVs,
TVs,
TVs,
TVs,
TVs,
place this apparatus nearorover a radiator or
place this apparatus nearorover a radiator or
place this apparatus nearorover a radiator or
place this apparatus nearorover a radiator or
place this apparatus nearorover a radiator or
place a water containing
place a water containing
place a water containing
place a water containing
place a water containing
expose
expose
expose
expose
expose
overload
overload
overload
overload
overload
the
the
the
the
the
allow childrentohang
allow childrentohang
allow childrentohang
allow childrentohang
allow childrentohang
accessories (battery, etc.)ina location safely
accessories (battery, etc.)ina location safely
accessories (battery, etc.)ina location safely
accessories (battery, etc.)ina location safely
accessories (battery, etc.)ina location safely
install
install
install
install
install
droporimpart
droporimpart
droporimpart
droporimpart
droporimpart
the
the
the
the
the
dispose of batteriesina
dispose of batteriesina
dispose of batteriesina
dispose of batteriesina
dispose of batteriesina
THIS
THIS
THIS
THIS
THIS
slots
the
slots
the
slots
the
slots
the
slots
the
slots
the
slots
the
slots
the
slots
the
slots
this
apparatusina confined space, suchasa bookcase,orbuilt-in cabinet, unless proper ventilationisprovided.
this
apparatusina confined space, suchasa bookcase,orbuilt-in cabinet, unless proper ventilationisprovided.
this
apparatusina confined space, suchasa bookcase,orbuilt-in cabinet, unless proper ventilationisprovided.
this
apparatusina confined space, suchasa bookcase,orbuilt-in cabinet, unless proper ventilationisprovided.
this
apparatusina confined space, suchasa bookcase,orbuilt-in cabinet, unless proper ventilationisprovided.
product keeping
product keeping
product keeping
product keeping
product keeping
Direct
View
Direct
View
Direct
View
Direct
View
Direct
View
with
32"orlarger display s
with
32"orlarger display s
with
32"orlarger display s
with
32"orlarger display s
with
32"orlarger display s
--+
--+
--+
--+
--+
this
apparatustorainorplaceitnear
this
apparatustorainorplaceitnear
this
apparatustorainorplaceitnear
this
apparatustorainorplaceitnear
this
apparatustorainorplaceitnear
pool
pool
pool
pool
pool
out
the
out
the
out
the
out
the
out
the
use
batteries.Inyour community there
use
batteries.Inyour community there
use
batteries.Inyour community there
use
batteries.Inyour community there
use
batteries.Inyour community there
wall
outlets. extension cordsoradaptors beyond their capacity, since this can resultinfire
wall
outlets. extension cordsoradaptors beyond their capacity, since this can resultinfire
wall
outlets. extension cordsoradaptors beyond their capacity, since this can resultinfire
wall
outlets. extension cordsoradaptors beyond their capacity, since this can resultinfire
wall
outlets. extension cordsoradaptors beyond their capacity, since this can resultinfire
to
cordsatplug
to
cordsatplug
to
cordsatplug
to
cordsatplug
to
cordsatplug
disconnect
disconnect
disconnect
disconnect
disconnect
plug
plug
plug
plug
plug
power cord
power cord
power cord
power cord
power cord
shall
shall
shall
shall
shall
the
the
the
the
the
theACpower cordtotheDCadaptor outlet,
theACpower cordtotheDCadaptor outlet,
theACpower cordtotheDCadaptor outlet,
theACpower cordtotheDCadaptor outlet,
theACpower cordtotheDCadaptor outlet,
the
the
the
the
the
from
the
from
the
from
the
from
the
from
the
does
not operate normally -inparticular, if there
does
not operate normally -inparticular, if there
does
not operate normally -inparticular, if there
does
not operate normally -inparticular, if there
does
not operate normally -inparticular, if there
the
power plug out of
the
power plug out of
the
power plug out of
the
power plug out of
the
power plug out of
when
when
when
when
when
cause serious damagetoyour
cause serious damagetoyour
cause serious damagetoyour
cause serious damagetoyour
cause serious damagetoyour
the
apparatus
the
apparatus
the
apparatus
the
apparatus
the
apparatus
the
productinan
the
productinan
the
productinan
the
productinan
the
productinan
notbeexposedtodrippingorsplashing.
notbeexposedtodrippingorsplashing.
notbeexposedtodrippingorsplashing.
notbeexposedtodrippingorsplashing.
notbeexposedtodrippingorsplashing.
PREVENT
PREVENT
PREVENT
PREVENT
PREVENT
PRODUCT AT
PRODUCT AT
PRODUCT AT
PRODUCT AT
PRODUCT AT
OF
ELECTRIC SHOCK.DONOT
OF
ELECTRIC SHOCK.DONOT
OF
ELECTRIC SHOCK.DONOT
OF
ELECTRIC SHOCK.DONOT
USER
SERVICEABLE
USER
SERVICEABLE
USER
SERVICEABLE
USER
SERVICEABLE
USER
SERVICEABLE
SERVICIN(jTO()UALIFIED
SERVICIN(jTO()UALIFIED
SERVICIN(jTO()UALIFIED
SERVICIN(jTO()UALIFIED
SERVICIN(jTO()UALIFIED
cabinet
andinthe
cabinet
andinthe
cabinet
andinthe
cabinet
andinthe
cabinet
andinthe
overheating, these slots
overheating, these slots
overheating, these slots
overheating, these slots
overheating, these slots
and
openings
and
openings
and
openings
and
openings
and
openings
and
openingsbyplacing this apparatusona
and
openingsbyplacing this apparatusona
and
openingsbyplacing this apparatusona
and
openingsbyplacing this apparatusona
and
openingsbyplacing this apparatusona
the
the
the
the
the
Type
Type
Type
Type
Type
4cm
4cm
4cm
4cm
4cm
etc.). If this appratus accidentally gets
etc.). If this appratus accidentally gets
etc.). If this appratus accidentally gets
etc.). If this appratus accidentally gets
etc.). If this appratus accidentally gets
power cord
power cord
power cord
power cord
power cord
from
from
from
from
from
antennaorcable system. This
antennaorcable system. This
antennaorcable system. This
antennaorcable system. This
antennaorcable system. This
power cordinuntilitis
power cordinuntilitis
power cordinuntilitis
power cordinuntilitis
power cordinuntilitis
outlet.Donot
outlet.Donot
outlet.Donot
outlet.Donot
outlet.Donot
and
contactanauthorized dealerorservice center.
and
contactanauthorized dealerorservice center.
and
contactanauthorized dealerorservice center.
and
contactanauthorized dealerorservice center.
and
contactanauthorized dealerorservice center.
children, elderly or disabled people
children, elderly or disabled people
children, elderly or disabled people
children, elderly or disabled people
children, elderly or disabled people
may
cause electric shockorequipment damage. (Class I Equipment only.)
may
cause electric shockorequipment damage. (Class I Equipment only.)
may
cause electric shockorequipment damage. (Class I Equipment only.)
may
cause electric shockorequipment damage. (Class I Equipment only.)
may
cause electric shockorequipment damage. (Class I Equipment only.)
from
from
from
from
from
any
shocktothe
any
shocktothe
any
shocktothe
any
shocktothe
any
shocktothe
from
the
from
the
from
the
from
the
from
the
with
with
with
with
with
specilled distance
specilled distance
specilled distance
specilled distance
specilled distance
TVs,
and
TVs,
and
TVs,
and
TVs,
and
TVs,
and
--+
--+
--+
--+
--+
vessel
(vases etc.)onthis
vessel
(vases etc.)onthis
vessel
(vases etc.)onthis
vessel
(vases etc.)onthis
vessel
(vases etc.)onthis
from
from
from
from
from
end,
adaptors
end,
adaptors
end,
adaptors
end,
adaptors
end,
adaptors
a lightning storm, or
a lightning storm, or
a lightning storm, or
a lightning storm, or
a lightning storm, or
the
open partsofthis apparatus.
the
open partsofthis apparatus.
the
open partsofthis apparatus.
the
open partsofthis apparatus.
the
open partsofthis apparatus.
touch
the
touch
touch
touch
touch
an
an
an
an
an
and
and
and
and
and
plug
plug
plug
plug
plug
onto
onto
onto
onto
onto
unstable location suchasa shaky
unstable location suchasa shaky
unstable location suchasa shaky
unstable location suchasa shaky
unstable location suchasa shaky
fire.
fire.
fire.
fire.
fire.
THE
THE
THE
THE
THE
insideofthis apparatus. Only a qualified technician should open
the
insideofthis apparatus. Only a qualified technician should open
the
insideofthis apparatus. Only a qualified technician should open
the
insideofthis apparatus. Only a qualified technician should open
the
insideofthis apparatus. Only a qualified technician should open
touch
touch
touch
touch
touch
the
outlet if
the
outlet if
the
outlet if
the
outlet if
the
outlet if
electric shock,anelectric leakage or a tirebycausing
electric shock,anelectric leakage or a tirebycausing
electric shock,anelectric leakage or a tirebycausing
electric shock,anelectric leakage or a tirebycausing
electric shock,anelectric leakage or a tirebycausing
whereitoperates
whereitoperates
whereitoperates
whereitoperates
whereitoperates
and
receptacle.
and
receptacle.
and
receptacle.
and
receptacle.
and
receptacle.
the
mains,
the
mains,
the
mains,
the
mains,
the
mains,
the
product.
the
product.
the
product.
the
product.
the
product.
product. If
product. If
product. If
product. If
product. If
power outlet
power outlet
power outlet
power outlet
power outlet
SPREAD OF FIRE, KEEP CANDLES OR
SPREAD OF FIRE, KEEP CANDLES OR
SPREAD OF FIRE, KEEP CANDLES OR
SPREAD OF FIRE, KEEP CANDLES OR
SPREAD OF FIRE, KEEP CANDLES OR
ALL
TIMES.
ALL
TIMES.
ALL
TIMES.
ALL
TIMES.
ALL
TIMES.
PERSONNEL.
PERSONNEL.
PERSONNEL.
PERSONNEL.
PERSONNEL.
backorbottom
backorbottom
backorbottom
backorbottom
backorbottom
and
openings
and
openings
and
openings
and
openings
and
a cloth or other materials.
a cloth or other materials.
a cloth or other materials.
a cloth or other materials.
a cloth or other materials.
from
from
from
from
from
Projectors
Projectors
Projectors
Projectors
Projectors
Scm
Scm
Scm
Scm
Scm
the
outlet before cleaning.
the
outlet before cleaning.
the
outlet before cleaning.
the
outlet before cleaning.
the
outlet before cleaning.
local
local
local
local
local
they
are
they
are
they
are
they
are
they
are
and
and
and
and
and
whenitis
whenitis
whenitis
whenitis
whenitis
firmly inserted.
firmly inserted.
firmly inserted.
firmly inserted.
firmly inserted.
the
power cord
the
power cord
the
power cord
the
power cord
the
power cord
theTVistoremain
theTVistoremain
theTVistoremain
theTVistoremain
theTVistoremain
when
when
when
when
when
set.
set.
set.
set.
set.
the
plug
the
plug
the
plug
the
plug
the
plug
the
the
the
the
the
and
wipe
and
wipe
and
wipe
and
wipe
and
wipe
the
batleries.
the
batleries.
the
batleries.
the
batleries.
the
batleries.
openings
the
wall
the
wall
the
wall
the
wall
the
wall
--+
IOcm
--+
IOcm
--+
IOcm
--+
IOcm
--+
IOcm
heat
resistor,orwhereitis
heat
resistor,orwhereitis
heat
resistor,orwhereitis
heat
resistor,orwhereitis
heat
resistor,orwhereitis
apparatus,asthis
apparatus,asthis
apparatus,asthis
apparatus,asthis
apparatus,asthis
water(
near a bathtub, washbowl, kitchen sink,orlaundry
water(
near a bathtub, washbowl, kitchen sink,orlaundry
water(
near a bathtub, washbowl, kitchen sink,orlaundry
water(
near a bathtub, washbowl, kitchen sink,orlaundry
water(
near a bathtub, washbowl, kitchen sink,orlaundry
wet,
wet,
wet,
wet,
wet,
mightberegulations
mightberegulations
mightberegulations
mightberegulations
mightberegulations
authorities
authorities
authorities
authorities
authorities
not
likelytobe
not
likelytobe
not
likelytobe
not
likelytobe
not
likelytobe
the
point
the
the
the
the
installing your
installing your
installing your
installing your
installing your
for24hours
for24hours
for24hours
for24hours
for24hours
mustbepulled
mustbepulled
mustbepulled
mustbepulled
mustbepulled
outofthe
outofthe
outofthe
outofthe
outofthe
productisdamaged, disconnect
productisdamaged, disconnect
productisdamaged, disconnect
productisdamaged, disconnect
productisdamaged, disconnect
or
or
or
or
or
where
point
where
point
where
point
where
point
where
left
left
left
left
left
will
prevent damagetothe
will
prevent damagetothe
will
prevent damagetothe
will
prevent damagetothe
will
prevent damagetothe
When
When
When
When
When
with
with
with
with
with
willbeleft aloneinthe
willbeleft aloneinthe
willbeleft aloneinthe
willbeleft aloneinthe
willbeleft aloneinthe
the
product using a soft,
the
product using a soft,
the
product using a soft,
the
product using a soft,
the
product using a soft,
detergent. This
detergent. This
detergent. This
detergent. This
detergent. This
This
symbol
This
This
This
This
concerning
concerning
concerning
concerning
concerning
included with this product.
included with this product.
included with this product.
included with this product.
included with this product.
are
provided
are
provided
are
provided
are
provided
are
provided
(see
(see
(see
(see
(see
unplugitand
unplugitand
unplugitand
unplugitand
unplugitand
for
for
for
for
for
unattended
unattended
unattended
unattended
unattended
make
make
make
make
make
Doingsomany
Doingsomany
Doingsomany
Doingsomany
Doingsomany
wet
wet
wet
wet
wet
are
are
are
are
are
suchasthe
suchasthe
suchasthe
suchasthe
suchasthe
out
out
out
out
out
reach
reach
reach
reach
reach
selt~
selt~
selt~
selt~
selt~
with
with
with
with
with
for
necessary ventilation.Toensure reliable operationofthis
for
necessary ventilation.Toensure reliable operationofthis
for
necessary ventilation.Toensure reliable operationofthis
for
necessary ventilation.Toensure reliable operationofthis
for
must
must
must
must
must
bed.
bed.
bed.
bed.
bed.
the
the
the
the
the
disposalorrecycling information.
disposalorrecycling information.
disposalorrecycling information.
disposalorrecycling information.
disposalorrecycling information.
walkedonor
walkedonor
walkedonor
walkedonor
walkedonor
they
they
they
they
they
sure
sure
sure
sure
sure
removing
removing
removing
removing
removing
hands.
hands.
hands.
hands.
hands.
any
any
any
any
any
unused or if
unused or if
unused or if
unused or if
unused or if
setina location
setina location
setina location
setina location
setina location
of children.
of children.
of children.
of children.
of children.
a slanted floorora location exposedtovibration.
a slanted floorora location exposedtovibration.
a slanted floorora location exposedtovibration.
a slanted floorora location exposedtovibration.
a slanted floorora location exposedtovibration.
may
may
may
may
may
necessary ventilation.Toensure reliable operationofthis
neverbeblockedorcovered.
neverbeblockedorcovered.
neverbeblockedorcovered.
neverbeblockedorcovered.
neverbeblockedorcovered.
sofa,
rugorother similar surface.
sofa,
rugorother similar surface.
sofa,
rugorother similar surface.
sofa,
rugorother similar surface.
sofa,
rugorother similar surface.
infonllation below.)
infonllation below.)
infonllation below.)
infonllation below.)
infonllation below.)
exposedtodirect sunlight.
exposedtodirect sunlight.
exposedtodirect sunlight.
exposedtodirect sunlight.
exposedtodirect sunlight.
can
resultina
can
resultina
can
resultina
can
resultina
can
resultina
contactanauthorized dealer immediately.
contactanauthorized dealer immediately.
contactanauthorized dealer immediately.
contactanauthorized dealer immediately.
contactanauthorized dealer immediately.
that
require
that
require
that
require
that
require
that
require
exit
from
exit
from
exit
from
exit
from
exit
from
and
and
and
and
and
the
voltage designationoftheDCadaptor corrspondstothe
the
voltage designationoftheDCadaptor corrspondstothe
the
voltage designationoftheDCadaptor corrspondstothe
the
voltage designationoftheDCadaptor corrspondstothe
the
voltage designationoftheDCadaptor corrspondstothe
the
the
the
the
the
unusual soundsorsmells coming
unusual soundsorsmells coming
unusual soundsorsmells coming
unusual soundsorsmells coming
unusual soundsorsmells coming
airport,
airport,
airport,
airport,
airport,
trom
the
trom
trom
trom
trom
mains
the
mains
the
mains
the
mains
the
mains
dry
dry
dry
dry
dry
damage
damage
damage
damage
damage
the
sameorequivalent
the
sameorequivalent
the
sameorequivalent
the
sameorequivalent
the
sameorequivalent
riskoffireorelectric shock.
riskoffireorelectric shock.
riskoffireorelectric shock.
riskoffireorelectric shock.
riskoffireorelectric shock.
youtodispose of these batleries properly
youtodispose of these batleries properly
youtodispose of these batleries properly
youtodispose of these batleries properly
youtodispose of these batleries properly
pinchedbyitems placed
pinchedbyitems placed
pinchedbyitems placed
pinchedbyitems placed
pinchedbyitems placed
the
appliance.
the
appliance.
the
appliance.
the
appliance.
the
appliance.
unused
for
unused
for
unused
for
unused
for
unused
for
set
duetolightning
set
duetolightning
set
duetolightning
set
duetolightning
set
duetolightning
create a danger of electric shock.
create a danger of electric shock.
create a danger of electric shock.
create a danger of electric shock.
create a danger of electric shock.
power cord,
power cord,
power cord,
power cord,
power cord,
you
aretoleave
you
aretoleave
you
aretoleave
you
aretoleave
you
aretoleave
house).
house).
house).
house).
house).
the
the
the
the
the
with
heavy dust,
with
heavy dust,
with
heavy dust,
with
heavy dust,
with
heavy dust,
the
train station
the
train station
the
train station
the
train station
the
train station
socket, therefore
socket, therefore
socket, therefore
socket, therefore
socket, therefore
the
power cord
the
power cord
the
power cord
the
power cord
the
power cord
cloth.Donot
cloth.Donot
cloth.Donot
cloth.Donot
cloth.Donot
the
appearanceorerase the printingonthe
the
appearanceorerase the printingonthe
the
appearanceorerase the printingonthe
the
appearanceorerase the printingonthe
the
appearanceorerase the printingonthe
OTHER
OTHER
OTHER
OTHER
OTHER
alerts
symbol
alerts
symbol
alerts
symbol
alerts
symbol
alerts
operation
operation
operation
operation
operation
long periods of
long periods of
long periods of
long periods of
long periods of
and
and
and
and
and
make
suretohold
make
suretohold
make
suretohold
make
suretohold
make
suretohold
the
house
the
house
the
house
the
house
the
house
power cordtogenerate sparks
power cordtogenerate sparks
power cordtogenerate sparks
power cordtogenerate sparks
power cordtogenerate sparks
highorlow
highorlow
highorlow
highorlow
highorlow
etc.
etc.
etc.
etc.
etc.
and
and
and
and
and
use
any
use
any
use
any
use
any
use
any
type.
type.
type.
type.
type.
OPEN FLAMES
OPEN FLAMES
OPEN FLAMES
OPEN FLAMES
OPEN FLAMES
you
that important literature
you
that important literature
you
that important literature
you
that important literature
you
that important literature
and
maintenance
and
maintenance
and
maintenance
and
maintenance
and
maintenance
tub,ina
tub,ina
tub,ina
tub,ina
tub,ina
or electric
or electric
or electric
or electric
or electric
uponoragainst
uponoragainst
uponoragainst
uponoragainst
uponoragainst
time,
unplugitfrom
time,
unplugitfrom
time,
unplugitfrom
time,
unplugitfrom
time,
unplugitfrom
power line surges.
power line surges.
power line surges.
power line surges.
power line surges.
this
apparatus.
this
apparatus.
this
apparatus.
this
apparatus.
this
apparatus.
the
the
the
the
the
from
it
from
it
from
it
from
it
from
it
foranextended period of
foranextended period of
foranextended period of
foranextended period of
foranextended period of
temperatures,
temperatures,
temperatures,
temperatures,
temperatures,
the
mains
mains
mains
mains
mains
AWAY
AWAY
AWAY
AWAY
AWAY
plug
plug
plug
plug
plug
the
the
the
the
contact a service center.
contact a service center.
contact a service center.
contact a service center.
contact a service center.
chemicals suchaswax,
chemicals suchaswax,
chemicals suchaswax,
chemicals suchaswax,
chemicals suchaswax,
has been
has been
has been
has been
has been
wet
basement,
wet
basement,
wet
basement,
wet
basement,
wet
basement,
shock.
shock.
shock.
shock.
shock.
them,
them,
them,
them,
them,
power plug
power plug
power plug
power plug
power plug
and
and
and
and
and
shallbereadily
shallbereadily
shallbereadily
shallbereadily
shallbereadily
G;)
G;)
G;)
G;)
G;)
or
or
or
or
or
under
under
under
under
under
paying
paying
paying
paying
paying
the
wall
the
wall
the
wall
the
wall
the
wall
when
when
when
when
when
heatorthe
heatorthe
heatorthe
heatorthe
heatorthe
high
high
high
high
high
benzene,
benzene,
benzene,
benzene,
benzene,
product.
product.
product.
product.
product.
.
.
.
.
.
Page 29
AITI:~T1UN:
I'OUK
KWUIKLII'"
KISl,)UFS
IYU.I.l'IIWCU
I
)()~.
Nt.:
TIO'J.l\l
TIO'J.l\l
TIO'J.l\l
AJTI·.\JTION l'OlIK KI-.IHII(I.I.I'" KIS()llES LJEL[(TROt."
AJTI·.\JTION l'OlIK KI-.IHII(I.I.I'" KIS()llES LJEL[(TROt."
AJTI·.\JTION l'OlIK KI-.IHII(I.I.I'" KIS()llES LJEL[(TROt."
AJTI·.\JTION l'OlIK KI-.IHII(I.I.I'" KIS()llES LJEL[(TROt."
RETIKE/. l'A'lI.1:
l'AI'(lT
('\;I
1.1:
Rn
IRU: PA"ITeM't),.
Rn
IRU: PA"ITeM't),.
Rn
IRU: PA"ITeM't),.
Rn
IRU: PA"ITeM't),.
I.'APPAREI!.. I\UrU;\J1;
I:APP,\RI·]I../\lr~l;
I:APP,\RI·JI../\lr~l;
I:APP,\RI·]I../\lr~l;
I:APP,\RI·JI../\lr~l;
POL'K
nlU
I
PO!.:R
rou
I
PO!.:R
rou
I
PO!.:R
rou
I
PO!.:R
rou
I
, ,
...
_-
~::::::=-=--=--=-=-~~~~----
~::::::=-=--=--=-=-~~~~----
~::::::=-=--=--=-=-~~~~----
~::::::=-=--=--=-=-~~~~----
•
•
Les
It-ntes
Les
It'llleselles
•
Les
It'llleselles
•
Les
It'llleselles
•
Les
It'llleselles
AllndeganllltirIcbon
AfindegarantirIebon
AfindegarantirIebon
AfindegarantirIebon
AfindegarantirIebon
ni
COllvertes,
ni
ni
ni
ni
cou
vcnes.
cou
vcnes.
cou
vcnes.
cou
vcnes.
-Nccouncz
~
I'\e
com
rez
~
I'\e
com
rez
~
I'\e
com
rez
~
I'\e
com
rez
-
Ne
Ics
obstrucz
~
Nt:'
les
obstruez
~
Nt:'
les
obstruez
~
Nt:'
les
obstruez
~
Nt:'
les
obstruez
-
Ne
plaea
~
Ne
placa
~
Ne
placa
~
Ne
placa
~
Ne
placa
est
prevue.
eSI
prevue.
eSI
prevue.
eSI
prevue.
eSI
prevue.
• InswllezIeproduilt.'11
• InstallezIeproduit
• InstallezIeproduit
• InstallezIeproduit
• InstallezIeproduit
* Tclcviscurs
* Tcleviscurs
* Televiscurs
* Tcleviscurs
* Televiscurs
* Appareils
* Appareils
* Appareils
* Appareils
* Appareils
*
Aulres
*
Autres
*
Autres
*
Autres
*
Autres
•Nepl"eez
•Neplaeez
•Neplaeez
•Neplaeez
•Neplaeez
11ll11icrc
direcledusolei!.
lUl11iere
directcdusolei!.
lUl11iere
directcdusolei!.
lUl11iere
directcdusolei!.
lUl11iere
directcdusolei!.
Nc
placcz
•
•Neplaeez
•Neplaeez
•Neplaeez
•Neplaeez
• N'exposez
• N'cxposez
• N'cxposez
• N'cxposez
• N'cxposez
bacdelavage,
bacdelavage.unsOlis-sol
bacdelavage.unsOlis-sol
bacdelavage.unsOlis-sol
bacdelavage.unsOlis-sol
illllllcdiatelllentlln revenckur
immcdiatemenlUIl
immcdiatemenlUIl
immcdiatemenlUIl
immcdiatemenlUIl
•
eet
appareil
•
eet
appareil
•
eet
appareil
•
eet
appareil
•
eet
appareil
mcsures speciriques
mesures
spetifiquesderecuperation
mesures
spetifiquesderecuperation
mesures
spetifiquesderecuperation
mesures
spetifiquesderecuperation
la
mise
all
la
mise
all
la
mise
all
la
mise
all
la
mise
all
•
EvitezdesurchargeI'
•
Evilezdesurcharger
•
Evilezdesurcharger
•
Evilezdesurcharger
•
Evilezdesurcharger
•
Les
cordons d'alimclllation doiwlll clrc dcroulcsdesorte qu'aucull objet
o
Les
cordons d'alirncnlalion doivent etre deroulesdesorte qu'aucun
o
Les
cordons d'alirncnlalion doivent etre deroulesdesorte qu'aucun
o
Les
cordons d'alirncnlalion doivent etre deroulesdesorte qu'aucun
o
Les
cordons d'alirncnlalion doivent etre deroulesdesorte qu'aucun
Aceordez lllll;'
Accordez line allcntion
Accordez
Accordez line allcntion
Accordez
En
cas d'orage,
•
•Encas
d'oragc. Oll
•Encas
d'oragc.
•Encas
d'oragc. Oll
•Encas
d'oragc.
prise muralectdCbrancht:lt.'gak'lllclll
prise
muralcCIdCbranchez
prise
muralcCIdCbranchez
prise
muralcCIdCbranchez
prise
muralcCIdCbranchez
ecs
precautions cvileronl
Ccs
precautions cvilcront
Ccs
precautions cvilcront
Ccs
precautions cvilcront
Ccs
precautions cvilcront
AvantderaecorderIecordon cralimenlatiollCAilia
•
•
•
•
•
AvanlderaccorderIecordon d'alimemation
AvanlderaccorderIecordon d'alimemation
AvanlderaccorderIecordon d'alimemation
AvanlderaccorderIecordon d'alimemation
bien
a
la
lension
bienala
lens
bienala
lens
bienala
lens
bienala
lens
• N'inserez
aueun
• N'inserez
aueun
• N'inserez
aueun
• N'inserez
aueun
• N'inserez
aueun
Alin
d'eviler
•
Ann
d'eviler
Ann
d'eviler
Ann
d'eviler
Ann
d'eviler
•
•
•
•
Selllunt('chnicien qualili0
Seuluntechnicien qualitie
Seuluntechnicien qualitie
Seuluntechnicien qualitie
Seuluntechnicien qualitie
•
AssLlrez~vous
• Assurez-vous
• Assurez-vous
• Assurez-vous
• Assurez-vous
Ne
tOllchezenaucune
Ne
louchezenaucune cireonstanceIecordon d'alirnentJtion
Ne
louchezenaucune cireonstanceIecordon d'alirnenwtion
Ne
louchezenaucune cireonstanceIecordon d'alirnentJtion
Ne
louchezenaucune cireonstanceIecordon d'alirnenwtion
•SiI'appareillle
•
•
•
•
Si
l'appareilnefonctionnepas
Si
l'appareilnefonctionnepas
Si
l'appareilnefonctionnepas
Si
l'appareilnefonctionnepas
contactezunrevendeurouun
conlaClezunrevendeur auuncentrededepannage agree.
conlaClezunrevendeur auuncentrededepannage agree.
conlaClezunrevendeur auuncentrededepannage agree.
conlaClezunrevendeur auuncentrededepannage agree.
•
Veillez11bien
•
•
•
•
Veillezitbien
Veillezitbien
Veillezitbien
Veillezitbien
periode
assez
periode
assez
periode
assez
periode
assez
periode
assez
- L'accumulation
- L'aecumulationdepoussieres
- L'aecumulationdepoussieres
- L'aecumulationdepoussieres
- L'aecumulationdepoussieres
dl!ades
variations
dllades
varialions
dllades
varialions
dllades
varialions
dllades
varialions
•
Veillez
acontacter
•
•
•
•
Veillezitcon
Veillezitcon
Veillezitcon
Veillezitcon
exposeitdes
exposeitdes
exposeitdes
exposeitdes
exposeitdes
aeroports.
aeropons.
aeropons.
aeropons.
aeropons.
•
UtiliseI'
uniquemcllI
•
Uliliser
uniquemclll
•
Uliliser
uniquemclll
•
Uliliser
uniquemclll
•
Uliliser
uniquemclll
-Unsol
inadaplc
~
Un
sol
inadaplc
~
Un
sol
inadaplc
~
Un
sol
inadaplc
~
Un
sol
inadaplc
•
Pour
dcconneeter I'appareildusecteur,laprise
•
Pour
dcconneclcr
•
Pour
dcconnectcr
•
Pour
dcconneclcr
•
Pour
dcconnectcr
etreenctatdemarc
etreenctatdemarc
etreenctatdemarc
etreenctatdemarc
etreenctatdemarc
• Uliliser
ulliquclIlelll
•
Uliliscr
uniquemem
•
Uliliscr
uniquemem
•
Uliliscr
uniquemem
•
Uliliscr
uniquemem
•
Rangez
les
• Rangel
Irs
• Rangel
Irs
• Rangel
Irs
• Rangel
Irs
• N'installez
• N'inslallez
• N'inslallez
• N'inslallez
• N'inslallez
•
Ne
l~litt:s
ni
•
•
•
•
Ne
faitesnitomber,nisubirdeehocauprodllil.SiIe
Ne
faitesnitomber,nisubirdeehocauprodllil.SiIe
Ne
faitesnitomber,nisubirdeehocauprodllil.SiIe
Ne
faitesnitomber,nisubirdeehocauprodllil.SiIe
de
services.
de
services.
de
services.
de
services.
de
services.
• Dcbranchez
o Debranehez
o Debranehez
o Debranehez
o Debranehez
chimique.
chimique,
chimique,
chimique,
chimique,
CcIa
petit
t:ndonllnagcr I'aspcctuuc1Taccr
Ceta
peut
endol1llllJger
Ceta
peut
endol1llllJger
Ceta
peut
endol1llllJger
Ceta
peut
endol1llllJger
• L'appareilne
o L'apparcilnc
o L'apparcilnc
o L'apparcilnc
o L'apparcilnc
Nc
jctcz
pas
Nc
jctez
pas
Nc
jctez
pas
Nc
jctez
pas
Nc
jctez
pas
•
o
o
o
o
•Necourt-cireuitel
•
Nc
courl~circuitt'z
•
Nc
court~circuitt'z
•
Nc
courl~circuitt'z
•
Nc
court~circuitt'z
•
UI.l
risque d'cxplosion survienlsila
•Unrisque
d'cxplosion survielll
•Unrisque
d'cxplosion survielll
•Unrisque
d'cxplosion survielll
•Unrisque
d'cxplosion survielll
me me
type.
me
me
Iype.
me me
type.
me
me
Iype.
me me
type.
•
AYERTISSEMENT
• AVERTISSEMENT· POUR
• AVERTISSEMENT· POUR
• AVERTISSEMENT· POUR
• AVERTISSEMENT· POUR
BOUGIESOUll'AUTRES
BOUClES OU ll'AUTRES SOURCES IlE n:u.
BOUClES OU ll'AUTRES SOURCES IlE n:u.
BOUClES OU ll'AUTRES SOURCES IlE n:u.
BOUClES OU ll'AUTRES SOURCES IlE n:u.
l'AN~b\lI
(-';1
u:
I·A'\~b\llARRIERI::.I
(-';1
u:
I·A'\~b\llARRIERI::.I
(-';1
u:
I·A'\~b\llARRIERI::.I
(-';1
u:
I·A'\~b\llARRIERI::.I
I'll:l'I
'Jl
1'1
UI t I Kk KI:i!AKEL I'/\K
1'II;t"I.'IPI:L I I
1'II;t"I.'IPI:L I I
1'II;t"I.'IPI:L I I
1'II;t"I.'IPI:L I I
DEI'A~NMjr.
AllRr"sl./-\·OUSAUN
lJl:I'A~Nt\{ir.AI>Rr"SI-.l-\·()US
lJl:I'A~Nt\{ir.AI>Rr"SI-.l-\·()US
lJl:I'A~Nt\{ir.AI>Rr"SI-.l-\·()US
lJl:I'A~Nt\{ir.AI>Rr"SI-.l-\·()US
,-_..
t:t
les
pas
pas
pas
pas
pas
pas
pas
pas
pas
pas
dOI~s
dotes
dotes
dotes
dotes
produils
prodllils
prodllils
prodllils
prodllils
pas
I'apparcil<Iproximitcouilu·c1csSllS
P(lS I'appareil
P(lS
I'appareil,iproximite
P(lS I'appareil
P(lS
I'appareil,iproximite
aueun
(lueun
(lueun
(lueun
(lueun
pas
pas
pas
pas
pas
peut
peut
peut
peut
peut
rebulouIe
rebut
rebutouIe
rebut
rebutouIe
i.l1l(,lltiol1
line
allcntion
line
allcntion
ion
ion
ion
ion
toul
loul
loul
loul
loul
de
de
de
de
de
debrancher
debrancherIecordoll
debrancherIecordoll
debrancherIecordoll
debrancherIecordoll
longue
longue
longue
longue
longue
laCieruncenlredesen
laCieruncenlredesen
laCieruncenlredesen
laCieruncenlredesen
temperatures cleveesouraibks oll;i
temperaturt's eleveesoufaiblesou,i
temperaturt's eleveesoufaiblesou,i
temperaturt's eleveesoufaiblesou,i
temperaturt's eleveesoufaiblesou,i
les
gares. CIC.
les
garcs.
les
garcs.
les
garcs.
les
garcs.
accessoires (batlerie,
accessoires (balterie. etc.)
accessoires (balterie. etc.)
accessoires (balterie. etc.)
accessoires (balterie. etc.)
pasIeproduil
pasIeproduil
pasIeproduil
pasIeproduil
pasIeproduil
tomber,nisubird~chocauproduil.SiIe
Ie
corool1
Ie
cordon
Ie
cordon
Ie
cordon
Ie
cordon
tcls
que
tcls
quedela
tcls
quedela
tcls
quedela
tcls
quedela
doit
doit
doit
doit
doit
Ics
Ics
Ics
Ics
Ics
_.~-
ouvcrtun:s
1llcnagces
ouvertures mcnagees
ouvertures menagees
ouvertures mcnagees
ouvertures menagees
fonetionncll1cntdcI'apparcilClevilcr
fonclionnementdeI'appareilelt:vitcr
fonclionnementdeI'appareilelt:vitcr
fonclionnementdeI'appareilelt:vitcr
fonclionnementdeI'appareilelt:vitcr
les
Icnh:s
t:t
les
les
lellleSetles
les
lellleSetles
les
lellleSetles
les
lellleSetles
pas
nOll
plusenplacalll I'appareil
pas
non
plusenplar;am
pas
non
plusenplar;am
pas
non
plusenplar;am
pas
non
plusenplar;am
I'appareil dansunenvironncmeIH
I'apparcil
dansunenvironnemcm
I'apparcil
dansunenvironnemcm
I'apparcil
dansunenvironnemcm
I'apparcil
dansunenvironnemcm
l1lai11ll.'nanlUne
t:1l Illaintenant
t:1l Illaintenant
t:1l Illaintenant
t:1l Illaintenant
DLP,
lel~vist.,urs
DLP,
DLP,
DLP,
DLP,
I'apparcil nlapluicctneIcplaccz pas;]
l'appJrcil JIJpluicctnl'Ieplaeez
l'appJrcil JIJpluicctnl'Ieplaeez
l'appJrcil JIJpluicctnl'Ieplaeez
l'appJrcil JIJpluicctnl'Ieplaeez
lin
Oll
Oll
Oll
fonctionnepas
bauaies
battcries all
battcries all
battcries all
battcries all
de
te!evist::ursdetype
teJeviseursdetype
te!evist::ursdetype
teJeviseursdetype
d'ull
reran
32"
d'UIl
rcran
32"
d'UIl
rcran
32"
d'UIl
rcran
32"
d'UIl
rcran
32"
--4em
- 4
em
- 4
em
- 4
em
- 4
em
,i
proximite
,i
proximite
rccipient (vases etc.) d'cau sur I'appan:il car
rccipient (vases etc.) d'eall sur I'appareil car cda
recipient (vases etc.) d'eall sur I'appareil car cda
rccipient (vases etc.) d'eall sur I'appareil car cda
recipient (vases etc.) d'eall sur I'appareil car cda
sous·sol
hum
ide,
humidc.
humidc.
humidc.
humidc.
i.l!!rce.
revendeur
agree.
revendeur
agree.
revendeur
agree.
revendeur
agree.
ronctionnt.:r
stir
pill'S.
fonclionner sur
pilt'S.
fonclionner sur
pilt'S.
fonclionner sur
pilt'S.
fonclionner sur
pilt'S.
de
recuperalion
rec)'clag('
dl'S
ouIerecyclage
des
recyclage
des
ouIerecyclage
des
recyclage
des
les
prises Illurales,
les
prises
murales.
les
prises
murales.
les
prises
murales.
les
prises
murales.
particulicn:
pal1iculierc
pal1iculierc
pal1iculierc
pal1iculierc
bicn
lorsquc VOliS VOliS absenlezoun'utiliscz
bien
lorslJue
vous
bien
lorslJue
vous
bien
lorslJue
vous
bien
lorslJue
vous
egalementIecable
egalementIecable
egalementIecable
egalementIecable
qut.'
rappareilnc
quc
I'appareilnesoit
quc
I'appareilnesoit
quc
I'appareilnesoit
quc
I'appareilnesoit
dclivn?c
parIerCst.:au
dcliHee
parIereseau
dcliHee
parIereseau
dcliHee
parIereseau
dcliHee
parIereseau
objctl11~tallique
objclmclal1iquc
objclmclal1iquc
objclmclal1iquc
objclmclal1iquc
bien
bien
bien
bien
bien
dans
dans
dans
dans
dans
risquc
d'~1cctroculion,
risque d'elcClrocution.nemcttezjamaisksdoiglsitI'interieurdeI'appareil.
risque d'elcClrocution.nemcttezjamaisksdoiglsitI'interieurdeI'appareil.
risque d'elcClrocution.nemcttezjamaisksdoiglsitI'interieurdeI'appareil.
risque d'elcClrocution.nemcttezjamaisksdoiglsitI'interieurdeI'appareil.
est
hnbilih~
est
habilitcituuvrirIeboitierdel'apparcil.
est
habilitcituuvrirIeboitierdel'apparcil.
est
habilitcituuvrirIeboitierdel'apparcil.
est
habilitcituuvrirIeboitierdel'apparcil.
bwnchcrIecordon d'nlimentation. Assurez-vollsdebien
brancherIecordon d'alimentation. Assurez-vousdebien
brancherIecordon d'alimentation. Assurez-vousdebien
brancherIecordon d'alimentation. Assurez-vousdebien
brancherIecordon d'alimentation. Assurez-vousdebien
circonsranccIecordon d'nlimentalion
nornwlel1lent,enparticlllier s'il
normalement.enpaniculier s'il
normalement.enpaniculier s'il
normalement.enpaniculier s'il
normalement.enpaniculier s'il
centre
It,
cordon
(et
plus
specialelllt:lltsides
(el
plus
specialementsides
(el
plus
specialementsides
(el
plus
specialementsides
(el
plus
specialementsides
de
poussicres
peUi
peut
peut
peut
peut
cit:
tension.
line
dl:'
lens
ion.
une
dl:'
lens
ion.
une
dl:'
lens
ion.
une
dl:'
lens
ion.
une
un
ccntr('deservices homologue lorsquc
Si
VOliS
nl'Ie!'ailes
CIC.SivousneIe
CIC.SivousneIe
CIC.SivousneIe
CIC.SivousneIe
des
priscs
eorreclclll..:nt
des
priscs correclcmcnl
des
priscs correclcmcnl
des
priscs correclcmcnl
des
priscs correclcmcnl
pellt
causer Ull choc
peut
causerunchoc
peut
causerunchoc
peut
causerunchoc
peut
causerunchoc
I'apparcilduseClcULlaprise
I'apparcilduseClcULlaprise
I'apparcilduseClcULlaprise
I'apparcilduseClcULlaprise
he.
he.
he.
he.
he.
d('s
prises correctellleni
des
priscs eorrectcmcnl rdices~la
des
priscs eorrectcmcnl rdices~la
des
priscs eorrectcmcnl rdices~la
des
priscs eorrectcmcnl rdices~la
t.:tc.)
sur
(Jile
surl~lCe
sur
une
surl~lCe
sur
une
surl~lCc
sur
une
surl~lCe
sur
une
surl~lCc
d'alimcmalioll
d'alilllemaliondela
d'alilllemaliondela
d'alilllemaliondela
d'alilllemaliondela
cle
Iii
eire,
till
bcnl.cne,
eire.dubent:t:lll'.
eire.dubent:t:lll'.
eire.dubent:t:lll'.
eire.dubent:t:lll'.
l'aspecloue1Tact'r
l'aspecloue1Tact'r
l'aspecloue1Tact'r
l'aspecloue1Tact'r
pas
etre
Cxros~
;ll'hulllioitl'niaux
pas
etre expose j rhu1Iliditeniau."
pas
etre expose j rhu1Iliditeniau."
pas
etre expose j rhu1Iliditeniau."
pas
etre expose j rhu1Iliditeniau."
all
!Cu.
teu.
teu.
teu.
teu.
pasnine
d~sasselllhlez
pasnine
desass\.'lllblezkshallerir.:s
pasnine
desass\.'lllblezkshallcrir.:s
pasnine
desass\.'lllblezkshallerir.:s
pasnine
desass\.'lllblezkshallcrir.:s
siIahattcrit:
siIahattcrit:
siIahattcrit:
siIahattcrit:
·I'OUR
tYITER
tVITER
tVITER
tVITER
tVITER
SOUllCES
TIO'J.l\l
AI(KIEKl:1 A
l.'I~TI·RrUIR
1)1:
A
L'I''TERIITR
1>1:
A
L'I''TERIITR
1>1:
A
L'I''TERIITR
1>1:
A
L'I''TERIITR
1>1:
r'L
n(l~
n(l~
n(l~
n(l~
ouvcrtures
ouverlures
ouverlures
ouverlures
ouverlures
une
une
une
une
type
Oll
ou
ou
ou
ou
ou
ou
ou
ou
une
line
line
line
line
Assurcz·youS
Assurez~vous
Assurez~vous
Assurez~vous
Assurez~vous
des
des
des
des
des
piles.
piles.
piles.
piles.
piles.
:JUX
aux
aux
aux
aux
d('
d'alimentation
d'alimentationsila
d'alimentationsila
d'alimentationsila
d'alimentationsila
provoquer llllC electrocution, llllC pene d'energie,ouun
provoquer
provoquer
provoquer
provoquer
surchaulli:
surchaulTcouune
surchaulTcouune
surchaulTcouune
surchaulTcouune
ices
ices
ices
ices
hnllerie
IJLlSAI U
REPAREI.
PI\R
I'll
REPAREI.
REPAREI.
REPAREI.
AUNSPECIALl'\11..
AUNSPECIALl'\11..
AUNSPECIALl'\11..
AUNSPECIALl'\11..
dansIeboilier ainsi
dansIeboilier ainsi
dansIeboilier ainsi
dansIeboilier ainsi
dansIeboilier ainsi
plus-+5 Clll
plus
plus
plus
plus
vous
vous
vous
vous
fait~s
fait~s
fait~s
fait~s
~leclri4ue
eleclriquc ouunillcclldic.
eleclriqucouun
eleclriquc ouunillcclldic.
eleclriqucouun
dansun('ndroil
d<l1lsunendroil
d<l1lsunendroil
d<l1lsunendroil
d<l1lsunendroil
d..:laprisc
]US,\]]-I
PI\R
I'll
JUS,\J]-I
PI\R
I'll
]US,\]]-I
PI\R
I'll
JUS,\J]-I
SI't-:l'IALI'iII..
.
---
qU'~1
qu'a
qu'a
qu'a
qu'a
lcs
les
les
les
avec
avecunmorceaudetissuoutoUl
avecunmorceaudetissuoutoUl
avecunmorceaudetissuoutoUl
avecunmorceaudetissuoutoUl
I'appareil
I'appareil
I'appareil
I'appareil
distance
distance correcte
distance correcte
distance correcte
distance correcte
DireL'1
Direct
Direct
Direct
Direct
- 5
- 5
- 5
- 5
au~desslls
au~desslls
au~desslls
au~desslls
piscine,
piscinc.
piscinc.
piscinc.
piscinc.
Dans
DansunSOUcideprcserv<ltioll
DansunSOUcideprcserv<ltioll
DansunSOUcideprcserv<ltioll
DansunSOUcideprcserv<ltioll
piles usagees.Veuil!ez
piles usagees.Vcuillez
piles usagees.Vcuillez
piles usagees.Vcuillez
piles usagees.Vcuillez
les
rallongcsetIcs
Irs
rallongcsetIl:s
Irs
rallongcsetIl:s
Irs
rallongcsetIl:s
Irs
rallongcsetIl:s
cordonsaunivl'Ju
cordonsauniveau
cordonsauniveau
cordonsauniveau
cordonsauniveau
abscnh:z
abscnh:z
abscnh:z
abscnh:z
1<.'
cable
Soil
CA
CAitla
CA
CAitla
~Icctrique
electrique
electrique
electrique
electrique
Ics
Ollvcrturcs
les
ouvenuresdel'apparei!.
les
ouvenuresdel'apparei!.
les
ouvenuresdel'apparei!.
les
ouvenuresdel'apparei!.
ne
rneu('zjamais
,1
uLlvrirIebailierdel·appareil.
depannage
homologue
homologue
homologue
homologue
pas,
pas.
pas.
pas.
pas.
reli~cs
reli~es
reli~es
reli~es
reli~es
relict.'s,ila
instable
illswblc
illswblc
illswblc
illswblc
prise
prise
prise
prise
cle
I'all.:ool.dutlilualll,OCI·ins..:cticide,dudesodorisanLduluoriliarHoudll
dL'
I'alcool.duJiluant.deI'
dL'
I'alcool.duJiluant.deI'
dL'
I'alcool.duJiluant.deI'
dL'
I'alcool.duJiluant.deI'
1';ll1prL'ssinl1
l'ill1prl'ssiun
l'ill1prl'ssiun
l'ill1prl'ssiun
l'ill1prl'ssiun
It:s
L'st
l'st
l'st
l'st
l'st
TOUT
TOUT
TOUT
TOUT
TOUT
IlE FEU.
les
llll
Illorceau
surunlit.
surunlit.
surunlit.
surunlit.
surunlit.
elos
lcl
qu'une bibliothcqllc Ollllnc annoirc
c10s
tel
qu'unl' bibliolhequc Ollllne annoire encaslree. saufsi
c10s
tel
qu'unl' bibliolhequc Ollllne annoire encaslree. saufsi
c10s
tel
qu'unl' bibliolhequc Ollllne annoire encaslree. saufsi
c10s
tel
qu'unl' bibliolhequc Ollllne annoire encaslree. saufsi
correCle
avecIeIllur
avecIell1ur
avecIell1ur
avecIell1ur
avecIell1ur
View
('I
projccl('urs
Viewetprojectcurs10elll
Viewetprojectcurs10elll
Viewetprojectcurs10elll
Viewetprojectcurs10elll
Clll
Clll
Clll
Clll
crun
racliateur
d'ull radiateuraud'une
d'ull radiateuraud'une
d'ull radiateuraud'une
d'ull radiateuraud'une
proxilllit~
pas
aproximitc
pas
aproximitc
pas
aproximitc
pas
aproximitc
etc,SiI'app arcil
ctc.SiI'app
areil
ctc.SiI'app
areil
ctc.SiI'app
areil
ctc.SiI'app
areil
que
II.:
cordon
quekcordon
quekcordon
quekcordon
quekcordon
lIlI
soutideprcservntion
priscs
prises
prises
prises
prises
des
des
des
des
des
Oll
n'lIIilisez
Oll
n'lIIilisez
Oll
n'lIIilisez
Oll
n'lIIilisez
d'anlCIllIi:
uuIecordon
d'<!llIenne
Oll
Ie
d'<!llIenne
Oll
Ie
d'<!llIenne
Oll
Ie
d'<!llIenne
Oll
Ie
t:lldollll1lag~
parlafUlldre
endomlllag~
parlaIOlldre
endomlllag~
parlaIOlldre
endomlllag~
parlaIOlldre
endomlllag~
parlaIOlldre
prisedeI'a(h!ptatcur Cc. v('rifiez
it
la
prisedel'adaptaleur ce,
prisedel'adaptaleur ce,
it
la
prisedel'adaptaleur ce,
prisedel'adaptaleur ce,
locnl.
local.
local.
local.
local.
de I'appareil.
les
doigts{Il'interiellrdeI"appareil.
awe
avec
avec
avec
avec
a~rc(~.
si
1:1
television
Icle\'isioll
Icle\'isioll
Icle\'isioll
Icle\'isioll
cnfants,
des
pcrsonnes
enranls.
des
pcrsonncs
enranls.
des
pcrsonncs
enranls.
des
pcrsonncs
enranls.
des
pcrsonncs
une
electroculion.
une
electroculion.
une
electroculion.
une
electroculion.
Oll
lITle
deteriorationdeI'isolation.
deleriorationdeI'isolation.
deleriorationdeI'isolation.
deleriorationdeI'isolation.
deleriorationdeI'isolation.
vous
lorsque
vous
lorsque
vous
lorsque
vous
lorsque
vous
d('s
produils chimiques.
des produits chimiques. Oll s'illonctionne sans illlerruplioll.
des produits chimiques. Oll s'illonctionne sans illlerruplioll.
des produits chimiques. Oll s'illonctionne sans illlerruplioll.
des produits chimiques. Oll s'illonctionne sans illlerruplioll.
vous
risqul'Z
vous
risqul'Z
vous
risqul'Z
vous
risqul'Z
vous
risqul'Z
a
la
terre.
it
la
lerre.
it
la
lerre.
it
la
lerre.
it
la
lerre.
ouunincendie. (ApparcilsdeCLASSE I
illcclldic.
illcclldic.
doit
elrt:
dChranch~e
doit
eire
dehranch~c
doit
eire
dehranch~c
doit
eire
dehranch~c
doit
eire
dehranch~c
terrt:.
lerrc.
lerrc.
lerrc.
lerrc.
sllr,
hoI'S
sur,
hoI'S
sur,
hoI'S
sur,
hoI'S
sur,
hoI'S
tellc
qll'LIllt.'
0tagcre
tdle
qU'Ulll'
~tagCrt':
tdle
qU'Ulll'
~tagCrt':
tdle
qU'Ulll'
~tagCrt':
tdle
qU'Ulll'
~tagCrt':
produit
est
produil
cst
produil
cst
produil
cst
produil
cst
seett.'ur
t.'1
('ssuye7.Ieproduil ill'aide d'un chiffon
Sl.'ct\;.'ur
l't
essuyezlcprodllil:1
Sl.'ct\;.'ur
l't
essuyezlcprodllil:1
Sl.'ct\;.'ur
l't
essuyezlcprodllil:1
Sl.'ct\;.'ur
l't
essuyezlcprodllil:1
sur I'appart'il.
sur
I'apparl'il.
sur
I'apparl'il.
sur
I'apparl'il.
sur
I'apparl'il.
0dahoussures.
0dahullssures.
0dahullssures.
0dahullssures.
0dahullssures.
hallerit:s
etnL'
ks
elllL'ksSllulllettL't:
elllL'ksSllulllettL't:
elllL'ksSllulllettL't:
elllL'ksSllulllettL't:
rt:plac~t.'
de
lllani0rt.'
replae~('
de
manieR'
replae~('
de
manieR'
replae~('
de
manieR'
replae~('
de
manieR'
RISQUE
ll'INCENIlIF..
RISQUE ll'INCENIlIF:.
RISQUE ll'INCENIlIF:.
RISQUE ll'INCENIlIF:.
RISQUE ll'INCENIlIF:.
c\.'
s~l1lhok
inttiquc
qu'UtlC
Cl'
s~mhok
Cl'
s~mhok
Cl'
s~mhok
Cl'
s~mhok
pr~sente
aI'itltt-ricur
it
it
it
it
presentl'
presentl'
presentl'
presentl'
a\"\.'1.:
Ulll'
a\ l'l' unt' picl'l' siltlCl'
a\ l'l' unt' picl'l' siltlCl'
a\ l'l' unt' picl'l' siltlCl'
a\ l'l' unt' picl'l' siltlCl'
est
dang\.'rcux.
rst
dangcreux.
rst
dangcreux.
rst
dangcreux.
rst
dangcreux.
Ce symbolc
Ct'
Ct'
Ct'
Ct'
symbnk
symbnk
symbnk
Ie
K.
K.
K.
K.
rarriere
el
au~dessous
I'arriere
el
au~dcssous
I'arriere
el
au~dcssous
I'arriere
el
au~dcssous
I'arriere
el
au~dcssous
risquesdesllrchaulTc,
risqu\.'sdesurchaulTc.
risqu\.'sdesurchaulTc.
risqu\.'sdesurchaulTc.
risqu\.'sdesurchaulTc.
d('
tiSSll
Oll
tOll!
Lin
c;;lllap~.
lin
L11l
canap~.
un
L11l
canap~.
un
L11l
canap~.
un
L11l
canap~.
un
(voir informal
(voir
informal
(voir
informal
(voir
informal
(voir
informal
--10Cill
()U
d'unt'
bOllCht'
DOLlCht'
bOLlCht'
DOLlCht'
bOLlCht'
cela
repr~senle
repr~senle
repr~senle
repr~senle
repr~senle
d'une
SOllrce
d'ulle
SOllrce
d'ulle
SOllrce
d'ulle
SOllrce
d'ulle
SOllrce
vientitctrc Illouille par accident. debranchez·leetcontaclez
vientitetre mouille
vientitetre mouille
vientitetre mouille
vientitetre mouille
d'alimerllatioll
d'alimenlation
d'alimenlation
d'alimenlation
d'alimenlation
dt.'
l·t.'rwironneillenl.
dt.'
l·\;.'nvironncmcnt.larcgkmerllation locak
dt.'
l·\;.'nvironncmcnt.laregkmerllation locak
dt.'
l·\;.'nvironncmcnt.larcgkmerllation locak
dt.'
l·\;.'nvironncmcnt.laregkmerllation locak
donc
con
lac
tel'
donc
contacler
donc
contacler
donc
contacler
donc
contacler
mull
iples
lllull
iples
lllull
iples
lllull
iples
lllull
iples
plact'
objet
plact:
objet
plact:
objet
plact:
objet
plact:
liches,
des
prisesetde
!ides.
des
prisesetdelasortie
!ides.
des
prisesetdelasortie
!ides.
des
prisesetdelasortie
!ides.
des
prisesetdelasortie
pas
votre appareil pendant
pas
volre
appareil pendalllune
pas
volre
appareil pendalllune
pas
volre
appareil pendalllune
pas
volre
appareil pendalllune
dt:
connexionaureseau cable.
cordondeconnexionaurescau cable.
cordondeconnexionaurescau cable.
cordondeconnexionaurescau cable.
cordondeconnexionaurescau cable.
Oll
Oll
Oll
Oll
Oll
VOliS
risqucriezderecevoir llne dechargc elt:clrique.
VOIIS
risqueriaderecevoir
VOIIS
risqueriaderecevoir
VOIIS
risqueriaderecevoir
VOIIS
risqueriaderecevoir
Ies
mains
Ics
mains
Ics
mains
Ics
mains
Ics
mains
CIllCI
des
odcurs oudes sons anormaux, dcbranchcz·Jc immcdialclIlcnt
ClllL't
des
odeurs
ClllL't
des
odeurs
ClllL't
des
odeurs
ClllL't
des
odeurs
doit
r('stct'
illlltilisee.oulorsqllc
doil
restec
inulilisee.
doil
restec
inulilisee.
doil
restec
inulilisee.
doil
restec
inulilisee.
,igees
,igeesoudes
,igeesoudes
,igeesoudes
,igeesoudes
une
pcrte d'encrgie,ouun
une
pcrte d'encrgie,ouun
une
pcrte d'encrgie,ouun
une
pcrte d'encrgie,ouun
inslallez
vOlre
installez
votre
installez
votre
installez
votre
installez
votre
Oll
d't:ndommagcr gravemelll
d'L'ndommagcr
d'L'ndommagcr
d'L'ndommagcr
d'L'ndommagcr
(AppareilsdeCLASSE11I1liqucmcllt.)
(AppareilsdeCLASSE11I1liqucmcllt.)
(AppareilsdeCLASSE11I1liqucmcllt.)
(AppareilsdeCLASSE11I1liqucmcllt.)
de
la
prise eleclriquedusecteur.
deIaprise
deIaprise
deIaprise
deIaprise
de
la portce
des
delaPOrlee
des
delaPOrlee
des
delaPOrlee
des
delaPOrlee
des
chanet.'lal11t.'.unsol
chancdal1\e.unsol
chancdal1\e.unsol
chancdal1\e.unsol
chancdal1\e.unsol
t:ndolllll1a~c,
\.'ncloIl11l1agr,
\.'ncloIl11l1agr,
\.'ncloIl11l1agr,
\.'ncloIl11l1agr,
insecticide.dud0sodorisant.duluhrifiantoudu
insecticide.dud0sodorisant.duluhrifiantoudu
insecticide.dud0sodorisant.duluhrifiantoudu
insecticide.dud0sodorisant.duluhrifiantoudu
SOUlllClt..:1. pas
pas
pas
pas
pas
incorrecle.
incorrL'elt'.
incorrL'elt'.
incorrL'elt'.
incorrL'elt'.
\'EILLEZAGARIlERCErROIlUIT
\'EILLEZ'\
\'EILLEZ'\
\'EILLEZ'\
\'EILLEZ'\
- F
ranc;ais
-
- Franc;ais -
- Franc;ais -
- Franc;ais -
- Franc;ais -
symbnk
imporWntl'
importantl'
importantl'
importantl'
importantl'
I'entrelien
1\~1l1h~lil'n
1\~1l1h~lil'n
1\~1l1h~lil'n
1\~1l1h~lil'n
_-_.
---~~':'7-:':-.':'
------
------
------
------
dt.'
I'appareil assurentlaventilationdece
de
I'appareil assurentlavenlilation
de
I'appareil assurentlavenlilation
de
I'appareil assurentlavenlilation
de
I'appareil assurentlavenlilation
ces fentesetouvcrturcsnedoiwnt
ccs
fenlcsctouvcnurcs
ccs
fenlcsctouvcnurcs
ccs
fenlcsctouvcnurcs
ccs
fenlcsctouvcnurcs
autre objet.
autre objet.
autre objet.
autre objet.
autre objet.
tapis
Oll
tOllte
alltr~
tapisoutoute autre surface
tapisoutoute autre surface
tapisoutoute autre surface
tapisoutoute autre surface
un
un
un
un
un
d'eau. par exclllple
d'eau.
d'eau.
d'eau.
d'eau.
est
est
est
est
est
les
les
les
les
les
car
cela
car
cela
car
cela
car
cela
car
cela
sur
suroucolllrc
suroucolllrc
suroucolllrc
suroucolllrc
par
par
par
par
par
verilie-z
verilie-z
verilie-z
verilie-z
tcnirlapriseenmain
lenirlapriseenmain
lenirlapriseenmain
lenirlapriseenmain
lenirlapriseenmain
1ll0uillces,
mouillecs.
mouillecs.
mouillecs.
mouillecs.
Oll
des
s'il fonctionne sans illlerruptioll, par cxemplc dans
gravemcllI
gravemcllI
gravemcllI
gravemcllI
eleclriqueduseClcur.
eleclriqueduseClcur.
eleclriqueduseClcur.
eleclriqueduseClcur.
t:nfanIS.
enfallls.
enfallls.
enfallls.
enfallls.
dcconnectczlccordon o'alimcnlalionctconWelez
dccOlllleetezlccordon d'alimclltatiolll't contJctcz
dccOlllleetezlccordon d'alimclltatiolll't contJctcz
dccOlllleetezlccordon d'alimclltatiolll't contJctcz
dccOlllleetezlccordon d'alimclltatiolll't contJctcz
I'aide
I'aide
I'aide
I'aide
il
LIIlL'
il 1I1ll' chak'ur l'.'\ccssiw.
il 1I1ll' chakur l'.'\ccssiw.
il 1I1ll' chak'ur l'.'\ccssiw.
il 1I1ll' chakur l'.'\ccssiw.
Nt:
Nt'lar(,lllplaeel.
Nt'lar(,lllplaeel.
Nt'lar(,lllplaeel.
Nt'lar(,lllplaeel.
surface apparentee.
eneastr~e,
ions
ci-dessolls).
ions
ci~dessous).
ions
ci~dessous).
ions
ci~dessous).
ions
ci~dessous).
d'air chaud,de1lI0me
d'air chaud.
cit'
d'air chaud.
cit'
d'air chaud.
cit'
d'air chaud.
cit'
risque d'incendieoude
risque d'incendieaude
risque d'incendieaude
risque d'incendieaude
risque d'incendieaude
par
cxemple
par
cxemple
par
cxemple
par
cxemple
par
accident. debranchcz·lcCICOlltaclez
par
accident. debranchcz·lcCICOlltaclez
par
accident. debranchcz·lcCICOlltaclez
par
accident. debranchcz·lcCICOlltaclez
dcbranchc avant
dcbranchc
avant
dcbranchc
avant
dcbranchc
avant
dcbranchc
avant
1<1
rcgklllcntation
alltorites
compClentcs
autorites
eOlllpctcnlcs
autorites
eOlllpctcnlcs
autorites
eOlllpctcnlcs
autorites
eOlllpctcnlcs
entraint'
lin
risque
e11lraineunrisque
e11lraineunrisque
e11lraineunrisque
e11lraineunrisque
Oll
cOlltn?
ellxncIt'S
euxneks
euxneks
euxneks
euxneks
1:J
sortiedeI"appareil.
de
de
de
de
une
longue periode,
longue
longue
longue
longue
des
surtensions.
des
surtensions.
des
surtensions.
des
surtensions.
des
surtensions.
quelatension
quelalens
quelalens
quelalens
quelalens
une
une
une
une
oudes
sons
anorl11aux.
oudes
sons
anorl11aux.
oudes
sons
anorl11aux.
oudes
sons
anorl11aux.
VOLIS
011
lorsque
\OUS
011
lorsque
\OUS
011
lorsque
\OUS
011
lorsque
\OUS
majeurs
incapables doiwnl rester
majeurs
incapable:;
majeurs
incapable:;
majeurs
incapable:;
majeurs
incapable:;
incendie
incendie
incendie
incendie
incendie
tclcviseur dansunendroit
tcleviseur dans
lin
televiseur dansunendroit
tcleviseur dans
lin
televiseur dansunendroit
volre
t&10viscur.
\'olre
h~ICvisCLIr.
\'olre
h~ICvisCLIr.
\'olre
h~ICvisCLIr.
\'olre
h~ICvisCLIr.
uniqllemClll.)
non
horizolltal ouun
non
horizontal
non
horizontal
non
horizontal
non
horizontal
(\'lIn
chiffon
(\'lIn
chiffon
(\'lIn
chiffon
(\'lIn
chiffon
chak'ur L'xl't:ssiw.
III
rClllplacel.
tlu'avec
qu'avct::
qu'avce
qu'avct::
qu'avce
GARIlER
GARIlER
GARIlER
GARIlER
1I.:llSitlil
imlitlUl' qu'unt'
imlitlUl' qu'unt'
imlitlUl' qu'unt'
imlitlUl' qu'unt'
d\.'
I'apparcil.
J'illt~r;eur
Jl' I'apparei!.
J'illt~r;eur
Jl' I'apparei!.
J'illt~r;eur
Jl' I'apparei!.
J'illt~r;eur
Jl' I'apparei!.
piCl'l'
si(uc\.'
;'1
l'itltt-ri\.'L1r
:'t
I'intt:ril'ur de cet apparl'il
:'t
I'intt:ril'ur de cet apparl'il
:'t
I'intt:ril'ur de cet apparl'il
:'t
I'intt:ril'ur de cet apparl'il
\'OUS
prl'\'iClll
qU'Utll'
\OUS
pr~\";enl
qu'ullc documentatinn
\OUS
pr~\";enl
qu'ullc documentatinn
\OUS
pr~\";enl
qu'ullc documentatinn
\OUS
pr~\";enl
qu'ullc documentatinn
relatin'auti,mc(iunlll.'lI\cnt
rdali\cauli.ml:lionnClIll'llt d
rdali\cauli.ml:lionnClIll'llt d
rdali\cauli.ml:lionnClIll'llt d
rdali\cauli.ml:lionnClIll'llt d
\.'$1
fOllrnie
,l\eek'prod\liL
cst fOllm;e
aH'C
It'
cst fOllm;e
aH'C
It'
cst fOllm;e
aH'C
It'
cst fOllm;e
aH'C
It'
nl"
nl"
nl"
nl"
app<lrl'lllce.
app<lrl'lllce.
app<lrl'lllce.
app<lrl'lllce.
saufsi
line
line
line
line
line
que
Jansuncndroitl,:XpOSc~lla
m0me
que
Jansunendroil expose,ila
m0me
que
Jansunendroil expose,ila
m0me
que
Jansunendroil expose,ila
m0me
que
Jansunendroil expose,ila
dechargc dectriquL'.
dechJrgc
dechJrgc
dechJrgc
dechJrgc
une
bai~noire.
un
une
baignairc,unlavabo.
une
baignairc,unlavabo.
une
baignairc,unlavabo.
une
baignairc,unlavabo.
dt'
netloyerIeproduil.
dt'
nettoyerIeproduit.
dt'
nettoyerIeproduit.
dt'
nettoyerIeproduit.
dt'
nettoyerIeproduit.
locnlc
<llin
d'oblcnir
alin d'oblcnir
alin d'oblcnir
alin d'oblcnir
alin d'oblcnir
d'inct.'ndi<.'
Ollded0charge
d'incL'ndieoude
d'incL'ndieoude
d'incL'ndieoude
d'incL'ndieoude
chcvauche Oll
cheval/che Oll
cheval/che
cheval/che Oll
cheval/che
rappar~i1.
rappar~i1.
rappar~i1.
rappar~i1.
d~branchc7.
periode.
dc5branchez
periode.
dc5branchez
periode.
dc5branchez
periode.
dc5branchez
indiqll~e
surceoernicr com:spond
ion
indiqu~t.'
surccdemit.'r
ion
indiqu~t.'
surccdemit.'r
ion
indiqu~t.'
surccdemit.'r
ion
indiqu~t.'
surccdemit.'r
de-charge
eleclriquc.
de-chargc
eleclriquc.
de-charge
eleclriquc.
de-chargc
eleclriquc.
lorsque
vous
la
lorsque
vousladebranchcz.
lorsque
vousladebranchcz.
lorsque
vousladebranchcz.
lorsque
vousladebranchcz.
dCbrancha-le
dCbrancha-le
dCbrancha-le
dCbrancha-le
quilla
votre
domicile,
quittl'Z
vOlre
domicile.
quittl'Z
vOlre
domicile.
quittl'Z
vOlre
domicile.
quittl'Z
vOlre
domicile.
doivenl
restt:r
doivenl
restt:r
doivenl
restt:r
doivenl
restt:r
induit
parIecordon d'alimentation.
induil
parIecordon d'alimenlation.
induil
parIecordon d'alimenlation.
induil
parIecordon d'alimenlation.
induil
parIecordon d'alimenlation.
tres
poussicrellx,
endroit
Ires
poussicreux.
Ires
poussicreux.
endroit
Ires
poussicreux.
Ires
poussicreux.
par
par
par
par
Par
consequent.laprisedust:cleur
Par
cOllseqUL'llt.laprisedusl:'cteur
Par
cOllseqUL'llt.laprisedusl:'cteur
Par
cOllseqUL'llt.laprisedusl:'cteur
Par
cOllseqUL'llt.laprisedusl:'cteur
t:lldroil
OUUIl
elldroit
OUUIl
clldroit
OUUIl
elldroit
OUUIl
clldroit
dOlI.\:els..:c.
N'utilisCl
dOLI."etSL'C.
N'utilisez
dOLI."etSL'C.
N'utilisez
dOLI."etSL'C.
N'utilisez
dOLI."etSL'C.
N'utilisez
1II1t.'
haltt:rit.'
lIIll'
hath.:ril'
lIIll'
hath.:ril'
lIIll'
hath.:ril'
lIIll'
hath.:ril'
CE PROIlVIT
CE PROIlVIT
CE PROIlVIT
CE PROIlVIT
~1c\Cl'
kll~itlll
~k\t:l'
kll~itlll
~k\t:l'
kll~itlll
~k\t:l'
kll~itlll
~k\t:l'
TnlllC0l11:lct
THill
\:lll1!<lct
THill
\:lll1!<lct
THill
\:lll1!<lct
THill
\:lll1!<lct
tt\.'Cdapp:l1'cil
dllUlInt'll(iltinn
\:(
~'l
it
it
it
it
produil.
produil.
produil.
produil.
_ . _
-----
-----
-----
-----
dec~demier.
dec~demier.
dec~demier.
dec~demier.
eire:
ni
doinnt
etreniobstruees
doinnt
etreniobstruees
doinnt
etreniobstruees
doinnt
etreniobstruees
ventilation adequate
vcnlilation
vcnlilation
vcnlilation
vcnlilation
\;.;Icctriqw:.'.
\;.;Icctriqw:.'.
\;.;Icctriqw:.'.
\;.;Icctriqw:.'.
lavabo,
un
Ull
Ull
Ull
Ull
prcvoil
pClIt-etre
prcvoit
pCllt~elre
prevoit
pCllt~elre
prcvoit
pCllt~elre
prevoit
pCllt~elre
dt:s
informations
d~s
informations
d~s
informations
d~s
informations
d~s
informations
d0charg~
d0charg~
d0charg~
d0charg~
les
pincl'.
les
pince.
Oll
les
pince.
les
pince.
Oll
les
pince.
cclui-cidela
cdui~ci
cdui~ci
cdui~ci
cdui~ci
corre-spond
corre-spond
corre-spond
corre-spond
d~branchez.
iltllllCdialcmcm
iltllllCdialcmcm
iltllllCdialcmcm
iltllllCdialcmcm
pendant
pendanl
pendanl
pendanl
pendanl
seul,ivolre
seul;]
\'otre
seul;]
\'otre
seul;]
\'otre
seul;]
\'otre
humid..:,
hum
hum
hum
hum
cxemple
dans
cxemple
dans
cxemple
dans
cxemple
dans
soul1lis,1ot:s
soulllis~des
soulllis~des
soulllis~des
soulllis~des
pas
cle
pasdeproduit
pasdeproduit
pasdeproduit
pasdeproduit
delcrgcnt.
dClercellt.
dClercellt.
dClercellt.
dClercellt.
..
..
..
..
till
UU
UU
UU
UU
LOIN
IlE
LOI~
IlE ,
LOI~
IlE ,
LOI~
IlE ,
LOI~
IlE ,
l'st
l'st
l'st
l'st
l'st
d~lllicr.
obstruccs
adequme
adequme
adequme
adequme
~vit:r,
evicr.
evicr.
evicr.
evicr.
~lcctriquc,
~Ieclrique.
~Ieclrique.
~Ieclrique.
~Ieclrique.
lll1t'
line
line
line
line
domicile).
domicile).
domicile).
domicile).
domicile).
ide.
ide.
ide.
ide.
les
Ics
Ics
Ics
Ics
vibralions
vihrations
vihrations
vihrations
vihrations
llll
celltrt:
lill
cenlre
lill
cenlre
lill
cenlre
lill
cenlre
produit
~
~
~
~
~
Este
simb{)10
indica
I:l
presencia
dt"
aho
yoltaje
ESlc
simbol0
indic<llapresencia
ESlc
simbol0
indic<llapresencia
ESlc
simbol0
indic<llapresencia
ESlc
simbol0
indic<llapresencia
cl
intcrior.Espcligroso
el interior.
el interior.
el interior.
....
~.,:I~II.
PRECAlXION:
PARA REDUCIR EL PIJ.IGRODEDESCAIHiA
PRI'C'AGClON:
PARA
PRI'C'AGClON:
PRI'C'AGClON:
PRI'C'AGClON:
EI.I'l'TRICA,
EI.ElTRICA.NORETIRELAC'CBlERTA.'0IIAY
EI.ElTRICA.NORETIRELAC'CBlERTA.'0IIAY
EI.ElTRICA.NORETIRELAC'CBlERTA.'0IIAY
EI.ElTRICA.NORETIRELAC'CBlERTA.'0IIAY
INTFRIOR QUI: PUEDA REPARAR EL USUARIO
INTFRIOR (lUE P EDA
INTFRIOR (lUE P EDA
INTFRIOR (lUE P EDA
INTFRIOR (lUE P EDA
CONSUI.TI:
CONSUI1T
CONSUI1T
CONSUI1T
CONSUI1T
---
•
Las
ranuras)' aberturas existentesenla
•
Las
ranuras
•
Las
ranuras
•
Las
ranuras
•
Las
ranuras
garalllizarelfuncionamiento liabledeeste aparato. y
garalllizarelfuncionamienlo
garalllizarelfuncionamienlo
garalllizarelfuncionamienlo
garalllizarelfuncionamienlo
bloquearse
bloqucarsenicubrirse.
bloqucarsenicubrirse.
bloqucarsenicubrirse.
bloqucarsenicubrirse.
No
•
~
No
~
No
~
No
~
No
No
-
-
-
-
-
No
No
No
No
No
•
~
No
~
No
~
No
~
No
correcla.
correcla.
correcla.
correcla.
correcla.
- Inslale
~
Inslaleelproduclo conserv3ndoladislancia especilicada respeclo alapared
~
Inslaleelproduclo conservJndoladislancia especilicada respeclo alapared
~
Inslaleelproduclo conserv3ndoladislancia especilicada respeclo alapared
~
Inslaleelproduclo conservJndoladislancia especilicada respeclo alapared
* Telcvisores
'"
Televisores
'"
Televisores
'"
Televisores
'"
Televisores
* Aparatos
...
Aparatos
...
Aparatos
...
Aparatos
...
Aparatos
* Otros productos
* Olros productos - 4
* Olros productos - 4
* Olros productos - 4
* Olros productos - 4
•Nocoloquc
•Nocoloque
•Nocoloque
•Nocoloque
•Nocoloque
•
No
colaquc rccipientcs
No
coloque recipientes
No
coloque recipientes
No
coloque recipientes
No
coloque recipientes
•
•
•
•
•Not':xponga
•
•
•
•
No
l,).xponga
No
l,).xponga
No
l,).xponga
No
lIl1
lin
lin
lin
lin
des
des
des
des
des
sur
sur
sur
sur
sur
dc
13
dc
13
dc
13
dc
13
et
el
el
el
el
doil
doit
doit
doit
doit
l,).xponga
ni
c('rcadeuna
ni
cercadeuna
ni
cercadeuna
ni
cercadeuna
ni
cercadeuna
l~cnieo
t~cnico
t~cnico
t~cnico
t~cnico
• [SIC aparato utiliza baterias.
•
•
•
•
[SIC
[SIC
[SIC
[SIC
aclecllada
adecllada
adecuada
adecllada
adecuada
Pongasc
Pongasc
Pongasc
Pongasc
Pongasc
No
sobrecarglle
•
No
sobrecargue
No
sobrecargue
No
sobrecargue
No
sobrecargue
•
•
•
•
general' inecndios 0 descargas elcetricas.
generar incendios 0 descargas electricas.
generar incendios 0 descargas electricas.
generar incendios 0 descargas electricas.
generar incendios 0 descargas electricas.
Los
cablesdealimentation y
•
Los
cablesdealimentation y
Los
cablesdealimentation y
Los
cablesdealimentation y
Los
cablesdealimentation y
o
o
o
o
ponicndo
pon;cndo
pon;cndo
pon;cndo
pon;cndo
Para
•
•
Para
•
Para
•
Para
•
Para
delapared
delapared
delapared
delapared
delapared
• Anles
Anlesdeconectarelcabledealimentacion
Anlesdeconectarelcabledealimentacion
Anlesdeconectarelcabledealimentacion
Anlesdeconectarelcabledealimentacion
•
•
•
•
adapladordeCC
adaplador
adapladordeCC
adaplador
adapladordeCC
Nunca
•
•
unca
•
unca
•
unca
•
unca
•
Para
Para
Para
Para
Para
o
o
o
o
•
Cuando
Cuando
Cuando
Cuando
Cuando
•
•
•
•
pOl'clenchllfeytiredecste
parclenehufeyliredeeste
parclenehufeyliredeeste
parclenehufeyliredeeste
parclenehufeyliredeeste
•
Si
('SI('
•Siestc
•Siestc
•Siestc
•Siestc
inmedbtamente y p6ngase
inmediatamcnte y
inmediatamcnte y
inmediatamcnte y
inmediatamcnte y
o Asegllrese
o Asegllrese
o Asegllrese
o Asegllrese
• Ascgurcsc
un
lar~o
Ull
largo
Ull
largo
Ull
largo
Ull
largo
-
EI
~
EI
~
EI
~
EI
~
EI
calor. 0 deteriorilndo
calor. 0 delcriorando
calor. 0 delcriorando
calor. 0 delcriorando
calor. 0 delcriorando
POllg:lseenconlileto con
•
o
o
o
o
POllg.aseencontaclo
POllg.aseencontaclo
POllg.aseencontaclo
POllg.aseencontaclo
Icmperaturas extremas, alto nivel
tcmperaturas exlremas.
tcmperaturas exlremas.
tcmperaturas exlremas.
tcmperaturas exlremas.
:lCroplienos, estaciones,
aeropuenos,
aeropuenos,
aeropuenos,
aeropuenos,
•
CUilndo
• Cuando instale
• Cuando instale
• Cuando instale
• Cuando instale
•
Usc
solamente coneclores y rt:ccplaculos apropiados
o
o
o
o
Usc
solamenle coneclores y reeeplaeulos apropiados
Usc
solamenle coneclores y reeeplaeulos apropiados
Usc
solamenle coneclores y reeeplaeulos apropiados
Usc
solamenle coneclores y reeeplaeulos apropiados
-Una
·Una
·Una
·Una
·Una
•
Para
o
o
o
o
Para
Para
Para
Para
sielllpre mcilmcnle aecesible.
sicmpre
sicmpre
sicmpre
sicmpre
No
pt:rmita
•
No
pcrmita
No
pcrmita
No
pcrmita
No
pcrmita
•
•
•
•
• Guardc
GuardL'
GuardL'
GuardL'
GuardL'
•
•
•
•
•Nocoloqut:elproductoenllnlugar illestahk. inclinado 0
•NocoloquL'elproductoenunlugar inestahle. inclinado u
•NocoloquL'elproductoenunlugar inestahle. inclinado u
•NocoloquL'elproductoenunlugar inestahle. inclinado u
•NocoloquL'elproductoenunlugar inestahle. inclinado u
No10deje
•
o
o
o
o
No10deje
No10deje
No10deje
No10deje
centrodescrvicio.
centrodeservicio.
centrodeservicio.
centrodeservicio.
centrodeservicio.
• Descollcclc
o Desconccte
o Desconccte
o Desconccte
o Desconccte
(]llimieo
qllilllico
qllilllico
qllilllico
qllilllico
borrar
horrar
horrar
horrar
horrar
•
Evile
•
•
•
•
Evile
Evile
Evile
Evile
•Notire
•Nolirt.'
•Nolirt.'
•Nolirt.'
•Nolirt.'
• No conocircllitc.
•Nocortocircuitc. deslllontenisobrecaliente
•Nocortocircuitc. deslllontenisobrecaliente
•Nocortocircuitc. deslllontenisobrecaliente
•Nocortocircuitc. deslllontenisobrecaliente
•
Si
Ia
•
Si
la
•Sila
•
Si
la
•Sila
especllicacionL's
especilicac
especilicac
especilicac
especilicac
•
AIlYI:RTENCIA·
•
AI)\'I:RTENCIA·
•
AI)\'I:RTENCIA·
•
AI)\'I:RTENCIA·
•
AI)\'I:RTENCIA·
LLAMAS
LLA .AS EXI'l;ESTAS
LLA .AS EXI'l;ESTAS
LLA .AS EXI'l;ESTAS
LLA .AS EXI'l;ESTAS
REDUCIRELPFl.IGRODEDESCAR(;A
PARA
REDUCIRELPFl.IGRODEDESCAR(;A
PARA
REDUCIRELPFl.IGRODEDESCAR(;A
PARA
REDUCIRELPFl.IGRODEDESCAR(;A
NO RETIRE
LACUBIERTA,NO11,11'
REPARARELSUARIO.
REPARARELSUARIO.
REPARARELSUARIO.
REPARARELSUARIO.
AL
PERSONAL
CALlIKADODESERVICIO TI:CNICO,
AL
PERSONAL
C'ALlFICADllDESER\'ICIO
AL
PERSONAL
C'ALlFICADllDESER\'ICIO
AL
PERSONAL
C'ALlFICADllDESER\'ICIO
AL
PERSONAL
C'ALlFICADllDESER\'ICIO
-
---------.
y abenuras
e.xistentesenla
y abenuras
e.xistentesenla
y abenuras
e.xistentesenla
y abenuras
e.xistentesenla
fiabledeeste aparato. y
fiabledeeste aparato. y
fiabledeeste aparato. y
ni
cubra
las
cubra
las
cubra
las
cubra
las
cubra
las
bloquee
bloquee
bloquee
bloquee
bloquee
coloque este aparaloenun
coloque
coloque
coloque
coloque
el
produclo conservandoladislancia especilicada
CSIC
CSIC
CSIC
CSIC
CSIC
eSle
este aparato a
este aparato alalluvia
este aparato a
este aparato alalluvia
autorizado.
aUlOrizado.
aUlOrizado.
aUlOrizado.
aUlOrizado.
ap:trato
utiliza balerias.EnSll
ap:trato
utiliza balerias.EnSll
ap:trato
utiliza balerias.EnSll
ap:trato
utiliza balerias.EnSll
bajo consideraciones ambientales.
bajo
bajo
bajo
bajo
en
conlaclO
t'll
eonlaclO
t'll
eonlaclO
t'll
eonlaclO
t'll
eonlaclO
especial
especial
especial
especial
especial
protegeI'
proleger
proleger
proleger
proleger
y dcsconecle
y desconecte
y desconectelaanlena0el
y desconecte
y desconectelaanlena0el
dt:
coneclarelcabledealimentacion
deCCcorresponde a13fuenre
deCCcorresponde a13fuenre
inserle
inserte
inserte
inserte
inserte
cvitar descarga eleclrica,notoque
evitar descarga electrica.notoque
evitar descarga electrica.notoque
evitar descarga electrica.notoque
evitar descarga electrica.notoque
COll('eteelcabledealimentation
coneeteelcabledealimenlation
coneeteelcabledealimenlation
coneeteelcabledealimenlation
coneeteelcabledealimenlation
apar:ltonofunciona nornwllllt'nte,enconcreto,siemite sonidos extranos 0 dcsprcndc olorcs desdeclinterior. descnchufclo
apar.lIonofunciona
apar.lIonofunciona
apar.lIonofunciona
apar.lIonofunciona
de
de
de
de
de
periododeliempo (cspecialmente
periododeliempo (especialmenle
periododeliempo (especialmenle
periododeliempo (especialmenle
periododeliempo (especialmenle
polvo aculllul3do puede provocar
polvo
acumulado
polvo
acumulado
polvo
acumulado
polvo
acumulado
eSlaciones.
eSlaciones.
eSlaciones.
eSlaciones.
instaleelequipo, procure guardar
conexi6n a lierra inapropiada
cone.xion
cone.xion
cone.xion
cone.xion
desconectarelaparalodela
dcsconectarelaparatodela
dcsconectarelaparatodela
dcsconectarelaparatodela
dcsconectarelaparatodela
mcilmel1le
mcilmel1le
mcilmel1le
mcilmel1le
que
que
que
que
que
los
aecesorios (pibs, etc.)enun
los
accesorios
los
accesorios
los
accesorios
los
accesorios
GlerniIedegolpt:s.Siel
GlerniIedegolpcs.Sicl
GlerniIedegolpcs.Sicl
GlerniIedegolpcs.Sicl
GlerniIedegolpcs.Sicl
t:1
L'I
L'I
L'I
L'I
como
como
como
como
como
las
cst<lmpaciollt.'s
las
estampat::ionl's
las
estampaeionl's
las
estampat::ionl's
las
estampaeionl's
que
cualquier
que
cualquier liquido salpiqw:elaparalo 0
que
cualquier liquido salpiqw:elaparalo 0
que
cualquier liquido salpiqw:elaparalo 0
que
cualquier liquido salpiqw:elaparalo 0
las
pilasalfuego.
las
pilasalfuego.
las
pilasalfuego.
las
pilasalfuego.
las
pilasalfuego.
I~ilil
nusecoloca
pilanusc
pilanusc
pilanusc
pilanusc
ionl's
ionl's
ionl's
ionl's
EXI'UESTAS
fiabledeeste aparato. y
cubrirse.
ranuras y aberturas conunpano
ranuras y abenuras
ranuras y abenuras
ranuras y abenuras
ranuras y abenuras
las
ranurasniaberturas colocando esle aparato sobrelacmna.
las
ranurasniabenuras colocando
las
ranurasniabenuras colocando
las
ranurasniabenuras colocando
las
ranurasniabenuras colocando
eSle
eSle
eSle
eSle
DLP,
DLP.
DLP.
DLP.
DLP.
con
con
con
con
con
piscina 0 similar).Sieste
piscina 0 similar).Sieslc aparato
piscina 0 similar).Sieslc aparato
piscina 0 similar).Sieslc aparato
piscina 0 similar).Sieslc aparato
consideraciones Jmbientalcs.
consideraciones Jmbientalcs.
consideraciones Jmbientalcs.
consideraciones Jmbientalcs.
cSle
este
este
este
este
nada
nada
nada
nada
nada
desconccl:Jrelellchutedealimentationdela
desconeclarelcnchutedealimemad6ndela
desconeclarelcnchutedealimemad6ndela
desconeclarelcnchutedealimemad6ndela
desconeclarelcnchutedealimemad6ndela
el
el
el
el
a lierra inapropiada
a lierra inapropiada
a lierra inapropiada
a lierra inapropiada
los
los
los
los
los
cablt'dealimt'ntacion
cabledenlillK'ntaeilll1
cabledenlillK'ntaeilll1
cabledenlillK'ntaeilll1
cabledenlillK'ntaeilll1
cera, benzol. alcohol. disolwlltl's. insecticida, illlloit:ntadm
cera, benzol. alcohol.
cera, benzol. alcohol.
cera, benzol. alcohol.
cera, benzol. alcohol.
coloca correetamenh.'seemr\.'dri\.'sgodeUI1<.1l'.xplosion.
coloca correetamenh.'seemr\.'dri\.'sgodeUI1<.1l'.xplosion.
coloca correetamenh.'seemr\.'dri\.'sgodeUI1<.1l'.xplosion.
coloca correetamenh.'seemr\.'dri\.'sgodeUI1<.1l'.xplosion.
espaeio ccrrado,
aparatoenun
espacio cerrado.
aparatoenun
espacio cerrado.
aparatoenun
espacio cerrado.
aparatoenun
espacio cerrado.
televisores
tipo
lelevisores
lipo
lelevisores
lipo
lelevisores
lipo
lelevisores
lipo
una
pantallade32"0moyor-+5
una
pamalla
de
una
pamalla
de
una
pamalla
de
una
pamalla
de
-+
4
Clll
em
em
em
em
aparalo cerca 0 sabreunradiador 0
aparato
cerca0sobrL'unradiador 0
aparato
cerca0sobrL'unradiador 0
aparato
cerca0sobrL'unradiador 0
aparato
cerca0sobrL'unradiador 0
con
agua
con
agua
con
agua
con
agua
con
agua
aparato alalIuvia
1<1
lluvia
1<1
lluvia
Antesdelimpiarelproducto
Antesdelimpiarelproducto dcsconcctcelcabledealimentaciondela
Antesdelimpiarelproducto dcsconcctcelcabledealimentaciondela
Antesdelimpiarelproducto dcsconcctcelcabledealimentaciondela
Antesdelimpiarelproducto dcsconcctcelcabledealimentaciondela
Ensucomunidad pucde
con
las
alltoridades
con
las
3utoridades locales
con
las
Jutoridades locales
con
las
3utoridades locales
con
las
Jutoridades locales
las
tomas murales,
las
tomas murales.
las
tomas murales.
las
tomas murales.
las
tomas murales.
proteccion
proteccion
proteccion
proteccion
proteccion
alene
ionenlos
cables
atL'ncionenlos
eilbles
atL'ncionenlos
eilbles
atL'ncionenlos
eilbles
atL'ncionenlos
eilbles
aparato durante
aparato
duranle
aparato
duranle
aparato
duranle
aparato
duranle
la
anlena 0elcable
la
anlena0el
la
anlena0el
cOITespondeala
corresponde alafuenre
corresponde alafuenre
mClalicoenlas
metalicoenlas
metalicoenlas
metalicoenlas
metalicoenlas
para
sllcarlodela
para
sacarlodela
para
sacarlodela
para
sacarlodela
para
sacarlodela
nom1Jll11t'nle.enconcrelO,sicmite sonidos
nom1Jll11t'nle.enconcrelO,sicmite sonidos
nom1Jll11t'nle.enconcrelO,sicmite sonidos
nom1Jll11t'nle.enconcrelO,sicmite sonidos
en
contacto
p6ngaseenconlacto
p6ngaseenconlacto
p6ngaseenconlacto
p6ngaseenconlacto
puede
pro\'ocar
puede
pro\'ocar
puede
pro\'ocar
puede
pro\'ocar
I:J
runda
proleclora.
la
funda
proteclora.
la
funda
proteclora.
la
funda
proteclora.
la
funda
proteclora.
LIn
centrodescn
conuncenlrodesen
conuncenlrodesen
conuncenlrodesen
conuncenlrodesen
<lito
niveldehultledadyproduclOs
<lito
niveldehultledadyproduclOs
<lito
niveldehultledadyproduclOs
<lito
niveldehultledadyproduclOs
etc.EIincumplimientodet.'slas
elc.EIincumplimienlode\.'stas
elc.EIincumplimienlode\.'stas
elc.EIincumplimienlode\.'stas
elc.EIincumplimienlode\.'stas
equipo, procure guardar
equipo, procure guardar
equipo, procure guardar
equipo, procure guardar
corrienle,
corrientc.
corrientc.
corrientc.
corrientc.
accesible.
accesible.
accesible.
accesible.
nillos jlleguen
nillOS
jueguel1
nillOS
jueguel1
nillOS
jueguel1
nillOS
jueguel1
(pi
las.
elc.)enun
(pi
las.
elc.)enun
(pi
las.
elc.)enun
(pi
las.
elc.)enun
del
producto.
del
producto.
del
producto.
del
producto.
del
producto.
Iiqllido
salpiqucelaparato u gotcc suhre
dt.'slllonlenisobrccaliellle
COITectamcntcsceorrl'cIricsgo
eqllival~ntcs.
("qui
val
entcs.
("qui
val
entcs.
("qui
val
entcs.
("qui
val
entcs.
I'ARA
IMrElllR
PARA
I '1I'EiliR QUE EL
PARA
I '1I'EiliR QUE EL
PARA
I '1I'EiliR QUE EL
PARA
I '1I'EiliR QUE EL
SIE~1rRE
SIEMPRE
SIEMPRE
SIEMPRE
SIEMPRE
-
PIE/AS
leN
EL
Plt:/ASENEL
Plt:/ASENEL
Plt:/ASENEL
Plt:/ASENEL
['EC'NICll,
['EC'NICll,
['EC'NICll,
['EC'NICll,
,-
unidad y
t.:nlapam:
unidadyenlaparte trasefa 0 inleriorsefacilitall
unidadyenlaparte trasefa 0 inleriorsefacilitall
unidadyenlaparte trasefa 0 inleriorsefacilitall
unidadyenlaparte trasefa 0 inleriorsefacilitall
con
lIll
pano0con
con
lIll
pano0con
con
lIll
pano0con
con
lIll
pano0con
visualizacion direcla)'proyeclores
visualizacion directa y proyectores -10cm
visualizacion directa y proyectores -10cm
visualizacion directa y proyectores -10cm
visualizacion directa y proyectores -10cm
31"
0
mayor
31"
0
mayor
31"
0
mayor
31"
0
mayor
sobre cstc aparato
sobre
csle aparato Uanos, ctc.).
sobre
csle aparato Uanos, etc.).yaque
sobre
csle aparato Uanos, ctc.).
sobre
csle aparato Uanos, etc.).yaque
ni
10 coloque cerca
ni10coloque
ni10coloque
ni10coloque
ni10coloque
aparalO
comunidad
comunidad
comunidad
comunidad
10C~11CS
los
alargadoresnilos
los
alargadoresnilos
los
alargadoresnilos
los
alargadoresnilos
los
alargadoresnilos
debcn
debcn
debcn
debcn
debcn
cerca
cerca
cerca
cerca
cerca
una
tormcnta
una
tormenta
una
tormenta
una
tormenta
una
tormenta
cable
cable
cable
cable
cit.'CAalatoma
d('
d('
d('
d('
fuente
el~clrica
eleclrica
eleclrica
eleclrica
eleclrica
abertllras
abcnuras
abcnuras
abcnuras
abcnuras
nuncaelinleriordeestc aparalo, Solountccnico cnlilkado
nuncaelillleriordeeste aparato. Solountee-nico
nuncaelillleriordeeste aparato. Solountee-nico
nuncaelillleriordeeste aparato. Solountee-nico
nuncaelillleriordeeste aparato. Solountee-nico
comprucbt:
compruebe
compruebe
compruebe
compruebe
concldistribuidor
concldistribuidor autorizado 0elccntrodcscrvicio
concldistribuidor autorizado 0elccntrodcscrvicio lecnico.
concldistribuidor autorizado 0elccntrodcscrvicio
concldistribuidor autorizado 0elccntrodcscrvicio lecnico.
cLlando
clI<lndo
clI<lndo
clI<lndo
clI<lndo
una
dcsc;Jrga
una
descarga
una
descarga
una
descarga
una
descarga
icio
icio
icio
icio
icio
de
humcdad y productos
una
una
una
una
una
pod
ria
causal'
podria
causar
podria
causar
podria
causar
podria
causar
debt.'
deb\.'
deb\.'
deb\.'
deb\.'
conelprodllcto.
conelproduclo.
conelproduclo.
conelproduclo.
conelproduclo.
lugar
lugar
lugar
lugar
lugar
prooueto
produetosecSlropca.
produetosecSlropca.
produetosecSlropca.
produetosecSlropca.
dt'Intomadccorrii.'llt..:yse(]uc..:l
dt'
In
tomad~corril'llle y
dt'Intomad~corril'llle y
dt'
In
tomad~corril'llle y
dt'Intomad~corril'llle y
disulWlllt.'S,
disulWlllt.'S,
disulWlllt.'S,
disulWlllt.'S,
las
laspilas.
laspilas.
laspilas.
laspilas.
QUE
ALEJAI>AS 01: I:STE
ALEJAIMSDEESTE I'ROIlUCTO.
ALEJAIMSDEESTE I'ROIlUCTO.
ALEJAIMSDEESTE I'ROIlUCTO.
ALEJAIMSDEESTE I'ROIlUCTO.
trasera 0 inlcrior
pnr~l
protegcrlo
frt.'nlc
par:.l
prolegerlo
fn:nte
par:.l
prolegerlo
fn:nte
par:.l
prolegerlo
fn:nte
par:.l
prolegerlo
fn:nte
0 con cualquicr 011'0 material.
cualquier olro material.
cualquier olro material.
cualquier olro material.
cualquier olro material.
eSle
aparato
sobrelacamil.
eSle
aparato
sobrelacamil.
eSle
aparato
sobrelacamil.
eSle
aparato
sobrelacamil.
COIllO
lIna
Iibreria, 0 Ull anllario cmpotrado, a
COIllO
una
Iibreria.0un
COIllO
una
Iibreria.0un
COIllO
una
Iibreria.0un
COIllO
una
Iibreria.0un
n.:spcctoa13
Clll
- 5
Clll
- 5
Clll
- 5
Clll
- 5
Clll
unn
r('jillnde<lire
un[l
un[l
un[l
un[l
UalTos,
cercn
cercn
cercn
cercn
accidel1talmentesc1110ja,
:.lccidentalmente
:.lccidentalmente
:.lccidentalmente
:.lccidentalmente
deseollL'cteelcabledealimentationdela
quc
puede
que
puede
que
puede
que
puede
que
para
obtcllcr informacion sabre dcsccho y recielaje.
para
obtclIer
para
obtclIer
para
obtclIer
para
obtclIer
colocarscdelonna
colocarsederOmla
colocarsederOmla
colocarsederOmla
colocarsederOmla
del
cnchufc.
del
enchufe.
del
enchufe.
del
enchufe.
del
enchufe.
ek~clriei.1
L'1t;ctrica0euando
L'1t;ctrica0euando
L'1t;ctrica0euando
L'1t;ctrica0euando
del
sislema.
del
sislcma.
del
sislcma.
del
sislcma.
del
sislcma.
C'A
alalama
C'Aala
lama
C'A
alalama
C'Aala
lama
local.
local.
local.
local.
local.
del
aparalO,
del
aparalO.
del
aparalO.
del
aparalO.
del
aparalO.
qut.'cl(,llehull:
queelenchufc
queelenchufc
queelenchufc
queelenchufc
tomadecorril.'nte.
tomadecorriCnlc.
tomadecorriCnlc.
tomadecorriCnlc.
tomadecorriCnlc.
sea
sea
sea
sea
sea
el~ctrica.
el~ctrica.
el~ctrica.
el~ctrica.
el~ctrica.
lccnico autorizado cuando
tecnico alllorizado cuando instaleelaparatoenun
tecnico
aUlorizado
tecnico alllorizado cuando instaleelaparatoenun
tecnico
aUlorizado
distilnciademas
diswnciademas
diswnciademasde10cmdesdeInpared
diswnciademas
diswnciademasde10cmdesdeInpared
para
para
para
para
para
una
deseargn
IIna
descarga
IIna
descarga
IIna
descarga
IIna
descarga
desenchufarclcabledc1a
dcs~nchufar
dcs~nchufar
dcs~nchufar
dcs~nchufar
SC'gllro
rll..:ra
scgllro
ru~ra
scgllro
ru~ra
scgllro
ru~ra
scgllro
ru~ra
SC'
cstrop~a,
illst'cticida. ilmhil'ntadordcairt'. luhricanll' 0
illst'cticida. ilmhil'ntadordcairt'. luhricanll' 0
illst'cticida. ilmhil'ntadordcairt'. luhricanll' 0
illst'cticida. ilmhil'ntadordcairt'. luhricanll' 0
gOICC
suhrc
gOICC
suhrc
gOICC
suhrc
gOICC
suhrc
pibs.
de
1:1.
FUI:C.O SI:
Fl;Er.O
Fl;Er.O
Fl;Er.O
Fl;Er.O
calit'llte, 0enlugures expucstos a luz solar directa.
rejilladeaire
calienle. 0
rejilladeaire
calienle. 0
rejilladeaire
calienle. 0
rejilladeaire
calienle. 0
ctc,).yaque
ya
que
ya
que
oe
~lglla
(cerca
de
dt'
agua
(cercadeuna
dt'
agua
(cercadeuna
dt'
agua
(cercadeuna
dt'
agua
(cercadeuna
SL'
moja.
SL'
moja.
SL'
moja.
SL'
moja.
existan nonnmivas
existan
llorl1lativas
existan
llorl1lativas
existan
llorl1lativas
existan
llorl1lativas
informacion sobre desecho y reciclajc.
informacion sobre desecho y reciclajc.
informacion sobre desecho y reciclajc.
informacion sobre desecho y reciclajc.
receptaculos correspondienlCs
recepulculos correspondientcs
recepulculos correspondientcs
recepulculos correspondientcs
recepulculos correspondientcs
quenopuedan
quenopuedan
quenopuedan
quenopuedan
quenopuedan
los
reccpl<leulosdelos
los
receptaculosdelos
los
receptaculosdelos
los
receptaculosdelos
los
receptaculosdelos
0 cuandono10
no10utilice
no10utilice
no10utilice
no10utilice
Esto
evitani
quecI('quiposedane
[SIO
cvilani
queelequiposedai'le
[SIO
cvilani
queelequiposedaiie
[SIO
cvilani
queelequiposedai'le
[SIO
cvilani
queelequiposedaiie
del
adaptadordeCc.
del
adaplador
del
adapladordeCc. asegurcsedequeladcsignacion
del
adaplador
del
adapladordeCc. asegurcsedequeladcsignacion
Haccrlo
nsi
pucde crear peligrosdedcscarga eleclrica.
Hacerlo
asi
puede crear pcligrosdedescarga elcclrica.
Hacerlo
asi
puede crear pcligrosdedescarga elcclrica.
Hacerlo
asi
puede crear pcligrosdedescarga elcclrica.
Hacerlo
asi
puede crear pcligrosdedescarga elcclrica.
cst~
lirlllCl1lentc
este
linnemenle
este
linnemenle
este
linnemenle
este
linnemenle
Nunca
loqueelcabledealimenlHcion
Nunca
roqueelcabledealimentacion
Nunca
roqueelcabledealimentacion
Nunca
roqueelcabledealimentacion
Nunca
roqueelcabledealimentacion
extrJJlOS
extrJJlOS
extrJJlOS
extrJJlOS
<lutorizado0el
tomade
corricntcsiIII
{omadecorrienlesilaTVha
{omadecorrienlesilaTVha
{omadecorrienlesilaTVha
{omadecorrienlesilaTVha
nec('sario dejar soloscncasa<lnii\os. ancianos 0 personas incapacitadas).
neccsario dcjar solosencasaaniilos.
neccsario dcjar solosencasaaniilos.
neccsario dcjar solosencasaaniilos.
neccsario dcjar solosencasaaniilos.
LIn
corlocircuito 0unl"u('go,
un
conocircuilO 0unfuego.
un
conocircuilO 0unfuego.
un
conocircuilO 0unfuego.
un
conocircuilO 0unfuego.
cuando instaleelaparatoenun
cuando instaleelaparatoenun
quil1licos.ycn
quimicos. ycnlugares
quimicos. ycnlugares
quimicos. ycnlugares
quimicos. ycnlugares
indicaciones
pucdt.'
indicaciones
puede
indicaciones
puede
indicaciones
puede
indicaciones
puede
de10cm
de10cm
de10cm
haec
I'
la
cOllcxion
hacerlacOllexion
hacerlacOllexion
hacerlacOllexion
hacerlacOllexion
elcctrica 0
eleClrica0Ulla
eleClrica0Ulla
eleClrica0Ulla
eleClrica0Ulla
el
cabled~la
el
cabled~la
el
cabled~la
el
cabled~la
del
alcanccdelos
del
alcanccdelos
del
alcanccdelos
del
alcanccdelos
del
alcanccdelos
..:XpUt.'SIO
a vibracioncs.
~xpLJesto
a vibraciones.
~xpLJesto
a vibraciones.
~xpLJesto
a vibraciones.
~xpLJesto
a vibraciones.
descnchulcelcabledealimenlacion y
deSl..'IlChulcelcabll..'
deSl..'IlChulcelcabll..'
deSl..'IlChulcelcabll..'
deSl..'IlChulcelcabll..'
Hparato
SL'qlle~laparalo
SL'qlle~laparalo
SL'qlle~laparalo
SL'qlle~laparalo
cl.
cl.
cl.
cl.
cl.
lJllil
L'.xp]osi()n.
I'ROI'A(;UI:.
SE I'ROPAGUE.
SE I'ROPAGUE.
SE I'ROPAGUE.
SE I'ROPAGUE.
"ROIIUCTO.
• Espanol-
Espanal-
Espanal-
Espanal-
Espanal-
•
•
•
•
el interior.
cualqukr
cualquier
cualquier
cualquier
cualquier
!:sIC
silllbol0Ieakna
[SiC simbolo
[SiC simbolo
[SiC simbolo
[SiC simbolo
int.'lllye
incluye
incluye
incluye
incluye
fUI1l:ionarniclltD
funciont1micnlO~manlenimiento.
funciont1micnlO~manlenimiento.
funciont1micnlO~manlenimiento.
funciont1micnlO~manlenimiento.
51;.'
I~eilitan
pal'il
para
para
para
para
a sobrecalentamicllto, estas
a sobrecalentamielllo, estas ranuras y aberturas
a sobrecalentamielllo, estas ranuras y aberturas
a sobrecalentamielllo, estas ranuras y aberturas
a sobrecalentamielllo, estas ranuras y aberturas
sol~,
allombra 0 superficie similar.
sofa. alfombra 0 superlieie
sofa. alfombra 0 superlieie
sofa. alfombra 0 superlieie
sofa. alfombra 0 superlieie
armario empotrado, a
armario empotrado, a
armario empotrado, a
armario empotrado, a
pared
(veaIninlormacion siguienlc) .
(vea
1<1
informacion siguiente) .
(vea
1<1
informacion siguiente) .
(vea
1<1
informacion siguiente) .
(vea
1<1
informacion siguiente) .
-0
10
Clll
ell
lugares expucstos a
ell
lugares expucstos a
ell
lugares expucstos a
ell
lugares expucstos a
poclria
represcmar riesgodeincelldio 0 dcsearga
pod
ria
representar
pod
pod
pod
ulla
lllilice
de
de
ccntrodcservicio tcenico.
iJlst~lle
lugares dondcsevayn
dcsdelapared
desdeInpared
desdeInpared
una
IOllla principal. par
lOrna
lOrna
lOrna
lOrna
dc
R":":Jl1placelapila
Rccmplacelapita
Rccmplacelapita
Rccmplacelapita
Rccmplacelapita
riesgodcineendio 0 descarga ekelriea.
ria
representar
riesgodcineendio 0 descarga ekelriea.
ria
representar
riesgodcineendio 0 descarga ekelriea.
ria
representar
riesgodcineendio 0 descarga ekelriea.
bmicra,
lavabo, rrcgadero 0 lavadero,enun
bmlera,
lavabo.
fregadero
bmlera,
lavabo.
fregadero
bmlera,
lavabo.
fregadero
bmlera,
lavabo.
descnchllfelo y pongaseencontacto
desenchllfelo y pongaseencontaclo inrned;mamcnte
desenchllfelo y pongaseencontaclo inrned;mamcnte
desenchllfelo y pongaseencontaclo inrned;mamcnte
desenchllfelo y pongaseencontaclo inrned;mamcnte
que
que
que
que
que
Cc.
Cc.
causal'
causar serios desperlcclosencl
causar serios desperlcclosencl
causar serios desperlcclosencl
causar serios desperlcclosencl
a tierra.
a tierra.
a tierra.
a tierra.
a tierra.
nilios.
nillos.
nillos.
nillos.
nillos.
~tirt:,
~IANTEN(;A
~IANTI:NGA
~IANTI:NGA
~IANTI:NGA
~IANTI:NGA
fregadero
tolna
lornadccorrientc.
lornadccorrientc.
lornadccorrientc.
lornadccorrientc.
rcquieranIadispositiondeeSlas
requicranladisposici6ndeeSlas
requicranladisposiciondeeSlas
requicranladisposici6ndeeSlas
requicranladisposiciondeeSlas
pOI'
cncima
por
encimadcSll
por
encimadcSll
por
encimadcSll
por
encimadcSll
pisarseniqu('dar
pisarseniquedar
pisarseniquedar
pisarseniquedar
pisarseniquedar
clectrodomcsticos yelpuntoenel
eleclrodomeslicos
eleclrodomeslicos
eleclrodomeslicos
eleclrodomeslicos
durante
largos
periodosdelicmpo. descnchufclodela
durante
largos
periodosdelicmpo.
durante
largos
periodosdelicmpo.
durante
largos
periodosdelicmpo.
durante
largos
periodosdelicmpo.
pOl'
por
por
por
por
ascgill'l':scdeqLleladesignaeion
asegurcsedequeladcsignacion
asegurcsedequeladcsignacion
caliticado debe abrirelalojamiento
caliticado debe abrirelalojamiento
caliticado debe abrirelalojamiento
caliticado debe abrirelalojamiento
insertado,
Para
insertado.
Para
insertado.
Para
insertado.
Para
insertado.
Para
0 dcsprcnde olores
0 dcsprcnde olores
0 dcsprcnde olores
0 dcsprcnde olores
Iccnico.
Iccnico.
TV
IHi
dcjadodeutilizarsc, 0
dcjadode1Ililizarse.0dc-sea
dcjadode1Ililizarse.0dc-sea
dcjadode1Ililizarse.0dc-sea
dcjadode1Ililizarse.0dc-sea
ancianos 0 personas incapaciladas).
ancianos 0 personas incapaciladas).
ancianos 0 personas incapaciladas).
ancianos 0 personas incapaciladas).
haciendo
haciendo
haciendo
haciendo
haciendo
el
aparato
cnunlugar
dondescvaya
dondescvaya
dondescvaya
dondescvaya
serios desperlcclosenel
para
I~cililar
para
fncilitarlavcntilacion.
para
fncilitarlavcntilacion.
para
fncilitarlavcntilacion.
para
fncilitarlavcntilacion.
avcriaenel
cquipo. (Solo cquipodeC1ase
avcriacnel
equipo. (Solo
avcriacnel
equipo. (Solo
avcriacnel
equipo. (Solo
avcriacnel
equipo. (Solo
10
principal. por10queelenchulc principal
principal. por10queelenchulc principal
principal. por10queelenchulc principal
principal. por10queelenchulc principal
dt'
alinll..'nt"lcion
dt'
alinll..'nt"lcion
dt'
alinll..'nt"lcion
dt'
alinll..'nt"lcion
con
lin
paiio
slIa\'\.'
conunpallO
suaveyscco.Noulilict'
conunpallO
suaveyscco.Noulilict'
conunpallO
suaveyscco.Noulilict'
conunpallO
suaveyscco.Noulilict'
luhricantt.'0dt.'t..:rg..:ntl'.ScpUt.'de
dl'tL'rgenle.ScpUl'de
dl'tL'rgenle.ScpUl'de
dl'tL'rgenle.ScpUl'de
dl'tL'rgenle.ScpUl'de
SI)lO
solo
solo
solo
solo
LAS
LAS
LAS
LAS
LAS
t'ntmrencontacto
Es
pchgroso l'ntrar en contacto con
Es
pchgroso l'ntrar en contacto con
Es
pchgroso l'ntrar en contacto con
Es
pchgroso l'ntrar en contacto con
rieZ:1
interior de este producto.
piCZ:1
interiordeestc producto.
piCZ:1
interiordeestc producto.
piCZ:1
interiordeestc producto.
piCZ:1
interiordeestc producto.
dl.:
que con
Ie
alt'rtadeque con este produclo
Ie
alt'rtadeque con este produclo
Ie
alt'rtadeque con este produclo
Ie
alt'rtadeque con este produclo
docu11ll.'tltacion
importame correspondienlc
docuITlc111aci6n
imponame
docuITlc111aci6n
imponame
docuITlc111aci6n
imponame
docuITlc111aci6n
imponame
y l11antenimicnto.
proporcionarlaventilacion necesaria.
proporcionarlaventilacion necesaria.
proporcionarlaventilacion necesaria.
proporcionarlaventilacion necesaria.
proporcionarlaventilacion necesaria.
rnnuras
y aberluras nunca dcben
similar.
similar.
similar.
similar.
menos
queseproporcione
menos
queseproporcione
menos
queseproporcione
menos
queseproporcione
menos
queseproporcione
luz
solar directa.
luz
solar directa.
luz
solar directa.
luz
solar directa.
0 lavadero,
enunsotano
0 lavadero,enun
0 lavadero,
enunsotano
0 lavadero,enun
inl11edimamente
cle
eorriente.
bateriasdefortna
batcriasdefartna
batcriasdefartna
batcriasdefartna
batcriasdefartna
de
Sll capacidad,
capaeidad.yaque
capaeidad.yaque
capaeidad.yaque
capaeidad.yaque
atrapados
POl'
objetos
atrapados
por
objetos
atrapados
por
objetos
atrapados
por
objetos
atrapados
por
objetos
que
ycIpuntoenel
que
y
cI
puntoenel
que
ycIpuntoenel
que
y
cI
puntoenel
que
dcsenchufelodela
dcsenchufelodela
dcsenchufelodela
debe
abrirelalojamicnto
eI
con
las
Illanos
con
las
manos
con
las
manos
con
las
manos
con
las
manos
desdcclinterior.
desdcclinterior.
desdcclinterior.
desdcclinterior.
dcsenchufelodela
iondela
iondela
iondela
iondela
del
del
del
del
del
cabledealimenlacion.
lllojadas.
mojadas.
mojadas.
mojadas.
mojadas.
rayos0picosdetensiondela
faYos0picosdelens
faYos0picosdelens
faYos0picosdelens
faYos0picosdelens
dcsenehul~r
dcsenchufarcIcabledealimcntacion.
dcsenchufarcIcabledealimcntacion.
dcsenchufarcIcabledealimcntacion.
dcsenchufarcIcabledealimcntacion.
dcsca
queelcable
c1cclrico
queelcable
c1cclrico
queelcable
c1cclrico
queelcable
c1cclrico
queelcable
c1cclrico
expuesto a
la
una
Ull:!
Ull:!
Ull:!
Ull:!
las24horas
las24horas
las24horas
las24horas
las24horas
aparato.
aparalo.
aparalo.
aparalo.
aparalo.
velllilacion.
~quipo
~quipo
~quipo
~quipo
en
COl1laclo
en
COl1laclo
No
lltiliet:
i~ual
0
igual0de
igual0de
igual0de
igual0de
gran
gran
gran
gran
gran
dc
Clase 1.)
dc
Clase 1.)
dc
Clase 1.)
dc
Clase 1.)
principal
ningllll
ningllll
ningllll
ningllll
ningllll
d,uiarelaspec(o 0
d,ularelaspeclo
d,ularelaspeclo
d,ularelaspeclo
d,ularelaspeclo
dt.'
lugar expueslo a
lugar expueslo a
lugar expueslo a
lugar expueslo a
a lllilizm
a utilizar
a utilizar
a utilizar
a utilizar
queclenchul't:
pongast:enconlacio
y pongast'enCOl1laclo
y pongast'
y pongast'enCOl1laclo
y pongast'
y seco,
pOl'
por
por
por
por
"ELASUOTllAS
VELAS U OTRAS '
VELAS U OTRAS '
VELAS U OTRAS '
VELAS U OTRAS '
do:
alto
\"oltaje en
do:
alto
\"oltaje en
do:
alto
\"oltaje en
do:
alto
\"oltaje en
can
cSle
producto
correspondicnle
correspondicnle
correspondicnle
correspondicnle
nunca
debcn
nunca
debcn
nunca
debcn
nunca
debcn
una
venti
una
venti
una
venti
una
venti
una
venti
clCctrica.
sotano
hUlllcdo
hUllledo
sotano
hUllledo
hUllledo
sotano
hUllledo
con
con
con
con
con
ya
que
csto
plIede
csto
pllede
csto
pllede
csto
pllede
csto
pllede
encima
0 contra
encima0contra
encima0contra
encima0contra
encima0contra
salen
clel
aparato,
salcn
del
aparato.
salcn
del
aparato.
salcn
del
aparato.
salcn
del
aparato.
linea
ch~clrica.
linea
cleelrica.
linea
cleelrica.
linea
cleelrica.
linea
cleelrica.
voltajc
dcl
voltajc
del
voltajc
del
voltajc
del
voltajc
del
del
aparalO.
del
aparalo.
del
aparalo.
del
aparalo.
del
aparalo.
sujctclo
sujetelo
sujetelo
sujetelo
sujetelo
descnchUfelo
descnchUfelo
descnchUfelo
descnchUfelo
salirdecasa. durante
salirdecasa. durante
salirdecasa. durante
salirdecasa. durante
salirdecasa. durante
generc chispas)'
gencrc chispas y
gencrc chispas y
gencrc chispas y
gencrc chispas y
cantidaddepolvo,
cantidaddepolvo.
cantidaddepolvo.
cantidaddepolvo.
cantidaddepolvo.
del
dia.
como
del
dia.
como
del
dia.
como
del
dia.
como
del
dia.
como
I.)
debe
eSlar
debe
estar
debe
estar
debe
estar
debe
estar
con
L1ll
con
UI1
con
UI1
con
UI1
con
UI1
prodliCIO
produelo
produelo
produelo
produelo
~
~
~
~
~
'
en
51.:
St'
St'
St'
St'
Para
Para
Para
Para
Para
lac
lac
lac
lac
lac
ellos,
ellos.
ellos.
ellos.
ellos.
tom
toma
toma
toma
toma
()
()
()
()
al
al
al
al
al
ion
ion
ion
ion
ion
un
un
un
un
un
a
Page 30
L:.h:
:.il1lhuhl
illdil;a
L~ll.'
~il1lhtllll
indil.'a a
L~ll.'
~il1lhtllll
indil.'a a
L~ll.'
~il1lhtllll
indil.'a a
L~ll.'
~il1lhtllll
indil.'a a
l.:ns;lo
lHI
inl':l'i.11'
....
ns:io
IHI
inl
......
....
ns:io
IHI
inl
....
ri,lr till t
....
ns:io
IHI
inl
....
ri,lr till t
....
ns:io
IHI
inl
......
I
I
I
I
l]U<l]{llll.:r parI\.'
ljU<llqlll.:r
park
ljU<llqlll.:r
park
ljU<llqlll.:r
park
ljU<llqlll.:r
..
..
..
('[
..
'11),\1
)():
l'i\I{i\
KI:I)l 'III<()KI:-.t
('I
'IDA[)O:
I't\I{.A
('I
'IDA[)O:
I't\I<.A
('I
'IDA[)O:
I't\I<.A
('I
'IDA[)O:
I't\I{.A
'\
Ir\MI'i\(NH.t/\I'i\I{II:
A I
Mvll'A
(N!:1'\ll\
A I
Mvll'A
(N!:1'\ll\
A I
Mvll'A
(N!:1'\ll\
A I
Mvll'A
(N!:1'\ll\
I.\IS11..\11'1~i\S
I.\IS11..
\11'1~AS
I.\IS11..
\11'1~AS
I.\IS11..
\11'1~AS
I.\IS11..
\11'1~AS
A:-.
...
ISlt'M
1/\SOI'lll
A~"IS
II'Nt'IA
"11
A~"IS
II'Nt'IA
"11
A~"IS
II'Nt'IA
"11
A~"IS
II'Nt'IA
"11
----..-c:::=-...::-..:=---_--_-_-
----..-c:::=-...::-..:=---_--_-_-
----..-c:::=-...::-..:=---_--_-_-
----..-c:::=-...::-..:=---_--_-_-
• As ranhuras c ,Jbl'rturnsnacaixa enaparte:
• As ranhuras e
• As ranhuras e
• As ranhuras e
• As ranhuras e
do
ap~lrl'lh{l
e
do apardho e
do apardho e
do apardho e
do apardho e
• N,io tapt'
as
~ao
tapeasri.lnhllras e alxnuras
~ao
tapeasri.lnhllras e alxnuras
~ao
tapeasri.lnhllras e alxnuras
~ao
tapeasri.lnhllras e alxnuras
•
•
•
•
N~o
bloqucieasranhllras e aberturas eolocando 0 aparclho nUllla
• :\ao bloqueicasranhuras e abenuras colocando 0 aparelho
• :\ao bloqueicasranhuras e abenuras colocando 0 aparelho
• :\ao bloqueicasranhuras e abenuras colocando 0 aparelho
• :\ao bloqueicasranhuras e abenuras colocando 0 aparelho
•
- Nao eoloque
- Nao coloque
- Nao coloque
- Nao coloque
- Nao coloque
adcquada.
adequada.
adequada.
adequada.
adequada.
- Instale 0 produto.
- Instale 0 produto. mantcndo a distancia
- Instale 0 produto. mantcndo a distancia
- Instale 0 produto. mantcndo a distancia
- Instale 0 produto. mantcndo a distancia
• Telc"isores DLP. Televisores do
'"
Televisores DLP. Tclevisores do Tipo Direct Vic\\ c Projectores -10em
'"
Televisores DLP. Tclevisores do Tipo Direct Vic\\ c Projectores -10em
'"
Televisores DLP. Tclevisores do Tipo Direct Vic\\ c Projectores -10em
'"
Televisores DLP. Tclevisores do Tipo Direct Vic\\ c Projectores -10em
* Produtos
'"
Produtos COIll visores
'"
Produtos COIll visores
'"
Produtos COIll visores
'"
Produtos COIll visores
• Qutros
!>rodlltOS
'"
Qutros produtos - 4
'"
Qutros produtos - 4
'"
Qutros produtos - 4
'"
Qutros produtos - 4
• Niio eoloque
• Nao coIoque
• Nao coIoque
• Nao coIoque
• Nao coIoque
directa
dos
raios solares.
directa
directa
directa
directa
dos
raias
dos
raias
dos
raias
dos
raias
• Nao coloque rccipicl1tes com itglla
• Nao coloque recipicnlcs
• Nao coloque recipicnlcs
• Nao coloque recipicnlcs
• Nao coloque recipicnlcs
N~o
cxponha 0 aparelho achuva
•
• Nao exponha 0 aparelho achuva
• Nao exponha 0 aparelho achuva
• Nao exponha 0 aparelho achuva
• Nao exponha 0 aparelho achuva
lavar a
loi~a.
lavar a loil;a. piscinaoullUllla cave com humidadc).SeIllolhar acidentallllellie 0 aparelho.
lavar a loil;a. piscinaoullUllla cave com humidadc).SeIllolhar acidentallllellie 0 aparelho.
lavar a loil;a. piscinaoullUllla cave com humidadc).SeIllolhar acidentallllellie 0 aparelho.
lavar a loil;a. piscinaoullUllla cave com humidadc).SeIllolhar acidentallllellie 0 aparelho.
rc:vcndcdor <lutorizado. Retire scmpre 0 cabo
revcndedor autorizado. Retire scmpre 0 cabo dc
revcndedor autorizado. Retire scmpre 0 cabo dc
revcndedor autorizado. Retire scmpre 0 cabo dc
revcndedor autorizado. Retire scmpre 0 cabo dc
•
Este
apnrclho tem pilhas. Deite foraaspilhas adequadamcllIcdeaeordo
Este
aparclho tcm pilhas. Deile foraaspilhas adcquadamellledeacordo comasconsideral;oe:s
Este
aparclho tcm pilhas. Deile foraaspilhas adcquadamellledeacordo comasconsideral;oe:s
Este
aparclho tcm pilhas. Deile foraaspilhas adcquadamellledeacordo comasconsideral;oe:s
Este
aparclho tcm pilhas. Deile foraaspilhas adcquadamellledeacordo comasconsideral;oe:s
•
•
•
•
Conwetcasallioridadcs locais
Contacteasautoridades loeais
Contacteasautoridades loeais
Contacteasautoridades loeais
Contacteasautoridades loeais
• Nao
sobrccarrcgll~
• Nao sobrccarregllc tomadas
• Nao sobrccarregllc tomadas
• Nao sobrccarregllc tomadas
• Nao sobrccarregllc tomadas
• Dcve colocaroscHbasdealimcniacaade10rlna a
• Deve colocar
• Deve colocar
• Deve colocar
• Deve colocar
ligados a
tidws.
ligados a fichas. a rcccptaculos eaopontodeondeoscabos
ligados a fichas. a rcccptaculos eaopontodeondeoscabos
ligados a fichas. a rcccptaculos eaopontodeondeoscabos
ligados a fichas. a rcccptaculos eaopontodeondeoscabos
Para
proteger 0 aparelhodetrovoadas.auquundo n:io
•
Para
proteger 0 aparelhodetrovoadas,ouquando
Para
proteger 0 aparelhodetrovoadas,ouquando
Para
proteger 0 aparelhodetrovoadas,ouquando
Para
proteger 0 aparelhodetrovoadas,ouquando
•
•
•
•
paredc e desligllc a
parcde e dcsligue a
parcde e dcsligue a
parcde e dcsligue a
parcde e dcsligue a
Oeste
modo, 0 aparclho
Oeste
modo, 0 aparelho
Oeste
modo, 0 aparelho
Oeste
modo, 0 aparelho
Oeste
modo, 0 aparelho
• Antes
de
ligar 0
de
ligar 0
de
ligar 0
de
ligar 0
de
ligar 0
• Antes
• Antes
• Antes
• Antes
IranSrOnllador
tranSf0n11adordeCC corresponde aalimenta\ao clectrica local.
tranSf0n11adordeCC corresponde aalimenta\ao clectrica local.
tranSf0n11adordeCC corresponde aalimenta\ao clectrica local.
tranSf0n11adordeCC corresponde aalimenta\ao clectrica local.
• Nunea introduza objectos Illctalicos
• Nlinca introduza objectos mctalieos
• Nlinca introduza objectos mctalieos
• Nlinca introduza objectos mctalieos
• Nlinca introduza objectos mctalieos
•
Para
cvilar choqlles electricos, nunca toque no interior do aparelho. A caixa do aparelhos6dcve scr aberta
Para
evitar choques electricos,
Para
evitar choques electricos,
Para
evitar choques electricos,
Para
evitar choques electricos,
•
•
•
•
• Introduza 0 cabo
0 cabo
0 cabo
0 cabo
0 cabo
• Introduza
• Introduza
• Introduza
• Introduza
quando pllxar a
quando pllxar a
quando puxar a
quando puxar a
quando pllxar a
Sc
0 aparelho
•
• 5c 0 aparelho
• 5c 0 aparelho
• 5c 0 aparelho
• 5c 0 aparelho
imediato e contacte a rcvendedor autorizadooucenlrodeassistcncia tcenica.
imediato e contaetc 0 rcvendedor
imediato e contaetc 0 rcvendedor
imediato e contaetc 0 rcvendedor
imediato e contaetc 0 rcvendedor
• Certifiquc-se
• Certifique-se
• Certifique-se
• Certifique-se
• Certifique-se
durante Ulll periododetempo longo (especialmeme quando
duranteumperiododetempo longo (especialmemc quando crianl;as.
duranteumperiododetempo longo (especialmemc quando crianl;as.
duranteumperiododetempo longo (especialmemc quando crianl;as.
duranteumperiododetempo longo (especialmemc quando crianl;as.
- Poeim aeumlilada pode provocarumchoque elect rico, lima
- Poeira acumulada pode provocarumchoquc clcctrico.
- Poeira acumulada pode provocarumchoquc clcctrico.
- Poeira acumulada pode provocarumchoquc clcctrico.
- Poeira acumulada pode provocarumchoquc clcctrico.
prodllza faiseas e
produza faiscas c
produza faiscas c
produza faiscas c
produza faiscas c
• Contactc
lun
urn
urn
urn
urn
• Contactc
• Contactc
• Contactc
• Contactc
temperaturas altas
temperaturas altas
temperaturas altas
temperaturas altas
temperaturas altas
24
24
24
24
24
funcionar
funcionar
funcionar
funcionar
funcionar
Utilize
lima ficha e uma
•
uma
ficha e
uma
ficha e
uma
ficha e
uma
ficha e
• Utilize
• Utilize
• Utilize
• Utilize
-Uma
liga~ao
Iiga~ao
Iiga~ao
Iiga~ao
Iiga~ao
-Uma
-Uma
-Uma
-Uma
• Deve puxar a lichadatomada
• Deve puxar a fichadatomada
• Deve puxar a fichadatomada
• Deve puxar a fichadatomada
• Deve puxar a fichadatomada
• Nao deixe
as
• Nao deixe
• Nao deixe
• Nao deixe
• Nao deixe
as
as
as
as
os
acess6rios (batcria, etc.) num local seguro fora do
• Guardc
os
acessorios (batcria, ele.) num local seguro fora do
os
acessorios (batcria, ele.) num local seguro fora do
os
acessorios (batcria, ele.) num local seguro fora do
os
acessorios (batcria, ele.) num local seguro fora do
• Guarde
• Guarde
• Guarde
• Guarde
• Niio instalc 0 produto num local instavel, como
Nao
instale 0 produto num local instavel, como
Nao
instale 0 produto num local instavel, como
Nao
instale 0 produto num local instavel, como
Nao
instale 0 produto num local instavel, como
•
•
•
•
• Nilo deixe eair
• Nao deixe cair
• Nao deixe cair
• Nao deixe cair
• Nao deixe cair
centro
de
assistencia.
centrodeassistencia.
centrodeassistencia.
centrodeassistencia.
centrodeassistencia.
• Desligue a cabo
• Desligue a cabo
• Desligue a cabo
• Desligue a cabo
• Dcsliguc 0 cabo
como cera, benzina, aleool, dilucntes. inseeticida. ambiciltador.lubrificante
como
como
como
como
cera,
benzina, alcool, dilucntes, insccticida. ambicntadar, lubrifieanteaudetergente. Tal pode danificar 0 aspecto do produto
cera,
benzina, alcool, dilucntes, insccticida. ambicntadar, lubrifieanteaudetergente. Tal pode danificar 0 aspecto do produto
cera,
benzina, alcool, dilucntes, insccticida. ambicntadar, lubrifieanteaudetergente. Tal pode danificar 0 aspecto do produto
cera,
benzina, alcool, dilucntes, insccticida. ambicntadar, lubrifieanteaudetergente. Tal pode danificar 0 aspecto do produto
climinar a impressao do mesmo.
eliminar a impressao do mesmo.
eliminar a impressao do mesmo.
eliminar a impressao do mesmo.
eliminar a impressao do mesmo.
• Niio deixe cair gotilS au salpicosemcima do aparelho.
ao
deixe cair gotas Oll salpicosemcima do aparelho,
ao
deixe cair gotas Oll salpicosemcima do aparelho,
ao
deixe cair gotas Oll salpicosemcima do aparelho,
ao
deixe cair gotas Oll salpicosemcima do aparelho,
•
•
•
•
•
•
•
•
• Nao destrlla
as
ao
deslruaaspilhas atravesdefogo.
ao
deslruaaspilhas atravesdefogo.
ao
deslruaaspilhas atravesdefogo.
ao
deslruaaspilhas atravesdefogo.
• Nao provoque eurto-circuito,
• Nao provoque curto-cireuito,
• Nao provoque curto-cireuito,
• Nao provoque curto-cireuito,
• Nao provoque curto-cireuito,
• Existc perigo
• Existe perigo
• Existe perigo
• Existe perigo
• Existe perigo
Lima
equivalcntc.
uma
equivalente.
uma
equivalente.
uma
equivalente.
uma
equivalente.
AVISO
- PARA
•
AVISO-
PARA
AVISO-
PARA
AVISO-
PARA
AVISO-
PARA
•
•
•
•
DE
CHAMA
CHAMA
CHAMA
CHAMA
CHAMA
DE
DE
DE
DE
'()
I<I-:I>l
'11K
0
I<I~('()
I<I-:I>l
'11K
0
I<I~('()
I<I-:I>l
'11K
0
I<I~('()
I<I-:I>l
'11K
0
I<I~('()
It{r\SUI{AI.NOINII:I{I\)I{I)(lIFI.I'.VISOI(NA()
1',\1<
I E I RASLlI<AI. NO IN
1',\1<
I E I RASLlI<AI. NO IN
1',\1<
I E I RASLlI<AI. NO IN
1',\1<
I E I RASLlI<AI. NO IN
I.ll II'
1'1
)'1'1/\,\1
'11:1{
()lll-: I't)SSi\,\1 SI:K
()lll-: I't)SSi\,\1 SI:K
()lll-: I't)SSi\,\1 SI:K
()lll-: I't)SSi\,\1 SI:K
>I
,
SII{
]IH'llIA[>:\
I'lll)l'
"ll{IF1.{'
11I,\[l:\
I'lll)l'
"11<IF1.{'
11I,\[l:\
I'lll)l'
"11<IF1.{'
11I,\[l:\
I'lll)l'
"ll{IF1.{'
11I,\[l:\
abt'nuf<1snacaixaeona
abt'nuf<1snacaixaeona
abt'nuf<1snacaixaeona
abt'nuf<1snacaixaeona
para
0 proteger do sobreaqllt:cimento, nunca deve bloqucar
para
0 proteger do sobreaquecimenlO, nllnca de"c
para
0 proteger do sobreaquecimenlO, nllnca de"c
para
0 proteger do sobreaquecimenlO, nllnca de"c
para
0 proteger do sobreaquecimenlO, nllnca de"c
I'ilnhllras e abcrturas
cste
aparclho IllUll
estc
apardho nUIll
estc
apardho nUIll
estc
apardho nUIll
estc
apardho nUIll
man
tendo a dist;:inciadapan:l.Ic:
eOIll
visort'sde32
de32polegadasoumaiores - 5 cm
de32polegadasoumaiores - 5 cm
de32polegadasoumaiores - 5 cm
de32polegadasoumaiores - 5 cm
- 4 elll
cm
cm
cm
cm
estc
aparelho peno ou por cimadelllll
estc
aparclho penooupor cimadeum
estc
aparclho penooupor cimadeum
estc
aparclho penooupor cimadeum
estc
aparclho penooupor cimadeum
solares.
solares.
solares.
solares.
com
agua
com
agua
com
agua
com
agua
piseina ou nllllla cave com humidadc).SeIlloillar a<.:idcliialmentc 0 aparelho. desliguc-o
lomadasdcparede. extcns6es ncm rcccplaculos. porque pode provocar lim inccndiooul.'hoque'
d~
d~
d~
d~
os
cabosdealimentac;aodeforma a
os
cabosdealimentac;aodeforma a
os
cabosdealimentac;aodeforma a
os
cabosdealimentac;aodeforma a
a reccptitculos eaopontodeondeoscabos
atHena
ou
0 sistema
antena
ou
0 sistema
antena
ou
0 sistema
antena
ou
0 sistema
antena
ou
0 sistema
nao
sofre eventuais danos provocados por raios e
nao
sofre evcnlllais danos provocados por raios e
nao
sofre evcnlllais danos provocados por raios e
nao
sofre evcnlllais danos provocados por raios e
nao
sofre evcnlllais danos provocados por raios e
cabo
de
alilllenta~ao
cabodealimcillaltaodeCA
cabodealimcillaltaodeCA
cabodealimcillaltaodeCA
cabodealimcillaltaodeCA
de
CC eorresponde aalimentaltao elcctriea local.
de
alimentayao compJetamentc
de
alimentavao completamcllte
de
alimentavao completamcllte
de
alimentavao completamcllte
de
alimentavao completamcllte
mesmadatomada. Nao toquenocabodeal
mesmadatomada. Nao toquenocabodeal
mesmadatomada. Nao toquenocabodeal
mesmadatomada. Nao toquenocabodeal
mesmadatomada. Nao toquenocabodeal
nao
funcionar normalmentefiem
nao
fUllcionar normalmente -emparticular.sea aparelho emitir midasouchciros invulgares - desliguc 0 aparelho
nao
fUllcionar normalmente -emparticular.sea aparelho emitir midasouchciros invulgares - desliguc 0 aparelho
nao
fUllcionar normalmente -emparticular.sea aparelho emitir midasouchciros invulgares - desliguc 0 aparelho
nao
fUllcionar normalmente -emparticular.sea aparelho emitir midasouchciros invulgares - desliguc 0 aparelho
de
que
rei
ira a ficha
de
que
ret
ira a fichadealimenta\aodalomada
de
que
ret
ira a fichadealimenta\aodalomada
de
que
ret
ira a fichadealimenta\aodalomada
de
que
ret
ira a fichadealimenta\aodalomada
aqlle~a
ou
aque~a
ou
aque~a
ou
aque~a
ou
aque~a
ou
centro autorizadodeassistcncia Iecnica quando instalar a produloemlocais sujeitos a pociras exccssivas. loeais sujeitos a
centro autorizadodeassisteneia tccnica quando instalar 0
centro autorizadodeassisteneia tccnica quando instalar 0
centro autorizadodeassisteneia tccnica quando instalar 0
centro autorizadodeassisteneia tccnica quando instalar 0
Oll baixas. locais com mllita humidadc. locais onde
ou
baixas. locais com muita humidade, locais
ou
baixas. locais com muita humidade, locais
ou
baixas. locais com muita humidade, locais
ou
baixas. locais com muita humidade, locais
horas por dia comoemaeroportos.
horas
por dia COIllOemaeroponos,
horas
por dia COIllOemaeroponos,
horas
por dia COIllOemaeroponos,
horas
por dia COIllOemaeroponos,
IOmada
uma
tomada devidamente ligadas a terra.
uma
tomada devidamentc ligadas a terra.
uma
tomada devidamentc ligadas a terra.
uma
tomada devidamente ligadas a terra.
de
terra deficicllte pode causar cheque elcctrico ou danos no eqllipamento.
dc terra deficientc
dc terra deficientc
dc terra deficientc
dc terra deficientc
eriancas mexer no produto.
criancas
l11exer
no produto.
criancas
l11exer
no produto.
criancas
l11exer
no produto.
criancas
l11exer
no produto.
Oll
provoquc qualquer embatenoprodulo.
ou
pravoque qualqller embatenoprodulo.Se0 produlO cstiver danilicado. desligllc a cabodealimentacao c tontaete
ou
pravoque qualqller embatenoprodulo.Se0 produlO cstiver danilicado. desligllc a cabodealimentacao c tontaete
ou
pravoque qualqller embatenoprodulo.Se0 produlO cstiver danilicado. desligllc a cabodealimentacao c tontaete
ou
pravoque qualqller embatenoprodulo.Se0 produlO cstiver danilicado. desligllc a cabodealimentacao c tontaete
de
Cllilllenta~ao
de
alilllenta~ao
de
alilllenta~ao
de
alilllenta~ao
de
alilllenta~ao
pilhas atravesdefogo.
nem
nem
nem
nem
nem
de
explosaosea pilha ror substituida incorrectamclllc. SlIbstitua-a
de
explosaosea pilha for substituida incorreclamente. Substitua-a
de
explosaosea pilha for substituida incorreclamente. Substitua-a
de
explosaosea pilha for substituida incorreclamente. Substitua-a
de
explosaosea pilha for substituida incorreclamente. Substitua-a
EVITAR0ALASTRARDEUM
EVITAR0ALASTRARDEUM
EVITAR0ALASTRARDEUM
EVITAR0ALASTRARDEUM
EVITAR0ALASTRARDEUM
LONGE DESTE PRODUTO. .
LO:'<GE OESTE PROOUTO.
LO:'<GE OESTE PROOUTO.
LO:'<GE OESTE PROOUTO.
LO:'<GE OESTE PROOUTO.
··.lr~';I·
1)1'.
{'III
)(-,UI.
1)1'.
CII()()UJ.I:l.t"-.tTRI{'O.
1)1'.
CII()()UJ.I:l.t"-.tTRI{'O.
1)1'.
CII()()UJ.I:l.t"-.tTRI{'O.
1)1'.
CII()()UJ.I:l.t"-.tTRI{'O.
II:RI\1R1)0 I
II:RI\1R1)0 I
II:RI\1R1)0 I
II:RI\1R1)0 I
HI,I',\I{i\]),\S
HII',\HAIMS
HII',\HAIMS
HII',\HAIMS
HII',\HAIMS
POI{
Pl)H.IICt\11'IlS
Pl)H.IICt\11'IlS
Pl)H.IICt\11'IlS
Pl)H.IICt\11'IlS
parle:
parle:
parle:
parle:
CUIll
com
com
com
com
espal;o
espal;o
espal;o
espal;o
espal;o
Tipo
polegadas ou maiort's-.5
em
elll cillla do aparelho (jarras etl:.).
elll cillla do aparelho (jarras etl:.).
elll cillla do aparelho (jarras etl:.).
elll cillla do aparelho (jarras etl:.).
nem
coloque CIll locais pertode:Iglla (pertodeuma
nem
coloquccmlocais penodeagua
nem
coloquccmlocais penodeagua
nem
coloquccmlocais penodeagua
nem
coloquccmlocais penodeagua
para
ohler
para
obler informJl;oC's
para
obler informJl;oC's
para
obler informJl;oC's
para
obler informJl;oC's
parede..extensoes
parede..extensoes
parede..extensoes
parede..extensoes
de
nas
nas
nas
nas
nas
nUllea
toque no interior do aparelho. A caixa do aparelhos6deve
nUllea
toque no interior do aparelho. A caixa do aparelhos6deve
nUllea
toque no interior do aparelho. A caixa do aparelhos6deve
nUllea
toque no interior do aparelho. A caixa do aparelhos6deve
aUlOrizadooucenlrodeassistencla tccnica.
aUlOrizadooucenlrodeassistencla tccnica.
aUlOrizadooucenlrodeassistencla tccnica.
aUlOrizadooucenlrodeassistencla tccnica.
de
alimenta~ao
deteriore 0 isolamento.
deleriore 0 isalamemo.
deleriore 0 isalamemo.
deleriore 0 isalamemo.
deleriore 0 isalamemo.
devidamente ligadas aterra.
pode
causar choque electricooudanosnOequipamento. (So equipamcnlodec1asse
pode
causar choque electricooudanosnOequipamento. (S6 equipamcnlodec1asse
pode
causar choque electricooudanosnOequipamento. (S6 equipamcnlodec1asse
pode
causar choque electricooudanosnOequipamento. (So equipamcnlodec1asse
para
desligar 0 aparelhodacorrenle.dcfanna a deixar a fieha pronta a
para
desligar 0 aparelhodacorrente.deforma a deixar a ficha pronta a
para
desligar 0 aparelhodacorrente.deforma a deixar a ficha pronta a
para
desligar 0 aparelhodacorrente.deforma a deixar a ficha pronta a
para
desligar 0 aparelhodacorrente.deforma a deixar a ficha pronta a
da
tom
da
tom
da
tom
da
tom
da
tom
desfa~a
desfac;a
desfac;a
desfac;a
desfac;a
•.
1:1.I·'.{'
rim
'I
l. "oJ'\'()
1<1.
I
II{I.
~A()
1<1·:'JlI<I
~A()
1<1·:'JlI<I
~A()
1<1·:'JlI<I
~A()
1<1·:'JlI<I
n.I.V!SOK
N'\O
n.I.V!SOK
N'\O
n.I.V!SOK
N'\O
n.I.V!SOK
I'IH
I'UJJl'
I'UJJl'
I'UJJl'
I'UJJl'
II
ti'II'(}S<.,H)i\UII('/\l)(lS.
panus
panosoumilros materia
panosoumilros materia
panosoumilros materia
panosoumilros materia
lechado,
Ihhado.
Ihhado.
Ihhado.
Ihhado.
tla
tla
tla
tla
Direct Vic\\ c
cima do
inronna~oes
de
de
de
de
de
CA
abcrlurasdoaparclho.Se0 lizcr.
aberturas do aparelho.
aberturas do aparelho.
aberturas do aparelho.
aberturas do aparelho.
ada
ada
ada
ada
ada
ou
ou
ou
ou
ou
N'\O
Jl'lll.ll.i\I)\
II{.
1\
1II.II.A1)(
11<,1\
1II.II.A1)(
11<,1\
1II.II.A1)(
11<,1\
1II.II.A1)(
11<,1\
()l
)"'.llll·AI)!)S.
()l
)"'.llll·AI)!)S.
()l
)"'.llll·AI)!)S.
()l
)"'.llll·AI)!)S.
--_._,_._~.-
_---=-==-::::::::::=_.---C
_---=-==-::::::::::=_.---C
_---=-==-::::::::::=_.---C
_---=-==-::::::::::=_.---C
----
---
puste:rior ou
inlcrior
puste:rior Oll
inl~rior
puste:rior Oll
inl~rior
puste:rior Oll
inl~rior
puste:rior Oll
inl~rior
Oll
uutros l1lalcriais.
nUl1la
nUl1la
nUl1la
nUl1la
COIIIO
uma
estalltc
COIllO ullla estanlc Oll lIlll armt"lrio
COIllO ullla estanlc Oll lIlll armt"lrio
COIllO ullla estanlc Oll lIlll armt"lrio
COIllO ullla estanlc Oll lIlll armt"lrio
cspc:cilkal.la (collsuhcasinl'ormar;ih..'s
paretic especificada
paretic especificada
paretic especificada
paretic especificada
ProjL'Clon..'s
(Ill
r;ldiador.
sistl..'lIla
racliador. sistemadeaquL'l:illlL'll1o
racliador. sistemadeaquL'l:illlL'll1o
racliador. sistemadeaquL'l:illlL'll1o
racliador. sistemadeaquL'l:illlL'll1o
apan,,'lho
(jarras l'U:.). porqut' podc provocar
de
alimcnta~no
di!
alil1lenta~ao
da
alil1lenta~ao
da
alil1lenta~ao
da
alil1lenta~ao
da
sabre a
destrlli~ao
sobre
a destruil;aoourcciclagemdepilhas.
sobre
a destruil;aoourcciclagemdepilhas.
sobre
a destruil;aoourcciclagemdepilhas.
sobre
a destruil;aoourcciclagemdepilhas.
nem
receptaculos. porquc
nem
receptaculos. porquc
nem
receptaculos. porquc
nem
receptaculos. porquc
11aO
scrl'l1l pisados nClll cntalados por object
nao
serem
pisados
nao
serem
pisados
nao
serem
pisados
nao
serem
pisados
S<lCI11
saelll do aparelho.
saelll do aparelho.
saelll do aparelho.
saelll do aparelho.
lor
lltiliza-Io durante longos periodosdetempo, desligue 0
nao
for utiliza-Io durante
nao
for utiliza-Io durante
nao
for utiliza-Io durante
nao
for utiliza-Io durante
televisao por cabo.
televisao por
cabo.
televisao por
cabo.
televisao por
cabo.
televisao por
cabo.
atom
ada
do transfonnadordeCC'.
atom
ada
do transformador
atom
ada
do transformador
atom
ada
do transformador
atom
ada
do transformador
ate
ao
Ii
Ill.
Quando rctirar 0 cabodealimentaciio, ccrtilique-sc:
ateaolim. Quando rctirar 0 cabodealimcntaciio. certilique-sedequeasegura
ateaolim. Quando rctirar 0 cabodealimcntaciio. certilique-sedequeasegura
ateaolim. Quando rctirar 0 cabodealimcntaciio. certilique-sedequeasegura
ateaolim. Quando rctirar 0 cabodealimcntaciio. certilique-sedequeasegura
imentacao comasmaos Illolhadas.
imentacao
imentacao
imentacao
imentacao
particular,se0 aparelho
da
tomadase0 aparelhodetelevisao
se
0 aparelho
se
0 aparelho
se
0 aparelho
se
0 aparelho
crial1~as.
fuga
uma
fuga
uma
fuga
uma
fuga
uma
fuga
estacoesdecomboio, ctc.Scnao
est3l;oesdecomboio. etc.Scnao
est3l;oesdecomboio. etc.Scnao
est3l;oesdecomboio. etc.Scnao
est3l;oesdecomboio. etc.Scnao
a1cancc
aleanee
aleanee
aleanee
aleanee
uma
prateleira inclinada. um
Luna
prateleira indinada.umchao
Luna
prateleira indinada.umchao
Luna
prateleira indinada.umchao
Luna
prateleira indinada.umchao
Se
0 produto estiver danilicado. desligue 0 cabo
e utilize
lllll
pano
sobrcaquc~a
sobrcaquc~a
sobrcaquc~a
sobrcaquc~a
sobrcaquc~a
secoCmado
pano
sccoenucio
pano
sccoenucio
pano
sccoenucio
pano
sccoenucio
as
pilhas.
as
pilhas.
as
pilhas.
as
pilhas.
as
pilhas.
INcE:NOIO,
INcE:NOIO.
INcE:NOIO.
INcE:NOIO.
INcE:NOIO.
-
-
-
-
-
e utilize lIlll
e utilize lIlll
e utilize lIlll
e utilize lIlll
._---------
pcrmilcm a
\·cn[ili.l~·ao
pCflnilcm
it
\
cntilac;;,io
pCflnilcm
it
\
cntilaC;;,io
pCflnilcm
it
\
cntilaC;;,io
pCflnilcm
it
\
cntilaC;;,io
llU
lapar
bl0411~ar
Oll
tapar
bl0411~ar
Oll
tapar
bl0411~ar
Oll
tapar
bl0411~ar
Oll
tapar
is.
is.
is.
is.
cama.
sof~l.
tapclt' Oll outra supcrlh:ic sClllclhantc.
call1;,1.
sol~i.
tap(,l~
call1;,1.
sol~i.
tap(,l~
call1;,1.
sol~i.
tap(,l~
call1;,1.
sol~i.
tap(,l~
ou
lllll
arm<'lrio
{collsuh~
as
il\lorll1a~oi..'s
(collsuh~
as
il\lorll1a~oi..'s
(collsuh~
as
il\lorll1a~oi..'s
{collsuh~
as
il\lorll1a~oi..'s
- 1()em
de'
aqllccillll'llIo ou
porqll~
pude
porqll~
pude
porqll~
pude
porqll~
pude
(pertodeuma
(pertodeuma
(pertodeuma
(pertodeuma
10m
ada
antesdelimpar 0 prodllto.
10lllada
antesdelimpar 0 produto.
10lllada
antesdelimpar 0 produto.
10lllada
antesdelimpar 0 produto.
10lllada
antesdelimpar 0 produto.
COIll
as
considera~ocs
ou reciclagemdepllhas.
pode
pode
pode
pode
nem
ental
ados
nem
ental
ados
nem
ental
ados
nem
ental
ados
do
aparclho.
lon£oos
lon£oos
lon£oos
lon£oos
deseargasemeabosdealta tcnsuo.
deseargasemcabosdealta lensao.
deseargasemcabosdealta lensao.
deseargasemcabosdealta lensao.
deseargasemcabosdealta lensao.
eenifique-sedeque
deCCccnifique-se
deCCccnifique-se
deCCccnifique-se
deCCccnifique-se
pod
I..'
Se
Se
Se
Se
Portugues-
Portugues-
Portugues-
Portugues-
Portugues-
provoear choques
0 tizcr,
pode
provocm choques electricos,
0 tizcr,
pode
provocar choques electricos,
0 tizcr,
pode
provocar choques electricos,
0 tizcr,
pode
provocm choques electricos,
COI11
as
maos
COI11
as
maos
COI11
as
maos
COI11
as
maos
emitir
ruidos ou cheiros invulgarcs desligllc 0 aparelho
de
tclevisao
de
tclevisao
de
tclevisao
de
tclevisao
idososoupessoas
idososoupessoas
idososoupessoas
idososoupessoas
idososoupessoas
electrica ouumincendio. fazendo com
eleetricaouum
eleetricaouum
eleetricaouum
eleetricaouum
prOOuloemlocais sujeitos a poeiras excessivas. locais sujeitos a
prOOuloemlocais sujeitos a poeiras excessivas. locais sujeitos a
prOOuloemlocais sujeitos a poeiras excessivas. locais sujeitos a
prOOuloemlocais sujeitos a poeiras excessivas. locais sujeitos a
se
utilizem substfmcias quimicas c locaisunde
ondeseutilizem substancias quimieas e locais
ondeseutilizem substancias quimieas e locais
ondeseutilizem substancias quimieas e locais
ondeseutilizem substancias quimieas e locais
das
eriancas.
das
criancas.
das
criancas.
das
criancas.
das
criancas.
chao
para
limpar 0 produto. Nilo utilize quaisquer produtos quimicos
para
limpar 0 praduto.
para
limpar 0 praduto.
para
limpar 0 praduto.
para
limpar 0 praduto.
ou
detergente. Tal pode danificar 0 aspcctodoproduto ou
apenas
apenas
apenas
apenas
apenas
MANTENHA
MANTENHA
MANTENHA
MANTENHA
MANTENHA
park
hI.:
,~il11l'llhl
intill"ll1a-lllk
hk'
.~iI11l1\lhl
infOl"111;1-0d..:qu
hk'
.~iI11l1\lhl
infOl"111;1-0
hk'
.~iI11l1\lhl
infOl"111;1-0
hk'
.~iI11l1\lhl
infOl"111;1-0d..:qu
itK'llii
lil
...
·r:llllraitlljlorl;llll\.·
im.'llii lil\.·railirailllport;llll\.·
im.'llii lil\.·railirailllport;llll\.·
im.'llii lil\.·railirailllport;llll\.·
im.'llii lil\.·railirailllport;llll\.·
futll.:illllall\\.·llhl
fllm:imWllh..'1ll\1\.'lllilllllk1l1;:lO
fllm:imWllh..'1ll\1\.'lllilllllk1l1;:lO
fllm:imWllh..'1ll\1\.'lllilllllk1l1;:lO
fllm:imWllh..'1ll\1\.'lllilllllk1l1;:lO
. _
. _
. _
. _
neccss,iria.
Para
ncce:ssaria.
Para
ncce:ssaria.
Para
ncce:ssaria.
Para
ncce:ssaria.
Para
estas
ranhuras('ahcrtllras.
cstas
rilnhuras e aocnuras .
cstas
rilnhuras e aocnuras .
cstas
rilnhuras e aocnuras .
cstas
rilnhuras e aocnuras .
ou
outra supcrficiL' scmclhante.
ou
outra supcrficiL' scmclhante.
ou
outra supcrficiL' scmclhante.
ou
outra supcrficiL' scmclhante.
c'lllbutil.lo. a
rnenos
~mblilitl().
a
menos
~mblilitl().
a
menos
~mblilitl().
a
menos
~mblilitl().
a
menos
abaixu.)
abaixtl.}
abaixtl.)
abaixtl.)
abaixtl.}
nUI1l
locall..'111
ou
Illlll}
localemque
ou
Illlll}
localemque
ou
Illlll}
localemque
ou
Illlll}
localemque
lllll
incclldio
provocar
lllll
irKcndioouchoque electrico.
provocar
lllll
irKcndioouchoque electrico.
provocar
lllll
irKcndioouchoque electrico.
provocar
lllll
irKcndioouchoque electrico.
banheira. l:t"morio,
banheira. lavalorio. lava-loi\<L tubodamaqllilla
banheira. laval6rio. lava-loi\<L tubodamaqllilla
banheira. laval6rio. lava-loi\<L tubodamaqllilla
banheira. lavalorio. lava-loi\<L tubodamaqllilla
d~sligue-o
d~sligue-o
d~sligue-o
d~sligue-o
<lmbit'lltais t'xistt'ntcsnoscu
ambienlais cxislcntesnosell
ambienlais cxislcntesnoseu
ambienlais cxislcntesnoseu
ambienlais cxislcntesnosell
provocarumincendioouchoque e1i-ctrico.
provocarumincendioouchoque e1i-ctrico.
provocarumincendioouchoque e1i-ctrico.
provocarumincendioouchoque e1i-ctrico.
os,
tendoemespecial
por objectos, tendoemespecial atell\aooscabos
por objectos, tendoemespecial atell\aooscabos
por objectos, tendoemespecial atell\aooscabos
por objectos, tendoemespecial atell\aooscabos
periodosdetempo. desligue 0 aparelhodatamada
periodosdetempo. desligue 0 aparelhodatamada
periodosdetempo. desligue 0 aparelhodatamada
periodosdetempo. desligue 0 aparelhodatamada
a
dt:
que
a designal;ao
dt:
que
a designal;ao
dt:
que
a designal;ao
dt:
que
a designal;ao
elt~ctricos.
ser
abena por tecnieos qllalificados.
ser
abena por tecnieos qllalificados.
ser
abena por tecnieos qllalificados.
ser
abena por tecnieos qllalificados.
molhadas.
molhadas.
molhadas.
molhadas.
nao
for utilizadoouse
nao
for utilizadoouse
nao
for utilizadoouse
nao
for utilizadoouse
nao
for utilizadoouse
com delicicncias forem deix:ldas sozinhasemcasa).
com
deliciencias forem deixadas
com
deliciencias forem deixadas
com
deliciencias forem deixadas
com
deliciencias forem deixadas
incendio. fazcndo COIll
incendio. fazcndo COIll
incendio. fazcndo COIll
incendio. fazcndo COIll
0 fizer.
jJode
provocar serios danosnoproduto.
0 fizer,
jJOde
provocar serios danos no produto,
0 fizer,
jJOde
provocar serios danos no produto,
0 fizer,
jJOde
provocar serios danos no produto,
0 fizer,
jJOde
provocar serios danos no produto,
(56
equipamcnlodec1assc
SCI'
ser
ser
ser
ser
desnivcladoouum local c.xposto;:i vibracii.o.
desnivclado
ou
UJll
desnivclado
ou
UJll
desnivclado
ou
UJll
desnivclado
ou
UJll
Nao
Nao
Nao
Nao
pelo mesilla tipodepilha Oll por
pclo meslllo lipodepilhaoupor
pclo meslllo lipodepilhaoupor
pclo meslllo lipodepilhaoupor
pclo meslllo lipodepilhaoupor
SEMPREASVELASOUOUTRO
SEMPREASVELASOUOUTRO
SEMPREASVELASOUOUTRO
SEMPREASVELASOUOUTRO
SEMPREASVELASOUOUTRO
a
.:.\l:'l~ll\:ia
d\.' alta
.xisl~'n
..
:ia
d\.'
alta
.xisl~'n
..
:ia
d\.'
alta
.xisl~'n
..
:ia
d\.'
alta
.xisl~'n
..
:ia
d\.'
tin
i,l..till t
i,l..till t
Illi
!HI
!HI
!HI
!HI
\.'
11l:lIlUI\.'Il~·;ill.
garantir 0 rllncioll<lIlH:.'nto correcto
garantir 0 l'uncionaIlH:nto rorreclu
garantir 0 l'uncionaIlH:nto rorreclu
garantir 0 l'uncionaIlH:nto rorreclu
garantir 0 l'uncionaIlH:nto rorreclu
que
que
que
que
que
qUl..'
da
da
da
da
da
desigml~;:io
utilizada.
utilizada.
utilizada.
utilizada.
utilizada.
local cxposto a vibral;ao.
local cxposto a vibral;ao.
local cxposto a vibral;ao.
local cxposto a vibral;ao.
utilize quaisqucr produtos quimicos
utilize quaisqucr produtos quimicos
utilize quaisqucr produtos quimicos
utilize quaisqucr produtos quimicos
alta
1.:11..'\
i:.or.f.P\.'l'iJ;lbU lo!.:;!r \.'Ill
k,\"i~or.
f:
p\.,
..
it!"htl
Itl
f:
p\.'rit!"htl
f:
p\.'rit!"htl
f:
p\.,
..
it!"htl
prt1dlllll.
prodlllil.
prodlllil.
prodlllil.
prodlllil.
.:sl.: prodtllo
....
\.·sl
....
produl\!
....
\.·sl
....
produl\!
....
\.·sl
....
produl\!
....
\.·sl
....
produl\!
rl:.~p':l:lj\
....IIr
....
:-.p
........
....IIr
....
:-.p
........
....IIr
....
:-.p
........
....IIr
....
:-.p
........
Vl'lllila~;10
exposto
<"I
exposlO
,'\
exposlO
,'\
exposlO
,'\
exposlO
,'\
e1cctrico.
tubodam::iqull1a
dt' imcdiato 0
pais.
pais.
pais.
pais.
c1~ctrico.
ntt'n~:10
~lpardho
da
de
tensao
de
t~nsao
de
t~nsao
de
t~nsao
de
t~nsao
que0segura
nao
nao
nao
nao
nao
sozinhasemcasa).
sozinhasemcasa).
sozinhasemcasa).
sozinhasemcasa).
de
alimcllta~ao
0 monitor esteja a
0 monilor
0 monilor
0 monilor
0 monilor
I.)
I.)
I.)
I.)
I.)
c contacte lim
TirO
TlPO
TlPO
TlPO
TlPO
....ar\.'Ill
Itl
....ar\.'Ill
Itl
....ar\.'Ill
Itl
....ar\.'Ill
(l
lj,
\)
lj,
\)
lj,
\)
lj,
\)
ineidenda
incidencia
incidencia
incidencia
incidencia
pais.
os
cabos
tol11ada
do
do
do
do
do
pelCl
pel<-l
pel<-l
pel<-l
pel<-l
cstiveremcasa
cstiveremcasa
cstiveremcasa
cstiveremcasa
cstiveremcasa
esteja
esteja
esteja
esteja
(\)
Gb)
Gb)
Gb)
Gb)
k,\"i~or.
k,\"i~or.
k,\"i~or.
Illl.:rim
dll
Illl
....
rim
(.hI
Illl
....
rim
(.hI
Illl
....
rim
(.hI
Illl
....
rim
(.hI
qu\.·
d..:
qu
d..:
qu
:'llhl'l: (I
sobr
sobr
sobr
sobr
tenh;"l
lcnh" v('lltikt\:io
lcnh" v('lltikt\:io
lcnh" v('lltikt\:io
lcnh" v('lltikt\:io
t:.'stt:.'ja
~steja
~steja
~steja
~steja
Oll
ChOqUl'
lllvafiloi~a.
lich~l
e
eOl1laCIC
ficha c contacledeimedialO 0
ficha c contacledeimedialO 0
ficha c contacledeimedialO 0
ficha c contacledeimedialO 0
pOl'
tecnicos qualificCldos.
dl..'
0 1I1ilizador
0 ulilizadar
0 utilizadar
0 utilizadar
0 ulilizadar
que0lio
que0liodealimentacao
que0liodealimentacao
que0liodealimentacao
que0liodealimentacao
onde
onde
onde
onde
de
alilllcnta~;10
de
de
de
de
de
ou
ou
ou
ou
Regulatory Compliance Statements
Regulatory Compliance Statements
Regulatory Compliance Statements
Regulatory Compliance Statements
Regulatory Compliance Statements
Your
SamsOngproduct compliance classJs markedinthe
Your
Samsurig
Your
Samsurig
Your
Samsurig
Your
Samsurig
• I:l'lk:ral CllllllllLlIli(<Ilions COllllllissi(lIl (reel
-
FL'deral
C'tlllll1luniL'<llioIlS
-
FL'deral
C'tlllll1luniL'<llioIlS
-
FL'deral
C'tlllll1luniL'<llioIlS
-
FL'deral
C'tlllll1luniL'<llioIlS
- Industry
Canild"
- Industry Call,llla
- Industry Call,llla
- Industry Call,llla
- Industry Call,llla
-
Voluntary
- Volulltary Control COUIK'il
- Volulltary Control COUIK'il
- Volulltary Control COUIK'il
- Volulltary Control COUIK'il
- Burl'au
ofSlandards
- Burl'au OfSlalH
- Burl'au OfSlalH
- Burl'au OfSlalH
- Burl'au OfSlalH
fi
Korl'(1 COllllllunications
-
-
-
-
Kor~a
COllllllunications Commission
Kor~a
COllllllunications Commission
Kor~a
COllllllunications Commission
Kor~a
COllllllunications Commission
- Ilalian Post
POSI
POSI
POSI
POSI
- Italiall
- Italiall
- Italiall
- Italiall
FCC Class A Notice
FCC Class A Notice
FCC Class A Notice
FCC Class A Notice
FCC Class A Notice
This
device
This
This
This
This
device
device
device
device
1.
This
device
1.
This device
1.
This device
1.
This device
1.
This device
device
2. This
2. This device
2. This device
2. This device
2. This device
NOTE:
NOTE:
NOTE:
NOTE:
NOTE:
This equipment has been tested and found
This equipment has been tested and found to comply with the limits for a Class A digital device. pursuant to Part 15
This equipment has been tested and found to comply with the limits for a Class A digital device. pursuant to Part 15
This equipment has been tested and found to comply with the limits for a Class A digital device. pursuant to Part 15
This equipment has been tested and found to comply with the limits for a Class A digital device. pursuant to Part 15
Rules.
These
These
These
These
These
Rules.
Rules.
Rules.
Rules.
in a commercial environment. This
in a commercial environment. This
in a commercial environment. This
in a commercial environment. This
in a
commercial
usedinaccordance
used
used
used
used
in
accordance with the instruction manual,
in
accordance with the instruction manual,
in
accordance with the instruction manual,
in
accordance with the instruction manual,
Operationofthis
of
of
of
of
Operation
Operation
Operation
Operation
correct
the interference at his
correct the interference at his
correct the interference at his
correct the interference at his
de
d~
d~
d~
d~
de
de
de
de
de
ficha
ficha
ficha
ficha
ficha
a
a
a
a
um
um
um
um
.
.
.
.
correct the interference at his
FCC
Class B Notice
FCC
Class B Notice
FCC
Class B Notice
FCC
Class B Notice
FCC
Class B Notice
This
device
This
This
This
This
device
device
device
device
1. This
device
1.
This device
1.
This device
1.
This device
1.
This device
2.
This
device
2. This device
2. This device
2. This device
2. This device
NOTE:
NOTE:
NOTE:
NOTE:
NOTE:
This equipment has been tested and found
This equipment has been tested and found to comply with the limits for a Class B digital device, pursuant
This equipment has been tested and found to comply with the limits for a Class B digital device, pursuant
This equipment has been tested and found to comply with the limits for a Class B digital device, pursuant
This equipment has been tested and found to comply with the limits for a Class B digital device, pursuant
Rules.
These
Rules.
These
Rules.
These
Rules.
These
Rules.
These
equipment
generates,
equipment
generates,
equipment
generates,
equipment
generates,
equipment
generates,
instructions,
instructions,
instructions,
instructions,
instructions,
occur
in a
particular
occur
in a particular installation. If this
occur
in a particular installation. If this
occur
in a particular installation. If this
occur
in a particular installation. If this
determined
determined by turning the
determined by turning the
determined by turning the
determined by turning the
following measures:
follOWing measures:
follOWing measures:
follOWing measures:
follOWing measures:
_.
Reorientorrelocate the receiving
-- Reorient or relocate the receiving antenna.
-- Reorient or relocate the receiving antenna.
-- Reorient or relocate the receiving antenna.
-- Reorient or relocate the receiving antenna.
--
Increase
-- Increase the separation
-- Increase the separation
-- Increase the separation
-- Increase the separation
_.
Connect
the
Connect
the
Connect
the
Connect
the
Connect
the
--
--
--
--
-- Consult the dealer oranexperienced radiolTV technician for help.
_.
Consult
the
_.
Consult
the
_.
Consult
the
_.
Consult
the
User Information
User Information
User Information
User Information
User Information
Changes or modifications not expressly approved by the party responsible for compliance could void the user's authority
Changesormodifications not expressly approved by the party responsible for
Changesormodifications not expressly approved by the party responsible for
Changesormodifications not expressly approved by the party responsible for
Changesormodifications not expressly approved by the party responsible for
operate
the
operate the equipment. If necessary. consult with
operate the equipment. If necessary. consult with
operate the equipment. If necessary. consult with
operate the equipment. If necessary. consult with
suggestions. You may find the booklet called How
suggestions. You may find the booklet called How
suggestions. You may find the booklet called How
suggestions. You may find the booklet called How
suggestions. You may find the booklet called How
This booklet was prepared by the Federal Communications Commission.
This
booklet
This
booklet
This
booklet
This
booklet
Washington,
Washington, DC 20402, Stock Number 004-000-00345-4.
Washington, DC 20402, Stock Number 004-000-00345-4.
Washington, DC 20402, Stock Number 004-000-00345-4.
Washington, DC 20402, Stock Number 004-000-00345-4.
The
party
The
party
The
party
The
party
The
party
SAMSUNG ELECTRONICS
SAMSUNG ELECTRONICS
SAMSUNG ELECTRONICS
SAMSUNG ELECTRONICS
SAMSUNG ELECTRONICS
America QA Lab
America QA LabofSamsung
America QA LabofSamsung
America QA LabofSamsung
America QA LabofSamsung
3351 Michelson Drive
3351 Michelson Drive
3351 Michelson Drive
3351 Michelson Drive
3351 Michelson Drive
Suite #290, Irvine, CA92612 USA
Suite #290. Irvine, CA92612 USA
Suite #290. Irvine, CA92612 USA
Suite #290. Irvine, CA92612 USA
Suite #290. Irvine, CA92612 USA
Waming
Warning
Warning
Warning
Warning
User must use shielded signal interface cablestomaintain FCC compliance for the product.
User
must use shielded signal interface
User
must use shielded signal interface
User
must use shielded signal interface
User
must use shielded signal interface
Provided with this monitor is a detachable power supply cord with IEC320 style terminations.
Provided with this monitor is a detachable power supply cord with IEC320 style terminations.
Provided with this monitor is a detachable power supply cord with IEC320 style terminations.
Provided with this monitor is a detachable power supply cord with IEC320 style terminations.
Provided with this monitor is a detachable power supply cord with IEC320 style terminations.
It
may
be suitable for
may
be suitable for connection to
may
be suitable for connection to
may
be suitable for connection to
may
be suitable for connection to
It
It
It
It
Before
making
Before making
Before making
Before making
Before making
that
the
ampere
that the
that the
that the
that the
ampere
ampere
ampere
ampere
For 120 Volt applications, use only UL Listed detachable power cord with NEMA configuration 5-15P type (parallel blades) plug
For 120 Volt applications, use only UL Listed detachable power cord with NEMA configuration 5-15P type (parallel blades) plug
For 120 Volt applications, use only UL Listed detachable power cord with NEMA configuration 5-15P type (parallel blades) plug
For 120 Volt applications, use only UL Listed detachable power cord with NEMA configuration 5-15P type (parallel blades) plug
For 120 Volt applications, use only UL Listed detachable power cord with NEMA configuration 5-15P type (parallel blades) plug
cap. For 240 Volt applications use only UL Listed detachable power supply cord with NEMA configuration 6-15P type
cap. For 240 Volt applications use only UL Listed detachable power supply cord with NEMA configuration 6-15P type
cap. For 240 Volt applications use only UL Listed detachable power supply cord with NEMA configuration 6-15P type
cap. For 240 Volt applications use only UL Listed detachable power supply cord with NEMA configuration 6-15P type
cap. For 240 Volt applications use only UL Listed detachable power supply cord with NEMA configuration 6-15P type
(tandem blades) plug cap.
(tandem blades) plug cap.
(tandem blades) plug cap.
(tandem blades) plug cap.
(tandem blades) plug cap.
This television receiver provides display
This
television receiver provides
This
television receiver provides
This
television receiver provides
This
television receiver provides
(TV
broadcast
(TV broadcast receivers with picture
(TV broadcast receivers with picture
(TV broadcast receivers with picture
(TV broadcast receivers with picture
produ~
compliance class is markedintile
produ~
compliance class is markedintile
produ~
compliance class is markedintile
produ~
compliance class is markedintile
('I)Il1111issitlll
('I)Il1111issitlll
('I)Il1111issitlll
('I)Il1111issitlll
l~qlliprnl.:lll
Standard
l~qllipll1L'lll
Standard I'm
l~qllipll1L'lll
Standard I'm
l~qllipll1L'lll
Standard I'm
l~qllipll1L'lll
Control
Ministry
Minislry
Minislry
Minislry
Minislry
complies
complies
complies
complies
complies
limits are
limits are designed to provide reasonable protection against harmful interference when the equipment is operated
limits are designed to provide reasonable protection against harmful interference when the equipment is operated
limits are designed to provide reasonable protection against harmful interference when the equipment is operated
limits are designed to provide reasonable protection against harmful interference when the equipment is operated
this
this
this
this
complies
complies
complies
complies
complies
limits are
limits are designed to provide reasonable protection against harmful interference in a residential installation. This
limits are designed to provide reasonable protection against harmful interference in a residential installation. This
limits are designed to provide reasonable protection against harmful interference in a residential installation. This
limits are designed to provide reasonable protection against harmful interference in a residential installation. This
may
may
may
may
may
by turning the
the
equipment.Ifnecessary,
was
was
was
was
DC
responsible
responsible for
responsible for
responsible for
responsible for
Standard I'm
COUIK'il Illl' Intl.:rlerl.:llCl'
Ii.)l'
Ii.)l'
Ii.)l'
Ii.)l'
Metrology
..
hlru::.;
M~{rology
..
hlru::.;
M~{rology
..
hlru::.;
M~{rology
..
hlru::.;
M~{rology
Commission
(Homologalion)·
(Homolog<1lion) - Italy
(Homolog<1lion) - Italy
(Homolog<1lion) - Italy
(Homolog<1lion) - Italy
with
part15of
with
part15of
with
part15of
with
part15of
with
part15of
may
not
cause
may
not
cause
may
not
cause
may
not
cause
may
not
cause
must
accept
any
must
accept
any
must
accept
any
must
accept
any
must
accept
any
designedtoprovide
environment.
This
with the instruction
equipment
in a residential
equipmentina residential area is likely to cause harmful interference in which case the user will be required to
equipmentina residential area is likely to cause harmful interference in which case the user will be required to
equipmentina residential area is likely to cause harmful interference in which case the user will be required to
equipmentina residential area is likely to cause harmful interference in which case the user will be required to
own
own
own
own
own
with
part15of
with
part15of
with
part15of
with
part15of
with
part15of
may
not
cause
may
not
cause
may
not
cause
may
not
cause
may
not
cause
must
accept
any
must
accept
any
must
accept
any
must
accept
any
must
accept
any
designedtoprovide
uses
and
uses
and
uses
and
uses
and
uses
and
cause
harmful
cause harmful interference to radio communications. However, there isnoguarantee
cause harmful interference to radio communications. However, there isnoguarantee
cause harmful interference to radio communications. However, there isnoguarantee
cause harmful interference to radio communications. However, there isnoguarantee
installation. If this
equipmentonand
equipment
equipment
equipment
equipment
separation
between
between
between
between
between
equipment
into an outletona circuit different from that to
equipment
into an outlet on a circuit different from that to which the receiver is connected.
equipment
into an outlet on a circuit different from that to which the receiver is connected.
equipment
into an outlet on a circuit different from that to which the receiver is connected.
equipment
into an outlet on a circuit different from that to which the receiver is connected.
dealeroran experienced
dealeroran experienced
dealeroran experienced
dealeroran experienced
preparedbythe Federal
preparedbythe Federal
preparedbythe Federal
preparedbythe Federal
20402, Stock Number 004-000-00345-4.
1'0'-
CO,
CO,LTO.
CO,LTO.
CO,LTO.
CO,LTO.
of
Samsung
connectiontoanyULListed
the
connection,
the
connection.
the
connection.
the
connection.
the
connection.
ratingofthe
computer
ratingofthe
computer
ratingofthe
computer
ratingofthe
computer
ratingofthe
computer
receivers
with picture
·lJSJ\
(F('C')
-USA
(F('C')
-USA
(F('C')
-USA
(F('C')
-USA
lill·l)igiWII-.quipllll'nt
Digit;d
Digit;d
Digit;d
Digit;d
(veCI)-.lap:l11
lnlt:rfert:llcc
(VCCI)
lnlt:rfert:llcc
(VCCI)
lnlt:rfert:llcc
(VCCI)
lnlt:rfert:llcc
(VCCI)
amI lnspcl:tion
and In::.;pt:dion
and In::.;pt:dion
and In::.;pt:dion
and In::.;pt:dion
(KCC)
. RepuhlicorKurca
(KCC)
(KCC)
(KCC)
(KCC)
Italy
the
FCC Rules.
the
FCC Rules.
the
FCC Rules.
the
FCC Rules.
the
FCC Rules.
harmful
interference. and
harmful interference,
harmful interference,
harmful interference,
harmful interference,
interference
interference received. including interference that
interference received. including interference that
interference received. including interference that
interference received. including interference that
to
reasonable
equipment
equipment
equipment
equipment
equipment
manual,
area
expense.
expense.
expense.
expense.
expense.
the FCC Rules. Operationissubjecttothe
the FCC Rules.
the FCC Rules.
the FCC Rules.
the FCC Rules.
harmful
interference. and
harmful
interference. and
harmful
interference. and
harmful
interference. and
harmful
interference. and
interference
interference received, inclUding interference that
interference received, inclUding interference that
interference received, inclUding interference that
interference received, inclUding interference that
to
reasonable
can
radiate radio
can
radiate radio frequency energy and.ifnot installed
can
radiate radio frequency energy and.ifnot installed
can
radiate radio frequency energy and.ifnot installed
can
radiate radio frequency energy and.ifnot installed
interference
equipment
equipment
equipment
equipment
equipment
off
and
off
and
off
and
off
and
antenna.
the
equipment
the
equipment
the
equipment
the
equipment
the
equipment
radiolTV
radiolTV
radiolTV
radiolTV
consult
Communications
Communications
Communications
Communications
product
compliance:
product
compliance:
product
compliance:
product
compliance:
product
compliance:
(ICI':S-()o,1) -
Equipnh..'lIt
Equipnh..'lIt
Equipnh..'lIt
Equipnh..'lIt
- .Iapan
- .Iapan
- .Iapan
- .Iapan
(135MI)·
Taiwan
(85MI)
- Taiwan
(85MI)
- Taiwan
(85MI)
- Taiwan
(85MI)
- Taiwan
- Rt:puhlicofKurea
- Rt:puhlicofKurea
- Rt:puhlicofKurea
- Rt:puhlicofKurea
Operationissubject
Operationissubject
Operationissubject
Operationissubject
Operationissubject
and
and
and
and
received. including interference that
comply with the limits for a Class A digital device, pursuant to Part 15ofthe FCC
protection
generates.
uses. and can radiate radio
generates, uses, and can radiate radio frequency
generates, uses, and can radiate radio frequency
generates, uses, and can radiate radio frequency
generates, uses, and can radiate radio frequency
may
cause
may
cause harmful interference to radio communications.
may
cause harmful interference to radio communications.
may
cause harmful interference to radio communications.
may
cause harmful interference to radio communications.
is likely to cause
Operationissubjecttothe
Operationissubjecttothe
Operationissubjecttothe
Operationissubjecttothe
received. inclUding interference that
compiy with the limits for a Class B digital device, pursuanttoPart 15 of the
protection
frequency
to radio
communications.
does
cause
does
cause harmful interference to radioortelevision reception. which can be
does
cause harmful interference to radioortelevision reception. which can be
does
cause harmful interference to radioortelevision reception. which can be
does
cause harmful interference to radioortelevision reception. which can be
on. the
userisencouraged
on. the user is
on. the user is
on. the user is
on. the user is
and
receiver.
and
receiver.
and
receiver.
and
receiver.
and
receiver.
technician for help.
technician for help.
technician for help.
technician for help.
with
your
dealeroran
your
dealer or an experienced radio/television technician for addition a
your
dealer or an experienced radio/television technician for addition a
your
dealer or an experienced radio/television technician for addition a
your
dealer or an experienced radio/television technician for addition a
to
Identify and Resolve Radio/TV Interference Problems helpful.
to
Identify and Resolve RadiofTV Interference Problems helpful.
to
Identify and Resolve RadiofTV Interference Problems helpful.
to
Identify and Resolve RadiofTV Interference Problems helpful.
to
Identify and Resolve RadiofTV Interference Problems helpful.
ClIW{\;1
(It
TS-()(),1) -
Clll<ll.h1
(It
TS-()(),1) -
Clll<ll.h1
(It
TS-()(),1) -
Clll<ll.h1
(It
TS-()(),1) -
Clll<ll.h1
to the
to the
to the
to the
to the
against
harmful
harmful interference to radio
harmful
interferenceinwhich
against
harmful
energy
and, if
not
installed
However,
harmful
interferencetoradioortelevision reception.
to try to
encouraged
to try to correct
encouraged
to try to correct
encouraged
to try to correct
encouraged
to try to correct
which
the
compliance
compliance
compliance
compliance
experienced
It
Commission. It is available from
Commission. It is available from
Commission. It is available from
Commission. It is available from
is available from the U.S. Government Printing Office.
LTD.
cables
to maintain FCC compliance for the product.
cables
to maintain FCC compliance for the product.
cables
to maintain FCC compliance for the product.
cables
to maintain FCC compliance for the product.
personal
computer
anyULListed personal
anyULListed personal
anyULListed personal
anyULListed personal
make
sure
the voltage ratingofthe
make
sure
the
make
make
make
voltage ratingofthe computer
sure
the
voltage ratingofthe computer
sure
the
voltage ratingofthe computer
sure
the
voltage ratingofthe computer
convenience
outlet
convenience
outlet is equal or
convenience
outlet is equal or
convenience
outlet is equal or
convenience
outlet is equal or
of
television closed captioning in accordance with Section 15.119 of the FCC rules
displayoftelevision closed captioning in accordance with Section 15.119ofthe FCC rules.
displayoftelevision closed captioning in accordance with Section 15.119ofthe FCC rules.
displayoftelevision closed captioning in accordance with Section 15.119ofthe FCC rules.
displayoftelevision closed captioning in accordance with Section 15.119ofthe FCC rules.
screens13inchesorlarger in
screens
13 inches
screens
13 inches
screens
13 inches
screens
13 inches
computer
computer
computer
computer
computer
is equalorexceeds
diameter
or
larger in
diameter
or
larger in
diameter
or
larger in
diameter
or
larger in
diameter
-
5-
-
5-
-
5-
-
5-
-
5-
with similar configuration.
with similar configuration.
with similar configuration.
with similar configuration.
with similar configuration.
convenience
convenience
convenience
convenience
convenience
the
exceeds
the
exceeds
the
exceeds
the
exceeds
the
models
models
models
models
models
user
user
user
user
user
~.'
~.'
~.'
~.'
following
two
following
two
following
two
following
two
following
two
may
cause
undesired
may
cause undesired operation.
may
cause undesired operation.
may
cause undesired operation.
may
cause undesired operation.
interference
when
frequency
energy
energy
energy
energy
energy
communications.
case
following
two
following
two
following
two
following
two
following
two
may
cause
undesired
may
cause
undesired operation.
may
cause
undesired operation.
may
cause
undesired operation.
may
cause
undesired operation.
interference
in a residential installation. This
and
used in
accordance
and
usedinaccordance with the
and
usedinaccordance with the
and
usedinaccordance with the
and
usedinaccordance with the
thereisno
guarantee
correct
the
interferencebyoneormoreofthe
the
interference by oneormoreofthe
the
interference by oneormoreofthe
the
interference by oneormoreofthe
the
interference by oneormoreofthe
receiverisconnected
could void
could void
could void
could void
radio/television
monitor
monitor
monitor
monitor
monitor
only)
only)
only)
only)
only)
technician for additiona
the
U.S.
the
U.S.
the
U.S.
the
U.S.
outlet is the
outlet is the
outlet is the
outlet is the
outlet is the
voltage rating.
voltage rating.
voltage rating.
voltage rating.
voltage rating.
;a~~al.
mantial.
mantial.
mantial.
mantial.
-- -
-- -
-- -
-- -
~-~
------
~-~
------
~-~
------
~-~
------
conditions:
conditions:
conditions:
conditions:
conditions:
operation.
of
of
of
of
the
equipmentisoperated
and, if not installed and
and, if not installed and
and, if not installed and
and, if not installed and
and, if not installed and
the
user
will be required to
conditions:
conditions:
conditions:
conditions:
conditions:
operation.
to
Part 15ofthe
to
Part 15ofthe
to
Part 15ofthe
to
Part 15ofthe
with the
that interference will
that interference will not
that interference will not
that interference will not
that interference will not
which
the
user's authority to
the
user's authority to
the
user's authority to
the
user's authority to
Government
Printing Office.
Government
Printing Office.
Government
Printing Office.
Government
Printing Office.
same
as the
monitor
same
as the monitor and
same
as the monitor and
same
as the monitor and
same
as the monitor and
the FCC
the FCC
the FCC
the FCC
FCC
FCC
FCC
FCC
FCC
can be
to
not
and
Page 31
ICES-003 Class A Notice -
ICES-003 Class A Notice -
ICES-003 Class A Notice -
ICES-003 Class A Notice -
ICES-003 Class A Notice -
This Class A digital apparatus complies with Canadian ICES-003.
This Class A digital apparatus complies with Canadian ICES-003.
This Class A digital apparatus complies with Canadian ICES-003.
This Class A digital apparatus complies with Canadian ICES-003.
This Class A digital apparatus complies with Canadian ICES-003.
Cet appareil numerique de
Cet appareil numerique de
Cet appareil numerique de
Cet appareil numerique de
Cet appareil numerique de
ICES-003 Class 8 Notice -
ICES-003 Class 8 Notice -
ICES-003 Class 8 Notice -
ICES-003 Class 8 Notice -
ICES-003 Class 8 Notice -
This Class B digital apparatus complies with Canadian ICES-003.
This Class B digital apparatus complies with Canadian ICES-003.
This Class B digital apparatus complies with Canadian ICES-003.
This Class B digital apparatus complies with Canadian ICES-003.
This Class B digital apparatus complies with Canadian ICES-003.
Cet appareil numerique de
Cet appareil numerique de
Cet appareil numerique de
Cet appareil numerique de
Cet appareil numerique de
VCCI Class A Notice
VCCI Class A Notice
VCCI Class A Notice
VCCI Class A Notice
VCCI Class A Notice
;:0)~~1;j:,
~\U&9!!I!~~~1f[;~~~
0)~~1;j:,
!\U&9!!I!~~~1f[;~~~
0)~~1;j:,
!\U&9!!I!~~~1f[;~~~
0)~~1;j:,
!\U&9!!I!~~~1f[;~~~
0)~~1;j:,
!\U&9!!I!~~~1f[;~~~
;:
;:
;:
;:
;:O)~ii:~~liHil.l!-c1tIll9'.o
;:O)~ii:~~liHil.l!-c1tIll9'.o
;:O)~ii:~~liHil.l!-c1tIll9'.o
;:O)~ii:~~liHil.l!-c1tIll9'.o
;:O)~ii:~~JiHil.l!-c1tIll9'.o
O)~f;I:I;j:1tIll~;/)liil;JJt
;:
O)~f;I:I;j:1tIll~;/)liil;JJt
O)~f;I:I;j:1tIll~;/)liil;JJt
O)~f;I:I;j:1tIll~;/)liil;JJt
O)~f;I:I;j:1tIll~;/)liil;JJt
;:
;:
;:
;:
VCCI Class 8 Notice
VCCI Class 8 Notice
VCCI Class 8 Notice
VCCI Class 8 Notice
VCCI Class 8 Notice
;:
0)~~1;j:,
~jU&9!!I!~ii:~1lt;~~~
0)~~1;j:,
!lU&9!!I!~ii:~1lt;~~~
0)~~1;j:,
!lU&9!!I!~ii:~1lt;~~~
0)~~1;j:,
!lU&9!!I!~ii:~1lt;~~~
0)~~1;j:,
!lU&9!!I!~ii:~1lt;~~~
;:
;:
;:
;:
;:0)~ii'1;j:,
~Ji!~l.l!-c1tIll9'.o;:
;:0)~ii'1;j:,
~1i!~l.l!-c1tIll9'.o;:
;:0)~ii'1;j:,
~1i!~l.l!-c1tIll9'.o;:
;:0)~ii'1;j:,
~1i!~l.l!-c1tIll9'.o;:
;:0)~ii'1;j:,
~1i!~l.l!-c1tIll9'.o;:
1t1ll~tt..o
c,
1t1ll~tt..o
1t1ll~tt..o
1t1ll~tt..o
1t1ll~tt..o
If2miil.BJHI'I:l!E-::>"CiE
If2miil.BJHI'I:l!E-::>"CiE
If2miil.BJHI'I:l!E-::>"CiE
If2miil.BJHI'I:l!E-::>"CiE
If2miil.BJHI'I:l!E-::>"CiE
CCC Class A
CCC Class A
CCC Class A
CCC Class A
CCC Class A
~~Am~~,a~~~l.l!~,~~~~~*m~~~~Ttto
~~Am~~,a~~~l.l!~,~~~~~*m~~~~Ttto
~~Am~~,a~~~l.l!~,~~~~~*m~~~~Ttto
~~Am~~,a~~~l.l!~,~~~~~*m~~~~Ttto
~~Am~~,a~~~l.l!~,~~~~~*m~~~~Ttto
a~~.mr,~~~~Ill~n.Ttt*.l;JJ~~fi~
a~~.mr,~~~~Ill~n.Ttt*.l;JJ~~fia1
a~~.mr,~~~~Ill~n.Ttt*.l;JJ~~fia1
a~~.mr,~~~~Ill~n.Ttt*.l;JJ~~fia1
a~~.mr,~~~~Ill~n.Ttt*.l;JJ~~fia1
8SMI
8SMI
8SMI
8SMI
8SMI
The following statement is applicable to products shipped
The following statement is applicable to products shipped
The following statement is applicable to products shipped
The following statement is applicable to products shipped
The following statement is applicable to products shipped
compliance label.
compliance label.
compliance label.
compliance label.
compliance label.
Wi!r!t.I!Jll':
w*!t.I!Jll':
w*!t.I!Jll':
w*!t.I!Jll':
w*!t.I!Jll':
•••
•••
•••
•••
•••
Rmt'~~~*~.¥~ii~~~ll!o
Rmt'~~~*~.¥~ii~a1~mo
Rmt'~~~*~.¥~ii~a1~mo
Rmt'~~~*~.¥~ii~a1~mo
Rmt'~~~*~.¥~ii~a1~mo
Compliance with these directives implies conformity
Compliance with these directives implies conformity
Compliance with these directives implies conformity
Compliance with these directives implies conformity
Compliance with these directives implies conformity
- EN55022: Radio Frequency Interference
- EN55022: Radio Frequency Interference
- EN55022: Radio Frequency Interference
- EN55022: Radio Frequency Interference
- EN55022: Radio Frequency Interference
- EN55024: Electromagnetic Immunity of Information Technology Equipment
- EN55024: Electromagnetic Immunity of Information Technology Equipment
- EN55024: Electromagnetic Immunity of Information Technology Equipment
- EN55024: Electromagnetic Immunity of Information Technology Equipment
- EN55024: Electromagnetic Immunity of Information Technology Equipment
- EN61 000-3-2: Power Line Harmonics
- EN61 000-3-2: Power Line Harmonics
- EN61 000-3-2: Power Line Harmonics
- EN61 000-3-2: Power Line Harmonics
- EN61 000-3-2: Power Line Harmonics
- EN61000-3-3: Voltage Fluctuations
- EN61000-3-3: Voltage Fluctuations
- EN61000-3-3: Voltage Fluctuations
- EN61000-3-3: Voltage Fluctuations
- EN61000-3-3: Voltage Fluctuations
- EN55013: Radio disturbance characteristics of broadcast receivers and associated equipments
- EN55013: Radio disturbance characteristics of broadcast receivers and associated equipments
- EN55013: Radio disturbance characteristics of broadcast receivers and associated equipments
- EN55013: Radio disturbance characteristics of broadcast receivers and associated equipments
- EN55013: Radio disturbance characteristics of broadcast receivers and associated equipments
- EN55020: Electromagnetic immunity of broadcast receivers and associated equipments
- EN55020: Electromagnetic immunity of broadcast receivers and associated equipments
- EN55020: Electromagnetic immunity of broadcast receivers and associated equipments
- EN55020: Electromagnetic immunity of broadcast receivers and associated equipments
- EN55020: Electromagnetic immunity of broadcast receivers and associated equipments
European Class A
European Class A
European Class A
European Class A
European Class A
(If the user manual declares the product as ClassA,following statement applies.)
(If the user manual declares the product as ClassA,following statement applies.)
(If the user manual declares the product as ClassA,following statement applies.)
(If the user manual declares the product as ClassA,following statement applies.)
(If the user manual declares the product as ClassA,following statement applies.)
This is a class A product.
This is a class A product.
This is a class A product.
This is a class A product.
This is a class A product.
user may be required
user may be required
user may be required
user may be required
user may be required
gj!p§
gj!p§
gj!p§
gj!p§
gj!p§
OI717!E~E~~7':fII~~~~8
01717!E
01717!E
01717!E
01717!E
Af§51E
Af§51E
Af§51E
Af§51E
Af§51E
7~i§-
7~i§-
7~i§-
7~i§-
7~i§-
01717!E
01
01
01
01
Italian
Italian
Italian
Italian
Italian
Questo apparecchio e fabbricato
Questo apparecchio e fabbricato
Questo apparecchio e fabbricato
Questo apparecchio e fabbricato
Questo apparecchio e fabbricato
edinparticolare a quanto specificato nell Art.2, comma
edinparticolare a quanto specificato nell Art.2, comma
edinparticolare a quanto specificato nell Art.2, comma
edinparticolare a quanto specificato nell Art.2, comma
edinparticolare a quanto specificato nell Art.2, comma
Questo apparecchio e fabbricato nella U.E.inconformita al D.M.28.08.95 n.548
Questo apparecchio e fabbricato nella U.E.inconformita al D.M.28.08.95 n.548
Questo apparecchio e fabbricato nella U.E.inconformita al D.M.28.08.95 n.548
Questo apparecchio e fabbricato nella U.E.inconformita al D.M.28.08.95 n.548
Questo apparecchio e fabbricato nella U.E.inconformita al D.M.28.08.95 n.548
Art.2, comma 1
Art.2, comma 1
Art.2, comma 1
Art.2, comma 1
Art.2, comma 1
~i~~~BI~~;:9';:
c,
~i~~~BI~~;:9';:
c,
~i~~~BI~~;:9';:
c,
~i~~~BI~~;:9';:
c,
~i~~~BI~~;:9';:
notice
notice
notice
notice
notice
Class A Notice
Class A Notice
Class A Notice
Class A Notice
Class A Notice
~~m~~~,a~tt~~~Rmq,~~~.~M~.~,a.~.Rr,
~~m~~~,a~tt~~~Rmq,~~~.~M~.~,a.~.Rr,
~~m~~~,a~tt~~~Rmq,~~~.~M~.~,a.~.Rr,
~~m~~~,a~tt~~~Rmq,~~~.~M~.~,a.~.Rr,
~~m~~~,a~tt~~~Rmq,~~~.~M~.~,a.~.Rr,
European Notice(Europe Only)
European Notice(Europe Only)
European Notice(Europe Only)
European Notice(Europe Only)
European Notice(Europe Only)
(
(
(
(
(
Products with the CE marking comply with the EMC Directive(2004/1 08/EC) and the Low Voltage
Products with the CE marking comply with the EMC Directive(2004/1 08/EC) and the Low Voltage
Products with the CE marking comply with the EMC Directive(2004/1 08/EC) and the Low Voltage
Products with the CE marking comply with the EMC Directive(2004/1 08/EC) and the Low Voltage
Products with the CE marking comply with the EMC Directive(2004/1 08/EC) and the Low Voltage
E
E
E
E
E
Directive(2006/95/EC) issued by the Commission of the European Community.
Directive(2006/95/EC) issued by the Commission of the European Community.
Directive(2006/95/EC) issued by the Commission of the European Community.
Directive(2006/95/EC) issued by the Commission of the European Community.
Directive(2006/95/EC) issued by the Commission of the European Community.
'6~7/7/
'6~7/7/
'6~7/7/
'6~7/7/
'6~7/7/
~E~~7':fII~~~~8
~E~~7':fII~~~~8
~E~~7':fII~~~~8
~E~~7':fII~~~~8
~
~~
~
~~
~
~~
~
~~
~
~~
'6~7/7/
'6~7/7/
'6~7/7/
'6~7/7/
'6~7/7/
7~~sg~
717!E
7
~~sg~
717!E
7
~~sg~
717!E
7
~~sg~
717!E
7
~~sg~
Homologation
Homologation
Homologation
Homologation
Homologation
ed
ed
ed
ed
ed
For products produced
For products produced
For products produced
For products produced
For products produced
Questo apparecchio e fabbricato
Questo apparecchio e fabbricato
Questo apparecchio e fabbricato
Questo apparecchio e fabbricato
Questo apparecchio e fabbricato
edinparticolare a quanto specificato nell Art.2. comma
edinparticolare a quanto specificato nell Art.2. comma
edinparticolare a quanto specificato nell Art.2. comma
edinparticolare a quanto specificato nell Art.2. comma
edinparticolare a quanto specificato nell Art.2. comma
For products producedinEuropean Community
For products producedinEuropean Community
For products producedinEuropean Community
For products producedinEuropean Community
For products producedinEuropean Community
Questo apparecchio'e fabbricato nella U.E.
Questo apparecchio'e fabbricato nella U.E.
Questo apparecchio'e fabbricato nella U.E.
Questo apparecchio'e fabbricato nella U.E.
Questo apparecchio'e fabbricato nella U.E.
Art.2, comma 1
Art.2, comma 1
Art.2, comma 1
Art.2, comma 1
Art.2, comma 1
ed
ed
ed
ed
ed
Avis
NM8-003, Classe A
Avis
NM8-003, Classe A
Avis
NM8-003, Classe A
Avis
NM8-003, Classe A
Avis
NM8-003, Classe A
la
classe A est conforme
la
classe A est conforme
la
classe A est conforme
la
classe A est conforme
la
classe A est conforme
Avis
NM8-003, Classe 8
Avis
NM8-003, Classe 8
Avis
NM8-003, Classe 8
Avis
NM8-003, Classe 8
Avis
NM8-003, Classe 8
la
classe
Best
la
classe
Best
la
classe
Best
la
classe
Best
la
classe
Best
El::EJUIII~~1
El::EJUIII~~1
El::EJUIII~~1
El::EJUIII~~1
C
~;~Yn~BI
C
~;~Yn~BI
C
~;~Yn~BI
C
~;~Yn~BI
C
~;~Yn~BI
..
;tjll!~~9'.o
..
;tjll!~~9'.o
..
;tjll!~~9'.o
..
;tjll!~~9'.o
..
;tjll!~~9'.o
El±m*III~~ii
El±m*III~~ii
El±m*III~~ii
El±m*III~~ii
C
HH1c
C
H3a1c
C
H3a1c
C
H3a1c
C
H3a1c
LL
'1f2
~J
j},H'~
LL
'1f2
~J
j},H'~
LL
'1f2
~J
j},H'~
LL
'1f2
~J
j},H'~
LL
'1f2
~J
j},H'~
- China
- China
- China
- China
- China
Warning
Warning
Warning
Warning
Warning
In
a domestic environment this product may cause radio interferenceinwhich case the
In
a domestic environment this product may cause radio interferenceinwhich case the
In
a domestic environment this product may cause radio interferenceinwhich case the
In
a domestic environment this product may cause radio interferenceinwhich case the
In
a domestic environment this product may cause radio interferenceinwhich case the
to
take adequate measures.
to
take adequate measures.
to
take adequate measures.
to
take adequate measures.
to
take adequate measures.
~7
/7/
(K:C
~7
~7
~7
~7
BS-7/7/
BS-7/7/
BS-7/7/
BS-7/7/
BS-7/7/
al D.M.26.03.92 Art.1
al D.M.26.03.92 Art.1
al D.M.26.03.92 Art.1
al D.M.26.03.92 Art.1
al D.M.26.03.92 Art.1
cass
/7/
(K:C
cass
/7/
(K:C
cass
/7/
(K:C
cass
/7/
(K:C
cass
~'Llq.
~'Llq.
~'Llq.
~'Llq.
~'Llq.
(K:C
cass
(K:C
cass
(K:C
cass
(K:C
cass
(K:C
cass
~7':fII~~~~8
~7':fII~~~~
~7':fII~~~~
~7':fII~~~~
~7':fII~~~~
al D.M.26.03.92 Art. 1
al D.M.26.03.92 Art. 1
al D.M.26.03.92 Art. 1
al D.M.26.03.92 Art. 1
al D.M.26.03.92 Art. 1
8
8
8
8
Notice
Notice
Notice
Notice
Notice
in
conformita al D.M.28.08.95 n.548
in
conformita al D.M.28.08.95 n.548
in
conformita al D.M.28.08.95 n.548
in
conformita al D.M.28.08.95 n.548
in
conformita al D.M.28.08.95 n.548
in
countries except European Community
in
countries except European Community
in
countries except European Community
in
countries except European Community
in
countries except European Community
in
conformita al D.M.28.08.95 n.548
in
conformita al D.M.28.08.95 n.548
in
conformita al D.M.28.08.95 n.548
in
conformita al D.M.28.08.95 n.548
in
conformita al D.M.28.08.95 n.548
ilia
norme NMB-003 du Canada.
ilia
norme NMB-003 du Canada.
ilia
norme NMB-003 du Canada.
ilia
norme NMB-003 du Canada.
ilia
norme NMB-003 du Canada.
conforme
ilia
norme NMB-003 du Canada.
ilia
norme NMB-003 du Canada.
ilia
norme NMB-003 du Canada.
ilia
norme NMB-003 du Canada.
ilia
norme NMB-003 du Canada.
(Vee
I)
(Vee
I)
(Vee
I)
(Vee
I)
~~;:
9';:
~~;:
9';:
~~;:
9';:
~~;:
9';:
~~;:
9';:
~*
~
tt..o;: c
~*
~
tt..o;: c
~*
~
tt..o;: c
~*
~
tt..o;: c
~*
~
tt..o;: c
(Veel)
(Veel)
(Veel)
(Veel)
(Veel)
VCL'*9';/)I,
VCL'*9';/)I,
VCL'*9';/)I,
VCL'*9';/)I,
VCL'*9';/)I,
*9'
0
*9'
0
*9'
0
*9'
0
*9'
0
~
L'o
~
L'o
~
L'o
~
L'o
~
"'0
••
••
••
••
••
to
the following European Norms:
to
the following European Norms:
to
the following European Norms:
to
the following European Norms:
to
the following European Norms:
I2.LI
't.I!JH7':f
.'E.EAf§7':1E01
I2.LI
't.I!JH7':f
.'E.EAf§7':1E01
I2.LI
't.I!JH7':f
.'E.EAf§7':1E01
I2.LI
't.I!JH7':f
.'E.EAf§7':1E01
I2.LI
't.I!JH7':f
.'E.EAf§7':1E01
9-£
7i{gDiIAi
~i 9-£ 7
i{gOiIAi
~i 9-£ 7
i{gOiIAi
~i 9-£ 7
i{gOiIAi
~i 9-£ 7
i{gOiIAi
1.
1.
1.
1.
1.
in
conformitaalD.M.28.08.95 n.548
in
conformitaalD.M.28.08.95 n.548
in
conformitaalD.M.28.08.95 n.548
in
conformitaalD.M.28.08.95 n.548
in
conformitaalD.M.28.08.95 n.548
-
-
-
-
-
6-
6-
6-
6-
El::EJUIII~~ll(Veel)
El±m*III~~1
L
"Cr
L
"Cr
L
"Cr
L
"Cr
L
"Cr
A
A
A
A
A
7
7
7
7
7
8
8
8
8
8
717~i
717
717
717
717
conforme
conforme
conforme
conforme
J: ?
J: ?
J: ?
J: ?
J: ?
c;/)Ii1.>~)
c;/)Ii1.>~)
c;/)Ii1.>~)
c;/)Ii1.>~)
c;/)Ii1.>~)
fIJ::ire)
fIJ::ire)
fIJ::ire)
fIJ::ire)
fIJ::ire)
17 10
17 10
17 10
17 10
17 10
fIJ::ire)
fIJ::ire)
fIJ::ire)
fIJ::ire)
fIJ::ire)
O)£!I'I:£-:i
<
'J
O)£!I'I:£-:i
O)£!I'I:£-:i
O)£!I'I:£-:i
O)£!I'I:£-:i
C
tNi>~)
C
tNi>~)
C
tNi>~)
C
tNi>~)
C
tNi>~)
O)£!I'I:£-:i
O)£!I'I:£-:i
O)£!I'I:£-:i
O)£!I'I:£-:i
O)£!I'I:£-:i
o
o
o
o
o
to
Taiwan and marked as Class A on the product
to
Taiwan and marked as Class A on the product
to
Taiwan and marked as Class A on the product
to
Taiwan and marked as Class A on the product
to
Taiwan and marked as Class A on the product
Af§51E
Af§5!E
Af§5!E
Af§5!E
Af§5!E
1.
1.
1.
1.
1.
6-
TAAljU&t.i1fr~ii:-c9'
<
'J
T
AAljU&t.t1fr~ii:-c9'
<
'J
T
AAljU&t.t1fr~ii:-c9'
<
'J
T
AAljU&t.t1fr~ii:-c9'
<
'J
T
AAljU&t.t1fr~ii:-c9'
*9'
0
*9'
0
*9'
0
*9'
0
*9'
0
;/)1i1.>~)
*9'
0
;/)1i1.>~)
*9'
0
;/)1i1.>~)
*9'
0
;/)1i1.>~)
*9'
0
;/)1i1.>~)
*9'
0
<'J
TABij!j~t.i1fr~ii:-c9'
<'J
TAB!j!j~t.t1fr~ii:-c9'
<'J
TAB!j!j~t.t1fr~ii:-c9'
<'J
TAB!j!j~t.t1fr~ii:-c9'
<'J
TAB!j!j~t.t1fr~ii:-c9'
;:0)~jff;/)17
~;t~T
v
~~~T
~~~T
~~~T
~~~T
v
v
v
v
~l2-fOj.
~l2-fOj.
~l2-fOj.
~l2-fOj.
~l2-fOj.
0101.
2.§7':IQiDlIAi
0101.
2.§
0101.
2.§
0101.
2.§
0101.
2.§
c~3:"-~i~lIJ!l:iliH1
c~3:"-~i~lIJ!l:iliH1
c~3:"-~i~lIJ!l:iliH1
c~3:"-~i~lIJ!l:iliH1
c~3:"-~i~lIJ!l:iliH1
7':IQiOlIAi
7':IQiOlIAi
7':IQiOlIAi
7':IQiOlIAi
;:0)~jff;/)17
;:0)~jff;/)17
;:0)~jff;/)17
;:0)~jff;/)17
~9-2.lOfAI71
~9-2.lOfAI71
~9-2.lOfAI71
~9-2.lOfAI71
~9-2.lOfAI71
~~~
~
~~
~
~~
~
~~
~
~~
7i{g.2.I2.j
7i{g.2.I2j
7i{g.2.I2j
7i{g.2.I2j
7i{g.2.I2j
0
0
0
0
0
0
0
0
0
0
7':IQiDIIAi
7':IQiOllAi
7':IQiOllAi
7':IQiOllAi
7':IQiOllAi
Af§~-4'
Af§~
Af§~
Af§~
Af§~
-4'
-4'
-4'
-4'
L
L
L
L
L
9.'BLICi.
9.'BLICi.
9.'BLICi.
9.'BLICi.
9.'BLICi.
Important Safety Instructions (UL Only)
Important Safety Instructions (UL Only)
Important Safety Instructions (UL Only)
Important Safety Instructions (UL Only)
Important Safety Instructions (UL Only)
I)
Read these instructions.
I)
Read these instructions.
I)
Read these instructions.
I)
Read these instructions.
I)
Read these instructions.
2) Keep these instructions.
2) Keep these instructions.
2) Keep these instructions.
2) Keep these instructions.
2) Keep these instructions.
3) Heed all warnings.
3) Heed all warnings.
3) Heed all warnings.
3) Heed all warnings.
3) Heed all warnings.
4)
Follow
all instructions.
4)
Follow
all instructions.
4)
Follow
all instructions.
4)
Follow
all instructions.
4)
Follow
all instructions.
Do
not
use
5)
5)
5)
5)
5)
6)
6)
6)
6)
6)
7)
7)
7)
7)
7)
8)
8)
8)
8)
8)
9)
9)
9)
9)
9)
"C
"C
"C
"C
"C
10) Protect the
10) Protect the
10) Protect the
10) Protect the
10) Protect the
II)
II)
II)
II)
II)
12) Use
12) Use
12) Use
12) Use
12) Use
13)
13)
13)
13)
13)
14) Refer all servicing to
14) Refer all servicing to
14) Refer all servicing to
14) Refer all servicing to
14) Refer all servicing to
• Ventilation
• Ventilation
• Ventilation
• Ventilation
• Ventilation
Do not place the apparatus
Do not place the apparatus
Do not place the apparatus
Do not place the apparatus
Do not place the apparatus
followed that manufacturer's instructions for mounting and installation.
followed that manufacturer's instructions for mounting and installation.
followed that manufacturer's instructions for mounting and installation.
followed that manufacturer's instructions for mounting and installation.
followed that manufacturer's instructions for mounting and installation.
• ENERGYSTAR
• ENERGYSTAR
• ENERGYSTAR
• ENERGYSTAR
• ENERGYSTAR
- Your SamsungTVis ENERGYSTAR qualified in its factory default settings.
- Your SamsungTVis ENERGYSTAR qualified in its factory default settings.
- Your SamsungTVis ENERGYSTAR qualified in its factory default settings.
- Your SamsungTVis ENERGYSTAR qualified in its factory default settings.
- Your SamsungTVis ENERGYSTAR qualified in its factory default settings.
- As an ENERGY STAR Partner, Samsung has determined that this product
- As an ENERGY STAR Partner, Samsung has determined that this product
- As an ENERGY STAR Partner, Samsung has determined that this product
- As an ENERGY STAR Partner, Samsung has determined that this product
- As an ENERGY STAR Partner, Samsung has determined that this product
Contains Mercury, Dispose AccordingtoLocal, State or Federal Laws
Contains Mercury, Dispose AccordingtoLocal, State or Federal Laws
Contains Mercury, Dispose AccordingtoLocal, State or Federal Laws
Contains Mercury, Dispose AccordingtoLocal, State or Federal Laws
Contains Mercury, Dispose AccordingtoLocal, State or Federal Laws
this apparatus near water.
Do
not
use
this apparatus near water.
Do
not
use
this apparatus near water.
Do
not
use
this apparatus near water.
Do
not
use
this apparatus near water.
Clean
only
with
dry
Clean
only
Clean
only
Clean
only
Clean
only
Do
not block any ventilation openings, Install in accordance
Do
not block any ventilation openings, Install in accordance
Do
not block any ventilation openings, Install in accordance
Do
not block any ventilation openings, Install in accordance
Do
not block any ventilation openings, Install in accordance
manufacturer's instructions.
manufacturer's instructions.
manufacturer's instructions.
manufacturer's instructions.
manufacturer's instructions.
Do
not install near any heat sources suchasradiators, heat registers, stoves,
Do
not install near any heat sources suchasradiators, heat registers, stoves,
Do
not install near any heat sources suchasradiators, heat registers, stoves,
Do
not install near any heat sources suchasradiators, heat registers, stoves,
Do
not install near any heat sources suchasradiators, heat registers, stoves,
or
other apparatus
or
other apparatus
or
other apparatus
or
other apparatus
or
other apparatus
Do
not defeat the safety purposeofthe polarizedorgrounding-type plug. A polarized
Do
not defeat the safety purposeofthe polarizedorgrounding-type plug. A polarized
Do
not defeat the safety purposeofthe polarizedorgrounding-type plug. A polarized
Do
not defeat the safety purposeofthe polarizedorgrounding-type plug. A polarized
Do
not defeat the safety purposeofthe polarizedorgrounding-type plug. A polarized
blades
blades
with
blades
with
blades
with
blades
with
wide
The
The
The
The
The
wide
wide
wide
wide
consult
consult
consult
consult
consult
point where they
point where they
point where they
point where they
point where they
Only
use
Only
use
Only
use
Only
use
Only
use
only
only
only
only
only
When a cart is used,
When a cart is used,
When a cart is used,
When a cart is used,
When a cart is used,
Unplug
Unplug
Unplug
Unplug
Unplug
any way, such
any way, such
any way, such
any way, such
any way, such
apparatus, the apparatus
apparatus, the apparatus
apparatus, the apparatus
apparatus, the apparatus
apparatus, the apparatus
WARNING:Toprevent damage which may resultinfireorelectric
WARNING:Toprevent damage which may resultinfireorelectric
WARNING:Toprevent damage which may resultinfireorelectric
WARNING:Toprevent damage which may resultinfireorelectric
WARNING:Toprevent damage which may resultinfireorelectric
Change to certain features, settings and functionality in this TV can change the power
Change to certain features, settings and functionality in this TV can change the power
Change to certain features, settings and functionality in this TV can change the power
Change to certain features, settings and functionality in this TV can change the power
Change to certain features, settings and functionality in this TV can change the power
consumption, possibly beyond the limits required for ENERGYSTAR qualification.
consumption, possibly beyond the limits required for ENERGYSTAR qualification.
consumption, possibly beyond the limits required for ENERGYSTAR qualification.
consumption, possibly beyond the limits required for ENERGYSTAR qualification.
consumption, possibly beyond the limits required for ENERGYSTAR qualification.
or product models meets the ENERGY STAR guidelines for energy efficiency.
or product models meets the ENERGY STAR guidelines for energy efficiency.
or product models meets the ENERGY STAR guidelines for energy efficiency.
or product models meets the ENERGY STAR guidelines for energy efficiency.
or product models meets the ENERGY STAR guidelines for energy efficiency.
cloth.
with
dry
cloth.
with
dry
cloth.
with
dry
cloth.
with
dry
cloth.
(including
amplifiers)
(including
(including
(including
(including
with
one
wider
than the other. A grounding type
one
wider
than the other. A grounding type
one
wider
than the other. A grounding type
one
wider
than the other. A grounding type
one
wider
than the other. A grounding type
bladeorthe
third
bladeorthe
third
bladeorthe
third
bladeorthe
third
bladeorthe
an
an
an
an
an
this apparatus
this apparatus
this apparatus
this apparatus
this apparatus
third
electrician
for
electrician
electrician
electrician
electrician
power
power
power
power
power
attachments/accessories specifiedbythe manufacturer.
attachments/accessories specifiedbythe manufacturer.
attachments/accessories specifiedbythe manufacturer.
attachments/accessories specifiedbythe manufacturer.
attachments/accessories specifiedbythe manufacturer.
with
with
with
with
with
replacementofthe obsolete outlet.
for
replacementofthe obsolete outlet.
for
replacementofthe obsolete outlet.
for
replacementofthe obsolete outlet.
for
replacementofthe obsolete outlet.
cord from being walked onorpinched
cord from being walked onorpinched
cord from being walked onorpinched
cord from being walked onorpinched
cord from being walked onorpinched
exit
from the apparatus.
exit
from the apparatus.
exit
from the apparatus.
exit
from the apparatus.
exit
from the apparatus.
cart. stand, tripod, bracket,ortable specifiedbythe manufacturer,orsold
cart. stand, tripod, bracket,ortable specifiedbythe manufacturer,orsold
cart. stand, tripod, bracket,ortable specifiedbythe manufacturer,orsold
cart. stand, tripod, bracket,ortable specifiedbythe manufacturer,orsold
cart. stand, tripod, bracket,ortable specifiedbythe manufacturer,orsold
usc
caution when
usc
caution when
usc
caution when
usc
caution when
usc
caution when
during
during
during
during
during
qualilied
qualilied
qualilied
qualilied
qualilied
as
power-supply cordorplug
as
power-supply cordorplug
as
power-supply cordorplug
as
power-supply cordorplug
as
power-supply cordorplug
has
has
has
has
has
shock hazard, do not expose this appliance to rain
shock hazard, do not expose this appliance to rain
shock hazard, do not expose this appliance to rain
shock hazard, do not expose this appliance to rain
shock hazard, do not expose this appliance to rain
in
in
in
in
in
qualified
qualified
qualified
qualified
qualified
that produce heat.
amplifiers)
that produce heat.
amplifiers)
that produce heat.
amplifiers)
that produce heat.
amplifiers)
that produce heat.
prong
arc provided
prong
arc provided
prong
arc provided
prong
arc provided
prong
arc provided
moving
the cart/apparatus combination to avoid
moving
the cart/apparatus combination to avoid
moving
the cart/apparatus combination to avoid
moving
the cart/apparatus combination to avoid
moving
lightning
lightning
lightning
lightning
lightning
service personnel. Servicing is required when the apparatus
service personnel. Servicing is required when the apparatus
service personnel. Servicing is required when the apparatus
service personnel. Servicing is required when the apparatus
service personnel. Servicing is required when the apparatus
been exposed to rainormoisture, does not operate normally,orhas
been exposed to rainormoisture, does not operate normally,orhas
been exposed to rainormoisture, does not operate normally,orhas
been exposed to rainormoisture, does not operate normally,orhas
been exposed to rainormoisture, does not operate normally,orhas
a rack or bookcase. Ensure that thereisadequate ventilation and that you've
a rack or bookcase. Ensure that thereisadequate ventilation and that you've
a rack or bookcase. Ensure that thereisadequate ventilation and that you've
a rack or bookcase. Ensure that thereisadequate ventilation and that you've
a rack or bookcase. Ensure that thereisadequate ventilation and that you've
model
model
model
model
model
the cart/apparatus combination to avoid
stormsorwhen unused
stormsorwhen unused
stormsorwhen unused
stormsorwhen unused
stormsorwhen unused
is damaged,
is damaged,
is damaged,
is damaged,
is damaged,
only
only
only
only
only
with
the
with
the
with
the
with
the
with
the
plug
has
two
plug
plug
plug
plug
for
your
for
your
for
your
for
your
for
your
-
7-
-
7-
-
7-
-
7-
-
7-
blades and a
has
two
blades and a
has
two
blades and a
has
two
blades and a
has
two
blades and a
safety. If the provided
safety. If the provided
safety. If the provided
safety. If the provided
safety. If the provided
particularlyatplugs, convenience receptacles, and the
particularlyatplugs, convenience receptacles, and the
particularlyatplugs, convenience receptacles, and the
particularlyatplugs, convenience receptacles, and the
particularlyatplugs, convenience receptacles, and the
for
long periodsoftime.
for
long periodsoftime.
for
long periodsoftime.
for
long periodsoftime.
for
long periodsoftime.
liquid
has been spilledorobjects have fallen into the
liquid
has been spilledorobjects have fallen into the
liquid
has been spilledorobjects have fallen into the
liquid
has been spilledorobjects have fallen into the
liquid
has been spilledorobjects have fallen into the
tIm
"""~
plug
plug
plug
plug
plug
third
grounding prong.
third
grounding prong.
third
grounding prong.
third
grounding prong.
third
grounding prong.
plug
does not
plug
does not
plug
does not
plug
does not
plug
does not
with
with
with
with
with
injury
injury
injury
injury
injury
or
or
or
or
or
has
two
has
two
has
two
has
two
has
two
fit
into
fit
into
fit
into
fit
into
fit
into
the apparatus.
the apparatus.
the apparatus.
the apparatus.
the apparatus.
from tip-over.
from tip-over.
from tip-over.
from tip-over.
from tip-over.
has
been damaged in
has
been damaged in
has
been damaged in
has
been damaged in
has
been damaged in
been dropped .
been dropped .
been dropped .
been dropped .
been dropped .
moisture.
moisture.
moisture.
moisture.
moisture.
.,
.,
.,
.,
your
outlet,
your
outlet,
your
outlet,
your
outlet,
your
outlet,
.,
mtmirmi.1iI
mtIitirmim
mtIitirmim
mtIitirmim
mtIitirmim
I!iIImIII
I!iIImIII
I!iIImIII
I!iIImIII
I!iIImIII
Page 32

1111111111111111111111111111111111111111111
1111111111111111111111111111111111111111111
111111111111I111111111111111111111111111111
1111111111111111111111111111111111111111111
1111111111111111111111111111111111111111111
AA68-03242L-07
AA68-03242L-07
AA68-03242L-07
AA68-03242L-07
AA68-03242L-07
Page 33
E-MANUAL
imagine the possibilities
Thank you for purchasing this Samsung product.
To receive more complete service, please register
your product at
www.samsung.com/register
Model _____________ Serial No. _____________
Page 34

Contents
Channel Menu
• Using the Channel Menu 1
• Memorizing Channels 17
• Other Features 22
Basic Features
• Changing the Preset Picture Mode 24
• Adjusting Picture Settings 25
• Changing the Picture Size 26
• Changing the Picture Options 31
• Using the TV with Your PC 38
• Changing the Preset Sound Modes 42
• Adjusting Sound Settings 43
Preference Features
• Wired Network Connection 51
• Wireless Network Connection 62
• Setting the Time 88
• Blocking Programs 95
• Economical Solutions 107
• Picture In Picture (PIP) 109
• Other Features 112
• Support Menu 126
Advanced Features
• 3D 139
•
AllShare™ 151
• Anynet+(HDMI-CEC) 157
• Using the My Contents 167
•
Videos 177
•
Music 184
•
Photos 186
•
My Contents - Additional Functions 188
Other Information
• TroubleShooting 195
• Anti-theft Kensington Lock 207
• License 209
Page 35
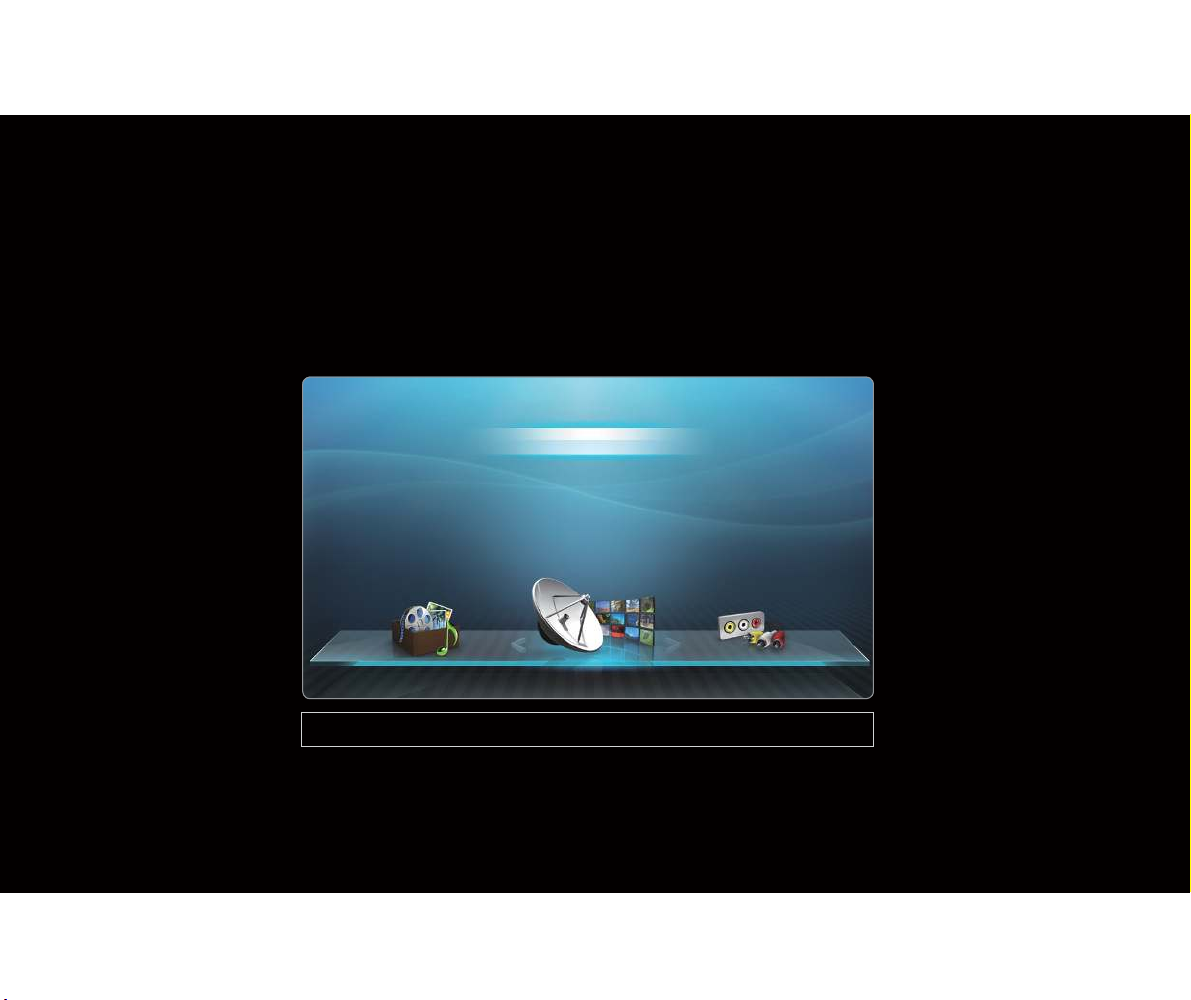
▶
English
Channel Menu
❑Using the Channel Menu
Press the CONTENT button to select
Watch TV, and then select the desired menu
item. Choose from Schedule Manager, Channel List, and Channel Manager.
● The displayed image may differ depending on the model.
Watch TV
Schedule Manager
Channel List
Channel Manager
My Contents Source
Page 36

◀ ▶
English
■Schedule Manager
O
CONTENT →
Watch TV → Schedule Manager → ENTER
E
To cancel or set Timer Viewing. Timer Viewing lets you display the channel you
want at the time of your choice.
Using
Timer Viewing
You can set the TV to display a desired channel automatically on a day and at a
time of your choice.
N
You must set the current time first using the
Time → Clock function in the
System menu to use this function.
Page 37

English
To use Timer Viewing, follow these steps:
1. Press the ENTER
E
button to add a scheduled viewing.
2. Press the l / r / u / d buttons to set Antenna, Channel, Repeat, Date, and
Start Time.
●
Antenna: Select the desired antenna source.
●
Channel: Select the desired channel.
●
Repeat: Select Once, Manual, Sat~Sun, Mon~Fri or Everyday. If you
select
Manual, you can set the day you want.
N
The
c
mark indicates a day you are selected.
Page 38

◀ ▶
English
●
Date: you can set a desired date.
N
Date is available only when you select Once in Repeat.
●
Start Time: You can set the start time you want.
N
You can only schedule memorized (added) channels.
N
On the
Information screen, you can change or cancel a scheduled viewing.
●
Cancel Schedules: Cancel a scheduled viewing.
●
Edit: Change a scheduled viewing.
●
Return: Return to the previous screen.
Page 39
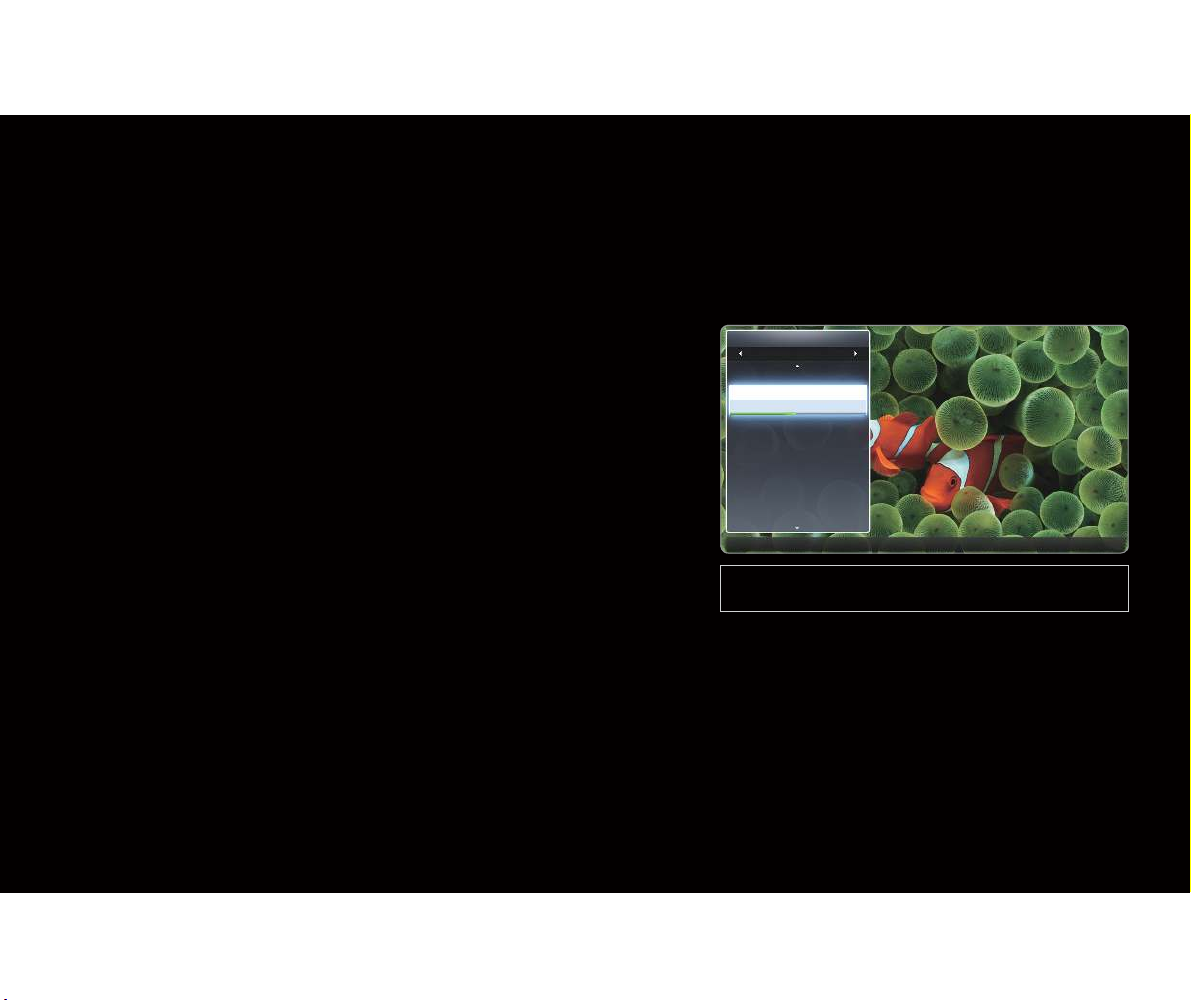
English
■Channel List
The Channel List contains the channels your TV displays (Added Channels) when
you press the
Channel button on your remote. On the Channel List, you can view
Added Channels, channel information, Favorites, and manage channels.
O
When you press the CH LIST button on the
remote control, the
Channel List screen is
displayed at once.
●
Added Channels: Shows all added
(memorized) channels.
●
Favorites 1-5: Shows all favorite channels,
arranged in up to five groups. Each group
has a separate screen.
N
The TV displays
Favorites only if you have added favorites using Add to
Favorites.
● The displayed image may differ depending on the
model.
Channel List
Added Channels
6-1 TV#6
7 TV#7
a
3 Air
23 TV#6
33 TV#6
32 TV#6
a
9 Air
a
11 Air
a
Antenna { Program View L CH Mode E Watch k Page
Air
Page 40

◀ ▶
English
N
If you want to view the list of favorite channels, press the CH LIST button,
and then press the
r
(CH Mode) button to display Favorites 1-5. If you
have favorites in more than one Favorite Group, press the L (CH Mode) to
view the other groups. Press the
l
button to return to the Channel List.
N
Using the colored and function buttons with the
Channel List.
●
a
Red (Antenna): Switches the mode and display between Air or Cable.
●
{
Yellow (Program View / Channel View): For digital channels, switches
the display between
Program View and Channel View. When you select a
digital channel in
Channel View, press once to display a list of programs on
that channel. Press again to re-display the
Channel List.
Page 41

English
●
l / r
(CH Mode): Toggles between the Favorites list (if you have added
favorites using
Add to Favorites) and the Channel List.
●
E
(Watch / Information): Press to watch the channel you selected /
Displays details of the selected program.
●
k
(Page): Scrolls the Channel List to the next or previous page.
Channel Status Display Icons
Icon Description
a
An analog channel.
)
A reserved program.
Page 42

◀ ▶
English
How to use Timer Viewing in Channel List (digital channels only)
You can use
Timer Viewing in Channel List to schedule a digital channel program for
viewing. The TV will turn on and display the digital channel program when the program
begins. To schedule a digital program, follow these steps:
1. Press the CH LIST button, then select a desired digital channel.
2. Press the { (Program View) button. The Program List for that channel appears.
3. Press the u or d buttons to select the desired program, and then press the INFO
button.
4. Press the
l
or r buttons to select Timer Viewing, and then press the ENTER
E
button.
5. Press RETURN twice to exit.
N
If you want to cancel
Timer Viewing, follow Steps 1 through 3, and then select
Cancel Schedules.
Page 43
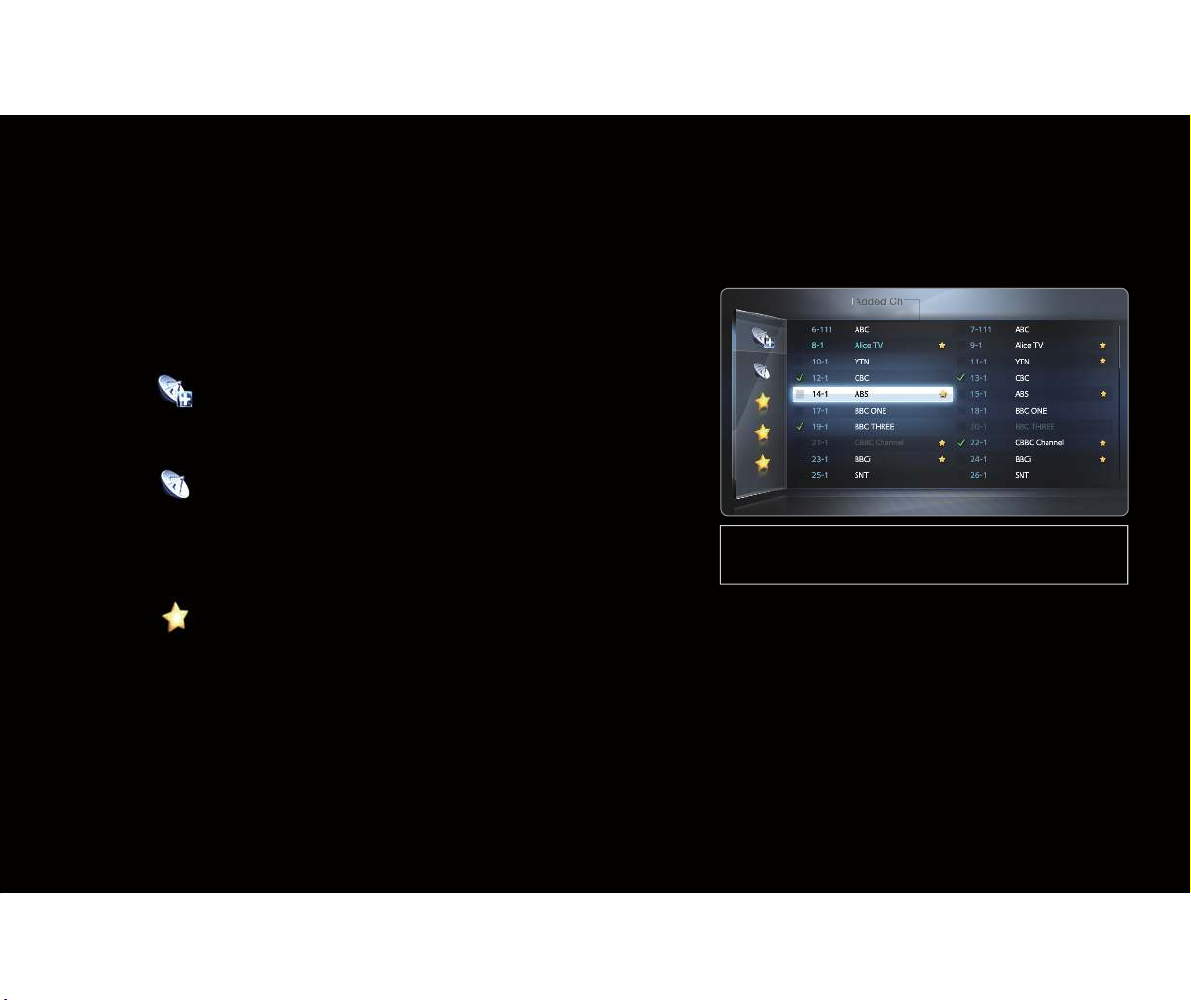
English
■Channel Manager
O
CONTENT →
Watch TV → Channel Manager → ENTER
E
Using Channel Manager, you can add, edit, or delete Added and Favorite
channels. You can also add and edit channel
names - for analog channels only.
●
(
) Added Ch.: Shows all added
channels.
●
(
) All Channels: Shows all currently
available channels. Includes channels that
have not been added.
●
(
) Favorites 1-5: Shows five favorite
channels, arranged in up to five groups. Each group has a separate screen.
N
Using the colored buttons with
Channel Manager.
●
a
Red (Antenna): Switches between Air and Cable.
●
}
Blue (Sorting): Sorts the channel list by channel number or by channel
name.
● The displayed image may differ depending on the
model.
Channel Manager Added Ch.
Selected items : 4 Channel Number
1/1 page
a
Antenna } Sorting k Page E Select T Tools R Return
Air
Page 44
◀ ▶
English
N
Using the Arrow buttons with
Channel Manager
1. Highlight a channel in the first column on the left, and then press the Left
arrow button. The Channel Manager sub-menu appears.
2. Use the Up or Down arrow buttons to select
Added Ch., All Channels
or
Favorites 1 through 5, and then press ENTER
E
or the Right arrow
button. The cursor enters the screen you selected.
N
If you have no favorites in a Favorite Group, the cursor will not enter that
screen.
Channel Status Display Icons
Icon Description
a
An analog channel.
c
A selected channel.
F
A favorite channel.
Page 45

English
Channel Manager Option Menu
t
Manage channels using the Channel Manager menu options (Watch, Add to
Favorites / Edit Favorites, Channel Name Edit, Add / Delete, Deselect All, Select
All
). The Option menu items that appear may differ depending on the channel status
and type.
1. Use the arrow buttons to select a channel, and then press the ENTER
E
button.
A check appears next to the channel.
N
You can select more than one channel by highlighting each channel with the
cursor, and then pressing ENTER
E
.
N
Pressing ENTER
E
again deselects the channel.
2. Press the TOOLS button on your remote.
3. Select an option, and then press ENTER
E
to activate the option or change its
settings.
N
Exceptions: Select
All. See the end of the Channel Manager section for
information.
Page 46

◀ ▶
English
Options
●
Watch: Watch the channel you selected. To use, select Watch on the Option
menu, and then press ENTER
E
.
●
Add to Favorites / Edit Favorites: Add to Favorites appears if the channel
you selected is not already a favorite. Edit Favorites appears if the channel you
selected is already a favorite.
Using Add to Favorites to add a channel to the Favorites List:
1. Select
Add to Favorites, and then press the ENTER
E
button. The Add to
Favorites screen appears.
2. The Add to Favorites screen has five groups, Favorites 1, Favorites 2, etc. You
can add a favorite channel to any one of the groups. Select a group using the
up and down arrows on your remote, and then press ENTER
E
.
3. Select
OK, press ENTER
E
, and then press ENTER
E
again.
Page 47

English
Using Edit Favorites to delete a channel from the Favorites List:
1. Select
Edit Favorites, and then press the ENTER
E
button. The Edit
Favorites
screen appears.
2. The Favorites Group you assigned the channel to is checked. Select the group,
and then press ENTER
E
. The check disappears.
3. Select OK, press ENTER
E
, and then press ENTER
E
again.
Using Edit Favorites to move a channel from one Favorites Group to another:
1. Select
Edit Favorites, and then press the ENTER
E
button. The Edit
Favorites screen appears.
2. The Favorites Group you assigned the channel to is checked. Select the group,
and then press ENTER
E
. The check disappears.
3. Use the Up or Down arrow key to highlight a different group, and then press
ENTER
E
. A check appears by the group’s name.
4. Select OK, press ENTER
E
, and then press ENTER
E
again.
Page 48

◀ ▶
English
●
Channel Name Edit (analog channels only): Assign a name of up to five characters
to a channel. For example, Hist, Food, Golf, etc. This makes it easier to find and
select the channel.
●
Add / Delete: Add a channel to or delete a channel from the Channel Manager.
When you use the Channel button on your remote to change channels, your TV
only displays the channels on the Channel Manager.
Deleting a Channel from the Channel List:
1. Select
Delete, and then press the ENTER
E
button. The Delete pop-up
appears.
2. Select OK on the pop-up, press ENTER
E
, and then press ENTER
E
again.
Page 49

English
Adding a Channel to the Channel List:
1. Select a deleted channel on the All Channels list, and then press the
ENTER
E
button.
N
Deleted channels are grayed out.
2. Press the TOOLS button on your remote. The Options menu appears.
3. Select
Add, press ENTER
E
, and then press ENTER
E
again.
N
NOTE
●
Your TV will display all channels, including channels you deleted from the
Channel Manager, on the All Channels list.
●
A gray-colored channel on the
All Channels list indicates the channel has
been deleted from the
Channel Manager.
●
The
Add menu only appears for deleted channels.
Page 50

◀ ▶
English
●
Deselect All: Deselect all the selected channels.
N
You can only select
Deselect All when you have selected one or more
channels.
●
Select All: Select all the channels in the channel list. To use, choose Select All
in the Options menu, and then press ENTER
E
. All channels are selected and a
check appears by each channel. You can then apply one of the other options on
the Options menu to all the selected channels.
Page 51

English
❑Memorizing Channels
O
MENU
m
→ Channel → ENTER
E
■Antenna (Air / Cable)
t
To select Air or Cable, follow these steps:
Your TV memorizes channels and adds the memorized channels to the
Channel Manager with the Auto Program function. Before your TV can memorize
channels, you must specify the signal source, either
Air or Cable. If you select
cable, when your start Auto Program, you must also specify the cable system
type, STD, HRC, or IRC. If you don’t know your cable system type, contact your
local cable company for the information. Most cable companies use
STD.
Page 52

◀ ▶
English
1. Push MENUm → Channel → ENTER
E
on your remote.
2. Select
Antenna, and then press ENTER
E
.
3. Select the source of your TV signal, Air or Cable, and then press the RETURN
button.
Page 53

English
■Auto Program
Scans for channels automatically and stores them in the TV’s memory.
To start Auto Program, follow these steps:
1. Push MENU
m
→ Channel → ENTER
E
on your remote.
2. Select Auto Program, and then press ENTER
E
.
3. Select Air or Cable or both by highlighting and then pressing ENTER
E
.
N
If you selected
Air or Cable or both on the Antenna screen, your choice will
already be selected.
4. Select
Search or Next, and then press ENTER
E
.
Page 54

◀ ▶
English
5. If you selected Cable, the Cable System screen appears. Select Digital, and
then press ENTER
E
.
N
If you selected
Air only, Auto Program starts.
6. Select
STD, HRC, or IRC, and then press ENTER
E
.
7. Repeat for Analog.
8. Select Search or Next, and then press ENTER
E
. Auto Program starts.
N
After all the available channels are stored,
Auto Program removes scrambled
channels. When done, the Auto Program menu then reappears. This process
can take up to 30 minutes.
Page 55

English
How to Stop Auto Programming
1. Press the ENTER
E
button.
2. A message will ask Stop Auto Program? Select Yes by pressing the l or r
button.
3. Press the ENTER
E
button.
Page 56

◀ ▶
English
❑Other Features
O
MENU
m
→ Channel → ENTER
E
■Clear Scrambled Channel
This function is filters out scrambled channels after Auto Program is completed.
This process may take up to 20~30 minutes.
How to Stop the clear Scrambled Channels function
1. Press the ENTER
E
button to select Stop.
2. Press the u button to select Yes.
3. Press the ENTER
E
button.
N
This function is only available in
Cable mode.
Page 57

English
■Fine Tune
(analog channels only)
If the reception is clear, you do not have to fine tune the channel, as this is done
automatically during the search and store operation. If the signal is weak or
distorted, fine tune the channel manually. Scroll to the left or right until the image is
clear.
N
Settings are applied to the channel you’re currently watching.
N
Fine tuned channels that have been saved are marked with an asterisk “*” on
the right-hand side of the channel number in the channel banner.
N
To reset the fine-tuning, select
Reset.
Page 58

◀ ▶
English
Basic Features
Picture Menu
❑Changing the Preset Picture Mode
O
MENU
m
→ Picture → Picture Mode → ENTER
E
■Picture Mode
Picture modes apply preset adjustments to the picture. Select a mode using the
up and down arrow keys, and then press the ENTER
E
button.
N
When connecting a PC, you can only select
Entertain and Standard.
●
Dynamic: Suitable for a bright room.
●
Standard: Suitable for a normal environment.
●
Movie: Suitable for watching movies in a dark room.
●
Entertain (When connecting a PC): Suitable for watching movies and games.
Page 59

English
❑Adjusting Picture Settings
O
MENU
m
→ Picture → ENTER
E
■Cell Light / Contrast / Brightness / Sharpness / Color / Tint (G/R)
Your television has several options for adjusting picture quality. Select an option
using the up and down arrow keys, and then press ENTER
E
. Use the arrow
keys to adjust the option value or select an option setting. When done, press
ENTER
E
.
N
When you make changes to
Cell Light, Contrast, Brightness, Sharpness,
Color or Tint (G/R), the OSD will be adjusted accordingly.
N
When connecting a PC, you can only make changes to
Cell Light, Contrast,
Brightness
, and Sharpness.
N
You can adjust and store settings for each external device connected to the TV.
N
Lowering picture brightness reduces power consumption.
Page 60

◀ ▶
English
❑Changing the Picture Size
O
MENU
m
→ Picture → Screen Adjustment → ENTER
E
■Screen Adjustment
Screen Adjustment
provides various picture size and aspect ratio options. Select
an option using the up and down arrow keys, and the press ENTER
E
. Use the
arrow keys to select an option in the sub-menu, and then press ENTER
E
.
●
Picture Size: If you have a cable box or satellite receiver, it may have its own
set of screen sizes as well. However, we highly recommend you use your TV’s
16:9 mode most of the time.
16:9: Sets the picture to 16:9 wide screen mode.
Page 61

English
Zoom1: Use for moderate magnification. Cuts off the top and sides.
Zoom2: Use for a stronger magnification.
Wide Fit: Enlarges the aspect ratio of the picture so it fits the entire screen.
N
Available with HD 1080i / 720p signals in 16:9 mode.
4:3: Sets the picture to (4:3) mode. For analog TV programs.
N
Do not set your TV to 4:3 format for a long time. The borders displayed
on the left and right, or top and bottom of the screen may cause image
retention (screen burn) which is not covered by the warranty.
Screen Fit: When your TV inputs HDMI (720p / 1080i / 1080p) or Component
(1080i / 1080p) signals, displays the full image without any cut-off.
●
Position: Adjusts the picture position. Position is only available if Picture size is
set to Zoom1, Zoom2, Wide Fit, or Screen fit.
Page 62

◀ ▶
English
N
To use the Position function after selecting
Zoom1, Zoom2 or Wide Fit, follow
these steps:
1. Press the d button to select Position.
2. Press the ENTER
E
button.
3. Press the
u
or d button to move the picture up or down.
4. Press the ENTER
E
button.
5. Select Close by pressing the d and r buttons sequentially. To reset the picture
position, press
Reset.
N
If you want to reset the pictures to its original position, select
Reset in the
Position screen, and then press ENTER
E
. The picture will be reset to its
default position.
Page 63

English
N
To use the
Position function after selecting Screen Fit when connected to an
HDMI (1080i/1080p) or Component (1080i/1080p) source, follow these steps:
1. Press the d button to select Position.
2. Press the ENTER
E
button.
3. Press the
u, d, l
or r button to move the picture.
4. Press the ENTER
E
button.
5. Select Close by pressing the d and r buttons sequentially.
N
If you want to reset the pictures to its original position, select
Reset in the
Position screen. The picture will be set to its default position.
Page 64
◀ ▶
English
●
HD (High Definition): 16:9 - 1080i / 1080p (1920x1080), 720p (1280x720)
●
You can adjust and store settings for each external device you have connected
to an input on the TV.
●
Picture Sizes available by Input Source:
Input Source Picture Size
ATV, AV, Component (480i, 480p) 16:9, Zoom1, Zoom2, 4:3
DTV(1080i), Component (1080i, 1080p),
HDMI (720p, 1080i, 1080p)
16:9, 4:3, Wide Fit, Screen Fit
PC 16:9, 4:3
Page 65
English
❑Changing the Picture Options
■
Advanced Settings
O
MENU
m
→ Picture → Advanced Settings → ENTER
E
Advanced Settings are available in the
Standard and Movie modes. When connecting
a PC, you can only make changes to Gamma
and
White Balance. They are not available when
you are watching a digital channel.
To use, select an option using the up and down
arrow keys, and then press ENTER
E
. Use the
arrow keys to change a value or setting, and
then press ENTER
E
.
● The displayed image may differ depending on
the model.
Advanced Settings
Black Tone : Off
►
Dynamic Contrast : Medium
Gamma : 0
RGB Only Mode : Off
Color Space : Native
White Balance
Flesh Tone : 0
▼
U
Move E Enter R Return
Page 66

◀ ▶
English
●
Black Tone (Off / Dark / Darker / Darkest): Select the black level to adjust the
screen depth.
●
Dynamic Contrast (Off / Low / Medium / High): Adjusts the screen contrast.
●
Gamma: Adjusts the primary color intensity.
●
RGB Only Mode (Off / Red / Green / Blue): Displays the Red, Green and
Blue color for making fine adjustments to hue and saturation.
Page 67

English
●
Color Space (Auto / Native): Adjusts the range of colors (the color gamut)
available to create images.
●
White Balance: Adjusts the color temperature for a more natural picture.
R-Offset / G-Offset / B-Offset: Adjusts each color’s (red, green, blue)
darkness.
R-Gain / G-Gain / B-Gain: Adjusts each color’s (red, green, blue) brightness.
Reset: Resets the White Balance to its default settings.
●
Flesh Tone: Emphasizes pink “Flesh Tone.”
●
Edge Enhancement (Off / On): Emphasizes object boundaries.
●
Motion Lighting (Off / On): Reduces power consumption by reducing screen
brightness when the picture on the screen is in motion.
N
3D is not supported.
N
When you change the
Cell Light, Contrast, or Brightness, the TV sets
Motion Lightning to Off.
Page 68

◀ ▶
English
■Picture Options
O
MENU
m
→ Picture → Picture Options → ENTER
E
Select an option using the up and down arrow keys, and then press ENTER
E
.
Use the arrow keys to change the setting, and then press ENTER
E
.
N
When connecting a PC, you can only make
changes to
Color Tone.
●
Color Tone (Cool / Standard / Warm1 /
Warm2)
N
Warm1 or Warm2 will be deactivated
when the picture mode is Dynamic.
N
You can adjust and store settings for each
external device connected to an input on
the TV.
● The displayed image may differ depending on
the model.
Picture Options
Color Tone : Standard
►
Digital Noise Filter : Auto
MPEG Noise Filter : Auto
HDMI Black Level : Normal
Film Mode : Off
U
Move E Enter R Return
Page 69

English
●
Digital Noise Filter (Off / Low / Medium / High / Auto / Auto Visualization):
If the broadcast signal received by your TV is weak, you can activate the Digital
Noise Filter feature to reduce any static and ghosting that may appear on the
screen.
N
When the signal is weak, try each option until the the TV displays the best
picture.
Auto Visualization: When changing analog channels, displays signal strength.
N
Only available for analog channels.
N
When the bar is green, you are receiving the best possible signal.
●
MPEG Noise Filter (Off / Low / Medium / High / Auto): Reduces MPEG noise
to provide improved picture quality.
Page 70

◀ ▶
English
●
HDMI Black Level (Low / Normal): Lets you select the black level on the
screen to adjust the screen depth.
N
Available only in
HDMI mode.
●
Film Mode (Off / Auto1 / Auto2
/ Cinema Smooth
for PDP 550 Series and above
): Sets the TV so that it senses
and then processes film signals from all sources automatically and adjusts the
picture for optimum quality. The
Cinema Smooth function is only activated
when the TV inputs an HDMI 24Hz signal.
N
Available in TV, AV, COMPONENT (480i / 1080i) and HDMI (1080i).
Page 71

English
■Reset Picture (OK / Cancel)
Resets your current picture mode to its default settings.
Page 72

◀ ▶
English
❑Using the TV with Your PC
Set the input source to PC.
■Auto Adjustment
t
O
MENU
m
→ Picture → Auto Adjustment → ENTER
E
Automatically adjusts the picture’s frequency, position, and fine tune settings in the
PC mode.
N
Available in
PC mode only.
N
Not available if you connect your PC with an HDMI to DVI cable.
Page 73

English
■PC Screen Adjustment
O
MENU
m
→ Picture → Screen Adjustment → PC Screen Adjustment →
ENTER
E
N
Available in
PC mode only.
●
Coarse / Fine: Removes or reduces picture noise. If the noise is not removed
by Fine-tuning alone, use the Coarse function to adjust the frequency as best
as possible (
Coarse) and Fine-tune again. After the noise has been reduced,
re-adjust the picture so that it is aligned to the center of screen.
●
Position: To adjust the PC’s screen position if it is not centered or does not fit
the TV screen. Press the u or d button to adjust the vertical position. Press the
l
or r button to adjust the horizontal position.
●
Image Reset: Resets the image to the default settings.
Page 74

◀ ▶
English
Using Your TV as a Computer (PC) Display
Entering the Video Settings (Based on Windows XP)
For your TV to work properly as a computer display, you must enter the correct video
settings into your PC.
N
Depending on your version of Windows and your video card, the procedure on
your PC will probably differ slightly from the procedure presented here. However,
the same basic information will apply in most cases. (If not, contact your computer
manufacturer or Samsung Dealer.)
Page 75

English
1. On your PC, click “Control Panel” on the Windows start menu.
2. Click “Appearance and Themes” in the “Control Panel” window, A display dialog-
box appears.
3. Click “Display”. Another display dialog box appears.
4. Click the “Settings” tab on the display dialog-box.
●
On the Settings tab, set the correct resolution.
●
If a vertical-frequency option exists on your display settings dialog box, select
“60” or “60 Hz”. Otherwise, just click “OK” and exit the dialog box.
Page 76

◀ ▶
English
Sound Menu
❑Changing the Preset Sound Modes
O
MENU
m
→ Sound → Sound Mode → ENTER
E
■Sound Mode
t
Use the up and down arrow keys to select an option, and then press ENTER
E
.
●
Standard: Selects the normal sound mode.
●
Music: Emphasizes music over voices.
●
Movie: Provides the best sound for movies.
●
Clear Voice: Emphasizes voices over other sounds.
●
Amplify: Increase the intensity of high-frequency sound to allow a better
listening experience for the hearing impaired.
N
If
Speaker Select is set to External Speaker, Sound Mode is disabled.
Page 77

English
❑Adjusting Sound Settings
O
MENU
m
→ Sound
→
ENTER
E
■Sound Effect
N
If
Speaker Select is set to External Speaker, Sound Effect is disabled.
●
SRS TruSurround HD (Off / On)
(standard sound mode only)
This function provides a virtual 5.1 channel surround sound experience through
a pair of speakers using HRTF (Head Related Transfer Function) technology.
●
SRS TruDialog (Off / On)
(standard sound mode only)
This function allows you to increase the intensity of a voice over background
music or sound effects so that dialog can be heard more clearly.
Page 78

◀ ▶
English
●
Equalizer
The Equalizer displays a series of sliders. Use the up and down arrow keys
to select a slider. Use the left and right arrow keys to change the slider’s
value. To Reset the
Equalizer, select Reset and press ENTER
E
, then press
ENTER
E
again. To exit, select Close, and then press ENTER
E
. Equalizer is
available in the standard sound mode only.
●
Balance L/R: Adjusts the balance between the right and left speaker.
●
100Hz / 300Hz / 1kHz / 3kHz / 10kHz (Bandwidth Adjustment): Adjusts the
volume level of specific bandwidth frequencies.
●
Reset: Resets the equalizer to its default settings.
Page 79

English
■Broadcast Audio Options
●
Preferred Language
(digital channels only)
Use the up and down arrow keys to select a language, and then press
ENTER
E
.
Digital-TV broadcasts can simultaneously transmit many audio tracks (for
example, simultaneous translations of the program into foreign languages).
N
You can only select a language from among the ones being broadcasted.
Page 80

◀ ▶
English
●
Multi-Track Sound (MTS)
t
(analog channels only)
Select an option using the up and down arrow keys, and the press ENTER
E
.
Mono: Choose for channels that are broadcasting in mono or if you are having
difficulty receiving a stereo signal.
Stereo: Choose for channels that are broadcasting in stereo.
SAP: Choose to listen to the Separate Audio Program, which is usually a
foreign-language translation.
N
Depending on the program being broadcast, you can listen to
Mono,
Stereo, or SAP.
Page 81

English
■SPDIF Output
The SPDIF (Sony Philips Digital InterFace) outputs an uncompressed digital audio
signal when you connect the digital audio jack on the back of the TV to a digital
audio in jack on a receiver or home theater.
●
Audio Format: You can select the Digital Audio output (SPDIF) format.
N
The available Digital Audio output (SPDIF) format may differ depending on
the input source.
●
Audio Delay: Lets you correct timing mismatches between the audio track and
the video when you are watching the TV and listening to digital audio output
from the TV through an external device such as an AV receiver. When you
select Audio Delay, a slider appears. User the left and right arrow buttons to
adjust the slider. Press ENTER
E
when done (0ms ~ 250ms).
Page 82

◀ ▶
English
■Speaker Settings
●
Speaker Select (External Speaker / TV Speaker)
If you are listening to the sound track of a broadcast or movie through an
external receiver, you may hear a sound echo caused by the difference in
decoding speed between the TV’s speakers and the speakers attached to your
audio receiver. If this occurs, set the TV to
External Speaker.
N
When you set Speaker Select to
External Speaker, the TV’s speakers are
turned off. You will hear sound through the external speakers only. When
you set
Speaker Select to TV Speaker both the TV’s speakers and the
external speakers are on. You will hear sound through both.
N
When
Speaker Select is set to External Speaker, the
y
and MUTE
buttons will not operate and the sound settings will be limited.
N
If there is no video signal, both speakers will be mute.
Page 83

English
●
Auto Volume (Off / Normal / Night)
Normal equalizes the volume level on each channel, so that when you change
channels, the volume level is the same.
Night equalizes and decrease the volume level on each channel, so each
channel is quieter.
Night is useful at night, when you may want to keep the
volume low.
N
To use the volume control of a connected source device, set
Auto Volume
to
Off. A change to the volume control of the connected source device may
not be applied if Auto Volume is set to Normal or Night.
Page 84

◀ ▶
English
■Reset Sound (OK / Cancel)
Reset all sound settings to the factory defaults. Select Reset, press ENTER
E
,
select OK on the pop-up, and then press ENTER
E
again.
Page 85
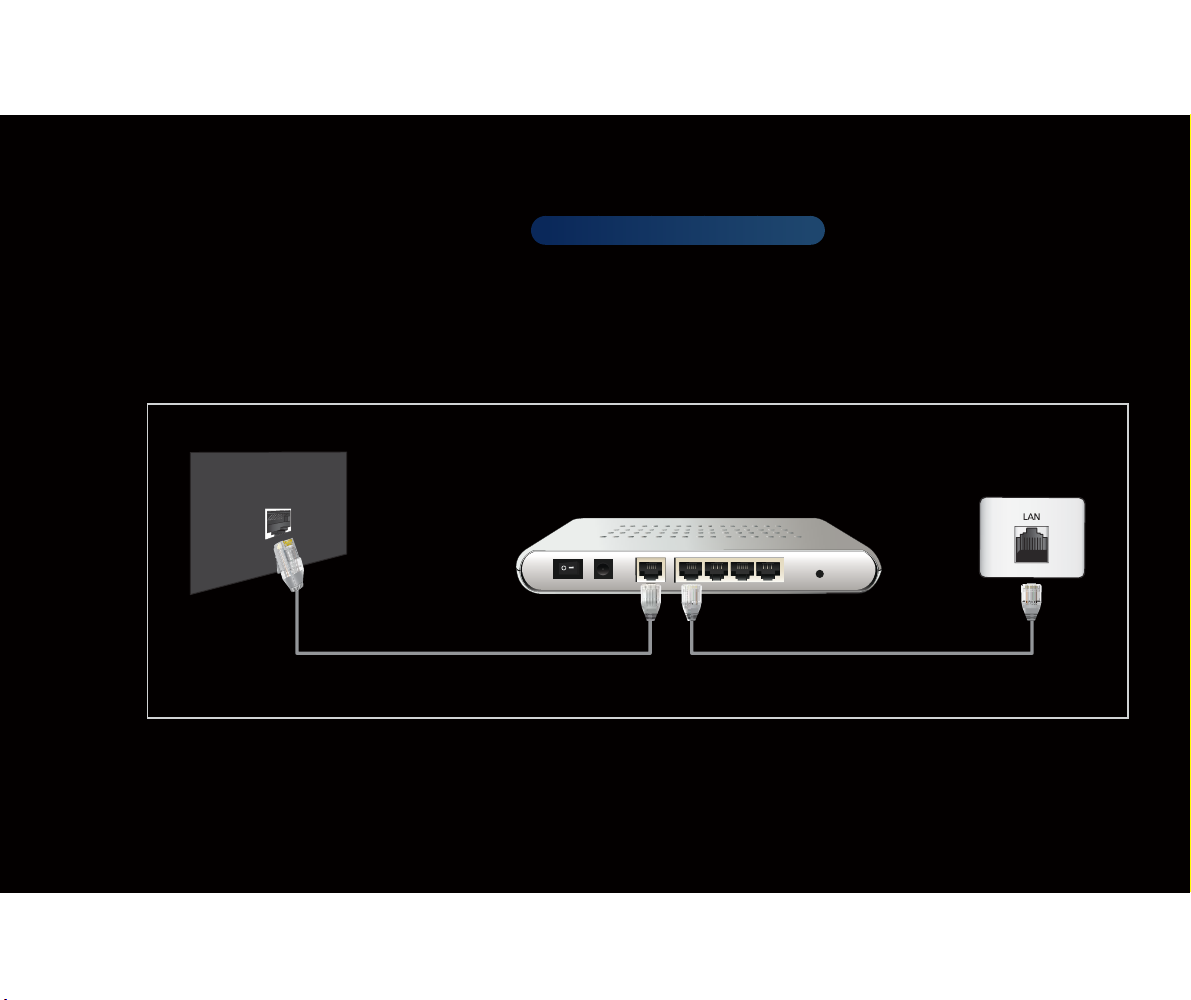
◀ ▶
English
Preference Features
❑Wired Network Connection
■Connecting to a Wired Network
for PDP 550 Series and above
There are three ways to attach your TV to your LAN using cable:
●
You can attach your TV to your LAN by connecting the LAN port on the back of
your TV to an external modem using a LAN cable. See the diagram below.
The Modem Port on the Wall
LAN
LAN CableModem Cable
External Modem
(ADSL / VDSL / Cable TV)
Page 86
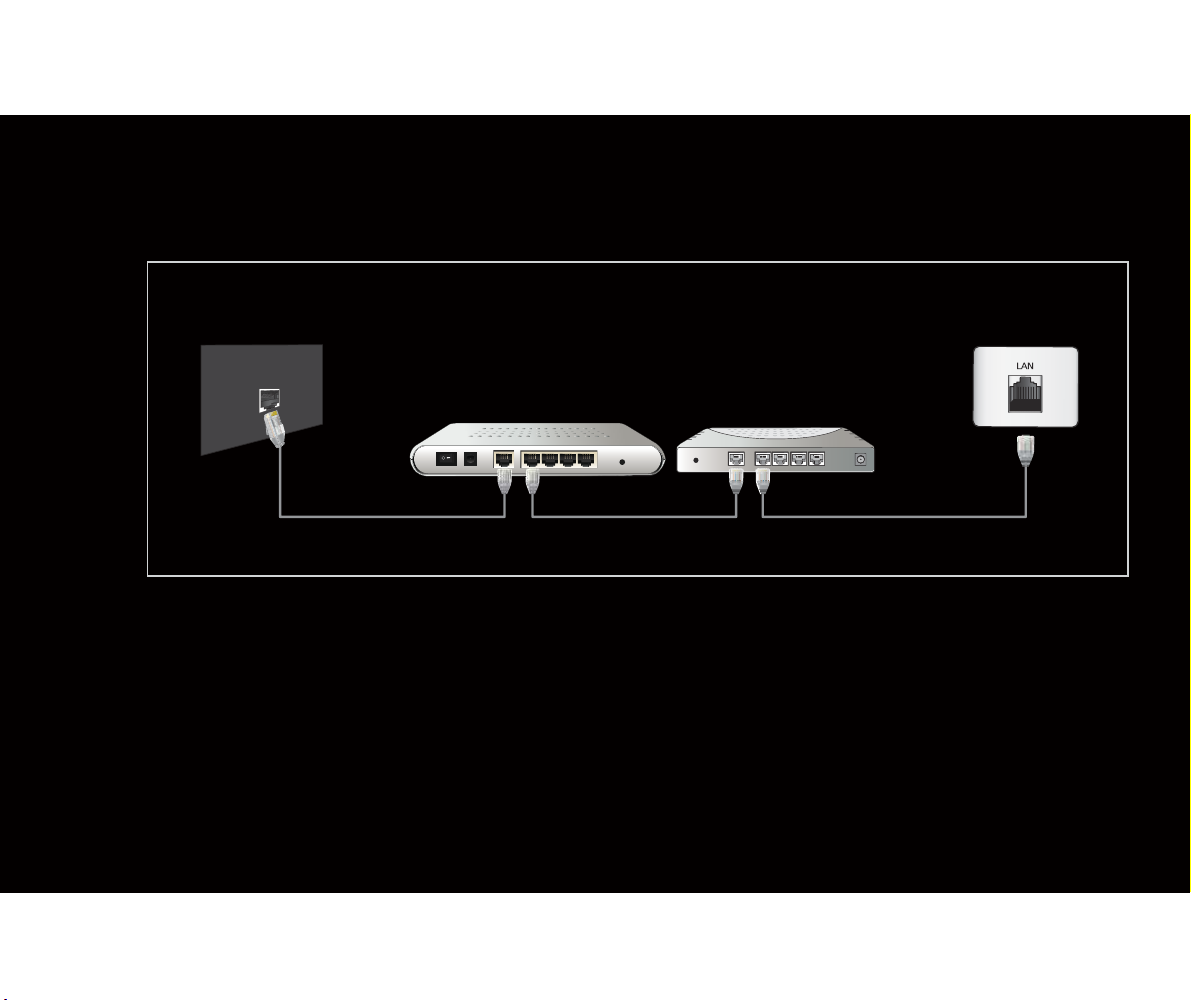
◀ ▶
English
●
You can attach your TV to your LAN by connecting the LAN port on the back of
your TV to a IP Sharer (router) which is connected to an external modem. Use
LAN cable for the connection. See the diagram below.
The Modem
Port on the Wall
LAN
LAN Cable LAN CableModem Cable
External Modem
(ADSL / VDSL / Cable TV)
IP Sharer
(having DHCP server)
Page 87
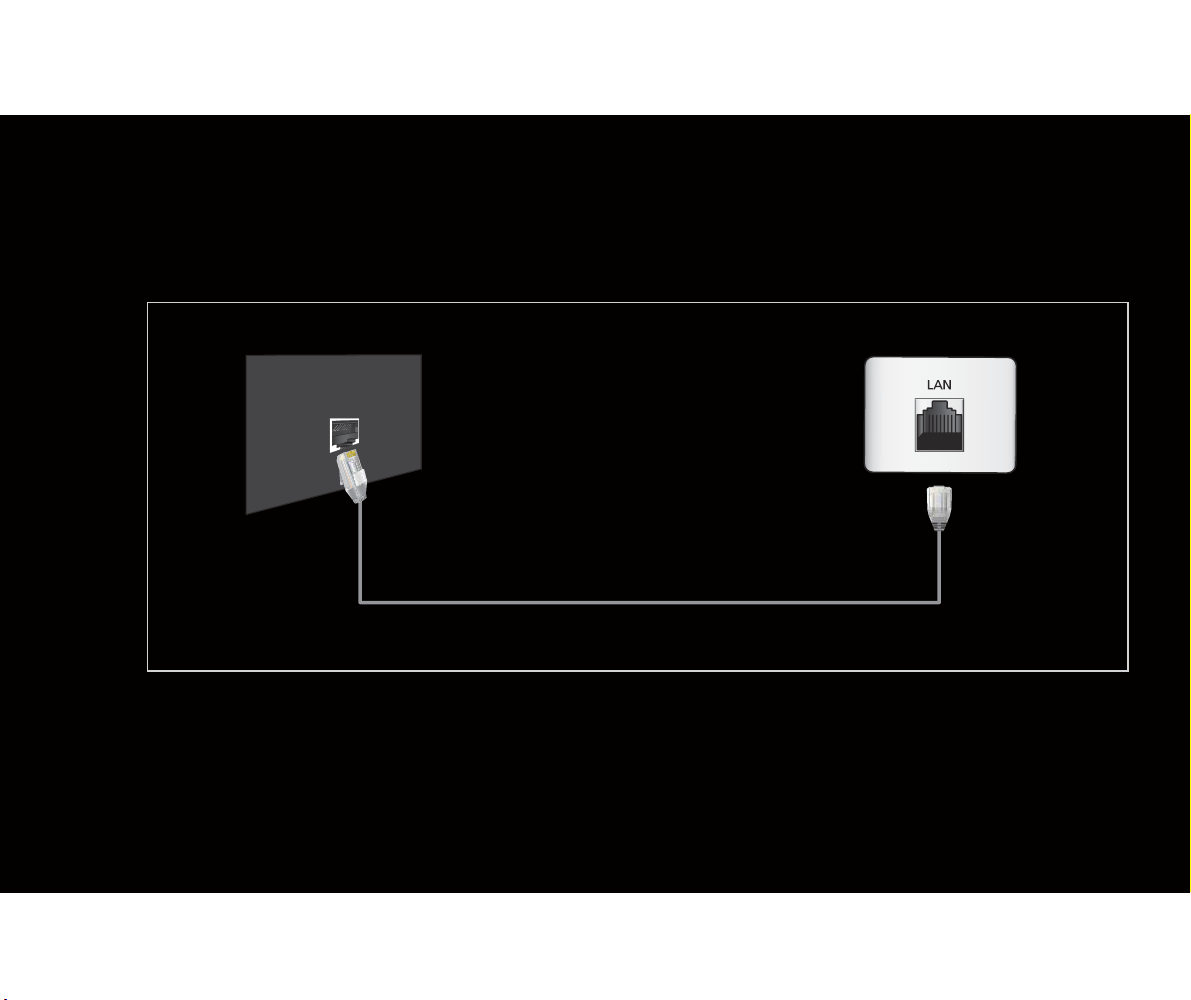
English
●
Depending on how your network is configured, you may be able to attach your
TV to your LAN by connecting the LAN port on the back of your TV directly to
a network wall outlet using a LAN cable. See the diagram below. Note that the
wall outlet is attached to a modem or router elsewhere in your house.
The LAN Port on the Wall
LAN
LAN Cable
Page 88

◀ ▶
English
●
If you have a Dynamic Network, you should use an ADSL modem or router
that supports the Dynamic Host Configuration Protocol (DHCP). Modems and
routers that support DHCP automatically provide the IP address, subnet mask,
gateway, and DNS values your TV needs to access the Internet so you do not
have to enter them manually. Most home networks are Dynamic Networks.
Some networks require a Static IP address. If your network requires a Static
IP address, you must enter the IP address, subnet mask, gateway, and DNS
values manually on your TV’s Cable Setup Screen when you set up the network
connection. To get the IP address, subnet mask, gateway, and DNS values,
contact your Internet Service Provider (ISP). If you have a Windows computer,
you can also get these values through your computer.
N
You can use ADSL modems that support DHCP if your network requires a
Static IP address. ADSL modems that support DHCP also let you use Static
IP addresses.
Page 89

English
■Network Settings
O
MENU
m
→ Network → Network Settings → ENTER
E
Set up your network connection so you can use various Internet services such as
My Contents, AllShare™ and perform software upgrades.
■
Network Status
O
MENU
m
→ Network → Network Status → ENTER
E
Lets you check the current network and Internet status.
■
AllShare Settings
O
MENU
m
→ Network → AllShare Settings → ENTER
E
Lets you select whether to use media functions on the network. For details on set
up options, refer to the “AllShare™” instructions.
Page 90
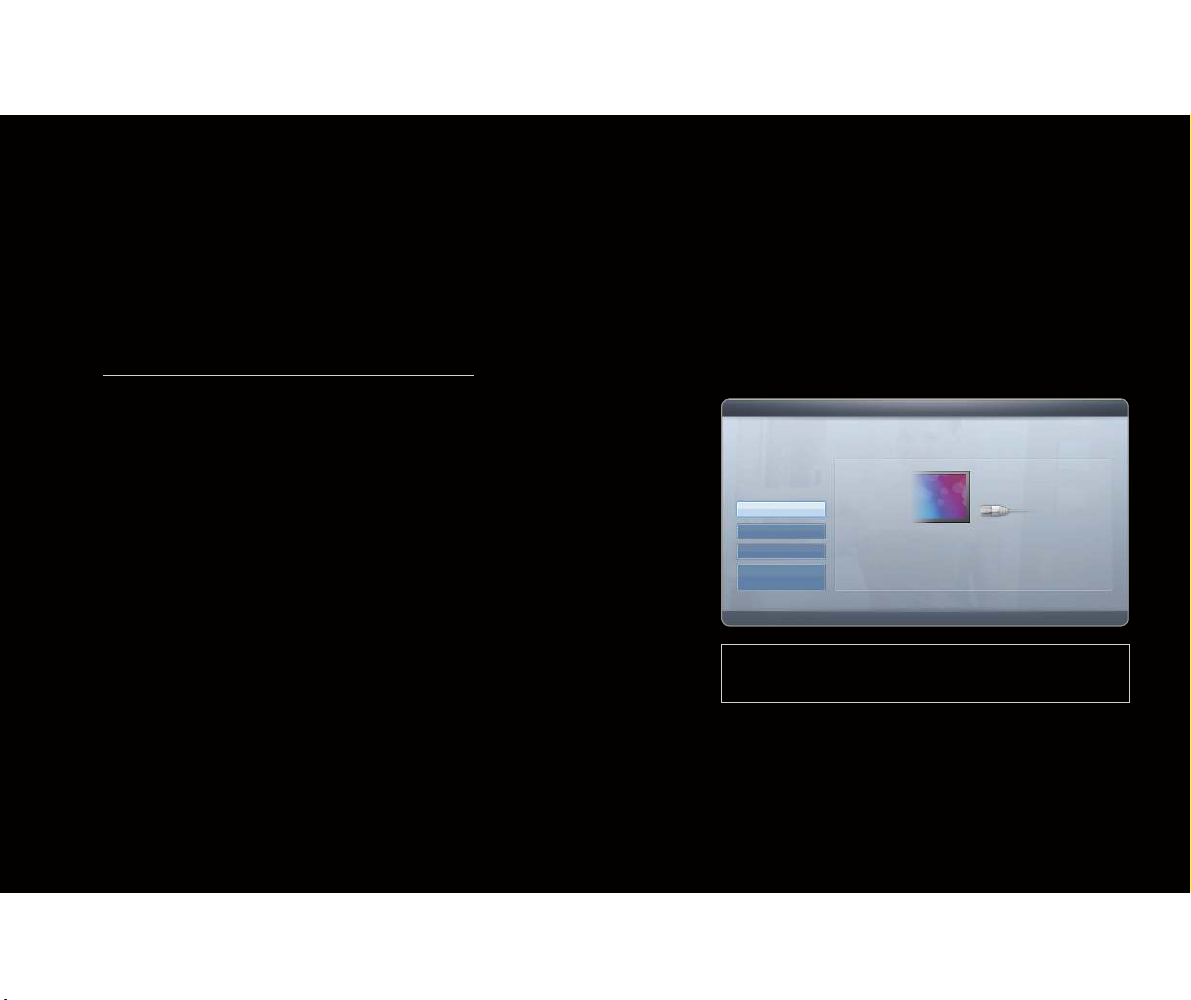
◀ ▶
English
■Automatic Network Setup
Use the Automatic
Network Setup when connecting your TV to a network that
supports DHCP. To set up your TV’s cable network connection automatically,
follow these steps:
How to set up automatically
1. Go to the
Network Settings screen.
(MENUm → Network → Network Settings
→
ENTER
E
)
2. Select Wired, and then press
ENTER.
3. The network test screen appears and
verifies the network connection. When the
connection has been verified, the “Internet
connection successful.” message appears.
● The displayed image may differ depending on the
model.
U
Move E Enter R Return
Network Settings
Select a network connection type.
Wired
Wireless(General)
WPS(PBC)
One Foot
Connection
Connect to the network using LAN cable. Please
make sure that the LAN cable is connected.
Page 91
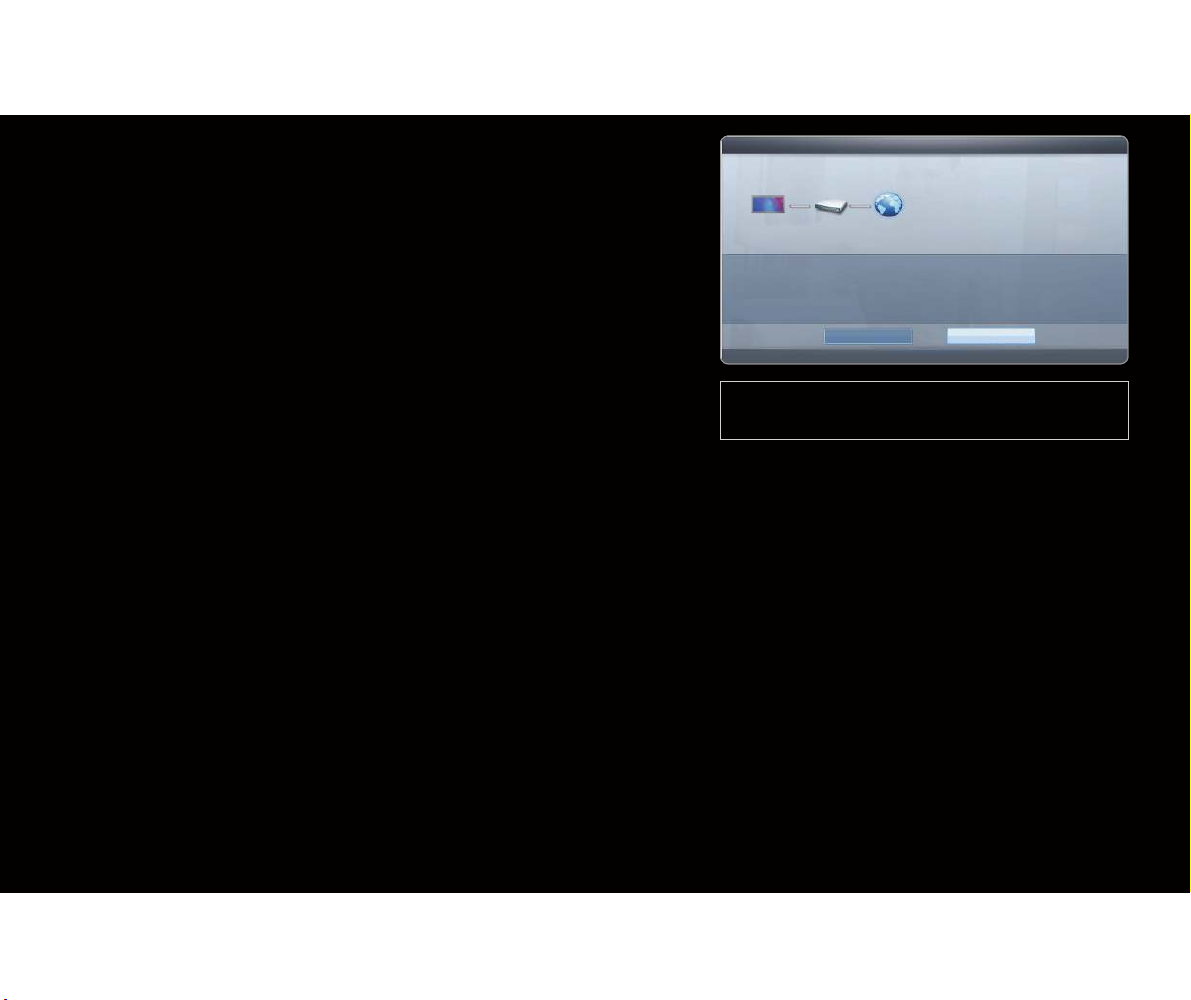
English
N
If the connection process fails, check the
LAN port connection.
N
If the automatic process cannot find the
network connection values or if you want to
set the connection manually, go to the next
secton, Manual Network Setup.
● The displayed image may differ depending on the
model.
a
Previous E Enter R Return
Network Settings
Wired network and Internet connection completed.
IP Settings OK
MAC Address 00:40:30:30:20:10
IP Address 192.168.10.21
Subnet Mask 255.255.255.0
Gateway 192.168.10.1
DNS Server 203.248.252.2
Internet is connected successfully.
If you have a problem with using Internet service, contact your Internet service
provider.
Page 92

◀ ▶
English
■Manual Network Setup
Use the Manual Network Setup when connecting your TV to a network that
requires a Static IP address.
Getting the Network Connection Values
To view the Network connection values on most Windows computers, follow these
steps:
1. Right click the Network icon on the bottom right of the screen.
2. In the pop-up menu that appears, click Status.
3. On the dialog that appears, click the Support tab.
4. On the Support Tab, click the Details button. The Network connection values
are displayed.
Page 93
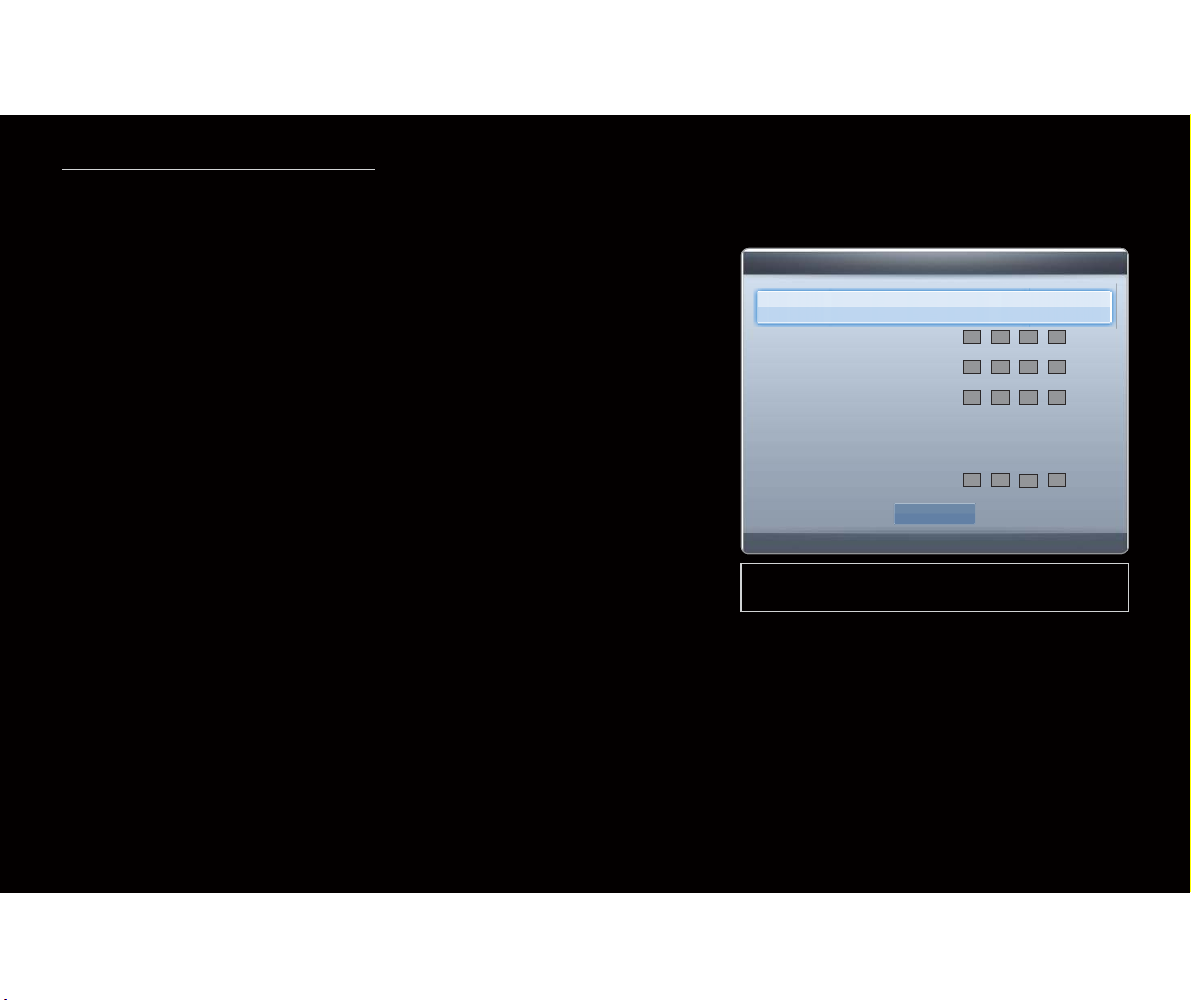
English
How to set up manually
To set up your TV’s cable network connection manually, follow these steps:
1. Go to the
Network Settings screen. (MENUm
→
Network → Network Settings → ENTER
E
)
2. Select Wired, press ENTER
E
, then press
ENTER
E
again. The network test screen
appears and the verification process starts.
3. Press ENTER
E
. The verification process stops.
Select IP Settings on network test screen. The
IP Settings screen appears.
● The displayed image may differ depending on
the model.
U
Move E Enter R Return
IP Settings
Internet Protocol Setup : Manual
►
IP Address
. . .
Subnet Mask
. . .
Gateway
. . .
DNS : Manual
DNS Server
. . .
OK
Page 94

◀ ▶
English
4. In the top entry field, press ENTER
E
, and then set IP Mode to Manual.
5. Press the
d
button on your remote to go to the IP Address entry field, and then
press ENTER
E
.
6. Enter the first portion of the IP Address (for example, 105) into the first entry field
using the number keys on your remote. Press the right arrow button to go to the
next field.
7. Enter the next portion of the IP Address. Press the right arrow button to go to the
next field.
Page 95

English
8. Repeat the entry process for each field in the IP Address.
N
If you make a mistake when entering a number, re-enter the number to correct
it. You can also press the up or down arrow button to change the number one
unit at a time.
9. When done entering the
IP Address, press ENTER
E
.
10. Press the down arrow key to go to the Subnet Mask fields, and then press
ENTER
E
.
11. Repeat the same entry process for Subnet Mask, Gateway, and DNS Server.
12. When done, select OK at the bottom of the page, and then press ENTER
E
.
The network test screen appears and the verification process starts. When the
connection has been verified, the “Internet connection successful.” message
appears.
Page 96
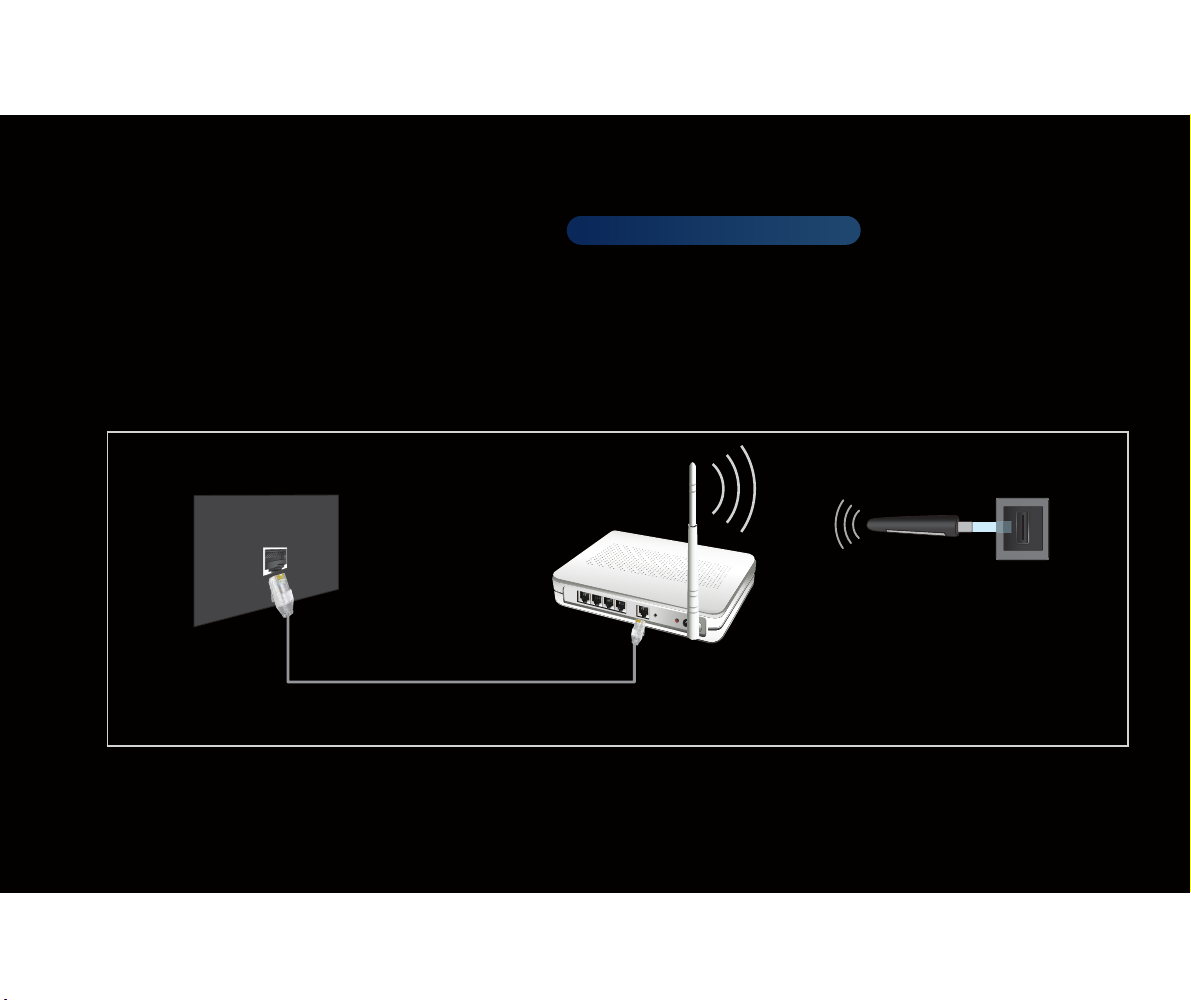
◀ ▶
English
❑Wireless Network Connection
■Connecting to a Wireless Network
for PDP 550 Series and above
To connect your TV to your wireless network, you need a wireless router or
modem and a Samsung Wireless LAN adapter (WIS09ABGN, WIS09ABGN2, or
WIS10ABGN), which you connect to your TV’s back or side panel USB jack. See
the illustration below.
The LAN Port on the Wall
LAN Cable
Wireless IP sharer
(router having DHCP server)
Samsung
Wireless LAN
adapter
USB Port
Page 97

English
Samsung’s Wireless LAN adapter is sold separately and is offered by select
retailers, Ecommerce sites, and Samsungparts.com. Samsung’s Wireless LAN
adapter supports the IEEE 802.11a/b/c and n communication protocols. Samsung
recommends using IEEE 802.11n. When you play video over a network connection,
the video may not be played smoothly.
N
NOTE
●
You must use the “Samsung Wireless LAN adapter” (WIS09ABGN,
WIS09ABGN2, or WIS10ABGN) to use a wireless network.
●
To use a wireless network, your TV must be connected to a wireless IP sharer
(either a router or a modem). If the wireless IP sharer supports DHCP, your TV
can use a DHCP or static IP address to connect to the wireless network.
Page 98

◀ ▶
English
●
Select a channel for the wireless IP sharer that is not currently being used. If the
channel set for the wireless IP sharer is currently being used by another device
nearby, this will result in interference and communication failure.
●
Your TV supports the following wireless security systems only:
–
Authentication Mode : WEP, WPAPSK, WPA2PSK
–
Encryption Type : WEP, AES
●
If you select the Pure High-throughput (Greenfield) 802.11n mode and the
Encryption type is set to WEP, TKIP or TKIP AES (WPS2Mixed) on your wireless
router, Samsung TVs will not support a connection in compliance with new WiFi certification specifications.
Page 99

English
●
If your AP supports WPS (Wi-Fi Protected Setup), you can connect to the
network via PBC (Push Button Configuration) or PIN (Personal Identification
Number). WPS will automatically configure the SSID and WPA key in either
mode.
●
If your router, modem, or device is not certified, it may not connect to the TV
via the “Samsung Wireless LAN adapter.”
●
Ensure the TV is turned off before you connect the Samsung Wireless LAN
adapter.
Page 100

◀ ▶
English
●
Connection Methods: You can setup the wireless network connection in five
ways:
–
Auto Setup (Using the Auto Network Search function)
–
Manual Setup
–
WPS(PBC)
–
One Foot Connection
–
Plug & Access
●
The TV may not recognize the Samsung Wireless LAN adapter if it is connected
to the TV using a USB hub or USB extension cable other than the cable
supplied.
 Loading...