

Page 1
©2010 Sprint. SPRINT and the logo are trademarks of Sprint.
Other marks are the property of their respective owners.
10/11/10
www.sprint.com
User Guide
M350.book Page A Monday, October 11, 2010 9:58 AM
Page 2
SPH-M350_UG_DG29_PS_101110_F7
Consejo: Para encontrar esta guía para usuarios en español,
por favor visita a
www.sprint.com y haz clic en
Support > Phones & Devices.
To find this user guide in Spanish, please visit
www.sprint.com and click Support > Phones &
Devices
.
Important Privacy Message – Sprint’s policies often do not
apply to third-party applications. Third-party applications may
access your personal information or require Sprint to disclose
your customer information to the third-party application
provider. To find out how a third-party application will collect,
access, use, or disclose your personal information, check the
application provider’s policies, which can usually be found on
their website. If you aren’t comfortable with the third-party
application’s policies, don’t use the application.
Open Source Software – Some software components of this
product incorporate source code covered under GNU General
Public License (GPL), GNU Lesser General Public License
(LGPL), OpenSSL License, BSD License and other open
source licenses. To obtain the source code covered under the
open source licenses, please visit:
http://opensource.samsungmobile.com/index.jsp.
M350.book Page B Monday, October 11, 2010 9:58 AM
Page 3
Table of Contents
Introduction . . . . . . . . . . . . . . . . . . . . . . . . . . . . . . . i
Your Phone’s Menu . . . . . . . . . . . . . . . . . . . . . . . . i
Section 1: Getting Started . . . . . . . . . . . . . . . . . 1
1A. Setting Up Service . . . . . . . . . . . . . . . . . . . 2
Setting Up Your Phone . . . . . . . . . . . . . . . . . . . . . . 2
Activating Your Phone . . . . . . . . . . . . . . . . . . . . . . . 4
Setting Up Your Voicemail . . . . . . . . . . . . . . . . . . . 6
Sprint Account Passwords . . . . . . . . . . . . . . . . . . . 6
Getting Help . . . . . . . . . . . . . . . . . . . . . . . . . . . . . . . 7
Section 2: Your Phone . . . . . . . . . . . . . . . . . . . . 9
2A. Phone Basics . . . . . . . . . . . . . . . . . . . . . . . 10
Your Phone . . . . . . . . . . . . . . . . . . . . . . . . . . . . . . . 10
Viewing the Display Screen . . . . . . . . . . . . . . . . . 13
Turning Your Phone On and Off . . . . . . . . . . . . . 14
Battery and Charger . . . . . . . . . . . . . . . . . . . . . . . 15
Navigating Through the Menus . . . . . . . . . . . . . . 17
Displaying Your Phone Number . . . . . . . . . . . . . 24
Making and Answering Calls . . . . . . . . . . . . . . . 24
Entering Text . . . . . . . . . . . . . . . . . . . . . . . . . . . . . . 32
2B. Settings . . . . . . . . . . . . . . . . . . . . . . . . . . . . 37
Personalizing Your Phone . . . . . . . . . . . . . . . . . . 37
Sound Settings . . . . . . . . . . . . . . . . . . . . . . . . . . . 38
Display Settings . . . . . . . . . . . . . . . . . . . . . . . . . . . 40
Touch Settings . . . . . . . . . . . . . . . . . . . . . . . . . . . . 41
Location Settings . . . . . . . . . . . . . . . . . . . . . . . . . . 42
Messaging Settings . . . . . . . . . . . . . . . . . . . . . . . 43
Airplane Mode . . . . . . . . . . . . . . . . . . . . . . . . . . . . 43
TTY Use With Sprint Service . . . . . . . . . . . . . . . . 44
Updating the Phone’s Software . . . . . . . . . . . . . 45
Updating the PRL . . . . . . . . . . . . . . . . . . . . . . . . . 45
Updating the Data Profile . . . . . . . . . . . . . . . . . . . 45
Favorites . . . . . . . . . . . . . . . . . . . . . . . . . . . . . . . . . 46
Security Settings . . . . . . . . . . . . . . . . . . . . . . . . . . 46
2C. History . . . . . . . . . . . . . . . . . . . . . . . . . . . . . 52
Viewing Recent Calls . . . . . . . . . . . . . . . . . . . . . . 52
Recent Calls Options . . . . . . . . . . . . . . . . . . . . . . 53
Making a Call From Recent Calls . . . . . . . . . . . 54
Tip: Looking for something? If you don’t see it in the headings
listed here, try the Index on page 175.
M350.book Page 1 Monday, October 11, 2010 9:58 AM
Page 4

Saving a Phone Number From Recent Calls . 55
Erasing History Entries . . . . . . . . . . . . . . . . . . . . . 56
2D. Contacts . . . . . . . . . . . . . . . . . . . . . . . . . . . 57
Adding a New Contacts Entry . . . . . . . . . . . . . . . 57
Saving A Phone Number . . . . . . . . . . . . . . . . . . 58
Contacts Entry Options . . . . . . . . . . . . . . . . . . . . 59
Editing a Contacts Entry . . . . . . . . . . . . . . . . . . . . 61
Adding a Number to a Contacts Entry . . . . . . . . 61
Editing a Contacts Entry’s Numbers . . . . . . . . . 62
Deleting Contacts Entries . . . . . . . . . . . . . . . . . . 62
Assigning Speed Dial Numbers . . . . . . . . . . . . 63
Selecting a Ringer Type for an Entry . . . . . . . . 64
Assigning a Picture to an Entry . . . . . . . . . . . . . 65
Finding Contacts Entries . . . . . . . . . . . . . . . . . . . 66
Transferring Your Contacts . . . . . . . . . . . . . . . . . 66
Dialing Sprint Services . . . . . . . . . . . . . . . . . . . . 68
Wireless Backup . . . . . . . . . . . . . . . . . . . . . . . . . . 68
2E. Calendar & Tools . . . . . . . . . . . . . . . . . . . . 71
Calendar . . . . . . . . . . . . . . . . . . . . . . . . . . . . . . . . . 71
Alarm Clock . . . . . . . . . . . . . . . . . . . . . . . . . . . . . . . 74
Timer . . . . . . . . . . . . . . . . . . . . . . . . . . . . . . . . . . . . . 76
Stopwatch . . . . . . . . . . . . . . . . . . . . . . . . . . . . . . . . 76
World Clock . . . . . . . . . . . . . . . . . . . . . . . . . . . . . . 76
Notes . . . . . . . . . . . . . . . . . . . . . . . . . . . . . . . . . . . . 78
Calculator . . . . . . . . . . . . . . . . . . . . . . . . . . . . . . . . 78
Tip Calculator . . . . . . . . . . . . . . . . . . . . . . . . . . . . . 79
Unit Converter . . . . . . . . . . . . . . . . . . . . . . . . . . . . . 79
2F. Voice Services . . . . . . . . . . . . . . . . . . . . . . 81
Automatic Speech Recognition (ASR) . . . . . . . . 81
Sending a Message . . . . . . . . . . . . . . . . . . . . . . . 84
Opening Menus with ASR . . . . . . . . . . . . . . . . . . 86
ASR Options . . . . . . . . . . . . . . . . . . . . . . . . . . . . . . 86
2G. microSD Card . . . . . . . . . . . . . . . . . . . . . . 90
Using Your Phone’s microSD Card
and Adapter . . . . . . . . . . . . . . . . . . . . . . . . . . . . . . 90
Memory Status . . . . . . . . . . . . . . . . . . . . . . . . . . . . 92
Connecting Your Phone to Your Computer . . . 92
2H. Camera . . . . . . . . . . . . . . . . . . . . . . . . . . . . . 97
Taking Pictures . . . . . . . . . . . . . . . . . . . . . . . . . . . . 97
Storing Pictures . . . . . . . . . . . . . . . . . . . . . . . . . . 101
2I. Bluetooth . . . . . . . . . . . . . . . . . . . . . . . . . 104
Turning Bluetooth On and Off . . . . . . . . . . . . . . 104
M350.book Page 2 Monday, October 11, 2010 9:58 AM
Page 5

Using the Bluetooth Settings Menu . . . . . . . . . 105
Pairing Bluetooth Devices . . . . . . . . . . . . . . . . . 106
Sending Items via Bluetooth . . . . . . . . . . . . . . . 108
Section 3: Sprint Service. . . . . . . . . . . . . . . . 111
3A. Sprint Service: The Basics . . . . . . . . . . 112
Voicemail . . . . . . . . . . . . . . . . . . . . . . . . . . . . . . . . 112
Text Messaging (SMS) . . . . . . . . . . . . . . . . . . . . 115
Caller ID . . . . . . . . . . . . . . . . . . . . . . . . . . . . . . . . . 117
Call Waiting . . . . . . . . . . . . . . . . . . . . . . . . . . . . . . 117
Making a Three-Way Call . . . . . . . . . . . . . . . . . . 118
Call Forwarding . . . . . . . . . . . . . . . . . . . . . . . . . . 119
Roaming . . . . . . . . . . . . . . . . . . . . . . . . . . . . . . . . 120
3B. Web and Data Services . . . . . . . . . . . . . 123
Getting Started With Data Services . . . . . . . . . 123
Browser Menu . . . . . . . . . . . . . . . . . . . . . . . . . . . 126
Accessing Messages . . . . . . . . . . . . . . . . . . . . . 130
Using Sprint Desktop Sync . . . . . . . . . . . . . . . . 141
Downloading Games, Ringers and More . . . . 143
Information Services on the Web . . . . . . . . . . . 146
Data Services FAQs . . . . . . . . . . . . . . . . . . . . . . . 148
3C. Entertainment . . . . . . . . . . . . . . . . . . . . . . 150
Music . . . . . . . . . . . . . . . . . . . . . . . . . . . . . . . . . . . 150
Transferring Multimedia Content . . . . . . . . . . . 153
MySpace . . . . . . . . . . . . . . . . . . . . . . . . . . . . . . . . 153
Facebook . . . . . . . . . . . . . . . . . . . . . . . . . . . . . . . 154
Twitter . . . . . . . . . . . . . . . . . . . . . . . . . . . . . . . . . . 156
Section 4: Safety and Warranty
Information . . . . . . . . . . . . . . . . . . . . . . . . . . . . . 157
4A. Important Safety Information . . . . . . . . 158
General Precautions . . . . . . . . . . . . . . . . . . . . . . 158
Maintaining Safe Use of and Access to
Your Phone . . . . . . . . . . . . . . . . . . . . . . . . . . . . . 159
Using Your Phone With a Hearing
Aid Device . . . . . . . . . . . . . . . . . . . . . . . . . . . . . . 160
Caring for the Battery . . . . . . . . . . . . . . . . . . . . . 162
Radio Frequency (RF) Energy . . . . . . . . . . . . . 163
Owner’s Record . . . . . . . . . . . . . . . . . . . . . . . . . . 165
User Guide Proprietary Notice . . . . . . . . . . . . . 165
4B. Manufacturer’s Warranty . . . . . . . . . . . . 166
Manufacturer’s Warranty . . . . . . . . . . . . . . . . . . 166
Index. . . . . . . . . . . . . . . . . . . . . . . . . . . . . . . . . . . 175
M350.book Page 3 Monday, October 11, 2010 9:58 AM
Page 6

M350.book Page 4 Monday, October 11, 2010 9:58 AM
Page 7
i
Introduction
This User Guide introduces you to Sprint® service and
all the features of your new phone. It’s divided into four
sections:
⽧ Section 1: Getting Started
⽧ Section 2: Using Your Phone
⽧ Section 3: Sprint Service Features
⽧ Section 4: Safety and Warranty Information
Your Phone’s Menu
The following table outlines your phone’s menu
structure. For more information about using your
phone’s menus, see “Navigating Through the Menus”
on page 17.
To exit an active menu and return to the previous page:
䊳 Touching allows you to go back to a previous
menu item.
Touching
provides access to your phone’s Main
Functions menu, such as:
䡲 Favorites ( )
䡲 Main ( )
䡲 Fun ( )
䡲 Web ( )
Note: Because of updates in phone software, this printed
guide may not be the most current version for your
phone. Visit
www.sprint.com and sign on to My Sprint
to access the most recent version of the user guide.
WARNING: Please refer to the Important Safety Information
section on page 158 to learn about information
that will help you safely use your phone. Failure to
read and follow the Important Safety Information
in this phone guide may result in serious bodily
injury, death, or property damage.
Favs
Main
Fun
Web
M350.book Page i Monday, October 11, 2010 9:58 AM
Page 8
ii
Favorites
Touch to display the following options:
1: Messaging
2: Facebook
3: MySpace
Main
Touch to display the following options:
1: Email
2: Messaging
3: IM
4: Voice Command
5: Calculator
1: Calculator 2: Tip Calculator
3: Unit Converter
6: Notes
7: Calendar
1: Personal Calendar 2: Add Calendar
Favs
Main
8: Clock
1: Alarm 2: Timer
3: Stopwatch 4: World Clock
9: Settings
1: Display
1: Background 2: Brightness
3: Dim 4: Off
5: Java Backlight 6: Keypad Backlight
7: Color Theme
2: Volume
1: Ringer volume 2: Always Vibrate
3: System volume 4: Touch Vibrate
5: Touch Tone 6: Startup/Shutdown
3: Ringers & Vibrations
1: Voice call 2: Voicemail
3: Message 4: Alarm/Timer/Calendar
5: Voice Notification
4: General
1: Phone Information 2: Memory status
3: Airplane Mode 4: Location
5: Net Guard 6: One Hand Operation
7: TTY 8: Ignore With Text
9: Touch Sensitivity 10: Text Entry
11: Language 12: Update Data Profile
13: Update Software 14: Update PRL
M350.book Page ii Monday, October 11, 2010 9:58 AM
Page 9
iii
5: Bluetooth
1: Bluetooth (On/Off) 2: Visibility
3: Trusted devices 4: Device Info
5: Device Name
6: Web Browser
1: Launch Page 2: Clear Cache
3: Clear Cookies 4: Clear History
7: Device Self-Service
8: Speech to Action
1: Confirmation 2: Adaptation
3: Mode 4: About
9: Lock
1: Lock Phone 2: Lock Applications
3: Change Lock Code
4: Emergency Numbers
10: Reset
1: Reset Settings 2: Delete Contents
3: Reset Phone
11: Parental Controls
1: Parental Controls (On/Off)
2: Change Parental Control Code
3: Restriction
12: Roaming
1: Roaming Mode 2: Call Guard
3: Data Roam Guard
13: Wireless Backup
Fun
Touch to display the following options:
1: Music
2: Camera
3: My Photos
4: My Stuff
1: Application Manager 2: Games
3: Ringers 4: Screen Savers
5: Applications 6: Call Tones
5: MySpace
6: Facebook
7: Twi tte r
8: Shopping
Fun
M350.book Page iii Monday, October 11, 2010 9:58 AM
Page 10
iv
Touching provides access to the Phone Functions
menu, such as:
䡲 Speed Dial ( )
䡲 Contacts ( )
䡲 Recent ( )
䡲 Dialer ( )
Web
Touch to display the following options:
1: My Account
2: Web
3: Bookmarks
4: Search
5: Weather
6: News
7: Sport s
8: Movies
9: Horoscopes
Web
Contacts
Recent
Dialer
Speed Dial
Contacts
Touch to display the following options:
1: My Info
2: Services
Recent
Dialer
In Use Menu
While on an active call, touch the corresponding
onscreen button to activate a feature:
1: Mute/Unmute 2: Speakerphone (On/Off)
3: End Call 4: Add Call
5: Contacts 6: Dialpad
Once the call has been ended, touch the
corresponding onscreen button to activate a feature:
1: Redial 2: Save
3: Done
Contacts
M350.book Page iv Monday, October 11, 2010 9:58 AM
Page 11
Section 1
Getting Started
M350.book Page 1 Monday, October 11, 2010 9:58 AM
Page 12
2 1A. Setting Up Service
⽧ Setting Up Your Phone (page 2)
⽧ Activating Your Phone (page 4)
⽧ Setting Up Your Voicemail (page 6)
⽧ Sprint Account Passwords (page 6)
⽧ Getting Help (page 7)
Setting Up Your Phone
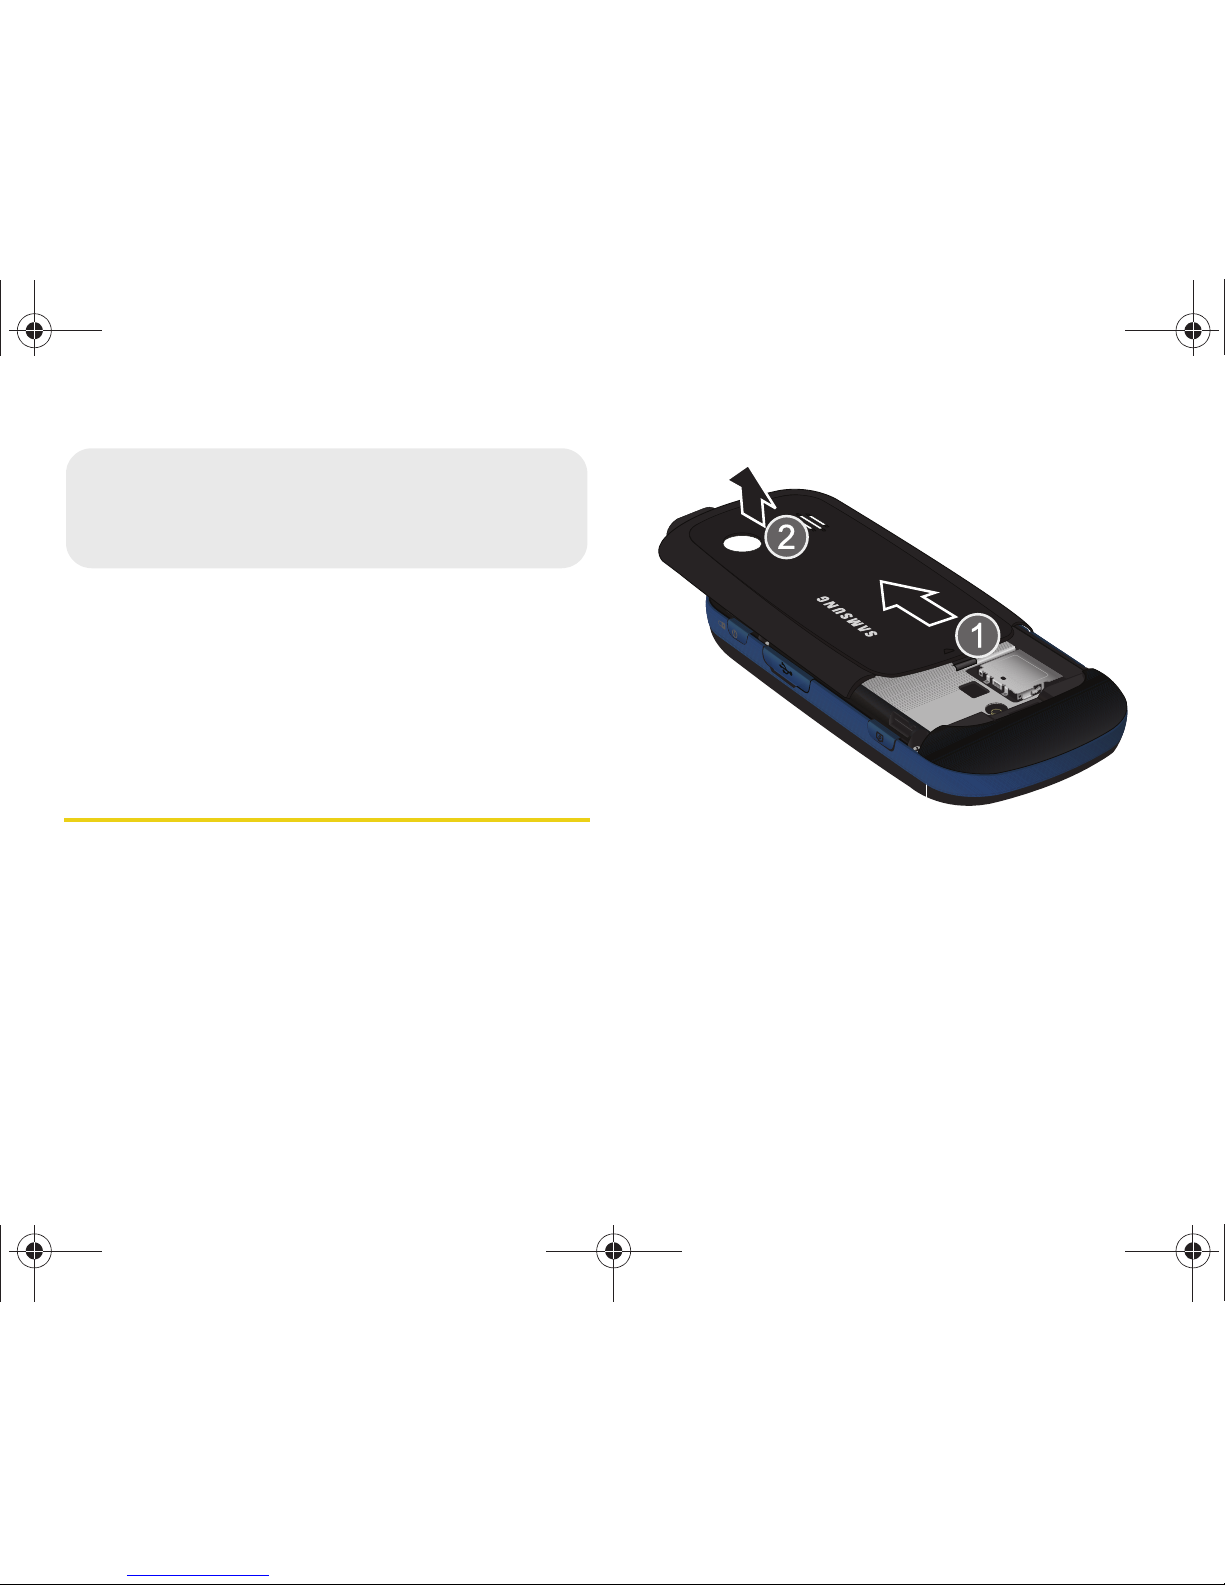
1. Remove the battery cover.
䡲 While applying pressure, slide the cover towards
the camera lens (as shown).
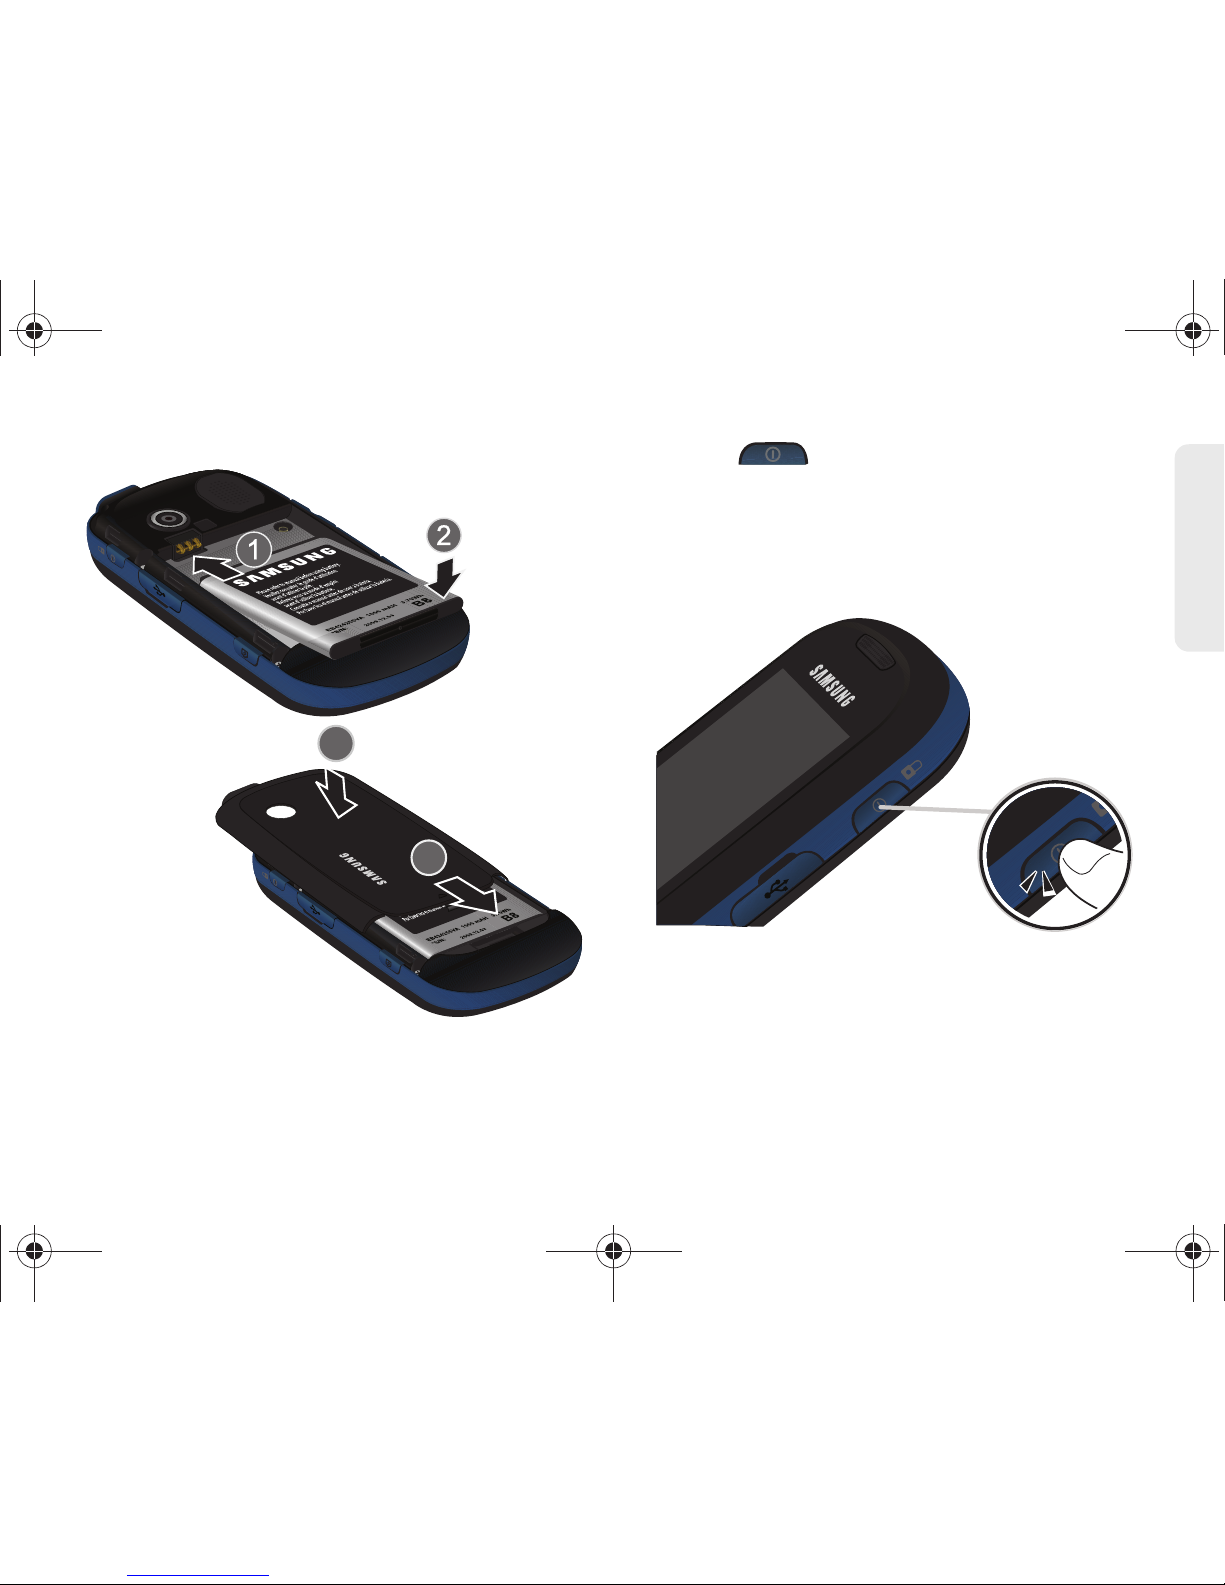
2. Install the battery.
䡲 Insert the battery into the opening on the back of
the phone, making sure the connectors align (1).
Gently press down to secure the battery (2).
䡲 Position the battery cover (3) and firmly slide it in
until you hear a click (4).
1A. Setting Up Service
M350.book Page 2 Monday, October 11, 2010 9:58 AM
Page 13
1A. Setting Up Service 3
Setting Up Service
3. Press to turn the phone on.
䡲 Your phone will turn on, search for Sprint service,
and then show the Unlock screen.
䡲 If your phone is not yet activated, or if it is locked,
see “Activating Your Phone” on page 4 for more
information.
M350.book Page 3 Monday, October 11, 2010 9:58 AM
Page 14
4 1A. Setting Up Service
4.
Make your first call.
䡲 Press and touch . Use the onscreen
dialpad to enter a phone number.
䡲 Touch . (The phone number appears in
the button.)
Activating Your Phone
䢇 If you purchased your device at a Sprint Store, it is
probably activated and ready to use.
䢇 If you received your device in the mail and it is for a new
Sprint account or a new line of service, it is designed to
activate automatically. To confirm your activation,
make a phone call.
WARNING: If your phone has a touchscreen display,
please note that a touchscreen responds best to
a light touch from the pad of your finger. Using
excessive force or a metallic object when
pressing on the touchscreen may damage the
tempered glass surface and void the warranty.
See “4B. Manufacturer’s Warranty” on page 166.
Note: Your phone’s battery should have enough charge for
your phone to turn on and find a signal, set up your
voicemail, and make a call. You should fully charge
your battery as soon as possible.
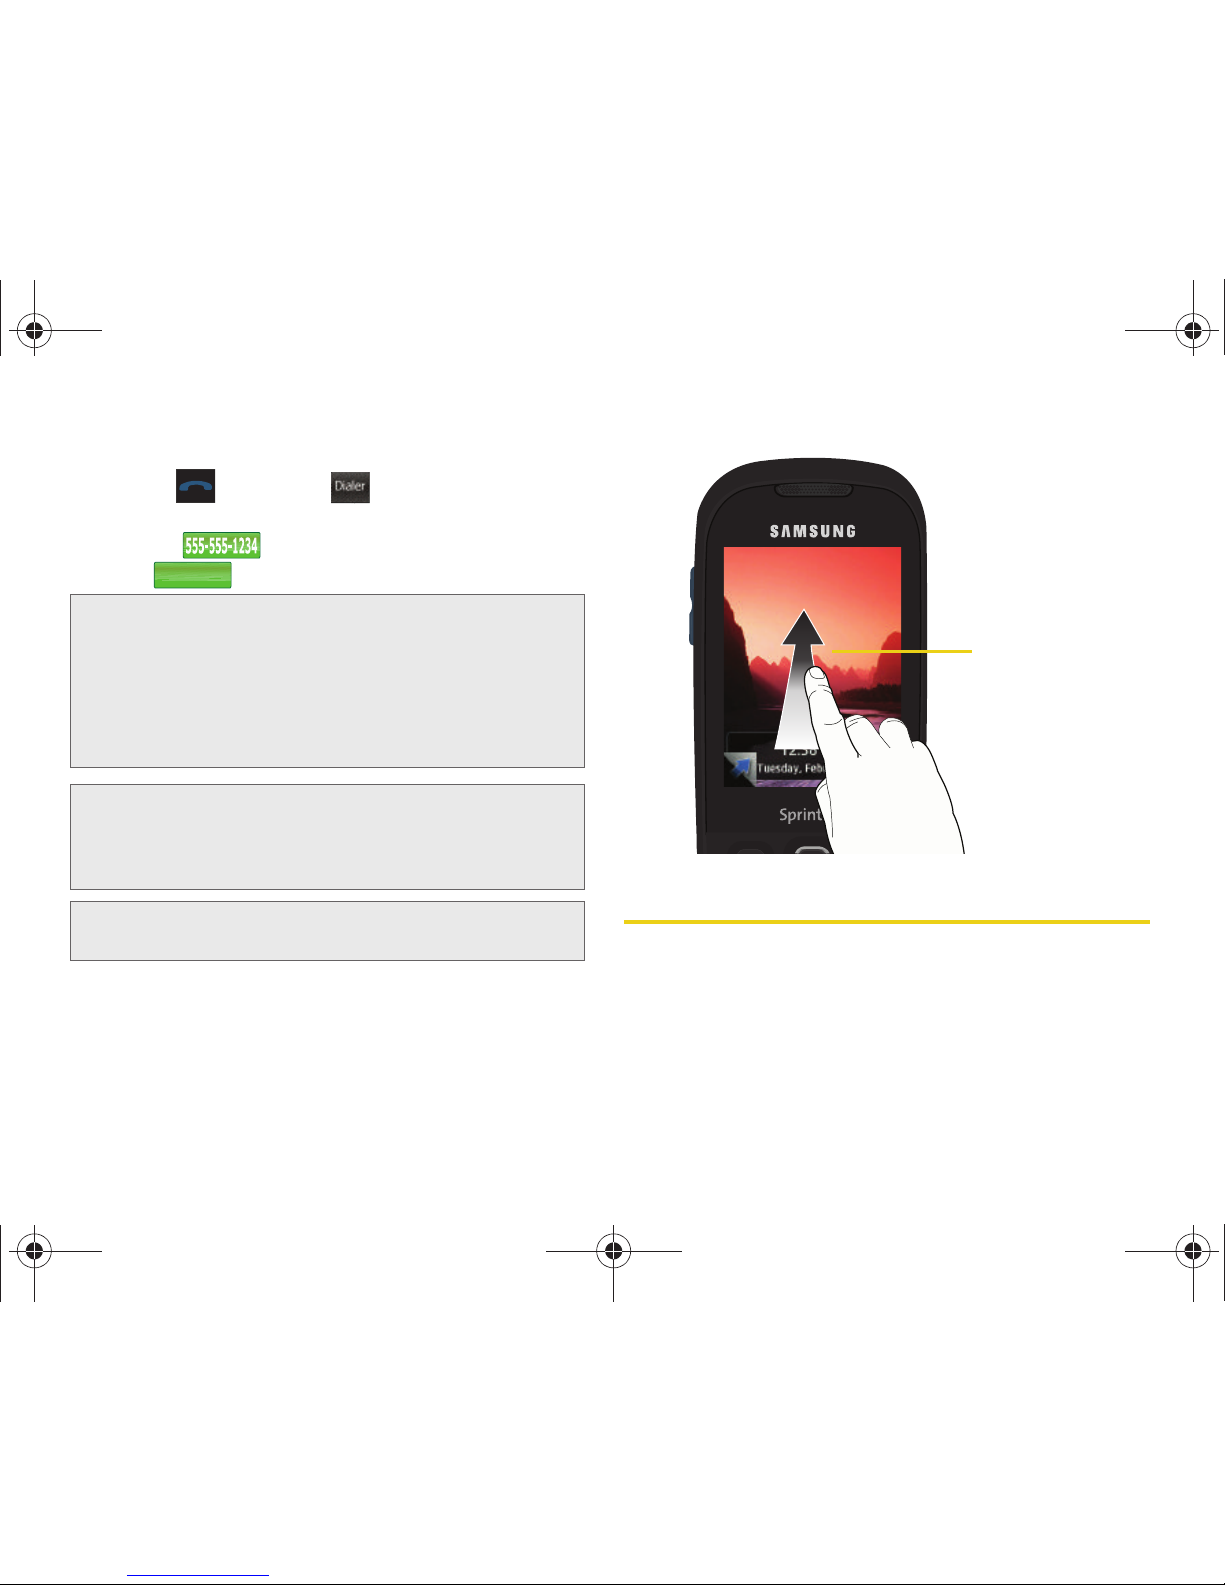
Note: To unlock your phone from this screen, touch and
drag the screen up.
Dialer
Talk
TALK
Unlock Screen
M350.book Page 4 Monday, October 11, 2010 9:58 AM
Page 15
1A. Setting Up Service 5
Setting Up Service
䢇 If you received your device in the mail and you are
activating a new device for an existing number on your
account, (you’re swapping phones), you can activate
on your computer online or directly on your phone.
䡲 Activate on your computer:
● Go to sprint.com/activate and follow the
instructions.
䡲 Activate on your phone:
1. Turn on your new phone. (Make sure the old one is
turned off.) Your phone will automatically attempt
Hands-Free Activation.
2. Tap Activate to override auto-activation and start
the manual activation wizard.
3. Follow the on-screen prompts to complete the
activation process.
4. After you have completed the wizard, make a
phone call to confirm your activation.
If your device is still not activated or you do not have
access to the Internet, contact Sprint Customer
Service at
1-888-211-4727 for assistance.
Using Device Self Service
This built-in service can allows you to activate your
phone manually via a Web-enabled UI.
1. Press and touch Main () > Settings >
Device Self Service.
2. Follow the onscreen prompts to manually activate
your new phone.
Important: For security reasons, you will need your Sprint
phone number and PIN to use this activation
method.
Note: Your phone will need to complete one hands-free
activation attempt before you can continue.
Note: If you don’t override Hands-Free Activation, your phone
will attempt to auto activate five times. Wait for
Retry to
appear on your screen. Tap
Retry and then tap
Activate.
Tip: Do not press while the device is being activated.
Pressing cancels the activation process.
Note: If you are having difficulty with activation, contact Sprint
Customer Service by dialing
1-888-211-4727 from any
other phone.
Main
M350.book Page 5 Monday, October 11, 2010 9:58 AM
Page 16
6 1A. Setting Up Service
Unlocking Your Phone
䊳 Press to reveal the unlock screen (see
page 4).
– or –
Slide open the QWERTY keyboard or unlock the
phone and reveal the most recent menu screen.
Setting Up Your Voicemail
Your phone automatically transfers all unanswered
calls to your voicemail, even if your phone is in use or
turned off. You should set up your Sprint Voicemail and
personal greeting as soon as your phone is activated.
Always use a password to protect against unauthorized
access.
1. Press and touch .
2. Press and hold .
– or –
Touch
.
3. Follow the system prompts to:
䡲 Create your password.
䡲 Record your name announcement.
䡲 Record your greeting.
For more information about using your voicemail, see
“Voicemail” on page 112.
Sprint Account Passwords
As a Sprint customer, you enjoy unlimited access to
your personal account information, your voicemail
account, and your data services account. To ensure
that no one else has access to your information, you
will need to create passwords to protect your privacy.
Dialer
1
Note: Voicemail Password
Sprint strongly recommends that you create a
password when setting up your voicemail to protect
against unauthorized access. Without a password,
anyone who has access to your phone is able to
access your voicemail messages.
M350.book Page 6 Monday, October 11, 2010 9:58 AM
Page 17

1A. Setting Up Service 7
Setting Up Service
Account Username and Password
If you are the account owner, you will create an account
username and password when you sign on to
www.sprint.com. (Click Need to register for access? to get
started.) If you are not the account owner (if someone
else receives the bill for your Sprint service), you can
get a sub-account password at
www.sprint.com.
Voicemail Password
You’ll create your voicemail password (or passcode)
when you set up your voicemail. See “Setting Up Your
Voicemail” on page 6 for more information on your
voicemail password.
Data Services Password
With your Sprint phone, you may elect to set up an
optional data services password to control access and
authorize Premium Service purchases.
For more information, or to change your passwords,
sign on to
www.sprint.com or call Sprint Customer
Service at
1-888-211-4727.
Getting Help
Managing Your Account
Online: www.sprint.com
䢇 Access your account information.
䢇 Check your minutes used (depending on your Sprint
service plan).
䢇 View and pay your bill.
䢇 Enroll in Sprint online billing and automatic payment.
䢇 Purchase accessories.
䢇 Shop for the latest Sprint phones.
䢇 View available Sprint service plans and options.
䢇 Learn more about data services and other products
like games, ringers, screen savers, and more.
M350.book Page 7 Monday, October 11, 2010 9:58 AM
Page 18
8 1A. Setting Up Service
From Your Phone’s Dialer
1. Press and touch .
2. Use the onscreen dialpad to enter one of the
following phone numbers.
䡲 Touch to check minute usage
and account balance.
䡲 Touch to make a payment.
䡲 Touch to access a summary of
your Sprint service plan or get answers to other
questions.
䡲 Touch to add a new line of
service, upgrade your phone, purchase
accessories, or access other account services.
From Any Other Phone
䢇 Sprint Customer Service: 1-888-211-4727.
䢇 Business Customer Service: 1-800-927-2199.
Sprint 411
Sprint 411 gives you access to a variety of services and
information, including residential, business, and
government listings; movie listings or showtimes;
driving directions, restaurant reservations, and major
local event information.
You can get up to three pieces of information per call,
and the operator can automatically connect your call at
no additional charge. There is a per-call charge to use
Sprint 411, and you will be billed for airtime.
1. Press and touch .
2. Use the onscreen dialpad to enter
and touch .
Sprint Operator Services
Sprint Operator Services provides assistance when you
place collect calls or when you place calls billed to a
local telephone calling card or third party.
1. Press and touch .
2. Use the onscreen dialpad to enter and touch
.
For more information or to see the latest in products
and services, visit us online at www.sprint.com.
Dialer
7
Dialer
Dialer
M350.book Page 8 Monday, October 11, 2010 9:58 AM
Page 19
Section 2
Your Phone
M350.book Page 9 Monday, October 11, 2010 9:58 AM
Page 20
10 2A. Phone Basics
⽧ Your Phone (page 10)
⽧ Viewing the Display Screen (page 13)
⽧ Turning Your Phone On and Off (page 14)
⽧ Battery and Charger (page 15)
⽧ Navigating Through the Menus (page 17)
⽧ Displaying Your Phone Number (page 24)
⽧ Making and Answering Calls (page 24)
⽧ Entering Text (page 32)
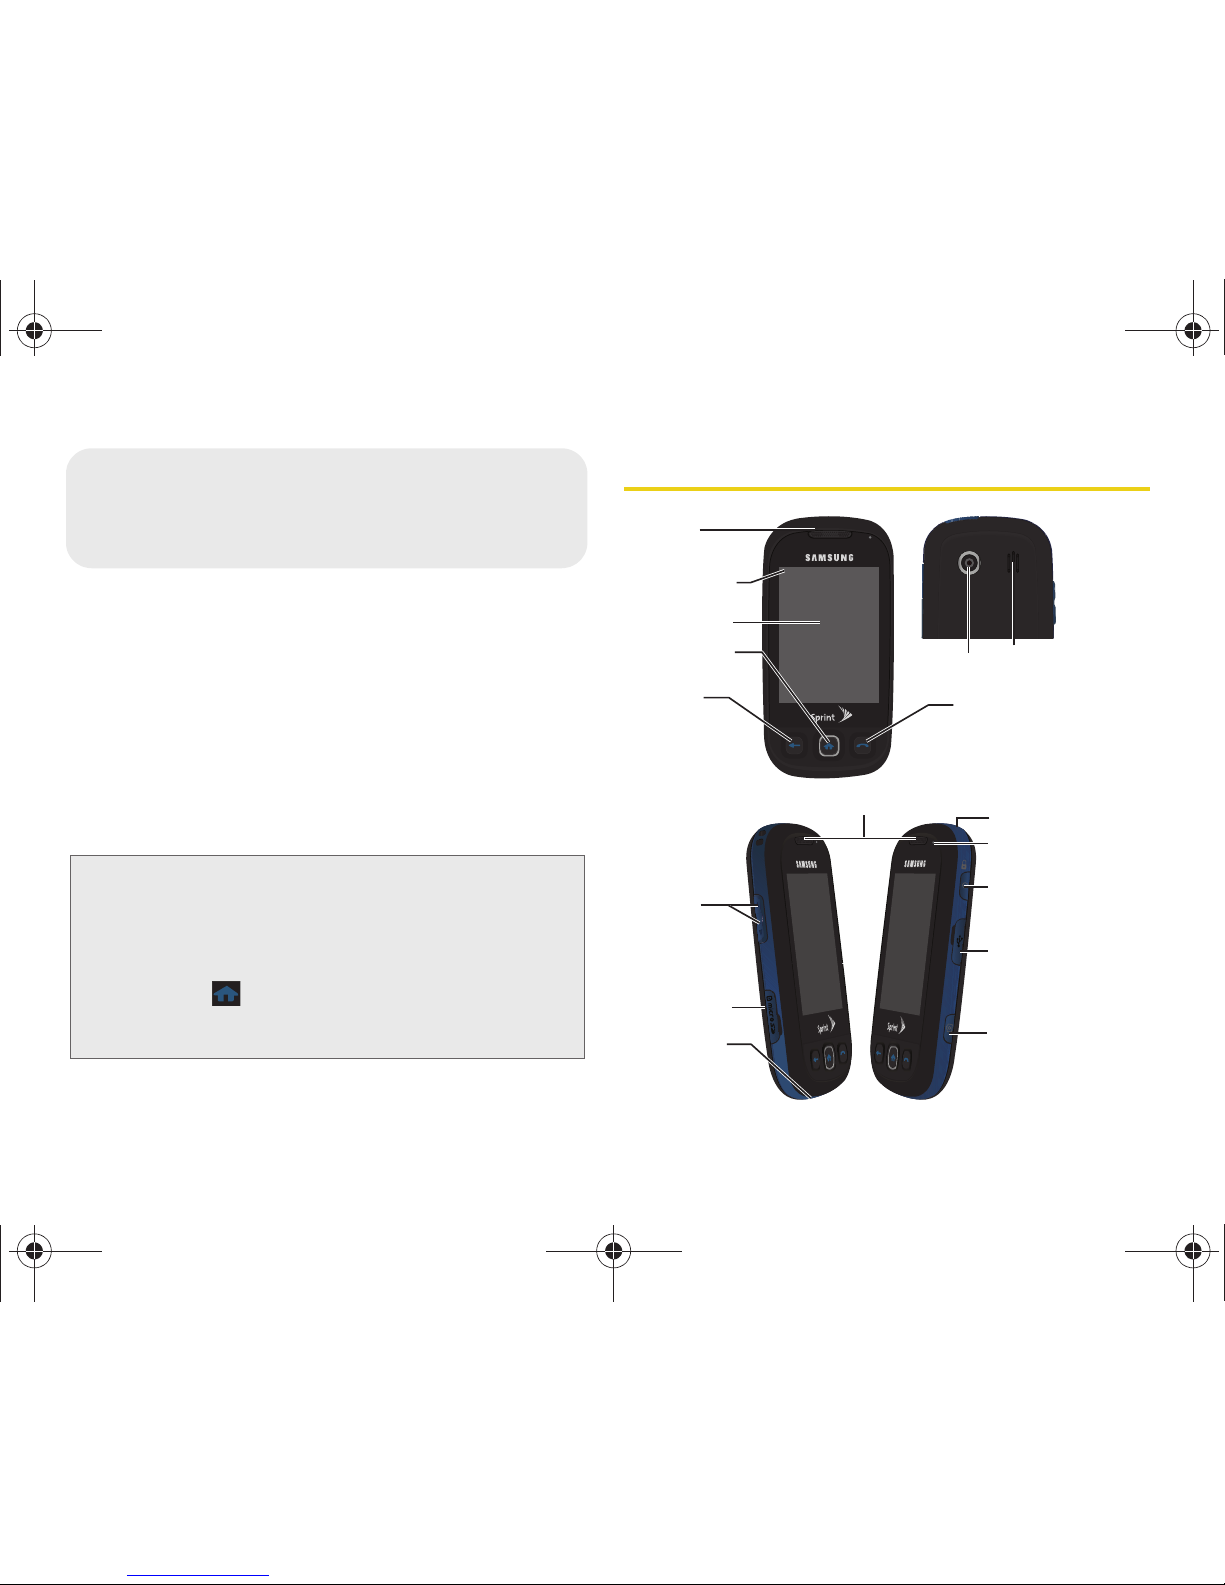
Your Phone
Tip: Phone Software Upgrades – Updates to your phone’s
software may become available from time to time.
Sprint will automatically upload critical updates to your
phone. You can also use the menu to check for and
download updates.
• Press
> Main > Settings > General > Update
Software to search for and download available
updates.
2A. Phone Basics
9. Volume
Button
4. Main Functions
Key
3. Display Screen
13. Accessories/
Power Cable
Jack
7. Camera Lens
11. Microphone
10. microSD Slot
2. Signal Strength
Indicator
1. Earpiece
1. Earpiece
12. Camera Button
14. Power/Lock Button
15. Front Indicator
Light (LED)
5. Back Key
6. Phone Functions Key
16. Headset Jack
8. Speaker
Portrait Mode
M350.book Page 10 Monday, October 11, 2010 9:58 AM
Page 21
2A. Phone Basics 11
Phone Basics
Key Functions
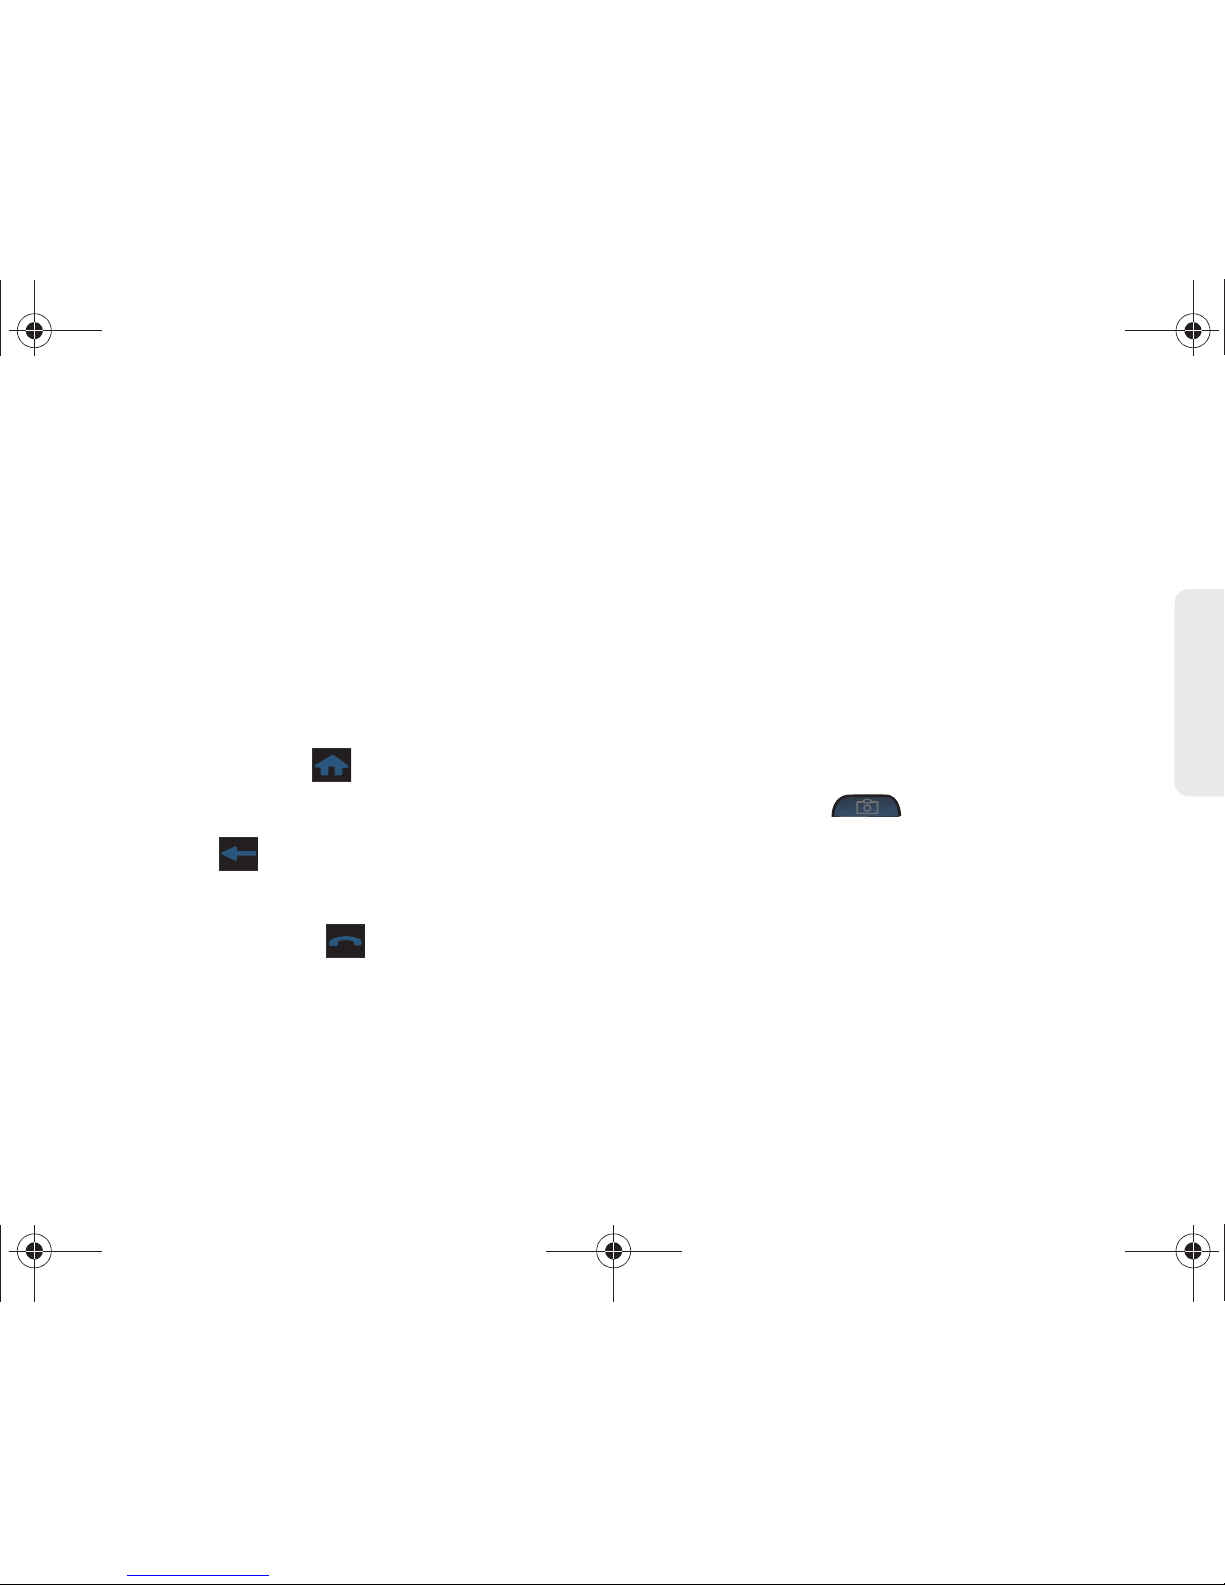
1. Earpiece lets you hear the caller and automated
prompts.
2. Signal Strength Indicator represents the signal
strength by displaying bars. The more bars
displayed, the better the signal strength.
3. Display Screen displays all of the information
needed to operate your phone, such as the call
status, the Contacts list, the date and time, and the
signal and battery strength.
4. Main Functions Key ( ) allows you to access
your phone’s Main Functions menu, such as
Favorites, Main, Fun, and Web.
5. Back Key ( ) returns you to the previous menu.
This key also allows you to return to the previous
page in the Web browser during your data session.
6. Phone Functions Key ( ) allows you to access
your Phone Functions menu, such as Speed Dial,
Contacts, Recent, and Dialer.
7. Camera Lens, as part of the built-in camera, lets
you take pictures.
8. Speaker lets you hear the different ringers and
sounds. The speaker also lets you hear the caller’s
voice in speakerphone mode.
9. Volume Button allows you to adjust the ringer
volume or adjust the voice volume during a call.
The volume button can also be used to scroll up or
down to navigate through the different menu
options.
10. microSD Card Slot lets you use a microSD card to
expand the memory of your phone.
11 . Microphone allows other callers to hear you clearly
when you are speaking to them.
12. Camera Button ( ) lets you take pictures.
13. Accessories/Power Cable Jack allows you to
connect a power cable or a USB cable.
CAUTION! Inserting an accessory into the incorrect
jack may damage the phone.
M350.book Page 11 Monday, October 11, 2010 9:58 AM
Page 22
12 2A. Phone Basics
14 .
Power/Lock Button ( ) lets you turn it on or
off, or lock/unlock the phone. While in a menu, it
returns the phone to the unlock screen and
cancels your input. When you receive an incoming
call, press
to enter silent mode and mute
the ringer.
15. Front Indicator Light (LED) shows your phone’s
connection status at a glance.
16. Headset Jack allows you to plug in either a stereo
headset or an optional headset for convenient,
hands-free conversations.
CAUTION! Inserting an accessory into the incorrect
jack may damage the phone.
Landscape Phone Features
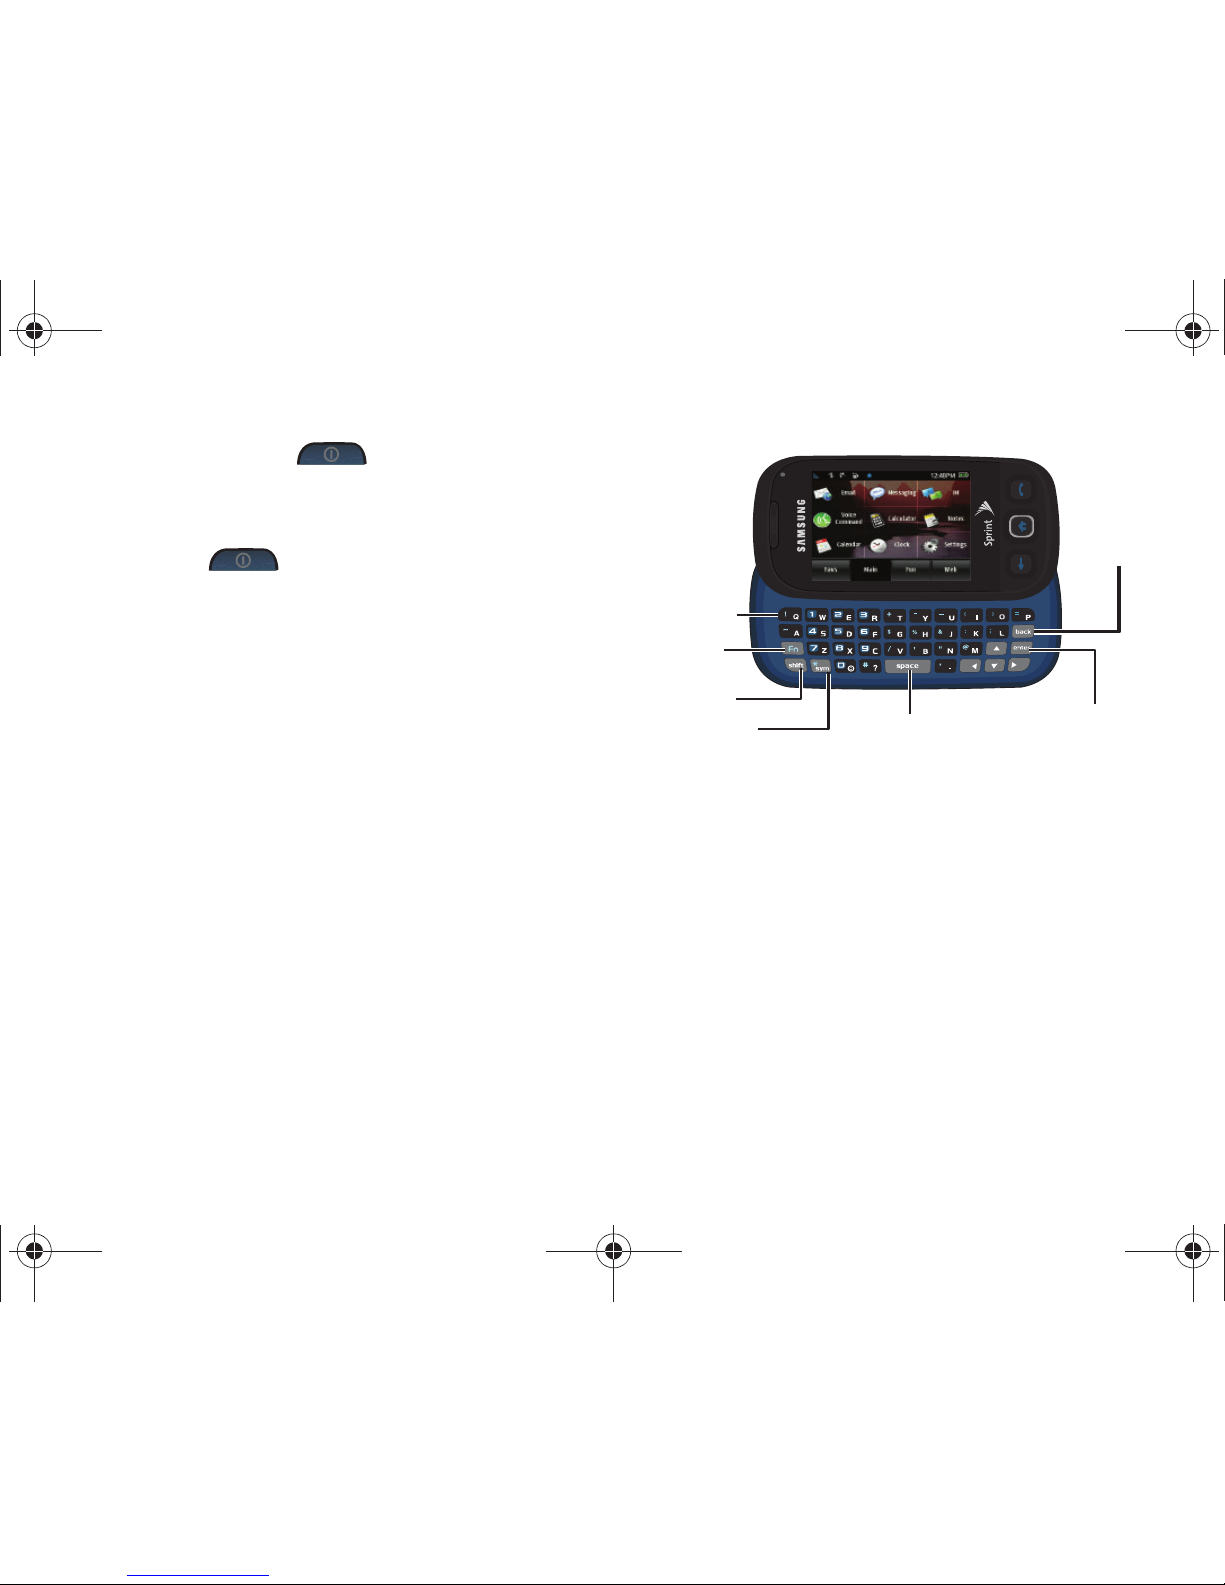
17. QWERTY keyboard provides a retractable
alphanumeric character keyboard layout.
18. Fn (Function) Key toggles to access the blue
numbers/symbols on the QWERTY keyboard.
19. Shift Key lets you toggle alphabet characters
between mixed case, uppercase and lowercase.
Character case remains as selected until the Shift
key is pressed again.
20. Symbol Key lets you access symbol characters.
21. Space Key lets you add spaces between words
and characters.
22. Enter/OK Key lets you perform the function
highlighted in the current menu. Press to enter
additional lines of text.
Landscape Mode
21. Space Key
23. Back
Key
22. Enter/
OK Key
19. Shift Key
18. Fn Key
20. Symbol Key
17. QWERTY
Keyboard
M350.book Page 12 Monday, October 11, 2010 9:58 AM
Page 23
2A. Phone Basics 13
Phone Basics
23. Back Key deletes characters from the display in text
entry mode. When in a menu, pressing
returns you to the previous menu. This key also
allows you to return to the previous screen in a
data session.
Viewing the Display Screen
Your phone’s display screen provides information
about your phone’s status and options. This list
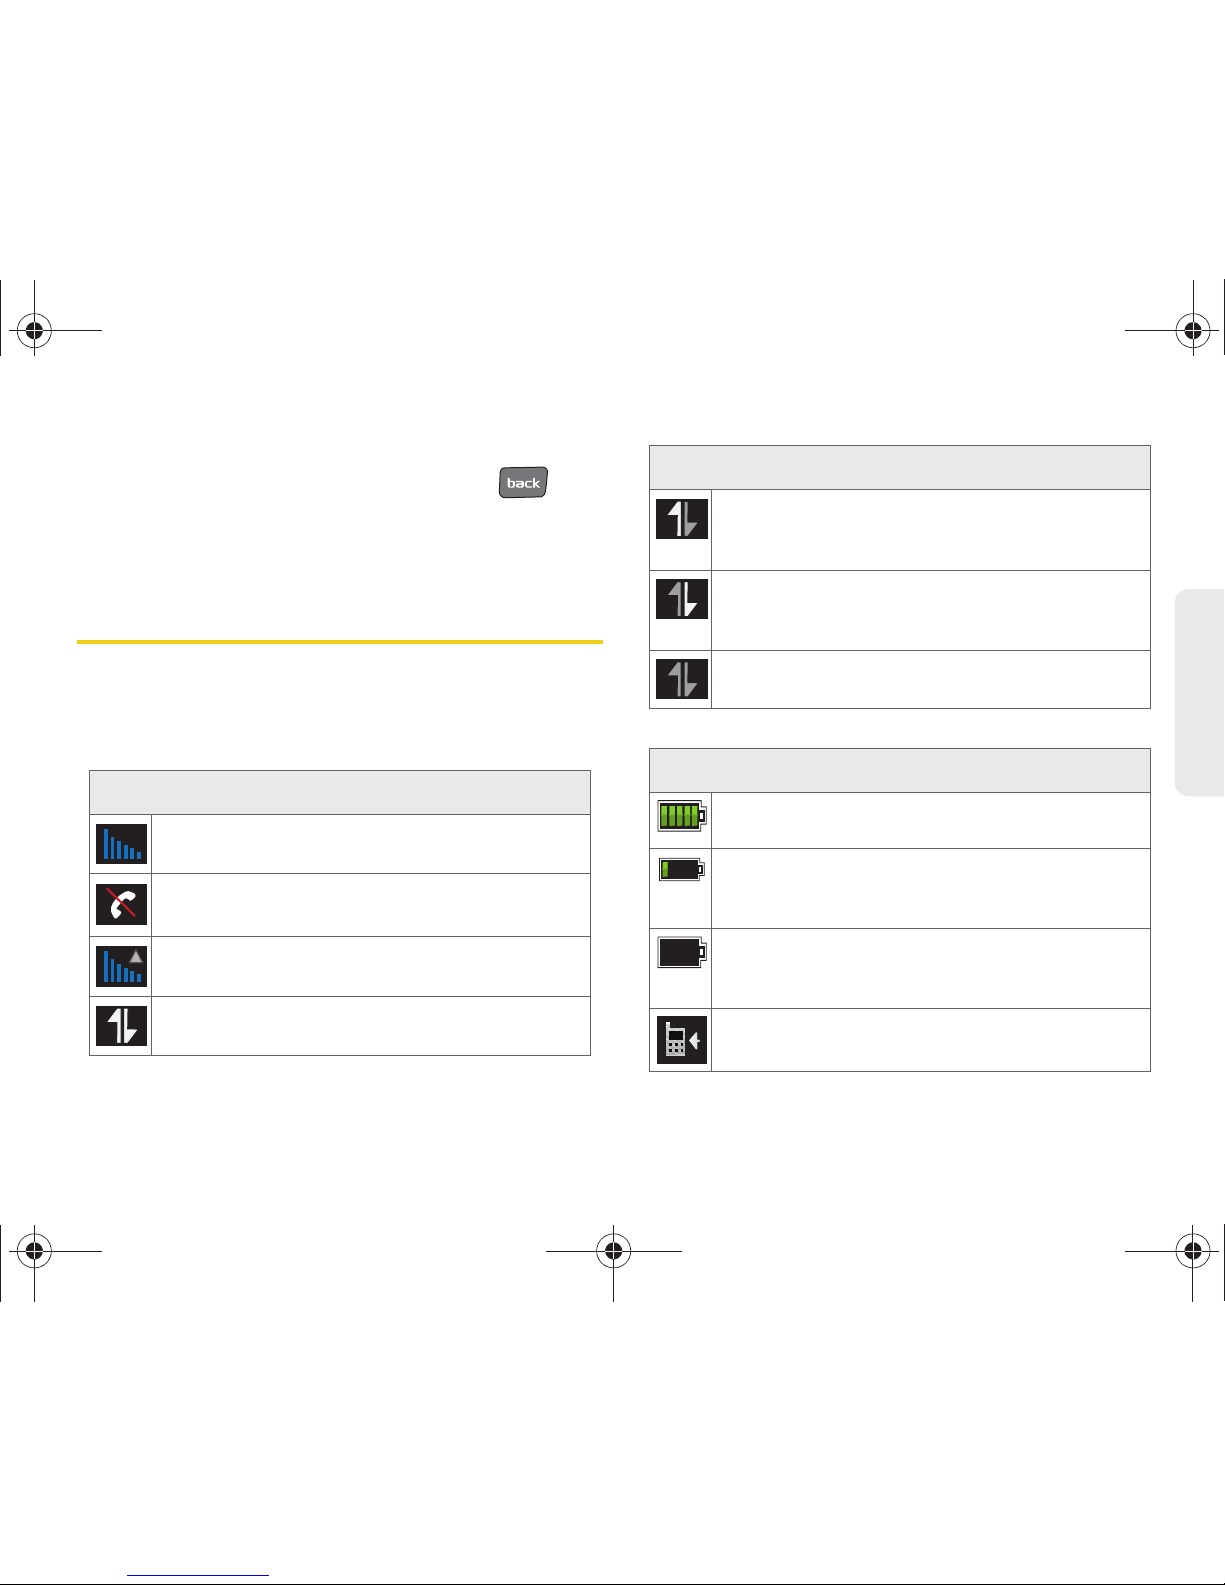
identifies the symbols you’ll see on your phone’s
display screen:
Status Bar – Service Icons
Signal Strength – Shows your current signal
strength. (More bars = stronger signal.)
No Service – Your phone cannot find a usable
signal.
Roaming – Your phone is “roaming” off the
Nationwide Sprint Network.
Data Service Status – Sprint 1xRTT data service
status.
Data Service Transmitting – Sprint 1xRTT data
service is available and data is being
transmitted. When active, the icon is animated.
Data Service Receiving – Sprint 1xRTT data
service is available and data is being received.
When active, the icon is animated.
Data Service Unavailable – Data service is
currently unavailable or dormant.
Status Bar – Status Icons
Battery Strength – Shows your current battery
charge level. (Icon shown is fully charged.)
Battery Strength Low – Shows your current
battery charge level has only 20% charge
remaining.
Battery Strength Critical – Shows your current
battery charge level has only 3% charge
remaining.
Ringers – Ringer volume is set between Levels
1 - 8.
Status Bar – Service Icons
M350.book Page 13 Monday, October 11, 2010 9:58 AM
Page 24
14 2A. Phone Basics
Turning Your Phone On and Off
Turning Your Phone On
䊳 Press , located at the side of the phone.
Once your device is on, it may display “No Service.”
When your phone finds a signal and an available
network, you are ready to begin making and receiving
calls.
If your phone is unable to find a signal after 15 minutes
of searching, a Power Save feature is automatically
activated. When a signal is found, your phone
automatically returns to standby mode.
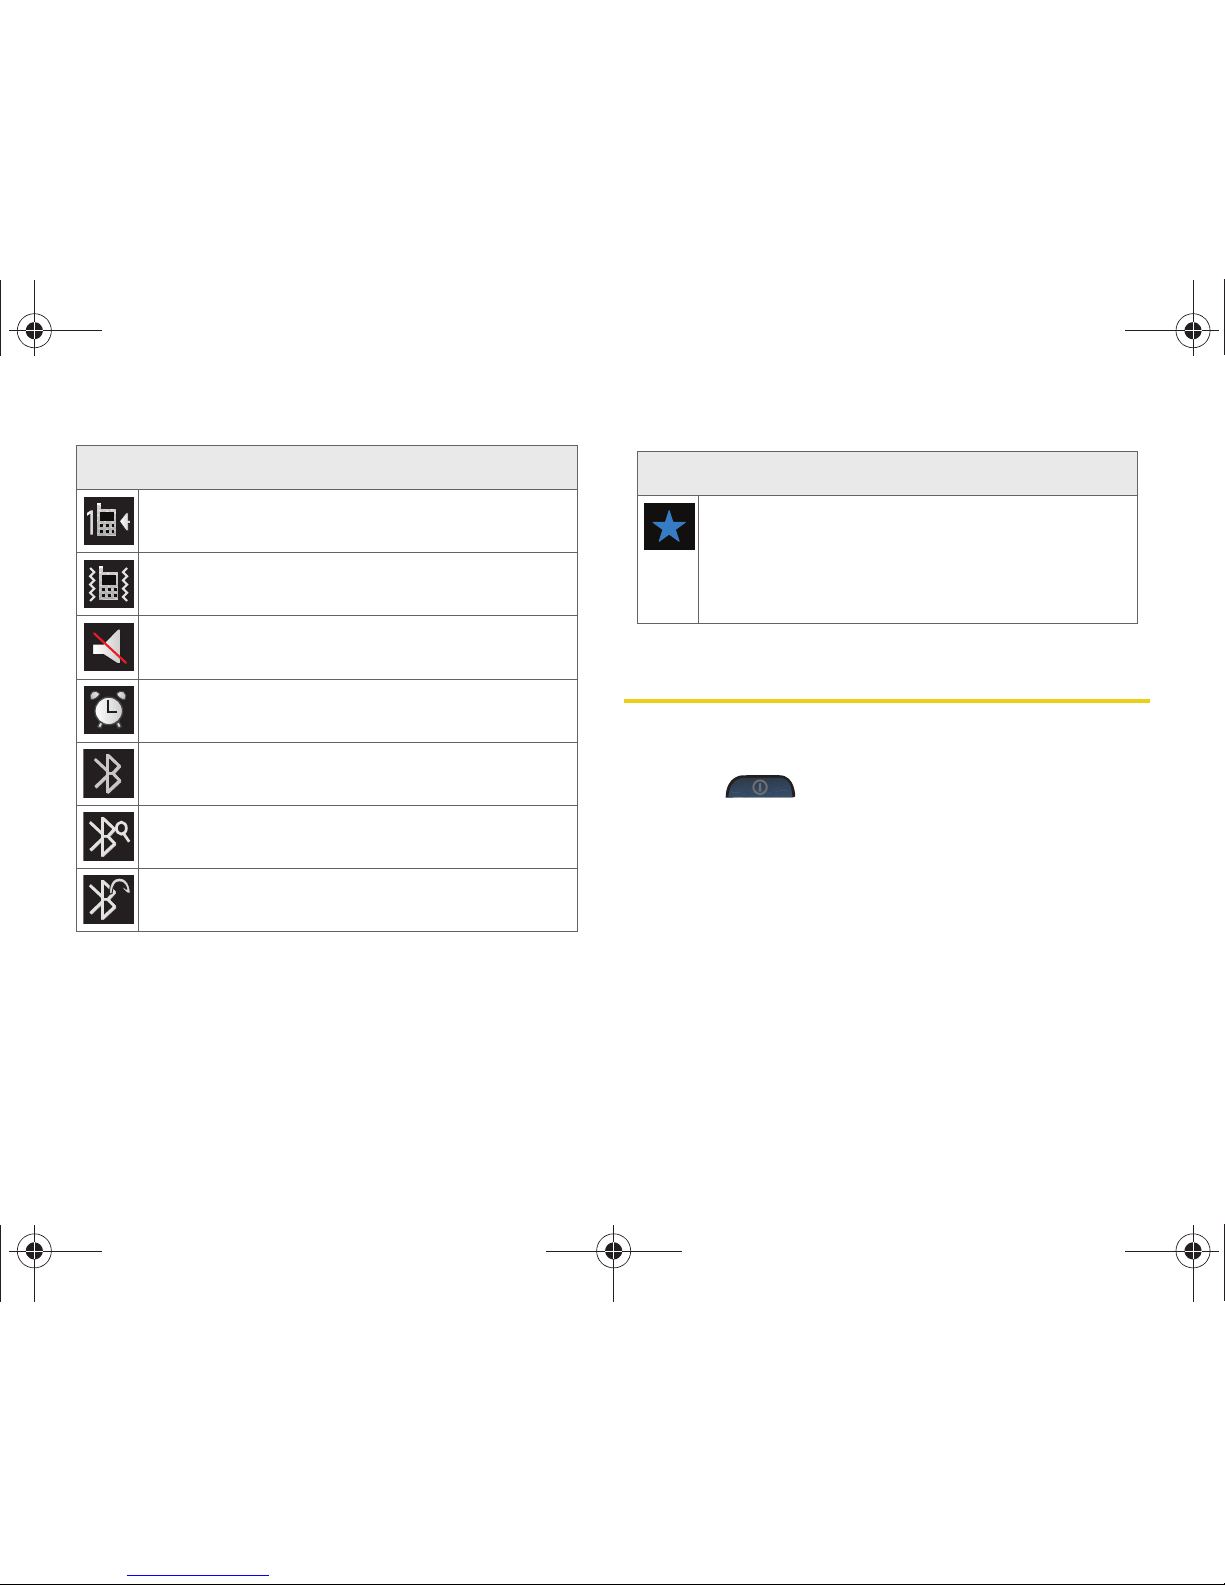
Beep – Ringer volume is set to Beep-1.
Vibrate All – The ringer is set to vibrate only.
Silence All – All incoming sounds are turned off.
Alarm – An upcoming alarm event is scheduled.
Bluetooth Active – Bluetooth technology is
active and enabled.
Bluetooth Searching – Phone is searching for
available (visible) Bluetooth devices.
Bluetooth Connected – Bluetooth device is
connected to a wireless headset.
Status Bar – Status Icons
Status Bar – Messaging Icons
Message Indicator – You have new text
messages. (It also indicates when you have a
missed call, a voicemail message, Calendar
event, Alarm, Email, Picture Mail, or Text
Message.)
M350.book Page 14 Monday, October 11, 2010 9:58 AM
Page 25
2A. Phone Basics 15
Phone Basics
In Power Save mode, your phone searches for a signal
periodically without your intervention. You can also
initiate a search for Sprint service by pressing any key
(when your phone is turned on).
When a signal is found, your phone automatically
returns to the unlock screen. (You can also initiate a
search for Sprint service by pressing any key when
your phone is turned on.)
Turning Your Phone Off
䊳 Press and hold for two seconds until you
see the powering down animation on the display
screen.
Your screen remains blank while your phone is off
(unless the battery is charging).
Battery and Charger
Sprint-approved or Samsung-approved batteries and
accessories can be found at Sprint Stores or through
Samsung; or call 1-866-866-7509 to order. They’re
also available at
www.sprint.com.
Battery Capacity
Your phone is equipped with a Lithium Ion (Li-Ion)
battery. It allows you to recharge your battery before it is
fully drained. The battery provides up to 5.8 hours of
continuous digital talk time.
At 20% of charge capacity, the battery icon is displayed
( ). At 3% of charge capacity, there are only a few
minutes of talk time left, the phone sounds an audible
alert, blinks, and displays a critical charge icon ( ),
and then turns off.
Tip: The Power Save feature conserves your battery power
when you are in an area where there is no signal.
WARNING: Use only Sprint-approved or Samsung-approved
batteries and chargers with your phone. The
failure to use a Sprint-approved or Samsungapproved battery and charger may increase the
risk that your phone will overheat, catch fire, or
explode, resulting in serious bodily injury, death,
or property damage.
M350.book Page 15 Monday, October 11, 2010 9:58 AM
Page 26
16 2A. Phone Basics
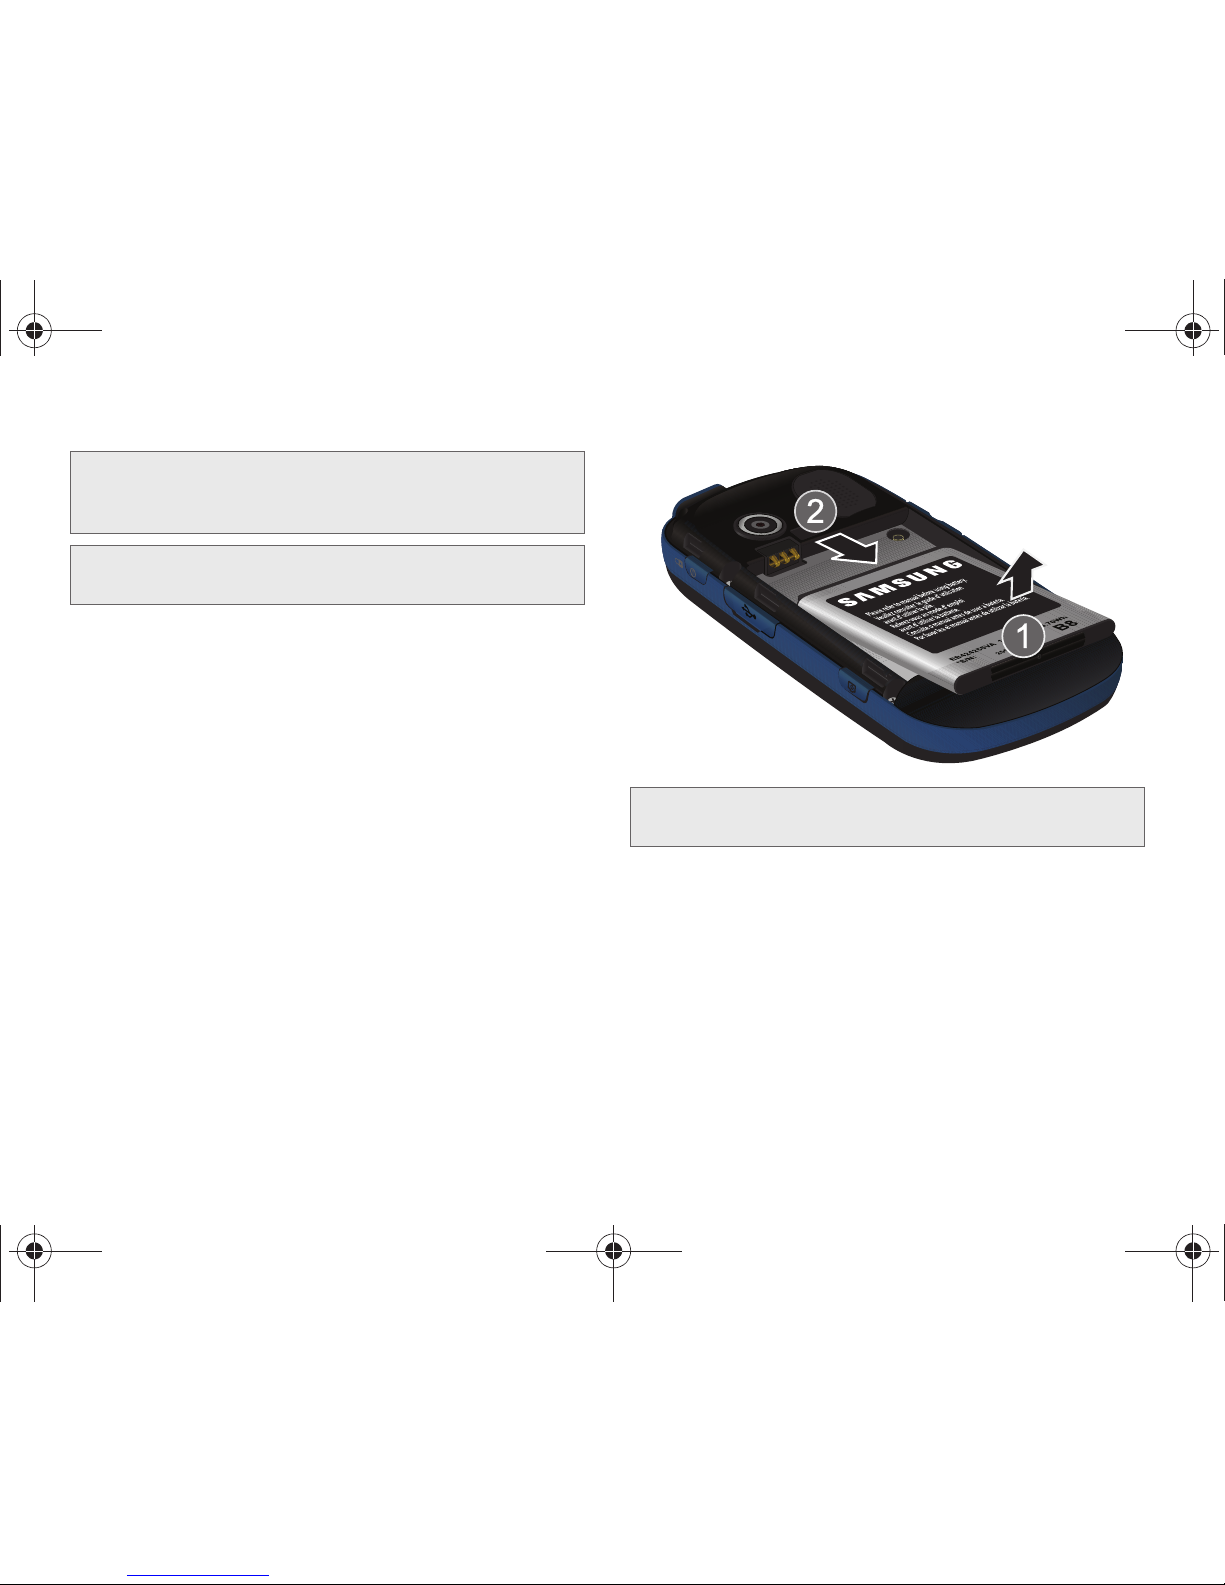
Installing the Battery
䊳 See “Setting Up Your Phone” on page 2.
Removing the Battery
1. Make sure the power is off so that you don’t lose
any stored numbers or messages.
2. Press the battery cover and slide it towards the
camera lens and slide the cover off.
3. Carefully remove the battery from the phone.
Charging the Battery
Keeping track of your battery’s charge is important. If
your battery level becomes too low, your phone
automatically turns off, and you will lose any
information you were just working on.
Always use a Sprint-approved or Samsung-approved
desktop charger, travel charger, or vehicle power
adapter to charge your battery.
Note: Long backlight settings, searching for service, vibrate
mode, browser use, and other variables may reduce
the battery’s talk and standby times.
Tip: Watch your phone’s battery level indicator and charge the
battery before it runs out of power.
WARNING: Do not handle a damaged or leaking Li-Ion
battery as you can be burned.
M350.book Page 16 Monday, October 11, 2010 9:58 AM
Page 27
2A. Phone Basics 17
Phone Basics
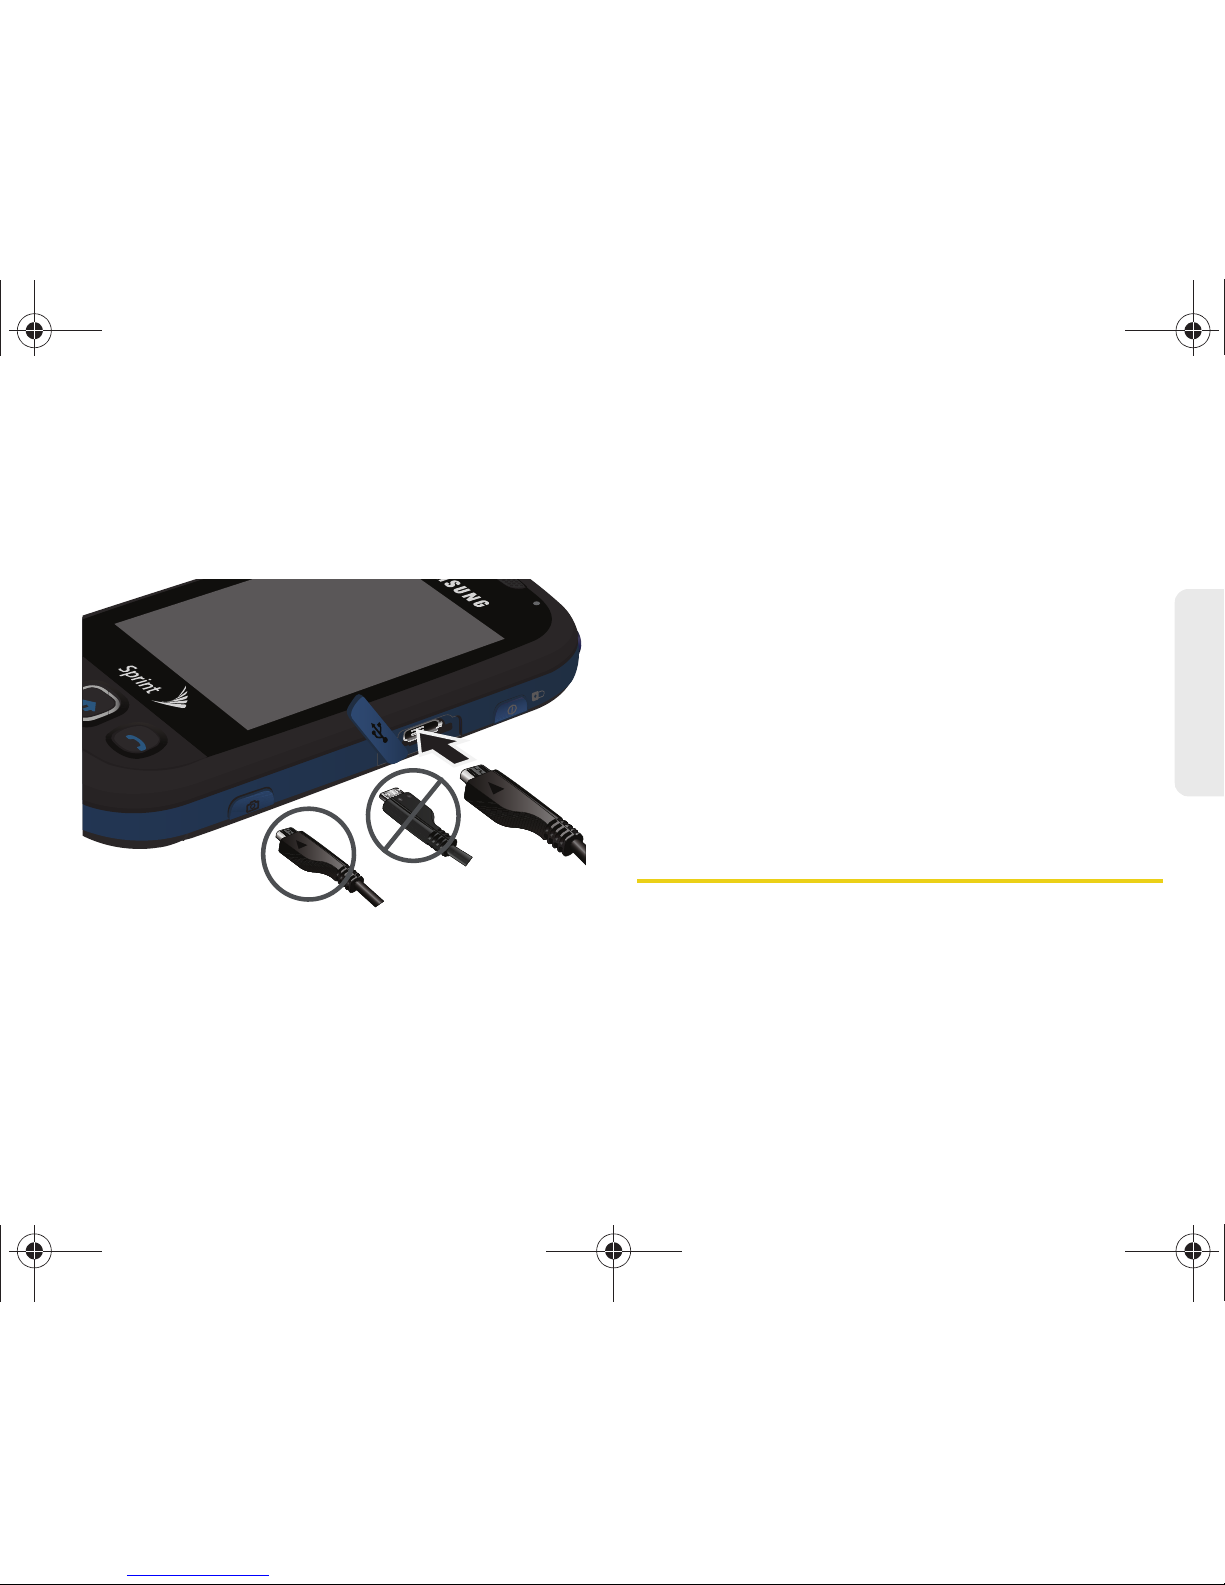
䊳 Plug the flat end of the charger into the phone’s
charger jack and the other end into an electrical
outlet. The phone turns on with the screen locked
and indicates both its charge state and percent of
charge.
Extending Your Battery Life
Active applications, light levels, Bluetooth usage, and
other functionality all act to drain your battery. The
following is a list of helpful tips that can help conserve
your battery power:
䢇 Reduce your Backlight on time. See “Changing the
Backlight Time Length” on page 40.
䢇 Reduce the screen Brightness. See “Adjusting the
Screen's Brightness” on page 41.
䢇 Turn Bluetooth off when not in use. See “Turning
Bluetooth On and Off” on page 104.
䢇 Disconnect from Web services that are not in use
(Facebook
®
, MySpace®, Twitter®, etc.) See “3C.
Entertainment” on page 150.
Do not wait until your battery is completely depleted
before charging your phone. Repeating this process of
a complete discharge and recharge, can over time
reduced the storage capacity of any battery.
Navigating Through the Menus
There is no longer a need to use a navigation wheel or
dialpad button. The Samsung Seek
™ is a
touch-sensitive phone which allows you to not only
select an onscreen option with a single touch, but also
scroll through long menu lists by simply sliding up and
down through the display by using your fingertip.
Correct
Incorrect
M350.book Page 17 Monday, October 11, 2010 9:58 AM
Page 28
18 2A. Phone Basics
Accessing Menus
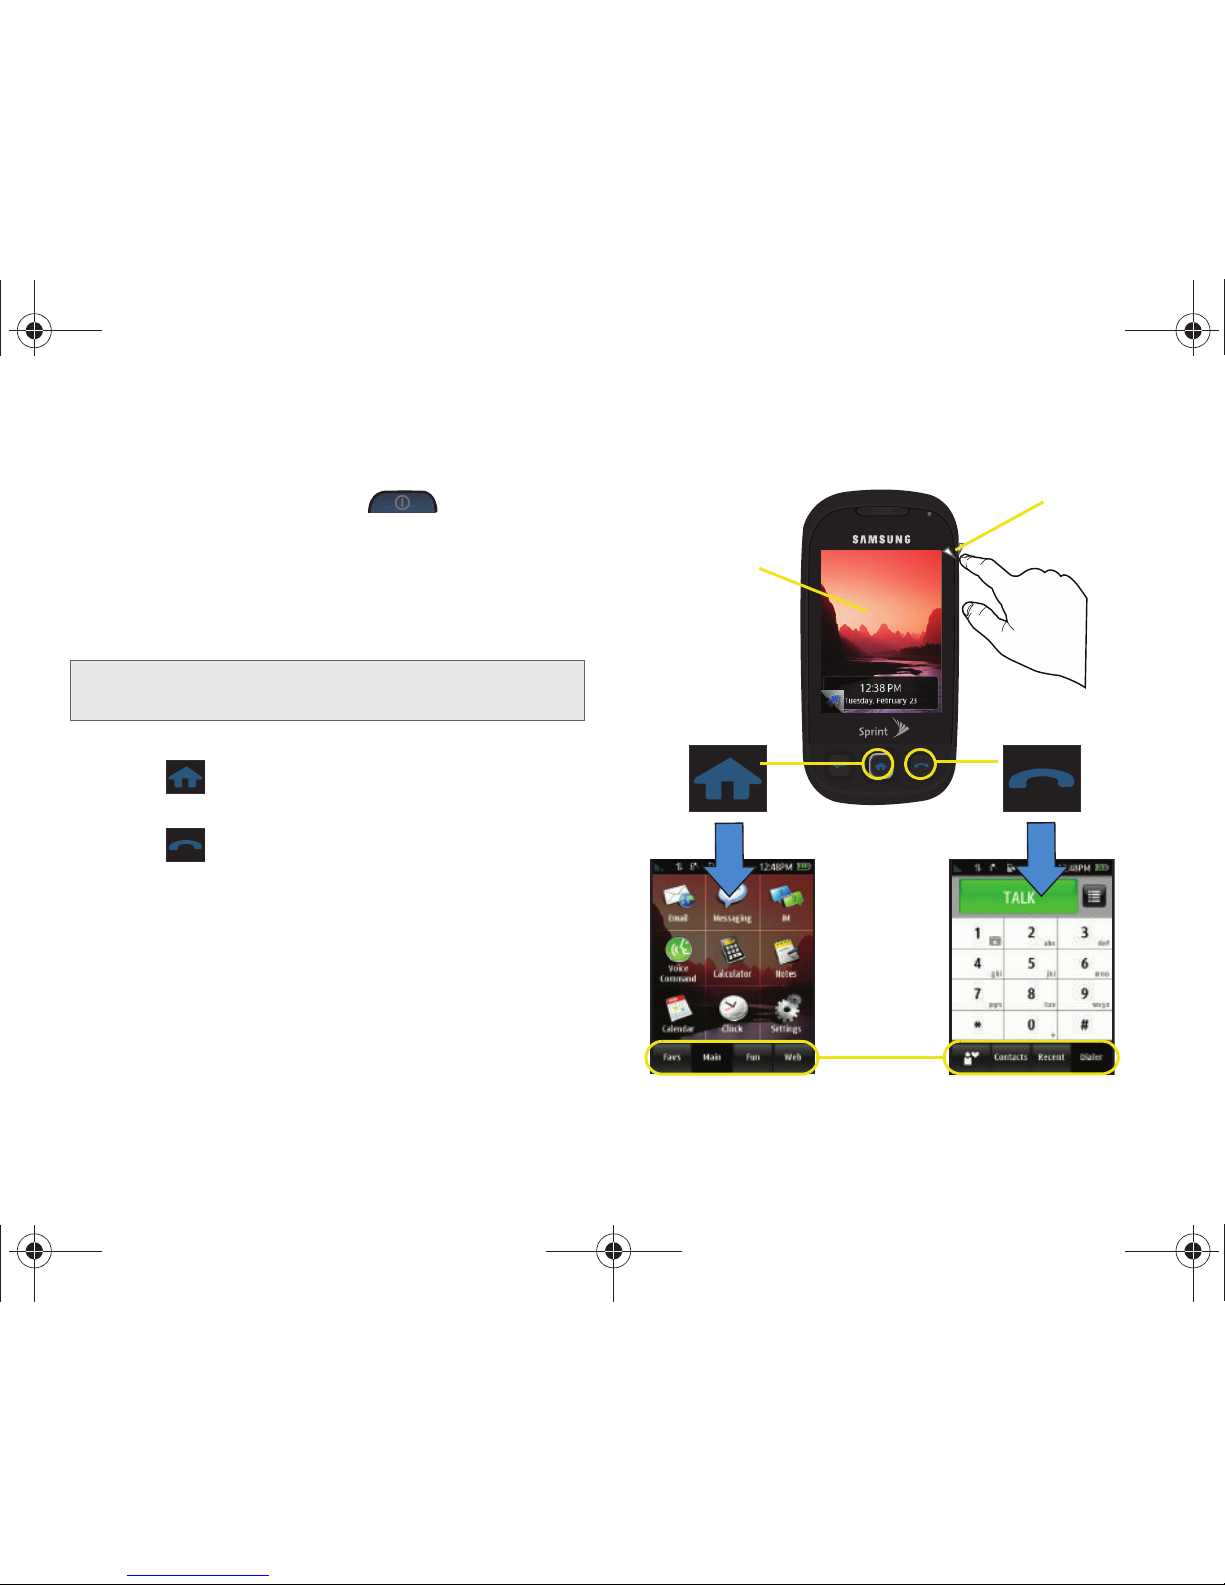
When the phone is locked and is pressed, the
Samsung Seek
™
displays the unlock screen (page 4).
䡲 To access the Phone Functions and Main
Functions menus, you must first drag the screen
to unlock the phone (drag up from the blue arrow
tab at the bottom left of the unlock screen).
To access a menu:
䊳 Press to access the Main Functions menu.
– or –
Press to access the
Phone Functions menu.
Note: You can also slide open the keyboard to unlock the
phone.
Main Functions
Menu
Phone Functions
Menu
Unlock Screen
Power/Lock Button
Menu Tabs
M350.book Page 18 Monday, October 11, 2010 9:58 AM
Page 29
2A. Phone Basics 19
Phone Basics
Scrolling Through Menus
As you navigate through the menu, menu options are
presented onscreen as scrollable lists that allow up or
down navigation.
To navigate through a scrollable menu:
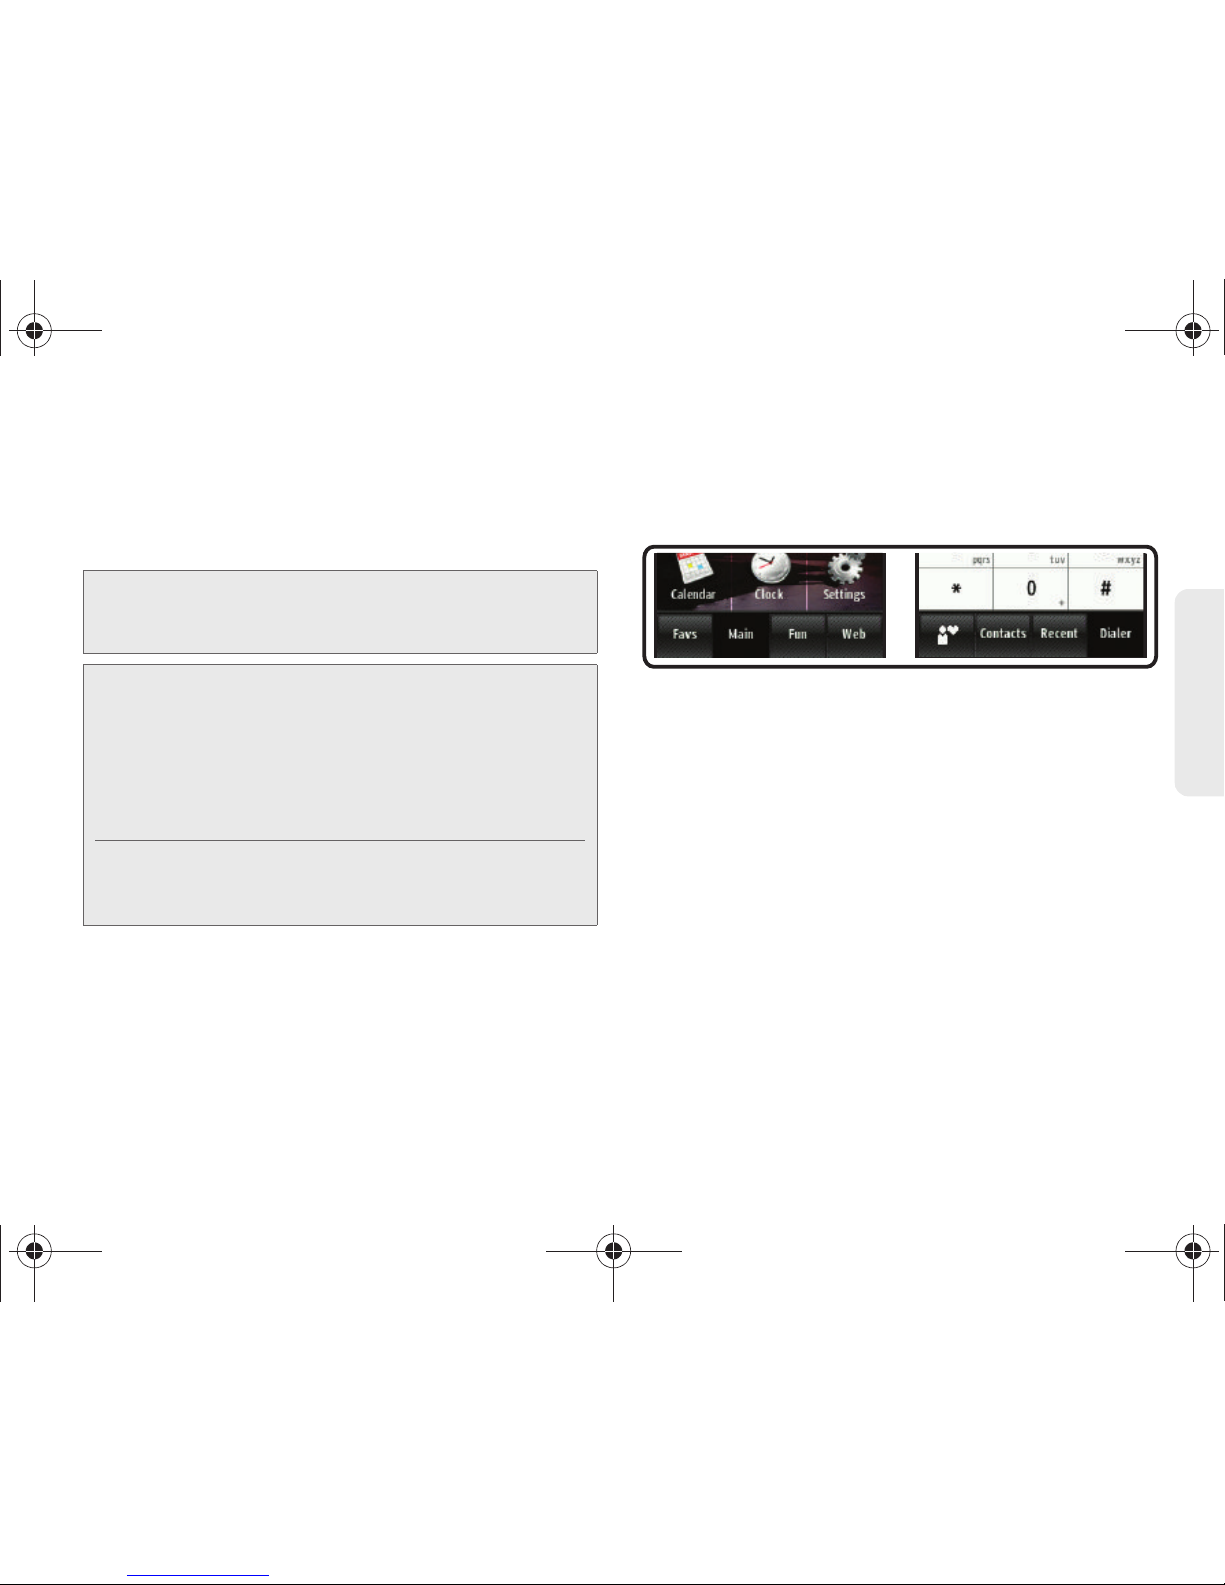
1. Touch a desired onscreen menu tab (located at
the bottom of the screen).
2. Touch and gently press an onscreen option.
3. From the available list of options you can either:
䡲 Touch and gently press an entry to activate it.
䡲 In a single motion, firmly press and slide your
finger up or down the screen to scroll through lists
of menu items. Scrolling on your phone requires
that you press more firmly on the screen than the
gentle press required to open menu items.
Note: The One Hand Operation of the menus is set to
Right Handed by default. See “Changing the One
Hand Operation Setting” on page 21.
Tip: The screen on your phone is touch-resistive, which
means that when you touch an item to select it or when
you drag your finger to scroll, you have to press down
slightly to activate the item. This helps avoid selecting
menus or items unintentionally. You can adjust the touch
sensitivity of your screen through the
Settings menu. See
“Touch Settings” on page 41.
The smaller the contact point on your screen, the less
pressure required. In this case, touch the screen with the
tip of your finger, your fingernail.
Main Functions
menu tabs
Phone Functions
menu tabs
M350.book Page 19 Monday, October 11, 2010 9:58 AM
Page 30
20 2A. Phone Basics
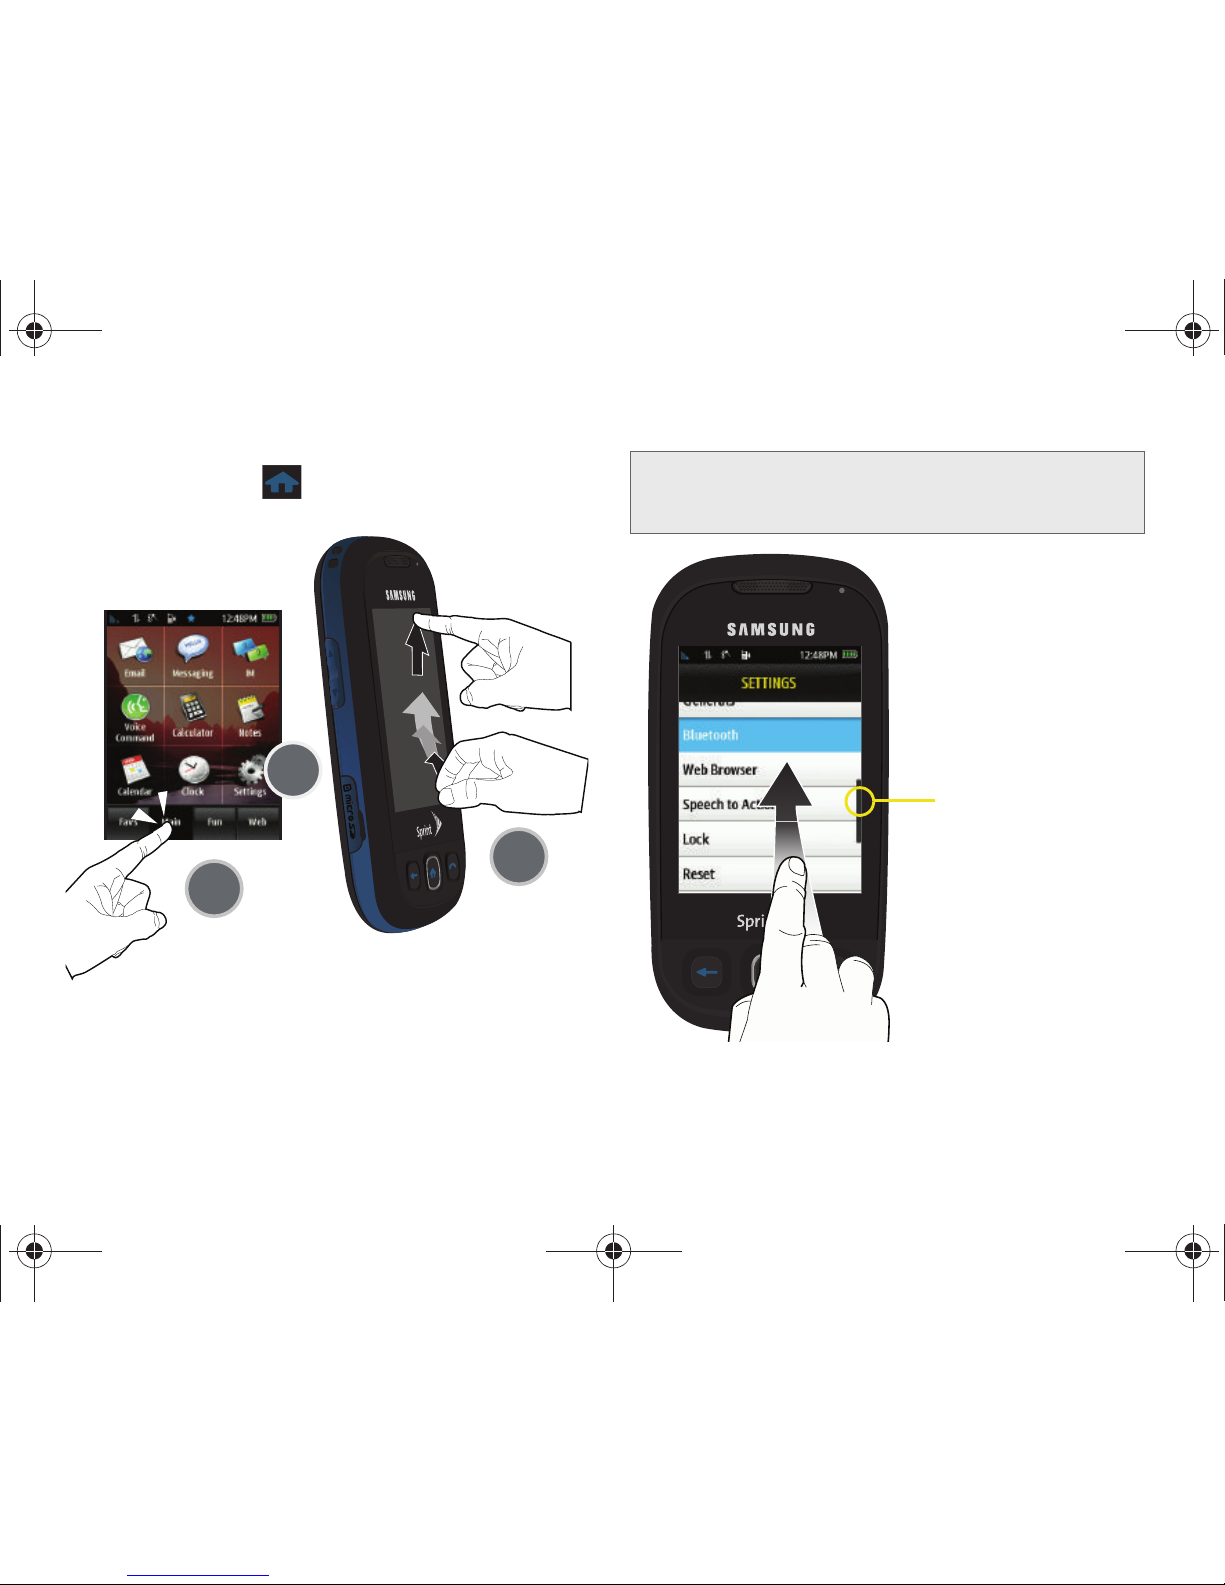
䡲 The image below shows how to access the
Display menu (
> Main > Settings).
For a diagram of your phone’s menu, please see “Your
Phone’s Menu” on page i.
Tip: When scrolling through a list (see illustration) make sure
NOT to tap or press individual entries on the list. This
action will open the list entry.
List Position
(indicates your
position in the
current list)
M350.book Page 20 Monday, October 11, 2010 9:58 AM
Page 31
2A. Phone Basics 21
Phone Basics
Changing the Screen Orientation
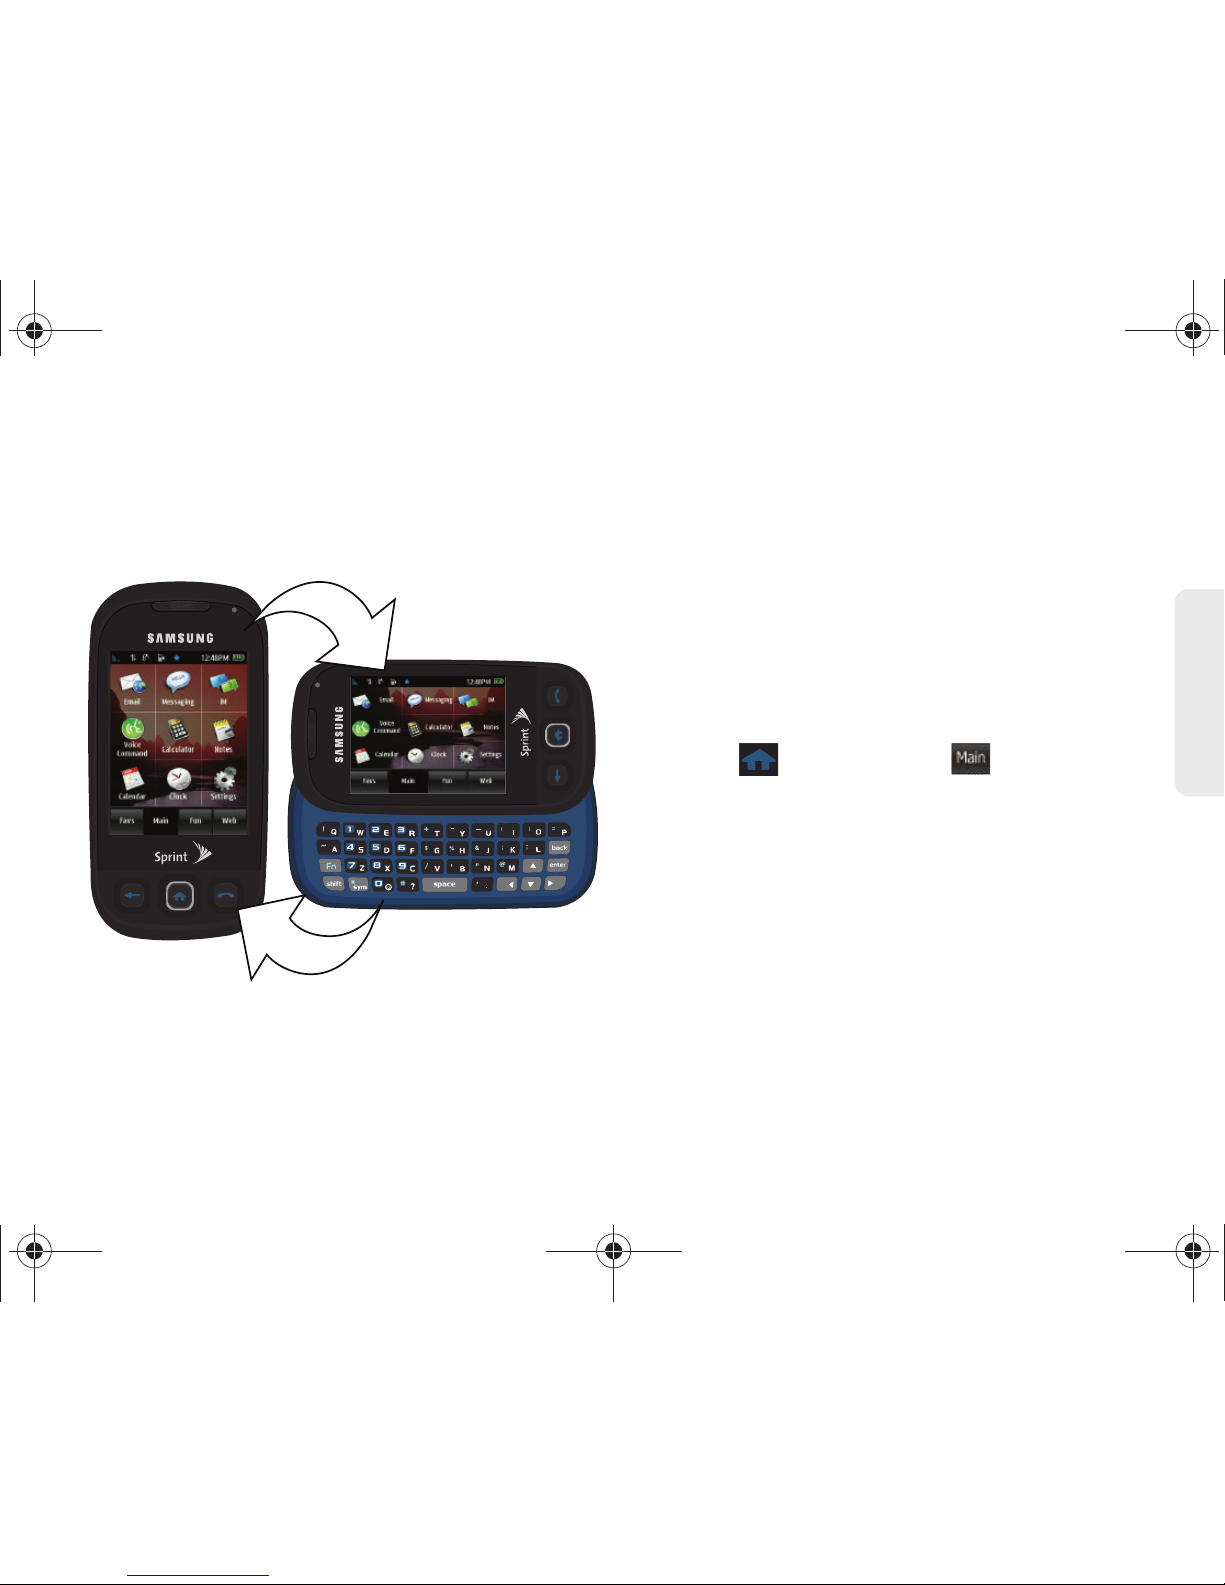
The Samsung Seek™ is capable of changing the
orientation of the onscreen content when you slide the
keyboard out.
There are some actions that automatically cause the
screen to auto-rotate:
䢇 Creating a new Contacts entry
䢇 Editing a Contacts entry
䢇 Creating a new Text Message
䢇 Replying to a Message
Selecting Menu Items
As you navigate through the menu, menu options are
highlighted. Select any option by pressing it on screen
with your fingertip.
For example, to view your text messages:
䊳 Press and touch Main () > Messaging. (If
you have any text messages, they are displayed.)
Changing the One Hand Operation Setting
The Samsung Seek allows you to configure the Power
Search tab to be on either the right or left of the screen.
As an example, when the
Right Handed option is
selected, the
Power Search tab is located along the
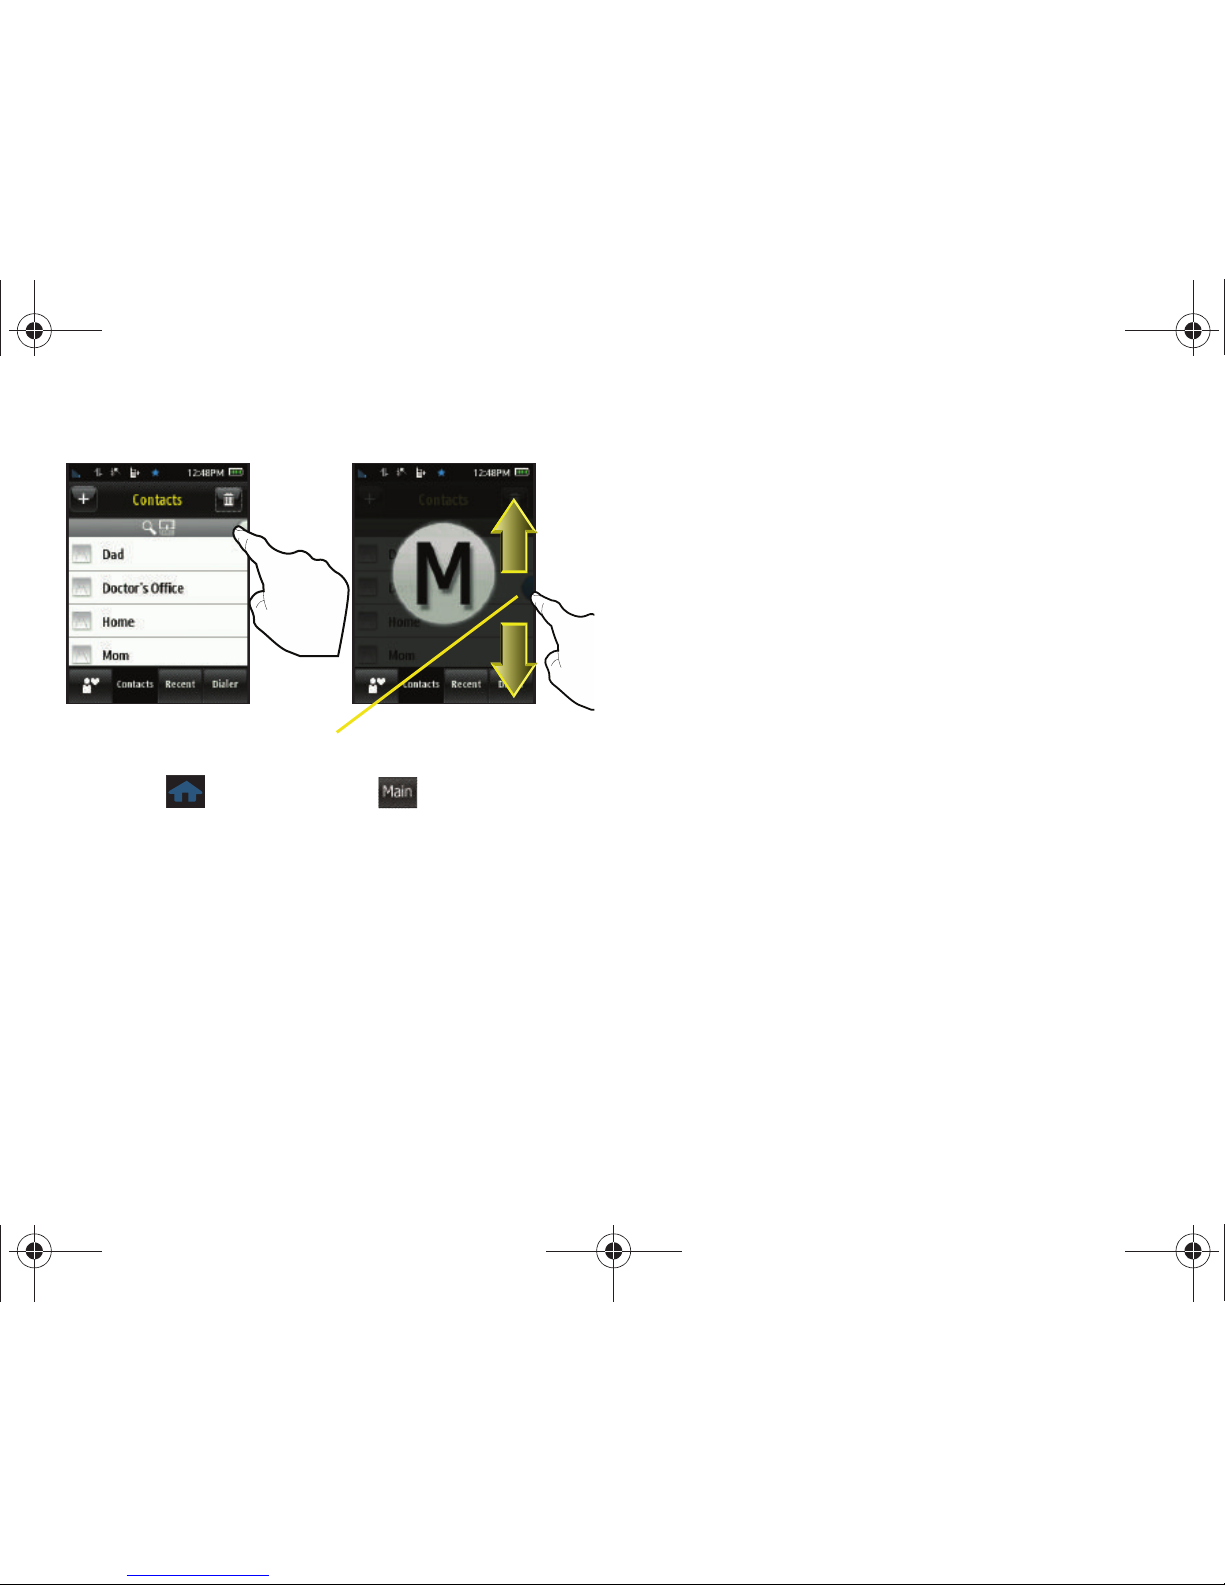
right side of the screen and Contacts entries are then
selected by pressing their name fields along the left
side of the display screen.
Main
M350.book Page 21 Monday, October 11, 2010 9:58 AM
Page 32
22 2A. Phone Basics
1.
Press and touch Main () > Settings >
General > One Hand Operation.
2. Touch either Right Handed (to place the Power
Search tab along the right of the display screen)
– or –
Touch
Left Handed (to place the Power Search tab
along the left of the screen).
Adjusting Numeric Entries
There are several pages where you’ll be asked to make
a field selection and then enter a new value. This
adjustment can be done by either activating numeric
character lines or by using a rotating time field
(up/down selection or quickly sliding) by using your
fingertip.
To adjust numeric values by using reels:
1. Open a new Calendar event (page 71).
2. Select a start and end time for the event by
touching the corresponding
Start or End fields.
3. Assign an hour and minute by either:
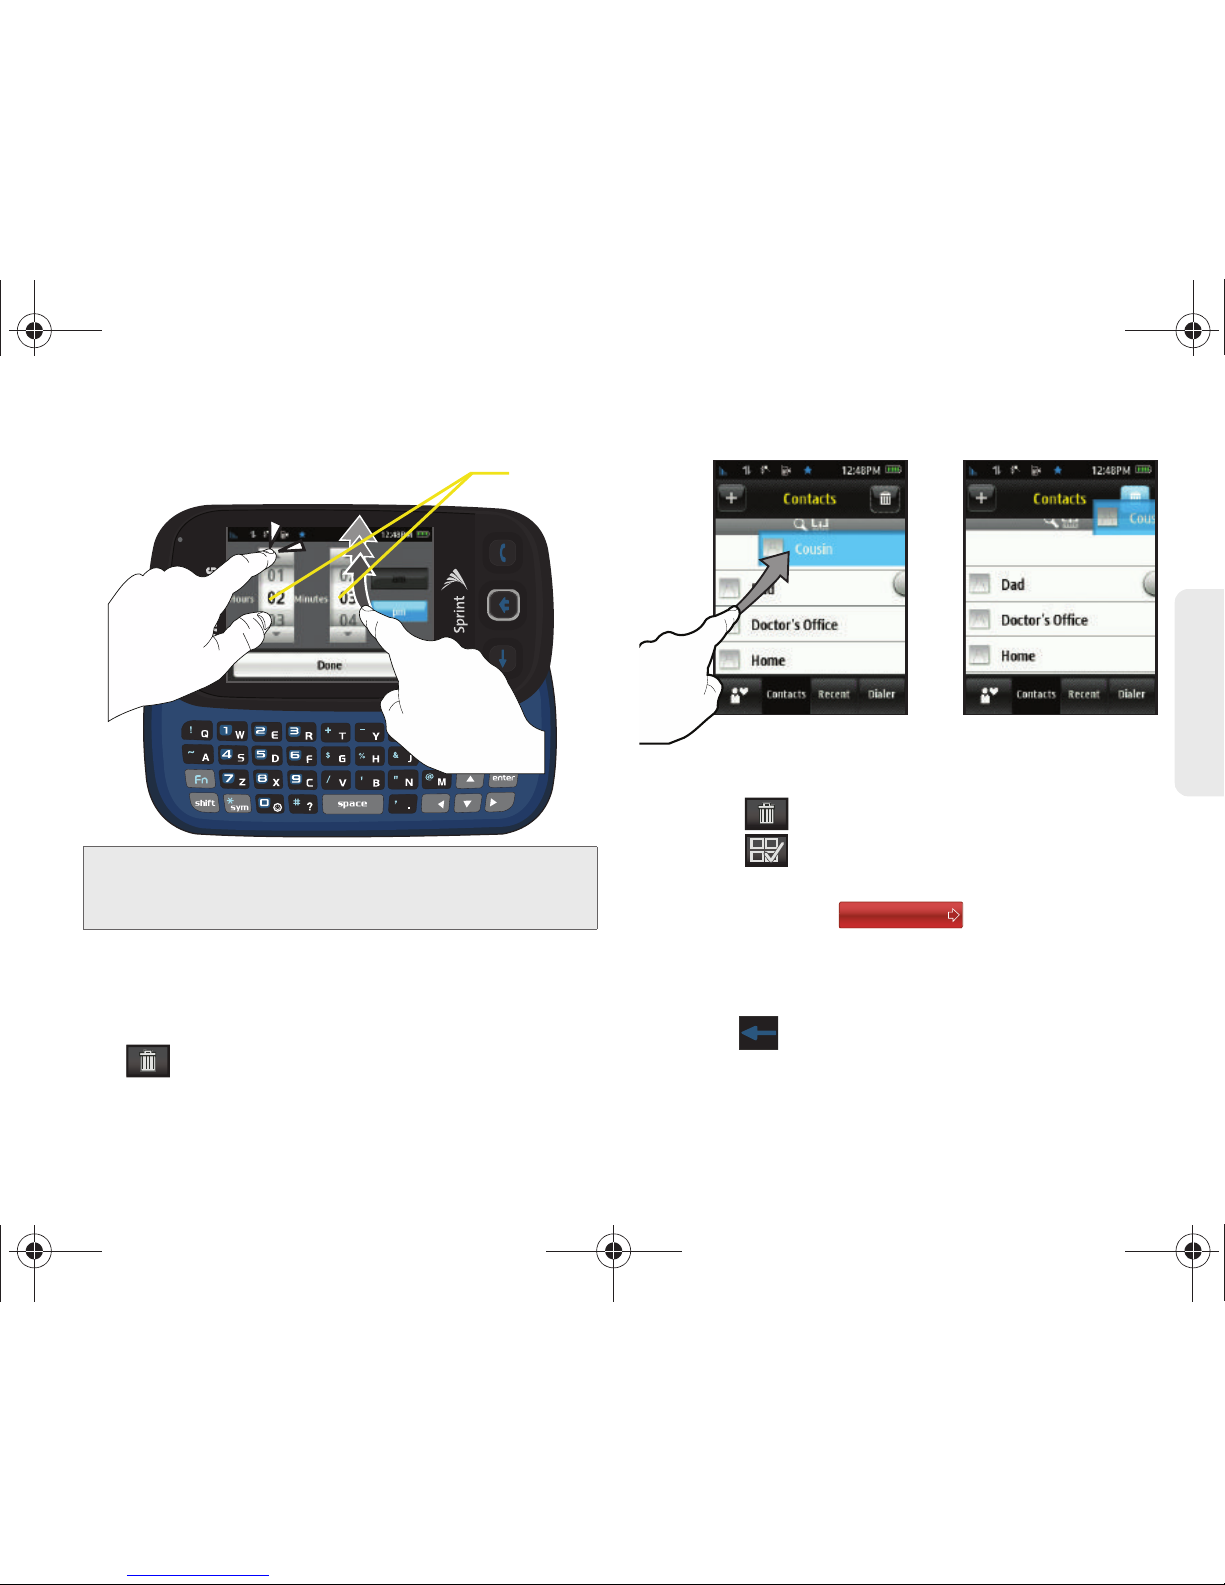
䡲 Scrolling through both reels (Hours and Minutes)
by sliding your finger up and down on the screen.
䡲 Touching the arrows above/below each field.
Power
Search
tab
Main
M350.book Page 22 Monday, October 11, 2010 9:58 AM
Page 33
2A. Phone Basics 23
Phone Basics
Deleting Entries
To delete a single entry:
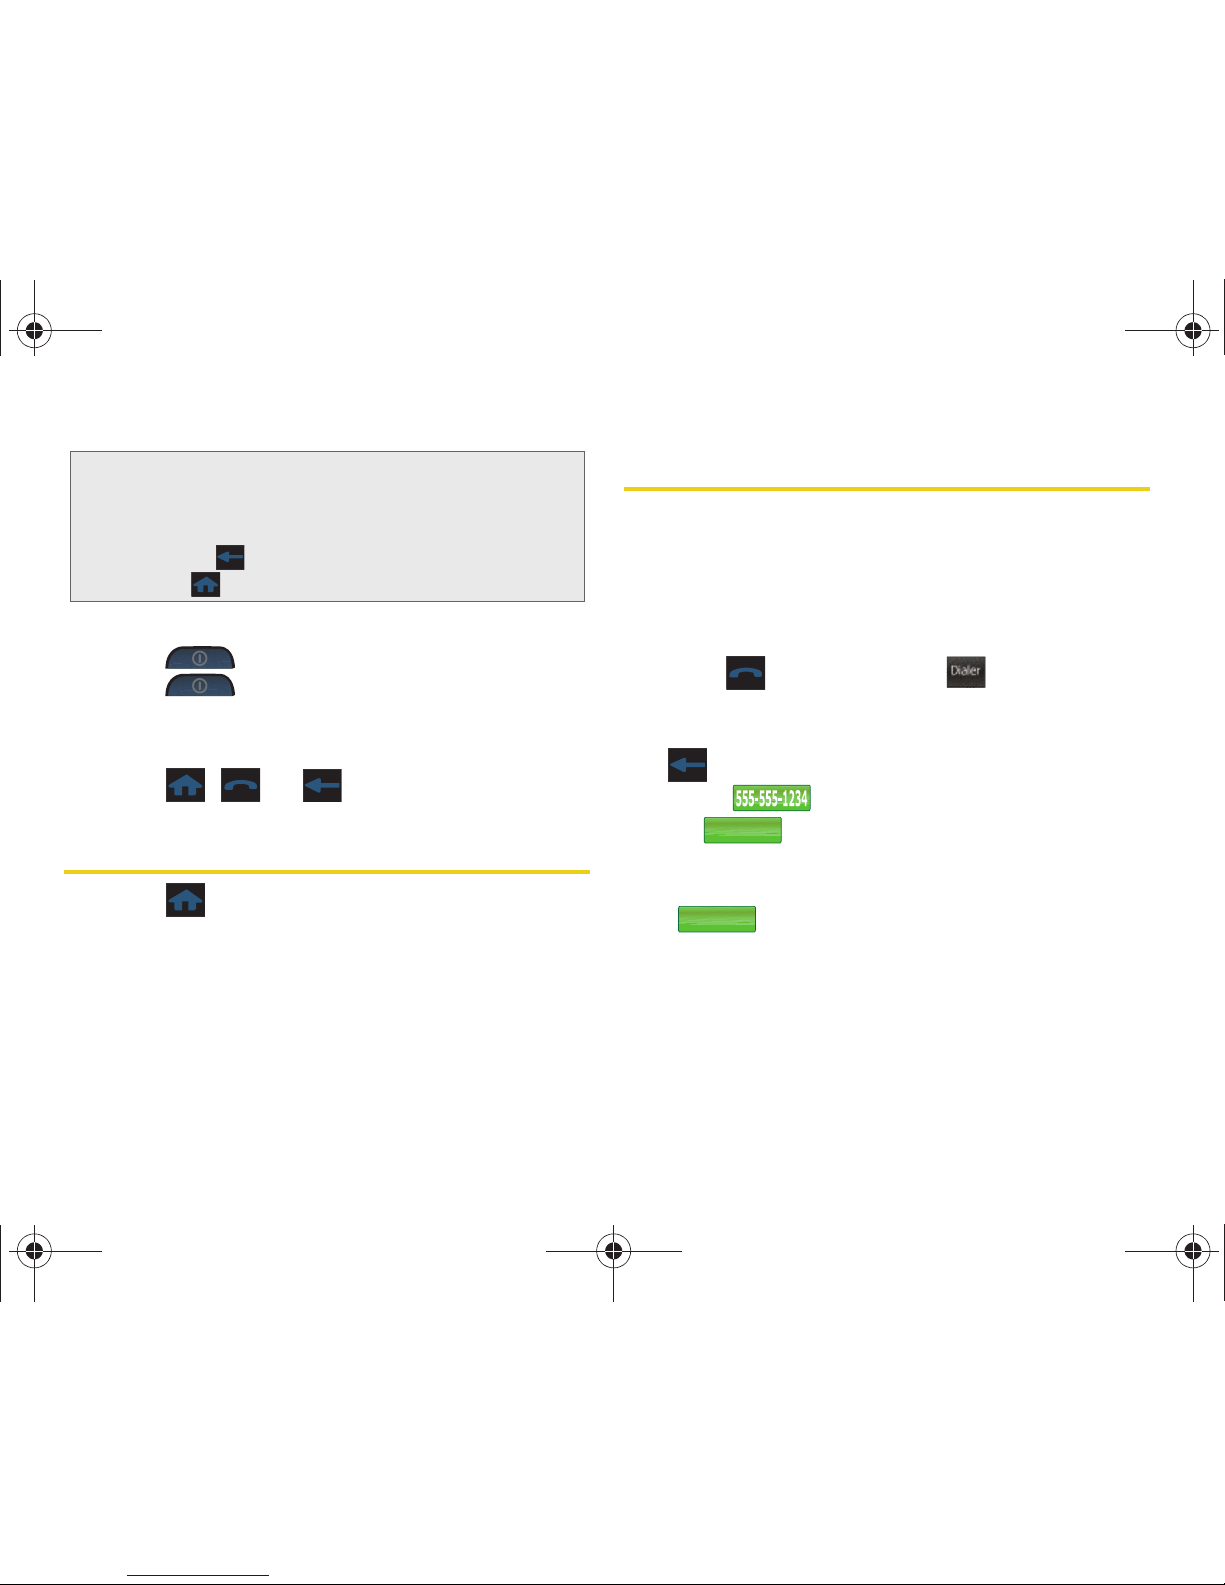
䊳 Delete an entry by dragging it over the Trash Bin
( ) and then releasing it. The entry then
disappears into the icon.
To delete multiple entries:
1. Touch to open the Delete menu.
2. Touch to select all entries in the current list.
Selected entries are then highlighted in blue.
3. Touch and drag to the right.
Backing Up Within a Menu
To go to the previous menu:
䊳 Press .
Tip: Touching and holding down on the arrows (up or down)
increases the speed at which the numbers scroll through
each reel.
Reels
tab
Delete Selected
M350.book Page 23 Monday, October 11, 2010 9:58 AM
Page 34
24 2A. Phone Basics
To return to the unlock screen:
䊳 Press to turn off the display and then
press
again to reveal the unlock screen
(page 18).
To exit out of your current application:
䊳 Press , , or .
Displaying Your Phone Number
䊳 Press and touch Main > Settings > General >
Phone Information. (Your phone number and other
information about your phone and account will be
displayed.)
Making and Answering Calls
Making Calls
Placing a call from your phone is as easy as making a
call from any landline phone.
1. Make sure your phone is on.
2. Press and touch Dialer ().
3.
Enter a phone number using the onscreen
dialpad. (If you make a mistake while dialing, press
to erase the numbers.)
4. Touch . (The phone number appears in
the
button.)
䡲 To make a call when you are roaming and Call
Guard is enabled, select
Roam Call and touch
where the phone number now appears.
See “Call Guard” on page 121.)
Note: There might be cases where pressing this button will
not exit the current menu. In these cases, try pressing
another Functions menu button to “release” the current
activity. For example, if you are in the dialer and
pressing doesn’t send you to the previous menu,
press .
Dialer
Talk
TALK
Talk
TALK
M350.book Page 24 Monday, October 11, 2010 9:58 AM
Page 35
2A. Phone Basics 25
Phone Basics
5. In a single motion, touch and slide to
the right when you are finished.
You can also place calls from your phone by using
speed dialing numbers from your Contacts (page 31)
and using your History listings (page 54).
Dialing Options
When you enter numbers from the Dialer, touch the
Dialer Options icon ( ) to display the two dialing
options.
To initiate an option, touch the corresponding button.
䢇 Pause: Insert a hard pause to the current phone
number. A hard pause requires that any consecutive
numbers be manually sent by touching
Tal k. (See
“Saving a Phone Number” on page 29.)
䢇 Save: Enter a seven-digit or ten-digit number (phone
number and area code) and touch
Save to save the
phone number in your Contacts. (See “Saving a
Phone Number” on page 29.)
Touch to exit from this onscreen Options popup
menu.
Answering Calls
To answer a call while the phone is active:
1. Make sure your phone is on. (If your phone is off,
incoming calls go to voicemail.)
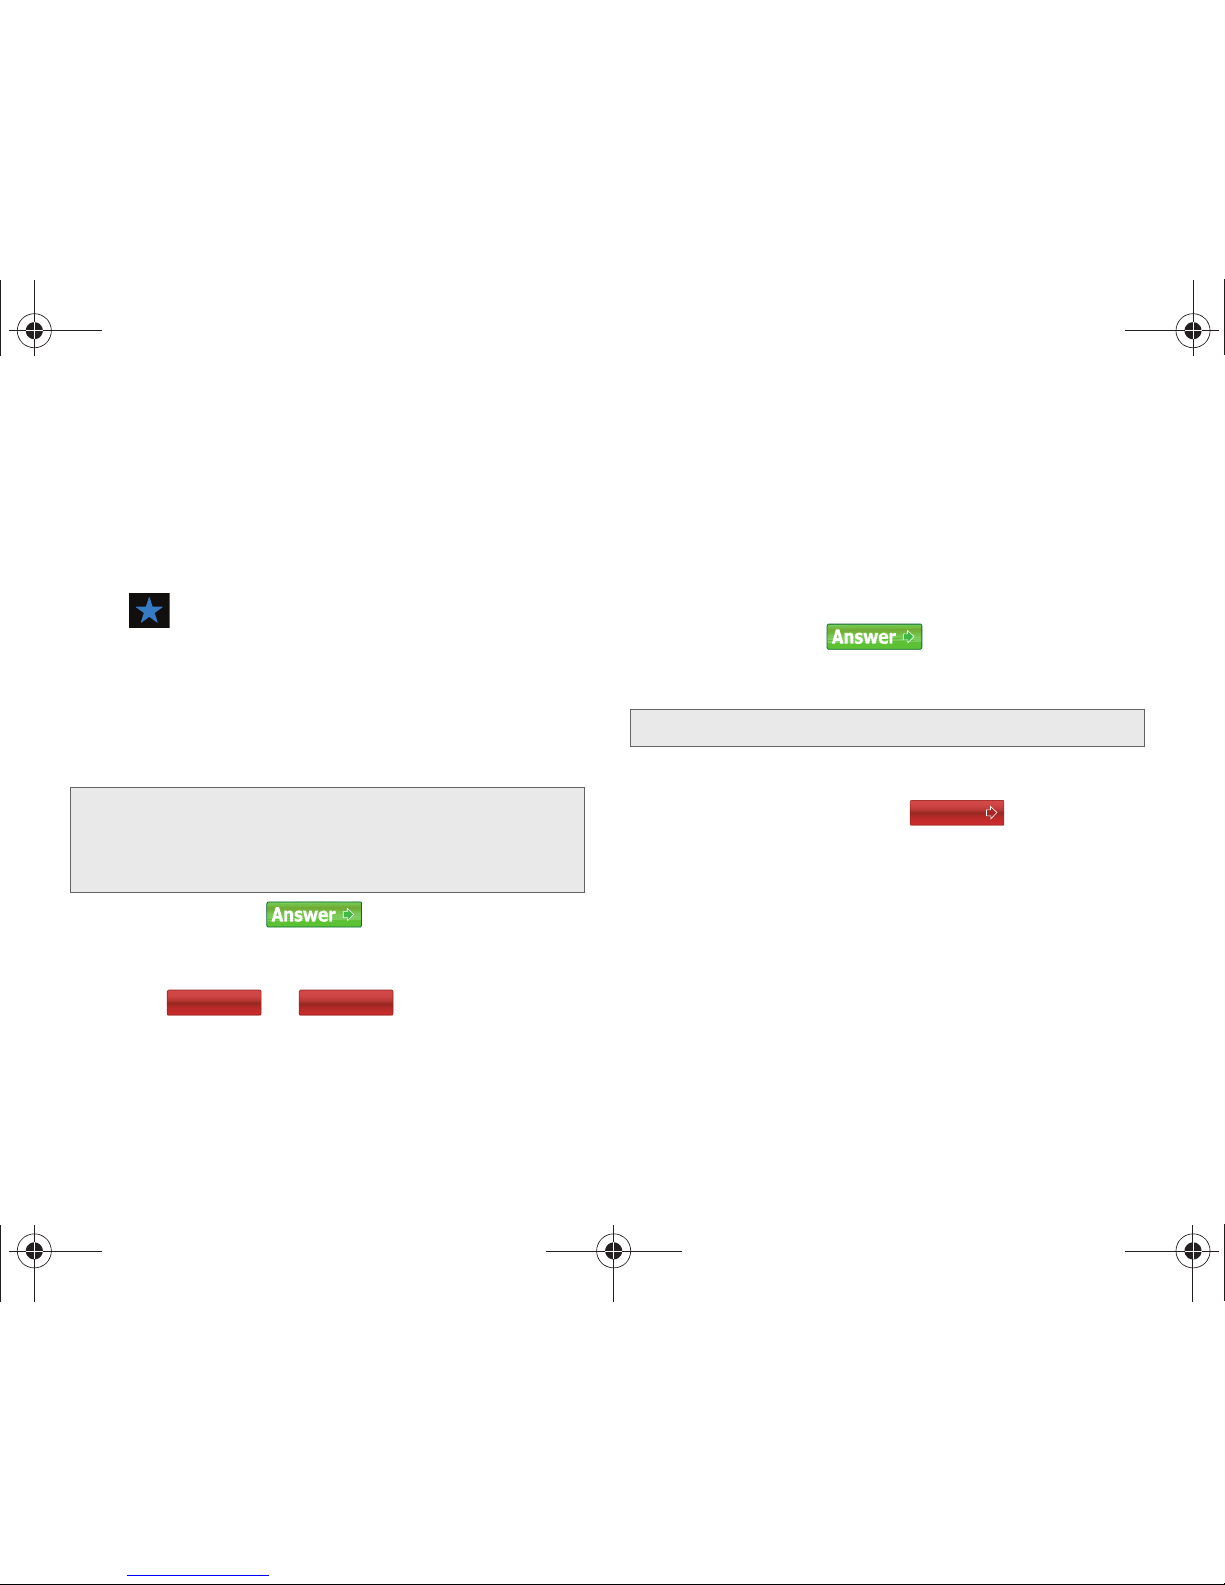
2. Touch and slide
to begin the
conversation.
Other options include:
䡲 Ignore with text to send
the call to your
voicemail box and
immediately send the
caller a text message.
䡲 Ignore to send the call
to your voicemail box.
Tip: To redial your last outgoing call, touch either Redial or
access the
Recent screen and then touch the number
from the list.
End Call
M350.book Page 25 Monday, October 11, 2010 9:58 AM
Page 36
26 2A. Phone Basics
Your phone notifies you of incoming calls in the
following ways:
䢇 The phone rings or vibrates.
䢇 The backlight illuminates.
䢇 The screen displays the incoming call.
䢇 The is displayed at the top of the screen.
If the incoming call is from a number stored in your
Contacts, the entry’s name is displayed. The caller’s
phone number or picture may also be displayed, if
available.
To answer a call while the phone is locked:
1. Touch and slide to begin the
conversation
2. To ignore the call, slide the bottom slider towards
either or .
Answering a Roam Call With Call Guard Enabled
Call Guard is an option that helps you manage your
roaming charges when making or receiving calls while
outside the Nationwide Sprint Network. Please see
“Roaming” on page 120 for more information about
roaming.
䊳 Touch and slide to answer the call.
(See “Call Guard” on page 121 for additional
information.)
Ending a Call
䊳 In a single motion, touch and slide to
the right.
Missed Call Notification
When an incoming call is not answered, the WHILE
YOU WERE OUT is displayed on your screen.
To display the Missed Call entry from the “While you were
out” screen:
䊳 Touch an entry from the list to reveal the Recent
calls screen.
Note: When your phone is locked and you receive an
incoming call, your display illuminates with the
Incoming Call screen. Touch and slide an option on the
screen.
Ignore with text
Ignore
Note: When your phone is off, calls go directly to voicemail.
End Call
M350.book Page 26 Monday, October 11, 2010 9:58 AM
Page 37
2A. Phone Basics 27
Phone Basics
To display a Missed Call entry:
1. Press and touch Recent ().
2.
Touch an entry from the list to begin dialing the
associated phone number.
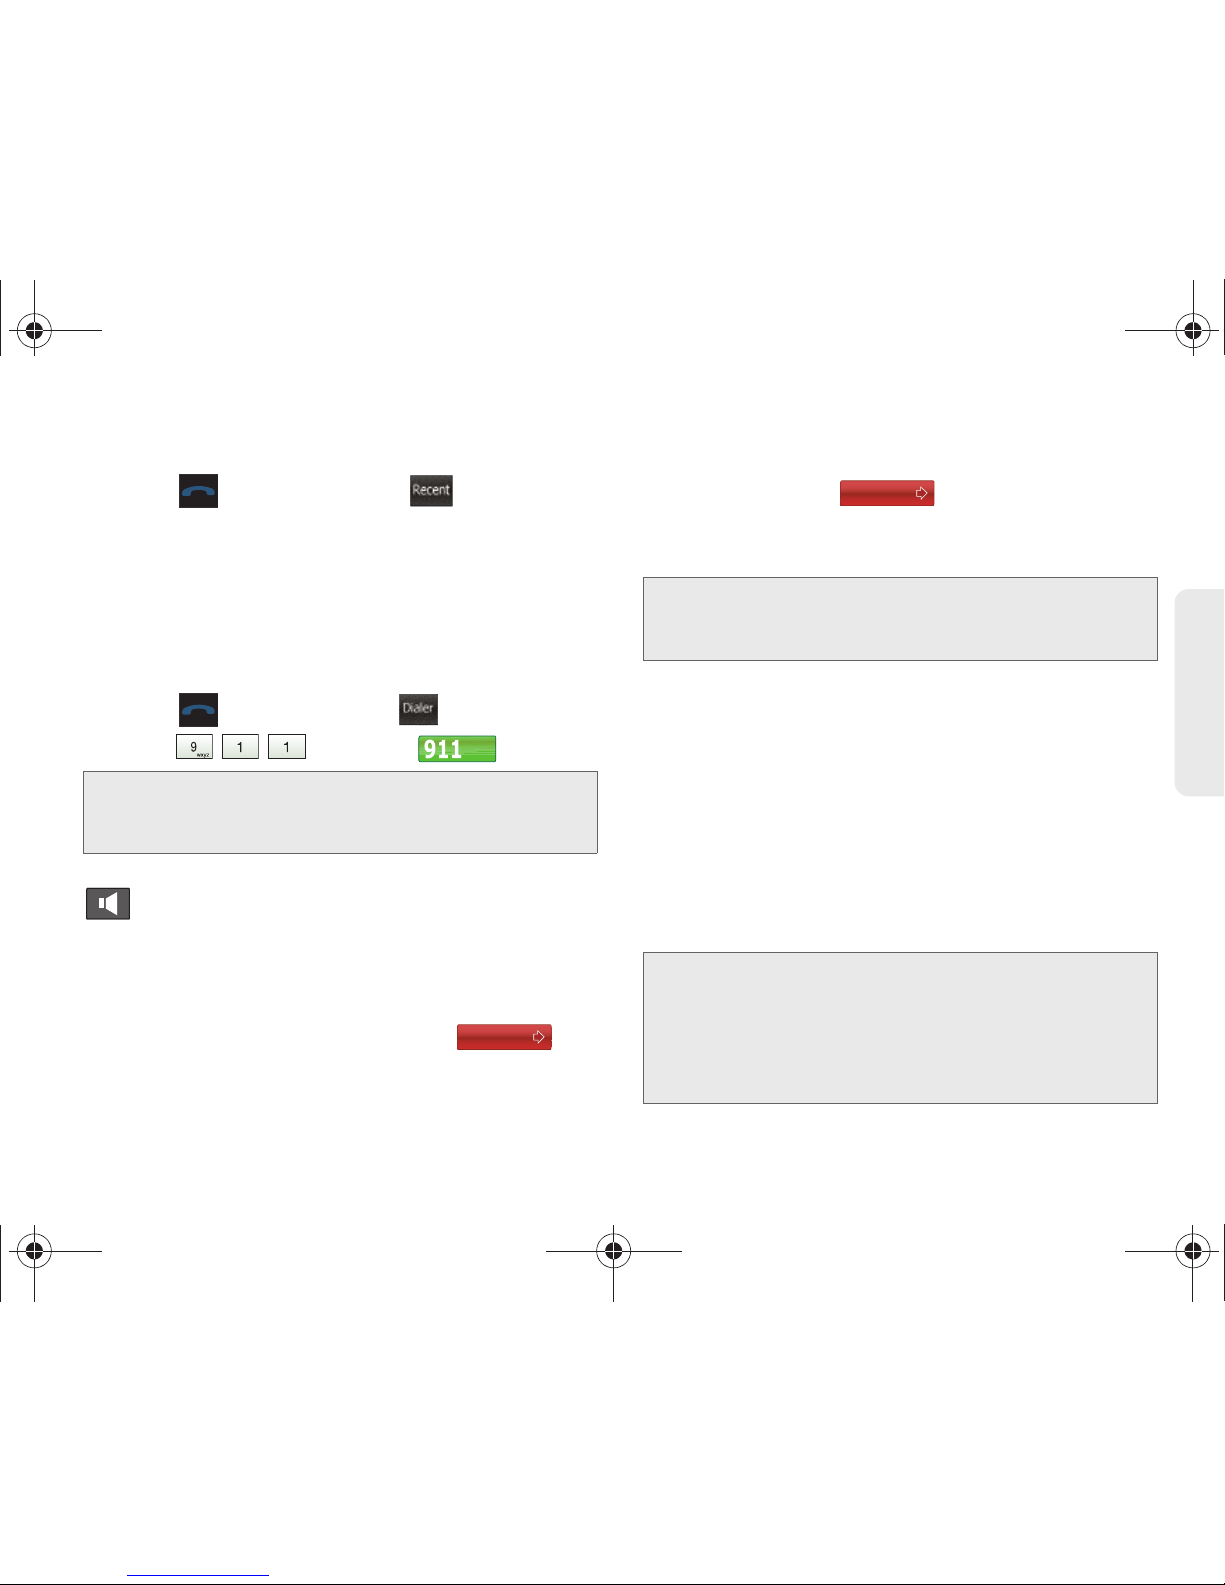
Calling Emergency Numbers
You can place calls to 911, even if your phone is
locked or your account is restricted.
1. Press and touch Dialer ().
2.
Enter and touch .
During an emergency call, slide the speaker button
( ) to the left (
On) to activate speakerphone mode.
Slide the speaker button to the right (
Off) to deactivate
speakerphone mode.
To exit Emergency mode:
䊳 In a single motion, touch and slide to
the right to end the 911 call.
To inactivate the Emergency call back mode:
1. Touch and slide to the right to end a
911 call.
2. Toggle the power to the phone (turn off then on).
Enhanced 911 (E911) Information
This phone features an embedded Global Positioning
System (GPS) chip necessary for utilizing E911
emergency location services where available. When
you place an emergency 911 call, the GPS feature of
your phone seeks information to calculate your
approximate location. Depending on several variables,
including availability and access to satellite signals, it
may take up to 30 seconds or more to determine and
report your approximate location.
Note: When you place an emergency call, your phone
automatically enters Emergency mode and remains in
this mode until you manually exit.
Recent
Dialer
End Call
Note: Additional Emergency numbers can be added to the
phone and designated as “always available”. See
“Using Emergency Numbers” on page 48.
Important: Always report your location to the 911 operator
when placing an emergency call. Some
designated emergency call takers, known as
Public Safety Answering Points (PSAPs) may not
be equipped to receive GPS location information
from your phone.
End Call
M350.book Page 27 Monday, October 11, 2010 9:58 AM
Page 38
28 2A. Phone Basics
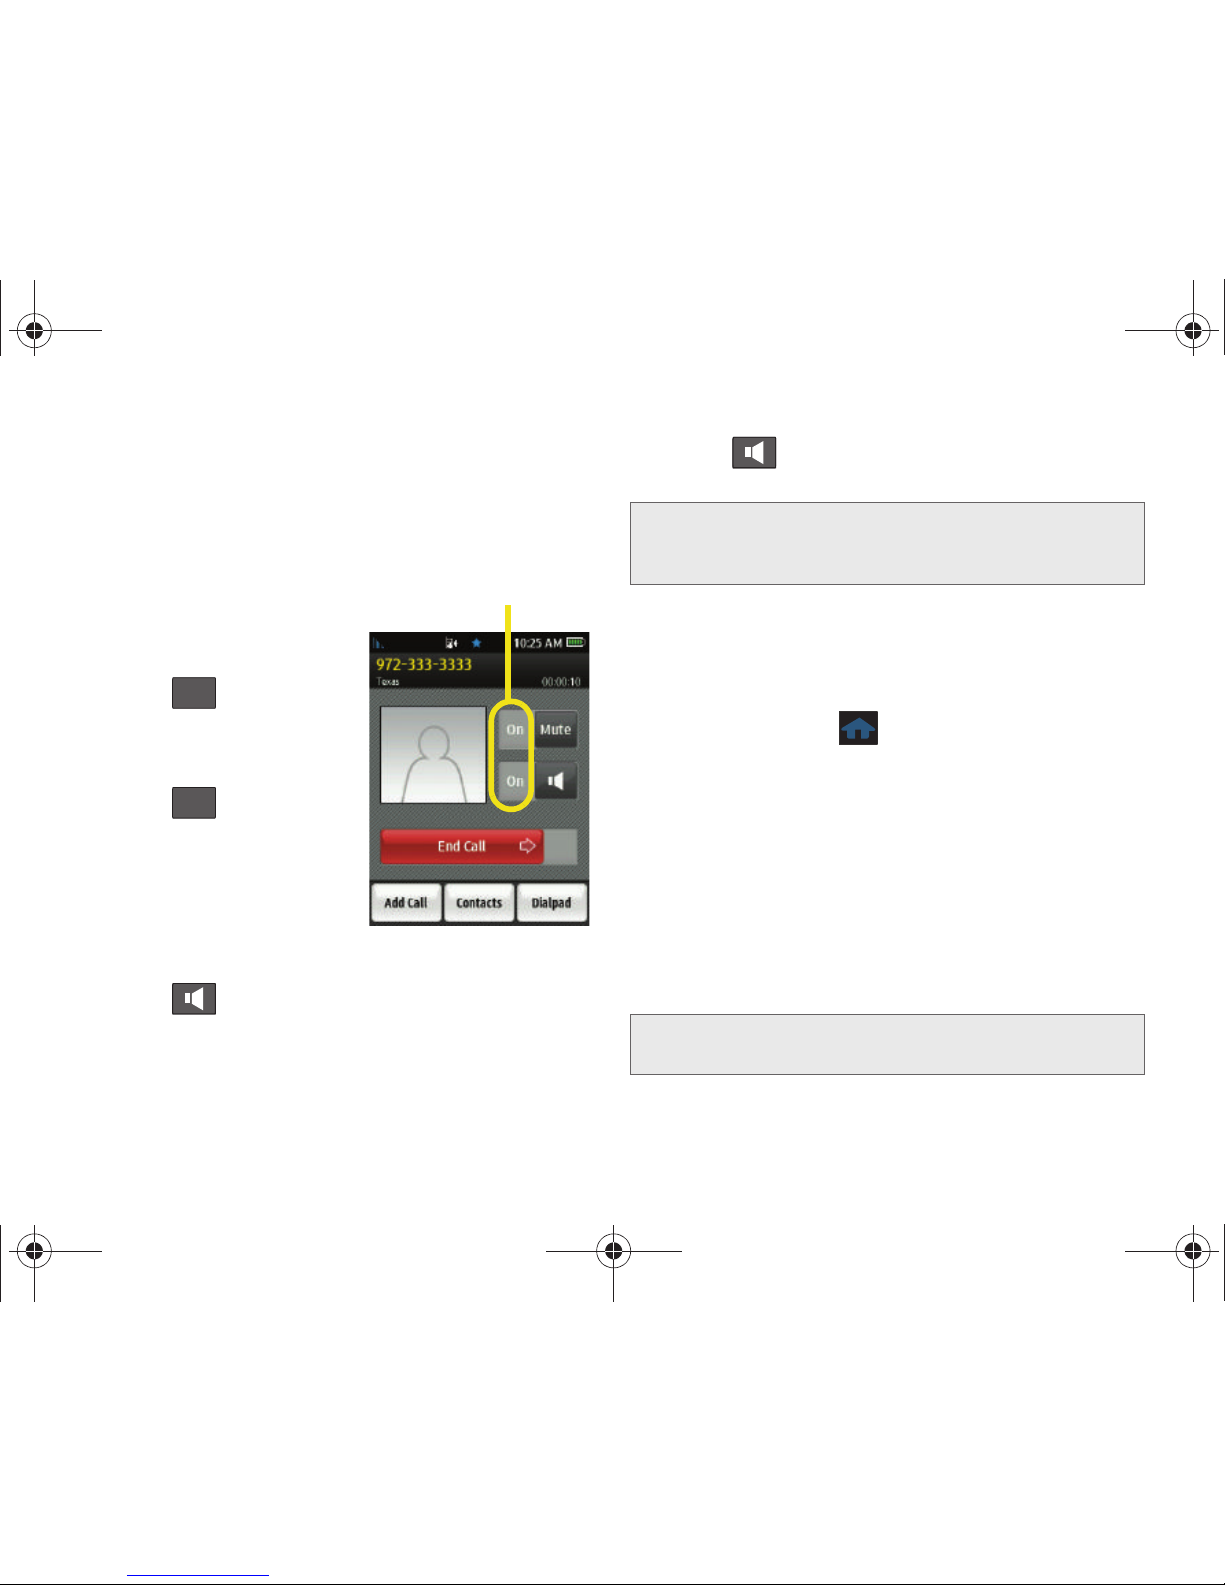
In-Call Options
To select an in-call option, touch the corresponding
onscreen button. The following options may be
available:
䢇 Mute on or Mute off to
toggle the onboard
microphone’s mute state
(on/off).
䡲 Slide to the On
position (left) during a
call to mute the
microphone.
䡲 Slide to the Off
position (right) to
unmute the microphone.
䢇 Speakerphone On or
Speakerphone Off to route
the phone’s audio through the speaker or through
the earpiece.
䡲 Slide to the left (On) to activate the feature
and route the phone’s audio through the speaker.
(You can adjust the speaker volume using the
volume button on the side of the phone.)
䡲 Slide to the right (Off) to deactivate the
feature and use the phone’s earpiece.
䢇 Add Call to initiate a three-way call.
䢇 Contacts to display your Contacts list.
䢇 Dialpad to display the onscreen dialpad where you
can choose to
Save the current number or End call.
䢇 During a call, press to return to the previous In-
Call screen.
End-of-Call Options
After you receive or make a call, the phone provides
you with three end-of-call options:
䡲 Redial to dial the last outgoing or received phone
number.
䡲 Save to store the current phone number in your
Contacts list.
Features are On
Mute
Mute
WARNING: Because of higher volume levels, do not place
the phone near your ear during speakerphone
use.
Note: If the current number has already been stored to your
Contacts list, Save is replaced with Contacts.
M350.book Page 28 Monday, October 11, 2010 9:58 AM
Page 39
2A. Phone Basics 29
Phone Basics
䡲 Done to exit from the end-of-call screen and
return to the Speed Dial screen by default.
If no action is taken after a few seconds, the phone
automatically returns to the Speed Dial screen.
Saving a Phone Number
Your phone can store up to 600 phone numbers in
each of seven Contacts entries. Each entry’s name can
contain 64 characters. Your phone automatically sorts
the Contacts entries alphabetically. (For more
information, see “2D. Contacts” on page 57.)
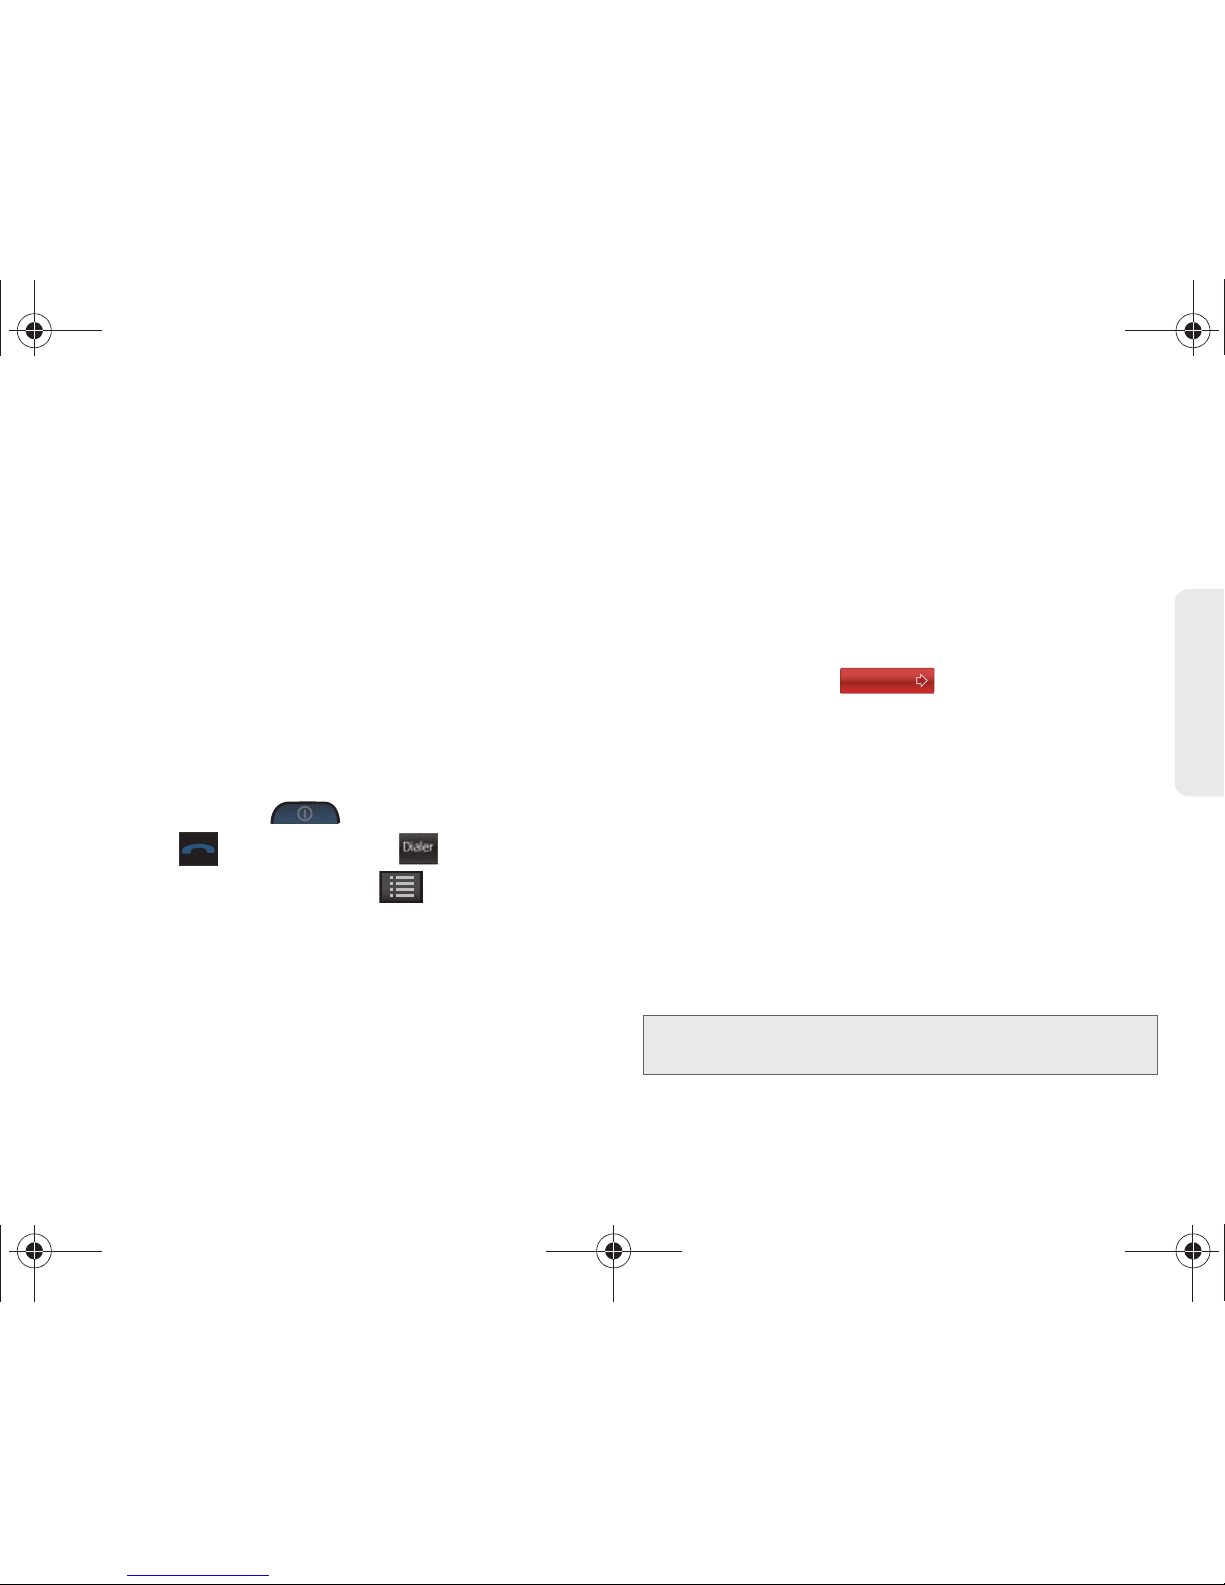
To save a number from standby mode:
1. Press and hold to unlock your phone.
2. Press and touch Dialer ().
3.
Enter a number and touch > Save.
4. Touch either New Contact or Existing Contact.
5. Touch a label (Mobile, Home, Work, Pager, Others).
The screen changes to the Landscape orientation.
6. Touch the Enter Name field and use the keyboard
to enter the new contact name. See “Entering Text”
on page 32.
7. Enter information into any of the other desired
fields by using the keyboard.
8. Touch Done (onscreen) to store the name and save
the new entry.
To save a number from the end-of-call screen:
After you have received or made a call, the phone
displays end-of-call options.
1. Touch and slide to the right to end the
current call.
2. Touch Save.
3. Touch either New Contact or Existing Contact.
4. Touch a label (Mobile, Home, Work, Pager, Others).
The screen changes to the Landscape orientation.
5. Touch the Enter Name field and use the keyboard
to enter the new contact name. See “Entering Text”
on page 32.
6. Touch Done (onscreen) to store the name and save
the new entry.
Dialer
Note: The phone number is pre-populated into the
appropriate field.
End Call
M350.book Page 29 Monday, October 11, 2010 9:58 AM
Page 40
30 2A. Phone Basics
To save a number from the Recent Calls screen:
Any recently received or made calls are stored within
the Recent Calls screen as a chronological list of
entries.
1. Press and touch Recent ().
2.
Touch adjacent to a desired entry.
3. Touch Save.
4. Touch either New Contact or Existing Contact.
5. Touch a label (Mobile, Home, Work, Pager, Others).
The screen changes to the Landscape orientation.
6. Touch the Enter Name field and use the keyboard
to enter the new contact name. See “Entering Text”
on page 32.
7. Touch Done (onscreen) to store the name and save
the new entry.
8. Enter information into any of the other desired
fields by using the keyboard.
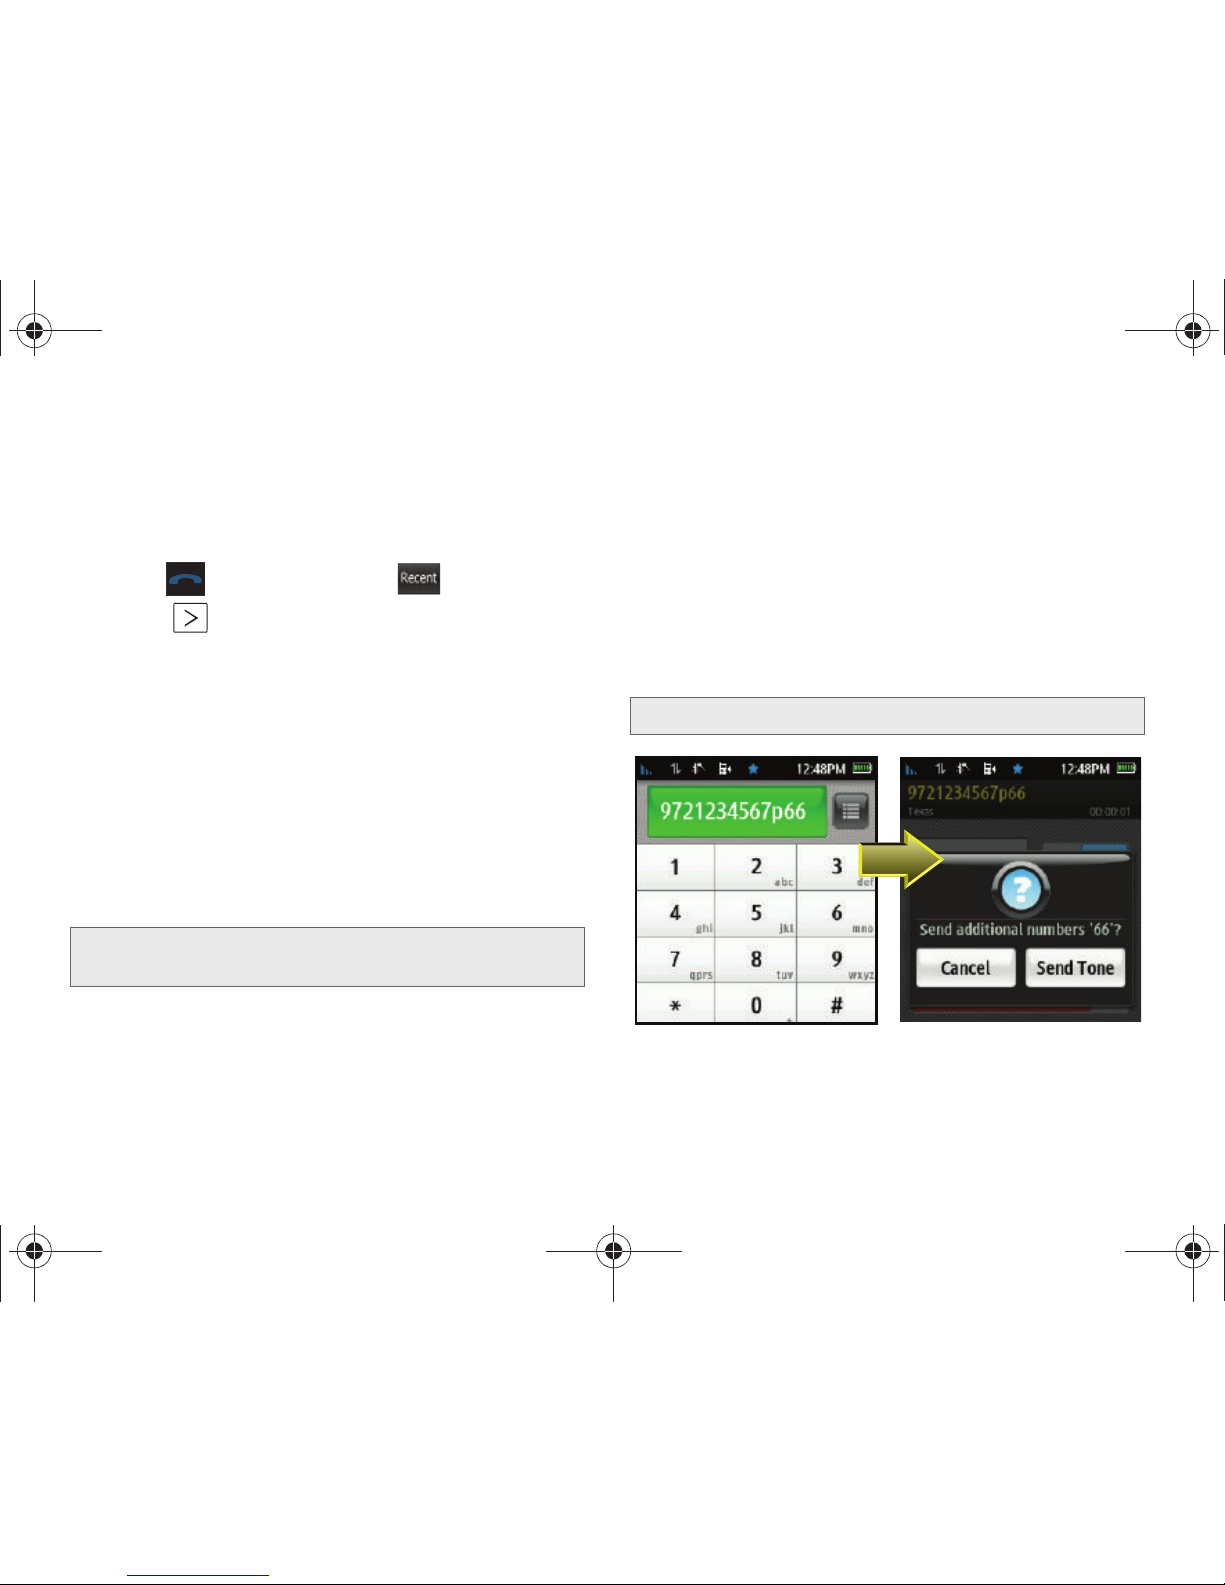
Dialing and Saving Phone Numbers With
Pauses
You can dial or save phone numbers with pauses for
use with automated systems, such as voicemail or
credit card billing numbers. There is a single pause
available on your phone:
䢇 Manual Pause (P) requires you to manually send the
next set of numbers by pressing
Tal k.
Note: The phone number is pre-populated into the
appropriate field.
Recent
Note: You can have multiple pauses in a phone number.
M350.book Page 30 Monday, October 11, 2010 9:58 AM
Page 41
2A. Phone Basics 31
Phone Basics
To dial or save phone numbers with pauses:
1. Press and touch Dialer ().
2.
Enter a number and touch > Pause.
3. Enter additional numbers using the dialpad.
4. Touch . (The phone number and pauses
appear in the
button.) When prompted to
send the numbers after each pause, touch
Talk .
– or –
Touch
> Save to save the number in your
Contacts. (See “Saving a Phone Number” on
page 29.)
Dialing From the Contacts List
1. Press and touch Contacts ().
2. You can scroll through the list (up/down) until you
find your entry.
– or –
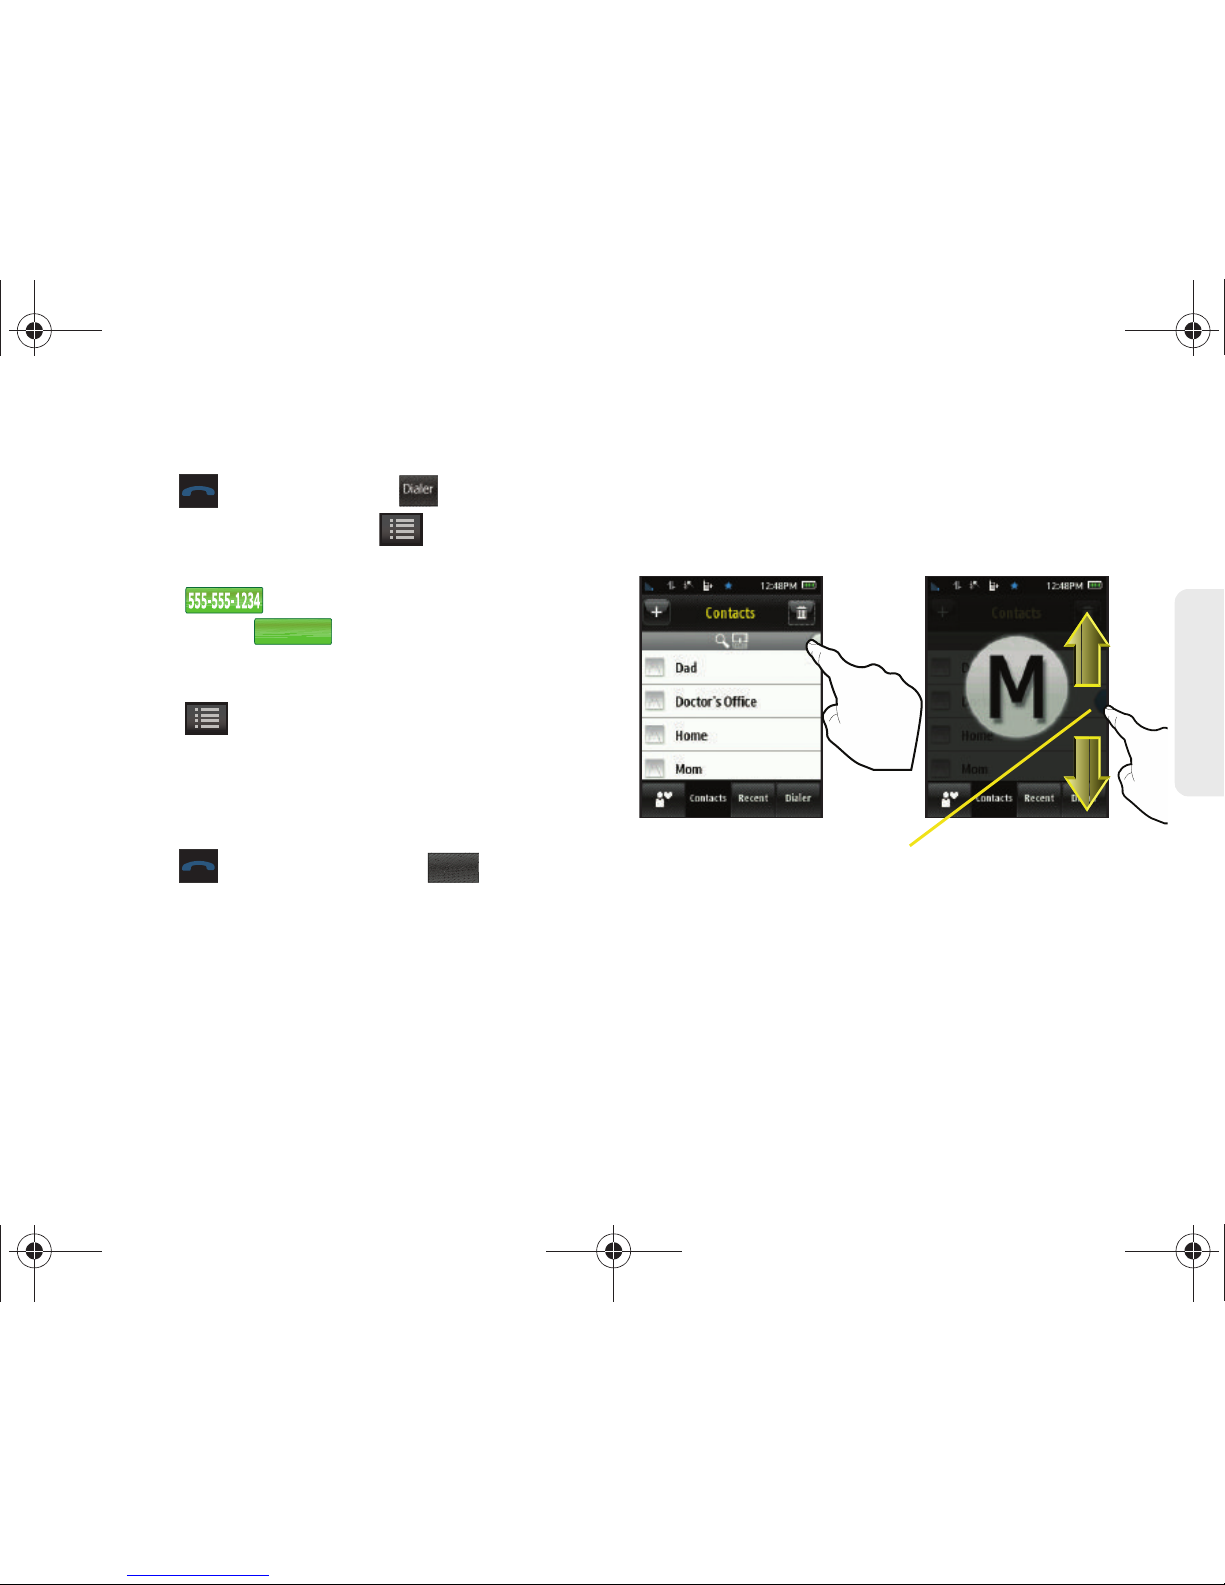
Use the
Power Search tab to quickly tab through
the current Contacts list based on an alphabetical
grouping that is dynamically shown onscreen.
3. Touch the name you want to call from the list to
display the Contact details page.
4. Touch an entry number from the available list to
initiate the call.
Speed Dialing
You can store up to eight numbers in your phone’s
speed dial memory to make contacting friends and
family as easy as pressing a button or two. With this
feature, you can dial speed dial entries using a single
Dialer
Talk
TALK
Contacts
Power
Search
tab
M350.book Page 31 Monday, October 11, 2010 9:58 AM
Page 42
32 2A. Phone Basics
touch. (See “Assigning Speed Dial Numbers” on
page 63.)
1. Press and touch Speed Dial ().
2.
Touch any of the eight available Speed Dial
locations to begin dialing.
Entering Text
Accessing the QWERTY Keyboard
The Samsung Seek has a built-in keyboard, referred to
as a QWERTY keyboard. The keyboard is located
beneath the display screen and is accessed by sliding
it open. This orients the phone's display to landscape
(widescreen) mode. Some features automatically
change the screen orientation (page 21).
Using the QWERTY keyboard, you can type letters,
numbers, punctuation, and other special characters
into text entry fields or other applications.
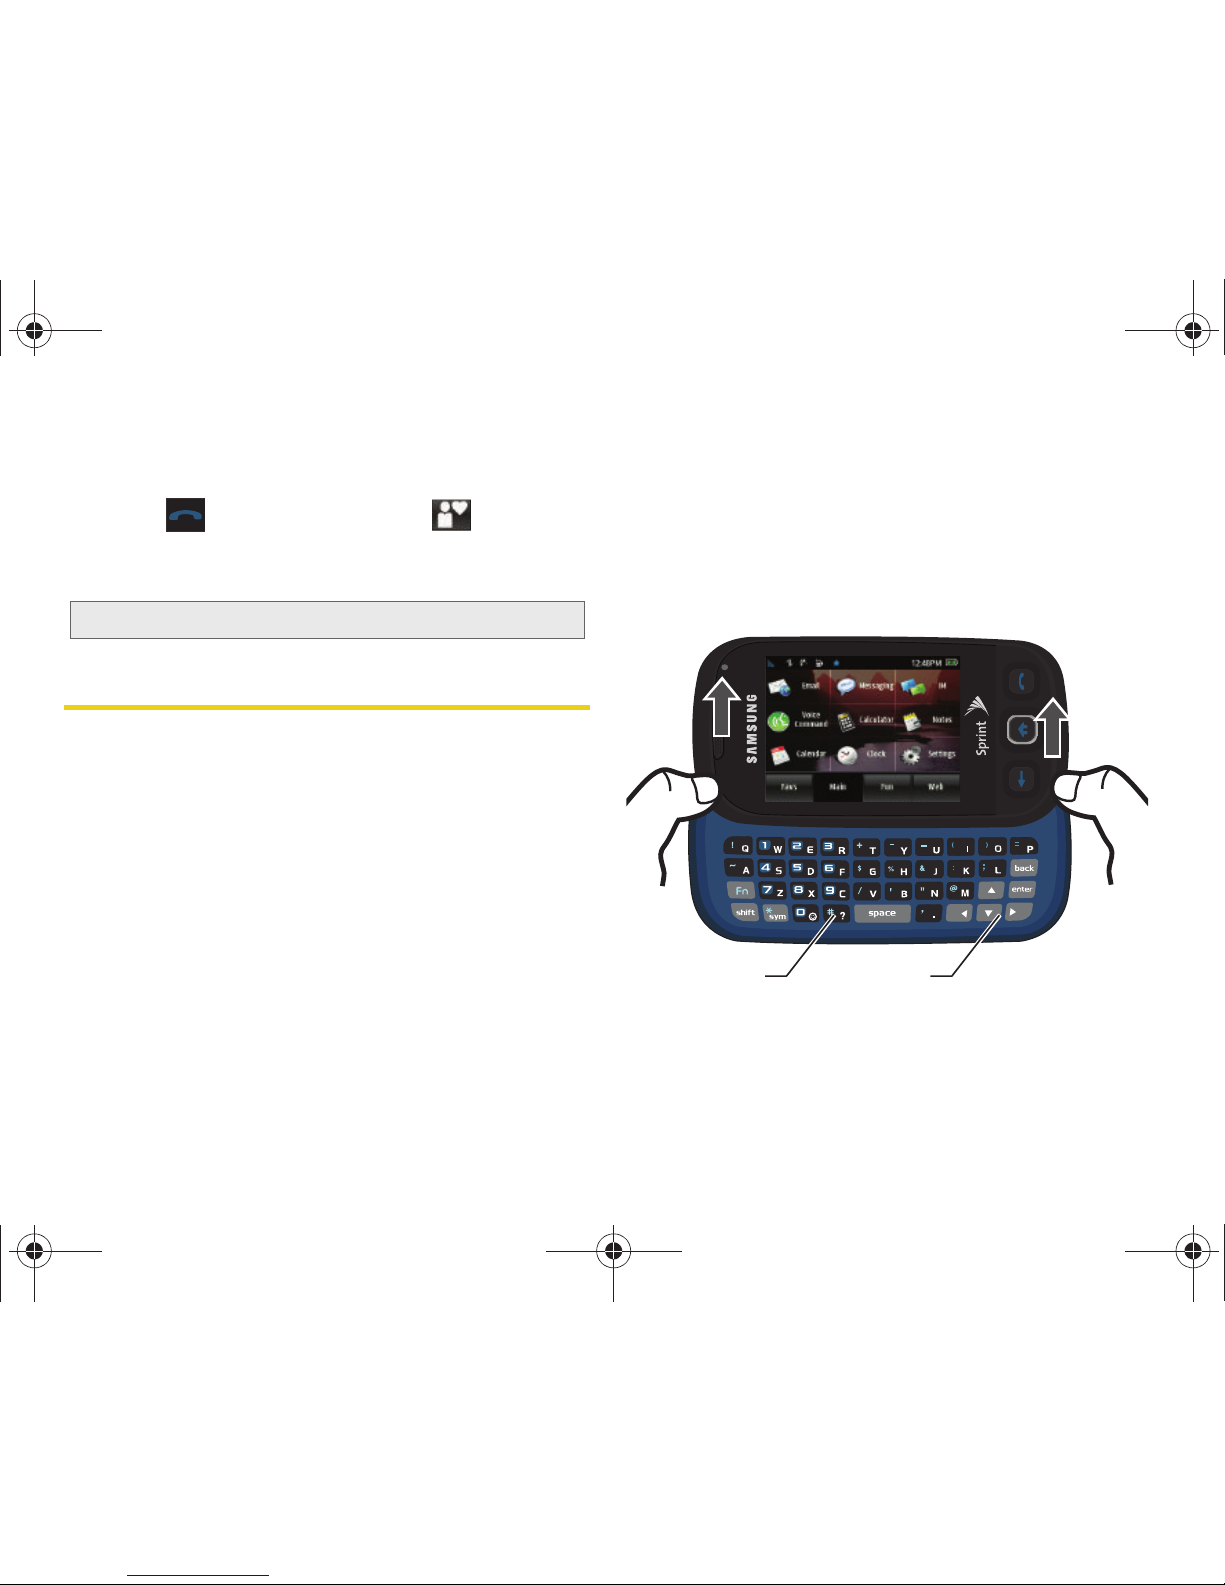
To open the phone and access the keyboard:
1. Rotate the phone 90 degrees counter-clockwise.
2. Slide the top section of the phone up to open, as
shown in the illustration below. Once open, the
display rotates from a vertical viewing mode
(portrait) to a horizontal viewing mode (landscape).
Note: Speed dialing is not available when you are roaming.
QWERTY
Keyboard
Navigation
Keys
M350.book Page 32 Monday, October 11, 2010 9:58 AM
Page 43
2A. Phone Basics 33
Phone Basics
Entering Text Using the Keyboard
Your phone’s keyboard provides a convenient way to
enter letters, numbers, and symbols whenever you are
prompted to enter text. Using your phone's keyboard is
just like using any standard computer keyboard, except
that here each key has a primary character in white on
the bottom (usually letters) and a secondary character
in red on the top (numbers and punctuation).
Secondary characters are accessed by first pressing
the Function key ( ).
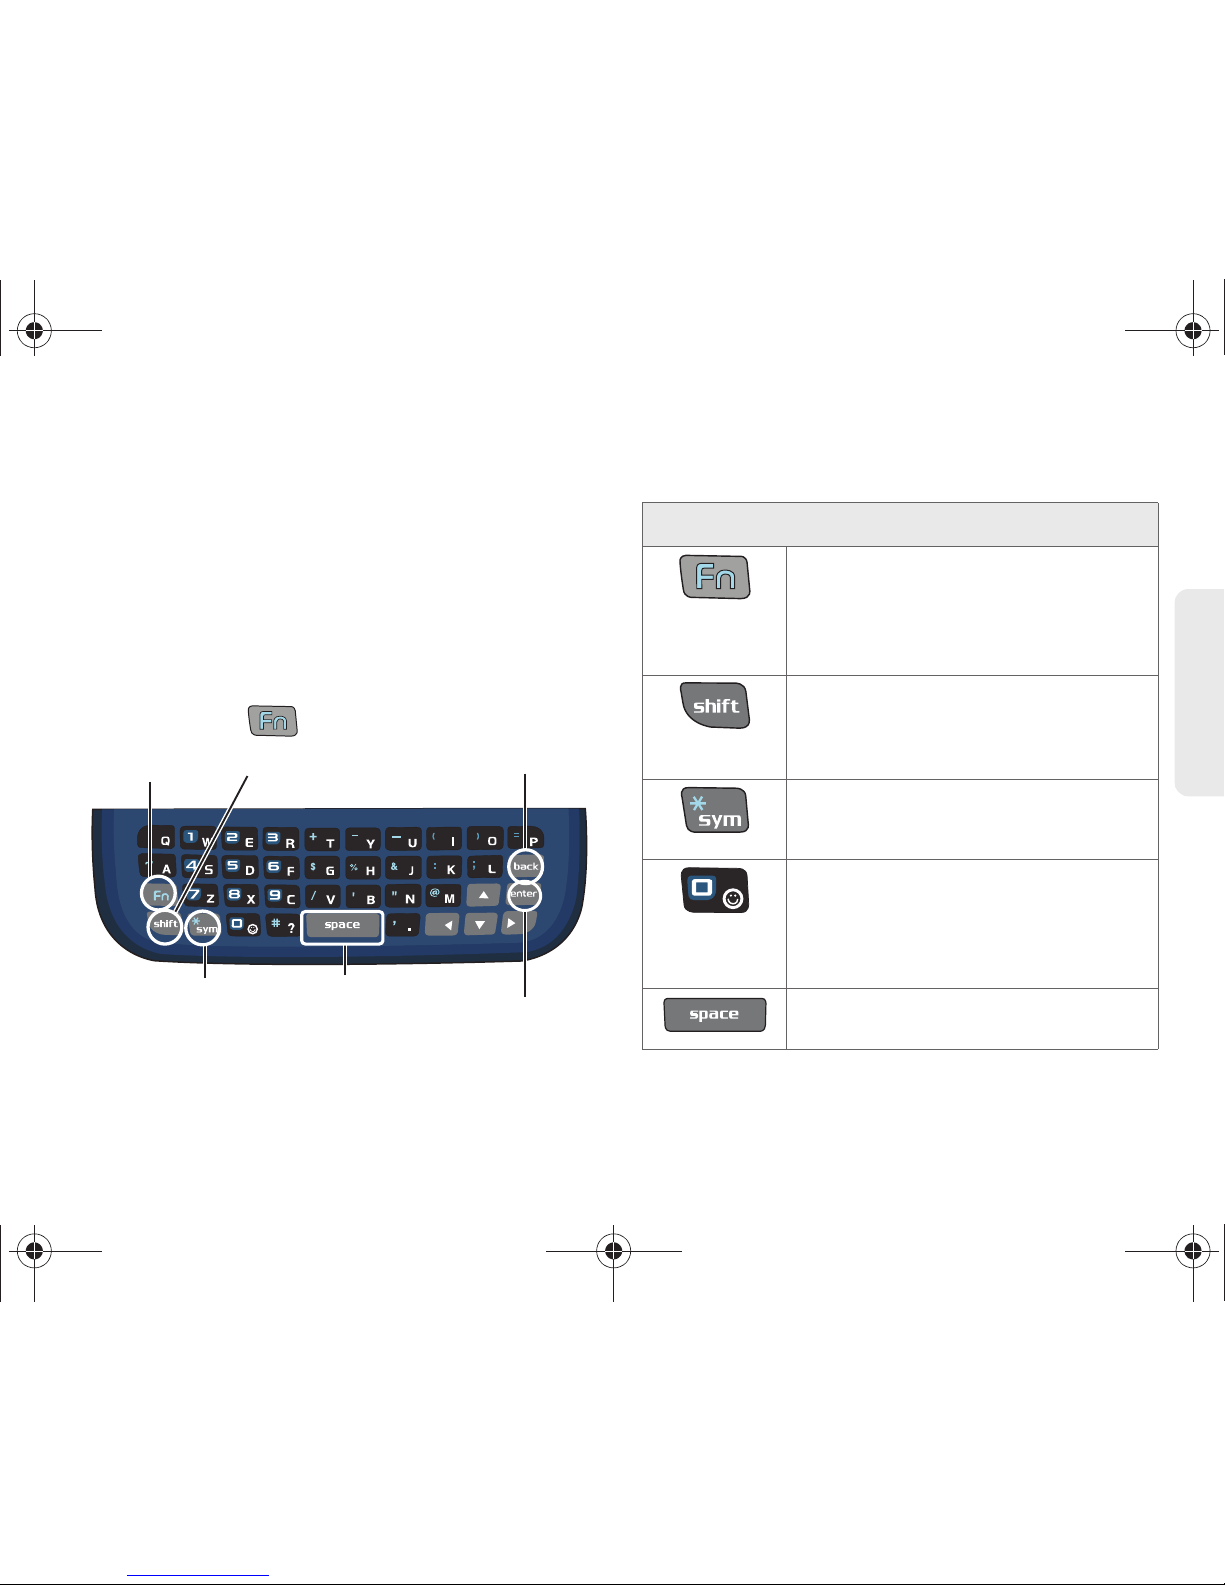
The following keys perform special functions when
entering text:
Space Key
Delete Key
Enter Key
Fn Key Caps/Shift Key
Symbol Key
Keyboard Functions
Function – Allows you to enter the
numbers or characters displayed in blue
at the top of the QWERTY keys.
Examples: 1, $, @, #, !
(Press twice to turn Fn lock on.)
Shift – Changes the text input mode
among Upper/Lower/Mixed case
modes. (Press twice to turn Shift lock
on.)
Sym – Launches the Symbols page.
Choose from onscreen symbols by
using their associated numbers.
Smiley’s – Launches the Smiley’s page.
Choose from an extensive list of smiley’s
(emoticons). Use the left and right
navigation keys to scroll to the different
pages.
Space – Inserts an empty space.
M350.book Page 33 Monday, October 11, 2010 9:58 AM
Page 44
34 2A. Phone Basics
Using the Keyboard
Entering Letters
䊳 Press the desired letter keys to enter words.
䡲 Press once to capitalize the next letter.
䡲 Press twice to turn on Shift (Caps) lock.
䡲 Press to erase the previous letter.
䡲 Press and hold to erase all previous text.
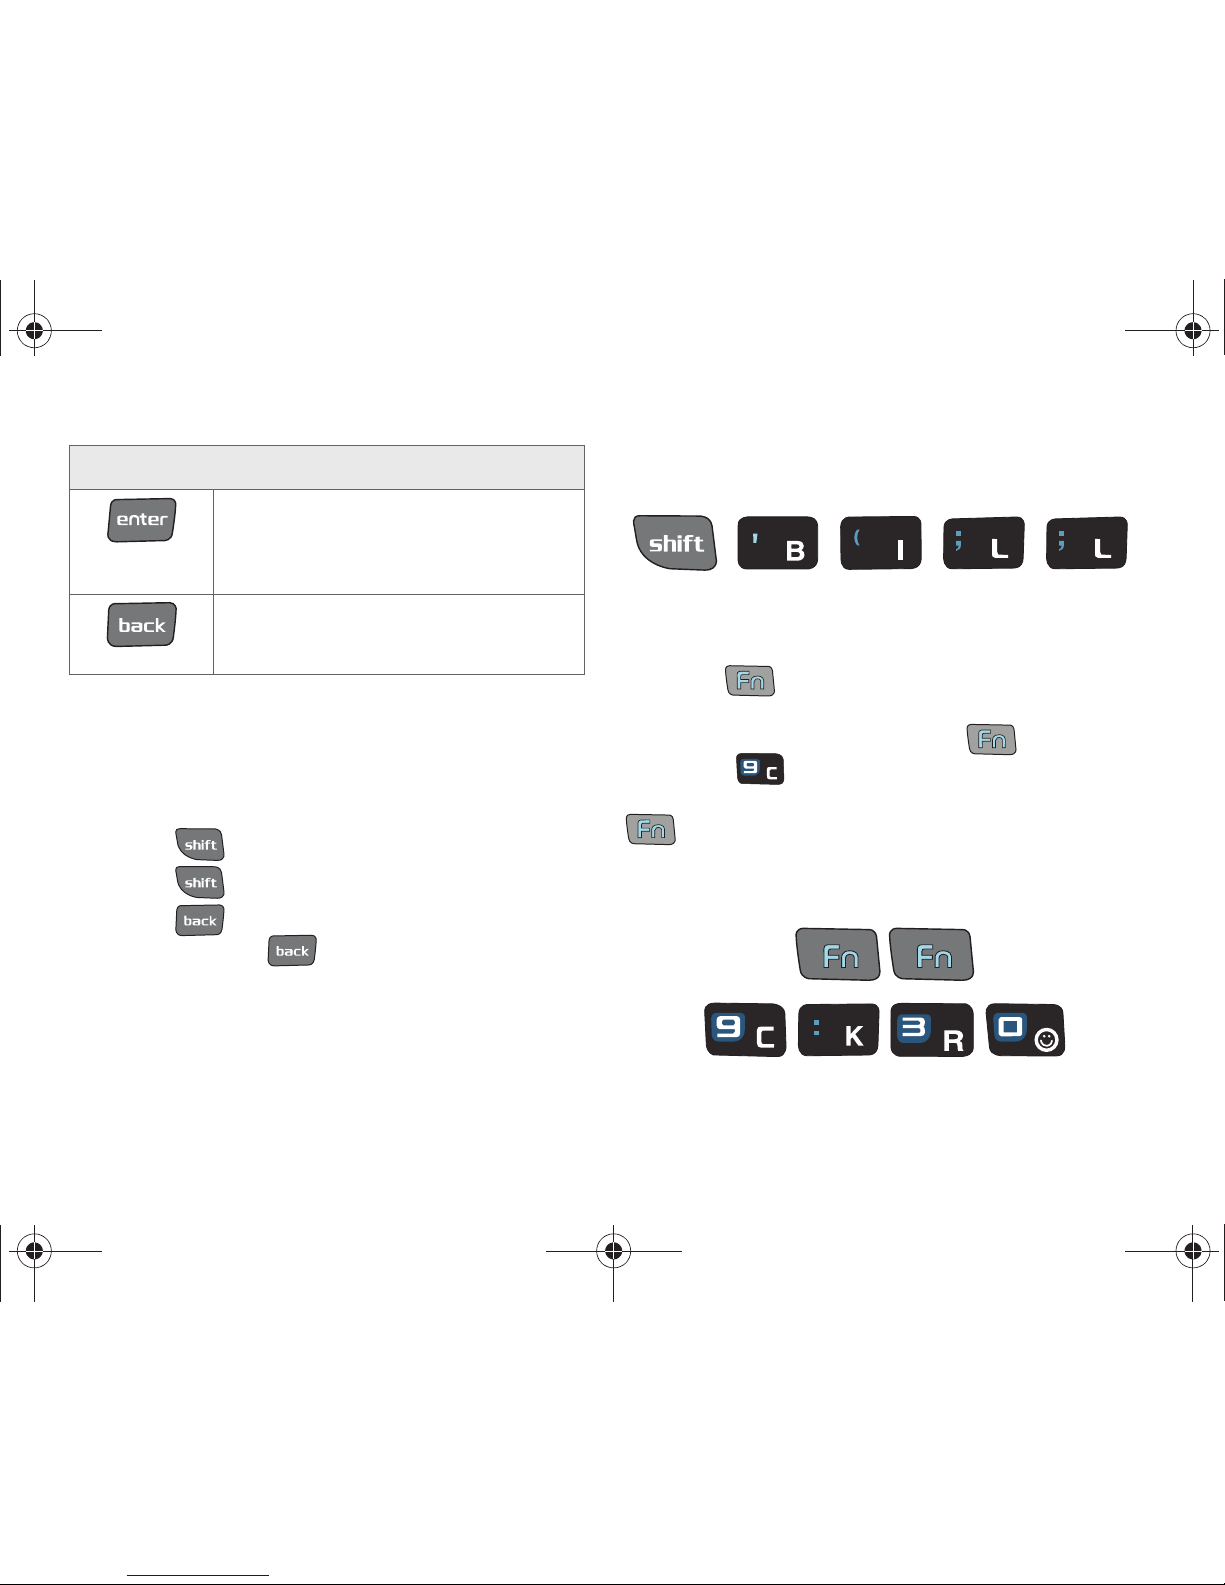
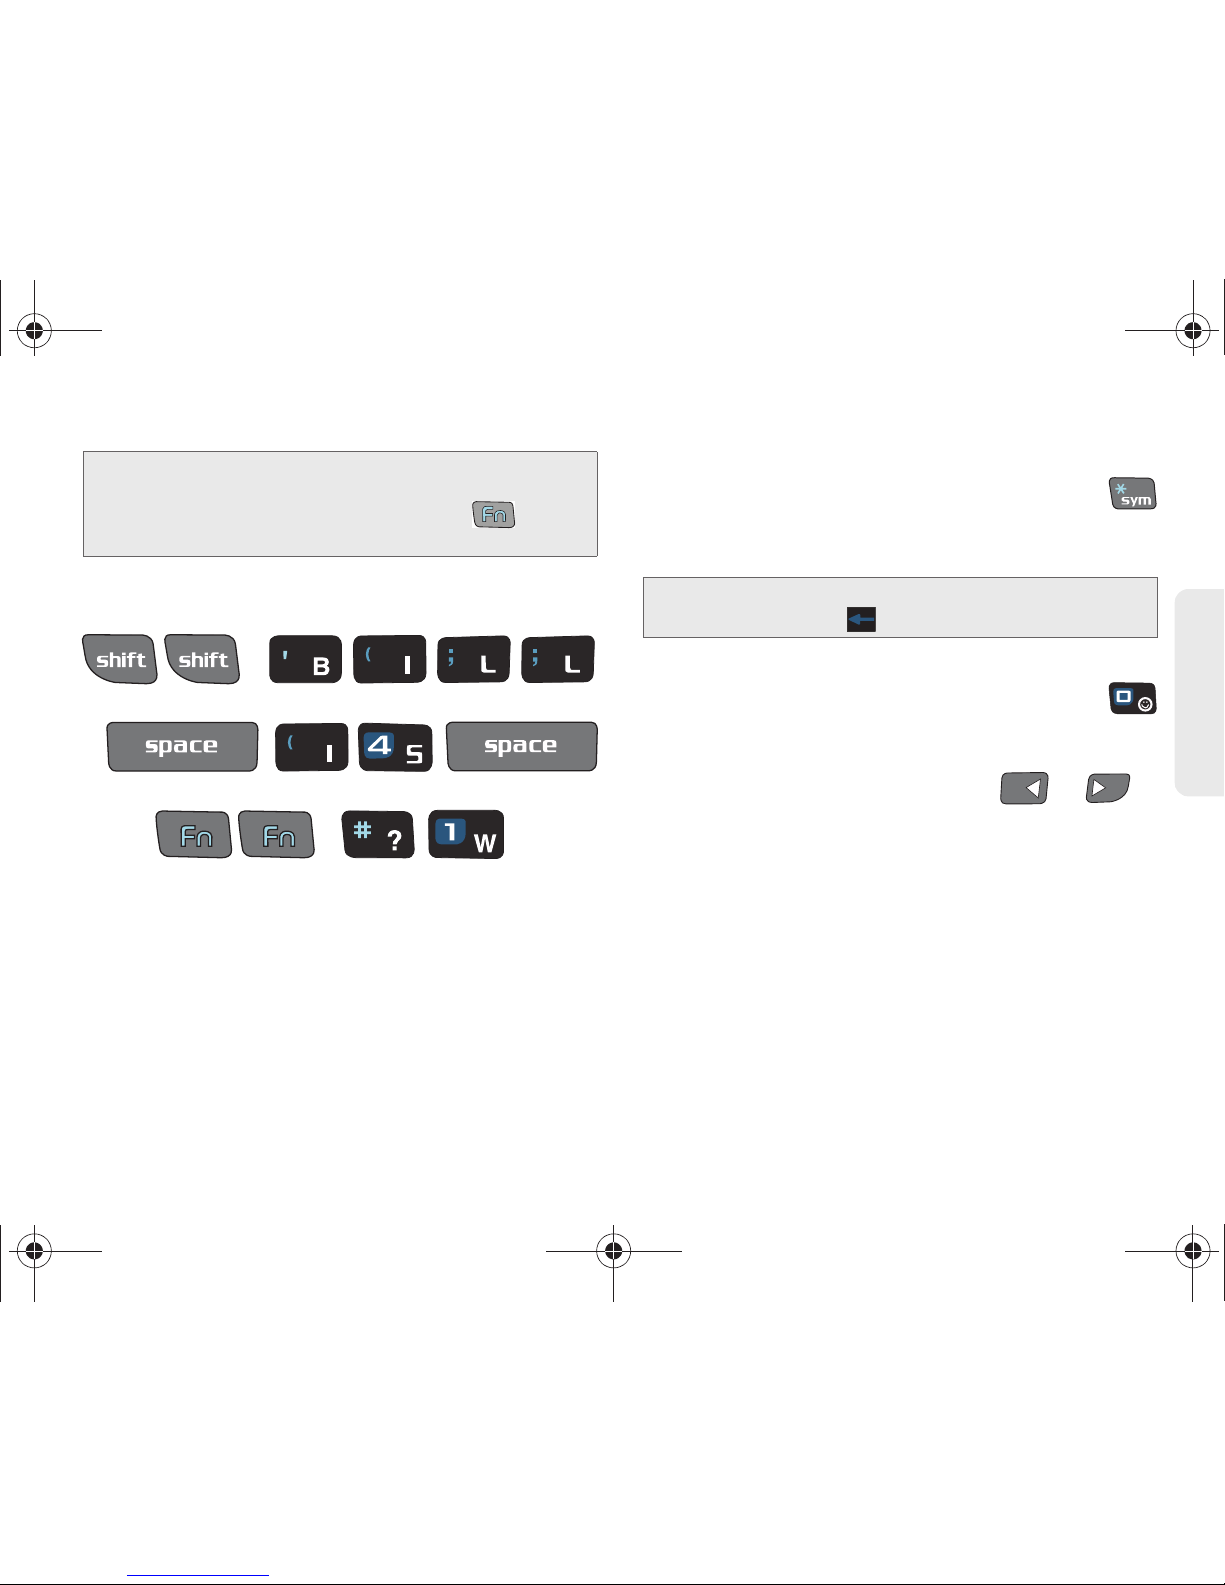
Example: To enter the name "Bill," press the following
keys:
Entering Numbers and Punctuation
䊳 Press and then press the key with the
desired character displayed on top.
䡲 For example, to enter 9, press and then
press .
To enter only the top row of characters, double press
to fix all consecutive characters.
Example: To enter “9:30,” you would use the keyboard
sequence shown below.
OK/Enter – Accepts a change or option.
While entering text, moves the insertion
point to the next line in a message, like
the Enter key on a computer keyboard.
Back – Deletes the previous character,
similar to the backspace key on a
computer keyboard.
Keyboard Functions
B i l l
9 : 3 0
M350.book Page 34 Monday, October 11, 2010 9:58 AM
Page 45
2A. Phone Basics 35
Phone Basics
Example: Here's an example showing how to enter a
combination of letters and numbers.
Entering Symbols and Smiley’s
Symbols and Smiley’s (emoticons) are entered by
accessing onscreen menus and touching the desired
item.
To enter symbols:
1. With the cursor in the desired location, press .
2. Touch the numeric key corresponding to the
desired symbol.
To enter smiley’s
1. With the cursor in the desired location, press .
2. Touch the numeric key corresponding to the
desired smiley or emoticon. (To display additional
symbols, use the navigation keys
or to
reveal additional pages.)
To edit specific text by touching the screen:
䊳 Use your fingertip to touch a location in your text
message. The cursor then appears at that location.
To edit specific text using the onscreen navigation keys:
䊳 Use the navigation keys to place your cursor in the
desired location.
Note: In some applications, certain fields may default to
entering numbers (such as the phone number fields in
Contacts). In others, you will need to use to enter
numbers.
B I L L is #1
Note: You can exit from the Symbols page by pressing any
keyboard key or .
M350.book Page 35 Monday, October 11, 2010 9:58 AM
Page 46
36 2A. Phone Basics
䡲 If you make a mistake, press to reveal the
keyboard and press
to erase a single
character.
䡲 Press and hold to erase an entire word or
all entered characters.
M350.book Page 36 Monday, October 11, 2010 9:58 AM
Page 47
2B. Settings 37
Settings
⽧ Personalizing Your Phone (page 37)
⽧ Sound Settings (page 38)
⽧ Display Settings (page 40)
⽧ Touch Settings (page 41)
⽧ Location Settings (page 42)
⽧ Messaging Settings (page 43)
⽧ Airplane Mode (page 43)
⽧ TTY Use With Sprint Service (page 44)
⽧ Updating the Phone’s Software (page 45)
⽧ Updating the PRL (page 45)
⽧ Updating the Data Profile (page 45)
⽧ Favorites (page 46)
⽧ Security Settings (page 46)
Personalizing Your Phone
Assigning a Background Image
Choose what you see on the screen while powering on
or off and when in the unlock screen. See “Assigning
an Image to the Background Display” on page 100.
1. Press and touch Main () > Settings >
Display > Background.
2. Choose a source for your new image by touching
the corresponding onscreen button. (A list of
available images will be displayed.)
䡲 Choose from: Take Picture, Preset Images, My
Photos, or Downloads.
3. Scroll through the available images and with the
selected image onscreen, touch
Assign. (For more
information on downloading images, see
“Downloading Games, Ringers and More” on
page 143.)
2B. Settings
Main
M350.book Page 37 Monday, October 11, 2010 9:58 AM
Page 48
38 2B. Settings
䡲 Touch to access the online Downloads
page where you can then purchase new images.
䡲 Follow the onscreen instructions.
Sound Settings
Ringer Types
Ringer types help you identify incoming calls and
messages. You can assign ringer types to individual
Contacts entries, types of calls, and types of messages.
Selecting Ringer Types
Your phone provides a variety of ringer options that allow
you to customize your ring and volume settings. These
options allow you to identify incoming calls, messages,
voicemails, alarm, timer, and calendar entries by the ring.
1. Press and touch Main () > Settings >
Ringers & Vibrations.
2. Touch the entry for which you want to add a ringer
type (
Voice Call, Voicemail, Message, Alarm/Timer/
Calendar).
3. Scroll through the list of available ringer sounds.
䡲 Touch to play a sample of the current sound
file.
4. Touch a sound name to assign it.
Activating Voice Notification
This feature will call out a phone number instead of
using your assigned ringer.
1. Press and touch Main () > Settings >
Ringers & Vibrations.
2. Locate the Voice Notification field.
3. Touch the adjacent button until it displays either On
or
Off. This activates or deactivates the feature.
Getting New Ringers
A wide variety of new ringers is available from the
Sprint Digital Lounge, and you can access them right
from your phone. (Additional charges may apply, but
some are free.)
1. Press and touch Main () > Settings >
Ringers & Vibrations.
Main
Main
Main
M350.book Page 38 Monday, October 11, 2010 9:58 AM
Page 49
2B. Settings 39
Settings
2. Select a call or message type to display a list of
ringer type categories. Touch the ringer name field.
3. Press . (The browser starts and displays the
appropriate menu.)
4. Search through available ringers. When you find
one you want, press it.
5. To make a purchase, touch Download. (Your phone
automatically downloads the ringer.)
6. When the download is finished, read the onscreen
message and touch
Done.
䡲 The message reads: “To assign your ringer go to
Settings > Ringers or add it as a custom ringers
in contacts”.
Adjusting the Phone’s Volume Settings
Adjust your phone’s volume settings to suit your needs
and your environment.
Adjusting the Ringer Volume
1. Press and touch Main () > Settings >
Volume.
2. Touch and drag the Ringer Volume slider left or
right to adjust the volume level.
3. Once you are done, press .
Adjusting the System Volume
1. Press and touch Main () > Settings >
Volume.
2. Touch and drag the System volume slider left or
right to adjust the volume level.
Adjusting Other Volume Settings
1. Press and touch Main () > Settings >
Volume.
2. Touch the corresponding buttons to toggle it to the
On or Off state.
䡲 Choose from: Touch Vibrate, Touch Tone, and
Startup/Shutdown.
3. Once you are done, press .
Main
Tip: You can adjust the ringer volume (or the earpiece volume
during a call) by using the volume button on the left side
of your phone.
Main
Main
M350.book Page 39 Monday, October 11, 2010 9:58 AM
Page 50
40 2B. Settings
Always Vibrate
The Always Vibrate option allows you to add a vibrate
to a ringer. This option is only available with volume
levels
1 Beep and Levels 1 - 8.
To activate Always Vibrate:
1. Press and touch Main () > Settings >
Volume.
2. Touch the Always Vibrate button to toggle it to the
On state.
To deactivate Always Vibrate
1. Press and touch Main () > Settings >
Volume.
2. Touch the Always Vibrate button to toggle it to the
Off state.
Silence All
The Silence All option allows you to mute all sounds
without turning your phone off.
To activate Silence All:
䊳 Press and hold the volume button down until
Silence All appears onscreen.
To deactivate Silence All:
䊳 Press and hold the volume button up repeatedly to
select a new volume level.
Display Settings
Changing the Backlight Time Length
Select how long the display screen remains backlit
after any action.
To set the backlight dim time:
1. Press and touch Main () > Settings >
Display > Dim.
2. Touch a time setting.
Main
Main
Note: Long backlight settings reduce the battery’s talk and
standby times.
Main
M350.book Page 40 Monday, October 11, 2010 9:58 AM
Page 51
2B. Settings 41
Settings
To set the backlight deactivation time:
1. Press and touch Main () > Settings >
Display > Keypad Backlight.
2. Touch a time setting.
Adjusting the Screen's Brightness
Adjust your screen’s brightness to suit your
surroundings.
1. Press and touch Main () > Settings >
Display.
2. Touch and drag the Brightness slider left or right to
adjust the brightness level.
Adjusting the Display Language
1. Press and touch Main () > Settings >
General.
2. Touch Language and select the desired language
for the user-interface.
3. Choose either English or Spanish.
Color Theme
This theme adds a selected color blend to all available
menu titles and menu tabs.
1. Press and touch Main () > Settings >
Display.
2. Touch Color Theme and select the desired color.
3. Choose either Black or Red.
Touch Settings
Touch Sensitivity
The Samsung Seek’s touchscreen requires a small
amount of pressure to operate. The smaller the size of
your contact point on the screen, the less the amount
of pressure required. The tip of your finger will work
better than the pad of your finger, and a fingernail will
require even less pressure. Initially, your phone's
sensitivity is set to its highest level. Once you have
discovered your preferred method for operating your
touchscreen, you may find that it is too sensitive for
Main
Main
Main
Main
M350.book Page 41 Monday, October 11, 2010 9:58 AM
Page 52
42 2B. Settings
some applications. You can adjust how sensitive the
phone is to touch actions on the screen.
1. Press and touch Main () > Settings >
General > Touch Sensitivity.
2. Touch and drag the slider left or right to adjust the
sensitivity level.
䡲 Touch the onscreen Touch here button to gauge
the response of the new sensitivity level.
3. Once you are done, press .
Location Settings
Your phone is equipped with a Location feature for use
in connection with location-based services.
The Location feature allows the network to detect your
position. Turning Location off will hide your location
from everyone except 911.
To enable your phone’s Location feature:
1. Press and touch Main () > Settings >
General.
2. Touch the Location button. Read the disclaimer
and touch
OK.
䡲 Touch the Location button (On when active) until it
reads
Off position (feature disabled).
3. Once you are done, press .
Main
Note: Turning Location on will allow the network to detect
your position using GPS technology, making some
Sprint applications and services easier to use. Turning
Location off will disable the GPS location function for all
purposes except 911, but will not hide your general
location based on the cell site serving your call. No
application or service may use your location without
your request or permission.
GPS-enhanced 911 is not available in all areas.
Main
M350.book Page 42 Monday, October 11, 2010 9:58 AM
Page 53
2B. Settings 43
Settings
Messaging Settings
Your phone’s advanced messaging capabilities let you
send and receive many different kinds of text
messages without placing a voice call. (For more
information, see “Accessing Messages” on page 130.)
Messaging settings make text messaging easier by
letting you decide how you would like to be notified of
new messages.
Deleting Old Messages
To delete selected messages:
1. Press and touch Main () > Messaging.
2. Touch to open the Delete menu.
3. Touch those messages you wish to delete.
Selected messages are then highlighted in blue.
4. Touch and drag the slider right to
confirm the deletion.
Airplane Mode
Airplane Mode allows you to use many of your phone’s
features, such as Camera and Notes, when you are in
an airplane or in any other area where making or
receiving calls or data is prohibited. When you set your
phone to Airplane Mode, it cannot send or receive any
calls or access online information.
1. Press and touch Main () > Settings >
General.
2. Touch the Airplane Mode button to toggle it to
either the
On or Off state.
3. Read the onscreen message and touch OK to
continue.
While in Airplane Mode, your phone’s standby screen
will display “Phone off.”
Note: Messages can also be deleted by touching and
holding the selected message until it detaches from the
list, dragging it over the Delete icon, and then lifting your
finger to release it into the Trash Bin.
Main
Delete Selected
Main
M350.book Page 43 Monday, October 11, 2010 9:58 AM
Page 54
44 2B. Settings
TTY Use With Sprint Service
A TTY (also known as a TDD or Text Telephone) is a
telecommunications phone that allows people who are
deaf, hard of hearing, or who have speech or language
disabilities, to communicate by telephone.
Your phone is compatible with select TTY devices.
Please check with the manufacturer of your TTY device
to ensure that it is compatible with digital cell phones.
Your phone and TTY device will connect via a special
cable that plugs into your phone’s headset jack. If this
cable was not provided with your TTY device, contact
your TTY device manufacturer to purchase the
connector cable.
To turn TTY Mode on or off:
1. Press and touch Main () > Settings >
General > TTY. (An informational message will be
displayed.)
2. Touch OK.
3. Touch TTY OFF to turn TTY mode off.
– or –
Touch any of the following to enable the feature:
● TTY Full, TTY + Hear, or TTY + Talk.
To access the state Telecommunications Relay Service
(TRS) for assistance with TTY calls:
䊳 Dial and press to
reach an operator.
For additional information about Sprint Relay Services
and TTY compatibility, call Sprint Relay Customer
Service at
800-676-3777 or visit www.sprintrelay.com.
For additional technical support you may call
1-888-987-4357, or access the following website:
www.samsung.com/us/consumer/learningresources/
mobile/accessibility/pop_accessibility.html.
Main
Note: In TTY Mode, your phone will display the TTY access
icon.
If TTY mode is enabled, the audio quality of non-TTY
devices connected to the headset jack may be
impaired.
Talk
TALK
M350.book Page 44 Monday, October 11, 2010 9:58 AM
Page 55
2B. Settings 45
Settings
Updating the Phone’s Software
The update phone firmware (software) option allows
you to download and update the software in your
phone automatically. Only the internal software is
updated; no Contacts entries or other information
saved to your phone will be deleted.
1. Press and touch Main () > Settings >
General > Update Software.
2. Follow the onscreen instructions.
Updating the PRL
The update PRL option allows you to download and
update the PRL (preferred roaming list) in your phone
automatically.
1. Press and touch Main () > Settings >
General > Update PRL.
2. Follow the onscreen instructions.
Updating the Data Profile
If there are any changes to your account such as a
plan change, a change to your username and
password, etc., it will be necessary to update this profile
to your phone.
1. Press and touch Main () > Settings >
General > Update Data Profile.
2. Follow the onscreen instructions.
WARNING: 911 Emergency Calling
Sprint recommends that TTY users make
emergency calls by other means, including
Telecommunications Relay Services (TRS),
analog cellular, and landline communications.
Wireless TTY calls to 911 may be corrupted
when received by public safety answering points
(PSAPs), rendering some communications
unintelligible. The problem encountered appears
related to software used by PSAPs. This matter
has been brought to the attention of the FCC,
and the wireless industry and the PSAP
community are currently working to resolve this.
Main
Main
Main
M350.book Page 45 Monday, October 11, 2010 9:58 AM
Page 56
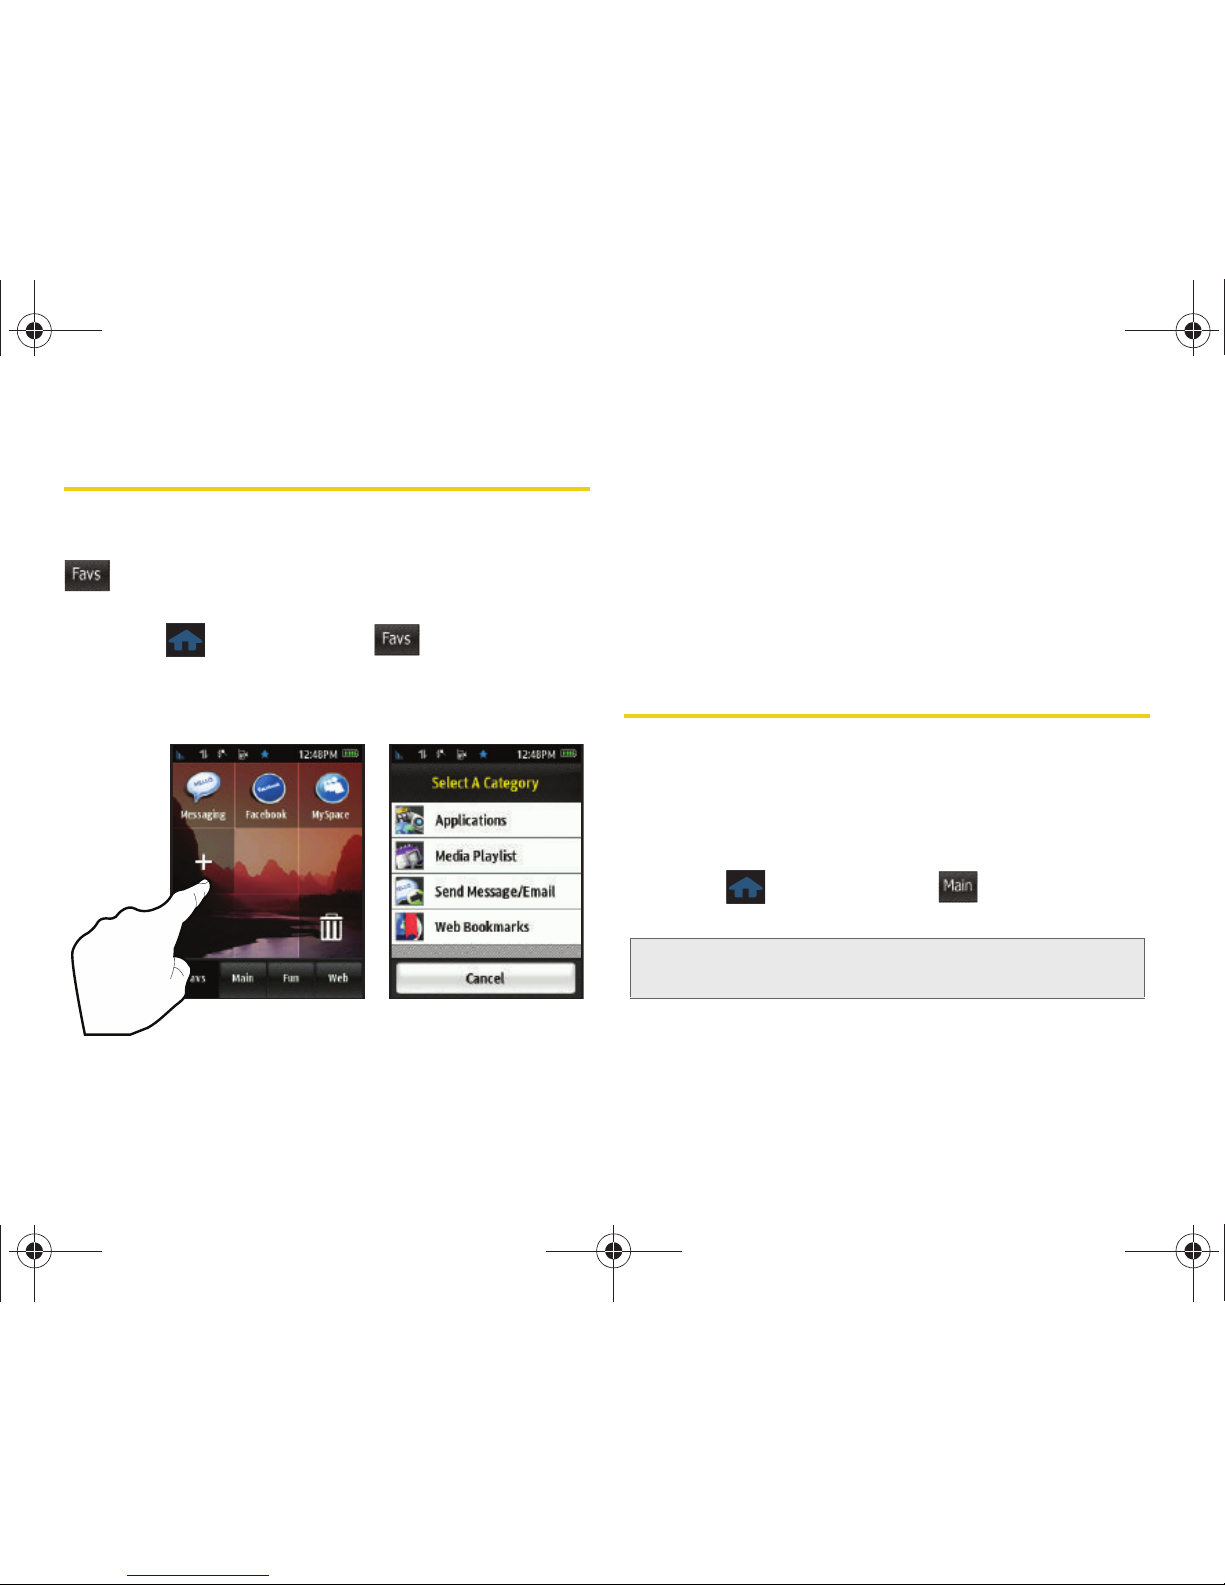
46 2B. Settings
Favorites
Your phone offers you the option of assigning shortcuts
to favorite or often-used functions. You can use the
function to quickly launch your personally
designated shortcuts.
䊳 Press and touch Favs ().
To add an application as a Favorite Function:
1. Touch the onscreen + button.
2. Touch Applications and choose to assign a favorite
from one of the following category types:
Main, Fun
or
Web.
3. Touch an application from one of these five
category functions to add it to the Favorites page.
4. Repeat this process to add other functions and
applications.
Security Settings
Accessing the Security Menu
All of your phone’s security settings are available
through the Security menu. You must enter your lock
code to view the Security menu.
䊳 Press and touch Main () > Settings >
Lock.
Favs
Favs
Note: Initially, the phone does not contain a Lock code until
you create one.
Main
M350.book Page 46 Monday, October 11, 2010 9:58 AM
Page 57
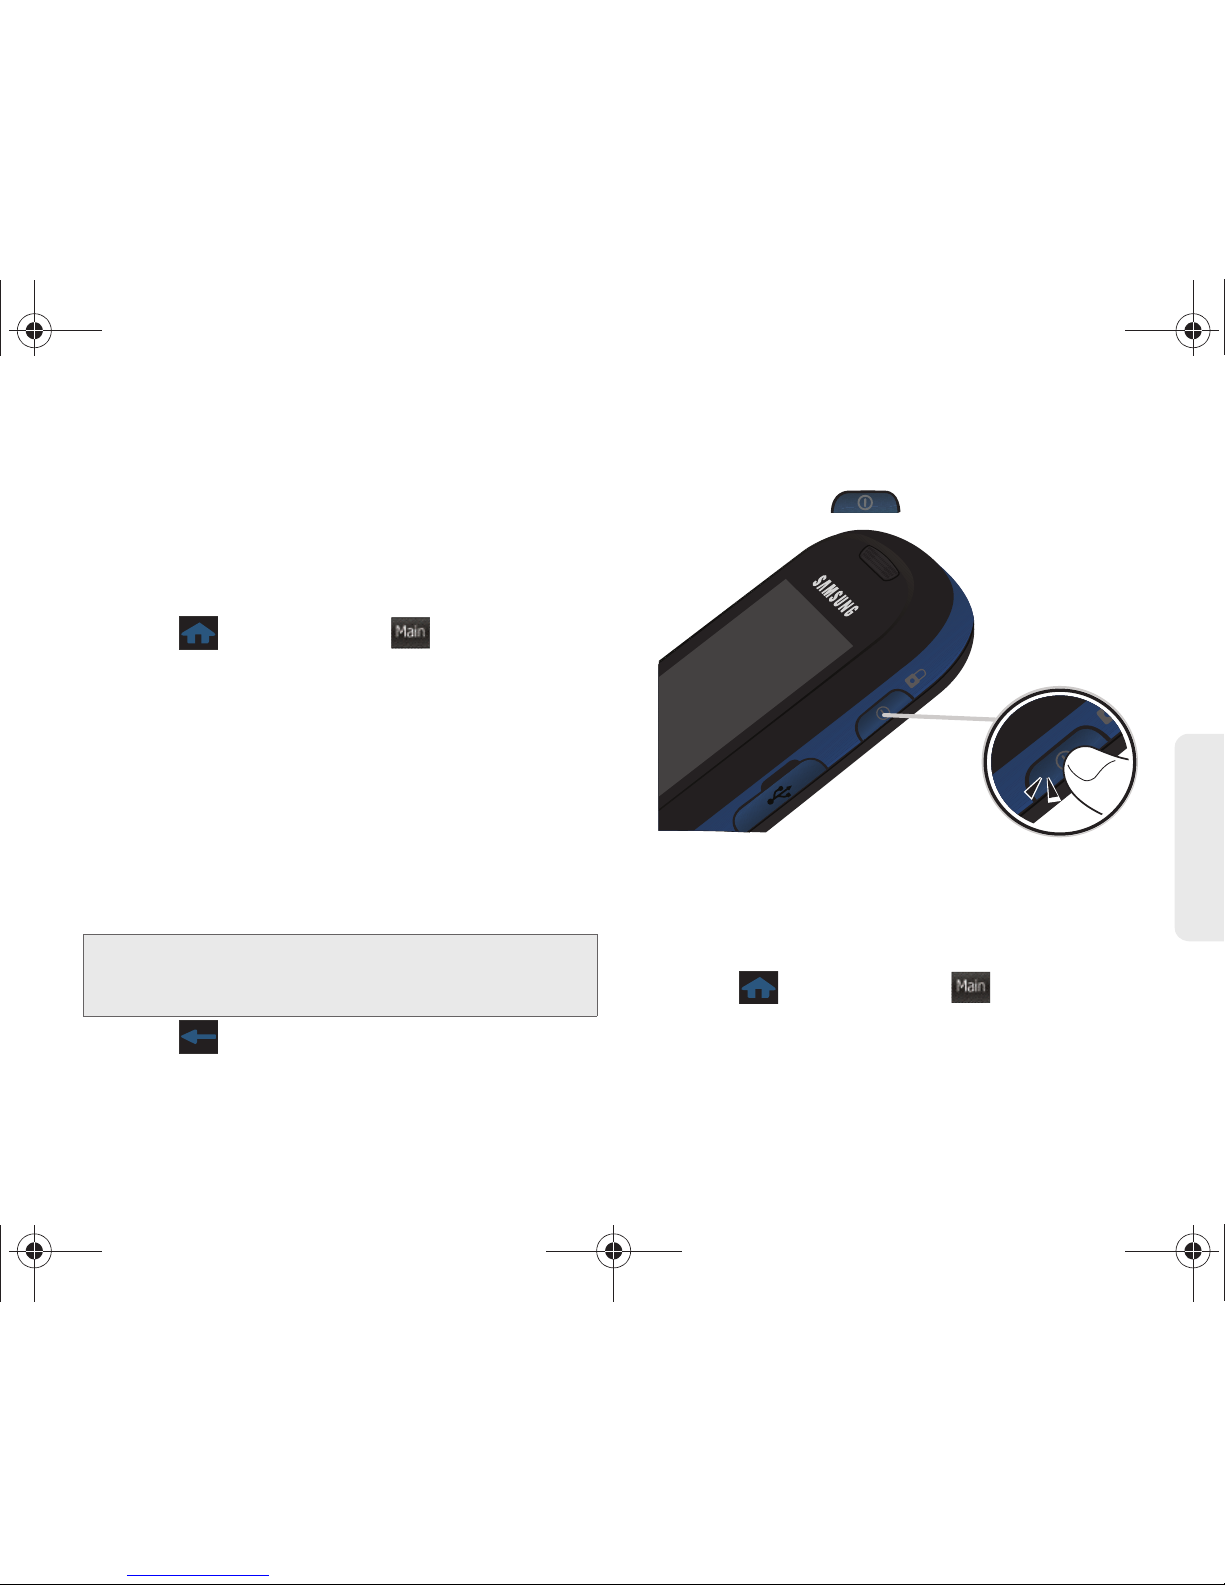
2B. Settings 47
Settings
Your Phone’s Lock Feature
Locking Your Phone
When your phone is locked, your screen turns off and
neither the Display Screen or keyboard will accept
input. Regaining access requires entering a lock code.
1. Press and touch Main () > Settings >
Lock.
2. Use the onscreen keypad to enter a new Lock
Code and touch
Done.
3. Use the onscreen keypad to re-enter the new Lock
Code and touch
Done.
4. Touch the Lock Off button.
5. Read the onscreen information and touch OK to
activate the Lock feature (button is placed in the
On position).
6. Press to return to the previous screen.
Unlocking Your Phone
1. Press and hold to turn the phone on.
2. Drag the screen to unlock it, then enter your lock
code and touch
Done.
Changing the Lock Code
1. Press and touch Main () > Settings >
Lock.
2. Use the onscreen keypad to enter your current lock
code and touch
Done.
Tip: If you can’t recall your lock code, try using the last four
digits of your wireless phone number. If this doesn’t work,
call Sprint Customer Service at
1-888-211-4727.
Main
Main
M350.book Page 47 Monday, October 11, 2010 9:58 AM
Page 58
48 2B. Settings
3.
Touch the Change Lock Code field.
4. Enter your new lock code and touch Done.
5. Re-enter your new lock code and touch Done.
Using Emergency Numbers
Emergency numbers (special numbers) are important
numbers that you have designated as being “always
available.” You can call and receive calls from
emergency numbers even if your phone is locked. You
can save up to two additional numbers to your phone
for a total of three (911 is always your first available
emergency number).
1. Press and touch Main () > Settings >
Lock.
2. Use the onscreen keypad to enter your current lock
code and touch
Done.
3. Touch the Emergency Numbers field.
4. Touch to begin entering your new
emergency numbers via the onscreen keypad.
5. Touch Done to complete the entry and store the
new number to your available list.
To delete an existing Emergency number:
1. Press and touch Main () > Settings >
Lock.
2. Use the onscreen keypad to enter your current lock
code and touch
Done.
3. Touch the Emergency Numbers field.
4. Press and hold the emergency number you want
to delete. The selected number is then detached
from the list.
5. Drag the selected number to the delete icon ( )
and release it by lifting your finger.
Deleting Phone Content
Use the Security menu to quickly erase selected
content you have created or stored in your phone.
1. Press and touch Main () > Settings >
Reset > Delete Contents.
2. Touch an option:
䡲 Delete Contacts to delete all Contacts entries.
䡲 Delete Downloads to delete all downloaded
content such as games, ringers, and images.
Main
Main
Main
M350.book Page 48 Monday, October 11, 2010 9:58 AM
Page 59
2B. Settings 49
Settings
䡲 Delete Messages to delete all received Text and
Picture messages.
䡲 Delete Calendar to delete all calendar events.
䡲 Delete Speed Dial to delete all speed dial entries.
䡲 Delete Favorites to delete your current list of
favorite functions from the Favs list.
3. Touch a category entry then touch Delete to
confirm the deletion.
Resetting Your Phone’s Settings
Resetting the phone settings only restores all of the
factory defaults, including the ringer types and display
settings. Onboard data such as Contacts, History,
Scheduler, and Messaging are not affected.
1. Press and touch Main () > Settings >
Reset > Reset Settings. (A disclaimer is displayed.)
2. Read the disclaimer, write down the lock code, and
touch
Proceed.
3. Enter the lock code provided on the disclaimer by
using the onscreen keypad.
4. Touch Done to reset the phone’s settings.
Resetting Your Phone
Resetting the phone restores all of the factory defaults,
including the ringer types and display settings and
deletes all content stored on the phone.
1. Press and touch Main () > Settings >
Reset > Reset Phone. (A disclaimer is displayed.)
2. Read the disclaimer, write down the lock code, and
touch
Proceed.
3. Enter the lock code provided on the disclaimer by
using the onscreen keypad.
4. Touch Done to restore your phone to its factory
default state.
Note: If Parental Control has been enabled (page 50), this
code will also need to be entered before continuing.
Main
Main
M350.book Page 49 Monday, October 11, 2010 9:58 AM
Page 60
50 2B. Settings
Security Features for Data Services
Net Guard
When you first connect to the Web, the Net Guard will
be displayed to confirm that you want to connect. This
feature helps you avoid accidental connections. You
can disable the Net Guard in the future by selecting
Always Auto-Connect when the Net Guard is displayed.
To change your Net Guard settings:
䊳 Press and touch Main () > Settings >
General > Net Guard.
䡲 Select On to activate the Net Guard.
䡲 Select Off to deactivate the Net Guard.
Using Parental Controls
You can disable certain phone services without turning
off your phone. You can restrict access to all data
services, including Web and messaging.
Disabling data services will avoid any charges
associated with these services. While signed out, you
can still place or receive phone calls, check voicemail,
and use other voice services. You may enable data
services again at any time.
New Parental Controls provide restrictions to various
phone services such as Voice, Messaging, Data, and
Camera.
These restrictions are governed by an independent
Parental Code that is separate from the previously
mentioned Lock code.
To enable Parental Controls:
1. Press and touch Main () > Settings >
Parental Controls.
2. Touch the Parental Controls button to toggle it to
the
On state. (Additional options then appear
onscreen.)
Note: When enabled, the Net Guard appears only once as
long as you have not turned the phone off and on.
Main
Main
M350.book Page 50 Monday, October 11, 2010 9:58 AM
Page 61
2B. Settings 51
Settings
3. If this is your first time to setup these controls, you
will be asked to setup a parental lock code that
manages the areas that will be locked via this
menu.
䡲 Enter a new four-digit code and touch Done.
䡲 Re-enter the new code and touch Done.
To disable Parental Controls:
1. Press and touch Main () > Settings >
Parental Controls.
2. Touch the Parental Controls button to toggle it to
the
Off state.
3. Enter your current four-digit code into the onscreen
dialpad and touch
Done.
Configuring Restrictions
To disable data services:
1. Press and touch Main () > Settings >
Parental Controls > Restriction.
2. Touch any of the following buttons to either activate
or deactivate an option.
䡲 Voice to lock the phone and prevent outgoing
calls. Incoming calls can still be received.
䡲 Messaging to restrict access to the Messaging
folder, including all Text and Picture messages.
䡲 Web Browser to restrict access to all data features
such as Internet, and other data usage.
䡲 Camera to restrict access to the Camera
functionality.
3. Press to return to the previous page.
Changing the Parental Control Code
1. Press and touch Main () > Settings >
Parental Controls > Change Parental Control Code.
2. Enter your current four-digit code into the onscreen
keypad and touch
Done.
3. Enter a new four-digit code and touch Done.
4. Re-enter the code and touch Done.
Main
Main
Main
M350.book Page 51 Monday, October 11, 2010 9:58 AM
Page 62
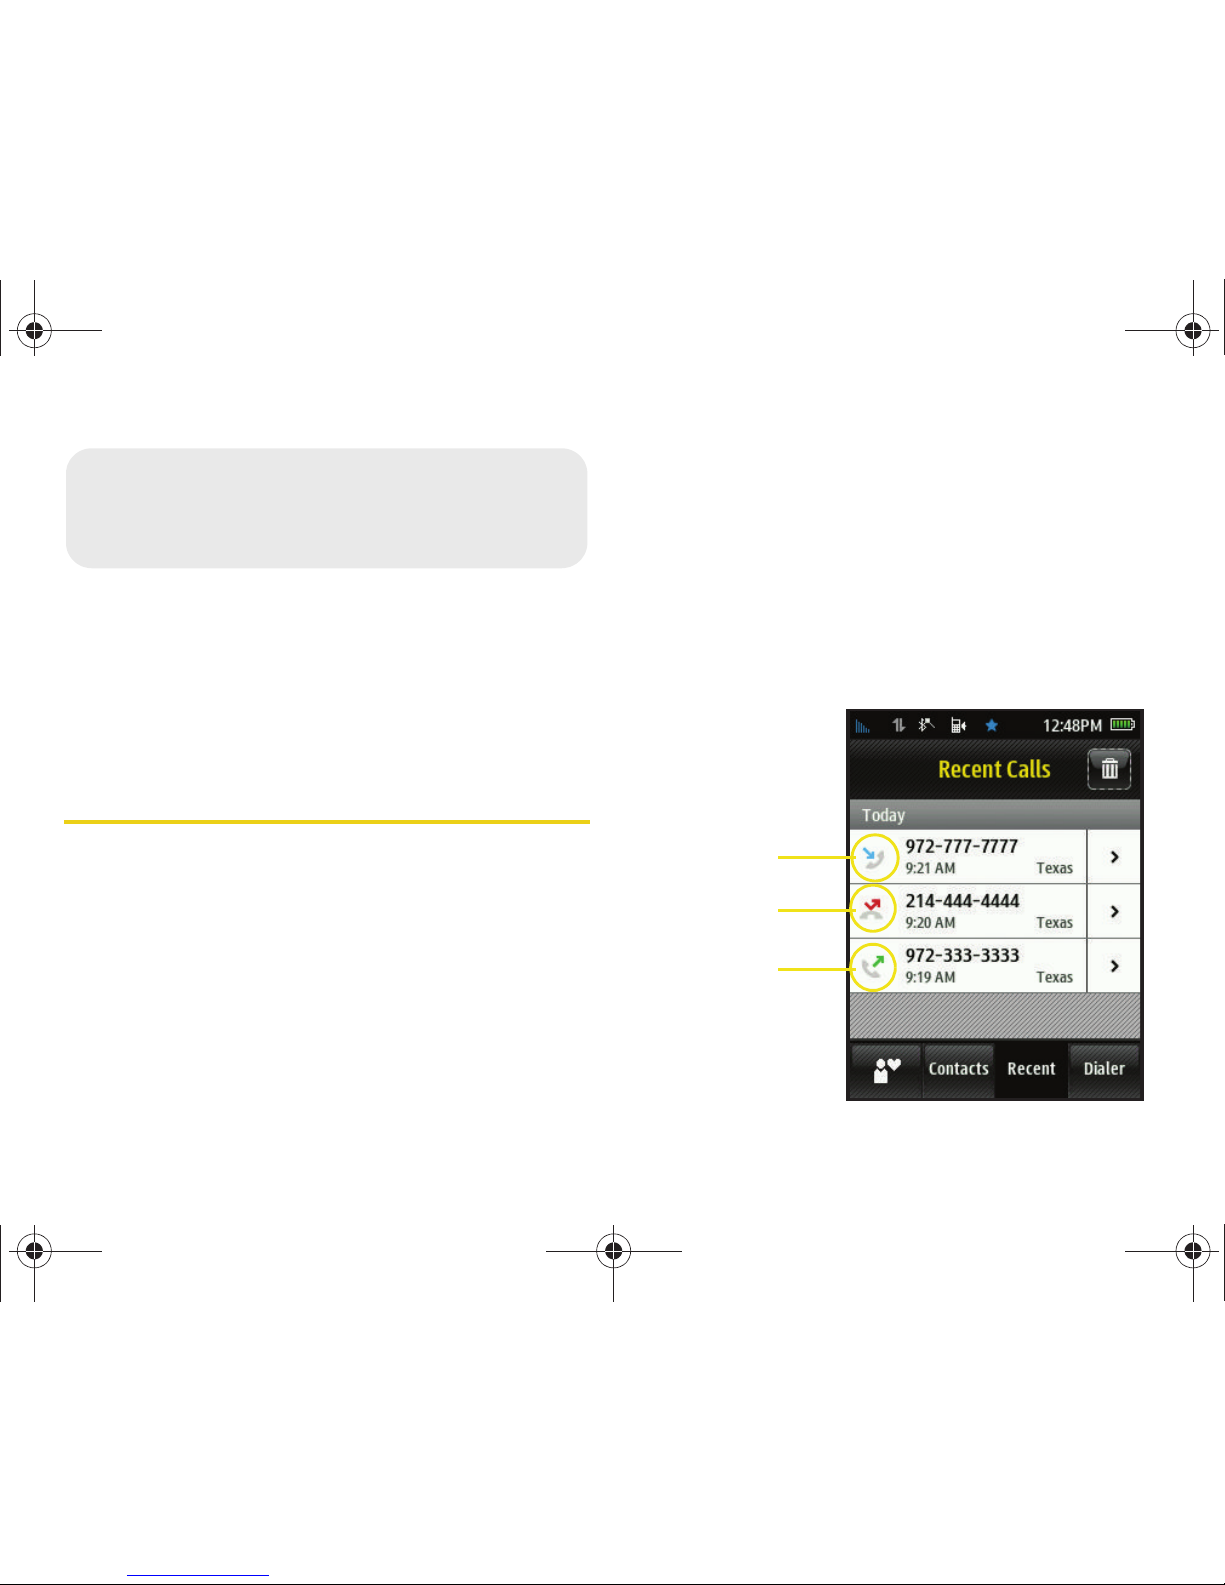
52 2C. History
⽧ Viewing Recent Calls (page 52)
⽧ Recent Calls Options (page 53)
⽧ Making a Call From Recent Calls (page 54)
⽧ Saving a Phone Number From Recent Calls (page 55)
⽧ Erasing History Entries (page 56)
Viewing Recent Calls
Recent Calls is a list of your call history: up to 240 (80
incoming, 80 outgoing, and 80 missed) phone
numbers (or Contacts entries) for calls you placed,
accepted, or missed. Recent Calls makes redialing a
number fast and easy. This list of your call history is
continually updated as new numbers are added to the
beginning of the list and the oldest entries are removed
from the bottom of the list.
When you place, accept, or miss a call, a record of the
call is saved in the Recent Calls list. When you view the
numbers in this list, the phone icon to the left of the
number indicates the call type:
䡲 Received: Indicates any received calls that were
answered.
䡲 Missed: Indicates any missed calls.
䡲 Dialed: Indicates all outgoing calls made from
your phone.
2C. History
Missed Call
Dialed Call
Received Call
M350.book Page 52 Monday, October 11, 2010 9:58 AM
Page 63
2C. History 53
History
Each entry contains the phone number (if it is
available) and Contacts entry name (if the phone
number is in your Contacts). Duplicate calls (same
number and type of call) may only appear once on the
list.
1. Press and touch Recent ().
2.
Touch the entry’s phone number to dial it.
– or –
Touch the entry’s
to display history options
(page 53).
Recent Calls Options
1. Press and touch Recent ().
2.
Touch to display an entry’s options.
3. If the entry is not currently part of your Contacts list,
touching
reveals the following options:
䡲 Save to store the entry into your Contacts list.
䡲 Call to dial the phone number for the currently
selected entry.
䡲 Message to send the current history entry a new
text message.
䡲 History provides a specific call history list for the
current entry.
Note: Recent Calls records only calls that occur while the
phone is turned on. If a call is received while your
phone is turned off, it will not be included in the phone’s
call history. SMS conversation histories are also saved.
If you return a call from the voicemail menu, it will not be
included in your phone’s history.
Recent
Tip: An unknown entry only displays a contact number.
Tip: A known entry (found within the Contacts list) is shown
with the entry name and contact number.
Recent
M350.book Page 53 Monday, October 11, 2010 9:58 AM
Page 64
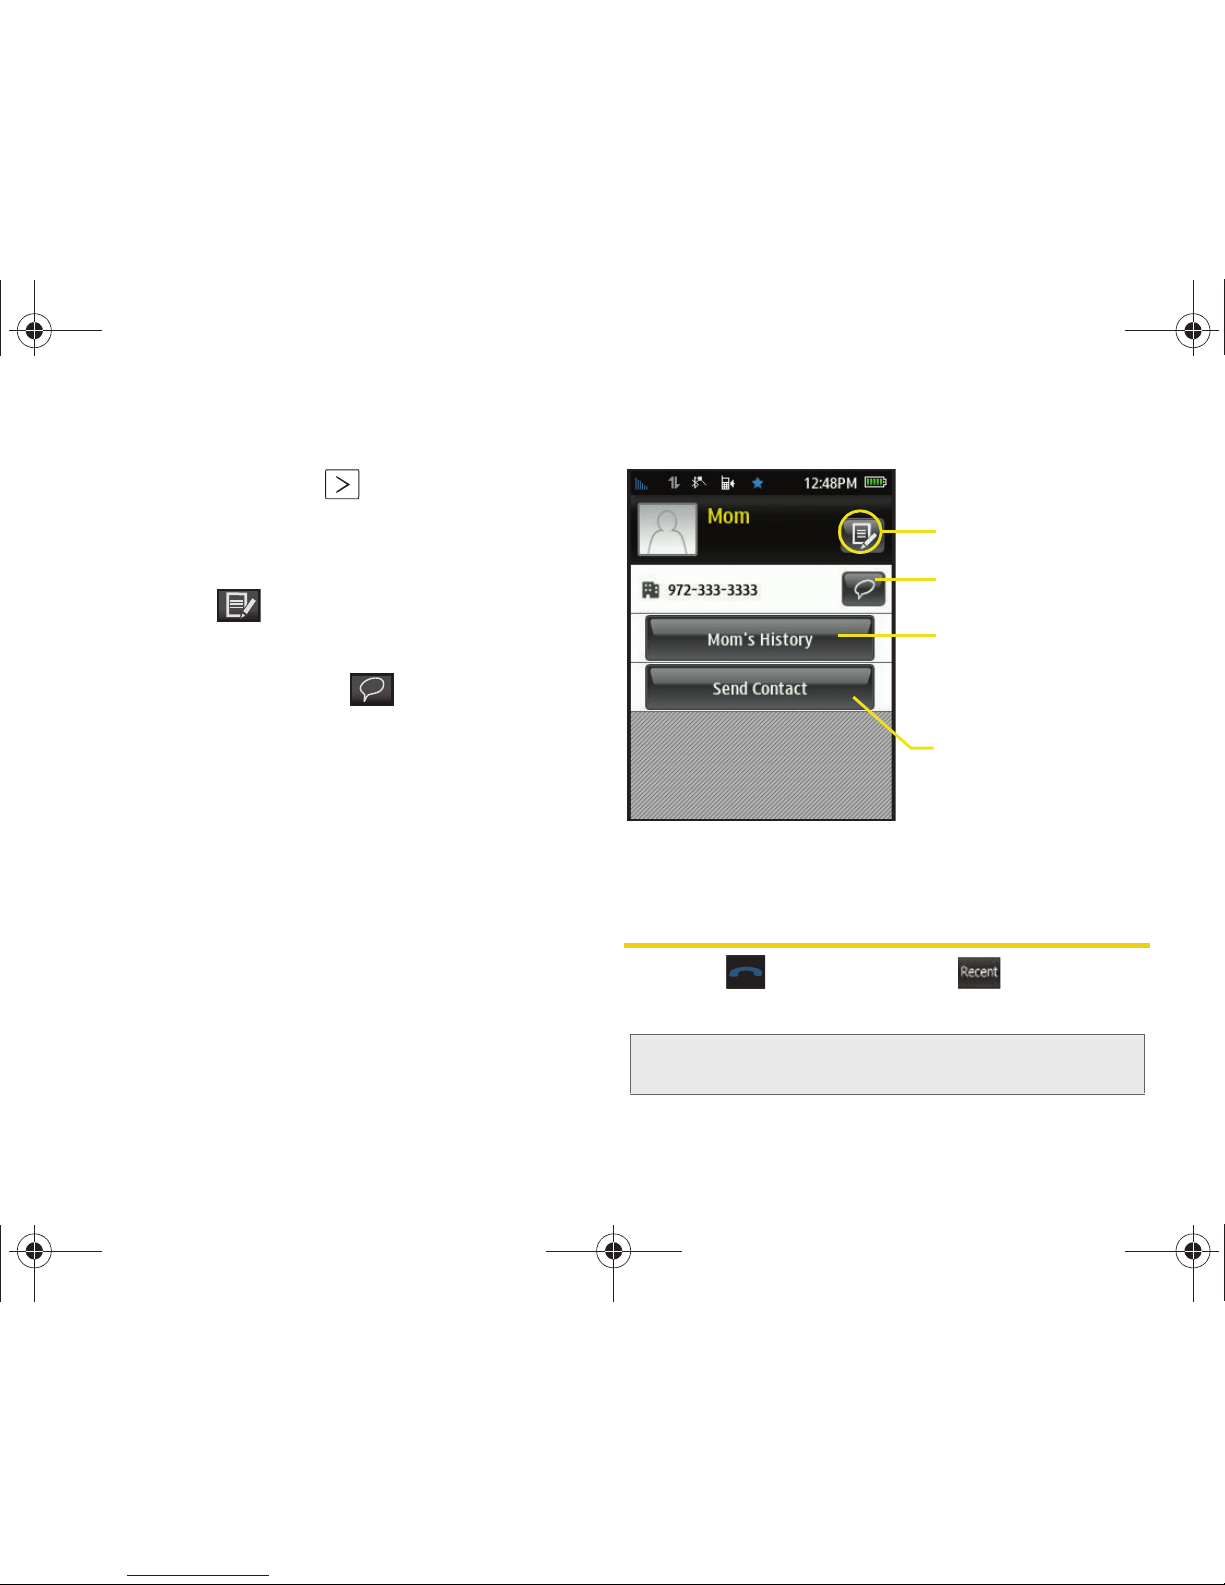
54 2C. History
4.
If the entry has been previously entered into your
Contacts list, touching
reveals the Contacts
entry page and the following options:
䡲 Caller’s name (if the number is already in your
Contacts).
䡲 Edit Entry ( ) to either edit the existing number
(if already in your Contacts list) or create a new
entry.
䡲 Send New Text Message ( ) to send the current
recent call entry a text message.
䡲 <Name’s> history provides a specific call history
list for the current entry.
䡲 Send Contact delivers the current recent call entry
information to an available user via a wireless
Bluetooth connection. See “2I. Bluetooth” on
page 104.
Making a Call From Recent Calls
1. Press and touch Recent ().
2.
Touch an entry’s name or number.
Note: You cannot make calls from within the Recent Calls list
that are identified as
No ID or Restricted.
Edit Entry Button
Send New Text
Contact’s History
Send Contact Info via
Bluetooth Button
Message Button
Button
Contact entry’s options page
Recent
M350.book Page 54 Monday, October 11, 2010 9:58 AM
Page 65
2C. History 55
History
Saving a Phone Number From
Recent Calls
Your phone can store up to 600 Contacts entries.
Contacts entries can store up to a total of 4200 phone
numbers, and each entry’s name can contain 64
characters. See “Saving a Phone Number” on page 29.
Saving a New Number from Recent Calls
1. Press and touch Recent ().
2.
Touch the unknown History entry’s .
3. Touch Save.
4. Touch either New Contact or Existing Contact.
5. Touch a label (Mobile, Home, Work, Pager, Others).
The screen changes to the Landscape orientation.
6. Touch the Enter Name field and use the keyboard
to enter the new contact name. See “Entering Text”
on page 32.
7. Touch Done (onscreen) to store the name and save
the new entry.
Editing an Existing Number from Recent Calls
1. Press and touch Recent ().
2.
Touch the known entry’s available options
page (page 54).
3. Touch to display the Contacts entry page that
displays the current entry’s information.
4. Touch a field and use the keyboard to either enter
new information or edit any existing field. See
“Entering Text” on page 32.
5. Touch Done (onscreen) to store the name and save
the new entry.
After you have saved the number, the new Contact
Entry’s Options page is displayed. (See “Contacts Entry
Options” on page 59.)
Recent
Note: The phone number is pre-populated into the
appropriate field.
Note: You cannot make calls from within the Recent Calls list
that are identified as
No ID or Restricted.
Recent
M350.book Page 55 Monday, October 11, 2010 9:58 AM
Page 66
56 2C. History
Erasing History Entries
To erase individual Recent Calls entries, see “Recent
Calls Options” on page 53.
To delete all recent call entries:
1. Press and touch Recent ().
2.
Touch to open the Delete Recent Calls screen.
3. Touch to select all entries in the current list.
Selected entries are then highlighted in blue.
4. Touch and drag to the right.
To delete selected recent call entries:
1. Press and touch Recent ().
2.
Touch to open the Delete Recent Calls screen.
3. Touch those entries you wish to delete. Selected
history entries are then highlighted in blue.
4. Touch and drag to the right.
Note: An individual entry can also be deleted by touching
and holding it until it detaches from the list, dragging it
over the Delete icon, and then lifting your finger off the
screen to release it into the Trash Bin.
Recent
Delete Selected
Recent
Delete Selected
M350.book Page 56 Monday, October 11, 2010 9:58 AM
Page 67
2D. Contacts 57
Contacts
⽧ Adding a New Contacts Entry (page 57)
⽧ Saving A Phone Number (page 58)
⽧ Contacts Entry Options (page 59)
⽧ Editing a Contacts Entry (page 61)
⽧ Adding a Number to a Contacts Entry (page 61)
⽧ Editing a Contacts Entry’s Numbers (page 62)
⽧ Deleting Contacts Entries (page 62)
⽧ Assigning Speed Dial Numbers (page 63)
⽧ Selecting a Ringer Type for an Entry (page 64)
⽧ Assigning a Picture to an Entry (page 65)
⽧ Finding Contacts Entries (page 66)
⽧ Transferring Your Contacts (page 66)
⽧ Dialing Sprint Services (page 68)
⽧ Wireless Backup (page 68)
Adding a New Contacts Entry
Your phone can store up to 600 Contacts entries for a
total of up to 4200 phone numbers, and each entry’s
name can contain 64 characters.
1. Press and touch Contacts ().
2. From the upper-left of the Contacts page, touch
to begin creating a new Contacts entry. The
screen is re-oriented to display in Landscape
mode.
3. Touch the Enter Name field, slide out and use the
keyboard to enter a name for the new entry. (See
“Entering Text” on page 32.)
4. Touch the Add Number field, use the keyboard to
enter the phone number.
5. Use the navigation keys or touch an empty white
area to the left of the newly entered number and
select a label for the entry (
Mobile, Home, Work,
Pager, or Others).
2D. Contacts
Contacts
M350.book Page 57 Monday, October 11, 2010 9:58 AM
Page 68
58 2D. Contacts
6.
Touch Done (onscreen) to save the Contacts entry.
Once saved, the new Contacts entry is displayed
within the Contacts page.
Saving A Phone Number
To save a number from standby mode:
1. Press to view the Unlock screen.
2. Touch and drag the screen up to unlock the
phone.
3. Press and touch Dialer ().
4.
Enter a number and touch > Save.
5. Touch either New Contact or Existing Contact.
6. Touch a label (Mobile, Home, Work, Pager, Others).
The screen changes to the Landscape orientation.
7. Touch the Enter Name field and use the keyboard
to enter the new contact name. See “Entering Text”
on page 32.
8. Enter information into any of the other desired
fields by using the keyboard.
9. Touch Done (onscreen) to store the name and save
the new entry.
To save a number from the end-of-call screen:
After you have received or made a call, the phone
displays end-of-call options.
1. Touch and slide to the right to end the
current call.
2. Touch Save > New Contact or Existing Contact.
3. Touch a label (Mobile, Home, Work, Pager, Others).
The screen changes to the Landscape orientation.
Tip: ICE – In Case of Emergency
To make it easier for emergency personnel to identify
important contacts, you can list your local emergency
contacts under “ICE” in your phone’s Contacts list. For
example, if your mother is your primary emergency
contact, list her as “ICE–Mom” in your Contacts list. To list
more than one emergency contact, use
“ICE1–__,”
“
ICE2–__,” etc.
Note: You can transfer all of your contacts from your old
phone to your new Samsung Seek. See “Sending
Contact Information via Bluetooth” on page 108.
Dialer
End Call
M350.book Page 58 Monday, October 11, 2010 9:58 AM
Page 69
2D. Contacts 59
Contacts
4. Touch the Enter Name field and use the keyboard
to enter the new contact name. See “Entering Text”
on page 32.
5. Touch Done (onscreen) to store the name and save
the new entry.
To save a number from the Recent Calls screen:
Any recently received or made calls are stored within
the History page as a chronological list of entries.
1. Press and touch Recent ().
2.
Touch adjacent to a desired entry.
3. Touch Save.
4. Touch either New Contact or Existing Contact.
5. Touch a label (Mobile, Home, Work, Pager, Others).
The screen changes to the Landscape orientation.
6. Touch the Enter Name field and use the keyboard
to enter the new contact name. See “Entering Text”
on page 32.
7. Touch Done (onscreen) to store the name and save
the new entry.
8. Enter information into any of the other desired
fields by using the keyboard.
Contacts Entry Options
To access the Contacts entry's options page:
1. Press and touch Contacts ().
2. Touch an entry to display its available options page
where you can edit the Contacts entry, send a new
text message, view specific calling history or share
information via Bluetooth.
Note: The phone number is pre-populated into the
appropriate field.
Recent
Note: The phone number is pre-populated into the
appropriate field.
Contacts
M350.book Page 59 Monday, October 11, 2010 9:58 AM
Page 70
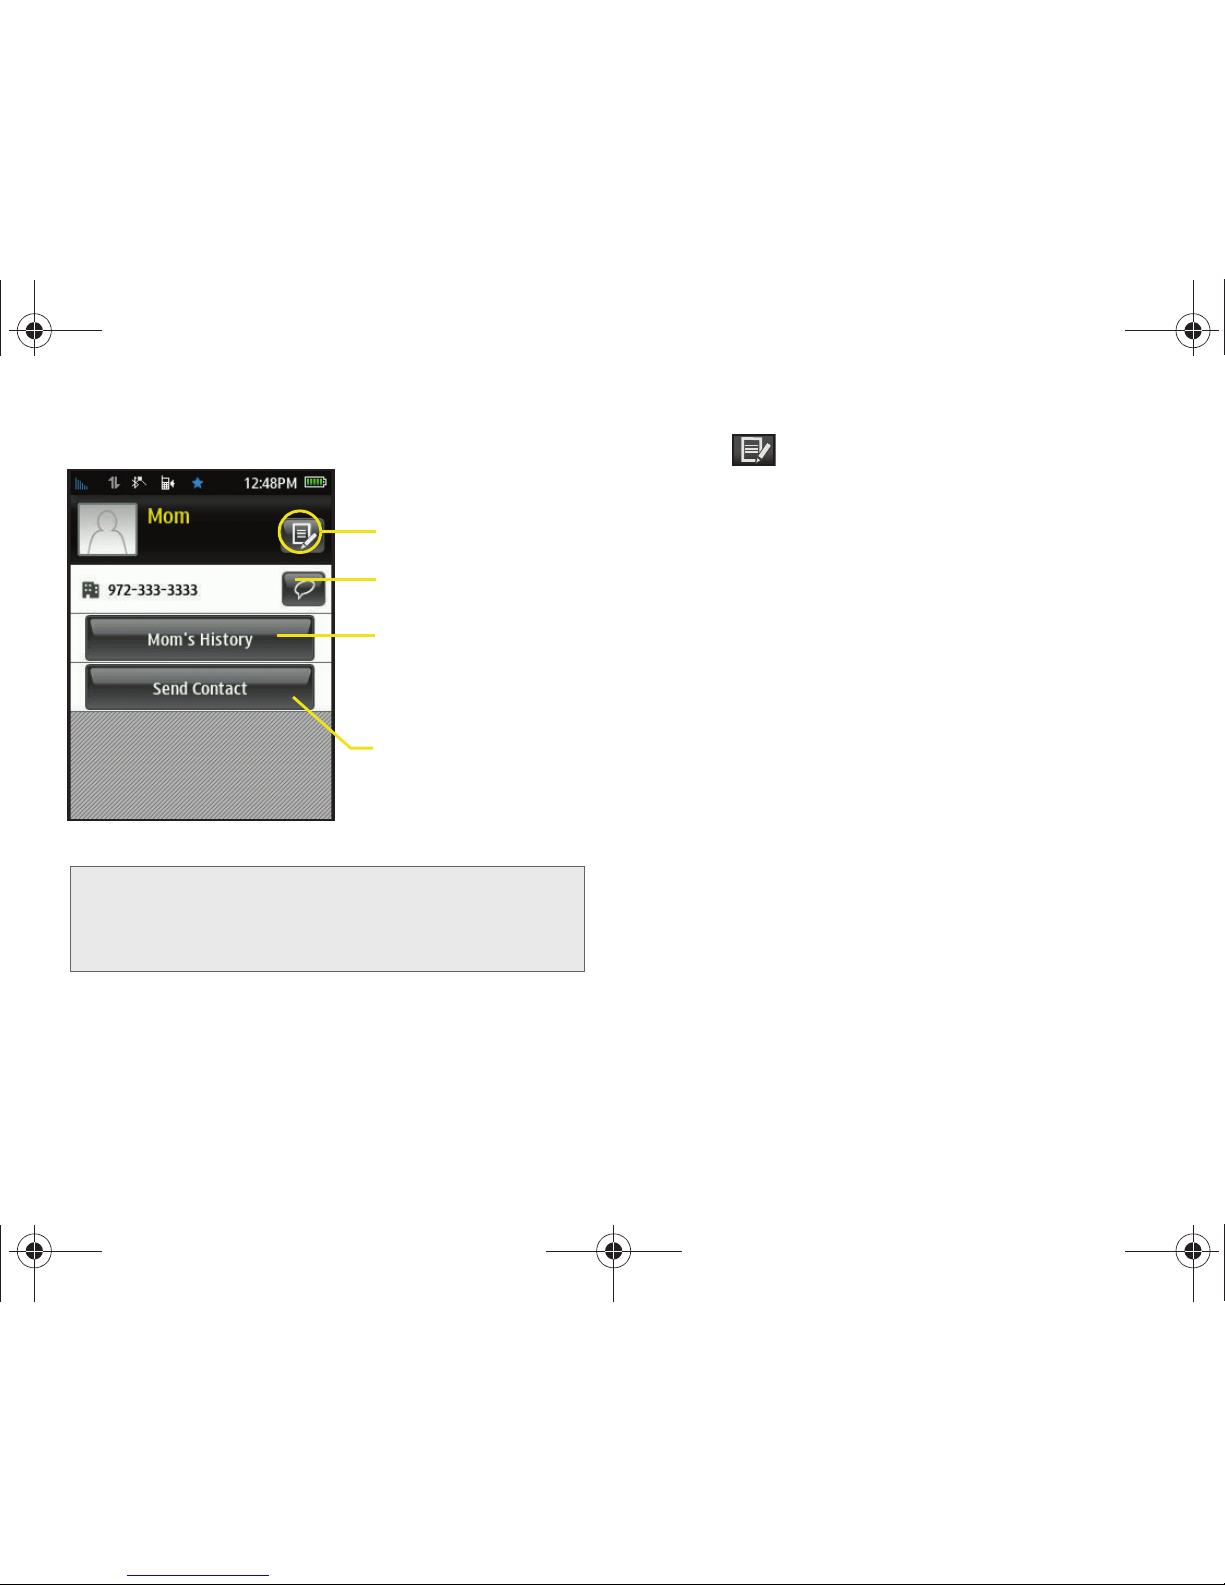
60 2D. Contacts
To access a Contacts entry’s options:
1. Touch a Contacts entry to display its available
options page (page 59).
2. Touch to edit the Contact entry’s information.
䡲 <image icon> to assign a picture to the entry.
Choose an option to select a picture:
● Take Picture to use the camera to take a new
picture and assign it to this entry.
● My Photos to retrieve a previously stored
image from your My Photos folder and assign
it to this entry.
● Downloads to access the Downloads folder
and then assign a previously downloaded
image.
䡲 Add Number to add a phone number to the entry.
(See “Adding a Number to a Contacts Entry” on
page 61.)
䡲 Add Email to add an email address to the entry.
䡲 Enter IM to add an Instant Messenger address to
the entry.
䡲 Enter Address to add a mailing address to the
entry. (Capitalize the two character abbreviation
for the state in the mailing address so that it can
be recognized by applications other than those
on your Samsung Seek.)
Note: If your old phone has Bluetooth capability, you can
transfer Contacts from it to your Samsung Seek.
See “Sending Contact Information via Bluetooth” on
page 108.
Edit Entry Button
Send New Text
Contact’s History
Send Contact Info via
Bluetooth Button
Message Button
Button
Contact entry’s options page
M350.book Page 60 Monday, October 11, 2010 9:58 AM
Page 71
2D. Contacts 61
Contacts
䡲 Set Ringer to assign a custom ring tone to the
entry. This custom ring tone will be played when
an incoming call from this entry is announced.
䡲 Enter URL to add a website’s URL to the entry.
䡲 Enter Birthday to add a birth date to the entry’s
information card.
䡲 Enter Memo to add a note, street address, or other
information.
3. Touch Done (onscreen) to save the Contacts entry.
Once saved, the new Contacts entry is displayed
within the Contacts page.
Editing a Contacts Entry
1. Press and touch Contacts ().
2. Touch to edit the Contact entry’s information.
3. Use your fingertip to scroll up and down the screen
and touch any of the fields.
4. Use your keyboard to update the information on
this page.
5. Touch Done to save the new updates. See “Adding
a New Contacts Entry” on page 57.
Adding a Number to a Contacts
Entry
1. Press and touch Contacts ().
2. Touch an entry to display the entry’s options page.
(See “Contacts Entry Options” on page 59.)
3. From the options page, touch > Add Number.
You may have to scroll down to locate this field.
4. Use the keyboard to enter the new phone number
and touch
Done.
5. Touch an empty white area to the left of the newly
entered number and select a label for the entry
(
Mobile, Home, Work, Pager, or Others).
6. Repeat the previous steps to add additional
numbers with the
Add Number fields.
7. Touch Done (onscreen) to save the new numbers.
Contacts
Contacts
M350.book Page 61 Monday, October 11, 2010 9:58 AM
Page 72
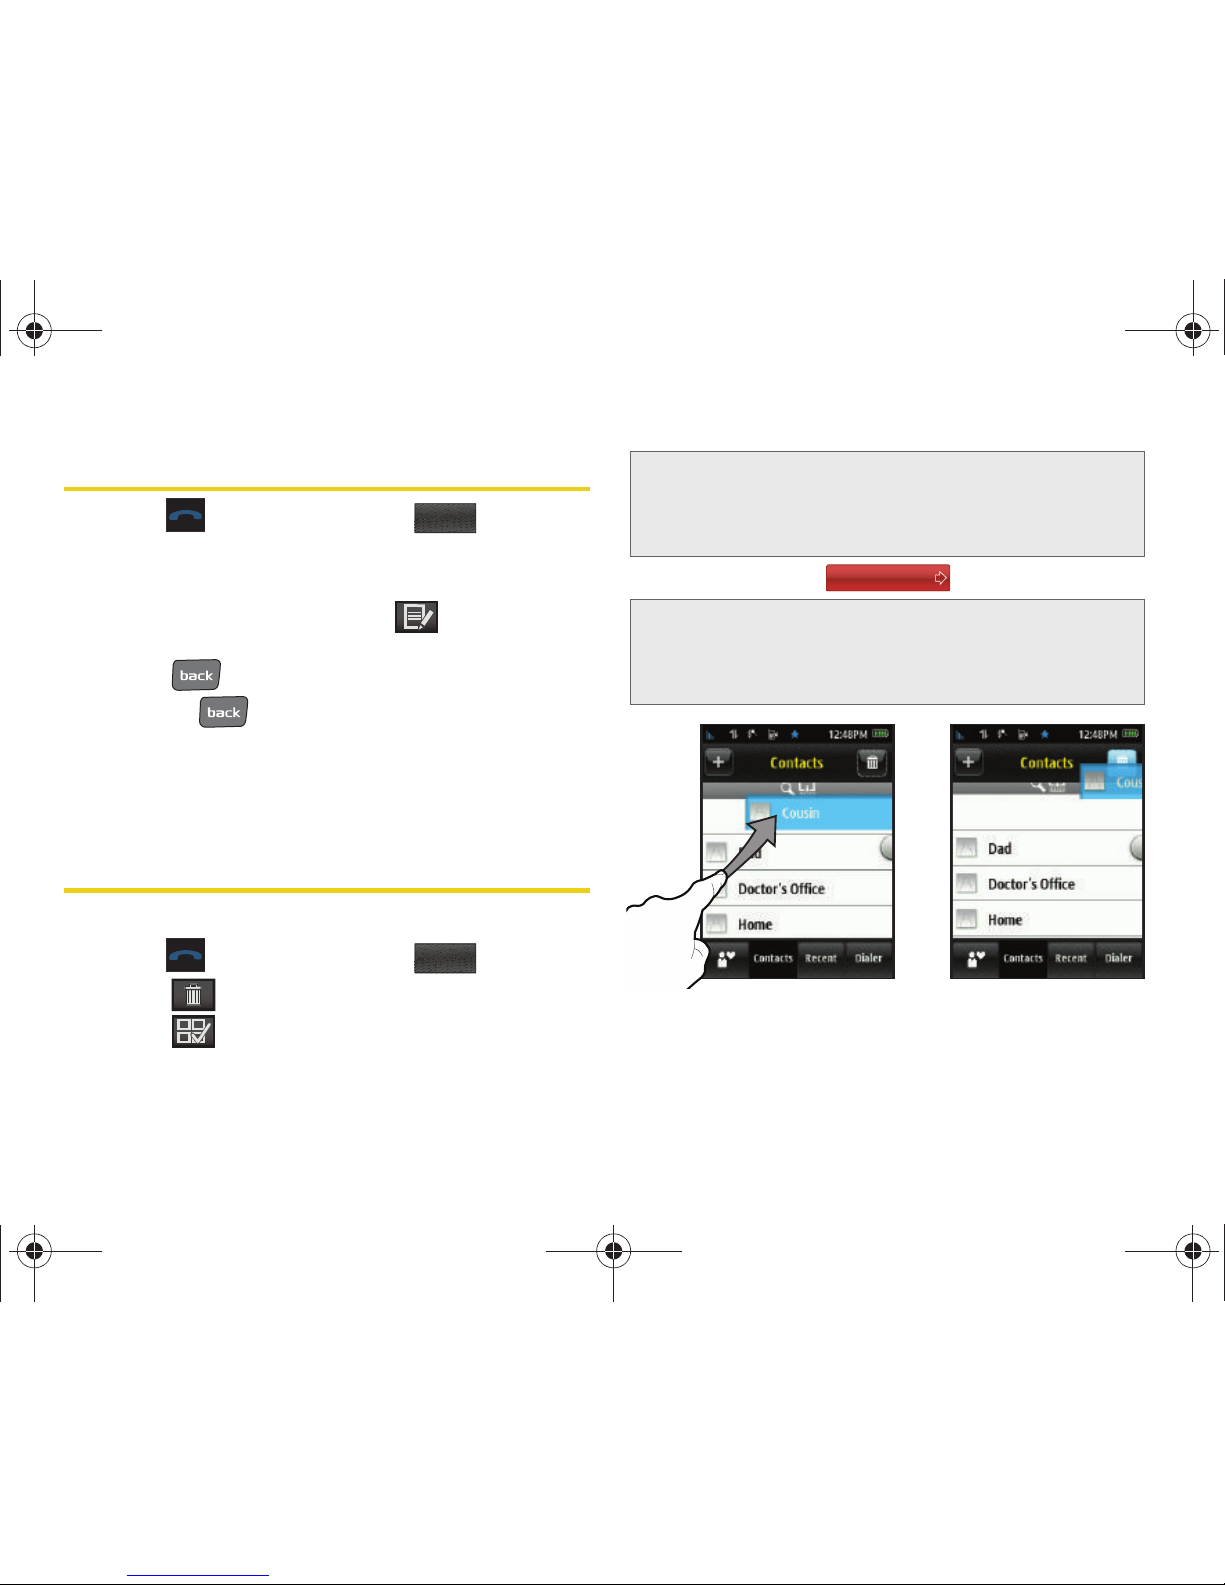
62 2D. Contacts
Editing a Contacts Entry’s Numbers
1. Press and touch Contacts ().
2. Touch an entry to display the entry’s options page.
(See “Contacts Entry Options” on page 59.)
3. From the options page, touch and touch a
number field.
4. Touch to clear one digit at a time, or press
and hold to erase the entire number.
5. Use the keyboard to re-enter or edit the number.
6. Touch Done (onscreen) to save your changes and
return to the previous screen.
Deleting Contacts Entries
To delete selected Contacts entries:
1. Press and touch Contacts ().
2. Touch to open the Delete menu.
3. Touch to select all entries in the current list.
Selected entries are then highlighted in blue.
4. Touch and drag to the right.
Contacts
Contacts
Note: Touching an entry that is currently highlighted in blue
deselects it and prevents it from being selected for
deletion. Select or deselect an entry to touching it from
the selected list.
Note: An individual entry can also be deleted by touching
and holding it until it detaches from the list, dragging it
over the Delete icon, and then lifting your finger off the
screen to release it into the Trash Bin.
Delete Selected
M350.book Page 62 Monday, October 11, 2010 9:58 AM
Page 73
2D. Contacts 63
Contacts
Assigning Speed Dial Numbers
Your phone can store up to 8 phone numbers on the
Speed Dial screen. Entries appear as icons in the order
in which you have added them.
To change the order in which they appear, you must
delete and re-add the entries in your desired order on
the Speed Dial screen (see “Arranging Speed Dial
Numbers” on page 64). (For details on how to make
calls using the Speed Dial screen, see “Speed Dialing”
on page 31.)
To add a phone number to the speed dial screen:
1. Press to launch the Speed Dial screen
(loaded by default).
2. To begin adding an existing number, touch the
onscreen
Add button.
3. Use your fingertip to scroll through the available list
of Contacts entries.
4. Touch the name of a Contacts entry you wish to
add.
䡲 If the entry has more than one number, the Assign
a Speed Dial page then displays a list of available
numbers from the entry from which you can
choose.
5. Touch an available phone number and assign it to
the available location on the Speed Dial screen.
䡲 The icons to the left of the phone number
correspond to their previously selected label.
Dialing Speed Dial Numbers
1. Press to launch the Speed Dial screen
(loaded by default). See “Assigning Speed Dial
Numbers” on page 63.
2. Touch an entry from the page to begin dialing the
assigned number. When only a single number
exists the entry’s default phone number is dialed.
䡲 Speed dial numbers are displayed in the order in
which they were added.
Note: Only phone numbers that are currently used by a
Contacts entry can be added to the Speed Dial screen.
M350.book Page 63 Monday, October 11, 2010 9:58 AM
Page 74
64 2D. Contacts
Arranging Speed Dial Numbers
1. Press to launch the Speed Dial screen
(appears by default).
䡲 Speed dial numbers are displayed in the order in
which they were added.
2. Delete both the desired speed dial location and all
others occurring after it.
3. Starting with the first available location, add the
desired entry and then repeat this process for the
remaining empty locations on the Speed Dial
screen.
To delete an entry from the Speed Dial screen:
1. Press to launch the Speed Dial screen
(loaded by default).
2. Touch to open the Delete menu.
3. Touch the entries you wish to select. Selected
entries are then highlighted in blue.
4. Touch and drag to the right.
Selecting a Ringer Type for an Entry
Assign a ringer type to a Contacts entry so you can
identify the caller by the ringer type. (See “Ringer
Types” on page 38.)
1. Press and touch Contacts ().
2. Touch an entry from the list and touch . The
screen is re-oriented to Landscape mode.
3. Scroll through the page by sliding your finger up
and down on the screen until you locate the
Set
Ringer field.
4. Touch the area within the Set Ringer field and scroll
through the
Ringers & Vibrations list of available
ringer sounds.
䡲 Touch to play a sample of the current sound
file.
5. Touch a ringer name to assign it.
Delete Selected
Note: An individual entry can also be deleted by touching
and holding it until it detaches from the screen,
dragging it over the Delete icon, and then lifting your
finger off the screen to release it into the Trash Bin.
Contacts
M350.book Page 64 Monday, October 11, 2010 9:58 AM
Page 75
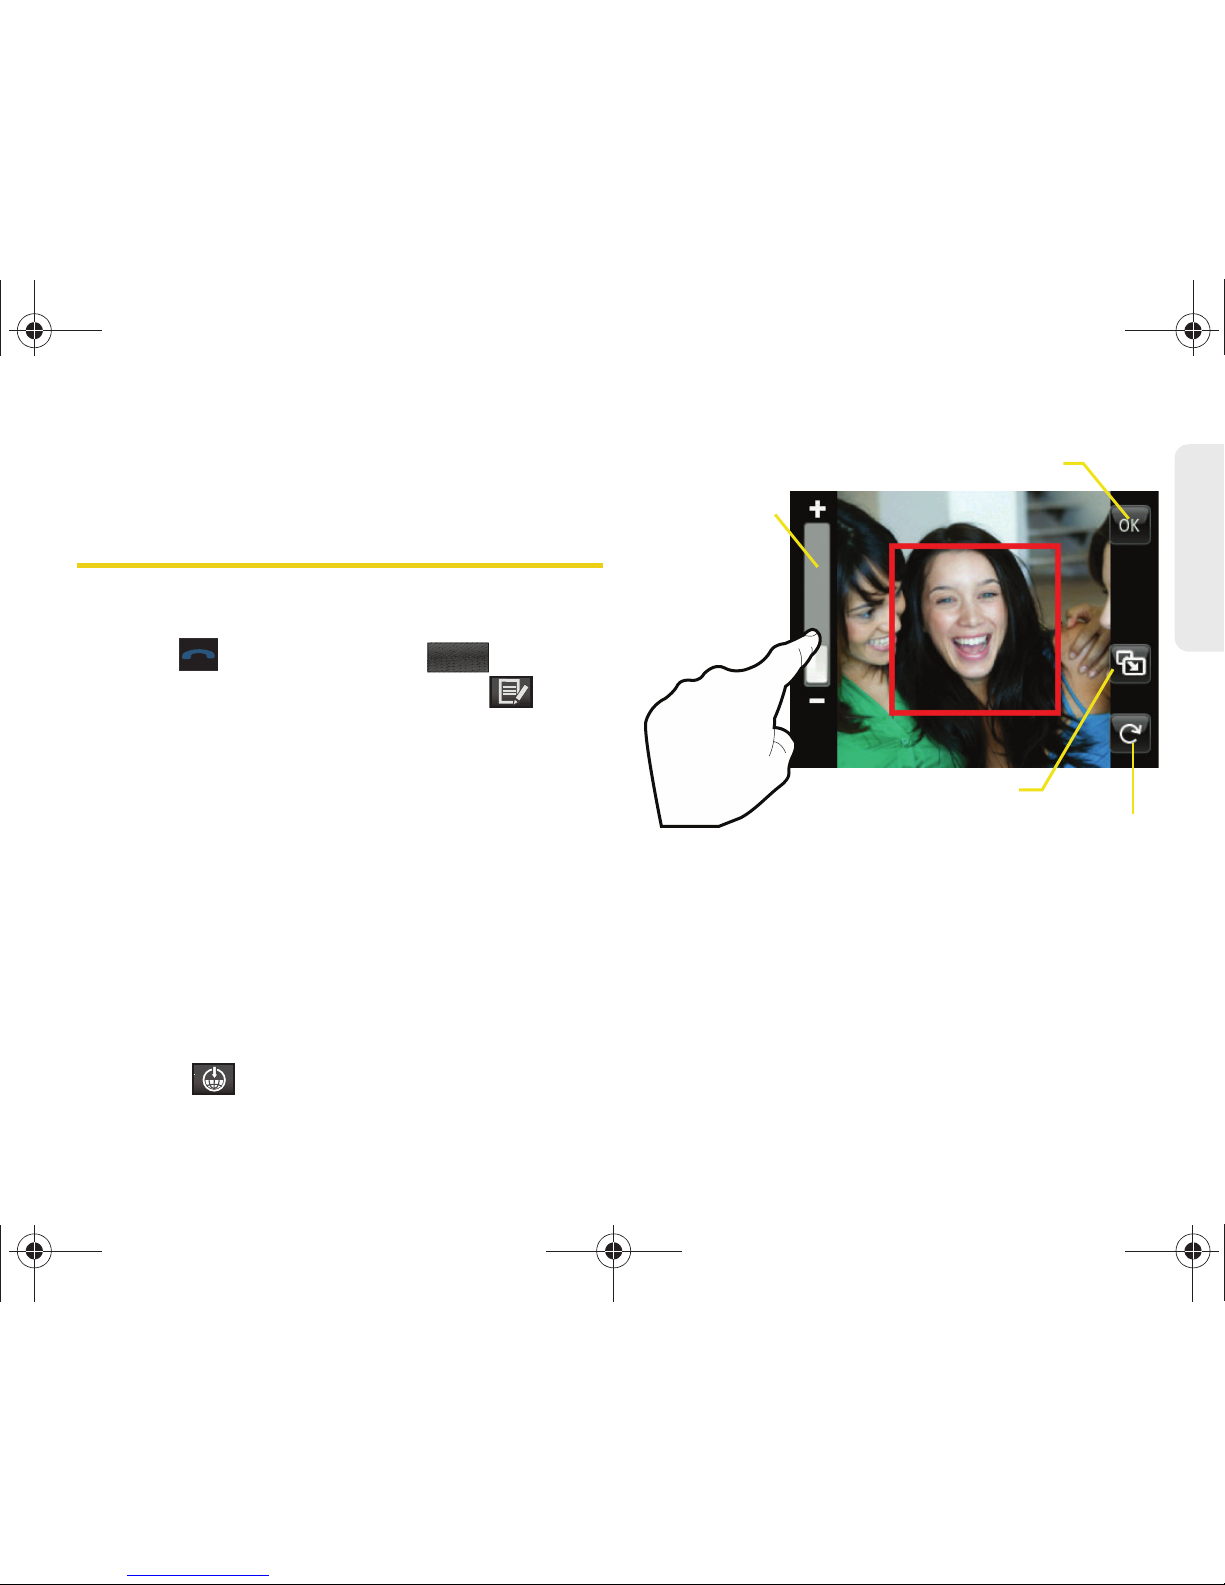
2D. Contacts 65
Contacts
6. Touch Done (onscreen) to save the new ringer
type.
Assigning a Picture to an Entry
Assign a picture to display each time a certain contact
calls you.
1. Press and touch Contacts ().
2. Touch an entry from the list and touch . The
screen is re-oriented to Landscape mode.
3. Touch the picture icon (adjacent to the entry name
at the top left of the screen) to display the
ADD
PHOTO menu.
4. Select an option, such as Take Picture, My Photos,
or
Downloads.
5. Navigate to and locate a picture and touch it to
begin editing the image prior to assignment.
䡲 If you selected Take New Picture, the camera will
launch and you will use it to take a new picture.
(See “2H. Camera” on page 68 for details.)
䡲 If you selected Downloads, you may need to
select to download an image.
6. Adjust the image size and orientation using the
onscreen tools:
䡲 Resize slider allows you to zoom in and out on the
current image. The red square indicates the area
used by the Contacts entry image icon.
䡲 Accept closes the edit session and assigns the
current image to the active Contacts entry.
䡲 Visible area indicates the available area used by
the Contacts image.
Contacts
Resize slider
Visible area
Rotate image
Accept
M350.book Page 65 Monday, October 11, 2010 9:58 AM
Page 76
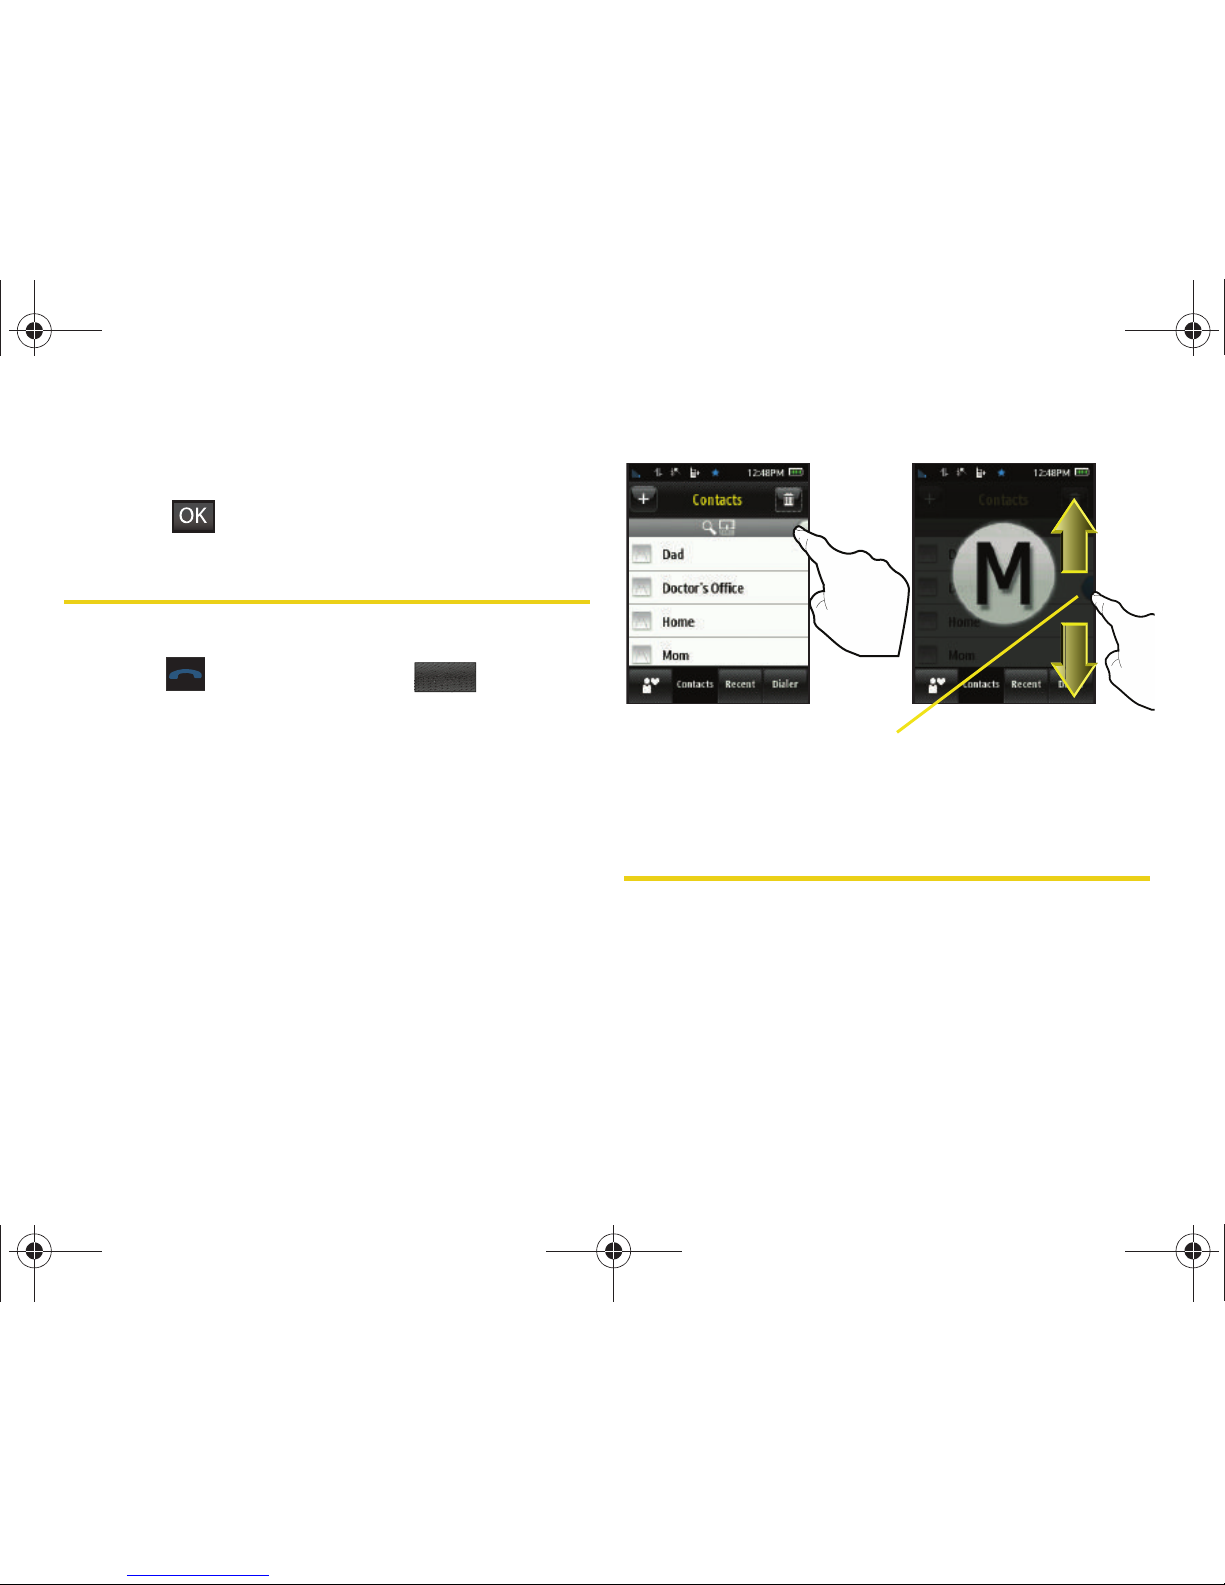
66 2D. Contacts
䡲 Rotate image allows you to rotate the orientation of
the currently visible image.
7. Touch to save the assigned picture.
Finding Contacts Entries
Finding Contacts by Name
1. Press and touch Contacts ().
2. Scroll down through the list by sliding your fingertip
up or down on the screen.
– or –
In Portrait mode, touch and hold the
Power Search
tab to activate the feature, then drag the slider
down the screen until the letter range
corresponding to the first letter of the entry’s first
name. (The list is alphabetized by the first letter.)
– or –
In Landscape mode, touch the Find field and use
the keyboard to enter the first few letters of the
Contacts name.
3. Touch the entry to dial its default phone number.
Transferring Your Contacts
All of your contacts from your old phone can be
transferred to your new phone:
䡲 At the Store—Where you purchase your Samsung
Seek, the sales person can help you transfer your
contacts over to the phone.
Contacts
Power
Search
tab
M350.book Page 66 Monday, October 11, 2010 9:58 AM
Page 77
2D. Contacts 67
Contacts
䡲 Bluetooth—Use the Bluetooth capabilities of your
old phone to transfer all of your contacts to the
phone. See “2I. Bluetooth” on page 104.
Transfer Contacts with Bluetooth
The process of transferring data via Bluetooth is also
known as “beaming” and might be referred to that way
within other literature.
To set up your old phone and the Seek to transfer
contacts:
1. Turn on your old phone and then activate the
Samsung Seek.
2. Activate Bluetooth functionality on your old phone
and set visibility to
Always visible (page 105).
3. Activate Bluetooth on your new phone by pressing
and touch
Main () > Settings > Bluetooth.
4. Touch the Bluetooth button to toggle it to the On
state. (The page then refreshes to reveal new
functionality and options.)
5. Touch Visibility and set your Bluetooth visibility to
Always visible.
To pair the two phones and send contacts to your
Samsung Seek:
1. On your Samsung Seek phone, press and
touch
Main () > Settings > Bluetooth > Trusted
Devices. See “Pairing Bluetooth Devices” on
page 106.
2. Select the previous phone by touching its name.
3. Once connected and communicating, confirm the
PIN code on both phones match.
4. Slide the connection slider on the Seek to Accept.
Accept the connection and confirm the PIN on
your other device.
5. On your old phone, go to the Bluetooth function
that allows you to send all of your contacts to the
trusted device.
6. Select a contact and begin the transmit process.
7. On the Seek, move the acceptance slider to the
right and
Accept. Within a few seconds, your other
phone begins transmitting the new contact entry
and the Seek begins the storage process.
Main
Main
M350.book Page 67 Monday, October 11, 2010 9:58 AM
Page 78
68 2D. Contacts
To confirm that contacts have been transferred:
1. Press and touch Contacts ( ) to view the
transferred contacts.
2. Once you have confirmed that the contacts are
transferred, turn off your old phone.
Dialing Sprint Services
Your Contacts list is preprogrammed with contact
numbers for various Sprint services.
To dial a service from your Contacts:
1. Press and touch Contacts ().
2. Touch the onscreen Services button and select an
available service, such as
Account Info, Pay Bill,
Customer Solutions, Sprint Operator, Directory
Assistance (Sprint 411), TRS, or Call Before You Dig.
3. Touch an entry from this list to automatically dial
the service.
To dial a service from Dialer screen using your dialpad:
1. Press and touch Dialer ().
2. Enter the appropriate service number:
䡲 Customer Solutions – and touch
.
䡲 Sprint 411 – and touch .
䡲 Account Info – and touch .
䡲 Sprint Operator – and touch .
Wireless Backup
This feature allows you to back up all of your contacts
to the Sprint website and restore them if your phone is
lost, stolen, damaged, or replaced.
To subscribe to the wireless backup service, you must
purchase a license to use the service through your
phone’s browser. The license expires after a set period
of time and you must renew it regularly.
Contacts
Contacts
Tip: To use the wireless backup service, you are required to
activate the service from your phone.
Dialer
Talk
TALK
Talk
TALK
Talk
TALK
Talk
TALK
M350.book Page 68 Monday, October 11, 2010 9:58 AM
Page 79
2D. Contacts 69
Contacts
As part of the initial subscription process, the service
generates a random wireless backup password. The
service sends the password to your phone as a text
message.
Activating and Deactivating Wireless Backup
To activate the wireless backup service:
1. Press and touch Main () > Settings >
Wireless Backup > Subscribe. (The phone prompts
you to confirm your license status.)
2. Follow the onscreen instructions to purchase the
license.
䡲 If no valid subscription can be found touch Yes
and follow the onscreen instructions to purchase
the license.
3. Please wait while registering the license. (You will
see a confirmation screen once registration is
complete.)
To deactivate the wireless backup service:
1. Press and touch Main () > Settings >
Wireless Backup > Unsubscribe. (A message is
displayed.)
2. Follow the onscreen instructions to unsubscribe
from the wireless backup service.
Viewing Your Wireless Backup Status
䊳 Press and touch Main () > Settings >
Wireless Backup > View Status.
Setting the Wireless Backup Alert
This feature turns the pop-up alert on or off when a
wireless backup update has been completed.
1. Press and touch Main () > Settings >
Wireless Backup > Alert.
2. Touch Alert me or No alerts.
Note: Once you have completed the registration, you will
receive a text message with your password. This
password is required for the Wireless Backup website
(
www.wirelessbackup.sprint.com) in order to edit your
contacts from your computer.
Main
Tip: Each time you edit Contacts on your phone, they are
backed up at
www.wirelessbackup.sprint.com.
Note: You can unsubscribe from the wireless backup service
only through the Sprint website.
Main
Main
Main
M350.book Page 69 Monday, October 11, 2010 9:58 AM
Page 80
70 2D. Contacts
Tip: To display the wireless backup information,
press
> Main > Settings > Wireless Backup >
Learn More. When the service is available, you can also
select
Troubleshoot to display the troubleshooting guide.
M350.book Page 70 Monday, October 11, 2010 9:58 AM
Page 81
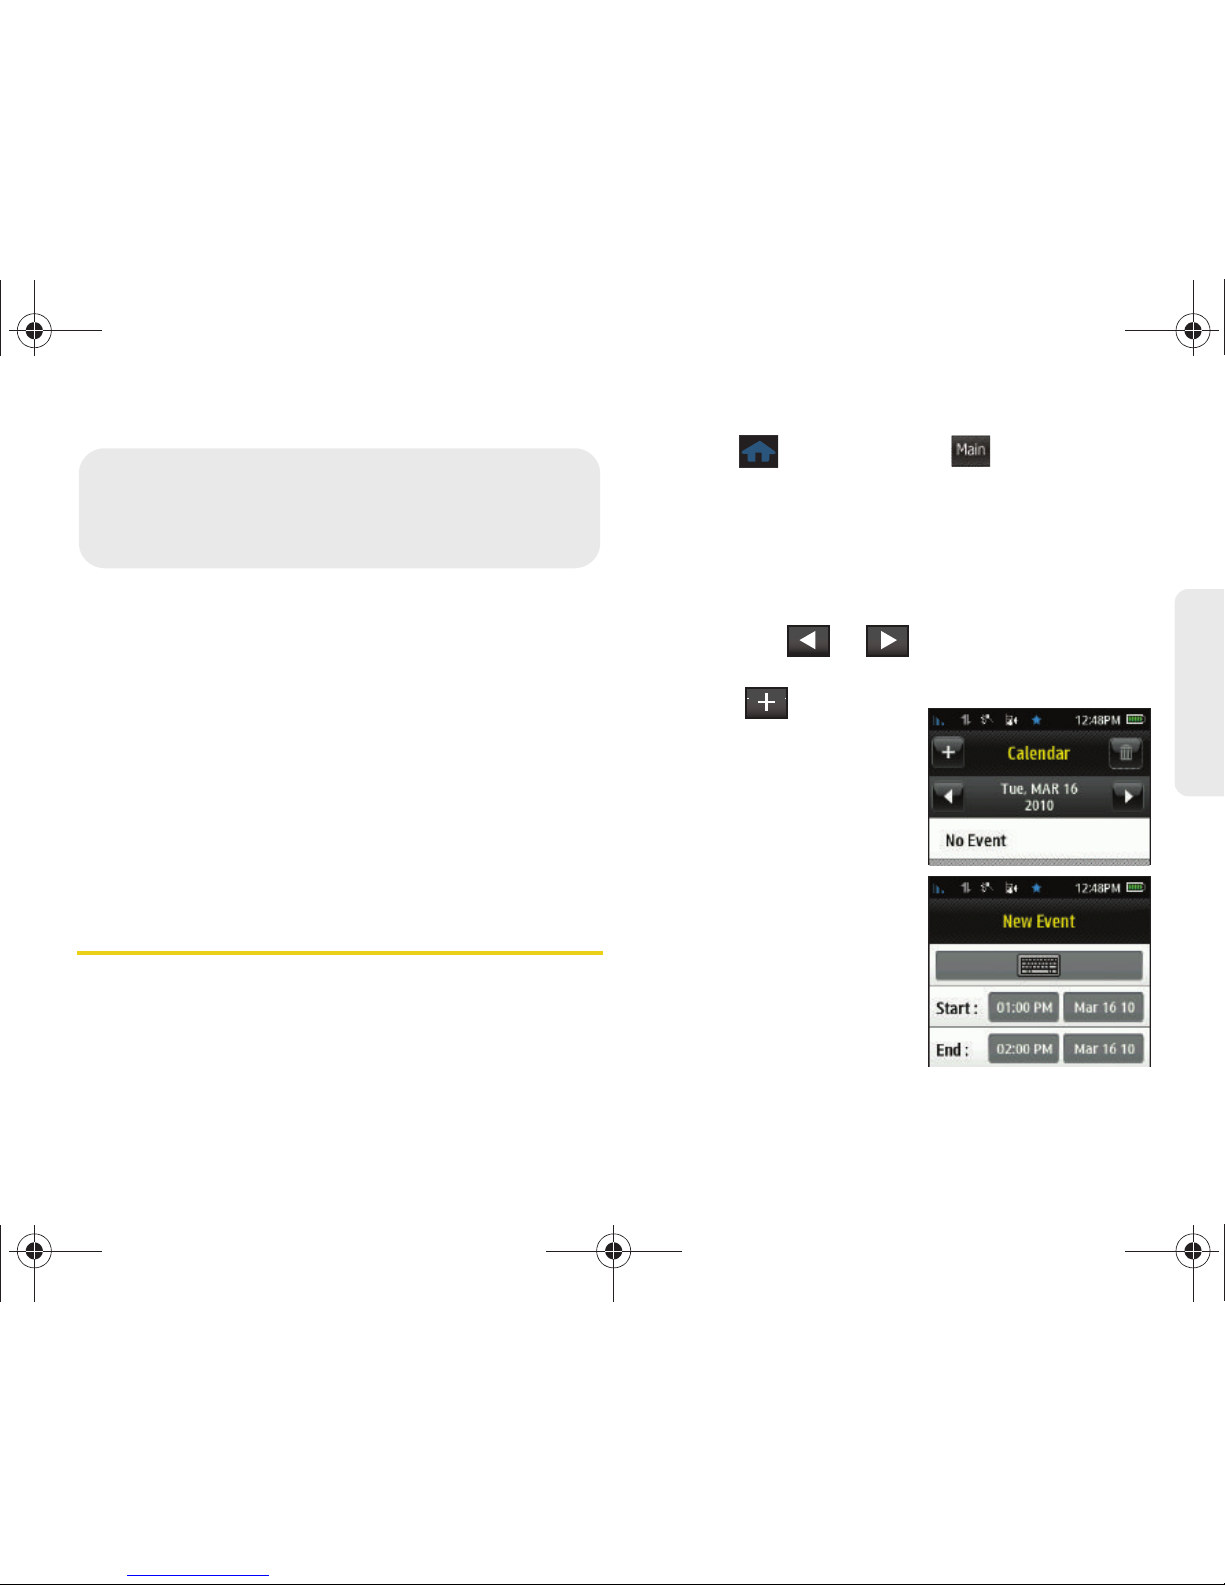
2E. Calendar & Tools 71
Calendar / Tools
⽧ Calendar (page 71)
⽧ Alarm Clock (page 74)
⽧ Timer (page 76)
⽧ Stopwatch (page 76)
⽧ World Clock (page 76)
⽧ Notes (page 78)
⽧ Calculator (page 78)
⽧ Tip Calculator (page 79)
⽧ Unit Converter (page 79)
Calendar
Adding an Event to the Calendar
Your Calendar helps you organize your time and
reminds you of important events.
1. Press and touch Main () > Calendar >
Personal Calendar.
2. Select the day to which you would like to add an
event by either:
䡲 Touching a day on the calendar.
– or –
䡲 Using the or navigation arrows to view
a different month and then touch a desired day.
3. Touch to open
the
New Event window.
4. Touch the keyboard
field and slide out the
keyboard to create a
new title for the event
in Landscape mode.
䡲 Enter the event title.
(See “Entering Text”
on page 32.)
2E. Calendar & Tools
Main
M350.book Page 71 Monday, October 11, 2010 9:58 AM
Page 82
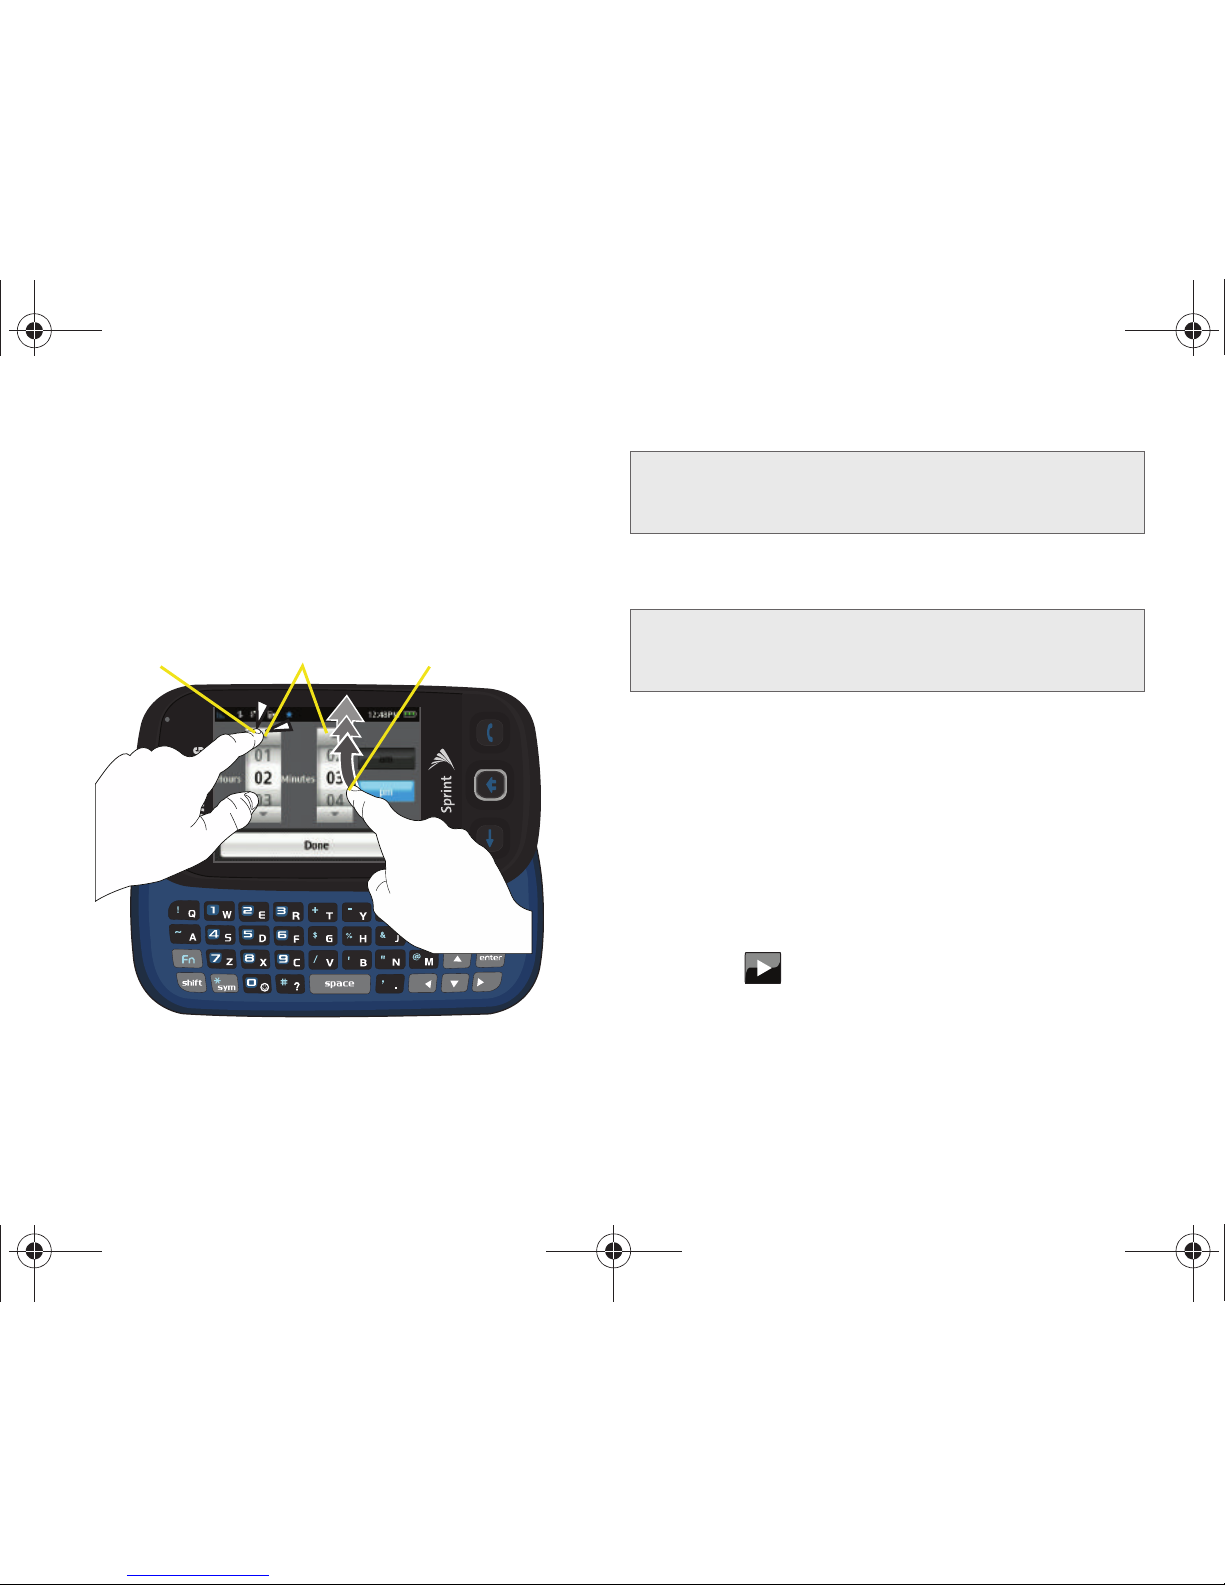
72 2E. Calendar & Tools
5.
Select a start and end time for the event by
touching the corresponding
Start or End fields.
6. Assign an hour and minute by either:
䡲 Scrolling through both reels (Hours and Minutes)
by sliding your finger up and down on the screen.
䡲 Touching the arrows above/below each field.
䡲 Touch either am or pm.
䡲 Once you are done setting the times, touch Done.
7. Select an alert time for the event by touching the
Alert field and touching one of the following
options:
䡲 Select On Time, 5 minutes before, 10 minutes
before, 15 minutes before, 30 minutes before,
1 hour before, 3 hours before, 5 hours before, or
1 day before.
8. Select a ringer type for the alarm by touching
Set Ringer and then selecting a sound file.
䡲 Touch to play a sound sample for a selected
ringer.
䡲 If a ringer has been previously selected, scroll
through the list of available ringer sounds and
touch a ringer name to re-assign it.
ReelsTapping Scrolling
Tip: Touching and holding down on the arrows (up or down)
increases the speed at which the numbers scroll through
each reel.
Note: If you need to adjust the end date for an event, touch
the date field and select a new end date by touching a
day from the onscreen calendar.
M350.book Page 72 Monday, October 11, 2010 9:58 AM
Page 83
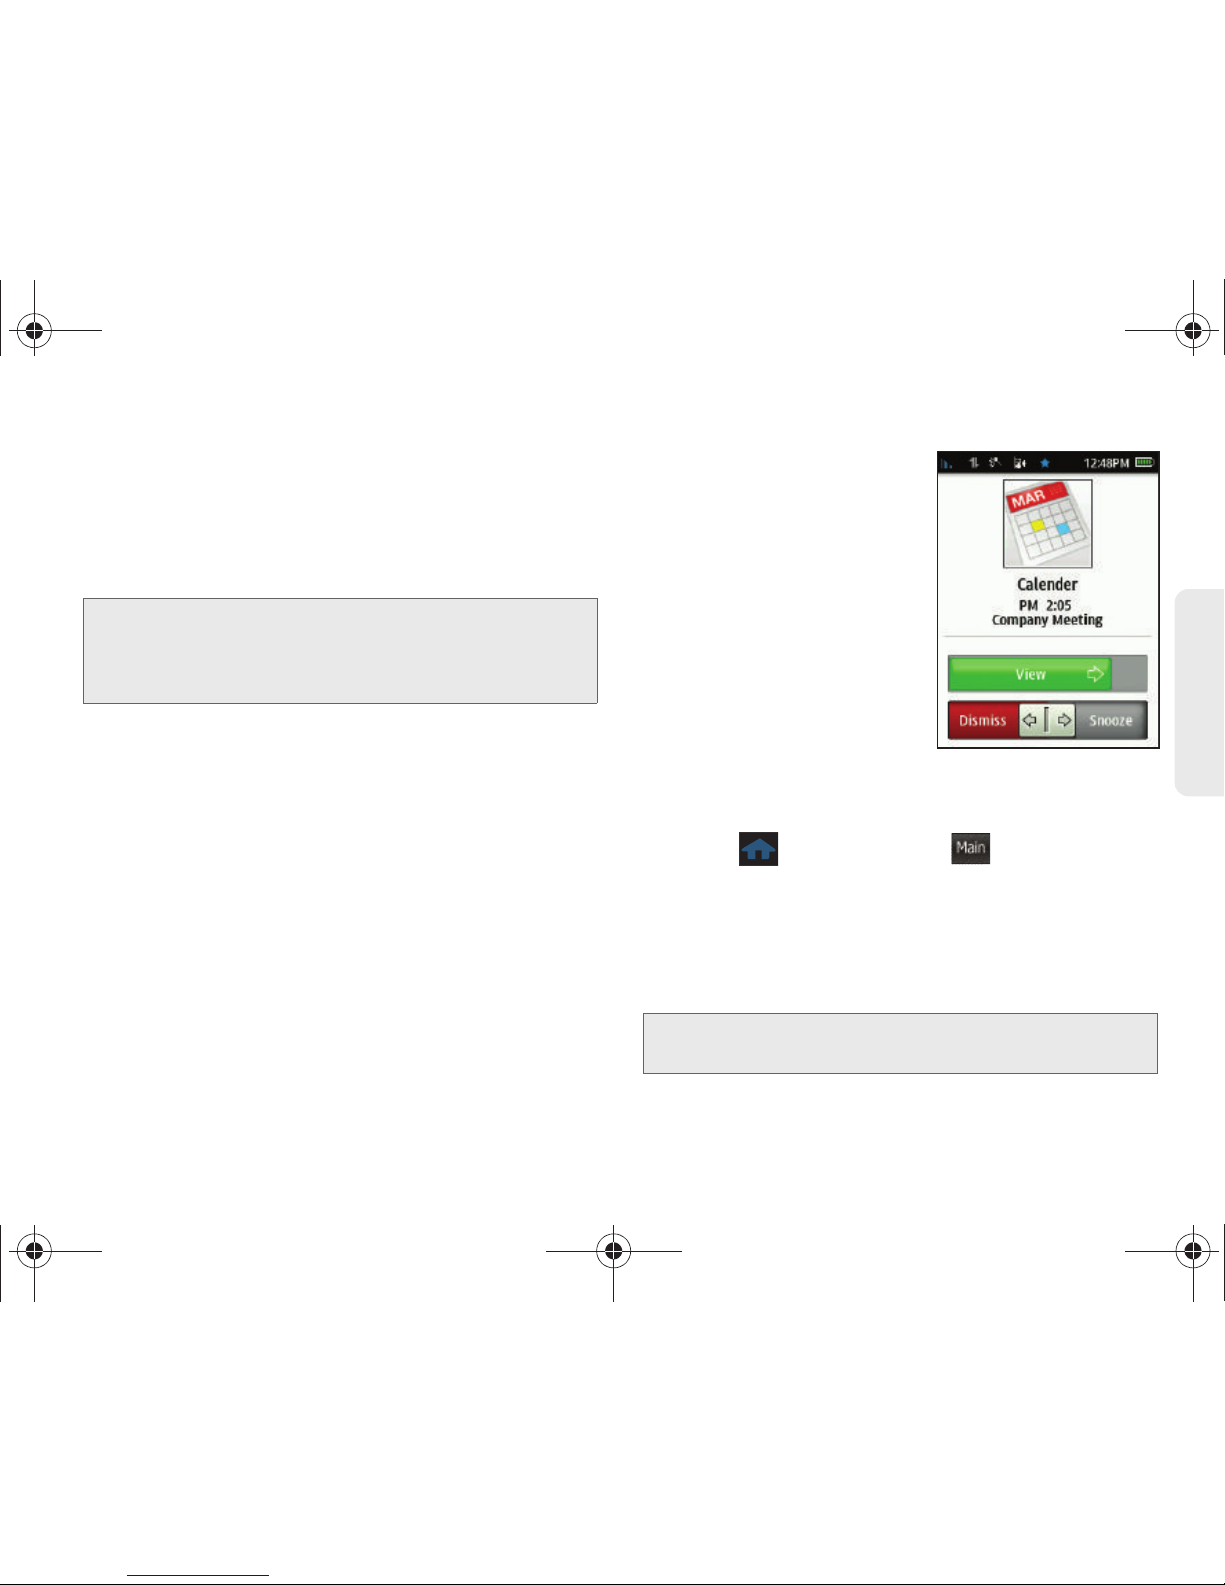
2E. Calendar & Tools 73
Calendar / Tools
9. Select a reminder status for the event by touching
the
Reminder field and touching one of the
following options:
䡲 Select Off, Every 2 minutes or Every 15 minutes.
10. Touch Save to save the new event.
Event Alert Menu
When your phone is turned on and you have an event
alarm scheduled, your phone alerts you and displays
the event summary. By default, the alarm will sound ten
minutes before the event, and then again on the event.
There are several ways your phone alerts you to
scheduled events:
䢇 By playing the assigned ringer type.
䢇 By illuminating the backlight.
To silence the alarm and reset the schedule, touch and
drag the onscreen
Dismiss button. (You can also
silence the alarm by pressing the side volume button.)
To view additional options,
use the appropriate
onscreen slider:
䢇 View silences the alarm
and displays the details of
the current event.
䢇 Dismiss silences the
alarm and replays it again
at the time of the event.
䢇 Snooze silences the alarm
and schedules it to replay
again later
Viewing Events
1. Press and touch Main () > Calendar >
Personal Calendar.
2. Select the day for which you would like to view
events by touching it. (If you have events
scheduled for the selected day, they will be listed
in chronological order.)
Note: If the End time and date fall before the Start date and
time, an onscreen warning message will appear, and
you will be given the opportunity to revise the values
onscreen.
Tip: In the calendar view, days with events scheduled are
underlined in blue.
Main
M350.book Page 73 Monday, October 11, 2010 9:58 AM
Page 84
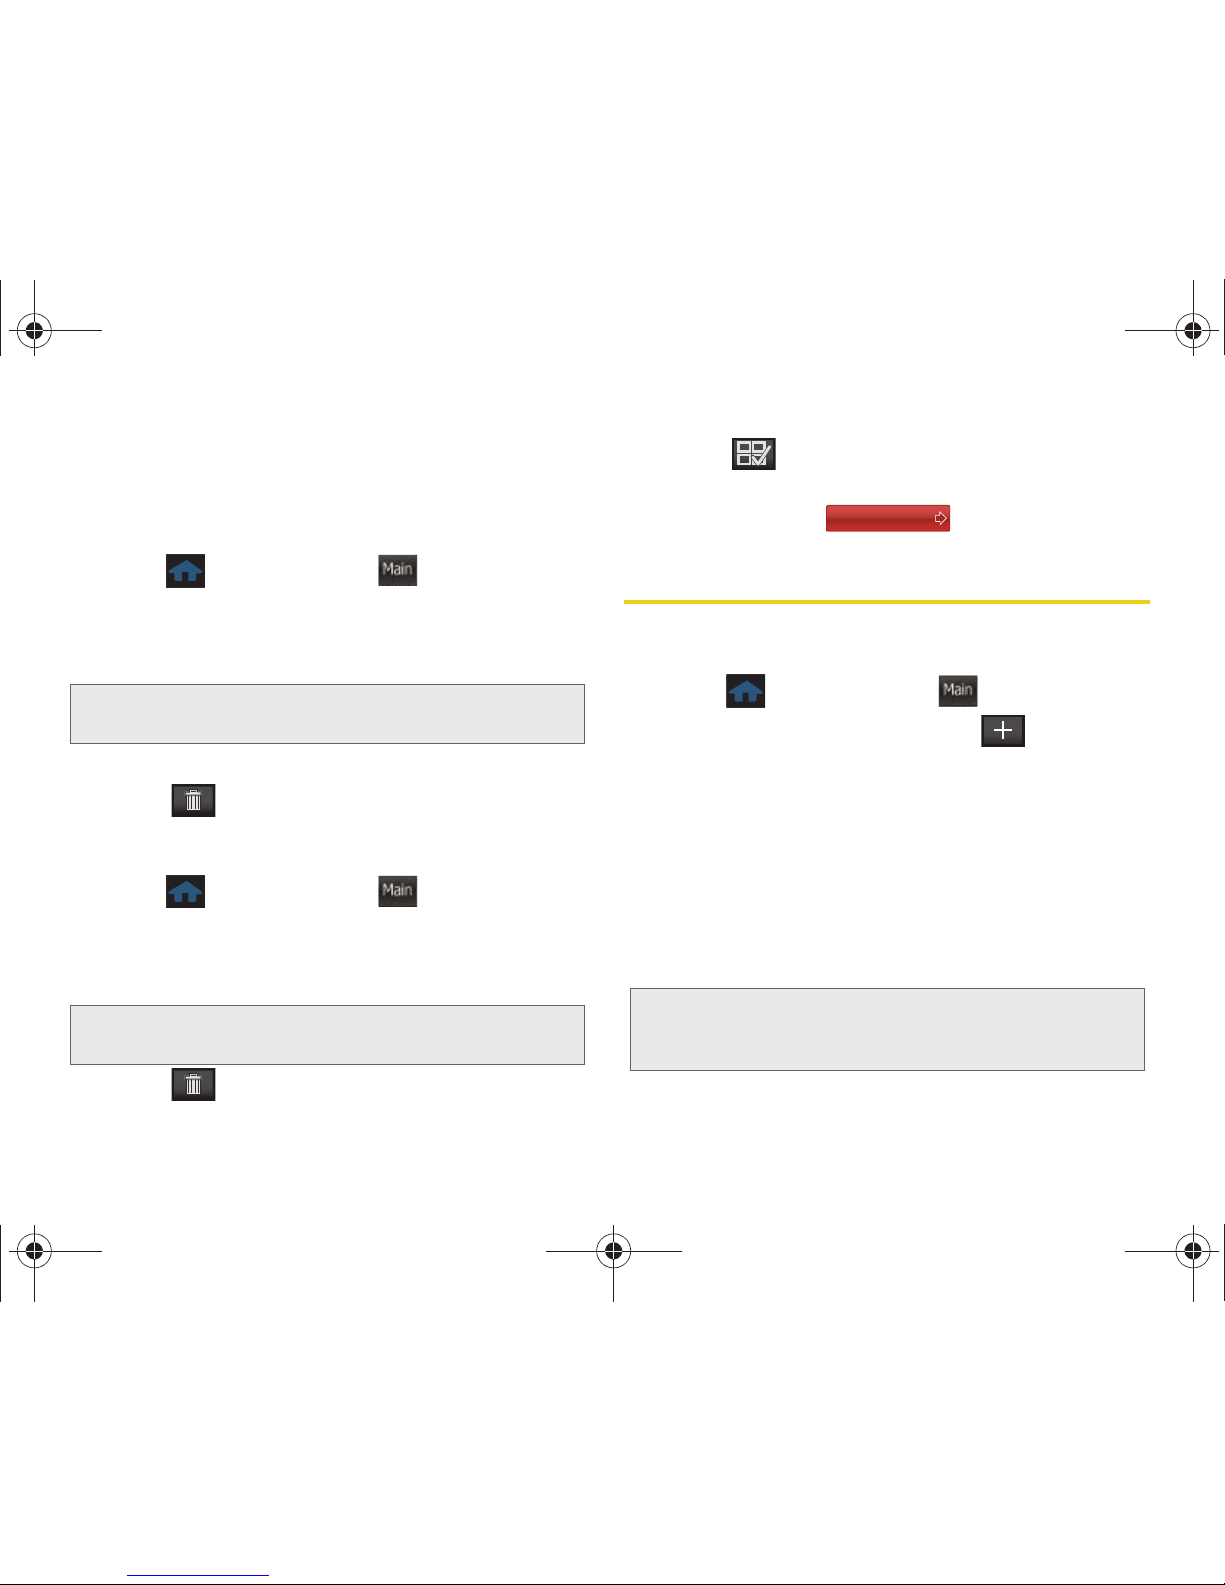
74 2E. Calendar & Tools
3.
To display an event’s details, touch the event entry
from the selected day’s listing.
Erasing Selected Events
1. Press and touch Main () > Calendar >
Personal Calendar.
2. Touch the day containing the event you would like
to erase to open the event details page.
3. Touch an event to display the event’s details page.
4. Touch > Delete.
Erasing All Events
1. Press and touch Main () > Calendar >
Personal Calendar.
2. Touch the day containing the event you would like
to erase to open the event details page.
3. Touch to open the Delete menu.
4. Touch to select all entries in the current list.
Selected entries are then highlighted in blue.
5. Touch and drag to the right.
Alarm Clock
Your phone comes with a built-in alarm clock that has
multiple alarm capabilities.
1. Press and touch Main () > Clock > Alarm.
2. Create a new alarm by touching .
3.
Turn the alarm on or off by touching the alarm
activation button to read either
On or Off.
4. Select a time for the alarm by touching the time
field.
䡲 Assign an hour and minute by either scrolling
through both reels (
Hours and Minutes) or by
touching the up or down arrows above/below
each field (page 72).
Tip: In the calendar view, days with events scheduled are
underlined in blue.
Tip: In the calendar view, days with events scheduled are
underlined in blue.
Main
Main
Tip: Touching and holding down on the arrows (up or down)
increases the speed at which the numbers scroll through
each reel.
Delete Selected
Main
M350.book Page 74 Monday, October 11, 2010 9:58 AM
Page 85
2E. Calendar & Tools 75
Calendar / Tools
䡲 Touch either am or pm.
䡲 Once you are done setting the times, touch Done.
5. Select a reminder status for the event by touching
the
Repeat button and then choosing from one of
the following:
䡲 Once, Mon to Fri, Sat & Sun, Daily, or Set Days.
6. Select a ringer type for the alarm by touching the
Ringer field and then selecting a sound file.
䡲 Touch to play a sound sample for a selected
ringer.
䡲 If a ringer has been previously selected, scroll
through the list of available ringer sounds and
touch a ringer name to re-assign it.
7. Select a snooze status for the alarm by touching
the
Snooze field and then choosing from one of the
following:
䡲 5 minutes, 10 minutes, 15 minutes, or 20 minutes.
8. Touch Save to save your new alarm.
To turn alarm off (when sounding):
1. With the alarm sounding an alert, move the slider
to either:
䡲 Stop Alarm to permanently deactivate the alarm
notification.
䡲 Snooze to temporarily deactivate the alarm for a
few minutes until the next notification.
To delete all alarm events:
1. Press and touch Main () > Clock > Alarm.
2. Touch to open the Delete menu.
3. Touch to select all alarm events in the current
list. Selected events are then highlighted in blue.
4. Touch and drag to the right.
To delete a specific alarm event:
1. Press and touch Main () > Clock > Alarm.
2. Touch to open the Delete menu.
3. Touch the entry you wish to delete. Selected
history entries are then highlighted in blue.
4. Touch and drag to the right.
Note: Any stored alarms will appear on the Alarm page in the
order in which they were created.
Main
Delete Selected
Main
Delete Selected
M350.book Page 75 Monday, October 11, 2010 9:58 AM
Page 86
76 2E. Calendar & Tools
Timer
Use a timer to count down to an event based on a
preset time length (hours, minutes, and seconds).
1. Press and touch Main () > Clock > Timer.
2. Select a countdown time length for the alert by
setting the
Hours, Minutes, and Seconds value.
䡲 Assign the time by either scrolling through each
reel or by touching the up or down arrows
above/below each field (page 72).
3. Touch Start to save the countdown.
Stopwatch
Your phone comes with a built-in stopwatch.
1. Press and touch Main () > Clock >
Stopwatch.
2. Touch Start to turn on the timer.
3. Touch Lap to place a marker on the list. This helps
you keep track on certain time segments.
– or –
Touch
Stop to stop the process.
4. Touch Restart to continue the stopwatch function
from its last paused time marker.
– or –
Touch
Reset to stop the process and restart the
counter back to zero.
5. Press to return to the previous screen.
World Clock
To view the time in several different world locations:
1. Press and touch Main () > Clock > World
Clock.
Tip: Touching and holding down on the arrows (up or down)
increases the speed at which the numbers scroll through
each reel.
Main
Main
Main
M350.book Page 76 Monday, October 11, 2010 9:58 AM
Page 87
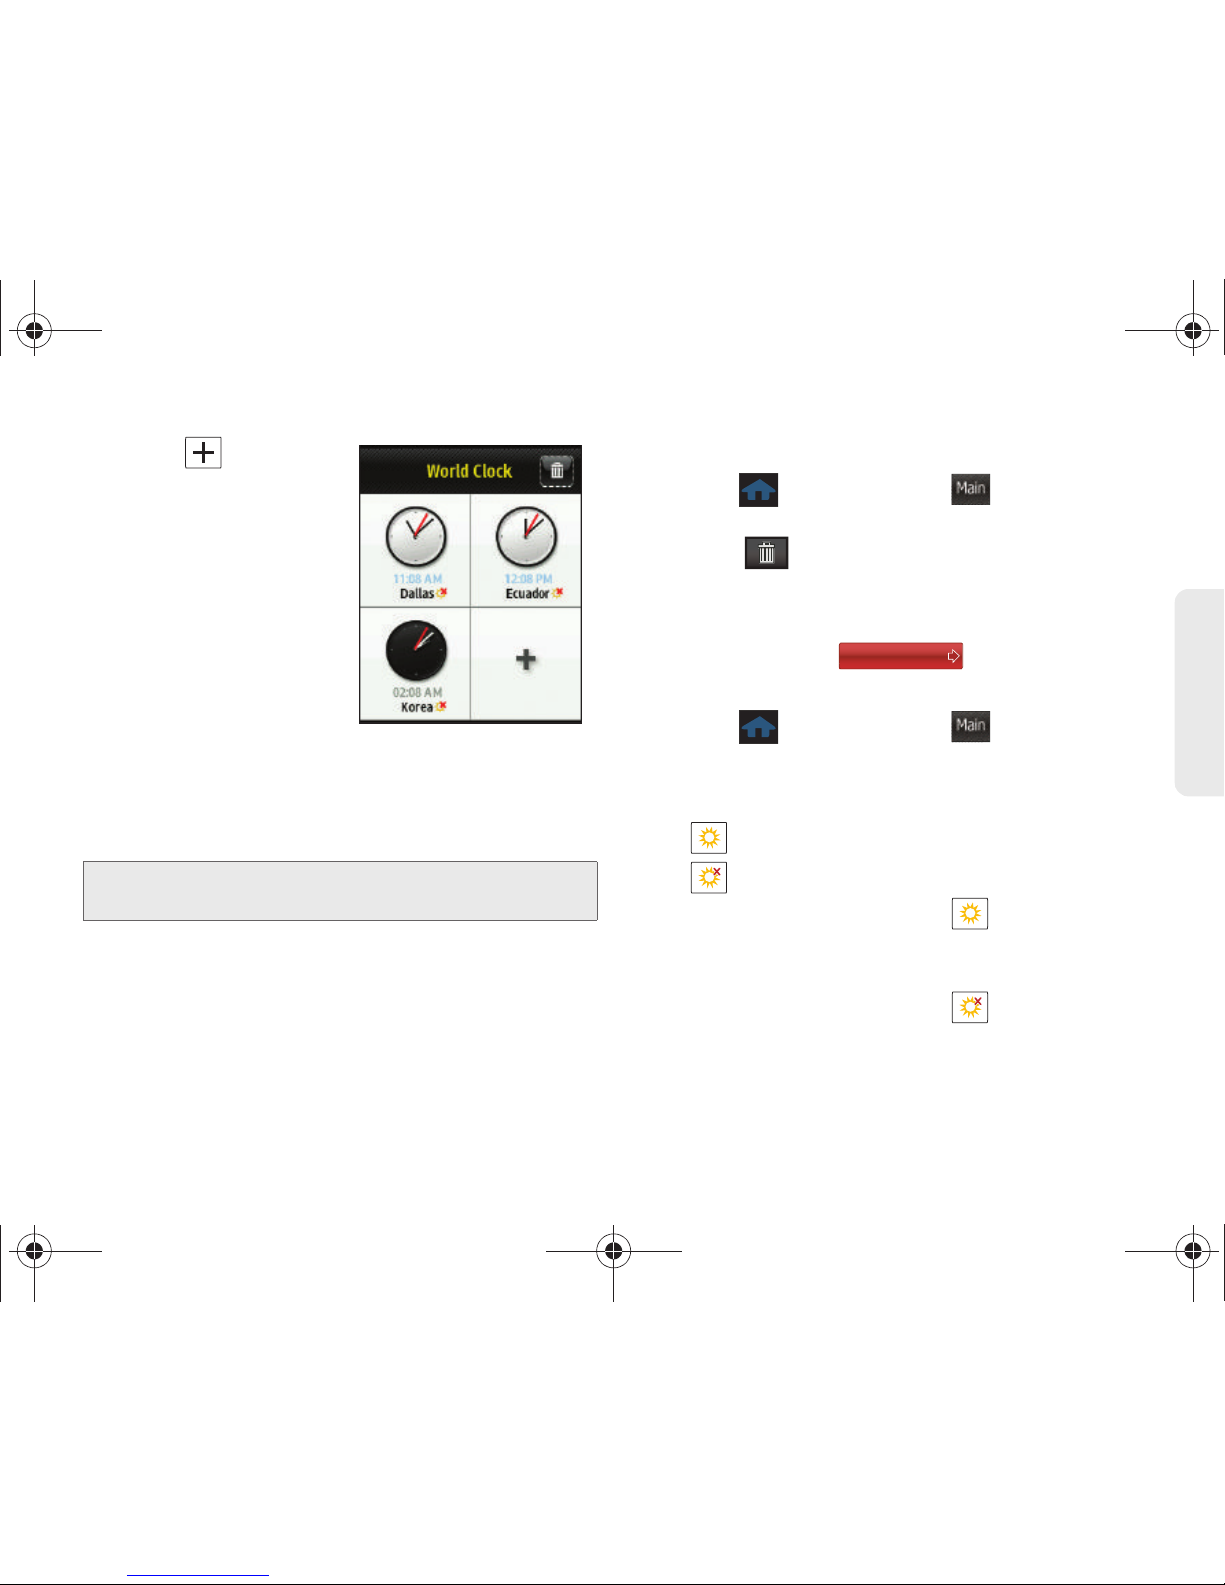
2E. Calendar & Tools 77
Calendar / Tools
2. Touch to begin
using the world map.
3. Touch United States or
Other Countries. This
reveals an alphabetical
list of the cities
available within that
category.
䡲 Selecting United
States displays all
available major cities
within the US.
䡲 Selecting Other Countries displays countries, and
in some cases cities and their corresponding
countries.
4. Touch an available city from the list.
5. Repeat the process to add additional cities.
To delete existing World Clock entries:
1. Press and touch Main () > Clock > World
Clock.
2. Touch to open the Delete menu.
3. Touch the location you wish to delete. Selected
history entries are then highlighted in blue.
4. Touch and drag to the right.
To Assign Daylight Saving Time:
1. Press and touch Main () > Clock > World
Clock. Stored locations indicate the Daylight
Saving Time icon at the bottom-right of each
onscreen clock.
䡲 indicates Daylight Saving Time is On.
䡲 indicates Daylight Saving Time is Off.
2. Touch a location containing to deactivate
Daylight Saving Time.
– or –
Touch a location containing
to activate
Daylight Saving Time.
Note: Dark clocks indicate the selected time zone is currently
in its evening (nighttime) hour.
Main
Delete Selected
Main
M350.book Page 77 Monday, October 11, 2010 9:58 AM
Page 88
78 2E. Calendar & Tools
Notes
Your phone comes with a notepad that you can use to
compose and store reminders and notes to help keep
you organized.
To compose a note:
1. Press and touch Main () > Notes > .
2. Type your note using the keyboard and touch Save
to save your note. (See “Entering Text” on
page 32.)
To read a saved note:
1. Press and touch Main () > Notes.
2. Touch a note from the list.
To delete saved notes:
1. Press and touch Main () > Notes.
2. Touch and hold the note from the list until it
detaches from the page, drag the selected note
over and release it by lifting your finger off the
screen. See “Deleting Entries” on page 23.
– or –
Touch , touch the note you wish to delete,
then touch and drag to the right.
Calculator
Your phone comes with a built-in calculator. This
application becomes the default until another
calculator option is chosen.
1. Press and touch Main () > Calculator >
Calculator.
2. Enter numbers using the onscreen keypad.
3. Press equals (=) for the total.
4. Press to return to the previous screen.
Main
Main
Main
Delete Selected
Main
M350.book Page 78 Monday, October 11, 2010 9:58 AM
Page 89
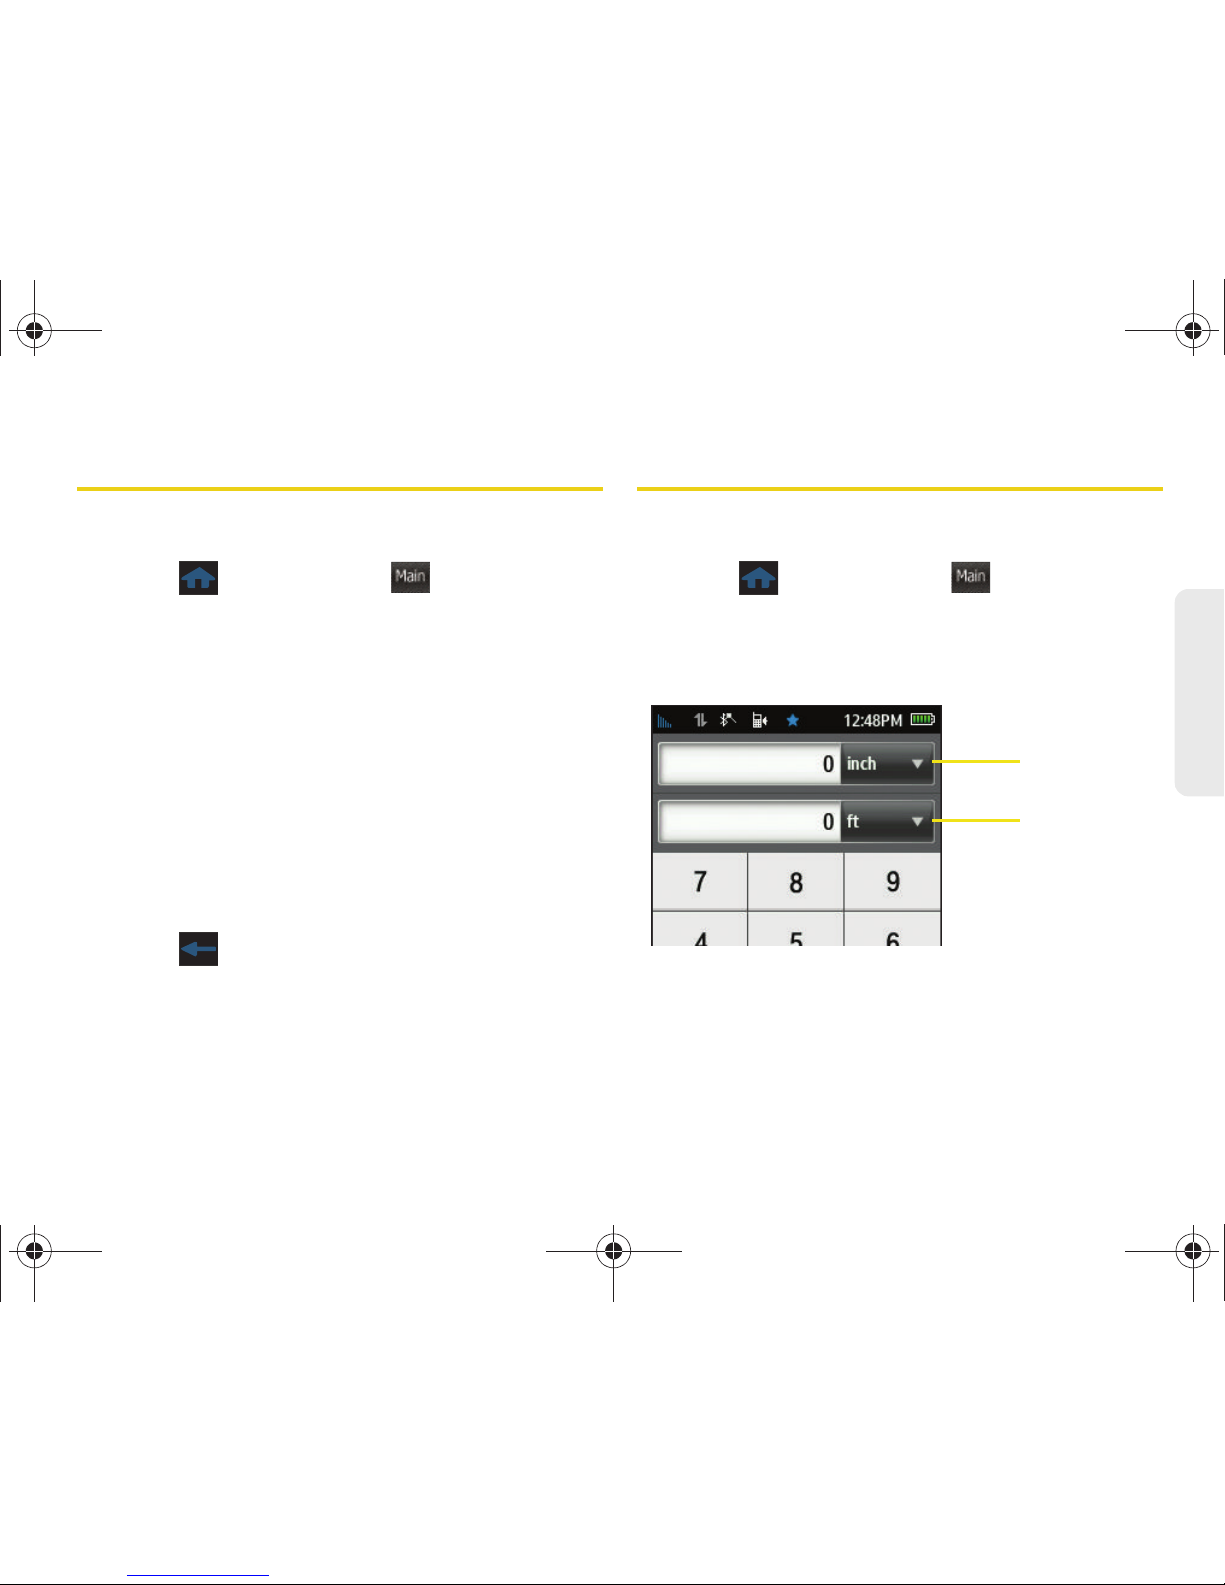
2E. Calendar & Tools 79
Calendar / Tools
Tip Calculator
Your phone comes with a built-in tip calculator
application.
1. Press and touch Main () > Calculator >
Tip Calculator.
2. Use the onscreen keypad to enter the total bill
amount and touch
Done.
䡲 The total tip amount is then displayed at the
default percentage (default is 15%).
3. Touch the Tip Rate field and use the dialpad to
enter a new tip percentage value. (The correct tip
will be calculated instantly.)
4. If you’re splitting the check, touch the Split field and
enter the number of people in your party.
5. Touch Reset to delete all values.
6. Press to return to the previous screen.
Unit Converter
Your phone comes with a built-in conversion
application.
1. Press and touch Main () > Calculator >
Unit Converter.
2. Select Distance, Temperature, Speed, Volume,
Weight, or Area.
3. Touch the gray unit fields and select an initial and
target unit of measurement from the Unit page.
4. Use the onscreen keypad to enter a value for the
initial unit. (The converted value will be instantly
calculated.)
Main Main
Initial Unit
Target Unit
M350.book Page 79 Monday, October 11, 2010 9:58 AM
Page 90

80 2E. Calendar & Tools
5.
Touch Reset to delete all numbers.
6. Press to return to the previous screen.
M350.book Page 80 Monday, October 11, 2010 9:58 AM
Page 91
2F. Voice Services 81
Voice Services
⽧ Automatic Speech Recognition (ASR) (page 81)
⽧ Sending a Message (page 84)
⽧ Opening Menus with ASR (page 86)
⽧ ASR Options (page 86)
Automatic Speech Recognition
(ASR)
You can use your phone’s built-in automatic speech
recognition (ASR) software to dial a phone number in
your Contacts or to launch phone functions. All you
have to do is to talk into the phone, and ASR will
recognize your voice and complete tasks by itself.
Activating ASR
䊳 Press and touch Main () > Voice
Command.
– or –
Press and hold .
The screen displays and says “Say a command.” The
phone prompts you to say the name of the command
you want to use. To complete your task, simply follow
the voice prompts.
Available ASR commands include:
䢇 Call <Name or#> to call an entry in your Contacts
list or a spoken phone number. (See “Making a
Voice Call With Speech to Action” on page 82.)
䢇 Send Text <Name or #> to launch text messaging
on your phone and specify a recipient for a new
message. (See “Sending a Message” on page 84.)
䢇 Lookup <Name> to lookup a Contacts entry name
from your current list of available contacts. (See
“Calling Contacts Entries” on page 83.)
2F. Voice Services
Note: Any of the onscreen options and functions can also be
touched to activate.
Main
M350.book Page 81 Monday, October 11, 2010 9:58 AM
Page 92
82 2F. Voice Services
䢇 Go To <Menu> to jump directly to menu items or
applications. (Opening Menus with ASR (page 86))
䢇 Check <Item> to check your phone’s status. (See
“Checking Phone Status Using ASR” on page 86.)
Tips for Using Voice Dial
Voice Dial works best in quieter environments.
When saying a name, speak at a normal speed and
say the name clearly. There is no need to pause
between the first name and last name.
Running the Speech to Action Tutorial
1. Press and touch Main () > Voice
Command.
– or –
Press and hold .
2. Touch Tutorial.
Making a Voice Call With Speech to Action
1. Press and touch Main () > Voice
Command.
– or –
Press and hold .
2. If you hear “Say a command,” say “Call.”
3. If you hear “Say the name or number,” say a name
or a phone number.
4. If you hear “Which number?,” say a number type
(for example, “Mobile”).
Tip: Use ASR in a quiet environment so it can accurately
recognize your commands.
During ASR operation, press Help (left softkey) to get
instructions using the software.
Main
Tip: You can skip steps 3 and 4 by saying a name and
location after “Call” without pausing (for example, “
Call
John Jones mobile
”).
Note: If ASR does not recognize the name or number, it will
find the most likely matches and display a list of up to
three names or numbers. You will hear “Did you say…”
followed by the name or number. You can confirm by
saying “
Yes .” Say “No” to change the selection.
Main
M350.book Page 82 Monday, October 11, 2010 9:58 AM
Page 93
2F. Voice Services 83
Voice Services
Calling Contacts Entries
1. Press and touch Main () > Voice
Command.
– or –
Press and hold .
2. Say “Call” followed by the name and the label for
the phone number you wish to call. For example,
say “
Call John Smith Mobile.” The phone dials the
number stored for the contact “
John Smith” with
the label “
Mobile.”
If the location is not recognized or the name does not
have a phone number stored in Contacts, your phone
will play the message “
Sorry, command not recognized,
try again?” and then choose to try again or cancel.
If a name has only a single number, or if you know the
name but are not sure which number to call, say “
Call”
followed by the name only. For example, say “
Call
John.” If the name is recognized and there is only one
phone number for the name, your phone immediately
places the call.
If there are multiple numbers stored for the contact, the
phone prompts you with “
Which Number?” and displays
a list of options. You can select an option by saying it or
by touching the corresponding phone number
onscreen.
Calling Phone Numbers (Digit Dialing)
1. Press and touch Main () > Voice
Command.
– or –
Press and hold .
2. Say “Call” followed immediately by a valid string of
digits to be dialed, for example, say “
Call 555 555
5555.”
3. If the correct number is repeated, say “Yes ” to dial
the number.
䡲 If the number is not recognized, the phone will
play the message “
Did you say call?”
䡲 If the announced number is not correct, either say
“
Yes, ” “No,” “Cancel,” or “Repeat.” When the
correct number is announced, say “
Yes” to dial
the number.
Main
Main
M350.book Page 83 Monday, October 11, 2010 9:58 AM
Page 94
84 2F. Voice Services
Speak naturally and clearly and remember to speak
one digit at a time—1-800 should be pronounced “One
Eight Zero Zero.”
Sending a Message
To send a text message:
1. Press and touch Main () > Voice
Command.
– or –
Press and hold .
2. If you hear “Say a command,” say “Send Text.”
3. Say the name or phone number of the recipient.
For example, say “
John Smith” or “9725551212.”
The entry information for the specified contact is
displayed. Use the name of a person in your
Contacts list and, optionally, the type of number
(Mobile1, Home1, etc.) you want to send it to. For
example, say “Send Text John Smith Mobile1.”
4. If you hear “Say the name or number,” say a name
or a phone number.
5. If you hear “Which number?,” say a number type
(for example, “Mobile”) or press
Call.
6. If the phone did not properly recognize the
command, it prompts you with “
Did you say, send
text to?”
7. Respond by saying one of the following: Yes , No
Repeat, or Cancel.
8. Use the keyboard to enter text and touch Send to
complete the message and deliver it.
To send a Picture Message:
1. Press and touch Main () > Voice
Command.
– or –
Press and hold .
2. If you hear “Say a command,” say “Send Text.”
3. Repeat steps 3 - 7 from “Sending a Message” on
page 84.
Note: If a name contains multiple numbers and you do not
specify the number type (work, mobile, etc.), your
phone chooses the mobile number by default.
Main
Note: When you start a text message through voice activation,
the message opens in Voice Mode automatically.
Main
M350.book Page 84 Monday, October 11, 2010 9:58 AM
Page 95
2F. Voice Services 85
Voice Services
4. Touch > Picture and touch the location of the
picture you wish to send with the outgoing Picture
Mail message (
My Photos or Take new Picture).
䡲 Follow the onscreen prompts to select a picture
and then attach it to the new Picture message.
5. Touch > Add Subject to toggle it to the On
state and use the keyboard to enter text into the
Subject field.
6. Once complete, touch Send to complete the
process.
To send a voice message:
1. Press and touch Main () > Voice
Command.
– or –
Press and hold .
2. If you hear “Say a command,” say “Send Text.”
3. Repeat steps 3 - 7 from “Sending a Message” on
page 84.
4. Touch > Voice Memo > Record.
5. Begin recording your new outgoing voice
message.
䡲 You can pause the recording process
by touching
Done.
To set the urgency of the message:
1. Press and touch Main () > Voice
Command.
– or –
Press and hold .
2. If you hear “Say a command,” say “Send Text.”
3. Repeat steps 3 - 7 from “Sending a Message” on
page 84.
4. Touch .
䡲 Touch the Mark as Urgent button to toggle it to the
On state and mark the new message as Urgent.
5. Touch Send to store your new voice message and
begin the delivery process.
Main
Main
M350.book Page 85 Monday, October 11, 2010 9:58 AM
Page 96
86 2F. Voice Services
Opening Menus with ASR
Open an application or access a menu by saying “Go
To” followed by the name of the application or menu.
To see a list of possible choices:
1. Press and touch Main () > Voice
Command.
– or –
Press and hold .
2. Say “Go To.” A list of valid destinations is displayed
and you are prompted with “
Which shortcut?”
䡲 If the list is too long to fit on one screen, you can
say the name of a destination.
䡲 Examples can include: Email, Messaging, IM,
Calculator, Notes, Calendar, Clock, or Settings.
3. Say the name of the application you want the
phone to activate.
Checking Phone Status Using ASR
You can use ASR to obtain information about your
phone such as
Status, Time, Signal Strength, Network,
Battery, and My Phone Number.
1. Press and touch Main () > Voice
Command.
– or –
Press and hold .
2. If you hear “Say a command,” say “Check.”
3. If you hear “Which status item?,” say a command.
ASR Options
To configure the voice settings:
1. Press and touch Main () > Voice
Command.
– or –
Press and hold .
Main
Main
Main
M350.book Page 86 Monday, October 11, 2010 9:58 AM
Page 97
2F. Voice Services 87
Voice Services
2. From the “Say a Command” page, touch Settings.
– or –
Press and touch
Main () > Settings >
Speech to Action.
From the Settings page you can configure the verbal
Confirmation, activate the training mode (Adaptation),
configure the modes (Expert/Prompt), or get
information about the Speech to Action software.
To change ASR confirmation:
Your phone can be configured to take a specific action
prior to initiating any voice command parameter.
1. Press and touch Main () > Voice
Command.
– or –
Press and hold .
2. From the “Say a Command” page, touch Settings
> Confirmation.
– or –
Press and touch
Main () > Settings >
Speech to Action > Confirmation.
3. Touch one of the available options:
䡲 Automatic to always provide you with options if
there was an issue registering the command,
confirm any commands, and then announce any
actions.
䡲 Always Confirm to always confirm any command
actions before they are done, even if it was
properly registered.
䡲 Never Confirm to never confirm any command
operations. The phone will always act on what it
registers as the current command, even if it is
incorrect and without notifying you.
Adaptation
To adapt the system to your voice:
1. Press and touch Main () > Voice
Command.
2. From the “Say a Command” page, touch Settings
> Adaptation > Adapt Voice > Start.
Main
Main
Main
Note: This can also be reached from Main > Settings >
Speech to Action.
Main
M350.book Page 87 Monday, October 11, 2010 9:58 AM
Page 98
88 2F. Voice Services
3.
Hold the phone so that the microphone is
approximately six inches away from your mouth
and you can clearly read the onscreen number
sequences.
4. Repeat either the digits or words shown onscreen
using a normal tone of voice.
䡲 If the phone cannot recognize your words, it will
continue to display the same information
onscreen.
5. Repeat the previous step for the remaining sets of
digits or words.
6. When you are finished with a full session, you will
reach a screen that reads, “
Adapting.”
7. Touch OK to save.
To reset the adaptation:
1. Press and touch Main () > Voice
Command.
– or –
Press and hold .
2. From the “Say a Command” page, touch Settings
> Adaptation > Reset Voice. (The phone displays a
reset voice dialog.)
3. Touch Yes to reset the voice recognition
parameters or
No to exit.
Using Choice Lists
If your phone is not confident it has recognized a name
or number correctly, it might display a choice list and
prompt you with “
Call?” followed by the first choice on
the list. To confirm the choice, say “
Yes,” or to hear the
next choice, say “
No.” You can also select the correct
choice by touching the associated onscreen option. To
cancel the command, say “
Cancel,” or to say the name
or number again, say “
Repeat.”
Note: It is recommended that you perform the complete
Adapt Voice session at least once to achieve the
maximum benefit of this feature. If a partial adaptation is
performed, you can always return later and resume the
process from the halfway point.
Main
M350.book Page 88 Monday, October 11, 2010 9:58 AM
Page 99
2F. Voice Services 89
Voice Services
Enabling and Disabling ASR Audio Modes
You can customize whether the Voice Recognition
feature displays either a list of top Voice Recognition
choices or automatically dials the first number without
displaying a choice list.
To change the ASR mode:
1. Press and touch Main () > Voice
Command.
– or –
Press and hold .
2. From the “Say a Command” page, touch Settings
> Mode.
3. Touch one of the following onscreen options:
䡲 Expert Mode displays both a selectable list of
matching entries and if the first entry is not
correct, the phone will continue to read out each
available option until it detects either a
confirmation (Yes) or rejection (No).
䡲 Prompt Mode displays a selectable list of available
dialing options and only reads out the entry
name. You are required to touch an onscreen
option to activate a command.
Main
M350.book Page 89 Monday, October 11, 2010 9:58 AM
Page 100
90 2G. microSD Card
⽧ Using Your Phone’s microSD Card and Adapter (page 90)
⽧ Memory Status (page 92)
⽧ Connecting Your Phone to Your Computer (page 92)
Your phone lets you use a microSD™ card to expand
the available memory space.
Using Your Phone’s microSD Card
and Adapter
Using the microSD Card
Your phone is capable of supporting a standard
microSD (Secure Digital) memory card to expand the
phone’s available memory space.
It allows you to store images, music, and voice data in
your phone.
Inserting the microSD Card
1. Locate the microSD card slot along the side of the
phone.
2. Slide the cover off to reveal the open slot.
3. Make sure the microSD card's gold contacts are
facing down.
2G. microSD Card
Important: Although the Camera can function with or without
a microSD card present, music playback is
dependant on the presence of an internal
microSD card. The Samsung Seek can support a
microSD card of up to 32GB.
Important: The phone does not support formatting of the
microSD card using anything other than FAT16.
FAT32 formatting file systems are not supported.
FAT32 is the file system utilized in some of the
older versions of Microsoft Windows.
M350.book Page 90 Monday, October 11, 2010 9:58 AM
 Loading...