

Samsung SDH-P4041, SDH-P5081, SDC-9440BU, SDC-7340BC, SDR-5200 User Manual

Samsung All-in-One
Security System
User Manual
SDH-P4041
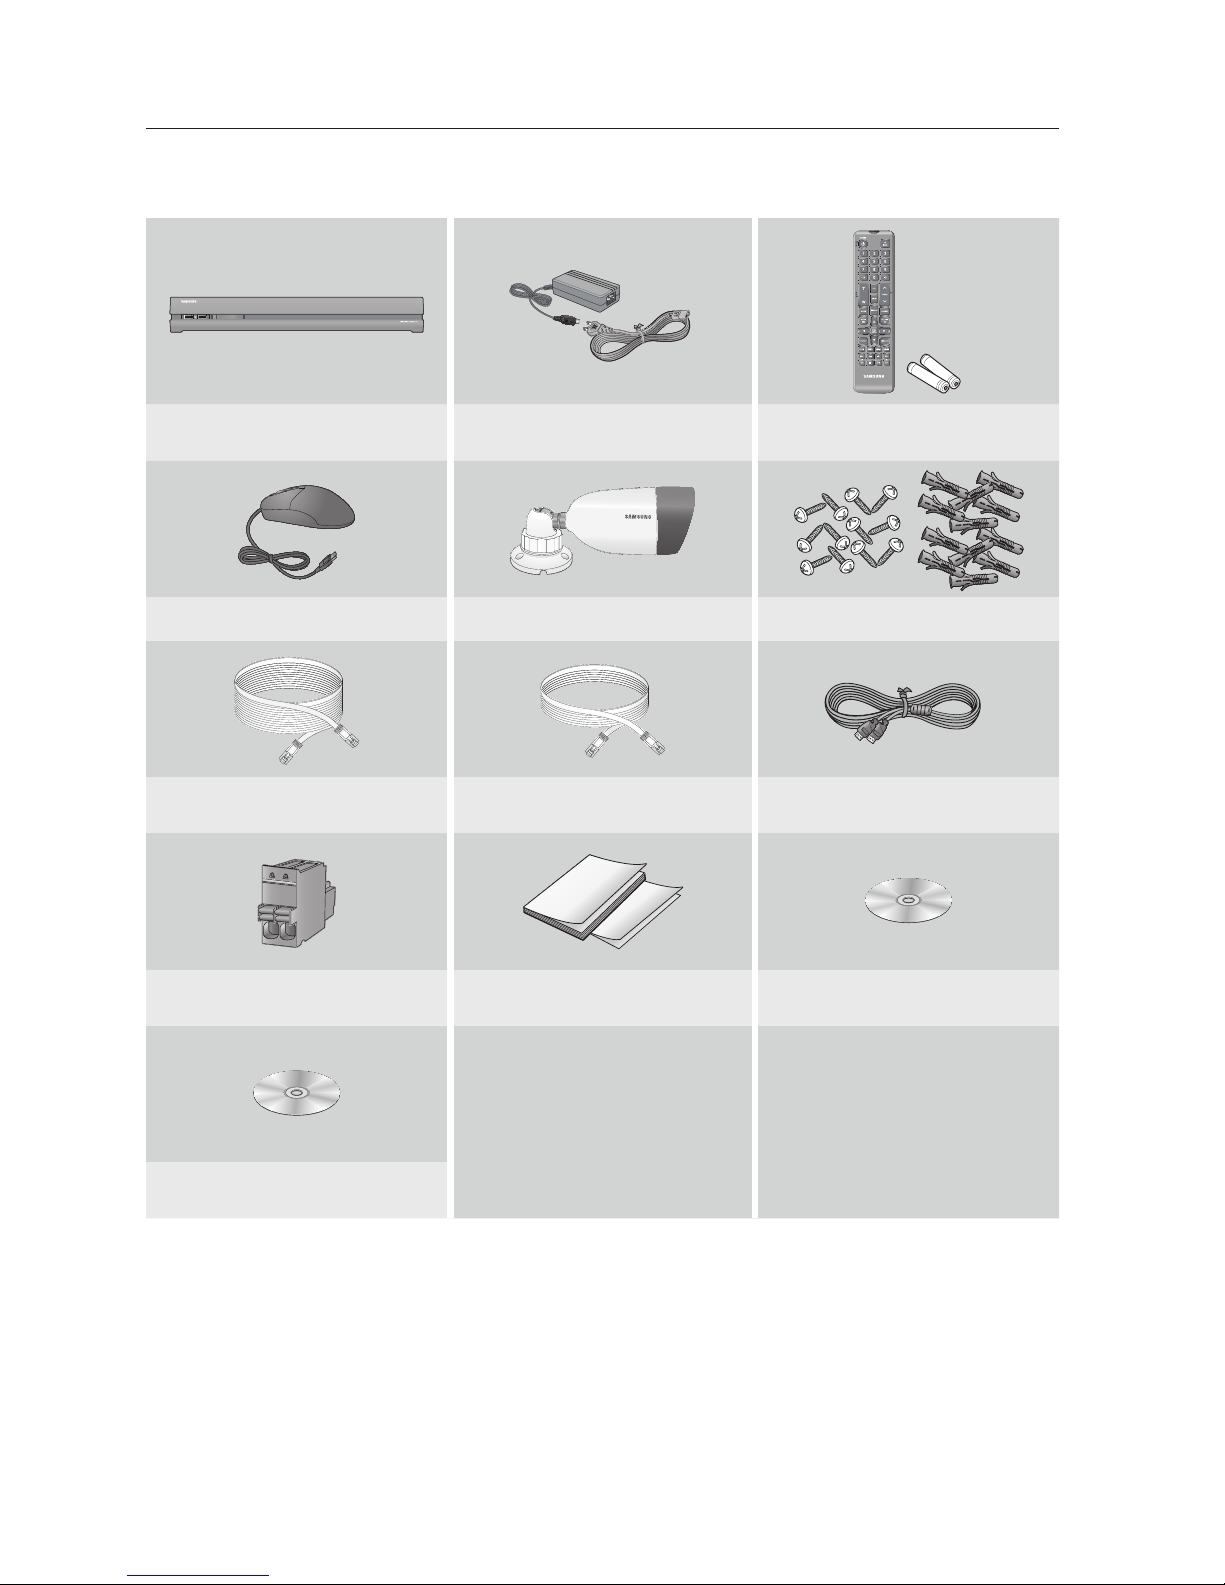
PACKAGE CONTENTS
Please unwrap the product, and place the product on a flat place or in the place to be installed.
Please check the following contents are included in addition to the main unit.
POWER REC NETWORK
SDR-4200 8CH DVR Adapter/Power Cable
Mouse
Camera Cable 4EA
(60FT)
SDC-9440BU 4EA Expansion pipe and Screw
Network Cable
RS-485 Connector Quick Guide/Warranty Card (Optional)
Remote Control /
Remote Control Battery (AAA x 2)
HDMI Cable
CD (User Manual, Quick Guide,
Router Guide)
Network Viewer Software
2_ Samsung All-in-One Security System

PRODUCT SPECIFICATION (CAMERA)
Item
Electrical
Input V
oltage
Power Consumption
Video
Imaging Device
Total Pixels 1920 x 1080(1080p) or Higher
Scanning System Progressive
hronization Internal
Sync
Frequency
Horizontal Resolution
Min. Illumination
UTP
DC 12V(by PoE) (not compatible with general PoE)
4W
1/2.9" 2M COS
-
-
OLux (IR-LED)
Built-in UTP
Maximum Transmission Length:
100m (UTP CAT5e, Solid Wire)
50m (UTP CAT5e, Stranded Wire)
TX
It is subject to change depending on user environment.
Details
SDC-9440BU
Camera connection time
Lens
Focus Length
Max.Aperture Ratio
Angular Field of
Operational
Shutter Mode
Gain Control
White Balance
WDR
Sharpness
Contrast
Brightness
Flickerless
Digital Noise Reduction
View H : 87.92˚, V : 47.66˚, D : 103.1˚
Normal 3~6 Sec
Camera image may take longer time to show depend on camera type and status. (over 10 Sec)
3.6mm
1.8
Auto(Rolling Shutter)
Flickering may occur with electronic fluorescent lamps.
Auto
Auto (1,800 ~ 10,500˚K)
-
-
-
-
Auto
Auto
Day & Night
IR Distance
Auto
30m
English _3

Item
Environmental
Oper
ating Temperature/
Humidity
Details
SDC-9440BU
-10°C ~ +50°C / 90%
IP Grade
Appearance
Dimension (W x H x D)
Weight
Design type
IP66
W70.8 x H70.4 x D200mm (Bracket included)
255g
Box Camera
4_ Samsung All-in-One Security System

PRODUCT SPECIFICATION (DVR)
Item
Operation System Embedded LINUX
Input Video Format HD : HD-UTP (Own format, 1080P/720P), SD : CVBS
Operation Mode Live/REC/PB/NW
Video In
Video Out
Audio In
Audio Out
Compression
Channel 8CH(4CH HD,
Connector Type UTP(HD) x 4CH, BNC(SD) x 4CH
VGA NTSC : MAX 1080P (60Hz), PAL : MAX 1080P (50Hz)
HDMI NTSC : MAX 1080P (60Hz), PAL : MAX 1080P (50Hz)
Simultaneous Out VGA and HDMI
Channel 4
Connector Type RCA
Channel 1
Connector Type RCA
Video H.264
Audio G.711
ype H/W
Codec T
4CH SD)
Details
SDR-4200
Live
Recording
Dual Codec O
Resolution 1080P/720P/960H
Split Mode 1/4/8/9/13/PIP
Resolution & Fr
Rate
Quality Level 8Level(LV1~LV8)
REC Mode
Function
ame
HD : 1080p (NTSC:MAX 120fps / PAL:MAX 100fps),
720p (NTSC:MAX 120fps / PAL:MAX 100fps)
SD : 960H (NTSC:MAX 120fps / PAL:MAX 100fps)
1. Normal REC
2. Schedule REC
3. Event REC
- Motion/Tampering/Video Loss
4. Pre REC
- Off/5sec
5.
Post REC
- 5/10/20/30sec
- 1/2/3/5/60min
6. Time Laps REC
- 1,2,3,.., 29,30 fps
1. Setting for each channel
- Resolution
- Frame Rate
English _5

Item
Details
SDR-4200
Playback
Storage
Resolution & Frame
Rate
Search Mode
Tric Mode
Internal
External
HD : 1080p (NTSC:MAX 30fps / PAL:MAX 25fps),
720p (NTSC:MAX 60fps / PAL:MAX 50fps)
SD : CIF (NTSC:MAX 120fps / PAL:MAX 100fps)
1. Time Search
- Date/Time
- Go to First/Go to Last
- Calendar
- Time Bar
2. Event Search
Motion/Tampering/Video Loss
-
3. Backup Search
- USB Memor
y
- USB External HDD
1. Play/Pause/Stop
2. Fast Forward/Backward
- x2/x4/x8/x16/x32/x64
3. Slow Forward/Backward
- x1/2, x1/4, x1/8
4. Step Play
- Forward : I+P frame
- Backward : I frame
Max Capacity : 2TB
1.
2. Install HDD : 1EA
3. Packing : 2TB
1.
USB 2.0 I/F
2. E-SATA
3. Max Capacity : 2TB
Backup
Remote Viewer
1. USB 2.0
USB
2. Memory : Max 32G
3. External HDD : Max 1TB
Format
1. SEC
2. DVR
Network 10/100 Mbps Ethernet
Transmit Speed
4CIF/640 x 360 120fps/100fps (Web), CIF/320 x 180 480fps/400fps (Web)
4CIF/640 x 360 16fps (Mobile), CIF/320 x 180 16fps (Mobile)
Connection No 10 (Admin 1 + User 9)
6_ Samsung All-in-One Security System

Remote Viewer
Item
Details
SDR-4200
1. Static IP
Connection Mode
2. Dynamic IP
3. PPPoE
Protocol TCP/IP, DHCP, PPPoE, SMTP, NTP, HTTP, DDNS, RTP, RTSP, UPnP
Webviewer IE, Safari, Chrome, Firefox
Mobile iPOLiS Mobile
1. Quality
2. Bandwidth
- Unlimited/2/1.5/1M
- 800/600/500/400/300Kbps
- 128Kbps
3. TCP/UDP Port
Function
4. Unicast/Multicast
5. Webviewer Port
6. DDNS
- Samsung iPOLiS DDNS
- dyndns.com
- no-ip.com
- changeip.com
7. Mailing Service
PTZ Control
I/F RS-485 Half Duplex
Protocol SAMSUNG-T, VICON, PANASONIC,AD, PHILIPS, PELLCO D, PELLCO P, SAMSUNG-E, GE
Intelligent Video Tampering Support
Jog & Shuttle X
Control
Mouse USB I/F
Remocon Samsung Remocon
a Control I2C
Camer
USB 2
RS-485 O
RS-232C X
In/Out
TA O
E-SA
Alarm In X
Alarm Out X
Korean, Japanese, Chinese (Simplified), English, French, German,
Language OSG
Spanish (European),
(South American), Swedish, Danish, Thailandais, Rumania, Serbia, Croatia, Hungary,
Greek, Chinese (Traditional), Finnish, Norwegian (25 Language)
Italian, Russian, Polish, Czech, Turkish, Netherlands, Portuguese
English _7
The Other Function
Item
1. Tool Bar
2. Pop Menu
3. S/W Upgrade
- USB / Network
4. Live & Network Monitoring without HDD
wer Type Adaptor(12V DC)
Po
Details
SDR-4200
Electrical
Mechanical
SDH-P4041
Dimensions (WxHxD)
Gross weight
Power MAX 40W(DVR + HD CAM 4EA)
Input Voltage 100 ~ 240V
AC
Operation Condition Temperature 0~40, Humidity 20~85%RH
Dimensions (WxHxD)
W413 x H57.7 x D178.5 mm
Gross weight 1.52 Kg
LAN Cable
1.
2. Power Cord
3. Remocon
Packing List
4. Mouse(Included Camera)
5. Quick Guide
6. CD(User Manual, Quick Guide, Router Guide)
7. Cushion
8. PE Bag
W497 x H298 x D323 mm
7.6 Kg
8_ Samsung All-in-One Security System

SALES NETWORK
SAMSUNG TECHWIN CO., LTD.
Samsung Techwin R&D Center, 6, Pangyo-ro 319beon-gil, Bundang-gu, Songnam-si, Gyeonggi-do 463-400, Korea
TEL : +82-70-7147-8740~60 FAX : +82-31-8018-3745
SAMSUNG TECHWIN AMERICA Inc.
100 Challenger Rd. Suite 700 Ridgefield Park, NJ 07660
Toll Free : +1-877-213-1222 Direct : +1-201-325-6920
Fax : +1-201-373-0124
www.samsungsv.com
www.samsungtechwin.com
www.samsungsecurity.com
www.samsungipolis.com
SAMSUNG TECHWIN EUROPE LTD.
Samsung House, 1000 Hillswood Drive, Hillswood Business
Park Chertsey, Surrey, UNITED KINGDOM KT16 OPS
TEL : +44-1932-45-5300 FAX : +44-1932-45-5325

DVR Quick Start Guide
AUDIO IN
AUDIO IN
VIDEO IN
VIDEO IN
1
2
3
4
1
2
3
4
AUDIO OUT
AUDIO OUT
5
6
8
VGA
NETWORK
e-SATA
HDMI HD VIDEO IN POWER
DC-12V1
234
CONSOLE
7
56
VGA
NETWORK e-SATA HDMI
HD VIDEO IN
POWER
DC-12V
123
4
CONSOLE
7
8
RS-485
RS-485
1
.
A
LA
R
M
I
N
2
.
GN
D
SAMSUNG ALL-IN-ONE SECURITY SYSTEM
Thank you for purchasing a Samsung All In One Security System.
Follow the simple steps in this guide to set up and start using your new system.
If you have any questions or need help installing your new product please contact our free technical support.
Internet: http://www.samsungsecurehome.eu/
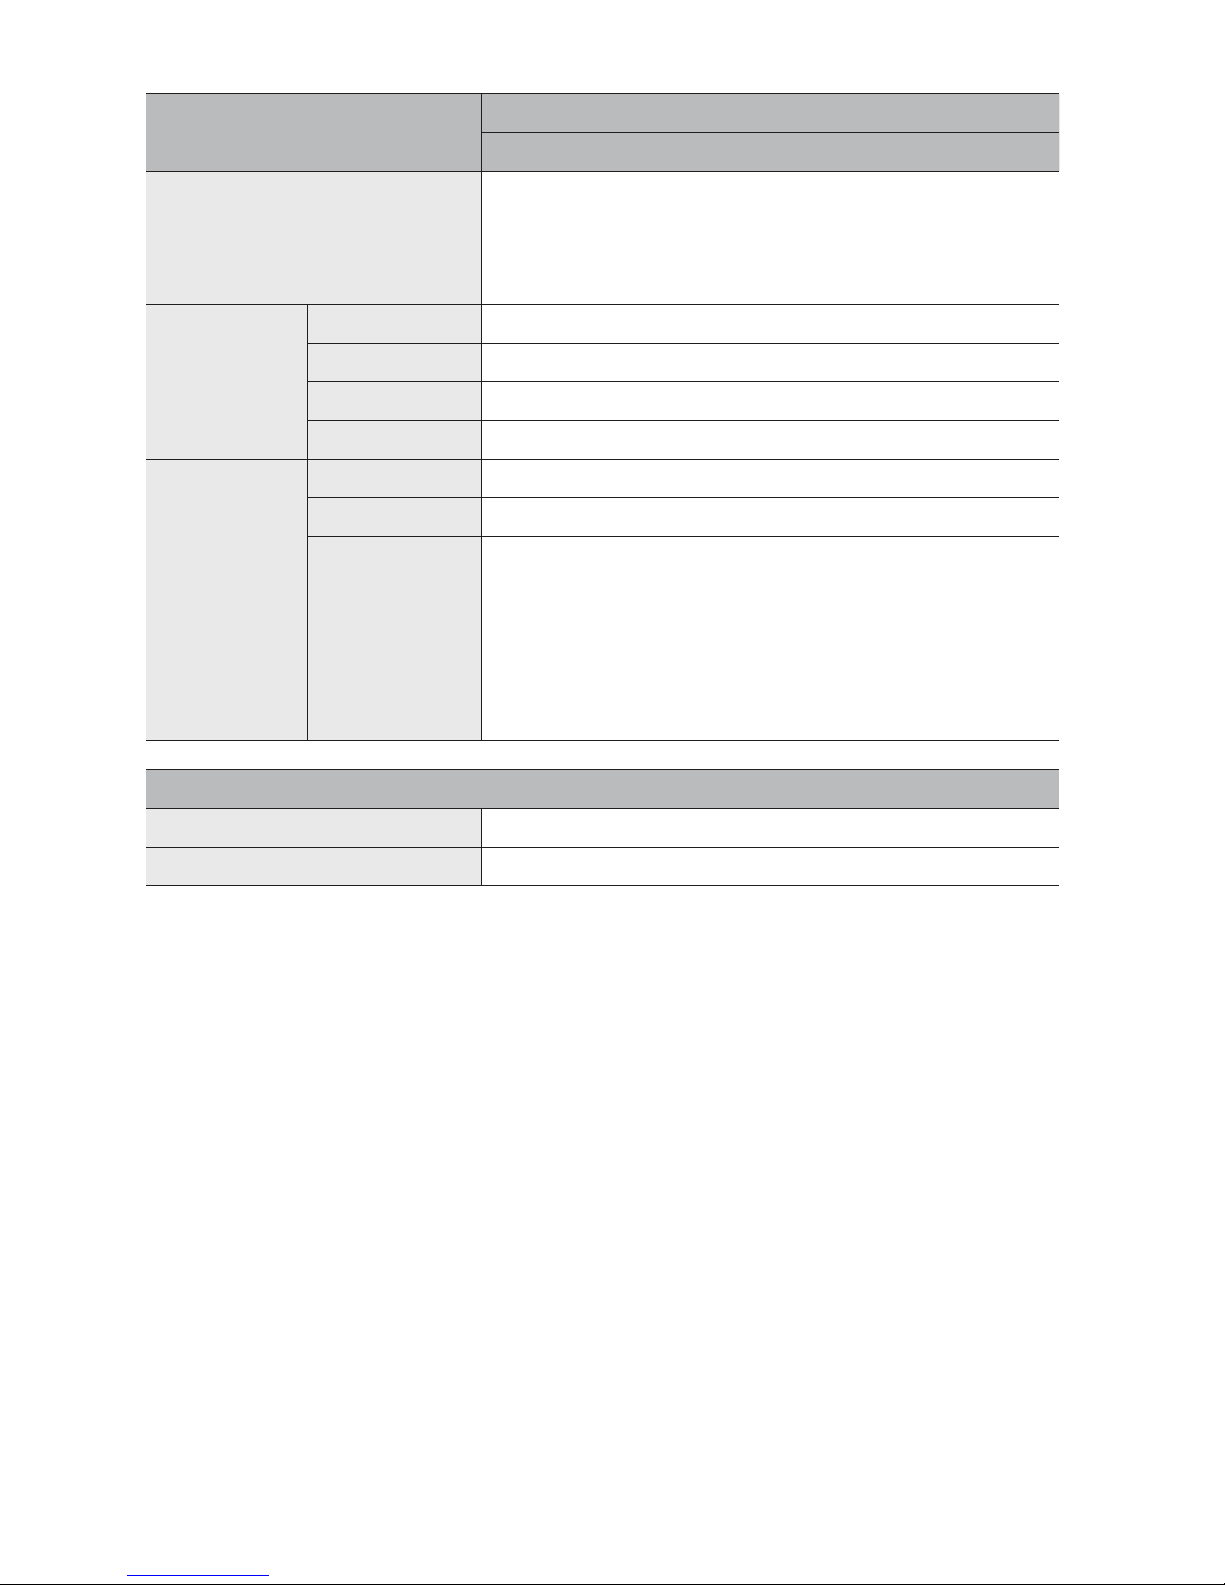
INSTALLING YOUR SYSTEM
❒8CH DVR
Front
SDR-4200/SDR-5200
1
Rear
2
Connect a mouse
1
Connect an BNC camera
2
Connect the DC adaptors (Camera)
3
Connect to a network router
4
POWER REC NETWORK
3
4
5
5
6
7
6
Connect a monitor
Connect an UTP camera
Connect the DC adaptors (DVR)
7
English _1
❒16CH DVR
AUDIO IN
AUDIO IN
VIDEO IN
VIDEO IN
1
2
3
4
12
34
AUDIO OUT
AUDIO O
UT
5
67
8910
11
12 13
14
15
16
VGA
NETWORK e-SATA HDMI HD VIDEO IN POWER
DC-12V
1234
CONSO
LE
5
6
7
8
9
10
11
12
13
14
15
16
VGA
NETWORK
e-SATA HDMI
HD VIDEO IN
POWER
DC-12V
123
4
CONSOLE
RS-485
RS-485
1
.
A
L
A
R
M
I
N
2.
G
ND
Rear
2
4
6
Connect a monitor
Connect an UTP camera
Connect the DC adaptors (DVR)
Connect a mouse
1
Connect an BNC camera
2
Connect the DC adaptors (Camera)
3
Connect to a network router
4
3
5
5
6
7
CAUTION
Maximum Transmission Length : 100m (UTP CAT5e, Solid Wire)/50m (UTP CAT5e, stranded wire)
Do not plug any other cable except normal direct cable in the camera UTP port.
Do not plug any other cable except the one connected with the camera in the camera HD UTP port.
(Samsung HD UTP dedicated camera : SDC-8340BU, SDC-9440BU, SDC-9410DU)
This product may not work properly if the air opening is blocked or if other unit is laid upon this product.
Please install the unit in a well-ventilated place.
Camera image may take longer time to show depend on camera type and status. (over 10 Sec)
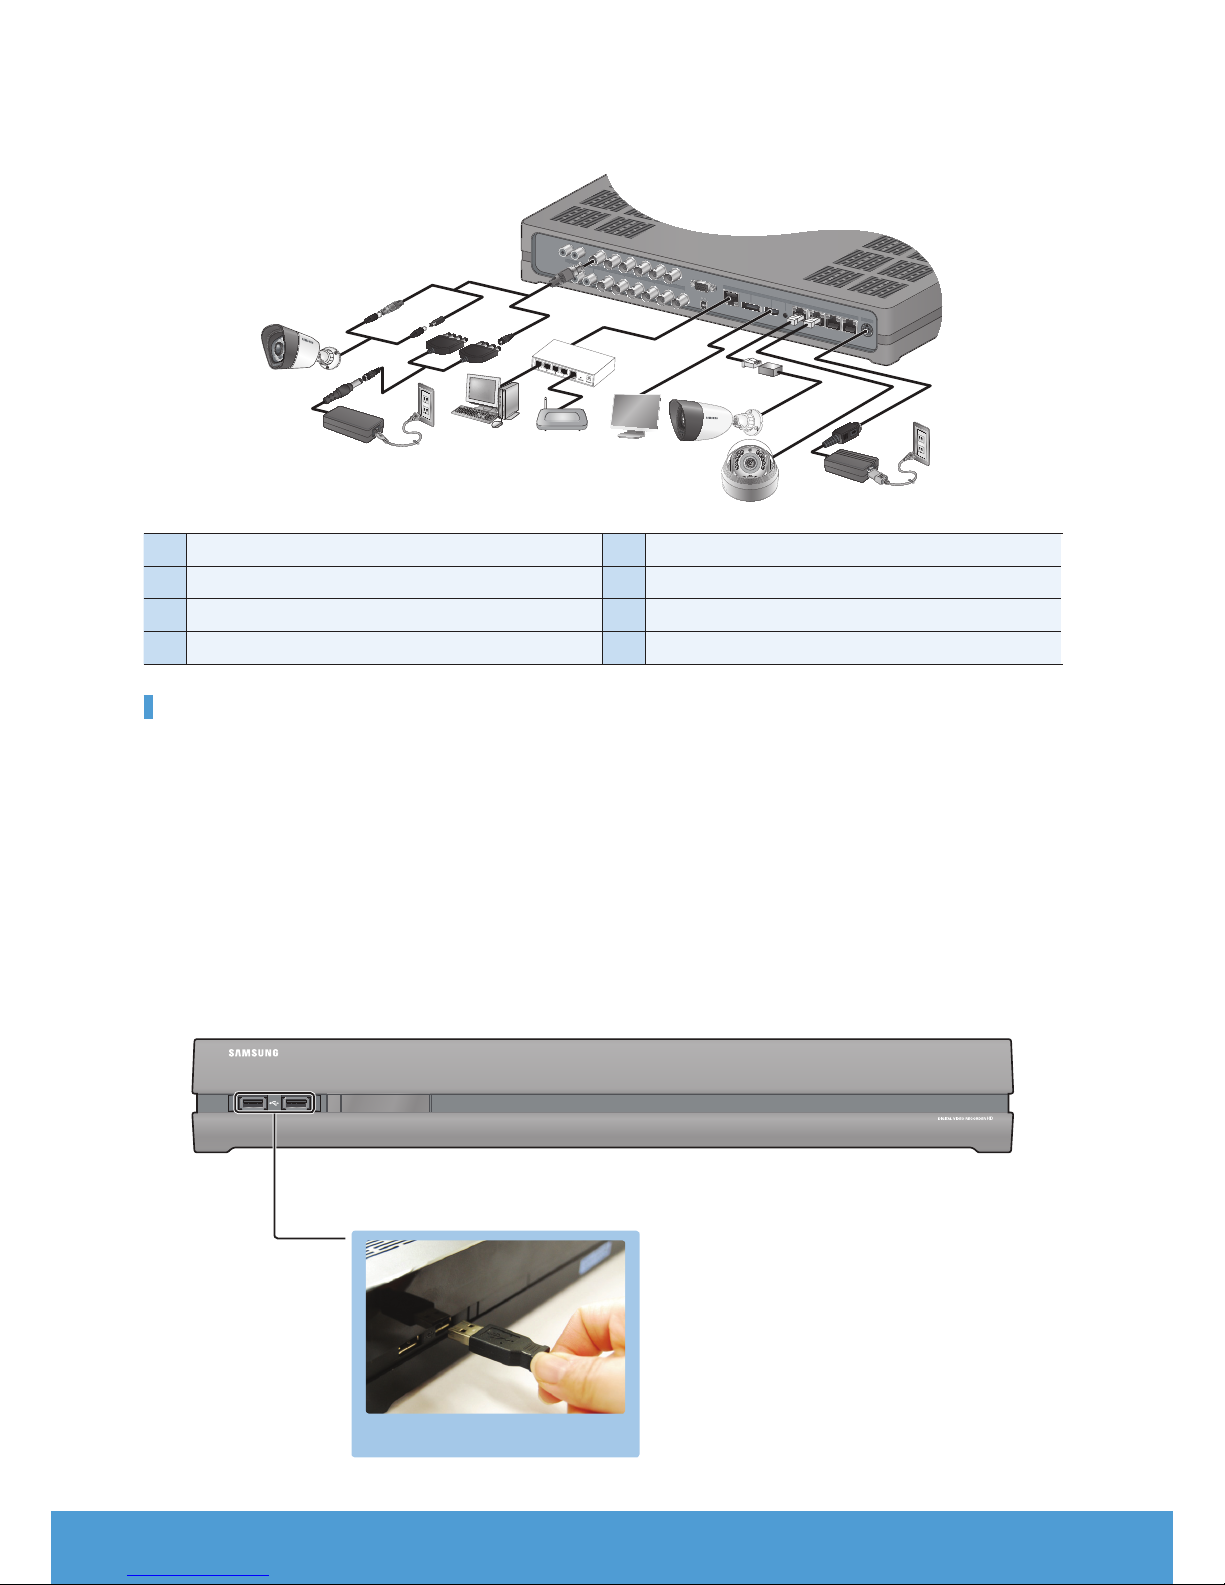
❒Connecting the DVR to Live monitoring
Front
7
POWER REC NETWORK
1 Connect a mouse
2_ English
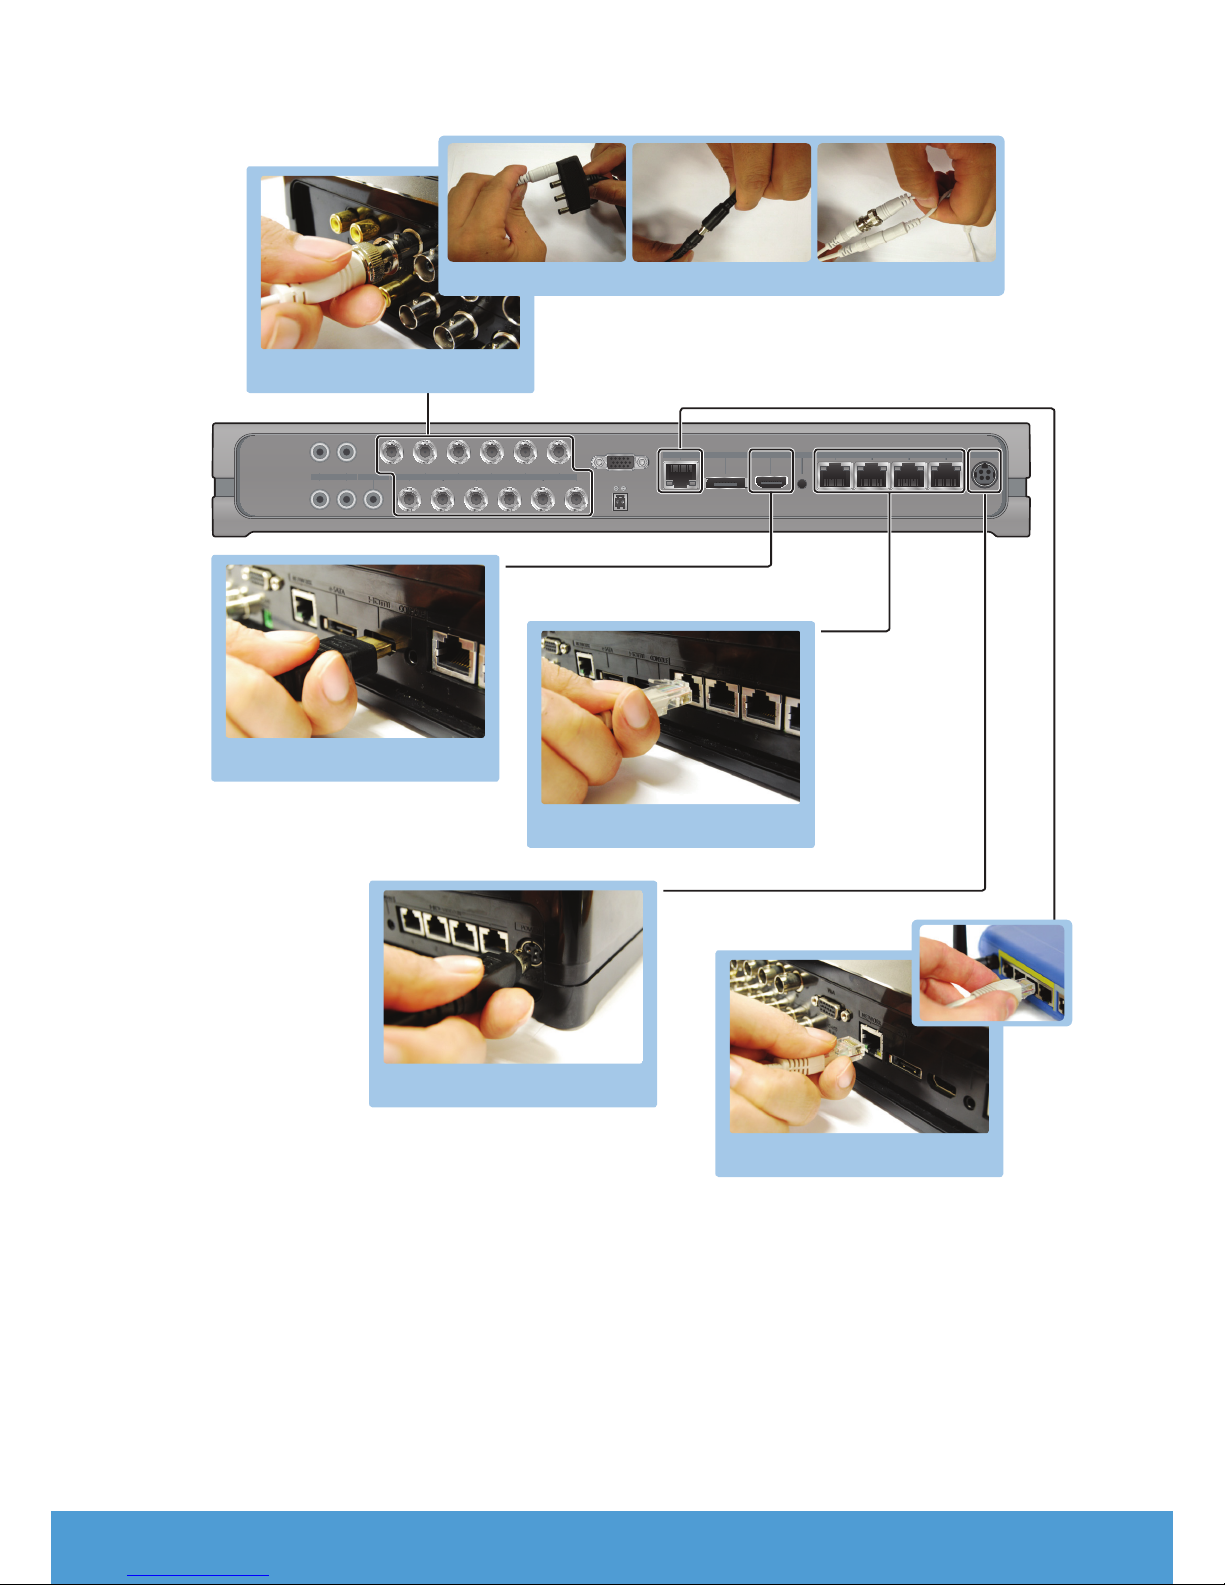
Rear
2 Connect an BNC camera
12
12
AUDIO INAUDIO IN VIDEO INVIDEO IN
34
34
5678910
5678910
AUDIO OUTAUDIO OUT
11 12 13 14 15 16
11 12 13 14 15 16
3 Connect the DC adaptors (Camera)
VGA
VGA
NETWORK e-SATA HDMI HD VIDEO IN POWER
NETWORK e-SATA HDMI HD VIDEO IN POWER
RS-485
RS-485
CONSOLE
CONSOLE
DC-12V1234
DC-12V1234
5 Connect a monitor
6 Connect an UTP camera
7 Connect the DC adaptors (DVR)
4 Connect to a network router
English _3
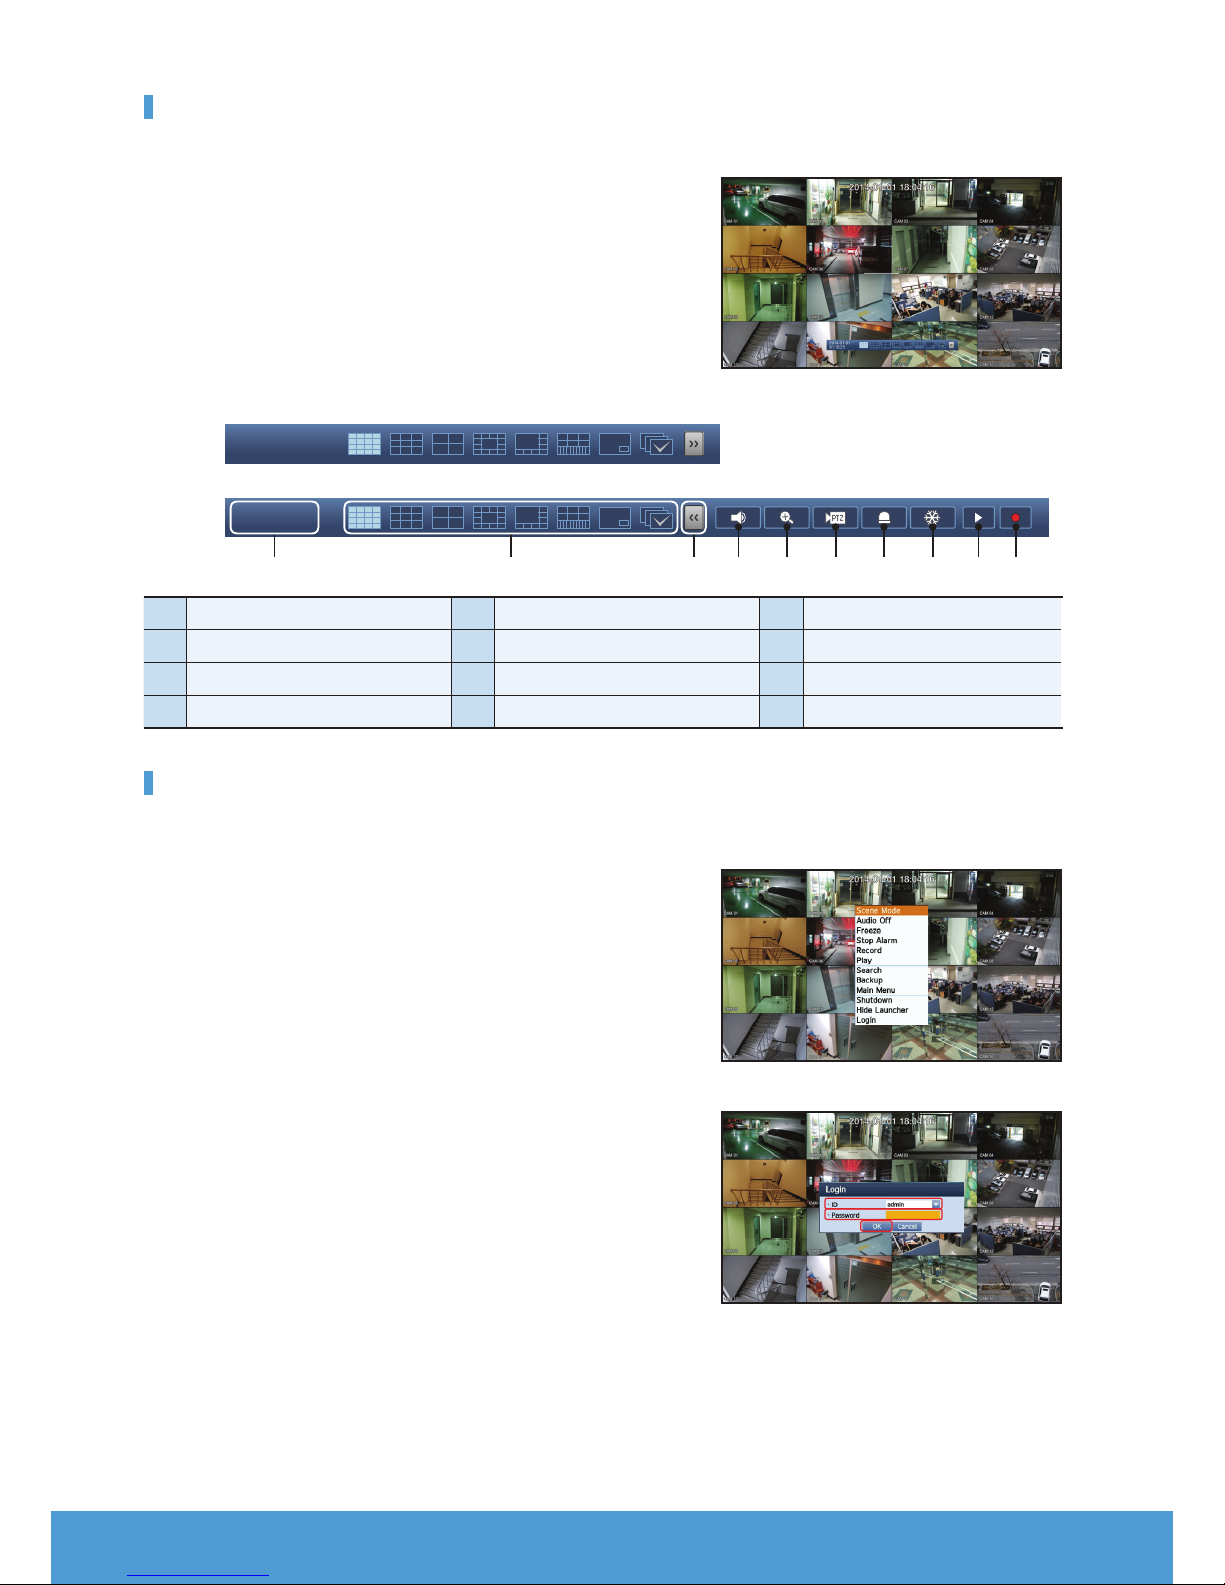
VIEW THE LAUNCHER MENU
The Launcher menu appears on the bottom of the live screen.
In Live mode, right-click to display the context menu and select
1.
<Show Launcher>.
Move the cursor to the bottom and click a desired item in the Launcher
2.
menu.
If no input is entered for 10 seconds, the menu will disappear.
M
The Launcher menu can be accessed only by using the mouse.
Screen mode may vary depending on the DVR supported channel.
2014-01-01
01:10:25
2014-01-01
01:10:25
1 2 34567890
Date/Time
1
Screen Mode
2
Menu Expansion Button
3
Audio
4
5
6
7
8
SYSTEM SETTING
❒Time Setting
Right click on the mouse and select main menu.
1.
In the login window, enter the password and click <OK>.
2.
J The initial administrator ID is “admin” and the password should be set
when logging in for the first time.
Set password for your wireless network if you use the product with a
wireless router. Being not protected with password or using the default
wireless router password may expose your video data to potential threat.
Please change your password every three months to safely protect
personal information and to prevent the damage of the information theft.
Please, take note that it’s a user’s responsibility for the security and any
other problems caused by mismanaging a password.
Zoom
PTZ
Alarm
Freeze
9
0
Play
Record
4_ English
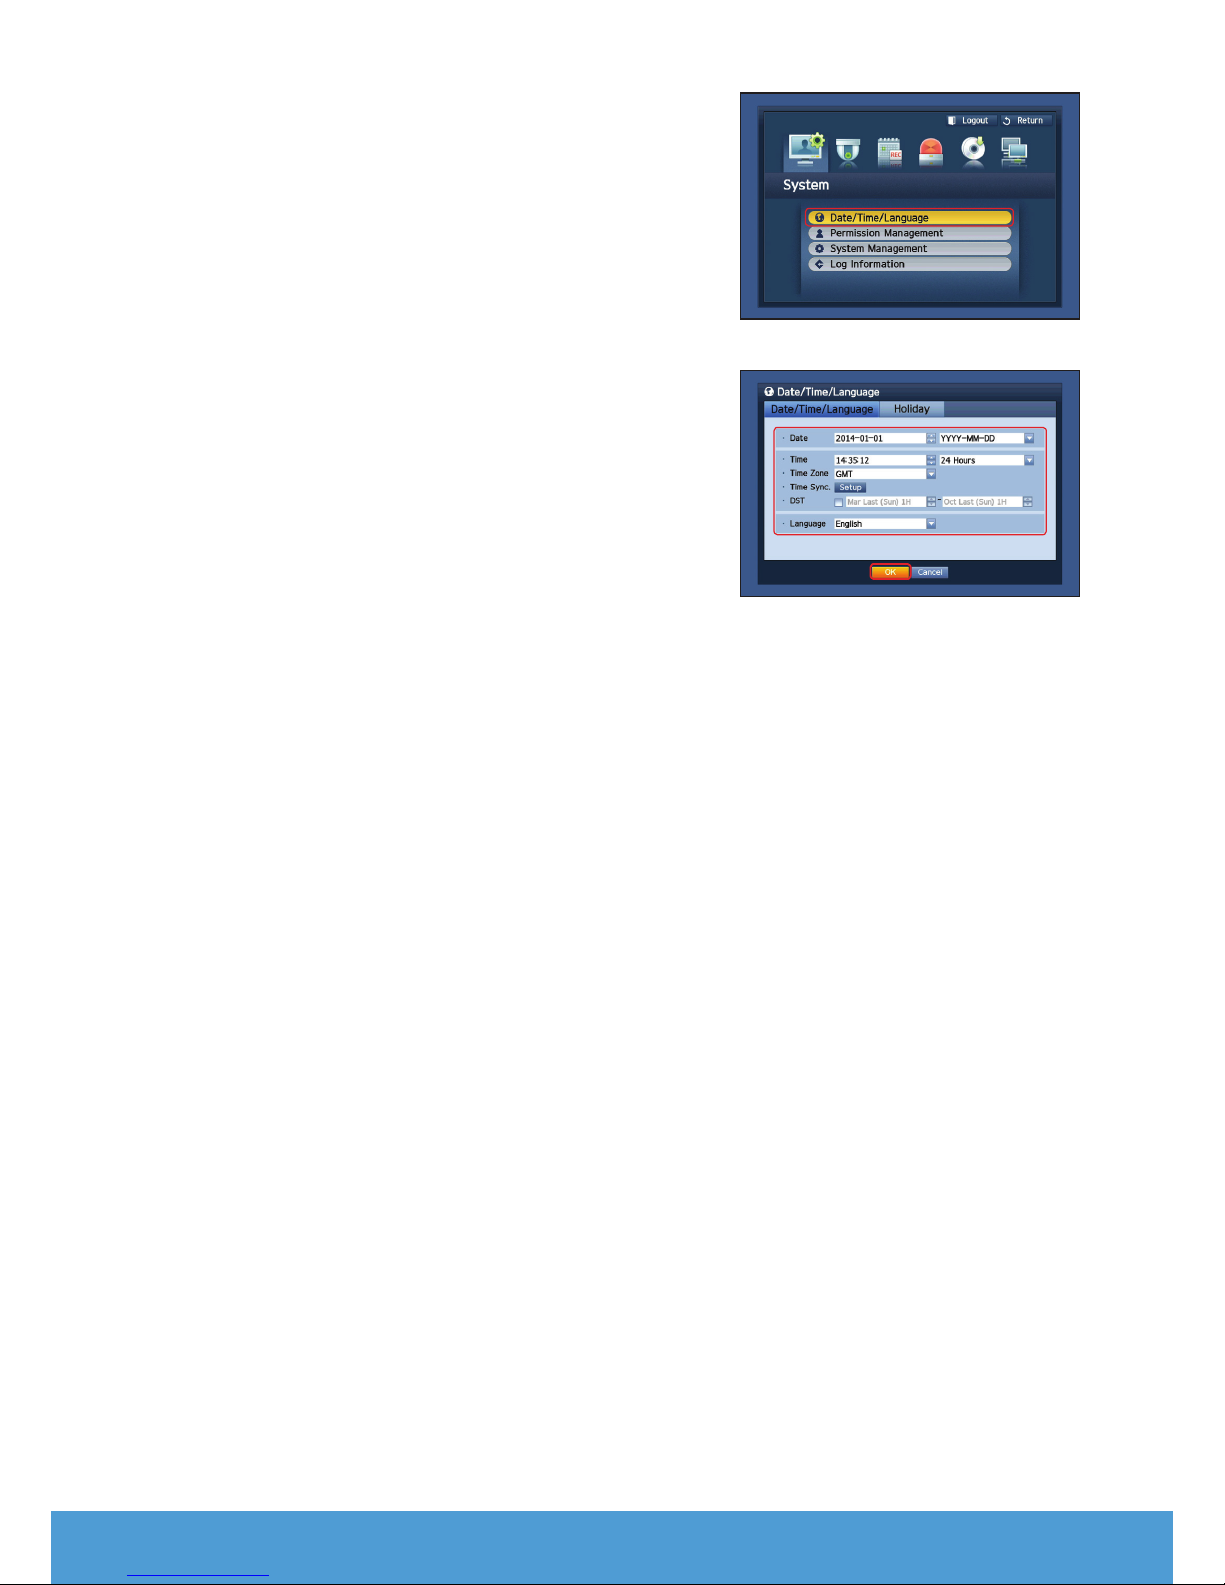
Click on Date/Time/Language. Set time and date.
3.
After filling in the information, Click <OK>.
4.
English _5
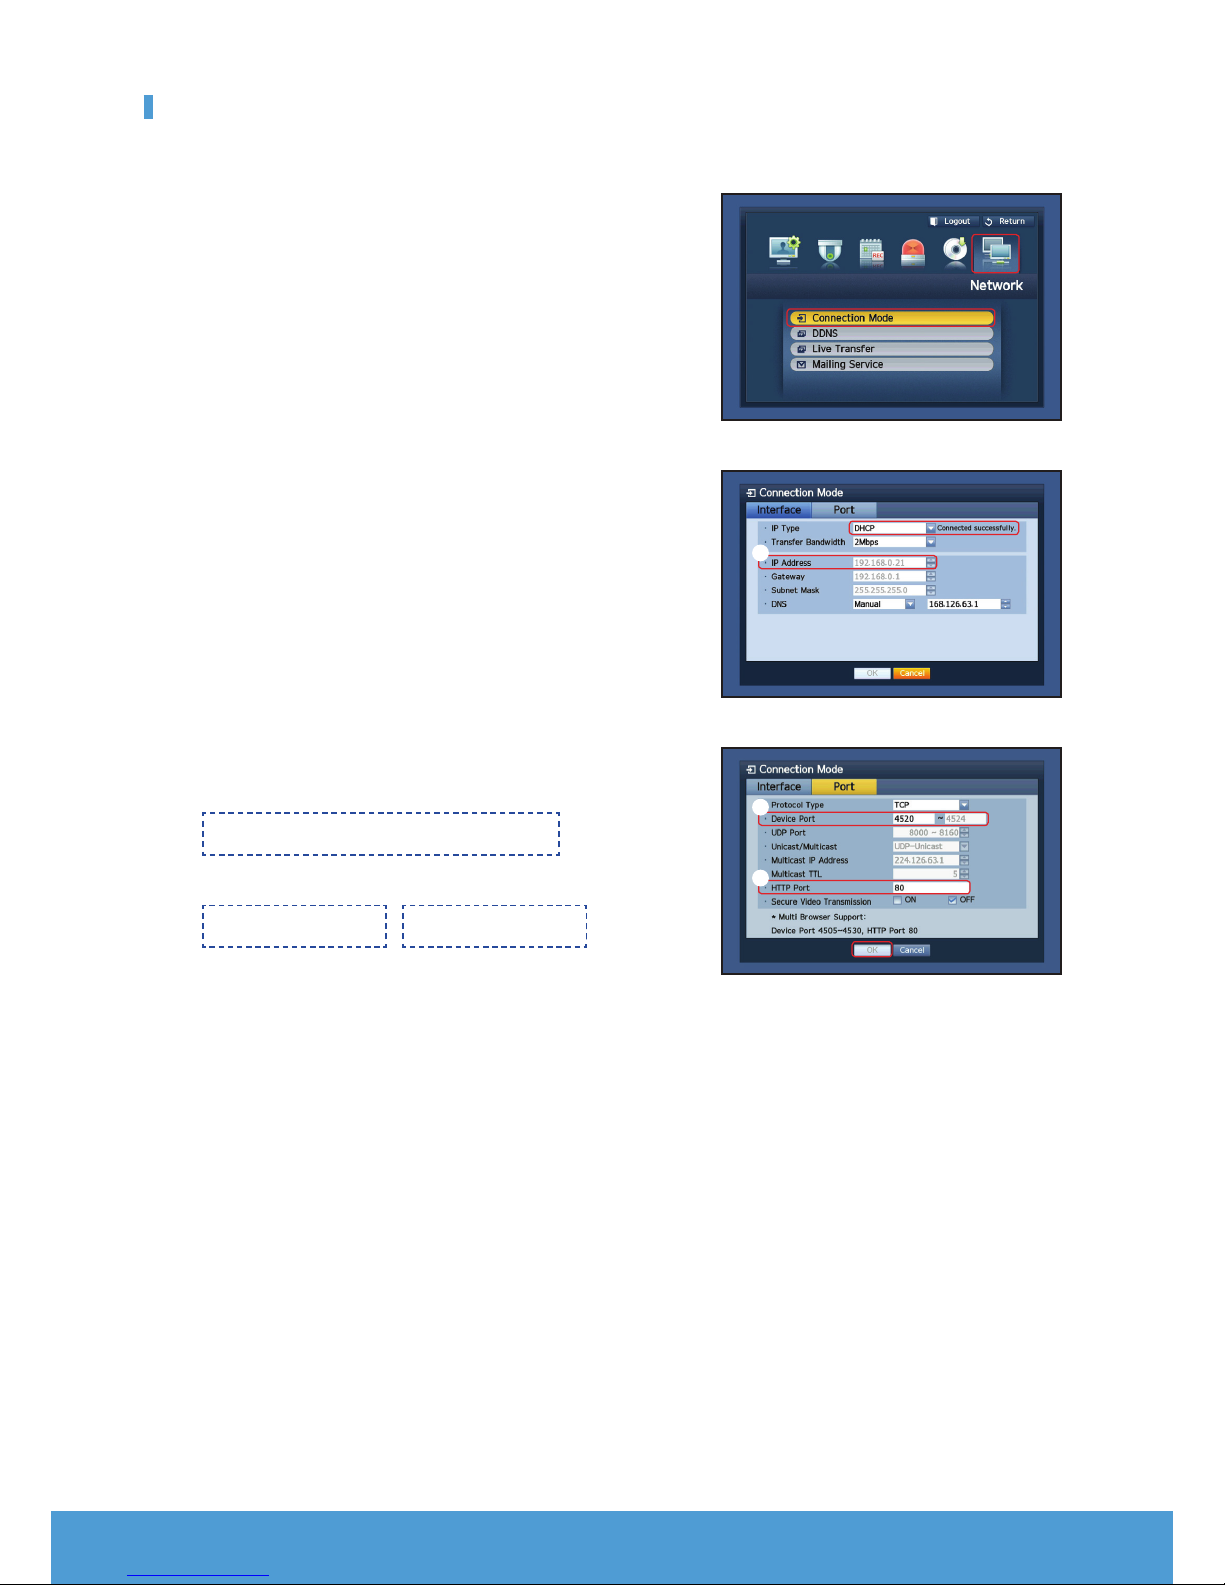
Network Setting
❒Connection Mode (DHCP)
Click on Network and select <Connection Mode>.
1.
If there occur a problem with Connection Mode, check the connection
as “Installing your system” on page 1.
If you still have a problem, contact the nearest service center for more
information.
Under <Interface> Tab.
2.
Check <IP Type> is set to <DHCP> as default.
If it connected successfully, you can see the success comment.
J If you know Static IP information from your router, please select
<Static> and enter IP address, Gateway, and Subnet Mask etc.
Please refer to the Router Guide in provided CD when you use a static IP.
M
1
Under <Port> Tab.
3.
J Write down <Device Port> and <HTTP Port>.
1 IP Address
2 Device Port 3 HTTP Port
When completing the setting, click <OK>.
4.
2
3
6_ English
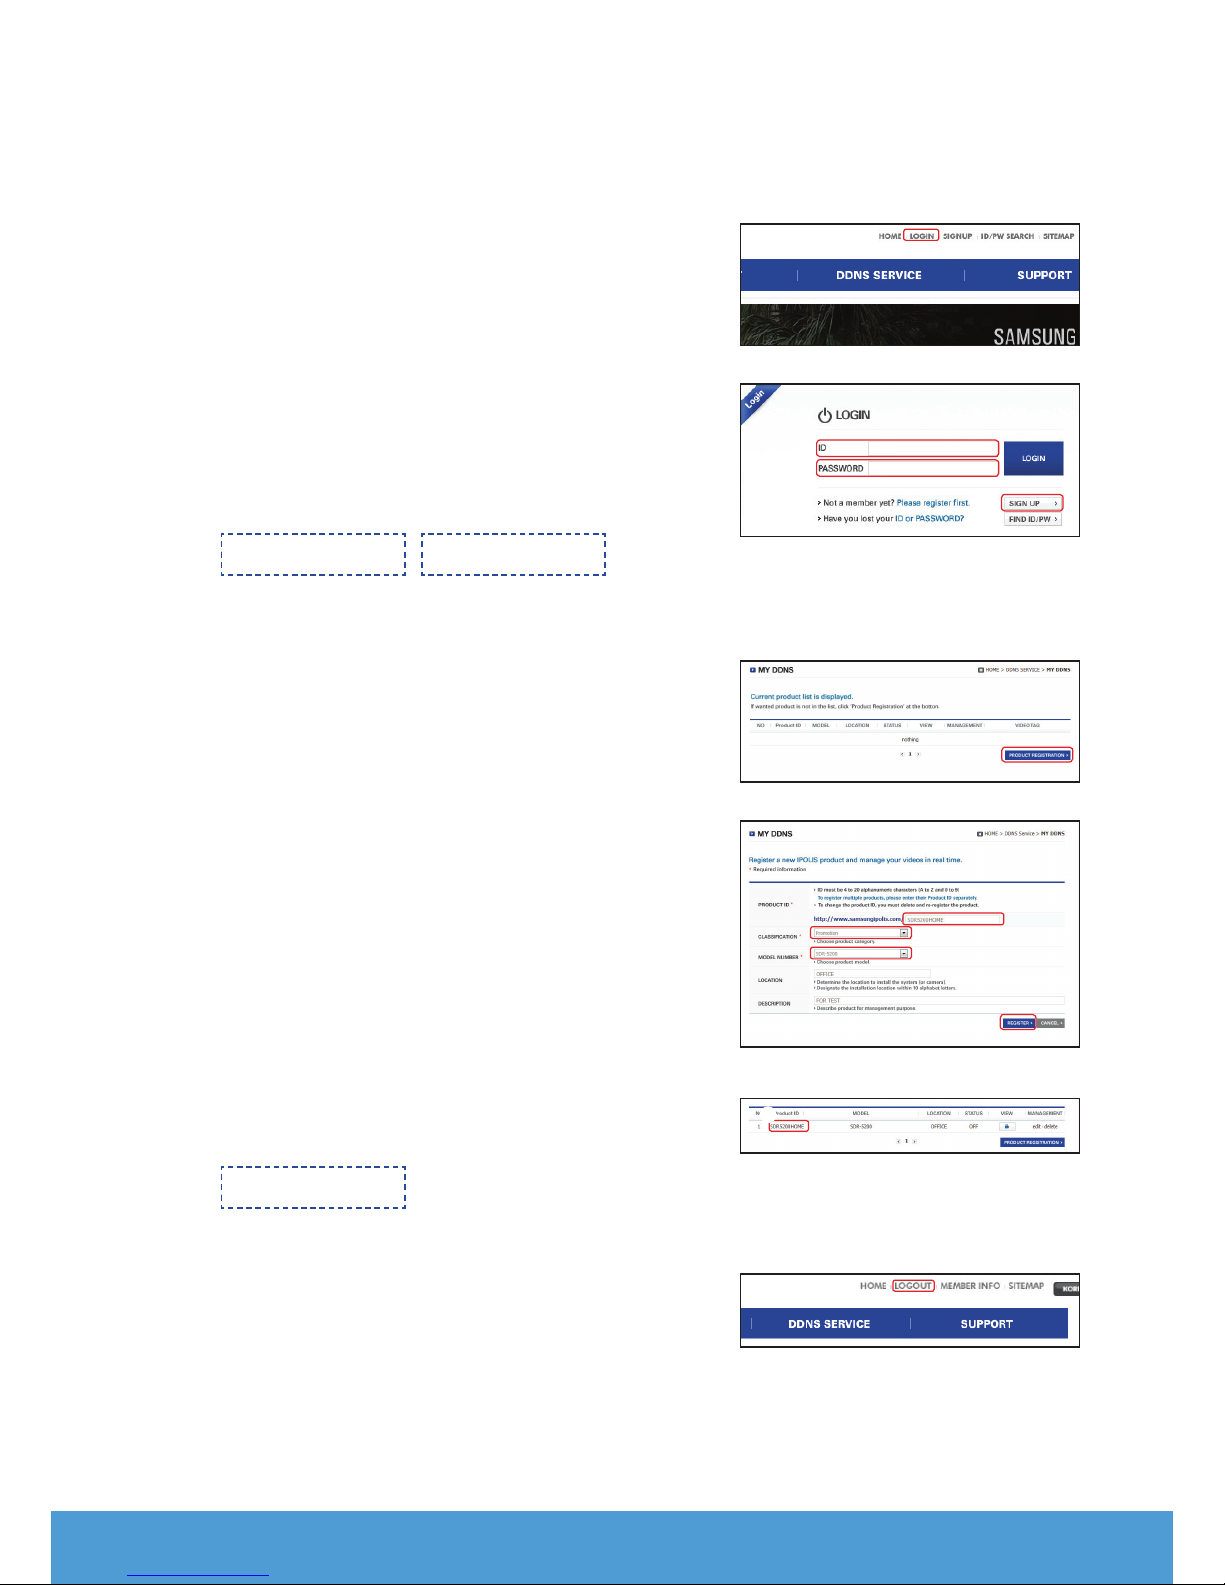
❒SETTING UP SAMSUNG iPOLiS DDNS
Since you will be accessing the DVR remotely, let’s setup your Samsung iPOLiS account first using the PC.
Go to Your PC
Open your browser and go to http://www.samsungipolis.com and click
1.
<LOGIN>.
You first need to create an account.
2.
Click <SIGN UP>.
Follow the account registration instructions on the website.
3.
After completing the account registration, login to your account.
4.
J Write down your ID and Password below.
1 ID 2 Password
Add your DVR to your account. Click <PRODUCT REGISTRATION>.
5.
1
2
Create a name(Product ID) for your DVR. Use 4 to 20 alphanumeric
6.
characters without spaces. Select classification, model number of the
DVR and click <REGISTER>.
J Model Number
16CH DVR : SDR-5200
8CH DVR : SDR-4200
After registration, you should see your product in the list.
7.
J Write down the product ID below.
3 Product ID
Click <LOGOUT> to close the Web Page.
8.
3
English _7
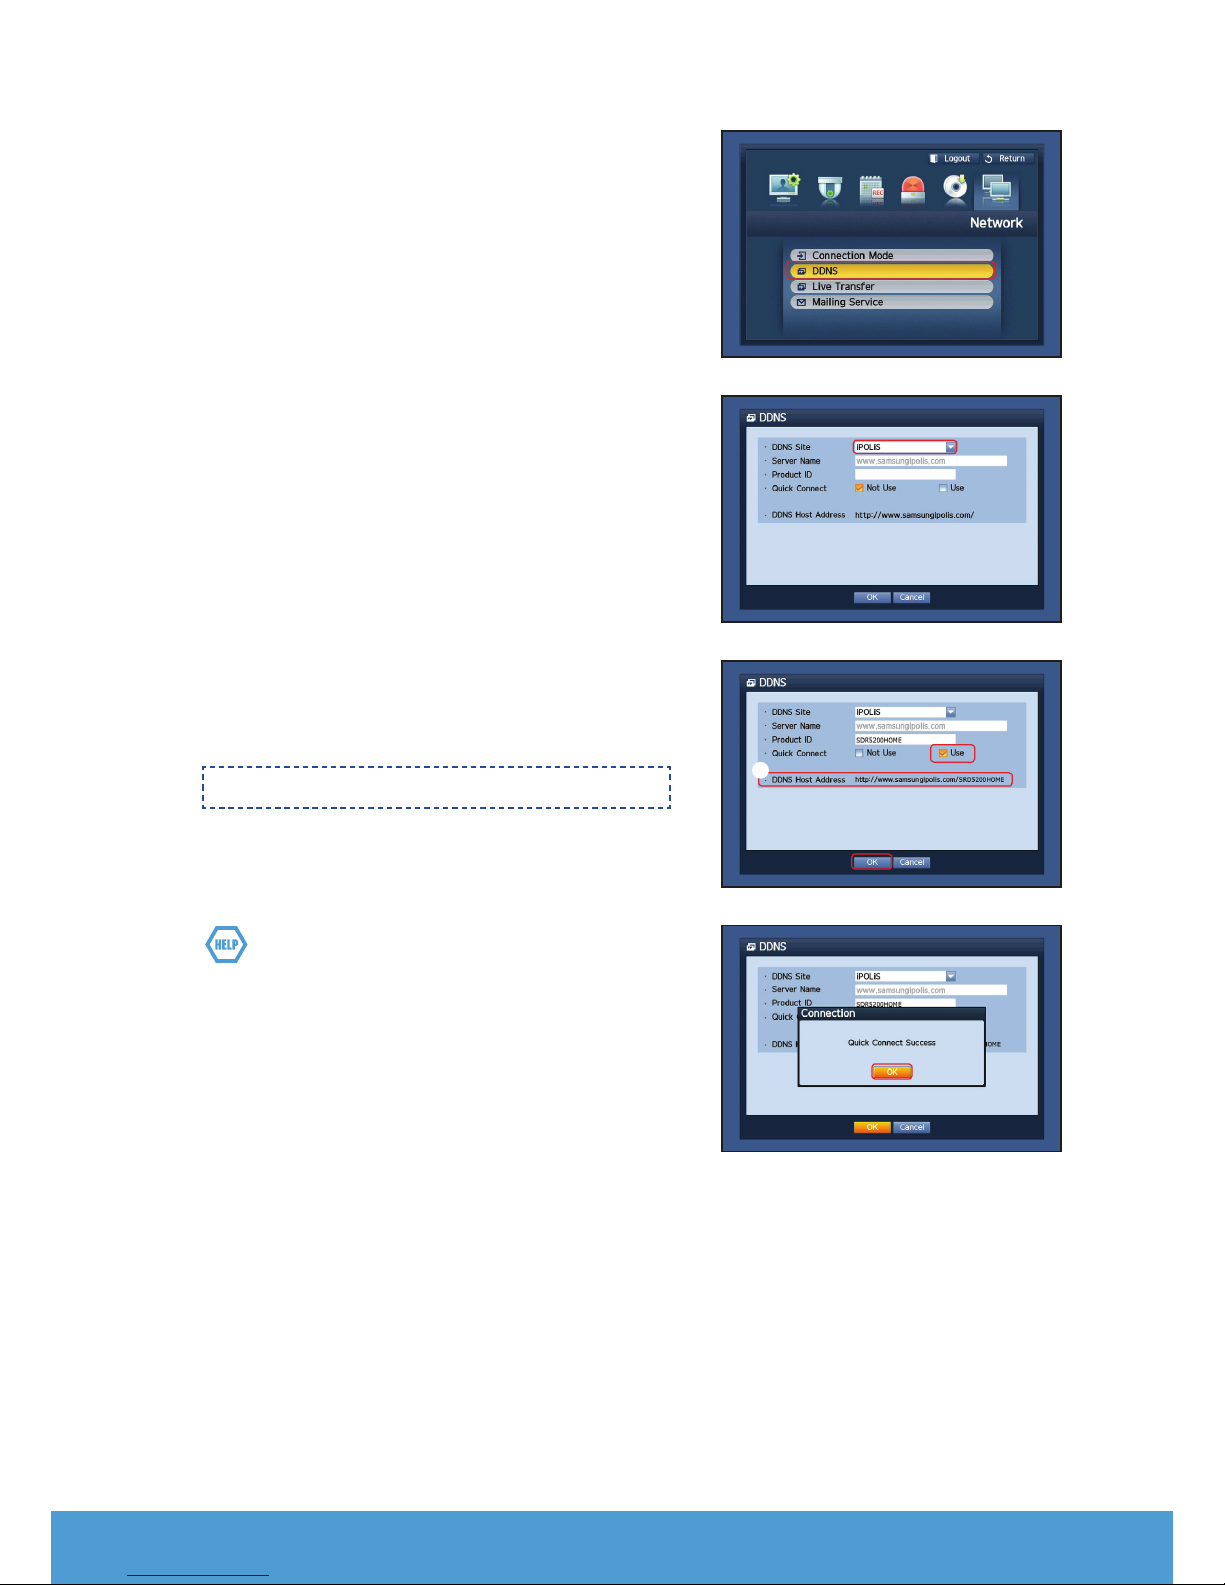
Go back to DVR
From network tab, click on <DDNS>.
1.
Under DDNS Site, select <iPOLiS>.
2.
Under Product ID, enter the product ID you created on the Samsung
3.
iPOLiS website.
Under Quick Connect, select <Use> and click <OK>.
J Write down the DDNS Host address:.
1
1 DDNS Host Address
If the connection was not successful, your router may not be
supporting UPNP.
For more information on enabling UPNP on your router, please see
Router manual.
8_ English

REMOTE MONITORING
From a Windows computer
Open Windows Internet Explorer and go to http://www.samsungipolis.
1.
com and click <LOGIN>.
Login with the user ID and password you wrote down earlier.
2.
Click < > icon.
3.
You will be asked to install the active X plug-in.
4.
Enter the user ID and password for the DVR.
5.
J If the screen to the bottom right does not appear, check if the DVR set is
connected properly with a valid IP address.
Now, you can install the cameras and place the cameras where they are
6.
needed.
English _9
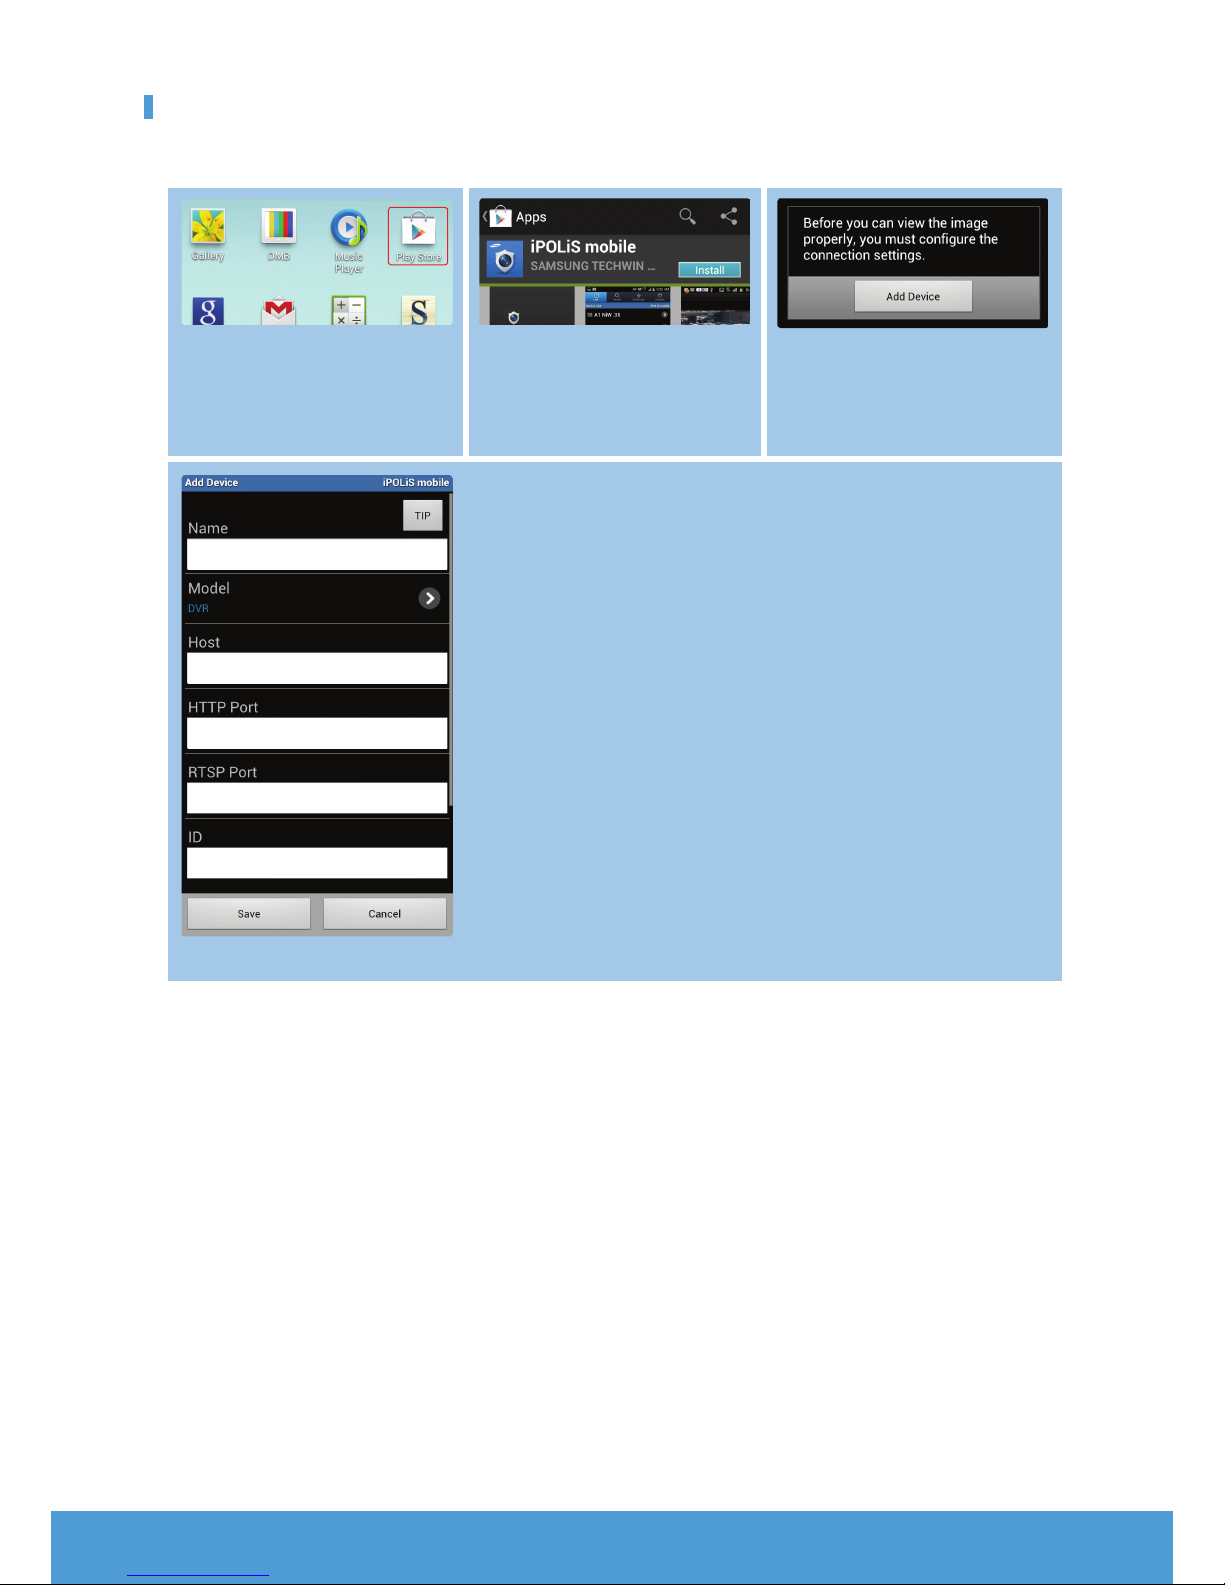
USING A SMARTPHONE
❒For Android Phone
SDR-5200
1 Visit Play Store to Download the
Samsung iPOLiS mobile app.
SDR-5200
www.samsungipolis.com/SDR-5200
80
4254
admin
2 Search for Samsung iPOLis and install
<iPOLiS mobile>.
3 Launch the iPOLiS mobile app add the
DVR.
Tap on the menu icon and tap <Add
Device>.
4 Register the DVR to the iPOLiS mobile.
J Name : Create a name for the DVR you are adding
Model : Select the DVR
Host : If you are using Samsung iPOLiS DDNS, enter the DDNS Host Address you
wrote down earlier. (Page 7, 8)
It should be www.samsungipolis.com/Product ID
HTTP Port : Enter the HTTP Port you wrote down earlier.
RTSP Port : Enter the last port number of Device Port you wrote down earlier.
ID : Default ID is <admin>. If you change before, please enter changed ID.
Password : If you changed before, please enter changed Password.
Camera : Select the cameras you want to view.
J The initial administrator ID is “admin” and the password should be set when
logging in for the first time.
Set password for your wireless network if you use the product with a wireless
router. Being not protected with password or using the default wireless router
password may expose your video data to potential threat.
Please change your password every three months to safely protect personal
information and to prevent the damage of the information theft.
Please, take note that it’s a user’s responsibility for the security and any other
problems caused by mismanaging a password.
10_ English

❒For iPhone
1 Visit App Store to Download the
Samsung iPOLiS mobile app.
SDR-5200
DVR
www.samsungipolis.com/s...
80
4254
SAMSUNG TECHWIN C...
Utilities
2 Search for Samsung iPOLis and install
<iPOLiS mobile>.
Install
3 Launch the iPOLiS mobile app add the
DVR.
At the Add Device pop-up, tap <OK>.
4 Register the DVR to the iPOLiS mobile and click <Save>.
For more information of each item, refer to “For Android Phone”.
M
RECORDING AND PLAYBACK
Press the [MENU] button on the remote control.
1.
Use the left/right buttons (◄►) to select <Record>.
Use the up/down buttons (▲▼) to move to <Recording Schedule>,
and press [ENTER] button.
Set each of the Record Schedule options.
2.
To change the setting, set the channel then select the time and date you
want to record and click <OK>.
The default is as shown.
Color Part Names Functions
White No Recording No schedule / event recording
Orange Continuous Scheduled recording only
Blue Event Event recording only
Green Both(Cont&Evnt) Both scheduled / event recordings
English _11
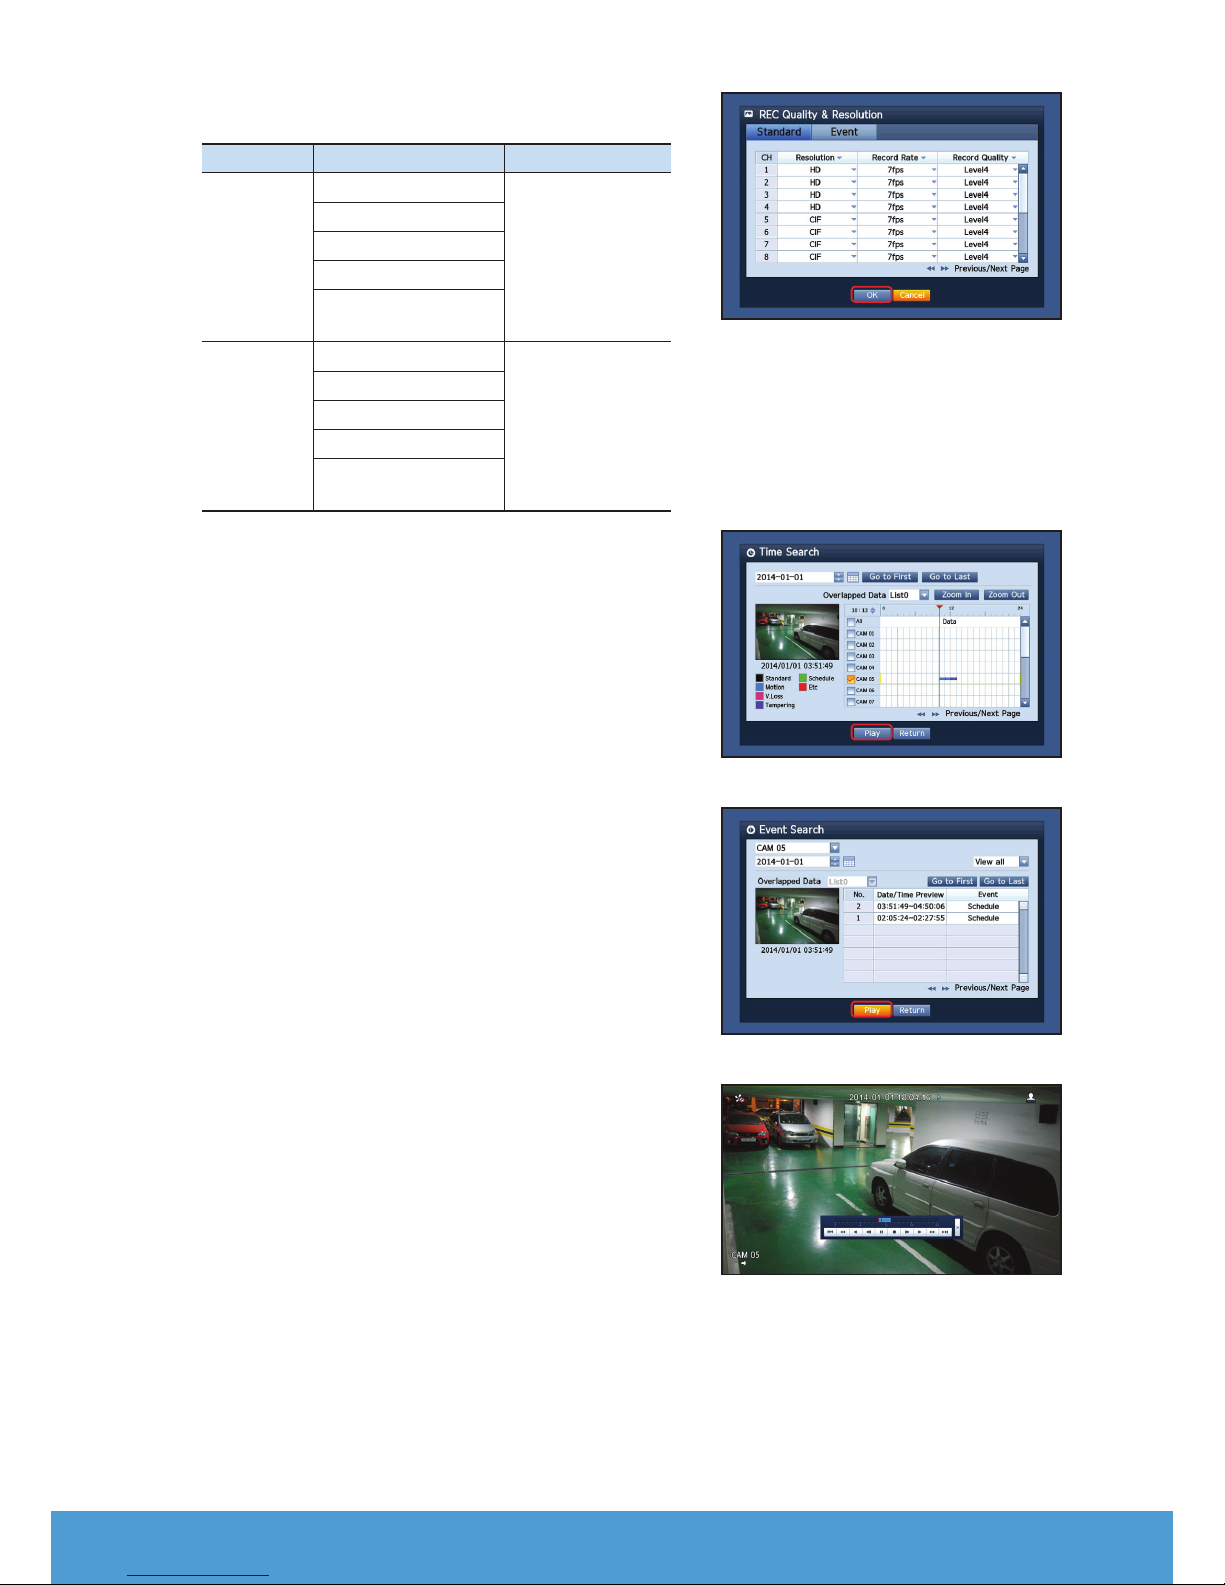
To change the record quality and resolution, select <REC Quality &
3.
Resolution> and click <OK>.
System Record Size Possible FPS
CIF 352 × 240
2CIF 704 × 240
NTSC
4CIF 704 × 480
OFF, 1~30
WD1: 960 × 480
HD:1280 × 720 or
1920 × 1080
CIF 352 × 288
2CIF 704 × 288
PAL
4CIF 704 × 576
OFF, 1~25
WD1 PAL 960 × 576
HD:1280 × 720 or
1920 × 1080
In Live mode, click <Search> in the right-click menu.
4.
Select <Time Search> in the <Search> menu.
Select a desired date in the calendar, and a desired timeline in the Time
bar, and press the <Play> button if you want to watch the recorded
video.
J The colored line indicates types of the recording data.
If you want to play a time specific data, enter an exact time.
If you have set the event recording, you can play a desired scene using
5.
the <Event Search> function. In Live mode, click <Search> in the
right-click menu. Select <Event Search> in the <Search> Menu. Set
a desired date in the calendar and the result will be listed on the table.
Select one you wish to view and press the <Play> button.
You can change the play speed, or stop the playback using the onscreen
6.
button bar.
12_ English

8 CHANNEL/
16 CHANNEL DVR
User Manual
SDR-4200/SDR-5200

8 Channel/
16 Channel DVR
User Manual
Copyright
©
2014 Samsung Techwin Co., Ltd. All rights reserved.
Tra de mar k
is the registered logo of Samsung Techwin Co., Ltd.
The name of this product is the registered trademark of Samsung Techwin Co., Ltd.
Other trademarks mentioned in this manual are the registered trademark of their respective company.
Restriction
Samsung Techwin Co., Ltd shall reserve the copyright of this document. Under no circumstances, this document shall be reproduced,
distributed or changed, partially or wholly, without formal authorization of Samsung Techwin.
Disclaimer
Samsung Techwin makes the best to verify the integrit y and correctness of the contents in this document, but no formal guarantee shall be
provided. Use of this document and the subsequent results shall be entirely on the user's own responsibilit y. Samsung Techwin reserves the
right to change the contents of this document without prior notice.
Design and specifications are subject to change without prior notice.
The initial administrator ID is “admin” and the password should be set when logging in for the first time.
Set password for your wireless network if you use the product with a wireless router. Being not protected with password or
using the default wireless router password may expose your video data to potential threat.
Please change your password every three months to safely protect personal information and to prevent the damage of the
information theft.
Please, take note that it’s a user’s responsibility for the securit y and any other problems caused by mismanaging a password.

overview
IMPORTANT SAFETY INSTRUCTIONS
Read these operating instructions carefully before using the unit.
Follow all the safety instructions listed below.
Keep these operating instructions handy for future reference.
1) Read these instructions.
2) Keep these instructions.
3) Heed all warnings.
4) Follow all instructions.
5) Do not use this apparatus near water.
6) Clean only with dry cloth.
7) Do not block any ventilation openings, Install in accordance with the manufacturer’s instructions.
8) Do not install near any heat sources such as radiators, heat registers, stoves, or other apparatus
(including amplifiers) that produce heat.
9) Do not defeat the safety purpose of the polarized or grounding- type plug. A polarized plug has two
blades with one wider than the other. A grounding type plug has two blades and a third grounding
prong. The wide blade or the third prong are provided for your safety. if the provided plug does not fit
into your outlet, consult an electrician for replacement of the obsolete outlet.
10) Protect the power cord from being walked on or pinched particularly at plugs, convenience
receptacles, and the point where they exit from the apparatus.
11) Only use attachments/accessories specified by the manufacturer.
12) Use only with the cart, stand, tripod, bracket, or table specified by the
manufacturer, or sold with the apparatus. When a cart is used, use caution
when moving the cart/apparatus combination to avoid injury from tip-over.
13) Unplug this apparatus during lightning storms or when unused for long periods
of time.
14) Refer all servicing to qualified service personnel. Servicing is required when the
apparatus has been damaged in any way, such as power-supply cord or plug is
damaged, liquid has been spilled or objects have fallen into the apparatus, the apparatus has been
exposed to rain or moisture, does not operate normally, or has been dropped.
● OVERVIEW
English _3
overview
CAUTION
RISK OF ELECTRIC SHOCK.
DO NOT OPEN
CAUTION
: TO REDUCE THE RISK OF ELECTRIC SHOCK, DO NOT REMOVE COVER (OR BACK) NO USER
SERVICEABLE PARTS INSIDE. REFER SERVICING TO QUALIFIED SERVICE PERSONNEL.
This symbol indicates that dangerous voltage consisting a risk of electric shock is present within
this unit.
This exclamation point symbol is intended to alert the user to the presence of important operating
and maintenance (servicing) instructions in the literature accompanying the appliance.
WARNING
1
To reduce the risk of fire or electric shock, do not expose this appliance to rain or moisture.
1
To prevent injury, this apparatus must be securely attached to the floor/wall in accordance with the installation
instructions.
WARNING
1. Be sure to use only the standard adapter that is specified in the specification sheet.
Using any other adapter could cause fire, electrical shock, or damage to the product.
2. Incorrectly connecting the power supply or replacing battery may cause explosion, fire, electric shock, or
damage to the product.
3. Do not connect multiple cameras to a single adapter. Exceeding the capacity may cause abnormal heat
generation or fire.
4. Securely plug the power cord into the power receptacle. Insecure connection may cause fire.
5. When installing the camera, fasten it securely and firmly. The fall of camera may cause personal injury.
6. Do not place conductive objects (e.g. screwdrivers, coins, metal parts, etc.) or containers filled with water on
top of the camera. Doing so may cause personal injury due to fire, electric shock, or falling objects.
7. Do not install the unit in humid, dusty, or sooty locations. Doing so may cause fire or electric shock.
8. If any unusual smells or smoke come from the unit, stop using the product. In such case, immediately
disconnect the power source and contact the service center. Continued use in such a condition may cause fire
or electric shock.
9. If this product fails to operate normally, contact the nearest service center. Never disassemble or modify this
product in any way. (SAMSUNG is not liable for problems caused by unauthorized modifications or attempted
repair.)
When cleaning, do not spray water directly onto parts of the product. Doing so may cause fire or electric shock.
10.
11. Do not expose the product to the direct airflow from an air conditioner.
Otherwise, it may cause moisture condensation inside the Clear Dome due to temperature difference between
internal and external of the dome camera.
12. If you install this product in a low-temp area such as inside a cold store, you must seal up the wiring pipe with
silicon, so that the external air can not flow inside the housing.
Otherwise, external high, humid air may flow inside the housing, pooling moisture or vapor inside the product
due to a difference between internal and external temperature.
4_ overview

BEFORE START
This user manual provides Information for using the DVR such as brief introduction, part names, functions, connection
to other equipment, menu setup, etc.
You have to keep in mind the following notices :
1 SAMSUNG retains the copyright on this manual.
1 This manual cannot be copied without SAMSUNG’s prior written approval.
1 We are not liable for any or all losses to the product incurred by your use of non-standard product or violation of
instructions mentioned in this manual.
1 Prior to opening the case, please consult a qualified technician first. Whenever this is needed power must be
removed from the unit.
1 Before replacing HDD or connect any external storage device (USB memory, USB HDD, etc.) with this DVR, make
sure that it is compatible with this DVR. Contact the dealer for the list of the compatible devices.
Warning
Battery
It is essential that when changing the battery in the unit, the replacement battery must be of the same type
otherwise there may be a possibility of an explosion.
The following are the specifications of the battery you are using now.
1 Normal voltage : 3V
1 Normal capacity : 170mAh
1 Continuous standard load : 0.2mA
1 Operating temperature : -20°C ~ +85°C
(-4°F ~ +185°F)
CALIFORNIA USA ONLY
This Perchlorate warning applies only to primary CR (Manganese Dioxide)
Lithium coin cells in the product sold or distributed ONLY in California USA.
“Perchlorate Material - special handling may apply,
See www.dtsc.ca.gov/hazardouswaste/perchlorate.”
● OVERVIEW
Caution
1 Connect the power cord into a grounded outlet.
1 The Mains plug is used as a disconnect device and shall stay readily operable at any time.
1 Batteries shall not be exposed to excessive heat such as sunshine, fire or the like.
1 Risk of Explosion if Battery is replaced by an Incorrect Type. Dispose of Used Batteries According to the
Instructions.
System Shutdown
Turning off the power while the product is in operation, or undertaking improper actions may cause damage
or malfunction to the hard drive or the product.
After selecting <OK> in the pop-up menu, you can pull off the power cord.
You may want to install a UPS system for safe operation in order to prevent damage caused by an
unexpected power stoppage. (Any questions concerning UPS, consult your UPS retailer.)
English _5

overview
Operating Temperature
The guaranteed operating temperature range of this product is 0°C ~ 40°C (32°F ~ 104°F).
This product may not work properly if you run right after a long period of storage at a temperature below the
guaranteed one.
Prior to using a device that has been stored for a long period in low temperatures, allow the product to stand
at room temperature for a period.
Especially for the built-in HDD in the product, its guaranteed temperature range is 5°C ~ 55°C (41°F ~ 131°F).
Likewise, the hard drive may not work at a temperature below the guaranteed one.
This product may not work properly if the air opening is blocked or if other unit is laid upon this product.
Please install the unit in a well-ventilated place.
Ethernet Port
DVR is designed for indoor use only and all the communication wirings are limited to inside of the building.
Security Precautions
The initial administrator ID is “admin” and the password should be set when logging in for the first time.
Set password for your wireless network if you use the product with a wireless router. Being not protected with
password or using the default wireless router password may expose your video data to potential threat.
Please change your password every three months to safely protect personal information and to prevent the
damage of the information theft.
Please, take note that it’s a user’s responsibility for the security and any other problems caused by
mismanaging a password.
6_ overview

CONTENTS
OVERVIEW
3
CONNECTING WITH OTHER DEVICE
14
LIVE
19
3 Important Safety Instructions
5 Before Start
7 Contents
9 Features
10 Part Names and Functions (Front)
11 Part Names and Functions (Rear)
12 Remote Control
14 Installation
14 Checking the Installation Environment
15 Connecting External Devices
17 Connecting the Network
19 Getting Started
22 Live Screen Configuration
27 Live Mode
30 Zoom
30 Audio ON/OFF
30 Freeze
31 Event Monitoring
● OVERVIEW
MAIN MENU
32
32 System Setup
42 Setting the Device
50 Setting the Recording
53 Setting the Event
56 Backup
58 Network Configuration
69 Controlling a PTZ device
English _7

overview
SEARCH & PLAY
72
WEB VIEWER
77
BACKUP VIEWER
72 Search
75 Playback
77 Introducing Web Viewer
78 Connecting Web Viewer
80 Using Live Viewer (Windows)
85 Controlling a Connected PTZ Camera
88 Using Search Viewer
91 Viewer Setup
102 About
103 Connecting Web Viewer (Mac)
105 Using Live Viewer (Mac)
106 Mobile Viewer
107 SEC Backup Viewer
(Windows)
107
APPENDIX
109
109 Product Specification
113 Product Overview
115 Default Setting
118 Troubleshooting
121 Open Source Announcement
8_ overview
FEATURES
This product can compress 8-channel or 16-channel camera input into a H.264 video clip, or compress 4-channel
HD-UTP input or 4/12-channel composite input, and record in HDD and replay the video at the same time.
These DVRs also supports network connectivity, providing remote monitoring from a remote PC transferring video
and audio data.
1 Provides a convenient User Interface
1 8/16 CH Composite/UTP Input Connectors
1 HD(CH1~4): Supports CIF/2CIF/4CIF/WD1/HD (Full-HD recording support : When using the Full-HD Camera)
1 SD(CH5~8/5~16): Supports CIF/2CIF/4CIF/WD1 recording
1 With the network specific codec, network transfer enabled regardless of the recording conditions
1 De-interlacing processor for better picture quality
1 Display of HDD information and status by using HDD SMART
1 HD CODEC performance: Full HD 120FPS(NTSC)/100FPS(PAL)
1 SD CODEC performance: 8CH DVR: 120FPS(NTSC)/100FPS(PAL),
16CH DVR: 360FPS(NTSC)/300FPS(PAL)
1 Hard Disk overwrite function
1 Mass storage hard disk backup through high-speed USB 2.0
1 Simultaneous Record and Playback of 8/16-channel video data
1 Various Search Modes (Time, Event, Backup, Motion Detection)
1 Various Recording Modes (Manual, Event, Scheduled Recording)
1 Alarm Interface
1 Remote Monitoring on the Smart Viewer or the Mobile Viewer
1 Tampering Detection
● OVERVIEW
Standards Approvals
This equipment has been tested and found to comply with the limits for a Class A digital device, pursuant to part 15 of the
M
FCC Rules. These limits are designed to provide reasonable protection against harmful interference when the equipment is
operated in a commercial environment.
This equipment generates, uses, and can radiate radio frequency energy and, if not installed and used in accordance with
the instruction manual, may cause harmful interference to radio communications. Operation of this equipment in a
residential area is likely to cause harmful interference in which case the user will be required to correct the interference at
his own expense.
English _9
 Loading...