

Page 1

SAMSUNG
®
SCX-6320
TONER & DRUM CARTRIDGE REMANUFACTURING INSTRUCTIONS
SAMSUNG®SCX-6320 TONER CARTRIDGE
SAMSUNG
®
SCX-6320 DRUM CARTRIDGE
© 2010 UniNet Imaging Inc. All trademark names and artwork are property of their respective owners. Product brand names mentioned are intended to show compatibility only.
UniNet Imaging does not warrant downloaded information. Unauthorized sale, reproduction or distribution of this article is prohibited. For additional support, please contact techsupport@uninetimaging.com
www.uninetimaging.com
Page 2

SAMSUNG SCX-6320 TONER & DRUM CARTRIDGE REMANUFACTURING INSTRUCTIONS
First released in November 2004, the Samsung SCX-6320 Engine is a 22 ppm fax engine that runs at 1200 dpi. The Samsung
toner cartridge SCX-6320D8 is rated for 8,000 pages, and has a list price of $79.00 USD. This engine is similar to the Samsung
SF-830 in that the toner and drum have been split into two different cartridges. These instructions cover both the toner cartridge
and the drum unit. Both cartridges are very simple to remanufacture. The toner cartridges are chipped, and the chip does need
to be replaced each cycle. The chip also identifies if it is a Samsung, Xerox (US/Canada), or Xerox (Europe). The SCX-6320
machines have a TONER SAVE function. The toner save mode is basically just like the economode method used by other
manufacturers. Only half the dots are printed using less toner.
CURRENT MACHINES BASED ON THE SCX-6320 ENGINE:
Samsung SCX-6120
Samsung SCX-6220
Samsung SCX-6320F
Samsung SCX-6520FN
Xerox WorkCentre M20
Xerox WorkCentre M20i
Xerox CopyCentre C20
PART NUMBERS FOR THE CARTRIDGES:
Samsung Toner SCX-6320D8/XAA 8,000 pages
Samsung Toner SCX-6320D4 4,000 pages (starter cartridge)
Samsung Drum Unit SCX-6320R2 20,000 pages
Xerox Toner Cartridge 106R01047 8,000 pages USA/Canada
Xerox Toner Cartridge 106R01048 8,000 pages Europe
Xerox Toner Starter Cartridge 4,000 pages
Xerox Drum Unit 113R00671 20,000 pages
Samsung and Xerox list pricing as of November 2005 for the toner cartridges is $79.99. The drum units list for $99.99
All list prices shown are in U.S. American dollars. Samsung does not have different part numbers for Europe.
SUPPLIES REQUIRED:
1. 250g dedicated toner for SCX-6320
2. New replacement drum (for drum unit)
3. New replacement wiper blade (for drum unit)
4. Replacement fuse for drum unit (same fuse for use in Samsung SF-5100)
5. Conductive grease (both cartridges)
TOOLS REQUIRED:
1. Phillips head screwdriver
2. Small common screwdriver
3. Spring hook
4. Vacuum approved for toner
Machine and cartridge troubleshooting/information are covered at the end of this article.
REMANUFACTURING THE SAMSUNG
SCX-6320 TONER & DRUM CARTRIDGES
By Mike Josiah and the Technical Staff at UniNet
© 2010 UniNet Imaging Inc. All trademark names and artwork are property of their respective owners. Product brand names mentioned are intended to show compatibility only.
UniNet Imaging does not warrant downloaded information. Unauthorized sale, reproduction or distribution of this article is prohibited. For additional support, please contact techsupport@uninetimaging.com
www.uninetimaging.com
Page 3
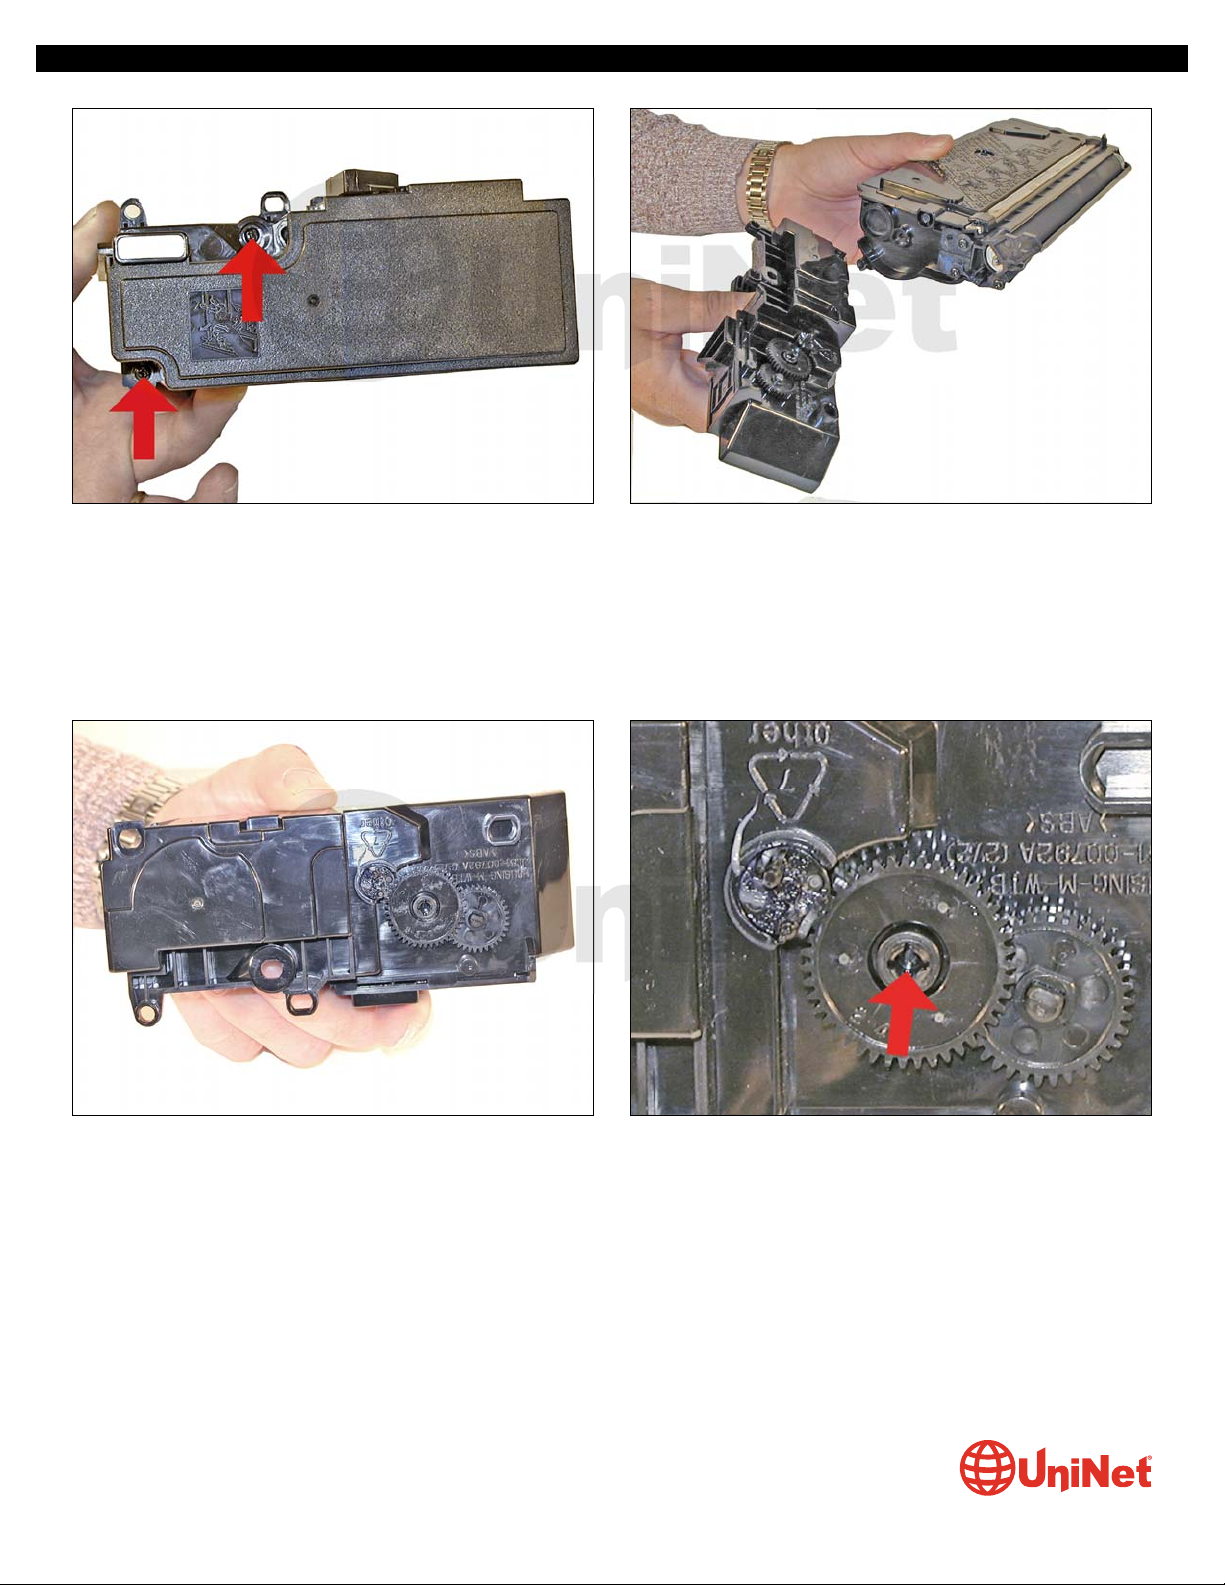
TONER CARTRIDGE
1. Remove the two screws located on the waste chamber.
Remove the waste chamber. Be careful not to lose the gears!
2. The gears on the waste chamber are on fairly tight so if you are careful there is no need to remove them.
There are locking tabs on the center shafts that keep the gears in place.
Vacuum/blow out the waste chamber clean.
SAMSUNG SCX-6320 TONER & DRUM CARTRIDGE REMANUFACTURING INSTRUCTIONS
© 2010 UniNet Imaging Inc. All trademark names and artwork are property of their respective owners. Product brand names mentioned are intended to show compatibility only.
UniNet Imaging does not warrant downloaded information. Unauthorized sale, reproduction or distribution of this article is prohibited. For additional support, please contact techsupport@uninetimaging.com
www.uninetimaging.com
Page 4

3. On the same side of the cartridge as the waste chamber,
remove the toner fill plug. Dump the bulk of the remaining
toner out of the cartridge. Vacuum/blow out the toner supply
chamber clean. It is not necessary to get the cartridge
completely clean now, as the developer roller needs to come
out so the doctor blade can be cleaned. You will have easy
access to clean out the hopper then.
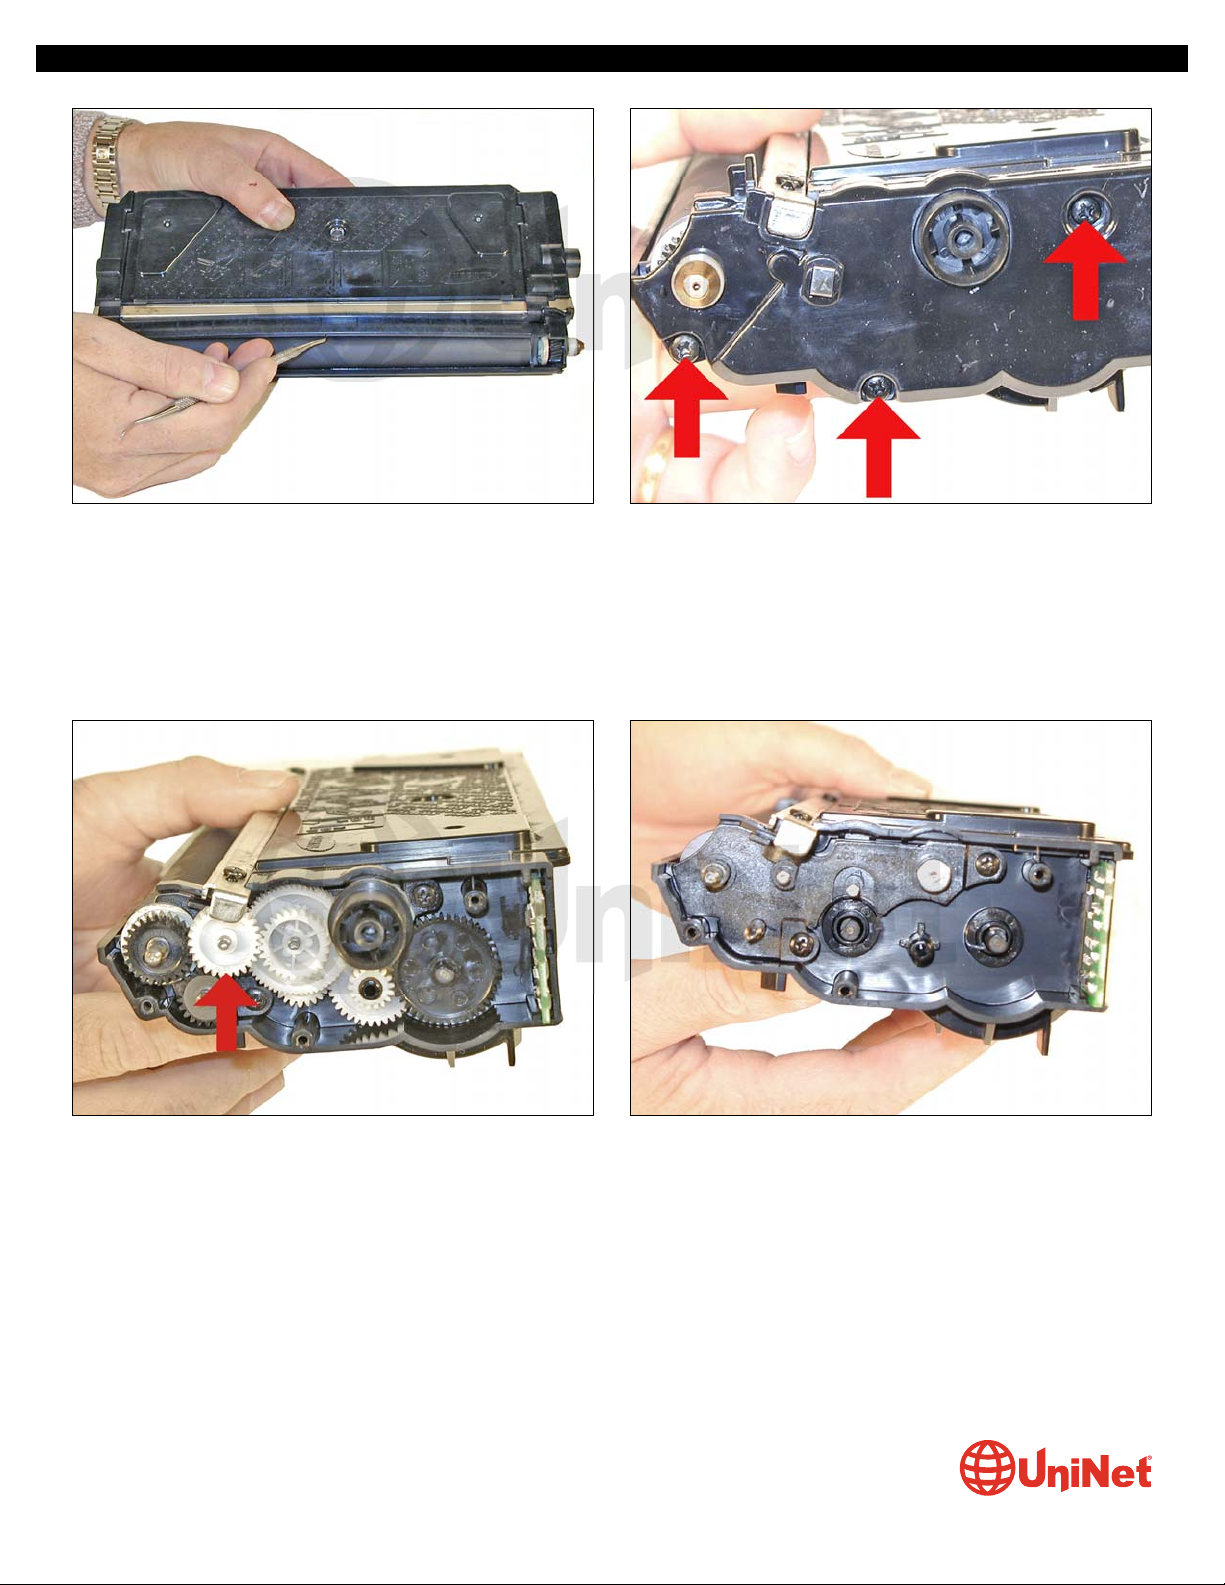
4. Remove the waste chamber drive gear.
5. Remove the three developer roller screws and end cap.
Watch out for the white bushing, it can fall out of the end cap.
SAMSUNG SCX-6320 TONER & DRUM CARTRIDGE REMANUFACTURING INSTRUCTIONS
© 2010 UniNet Imaging Inc. All trademark names and artwork are property of their respective owners. Product brand names mentioned are intended to show compatibility only.
UniNet Imaging does not warrant downloaded information. Unauthorized sale, reproduction or distribution of this article is prohibited. For additional support, please contact techsupport@uninetimaging.com
www.uninetimaging.com
Page 5
6. With a spring hook, bend up the middle of the developer
roller cover, and remove from the cartridge. The cover has a
small plastic tab that locks it in place on each side.
7. Remove the three screws from the opposite side end cap.
8. Note the location and placement of the gears, and remove them.
The small gear that fits under the tail of the doctor blade comes off you just have to pry it up at an angle.
SAMSUNG SCX-6320 TONER & DRUM CARTRIDGE REMANUFACTURING INSTRUCTIONS
© 2010 UniNet Imaging Inc. All trademark names and artwork are property of their respective owners. Product brand names mentioned are intended to show compatibility only.
UniNet Imaging does not warrant downloaded information. Unauthorized sale, reproduction or distribution of this article is prohibited. For additional support, please contact techsupport@uninetimaging.com
www.uninetimaging.com
Page 6

9. Remove the two screws on the small internal end cap from the gear side on the developer roller shaft.
Remove the end cap.
10. Lift the developer roller out of the cartridge.
Clean out all the remaining toner from the hopper.
11. Clean the doctor blade. Until new blades are available, we
do not recommend that this blade be removed, as it is held in
place by an adhesive foam seal under the blade. If the blade
is pried up (not an easy thing to do) the blade will bend, and
become useless. Clean the blade with a cotton swab
dampened with alcohol with the blade in place. Make sure that
you do not drip any alcohol into the cartridge.
SAMSUNG SCX-6320 TONER & DRUM CARTRIDGE REMANUFACTURING INSTRUCTIONS
© 2010 UniNet Imaging Inc. All trademark names and artwork are property of their respective owners. Product brand names mentioned are intended to show compatibility only.
UniNet Imaging does not warrant downloaded information. Unauthorized sale, reproduction or distribution of this article is prohibited. For additional support, please contact techsupport@uninetimaging.com
www.uninetimaging.com
Page 7

12. Install the developer roller.
Be careful not to damage the shims!
13. Install the developer roller internal end cap and two
screws.
14. Install the gears.
Start from left to right and put the inside gears in place first.
15. Replace the chip.
SAMSUNG SCX-6320 TONER & DRUM CARTRIDGE REMANUFACTURING INSTRUCTIONS
© 2010 UniNet Imaging Inc. All trademark names and artwork are property of their respective owners. Product brand names mentioned are intended to show compatibility only.
UniNet Imaging does not warrant downloaded information. Unauthorized sale, reproduction or distribution of this article is prohibited. For additional support, please contact techsupport@uninetimaging.com
www.uninetimaging.com
Page 8

16. Install the gear end cap and three screws. 17. Install the waste chamber drive gear, end cap, and three
screws on the waste chamber side.
18. Install the developer roller cover in the same way it was
removed. Do not bend it at too much of an angle or it will stay
bent.
19. Fill with 250g toner for use in SCX-6230.
SAMSUNG SCX-6320 TONER & DRUM CARTRIDGE REMANUFACTURING INSTRUCTIONS
© 2010 UniNet Imaging Inc. All trademark names and artwork are property of their respective owners. Product brand names mentioned are intended to show compatibility only.
UniNet Imaging does not warrant downloaded information. Unauthorized sale, reproduction or distribution of this article is prohibited. For additional support, please contact techsupport@uninetimaging.com
www.uninetimaging.com
Page 9

20. Install the fill plug, check for leaks. 21. Install the waste chamber and two screws. The waste
chamber does not fit tight, even when the screws are snug.
This is to allow it to fit to the waste section of the drum unit
better.
22. Make sure the waste chamber drive gear is meshed with
the waste chamber gears.
OPC DRUM CARTRIDGE
23. Remove the single screw from the handle end cap.
SAMSUNG SCX-6320 TONER & DRUM CARTRIDGE REMANUFACTURING INSTRUCTIONS
© 2010 UniNet Imaging Inc. All trademark names and artwork are property of their respective owners. Product brand names mentioned are intended to show compatibility only.
UniNet Imaging does not warrant downloaded information. Unauthorized sale, reproduction or distribution of this article is prohibited. For additional support, please contact techsupport@uninetimaging.com
www.uninetimaging.com
Page 10

24. Press in on the tab, and remove the end cap. 25. Remove the top two screws.
26. Remove the side screw and lift off the PCR assembly.
SAMSUNG SCX-6320 TONER & DRUM CARTRIDGE REMANUFACTURING INSTRUCTIONS
© 2010 UniNet Imaging Inc. All trademark names and artwork are property of their respective owners. Product brand names mentioned are intended to show compatibility only.
UniNet Imaging does not warrant downloaded information. Unauthorized sale, reproduction or distribution of this article is prohibited. For additional support, please contact techsupport@uninetimaging.com
www.uninetimaging.com
Page 11

27. Remove the two screws from the metal drum axle plate and the axle plate.
28. Carefully pry off the opposite side drum drive gear. It is on
tight!
29. Remove the drum and place aside.
SAMSUNG SCX-6320 TONER & DRUM CARTRIDGE REMANUFACTURING INSTRUCTIONS
© 2010 UniNet Imaging Inc. All trademark names and artwork are property of their respective owners. Product brand names mentioned are intended to show compatibility only.
UniNet Imaging does not warrant downloaded information. Unauthorized sale, reproduction or distribution of this article is prohibited. For additional support, please contact techsupport@uninetimaging.com
www.uninetimaging.com
Page 12

30. Remove the two screws and wiper blade.
31. Remove the waste auger from the chamber.
Be careful not to lose the gear on the end of the auger.
Clean out all the waste toner from the chamber and auger.
SAMSUNG SCX-6320 TONER & DRUM CARTRIDGE REMANUFACTURING INSTRUCTIONS
© 2010 UniNet Imaging Inc. All trademark names and artwork are property of their respective owners. Product brand names mentioned are intended to show compatibility only.
UniNet Imaging does not warrant downloaded information. Unauthorized sale, reproduction or distribution of this article is prohibited. For additional support, please contact techsupport@uninetimaging.com
www.uninetimaging.com
Page 13

32. Install the cleaned auger in the chamber (keyed end into
the gear).
33. Install the new wiper blade and two screws.
34. Install the OPC drum.
Make sure the white hub is towards the gear side and that the tab on the hub is set in the slot on the top side.
SAMSUNG SCX-6320 TONER & DRUM CARTRIDGE REMANUFACTURING INSTRUCTIONS
© 2010 UniNet Imaging Inc. All trademark names and artwork are property of their respective owners. Product brand names mentioned are intended to show compatibility only.
UniNet Imaging does not warrant downloaded information. Unauthorized sale, reproduction or distribution of this article is prohibited. For additional support, please contact techsupport@uninetimaging.com
www.uninetimaging.com
Page 14

35. Snap in the drum drive gear. 36. Install the drum axle plate and screws.
37. On the PCR assembly, gear side, move the PCR drive gear
so that it no longer meshes with the cleaning roller drive gear.
38. Press down on the PCR shaft and pry the black PCR
holder out from the inside. Make sure you don’t lose the
spring.
SAMSUNG SCX-6320 TONER & DRUM CARTRIDGE REMANUFACTURING INSTRUCTIONS
© 2010 UniNet Imaging Inc. All trademark names and artwork are property of their respective owners. Product brand names mentioned are intended to show compatibility only.
UniNet Imaging does not warrant downloaded information. Unauthorized sale, reproduction or distribution of this article is prohibited. For additional support, please contact techsupport@uninetimaging.com
www.uninetimaging.com
Page 15

39. Slide the PCR over, and remove. Vacuum/blow clean the
PCR cleaning roller. Clean the PCR with a clean lint free cloth.
For now we do not recommend any chemicals be used other
than pure distilled water to clean the PCR.
40. Install the PCR.
41. Install the black PCR holder so that the tabs fit on both sides of the track.
Install the spring.
SAMSUNG SCX-6320 TONER & DRUM CARTRIDGE REMANUFACTURING INSTRUCTIONS
© 2010 UniNet Imaging Inc. All trademark names and artwork are property of their respective owners. Product brand names mentioned are intended to show compatibility only.
UniNet Imaging does not warrant downloaded information. Unauthorized sale, reproduction or distribution of this article is prohibited. For additional support, please contact techsupport@uninetimaging.com
www.uninetimaging.com
Page 16

42. Place a small amount of conductive grease on the bullet
shaped end of the PCR.
43. Set the two white gears so they mesh again. Failure to do
this will allow a buildup on the PCR, ghosting and/or
backgrounding will then occur.
44. Install the PCR assembly and three screws.
SAMSUNG SCX-6320 TONER & DRUM CARTRIDGE REMANUFACTURING INSTRUCTIONS
© 2010 UniNet Imaging Inc. All trademark names and artwork are property of their respective owners. Product brand names mentioned are intended to show compatibility only.
UniNet Imaging does not warrant downloaded information. Unauthorized sale, reproduction or distribution of this article is prohibited. For additional support, please contact techsupport@uninetimaging.com
www.uninetimaging.com
Page 17

45. Clean any remaining waste toner from the handle/end
cap. Install the end cap and screw.
46. Replace the fuse.
SAMSUNG SCX-6320 TONER & DRUM CARTRIDGE REMANUFACTURING INSTRUCTIONS
© 2010 UniNet Imaging Inc. All trademark names and artwork are property of their respective owners. Product brand names mentioned are intended to show compatibility only.
UniNet Imaging does not warrant downloaded information. Unauthorized sale, reproduction or distribution of this article is prohibited. For additional support, please contact techsupport@uninetimaging.com
www.uninetimaging.com
PAGE COUNT:
Even though this is a small copier, it does keep a page count. It is accessible through the control center software.
Click on the information tab to see the counter(s).
“TONER LOW” NOTIFICATION:
As with many fax machines, you can program the machine to fax you a TONER LOW notification when the cartridge needs to be
replaced. This is done through the SYSTEM ADMIN TOOLS. If you are not the seller of the copier, this may have been done by the
vendor, and may have been password protected. Do not change this unless you have the machine owner’s permission!
RESETTING THE DRUM COUNTER (IF THE FUSE DOES NOT WORK):
1. Press the MACHINE STATUS key.
2. Using the navigation keys, scroll until SYSTEM ADMIN TOOLS appears on the display.
3. Press ENTER.
4. If it has been password protected, enter the password now.
5. Use the navigation keys again until you see NEW DRUM on the display.
6. Press ENTER.
7. To set the counter to ZERO, select ON, and press ENTER.
RUNNING THE DRUM CLEANING PAGE:
1. Press the MACHINE STATUS key.
2. Using the navigation keys, scroll until SYSTEM ADMIN TOOLS appears on the display.
3. Press Enter.
4. If it has been password protected, enter the password now.
5. Use the navigation keys again until you see CLEAN DRUM on the display.
6. Press ENTER.
7. The cleaning page will print.
Page 18

SAMSUNG SCX-6320 TONER & DRUM CARTRIDGE REMANUFACTURING INSTRUCTIONS
CARTRIDGE TROUBLESHOOTING:
There is really not much that can go wrong with these cartridges. From our experience, it is a safe bet that most of the problems
will come from either the developer roller or the doctor blade. Streaking, shading, backgrounding, etc. can come from these two
parts. We will write an update after we have more information.
DEFECT CHART:
OPC Drum 94.30 mm
PCR 38.30 mm
Toner Feed Roller 43.80 mm
Developer Roller 54.30 mm
Transfer Roller 56.60 mm
Upper Fuser Roller 83.60 mm
Lower Pressure Roller 91.00 mm
MACHINE TROUBLESHOOTING:
As with most Samsung machines, the error codes are in plain English.
There are however, a few messages that can be confusing (different words are used for the same parts) as follows:
Drum warning:
The drum cartridge is nearing the end of its life
Drum empty:
The drum cartridge is finished.
No developer cartridge:
This means the toner cartridge is missing. Actual developer is not used in these machines.
I’m not sure why they didn’t use a “no toner cartridge” message, but that is why we included the messages here.
Invalid cartridge:
The wrong cartridge is installed (Xerox/Samsung) or the wrong chip is installed.
© 2010 UniNet Imaging Inc. All trademark names and artwork are property of their respective owners. Product brand names mentioned are intended to show compatibility only.
UniNet Imaging does not warrant downloaded information. Unauthorized sale, reproduction or distribution of this article is prohibited. For additional support, please contact techsupport@uninetimaging.com
www.uninetimaging.com
 Loading...