

4-1
Samsung Electronics
4. Troubleshooting
4-1 Setting-up System in User Mode
FUNCTION ITEM CONTENT DEFAULT
SYSTEM SETUP FAX NUMBER/NAME FAX NUMBER
FAX NAME
DATE FORMAT EUROPE/USA EUROPE
DATE/TIME
LANGUAGE ENG/GER/FRE/ITA/SPA/POR/DUT ENGLISH
DISCARD SIZE 0~30MM 20 MM
RINGER VOLUME OFF/LOW/MID/HIGH MID
ALARM VOLUME ON/OFF ON
KEY VOLUME ON/OFF ON
DIALING MODE TONE/PLUSE TONE
CLOCK MODE 24HOURS/12HOURS 24 HOURS
USB MODE FAST/SLOW FAST
SET DEFAULT CONTRAST
QUALITY
COPY PAGE
ZOME RATE
RESOLUTION
FAX SETUP SEND FORM MEMORY ON/OFF ON
SENDING CONFIRM ON/OFF/ERROR ERROR
FAX PAPER SIZE LETTER/A4/LEGAL A4
AUTO REDUCTION ON/OFF ON
SAVE TOLL TIME START TIME _ _ : _ _
RINGS TO ANSWER 1-7 TIME 1
STAMPRCV. NAME ON/OFF OFF
RCV. STARTCODE * _ * 9
DRPD MODE ON/OFF OFF
ECM MODE ON/OFF ON
CALLER ID ON/OFF OFF
AUTO JOURNAL ON/OFF ON
COPY SET UP PAPER SIZE LETTER/A4/LEGAL A4
PAPER TYPE PLAIN/INKJET/PHOTO/TRANSP ARENCY PLAIN PAPER
COLLATE ON/OFF OFF
ADVANCED FAX BROADCASTING
DELAYED FAX
PRIORITY FAX
SEND POLLING
ADD SCHEDULE
CANCEL SCHEDULE
REPORT/HELP HELP LIST
SENT JOURNAL
RECEIVED JOURNAL
PHONEBOOK
SEADING CONFIRM
SCHEDULE INFORM
SYSTEM DATA
SELF TEST
CID LIST
GROUP DIAL SET
MEMORY CLEAR FAX NUMBER/NAME
DIAL/SCHEDULE
JOURNAL
DEFAULT SETUP
MAINTENANCE CLEAN CARTRIDGE
ALIGN CARTRIDGE
VIEW INK LEVEL "COLOR : _/8 , BLOCK : _/8"
ADJUST SHADING
REMOTE TEST ON/OFF OFF
4-2
Troubleshooting
Samsung Electronics
4-2-2 Setting-up System in Tech Mode
4-2 Tech Mode
4-2-1 HOW TO ENTER Tech Mode
In Tech Mode, the technician can check the machine and perform various test to isolate the cause of a malfunction.
To enter the Tech Mode, press MENU, #, 1, 9, 3, 4 in sequence, and the LCD briefly displays ‘T’, the machine has entered
service (tech) mode.
While in Tech Mode, the machine still performs all normal operations.
To return to normal user mode, press MENU, #, 1, 9, 3, 4 in sequence again, or turn the power off, then on by unplugging
and plugging the power cord.
Options changed while in Tech Mode do not remain changed unless you clear the machine’s memory.
Because the explanation of the User Mode items is already mentioned at the User guide in detail, It will not be described at
Tech manual.
FUNCTION ITEM CONTENT
SYSTEM SETUP MODEM TEST
DTMF TEST
ROM TEST Display ROM version
PROGRAM DOWNLOAD
AGING TEST
FAX SETUP MODEM SPEED 2.4/4.8/7.2/9.6/12.0/14.4/28.8/33.6
SEND FAX LEVEL 0~15
RCV. FAX LEVEL 40~50
DTMF HIGH LEVEL 00~15
DTMF LOW LEVEL 00~15
PAUSE TIME 1~9
ERROR RATE 5%/10%
MAKE/BREAK RATIO 40/60~33/67
CNG DETECT COUNT 1~4
AUTODIALTIMEOUT 30~150
DIAL MODE LOC. USER/TECH
COPY SET UP The same items as user mode.
ADVANCED FAX The same items as user mode.
REPORT/HELP HELP LIST
SENT JOURNAL
RECEIVED JOURNAL
PHONEBOOK
SEADING CONFIRM
SCHEDULE INFORM
SYSTEM DATA
SELF TEST
CID LIST
PROTOCOL DUMP
CCD SHADING
ASF TEST
GROUP DIAL SET The same items as user mode.
MEMORY CLEAR ALL MEMORY CLEAR
MAINTENANCE CLEAN CARTRIDGE
ALIGN CARTRIDGE
VIEW INK LEVEL "COLOR : _/8 , BLOCK : _/8"
ADJUST SHADING
REMOTE TEST ON/OFF

4-3
Troubleshooting
Samsung Electronics
SYSTEM SETUP
• MODEM TEST :
Use this feature to hear various transmission signals to the telephone line from the modem and to check the modem. If no transmission signal sound is heard, it means that the modem part of
the main board is poor.
• DTMF TEST :
DTMF (Dual Tone Multi Frequency) signal. When you press any
key on the number keypad including * and #, you will hear the
corresponding key tone.
• ROM TEST :
Use this feature to test the machine'S ROM. The result and the
software version appear in the LCD display .
• PROGRAM DOWNLOAD :
Use this feature to download a new upgraded ROM file
from a PC which is connected to the machine with a parallel cable (IEEE 1284).
< Download >
1. Connect printer to PC with a parallel cable(IEEE 1284.)
2. Select the PROGRAM DOWNLOAD function at the TECH
MODE.
3. Input COPY/B FILENAME PRN at the MS-DOS and push
the ENTER key .
(filename : the latest ROM file name when the downloading)
4. After the download is completed, the system will be automatically initialized.
• KEY TEST
The function is to test the capacity of product in the production progress. Service person doesn't need to use it.
FAX SETUP
• MODEM SPEED :
You can set the maximum modem speed. Communication is done
with modem speed automatically set at lower speed when communicating with the modem with lower speed since communication is
done on the standard of the side where modem speed is low for
transmission/reception. It is better set 33.6KBPS as default setting.
• SEND FAX LEVEL:
Y ou can set the level of the transmission signal. T ypically , the Tx level
should be under -12 dBm.
Caution : The Send Fax Level is set at the best condition in the ship-
ment from factory . Never change settings arbitrarily.
• RCV FAX LEVEL:
- You can set the level of the receiving signal.
- The reception level may be too low due to the cable losses.
- If it is set to -43 dBm, the reception sensitivity will be between 0
and -43 dBm. If it is set to -48 dBm, the reception sensitivity will
be between 0 and -48 dBm.
Caution : The Send Fax Level is set at the best condition in the ship-
ment from factory . Never change settings arbitrarily.
• DTMF HIGH LEVEL :
Select high frequency level when dialing in the MF mode.The input
range is between 00~15dBm.
Caution : The Send Fax Level is set at the best condition in the ship-
ment from factory . Never change settings arbitrarily.
• DTMF LOW LEVEL :
Select high frequency level when dialing in the MF mode.The input
range is between 00~15dBm.
Caution : The Send Fax Level is set at the best condition in the shipment
from factory. Never change settings arbitrarily.
• P AUSE TIME :
Pause time mean delay time (unit: second) inserted between dial
number signal and the next number of signal in the automatic dial
(One touch, Speed dial, Redial) and the manual dial.
Caution : The Send Fax Level is set at the best condition in the shipment
from factory . Never change settings arbitrarily.
• ERROR RA TE :
- When the error rate is about to be over the setting value, the
Baud rate automatically lowers up to 2400 bps to make the error
rate remain below the setting value.
- You can select the rate between 5% and 10%.

4-4
Troubleshooting
Samsung Electronics
• Make/Break RATIO :
Select the dial pulse make and break time: 40-60 or 33-67.
Caution : Send Fax Level is set at the best condition in the shipment from
factory. Never change settings arbitrarily.
• CNG DETECT COUNT :
The function is to control the CNG TONE cognition times for
entering receiving mode from the AUT O MODE or ANS/F AX
MODE.
• AUTODIAL TIMEOUT :
It is the certain time to be converting to ST ANDBYin case of
a receiver doesn't answer when caller uses AUTO DIAL,
such as ONE-TOUCH/SPEED DIAL/RESERVED SENDING
and etc.
• DIAL MODE LOC. :
The function is to take care the DIALMODE SETTING, which
is set in at USER MODE or TECH MODE differently by countries.
If you select the USER MODE, you can choose DIAL MODE
OPTION at the USER MODE.
4-2-3 REPORT/HELP
HELP LIST
It shows a brief description on the machine's basic functions
and commands.
Use it as a quick reference guide.
SENT JOURNAL
This journal shows a specific information concerning
transmission activities, the time and dates of up to 40 of
the most recent transmissions.
RECEIVED JOURNAL
This journal shows a specific information concerning
reception activities, the time and dates of up to 40 of the
most recent receptions.
PHONEBOOK
It lists all telephone numbers that have been stored in the
machine.
SENDING CONFIRM
It shows the result of the last send operation.
SCHEDULE INFORM
This list shows a specific information on the documents
currently stored for delayed transmission. It provides the
operation number, starting time, type of operation, etc.
SYSTEM DATA
This list provides a list of the user system data settings
and tech mode settings.
4-5
Troubleshooting
Samsung Electronics
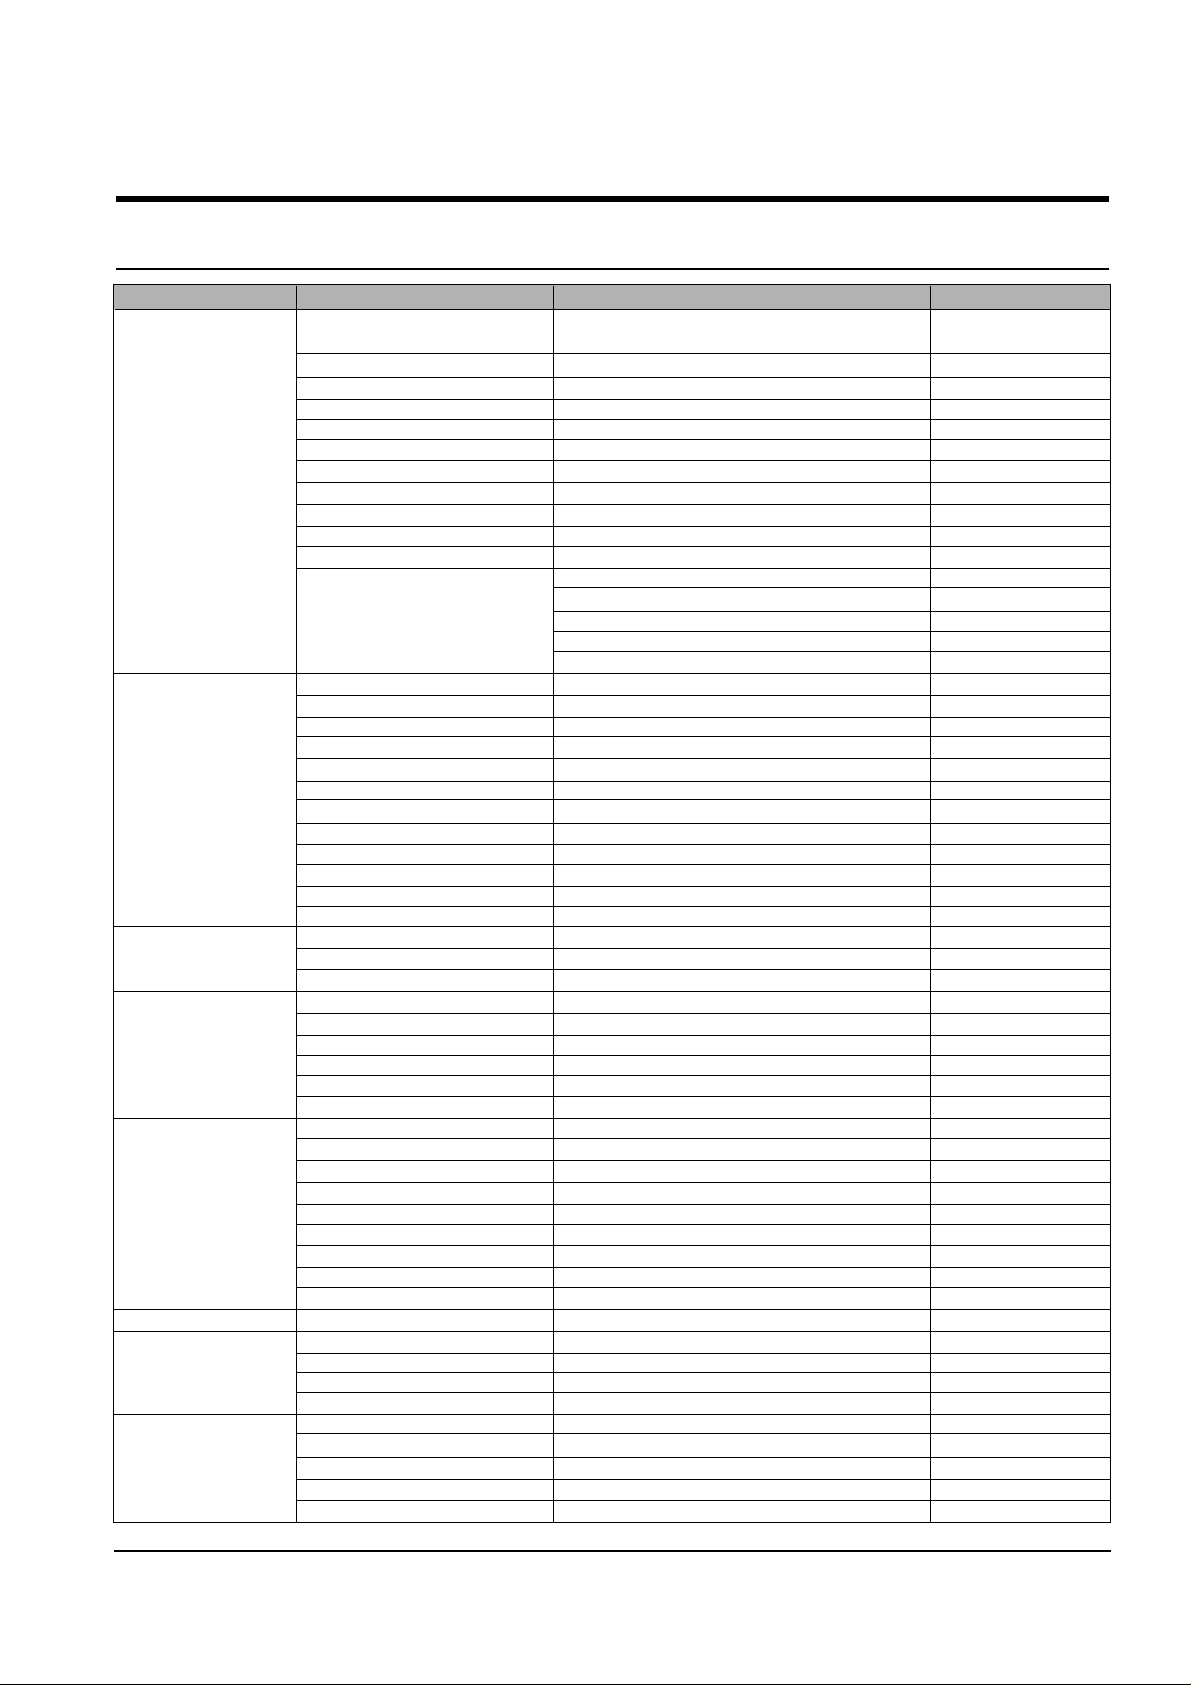
SELF TEST
Using this pattern printout, you can check if the printer
mechanism is functioning properly. Examine the pattern
and look for a break in the diagonal line. If the diagonal
lines are not broken, the printer mechanism is functioning
properly .
CID LIST
In the country which supports CALLER ID, information of
the dates and numbers of calls is stored when RING is
receiving. (CALLER ID : it is a telephone service to send a
caller's number to the receiver.)
JUNK FAX LIST
The function is to reject the receiving fax. Among the limited 30
numbers which are already memorized in the product by user
at the CID LIST can be rejected by performing this function.
PROTOCOL DUMP
This list shows the sequence of the CCITT group 3 T.30
protocol during the most recent sending or receiving operation. Use this list to check for send and receive errors. If
a communication error occurs while the machine is in
TECH mode, the protocol list will print automatically.
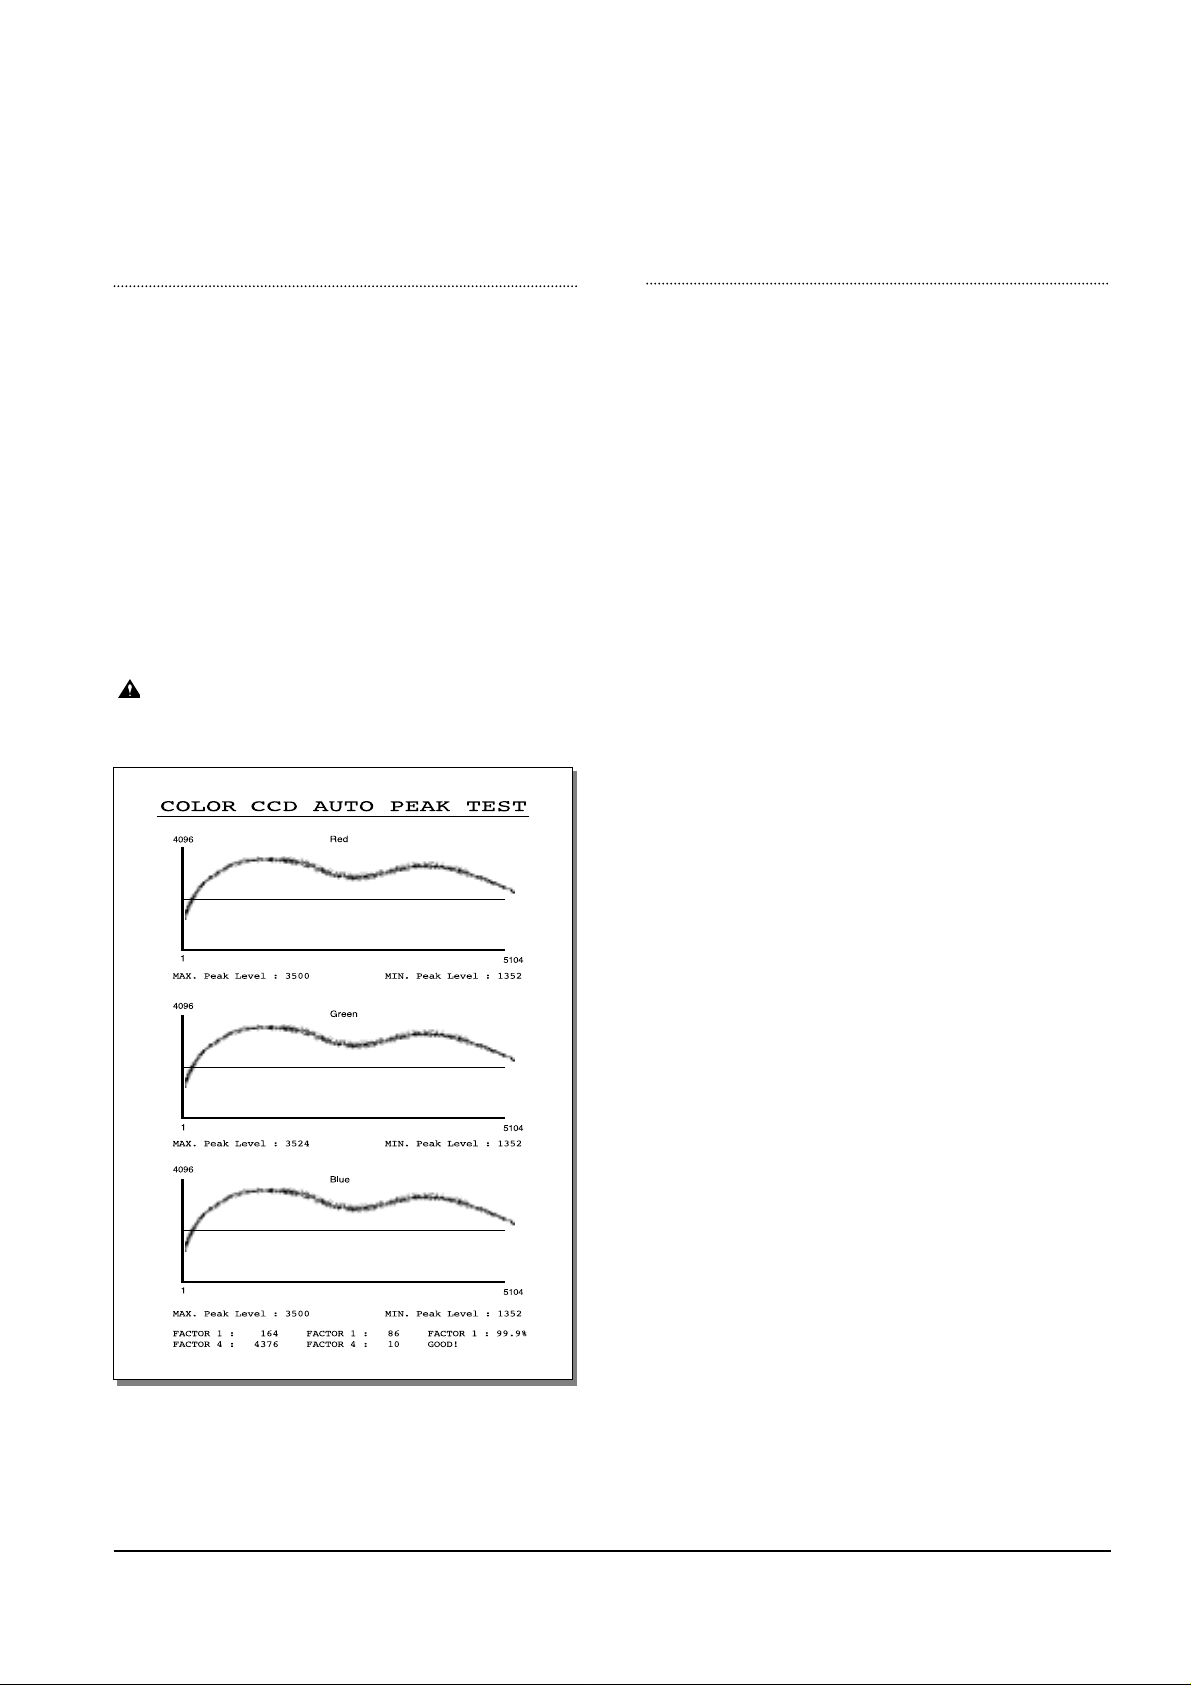
CCD SHADING
With this print, you can check the scanning elements of
the CCD(Change Coupled Device).
ASF TEST
The function is to test the function of ASF(AUTO SHEET
FEEDER) and it is needed in the production progress.
Service person doesn’t need to use it.

4-6
Troubleshooting
Samsung Electronics
NVRAM DUMP LIST
1. Press the SETUP button until “PRINT NVRAM DUMP”
is displayed in LCD.
2. Press the START button when the NVRAM Test operation menu displayed. And then the machine prints the
list for NVRAM testing.
* NVRAM : NonVolatile Random Access Memory
4-2-4 Memory Clear
ALL MEMORY CLEAR
The function resets the system as its very first condition
as setting in at the factory. This function is needed to
operate to reset the system to the initial value when the
product is abnormally operated or malfunction. All the values are returned to the default values, and all the information, which set in by user, will be erased.
4-2-4-1 Method to use TECH MODE
• Perform the MEMORY CLEAR at the TECH MODE.
4-2-4-2 Method to use CANCEL BUTTON
1. Turn off the power.
2. Keep pushing the CANCEL button till the MEMORY
CLEARING is shown up at the LCD panel.
3. Turn on the power.
NVRAM DUMP LIST
DATE : 10-MAY-2001 THU 16:22
NAME : SAMSUNG
TEL. : 82-2-123-456
LIST Left Head Detect : 1c
Right Head Detect : 7
Left Head Type : 1c
Right Head Type : 7
< Device Identification >
MFG:Samsung;
CMD:LNPAP;
MODEL:SCX-1150F;
CLASS :Printer;
DES:Samsung SCX-1150F;
< Dot Count Variables >
Black Dot Count : 1939682
Color Cyan Dot Count : 619136
Color Magenta Dot Count : 619136
Color Yellow Dot Count : 619136
Photo Black Dot Count : 0
Photo Cyan Dot Count : 0
Photo Magenta DotCount : 0
Total Black Dot Count : 1939682
Total Color Cyan Dot Count : 619136
Total Color Magenta Dot Count : 619136
Total Color Yellow Dot Count : 619136
Total Photo Cyan Dot Count : 0
Total Photo Magenta Dot Count : 0
Total Photo Black Dot Count : 0
< Page Count Variables >
Total Page Count : 2
< Cartridge Types >
Left Cartridge Type : Color Standard Capacity
Right Cartridge Type : Black High Capacity
< Alignment Variables >
Horizontal Align Value : 15
Vertical Align Value : 8
Quick Black Bidi Align Value : 15
Quick Color Bidi Align Value : 15
Normal Black Bidi Align Value : 15
Normal Color Bidi Align Value : 15
Photo Horizontal Align Value : 15
Photo Vertical Align Value : 8
Photo Normal Black Bidi Align Value : 15
Photo Normal Color Bidi Align Value : 15
4-2-5 Maintenance
CLEAN CARTRIDGE
ALIGN CARTRIDGE
VIEW INK LEVEL
To check the amount of the mounted ink cartridge.
4-7
Troubleshooting
Samsung Electronics
When white lines are appeared, when image is printed
poorly in part, or when specific color is not printed, sweep
the nozzle of the ink cartridge and contacting surface of the
cartridge, then clean the cartridge.
Until it gets better, do it several times.
Using this feature to get fine print quality when a vertical
line is printed not in straight or when ink cartridge is just
replaced.
4-8
Troubleshooting
Samsung Electronics
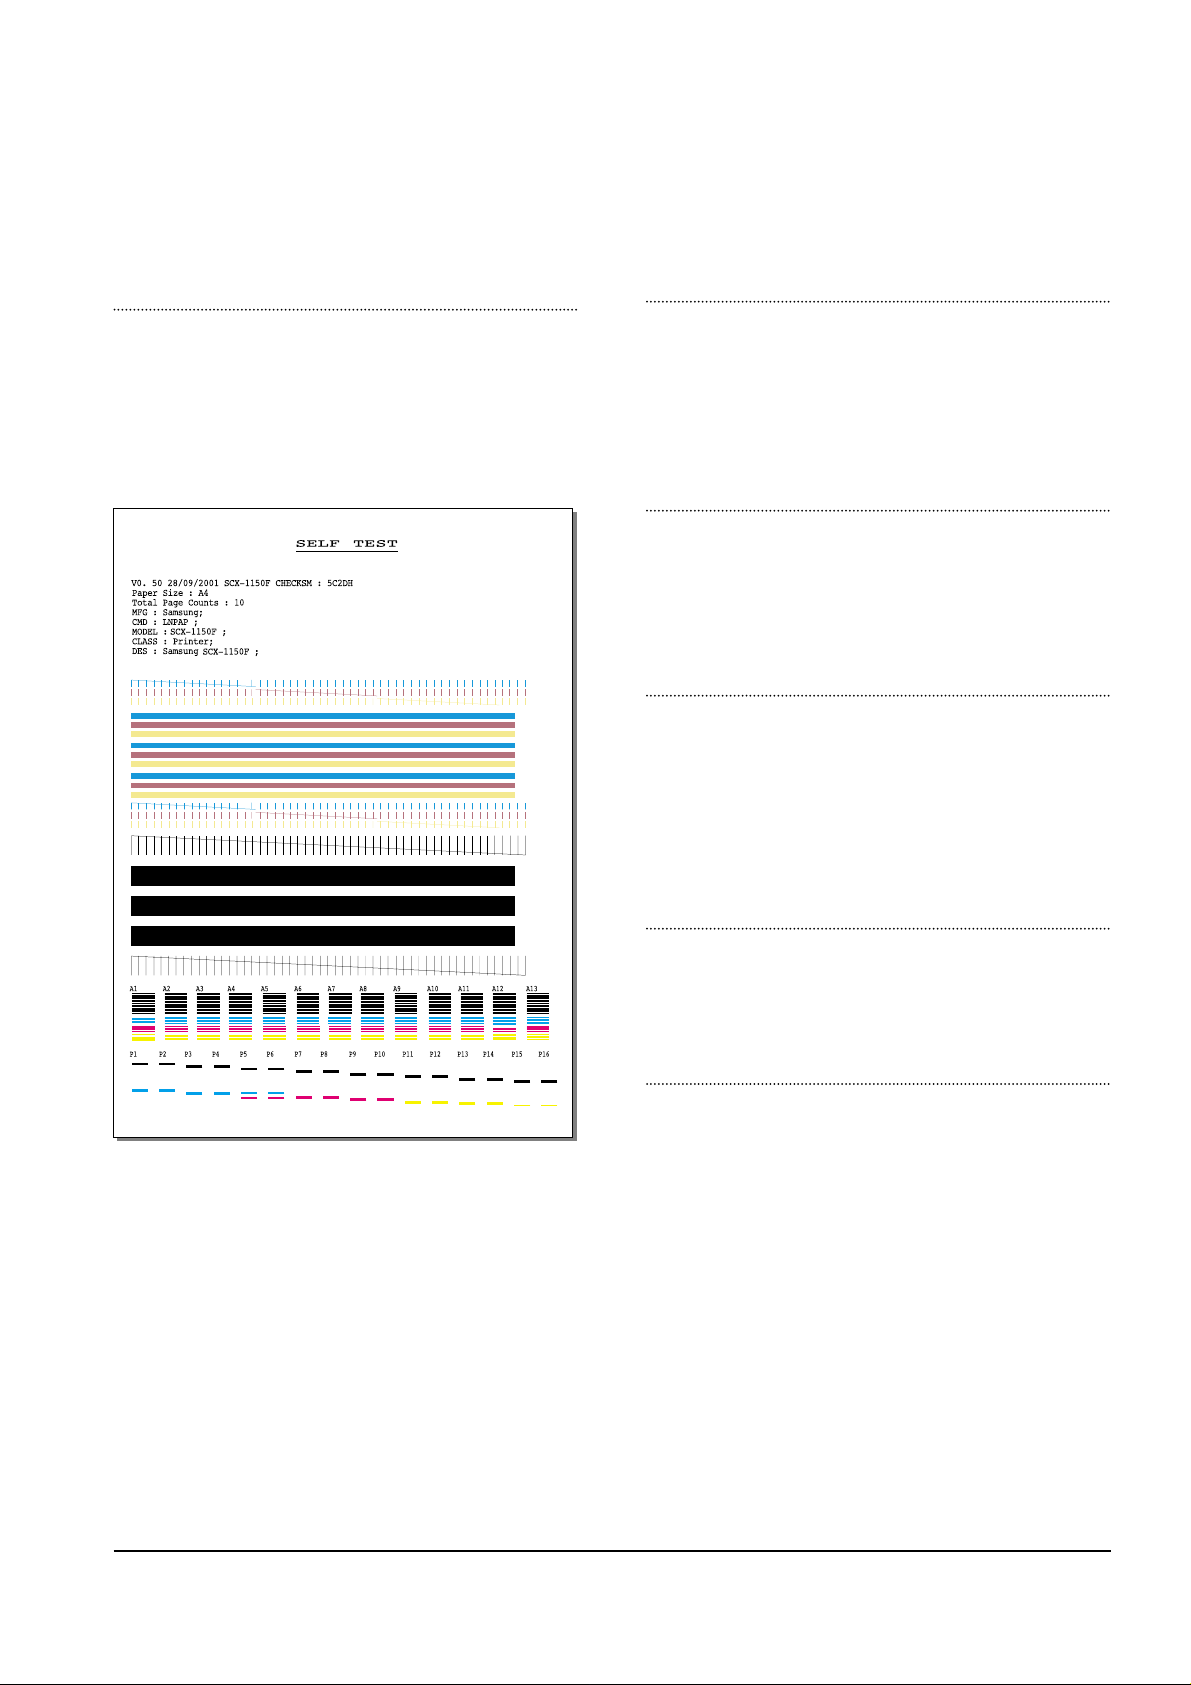
ADJUST SHADING
The function is to control to get the optimum scan quality by
the specific character of the CCD(Charge Coupled Device).
If the copy image quality is unsatisfied, perform the function
to check the condition of the print out for checking whether
or not having CCD trouble.
( ADJUST SHADING )
1. Select the [ADJUST SHADING] at the TECH MODE.
2. Push the SET UP button then an image will be scanned.
3. After the scan, CCD SHADING PROFILE will be print
out.
4. If the printed image is different to the image, the CCD is
defect.
NOTICE
When you test CCD, make sure that the cover is
closed.
REMOTE TEST
The Remote Test feature can be enabled in order to allow
a remote location to call up and run a diagnostic test on
your machine. You may be instructed by a service representative to enable this feature.

4-9
Troubleshooting
Samsung Electronics
4-3. Troubleshooting
4-3-1 Defective PC Scan . . . . . . . . . . . . . . . . . . . . . . . . . . . . . . . . . . . . . . . . . . . . . . . . . . . . . . . . . . . . . .page(4-10)
4-3-2 Defective Image quality of PC Scan . . . . . . . . . . . . . . . . . . . . . . . . . . . . . . . . . . . . . . . . . . . . . . . . .page(4-10)
4-3-3 Defective Operation (LCD WINDOW ) Display . . . . . . . . . . . . . . . . . . . . . . . . . . . . . . . . . . .page(4-11)
4-3-4 No Power . . . . . . . . . . . . . . . . . . . . . . . . . . . . . . . . . . . . . . . . . . . . . . . . . . . . . . . . . . . . . . . . . . . . .page(4-11)
4-3-5 Defective LCD Operation . . . . . . . . . . . . . . . . . . . . . . . . . . . . . . . . . . . . . . . . . . . . . . . . . . . . . . . . .page(4-12)
4-3-6 Defective Operation of Key Button . . . . . . . . . . . . . . . . . . . . . . . . . . . . . . . . . . . . . . . . . . . . . . . . . .page(4-12)
4-3-7 Paper Jam . . . . . . . . . . . . . . . . . . . . . . . . . . . . . . . . . . . . . . . . . . . . . . . . . . . . . . . . . . . . . . . . . . . .page(4-13)
4-3-8 Defective Paper Feed (1) . . . . . . . . . . . . . . . . . . . . . . . . . . . . . . . . . . . . . . . . . . . . . . . . . . . . . . . . .page(4-13)
4-3-9 Defective Paper Feed (2) -Display of NO PAPER . . . . . . . . . . . . . . . . . . . . . . . . . . . . . . . . . . . . . .page(4-14)
4-3-10 Multi-Feeding (1) . . . . . . . . . . . . . . . . . . . . . . . . . . . . . . . . . . . . . . . . . . . . . . . . . . . . . . . . . . . . . . . .page(4-14)
4-3-11 Defective ADF . . . . . . . . . . . . . . . . . . . . . . . . . . . . . . . . . . . . . . . . . . . . . . . . . . . . . . . . . . . . . . . . . .page(4-15)
4-3-12 Defective Sensing-ink . . . . . . . . . . . . . . . . . . . . . . . . . . . . . . . . . . . . . . . . . . . . . . . . . . . . . . . . . . . .page(4-15)
4-3-13 Defective Motor Drive (LF : Line Feed) . . . . . . . . . . . . . . . . . . . . . . . . . . . . . . . . . . . . . . . . . . . . . . .page(4-16)
4-3-14 Defective Motor Drive (CR : Carriage Return) . . . . . . . . . . . . . . . . . . . . . . . . . . . . . . . . . . . . . . . . .page(4-16)
4-3-15 Defective Motor Drive (TX) . . . . . . . . . . . . . . . . . . . . . . . . . . . . . . . . . . . . . . . . . . . . . . . . . . . . . . . .page(4-17)
4-3-16 Blank Page Print Out (When Copying) . . . . . . . . . . . . . . . . . . . . . . . . . . . . . . . . . . . . . . . . . . . . . . .page(4-17)
4-3-17 Blank Page Print Out (When Receiving) . . . . . . . . . . . . . . . . . . . . . . . . . . . . . . . . . . . . . . . . . . . . .page(4-18)
4-3-18 Vertical Black Line (When Copying) . . . . . . . . . . . . . . . . . . . . . . . . . . . . . . . . . . . . . . . . . . . . . . . . .page(4-18)
4-3-19 Vertical Black Line (When Receiving) . . . . . . . . . . . . . . . . . . . . . . . . . . . . . . . . . . . . . . . . . . . . . . . .page(4-19)
4-3-20 Contaminated Stains on Paper . . . . . . . . . . . . . . . . . . . . . . . . . . . . . . . . . . . . . . . . . . . . . . . . . . . . .page(4-19)
4-3-21 Bad printed Image . . . . . . . . . . . . . . . . . . . . . . . . . . . . . . . . . . . . . . . . . . . . . . . . . . . . . . . . . . . . . .page(4-20)
4-3-22 Vertical Lines are printed crookedly . . . . . . . . . . . . . . . . . . . . . . . . . . . . . . . . . . . . . . . . . . . . . . . . .page(4-20)
4-3-23 Bad Color (Intensity) . . . . . . . . . . . . . . . . . . . . . . . . . . . . . . . . . . . . . . . . . . . . . . . . . . . . . . . . . . . . .page(4-21)
4-3-24 No Dial Tone . . . . . . . . . . . . . . . . . . . . . . . . . . . . . . . . . . . . . . . . . . . . . . . . . . . . . . . . . . . . . . . . . . .page(4-21)
4-3-25 Defective MF DIAL . . . . . . . . . . . . . . . . . . . . . . . . . . . . . . . . . . . . . . . . . . . . . . . . . . . . . . . . . . . . . .page(4-22)
4-3-26 Defective FAX FORWARD/RECEIVE . . . . . . . . . . . . . . . . . . . . . . . . . . . . . . . . . . . . . . . . . . . . . . .page(4-22)
4-3-27 Defective FAX FORWARD . . . . . . . . . . . . . . . . . . . . . . . . . . . . . . . . . . . . . . . . . . . . . . . . . . . . . . . .page(4-23)
4-3-28 Defective FAX RECEIVE (1) . . . . . . . . . . . . . . . . . . . . . . . . . . . . . . . . . . . . . . . . . . . . . . . . . . . . . . .page(4-23)
4-3-29 Defective FAX RECEIVE (2) . . . . . . . . . . . . . . . . . . . . . . . . . . . . . . . . . . . . . . . . . . . . . . . . . . . . . . .page(4-24)
4-3-30 Defective FAX RECEIVE (3) . . . . . . . . . . . . . . . . . . . . . . . . . . . . . . . . . . . . . . . . . . . . . . . . . . . . . . .page(4-24)
4-3-31 Defective FAX RECEIVE (4) . . . . . . . . . . . . . . . . . . . . . . . . . . . . . . . . . . . . . . . . . . . . . . . . . . . . . . .page(4-25)
4-3-32 Defective Automatic Receiving . . . . . . . . . . . . . . . . . . . . . . . . . . . . . . . . . . . . . . . . . . . . . . . . . . . . .page(4-25)
4-3-33 The Printer is Not Working (1) . . . . . . . . . . . . . . . . . . . . . . . . . . . . . . . . . . . . . . . . . . . . . . . . . . . . .page(4-26)
4-3-34 The Printer is Not Working (2) . . . . . . . . . . . . . . . . . . . . . . . . . . . . . . . . . . . . . . . . . . . . . . . . . . . . .page(4-26)
4-3-35 Abnormal Printing . . . . . . . . . . . . . . . . . . . . . . . . . . . . . . . . . . . . . . . . . . . . . . . . . . . . . . . . . . . . . . .page(4-27)
4-3-36 Spool Error and Release of Spool Error . . . . . . . . . . . . . . . . . . . . . . . . . . . . . . . . . . . . . . . . . . . . . .page(4-28)
• The solutions of troubleshooting in this 'Service Manual' explain the expected causes and how to
check according to each problem and describe how to replace the defected parts (unit of ASS’Y) if
necessary.
• The contents of this 'Service Manual' describe general ones only among many kinds of problems and
causes while using the Product.
• The contents of this 'Service Manual' describe mainly technical explanations of the Product H/W and
parts on the assumption that there is no problem in S/W.
 Loading...