


Important Precautions and Safety Information
When using this product, these basic safety precautions should always be followed
to reduce risk of fire, electric shock, and injury to persons:
1
Read and understand all instructions.
2
Use common sense whenever operating electrical appliances.
3
Follow all warnings and instructions marked on the product and in the literature
accompanying the product.
4
If an operating instruction appears to conflict with safety information, heed the
safety information. You may have misunderstood the operating instruction. If
you cannot resolve the conflict, contact your sales or service representative for
assistance.
5
Unplug the product from the AC wall socket and/or telephone jack before
cleaning. Do not use liquid or aerosol cleaners. Use only a damp cloth for
cleaning.
6
Do not place the product on an unstable cart, stand, or table. It may fall,
causing serious damage.
7
Your product should never be placed on, near, or over a radiator, heater, air
conditioner, or ventilation duct.
8
Do not allow anything to rest on the power. Do not locate your product where
the cords will be abused by persons walking on them.
9
Do not overload wall outlets and extension cords. This can diminish
performance, and may result in the risk of fire or electric shock.
10
Do not allow pets to chew on the AC power, telephone, or PC interface cords.
11
Never push objects of any kind into the product through case or cabinet
openings. They may touch dangerous voltage points, creating a risk of fire or
shock. Never spill liquid of any kind onto or into the product.

12
Your product may have a heavy cover for optimal pressure on the document for
the best scanning and/or faxing (usually the flatbed-type product). In this case,
replace the cover after placing document on the scan glass, hold the cover and
move it down slowly until it seats on its location.
13
To reduce the risk of electric shock, do not disassemble the product. Take it to a
qualified service technician when repair work is required. Opening or removing
covers may expose you to dangerous voltages or other risks. Incorrect
reassembly could cause electric shock when the unit is subsequently used.
14
Unplug the product from the telephone jack, PC and AC wall outlet, and refer
servicing to qualified service personnel under the following conditions:
• When any part of the power cord, plug, or connecting cable is damaged or
frayed.
• If liquid has been spilled into the product.
• If the product has been exposed to rain or water.
• If the product does not operate properly after instructions have been followed.
• If the product has been dropped, or the cabinet appears damaged.
• If the product exhibits a sudden and distinct change in performance.
15
Adjust only those controls covered by the operating instructions. Improper
adjustment of other controls may result in damage, and may require extensive
work by a qualified service technician to restore the product to normal
operation.
16
Avoid using this product during a lightning storm. There may be a remote risk of
electric shock from lightning. If possible, unplug the AC power and telephone
cord for the duration of the lightning storm.
17
SAVE THESE INSTRUCTIONS.

C
ONTENTS
Important Precautions and Safety Information .................. i
Chapter 1:
ET
S
Setting Up Your Product ......................................... 1.2
Contents ...................................................................... 1.2
Control Locations and Functions ..................................... 1.3
Operation Panel Button Functions .................................... 1.5
Choosing a Location ....................................................... 1.7
Making Connections ....................................................... 1.7
Loading Paper .............................................................. 1.11
Installing Print Cartridges .............................................. 1.13
Installing Software .............................................. 1.18
About Samsung Software .............................................. 1.18
System Requirements ................................................... 1.19
Installing Samsung Software .......................................... 1.20
Configuring Fax and Internet Gates ................................. 1.24
Uninstalling Samsung Software ...................................... 1.28
P
U
Front View ................................................................ 1.3
Rear View ................................................................. 1.4
Top View .................................................................. 1.4
Uninstalling the MFP Driver ........................................ 1.28
Using the SmarThru CD-ROM ..................................... 1.32
Basic System Setup .............................................. 1.33
Setting Date and Time .................................................. 1.33
Changing Date Format .............................................. 1.35
Changing Clock Mode ................................................ 1.35
Setting Fax Number and Name ....................................... 1.36
How To Enter Characters Using the Number Keypad ...... 1.37
Changing the Display Language ...................................... 1.39
Setting the Discard Size ................................................ 1.40
Setting Sounds ............................................................ 1.41
Ringer Volume, Alarm Sound, Key Sound .................... 1.41
Speaker Volume ....................................................... 1.41
Contents
i

Setting Dialling Mode .................................................... 1.42
Using Save Mode .......................................................... 1.43
Ink Save ................................................................. 1.43
Paper Save .............................................................. 1.43
Power Save ............................................................. 1.44
Chapter 2:
Chapter 3:
RINT
P
Paper Selection ............................................................. 2.2
Guidelines for Special Media ....................................... 2.3
Loading Speciality Paper ................................................. 2.4
Paper Guidelines ....................................................... 2.5
Printing a Document ...................................................... 2.6
Printer Settings ............................................................. 2.8
Accessing Printer Settings .......................................... 2.8
Printer Properties Tabs (Windows 95/98/Me) ................. 2.9
Printer Properties Tabs (Windows NT 4.0) .................... 2.14
Printer Properties Tabs (Windows 2000/XP) ................. 2.16
Printer Properties Buttons & Icons .............................. 2.17
Using the Printer Control Program ................................... 2.17
Accessing the Printer Control Program ......................... 2.17
About Tab ............................................................... 2.19
C
OPY
Setting Paper Size and Type ........................................... 3.2
Paper Size ................................................................ 3.2
Paper Type ............................................................... 3.3
Loading the Original Documents ...................................... 3.3
Using Automatic Document Feeder (ADF) ..................... 3.4
Using Document Glass ............................................... 3.5
Copying a Document ...................................................... 3.7
Setting Copy Options ..................................................... 3.8
Quality ..................................................................... 3.8
Contrast ................................................................... 3.9
Copy page ................................................................ 3.9
Zoom rate ............................................................... 3.10
Collating ................................................................. 3.10
Using Special Copy ....................................................... 3.11
Fit to Page ............................................................... 3.12
Clone ...................................................................... 3.12
Poster ..................................................................... 3.13
Mirror ..................................................................... 3.14
ii
Contents

Changing Default Settings ............................................. 3.15
Blocking Colour Copying ................................................ 3.16
Chapter 4:
Chapter 5:
CAN
S
Scanning Basics ............................................................ 4.2
Starting Scan from the Operation Panel ............................ 4.2
Scanning Process with TWAIN-enabled Software ................ 4.6
FAX
Sending a Fax ........................................................ 5.2
Preparing Documents for Faxing ...................................... 5.2
Loading Document(s) ..................................................... 5.3
Adjusting Quality of Your Fax .......................................... 5.4
Setting Resolution ..................................................... 5.4
Setting Contrast ........................................................ 5.5
Setting Default Resolution and Contrast ....................... 5.6
Sending a Fax Automatically ........................................... 5.7
Confirming a Transmission .......................................... 5.8
Automatic Redial ....................................................... 5.8
Sending a Fax Manually .................................................. 5.9
Redial ......................................................................... 5.10
Using Toll Save Transmission ......................................... 5.11
Receiving a Fax .................................................... 5.13
About Reception Modes ................................................. 5.13
Loading Paper for Receiving Faxes .................................. 5.14
Receiving Automatically in FAX Mode .............................. 5.15
Receiving Automatically in ANS/FAX Mode ....................... 5.15
Receiving Manually in TEL Mode Using an Extension Phone . 5.16
Receiving Using DRPD Feature ....................................... 5.17
Receiving in Colour ....................................................... 5.17
Receiving Fax in Memory ............................................... 5.17
Using Fax Forwarding .................................................... 5.18
Automatic Dialling ............................................... 5.20
One-touch Dialling ........................................................ 5.20
Storing a Number for One-touch Dialling ..................... 5.20
Sending a Fax using a One-touch Number ................... 5.21
Speed Dialling .............................................................. 5.22
Storing a Number for Speed Dialling ........................... 5.22
Sending a Fax using a Speed Number ......................... 5.23
Contents
iii

Group Dialling .............................................................. 5.24
Setting Group Dial .................................................... 5.24
Sending a Fax Using Group Dialling
(Multi-Address Transmission) ..................................... 5.25
Searching for a Number in the Memory ........................... 5.26
Searching Sequentially through the Memory ................ 5.26
Searching with a Particular First Letter ........................ 5.27
Advanced Fax ....................................................... 5.28
Broadcasting ................................................................ 5.28
Delayed Fax ................................................................. 5.30
Priority Fax .................................................................. 5.32
Polling ........................................................................ 5.34
Polling Transmission ................................................. 5.34
Polling a Remote Machine .......................................... 5.36
Adding Documents To a Scheduled Operation ................... 5.37
Cancelling a Scheduled Operation ................................... 5.38
Additional Features .............................................. 5.39
Printing Reports ........................................................... 5.39
Printing List ............................................................. 5.41
Fax Setup Options ........................................................ 5.41
Setting an Option ..................................................... 5.41
Selectable Options .................................................... 5.42
Using the Fax Settings Utility ......................................... 5.47
Accessing the Fax Settings Utility ............................... 5.47
Chapter 6:
Contents
iv
M
AINTENANCE
Maintaining Print Cartridges ............................................ 6.2
Viewing Ink Level .......................................................... 6.3
Cleaning Print Cartridges ................................................ 6.3
Printing a Cleaning Page from the Product .................... 6.4
Printing a Cleaning Page from Your Computer ............... 6.5
Cleaning Print Cartridge Nozzles .................................. 6.6
Cleaning Cartridge Holder Contacts .............................. 6.8
Replacing Print Cartridges ............................................... 6.9
Replacing Print Cartridges from the Product ................. 6.11
Replacing Print Cartridges from the Computer .............. 6.13
Aligning Print Cartridges ................................................ 6.15
Aligning Print Cartridges from the Product ................... 6.15
Aligning Print Cartridges from the Computer ................ 6.16
Clearing Memory .......................................................... 6.18
Remote Test ................................................................ 6.19
Cleaning the Document Glass ......................................... 6.20

Chapter 7:
Chapter 8:
T
ROUBLESHOOTING
Clearing Document Jams ................................................ 7.2
Input Misfeed ............................................................ 7.2
Exit Misfeed .............................................................. 7.3
Roller Misfeed ........................................................... 7.3
Clearing Paper Jams ...................................................... 7.4
Tips for Avoiding Paper Jams ...................................... 7.6
LCD Error Messages ....................................................... 7.7
Fixing Problems ............................................................. 7.8
Fax Problems ............................................................ 7.8
Paper Feeding Problems ............................................ 7.10
General Printing Problems ......................................... 7.11
Colour Printing Problems ........................................... 7.13
Print Quality Problems ............................................... 7.14
Scanning Problems ................................................... 7.16
PPENDIX
A
Printer Specification ................................................... 8.2
Scanner and Copier Specification ................................. 8.2
Fax Specification ....................................................... 8.3
General Specification ................................................. 8.4
Paper Specification .................................................... 8.5
Replacing the Fitted Plug (UK) ..................................... 8.7
Notes For Use of This Device (New Zealand) ................. 8.8
Declaration of Conformity (European Countries) ............ 8.9
Fax Branding (US) .................................................... 8.10
Telephone Company Information (US) ......................... 8.10
Index
Contents
v

NOTE
vi
Contents

1
S
ET
U
P
Thank you for purchasing the Samsung SCX-1150F InkJet
All in One. This multifunctional product provides printing,
copying, scanning, and faxing functions!
This chapter provides step-by-step instructions on
setting up the product, installing the software, and basic
system setup. The chapter includes:
•Setting Up Your Product
Contents
Control Locations and Functions
Operation Panel Button Functions
Choosing a Location
Making Connections
Loading Paper
Installing Print Cartridges
•Installing Software
About Samsung Software
System Requirements
Installing Samsung Software
Configuring Fax and Internet Gates
Uninstalling Samsung Software
•Basic System Setup
Setting Date and Time
Setting Fax Number and Name
Changing the Display Language
Setting the Discard Size
Setting Sounds
Setting Dialling Mode
Using Save Mode
Setting Up Your
Product
Contents
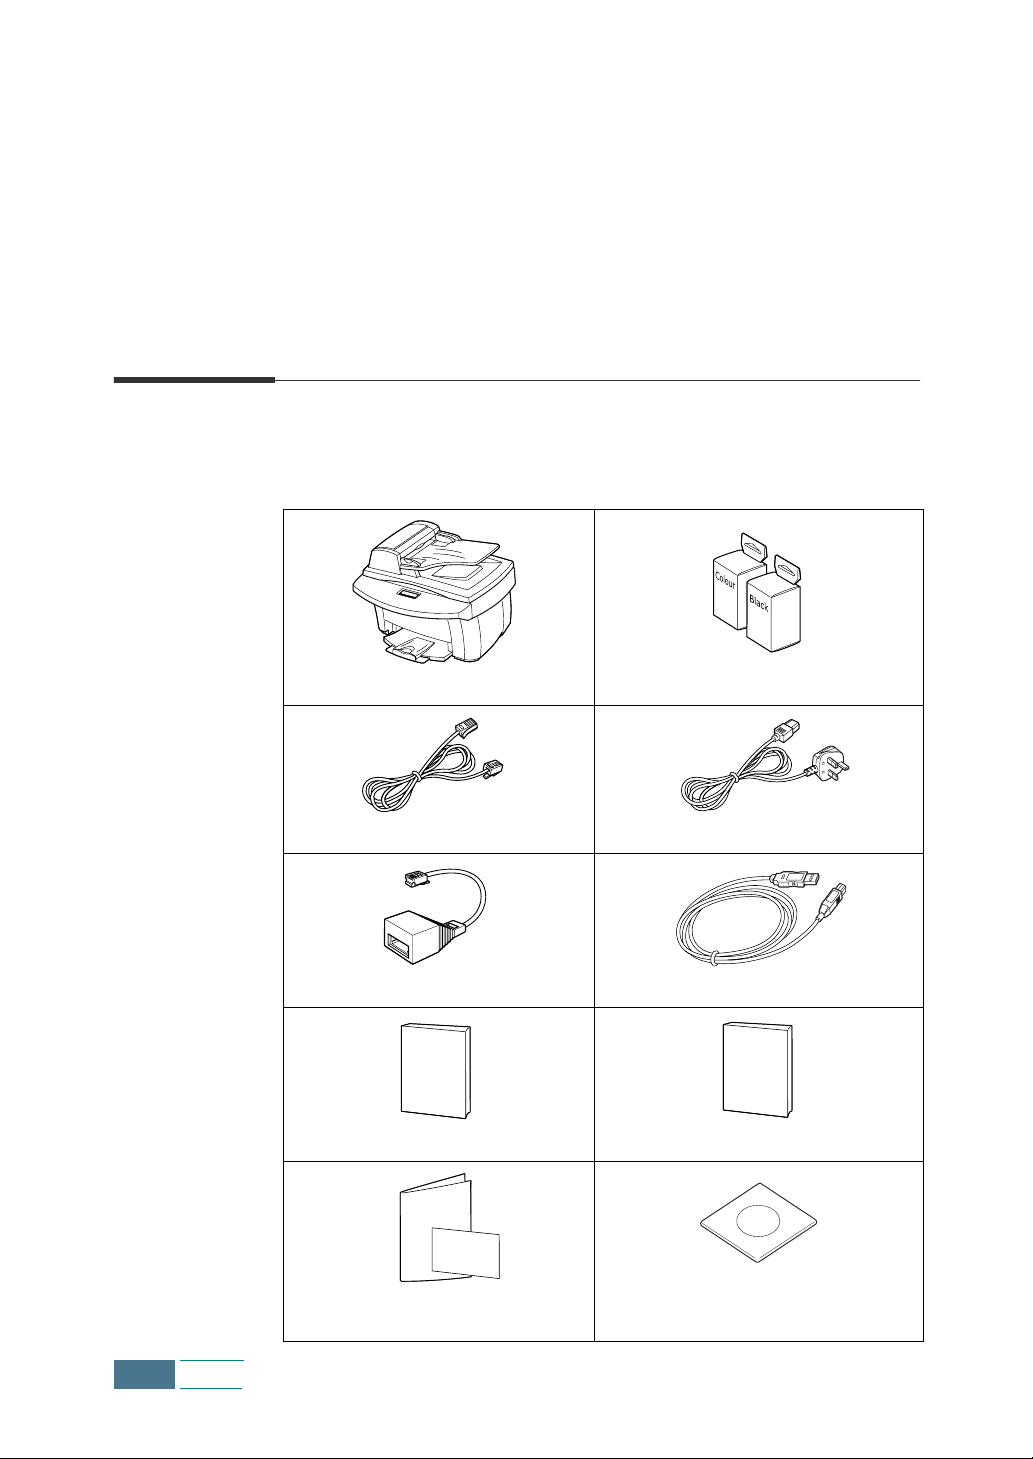
Below is what is included with your product.
SCX-1150F Colour and Black ink cartridges
Telephone line cord
TAM lead USB cable
This User’s Guide SmarThru User’s Guide
*
Power cord
*
1.2
Set Up
Quick Install Guide,
Warranty Card
*
The shape of the power and the telephone line cord plugs may differ,
Software CD
depending on your country.
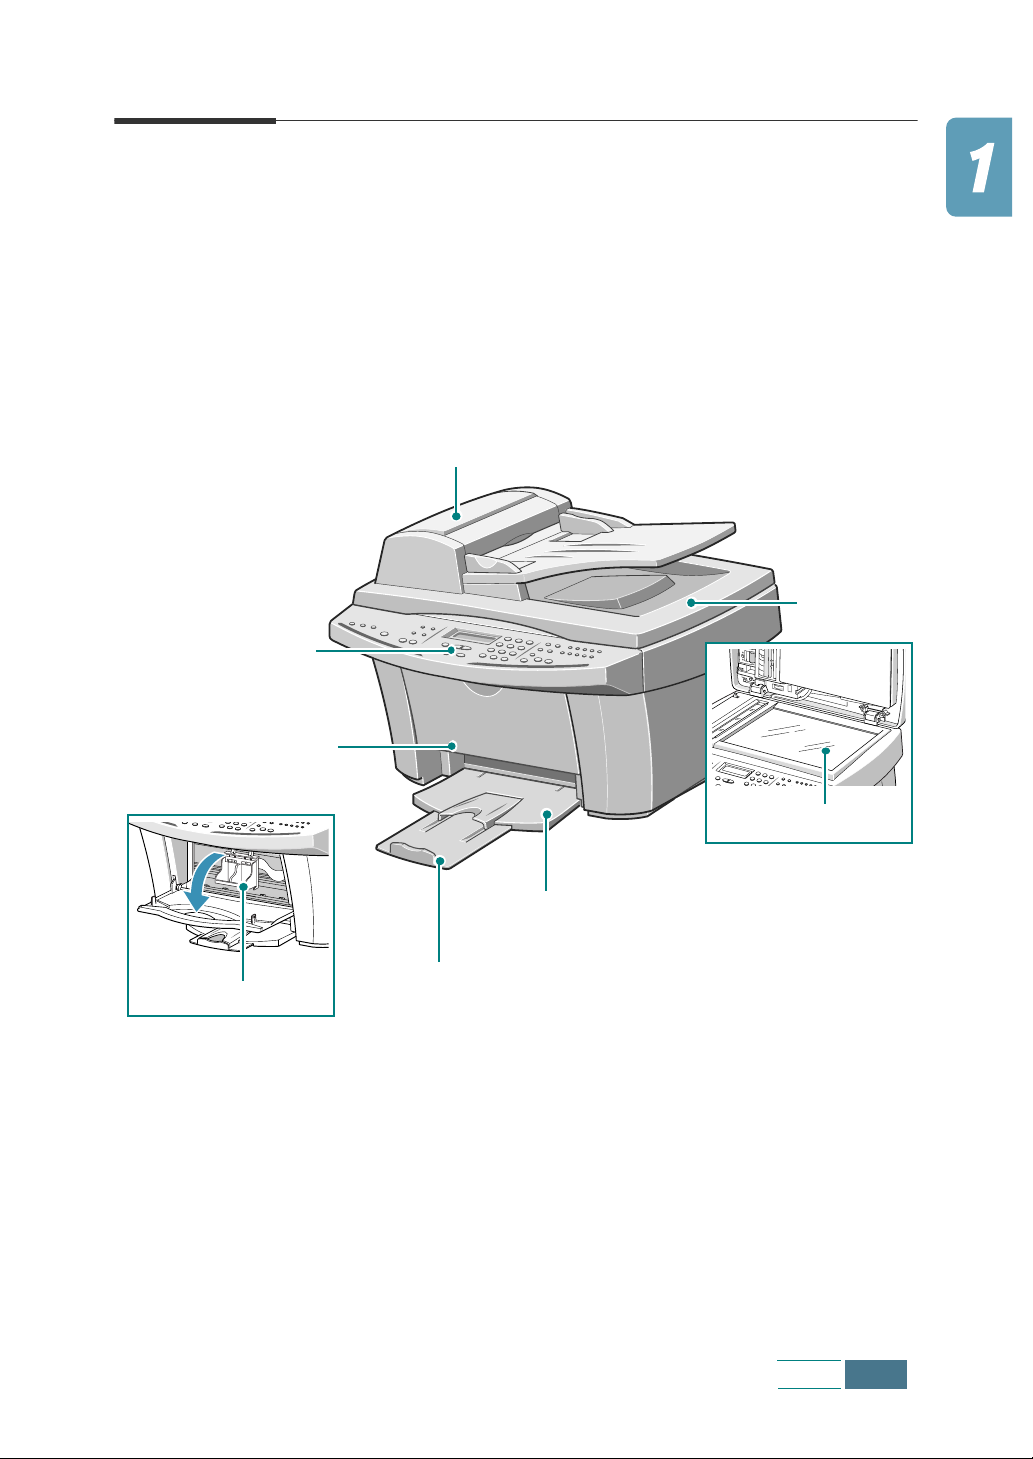
Control Locations and Functions
Document Glass
Take a moment to familiarize yourself with the main components
of your product.
Front View
Document Feeder
Operation Panel
(see page 1.5)
Automatic
Document
Cover
Cartridge Door
Grab the handle of the
door and open it wide.
Cartridge HolderCartridge Holder
Paper Output Tray
Paper Output Tray
Extension
Set Up
1.3
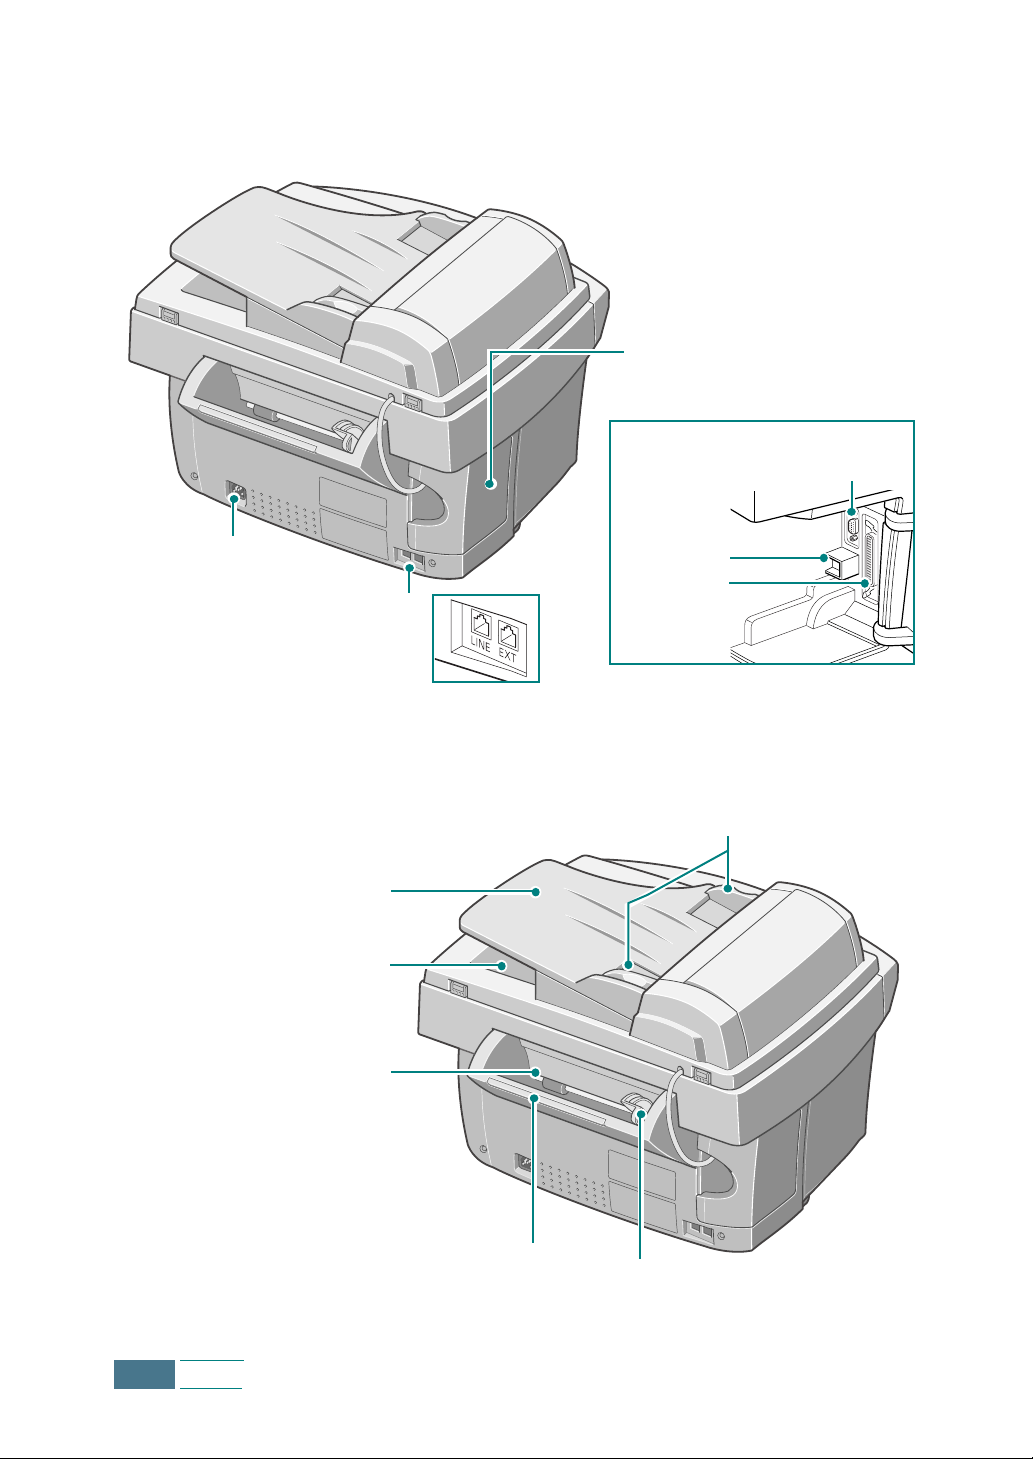
Rear View
Connector Door
To access connectors, open it
wide.
ADF(Automatic Document
Feeder) Connector
AC Power
Socket
Telephone
Connections
Top View
Document
Input Tray
Document
Output Tray
Paper Bin
USB
Connector
Parallel
Connector
Document Guides
1.4
Paper Support
Paper Guide
Set Up
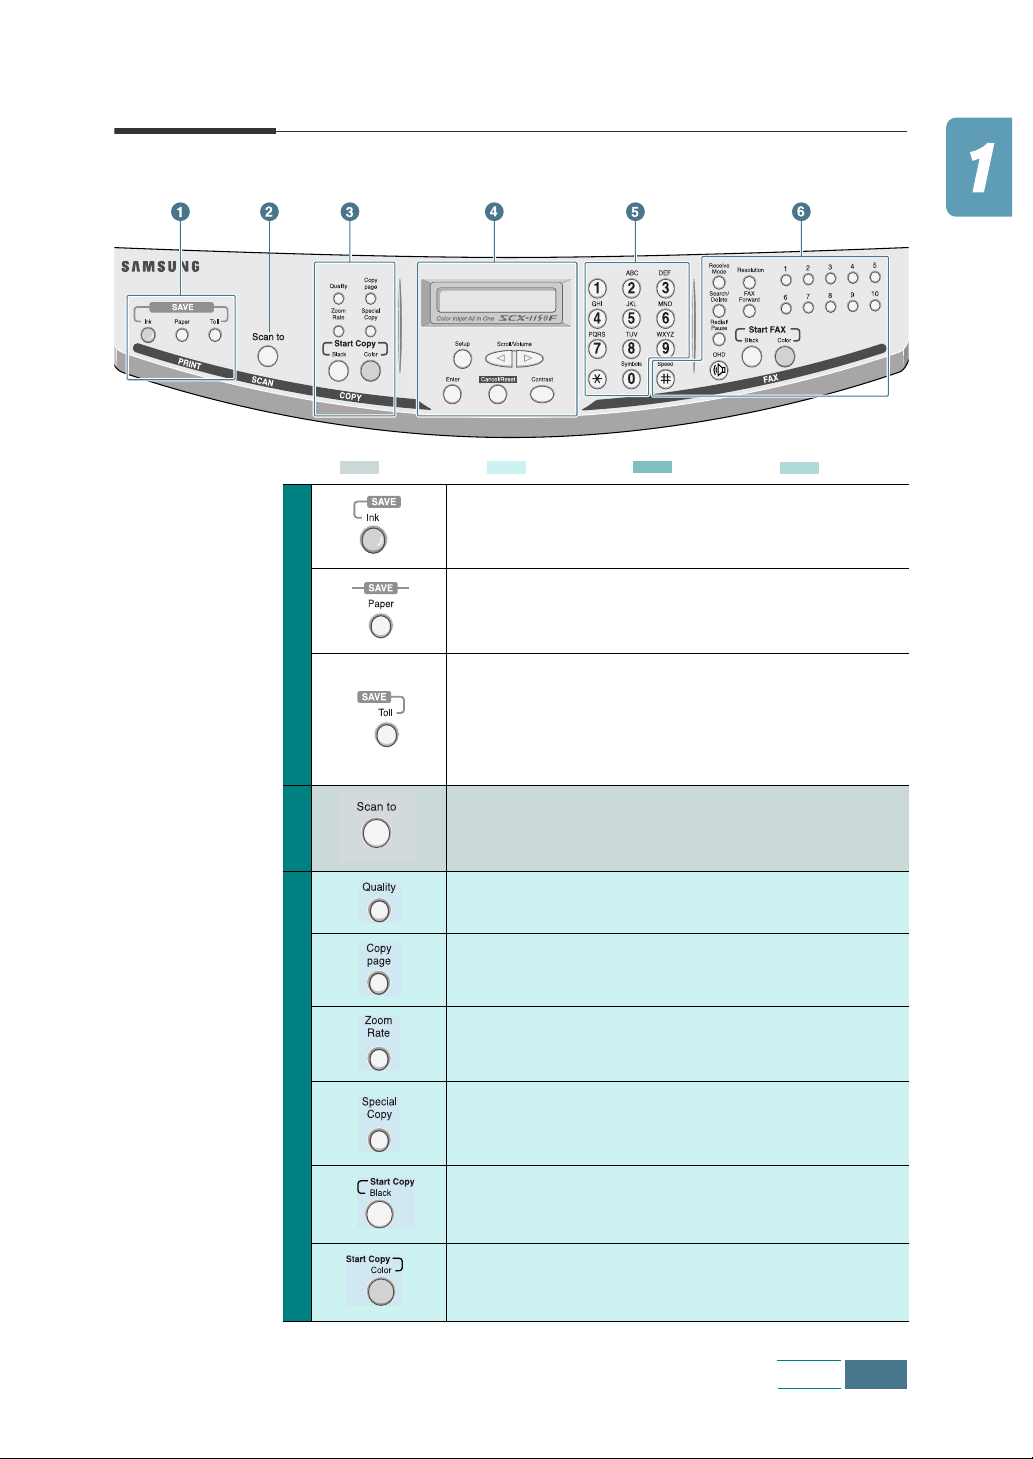
Operation Panel Button Functions
: Scan mode
: Copy mode
: Common
: Fax mode
Allows you to save ink to a maximum of 50% by
printing images lighter (available in PC print,
Copy, and Fax receiving modes).
Allows you to save paper by printing 2 pages on
a single sheet of paper (available in Black&white
1
Fax/Copy modes only).
Allows you to save on call costs by sending a fax
at a preset time. By using this feature, you can
take advantage of lower long distance rates at
night, for example (available in Fax sending
only).
Launches Samsung Scan Wizard in the desktop
2
window from which you can select the scan
destination and adjust scan settings.
Adjusts the copy quality.
Selects the number of copies.
Makes a copy smaller or larger than the original.
3
Allows you to set up special copy features
including Fit to Page, Clone, Poster, and Mirror
copy.
Makes a black and white copy.
Makes a colour copy.
Set Up
1.5
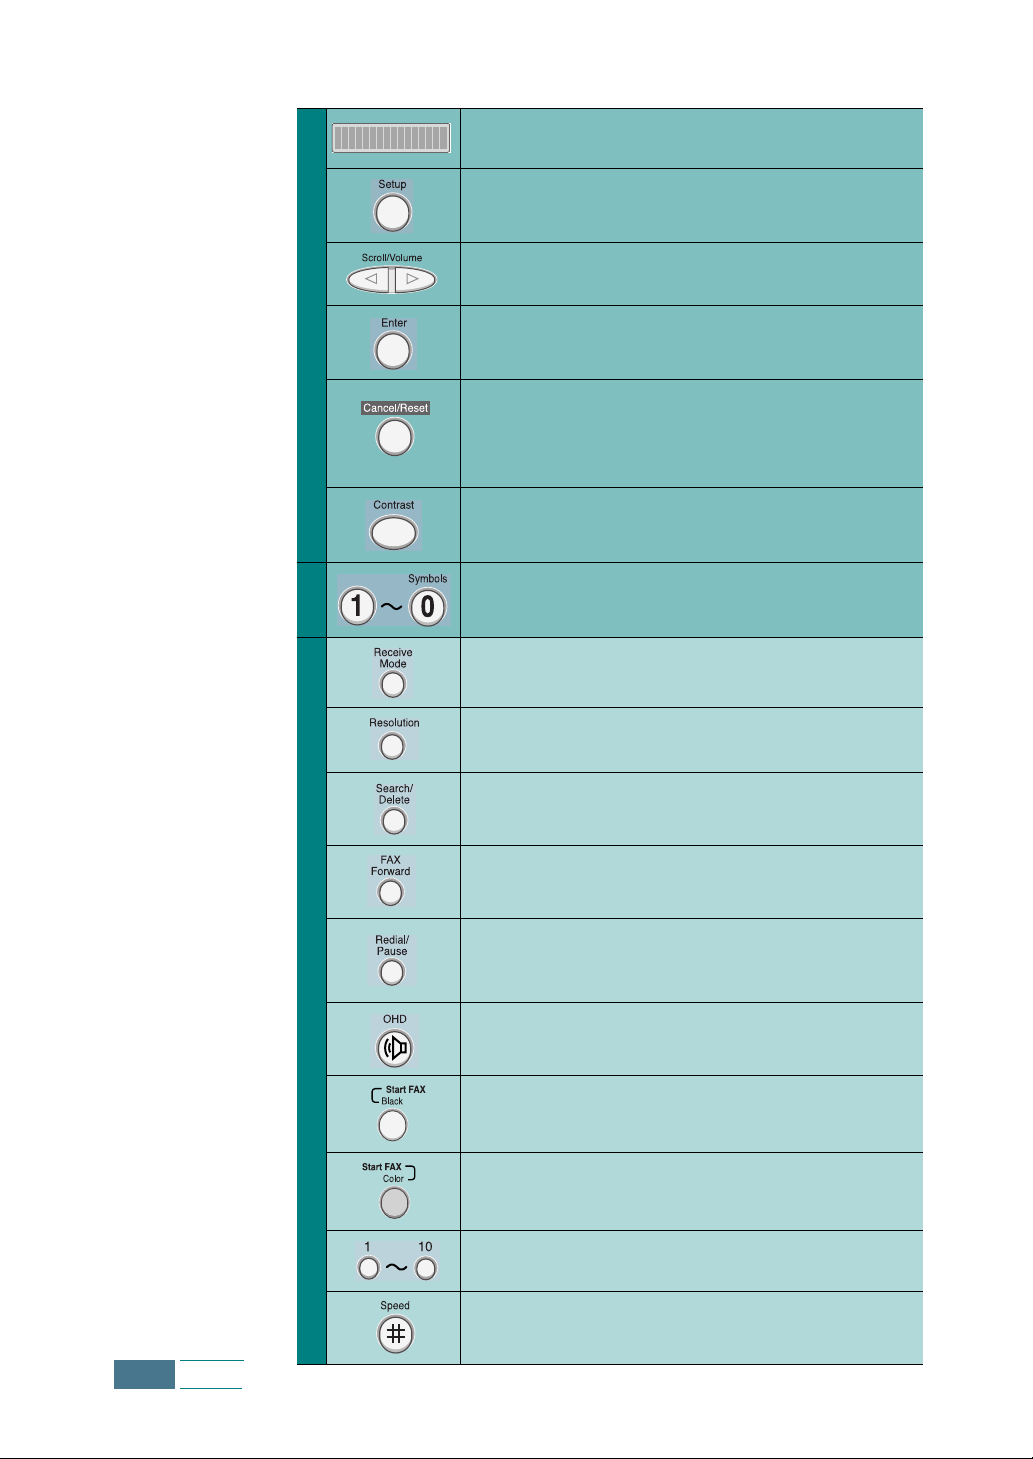
Displays current status and prompts during
operation.
Enters menu mode.
Scrolls through the menu items. Also used to
adjust the volume.
4
Confirms the selection on the display.
Cancels a current operation including PC printing
or resets the copy and fax setting item (Quality,
Copy Page, Zoom Rate, Resolution or Contrast)
to its default setting.
Adjusts the contrast of the documents for the
current fax or copy job.
5
Use to dial a number or enter alphanumeric
characters.
Use to choose the receive mode. The selected
mode is displayed in Standby mode.
Adjusts the resolution of the documents for the
current fax job.
Searches for numbers in memory. Also use to
delete digits in the edit mode.
Sets your product to forward incoming faxes to
another fax number.
1.6
Redials the last number or inserts a pause into a
fax number. You can also view and dial any of the
last numbers you dialled or received.
6
Engages the telephone line.
Starts to send a black and white fax.
Starts to send a colour fax.
Use to store frequently dialled fax numbers and
dial them with a single press.
Stores frequently dialled fax numbers and dial
them using a 2-digit speed number.
Set Up
Choosing a Location
To achieve trouble-free operation of your product, place it on a
flat, stable surface near your workstation. Leave enough space to
allow for easy paper loading, paper out and opening the top cover.
Do not place your product:
• In direct sunlight.
• Near heat sources or air conditioners.
• In dusty or dirty environments.
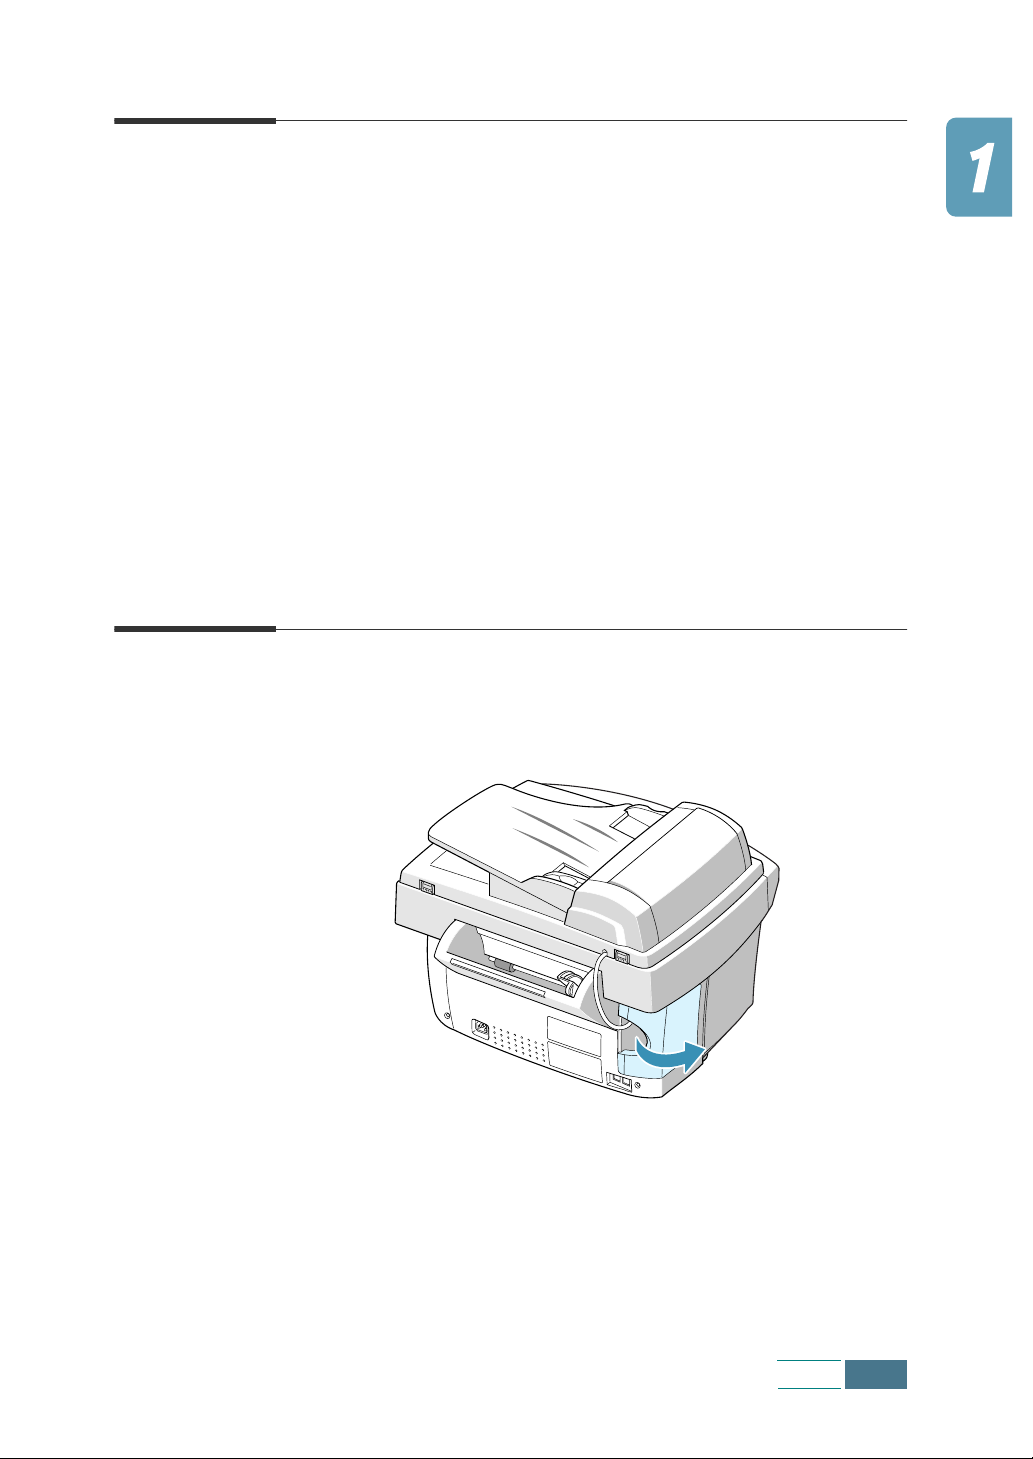
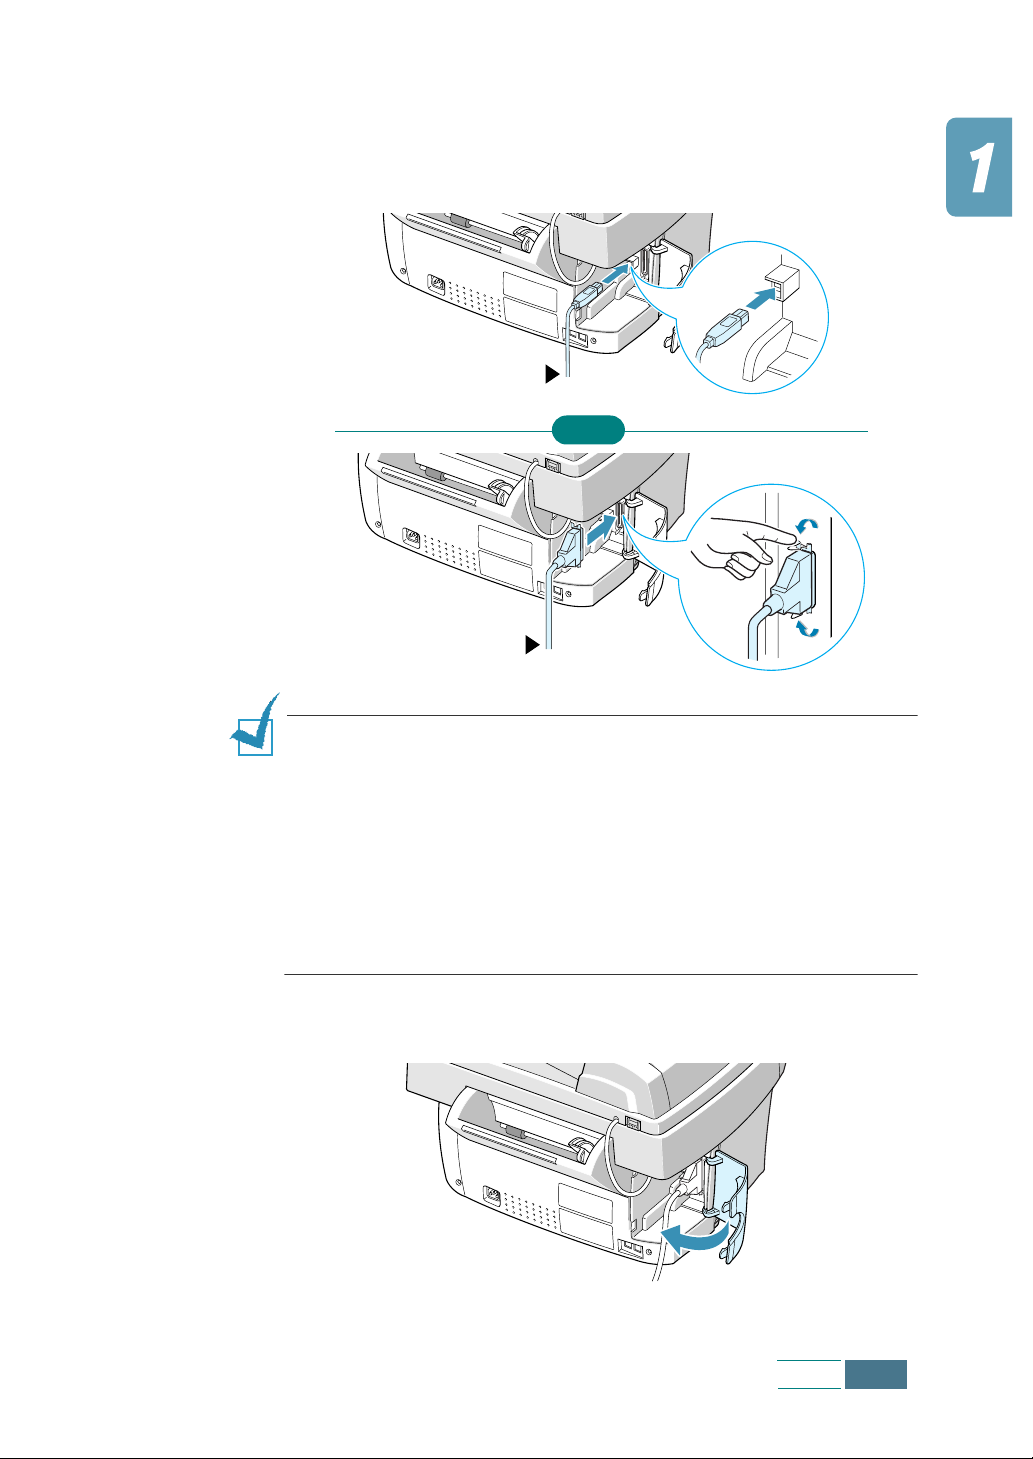
Making Connections
1
Open the connector door.
Set Up
1.7
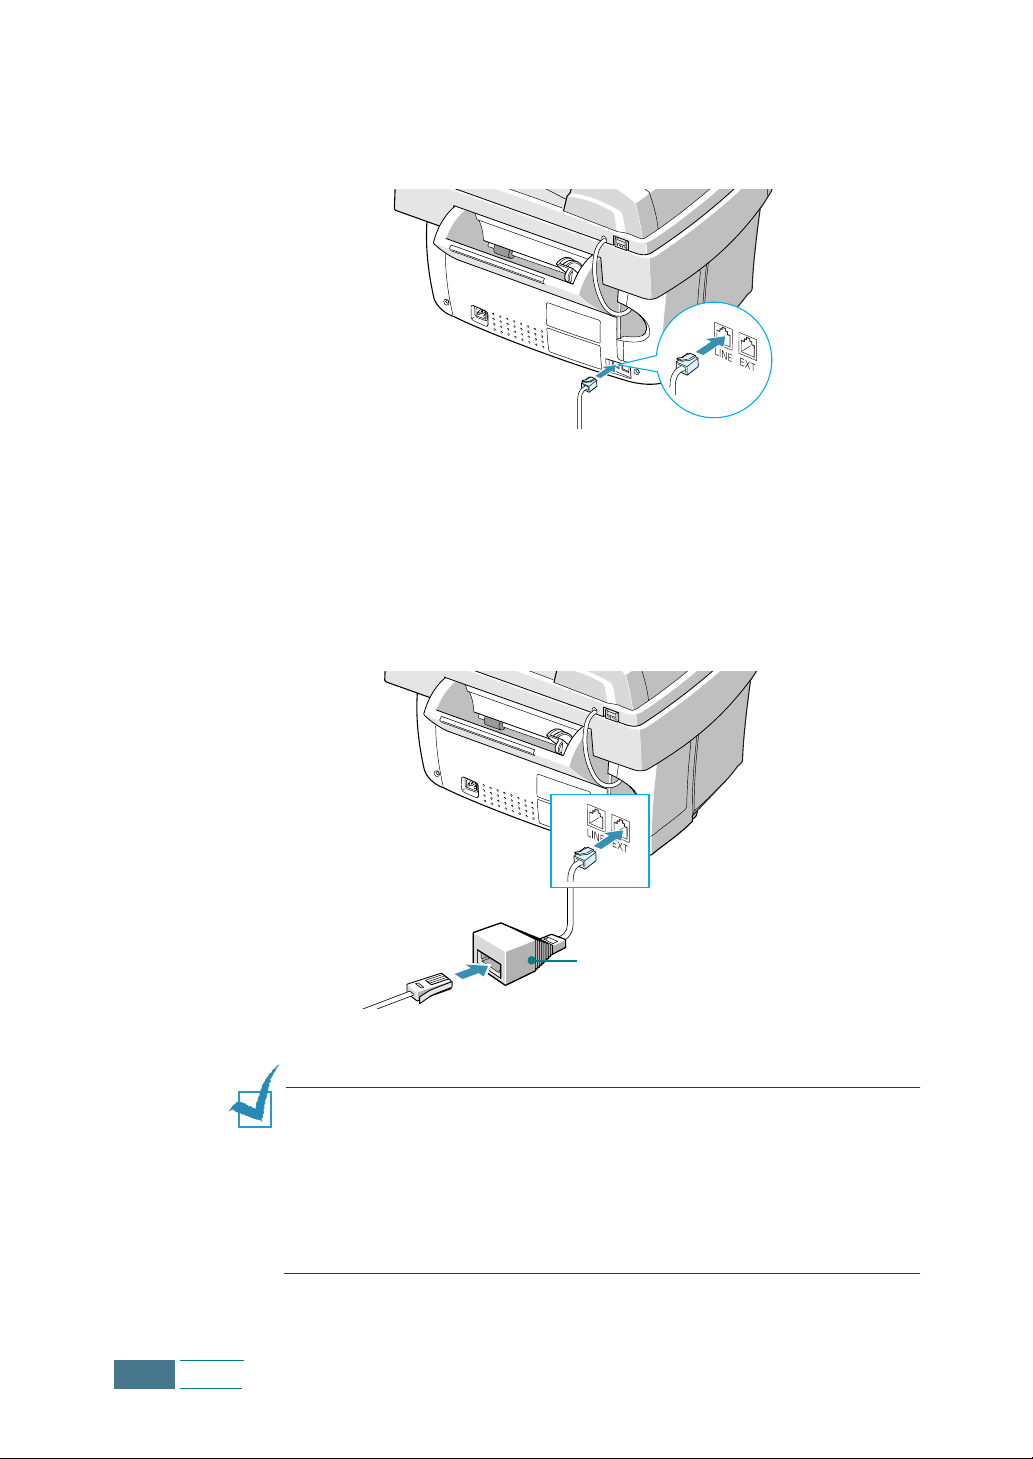
2
Connect the supplied telephone line to the LINE jack and the
other end to the wall jack.
If you want to use your product for receiving both faxes and
voice calls, you will need to connect a telephone and/or
answering machine to your product.
Plug the cord of your extension phone or answering machine
into the supplied TAM lead and plug the cord of the TAM lead
into the EXT jack on the back of your product.
1.8
Set Up
TAM lead
N
OTES
:
• This product is intended for connection to analogue telephone
networks in the United Kingdom. It is strongly recommended to use
the TAM lead and the telephone line cord supplied with your
product.
• If you are replacing the line cord with other manufacturer’s, it
should be AWG #26 or lower guage.
3
Connect the printer cable. Use either the USB cable that came
with your product or an IEEE-1284 compliant parallel cable
purchased separately.
USB connection
OR
Parallel connection
N
OTES
:
• You only need to connect one of the above cables. Shut down your
computer before connecting the cable.
• When you are using a USB cable, you must be running Windows
98/Me/2000/XP.
• When using USB connection, your product provides two USB
modes: Fast and Slow. Fast is the default mode. Some PC user may
experience poor USB implementation in the default mode. If this
occurs, select Slow mode to achieve successful results. For details
on changing the USB mode, see page 7.12.
4
Close the connector door.
Set Up
1.9
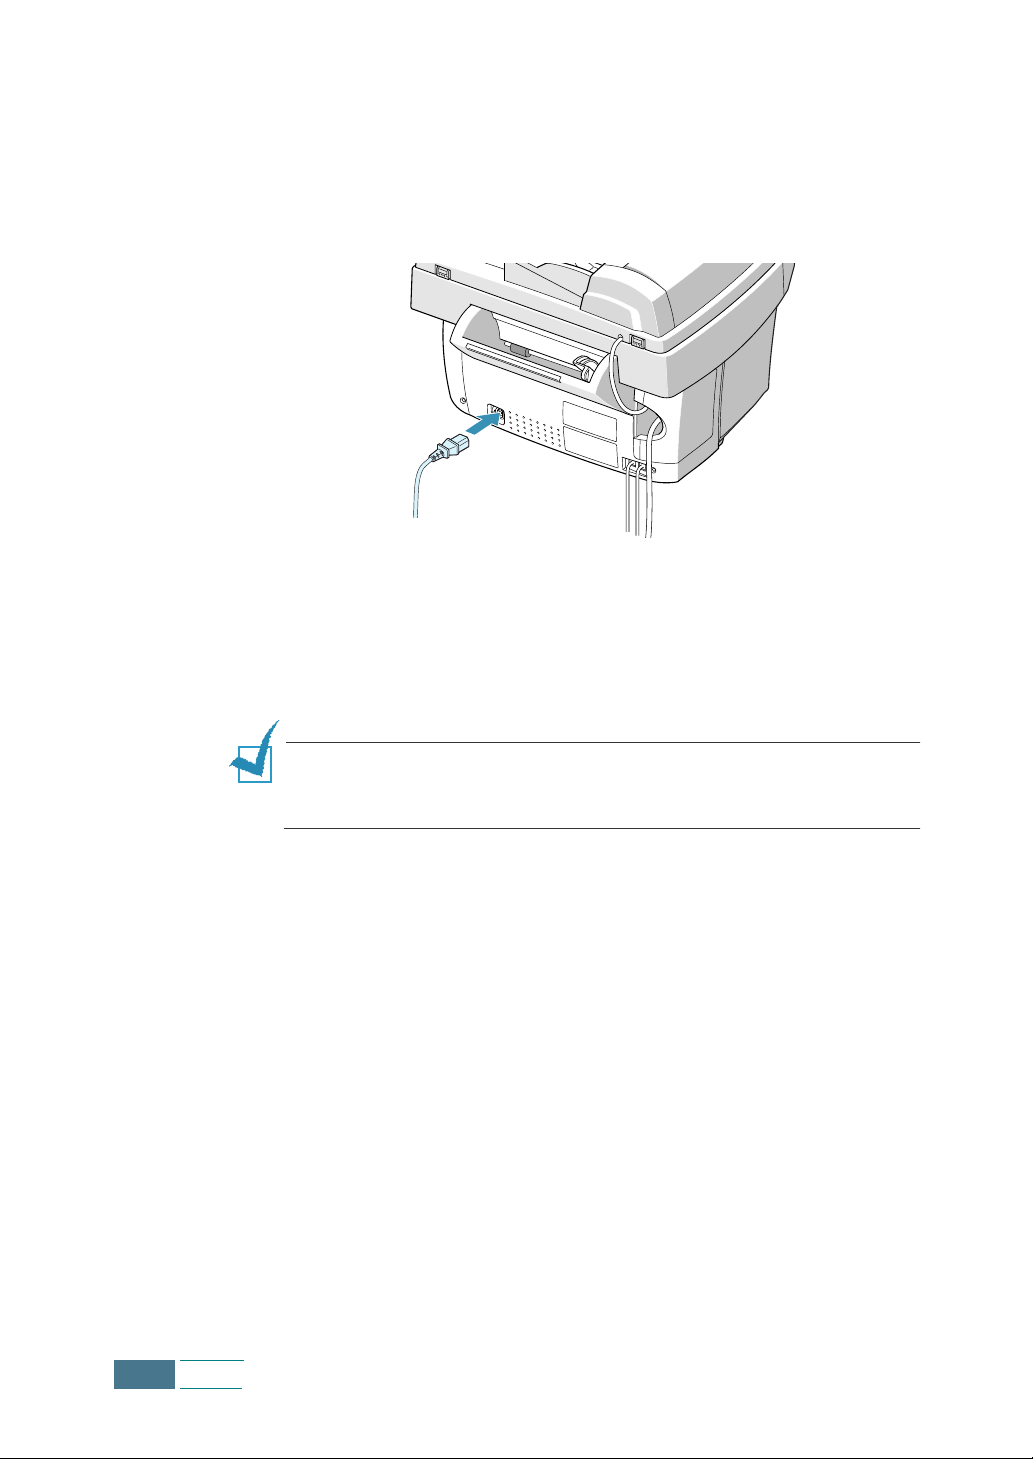
5
Connect the power cord.
Plug one end of the supplied three-wire electrical grounding
type cord into the back of the product and the other end into a
properly grounded AC outlet.
As you plug it in, your product will turn on. “POWERING UP
PLEASE WAIT” appears on the display indicating the product is
on. To view your display text in another language, see page
1.39.
If you want to turn your product off, unplug the power cord.
N
OTES
:
When you first set up the product, you see “CHECK
CARTRIDGES” on the display. Load the paper (see page 1.11), then
install the print cartridges (see page 1.13).
1.10
Set Up
Loading Paper
The display will show “ADD PAPER THEN PRESS ENTER” if no
paper is loaded when starting to print a job. The paper bin can
hold approximately 100 sheets of 20lb plain paper.
In the Fax or Copy mode, you can use A4-, letter-, or legal-size
paper.
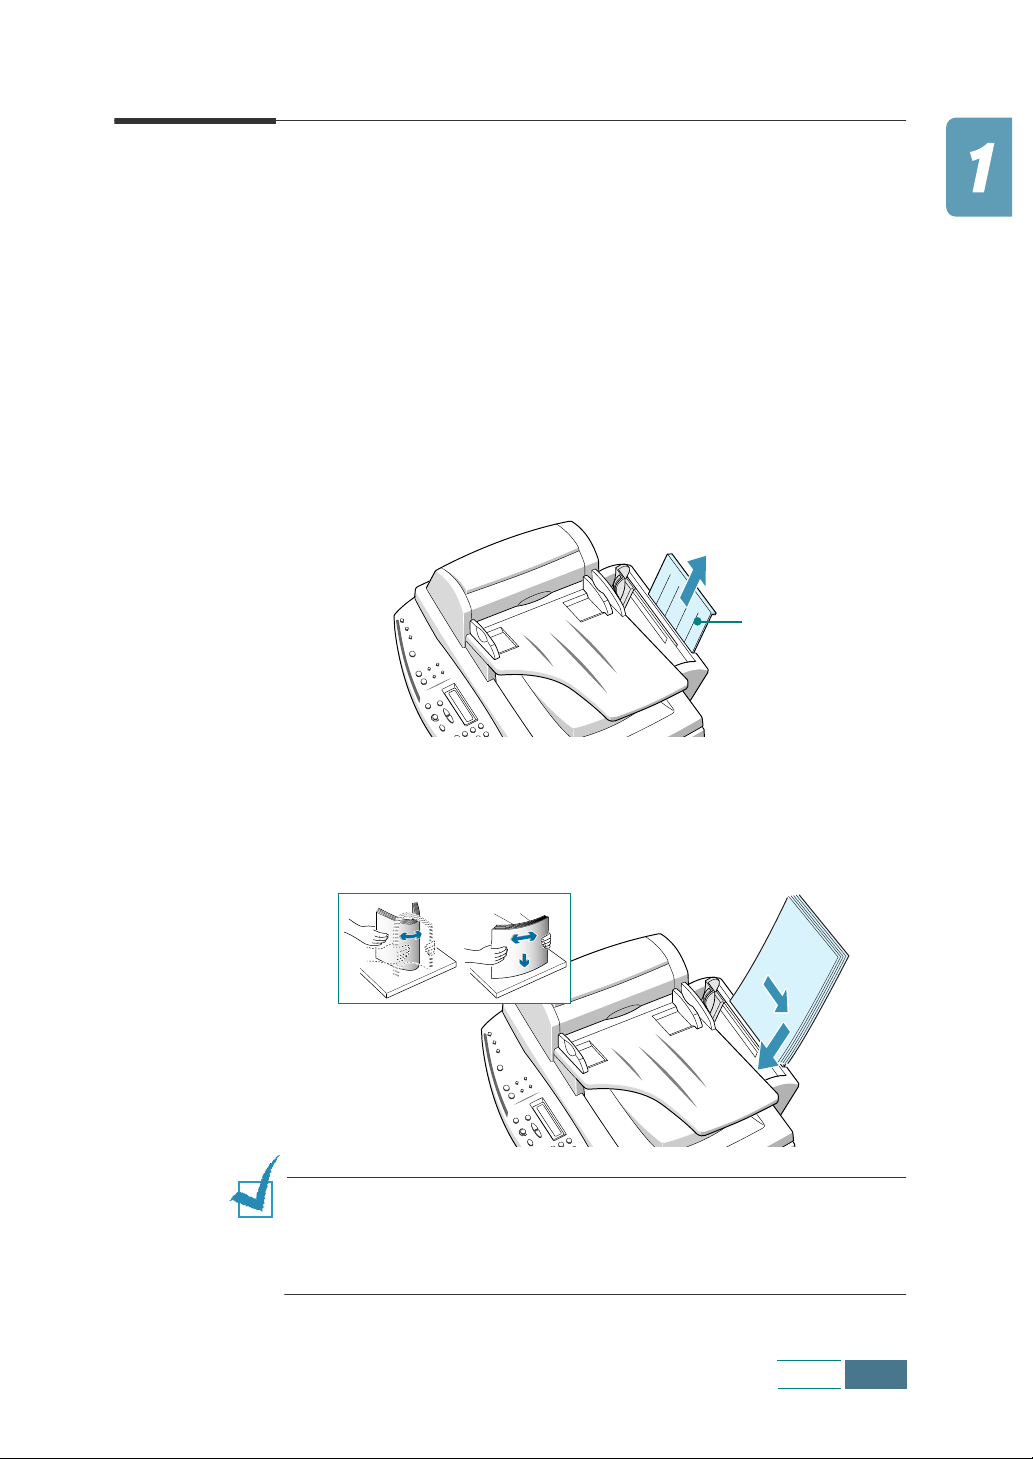
To load plain paper:
1
Pull the paper support on the paper bin all the way up.
Paper support
2
Fan the paper and then insert it with the print side facing
you. Ensure that the right edge of the paper is in contact
with the right side of the paper bin. Do not exceed the
specified capacity.
N
OTES
:
• Do not force the paper down into the printer.
• It is recommended to load a stack of paper (more than 20 sheets)
to ensure proper paper feeding.
Set Up
1.11
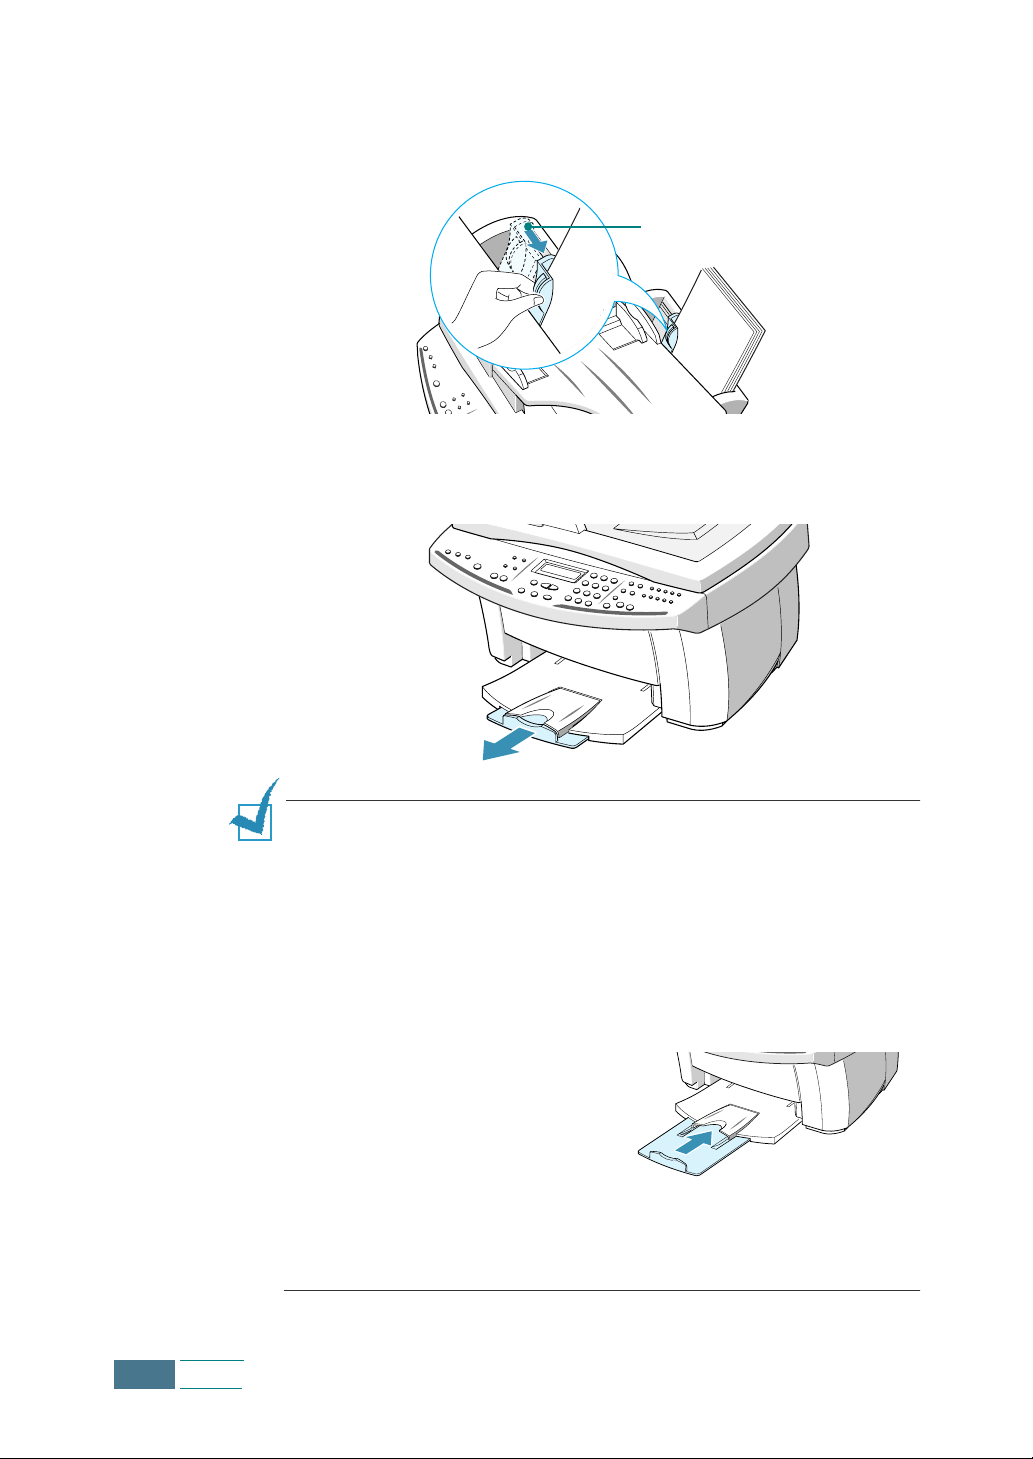
3
Squeeze the left paper guide and move it to the right to match
the width of the paper.
Paper guide
4
Pull the output tray and the output tray extender on the front
of the product all the way out.
1.12
Set Up
N
OTES
:
• Your product emits warning tones when the paper bin is empty due
to one of the following reasons:
- The paper does not load when starting to print a job.
- It runs out of paper while printing.
The LCD display shows “ADD PAPER THEN PRESS ENTER.” To start
or continue the print job, install paper into the paper bin then press
the
Enter
button.
• If you are using legal-size paper,
do not pull the output tray out.
Push it in, or it may cause a
paper jam when the paper prints
out.
• After you load paper, you have to set up your product for the paper
size you have used. See page 3.2 for copying, 5.42 for faxing, or
2.10 for PC printing.
Installing Print Cartridges
Your product comes with a black and a colour cartridge. You can
purchase an optional photo cartridge and install it instead of the
black cartridge. See page 1.17 for the options you can purchase.
When the product is turned on without the print cartridges
installed, the display shows “CHECK CARTRIDGES.”
Use this procedure when installing print cartridges for the first
time. To install replacement print cartridges, refer to “Replacing
Print Cartridges” on page 6.9.
N
OTE
:
There are two types of black and colour cartridge: Standard
and High yield. Before proceeding to install, you need to check which
cartridge type you have. When you install the cartridges, you will be
asked if it is Standard or High Yield. To find out the type, please refer
to the table on the page 6.9.
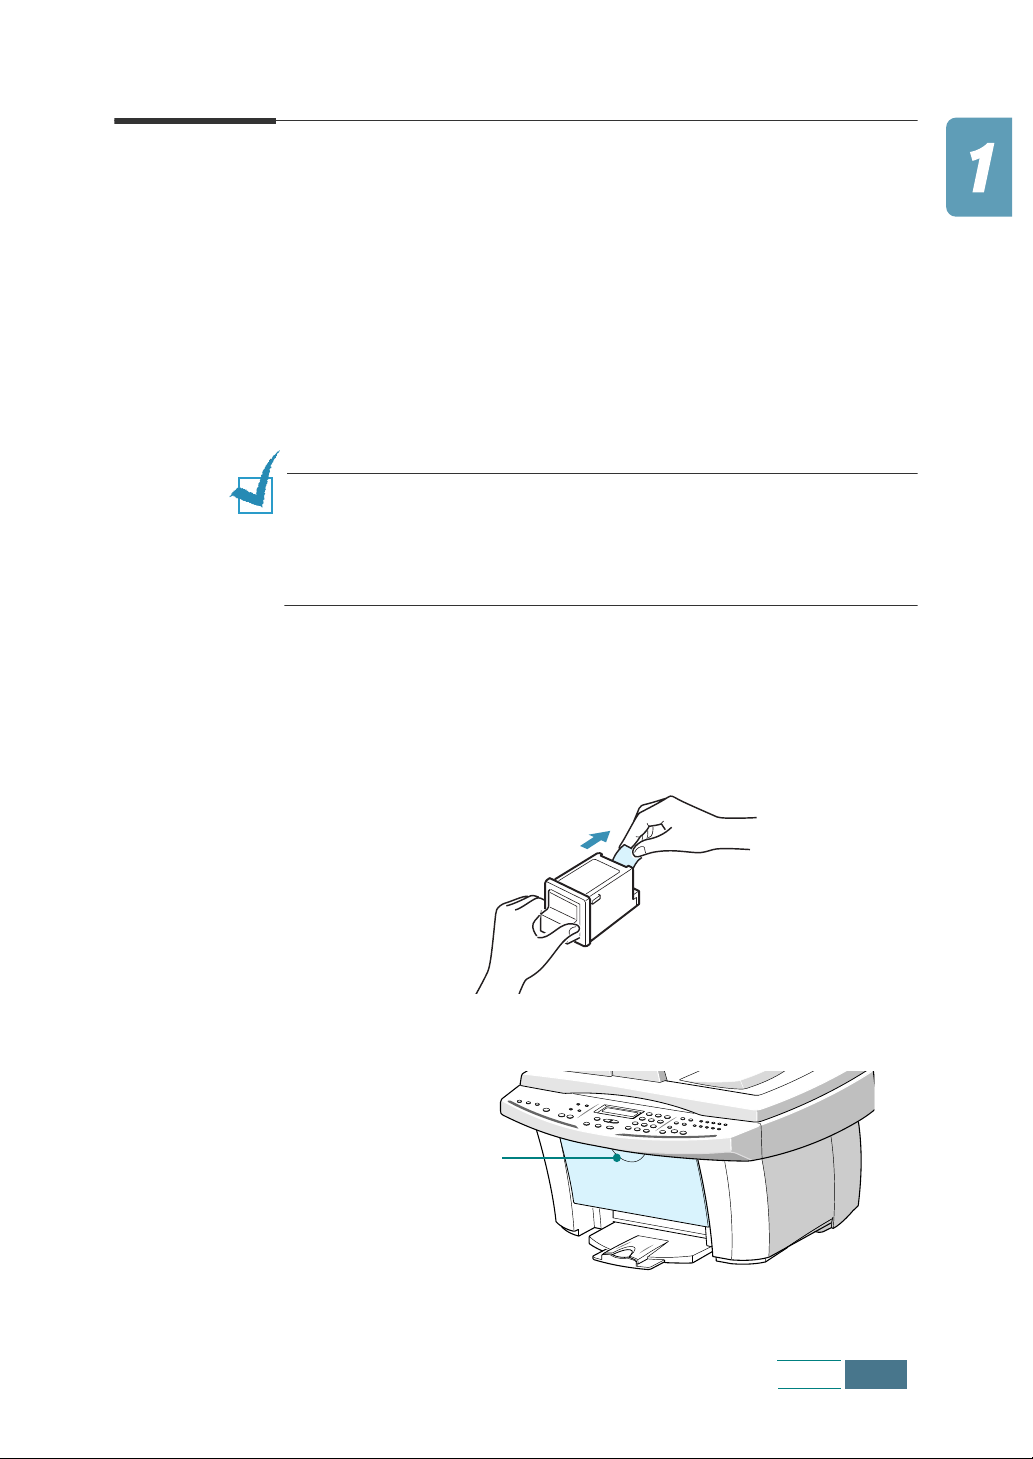
1
Unwrap and remove the colour print cartridge from its plastic
bag. Hold the print cartridge at the top only. Do not touch the
electrical contacts.
Carefully remove the sealing tape covering the print head.
2
Grab the handle on the cartridge door and open the door.
Grab the handle.
Set Up
1.13
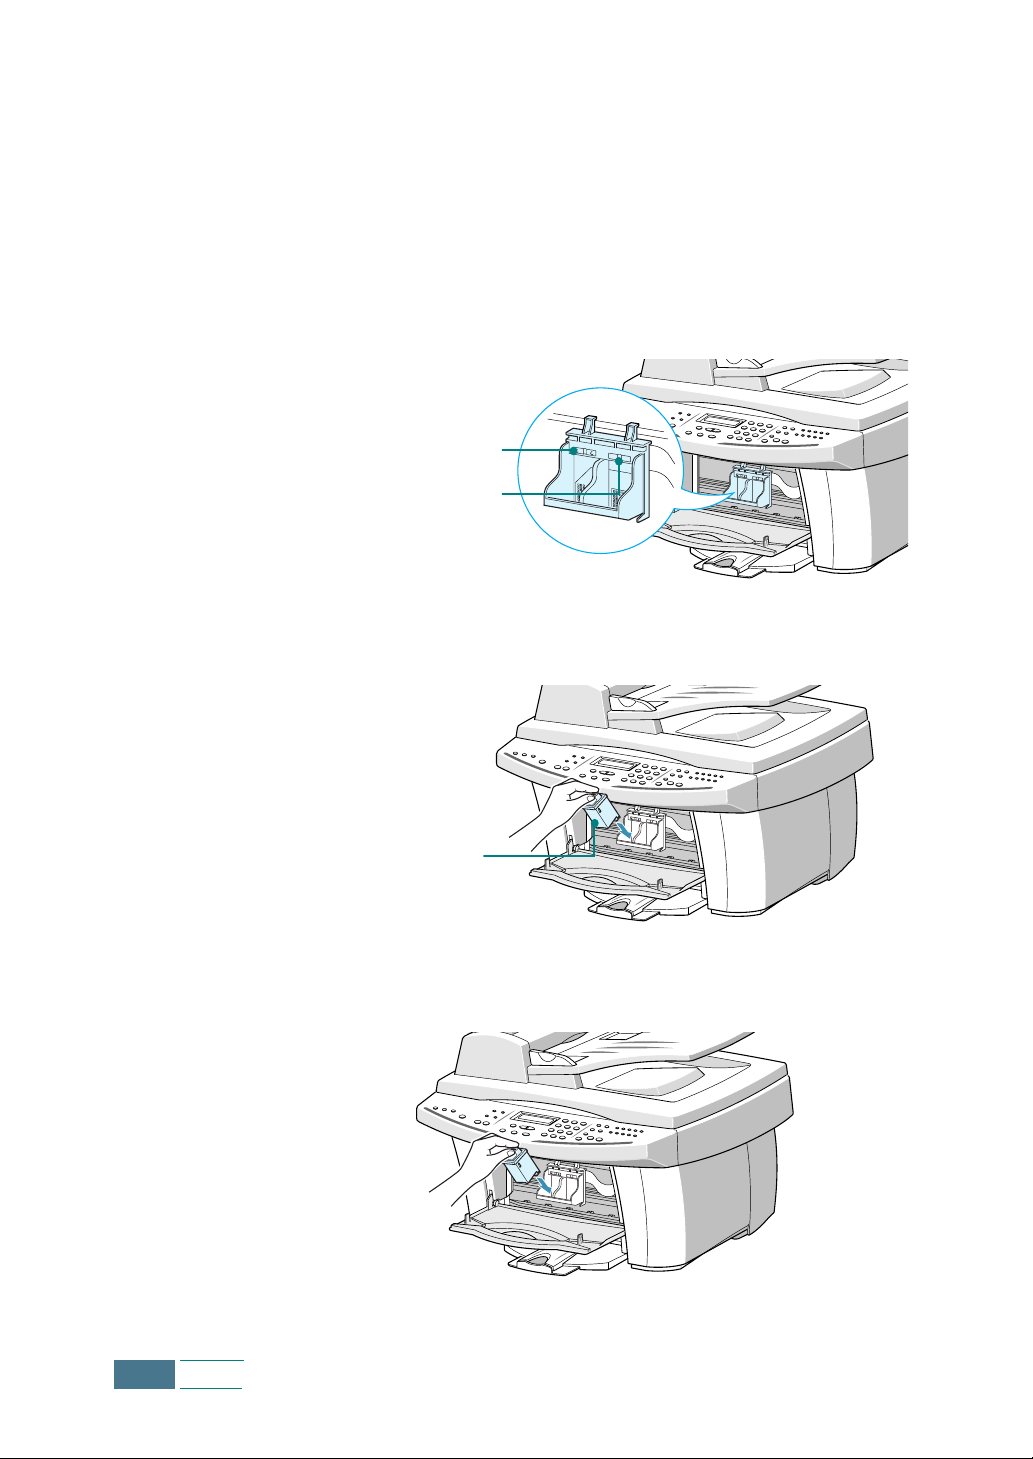
3
The cartridge holder moves to the install position.
The colour cartridge is inserted into the left side of the
cartridge holder and can be identified by a yellow tab on the
top of the holder.
The black (or photo) cartridge is inserted into the right side of
the cartridge holder and can be identified by a green tab on
the top of the holder.
Yellow tab indicates
colour cartridge position.
Green tab indicates black or
photo cartridge position.
4
Place the colour print cartridge into the left side of the holder.
1.14
Set Up
Colour ink cartridge
5
Push the colour cartridge back until it clicks into place.
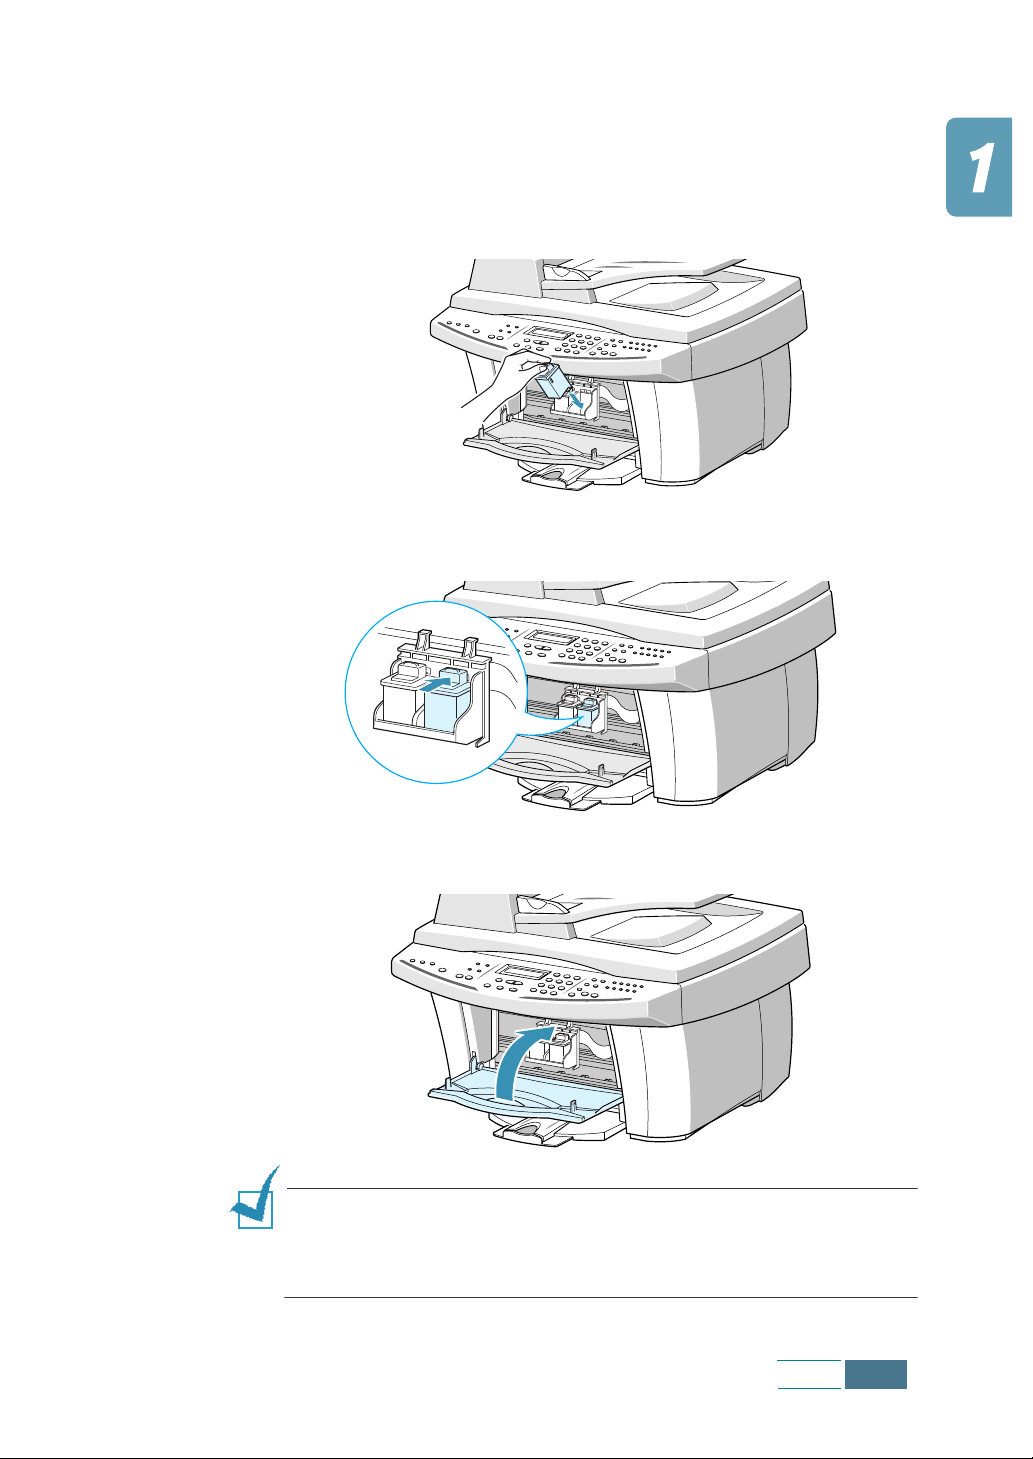
6
Unwrap and remove the black print cartridge from its plastic
bag. Holding the cartridge at the top, carefully remove the
sealing tape covering the print head.
Place the black print cartridge into the right side of the holder.
7
Push the black print cartridge back until it clicks into place.
8
After installing the print cartridges, close the cartridge door.
N
OTE
:
If the display shows “REMOVE PAPER JAM AND PRESS
CANCEL” when you have closed the cartridge door, re-install the
cartridge(s). With the print cartridge(s) installed improperly, the
product might not print.
Set Up
1.15

9
When you close the door, the display shows “CARTRIDGE
CHANGED? NO.” Press the Scroll buttons ( or ) until you
see “BOTH” at the bottom right corner of the display and then
press Enter.
10
The display shows “LEFT CARTRIDGE NEW COLOR”. Press
Enter to confirm you have installed a new colour cartridge.
11
The display shows “LEFT CARTRIDGE STANDARD COLOR”. If
you have installed a standard capacity colour cartridge, press
Enter. If not, press the Scroll buttons ( or ) to display
“LEFT CARTRIDGE HIGH YIELD COLOR” and then press Enter.
12
The display shows “RIGHT CARTRIDGE NEW BLACK”. Press
Enter to confirm you have installed a new black cartridge.
13
The display shows “RIGHT CARTRIDGE STANDARD BLACK”. If
you have installed a standard capacity black cartridge, press
Enter. If not, press the Scroll buttons ( or ) to display
“RIGHT CARTRIDGE HIGH YIELD BLACK” and then press
Enter.
14
The cartridge holder returns to the home position. The
Cartridge Alignment procedure begins automatically by
printing a Cartridge Alignment form.
Use this form to identify the straightest line in each of six
alignment areas. By selecting the straightest line for each
pattern, you will optimise the print head alignment.
1.16
Set Up
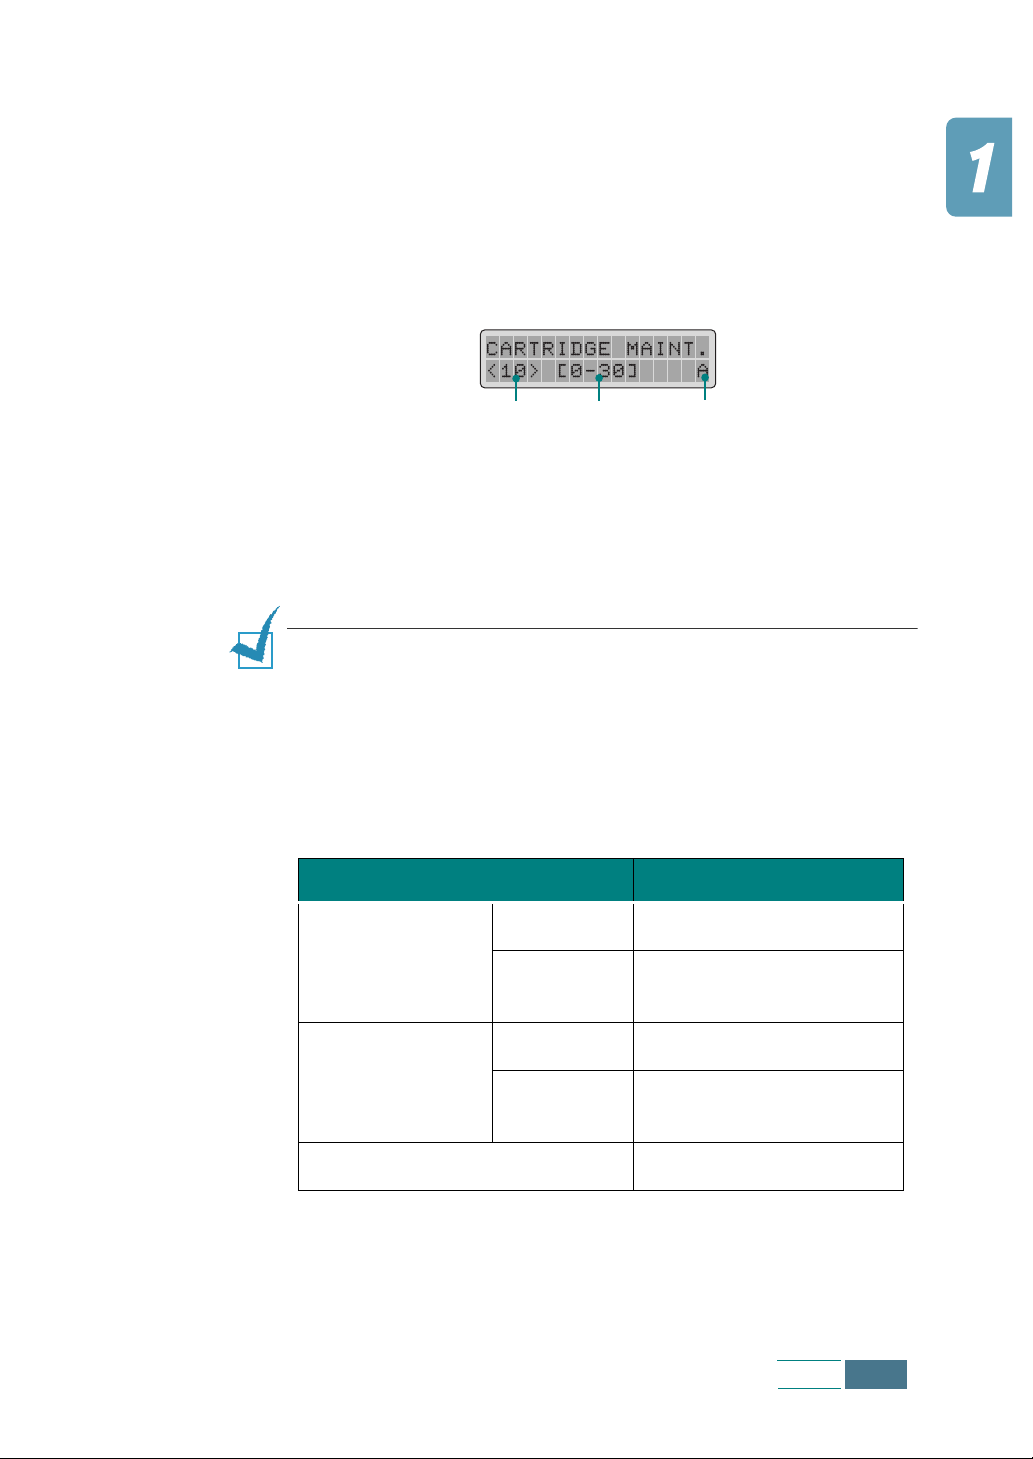
15
Looking at the Cartridge Alignment form, identify the
straightest line in Alignment A. Using the number keypad,
enter the two digit number of the straightest line and then
press Enter.
16
The display accepts the number and moves to Alignment B.
Repeat step 15 for Alignment patterns B-F.
Last Alignment
17
When you finish entering the number for Alignment F, the
Number Range
Entry
Alignments
(A, B, C, D, E, F)
display returns to Standby mode.
Then the display prompts you to set the current date and
time. See page 1.33 to set the date and time.
N
OTES
:
• Keep a spare print cartridge on hand. When buying print
cartridges, check the part numbers referenced below to ensure
buying the correct print cartridge. These print cartridges have been
specifically designed to work with your product to produce results
that are always clear and sharp.
• If you want to purchase a new print cartridge, either contact your
point of purchase or any Lexmark authorised supplies dealer.
Cartridge type Part number
High yield Lexmark 12A1975
Black cartridge
Standard
Samsung INK-M50
Lexmark 12A1970
High yield Lexmark 15M0125
Colour cartridge
Standard
Samsung INK-C60
Lexmark 15M0120
Photo cartridge Lexmark 12A1990
Set Up
1.17

Installing Software
About Samsung Software
You must install the SmarThru CD-ROM after you have setup your
product and connected it to your computer. The SmarThru CD-ROM
includes the following:
• MFP Driver
• SmarThru Software
• OCR Software (AnyPage Lite)
MFP Driver
To use your product as a printer and scanner, you must install the
MFP driver.
SmarThru Software
SmarThru is the accompanying software for your SCX-1150F
multifunctional product. SmarThru contains a powerful image
editor that allows you to edit images in many ways and also
includes a powerful Internet mail client software. With SmarThru,
you can save the scanned images in a dedicated storage area for
subsequent editing, sending via e-mail or fax, printing, and
processing by other programs of your choice.
OCR Software (AnyPage Lite)
OCR (Optical Character Recognition) is software that has the ability
to recognise most character formats, so that a scanned document
can be read and edited with word processing software.
1.18
Set Up

System Requirements
Before you begin, ensure your system meets the minimum
requirements.
Supported Operating System
Windows 95 OSR2/Windows 98/Windows Me/Windows NT 4.0
Workstation or Server with Service Pack 3/Windows 2000
Professional or Server/Advanced Server/Windows XP Home edition
or Professional.
Minimal Requirements
• Disk space: 130 MB for installation
• Memory: 64 MB
• CPU: Pentium II 233
• Required software: Internet Explorer 4.01
Recommended
• Disk space: 250MB for installation database
• Memory: 128MB
• CPU: Pentium II 400 or higher
• Required software: Internet Explorer 5.5 or above
N
OTES
:
• Administrative rights should be set for installation on Windows
NT4.0/2000/XP.
• Windows 95 versions prior to OSR2 are not recommended due to
compatibility with OLE/COM libraries.
Set Up
1.19
Installing Samsung Software
N
OTES
:
• For Windows 95/98/Me/2000/XP users, cancel the “New Hardware
Found” screen when the computer boots up.
• Make sure that your SCX-1150F is plugged in and connected to
your computer’s parallel port or USB port before installing the
software from the CD. Windows 95 and Windows NT 4.0 do not
support USB connection.
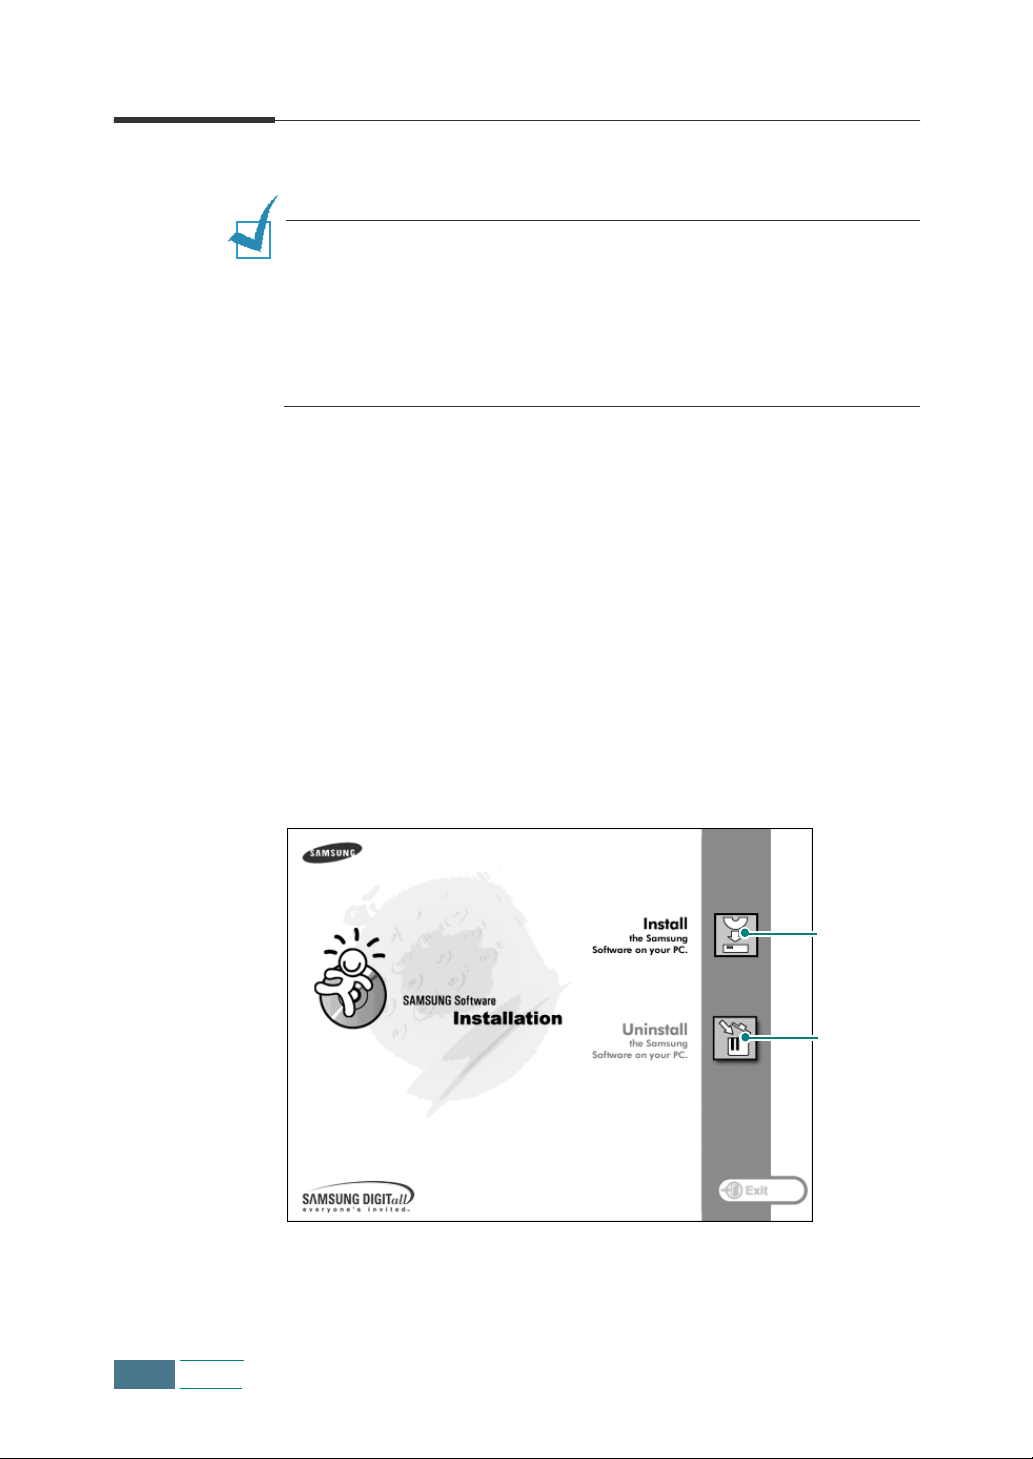
1
Insert the supplied SmarThru CD-ROM into your CD-ROM
drive.
The SmarThru CD-ROM should automatically run and the
opening window appears.
If the opening window does not appear, click Start, and then
Run. Type X:Autorun.exe, replacing “X” with the letter of
your drive, and click OK.
If you are asked to select the language, choose the desired
language.
2
Click Install the Samsung Software on your PC.
3
Follow the on-screen instructions and click Next.
Installs the
Samsung
Software on
your PC
Uninstall the
Samsung
Software. See
page 1.28.
1.20
Set Up
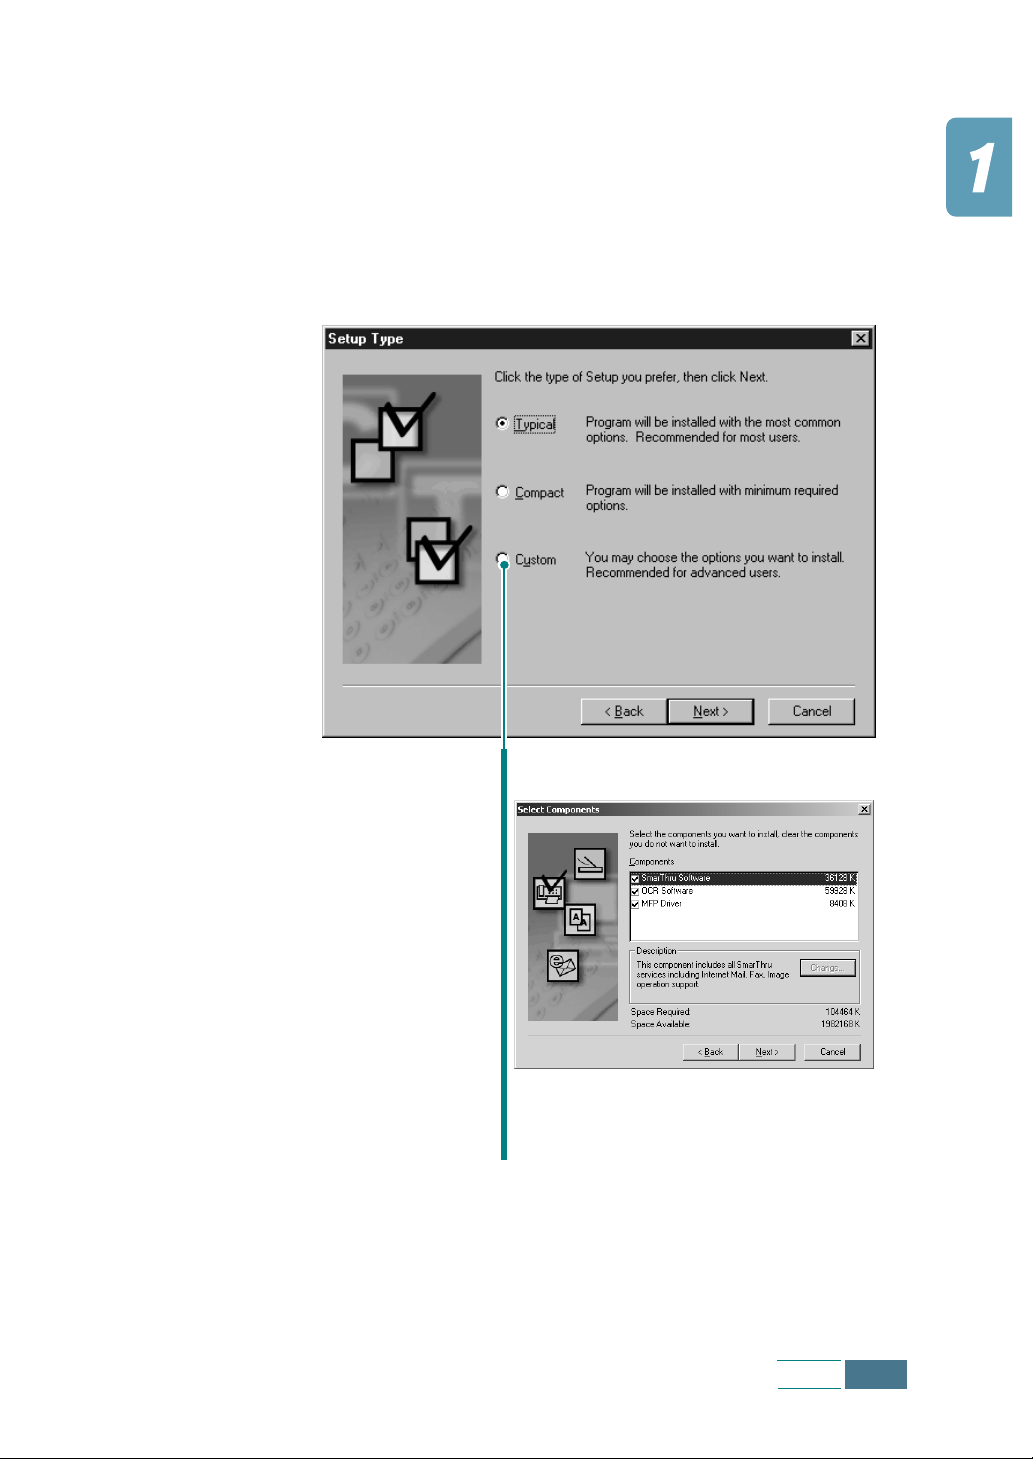
4
The SmarThru installation supports three types of setup:
• Typical: Program will be installed with the most common
options and is recommended for most users.
• Compact: Only the MFP driver will be installed.
• Custom: You may choose the options you want to install.
Recommended for advanced users.
5
Click Next.
If you select the Custom installation, you may choose the
options you want to install.
•
SmarThru Software:
work with electronic documents.
OCR Software:
•
MFP Driver:
•
to print and scan.
to scan and edit images and
AnyPage Lite software to enable OCR.
Set Up
1.21
 Loading...