

Page 1
4-1
Samsung Electronics
4. Troubleshooting
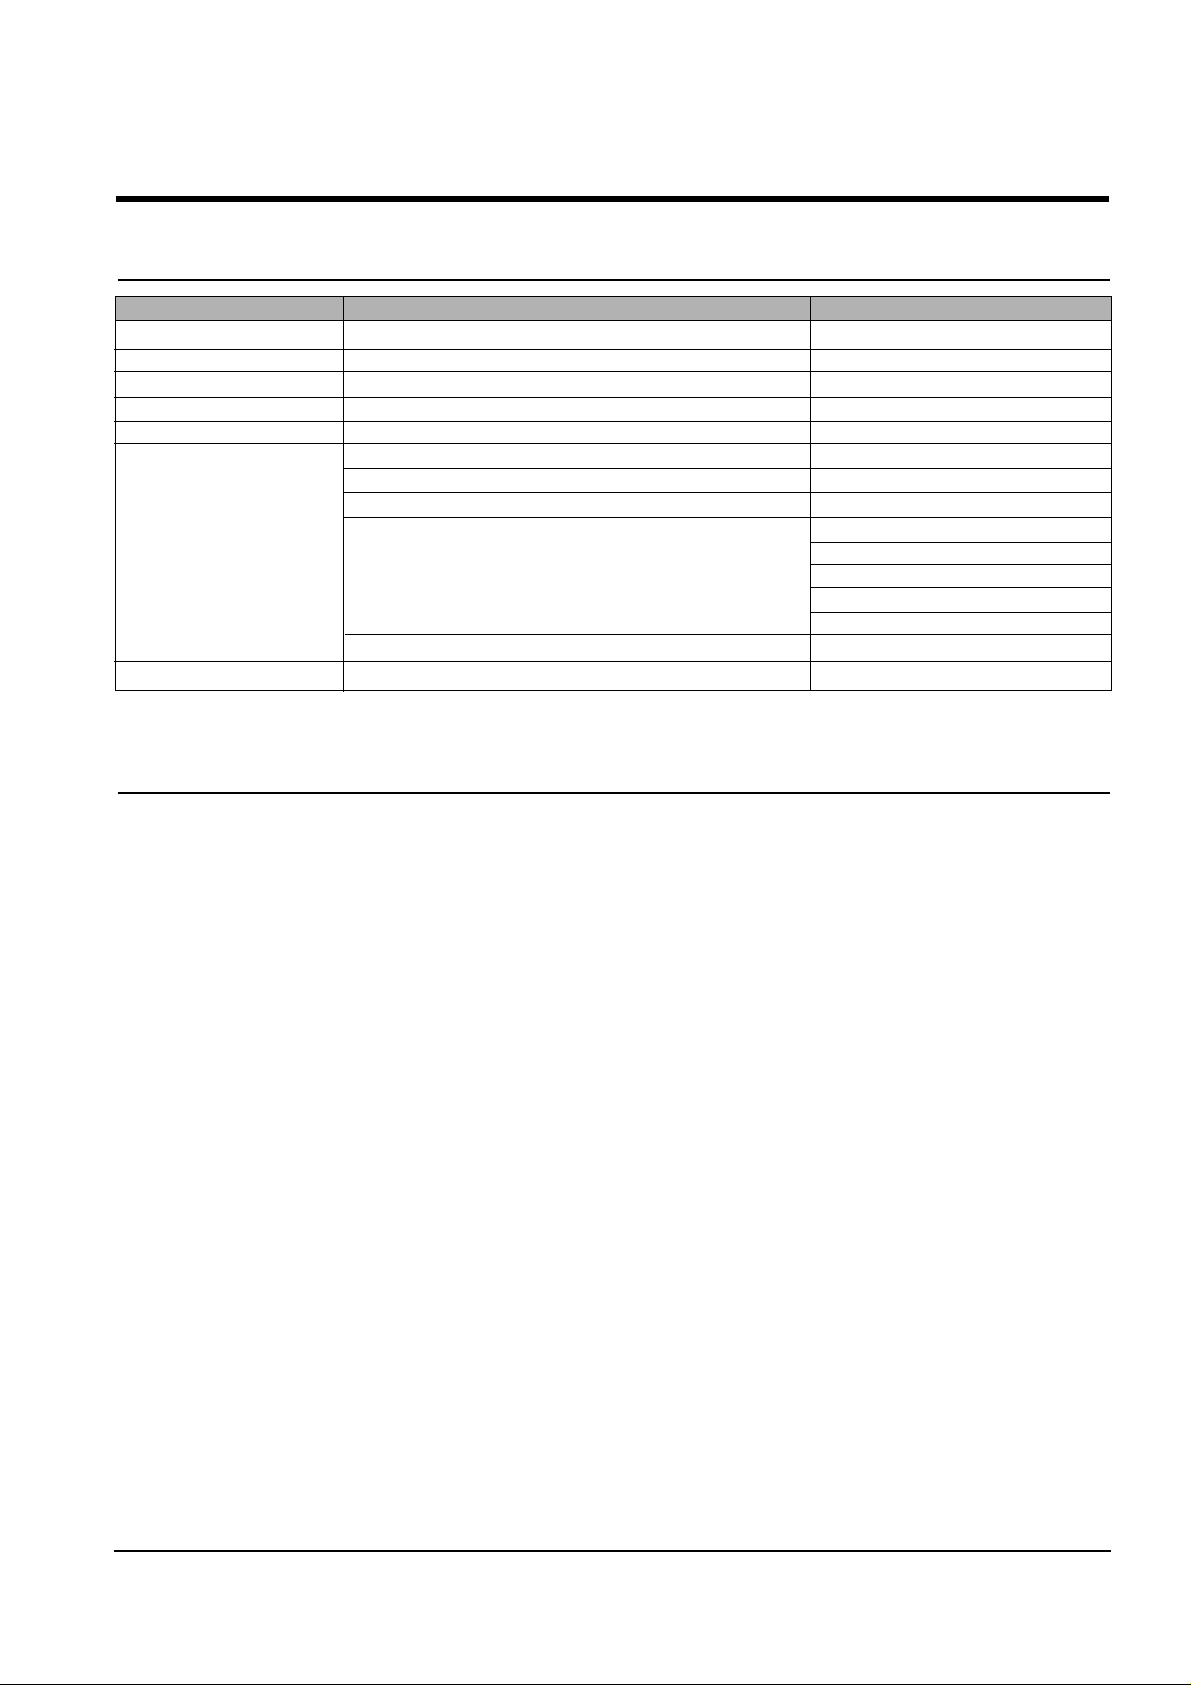
4-1 Setting-up System in User Mode
FUNCTION ITEM DEFAULT
LANGUAGE ENG/GER/FRE/IT A/SPA/POR/DUT ENGLISH
POWER SAVE MODE 1/4/8/12 HOUR 1
PAPER SIZE LETTER/A4/LEGAL A4
P APER TYPE PLAIN/INKJET/PHOTO/TRANSPARENCY PLAIN PAPER
MAINTENANCE CLEAN CARTRIDGE
ALIGN CARTRIDGE
VIEW INK LEVEL "COLOR : _/8 , BLOCK : _/8"
HELP LIST
DEFAULT SETUP CONTRAST
QUALITY
COPY P AGE
ZONE RATE
RESOLUTION
ADJUST SHADING
KEY SOUND ON/OFF ON
4-2 Setting-up System in Service Mode
• How to enter service mode
In service (tech) mode, the technician can check the machine and perform various tests to isolate the cause of a malfunction.
To enter the service mode, press ENTER, LEFT, RIGHT, LEFT, SETUP in sequence, and the LCD displays ‘ T ’, the machine
has entered service (Tech) mode.
To return to normal user mode, press ENTER, LEFT, RIGHT, LEFT, SETUP in sequence again, or turn the power off, then
on by unplugging and plugging the power cord.
Because the explanation of the User Mode items is already mentioned at the User guide in detail, It will not be described at
Service manual.
Page 2
4-2
Troubleshooting
Samsung Electronics
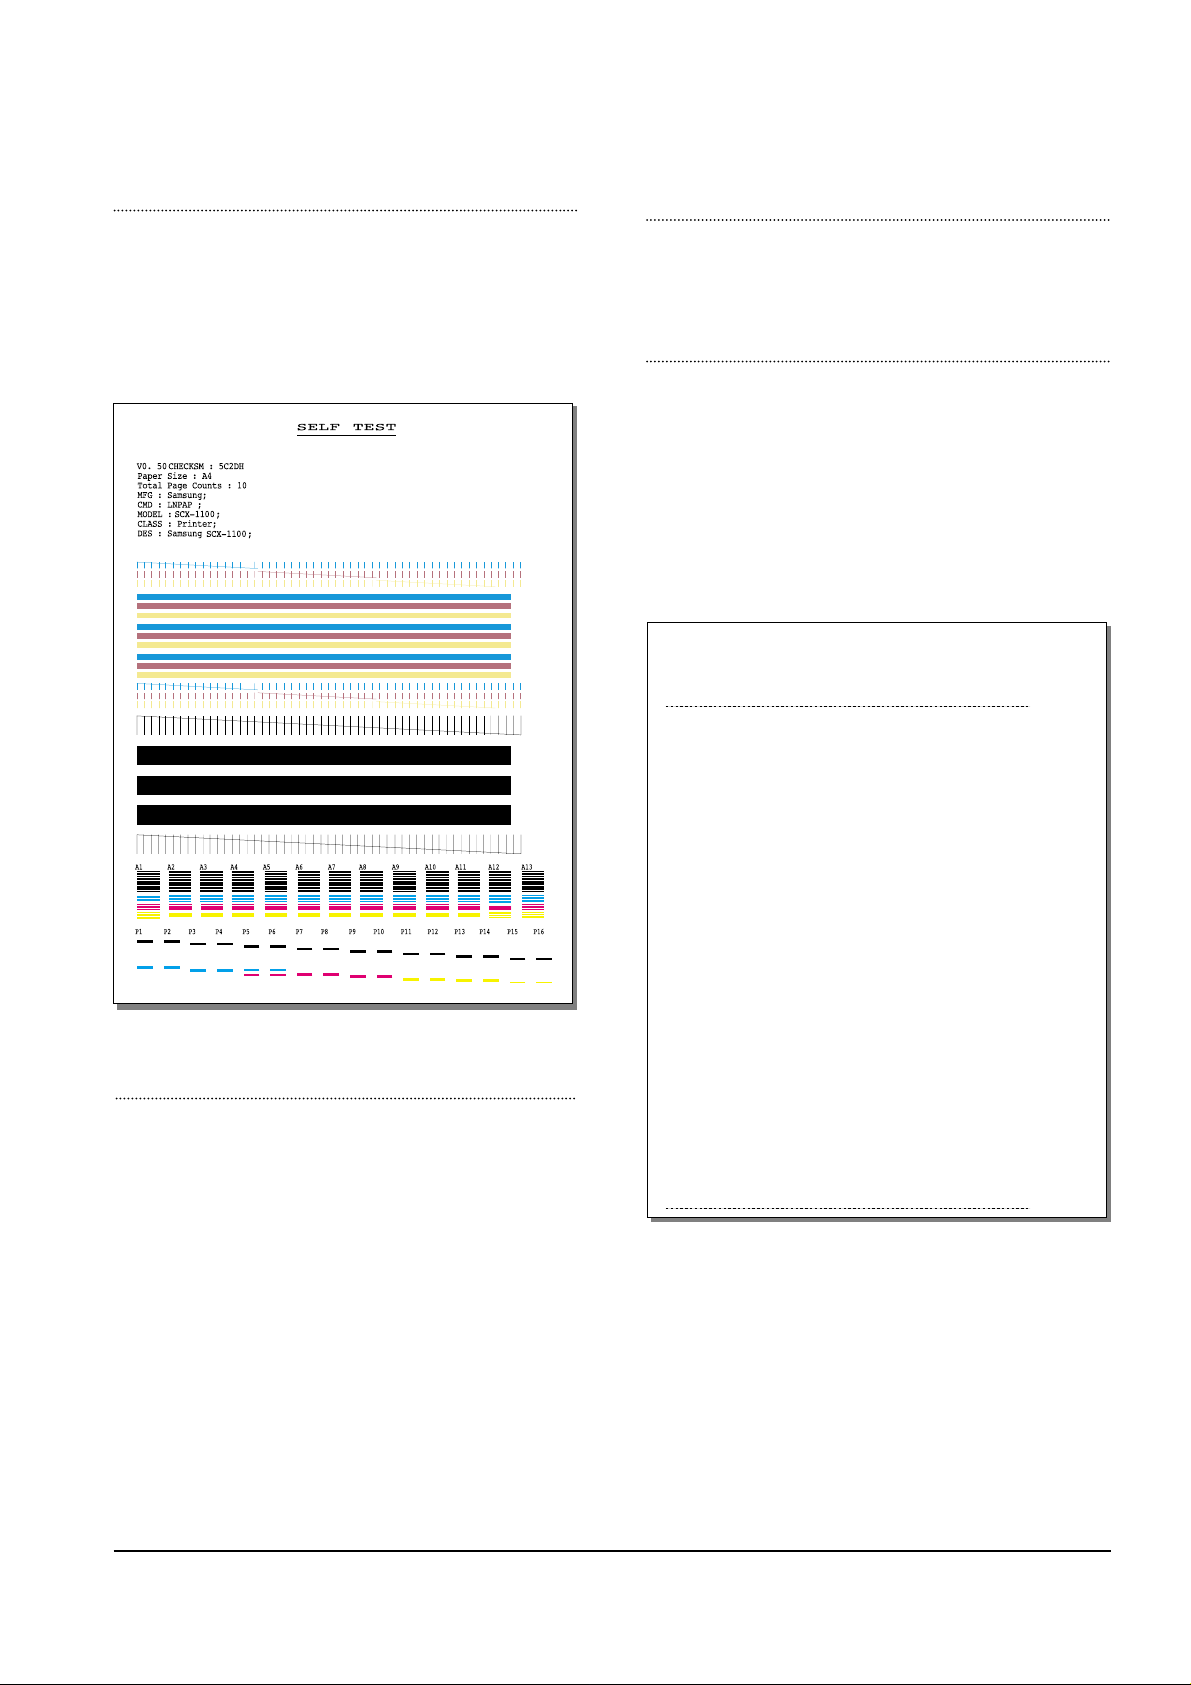
FACT OR Y SELFTEST
Using this pattern printout, you can check if the printer
mechanism is functioning properly. Examine the pattern
and look for a break in the diagonal line. If the diagonal
lines are not broken, the printer mechanism is functioning
properly .
ROM TEST
Use this feature to test the machine'S ROM. The result and the
software version appear in the LCD display .
PRINT NVRAM TEST
1. Press the SETUP button until “PRINT NVRAM DUMP”
is displayed in LCD.
2. Press the START button when the NVRAM Test operation menu displayed. And then the machine prints the
list for NVRAM testing.
The Remote Test feature can be enabled in order to allow
a remote location to call up and run a diagnostic test on
your machine. You may be instructed by a service representative to enable this feature.
NVRAM DUMP LIST
LIST Left Head Detect : 1c
Right Head Detect : 7
Left Head Type : 1c
Right Head Type : 7
< Device Identification >
MFG:Samsung;
CMD:LNPAP;
MODEL:SCX-1100;
CLASS :Printer;
DES:Samsung SCX-1100;
< Dot Count Variables >
Black Dot Count : 2436256
Color Cyan Dot Count : 1368128
Color Magenta Dot Count : 1368128
Color Yellow Dot Count : 1368128
Photo Black Dot Count : 0
Photo Cyan Dot Count : 0
Photo Magenta DotCount : 0
Total Black Dot Count : 2436256
Total Color Cyan Dot Count : 1368128
Total Color Magenta Dot Count : 1368128
Total Color Yellow Dot Count : 1368128
Total Photo Cyan Dot Count : 0
Total Photo Magenta Dot Count : 0
Total Photo Black Dot Count : 0
< Page Count Variables >
Total Page Count : 2
< Cartridge Types >
Left Cartridge Type : Color Standard Capacity
Right Cartridge Type : Black High Capacity
< Alignment Variables >
Horizontal Align Value : 15
Vertical Align Value : 8
Quick Black Bidi Align Value : 15
Quick Color Bidi Align Value : 15
Normal Black Bidi Align Value : 15
Normal Color Bidi Align Value : 15
Photo Horizontal Align Value : 15
Photo Vertical Align Value : 8
Photo Normal Black Bidi Align Value : 15
Photo Normal Color Bidi Align Value : 15
PROGRAM DOWNLOAD
Use this feature to download a new upgraded ROM file from
a PC which is connected to the machine with a parallel cable
(IEEE 1284).
< Download >
1. Connect printer to PC with a parallel cable(IEEE 1284.)
2. Select the PROGRAM DOWNLOAD function at the TECH
MODE.
3. Input COPY/B FILENAME PRN at the MS-DOS and push
the ENTER key .
(filename : the latest ROM file name when the downloading)
4. After the download is completed, the system will be automatically initialized.
Page 3

4-3
Troubleshooting
Samsung Electronics
PRINT CCD PATTERN
It is used to adjust the light of CCD. It is already set at
CCD Test to get optimum quality.
NOTICE
When you test CCD, make sure that the cover is
closed.
1. Press the SETUP button until “Print CCD Pattern” is
displayed in LCD.
2. Press the START button when the CCD Test operation
menu displayed.
3. After scanner calibrating, wave form will be automatically printed out.
All the wave forms should be similar each other. CCD
problems may occur, if:
• More than one of the wave forms are straight lines.
• All wave forms are positioned under the center line.
WHITE LINES ON LETTERS OR GRAPHICS
• Cause
If nozzles in print head has a problem, white lines are
marked on the print.
‘CARTRIDGE MAINTENANCE’ will let you know if nozzles have fallen problems.
• Solution
1
) Run ‘print control panel’ to “clean print nozzles” and check if
nozzles have been blocked.
2) Wipe
with soft cloth the contact surfaces of ink cartridge and car-
riage, and check if nozzles have been cleaned properly.
3) Separate ink cartridge from carriage and combine them.
Repeat it about 5 to 6 times and check if connection is proper.
4) Replace ink cartridge and check whether there’s a problem
with the head.
5) Check if head cable is inserted well into the main circuit board
and then check if nozzles have problems.
6) Check if head cable is broken or torn and then check if nozzles
have problems.
7) Replace the main circuit board with a new one and
check if nozzles have problems.
MEMORYALL CLEAR
Initiating this function will put the system into the factory
shipping state. The procedure is as follows :
1. Unplug power
2. Press and hold " SETUP" button
3. Plug power in
4. Continue holding " SETUP" button until CLEARING
MEMORY message appears on LCD
5. Unplug power
If this line is broken, it confirms that nozzles
have problems.
Page 4

4-4
Troubleshooting
Samsung Electronics
4-3. Troubleshooting
4-3-1 Defective PC Scan . . . . . . . . . . . . . . . . . . . . . . . . . . . . . . . . . . . . . . . . . . . . . . . .page(4-5)
4-3-2 Defective Image quality of PC Scan . . . . . . . . . . . . . . . . . . . . . . . . . . . . . . . . . . .page(4-5)
4-3-3 Defective Operation (LCD WINDOW ) Display . . . . . . . . . . . . . . . . . . . . . . .page(4-6)
4-3-4 No Power . . . . . . . . . . . . . . . . . . . . . . . . . . . . . . . . . . . . . . . . . . . . . . . . . . . . . .page(4-6)
4-3-5 Defective LCD Operation . . . . . . . . . . . . . . . . . . . . . . . . . . . . . . . . . . . . . . . . . . .page(4-7)
4-3-6 Defective Operation of Key Button . . . . . . . . . . . . . . . . . . . . . . . . . . . . . . . . . . . .page(4-7)
4-3-7 Paper Jam . . . . . . . . . . . . . . . . . . . . . . . . . . . . . . . . . . . . . . . . . . . . . . . . . . . . . .page(4-8)
4-3-8 Defective Paper Feed (1) . . . . . . . . . . . . . . . . . . . . . . . . . . . . . . . . . . . . . . . . . . .page(4-8)
4-3-9 Defective Paper Feed (2) -Display of NO PAPER . . . . . . . . . . . . . . . . . . . . . . . . .page(4-9)
4-3-10 Multi-Feeding . . . . . . . . . . . . . . . . . . . . . . . . . . . . . . . . . . . . . . . . . . . . . . . . . . . .page(4-9)
4-3-11 Defective Sensing-ink . . . . . . . . . . . . . . . . . . . . . . . . . . . . . . . . . . . . . . . . . . . .page(4-10)
4-3-12 Defective Sensing-paper . . . . . . . . . . . . . . . . . . . . . . . . . . . . . . . . . . . . . . . . . .page(4-10)
4-3-13 Defective Motor Drive (LF) . . . . . . . . . . . . . . . . . . . . . . . . . . . . . . . . . . . . . . . . .page(4-11)
4-3-14 Defective Motor Drive (CR) . . . . . . . . . . . . . . . . . . . . . . . . . . . . . . . . . . . . . . . .page(4-11)
4-3-15 Defective Motor Drive (Scan) . . . . . . . . . . . . . . . . . . . . . . . . . . . . . . . . . . . . . . .page(4-12)
4-3-16 Blank Page Print Out (When Copying) . . . . . . . . . . . . . . . . . . . . . . . . . . . . . . . .page(4-12)
4-3-17 Vertical Black Line (When Copying) . . . . . . . . . . . . . . . . . . . . . . . . . . . . . . . . . .page(4-13)
4-3-18 Contaminated Stains on Paper . . . . . . . . . . . . . . . . . . . . . . . . . . . . . . . . . . . . . .page(4-13)
4-3-19 Bad printed Image . . . . . . . . . . . . . . . . . . . . . . . . . . . . . . . . . . . . . . . . . . . . . . .page(4-14)
4-3-20 Vertical Lines are printed crookedly . . . . . . . . . . . . . . . . . . . . . . . . . . . . . . . . . .page(4-14)
4-3-21 Bad Color (Intensity) . . . . . . . . . . . . . . . . . . . . . . . . . . . . . . . . . . . . . . . . . . . . .page(4-15)
4-3-22 The Printer is Not Working (1) . . . . . . . . . . . . . . . . . . . . . . . . . . . . . . . . . . . . . .page(4-15)
4-3-23 The Printer is Not Working (2) . . . . . . . . . . . . . . . . . . . . . . . . . . . . . . . . . . . . . .page(4-16)
4-3-24 Abnormal Printing . . . . . . . . . . . . . . . . . . . . . . . . . . . . . . . . . . . . . . . . . . . . . . .page(4-17)
4-3-25 Spool Error and Release of Spool Error . . . . . . . . . . . . . . . . . . . . . . . . . . . . . . .page(4-18)
• The solutions of troubleshooting in this 'Service Manual' explain the expected causes and
how to check according to each problem and describe how to replace the defected parts (unit
of ASS'Y) if necessary.
• The contents of this 'Service Manual' describe general ones only among many kinds of problems and causes while using the Product.
• The contents of this 'Service Manual' describe mainly technical explanations of the Product
H/W and parts on the assumption that there is no problem in S/W.
Page 5

4-5
Troubleshooting
Samsung Electronics
4-3-1 Defective PC Scan
4-3-2 Defective Image Quality of PC Scan
• Description
• Location 1.UBS Cable of the Printer or Centronics Cable 2.Driver 3.Main B’d
The PC Scan is not functioning at all.
Check and Cause Solution
1. Check the Cable (USB or Parallel)
2. Check if the driver is installed properly.
1. If the PC and the cable are not connected properly,
reconnect it.
2. After confirming that it is proper by performing a PC
printing test related to driver setup, if it is not so, reinstall
it. (Refer to User's Manual.)
• Description
• Location 1. CCD ASS'Y 2.Main B’d
The image PC scanned is not clear or bad.
Check and Cause Solution
1. Check the waveform form by performing a CCD test
in TECH mode. (Refer to 4-1-3)
2. Check if the resolution is set too low in PC Scan
options. (Refer to User's Manual.)
1. If the CCD waveform form is abnormal, try to replace
CCD ASS'Y.
2. If the resolution is set to low, let the user be acquainted
with the using method well.
Page 6

4-6
Troubleshooting
Samsung Electronics
4-3-3 Defective Operation (LCD WINDOW ) Display
4-3-4 No Power
• Description
• Location 1.OPE ASS'Y 2.Connection between the Main B'D and OPE ASS'Y 3.Main B'D.
Strange characters are displayed on the OPE Panel and buttons are not operated.
Check and Cause Solution
1. Clear the memory.
2. Check if OPE HARNESS is connected to the Main
Board correctly.
1. Try again after clearing the memory.
2. After confirming that OPE HARNESS is connected to
the Main Board correctly, if it is so, then replace the
OPE ASS'Yand Main Board in sequence.
• Description
• Location
1.Power code 2.Connection between the Main B'D and Power HARNESS
3.Power ASS'Y 4.Main B'D. 5.OPE Ass’y
While the power S/W is turned on, it does not work at all.
Check and Cause Solution
1. Check if the connection of power code is normal.
2. Check if DC +3.3V and +30V is supplied to POWER
ASS'Y from MAIN B'd.
3. Check if POWER DOWN KEY in OPE ASS'Y is
working regularly.
1. Try to replace the power code.
2. If all the connections are correct, try to replace the
power ASS'Yand the Main B/D in sequence.
( +3.3V and +30V is supplied to POWER ASS'Y from
MAIN B'd)
3. Replace OPE ASS'Y
Page 7

4-7
Troubleshooting
Samsung Electronics
4-3-5 Defective LCD Operation
4-3-6 Defective Operation of Key Button
• Description The LCD screen is not turned on or has a strange display.
Check and Cause Solution
1. Clear the memory. (Refer to page 4-1).
2. Confirm to catch a click sound, while a key on the
OPE panel is pressed on.
3. Check the status of Harness between LCD and OPE
Panel, replace in order of Main B'd/LE Motor.
1. The key is wrong itself or wrongly assembled.
2. Even after the key or harness has been replaced, it is
still wrong, try to replace the OPE ASS'Y and the Main
B'D in sequence.
• Description
• Location 1. OPE ASS'Y 2. Main Board
The button of the OPE Panel is not operated..
Check and Cause Solution
1. Confirm to catch a click sound while the key is
pressed on.
2. Check if a specific key is pressed by another equipment.
1. If you cannot catch a click sound, the key is wrong itself
or wrongly assembled.
2. Even after the key has been replaced, it is still wrong,
try to replace the OPE ASS'Yand the Main B'D in
sequence.
• Location 1.LCD 2.OPE Ass’y 3.Main B’d
Page 8

4-8
Troubleshooting
Samsung Electronics
4-3-7 Paper Jam
4-3-8 Defective Paper Feed (1)
• Description
• Location ASF ASS'Y
The paper is jammed inside the set and not exited from.
Check and Cause Solution
1. Check if the paper is crumpled or preprinted.
2. Check if too many sheets of recording paper are put
into ASF (Automatic Sheet Feeder).
(Standard : up to 100 sheets).
3. Check if the remaining papers are stuck in the frame
base.
1. If the papers jammed or pieces of the paper are stuck
inside the set, remove them and then try it again.
2. If the problem still exists, try to replace ASF ASS'Y.
• Description
• Location ASF ASS'Y
A recording paper is tilted while feeding.
Check and Cause Solution
1. Check if the paper guide of ASF (Automatic Sheet
Feeder) is set up properly with the width of recording
paper.
2. Check if too many sheets of recording paper are put
into ASF (Automatic Sheet Feeder).
(Standard: up to 100 sheets).
3. Check if the recording paper is crumpled or preprinted.
1. After all have been checked, the problem still exists, try
to replace the ASF ASS'Y.
Page 9

4-9
Troubleshooting
Samsung Electronics
4-3-9 Defective Paper Feed (2)-Display of NO PAPER
• Description
• Location 1. ASF ASS'Y 2. Main B’d 3. LF Motor
paper does not feed into the printer.
Check and Cause Solution
1. Press ENTER button to check. 1. Even if the ENTER button is pressed, a recording paper
is not drawn into, then try to replace the ASF ASS'Y.
2. Even if the ASF Ass’y or harness has been replaced, it
is still wrong, try to replace the Main B’d and the LF
Motor in sequence.
4-3-10 Multi-Feeding
• Description
• Location ASF ASS'Y
Multiple-sheets of recording paper are fed at once.
Check and Cause Solution
1. Adjust the paper guide of ASF to the width of paper
correctly .
2. Check if the recording paper is preprinted or crumpled.
3. Check if too many sheets of recording paper are put
into ASF (Automatic Sheet Feeder).
(Standard: up to 100 sheets).
1. Blow several times of puff into the paper in order to prevent static electricity.
2. Even after the papers are loaded correctly, if multiple
sheets of paper are still fed at once, then try to replace
the ASF ASS'Y.
Page 10

4-10
Troubleshooting
Samsung Electronics
4-3-11 Defective Sensing-ink
4-3-12 Defective Sensing-paper
• Description
• Location 1.Cartridge ASS'Y 2.Main B'D
The ink is put in the set, but it cannot sensed.
Check and Cause Solution
1. Check if the cartridge is installed in the cartridge box
properly.
(It makes a click sound normally when it is normal.)
2. Check if the cartridge box is operated normally.
3. Check if there is an alien matter in the Dimple contact
point of HEAD of CARTRIDGE BOX
1. Even after the cartridge is installed normally, it still cannot sense, then try to replace the Main B'D.
2. In case the cartridge box is not moved from side to side,
check the Flat Cable connection between the Main PBA
& Frame Home Unit, and even after being connected
properly, if it is still not improved, then try to replace the
cartridge ASS'Y.
• Description
• Location 1.Main B'D 2. LF Motor
The recording papers are put in already, but it cannot be sensed.
Check and Cause Solution
1. Check if the ENTER key on the OPE panel is pressed. 1. Refer to "Defective Paper Feed".
2. Even if the ENTER key on the OPE panel is pressed, it
still cannot sense, then try to replace the Main B'D and
LF Motor in sequence.
Notes:
The SCX-1100 Product has no paper sensor, instead it
displays ERROR when it cannot pick up the paper.
Page 11

4-11
Troubleshooting
Samsung Electronics
4-3-13 Defective Motor Drive (LF)
4-3-14 Defective Motor Drive (CR)
• Description
• Location 1.Main B'D 2.LF Motor
The motor drive of Line Feeder is not working.
Check and Cause Solution
1. Check if the connector of LF Motor is connected to
the Main B'D normally.
1. Try to replace the Main B'D and the LF Motor ASS'Y in
sequence.
• Description
• Location 1.Main B'D 2.CR Motor
The drive of CR Motor is not working.
Check and Cause Solution
1. Check if the connector of CR Motor is connected to
the Main B'D normally.
1. Try to replace the Main B'D, the CR Motor ASS'Y in
sequence.
Page 12

4-12
Troubleshooting
Samsung Electronics
4-3-15 Defective Motor Drive (SCAN)
4-3-16 Blank Page Print Out (When Copying)
• Description
• Location 1.Main B'D 2.Scan Motor
The Scan Motor is not driven.
Check and Cause Solution
1. Check if the connector of Scan Motor is connected to
the Main B'D normally.
1. Try to replace the Main B'D and the Scan Motor ASS'Y
in sequence.
• Description
• Location 1.CCD ASS'Y 2.Main B'D
Blank page is printed out when copying.
Check and Cause Solution
1. Check if the recording papers are inserted reversely.
2. Perform the CCD test in the service mode.
(Refer to 4-1-3)
1. Insert the paper with the copy side to be faced down.
2. In case the output waveform is abnormal in the CCD
test, replace the CCD ASS'Y, while replace the Main
B'D in normal.
Page 13

4-13
Troubleshooting
Samsung Electronics
4-3-17 Vertical Black Line (When Copying)
• Description
• Location 1.CCD ASS'Y 2.Main B'D.
Vertical black lines occur in the printing.
Check and Cause Solution
1. Check the alien matter of flat glass face.
2. Perform a CCD Test to check if the waveform is normal. (Refer to 4-1-3.)
3. Clean the cartridge nozzle.
1. If there are some stains on the surface of CCD, wipe
them off with alcohol (IPA).
2. If the CCD waveform is abnormal, replace the CCD
ASS'Y.
3. Clean the nozzle and confirm again.
4. After confirming the CCD waveform and cleaning the
nozzle, if the vertical black lines still occur, then try to
replace the Main B'D.
4-3-18 Contaminated Stains on Paper
• Description
• Location 1.CCD ASS'Y 2.Main B'D.
Contaminated stains on the copied paper occur in the printing.
Check and Cause Solution
1. Check the status of document.
2. Check the waveform by performing a CCD test.
(Refer to 4-1-3)
1. If the CCD waveform is abnormal, try to replace the
CCD ASS'Y.
2. In case the CCD waveform is normal but the print quality is bad, try to replace the Main B'D.
Page 14

4-14
Troubleshooting
Samsung Electronics
4-3-19 Bad Printed Image
4-3-20 Vertical Lines are printed crookedly
• Description
• Location 1.CCD ASS'Y
The copied image is light or bad.
Check and Cause Solution
1. Check the CCD waveform.
(Refer to 4-1-3)
2. Test and check the cartridge arrangement.
(Refer to 4-2)
3. Clean the cartridge nozzle.
(Refer to 4-2)
1. In case the CCD waveform is good, clean the outlet of
cartridge.
2. In case the CCD waveform is abnormal, try to replace
the CCD ASS'Y.
3. Even after cleaning the outlet of nozzle, the received
data image is still bad, then replace the cartridge.
4. Try to replace the Main B'D.
• Description
• Location Cartridge
The vertical lines are printed crookedly.
Check and Cause Solution
1. Test and check the cartridge arrangement.
(Refer to 4-2)
1. Perform the cartridge arrangement to set up black/color
newly. Repeat it several times until you get the sufficient
condition.
Page 15

4-15
Troubleshooting
Samsung Electronics
4-3-21 Bad Color (Intensity)
• Description
• Location 1.Capacity of Ink Cartridge 2.CCD ASS'Y.
The color is different from the original document in the printing.
Check and Cause Solution
1. It may occur when the amount of specific ink in the
ink cartridge (color) is deficient.
2. Check the waveform by performing a CCD test.
(Refer to 4-1-3)
1. After checking if the capacity of ink cartridge is deficient,
try to replace it.
2. After having performed a CCD shading test, if it is not
still improved, then try to replace the CCD ASS'Y.
4-3-22 The Printer is Not Working (1)
• Description
While the power is turned on, the printer is not working at all by the PRINT command from the com-
puter.
Check and Cause Solution
1. Perform the Printer Self-Test.
2. Check if the PC and the printer cable are properly
connected.
3. Check if the printer driver is correctly installed.
1. Check the power source of the printer first and perform the
Printer Self-Test. If the test results in printing, it is considered
as there is no problem in the printer itself. If the printer is not
working, the function may be defective (not due to S/W), so
take another proper measure.
2. Check the status of the printer connection, and if it is defective, replace the printer cable (USB or Parallel).
3. Check the connection between PC and printer port (USB port
or LPT port). Check if the printer driver at the Printers on the
Control Panel is installed. If the printer driver is properly setup,
check in which program the printing is not working. The best
way is to try printing from the Memo pad, the WINDOWS
basic program. Sometimes, the print out is normal within the
WINDOWS basic programs, but it may not work in a specific
program. In such case, reinstall the printer driver.
Page 16

4-16
Troubleshooting
Samsung Electronics
4-3-23 The Printer is Not Working (2)
• Description Even after the Print command, there is no response at all or the printing speed is low.
Check and Cause Solution
It may due to wrong setup of the environment rather
than malfunction of the printer itself. And in case that
abnormal characters are printed out, also check the
environment setup.
1. Secure the hard disk space.
2. Printing error occurs even if there is enough space in
the hard disk.
3. Reboot the system, and try printing again.
1. Not working with the message 'Insufficient memory' means
that the hard disk space to store the print information is insufficient rather than the RAM insufficiency. In this case, secure
more space for the hard disk.
Secure more space for C drive by using the Disk utilities program at 'PROGRAM - ACCESSORIES - SYSTEM TOOL'
from the Start menu.
2. The connection of the cable or printer port is not properly
setup.
3. If characters are printed abnormally, the cable or the printer
driver may be defective. Turn the PC and printer off, and
reboot the system to try printing again. If the problem still
exists, double click to install the printer from My Computer
and right-click the mouse, then click 'Test Print' button at the
bottom of the file information tab. If normal characters are not
printed again, the cable must be defective so replace the
cable with a new one.
Page 17

4-17
Troubleshooting
Samsung Electronics
4-3-24 Abnormal Printing
• Description
The printing is not working properly even when the cable has no problem.
(even after the cable is replaced)
If the printer won't work at all or strange characters are only printed,
it may be the printer driver problem.
Check and Cause Solution
1. Printer driver error
2. Error due to insufficient memory.
(The printing job sometimes stops during proceeding
or not completed due to insufficient memory.)
1. Check 'My Computer - Printers'.
(If the printer driver is installed not compatible with the
printer currently installed or an error occurs in the driver
file, remove the existing driver and reinstall the printer
driver by using the 'Printer Add' menu.
2. This is because of an insufficient virtual memory.
(It does not mean the actual capacity of RAM but the
space of hard disk.)
Delete unnecessary files to secure enough space of the
hard disk and try printing again.
Name of Printer Port :
To reinstall the printer driver, do after removing the current driver.
• While installing the driver, Set and PC should be connected.
(The printer setup may be wrong if they are not connected during installing.)
• The SCX-1100 Model supports all the USB/Parallel Print, select the USB Port when using
the USB, while select the LPT Port when using the Parallel.
Page 18

4-18
Troubleshooting
Samsung Electronics
4-3-25 Spool Error and Release of Spool Error
• Description
pool (Simultaneous Peripheral Operations Online) refers to process the document to be read and
stored in the hard disk or the mass storage media, and then to be printed at more convenient time.
While the printer is outputting other file, the file requested to output is undergone to be spooled in the
hard disk, the spool error may occur if a problem occurs in this process.
First, delete the Spool Data if the Spool Error occurs.
Check and Cause Solution
I. Insufficient space of the hard disk set as the default
spool directory.
2. If the previous printing out error is not solved.
3. In case a collision with other program is expected.
4. When an application program or the printer driver file
is damaged.
5. If some of OS related files are damaged or malfunctioning due to virus infections.
6. The memory is less than that recommended by the
OS.
1. Delete unnecessary files to provide more hard disk
space and try printing job.
2. Since there may be some journal files with the extension ***.jnl, delete them and reboot the WINDOWS to
restart printing job.
3. Exit all other programs except the program currently
using, if possible, and print again.
4. Delete the printer driver completely and reinstall it.
5. After rebooting the computer, check viruses, restore the
damaged files and reinstall the program, then try print
ing again.
6. Add memory to the PC.
How to delete the data in the spool manager :
In the spool manager, the installed drivers and the list of all the documents waiting to be
printed are shown. Select the data of the document to be deleted and select Document menu
--> Delete.
If you intend to delete the current document being printed, the data being transferred to the
printer will be printed out and then the document will be removed. Before choosing the document data, the document menu is still inactive.
Or Hold the document in the waiting list and repeat the routine as the above or exit the Spool
manager
 Loading...