

Page 1

Smart Dome Camera
User Manual
SCP-2430H
Page 2
overview
CAUTION
RISK OF ELECTRIC SHOCK.
DO NOT OPEN
CAUTION: TO REDUCE THE RISK OF ELECTRIC SHOCK, DO NOT REMOVE COVER (OR BACK) NO USER
SERVICEABLE PARTS INSIDE. REFER SERVICING TO QUALIFIED SERVICE PERSONNEL.
This symbol indicates that dangerous voltage consisting a risk of
electric shock is present within this unit.
This symbol indicates that there are important operating and
maintenance instructions in the literature accompanying this unit.
WARNING
To reduce the risk of fire or electric shock, do not expose this appliance to rain or
moisture.
To prevent injury, this apparatus must be securely attached to the floor/wall in
accordance with the installation instructions.
Use an adaptor over 3A when the heater works.
WARNING
Be sure to use only the standard adapter that is specified in the specification sheet.
1.
Using any other adapter could cause fire, electrical shock, or damage to the
product.
Incorrectly connecting the power supply or replacing battery may cause explosion,
2.
fire, electric shock, or damage to the product.
Do not connect multiple cameras to a single adapter. Exceeding the capacity may
3.
cause abnormal heat generation or fire.
Securely plug the power cord into the power receptacle. Insecure connection may
4.
cause fire.
When installing the camera, fasten it securely and firmly. The fall of camera may
5.
cause personal injury.
Do not place conductive objects (e.g. screwdrivers, coins, metal parts, etc.) or
6.
containers filled with water on top of the camera. Doing so may cause personal
injury due to fire, electric shock, or falling objects.
Do not install the unit in humid, dusty, or sooty locations. Doing so may cause fire
7.
or electric shock.
2_ overview
Page 3

If any unusual smells or smoke come from the unit, stop using the product. In such
8.
case, immediately disconnect the power source and contact the service center.
Continued use in such a condition may cause fire or electric shock.
If this product fails to operate normally, contact the nearest service center. Never
9.
disassemble or modify this product in any way. (SAMSUNG is not liable for
problems caused by unauthorized modifications or attempted repair.)
When cleaning, do not spray water directly onto parts of the product. Doing so may
10.
cause fire or electric shock
Do not expose the product to the direct airflow from an air conditioner.
11.
Otherwise, it may cause moisture condensation inside the Clear Dome due to
temperature difference between internal and external of the dome camera.
If you install this product in a low-temp area such as inside a cold store, you must
12.
seal up the wiring pipe with silicon, so that the external air can not flow inside the
housing. Otherwise, external high, humid air may flow inside the housing, pooling
moisture or vapor inside the product due to a difference between internal and
external temperature.
CAUTION
Do not drop objects on the product or apply strong blows to it. Keep away from a
1.
location subject to excessive vibration or magnetic interference.
Do not install in a location subject to high temperature (over 50°C), low temperature
2.
(below -50°C), or high humidity. Doing so may cause fire or electric shock.
If you want to relocate the already installed product, be sure to turn off the power
3.
and then move or reinstall it.
Remove the power plug from the outlet when there is a lighting storm. Neglecting
4.
to do so may cause fire or damage to the product.
Keep out of direct sunlight and heat radiation sources. It may cause fire.
5.
Install it in a place with good ventilation.
6.
Avoid aiming the camera directly towards extremely bright objects such as sun, as
7.
this may damage the CCD image sensor.
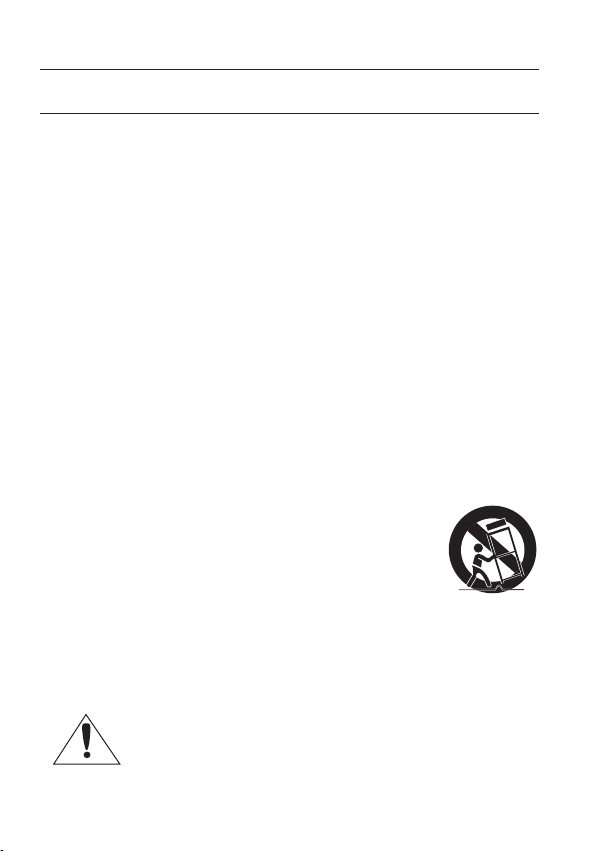
Apparatus shall not be exposed to dripping or splashing and no objects filled with
8.
liquids, such as vases, shall be placed on the apparatus.
The Mains plug is used as a disconnect device and shall stay readily operable at
9.
any time.
When the unit is stored in high humidity environment, moisture may occur inside
10.
the cover dome of the Housing. Before installation, please open the cover dome
and wipe off all moisture with a soft dry cloth.
English
English _3
Page 4
overview
4_ overview
IMPORTANT SAFETY INSTRUCTIONS
Read these instructions.
1.
Keep these instructions.
2.
Heed all warnings.
3.
Follow all instructions.
4.
Do not use this apparatus near water.
5.
Clean only with dry cloth.
6.
Do not block any ventilation openings. Install in accordance with the manufacturer’s
7.
instructions.
Do not install near any heat sources such as radiators, heat registers, or other
8.
apparatus (including amplifiers) that produce heat.
Do not defeat the safety purpose of the polarized or grounding-type plug.
9.
A polarized plug has two blades with one wider than the other. A grounding type
plug has two blades and a third grounding prong. The wide blade or the third prong
is provided for your safety. If the provided plug does not fit into your outlet, consult
an electrician for replacement of the obsolete outlet.
Protect the power cord from being walked on or pinched particularly at plugs,
10.
convenience receptacles, and the point where they exit from the apparatus.
Only use attachments/accessories specified by the manufacturer.
11.
Use only with the cart, stand, tripod, bracket, or table specified
12.
by the manufacturer, or sold with the apparatus. When a
cart is used, use caution when moving the cart/apparatus
combination to avoid injury from tip-over.
Unplug this apparatus during lightning storms or when unused
13.
for long periods of time.
Refer all servicing to qualified service personnel. Servicing is required when the
14.
apparatus has been damaged in any way, such as powersupply cord or plug is
damaged, liquid has been spilled or objects have fallen into the apparatus, the
apparatus has been exposed to rain or moisture, does not operate normally, or has
been dropped.
Apparatus shall not be exposed to dripping or splashing and no objects
filled with liquids, such as vases, shall be placed on the apparatus
Page 5

CONTENTS
OVERVIEW
2
INSTALLATION &
CONNECTION
8
SETUP
20
APPENDIX
46
4 Important Safety Instructions
5 Contents
6 Features
6 What’s Included
7 At a Glance
8 Optional Accessories for
Installation
10 Precautions
10 Preparation
11 Installation
14 Initial Setup
17 Connecting With Other Device
20 How to use the Keyboard
Controller
21 Main Menu
22 Profile
24 Camera Set
33 Intelligent Video
34 Privacy Zone
35 Preset
37 Auto Set
40 Zone Set
41 Alarm Set
43 Clock Set
43 Other Set
45 Communication
45 System Info
46 Shortcut Keys
47 Specifications
49 Product Appearance
English
English _5
Page 6
overview
6_ overview
User Manual
FEATURES
With the state-of-the-art digital signal processing technology, full digital image
processing and special algorithm of 600-line high resolution implemented
High performance surveillance camera, equipped with x43 zoom lens and digital
zoom IC, enabling monitoring up to 688 times
DAY/NIGHT to improve the sensitivity by automatic conversion into the black and
white mode at night or in the environment with low illumination
White Balance to control the brightness to the illumination
Backlight Compensation under spotlight or utmost bright illumination
Auto Focus to automatically adjust the focus to the subject movement
Privacy zone to hide a specific area for personal privacy
PAN/TILT for precise control at high speed
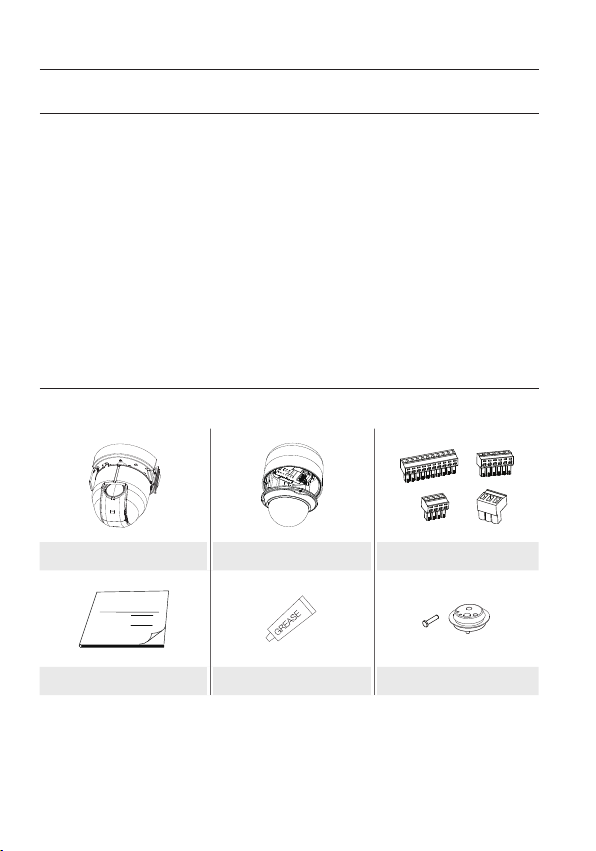
WHAT’S INCLUDED
Please check if your camera and accessories are all included in the product package.
Camera Housing Connectors
User Manual Grease Pin & Bush
Page 7
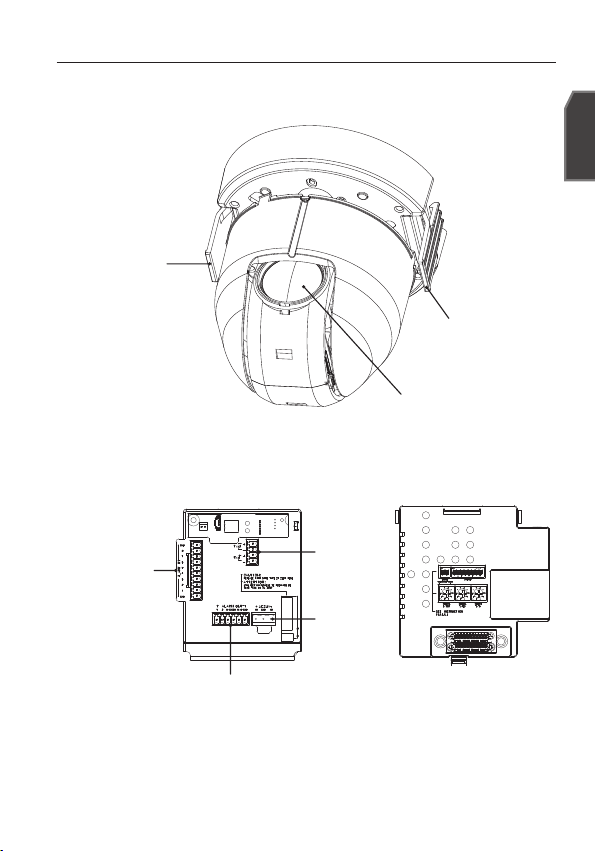
AT A GLANCE
CAMERA
HOOK
FRAME SET
ALARM IN
English
HOOK
LENS
RS-485
POWER
INPUT
ALARM OUT
Wipe out a dirty surface of the lens softly with a lens tissue or cloth to which you
M
have applied ethanol.
English _7
Page 8
installation & connection
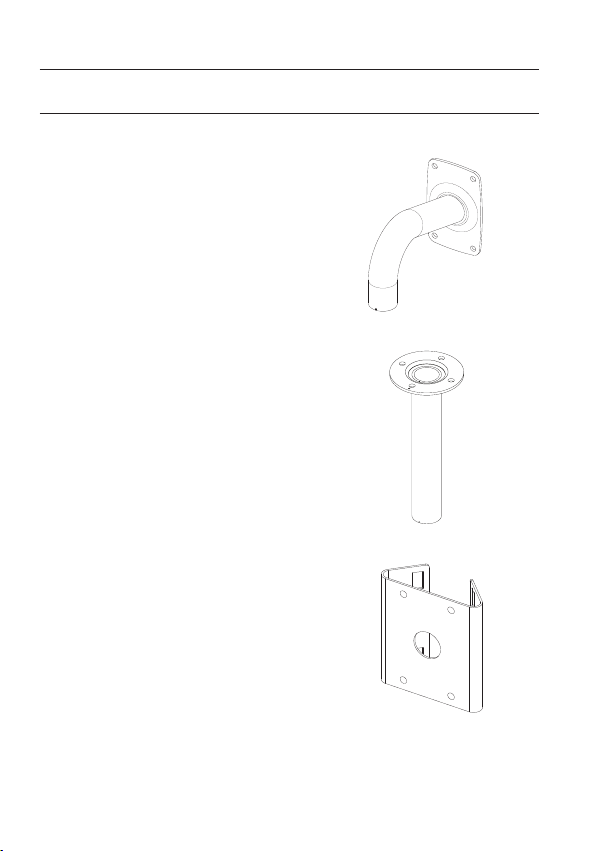
OPTIONAL ACCESSORIES FOR INSTALLATION
For your easier installation, you can purchase appropriate optional accessories available.
WALL MOUNT ADAPTOR (SCX-300WM)
1.
This is a wall mount adaptor, used for wallmounted installation of SMART DOME
CAMEA units.
CEILING MOUNT ADAPTOR (SCX-300CM)
2.
This is a ceiling mount adaptor, used for
installation of SMART DOME CAMEA units on
a concrete ceiling.
POLE MOUNT ADAPTOR (SCX-300PM)
3.
This is an adaptor for WALL MOUNT
ADAPTOR (SCX-300WM) installation on a
pole whose diameter is bigger than 80mm.
8_ installation & connection
Page 9
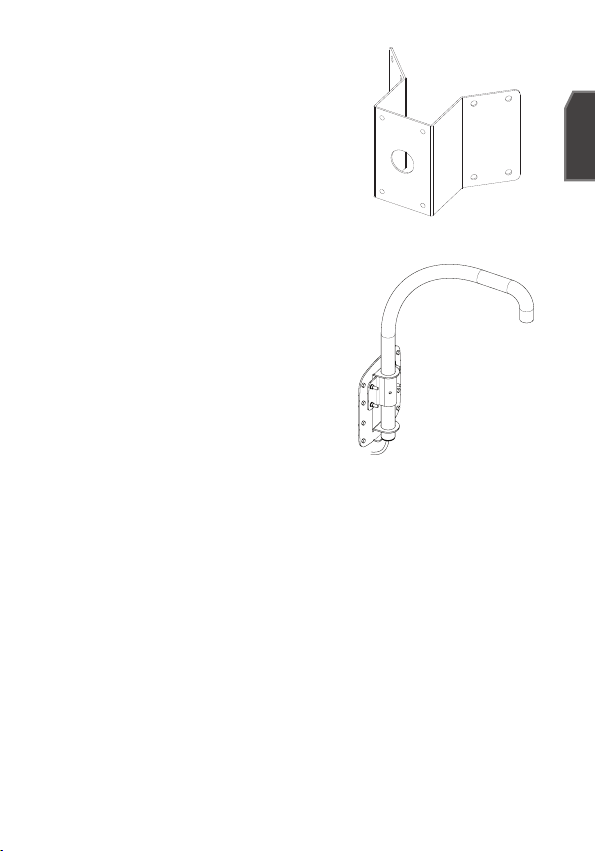
CORNER MOUNT ADAPTOR (SCX-300KM)
4.
This is an adaptor for WALL MOUNT
ADAPTOR (SCX-300WM) installation on the
corner of wall joint.
PARAPET (LONG) MOUNT (SCX-300LM)
5.
This is a mounting kit used for installation of
SMART DOME CAMEA units on a parapet.
English
English _9
Page 10
installation & connection
10_ installation & connection
PRECAUTIONS
Select an installation spot which can endure more than 4 times of the product
1.
weight.
When installing, prevent peoples approaching to avoid personal injury.
2.
Move valuables to a safer place before installing.
PREPARATION
Run all the external cables through the bracket adaptor’s PIPE or MOUNT hole.
Wrap around the HOUSING’s screw hole with the Teflon Tape.
1.5" PT
PIPE OR
MOUNT
1.5" PT
EXTERNAL
CABLE
HOUSING
TEFLON TAPE
Page 11

INSTALLATION
Press the SNAP FIT of the ADAPTOR in the HOUSING to open the ADAPTOR
1.
part, and then insert all external cables into the HOUSING. Secure the HOUSING
on the PIPE or MOUNT by turning it clockwise.
(Secure two components tightly, to avoid loosened HOUSING.)
English
PIPE OR
MOUNT
HOUSING
EXTERNAL
CABLE
ADAPTOR
SNAP-FIT
Connect external cables to the CONNECTORS(ALARM IN, POWER, RS-485,
2.
ALARM OUT) and connect the CONNECTOR to the ADAPTOR.
Insert the cable into the FRAME SET, and close the ADAPTOR.
HOUSING
POWER INPUT
ALARM IN
M
ALARM OUT
RS-485
Then, wrap the BNC JACK with the INSULATION TUBE, and use an insulation tape
to seal up the end of the INSULATION TUBE so that the BNC JACK does not
protrude outside of the INSULATION TUBE coating.
For more information about cable connection, refer to Connecting the adaptor
cable. (page 19)
EXTERNAL
CABLE
PIPE OR
MOUNT
HOUSING
BNC JACK
INSULATION
TUBE
ADAPTOR
English _11
Page 12
installation & connection
12_ installation & connection
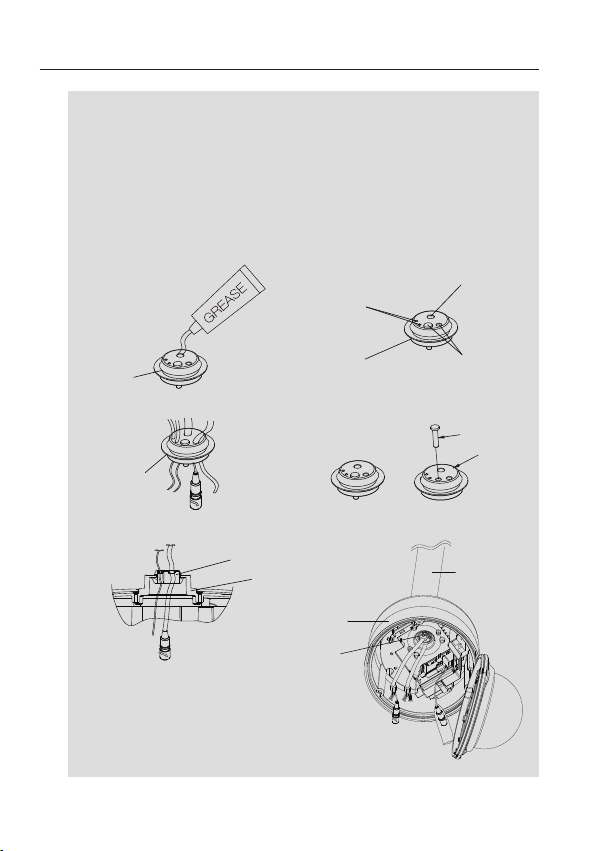
Note that BUSHINGs are provided for outdoor installations where exposed to a
moisture condition through the PIPE or MOUNT, install the HOUSING using the
BUSHING to prevent moisture entering.
- Apply grease of proper dose on the BUSHING before assembling, and run
cables through each hole of the bushings. Use PINS to stop up empty holes
having no cable running.
- Assemble the
diagram below. At the moment, apply pressure evenly on the BUSHING to
secure it tightly to the HOUSING as shown in the diagram.
BUSHING to the top side of HOUSING’s inside as shown in the
POWER
(24V) CABLE
BNC CABLE
BUSH
BUSH
BUSH
HOUSING
BUSH
HOUSING
BUSH
ETC CABLE
PIN
BUSH
PIPE OR
MOUNT
Page 13
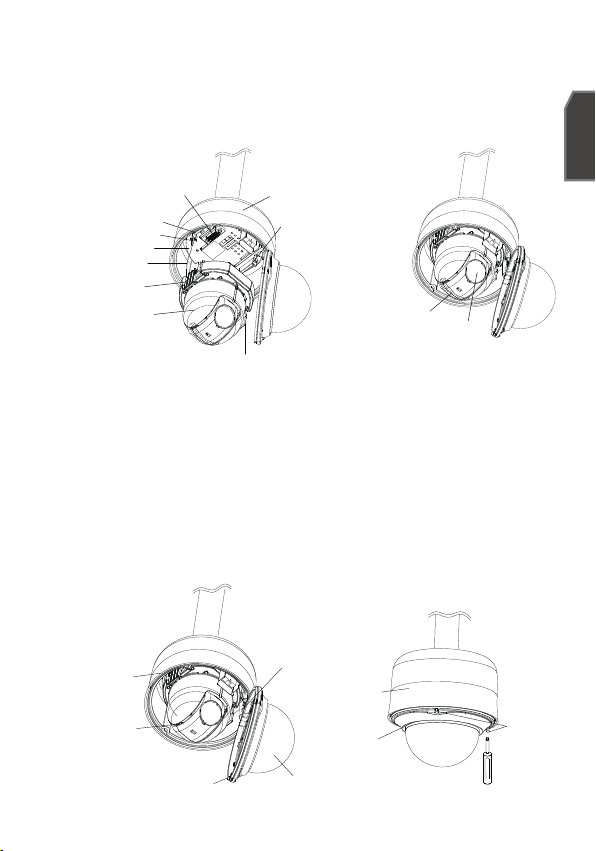
Tie up the SAFETY WIRE of the CAMERA on the BRACKET WIRE of the FRAME
3.
SET.
Arrange the 22P CONNECTOR of the CAMERA in line with that of the ADAPTOR,
push the HOOKs on either end of the CAMERA in the RACK direction of the
FRAME SET to secure the two.
Then, ensure that all of the two HOOKs clicks to fix to the RACK properly.
English
22P CONNECTOR
RACK
BRACKET WIRE
FRAME SET
SAFETY WIRE
HOOK
CAMERA
When the installation is completed, remove the PROTECTIVE COVER and
M
PRETOECTIVE TAPE from the lens.
Align each of the 3 SCREWS of COVER DOME and 3 SCREW HOLEs of the
4.
HOUSING respectively, and assemble the COVER DOME and HOUSING. During
the assembling, note on the followings.
Insert and arrange SAFETY WIRE into the HOUSING while not disturbing the
camera operation.
Ensure that the GASKET DOME component does not separate from the
COVER DOME
the waterproofness.)
HOUSING
CAMERA
GASKET DOME
. (If the GASKET DOME is not properly assembled, it damages
HOOK
SAFETY WIRE
COVER DOME
HOUSING
RACK
PROTECTIVE
TAPE
PROTECTIVE
COVER
HOUSING
COVER DOME
English _13
SCREWS
Page 14
installation & connection
14_ installation & connection
INITIAL SETUP
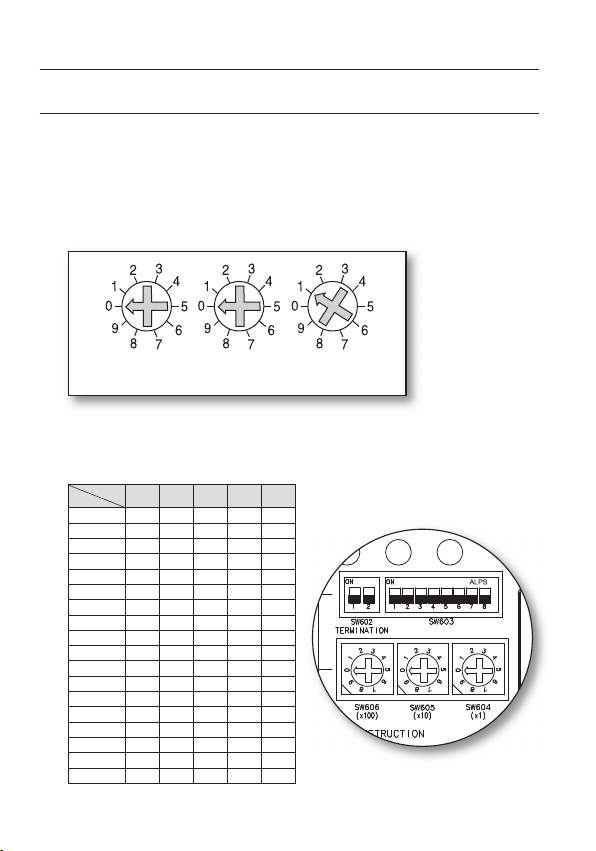
Camera Address Setup
Use SW606, SW605, and SW604 to specify the camera address.
You can specify between 0 and 255 for the address, where the hundreds digit is
with SW606, the tens digit with SW605, and the ones digit with SW604.
ex) Camera address: If the address is 1, follow the steps in the figure below.
Communication Protocol Setup
Use pins #1~#4 of SW603 to specify the communication protocol.
PIN
Comp
PIN1 PIN2 PIN3 PIN4 PIN7
A OFF OFF OFF OFF OFF
B ON OFF OFF OFF OFF
C OFF ON OFF OFF OFF
D ON ON OFF OFF OFF
E OFF OFF ON OFF OFF
--- ON OFF ON OFF OFF
--- OFF ON ON OFF OFF
H ON ON ON OFF OFF
I OFF OFF OFF ON OFF
J ON OFF OFF ON OFF
--- OFF ON OFF ON OFF
--- ON ON OFF ON OFF
--- OFF OFF ON ON OFF
N ON OFF ON ON OFF
O OFF ON ON ON OFF
P ON ON ON ON OFF
Q OFF OFF OFF OFF ON
R ON OFF OFF OFF ON
A : SAMSUNG HALF
B : SAMSUNG FULL
<Bottom of the camera holder>
SW606
(x100)
SW605
(x10)
SW604
(x1)
Page 15
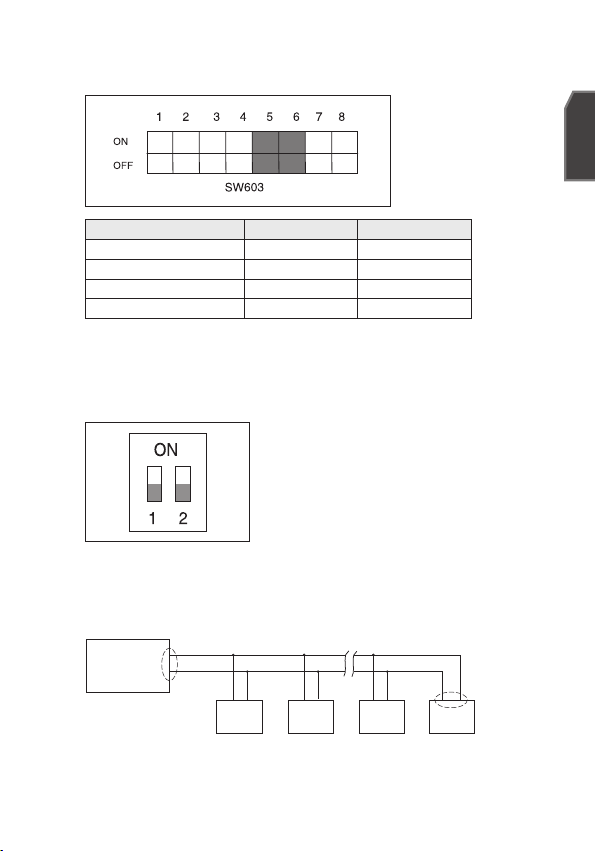
Baud Rate Setup
Use pins #5, #6 of SW603 to set the baud rate.
BAUD RATE PIN 5 PIN 6
4800 BPS ON ON
9600 BPS OFF ON
19200 BPS ON OFF
38400 BPS OFF OFF
The factory default is 9600 BPS.
Setting RS-422A/RS-485 Termination
As it is shown in the structure map, when Controller and RS-422A/RS-485 is
connected, it should be terminated according to the Cable feature of impedance
on the each end of the transmitting line to transfer the signals in long distance by
controlling the reflection of the signals to the lowest.
CAM n-1
n < 32
RX-
CAM n
Termination
SW1-ON
RX+
Termination
Controller
TX+(DATA+)
TX-(DATA-)
RX+ RX- RX+ RX- RX+ RX-
CAM 1
CAM 2
<RS-485 Half Duplex Organization>
Termination : Using numbers 1 and 2 PIN, turn to <ON> and it will be terminated.
English
English _15
Page 16

installation & connection
16_ installation & connection
Controller
Termination
CAM 2CAM 1
<RS-422A/RS-485 Full Duplex Organization>
A communication error may occur if you connect multiple cameras that are assigned
M
the same address in the network.
CAM n-1
n < 32
CAM n
Termination
SW1-ON
SW2-ON
Page 17

CONNECTING WITH OTHER DEVICE
MONITOR
ALARM IN
ALARM OUT
Connecting to a monitor
Connect one end of the BNC
1.
video cable connector to the
Video Output Terminal (VIDEO
OUT).
Connect the other end of the
2.
connector to the Video Input
Terminal of the monitor.
English
CONTROLLER/DVR
POWER SOURCE
Video terminal on the
rear of monitor
BNC Cable
English _17
Page 18

installation & connection
18_ installation & connection
TxRx
To connect ALARM IN
Connect one end of the external device's signal line to a corresponding ALARM
1.
IN port of the monitor.
Connect the other end of the signal line to the earth-grounding [GND] port.
2.
To connect ALARM OUT
Connect one end of the external device's signal line to a corresponding ALARM
1.
OUT port of the monitor.
Connect the other end of the signal line to the common [COM] port.
2.
To connect the controller
Connect an external controller or DVR to the camera, with which you can adjust the
camera.
Connect the Rx+ pin of the
1.
camera to the Tx+ pin of the
controller.
Connect the Rx- pin of the
2.
camera to the Tx- pin of the
controller.
Connect the Tx+ pin of the
3.
camera to the Rx+ pin of the
controller.
Connect the Tx- pin of the
4.
camera to the Rx- pin of the
controller.
Page 19

Connecting the adaptor cable
Adaptor Board
English
Power Supply
Connect the cables as necessary, and turn on the camera to check if it works
properly.
Connect the adaptor to the power terminal of the camera.
1.
Plug the power cord of the adaptor into the wall outlet.
2.
English _19
Page 20

setup
Connect the camera to the keyboard controller or DVR, with which you
can manipulate and change the settings of the camera.
HOW TO USE THE KEYBOARD CONTROLLER
Follow the steps below to set the camera menu using the controller.
Open the Camera Setup screen.
1.
Use the joystick to navigate through the menus.
2.
Press [ENTER] to select a menu item.
3.
Use the joystick to change the value of the selected item.
4.
Press [ENTER] to apply your changes.
5.
Using OSD icons
_+
:
If these icons appear in the left and right corner of a menu item, you can use
the joystick to move to the previous or next menu.
(EXIT): Exits the menu setup screen.
Before exiting the setup screen, select <SAVE> to save your settings
to the whole menus, or <QUIT> to cancel them.
(RET): Saves your settings and returns to the previous screen.
(HOME): Returns to the main menu.
(SAVE): Use this icon if you want to save your settings after you specified the
mask area and privacy area, etc.
Once you saved your settings, the changes remain intact even if you
select <QUIT> on exit.
(DEL): Use this icon if you want to delete a mask, or privacy area, etc.
Once you deleted your settings, the deletions remain valid even if you
select <QUIT> on exit.
: This icon appears in the right of a menu containing sub menu items.
M
20_ setup
While any operation of PRESET, AUTO PAN, SCAN, and PATTERN is running, and if
the camera is turned off and back on without any particular manipulation, the
camera will resume the last run operation.
You can set the menu item only if the tilt angle is within 90°.
If you enter the menu setup screen with the camera positioned out of a tilt of 90°,
the camera will rotate by 180° to fall into the opposite position within a tilt of 90°.
Page 21

MAIN MENU
This is the first screen you ever see when you turn on the camera where you can set the
camera environment to your needs.
For selecting and saving each menu item, refer to “How to use the keyboard controller”. (page 20)
PROFILE
Select a mode appropriate to the camera
installation environment.
CAMERA SET
You can configure the camera settings.
INTELLIGENCE
Offers motion detection and tracking
functions.
PRIVACY ZONE
You can configure the privacy settings.
PRESET
You can set the PRESET POSITION and
DURATION.
AUTO SET
Contains sub menu items of AUTO PAN,
PATTERN, and SCAN.
ZONE SET
You can set the standard azimuth and zone
area for the camera.
ALARM SET
You can set the alarm priority and I/O sequence.
CLOCK SET
You can set the display time and format.
OTHER SET
You can set preferred language, reset the system, and select an OSD color to
your preference.
COMMUNICATION
Configures the settings pertaining to RS-485 communication.
SYSTEM INFO
Shows the system information such as the camera version or communication
settings.
MAIN M ENU
PROFILE
CAMERA SE T
INTELLI GENCE
PRIVACY ZONE
PRESET
AUTO SET
ZONE SE T
ALARM S ET
CLOCK S ET
OTHER S ET
COMMUNI CATION
SYSTEM INFO
English
English _21
Page 22

22_ setup
setup
PROFILE
You can select one from the pre-determined configurations as appropriate to your
specific camera installation environment.
Your selection on each item in PROFILE will affect all other settings of the camera.
STANDARD
Automatically optimizes the camera settings
to the normal environment.
ITS
This setting enables you to analyze the traffic
situation and take the traffic information at a
glance.
BACKLIGHT
This setting enables you to view a sharp
background and object even in a severe
backlight scene.
DAY/NIGHT
Automatically optimizes the camera settings to the day and night scene.
GAMING
This automatically configures the settings so that you can work in a stable illumination condition as indoors.
CUSTOM
Your change to any of the PROFILE settings will switch the display to CUSTOM.
PROFI LE
STANDARD
ITS
BACKLIG HT
DAY/NIGHT
GAMING
CUSTOM
CAMERA SETUP MENU
Parent Menu
SHUTTER OFF OFF OFF OFF OFF
SENSE UP AUTO X4 AUTO X2 AUTO X4 AUTO X4 AUTO X4
Sub-menus
ALC - - - - -
IRIS
BACKLIGHT OFF OFF BLC OFF OFF
MOTION
DNR MEDIUM MEDIUM MEDIUM MEDIUM MEDIUM
STANDARD ITS BACKLIGHT DAY/NIGHT GAMING
ALC ALC ALC ALC ALC
LEVEL
0 0 0 0 0
(F.FAST)
---
(F.FAST)
---
NORM
(F.FAST)
---
SLOW
Page 23

CAMERA SETUP MENU
Parent Menu
DAY/NIGHT
WHITE BAL
Sub-menus
XDR
NIGHT - - - - -
EXT
DAY
NIGHT - - - - -
BRIGHTNESS
DETAIL 2 2 2 2 2
STANDARD ITS BACKLIGHT DAY/NIGHT GAMING
MEDIUM MEDIUM MEDIUM MEDIUM MEDIUM
AUTO AUTO DAY AUTO DAY
BURST OFF ON OFF OFF OFF
- - - - -
BURST OFF ON OFF OFF OFF
DAY DAY/NIGHT DAY DAY/NIGHT DAY
- - - - -
MODE
MODE
ATW2 ATW1 ATW1 ATW1 ATW1
RED 0 0 0 0 0
BLUE 0 0 0 0 0
Custom Setting MEDIUM Custom Setting MEDIUM Custom Setting
OFF ATW2 OFF ATW2 OFF
RED Custom Setting 0 Custom Setting 0 Custom Setting
BLUE Custom Setting 0 Custom Setting 0 Custom Setting
English
English _23
Page 24

24_ setup
setup
CAMERA SET
You can configure the general settings of the camera module.
For selecting and saving each menu item, refer to “How to use the keyboard controller”. (page 20)
Select <MAIN MENU> - <CAMERA SET>.
1.
The Camera Setup menu appears.
Change the settings as necessary, or select
2.
an item to check.
CAMERA ID
Provide the ID and location for a camera that displays on the screen.
For selecting and saving each menu item, refer to “How to use the keyboard controller”. (page 20)
Select <CAMERA SET> - <CAMERA ID>.
1.
Use the joystick to select a desired character,
2.
then press [ENTER].
In the lower input box of the screen, the
selected character will be entered.
You can enter up to 54 characters including
alphabets, numbers and special characters.
LOCATION : Specify the display position
of the camera ID.
When done, press [ENTER].
3.
The camera ID will be displayed in the specified position.
CAMER A SET
CAMERA ID OFF
IRIS ALC
MOTION (F.FAST)
DNR MID
SHUTTER (O FF)
SENS-UP AUTO X4
FLICKER LESS OFF
XDR MID
CAMER A ID
ABC DEFGHI JKLMN OPQRS TUVWX YZO
12 3456 789
: ?
SP SP LOCATION
-
- - - - - - - - - - - - - - - - - - - - - - - - - - - - - - - -
- - - - - - - - - - - - - - - - - - - - - - - - - - - - - - - - -
_
+
()/
---
---
Page 25

IRIS
The IRIS menu is useful if you set to adjust the
intensity of radiation incoming to the camera.
ALC : Adjust the open and close of the iris.
- LEVEL : Select an overall brightness level.
- BLC : With <
<BLC>, you can specify the BLC area.
BACKLIGHT> set to
With AREA set to <USER>, you can
specify the position and size.
MANUAL : Adjust the iris level manually.
The overall brightness target of a camera
M
will be set to ALC level 0, while the iris
can be adjusted manually.
LEVEL
BACKLIG HT BLC
AREA USER
<SIZE>
<LOCATION>
LEVEL
ALC
MANUA L
[
00]
----I----
[ 00]
----I----
AGC
With this, you can adjust the AGC level of a
camera.
With AGC active, if the signal strength falls
below the standard level, AGC will amplify the
video signal to automatically improve the
sensitivity.
If <SENS-UP> is set to <OFF>, or <FIX>
mode, the <MOTION> menu will switch to
<AGC>.
With the USER
( )
submenu selected, press
[ENTER] to display the corresponding screen.
In this mode, you can select from VERY LOW
to VERY HIGH in 16 levels, enabling deeper, wider choices to your convenience.
With the FIX
( )
submenu selected, press [ENTER] to display the corresponding
screen. In this mode, you can select an individualized mode in 16 levels, regardless of
the brightness.
CAMERA SE T
CAMERA ID OFF
IRIS ALC
AGC (VERY H IGH)
DNR MID
SHUTTER OFF
SENS-UP OFF
FLICKER LESS OFF
XDR MID
---
English
English _25
Page 26

26_ setup
setup
As long as the DAY/NIGHT menu is set to AUTO in Camera Setup, the AGC menu is
M
not available.
As long as FLICKERLESS is set to ON, the AGC mode is not available.
MOTION
You can specify a level of AGC for controlling the camera motion.
This is available only of the SENSE UP menu is set to AUTO.
Select F.FAST if you want to monitor a very fast moving object in a low contrast
scene, and S.SLOW if monitoring a very slow moving, inanimate object in the same
condition.
As long as DAY/NIGHT is set to <AUTO>, the <MOTION> menu is not available.
DNR
Reduces the noise on the camera image.
The higher the level is, the greater the effect is.
Set it to <USER> to specify the level.
SHUTTER
CAMERA SE T
You can select a fixed fast electronic shutter
speed in 7 options ranging from 1/120(PAL) or
1/100(NTSC) to 1/10k, which is mostly used to
take a picture of a fast moving object.
As long as SENSE UP is set to AUTO, FIXED /
FLICKERLESS to ON, the SHUTTER menu is not
available.
SENS-UP
Automatically senses the darkness level at night or in a low contrast scene, and
extends the accumulation time accordingly; you can select <AUTO> or <FIX> for a
bright and sharp image.
CAMERA ID OFF
IRIS ALC
AGC (VERY H IGH)
DNR MID
SHUTTER 1/120
SENS-UP (OFF)
FLICKER LESS (OFF)
XDR MID
---
---
---
M
If the SHUTTER menu is set to fixed electronic shutter mode, the SENSE UP menu
will not be available.
As long as the FLICKERLESS is set to ON, you cannot set the SENS-UP FIX.
Page 27

FLICKERLESS
This will prevent possible screen distortion due to a mismatch between the vertical
sync frequency and the blinking frequency of the lighting; if set to <ON>, the shutter
speed will be fixed to 1/120 second.
If SHUTTER is set to FIX, SENSE UP to FIX, and AGC to FIX, the <FLICKERLESS> menu is
not available.
XDR
This will correct a brightness difference between different scenes for the optimal
visibility by calculating the ambient luminance contrast in a certain unit of pixels.
The higher the value is, the higher the correction level is.
DAY/NIGHT
You can specify a recording mode according to the scene.
For selecting and saving each menu item, refer to “How to use the keyboard controller”. (page 20)
Select <CAMERA SET> - <DAY/NIGHT>.
1.
Select a screen transition mode according
2.
to the illumination, and set options as
appropriate.
DAY : Fixed to DAY mode, regardless of
the scene.
NIGHT : Fixed to NIGHT mode,
regardless of the scene.
If BURST is set to <ON>, the burst
signal will be output along with the
black-and-white composite video signal.
AUTO : According to the luminance, this
will switch DAY to NIGHT mode, or vice
versa.
BURST : If set to <OFF>, the burst
signal will not be output in NIGHT mode.
DAYNIGHT BRIGHTNESS : Specify
the brightness level switching from
COLOR to BW filter.
Adjusting from HIGH to LOW will cause
to switch the filter in a darker screen.
DAYNIGHT DWELL TIME : Time
required to determine the filter switch.
NIGHTDAY BRIGHTNESS : Specify the brightness level switching from
BW to COLOR filter. Adjusting from HIGH to LOW will cause to switch the
filter in a darker screen.
DAY/NIGHT AUTO
WHITE B AL
FOCUS M ODE ONEAF
ZOOM SP EED [2]
DISPLAY ZOOM OFF
DISPLAY P/T OFF
DIGITAL ZOOM OFF
DETAIL [2]
V-SYNC INT
AUTO
BURST OFF
DAYNIGHT
BRIGHTNESS MID
DWELL TIME 2SEC
NIGHTDAY
BRIGHTNESS MID
DWELL TIME 5SEC
MASK AREA
1 2
English
English _27
Page 28

28_ setup
setup
M
NIGHTDAY DWELL TIME : Time required to determine the filter switch.
MASK AREA : If there exists a bright
spot light source in a night scene, you
can specify the size and position as
needed.
This will prevent an error in switching
filter, or failure to determine the filter
switch in a night scene where a bright
spot light source exists.
Any excessively bright area in a night
scene will be MASKed.
You can specify MASK 1 and 2 simultaneously.
If <BACKLIGHT> is set to <BLC>, the MASK AREA function is not available.
EXT : The interface to an external alarm enables an automatic switch between
DAY and NIGHT mode.
If you set <DAY/NIGHT> to EXT, and alarm #1 to NO/NC in ALARM SET-
ALARM IN SET, the alarm can be used for an input signal in EXT mode of
<DAY/NIGHT>.
If an alarm signal occurs, the mode will switch to NIGHT.
If <DAY/NIGHT> is set to EXT, ALARM1 in ALARM OUT SET, and ALARM1 in ALARM
SET-AUTO SET are not available.
If you use an infrared light source while in AUTO mode, this may cause a failure in
AUTO SWITCH or AUTO FOCUS.
<SIZE>
<LOCATION>
MASK AR EA
Page 29

WHITE BAL
If you need to adjust the color according to the ambient illumination, you can use
the <WHITE BAL> function.
For selecting and saving each menu item, refer to “How to use the keyboard controller”. (page 20)
Illumination is generally referred to as color temperature, which is represented in a
measurement of kelvin (K). Color temperatures for ordinary lighting are as follows:
In the <WHITE BAL> menu, you
can set a mode for correcting the
<WHITE BAL>.
- ATW1,2 : If you set the <
BAL> menu to <ATW1> or
WHITE
<ATW2> mode, this will monitor
the change of the color temperature
to correct the <WHITE BAL> as
needed.
The following color temperature
ranges are assured in individual
modes:
ATW1 : 2500K ~ 9300K (1)
ATW2 : 2000K ~ 10000K
(suitable to sodium light source) (2)
1 :
With <ATW1> mode active in a color temperature environment ranging
beyond between 2500K and 9300K, a proper white balance value may not be
produced; if this is the case, you are recommended to use <ATW2> mode.
2 : With <
ATW2> mode active in a mostly single color environment, the display
color and the actual one may differ; so select a mode as appropriate to your
color temperature environment.
10000K
9000K
8000K
7000K
6000K
5000K
4000K
3000K
2000K
1000K
Blue sky
Cloudy
Sunny
Halogen lamp
Candlelight
Rainy
Partly Cloudy
Fluorescent lamp
Tungsten lamp
English
English _29
Page 30

30_ setup
setup
Select <CAMERA SET> - <WHITE BAL>.
1.
Select a mode where you set the <WHITE BAL>.
2.
DAY : You can set the RED, and BLUE
value in DAY mode.
The screen will be displayed in colors
according to your settings.
You can set the R-GAIN, and B-GAIN value
only in <AWC> mode.
If AGC is set to <OFF> or <FIX>, the NIGHT
menu can not be accessed.
NIGHT : You can set the <WHITE BAL>
according to the ambient illumination.
If NIGHT mode is set to <OFF>, the
<WHITE BAL> will operate in a mode
specified in DAY mode at all times;
otherwise, the screen will switch to a
mode specified in <DAY/NIGHT>.
You can set the RED, BLUE and
BRIGHTNESS value in DAY mode.
The screen will be displayed in colors
according to your settings.
According to the specified recording mode, select a <WHITE BAL> mode with
3.
necessary options.
ATW1,2 : The camera can automatically adjust the color temperature in real
time, according to the ambient conditions.
(Color temperature range 1: 2500K ~ 9300K, 2 : 2000K ~ 10000K)
AWC : Pressing [ENTER] on a desired item will perform ATW once.
You can set the R-GAIN/B-GAIN value.
3200K : Set the color temperature to 3200K.
5600K : Set the color temperature to 5600K.
BRIGHTNESS : Specify a brightness level switching from DAY mode to
NIGHR mode setting.
RED : Adjust the strength of the red color.
BLUE : Adjust the strength of the blue color.
R-GAIN/B-GAIN : Specify the current color temperature manually.
-
WHITE BAL
DAY/NIGHT DAY
MODE AWC
RED
BLUE
[
R-GAIN
[
B-GAIN
WHITE BAL
DAY/NIGHT NIGHT
BRIGHTN ESS MID
MODE AWC
RED
BLUE
[
R-GAIN
[
B-GAIN
[ 00]
[ 00]
0128
0128
[ 00]
[ 00]
0128
0128
----
----
]
]
----
----
]
]
----
I
----
I
----
I
----
I
Page 31

FOCUS MODE
You can select a focus mode according to the
angle that you adjusted for camera recording.
- AF : This will monitor the screen continuously
to focus automatically. If you adjust the focus
manually, that will operate the same as in
<MF>. This will also restore focus after the
operation of pan/tile/zoom.
- SENSITIVITY : Indicates the sensitivity
of auto focus, which you can
DAY/NIGHT AU TO
WHITE B AL
FOCUS M ODE AF
ZOOM SP EED [2]
DISPLAY ZOOM OFF
DISPLAY P/T OFF
DIGITAL ZOOM X 16
DETAIL [2]
V-SYNC INT
adjust between level 1 and level 7.
The closer your setting is to 7, the more
sensitively the auto focus function performs.
The Night setting is used when a strong
light reflects in a low contrast scene.
You can set it to OFF, LOW, MEDIUM, or
SENSITI VITY [5]
NIGHT MID
HIGH; set it to <HIGH> when there exist a
strong light such as street light.
- ONEAF : Restores focus after the operation
of pan/tile/zoom, and operates the same as
in <MF> unless the operation of pan/tile/
zoom is executed.
- MF : You can adjust the focus manually.
While you are working on the following objects, <AF> may not work properly.
M
If this is the case, use <MF> instead.
- Very bright object, or dominant object in a dark scene
- Object against the rear side of a moist or dirty glass
- A scene where nearby and distant objects co-exist
- White wall or single-colored object
- Venetian blinds and other horizontally striped objects
ZOOM SPEED
You can adjust the zoom operation speed.
English
AF
DISPLAY ZOOM
You can set to display the zoom status on the screen.
It will disappear in about 3 seconds if the zoom factor has no further change.
DISPLAY P/T
You can set to display the operation status of pan/tilt when it is active.
It will disappear in about 3 seconds if the pan/tilt position has no further change.
However, the allowable error is ±2°.
English _31
Page 32

32_ setup
setup
DIGITAL ZOOM
You can set the maximum allowable digital zoom ratio.
Digital Zoom will start operation after it is zoomed in to the maximum optical ratio of
x43. If you set DIGITAL ZOOM to x16, you can take a shot at up to x688 (43x16).
DETAIL
Used to adjust the vertical and horizontal distinction, respectively.
V-SYNC
You can set the V-SYNC mode.
- If you select <INT>, the camera will use the internal synchronization.
- If selecting <LINE>, the camera will use an external power frequency for
synchronization. The LL-PHASE can be adjusted as appropriate.
AGC COLOR SUP
You can adjust the color reproduction range
according to AGC.
REVERSE
You can reverse the video signal from left
to right, upside down, or vice versa to your
convenience.
POSI/NEGA
You can set the video brightness signal to normal or reverse.
PIP
You can view a main image with a sub image on the same screen.
AGC COL OR SUP MID
REVERSE OFF
POSI/NE GA +
PIP OFF
DIS OFF
M
If more than one PRIVACY ZONE is specified, and PRIVACY SET to <ON>, the PIP
function is not available.
As long as SENSE UP is set to FIXED, PIP menu is not available.
According to the luminance, PIP will disappear if the SENSE UP menu is set to AUTO.
Page 33

DIS (Digital Image Stabilization)
If you set it to <ON> for a camera that is trembled or vibrated from an ambient
change, this will automatically compensate for the flicker on the screen.
If you set <DIS> to <ON>, the image will be enlarged with digital zoom as much
M
area as compensated.(Approximately 1.2 times of the optical zoom factor)
If you set the digital zoom to a larger ratio than the actual enlargement for
compensation, the <DIS> function will be disabled.
<DIS> may not work properly in the following images:
Flat, i.e., no regular-patterned image / Low contrast scene / High frequency image
taken under a fluorescent lamp / Regular-patterned image
INTELLIGENT VIDEO
You can enable the motion detection and tracking functions.
For selecting and saving each menu item, refer to “How to use the keyboard controller”. (page 20)
Select <MAIN MENU>-<INTELLIGENCE>.
1.
Select each item and set appropriately.
2.
MOTION
You can enable the motion detection and
tracking functions.
If you set it to <DETECTION>, the
M
<FIXED/MOVED> option of ADVANCED
menu will not be available.
In following situations, motion detection and tracking function may not work properly.
- When there is sudden changes of brightness
- When the device moves
- When a certain object’s movement fills most of the framing area
- When there is difficulties in distinguishing the moving object and background
ADVANCED
You can detect motions and mark the video that contains such motion, and enables
tracking of the movement.
Selecting the <FIXED/MOVED> option will mark a region if an existing object
disappears, or a new object appears and fixed for a certain period of time.
INTEL LIGENCE
MOTION OFF
ADVANCED OFF
MASK AREA
DISPLAY ON
[4]
SENSITI VITY
[3]
RESOLUT ION
ALARM O UT
1 2 3 4
English
In following situations, FIXED/MOVED detection may not work properly.
M
- When multiple motions continue arbitrarily.
- When the object that is fixed continues to move in the same position.
- When a newly appearing object conceals another object that is moving.
English _33
Page 34

34_ setup
setup
MASK AREA
Select the number of the area to be
1.
masked that will be excluded from motion
<SIZE>
<LOCATION>
MASK AR EA
detection.
Select the mask number and set the mask
2.
size and its coverage.
DISPLAY
When selected <ON>, it displays the motion
detected and detection of configured advanced function.
SENSITIVITY
Sets the sensitivity of motion sensor.
RESOLUTION
The bigger the resolution setting, the smaller the object that can be detected.
ALARM OUT
When selected <ON>, it outputs alarm
signal when the motion is detected and on a
ALARM O UT
MOTION ON
FIXED/M OVED ON
detection of configured advanced function.
PRIVACY ZONE
You can set up to 12 privacy zones that will be
hided for privacy of the subject when recording.
Zone Setup
For selecting and saving each menu item, refer to “How
to use the keyboard controller”. (page 20)
Select <MAIN MENU>-<PRIVACY ZONE>.
1.
PRIVACY ZO NE
1 2 3 4 5 6
7 8 9 10 11 12
PRIVACY SET
STYLE
MOSAIC1
ON
Page 35

Select the number of the zone and press
2.
[ENTER].
The Zone setup screen appears.
Select the <SET P/T/Z> and press
3.
[ENTER].
PRIVACY ZO NE SET 1
<SET P/ T/Z>
PIXEL LE VEL [4]
<POINT>
Using the joystick, adjust the camera’s
pan, tilt and zoom.
Select <POINT> and press [ENTER]. The
4.
privacy zone available will be displayed in
points. Each time you press [ENTER], the
available points will be moved accordingly.
Use the joystick to set the position of each point (top left, top right, bottom
5.
right, bottom left), and press [ENTER]. Position setting is completed.
Select the <LOCATION> and press [ENTER].
6.
Using the joystick, set the position of the privacy zone.
Save the changes and move to the previous screen and select the <STYLE>.
7.
Select the <COLOR> and pick a desired color.
Setting one or more privacy zone and enabling privacy function will disable the PIP
M
function.
For better privacy protection, make your privacy zone bigger than the required,
bigger by about 30%.
Video portion of mosaic pattern or colored by the privacy zone setup is not
recoverable.
PRESET
This function provides preset camera settings
such as pan, tilt, zoom and focus so to enable
quicker and easier accessing and monitoring, which
supports up to 512 presets.
For selecting and saving each menu item, refer to “How to
use the keyboard controller”. (page 20)
Select <MAIN MENU>-<PRESET>.
1.
MAIN M ENU
PROFILE
CAMERA SE T
INTELLI GENCE
PRIVACY ZONE
PRESET
AUTO SET
ZONE SE T
ALARM S ET
CLOCK S ET
OTHER S ET
English
English _35
Page 36

36_ setup
setup
Select the preset number.
2.
Select <POSITION> and adjust <PAN/
3.
TILT/ZOOM
the joystick.
Set <PRESET ID> to <ON> and enter the
4.
name.
Select <PRESET SPEED> and adjust the
5.
pan/tilt speed of the preset.
Set the <DWELL TIME> that defines the
6.
camera's hold duration and <IMAGE HOLD> of the preset.
Set <CAMERA SET> to <ON>.
7.
You can adjust camera setups for each
preset.
> to the desired setup using
For entering the name, refer to “CAMERA ID”.
(page 24)
If you set the <IMAGE HOLD> to <ON>, the video image will be held still until the
camera reaches the preset position.
For details on setting <IRIS>, <WHITE BAL>
and <FOCUS MODE>, refer to “CAMERA
SET”. (pages 24 ~ 32)
0 1 2 3 4
5 6 7 8 9
10 11 12 13 14
15 16 17 18 19
20 21 22 23 24
25 26 27 28 29
30 31
POSITIO N
PRESET ID ON
PRESET SPEED [5]
DWELL TI ME 3SEC
IMAGE H OLD OFF
CAMERA SE T O N
IRIS ALC
WHITE B AL
FOCUS M ODE MF
PRESE T
1/16
PRESE T NO. 1
CAMER A SET
M
The preset position can be specified for a
tilt range of between 0° and 90°.
Those presets that are out of a tilt of 90° can not be specified.
If you try to specify a preset position for a range exceeding a tilt of 90° using a
controller (SSC-1000, 2000 or 5000), you will see a message of <SET AGAIN> on
the screen. If this is the case, try again for a range below a tilt of 90°.
If you upload/download the menu setting using SSC-1000, 2000 or 5000, the preset
may differ from the menu setting so define the preset again after the operation.
Page 37

AUTO SET
You can set the AUTO PAN, PATTERN, and AUTO PLAY.
If you upload/download the menu setting using SSC-1000, 2000 or 5000, the
M
settings for AUTO PAN, PATTERN, SCAN, and PRESET may differ from the menu
settings so define them again after the operation.
Auto Pan Setup
Set the starting and ending positions to patrol between points at specified speed.
For selecting and saving each menu item, refer to “How to use the keyboard controller”. (page 20)
Select <MAIN MENU>-<AUTO SET>.
1.
Select the number of <AUTO PAN>.
2.
AUTO PAN setup screen appears.
MAIN M ENU
PROFILE
CAMERA SE T
INTELLI GENCE
PRIVACY ZONE
PRESET
AUTO SET
ZONE SE T
ALARM S ET
CLOCK S ET
OTHER S ET
AUTO SET
AUTO PAN
PATTERN
SCAN
AUTO PLAY OFF
1 2 3 4
1 2 3 4
1 2 3
English
Select each item and set appropriately.
3.
POSITION : Set the starting and ending
positions for the <AUTO PAN>.
Move to the setting screen and adjust
pan/tilt to the desired starting position,
and then press [ENTER].
Again, adjust pan/tilt to the desired
ending position and press [ENTER] to
finish <AUTO PAN> setup.
AUTO PAN 1
POSITIO N
DIRECTI ON LE FT
ENDLESS OFF
SPEED
DWELL TI ME 3SEC
[10]
English _37
Page 38

38_ setup
setup
DIRECTION : Sets the direction of the camera’s movement from the starting to
the end position. (Based on panning)
<RIGHT> <LEFT>
START START
END
ENDLESS : Instead of shuttling between start and end positions, the camera
END
turns 360° endlessly while stops for the <DWELL TIME> at both positions.
SPEED : Sets the moving speed of the camera, from 1 to 64.
DWELL TIME : Sets the dwell time at the starting and ending positions, from
1 to 60 seconds.
Pattern Setup
You can manually record your pan/tilt/zoom movements to a monitoring pattern for
up to 2 minutes.
For selecting and saving each menu item, refer to “How to use the keyboard controller”. (page 20)
Select <MAIN MENU>-<AUTO SET>.
1.
Select the pattern number.
2.
PATTERN setup screen appears.
Select the <POSITION> and set the
3.
pattern's starting position and press
[ENTER].
Select the <START> and move the
4.
camera using pan/tilt/zoom.
Your manual camera actions will be
5.
recorded for up to 2 minutes, and returns
to the previous menu automatically.
To stop manual recording and return to the
previous menu before 2 minutes, press
[ENTER].
<POSITI ON>
START
<POSITI ON>
START
PATTERN SET 1
PATTERN SET 1
Page 39

Scan Setup
You can set the SCAN operation to include a defined preset position.
For selecting and saving each menu item, refer to “How to use the keyboard controller”. (page 20)
Select <MAIN MENU>-<AUTO SET>.
1.
Select the scan number.
2.
SCAN setup screen appears.
Move the cursor to a number with the []
3.
mark which contains a defined preset.
Press [ENTER].
4.
[S] mark appears beside the [
corresponding preset is included in the
] and the
0S 1 2 3 4
5 6 7 8 9
10 11 12 13 14
15 16 17 18 19
20 21 22 23 24
25 26 27 28 29
30 31
SCAN 1
1/16
scan.
SCAN numbers configured for a certain page can be saved only in the corresponding
M
page. Make sure to save it before moving to the next page.
Auto Play Setup
AUTO PLAY runs configured AUTO PAN, PATTERN, and SCAN functions
automatically.
For selecting and saving each menu item, refer to “How
to use the keyboard controller”. (page 20)
Select <MAIN MENU>-<AUTO SET>.
1.
Select the <AUTO PLAY> and select a
2.
number.
AUTO PLAY setup screen appears.
AUTO PLAY1 : Sets overall function
properties of the AUTO PLAY.
AUTO RETURN : Sets the interval
between auto plays.
AUTO PLAY : Sets the auto play action
at every auto play interval.
You can set between 1 ~ 4 for SCAN
or AUTO PAN, 1 ~ 3 for PATTERN, and
0 ~ 511 for PRESET.
PLAY NUMBER : Sets the number of
the defined auto play operation.
AUTO SET
AUTO PAN
PATTERN
SCAN
AUTO PLAY 1
AUTO RET URN 1 MIN
AUTO PLAY PRESE T
PLAY NUMBER 0
1 2 3 4
1 2 3 4
AUTO PLAY 1
1 2 3
English
English _39
Page 40

40_ setup
setup
AUTO PLAY2 : Select the auto play
action and set its starting / ending time.
When the time hits the defined starting
time, configured auto play will begin.
You can set between 1 ~ 4 for SCAN or
AUTO PAN, 1 ~ 3 for PATTERN, and
0 ~ 511 for PRESET.
ZONE SET
You can set the north direction and the zone coverage.
For selecting and saving each menu item, refer to “How to use the keyboard controller”. (page 20)
Select <MAIN MENU>-<ZONE SET>.
1.
AUTO PLAY 2
ID: START END P LAY NO.
1 00:00 03: 00 OFF 0
2 03:00 06: 00 OFF 0
3 06:00 09: 00 OFF 0
4 09:00 12: 00 OFF 0
5 12:00 15: 00 OFF 0
6 15:00 18: 00 OFF 0
7 18:00 21: 00 OFF 0
8 21:00 00: 00 OFF 0
CAMERA SE T
INTELLI GENCE
PRIVACY ZONE
MAIN M ENU
PROFILE
PRESET
AUTO SET
ZONE SE T
ALARM S ET
CLOCK S ET
OTHER S ET
Set <AZIMUTH> to <ON>.
2.
Set the north direction using the joystick
3.
and press [ENTER].
SET NORTH : In SET NORTH, press
[ENTER] to set the north direction
which will be the reference for all other
directions.
Set <ZONE AREA SET> to <ON>.
4.
AZIMUTH OFF
ZONE AREA S ET OFF
ZONE SET
Page 41

When the <ZONE AREA MAP> screen
5.
appears, select a number.
When the <ZONE AREA SET> screen
6.
appears, set the <POSITION> and
<ZONE ID SET>.
For entering the name, refer to “CAMERA ID”.
ZONE AR EA MAP
1 2 3 4
5 6 7 8
(page 24)
POSITION : Sets the left/right boundaries
of the zone.
ALARM SET
It provides 8 alarm inputs and 3 alarm outputs. Detects alarm inputs from the external
sensors cooperating with configured presets, patterns, and scan functions, and
produces alarm outputs. Alarm’s dwell time is defined by the corresponding preset’s
<DWELL TIME> and its alarm action.
For selecting and saving each menu item, refer to “How to use the keyboard controller”. (page 20)
1.
Select <MAIN MENU>-<ALARM SET>.
Select each item and set appropriately.
2.
CAMERA SE T
INTELLI GENCE
PRIVACY ZONE
ALARM P RIORITY SET
ALARM I N SET
ALARM O UT SET
AUTO SET
AUX OUT CONTROL
MAIN M ENU
PROFILE
PRESET
AUTO SET
ZONE SE T
ALARM S ET
CLOCK S ET
OTHER S ET
ALARM S ET
English
English _41
Page 42

42_ setup
setup
M
ALARM PRIORITY : Sets the priorities of
alarms. Setting the priorities of 8 alarms
defines the alarm notification priorities
of them in the highest orders.
By default, the priorities are set as
Alarm 1 Alarm 2 ..... Alarm 8.
When multiple alarms are generated
at the same time, alarm notifies in the
order of the default priority setting.
While an alarm is generating, no motion
is detected.
ALARM IN SET : Select the alarm
sensor operation between <NO>, <NC>
and <OFF>.
ALARM OUT SET : Set the alarm out
port matched to the alarm input port.
AUTO SET : Sets the pattern and scan
action for the corresponding alarm
input. When the alarm is generated, the
camera moves to the preset position
coupled to the corresponding alarm.
Presets 1 ~ 8 are coupled with alarms
1 ~ 8 inputs respectively, and the preset
9 is coupled to the motion detection.
The camera stops and remains in the corresponding preset position for the
defined <DWELL TIME>, and performs pattern or scan action defined by
the <AUTO SET>. Setting to <OFF> will discard with the pattern or scan
action after moving to the preset position.
- PATTERN 1 ~ 3 : Defined pattern action
- HALF1 : Patterns 1 and 2 in serial action
- HALF2 : Patterns 2 and 3 in serial action
- WHOLE : Patterns 1, 2 and 3 in serial action
- SCAN 1 ~ 4 : Predefined SCAN action
The <ALARM1> is used as external switching signal if the <DAY/NIGHT> is set to
ALARM P RIORITY SET
ALARM1 1
ALARM2 2
ALARM3 3
ALARM4 4
ALARM5 5
ALARM6 6
ALARM7 7
ALARM8 8
ALARM1 OFF
ALARM2 OFF
ALARM3 OFF
ALARM4 OFF
ALARM5 OFF
ALARM6 OFF
ALARM7 OFF
ALARM8 OFF
MOTION OFF
AUTO SET
<EXT>.
AUX OUT CONTROL : Sets whether to
sustain the alarm output despite of the
alarm generation or to output alarm out
signal while the coupled alarm is alive.
When selected <OFF>, outputs alarm
only if the alarm is generated. When
selected <ON>, it always outputs
alarm out signal despite of the alarm
generation.
AUX OUT CONTROL
OUT1 OFF
OUT2 OFF
OUT3 OFF
Page 43

CLOCK SET
Sets whether to display the clock on the screen and its time format.
For selecting and saving each menu item, refer to “How to use the keyboard controller”. (page 20)
Select <MAIN MENU>-<CLOCK SET>.
1.
Select <DISPLAY> and set whether to
2.
display the time on the screen.
Select the time format and set the clock.
3.
Select the date format and set the date.
4.
CLOCK SET
DISPLAY OF F
TIME FO RMAT 12HOUR
SET TIM E AM 07: 34:48
DATE FORMAT MM/DD/Y YYY
SET DATE 0 1/01/2009
OTHER SET
You can reset the system by running FACTORY DEFAULTS, or set the font color, zoom,
turbo pan/tilt, etc.
For selecting and saving each menu item, refer to “How to use the keyboard controller”. (page 20)
Select <MAIN MENU>-<OTHER SET>.
1.
Select each item and set appropriately.
2.
OTHER SET
LANGUAG E ENGL ISH
FACTORY DEFAULTS
OSD COL OR BW
PROPORT IONAL P/T ON
P/T SPE ED
AUTO CAL . OFF
D-FLIP OFF
PASSWORD OF F
[2]
English
Language
Select <LANGUAGE> and use the left/right
button to select a preferred display language.
LANGUAG E ENGL ISH
FACTORY DEFAULTS
OSD COL OR BW
PROPORT IONAL P/T ON
P/T SPE ED [2]
AUTO CAL . OFF
D-FLIP OFF
PASSWORD OF F
OTHER SET
English _43
Page 44

44_ setup
setup
FACTORY DEFAULTS
When selected, the <FACTORY DEFAULTS>
screen appears and you can reset all settings
to the factory default settings by selecting
the <OK>. However, the protocol, baud rate,
address and the language settings will not be
reset.
Note that the resetting the system to the
M
factory default will erase all settings data.
OSD COLOR
Selects the color of the on-screen display font.
PROPORTIONAL P/T
When selected <ON>, manual pan / tilt movement speed will vary proportionally to
the zoom ratio.
P/T SPEED
When selected <ON>, manual pan / tilt movement speed will be doubled.
AUTO CAL. (AUTO CALIBRATION)
To enhance the lens and pan/tilt motor’s accuracy, the automatic compensation
function is provided. It automatically resets the lens and pan/tilt when there is no
user operation for a specified time period.
D-FLIP (DIGITAL FLIP)
When selected <ON>, the displayed screen will be flipped vertically and horizontally
if the subject turns over 90°.
PASSWORD
When selected <ON>, it is asked to enter the
password for accessing the menu.
Select the numbers using direction keys and
press [ENTER].
The default password is “4321”.
FACTORY DEFAULTS
OK
0 1 2 3 4
5 6 7 8 9
CANCEL
PASSWORD
[
]
[
]
Page 45

COMMUNICATION
You can set the RS-485 communications setting in regard of the camera.
For selecting and saving each menu item, refer to “How to use the keyboard controller”. (page 20)
Select <MAIN MENU>-<COMMUNICATION>.
1.
Select each item and set appropriately.
2.
PRIORITY : Set the priority by selecting
<HW> or <SW>.
When selected <HW>, the protocol,
baud rate and address settings will
follow those settings of the adaptor
COMMU NICATION
RS485
PRIORIT Y HW
PROTOCOL SAMSUNG -E
HALF
BAUD RATE 9600
ADDRESS 0
switch.
PROTOCOL, BAUD RATE, ADDRESS :
When selected <SW>, you can manually
set the protocol, baud rate and address.
SYSTEM INFO
You can check the system information.
For selecting and saving each menu item, refer to “How to use the keyboard controller”. (page 20)
Select <MAIN MENU>-<SYSTEM INFO>.
1.
The current system information is displayed.
2.
SYSTE M INFO
TYPE 4_43PTZ_NOR_P
PROTOCOL SAMS UNG-E
ADDRESS 0
COMM. T YPE HW, R S485, HALF
BAUD RATE 9600
SERIAL N O. 000 000000000000
CAMERA VE R. v2.00_10000 0
ALARM V ER. v2 .00_100000
English
English _45
Page 46

appendix
46_ appendix
appendix
SHORTCUT KEYS
DAY/NIGHT - DAY [PRESET] + [5] + [1] + [2] + [ENTER]
DAY/NIGHT - NIGHT [PRESET] + [5] + [1] + [3] + [ENTER]
DAY/NIGHT - AUTO [PRESET] + [5] + [1] + [4] + [ENTER]
DAY/NIGHT - EXT [PRESET] + [5] + [1] + [5] + [ENTER]
CAMERA SET
ALARM SET
OTHER SET
AUTO SET
Function
AUX OUT CONTROL – OUT1 – ON [PRESET] + [5] + [2] + [3] + [ENTER]
AUX OUT CONTROL – OUT1 – OFF [PRESET] + [5] + [2] + [4] + [ENTER]
AUX OUT CONTROL – OUT2 – ON [PRESET] + [5] + [2] + [5] + [ENTER]
AUX OUT CONTROL – OUT2 – OFF [PRESET] + [5] + [2] + [6] + [ENTER]
AUX OUT CONTROL – OUT3 – ON [PRESET] + [5] + [2] + [7] + [ENTER]
AUX OUT CONTROL – OUT3 – OFF [PRESET] + [5] + [2] + [8] + [ENTER]
IRIS - ALC [PRESET] + [5] + [1] + [8] + [ENTER]
IRIS - MANU [PRESET] + [5] + [1] + [9] + [ENTER]
FOCUS MODE – AF [PRESET] + [5] + [2] + [0] + [ENTER]
FOCUS MODE – MF [PRESET] + [5] + [2] + [1] + [ENTER]
FOCUS MODE – ONEAF [PRESET] + [5] + [2] + [2] + [ENTER]
PROPORTIONAL P/T – ON [PRESET] + [5] + [2] + [9] + [ENTER]
PROPORTIONAL P/T – OFF [PRESET] + [5] + [3] + [0] + [ENTER]
P/T SPEED – 9 [PRESET] + [5] + [3] + [1] + [ENTER]
P/T SPEED – 5 [PRESET] + [5] + [3] + [2] + [ENTER]
D-FLIP – ON [PRESET] + [5] + [3] + [3] + [ENTER]
D-FLIP – OFF [PRESET] + [5] + [3] + [4] + [ENTER]
AUTO PLAY – 1 [PRESET] + [5] + [3] + [5] + [ENTER]
AUTO PLAY – 2 [PRESET] + [5] + [3] + [6] + [ENTER]
AUTO PLAY – OFF [PRESET] + [5] + [3] + [7] + [ENTER]
Running A.C (Auto Calibration) [PRESET] + [5] + [3] + [8] + [ENTER]
Function Key
Page 47

SPECIFICATIONS
Item Description
Product Type
Power Source
Power Consumption
TV Standard
Image Sensor
Effective Pixels
TV line frequency
Synchronization
Resolution
S/N Ratio
Minimum subject
illumination
Signal Output
Lens
SMART DOME CAMERA
AC 24 V (50 Hz)
Use an adaptor over 3A when the heater works.
16.3W(Camera, Fan) / 47W(Heater ON)
NTSC/PAL STANDARD COLOR SYSTEM
Super-HAD IT CCD
PAL: 752(H) × 582(V)
NTSC: 768(H) × 494(V)
PAL- Horizontal : 15, 625 Hz (INT) / 15, 625 Hz (L/L)
Vertical : 50 Hz (INT) / 50 Hz (L/L)
NTSC-Horizontal : 15, 734 Hz (INT) / 15, 750 Hz (L/L)
Vertical : 59.94 Hz (INT) / 60 Hz (L/L)
INT/LINE LOCK
Horizontal : 600 TV LINES
Vertical : 350 TV LINES
Approximately 52 dB
SENS-UP Illumination Color B/W
Off 50IRE 0.2 0.02
Off 30IRE 0.12 0.012
Off 15IRE 0.06 0.006
x512 50IRE 0.00039 0.00004
x512 30IRE 0.00023 0.00002
x512 15IRE 0.00012 0.00001
COMPOSITE VIDEO OUT : 1.0 Vp-p 75 ohms/BNC
x43 Zoom Lens Integrated
Focal length : 3.2 ~ 138.5mm
Aperture : F1.65(Wide) F3.7(Tale)
- MOD(Minimum Object Distance) : 1000mm
English
English _47
Page 48

appendix
48_ appendix
Item Description
PAN range : 360˚Endless
PAN
TILT
Remote Control
Alarm
Operation Temperature
Operation Humidity
Dimensions (Ø x H)
Weight
Product Color
Preset Pan Speed : 600˚/sec, maximum
Manual Pan Speed : 0.01˚~ 180˚/sec
Tilt range : -6˚~186˚
Preset Tilt Speed : 600˚/sec, maximum
Manual Tilt Speed : 0.01˚~ 180˚/sec
RS485(Half&Full Duplex)/RS422,
Data on Coaxial Cable
Alarm Inputs : 8 IN
Alarm Outputs : 3 OUT (2 Open collector 1 relay)
-50°C(absolute minimum) ~ +50°C
~90%
228(Ø) x 256(H)mm
5.52 Kg
Light Gray
Page 49

PRODUCT APPEARANCE
256mm
240mm
English
Ø216mm (Housing Body)
Ø228mm (Shield Sun)
English _49
Page 50

SALES NETWORK
SAMSUNG TECHWIN CO., LTD.
Samsungtechwin R&D Center, 701, Sampyeong-dong, Bundang-gu, Seongnam-si, Gyeonggi-do, Korea, 463-400
TEL : +82-70-7147-8740~60 FAX : +82-31-8018-3745
SAMSUNG TECHWIN AMERICA Inc.
1480 Charles Willard St, Carson, CA 90746, UNITED STATES
Tol Free : +1-877-213-1222 FAX : +1-310-632-2195
www.samsungcctvusa.com
www.samsungtechwin.com
www.samsungsecurity.com
SAMSUNG TECHWIN EUROPE LTD.
Samsung House, 1000 Hillswood Drive, Hillswood Business Park
Chertsey, Surrey, UNITED KINGDOM KT16 OPS
TEL : +44-1932-45-5300 FAX : +44-1932-45-5325
Z6806138901A
 Loading...