

Samsung SCH-R920DSAMTR User Manual

PORTABLE DUAL-BAND
MOBILE PHONE
User Manual
Please read this manual before operating your
phone and keep it for future reference.

Intellectual Property
All Intellectual Property, as defined below, owned by or which is otherwise the property of Samsung or its respective suppliers relating to
the SAMSUNG Phone, including but not limited to, accessories, parts, or software relating there to (the “Phone System”), is proprietary to
Samsung and protected under federal laws, state laws, and international treaty provisions. Intellectual Property includes, but is not limited
to, inventions (patentable or unpatentable), patents, trade secrets, copyrights, software, computer programs, and related documentation
and other works of authorship. You may not infringe or otherwise violate the rights secured by the Intellectual Property. Moreover, you
agree that you will not (and will not attempt to) modify, prepare derivative works of, reverse engineer, decompile, disassemble, or
otherwise attempt to create source code from the software. No title to or ownership in the Intellectual Property is transferred to you. All
applicable rights of the Intellectual Property shall remain with SAMSUNG and its suppliers.
Samsung Telecommunications America (STA), LLC
Headquarters:
1301 E. Lookout Drive
Richardson, TX 75082
Toll Free Tel:
Internet Address:
©2012 Samsung Telecommunications America, LLC is a registered trademark of Samsung Electronics America, Inc. and its related
entities.
Do you have questions about your Samsung Mobile Phone?
For 24 hour information and assistance, we offer a new FAQ/ARS System (Automated Response System) at:
http://www.samsung.com/us/support
http://www.samsungusa.com
Customer Care Center:
1000 Klein Rd.
Plano, TX 75074
1.888.987.HELP (4357)
MPC_SCH-R920_Attain_English_UM_EL03_CB_011712_F4

4GLTE coverage is available in select markets. 4G, as used with this phone, refers to the fact that the phone is designed with LT E
technology.
Google™, the Google logo, Google Maps™, Gmail™, Google Talk™, YouTube™, Picasa™, Android™, and the Android Market™ are
trademarks of Google, Inc.
TM
, DivX®, DivX Certified® and associated logos are trademarks of Rovi Corporation or its subsidiaries and are used under license.
DivX Certified® to play DivX® video up to HD 720p, including premium content.
ABOUT DIVX VIDEO: DivX® is a digital video format created by DivX, LLC, a subsidiary of Rovi Corporation. This is an official DivX
Certified® device that plays DivX video. Visit
divx.com
for more information and software tools to convert your files into DivX videos.
ABOUT DIVX VIDEO-ON-DEMAND: This DivX Certified® device must be registered in order to play purchased DivX Video-on-Demand (VOD)
movies. To obtain your registration code, locate the DivX VOD section in your device setup menu. Go to
vod.divx.com
for more information
on how to complete your registration.
The Bluetooth® word mark, figure mark (stylized “B Design”), and combination mark (Bluetooth word mark and “B Design”) are registered
trademarks and are wholly owned by the Bluetooth SIG.
Nuance®, VSuite™, and the Nuance logo are trademarks or registered trademarks of Nuance Communications, Inc. or its affiliates in the
United States and/or other countries.
microSD™, microSDHC™, and the microSD logo are Trademarks of the SD Card Association.
Swype™ and the Swype logos are trademarks of Swype, Inc.
AccuWeather® and AccuWeather.com® are registered trademarks of AccuWeather Inc.
Wi-Fi® is a Certification Mark of the Wireless Fidelity Alliance, Inc.
ThinkFree Office Mobile for Android™ is a trademark of Hancom, Inc.
Microsoft® and Microsoft Office® are registered trademarks of Microsoft, Inc. Microsoft Live™ is a trademark of Microsoft, Inc.
Samsung®, Samsung Attain™, and SCH-R920™ are all trademarks of Samsung Electronics America, Inc. and/or its related entities.

Open Source Software
Some software components of this product incorporate source code covered under GNU General Public License (GPL), GNU Lesser General
Public License (LGPL), OpenSSL License, BSD License and other open source licenses. To obtain the source code covered under the open
source licenses, please visit:
http://opensource.samsung.com
.
Disclaimer of Warranties; Exclusion of Liability
EXCEPT AS SET FORTH IN THE EXPRESS WARRANTY CONTAINED ON THE WARRANTY PAGE ENCLOSED WITH THE PRODUCT, THE
PURCHASER TAKES THE PRODUCT “AS IS”, AND SAMSUNG MAKES NO EXPRESS OR IMPLIED WARRANTY OF ANY KIND WHATSOEVER
WITH RESPECT TO THE PRODUCT, INCLUDING BUT NOT LIMITED TO THE MERCHANTABILITY OF THE PRODUCT OR ITS FITNESS FOR ANY
PARTICULAR PURPOSE OR USE; THE DESIGN, CONDITION OR QUALITY OF THE PRODUCT; THE PERFORMANCE OF THE PRODUCT; THE
WORKMANSHIP OF THE PRODUCT OR THE COMPONENTS CONTAINED THEREIN; OR COMPLIANCE OF THE PRODUCT WITH THE
REQUIREMENTS OF ANY LAW, RULE, SPECIFICATION OR CONTRACT PERTAINING THERETO. NOTHING CONTAINED IN THE INSTRUCTION
MANUAL SHALL BE CONSTRUED TO CREATE AN EXPRESS OR IMPLIED WARRANTY OF ANY KIND WHATSOEVER WITH RESPECT TO THE
PRODUCT. IN ADDITION, SAMSUNG SHALL NOT BE LIABLE FOR ANY DAMAGES OF ANY KIND RESULTING FROM THE PURCHASE OR USE OF
THE PRODUCT OR ARISING FROM THE BREACH OF THE EXPRESS WARRANTY, INCLUDING INCIDENTAL, SPECIAL OR CONSEQUENTIAL
DAMAGES, OR LOSS OF ANTICIPATED PROFITS OR BENEFITS.
SAMSUNG IS NOT LIABLE FOR PERFORMANCE ISSUES OR INCOMPATIBILITIES CAUSED BY YOUR EDITING OF REGISTRY SETTINGS, OR
YOUR MODIFICATION OF OPERATING SYSTEM SOFTWARE.
USING CUSTOM OPERATING SYSTEM SOFTWARE MAY CAUSE YOUR DEVICE AND APPLICATIONS TO WORK IMPROPERLY.
MPC_SCH-R920_Attain_English_UM_EL03_CB_011712_F4

Table of Contents
Section 1: Getting Started ..............................................5
Understanding this User Manual . . . . . . . . . . . . . . . . . . . . . . . . 5
Setting Up Your Phone . . . . . . . . . . . . . . . . . . . . . . . . . . . . . . . 6
TTY Mode . . . . . . . . . . . . . . . . . . . . . . . . . . . . . . . . . . . . . . . 10
Turning Your Phone On . . . . . . . . . . . . . . . . . . . . . . . . . . . . . 11
Voicemail . . . . . . . . . . . . . . . . . . . . . . . . . . . . . . . . . . . . . . . . 12
Your Google™ Account . . . . . . . . . . . . . . . . . . . . . . . . . . . . . 12
Roaming . . . . . . . . . . . . . . . . . . . . . . . . . . . . . . . . . . . . . . . . 13
Securing Your Phone . . . . . . . . . . . . . . . . . . . . . . . . . . . . . . . 13
System Tutorial . . . . . . . . . . . . . . . . . . . . . . . . . . . . . . . . . . . 14
Turning Your Phone Off . . . . . . . . . . . . . . . . . . . . . . . . . . . . . 14
Removing the Battery . . . . . . . . . . . . . . . . . . . . . . . . . . . . . . . 14
Removing the SIM Card . . . . . . . . . . . . . . . . . . . . . . . . . . . . . 15
Memory Card . . . . . . . . . . . . . . . . . . . . . . . . . . . . . . . . . . . . . 15
Section 2: Understanding Your Phone ......................... 16
Features . . . . . . . . . . . . . . . . . . . . . . . . . . . . . . . . . . . . . . . . 16
Front View . . . . . . . . . . . . . . . . . . . . . . . . . . . . . . . . . . . . . . . 17
Side Views . . . . . . . . . . . . . . . . . . . . . . . . . . . . . . . . . . . . . . . 18
Back View . . . . . . . . . . . . . . . . . . . . . . . . . . . . . . . . . . . . . . . 19
Touch Screen Display . . . . . . . . . . . . . . . . . . . . . . . . . . . . . . 20
Navigation . . . . . . . . . . . . . . . . . . . . . . . . . . . . . . . . . . . . . . . 22
Notification Panel . . . . . . . . . . . . . . . . . . . . . . . . . . . . . . . . . . 23
Home Screen . . . . . . . . . . . . . . . . . . . . . . . . . . . . . . . . . . . . . 24
Primary Shortcuts . . . . . . . . . . . . . . . . . . . . . . . . . . . . . . . . . 25
Customizing the Home Screen Panels . . . . . . . . . . . . . . . . . . 26
Section 3: Call Functions ............................................. 30
Making Calls . . . . . . . . . . . . . . . . . . . . . . . . . . . . . . . . . . . . . 30
Answering Calls . . . . . . . . . . . . . . . . . . . . . . . . . . . . . . . . . . . 32
Ending a Call . . . . . . . . . . . . . . . . . . . . . . . . . . . . . . . . . . . . . 34
Call Log . . . . . . . . . . . . . . . . . . . . . . . . . . . . . . . . . . . . . . . . . 34
Voicemail . . . . . . . . . . . . . . . . . . . . . . . . . . . . . . . . . . . . . . . 35
Section 4: Entering Text ............................................... 36
Screen QWERTY Keyboards . . . . . . . . . . . . . . . . . . . . . . . . . . 36
Screen Keyboard Types . . . . . . . . . . . . . . . . . . . . . . . . . . . . . 37
Changing the Keyboard Type . . . . . . . . . . . . . . . . . . . . . . . . . 37
Using the Swype Keyboard . . . . . . . . . . . . . . . . . . . . . . . . . . 37
Using the Samsung Keypad . . . . . . . . . . . . . . . . . . . . . . . . . . 39
Section 5: Accounts and Contacts ..............................43
Accounts . . . . . . . . . . . . . . . . . . . . . . . . . . . . . . . . . . . . . . . . 43
Contacts . . . . . . . . . . . . . . . . . . . . . . . . . . . . . . . . . . . . . . . . 47
Favorites . . . . . . . . . . . . . . . . . . . . . . . . . . . . . . . . . . . . . . . . 50
My Profile . . . . . . . . . . . . . . . . . . . . . . . . . . . . . . . . . . . . . . . 51
Groups . . . . . . . . . . . . . . . . . . . . . . . . . . . . . . . . . . . . . . . . . 51
History . . . . . . . . . . . . . . . . . . . . . . . . . . . . . . . . . . . . . . . . . . 53
Activities . . . . . . . . . . . . . . . . . . . . . . . . . . . . . . . . . . . . . . . . 53
Speed Dials . . . . . . . . . . . . . . . . . . . . . . . . . . . . . . . . . . . . . . 53
1

Section 6: Messaging ...................................................55
Types of Messages . . . . . . . . . . . . . . . . . . . . . . . . . . . . . . . . . 55
Text and Multimedia Messaging . . . . . . . . . . . . . . . . . . . . . . .55
Gmail . . . . . . . . . . . . . . . . . . . . . . . . . . . . . . . . . . . . . . . . . . . 57
Google Talk . . . . . . . . . . . . . . . . . . . . . . . . . . . . . . . . . . . . . .59
Email . . . . . . . . . . . . . . . . . . . . . . . . . . . . . . . . . . . . . . . . . . . 59
Section 7: Web and Social Networking .......................63
YouTube . . . . . . . . . . . . . . . . . . . . . . . . . . . . . . . . . . . . . . . . . 63
Voice Search . . . . . . . . . . . . . . . . . . . . . . . . . . . . . . . . . . . . .63
MetroWEB . . . . . . . . . . . . . . . . . . . . . . . . . . . . . . . . . . . . . . .63
Maps . . . . . . . . . . . . . . . . . . . . . . . . . . . . . . . . . . . . . . . . . . . 68
Section 8: Music ...........................................................70
Music Player . . . . . . . . . . . . . . . . . . . . . . . . . . . . . . . . . . . . . . 70
Section 9: Pictures and Video ......................................72
Camera . . . . . . . . . . . . . . . . . . . . . . . . . . . . . . . . . . . . . . . . .72
Camcorder . . . . . . . . . . . . . . . . . . . . . . . . . . . . . . . . . . . . . . . 74
Video Player . . . . . . . . . . . . . . . . . . . . . . . . . . . . . . . . . . . . . . 75
Gallery . . . . . . . . . . . . . . . . . . . . . . . . . . . . . . . . . . . . . . . . . . 76
Section 10: Connections ..............................................79
Wi-Fi . . . . . . . . . . . . . . . . . . . . . . . . . . . . . . . . . . . . . . . . . . .79
Bluetooth . . . . . . . . . . . . . . . . . . . . . . . . . . . . . . . . . . . . . . . . 80
Airplane mode . . . . . . . . . . . . . . . . . . . . . . . . . . . . . . . . . . . . 81
Mobile networks . . . . . . . . . . . . . . . . . . . . . . . . . . . . . . . . . . . 81
USB Connections . . . . . . . . . . . . . . . . . . . . . . . . . . . . . . . . . . 81
2
Section 11: Applications .............................................. 83
Accessing Applications . . . . . . . . . . . . . . . . . . . . . . . . . . . . . . 83
Customizing the Applications Screens . . . . . . . . . . . . . . . . . . 83
AllShare . . . . . . . . . . . . . . . . . . . . . . . . . . . . . . . . . . . . . . . . . 83
AppStore . . . . . . . . . . . . . . . . . . . . . . . . . . . . . . . . . . . . . . . . 85
Books . . . . . . . . . . . . . . . . . . . . . . . . . . . . . . . . . . . . . . . . . . 85
Calculator . . . . . . . . . . . . . . . . . . . . . . . . . . . . . . . . . . . . . . . 85
Calendar . . . . . . . . . . . . . . . . . . . . . . . . . . . . . . . . . . . . . . . . 85
Camera & Camcorder . . . . . . . . . . . . . . . . . . . . . . . . . . . . . . . 86
Clock . . . . . . . . . . . . . . . . . . . . . . . . . . . . . . . . . . . . . . . . . . . 87
Downloads . . . . . . . . . . . . . . . . . . . . . . . . . . . . . . . . . . . . . . . 87
Email . . . . . . . . . . . . . . . . . . . . . . . . . . . . . . . . . . . . . . . . . . . 87
Gallery . . . . . . . . . . . . . . . . . . . . . . . . . . . . . . . . . . . . . . . . . . 87
Gmail . . . . . . . . . . . . . . . . . . . . . . . . . . . . . . . . . . . . . . . . . . . 87
Google Search . . . . . . . . . . . . . . . . . . . . . . . . . . . . . . . . . . . . 87
IM and Social . . . . . . . . . . . . . . . . . . . . . . . . . . . . . . . . . . . . . 87
Latitude . . . . . . . . . . . . . . . . . . . . . . . . . . . . . . . . . . . . . . . . . 88
Loopt . . . . . . . . . . . . . . . . . . . . . . . . . . . . . . . . . . . . . . . . . . . 90
M Studio . . . . . . . . . . . . . . . . . . . . . . . . . . . . . . . . . . . . . . . . 90
mail@metro . . . . . . . . . . . . . . . . . . . . . . . . . . . . . . . . . . . . . . 90
Maps . . . . . . . . . . . . . . . . . . . . . . . . . . . . . . . . . . . . . . . . . . . 90
Market . . . . . . . . . . . . . . . . . . . . . . . . . . . . . . . . . . . . . . . . . . 92
Memo . . . . . . . . . . . . . . . . . . . . . . . . . . . . . . . . . . . . . . . . . . 93
Metro Navigator . . . . . . . . . . . . . . . . . . . . . . . . . . . . . . . . . . . 93
Metro411 . . . . . . . . . . . . . . . . . . . . . . . . . . . . . . . . . . . . . . . . 93
MetroPCS Easy WiFi . . . . . . . . . . . . . . . . . . . . . . . . . . . . . . . . 93
MetroWEB . . . . . . . . . . . . . . . . . . . . . . . . . . . . . . . . . . . . . . . 93

Music Player . . . . . . . . . . . . . . . . . . . . . . . . . . . . . . . . . . . . . 93
My Files . . . . . . . . . . . . . . . . . . . . . . . . . . . . . . . . . . . . . . . . . 93
MyExtras . . . . . . . . . . . . . . . . . . . . . . . . . . . . . . . . . . . . . . . . 94
myMetro . . . . . . . . . . . . . . . . . . . . . . . . . . . . . . . . . . . . . . . . 94
Navigation . . . . . . . . . . . . . . . . . . . . . . . . . . . . . . . . . . . . . . . 94
Places . . . . . . . . . . . . . . . . . . . . . . . . . . . . . . . . . . . . . . . . . . 94
Pocket Express . . . . . . . . . . . . . . . . . . . . . . . . . . . . . . . . . . . 94
Quickoffice . . . . . . . . . . . . . . . . . . . . . . . . . . . . . . . . . . . . . . . 95
Rhapsody . . . . . . . . . . . . . . . . . . . . . . . . . . . . . . . . . . . . . . . . 95
Settings . . . . . . . . . . . . . . . . . . . . . . . . . . . . . . . . . . . . . . . . . 95
Talk . . . . . . . . . . . . . . . . . . . . . . . . . . . . . . . . . . . . . . . . . . . . 95
Task . . . . . . . . . . . . . . . . . . . . . . . . . . . . . . . . . . . . . . . . . . . 95
Task Manager . . . . . . . . . . . . . . . . . . . . . . . . . . . . . . . . . . . . 95
Video Player . . . . . . . . . . . . . . . . . . . . . . . . . . . . . . . . . . . . . . 95
Virtual Card . . . . . . . . . . . . . . . . . . . . . . . . . . . . . . . . . . . . . . 95
Visual Voice Mail . . . . . . . . . . . . . . . . . . . . . . . . . . . . . . . . . . 96
Voice Control . . . . . . . . . . . . . . . . . . . . . . . . . . . . . . . . . . . . . 96
Voice Recorder . . . . . . . . . . . . . . . . . . . . . . . . . . . . . . . . . . . . 99
Voice Search . . . . . . . . . . . . . . . . . . . . . . . . . . . . . . . . . . . . . 99
Write & Go . . . . . . . . . . . . . . . . . . . . . . . . . . . . . . . . . . . . . . . 99
YouTube . . . . . . . . . . . . . . . . . . . . . . . . . . . . . . . . . . . . . . . . 99
Section 12: Settings ...................................................100
Accessing Settings . . . . . . . . . . . . . . . . . . . . . . . . . . . . . . . . 100
Wireless and network . . . . . . . . . . . . . . . . . . . . . . . . . . . . . . 100
Call settings . . . . . . . . . . . . . . . . . . . . . . . . . . . . . . . . . . . . . 103
Sound settings . . . . . . . . . . . . . . . . . . . . . . . . . . . . . . . . . . . 105
Display settings . . . . . . . . . . . . . . . . . . . . . . . . . . . . . . . . . . 108
Location and security . . . . . . . . . . . . . . . . . . . . . . . . . . . . . 109
Applications . . . . . . . . . . . . . . . . . . . . . . . . . . . . . . . . . . . . . 112
Accounts and sync . . . . . . . . . . . . . . . . . . . . . . . . . . . . . . . 114
Privacy . . . . . . . . . . . . . . . . . . . . . . . . . . . . . . . . . . . . . . . . 115
SD card and phone storage . . . . . . . . . . . . . . . . . . . . . . . . . 116
Search . . . . . . . . . . . . . . . . . . . . . . . . . . . . . . . . . . . . . . . . . 116
Locale and text . . . . . . . . . . . . . . . . . . . . . . . . . . . . . . . . . . 117
Voice input and output . . . . . . . . . . . . . . . . . . . . . . . . . . . . . 118
Accessibility . . . . . . . . . . . . . . . . . . . . . . . . . . . . . . . . . . . . 119
Date and time . . . . . . . . . . . . . . . . . . . . . . . . . . . . . . . . . . . 120
About phone . . . . . . . . . . . . . . . . . . . . . . . . . . . . . . . . . . . . 120
Section 13: Health and Safety Information ............... 122
Exposure to Radio Frequency (RF) Signals . . . . . . . . . . . . . . 122
Specific Absorption Rate (SAR) Certification Information . . . 126
FCC Part 15 Information to User: . . . . . . . . . . . . . . . . . . . . . 128
Smart Practices While Driving . . . . . . . . . . . . . . . . . . . . . . . 128
Battery Use and Safety . . . . . . . . . . . . . . . . . . . . . . . . . . . . 129
Samsung Mobile Products and Recycling . . . . . . . . . . . . . . . 130
UL Certified Travel Charger . . . . . . . . . . . . . . . . . . . . . . . . . 132
Display / Touch-Screen . . . . . . . . . . . . . . . . . . . . . . . . . . . . 132
GPS & AGPS . . . . . . . . . . . . . . . . . . . . . . . . . . . . . . . . . . . . 133
Emergency Calls . . . . . . . . . . . . . . . . . . . . . . . . . . . . . . . . . 134
Care and Maintenance . . . . . . . . . . . . . . . . . . . . . . . . . . . . . 134
Responsible Listening . . . . . . . . . . . . . . . . . . . . . . . . . . . . . 135
Operating Environment . . . . . . . . . . . . . . . . . . . . . . . . . . . . 137
FCC Hearing Aid Compatibility (HAC) Regulations
for Wireless Devices . . . . . . . . . . . . . . . . . . . . . . . . . . . . 139
3

Restricting Children's Access to Your Mobile Device . . . . . . . 140
FCC Notice and Cautions . . . . . . . . . . . . . . . . . . . . . . . . . . .140
Other Important Safety Information . . . . . . . . . . . . . . . . . . . . 141
Section 14: Warranty Information .............................142
Standard Limited Warranty . . . . . . . . . . . . . . . . . . . . . . . . . . 142
End User License Agreement for Software . . . . . . . . . . . . . . 146
Index ............................................................................151
4

Section 1: Getting Started
This section allows you to quickly start using your Samsung
SCH-R920 phone by installing the SIM and microSD cards,
installing and charging the battery, activating your service, and
setting up your voicemail account.
Understanding this User Manual
The sections of this manual generally follow the features of your
phone. A robust index for features begins on page 151.
Also included is important safety information that you should
know before using your phone. Most of this information is near
the back of the guide, beginning on page 122.
This manual gives navigation instructions according to the
default display settings. If you select other settings, navigation
steps may be different.
Unless otherwise specified, all instructions in this manual
assume that you are starting from the Home screen. To get to the
Home screen, you may need to unlock the phone or keypad. (For
more information, refer to “Securing Your Phone” on page 13.)
Note:
Instructions in this manual are based on default settings, and may vary
from your phone, depending on the software version on your phone,
and any changes to the phone’s Settings.
Unless stated otherwise, instructions in this User Manual start with the
phone unlocked, at the Home screen.
All screen images in this manual are simulated. Actual displays may
vary, depending on the software version of your phone and any
changes to the phone’s Settings.
Special Text
In this manual, you’ll find text that is set apart from the rest.
These are intended to point out important information, share
quick methods for activating features, to define terms, and more.
The definitions for these methods are as follows:
•
Notes
: Presents alternative options for the current feature, menu, or
sub-menu.
•
Tips
: Provides quick or innovative methods, or useful shortcuts.
•
Example
: Gives an example of the feature or procedure.
•
Important
: Points out important information about the current feature
that could affect performance.
•
Warning
: Brings to your attention important information to prevent
loss of data or functionality, or even prevent damage to your phone.
Getting Started 5
Text Conventions
This manual provides condensed information about how to use
your phone. To make this possible, the following text conventions
are used to represent often-used steps:
➔
Arrows are used to represent the sequence of
selecting successive options in longer, or repetitive,
procedures.
Example:
“From the Home screen, press Menu
Wireless and networks ➔ Wi-Fi settings
, then touch
.”
Settings
Setting Up Your Phone
Before using your phone, you need to install the SIM card,
microSD™ card, and battery into their respective internal slots
and compartment.
6
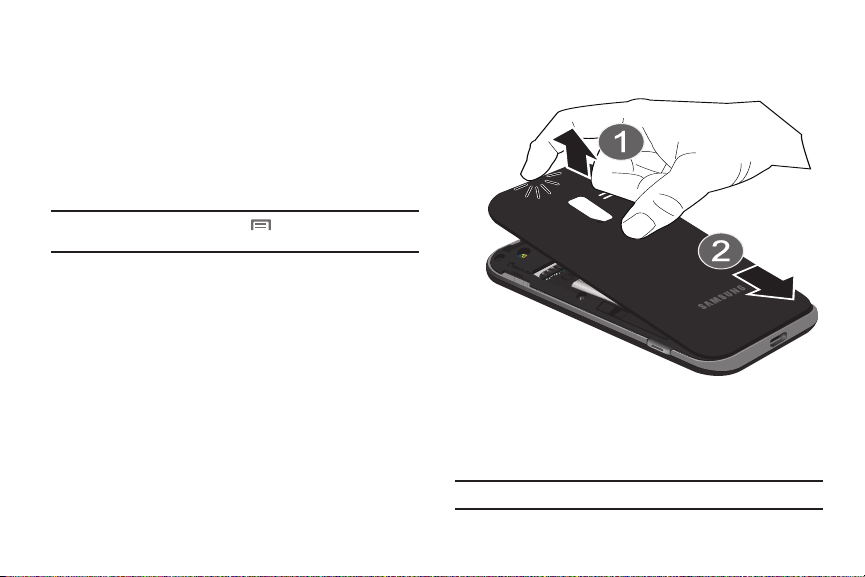
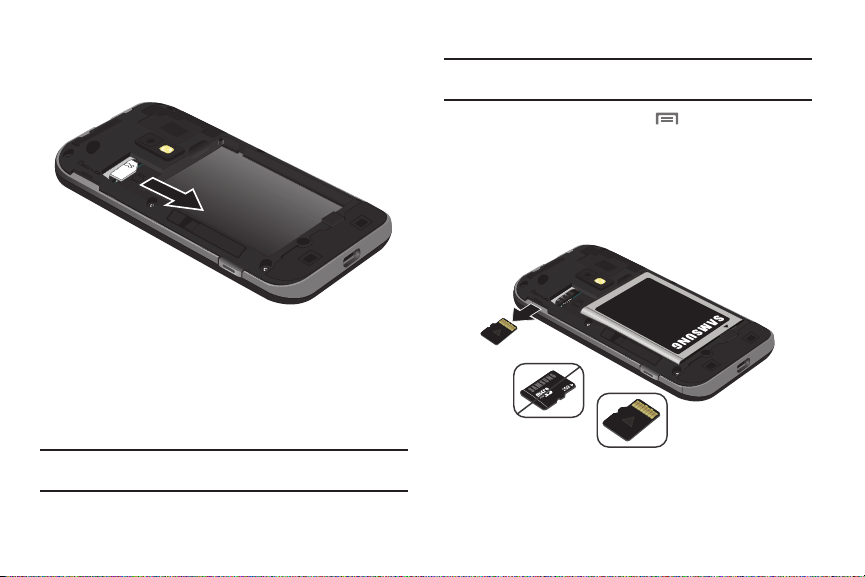
Removing the battery cover
䊳
Pull up using the slot provided (1), while lifting the cover off
the phone (2).
➔
Installing the SIM Card
When you subscribe to a 4G LTE cellular network, you are
provided with a plug-in SIM card loaded with your subscription
details.
Important!:
The SIM card must be installed for your phone to access 4G LTE.
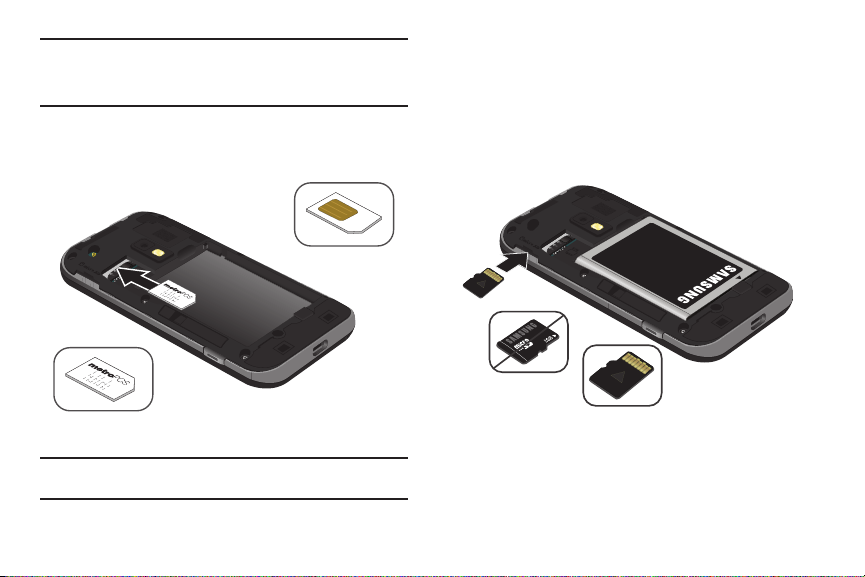
Important!:
Correct
Incorrect
Incorrect
Correct
The plug-in SIM card information and its contacts can be easily
damaged by scratching or bending, so be careful when handling,
inserting, or removing the card. Keep all SIM cards out of reach
of small children.
䊳
Make sure the gold contacts of the SIM card face into the
phone, then carefully slide the SIM card into the SIM card
socket (as shown) until the card locks into place.
Note:
If the SIM card is not inserted correctly, the phone cannot make an LTE
connection with the network.
Installing the Memory Card
Your device lets you install a microSD (SD) or microSDHC
memory card to expand available memory to store images,
videos, music, some applications, and data.
䊳
With the gold contacts facing up, carefully slide the
memory card into the slot (as shown), pushing gently until
it clicks into place.
Getting Started 7
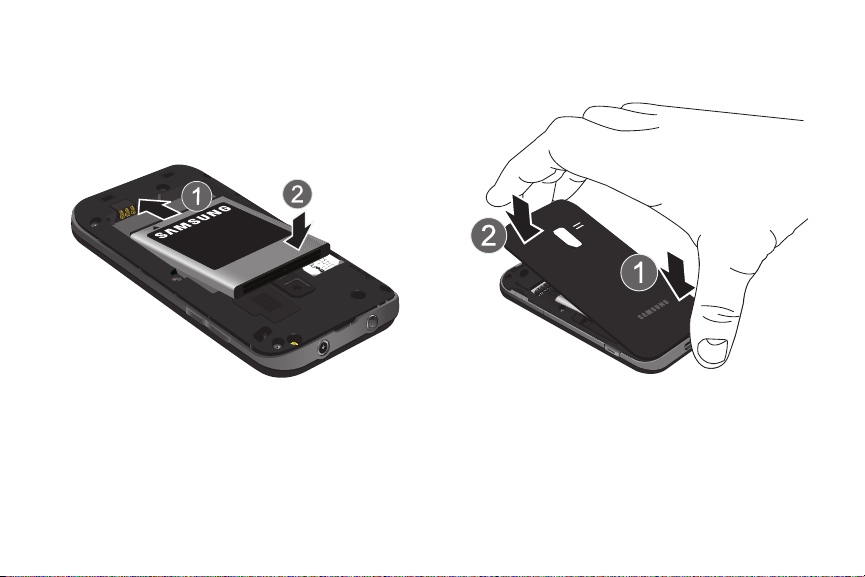
Installing the Battery
1. Remove the battery cover. (For more information, see
“Removing the battery cover”.)
2. Insert the battery into the phone, aligning the gold contacts
on the battery with the gold contacts in the phone. Push
down on the bottom of the battery until it snaps into place.
8
Installing the battery cover
䊳
Align the cover and press it firmly into place, making sure
it snaps into place at the corners.
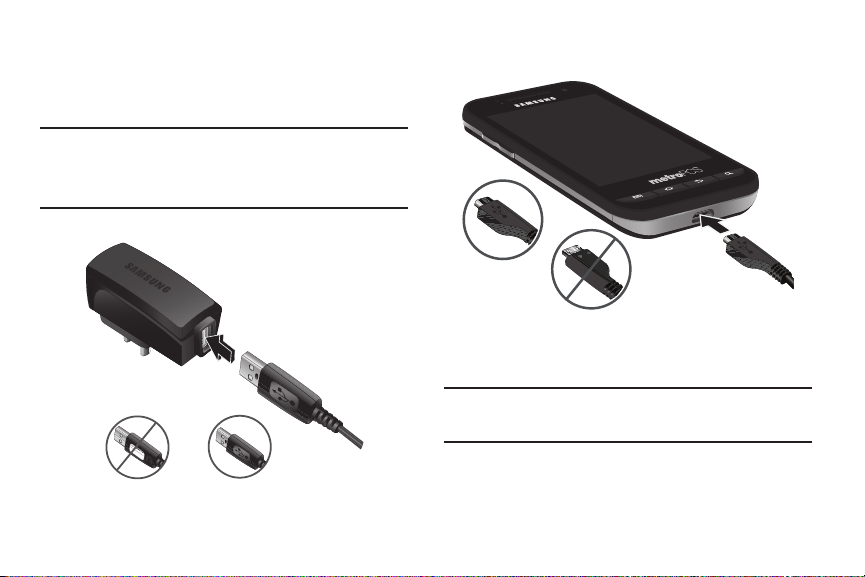
Charging the Battery
CorrectIncorrect
Your phone comes with a Wall/USB Charger (Charging Head and
USB cable) to rapidly charge your phone from any 120/220 VAC
outlet.
Note:
The battery comes partially charged. You must fully charge the battery
before using your phone for the first time. A fully discharged battery
requires up to 4 hours of charge time.
After the first charge, you can use the phone while charging.
1. Connect the USB cable to the charging head.
2. On the phone, slide the connector cover (1) to expose the
connector.
Correct
Incorrect
3. Insert the USB cable into the port (2).
4. Plug the charging head into a standard AC power outlet.
Warning!:
While the device is charging, if the touch screen does not function
due to an unstable power supply unplug the USB power adapter
from the power outlet or unplug the USB cable from the device.
5. When charging is complete, unplug the charging head
from the power outlet and remove the USB cable from the
phone.
Getting Started 9

Battery
Your phone is powered by a rechargeable, standard Li-Ion
battery. A Wall/USB Charger (Charging Head and USB cable) is
included with the phone, for charging the battery.
Note:
The battery comes partially charged. You must fully charge the battery
before using your phone for the first time. A fully discharged battery
requires up to 4 hours of charge time.
After the first charge, you can use the phone while charging.
Warning!:
Use only Samsung-approved charging devices and batteries.
Samsung accessories are designed to maximize battery life. Using
other accessories may invalidate your warranty and may cause
damage.
Battery Indicator
The battery icon in the Annunciator Line shows battery power
level. Two to three minutes before the battery becomes too low to
operate, the empty battery icon will flash and a tone will sound. If
you continue to operate the phone without charging, the phone
will power off.
10
Non-Supported Batteries
Samsung handsets do not support the use of non-approved
batteries.
Important!:
Using a non-supported battery may damage to your phone.
When using a non-supported battery you will hear a series of
beeps and see a warning message:
“
UNABLE TO CHARGE NON-SUPPORTED BATTERY. SEE USER
MANUAL
”
If you receive this warning, battery charging has been disabled.
Samsung charging accessories, such as the charging head and
cigarette lighter adapter, will only charge Samsung-approved
batteries.
Note:
When using a non-supported battery, the phone can only be used for
the duration of the life of the battery and cannot be recharged.
TTY Mode
Your phone is fully TTY-compatible, allowing you to connect a
TTY device to the phone’s headset jack. Before you can use your
phone with a TTY device, you’ll need to enable TTY Mode.
For more information, refer to “TTY mode” on page 104.
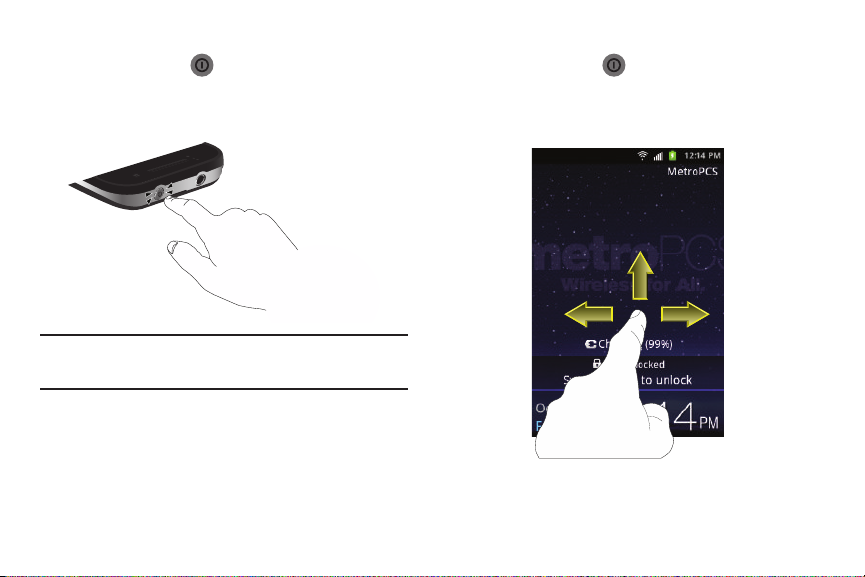
Turning Your Phone On
䊳
Press and hold the
Power/Lock Key
for three seconds.
While powering on, the phone connects with the network
(both digital and LTE), then displays the Locked screen and
puzzle pieces for any active Notification alerts.
Note:
Your phone’s internal antenna is located along the bottom back of the
phone. Do not block the antenna; doing so may affect call quality or
cause the phone to operate at a higher power level than necessary.
Unlocking Your Phone
1. If needed, press the
Power/Lock Key
screen.
2. To unlock the screen, sweep across it.
The Home screen appears.
to wake the
Getting Started 11
Voicemail
All unanswered calls to your phone are sent to voicemail, even if
your phone is turned off, so you’ll want to set up your voicemail
and personal greeting as soon as you activate your phone.
Setting up Voicemail
1. Press
Home
, then touch
Phone
, then touch and
hold .
2. Follow the automated instructions to set up your new
password and record a greeting.
Checking Voicemail
1. Press
Home
, then touch
Phone
, then touch and
hold .
2. Follow the automated instructions to manage voicemail.
Tip:
You can also access
touch-tone phone.
Displaying Your Phone Number
䊳
Press Home
Settings ➔ About phone ➔ Status
Your phone number displays under
12
Voicemail
by dialing your phone number from any
, then press Menu
.
Phone number
, then touch
.
Your Google™ Account
Your new phone uses your Google account to fully utilize its
Android features, including Gmail, Google Maps, Google Talk, and
the Android Market. When you turn on your phone for the first
time, you should set up a connection with your existing Google
account, or create a new Google account.
1. Press
The
2. Tap
3. Follow the on-screen instructions to create a Google
Home
Gmail
, then touch
.
Add a Google Account
Next
to continue.
Applications
screen displays.
➔
Account, or to sign in if you already have a Google account.
Resetting your Google Account Password
A Google account password is required for Google applications. If
you misplace or forget your Google Account password, follow
these instructions to reset it:
1. From your computer, use an Internet browser to navigate
to
http://google.com/accounts
2. Once the URL loads, click on the
account?
link.
3. Under
Forgot your password?
.
Can’t access your
, follow the password reset
prompts.
Roaming
When you travel outside your home network’s coverage area,
your phone can roam to acquire service on other compatible
digital networks. When Roaming is active, the Roaming icon
( ) appears in the Annunciator Line of the display.
Tip:
You can set your phone’s roaming behavior. (For more information, refer
to “Mobile networks” on page 103.)
During roaming, some services may not be available. Depending
on your coverage area and service plan, extra charges may apply
when making or receiving calls.
Note:
Contact your Wireless Provider for more information about your
coverage area and service plan.
Securing Your Phone
By default, the phone locks automatically when the screen times
out, or you can lock it manually. You can unlock the phone using
one of the default Unlock screens, or for increased security, use a
personal screen unlock pattern, a Personal Identification Number
(PIN), or a password.
For more information about creating and enabling a Screen
unlock pattern, see “Screen unlock settings” on page 110.
For other settings related to securing your phone, see “Location
and security” on page 109.
Note:
Unless stated otherwise, instructions in this User Manual start with the
phone unlocked, at the Home screen.
Locking the phone manually
䊳
Press the
Power/Lock Key
on the top of the phone.
Unlocking the phone
For information on unlocking your phone, see “Unlocking Your
Phone” on page 11.
Unlocking with a Personal Screen Unlock Pattern
1. Press the
2. Draw your personal unlock pattern on the screen.
Power/Lock Key
to wake the screen.
Getting Started 13

For more information, refer to “Set unlock pattern/Change unlock
pattern” on page 110.
Unlocking with a Password
1. Press the
2. Enter your Password.
3. Press
OK
.
Power/Lock Key
to wake the screen.
System Tutorial
Learn about important concepts to get the most out of your
phone.
䊳
From the Home screen, press Menu
Settings ➔ About phone ➔ System tutorial
, then touch
.
Turning Your Phone Off
1. Press and hold the
2. At the prompt, tap
14
Power/Lock Key
Power off
for two seconds.
.
Removing the Battery
1. Remove the battery cover. (For more information, refer to
“Removing the battery cover” on page 6.)
2. Lift the battery up by the slot provided.
3. Lift the battery up and out of the phone.
Removing the SIM Card
䊳
To remove the SIM card, slide it away from the handset.
See the following illustration.
Removing a Memory Card
Important!:
To prevent damage to information stored on the memory card,
unmount the card before removing it from the phone.
Memory Card
Your phone includes a removable microSD™ memory card, for
storage of music, pictures, and other files, and supports optional
microSD™ or microSDHC™ memory cards of up to 32GB
capacity. (For information on installing a memory card, see
“Installing the Memory Card” on page 7.)
Note:
You can only store music files that you own (from a CD or purchased
using the phone) on a memory card.
1. From the Home screen, press
Menu
, then touch
Settings ➔ SD card and phone storage ➔ Unmount SD card
2. Remove the rear cover. (For more information, refer to
“Removing the battery cover” on page 6.)
3. Gently press on the memory card, then release so that it
pops out from the slot, and carefully pull the card out.
Incorrect
Correct
4. Install the cover. (For more information, refer to “Installing
the battery cover” on page 8.)
Getting Started 15
.

Section 2: Understanding Your Phone
This section outlines key features of your phone, including keys,
displays, and icons.
Features
•
3.5-inch (480x320 pixel) HVGA full-screen touch screen
•
7-panel Home screen, simplefied main menu, and separate, 3-page
Applications menu
•
High Speed Data [EVDO 1x - Rev 0 Capable Technology, 4G Long Term
Evolution (LTE) Technology, and Wi-Fi Technology]
•
Android OS
•
Motion and position sensitivity
•
Full integration with Google applications, including Google Search,
Google Maps, Google Talk, and Gmail
•
Android Market®, plus pre-loaded applications
•
Connections
–
4G LTE
–
Wi-Fi 802.11 b/g/n
–
Bluetooth 2.1 + EDR
•
Messaging Services (with on-screen QWERTY Keypads)
–
Text Messaging
–
Picture Messaging
–
Video Messaging
–
Voice Messaging
16
–
Email
–
Mobile Instant Messenger (IM)
–
Chat
•
Full-HTML Browser
•
Global Positioning (GPS) Technology
•
3.0 Megapixel CMOS Camera-Camcorder, rear-facing
•
1.3 Megapixel CMOS Camera-Camcorder, front-facing
•
Picture Gallery, supporting JPG, PNG, GIF, and BMP formats
•
Music Player, supporting MP3 format
•
Video Player, supporting MP4, 3GP, WMV, AVI, MKV, FLV, and ASF
formations, and plays DivX® video up to HD 720p, including premium
content
•
Speakerphone
•
Voice recognition by Nuance®
•
Ringtone and Alert tone support for MP3, AAC, WMA, M4A, OGG, MID,
and AMR formats
•
Support for microSD™ and microSDHC™ Memory Cards (up to 32 GB
capacity) (A microSD Memory Card is included with your phone.)
•
Bluetooth® 3.0 + EDR Wireless Technology. (For more information,
refer to
“Bluetooth profiles”
on page 101.)

Front View
1
3 654
2
7
1.
Earpiece
: Listen to callers.
2.
Light and Proximity Sensors
brightness when Brightness is set to
: Light sensor adjusts screen
Automatic brightness
.
(For more information, refer to “Brightness” on page 108.)
During a call, Proximity sensor detects that the phone is
next to your face and darkens the screen to save battery
power.
3.
Menu Key
4.
: Press to display options for the current screen.
Home Key
: Press to display the Home screen. Press and
hold at any time to launch Task Manager.
5.
Back Key
: Press to return to the previous screen or option.
6.
Search Key
: Press to launch Search, to search your device
or the web.
7.
Camera Lens
: Used when taking photos or recording
videos.
Understanding Your Phone 17
1
3
6
4
7
5
2
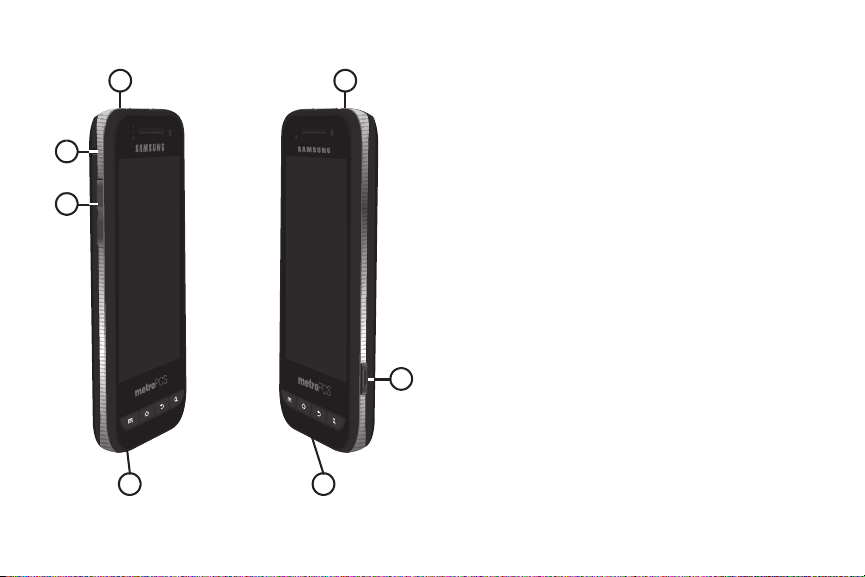
Side Views
18
1.
3.5mm Headset Jack
2.
Accessory Hook
: allows you to plug in headphones.
: Attach optional accessories, such as a
lanyard, here.
3.
Volume Key
: From a Home screen, press to adjust Master
Volume. During calls or music playback, press to adjust
volume. Press to mute the ringtone of an incoming call.
4.
Microphone
: allows other callers to hear you when you are
speaking to them.
5.
USB Power/Accessory Port
: Plug in a USB cable for
charging or to sync music and files.
6.
Camera Key
: From a Home screen, press and hold to
launch the Camera application. From the Camera
viewfinder screen, press to take a picture or begin/end
recording a video.
7.
Power/Lock Key
: With the phone off, press and hold to
power your phone on.
With the phone on:
•
Press to blank the display and lock your phone or to waken the
display when blanked.
•
Press and hold to power phone off or to access these options:
–
Silent mode
: Phone vibrates instead of ringing.
–
Airplane mode
–
Restart
: Disables all radio functions.
: Power cycles the phone.
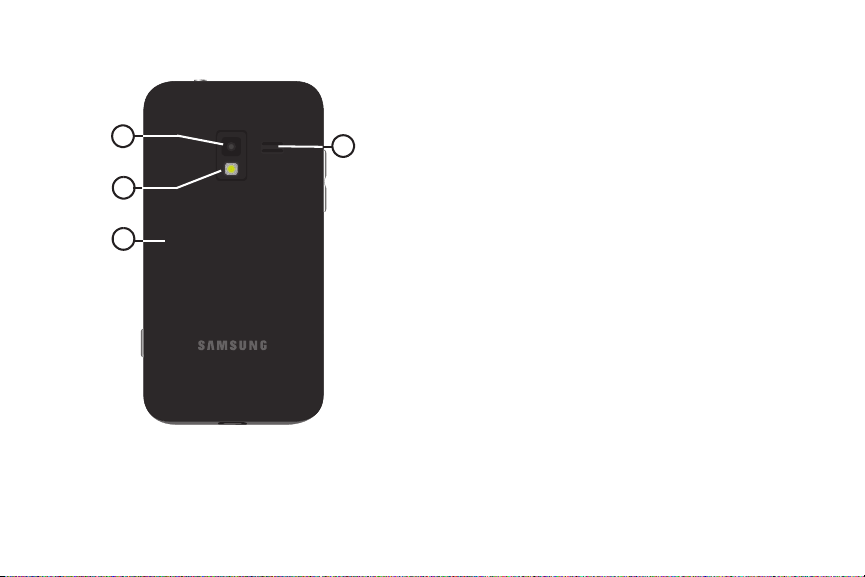
Back View
4G
2
1
3
4
1.
Camera Lens
: Used when taking photos or recording
videos.
2.
Flash
: Used taking photos in low light conditions.
3.
Back Cover
: Protects the battery, LTE SIM slot, and Memory
Card slot.
4.
Speaker Grill
: Plays ringtones, call audio when in
Speakerphone mode, music, and other sounds.
Understanding Your Phone 19
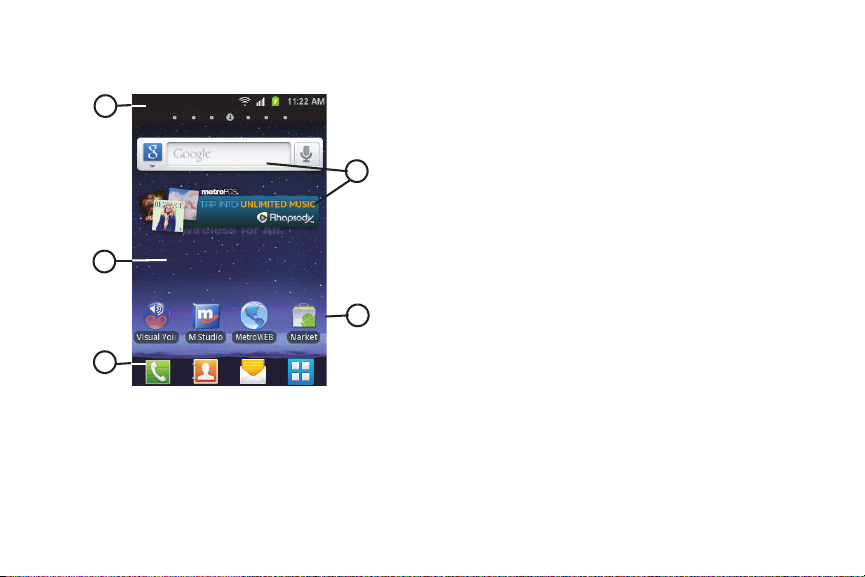
Touch Screen Display
1
3
4
2
5
Your phone’s touch screen display is the interface to its features.
1.
Annunciator Line
: Presents icons to show network status,
battery power, and connection details. (For more
information, refer to “Annunciator Line” on page 21.)
20
2.
Home screen
: The starting point for using your phone.
Place icons, widgets, and other items to customize your
phone to your needs. (For more information, refer to
“Home Screen” on page 24.)
3.
Primary Shortcuts
: Shortcuts to your phone’s common
features. (For more information, refer to “Primary
Shortcuts” on page 25.) You can add more shortcuts (as
shown above the Primary Shortcuts) by using the
Home screen
menu. (For more information, refer to
“Customizing the Home Screen Panels” on page 26 and
For more information, refer to “Adding Shortcuts to a Home
Screen panel” on page 27.)
4.
Widgets
: Applications that run on a Home screen panel.
These widgets are found on this Home screen panel by
default. (For more information, refer to “Adding Widgets to
a Home Screen panel” on page 26.)
5.
Shortcuts
: Shortcuts can be added for quick access to
applications or features, such as MetroWEB or other
applications.
to a Home Screen panel” on page 27
For more information, refer to
.
“Adding Shortcuts
Display settings
You can customize display settings to your preferences. (For
more information, refer to “Display settings” on page 108.)
Add to
Changing the Screen Orientation
You can manually change the orientation of most of your phone’s
screens by opening the QWERTY keypad.
Your SCH-R920 can also automatically change the orientation of
some screens. The phone’s built-in accelerometer senses
movement and changes a screen’s orientation from portrait to
landscape.
Note:
Some screens, especially those for applications and games, do not
respond to the accelerometer.
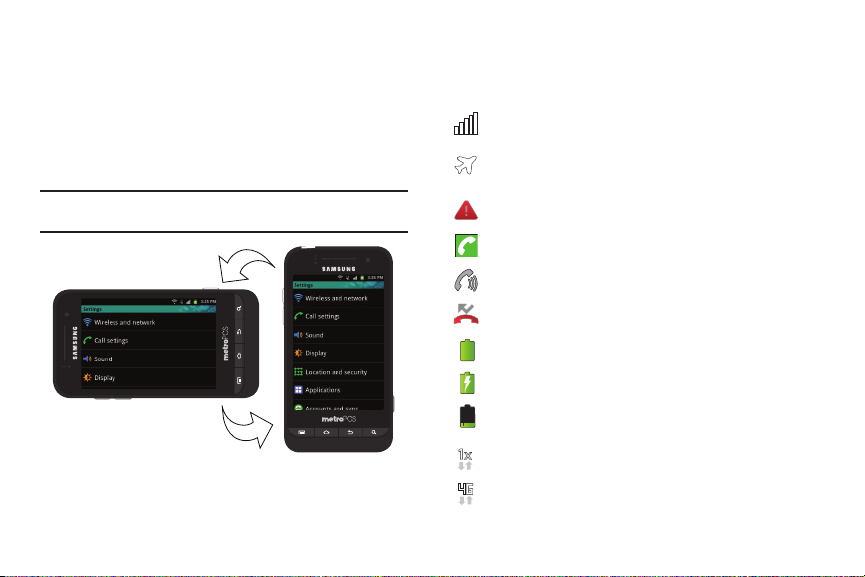
Annunciator Line
The Annunciator line displays icons to show network status,
battery power, and other details.
Signal Strength
: Current signal strength. The greater
the number of bars, the stronger the signal.
Airplane Mode Active
: All wireless communications
are disabled. (See “Airplane mode” on page 102.)
System Alert
Voice Call
: Check Notifications Panel for alerts.
: A voice call is in progress.
Speakerphone
Missed Call
Battery Level
Charging Indicator
Device Power Critical
: Speakerphone is enabled.
: Displays when there is a missed call.
: Shown fully charged.
: Battery is charging.
: Battery has only three percent
power remaining. Charge immediately.
1X Connection Active
4G Connection Active
: Phone is active on a 1X system.
: Phone is active on a 4G system.
Understanding Your Phone 21
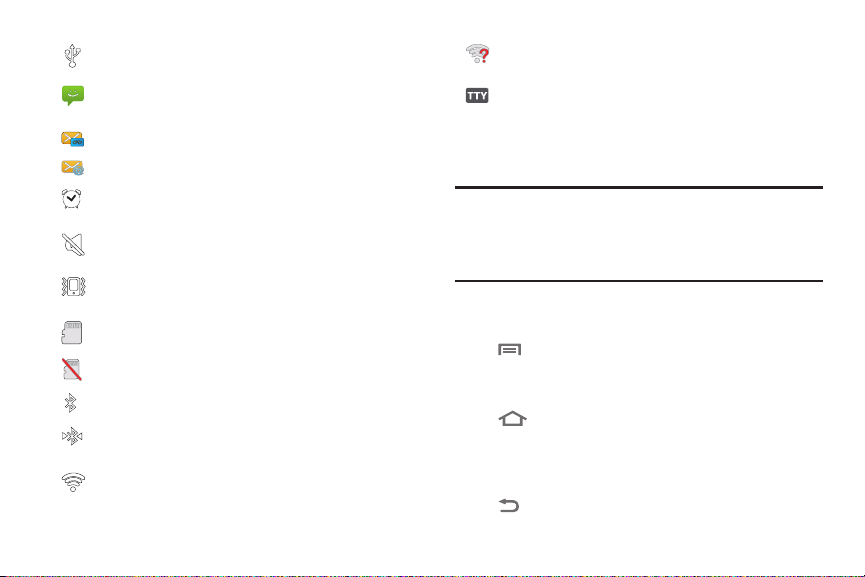
USB Connected
:The phone is connected to a computer
using a USB cable.
New Text Message
message.
New Voicemail
New Email Message
Alarm Set
refer to “Clock” on page 87.)
Silent mode
: You have a new text or multimedia
: You have new voicemail.
: You have new email.
: An alarm is active. (For more information,
: All sounds except media and alarms are
Navigation
Navigate your phone’s features using the command keys and the
touch screen.
Warning!:
silenced. (See “Silent mode” on page 105.)
Vibrat e mode
vibrates for alerts. (See “Vibrate” on page 105.)
SD Card Ready
SD Card Removed
Bluetooth Active
Bluetooth Connected
another Bluetooth device.
Wi-Fi Active
communicating with a Wireless Access Point (WAP).
22
: All sounds are silenced, but the phone
: An optional memory card is installed.
: A memory card was uninstalled.
: Bluetooth is turned on.
: The phone is paired with
: Wi-Fi is connected, active, and
Command Keys
Menu Key
Press Menu
for the current screen or feature.
Home Key
Press Home
any time to launch Task Manager. (For more information, refer to
“Task Manager” on page 95.)
Back Key
Press Back
Wi-Fi Action Needed
Wireless Access Point (WAP).
TTY
: TTY Mode is active.
If your handset has a touch screen display, please note that a
touch screen responds best to a light touch from the pad of your
finger. Using excessive force or a metallic object when pressing on
the touch screen may damage the tempered glass surface and
void the warranty. (For more information, refer to “Warranty
Information” on page 142.)
to display a context-sensitive menu of options
to display the Home screen. Press and hold at
to return to the previous screen, option or step.
: Action needed to connect to
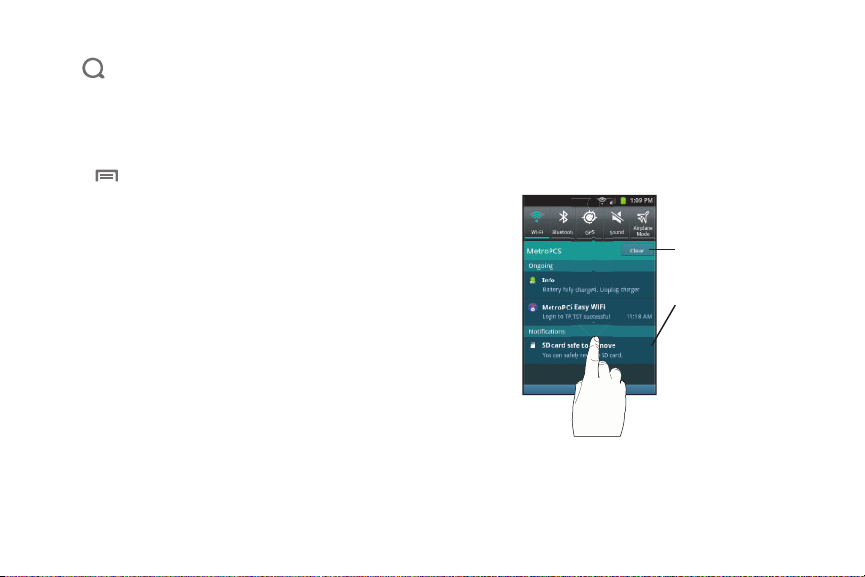
Search Key
Touch a
notification
to open
any related
application
Touch and
slide up to
close the
Notification
panel
Touch to
clear all
notifications
Press
Search
to launch Quick Search, to search the web and your
phone.
Context-sensitive Menus
While using your phone, context-sensitive menus offer options
for the feature or screen. To access context-sensitive menus:
• Touch
•
Touch and hold on an item.
Menu
.
Tou ch
Touch items to select or launch them. For example:
•
Touch the on screen keypad to enter characters or text.
•
Touch a menu item to select it.
•
Touch an application’s icon to launch the application.
Touch and Hold
Activate onscreen items by a touch and hold gesture. For
example:
•
Touch and hold a widget on the home screen to move it.
•
Touch and hold on a field to display a pop-up menu of options.
Sweep
To sweep, lightly drag your finger vertically or horizontally across
the screen. Use sweep when:
•
Unlocking the screen
•
Scrolling the Home screen or a menu
Notification Panel
The Notification Panel shows information about connections,
messages and other items.
䊳
Sweep your finger downward from the top of the screen.
To close Notification Panel, tap the panel.
Understanding Your Phone 23

Status Buttons
Buttons at the top of the Notification Panel show statuses for
Wi-Fi, Bluetooth, GPS, Sound
, and
Airplane Mode
. You can change
any of these statuses between enable and disable by touching
the appropriate button.
Clearing Notifications
1. Sweep your finger downward from the top of the screen to
display the Notifications Panel.
2. Touch
Clear
to clear all notifications.
Home Screen
The Home screen is the starting point for using your phone.
24
Note:
Unless stated otherwise, instructions in this User Manual start with the
phone unlocked, at the Home screen.
Extended Home Screen
The Home screen consists of the Home panel, plus 6 panels that
extend beyond the display width to provide more space for
adding shortcuts, widgets and folders.
Slide your finger horizontally across the screen to scroll to the left
or right side panels. As you scroll, the indicator at the top of the
display shows your current position.
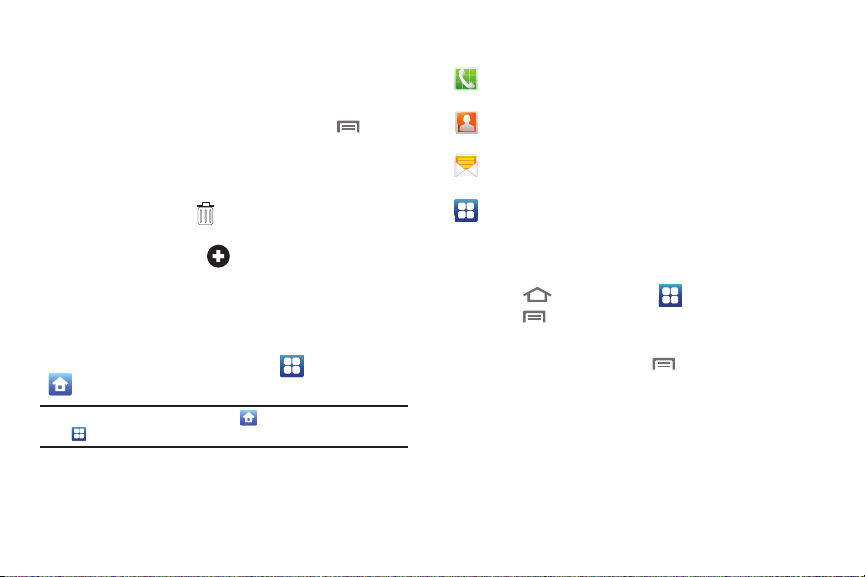
Adding and removing Home screen panels
Your phone comes with 7 Home screen panels. You can
customize the Home screen to include up to the seven default
panels, and set one as Home.
1. Navigate to a Home screen panel, then press
2. Touch
Edit page
. An array of thumbnail images of the Home
screen panels appears in the display.
3. To remove a panel, touch, hold, and drag the panel image
to the
Remove
icon ( ). At the prompt, touch OK. The
panel is deleted.
4. To add a panel, touch .
5. To set a panel as the Home panel, touch, hold, and drag
the panel image to the center (panel 4) position.
Primary Shortcuts
Primary Shortcuts appear at the bottom of the display. You can
edit the Primary Shortcuts, except for the
Home
shortcut.
Note:
When you access
Applications
Applications
shortcut to provide quick return to the Home screen.
, the Home
Applications
shortcut replaces the
Menu
/
The default primary shortcuts are:.
Phone
information, refer to “Making Calls” on page 30.)
.
Contacts
information, refer to “Contacts” on page 47.)
Messaging
information, refer to “Messaging” on page 55.)
Applications
more information, refer to “Accessing Applications” on
page 83.)
Editing the Primary Shortcuts
1. Press
2. Press
3. Touch and drag an icon to replace a primary shortcut.
4. When you are finished, press
: Launches the Phone, to make calls. (For more
: Store and manage your contacts. (For more
: Send and receive messages. (For more
: Access your phone’s applications. (For
Home
, then touch
Menu
, then touch
Applications
Edit
.
Menu
Understanding Your Phone 25
.
, then touch
Save
.
Customizing the Home Screen Panels
Customize the Home screen panels to suit your preferences.
•
Add Widgets
Home Screen panel”
•
Add Shortcuts
a Home Screen panel”
•
Add Folders
Home Screen panel”
•
Change the Wallpaper
Wallpaper on a Home Screen panel”
: For more information, refer to
on page 26.
: For more information, refer to
on page 27.
: For more information, refer to
on page 28.
: For more information, refer to
on page 29.
“Adding Widgets to a
“Adding Shortcuts to
“Adding Folders to a
“Changing the
Adding Widgets to a Home Screen panel
Widgets are self-contained applications that you can place on the
Home screen to access favorite features.
1. Navigate to the desired Home screen panel. (For more
information, refer to “Extended Home Screen” on
page 24.)
2. Touch and hold on the screen to display the
screen
menu.
3. Touch
Widgets
, then touch a selection to add it to the Home
Add to Home
screen.
26
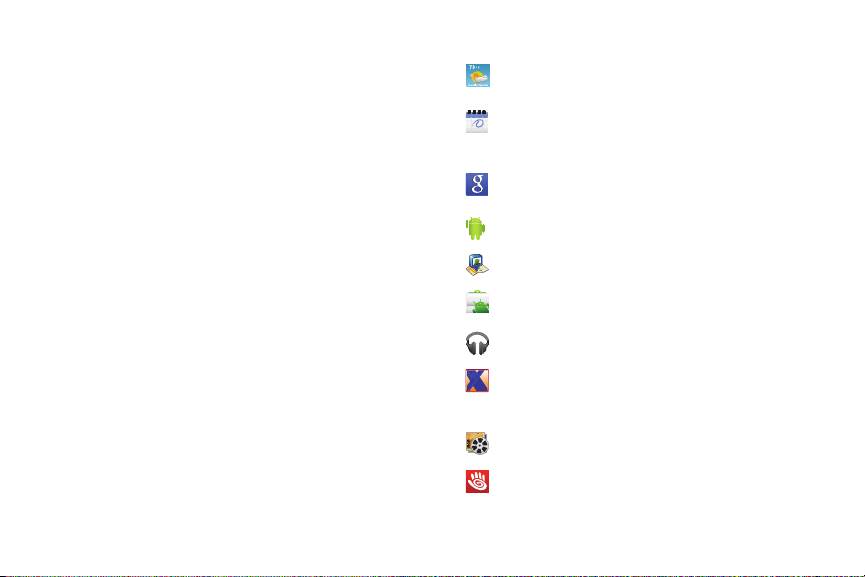
Widgets
AccuWeather.com
: Display weather information from
AccuWeather.com®.
Calendar
: Record events and appointments to manage
your schedule. (For more information, refer to “Calendar”
on page 85.)
Google Search
: Add a universal, Web-only, Apps-only, or
Contacts-only Google Search bar.
Home screen tips
Latitude
Market
: Display tips about the Home screen.
: Share your location with selected people.
: Browse, download, and install Android
applications.
Music
: Browse, download, and play music files.
MyExtras
: MyExtras daily delivers information and
entertainment, such asweather, trivia, sports scores, and
savings.
Picture frame
Pocket Express
: Launch the Picture Frame application.
: Launch the Pocket Express application.
 Loading...