

Page 1

(Samsung SCH-R560)
PORTABLE TRI-BAND
MOBILE PHONE
User Manual
Please read this manual before operating your
phone, and keep it for future reference.
Page 2

Intellectual Property
All Intellectual Property, as defined below, owned by or which is otherwise the property of Samsung or its respective suppliers relating to
the SAMSUNG Phone, including but not limited to, accessories, parts, or software relating there to (the “Phone System”), is proprietary to
Samsung and protected under federal laws, state laws, and international treaty provisions. Intellectual Property includes, but is not limited
to, inventions (patentable or unpatentable), patents, trade secrets, copyrights, software, computer programs, and related documentation
and other works of authorship. You may not infringe or otherwise violate the rights secured by the Intellectual Property. Moreover, you
agree that you will not (and will not attempt to) modify, prepare derivative works of, reverse engineer, decompile, disassemble, or
otherwise attempt to create source code from the software. No title to or ownership in the Intellectual Property is transferred to you. All
applicable rights of the Intellectual Property shall remain with SAMSUNG and its suppliers.
Samsung Telecommunications America (STA), LLC
Headquarters: Customer Care Center:
1301 E. Lookout Drive 1000 Klein Rd.
Richardson, TX 75082 Plano, TX 75074
Toll Free Tel: 1.888.987.HELP (4357)
Internet Address: http://www.samsungusa.com
©2009 Samsung Telecommunications America, LLC is a registered trademark of Samsung Electronics America, Inc. and its related
entities.
Do you have questions about your Samsung Mobile Phone?
For 24 hour information and assistance, we offer a new FAQ/ARS System (Automated Response System) at:
www.samsungtelecom.com/support
GH68-24092A
R560.03_CG10_CB_071709_F2
Page 3

Printed in Korea.
Nuance®, VSuite™, T9® Text Input, and the Nuance logo are trademarks or registered trademarks of Nuance Communications, Inc. or its
affiliates in the United States and/or other countries.
ACCESS® and NetFront™ are trademarks or registered trademarks of ACCESS Co., Ltd. in Japan and other countries.
The Bluetooth® word mark, figure mark (stylized “B Design”), and combination mark (Bluetooth word mark and “B Design”) are registered
trademarks and are wholly owned by the Bluetooth SIG.
microSD™ and the microSD logo are Trademarks of the SD Card Association.
Disclaimer of Warranties; Exclusion of Liability
EXCEPT AS SET FORTH IN THE EXPRESS WARRANTY CONTAINED ON THE WARRANTY PAGE ENCLOSED WITH THE PRODUCT, THE
PURCHASER TAKES THE PRODUCT "AS IS", AND SAMSUNG MAKES NO EXPRESS OR IMPLIED WARRANTY OF ANY KIND WHATSOEVER
WITH RESPECT TO THE PRODUCT, INCLUDING BUT NOT LIMITED TO THE MERCHANTABILITY OF THE PRODUCT OR ITS FITNESS FOR ANY
PARTICULAR PURPOSE OR USE; THE DESIGN, CONDITION OR QUALITY OF THE PRODUCT; THE PERFORMANCE OF THE PRODUCT; THE
WORKMANSHIP OF THE PRODUCT OR THE COMPONENTS CONTAINED THEREIN; OR COMPLIANCE OF THE PRODUCT WITH THE
REQUIREMENTS OF ANY LAW, RULE, SPECIFICATION OR CONTRACT PERTAINING THERETO. NOTHING CONTAINED IN THE INSTRUCTION
MANUAL SHALL BE CONSTRUED TO CREATE AN EXPRESS OR IMPLIED WARRANTY OF ANY KIND WHATSOEVER WITH RESPECT TO THE
PRODUCT. IN ADDITION, SAMSUNG SHALL NOT BE LIABLE FOR ANY DAMAGES OF ANY KIND RESULTING FROM THE PURCHASE OR USE OF
THE PRODUCT OR ARISING FROM THE BREACH OF THE EXPRESS WARRANTY, INCLUDING INCIDENTAL, SPECIAL OR CONSEQUENTIAL
DAMAGES, OR LOSS OF ANTICIPATED PROFITS OR BENEFITS.
Page 4

Table of Contents
Section 1: Getting Started .............................................. 4
Understanding this User Manual . . . . . . . . . . . . . . . . . . . . . . . .4
Installing the Battery . . . . . . . . . . . . . . . . . . . . . . . . . . . . . . . . . 4
Charging the Battery . . . . . . . . . . . . . . . . . . . . . . . . . . . . . . . . . 5
Activating Your Phone . . . . . . . . . . . . . . . . . . . . . . . . . . . . . . . . 6
Memory Card (Optional) . . . . . . . . . . . . . . . . . . . . . . . . . . . . . . 7
Section 2: Understanding Your Phone ........................... 9
Features of Your Phone . . . . . . . . . . . . . . . . . . . . . . . . . . . . . . . 9
Closed View of Your Phone . . . . . . . . . . . . . . . . . . . . . . . . . . . .9
Open View (Front) of Your Phone . . . . . . . . . . . . . . . . . . . . . . . 11
Closed Rear View of Your Phone . . . . . . . . . . . . . . . . . . . . . . . 13
Command Keys . . . . . . . . . . . . . . . . . . . . . . . . . . . . . . . . . . . 13
Understanding the Display Screen . . . . . . . . . . . . . . . . . . . . .15
Your Phone’s Modes . . . . . . . . . . . . . . . . . . . . . . . . . . . . . . . . 16
Section 3: Call Functions .............................................21
Making a Call . . . . . . . . . . . . . . . . . . . . . . . . . . . . . . . . . . . . . 21
Answering a Call . . . . . . . . . . . . . . . . . . . . . . . . . . . . . . . . . . . 25
Recent Calls . . . . . . . . . . . . . . . . . . . . . . . . . . . . . . . . . . . . . .27
Section 4: Menu Navigation ......................................... 32
Menu Navigation . . . . . . . . . . . . . . . . . . . . . . . . . . . . . . . . . . . 32
Menu Shortcuts . . . . . . . . . . . . . . . . . . . . . . . . . . . . . . . . . . . 32
Navigate Using Shortcut Icons . . . . . . . . . . . . . . . . . . . . . . . . 32
Navigation Key Shortcuts . . . . . . . . . . . . . . . . . . . . . . . . . . . . 33
Quick Search Shortcut . . . . . . . . . . . . . . . . . . . . . . . . . . . . . . 33
1
Section 5: Entering Text ............................................... 35
Built-in QWERTY Keypad . . . . . . . . . . . . . . . . . . . . . . . . . . . . 35
Changing the Text Entry Mode . . . . . . . . . . . . . . . . . . . . . . . . 35
®
Using T9
Mode (Phone Keypad Only) . . . . . . . . . . . . . . . . . . 36
Using Abc Mode . . . . . . . . . . . . . . . . . . . . . . . . . . . . . . . . . . . 37
Entering Numbers . . . . . . . . . . . . . . . . . . . . . . . . . . . . . . . . . 37
Entering Symbols . . . . . . . . . . . . . . . . . . . . . . . . . . . . . . . . . . 38
Section 6: Understanding Your Contacts ....................39
Contacts . . . . . . . . . . . . . . . . . . . . . . . . . . . . . . . . . . . . . . . . 39
Finding a Contacts Entry . . . . . . . . . . . . . . . . . . . . . . . . . . . . 40
Adding a New Contacts Entry . . . . . . . . . . . . . . . . . . . . . . . . . 42
Editing a Contacts Entry . . . . . . . . . . . . . . . . . . . . . . . . . . . . . 43
Saving a Number After a Call . . . . . . . . . . . . . . . . . . . . . . . . . 46
Speed Dial . . . . . . . . . . . . . . . . . . . . . . . . . . . . . . . . . . . . . . . 48
Contacts Groups . . . . . . . . . . . . . . . . . . . . . . . . . . . . . . . . . . . 49
Deleting a Contacts Entry . . . . . . . . . . . . . . . . . . . . . . . . . . . . 51
Memory Info . . . . . . . . . . . . . . . . . . . . . . . . . . . . . . . . . . . . . . 52
Section 7: Games & Apps ............................................. 53
Accessing Games & Apps (Mobile Shop) . . . . . . . . . . . . . . . . . 53
Section 8: Messages .................................................... 54
Types of Messages . . . . . . . . . . . . . . . . . . . . . . . . . . . . . . . . 54
Launching Messages . . . . . . . . . . . . . . . . . . . . . . . . . . . . . . . 54
Create and Send Text Messages . . . . . . . . . . . . . . . . . . . . . . 54
Receive Text Messages . . . . . . . . . . . . . . . . . . . . . . . . . . . . . 55
Page 5

Chat View . . . . . . . . . . . . . . . . . . . . . . . . . . . . . . . . . . . . . . . 55
Send Picture/Video Messages . . . . . . . . . . . . . . . . . . . . . . . . 56
Receive Picture/Video Messages . . . . . . . . . . . . . . . . . . . . . . 58
Message Boxes . . . . . . . . . . . . . . . . . . . . . . . . . . . . . . . . . . . 59
Erase Messages . . . . . . . . . . . . . . . . . . . . . . . . . . . . . . . . . . . 64
Message Settings . . . . . . . . . . . . . . . . . . . . . . . . . . . . . . . . . 65
E-mail Messages . . . . . . . . . . . . . . . . . . . . . . . . . . . . . . . . . . 66
Section 9: Widgets .......................................................67
Accessing Widgets . . . . . . . . . . . . . . . . . . . . . . . . . . . . . . . . . 67
Configure Widgets . . . . . . . . . . . . . . . . . . . . . . . . . . . . . . . . . 68
Section 10: Browser ..................................................... 69
Stored Web Content . . . . . . . . . . . . . . . . . . . . . . . . . . . . . . . . 69
Launching the Browser . . . . . . . . . . . . . . . . . . . . . . . . . . . . . 69
Using the Browser . . . . . . . . . . . . . . . . . . . . . . . . . . . . . . . . . 69
Using Links . . . . . . . . . . . . . . . . . . . . . . . . . . . . . . . . . . . . . . 70
How Browser Keys Work . . . . . . . . . . . . . . . . . . . . . . . . . . . . 70
Section 11: Voice SVC ..................................................71
Voice SVC Options . . . . . . . . . . . . . . . . . . . . . . . . . . . . . . . . . 71
Voice Command . . . . . . . . . . . . . . . . . . . . . . . . . . . . . . . . . . . 71
Voice Settings . . . . . . . . . . . . . . . . . . . . . . . . . . . . . . . . . . . . 72
Section 12: Camera-Camcorder ..................................76
Taking Pictures and Videos . . . . . . . . . . . . . . . . . . . . . . . . . . 76
Taking Snap Shots (Single Pictures) . . . . . . . . . . . . . . . . . . . . 76
Screen Layouts . . . . . . . . . . . . . . . . . . . . . . . . . . . . . . . . . . . 78
Saving Pictures and Videos . . . . . . . . . . . . . . . . . . . . . . . . . . 82
Camera Options . . . . . . . . . . . . . . . . . . . . . . . . . . . . . . . . . . . 82
Camera Settings . . . . . . . . . . . . . . . . . . . . . . . . . . . . . . . . . . 85
Camcorder Options . . . . . . . . . . . . . . . . . . . . . . . . . . . . . . . . 87
Camcorder Settings . . . . . . . . . . . . . . . . . . . . . . . . . . . . . . . . 89
Camera-Camcorder Adjustments . . . . . . . . . . . . . . . . . . . . . . 91
The Photo Gallery . . . . . . . . . . . . . . . . . . . . . . . . . . . . . . . . . 92
The Video Gallery . . . . . . . . . . . . . . . . . . . . . . . . . . . . . . . . . . 92
Point, Click, and Send Pictures and Videos . . . . . . . . . . . . . . 94
Section 13: Multimedia ................................................ 95
Accessing Multimedia . . . . . . . . . . . . . . . . . . . . . . . . . . . . . . 95
Using My Images Gallery . . . . . . . . . . . . . . . . . . . . . . . . . . . . 95
Using Your Music Player . . . . . . . . . . . . . . . . . . . . . . . . . . . . 96
Using My Ringtones Gallery . . . . . . . . . . . . . . . . . . . . . . . . . . 99
Using My Sounds Gallery . . . . . . . . . . . . . . . . . . . . . . . . . . . . 99
Section 14: Tools/Utilities .......................................... 101
Accessing Your Phone’s Tools . . . . . . . . . . . . . . . . . . . . . . . 101
Bluetooth . . . . . . . . . . . . . . . . . . . . . . . . . . . . . . . . . . . . . . . 101
Calendar . . . . . . . . . . . . . . . . . . . . . . . . . . . . . . . . . . . . . . . 104
Memo Pad . . . . . . . . . . . . . . . . . . . . . . . . . . . . . . . . . . . . . . 106
Alarm Clock . . . . . . . . . . . . . . . . . . . . . . . . . . . . . . . . . . . . . 107
World Time . . . . . . . . . . . . . . . . . . . . . . . . . . . . . . . . . . . . . 109
Calculator . . . . . . . . . . . . . . . . . . . . . . . . . . . . . . . . . . . . . . 110
Stop Watch . . . . . . . . . . . . . . . . . . . . . . . . . . . . . . . . . . . . . 111
Converter . . . . . . . . . . . . . . . . . . . . . . . . . . . . . . . . . . . . . . 111
Tip Calculator . . . . . . . . . . . . . . . . . . . . . . . . . . . . . . . . . . . 114
Section 15: Settings ................................................... 115
Accessing Your Phone’s Settings . . . . . . . . . . . . . . . . . . . . . 115
2
Page 6

Location Setting . . . . . . . . . . . . . . . . . . . . . . . . . . . . . . . . . . 115
Display Settings . . . . . . . . . . . . . . . . . . . . . . . . . . . . . . . . . . 115
Sound Settings . . . . . . . . . . . . . . . . . . . . . . . . . . . . . . . . . . . 116
Call Settings . . . . . . . . . . . . . . . . . . . . . . . . . . . . . . . . . . . . . 118
Phone Settings . . . . . . . . . . . . . . . . . . . . . . . . . . . . . . . . . . .120
Memory Info . . . . . . . . . . . . . . . . . . . . . . . . . . . . . . . . . . . . . 127
Phone Info . . . . . . . . . . . . . . . . . . . . . . . . . . . . . . . . . . . . . . 129
Section 16: Health and Safety Information ...............132
Health and Safety Information . . . . . . . . . . . . . . . . . . . . . . . . 132
Samsung Mobile Products and Recycling . . . . . . . . . . . . . . . 133
UL Certified Travel Adapter . . . . . . . . . . . . . . . . . . . . . . . . . . 133
Consumer Information on Wireless Phones . . . . . . . . . . . . . . 134
Road Safety . . . . . . . . . . . . . . . . . . . . . . . . . . . . . . . . . . . . . 139
Responsible Listening . . . . . . . . . . . . . . . . . . . . . . . . . . . . . . 141
Operating Environment . . . . . . . . . . . . . . . . . . . . . . . . . . . . . 143
Using Your Phone Near Other Electronic Devices . . . . . . . . . 143
FCC Hearing-Aid Compatibility (HAC) Regulations for
Wireless Devices . . . . . . . . . . . . . . . . . . . . . . . . . . . . . . . 144
Other Medical Devices . . . . . . . . . . . . . . . . . . . . . . . . . . . . . 145
Potentially Explosive Environments . . . . . . . . . . . . . . . . . . . .145
Emergency Calls . . . . . . . . . . . . . . . . . . . . . . . . . . . . . . . . . . 146
FCC Notice and Cautions . . . . . . . . . . . . . . . . . . . . . . . . . . . 147
Other Important Safety Information . . . . . . . . . . . . . . . . . . . . 147
Product Performance . . . . . . . . . . . . . . . . . . . . . . . . . . . . . . 148
Availability of Various Features/Ring Tones . . . . . . . . . . . . . . 148
Battery Standby and Talk Time . . . . . . . . . . . . . . . . . . . . . . . 149
Battery Precautions . . . . . . . . . . . . . . . . . . . . . . . . . . . . . . . 149
3
Care and Maintenance . . . . . . . . . . . . . . . . . . . . . . . . . . . . . 150
Section 17: Warranty Information ............................. 152
Standard Limited Warranty . . . . . . . . . . . . . . . . . . . . . . . . . . 152
End User License Agreement for Software . . . . . . . . . . . . . . 155
Index ............................................................................ 160
Page 7

Section 1: Getting Started
This section explains how to start using your Messager™ II
phone by activating your service, setting up your Voicemail, or
getting an understanding of how this manual is put together.
Understanding this User Manual
The chapters of this guide generally follow the same order as the
menus and sub-menus in your phone. A robust index for quick
reference to most features begins on page 160.
Also included is important safety information that you should
know before using your phone. Most of this information is near
the back of the guide, beginning on page 132.
Notes and Tips
Throughout this guide there is text that is set apart from the rest.
These are intended to point out important information, quick
methods for activating features, to define terms, and more. The
definitions for these methods are as follows:
•
Notes
: Explain alternative options within the current feature, menu, or
sub-menu.
•
Tips
: Provide quick or innovative methods for performing functions
related to the subject at hand.
•
Important
: Points out important information about the current feature
that could affect performance, or even damage your phone.
Text Conventions
This manual provides condensed information about how to use
your phone. To make this possible, the following terms and icon
appear in place of repeatedly-used procedural steps:
highlight
Use the Navigation key ( ) to move a highlighting
effect onto a menu item or screen item of interest.
select
After “highlighting” a menu item or screen item,
press the OK key to launch, access, or save a
highlighted menu item or screen field of interest.
➔ Used in place of “select” in long “drill down”
procedure steps.
Example:
“...
Settings
➔
Call Settings
➔
Call Answer
...”
Installing the Battery
Note:
Your phone comes packaged with a partially charged rechargeable
standard Li-Ion battery and travel adapter.
Important!:
You must fully charge the battery the first time you use your
phone, otherwise you could damage the battery.
Getting Started 4
Page 8

1.
Insert the top end of the
battery first, matching the
gold contacts on the inside of
the battery to those on the
phone.
2. Press lightly on the bottom end of the battery down into the
phone until it slips into place.
3. Press lightly down on the
middle of the battery cover
(1) and upward at the top (2)
until the cover locks into
place.
Remove the Batter y
1. Press and hold the key to turn off the phone (if on).
2. Press downward at the top
of the battery cover (1) and
lift the cover (2) up and
away from the phone.
5
3. Lift the battery (1) up at the
bottom and away from the
phone (2).
Charging the Battery
Your phone is powered by a rechargeable standard Li-Ion battery.
Only use Samsung-approved charging devices and batteries.
Samsung accessories are designed to maximize battery life. Use
of other accessories may invalidate your warranty and may
cause damage.
Use the Travel Adapter
The travel adapter included
with your phone is a
convenient, light-weight
charger that rapidly charges
your phone from any 120/220
VAC outlet.
1. Plug the large end of the Travel Adapter into a standard
120 VAC or 220 VAC wall outlet.
Page 9

Important!:
Press
& Hold
Internal
Antenna
For connection to an electrical supply not located in North
America, you must use an adaptor of the proper configuration for
the power outlet. Use of the wrong adapter could damage your
phone and void your warranty.
2. Insert the smaller end of the Travel Adapter into the
charger/accessory connector on the upper right side of
your phone.
Important!:
You must unplug the adapter before removing the battery from
the phone during charging to avoid damage.
Low battery indicator
The battery indicator ( ) in the upper-right corner of the
display indicates power level. Monitor the battery strength and
ensure your battery is adequately charged.
•
Five bars ( ) indicate a full charge.
•
An empty battery icon ( ) indicates a near empty battery.
•
A blinking empty battery icon ( ) and a tone sounding indicate you
have two to three minutes before the battery is too low to operate the
phone.
If you continue to use your phone without charging its battery, the
phone will shut down.
Activating Your Phone
Contact your Wireless Carrier and follow their instructions for
obtaining service, if necessary. We suggest that you read this
guide to fully understand the services your phone supports.
Turning Your Phone On
1. With the phone
closed, press and
hold the key
until the display
lights.
Note:
As with any other radiotransmitting device, do not
touch the antenna while
using your phone as this
can affect call quality and
can cause the phone to
operate at a higher power
level than is necessary.
2. The phone begins searching for a network signal.
Getting Started 6
Page 10

3.
Once the phone finds a signal, the time, date, and day
appear near the top of the display.
4. You’re now ready to place and receive calls.
Note:
If you are outside of your carrier’s coverage or roaming area, the No
Service icon ( ) appears at the top of the phone’s display. If you
cannot place or receive calls, try later when service is available, or at
another location.
Turn Your Phone Off
䊳
With the phone closed, press and hold the key for two
or more seconds. Your phone powers off.
Note:
If your phone is on and you press for less than one second, the
phone will not power off. This prevents your phone from being turned
off accidentally.
Setting Up Your Voicemail
Voicemail allows callers to leave voice messages, which can be
retrieved any time.
Note:
Once your Voicemail account has been set up, you can use the
Voicemail folder (under the Message menu) to view details of voice
messages in your Voicemail box.
1. In standby mode, press and hold the key or dial your
own mobile number to dial Voicemail.
7
2. Follow the prompts in the new user tutorial to setup your
mail box.
Listen to Voicemail
1. In standby mode, press and hold the key or dial your
own mobile number to dial Voicemail. After connecting,
you will hear your voice greeting.
2. You are prompted to enter your password.
Memory Card (Optional)
Your phone has a Memory Card slot on its right side, behind the
battery cover. You can install a microSD™ card to provide
additional memory for storing files (such as, sound files and
photos) in your phone.
You can install a microSDTM card to provide additional memory
for storing files (such as, sound files and photos) in your phone.
Page 11

Install a Memory Card
Correct
Incorrect
1. Open the microSD cover on the left hand side of the phone,
as shown.
2. Make sure that the gold contacts of the card are face up,
as shown, then carefully slide the memory card into the
memory card slot until you feel it click into place.
3. Replace the microSD cover.
Remove a Memor y Car d
1. Open the microSD cover on the right hand side of the
phone.
2. Carefully press the memory card inward until you feel it
release.
3. Slowly release your pressure on the card. It will slide
outward a short distance.
4. Remove the memory card from the memory card slot.
5. If desired, install another memory card. (For more
information, refer to “Install a Memory Card” .)
6. Replace the microSD cover.
Getting Started 8
Page 12

Section 2: Understanding Your Phone
This section outlines some key features of your phone. It also
describes the screen format and the icons that will be displayed
when the phone is in use.
Features of Your Phone
•
Domestic and international voice and text messaging service (available
on participating networks).
•
High speed data (CDMA 2000 1xEVDO Technology)
•
Bluetooth® Stereo (v2.0) Wireless Technology (see Note)
•
Global Positioning (GPS) Technology
•
PIM Functions
•
Picture and Video (MMS) Messaging
•
Text (SMS) Messaging
•
E-mail Messaging
•
QWERTY Keypad
•
Built-in 2.0 Megapixel Digital Camera-Camcorder
•
Music Player (MP3 compatible, requires microSD™ memory card)
•
Voice Dial
•
Speakerphone
9
Note:
The Samsung Messager II supports the wireless Handsfree Profile
(HFP) and OBEX profiles for Bluetooth
Samsung Messager II does not support the Bluetooth serial port
profile.
®
wireless technology. The
Closed View of Your Phone
Page 13

Features
1. Volume Key — Lets you adjust the ring volume in standby
mode, adjust the voice volume during a call, or mute the
ringer during an incoming call.
2. Left Soft Key — Used to navigate through menus and
applications and to select the choice indicated at the
bottom left corner of the Main LCD.
3. Speakerphone Key — Lets you enable/disable
speakerphone mode.
4. SEND Key — Lets you place or receive a call. In standby
mode, press the key once to access the recent call log.
5.
Memory Card Slot
— Lets you insert a microSD™ memory
card for additional storage of images, videos, music,
ringtones, and recorded sound files.
6. Alpha-numeric Keys — Use these keys to enter
numbers, letters, and characters.
7. Earpiece / Speaker — Lets you hear ringing and alert
tones, alarm tones, and the other parties to calls.
8. Display — Indicates the status of your phone, including
numbers dialed, feature and function screens, status
icons, message indicators, signal strength, and so on.
9. OK Key — In standby mode, launces the highlighted
Widget. Pressing when navigating through a menu accepts
the highlighted choice in a menu.
10. Navigation Key /
Jog Wheel
— In Menu mode, lets you
scroll through the phone menu options. In Standby mode,
lets you access preset functions.
11. Voicemail Key — Lets you speed dial your Voicemail
account to review your voice messages.
12. Special Function Keys — Enters special characters.
Performs various functions.
13. Microphone — Lets the other party to a call hear you
clearly when you are speaking to them.
14. Power/Accessory Connector — Used to plug in charging
accessories and to connect any available accessory cables
to your phone.
Understanding Your Phone 10
Page 14

15.
Right Soft Key — Used to navigate through menus and
applications and to select the choice indicated at the
bottom right corner of the Main Display.
16. CLR Key — Deletes characters from the display when you
are in text entry mode. Press this key to return to the
previous menu or screen when navigating features on your
phone.
17. END Key — Ends a call. If you press and hold the END key,
the power goes On or Off. When you receive an incoming
call, press to send the call to voicemail.
18. Camera / Multimedia Key — Launches the Camera or
the Multimedia menu of your phone.
19. Voice Recognition Key — In standby mode, pressing and
holding this key launches Voice SVC options.
11
Open View (Front) of Your Phone
Page 15

Features
1.
Earpiece
/
Speaker
— Lets you hear ringing and alert
tones, alarm tones, and the other parties to calls.
2.
Display
— Indicates the status of your phone, including
numbers dialed, feature and function screens, status
icons, message indicators, signal strength, and so on.
3.
soft1 Key
— Left soft key — Used to navigate through
menus and applications and to select the choice indicated
at the bottom left corner of the Main LCD.
4.
shift Key
— Toggles
ABC, Abc
, and
5.
Messaging Key
6.
Fn Key
— Text Function Key — Toggles text entry mode
between
ABC
7.
Space Key
8.
Arrow (Navigation) Keys
ABC
mode capitalization between
abc
.
— Launches the
and
123/Sym
Messages
modes.
— Inserts a space character in a text entry.
— In menu mode, lets you scroll
through the phone menu options. In standby mode, lets
you access preset functions and navigate the Shortcut
Icons .
menu.
9.
soft2 Key
— Right soft key — Used to navigate through
menus and applications and to select the choice indicated
at the bottom right corner of the Main Display.
10.
OK Key
— In standby mode, launches the highlighted
Shortcut Icon. When navigating through a menu, accepts
the highlighted choice in a menu.
11.
Back
/
Clear Key
— Deletes characters from the display
when you are in text entry mode. Press this key to return to
the previous menu or screen when navigating features on
your phone.
12.
Speakerphone Key
— Lets you enable/disable
speakerphone mode.
13.
SEND Key
— Lets you place or receive a call. In standby
mode, press the key once to access the recent call log.
14.
END Key
— Ends a call. If you press and hold the END key,
the power goes On or Off. When you receive an incoming
call, press to send the call to voicemail.
Understanding Your Phone 12
Page 16
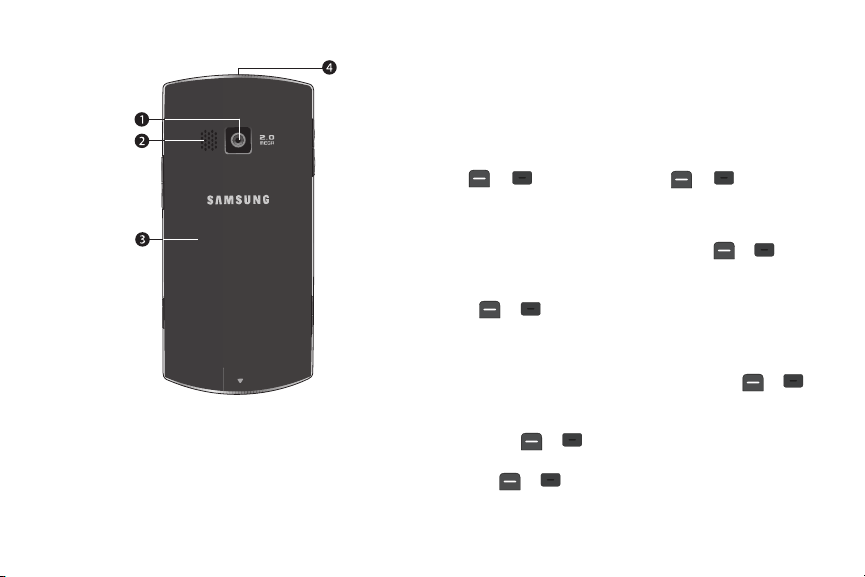
Closed Rear View of Your Phone
1.
Camera Lens
2.
Speaker Grill
— The lens of your built-in camera.
— Lets you hear ringing and alert tones,
alarm tones, and the other parties to calls.
3.
Battery Cover
13
— Lets you access your phone’s battery.
4.
Headset Connector
— Used to connect a headset or TTY
device to your phone. (For more information, refer to “TTY
Mode” on page 119.)
Command Keys
Functions for the soft keys are defined by what appears above
each in the display. There are two soft keys, the Left soft key
( or ) and the Right soft key ( or ).
Left Soft Key
Some functions of the Left soft key are as follows:
•
In standby mode, press the
Menu
(left) soft key ( or ) to show
the Main Menu.
•
When the Left soft key function is Edit, press the
Edit
(left) soft key
( or ) to edit a Contact.
Right Soft Key
Some functions of the Right soft key are as follows.
•
In standby mode, press the
launch the Contacts
•
When the Right soft key function is Options, press the
Find
Contacts
(Right) soft key ( or ) to
screen.
Options
soft key ( or ) and a pop-up menu appears.
•
When the Right soft key function is Back, press the
Back
(right) soft
key ( or ) to back up one menu level.
(right)
Page 17

OK Key
•
In standby mode, press the OK key ( or ) to launch the
function or application linked to the icon highlighted in the Shortcut
Icon Bar.
•
In a menu, press the OK key ( or ) to accept the highlighted
selection.
•
In camera mode, press the
Tak e
key ( or ) to take a photo or
to create a Picture message.
•
When the OK key function is Edit, press the
Edit
key ( or ) to
edit a Draft message.
Speakerphone Key
The Speakerphone key ( ) is used to place your phone in
Speakerphone mode, allowing you to use your phone handsfree
and/or to share a call with others, such as in an office or
conference room
Clear Key
The C/Back Arrow key ( or ) is used to erase or clear
numbers, text, or symbols from the display. You can also use the
or key to return to a previous menu.
•
If you enter an incorrect character, briefly press or
to
backspace (and delete) the character.
•
To erase the entire sentence, press and hold or .
•
To back up one menu level, briefly press or .
End Key
•
Press and hold the End key to turn on your phone.
•
Briefly press once to disconnect a call.
•
Press to return to standby mode from any menu, or to cancel the
last input.
Send Key
The Send key is used to answer calls, dial calls, and to
recall the last number(s) dialed, received, or missed.
•
Press once to answer calls.
•
Enter a number and briefly press to make a call.
•
Briefly press in standby mode to display a list of recent calls to
and from your phone.
•
Press twice in standby mode to call the most recent number.
•
Press to pick up a waiting call. Press again to switch back
to the other call.
Navigation Key
Use the directional keys on the Navigation key to browse
menus, sub-menus, and lists. Each directional key also acts as a
shortcut to launch applications. (For more information, refer to
“Menu Navigation” on page 32.)
Understanding Your Phone 14
Page 18

Camera / Multimedia Key
1
2
3
4
5
6
Use the Camera/Multimedia key ( ) on the lower right side of
the phone to activate the camera built into your phone and to
take pictures, and to activate the Multimedia menu of your
phone.
Understanding the Display Screen
1. The top line of your
phone’s display contains
icons that indicate network
status, battery power,
signal strength, connection
type, and more.
2. The Auto Answer icon
appears beneath the
current date to indicate
that the Auto Answer function is active. (For more
information, refer to “Auto Answer” on page 119.)
3. The center portion of the display shows information such
as call progress information, messages, and photos.
4. This line contains the calendar and clock showing the
current day of the week, date, and time.
15
5. This line contains the Shortcut Icon bar. These icons act as
shortcuts to directly access some of your phone’s features
without using the menus.
6. The bottom line of the display shows current soft key
functions. The sample screen shows that pressing the Left
soft
key ( or )
will display the Main
Menu
and
pressing the Right soft key ( or ) will launch the
Contacts Find screen.
Rotated Screens
With the QWERTY keypad
open, the display rotates
automatically from portrait
mode (as shown above) to
landscape mode (as shown
here).
Display Screen Icons
Your Samsung Messager II phone can show you definitions of the
icons that appear on the top line of the display.
To access the Icon Glossary:
Page 19

䊳
In standby mode, press the
Menu
soft key, then select
Settings ➔ Phone Info ➔ Icon Glossary.
A list appears showing all of the icons that can appear on
the top line of the display.
Dialogue Boxes
Dialogue boxes prompt for action, inform you of status, or warn
of situations such as low battery. Dialogue boxes and their
definitions are outlined below.
•
Choice
•
Example: “Save Message?”
•
Reconfirm
•
Example: “Erase All Messages?”
•
Performing
•
Example: “Sending...” “Connecting...”
•
Completed
•
Example: “Message Saved”
•
Information
•
Example: “New Message”
•
Error
•
Example: “System Error!”
•
Warning
•
Example: “Low Battery,” “Memory Full!”
Backlights
Backlights illuminate the display and the keypad. When you press
any key or open the phone, the backlights come on. They go off
when no keys are pressed within a period of time set in the
Backlight menu.
Note:
During a phone call, the display backlight dims when you press
and turns off after 10 seconds to conserve battery power, unless the
Backlight
setting is
Always On
seconds and turns off after 1 minute.
, then the backlight dims after 20
For more information, refer to “Backlight” on page 116.
Your Phone’s Modes
Call Answer Mode
You can choose to answer a call by pressing any key except the
key or key, by pressing only the key, or by
opening the phone’s slide. (For more information, refer to “Call
Settings” on page 118.)
Input mode
Input mode determines how you enter text, numbers, and
symbols. While at any text entry screen, press the Left soft key
( or ), then choose the input mode from the pop-up
menu using the Navigation key. Available input modes are:
•
Phone keypad
—
T9 Word, Abc, 123
, and
Symbols
.
Understanding Your Phone 16
Page 20

•
QWERTY keypad
—
Abc
and
123/Sym
.
(For more information, refer to “Entering Text” on page 35.)
Note:
With the QWERTY keypad open, use 123/Sym mode instead of Abc to
enter symbols and punctuation in your text. To switch between these
modes, press the key.
Tip:
With the phone closed, you can cycle between T9 Word, Abc, and 123
by pressing and holding the key until the phone beeps, for each
cycle.
Lock Modes
When the phone is in either Key Lock Mode or Device Lock Mode,
restrictions are placed on phone use. You can receive calls and
messages, but cannot place outgoing calls (except for
emergency numbers) until you unlock the phone. Lock Modes
also restrict access to menus and the Volume key.
Manual Keypad Lock Mode
•
To lock the keys
“
Keypad is locked!
•
To unlock the keys
Automatic Key Lock Mode
•
To lock the keys
select
more information, refer to
17
, in standby mode, press and hold
” pops-up in the display.
, press the
, in standby mode, press the
Settings
➔
Phone Settings
“Auto Key Lock”
Unlock
soft key, then press .
Menu
➔
Auto Key Lock
on page 127.)
until
soft key, then
➔ On. (For
•
To unlock the keys
Device Lock Mode
•
To lock the device
–
In standby mode, press the
Phone Settings
lock code (password).
–
Enter the Code (usually the last four digits of the phone number
assigned to your Samsung Messager II). The
the display.
–
Select
display, and you are returned to standby mode.
•
To unlock the device
–
Press the
code (password).
–
Enter the Lock Code (usually the last four digits of the phone number
assigned to your Samsung Messager II). You are returned to standby
mode.
Note:
For more information, refer to “Lock Phone” on page 121.
, press the
Unlock
soft key, then press .
:
Menu
➔
Lock Phone
Security
➔
soft key, then select
. You are prompted to enter the device
Security
Lock
. “
Device lock mode set
:
Unlock
soft key, You are prompted to enter the device lock
Settings
➔
menu appears in
” appears in the
Standby Mode
Standby mode is the state of the phone once it has found service
and is idle. The phone goes into standby mode:
•
After you power the phone on.
•
When you press after a call or from within a menu.
Page 21

In standby mode, you will see the time, day, and date as well as
all phone status icons.
Place Calls in Standby Mode
1. While in standby mode, enter a phone number, and press
to place a call.
2. Press to return to standby mode.
Receive Messages in Standby Mode
You can receive messages in standby mode. An alert tone sounds
and a notification message appears in the display when a new
message arrives. The following call message options appear:
•
View Now
•
— This selection allows you to view the message now.
View Later
— This selection allows you to view the message at a
later date.
䊳
Highlight the desired viewing option and then press .
Talk Mode
You can place and receive calls only when your phone is on.
While in a call your phone is in talk mode. Press the Options soft
key to display a list of menu options. (For more information, refer
to “In-Use Menu” on page 27.)
Speakerphone Mode
Lets you use your phone handsfree or to share a call with other
people nearby.
•
To place your phone in Speakerphone Mode:
䊳
Press and hold the Speakerphone key ( ) until
“Speakerphone On” appears in the display.
Caution!:
Keep the phone away from you ear while in Speakerphone Mode.
(For more information, refer to “Responsible Listening” on
page 141.)
•
To disable Speakerphone Mode:
䊳
Press and hold until “Speakerphone Off” appears in
the display.
Note:
Your phone automatically enters Speakerphone Mode when you dial a
call using the QWERTY keypad and the called phone begins ringing.
Enter/Exit Silent Mode
Silence the tones your keypad makes when you press a key.
•
To enter Silent Mode:
䊳
In standby mode, press and hold . “Entering Silent
Mode” briefly appears in the display and your phone
returns to standby mode.
•
To exit Silent Mode:
Understanding Your Phone 18
Page 22

䊳
While in Silent mode and standby mode, press and hold
. “Exit Silent Mode” briefly appears in the display
and your phone returns to standby mode.
Vibrate Mode
䊳
In standby mode, repeatedly press the Volume key
( ) down until Vibrate appears in the display.
The Volume key is on the upper left side of phone.
Adjust the Ringer
1. In standby mode, press the Volume key ( ) on the
left side of the phone Up or Down.
Options are:
•
Ringer Off
•
Vibrate
•
Low
•
Low/Medium
2. When you are satisfied with the setting, press or .
•
Medium
•
Medium/High
•
High
•
Vibrate/High
Your phone returns to standby mode.
Tip:
You can also enter the Volume > Voice Calls sub-menu by pressing the
Menu soft key, then pressing the , , , and keys. Use the
Volume key on the left side of your phone to adjust the ringer volume
setting.
19
Note:
The Vibrate icon ( ) appears in the display when the phone is in
Vibrate mode. The Vibrate/Ring icon ( ) appears in the display
when the phone is in Vibrate/High mode.
Camera Mode
Camera mode lets you activate your phone’s camera to take
pictures. In Camera mode, you can also adjust the resolution and
appearance of your pictures.
Note:
For more information, refer to “Camera-Camcorder” on page 76.
•
Entering Camera Mode
— In standby mode, press and hold the
Camera key ( ) — on the lower right side of the phone.
•
Exiting Camera Mode
— Press the key.
Camcorder Mode
Camcorder mode lets you activate your phone’s camera to take
videos. In Camcorder mode, you can also adjust the resolution
and appearance of your videos.
Note:
For more information, refer to “Camera-Camcorder” on page 76.
•
Entering Camcorder Mode
— In standby mode, press the Camera
key ( ) — on the lower right side of the phone — then select
Camcorder
.
•
Exiting Camcorder Mode
— Press the key.
Page 23

Music Player Mode
Music Player mode lets you activate you phone’s Music Player to
play music files loaded onto an optional microSD™ Memory
Card.
Note:
For more information, refer to “Memory Card (Optional)” on page 7
and to “Using Your Music Player” on page 96.
•
Entering Music Player Mode
soft key, then select Multimedia ➔ Music Player
•
Exiting Music Player Mode
—
In standby mode, press the
— Press the key.
.
Video Player Mode
Video Player mode lets you activate your phone’s Video Player to
play videos (.3G2 files — taken with your phone’s Camcorder —
or downloaded .MP4 files) up to 1 hour in length.
•
Entering Video Player Mode
— In standby mode, press the Camera
key ( ) — on the lower right side of the phone — then select
Video
, then select a video file. The Video Player begins playing.
•
Exiting Video Player Mode
— Press the key.
Menu
My
Understanding Your Phone 20
Page 24

Section 3: Call Functions
This section provides procedures for making and answering
calls. This section also describes features, such as call logs and
call timers, that help you make calls and manage your call time.
Note:
The procedures in this section can be performed using the phone
keypad or the QWERTY keypad.
Tip:
When using the QUERTY keypad, it is recommended that you also use an
optional headset or an optional handsfree car kit or that you place your
phone in Speakerphone mode. (For more information, refer to
“Speakerphone Key” on page 14.)
Making a Call
1. With the phone on, enter the number you wish to call using
the keypad.
2. Press to place the call.
Emergency Calls
When you call an Emergency Number, such as 911, your
Samsung Messager II phone locks itself in emergency mode, only
allowing you to make calls to the emergency call center you
originally contacted. This enables emergency operators to more
21
easily dispatch aid, such as police, fire fighting, and emergency
medical personnel.
1. With the phone on, enter the Emergency Number you wish
to call using the keypad.
Note:
You can define up to 3 emergency numbers in your phone. (For more
information, see “Emergency #” on page 122.)
2. Press to place the call.
Tip:
If you need to make an emergency (911) call with Airplane mode
enabled, just dial the emergency number and press . (For more
information, see “Airplane Mode” on page 120.)
Three-way Calling
Call two other numbers and connect them to your call using
three-way calling.
1. In standby mode, enter the number for the first party in
your call, then press .
2. When connected, ask the other party to remain on the line.
Press to place them on hold.
3. Enter the second party’s phone number and press .
Page 25

When the second party answers, press to connect all
4.
three parties.
Manual Pause Calling
To manually call a number with pause(s) without storing it in your
Contacts list:
1. In standby mode, enter the number you wish to call.
2. Press the Options soft key. The following pause options
appear in the display:
•
2-Sec Pause
•
Wait
3. Highlight the desired pause.
4. Press the key or the key to enter the highlighted
— A 2-second pause after which dialing resumes.
— A hard pause (waits for input from you).
pause into the number sequence.
5. Press to call the number.
Tip:
Press the Save soft key to store pauses along with the number if you
plan to call the number frequently.
Speed Dialing
Speed Dialing lets you place a call to any Contact stored in your
Contacts list by dialing the Contact’s Location number.
1-Touch Dialing
Use 1-touch dialing to speed dial Contacts from 1 (Voicemail)
through 9.
䊳
In standby mode, press and hold the number key
corresponding to the desired Contact’s speed dial number.
Example:
To speed dial the Contact assigned speed dial 5, press and hold
or .
2-Touch Dialing
Use 2-touch dialing to speed dial Contacts from 10 through 99.
1. In standby mode, press and release the number key
representing the first digit of the desired Contact’s speed
dial number.
2. Press and hold the number key representing the second
digit of the desired Contact’s speed dial number.
Example:
To speed dial the Contact assigned speed dial 35, press or
then press and hold or .
3-Touch Dialing
Use 3-touch dialing to speed dial Contacts from 100 through 999.
Call Functions 22
Page 26

1.
In standby mode, press and release the number key
representing the first digit of the desired Contact’s speed
dial number.
2. Press the number key representing the second digit of the
desired Contact’s speed dial number.
3. Press and hold the number key representing the third digit
of the desired Contact’s speed dial number.
Example:
To speed dial the Contacts entry assigned to speed dial 325, press
or , press or , then press and hold or
.
Voice Dialing
The voice recognition capabilities of your Samsung Messager II
are exceptional due to advanced, speaker-independent
technology. This means you do not need to “train” your phone to
understand your voice. You can use your voice in a natural
manner to dial numbers.
Note:
End Calls Before relaunching the VoiceSignal voice recognition
software — When you use Voice Dialing to make a call, you must end
that call before you can use other Voice Commands. See “Voice SVC”
on page 71 for more information.
23
Use the Call command to dial any number stored in your
Contacts list by saying the name of the contact (Name Dialing).
You can also use Call to dial any telephone number, even
numbers not stored in your contact list, by speaking the
individual digits in the number (Digit Dialing).
Voice Dialing Tips:
•
Wait for the beep before speaking.
•
Speak clearly at a normal volume, as if you were talking to someone
on the phone.
•
When saying a name, say the first name then the last name.
Dialing a Name
To dial a name, do the following:
1. In standby mode, press and hold or .
“Say a command” appears in the display and is
pronounced through the earpiece.
2. Say, “Call”.
You are prompted to “Say the name or number”.
3. Speak clearly and say the name of a person in your
Contacts list, first name followed by last name.
If the name is recognized, Voice Dial repeats the name and
dials the number.
Page 27

If Voice Dial is not sure which name you said, it displays a
choice list of up to three names and prompts you with “Did
you say?” followed by the first name on the list.
4. Say “Yes ” to confirm the name or “No” to hear the next
name, or use the keypad to select the correct name from
the list. (See “Choice Lists” on page 72, for more
information.)
•
Press the
Repeat
soft key to say the name again.
•
Press to exit VoiceSignal without dialing.
If the recognized name has multiple numbers stored for it
(that is, Mobile, Work, Home, and so on), Voice Dial
displays the possible choices and prompts you with
“Which number?”
5. Say one of the following number types:
•“Home
”
•“Work
”
•“Mobile
”
Voice Dial dials the specified number.
Dialing a Number
To dial a number using Voice Dial, do the following:
1. In standby mode, press and hold or .
“Say a command” appears in the display and is
pronounced through the speaker.
2. Say “Call”.
VoiceSignal prompts you to “Say the name or number.”
3. Speak clearly and say the telephone number of the person
you want to call.
For example, say “7 8 1 9 7 0 5 2 0 0."
If it recognizes the number, Voice Dial repeats it and dials
the number. If Voice Dial is not sure it has recognized the
number, it displays a choice list of up to three numbers and
prompts you with “Did you say?” followed by the first
number on the list.
4. Say “Yes ” to confirm the number or “No” to hear the next
one, or use the keypad to select the correct number from
the list. (See “Choice Lists” on page 72, for more
information.)
•
Press the
Repeat
soft key to say the name again.
•
Press to exit VoiceSignal without dialing.
Call Functions 24
Page 28

Pause Dialing From a Contacts Entry
•
If you voice dial a contact that contains 2-Sec Pause(s) simply wait for
the pauses to pass and the dialing to complete.
•
If you voice dial a contact that contains Wait(s), wait for the appropriate
prompt(s) from the number you are calling (credit card number, bank
account number, and so on) and enter the appropriate response(s).
Answering a Call
Incoming
When you receive a call, the phone displays one of the following:
•
If the caller can be identified, the caller’s number (or name if it’s in your
Contacts) appears in the display.
•
If the caller cannot be identified,
restricted #
, or no number appears in the display.
Tip:
Assign pictures to Contacts entries. The entry’s assigned picture
appears in the display when you receive a call from that entry. (See
“Assigning a Picture to a Contacts Entry” on page 45).
Call from unavailable #, Call from
The phone continues to notify you of the call until one of the
following events occur:
•
You answer the call.
•
The calling party ends the call.
•
The call is sent to voicemail.
25
Call Notification Features
Your phone notifies you of a call in a variety of ways.
•
Eight ring volume settings:
Medium, Medium/High, High
•
Different ring types or melodies to distinguish callers.
•
Name display with caller ID. (If the caller’s name is programmed into
Ringer Off, Vibrate, Low, Low/Medium
, or
Vibrate/High
.
your Contacts).
•
Information about the last 90 each of incoming, missed, and outgoing
calls are automatically stored to a call log.
Set Call Ringer Volume
1. In standby mode, press the Volume key on the left side of
the phone.
2. Press the Volume key up or down to set the call ringer
volume as desired.
3. Once you’re satisfied with the setting, press or .
The phone returns to standby mode.
Tip:
You can also enter the
mode by pressing the
➔
Settings
of your phone to adjust the ringer volume setting.
Volume
Volume
> Voice Calls sub-menu from standby
Menu
soft key, then selecting
➔
Voice Calls
. Use the Volume key on the right side
Settings
➔
,
Sound
Page 29

Note:
The Vibrate icon ( ) appears in the display when the call ringer is
set to Vibrate. The Vibrate/Ring icon ( ) appears in the display
when the call ringer is set to Vibrate/High.
Call Answer
Select from two methods for answering calls. This option can be
changed in the Settings menu.
1. In standby mode, press the
Menu
soft key, then select
Settings ➔ Call Settings ➔ Call Answer.
The following options appear in the display:
•
Any Key
— Pressing any key except , , or
answers a call.
•
Send Key
— Only pressing answers a call.
2. Select Call Answer option of your choice.
Call Waiting
If you’re on a call, your phone beeps when you receive a second
call. Call Waiting lets you answer the second call and alternate
between both calls.
Note:
Contact your Wireless Carrier for availability.
1. Press to place the first call on hold, answer the second
call, and ask the caller to remain on the line.
2. Press to place the second call on hold and return to the
first call.
3. Press to alternate between calls.
Caller ID
Caller ID lets you identify who is calling you by displaying a
caller’s number. If the caller’s name and number are stored in
Contacts, the caller’s name also appears. If you’ve assigned a
picture to the entry, it appears in the display as well.
Call Block
You can prevent your number from displaying on another phone’s
caller ID screen by enabling Call Block.
1. In standby mode, press , , (or , ,
).
2. Enter the number you wish to call, then press .
Silence an Incoming Ring
To temporarily silence the incoming call ringer:
䊳
While your phone is ringing, press the Volume key
( ), on the left side of the phone, up or down.
Ignore an Incoming Call
Ignored calls are immediately forwarded to Voicemail.
Call Functions 26
Page 30

To ignore an incoming call:
䊳
While your phone is ringing, press the Ignore soft key. The
incoming call is forwarded to Voicemail.
In-Use Menu
You can access a number of menus and features even while in a
call.
1. While in a call, press the Options soft key. The following
options pop-up in the display:
•
Message
— Display the Messages menu.
•
Contacts
— Display the Contacts menu.
•
Recent Calls
•
Send DTMF
— View your recent calls log.
— Send your phone number as DTMF tones to the
other person on the call.
•
Location
— Turn your GPS location on or set GPS location for
emergency calls only.
2. With the above menu displayed, do one of the following:
•
Select a menu or feature to access the menu or activate the
highlighted feature.
•
Press the
Cancel
soft key to exit the menu.
Recent Calls
Your phone has Call Logs that retain information about Outgoing,
Incoming, and Missed Calls. The Recent Calls menu lets you
27
access this information for future reference, to return calls, and
to add new Contacts. You can also view times for your last call
and the total of all calls.
Tip:
To quickly view a list of your most recent calls (outgoing, incoming, and
missed), briefly press while in standby mode. The All Calls screen,
listing up to 270 of your most recent calls, appears in the display.
Outgoing Calls
The last 90 outgoing calls are stored in the Outgoing calls log.
Review the Outgoing calls log for the time and date of a call, as
well as other information.
1. In standby mode, press the
Menu
soft key, then select
Recent Calls ➔ Outgoing Calls. A list of your outgoing
calls appears in the display.
2. Highlight a call. You have the following options:
•
To compose and send a message to the caller, press the
key. The
Send Message
information, refer to
page 54 or
“Send Picture/Video Messages”
•
To view further information about the call, press
screen appears in the display. (For more
“Create and Send Text Messages”
on page 56.)
OPEN
( or
Msg
).
•
To access further options, press the
Options
soft key. The following
options appear in the display:
–
Save
— Save the number to your Contacts.
soft
on
Page 31

–
Details
— Contacts calls only — Lets you view the Contacts entry for
the recipient of this call.
–
Erase
— Erase the selected call from your Outgoing calls list.
–
Lock/Unlock
— Blocks/permits erasure of the selected call from your
Outgoing call list.
–
Erase all
— Erase all unlocked calls from your Outgoing call list.
–
View Timer
—
Call Timer
number and types of calls and their total durations. (See
on page 29 for more information.)
screen appears in the display listing the
“Call Timer”
Select an option to perform its function.
Incoming Calls
The last 90 Incoming calls are stored in your phone’s Incoming
calls log. You can review the Incoming calls log for time and date
of each call, as well as other information.
1. In standby mode, press the
Menu
soft key, then select
Recent Calls ➔ Incoming Calls. A list of your Incoming
calls appears in the display.
2. Highlight a call. You have the following options:
•
To compose and send a message to the caller, press the
key. The
Send Message
information, refer to
page 54 or
•
To view further information about the call, press
screen appears in the display. (For more
“Create and Send Text Messages”
“Send Picture/Video Messages”
on page 56.)
OPEN
( or
Msg
).
soft
on
•
To access further options, press the
Options
soft key. The following
options appear in the display:
–
Save
— Save the number to your Contacts.
–
Details
— Contacts calls only — Lets you view the Contacts entry for
the originator of this call.
–
Erase
— Erase the selected call from your Incoming calls list.
–
Lock/Unlock
Incoming calls list.
–
Erase all
–
View Timer
number and types of calls and their total durations. (See
on page 29 for more information.)
— Blocks/permits erasure of the selected call from your
— Erase all unlocked calls from your Incoming calls list.
—
Call Timer
screen appears in the display listing the
“Call Timer”
Select an option to perform its function.
Missed Calls
The last 90 missed calls (calls you did not answer) are stored in
the Missed calls log. Review the Missed calsl log for the time and
date of the call, as well as other information.
1. In standby mode, press the
Menu
soft key, then select
Recent Calls ➔ Missed Calls. A list of your missed calls
appears in the display.
2. Highlight a call. You have the following options:
Call Functions 28
Page 32

•
To compose and send a message to the caller, press the
key. The
Send Message
type of message. (For more information, refer to
Send Text Messages”
Messages”
•
To view further information about the call, press
menu appears in the display. Select the
on page 54 or
on page 56.)
“Create and
“Send Picture/Video
OPEN
).
•
To access further options, press the
Options
soft key. The following
options appear in the display:
–
Save
— Save the number to your Contacts.
–
Details
— Contacts calls only — Lets you view the Contacts entry for
the originator or recipient of this call.
–
Erase
— Erase the selected call from your Missed calls list.
–
Lock/Unlock
— Blocks/permits erasure of the selected call from your
Missed calls list.
–
Erase all
— Erase all unlocked calls from your Missed calls list.
–
View Timer
—
Call Timer
number and types of calls and their total durations. (See
on page 29 for more information.)
screen appears in the display listing the
Select an option to perform its function.
Erase Logs
You can erase Outgoing, Incoming, Missed, or All Calls.
29
Msg
soft
( or
“Call Timer”
Erase All Calls
1. In standby mode, press the
Menu
soft key, then select
Recent Calls ➔ All Calls. The All Calls list appears in the
display with the first call in the list highlighted.
2. Press the Options soft key, then select Erase all. “Erase
all entries?” prompts you to confirm erasure of all Calls
log entries.
3. To Erase all calls, press the Yes soft key. To keep the calls,
press the No soft key.
Call Timer
View the duration of your last call, total calls, and calls made
during the life of your phone using the Call timer feature. Call
timer is not for billing purposes.
1. In standby mode, press the
Menu
soft key, then select
Recent Calls ➔ Call Timer. The following options appear
in the display:
•
Last Call
— Shows the duration of your last call.
•
Home Outgoing
— Shows the number and total duration of all
calls originated by your phone since the last reset.
•
Home Incoming
— Shows the number and total duration of all
calls made to your phone since the last reset.
Page 33

•
Roaming Calls
— Shows the number and total duration of all
calls originated by and made to your phone while roaming and
since the last reset.
•
All Calls
— Shows the number and total duration of all calls
originated by and made to your phone since the last erasure.
•
Last Reset
— Shows the date and time all counters, except
Lifetime Calls
•
Lifetime Calls
, were reset.
— Shows the duration of all calls on your phone
since activation (Lifetime timers cannot be reset).
2. If desired, highlight a particular timer.
3. Press the Reset soft key to reset the highlighted timer.
Press the Reset All soft key to reset all of the timers
except Lifetime Calls.
4. Press to exit the Call Timer screen.
Note:
Although Total call timers can be erased, LifeTime call timers can
never be erased.
Data Counter
Use Data Counter to view the amount of data that has been sent
or received (or a total of both) using the data services that your
phone supports. The Data Counter can be a helpful tool for
monitoring data usage, especially if your service agreement has
specified limits.
1. In standby mode, press the
Menu
soft key, then select
Recent Calls ➔ Data Counter. The following options
appear in the display:
•
Tra ns m it
— Shows the amount of data (in kilobytes) that your
phone has transmitted since last being reset.
•
Received
— Shows the amount of data (in kilobytes) that your
phone has received since last being reset.
•
Tot al
— Shows the amount of data (in kilobytes) that your phone
has transmitted and received since last being reset.
•Last Reset
— Shows date and time the Data Counters (except
Lifetime Data Counter) were last reset.
•
Lifetime Data Counter
— Shows the amount of data (in
kilobytes) that your phone has transmitted and received since being
activated.
2. To reset a timer other than Lifetime Data Counter, highlight
the timer you want to reset and press the Reset soft key.
3. To reset all timers except
Lifetime Data Counter
, press the
Reset All soft key.
4. Press to exit the Data Counter screen.
Note:
Although other data counters can be reset, only the
Counter
can never be reset.
Lifetime Data
Call Functions 30
Page 34

Store Numbers from Call Logs
Store numbers from your Outgoing, Incoming, Missed, and All
calls logs to Contacts.
Tip:
In standby mode, briefly press to display the Recent Calls list. You
can then select any call in the list to save to Contacts.
6. Follow the prompts to store the number to Contacts.
1. In standby mode, press the
Menu
soft key, then select
Recent Calls.
2. Press the corresponding number on the keypad to view
call logs for the following call types:
•
for
Outgoing Calls
•
for
Incoming Calls
•
for
Missed Calls
•
for
All Calls
3. Use the Up and Down navigation keys to highlight the
number you wish to store in Contacts and press .
4. Press the Options soft key, then use the Up and Down
navigation keys to highlight Save.
5. Select Create New to add the number as a Contacts entry,
or select Update Existing to find a Contact with which to
associate the new number.
31
Page 35
Section 4: Menu Navigation
This section explains the menu navigation for your phone.
Menu Navigation
Access the menus and sub-menus in your phone using the
Navigation key ( ) , the arrow keys ( , , , ),
and soft keys ( or ), or use a shortcut.
1. In standby mode, press the
Menu
soft key. The first of
several menus appears in the display.
2. Use the Navigation key to browse through the menus.
3. Press or to enter the menu or sub-menu that
appears in the display.
4. Press the Back soft key or press or to return to
the previous menu.
Return to the Previous Menu
•
Press the
Back
soft key to return to a previous menu.
•
When
Back
does not appear in the display,
press or to
return to the previous menu.
Menu Shortcuts
Use shortcuts to quickly access menus and sub-menus. Press
the
Menu
soft key, then press the number to the left of the menu
label to jump to the desired menu, sub-menu, or feature.
Example:
To jump to the
press or (for Messages) and or for
Outbox.
Outbox
sub-menu, press the
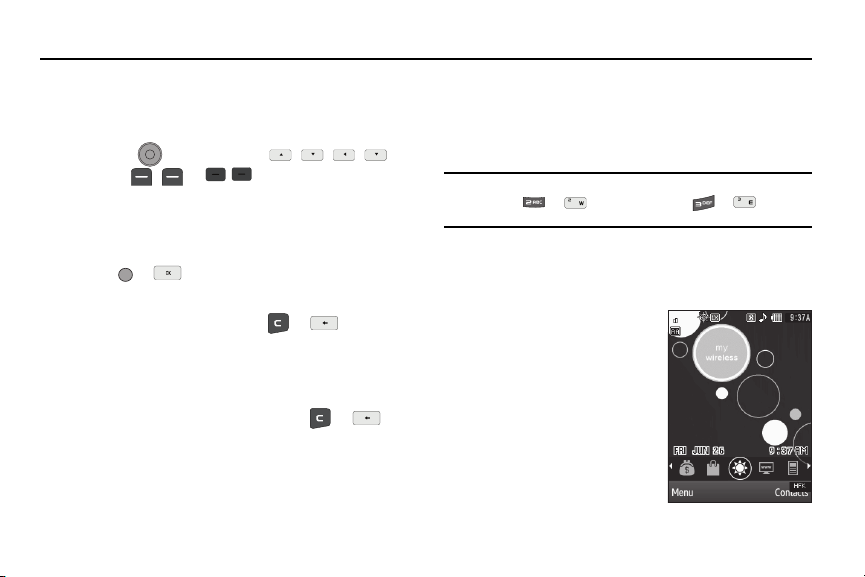
Navigate Using Shortcut Icons
You can also access menus and sub-menus using Shortcut Icons,
and without the menu-based drill down.
1. In standby mode:
•
with the QWERTY keypad closed,
press the Navigation key Left or
Right to show the desired
shortcut icon.
•
with the QWERTY keypad open,
press the Navigation key Up or
Down to show the desired
shortcut icon.
2. Press the
OK
soft key to
launch the related application.
Menu
soft key, then
Menu Navigation 32
Page 36
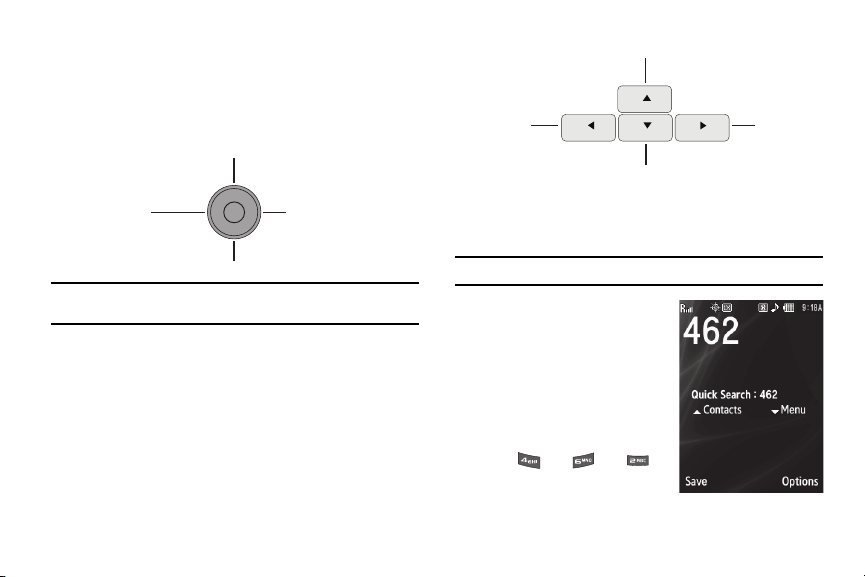
Navigation Key Shortcuts
Down Navigation
Up Navigation
Messages
Browser
Numeric Keypad Shortcuts
In standby mode and with the QWERTY keypad closed, press the
Navigation key Up or Down to launch the corresponding
applications in the pattern shown here.
Messages
Left
Navigation
Browser
Note:
In standby mode and with the QWERTY keypad open, the Navigation
key shortcut pattern rotates 90o to match the screen.
QWERTY Keypad Shortcuts
In standby mode and with the QWERTY keypad open, you have
the option of using the arrow keys on the QWERTY keypad itself
to launch applications, as shown here.
33
Right
Navigation
Quick Search Shortcut
With
Quick Search
set to On, do the following to quickly access a
menu option:
Note:
For more information, refer to “Quick Search” on page 125.
1. In standby mode, press the
first few numeric keys that
correspond to letters in the
Menu option name.
For example, to search for
“Inbox” you would enter
INB
Page 37
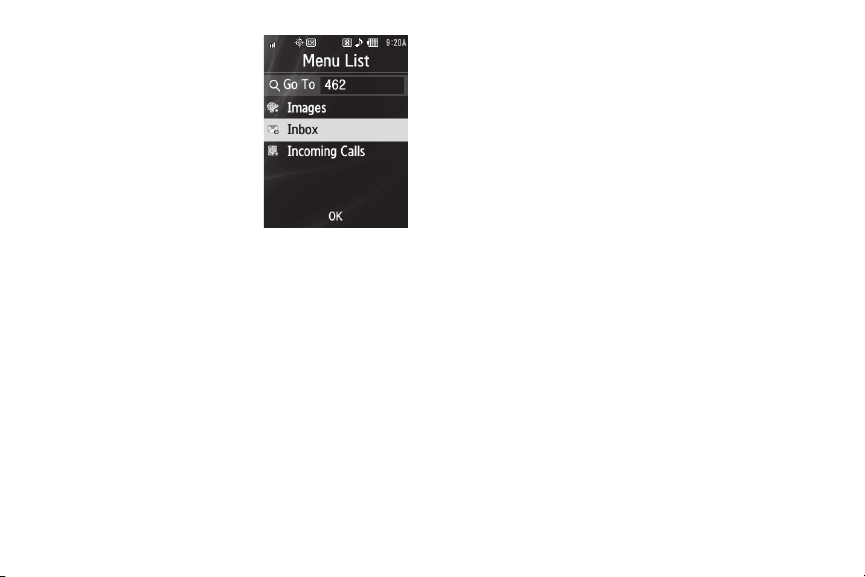
Press the Navigation key
2.
Down. The
Menu List
screen
appears in the display with
the first matching menu
option highlighted.
3. Select the desired menu
option.
Menu Navigation 34
Page 38
Section 5: Entering Text
r
This section outlines how to select the desired text entry mode
when entering characters using the phone keypad or the nested,
QWERTY keyboard-style keypad. This section also describes how
to use the T9 predictive text entry system to reduce the number
of key strokes needed to enter text.
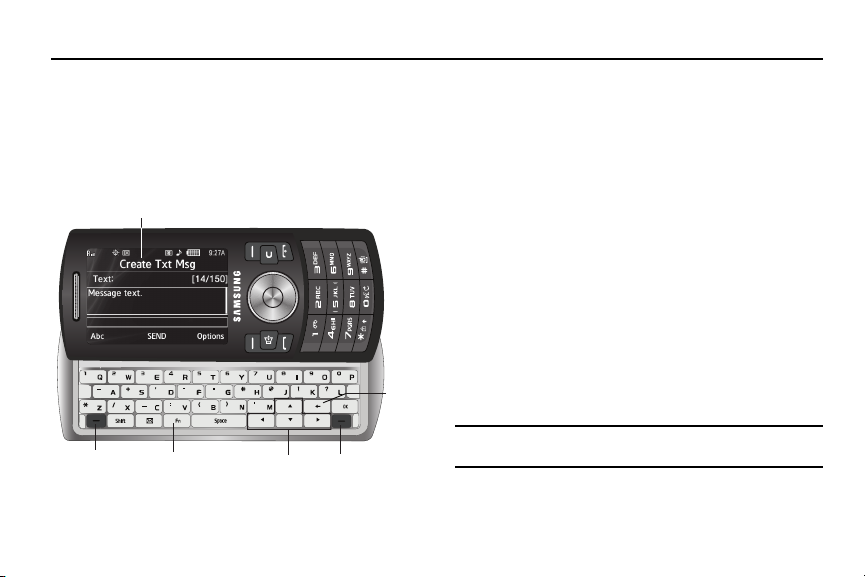
Built-in QWERTY Keypad
Display
Clea
Key
35
Left Soft
Key
Fn (Input
Mode) Key
Navigation
Keys
Right
Soft Key
Your Samsung Messager II has a built-in, keyboard-style keypad,
commonly called QWERTY, that you can access by sliding it open
from beneath the top section of the phone. This also
automatically rotates the image in the display to show
information in a wider, landscape format. Using the QWERTY
keypad, you can type letters, numbers, punctuation, and other
special characters into text entry fields or other applications
simpler and faster than using the telephone keypad.
Changing the Text Entry Mode
Text messages can be made up of alphabetical characters,
numbers, and symbols. You can use the following text entry
modes to simplify text entry:
•
T9 Word
— Press each phone key only once to enter the letter of the
word that you’re spelling. T9 WORD mode letter options are:
–
T9 Word
— Enter initial capital letters
–
T9 WORD
— Enter all upper case letters
–
T9 word
— Enter all lower case letters
Note:
T9 Word does not support the QWERTY keypad, which does not need
this function.
•
Abc
— Enter letters, numbers, and symbols by using the QWERTY
keypad or by repeatedly pressing each phone key until the desired
Page 39

character (as shown on the key) appears in the display. ABC mode
letter options are:
–
Abc
— Enter initial capital letters
–
ABC
— Enter all upper case letters
–
abc
— Enter all lower case letters
•
123
— Enter numbers by pressing the corresponding keys on the
phone keypad or the QWERTY keypad.
Tip:
Using the QWERTY keypad, also use 123 mode to enter symbols into
your message simply by pressing the keys labeled with the symbols you
want.
•
Symbols
— Using the phone keypad, enter a symbol into your
message by pressing the number above the symbol in the
Symbols
pop-up window.
The current text entry mode (T9 Word, Abc, ABC, 123, or
Symbols) is indicated in the lower part of a text entry screen. To
change the text entry mode, do the following:
1. While composing a text message, press the Left soft key.
The following options appear in the display:
•
T9word
•
T9Word
•
T9WORD
•
abc
•
Abc
•
ABC
•
123
•
Symbols
• Add T9 Word
2. Select the desired text entry mode.
Using T9® Mode (Phone Keypad Only)
T9 Word recognizes commonly used words for the numeric
sequence of key presses and inserts the word into your message.
T9 Word is much faster than the traditional method of text entry
(Abc) and requires only one key press per letter of the word that
you’re spelling.
1. While composing a text message, press the Left soft key,
then select T9Word.
•
For practice, enter the word “Samsung” by pressing each of the
following keys only once:
SAMSUNG
T9 Word recognizes that the most commonly used word for the
numeric sequence you just entered is “Samsung.”
Entering Text 36
Page 40
If more than one word shares the same numeric sequence, T9 Word
provides the most commonly used word, any additional words appear in
a pop-up window, in which you can select a desired word.
Note:
To enter a space, press . To enter a period, press . These key
functions apply to both T9 Word and Abc modes. For other symbols,
see “Entering Symbols” on page 38
Adding Words to the T9 Word Dictionary
If pressing the keys corresponding to a word you want to enter
and then scrolling through the pop-up list does not display that
word, do the following:
1. Clear the word by pressing and holding .
2. Change the text entry mode to
Note:
See “Changing the Text Entry Mode” on page 35 for instructions on
changing the text entry mode to
3. Enter the word you want to add to the T9 Word dictionary.
Note:
In
Add T9 Word
keypress method as when in Abc text entry mode.
4. Press . The word is added to the T9 dictionary.
mode, you enter a word using the same multiple
Add T9 Word
Add T9 Word
.
.
Using Abc Mode
1. While composing a text message, do one of the following:
37
•
Using the QWERTY keypad, press until “
Abc
” appears in the
lower left corner of the display.
•
Using the phone keypad, press the Left soft key, then select
2. Enter characters while in Abc mode by using one of
following keypads:
•
Using the QWERTY keypad, press the key labeled with the desired
character (such as, press for “G” and for “H”).
•
Using the phone keypad:
–
Press the key repeatedly until the desired character appears in the
display (such as, press once for “G” and twice for “H”).
–
Pause briefly and the displayed character is accepted and inserted into
your message.
–
Press to enter a space and press to enter a period.
Entering Numbers
Enter numbers into a text message while in 123 mode.
1. While composing a text message, do one of the following:
•
Using the QWERTY keypad, press until “
123/Sym
in the lower left corner of the display.
•
Using the phone keypad, press the Left soft key, then select
2. Enter numbers while in 123 mode by pressing the key
labeled with the corresponding number that you wish to
insert into your message.
Abc
” appears
123
.
.
Page 41

Entering Symbols
Enter symbols such as “@” or “%” into a text message.
䊳
While composing a text message, enter symbols by using
one of following keypads:
•
Using the QWERTY keypad:
–
Press until “
display, or press the Left soft key, then select
–
Press the key(s) labeled with the corresponding symbol(s) that you wish
123/Sym
” appears in the lower left corner of the
Symbols
to insert into your message, or use the Left and Right soft keys to page
through the other symbols, if desired.
•
Using the phone keypad:
–
Press the Left soft key, then select
Symbols
. The first of three symbol
screens appears in the display.
–
Use the Left and Right soft keys to page through the other symbols, if
desired.
–
Press the key that corresponds with the symbol that you wish to enter.
For example, press for an exclamation point (!).
–
Repeat these steps to insert additional symbols into your message.
.
Entering Text 38
Page 42

Section 6: Understanding Your Contacts
This section details how you can manage your daily contacts by
storing their names and numbers in your Contacts list. You can
have your Contacts entries sorted by name.
Note:
Although the procedures in this section are written for the phone
keypad, you can also perform these procedures using the QWERTY
keypad.
Contacts
Up to 1000 entries can be stored in Contacts. Each entry can
have up to five associated phone numbers and one E-Mail
address. Each phone number can be up to 32 digits in length,
including 2-Sec or Wait pauses (see “Manual Pause Calling” on
page 22 for more information), and associated names can be up
to 32 characters in length. You can assign the Speed Dial
numbers of your choice for each entry. You can also mark your
Contacts list as Restricted to prevent unauthorized viewing. (See
“Restriction” on page 124 for more information).
Tip:
Speed Dial One-Touch Dialing, Two-Touch Dialing, and Three-Touch
Dialing allow you to call numbers stored in Contacts faster.
39
Open Contacts
1. In standby mode, press the
Menu
soft key, then select
Contacts.
The following options appear in the display:
•
Find
— Find a phone number By Name.
Tip:
You can also access the Find option from standby mode, by pressing the
Contacts shortcut (Up Navigation) key.
•
Add New Contact
— Add a number or E-Mail address to your
Contacts.
•
Speed Dial
— Assign a Contacts entry to a Speed Dial number.
(See
“Speed Dial”
•
Group
— Review, send messages to, add Contacts to, or rename
four out of your five groups. (See
on page 48 for more information.)
“Contacts Groups”
for more information.)
•
Memory Info
— Display used and available memory for Contacts
entries.
Tip:
To launch the Contacts menu using a voice command — In standby
mode, press and hold until the phone prompts, “Say a
command.” Say “Go to Contacts” into the microphone.
2. Select the desired option.
on page 49
Page 43

Tip:
You can also press the keypad number key that corresponds to the
menu option number.
Finding a Contacts Entry
Contacts Soft Key Method
If you’ve stored a name entry in Contacts, Find allows you to find
it quickly.
1. In standby mode, press the
Contacts
soft key.
The Find screen appears in the display with the Go To field
and the first Contacts entry highlighted.
Tip:
You can also access the Find screen by pressing the
selecting Contacts ➔ Find.
2. Enter a name as entered in Contacts. For example, if you
Menu
soft key, then
saved the name as “Amy Smith”, begin the search by
pressing or (for “A”).
As you enter letters, the names of the closest matches
appear in the display.
3. When the desired entry is listed in the display, highlight the
entry.
•
To dial the default number associated with the name, press .
Tip:
You can select another number assigned to the name by using the Left/
Right navigation keys.
•
To add or change information for this entry, press the
•
To show information about the entry., press
•
For more options, press the
Options
soft key and the following
VIEW
()
Edit
soft key.
options pop-up in the display:
–
New Contact
–
Erase
–
Send Txt Msg
— Add a new entry to Contacts.
— Erase the name and associated information.
— Create and send a text message to the selected
Contact.
–
Send Pic Msg
— Create and send a picture message to the selected
Contact.
–
Send Video Msg
— Create and send a video message to the selected
Contact.
–
Call
— Dial the number associated with the name.
–
Send Name Card Via Bluetooth
— Send a copy of a Contacts entry
to another Bluetooth device.
Select an option. The selected option’s sub-menu appears in the
display.
Voice Method
Use the Voice SVC Lookup command to view contact information
for any named contact stored in your Contacts list by saying the
name.
Understanding Your Contacts 40
Page 44

Note:
The Lookup command shows the requested contact information in the
display but does not dial any phone numbers for the contact.
To look up information for a specific contact:
1. In standby mode, press and hold to launch Voice
SVC.
“Say a Command” appears in the display and is
pronounced through the speaker.
2. Say “Lookup”.
Voice SVC prompts you to “Say the name.”
3. Speak clearly and say the full name of the person you want
to call, exactly as it is entered in your Contacts list.
•
If VoiceSignal recognizes the name you said, the contact
information for that name appears in the display.
•
If VoiceSignal does not recognize the name you said, a choice list of
up to three names appears in the display, and VoiceSignal prompts
you with “
Did you say?
4. Say “Ye s” to confirm the name or “No” to hear the next
” followed by the first name on the list.
name, or use the keypad to select the correct name from
the list. (See “Choice Lists” on page 72, for more
information.)
41
•
To say the name again, press the
•
To exit VoiceSignal without dialing, press .
5. The contact information for the name you selected appears
Repeat
soft key.
in the display.
•
To dial the number associated with the name, press .
•
To erase this entry from your Contacts list, press the
•
To add or change information for this entry, press
•
For more options, press the
Options
soft key and the following
EDIT
Erase
().
options pop-up in the display:
–
Send Txt Msg
–
Send Pic Msg
–
Send Video Msg
–
Call
–
Send Name Card Via Bluetooth
Quick Search Method
With
Quick Search
set to On, you can quickly access a Contact by
doing the following:
Note:
For more information, refer to “Quick Search” on page 125.
1. In standby mode, press the first few numeric keys that
correspond to the letters of the contact’s name.
soft key.
Page 45
For example, to search for “Sally” you would enter
3. Select Create New. The
display showing the following icons:
Create New
screen appears in the
SAL
2. Press the Navigation key Up. The Contacts
appears in the display with the first matching contact
name in a list highlighted.
3. Highlight the desired Contact and press to call the
contact.
Find
screen
Adding a New Contacts Entry
You can use either of two methods to add an entirely new entry to
Contacts.
Dial Method
1. Using the keypad, enter the number you wish to add to
your Contacts.
2. Press the Save soft key.
The following options appear in the display:
•
Create New
•
Update Existing
existing Contacts entry.
— Lets you create a new Contacts entry.
— Lets you add the number you entered to an
Mobile
Home
Work
Pager
Fax
4. Select the number type that matches your new entry.
5. Use the keypad to enter a name to associate with the
Contacts entry.
6. Press or to save the new entry.
Menu Method
1. From the Contacts menu, select Add New Contact.
The Add New Entry screen appears in the display with the
Name field highlighted.
Understanding Your Contacts 42
Page 46

2.
Enter the name of the new entry using either keypad. (See
“Entering Text” on page 35 for more information.)
3. Highlight one of the following fields:
•
Mobile
•
Home
•
Work
•
Pager
•
E-Mail
•
Group
•
Ringtone
•
Fax
4. Enter a phone number or E-Mail address in the highlighted
field.
5. Repeat steps 3 and 4 as needed.
6. Press or to save the new entry.
Editing a Contacts Entry
Editing Contacts Name and Numbers
1. Find the Contacts entry you wish to change. See “Finding a
Contacts Entry” on page 40 for more information.
43
2. Highlight the entry and press
VIEW
( or ). The View
Contact screen appears in the display showing the
highlighted entry’s information.
3. Use the Up/Down navigation keys to review the information
for the entry that you wish to change, then press EDIT (
or ). The Edit Contact screen appears in the display.
4. Highlight the particular information you want to add or
change.
•
To backspace and delete numbers or letters, press or .
•
To clear all numbers or letters in the highlighted field, press and
hold or .
•
For more options, press the
Options
soft key and the following
options pop-up in the display:
–
Set Speed Dial
number (see
–
Set as default
dialing, speed dialing, or voice dialing.
–
Wait
–
2-Sec Pause
“Add Pauses to Contacts Numbers”
information).
/
Remove speed dial
“Speed Dial”
— Set the number the phone will dial when Contacts
— A hard pause (waits for input from you).
— A 2-second pause after which dialing resumes (see
— Assign/remove a speed dial
on page 48 for more information).
on page 44 for more
Select the desired option.
Page 47

When you’re finished changing the contents of a field,
5.
press or . Your changes are saved and a
confirmation message appears in the display.
Add Pauses to Contacts Numbers
Calls to automated systems such as banking services often
require a password or account number. Instead of manually
entering these numbers, you can store them in a Contacts entry
with the phone number and with special characters called
pauses, up to a maximum of 32 digits.
•
Wait
— Stops the calling sequence until the phone receives further
input.
•
2-Sec Pause
— Stops the calling sequence for two seconds, then
sends the remaining digits.
Note:
You can enter multiple Waits to extend the length of a pause. For
example, two consecutive Waits cause a total pause time of four
seconds. Keep in mind that pauses count as digits towards the 32-digit
maximum.
To add pauses to a Contacts entry number, do the following:
1. Find the Contacts entry associated with the number you
want to include one or more pauses. (See “Finding a
Contacts Entry” on page 40 for more information.)
2. Select and edit the desired number. (See “Editing a
Contacts Entry” on page 43 for more information.)
3. Press the Options soft key. The following pause options
appear in the display:
•
Wait
— A hard pause (waits for input from you).
•
2-Sec Pause
4. Select the desired pause to add it to the number sequence.
5. When you’re finished entering information, press or
— A 2-second pause after which dialing resumes.
to store the number to Contacts.
Pause Dial from Contacts
1. If you stored the number using 2-second pause(s), simply
recall the number from Contacts.
2. If you stored the number using Wait(s), recall the number
from Contacts and wait for the appropriate prompt from
the dialed number.
3. Press to dial the number.
Edit an Existing E-mail Address
1. Find the Contacts entry you want to edit. (See “Finding a
Contacts Entry” on page 40 for more information.)
Understanding Your Contacts 44
Page 48

2.
Highlight the desired Contacts entry, then press the Edit
soft key.
The Edit Contact screen appears in the display.
3. Highlight the E-Mail field.
4. Use either keypad to edit the E-Mail address. (See
“Entering Text” on page 35 for more information.)
5. Press or to save your changes.
Assigning a Picture to a Contacts Entry
When you assign a picture to a Contacts entry, the picture you
assign appears in the display when you receive a call from that
Contact.
1. Download a picture or, using your phone’s Camera with the
Resolution set to
176x144
, take and save a picture that you
wish to assign as the picture ID for a Contact. (For more
information, refer to “Browser” on page 69 or “Camera-
Camcorder” on page 76.)
2. From Standby mode, press the
Multimedia
➔
My Images
Menu
soft key, then select
. A photo gallery screen appears
in the display, showing a series of thumbnail photos.
45
3. Highlight the picture that you wish to assign to the
Contacts entry.
4. Press the
5. Find the Contacts entry you want to edit. (For more
Options
The
SET AS PICTURE ID
soft key, then select
Set As
screen appears in the display.
➔
Picture ID
information, refer to “Finding a Contacts Entry” on
page 40.)
6. Highlight the desired Contact, then press or .
“
Image set as picture ID.
” appears in the display and your
are returned to the photo gallery screen.
Assigning a Ringtone to a Contacts Entry
When you assign a ringtone to a Contacts entry, the phone plays
the ringtone that you assign when you receive a call from that
Contact instead of the Voice Calls ringtone.
1. Find the Contacts entry you want to edit. See “Finding a
Contacts Entry” on page 40 for more information.
2. Highlight the desired Contact, then press the Edit soft key.
The Edit Contact screen appears in the display.
.
Page 49
Highlight the Ringtone field, then press the Set soft key.
3.
The Contact Tone menu showing the following options
appears in the display:
•
My Ringtones
•
My Sounds
4. Select the desired option. The My Ringtones file list or the
My Sounds file list appears in the display.
5. Select the ringtone or sound that you wish to assign to the
Contacts entry. The Contacts entry screen appears in the
display with the name of the selected file in the Ringtone
field.
6. Press or to save the ringer assignment to the
selected Contacts entry.
Saving a Number After a Call
Once you finish a call, you can store the caller’s number to your
Contacts list.
Note:
If the call was incoming and Caller ID information was unavailable,
then the Save option is also unavailable.
1. Press
to end your call. The call time, length of call,
phone number, and name of the party (if available) appear
in the display.
2. Press the Save soft key. The Save screen appears in the
display showing the following options:
•
Create New
•
Update Existing
— Lets you create a new Contacts entry.
— Lets you add the number you entered to an
existing Contacts entry.
3. Select the desired option, then follow the instructions in
the upcoming sub-sections depending on whether the
number is a new entry or you are adding it to an existing
entry.
Create a New Entry
1. From the
Save
screen, select Create New. The Create
New screen appears in the display showing the following
number type options:
Mobile
Home
Understanding Your Contacts 46
Page 50
Work
Pager
Fax
2.
Select the number type that matches your new entry.
3. Enter a name for the new entry. (See “Entering Text” on
page 35 for more information.)
4. Press or to save the new entry to your Contacts
list.
Add to an Existing Entry
1. From the
2. Find and select the Contacts entry to which you want to
47
Save
screen, select Update Existing. The
Update Existing screen appears in the display showing
your Contacts list with the Go To field and the first
Contacts entry highlighted.
add the new number. (See “Finding a Contacts Entry” on
page 40 for more information.)
The following number type options appear in the display:
Mobile
Home
Work
Pager
Fax
Note:
Number types that are already assigned a number show the number
instead of the number type label.
3. Select the desired unassigned number type. The Contacts
entry information appears in the display with the new
number posted in the appropriate number type field.
4. Press or to save your changes to the existing
entry.
Page 51
Speed Dial
A Contacts entry’s Speed Dial number corresponds to the number
keys you press to speed dial one of that entry’s numbers. For
example:
•
To speed dial the Contacts entry assigned to Location 5, press and hold
or , (1-touch dialing).
•
To speed dial the Contacts entry assigned to Location 35, press
or then press and hold or , (2-touch dialing).
•
To speed dial the Contacts entry assigned to Location 235, press
or , press or , then press and hold hold or
, (3-touch dialing).
You can assign one or more Speed Dial numbers to a Contacts
entry during new entry creation or by editing an existing entry.
Assignment During Entry Creation
To assign a Speed Call number to a new Contacts entry number,
do the following:
1. Follow either of the New Contacts entry procedures (see
“Adding a New Contacts Entry” on page 42) until you enter
a name for the entry.
2. After entering the Contacts entry name, do not press
or . Instead, highlight the number field to be assigned
a Speed Dial number.
3. Press the Options soft key, then select
Set Speed Dial
Speed Dial screen appears in the display.
4. Highlight an Unassigned Speed Dial number or enter an
Unassigned Speed Dial number in the Go To field using
either keypad.
Important!:
Do not enter Speed Dial numbers 1, 311, 411, 611 or 911. These
numbers are already assigned to Voicemail (001), municipal
services (311), Directory Assistance (411), account information
(611), and emergency use (911).
5. Press SET ( or ). You are prompted to confirm your
Speed Dial number assignment.
6. Press the Yes soft key to save your Speed Dial assignment
and return to the Add New Entry screen.
Press the No soft key to discard the assignment and return
to the Speed Dial screen.
7. Press or to save your changes.
Changing a Speed Dial Location
1. Find the Contacts entry you want to edit. See “Finding a
Contacts Entry” on page 40 for more information.
2. Highlight the desired entry, then press the Edit soft key.
Understanding Your Contacts 48
. The
Page 52

3.
Highlight the number field marked by the Speed Dial icon
().
4. Press the Options soft key, then select
Remove speed dial
“Remove speed dial?” prompts you to confirm your
desire to remove the entry.
5. Press the Yes soft key to remove the Speed Dial
assignment. “Speed Dial Removed” pops up in the
display, and you are returned to the Edit Contact screen.
6. Do steps 2 through 7 of the “Assignment During Entry
Creation” procedure on page 48.
Contacts Groups
Contact Groups let you easily send messages to multiple,
selected Contacts. You can also use Groups to find Contact
entries and to add/remove Contacts names in a Group or to
create or rename a Group.
Add Contacts Entry to a Group
Using Add New/Edit Contact Option
To add a Contact to a Group using either the Add New Contact
option or the Edit Contact option, do the following:
49
1. Create a Contacts entry (see “Adding a New Contacts
Entry” on page 42 for more information) that you want to
.
add to a Group.
– Or –
Find the Contacts entry you want to edit. See “Finding a
Contacts Entry” on page 40 for more information.
2. Highlight the Group field, then press the Set soft key.
The Select Group screen appears in the display showing
Groups similar to the following:
•
No Group
•
Business
•
Colleague
•
Famil y
•
Friends
3. Select the Group to which you want to assign the selected
Contact.
You are returned to the Add New Entry/Edit Contact
screen and the selected Group name populates the Group
field.
4. Press or to save your changes.
Page 53
Using Group Add Option
The Add option lets you add one or more existing Contacts to a
Group.
1. From the Contacts menu, select Group.
The Group List screen appears in the display showing
Groups similar to the following:
•
No Group
•
Business
•
Colleague
•
Family
•
Friends
2. Highlight a Group, then press the Options soft key. The
following options pop-up in the display:
•
Send Txt Msg
•
Send Pic Msg
•
Send Video Msg
•
Rename
•
Erase
•
Add
3. Select Add. The Add Contacts screen appears in the
display showing a list of Contacts entries.
4. Do one of the following:
•
Highlight a Contacts entry you want to add to the group, then press
MARK
( or ). A checkmark appears in the entry’s
checkbox.
Repeat as needed to check all the desired Contacts.
•
Press the
Options
soft key, then select
Note:
To unmark a marked Contact, highlight the Contact and press
( or ) to clear the checkmark.
5. When you have marked the Contacts you want to add to
Mark All
or
Unmark All
MARK
the group, press the Done soft key. “Contact added to
group” appears in the display, followed by the selected
Group list including the added Contacts.
Rename a Group
The Rename option lets you change the name any of the Groups,
except No Group.
1. From the Contacts menu, select Group. The Group List
screen appears in the display.
2. Highlight a Group name (other than No Group) that you
wish to change, then press the Options soft key.
3. Select Rename.
Understanding Your Contacts 50
.
Page 54

The Rename Group screen appears in the display.
4. Enter changes to the group name using either keypad.
(See “Entering Text” on page 35 for more information.)
5. When you have completed your changes to the Group
name, press SAVE ( or ).
“Group Renamed” appears in the display followed by the
Group List screen showing your renamed Group.
Add a New Group
The
New
option lets you add Groups.
1. From the Contacts menu, select Group. The Group List
screen appears in the display.
2. Press the New soft key. The New Group screen appears in
the display.
3. Enter a new group name using either keypad. (See
“Entering Text” on page 35 for more information.)
4. Press SAVE ( or ). “Group Saved” appears in the
display followed by the Group List screen showing your
new Group.
51
Erase a Group
The Erase option lets you delete a Group, thus freeing you to
reassign the Contacts formerly in the Group.
1. From the Contacts menu, select Group. The Group List
screen appears in the display.
2. Highlight the Group you wish to delete, then press the
Options soft key, and select Erase.
You are prompted to confirm the Group erasure.
3. Press the Yes soft key to confirm erasure of the highlighted
Group. Press the No soft key to retain the Group.
Note:
When you delete a Group, the assigned Contacts entries return to
Group
.
Deleting a Contacts Entry
1. Find the Contacts entry you want to delete. (See “Finding a
Contacts Entry” on page 40 for more information.)
2. Highlight the desired entry, then press the Options soft
key, and select Erase. The phone prompts you to confirm
the erasure.
No
Page 55

Press the Yes soft key to confirm erasure of the selected
3.
Contact. Press the No soft key to retain the Contact.
Memory Info
The Memory Info menu option lets you view the amount of
memory you have used to store Contacts entries, as well as the
memory remaining to store more Contacts entries.
䊳
From the
Contacts
menu, select Memory Info.
The Memory Info Contacts screen appears in the display
showing the amount of memory Used and remaining (Free)
for Contacts entries.
Understanding Your Contacts 52
Page 56
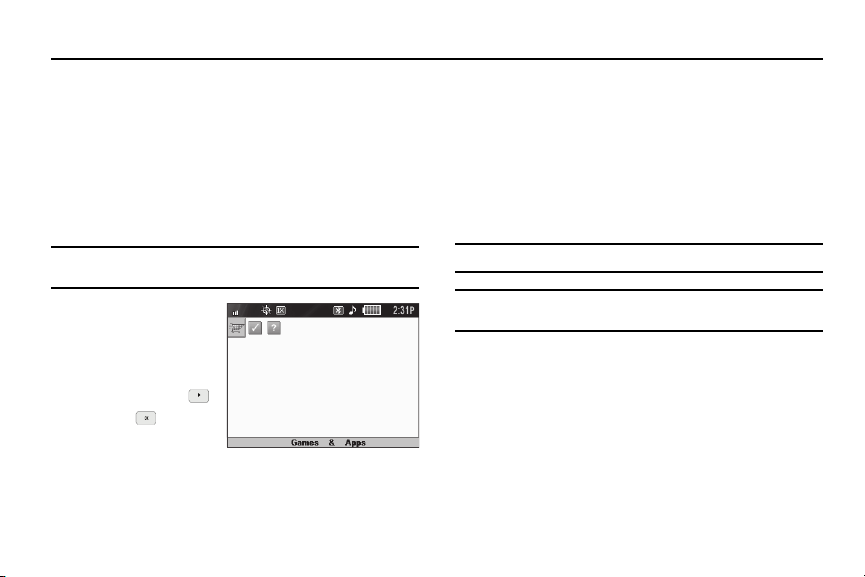
Section 7: Games & Apps
With Games & Apps, you can download full featured applications
over the air including games, personalized ring tones, pictures,
and more. You can send and receive instant messages and EMail, or browse the web to catch up on all the latest news.
This section outlines how to obtain games and other applications
for your phone. For more information, contact your Wireless
Carrier.
Accessing Games & Apps (Mobile Shop)
Note:
The Games & Apps screen displays in both portrait and landscape
formats.
1. In standby mode, do
one of the following to
launch Games & Apps:
•
Press the Right
navigation key or .
•
Press , then select
Games & Apps
Games & Apps
➔
.
The Games & Apps screen appears in the display as
shown.
53
Applications Shopping and Downloading
Download games, ring tones, E-Mail, and more using the Games
& Apps. For information on airtime charges, contact your
Wireless Carrier.
1. At the Games & Apps screen, select Games & Apps. The
Games & Apps catalog menu appears in the display.
2. Follow the instructions in your phone’s display.
Note:
Please check with your Wireless Carrier for availability of applications.
Tip:
To simplify any text entries in Games & Apps screens, try using the
QWERTY keypad.
Page 57
Section 8: Messages
This section explains how to send or receive different types of
messages. This section also describes the features and
functionality associated with messaging.
Note:
Although the procedures in this section are written for the phone
keypad, you can also perform these procedures using the QWERTY
keypad.
Types of Messages
Your phone is able to send and receive Text, Picture, and Video
messages to compatible phones and devices. Text messages can
be up to 160 characters in length.
Note:
Available memory is shared between all messages. You can store up to
100 messages. However, the exact number is dependent upon
message length.
Launching Messages
To launch Messages:
1. In standby mode, press the Messages shortcut (Up
navigation) key.
– or –
Press the
Menu
soft key, then select Messages.
The Messages menu appears in the display.
Create and Send Text Messages
1. From the
Messages
menu, select Send Message ➔ Text
Message. The Create Txt Msg screen appears in the
display showing the To: list.
Tip:
To launch the
standby mode, press and hold or until the phone prompts,
Say a command.
“
prompted to say a Contact name or a number for the first recipient of the
message.
2. Enter the phone number or E-Mail address of the recipient,
Create Txt Msg
” Say “
Send Text
screen using a voice command — In
” into the microphone. You are then
then press or . The Tex t: appears in the display.
Tip:
Press the
Add
Groups
recipients to the
3. Enter the text content of your message using either
soft key to display a pop-up menu containing:
, and
Recent Calls
. These options allow you to find and add
To:
list.
Contacts
keypad. (See “Entering Text” on page 35 for more
information.)
4. At any point while composing a message:
Messages 54
,
Page 58

•
To change the text entry mode, press the Left soft key and select
the desired text entry mode, repeatedly press and hold , or
press . (For more information, refer to
“Entering Text”
page 35.)
•
To complete the message text and set message send options,
press the
Options
soft key. The following options appear in the
display:
–
Preset Msgs
— Insert pre-composed text in your message.
–
Save As Draft
–
Save As Preset
list.
–
Add To Contacts
the Contacts list.
–
Delivery
Normal),
–
Cancel Msg
your Drafts folder.
5. Once you’re finished entering your message, press
— Save the message to your Drafts folder.
— Save the message text to the
— Save the recipient’s number or E-Mail address to
— Choose the
CB#
Enh. Delivery Ack
(On/Off), or
Signature
— Discard this message. You are prompted to save it to
(On/Off).
Add Preset Msg
(On/Off),
Priority
(Urgent/
SEND
( or ).
Receive Text Messages
When you receive a message in standby mode, the ringer sounds
(unless turned off) and New Message appears in the display
along with the closed envelope icon ( ). The date and time of
the message also appear in the display along with the following
options:
55
•
View Now
— Opens the message, where you have the option to
on
Forward, Reply With Copy, Save As Preset, Lock, Add To Contacts,
Message Info, or Extract.
•
View Later
— Saves the message to your inbox, where you can view
it later, then returns your phone to standby mode.
Select the option of your choice.
Receive Messages While in a Call
When you receive a message while in a call, New Message
appears in the display along with the closed envelope icon ( ).
The date and time of the message also appear in the display
along with the following options:
•
View Now
— Opens the message, where you have the option to
Forward, Reply With Copy, Save Quick Text, Lock, Add To Contacts,
Message Info, or Extract.
•
View Later
— Saves the message to your inbox, where you can view
it later, and returns your phone to call mode.
Select the option of your choice.
Chat View
Chat View mode is the default format for viewing text messages.
In Chat View mode, you can view a series of text messages
exchanged between your phone and another phone as if the
messages were a chat session, instead of viewing only the
incoming messages individually.
Page 59
Note:
To disable/enable Chat View mode, change the
(For more information, refer to “Message Settings” on page 65.)
Tip:
To simplify the exchange of messages with
Chat
, you might want to change the
Auto Save
Message View
Message View
setting to
setting.
setting to
Auto Save
Send Picture/Video Messages
Send Picture/Video messages to recipients with a compatible
phone or other device, and accompany a Picture message with a
voice memo, ringtone, or downloaded melody.
Tip:
You can also send Picture/Video messages while in Camera/Camcorder
mode. (For more information, refer to “Point, Click, and Send Pictures
and Videos” on page 94.)
You can send a Picture/Video message to up to ten recipients. Enter
each recipient’s address or phone number in a separate
the Picture message composer.
1. From the
Messages
Picture Message /
Create Video Msg
screen appears in the display with the
menu, select Send Message ➔
Video Message
Send To
field of
. The Create Pic Msg /
Send To tab highlighted and showing the To: list.
Tip:
To launch the
standby mode, press and hold or until the phone prompts,
Say a command.
“
prompted to say a Contact name or a number for the first recipient of the
message.
.
2. Enter the phone number or E-Mail address of the recipient
Create Pic Msg
” Say “
Send Picture
screen using a voice command — In
” into the microphone. You are then
using the keypad, then press or .
Tip:
Press the
Add
Groups
, and
recipients to the
Recent Calls
soft key to display a pop-up menu containing:
. These options allow you to find and add
To:
list.
Contacts
,
3. The Subject: field appears in the display. Enter a subject
for the Picture message using the keypad. (See “Entering
Tex t” on page 35 for more information.)
4. Highlight the Tex t: field, then enter the message text using
either keypad. (See “Entering Text” on page 35 for more
information.)
5. For a Picture Message, highlight the PIC: field, then press
the
Pictures
soft key. A photo gallery of thumbnail images
appears in the display.
– or –
Messages 56
Page 60
For a Video Message, highlight the Video: field, then press
the Videos soft key. A video gallery of thumbnail images
appears in the display.
6. Select a picture/video to add it to your message.
To expand the highlighted picture/video for easier viewing,
press the
View
/
Play
soft key.
7. Press or to exit the Pictures/Videos gallery screen
without selecting a picture.
You are returned to the Create Pic Msg / Create Video
Msg screen with the selected picture in the PIC: field or
video in the
8. For a Picture Message, if you wish to insert a sound into
Video:
field.
your message, highlight the Sound: field, then press the
Sounds soft key. The My Sounds screen appears in the
display.
9. Do one of the following:
•
Select a file from the list of previously recorded voice memos and
preloaded audio files on your phone.
•
Select
Record New
and record a new voice memo, then select the
new recorded sound file to add it to the message.
57
Note:
You can record and insert a voice memo of up to 60 seconds in length,
if you record first before attaching a picture. If a picture is attached
before recording, the size of the voice memo is limited to the amount
of remaining memory.
•
Press or to exit the
My Sounds
screen without selecting a
sound.
10. Press the Options soft key to complete the message text
and set message send options. The following options
appear in the display:
•
Preview
— View the picture/video as the recipient will see it.
•
Add Preset Msg
•
Save As Draft
•
Priority Level
•
Validity Per iod
— Add precomposed text to your message.
— Save the message to your Drafts folder.
— Choose
Urgent
or
Normal
.
— Enter the
Date
when this message will cease
to be valid, then use the Left and Right navigation keys to choose
the
Time
.
•
Delivery Ack
— Choose On or
Off
— Requests confirmation
when your message is received.
•
Remove Pic
•
Remove Video
•
Remove Sound
•
Add To Contacts
— Remove the picture from your message.
— Remove the video from your message.
— Remove the sound file from your message.
— Save the recipient’s number or E-Mail
address as a Contacts list entry.
Page 61

Select the desired option and setting.
11. Press
SEND
( or ) to send the message. “Pic Msg
Sending” appears in the display and a progress bar
indicates the send status.
Receive Picture/Video Messages
When you receive a Picture/Video Message in standby mode, the
ringer sounds (unless turned off) and New Message appears in
the display along with the closed envelope icon ( ). The date
and time of the message also appear in the display along with
the following options:
•
View Now
— Retrieves and opens the message, where you have the
option to Reply, Forward, Delete, Save Text, Save Pic, Save Video, or
Save Msg.
•
View Later
— Saves the message to your inbox, where you can view
it later, then returns your phone to standby mode.
Select the desired option.
View a Picture/Video Message Later
1. From the
Messages
menu, select Inbox. The
Inbox
appears
in the display.
2. Select the new message. “
display followed by “
Connecting
Retrieving
” appears in the
” and a progress bar
indicating that the message is downloading to your phone.
3. Once a Picture/Video message has been downloaded to
your phone, the new Picture/Video message appears in the
display. If the message includes a sound file, the phone
begins playing it.
Note:
For more information on viewing and managing received picture
messages, see “Inbox” on page 59.
View a Picture Message Now
1. After you select the View Now option, “Connecting”
appears in the display followed by “Retrieving” and a
progress bar indicating that the message is downloading
to your phone.
2. After the Picture/Video message has downloaded, an alert
sounds, and the new Picture/Video message appears in
the display. If the message includes a sound file, the phone
begins playing it.
3. While viewing your message press the Options soft key.
The following options appear in the display:
•
Replay
— Play the video or sound fil e included in the video/picture
message again.
•
Forward
— Send a copy of this message to another recipient.
Messages 58
Page 62

•
Reply With Copy
— Compose and send a reply message to the
originator of the received message and include a copy of the
original message.
•
Save Sound
— Save the sound file included in this message to
the My Sounds folder.
•
Save Pic
— Save the picture included in this message to the My
Images folder.
•
Save Video
— Save the video included in this message to the My
Videos folder.
•
Save Quick Text
— Save the text in this message as a new Quick
Tex t.
•
Lock
/
Unlock
— Block/permit erasure of the highlighted
message.
•
Add To Contacts
•
Message Info
— Save the sender’s number to your Contacts.
— Shows message delivery status, addressee,
size, and so on.
4. Select an option to perform its function.
Note:
For more information on received picture message options, see
“Inbox” on page 59.
Message Boxes
Your phone stores messages in any one of five message boxes.
The subsections that follow describe each message box in detail.
59
Inbox
Received messages of all types (except Voicemail) are stored in
the Inbox.
1. From the
Messages
menu, select Inbox. The
Inbox
appears
in the display showing a list of received messages.
Tip:
While in a call, press the
2. Highlight the message you wish to view, then press
Options
soft key, then select
Messages
.
( or ) to view contents of the highlighted message.
3. While viewing your message, press the Options soft key.
The following options appear in the display:
•
Forward
— Send a copy of this message to another recipient.
•
Reply With Copy
— Compose and send a reply message to the
originator of the received message and include a copy of the
original message.
•
Save Sound
— Picture Messages Only — Save the audio file
(sound) included in this message to the My Sounds folder.
•
Save Pic
— Picture Messages Only — Save the picture included
in this message to the My Images folder.
•Save Video
— Video Messages Only — Save the picture included
in this message to the My Videos folder.
• Save As Preset
— Save the text in this message as a new Quick
Tex t.
OPEN
Page 63

•
Lock
/
Unlock
— Block/permit erasure of the highlighted
message.
•
Add To Contacts
•
Message Info
— Save the sender’s number to your Contacts.
— Shows message delivery status, addressee,
size, and so on.
•
Extract
— Calls the sender of the received message.
4. Select an option to perform its function.
Messages and Lock Mode
Your phone can still receive messages while in Lock Mode. The
time and date of the message appear in the display, but you
cannot access the message until you enter the lock code.
Managing Inbox Messages
1. From the
Messages
menu, select Inbox. The
Inbox
appears
in the display showing a list of received messages.
2. Highlight a message in the list, you have the following
options:
•
To remove the highlighted message from the Inbox, press the
soft key.
•
To review the highlighted message, press
•
For more options, press the
Options
OPEN
( or ).
soft key. The following options
appear in the display:
Erase
–
Reply
— Compose and send a reply message to the originator of the
received message.
–
Reply With Copy
originator of the received message and include a copy of the original
message.
–
Forward
–
Lock
–
Add To Contacts
–
Erase Inbox
–
Message Info
and so on.
— Compose and send a reply message to the
— Send a copy of this message to another recipient.
/
Unlock
— Block/permit erasure of the highlighted message.
— Save the sender’s number to your Contacts.
— Delete all unlocked messages from the Inbox.
— Shows message delivery status, addressee, size,
Select an option to perform its function.
Outbox
Your phone stores messages in the Outbox, regardless of
whether the message was successfully transmitted. Verify if and
when a message or E-Mail was successfully received by enabling
the Enh. Delivery Ack/Delivery Ack feature.
Review Messages in the Outbox
1. From the
Messages
menu, select Outbox. Your list of sent
messages appear in the display.
2. Highlight a message in the list, you have the following
options:
Messages 60
Page 64

•
To remove the highlighted message from the Inbox, pres s the
soft key.
•
To review the highlighted message, press
•
For more options, press the
Options
OPEN
( or ).
soft key. The following options
appear in the display:
–
Play Again
— Replay the sound file in a Picture message or the video
in a Video message.
–
Forward
— Send the highlighted message to another recipient.
–
Erase
— Delete this message from the Outbox, if the message is
Unlocked.
–
Lock
/
Unlock
— Block/permit erasure of the highlighted message.
–
Save As Preset
into other messages.
–
Add To Contacts
–
Message Info
and so on.
–
Extract
— Save the message text as Quick Text for insertion
— Save the recipient’s number to your Contacts.
— Shows message delivery status, addressee, size,
— Calls the originator of the message.
Select an option to perform its function.
Managing Outbox Messages
1. From the
Messages
menu, select Outbox. Your list of sent
messages appear in the display.
2. Highlight a message in the list, you have the following
options:
61
Erase
•
To remove the highlighted message from the Inbox, press the
soft key.
•
To review the highlighted message, press
•
For more options, press the
Options
OPEN
soft key. The following options
appear in the display:
–
Forward
— Send the highlighted message to another recipient.
–
Resend
— Send another copy of the highlighted message to the
original recipient
–
Lock
/
Unlock
— Block/permit erasure of the highlighted message.
–
Add To Contacts
–
Erase Outbox
–
Message Info
and so on.
— Save the recipient’s number to your Contacts.
— Erase all Unlocked messages from the Outbox.
— Shows message delivery status, addressee, size,
Select an option to perform its function.
Drafts Box
Messages in the Drafts box are those that have been composed
but never sent. You can return to the Drafts box at any time to
view, edit, or send a draft message.
Create a Draft Message
1. From the
Messages
menu, select Send Message and then
select one of the following Send Message options:
•
Text Message
•
Picture Message
( or ).
Erase
Page 65
•
Video Message
The Create Txt Msg / Create Pic Msg /
Create Video Msg
screen appears in the display showing the To: list.
2. Enter the phone Number or E-Mail address of a recipient,
then press the key.
Tip:
Press the
Add
Groups
recipients to the
3. Compose your message using either keypad, press the
soft key to display a pop-up menu containing:
, and
Recent Calls
. These options allow you to find and add
Send To:
list.
Options soft key, then select Save As Draft. “
saved in drafts
” appears in the display and your message
Contacts
Message
is saved to the Drafts box.
View and Edit Draft Text Messages
1. From the
Messages
menu, select Drafts. A list of any draft
messages that you’ve saved appears in the display.
2. Highlight a text message that you wish to view or edit, then
press
EDIT
( or ). The
Create Txt Msg
screen appears
in the display.
3. Enter or change the recipient’s number and/or E-Mail
address and the message text using the keypad. (See
“Entering Text” on page 35 for more information.)
4. To complete the message text and set message send
options, press the Options soft key. The following options
,
appear in the display:
•Preset Msgs
•Save As Draft
• Save As Preset
— Insert pre-composed text in your message.
— Save the message to your Drafts folder.
— Save the message text to the
list.
• Add To Contacts
— Save the recipient’s number or E-Mail address
to the Contacts list.
• Delivery
— Choose the
(Urgent/Normal),
• Cancel Msg
CB#
— Discard this message. You are prompted to save it
to your Drafts folder.
5. Select an option to perform its function.
6. When you have completed composing your message,
press
SEND
( or ) to send it.
View and Edit Draft Pic. / Video Messages
1. From the
Messages
messages that you’ve saved appears in the display.
Add Preset Msg
Enh. Delivery Ack
(On/Off), or
Signature
(On/Off),
(On/Off).
Priority
menu, select Drafts. A list of any draft
Messages 62
Page 66

2.
Highlight the picture/videomessage that you wish to view,
then press EDIT key ( or ). The
Create Video Msg
3. Make any needed changes and press the Options soft key.
screen appears in the display.
Create Pic Msg
The following options appear in the display:
•
Preview
— Shows the message contents.
• Add Preset Msg
— Insert pre-composed text into your message
text.
•
Save As Draft
•
Priority Level
•
Validity Per iod
— Saves the changed message to the Draft Box.
— Choose
Urgent
or
Normal
.
— Enter the
Date
when this message will cease
to be valid, then use the Left and Right navigation keys to choose
the
Time
.
•
Delivery Ack
— Choose On or
Off
— Requests confirmation
when your message is received.
•
Remove Pic
•
Remove Video
•
Remove Sound
•
Add To Contacts
— Remove image included in draft message.
— Remove video included in draft message.
— Remove sound file included in draft message.
— Save the recipient’s number or E-Mail
address to your Contacts.
4. Select an option to perform its function.
63
5. When you have completed composing your message,
/
press
SEND
( or ) to send it.
Managing Draft Messages
1. From the
Messages
menu, select Drafts. A list of any draft
messages that you’ve composed appears in the display.
2. Highlight a message, then do one of the following:
•
To remove the highlighted message from the
Erase
soft key.
•
To access other options, press the
Drafts
Options
soft key. The following
box, press the
options appear in the display:
–
Send
— Send the highlighted message to the number or E-Mail
address currently included with the message.
–
Lock
/
Unlock
— Block/permit erasure of the highlighted message.
–
Add To Contacts
address to your Contacts.
–
Save As Preset
into other messages.
–
Erase Drafts
— Save the recipient’s number and/or E-Mail
— Save the message text as Quick Text for insertion
— Delete all unlocked draft messages.
Select an option to perform its function.
Voicemail
Messages in your voice mailbox are logged in the Voicemail box
of the Messages menu. Open the Voicemail box to view the
details of the Voicemail message.
Page 67

When you’re notified of a new voicemail message by an alert
tone and the new message icon, the following options pop:
•
Listen Now
— Calls your voice mailbox and lets you listen to your
messages.
•
Listen Later
— Returns you to standby mode where you can choose
to call your mailbox and review your messages at a later time.
Listen to Voicemail Now
1. In standby mode, select
Listen Now
in the New Voicemail
pop-up. Your phone automatically calls your voice mailbox.
2. Follow the voice prompts to access your voicemail
messages.
Listen to Voicemail Later
If you have chosen to review your voicemail messages at a later
time:
1. From the
Messages
menu, select
Voicemail
. The
Voicemail
screen appears in the display, showing the number of new
voicemail messages received and the date and time the
latest message was received.
Tip:
You can also access your voicemail from standby mode, by pressing and
holdolding or to speed call your voice mailbox.
2. Follow the voice prompts to access your voicemail
messages.
Erase Messages
You can erase all of the messages in any or all of message boxes
using one convenient sub-menu.
Note:
This function erases all messages in the selected message box. To
delete a single message, go to the respective message box, highlight
the message, and press the
to “Managing Inbox Messages” on page 60, “Managing Outbox
Messages” on page 61, or “Managing Draft Messages” on page 63.)
1. From the
Messages
Erase
soft key. (For more information, refer
menu, select Erase Messages. The
following options appear in the display:
•
Inbox
— Deletes all unlocked messages stored in the Inbox.
•
Outbox
— Deletes all unlocked messages stored in the Outbox.
•
Drafts
— Deletes all unlocked messages stored in the Drafts box.
•
All Messages
— Deletes all unlocked messages stored in all of
the message boxes, except Voicemail.
2. Select the message box containing the messages you
want to delete. You’re prompted to confirm the erasure of
all messages in the selected box or in all boxes.
3. To delete the messages, press the Yes soft key. To cancel
deleting the messages, press the No soft key.
Messages 64
Page 68

Message Settings
Use the Msg Settings sub-menus to define settings for general,
text, and picture messages.
1. From the
Messages
menu, select Msg Settings. The
following options appear in the display.
•
Notification
messages (
•
Auto Save
automatically when you exit them (
Prompt
•
Auto Erase
— Choose how your phone notifies you of incoming
Msg. & Icon Icon Only
).
— Choose whether your messages are saved
Auto Save, Do not Save
).
—
Choose to receive (On) or not receive (
Off
) a
warning message when you delete a message.
•
Auto View
— On/Off — With Auto View On, the full content of a
text message appears in the display as the messages is received.
•
Entry Mode
messages (
•
CB#
— Choose the default method for entering text into
T9word, T9Word, T9WORD, abc, Abc, ABC, 123
— Choose whether to include a callback phone number with
your outgoing messages, and enter the number to be included.
•
VM#
— Edit or view your Voicemail number.
•
Signature
— Create a signature and choose whether to include it
at the end of outgoing message text.
•
Preset Msgs
— Edit your pre-composed messages, which can
then be inserted into new messages.
65
•
Auto Scroll
— With Auto Scroll On, the full content of a text
message automatically rolls upward on the display, one screen-full
at a time.
• Messaging Font Size
appear using
•Message View
Chat
, multiple text messages exchanged with a single addressee
— Choose whether message text will
Large
or
Normal
font size.
— Chat/Normal — With Message View set to
appear as a chat session.
2. Select the desired option, then select the desired setting or
,
enter the desired value.
Editing and Entering Preset Messages
1. From the
Messages
menu, select Msg Settings ➔ Preset
Msgs. The Preset Msgs sub-menu appears in the display.
2. Select a Preset Msg you want to change.
).
Note:
You cannot change the pre-defined Quick Text included with your
phone.
3. To create a new Preset Msg, press the New soft key.
Tip:
You can also create new Preset Msgs by viewing/editing an Outbox
message and using the
“Review Messages in the Outbox” on page 60 for more information.
Save Quick Text
option in the
Options
menu. See
Page 69
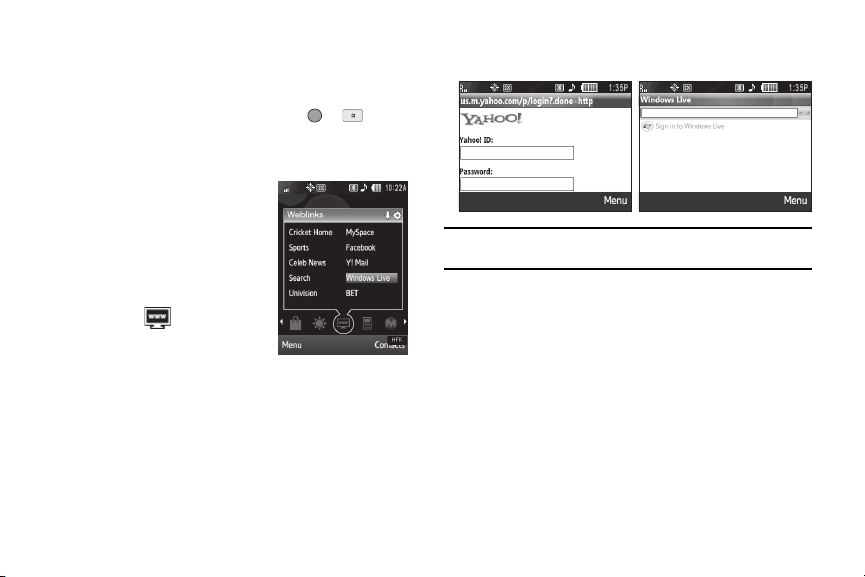
Enter/change the text content of your Preset Msg using
4.
either keypad. (See “Entering Text” on page 35 for more
information.)
5. To save your finished Preset Msg, press or . The
Preset Msgs menu appears in the display with your new
Preset Msg highlighted.
E-mail Messages
Your r560 phone includes links to your
Wireless Provider’s Mobile Web service
that can let you access your personal
E-mail account(s).
1. In Standby mode, select
Weblinks ( ) ➔
Windows Live
Y! Mail
. The respective
/
login screen appears in the
display.
2. To create an account, follow the on-screen prompts.
3. If you have an account, enter your account ID and
password.
Note:
For more information about Mobile Web E-mail, contact your Wireless
Provider.
Messages 66
Page 70
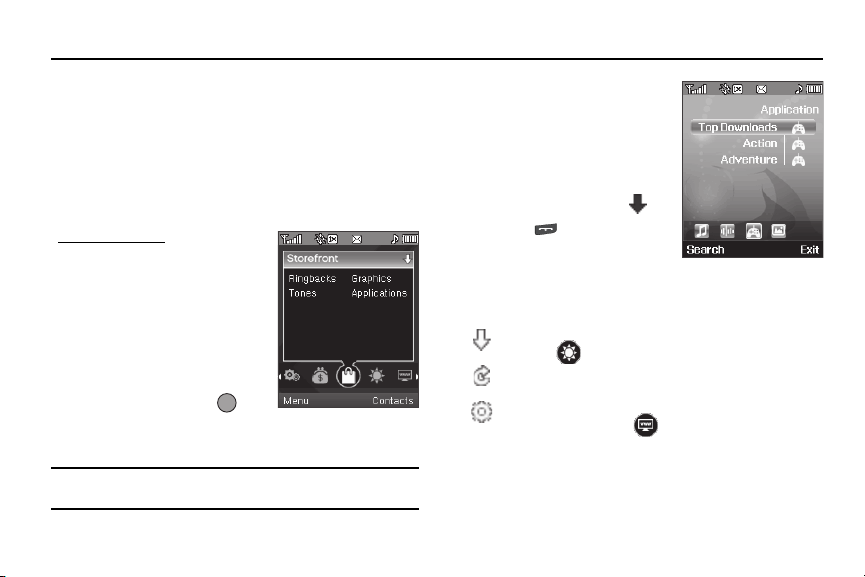
Section 9: Widgets
Widgets are special icons that you can use to launch particular
phone features and functions or to quickly access particular
Internet addresses. You can access the widgets on your U460
phone by using the Widget Bar.
Accessing Widgets
The Widget Bar is an list of easily accessed widgets that acts like
a menu.
To access a Widget:
1. In standby mode, using the
Left and Right navigation keys
to highlight a particular
widget.
2. To view information about the
widget and/or to access
widget options, press .
Preview information or a menu
of options for the highlighted widget pops-up.
Tip:
You can hide or display individual widgets by changing the Widget
settings. (For more information, refer to “Widgets” on page 67.)
67
3. To launch a function/feature/
application linked with the
highlighted widget, select an
option in the widget’s pop-up
window.
4. To exit a widget, select or
press .
Widget Pop-Up Controls
One or more of the following controls appear in the upper right
corner of widget pop-up menus:
Closes the pop-up menu and highlights the
Weather
widget( ).
Refreshes the contents of the pop-up menu.
Launches another screen, such as a settings screen for
the
Weblinks
widget ( ).
Page 71
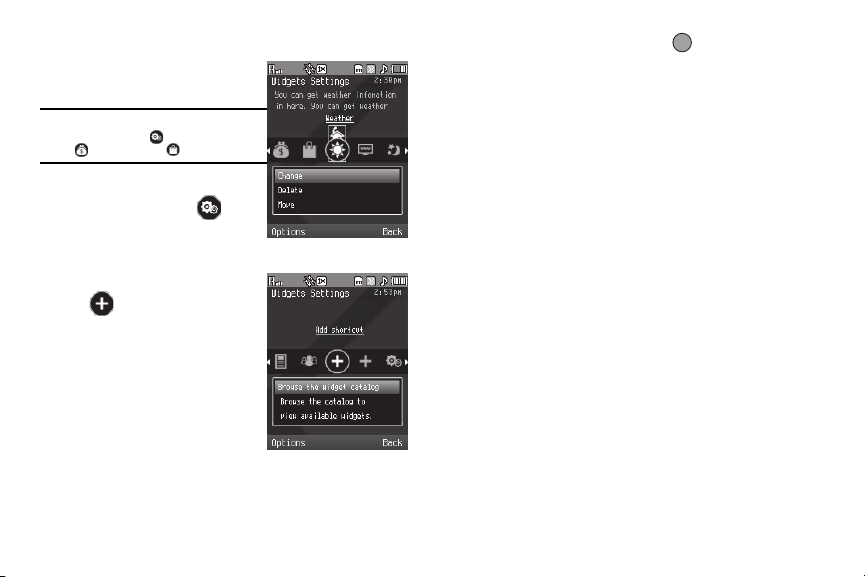
Configure Widgets
This option lets you select which
widgets appear in the Widget Bar.
Note:
You cannot Change, Delete, or Move
Personali ze
( ),
the
(), or
Storefront
1. In standby mode, select the
My Account
( ) widgets.
Personalize widget ( ),
then select
Widgets
2. Select an Add Shortcut widget
( ), then select
widget catalog
Personalize
.
Browse the
. Widget catalog
options appear in the display.
3. To enable/disable a particular
widget, select the associated
option in the widget catalog. A
check mark appears in/
disappears from the option’s
check box.
4. To save your new settings, press . You are returned to
the Widget Bar.
Widgets 68
Page 72
Section 10: Browser
This section outlines how to launch the Browser, how to navigate
to pages on the web, and how the keys on the keypads are used
with the Browser. Additionally, links to other sites are briefly
discussed.
Note:
Browser is usable in either portrait or landscape format (that is, with
the QWERTY keypad open or closed).
Using the Browser, you can conveniently surf the web and
download ringtones, music, videos, and wallpapers using your
phone. Each time you launch the Browser, your phone connects
to the Internet and the service indicator icon ( ) appears in
the display.
Stored Web Content
The Browser ends an Internet connection after a certain period of
inactivity, however some information from your session remains
stored in the phone (if you leave your phone turned on). You can
access this information without reconnecting to the Internet.
However, if you are viewing stored information, and you select a
link to a site that was not accessed in your last session, you
automatically re-connect to the Internet.
69
Launching the Browser
1. In standby mode, do one of the following to launch the
Browser:
•
Press the Navigation key Down or press (the Browser
shortcuts).
– or –
•
Press the
Menu
soft key, then select
2. A list of categories (each representing one or more web
Browser
➔
Go to Web
sites) appears in the display.
3. Use the arrow keys to browse the categories.
4. Once the desired category is highlighted, press to
enter the category list.
Exiting the Browser
䊳
To exit the Browser, press .
Using the Browser
When you use the Browser, some of the keys operate differently
than during a normal phone call. The Browser presents onscreen items in any of the following ways:
•
Text or numeric input.
.
Page 73
Links (embedded in content).
•
•
Numbered options (some may not be numbered).
•
Simple text.
You can act upon options or links by using the soft keys.
Browser Soft Keys
At the bottom of the Browser screen is a bar that contains
browser commands. The Left and Right soft keys on either
keypad are used to execute the commands that appear in their
respective corners of the display. These are called “soft keys”
because their functions change depending on the application.
Using Links
Links have several purposes, such as jumping to a different
page, to a different site, or even initiating a phone call. Links are
shown inside of brackets ([ ]). You can normally use the Left soft
key to select a link when it is highlighted.
How Browser Keys Work
The following table lists Browser keys and their functions.
Arrow/Navigation keys — Use to browse
lists and options.
Back Keys — Press once to back up one page. Press
and hold to go back to home page.
Press once to clear the last number, letter, or symbol
entered. Press and hold to completely clear the entry.
SHIFT/* Key — Press before entering text to enable
uppercase characters.
Spacebar/# key — Press to insert a space when
entering text.
Number 1 thru 0 — Use the number keys to
select items in a menu if they are numbered.
End Key — Press to exit the Browser and return your
phone to standby mode.
Left Soft Key — Press to activate the command that
appears above it in the display.
Right Soft Key — Press to activate the command
that appears above it in the display.
Browser 70
Page 74

Section 11: Voice SVC
This section explains how you can use and customize your
phone’s Voice SVC voice recognition feature.
Voice SVC Options
Your Samsung Messager II includes Nuance Vsuite, state-of-theart voice recognition software that lets you use your voice to dial
numbers, access your Contacts list, and open Tools. To access
your phone’s voice recognition, do the following:
1. In standby mode, press the
Menu
soft key, then select
VoiceSVC. The following options appear in the display:
•
Voice Commands
— Lets you place calls, access your Contacts
List, review your appointments, and more by speaking commands
into your phone. Also see
“Voice Method”
•
Voice Settings
voice and your phone use preferences. See
“Voice Dialing”
on page 23 and
on page 40 for more information.
— Lets you tailor Vsuite to better respond to your
“Digit Dialing”
page 73 for more information.
2. Select the desired sub-menu.
Voice Command
To access the Voice Command menu, do one of the following:
•
In standby mode, press and hold or .
71
“
Say a Command
” appears in the display and plays through the
earpiece, followed by a list of available commands.
•
In standby mode,
➔
Voice Command
Note:
You can also set your phone to start VoiceSignal when you connect an
optional headset to the phone. (For more information, see “Voice
Launch” on page 75)
press the
.
Menu
soft key, then select VoiceSVC
The following voice commands appear in the display:
•
Call
— Lets you dial the phone by saying any name stored in your
Contacts list, without ever having to record, or “train” that name.
VoiceSignal automatically voice-activates all your Contacts, even if you
have hundreds of them stored on your phone. You can also dial any
telephone number, even if it is not stored in your Contacts list, by
on
saying the digits in the number. (See
more information.)
•
Send Text
— Lets you access Create Text Message.
•
Send Picture
•
Lookup
— Lets you access Create Picture Message.
— Lets you find a Contact by name and review the Contact’s
“Voice Dialing”
on page 23 for
information.
Page 75

Go to
— Lets you access the following list of your phone’s features
•
and functions:
–
Recent Calls
–
Messages
–
Contacts
–
Multimedia
–
Browser
–
Games & Apps
–
Tools & Utilities
–
VoiceSVC
–
Settings
•
Check
your phone's:
Note:
Speaking clearly, say the command that you want to use. If VoiceSignal
does not recognize a command, it prompts you to repeat the
command. If VoiceSignal still does not recognized the command, it
tells you “Sorry, no match found” and cancels voice recognition.
— Lets you say a single command (such as “
Status, Signal, Coverage, Battery
, or
Status
”) to verify
My Phone #
Voice Command Tips:
•
Make sure you wait for the beep before speaking.
•
Speak clearly at a normal volume, as if you were talking on the phone.
.
Voice Settings
To access the Voice Settings menu, do one of the following:
䊳
In standby mode, press and hold , then press the
Settings
soft key.
– or –
䊳
In standby mode, press the
VoiceSVC
➔ Voice Settings.
Menu
soft key, then select
Choice Lists
When Vsuite cannot recognize a name or number, it displays a
choice list of up to three possible choices, and prompts you to
confirm the correct one.
You can select how Vsuite will use choice lists with name dialing,
digit dialing, and Contacts.
To change the way Vsuite uses choice lists:
1. From the
Voice Settings
menu, select Choice Lists. The
following options appear in the display:
•
Automatic
— Vsuite displays a choice list only when it is not sure
if it has correctly recognized the name or number.
•
Always On
— Vsuite always displays a choice list, even when
there is only one choice.
•
Always Off
— Vsuite never displays a choice list.
Voice SVC 72
Page 76
2.
Select a new setting or press or to return to the
Voice Settings
menu.
Sensitivity
1. From the
2. Use the Up and Down navigation keys to adjust the
Voice Settings
menu, select Sensitivity.
selected Sensitivity setting incrementally between Reject
More spoken commands or names and Reject Less
spoken commands or names.
3. Press or to accept the new setting. Press or
to discard the new setting and return to the
Settings
menu.
Digit Dialing
If you regularly have trouble with Vsuite not recognizing the
numbers you speak, try adapting digit dialing to your voice.
Adapting can improve the accuracy of digit recognition,
especially for people with strong regional accents.
Note:
After you adapt Digit Dial, your phone is customized to your voice, and
your voice only. Others will not be able to use it unless they reset the
phone to factory defaults.
73
Voice
Adaptation involves recording several sequences of four digits
each. The recording process takes about a minute.
Tips for Adapting Digit Dialing
•
Use Adapt Digits in a quiet place.
•
Make sure you wait for the beep before starting to speak.
•
Speak clearly, and say each digit distinctly.
•
If you make a mistake while recording a sequence of digits, or if there
is an unexpected noise that spoils the recording, re-record that
sequence.
•
Only adapt digits if you are regularly having problems with digit dialing.
Once you adapt, digit dialing will not work as well for other people
using your phone. (You can always reset digit adaptation to its original
state, as described below.)
Adapt Digits
To adapt digit dialing, do the following:
1. From the
Voice Settings
menu, select Digit Dialing. The
following options appear in the display:
•
Adapt Digits
•
Reset Digits
2. Select Adapt Digits. Your phone displays text describing
the Adapt Digits process.
Page 77

Press or . Your phone displays the first digit
3.
sequence and “Please say” plays through the speaker
followed by the four digits appearing in the display.
4. Wait for the beep and say the digits using your normal tone
of voice. After a moment, the phone plays back the
recording and prompts “Did the recording sound ok?”
•
If the recording was good, say “
•
If you need to re-record, say “No.”
•
To stop the Adapt Digits process, say “
•
To replay the last prompt, say “
Yes
Repeat
.”
Cancel
.”
.”
If you say “No,” the phone prompts you to pronounce the
digits again. Wait for the beep and then say the digits.
Repeat this step until you’re satisfied with the recording.
5. After confirming that the recording sounds “ok”, continue
the recording process with the next set of digits.
6. After 10 sets of digits, the phone asks whether you want to
do more adaptation. Answer “Yes .”
7. Repeat steps 4 and 5 for another 10 sets of digits. After the
second group of 10 sets of digits, “Adaptation complete”
plays through the speaker and you are returned to the
Digit Dialing menu.
Reset Digi ts
To reset digit dialing to factory default settings, do the following:
1. From the
Voice Settings
menu, select Digit Dialing. The
following options appear in the display:
•
Adapt Digits
•
Reset Digits
2. Select Reset Digits. The phone prompts you to confirm
digit rest.
3. Press the OK soft key to reset your digit adaptation, or
press the Back soft key to cancel.
Sound
Sound lets you specify what (if any) text prompts you want your
phone to read to you through the earpiece.
1. From the
Voice Settings
menu, select Sound. The following
options appear in the display:
•
Prompts
— On/Off — Enables or disables audio prompts.
Voice SVC 74
Page 78
•
Digits
— On/Off — Enables or disables digit playback.
•
Names
— On/Off — Enables or disables name playback.
•
Name Settings
and
— Lets you adjust the
Volum e (Louder
or
Softer
) of your phone’s audio name
Speed (Faster
or
playback. (To restore the factory Speed and Volume settings, select
Recommended
2. Select the desired option and the desired setting, or
3. Press or to accept the new setting. Press or
.)
to discard the new setting and return to the
menu.
Voice Launch
To set the key or action that launches Nuance Vsuite, do the
following:
1. From the
Voice Settings
menu, select Voice Launch. The
following options appear in the display:
•
Key Only
— Press and hold or to activate Vsuite for
one call.
•
Key/EarMic
— Attach a headset to your phone. Press and hold
or or press and hold the button on the headset to
activate VoiceSignal.
75
Slower
Sound
2. Press or to accept the new setting. Press or
to discard the new setting and return to the
)
Settings
menu.
Voice
About
This option causes the About Nuance screen to appear in the
display, showing version and build information about the Vsuite
software included on your phone.
䊳
From the
Voice Settings
menu, select About.
The About Nuance screen appears in the display showing
the version level of the Vsuite software currently installed
on your phone.
Page 79
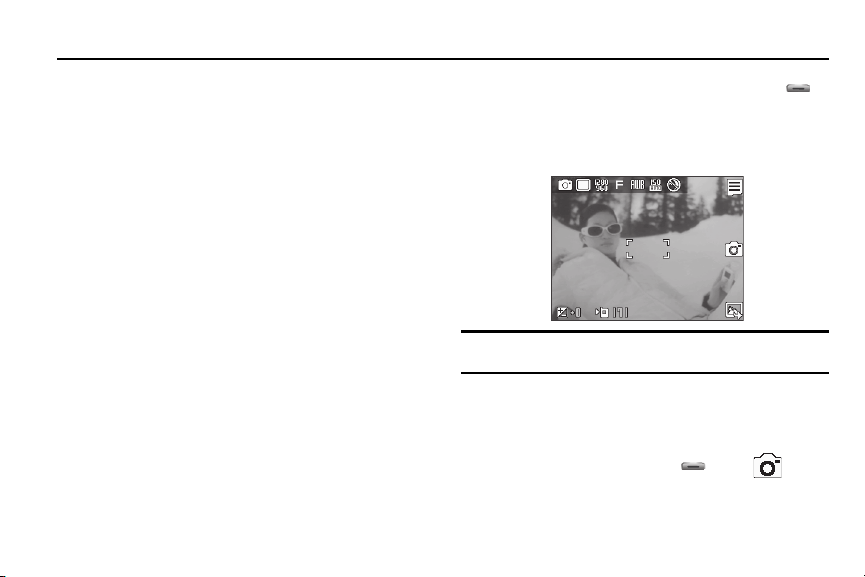
Section 12: Camera-Camcorder
Use your Samsung Messager II phone to take full color digital
pictures and videos, display them on your phone’s vivid color
display, and instantly share them with family and friends. It’s fun,
and as easy to use as a traditional point-and-click camera or
camcorder. This section explains how you can do the following:
•
Take pictures and videos with your phone’s built-in digital cameracamcorder.
•
Send and receive pictures and videos taken with your phone’s cameracamcorder.
•
Set the several options associated with the camera-camcorder that
help you take crisp, clear pictures and videos.
Taking Pictures and Videos
Taking pictures videos with the built-in camera-camcorder is as
simple as choosing a subject, pointing the lens (located on the
rear of your phone, at the top), and pressing a button.
Taking Snap Shots (Single Pictures)
To take a single picture using the current camera settings, do the
following:
1. In standby mode, press and hold the Camera key ( )
on the right side of the phone. The camera view finder
screen appears in the display. (For more information, refer
to “Screen Layouts” on page 78.)
Note:
You can also activate the camera by pressing the
select
Multimedia
➔
Camera
.
2. Using the display as a viewfinder, point the camera at your
Menu
soft key, then
subject.
3. When the image that you wish to capture appears in the
display, press the Camera key ( ) or the soft
key. The photo you’ve taken appears in the display.
Camera-Camcorder 76
Page 80
•
To erase the photo, press the soft key.
•
To send the photo as part of a Picture message, press the
soft key.
•
To save the picture to memory, press the soft key.
Tip:
You can change a number of the camera’s settings to suit particular
uses for your pictures. For more information, refer to “Camera Options”
on page 82.
Taking Multi Shot Pictures
When taking pictures of moving subjects or subjects you cannot
pose, such as children and pets, the camera’s Multi Shot mode
simplifies the process of taking multiple pictures in quick
succession. After taking Multi Shot pictures, the camera
automatically displays thumbnail views of the pictures you have
just taken so you can select the best picture(s) and discard the
rest.
1. In standby mode, press and hold the Camera key ( )
on the right side of the phone. The camera view finder
screen appears in the display. (For more information, refer
to “Screen Layouts” on page 78.)
Note:
You can also activate the camera by pressing the
select
Multimedia
➔
Camera
.
77
Menu
soft key, then
2. Press the soft key, then highlight the icon. The
following options appear in the display:
• Single Shot
— Take one photo with each press of the Camera
button.
• Series Shot 4
• Mosaic Shot
When you select
/ 6 — Lets you take a series of 4 or 6 photos.
— Lets you take a mosaic of 1 to 18 photos.
Series Shot 4
or
Series Shot 6
, the Series
progress bar ( or
) appears in the display.
3. When you select
Mosaic
, the following options are
available:
•None
•1/18
–
18/18
Select the desired number of shots.
4. Using the display as a viewfinder, point the camera lens at
your subject.
5. Press the soft key or the Camera key ( ). The
camera takes one picture (
in quick succession (
6. To save the picture(s) to memory, press the soft key.
Single Shot
Series Shot 4
) or multiple pictures
/ 6 or
Mosaic Shot
).
Page 81
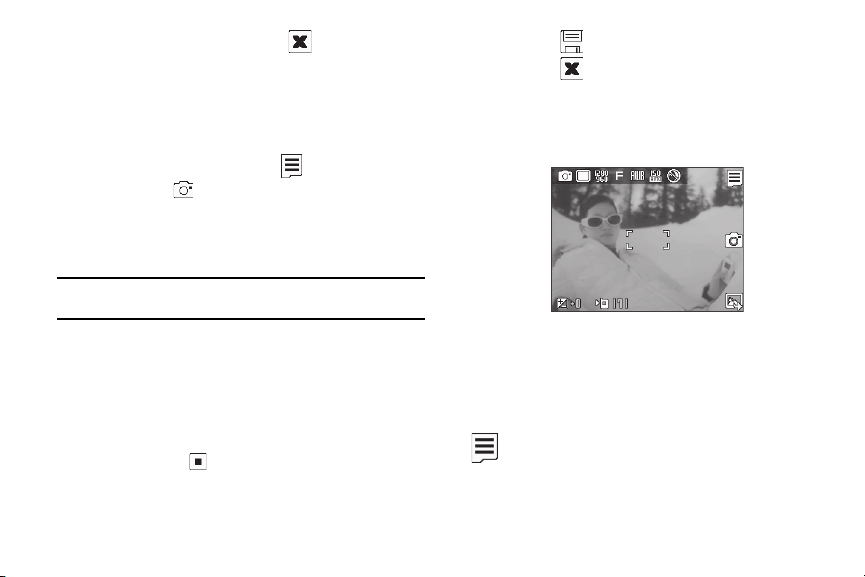
To discard the pictures, press the soft key.
You are prompted to confirm the erasure.
Taking Videos
To take a video using the current camcorder settings, do the
following:
1. In the Camera screen, press the soft key, then
highlight the icon and select
Camcorder
. The
camcorder view finder screen appears in the display. (For
more information, refer to “Camcorder Screen” on
page 80)
Note:
You can also activate the camcorder from standby mode by pressing
the
Menu
soft key, then selecting
2. Using the display as a viewfinder, point the camera lens at
Multimedia
➔
Camcorder
.
your subject.
3. Press the Camera key when the image that you wish to
capture appears in the display. Recording continues until
one of the following occurs:
•
You press
Stop
( ).
•
Available memory is used up (
•
30 seconds of video have been recorded (
Normal
setting).
Video Msg
setting).
4. Press the soft key to save the video to memory.
5. Press the soft key to discard the video. You are
prompted to confirm the erasure.
Screen Layouts
Camera Screen
When you activate your phone’s camera, the second line of the
display is reserved for the current camera resolution setting and
the picture counter. The center of the display shows a viewfinder
image of the subject at which the camera is pointed.
Camera Screen Soft Keys
Activates the Camera Options menu.
Camera-Camcorder 78
Page 82

Takes a picture.
Opens the My Images folder.
Discards the new photo.
Saves the new photo and includes it in a Picture
message.
Saves the new photo.
Camera Screen Icons
The following icons appear in the Camera screen when the
Display
Camera setting is set to On.
Mode
— Indicates whether in Camera mode (shown) or
Camcorder mode ( ).
Shooting Mode (Series)
— Takes multiple pictures (4 or
6) automatically or individually when you press the
Camera key ( ). The number of pictures taken
depends upon the
A/M
setting.
79
Series Shot
option and the
Series Shot
Icon
Shooting Mode (Mosaic)
— Takes up to 18 pictures
manually when you press the Camera key ( ). The
number of pictures taken depends upon the Mosaic
setting.
Size
— Indicates the current camera resolution setting.
(For more information, refer to “Size” on page 83.)
Quality
— Indicates camera’s picture quality setting.
[You can change the picture quality setting. (For more
information, refer to “Quality” on page 83.)]
White Balance
— Indicates the current photo White
Balance setting (Auto shown). Other options are:
Sunny
Cloudy
Tungsten
Flourescent
(For more information, refer to “White Balance” on
page 83.)
ISO
— Indicates camera exposure index setting (Auto,
100, 200, or 400).
Night Shot
— Indicates whether your phone is ready to
take photos in low light:
Off
(shown) or On ( ).
Page 83
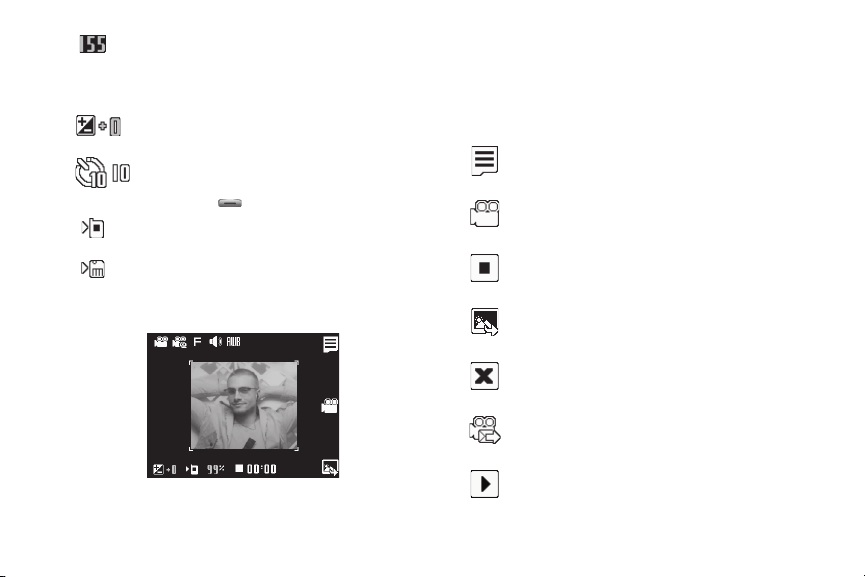
Photo Limit
you can take. [Depending on the camera size and
quality settings. (For more information, refer to “Size”
on page 83 and “Quality” on page 83.)]
Brightness
to +4.
Self Timer in use
5, or 10 seconds (
Camera key ( ).
Phone Memory
phone’s memory.
Card Memory
microSD Memory Card.
Camcorder Screen
— Indicates the available number of photos
— Brightens or darkens the image from 4
— Delays the camera shutter for 2,
10 Sec.
shown) after you press the
— Indicates photos will be stored in the
— Indicates photos will be stored on a
When you activate your phone’s camcorder, the first line of the
display is shows current camcorder setting icons. The center of
the display shows a viewfinder image of the subject at which the
camcorder is pointed.
Camcorder Screen Soft Keys
Activates the Camcorder Options menu.
Begins recording a video.
Ends a video recording.
Opens the My Videos folder.
Discards the new video.
Saves and includes the new video in a new Video
message.
Launches Video Player to view the new video.
Camera-Camcorder 80
Page 84
Saves the new video.
Camcorder Screen Icons
The following icons appear in the Camcorder screen when the
Icon Display
Camcorder setting is set to On.
Mode
— Indicates whether in Camcorder mode (shown)
or Camera mode ( ).
Recording Mode
mode setting [
— Indicates camcorder’s recording
Limit for MMS
(shown) or
Normal
()].
(You can change the recording mode setting. For more
information, refer to “Recording Mode” on page 87.)
Quality
— Indicates camcorder’s video quality setting.
(You can change the video quality setting. For more
information, refer to “Quality” on page 87.)
Sound Recording
— Indicates camcorder’s sound
recording setting: On (shown) or Off ( ). (You can
change the video quality setting. For more information,
refer to “Quality” on page 87.)
81
White Balance
— Indicates the current video White
Balance setting (Auto shown). Other options are:
Sunny
Cloudy
Tungsten
Flourescent
(For more information, refer to “White Balance” on
page 88.)
S
elf Timer in use
recording for 2, 5, or 10 seconds (
— Delays the camcorder from
10 Sec.
shown)
after you press the Camera key ( ).
Brightness
— Brightens or darkens the image from 4
to +4.
Phone Memory
— Indicates videos will be stored in the
phone’s memory.
Card Memory
— Indicates videos will be stored on a
microSD Memory Card.
Memory Available
— Indicates the percentage of
memory available for you to store a video.
Page 85
Saving Pictures and Videos
After you’ve taken a picture or video, you can do any of the
following:
•
Save the picture or video
On your phone, a picture is stored in the
stored in the
My Videos
by pressing the soft key.
My Images
folder. A video is
folder. These folders are part of the phone’s
memory and/or part of an optional Memory Card devoted to storing,
browsing, and viewing saved pictures and videos. (For more
information, refer to
•
Access the My Images
“The Photo Gallery”
/
My Videos folder
on page 92)
by pressing the soft
key.
•
Send the picture or video
to someone else by pressing the /
soft key.
(For a detailed procedure, see
Videos”
on page 94.)
•
Discard the picture or video
“Point, Click, and Send Pictures and
by pressing the soft key.
Camera Options
The Camera Option buttons let you adjust the default camera
settings to suite available lighting, the subject of the photo, or the
purpose of the photo.
Mode
Switches the Camera to Camcorder mode.
䊳
In camera mode, press the soft key, then highlight
and select
Camcorder
. The Camcorder view finder
screen appears in the display.
Shooting Mode
Shooting Mode lets you select Fun Frames and/or take multiple
pictures in succession when you press the Camera key ( ).
1. In camera mode, press the soft key, then highlight
/ / / . The following options are
available:
• Single
— 1 picture taken when your press the Camera key
().
• Series Shot 4
• Series Shot 6
•Mosaic
— 4 new pictures taken in succession.
— 6 new pictures taken in succession.
— 1-18 new shots taken in succession and combined into
a single picture in an array.
2. Select the desired option and setting. The related icon
appears in the display.
Note:
When the Shooting Mode option is set to a value other than
either a Series Shot progress bar ( ) or a Mosaic
shot icon ( ) appears in the viewfinder screen.
Single
When you press the Camera key ( ), the camera takes
several pictures in rapid succession (
Multi
and
Mosaic
Camera-Camcorder 82
,
).
Page 86
Size
Change the size (in bytes) of your pictures using the Size setting.
1. In camera mode, press the soft key, then highlight
/ / / / . The following options are
available:
• 1600x1200
• 1280x960
• 640 X 480
• 320x240
• 176x144
2. Select the desired option. You’re returned to the camera
pixels
pixels
pixels
pixels
pixels
viewfinder screen.
Note:
The Size setting affects zoom capabilities. When Size is set to
1600x1200
pixels, zoom is not available. When Size is set to any value
lower than
1600x1200
pixels, zoom settings 1 – 9 are available.
Quality
You can affect how much your picture is compressed, thereby
reducing it’s overall size, not to be confused with picture Size
(resolution).
1. In camera mode, press the soft key, then highlight
/ / . The following options appear in the display:
83
•Fine
•Normal
•Economy
2. Select the quality setting of your choice. You’re returned to
the camera viewfinder screen.
White Balance
White Balance allows you to adjust video quality according to
available light.
1. In camera mode, press the soft key, then highlight
/ / / / . The following options
appear in the display:
•Auto
— The camera automatically adjusts color balance to
available light.
• Sunny
— Use this setting when taking photos in full sun.
• Cloudy
— Use this setting when taking photos in cloudy
conditions.
• Tungsten
— Use this setting when taking photos under
incandescent lights.
• Fluorescent
— Use this setting when taking photos under
fluorescent lights.
Page 87

Select the White Balance you wish to use. The camera
2.
viewfinder screen appears in the display with your
selected White Balance applied.
The next time you press the Camera key ( ), the
camera applies the selected White Balance to your photo.
ISO
ISO lets you set your camera’s exposure index.
1. In camera mode, press the soft key, then highlight
/ / / . The options are:
•Auto
• ISO 100
• ISO 200
• ISO 400
2. Select the ISO setting of your choice. You’re returned to the
camera viewfinder screen.
Night Shot
Night Shot lets you take pictures in low light conditions.
1. In camera mode, press the soft key, then highlight
/ . The following options appear in the display:
•Off
•On
2. Select the Night Shot setting of your choice. You’re
returned to the camera viewfinder screen.
Self Timer
Self Timer lets you delay taking a picture long enough to let you
join others in a picture.
1. In camera mode, press the soft key, then highlight
. The following options are available:
•Off
•2 Sec.
•5 Sec.
• 10 Sec.
2. Select the desired Self Timer option. If you select
10
, the Self Timer icon appears in the camera screen in the
2, 5
display.
When you press the Camera key ( ), the countdown
timer indicates the time remaining before the camera
takes the picture.
Tip:
To stop or disable the Self Timer without resetting it, press .
Camera-Camcorder 84
, or
Page 88
Color Effects
Change the look of your pictures with Color Effects. Choose from
six available settings such as Green, Negative, and Sepia. The
selected color effect previews in the display before you take the
picture.
1. In camera mode, press the soft key, then highlight
. The following options pop-up:
Note:
To disable Color Effects, choose
•Normal
— Subjects and pictures appear with a normal hue.
•Black&White
•Sepia
•Negative
•Green
• Aqua
2. Select the color effect of your choice. You’re returned to
— Subjects and pictures appear in black and white.
— Subjects and pictures appear in a brownish-gray hue.
— Subjects and pictures appear in inverted colors.
— Subjects and pictures appear in a greenish hue.
— Subjects and pictures appear in an aqua hue.
Normal
.
the camera viewfinder screen.
When you take your next picture, the phone’s display
previews your subject image with the selected color effect.
85
Camera Settings
When you change a setting, your change is retained until you
change that setting or reset all your camera settings.
Memory
1. In camera mode, press the soft key, then highlight
( ) and select
Memory
. The following storage options
appear in the display:
• Phone
— Stores pictures in phone memory.
•Card
— Stores pictures on an optional microSD Memory Card.
2. Select the memory location setting of your choice. You’re
returned to the camera viewfinder screen.
Auto Save
1. In camera mode, press the soft key, then highlight
( ) and select
Auto Save
. The following options appear
in the display:
•Off
•On
2. Select the automatic save setting of your choice. You’re
returned to the camera viewfinder screen.
Page 89

Series Shot A/M
Series Shot A/M lets you select whether the Camera takes Series
Shot automatically, in quick succession, when you press the
Camera key ( ).
1. In camera mode, press the soft key, then highlight
( ) and select
•Auto
— The Camera takes the selected number of Series Shots in
Series Shot A/M
.
quick succession.
• Manual
— The Camera takes one of the selected number of
Series Shots each time you press the Camera key ( ).
2. Select the series shot setting of your choice. You’re
returned to the camera viewfinder screen.
Metering
1. In camera mode, press the soft key, then highlight
( ) and select
Metering
. The following options appear
in the display:
•Average
— Adjusts exposure to the average light level over a large
picture area.
•Center
— Adjusts exposure to the average light level over a center
portion of the subject.
•Spot
— Adjusts exposure to the light level over a small portion of
the subject.
2. Select the Metering setting of your choice. You’re returned
to the camera viewfinder screen.
When you take your next picture, the phone’s display
previews your subject image with the measured exposure.
Icon Display
View Mode lets you quickly add or remove elements of the
Camera viewfinder screen.
1. In camera mode, press the soft key, then highlight
( ) and select
Icon Display
. The following options
appear in the display:
•Display All
— All Camera display ic ons appear in the Camera view
finder screen.
• Guideline
— Removes the Camera display icons (if displayed) and
displays a crosshatch pattern in the Camera view finder screen.
Camera display icons appear when you press the soft key.
•No Icons
— Removes the Camera display icons (if displayed) from
the Camera view finder screen. Camera display icons appear when
you press the soft key.
Shutter Sound
Choose from four different sounds whenever you take a picture.
Aside from being a cool sound effect, Shutter Sounds act as an
audible reminder that your camera has taken a picture.
Camera-Camcorder 86
Page 90

1.
In camera mode, press the soft key, then highlight
( ) and select
Shutter Sound
. The following shutter
sounds appear in the display:
•Off
• Shutter
•OK
• DingDong
2. Select the shutter sound setting of your choice. You’re
returned to the camera viewfinder screen.
Reset Settings
This option lets you reset the Camera’s settings to their factory
default values.
䊳
In camera mode, press the soft key, then highlight
( ) and select
Reset Settings
. You are prompted to
confirm the reset.
•
To reset the Camera settings, select
•
To keep the current Camera settings, select No.
Yes
.
Camcorder Options
The Camcorder Options let you adjust the default camcorder
settings to suite available lighting, the subject of the video, or the
purpose of the video.
87
Mode
Switches the Camcorder to Camera mode.
䊳
In camcorder mode, press the soft key, then highlight
/ and select
Camera
. The Camera view finder
screen appears in the display.
Recording Mode
1. In camcorder mode, press the soft key, then highlight
/ . The following options appear in the display:
• Limit for MMS
— Record videos that are a maximum of 30
seconds long. The videos can be included in video messages.
•Normal
— Record videos that are any length up, depending on
available memory.
2. Select the desired recording mode setting. You are
returned to the camcorder viewfinder screen.
Quality
You can affect how much your picture is compressed, thereby
reducing it’s overall size, not to be confused with picture Size
(resolution).
1. In camcorder mode, press the soft key, then highlight
/ / . The following options appear in the display:
•Fine
Page 91
•Normal
•Economy
2. Select the quality setting of your choice. You’re returned to
the camcorder viewfinder screen.
Note:
The Quality is affected by the Recording Mode setting. When Recording
Mode is set to
Limit for MMS
, the Quality setting is locked at
Economy
Video Sound
Video Sound lets you enable or disable sound recording by the
Camcorder when you record a video.
1. In camcorder mode, press the soft key, then highlight
/ . The following options appear in the display:
•On
— Record sound with the video.
•Off
— Do not record sound with the video.
White Balance
White Balance allows you to adjust video quality according to
available light.
1. In camcorder mode, press the soft key, then highlight
/ / / / . The following options
appear in the display:
•Auto
— The Camcorder automatically adjusts color balance to
available light.
• Sunny
— Use this setting when recording videos in full sun.
• Cloudy
— Use this setting when recording videos in cloudy
conditions.
• Tungsten
— Use this setting when recording videos under
incandescent lights.
.
• Fluorescent
2. Select the White Balance you wish to use. The camera
— Use this setting when recording videos under
fluorescent lights.
viewfinder screen appears in the display with your
selected White Balance applied.
The next time you press the Camera key ( ), the
camera applies the selected White Balance to your photo.
Color Effects
Change the look of your videos with Color Effects. Choose from
six available settings such as Green, Negative, and Sepia. The
selected color effect previews in the display before you take the
picture.
1. In camcorder mode, press the soft key, then highlight
Note:
. The following options appear in the display:
To disable Color Effects, choose
•Normal
— Subjects and videos appear with a normal hue.
Normal
.
Camera-Camcorder 88
Page 92
•Black&White
•Sepia
•Negative
•Green
• Aqua
2. Select the color effect of your choice. You’re returned to
— Subjects and videos appear in black and white.
— Subjects and videos appear in a brownish-gray hue.
— Subjects and videos appear in inverted colors.
— Subjects and videos appear in a greenish hue.
— Subjects and videos appear in an aqua hue.
the camcorder viewfinder screen.
When you record your next video, the phone’s display
previews your subject image with the selected color effect.
Self Timer
Self Timer lets you delay recording a video long enough to let you
join others in the video.
1. In camcorder mode, press the soft key, then highlight
. The following options are available:
•Off
•2 Sec.
•5 Sec.
• 10 Sec.
2. Select the desired Self Timer option. If you select
10
, the Self Timer icon appears in the camcorder screen in
2, 5
, or
the display.
89
When you press the Camera key ( ), the countdown
timer indicates the time remaining before the camcorder
records the video.
Tip:
To stop or disable the Self Timer without resetting it, press .
Camcorder Settings
Memory
1. In camcorder mode, press the soft key, then highlight
( ) and select
Memory
. The following storage options
appear in the display:
• Phone
— Stores videos in phone memory.
•Card
— Stores videos on an optional microSD Memory Card.
2. Select the memory location setting of your choice. You’re
returned to the Camcorder viewfinder screen.
Auto Save
1. In camcorder mode, press the soft key, then highlight
( ) and select
Auto Save
. The following options appear
in the display:
• Off
•On
Page 93

Select the automatic save setting of your choice. You’re
2.
returned to the camcorder viewfinder screen.
Icon Display
View Mode lets you quickly add or remove elements of the
Camera viewfinder screen.
1. In camcorder mode, press the soft key, then highlight
( ) and select
Icon Display
. The following options
appear in the display:
• Display All
— All Camcorder display icons appear in the
Camcorder view finder screen.
•No Icons
— Removes the Camcorder display icons (if displayed)
from the Camcorder view finder screen. Camcorder display icons
appear when you press the soft key.
2. Select the desired Icon Display setting. You’re returned to
the camcorder viewfinder screen.
Start Sound
Choose from two different sounds whenever you begin video
recording. Aside from being a cool sound effect, Start Sound acts
as an audible reminder that your camcorder has begun recording
a video.
1. In camcorder mode, press the soft key, then highlight
( ) and select
Start Sound
. The following Start Sound
options appear in the display:
•Off
• Look here
• 1,2,3!
2. Select the desired start sound. You’re returned to the
camcorder viewfinder screen.
End Sound
Choose from two different sounds whenever you stop video
recording. Aside from being a cool sound effect, End Sound acts
as an audible reminder that your camcorder has stopped
recording a video.
1. In camcorder mode, press the soft key, then highlight
( ) and select
End Sound
. The following End Sound
options appear in the display:
•Off
•OK
•Melody
2. Select the desired end sound. You’re returned to the
camcorder viewfinder screen.
Camera-Camcorder 90
Page 94
Reset Settings
This option lets you reset the Camcorder’s settings to their
factory default values.
䊳
In camcorder mode, press the soft key, then highlight
( ) and select
Reset Settings
. You are prompted to
confirm the reset.
•
To reset the Camcorder settings, select
•
To keep the current Camcorder settings, select No.
Yes
.
Camera-Camcorder Adjustments
Zoom
Zoom lets you temporarily enlarge the pictures you take or videos
you record. Increasing the Zoom (2 – 9) enlarges your pictures or
videos (1 is normal).
Note:
Zoom is not available to the Camera if the Size Camera option is set to
1600x1200
.
䊳
In camera or camcorder viewfinder screen, press the
Navigation key Left and Right to adjust the Zoom. The
Zoom adjustment appears in the display, and the screen
image enlarges to show the affects of your changes.
91
The next time you press the Camera key ( ), the
Camera takes an enlarged picture or the Camcorder
records an enlarged video, according to your selected
Zoom setting.
Brightness
Brightness lets you temporarily lighten the pictures you take or
videos you record. Increasing the Brightness (-4 – +4) lightens
your pictures or videos (0 is normal).
1. In camera mode, press the Navigation key Up or Down.
The Brightness adjustment appears in the display.
2. To brighten your next picture(s), press the Navigation key
Up. To darken your next picture(s), press the Navigation
key Down. (The screen image lightens or darkens to show
the affects of your changes).
The next time you press the Camera key ( ), the
camera takes a lighter or darker picture or records a lighter
or darker video according to your selected Brightness
setting.
Page 95

The Photo Gallery
Saved pictures are stored in the My Images folder. You can
browse the pictures one at a time (expanded mode), or view
several pictures at once in thumbnail format.
1. In the Camera viewfinder screen, press the soft key.
Any pictures that you’ve saved are listed with their
thumbnail images in the display.
2. To launch the Camera and take new pictures, press the
Camera
soft key.
3. To view a picture, press the
4. For more options, press the
VIEW
soft key.
Options
soft key. The following
additional options pop-up:
•Send
— Send the currently highlighted or displayed image as part
of a Picture Message or Via a Bluetooth connection.
•Set As
— Assign the currently highlighted or displayed image as
the Main Wallpaper or as the Picture ID for a Contact.
•Rename
— Change the name of the picture file.
•Move
— Relocate the currently highlighted or displayed image
from phone memory to a Memory Card or from a Memory Card to
phone memory.
•Copy
— Copy the currently highlighted or displayed image from
phone memory to a Memory Card or from a Memory Card to phone
memory.
•Lock/Unlock
— Prevent/allow erasure of the currently highlighted
or displayed image.
• Erase Files
— Delete one or more marked images from the My
Images folder.
• Picture Info
— View the Name, Date and Time created,
Resolution, and Size of the currently highlighted or di splayed image.
5. Select the desired option to perform its function or to enter
its sub-menu.
The Video Gallery
Saved videos are stored in the My Videos folder. You can browse
the videos one at a time (expanded mode), or view several videos
at once in thumbnail format.
1. In the Camcorder viewfinder screen, press the soft
key. Any videos that you’ve saved are listed with their
thumbnail images in the display.
2. To launch the Camcorder and record a video, press the
Video
soft key.
Camera-Camcorder 92
Page 96
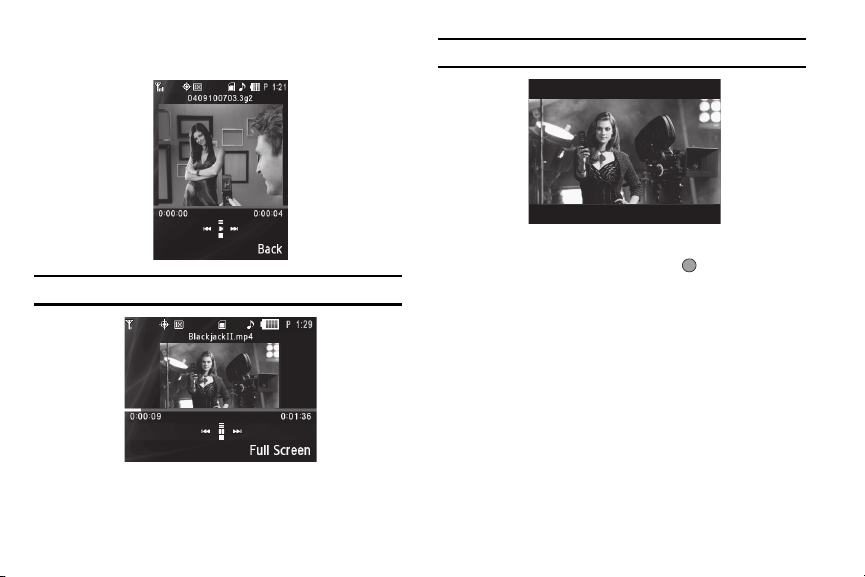
3.
To launch the Video Player and view a video, highlight the
video and press the
Tip:
To view a video in landscape mode, open the QWERTY keypad.
93
PLAY
soft key.
Note:
To enlarge the video playback, press the
Full Screen
The following controls are available
•
To pause/resume playing a video, press .
•
To stop playing a video, press the Down navigation key.
•
To skip play to an earlier video in the My Videos folder, press the
Left navigation key.
•
To skip play to a later video in the My Videos folder, press the Right
navigation key.
•
To return to the My Videos folder and choose another video file to
play, press the Up navigation key.
4. To access video options, press the
Options
following options pop-up:
•Send
— Lets you send the highlighted video as part of a Video
Message or Via a Bluetooth connection.
•Rename
— Rename the highlighted video.
soft key.
soft key. The
Page 97

•Move
— Relocate the highlighted video from phone memory to a
Memory Card or from a Memory Card to phone memory.
•Copy
— Copy one or more videos from phone memory to a
Memory Card or from a Memory Card to phone memory.
•Lock / Unlock
• Erase Files
— Prevent/allow erasure of one or more images.
— Delete one or more marked unlocked videos from
the My Videos folder.
•Video Info
— View the Name, Date and Time created, Resolution,
Size, and Duration of the currently highlighted video.
5. Select the desired option to perform its function or to enter
its sub-menu.
Point, Click, and Send Pictures and Videos
Take a picture or record a video and send it to anyone with a
compatible device in a few easy steps.
Note:
To record and send a video while in Camcorder mode, set Shooting
Mode to
Limit for MMS
1. In standby mode, press and hold the Camera key ( )
( ) .
on the right side of the phone. The camera view finder
screen appears in the display.
2. To record a video, press the soft key. The camcorder
view finder screen appears in the display.
3. Using the display as a viewfinder, take the desired picture
or begin record the desired video by pressing the Camera
key ( ). To stop video recording, press the Camera key
( ) again.
The photo/video review screen appears in the display.
4. Press the / soft key.
5. Enter the recipient’s phone number or E-Mail address
using the keypad.
6. Press the
7. Select other message fields as needed. (For more
OK
soft key to save the address(es).
information, refer to “Send Picture/Video Messages” on
page 56.)
8. When you are finished composing your message, press
SEND
soft key to send the Picture or Video message to the
intended recipient(s).
Camera-Camcorder 94
Page 98

Section 13: Multimedia
Use your Samsung Messager II phone to take full color digital
pictures, display them on your phone’s vivid color display, and
instantly share them with family and friends.
With Mobile Shop, you can download personalized ringtones,
pictures, and more. For more information, contact your
Wireless Carrier.
Note:
Although the procedures in this section are written for the phone
keypad, you can also perform these procedures using the QWERTY
keypad.
Accessing Multimedia
1. In standby mode, press the
Multimedia
. The following Multimedia sub-menus appear
Menu
soft key, then select
in the display:
•Camera
— Lets you launch and set up your phone’s camera. (For
more information, refer to
• Camcorder
— Lets you launch and set up your phone’s
camcorder. (For more information, refer to
Camcorder”
• Music Player
“Camera-Camcorder”
on page 76.)
“Camera-
on page 76.)
— Lets you launch and set up your phone’s music
player and manage music files stored on an optional microSD
95
memory card. (For more information, refer to
Player”
on page 96.)
•My Images
— Lets you choose the multi-media or pictures that
“Using Your Music
appear in your phone’s display.
•My Videos
• My Ringtones
— Lets you choose and play the videos that appear in
your phone’s display. (For more information, refer to
Gallery”
on page 92.)
— Lets you assign melody tones for calls, alarms,
“The Video
and other alerts.
• My Sounds
— Lets you assign melody tones for calls, alarms, and
other alerts.
• Ringback Tones
— Launches the Browser to access your account
and subscribe to and/or manage your ringback tones.
2. Select a sub-menu to launch it. The following sections
describe the above listed sub-menus in greater detail.
Using My Images Gallery
My Images lets you manage your photos and pictures you
download, and lets you choose the pictures that appear in your
phone’s display when you turn it on or off, while in standby mode
(wallpaper), and as image IDs for your contacts.
Page 99

In standby mode, press the
1.
Menu
soft key, then select
Multimedia ➔ My Images. A multiple-page matrix of
thumbnail views of saved photos and images appears in
the display.
2. Highlight an image or photo. You have the following
options:
•
To take new photos, press the
•
To expand the highlighted image to fill the screen, press
Camera
soft key.
or ).
•
To access other options, press the
Options
soft key. The following
options appear in the display:
–
Send
— Send image as part of a Picture Message or Via a Bluetooth
connection. (See
for more information.)
–
Set As
Main Wallpaper or as the Picture ID for a Contact.
–
Rename
–
Move
phone memory to a Memory Card or from a Memory Card to phone
memory.
–
Copy
memory to a Memory Card or from a Memory Card to phone memory.
–
Lock/Unlock
displayed image.
“Send Picture/Video Messages”
— Assign the currently highlighted or displayed image as the
— Change the name of the picture file.
— Relocate the currently highlighted or displayed image from
— Copy the currently highlighted or displayed image from phone
— Prevent/allow erasure of the currently highlighted or
on page 56
VIEW
(
–
Erase Files
— Delete one or more marked images from the My
Images folder.
–
Picture Info
— View the Name, Date and Time created, Resolution,
and Size of the currently highlighted or displayed image.
–
Get More Graphics
download graphics files.
— Launches the Browser to let you locate and
Select the desired option and a desired value.
3. To return to the previous menu, press or . To
return to standby mode, press .
Using Your Music Player
Music Player lets you play MP3 and unprotected AAC, AAC+,
WMA music files, loaded onto an optional microSD™ Memory
Card using a personal computer. (For information on loading
music files on a Memory Card, see “Loading Music Files” on
page 98.)
Launching the Music Librar y Menu
1. In standby mode, press the
Menu
soft key, then select
Multimedia ➔ Music Player.
– Or –
On the Music Player screen, press the
2. The
Library
menu appears in the display showing the
Library
soft key.
following options:
Multimedia 96
Page 100
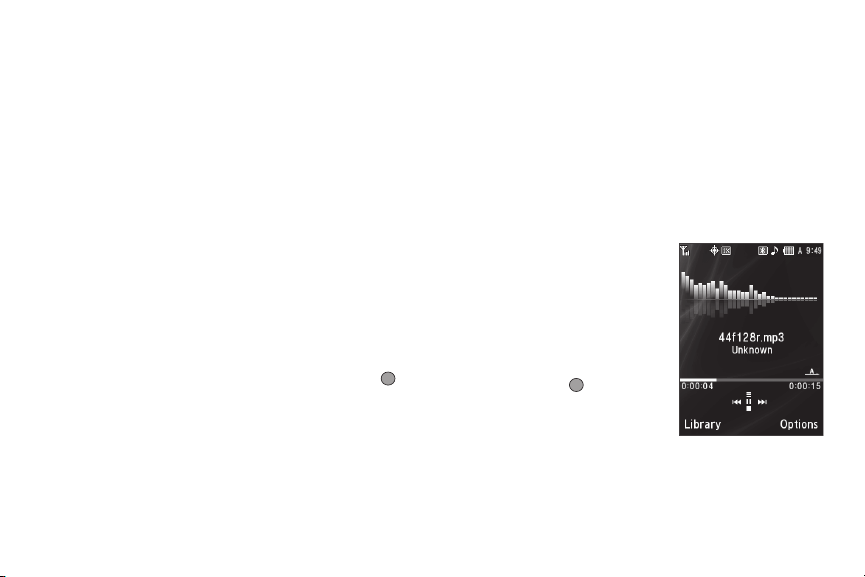
• Now Playing
— Music Player mode only — Indicates number of
music files currently playing. Select this option (or press the
soft key) to return to the Music Player screen.
•All
— Lists all music files on the Memory Card and lets you play
individual music files or play multiple music files by creating a
temporary music playlist.
•Artists
— Lists artist names for music files on the Memory Card
and lets you play one or more music files by a selected artist.
• Albums
— Lists album titles for music files on the Memory Card
and lets you play one or more music files from a selected album.
• Recently Added
— Lists music files last added to your music
Library.
• Playlists
— Lists any playlists you have saved and lets you create,
save, and manage playlists.
3. Use the Navigation key or Arrow keys to highlight a music
file, then:
•
To play the file, press the
•
To select the file for playing or other options, press
•
To select and apply any of the following options to the highlighted or
marked music file(s), press the
–
Mark All
— Marks all listed music files for playing, removal, or
assignment of player settings.
–
Erase
— Deletes highlighted or marked music file(s) from the Memory
Card.
97
Play
soft key.
Options
MARK
soft key:
Back
().
–
Add to Playlist
playlist.
–
Song Info
information, time length, file size, and bit rate of the highlighted music
file.
— Lets you add a marked music file to an existing
— Lists the title, artist, album, genres, copyright
Select the desired option.
Playing Music
1. At the
Multimedia
menu, select Music Player. The
screen appears in the display, showing the following
options:
•All
•Artists
• Albums
• Recently Added
• Playlists
2. Highlight the desired option,
press
OPEN
( ), and then do
one of the following:
• All option
— Highlight a music
file, then press the
Play
soft key
to play the file.
Library
 Loading...