

Samsung SCH-R200 (Alltel) User Guide

SCH-r200
ALL DIGITAL
Tri-Mode PHONE
User Guide
Please read this manual before operating your
phone, and keep it for future reference.

Intellectual Property
All Intellectual Property, as defined below, owned by or which is otherwise the
property of Samsung or its respective suppliers relating to the SAMSUNG Phone,
including but not limited to, accessories, parts, or software relating there to (the
“Phone System”), is proprietary to Samsung and protected under federal laws, state
laws, and international treaty provisions. Intellectual Property includes, but is not
limited to, inventions (patentable or unpatentable), patents, trade secrets,
copyrights, software, computer programs, and related documentation and other
works of authorship. You may not infringe or otherwise violate the rights secured by
the Intellectual Property. Moreover, you agree that you will not (and will not attempt
to) modify, prepare derivative works of, reverse engineer, decompile, disassemble,
or otherwise attempt to create source code from the software. No title to or
ownership in the Intellectual Property is transferred to you. All applicable rights of
the Intellectual Property shall remain with SAMSUNG and its suppliers.
Samsung Telecommunications America (STA), LLC
Headquarters: Customer Care Center:
1301 E. Lookout Drive 1000 Klein Street
Richardson, TX 75082 Plano, TX 75074
Toll Free Tel: 1.888.987.HELP (4357)
Internet Address: http://www.samsungusa.com
©
2007 Samsung Telecommunications America, L.L.C. Samsung is a registered
trademark of Samsung Electronics Co., Ltd. and its related entities.
Licensed by Qualcomm Incorporated under one or more of the following patents:
U.S. Patent No. 4, 901, 307; 5, 056, 109; 5, 099, 204; 5, 101, 501; 5, 103, 459; 5,
107, 225; 5, 109, 390.
GH68-______A
Openwave® is a registered Trademark of Openwave, Inc.
RSA® is a registered Trademark of RSA Security, Inc.

The Alltel SnapTM is a Trademark of Alltel Communications, Inc.
Disclaimer of Warranties; Exclusion of Liability
EXCEPT AS SET FORTH IN THE EXPRESS WARRANTY CONTAINED ON THE
WARRANTY PAGE ENCLOSED WITH THE PRODUCT, THE PURCHASER TAKES THE
PRODUCT “AS IS”, AND SAMSUNG MAKES NO EXPRESS OR IMPLIED WARRANTY OF
ANY KIND WHATSOEVER WITH RESPECT TO THE PRODUCT, INCLUDING BUT NOT
LIMITED TO THE MERCHANTABILITY OF THE PRODUCT OR ITS FITNESS FOR ANY
PARTICULAR PURPOSE OR USE; THE DESIGN, CONDITION OR QUALITY OF THE
PRODUCT; THE PERFORMANCE OF THE PRODUCT; THE WORKMANSHIP OF THE
PRODUCT OR THE COMPONENTS CONTAINED THEREIN; OR COMPLIANCE OF THE
PRODUCT WITH THE REQUIREMENTS OF ANY LAW, RULE, SPECIFICATION OR
CONTRACT PERTAINING THERETO. NOTHING CONTAINED IN THE INSTRUCTION
MANUAL SHALL BE CONSTRUED TO CREATE AN EXPRESS OR IMPLIED WARRANTY
OF ANY KIND WHATSOEVER WITH RESPECT TO THE PRODUCT. IN ADDITION,
SAMSUNG SHALL NOT BE LIABLE FOR ANY DAMAGES OF ANY KIND RESULTING
FROM THE PURCHASE OR USE OF THE PRODUCT OR ARISING FROM THE BREACH OF
THE EXPRESS WARRANTY, INCLUDING INCIDENTAL, SPECIAL OR CONSEQUENTIAL
DAMAGES, OR LOSS OF ANTICIPATED PROFITS OR BENEFITS.
r200_AD20_cb_051407_d1

Table of Contents
Intellectual Property ..................................................................................................2
Samsung Telecommunications America (STA), LLC ...................................................2
Disclaimer of Warranties; Exclusion of Liability .........................................................3
Getting Started .............................................................................................7
Understanding this User Manual ...............................................................................7
Activating Your Phone ...............................................................................................8
Charging the Battery ...............................................................................................10
Setting Up Your Voice Mail ......................................................................................11
Understanding Your Phone ........................................................................12
Features of Your Phone ...........................................................................................12
Front View of Your Phone ........................................................................................13
Side View of Your Phone .........................................................................................14
Command Keys ......................................................................................................15
Understanding the Display Screen ..........................................................................17
Your Phone’s Modes ...............................................................................................18
Call Functions ............................................................................................22
Making a Call — Number Entry Dialing ...................................................................23
Making a Call — Contacts Dialing ..........................................................................24
Making a Call — Speed Dialing ..............................................................................25
Answering a Call .....................................................................................................26
Rejecting a Call .......................................................................................................26
Adjusting the Call Volume .......................................................................................26
Calls Log ................................................................................................................27
Phone Modes ..........................................................................................................30
Alpha Mode ............................................................................................................32
Roaming .................................................................................................................33
Menu Navigation ........................................................................................34
Menu Navigation .....................................................................................................35
In Use Menu Outline ................................................................................................36
Menus and sub-menus ...........................................................................................36
Entering Text ..............................................................................................41
Text Entry Modes ....................................................................................................42
Changing the Text Entry Mode ................................................................................42
Entering Text in Alpha (ABC) Mode ..........................................................................43
Entering Text in T9 Word Mode ...............................................................................43
Entering Upper and Lower Case Letters ..................................................................44
Entering Symbols ....................................................................................................45
Entering Numbers ...................................................................................................45
Understanding Your Contacts ...................................................................46
Your Contacts List ...................................................................................................47
Adding a New Contacts Entry ..................................................................................47
4

Finding a Contacts Entry .........................................................................................53
Editing an Existing Contact Entry .............................................................................55
Using Contacts Groups ............................................................................................60
Deleting a Contact Entry ..........................................................................................64
Memory ..................................................................................................................65
Messaging ................................................................................................. 66
Creating and Sending New Messages .....................................................................67
Receiving and Handling Messages ..........................................................................70
Voicemail ................................................................................................................70
Message Folders .....................................................................................................71
Erasing Messages ...................................................................................................75
Message Settings ...................................................................................................75
Axcess Shop .............................................................................................. 77
Axcess Shop Options ..............................................................................................78
Axcess Shop Settings ..............................................................................................78
Axcess Shop Help ...................................................................................................79
My Images ..............................................................................................................81
My Ringtones ..........................................................................................................82
Shuffle ....................................................................................................................84
Tools .......................................................................................................... 87
Tools Menu .............................................................................................................88
Calendar .................................................................................................................88
Memo Pad ..............................................................................................................93
Alarm Clock ............................................................................................................95
World Time .............................................................................................................97
Calculator ...............................................................................................................99
Stop Watch ...........................................................................................................100
Converter ..............................................................................................................100
Tip Calculator ........................................................................................................103
Changing Your Settings .......................................................................... 104
Location Setting ....................................................................................................105
Display Settings ....................................................................................................105
Sound Settings .....................................................................................................108
Call Settings .........................................................................................................110
Phone Settings ......................................................................................................113
Memory Info .........................................................................................................119
Phone Info ............................................................................................................119
Health and Safety Information ............................................................... 121
Health and Safety Information ...............................................................................122
Samsung Mobile Products and Recycling ..............................................................123
UL Certified Travel Adapter ...................................................................................123
Consumer Information on Wireless Phones ...........................................................124
Road Safety ..........................................................................................................130
Responsible Listening ...........................................................................................131
Table of Contents 5

Operating Environment .........................................................................................133
Using Your Phone Near Other Electronic Devices ...................................................133
Potentially Explosive Environments .......................................................................135
Emergency Calls ...................................................................................................135
FCC Notice and Cautions .......................................................................................136
Other Important Safety Information .......................................................................137
Product Performance ............................................................................................137
Availability of Various Features/Ring Tones ...........................................................138
Battery Standby and Talk Time .............................................................................138
Battery Precautions ..............................................................................................139
Care and Maintenance ..........................................................................................140
Warranty Information ..............................................................................142
Standard Limited Warranty ...................................................................................142
Index .........................................................................................................147
6

Understanding this User Manual
Section 1: Getting Started
Topics Covered
• Understanding this User Manual
• Activating Your Phone
• Charging the Battery
• Setting Up Your Voice Mail
This section explains how to start using your phone by activating your service, setting
up your voice mail, or getting an understanding of how this manual is put together.
Understanding this User Manual
The chapters of this guide generally follow the same order as the menus and submenus in your phone. A robust index for quick reference to most features begins on
page 147.
Also included is important saf ety info rmation that you should know before using your
phone. Most of this information is near the back of the guide, beginning on page
121.
Notes and tips
Throughout this guide are icons and text that are set apart from the rest. These are
intended to point out important information, quick methods for activating features, to
define terms, and more. The definitions for these methods are as follows:
• Notes: Explain alternative options within the current feature, menu, or sub menu.
• Tips: Provide quick or innovative methods for performing functions related to the
subject at hand.
• Important: Points out important information about the current feature that could
affect performance, or even damage your phone.
Getting Started 7
Activating Your Phone
Contact your Wireless Carrier and follow their instructions for obtaining service, if
necessary. We suggest that you read this guide to fully understand the services your
phone supports.
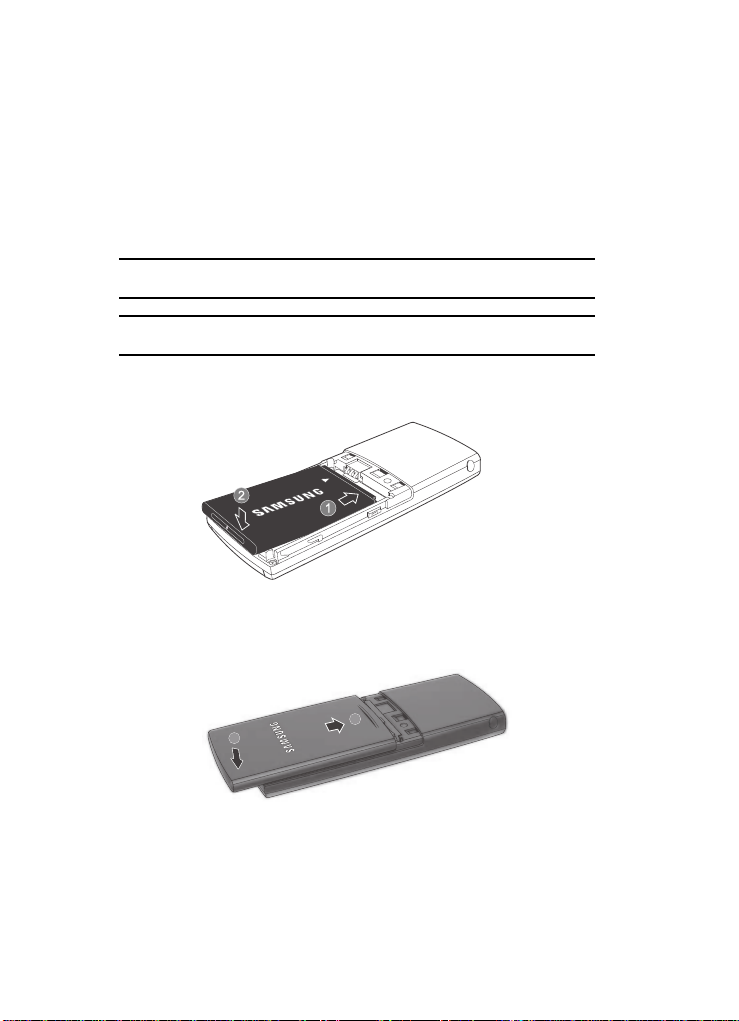
Install the Battery
Note: Your phone comes packaged with a partially charged rechargeable standard Li-Ion battery and travel
adapter.
Important!: You must fully charge the battery the first time you use your phone, otherwise you could
damage the battery.
1. Insert the top end of the battery first, matching the gold contacts on the top
end of the battery to those inside of the phone.
2. Press the bottom end of the battery down into the phone.
3. Place the battery cover over the battery and slide the cover upward into
place.
3
4
8
Activating Your Phone
Turn Your Phone On
1. Press the key.
2. The phone begins searching for a network
signal.
3. Once the phone finds a signal, the time, date
and day appear in the bottom of the display.
4. You’re now ready to place and receive calls.
Tip: Your phone has an internal antenna. Do not touch the phone
case over the antenna while using your phone as this can
affect call quality and can cause the phone to operate at a
higher power level than is necessary.
Note: If you are outside of your Wireless Carrier’s coverage or roaming area, the No Service icon ( )
appears at the top of the phone’s display. If you cannot place or receive calls, try later when service
is available, or at another location.
Antenna
Turn Your Phone Off
䊳 Press and hold the key for two or more seconds. Your phone powers
off.
Note: If your phone is on and you press for less than one second, the phone will not power off. This
prevents your phone from being turned off accidentally.
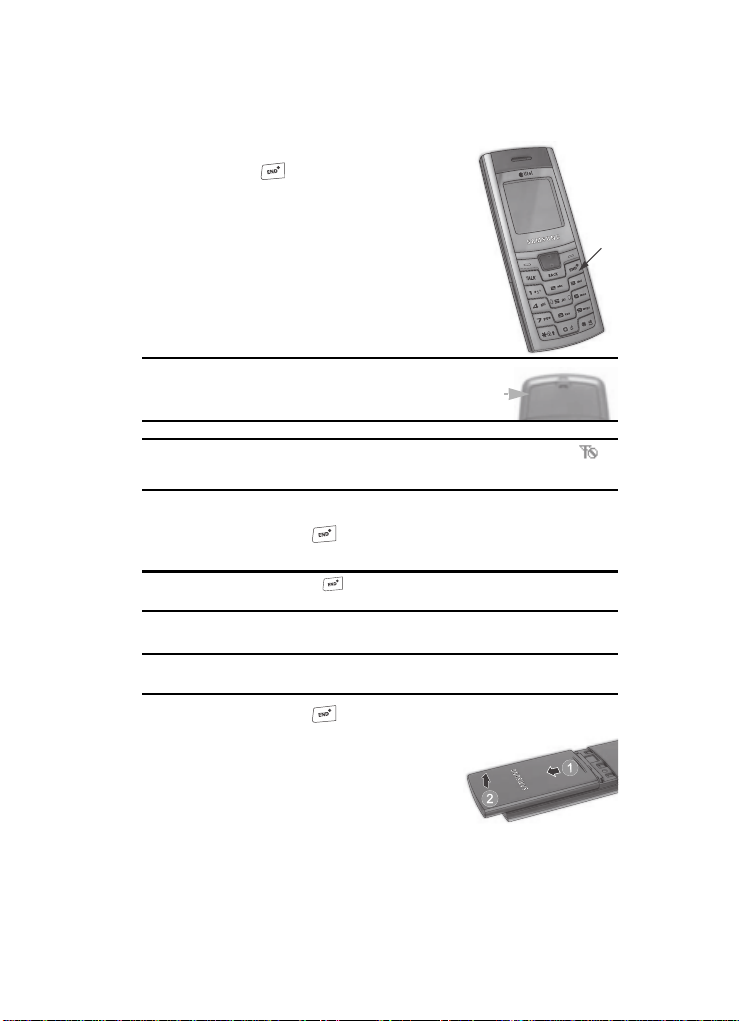
Remove the Battery
Important!: You must unplug the Travel Adapter (if it is connected) before removing the battery from the
phone during charging to avoid damage.
Press
1. Press and hold the key to turn off the phone (if on).
2. Press the battery cover at point (1) and slide
the cover (2) toward the bottom end of the
phone.
3. Lift the battery cover up and away from the
phone, bottom end first.
Getting Started 9

4.
+
Lift the battery (3) up and away from the
phone, bottom end first.
3
Charging the Battery
Your phone is powered by a rechargeable standard Li-Ion battery. Only use
Samsung-approved charging devices and batteries. Samsung accessories are
designed to maximize battery life. Using other accessories may invalidate your
warranty and may cause damage.
Use the Travel Adapter
The travel adapter included with your phone is a
convenient, light-weight charger that rapidly
charges your phone from any 120/220 VAC
outlet.
1. Plug the large end of the Travel
Adapter into a standard 120 VAC or 220 VAC wall outlet.
Note: For connection to an electrical supply not located in North America, you must use an adaptor of the
proper configuration for the power outlet. Use of the wrong adapter could damage your phone and
void your warranty.
2. Insert the smaller end of the Travel Adapter into the charger/accessory
connector at the bottom end of your phone.
Note: With the phone turned OFF, a discharged battery recharges fully in approximately 4 hours.
10

Setting Up Your Voice Mail
Low battery indicator
The battery indicator ( ) in the upper-right corner of the display indicates power
level. Monitor the battery strength and ensure your battery is adequately charged.
• Three bars ( ) indicate a full charge.
• An empty battery icon ( ) indicates a near empty battery.
• A blinking empty battery icon ( ) and a tone sounding indicate you have two to
three minutes before the battery is too low to operate the phone.
If you continue to use your phone without charging its battery, the phone shuts
down.
Setting Up Y our Voice Mail
Voice mail allows callers to leave voice messages, which can be retrieved any time.
Note: Once your voice mail account has been set up, you can use the Voice Mail folder (under the Message
menu) to view details of voice messages in your voice mail box.
1. In idle mode, press and hold the key or dial your own mobile number
to dial voice mail.
2. Follow the prompts in the new user tutorial to setup your mail box.
Listen to voice mail
1. In idle mode, press and hold the key or dial your own mobile number
to dial voice mail.
2. After connecting, you are prompted to enter your password.
Getting Started 11

Section 2: Understanding Your Phone
Topics Covered
• Features of Your Phone
• Front View of Your Phone
• Command Keys
• Understanding the Display Screen
• Your Phone’s Modes
This section outlines some key features of your phone. This section also explains the
screen and the icons that are displayed when the phone is in use.
Features of Your Phone
• High speed data (CDMA 2000 1X Technology)
• Global Positioning Technology (GPS)
• Personal Information Management (PIM) functions
(Calendar, Memo Pad, and so on)
• SMS and EMS Text Messaging
• Axcess Shop
• Speakerphone
12

Front View of Y our Phone
1. Earpiece /
Speaker
2. Display
3. Left soft
4. TALK key
5. Voicemail
hot key
Front View of Your Phone
12. Navigation key
11. Right soft key
10. END (exit) /
Power key
9. BACK / Clear
key
8. Alphanumeric
keypad
6. Microphone
7. Special
function keys
Command Keys and Features
1. Earpiece/Speaker — Plays sounds such as caller voices and call
progress tones. In Speakerphone mode, plays amplified voices for handsfree calls. (
2. Display — Displays the numbers, messages, and icons you need to
operate your phone.
3. Left Soft Key — Performs the functions indicated on the botto m line of t he
display.
4. TALK Key — This key is used to initiate your calls and to display the All
Calls list.
Understanding Your Phone 13

5.
Voicemail Hot Key — In idle mode, press and hold to automatically dial
your voicemail account. In T9 Word or Abc text entry mode, press to enter
a period (.) in the text.
6. Microphone — The microphone used during phone calls and voice memo
recordings.
7. Special Function Keys — Enter special characters. Perform various
functions.
8. Alphanumeric Keypad — Use these keys to enter numbers, letters, and
characters.
9. BACK Key — Deletes characters from the display when you are in text
entry mode. When in a menu, press to return to the previous menu.
10. END/Power/MENU Exit Key — Ends a call. Press and hold this key for a
few seconds to turn your phone On or Off. When you receive an incoming
call, press to mute the ringer and send the call to Voice Mail.
11. Right Soft Key — Performs the functions indicated on the bottom line of
the display.
12. Navigation Key — In menu mode, lets you browse and highlight menu
options.
Side View of Your Phone
1. Power/Accessory
Connector
2. Microphone
Command Keys and Features
13. Power/Accessory Connector — Used to plug in the Travel Charger and to
connect any available accessory cable, such as, handsfree, Teletypewriter
(TTY), or Telecommunication Device for the Deaf (TDD) equipment.
14

Command Keys
14. Microphone — The microphone used during phone calls and voice memo
recordings.
Command Keys
Soft Keys
Functions for the soft keys are
identified by labels that appear in the
display above each key. There are two
Left Soft Key
Function
Left Soft Key
Right Soft Key
Function
Right Soft Key
soft keys, Left and Right .
Left Soft Key
Some functions of the Left soft key are as follows:
• In standby mode, press the Menu (left) soft key ( ) to open the main menu.
• In a menu, press the OK (left) soft key ( ) to accept the highlighted selection.
• When the Left so ft key f unction is Edit, press the Edit (left) soft key ( ) to edit a
Contact.
Right Soft Key
Some functions of the Right soft key are as follows:
• In standby mode, press the MESSAGE (right) soft key ( ) to open the
Messages menu.
• When the Right soft key function is Back, press the Back (right) soft key ( ) to
back up one menu level.
• When the Right soft key function is Option, press the Options (right) soft key
( ) and a pop-up menu appears.
BACK Key
The BACK key ( ) is used to erase or clear numbers, text, or symbols from the
display. You can also use the key to return to a previous menu or to return to
standby mode from any menu.
1. If you enter an incorrect character, briefly press to backspace (and
delete) the character.
2. To erase the entire sentence, press and hold .
3. To back up one menu level, briefly press .
4. To return to standby mode, press and hold until you return to
standby mode.
Understanding Your Phone 15

End Key
1. Press and hold the End key to turn your phone on or off.
2. Briefly press once to disconnect a call.
3. Press to return to standby mode from any menu, or to cancel the last
input.
Send Key
The Send key is used to answer calls, dial calls, and to recall the last
number(s) dialed, received, or missed.
1. Press once to answer calls.
2. Enter a number and briefly press to make a call.
3. Briefly press in standby mode to display a list of recent calls to and
from your phone.
4. Press twice in standby mode to call the most recent number.
5. Press to pick up a waiting call. Press again to switch back to
the other call.
Navigation Key
Use the directional keys on the Navigation key to browse menus, sub menus,
and lists, and to adjust settings. In standby mode, each key also acts as a shortcut to
launch applications.
Special Function Keys
Special function keys let you enter special characters and perform special functions.
Voicemail Hot Key (1 key)
In standby mode (in addition to entering the number “1” when you are dialing a
phone number), pressing and holding the automatically dials your Voicemail
account.
When entering text in T9 Word or Abc mode, pressing the key enters a period (.)
in your text. (For more information, see “Entering Text” on page 41.)
Key Lock and Shift Key (* key)
In standby mode, pressing and holding the key locks the keypad and prevents
accidental dialing. Unline Lock mode, you can unlock the keypad lock without the
phone Lock Code (see “Lock Mode” on page 19 for more information). Simply press
the Unlock (left) soft key ( ), then press the key.
16

Understanding the Display Screen
When entering text, momentarily pressing the key shifts the current
capitalization setting between Word/Abc, WORD/ABC, and word/abc.
Also when entering text, pressing and holding the key shifts the text entry
mode between Word, Abc, and 123. (For more information, see “Entering Text” on
page 41.)
Next Word Key (0 key)
When entering text in T9 Wo rd mode , momentarily pressing the key at the end
of the word you just entered toggles through any other words with the same key
press combination. (For more information, see “Entering Text” on page 41.)
Example: Pressing in T9 Word mode, can produce “and”, “bod”, and “cod”.
Silent Mode and Space Key (# key)
In standby mode, pressing and holding the key places your phone in Silent
mode, which silences all tones. To restore these tones, press and hold the key
again. (For more information, see “Enter/Exit Silent Mode” on page 20.)
When entering text in T9 Word or Abc mode, pressing the key enters a space in
your text. (For more information, see “Entering Text” on page 41.)
Understanding the Display Screen
1. The top line of your phone’s display
contains icons that indicate network
status, battery power, signal strength,
1
2
connection type, and more.
2. The center portion of the display shows
information such as call progress
3
information, messages, and photos.
3. The bottom line of the display shows current soft key functions. The
sample screen shows that pressing the Left soft key ( ) will display
the Main Menu, and pressing the Right soft key ( ) will show the
Messages menu.
Display Screen Icons
Your SCH-r200 phone can show you definitions of the icons that appear on the top
lines of the front and main displays.
Understanding Your Phone 17

To access the Icon Glossary:
䊳 In standby mode, press the Menu (left) soft key ( ), then press
(for Settings), (for Phone Info), and for Icon Glossary. A list
shows of the icons that can appear on the top line of the display.
Dialogue Boxes
Dialogue boxes prompt for action, inform you of status, or warn of situations such as
low memory. Dialogue boxes and their definitions are outlined below.
• Choice
• Example: “Save to draft?”
• Reconfirm
• Example: “Erase all inbox msgs?”
• Performing
• Example: “Sending...” “Connecting...”
• Completed
• Example: “Message Saved”
• Information
• Example: “New Message”
• Error
• Example: “System Error!”
• Warning
• Example: “Battery Low,” “Memory Full!”
Backlights
Backlights illuminate the display and the keypad. When you press any key or open
the phone, the backlights come on. They go off when no keys are pressed within a
period of time set in the Backlight menu.
Note: During a phone call, the display backlights dim and turn off after one minute to conserve battery
power, regardless of the Backlight setting.
For more information, see “Backlight” on page 107.
Your Phone’s Modes
Call Answer Mode
You can select how you wish to answer a call.
18

Your Phone’s Modes
1. In standby mode, press the Menu (left) soft key ( ), then press
(for Settings), (for Call Settings), and for Call Answer. The
following call answer options appear in the display:
• Any Key — Pressing any key except the key answers a call.
• Talk Key — Only pressing answers a call.
2. Use the Navigation key to highlight an option.
3. Press the key to select the method for answering calls.
Input mode
Input mode determines how you enter text, numbers, and symbols. While at any text
entry screen, press the Right soft key ( ) (when creating a text message, also
press for Entry Mode), then use the Navigation key to choose the input mode
from the pop-up menu. Optional input modes are T9 Word, Abc, ABC, 123, and
Symbols. (For more information, see “Entering Text” on page 41.)
Tip: You can also cycle between Word, Abc, and 123 by repeatedly pressing and holding .
Lock Mode
When the phone is in Lock Mode, restrictions are placed on phone use. You can
receive calls and messages, but cannot place outgoing calls (except for emergency
numbers) until you unlock the phone.
Lock Mode also restricts access to menus and keypad shortcuts. Unlock your phone
by entering the lock code when prompted. (For more information, see “Lock Phone”
on page 113.)
Standby Mode
Standby mode is the state of the phone once it has found service and is idle. The
phone goes into standby mode:
• After you power the phone on.
• When you press after a call or from within a menu.
In standby mode, you will see the time, day, and date as well as all phone status
icons.
1. While in standby mode, enter a phone number, and press to place a
call.
2. Press to return to standby mode.
Understanding Your Phone 19

Receive Messages in Standby Mode
You can receive messages in standby mode. An alert tone sounds and a notification
message appears in the display when a new message arrives.
• Press the View (right) soft key ( ) to view now.
• Press the Ignore (left) soft key ( ) to view later.
Talk Mode
You can place and receive calls only when your phone is on. While in a call your
phone is in talk mode. Press the Options (left) soft key ( ) to display a list of
menu options. For more information, see “In Use Menu Outline” on page 36.
Enter/Exit Silent Mode
Silence the tones your keypad makes when you press a key.
• In standby mode, press and hold . “Entering Silent Mode” briefly appears in
the display and your phone does not play ringtones for incoming calls, soun d aler t
tones, or play keypad tones.
• While in Silent mode and standby mode, press and hold . “Exit Silent Mode”
briefly appears in the display and your phone returns to standby mode.
Vibrate Mode
1. In standby mode, press the Menu (left) soft key ( ), then press
(for Settings), (for Sound Settings), (for Volume), and for
Voice Calls. The current calls ringer volume setting appears in the display.
2. Repeatedly press the Down navigation key until Vibrate appears in the
display, then press the Set (left) soft key ( ).
Your phone will now vibrate when you receive a call, the keypad tones are
silenced, but the phone will play tones for messages, alarms, and alerts.
Adjust the Ringer
1. In standby mode, press the Menu (left) soft key ( ), then press
(for Settings), (for Sound Settings), (for Volume), and for
Voice Calls. The current calls ringer volume setting appears in the display.
Available options are:
• Silence All •Medium
• Vibrate • Medium/High
•1 Beep •High
•Low
2. When you are satisfied with the setting, press the Set (left) soft key ( ).
20

Your Phone’s Modes
Note: The Vibrate icon ( ) appears in the display when the phone is in Vibrate mode.
Understanding Your Phone 21

Section 3: Call Functions
Topics Covered
• Making a Call — Number Entry Dialing
• Making a Call — Speed Dialing
• Answering a Call
• Rejecting a Call
• Adjusting the Call Volume
• Calls Log
• Phone Modes
•Roaming
This section explains how to make or answer a call. This section also includes the
features and functionality associated with making or answering a call.
22

Making a Call — Number Entry Dialing
Making a Call — Number Entry Dialing
1. With the phone on, enter the number you wish to call using the keypad.
2. Press the key to place the call.
Dialing Emergency Numbers
You can dial any of the numbers 911, *911, or #911 to place an emergency call.
If you dial 911, *911, or #911 and press the key, your phone dials the
emergency number 911, automatically.
Important!: Emergency number 911 is hard-coded into your phone. You can dial this number almost any
time, even when the phone is locked or restricted.
If you call 911 an audible tone is heard and an Emergency prompt appears in the display for
the duration of the call.
Important!: Because of various transmission methods, network parameters, and user settings necessary
to complete a call from your wireless phone, a connection cannot always be guaranteed.
Therefore, emergency calling may not be available on all wireless networks at all times.
Important!: DO NOT depend on this phone as a primary method of calling 911 or for any other essential or
emergency communications.
Dialing International Numbers
Call another country from the U.S.
1. In standby mode, enter the three-digit exit code (011) for the United States.
2. Enter the country code for the country that you are calling.
3. Enter the number that you wish to call, then press the key.
Note: Puerto Rico and Canada are on the North American dialing plan. When making calls to Puerto Rico
and Canada it is similar to making calls within the United States, no unique country codes are
necessary.
Placing calls when outside the U.S. — Mexico
• Calling locally within Mexico: Dial the seven or eight-digit number.
• Calling long distance within Mexico: Dial 01, plus the ten-digit number (inc ludes
area code).
• Calling to the U.S. or Canada from Mexico: Dial 001, plus the ten-digit number
(includes area code).
Call Functions 23

•
Calling Voicemail from Mexico: Dial 001, plus your ten-digit wireless number.
Once you hear the recorded prompt, press and enter your passcode.
Manual Pause Calling
When you call automated systems (like banking services), you are often required to
enter a password or account number. Instead of manually entering the numbers
each time, you can store the numbers in your Contacts along with special characters
called pauses.
• P pause — A hard pause stops the calling sequence until you press the key.
• T pause — A two-second pause stops the calling sequence for two seconds and
then automatically sends the remaining digits.
To manually call a number with pause(s) without storing it to your Contacts:
1. Enter the number you wish to call.
2. Press the Option (left) soft key ( ). A pop-up menu containing the
following options appears in the display:
• P pause — a hard pause (awaits input from you).
• T pause — a two-second pause.
3. Use the Navigation key to highlight the desired pause option.
4. Press to enter the highlighted pause into your number sequence.
5. Press to call the number.
Making a Call — Contacts Dialing
After you store phone numbers and contact names in y our phone’s Contacts list, you
can dial any Contacts entry without having to remember and enter the entire phone
number.
To dial a Contacts entry:
1. In standby mode, press the Up navigation key. The Contacts Find screen
appears in the display.
2. Use the keypad keys to enter the first few letters of the name of a Contacts
entry you want to call. (See “Entering Text” on page 41 for more
information.)
3. Use the Navigation key to highlight the Contacts entry you want to dial.
To dial the Default Number for this Contact:
4. Press the key.
24

Making a Call — Speed Dialing
Tip: You can select any number stored in a Contacts entry as the Default Number. See “Assigning a Default
Number” on page 50 for more information.
To dial a number other than the Default Number:
5. After highlighting the desired Contacts entry, press the View (left) soft key
( ). The View Contact screen appears in the display.
6. Use the Navigation key to highlight the particular number you want to dial,
then press the key.
Making a Call — Speed Dialing
You can store phone numbers and contact names in your phone’s Contacts list.
Speed Dialing lets you quickly and easily dial any contact in your Contacts list by
using that contact’s Speed Dial number in the list. You can assign and change Speed
Dial numbers for your Contacts. (See “Assigning Speed Dial Numbers” on page 56
for more information.)
One-Touch Dialing
Speed Dial numbers 002 through 009 are One-Touch dialing numbers. You can call
the Contacts phone numbers assigned Speed Call numbers 002 through 009 by
pressing and holding a single key.
Example: For location number 003, press and hold the key until the name and number appear in the
display and the number is dialed.
Two-Touch Dialing
Speed Dial numbers 010 through 099 are Two-Touch dialing numbers.
Example: For location number 013, briefly press the key, then press and hold the key until the
name and number appear in the display and the number is dialed.
Three-Touch Dialing
Speed Dial numbers 100 through 999 are Three-Touch dialing numbers.
Example: For location number 113, briefly press the key, briefly press the key again, then press
and hold the key until the name and number appear in the display and the number is
dialed.
Pause Dialing From a Contacts Entry
• If you speed dial a contact that contains (two-second) T pause(s) simply wait for
the pauses to pass and the dialing to complete.
Call Functions 25

•
If you speed dial a contact that contains (hard) P pause(s), wait for the appropriate
prompt(s) from the number you are calling (credit card number, bank account
number, and so on) and enter the appropriate response(s).
Answering a Call
Your phone notifies you of a call in the following ways:
• A ring tone sounds and/or your phone vibrates (Your phone provides: nine ring
volume settings including
1- beep, Vibrate, Ringer Off, or Vibrate+Ring, and/or
different ring types to distinguish callers.)
• A phone number (unless blocked by the caller) and a name appear in the displa y (If
the caller’s number and name are stored in your Contacts list).
• If the caller can’t be identified, Call from unavailable#, Call from restricted
number, or no number appears in the display.
Your phone continues to notify you of the call until one of the following events
occurs:
• You answer the call.
• You ignore the call.
• The calling party ends the call.
• The call is sent to voicemail.
Answering an Incoming Call
䊳 Press the key. The ring tone and/or vibration stop and the caller’s
voice can be heard in the earpiece.
Tip: You can set your phone to answer calls when you open the folder, when you press any key but the
key, or automatically. (See See “Call Settings” on page 110 for more information.
Rejecting a Call
When you reject an incoming call, the call is immediately forwarded to your voice
mail.
䊳 During an incoming call, press the Reject (right) soft key ( ). The
caller is immediately forwarded to your voice mail.
Tip: You can mute the ringer to ignore an incoming call by closing the folder or by pressing the volume key.
Adjusting the Call Volume
In standby mode, repeatedly press the Volume key ( ) down until the desired
Call Volume Level appears in the display. The Volume key is on the left side of phone.
26

Calls Log
Calls Log
The Calls log retains information about Outgoing, Incoming, and Missed calls. You
can also view times for your last call and the time totals for all calls.
Review the Calls Log
1. In standby mode, press the MENU (left) soft key ( ). The Main Menu
appears in the display.
2. Press the key (for Calls).
3. Press the number key associated with the Calls log that you wish to review
or the function you wish to access:
• Press for Outgoing calls.
• Press
for Incoming calls.
• Press for Missed calls.
• Press for Erase Logs.
• Press for Call Timer .
• Press for Data Counter.
Note: In cases where there is a Contacts match for a Calls log entry, the name associated with the number
appears in the display instead of the number.
Outgoing Calls
Your phone retains information about the last 20 outgoing calls and stores them in
the Outgoing calls log. You can revi ew th e Outgoing calls log for th e time and date of
a call, as well as other information.
Note: To quickly view your most recent calls, briefly press in standby mode. Up to 20 of your most
recent outgoing, incoming, and missed calls appear in the display.
1. In standby mode, press the MENU (left) soft key ( ) then press
(for Calls) and for Outgoing. A list of your outgoing calls appears in
the display.
2. Use the Navigation key to highlight a call, then press to view further
information about the call.
3. Press the Option (left) soft key ( ). A pop-up menu containing the
following options appears in the display:
•Talk — Call the selected number.
•Save — Save the number to your Contacts.
• Prepend — Add a prefix to the number .
Call Functions 27

•Erase — Erase the selected call from your Outgoing call log. (If this is a recent
call, it will no longer appear in the Recent Calls list.)
4. Use the Navigation key to highlight an option.
5. Press the key to perform the highlighted option’s function.
Incoming Calls
Your phone retains information about the last 20 Incoming calls and stores them in
the Incoming call log. You can review the Incoming call log for the time and date of
the call, as well as other information.
1. In standby mode, press the MENU (left) soft key ( ) then press
(for Calls) and for Incoming. A list of your Incoming calls appears in
the display.
2. Use the Navigation key to highlight a call, then press the key to view
further information about the call.
3. Press the Option (left) soft key ( ). A pop-up menu containing the
following options appears in the display:
•Talk — Call the selected number.
•Save — Save the number to your Contacts.
• Prepend — Add a prefix to the number.
•Erase — Erase the selected call from your Incoming call list. (If this is a recent
call, it will no longer appear in the Recent Calls list.)
4. Use the Navigation key to highlight an option.
5. Press the key to perform the highlighted option’s function.
Missed Calls
Your phone retains information about the last 20 missed calls (calls that were never
answered) and stores them in the Missed call log. You can review the Missed call
log for the time and date of the call, as well as other information.
1. In standby mode, press the MENU (left) soft key ( ) then press
(for Calls) and for Missed. A list of your missed calls appears in the
display.
2. Use the Navigation key to highlight a call, then press the key to view
further information about the call.
3. Press the Option (left) soft key ( ). A pop-up menu containing the
following options appears in the display:
•Talk — Call the selected number.
28

Calls Log
•Save — Save the number to your Contacts.
• Prepend — Add a prefix to the number .
•Erase — Erase the selected call from your Missed call list. (If this is a recent
call, it will no longer appear in the Recent Calls list.)
4. Use the Navigation key to highlight an option.
5. Press the key to perform the highlighted option’s function.
Erase Logs
You can erase all calls from the Outgoing, Incoming, and Missed calls logs
individually or you can erase All Calls from these calls logs at the same time.
Erase All Calls
1. In standby mode, press the MENU (left) soft key ( ) then press
(for Calls), (for Erase Logs), and for All Calls.
“Erase All Calls?” appears in the display as well as the following options:
•Yes — Erases all calls in the Calls log.
•No — Cancels erasing calls.
2. Use the Navigation key to highlight the desired option, then press the
key.
Call Timers
View the duration of your last call, total calls, and calls made during the life cycle of
you phone using the Call Timer feature.
Note: Call Timer is not for billing purposes.
1. In standby mode, press the MENU (left) soft key ( ) then press
(for Calls) and for Call Timer. The following options appear in the
display:
• Last Call — View the duration of your last call.
• Total — View the duration of the total call, incoming and outgoing, made on
your phone since the last erasure.
• LifeTime — View the duration of all calls on your phone since activation
(LifeTime timers cannot be erased).
• Erase Total — Erases the counters for the Total call timer.
Press the number of the option you wish enter, or use the Navigation key to
highlight the option and press the key.
2. Press the key if you wish to exit the menu.
Call Functions 29

Note: Although Total call timers can be erased, LifeTime call timers can never be erased.
Data Counter
Use Data Counter to view the amount of data that has been sent or received (or a
total of both) using the data services that your phone supports, such as Axcess
Shop. The Data Counter can be a helpful tool for monitoring data usage, especially if
your service agreement has specified limits.
1. In standby mode, press the MENU (left) soft key ( ) then press
(for Calls) and for Data Counter . The following options appear in the
display:
• Transmit — View the amount of data (in kilobytes) that your phone has
transmitted since last being reset.
• Received — View the amount of data (in kilobytes) that your phone has
received since last being reset.
• Total — View the amount of data (in kilobytes) that your phone has transmitted
and received since last being reset.
• Erase Total — Erase (reset) the Transmit, Received, and Total data
counters.
Phone Modes
Standby Mode
Standby mode is the state of your phone once it is powered on and has found a
wireless service. Your phone goes into standby mode:
• After you power the phone on.
• When you press the key after a call or from within a menu or phone function
screen.
When in standby mode, you will see the time, day, and date in the display as well as
all currently active icons.
When in standby mode, you can:
• Make calls.
• Receive calls and messages.
• Access your phone’s menus.
• Change your phone’s mode.
• Activate Voice Command.
• Adjust calls ringer volume.
30
 Loading...