

Samsung SCHN415 Users Manual

* Some of the contents of this manual may differ from your phone,
S
depending on the software installed or your service provider.
ELECTRONIC
PORTABLE CELLULAR
TELEPHONE
SCH-N415
User’s Manual
World Wide Web
http://www .sam sungmobile.com
Printed in KOREA
Code No.: GH68-XXXXX
English. 08/2004. Rev.1.0
Please read this ma nu al before operating your
phone, and keep it for future reference.


Table of contents
Important safety precautions .......................6
Unpacking.....................................................8
Your phone ...................................................9
Phone la yout......................................... .............. 9
Display.............................................................. 12
Service light ...................................................... 14
Getting started............................................15
Using the battery................................................ 15
Switching on or off the phone............................... 19
Using the soft keys.......................................... ... 20
Your phone’s modes........... ............................ ..... 21
Call functions ..............................................23
Making a call.......................... ........................... . 23
Ending a call.................................. .................... 24
Emergency dialing.............................................. 24
Using the recent call logs................. .................... 25
Making a call from C ontacts........... ...................... 25
Prepend dialing ................. ............................ ..... 26
Speed dialing............................. ........................ 26
4-digit dialing..................................................... 28
Pause diali ng .................. .. .. ... .. .... .. .. .. ... .... .. .. .. .. . 28
Voice dialing............... ............................ ........... 31
Adjusting the volume during a call........................ 33
Answerin g a ca ll.............. .. .. ... .. .... .. .. .. ... .... .. .. .. .. . 34
Silencing a call ringer.......................................... 35
Viewing missed calls ........................................... 35
Options during a call............ ............................ ... 36
Using ca ller ID .................. ............................ ..... 37
Call forwarding............................................ ....... 37
Call waiting......................... ............................... 38
Three-way calling............................................ ... 39
Entering text...............................................40
3

Table of cont ents
Table of con t ents
Changing the text input mode................... ........... 41
Using T9 (English) mode...................................... 42
Using Alphabet m ode............................. ............. 44
Using Symbol mode............................................ 46
Using Number mode ........ ................................... 46
Using the menus .........................................48
Accessing a menu function by scrolling.................. 48
Using shortcuts.......................... ........................ 49
List of me nu functions......................................... 50
Downloads ..................................................54
Downloading multimedia files.............................. . 54
Changing the browser settings............................. 55
Viewing help information.............................. ....... 56
WAP............................................................57
About the W A P br o w ser............... .. .... .. ... .. .. .... .. .. . 57
Get In WAP
Prompt
Push SL Option
(Menu 2-1)
(Menu 2-2)
(Menu 2-3)
........................................ 58
.............................................. 62
................................... 62
Voice Mail ...................................................63
Voice Mail
Voice Mail#
(Menu 3-1)
(Menu 3-2)
.......................................... 63
........................................ 63
Voice Portal ...................................... ..........64
Voice Po rtal
Voice Portal#
(Menu 4-1)
(Menu 4-2)
....................................... 64
..................................... 64
Messaging..................................................65
Messenger
Chat
Torpedo SMS
E-mail
(Menu 5-1)
(Menu 5-2)
(Menu 5-4)
......................................... 65
................................................. 66
(Menu 5-3)
..................................... 66
............................................... 67
Torpedo SMS ...............................................68
New Msg
Voice
Inbox
Sent
Draft
Saved
(Menu 6-1)
(Menu 6-2)
(Menu 6-3)
(Menu 6-4)
(Menu 6-5)
(Menu 6-6)
........................................... 68
................................................ 70
................................................ 71
................................................. 72
................................................. 73
............................................... 73
Web Alert
Erase Msg
Msg Setting
(Menu 6-7)
(Menu 6-8)
(Menu 6-9)
.......................................... 73
.......................................... 74
....................................... 74
Calls............................................................77
Outgoing
Incoming
Missed
Erase History
Air Time
(Menu 7-1)
(Menu 7-2)
(Menu 7-3)
(Menu 7-4)
(Menu 7-5)
........................................... 77
........................................... 78
............................................... 79
..................................... 79
............................................ 80
Contacts......................................................81
Find
(Menu 8-1)
Add New Entry
Group Setting
My Phone#
Memory
.................................................. 81
(Menu 8-2)
(Menu 8-3)
(Menu 8-4)
(Menu 8-5)
................................... 84
..................................... 87
........................................ 88
............................................. 88
Other Functions ..........................................89
Planner
Display
Sounds
Voice Dial
Setup
(Menu 9-1)
(Menu 9-2)
(Menu 9-3)
(Menu 9-4)
(Menu 9-5)
............................................. 89
............................................ 102
............................................ 105
........................................ 109
.............................................. 110
Voice command.............. ...........................119
Health and safety information...................120
Exposure to radio frequency (RF) signals ............. 120
Road safet y............ .... .. .. .. ..... .. .. .. .... .. ... .. .. .... .. . 124
Operating e nv ir on m ent ................... .... ... .. .. .. .... . 125
Electronic devices.................................... ......... 125
Potential ly ex pl o si v e en vi ro nment.............. .. .. .... . 127
Emergency calls...................................... ......... 128
Other im portant safety information..................... 129
Care and maintenance ........................ .............. 130
Acknowledging special precautions and the FCC and in-
dustry canada notic e....................... .................. 131
Glossary....................................................150
4
5

Important safety precautions
Important safety
precautions
Read these guidelines before using your wireless
phone. Failure to comply with them may be
dangerous or illegal.
Road safety at all times
Do not use a hand-held phone while driving; park
the vehicle first.
Switching off when refuelling
Do not use the phone at a re fuelling poi nt (service
station) or near fuels or chemicals.
Switching off in an aircraft
Wireless phon es can cause interference. Using
them in an air craft is both illegal and dange rous.
Switching off in near all medical equipment
Switch off your phone near medical equipment.
Hospitals and health care facilities may be using
equipment that could be sensitive to external RF
energy. Follow any regulations or rules in force.
Interference
All wireless phones may be subject to
interference, which could affect their performance.
Special regulati on s
Follow any special regulations in force in any area
and always switch off your phone whenever it is
forbidden to use it , or w hen it may cause
interference or danger (in a hospital for example).
Water resistance
Your phone is not water -r e s i stant. Keep it dry.
Sensible use
Use only in the normal position (held to the ear).
Avoid unnecessary contact with the antenna when
the phone is swit ched on.
Emergency call
Key in the emergency nu m ber for y ou r pr esent
location, then press . Give all necessary
information as accurately as possible. Do not end
the call until give n pe rmission to do so.
Keeping small children away from your
phone
Keep the phone and all its parts including
accessories out of reach of small children.
Accessories and ba tter ies
Use only Samsung-approved accessories and
batteries. Use of any unauthorised accessories
could damage your phone and ma y be dangerous.
Use only Samsung-approved batteries and
recharge your battery only with Samsungapproved chargers.
Qualified servic e
Only qualified service personnel may repair you r
phone.
For more detailed safety information, see “Health
and safety information” on page 120.
CAUTION
RISK OF EXPLOSION IF A BATTERY IS
REPLACED BY AN INCORRECT TYPE.
DISPOSE USED BATTERIES ACCORDING TO
THE INSTRUCTIONS.
6
7
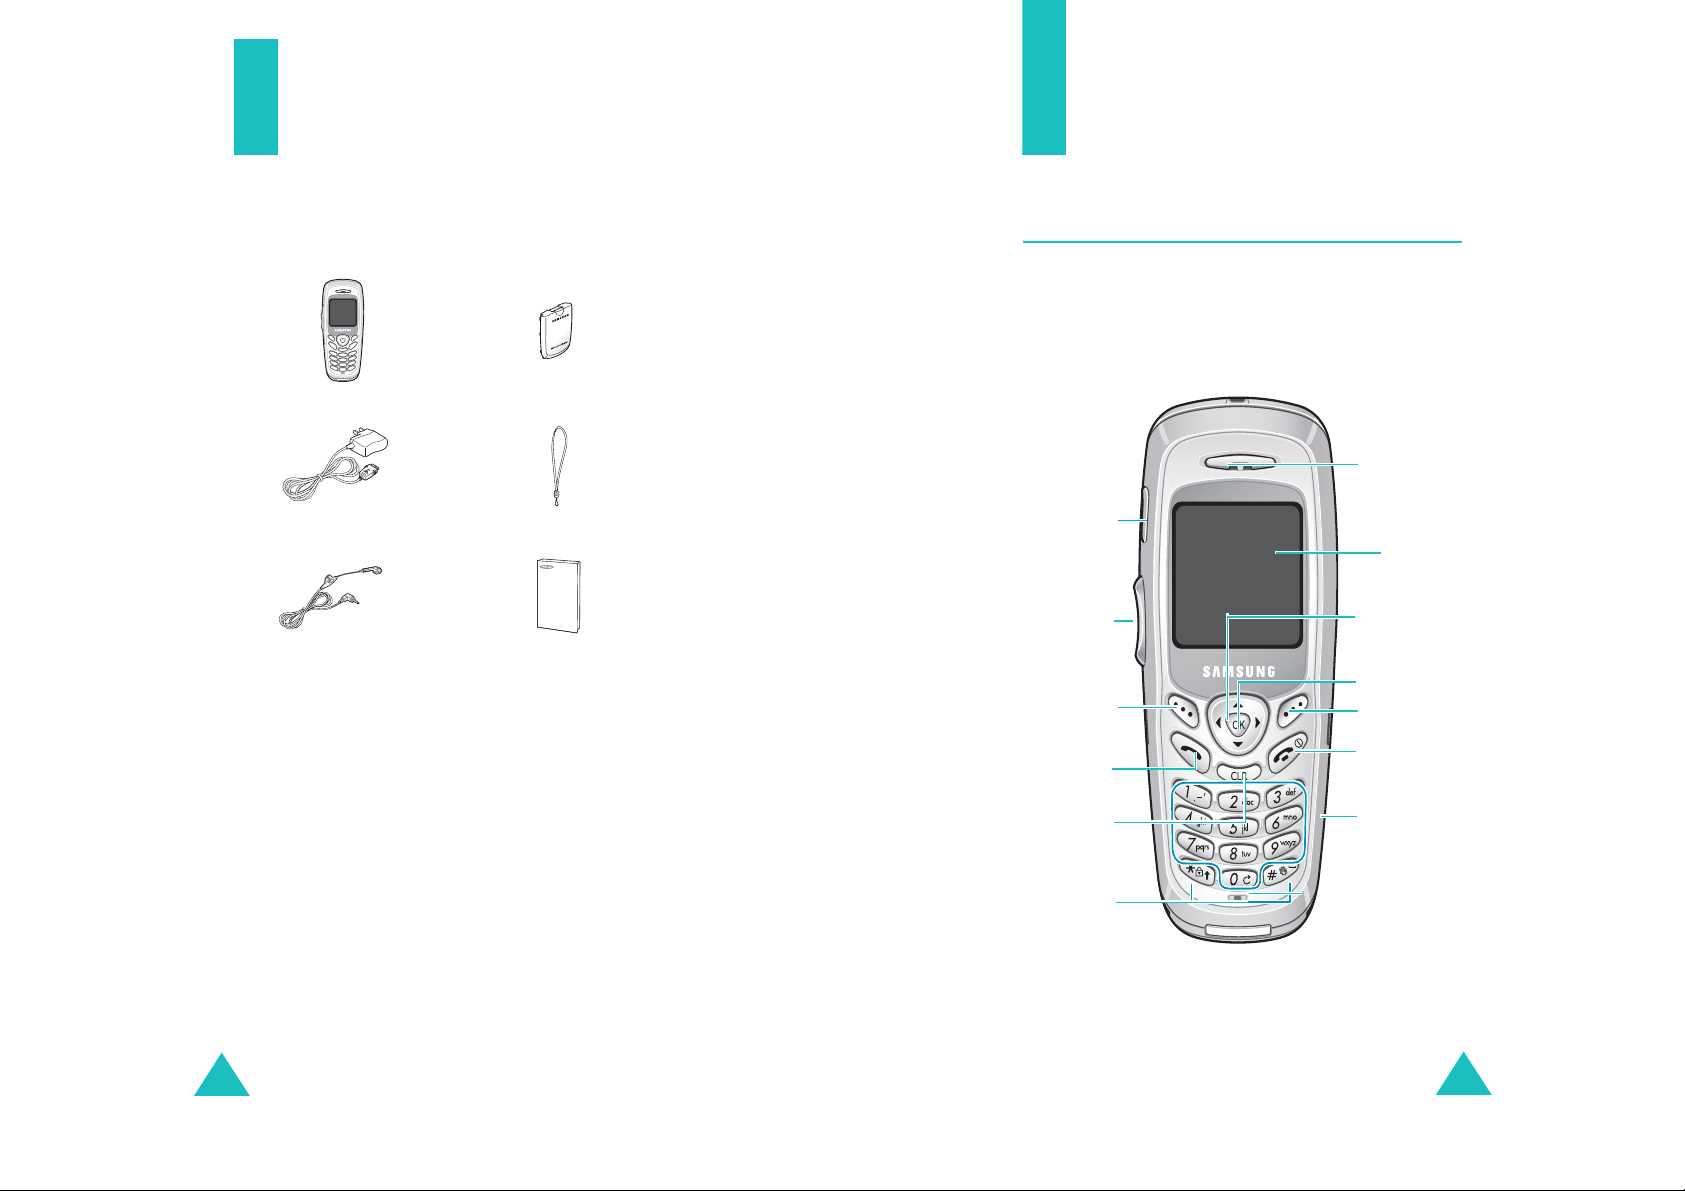
Unpacking
Your pac kage contains the following items . The
illustrations below may look different from your
phone and accessories:
Your phone
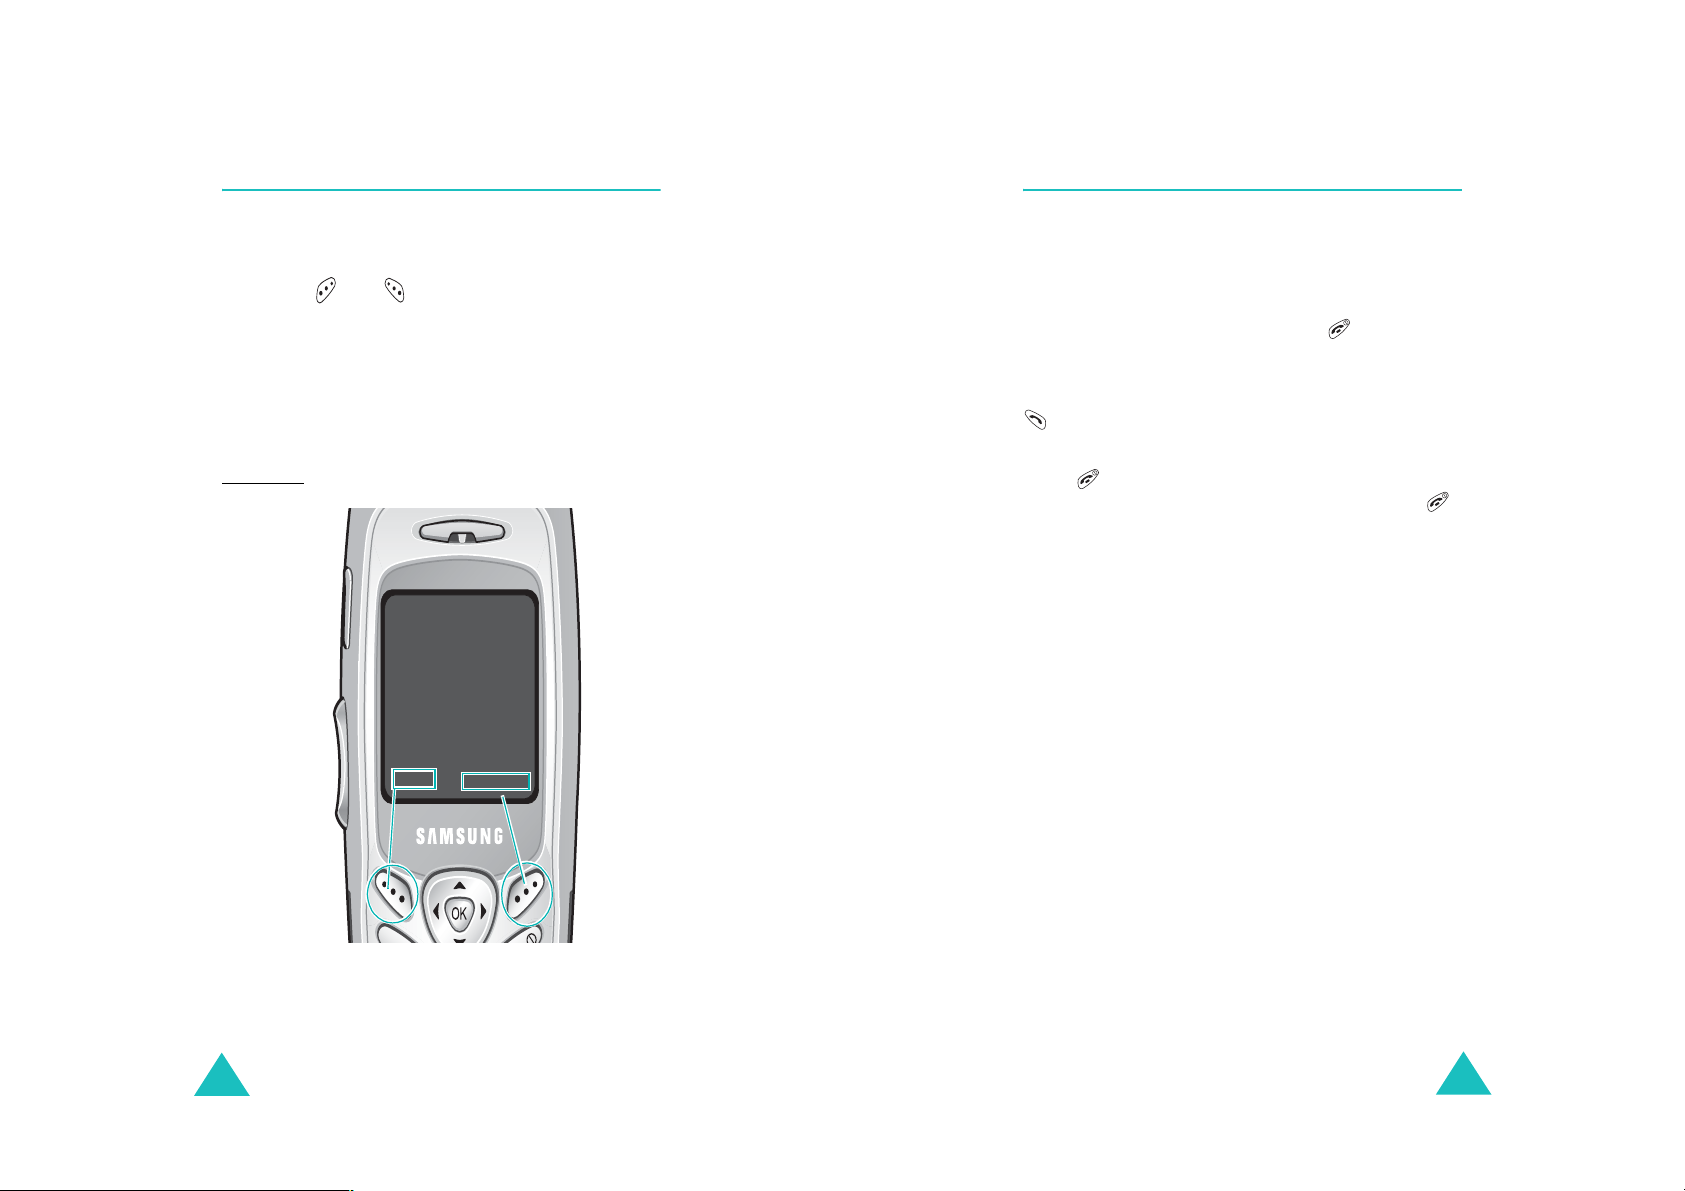
Phone layout
The following illustrations show the ma in elements
of your phone.
With the phone open
Handset
Trav e l adapter Hand strap
Headset
Battery
User’s manual
In addition, you can obtain the following
accessories for your phone from your local
Samsung dealer:
• Headset • Travel adapter
• Standard battery • Cigarette lighter
adapter
• Hands-free car kit • Data cable
Headset jack
Soft key (left)
Volume/menu
browse keys
Send key
Cancel/clear
function keys
key
Special
Earpiece
Display
Navigation (Up/
Down/Left/
Right) keys
OK key
Soft key (right)
Power on/off/
Menu exit key
Alphanumeric
keys
Microphone
8
9
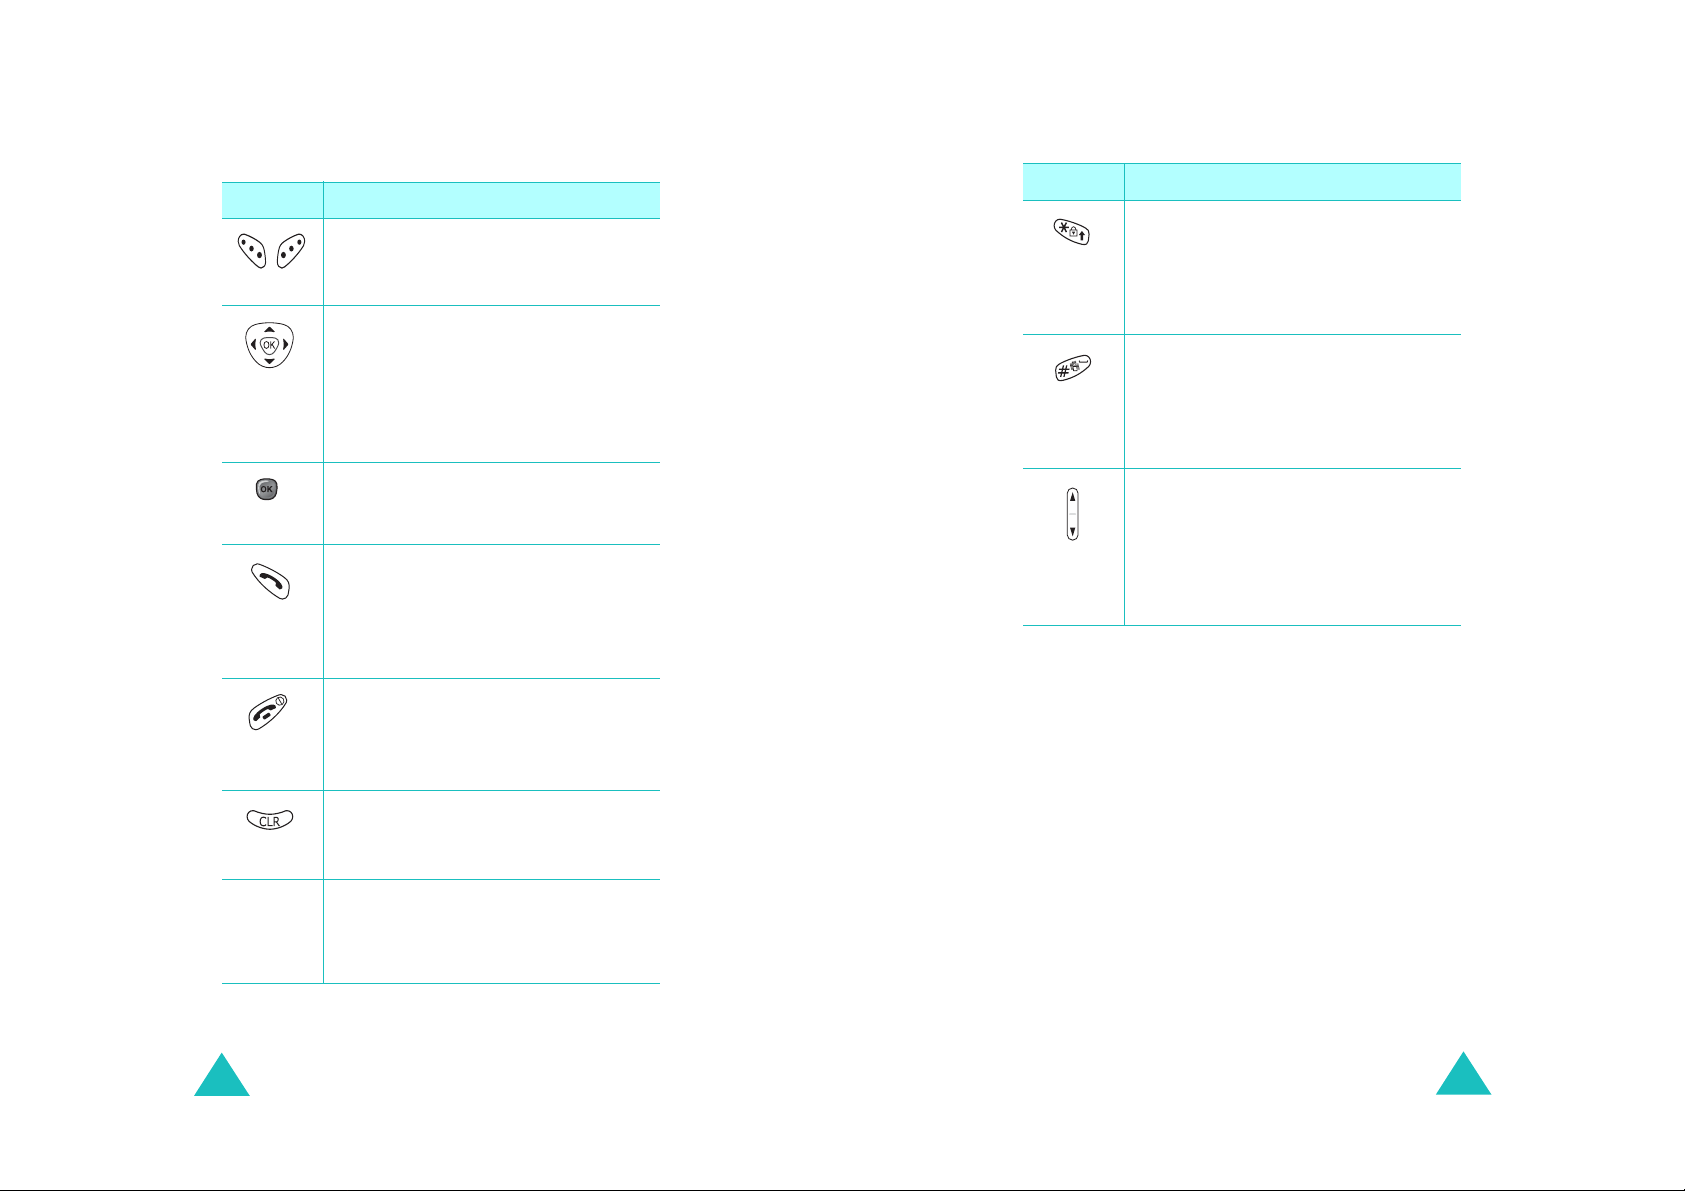
Your phone
Your phone
Tecla
Key
(s)
(soft keys)
(Navigatio n
keys)
Description
Performs th e functions indicated by
the text above them, on the bottom
line of the displa y.
In Menu mode, scrolls through menu
options.
In Standby mode, quickly enters
favorite menu options directly. For
further details about shortcuts, see
page 103.
In Menu mode, selects the current
menu or option or confirms your
input.
Makes or an sw ers a call.
In Standby mode, retrieves the most
recent numbers dialed, received, or
missed. Redials the last number when
pressed and held.
Ends a call. Also switches the phone
on and off when pressed and held.
In Menu mode, cancels you r input and
returns the display to Standby mode.
Key
(s)
Description
(continued)
In Standby mode, initiates the Voice
Command feature when pressed and
held.
In the te xt e ntr y mo d e, ch a nge s c as e
of letters.
In Standby mode, quic kly enters or
exits Silent mode when pressed and
held.
In the text entry mode, inserts a
space.
(on the left side of the phone)
Adjusts the ringer volume when the
phone is ringing and the earpiece
volume during a call.
In Standby mode, adjusts the key
tone volume.
10
Deletes characters from the display.
In Menu mode, returns the display to
the previous menu level.
Enters numbers, let ter s, a nd s om e
special cha racters.
11
Your phone
Your phone
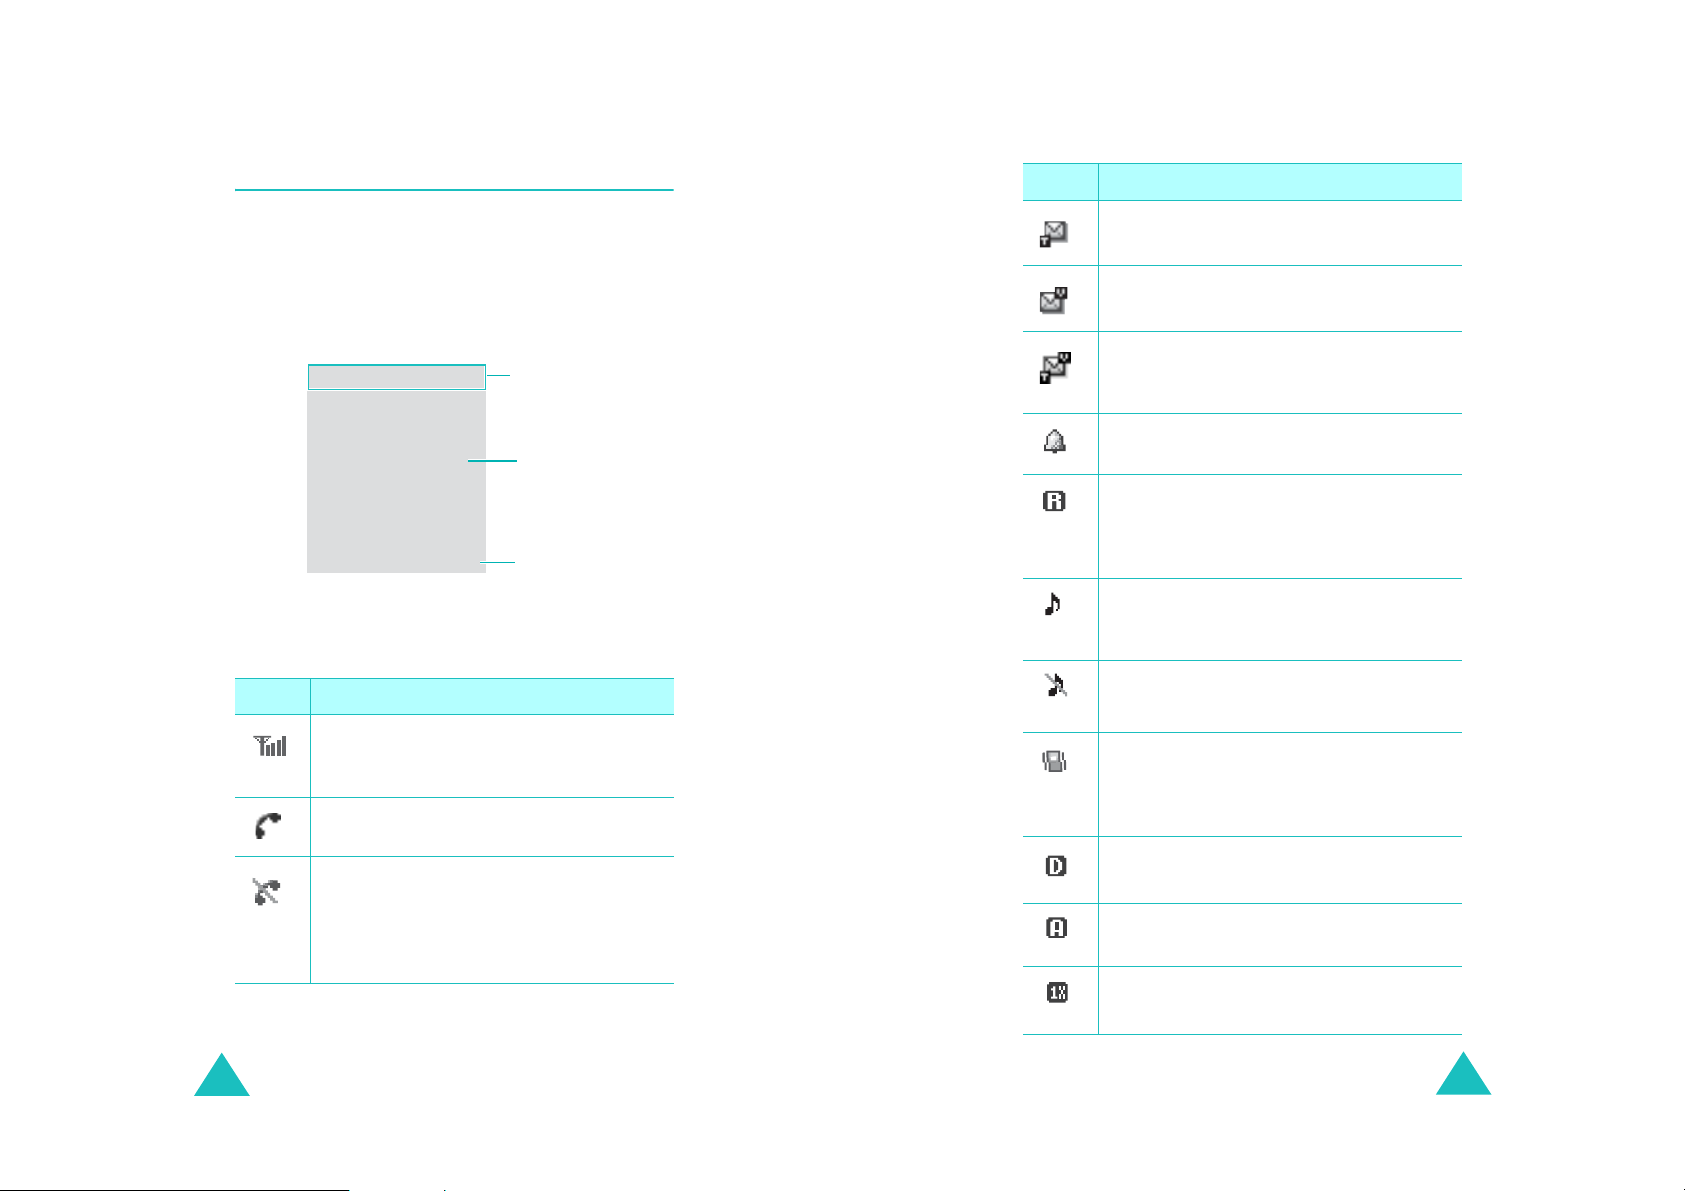
Display
Layout
The display has three areas; the top line of icons,
the text and graphic area, and the bottom line of
soft key indicators.
Icons
Text and
graphics area
Menu Contacts
Icons
Icon Description
Signal strength
signal strength. The greater the number
of bars, th e b e t ter the signa l .
Service
progress.
No service
outside a service area. When it displays,
you cannot ma ke or rec eive calls. Wait a
little while for a better signal or move
into an open area to regain service.
: Appears when a call is in
: Appears when you are
Soft key fun cti o n
indicators
: Shows the received
Icon Description
New text message
new text message received.
New voice mail
voice mail is re ceived.
New text message and voice mail:
Appears when there are new text
messages an d voice mails rece ived.
Alarm mode
alarm to ring at a specified time.
Roaming
: Appears when you are out of
your home area and have logged onto a
different network; for example, when
travel in g in ot her countries.
Ringer on
: Appears when you set the
ringer volume for calls to one from
Level 1
to
Ringer off
ringer volume for calls to
Vibration mode
ringer volum e for calls is set to
High+Vib
or
Silent mode .
Digital mode
phone is logged onto a digital network.
Analog mode
phone is logged onto an analog network.
1x mode
: Indicates when the phone is
in 1x mode.
(continued)
: Appears when a
: Appears when a new
: Appears when you set an
Level 8
or to
1-Beep
.
: Appears when you set th e
Silent
.
: Appears when the
Vibrate
, or when your phone is in
: Indicates when the
: Indicates when the
12
13

Your phone
Icon Description
Getting started
(continued)
Battery status
battery . The more bars you see, the
more power you ha ve remaining.
: Shows the level of your
Service light
The service light on the top right corner of the
phone, flashes to indicate an incoming call,
message, or alarm and flashes f or a few seconds
when you turn on or off the phone.
It blinks while the battery is charging with the
travel adapter ; it l ig hts when the batter y is fully
charged.
To make the service light turn on, set the
menu; see page 104 for further details.
LED
Service
Using the battery
Your phone is powered by a rechargeable Li-ion
battery. Use only approved batteries and
chargers. Ask you r local Samsung dealer for
further details.
Note
: Y ou must fu lly charge the batter y before us ing
your phone for the first time. A discharged
battery is fully re charged in appr oximately
180 minutes for a standard battery.
Installing the battery
1. Place the battery so that the tabs on the end
align with the slots at the bottom of the phone.
14
15
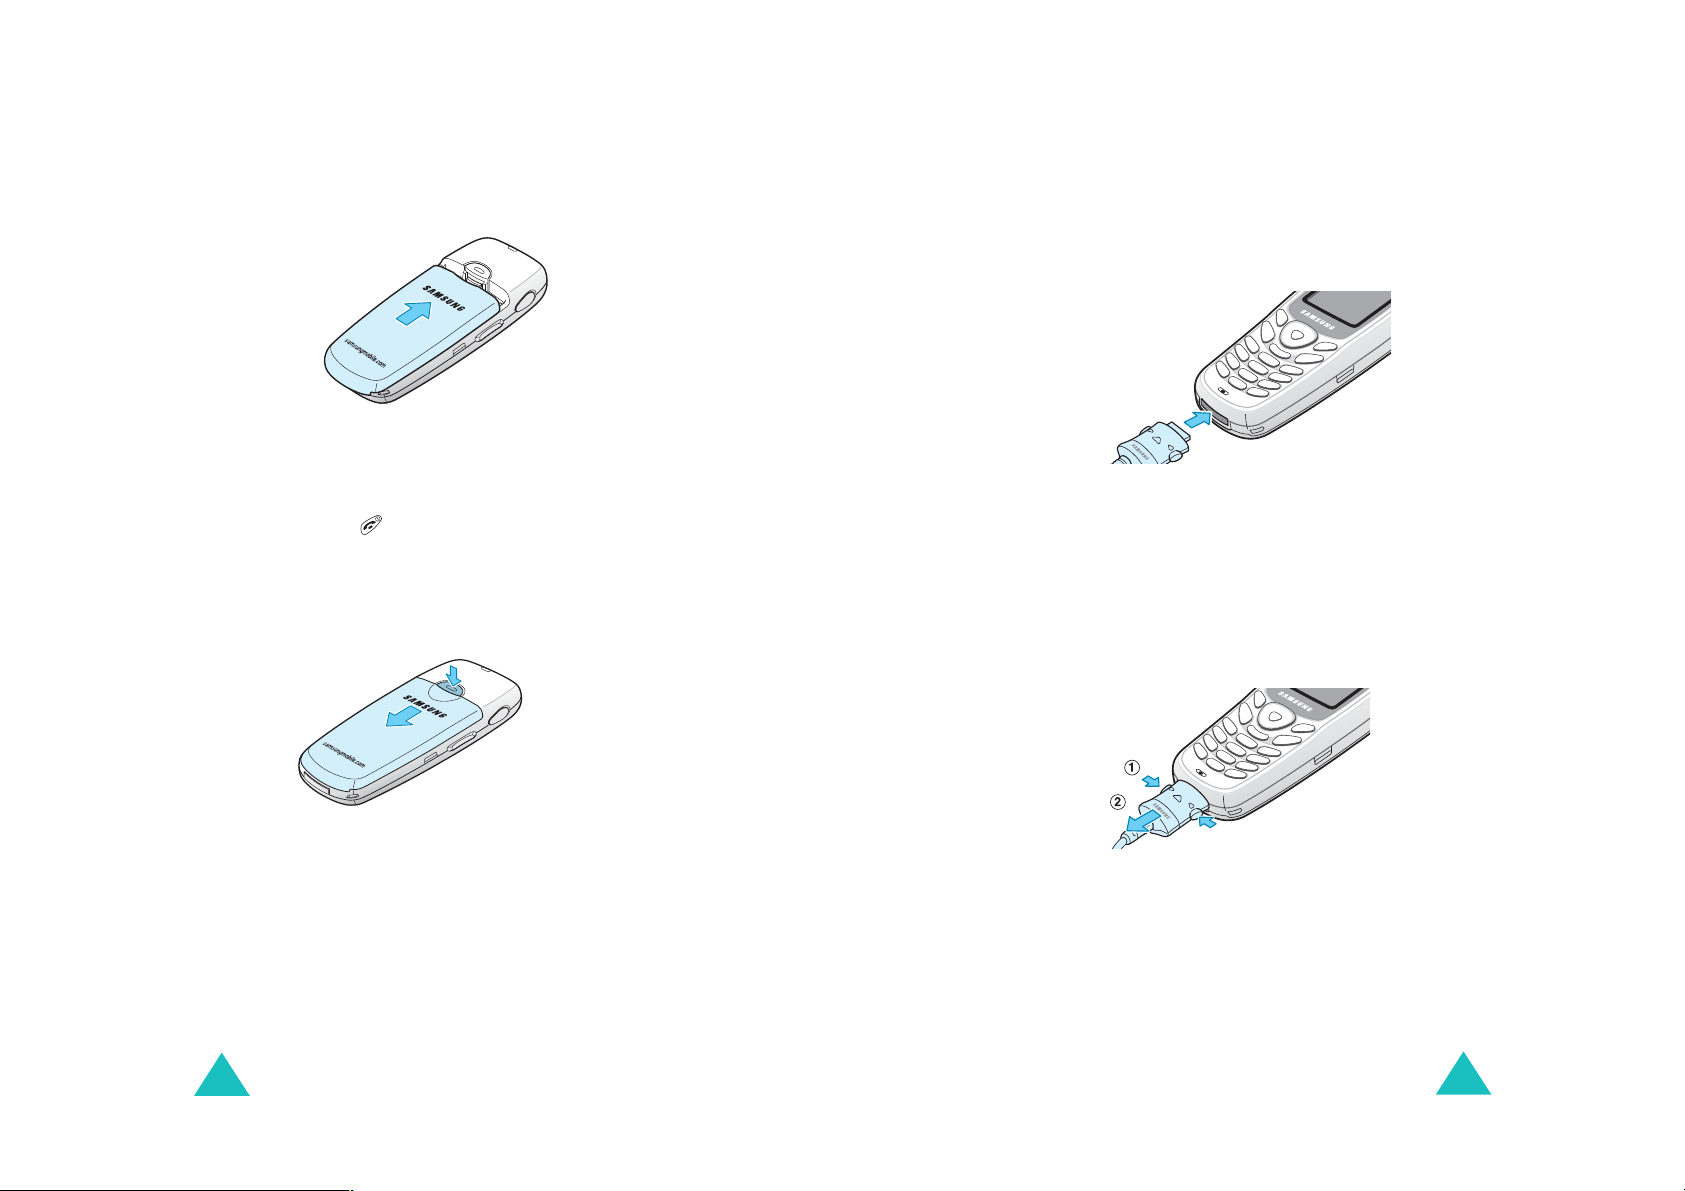
Getting started
Getting started
2. Press the batte ry until it clicks int o place. Mak e
sure that the battery is properly installed
before switching the phone on.
Removing the battery
1. If necessary, switch off the phone by pressing
and holding until the power-off im age
displays.
2. Slide the battery lock toward the top of the
phone and lift away the battery, as shown.
➀
➁
1. With the battery in position on the phone, plu g
the connector of the travel adapter into the
jack at the bottom of the phone.
Make sure that the a rrow on the connector is
facing up, as is the phone.
2. Plug the adapter into a standard AC wall outlet.
The battery strength icon on the display shows
that the battery is charging.
3. When charging is finished, unplug the adapter
from both the power outlet and the phone by
pressing the buttons on both sides of the
connector and pulling the co nnector out.
➀
Charging the battery
A travel adapter is provided for charging your
batteries. The travel adapter allows you to use the
phone while the b a t tery is charging, b ut this will
cause the battery to charge more slowly.
16
➁
Note
: You must unplug the charger before removing
➀
the battery from the phone during c harging;
otherwise, the phone could be damaged.
Low battery indicator
17

Getting started
Getting started
When the battery is weak and only a few minutes
of talk time re main, a warning tone sounds and a
“Low Battery! Recharge Soon” message repeats at
regular intervals on the display. In this case, the
phone turns off the backlight of the display to
conserve battery power.
When the battery becomes too weak for the phone
to operate, it switches off automatically.
Switchin g on or off the phone
1. Open the phone.
2. Press and hold until the power-o n imag e
displays to switch on the phone.
The service light on the phone flashes and an
alert sounds . W hen the system locates
services, the greeting message displays along
with the time and date. You can now place and
receive calls.
If the phone is out of service, the No Service
icon ( ) appears on the display. In this case,
you cannot place and receive calls. You can try
again later when service is available.
Note
: You can change the display language in
Language
the
further details, see page 112.
3. When you wish to switch off the phone, press
and hold for more than two seconds until
the power-off image displays.
menu (
Menu 9-5-5
). For
18
WARNING!
Do not switch on the phone when mobile phone
use is prohibited or when it may cause
interference or danger.
Note
: As with any other radio-transmitting device,
do not touch the antenna unnecessarily when
the phone is switched on. Contact with the
antenna affects the call quality and may cause
the phone to operate at a hi gher power level
than otherwise needed.
19
Getting started
Getting started
Using the soft keys
Your phone offers a set of functions that allows
you to customize it. These functions are arranged
in menus and submenus, accessed using the two
soft keys, and . Each menu and submenu
allows you to view and alter the settings of a
particular function.
The roles of the soft keys vary depending on the
current function you are using; the labels on the
bottom line of the display just above each key
indicate their current role.
Example:
VIVO ao VIVO
9:43ATue May 04
Menu Contacts
Your phone’s modes
Standby mode
Standby is the most basic state of your phone.
The phone goes into Standby mo de after you turn
it on or whenever yo u briefly press . When your
phone is in Standby mode, you will typicall y see
the greeting message and the current time and
date. If you enter a phone number, you can press
Save
to dial it or press the
in Contacts.
Press at any time to return to Standby mode.
Be careful; if you are on a call w hen you p ress ,
the call disconnects and the phone returns to
Standby mode.
Talk mode
You can place and answer calls only when your
phone is turned on. During a call, the phone is in
Talk mode. While you a re in Talk mode, pressing
Menu
the
soft key gives you a list of options. See
page 36 for details.
Power Save mode
soft key to save it
9:43A Tue May 04
Press the left soft
key to access Menu
mode.
20
Press the right soft
key to access the
Contacts
menu.
Your phone comes with a Power Save feature that
is automatically activ a te d if your phon e is unable
to find a signal after 15 minutes of searching.
While this feature is active, the phone’s battery
charge is conserved. The phone automatically
rechecks for a signal periodically. To manually
force the phone to recheck for a signal, press any
key.
21

Getting started
Call functions
Lock mode
When you lock your phon e usin g the
menu (
you cannot use the phone. In Lock mode, you can
receive mes sa ge s and calls, but y ou cannot place
an outgoing call until you unlock t he p hone.
To unlock the phone, you need to enter the lock
code.
For detail s about locking an d unlocking your
phone, see page 115.
Menu 9-5-0-1
) in the
Lock Phone
Security
menu,
Silent mode
Silent mode disables all s ounds on th e phone. T his
feature is best used in situations where the pho ne
might disturb others, such as in a meeting, in a
library, or in a theater. Your phone can be set to
Silent mode with a press of a key in Standby
mode.
In Standby mode, press and hold until “Enter!
Silent mode” and the Vibration icon ( ) display.
T o exit and reactivate the previous sound settings,
press and hold until “Exit! Silent mode”
appears. The Vibration icon no longer displays.
Call functions
Making a call
In Standby mode, enter the area code and phone
number and press .
Note
: When you have activated the
menu (
automatically retry to make the call if no one
answers or the line is busy. See page 112 for
further details .
While entering a number, press the
or to save the number in Contacts. Press the
Menu
soft key to access the following options:
4-digit Dial
feature. This option is only available when you
enter 4 digits. For details, see page 28.
Speed Dial
feature. This option is only available when you
enter a number corresponding to a location in
contacts. For details, see page 26.
Talk
: places a call to the number.
Save
: saves the number to Contacts.
Menu 9-5-4
: allows you to use the 4-digit Dialing
: allows you to use the Speed Dialing
), the phone will
Auto Retry
Save
soft key
22
Find
: finds a number from Contacts.
Hard Pause
2sec Pause
: enters a hard pause.
: enters a 2-second pause.
23
Correcting the number
To clear the Press
last digit displayed .
whole display and hold it for more
than one second.
Ending a call
When you want to end your call, press .
The length of the call display s a long with the
phone number of th e called person . If the numb er
is stored in your Con t acts, the name displays. If
there is no match, y ou ca n pres s an d store t he
number in Contacts. For further deta ils about
storing the number in Contacts, see page 84.
Alternatively, simply close the phone to end a call.
Emergency dialing
Call functions
Using the recent call logs
The phone stores up to 30 of the ca ll s you have
dialed, received, or missed ch ronologically. The
last call is sa ved in the first p o s ition.
To recall any of these numbers:
1. If there are any characters on the display,
return to Standby mode by pressing .
2. Press . The list of recent ca lls displays.
The following icons indicate the types of calls:
• : Outgoing calls
• : Incoming calls
• : Missed cal ls
3. Press the Navigation keys or the Volume keys
on the left side of the phone until you find the
number you want.
4. Press to dia l the highlighted number.
Yo u can place calls to standard emerge nc y
numbers, such as 190, 192, 193, and three
specified numbers on the Emergenc y # list, even
if your phone is locked or all of the outgoing calls
are restricted.
For further details about emergency nu mbers, see
page 117.
24
Making a call from Contacts
Yo u can store the ph on e numbers you called
regularly in the phone’s memory, which is called
“Contacts”. You then simply recall the number to
dial.
For further det ails abou t the Con tacts fe ature, se e
page 81.
25

Call functions
Call functions
Prepend dialing
The Prepend option lets you add digits, such as
area codes and network fe ature activ a tion codes,
to a phone num be r t hat is in your call lo gs or
Contacts.
To prepend a phone number stored in your phone:
1. Access a call log in the Call lo gs list by pre ssing
. Or access Contacts by pressing the
Contacts
2. Select the item you want using the Navigation
keys and press .
The display shows the details of the number.
3. Press the
pop-up list.
4. Press to select the
5. Enter the area code or network feature code.
6. Press to dial the number.
soft key .
Menu
soft key to access the menu
Prepend
option.
Speed dialing
Memory locations 001 through 009 are special
one-touch locations. You can dial the phone
numbers stored in Co ntacts from 001 through 009
simply by pressing one key.
Press and hold the third digit of the memory
location.
For example
The number (and name) stored displays, and then
dials.
: Location no. 009
Press and hold .
Two-touch dial
Memory locations 010 through 099 are special
one-touch lo cations.
Press the second digit(s) briefly, then hold down
the last digit of the memory location.
For example
The number (and name) stored displays, and then
dials.
: Location no. 023
Press briefly and hold down
.
Once you have stored phone numbers in Contacts,
you can dial them easily with a few presses of the
keys.
Note
: When several numbers are saved in one name
entry, the first number you entered is
automatically specified as a speed dial
number. To change the speed dial number,
Speed dia l
use
page 85.
One-touch dial
26
of the Contacts options; see
Three-touch dial
Memory locations 100 through 500 are special
three-touch locati on s.
Press the first two digit(s) briefly, then hold down
the third digit of the memory location.
For example
The number (and name) stored displays, and then
dials.
: Location no. 123
Press and briefly, then
hold down .
27
Call functions
Call functions
4-digit dialing
You can quickl y dial a phone nu m ber in Contacts
by entering its la s t 4 c onsecutive digit s. This
feature is convenient if you ha v e th e nu m ber
memorized, but you have forgotten where the
number is stored in your Contacts.
1. Enter the last 4 digits of the phone number you
want to dial.
Menu
2. Press the
option. The phone displays the phone
Dial
number that matches th e fo ur digit s .
If the phone found more than one number that
contains those four digits, it displays the first
number. Scroll through the nu m b ers us ing
or to select a number.
3. Press to dial the number.
soft key and select the
4-digit
Pause dialing
When you ca ll an automated sy stem, like a
banking service, you are o ften required to enter a
password o r ac co un t nu mb er. Ins t ead of man ua lly
entering the number s each time, you can store
the numbers in your Contacts, separated by
pauses.
•
Hard pause
sequence until you press .
•
2-sec pause
dialing sequence for 2 seconds and then
automatically sends the remaining digits.
Note
: Multiple tw o seco n d pa use s can be en tere d to
extend the length of a pause. Keep in mind
that pauses count as di gits towards the 32
digit dialing maximum.
: A hard pause stops the dialing
: A 2-second paus e st ops the
Storing pauses in a Contacts entry
To store a number in your Contact s t ha t contains
pauses:
1. Enter the phone number you want to store,
such as the bank’s teleservice phone number.
2. Press the
3. Select the required pause type and press .
• Press for
displays, meaning that a hard pause will
occur at that point in the dialing sequence.
• Press for
displays, meaning that a 2-second pause will
occur at that point in the dialing sequence.
Menu
soft key to access the options.
Hard Pause
2sec Pause
. The letter “P”
. The letter “T”
There are two kinds of pauses that ca n be entered
on your phone:
28
29

Call functions
Call functions
4. Enter the digits that need to follow the pause,
such as your account number.
5. Repeat steps 2 through 4 to add more pauses
and numbers, if necessary.
6. Store the number in your Contacts as you
Save
normally would by pressing or the
key and following from step 2 on page 84.
soft
Pause dialing from a stored Contacts
entry
1. Dial the number of the service from Contacts.
2. If you stored the number using a hard pause,
wait for the appropriate prompt from the
number you are calling. When prompted, press
to send the DTMF (Dual tone multi-
frequency) number that follows the pause.
If you stored the number using a 2-second
pause, your phone transmits the number that
follows the “T” pause two seconds after the
connection.
3. “Sending DTMF” flashes on the display an d the
transmitted tone sounds.
3. Select the required pause type and press .
• Press for
displays, meaning that a hard pause will
occur at that point in the dialing sequence.
• Press for
displays, meaning that a 2-second pause will
occur at that point in the dialing sequence.
4. Enter the number to be sent after the pause
and then press to dial the first number.
5. For a hard pause, press again at the
prompt to send the additional number after
connecting.
If you enter the number using a 2-second
pause(s), the phone sends the number that
follows the pause two seconds after the
connection.
Hard Pause
2sec Pause
. The letter “P”
. The letter “T”
Voice dialing
Once you have stored a ph on e number in
Contacts, you can dial it simply by saying the
associated name or the number.
4. Repeat from step 2, if necessary .
Manual paus e dialing
You can enter pauses manually during the dialing
process.
1. Enter the phone number of the service you
want to call, such as a bank’s teleservice
number.
Menu
2. Press the
30
soft key to access the options.
Before using the Voice Dial feature, you first need
to program your phone to recognize your voice
31
Call functions
Call functions
and pronunci atio n in the
). For details, see page 109.
9-4
Voice Dial
menu (
Menu
To begin voice dialing:
1. In Standby mode, open the phone or pr ess and
hold , depending on the setting in the
Active
menu (
Menu 9-4-3
).
Set
For details about the menu, see page 109.
2. At a prompt, say
Name Dial
or
Digit Dial
.
3. Say a name or a phone number to the
microphone.
4. When the phone confirm s the name o r numb er
you said, say “Ye s ” to place a call.
Alternatively, say “No” to cancel.
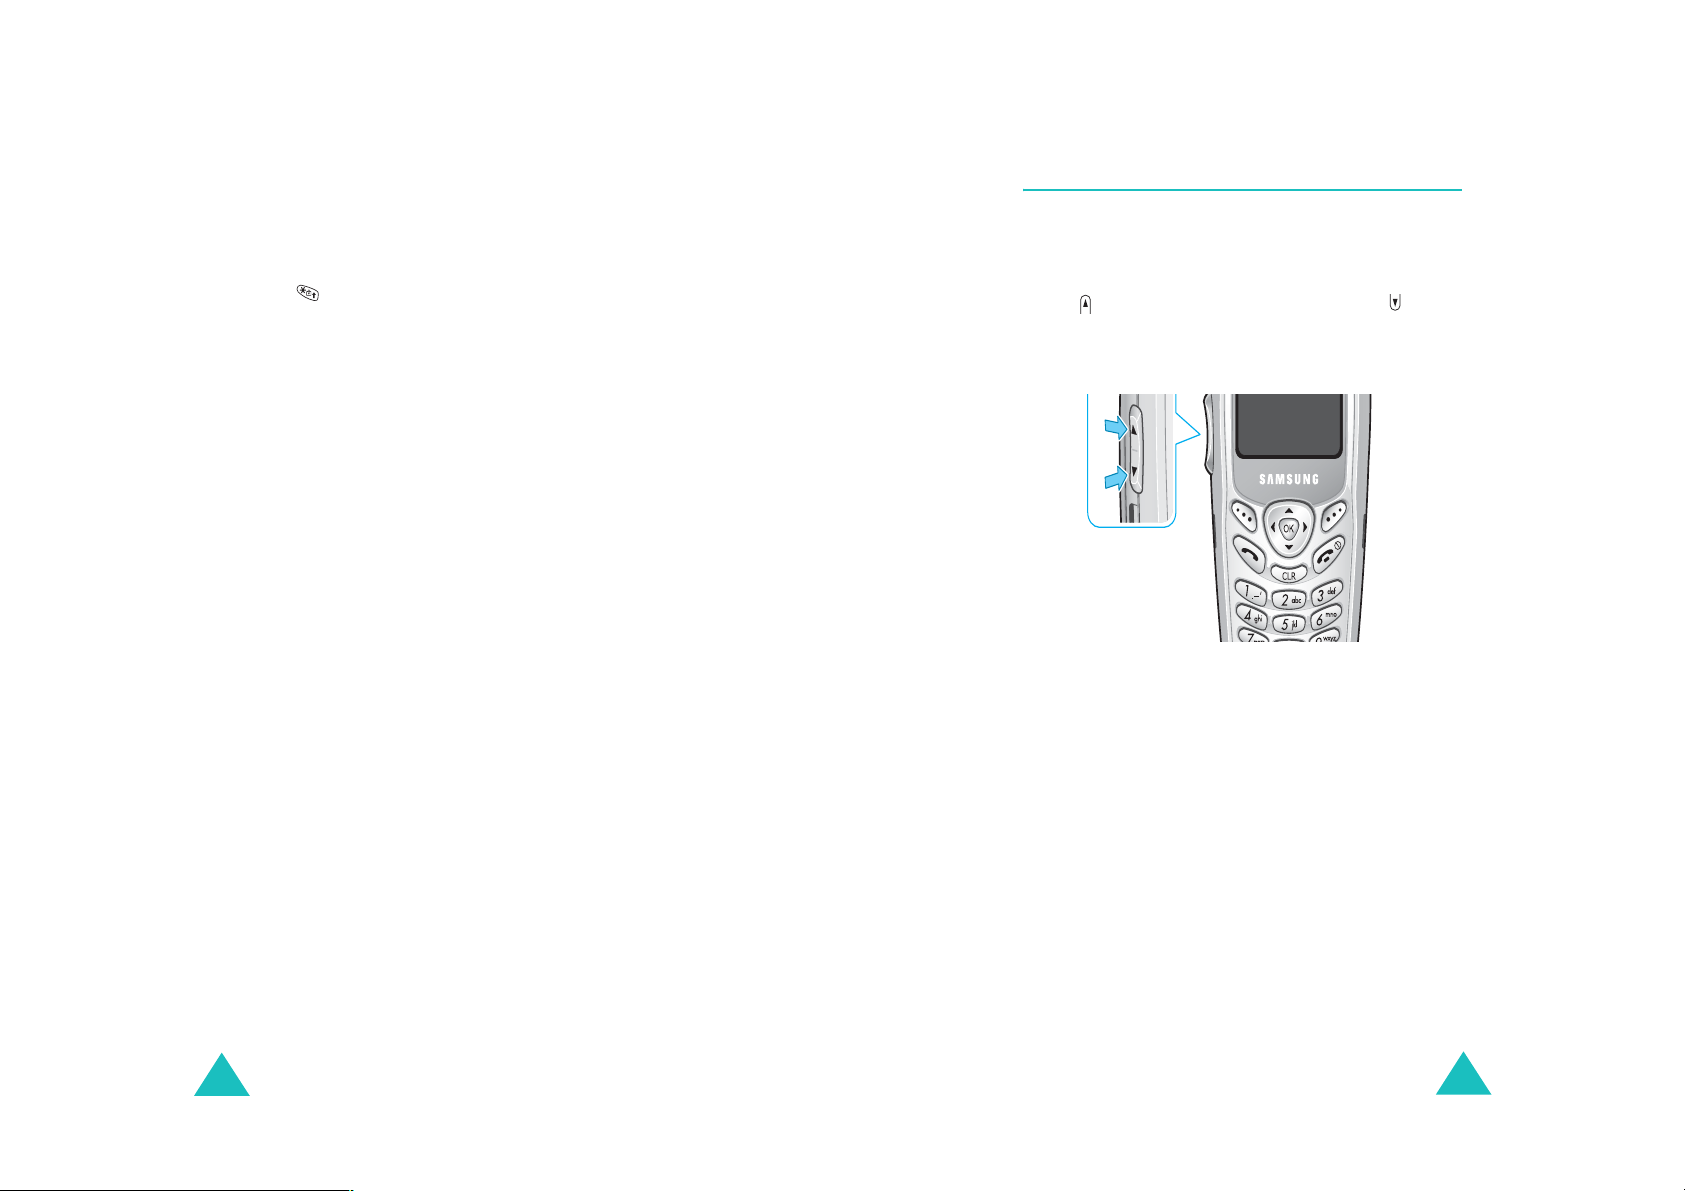
Adjusting the volume during a call
During a call, if y o u w ant to adjust the voice
volume, use the Vol um e ke ys on the left side of
the phone.
Press to increase the volume level and to
decrease the level. The image on the display
shows all eight levels; the mo re b a rs y ou s ee, the
higher the level is.
In Standby mode, you can also adjust the keypad
tone volume using these keys.
32
33

Call functions
Call functions
Answering a call
When somebody calls you, the phone alerts you
by ringing and blinking the service light.
If the caller can be identified, the caller’s phone
number, or name if stored in your Contacts,
displays.
There are three ways to answer a call depending
on your setting in th e
):
9-5-3
If you select To answer the call,
Any Key open the phone or press any
Send Key press .
Folder Open open the phone or press
To end the call, close the phone or press .
Note
: You can answ er a ca ll wh ile us ing Co n tac ts or
menu functions. The current operation stops.
Call Answer
key, except and the
Volume keys.
menu (
Menu
Silencing a call ringer
You ca n silence the ringer wh en a call comes in by
pressing one of the V olu me keys on the left side of
the phone. If the phone is open, you can also
press .
The “Ringer Silenced” message appears and the
phone does no t ring.
Viewing missed calls
If you fai l to answer a call for an y r e ason, the
phone indicates the missed call by displaying a
text notification on the screen. Additionally, if
caller information is available, a Missed entry is
created and the screen displays the phone numb er
.
of the last mis sed call.
When the display informs you of the m issed c all,
press to dial the number, or to clear the
message and return to Standby mode.
To view missed calls, access the
Menu 7-3
(
). For details, see page 79.
Missed
menu
34
35

Call functions
Call functions
Options during a call
Your phone pr o vides a number of func tions that
you can use during a call. As many of these
options are network s ervices, yo u may n ot be able
to use all of them at all times.
Menu
Press the
the following options:
Contacts
menu. See page 81 for details.
Mute/Quit
microphone off, so that the other person on the
phone cannot hear you.
Example
in the room, but do not want the other person on
the phone to hear you.
Silent/Quit
allows you to press keys without hearing annoying
key tones during a call.
Send Tel#
other person’s phone.
Calls
details, see page 77.
: You wish to say something to a person
: allows you to access the
soft key during a call to access
: allows you to access the
: allows you to switch your phone’s
: does not sound the k ey t on e s. I t
: sends your telephone num ber to th e
Contacts
Calls
menu. For
Using caller ID
This feature tells you who is calling you by
displaying the caller’s number wh en the ph one
rings. If the number is stored in your Contacts,
the corresponding name is also displayed. If you
call someone who h as th is fea t ure, your phone
number displays on her/his phone.
Note
: Contact your service provider to set up the
Caller Line Identification service.
Call forwarding
This network feature allows you to forward
incoming calls to another phone number, even
while your phone is turned off . Activating Call
forwarding does not affect outgoing calls made
from your phone.
Note
: Contact your service provider to activate Call
forwarding.
Messages
menu. For details, see page 68.
Planner
For details, see page 89.
Voice Privacy
Privacy
36
: allows you to use the
: allows you to access the
: allows you to access the
menu. For details, see page 118.
Torpedo SMS
Planner
menu.
Voice
37

Call functions
Call functions
Call waiting
Call W aiting l ets yo u recei ve a se cond ca ll during a
conversation. Your phone notifies you of a waiting
call by beeping and displayin g “ Ca ll Waiting.”
Your network provides you with the option of
turning the Ca ll Waiting feature on and of f, if you
have subscribed to the service. Call Waiting is on
by default in the phone. If you choose to have a
undisturbed conversation, simply turn off the
feature for the current ca ll.
Note
: Contact your servic e provider to activate the
Call Waiting service.
To answer a waiting call during a call:
1. When you hear a beep telling that you have a
waiting call, press . The phone connects the
calling person and places the current call on
hold.
2. Press again to switch between the two
calls.
Note
: If you do not respond to a call waiting
notification, the phone will forward t he call to
the voice m ail server or anot her number that
you have set up. Contact your service
provider for more information.
Three-way calli ng
This feature enables you to conduct conference
calls with two separate people at the same time.
The phone records both of them into the Outgoing
call log and you are billed air time for each of
outgoing call s separately. Contact your service
provider to activate Three-way calling.
To place a Three-way call:
1. During a conversation, press . The phone
places the other person on hold.
2. Enter th e p hone number for the third person,
and then press . The phone dials the third
person.
3. When you are connected to the person, press
again to begin your Three-way call.
If one of the callers (not y ou) hangs up, you and
the remainin g calle r stay co nnected . If you initiat e
the call and hang up first, all thre e participants a re
disconnected.
38
39
Entering text
At many times when using your phone, you will
need to enter text, such as when storing a name
in Contacts, creating your personal greeting, or
scheduling ev ents on y our cal endar. You can enter
alphanume ric characters int o your phone using
your phone’s keypad.
Your phone has the following text input modes:
Entering text
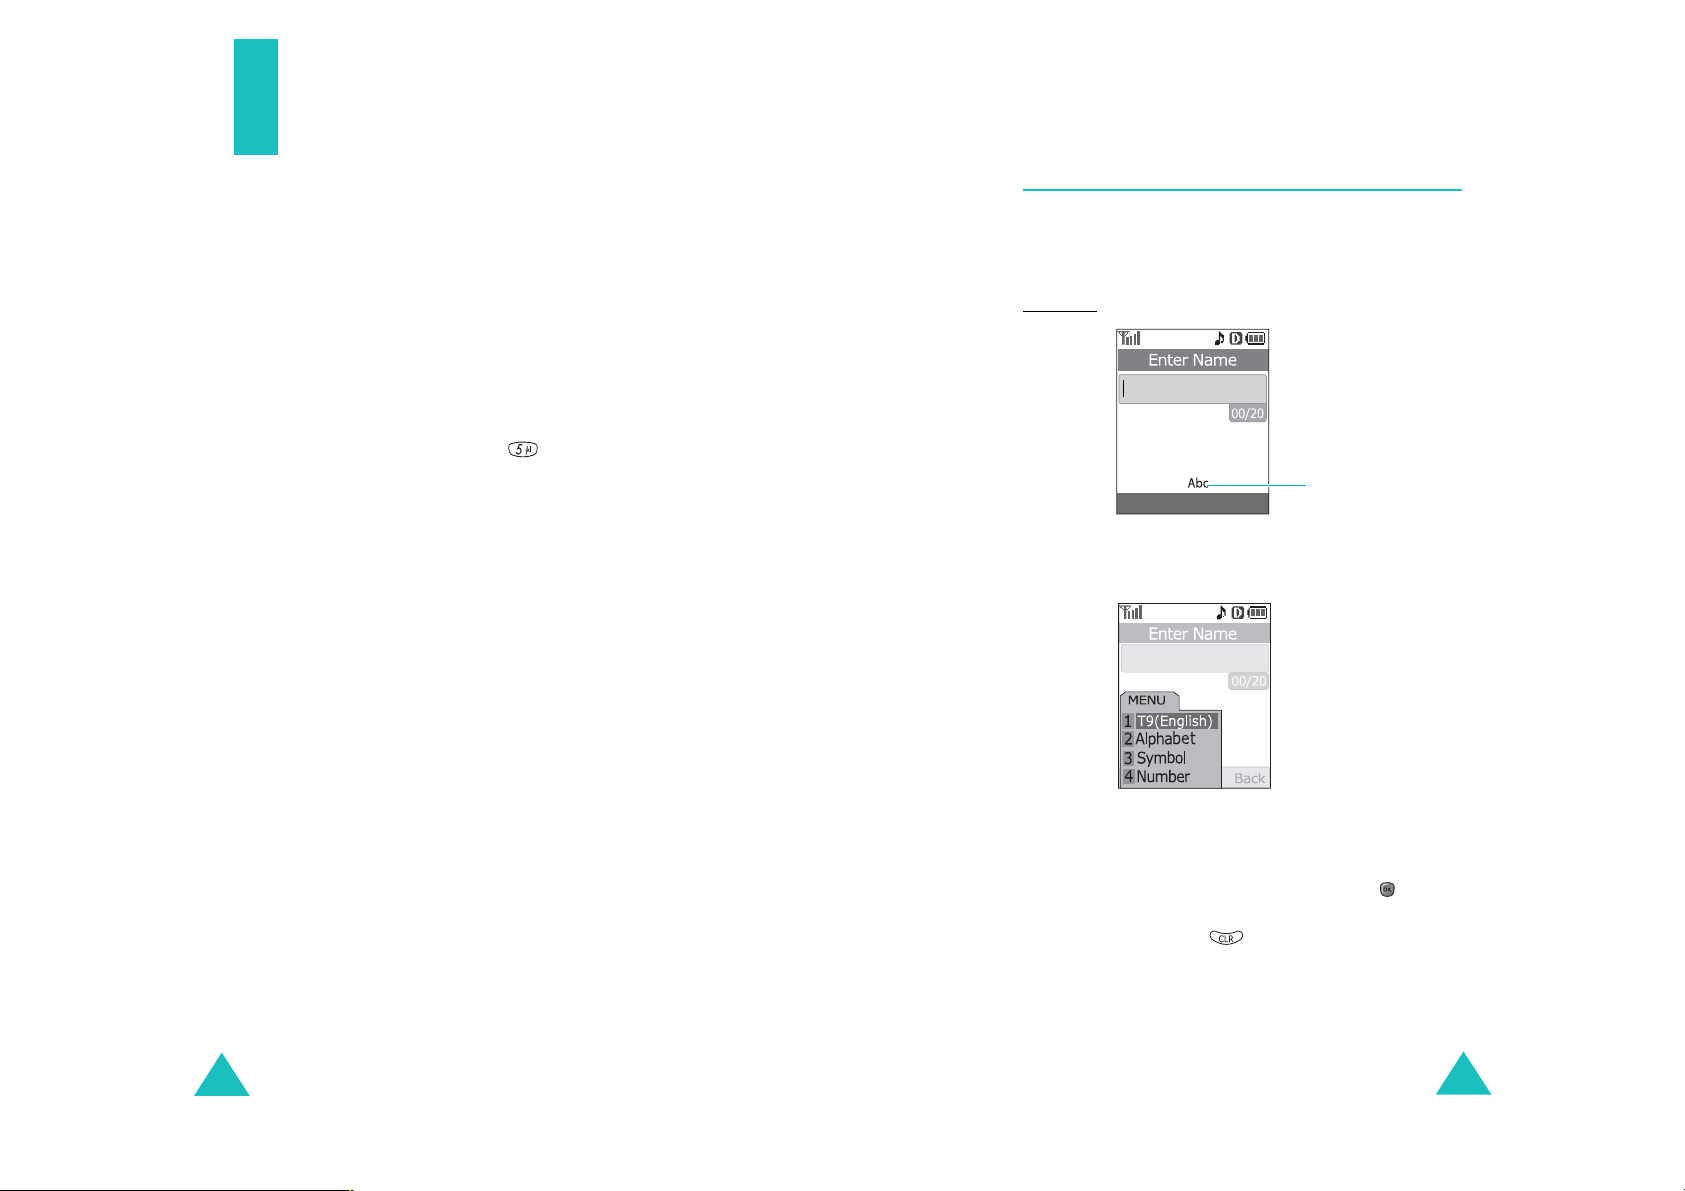
Changing the text input mode
When you are in a field that allows characters to
be entered, you will notice the text input mode
indicator on the display.
Example
: Entering a name for a Contacts entry
T9(English) mode
•
enter words with only one keystroke pe r letter.
Each key on the keypad has more than one
letter; for example, pressing can enter J, K,
or L. However , T9 mode automatically compares
the series of keystrokes you make with an
internal linguistic dictionary to determine the
most likely w ord, thus requiri ng f ar fewer
keystr okes than the traditional Alphabet
•
Alphabet mode
letters by pressing the key labeled with the
letter you want. Press the k ey once, twice, three
or four times until it displays.
Symbol mode
•
various sy mbols and punctu a ti on marks.
•
Number mode
numbers.
Note
: The T9 mode supplies an appr opriate
language database as your language setting
menu (
Menu 9-5-5
: This mode allows you to
mode.
: This mode allows y ou to ent er
: This mode allows you to enter
: This mode a llows you to enter
).
Tex t input
Menu Back
To change to ano ther text input mode:
1. Press the
2. Scroll to the mode you want by pressing the
Navigation keys.
3. T o select the highlighted mode, pres s . If you
want to exit the menu without ch anging to a
new mode, press .
Menu
soft key.
mode indicator
40
The selected text input m ode ind icator appear s
on the display.
41
Entering text
Entering text
Using T9 (Englis h) mo de
T9 is a predictive text input mode that allows you
to key in any character using single keystrokes.
This text input mode is based on a built-in
dictionary.
To enter a word in T9 mode:
1. Press the keys on the phone just once per
desired letter. For example, to enter “Hello”,
press , , , , and .
2. The word that you are typing appears on the
display. It may change with each key that you
press.
3.
T ype to the end of the word before editing or
deleting any keystrokes.
4. Put a space between each word by pressing
.
If the word doesn’t display correctly , press
repeatedly to d is p lay alternative word choice s
for the keys that you have pressed.
Example
5. Continue entering the next word.
Note
: Both “of” and “me” use and
. The phone displays the most
commonly used choice first.
: T o type words not found in T9 mode, you need
to change the text input mode to Alphabet
mode.
Periods, hyphens, and apostrophes are available
by pressing . T9 mode applies rules of
grammar to insert the correct punctuation. Notice
that is used twice in this example
two punctuation marks:
to display
L e t s e a t .
Changing the letter case
To shift case of the next letter(s) that you type,
press . There are three cases:
• Initial Ca p ital (
• Capitals Lock (
•Lower Case (
Inserting a space
Press to insert a space between words.
Including a number
Yo u ca n in clude a n umber be twe en let ters with out
exiting T9 mode. Press and hold the
correspondi ng number key.
Scrolling
To move the cursor to the left or right through
your text, press or .
Clearing letters and words
T9Word
T9WORD
T9word
)
)
)
Smart punctuation
42
Press once or repeatedly to clear letters one
by one to the left. Press and hold to erase all
of the lette rs on the display.
43
Entering text
Entering text
Using Alphabet mo de
When typing in Alphabet mode, you need to press
the keys labeled with the letter you want:
- once for the first letter
- twice for the second letter
- and so on
This method is called multi-tap typing.
For example, you press three times to display
the letter “C” and two times to display the
letter “K. ”
The cursor moves to the right when you pres s a
different key. When entering the same letter twice
or a different letter on the same key, just wait for
a few seco nd s for the cursor to move to the ri g ht
automatically, and then enter the next letter.
Refer to the table below for the list of characters
assigned on each key.
Key Characters in the Order Displayed
. @ ? ! - , & : ’ 1
AB C 2
DE F 3
GH I 4
JKL 5
MN O 6
PQR S 7
TU V 8
WX Y Z 9
0
Changing the letter case
To shift case of the next letter(s) that you type,
press . There are three cases:
• Initial Ca p ital (
• Capitals Lock (
•Lower Case (
Abc
ABC
abc
)
)
)
Inserting a space
Press to insert a space between words.
Including a number
Yo u can quickly inc lude a number betw een letters.
Press and hold the corresponding numb er key.
Scrolling
To move the cursor to the left or right through
your text message, press or .
Clearing letters and words
Press once or repeatedly to clear letters one
by one to the left. Press and hold to erase all
of the lette rs on the display.
44
(Caps Lock mode)
45
 Loading...