

Samsung SCH-N362PR, SCH-N362SS User Manual

World Wide Web
http://www.samsungmobile.com
Printed in Korea
Code No.: GH68-04763A
English.3/2004.Rev.1.0
* Some contents in this manual may differ from your phone
depending upon the software of the phone or your service
provider.
PORTABLE CELLULAR
TELEPHONE
SCH-N362
User’s Manual
ELECTRONICS

1
IMPORTANT SAFETY PRECAUTIONS ............................................... 5
UNPACKING...................................................................................... 7
YOUR PHONE
Phone Layout ...................................................................................... 8
Display .............................................................................................. 11
Backlight ........................................................................................... 13
Service Light ...................................................................................... 13
GETTING STARTED
Installing the Battery .......................................................................... 14
To Install the Battery ...................................................................... 14
To Remove the Battery ................................................................... 15
Charging the Battery ........................................................................... 16
Low Battery Indicator ..................................................................... 17
Switching the Phone On/Off ................................................................ 18
Your Phone’s Modes ........................................................................... 18
Standby Mode ................................................................................ 18
Talk Mode ...................................................................................... 19
Power Save Mode ........................................................................... 19
Lock Mode ..................................................................................... 20
Silent Mode .................................................................................... 20
CALL FUNCTIONS
Making a Call ..................................................................................... 21
Answering a Call .................................................................................28
Options During a Call .......................................................................... 29
Using Caller ID .................................................................................... 30
Viewing Missed Calls ........................................................................... 31
Three-Way Calling ............................................................................... 32
Call Waiting ........................................................................................33
Call Forwarding .................................................................................. 34
Adjusting the Volume ..........................................................................34
Table of Contents

2 3
ENTERING TEXT
Changing Text Input Mode ................................................................... 36
T9(Hebrew), T9(English) Mode ............................................................. 37
Hebrew, Alphabet Mode ....................................................................... 39
Symbol Mode ......................................................................................41
Number Mode .....................................................................................41
USINGTHE MENUS
Accessing Menu Functions by Scrolling .................................................. 42
Accessing Menu Functions by Using its Shortcut .................................... 43
List of Menu Functions .........................................................................44
CALLS
Outgoing (MENU 1-1) ................................................................... 47
Incoming
(MENU 1-2) ................................................................... 48
Missed
(MENU 1-3) ....................................................................... 48
Erase History
(MENU 1-4) ............................................................. 48
Air Time
(MENU 1-5) .................................................................... 49
PHONE BOOK
Find (MENU 2-1) ........................................................................... 50
Add New Entry
(MENU 2-2) .......................................................... 52
Group Setting
(MENU 2-3) .............................................................54
My Phone #
(MENU 2-4) ............................................................... 55
Memory
(MENU 2-5) ...................................................................... 55
MESSAGES
New Message (MENU 3-1) ............................................................. 56
Voice (
MENU 3-2) .......................................................................... 58
Inbox (
MENU 3-3) ......................................................................... 59
Outbox (
MENU 3-4) ...................................................................... 60
Saved Message (
MENU 3-5) .......................................................... 61
Erase Message (
MENU 3-6) ........................................................... 62
Message Setting (
MENU 3-7) ......................................................... 62
PLANNER
Today (MENU 4-1) ........................................................................ 65
Calendar
(MENU 4-2) ................................................................... 67
Task List
(MENU 4-3) .................................................................... 69
Memo Pad
(MENU 4-4) ................................................................. 71
Alarm
(MENU 4-5) ........................................................................ 72
Calculator
(MENU 4-6) .................................................................. 73
World Time
(MENU 4-7) ................................................................ 74
Count Down
(MENU 4-8) ............................................................... 74
Set Time
(MENU 4-9) .................................................................... 76
VOICE TOOLS
Voice Memo (MENU 5-1) ............................................................... 77
Voice Answer
(MENU 5-2) ............................................................. 79
SOUNDS
Ringer Volume (MENU 6-1) ........................................................... 82
Ringer Type
(MENU 6-2) ............................................................... 83
Alerts
(MENU 6-3) ........................................................................ 84
Key Tone
(MENU 6-4) ................................................................... 85
Power On/Off
(MENU 6-5) ............................................................ 85
DISPLAY
Menu Style (MENU 7-1) ................................................................ 86
Wall Paper
(MENU 7-2) ................................................................ 86
Language
(MENU 7-3) .................................................................. 87
Backlight
(MENU 7-4) ................................................................... 87
Banner
(MENU 7-5) ...................................................................... 88
Dual Clock
(MENU 7-6) .................................................................. 88
Service LED
(MENU 7-7) ................................................................. 89
Contrast
(MENU 7-8) ...................................................................... 89
GAMES
Fun Bowling (MENU 8-1) .............................................................. 90
Honey Ball
(MENU 8-2) ................................................................ 90
Hamster Box
(MENU 8-3) ............................................................. 90

54
SETUP
Auto Answer (MENU 9-1) .............................................................. 91
Call Answer
(MENU 9-2) ............................................................... 91
Auto Key Lock
(MENU 9-3) ........................................................... 92
Power Saving
(MENU 9-4) ............................................................ 92
Auto Retry
(MENU 9-5) ................................................................. 93
Data/Fax
(MENU 9-6) .................................................................. 93
Version
(MENU 9-7) ...................................................................... 94
Security
(MENU 9-8) ..................................................................... 95
HEALTH ANDSAFETY INFORMATION
Exposure to Radio Frequency(RF) Signals ............................................ 98
For Body Operation............................................................................100
Precautions When Using Batteries....................................................... 101
Road Safety ...................................................................................... 103
Operating Environment....................................................................... 103
Electronic Devices ..............................................................................104
Potentially Explosive Atmospheres ..................................................... 106
Emergency Calls ................................................................................107
Other Important Safety Information ................................................... 108
Care and Maintenance ....................................................................... 109
GLOSSARY .........................................................................111
INDEX ............................................................................... 114
QUICK REFERENCE CARD ....................................................
117
Important Safety
Precautions
Read these guidelines before using your wireless phone.
Failure to comply with them may be dangerous or
illegal. For more detailed safety information, see
“Health and Safety Information” on page 98.
Road Safety at All Times
Do not use a hand-held phone while driving; park the
vehicle first.
Switching Off When Refuelling
Do not use the phone at a refuelling point (service
station) or near fuels or chemicals.
Switching Off in Aircraft
Wireless phones can cause interference. Using them in
aircraft is both illegal and dangerous.
Switching Off in Hospitals
Switch off your phone near medical equipment.
Follow any regulations or rules in force.
Interference
All wireless phones may be subject to interference,
which could affect their performance.
Special Regulations
Meet any special regulations in force in any area and
always switch off your phone whenever it is forbidden
to use it, or when it may cause interference or danger
(in a hospital for example).
76
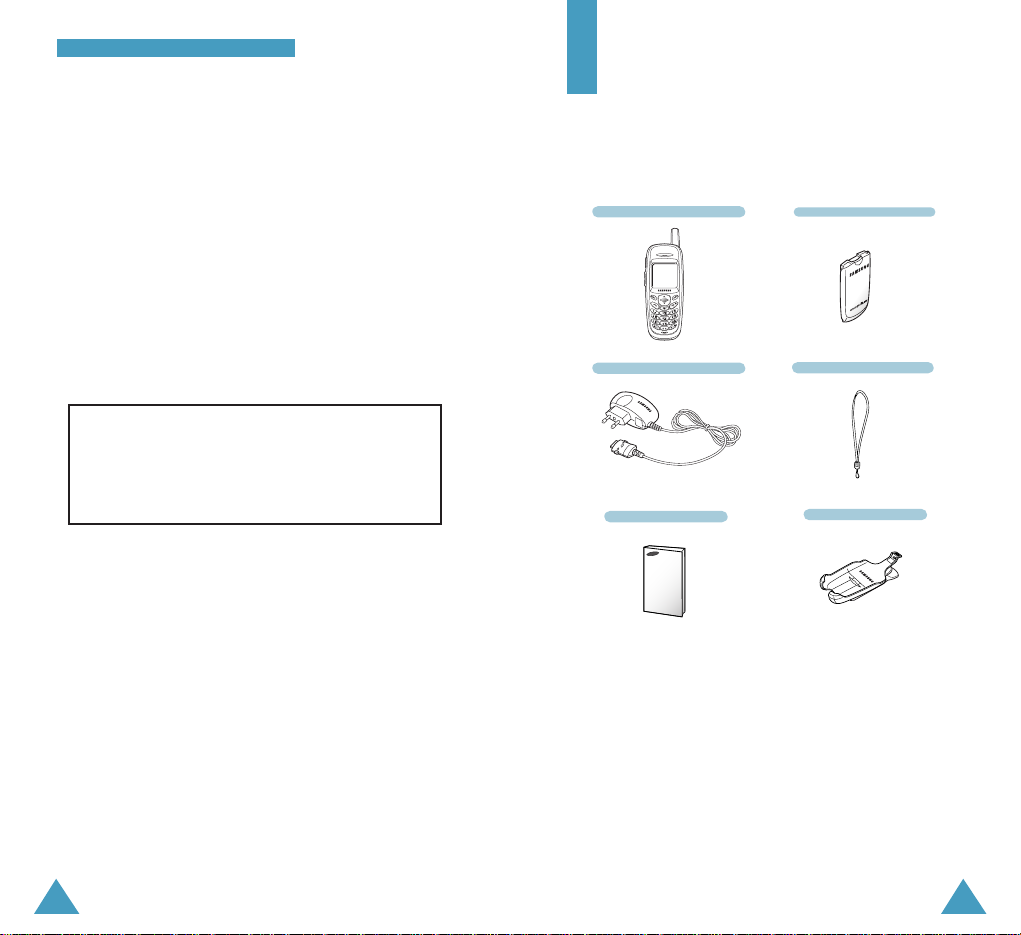
Travel Adaptor
Handset
Battery
User’s Manual
Hand Strap
Unpacking
Your package contains the following items.
IImmppoorrttaanntt SSaaffeettyy PPrreeccaauuttiioonnss
Sensible Use
Use only in the normal position (held to the ear). Avoid
unnecessary contact with the antenna when the phone
is switched on.
Accessories and Batteries
Use only Samsung-approved accessories and batteries.
Qualified service
Only qualified service personnel may install or repair
your phone.
In addition, you can obtain the following accessories for
your phone from your local SAMSUNG dealer:
• Standard Battery
• Travel Adapter
• Wearable Ear-micro phone
• Car Charger
• Hands-free kit
• PC Data Link cable
• Holster
Holster
CAUTION
RISK OF EXPLOSION IF BATTERY IS REPLACED
BY AN INCORRECT TYPE
DISPOSE OF USED BATTERIES ACCORDING
TO THE INSTRUCTIONS
9
GGeettttiinngg SSttaarrtteedd
8
YYoo uurr PPhh oonn ee
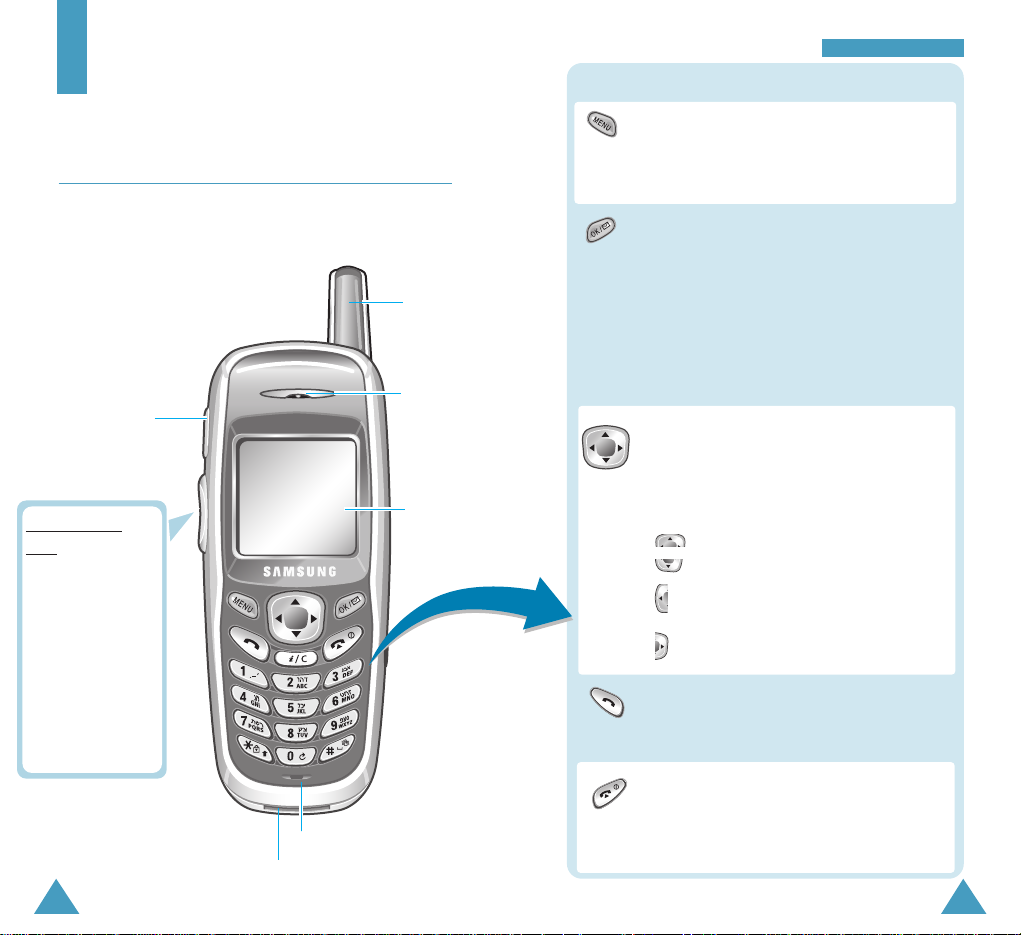
Enters the menu facility. Also, scrolls
through the menu options. Makes the key
guard deactivate when the key guard is
activated.
In the menu facility, scroll through the menu
options and phonebook memory using this
navigation keys.
In Standby Mode, directly access you to the
following menus:
• : Find
• : Ringer Type
• : Mobile Shop
(Voice memo during a call)
• : Voice Answer
Key Functions
Antenna
In the menu facility,selects a menu function
or stores information that you have entered
(such as a name) in the phone memory.
When entering a number, saves the number
to the PhoneBook.
In Standby mode, enters the Messages
menu. Connects the Voice Mail center when
pressed and hold.
Earphone jack
Microphone
Earpiece
Display
Volume/Scroll
keys
During a call,
adjusts the voice
volume.
In Standby mode,
adjusts the key
volume.
In the menu facility,
scrolls through the
menu options.
Your Phone
Phone Layout
The following illustrations shows the main elements of
your phone.
Makes or answers a call.
In Standby mode, shows the log of outgoing,
incoming and missed call.
Ends a call. Also switches the phone on and
off when pressed and held.
In the menu facility, returns to Standby mode
and cancels your input.
Adapter outlet
11
GGeettttiinngg SSttaarrtteedd
10
GGeettttiinngg SSttaarrtteedd YYoo uurr PPhh oonn ee
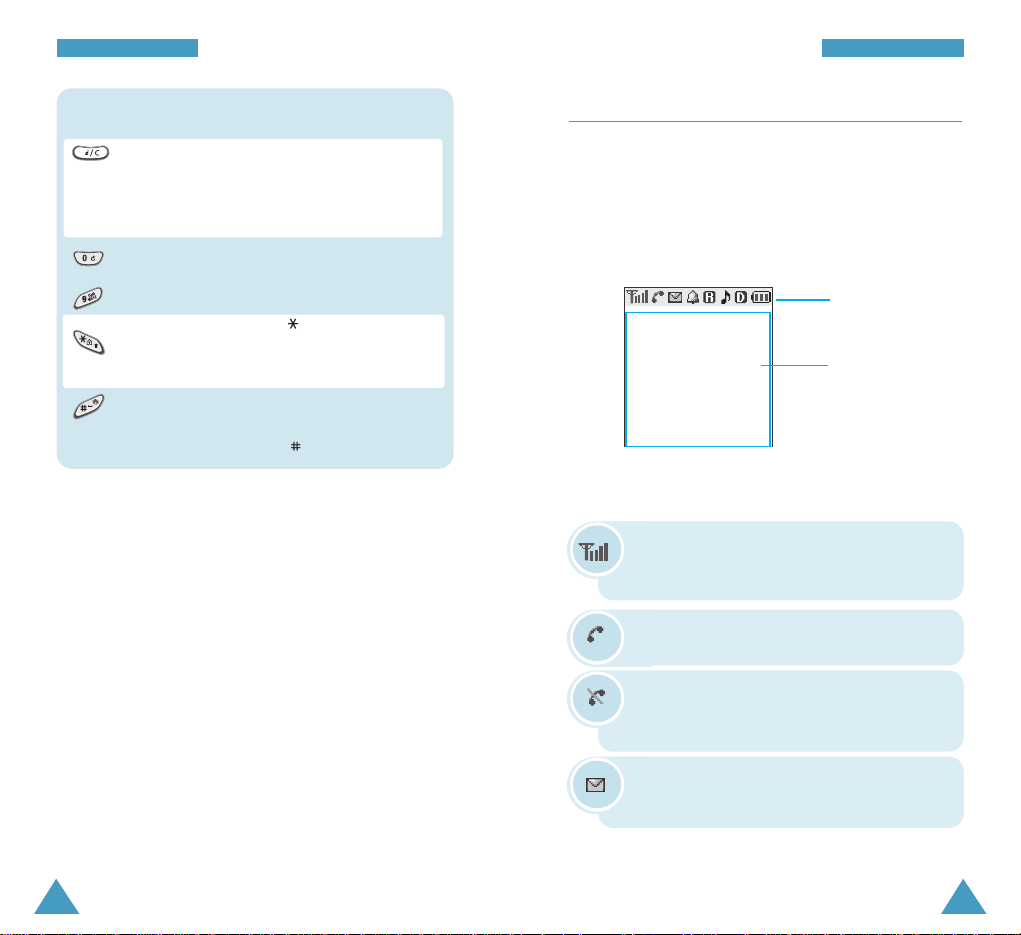
Display
Layout
The display comprises two areas; an upper line of fixed
icons, and the lower text and graphic area. The
following icons display at power-on:
Icons
Text and
graphic area
Signal strength : Shows the received
signal strength. The greater the number of
bars, the better the signal strength.
Icons
Service: Appears when a call is in
progress.
No service indicator: Appears when you
are outside a service area. When it
appears, you cannot make or receive calls.
YYoo uurr PPhh oonn ee
Enters numbers, letters and some special
characters.
In the text input mode, changes the case.
Makes the key guard activate when pressed
and held.
In Standby mode, toggles the silent mode on
and off when pressed and held.
In the text input mode, inserts a space.
Key Functions (continued...)
~
New Message: Appears when a new text
message has been received.
Deletes characters from the display.
In the menu facility, returns to the previous
menu level.
In Standby mode, quickly enters Web Menu.
13
GGeettttiinngg SSttaarrtteedd
12
GGeettttiinngg SSttaarrtteedd YYoo uurr PPhh oonn ee
Backlight
The display is illuminated by a backlight. When you press
any key, the backlight illuminates. It turns off if no key is
pressed within a given period of time, depending on the
Backlight option set in the Display menu. The backlight
remains on at all times when the phone is connected to a
car kit (optional).
The backlight turns on only when you press , ,
or hold side keys in key guard mode on.
To specify the length of time for which the backlight is
active, set the Backlight menu option (MENU 7-4); see
page 87 for further details.
Service Light
The service light is at the outline of the navigation key. It
flashes to indicate incoming call or message. Also, the
service light flashes for a few seconds when you turn on
the phone.
To make the service light turns on, set the Service LED
menu option (MENU 7-7); see page 89 for further details.
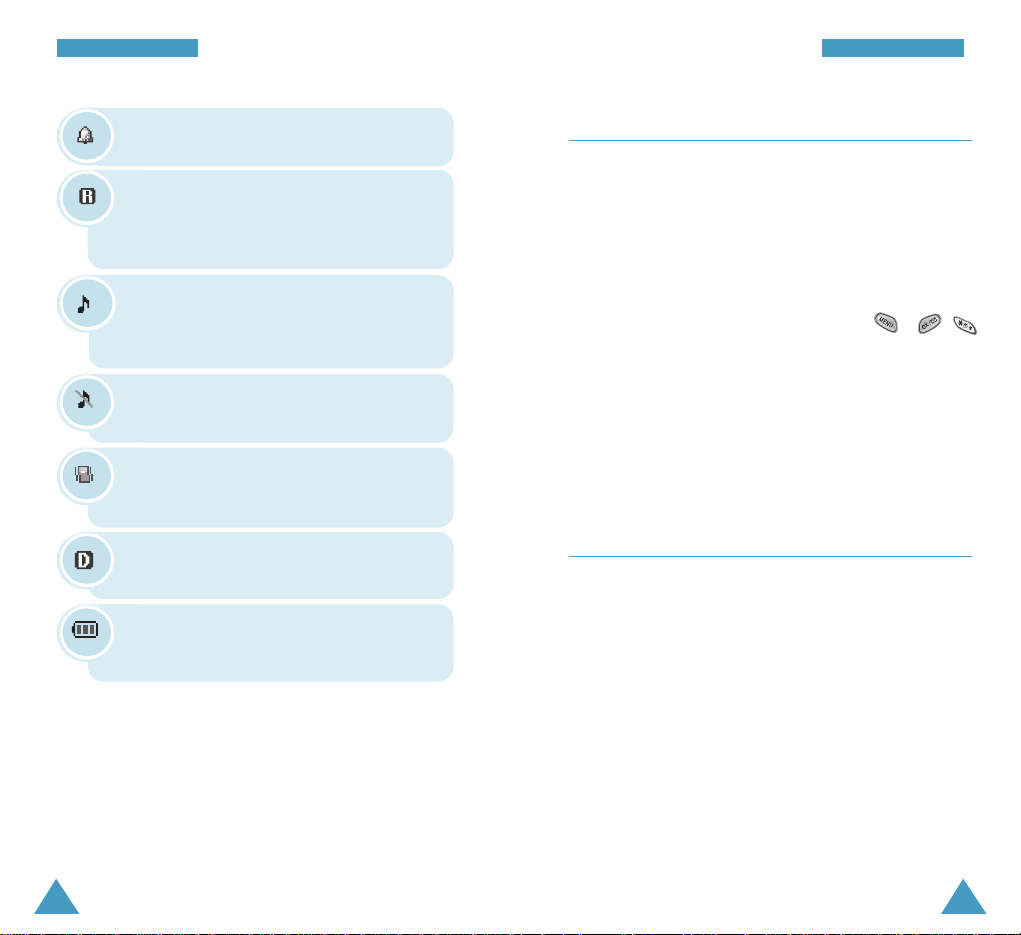
YYoo uurr PPhh oonn ee
Alarm On: Appears when you set an alarm.
Battery strength: Shows the level of your
battery. The more bars you see, the more
power you have left.
Vibrator On: Appears when a vibrate mode
is on. An incoming call will vibrate the
phone rather than ring it.
Roaming: Appears When you are out of
your home area and have registered with a
different network (when travelling in other
countries, for example).
Ringer Off: Appears When you Ringer Vol
option to Silent.
Ringer On: Appears when you set the
ringer volume for calls to one from Level 1
to Level 8 or to 1-Beep.
Digital Mode: Indicates when the phone is
logged onto a digital network.

15
GGeettttiinngg SSttaarrtteedd
14
Getting Started
Installing the Battery
Your Samsung phone comes packaged with a partially
charged, rechargeable Lithum Ion(Li-lon) battery.
To Install the Battery
1. Place the battery so that the tabs on it align with the
slot on the back of the phone.
2. Slide the battery toword the top of the phone until it
clicks into place.
To Remove the Battery
If you want to remove the battery, do as follows:
1. If necessary, switch off the phone by holding down
until the power-off animation begins playing.
2. Press and hold the catch above the battery on the
back of the phone.
3. Slide the battery toward the bottom of the phone and
take it away.

16
GGeettttiinngg SSttaarrtteedd
17
GGeettttiinngg SSttaarrtteedd
Charging the Battery
The travel adaptor allows you to charge your phone’s
battery from any 220 volt AC standard wall outlet. Also,
using the travel adaptor allows you to make a phone call
while the battery is charging. The travel adaptor will
fully charge an “empty” standard battery in
approximately 3 hours.
Follow these steps:
1. With the battery in position in the phone, attach the
cord from the travel adaptor by plugging it into the
adaptor outlet at the bottom of the phone.
2. Connect the adaptor to a wall outlet. The battery will
begin charging immediately.
When charging is finished, disconnect the adaptor from
the power outlet and from the phone.
Note: You can make a call at your convenience when
the phone is plugged into the adaptor. The adaptor
will continue to charge the battery even when you are
making the call
.
Low Battery Indicator
You can easily tell if your battery needs to be recharged
by checking the battery strength indicator in the
upper-right corner of your phone’s display. The presence
of all three bars indicates a full charge, two bars
indicates a smaller charge, and one bar indicates an
even smaller charge. No bars (the battery icon is empty)
means your battery must be charged.
When the battery charge level gets low, the battery
sensor blinks an empty battery icon ( ), sounds a
tone. If the battery level gets too low, the phone will
turn off automatically. Unfortunately, if this happens
you’ll lose whatever you are doing, including dropping
your call. Watch the battery strength icon and make sure
your battery is adequately charged.

19
GGeettttiinngg SSttaarrtteedd
18
GGeettttiinngg SSttaarrtteedd
Switching the Phone On/Off
Hold down for more than one second to switch the
phone on.
The service light on the middle of the phone flashes,
and an alert sounds. When the system locates services,
the greeting message displays along with the date and
time.You can now place and receive calls.
If the phone is out of service, the icon appears in
the display. In this case, you cannot make and receive
calls. You can try again later when service is available.
Note: You can change the LCD display language. To
change the language, use the Language menu option
(MENU 7-3); for further details, refer to page 87.
When you wish to switch the phone off, hold down
for more than two seconds.
Note: If you want to switch the phone off in key guard
mode, unlock the phone first by pressing and .
Your Phone’s Modes
Standby Mode
Standby is the most basic state of your phone. The
phone goes into Standby mode soon after you turn it on,
or whenever you briefly press . When your phone is
in Standby mode, you will typically see the greeting
message and current date and time.
If you enter a phone number, you can press to dial
it, or press to save it in the internal phone book.
Press at any time to return to Standby mode. Be
careful; if you are on a call when you press , you
will return to Standby mode, but it also disconnects the
call.
The Main Menu is accessed when you are in Standby
mode.
Talk Mode
You can place and answer calls only when your phone is
turned on. During a call, the phone is in Talk mode.
While you are in Talk mode, pressing gives you a
list of options referred to as “In-Use Menu” See page
29 for details on the options.
Power Save Mode
Your phone comes with a Power Save feature that will
automatically be activated if your phone is unable to
find a signal after 15 minutes of searching. While this
feature is active, the phone’s battery charge will
conserved. The phone will automatically recheck for a
signal periodically. To manually force the phone to
recheck for a signal, press any key.
2120
GGeettttiinngg SSttaarrtteedd
Call Functions
Making a Call
In Standby mode, key in the area code and phone
number and press .
Note: If you have set Auto Retry option (MENU 9-5)
activated (see page 93), and the line is busy, the
phone automatically retries to make the call.
Correcting the Number
To clear ... Then ....
The last digit displayed Press .
The whole display Hold down for more
than one second.
Ending a Call
When you have finished your call, briefly press .
If you press , the call time (length of the call)
displays briefly and the phone returns to Standby mode.
Lock Mode
When you lock your phone using the Lock Phone menu
(MENU 9-8-1) in the Security menu, you cannot use
the phone. In the lock mode, you can receive messages
and calls, but you cannot place an outgoing call until
you unlock the phone. To unlock the phone, you need to
enter the lock code.
For details about locking and unlocking your phone, see
page 95.
Silent Mode
Silent Mode disables all of the sounds on the phone.
This feature is best used in situations where the phone
might disturb others, such as in a meeting, at a library or
in a theater. You can switch your phone to Silent Mode
with one touch of a key.
In Standby Mode, press and hold the key until
“Silent mode Enabled” and the Vibration indicator ( )
display.
To exit and reactivate the previous sound settings, press
and hold the key again until “Silent mode Disabled”
appears. The Vibration indicator no longer displays.

Prepend Dialing
The prepend option lets you add digits such as area
codes and network feature activation codes to a phone
number that is in your Internal Phone Book or Call Logs.
To prepend existing phone numbers in the Phone Book or
Call Logs:
1. Access the phone number entry.
2. When the desired phone number displays, press
to access the Options menu.
3. Use or to scroll through the list until
Prepend option is highlighted.
4. Press .
5. Enter the area code or feature code.
6. Press to dial the number.
Making a Call from the Phone Book
You can store the phone numbers called regularly in
memory, which is called the Phone Book. You then
simply recall the number to dial. For further information
on Phone Book, refer to page 50.
2322
Redialing the Last Call
To redial the last call you made, press twice
quickly.
Your phone stores the last 20 incoming, 20 outgoing or
20 missed calls. To recall any of these numbers, proceed
as follows.
1. If there are any characters on the display, clear the
display by holding down for more than one
second.
2. Press . The list of recent calls are displayed.
3. Use or to scroll through the list until you
select the required name or number.
4. Press to dial the number displayed.
Emergency Dialing
You can place emergency call from your emergency
number list even if your phone is locked. For further
information on emergency numbers, refer to page 96.
CCaallll FFuunnccttiioonnssCCaallll FFuunnccttiioonnss

25
CCaallll FFuunnccttiioonnss
24
CCaallll FFuunnccttiioonnss
Speed Dialing
Once you have stored phone numbers in the phone book
memory, you can dial them easily whenever you want.
You can dial the stored phone number automatically
without pressing . See below.
One-Touch Dial
Memory locations 01 through 09 are special one-touch
locations. You can dial the phone numbers stored in the
Phone Book memory from 01 through 09 simply by
pressing one button.
Press and hold the third digit of the memory location
containing the number to be dialed.
For example: Location no. 009
Press and hold.
The number (and name) stored is displayed, then dialed.
Two-Touch Dial
Memory locations 10 through 99 are special two-touch
locations.
Press the second digit briefly, then hold down the third
digit of the memory cell.
For example: Location no. 023
Press briefly and hold down .
The number (and name) stored is displayed, then dialed.
Three-Touch Dial
Memory locations 100 through 900 are special threetouch locations.
Press the first and the second digit briefly, then hold
down the third digit of the memory cell.
For example: Location no. 123
Press and briefly, then hold down
.
The number (and name) stored is displayed, then dialed.
Note : When several numbers are saved in one
location, only the phone number which is specified with
Set Speed Dial option will be automatically dialed. For
details, refer to the Edit option under Find menu on
page 50.
Pause Dialing
When you call automated system, like banking services,
you are often required to enter a password or account
number. Instead of manually entering the numbers each
time, you can store the numbers in your Phone Book,
separated by special characters called pauses.

Storing Pauses in a Phone Book Entry
To store a number in your Phone Book that contains
pauses:
1. Enter the phone number you want to store (such as the
bank’s tele-service phone number).
2. Press . The pause menu options display.
3. Toggle to highlight one of the two pause menu
options offered.
4. Select the required pause type and press the key.
• Hard pause : The letter ‘P’ displays within the number,
meaning that a hard pause will occur at that point in
the calling sequence. Enter digits that need to
follow the pause.
• 2sec pause: The letter ‘T’ displays in the number,
meaning that a “Timed (2 second) pause will occur
at that point in the calling sequence.
5. Enter the digits that need to follow the pause, such as
your account number.
6. Repeat steps 2 through 4 to add more pauses and
numbers, if necessary.
7. Store the number in your Phonebook as you normally
would by pressing the key and following from step
2 on page 52.
27
CCaallll FFuunnccttiioonnss
26
CCaallll FFuunnccttiioonnss
Pause Dialing from a Stored Phone Book Entry
1. Dial the number from the Phone Book.
2. If you stored the number using 2sec pause, simply call
the number form the Phone Book.
If you stored the number using Hard pause, wait for the
appropriate prompt for the number (credit card number,
bank account number, etc.).
When prompted, press to send the DTMF number
that follows your pause.
Manual Pause Dialing
You can enter pauses manually during the dialing
process.
1. Enter the phone number of the service you want to
connect to (such as a bank’s tele-service phone number).
2. Press . The pause menu options display.
3. Toggle to highlight one of the two pause menu
options offered.
4. Press to select an option. Continue entering the
number.
5. When the number completed, press
to call the
number.

29
CCaallll FFuunnccttiioonnss
28
CCaallll FFuunnccttiioonnss
Options During a Call
Your phone provides a number of functions that you can
use during a call. You may not utilize all of these
functions at all times. Many of the in-call options are
network services.
Press during a call to access the following in-call
options:
Phone Book: allows you to access the Phone Book
menu.
Mic Mute: allows you to switch your phone’s
microphone off, so that the other party cannot hear you.
Example
: You wish to say something to another person
in the room but do not want the other party to hear you.
Silent key tone: does not transmit the key tones. It
allows you to press keys without hearing annoying key
tones during a call.
Send DTMF: allows you to send the DTMF tone.
Calls: allows you to access the Calls menu.
Messages: allows you to use the Messages menu.
For details, see page 56.
Planner: allows you to access the Planner menu. For
details, see page 65.
Answering a Call
When somebody calls you, the phone rings and the
phone icon is displayed in the middle of the display.
If the caller can be identified, the caller’s phone number
(and name if pre-stored in your Phone Book) is
displayed. If the caller cannot be identified, only the
phone icon appears.
1. To answer a call press .
If the Call Answer menu (MENU 9-2) is set to Any
key, you can answer a call only by pressing any key
except for or / .
2. End the call by pressing .
Note: You can answer a call while using the phone
book or menu features. The current operation will be
interrupted.

31
CCaallll FFuunnccttiioonnss
30
CCaallll FFuunnccttiioonnss
Viewing Missed Calls
Your phone keeps a list of calls that you do not answer
when the phone is on and service is available. The
phone indicates a missed call by displaying a text
notification on the screen. Additionally, if caller
information is available, the screen displays the phone
number of the most recent missed call.
Press to call the displayed number, or to save
the number in Phone Book.
Dropped Calls
A dropped call can occur during a conversation in
response to a signal fade or leaving a service area. In
this case, the call ends and “Signal Faded” displays.
Press to clear the message and return to Standby
mode.
Using Caller ID
This feature tells you who is calling you by displaying
the caller’s number when the phone rings. If a caller’s
name and number are stored in your Phone Book, the
corresponding name is also displayed. If you call
someone who has this feature, your phone number will
be displayed on the their phone.
Note: Contact your service provider to setup the Caller
ID service.

33
CCaallll FFuunnccttiioonnss
32
CCaallll FFuunnccttiioonnss
Call Waiting
Call Waiting lets you receive a second call during
conversation. Your phone notifies you of a call waiting by
beeping and displaying “Call Waiting.”
Note: Contact your service provider to activate the Call
Waiting service.
To answer a waiting call:
1. To answer the call, press . The phone connects the
calling party, and places the current party on hold.
2. Press again to switch between two parties.
Note: If you do not respond to a Call Waiting notification,
the phone will forward the call to voicemail or another
number that you have set up. Contact your service
provider for more information.
Three-Way Calling
This feature enables you to conduct conference calls
with two separate parties at the same time. The phone
records each party into the Outgoing Calls Log. Also,
You are billed airtime for each outgoing call separately.
Note: Contact your service provider to activate ThreeWay Calling.
To place a Three-Way call:
1. During a conversation, enter the phone number for
the third party, and then press . The phone dials
the third party.
2. When you are connected to the third party, press
again to begin your three-way call.
If one of the callers (not you) hangs up, you and
remaining caller stay connected. If you initiated the call
and you hang up first, all three parties are disconnected.

35
34
CCaallll FFuunnccttiioonnss
Entering Text
When using your phone, you will need to enter text at
many times. For example, when storing a name in the
Phone Book, creating your personal greeting or
scheduling events in your calendar. You can enter
alphanumeric characters into your phone by using your
phone’s keypad.
You are provided with the following text input modes;
• T9(Hebrew)
• Hebrew
• T9(English): This mode allows you to enter words
with only one key press per letter. Each key on a
keypad has more than one letter - a single press on
the key could be J, K or L. The T9 mode
automatically compares your key presses to an
internal linguistic database to determine the correct
word. The T9 mode requires far fewer keystrokes than
the traditional multi-tap method, alphabet mode.
• Alphabet: This mode allows you to enter letters by
pressing the key labeled with the letter you want to
enter once, twice, or three times until it appears on
the display.
• Symbol: This mode allows you to enter special
characters.
• Number: This mode allows you to enter numbers.
Note: Not in Number mode, To enter a number, press
and hold down the corresponding key.
Call Forwarding
This feature provides the option of forwarding incoming
calls to another phone number, even while your phone is
off. Activating Call Forwarding does not affect outgoing
calls made from this phone. Contact your service
provider to activate Call Forwarding.
Adjusting the Volume
During a call, if you want to adjust the voice volume,
use the volume keys on the left side of the phone. Press
to increase and to decrease the volume.
In Standby mode, you can adjust the key volume using
the same keys.
 Loading...