

Samsung SCH-N300DA, SCH-N300DV User Manual

SCH-N300 Series
PORTABLE
Tri-Mode
TELEPHONE
User’s Guide
Please read this manual before operating your
phone, and keep it for future reference.

Intellectual Property
All Intellectual Property, as defined below, owned by or which is otherwise the
property of Samsung or its respective suppliers relating to the SAMSUNG Phone,
including but not limited to, accessories, parts, or software relating thereto (the
“Phone System”), is proprietary to Samsung and protected under federal laws, state
laws, and international treaty provisions. Intellectual Property includes, but is not
limited to, inventions (patentable or unpatentable), patents, trade secrets,
copyrights, software, computer programs, and related documentation and other
works of authorship. You may not infringe or otherwise violate the rights secured by
the Intellectual Property. Moreover, you agree that you will not (and will not attempt
to) modify, prepare derivative works of, reverse engineer, decompile, disassemble, or
otherwise attempt to create source code from the software. No title to or ownership
in the Intellectual Property is transferred to you. All applicable rights of the
Intellectual Property shall remain with SAMSUNG and its suppliers.
Samsung Telecommunications America (STA), Inc.
Headquarters: Customer Care Center:
1130 E. Arapaho Road 1601 E. Plano Parkway, Suite 150
Richardson, TX 75081 Plano, TX 75074
Tel: 972.761.7000 Toll Free Tel: 1.888.987.HELP (4357)
Fax: 972.761.7001 Fax: 972.761.7501
Internet Address: http://www.samsungtelecom.com
©2001 Samsung Telecommunications America, Inc. All rights reserved. No
reproduction in whole or in part allowed without prior written approval. Samsung
Telecommunications America, Inc. is a trademark of Samsung Electronics
Corporation, Ltd.
Licensed by Qualcomm Incorporated under one or more of the following patents:
U.S. Patent No. 4, 901, 307; 5, 056, 109; 5, 099, 204; 5, 101, 501; 5, 103, 459; 5, 107,
225; 5, 109, 390.
Printed in South Korea
®
Openwave
®
RSA
is a registered Trademark RSA Security, Inc.
is a registered Trademark of Openwave, Inc.

Disclaimer of Warranties;
Exclusion of Liability
EXCEPT AS SET FORTH IN THE EXPRESS WARRANTY CONTAINED
ON THE WARRANTY PAGE ENCLOSED WITH THE PRODUCT, THE
PURCHASER TAKES THE PRODUCT "AS IS", AND SAMSUNG
MAKES NO EXPRESS OR IMPLIED WARRANTY OF ANY KIND
WHATSOEVER WITH RESPECT TO THE PRODUCT, INCLUDING BUT
NOT LIMITED TO THE MERCHANTABILITY OF THE PRODUCT OR ITS
FITNESS FOR ANY PARTICULAR PURPOSE OR USE; THE DESIGN,
CONDITION OR QUALITY OF THE PRODUCT; THE PERFORMANCE
OF THE PRODUCT; THE WORKMANSHIP OF THE PRODUCT OR THE
COMPONENTS CONTAINED THEREIN; OR COMPLIANCE OF THE
PRODUCT WITH THE REQUIREMENTS OF ANY LAW, RULE,
SPECIFICATION OR CONTRACT PERTAINING THERETO. NOTHING
CONTAINED IN THE INSTRUCTION MANUAL SHALL BE
CONSTRUED TO CREATE AN EXPRESS OR IMPLIED WARRANTY OF
ANY KIND WHATSOEVER WITH RESPECT TO THE PRODUCT. IN
ADDITION, SAMSUNG SHALL NOT BE LIABLE FOR ANY DAMAGES
OF ANY KIND RESULTING FROM THE PURCHASE OR USE OF THE
PRODUCT OR ARISING FROM THE BREACH OF THE EXPRESS
WARRANTY, INCLUDING INCIDENTAL, SPECIAL OR
CONSEQUENTIAL DAMAGES, OR LOSS OF ANTICIPATED PROFITS
OR BENEFITS.


Table of Contents
1. Getting Started..............................................................................11
Highlights .....................................................................................................12
Closed View of Phone....................................................................................14
Front View of Phone .....................................................................................15
Command Keys.............................................................................................16
Viewing the Display Screen...........................................................................18
Turning Your Phone ON and OFF ...............................................................19
Using Key Guard...........................................................................................20
Using the Battery ..........................................................................................21
2. Roaming.........................................................................................27
Setting Your Phone’s Roaming Mode..........................................................28
Setting the Time and Date............................................................................30
3. Making and Answering Calls....................................................31
Making Calls.................................................................................................32
Answering Calls.............................................................................................32
Missed Call Notification................................................................................33
Voice Dial......................................................................................................34
In-Call Options.............................................................................................35
Incoming Call Notification ..........................................................................36
End-of-Call Options......................................................................................36
Saving a Phone Number..............................................................................37
Finding a Phone Number.............................................................................39
Dialing and Saving Phone Numbers With Pauses ......................................40
Four-Digit Calling ........................................................................................41
Calling Emergency Numbers.......................................................................42
Using One/Two/Three Touch Speed Dialing...............................................42
Displaying Your Phone Number..................................................................44
4. Navigating Through Menus........................................................45
Menu Navigation..........................................................................................46
Working Within the Menu Structure............................................................46
Viewing the Menus........................................................................................47
Selecting a Character Input Mode................................................................54
Entering Characters by Using the Keypad....................................................55

Entering Characters Using T9 Text Input ...................................................57
5. Adjusting Volume.........................................................................59
Changing Ringer Volume............................................................................ 60
Silencing the Ringer.....................................................................................60
Adjusting Volume During a Conversation................................................... 60
Muting a Call................................................................................................ 61
6. Using Service Features...............................................................63
Using Caller ID.............................................................................................64
Responding to Call Waiting .........................................................................64
Three-Way Calling........................................................................................66
Forwarding Your Calls..................................................................................68
7. Managing Call History................................................................ 69
Viewing Call Logs .........................................................................................70
Call Log Options...........................................................................................71
Making a Call From a Call Log....................................................................72
Prepending a Phone Number From a Call Log........................................... 72
Saving a Phone Number From a Call Log...................................................73
Erasing Call Logs.......................................................................................... 74
8. Managing Messaging................................................................. 75
Setting Up voicemail ....................................................................................76
Knowing When You Have Messages.............................................................76
Message Types...............................................................................................76
New Voicemail Message Alerts...................................................................... 78
Retrieving Your Voicemail Messages ...........................................................78
Clearing the Voicemail Message Icon..........................................................78
New Web Messages........................................................................................ 79
Web Message Storage....................................................................................79
Displaying Web Messages.............................................................................79
Sending Numeric Pages...............................................................................80
Numeric Page Options .................................................................................80
Sending Web Messages................................................................................. 81
Web Message Options ...................................................................................81
Extracting Phone Numbers..........................................................................82
Erasing All Web Messages.............................................................................83
New Web Alerts..............................................................................................83
Displaying Web Alerts................................................................................... 84

9. Using Your Internal Phone Book...............................................85
Adding a New Internal Phone Book Entry...................................................86
Finding Internal Phone Book Entries..........................................................87
Internal Phone Book Entry Options.............................................................88
Replacing a Stored Number With a New Number.......................................89
Editing an Internal Phone Book Entry........................................................90
Selecting a Ringer Type for an Entry...........................................................91
My Phone Number........................................................................................92
10. Changing Your Phone’s Settings...............................................93
Changing the Greeting.................................................................................94
Setting the Language of your Phone ...........................................................94
Adjusting the Ringer Volume.......................................................................95
Ringer Types.................................................................................................95
Selecting Ringer Types for Voice Calls.........................................................96
Selecting Ringer Types for Messages............................................................96
Selecting Ringer Types for Alarms ...............................................................97
Selecting Ringer Types for Data / Fax In.....................................................97
Changing the Backlight Time Length .........................................................98
Changing the Contrast .................................................................................98
Data/Fax Mode .............................................................................................99
Receiving a Fax ............................................................................................99
Receiving Data..............................................................................................99
Returning to Voice Mode............................................................................100
11. Setting Your Phone’s Security.................................................101
Accessing the Security Menu......................................................................102
Locking Your Phone...................................................................................102
Unlocking Your Phone...............................................................................103
Changing the Lock Code ............................................................................103
Calling in Lock Mode .................................................................................104
Using Special Numbers ..............................................................................105
Erasing Special Numbers...........................................................................105
Erasing the Internal Phone Book ..............................................................106
Resetting Your Phone.................................................................................106
12. Personal Information Management........................................107
Accessing the Scheduler..............................................................................108
Calendar......................................................................................................108

Today..........................................................................................................108
Month View.................................................................................................109
Jump To Date..............................................................................................109
To Do List....................................................................................................109
Countdown .................................................................................................109
Alarm Clock................................................................................................110
Set Time...................................................................................................... 110
Adding New Events.....................................................................................111
Alarm Clock................................................................................................114
13. Using Voice Services................................................................ 117
Using Voice Dialing....................................................................................118
Programming the Phone for Voice Dialing............................................... 118
Setting Up Voice Dial..................................................................................120
Placing a Call Using Voice Dial.................................................................121
Reviewing Voice Dial Entries .....................................................................122
Erasing Voice Dial Entries..........................................................................123
14. Experiencing the Web .............................................................. 125
The Web......................................................................................................126
Web Browser................................................................................................ 127
Launching the Web Browser ......................................................................127
The Web Home Page ..................................................................................129
Using the Web Browser............................................................................... 130
Setting up a Web Connection.....................................................................135
15. Games .......................................................................................... 139
Flying Tight ................................................................................................140
Run For Money...........................................................................................141
16. Position Location....................................................................... 143
Services .......................................................................................................144
Settings.......................................................................................................145
17. Calculator .................................................................................... 147
Accessing the Calculator ............................................................................148
Performing Simple Calculations ............................................................... 148
18. Selecting Your Accessories .................................................... 149
Accessory Options........................................................................................ 150
19. Performance and Safety Guidelines ...................................... 153
Getting the Most Out of Your Reception....................................................154

Maintaining Safe Use of and Access to Your Phone ..................................157
Caring for the Battery .................................................................................161
Acknowledging Special Precautions and FCC............................................163
FDA Consumer Update................................................................................166
CTIA Safety Information ............................................................................179
Owner's Record...........................................................................................185
User Guide Proprietary Notice....................................................................185
20. Warranty Information ................................................................187
Manufacturer’s Warranty...........................................................................188


1
Y
Getting Started
In this Section
䊳 Your Phone’s Highlights and Features
䊳 Front View of Phone
䊳 Viewing the Display Screen
䊳 Turning Your Phone ON and OFF
䊳 Using the Battery
our phone is packed with features that simplify your life and
expand your ability to stay connected to the people and
information that are important to you. We know that you’re anxious to
start using it, so this section will give you a quick introduction to your
new phone. The easy-to-follow instructions will guide you through the
basics of the most common features of your phone and you’ll be on
your way to using it in no time.
Don’t forget the other chapters in this guide. They’re filled with
information about the capabilities and benefits of your new phone.
They include detailed step-by-step instructions that familiarize you with
all the features and explain how to customize your phone to meet your
specific needs.
Getting Started 11

Highlights
Congratulations on the purchase of your phone
(SCH-N300). This phone is lightweight, easyto-use, reliable, and offers many significant
features:
䊳 Tri-mode capability provides access to
other CDMA and analog cellular
networks. For further information see
"Setting Your Phone’s Roaming Mode"
on page 28.
䊳 Web Browser provides access to the
Internet in digital mode. For further
information see "Web Browser" on page
127.
䊳 Voice Dial
lets you dial phone numbers
by speaking someone’s name or the
digits in their phone number. For further
information see "Voice Dial" on page 34.
䊳 User friendly, menu driven access to
features and options.
䊳 The phone’s “flip” cover can be set to
answer an incoming call when opened,
and to cancel a call upon closing.
䊳 The backlit display screen makes it
effortless to read the display in low light
environments and at night.
Section 1
12 Getting Started
䊳 An Internal Phone Book with 199
memory registers. (Each name entry can
have up to six numbers).

䊳 Speed Dialing, there are four methods of
calling numbers previously stored in the
Internal Phone Book.
䊳 A Calendar function allows the
scheduling of events, the ability to create
“To Do Lists”, set timers and alarms.
䊳 Voice activated dialing with 10 locations.
䊳 T9 predictive text entry for simplicity in
entering names and events into both the
Internal Phone Book and Calendar.
䊳 Vibrate mode announces incoming calls
and messages without disturbing people
around you.
䊳 A choice of melodies can be used instead
of ringer types.
Getting Started 13
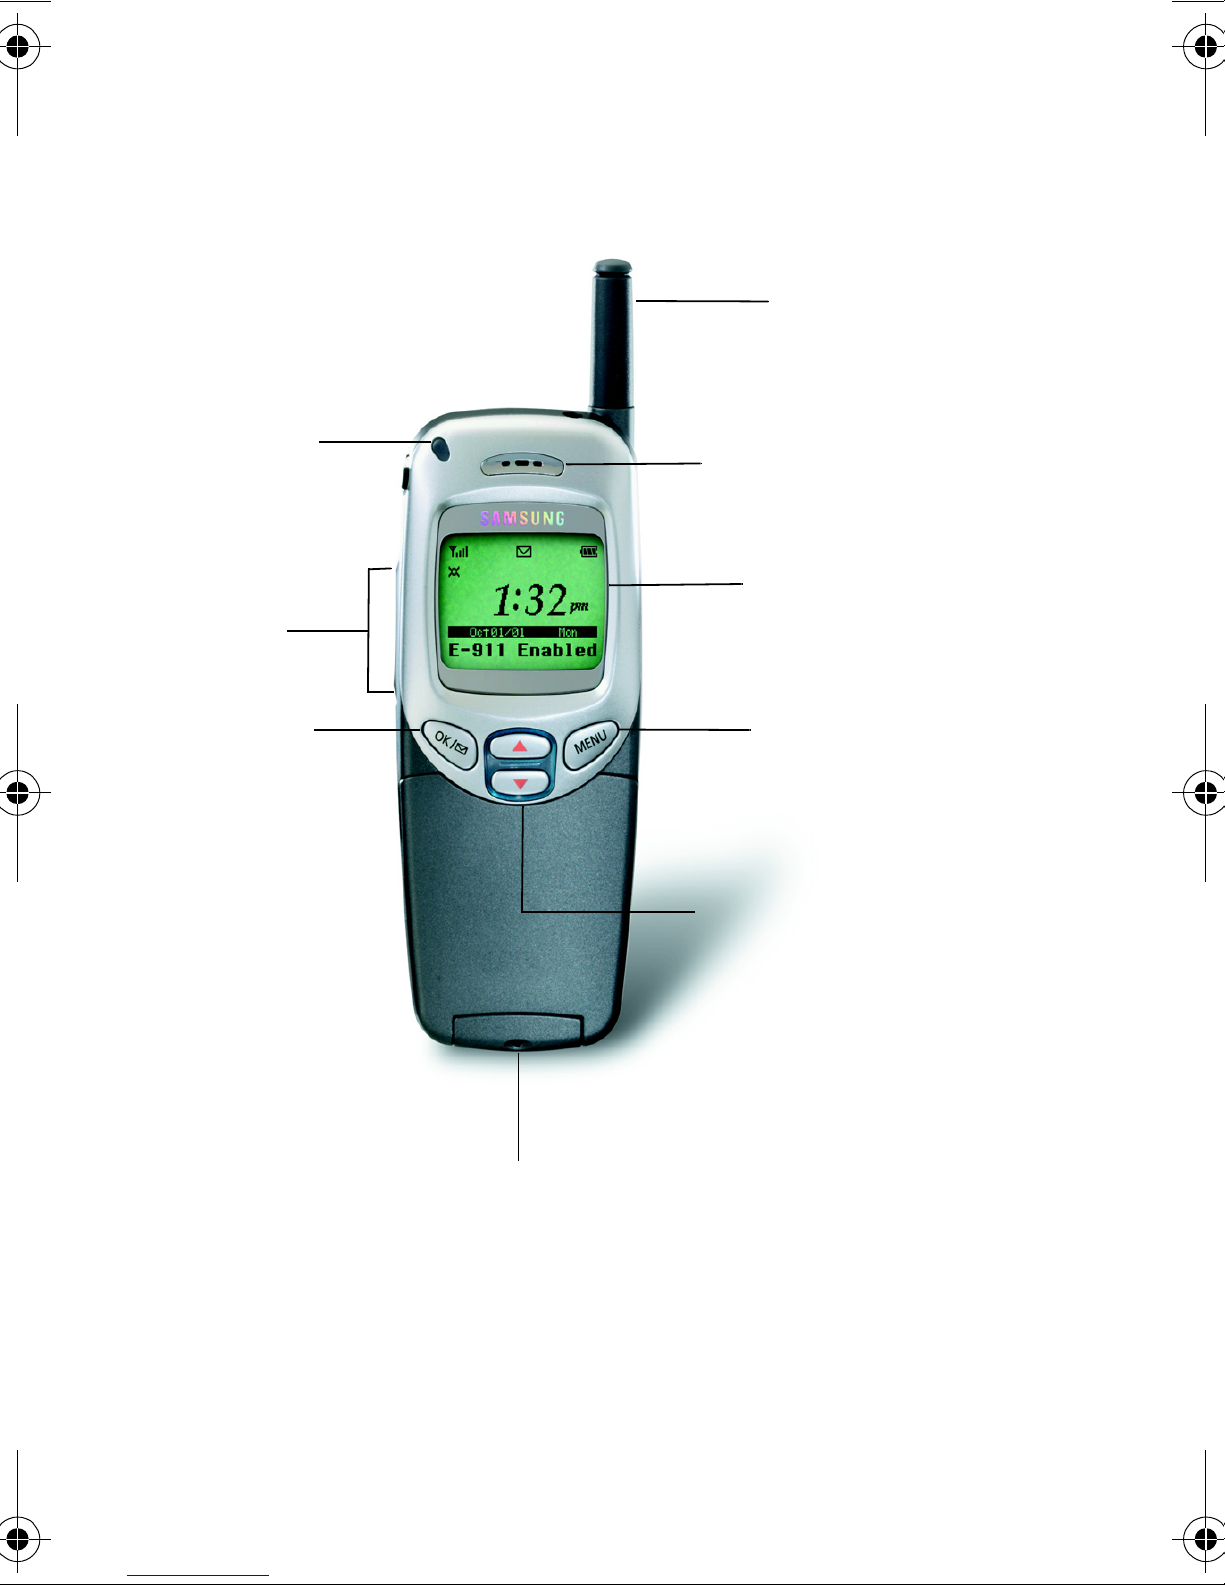
LED Indicator
Volume
Button
Closed View of Phone
Antenna
Receiver
Display
Screen
OK Button
Menu
Button
Up/Down
Navigation
Arrows
Serial Connector
Section 1
14 Getting Started

Front View of Phone
Headset
Jack
Signal
Strength
Indicator
GPS
Icon
Talk
Button
Numeric
Keypad
Microphone
Battery
Indicator
Clear
Button
End Button
Phone Flip
Getting Started 15

Command Keys
MENU Displays the first page of the
Main Menu of options on your
phone. Press again to display further
pages and options.
OK When navigating a menu, press to
select the highlighted item.
Navigation Arrows Use these arrows
to scroll through the phone menu
options.
Volume Key (On the side of your
phone). Adjust the ringer volume in
standby mode (with the flip open).
Adjust the voice volume during a call.
In a menu, scroll up or down to
navigate through the menu options.
TALK Places, or answers a call. In
standby mode, press the key once to
enter the Outgoing call log. Press and
hold the key down to initiate Voice Dial.
Section 1
16 Getting Started
CLR (CLEAR) Deletes characters from
the display. When in a menu, press to
return to the previous menu.

END Ends a call. Press and hold this
key to turn your phone on or off. In the
menu facility, it returns the phone to
standby mode and cancels your input.
Numeric Keys Use these keys to
enter numbers, letters, and
characters.
Pound Enters the [#] character for
calling features. In text entry mode,
press to enter a space.
Asterisk Enters the [*] character for
calling features. In text entry mode,
press to change the appearance of
input.
Headset Jack (on the side of the
phone.) Allows you to plug in a headset
for safe, convenient hands-free
conversations.
Getting Started 17

Viewing the Display Screen
This list identifies the symbols that show on
your display screen.
䊳 displays current signal strength.
The more lines displayed, the stronger
the signal.
䊳 GPS Position Location display.
䊳 indicates the phone cannot find a
signal.
䊳 indicates a call is in progress.
䊳 indicates that you are “roaming” off
the Digital Network. If you are:
䊳 in your home service area, this
icon will rarely display.
䊳 in a preferred analog or digital
roaming area (where a roaming
agreement is in place), this indicator
will remain on, but will not flash.)
䊳 in an analog or digital coverage
area that is not covered by a roaming
agreement, this indicator will flash
once every second.
䊳 indicates you have message(s)
waiting.
Section 1
18 Getting Started
䊳 indicates your phone is in vibrate
mode.

䊳 indicates your current battery charge
strength. (The displayed icon indicates a
fully charged battery.)
Turning Your Phone ON and OFF
Turning Your Phone ON
To turn your phone on, press for
approximately two seconds.
Once your phone is ON, it displays “Looking
For Service” indicating that your phone is
searching for a signal. When your phone finds
a signal, it automatically enters standby mode
– the phone’s idle state. At this point, you are
ready to begin making and receiving calls.
If your phone is unable to find a signal after 15
minutes of searching, a Power Save feature is
Tip:
The Power Save feature
helps to conserve your
battery power when you
are in an area where there
is no signal.
automatically activated. When a signal is
found, your phone automatically returns to
standby mode.
Getting Started 19

In power save mode, your phone searches for a
signal periodically without your intervention.
You can also initiate a search for Service by
pressing any key (when your phone is turned
ON).
Turning Your Phone OFF
Press for two seconds until you see
“Powering off” on the display screen.
Your screen remains blank when your phone is
off.
Using Key Guard
The Key Guard feature helps avoid accidental
key presses without blocking incoming calls or
messages. Key Guard is disabled when you
receive an incoming call and is automatically
reactivated when the call is completed.
1. Press for Main Menu.
2. Press for Key Guard.
Section 1
20 Getting Started
3. To disable Key Guard, press and hold
for at least two seconds.

Using the Battery
Battery Capacity
your phone is equipped with a Lithium Ion (LiIon) battery. It allows you to recharge your
battery before it is fully drained. The battery
provides up to 3.8 hours of continuous digital
talk time (up to one hour in analog) or up to
eight days of continuous digital standby time
(up to 15 hours in analog).
The Empty Battery Icon
Approximately five minutes before the battery
charge level gets too low to operate the phone,
the battery sensor will let you know by blinking
an empty battery icon ( ), sounding an
audible alert and displaying a warning
message. If you continue to operate the phone
without charging, the phone will turn off
automatically (after a three to five minute
delay). If this happens, your call will end. If
you plug into a charging device, you can
continue your call. Be sure to monitor the
battery strength icon and make sure your
battery is adequately charged.
Getting Started 21
Installing the Battery
Your phone comes with a Li-Ion battery. Follow
these steps to install it:
1. Place the battery on to the back of the
phone, making sure that the three plastic
tabs line up with the corresponding holes
on the phone.
2. Gently push the battery down on the phone
until it snaps into place.
Section 1
22 Getting Started
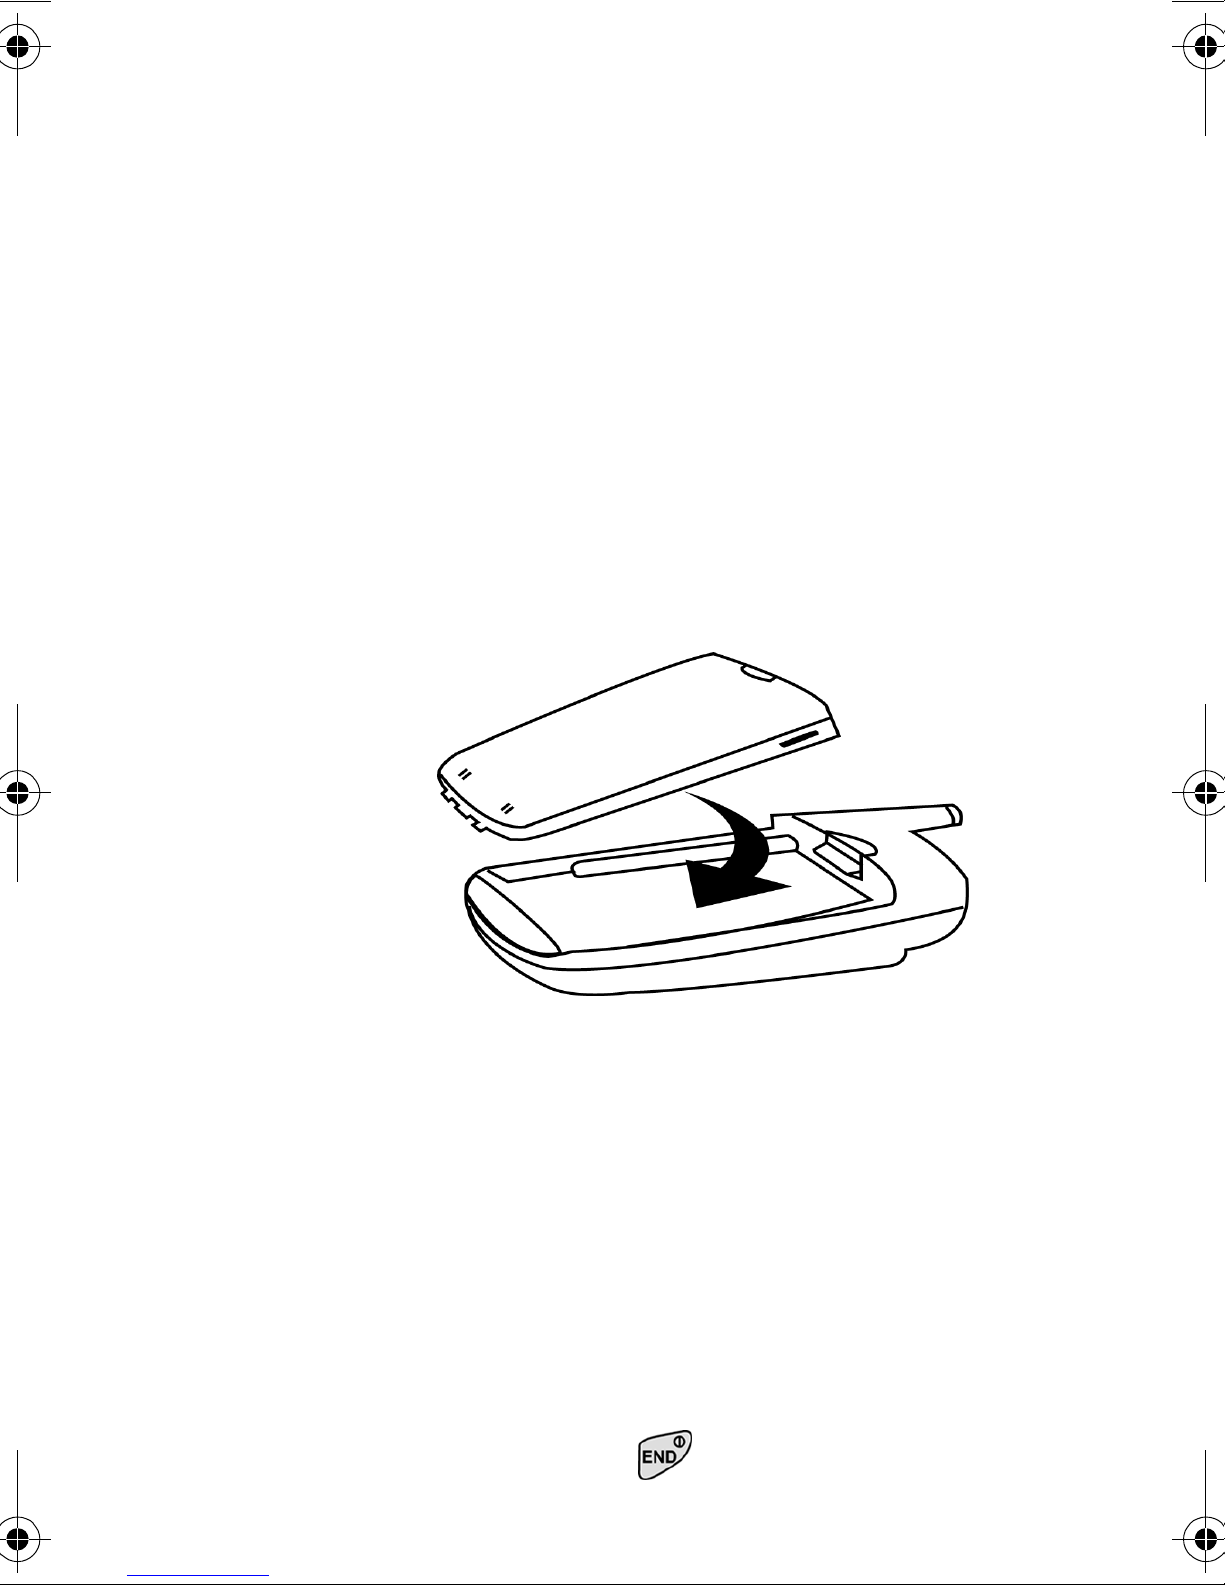
Removing the Battery
To remove your battery for charging, or for
another reason, follow these easy steps:
1. So that no stored messages or numbers are
lost, power off your phone by pressing and
holding the key.

2. Push the battery release latch up.
3. Slide the battery away from the latch.
4. Lift the battery away from the phone.
Charging the Battery
Your phone comes with a rechargeable battery.
You should charge the battery as soon as
possible so you can begin using your phone.
Keeping track of your battery’s charge is
important. If your battery level becomes too
low, your phone automatically turns off and
you will lose all the information you were just
working on. For a quick check of your phone’s
battery level, glance at the battery charge
indicator located in the upper-right corner of
your phone’s display screen. If the battery
charge is getting too low, the battery icon
blinks and the phone sounds a warning tone.
Always use the Samsung approved desktop
Warning:
Using the wrong battery
charger could cause
damage to your phone
and void the warranty.
charger, travel adapter or vehicle power charger
to charge your battery.
Getting Started 23

Travel Adapter
Tip:
The Travel Adapter is not
compatible with any other
Samsung product.
The travel adapter is used to recharge the
phone using a simple plug in located at the
bottom of the phone. When the travel adapter is
plugged in and charging the phone, the phone
displays a charging light and the battery icon
starts to blink. The phone can still be used
while it is plugged into the travel adapter, but
this will cause the phone to charge more slowly.
To quickly charge the phone, turn the power
Off.
Using the Single Desktop Charger
When you are ready to charge your battery, it is
vital that you use only Samsung approved
desktop chargers and AC adapter chargers.
1. Plug the single desktop charger’s power
cord into a wall outlet.
2. Insert the phone (with the battery
installed) into the front of the charger.
Section 1
24 Getting Started

The LED on the front of the phone indicates the
following:
䊳 A red light indicates the battery is
charging.
䊳 A green light indicates the battery is at
least 90 percent charged.
䊳 An orange light indicates that the
battery is operating at a temperature that
is too high or too low, or that there is a
poor connection. Make sure the phone is
resting in the charger.
It generally takes about three hours to fully
recharge a completely rundown battery. With
the Samsung approved Li-Ion battery, it is
practical to recharge the battery before it
becomes completely run down.
To get the quickest charge for any battery:
䊳 Turn the phone off.
䊳 Plug the phone with the battery attached
into the travel adapter.
䊳 Leaving the phone plugged into the
travel adapter fully charged will not
harm the battery.
Getting Started 25

Section 1
26 Getting Started

2
R
Roaming
In this Section
䊳 Setting Your Phone’s Roaming Mode
oaming is the ability to make or receive calls when you are out of
your home coverage area. Your new tri-mode phone allows you to
roam on analog cellular and digital networks virtually anywhere in the
U.S. where competitive wireless service is available.
This section explains how roaming works and the special features that
allow you to manage your roaming experience.
Roaming 27

Setting Your Phone’s Roaming Mode
Your phone allows you to control your ability to
roam. By using the Roaming menu option, you
can determine which signals your phone
accepts.
Set Mode
Choose from three different settings on your trimode phone to control your roaming
experience. When your phone is in standby
mode:
1. Press for Main Menu.
2. Press for Roaming.
3. Press for Set Mode. To select an
option, scroll to select
Automatic-B, or Home only.
4. Press .
䊳 Automatic-A This setting seeks an analog
Automatic-A,
or digital service automatically. It searches
for an alternative system.
䊳 Automatic-B This is your default setting.
It will always try your calls using the
Preferred Roaming List loaded into your
phone. If a preferred sevice is not found,
Section 2
28 Roaming
then it will attempt to aquire any digital or
analog service.

䊳 Home only With this setting, you cannot
roam. If your home system is not available
then your call will not be connected, and
the No service icon displays. In
some service areas, an operator may come
on-line and ask you how you would prefer
to pay for the call.
Note: Consult your Service Provider if you
have any questions about these options.
Roaming 29

Setting the Time and Date
If the time has not been set since the battery
was installed and you turn your phone on
outside a Service Area, you are prompted to
enter the current time and date.
Note:
If you do not enter the
time and date when
prompted in Analog
mode, you are not notified
of scheduled events or
call alarms.
To enter the time and date when the Set Time
and Date menu displays, press the appropriate
keys on your keypad. Fields must be two digits,
for example “05:07A and
01/01/01.”
To set the time and date before traveling to an
analog area:
1. Press for Main Menu.
2. Press for Calendar.
3. Press for Set Time.
Section 2
30 Roaming
4. Press the appropriate keys to enter the time
and date you require. (The volume keys or
the corresponding letters on the keypad
may be used to select “A” for AM or “P” for
PM.)
5. Press .
 Loading...