

Page 1
WELCOME TO VERIZON WIRELESS
6801-001224
quick
reference
guide
www.verizonwireless.com
SCHi600
Page 2

WELCOME
SM
3. If you ever have a problem, it becomes our problem the first time you call. No
runarounds, no hassles. If your issue can’t be resolved during the course of your first
call, we’ll take the responsibility of getting back to you with an answer.
4. With our New Every Two
SM
program, sign up for and maintain two years of service
on a select digital plan of $35 or higher to qualify for a phone (up to $100 value), or
receive $100 toward the purchase of a more expensive phone with a two-year renewal (see New Every TwoSMbrochure for details).
5. Your satisfaction is guaranteed on any equipment you purchase from us. We provide a 15-day satisfaction guarantee on any product you buy from Verizon Wireless.
You pay only for the service you’ve used.
Note: Certain conditions and restrictions apply. See store for details. Annual
Customer Agreement required. Network claim based on industry reports
of carrier-operated covered population, and over 32 million customers.
See the Worry-Free Guarantee brochure and our Return/Exchange Policy
for details.
Page 3
GETTING STARTED
■
Installing the Battery
1.) Line up the battery with the corresponding grooves on the Smartphone.
2.) Gently slide the battery toward the top of the Smartphone until it snaps into place.
■
Charging the battery
1.) Plug the AC module for the power accessory into a 120 or 220 VAC wall outlet.
2.) Remove the rubber plug from the power accessory port in the bottom end of your
Smartphone, if necessary.
3.) Plug the power accessory connector into the bottom end of your Smartphone,
button side facing up.
■
Powering the Smartphone on and off
1.) Press and hold .
PLACING AND RECEIVING CALLS
■
Placing Calls
1.) Enter the number that you wish to call using the keypad.
2.) Press .
■
Receiving Calls
1.) When you receive an incoming call, the Incoming screen appears in
the display.
2.) Press the left soft key Accept to answer the call or press the right soft key Reject
to send the call to voice mail.
SEND
END
SMARTPHONE BASICS
▲
▲
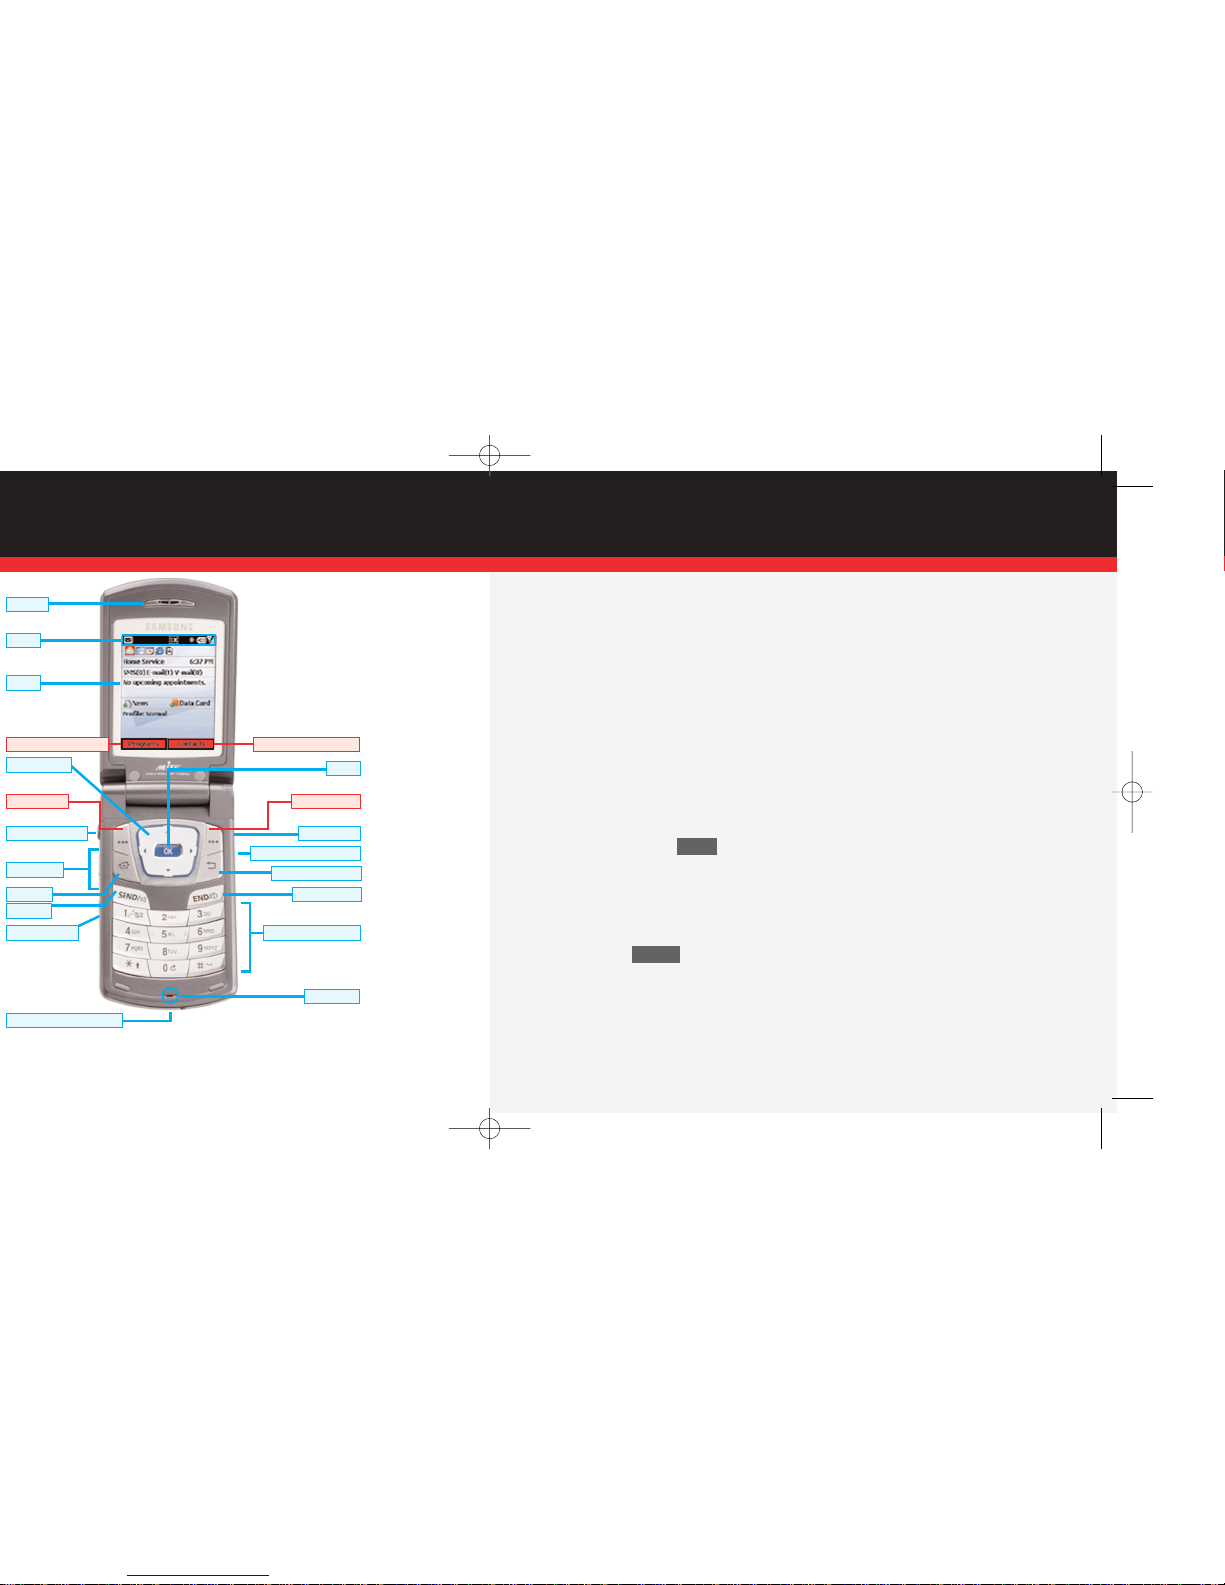
Samsung SCH-i600
Earpiece
*Left Soft Key Function
*Right Soft Key Function
Icons
Display
Microphone
*Right Soft Key
Backspace/Clear Key
END/Power Key
Quick List Key
Browser/Voice Signal Key
Alpha-Numeric Keypad
Navigation Key
*Left Soft Key
Headset Connector
Volume Keys
Home Key
SEND Key
Voice Memo Key
Power/Interface Connector
OK Key
*Functions for the left and
right soft keys are defined by
what appears above each (soft
key) in the display.
Page 4
SMARTPHONE BASICS
.
until the desired text entry mode appears in the upper right corner
of the display.
∗ ⇑
OK
# —
6
MNO
8
TUV
*
1
SEND
6
MNO
8
TUV
*
1
6.) Use the navigation key to move the cursor to the message composition field.
7.) Enter the content of your message using the keypad.
8.) Press the left soft key Send. Your message is sent.
■
Entering letters and numbers
You can enter letters and numbers into messages depending on the current mode of
TXT entry.
1.) To change between TXT entry modes: At any TXT entry screen, press and hold
until the desired mode of TXT entry appears in the upper right corner of
the display.
■
In 123 mode, press the corresponding number on the keypad to enter the
desired number.
■
In ABC mode, press the keys containing the letters that you wish to enter into your
message. Press a key repeatedly to cycle between letters. Pause briefly to allow the
displayed letter to be inserted into your message.
■
Entering symbols
1.) To change to symbol mode from any txt entry mode: At any TXTentry screen,
press and hold . The Symbols screen appears in the display.
2.) Use the navigation key to highlight the symbol that you wish to enter into
your message.
3.) Once the desired symbol is highlighted, press the left soft key Done to enter the
symbol into your message.
# —
∗ ⇑
Page 5
SMARTPHONE BASICS
only once
for each letter of the word
6
MNO
6
MNO
9
WXYZ
4
GHI
7
PQRS
3
DEF
∗ ⇑
3.) Press . The contact’s number and Calling... appear in the display.
■
Programming speed dial numbers
Entries in your Contacts list can be assigned to a speed dial location on your keypad.
Contacts can be assigned to available speed dial locations from 2-99. Locations 0 and
1 are reserved.
1.) At the Home Screen, press the right soft key Contacts. Your list of contacts
appears in the display.
2.) Use the navigation key to highlight the contact that you wish to add to speed dial,
then press .
3.) Use the navigation key to highlight the number you’d like to add to speed dial (if
more than one number exists).
4.) Press the right soft key Menu. A pop-up menu appears in the display with Add
Speed Dial highlighted.
5.) Press . The Add Shortcut screen appears in the display.
6.) Use the navigation key to highlight the Keypad assignment field.
7.) Use the navigation key to select an available keypad assignment.
8.) Press the left soft key Done when finished.
■
Placing a call using speed dial numbers
1.) At the Home Screen, press and hold the key assigned to the speed dial number
that you wish to call.
2.) Calling... appears in the display along with the phone number. After you are con-
nected, the name of the contact assigned to the speed dial location appears in
the display.
OK
OK
SEND
Page 6
PIM FUNCTIONS
OK
OK
OK
OK
■
Deleting appointments
1.) Highlight an appointment in the calendar as outlined in the previous section
“Viewing appointments.”
2.) Once the appointment is highlighted, press the right soft key Menu. A pop-up
menu appears in the display with New highlighted.
3.) Use the navigation key to highlight Delete, then press . A confirmation mes-
sage appears in the display asking if you want to permanently delete
the appointment.
4.) Press the left soft key Yes to delete the appointment, or press No to cancel and
return to the appointments list.
■
Editing appointments
1.) Open an appointment as outlined in “Viewing appointments.”
2.) Press the left soft key Edit. The details of the appointment appear in the display.
3.) Use the keypad to enter or change text. Use the navigation key to move the cursor
to another field.
4.) Press the left soft key Done when finished, or press Cancel to return to the
appointments list.
OK
Page 7

after you install ActiveSync.
■
Placing the Smartphone into the Sync cradle
1.) Connect the sync cradle to your PC’s USB port with the provided cable.
2.) Place the Smartphone in the cradle face up. Make sure the power accessory/data
port connector of the Smartphone is mated to its counterpart in the sync cradle.
3.) Press the back of the Smartphone between the two retainers on either side of the
cradle until the it snaps into place.
■
Starting the Sync process
1.) If the Smartphone is on and in the sync cradle as described in the previous sec-
tion, synchronization between it and the PC begins automatically.
WIRELESS SYNC
With Wireless Sync from Verizon Wireless, you can keep in contact and stay up-todate with important e-mails and appointments when you're on the go. Wireless Sync
works with ActiveSync allowing you to sync wirelessly with your desktop from virtually anywhere, making your Samsung i600 an even-more-powerful business tool.
Explore the enclosed Wireless Sync Start Up CD for more information or to begin
using the service.
(Requires subscription to 1- or 2-year Wireless Sync Express Networksmcalling plan. In order to
use Wireless Sync, your PC must remain on and in a condition to receive e-mail.)
ACTIVESYNC
®
▲
Page 8
However, only one configuration method may be used at a time.
OK
5.) Use the navigation key to highlight the Cc: and Subj: fields, entering information
via the keypad if desired.
6.) Use the navigation key to highlight the message body field.
7.) Enter the content of your e-mail using the keypad, then press the left soft key
Send.
8.) Press the right soft key Menu.
9.) Use the navigation key to highlight Send/Receive E-mail, then press . Your
connected to your service provider and your e-mail is sent.
■
Deleting e-mails from your e-mail account
Note: Messages can only be deleted one at a time.
1.) At the Home Screen, press the left soft key Programs. Inbox/SMS is highlighted.
2.) Press .
3.) Any e-mail or SMS messages in your Inbox appear in the display.
4.) Use the navigation key to highlight the message that you wish to delete.
5.) Press the right soft key Menu.
6.) Use the navigation key to highlight Delete, then press . The selected e-mail
is deleted.
OK
OK
OK
E-MAIL
Page 9

VOICE SIGNAL
5.) If Voice Signal is unsure of the number that you said, a list of possible matches
appears in the display. You’re asked to confirm each number as Voice Signal
scrolls through the list.
6.) Say Yes or No to confirm or reject the numbers when prompted.
■
Use Name Dial
To use Name Dial, you’ll need to have some entries in your Contacts list. See
“Contacts” on page 38 of the User Guide for information on creating a Contacts list.
1.) Press and hold the Browser/Voice Signal Key for two seconds. The Smartphone
prompts “Please say a command,” and a list of commands appears in the display.
2.) Say Name Dial (at a distance of 3-12 inches). The Smartphone prompts “Please
say the name.”
3.) Say the name exactly as it is displayed in your contacts list, first name followed by
last name. The contact name appears in the display. If your contact has more than
one number, such as a mobile number and a home number, you’re prompted for
which location.
4.) Say the location. The location is repeated through the speakerphone and the num-
ber is dialed.
Page 10

VOICE SIGNAL
■
Use Name Lookup
1.) Press and hold the Browser/Voice Signal Key for two seconds. The Smartphone
prompts “Please say a command,” and a list of commands appears in the display.
2.) Say “Name Lookup” at a distance of 3-12 inches from the microphone. “Please
say the name” plays through the speakerphone.
3.) Say the name exactly as it is displayed in your Contacts list, first name followed
by last name.
4.) The contact name appears in the display with other information that you’ve
entered for that contact.
■
Use Open App
The example that follows instructs you how to open Internet Explorer. However, you
can open any application on your smartphone using Voice Signal.
1.) Press and hold the Browser/Voice Signal Key for two seconds. The Smartphone
prompts “Please say a command,” and a list of commands appears in the display.
2.) Say “Open Internet Explorer” at a distance of 3-12 inches from the microphone.
3.) Internet Explorer opens and is directed to the last web page visited.
■
Voice Signal Settings
You can adjust the settings and preferences for Voice Signal by opening Voice Signal
Setup from the Home Screen. In the Voice Signal Setup menu you can train, edit, and
delete Quick Dial entries, adapt the Digit Dial feature, turn the “Did you say?” choice
lists on and off, adjust speed and accuracy, and select applications for launching
by voice.
Page 11

ENHANCED SERVICES
Voice Gear
With Voice Dialing, you can make calls with just the sound of your voice.
■
Press #84 SEND.
■
Say “Call Someone.”
■
Say the person’s name or number.
Service not available in all areas. Usage charged at subscription rates or per call, plus airtime fees.
When it comes to keeping in touch, your new Smartphone with Verizon Wireless service is
all you’ll ever need. Nonetheless, here are some great ways to accessorize your Smartphone.
HANDS-FREE VEHICLE KITS AND HEADSETS
Headsets plug directly into your Smartphone and include a microphone and earpiece.
VEHICLE POWER CHARGERS AND HOME/OFFICE CHARGERS
Use your car’s battery to power your Smartphone. Some home/office chargers can charge
two batteries at the same time and offer hands-free ability.
ADDITIONAL BATTERIES
For those instances when your first battery runs out and you need additional usage time.
THREE WAYS TO ACCESSORIZE
■
Visit our Communications Stores.
■
Go to verizonwireless.com, click on Accessories.
■
Try our Accessories Hotline at 1.866.VZ GOT IT.
▲
▲▲▲
ACCESSORIES
Page 12

SM
Directory Assistance: 411 SEND (charges apply)
MAY WE HELP YOU?
 Loading...