

Page 1

SCH-i600 Series
Portable Digital Dual Band
Telephone
User Guide
Please read this guide before operating your
phone, and keep it for future reference.
Page 2

Intellectual Property
All Intellectual Property, as defined below, owned by or which is
otherwise the property of Samsung or its respective suppliers relating
to the SAMSUNG Phone, including but not limited to, accessories,
parts, or software relating thereto (the “Phone System”), is
proprietary to Samsung and protected under federal laws, state laws,
and international treaty provisions. Intellectual Property includes, but
is not limited to, inventions (patentable or unpatentable), patents,
trade secrets, copyrights, software, computer programs, and related
documentation and other works of authorship. You may not infringe
or otherwise violate the rights secured by the Intellectual Property.
Moreover, you agree that you will not (and will not attempt to) modify,
prepare derivative works of, reverse engineer, decompile,
disassemble, or otherwise attempt to create source code from the
software. No title to or ownership in the Intellectual Property is
transferred to you. All applicable rights of the Intellectual Property
shall remain with SAMSUNG and its suppliers.
Samsung Telecommunications America (STA), Inc.
Headquarters Customer Care Center
1130 E. Arapaho Road 1601 E. Plano Parkway, Suite 150
Richardson, TX 75081
Tel: 972.761.7000 Toll Free Tel: 1.888.987.HELP (4357)
Fax: 972.761.7001 Fax: 972.761.7001 and 972.761.7501
Internet Address: http://www.samsungusa.com
Verizon Customer Care
verizonwireless.com is open 24 hours a day for customer service,
general information, even shopping. But just in case, be sure to keep
the following numbers handy.
Customer Service (6am–11pm): *611 SEND
24-Hour Technical Support (24 hrs.): *611 SEND
Plano, TX 75074
Page 3

©2003 Samsung Telecommunications America, Inc. All rights
reserved. No reproduction in whole or in part allowed without prior
written approval. Samsung is a registered trademark of Samsung
Electronics America, Inc. and its related entities.
Printed in South Korea, GH46-00050A
Openwave
RSA® is a registered Trademark RSA Security, Inc.
T9 text input software Copyright © 1999 - 2003. Tegic
Communications Corporation. All rights reserved.
Microsoft, ActiveSync, MSN, Outlook, Windows, the Windows logo,
and Windows Media are either registered trademarks or trademarks
of Microsoft Corporation in the United States and/or other countries
® is a registered Trademark of Openwave, Inc.
Disclaimer of Warranties; Exclusion of Liability
EXCEPT AS SET FORTH IN THE EXPRESS WARRANTY
CONTAINED ON THE WARRANTY PAGE ENCLOSED WITH THE
PRODUCT, THE PURCHASER TAKES THE PRODUCT "AS IS",
AND SAMSUNG MAKES NO EXPRESS OR IMPLIED WARRANTY
OF ANY KIND WHATSOEVER WITH RESPECT TO THE
PRODUCT, INCLUDING BUT NOT LIMITED TO THE
MERCHANTABILITY OF THE PRODUCT OR ITS FITNESS FOR
ANY PARTICULAR PURPOSE OR USE; THE DESIGN,
CONDITION OR QUALITY OF THE PRODUCT; THE
PERFORMANCE OF THE PRODUCT; THE WORKMANSHIP OF
THE PRODUCT OR THE COMPONENTS CONTAINED THEREIN;
OR COMPLIANCE OF THE PRODUCT WITH THE
REQUIREMENTS OF ANY LAW, RULE, SPECIFICATION OR
CONTRACT PERTAINING THERETO. NOTHING CONTAINED IN
THE INSTRUCTION MANUAL SHALL BE CONSTRUED TO
CREATE AN EXPRESS OR IMPLIED WARRANTY OF ANY KIND
WHATSOEVER WITH RESPECT TO THE PRODUCT. IN
ADDITION, SAMSUNG SHALL NOT BE LIABLE FOR ANY
DAMAGES OF ANY KIND RESULTING FROM THE PURCHASE OR
USE OF THE PRODUCT OR ARISING FROM THE BREACH OF
THE EXPRESS WARRANTY, INCLUDING INCIDENTAL, SPECIAL
OR CONSEQUENTIAL DAMAGES, OR LOSS OF ANTICIPATED
PROFITS OR BENEFITS.
.
Page 4

Page 5

Contents
Introduction ...............................................................................1
SCH-i600 features .....................................................................1
SCH-i600 closed view ...............................................................2
SCH-i600 open view ..................................................................3
Battery and accessories...........................................................4
Low battery indicator ................................................................. 4
Install the battery ....................................................................... 4
Remove the battery ................................................................... 5
Charge the battery..................................................................... 5
Getting Started ..........................................................................6
Antenna ..................................................................................... 6
Turn your Smartphone on.......................................................... 6
The SCH-i600 display................................................................ 6
The Home Screen .................................................................... 6
Display screen ........................................................................... 7
Icons.......................................................................................... 8
Your Smartphone’s keypad ....................................................... 9
Hot keys................................................................................... 10
Set up Voicemail...................................................................... 13
Contact Customer Care........................................................... 13
Make and answer calls ...........................................................14
Make a call from your Contacts list.......................................... 14
Answer Calls............................................................................ 15
Use the speakerphone in a call ............................................... 15
Navigate menus ......................................................................16
Navigate using shortcuts ......................................................... 16
Optional SD Card ....................................................................17
Transfer data to the SD Card from your computer .................. 17
Use the SD Card ..................................................................... 19
Settings ....................................................................................20
Call Options............................................................................. 20
Sounds .................................................................................... 21
Profiles..................................................................................... 22
Home Screen........................................................................... 24
About ....................................................................................... 25
Accessibility............................................................................. 26
1
Page 6

Data Connections.....................................................................27
Date and Time..........................................................................28
Owner Information....................................................................29
Power Management .................................................................30
Regional Settings .....................................................................31
Remove Programs ...................................................................32
Security ....................................................................................33
Phone Settings.........................................................................34
TTY/TDD ..................................................................................35
Your Personal Digital Assistant ............................................36
Calendar...................................................................................36
Contacts ...................................................................................38
Program Speed Dial numbers ..................................................42
Microsoft® ActiveSync® ........................................................44
Minimum PC requirements....................................................... 44
Install ActiveSync .....................................................................45
Upload and access media files.................................................47
Use ActiveSync via IR ..............................................................49
Partnerships ............................................................................58
Create a New Partnership ........................................................58
Text, symbols, and numbers .................................................59
Enter text using T9 ...................................................................59
Enter text using Multi-tap..........................................................61
Enter numbers..........................................................................62
Messaging ...............................................................................63
Voicemail..................................................................................63
SMS Text Messages ................................................................63
E-mail .......................................................................................66
Voice Signal ............................................................................72
Voice Signal Features ..............................................................72
Understanding Roaming ........................................................77
Roaming...................................................................................77
Roaming Options......................................................................77
Call History ..............................................................................78
View your Call History ..............................................................78
Caller ID ...................................................................................82
Call Waiting ..............................................................................82
Three-way Calling ....................................................................83
Tasks........................................................................................84
2
Page 7

Create a new task.................................................................... 84
Mark a Task complete ............................................................. 84
Activate a completed task........................................................ 85
Delete a Task .......................................................................... 85
Voice Notes .............................................................................86
Make a recording..................................................................... 86
Rename a recording ................................................................ 87
Other Applications ..................................................................88
Pocket Internet Explorer.......................................................... 88
MSN Messenger...................................................................... 90
My Text.................................................................................... 95
Windows® MediaTM Player 8 for Smartphone ....................... 96
Solitaire.................................................................................... 98
The Accessories menu...........................................................99
Calculator ................................................................................ 99
Wireless Link ......................................................................... 100
Infrared Receive .................................................................... 100
Modem link ............................................................................ 102
Portable Keyboard (optional accessory)................................ 104
Warranty ................................................................................114
STANDARD LIMITED WARRANTY ...................................... 114
Index . . . . . . . . . . . . . . . . . . . . . . . . . . . . . . . . . . . . . . . . . . . 121
3
Page 8

4
Page 9

Introduction
Introduction
Congratulations on your purchase of the Samsung SCH-i600.
The SCH-i600 is a Windows Mobile™ based device and is
compatible with Windows Mobile™ Smartphone applications.
The SCH-i600 is an integrated communication device that
allows you to make calls, send and receive e-mail, instant
message friends and family, sync personal information with
your PC, and much more. We ask that you take time to read
this guide and become familiar with this phone’s
many features.
SCH-i600 features
• Large 170 x 220 pixel, 65k color Transflective
TFT screen
• Pocket Outlook
• High speed data (CDMA 2000 1X Technology)
• E911 Capable
• Windows Mobile™ software for Smartphones
• Short Message Service (SMS) Messaging
• Advanced Voice Recognition
• Pocket Internet Explorer
• Secure Digital (SD) Expansion Card Capability
(Supports SDIO cards)
• Wave file, MIDI (Type 0) ring tone support
• Windows
• MSN Messenger
• ActiveSync
®
®
Media Player™ 8 for Smartphone
®
1
Page 10
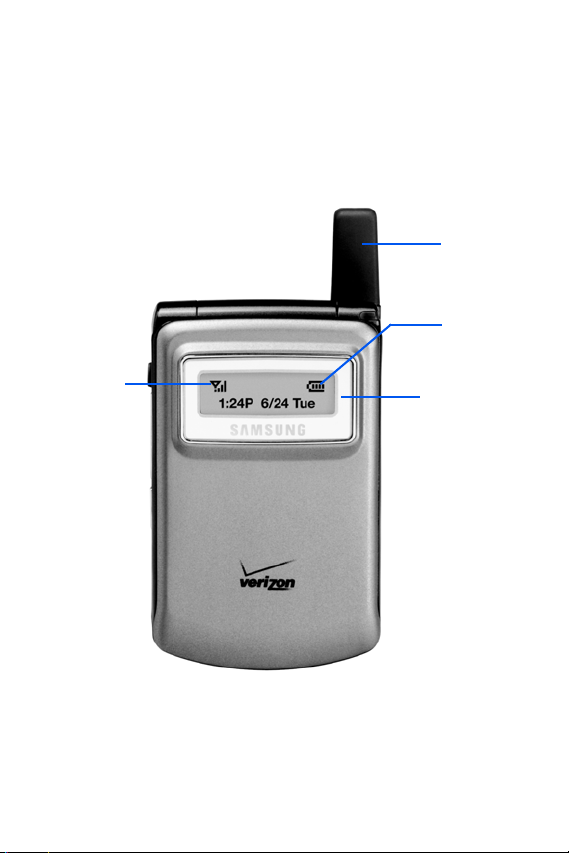
SCH-i600 closed view
Signal
Strength
Indicator
Antenna
Battery
Charge
Indicator
Front
Display
2
Page 11
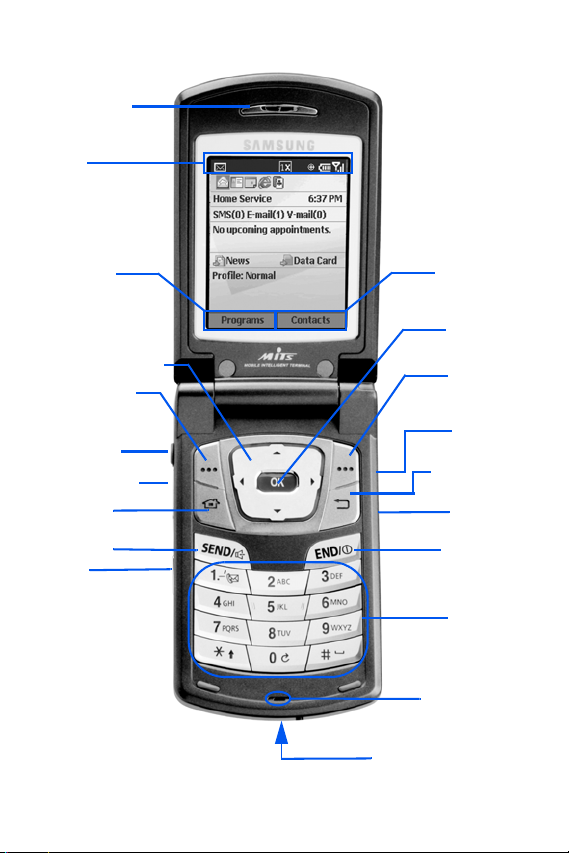
SCH-i600 open view
Earpiece
Icons
SCH-i600 open view
Left Soft
ey Option
avigation Key
Left Soft Key
Headset
Connector
Volume Keys
Home Key
END Key
Voice
Memo Key
Right Soft
Key Option
OK Key
Right
Soft Key
Quick
List Key
Backspace
/Clear Key
Browser
Key
END Key
/Power Key
Alpha-Numeric
Keypad
Microphone
Power/Interface
Connector
3
Page 12
Battery and accessories
The SCH-i600 comes with a standard rechargeable battery,
power accessory, and headset.
The battery for the SCH-i600 can be charged before it is fully
drained without causing damage.
Low battery indicator
An audible alert sounds in standby and talk modes to alert
you of a low battery.
• In standby mode with one bar left on the battery
strength indicator ( ), the Smartphone beeps every five
minutes until it shuts down (approximately 40 minutes for
a standard battery; 100 minutes for an extended battery).
• In talk mode with one bar left on the battery strength
indicator ( ), the Smartphone beeps every minute until
it shuts down (approximately 10 minutes for a standard
battery; 13 minutes for an extended battery).
Long backlight settings, searching for service, vibrate mode,
browser use, and other functions affect talk/standby times.
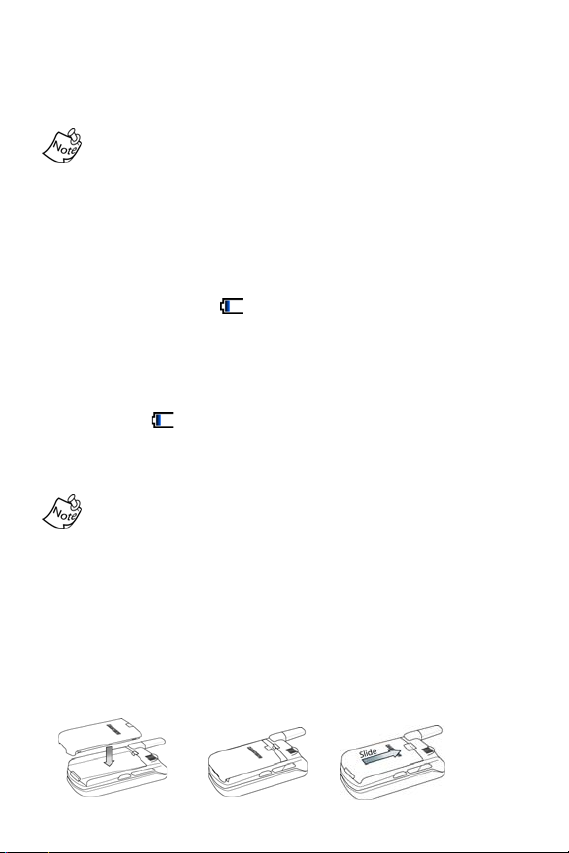
Install the battery
1. Position the battery on back of the Smartphone so the
plastic tabs on the battery line up with the grooves on the
Smartphone.
2. Gently slide the battery toward the top of the
Smartphone until it snaps into place.
a. b. c.
4
Page 13

Battery and accessories
Remove the battery
1. Press the battery release latch and slide
the battery toward the bottom end of the
Smartphone.
2. Lift the battery to remove.
Charge the battery
Connect the Power Accessory
The power accessory allows you to charge your
Smartphone’s battery from any standard 120 VAC wall outlet.
You can also place calls while the battery is charging.
1. With the battery installed, plug the connector from the
power accessory into the Power/Interface connector at
the bottom end of the Smartphone.
2. Plug the AC module for the power accessory
into a standard 120 VAC wall outlet. Your Smartphone
begins charging.
Although you can place calls while charging, the battery
charges faster when the Smartphone is turned off.
Disconnect the Power Accessory
Once your battery is fully charged, disconnect the power
accessory from the Smartphone.
1. Press the release button on top of the power accessory
connector that is plugged into the Smartphone.
2. Pull the connector away from the Smartphone.
3. Disconnect the AC module from the 120 VAC wall outlet.
5
Page 14
Getting Started
Antenna
Avoid touching the antenna while the phone on. Contact with
the antenna affects the quality of your calls and may cause
the phone to operate at a higher power level than necessary.
Turn your Smartphone on
Once you’ve installed and fully charged the battery, press and
hold . Your service provider’s name and logo briefly
appear in the display, followed by the Home Screen.
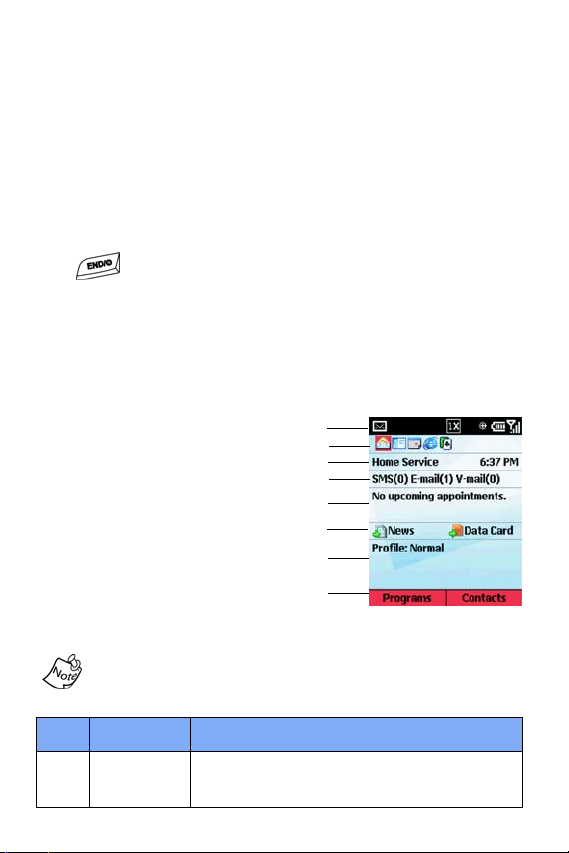
The SCH-i600 display
There are two different types of screen displays for your
Smartphone, the
Home Screen and the Display Screen.
The Home Screen
The Home Screen is the first
screen you’ll see upon power up.
Use the
choose and customize the Home
Screen. The numbered items in
the illustration to the right are
described in more detail in the
Home Screen sub menu to
1)
2)
3)
4)
5)
6)
7)
8)
following table.
The names and descriptions in the following table apply only
to the VZW Full Layout Home Screen. Other layouts are
available through the Home Screen sub menu.
Item Name Function
Indicates such things as signal strength, bat-
1 Title Bar
tery charge status, network mode,
messages, and ringer status.
6
Page 15
Getting Started
Item Name Function
2
Recent
Apps
Most
Service
3
Mode
E-mail/
4
SMS
Pending
5
appoint-
ments
News/
6
Data Card
7Profile
8 Menu Bar
Display screen
Indicates The five most recently used applications. Use the OK/Navigation key to highlight/launch any applications that appear.
Indicates the present mode of service, such
as Home Service or Roaming. The time of
day also appears in the display.
Indicates the number of E-mail or SMS messages in your Inbox.
Indicates names/times of pending appointments.
Access news through Internet Explorer.
Acess the data card through file explorer.
Indicates the currently selected profile.
Displays left and right soft key commands.
1)
The display screen is any screen
other than the Home Screen.
2)
Display screen format does not
change. However, Title Bar and
Menu Bar content change
according to the current menu or
application. The display screen
3)
contains some or all of the elements in the following table.
Item Name Function
Title
1
Bar
Appli-
2
cation
Display
Menu
3
Bar
Indicates the current application, menu, or sub
menu, battery charge status, signal strength,
network mode, and ringer status.
Contains menus, sub menus, Internet content,
and application work areas.
Displays left and right soft key commands.
7
Page 16
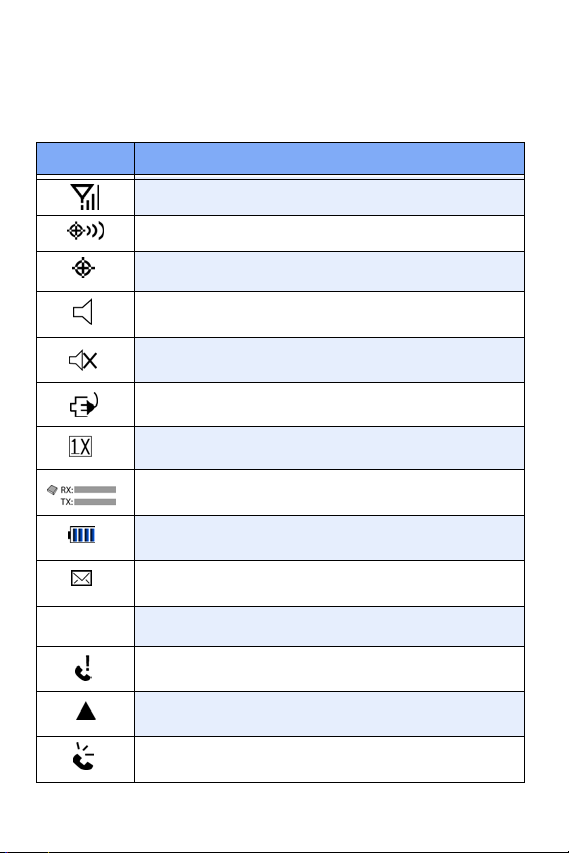
Icons
Various icons may appear in your Smartphone’s display or
Home Screen during operation. The following table lists these
icons as well as their descriptions.
Icon Definition
Signal strength, more bars indicate a better signal.
GPS is on for location.
Global Positioning Service (GPS) for 911 is active.
Indicates the ringer is set to On.
Indicates the ringer for the selected profile is set
to Vibrate or Off.
Indicates your Smartphone is charging.
Indicates that the 1X high speed data protocol
is supported.
Receive and transmit icon that appears in the Home
Screen whenever your Smartphone transmits or
Indicates the battery power level. More bars equal
more power.
You have a new SMS message or E-mail message in
your Inbox.
E-mail(1)
You have a new E-mail message. The number in
parenthesis indicates the number of messages.
You have a missed call. Also, the right soft key
changes from Contacts to Call History.
Your Smartphone is in Roaming mode.
You are in speakerphone mode.
8
Page 17
Getting Started
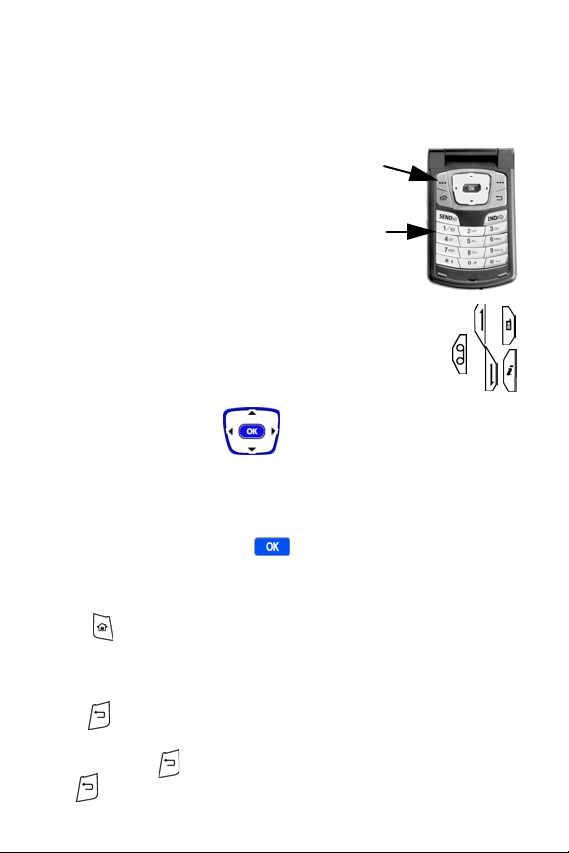
Your Smartphone’s keypad
The keys of the SCH-i600 are functionally divided into
three groups. The Navigation keys, Alpha-numeric keypad,
and Hot keys (on each side of the Smartphone).
1.) Navigation: Scroll through menus
and lists, confirm changes that you’ve
entered, and interact with menus that
appear in the display.
2.) Alpha-numeric:
Enter text, numbers, and symbols.
3.) Hot keys: Located on both sides of the
Smartphone. Used to launch applications,
increase volume, power the Smartphone on
and off, and more.
Navigation/OK key
Use any of the four directional arrows on the Navigation/OK
key to scroll through and highlight items, menus, and
programs in a list or on the Internet. Once an item, link, or
menu is highlighted, press to perform the function
related to the selection.
Home key
Press to return to the Home Screen from any menu, submenu, or application.
Back/Clear key
Press to close the current menu and return to the
previous menu or screen. While in any text edit screen, you
can also press to backspace and clear text. Press and
hold to clear all text in the field.
1.)
2.)
3.)
9
Page 18
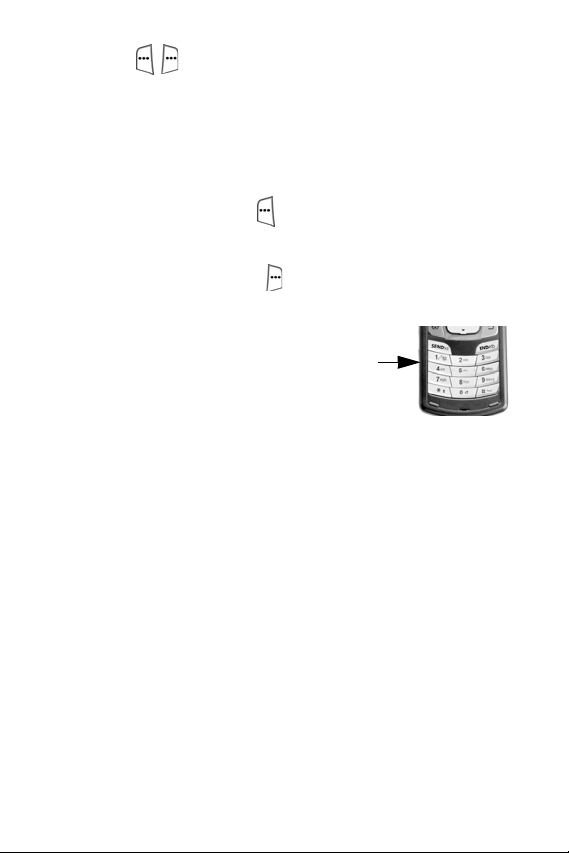
Soft keys
The soft keys are located at the top of your Smartphone’s
keypad, on either side of the Navigation key. The function of
each soft key is defined by what appears above it in the menu
bar, which is the bottom portion of the display screen.
• Press the left soft key ( ) to perform the function that
appears directly above it in the menu bar.
• Press the right soft key ( ) to perform the function that
appears directly above it in the menu bar.
Alpha-Numeric keypad
Use the alpha-numeric keypad to place
calls. You can also enter text, numbers,
and symbols into messages or
information into
Use multi-press as the standard method for entering text, or
T9 to write messages faster.
Contacts using the alpha-numeric keypad.
Hot keys
There are additional keys on both sides of the Smartphone
that perform a variety of useful functions.
10
Page 19

Getting Started
Voice Memo key
Briefly press the Record/Memo key ( ) to display any
recordings that you have made. You have the option of
recording a new memo or playing back an old memo.
• Once the record list appears in the display, press the left
soft key ( )
1. Press the right soft key ( ) Menu to display a pop-up
menu containing
2. Press the up or down arrows ( or ) on the
Record to record a new memo.
Play, Record, Rename, or Delete.
Navigation key to highlight your selection.
3. Press to confirm your choice.
Volume Up/Down keys
Press and release the up or down volume keys to adjust
earpiece volume from any screen.
Internet/Voice Signal key
Briefly press the Internet/Voice Signal key ( ) to launch
Internet Explorer and go to the most recently visited web
page. Press and hold until you hear a tone, then release it
to launch
numbers, open applications, look up contacts, and much
more using voice recognition technology.
Voice Signal. Voice Signal enables you to dial
11
Page 20
Quick List key
1. Briefly press the Quick List key ( ) to display the
functions listed in the following table.
Tip: Press and hold the Quick List key while the flip is closed to turn on the backlight for the front LED display.
Tip: Press and hold the Quick List key while the flip is open to turn the Radio function on or off. Radio functionality refers to the RF capabilities of your Smartphone. With the radio function off, you cannot place or receive calls.
Function Description
Set your Smartphone to lock after a specified
Device lock
Key lock
Radio off
Normal
Silent
Meeting
Loud
More...
period of time. You’ll be asked to set and confirm a password to enable this feature.
Lock your Smartphone’s keypad to prevent
accidental dialing. Press the soft key Unlock,
then press
phone’s keypad.
Turn the RF transmitting capabilities of your
Smartphone on or off, enabling you to use
your Smartphone’s PDA capabilities in areas
where phone use is prohibited.
Selects the Normal volume profile.
Selects the Silent volume profile.
Selects the Meeting volume profile.
Selects the Loud volume profile.
Displays the additional profiles of 1 Headset
and 2 Speakerphone.
to unlock your Smart-
2. Press the up or down arrows ( or ) on the
navigation key to scroll through the functions.
3. Once a function is highlighted, press the left soft key ( )
to enable the function.
12
Page 21

Getting Started
Set up Voicemail
All unanswered calls to your Smartphone are sent to
voicemail, even if your Smartphone is turned off. Therefore,
you’ll want to set up your voicemail and personal greeting as
soon as you activate your Smartphone. Your service provider
has assigned your voicemail number to the key.
1. Press and hold to dial your voicemail. *86 and
Calling... appear in the display.
2. When the system answers, enter your password then
press .
3. Follow the system prompts to set up your voicemail.
You can also press , , , then to dial
voicemail.
Contact Customer Care
verizonwireless.com is open 24 hours a day for customer
service, general information, even shopping. But just in case,
be sure to keep the following numbers handy.
• Customer Service (6am–11pm): *611 SEND
• 24-Hour Technical Support (24 hrs.): *611 SEND
13
Page 22
Make and answer calls
1. At the Home Screen, enter the number you wish to call
using the keypad.
2. Press .
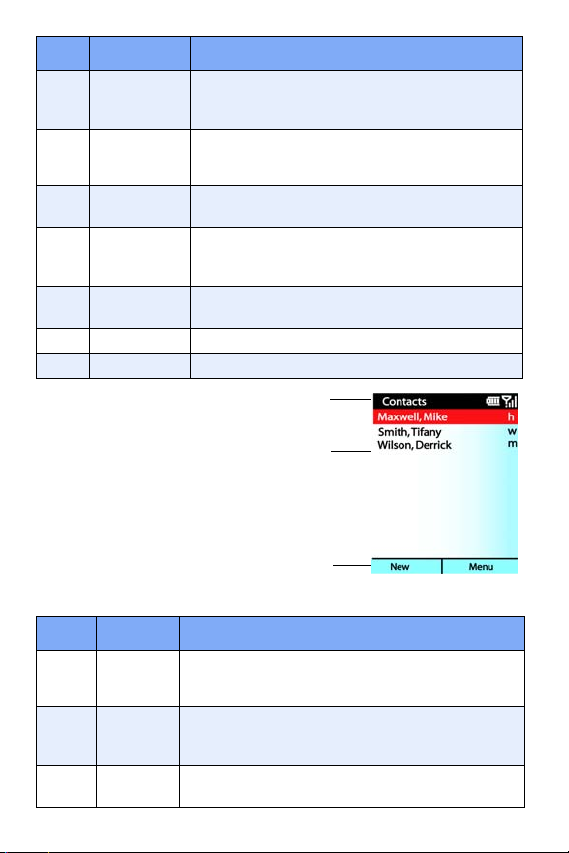
Make a call from your Contacts list
Contacts are entries that you create to store names,
numbers, and other information for people or groups of
interest. If you’ve already entered information into your
Contacts list, you can recall and dial the contact easily. See
“Contacts” on page 38 for information on creating contacts.
1. At the Home Screen, press the right soft key Contacts.
2. Press or until the contact that you wish to call
is highlighted.
Tip: To quickly locate a name, press (or multi-press) any key on the keypad that corresponds to the first letter of the contact’s name.
3. When the desired contact is highlighted, press .
Details for the contact appear in the display.
4. If the entry contains more than one number, use
or to highlight the desired number.
5. Press or to call the number.
14
Page 23
Make and answer calls
Answer Calls
1. Make sure that the Smartphone is turned on.
2. When you receive an incoming call, the Incoming screen
appears in the display. press
Reject to silence the ringer and let the call go
Accept to answer the call or
to voicemail.
Use the speakerphone in a call
Speakerphone amplifies the caller’s voice and routes it
through the speaker on back of the handset. You can then
place your Smartphone nearby and converse hands free.
1. While in a call, press the right soft key ( ) Menu. A pop-
up menu appears in the display.
2. Use the navigation key to highlight Speakerphone, then
press . The speakerphone icon ( )appears in the
upper portion of the display. You can now hear the
person you are calling over the speaker.
Tip: Press and hold while in a call to activate the speakerphone.
15
Page 24
Navigate menus
Navigation of your Smartphone’s menus and sub-menus is
similar to that of a Windows-based PC.
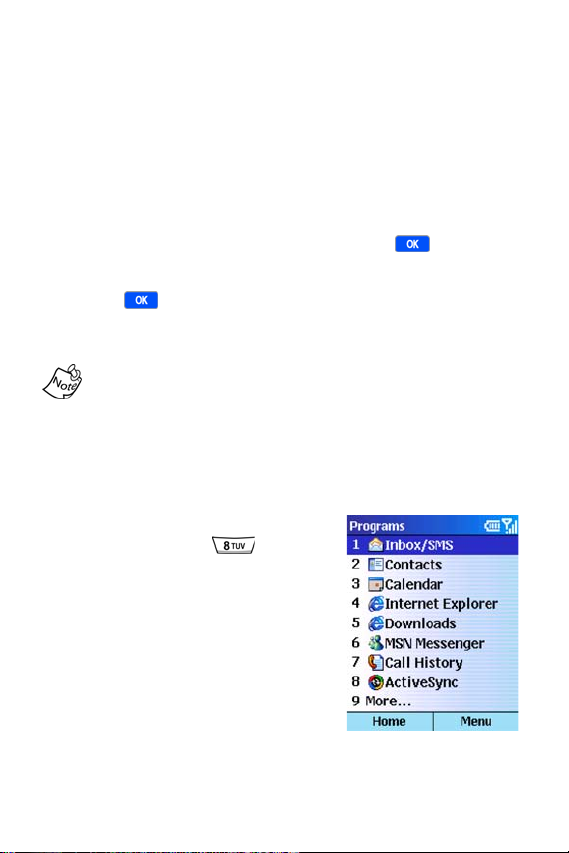
1. Press the left soft key, labeled Programs at the Home
Screen.
2. Use the navigation key to scroll through the menus. To
move to the next page of menus, ensure
highlighted (when available), then press
3. Once you arrive at a the desired menu or sub menu,
press .
Navigate using shortcuts
Due to dynamics of i600 menus, a list of menus and sub
menus (along with their corresponding menu numbers) is not
provided in this user guide.
• You can also shortcut to a menu by pressing the left soft
key
Programs, and then the corresponding menu and sub
menu numbers.
For example, press the left soft key
Programs, then press to
launch
ActiveSync.
More... is
.
16
Page 25
Optional SD Card
Optional SD Card
The open slot on the right side of the Smartphone is for use
with an optional SD (secure digital) card. SD cards come in a
variety of sizes and can hold up to 1 gigabyte of data.
Download and use applications, games, and more using the
enhanced storage capacity of the SD card.
Tip: The SD Slot is an I/O port, which allows Bluetooth,
802.11x, phone attachments, and more, enabling expansion
and making your Smartphone the ultimate communicator.
Transfer data to the SD Card from your
computer
1. Insert the SD Card (label side up) into the slot on the
right side of the Smartphone. The beveled edge should
be facing toward the top of the Smartphone.
2. Insert your Smartphone into the desktop cradle and
synchronize the Smartphone with your PC via
ActiveSync.
3. Open Windows Explorer then highlight the application,
game, or folder that you wish to transfer to the SD Card.
4. Highlight and copy the file(s) or folder(s) to your
computer’s clipboard.
5. Using the ActiveSync
menu, click the
icon to open the
folder.
Device
Explore
Mobile
17
Page 26
6. Double-click on the Smartphone folder to open it up.
7. Double-click the Storage Card folder to open it up. Any
contents of the SD Card appear in the display.
8. Locate the folder or subfolder where you wish to paste
the files that you’ve copied.
9. Press Ctrl-V on your computer to paste the files or folders
that you copied to your computer’s clipboard to the
Smartphone SD Card.
18
Page 27

Optional SD Card
Use the SD Card
Once you’ve transferred files from your computer to the SD
Card using ActiveSync, you can access games or
applications that have been transferred to your SD Card.
For example, if you’ve transferred any multimedia files onto
your SD Card that are compatible with Windows Media
Player, simply open Windows Media Player from the Home
Screen and select the media file that you wish to play. There
is no need to look or browse your Smartphone for the SD
Card. The SD Card is recognized when it is installed.
Remove the SD Card
1. Press in on the card with your fingernail until you hear a
click, then quickly release. The card pops out of the slot
approximately one quarter of an inch.
2. Grasp the exposed section of the card and pull it out with
your fingers.
19
Page 28

Settings
The Settings menu is the control center for a wide variety of
functions. Use the
ring tones, editing profiles, and displaying information about
your Smartphone’s hardware and software.
Call Options
1. At the Home Screen, press the left soft key ( )
Programs, then press until More... is highlighted.
2. Press , then use the navigation key to
highlight
3. Press . Call options is highlighted.
4. Press . The Call Options sub-menus in the following
table appear in the display.
Sub-menu Function
Call answer
Provide voice privacy notifications
Auto answer
Phone number
Voice mail
number
Country code
Area code
Settings menu for such things as changing
Settings.
Pick the method that you wish to answer
calls. Options are Send key, Folder open,
Any key.
Check the box to allow voice privacy notifications to be sent via the network.
Set your Smartphone to answer calls after a
specified period of time. Options range from
Off to 10 seconds.
View the phone number assigned to your
Smartphone.
Enter or view the voice mail number
assigned to your Smartphone.
Enter the country code for your Smartphone.
The country code for the U.S.A. is 1.
Enter the area code specific to your location.
5. Use the navigation key to highlight a sub-menu.
20
Page 29
Settings
Press or to choose from available options.
6.
7. Press the left soft key ( ) Done when finished or press
the right soft key ( )
Settings menu.
Cancel to return to the
Sounds
Use the Sounds sub-menu to set the desired tones for such
things as reminders, new messages, and alarms.
1. At the Home Screen, press the left soft key ( )
Programs, then press until More... is highlighted.
2. Press , then use the navigation key to
highlight
3. Press , then press until Sounds is highlighted.
4. Press , then use or to highlight any of the
sub-menus in the following table.
Sub-menu Function
Ring tone
Reminders
New e-mail
New SMS
New voice
message
New instant
message
New channel
message
Alarm clock
Exclamation
Question
Settings.
Selects the default ring tone for calls.
Selects the ring tone or melody for reminders.
Selects the ring tone or melody for new e-mail.
Selects the ring tone or melody for new
SMS messages.
Selects the ring tone or melody for new
voice messages.
Selects the ring tone or melody for new
instant messages.
Selects the ring tone or melody for new channel messages.
Selects the ring tone or melody for an alarm.
Selects the ring tone or melody for an
exclamation.
Selects the ring tone or melody for a question.
21
Page 30
Sub-menu Function
Warn ings
Keypad control
5. Once you arrive at an option, press or to select the
Selects the ring tone or melody for a warning.
Selects the type of sound emitted when a key
is pressed.
desired tone.
6. Press the left soft key ( ) Done when finished, or press
the right soft key ( )
the
Settings menu.
Menu then select Cancel to return to
Profiles
The Profiles sub-menu allows you to select and modify
available profiles. There are separate profiles for normal use,
when in meetings, when using the headset, and so on. Each
profile controls such properties as ringer volume and ringer
type for when you receive a call, when an alarm sounds, and
other essential functions.
1. At the Home Screen, press the left soft key ( )
Programs, then press until More... is highlighted.
2. Press , then use the navigation key to
highlight
3. Press , then press until Profiles is highlighted.
4. Press , then press or to highlight a profile.
Settings.
22
Headset and Speakerphone profiles cannot be selected
directly. These options are selected automatically when you
plug in a headset or use the speakerphone option.
1 Normal
2 Silent
3 Meeting
4 Loud
Page 31

Settings
5 Headset
6 Speakerphone
5. Once a profile is highlighted, press the left soft key ( )
Done to activate the profile.
When a profile is highlighted, you can also press the right
soft key ( ) Menu to display a pop-up menu from which you
can choose further options such as Edit, Select, Cancel, or
Reset to default. See the following section entitled “Edit a
profile” for information on how to edit profiles.
Edit a Profile
You can change properties such as ring type, notification
method, and volume level for any of the six profiles.
1. Highlight the profile that you wish to edit, then press the
right soft key ( )
display with
2. Press . The list of profile settings in the following
table appear in the display.
3. Press or to highlight the profile setting that you
wish to edit.
Profile setting Function
Name
Ring type
Ring volume
Alarm type
Alarm volume
Notification type
Menu. A pop-up menu appears in the
Edit highlighted.
Rename the profile.
Select from several different ring types
for incoming calls.
Select the default ringing volume for
incoming calls.
Select whether you wish an alarm to
vibrate, vibrate then sound, increase
in volume, and more.
Select the alarm for alarms.
Select how you are notified of incoming messages.
23
Page 32

Profile setting Function
Notification volume
System sound volume
4. Press or to change the selection for the
Select the volume of notifications for
incoming messages.
Set the volume for alerts, keypresses,
and other sounds that are made when
your Smartphone responds to an
action.
highlighted setting.
5. Press the left soft key ( ) Done when finished, or press
the right soft key ( )
Cancel to return to the Profiles
sub-menu.
Home Screen
The Home Screen sub-menu allows you to choose the layout,
color scheme, wallpaper, and other Home
Screen options.
1. At the Home Screen, press the left soft key ( )
Programs, then press until More... is highlighted.
2. Press , then use the navigation key to
highlight
3. Press , then press until Home Screen
is highlighted.
4. Press , then press or to highlight any of the
options in the following table.
Home Screen
setting
Home screen
layout
Color scheme
Settings.
Function
Select from several options that affect the format and layout of your Home Screen.
Select a color schemes for your Home Screen.
24
Page 33

Settings
Home Screen
setting
Background
image
Time out
5.
Once an option is highlighted, press or to display
Function
Select a wallpaper for your Home Screen and
add background images by copying images to
the Smartphone via ActiveSync
Select the desired time interval before the display automatically goes to the Home Screen
(after a period of inactivity).
®
.
and select alternatives for that option.
6. Press the left soft key ( ) Done to save your setting, or
press the right soft key ( )
Profiles sub-menu.
Cancel to return to the
About
The About sub-menu contains information regarding your
Smartphone’s operating system, processor, total and
available memory, and other system properties.
1. At the Home Screen, press the left soft key ( )
Programs, then press until More... is highlighted.
2. Press , then use the navigation key to
highlight
3. Press , then press until the About sub-menu is
highlighted.
4. Press to display information about your
Smartphone.
5. Use the up and down navigation keys ( ) to display
all of the information.
6. Press the left soft key ( ) Done when finished.
Settings.
25
Page 34

Accessibility
Use the Accessibility sub-menu to set system fonts, time-out
intervals between key presses, and other
accessibility options.
1. At the Home Screen, press the left soft key ( )
Programs, then press until More... is highlighted.
2. Press , then use the navigation key to
highlight
3. Press , then press until the Accessibility sub-
menu is highlighted.
4. Press . The accessibility sub-menus in the following
table appear in the display.
Sub-menu Function
System font
size
Multipress
time out
Confirmation
time out
In-call alert
volume
5.
Press or to highlight a sub-menu.
6. Press or to choose between settings for the
highlighted sub-menu.
7. Press the left soft key ( ) Done when finished.
Settings.
Choose the font size for many of your
phone’s functions.
Set the time before the text editor advances to
the next character when using multipress.
Set the time to respond to prompts before the
Smartphone returns to its prior state.
Set the volume of alerts for incoming calls while
in a call.
Although the System font affects the text size of menus and
submenus, it doesn’t control the size of embedded text in
applications such as Internet Explorer or ActiveSync
®
.
26
Page 35

Settings
Data Connections
Use the Data Connections sub-menu to configure connection
properties for the Internet, WAP, and data/fax.
1. At the Home Screen, press the left soft key ( )
Programs, then press until More... is highlighted.
2. Press , then use the navigation key to
highlight
3. Press .
4. Press until the Data Connections sub-menu is
highlighted, then press .
5. Press or to scroll through and highlight any of the
data connection types in the following table.
Sub-menu Function
Data/Fax
mode
Internet
connection
Wor k co nnection
WAP connection
Secure
WAP
connection
Settings.
Set the data/fax mode.
Choose the method for connecting to the Internet
Select the work connection type, if available.
Select the WAP connection type, if available.
Select the secure WAP connection type,
if available.
6. Press or to choose settings for the
highlighted sub-menu.
7. Press the left soft key ( ) Done when finished.
27
Page 36

EDIT CONNECTIONS AND OPTIONS
1. Press the right soft key ( ) Menu while in the Data
Connections
sub-menu to display a pop-up menu
containing the following.
Pop-up
menu item
Edit
Connections
Options
Cancel
2. Use the navigation keys to choose your setting.
3. Press the left soft key ( ) Done when finished. You’re
returned to the
Function
Choose your dial-up service provider.
Choose your VPN (Virtual Private Networking)
connection for service.
Choose your proxy connection.
Choose the number of times your Smartphone
attempts to redial the number for your
service provider.
Choose the amount of idle time for your connection before the session is terminated.
Choose between your Corporate Network, the
Internet, a secure or unsecure WAP network.
Cancel and return to the Settings menu.
Data Connections sub-menu.
Date and Time
Use the Date and Time sub-menu to set your time zone, date,
time, turn the alarm on and off, and to set a recurring
alarm time.
1. At the Home Screen, press the left soft key ( )
Programs, then press until More... is highlighted.
2. Press , then use the navigation key to
highlight
Settings.
28
Page 37

Settings
Press , then press until the Date and Time sub-
3.
menu is highlighted
4. Press , then press to highlight any of the options
in the following table.
Tip: When setting the time, press any alpha-numeric key at the AM or PM indicator to switch from AM - PM, or PM - AM.
Date and
time option
Time zone
Date
Time
Alarm
Alarm time
5. Use , , or the keypad to change values for the
Function
Set the time zone.
Set the date.
Set the time.
Turn the alarm on or off.
Set the time that you wish the alarm to come on.
highlighted option.
6. Press the left soft key ( ) Done when finished or the
right soft key ( )
Cancel to return to the Settings menu.
Owner Information
Use the Owner Information screen to enter personal
information and notes.
1. At the Home Screen, press the left soft key ( )
Programs, then press until More... is highlighted.
2. Press , then use the navigation key to
highlight
3. Press , then press until the More... sub-menu is
highlighted.
4. Press . Owner Information is highlighted.
Settings.
29
Page 38

5. Press , then press or to browse and highlight
the
Name, Telephone number, E-mail address, and Notes
fields.
6. Once a field is highlighted, use the keypad to enter
information for the field.
7. Press the left soft key ( ) Done when finished.
Power Management
Use the Power Management sub-menu to view the status of
the main battery, set the backlight time-out, and perform other
functions to regulate your Smartphone’s power usage.
1. At the Home Screen, press the left soft key ( )
Programs, then press until More... is highlighted.
2. Press . Settings is highlighted.
3. Press , then press until More... is highlighted.
4. Press , then press until Power Management
is highlighted.
5. Press . The options listed in the following table
appear in the display.
Option Function
Main battery
Brightness
level
Backlight
time out
Power saving time out
In-call screen
time out
View remaining battery power.
Set the brightness level of the display.
Set the amount of time the display screen backlight remains illuminated after a period
of inactivity.
Set the amount of time before the display screen
goes blank after a period of inactivity.
Set the amount of time before the display screen
goes blank while in a call.
30
Page 39

Settings
Press or to highlight an option.
6.
7. Once the desired option is highlighted, press or to
change settings for the option.
8. Press the left soft key ( ) Done when finished.
Regional Settings
You can customize language, date style, number, time and
currency format options using
1. At the Home Screen, press the left soft key ( )
Programs, then press until More... is highlighted.
2. Press , then use the navigation key to
highlight
3. Press , then press until the More... sub-menu
Settings.
is highlighted.
4. Press , then press until Regional Settings
is highlighted.
5. Press . The options listed in the following table
appear in the display.
Option Function
Language
Locale
Short
date style
Long
date style
Time
format
Positive
number
Set the default language.
Set the local language for your Smartphone. For
example: US English or UK English.
Choose how the short date appears in the display.
Choose how the long date appears in the display.
Set the format for the Home Screen clock.
Choose the decimal type and other settings for positive numbers.
Regional Settings submenu.
31
Page 40

Option Function
Negative
number
Positive
currency
Negative
currency
6. Press or to highlight an option.
7. Press to view available settings for the
Choose the decimal type and other settings for negative numbers.
Choose the positive currency symbol, position,
and more.
Choose the positive currency symbol,
position, and more.
highlighted option.
8. Press or to scroll between settings.
9. Press or to change the highlighted setting.
10. Press the left soft key ( ) Done when finished.
Remove Programs
To free up more space, you can remove programs that you’ve
downloaded from your Smartphone.
1. At the Home Screen, press the left soft key ( )
Programs, then press until More... is highlighted.
2. Press , then use the navigation key to
highlight
3. Press , then press until More... is highlighted.
4. Press , then press until Remove Programs
is highlighted.
5. Press . Any programs that you’ve downloaded
appear in the display.
6. Press until the program that you wish to remove is
highlighted.
Settings.
32
Page 41

Settings
Press the right soft key ( ) Menu. A pop-up menu
7.
appears in the display with
8. Press . The program is removed and a confirmation
Remove highlighted.
message appears in the display.
Security
The Security sub-menu allows you to define phone lock
settings, to enter special numbers, reset your Smartphone,
and initialize the memory.
1. At the Home Screen, press the left soft key ( )
Programs, then press until More... is highlighted.
2. Press , then use the navigation key to
highlight
3. Press , then press until More... is highlighted.
4. Press , then press until Security is highlighted.
5. Press , then press to highlight any of the options
in the following table.
Option
Enable Phone
Lock
Emergency
Numbers
Phone Reset
Settings.
Function
Define the period of inactivity before your
Smartphone locks. You’ll need to create and
confirm a password in this sub-menu before
Phone Lock can be enabled.
Enter up to three Emergency Numbers.
Default Emergency Numbers are 911, *911,
and #911. Emergency Numbers can be
dialed even while the Smartphone is locked.
Enter your Phone Lock password to reset the
Smartphone to default values. This affects all
settings for your Smartphone. The default
password is the last four digits of your telephone number unless Phone Lock password
is set.
33
Page 42

Option
Initialize
Memory
6. Once the desired option is highlighted, press to
Function
Enter your Phone Lock password to re-initialize the memory in your Smartphone.
enter that option’s sub-menu.
7. Press the left soft key ( ) Done when finished or press
the right soft key ( )
Security sub-menu.
Cancel to return to the
Phone Settings
The Phone Settings sub-menu controls NAM and roam
settings, alerts for reminding you of elapsed time while in a
phone conversation, connect and disconnect alert tones,
voice privacy settings, and more.
1. At the Home Screen, press the left soft key ( )
Programs, then press until More... is highlighted.
2. Press , then use the navigation key to
highlight
3. Press , then press until More... is highlighted.
4. Press , then press until Phone Settings
is highlighted.
5. Press , then press to highlight any of the options
in the following table.
Settings.
Option Function
NAM/
Roam
Mode
NAM1: Select if your Smartphone has one line.
NAM2: Select if your Smartphone has two lines.
34
Page 43

Settings
Option Function
Minute beep: If set to On, your Smartphone beeps
every 60 seconds that you are in a call.
Beep/
Alert
Version
Other
6.
Press to highlight an option.
7. Once the desired option is highlighted, press to
Connect tone: If set to On, a tone sounds when you
connect a call.
Disconnect tone: If set to On, a tone sounds when
you disconnect a call.
View the software versions for your Smartphone and
PDA, as well as the hardware version for the phone.
Voice privacy: Set to Enhanced to hide your name
and number from the recipient of the call.
GPS: Location on fully enables GPS functionality
while 911 only enables GPS functionality for emergency calls only.
Time: Select Auto to update time via the server.
Manual is not updated.
USB: External Data Call or ActiveSync.
enter that option’s sub-menu.
8. Press or to select from the available settings.
9. Press the left soft key ( ) Done when finished.
TTY/TDD
Your Smartphone is fully TTY/TDD compatible. Connect the
TTY/TDD equipment to the headset jack, which is
located on the left side of the Smartphone above the volume
keys. Before you can use your Smartphone with a TTY/TDD
device, you’ll need to enable TTY/TDD functions in the
Smartphone.
1. At the Home Screen, press , , , ,
. The TTY
Settings menu appears in the display.
2. Press to select On, then press the left soft key ( )
Save. TTY/TDD is enabled.
35
Page 44

Your Personal Digital Assistant
The i600 is not just a phone; it is an
integrated communication device. It has
the power of a mobile phone and the
intelligence of a Personal Digital Assistant.
The i600 is loaded with familiar Microsoft
applications, like Pocket Outlook, Pocket Internet Explorer,
®
MSN
Messenger, Windows® Media™ Player 8 for
Smartphone, and ActiveSync
®
. You don't have to learn new
software to use all the phone's features.
Calendar
Calendar allows you to set an appointment for a specific date
and time, and to be reminded of the appointment in advance.
Make a new appointment
1. At the Home Screen, press the left soft key ( )
Programs, then press until Calendar is highlighted.
2. Press to open the Calendar.
3. Press the right soft key( ) Menu. A pop-up menu
appears in the display with
4. Press , then enter the subject of the appointment
using the keypad.
5. After you enter the subject, press until Start date
is highlighted.
6. Enter the start date for the appointment using the
keypad, then press until
New highlighted.
Start time is highlighted.
®
pocket
36
Tip: To change from AM to PM (or vice versa), press any key
on the keypad when AM or PM is highlighted.
Page 45

Your Personal Digital Assistant
Continue to complete the necessary fields. Press or
7.
to move between fields.
8. Press the left soft key ( ) Done when finished or the
right soft key ( )
Cancel to return to the
previous menu.
Weekly, Monthly, and Agenda Views
Calendar offers the convenience of three different views.
Cycle between views by pressing the left soft key’s current
label at the
Calendar main screen. Use the navigation keys to
highlight specific dates or times in each view.
• Week view is a list of the appointments for the week.
•
Month view is an overview of the current month, with one
week at a time.
•
Agenda view is a monthly view of the current month
Calendar options
You can define your calendar’s weekly starting day (Sunday
or Monday), length of the week view, whether you wish the
week numbers to be visible in monthly view, and the default
amount of time that you wish to be reminded for an
appointment in advance.
1. At the Home Screen, press the left soft key ( )
Programs, then press until Calendar is highlighted.
2. Press to open the Calendar.
3. Press the right soft key ( ) Menu. A pop-up menu
appears in the display with
New highlighted.
37
Page 46

4. Press until Options is highlighted, then press .
The options listed in the following table appear in
the display.
Option Function
First day of the
week
Week view
Month view
Set reminders
5. Press or to browse the list of options.
6. Once an option is highlighted, press or to change
Choose between a Sunday or a Monday start
date.
Choose between a 5 or 7 day week.
Choose to have week numbers visible in the
Month view.
Choose the default amount of time that you
wish to be reminded of an appointment in
advance.
your preferences for that option.
7. Press to select a check box, if necessary.
8. Press the left soft key ( ) Done when finished or the
right soft key
Cancel to return to the previous menu.
Contacts
Your Smartphone can store contact information that contains
over fourty-three elements, ranging from the name and
number to details as such as personal web page and job title.
Make a new contact
1. At the Home Screen, press the right soft key
()
Contacts.
2. Press the left soft key ( ) New. The contact form
containing the elements listed in the following table,
appears in the display.
38
Page 47

Your Personal Digital Assistant
Press to page down and view all elements of the
3.
form. Use the keypad to enter text and data.
First name Home fax City ZIP
Last name Assistant phone State/Province Country
Work
phone
Mobile
phone
Home
phone
Email Web page City Spouse
Work2
phone
Home2
phone
Categories Department Country
Pager Company Other address
Radio phone ZIP Notes
E-mail2 Country Birthday
E-mail3 Home address
File as State/Province Children
Job title ZIP Assistant
Street
street
Anniversary
Car phone Office address:
Work fax State/Province
4. Press the right soft key ( ) Menu to display a pop-up
Street
City
menu where you can insert a pause, insert a wait, or
Cancel and return to the Contacts list.
5. Press the left soft key ( ) Done when finished.
39
Page 48

View Contacts
1. At the Home Screen, press the right soft key
()
Contacts. If you’ve entered any contact information,
a list of contacts appears in the display.
2. Press or to browse the contact list.
3. When the desired contact is highlighted, press to
view details about the contact.
Beam a contact via IR
You can beam contact information to a compatible device via
the infrared port. The distance between the two devices must
be unobstructed and within a range of 3 inches to 3 feet. Also,
ensure both devices have infrared reception enabled.
1. At the Home Screen, press the right soft key
()
Contacts.
2. Use and to browse the contact list. When the
contact that you’d like to beam via IR is highlighted,
press the right soft key ( )
3. Press until Beam Contact is highlighted, then
Menu.
press .
4. Align the IR ports of both devices and press the left soft
key ( )
Beam. The contact is sent to the other device via
IR and a confirmation message appears in
the display.
Make a call from Contacts
1. At the Home Screen, press the right soft key
()
Contacts.
2. Press to highlight the contact that you’d like to call,
then press . Your Smartphone dials the contact.
40
Page 49

Your Personal Digital Assistant
Categories
You can assign a contact to one of 3 categories and then filter
(view) the contacts assigned to those categories later. This is
helpful if you have a large number of contacts and only want
to view those of a certain type.
Assign a category to an existing contact
1. At the Home Screen, press the right soft key ( )
Contacts. Your list of contacts appear in the display.
2. Press to highlight the contact of your choice, then
press .
3. Press the left soft key ( ) Edit, then press to scroll
down to
4. Press , then use or to highlight the category
Categories.
of your choice. Available categories are as follows:
•
Business
• Miscellaneous
• Personal
Press once the category of your choice is
5.
highlighted. A checkmark appears next to your selection.
6. Press the left soft key ( ) Done. You’re returned to the
previous menu.
7. Press the left soft key ( ) Done again to return to the
Contacts list.
Filters
Once you’ve assigned a category to a contact, you can filter
them so that only contacts associated with the selected
category appear. This is helpful if you have a large number of
contacts and wish to view only those of a certain type.
41
Page 50

1. At the Home Screen, press the right
soft key
Contacts. Your list of contacts
appear in the display.
2. Press the right soft key ( ) Menu. A
pop-up menu appears in the lower part
of the display.
3. Press until Filter is highlighted, then
press . A list of filters appears in
the display.
4. Press to highlight the filter of your
choice, then press . Contacts
assigned to the selected category
appear in the display.
Program Speed Dial numbers
After you’ve added names or numbers to your Contacts list,
you can then assign a speed dial location (keypad number) to
the contact. Once a speed dial location is assigned, you
simply press and hold the assigned key or keys on the
keypad to dial the number. There are 98 Speed Dial locations
available (2-99), Speed Dial locations 0 and 1 are reserved
and not available for assignment.
1. At the Home Screen, press the right soft key Contacts.
If Call History appears as the right soft key (instead of
Contacts), this means that you have a missed a call. Press
the right soft key Call History and view the number to clear
Call History from the Home Screen.
2.
Use the navigation key to highlight the contact that
contains the number you wish to assign to speed dial.
3. Once the contact is highlighted, press .
42
Page 51

Your Personal Digital Assistant
Use the navigation key to highlight the number that you
4.
wish to assign to speed dial.
5. Press the right soft key Menu, Add Speed Dial
is highlighted.
6. Use the navigation key to highlight the Keypad
assignment
7. Use the navigation key to display available (open)
field.
keypad locations.
8. Once the desired keypad location appears in the display,
press the left soft key
Done to assign the number to the
speed dial key.
Use Speed Dial (One-Touch Dialing)
• At the Home Screen, press and hold the key to which
you’ve assigned the Speed Dial number. The number
is dialed.
Use Speed Dial (Two-Touch Dialing)
If you’ve assigned a number a two-digit location (such as 10
or 12), the method for speed dialing the number varies from
One-Touch Dialing.
1. At the Home Screen, press and release the first number
of the Speed Dial location.
2. Press and hold the second number of the Speed Dial
location until the number is dialed.
43
Page 52

Microsoft
Once ActiveSync is installed on a desktop/laptop PC and
your SCH-i600, you can use it to synchronize data between
the two devices. ActiveSync is already installed on your
Smartphone, but you’ll have to install it on your PC before you
can exchange information between the two devices.
Important! Do not attach the USB cable until ActiveSync is installed on the PC.
®
ActiveSync
®
Minimum PC requirements
ActiveSync comes with your Smartphone on a CDROM.
Following are the minimum resources that must be present
on your PC before you can install ActiveSync:
• Microsoft Windows XP, Windows 2000, Windows
Millennium Edition, Windows NT Workstation 4.0 with
SP6 or later, or Windows 98
• Microsoft Outlook 98 or later required for
synchronization to the desktop or portable computer of
e-mail, calendar, contacts, tasks, and notes. (Outlook
2002 recommended)
• Microsoft Internet Explorer 4.01 SP1 or later
• Hard-disk drive with 12 to 65 MB of available hard-disk
space (actual requirements will vary based on selection
of features and user's current system configuration)
• Infrared port or USB port (available for Windows 98,
Windows Me, Windows 2000, and Windows XP only)
• CD-ROM drive
• VGA graphics card or compatible video graphics adapter
at 256 color or later
• Keyboard
• Microsoft Mouse or compatible input device
44
Page 53

Microsoft® ActiveSync®
Install ActiveSync
1. Place the ActiveSync CD in the CDROM drive on your
computer. After a short time
Smartphone
2. Click Start Here.
3. Click Install ActiveSync 3.x.
4. Click Install. The following message appears in
appears in the display.
the display.
5. Click OK. The file download box appears in the display.
6. Click Open. The Microsoft ActiveSync setup dialogue box
appears in the display.
7. Click Next. You’re prompted to select the installation
folder for ActiveSync.
8. Click Next to install ActiveSync to the default folder, or
click
Change to select a different destination for the
program.
9. If you selected Change, follow the prompts to direct
installation of ActiveSync to the folder of your choice,
otherwise proceed to step 10.
Getting started with your
45
Page 54

10. Click Next. ActiveSync program files are copied to your
hard drive in the default folder.
• After the files are copied to your hard drive, the
Connected
dialogue box appears in the display. Use the
Get
instructions in following connection methods that best
suit your needs to connect your Smartphone and
computer via ActiveSync.
ActiveSync options menu
The ActiveSync options menu allows you to configure the
various applications which allow you to share data between
your Smartphone and PC.
1. At the Home Screen, press the left soft key
()
Programs, then press until ActiveSync
is highlighted.
2. Press , then press the right soft key ( ) Menu. A
pop-up menu appears in the display with
highlighted.
3. Press to highlight Options, then press . The
following menu items appear in the display:
1 Calendar 2 Contacts 3 Inbox 4 Connection 5 PC Settings 6 Schedule 7 Conflicts
4. Press to highlight the menu item of your choice, then
press . The following sections describe Calendar
menu options in more detail.
Connect via IR
46
Page 55

Microsoft® ActiveSync®
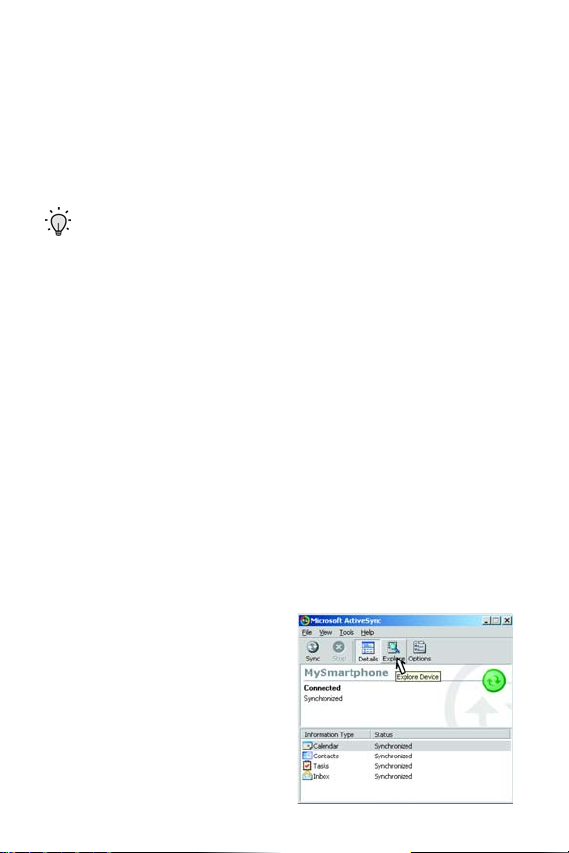
Upload and access media files
Before you can upload .jpg and .wav files to your
Smartphone, you’ll need to create the folders for each file
type (in your Smartphone) using
Windows
Explorer. Once the folders are created and media
files are uploaded to the appropriate folder, the files can be
accessed through the Smartphone user interface.
When saving files via ActiveSync, first verify that enough
space is available on your phone. To view Available
Storage, press the left soft key ( ) Programs, then open
the More, Settings, and About sub menus respectively.
Create media folders on your Smartphone
1. Place your Smartphone in the docking cradle with the flip
open. The Smartphone synchronizes with the computer
and the
the computer’s display.
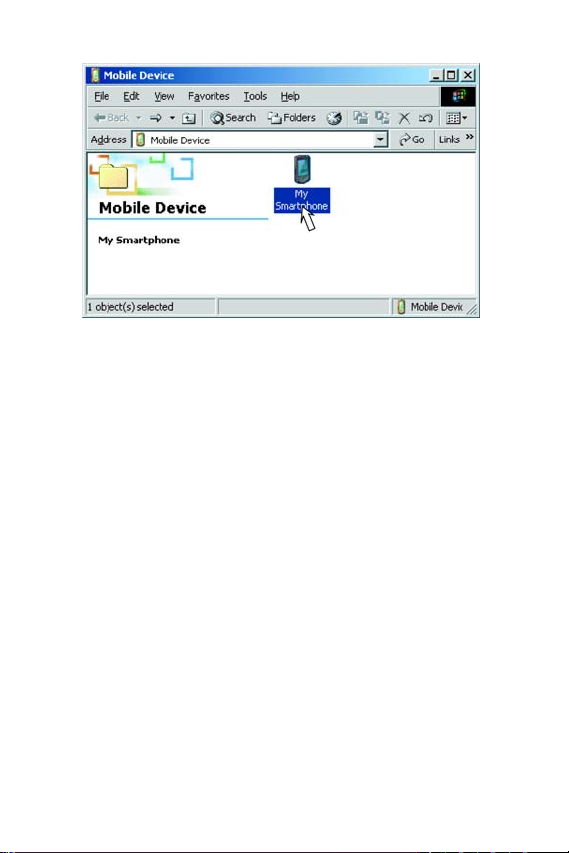
2. Click on the Explore icon. An
Explorer style window opens.
3. Right click on the Smartphone icon
( ), then select
dropdown list. Your Smartphone’s files and folders
appear in the display.
4. Double-click the IPSM folder ( ). Contents of the IPSM
folder appear in the display.
5. Double-click the Application Data folder. Contents of the
Application Data folder appear in the display.
6. Click on the File menu and select New Folder from the
dropdown list.
7. Name the new folder Sounds.
Microsoft ActiveSync application box appears in
Explore from the
ActiveSync and Microsoft
47
Page 56

8. Click on the File menu and select New Folder from the
dropdown list.
9. Name the new folder Home. You are now ready to upload
media files to your Smartphone from your PC.
Upload media files
Once you’ve created the appropriate folders on your
Smartphone using the ActiveSync interface as outlined in the
previous section, you can move the files from the PC to your
Smartphone using Windows
1. Right click on your computer’s Start button and select
Explore. The contents of your computer’s hard drive
appear in the display.
2. Locate and highlight the media files on your computer
that you wish to transfer to your Smartphone, then press
CTRL-C to copy the files to your computer’s clipboard.
3. Locate the Smartphone icon ( ) and explore the
Smartphone’s contents by clicking on the + to the left of
the icon.
• If the file that you copied is a .jpg file, open the
folder on your Smartphone and press
the .jpg file (or files) into the
• If the file that you copied is a .wav file, open the Sounds
folder on your Smartphone to, then press CTRL-V to past
the .wav file (or files) into the Sounds folder.
• The target folder for each media type (.jpg or .wav) in
your Smartphone’s folder hierarchy is as follows:
JPEG files - Mobile Device/Smartphone/IPSM/Application
Data/Home
WAV files
Mobile Device/Smartphone/IPSM/Application Data/Sounds
Explorer.
Home
CTRL-V to paste
Home folder.
48
Page 57

Microsoft® ActiveSync®
Access and use JPEG files
Once you’ve uploaded .jpg files to the appropriate folders on
your Smartphone, you can use the jpeg as a background
image for the Home Screen.
1. At the Home Screen, press the left soft key ( )
Programs, then press , , .
2. Use the navigation key to highlight the selection field
beneath
3. Use the navigation key to display the name of the file
Background image.
previously uploaded to your Smartphone.
4. Press the left soft key Done. The image will now appear
as a background image on your Home Screen.
Access and use WAV files
Once you’ve uploaded .wav files to the appropriate folders on
your Smartphone, you can use the .wav file as a ring tone.
1. At the Home Screen, press the left soft key ( )
Programs, then press , , . The Ring tone
field is highlighted.
2. Use the navigation key to display the name of the .wav
file that you wish to use as a ring tone.
3. Press the left soft key Done. The selected .wav file will
now play whenever you receive an incoming call.
Use ActiveSync via IR
1. At the Home Screen, press the left soft key
()
Programs, then press until ActiveSync
is highlighted.
49
Page 58

2. Press , then press the right soft key ( ) Menu. A
pop-up menu appears in the display with
highlighted.
IR
3. Ensure the IR ports on your Smartphone and computer
Connect via
are facing each other within a distance of 3 inches to 3
feet, then press .
4. After a short time, Connected appears in the display of
your Smartphone. The
New Partnership Wizard appears
in the display of your computer.
5. Select Standard Partnership or Guest Partnership and
click
Next.
Tip: Select Standard Partnership to synchronize Calendar
items or E-mail. Guest Partnership does not allow
synchronization options.
6. Next, you are given the option to synchronize with your
local computer or to synchronize with your local
computer and the Microsoft Mobile Information Server.
You must have access to a Microsoft Mobile Information
Server with Server ActiveSync to synchronize with a server.
You will also need to have the necessary information to
configure your connection with the server. Contact Verizon
Wireless if you don’t have this information at hand.
7.
Select Synchronize with this desktop computer and
click
Next.
Browse your files with ActiveSync
Once you’ve synchronized your Smartphone with your PC,
you can browse the files on your with the ActiveSync
application on your PC.
50
Page 59

Microsoft® ActiveSync®
In the ActiveSync application on your PC, click on the
1.
Explore icon. The Mobile Device folder opens with the
sub folder My Smartphone shown in the display.
2. Double-click on the My Smartphone folder. Several
folders appear in the display.
3. Open the sub folders and view their contents as you
would using Microsoft Explorer.
Smartphone folders
Your Smartphone has file and system folders much like your
PC. Using ActiveSync, you can view these folders and their
contents in the familiar format of a Windows Explorer
environment.
Calendar
The Calendar folder within ActiveSync allows you to configure
settings for the calendar application when you synchronize
your Smartphone with a PC. If this is the first time you’ve
entered the ActiveSync application, you’ll be asked to create
a new partnership when you enable calendar synchronization
(see “Partnerships” on page 58 for more information).
1. At the Home Screen, press the left soft key
()
Programs, then press until ActiveSync
is highlighted.
2. Press , then press the right soft key ( ) Menu. A
pop-up menu appears in the display with
highlighted.
IR
3. Press to highlight Options, then press . 1
Calendar is highlighted.
Connect via
51
Page 60

4. Press . The following options appear in the display.
Synchronize Calendar
Include past:
2 Weeks
5. With Synchronize Calendar highlighted, press to
place a check mark in the box.
6. Press to highlight the Include past: field.
• 1Day
• 3Days
• 1Week
• 2Week
• 1 Month
7. Press or to select from the options listed. Press the
left soft key ( )
Done when finished.
Contacts
The Contacts folder within ActiveSync allows you to select
whether you wish your contacts to be synchronized with the
PC whenever synchronization occurs.
1. At the Home Screen, press the left soft key
()
Programs, then press until ActiveSync
is highlighted.
2. Press , then press the right soft key ( ) Menu.
3. Press to highlight Options, then press .
4. Press to highlight Contacts, then press . The
following appears in the display:
Synchronize Contacts
Press .
5.
6. Press the left soft key ( ) Done when finished.
52
Page 61

Microsoft® ActiveSync®
Inbox
1. At the Home Screen, press the left soft key
()
Programs, then press until ActiveSync
is highlighted.
2. Press , then press the right soft key ( ) Menu.
3. Press to highlight Options, then press .
4. Press to highlight Inbox, then press . The
following appears in the display:
Synchronize Inbox
Include past:
3 Days
Limit e-mail size to:
.5k
5. With Synchronize Inbox highlighted, press to place a
check mark in the box.
6. Press until Include past is highlighted. Include past
allows you to set a time limit on the data that will be
synchronized when you connect with the server.
7. Press or to select one the following options:
3 Days
1 Week
2 Weeks
1 Month
All
8. When finished, press to highlight Limit e-mail size to:
Limit e-mail size to Allows you to limit the size of e-mail
items that are synchronized when you connect with
the server.
53
Page 62

9. Press or to select from the following options:
.5k
1K
5K
All
Header Only
10. Press the left soft key ( ) Done when finished.
Connection
The Connection folder within ActiveSync allows you to enter
and preset information necessary to connect to your server.
1. At the Home Screen, press the left soft key
()
Programs, then press until ActiveSync
is highlighted.
2. Press , then press the right soft key ( ) Menu.
3. Press to highlight Options, then press .
4. Press to highlight Connection, then press . The
options listed in the following table appear in the display.
Option Function
Username
Password
Domain
Save password
Server name
Logging
Enter the username for your account on
the server.
Enter the password for your account on
the server.
Enter the domain information for your server.
Press to check this box. Your password
is memorized each time you synchronize.
Enter the server name, which is furnished by
your service provider.
Enable logging only under the direction of a
Customer Care representative
5. Press until the desired option is highlighted.
54
Page 63

Microsoft® ActiveSync®
Press , , and the corresponding keys on the alpha-
6.
numeric keypad to enter and select information.
7. Press the left soft key ( ) Done when finished.
PC Settings
The PC Settings folder within ActiveSync allows you to set
default settings for the PC when synchronizing to the server.
1. At the Home Screen, press the left soft key
()
Programs, then press until ActiveSync
is highlighted.
2. Press , then press the right soft key ( ) Menu.
3. Press to highlight Options, then press .
4. Press to highlight PC Settings, then press . The
following options appear in the display.
Automatically start sync when connected using:
USB Default
Include PC sync remotely when synchronizing
Connect To:
No partnership created
5. Press to highlight an option.
6. Press , , or to select your preference for the
highlighted option.
7. Press the left soft key ( ) Done when finished.
55
Page 64

Schedule
The Schedule folder within ActiveSync allows you to
synchronize ActiveSync automatically with your computer at
various intervals, whether or not you’re connected to your PC
via cable.
1. At the Home Screen, press the left soft key
()
Programs, then press until ActiveSync
is highlighted.
2. Press , then press the right soft key ( ) Menu.
3. Press to highlight Options, then press .
4. Press to highlight Schedule, then press . The
following options appear in the display.
• When connected to the PC, synchronize with the server
every 5 min, 15 min, 30 min, 60 min, 2 hours, or 4 hours.
• When not connected to the PC, synchronize with the
server every 5 min, 15 min, 30 min, 60 min, 2 hours, or
4 hours.
5. Press to highlight an option, then press select
the check box next to that option.
6. Press to highlight the preferences for that option, then
press or to modify the preferences for the selected
option.
7. Press the left soft key ( ) Done when finished.
56
Page 65

Microsoft® ActiveSync®
Conflicts
The Conflict folder within ActiveSync allows you to globally
define those items that are replaced when there is a
data conflict. A data conflict occurs when information has
changed on your Smartphone or PC since the last
synchronization.
1. At the Home Screen, press the left soft key
()
Programs, then press until ActiveSync
is highlighted.
2. Press , then press the right soft key ( ) Menu.
3. Press until Options is highlighted, then press .
4. Press until Conflicts is highlighted, then press .
The following options appear in the display.
Replace on device - Replace data on your Smartphone if data on both your Smartphone and the PC has changed since the last synchronization.
Replace on server - Replace data on your PC if data on both your Smartphone and the PC has changed since the last synchronization.
5. Press or to select your Conflicts preference.
6. Press the left soft key ( ) Done when finished.
57
Page 66

Partnerships
A partnership is a set of rules governing file transfer and
synchronization between your Smartphone and PC. There
are two types of partnerships,
• A
Standard partnership is used to synchronize data and
transfer files between your device and the PC.
• A
Guest partnership can only be used to transfer files
between your device and the PC, not synchronize.
Create a New Partnership
After you install ActiveSync and the necessary USB drivers,
you’ll need to create a new partnership.
1. Connect the data cable between your Smartphone and
PC.
2. Double-click on the ActiveSync icon on your computer’s
desktop. If this is the initial launch of ActiveSync,
Partnership
3. Select Standard or Guest partnership and click Next.
4. Enter a unique name for your device and click Next.
5. Select the applications that you wish to synchronize and
click
Your Smartphone and PC begin synchronization. This may
take some time, depending on the amount of information to
be synchronized. When the process is complete, disconnect
the data cable from your Smartphone and close ActiveSync.
appears in the display.
Next, and then click Finish.
Standard and Guest.
New
58
Page 67

Text, symbols, and numbers
Text, symbols, and numbers
You can enter text, numbers and symbols into messages,
form fields, interactive applications, games, and on
the Internet.
Enter text using T9
There are 2 methods for entering text; T9 and Multi-tap. Multitap is the conventional method of entering text, while T9 uses
advanced software to greatly increase writing speed.
Activate T9
• While at any text entry screen, press and hold until
t9, T9, or T9 appears in the upper right corner of
the display.
T9 modes
Each of T9’s three modes is indicated by the following icons
in the upper right corner of the display.
T9 - Uppercase. Any words that you enter will be in uppercase, or all capital letters.
T9 - Initial caps. Only the first word of each sentence is in capital letters.
t9 - Lowercase. Any words that you enter will be in lower case letters.
• To cycle through T9 modes, briefly press while
T9 mode.
in
59
Page 68

Use T9
The fastest and easiest way to enter text into messages is
using
T9 Text Input. To spell a word using T9, you only have to
press one key per letter of the word that you’re spelling. For
example, to spell
following keys only once:
Samsung you would press each of the
It’s best not to look at the screen while writing a word. As you
enter letters, occasionally matches to other words appear in
the display.
The T9 dictionary
Occasionally, the word that appears isn’t the one that you had
in mind. If this happens, simply press (while the word is
underlined) to cycle through available words in the
T9 dictionary.
Enter symbols
1. To enter symbols while writing a word or letter, press and
hold until the
the display.
2. Press , , , or as necessary to highlight the
symbol that you wish to enter into your message.
3. Press the left soft key ( ) Done when the symbol of
your choice is highlighted. The selected symbol is placed
into your message.
Enter punctuation
Symbols screen appears in
• To enter a period while entering text, press .
60
Page 69

Text, symbols, and numbers
Enter spaces after words
• To enter a space after a word, thereby accepting the
word and proceeding to the next word, press
.
Enter text using Multi-tap
Activate multi-tap
• While at any text entry screen, press and hold until
ABC, ABC, or abc appears in the upper right corner of the
display.
Enter text
• The conventional method for entering text is called multi-
tap, which requires up to four key presses for each letter,
depending on the letter that you wish to enter.
• For example, to enter “z,” press four times in
succession. To enter an “a” however, only one press of
is required.
• Once the desired letter appears in the display, pause
briefly until the line beneath the letter disappears.
Continue to enter other letters as desired.
• Press to enter a space and continue on to the
next word.
• Press to enter a period.
61
Page 70

Multi-tap modes
Multi-tap mode is indicated by the following icons in the upper
right corner of the display.
ABC - Uppercase only. Any letters that you enter will be in uppercase, or all capital letters.
ABC - Initial caps. Only the first word of each sentence is in capital letters.
abc - Lowercase. Any words that you enter will be in lower case letters.
• To cycle through multi-tap modes, briefly press
while using multi-tap.
Enter symbols, spaces, and punctuation in T9
• Press and hold until a pop-up menu appears in the
display. Use the navigation key to highlight the symbol or
punctuation to insert into your message, then press the
left soft key ( )
Done. The selected symbol or
punctuation appears in the display.
• Briefly press whenever you want to enter a space
after a letter or word.
Enter numbers
1. Press and hold until 123 appears in the upper right
corner of the display.
2. Enter numbers using the alpha-numeric keypad.
62
Page 71

Messaging
Messaging
Your Smartphone can receive voicemail, SMS, and e-mail
messages. When a new message is received, a tone sounds
and a notification appears in the display.
Message Types
The following types of messages are supported by
your Smartphone.
• Voicemail
• SMS Text
• E-mail
Voicemail
When you receive a new voicemail, a notification appears in
the display. If you have multiple voicemail messages, the
notification displays the number of new or unread
messages received.
Set up voicemail
1. Press and hold to dial the voicemail system.
2. Follow the recorded prompts to set up your voicemail.
Check voicemail
1. Press and hold . Your Smartphone dials the
voicemail system.
2. When you’re connected to the voicemail system,
enter your password and press
3. Follow the recorded prompts to listen to your voicemail.
SMS Text Messages
You can send and receive text messages to other users with
SMS capability. Text messaging, also known as SMS (Short
63
Page 72

Message Service) can be sent from one device to another by
addressing the message to the recipient's phone number.
Create a new text message
Tip: Text messages can be sent to up to 10 people at once.
Simply recall the names from your Contacts list and add
them to the TO: field while composing a message.
1. At the Home Screen, press the left soft key
()
Programs. Inbox/SMS is highlighted.
2. Press , then press the left soft key ( ) New. The
New Message screen appears in the display.
3. Enter the phone number of the recipient in the To: field,
or press the right soft key ( )
highlighted). Press to review and select recipients
from your
4. Press to highlight the Cc: field. Enter the number of
Contacts list.
the person or persons that you wish to copy on
the message.
Tip: Press and hold to cycle between T9, 123, and
Abc modes. Briefly press to cycle between different
options within each mode.
5. Press to highlight the Subj: field. Enter a subject for
the message using the keypad.
6. Press to move the cursor to the message body field.
Enter your message using the keypad.
Menu (Add To: is
64
Tip: Press the right soft key Menu while composing a
message to display several options such as inserting a
short, pre-composed message, and more. See the following
section entitled Text message options for more infor mation.
Page 73

Messaging
Tip: Use T9 text entry to write messages, it’s much faster than the traditional multi-tap method.
7. When you’re finished writing the message, press the
right soft key
8. Press to highlight Send Message and press .
SMS messages are limited to 160 characters. If you send an
SMS message of more than 160 characters, it is broken up
and sent in separate messages until the entire message is
delivered. Charges apply for the delivery of each message
according to your billing plan.
Tip: You can send e-mail messages while in SMS mode. Simply enter the e-mail address of your recipient (instead of the phone number) in the To: field.
Menu.
Text message options
Press the right soft key ( ) Menu while composing a
message to display the options in the following table.
Some options may not be available depending upon your
location within the New Message screen. These options will
appear in a lighter text than other options.
Option Function
Add To
Insert Text
Insert Recording
Message Options
Postpone
Message
Send Message
Add up to ten contacts from your Contacts
list to the recipient field of the message
Insert pre-composed short phrases or
replies into your message
Record a memo and insert it into
your message
Allows you to request a message
delivery notification
Exit composition of the message. The message is saved as a draft in the Drafts folder
Send the message to the recipients in the
To: and Cc: fields
65
Page 74

Option Function
Cancel Compose
Cancels composition of the message
(after confirmation)
E-mail
You can send and receive e-mail to anyone with a valid
e-mail address through the
limited to 160 characters as in the case with SMS
text messages.
E-mail setup
You can set up your Smartphone to connect to any e-mail
account if you have necessary information about the account.
Contact your service provider for setup information specific to
your mobile account. Contact your Internet Service Provider
or look in your computer’s e-mail client for setup information
specific to your home e-mail service.
1. At the Home Screen, press the left soft key
()
Programs. Inbox/SMS is highlighted.
2. Press . The Inbox screen appears in the display.
3. Press the right soft key Menu, then press until Options
is highlighted.
4. Press . A list of Inbox options appear in the display.
5. Press to highlight E-mail Setup, then press .
6. Press the right soft key ( ) Next. The next page of the
E-mail Setup screen appears in the display.
Inbox/SMS menu. E-mail is not
66
Page 75

Messaging
Press to highlight any of the options listed in the
7.
following table.
Option Function
Your name
E-mail address
Server type
8. Once an option is highlighted, press , , or use the
Enter your name using the keypad.
Enter your E-mail address using the keypad.
Press or to select POP3 or IMAP4.
keypad to change or enter information.
9. Press the right soft key ( ) Next to display the next page
of options.
10. Press to highlight any of the options listed in the
following table.
Option Function
Incoming mail
server
Outgoing mail
server
Network
Enter the necessary information furnished by
your service provider.
Enter the necessary information furnished by
your service provider.
Press or to select from the following
options:
The Internet
Secure WAP Network
WAP Net wo rk
My Corporate Network
11. Once an option is highlighted, press , , or use the
keypad to change or enter information.
12. Press the right soft key ( ) Next to display the next
page of options.
67
Page 76

13. Press until the desired option (listed in the following
table) is highlighted.
Option Function
Username
Password
Domain (if necessary)
Save password
14. Once an option is highlighted, press , , , or use
Enter the username for your E-mail account.
Enter the password for your E-mail account.
Enter the domain name for your E-mail
account, if necessary.
Save the password for your E-mail account.
the keypad to change or enter information.
15. Press the right soft key ( ) Next when finished. Setup
complete!
16. Press the right soft key ( ) Finish to complete the
appears in the display.
E-mail setup process.
Send and Receive E-mail
After you’ve gone through the E-mail Setup process, you can
send and receive e-mail messages easily.
1. At the Home Screen, press the left soft key ( )
Programs. Inbox/SMS is highlighted.
2. Press . The Inbox screen appears in the display.
3. Press the left soft key ( ) New to open the New
Message
4. Enter the E-mail address of the recipient in the To: field
using the keypad.
screen.
68
To cycle between text entry modes, press and hold . To
display the Symbols screen (for the @ symbol), press and
hold . Use the navigation keys to highlight a symbol,
then press the left soft key ( ) to insert the symbol into
your message.
Page 77

Messaging
Press to highlight the Cc: field. Use the keypad to
5.
enter the e-mail address of any recipient (or recipients)
that you wish to copy on this e-mail.
6. Press to highlight the Subj: field. Use the keypad to
enter a subject for the e-mail.
7. Press to move the cursor to the message body field.
8. Compose your message using the keypad.
9. Once you’ve finished composing your message, press
the right soft key ( )
Menu. A pop-up menu appears in
the display.
10. Press until Send Message is highlighted, then press
. You’re returned to the
11. Press the right soft key ( ) Menu again. A pop-up menu
Inbox screen.
appears in the display.
12. Press until Send/Receive E-mail is highlighted, then
press . Your Smartphone dials the e-mail server
number and the message is delivered to the intended
recipients.
Postpone a message
You can compose a message and send it later. The message
is saved in the
1. While composing a message, press the right soft
key
2. Press until Postpone Message is highlighted, then
press .
Drafts folder for later use.
Menu.
Saved in Drafts briefly appears in the display.
69
Page 78

Recall and send a postponed message
1. At the Home Screen, press the left soft key ( )
Programs. Inbox/SMS is highlighted.
2. Press . The Inbox screen appears in the display.
3. Press the right soft key ( ) Menu.
4. Press until Show Folders is highlighted, then press
. The
Folders screen appears in the display.
5. Press . Drafts is highlighted.
6. Press the left soft key Select. Any messages saved to the
Drafts folder appear in the display.
7. Press until the message you’d like to recall is
highlighted, then press .
8. Press the left soft key Send. Your message is sent to the
intended recipients.
View folders in your Inbox/SMS menu
The Inbox/SMS menu contains folders similar to the e-mail
application on your PC. You can save messages to these
folders, recall and send them again at a later date, or keep
them for later viewing.
E-mail and SMS messages reside in the same inbox and are
identical in appearance.
1.
At the Home Screen, press the left soft key ( )
Programs. Inbox/SMS is highlighted.
2. Press . The Inbox screen appears in the display.
3. Press the right soft key ( ) Menu.
70
Page 79

Press until Show Folders is highlighted, then press
4.
. The
Folders screen with the contents in the
following table appears in the display.
Folder Description
Messages deleted from other folders are sent
Deleted Items
Drafts
Inbox
Outbox
Sent Items
Tip: If your Smartphone does not respond or send/receive e-
mail, go back to the Home Screen and re-establish an
Internet connection. While the connection is live, go back to
the Inbox/SMS menu and press the right soft key
Menu. Select Send/Receive E-mail from the pop-up menu.
here. You can restore deleted messages,
delete individual messages, or empty the
entire folder altogether.
Postponed messages are sent to the Drafts
folder where they can later be recalled and
sent to the intended recipient. You can edit
the message before sending, or delete the
message, thereby sending it to the deleted
New incoming messages are saved here. You
can delete, reply, forward, mark for download,
or mark the message as read.
Messages are stored in the Outbox until they
are sent. Messages that could not be sent
remain in the Outbox where you can view
and/or delete them later.
Messages that have been sent are stored
here. You can Reply, Forward, Delete, or
Mark as Read.
Messaging
( )
71
Page 80

Voice Signal
Voice Signal is advanced speech recognition software that
can be used to activate a wide-variety of functions on your
Smartphone. Voice Signal software automatically voice
activates all contacts in your Phone Book for voice dialing and
Phone Book searching, no pre-recording or training needed.
Speak phone numbers naturally to dial, and use voice
commands to launch applications and navigate
phone menus.
Voice Signal Features
The following is a list of functions that you can perform using
Voice Signal speech recognition on your Smartphone.
• Digit Dial: Dial by saying the phone number
• Name Dial: Dial by saying any name in your Contacts list
• Quick Dial: Dial by saying custom voice tags for any name in
your Contacts list
• Name Lookup: Open the contact record for any name in your
Contacts list
• Open App: Open any application installed on your device
Digit Dial
Digit Dial allows you to dial any phone number by simply
speaking the digits into the Smartphone. No training is
necessary, and Digit Dial is programmed to understand
natural speech.
1. Press and hold for two seconds.
2. After a brief pause, a list of optional commands appears
in the display and the audio prompt “Please say a
command” plays through the speakerphone.
72
Page 81

Voice Signal
Say “Digit Dial” at a distance of 3-12 inches from the
3.
Smartphone in a natural voice.
4. “Please say the number” plays through
the speakerphone.
5. Say the area code and number that you wish to dial into
the microphone. Say the number naturally.
6. The number that you said is repeated through the
speakerphone and your Smartphone dials the number.
7. If Voice Signal is not sure of the number that you said, a
list of possible matches appears in the display.
8. You’re asked to confirm the correct number as Voice
Signal displays the results. Say “Yes” or “No” to confirm
or reject the number when prompted.
Name Dial
To use Name Dial, you’ll need to have some entries in your
Contacts list. See “Contacts” on page 38 for information on
creating a Contacts list.
1. Press and hold for two seconds.
2. A list of commands appears in the display and the audio
prompt “Please say a command” plays through the
speakerphone.
3. Say “Name Dial” at a distance of 3-12 inches from the
microphone.
4. “Please say the name” plays through the speakerphone.
5. Say the name exactly as it is displayed in your contacts
list, first name followed by last name.
73
Page 82

6. The contact name appears in the display. If your contact
has more than one number, such as a mobile number
and a home number, you’re prompted for which location.
7. Say the location.
8. The location is repeated through the speakerphone and
your Smartphone dials the number.
Train Quick Dial
1. At the Home Screen, open the Voice Signal Setup menu
and then select
appears in the display and you have the choice to
or
Play the name of the contact.
2. Press Train . You’re prompted to say the name.
3. Say the name at a distance of 3-12 inches from
Record Names. Your list of contacts
Tra in
the microphone.
4. “Did the recording sound okay?” appears in the display.
5. Press Yes to proceed or No if the recording was
unacceptable. You’re returned to the Contacts list. A red
checkmark appears next to the “trained” contact.
Use Quick Dial
1. Press and hold for two seconds.
2. A list of commands appears in the display and the audio
prompt “Please say a command” plays through the
speakerphone.
3. Say “Quick Dial” at a distance of 3-12 inches from
the microphone.
4. “Who would you like to call” appears in the display and
the audio prompt is played through the speakerphone.
74
Page 83

Voice Signal
Say the contact name exactly as it is has been “trained.”
5.
If you haven’t trained any of your contacts for Quick Dial,
you’re prompted to do so.
6. The Smartphone displays the contact, you hear your
recorded Quick Dial entry through the speakerphone,
and your Smartphone dials the number.
Name Lookup
To perform a name lookup, you’ll need to have some entries
in your Contacts list. See “Contacts” on page 38 for
information on creating a contacts list.
1. Press and hold for two seconds.
2. A list of commands appears in the display and the audio
prompt “Please say a command” plays through the
speakerphone.
3. Say “Name Lookup” at a distance of 3-12 inches from the
microphone. “Please say the name” plays through the
speakerphone.
4. Say the name exactly as it is displayed in your Contacts
list, first name followed by last name.
5. The contact name appears in the display with other
information that you’ve entered for that contact.
75
Page 84

Open App
The example that follows instructs you how to open Internet
Explorer. However, you can open any application on your
Smartphone using Voice Signal.
1. Press and hold for two seconds.
2. A list of commands appears in the display and the audio
prompt “Please say a command” plays through the
speakerphone.
3. Say “Open Internet Explorer” at a distance of 3-12 inches
from the microphone.
4. Internet Explorer opens and is directed to the last web
page visited.
The last web page visited is stored in your system cache. If
you have not yet used Internet Explorer to browse the web,
you’re directed to your service provider’s home page.
Voice Signal Settings
You can adjust the settings and preferences for Voice Signal
by opening
Voice Signal Setup menu you can train, edit, and delete Quick
Dial entries, adapt the Digit Dial feature, turn the “Did you
say?” choice lists on and off, adjust speed and accuracy, and
select applications for launching by voice.
Voice Signal Setup from the Home Screen. In the
76
Page 85

Understanding Roaming
Understanding Roaming
Roaming
Roaming occurs when you travel outside the designated
coverage area. Your Smartphone automatically switches to
roaming and the roaming icon ( )appears in the display.
Your Smartphone can roam on other digital networks. When
you are roaming, extra charges may apply when making or
receiving a call.
During roaming, some of your Smartphone’s features may
not be available. Also, when roaming, your Smartphone
requires additional power from the battery and may require
frequent recharging.
Roaming Options
The following roaming options are available:
• Home only - Your Smartphone is available for normal
operation only in the designated coverage area.
•
Automatic-A - The preferred roaming list is used to
acquire service. If no preferred systems are found, any
digital “A” system is acquired.
•
Automatic-B - The preferred roaming list is used to
acquire service. If no preferred systems are found, any
digital “B” system is acquired.
Contact your service provider for information regarding
preferred systems.
77
Page 86

Call History
When you place a call, miss, or receive a call, a record of the
call is saved in
of the types of calls listed in the following table.
Call History
type
No Filter Displays all calls received, sent, or missed.
Missed Displays any missed calls.
Outgoing
Incoming
Find Contact
View your Call History
1. At the Home Screen, press the left soft key ( )
Programs, then press until Call History
is highlighted.
2. Press . A list of numbers appear in the display.
View information about a call
Call History retains information such as the duration, date
and time, whether the call was
1. At the Home Screen, press the left soft key ( )
Programs, then press until Call History
is highlighted.
2. Press , then press to highlight the
desired number.
Call History. Your Smartphone retains a history
Description
Displays all outgoing calls made from
your Smartphone.
Displays any incoming calls that
were answered.
Allows you to select an entry from the contacts and then displays any call information
related to the contact.
Incoming, Outgoing, or Missed.
78
Page 87

Call History
Once the desired number is highlighted, press . The
3.
options listed in the following table appear in the display.
Call History
Option
_______ call
Method
Duration The duration of the call.
Date The date of the call.
Time The time of the call.
4. Press to page down the display and view all of the
Function
Indicates the type of call, whether it was
missed, dialed, or received.
If the caller is in your Contacts list, the type
of call is listed here (M-Mobile, W-Work, etc.).
This option only appears if the caller is in
your Contacts list.
information, if necessary.
5. Press the left soft key ( ) Save to save the information
to your
Contacts list, or press the right soft key ( ) Menu
to display the options listed in the following table.
Call History
Option
Find Contact
E-mail
Delete
Save
Function
See if the number exists within your
Contacts list
Send an e-mail to the number
Delete the call from Call History
Save the number to your Contacts list
6. Press to highlight an option. Press to enter the
highlighted option’s sub-menu.
79
Page 88

Call History Icons
When you view Call History, an icon to the left of the number
indicates the type of call.
• Indicates a Missed call
• Indicates an
• Indicates a
Outgoing call
Received call
Make a Call from Call History
1. At the Home Screen, press the left soft key ( )
Programs, then press until Call History
is highlighted.
2. Press , then press to highlight the
desired number.
3. Press to call the highlighted number.
Create a new contact from Call History
1. At the Home Screen, press the left soft key ( )
Programs, then press until Call History
is highlighted.
2. Press , then press to highlight the number for
which you wish to create a contact.
3. Press the left soft key ( ) Save. The Select Contact
menu appears in the display with
4. Press . Enter information for the contact.
• Press the left soft key ( )
insert the phone number of the
are adding to your
Contacts.
New Item highlighted.
Insert (when applicable) to
Call History number you
80
Page 89

Call History
Press the left soft key ( ) Done when finished.
5.
Delete a Call History entry
1. At the Home Screen, press the left soft key ( )
Programs, then press to highlight Call History.
2. Press , then press to highlight the number you
wish to delete.
3. Press the right soft key ( ) Menu. A pop-up menu
appears in the display.
4. Press to highlight Delete and press . You’re
notified that this will delete the selected entry.
5. Press the left soft key ( ) Yes to delete the entry or the
right soft key ( )
No to return to the previous menu.
Delete all Call History entries
1. At the Home Screen, press the left soft key ( )
Programs, then press until Call History
is highlighted.
2. Press , then press the right soft key ( ) Menu. A
pop-up menu appears in the display.
3. Press to highlight Delete List, then press . You’re
notified that this will delete all entries in your
Call History list.
4. Press the left soft key ( ) Yes to delete the list or the
right soft key ( )
No to return to the previous menu.
81
Page 90

Caller ID
Caller ID alerts you to who is calling by displaying the caller’s
phone number. If you call someone who has this feature, your
phone number appears in their display as well. If the caller’s
name and number are stored in your Phone Book, their name
also appears with the number.
If you have a large number of contacts in your Phone Book,
Caller ID is somewhat slower in displaying names
and numbers.
Block caller ID
• Press , , , then dial the phone number.
Call Waiting
Incoming calls can be picked up, even when you are on an
existing call. When on a call and another call is received, a
tone sounds and a message appears in the display. If the
caller is stored in your Contacts list, their name also appears
in the display.
1. Press the left soft key ( ) Accept to pick up the call or
the right soft key ( )
with your conversation.
If you press Wait, the call is diverted to voicemail.
When you accept a new call, the original caller is put
on hold.
2.
Press to switch back to the original caller.
Wait to ignore the call and continue
82
Page 91

Call History
Three-way Calling
1. At the Home Screen, enter the number you wish to call,
then press .
2. After the first caller picks up, dial the second person and
press .
3. When the person answers, press again to connect
all three parties.
If one of the parties in the conversation ends the call, the
remaining parties stay connected. However, if you initiated
the call and are the first to hang up, all calls are disconnected.
83
Page 92

Tasks
Tasks are short to-do notes about anything you wish. Create
a single task, or a task list, then mark your tasks complete
once they’re finished.
Create a new task
1. At the Home Screen, press the left soft key ( )
Programs, then press until More... is highlighted.
2. Press , then press until Tasks is highlighted.
3. Press . The Tasks entry screen appears in
the display, with
4. Press to enter a new task.
5. Enter task information using the keypad. Press
when finished.
Mark a Task complete
Use a check to indicate when a task is complete.
1. At the Home Screen, press the left soft key ( )
Programs, then press until More... is highlighted.
2. Press , then press until Tasks is highlighted.
3. Press . Your list of tasks appear in the display.
4. Press to highlight a task.
5. Press the left soft key ( ) Complete or to place a
check mark next to a completed task.
Enter new task here highlighted.
84
Page 93

Ta s ks
Activate a completed task
You can reactivate a task after it has been marked complete.
1. At the Home Screen, press the left soft key ( )
Programs, then press until More... is highlighted.
2. Press , then press until Tasks is highlighted.
3. Press . Your list of tasks appear in the display.
4. Press to highlight a task.
5. Press the left soft key ( ) Activate or to activate a
completed task.
Delete a Task
When a task is competed, it can be deleted from the task list.
1. At the Home Screen, press the left soft key ( )
Programs, then press until More... is highlighted.
2. Press , then press until Tasks is highlighted.
3. Press . Your list of tasks appear in the display.
4. Press until you highlight a completed task.
5. Press the right soft key ( ) Delete to delete the task.
85
Page 94

Voice Notes
You can record a phone number, parking location, or a simple
reminder using Voice Notes.
Make a recording
1. At the Home Screen, press the left soft key ( )
Programs, then press until More... is highlighted.
2. Press , then press until Voice Notes
is highlighted.
3. Press . The Voice Notes screen appears in
the display.
4. Press the left soft key ( ) Record. Your Smartphone
begins recording and the elapsed time appears in the
display.
5. Record your information, then press the left soft key ( )
Stop when finished. The recording is named a default of
Recording #.
To record quick note, press on the left side of the
Smartphone to display the recording menu. Press again
to begin recording.
86
Page 95

Voi c e N o t e s
Rename a recording
1. At the Home Screen, press the left soft key ( )
Programs, then press until More... is highlighted.
2. Press , then press until Voice Notes
is highlighted.
3. Press to open Voi c e Notes. A list of recordings
appears in the display.
4. Press until the recording you wish to rename is
highlighted.
5. Press the right soft key ( ) Menu. A pop-up menu
appears in the display.
6. Press until Rename is highlighted, then press .
7. Press to backspace and clear the current name for
the recording. Use the keypad to enter a new name for
the recording.
8. Press the left soft key ( ) Done when finished or the
right soft key ( )
previous menu.
Cancel to exit and return to the
87
Page 96

Other Applications
In addition to the applications that come with your
Smartphone, you can also download and install other
applications as needed. The SCH-i600 contains 25MB of
memory to allow for continued expansion. Expand your
Smartphone’s capabilities even more with an optional SD
Card. An SD (Secure Digital) card can store up to a gigabyte
of data for use with your Smartphone. See “Use the SD Card”
on page 19 for more information about the SD Card.
Pocket Internet Explorer
Your Smartphone has a robust version of this popular web
browser in the convenience of a hand-held device. Pocket
Internet Explorer on your Smartphone has much of the
functionality of its PC counterpart. You can add bookmarks
for frequently visited web pages, modify connection settings,
language preferences, cookie permissions, and more.
Use Pocket Internet Explorer to view web pages on your
Smartphone two different ways:
• Download web pages then synchronize with ActiveSync
• Connect to the Internet and view web pages online
While browsing you can also download new files and
programs. If you are using Microsoft Internet Explorer version
4 or later, your favorites can be synchronized to your
Smartphone.
Launch Pocket Internet Explorer
1. At the Home Screen, press the left soft key ( )
Programs, then press until Internet Explorer is
highlighted.
2. Press . A list of Favorites appears in the display.
88
Page 97

Other Applications
Press to highlight the favorite that you’d like to visit on
3.
the Internet, then press .
4. Your Smartphone dials the service provider and
connects to the Internet.
Tip: If Internet Explorer is slow in responding or does not function at all, you may need to empty the cache file. See below.
Empty the cache
While browsing the web, pages that you visit sometimes
leave behind files in your Smartphone. The file types and
their descriptions are outlined in the following table. To delete
any or all of these files, use steps 1 - 5 below.
File type Description
Temporary
files
Cookies
History
1. At the Home Screen, press the left soft key ( )
Programs, then press until Internet Explorer is
highlighted.
2. Press , then press the right soft key ( ) Menu. A
pop-up menu appears in the display.
3. Press or to highlight Options, then press .
4. Press or to highlight Memory, then press .
5. Press or to highlight the file type that you wish to
clear from the cache, then press the right soft key ( )
Clear. Press the left soft key ( ) Yes to confirm.
Previously viewed pages of the current
browsing session.
Files created by websites that store information on
your computer, such as your preferences while
visiting that site.
Shortcuts to pages viewed during previous browsing sessions.
89
Page 98

Add Favorites
When you find a web page that contains useful or interesting
information, it can be saved as a favorite, which is also known
as a bookmark.
1. While viewing the web page that you’d like to save as a
favorite, press the right soft key ( )
2. Press until Add Favorite is highlighted, then
Menu.
press .
3. Press to delete the default text for the web page if
desired, then enter a name for the web page using
the keypad.
4. Press the left soft key ( ) Add to add the web page to
your list of favorites.
Add a new folder
You can add new folders to your Favorites sub-menu, then
add as many favorites to the folders as you like.
1. While in Favorites, press the right soft key ( ) Menu. A
pop-up menu appears in the display.
2. Press until Add Folder is highlighted, then
press .
3. Enter a name for the new folder using the keypad.
4. Press the left soft key ( ) Add when finished.
MSN Messenger
Log onto Microsoft MSN® Messenger and chat with others
right from your Smartphone. The mobile version of MSN
Messenger is the same as the PC version.
90
Page 99

Other Applications
Using your Internet connection, you can quickly send instant
messages to your list of online buddies, or interact with
multiple people at the same time. The chat window lets you
read and write messages, and notifications alert you if others
are trying to get in touch. “My Text” lets you store and recall
frequently used messages so you can respond without
composing a reply.
MSN Messenger is a MSN Passport service and requires a
Passport, Hotmail®, or MSN account.
Login to MSN Messenger
1. At the Home Screen, press the left soft key ( )
Programs, then press until MSN Messenger
is highlighted.
2. Press . The MSN Messenger Sign in screen appears
in the display.
3. Press the left soft key ( ) Sign In to log in with your
Passport, Hotmail, or MSN account.
4. Sign-in Name: is highlighted. Enter your sign-in name for
the Passport, Hotmail, or MSN account using
the keypad.
Tip: Press and hold to display the Symbols screen. Use the , , , or until the symbol you wish to enter is highlighted. Press the left soft key Done or to insert the symbol into your login or password field.
5. Press to highlight Password:, then enter your
password for the account using the keypad.
6. Press to highlight Remember my password:. If you
wish for MSN Messenger to remember your password
the next time you sign in, press .
91
Page 100

7. Press the left soft key ( ) Sign In to log in to MSN
Messenger, or the right soft key ( )
Cancel to return to
the previous menu.
Add a buddy to your contact list
A buddy is another MSN Messenger user who shares similar
interests. MSN Messenger automatically notifies a buddy
when the other is online.
1. Once you’ve logged in to MSN Messenger, press the
right soft key ( )
2. Press , then enter the e-mail address of the buddy
Menu. Add Contact is highlighted.
you wish to add to your contact list.
Only valid Passport, Hotmail®, or MSN accounts can be
added to your contact list.
3.
Press the right soft key ( ) Next.
An instant message is sent to the e-mail address of the buddy
you’ve added notifying them that you’ve added them to your
contact list. They are given the opportunity to accept your
request or block further requests. A message appears in your
Smartphone display that confirms or denies the request.
4. Press the left soft key ( ) Done when finished.
5. Your buddy’s e-mail address appears under Online or Not
in your Smartphone display, depending on their
Online
status.
Start a chat session
You can chat with another person if they’re online and you’ll
both receive your responses in “real time,” which means that
there is very little delay. You can even join several chats at the
same time.
92
 Loading...