

Page 1
ANDROID SMARTPHONE
User Manual
Please read this manual before operating your
device and keep it for future reference.
GHxx-xxxxxx Printed in Korea
Page 2

Warning!
This product contains chemicals known to the State of California to cause cancer and reproductive toxicity.
Intellectual Property
All Intellectual Property, as defined below, owned by or which is otherwise the property of Samsung or its respective suppliers
relating to the SAMSUNG mobile device, including but not limited to, accessories, parts, or software relating there to (the “mobile
device”), is proprietary to Samsung and protected under federal laws, state laws, and international treaty provisions. Intellectual
Property includes, but is not limited to, inventions (patentable or unpatentable), patents, trade secrets, copyrights, software,
computer programs, and related documentation and other works of authorship. You may not infringe or otherwise violate the
rights secured by the Intellectual Property. Moreover, you agree that you will not (and will not attempt to) modify, prepare
derivative works of, reverse engineer, decompile, disassemble, or otherwise attempt to create source code from the software. No
title to or ownership in the Intellectual Property is transferred to you. All applicable rights of the Intellectual Property shall remain
with SAMSUNG and its suppliers.
Open Source Software
Some software components of this product, including but not limited to 'PowerTOP' and 'e2fsprogs', incorporate source code
covered under GNU General Public License (GPL), GNU Lesser General Public License (LGPL), OpenSSL License, BSD License and
other open source licenses. To obtain the source code covered under the open source licenses, please visit:
http://opensource.samsung.com
VZW_i545_UM_Eng_NC5_TN_071814_F1
.
Page 3

Disclaimer of Warranties; Exclusion of Liability
EXCEPT AS SET FORTH IN THE EXPRESS WARRANTY CONTAINED ON THE WARRANTY PAGE ENCLOSED WITH THE PRODUCT, THE
PURCHASER TAKES THE PRODUCT "AS IS", AND SAMSUNG MAKES NO EXPRESS OR IMPLIED WARRANTY OF ANY KIND
WHATSOEVER WITH RESPECT TO THE PRODUCT, INCLUDING BUT NOT LIMITED TO THE MERCHANTABILITY OF THE PRODUCT OR
ITS FITNESS FOR ANY PARTICULAR PURPOSE OR USE; THE DESIGN, CONDITION OR QUALITY OF THE PRODUCT; THE
PERFORMANCE OF THE PRODUCT; THE WORKMANSHIP OF THE PRODUCT OR THE COMPONENTS CONTAINED THEREIN; OR
COMPLIANCE OF THE PRODUCT WITH THE REQUIREMENTS OF ANY LAW, RULE, SPECIFICATION OR CONTRACT PERTAINING
THERETO. NOTHING CONTAINED IN THE INSTRUCTION MANUAL SHALL BE CONSTRUED TO CREATE AN EXPRESS OR IMPLIED
WARRANTY OF ANY KIND WHATSOEVER WITH RESPECT TO THE PRODUCT. IN ADDITION, SAMSUNG SHALL NOT BE LIABLE FOR
ANY DAMAGES OF ANY KIND RESULTING FROM THE PURCHASE OR USE OF THE PRODUCT OR ARISING FROM THE BREACH OF
THE EXPRESS WARRANTY, INCLUDING INCIDENTAL, SPECIAL OR CONSEQUENTIAL DAMAGES, OR LOSS OF ANTICIPATED PROFITS
OR BENEFITS.
Modification of Software
SAMSUNG IS NOT LIABLE FOR PERFORMANCE ISSUES OR INCOMPATIBILITIES CAUSED BY YOUR EDITING OF REGISTRY SETTINGS,
OR YOUR MODIFICATION OF OPERATING SYSTEM SOFTWARE.
USING CUSTOM OPERATING SYSTEM SOFTWARE MAY CAUSE YOUR DEVICE AND APPLICATIONS TO WORK IMPROPERLY. YOUR
CARRIER MAY NOT PERMIT USERS TO DOWNLOAD CERTAIN SOFTWARE, SUCH AS CUSTOM OS.
IF YOUR CARRIER PROHIBITS THIS, IF YOU ATTEMPT TO DOWNLOAD SOFTWARE ONTO THE DEVICE WITHOUT AUTHORIZATION,
YOU WILL BE NOTIFIED ON THE SCREEN THAT THE DEVICE WILL NO LONGER OPERATE AND BE INSTRUCTED TO POWER DOWN
THE DEVICE. YOU MUST THEN CONTACT YOUR CARRIER TO RESTORE THE DEVICE TO THE CARRIER AUTHORIZED SETTINGS.
Page 4

SAFE™ (Samsung Approved For Enterprise)
SAFE™: "SAFE™" (Samsung for Enterprise) is a mark for a Samsung device which has been tested against Samsung's own
internal criteria for interoperability with certain third party security-related solutions for MDM and VPN. The testing includes field
testing with local network connection and menu tree testing which tests functionality of the solutions in conjunction with the
Samsung device. During the testing, the device is tested with the security solutions to see if the solutions work with the device as
described by the third party security solution providers. The testing, for example, includes field testing with local network
connection and menu tree testing which tests functionality of the solutions in conjunction with the Samsung device. For more
information about Samsung's SAFE™ program, please refer to
Disclaimer of Warranties: EXCEPT AS OTHERWISE PROVIDED IN THEIR STANDARD END USER LICENSE AND WARRANTY, TO THE
FULL EXTENT PERMITTED BY LAW SAMSUNG ELECTRONICS CO., LTD., SAMSUNG TELECOMMUNICATIONS AMERICA, LLC, AND
THEIR AFFILIATES (COLLECTIVELY REFERRED TO HEREIN AS THE "SAMSUNG ENTITIES") EXPRESSLY DISCLAIM ANY AND ALL
WARRANTIES, EXPRESS OR IMPLIED, INCLUDING ANY WARRANTY OF MERCHANTABILITY, FITNESS FOR A PARTICULAR PURPOSE,
INTEROPERABILITY OR NON-INFRINGEMENT, WITH RESPECT TO INFORMATION TECHNOLOGY SECURITY PROTECTION, SAFE™
DEVICES AND APPLICATIONS TESTED WITH SAFE™ DEVICES. IN NO EVENT SHALL THE SAMSUNG ENTITIES BE LIABLE FOR ANY
DIRECT, INDIRECT, INCIDENTAL, PUNITIVE, OR CONSEQUENTIAL DAMAGES OF ANY KIND WHATSOEVER WITH RESPECT TO
INFORMATION TECHNOLOGY SECURITY PROTECTION, SAFE™ DEVICES OR APPLICATIONS TESTED WITH SAFE™ DEVICES. In
addition, information technology security protection will be affected by features or functionality associated with, among other
things the e-mail platform, master data management, and virtual private network solutions selected by the software provider,
solution provider or user. Choice of an e-mail, master data management, and virtual private network solution is at the sole
discretion of the software provider, solution provider or user and any associated effect on information technology security
protection is solely the responsibility of the software provider, solution provider or user. For complete statement of limited
warranty, please refer to
www.samsung.com/us/safe
, available on the web and where Samsung smartphones and mobile devices
www.samsung.com/us/safe
.
are sold. [051214]
Page 5

Samsung Telecommunications America (STA), LLC
Headquarters:
1301 E. Lookout Drive
Richardson, TX 75082
Phone: 1-800-SAMSUNG (726-7864)
Phone: 1-888-987-HELP (4357)
Internet Address:
www.samsung.com
©
2013 Samsung Telecommunications America, LLC. Samsung is a registered trademark of Samsung Electronics Co., Ltd.
Do you have questions about your Samsung Mobile Phone?
For 24 hour information and assistance, we offer a new FAQ/ARS System (Automated Response System) at:
www.samsung.com/us/support
The Bluetooth® word mark, figure mark (stylized “B Design”), and combination mark (Bluetooth word mark and “B Design”) are
registered trademarks and are wholly owned by the Bluetooth SIG.
Nuance®, VSuite™, T9® Text Input, and the Nuance logo are trademarks or registered trademarks of Nuance Communications,
Inc., or its affiliates in the United States and/or other countries.
microSD™, microSDHC™, and the microSD logo are Trademarks of the SD Card Association.
Wi-Fi is a registered trademark of the Wireless Fidelity Alliance, Inc.
Page 6

LTE is a trademark of ETSI.
More
Swype and the Swype logos are trademarks of Swype, Inc. ©2010 Swype, Inc. All rights reserved.
Google, the Google logo, Android, the Android logo, Google Play, Google+, Gmail, Google Maps, Google Play Books,
Google Play Music, Google Play Store, Hangouts, Picasa, YouTube, and other marks are trademarks of Google Inc.
Polaris Office and the Polaris Office logo are marks owned by Infraware and may be trademarks or registered trademarks.
Peel and the Peel logo are marks owned by Peel Technologies, Inc. and may be registered.
DivX®, DivX Certified® and associated logos are trademarks of Rovi Corporation or its subsidiaries and are used under license.
DivX Certified
®
to play DivX® video up to HD 720p, including premium content.
ABOUT DIVX VIDEO: DivX® is a digital video format created by DivX, LLC, a subsidiary of Rovi Corporation. This is an official DivX
Certified® device that plays DivX video. Visit
www.divx.com
for more information and software tools to convert your files into DivX
videos.
ABOUT DIVX VIDEO-ON-DEMAND: This DivX Certified® device must be registered in order to play purchased DivX
Video-on-Demand (VOD) movies. To obtain your registration code, locate the DivX VOD section in your device setup menu (touch
Apps > Settings >
More > About phone > Legal information > License settings > DivX
®
VOD > Register
). Go to
vod.divx.com
more information on how to complete your registration.
©Samsung Telecommunications America, LLC (“Samsung”). Samsung, Galaxy S, Super AMOLED, and Samsung Link are all
trademarks of Samsung Electronics Co., Ltd. and/or its related entities. Other company names, product names and marks
mentioned herein are the property of their respective owners and may be trademarks or registered trademarks. Appearance of
device may vary.
©Verizon Wireless. Verizon Wireless and the Verizon Wireless logos are trademarks of Verizon Trademark Services LLC. All
company names, trademarks, logos and copyrights not property of Verizon Wireless are the property of their respective owners.
for
Page 7

Online Legal Information
The online version of the Health/Safety and Warranty guide for your device can be found at:
www.samsung.com
.
Page 8

Table of Contents
Section 1: Getting Started ...........................7
Understanding This User Manual . . . . . . . . . . . . 7
Setting Up Your Phone . . . . . . . . . . . . . . . . . . . . 9
Charging the Battery . . . . . . . . . . . . . . . . . . . . 12
Turning the Phone On or Off . . . . . . . . . . . . . . 14
Setup Wizard . . . . . . . . . . . . . . . . . . . . . . . . . . 14
Creating a Samsung Account . . . . . . . . . . . . . 14
Creating a New Google Account . . . . . . . . . . . 15
Smart Switch . . . . . . . . . . . . . . . . . . . . . . . . . 15
Displaying Your Phone Number . . . . . . . . . . . . 15
Voicemail . . . . . . . . . . . . . . . . . . . . . . . . . . . . 15
TTY Mode . . . . . . . . . . . . . . . . . . . . . . . . . . . . 15
Roaming . . . . . . . . . . . . . . . . . . . . . . . . . . . . . 16
Securing Your Phone . . . . . . . . . . . . . . . . . . . . 16
Top and Bottom Views . . . . . . . . . . . . . . . . . . .20
Back View . . . . . . . . . . . . . . . . . . . . . . . . . . . .20
Home Screen . . . . . . . . . . . . . . . . . . . . . . . . . .21
Display Layout . . . . . . . . . . . . . . . . . . . . . . . . .21
Status Bar . . . . . . . . . . . . . . . . . . . . . . . . . . . .21
Using Motions and Gestures . . . . . . . . . . . . . .25
Menu Navigation . . . . . . . . . . . . . . . . . . . . . . .27
Customizing Your Home Screen . . . . . . . . . . . .29
Notification Panel . . . . . . . . . . . . . . . . . . . . . . .34
Apps Screen . . . . . . . . . . . . . . . . . . . . . . . . . .35
Multi Window . . . . . . . . . . . . . . . . . . . . . . . . .37
Smart Screen . . . . . . . . . . . . . . . . . . . . . . . . .41
Air View . . . . . . . . . . . . . . . . . . . . . . . . . . . . . .42
Voice Control . . . . . . . . . . . . . . . . . . . . . . . . . .42
Section 2: Understanding Your Phone .....17
Features of Your Phone . . . . . . . . . . . . . . . . . . 17
Front View . . . . . . . . . . . . . . . . . . . . . . . . . . . . 19
LED Indicator . . . . . . . . . . . . . . . . . . . . . . . . . . 19
Side Views . . . . . . . . . . . . . . . . . . . . . . . . . . . 20
1
Pop-Up Video . . . . . . . . . . . . . . . . . . . . . . . . . .42
Memory Card . . . . . . . . . . . . . . . . . . . . . . . . . .43
Help . . . . . . . . . . . . . . . . . . . . . . . . . . . . . . . . .44
Page 9

Task Manager . . . . . . . . . . . . . . . . . . . . . . . . 44
Dialing Options . . . . . . . . . . . . . . . . . . . . . . . . 74
Entering Text . . . . . . . . . . . . . . . . . . . . . . . . . 45
Using Google Voice Typing . . . . . . . . . . . . . . . 49
Entering Text Using Swype . . . . . . . . . . . . . . . 49
Section 3: Contacts and Accounts ........... 52
Accounts . . . . . . . . . . . . . . . . . . . . . . . . . . . . 52
Contacts . . . . . . . . . . . . . . . . . . . . . . . . . . . . 54
Using Contacts . . . . . . . . . . . . . . . . . . . . . . . . 57
Linking Contacts . . . . . . . . . . . . . . . . . . . . . . 58
Contacts Options . . . . . . . . . . . . . . . . . . . . . . 60
Groups . . . . . . . . . . . . . . . . . . . . . . . . . . . . . . 61
Favorites . . . . . . . . . . . . . . . . . . . . . . . . . . . . 64
Managing Contacts . . . . . . . . . . . . . . . . . . . . 65
Speed Dials . . . . . . . . . . . . . . . . . . . . . . . . . . 67
Using the Service Dialing Numbers . . . . . . . . 68
Call Log . . . . . . . . . . . . . . . . . . . . . . . . . . . . . 74
Call Duration . . . . . . . . . . . . . . . . . . . . . . . . . 76
Options During a Call . . . . . . . . . . . . . . . . . . . 77
Call Settings . . . . . . . . . . . . . . . . . . . . . . . . . . 81
Section 5: Messaging ................................82
Types of Messages . . . . . . . . . . . . . . . . . . . . 82
Creating and Sending Messages . . . . . . . . . . 83
Message Options . . . . . . . . . . . . . . . . . . . . . . 84
Viewing New Received Messages . . . . . . . . . . 85
Deleting Messages . . . . . . . . . . . . . . . . . . . . . 86
Message Search . . . . . . . . . . . . . . . . . . . . . . 87
Saved Messages Folder . . . . . . . . . . . . . . . . . 87
Messaging Settings . . . . . . . . . . . . . . . . . . . . 87
Using Email . . . . . . . . . . . . . . . . . . . . . . . . . . 88
Section 4: Call Functions ......................... 69
Displaying Your Phone Number . . . . . . . . . . . 69
Phone . . . . . . . . . . . . . . . . . . . . . . . . . . . . . . 69
Making Calls . . . . . . . . . . . . . . . . . . . . . . . . . 69
Making Emergency Calls . . . . . . . . . . . . . . . . 72
Making a Call Using Speed Dial . . . . . . . . . . . 73
Answering a Call . . . . . . . . . . . . . . . . . . . . . . 73
Gmail . . . . . . . . . . . . . . . . . . . . . . . . . . . . . . . 91
Google+ . . . . . . . . . . . . . . . . . . . . . . . . . . . . . 92
Hangouts . . . . . . . . . . . . . . . . . . . . . . . . . . . . 92
Voicemail . . . . . . . . . . . . . . . . . . . . . . . . . . . . 93
2
Page 10

Section 6: Multimedia ...............................94
Section 8: Applications ...........................129
Music . . . . . . . . . . . . . . . . . . . . . . . . . . . . . . .94
Google Play Music . . . . . . . . . . . . . . . . . . . . . . 98
Video . . . . . . . . . . . . . . . . . . . . . . . . . . . . . . . . 98
Play Movies & TV . . . . . . . . . . . . . . . . . . . . . . . 99
Gallery . . . . . . . . . . . . . . . . . . . . . . . . . . . . . . 100
Camera . . . . . . . . . . . . . . . . . . . . . . . . . . . . . 102
Using the Camera . . . . . . . . . . . . . . . . . . . . . 102
Camera Modes . . . . . . . . . . . . . . . . . . . . . . . 104
Quick Settings . . . . . . . . . . . . . . . . . . . . . . . . 104
Camera and Camcorder Settings . . . . . . . . . . 105
Editing a Photo . . . . . . . . . . . . . . . . . . . . . . . 107
Using the Camcorder . . . . . . . . . . . . . . . . . . . 109
Section 7: Connections ...........................111
Internet . . . . . . . . . . . . . . . . . . . . . . . . . . . . . 111
Managing Applications . . . . . . . . . . . . . . . . . .129
Accessing Applications . . . . . . . . . . . . . . . . .131
Amazon . . . . . . . . . . . . . . . . . . . . . . . . . . . . .132
Amazon Kindle . . . . . . . . . . . . . . . . . . . . . . . .132
Amazon MP3 . . . . . . . . . . . . . . . . . . . . . . . . .132
Appstore (Amazon) . . . . . . . . . . . . . . . . . . . .132
Audible . . . . . . . . . . . . . . . . . . . . . . . . . . . . .132
Calculator . . . . . . . . . . . . . . . . . . . . . . . . . . .132
Calendar . . . . . . . . . . . . . . . . . . . . . . . . . . . .133
Caller Name ID . . . . . . . . . . . . . . . . . . . . . . .134
Camera . . . . . . . . . . . . . . . . . . . . . . . . . . . . .134
Chrome . . . . . . . . . . . . . . . . . . . . . . . . . . . . .134
Clock . . . . . . . . . . . . . . . . . . . . . . . . . . . . . . .134
Cloud . . . . . . . . . . . . . . . . . . . . . . . . . . . . . . .134
Wi-Fi . . . . . . . . . . . . . . . . . . . . . . . . . . . . . . . 114
NFC . . . . . . . . . . . . . . . . . . . . . . . . . . . . . . . . 118
S Beam . . . . . . . . . . . . . . . . . . . . . . . . . . . . . 118
Bluetooth . . . . . . . . . . . . . . . . . . . . . . . . . . . 118
Mobile Hotspot . . . . . . . . . . . . . . . . . . . . . . . 124
Tethering . . . . . . . . . . . . . . . . . . . . . . . . . . . 126
Connecting to a Computer . . . . . . . . . . . . . . . 127
3
Contacts . . . . . . . . . . . . . . . . . . . . . . . . . . . .135
Downloads . . . . . . . . . . . . . . . . . . . . . . . . . .135
Drive . . . . . . . . . . . . . . . . . . . . . . . . . . . . . . .135
Email . . . . . . . . . . . . . . . . . . . . . . . . . . . . . . .135
Emergency Alerts . . . . . . . . . . . . . . . . . . . . .136
Flipboard . . . . . . . . . . . . . . . . . . . . . . . . . . . .137
Gallery . . . . . . . . . . . . . . . . . . . . . . . . . . . . . .137
Page 11

Gmail . . . . . . . . . . . . . . . . . . . . . . . . . . . . . . 137
Play Games . . . . . . . . . . . . . . . . . . . . . . . . . 143
Google . . . . . . . . . . . . . . . . . . . . . . . . . . . . . 137
Google Settings . . . . . . . . . . . . . . . . . . . . . . 138
Google+ . . . . . . . . . . . . . . . . . . . . . . . . . . . . 138
Group Play . . . . . . . . . . . . . . . . . . . . . . . . . . 138
Hangouts . . . . . . . . . . . . . . . . . . . . . . . . . . . 138
Help . . . . . . . . . . . . . . . . . . . . . . . . . . . . . . . 139
IMDb . . . . . . . . . . . . . . . . . . . . . . . . . . . . . . 139
Internet . . . . . . . . . . . . . . . . . . . . . . . . . . . . 139
Isis Mobile Wallet . . . . . . . . . . . . . . . . . . . . . 139
KNOX . . . . . . . . . . . . . . . . . . . . . . . . . . . . . . 139
Maps . . . . . . . . . . . . . . . . . . . . . . . . . . . . . . 140
Messaging . . . . . . . . . . . . . . . . . . . . . . . . . . 141
Mobile Hotspot . . . . . . . . . . . . . . . . . . . . . . . 141
Music . . . . . . . . . . . . . . . . . . . . . . . . . . . . . . 141
Play Movies & TV . . . . . . . . . . . . . . . . . . . . . 144
Play Music . . . . . . . . . . . . . . . . . . . . . . . . . . 144
Play Newsstand . . . . . . . . . . . . . . . . . . . . . . 144
Play Store . . . . . . . . . . . . . . . . . . . . . . . . . . . 144
Polaris Office 5 . . . . . . . . . . . . . . . . . . . . . . . 145
S Health . . . . . . . . . . . . . . . . . . . . . . . . . . . . 145
S Memo . . . . . . . . . . . . . . . . . . . . . . . . . . . . 146
S Translator . . . . . . . . . . . . . . . . . . . . . . . . . 146
S Voice . . . . . . . . . . . . . . . . . . . . . . . . . . . . . 146
Samsung Hub . . . . . . . . . . . . . . . . . . . . . . . 147
Samsung Link . . . . . . . . . . . . . . . . . . . . . . . 148
Settings . . . . . . . . . . . . . . . . . . . . . . . . . . . . 150
Setup Wizard . . . . . . . . . . . . . . . . . . . . . . . . 150
Story Album . . . . . . . . . . . . . . . . . . . . . . . . . 150
My Files . . . . . . . . . . . . . . . . . . . . . . . . . . . . 141
My Verizon Mobile . . . . . . . . . . . . . . . . . . . . 142
NFL Mobile . . . . . . . . . . . . . . . . . . . . . . . . . 142
Optical Reader . . . . . . . . . . . . . . . . . . . . . . . 142
Phone . . . . . . . . . . . . . . . . . . . . . . . . . . . . . 143
Photos . . . . . . . . . . . . . . . . . . . . . . . . . . . . . 143
Play Books . . . . . . . . . . . . . . . . . . . . . . . . . . 143
TripAdvisor . . . . . . . . . . . . . . . . . . . . . . . . . . 150
Verizon Tones . . . . . . . . . . . . . . . . . . . . . . . . 150
Video . . . . . . . . . . . . . . . . . . . . . . . . . . . . . . 151
Voice Recorder . . . . . . . . . . . . . . . . . . . . . . . 151
Voice Search . . . . . . . . . . . . . . . . . . . . . . . . 151
Voicemail . . . . . . . . . . . . . . . . . . . . . . . . . . . 151
VZ Navigator . . . . . . . . . . . . . . . . . . . . . . . . . 151
4
Page 12

VZ Security . . . . . . . . . . . . . . . . . . . . . . . . . . 152
Display . . . . . . . . . . . . . . . . . . . . . . . . . . . . .166
WatchON . . . . . . . . . . . . . . . . . . . . . . . . . . . . 152
YouTube . . . . . . . . . . . . . . . . . . . . . . . . . . . . 153
Section 9: Settings ..................................154
Accessing Settings . . . . . . . . . . . . . . . . . . . . 154
Settings Tabs . . . . . . . . . . . . . . . . . . . . . . . . 154
Airplane Mode . . . . . . . . . . . . . . . . . . . . . . . . 155
Wi-Fi . . . . . . . . . . . . . . . . . . . . . . . . . . . . . . . 155
Bluetooth . . . . . . . . . . . . . . . . . . . . . . . . . . . 157
Data Usage . . . . . . . . . . . . . . . . . . . . . . . . . . 158
More Networks . . . . . . . . . . . . . . . . . . . . . . . 159
Default Messaging App . . . . . . . . . . . . . . . . . 159
Printing . . . . . . . . . . . . . . . . . . . . . . . . . . . . . 159
Mobile Networks . . . . . . . . . . . . . . . . . . . . . . 160
Mobile Hotspot . . . . . . . . . . . . . . . . . . . . . . . 160
LED Indicator . . . . . . . . . . . . . . . . . . . . . . . . .167
Sound . . . . . . . . . . . . . . . . . . . . . . . . . . . . . .167
Home Screen Mode . . . . . . . . . . . . . . . . . . . .169
Call . . . . . . . . . . . . . . . . . . . . . . . . . . . . . . . .169
Blocking Mode . . . . . . . . . . . . . . . . . . . . . . . .174
Hands-Free Mode . . . . . . . . . . . . . . . . . . . . .175
Power Saving Mode . . . . . . . . . . . . . . . . . . . .175
Accessories . . . . . . . . . . . . . . . . . . . . . . . . . .176
Accessibility . . . . . . . . . . . . . . . . . . . . . . . . .176
Language and Input . . . . . . . . . . . . . . . . . . . .179
Motions and Gestures . . . . . . . . . . . . . . . . . .184
Smart Screen . . . . . . . . . . . . . . . . . . . . . . . .186
Air view . . . . . . . . . . . . . . . . . . . . . . . . . . . . .186
Voice Control . . . . . . . . . . . . . . . . . . . . . . . . .187
Tethering . . . . . . . . . . . . . . . . . . . . . . . . . . . 160
VPN . . . . . . . . . . . . . . . . . . . . . . . . . . . . . . . . 161
NFC . . . . . . . . . . . . . . . . . . . . . . . . . . . . . . . . 161
S Beam . . . . . . . . . . . . . . . . . . . . . . . . . . . . . 162
Nearby Devices . . . . . . . . . . . . . . . . . . . . . . . 162
Screen Mirroring . . . . . . . . . . . . . . . . . . . . . . 163
Lock Screen . . . . . . . . . . . . . . . . . . . . . . . . . 164
5
Accounts . . . . . . . . . . . . . . . . . . . . . . . . . . . .187
Backup Assistant Plus . . . . . . . . . . . . . . . . . .187
Add Account . . . . . . . . . . . . . . . . . . . . . . . . .188
Back Up and Reset . . . . . . . . . . . . . . . . . . . .189
Location Services . . . . . . . . . . . . . . . . . . . . .191
Security . . . . . . . . . . . . . . . . . . . . . . . . . . . . .192
Application Manager . . . . . . . . . . . . . . . . . . .196
Page 13

Default Applications . . . . . . . . . . . . . . . . . . . 198
Battery . . . . . . . . . . . . . . . . . . . . . . . . . . . . . 198
Storage . . . . . . . . . . . . . . . . . . . . . . . . . . . . 198
Date and Time . . . . . . . . . . . . . . . . . . . . . . . 199
About Phone . . . . . . . . . . . . . . . . . . . . . . . . 200
Software Update . . . . . . . . . . . . . . . . . . . . . 201
Index ........................................................ 202
6
Page 14

Section 1: Getting Started
This section helps you to quickly start using your phone.
Note: Instructions in this manual are based on default settings
Understanding This User Manual
The sections of this manual generally follow the features of
your phone. A robust index for features begins on page 202.
This manual gives navigation instructions according to the
default display settings. If you select other settings,
navigation steps may be different.
Unless otherwise specified, all instructions in this manual
assume that you are starting with the phone unlocked, at the
Home screen. To get to the Home screen, you may need to
unlock the phone. For more information, see
Phone”
on page 16.
“Securing Your
and may vary from your phone depending on the
software version on your phone and any changes to the
phone’s settings.
Note: All screen images in this manual are simulated. Actual
displays may vary, depending on the software version
of your phone and any changes to the phone’s settings.
7
Page 15
Special Text
My device
Text Conventions
In this manual, some text is set apart from the rest. This
special text is intended to point out important information,
share quick methods for activating features, define terms,
and more. The definitions for these methods are as follows:
• Note: Presents alternative options for the current feature,
menu, or sub-menu.
• Tip: Provides quick or innovative methods or useful
shortcuts.
• Important: Points out important information about the
current feature that could affect performance.
• Warning: Brings important information to your attention
that can help to prevent loss of data or functionality or
damage to your phone.
This manual provides condensed information about how to
use your phone. To make this possible, the following text
conventions are used to represent often used steps:
➔
Arrows represent the sequence of onscreen items
you touch to navigate through menus and options.
For example:
From the Home screen, touch Apps ➔
Settings ➔ My device ➔ Display ➔
Brightness.
Certain features and options use a checkbox.
To enable an option, simply touch it to add or
remove a check mark.
For example:
Touch Auto rotate screen to enable it.
Some features and options use an OFF/ON button.
For example:
Touch OFF/ON to turn Bluetooth on.
Getting Started 8
Page 16

Setting Up Your Phone
Install the 4G LTE SIM (Subscriber Identity Module) card,
battery, and optional memory card, then charge the battery
to begin using your phone.
Tip: Your SIM card is preinstalled. For more information, refer
to “SIM Card” on page 10.
Note: A memory card is not included with your phone.
Memory cards are sold separately.
Back Cover
The battery, SIM card, and optional memory card are
installed under a removable cover on the back of the phone.
Note: The battery cover is flexible. Take care to avoid bending
or twisting the cover when removing and installing, to
prevent damage to the cover.
9
Remove the battery cover
䡲 Pull up using the slot provided (1), while lifting the
cover off the phone (2).
Install the battery cover
䡲 Align the cover and press it firmly into place, making
sure it snaps into place.
Page 17

SIM Card
Your phone uses a 4G LTE SIM (Subscriber Identity Module).
The 4G LTE SIM is a small, rectangular plastic card that
stores your phone number, information about your wireless
service, and other information such as messages.
The SIM card is installed under the back cover, and must
remain in the device when in use.
Note: If you purchased your phone at a Verizon Wireless store,
the SIM card is activated and ready to use. If you
ordered a new phone, the card may need to be
activated before you can use it. For more information
about activating the SIM card, visit:
verizonwireless.com/4GSIM.
Caution! Turn the phone off before installing or removing the
SIM card. Do not bend or scratch the SIM card. Take
care when handling, installing, or removing the SIM
card, and avoid exposing the SIM card to static
electricity, water, or dirt. Keep the SIM card out of
reach of small children.
Installing the 4G LTE SIM Card
1. Remove the back cover.
2. With the Verizon Wireless logo facing up, carefully
insert the 4G LTE SIM Card into the slot, pressing gently
until it clicks into place.
3. Make sure that the card’s gold contacts face into the
phone and that the upper-left angled corner of the card
is positioned as shown.
4. Install the back cover.
Note: If the card is not inserted correctly, the phone will not
detect the SIM card. Re-orient the card back into the
slot if the SIM is not detected.
Getting Started 10
Page 18
Installing the Battery
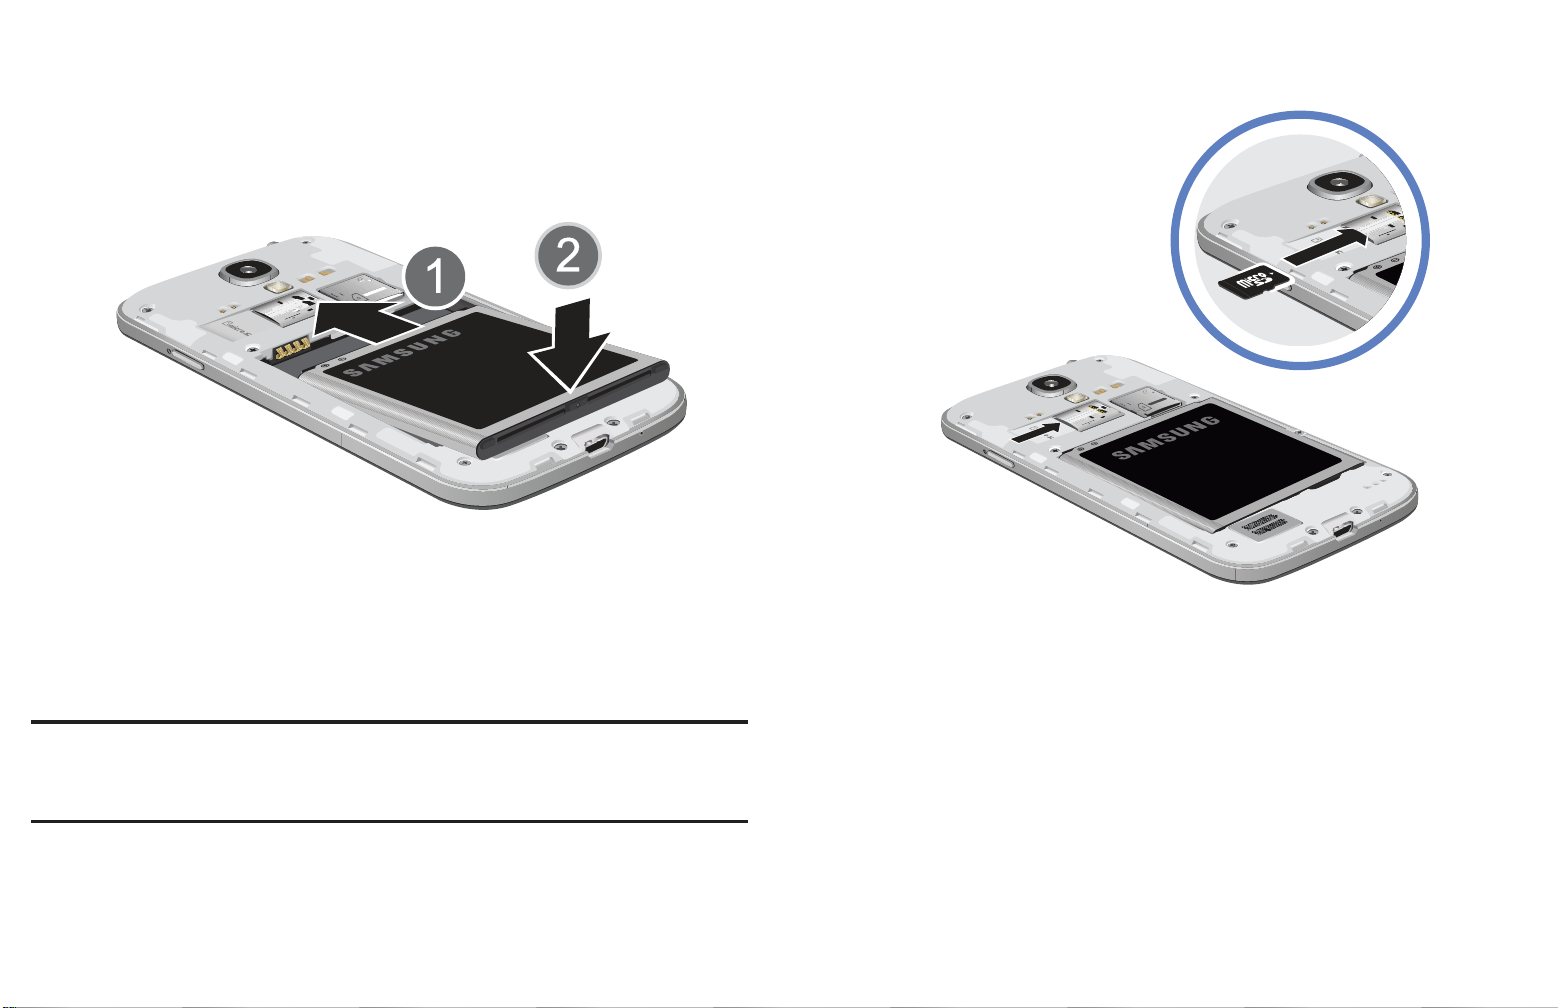
䡲 With the gold contacts facing down, slide the memory
1. Insert the battery into the opening on the back of the
phone, making sure the connectors align (1).
2. Gently press down to secure the battery (2).
Installing the Memory Card
You can use a microSD (SD) or microSDHC card to add
card into the slot and gently push it into place.
additional memory space to your device.
Note: Your phone has been tested to support up to a 64GB
memory card.
11
For more information on Memory Cards, see
on page 43.
“Memory Card”
Page 19
Charging the Battery
Using the Charger
Your phone is powered by a rechargeable, standard Li-Ion
battery. A Wall/USB Charger (Charging Head and USB cable)
is included with the phone, for charging the battery.
The battery comes partially charged. You must fully charge
the battery before using your phone for the first time. A fully
discharged battery requires up to 4 hours of charge time.
After the first charge, you can use the phone while charging.
Warning! Use only Samsung-approved charging devices and
batteries. Samsung accessories are designed to
maximize battery life. Using other accessories may
invalidate your warranty and may cause damage.
Note: Long backlight settings, searching for service, vibrate
mode, web browser use, and other variables may
Important! Verify that the phone battery is installed prior to
connection. If the battery is not properly installed
and the charger is connected, the handset may
power off and on continuously, preventing proper
operation.
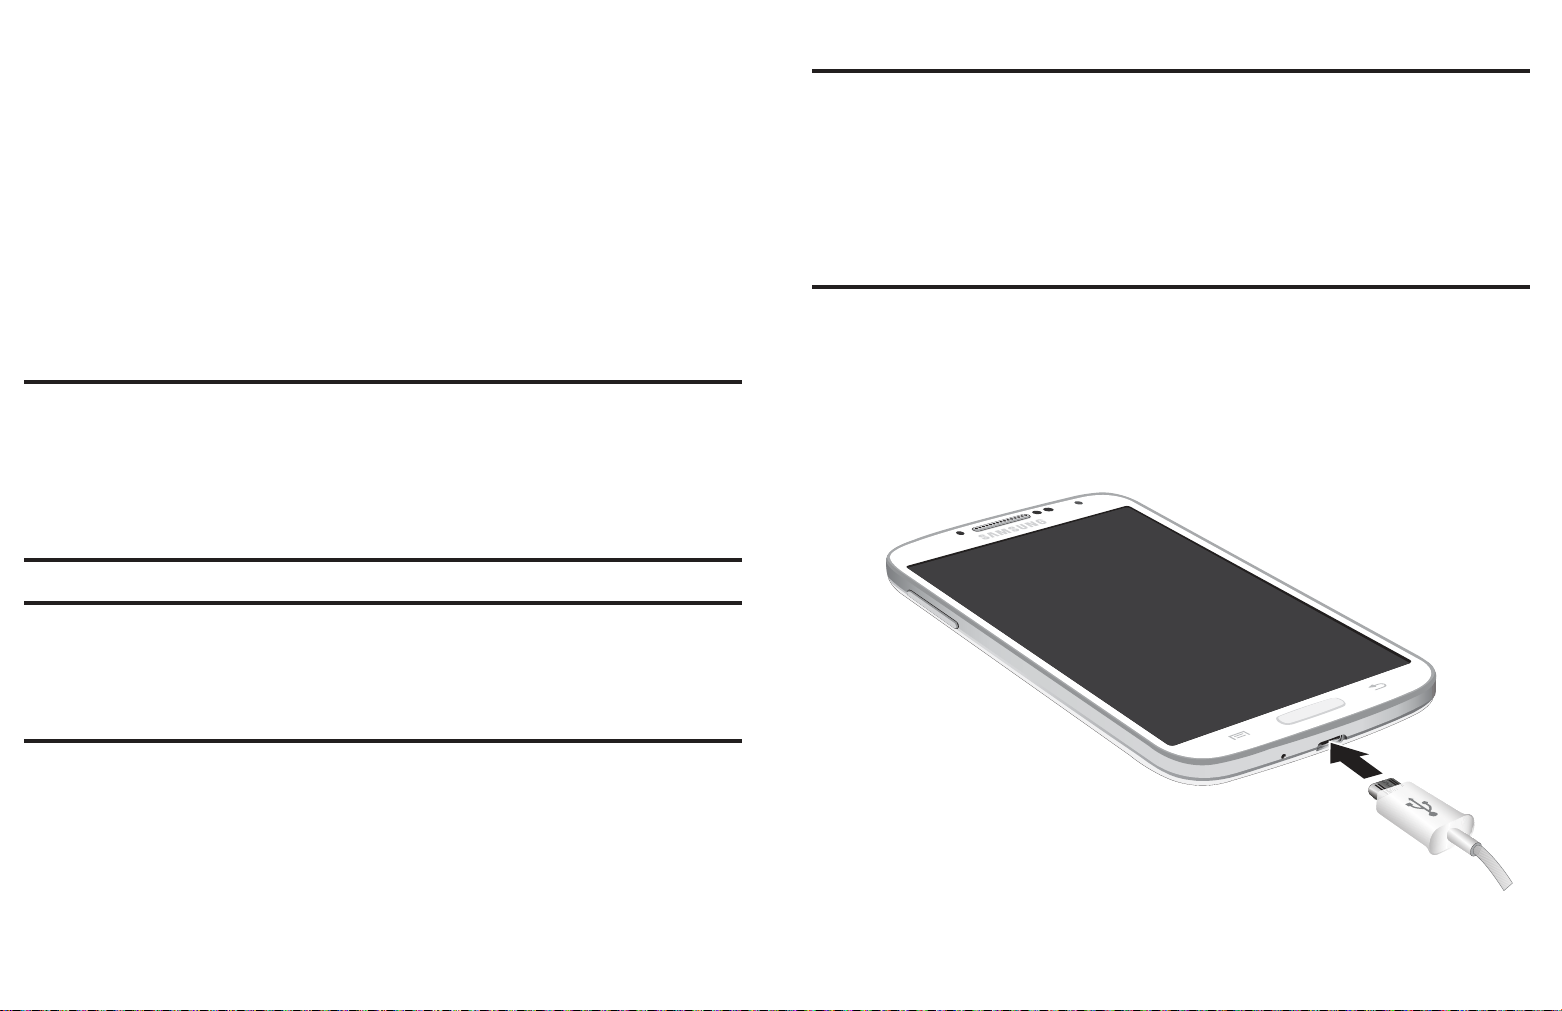
Your phone comes with a charger (charging head and USB
cable) to charge your phone from any 110/220 VAC outlet.
1. Insert the USB cable into the port.
reduce the battery’s talk and standby times.
Although you can use the phone while the battery is
charging, doing so will require additional charging time.
Getting Started 12
Page 20
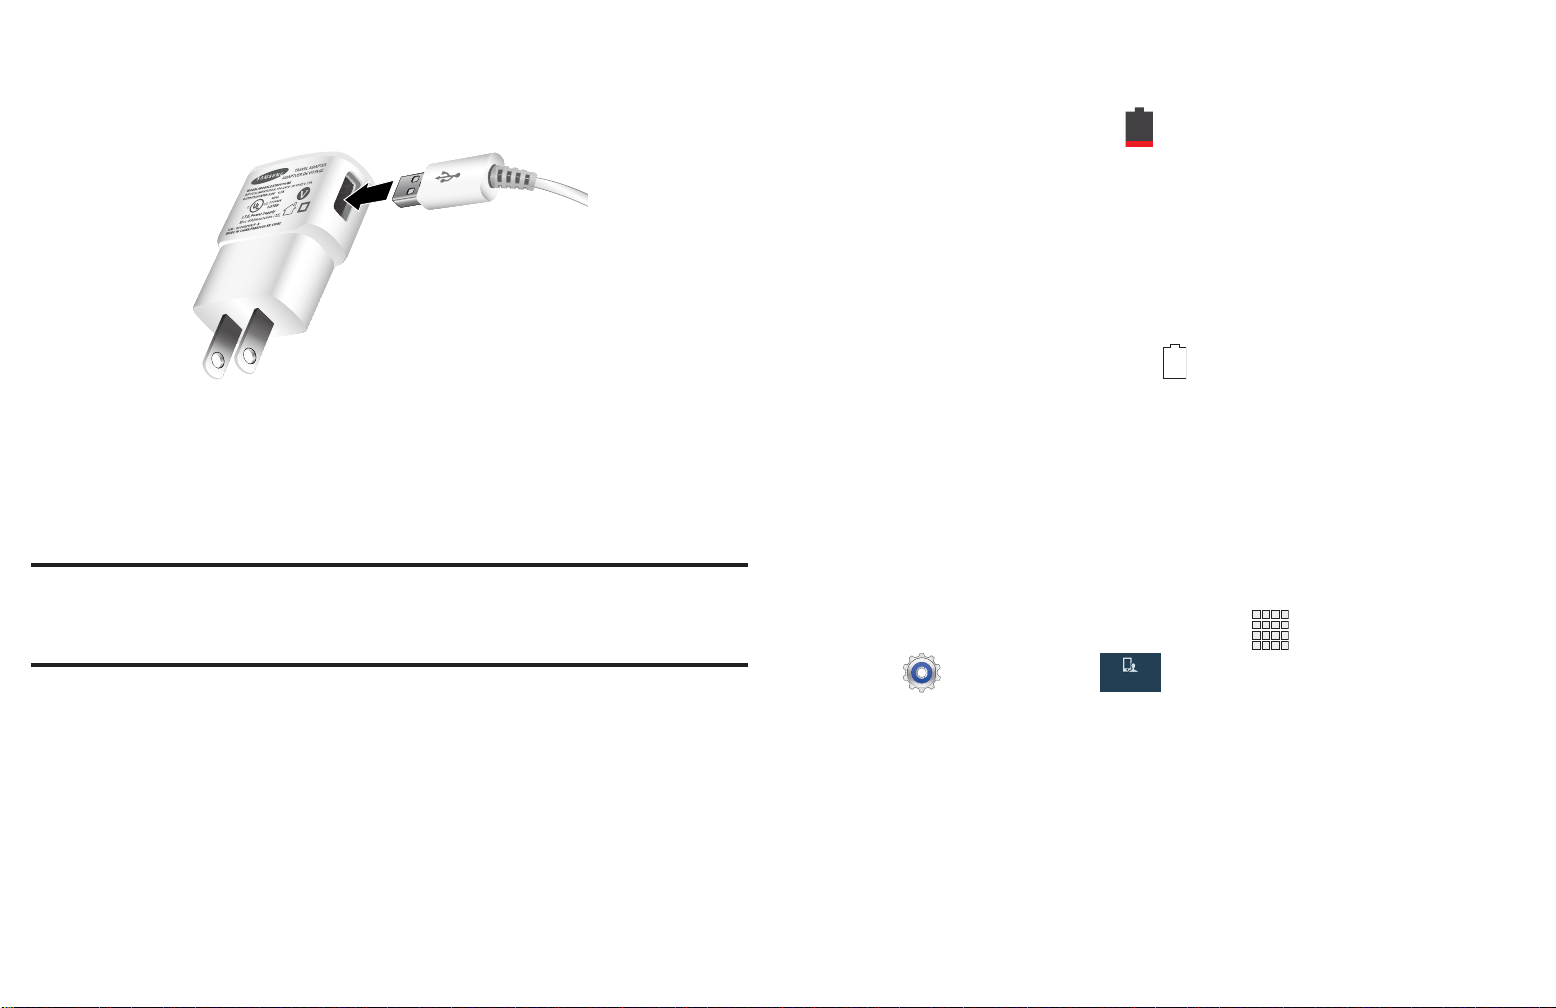
2. Connect the USB cable to the charging head, then plug
My device
Low Battery Indicator
the charging head into a standard AC power outlet.
3. When charging is complete, unplug the charging head
from the power outlet and remove the USB cable from
the phone.
Note: Failure to unplug the wall charger before you remove
the battery, can cause damage to the phone.
When the battery is weak and only a few minutes of talk time
remain, the battery icon ( ) blinks and the phone sounds a
warning tone at regular intervals. In this condition, your
phone conserves its remaining battery power, not by turning
off the backlight, but by entering the dimming mode. For a
quick check of your battery level, glance at the battery
charge indicator located in the upper-right corner of your
phone’s display. Solid color ( ) indicates a full charge.
When the battery level becomes too low, the phone
automatically turns off.
You can also choose to display a percentage value. Having a
percentage value onscreen can provide a better idea of the
remaining charge on the battery.
䡲 From the Home screen, touch
Apps ➔
Settings ➔ My device ➔ Display ➔
Show battery percentage.
13
Page 21
Turning the Phone On or Off
Accounts
Creating a Samsung Account
To turn the phone on:
䡲 Press and hold the Power/Lock Key until
the phone vibrates and starts up.
To turn the phone off:
1. Press and hold the Power/Lock Key until
the phone vibrates and the Phone Options menu
displays.
2. At the prompt, tap Power off.
Setup Wizard
The first time you turn your phone on, Setup Wizard will
guide you through the basics of setting up your phone.
Follow the prompts to choose a default language, set up
Create a Samsung account for access to Samsung apps on
your phone, such as Samsung Link. For more information,
see
“Accounts” on page 187.
If you did not create a Samsung account when you first set
up your phone, follow these steps:
1. From a Home screen, touch Apps ➔
Settings ➔ Accounts ➔ Add account
2. Touch Samsung account.
3. Touch Create new account.
4. Follow the onscreen instructions to create and activate
your account.
.
accounts, choose location services, and learn more about
your phone.
You can also use the Setup Wizard to quickly configure your
phone at any time.
䡲 From a Home screen, touch
Setup Wizard.
Apps ➔
Getting Started 14
Page 22

Creating a New Google Account
More
Displaying Your Phone Number
In order to utilize your phone to the fullest extent, create a
Google account when you first use your phone. With a Google
account, Google applications will always be in sync between
your phone and computer.
If you did not create a Google account when you first set up
your phone, follow these steps:
1. From a Home screen, touch Apps ➔ Gmail.
The Add a Google Account screen displays.
2. Touch New to create a new Google account.
– or –
If you already have a Google account, touch Existing to
sign in and add the account to your phone.
Smart Switch
1. From the Home screen, touch Menu.
2. Touch Settings ➔ More ➔ About phone ➔
Status ➔ My phone number.
Voicemail
All unanswered calls to your phone are sent to voicemail,
even if your phone is turned off, so you will want to set up
your voicemail and personal greeting as soon as you activate
your phone.
For more information, see
“Voicemail” on page 151.
TTY Mode
Your phone is TTY-compatible, allowing you to connect a TTY
phone to the phone’s headset jack. Before you can use your
phone with a TTY phone, you will need to enable TTY Mode.
Easily transfer your photos, videos, music, apps and more
from your old phone to the Samsung Galaxy S® 4.
Visit
www.samsungsmartswitch.com
15
For more information about enabling TTY mode, see
on page 169.
“Call”
Page 23

Roaming
Locking the Phone
When you travel outside your home network’s coverage area,
your phone can use roaming to acquire service on other
compatible digital networks. When roaming, the
Roaming icon displays in the Status Bar.
Tip: You can set your phone’s roaming behavior. For more
information, see “Mobile Networks” on page 160.
During roaming, some services may not be available.
Depending on your coverage area and service plan, extra
charges may apply when making or receiving calls,
connecting to the Internet, or using data services. Contact
Verizon Wireless for more information about your coverage
area and service plan.
Securing Your Phone
䡲 By default, the phone locks automatically when the
screen times out.
– or –
Press the Power/Lock Key.
Tip: When the phone is locked, the Emergency call feature is
available on the lock screen—allowing you to make
emergency calls even while the phone is locked.
Unlocking the Phone
Unlock the phone using one of the default unlock screens, or
use a Screen lock options for increased security.
䡲 Press the Power/Lock Key, then touch and
drag your finger across the screen.
Use your phone’s screen lock features to secure your phone.
To set a personal screen lock, use the Lock screen settings.
For more information, see “Lock Screen” on page 164.
For other settings related to securing your phone, see
“Security” on page 192.
Tip: Special notification icons display for missed calls or new
messages. Drag a missed call or message icon to view
the message or call log.
Getting Started 16
Page 24

Section 2: Understanding Your Phone
This section outlines some key features of your phone and
describes the screen and the icons that appear when the
phone is in use. It also shows how to navigate through the
phone and provides information on using a memory card.
Features of Your Phone
The following list outlines a few of the features included in
your phone.
• Brilliant HD Super AMOLED
(1920x1080 resolution)
• 4G LTE network with 1.9 gigahertz quad-core processor
• 1.9 GHz quad-core processor
• Android 4.4.2, Kit Kat
• SAFE
®
™
touch screen,
• Multi-task with Pop-Up Video
• Keep in touch
– SMS (Text) and MMS (Multimedia)
– Voice
– Email and Gmail
– Instant messaging with Google Hangouts
• Enjoy pictures, music and video
– Discover new media with Media Hub
– Gallery, Music player, and Video player
– DivX Certified
premium content
®
to play DivX® video at HD 720p, including
• Connect to other devices
• Smart Switch
www.samsungsmartswitch.com.
™
compliant. For more information, see
• Touch screen provides quick response to a variety of
in-phone menus and options including applications,
multi-windows and up to seven home screens
17
– Wi-Fi 802.11 a/b/g/n/ac
– Wi-Fi Direct
– Mobile Hotspot
– DLNA
Page 25

– Bluetooth 4.0
• Share with friends
– USB 2.0 High-speed
– Tethering
– NFC and S Beam
– Group Play
– Kies via Wi-Fi
• Capture memories
– 13 MP Camera and Camcorder with LED flash + 2.0 MP
front-facing camera
– Seamlessly share pictures via Group Play to other
devices
– Capture rapid-fire still pictures with Burst Shot
– Use Best Photo, Best Face, and Eraser to choose the
– S Beam
™
, for easy sharing of files via NFC
– Specialized apps, including Samsung Link and
Group Play
– Integrated features, such as Share Shot in Camera
• Take your content with you
– 16 GB memory device memory (actual formatted
capacity may vary)
– Support for microSD and microSDHC memory cards up
to 64GB capacity (not included)
best pictures
– Samsung Link to share media content across DLNA
certified devices.
• Control your device with S Voice, for natural voice
commands
Understanding Your Phone 18
Page 26
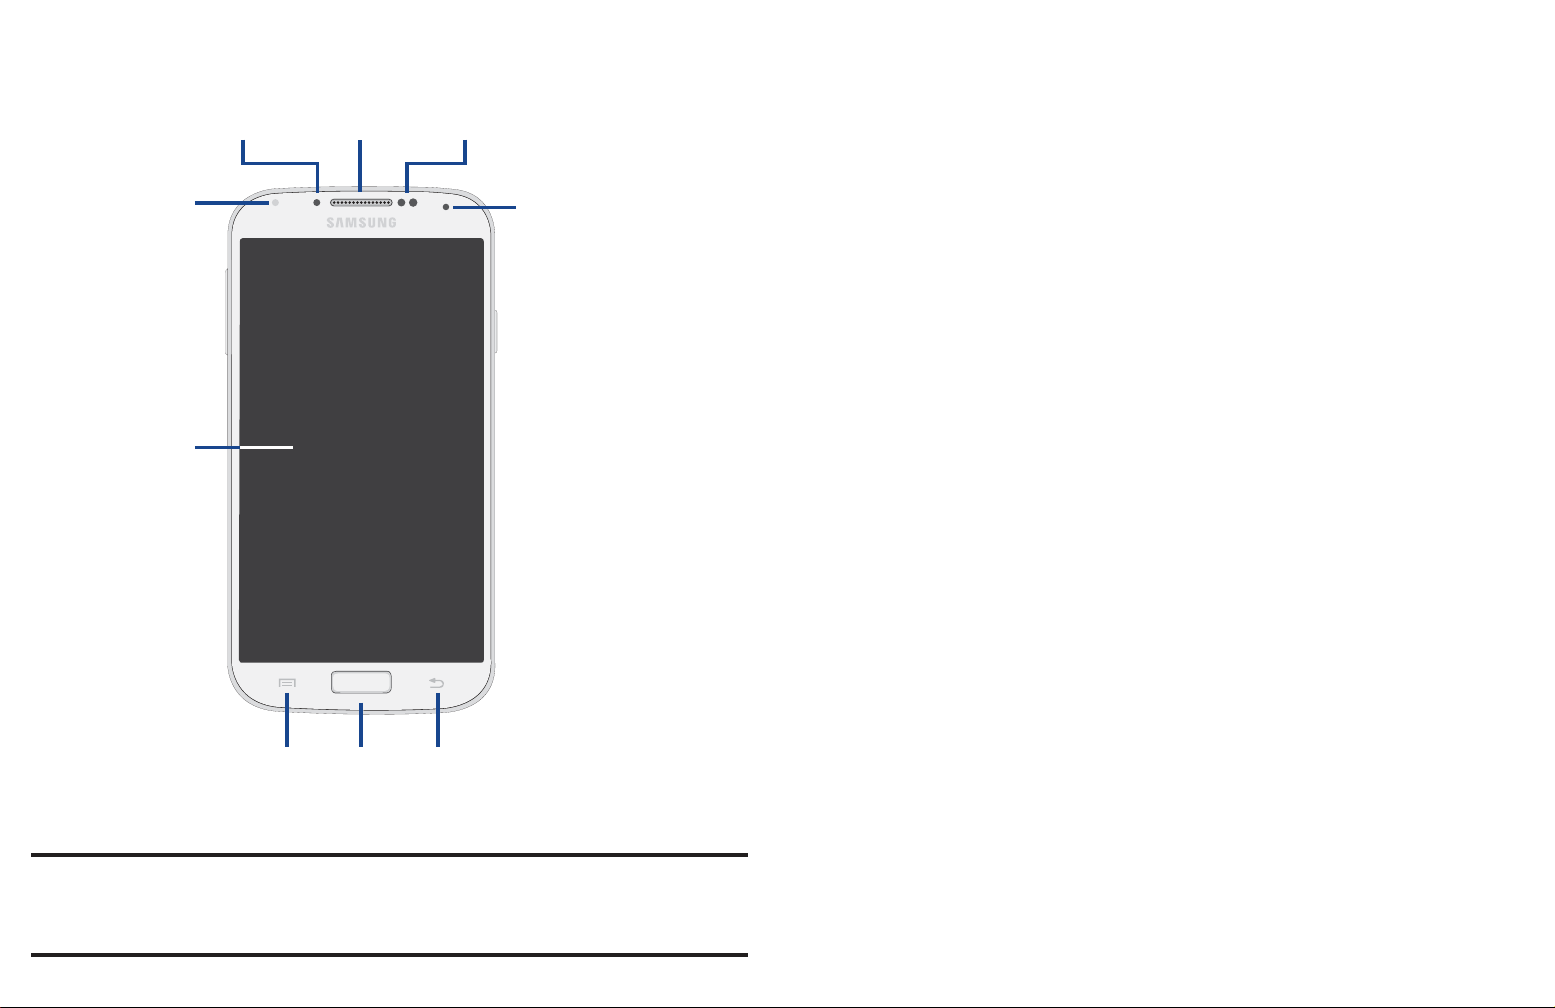
Front View
LED
Indicator
Display
Light (RGB)
Sensor
Proximity and
Light Sensors
Front
Camera
Menu
Home Back
Earpiece
LED Indicator
The LED indicator, on the front of the phone above the screen
(see
“Front View” on page 19) animates or glows to show
alerts or phone status.
• Blue:
– Pulses in multi-color blue while the phone is turning On
or Off.
– Blinks blue for a missed call, message or other
notification.
• Red:
– Glows red when the phone is connected to a charger and
charging.
– Blinks red when the phone is connected to a charger and
there is a problem with charging.
– Blinks red when battery power is low (phone not
connected to charger).
• Green:
– Glows green when the phone is connected to a charger
Note: The Menu and Back keys illuminate when navigating
through the device.
19
and the battery is fully charged.
Page 27
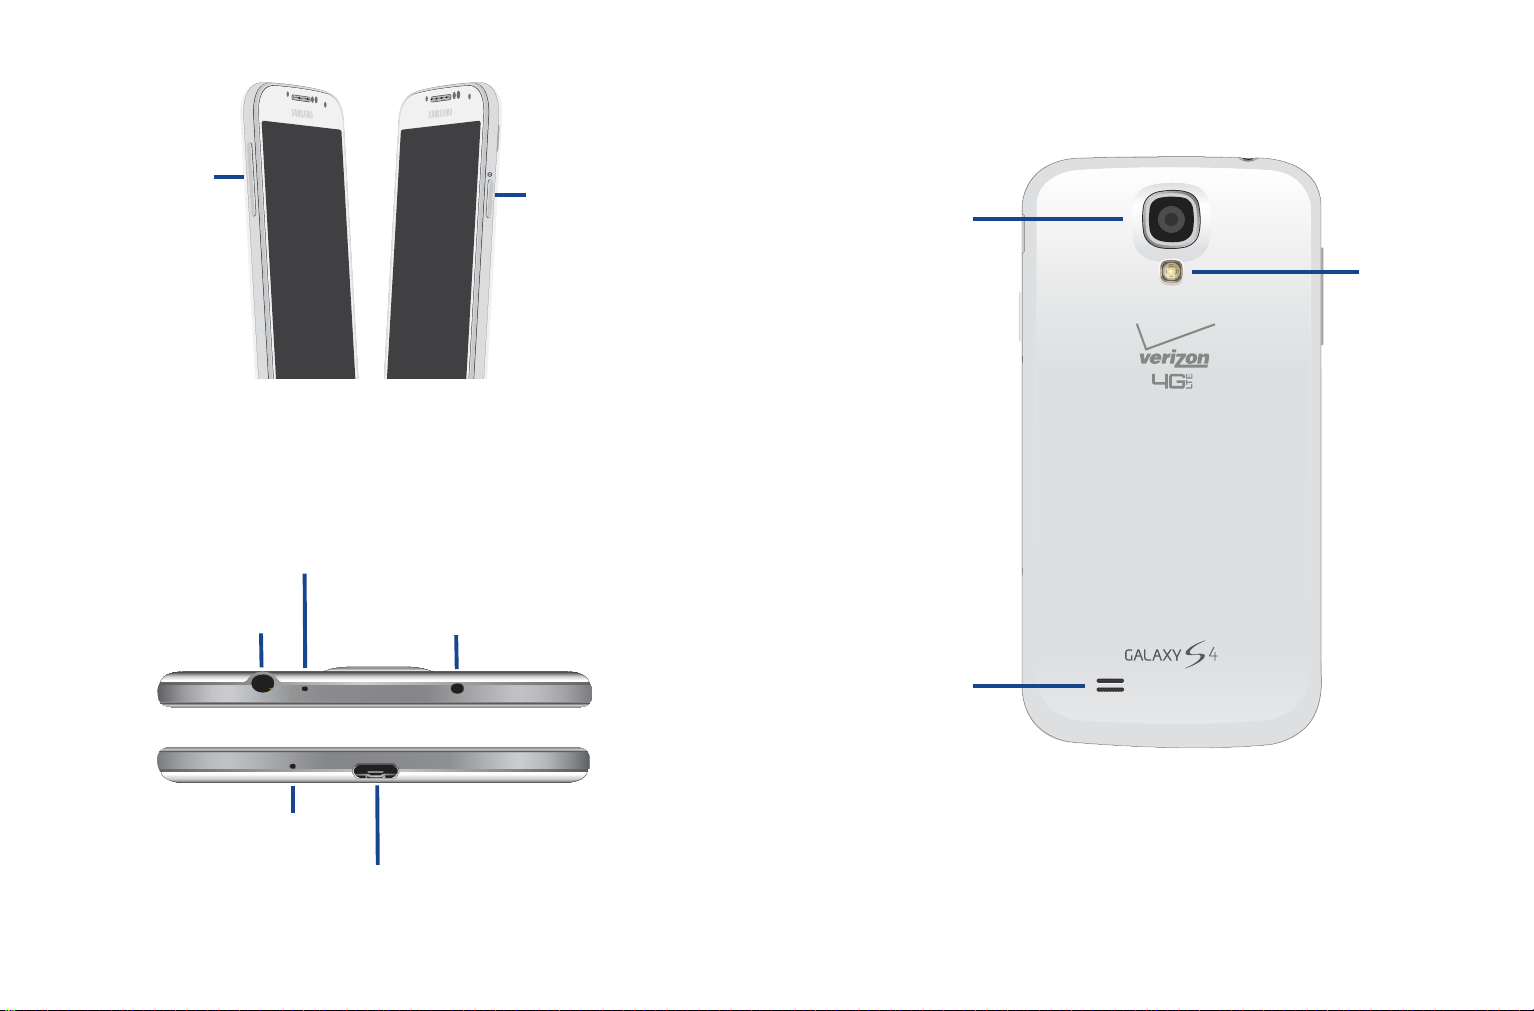
Side Views
Vol ume
Key
Power/Lock
Key
Microphone
3.5mm Headset Jack
Microphone
Infrared Sensor
Charging/USB Port
LED
Flash
Camera
Lens
External
Speaker
Back View
Top and Bottom Views
Understanding Your Phone 20
Page 28
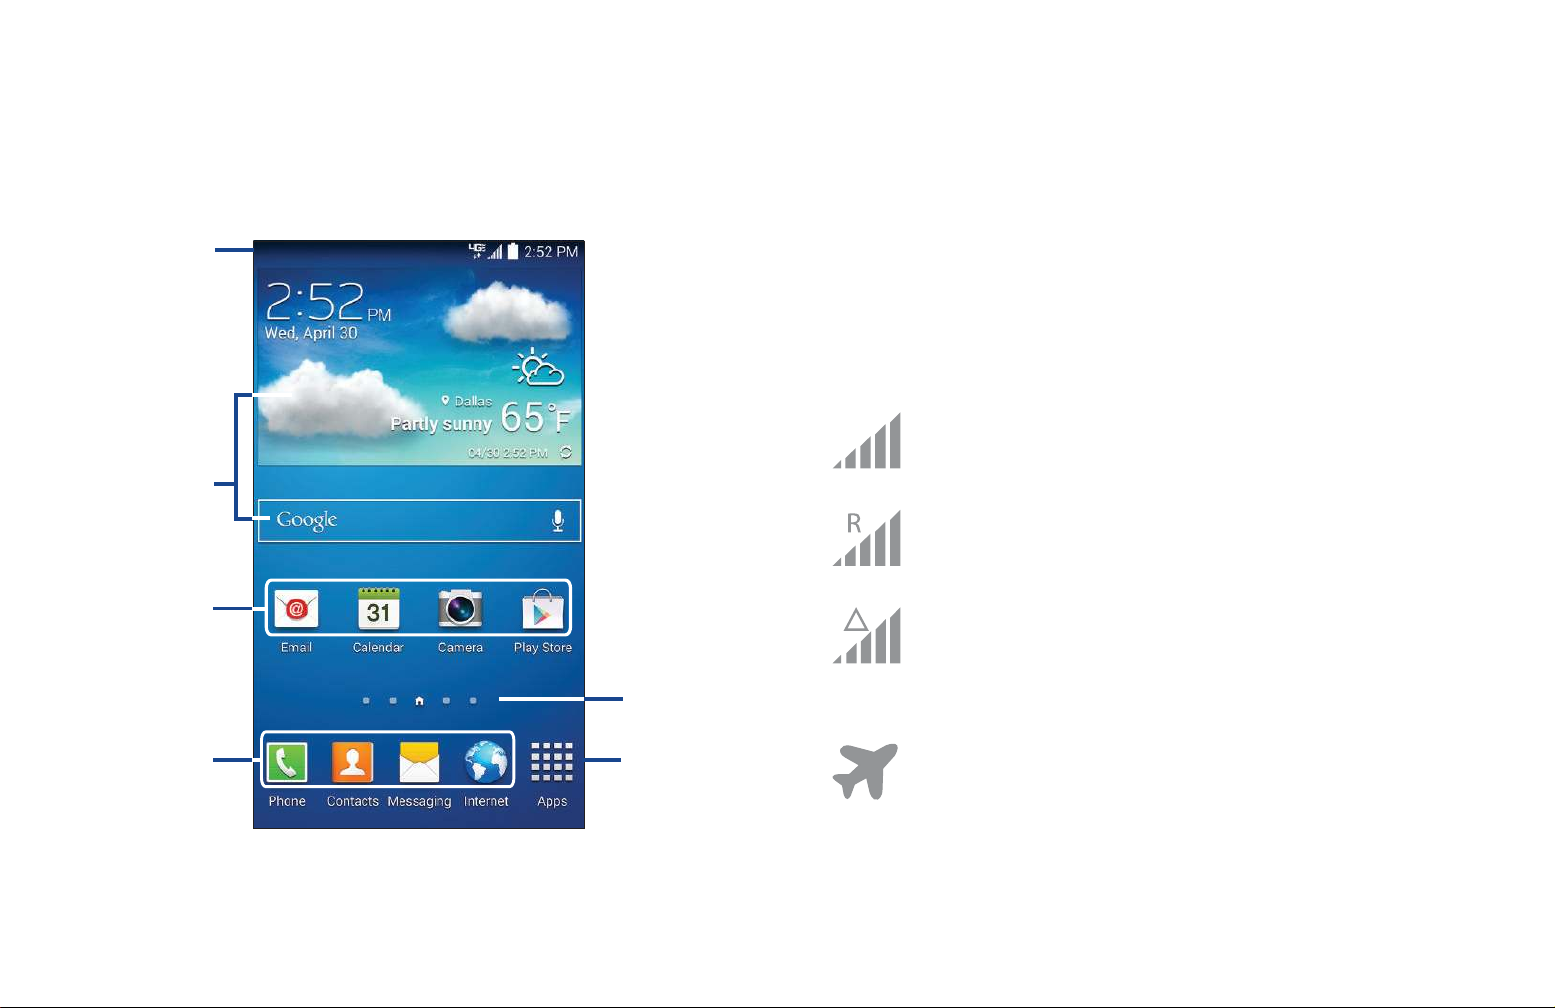
Home Screen
Status
Bar
Widgets
Application
Shortcuts
Current
Screen
Primary
Shortcuts
Apps
Display Layout
The Home screen is the starting point for using your device.
Place shortcuts, widgets and other items to customize your
device to your needs.
Your display screen provides a wealth of information about
the phone’s status and options, as well as providing access
to application icons. For more information, refer to
View”
on page 19.
“Front
Status Bar
The Status Bar shows network and battery status and other
details, including these common icons.
Current signal strength. The greater the number of bars,
the stronger the signal.
Current signal strength, when the phone is roaming.
The greater the number of bars, the stronger the signal.
Current signal strength, when the phone is roaming on
CDMA networks. The greater the number of bars, the
21
stronger the signal.
Indicates that the Airplane Mode is active. You cannot
send or receive any calls or access online information.
For more information, refer to
page 155.
“Airplane Mode” on
Page 29

There is no network available.
Your battery is charging. Also displays battery charge
level.
Your phone is in Blocking mode.
There is a system error or alert.
Indicates a security warning. You are prompted to set a
screen lock password.
A voice call is in progress.
A call is on hold.
The speakerphone is enabled.
A call has been missed.
A call has been muted.
Battery is critically low.
Your phone is actively connected to a 3G network.
Your phone is actively connected to a 4G LTE network.
Your phone is downloading or has downloaded a file. It
will blink green when it is installing.
An outbound file transfer is in progress.
Updates are available for download.
The phone is connected to a computer with a supported
USB cable connection. or more information about
transferring data between your phone and a computer,
Call forwarding is set to Always forward. For more
information, refer to
Battery charge level. Icon shown is fully charged.
“Call Forwarding” on page 81.
see
“Transferring Data” on page 127
The phone is tethered via a supported USB cable
connection.
Understanding Your Phone 22
Page 30
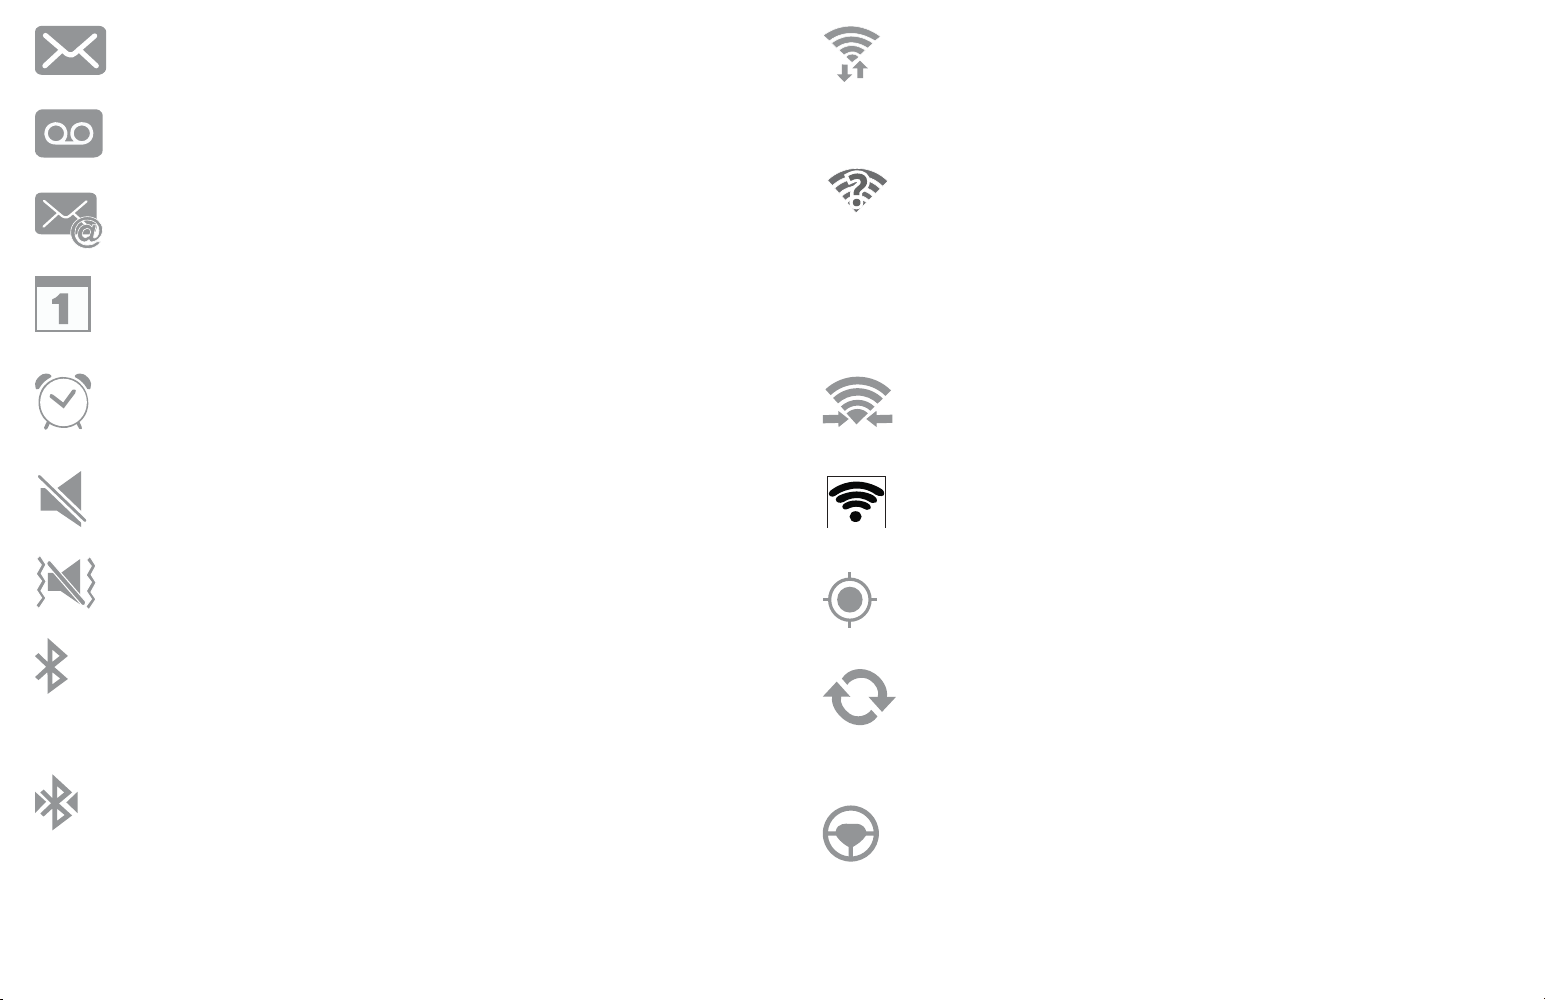
A new text or multimedia message is received.
Wi-Fi is connected, active, and communicating with a
Wireless Access Point (WAP). For more information,
A new voicemail is received.
Email has been received.
The time and date for a Calendar Event has arrived. For
more information, refer to
An alarm is set to ring at a specified time. For more
information, refer to
The Sound profile is set to Mute.
The Sound profile is set to Vibrate.
Bluetooth is activated. For more information, For more
information, refer to
page 118.
A Bluetooth device has been paired with the phone. For
more information, see
page 121.
“Clock” on page 134.
“Turning Bluetooth On and Off” on
“Calendar” on page 133.
“Pairing Bluetooth Devices” on
refer to
There is a Wi-Fi access point available, but you are not
connected to it. May also display if there is a
communication issue with the target Wireless Access
Point (WAP). For more information, refer to
page 114.
Wi-Fi Direct is active and your phone is connected to
another device.
Your phone has been configured as a portable Wi-Fi
hotspot.
GPS is active and acquiring a signal. For more
information, refer to “Location Services” on page 191.
Data synchronization and application sync is active and
synchronization is in progress for Gmail, Calendar, and
Contacts.
Your phone is in Hands-free mode. Incoming calls and
notifications will be read out aloud.
“Wi-Fi” on page 114.
“Wi-Fi” on
23
Page 31
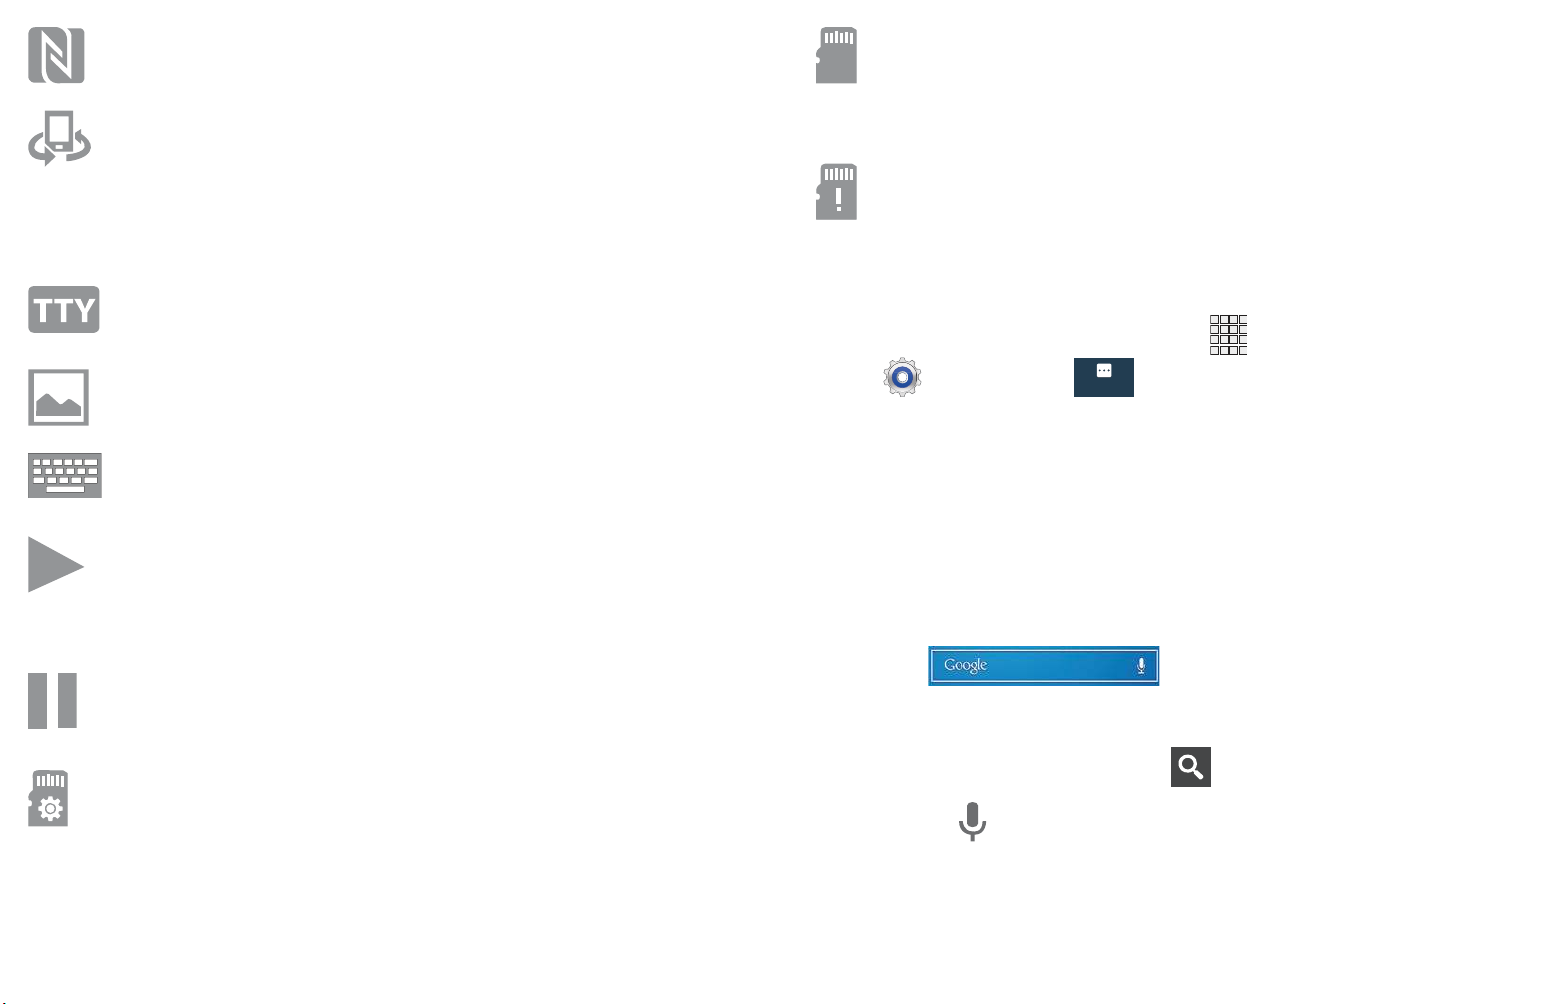
Near Field Communication (NFC) has been activated.
A memory card was unmounted, and it is safe to
Your device is connected being used to control
streaming media and is connected to a Digital Living
Network Alliance (DLNA) certified device using the
Samsung Link application.
A TTY device has been inserted.
A screen capture has been taken.
Displays when the keyboard is active.
Music is playing, but the app is in the background. You
can control playback from the Notification Panel or from
the Music app.
uninstall it. For more information, refer to
Card”
on page 43.
“Memory
A memory card was uninstalled. For more information,
refer to
“Memory Card” on page 43.
For a categorized list of icons that display on the phone:
䡲 From a Home screen, touch Apps ➔
Settings ➔ More ➔ About device ➔ Icon
More
glossary.
Google Search Bar
The Google Search Bar provides you an onscreen Internet
search engine powered by Google.
1. From the main Home screen, touch the Google Search
Music playback is paused. You can control playback
from the Notification Panel or from the Music app.
A memory card scan is underway, to prepare the card
for use. For more information, refer to
“Memory Card”
on page 43.
bar .
2. Use the onscreen keyboard to enter the item you want
to search for, then touch .
3. Touch to use Google Voice Search. Follow the
on-screen instructions.
Understanding Your Phone 24
Page 32

Using Motions and Gestures
Pinch and Spread
By activating the various motion and gesture features, you
can access a variety of time saving functions.
Terms Used in This User Manual
Touch
Touch items to select or launch them. For example:
• Touch the onscreen keyboard to enter characters or text.
• Touch an item to select it.
• Touch an app’s icon to launch the application.
Touch and Hold
Activate items by a touch and hold gesture. For example:
• Touch and hold a widget on the Home screen to move it.
• Touch and hold on a field to display a pop-up menu of
options.
Using two fingers, make a pinch or spread motion on the
screen. For example:
• Pinch in to zoom in on pictures or screens.
• Spread out your fingers to zoom out on pictures or screens.
Tilt
Touch and hold two points on the screen, with your thumbs,
then tilt the phone forward and back to zoom in or out.
• Tilt to zoom: When this setting is On, tilting the phone
while in Gallery or Internet causes the screen to zoom in
or out.
Pan
Touch and hold on the screen, then move the phone in a
side-to-side motion.
• Pan to move icon: When this setting is On, moving the
Swipe
Swipe your finger across the screen. For example:
• Unlocking the screen
• Scrolling the Home screen or a menu
• Combine touch and hold with swipe to drag an item.
25
phone in a panning motion (side-to-side) moves a
highlighted icon to a new location on the Home screen.
• Pan to browse images: When this setting is On, moving
the phone in a panning motion while viewing an image
moves focus around in the image.
Page 33

Pick Up or Turn Over
My device
Hand Gestures
Lift the phone, or place the phone screen-down, on a
horizontal surface, such as a table.
• Direct call: When this setting is On, you can lift the phone
to your ear to call a displayed contact in Messaging,
Contacts, or Call Log to dial the contact’s phone number.
• Smart alert: When this setting is On, the phone will
automatically notify you to missed calls and alerts that
occurred while the phone was stationary.
• Turn over to mute/pause: When this setting is On, turning
the phone screen-down automatically mutes incoming call
ringtones and alerts sounds.
Palm Swipe
Palm swipe by swiping the side of your hand horizontally
Your device recognizes motion, to allow you to navigate and
access features by moving the device in specific gestures.
To use gestures, enable the Motion settings. For more
information, see
Caution! Excessive shaking or impact to the device may
cause unintended results.
To learn how to properly control motions, touch Apps ➔
Settings ➔
When touched, each entry displays an on-screen tutorial.
“Motions and Gestures” on page 184.
My device ➔ Motions and gestures.
across the screen. Use palm swipe for:
• Palm swipe to capture: When this setting is On, swiping
the screen with the side of your hand (left to right, or right
to left) captures a screen shot.
• Palm touch to mute/pause: When this setting is On,
covering the screen with your hand mutes or pauses
media playback.
Understanding Your Phone 26
Page 34

Menu Navigation
Home Screen Overview
You can tailor the phone’s range of functions to fit your needs
using both menus and widgets. Menus, sub-menus, and
features can be accessed by scrolling through the available
onscreen menus. Your phone originally has three home
screens but you can expand up to seven home screens.
Command Keys
Menu Key
Touch
options for the current screen or feature.
Home Key
Press
and hold to display recently used apps and access the Task
manager.
Menu to display a context-sensitive menu of
Home to display the main Home screen. Press
The main Home screen is the starting point for many
applications and functions, and it allows you to add items
like application icons, shortcuts, folders, or Google widgets
to give you instant access to information and applications.
This is the default page and accessible from any menu by
pressing
Home.
Navigating Through the Home Screens
The Home screen consists of the Home panel, plus panels
that extend beyond the display width to provide more space
for adding shortcuts, widgets, and folders.
䡲 From the main Home screen, swipe the screen with
your finger in either direction. The main Home Screen
is located in the middle with Home screens on each
side. As you scroll, the indicator at the bottom of the
Back Key
Touch Back to return to the previous screen, option
or step.
27
display shows your current position.
Page 35

Navigating Through the
Navigating Using Sub-Menus
Application Menus
Your phone initially has four Application Menus available.
Follow these steps to navigate through the Application
Menus:
1. From a Home screen, touch Apps.
The first Apps Menu displays.
2. Swipe the screen left or right to access the other two
menus.
3. Touch one of the application icons.
Note: As you add applications, the number of Application
menus that you have available will increase.
Sub-menus are available when you are at any Home screen
or have selected a feature or application such as Phone,
Contacts, Messaging, or Internet.
To access a sub-menu:
1. Touch Menu.
A sub-menu will appear at the bottom of the phone
screen.
2. Touch an option.
Accessing Recently-Used Apps
1. Press and hold
the recently-used applications window.
2. Touch an option to open the selected application:
Home from any screen to open
• Task manager: Go to the Task manager.
• Google: Go to Google Search.
• Close all: Delete the record of all recently used
applications.
Understanding Your Phone 28
Page 36

Customizing Your Home Screen
Adding a Shortcut from the Apps Menu
You can customize your Home screen by doing the following:
• Creating Shortcuts
• Adding and Removing Primary Shortcuts
• Adding and Removing Widgets
• Moving Icons in the Apps Menu
• Creating Application Folders
• Adding a New Page to the Application Menu
• Changing the Wallpaper
• Adding and Deleting Home Screens
• Moving Home Screens
Creating Shortcuts
1. Press
2. Navigate to the desired Home Page.
3. Touch Apps to display your current applications.
4. Scroll through the list and locate your desired
application.
5. Touch and hold the application icon. This creates an
immediate shortcut of the selected icon and closes the
Apps tab.
6. While still holding the onscreen icon, position it on the
current page. Once complete, release the screen to
lock the new shortcut into its new position on the
current screen.
Home to activate the main Home screen.
Shortcuts are different than the current Home screen
Widgets that only launch an application. Shortcuts activate a
feature, action, or launch an application.
Note: To move a shortcut from one screen to another, it must
first be deleted from its current screen. Navigate to the
new screen, then add the shortcut.
29
Page 37
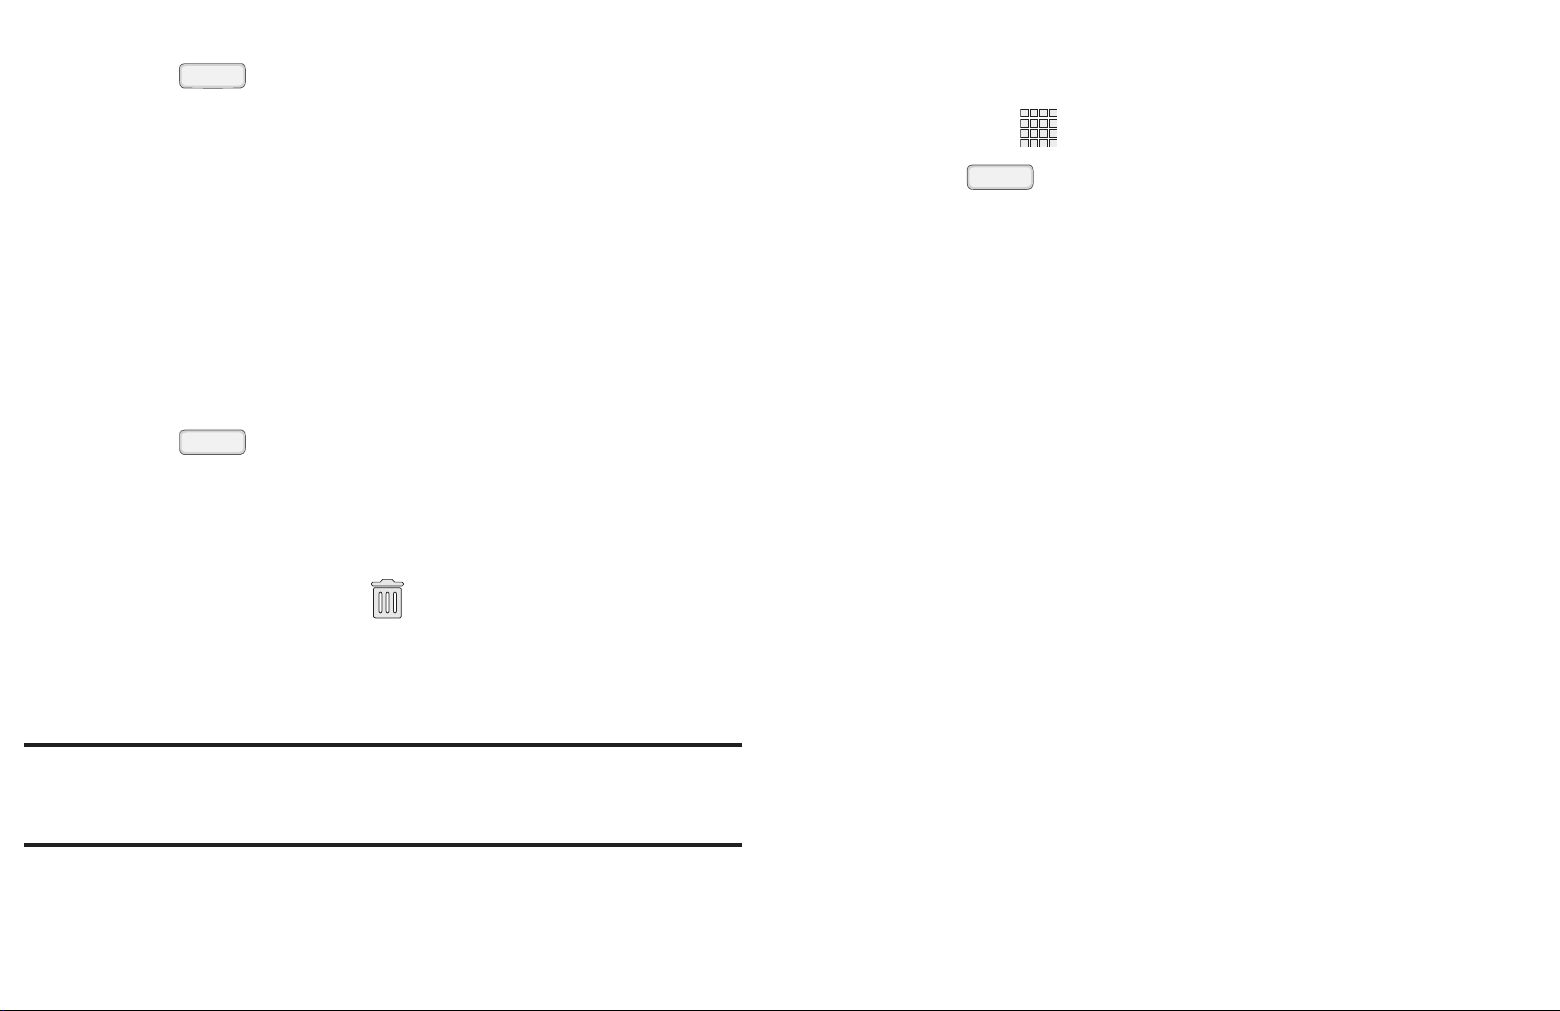
Adding a Shortcut via the Add to Home Screen
Adding and Removing Primary Shortcuts
1. Press
2. Navigate to the desired Home Page.
3. Touch and hold on an empty area of the Home screen.
4. Touch Apps and widgets, Folder, or Page.
5. Touch and hold a shortcut from the available list and
position it on the current screen.
Deleting a Shortcut
1. Press
2. Touch and hold the desired shortcut. This unlocks it
from its location on the current screen.
3. Drag the icon over the Remove icon and release it.
As you place the shortcut into the Trash, both items
Home to activate the main Home screen.
Home to activate the main Home screen.
You can change any of your primary shortcuts with the
exception of the Apps shortcut.
1. Press
2. Touch and hold the primary shortcut you want to
replace, then drag it to an empty space on any Home
screen.
3. Scroll through the Apps menu to find the shortcut you
want to add as the new primary shortcut.
4. Touch and hold the new shortcut, then drag it to the
empty space in the row of primary shortcuts.
The new primary shortcut will now appear on all Home
screens.
Home to activate the main Home screen.
turn red.
Note: This action does not delete the shortcut, it just removes
it from the current screen.
Understanding Your Phone 30
Page 38
Adding and Removing Widgets
Creating Application Folders
Widgets are self-contained applications that reside in either
your Widgets tab or on the main or extended Home screens.
Unlike a shortcut, the Widget appears as an onscreen
application.
Adding a Widget
1. Press
2. Navigate to the desired Home Page.
3. Touch and hold on an empty area of the screen.
4. Touch Apps and widgets.
5. Touch the Widgets tab at the top of the screen.
6. Touch and hold an available Widget to position it on the
current screen, then release the Widget.
Removing a Widget
Home to activate the main Home screen.
You can create application folders to hold similar
applications.
1. From a Home screen, touch Apps to display your
current applications.
2. Touch the Apps tab at the top of the screen if it is not
already selected.
3. Touch Menu and touch Edit.
4. Touch and hold the first application that you would like
to move to a folder.
5. Drag the icon to the Create folder icon.
6. Enter a folder name and touch OK.
A folder displays in the original place of the application
1. Touch and hold a Widget until you can move it around
on the screen.
2. Drag the Widget up to the Remove icon and
release it.
Note: This action does not actually delete the Widget, it just
removes it from the current Home screen.
31
icon with the application icon displayed on top of it. You
can now drag other Apps into the folder.
7. To view information on an App, drag the App icon up to
the App info icon to view information on the
application.
8. Touch Save.
Page 39

Adding a New Page to the
Changing the Wallpaper
Application Menu
You can add a new page to your application menu by
following these steps:
1. From a Home screen, touch Apps to display your
current applications.
2. Touch the Apps tab at the top of the screen if it is not
already selected.
3. Touch Menu and touch Edit.
4. Touch and hold the first application that you would like
to move to a new page.
5. Drag the icon to the Create page icon.
6. Touch Save.
You can change the Wallpaper (background) of your home
screens by following these steps:
1. From any Home screen, touch and hold on an empty
area of the screen.
The Home screen window displays.
2. Touch Set wallpaper.
3. Select the location where you would like to change the
wallpaper. Touch Home screen, Lock screen, or
Home and lock screens.
4. Touch one of the following options:
• Gallery: Select a wallpaper from photographs you have
taken with your camera.
The app will appear on a new page.
• Live wallpapers: Select an animated wallpaper. This
option is not available for the Lock screen option.
•Wallpapers: Select from many still-life wallpapers.
5. Select a wallpaper and touch Set wallpaper, Done, or
Cancel.
Understanding Your Phone 32
Page 40

Adding and Deleting Home Screens
5. Touch OK to delete the page and its contents,
You can add and delete Home screens. You can have up to
seven Home screens.
Add a new Home screen
1. From a Home screen, touch Menu ➔ Edit page.
2. Touch the Home screen that contains .
A new screen is added.
3. If desired, touch and hold the new screen and drag it to
a different location.
4. Press
You can now add items to your new Home screen.
Delete a Home screen
1. From a Home screen, touch Menu ➔ Edit page.
Home to return to the main Home screen.
otherwise touch Cancel.
6. Press
Home to return to the main Home screen.
Moving Home Screens
You can arrange your Home screens in any order that you
want.
To move a Home screen, follow these steps:
1. From a Home screen, touch Menu ➔ Edit page.
2. Touch and hold the Home screen you want to move.
3. Drag it to the location that you would like to place it.
When you move a Home screen, the other Home
screens are re-ordered automatically.
4. Press
Home to return to the main Home screen.
2. Touch and hold the Home screen you want to delete.
3. Drag it to the trash can located at the top of the screen.
The page will turn red.
4. If there are items on the Home screen, the
Remove home screen page prompt displays.
33
Page 41
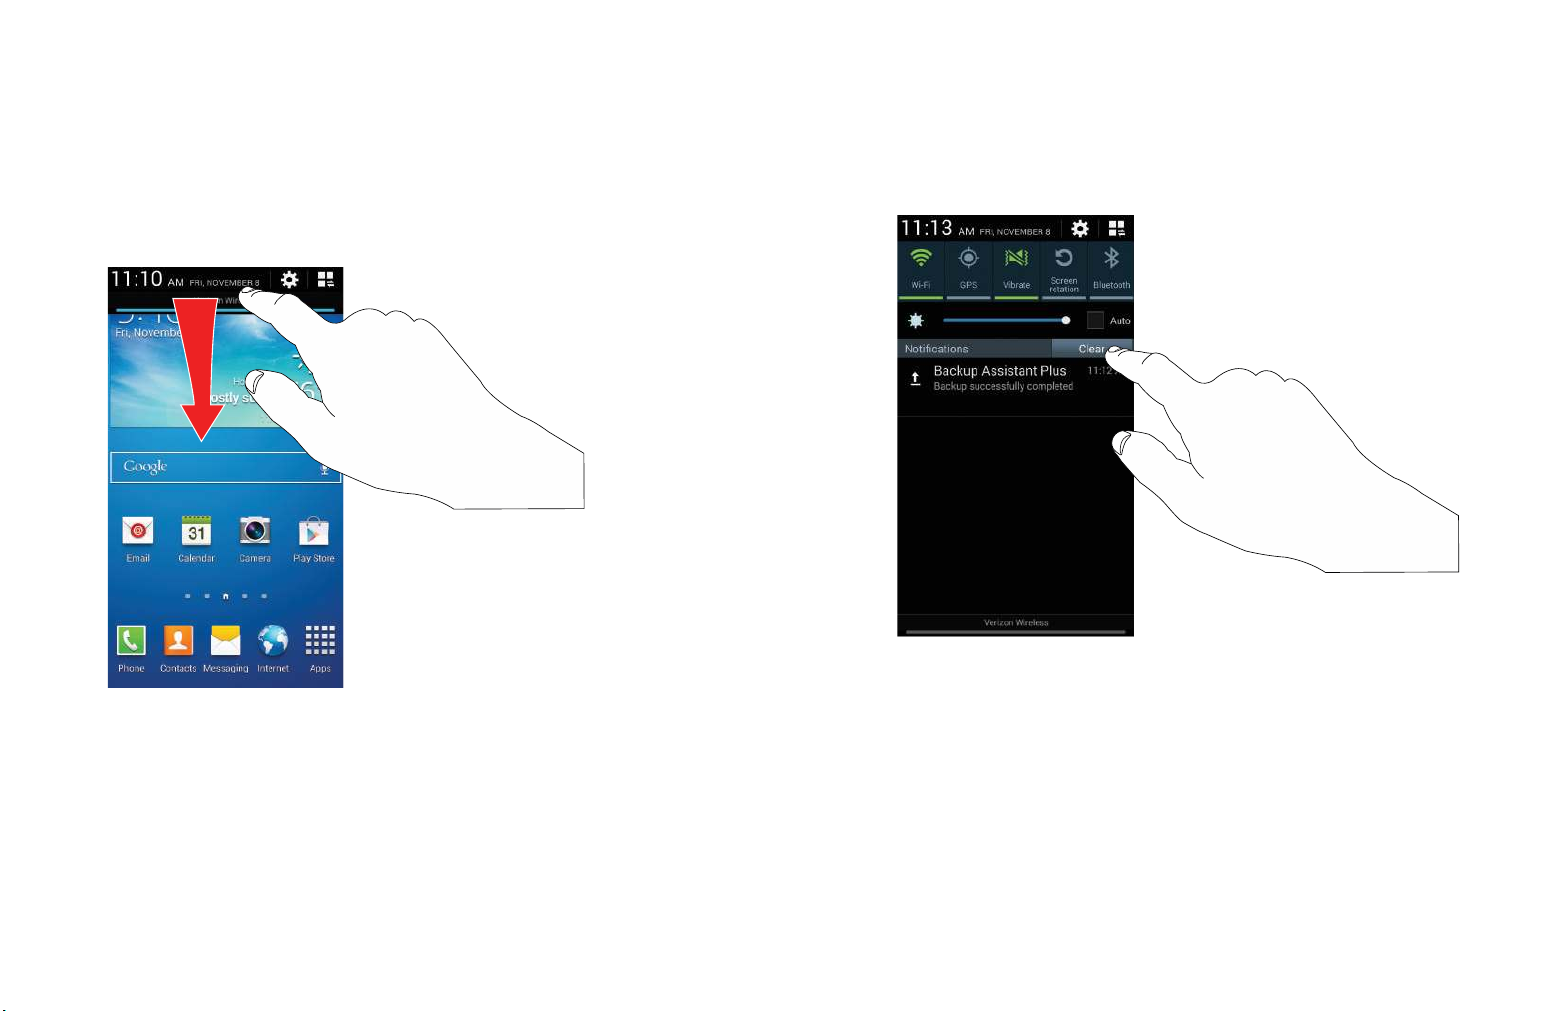
Notification Panel
Clearing Notifications
The Notification Panel shows information about connections,
alerts, and other items.
1. Touch and drag downward from the top of the screen
to display the Notification Panel.
To clear all notifications from the Notification Panel:
1. Touch and drag downward from the top of the screen
to display the Notification Panel.
2. Touch an item to open the item, or to launch the related
app or feature.
2. Touch the Clear button.
The notifications are cleared and the panel closes.
Understanding Your Phone 34
Page 42

Accessing Additional Panel Functions
Apps Screen
In addition to notifications, the Notification Panel also
provides quick and ready access to separate device
functions. These can be quickly activated or deactivated by
toggling them on or off. You can choose the functions that
will be displayed.
1. From the Notification Panel, touch to display
additional options.
2. Touch then locate the Notification Panel area
located at the bottom of the Notification Panel screen.
3. In a single motion, touch and hold a desired function
then drag it to the top row.
4. Touch Brightness adjustment to create a check mark
if you want to be able to adjust the screen brightness
via the Notification Panel.
The Apps screen displays all applications installed on your
wireless device. Applications that you download and install
from Google Play or from the web are also added to a Home
screen.
The Apps icons are arranged in a customizable grid. To
arrange the Apps icons in alphabetical order:
1. From a Home screen, touch Apps.
2. Touch
3. Touch Alphabetical grid.
To manually change the order of the icons on the Apps
screen:
1. From a Home screen, touch Apps.
2. Touch Menu ➔ Edit.
Menu ➔ View type.
5. Touch Back
your primary functions.
35
and then touch to display only
3. Touch and hold an icon and drag it to a new position.
4. Touch Save to save the changes.
Page 43

You can place shortcuts to applications on the Home screen
Application Information
for quick access to the application. For more information,
refer to
To view your downloaded applications:
1. From a Home screen, touch Apps ➔
2. Touch an icon on the Downloaded applications
“Creating Shortcuts” on page 29.
Menu ➔ Downloaded applications to view
downloaded apps.
screen to launch the application.
– or –
Add an App Shortcut to a Home screen by dragging the
App icon onto the Home Screen. For more information,
refer to
“Creating Shortcuts” on page 29.
To view information about an App, such as the amount of
storage it uses, force the App to stop, uninstall updates, and
clear data:
1. From a Home screen, touch Apps ➔
Settings ➔ Application manager.
2. Touch the All tab, scroll through the apps list, and
touch the app to open a screen with details about
the App.
More Application Information
For more information, refer to “Applications” on page 129.
In that section, each application that is available on the
Applications screen is listed and described. If the application
is also described in another section of this user manual, then
a cross reference to that particular section is provided.
Understanding Your Phone 36
Page 44
Multi Window
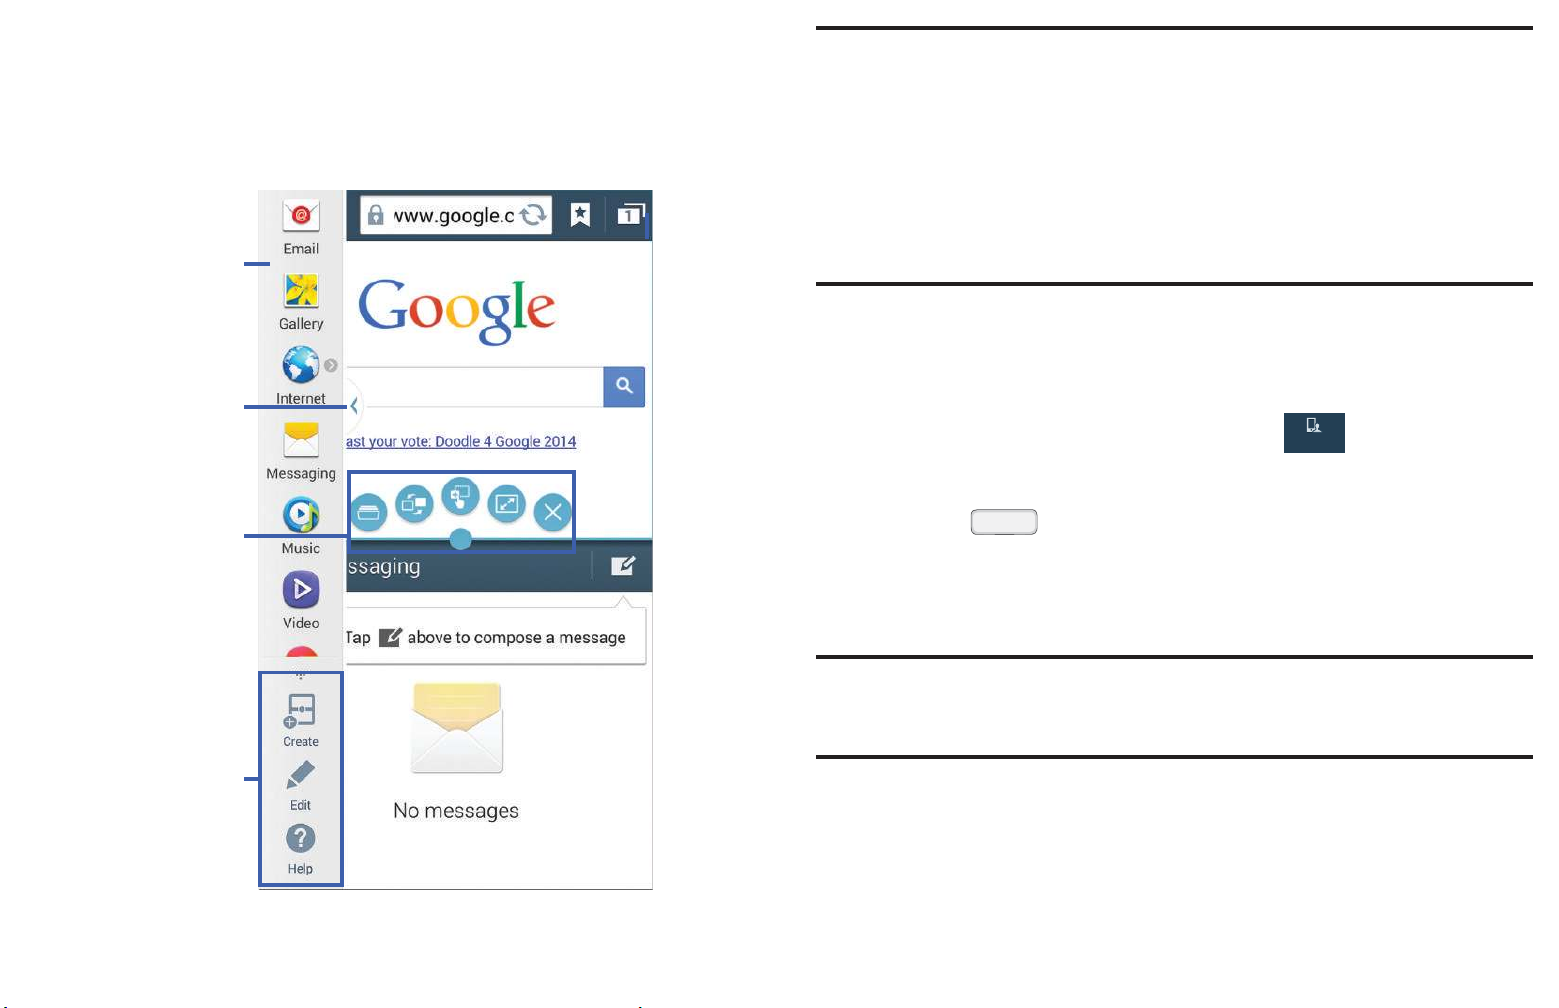
Tab
Panel controls
Window
controls
Multi window
panel
My device
This feature can be used to run multiple applications on the
current screen at the same time.
Note: Only applications found within the Multi window panel
can be active atop another current application on the
screen.
When launching applications that contain multimedia
files (music or video), audio from both files will be
played simultaneously.
Activating and Deactivating Multi Window
Activate Multi window
1. From the Settings screen, touch
My device ➔
Display ➔ Multi window.
2. Press Home to return to the Home screen.
3. Touch the Multi window tab to open the application
panel showing all the available Multi window apps.
Note: Initially upon activation, the entire apps panel is briefly
displayed, then minimized to only show the tab.
37
Page 45

Deactivate Multi window
Repositioning the Multi Window
䡲 Press and hold Back. This action hides the Multi
window tab from view.
Note: Once you have set the Multi window option On, you only
need to press and hold Back to re-activate the
Multi window feature.
Tip: Multi window can also be activated or deactivated by
touching the top of the screen, dragging downward to
display the Notification Panel, and then touching
Multi window.
The Multi window contains two components: the tab and the
apps panel. The tab can be manually moved up or down the
left or right edge of the screen. The Apps panel, which
contains the scrollable apps, and the tab can be relocated to
lock onto the left or right side of the screen.
Move the tab and relocate the apps panel
1. Activate the Multi window feature.
2. In a single motion, touch and hold the Multi window tab
for approximately one-second.
3. Slowly drag up or down the current side of the screen.
Note: This is a quick way to get the tab out of the way if you
cannot get to a button or option behind it.
– or –
In a single motion, touch and hold the tab for
approximately one-second to detach it from the
screen, then slowly drag it to the opposite screen edge.
Understanding Your Phone 38
Page 46
Using Multi Window
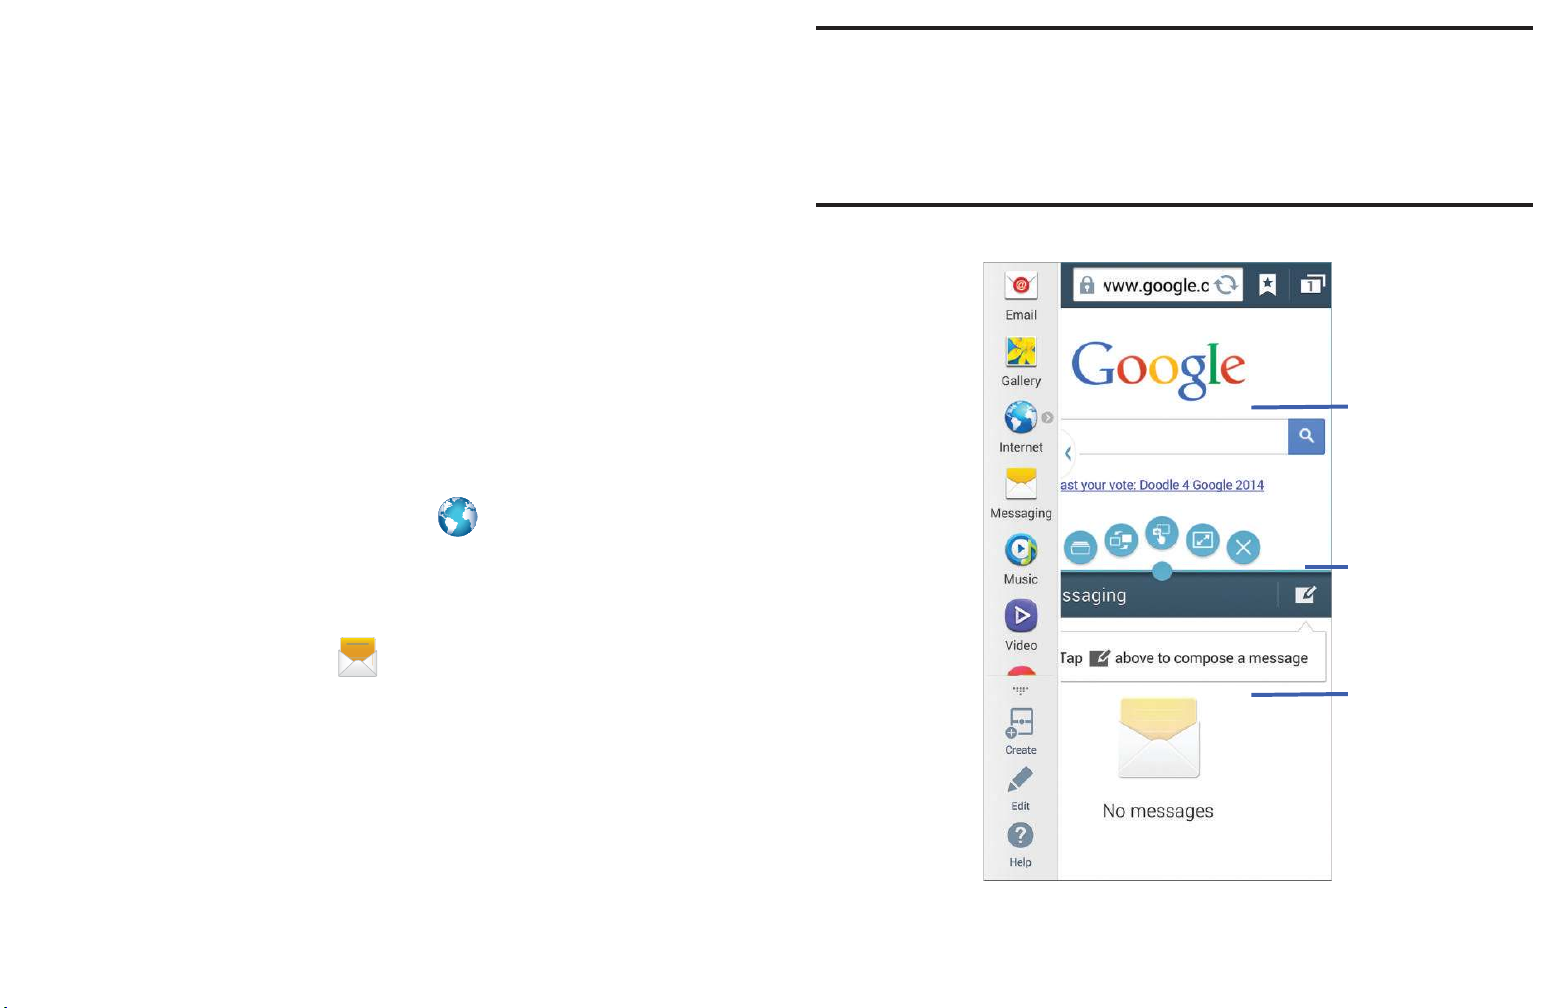
App #2
Border bar
App #1
You can use Multi Window to run multiple apps on the same
screen.
Note: Once the two applications are running, the device
displays a split screen view containing both the initial
Multi window app and the second Multi window app.
Any of the apps found within the Multi window panel can be
run at the same time as a current onscreen app.
Once multiple apps are running on the same screen, you can
then choose to either swap their positions or maximize a
desired app.
In the following example, we will be launching both the
Internet and Messaging applications, but any two apps listed
in the Multi window apps panel will work the same way.
1. From a Home screen, touch Internet.
2. Activate the Multi window feature.
3. Touch the tab to display the apps panel.
4. Touch and hold the Messaging icon until it
detaches from the panel.
5. In a single motion, drag it over the current Internet
Each application is still independent of the other.
screen and drop it over either the top or bottom area of
the screen.
39
Page 47
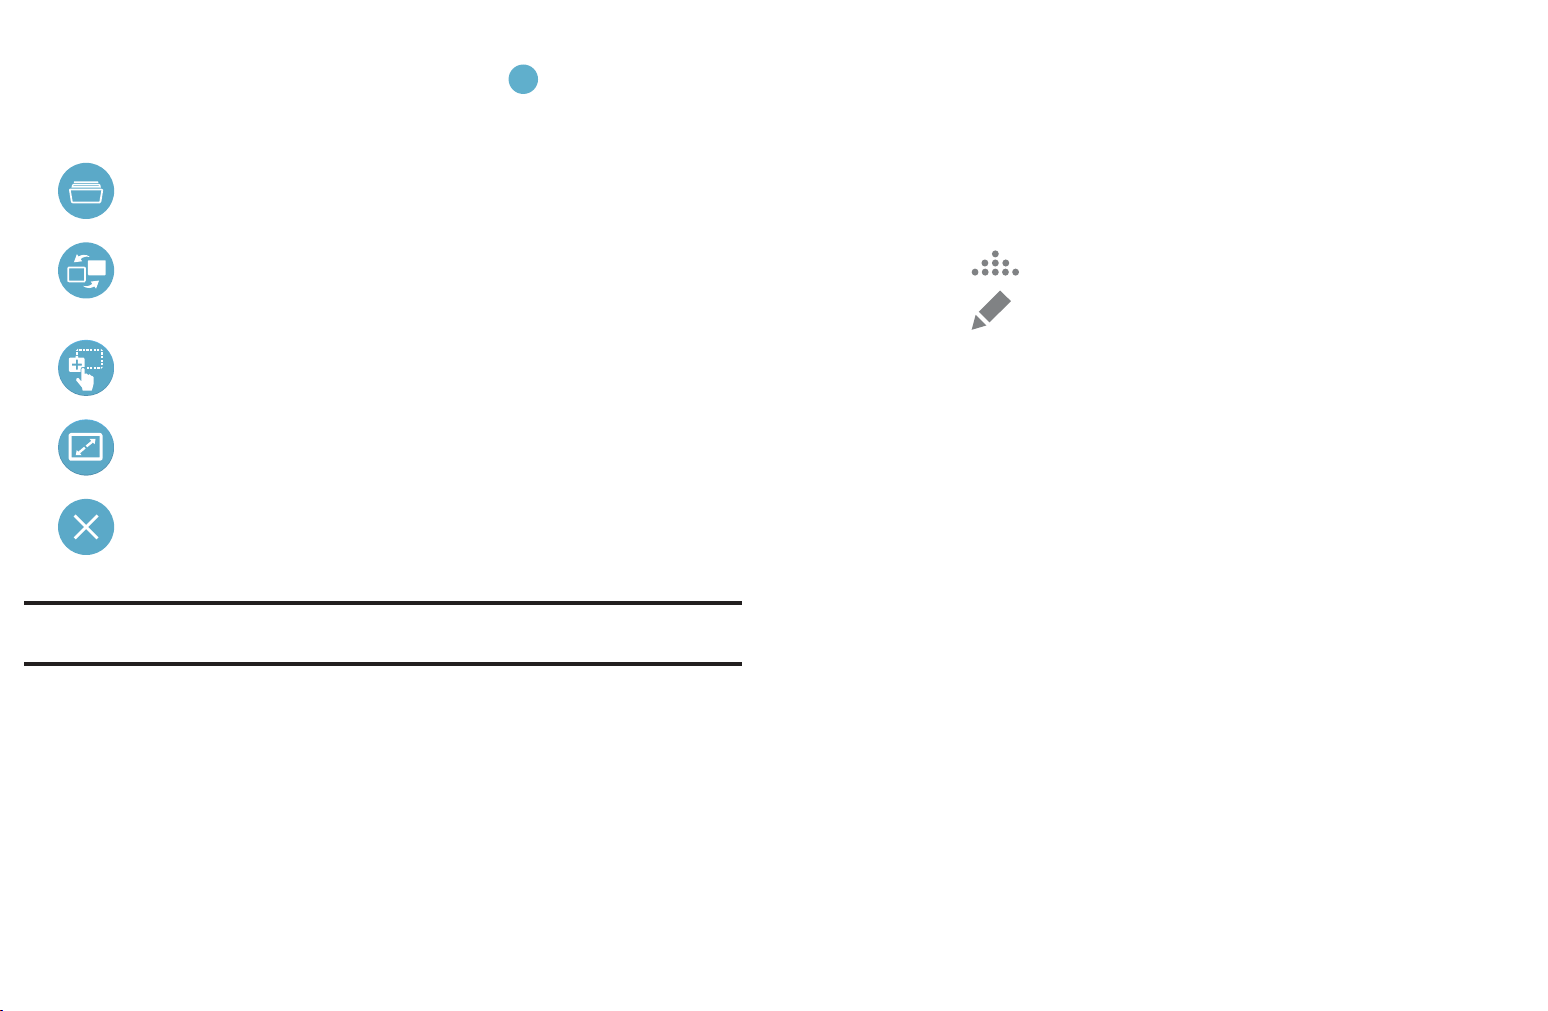
Window Controls
Customizing the Multi Window Apps
Select an application window and touch . Window
controls display:
Open a recent app in Multi Window.
Switch locations between Multi Window
applications.
Drag text or images between certain apps.
Maximize the application.
Close the application.
Tip: Touch and drag the Border bar to resize the windows.
Panel Configuration
You can rearrange the apps on the Multi window panel, add
new apps or remove apps.
On the Multi Window panel:
1. Touch to access the panel controls.
2. Touch Edit.
3. Configure apps:
• To remove an app from the panel, drag it off of the
panel and place it in the storage area.
• To add an app to the panel, drag it from the storage
area to the panel.
• To relocate an app, drag it to a new location.
Understanding Your Phone 40
Page 48

Smart Screen
With Smart screen activated your phone automatically
adjusts screen time-out, rotation when it detects you are
looking at the screen, and controls scrolling and playback
Smart screen uses the front camera to detect when you are
facing the screen. Some factors may affect the ability of the
front camera to detect your face:
• When the phone is not docked or held upright. For
when you are facing the screen.
Smart screen features include:
• Smart stay: The screen does not time out as long as you
are looking at it.
• Smart rotation: The screen automatically updates to
match the angle at which you are viewing the screen.
• Smart pause: The screen automatically pauses video
playback if you look away from the screen.
• Smart scroll: The screen scrolls according to the tilt of the
phone and your face.
example, when placed on a table.
• When the front camera cannot detect your face and eyes.
• When the front camera is used for the current application.
• When the light source is behind you, or when using the
phone in the dark.
Configure Smart Screen
To enable Smart screen features:
䡲 From a Home screen, touch
My device ➔ Smart screen.
My device
For more information, refer to
“Smart Screen” on page 186.
Menu ➔ Settings ➔
41
Page 49

Air View
Voice Control
Air view allows you to hover your finger over items on the
screen to display more information.
• Information preview: Hover over items to display
information previews, extended text, or enlarged images,
depending on the type of item.
• Progress preview: Hover over a progress bar, such as for
video playback, to display a scene preview or elapsed
playback time.
• Speed dial preview: Hover over a speed dial to display the
name of the contact assigned to the speed dial.
• Webpage magnifier: Hover over a webpage to magnify
the content under your finger.
For more detailed information and Air view settings, see
view”
on page 186.
“Air
Use voice commands to control and interact with the phone:
• Incoming calls: When enabled, use the voice commands
Answer or Reject to answer or reject calls. When you
answer, the Speaker automatically turns on for hands-free
conversation.
• Alarm: When enabled, say Stop or Snooze to stop or
snooze an alarm.
• Camera: When enabled, say Smile, Cheese, Capture, and
Shoot to take pictures.
• Music: When enabled, say Next, Previous, Play, Volume
Up, and Volume Down to control the music player.
Pop-Up Video
Multi-task with Pop-Up Video by transforming your video
player into a pop-up window floating on the screen. The
video continues to play, and the pop-up window can be
resized or moved anywhere on the screen.
To use Pop-up Video:
䡲 While watching a video, touch the Pop-Up Video
icon in the lower right corner of the screen.
Understanding Your Phone 42
Page 50

Memory Card
More
Unmounting the SD Card
Your device lets you use a microSD (SD) or microSDHC card
to expand available memory space. This secure digital card
enables you to exchange images, music, and data between
SD-compatible devices. This section addresses the features
and options of your device’s SD functionality. The device has
a USB SD card mode.
Mounting the SD Card
To store additional photos, music, videos, and other
applications, you must mount (install) the SD card prior to
use. Mounting the SD card establishes a USB connection
with your computer.
1. Insert the SD card into the external, SD card slot. For
more information, refer to
Memory Card”
on page 11.
2. Your SD card is scanned to see the available
information on it.
“Installing the
Unmounting the SD card prevents corruption and damage to
the SD card while removing it from the slot.
1. From a Home screen, touch
Settings ➔ More ➔ Storage.
More
Apps ➔
2. Scroll to the bottom of the display and touch Unmount
SD card.
3. Touch OK.
For more information, refer to
Memory Card”
on page 11.
“Installing the
SD Card Available Memory Status
To view the memory allocation for your external SD card:
1. From a Home screen, touch
➔ More ➔ Storage.
2. The available memory for Device and SD card displays
under the Total space and Available space headings.
Apps ➔ Settings
43
Page 51
Erasing Files from the SD Card
More
Task Manager
You can erase files from the SD card using the phone.
1. Ensure the SD card is mounted.
2. From a Home screen, touch
Apps ➔
Settings ➔ More ➔ Storage.
3. Touch Format SD card.
4. At the Format SD card confirmation prompt, touch
Format SD card.
Warning! Performing the next step erases all data stored on
the SD card.
5. Touch Delete all to format or touch Back to
cancel.
Your phone can run apps simultaneously, with some apps
running in the background. Use Task Manager to see which
apps are running on your phone and to end running apps to
extend battery life. You can also uninstall apps from your
phone and check memory usage.
1. From any unlocked screen, press and hold the
Home key, and then select Task mana ger.
2. Touch the Active applications tab to view apps
running on your phone. Touch End or End all to close
apps.
3. Touch the Downloaded tab to view information about
apps you have installed on your phone.
Touch Uninstall to remove an app from your phone.
Help
Access help information to learn how to use the device and
applications or configure important settings.
1. From a Home screen, touch Apps ➔ Help.
2. Select a category to view tips.
4. Touch the RAM tab to display the amount of RAM
(Random Access Memory) in use.
Touch Clear memory to clear processes to increase
available RAM.
5. Touch the Clear defaults tab to remove any default
app settings that have been set.
Understanding Your Phone 44
Page 52

6. Touch the Storage tab for internal system storage and
Text Input Methods
SD card memory statistics.
Tip: Touch and drag your finger on the tabs to scroll the tabs.
Entering Text
This section describes how to select the desired text input
method when entering characters into your phone. This
section also describes the predictive text entry system that
reduces the amount of key strokes associated with entering
text.
Your phone comes equipped with an orientation detector that
can tell if the phone is being held in an upright (Portrait) or
sideways (Landscape) orientation. This is useful when
entering text.
There are three text input methods available:
• Samsung keyboard (default): Samsung’s onscreen
QWERTY keyboard that can be used in both portrait and
landscape orientation.
• Swype: Instead of touching each key to enter text, use
your finger to trace over each letter of a word.
• Google voice typing: Enter text by speaking.
To change the input method, see
Methods”
To choose a text input method while entering text:
1. Touch the top of the screen and swipe downward.
on page 179.
The Notification Panel displays.
“Keyboards and Input
45
2. Touch Select input method.
The Select input method pop-up displays.
3. Touch an input method to activate it.
For more information, refer to
Methods”
on page 179.
“Keyboards and Input
Page 53

Using the Samsung Keyboard
1/2
1/2
Entering Upper and Lower Case Letters
The Samsung keyboard is a custom virtual QWERTY
keyboard, featuring optional predictive text. Input characters
by touching the onscreen keys with your finger or use speech
recognition.
You can enable predictive text, to have the Samsung
keyboard match your key touches to common words and
display them. The Personalization option learns from Gmail,
Facebook, and Twitter. Log into these applications to enable
the Samsung keyboard to learn from your text input.
Configuring the Samsung Keyboard
You can configure the Samsung keyboard to your
preferences. While entering text:
䡲 Touch and hold Options on the keyboard and then
touch Settings in the pop-up menu.
The default case is lower case (abc). Enter upper and lower
case alphabet letters by touching the Shift key to toggle
the case, before touching the letter keys.
• Touch once to switch from abc to Abc mode.
• Touch twice to switch to ABC mode. When ABC mode is
enabled, the Shift key background turns blue .
Entering Symbols and Numbers
The number keys are displayed at the top of the keyboard
and are always available.
Sym
To enter common symbols, touch to switch to symbol
mode, then touch the corresponding key.
There are three pages of symbols. Touch to switch to the
next page.
Sym
The Samsung keyboard settings screen displays.
For more information, refer to
page 180.
“Samsung Keyboard” on
Touch and hold a vowel key (A, E, I, O, U, or Y) or the C, N, or
S key to open a small window where you can chose an
accented vowel or other alternate letter. Slide to the letter
until it is highlighted, and release.
Touch and hold the Period key ( . ) to open a small window
with a set of common symbols.
Understanding Your Phone 46
Page 54
Using Predictive Text
Using Google Voice Typing from the
By using Predictive text, you can have next-letter prediction
and regional error correction, which compensates for
touching the wrong keys on the QWERTY keyboard.
Note: Enable Predictive text in Samsung keyboard settings.
For more information, refer to
page 180.
While entering characters, potential word matches display in
the Predictive text area above the keyboard.
䡲 Touch a word to insert it into your text.
Tip: Touch to display more words.
Note: Predictive Text mode is available for landscape or
portrait orientation.
“Samsung Keyboard” on
Samsung Keyboard
When you enable the Google voice typing setting, you can
use your voice to enter text instead of the keyboard.
For more information about enabling Voice input, see “Using
Google Voice Typing”
on page 49.
Editing Text
You can edit the text you enter in text fields by cutting,
copying, or pasting text. These operations can be performed
within and across apps. However, some apps do not support
editing some or all of the text displayed while others may
offer their own way to select text.
Editing Existing Text
To edit text that you have entered:
1. Touch the text at the point you want to edit.
47
The Cursor displays at the point you touched.
2. Touch and drag the Cursor to a better position, if
necessary.
3. Enter additional text or delete text by repeatedly
touching the Delete key.
Page 55

Copying, Deleting, or Replacing Text
Enter text by typing or speaking to replace the
To select and copy, delete, or replace text:
1. Touch and hold the text or word you want to select.
The selected text is highlighted with a tab at each
end of the selection.
2. Touch and drag either tab to select more or less text.
Tip: Touc h Select all in the pop-up to select all text in the
field. Touch on another area of the screen to deselect the
text.
3. Depending on the action you want to take for the
selected text, in the pop-up touch:
• Select all to highlight all text in the field.
selection with what you type.
– or –
Touch the Delete key to delete the selected text.
Pasting Text
To paste previously copied text:
1. Touch the text at the point you want to paste the
copied text.
The Cursor displays at the point you touched.
2. Touch the Cursor.
A pop-up displays.
3. Touch Paste in the pop-up.
•Cut to remove the selected text.
•Copy to save the selected text to the clipboard.
•Paste to paste previously copied text.
• Clipboard to display the text saved to the clipboard.
•Translate to translate the highlighted word. For more
information, refer to
– or –
“S Translator” on page 146.
To paste text directly from the clipboard:
1. Touch and hold Options on the keyboard and then
select
saved to the clipboard.
2. Touch a text block to paste that text where the Cursor
is positioned.
from the pop-up menu
Understanding Your Phone 48
to display the text
Page 56
Closing the Keyboard
Entering Text Using Swype
To close the keyboard:
䡲 Touch Back to close the keyboard.
Using Google Voice Typing
You can use your voice to enter text using the Google Voice
typing feature.
While entering text:
1. Touch
For more information, refer to
page 180.
2. At the Tap to speak prompt, touch and speak
clearly and distinctly into the microphone.
The software converts your voice to text, which
displays in the message.
Options on the keyboard.
“Samsung Keyboard” on
Swype is a text input method that allows you to enter a word
by sliding your finger or stylus from letter to letter, lifting your
finger between words. Swype uses error correcting
algorithms and a language model to predict the next word.
Swype also includes a touch predictive text system.
Enabling and Configuring Swype
To enable the Swype keyboard while entering text:
1. Touch the top of the screen and swipe downward, to
display the Notification Panel.
2. Touch Select input method.
3. Touch Swype.
4. Touch Continue.
5. Follow the onscreen instructions and touch Register
or Skip.
3. Keep speaking to add more text.
4. Touch to display the Samsung keyboard.
Note: The feature works best when you break your message
down into smaller segments.
49
6. Touch How to Swype, Gestures, or Swype, or touch
Start Swyping to use Swype.
The Swype keyboard displays.
Page 57

Swype Tips
Here are a few tips to get you started:
The following example shows how to enter the word “This”.
Put your finger down on the “T”, and without lifting, glide it
to the “h”, then to the “i” then over to the “s”.
• Auto-spacing: When you finish a word, just lift your finger
and start the next word.
• Double letters: Just “scribble” on the key.
• Auto-capitalization: Swype recognizes and capitalizes the
first word of sentences. If you want to capitalize a word
that is not at the beginning of a sentence, just glide above
the keyboard before gliding over the next letter.
• Contractions: Swype recognizes most words that include
an apostrophe, just swype the letters of the word,
including the apostrophe.
• Punctuation: Touch and hold a key to view a punctuation
menu and make a selection.
• Accented characters: Just glide through the letters of the
word. Swype usually recognizes the word and correctly
accents the letters.
• Error correction: If you make a mistake, double-tap on the
word you want to change.
Understanding Your Phone 50
Page 58

Swype Settings
To configure Swype to your preferences:
䡲 While entering text, touch and hold the Swype Key
to display the Settings screen.
For more information, refer to “Swype” on page 181.
Swype Help
While entering text, you can get information about Swype.
1. Touch and hold the Swype Key to access the
Swype options menu.
2. Touch Help ➔ How to Swype.
The Swype tutorial displays.
51
Page 59
Section 3: Contacts and Accounts
This section explains how to manage contacts and accounts.
Tip: For more information on setting up your email, visit the
Accounts
Your phone provides the ability to synchronize information,
from a variety of accounts, including Email, Facebook,
Google, and your Samsung account. Depending on the
account, you can choose to synchronize your calendar,
contacts, and other types of content.
Contacts from your accounts appear in your phone’s
Contacts.
With synchronization, you can ensure that information on
your phone is updated with any information that changes in
your accounts.
Setting Up Your Accounts
Set up and manage your accounts with the Accounts
Smartphone Resource Center at:
smartphones.verizonwireless.com
Adding an Account
1. From a Home screen, touch Apps ➔
Settings ➔ Accounts ➔ Add account.
2. Select an account provider, then follow the prompts to
enter your credentials and sign in.
3. The device communicates with the provider’s server to
set up your account on the device.
Accounts
settings.
For information about setting up other, non-synchronized
email accounts, see
page 88.
“Creating an Email Account” on
Contacts and Accounts 52
Page 60

Managing Accounts
Accounts
4. At the Sync settings screen, touch the options that
1. From the Home screen, touch Apps ➔
Settings ➔ Accounts.
2. Select an account, then touch a setting to enable or
disable synchronization. When enabled, a check mark
displays in the check box.
Synchronizing Accounts
From the Accounts menu, you decide if you want
applications to synchronize, send, and receive data at any
given time, or whether you want the applications to
synchronize automatically. After determining how you want
the accounts to synchronize, indicate which account to
synchronize with your Contacts list.
1. From a Home screen, touch Contacts.
you would like to synchronize for that account.
5. Touch Sync now to synchronize the account.
The account is synchronized.
6. Touch Back to return to the Contacts list.
Note: You can also synchronize your accounts using the
Settings menu. For more information, refer to
“Synchronizing Accounts” on page 188.
2. Touch Menu ➔ Accounts.
If you have previously added any accounts, the
Sync settings screen displays with your current
accounts listed.
3. Touch an account that you would like to synchronize.
53
Page 61
Contacts
Contacts
Choosing Contacts to Display
Use Contacts to store information for your friends, family, and
colleagues, to make contacting them easy.
There are several ways to access Contacts:
䡲 From a Home screen, touch Contacts.
– or –
From a Home screen, touch Apps ➔ Contacts.
– or –
From a Home screen, touch Phone ➔
Contacts.
Tip: Swipe your finger left-to-right across a contact to make a
call to the contact.
Swipe right-to-left across a contact to create a message
1. Touch Contacts.
2. Touch
Menu ➔ Contacts to display.
Choose one of the following display options:
• All contacts: Show all contacts.
•Device: Only contacts stored to your device.
•SIM: Only contacts saved to the SIM card.
•<account>: Only display contacts from this account.
• Customized list: Select contact types for each
account or the phone.
addressed to the contact.
Contacts and Accounts 54
Page 62
Creating Contacts
• Touch to add additional fields.Touch to remove
1. Touch Contacts ➔ Create contact.
2. At the Save contact prompt, select a save option for
the contact (options depend on accounts set up):
•OK: Save to the phone’s Contacts.
• Add new account: Add a new account type.
Note: New contacts are saved in “my device contacts” unless
you add an account.
3. Touch the Contact image to choose a picture to identify
the contact.
4. Touch contact fields to display the keyboard and enter
information:
an unused field. Also, touch Add another field to add
other fields.
• Touch the screen and swipe up or down to display
additional fields or touch Next on the keyboard to move
to the next field.
5. Touch Back to remove the keyboard.
6. When you finish entering information, touch Save
to save your changes or touch Cancel ➔ OK to
cancel and discard changes.
Tip: Display a contact’s record and touch the Email field to
send an email, the Address field to display the address
on a map, or the Website field to link to the website.
• Some fields have preset values. Touch the field and
touch the desired value. For example, touch the
Label tab and touch a label for the field.
• Other fields have to be input. Touch the field and use
the on-screen keyboard to input information.
• Touching the check box next to some fields may make
additional fields available.
55
Updating Contacts from Recent Calls
Save a phone number from a recent call to create a new
contact or update an existing contact.
For more information, refer to
Contact”
on page 75.
“Saving a Recent Call as a
Page 63
My Local Profile
Adding Pauses to Contact Numbers
My local profile is your own contact record, listed under ME
in Contacts. You can send My local profile as a vCard by
using Bluetooth or as an attachment.
Creating My Local Profile
1. Touch Contacts.
2. Touch Set up profile, then enter your information
contact fields.
Contacts”
For more information, see “Creating
on page 55.
in the
Sending My Local Profile
You can send your profile as a vCard by using Bluetooth to
other Bluetooth devices, or as an attachment.
1. Touch Contacts.
2. Touch your profile to display your contact information.
When you call automated systems, you are often required to
enter a password or account number. Instead of manually
entering the numbers each time, you can store the numbers
in your Contacts along with special characters called
waits. A pause stops the calling sequence for two
and
pauses
seconds and a wait pauses the calling sequence until you
enter a number or touch a key.
To add a pause or a wait to an existing Contact:
1. Touch Contacts.
2. Touch the name or number to open the Contact.
3. Touch to e dit .
4. Touch the phone number field and then touch the
screen at the position where the pause or wait needs to
be added.
3. Touch
Menu, then touch Share namecard via.
4. Choose a sending method, then follow the prompts to
send the profile.
5. Touch and then touch Pause(,) to add a
Sym
two-second pause or touch Wait(;) to add a wait.
A pause displays as a , (comma) and a wait displays
as a ; (semi-colon).
Contacts and Accounts 56
Page 64
6. Touch and use the keypad to enter the additional
123
numbers
7. Touch Save to save your changes or touch
Cancel ➔ OK to cancel and discard changes.
Using Contacts
Dialing or Messaging from Contacts
Call contacts quickly by either using their phone number or
by using the Search field to locate a contact entry.
Editing an Existing Contact
When editing an existing contact, you can touch a field and
change or delete the information, or you can add additional
fields to the contact’s list of information.
1. Touch Contacts.
2. Touch the name or number to open the Contact.
3. Touch to edit.
4. Touch any of the fields to add, change, or delete
information.
5. Touch Save to save the edited information.
You can also send messages from Contacts.
Finding a Contact
1. Touch Contacts.
2. Within the Contacts list (sorted alphabetically), touch a
letter on the right side of the display to quickly jump to
the contacts beginning with that letter.
3. Touch the contact you want to call or message.
4. To make a phone call, touch the phone icon .
– or –
To send a message, touch the message icon .
For more information, refer to
Messages”
on page 83.
“Creating and Sending
Tip: From the Contact list, swipe right over a listing to make a
call. Swipe left over a listing to send a message.
57
Page 65
Linking Contacts
Linking Contacts
Linking Contact Information
Your device can synchronize with multiple accounts,
including Google, Corporate, and other providers, plus social
networking sites like Facebook. When you synchronize
contacts from these accounts with your device, you may
have multiple contacts for one person.
Linking contact records allows you to see all the contact’s
numbers and addresses together. Linking also helps you
keep your contacts updated because any changes to
information in the respective accounts is automatically
updated the next time you synchronize with the account.
The next time you synchronize your phone with your
accounts, any updates that contacts make to email account
names, email addresses, and so on, automatically update in
1. Touch Contacts.
2. Touch a contact name that you want to link to another
contact entry.
Note: Typically this is the same contact with a different
name or account information.
3. Touch
The contact list displays.
Note: Only contacts stored on your phone can be linked.
4. Touch the second contact entry that you want to link
with the first contact entry.
The second contact is now linked with the first contact
Menu ➔ Link contact.
your contacts list.
For more information about synchronizing accounts, see
“Synchronizing Accounts” on page 53.
and the account information is merged into one screen.
Note: When you link the contacts, the information is still
maintained in both entries, but displays in one record
for easier viewing.
Contacts and Accounts 58
Page 66

5. Touch in the Connection section to view the
Marking a Contact as Default
linked contact information. The location of the contact,
such as Device or an account, displays along with the
contact’s name.
Unlinking Contacts
1. Touch Contacts.
2. Touch the linked contact name.
In the Connection section, various icons show how
many contacts are linked in this record.
3. Touch in the Connection section to display the
linked contacts list.
4. Touch next to a contact to remove it from the linked
contact record.
When you use messaging type applications, the application
needs to know which information is primary (default) in a
contact entry list. For example, you may have three different
contact records for John Smith, so the application will be
looking for the “default” number or entry.
1. Touch Contacts.
2. Touch a Contact name.
3. Touch Menu ➔ Mark as default. The Mark as
default screen displays radio buttons next to the
contact names or phone numbers of all the linked
contacts. The radio button next to the default contact
will be green.
4. To change the default contact, touch the radio button
5. At the Separate contact prompt, touch OK.
The contact is now separated and no longer displays in
the merged record screen.
59
next to another entry that you want to be the default.
The radio button will turn green, then touch Done.
Page 67

Contacts Options
• Send message/email: Send a text message or an
You can access Contacts options while at the main Contacts
screen or while in the details screen for a specific entry.
Options in Contacts
1. Touch Contacts.
2. Touch Menu.
The following options are displayed:
• Backup: Launch Backup Assistant Plus.
•Delete: Delete one or more contacts.
•Import/Export: Move contacts to or from your memory
card or USB storage.
• Share namecard via: Send one or more contact’s
information by using Bluetooth, Email, Gmail,
email to one or more contacts.
• Contacts to display: You can choose to display all of
your contacts or only display contacts on your Phone,
SIM, or contacts stored to other accounts. You can also
touch Customized list to change other options on how
your contacts are displayed.
• Settings: Displays options for viewing contacts:
– Only contacts with phones: Only display contacts
that have phone numbers.
– List by: List contacts by First name or Last name.
– Display contacts by: Display contacts by First
name first or Last name first.
– Service numbers: D
isplay or edit your service numbers.
Messaging, or Wi-Fi Direct.
•Accounts: Display the accounts set up on your phone.
Touch Add account to add additional accounts or
touch an existing account to manage sync settings.
• Speed dial setting: Set up speed-dialing. For more
information, refer to
on page 73.
“Making a Call Using Speed Dial”
– Contact sharing settings: Touch Settings to
specify how contacts are transferred to another
device, either as a full group or individually.
•Help: Displays information about how to use Contacts.
Contacts and Accounts 60
Page 68
Contact Options
Groups
Groups
1. Touch Contacts.
2. Touch a contact and at the contact’s display screen,
touch
Menu for options:
•History: View the phone and message history for the
contact.
•Edit: Edit the contact’s information.
• Delete: Delete the contact.
•Link contact: Link contacts with other contacts.
• Separate contact: Separate contacts that have been
linked.
• Mark as default: When you have multiple contacts
linked together, you can mark one of them as default
(only displays when contact is saved to the phone). For
more information, refer to
Default”
on page 59.
“Marking a Contact as
• Share namecard via: Send the contact’s information
Assign contacts to Groups to make searching for contacts
faster or to quickly call or send messages to group members.
There are several default groups that are predefined, which
you can use to add your contacts, or you can create new
groups.
Creating a New Group
1. Touch Contacts.
2. Touch Groups ➔
3. Touch the Group name field and use the onscreen
keyboard to enter a new group name. Touch Done to
remove the keyboard.
4. Touch Group ringtone to choose a ringtone for
assignment to this new group. Touch a ringtone to hear
how it sounds, then touch OK.
Menu ➔ Create.
by using Bluetooth, Email, or other services.
• Add to/Remove from reject list: Add or remove the
contact from your reject list. If they call while being on
the reject list, the call will be sent directly to voicemail.
• Add shortcut to home: Place a shortcut for this
contact on your Home screen.
61
– or –
Touch Add to select a ringtone from your music files.
5. Touch Message alert to choose an alert tone for
assignment to this new group, then touch OK.
Page 69
6. Touch Vibration pattern to choose a vibration audio
Groups
Groups
Removing a Contact from a Group
file for assignment to this new group, then touch OK.
– or –
Touch Create and follow the onscreen instructions to
create your own vibration pattern.
7. Touch Add member to add contacts to the new group.
Touch each contact you want to add to create a check
mark. You can also touch Select all.
Touch Done to add the members.
8. Touch Save to save the new contact Group.
Adding a Contact to a Group
1. Touch Contacts ➔ Groups
2. Touch a group entry.
Groups
1. Touch Contacts ➔ Groups
2. Touch a group entry.
3. Touch
Menu ➔ Remove member.
4. Touch each contact that you want to remove from this
group or touch Select all.
5. Touch Done.
Editing a Group
To edit a Group entry, there must be at least one member as
part of the selected group.
1. Touch Contacts ➔ Groups
2. Touch a group entry.
3. Touch Menu ➔ Edit group.
3. Touch Add to add to a member to the group.
4. Touch contacts to add to the group or touch Select all.
5. Touch Done.
4. Make modifications to the Group name, Group
ringtone, Message alert, or Vibration pattern fields.
5. Touch Add member to add more contacts to this
group. Touch Done to add the members.
6. Touch Save to save the edited contact Group.
Contacts and Accounts 62
Page 70
Deleting a Group
Groups
Groups
Sending a Message to Group Members
1. Touch Contacts ➔ Groups
2. Touch
Menu ➔ Delete groups.
3. Touch each group that you want to remove or touch
Select all.
Note: You cannot delete default groups.
4. Touch Delete, then choose Group only or Group and
group members, and touch OK.
Create a new text or email message, addressed to a group’s
members.
1. Touch Contacts ➔ Groups
2. Touch a Group to display it.
3. Touch
Menu ➔ Send message or Send email.
4. Touch contacts to mark them as recipients for the new
message or touch Select all, and then touch Done.
The new message opens with the marked contacts as
recipients. Continue creating the message, as desired.
For more information, see
Messages”
on page 83 or see “Using Email” on
“Creating and Sending
page 88.
63
Page 71
Favorites
Removing Favorites
Mark contacts with a
gold star to identify them as
Favorites.
Favorites display on the Favorites tab in the Phone and
Contacts apps for fast dialing or messaging, and are
indicated by the .
To view your Favorites list:
䡲 Touch Contacts ➔ Favorites.
Favor ite s
Adding Favorites
1. Touch Contacts ➔ Favorites.
2. Touch
Menu ➔ Add to favorites.
3. Touch contacts to mark them as favorites or touch
Select all, and then touch Done.
Favor ite s
1. Touch Contacts ➔ Favorites.
Favor ite s
2. Touch and hold the contact that you want to remove
from Favorites.
3. Touch Remove from favorites from the pop-up menu.
4. The contact is removed from Favorites and the
gold star no longer displays on the contact entry.
Tip: Touch a contact to display it, then touch the gold star at
the top right of the screen to turn it white.
A gold star displays next to the contact in the
Contacts list.
– or –
Touch a contact to display it, then touch the star at the
top right of the screen.
Contacts and Accounts 64
Page 72

Managing Contacts
Deleting Contacts
Exporting and Importing Contacts
You can export your contact list to and from USB storage or
an installed memory card. Contacts are exported and
imported as a special VCF file, and contacts are sent as
vCards.
1. Touch Contacts.
2. Touch Menu ➔ Import/Export.
3. Select an option, then follow the prompts to complete
the operation:
• Import from USB storage: Copy contacts that are
saved in device memory.
• Export to USB storage: Copy contacts to device
memory.
You can delete Phone or account contact records.
1. Touch Contacts.
2. Touch and hold a contact that you want to delete, then
select Delete from the pop-up menu.
Note: Deleting contacts that are saved under an account will
be deleted from the account, if sync is turned on.
3. At the Delete prompt, touch OK to delete the contact or
Cancel to exit.
• Import from SD card: Imports contacts from the SD
card.
•Export to SD card: Exports contacts to the SD card.
• Import from SIM card: Copy contacts to the device
that are saved to a SIM card.
65
Page 73

Sending Namecards (vCards)
Backing Up Contacts
You can send a contact namecard as a vCard by using
Bluetooth devices or as an attachment via Gmail or Email.
Important! Not all Bluetooth devices accept contacts and not
all devices support transfers of multiple contacts.
Check the target device’s documentation.
1. Touch Contacts.
2. Touch
3. Touch contacts to mark them for sending or touch
Select all to mark all contacts.
4. Touch Done.
5. At the prompt, choose a sending method, then follow
the prompts to send the namecard by using Bluetooth,
Menu ➔ Share namecard via.
Use Backup Assistant Plus to save a copy of your Contacts to
a secure web site.
1. Touch Contacts.
2. Touch
The Backup Assistant Plus screen displays.
3. Follow the prompts to log in to your Backup Assistant
account.
For more information, refer to
page 187.
Menu ➔ Backup.
“Backup Assistant Plus” on
Email, Gmail, Messaging, or Wi-Fi Direct.
Contacts and Accounts 66
Page 74
Speed Dials
Removing or Reassigning a Speed Dial
Speed dials are 1-, 2-, or 3-digit shortcuts (1 to 100) you
assign to contacts, to allow you to quickly call the contact.
For more information about calling using speed dials, see
“Making a Call Using Speed Dial” on page 73.
Note: Some speed dials are reserved by default, and cannot
be assigned:
Speed dial 1 is reserved for Voicemail.
Speed dial 96 is reserved for data usage inquiries.
Speed dial 97 is reserved for balance inquiries.
Speed dial 98 is reserved for minutes inquiries.
Speed dial 99 is reserved for payment inquiries.
Assigning Speed Dials
1. Touch Contacts.
1. Touch Contacts.
2. Touch
3. Touch
• Change order: Touch an assigned speed dial, then
touch a new speed dial location to change the order.
•Remove: Touch a speed dial to remove it.
Menu ➔ Speed dial setting.
Menu, then touch an option:
2. Touch
A list of speed dials displays.
3. Touch a Not assigned speed dial field, then touch a
contact to assign the contact to the speed dial location.
67
Menu ➔ Speed dial setting.
Page 75
Using the Service Dialing Numbers
You can view the list of Service Dialing Numbers (SDN)
assigned by your service provider. These numbers may
include emergency numbers, customer service numbers, and
directory inquiries.
1. Touch Contacts.
2. Touch Menu ➔ Settings ➔ Service numbers.
3. Scroll through the available numbers.
4. Touch a number and the call is made.
Note: This menu is available only when your SIM card
supports Service Dialing Numbers.
Contacts and Accounts 68
Page 76
Section 4: Call Functions
Phone
This section describes how to make or answer a call. It also
includes the features and functionality associated with
making or answering a call.
For more information, refer to
“Call” on page 169.
Displaying Your Phone Number
䡲 From a Home screen, touch Apps ➔
Settings ➔ More ➔ About phone ➔
Status.
Your phone number displays in the My phone number
field.
More
Phone
Use the Phone app to access the phone Keypad, Recent
From a Home screen, touch Contacts ➔
Phone.
Making Calls
Your phone offers multiple ways to make calls:
• Use the touch screen Phone Keypad to enter the phone
number or speed dial.
• Call a contact from Contacts.
• Call a contact from Favorites.
• Return a call or call a recent caller from Recent calls.
• Voice dial using S Voice.
Making a Call Using the Phone Keypad
1. Touch Phone.
calls, Favorites, and Contacts.
There are several ways to access Phone:
䡲 From a Home screen or Apps, touch Phone.
– or –
69
2. Touch the digits of the telephone number on the
Keypad.
3. Touch
Call to make the call.
Page 77
Note: When you activate the Auto retry option in the Call
0
+
settings, the phone automatically redials up to 10 times
when the person does not answer the call or is already
Manual Pause Dialing
To manually call a number with pauses without storing them
in your Contacts list:
on the phone. For more information, refer to
“Call” on
page 169.
Making an International Call
1. Touch Phone, then touch and hold .
The + character appears.
2. Use the onscreen keypad to enter the country code,
area code, and phone number.
If you make a mistake, touch until the desired
numbers have been deleted.
3. Touch Call to make the call.
1. Touch Phone and use the onscreen keypad to
enter the phone number.
2. Touch Menu to display the dialer sub-menu.
3. Touch Add 2-sec pause to add a two second pause,
and use the keypad to enter the additional numbers.
Tip: You can create pauses longer than two seconds by
entering multiple two second pauses.
4. Touch Menu ➔ Add wait to add a wait.
A wait will pause the calling sequence until you enter a
number or touch a key.
5. Touch Call to make the call.
For more information, refer to
Numbers”
on page 56.
“Adding Pauses to Contact
Call Functions 70
Page 78
Correcting an Entered Number
End call
Favor ite s
Recent
Making Calls Using Favorites
Use the following steps to correct a mis-typed entry when
dialing.
䡲 After entering a number using the keypad:
• If you make a mistake, touch to erase a single
character.
• Touch and hold to erase the entire string of
numbers.
Ending a Call
To end a call:
䡲 Touch End call.
Making Calls from Contacts
A contact is an entry that you have created to store the
Favorites are contacts that you designate as favorites by
starring them. For more information about creating favorites,
see
“Adding Favorites” on page 64.
1. From the Home screen, touch Phone.
2. Touch Favorites to display favorites.
3. Find the contact to call and touch to dial the
number.
Dialing a Recent Number
All incoming, outgoing and missed calls are recorded in the
Recent calls log. If the number or caller is listed in your
Contacts, the associated name is also displayed.
1. Touch Phone.
name, phone numbers, and other information for people or
groups of interest.
For more information, see
“Contacts” on page 54.
1. From a Home screen, touch Contacts.
2. Find the contact and touch it to open the Contact entry.
3. Touch to dial the number.
71
2. Touch Recent.
A list of recent calls displays.
3. Touch the desired Contact to enter the Details page,
then touch to make a call.
Page 79
Making Calls Using S Voice
Making Emergency Calls
Place a call by speaking the name or number.
1. From the Home screen, touch Phone then
touch .
2. The first time you access, touch Confirm to accept the
Samsung Disclaimer.
3. The first time you access, touch Agree to confirm the
Terms of Service.
4. Follow the prompts to speak a command. You can say
commands such as:
• Call <Name device>: Ex: “Call Charlie mobile” or
“Call Joe work”. Call an entry in the Contact list.
• Dial <Phone number>: Ex: “Dial 555-123-1234”.
Call a spoken phone number.
If you do not have a SIM card installed the first time you turn
on the phone, the No SIM card found message displays.
Follow the onscreen instructions to install your SIM card and
then restart your phone.
Without a SIM card, you can only make an emergency call
with the phone. Normal cell phone service is not available.
To make an Emergency Call with or without a SIM Card:
1. Touch Phone.
2. Enter 9-1-1 and touch Call. Complete your call.
During this type of call, you will have access to the
Speaker mode, Keypad, and End Call features.
3. Touch End call to exit this calling mode.
End call
•Redial: Redials the last number called.
Tip: To launch S Voice from most unlocked screens by
pressing Home twice, set the option: launch
SVoice and then touch Menu ➔ Settings ➔
Open via the home key. The default setting value is Off.
Call Functions 72
Page 80
Making a Call Using Speed Dial
To make a call using Speed Dial:
You can assign a shortcut number to a phone number in your
Contacts List for speed dialing.
1. From a Home screen, touch Contacts to display
your Contacts List.
2. Touch Menu ➔ Speed dial setting.
The Speed dial setting screen displays showing the
numbers 1 through 100. The number 1 is reserved for
Voicemail.
3. Touch an unused number.
The Select contact screen displays.
4. Touch a contact to assign to the number.
The selected contact number displays in the speed dial
1. Touch Phone.
2. On the keypad, touch and hold the speed dial number.
If the speed dial number is more than 1 digit long,
enter the first digits, then hold the last digit.
Answering a Call
You can answer incoming calls when the device is locked or
unlocked. When you receive a call, an incoming call screen
displays.
To answer the call:
䡲 Touch and drag in any direction.
To reject the call and send it to your voicemail:
䡲 Touch and drag in any direction.
number box.
To remove a speed dial number or change the order:
䡲 Touch Menu ➔ Change order or Remove.
73
To reject the call with a message:
䡲 Touch and drag the Reject call with message tab
upward.
• Touch a predefined text message to send to the caller.
– or –
• Touch Create new message to compose a new
message.
Page 81
To end the call:
End call
Call Log
䡲 Touch End call.
Note: You can answer a call while using Contacts or other
functions. After ending the call, the phone returns to the
previously active function screen.
Dialing Options
From the Home and Apps screens, you have the option to
access the Dialer and initiate a call by touching Phone.
The following tabs are located at the top of the screen:
• Keypad: Dial the current number entered using the
onscreen keypad.
• Recent: Display a list of all dialed, received, and missed
calls.
The phone stores the numbers of the calls you have dialed,
received, or missed in the Call log. The Call log displays the
details of the call.
1. Touch Phone.
2. Touch Recent.
A list of recent calls displays. If the number or caller is
listed in your Contacts, the associated name displays.
All calls made, received, and missed are listed. Types of calls
are identified by the following icons:
Recent
• Incoming Calls:
• Outgoing Calls:
• Favorites: Display your contacts that you have marked as
Favorites.
• Contacts: Launch the Contacts app where you can select a
contact to call.
When you touch Keypad and begin to enter numbers, the
Add to Contacts option appears so you can save the
Contact, if needed.
• Missed Calls:
• Rejected Calls:
• Auto Rejected
Calls:
Call Functions 74
Page 82

Calling Back a Missed Call
4. Enter information into the various fields using the
To call a missed call number:
1. Touch Phone ➔ Recent.
Recent
A list of recent calls displays. If the number or caller is
listed in your Contacts, the associated name displays.
2. Swipe the desired missed call to the right to call.
– or –
Swipe the desired missed call to the left to create and
send a message.
Saving a Recent Call as a Contact
1. Touch Phone ➔ Recent.
A list of recent calls displays.
2. Touch the call you want to save to your Contacts.
3. Touch Create contact to add the call to your Contacts.
Recent
keyboard.
5. Touch Save to save when you are finished.
For further details about the Contacts feature, see
Contacts”
on page 55.
“Creating
Sending a Message to a Recent Call
1. Touch Phone ➔ Recent.
A list of recent calls displays.
2. Swipe the entry you want to message to the left.
3. At the New message screen, touch the Enter message
field and use the onscreen keyboard to enter in a
message.
4. When you are done with your message, touch Send.
For more information, refer to
Messages”
on page 83.
Recent
“Creating and Sending
– or –
If you want to replace the number for an existing
contact, touch Update existing.
75
Page 83
Deleting a Call from the Call Log
Recent
Recent
Recent
Call Duration
1. Touch Phone ➔ Recent.
2. Touch and hold the call you want to delete from the
Recent calls log.
3. Touch Delete.
4. At the Delete log prompt, touch Delete.
The call is deleted from the Recent calls log.
Adding a Call to the Reject List
1. Touch Phone ➔ Recent.
A list of recent calls displays.
2. Touch and hold the call you want to add to the Reject
List.
1. Touch Phone ➔ Recent.
2. Touch Menu ➔ Call duration.
The following times are displayed for Voice and Data:
•Last call: Shows the length of time for the last call.
• Dialed calls: Shows the total length of time for all calls
made.
• Received calls: Shows the total length of time for all
calls received.
• All calls: Shows the total length of time for all calls
made and received.
3. To reset these times to zero, touch
Menu ➔ Reset.
3. Touch Add to reject list.
4. At the Add to reject list prompt, touch OK.
Future calls from this number will be rejected and sent
to your voicemail.
Call Functions 76
Page 84

Options During a Call
In-Call Options
Your phone provides a number of control functions that you
can use during a call.
Adjusting the Call Volume
During a call, to adjust the volume, use the Volume key on
the left side of the phone.
䡲 Press the Up end of the volume key to increase the
volume level and press the Down end of the volume
key to decrease the volume level.
– or –
Quickly add more volume to the incoming audio by
touching the onscreen Extra volume button .
From a Home screen, you can also adjust the ringer volume
using these same keys.
During an active call there are several functions available by
touching a corresponding onscreen button.
• Add call: Display the dialer so you can call another person.
• Keypad: Display the onscreen keypad, where you can
enter number using DTMF (Dual Tone Multi-Frequency).
• End call: Terminate the call.
• Speaker: Route the phone’s audio through either the
speaker or through the earpiece.
– Touch Speaker to route the audio through the speaker.
(You can adjust the speaker volume using the volume
keys.) A green line will appear under the Speaker button.
– Touch Speaker again to use the phone’s earpiece (see
“Using the Speakerphone During an Active Call” on
page 79). The green line will disappear when Speaker
is not activated.
77
• Mute/Unmute turn the onboard microphone either on or
off.
– Touch Mute during a call to mute the microphone. A
green line will appear under the Mute button.
– Touch Mute again to unmute the microphone. The green
line will disappear when Mute is not activated.
Page 85

• Headset connects to a Bluetooth headset.
Activating Noise Reduction
– Touch Headset during a call to activate a Bluetooth
headset. A green line will appear under the Headset
button.
– Touch Headset again to de-activate the Bluetooth
headset. The green line will disappear when the Headset
is not activated.
• Touch Menu for more options:
– Contacts: Go to your Contact list.
– Memo: Write a memo.
– Message: Write a message during a call.
Personalizing the Call Sound Setting
During a call it may be necessary to adjust the sound of the
incoming call by selecting an audio equalizer setting for the
current call.
During a call it may be necessary to activate the noise
reduction feature. Activating this feature can improve the
quality of your conversation by reducing ambient noise.
Noise reduction in on by default.
1. Touch to t urn Noise reduction off.
2. Touch to t urn Noise reduction on.
1. From the call screen, touch .
2. Select an available option.
3. Confirm the option is enabled .
Call Functions 78
Page 86

Multi-Party Calling
Add call
Merge
End call
Speaker
Speaker
Using the Speakerphone During an
Use multi-party call features to set up a call between multiple
callers, such as for a conference call.
1. Establish the first call, by answering an incoming call
or making a call.
2. Touch Add call.
The first call is placed on hold.
3. Make the second call by touching the phone number
digits, then touch Call.
4. To merge the calls into one conference call, touch
Merge.
5. Touch End call to end the calls
.
Active Call
While in an active call, it is possible to enable the
speakerphone feature.
1. Touch Speaker.
The Speaker button now appears as and the
speakerphone is activated.
2. Use the Volume key (located on the left side of your
phone) to adjust the volume.
3. To deactivate the speakerphone, touch Speaker.
Speaker
79
Page 87

Switching off the Microphone (Mute)
Mute
Mute
Headset
Headset
To use a Bluetooth headset:
You can temporarily switch your phone’s microphone off, so
that the other person cannot hear you.
Example: You want to say something to someone in the room,
but do not want the person on the phone to hear
what you say.
To mute your phone during a call:
1. Touch Mute.
The Mute button now appears as and Mute is
Mute
activated.
2. Touch Mute to deactivate the Mute function and
reactivate the microphone.
1. Touch Headset.
Headset
2. The phone will scan for your Bluetooth headset. When
found, connect to the headset.
The Headset button now appears as and the
Bluetooth headset is activated.
3. Touch Headset to deactivate the Bluetooth headset
and reactivate the phone speaker.
Searching for a Number in Contacts
1. During the active call, touch Menu then touch
Contacts.
2. Touch the contact entry.
For further details about the Contacts feature, see
“Finding a
Contact”
on page 57.
Call Functions 80
Page 88
Call Forwarding
Call Settings
1. Touch Phone ➔ Menu ➔
Call settings ➔ Call forwarding.
2. Touch one of the following options:
• Activate call forwarding: Enables the Call forwarding
feature.
• Deactivate call forwarding: Disables the Call
forwarding feature.
To access the Call settings menu:
䡲 Touch Phone ➔ Menu ➔ Call settings.
– or –
From a Home screen, touch Apps ➔
Settings ➔ Call.
For detailed information on all of the call settings, see
on page 169.
“Call”
81
Page 89

Section 5: Messaging
This section describes how to send and receive different
types of messages. It also includes the features and
functionality associated with messaging.
Types of Messages
Your phone provides the following message types:
• Text Messages
• Multimedia (Picture, Video, and Audio) Messages
• Email and Gmail Messages
• Google+ Messages
• Hangouts
• Voicemail
The Short Message Service (SMS) lets you send and receive
text messages to and from other mobile phones or email
addresses. To use this feature, you may need to subscribe to
your service provider’s message service.
The Multimedia Messaging Service (MMS) lets you send and
receive multimedia messages (such as picture, video, and
audio messages) to and from other mobile phones or email
addresses. To use this feature, you may need to subscribe to
your service provider’s multimedia message service.
Important! When creating a message, adding an image, a
sound file, or a video clip to a text message
changes the message from a text message to a
multimedia message.
Messaging icons are displayed at the top of the screen and
indicate when messages are received and their type. For
more information, refer to
Note: Messaging service availability depends on your network
and service plan. Multimedia Messaging charges apply
per your Calling Plan. Monthly plans are available.
Higher rates apply for International Multimedia
“Status Bar” on page 21.
Messaging (when available). Compatible Device
required. Consult Verizon Wireless for more information.
Messaging 82
Page 90
Creating and Sending Messages
5. Touch the Enter message field and use the onscreen
1. From a Home screen, touch Messaging.
– or –
From a Home screen, touch Apps ➔
Messaging.
2. Touch Compose.
3. Touch the Enter recipient field to manually enter a
recipient or touch to select a recipient from your
Contacts. You can also select the recipient based on
Groups, Favorites, or Logs.
4. If adding a recipient from your Contacts, touch the
contact to place a check mark then touch Done.
The contact is placed in the recipient field.
keyboard to enter a message.
6. Add more recipients by touching the recipient field.
7. Review your message and touch Send.
Note: If you exit a message before you send it, it will be
automatically saved as a draft.
Adding Attachments to a Message
To add an attachment to your message, touch and select
one of the options: Image, Take a picture, and so on.
Note: Enter additional recipients by separating each entry
with a semicolon (;) then using the previous procedure.
83
Page 91
Message Options
Options While Composing a Message
Options Before Composing a Message
1. Touch Messaging.
2. Before composing a message, touch Menu to
reveal additional messaging options:
•Search: Search through all of your messages for a
certain word or string of words. Enter a search string in
the Messaging Search window and touch Search.
• Delete threads: Delete any message thread. Select
the messages to delete and a green check mark will
appear next to the message. Touch Delete.
• Draft messages: Display the draft messages folder
and its contents.
• Locked messages: Display the locked messages
folder and its contents.
• Save messages
saved messages folder.
•Settings: Access Messaging settings. For more
information, refer to
: Select messages and save them to the
“Messaging Settings” on page 87.
䡲 While composing a message, touch Menu to
reveal additional messaging options.
• Insert smiley: Add emoticons, such as a happy face to
your message.
•Add text: Copy text from your contacts, calendar, or
from a memo to add to your message. This is a
convenient feature for adding names, phone numbers,
events, and so on, to your message.
• Add to contacts: Add the recipient to your Contacts
list. This option only appears if the recipient is not
already in your Contacts list.
•View contact: See information on the recipient. This
option only appears if the recipient is in your Contacts
list.
• Add slide
• Add subject: Add a subject to a message.
• Priority level: sets the messages priority level to
Normal or High.
•Discard
: Add a new page to a message.
: Delete the current message.
Messaging 84
Page 92

•Translate: Launches S Translator to translate text to or
Message Threads
from another language.
•Font size: Set the font size for the message.
Viewing New Received Messages
1. When you receive a new message, the new message
icon displays at the top of the screen.
2. Open the Notification Panel and select the message.
For more information, refer to “Notification Panel” on
page 34.
– or –
Touch Messaging then touch the new message to
view it.
The selected message displays.
3. To play a multimedia message, touch .
Sent and received text and picture messages are grouped
into message threads. Threaded messages allow you to see
all the messages exchanged (similar to a chat program) and
displays a contact on the screen. Message threads are listed
in the order in which they were received, with the latest
message displayed at the top.
To access message thread options:
䡲 From the main Messaging screen, touch and hold the
message to display the following options:
•Delete: Delete the currently selected message thread.
• Save messages
messages folder.
•View contact: Display the Contact’s Overview page.
• Add to contacts: Adds a new number to your
Contacts list. This option is only displayed if the number
: Save the message to the saved
To pause playback of the multimedia message,
touch .
4. To scroll through the message (if additional text pages
have been added), touch the screen and in a single
motion, scroll up or down the page.
85
is not already in your Contacts list.
Page 93
To access additional Bubble options:
Deleting Messages
䡲 Touch and hold the message bubble within an active
message conversation to display the following options:
•Delete: Delete any currently selected message bubble
from the thread.
•Copy: Copy the currently selected message bubble
from the thread.
•Forward: Forward the currently selected message
bubble to an external recipient.
•Lock/Unlock: Lock or unlock the currently selected
message bubble from being accidentally deleted.
•Copy to SIM: Copy the currently selected message
bubble as a single text message within the SIM card.
• Save message: Save the message to the saved
messages folder.
To delete a single message thread:
1. Touch Messaging.
2. Touch and hold a message, then touch Delete.
3. At the Delete prompt, touch OK to delete or Cancel to
cancel.
To delete multiple message threads:
1. Touch Messaging.
2. Touch Menu ➔ Delete threads.
3. Touch each message you want to delete or touch
Select all.
A check mark displays beside each message you
select.
• View message details: Display details for the
currently selected message bubble.
•Translate: Launches S Translator to translate text to or
from another language.
4. Touch Delete.
5. At the Delete all prompt, touch OK to delete or Cancel
to cancel.
Messaging 86
Page 94
Message Search
Messaging Settings
You can search through your messages by using the
Message Search feature.
1. Touch Messaging.
2. Touch Menu ➔ Search.
3. Use the onscreen keyboard to enter a word or phrase
to search for, then touch Search.
4. All messages that contain the search string you
entered are displayed.
Saved Messages Folder
To view messages that you have saved, access the saved
messages folder.
1. From a Home screen, touch Apps ➔ My Files.
To configure the settings for text messages, multimedia
messages, Voicemails, and Push messages.
1. Touch Messaging ➔ Menu ➔ Settings.
2. Options are described on the screen.
Touch each option to enable it. Checking some options
causes other options to become available to set.
Touch to set some options.
Touch other options, such as Emergency alerts, to
display additional instructions for setting the option.
3. Touch Menu ➔ Restore default settings to
restore all Messaging settings to their original state.
2. Touch All files ➔ Device storage ➔ Messaging.
3. Touch an entry to view the saved message.
– or –
Touch the check box to the left of messages you would
like to delete, share, move, copy, rename, or view
details about the file. Also, touch and hold an entry to
display those options.
87
Page 95
Emergency Alerts
Using Email
This device is designed to receive wireless emergency alerts
from the Commercial Mobile Alerting System (CMAS) which
may also be known as the Personal Localized Alerting
Network (PLAN). If your wireless provider has chosen to
participate in CMAS/PLAN, alerts are available while in the
provider’s coverage area. If you travel outside your provider’s
coverage area, wireless emergency alerts may not be
available. For more information, please contact your wireless
provider.
Emergency Alerts allows customers to receive
geographically-targeted messages. Alert messages are
provided by the US Department of Homeland Security and
will alert customers of imminent threats to their safety within
their area. There is no charge for receiving an Emergency
Alert message.
Email enables you to review and create email using various
email services. You can also receive text message alerts
when you receive an important email.
To access the Email app:
䡲 From the main Home screen, touch Email.
– or –
From a Home screen, touch Apps ➔ Email.
Creating an Email Account
To create your first email account:
1. Touch Email.
2. Touch an email account type, such as Corporate.
If you do select Corporate, see “Creating a Corporate
There are three types of Emergency Alerts:
• Alerts issued by the President
• Alerts involving imminent threats to safety of life (Extreme
and Severe)
• AMBER Alerts (missing child alert)
Email Account”
3. Enter your email address in the email address field.
4. Enter your password in the Password field.
If you want to see your password as it is being typed,
touch Show password to create a check mark.
on page 90 for more information.
Messaging 88
Page 96
5. Touch Next or touch Done on the keyboard.
Creating Additional Email Accounts
6. Review and configure the settings.
7. Touch Next.
8. Enter a name for this email account (optional) and
touch Next or touch Done on the keyboard.
The Set up email screen displays.
9. Touch another email account type and repeat Steps 3
through 8.
– or –
Touch Done with accounts.
The Email inbox displays.
Note: For more information on setting up your email, visit the
To create additional email accounts after setting up your first
account, follow these steps:
1. Touch Email.
Your Email screen displays showing your emails from
the active account.
2. Touch Menu ➔ Settings.
3. Touch Add account.
4. Enter the information required to set up another
account.
Touch Send email from this account by default, if
you want to enable the option. Touch the check box to
create a check mark.
Smartphone Resource Center at:
smartphones.verizonwireless.com.
89
For more information, refer to “Creating an Email
Account”
on page 88.
Page 97

Creating a Corporate Email Account
Switching Between Email Accounts
Use the following procedure to configure your phone to
synchronize with a corporate email account.
1. Touch Email.
2. Touch Corporate.
For more information, refer to
Account”
3. Touch Manual setup.
4. Enter all the Exchange server information, Domain,
user name and Password, then touch Next or touch
Done on the keyboard.
5. At the Activation prompt, touch OK.
6. Review and configure the settings.
on page 88.
“Creating an Email
1. Touch Email.
Your Email screen displays showing your emails from
the active account.
2. Touch the Inbox button at the top of the screen.
Your Email accounts screen displays.
3. Touch the Email account Inbox you would like to make
active.
– or –
Touch Combined inbox to display email messages
from all accounts.
The new Email account inbox or Combined inbox
displays.
7. Touch Next.
8. Enter an Account name for this account (Optional) and
touch Next or touch Done on the keyboard.
Wait for the Inbox to synchronize before use.
9. Touch
settings.
Menu ➔ Settings to change the account
Syncing Email Accounts
Syncing refreshes your phone with the account’s servers.
When you set up an email account, you can choose whether
the account syncs in the background, or manually.
䡲 Touch Email ➔ Refresh.
Messaging 90
Page 98
Gmail
Refreshing Your Gmail Account
Send and receive emails by using Gmail, Google’s
web-based email.
䡲 From a Home screen, touch Apps ➔ Gmail.
Setting Up Your Gmail Account
The first time you launch Gmail, your device prompts you to
set up your Google account, if you have not already set it up.
Once you set up your Google account on your device, Gmail
is set up automatically.
1. Touch Gmail.
2. Follow the prompts to sign in or create a new account.
3. The device communicates with the Google server to set
up your account and synchronize your email.
You can use more than one Google account on your
Syncing refreshes your device with the account’s servers.
When you set up an email account, you can choose whether
the account syncs in the background or manually.
䡲 Touch Gmail ➔
Menu ➔ Refresh.
Gmail Settings
Use settings to configure your Gmail preferences.
1. Touch Gmail.
2. Touch
Menu ➔ Settings for options.
Composing and Sending Gmail
1. Touch Gmail.
2. Touch , then touch fields to compose the message.
While composing, touch
Menu for options.
device.
Tip: Touch Menu ➔ Settings ➔ Accounts ➔ Add
account to add another Google account.
91
3. Touch SEND to send.
Page 99
Google+
Hangouts
Google+ makes messaging and sharing with your friends a
lot easier. You can set up Circles of friends, visit the Stream
to get updates from your Circles, use Hangouts for fast
messaging with everyone in your Circles, or use Instant
Upload to automatically upload videos and photos to your
own private album on Google+.
1. Sign on to your Google account. For more information,
refer to
2. From a Home screen, touch Apps ➔ Google+.
3. Select the account you want to use to sign in to
Google+.
– or –
Touch Add account to create another account.
4. Follow the onscreen instructions to use Google+.
5. Visit
“Creating a New Google Account” on page 15.
www.google.com/mobile/+/
for more information.
Hangouts is a free, web-based application for instant
messaging offered by Google. You can connect with your
friends across computers and various Android devices. You
can have conversations or video calls with up to 10 friends.
Note: The first time you use Hangouts, you will need to
download the updated application from the Play Store.
When the Play Store page displays, touch Update. For
more information, refer to “Play Store” on page 144.
1. Log on to your Google account, if you have not already
done so. For more information, refer to
New Google Account”
2. From a Home screen, touch Apps ➔
Hangouts.
3. Touch Menu ➔ Help for more information on
using Hangouts.
on page 15.
“Creating a
Messaging 92
Page 100
Voicemail
1
Checking Voicemail
All unanswered calls to your phone are sent to voicemail,
even if your phone is turned off, so you should set up your
voicemail and personal greeting as soon as you activate your
phone.
Visual Voice Mail is a feature that allows you to review your
voicemail on your phone, including the option to listen to your
voicemail in any order. There is a monthly charge for Visual
Voice Mail, and airtime charges may apply. For more
information, contact Verizon Wireless.
Setting Up Voicemail
1. From the Home screen, touch Apps ➔
Voicemail ➔ Call Voicemail.
– or –
From the Home screen, touch Phone, then touch
and hold .
2. Follow the automated instructions to set up your
1. From the Home screen, touch Apps ➔
Voicemail ➔ Call Voicemail.
– or –
From the Home screen, touch , then touch and
hold .
2. Follow the automated instructions to manage
voicemail.
1
Clearing Voicemail Notifications
When you have new voicemail, your phone alerts you by
displaying an icon in the Status Bar, and, depending on your
settings, by playing sound and vibration. If you want to
remove the icon from the Status Bar, use the Clear
notifications option.
䡲 From the Home screen, touch Apps ➔
Voicemail ➔ Clear notifications.
password and record a greeting.
93
 Loading...