

Samsung SCH-I519 User Manual
User’s Guide
SCH-i519
www.samsungmobile.com

i
CCoonntteennttss
Contents
Chapter 1. Getting Started
What’s in the Box? . . . . . . . . . . . . . . . . . . . . . . . . . . . . . 1-1
Getting to Know Your PDA Phone . . . . . . . . . . . . . . . . . . . 1-2
Front View . . . . . . . . . . . . . . . . . . . . . . . . . . . . . . . . . . . . . . . 1-2
Rear View . . . . . . . . . . . . . . . . . . . . . . . . . . . . . . . . . . . . . . . 1-4
Desktop Holder . . . . . . . . . . . . . . . . . . . . . . . . . . . . . . . . . . . . 1-4
Using the Stylus . . . . . . . . . . . . . . . . . . . . . . . . . . . . . . . . . . . 1-5
Installing the Battery . . . . . . . . . . . . . . . . . . . . . . . . . . . 1-6
Installing the Battery . . . . . . . . . . . . . . . . . . . . . . . . . . . . . . . . 1-6
Removing the Battery . . . . . . . . . . . . . . . . . . . . . . . . . . . . . . . 1-7
Installing the R-UIM Card . . . . . . . . . . . . . . . . . . . . . . . . 1-8
Inserting the R-UIM Card . . . . . . . . . . . . . . . . . . . . . . . . . . . . . 1-8
Removing the R-UIM Card . . . . . . . . . . . . . . . . . . . . . . . . . . . . 1-9
Charging Your Phone . . . . . . . . . . . . . . . . . . . . . . . . . . . . 1-9
Using the Travel Charger . . . . . . . . . . . . . . . . . . . . . . . . . . . . . 1-9
Using the Desktop Holder . . . . . . . . . . . . . . . . . . . . . . . . . . . . . 1-10
Low Battery Indicator . . . . . . . . . . . . . . . . . . . . . . . . . . . . . . . 1-13
Installing Sync Program . . . . . . . . . . . . . . . . . . . . . . . . . . 1-14
Installing an Optional Memory Card . . . . . . . . . . . . . . . . . . 1-15
Chapter 2. The Basics
Home Screen . . . . . . . . . . . . . . . . . . . . . . . . . . . . . . . . . 2-1
Adjusting Brightness of the Screen and the Backlight . . . . . . . . . . 2-2
Using Task Bar . . . . . . . . . . . . . . . . . . . . . . . . . . . . . . . . . . . . 2-3

ii
CCoonntteennttss
Entering Text . . . . . . . . . . . . . . . . . . . . . . . . . . . . . . . . . 2-4
Using the On-screen Keyboard . . . . . . . . . . . . . . . . . . . . . . . . . 2-5
Using the FSIM Mode . . . . . . . . . . . . . . . . . . . . . . . . . . . . . . . . 2-8
Using the GridIM Mode . . . . . . . . . . . . . . . . . . . . . . . . . . . . . . 2-11
Using the Numpad Mode . . . . . . . . . . . . . . . . . . . . . . . . . . . . . 2-14
Resetting Your Phone . . . . . . . . . . . . . . . . . . . . . . . . . . . 2-15
Synchronising Information . . . . . . . . . . . . . . . . . . . . . . . . 2-16
Beaming Information . . . . . . . . . . . . . . . . . . . . . . . . . . . 2-18
Chapter 3. Navigating Applications
Application Launcher Screen . . . . . . . . . . . . . . . . . . . . . . . 3-1
Command Bar . . . . . . . . . . . . . . . . . . . . . . . . . . . . . . . . . . . . 3-2
Status Bar . . . . . . . . . . . . . . . . . . . . . . . . . . . . . . . . . . . . . . . 3-3
Opening an Application . . . . . . . . . . . . . . . . . . . . . . . . . . 3-5
Closing an Application . . . . . . . . . . . . . . . . . . . . . . . . . . . 3-5
Actions Common to All Applications . . . . . . . . . . . . . . . . . . 3-6
Creating a New Item in an Application . . . . . . . . . . . . . . . . . . . . 3-6
Opening an Item for Viewing . . . . . . . . . . . . . . . . . . . . . . . . . . 3-6
Editing an Item . . . . . . . . . . . . . . . . . . . . . . . . . . . . . . . . . . . 3-6
Deleting an Item . . . . . . . . . . . . . . . . . . . . . . . . . . . . . . . . . . 3-6
Making Records Private . . . . . . . . . . . . . . . . . . . . . . . . . . . . . . 3-7
Categorising Records . . . . . . . . . . . . . . . . . . . . . . . . . . . . . . . . 3-9
Searching for Items . . . . . . . . . . . . . . . . . . . . . . . . . . . . 3-12
Chapter 4. Call Functions
Turning the Phone’s Power On or Off . . . . . . . . . . . . . . . . . 4-1

iii
CCoonntteennttss
Accessing the Phone Mode . . . . . . . . . . . . . . . . . . . . . . . . 4-2
Making a Call . . . . . . . . . . . . . . . . . . . . . . . . . . . . . . . . . 4-3
Making a Call Using the Phone Screen . . . . . . . . . . . . . . . . . . . . 4-3
Answering a Call . . . . . . . . . . . . . . . . . . . . . . . . . . . . . . 4-4
Quickly Changing the Ring Melody . . . . . . . . . . . . . . . . . . . 4-5
Options During a Call . . . . . . . . . . . . . . . . . . . . . . . . . . . 4-6
Redialling the Last Number . . . . . . . . . . . . . . . . . . . . . . . 4-8
Viewing Missed Calls . . . . . . . . . . . . . . . . . . . . . . . . . . . . 4-8
Advanced Calling Features . . . . . . . . . . . . . . . . . . . . . . . . 4-9
Making a Call from Addressbook . . . . . . . . . . . . . . . . . . . . . . . . 4-9
Making a Call from Quick Dial List . . . . . . . . . . . . . . . . . . . . . . . 4-9
Making an Emergency Call . . . . . . . . . . . . . . . . . . . . . . . . . . . . 4-10
Making an International Call . . . . . . . . . . . . . . . . . . . . . . . . . . . 4-10
Pause Dialling . . . . . . . . . . . . . . . . . . . . . . . . . . . . . . . . . . . . 4-11
Accessing Message Box . . . . . . . . . . . . . . . . . . . . . . . . . . . . . . 4-11
Using the Call Logs . . . . . . . . . . . . . . . . . . . . . . . . . . . . . 4-12
Using Silent Mode . . . . . . . . . . . . . . . . . . . . . . . . . . . . . . 4-14
Setting General Phone Options . . . . . . . . . . . . . . . . . . . . . 4-15
Answering Options . . . . . . . . . . . . . . . . . . . . . . . . . . . . . . . . . 4-16
Dialling Options . . . . . . . . . . . . . . . . . . . . . . . . . . . . . . . . . . . 4-16
Call Forwarding . . . . . . . . . . . . . . . . . . . . . . . . . . . . . . . . . . . 4-17
Call Waiting . . . . . . . . . . . . . . . . . . . . . . . . . . . . . . . . . . . . . . 4-19
Setting the Ringer Options . . . . . . . . . . . . . . . . . . . . . . . . 4-20
Setting the Sound Options . . . . . . . . . . . . . . . . . . . . . . . . 4-22
Setting the Phone’s Display . . . . . . . . . . . . . . . . . . . . . . . 4-23

iv
CCoonntteennttss
Setting the Phone System Options . . . . . . . . . . . . . . . . . . 4-24
Roam Option . . . . . . . . . . . . . . . . . . . . . . . . . . . . . . . . . . . . . 4-24
Call Meters Option . . . . . . . . . . . . . . . . . . . . . . . . . . . . . . . . . 4-25
DTMF Option . . . . . . . . . . . . . . . . . . . . . . . . . . . . . . . . . . . . . 4-25
Setting the Phone’s Security . . . . . . . . . . . . . . . . . . . . . . . 4-26
Locking the Phone . . . . . . . . . . . . . . . . . . . . . . . . . . . . . . . . . . 4-26
Restricting Calls . . . . . . . . . . . . . . . . . . . . . . . . . . . . . . . . . . . 4-27
Storing Emergency Numbers . . . . . . . . . . . . . . . . . . . . . . . . . . . 4-27
Resetting the Phone . . . . . . . . . . . . . . . . . . . . . . . . . . . . . . . . 4-27
Setting the R-UIM Card’s Security . . . . . . . . . . . . . . . . . . . 4-28
PIN Check . . . . . . . . . . . . . . . . . . . . . . . . . . . . . . . . . . . . . . . 4-29
Change PIN . . . . . . . . . . . . . . . . . . . . . . . . . . . . . . . . . . . . . . 4-29
R-UIM Lock . . . . . . . . . . . . . . . . . . . . . . . . . . . . . . . . . . . . . . 4-30
My Phone # . . . . . . . . . . . . . . . . . . . . . . . . . . . . . . . . . . . . . . 4-30
Clear Memory . . . . . . . . . . . . . . . . . . . . . . . . . . . . . . . . . . . . . 4-30
Chapter 5. Using Addressbook
Creating a New Entry . . . . . . . . . . . . . . . . . . . . . . . . . . . 5-1
Viewing the Addressbook Entries . . . . . . . . . . . . . . . . . . . . 5-7
Making a Call from the Address Screen . . . . . . . . . . . . . . . 5-9
Editing an Addressbook Entry . . . . . . . . . . . . . . . . . . . . . . 5-10
Copying Entries between the R-UIM Card and Addressbook . . 5-11
Deleting Addressbook Entries . . . . . . . . . . . . . . . . . . . . . . 5-12
Chapter 6. Messaging
Message Box . . . . . . . . . . . . . . . . . . . . . . . . . . . . . . . . . 6-1
Sending a Message . . . . . . . . . . . . . . . . . . . . . . . . . . . . . . . . . 6-1
Viewing a Received Message . . . . . . . . . . . . . . . . . . . . . . . . . . . 6-5

v
CCoonntteennttss
Managing Message Folders . . . . . . . . . . . . . . . . . . . . . . . . . . . . 6-8
Configuring the Message Box Settings . . . . . . . . . . . . . . . . . . . . 6-10
U-Info . . . . . . . . . . . . . . . . . . . . . . . . . . . . . . . . . . . . . 6-14
Web Browser . . . . . . . . . . . . . . . . . . . . . . . . . . . . . . . . . 6-16
Browser Setting . . . . . . . . . . . . . . . . . . . . . . . . . . . . . . . . . . . 6-19
Instant Messenger . . . . . . . . . . . . . . . . . . . . . . . . . . . . . 6-21
Signing Into Instant Messenger . . . . . . . . . . . . . . . . . . . . . . . . . 6-21
Chatting with Contacts . . . . . . . . . . . . . . . . . . . . . . . . . . . . . . . 6-23
Configuring the Messenger Settings . . . . . . . . . . . . . . . . . . . . . . 6-24
Creating Preset Messages . . . . . . . . . . . . . . . . . . . . . . . . . . . . . 6-25
Saving Instant Messages . . . . . . . . . . . . . . . . . . . . . . . . . . . . . 6-26
Chapter 7. Application
Camera . . . . . . . . . . . . . . . . . . . . . . . . . . . . . . . . . . . . 7-1
Taking Pictures . . . . . . . . . . . . . . . . . . . . . . . . . . . . . . . . . . . . 7-1
Photo Album . . . . . . . . . . . . . . . . . . . . . . . . . . . . . . . . . 7-7
Viewing Pictures . . . . . . . . . . . . . . . . . . . . . . . . . . . . . . . . . . . 7-7
Media Player . . . . . . . . . . . . . . . . . . . . . . . . . . . . . . . . . 7-10
Playing Media Files . . . . . . . . . . . . . . . . . . . . . . . . . . . . . . . . . 7-10
Using the Play List Options . . . . . . . . . . . . . . . . . . . . . . . . . . . . 7-13
Removing Medial Files from the Play List . . . . . . . . . . . . . . . . . . . 7-13
Schedule . . . . . . . . . . . . . . . . . . . . . . . . . . . . . . . . . . . . 7-14
Creating an Appointment . . . . . . . . . . . . . . . . . . . . . . . . . . . . . 7-14
Viewing Your Schedule . . . . . . . . . . . . . . . . . . . . . . . . . . . . . . . 7-17
Editing an Appointment . . . . . . . . . . . . . . . . . . . . . . . . . . . . . . 7-21
Deleting an Appointment . . . . . . . . . . . . . . . . . . . . . . . . . . . . . 7-21
Sending an Appointment . . . . . . . . . . . . . . . . . . . . . . . . . . . . . 7-21
To-do . . . . . . . . . . . . . . . . . . . . . . . . . . . . . . . . . . . . . . 7-22
Creating a Task . . . . . . . . . . . . . . . . . . . . . . . . . . . . . . . . . . . 7-22
Viewing Tasks . . . . . . . . . . . . . . . . . . . . . . . . . . . . . . . . . . . . . 7-24
Editing a Task . . . . . . . . . . . . . . . . . . . . . . . . . . . . . . . . . . . . 7-25

vi
CCoonntteennttss
Deleting a Task . . . . . . . . . . . . . . . . . . . . . . . . . . . . . . . . . . . . 7-25
Sending a Task . . . . . . . . . . . . . . . . . . . . . . . . . . . . . . . . . . . . 7-26
Memo . . . . . . . . . . . . . . . . . . . . . . . . . . . . . . . . . . . . . . 7-27
Creating a Memo . . . . . . . . . . . . . . . . . . . . . . . . . . . . . . . . . . 7-27
Viewing a Memo . . . . . . . . . . . . . . . . . . . . . . . . . . . . . . . . . . . 7-29
Editing a Memo . . . . . . . . . . . . . . . . . . . . . . . . . . . . . . . . . . . 7-30
Deleting a Memo . . . . . . . . . . . . . . . . . . . . . . . . . . . . . . . . . . 7-30
Sending a Memo . . . . . . . . . . . . . . . . . . . . . . . . . . . . . . . . . . . 7-31
Money . . . . . . . . . . . . . . . . . . . . . . . . . . . . . . . . . . . . . 7-32
MiniWord . . . . . . . . . . . . . . . . . . . . . . . . . . . . . . . . . . . 7-35
Creating a New Word Document . . . . . . . . . . . . . . . . . . . . . . . . 7-35
Viewing and Editing a Document . . . . . . . . . . . . . . . . . . . . . . . . 7-37
MiniSheet . . . . . . . . . . . . . . . . . . . . . . . . . . . . . . . . . . . 7-38
Creating a Workbook . . . . . . . . . . . . . . . . . . . . . . . . . . . . . . . . 7-38
Viewing and Editing a Workbook . . . . . . . . . . . . . . . . . . . . . . . . 7-40
Office Viewer . . . . . . . . . . . . . . . . . . . . . . . . . . . . . . . . . 7-42
Viewing a Presentation . . . . . . . . . . . . . . . . . . . . . . . . . . . . . . 7-42
Using the Navigation Tools . . . . . . . . . . . . . . . . . . . . . . . . . . . . 7-44
Additional Office Viewer Options . . . . . . . . . . . . . . . . . . . . . . . . 7-45
Text Reader . . . . . . . . . . . . . . . . . . . . . . . . . . . . . . . . . . 7-46
Reading a Text File . . . . . . . . . . . . . . . . . . . . . . . . . . . . . . . . . 7-46
Using the Control Bar . . . . . . . . . . . . . . . . . . . . . . . . . . . . . . . 7-48
Using Text Reader Options . . . . . . . . . . . . . . . . . . . . . . . . . . . . 7-48
Chapter
8. Miscellaneous
Alarm . . . . . . . . . . . . . . . . . . . . . . . . . . . . . . . . . . . . . . 8-1
Clock . . . . . . . . . . . . . . . . . . . . . . . . . . . . . . . . . . . . . . 8-2

vii
CCoonntteennttss
Calculator . . . . . . . . . . . . . . . . . . . . . . . . . . . . . . . . . . . 8-7
Using the Basic Calculator . . . . . . . . . . . . . . . . . . . . . . . . . . . . 8-7
Using the Scientific Calculator . . . . . . . . . . . . . . . . . . . . . . . . . . 8-8
Using the Financial Calculator . . . . . . . . . . . . . . . . . . . . . . . . . . 8-9
Converter . . . . . . . . . . . . . . . . . . . . . . . . . . . . . . . . . . . 8-11
Remocon . . . . . . . . . . . . . . . . . . . . . . . . . . . . . . . . . . . 8-13
Adding a Device . . . . . . . . . . . . . . . . . . . . . . . . . . . . . . . . . . . 8-13
Learning the Device . . . . . . . . . . . . . . . . . . . . . . . . . . . . . . . . 8-15
Using the Device . . . . . . . . . . . . . . . . . . . . . . . . . . . . . . . . . . . 8-16
Recorder . . . . . . . . . . . . . . . . . . . . . . . . . . . . . . . . . . . . 8-17
Making a Voice Recording . . . . . . . . . . . . . . . . . . . . . . . . . . . . . 8-17
Playing a Voice Recording . . . . . . . . . . . . . . . . . . . . . . . . . . . . . 8-18
Editing Information about the Recording . . . . . . . . . . . . . . . . . . . 8-19
Deleting a Voice Recording . . . . . . . . . . . . . . . . . . . . . . . . . . . . 8-20
Creating a Copy of the Voice Recording . . . . . . . . . . . . . . . . . . . 8-20
Sending a Voice Recording . . . . . . . . . . . . . . . . . . . . . . . . . . . . 8-20
Java . . . . . . . . . . . . . . . . . . . . . . . . . . . . . . . . . . . . . . . 8-21
Installing a Java Program . . . . . . . . . . . . . . . . . . . . . . . . . . . . . 8-21
Opening a Java Program . . . . . . . . . . . . . . . . . . . . . . . . . . . . . 8-23
Using Folder . . . . . . . . . . . . . . . . . . . . . . . . . . . . . . . . . . . . . . 8-24
Fruits Cocktail . . . . . . . . . . . . . . . . . . . . . . . . . . . . . . . . 8-24
Chapter 9. Setup
Customising Your PDA Phone . . . . . . . . . . . . . . . . . . . . . . 9-1
Chapter 10. Documents
Documents . . . . . . . . . . . . . . . . . . . . . . . . . . . . . . . . . . 10-1
File Manager . . . . . . . . . . . . . . . . . . . . . . . . . . . . . . . . . 10-2

viii
CCoonntteennttss
Chapter 11. Health and Safety Information
Battery Safety . . . . . . . . . . . . . . . . . . . . . . . . . . . . . . . . 11-1
Road Safety . . . . . . . . . . . . . . . . . . . . . . . . . . . . . . . . . . 11-3
Operating Environment . . . . . . . . . . . . . . . . . . . . . . . . . . 11-4
Electronic Devices . . . . . . . . . . . . . . . . . . . . . . . . . . . . . 11-4
Potentially Explosive Atmospheres . . . . . . . . . . . . . . . . . . . 11-6
Emergency Calls . . . . . . . . . . . . . . . . . . . . . . . . . . . . . . . 11-6
Care and Maintenance . . . . . . . . . . . . . . . . . . . . . . . . . . . 11-8

ix
Important Safety Precautions
Read these guidelines before using your wireless phone.
Failure to comply with them may be dangerous or illegal.
Road Safety at All Times
Do not use a hand-held phone while driving; park the vehicle
first.
Switching Off When Refuelling
Do not use the phone at a refuelling point (service station) or
near fuels or chemicals.
Switching Off in Aircraft
Wireless phones can cause interference. Using them in aircraft
is both illegal and dangerous.
Switching Off in Hospitals
Switch off your phone near medical equipment.
Follow any regulations or rules in force.
Interference
All wireless phones may be subject to interference, which could
affect their performance.
Special Regulations
Meet any special regulations in force in any area and always
switch off your phone whenever it is forbidden to use it, or
when it may cause interference or danger (in a hospital for
example).

x
CCoonntteennttss
Sensible Use
Use only in the normal position (held to the ear). Avoid
unnecessary contact with the antenna when the phone is
switched on.
Emergency Call
Ensure the phone is switched on and in service.
Key in the emergency number for your present location, then
press . If certain feature are in use, deactivate those features before you can make an emergency call. Give all the
necessary information as accurately as possible. Do not cut
off the call until given permission to do so.
Water Resistance
Your phone is not water-resistant. Keep it dry.
Accessories and Batteries
Use only Samsung-approved accessories and batteries. Use of
any unauthorised accessaries could damage your phone and
may be dangerous.
Qualified Service
Only qualified service personnel may install or repair your
phone.
For more detailed safety information, see “Health and
Safety Information” on page 11-1.
chapter
1
1-1
Getting Started
Congratulations on the purchase of your new PDA
phone! This chapter helps you familiarise yourself with
the different components of your phone, set up your
PDA phone and charge the battery.
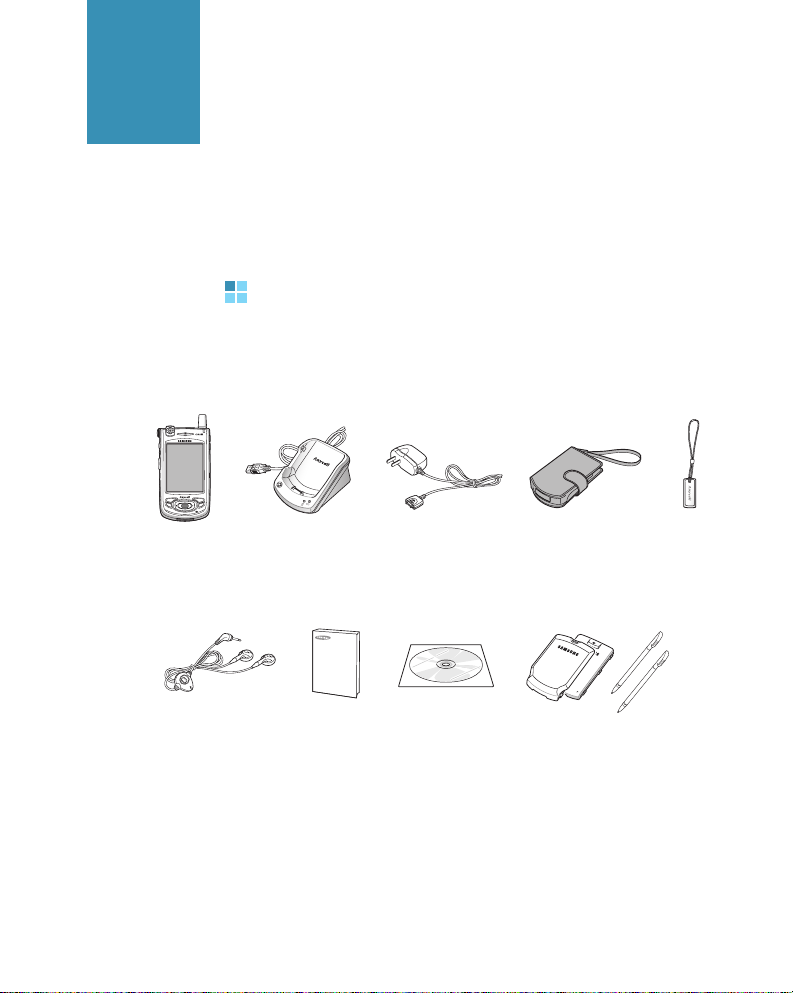
What's in the Box?
Your package contains the following items:
PDA phone
Desktop holder
Travel charger
Ear-microphone
Quick guide
Sync
installation CD
Batteries and
Stylus pens
In addition, you can obtain the following accessories
for your phone from your local Samsung dealer:
•PC data link cable
•Car charger/kit
•Waterproof case
Leather case
Screen cleaner
1-2
GGeettttiinngg SSttaarrtteedd
Getting to Know Your PDA Phone
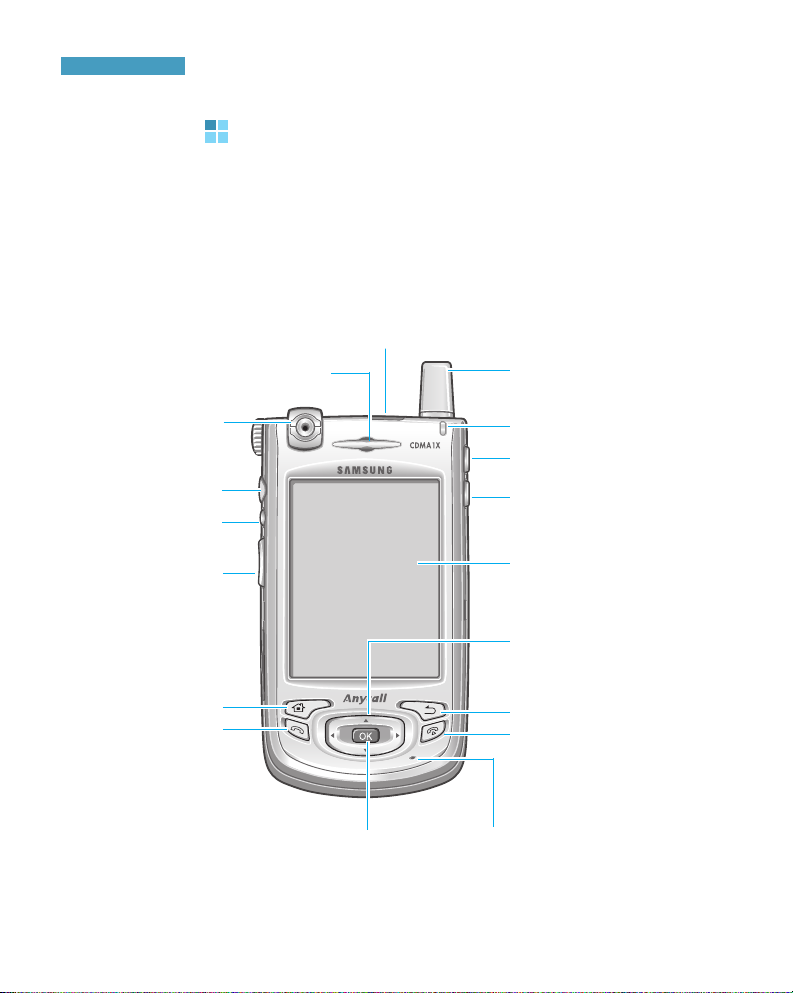
The following illustrations show the main elements of your
PDA phone:
Front View
Earpiece
Microphone
Lamp. Flashes to
indicate an incoming
call or a message.
IrDA port
➉
Volume buttons
➈
Voice memo
button
Touch screen for
handwriting, drawing or to
make a selection with the
stylus.
Ear-microphone
Jack
Camera module
➀
Launcher button
➂
4-way navigation buttons
➅
OK button
➇
Camera button
➆
Power button
/Backlight button
➁
Send button
➄
End button
➃
Back button
Antenna
1-3
GGeettttiinngg SSttaarrtteedd
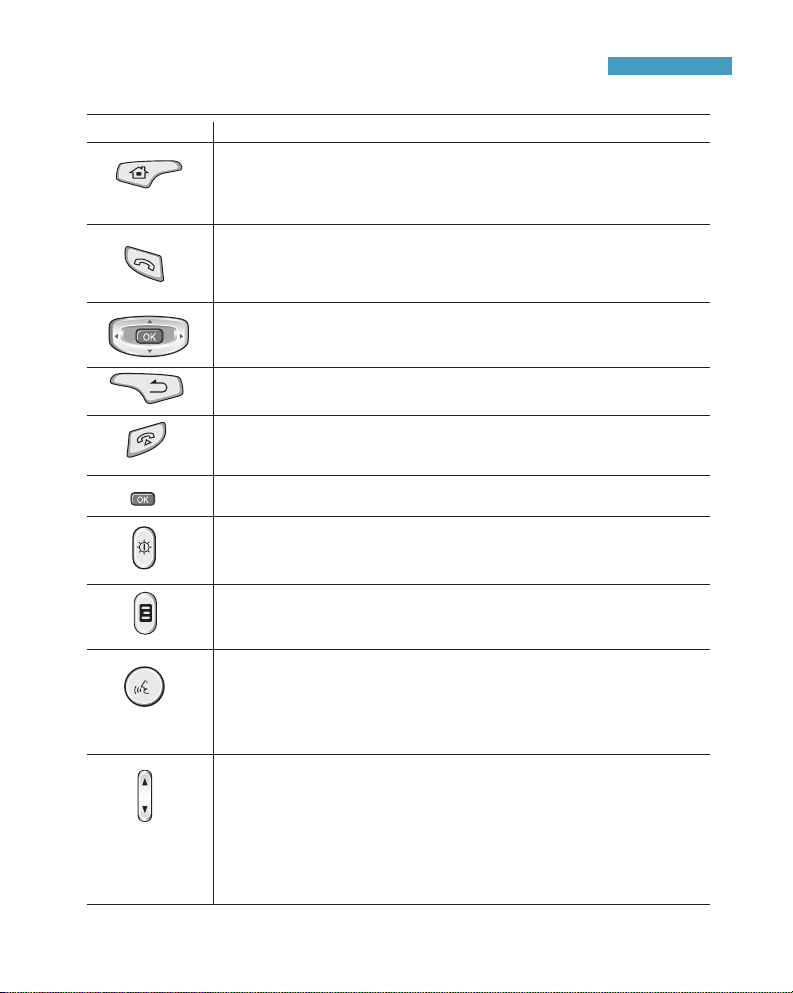
Descriptions
Button(s)
Accesses the Phone screen in PDA mode.
Dials a phone number and answers an incoming call.
In the phone idle mode, it shows the call log.
When pressed and held, it dials the last number.
When pressed repeatedly in the Launcher mode, goes through all
of the Launcher tabs in order.
Launches directly the Home screen when you use an application.
When pressed and held, it launches the Task Bar.
Accesses the optional Voice Recognition program supplied with
an optional CD. If you do not install the optional program, access
the Recorder application to record a voice memo.
When pressed and held, access the Recorder application to
record a voice memo.
Turns the backlight on or off.
When pressed and held, it turns your PDA phone sleep mode on
or off to save the power.
Works as a camera shutter in Camera mode.
When pressed and held, it launches the Camera.
Cancels the operation or goes back to the previous status or
application.
Ends a call or exits to Idle mode in Phone mode.
Ends a call in PDA mode.
When pressed and held, the phone mode turns off or on.
Confirms your selection or executes the selected application.
Moves up/down and left /right through any of the applications,
menus, or options.
Adjusts the voice volume during a call.
Adjusts the media volume when listening to Media Player.
Adjusts the system volume in Phone mode.
Scrolls pages when editing or entering text.
In the Launcher mode, it expands beyond the area of the PDA
phone.
➀
➁
➂
➃
➄
➅
➆
➇
➈
➉
1-4
GGeettttiinngg SSttaarrtteedd
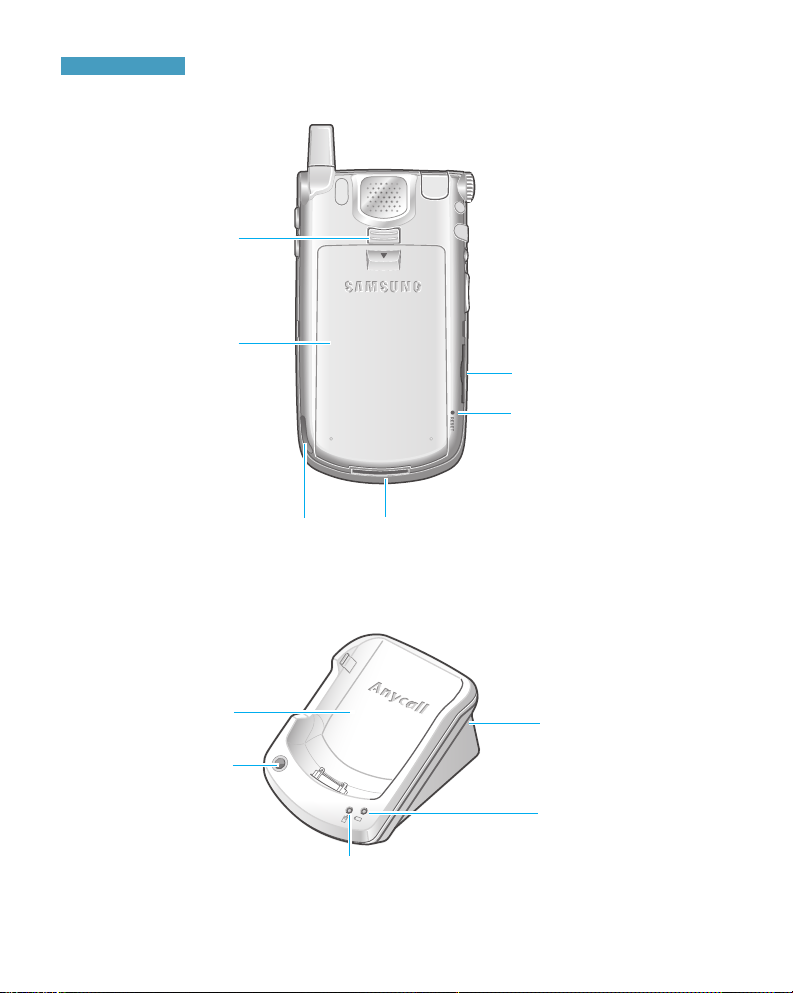
Rear View
Desktop Holder
Charging/Communication port
RESET button. Push this
button with the stylus to
reboot the PDA phone.
Battery
Battery lock
Stylus holder for
inserting the stylus
Expansion slot for an
optional memory card
Battery charge
indicator
Stylus holder
Charging compartment
for the phone with
battery attached
Phone indicator
Charging
compartment for
battery alone
(on the back)
1-5
GGeettttiinngg SSttaarrtteedd
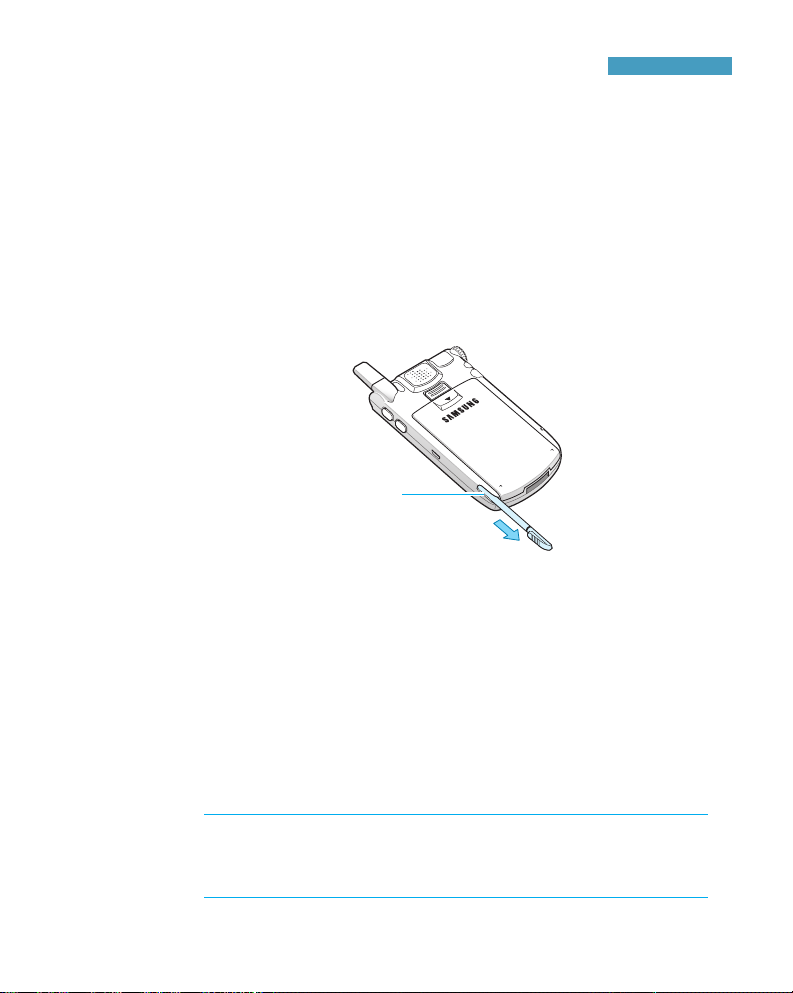
Using the Stylus
Your PDA phone has many of the same functions as a
portable personal computer, but does not have a
keyboard or a mouse. Instead, use the stylus provided
with your phone to access, run, or enter information
using the LCD touch-screen.
The stylus is stored on the back of the phone. When you
aren’t using the stylus, insert it back into the stylus
holder.
Use the stylus to:
Tap : Softly touch the screen once with the stylus to
select or execute a file or command. A tap works like a
mouse click on a computer.
Drag : Hold the stylus on the screen and drag it across
the screen to move text.
Tap-and-hold : Tap and hold the stylus on an item to
see a list of actions available for that item. Tap the action
you want to perform on the pop-up menu that appears.
Note: To prevent scratches, do not use an actual pen, pencil
or other sharp object to tap or write on the screen .
The stylus tip can also be used to press the RESET button.
For details about resetting, see page 2-15.
Stylus holder
1-6
GGeettttiinngg SSttaarrtteedd
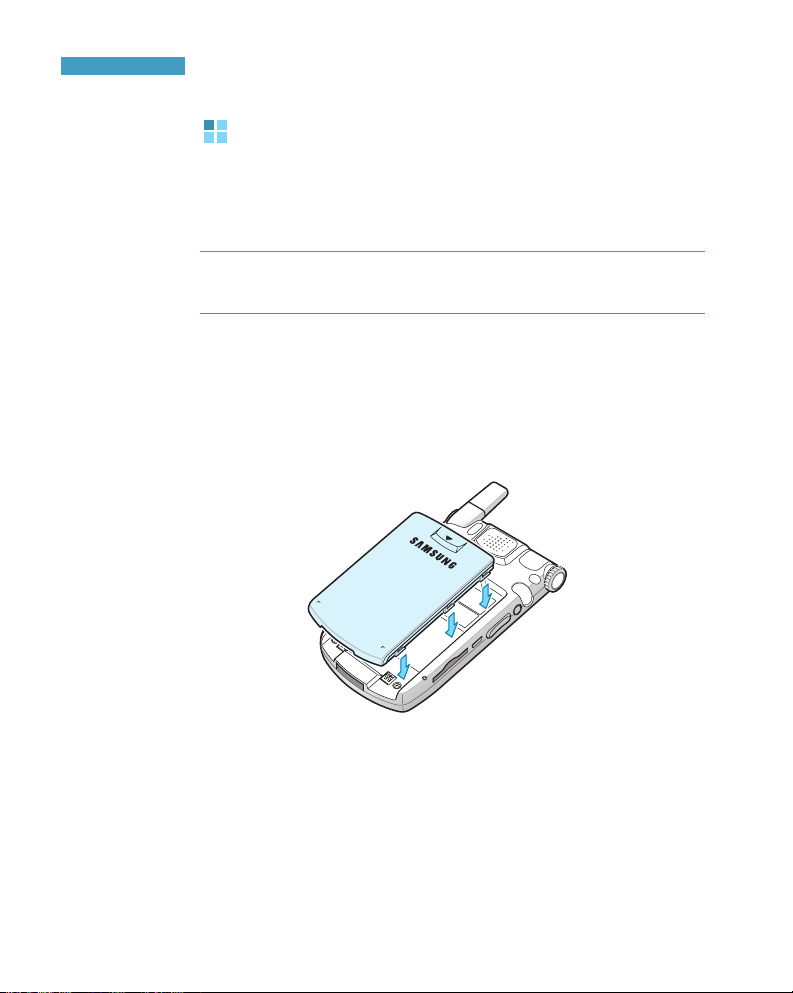
Installing the Battery
Your PDA phone is powered by a rechargeable Li-ion
battery. Use only approved batteries and chargers. Ask
your local Samsung dealer for further details.
Note: You must fully charge the battery before using your
phone for the first time. A discharged standard battery is
fully recharged in approximately 2.5 hours.
Installing the Battery
1. Put the battery on the back of the phone, lining it up
with corresponding slots on the phone.
1-7
GGeettttiinngg SSttaarrtteedd
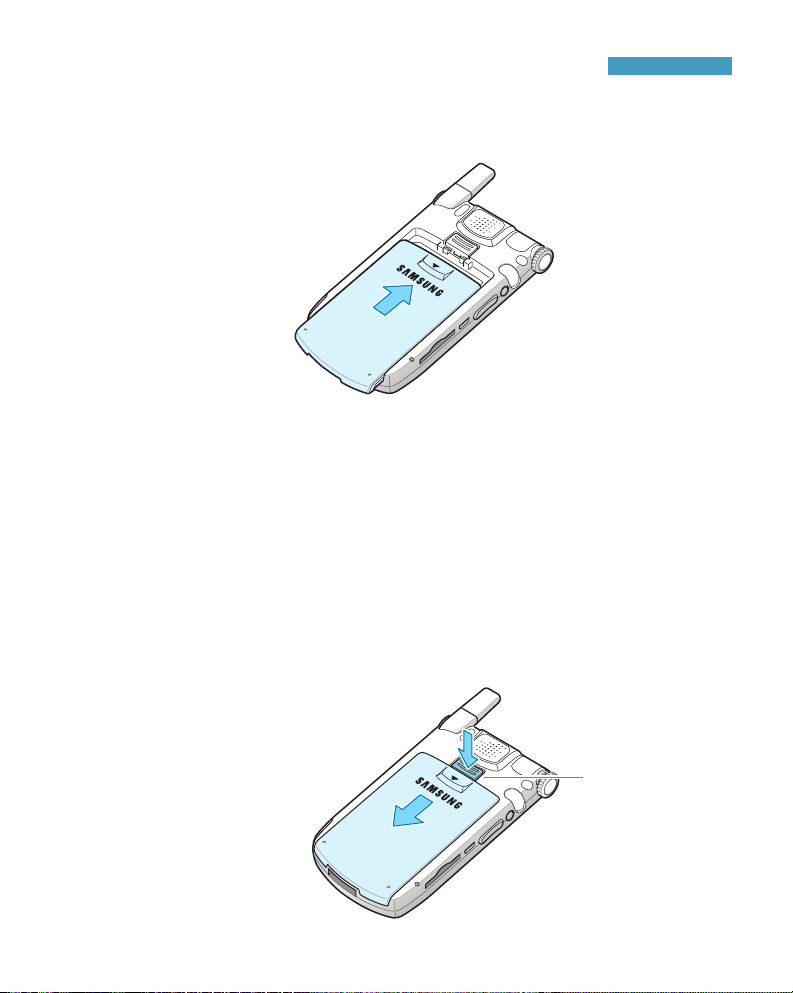
Make sure that the battery is securely locked before
switching the phone on.
Removing the Battery
1. Turn the power off.
2. To remove the battery, with the back of the phone
facing you, press the battery lock button to release the
battery and slide the battery off the phone, as shown.
Battery lock
button
2. Slide the battery up until it clicks into place.
1-8
GGeettttiinngg SSttaarrtteedd
Installing the R-UIM Card
When you subscribe to a cellular network, you are
provided with a plug-in R-UIM card loaded with your
subscription details, such as your PIN, any optional
services available and many others.
•
Keep all R-UIM cards out of the reach of small children.
•
The R-UIM card and its contacts can easily be damaged
by scratches or bending, so be careful when handling,
inserting or removing the card.
•
When installing the R-UIM card, always make sure that
the phone is turned off before you remove the battery.
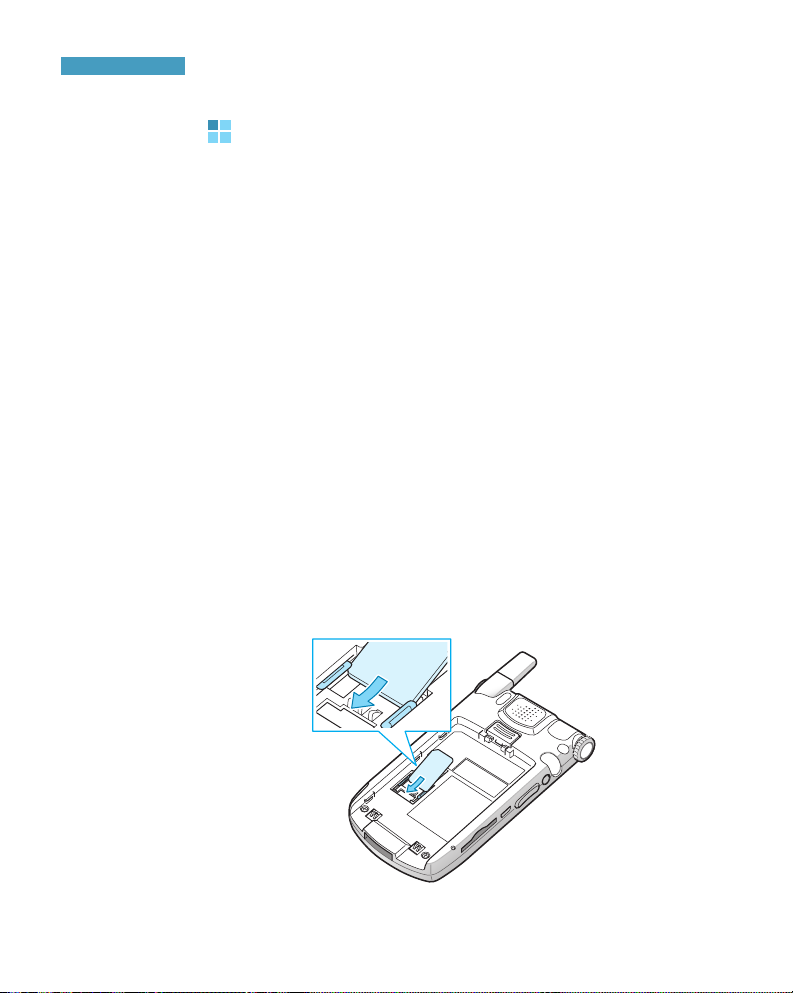
Inserting the R-UIM Card
1. Remove the battery.
2. Insert and slide the R-UIM card under the two tabs,
ensuring that the gold contacts of the card face down
into the phone, as shown.
1-9
GGeettttiinngg SSttaarrtteedd
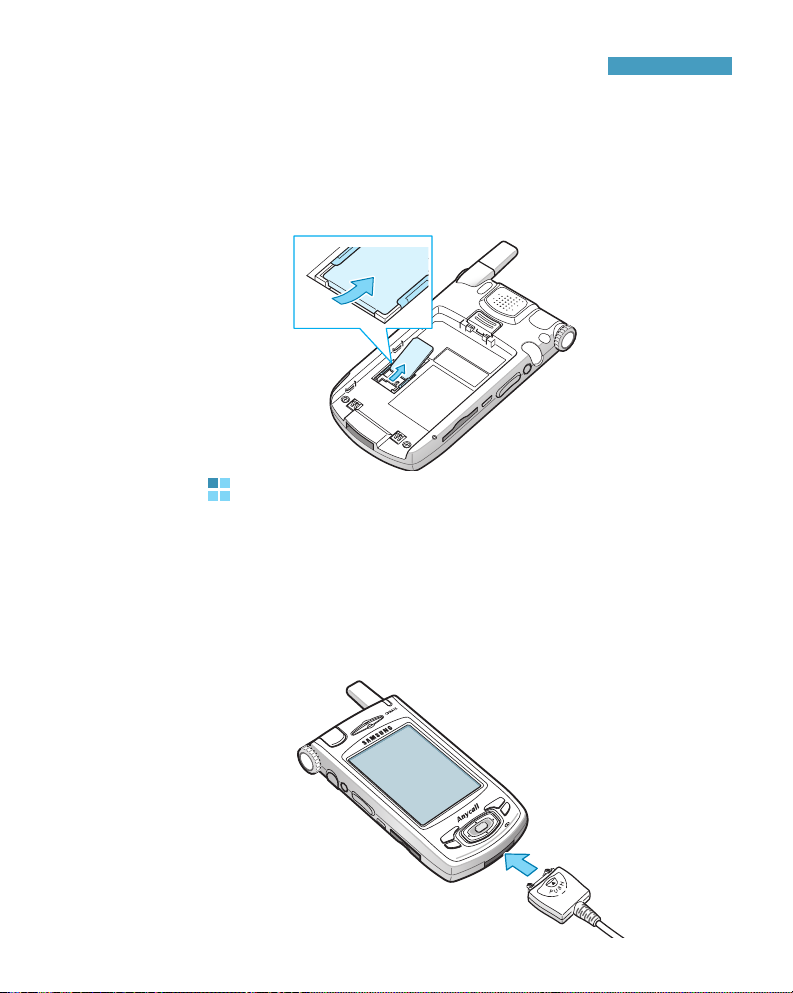
Removing the R-UIM Card
To remove the R-UIM card, slide the card out of the
holder, as shown.
Charging Your Phone
Using the Travel Charger
1. Plug the connector of the Travel charger into the
bottom of the phone. Check that the arrow on the
connector is facing upwards.
1-10
GGeettttiinngg SSttaarrtteedd
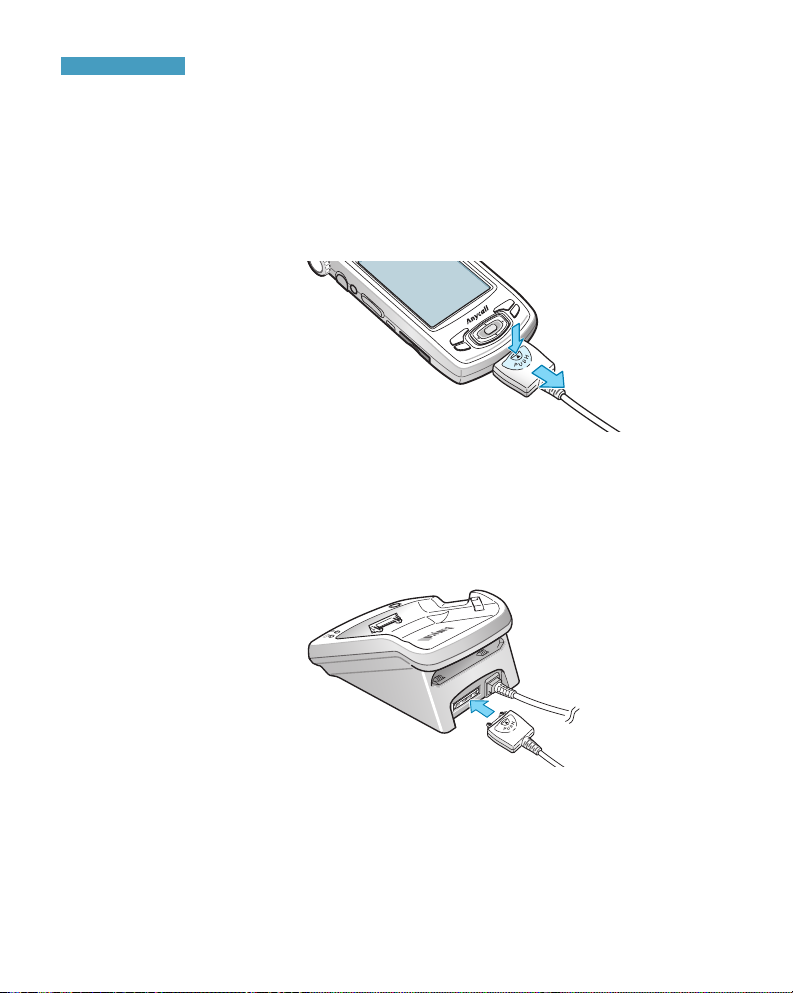
2. Plug the adapter into a standard AC wall outlet.
3. When charging is finished, unplug the adapter from the
AC wall outlet and unplug the adapter from the phone
by pressing the push buttons on the connector and
pulling the connector out.
Using the Desktop Holder
1. Connect the travel charger to the adapter jack on the
back of the Desktop holder. Check that the arrow in
the connector is facing upwards.
2. Plug the travel charger into a standard AC outlet.
1-11
GGeettttiinngg SSttaarrtteedd
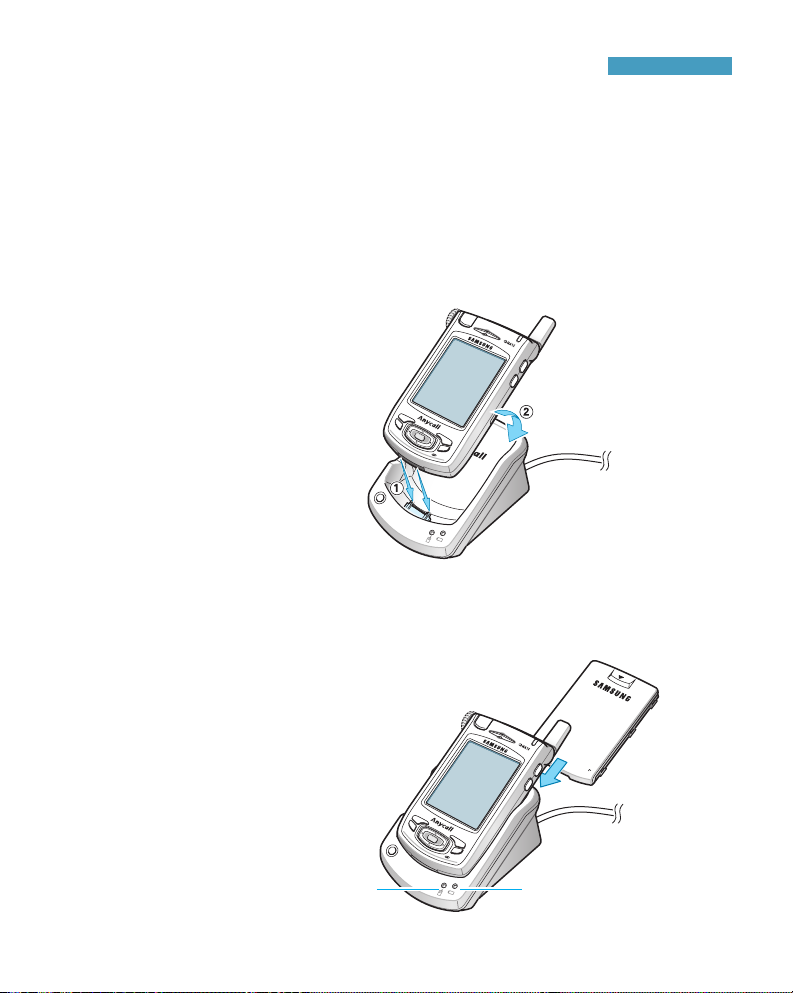
3. Select one of the following ways to charge your
phone’s battery.
• Slide the entire phone with battery attached into the
front compartment of the desktop holder so that the
connector on the charger is properly inserted into the
jack at the bottom of the PDA phone and then press
the PDA phone until it latches on both sides of the
desktop holder, as shown.
• Slide the battery alone, not attached to the phone,
into the rear compartment of the desktop holder.
• You can charge the phone and single battery
together.
Battery charge indicator
Phone charge indicator
1-12
GGeettttiinngg SSttaarrtteedd
3. The battery charge indicator on the left side of the
charger comes on.
The indicator lights show the status of the battery and
phone being charged.
• Red: the battery is charging.
• Green: the battery is fully charged.
• Orange: the battery is not seated correctly in the
desktop holder or the travel charger is not plugged in
correctly. Check the battery and the adapter.
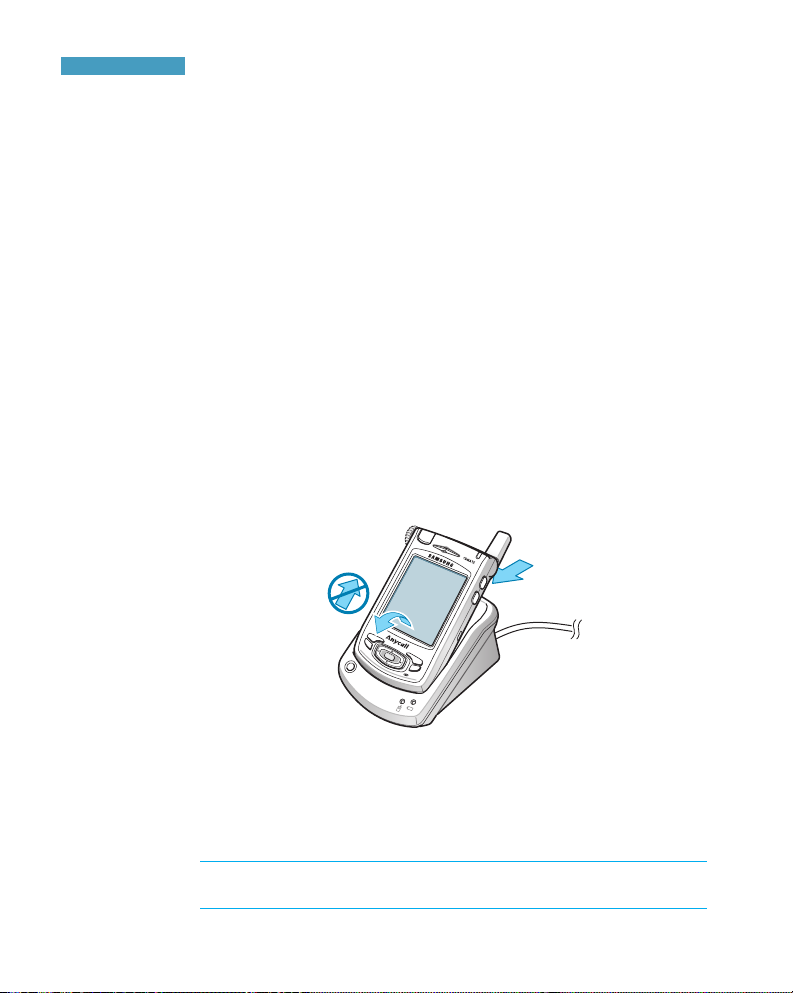
4. When the indicator light turns green, remove the PDA
phone or battery from the charger.
To remove your PDA phone from the holder pull your
PDA phone towards you to unlatch the PDA phone and
then pull it out, as shown.
Do not pull it straight up, or damage to the power
connector at the bottom of the desktop holder may
occur.
Once the battery is charged, you can use your PDA
phone in the desktop holder or out of the charger for all
functions. If you have purchased an extra battery, you
can charge it in the charger while you are using the
PDA phone.
Note: The phone can be used while the battery is being
charged, but this causes the battery to charge more slowly.
1-13
GGeettttiinngg SSttaarrtteedd
Low Battery Indicator
When the battery is weak and only a few minutes of talk
time remain, the battery sensor informs you in the
following ways:
• An empty battery icon appears on the status bar.
• You hear a warning tone.
• A message is repeated at regular intervals on the
display.
When the remaining amount of the battery power is low,
a warning message indicating the phone mode will be
turned off appears, and then the phone mode is
automatically turned off.
If you continue to use your PDA phone without charging,
your PDA phone is automatically turned off.
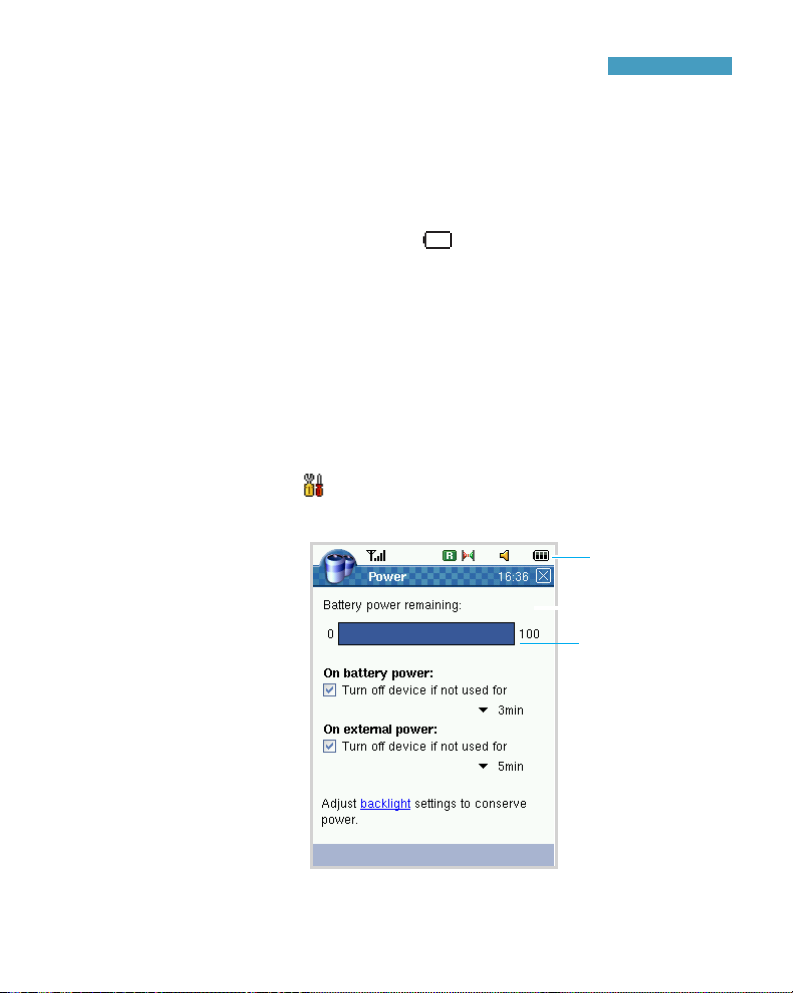
If you want to view the remaining amount of battery
power, tap → Power.
To conserve power, you can adjust the Backlight settings
and Power settings. For details, see page 2-2 and 9-4.
Battery
status icon
While charging
it shows the
charging
simulation.

1-14
GGeettttiinngg SSttaarrtteedd
Installing Sync Program
Your PDA phone comes with a program which lets you
synchronise and exchange information between your PDA
phone and your computer. Using this program, you can
install:
• PopSync- Sync manager program, which allows you to
synchronise between your PDA phone and your computer.
• Mobile Desk- Desktop PIMS program, which allows you
to synchronise Address, Schedule, To-do, Memo and
Money.
• USB Sync driver- USB driver for PC, which allows you
connect your computer using the USB cable to send and
receive data.
Before you can begin synchronising with your computer,
you must install the program on your computer from the
supplied CD-ROM.
To install the program:
1. Insert the CD-ROM into the CD-ROM drive of your
desktop computer.
2. The execution file will auto run.
3. Follow the instructions on the screen for installing the
program.
4. After installation is complete, you see the PopSync
program and Mobile Desktop icon on your Windows
Desktop.
Note: For details about installing the program, please refer
to the Sync User’s guide on the supplied CD-ROM.
1-15
GGeettttiinngg SSttaarrtteedd
Installing an Optional Memory Card
The expansion slot on your PDA phone allows you to
install a Secure Digital card (SD card).
The SD card is a stamp-sized flash memory card used for
extra storage capacity for data, music files, voice memos
and more. These can be transferred between your PDA
phone and your computer. Use the SD card when it is
inconvenient to perform a PopSync operation.
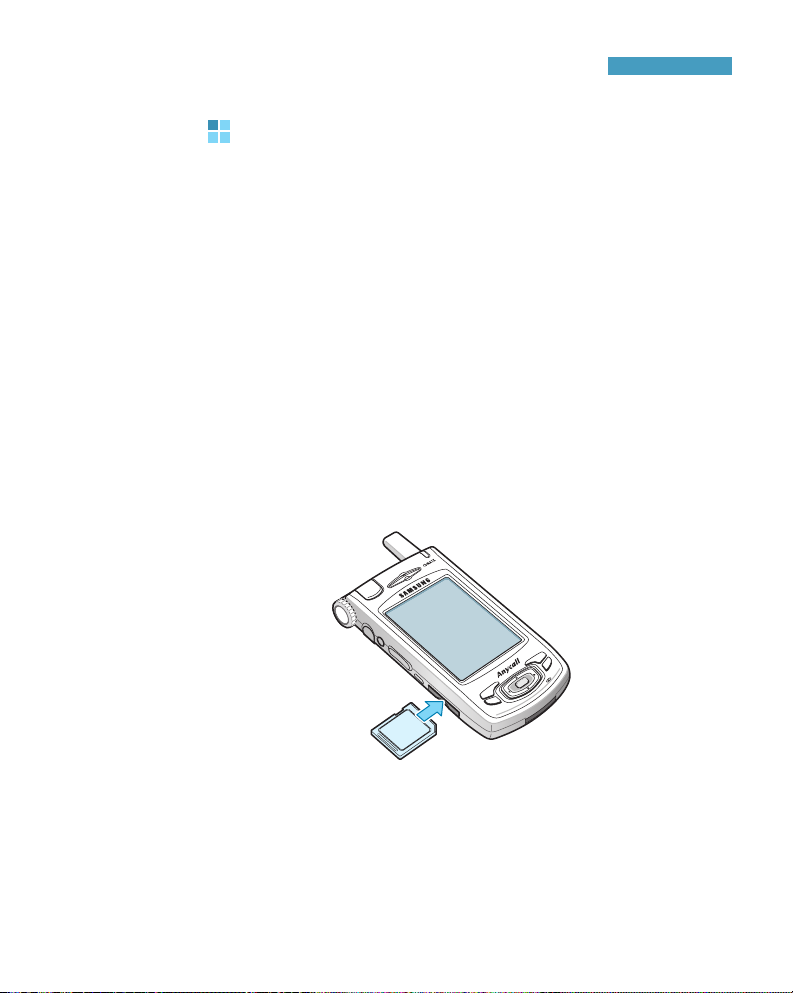
To insert an SD card:
1. Hold your PDA phone securely and make sure that the
card is facing the correct direction. Carefully push the
card into the slot until it clicks into place.
2. If your PDA phone does not recognize the card, check
to make sure that the card is facing in the right
direction.
1-16
GGeettttiinngg SSttaarrtteedd
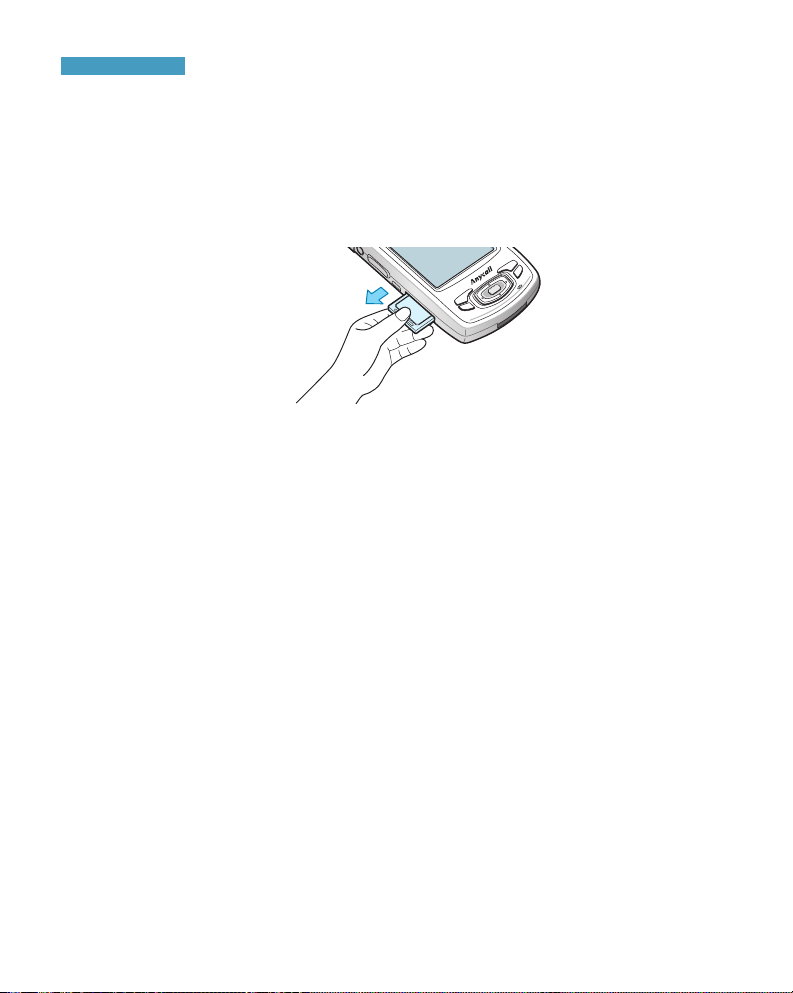
To remove an SD card:
1. Close all applications if any are open.
2. Tap the SD card to pop it out and carefully pull the
card out of the slot.
Guidelines for Using the SD Card
Your PDA phone recognises many different types of SD
cards. If the manufacturer of a specific SD card instructs
you to install a specific driver, you must install the driver
designed for that SD card. If you are not sure about
installing the driver, follow the instructions that come with
the SD card or contact your SD card manufacturer for
more information.
• Some SD cards consume large amounts of power. To
avoid draining the battery completely when using an SD
card, connect your PDA phone to an AC power outlet
whenever possible.
• If the battery is very low, do not save data to an SD
card. This may result in the loss of data. First connect
to an AC power outlet.
• Do not turn your PDA phone off or remove the SD card
when you are in the middle of performing an operation,
such as saving data to your SD card or dialling a
number.
• Keep your SD card in a protective case when not in use
to protect it from dirt and moisture.

2-1
chapter
2
The Basics
Home Screen
When you turn your PDA phone on for the first time
each day, you’ll see the Home screen. You can also
display it by selecting on the bottom of the screen
in Launcher mode.
In Home, you can see important information for the day
at a glance.
Tap to open the owner’s
information.
Tap to change the date
and time. For details,
see page 8-2.
New messages, today’s schedule
and to-do tasks.
Tap on each item to open it.
Tap to launch Home, Phone,
Application, Misc., Setup, or
Documents.
Tap to open the Task Bar.
2-2
TThhee BBaa ss iiccss
The Home screen shows your information, the current
date, the number of new SMS and e-mail messages, the
scheduled events and appointments for the day, and the
number of active To-do(s) or overdue To-do(s), all at
once. You can tap a specific item to open the
corresponding application and view or edit the item in
detail.
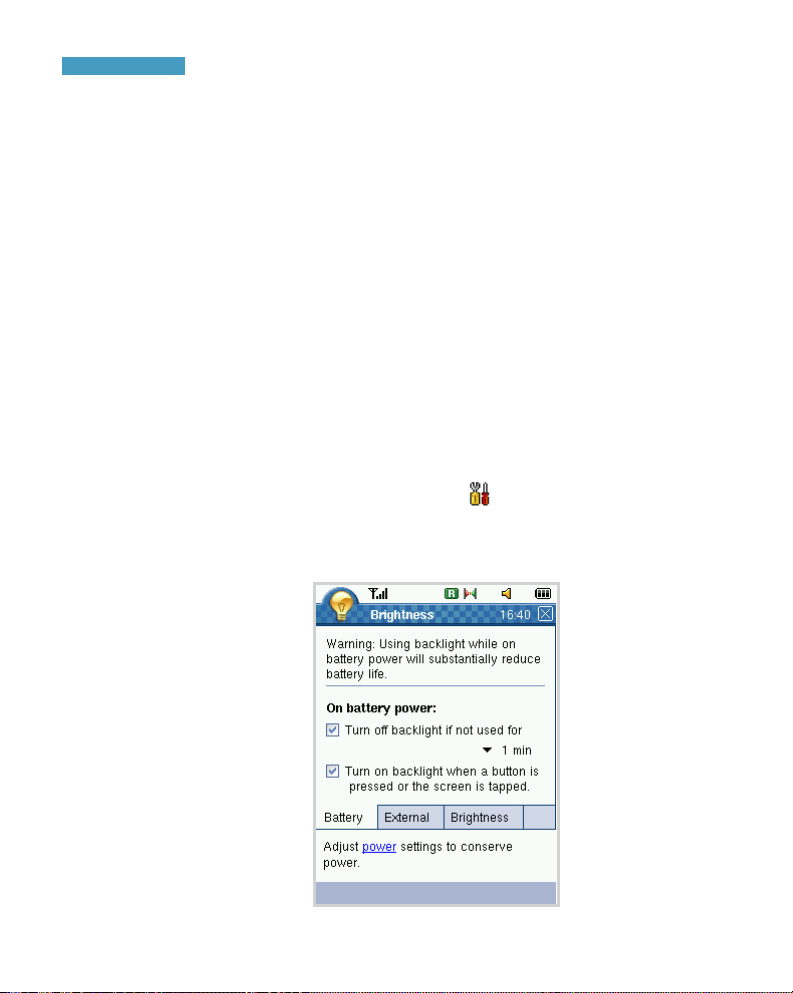
Adjusting Brightness of the Screen and
the Backlight
You can control the screen’s brightness and the backlight
usage. The backlight drains the battery, so you can
conserve power by reducing the brightness of the screen.
To adjust the brightness of the screen:
1. In the Launcher mode, tap at the bottom to open
the Setup launcher.
2. Tap Brightness.
2-3
TThhee BBaa ss iiccss
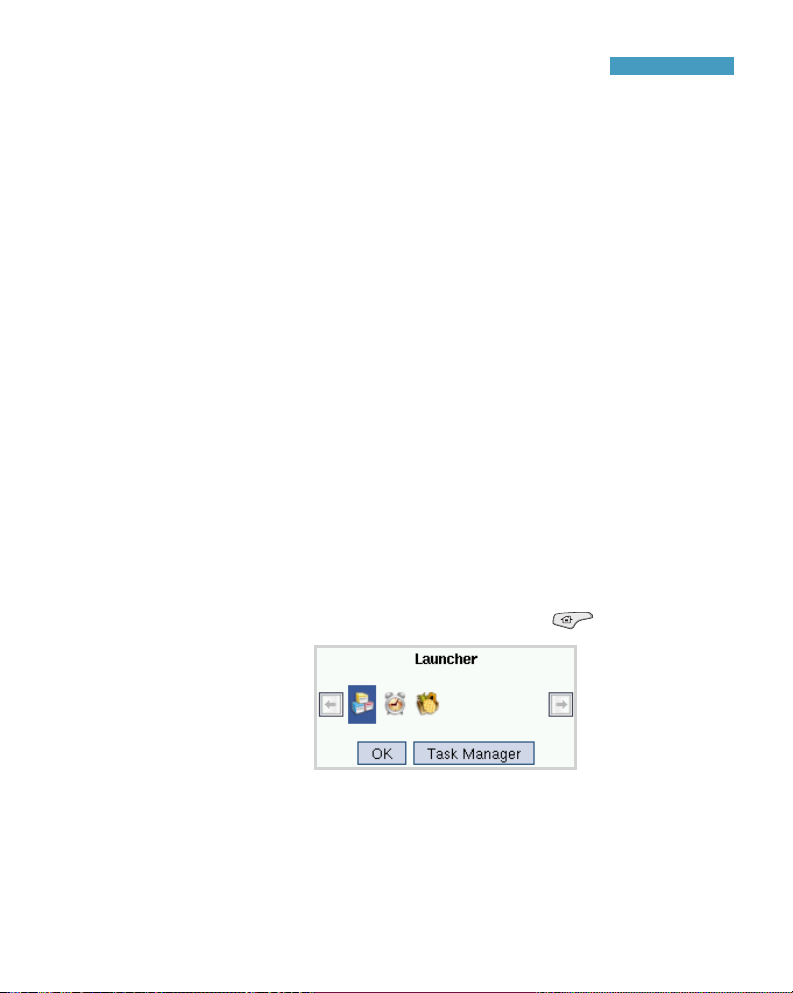
Using Task Bar
When you are using several applications at once, you can
quickly access one of the applications you have already
opened. Tap the application icon currently open on the top
left of the screen or press and hold the button.
The operating application icons display. Tap the
application icon you want to access. The selected
application opens.
If you want to end one of the applications currently open,
tap the Task Manager button, select the application(s)
and then tap the End Task button. For details, see page
9-6.
3. In both the Battery and External tabs, when Turn
off device if not used for is checked, the backlight
turns off automatically if the device is not used for the
specified period of time. The backlight turns off to
conserve power. You can change the time the backlight
stays on from the pull-down list.
When the Turn on backlight when a button is
pressed or the screen is tapped box is checked, the
backlight turns on when you touch the screen or push
a button. Even this option is checked, when you turn
off the backlight using the backlight button on the
right side of the PDA phone, you can turn on the
backlight only by pressing the backlight button.
4. In the Brightness tab, you can select the screen’s
brightness, from Super Bright down to Power
Bright.
 Loading...