

Samsung SCH-I435ZKAXAR User Manual

ANDROID SMARTPHONE
4
User Manual
Please read this manual before operating your
phone and keep it for future reference.
GH68_3XXXXA Printed in KoreaXX

Warning!
This product contains chemicals known to the State of California to cause cancer and reproductive toxicity.
Intellectual Property
All Intellectual Property, as defined below, owned by or which is otherwise the property of Samsung or its respective suppliers
relating to the SAMSUNG Phone, including but not limited to, accessories, parts, or software relating there to (the “Phone
System”), is proprietary to Samsung and protected under federal laws, state laws, and international treaty provisions. Intellectual
Property includes, but is not limited to, inventions (patentable or unpatentable), patents, trade secrets, copyrights, software,
computer programs, and related documentation and other works of authorship. You may not infringe or otherwise violate the
rights secured by the Intellectual Property. Moreover, you agree that you will not (and will not attempt to) modify, prepare
derivative works of, reverse engineer, decompile, disassemble, or otherwise attempt to create source code from the software. No
title to or ownership in the Intellectual Property is transferred to you. All applicable rights of the Intellectual Property shall remain
with SAMSUNG and its suppliers.
Open Source Software
Some software components of this product incorporate source code covered under GNU General Public License (GPL), GNU Lesser
General Public License (LGPL), OpenSSL License, BSD License and other open source licenses. To obtain the source code covered
under the open source licenses, please visit:
http://opensource.samsung.com
GEN_SCH-I435L_UM_Eng_NF1_TN_070314_F2
.

Disclaimer of Warranties; Exclusion of Liability
EXCEPT AS SET FORTH IN THE EXPRESS WARRANTY CONTAINED ON THE WARRANTY PAGE ENCLOSED WITH THE PRODUCT, THE
PURCHASER TAKES THE PRODUCT "AS IS", AND SAMSUNG MAKES NO EXPRESS OR IMPLIED WARRANTY OF ANY KIND
WHATSOEVER WITH RESPECT TO THE PRODUCT, INCLUDING BUT NOT LIMITED TO THE MERCHANTABILITY OF THE PRODUCT OR
ITS FITNESS FOR ANY PARTICULAR PURPOSE OR USE; THE DESIGN, CONDITION OR QUALITY OF THE PRODUCT; THE
PERFORMANCE OF THE PRODUCT; THE WORKMANSHIP OF THE PRODUCT OR THE COMPONENTS CONTAINED THEREIN; OR
COMPLIANCE OF THE PRODUCT WITH THE REQUIREMENTS OF ANY LAW, RULE, SPECIFICATION OR CONTRACT PERTAINING
THERETO. NOTHING CONTAINED IN THE INSTRUCTION MANUAL SHALL BE CONSTRUED TO CREATE AN EXPRESS OR IMPLIED
WARRANTY OF ANY KIND WHATSOEVER WITH RESPECT TO THE PRODUCT. IN ADDITION, SAMSUNG SHALL NOT BE LIABLE FOR
ANY DAMAGES OF ANY KIND RESULTING FROM THE PURCHASE OR USE OF THE PRODUCT OR ARISING FROM THE BREACH OF
THE EXPRESS WARRANTY, INCLUDING INCIDENTAL, SPECIAL OR CONSEQUENTIAL DAMAGES, OR LOSS OF ANTICIPATED PROFITS
OR BENEFITS.
Modification of Software
SAMSUNG IS NOT LIABLE FOR PERFORMANCE ISSUES OR INCOMPATIBILITIES CAUSED BY YOUR EDITING OF REGISTRY SETTINGS,
OR YOUR MODIFICATION OF OPERATING SYSTEM SOFTWARE.
USING CUSTOM OPERATING SYSTEM SOFTWARE MAY CAUSE YOUR DEVICE AND APPLICATIONS TO WORK IMPROPERLY. YOUR
CARRIER MAY NOT PERMIT USERS TO DOWNLOAD CERTAIN SOFTWARE, SUCH AS CUSTOM OS.

SAFE™ (Samsung Approved For Enterprise)
SAFE™: "SAFE™" (Samsung for Enterprise) is a mark for a Samsung device which has been tested against Samsung's own
internal criteria for interoperability with certain third party security-related solutions for MDM and VPN. The testing includes field
testing with local network connection and menu tree testing which tests functionality of the solutions in conjunction with the
Samsung device. During the testing, the device is tested with the security solutions to see if the solutions work with the device as
described by the third party security solution providers. The testing, for example, includes field testing with local network
connection and menu tree testing which tests functionality of the solutions in conjunction with the Samsung device. For more
information about Samsung's SAFE™ program, please refer to
Disclaimer of Warranties: EXCEPT AS OTHERWISE PROVIDED IN THEIR STANDARD END USER LICENSE AND WARRANTY, TO THE
FULL EXTENT PERMITTED BY LAW SAMSUNG ELECTRONICS CO., LTD., SAMSUNG TELECOMMUNICATIONS AMERICA, LLC, AND
THEIR AFFILIATES (COLLECTIVELY REFERRED TO HEREIN AS THE "SAMSUNG ENTITIES") EXPRESSLY DISCLAIM ANY AND ALL
WARRANTIES, EXPRESS OR IMPLIED, INCLUDING ANY WARRANTY OF MERCHANTABILITY, FITNESS FOR A PARTICULAR PURPOSE,
INTEROPERABILITY OR NON-INFRINGEMENT, WITH RESPECT TO INFORMATION TECHNOLOGY SECURITY PROTECTION, SAFE™
DEVICES AND APPLICATIONS TESTED WITH SAFE™ DEVICES. IN NO EVENT SHALL THE SAMSUNG ENTITIES BE LIABLE FOR ANY
DIRECT, INDIRECT, INCIDENTAL, PUNITIVE, OR CONSEQUENTIAL DAMAGES OF ANY KIND WHATSOEVER WITH RESPECT TO
INFORMATION TECHNOLOGY SECURITY PROTECTION, SAFE™ DEVICES OR APPLICATIONS TESTED WITH SAFE™ DEVICES. In
addition, information technology security protection will be affected by features or functionality associated with, among other
things the e-mail platform, master data management, and virtual private network solutions selected by the software provider,
solution provider or user. Choice of an e-mail, master data management, and virtual private network solution is at the sole
discretion of the software provider, solution provider or user and any associated effect on information technology security
protection is solely the responsibility of the software provider, solution provider or user. For complete statement of limited
warranty, please refer to
are sold. [051214]
www.samsung.com/us/safe
, available on the web and where Samsung smartphones and mobile devices
www.samsung.com/us/safe
.

Samsung Telecommunications America (STA), LLC
Headquarters:
1301 E. Lookout Drive
Richardson, TX 75082
Phone: 1-800-SAMSUNG (726-7864)
Phone: 1-888-987-HELP (4357)
Internet Address:
www.samsung.com
©2014th Samsung Telecommunications America, LLC. Samsung is a registered trademark of Samsung Electronics Co., Ltd.
Do you have questions about your Samsung Mobile Phone?
For 24 hour information and assistance, we offer a new FAQ/ARS System (Automated Response System) at:
www.samsung.com/us/support
The actual available capacity of the internal memory is less than the specified capacity because the operating system and default
applications occupy part of the memory. The available capacity may change when you upgrade the device.
®
, VSuite™, T9® Text Input, and the Nuance logo are trademarks or registered trademarks of Nuance Communications,
Nuance
Inc., or its affiliates in the United States and/or other countries.
®
and NetFront™ are trademarks or registered trademarks of ACCESS Co., Ltd. in Japan and other countries.
ACCESS
The Bluetooth
registered trademarks and are wholly owned by the Bluetooth SIG.
®
word mark, figure mark (stylized “B Design”), and combination mark (Bluetooth word mark and “B Design”) are

microSD™ and the microSD logo are Trademarks of the SD Card Association.
Openwave
®
is a registered Trademark of Openwave, Inc.
Google, the Google logo, Android, the Android logo, Google Play, Gmail, Google Mail, Google Maps, Google Music, Google Talk,
Hangouts, Picasa, YouTube and other marks are trademarks of Google Inc.
Wi-Fi is a registered trademark of the Wireless Fidelity Alliance, Inc.
Swype and the Swype logos are trademarks of Swype, Inc. © 2010 Swype, Inc. All rights reserved.
®
DLNA
, the DLNA Logo, and DLNA CERTIFIED® are trademarks, service marks, or certification marks of the Digital Living Network
Alliance.
®
Office is a trademark of Infraware, Inc.
Polaris
Online Legal Information
The online version of the Health/Safety and Warranty guide for your device can be found at:
https://www.samsung.com/us/Legal/Phone_HSGuide
English:
Spanish:
https://www.samsung.com/us/Legal/Phone_HSGuide_SP
The online version of the End User Licensing Agreement for your device can be found:
https://www.samsung.com/us/Legal/SamsungLegal-EULA1
Online at:
.

Table of Contents
Section 1: Getting Started .......................... 5
Understanding This User Manual . . . . . . . . . . . 5
Setting Up Your Phone . . . . . . . . . . . . . . . . . . . 6
Securing Your Device . . . . . . . . . . . . . . . . . . . 11
Section 2: Understanding Your Phone ..... 13
Front View . . . . . . . . . . . . . . . . . . . . . . . . . . . 14
Side Views . . . . . . . . . . . . . . . . . . . . . . . . . . . 14
Top and Bottom Views . . . . . . . . . . . . . . . . . . 15
Rear View . . . . . . . . . . . . . . . . . . . . . . . . . . . 15
Home Screen . . . . . . . . . . . . . . . . . . . . . . . . . 16
Navigation . . . . . . . . . . . . . . . . . . . . . . . . . . . 22
Customizing Your Home Screen . . . . . . . . . . . 26
Smart Stay . . . . . . . . . . . . . . . . . . . . . . . . . . . 28
Screen Capture . . . . . . . . . . . . . . . . . . . . . . . 28
Entering Text . . . . . . . . . . . . . . . . . . . . . . . . . 29
Section 3: Contacts and Accounts ........... 35
Accounts . . . . . . . . . . . . . . . . . . . . . . . . . . . . 35
Contacts . . . . . . . . . . . . . . . . . . . . . . . . . . . . 36
Using Contacts . . . . . . . . . . . . . . . . . . . . . . . . 39
Linking Contacts . . . . . . . . . . . . . . . . . . . . . . 39
Contacts Options . . . . . . . . . . . . . . . . . . . . . . 41
Groups . . . . . . . . . . . . . . . . . . . . . . . . . . . . . . 43
Favorites . . . . . . . . . . . . . . . . . . . . . . . . . . . . 45
Managing Contacts . . . . . . . . . . . . . . . . . . . . 46
Speed Dials . . . . . . . . . . . . . . . . . . . . . . . . . . 47
Section 4: Call Functions ..........................49
Displaying Your Phone Number . . . . . . . . . . . 49
Phone . . . . . . . . . . . . . . . . . . . . . . . . . . . . . . 49
Making Calls . . . . . . . . . . . . . . . . . . . . . . . . . 49
Making Emergency Calls . . . . . . . . . . . . . . . . 52
Making a Call Using Speed Dial . . . . . . . . . . . 52
Answering a Call . . . . . . . . . . . . . . . . . . . . . . 53
Dialing Options . . . . . . . . . . . . . . . . . . . . . . . . 53
Call Log . . . . . . . . . . . . . . . . . . . . . . . . . . . . . 54
Call Duration . . . . . . . . . . . . . . . . . . . . . . . . . 55
Options During a Call . . . . . . . . . . . . . . . . . . . 56
Call Settings . . . . . . . . . . . . . . . . . . . . . . . . . . 59
1

Section 5: Messaging ................................60
Types of Messages . . . . . . . . . . . . . . . . . . . . .60
Messaging . . . . . . . . . . . . . . . . . . . . . . . . . . .60
Using Email . . . . . . . . . . . . . . . . . . . . . . . . . . . 66
Gmail . . . . . . . . . . . . . . . . . . . . . . . . . . . . . . .67
Hangouts . . . . . . . . . . . . . . . . . . . . . . . . . . . . .68
Google+ . . . . . . . . . . . . . . . . . . . . . . . . . . . . . 68
Section 6: Multimedia ...............................69
Music Player . . . . . . . . . . . . . . . . . . . . . . . . . .69
Google Play Music . . . . . . . . . . . . . . . . . . . . . . 72
Camera . . . . . . . . . . . . . . . . . . . . . . . . . . . . . . 72
Gallery . . . . . . . . . . . . . . . . . . . . . . . . . . . . . . .77
Video Player . . . . . . . . . . . . . . . . . . . . . . . . . .82
Play Movies & TV . . . . . . . . . . . . . . . . . . . . . . . 84
Section 7: Connections .............................85
Wi-Fi . . . . . . . . . . . . . . . . . . . . . . . . . . . . . . . . 85
Wi-Fi Direct . . . . . . . . . . . . . . . . . . . . . . . . . . . 87
Bluetooth . . . . . . . . . . . . . . . . . . . . . . . . . . . .88
Tethering and Mobile Hotspot . . . . . . . . . . . . .92
VPN . . . . . . . . . . . . . . . . . . . . . . . . . . . . . . . . .95
NFC and Beaming . . . . . . . . . . . . . . . . . . . . . .95
S Beam . . . . . . . . . . . . . . . . . . . . . . . . . . . . . . 96
2
Nearby Devices . . . . . . . . . . . . . . . . . . . . . . . .97
Screen Mirroring . . . . . . . . . . . . . . . . . . . . . . .98
Connect to a Computer . . . . . . . . . . . . . . . . . .98
Section 8: Applications ........................... 100
Accessing Applications . . . . . . . . . . . . . . . . .100
Managing Applications . . . . . . . . . . . . . . . . . .100
Calculator . . . . . . . . . . . . . . . . . . . . . . . . . . .103
Calendar . . . . . . . . . . . . . . . . . . . . . . . . . . . .103
Camera . . . . . . . . . . . . . . . . . . . . . . . . . . . . .104
Chrome . . . . . . . . . . . . . . . . . . . . . . . . . . . . .104
Clock . . . . . . . . . . . . . . . . . . . . . . . . . . . . . . .104
Contacts . . . . . . . . . . . . . . . . . . . . . . . . . . . .104
Downloads . . . . . . . . . . . . . . . . . . . . . . . . . .105
Email . . . . . . . . . . . . . . . . . . . . . . . . . . . . . . .105
Flipboard . . . . . . . . . . . . . . . . . . . . . . . . . . . .105
Gallery . . . . . . . . . . . . . . . . . . . . . . . . . . . . . .105
Gmail . . . . . . . . . . . . . . . . . . . . . . . . . . . . . . .105
Google . . . . . . . . . . . . . . . . . . . . . . . . . . . . . .105
Google Settings . . . . . . . . . . . . . . . . . . . . . . .106
Google+ . . . . . . . . . . . . . . . . . . . . . . . . . . . .106
Group Play . . . . . . . . . . . . . . . . . . . . . . . . . . .106
Hangouts . . . . . . . . . . . . . . . . . . . . . . . . . . . .106

Help . . . . . . . . . . . . . . . . . . . . . . . . . . . . . . . 107
Internet . . . . . . . . . . . . . . . . . . . . . . . . . . . . 107
Maps . . . . . . . . . . . . . . . . . . . . . . . . . . . . . . 108
Messaging . . . . . . . . . . . . . . . . . . . . . . . . . . 108
Music Player . . . . . . . . . . . . . . . . . . . . . . . . 108
My Files . . . . . . . . . . . . . . . . . . . . . . . . . . . . 108
Phone . . . . . . . . . . . . . . . . . . . . . . . . . . . . . 109
Photos . . . . . . . . . . . . . . . . . . . . . . . . . . . . . 109
Play Books . . . . . . . . . . . . . . . . . . . . . . . . . . 109
Play Games . . . . . . . . . . . . . . . . . . . . . . . . . 109
Play Movies & TV . . . . . . . . . . . . . . . . . . . . . 110
Play Music . . . . . . . . . . . . . . . . . . . . . . . . . . 110
Play Newsstand . . . . . . . . . . . . . . . . . . . . . . 110
Play Store . . . . . . . . . . . . . . . . . . . . . . . . . . 110
Polaris Office 5 . . . . . . . . . . . . . . . . . . . . . . 111
S Memo . . . . . . . . . . . . . . . . . . . . . . . . . . . . 111
S Translator . . . . . . . . . . . . . . . . . . . . . . . . . 113
S Voice . . . . . . . . . . . . . . . . . . . . . . . . . . . . 113
Samsung Apps . . . . . . . . . . . . . . . . . . . . . . . 114
Samsung Hub . . . . . . . . . . . . . . . . . . . . . . . 114
Samsung Link . . . . . . . . . . . . . . . . . . . . . . . 115
Settings . . . . . . . . . . . . . . . . . . . . . . . . . . . . 115
SIM Toolkit . . . . . . . . . . . . . . . . . . . . . . . . . . 115
Story Album . . . . . . . . . . . . . . . . . . . . . . . . . 115
TripAdvisor . . . . . . . . . . . . . . . . . . . . . . . . . . 116
Video Player . . . . . . . . . . . . . . . . . . . . . . . . . 116
Voice Recorder . . . . . . . . . . . . . . . . . . . . . . . 116
Voice Search . . . . . . . . . . . . . . . . . . . . . . . . 116
VPN Client . . . . . . . . . . . . . . . . . . . . . . . . . . 116
WatchON . . . . . . . . . . . . . . . . . . . . . . . . . . . 117
YouTube . . . . . . . . . . . . . . . . . . . . . . . . . . . . 117
Section 9: Settings ..................................118
Accessing Settings . . . . . . . . . . . . . . . . . . . . 118
Settings Controls . . . . . . . . . . . . . . . . . . . . . 118
Settings Tabs . . . . . . . . . . . . . . . . . . . . . . . . 118
Wi-Fi . . . . . . . . . . . . . . . . . . . . . . . . . . . . . . 119
Bluetooth . . . . . . . . . . . . . . . . . . . . . . . . . . . 119
Data Usage . . . . . . . . . . . . . . . . . . . . . . . . . 119
More Networks . . . . . . . . . . . . . . . . . . . . . . . 121
NFC . . . . . . . . . . . . . . . . . . . . . . . . . . . . . . . 122
S Beam . . . . . . . . . . . . . . . . . . . . . . . . . . . . 122
Nearby Devices . . . . . . . . . . . . . . . . . . . . . . 122
Printing . . . . . . . . . . . . . . . . . . . . . . . . . . . . 122
Screen Mirroring . . . . . . . . . . . . . . . . . . . . . 122
3

Lock Screen . . . . . . . . . . . . . . . . . . . . . . . . . 122
Display Settings . . . . . . . . . . . . . . . . . . . . . .125
LED Indicator . . . . . . . . . . . . . . . . . . . . . . . . . 128
Sound Settings . . . . . . . . . . . . . . . . . . . . . . .128
Home Screen Mode . . . . . . . . . . . . . . . . . . . .131
Call Settings . . . . . . . . . . . . . . . . . . . . . . . . .131
Blocking Mode . . . . . . . . . . . . . . . . . . . . . . .137
Hands-Free Mode . . . . . . . . . . . . . . . . . . . . . 138
Power Saving Mode . . . . . . . . . . . . . . . . . . . .139
Accessories Settings . . . . . . . . . . . . . . . . . . . 139
Accessibility Settings . . . . . . . . . . . . . . . . . . .140
Language and Input . . . . . . . . . . . . . . . . . . . . 142
Motions and Gestures . . . . . . . . . . . . . . . . . .147
Smart Screen . . . . . . . . . . . . . . . . . . . . . . . . 148
Voice Control . . . . . . . . . . . . . . . . . . . . . . . . .148
Add an Account . . . . . . . . . . . . . . . . . . . . . . . 149
Backup and Reset . . . . . . . . . . . . . . . . . . . . .149
Location Services . . . . . . . . . . . . . . . . . . . . . 150
Security Settings . . . . . . . . . . . . . . . . . . . . . . 151
Application Manager . . . . . . . . . . . . . . . . . . .154
Battery . . . . . . . . . . . . . . . . . . . . . . . . . . . . . 154
Storage . . . . . . . . . . . . . . . . . . . . . . . . . . . . .154
4
Date and Time . . . . . . . . . . . . . . . . . . . . . . . .156
About Device . . . . . . . . . . . . . . . . . . . . . . . . .156
Index .........................................................157

Section 1: Getting Started
This section helps you to quickly start using your phone.
Understanding This User Manual
The sections of this manual generally follow the features of
your device. A robust index for features begins on page 157.
This manual gives navigation instructions according to the
default display settings. If you select other settings,
navigation steps may be different.
Unless otherwise specified, all instructions in this manual
assume that you are starting from a Home screen. To get to a
Home screen, you may need to unlock the device. For more
information, refer to “Securing Your Device” on page 11.
Note: Instructions in this manual are based on default settings
and may vary from your device depending on the
software version on your device and any changes to the
device’s settings.
Note: Unless stated otherwise, instructions in this manual
start with the device unlocked, at the Home screen. All
screen images in this manual are simulated. Actual
displays may vary depending on the software version of
your device and any changes to the device’s settings.
Special Text
In this manual, some text is set apart from the rest. This
special text is intended to point out important information,
share quick methods for activating features, define terms,
and more. The definitions for these methods are as follows:
• Notes: Presents alternative options for the current feature,
menu, or sub-menu.
• Tips: Provides quick or innovative methods or useful
shortcuts.
• Important: Points out important information about the
current feature that could affect performance.
• Warning: Brings important information to your attention
that can help to prevent loss of data or functionality or
damage to your device.
Getting Started 5
Text Conventions
My
This manual provides condensed information about how to
use your device. To make this possible, the following text
conventions are used to represent often-used steps:
➔ Arrows are used to represent the sequence of
selecting successive options in longer, or repetitive,
procedures.
For example:
From a Home screen, touch Apps ➔
Settings ➔ ➔ Display ➔ Screen
timeout.
ON/OFF Many settings use an ON/OFF switch. Touch the
ON/OFF button to turn a feature or setting on or off.
6
My device
device
Setting Up Your Phone
Install the SIM (Subscriber Identity Module) card, battery, and
optional memory card (not included), and then charge the
battery to begin using your device.
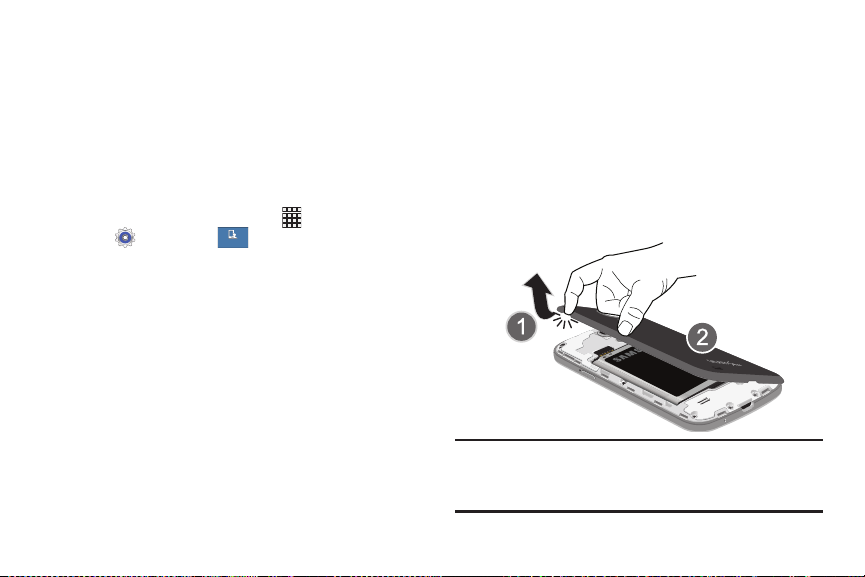
Remove the Back Cover
The battery, SIM card, and optional memory card are
installed under a removable cover on the back of the device.
Pull up using the slot provided, while lifting the cover
off the device.
Note: The battery cover is flexible. Take care to avoid bending
or twisting the cover when removing and installing to
prevent damage to the cover.
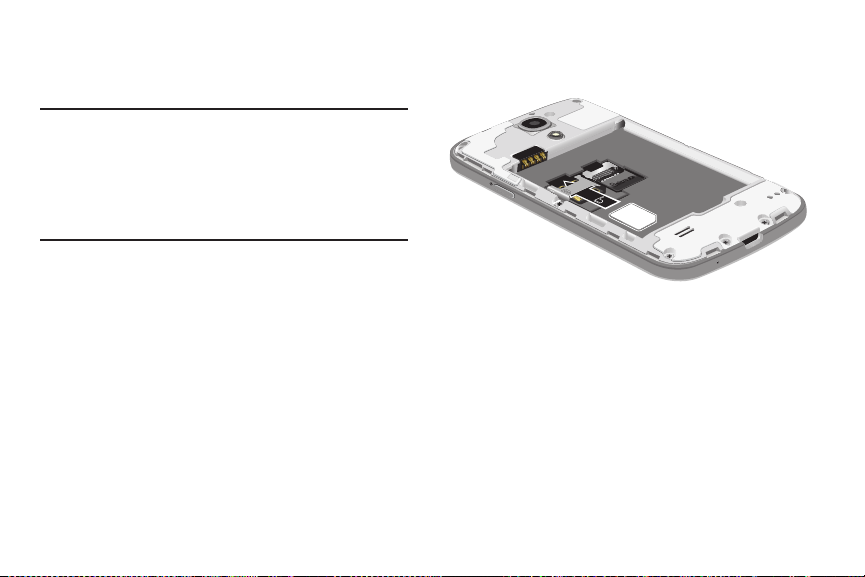
Install the SIM Card
A SIM (Subscriber Identity Module) card stores your phone
number and information about your wireless service.
Caution! Turn the device off before installing or removing the
SIM card. Do not bend or scratch the SIM card. Take
care when handling, installing, or removing the
SIM card, and avoid exposing the SIM card to static
electricity, water, or dirt. Keep the SIM card out of
reach of small children.
1. Carefully insert the 4G LTE SIM Card into the slot,
pressing gently until it locks into place.
2. Make sure that the card’s gold contacts face down and
that the upper-left angled corner of the card is
positioned as shown.
Getting Started 7
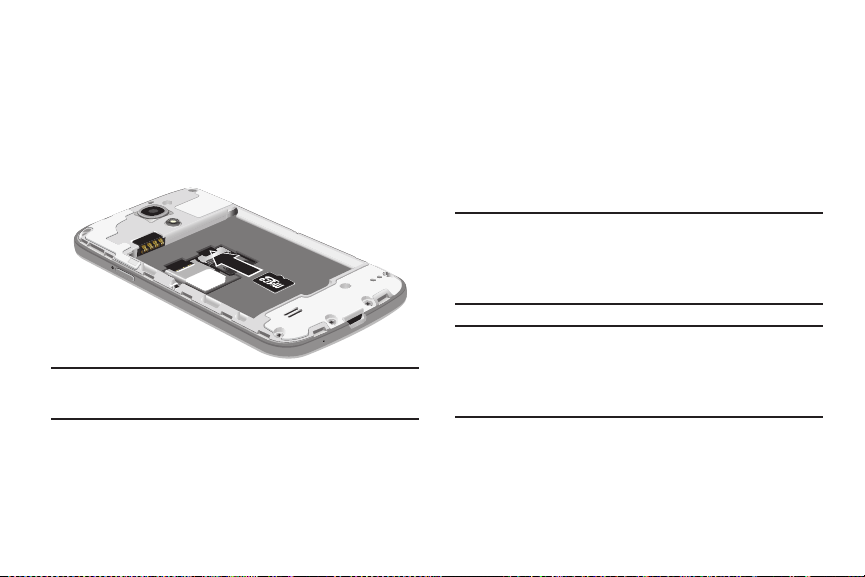
Install a Memory Card
Your device can use an optional microSD card (not included)
for additional storage of files and data.
With the gold contacts facing down, slide the
memory card into the slot, pushing gently until it
locks into place.
Note: For more information on using memory cards, see “SD
Card” on page 155.
8
Install the Battery
Your device is powered by a rechargeable, standard Li-Ion
battery. A Charging Head and USB cable are included with
the device for charging the battery.
The battery comes partially charged. You must fully charge
the battery before using your device for the first time. A fully
discharged battery requires up to 4 hours of charge time.
After the first charge, you can use the device while charging.
Warning! Use only Samsung-approved charging devices and
batteries. Samsung accessories are designed to
maximize battery life. Using other accessories may
invalidate your warranty and may cause damage.
Important! The battery provided with your device contains a
Near Field Communication (NFC) antenna.
To ensure proper operation of the NFC features,
do not use any other battery in your device.
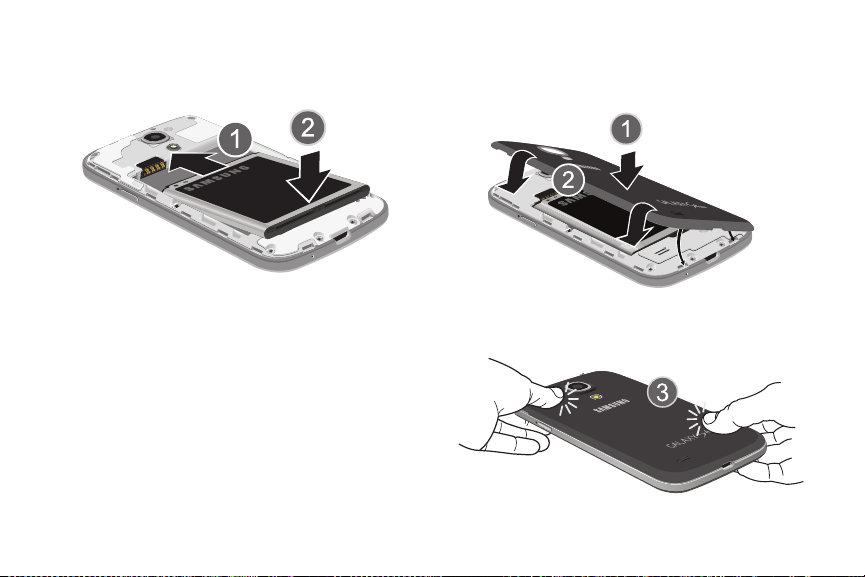
1. Insert the battery into the battery slot, making sure the
connectors align.
2. Gently press down to secure the battery.
Replace the Back Cover
1. Place the battery cover onto the back of the phone.
2. Press down.
3. Press down along the edge of the back cover until you
have a secure seal.
Getting Started 9
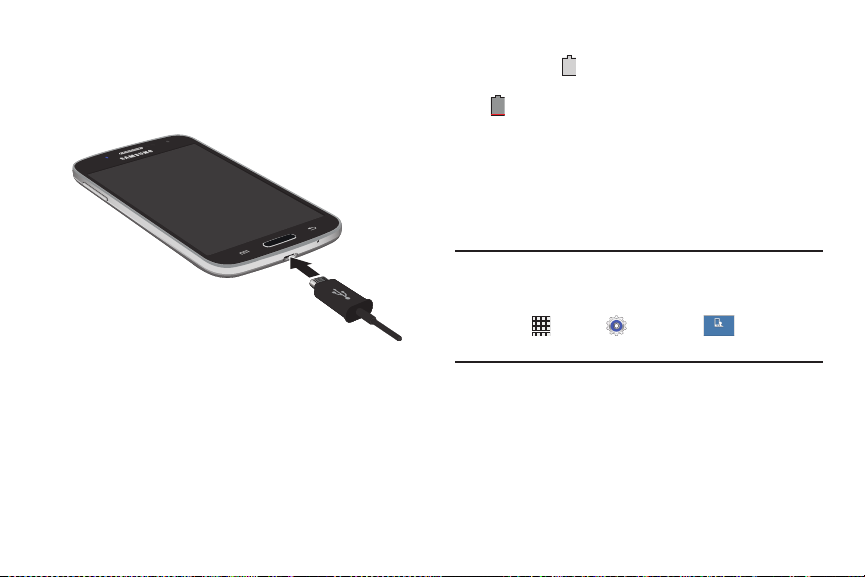
Charge the Battery
My
My device
Your device comes with a Travel Charger and USB cable for
charging your device from any standard power outlet.
1. Insert the USB cable into the port.
2. Connect the USB cable to the travel charger, then plug
the charging head into a standard AC power outlet.
3. When charging is complete, unplug the travel charger
from the power outlet and remove the USB cable from
the device.
10
Battery Indicator
The battery icon in the Status Bar shows the battery
power level. When the power level is very low, the battery
icon blinks and a warning tone sounds at regular
intervals. Your phone will conserve its remaining battery
power by dimming the screen.
When the battery level becomes too low, the phone
automatically turns off.
To view which apps and services are consuming battery
power, see “Battery” on page 154.
Note: The battery charge level displays as an icon on the
Status bar by default. You can also view the percentage
of battery charge remaining. From a Home screen,
touch Apps ➔ Settings ➔
➔ Display ➔
device
Show battery percentage.
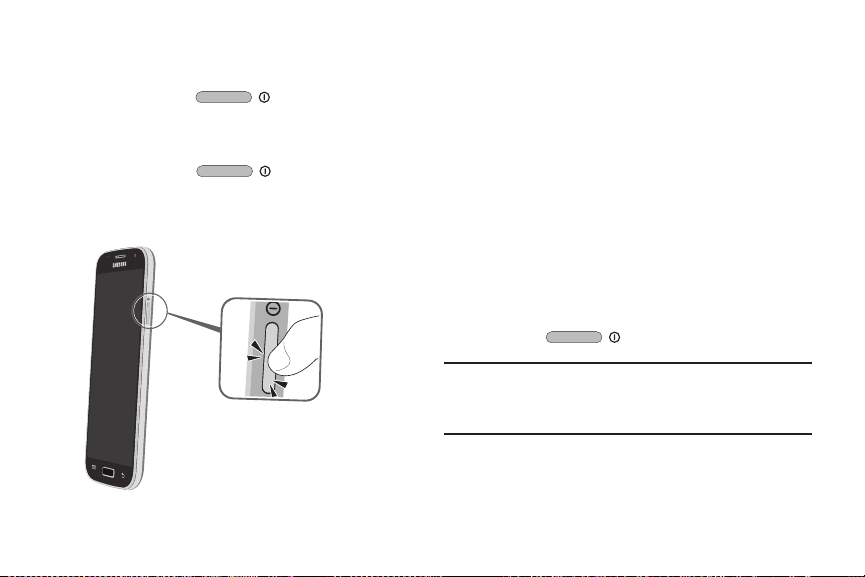
Turn the Phone On and Off
To turn the phone on:
Press and hold the Power/Lock Key until
the phone starts up.
To turn the phone off:
1. Press and hold the Power/Lock Key to
view the Phone options menu.
2. Touch Power off.
Setup Wizard
The first time you turn your phone on, the Setup Wizard will
guide you through the basics of setting up your device.
Follow the prompts to choose a default language, set up
accounts, choose location services, and learn more about
your phone.
Securing Your Device
Use lock features to secure your phone.
Lock the Device
By default, the device locks automatically when the
screen times out.
– or –
Press the Power/Lock Key.
Tip: When the device is locked, the Emergency call feature is
available on the lock screen, to allow you to make
emergency calls even while the device is locked.
Getting Started 11

Unlock the Device
Unlock the device using one of the default lock screens, or
use Screen lock options for increased security.
Press the Power/Lock Key, then touch
and drag your finger across the screen.
Tip: Special notification icons display for missed calls or new
messages. Drag a missed call or message icon to view
the message or call log.
Select a Screen Lock
A Screen lock provides security for your phone. When you
turn the phone on, the Screen lock may request a PIN,
password, or other authorization to access it. You can also
choose not to use a Screen lock.
Swipe is the default Screen lock, requiring no authorization
to access the phone. It is recommended that you set up a
secure Screen lock to protect your privacy.
For more information about setting up and using a
Screen Lock, see “Screen Lock” on page 122.
12

Section 2: Understanding Your Phone
• Touch screen with virtual (onscreen) QWERTY keyboard
• Brilliant 4.3" WVGA SAMOLED display
• Delivering data faster than the current 3G network
technology by using 4G LTE and High Speed Packet Access
Plus (HSPA+)
• Android 4.4, Kit Kat platform
®
Capability
™
compliant. Visit
™
samsungsmartswitch.com
™
Store
• Smart Switch
• Wi-Fi
• Apps available to download from the Google Play
and Samsung Hub
• Access Movies, TV Shows, Music, Games, and Books with
Samsung Hub
• Compliant with AllShare Cast Hub
®
(DLNA-certified)
• 8 megapixel camera and camcorder with LED flash plus
1.9 megapixel front-facing camera
• Share Shot picture sharing functionality
• S-Beam file transfer technology
• Bluetooth enabled
• NFC-compatible
• Full Integration of Google Mobile
™
Services (Gmail,
YouTube, Google Maps, Google Voice Search)
• Multiple Messaging Options: Text/Picture/Video Messaging
and Google Hangouts
™
• Corporate and Personal Email
• Music player with multitasking features and supporting
AAC, AAC+, eAAC+, MP3, and WMA file formats
• Speakerphone
• Support for microSD
to 64GB capacity
• Preloaded e-reader applications, such as Play Books
Play Magazines
™
and microSDHC™ memory cards up
™
™
and
• Assisted GPS (Google Navigation)
• Webkit-based browser
• Mobile HotSpot and USB Tethering-capability
• Video Chat via Google Hangouts
• Google Play
• Wi-Fi
™
Music
®
Calling via the use of a micro SIM card
™
Understanding Your Phone 13
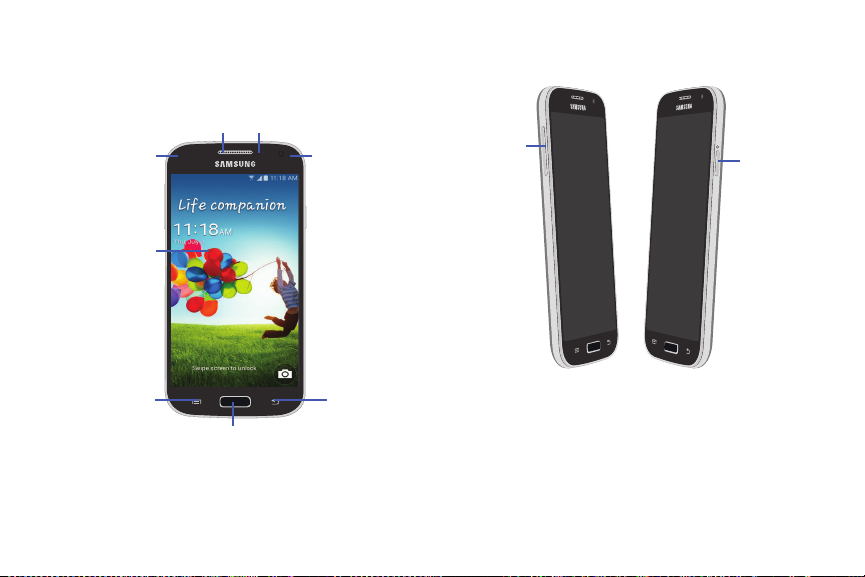
Front View
Earpiece
Proximity and
Light Sensor
Front-Facing
Camera
Touch Screen
Menu Key
(Context-sensitive
menu for the
current screen)
Home Key
(Display the main
Home screen or
Lock screen)
Back Key
(Return to the
previous screen
or option)
LED Indicator
Volume
Key
Power/ Lock
Key
Side Views
14
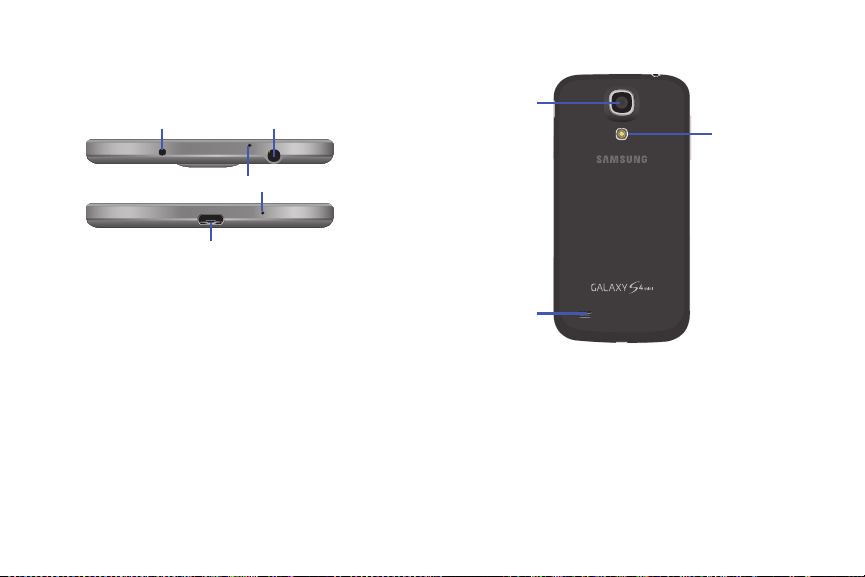
Top and Bottom Views
IR Blaster
Microphone
Charging/USB Port
3.5mm Headset Jack
External
Speaker
Camera
Lens
Flash
Rear View
Understanding Your Phone 15
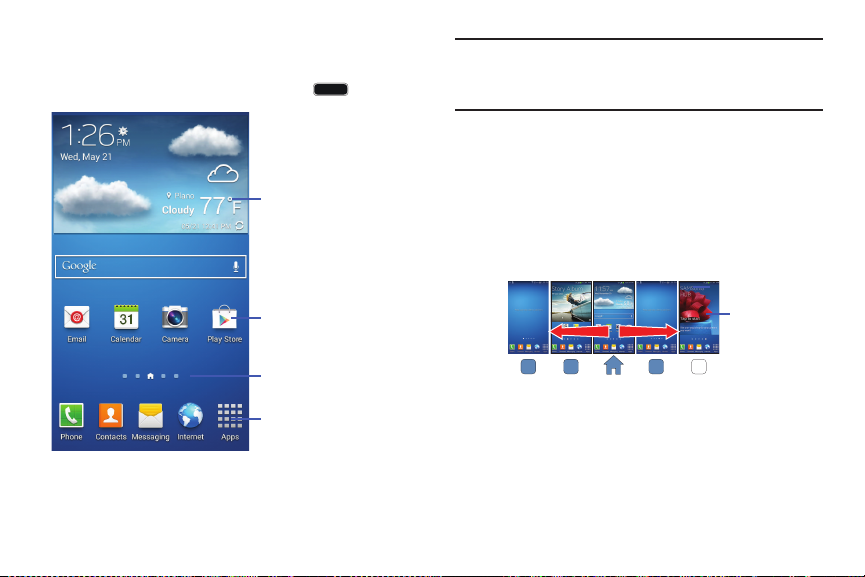
Home Screen
Widget
(App that runs on the
current Home screen
panel)
Primary Shortcuts
(Appear on every
Home screen panel)
Shortcuts
(Launch apps)
Current Panel Indicator
Current Panel
The Home screen is the starting point for using your device.
It is accessible at any time by pressing the Home Key
Note:
All screen images in this manual are simulated. Actual
.
displays may vary, depending on the software version of
your device and any changes to the device’s Settings.
Extended Home Screen
The Home screen consists of the Home panel, plus panels
that extend beyond the display width to provide more space
for adding shortcuts, widgets and folders.
Slide your finger horizontally across the screen to scroll to
the left or right side panels. As you scroll, the indicator at the
bottom of the display shows your current position.
16

Home Screen Panels
Touch and hold a
panel, and then drag it
here to delete it
Set this panel as the
main Home screen
(the panel with will
display when you press
the
Home Key
)
Add a new panel
(up to a total of seven)
Touch and hold a
panel, and then drag it
to a different location
Your device comes with 6 Home screen panels. You can
customize the Home screen to include up to seven panels.
From the Home screen, touch Menu ➔
Edit page
.
Status Bar
The Status Bar (at the top of most screens) shows network
connections, signal strength, battery charge, and other
details of your phone. Some common icons are:
Current signal strength. The greater the number of
bars, the stronger the signal.
Indicates that the Airplane Mode is active. You
cannot send or receive any calls or access online
information.
No SIM is installed.
There is no network available.
Your phone is in Blocking mode.
There is a system error or alert.
Indicates a security warning. You are prompted to
set a screen lock password.
A call is in progress.
The speakerphone is on.
A call has been missed.
Understanding Your Phone 17
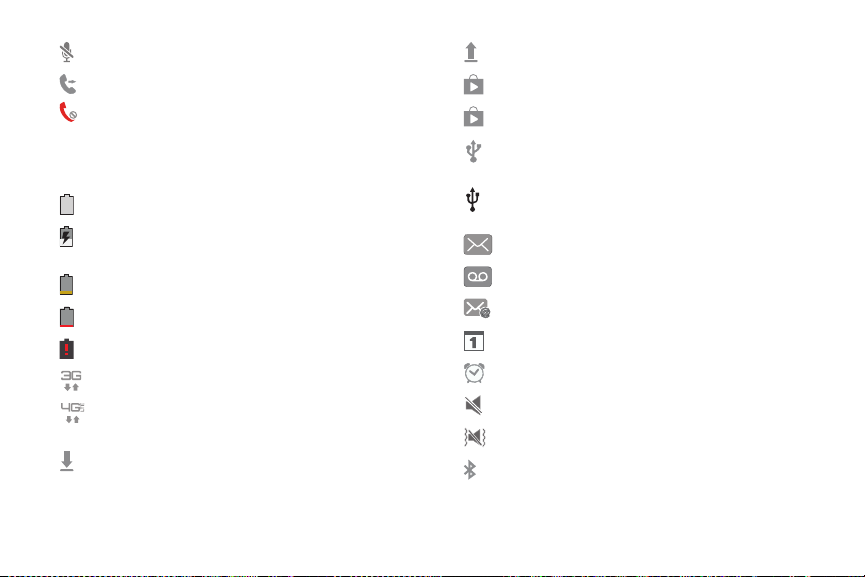
A call has been muted.
A
Call forwarding is set to Always forward.
Your device is set to automatically reject all
incoming calls. Enable the All numbers option
from the
Call settings
Auto reject mode
menu.
➔
Call rejection
➔
Battery charge level. Icon shown is fully charged.
Your battery is charging. Also displays battery
charge level.
Low battery power.
Battery is critically low.
Your battery is empty.
Your phone is actively connected to a 3G network.
Your phone is actively connected to a
4G LTE network.
Your phone is downloading or has downloaded a
file. It will blink green when it is installing.
An outbound file transfer is in progress.
A Play Store download has completed.
Updates are available for download.
The phone is connected to a computer with a
supported USB cable connection.
The phone is tethered via a supported USB cable
connection.
A new text or multimedia message is received.
A new voice mail is received.
Email has been received.
The time and date for a Calendar Event has arrived.
An alarm is set to ring at a specified time.
The Sound profile is set to Mute.
The Sound profile is set to Vibrate.
Bluetooth is activated.
18
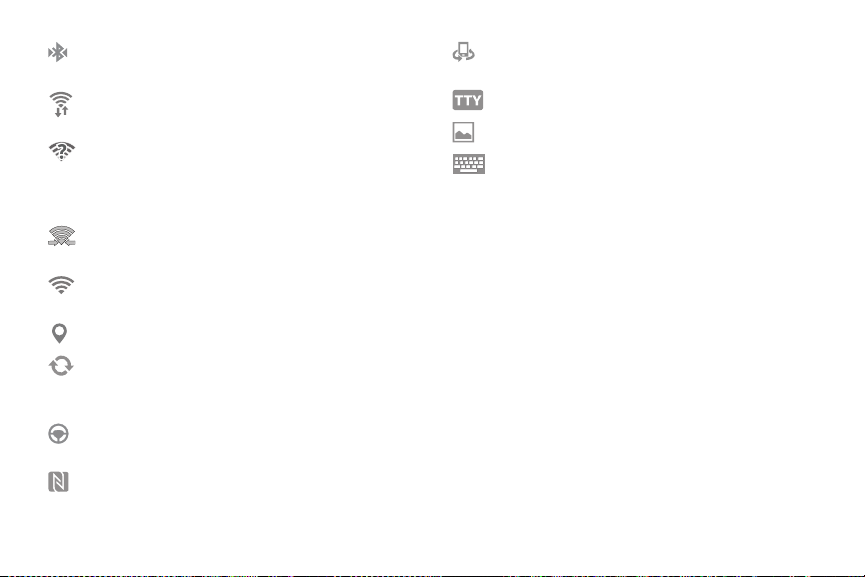
A Bluetooth device has been paired with
the phone.
Wi-Fi is connected, active, and communicating
with a Wireless Access Point (WAP).
There is a Wi-Fi access point available, but you are
not connected to it. May also display if there is a
communication issue with the target Wireless
Access Point (WAP).
Wi-Fi Direct is active and your phone is connected
to another device.
Your phone has been configured as a portable
Wi-Fi hotspot.
Location is active and acquiring a signal.
Data synchronization and application sync is
active and synchronization is in progress for
Gmail, Calendar, and Contacts.
Your phone is in Driving mode. Incoming calls and
notifications will be read out aloud.
Near Field Communication (NFC) has been
activated.
Your device is connected being used to control
streaming media and is connected via AllShare.
A TTY device has been inserted.
A screen capture has been taken.
Displays when the keyboard is active.
For more details on configuring your phone’s settings, see
“Settings” on page 118.
Understanding Your Phone 19
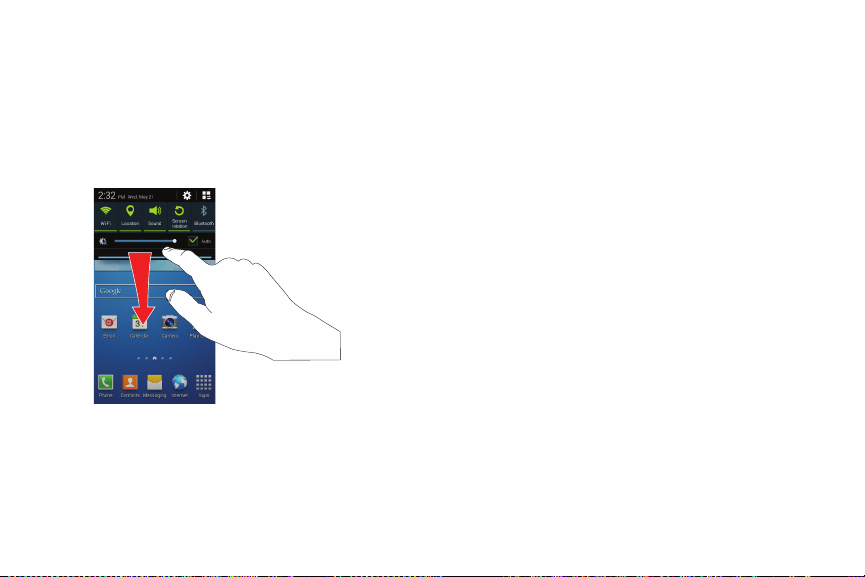
Notification Panel
The Notification panel displays information about
connections, alerts, new messages, and more. It also has
Quick settings-buttons which allow you to quickly access
and change common system settings.
1. Swipe your finger downward from the top of the screen
to display the Notification panel.
2. Touch an item to open the item, or to launch the related
app or feature.
20
Clear Notifications
1. Swipe your finger downward from the top of the screen
to display the Notification panel.
2. To clear one notification, touch and drag it to
one side and off the screen. To delete all
notifications, touch Clear.
World Clock
While displaying the Notification Panel, touch the time to
display a World clock. Add cities to the clock to display the
time in different zones around the world. For more
information, refer to “Clock” on page 104.

Quick Settings
Use Quick settings at the top of the Notification Panel to
control popular settings. Slide your finger right and left to see
additional settings, or touch to display them all:
• Wi-Fi: Turn Wi-Fi on or off. For more information, refer to
“Wi-Fi” on page 85.
• Location: Turn Standalone GPS services on or off.
For more information, refer to “Location Services” on
page 150.
• Sound: Switch between your sound settings (Sound, Mute,
and Vibrate). For more information, refer to “Sound
Settings” on page 128.
• Screen rotation: Enable or disable screen rotation.
For more information, refer to “Auto Rotate Screen” on
page 126.
• Bluetooth: Turn Bluetooth on or off. For more information,
refer to “Bluetooth” on page 88.
• Mobile data: Enable access to mobile data service.
• Wi-Fi hotspot: Share your Internet connection with
another devices. For more information, refer to “Mobile
Hotspot” on page 92.
• Screen Mirroring: Share your device’s screen with
another device, using an optional AllShare Cast accessory
(not included). For more information, refer to “Screen
Mirroring” on page 98.
• SBeam: S Beam uses your phone’s NFC (Near Field
Communication) to send, or “beam”, content to other NFC
and Wi-Fi Direct devices, by holding the devices close
together. For more information, refer to “S Beam” on
page 96.
• NFC: Use NFC (Near Field Communication) to share
information between your phone and another NFC device
by touching the devices together, typically back-to-back.
For more information, refer to “NFC and Beaming” on
page 95.
• Sync: Synchronize your accounts. For more information,
refer to “Synchronizing Accounts” on page 36.
• Smart stay: The phone automatically adjusts screen
timeout and rotation when it detects you are looking at the
screen. For more information, refer to “Smart Screen” on
page 148.
Understanding Your Phone 21

• Power saving: Enable or disable Power saving mode.
For more information, refer to “Power Saving Mode” on
page 139.
• Blocking mode: Block notifications for selected features.
For more information, refer to “Blocking Mode” on
page 137.
• Airplane mode: Turn Airplane mode On or Off.
For more information, refer to “Airplane Mode” on
page 121.
• Hands-free mode: Set incoming caller ID and text
messages to be read out. For more information, refer to
“Hands-Free Mode” on page 138.
22
Navigation
Navigate your phone’s features using the touch screen,
motions, gestures, command keys, and voice control.
Command Keys
Home Key
• Press to display the Home screen, or
Lock screen if the phone is locked.
• Press and hold to display recent applications
or launch Task Manager.
• Press twice from an unlocked screen to
launch S Voice.
Menu Key
• Touch to display a context-sensitive menu of
options for the current screen or feature.
Back Key
• Touch to return to the previous screen
or option.
Note:
While using your phone, you may notice that the
Menu Key and Back Key dim, but they are always
available and activate when you touch them.

Using the Touch Screen
Touch
Touch items to select or launch them. For example:
• Touch the onscreen keyboard to enter characters or text.
• Touch an item to select it.
• Touch an app’s icon to launch the application.
Touch and Hold
Activate items by a touch and hold gesture. For example:
• Touch and hold a widget on the Home screen to move it.
• Touch and hold on a field to display a pop-up menu of
options.
Swipe
Swipe your finger across the screen. For example:
• Unlocking the screen
• Scrolling the Home screen or a menu
• Combine touch and hold with swipe to drag an item.
Pinch and Spread
Using two fingers, make a pinch or spread
motion on the screen. For example:
• Pinch in to zoom in on pictures or
screens.
• Spread out your fingers to zoom out on pictures or screens.
Warning!
Please note that a touch screen responds best to a
light touch from the pad of your finger or a nonmetallic stylus. Using excessive force or a metallic
object when pressing on the touch screen may
damage the tempered glass surface and void the
warranty.
Understanding Your Phone 23

Motions and Gestures
Your phone recognizes motions and gestures, allowing you to
navigate and access features by moving the phone in
specific gestures.
To use motions, enable the Motion setting. For more
information, see “Motions and Gestures” on page 147.
Pick Up
Lift the phone to perform an action.
• Direct call: Pick up the phone and raise it to your ear to
call the contact displayed on the screen.
• Smart alert: The phone will automatically notify you to
missed calls and alerts that occurred while the phone was
stationary.
Tilt
Touch and hold the phone with your thumbs on the screen,
then tilt the phone forward and back.
• Zoom: Tilt the phone forward and back to zoom in or out.
24
Pan
Touch and hold on the screen, then move the phone in a
side-to-side motion.
• Move an icon: Pan the phone to move a highlighted icon to
a new location on the Home screen.
• Browse an image: Pan the phone to when viewing an
image to move focus around in the image.
Tur n Ove r
Turn the phone screen-down on a flat surface.
• Mute/pause: Turn the phone over to mute incoming calls
or pause music playback.
Palm Motion
Control certain features on your phone by touching the
screen with your hand.
• Mute/pause: Mute or pause sounds by covering the
screen with your palm.
 Loading...