

Page 1

Samsung Smartphone
SCH-i201
User’s Guide
Page 2

Contents
Getting Started
Unpacking ................................................... 1
Your Phone ................................................. 2
Phone Layout .........................................2
Installing the Battery .................................4
Attaching the Battery Pack ................... 4
Removing the Battery Pack ...................5
Charging the Battery Pack ......................... 6
Turning the Phone On/Off .......................... 8
Backlight ................................................ 8
Viewing the Remaining Battery
Power.................................................. 8
Using the Touchscreen ............................... 9
Using the Stylus ..................................... 9
Calibrating the Screen ......................... 10
Adjusting Screen Contrast ................... 11
Using as a Phone
Making a Call ........................................... 13
Making a Call ....................................... 13
Advanced Calling Features ...................... 15
Using Voice Dial .................................. 15
Using Speed Dial ................................. 17
Redialing the Last Number .................. 18
Using the Phone Book .........................19
Using Call History ................................ 20
Using Four-digit Dial ............................ 22
Answering Calls ....................................... 23
Answering a Call ................................. 23
Viewing Missed Calls .......................... 24
In-Call Options .......................................... 25
Using In-Call Options ........................... 25
Setting Basic Features ............................. 28
Adjusting the Volume .......................... 28
Easy Access to Applications
During Calls .........................................29
Selecting Bell/Vibrate .........................29
One-Touch Ringer Selection ................ 30
Viewing Air Time .................................31
Automatic Hyphenation ....................... 32
Answering Mode ...................................... 33
Turning On the Answering Mode ........ 33
Listening to a Caller Message ............ 35
Recording Your Own OGM
Message .............................................. 37
Playing or Selecting the OGM
Message .............................................. 39
i
Page 3

Contents
Learning to Use the
Applications
Working with Applications ...................... 41
Opening an Application ....................... 41
Displaying Applications ....................... 41
Brief Description on Applications .......44
Entering Text, Numbers or Symbols .... 46
Help Writing Characters ...................... 55
Using Application Controls .................. 55
Using Menus ........................................ 56
Finding Data on Your Phone ................ 59
Customizing Your Phone .......................... 61
Opening Control Application ............... 61
Bell ....................................................... 62
Sound ................................................... 62
Display ................................................. 64
Security ................................................ 65
Battery ................................................. 67
System ................................................. 68
Network ............................................... 68
Storage ................................................ 70
Owner Information ............................... 70
Calibration ........................................... 71
Contrast ............................................... 71
PC Synchronization ................................... 72
Synchronizing Data .............................. 72
Data Communication ........................... 75
Address Book
Address Book ........................................... 79
Creating an Address Book Entry .......... 80
Viewing Address Book Entries ............ 91
Editing an Address Book Entry ............ 95
Deleting an Address Book Entry .......... 98
Address Book Setup Options ............... 99
Personal Information
Manager
Memo ..................................................... 103
Creating a New Memo ...................... 103
Viewing a Memo ............................... 105
Attaching an Image in a Memo ........ 109
Sending a Memo as a SMS
Message (network dependent) .......... 112
Configuring Categories ...................... 113
Scheduler ............................................... 114
Recording a New Appointment ......... 114
Viewing Scheduled Appointments .... 118
Editing Details of a Selected
Appointment ...................................... 122
Removing a Selected Appointment ... 122
ToDo ....................................................... 124
Creating a ToDo Item ......................... 124
Viewing the ToDo List ........................ 127
Editing a ToDo Item ........................... 128
Deleting a Task in the List ................. 129
Continued
ii
Page 4

Contents
Communication Applications
SMS (Short Message Service) ............... 131
Sending a Short Message ................. 131
Receiving Messages .......................... 134
Deleting a SMS Message ................. 137
Internet ................................................... 138
Accessing GoNext .............................138
Navigating the Internet ..................... 139
Using Bookmarks ............................... 141
Internet Settings ................................ 144
E-mail ..................................................... 146
Accessing E-mail Service .................. 146
Mail Settings ..................................... 147
Reading an E-mail .............................. 149
Sending an E-mail .............................. 153
Writing a Signature ........................... 157
Additional Setup Options .................. 158
Chatting .................................................. 162
Using Chat Service ............................ 162
Creating a New Chat Room ............... 167
Person to Person Talking ................... 169
Sending a Chat Memo ....................... 170
Using Chat Book ................................ 171
Using Bulletin Board .......................... 173
Additional Chat Menu Options .......... 175
Extra
Clock ....................................................... 179
Setting Home Time ............................ 179
Setting Alarm ..................................... 181
Viewing World Time .......................... 183
Calculator ............................................... 184
Opening the Calculator ...................... 184
Using the Calculator .......................... 185
Error Message Display ...................... 189
Othello .................................................... 190
Accessing Othello Game ................... 190
Playing One Player Game .................. 191
Playing Two Player Game .................. 192
Playing Network Game ...................... 192
Viewing Your Play Records ................ 197
Appendix
Accessories............................................. 199
Care and Safety Guidelines ................... 200
Caring for Your Smartphone .............. 200
Antenna Care ..................................... 201
Battery Care ....................................... 201
Safety Precautions ............................. 203
Continued
iii
Page 5

Getting Started
Congratulations on your purchase of the Samsung
Smartphone. This phone combines a digital phone,
personal information managers, communication
applications and games in a single handset.
In this chapter, the topics included are:
• Unpacking
• Your Phone
• Installing the Battery
• Charging the Battery Pack
• Turning the Phone On/Off
• Using the Touchscreen
Page 6
Unpacking
1
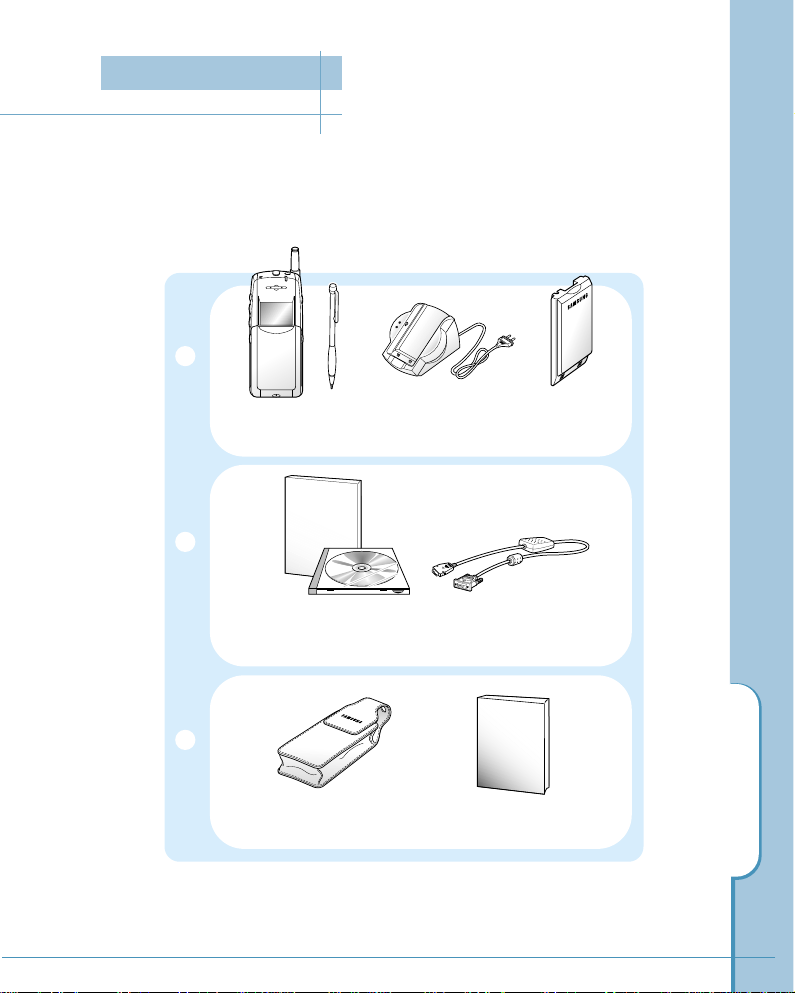
Check to make sure that all of the following items are included in the box when
you unpack it.
The phone with a stylus
Desktop
charger
Standard
battery
Data cable
CD-ROM for data synchronization
and the instruction guide
Leather case
This guide
Unpacking
Page 7
Home
Menu
Cont
Input
WWW
2
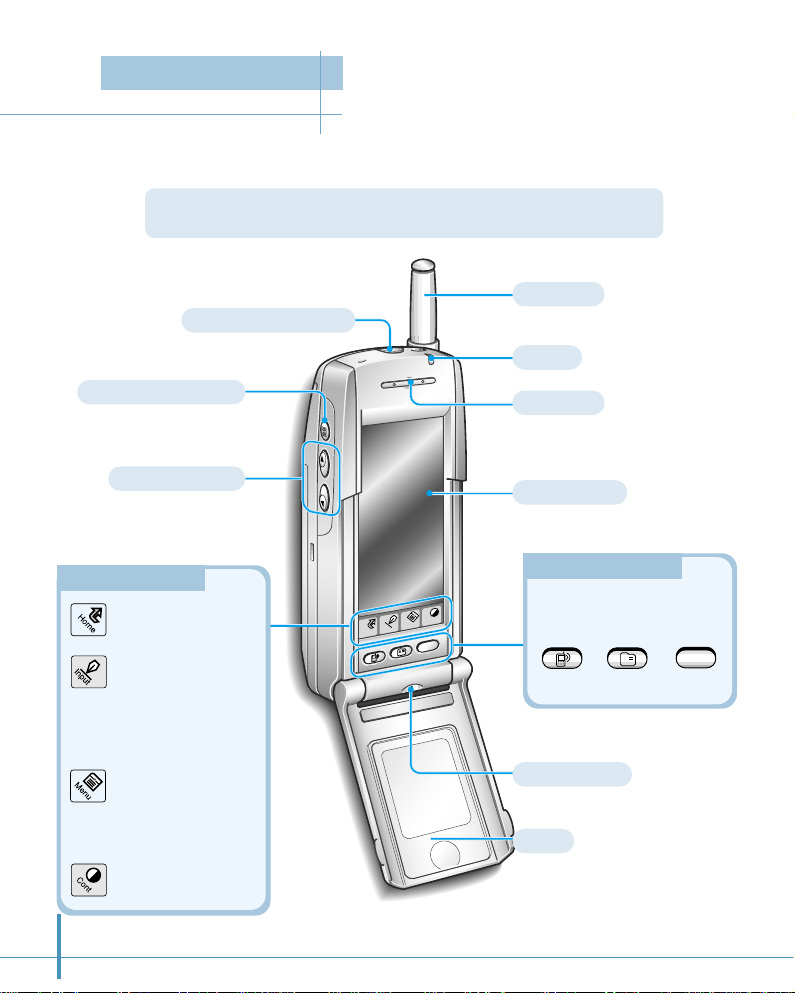
Auto answer button
Volume buttons
Ear microphone jack
Earpiece
Microphone
Press and hold to turn the
answering mode on or off.
Adjust the volume.
Antenna
Lamp
Touchscreen
Flip
Hard icon panel
Hard icon panel
Phone Layout
Launches
applications.
Opens text input
screen when you are
asked to enter
information on the
screen.
Opens a set of menu
options available in
the application you
are in.
Adjusts the contrast
of the screen.
Application buttons
Application buttons
Opens the associated
applications.
Phone Address GoNext
a
WWW
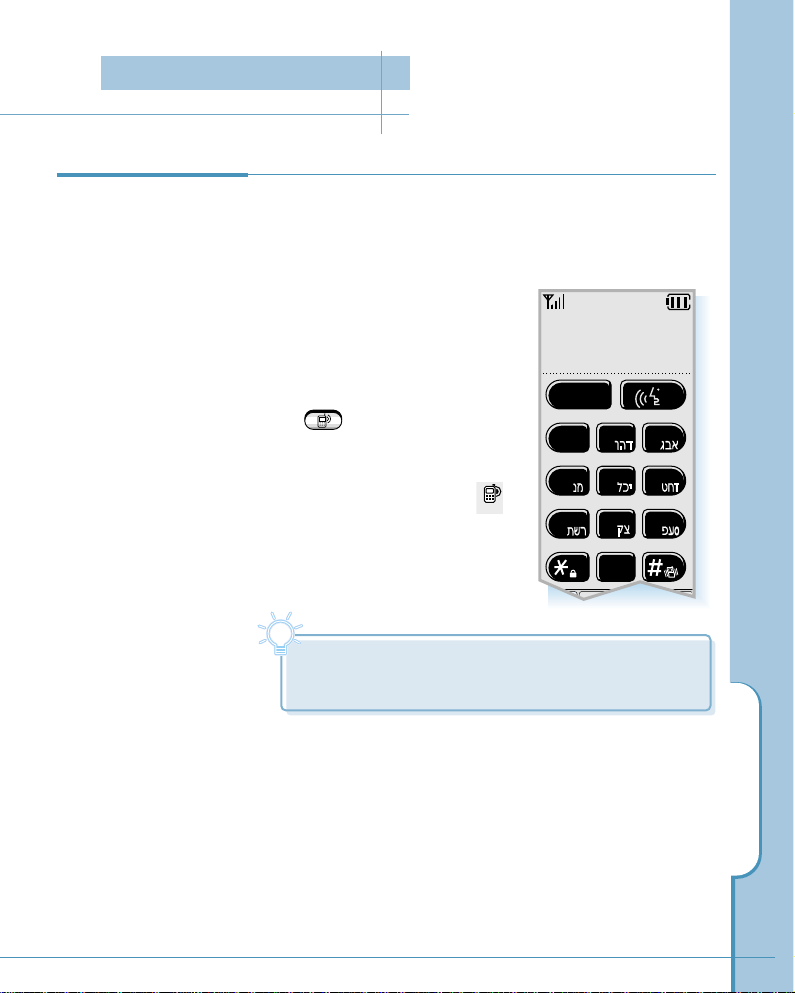
The following illustrations show the main elements of your phone.
Your Phone
Page 8
Home
Menu
Cont
Input
WWW
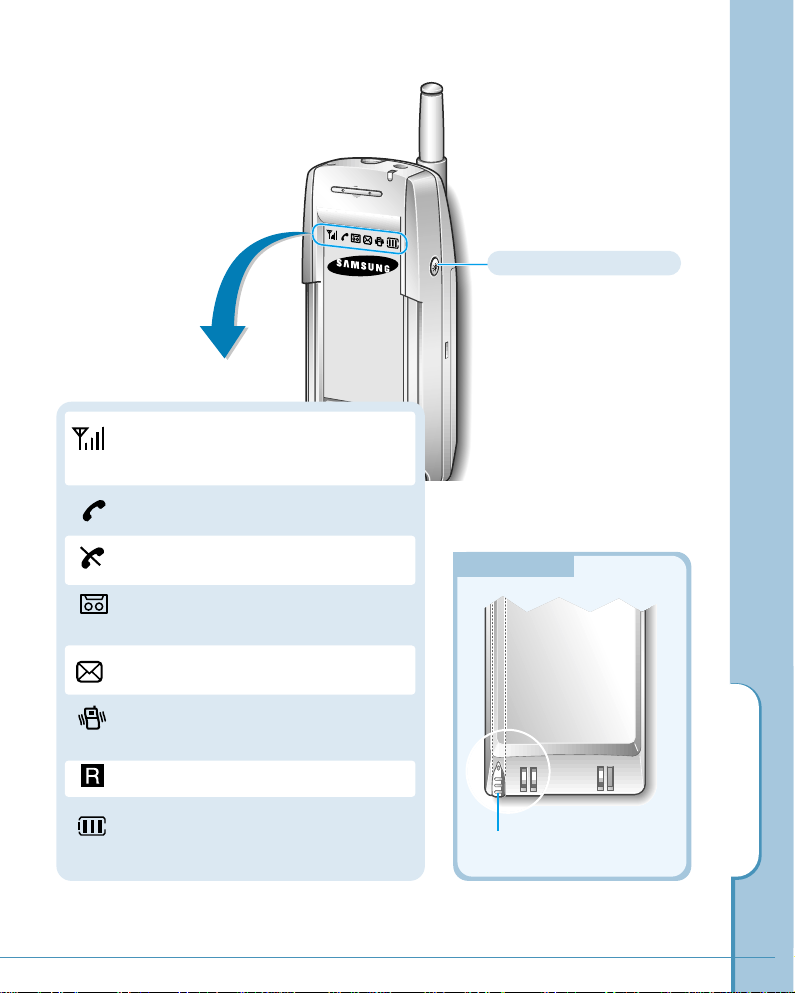
Shows the received signal strength.
The greater the number of bars, the
better the signal strength.
Appears when a call is in progress.
Appears when the phone is out of
service area.
Appears when a caller message has
been recorded.
Appears when a new message has
been received.
Appears when the vibrate mode is
activated.
Appears when you are roaming.
Shows the level of your battery. The
more bars you see, the more power you
have left.
Rear View
Rear View
Your Phone
3
Icons in the top strip
Power/Backlight button
Turns the phone on/off. Also,
turn the backlight of the
screen on/off.
Stylus
Page 9
4
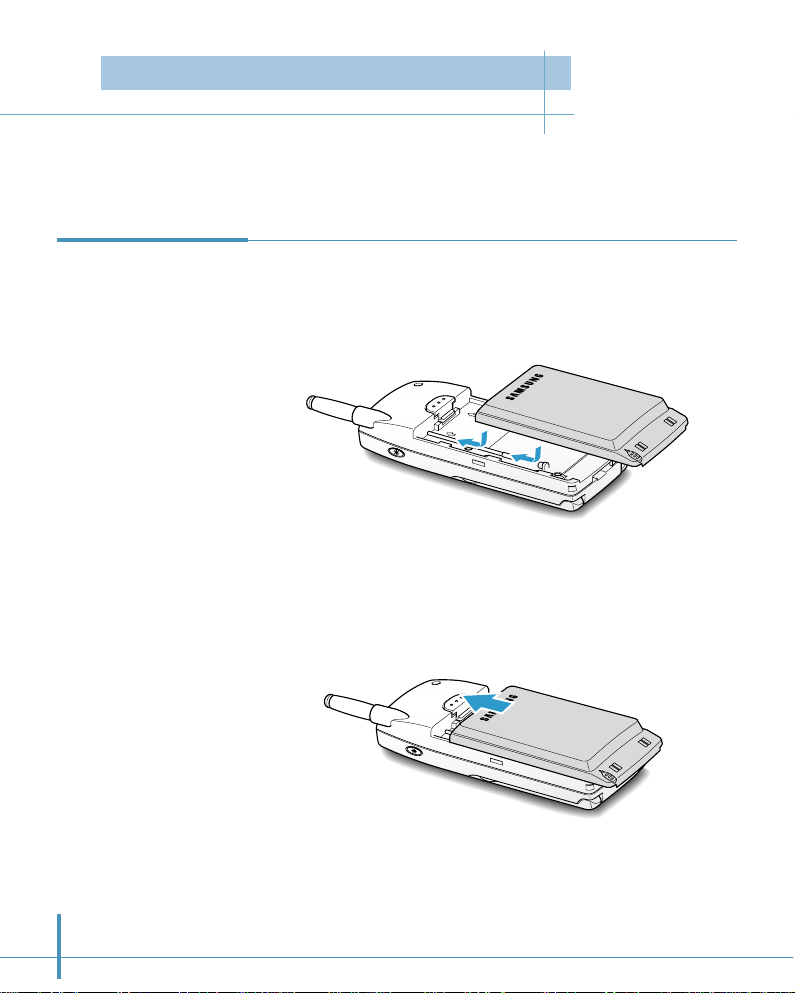
Your phone comes with an rechargeable standard battery. An extended-life battery is
available as an option.
1. To attach the battery pack, align it with the phone so that the
two arrows labeled on the back of the phone are seen, the
battery charge contacts pointing downward.
2. Slide the battery pack upwards until it clicks firmly into
position.
Attaching the
Battery Pack
Installing the Battery
Page 10

Removing the
Battery Pack
1. Release the battery pack by pressing the latch on the rear
of the phone.
2. Slide the battery pack downward and lift it away from the
phone.
Installing the Battery
5
Latch
Page 11
P
B
6
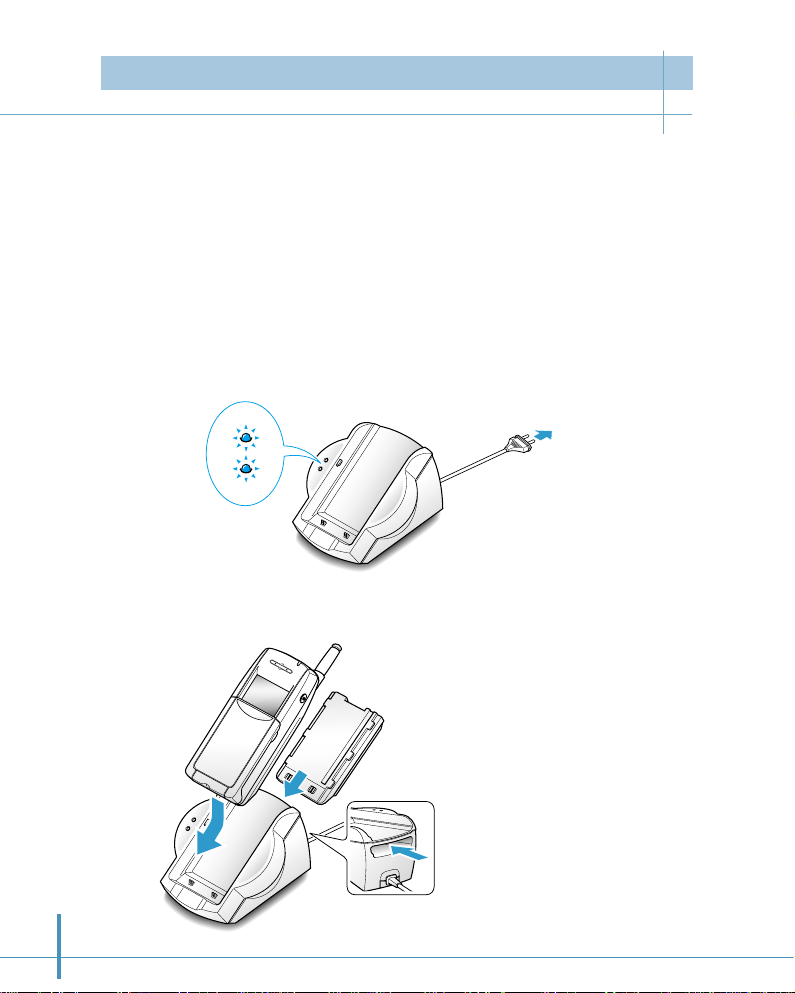
2. Select one of the following options:
• Insert the entire phone with battery
attached into the front compartment of
the charger.
• Insert a single battery (alone, not
attached to the phone) into the rear
compartment of the charger.
Charge
indicator lights
When you purchase the phone, the battery pack is not fully
charged. Please charge the battery fully before you operate
your phone.
You must fully charge the battery before using your phone for
the first time. A discharged battery is fully recharged in
approximately 8-12 hours.
1. Plug the power cord of the charger into a standard AC outlet.
When the power is connected properly, the battery charge
indicator lights on the left side of the charger blink once.
Charging the Battery Pack
Page 12

3. The battery charge indicators on the left side of the
charger come on.
The light is red while the batteries are charging. It turns
green when the batteries are fully charged. Charging the
main battery completely takes two to three hours.
4. When the indicator light turns green, remove the phone
from the charger by gently pulling it straight up.
Once the battery is charged, you can use the phone in the
charger or out of the charger for all functions. If you have
purchased an extra battery, you can charge it in the
charger while you are using the phone.
Charging the Battery Pack
7
Charge indicator light
Red=The battery is charging.
Green=The battery is fully charged.
Yellow=The battery is waiting to be
charged.
Phone’s battery (on the
front compartment)
indicator light
Battery (on the rear
compartment) indicator light
Note:
Leaving the battery in the charger once it is fully charged does not
harm the battery. For more information on battery safety, see page
201.
Page 13
8
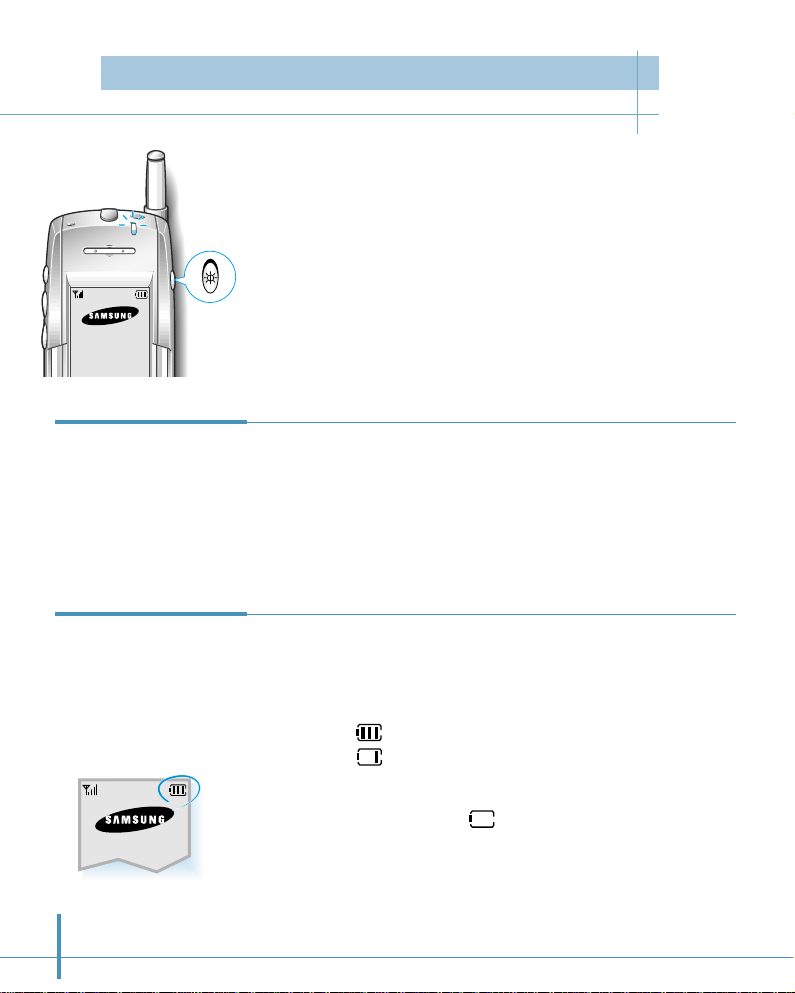
1. Hold down the Power button on the right side of the phone
for more than one second to switch the phone on.
The phone beeps and displays the greeting message, current
date and time.
2. To turn off the phone, press the button again until you hear a
beep tone.
The backlight comes on when you open the flip or receive a call
and switches off 8 seconds after the last input. If you want to
turn on the backlight manually, press the Powerbutton briefly.
Backlight
Viewing the
Remaining
Battery Power
Power
button
• The battery charge level is displayed at the right corner of the
LCD display, when the phone is powered on.
• The number of blocks represent the battery charge level.
Example: Battery fully charged
Battery low
• When the battery drops to a low level, the phone beeps and
the battery icon turns to .
• When the battery is fully discharged, a warning tone sounds
three times and the power turns off.
T urning the Phone On/Off
Page 14
Using the Touchscreen
9
Your phone is equipped with a large, sensitive touchscreen.
The screen provides on-screen number keyboard you would
expect on a normal phone and has versatile menu functions.
To prevent scratches, never use an actual pen, pencil or
other sharp object to tap or write on the screen.
With the stylus, you can:
• write, type, and draw on the screen.
• tap on the screen, which opens the selected application
and select an item or button in the application.
• drag across words to select them.
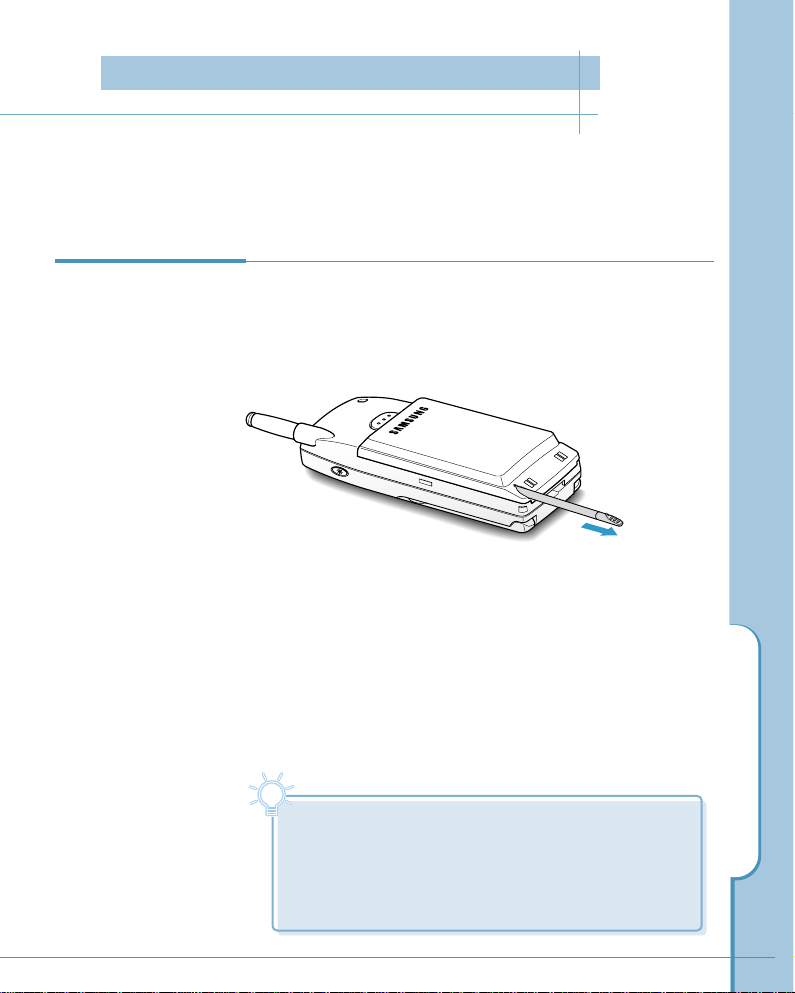
Use the stylus provided with your phone to make selection
on the touch screen. When the stylus is stored in a slot on
the back side of your phone, to use the stylus, remove it
from the slot and hold it as you would with pen or pencil.
Using the Stylus
Tip
Tip
• Tap means to touch the screen and lift the stylus off
the screen.
• Drag means to touch and slide the stylus. When you
are finished dragging, lift the stylus off the screen.
The selected words or text turns highlighted.
Using the Touchscr een
Page 15
10
Use stylus to tap
center of target.
4. Tap the Calib icon.
5. Tap the exact center of each target that appears
on the screen. After you have aligned four
targets, the Control screen reappears.
Control
Bell Sound Disp
Secur Batt Sys
Net Stor
Contr
Owner
Calib
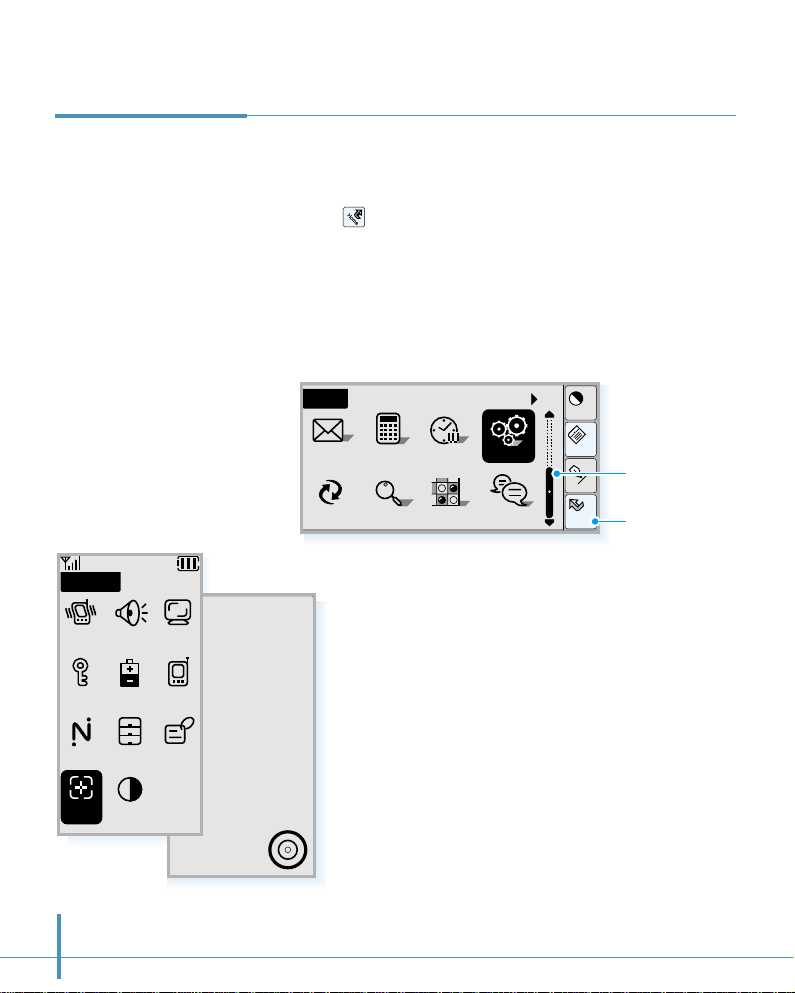
To make the screen respond correctly to the stylus tap, calibrate
the screen with the stylus before using your phone.
1. Tap the icon on the hard icon panel to launch
applications.
2. Drag the slider to scroll to the next page.
3. Tap the Ctrl icon to open the Control screen.
Calibrating the
Screen
Home
SMS
PCsync
Calc
Ctrl
Cont
Menu
Input
All
Clock
Find
Home
Chat
Othello
Slider
Tap to launch
applications
Page 16

You can adjust the screen contrast at any time, without
accessing the Contrast menu, by tapping the icon on the
hard icon panel.
Adjusting
Screen Contrast
Using the Touchscreen
11
tap this lower triangle
to darken the screen
To lighten the screen, tap the upper triangle of the icon
until you get the desired lightness.
To darken the screen, tap the lower triangle of the icon
until you get the desired darkness.
Home
Menu
Cont
Input
WWW
a
Cont
tap this upper triangle
to lighten the screen
Page 17

Using as a Phone
Samsung Smartphone gives you advanced phone
capabilities.
This chapter explains how to use the Samsung
Smartphone to make and receive a call.
Topics included in this chapter are:
• Making a Call
• Advanced Calling Features
• Answering Calls
• In-Call Options
• Setting Basic Features
• Answering Mode
Page 18
13
1. Open the Phone screen which allows you to dial a phone
number.
There are several ways to open the Phone screen:
• When the phone is powered
on or when the flip is open,
the Phone screen displays.
• When you have worked with
other application, press the
button below the screen
to open the Phone screen.
• You can also open the Phone
screen by selecting the
icon from the Home screen.
Making a Call
Phone
Making a Call
Tip
Tip
If the Phone screen disappears before you tap a
number, just touch on the screen to wake up the phone.
2. Key in the area code and the phone number by tapping the
number digits in the Phone screen with the stylus.
The number displays on the top of the screen as you tap
them.
SEND
1
abc def
jklghi mno
tuv
pqrs wxyz
23
456
789
0
May 25 THU
10 : 30
Phone screen ❿
Making a Call
Page 19

3. When the number is correctly displayed, tap the SEND
button to dial the number.
You can also start dialing by holding down the last digit of
the phone number without tapping the SEND button.
Correcting the Number
When you key in the number button on
the screen, the button (or END
button) is replaced with the CLR
button.
To clear the last digit displayed, tap
the CLR button briefly.
To clear the whole display, touch and
hold down the CLR button for more than
one second.
Ending a Call
When you have finished your call, tap the END button or close
the flip.
14
Tip
If you make an international call and need to find the country code,
use the following steps:
In the Phone screen, tap the icon, and select Country Code from
the Calls menu. The country code list appears. Tap the desired code,
and tap the OK button. The selected country code is displayed in the
number field on the Phone screen.
SEND
1
abc def
jklghi mno
23
00-182
Tip
Page 20
Advanced Calling Features
15
If you have set voice dial for the number you want to call
(see page 83), you can use voice to make a call.
To set a voice dial:
To use voice dial, you first set the phone to recognize the
name of the person you are calling.
You can record up to 20 names using the Address
application. See page 87 for information on how to record
name.
To place voice dialing calls:
1. In the Phone screen, tap the button on the screen.
2. At the voice prompt, say the name into the phone.
• If the phone recognizes the name, the phone attempts
a connection.
• If the phone does not recognize the name, the screen
prompts for the name again.
• If the phone does not recognize the name after two
attempts, the message ‘Could Not Recognize Name’
displays. Try the call again later, or check the recorded
name.
Using Voice Dial
Note:
If the phone is set to the Auto Voice Dialmode, you do not need
to tap the button in the phone screen. See page 17.
Advanced Calling Features
Page 21

16
To search, then make a call:
You can scan through the voice dial list you have recorded.
1. In the Phone screen, tap the icon on the hard icon
panel. The phone menu list appears.
2. Tap Voice Dial from the Calls menu. The Phone Book list
which shows the voice dial names appears.
4. Tap the desired name you want to call. To dial the selected
name, tap the SEND button.
Phone Book
Voice Dial7
OK
SEND
ABC co.
Bayer
Cooper chr..
John
Katherine
Moore Davi..
Russel Jack
3. To scroll through the list if necessary, tap ❷!or $ in the
lower right corner of the screen.
SMS SetupCalls
Outgoing
Incoming
Air Time
Outgoing
Incoming
Air Time
Country Code
Phone Book
Speed Dial
Voice Dial
Send DTMF
Auto Answering
Page 22

Advanced Calling Features
17
To set Auto Voice Dial:
You can initiate a voice dialing call by opening the flip, when
you select this option through the phone menu.
1. In the Phone screen, tap the icon on the hard icon
panel. The phone menu list appears.
2. Tap the Setup tab on the top of menu screen, and select
Auto Voice Dial. This option enables voice dialing by
opening the flip.
If you access the same menu next time, you will find
Hand Voice Dial instead of Auto Voice Dial. The Hand
Voice Dial enables voice dialing only by tapping the
button on the Phone screen.
3. When the desired option displays, tap the OK button.
1
abc def
23
Calls SMS Setup
Ring/Vibrate
Sounds
Display
Security
System
About Phone
Auto Voice Dial
Your phone enables you to place calls quickly by entering the
speed dial code you specified when you have stored the
phone number in your internal Address Book. For information
on setting Speed Dial, see page 85.
To make a call using speed dial:
In the Phone screen, touch and hold the speed number.
If the number contains more than one digit, tap briefly the
first digit(s) and touch and hold the last digit.
Using Speed Dial
Page 23
18
To search, then speed dial:
If you do not remember the speed dial number for someone
you want to call, follow these steps to select it from the
Speed Dial list.
1. In the Phone screen, tap the icon on the hard icon
panel. The phone menu list appears.
2. Select Speed Dial from the Calls menu. The Phone Book
list which shows the speed dial codes appears.
3. To scroll through the list if necessary, tap ❷!or $ in the
lower right corner of the screen.
4. Tap the desired entry you want to call. To dial the selected
entry, tap the SEND button.
Phone Book
Speed Dial7
OK
SEND
1
2
3
5
6
10
11
Bayer
Cooper chr..
Katherine
Moore Davi..
Russel Jack
John
ABC co.
Speed code
The phone stores the last number dialed. To redial the
number, just touch and hold down the SEND button in the
Phone screen.
Redialing the
Last Number
Page 24

Advanced Calling Features
19
3. To scroll through the list if necessary, tap ❷!or $ in the
lower right corner of the screen.
4. Select the desired number highlighted. To dial the selected
number, tap the SEND button. To exit, tap the OKbutton.
Phone Book
All
ABC co.
Bayer..
Coope..
John
Kathe..
Moore..
Russe..
44123456..
01198765..
44543210..
44876543..
01112345..
55161509..
44987654..
OK
A II P
SEND
Tap letter to find the name
and number beginning with
the specified letter quickly.
You can store the phone numbers called regularly in memory,
called the Address Book. You then simply recall the number
to dial. For further information on Address Book, see page
79.
To make a call from the Address Book:
1. In the Phone screen, tap the icon on the hard icon
panel. The phone menu list appears.
2. Select Phone Book from the Calls menu. The Phone
Book list appears in alphabetic order.
Using the Phone
Book
Page 25
Your phone stores up to 20 numbers you either called or
received calls from. It identifies callers, and the date and
time they called.
You can view the incoming and outgoing calls list
independently and dial a number from the list.
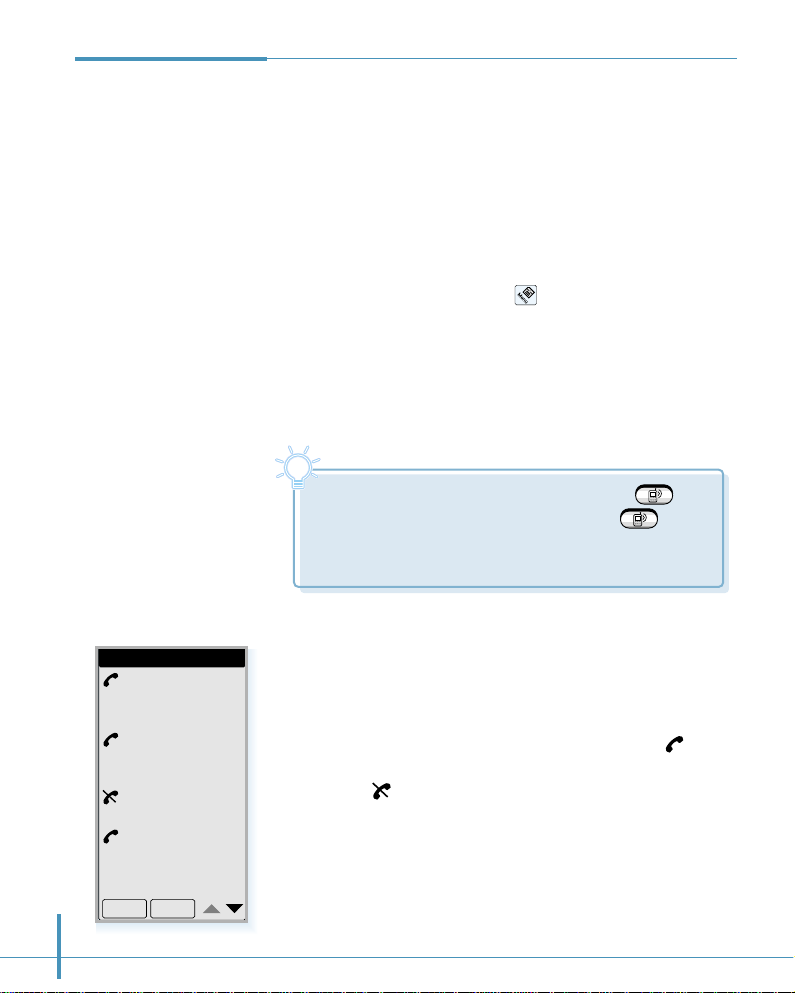
To make a call from the calls list:
1. In the Phone screen, tap the icon on the hard icon
panel. A menu list appears.
2. From the Calls tab on the top of the menu screen, select
Outgoing for outgoing calls and Incoming for incoming
calls .
3. The selected calls list appears. The date/time stamp
displays for each log.
If there is an internal Address Book match, the name
displays. If not, only the phone number displays.
symbol indicates you have successfully dialed or received
the call. symbol indicates you have not connected or
missed the call.
You can also open the calls list by pressing
button below the screen. If you press the button
in the Phone screen, the Outgoing Calls list, then the
Incoming Call list appears.
20
Using Call History
Outgoing Calls
Catherine
441234567
12/15 12:17P
Moore
449876543
12/15 12:03P
448768765
12/15 10:15A
David
447654321
12/15 10:09A
OK
SEND
Tip
Tip
Page 26
Advanced Calling Features
21
4. To scroll through the list if necessary, tap ❷!or $ in the
lower-right corner of the screen.
5. To dial the selected number highlighted, tap the SEND
button.
To save a number in the Address Book:
After selecting one from the outgoing calls list, you can
save the number in the phone’s Address Book. Tap the
icon on the hard icon panel in the outgoing calls list
screen. From the List menu, select Save. The Address
New screen opens which allows you to create a new
address book entry.
To delete one or all numbers from the outgoing calls
list:
The phone automatically replaces older calls with newer
ones. However, if you want to delete a selected number
or all numbers from the outgoing calls list immediately,
tap the icon in the outgoing calls list screen. From the
List menu, select Delete or Delete All.
Note:
In case of duplicate entries, the phone stores the number with each
time and date in which the call arrives.
Page 27

SEND
1
abc def
jklghi mno
23
44-123-4567
01/03
Catherine
22
Using Four-digit
Dial
Name
(if stored in the
Address Book)
Phone number matching
your input
Your phone provides the option of four-digit dialing of
numbers stored in the internal Address Book or the outgoing
calls list. This allows you to enter the last four consecutive
digits of someone’s phone number, have your phone
remember the rest, and then dial it for you.
To place a call using four-digit dialing:
1. In the Phone screen, key in the last four consecutive digits
of a phone number that you have stored in your Address
Book or you have dialed before.
2. The phone displays the number matching your input.
3. If the phone contains more than one phone number in
which the last four consecutive digits are the same, it
displays the number of the phone numbers matching your
input either from the outgoing calls list or Phone Book list
in the upper right corner of the screen.
Select the desired number by pressing the up/down button
on the left side of the phone.
4. To dial the number, tap the SEND button.
The number of total
numbers matching your
input
Page 28
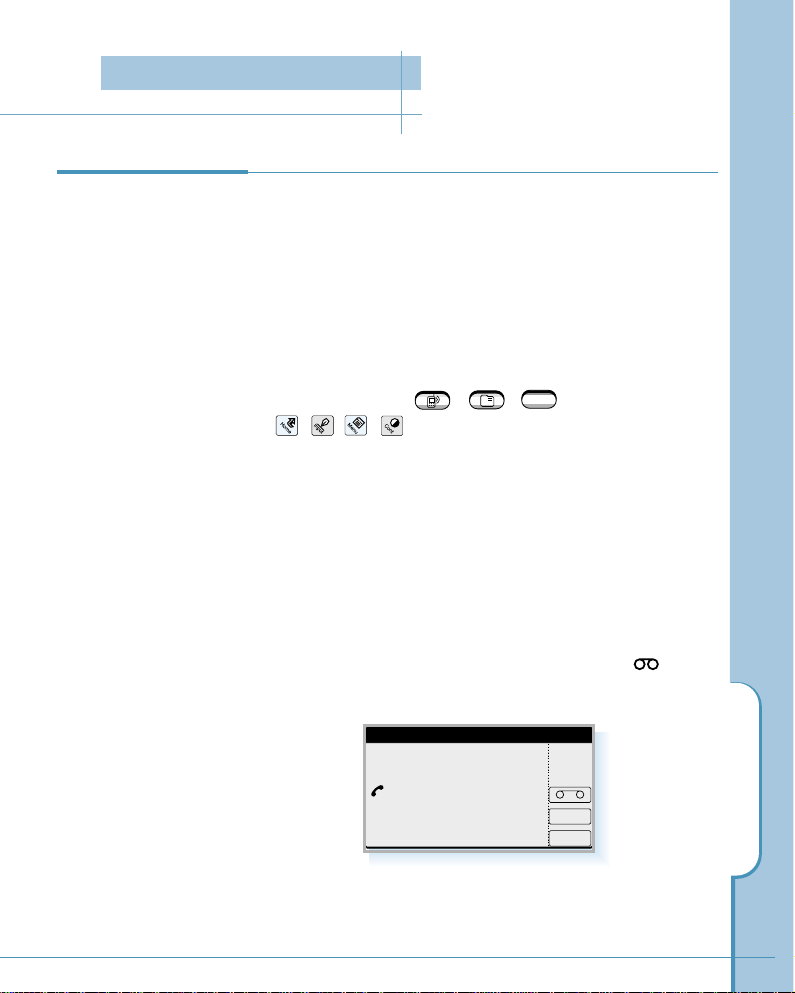
Answering Calls
23
When somebody calls you, the phone rings. If the caller can
be identified, the caller’s phone number (or name if prestored in your Address Book) is displayed. If the caller cannot
be identified, only the message ‘Phone Call’ is displayed.
To answer the call:
Open the flip to answer the call. If the flip is already open,
tap any button on the Phone screen (except END), any
application button ( , , ), or any icon
( , , , ) on the hard icon panel.
You can adjust the volume of the ringer for that call with the
volume buttons on the left side of the phone.
Note:
You can answer a call while using a menu feature. The screen alerts you
with the incoming call message. Tap Yes to answer the call, or No to reject
the call. If rejected, the call will be forwarded to your voice mailbox. If no
mailbox is available, the call will be disconnected. If you tap button,
the Answering feature is activated.
Answering a Call
a
WWW
Incoming Call
You've got an incoming call.
Do you want to answer it?
No
Yes
Answering Calls
Page 29

24
If you are unable to answer a call, you can find out who was
calling you, if this service is available on your network. You
can call the person back, if necessary.
The number of missed calls is displayed on the top of the
idle screen and the last caller name (if stored in the internal
Address Book) or the Phone number is displayed on the
bottom of the screen immediately after the call was missed.
If you tap the SEND button on this screen, you’ll be
connected to the last caller you have not answered. If you
press any other keys on this screen, the missed call
notification screen disappears.
To view the missed calls, refer to the incoming calls list on
page 20.
Viewing Missed
Calls
SEND
1
abc def
jklghi mno
23
May 25 THU
Catherine
Missed Call 03
Page 30

Answering Calls
25
Your phone provides a number of functions that you can use
during a call. You may not utilize all of these functions at all
times. Many of the in-call options are network services.
Tap the icon on the hard icon panel
during a call. The Busy menu appears on
the screen which allows you to access the
following options.
Mute Your Voice
This option allows you to switch your phone’s microphone off, so
that the other party cannot hear you. *Mute* displays on the
screen.
To resume, tap the icon and select this option again in the
Busy menu.
No Key Volume
This option does not transmit the key tones. It allows you to tap
buttons without hearing annoying key tones during a call.
Send My Phone Number
Selecting this option sends DTMF (Dual Tone Multi Frequency)
tones of your phone number. Use this option when you leave
your phone number for the person to return your call.
Send DTMF
This option allows you to send DTMF tones of the numbers you
have previously stored in the Send DTMF list. DTMF tones can
be used to control electronic phone services, such as a bank
account or voice mail system.
Using In-Call
Options
Mute Your Voice
No Key Volume
Send My Phone#
Send DTMF
Busy...
In-Call Options
Page 31

26
To use this option, you should store the numbers you want to
send as DTMF tones, for example, the bank account number
and password.
To register DTMF numbers:
1. In the Phone screen, tap the icon and select Send
DTMF from the Calls menu.
2. The Send DTMF screen opens. Tap the icon again, and
select New from the Setup menu.
3. Enter the desired number, then tap the OK button.
To use the DTMF number during a call:
1. After you call the service, select this option from the Busy
menu when the service asks to enter the DTMF code.
2. Select the desired number in the Send DTMF list.
3. Tap the SEND button.
Register DTMF
OK Clr PCancel
1
abc def
jklghi mno
tuv
pqrs wxyz
23
456
789
0
Cancels
registering.
Inserts a pause.
Clears the last entry.
Page 32

Call Waiting
You can answer an incoming call while you have a call in
progress, if this service is supported by the network. Contact
your service provider to activate Call Waiting.
During a call in progress, an incoming alert sounds for
another incoming call and a Call Waiting message appears
on the screen. The caller’s name (if stored in the internal
Address Book) or phone number is also displayed if the caller
identification feature is supported on your network.
The call waiting message disappears after 15 seconds or if
you tap SEND.
To answer a waiting call:
1. Tap the SEND button. The phone connects the calling
party, and places the current party on hold.
2. Tap the SEND button again to switch between the two
parties.
In-Call Options
27
Catherine
Call waiting
Air Time 1:14
Page 33

28
Ringer Volume
When a call comes in and the phone rings, you can adjust the
ringer volume with the volume buttons on the left side of the
phone. This volume setting affects only that call. To adjust ringer
volume for all calls, use the Volume function in the Sound
screen. See page 62.
Adjusting the
Volume
Key Volume
In the idle mode, you can adjust the key tone volume using the
volume buttons on the phone.
You can also adjust key volume using the Volume function in the
Sound screen. See page 62.
Home
Menu
Cont
Input
WWW
Voice Volume
During a call, if you want to adjust the earpiece volume, use the
volume buttons on the left side of the phone. Press to
increase and to decrease the volume. You can also adjust the
voice volume using the Volume function in the Sound screen.
See page 62.
Setting Basic Features
Page 34

Setting Basic Features
29
You can set your phone to signal an incoming call or
message in the following ways:
• the ringer sounds.
• the phone vibrates.
• the red LED on the top of the phone flashes.
• the phone vibrates and the ringer also sounds if you do not
answer the call.
To select the ring type:
1. In the Phone screen, tap the icon on the hard icon
panel. A menu list appears.
2. Tap the Setup tab on the top of the menu screen.
3. Select Ring/Vibrate from the Setup menu.
4. Select the desired ring type, then tap the OK button.
Selecting
Bell/Vibrate
If you’re talking on the phone and need to check information
in any of your applications (such as the Scheduler or Memo),
simply open the application you want to use. Your call is not
affected by opening any of the applications on your phone.
You can use the on-screen keyboard or the stylus to add or
change information (such as appointments, addresses, or
memos) during the call.
Easy Access to
Applications
During Calls
jklghi mno
tuv
oper
pqrs
wxyz
456
789
0
Ring Type
OK
Cancel
Vib + Bell
Lamp
Vibrate
Bell
Page 35

30
One-Touch Ringer
Selection
You can quickly select the ring type between Vibrate and
Bell without accessing menu commands.
Touch and hold the button on the Phone screen. Each
time you tap the button, your pone goes to the vibration
mode or bell mode alternatively.
When the vibrate mode is selected, the icon appears in
the top strip.
SEND
Home
Cont
Menu
Input
1
abc def
jklghi mno
tuv
pqrs wxyz
23
456
789
0
Note:
Your phone provides a variety of ringer options. To select another
type of ring, see page 29.
Page 36

Setting Basic Features
31
Air Time
Last Call
051123456
02min 11sec
Total Calls
Voice Calls
Total 6 Calls
02hr 10min 34sec
Data Calls
Total 2 Calls
00hr 58min 12sec
OK
Reset
3. The Air Time screen appears. You can review the last call
time, the total number of calls and the air time for all
voice calls and data calls, independently, since the last
reset action.
4. If you want to reset the call timer, tap the Reset button,
then the OK button.
To exit, tap the OK button.
Viewing Air Time
You can review the air time of the most recent call, as well
as total air time for all calls since the last reset action. You
can also reset the call timer.
To review the air time:
1. In the Phone screen, tap the icon on the hard icon
panel. A menu list appears.
2. Select Air Timefrom the Callsmenu.
Page 37

32
4. Find the Auto-Hyphen checkbox in the screen. Tap the
box to turn the feature on ( ) and tap again to turn the
feature off ( ).
5. To exit, tap the OK button.
Display
Initial Display
972-312-3456
Auto-Hyphen
OK
Cancel
Greeting
Big Clock
World Time
My Phone#
Automatic
Hyphenation
Your phone automatically hyphenates numbers as follows:
(area code)-(number). Digits following a pause are not
hyphenated.
To turn this feature off or turn it back on:
1. In the Phone screen, tap the icon on the hard icon
panel. The phone menu list appears.
2. Tap the Setup tab on the top of the menu screen.
3. Select Display from the Setup menu. The Display screen
appears.
Page 38

Answering Mode
33
You can set your phone to answer calls when you do not want to answer the call. The
caller can leave a message at a voice prompt.
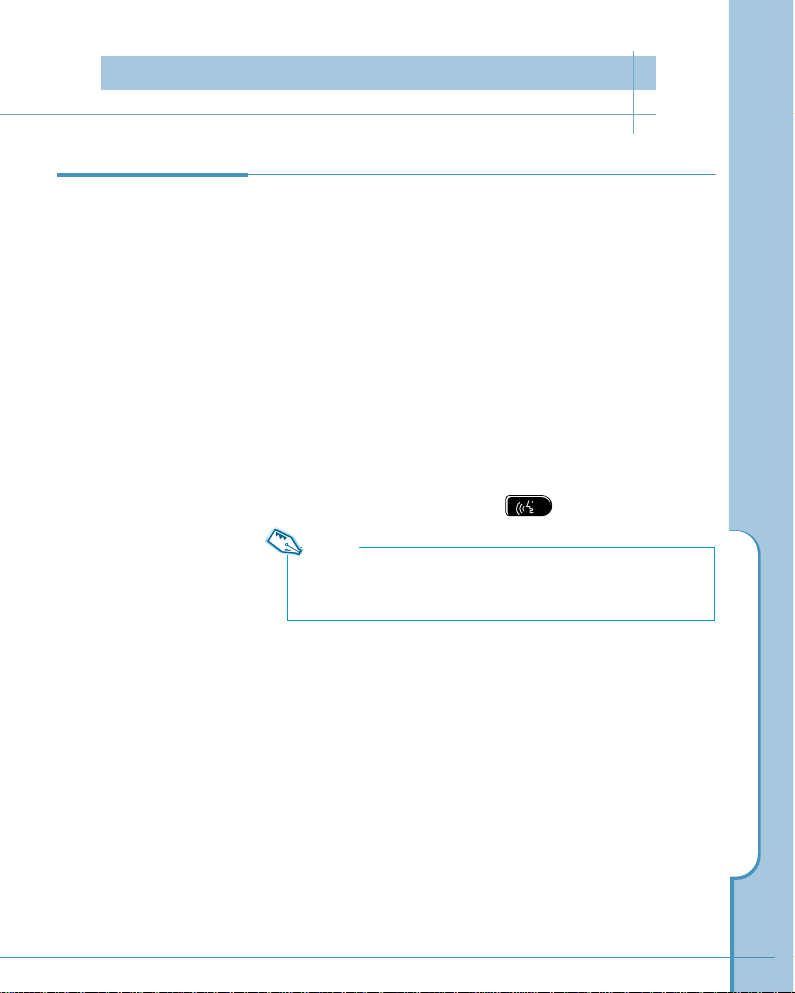
You can turn on or off the answering mode either using the
Answer button on the left side of the phone or accessing
the Answer menu after launching applications.
To set with the Answer button:
1. Press and hold button until
Answering Mode On displays.
Turning On the
Answering Mode
2. Your phone goes to the answering mode.
3. When a call comes in, your phone answers with a
specified OGM message.
You can use the default OGM message preset on your
phone, or record your own OGM message. For details on
recording your own message, see page 37.
Answer button
Note:
Pressing down button repeatedly
turns the answering mode on and off.
May 25 THU
10 : 50
-Answering Mode-
Answering Mode
Page 39

34
Receive
-Answering ModeRecording...
OGM Play
-Answering Mode2 New Messages
May 25 THU
4. After sounding a beep, your phone begins recording the
caller’s message up to one minute.
5. When a message has been successfully recorded, icon
appears in the top strip and the display shows the number
of newly recorded messages.
Notes:
• Your phone can record up to 12 caller messages.
• While recording a caller message, you can get an incoming call by
opening the flip, then tapping Receive on the screen. The message
already recorded is saved automatically.
• While recording, only the following options are available: Receive
button on the screen, the button on the right side of the phone
or the volume buttons on the left side of the phone.
Page 40

Answering Mode
35
Listening to a
Caller Message
AutoAnswer
OGM
Delete
Review
ON
2/12 recorded
2000.02.18.Fri. 14:50 25sec V
2000.02.18.Fri. 13:22 30sec V
To listen to the caller message:
1. Tap the icon on the hard icon panel to launch
applications.
2. Tap the icon to open the AutoAnswer screen.
3. Select the message you want to listen to, and tap the
Review button.
Answer
The recording time
Indicates that
the message has
not been reviewed.
Allows you to
record or play
OGM messages.
V
The time and date
when the message
was recorded.
Home
All
Cont
a
AddressEmailGoNextPhone
12
Sched ToDo Memo
Answer
Menu
Input
Home
Page 41

36
OK
Delete
stop
play
pause
2000.02.18 Fri 13:22 02/12
Name : ABC
Num : 051-123-456
Review
4. You can find the caller’s name (if stored Address Book) and
number in the Review screen.To listen to the message, tap
the play button. Your phone plays back the message.
Cancels playback.
To pause the playback, tap
pause. To resume the play
back, tap Play again.
Tap the arrows
to skip to the
next/previous
message.
The current
message number
of all messages
received.
Tap to delete the current message.
5. When you are done, tap the OK button to return to the
Answering screen.
To turn off or on the answering mode:
In the AutoAnswer screen, tap the ON or OFF button. The
button toggles each time you tap it.
To delete a message:
When you review the message, tap the Delete button to
delete the current message. You can also delete a message in
the message list screen. Select a message you want to delete
in the AutoAnswer screen, then tap the Delete button.
To adjust the speaker volume:
When you are listening to a message,
press the volume buttons on the left side
of the phone to increase or decrease the
volume.
Page 42

Answering Mode
37
Recording Your
Own OGM
Message
You can record your own OGM message which will be played
when a call comes in.
1. Tap the icon on the hard icon panel to launch
applications.
2. Tap the Answer icon to open the AutoAnswer screen.
Home
Cont
Menu
Input
All
Sched ToDo Memo
Home
12
AddressEmailGoNextPhone
a
Answer
3. The AutoAnswer screen displays the caller message list, if
recorded. To record an OGM message, tap the OGM button.
AutoAnswer
OGM
Delete
Review
ON
2/12 recorded
2000.02.18.Fri. 14:50 25sec V
2000.02.18.Fri. 13:22 30sec V
Page 43

38
4. Tab the OGM Message pick list, then select Custom.
OK
Default(H) Mode Setting
OGM Message Default(H)
stop
play
5. Tap the record button and record your own OGM
message.
6. If you want to finish recording, tap the Stop button.
7. Tap the OK button to return to the AutoAnswer screen.
Tap the pick list to select Custom.
OK
Default(H) Mode Setting
OGM Message Custom
stop
play
record
If you want to listen to the message
you have recorded, tap Play.
To stop listening,
tap Stop.
Note:
You can record the OGM message up to 1 minute. If the recording
time is over than 1 minute, the recording will automatically stop.
Tap to record your
own message.
Page 44

Answering Mode
39
Playing or
Selecting the
OGM Message
You can select the OGM message to be played when a call
comes in from the available default messages and your own
message.
1. In the AutoAnswer screen, tap the OGM button.
OK
Default(H) Mode Setting
OGM Message Default(H)
stop
play
3. If you want to listen to the selected OGM message, tap
the play button. To stop listening, tap the stopbutton.
4. To save your selection, tap the OK button.
2. Tap the OGM Message pick list, and select the message.
AutoAnswer
OGM
Delete
Review
ON
2/12 recorded
2000.02.18.Fri. 14:50 25sec V
2000.02.18.Fri. 13:22 30sec V
Default(H)
Default(E)
Custom
Tap the pick list.
Default OGM
message in Hebrew
Default OGM
message in
English
Your OGM message
Page 45

Learning to Use the
Applications
This chapter explains how to open applications, use
the on-screen keyboard, and use common features on
the applications.
Topics included in this chapter are:
• Working with Applications
• Customizing Your Phone
• PC Synchronization
Page 46

Working with Applications
41
Displaying
Applications
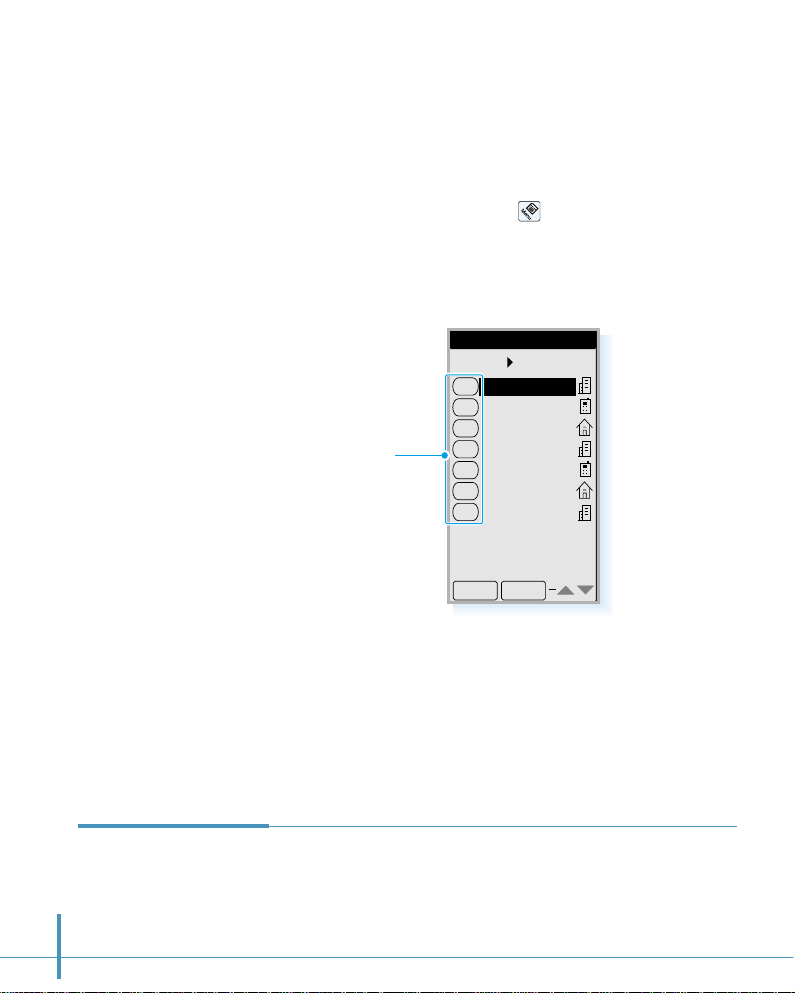
By default, the phone displays each application as an icon.
If you prefer, you can display applications as a list of names.
Your phone is equipped with a variety of applications. All the applications available on
your phone appear in the Home screen.
Bring up the Home screen to open any application. You can also open the three main
applications – Phone, Address and GoNext – with the application buttons below the
screen.
Home
Cont
Menu
Input
All
AnswerSched ToDo Memo
Home
Calc
Clock
SMS
12
Ctrl
1. Tap the icon on the hard icon panel to launch
applications.
2. Tap the icon of the application that you want to open. If
necessary, slide the scroll bar or press ❷ (or #) on the
scroll bar to move between screens.
# Home screen
Opening an
Application
Slide the scroll bar
to move between
screens.
Tap to launch
applications.
Working with Applications
Page 47

42
Listing Applications by Name
1. Tap the icon on the hard icon panel when the
applications are displayed as icons.
2. From the View menu on the top of the screen, select List
to display the applications in list format.
Displaying Applications by Category
The category feature enables you to group applications of
the same nature. You can choose to display a single category
or all your applications.
To display applications by category:
Tap the pick list in the upper-right corner of the screen and
select the application category you want to display.
All
Home
Open
Detail
Phone
GoNext
Email
Address
Sched
–
–
–
12
5
12
a
Displays the details on
the selected application
All
AnswerSched ToDo Memo
Home
Calc
Clock
SMS
12
Ctrl
Tap the pick list to
select category.
Opens the selected
application
Changes the display
format.
The number of entries stored in
the application
All
Basic
Communication
Game
PIM
Unfiled
Page 48

Working with Applications
43
Displaying Application Details
You can use the Application Details dialog to display
information about the selected application. You can also
change the application category in this Details dialog.
1. In the list view of the applications, tap the Detail button to
open the Application Details dialog.
2. To change the category, tap the Category pick list, and
select one from the list.
3. Tap the OK button to return to the Home screen.
OK
Application Details
Title
Category
Version
Records
Address
PIM
1.0
4
Software version
Category
pick list
The number of entries
stored in the application
Page 49

44
Brief Description
on Applications
Phone
Used for managing voice calls. In the Phone screen, you can
access many Calls options, SMS and Setup options by
tapping the icon on the hard icon panel.
GoNext
You can surf the Internet with the built-in web browser. Also,
you can enjoy GoNext network service, which enables you to
easily access Web-based, interactive information and
services, such as news, stock trading, weather, and web
based e-mail.
Email
Enables you to send and receive e-mails on your phone.
Address
Stores names, addresses, and telephone numbers.
Sched(Scheduler)
Keeps track of important dates and events, and helps
manage your schedule.
Answer
You can set the phone to answer calls automatically and
record your messages.
ToDo
Keeps track of to-do lists. Allows you to set an alarm or a
reminder.
Page 50

Working with Applications
45
Memo
Allows you to write a memo (including a graphic image) on
the screen. You can send the memo on the phone.
SMS
You can send and receive voice, text or paging messages.
Calc (Calculator)
Performs complex mathematical calculations on-screen.
Clock
Use this menu to set the system clock for your phone and to
keep track of the time and date around the world.
Ctrl (Control)
Contains security and other system-related feature settings.
PCsync(PC Synchronization)
Use this menu to synchronize data between your phone and
PC (with the supplied Datasync CD-ROM).
Find
Searches for keywords throughout the phone.
Othello
You can enjoy the Othello game.
Chat
You can use the on-line chatting service.
Page 51

46
Entering
Text,
Numbers or
Symbols
There are two ways to enter text, numbers or symbols into your
phone. You can use the on-screen keyboard or you can write
directly on the screen. Both of these methods use the stylus.
You can open the text input screen any time you need to enter
text or numbers.
Opening the Text Input Screen
1. When you are asked to enter information in any application,
tap the icon on the hard icon panel to open the text input
screen.
Home
Cont
Menu
Input
abc
123
ABC
OK
Cancel
E 1$
#!Text input screen
Select the input method.
Note:
Before you open the text input screen, make sure that you have
properly selected the field you want to enter information. Cursor
blinks in the selected field. If not, just tap the field to place a cursor
on the field. When you finish entering text and close the text input
screen, you will find the field displays the information you just
entered.
2. Select the input method. Tap to use the writing mode, or
to select the on-screen keyboard mode.
Tap to open
the text input
window.
Page 52

Working with Applications
47
Using the On-Screen Keyboard
1. In the text input screen, tap to open the Hebrew
keyboard, to open the English keyboard, or to open
the symbol keyboard.
OK
Cancel
1$
E
1234567890
space
cap
qwer tyui op
asdfghj kl ;
zxcvbnm,. /
English ❿
keyboard
Hebrew ❿
keyboard
Symbol ❿
keyboard
Backspace
Carriage return
Tap to open the
English keyboard.
Displays more
available characters.
Caps shift
OK
Cancel
1$
E
1234567890
space
Carriage return
Tap to open the
Hebrew keyboard.
Displays more
available characters.
OK
Cancel
E
123( ) { }[ ] _
space
456–~<>^ ?
789., $%' "|
0
000
#/ +=: ; `@
1$
Backspace
Carriage return
Tap to open the
Symbol keyboard.
Backspace
E
1$
Page 53

48
3. When you close the on-screen keyboard, you will find the
characters are inserted in the previonsly selected
information field.
OK
Cancel
1$
E
1
David
234567890
space
cap
qwer tyui op
asdfghj kl ;
zxcvbnm,. /
Characters you just
entered are displayed
in the selected field
Unfiled
Details
L. Name David
F. Name
Title
Company
Work
Home
Fax
OK
Address New
2. Tap the characters on the on-screen keyboard to enter
text, numbers and symbols. The selected characters
display in the text field on the top of the screen. When the
desired text is displayed, tap the OK button.
Text field. Characters
are displayed as you
tap them.
Page 54

Working with Applications
49
Writing Directly on the Screen (English & Symbol only)
Using your stylus, write a character in the text input screen.
Each character you write is translated into typed text and
displayed on the text field at the top of the text input screen.
Write a character in the writing area, one character at a
time, as you normally would on paper. Some characters must
be written in a particular way to be recognized. For details
on how to write characters, see the tables on page 51.
To reduce the chance for an unrecognizable letter, take the
following steps when you write letters on the screen:
1. Use the table on page 53 to find the stroke shape for the
letter you want to write. For example, the stroke below
creates letter “n”.
Text field:
Characters are
displayed as you write
them in the writing
area.
Writing area:
Write characters
here.
abc
123
ABC
OK
Cancel
E 1$
Start the stroke
at the heavy dot.
Lift the stylus here.
Tap to
write directly on
the screen.
Page 55

50
2. Select appropriate writing mode.
3. Position the stylus on the writing area, then start at the
heavy dot. Draw the shape as it appears in the table.
Don’t try to draw the dot itself. The dot is only there to
show the starting point of the stroke.
4. Lift the stylus from the screen at the end of the stroke
shape.
When you lift the stylus from the screen, the letter
appears in the text field on the top of the screen. You can
immediately begin the stroke for the next character.
#!Writing area for English letters
Note:
You must begin the character strokes in the writing area. If you do not
make strokes in the writing area, your phone does not recognize them
as text characters. For details on the writing areas, see page 51.
Select the writing
mode according to
the text you want
to write.
Text field
ABC
abc
123
E 1$
Cancel
OK
Page 56

Working with Applications
51
Writing Areas of the Text Input Screen
When you write a character on the text input screen, you
first select the writing mode.
To write English letters and numbers:
First tap to activate the writing area
for English and numbers.
You can write English in either uppercase or lowercase. How
the letter is interpreted and displayed depends on where you
write it in the writing area. For example, you can write a
letter in lowercase or uppercase, and it will appear in
lowercase if you write it in the lowercase letter area (abc) as
shown in the figure.
You can write numbers in the number area (123).
E
abc
123
ABC
E 1$
Tap to
write English
letters.
abc
123
ABC
To write in uppercase, write here.
To write in lowercase,
write here.
abc
123
ABC
Write number here.
Page 57

52
To write symbols and punctuation marks:
First tap to activate the writing area for symbols and
punctuation marks.
Write symbols and punctuation in the symbol writing area
(Sym1 or Sym2) and write numbers in the number area (123).
Sym1 Sym2 123
OK
Cancel
E 1$
To write symbol
marks and
punctuation,
write here.
Tap to write
symbol marks.
When writing, keep these tips in mind:
• If you draw the character, following the shape exactly as
shown in the tables on page 53. You can achieve 100%
accuracy.
• You can add or delete space in the writing area. First tap
the stylus to place the cursor to the right of the character
you want to delete or insert a space in the text field and
make the backspace stroke (a horizontal line from right to
left) or the space stroke (a vertical line from bottom to top)
in the writing area. See the tables on page 53 for details.
• To select the text you want to edit or delete in the text
field, tap the stylus to place the cursor to the right of the
last character and drag your stylus over the text. The
selected text will be highlighted. Then write correct
characters in the writing area to edit the text, or draw a
line from right to left (backspace stroke) to delete it.
• Write at natural speed. Writing too slowly can cause
recognition errors.
abc
ABC
call David
1$
Write numbers here.
# Backspace stroke
Page 58

Working with Applications
53
Character Set
These tables show how to write letters, numbers, symbols and
editing marks. For each character, the table shows alternatives
for writing characters. Use the one that is easiest for you.
The dots indicate where the strokes begins. Where appropriate,
the stroke sequence is indicated by numbers.
English Letters
Character Stroke options
a
b
c
d
e
f
g
h
i
j
k
l
m
Character Stroke options
n
o
p
q
r
s
t
u
v
w
x
y
z
1
2
1
2
1
2
1
2
1
2
1
2
1
2
1
2
1
2
1
2
Editing marks
To enter Stroke options
space
back space (back delete)
carriage return (next line)
Page 59

54
Numbers
Symbols
Character Stroke options
0
1
2
3
4
1
2
Character Stroke options
5
6
7
8
9
1
2
Character Stroke options
. (period)
, (comma)
?
!
:
;
‘
(single quote)
“ (double quote)
`
#
*
+
–
=
/
*1 These punctuation marks
must be written inside
lower one-third area.
*2 These marks must be
written inside upper
one-third area.
Character Stroke options
|
{
}
[
]
(
)
<
>
%
$
~
^
@
121
2
1
2
21
1
341
2
2
3
4
3 1
3 2
2
1
3
1 2
211
2
1
2
2
1
3
1
2
3
2
1
*
1
*
1
*
2
*
2
Page 60

Working with Applications
55
Using Application
Controls
The applications on your phone use standard controls for
moving around the screen. Once you become familiar with
them, you can easily select options and navigate through
applications.
Checkbox – Tap an empty checkbox to put a check mark on
the box to select that option. Tap it again to remove the
check mark.
Scroll arrows – Tap # to display the previous page.
Tap ❷ to display the next page.
Pick list – Tap the arrow to display a list of choices. From
the pick list, tap an item to select it.
button – Tap this button to perform a command. In most
cases, tapping this button opens or closes a dialog, a screen
where you enter information or change settings. A dialog
always contains an OK or Cancel button for closing the
dialog.
Scroll bar – Drag the slider to scroll the display one line at
a time. To scroll to the previous page, tap the arrow at the
top of the scroll bar. To scroll to the next page, tap the arrow
at the bottom of the scroll bar.
Help Writing
Characters
The software recognizes several alternative ways of writing
a character. If a character you are writing is misinterpreted,
You can use Input Help to see an animated demonstration of
how to write the letter. Tap the icon on the hard icon
panel on the text input screen. Select the character you want
to see. To return to the text input screen, tap the OK button.
Input Help
OK
1$
A a
abcdef
gijkl
mn o pq r
stuvwx
yz
h
OK
Page 61

56
Memo Edit
Delete
OK
Unfiled
Design meeting
Mr. Kim
14:30, Dec.12
1st, I.hotel
A menu is a set of commands for actions you can use in the
open application. You open the menus on your phone by
tapping the icon on the hard icon panel.
Some menu commands are common to all applications.
Others are specific to the application you are using (For
example, menus in the Memo have different options than
those in the Sched application).
To open the menus:
1. Open any application (such as the Memo).
2. Tap the icon on the hard icon panel to open the menus
for that application.
Using Menus
# Sample screen-Memo Edit
# Menu screen
Home
Cont
Menu
Input
Tap to open
menus.
◗
Record
Design meeting
Delete Memo
Mr. Kim
Delete Attachment
14:30, Dec.12
New Memo
1st, I.hotel
Send to SMS
Options SetupEdit
Delete
OK
Page 62

Working with Applications
57
In this example, there are three menus–Record, Edit, Options,
and Setup. The Record menu, which is open, contains four
commands–Delete Memo, Delete Attachment, New Memo,
and Send to SMS.
To choose a menu:
After you open the menus for an application, tap the menu that
contains the command you want to use.
The menus and menu commands you can see depend not only on
the application that is running, but also on which part of the
application is currently on the screen. For example, in the Memo
application, the menus for the Memo List screen are different
from those for the New Memo screen.
Page 63

58
Using the Edit Menu
The Edit menu is available with any screen where you enter or
edit text. In general, these commands apply to text that you select
in an application.
To select text in an application:
1. Tap the beginning of the text that you want to select.
2. Drag the stylus over the text to highlight it (in black). Drag
across the text to select additional words, or drag down to
select a group of lines.
The following commands may appear in an Edit menu:
Undo – Reverses the action of the last Edit command. For
example, if you used Cut to remove text, the Undo command
replaces the text.
Cut – Removes text and stores it in memory. You can paste
this text into another area of the application or into a different
application.
Copy – Copies text and stores it temporarily in memory. You
can paste this text into another area or into a different
application.
Paste – Inserts text you cut or copied at the selected point. If
you did not previously cut or copy text, the Paste command
does nothing.
Select All – Select all the text on the current record or
screen. Use this command to cut or copy all of the text and
paste it elsewhere.
Delete – Deletes text you cut or item you selected.
Page 64

Working with Applications
59
3. You can search for information in any application. Tap the
desired application icon or tap All.
Finding Data on
Your Phone
Cont
Menu
Input
All
Home
Calc
Clock
SMS
Ctrl
PCsync
Othello
Chat
Find
Home
Launches applications.
After using your phone for a while, you may have a large
amount of information stored on it. To locate specific data,
you can run the Find application.
To open the Find application:
1. Tap the icon on the hard icon panel to launch
applications.
2. Tap the Find icon. If necessary, slide the scroll bar to
display the next screen.
Address
Scheduler
ToDo
Memo
SMS
Find
All
a
12
All
Cancel
OK
a
12
Page 65

60
4. To enter text or number in the search line, tap the icon on
the hard icon panel. The text input screen opens.
5. Enter the text or number you want to search for, then tap the
OK button. Note that the Find command is not case-sensitive.
You can search for whole words or just the beginning letters of
a word. For details on entering information on the screen, see
page 46.
6. The text or number you entered displays in the search line.
7. Tap the OK button. The results of your search appears.
8. If there are multiple entries, tap the correct one.
If you tap the Open button, you can open the
corresponding entry and see the information that you
searched for.
Find
`David´ – 4 found
Cancel
Open
Repeat
a
a
David Jr.
P. david
ign conf: david
call david
Page 66

Customizing Your Phone
61
You can personalize and customize your phone by adjusting bell and sounds, display, and
setting security menu options in the Control application.
1. Tap the icon on the hard icon panel to launch
applications.
2. Tap the Ctrl icon. If necessary, slide the scroll bar to find
this icon in the Home screen.
Opening Control
Application
Home
SMS
PCsync
Calc
Ctrl
Cont
Menu
Input
All
Clock
Find
Home
Chat
Othello
3. The Control screen opens. The
following menu options are
available in the screen. Select
the desired menu icon. For
details on each menu option,
see the corresponding page.
Control
Bell Sound Disp
Secur Batt Sys
Net Stor
Calib Contr
Owner
Slide scroll
bar to move
the screen.
Customizing Your Phone
Page 67

62
To select the ring type, tap the icon in the Control screen
to open the Ring Type screen. Bell, Vibrate, Lamp, Vib+Bell
options are available. For details on each ring type, see
“Selecting Bell/Vibrate” on page 29.
When you select the desired type, tap the OK button.
Bell
Tap the icon in the Control screen to open the Sounds
screen. In this screen, you can adjust volumes and tones.
Volume
You can set the volume level for the ringing, voice volume and
key beep tone.
You can adjust the Ring Volume, earpiece Voice Volume,
and Key Volume. To increase the volume, tap the block on
the right side, and to decrease the volume, tap the left block.
The selected volume level sounds.
To save setting, tap the OK button.
Sound
Note:
You can also adjust volume using the volume keys on the left side of
the phone. See page 28.
jklghi mno
tuv
oper
pqrs
wxyz
456
789
0
Ring Type
OK
Cancel
Vib + Bell
Lamp
Vibrate
Bell
Bell
Sounds
Ring Volume
Voice Volume
Key Volume
OK
Cancel
Sound
ToneVolume
Page 68

Customizing Your Phone
63
Tone
In the Sounds screen, two tabs are available: Volume and
Tone. Tap Tone. The following tone menus are displayed. Use
the " or ❷ key in the bottom right corner to see the tone
menus not displayed in this screen.
• Ring Tone and Alarm Tone : You can change the ring
tone and alarm tone to the desired type from the list that
appears when you tap the corresponding pick list marked
with ❿. Each time you select a tone, it sounds for a few
seconds.
• Message Alert : This alert tone sounds Once or Every 2
Minutes when a new message comes in. To disable the
alert, select None from the pick list.
• Tone Length : Some phones you call can recognize only
longer tones. You may have to change the length to Long
for some calls. When calling a paging system, your phone
should be in the Short mode.
• Call Connected : If you put a check mark on this checkbox,
an alert tone sounds when a call is connected. Each time
you tap the box, check symbol appears and disappears.
• Call Disconnected : If you put a check mark on this
checkbox, an alert tone sounds when a call is disconnected.
• Service Area : If you put a check mark on this checkbox,
the phone beeps when you exit service area or when you
return to a service area.
• Power On : If you put a check mark on this checkbox, the
phone beeps when you turn the power on.
• Power Off : If you put a check mark on this checkbox, the
phone beeps when you turn the power off.
Sounds
Volume
Ring Tone
Bell 1
Alarm Tone
Bell 1
Message Alert
Once
Tone Length Short
Call Connected
Call Disconnected
OK
Cancel
Tone
Page 69

64
Tap the icon in the Control screen to open the Display
screen.
You can select the initial display that you see in the idle mode
of the Phone screen. You can select your phone number,
greeting message, world time or big clock. The selected item
will be displayed with the current date and time. Selecting Big
Clock makes the time in the idle mode displayed larger.
Select the desired item. You will see the contents at the top
of the window. ForGreeting, you can change the contents. See
below.
You can also turn the Auto-Hyphen feature on or off in the
Display screen. To turn the Auto-Hyphen feature on, put a check
mark on the box. For information on the Auto-Hyphenation, see
page 32.
To save the setting, tap the OK button.
To change the greeting:
1. Select the words or name displayed on the top of screen
by dragging the stylus over the text.
2. Tap the icon on the hard icon
panel. The on-screen keyboard
appears on the bottom of the
screen.
3. Tap the letters you want to display
on the Phone screen, then tap the
OK button. You can enter up to 9
characters. For details on
entering a text,
see page 46.
Display
Display
Initial Display
972-312-3456
Auto-Hyphen
OK
Cancel
Greeting
World Time
Big Clock
My Phone#
Display
Initial Display
World Time
My Phone#
Greeting
SAMSUNG
Home
Cont
Menu
Input
OK Cancel
Characters are
displayed as you
write or tap them on
the text input panel.
On-screen
keyboard
Tap to open the text input screen
Disp
Initial Display
Be happy day
OK Cancel
0123456789
qwer t yu iop
asdfghj kl ;
zx
OK
Display
My Phone#
Greeting
cvbnm,. /
cap space
1$E
Page 70

Your phone provides many security
options, including a user-programmable
password and call restriction features.
To access the Security menu, tap the
icon in the Control screen. You must
enter the four-digit password. It is preset
to 0000 . The Security screen opens. The
following menu options are available in
the Security screen.
Mode
When the phone is locked, you cannot access most of your
phone’s memory and menu features or make phone calls
without entering the lock code. You can only answer
incoming calls. The following options are available:
Unlock: the phone remains unlocked.
AutoLock: the phone locks automatically at the next power-
up and stays locked until the lock code is entered.
When the phone is locked, you can dial only pre-specified
emergency numbers if registered. To
place an emergency call, tap Emergency
Call button on the Locked screen, then
dial the registered number.
Enter Password
????
Cancel
1
abc def
jklghi mno
tuv
pqrs wxyz
23
456
789
0
Customizing Your Phone
65
Security
Note:
The numbers 100, 101, 102 and *166 are
preset as emergency numbers and can be
dialed in lock mode.
Security
Mode Unlock
Security
Incoming
Outgoing
International
OK
Cancel
Change Password
Reset Phone
Enter Emergency#
Secur
Locked
4 : 13
May 26 FRI
abc def
1
23
jklghi mno
456
tuv
pqrs wxyz
789
0
Emergency Call
Page 71

66
To place a normal call in lock mode or use your phone’s
functions, enter the lock code. The phone is unlocked.
Change Password
You can change your current password to a new one. The
password is preset to 0000 at factory.
Tap Change Password in the Security screen. The Change
Password screen opens. Tap the desired 4-digit number, then
tap the OK button. The phone asks to enter the password
again. Re-enter the password for confirmation, then tap the
OK button.
Security
This feature allows you to restrict your calls. Call restriction
can be set up in the following ways:
•
Incoming: If you put a check mark on this box, calls can not
be received.
•
Outgoing: If you put a check mark on this box, all calls
except to emergency call numbers cannot be
made.
•
International: If you put a check mark on this box,
international calls cannot be made. The
prefixes 00, 012, 013 and 014 are recognized
as international numbers.
Page 72

Customizing Your Phone
67
Enter Emergency Number
This feature allows you to call pre-specified emergency
numbers when the phone is locked or when outgoing calls
are restricted. You can store up to three emergency numbers.
Tap Enter Emergency # in the Security screen. When the
Enter Emergency # screen appears, tap a location in the top
of the screen and enter the desired number, then tap the OK
button.
Reset Phone
This menu enables you to reset the phone to its default
configuration. Also, all phone memories are cleared.
Tap Reset Phone in the Security screen. The display asks if
you are sure you want to initialize the memory. Tap the OK
button.
Enter Emergency#
OK
#2 #3
ClrCancel
#1
1
abc def
jklghi mno
tuv
pqrs wxyz
23
456
789
0
To save battery power, the screen blanks out (sleeps) after a
few minutes of non-use. Tap the icon in the Control
screen, and you can set the time period to 1, 2, 3, 4 or 5
minutes.
Select the length of idle time before your phone sleeps from
the pick list, then tap the OK button.
To “wake up” the phone, just tap the screen. You can also
“wake up” by closing and opening the flip.
Battery
Power Saving
Power-save Timer
1min
OK
Cancel
Batt
Page 73

68
If you have subscribed to more than one service network, tap
the icon in the Control screen to select the desired
NAM(Number Assignment Module).
You must enter the four-digit password to access the System
menu. This password is the same as the security password,
it is preset at the factory to 0000 (for further information
please refer to page 66 “Change Password”).
The System screen opens and your phone number, in the
selected NAM, displays in the top of the screen.
To save setting, tap the OK button.
System
System
My Phone #
972-312-3456
Set NAM
OK
Cancel
NAM2
NAM1
To connect to an Internet service provider or other networked
computer to receive and send e-mail and explore the Internet,
the network of your phone has to be set correctly a using the
icon in the Control screen.
The correct network information must be set up before you
can use the Email, GoNext, or Chat applications.
Before you begin, contact your network service operator. The
network service operator provides the information on the
network settings.
Network
Net
Cancel
OK
Account
User authentication
Name :
#1
Password :
Network Setup
Number
Sys
Page 74

Customizing Your Phone
69
To enter information on each field, tap the desired field to
position a cursor, then tap the icon on the hard icon panel
to open the text input screen and enter the correct
information.
Enter information on the following fields:
Account - It is preset by your service provider.
Put a check mark on the User authentication checkbox and fill
in the Name and Password fields.
Name - Enter the login name for your account.
Password - Enter your account password.
Number - Enter the phone number you use to connect with
your ISP or dial-in server.
Extra AT- It is preset by your network service operator. Do
not change the setting unless the service provider instructs
you to do so.
Time Out(MIN)- Timeout sets how long the phone waits
before dropping the connection with your service provider or
dial-in server after an application closes.
DNS - Enter the IP addresses of the Domain Name Server
given to you by your service provider.
Note:
Your phone comes pre-configured with your GoNext account
information. If you change the settings, you may not be able
to use your account.
Page 75

70
If you tap the icon in the Control screen, you can record
all the owner information. To enter information on each field,
tap the icon on the hard icon panel. For details on
entering information, see page 46.
To save settings, tap the OK button.
Owner
Information
Tap the icon in the Control screen. The Storage screen
appears. In this screen, you can see the amount of total
memory and the amount of available free memory for storing
data.
Storage
Storage
Total 1024K
896K Free
128K used
1024K
128K
OK
Stor
Owner
Name
Position
Company
Work
Home#
Cellular
OK
Cancel
Owner
Page 76

Customizing Your Phone
71
Tap the icon in the Control screen to open the calibration
screen.
The first time you start your phone, or when the screen
accuracy diminishes over time, calibrate the screen with the
stylus to make the screen respond correctly to a stylus tap.
Carefully press and briefly hold the stylus on the center of
the target that appears on the calibration screen. Repeat as
the target moves around the screen.
Calibration
Use stylus to tap
center of target.
If you tap the icon in the Control screen, you can adjust
the screen contrast. Each time you tap the Bright arrow, the
screen becomes lighter. When tapping the Dark arrow, the
screen becomes darker. To save the setting, tap the OK
button.
You can also adjust the screen contrast at any time without
going to this Control menu by:
• Tapping the light side on the icon on the hard icon
panel to lighten the screen.
• Tapping the dark side on the icon on the hard icon
panel to darken the screen.
Contrast
Contrast
Bright Dark
OK
Cancel
Home
Cont
Memo
Input
Net Stor
Calib Contr
Owner
Tap to darken.
Cont
Tap to lighten.
Calib
Contr
Page 77

72
PCsync technology enables you to synchronize data between your phone and the DataSync
software on your computer. To synchronize data, you must install the DataSync software
with the supplied CD-ROM and connect your phone to the PC with the supplied data cable.
For information on the DataSync software and PC connection, refer to the instruction guide
which comes with the CD-ROM.
1. Connect your phone to the PC with the supplied data
communication cable.
2. Tap the icon on the hard icon panel to launch
applications.
3. Tap the PCsync icon in the Home screen.
4. Tap the DataSync button.
Synchronizing
Data
All
Home
Calc
Clock
SMS
Ctrl
Othello
Chat
Find
PCsync
PC Synchronization
PC Sync
DataSync
DataCom
Setup
Page 78

PC Synchronization
73
5. The DataSync screen opens. To start synchronization, tap the
Start button. A connection is established, and the data is
transferred between your phone and the PC.
Cancels synchronization
Allows you to register
the user name and
password.
DataSync
Cancel H
Setup
Start
Shows the data synchronization
history in a separate screen.
Note:
You should register the same user information you entered in the Datasync
application on your PC.
Page 79

74
Automatic Synchronization
You can set your phone to synchronize automatically each time
you connect the phone to your desktop PC.
To setup automatic synchronization:
1. In the PC Sync screen, tap the Setup button on the bottom of
the screen.
2. In the Auto Start screen, tap the DataSync button, then tap
the OK button. If you want to cancel the automatic
synchronization, tap Auto Start(Off) in the same screen.
PC Sync
Setup
DataCom
DataSync
Auto Start
DataCom
Auto Start(Off)
OK
DataSync
Page 80

PC Synchronization
75
When your phone is connected to your PC with the supplied
data cable, you can use the phone as a modem to access the
Internet or send and receive data and fax (with third party
software).
1. Connect your phone to the PC with the supplied data
communication cable.
2. Tap the icon on the hard icon panel to launch
applications.
3. Tap the PCsync icon in the Home screen.
Data
Communication
4. Tap the DataCom button in
the PC Sync screen.
All
Home
Calc
Clock
SMS
Ctrl
Othello
Chat
Find
PCsync
PC Sync
DataSync
DataCom
Setup
Page 81

76
• To set the incoming mode or the bell sound, tap the Set
Incoming button.
• If you want to cancel Data Communication, tap the Exit
button.
5. Your phone will be connected
to the Internet.
DataCom
Data Service
Call Only
Set Incoming
Exit
FAX CALL ONLY
DATA CALL ONLY
VOICE CALL ONLY
Tap the pick list and select the
desired call type.
Bell 1
Bell 2
Bell 3
Bell 4
Bell 5
Tap the pick list and
select the desired bell
type for incoming
calls.
Set Data Service
Set Incoming Mode:
VOICE CALL
On Incoming Call
Set Bell Sound:
Bell 2
Data Roaming
OK
Cancel
Page 82

PC Synchronization
77
Memo
Page 83

Address Book
The Address Book enables you to keep names,
addresses, phone numbers and other information
about your personal or business contacts.
Page 84

Address Book
79
With the Address Book, you can:
■ Quickly look up or enter names, addresses, phone numbers and other information.
■ Enter up to six phone numbers (home, work, fax, mobile, pager, other) or e-mail address
for each name.
■ Define which phone numbers appear in the Address List screen for each Address Book
entry.
■ Attach a note to each Address Book entry where you can enter additional information
about the entry.
■ Assign categories to your Address Book entries, so you can quickly sort and view your
entries in logical groups.
To open the Address Book:
■ Press the Address button on the front panel of the phone to display the Address Book
on the screen.
Home
Menu
Cont
Input
WWW
a
Address button
Address Book
Page 85

80
Home
Cont
Menu
Input
All
AnswerSched ToDo Memo
Home
12
AddressEmailGoNextPhone
a
1. Tap the icon on the hard icon panel to launch
applications, and tap the Address icon.
An Address Book entry is where you store name and address
information about people or businesses. Your phone makes it
easy to create, edit and delete Address Book entries.
To create a new Address Book entry :
Creating an
Address Book
Entry
2. Tap the New button to display the Address New screen.
All
Edit
New
Address
View
Call
A-H
I
-
O
P
-
Z
-
-
-
Tap New.
Unfiled
Details
L. Name
F. Name
Title
Company
Work
Home
Fax
OK
Address New
Page 86

Address Book
81
3. An Address Book contains various information fields.
To select the field you want to enter information, just tap
the field so that a cursor blinks on the field.
4. To enter information on the field, tap the icon on the
hard icon panel to open the text input screen.
5. Type or write letters or numbers. Letters or numbers
display in the text field.
You can use Edit option by tapping the icon, which
allows you to cut, copy, and paste a selected text and
number.
For details on entering information on the screen,
see page 48.
Text field.
Letters are displayed
as you tap them.
Select Hebrew,
English or
Symbol mode.
Select the input
mode.
OK
Cancel
1$
E
1
David
234567890
space
cap
qwe r t y u i op
asdf gh j kl ;
zxcvbnm, . /
Page 87

6. When the name or number appears correctly in the text field
of the text input screen, tap the OK button.
7. The information you entered is displayed in the selected
field.
8. Repeat steps 3 through 7 to enter other information you want
to include in this Address Book entry.
9. Tap ▲ or ▼ in the lower-right corner of the screen to move
to the next page of information.
The three custom fields on the Address Book enable you to
customize the labels of the fields, for example, home page
address, birthday, etc. To rename custom fields, see page 96.
10. After you finish entering information, tap the OK button to
return to the Address screen.
82
Unfiled
Details
L. Name David
F. Name
Title
Company
Work
Home
Fax
OK
Address New
Page 88

Address Book
83
Setting Address Details
When you tap the Details button in the Address New or
Address Edit screen, the Address Details screen opens. The
Address Details screen provides a variety of options that you
can associate with the Address entry.
Unfiled
Details
L. Name David
abc tech.
1234567
9876543
F. Name
Title
Company
Work
Home
Fax
OK
Address New
Tap Details.
In the Address Details screen, you can set any of the
following settings.
Note:
If no information is given in the Address New or Address Edit screen,
the Address Details screen does not open.
OK
Delete
Address Details
Category Unfiled
OK
Show Work
Ring Default
Set Speed Dial
Set Voice Dial
Page 89

84
• Categories can help you file individual Address Book entries
into groups for easy review. To assign a category to an
Address Book entry, tap the category pick list and tap the
category that you want to assign to the Address Book entry.
You can select Personal, Business, and Unfiled.
If you want to add or rename the categories, see page 99.
• If you have stored several different numbers (e.g. Work,
Home, Mobile Phone, Fax) in the Address Book entry, you can
select one of them to be displayed on the Address screen.
You can see another phone number by tapping the Show pick
list and select the desired number from the pick list.
• Set a unique ring type for incoming calls from the numbers in
the current entry. Select one from the Ring pick list.
• Set speed dial codes for the numbers in the current entry. For
information on setting speed dial, see page 85.
• Set a voice dial for a selected number. For information on
setting voice dial, see page 87.
• Delete the entry.
Ring Default
Set S
d Dial
D
Category Unfiled
Show Work
pee
Set Voice Dial
elete
Page 90

Address Book
85
Setting Speed Dial
Speed dialing is a quick way to call frequently used phone
numbers. You can assign a speed dial code to each phone
number. For information on how to make a call using speed
dial, see page 17.
1. When you create or edit the address entry, after you filled
in the fields on the Address New or the Address Edit
screen, tap the Details button. The Address Details
screen opens.
2. Tap the Set Speed Dial button. All the phone number
fields for that entry appear.
3. Select the number to which you want to assign a speed
dial by tapping ❿ at the right side of the number.
OK
Delete
Address Details
Category Unfiled
OK
Show Work
Ring Default
Set Speed Dial
Set Voice Dial
Tap Set Speed Dial.
OK
Set Speed Dial
David Moore
OK
441234567
449876543
0119876543
Tap the pick
lists to select
the field.
Page 91

4. The Speed Dial code table appears. To select the desired
speed code in the table, tap the code.
Speed dial codes that have already been assigned for other
phone numbers have dark backgrounds and cannot be
selected.
To release the speed dial setting for the selected number,
select in the upper-left corner on the table.
5. You will find the selected code at the right of the number in
the Set Speed Dial screen.
6. Repeat steps 3 through 5 to set speed code for other
numbers, if necessary.
After you finish, tap the OK button to return to the Address
Details screen.
86
OK
Set Speed Dial
OK
01234
6578910
1211 13 14 15 16
1817 19 20 21 22
Tap to delete
speed dial code.
Tap to see next or previous numbers
screen by increments of 100.
Tap to see next or previous numbers
screen by increments of 23.
Set Speed Dial
David Moore
441234567
449876543
0119876543
15
OK
OK
Page 92

Address Book
87
Setting Voice Dial
Voice dialing feature requires that you first set the phone to
recognize the name of the person you are calling. You can
add voice tags for up to 20 numbers.
1. When you create or edit the address book entry, after you
filled in the information fields on the Address New or the
Address Edit screen, tap the Details button. The Address
Details screen opens.
2. Tap the Set Voice Dial button. All the phone number
fields for that entry appear.
OK
Delete
Address Details
Category Unfiled
OK
Show Work
Ring Default
Set Speed Dial
Set Voice Dial
Tap Set Voice Dial.
OK
441234567
449876543
0119876543
David Moore
Set Voice Dial
Tap to select
the field.
Page 93

Home
Menu
Cont
Input
WWW
a
88
3. Select the number to which you want to add a voice tag by
tapping ❿ at the right side of the number.
4. The phone will guide you with voice prompt to say the name
you want to record.
5. Say the name you want to record as a voice tag. The phone
stores the name as a first sample, and then prompts to say
the name again.
6. Respond to the prompt by repeating the name. The phone
stores the name as a second sample.
When the name is recorded successfully, you will be guided
with voice prompt and message on the screen.
Microphone
Page 94

Address Book
89
7. Tap the OK button. You will find the mark at the right
side of the number.
If you want to record other names, repeat steps 3 through 6.
OK
441234567
449876543
0119876543
David Moore
Set Voice Dial
Shortcut to Storing Phone Numbers
You can store a phone number quickly without opening the
Address screen.
Enter the number in the Phone screen, and tap the icon
on the hard icon panel. Then select Store from the Dial
menu. The Address New screen opens with the number
already entered in the first number field.
Voice tag is
added to the
number.
Unfiled
Details
L. Name
051123456
F. Name
Title
Company
Work
Home
Fax
OK
Address New
Dial
Store
Find
Pause
Send DTMF
Country Code
Page 95

90
Tips on recording names
• Avoid recording names phonetically similar. If you record a
similar name to one that is already in memory, the phone
requests another name.
• Avoid recording in a noisy place.
• Speak clearly and naturally.
• The person who will use the phone should record the
name. The phone does not recognize anyone else’s voice.
• Avoid very long or very short names. Names with two to
five syllables are recommended.
• If a voice dial entry does not properly connect, you may
need to record the name again.
Page 96

Address Book
91
2. If you tap the letter button at the left column on the
screen, the list scrolls to the first entry that begins with
that letter. Tap the same button again to scroll to the
entries beginning with the next letter.
After you have assigned categories to your Address
entries, you can easily view the entries by category.
Tap the pick list in the upper-right corner of the screen,
then tap the category you want to view.
The Address list now shows only entries in that category.
1. Tap the icon on the hard icon panel to launch
applications, and tap the icon to open the Address
screen.
You can also access the Address screen by pressing the
button below the screen.
Viewing Address
Book Entries
a
Address
a
All
Edit
New
Address
View
Call
I-O
-
A-H
P
-
Z
-
-
-
Alfred
Coope..
David..
Fuji
Golden..
KimY..
0119876543
441234567
449876543
8221234567
0161234567
8229876543
Tap to scroll to the first
entry that begins with
that letter.
Category pick
list.
Tap to move to
the next page.
Page 97

92
3. Tap any entry to select.
If the selected entry has several phone numbers, you will see
the following icons at the right side of the phone number:
Work place Home
Fax number Mobile phone number
Pager Others
Selecting the icon displays the corresponding number.
In the Address View screen, you can:
• Place a call to the selected number. Tap the desired
number, then tap the Call button.
• Open the Address Edit screen which allows you to edit the
information. Tap the desired number, then tap the Edit
button.
• Open the Address New screen which allows you to create
a new Address Book entry. Tap the desired number, then
tap the New button.
• Close the Address View screen and return to the Address
screen. Tap the OK button.
4. Tap the View button to view the contents of the selected
entry.
Business
New
OK
Address View
Edit
Call
David Moore
Chief manager
ABC Co.
Work: 441234567
Home: 449876543
Mobile: 0119876543
1!6
1!5
Name
Category
Title
Company
Phone numbers
Voice tag attached
Speed dial code
Voice dial/Speed
dial code
Page 98

Address Book
93
Viewing Speed Dial List
1. In the Address screen, tap the category pick list in the
upper-right corner and select Speed Dial from the list.
2. The Address screen shows only the Speed Dial list.
3. Scroll through the list by tapping ❷ or $ in the lower
right corner of the screen.
4. Tap the desired entry. The selected entry is highlighted.
Then:
• To change the speed dial code, tap the Edit button.
• To release the speed dial code, tap the Release button.
• To call the number, tap the Call button.
All
Edit
New
Address
View
Call
Alfred
Coope..
David..
Fuji
Golden..
KimY..
0119876543
441234567
449876543
8221234567
0161234567
8229876543
All
Business
Personal
Unfiled
Speed Dial
Voice Dial
A-H
I-O
P-Z
-
-
-
speed dial
codes
Category
pick list
Address
Alfred
1
Coope..
2
David..
3
Fuji
4
Golden..
10
KimY..
12
Speed Dial
0119876543
441234567
449876543
8221234567
0161234567
8229876543
Call
Edit
Release
Page 99

94
Viewing Voice Dial List
1. In the Address screen, tap the category pick list in the upper
right corner and select Voice Dial from the list.
2. The Address screen shows only the Voice Dial list.
3. Scroll through the list by tapping $ or ❷ in the lower-right
corner of the screen.
4. Tap the desired entry. The selected entry is highlighted.
Then:
• To call the selected number, tap the Call button.
• To play back the recorded name, tap the Review button.
• To remove the voice tag, tap the Release button.
All
Edit
New
Address
View
Call
Alfred
Coope..
David..
Fuji
Golden..
KimY..
0119876543
441234567
449876543
8221234567
0161234567
8229876543
All
Business
Personal
Unfiled
Speed Dial
Voice Dial
A-H
I-O
P-Z
-
-
-
Category pick
list
Address
Alfred
Coope..
David..
Fuji
Golden..
KimY..
Voice Dial
0119876543
441234567
449876543
8221234567
0161234567
8229876543
Call
Review
Release
Page 100

Address Book
95
All
Edit
New
Address
View
Call
I-O
-
A-H
P
-
Z
-
-
-
Alfred
Coope..
David..
Fuji
Golden..
KimY..
0119876543
441234567
449876543
8221234567
0161234567
8229876543
Tap Edit.
After you create an Address Book entry, you can update it or
enter additional information any time.
Editing an Address Book Entry
1. Tap the Address Book entry that you want to change in
the Address screen to display the Address Edit screen for
that entry.
2. Tap any field you want to change.
Editing an
Address Book
Entry
Unfiled
Details
OK
Address Edit
L.Name
F.Name
Title
Company
Work
Home
Fax
David
Moore
Chief manager
ABC Co.
441234567
449876543
 Loading...